

Page 1
HP Photosmart C4200 All-in-One series
Windows Help
Page 2

HP Photosmart C4200 All-in-One series
Page 3

Page 4

Contents
1 HP Photosmart C4200 All-in-One series Help........................................................................5
2 HP All-in-One overview
The HP All-in-One at a glance....................................................................................................7
Control panel buttons.................................................................................................................8
Use the HP Photosmart software...............................................................................................9
3 Find more information............................................................................................................11
4 How do I?.................................................................................................................................13
5 Connection information
Supported connection types.....................................................................................................15
Use printer sharing...................................................................................................................15
6 Load originals and load paper
Load originals...........................................................................................................................17
Choose papers for printing and copying...................................................................................18
Recommended papers for printing and copying.................................................................18
Recommended papers for printing only..............................................................................19
Papers to avoid...................................................................................................................20
Load paper...............................................................................................................................21
Load full-size paper............................................................................................................21
Load 10 x 15 cm (4 x 6 inch) photo paper..........................................................................23
Load index cards................................................................................................................24
Load envelopes..................................................................................................................25
Load other types of paper...................................................................................................26
Avoid paper jams......................................................................................................................27
Contents
7 Print from your computer
Print from a software application..............................................................................................29
Make the HP All-in-One the default printer...............................................................................30
Change the print settings for the current job............................................................................30
Set the paper size...............................................................................................................30
Set the paper type for printing............................................................................................31
View the print resolution.....................................................................................................32
Change the print speed or quality.......................................................................................32
Change the page orientation..............................................................................................32
Scale the document size....................................................................................................33
Change the saturation, brightness, or color tone................................................................33
Preview your print job.........................................................................................................33
Change the default print settings..............................................................................................34
Printing shortcuts......................................................................................................................34
Create printing shortcuts....................................................................................................35
1
Page 5

Perform special print jobs.........................................................................................................35
Print a borderless image.....................................................................................................36
Print a photo on photo paper..............................................................................................36
Create custom cd/dvd labels .............................................................................................37
Print using Maximum dpi...................................................................................................38
Print on both sides of the page...........................................................................................38
Print a multiple-page document as a booklet.....................................................................40
Print multiple pages on a single sheet................................................................................41
Print a multiple-page document in reverse order................................................................42
Contents
Reverse an image for iron-on transfers..............................................................................43
Print on transparencies.......................................................................................................43
Print a group of addresses on labels or envelopes............................................................44
Print a poster......................................................................................................................45
Print a Web page................................................................................................................45
Stop a print job.........................................................................................................................46
8 Use the photo features
Print photos..............................................................................................................................50
Print 10 x 15 cm (4 x 6 inch) photos...................................................................................50
Print enlargements.............................................................................................................51
Print photos from the HP Photosmart Software .................................................................52
Save photos to your computer..................................................................................................52
Edit photos using your computer..............................................................................................52
Share photos with friends and relatives....................................................................................53
9 Use the copy features
Make a copy.............................................................................................................................55
Change copy speed or quality..................................................................................................55
Make multiple copies of the same original................................................................................56
Make a borderless copy of a photo..........................................................................................56
Resize an original to fit onto letter or A4 paper........................................................................57
Stop copying.............................................................................................................................58
10 Use the scan features
Scan an image or document.....................................................................................................59
Edit a scanned image...............................................................................................................60
Edit a scanned document.........................................................................................................60
Stop scanning...........................................................................................................................61
11 Maintain the HP All-in-One
Clean the HP All-in-One...........................................................................................................63
Clean the exterior...............................................................................................................63
Clean the glass...................................................................................................................63
Clean the lid backing..........................................................................................................64
Print a self-test report...............................................................................................................64
2
Page 6

Contents
Work with print cartridges.........................................................................................................65
Handle the print cartridges.................................................................................................66
Check the estimated ink levels...........................................................................................67
Replace the print cartridges................................................................................................67
Use a photo print cartridge.................................................................................................70
Use the print cartridge protector.........................................................................................70
Align the print cartridges.....................................................................................................71
Clean the print cartridges...................................................................................................72
Clean the print cartridge contacts.......................................................................................73
Clean the area around the ink nozzles...............................................................................74
Remove ink from your skin and clothing.............................................................................76
12 Shop for printing supplies
Order paper or other media......................................................................................................77
Order print cartridges................................................................................................................77
Order other supplies.................................................................................................................78
13 Troubleshooting
Troubleshooting tips.................................................................................................................79
Communication problems over a USB connection.............................................................79
Information on print cartridges............................................................................................80
Information on paper..........................................................................................................81
Clear paper jams................................................................................................................82
Troubleshoot print cartridges..............................................................................................83
View the Readme file..........................................................................................................89
Hardware setup troubleshooting...............................................................................................89
Software installation troubleshooting........................................................................................91
Uninstall and reinstall the software.....................................................................................94
Print quality troubleshooting.....................................................................................................96
Print troubleshooting...............................................................................................................103
Memory card troubleshooting.................................................................................................112
Copy troubleshooting..............................................................................................................114
Scan troubleshooting..............................................................................................................119
Errors......................................................................................................................................122
Device messages.............................................................................................................122
File messages...................................................................................................................123
Supported file types for the HP All-in-One..................................................................125
General user messages...................................................................................................125
Paper messages...............................................................................................................128
Power and connection messages.....................................................................................130
Print cartridge messages..................................................................................................133
Contents
14 HP warranty and support
Warranty.................................................................................................................................137
Support process.....................................................................................................................137
Before you call HP customer support.....................................................................................137
HP support by phone..............................................................................................................138
Phone support period.......................................................................................................138
Placing a call....................................................................................................................138
After the phone support period.........................................................................................139
Additional warranty options....................................................................................................139
3
Page 7

HP Quick Exchange Service (Japan).....................................................................................139
Call HP Korea customer support............................................................................................140
Prepare the HP All-in-One for shipment.................................................................................140
Pack the HP All-in-One...........................................................................................................140
15 Technical information
Environmental product stewardship program.........................................................................143
Paper use.........................................................................................................................143
Plastics.............................................................................................................................143
Contents
Material safety data sheets...............................................................................................143
Recycling program............................................................................................................143
HP inkjet supplies recycling program...............................................................................143
Energy consumption.........................................................................................................144
Disposal of Waste Equipment by Users in Private Households in the European
Union................................................................................................................................145
Regulatory notices..................................................................................................................146
Regulatory model identification number...........................................................................146
FCC statement..................................................................................................................146
Notice to users in Australia...............................................................................................146
Notice to users in Korea...................................................................................................147
VCCI (Class B) compliance statement for users in Japan................................................147
Notice to users in Japan about power cord......................................................................147
Geräuschemission............................................................................................................147
Declaration of conformity (European Economic Area).....................................................147
HP Photosmart C4200 All-in-One series declaration of conformity..................................148
Index............................................................................................................................................149
4
Page 8

1 HP Photosmart C4200 All-in-
One series Help
For information about the HP All-in-One, see:
•“
HP All-in-One overview” on page 7
Find more information” on page 11
•“
How do I?” on page 13
•“
Connection information” on page 15
•“
Load originals and load paper” on page 17
•“
Print from your computer” on page 29
•“
Use the copy features” on page 55
•“
Use the photo features” on page 49
•“
Use the scan features” on page 59
•“
Maintain the HP All-in-One” on page 63
•“
Shop for printing supplies” on page 77
•“
HP warranty and support” on page 137
•“
Technical information” on page 143
•“
HP Photosmart C4200 All-in-
One series Help
HP Photosmart C4200 All-in-One series Help 5
Page 9

One series Help
Chapter 1
HP Photosmart C4200 All-in-
6 HP Photosmart C4200 All-in-One series Help
Page 10
2 HP All-in-One overview
Use the HP All-in-One to quickly and easily accomplish tasks such as making a copy,
scanning documents, or printing photos from a memory card. You can access many
HP All-in-One functions directly from the control panel, without turning on your computer.
This section contains the following topics:
•
The HP All-in-One at a glance
Control panel buttons
•
Use the HP Photosmart software
•
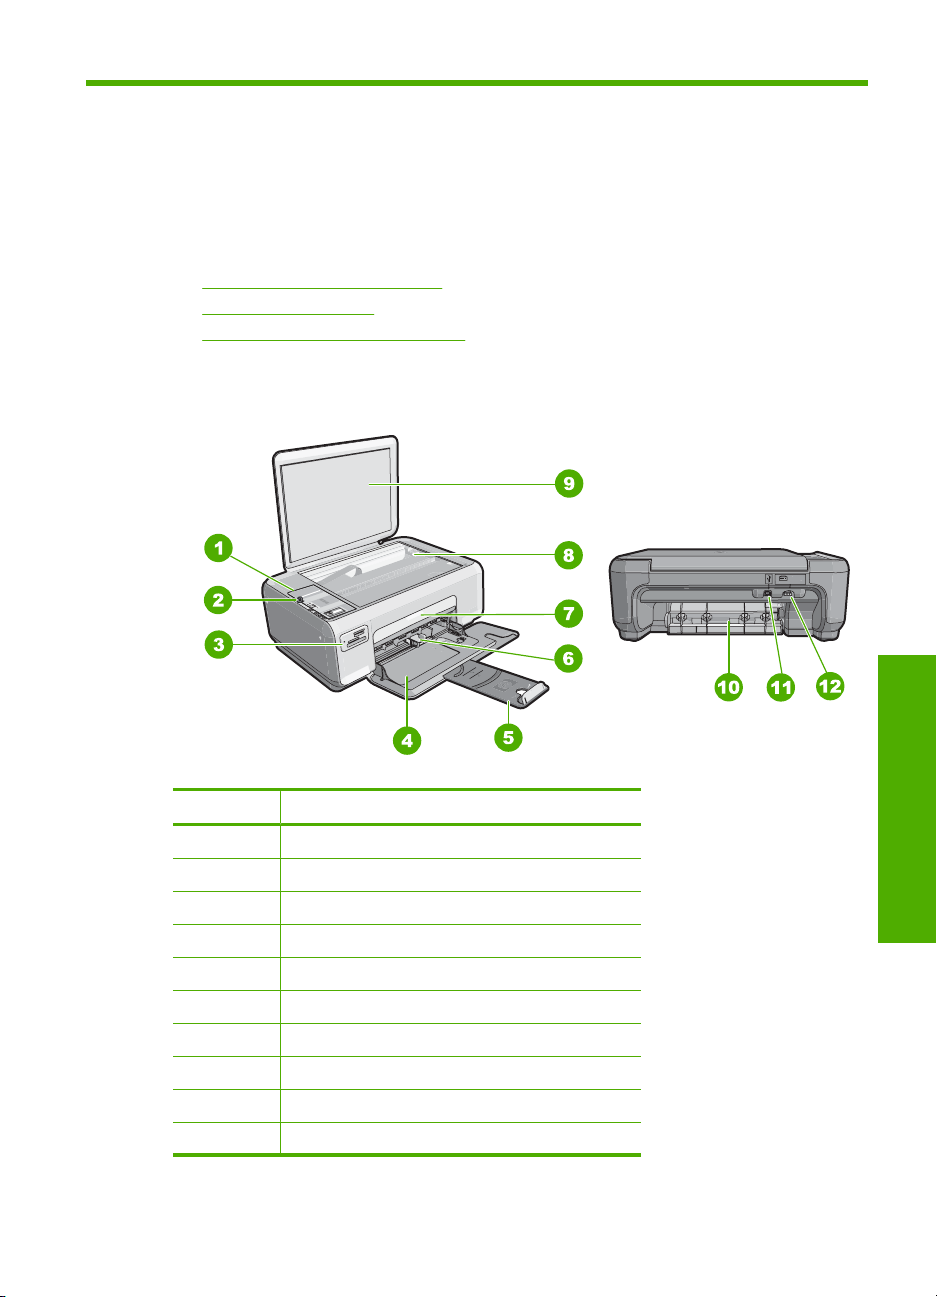
The HP All-in-One at a glance
Label Description
1 Control panel
2 On button
3 Memory card slots
4 Input tray
5 Tray extender
6 Paper-width guide
7 Print cartridge door
8 Glass
9 Lid backing
10 Rear door
HP All-in-One overview
HP All-in-One overview 7
Page 11
Chapter 2
(continued)
Label Description
11 Rear USB port
12 Power connection
* Use only with the power adapter supplied by HP.
Control panel buttons
*
HP All-in-One overview
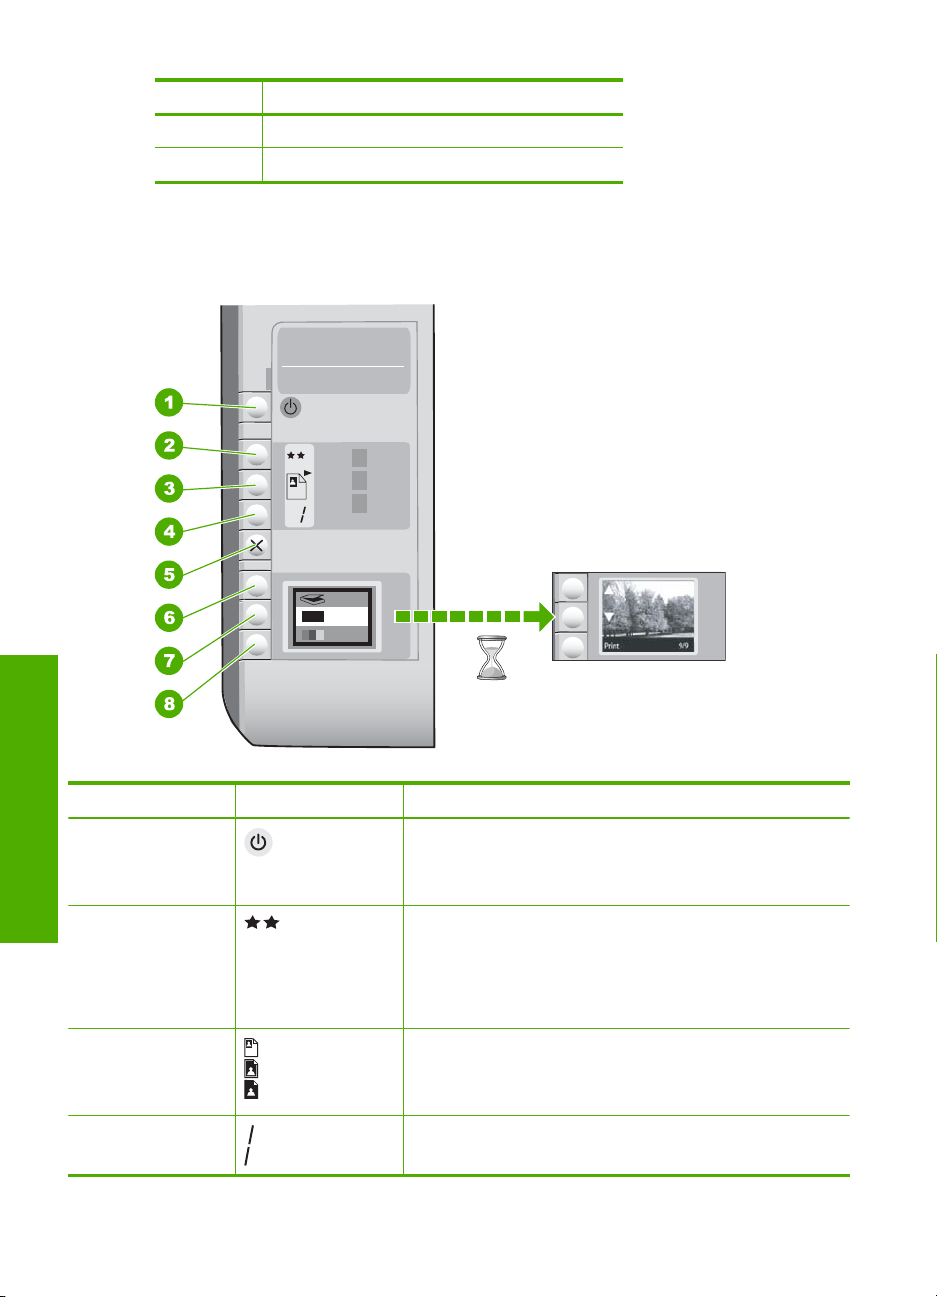
Label Icon Name and Description
1 On button: Turns the HP All-in-One on or off. When the HP All-
2 Quality button: Changes the copy quality or the quality of
3 Size button: Changes the image size to 100% (Actual Size),
4 Copies button: Specifies the desired number of copies.
8 HP All-in-One overview
in-One is off, a minimal amount of power is still used by the
device. To completely remove power, turn the HP All-in-One
off, and then unplug the power cord.
photos you print from a memory card. The default quality for
both plain and photo papers is two stars. However, the quality
produced varies depending on the paper type. For plain paper,
two stars represents normal quality. For photo paper, two stars
represents best quality.
fits it to the page (Resize to Fit), or prints borderless images
(Borderless). The default setting is 100% for plain paper and
borderless for photo paper.
Page 12
(continued)
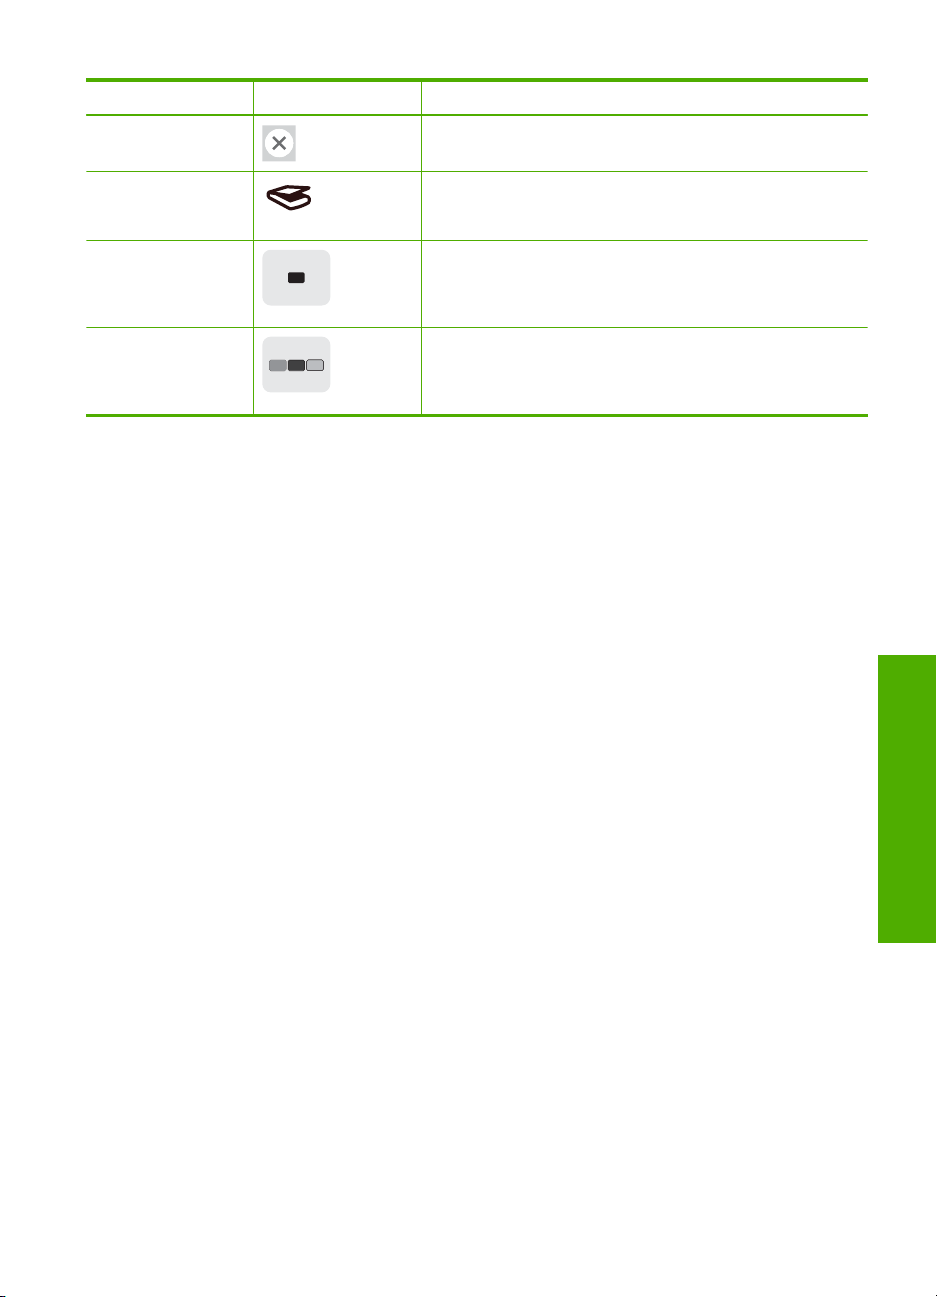
Label Icon Name and Description
5 Cancel button: Stops a task (such as scanning or copying) or
6 Scan button: Starts a scan. When a memory card is inserted,
7 Start Copy Black button: Starts a black-and-white copy. In
8 Start Copy Color button: Starts a color copy. In certain
resets settings (such as Quality and Copies).
this button advances to the next photo on the memory card
when pressed.
certain situations (for example, after clearing a paper jam), this
button resumes printing. When a memory card is inserted, this
button acts as a previous image button.
situations (for example, after clearing a paper jam), this button
resumes printing. When a memory card is inserted, this button
starts printing the image currently on the display.
Use the HP Photosmart software
The HP Photosmart Software provides a fast and easy way to make prints of your photos.
It also provides access to other basic HP imaging software features, such as saving and
viewing your photos.
For more information on using the HP Photosmart Software:
• Check the Contents panel on the left. Look for the HP Photosmart Software Help
contents book at the top.
• If you do not see the HP Photosmart Software Help contents book at the top of
the Contents panel, access the software help through the HP Solution Center.
Use the HP Photosmart software 9
HP All-in-One overview
Page 13

Chapter 2
HP All-in-One overview
10 HP All-in-One overview
Page 14
3 Find more information
You can access a variety of resources, both printed and onscreen, that provide
information about setting up and using the HP All-in-One.
Setup Guide
The Setup Guide provides instructions for setting up the HP All-in-One and
installing software. Make sure you follow the steps in the Setup Guide in order.
If you have problems during setup, check the Setup Guide for troubleshooting
information, or see “
Basics Guide
The Basics Guide contains an overview of the HP All-in-One, including stepby-step instructions for basic tasks, troubleshooting tips, and technical
information.
HP Photosmart Essential animations
The HP Photosmart Essential animations are an interactive way to get a brief
overview of the software included with the HP All-in-One. You will learn how the
software can help you create, share, organize, and print your photos.
Onscreen Help
The onscreen Help provides detailed instructions on using all features of the
HP All-in-One.
• The How Do I? topic provides links so you can quickly find information on
performing common tasks.
• The The HP All-in-One overview topic provides general information about
the main features of the HP All-in-One.
• The Troubleshooting topic provides information about resolving errors
you might encounter with the HP All-in-One.
Readme
The Readme file contains the most recent information which might not be found
in other publications.
Install the software to access the Readme file.
www.hp.com/support If you have Internet access, you can get help and support from the HP Web
site. This Web site offers technical support, drivers, supplies, and ordering
information.
Troubleshooting” on page 79 in this onscreen Help.
Find more information 11
Find more information
Page 15

Chapter 3
Find more information
12 Find more information
Page 16

4 How do I?
This section contains links to commonly performed tasks, such as sharing and printing
photos and optimizing your print jobs.
•“
How do I make a borderless copy of a photo?” on page 56
How do I print borderless photos on 10 x 15 cm (4 x 6 inch) paper?” on page 36
•“
How do I get the best print quality?” on page 32
•“
How do I print on both sides of the paper?” on page 38
•“
How do I make multiple copies of a document?” on page 56
•“
How do I?
How do I? 13
Page 17

Chapter 4
How do I?
14 How do I?
Page 18

5 Connection information
The HP All-in-One comes equipped with a USB port so you can connect directly to a
computer using a USB cable. You can also share the device over an existing home
network.
This section contains the following topics:
•
Supported connection types
Use printer sharing
•
Supported connection types
The following table contains a list of supported connection types.
Description Recommended number
of connected
computers for best
performance
USB connection One computer connected
with a USB cable to the
rear USB 2.0 HS port on
the HP All-in-One.
Printer sharing Five.
The host computer must
be on at all times in order
to print from the other
computers.
Use printer sharing
If your computer is on a network, and another computer on the network has an HP Allin-One connected to it by a USB cable, you can print to that printer using printer sharing.
The computer directly connected to the HP All-in-One acts as the host for the printer and
has full software functionality. The other computer, which is referred to as a client, has
access only to the print features. You must perform other functions, such as scanning
and copying, from the host computer or from the control panel on the HP All-in-One.
To enable printer sharing on a Windows computer
▲ Refer to the user guide that came with your computer or see the Windows onscreen
Help.
Supported software
features
All features are
supported.
All features resident on
the host computer are
supported. Only printing
is supported from the
other computers.
Setup instructions
Follow the Setup Guide
for detailed instructions.
Follow the instructions
in “Use printer sharing”
on page 15.
Connection information
Connection information 15
Page 19

Connection information
Chapter 5
16 Connection information
Page 20
6 Load originals and load paper
You can load many different types and sizes of paper in the HP All-in-One, including letter
or A4 paper, photo paper, transparencies, envelopes, and HP CD/DVD tattoo labels. By
default, the HP All-in-One is set to detect the size and type of paper you load in the input
tray automatically and then adjust its settings to generate the highest quality output for
that paper.
If you are using special papers, such as photo paper, transparency film, envelopes, or
labels, or if you experience poor print quality using the Automatic setting, you can
manually set the paper size and type for print and copy jobs.
This section contains the following topics:
•
Load originals
Choose papers for printing and copying
•
Load paper
•
Avoid paper jams
•
Load originals
You can copy or scan up to letter- or A4-size originals by loading them on the glass.
To load an original on the scanner glass
1. Lift the lid on the HP All-in-One.
2. Load your original print side down on the right front corner of the glass.
TIP: For more help on loading an original, refer to the engraved guides along the
edge of the glass.
3. Close the lid.
Load originals and load paper 17
Load originals and load paper
Page 21

Chapter 6
Choose papers for printing and copying
You can use different types and sizes of paper in the HP All-in-One. Review the following
recommendations to get the best printing and copying quality. If you use plain or photo
paper, the HP All-in-One can automatically detect the paper type and size. If you use
other types of paper, change the paper type and size settings in the software.
This section contains the following topics:
•
Recommended papers for printing and copying
Recommended papers for printing only
•
Papers to avoid
•
Recommended papers for printing and copying
If you want the best print quality, HP recommends using HP papers that are specifically
designed for the type of project you are printing. If you are printing photos, for example,
load HP Premium or HP Premium Plus photo paper in the input tray.
The following is a list of HP papers you can use for copying and printing. Depending on
your country/region, some of these papers might not be available.
HP Premium Plus Photo Paper
HP Premium Plus Photo Papers are the best HP photo paper, with image quality and
fade resistance superior to store-processed photos. They are ideal for printing your highresolution images for framing or including in a photo album. These papers are available
in several sizes, including 10 x 15 cm (4 x 6 inch) (with or without tabs), A4, and 8.5 x 11
inch sizes for printing or copying photos from the HP All-in-One.
Load originals and load paper
18 Load originals and load paper
HP Premium Photo Paper
HP Premium Photo Papers are high-quality, glossy-finish or soft gloss-finish photo
papers. They look and feel like store-processed photos and can be mounted under glass
or in an album. These papers are available in several sizes, including 10 x 15 cm (4 x 6
inch) (with or without tabs), A4, and 8.5 x 11 inch sizes for printing or copying photos from
the HP All-in-One.
HP Advanced Photo Paper or HP Photo Paper
HP Advanced Photo Paper or HP Photo Paper is a sturdy, glossy photo paper that
features an instant-dry finish for easy handling without smudging. It resists water, smears,
fingerprints, and humidity. Your prints have a look and feel comparable to a storeprocessed photo. It is available in several sizes, including A4, 8.5 x 11 inch, and 10 x 15
cm (4 x 6 inch) (with or without tabs) for printing or copying photos from the HP All-inOne. HP Advanced Photo Paper is marked on the nonprinting corners with the following
symbol.
Page 22

HP Premium Inkjet Transparency Film and HP Premium Plus Inkjet Transparency
Film
HP Premium Inkjet Transparency Film and HP Premium Plus Inkjet Transparency Film
make your color presentations vivid and even more impressive. This film is easy to use
and handle and dries quickly without smudging.
HP Premium Inkjet Paper
HP Premium Inkjet Paper is the ultimate coated paper for high-resolution usage. A
smooth, matte finish makes it ideal for your highest-quality documents.
HP Bright White Inkjet Paper
HP Bright White Inkjet Paper delivers high-contrast colors and sharp text. It is opaque
enough for two-sided color usage with no show-through, which makes it ideal for
newsletters, reports, and flyers.
HP All-in-One Paper or HP Printing Paper
• HP All-in-One Paper is specifically designed for HP All-in-One devices. It has an extra
bright blue-white shade that produces sharper text and richer colors than ordinary
multifunction papers.
• HP Printing Paper is a high-quality multifunction paper. It produces documents that
look and feel more substantial than documents printed on standard multipurpose or
copy paper.
To order HP papers and other supplies, go to
www.hp.com/buy/supplies. If prompted,
choose your country/region, follow the prompts to select your product, and then click one
of the shopping links on the page.
NOTE: At this time, some portions of the HP Web site are available in English only.
Recommended papers for printing only
Certain papers are supported only when you start the print job from your computer. The
following list provides information about these papers.
If you want the best print quality, HP recommends using HP papers. Using paper that is
too thin or too thick, paper that has a slick texture, or paper that stretches easily can cause
paper jams. Using paper that has a heavy texture or does not accept ink can cause printed
images to smear, bleed, or not fill in completely.
Depending on your country/region, some of these papers might not be available.
HP Iron-On Transfers
HP Iron-On Transfers (for color fabrics or for light or white fabrics) are the ideal solution
for creating custom T-shirts from your digital photos.
HP Inkjet labels
Letter or A4 label sheets designed for use with HP inkjet products (like HP inkjet labels).
Load originals and load paper
Choose papers for printing and copying 19
Page 23

Chapter 6
HP Photo Greeting Cards, HP Premium Photo Cards, and HP Note Cards
HP Photo Greeting Cards, Glossy or Matte, HP Premium Photo Cards, and HP Note
Cards enable you to make your own greeting cards.
HP Brochure & Flyer Paper
HP Brochure & Flyer Paper (Gloss or Matte) is glossy-coated or matte-coated on both
sides for two-sided use. They are the perfect choice for near-photographic reproductions
and business graphics for report covers, special presentations, brochures, mailers, and
calendars.
HP Premium Presentation Paper
HP Premium Presentation Paper gives your presentation a quality look and feel.
HP CD/DVD Tattoos
HP CD/DVD Tattoos allow you to personalize your CDs and DVDs by printing highquality, low-cost CD or DVD labels.
To order HP papers and other supplies, go to
www.hp.com/buy/supplies. If prompted,
choose your country/region, follow the prompts to select your product, and then click one
of the shopping links on the page.
NOTE: At this time, some portions of the HP Web site are available in English only.
Papers to avoid
Load originals and load paper
Using paper that is too thin or too thick, paper that has a slick texture, or paper that
stretches easily can cause paper jams. Using paper that has a heavy texture or does not
accept ink can cause printed images to smear, bleed, or not fill in completely.
Papers to avoid for all print and copy jobs
• Any size paper other than those listed in the printer software.
• Paper with cutouts or perforations (unless specifically designed for use with HP inkjet
devices).
• Highly textured stock, such as linen. It might not print evenly, and the ink can bleed
into these papers.
• Extremely smooth, shiny, or coated papers not specifically designed for the HP All-
in-One. They can jam the HP All-in-One or repel the ink.
• Multi-part forms, such as duplicate and triplicate forms. They can wrinkle or get stuck,
and the ink is more likely to smear.
• Envelopes with clasps or windows. They can get stuck in the rollers and cause paper
jams.
• Banner paper.
Additional papers to avoid when copying
• Envelopes.
• Transparency film other than HP Premium Inkjet Transparency Film or HP Premium
Plus Inkjet Transparency Film.
20 Load originals and load paper
Page 24

• Iron-On Transfers.
• Greeting card paper.
• HP CD/DVD tattoo labels.
Load paper
This section describes the procedure for loading different types and sizes of paper into
the HP All-in-One for your copies or printouts.
NOTE: After a copy or print job has started, the paper width sensor can determine
whether the paper is Letter, A4, or a smaller size.
TIP: To help prevent rips, wrinkles, and curled or bent edges, store all paper flat in
a resealable bag. If the paper is not stored properly, extreme changes in temperature
and humidity might result in curled paper that does not work well in the HP All-in-One.
This section contains the following topics:
•
Load full-size paper
Load 10 x 15 cm (4 x 6 inch) photo paper
•
Load index cards
•
Load envelopes
•
Load other types of paper
•
Load full-size paper
You can load many types of letter or A4 paper into the input tray of the HP All-in-One.
Load paper 21
Load originals and load paper
Page 25
Chapter 6
To load full-size paper
1. Slide the paper-width guide to its outermost position.
NOTE: If you are using letter or A4 paper or smaller, make sure the tray extender
is open all the way.
2. Tap a stack of paper on a flat surface to align the edges, and then check the paper
for the following:
• Make sure it is free of rips, dust, wrinkles, and curled or bent edges.
• Make sure all the paper in the stack is the same size and type.
Load originals and load paper
22 Load originals and load paper
Page 26
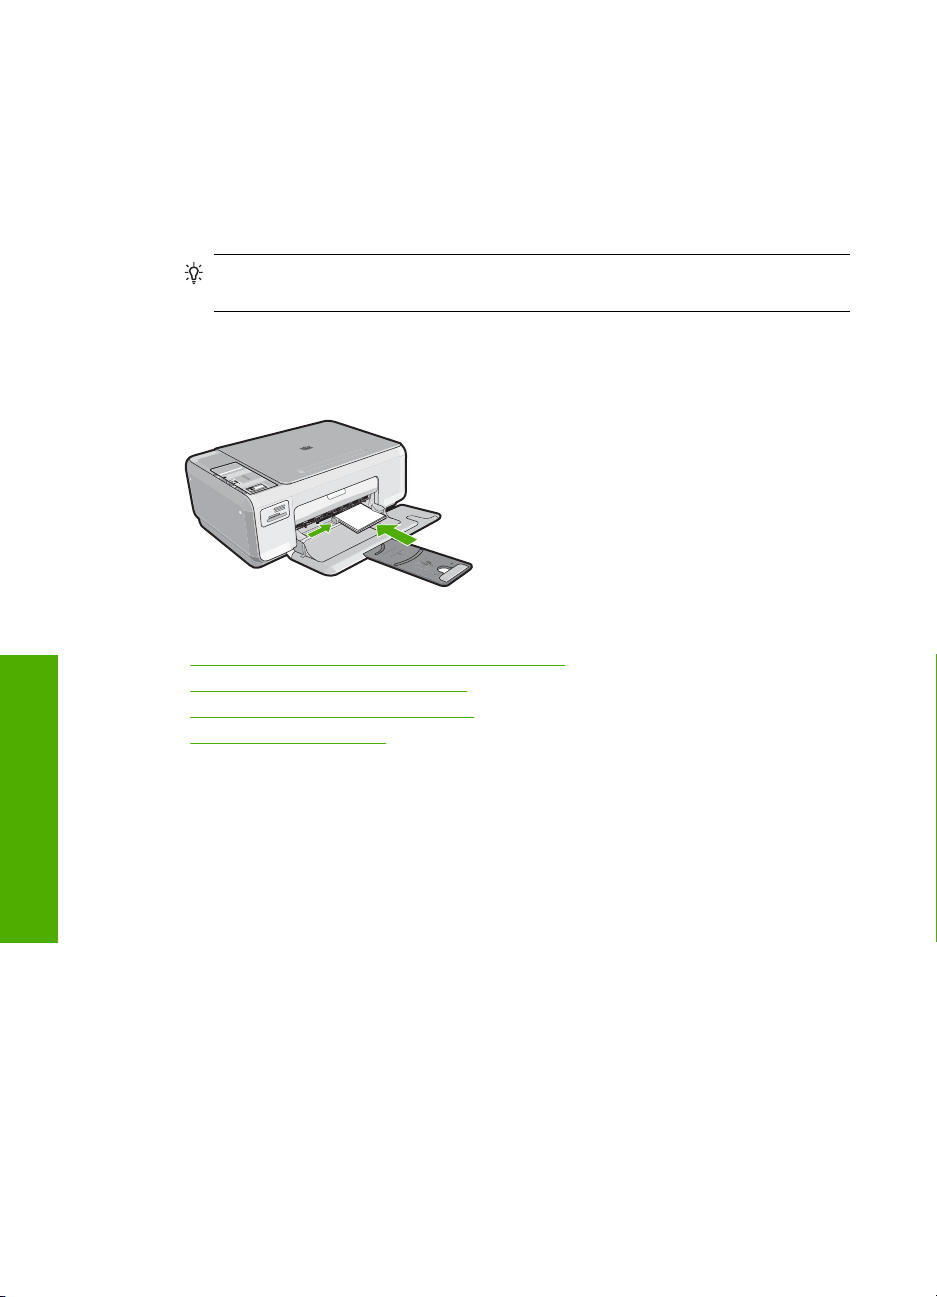
3. Insert the stack of paper into the input tray with the short edge forward and the print
side down. Slide the stack of paper forward until it stops.
CAUTION: Make sure that the HP All-in-One is idle and silent when you load
paper into the input tray. If the HP All-in-One is servicing the print cartridges or
otherwise engaged in a task, the paper stop inside the device might not be in
place. You could push the paper too far forward, causing the HP All-in-One to
eject blank pages.
TIP: If you are using letterhead, insert the top of the page first with the print side
down.
4. Slide the paper-width guide inward until it stops at the edge of the paper.
Do not overload the input tray; make sure the stack of paper fits within the input tray
and is no higher than the top of the paper-width guide.
NOTE: When you use legal-size paper, leave the tray extender closed.
Load 10 x 15 cm (4 x 6 inch) photo paper
You can load 10 x 15 cm (4 x 6 inch) photo paper into the input tray of the HP All-in-One.
For the best results, use 10 x 15 cm (4 x 6 inch) HP Premium Plus Photo Paper or HP
Premium Photo Paper.
TIP: To help prevent rips, wrinkles, and curled or bent edges, store all paper flat in
a resealable bag. If the paper is not stored properly, extreme changes in temperature
and humidity might result in curled paper that does not work well in the HP All-in-One.
Load originals and load paper
Load paper 23
Page 27
Chapter 6
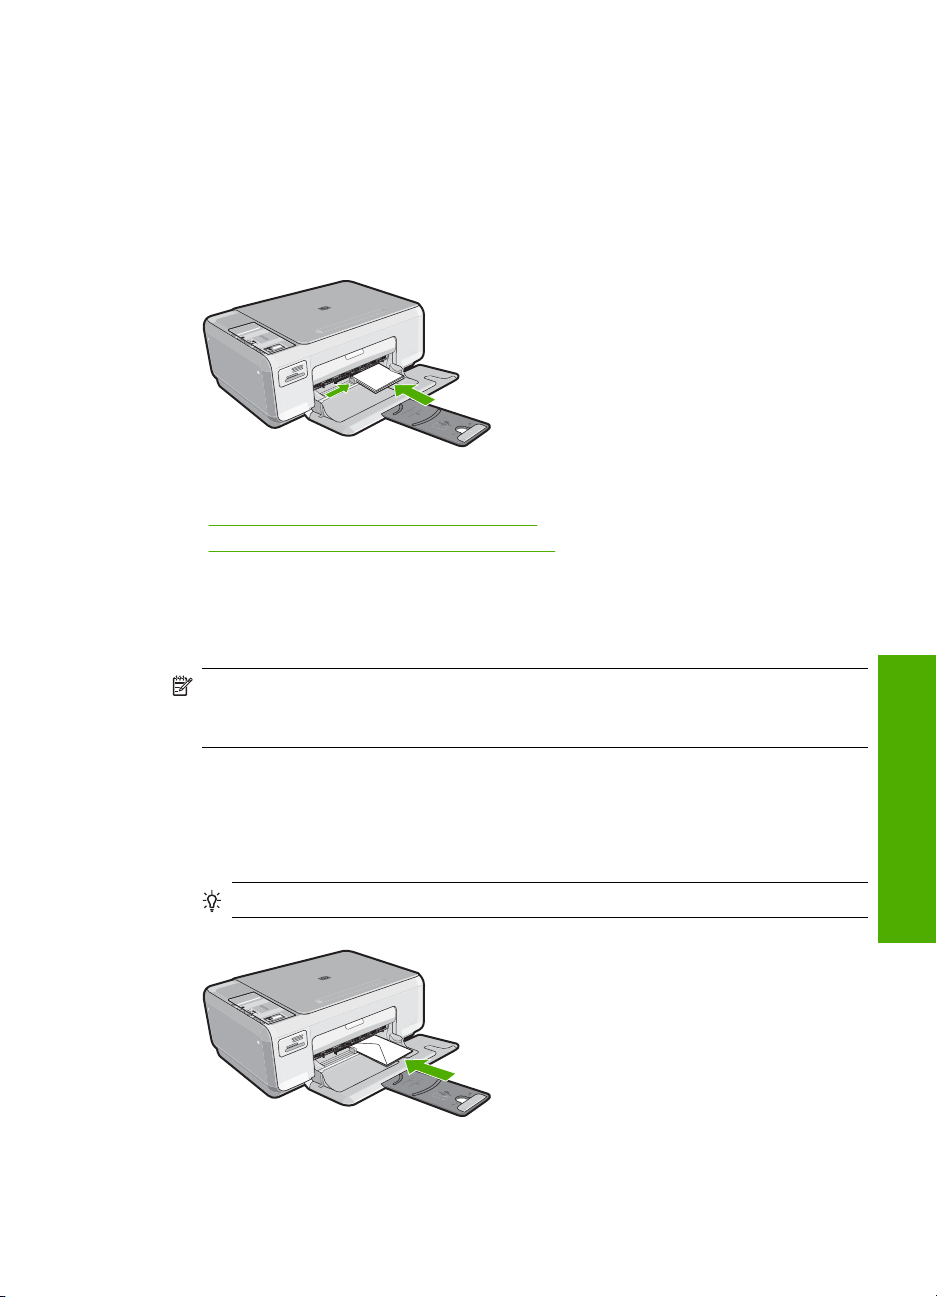
To load 10 x 15 cm ( 4 x 6 inch) photo paper in the input tray
1. Remove all paper from the input tray.
2. Insert the stack of photo paper into the far-right side of the input tray with the short
edge forward and the print side down. Slide the stack of photo paper forward until it
stops.
If the photo paper you are using has perforated tabs, load the photo paper so that the
tabs are closest to you.
TIP: For more help on loading small-size photo paper, refer to the guides
engraved in the base of the input tray for loading photo paper.
3. Slide the paper-width guide inward until it stops at the edge of the paper.
Do not overload the input tray; make sure the stack of paper fits within the input tray
and is no higher than the top of the paper-width guide.
Related topics
•“
•“
Load originals and load paper
•“
•“
Load index cards
You can load index cards into the input tray of the HP All-in-One to print notes, recipes,
and other text.
Recommended papers for printing and copying” on page 18
Make a borderless copy of a photo” on page 56
Print 10 x 15 cm (4 x 6 inch) photos” on page 50
Print a borderless image” on page 36
24 Load originals and load paper
Page 28
To load index cards in the input tray
1. Remove all paper from the input tray.
2. Insert the stack of cards, print side down, into the far-right side of the input tray. Slide
the stack of cards forward until it stops.
3. Slide the paper-width guide inward against the stack of cards until it stops.
Do not overload the input tray; make sure the stack of cards fits within the input tray
and is no higher than the top of the paper-width guide.
Related topics
Load 10 x 15 cm (4 x 6 inch) photo paper” on page 23
•“
Change the print settings for the current job” on page 30
•“
Load envelopes
You can load one or more envelopes into the input tray of the HP All-in-One. Do not use
shiny or embossed envelopes or envelopes that have clasps or windows.
NOTE: For specific details on how to format text for printing on envelopes, consult
the help files in your word processing software. For best results, consider using a label
for the return address on envelopes.
To load envelopes
1. Remove all paper from the input tray.
2. Insert one or more envelopes into the far-right side of the input tray, with the envelope
flaps on the left and facing up. Slide the stack of envelopes forward until it stops.
TIP: To avoid paper jams, tuck the flap inside each envelope.
Load paper 25
Load originals and load paper
Page 29

Chapter 6
3. Slide the paper-width guide inward against the stack of envelopes until it stops.
Do not overload the input tray; make sure the stack of envelopes fits within the input
tray and is not higher than the top of the paper-width guide.
Related topics
“
Print a group of addresses on labels or envelopes” on page 44
Load other types of paper
The following types of paper are designed for special projects. Create your project in the
HP Photosmart Software or another application, set the paper type and size, and then
print.
HP Premium Inkjet Transparency Film and HP Premium Plus Inkjet Transparency
Film
▲ Insert the film so that the white transparency strip (with arrows and the HP logo) is on
top and is going into the input tray first.
NOTE: For best results, set the paper type to transparency film before printing
on transparency film.
HP Iron-On Transfers
1. Flatten the transfer sheet completely before using it; do not load curled sheets.
Load originals and load paper
TIP: To prevent curling, keep transfer sheets sealed in the original package until
you are ready to use them.
2. Locate the blue stripe on the nonprinting side of the transfer paper and then manually
feed one sheet at a time into the input tray with the blue stripe facing up.
HP Greeting Cards, HP Photo Greeting Cards, or HP Textured Greeting Cards
▲ Insert a small stack of HP greeting card paper into the input tray with the print side
down; slide the stack of cards forward until it stops.
TIP: Make sure the area on which you want to print is inserted first, facing down
in the input tray.
HP Inkjet labels
1. Always use letter or A4 label sheets designed for use with HP inkjet devices (such as
HP inkjet labels), and make sure that the labels are no more than two years old. Labels
on older sheets might peel off when the paper is pulled through the HP All-in-One,
causing subsequent paper jams.
2. Fan the stack of labels to make sure none of the pages are sticking together.
3. Place a stack of label sheets on top of full-size plain paper in the input tray, label side
down. Do not insert labels one sheet at a time.
For best results, set the paper type and paper size before printing.
26 Load originals and load paper
Page 30

HP CD/DVD Tattoo labels
▲ Place one sheet of CD/DVD tattoo paper in the input tray with the print side down;
slide the CD/DVD tattoo paper forward until it stops.
NOTE: When you use CD/DVD tattoo labels, leave the tray extender closed.
Related topics
Choose papers for printing and copying” on page 18
•“
Set the paper type for printing” on page 31
•“
Print on transparencies” on page 43
•“
Reverse an image for iron-on transfers” on page 43
•“
Print a group of addresses on labels or envelopes” on page 44
•“
Create custom cd/dvd labels” on page 37
•“
Avoid paper jams
To help avoid paper jams, follow these guidelines.
• Remove printed papers from the output tray frequently.
• Prevent curled or wrinkled paper by storing all unused paper flat in a resealable bag.
• Ensure that paper loaded in the input tray lays flat and the edges are not bent or torn.
• Do not combine different paper types and paper sizes in the input tray; the entire stack
of paper in the input tray must be the same size and type.
• Adjust the paper-width guide in the input tray to fit snugly against all paper. Make sure
the paper-width guide does not bend the paper in the input tray.
• Do not overload the input tray; make sure the stack of paper fits within the input tray
and is no higher than the top of the paper-width guide.
• Do not force paper too far forward in the input tray.
• Use paper types that are recommended for the HP All-in-One.
Related topics
Clear paper jams” on page 82
“
Load originals and load paper
Avoid paper jams 27
Page 31

Chapter 6
Load originals and load paper
28 Load originals and load paper
Page 32

7 Print from your computer
The HP All-in-One can be used with any software application that allows printing. You
can print a range of projects, such as borderless images, newsletters, greeting cards,
iron-on transfers, and posters.
This section contains the following topics:
•
Print from a software application
Make the HP All-in-One the default printer
•
Change the print settings for the current job
•
Change the default print settings
•
Printing shortcuts
•
Perform special print jobs
•
Stop a print job
•
Print from a software application
Most print settings are automatically handled by the software application. You need to
change the settings manually only when you change print quality, print on specific types
of paper or transparency film, or use special features.
To print from a software application
1. Make sure you have paper loaded in the input tray.
2. On the File menu in your software application, click Print.
3. Select the HP All-in-One as the printer.
If you set the HP All-in-One as the default printer, you can skip this step. The HP Allin-One will already be selected.
4. If you need to change settings, click the button that opens the Properties dialog box.
Depending on your software application, this button might be called Properties,
Options, Printer Setup, Printer, or Preferences.
NOTE: When printing a photo, you must select options for the specific photo
paper and photo enhancement.
5. Select the appropriate options for your print job by using the features available in
the Advanced, Printing Shortcuts, Features, and Color tabs.
TIP: You can easily select the appropriate options for your print job by choosing
one of the predefined print tasks on the Printing Shortcuts tab. Click a type of
print task in the Printing Shortcuts list. The default settings for that type of print
task are set and summarized on the Printing Shortcuts tab. If necessary, you
can adjust the settings here and save your custom settings as a new printing
shortcut. To save a custom printing shortcut, select the shortcut and click Save
As. To delete a shortcut, select the shortcut and click Delete.
6. Click OK to close the Properties dialog box.
7. Click Print or OK to begin printing.
Print from your computer 29
Print
Page 33

Chapter 7
Make the HP All-in-One the default printer
You can set the HP All-in-One as the default printer to use from all software applications.
This means that the HP All-in-One is automatically selected in the printer list when you
select Print from the File menu in a software application. The default printer is also printed
to automatically when you click the Print button in the toolbar of most software
applications. For more information, see the Windows Help.
Change the print settings for the current job
You can customize the print settings of the HP All-in-One to handle nearly any print task.
This section contains the following topics:
•
Set the paper size
Set the paper type for printing
•
View the print resolution
•
Change the print speed or quality
•
Change the page orientation
•
Scale the document size
•
Change the saturation, brightness, or color tone
•
Preview your print job
•
Set the paper size
The Size setting helps the HP All-in-One determine the printable area on the page. Some
of the paper size choices have a borderless equivalent, which allows you to print to the
top, bottom, and side edges of the paper.
Usually, you set the paper size in the software application you used to create your
document or project. However, if you are using custom-size paper, or if you cannot set
the paper size from your software application, you can change the paper size in the
Properties dialog box before printing.
To set the paper size
1. Make sure you have paper loaded in the input tray.
2. On the File menu in your software application, click Print.
3. Make sure the HP All-in-One is the selected printer.
4. Click the button that opens the Properties dialog box.
Depending on your software application, this button might be called Properties,
Options, Printer Setup, Printer, or Preferences.
Print
30 Print from your computer
Page 34

5. Click the Features tab.
6. In the Resizing Options area, click the appropriate paper size from the Size list.
The following table lists the suggested paper size settings for the different types of
paper you can load in the input tray. Make sure to look at the long list of choices in
the Size list to see if a defined paper size already exists for the type of paper you are
using.
Paper type Suggested paper size settings
CD/DVD tattoo paper 5 x 7 in.
Copier, multi-purpose, or
plain papers
Envelopes Appropriate listed envelope size
Greeting-card papers Letter or A4
Index cards Appropriate listed card size (if listed sizes are not appropriate,
Inkjet papers Letter or A4
Iron-on T-shirt transfers Letter or A4
Labels Letter or A4
Legal Legal
Letterhead Letter or A4
Panorama photo paper Appropriate listed panorama size (if listed sizes are not
Photo papers 10 x 15 cm. (with or without tab), 4 x 6 in. (with or without tab),
Transparency films Letter or A4
Custom-size papers Custom paper size
Letter or A4
you can specify a custom paper size)
appropriate, you can specify a custom paper size)
letter, A4, or appropriate listed size
Set the paper type for printing
If you print on special papers, such as photo paper, transparency film, envelopes, or
labels, or if you experience poor print quality, you can set the paper type manually.
To set the paper type for printing
1. Make sure you have paper loaded in the input tray.
2. On the File menu in your software application, click Print.
3. Make sure the HP All-in-One is the selected printer.
4. Click the button that opens the Properties dialog box.
Depending on your software application, this button might be called Properties,
Options, Printer Setup, Printer, or Preferences.
5. Click the Features tab.
6. In the Basic Options area, click the appropriate paper type from the Paper Type list.
Print
Change the print settings for the current job 31
Page 35

Chapter 7
View the print resolution
The printer software displays the print resolution in dots per inch (dpi). The dpi varies
according to the paper type and print quality that you select in the printer software.
To view the print resolution
1. Make sure you have paper loaded in the input tray.
2. On the File menu in your software application, click Print.
3. Make sure the HP All-in-One is the selected printer.
4. Click the button that opens the Properties dialog box.
Depending on your software application, this button might be called Properties,
Options, Printer Setup, Printer, or Preferences.
5. Click the Features tab.
6. In the Print Quality drop-down list, select the appropriate print quality setting for your
project.
7. In the Paper Type drop-down list, select the type of paper that you have loaded.
8. Click the Resolution button to view the print resolution dpi.
Change the print speed or quality
The HP All-in-One automatically chooses a print quality and speed setting depending on
the paper type setting you select. You can also change the print quality setting to
customize the speed and quality of the print process.
To select a print speed or quality
1. Make sure you have paper loaded in the input tray.
2. On the File menu in your software application, click Print.
3. Make sure the HP All-in-One is the selected printer.
4. Click the button that opens the Properties dialog box.
Depending on your software application, this button might be called Properties,
Options, Printer Setup, Printer, or Preferences.
5. Click the Features tab.
6. In the Print Quality drop-down list, select the appropriate quality setting for your
project.
NOTE: To view the maximum dpi that the HP All-in-One will print, click
Resolution.
7. In the Paper Type drop-down list, select the type of paper that you have loaded.
Change the page orientation
The page orientation setting allows you to print your document vertically or horizontally
on the page.
Usually, you set the page orientation in the software application you used to create your
document or project. However, if you are using custom-size or special HP paper, or if you
cannot set the page orientation from your software application, you can change the page
Print
orientation in the Properties dialog box before printing.
32 Print from your computer
Page 36

To change the page orientation
1. Make sure you have paper loaded in the input tray.
2. On the File menu in your software application, click Print.
3. Make sure the HP All-in-One is the selected printer.
4. Click the button that opens the Properties dialog box.
Depending on your software application, this button might be called Properties,
Options, Printer Setup, Printer, or Preferences.
5. Click the Features tab.
6. In the Basic Options area, click one of the following:
• Click Portrait to print the document vertically on the page.
• Click Landscape to print the document horizontally on the page.
Scale the document size
The HP All-in-One allows you to print the document at a different size than the original.
To scale the document size
1. Make sure you have paper loaded in the input tray.
2. On the File menu in your software application, click Print.
3. Make sure the HP All-in-One is the selected printer.
4. Click the button that opens the Properties dialog box.
Depending on your software application, this button might be called Properties,
Options, Printer Setup, Printer, or Preferences.
5. Click the Features tab.
6. In the Resizing options area, click Scale to paper size, and then click the
appropriate paper size from the drop-down list.
Change the saturation, brightness, or color tone
You can change the intensity of colors and the level of darkness in your printout by
adjusting the Saturation, Brightness, and Color Tone options.
To change the saturation, brightness, or color tone
1. Make sure you have paper loaded in the input tray.
2. On the File menu in your software application, click Print.
3. Make sure the HP All-in-One is the selected printer.
4. Click the button that opens the Properties dialog box.
Depending on your software application, this button might be called Properties,
Options, Printer Setup, Printer, or Preferences.
5. Click the Color tab.
Preview your print job
You can preview your print job before sending it to the HP All-in-One. This helps to prevent
wasting paper and ink on projects that do not print as expected.
Change the print settings for the current job 33
Print
Page 37

Chapter 7
To preview your print job
1. Make sure you have paper loaded in the input tray.
2. On the File menu in your software application, click Print.
3. Make sure the HP All-in-One is the selected printer.
4. Click the button that opens the Properties dialog box.
Depending on your software application, this button might be called Properties,
Options, Printer Setup, Printer, or Preferences.
5. Select the print settings appropriate for your project on each of the tabs in the dialog
box.
Change the default print settings
If there are settings that you frequently use for printing, you might want to make them the
default print settings so they are already set when you open the Print dialog box from
within your software application.
To change the default print settings
1. In the HP Solution Center, click Settings, point to Print Settings, and then click
Printer Settings.
2. Make changes to the print settings, and click OK.
Printing shortcuts
Print
Use printing shortcuts to print with print settings that you use often. The printer software
has several specially designed printing shortcuts that are available in the Printing
Shortcuts list.
NOTE: When you select a printing shortcut the appropriate printing options are
automatically displayed. You can leave them as is or change them. You can also
create a shortcut. For more information, see “
on page 35.
Use the Printing Shortcuts tab for the following print tasks:
• General Everyday Printing: Print documents quickly.
• Photo Printing–Borderless: Print to the top, bottom, and side edges of 10 x 15 cm
(4 x 6 inch) HP Premium Plus Photo Papers with a tear-off tab. For more information,
see “
Print a borderless image” on page 36.
• Photo Printing–With White Borders: Print a photo with a white border around the
edges. For more information, see “
• Fast/Economical printing: Produce draft-quality printouts quickly.
• Presentation printing: Print high-quality documents, including letters and
transparencies. For more information, see “
on page 29 and “
• Two-sided (Duplex) Printing: Print two-sided pages with the HP All-in-One
manually. For more information, see “
Print on transparencies” on page 43.
Print a photo on photo paper” on page 36.
Print on both sides of the page” on page 38.
Create printing shortcuts”
Print from a software application”
34 Print from your computer
Page 38

Create printing shortcuts
In addition to the printing shortcuts that are available in the Printing Shortcuts list, you
can create your own printing shortcuts.
If you frequently print on transparency film, for example, you can create a printing shortcut
by selecting the Presentation Printing shortcut, changing the paper type to HP Premium
Inkjet Transparency Film, and then saving the modified shortcut under a new name; for
example, Transparency Presentations. After creating the printing shortcut, simply select
it when printing on transparency film rather than changing the print settings each time.
To create a printing shortcut
1. On the File menu in your software application, click Print.
2. Make sure the HP All-in-One is the selected printer.
3. Click the button that opens the Properties dialog box.
Depending on your software application, this button might be called Properties,
Options, Printer Setup, Printer, or Preferences.
4. Click the Printing Shortcuts tab.
5. In the Printing Shortcuts list, click a printing shortcut.
The print settings for the selected printing shortcut are displayed.
6. Change the print settings to those you want in the new printing shortcut.
7. In the Type new shortcut name here box, type a name for the new printing shortcut,
and then click Save.
The printing shortcut is added to the list.
To delete a printing shortcut
1. On the File menu in your software application, click Print.
2. Make sure the HP All-in-One is the selected printer.
3. Click the button that opens the Properties dialog box.
Depending on your software application, this button might be called Properties,
Options, Printer Setup, Printer, or Preferences.
4. Click the Printing Shortcuts tab.
5. In the Printing Shortcuts list, click the printing shortcut that you want to delete.
6. Click Delete.
The printing shortcut is removed from the list.
NOTE: Only the shortcuts that you have created can be deleted. The original HP
shortcuts cannot be deleted.
Perform special print jobs
In addition to supporting standard print jobs, the HP All-in-One can perform special jobs
such as printing borderless images, iron-on transfers, and posters.
This section contains the following topics:
•
Print a borderless image
Print a photo on photo paper
•
Create custom cd/dvd labels
•
Print
Perform special print jobs 35
Page 39

Chapter 7
• Print using Maximum dpi
Print on both sides of the page
•
Print a multiple-page document as a booklet
•
Print multiple pages on a single sheet
•
Print a multiple-page document in reverse order
•
Reverse an image for iron-on transfers
•
Print on transparencies
•
Print a group of addresses on labels or envelopes
•
Print a poster
•
Print a Web page
•
Print a borderless image
Borderless printing lets you print to the top, bottom, and side edges of 10 x 15 cm (4 x 6
inch) HP Premium Plus Photo Papers with or without a tear-off tab. When you remove
the tear-off tab, the printed image is borderless and extends to the edges of the paper.
To print a borderless image
1. Remove all paper from the input tray.
2. Place the photo paper print side down on the right side of the input tray.
3. On the File menu in your software application, click Print.
4. Make sure the HP All-in-One is the selected printer.
5. Click the button that opens the Properties dialog box.
Depending on your software application, this button might be called Properties,
Options, Printer Setup, Printer, or Preferences.
6. Click the Features tab.
7. In the Size list, click the size of photo paper loaded in the input tray.
If a borderless image can be printed on the specified size, the Borderless printing
check box is enabled.
8. In the Paper Type drop-down list, click More, and then select the appropriate paper
type.
NOTE: You cannot print a borderless image if the paper type is set to Plain
paper or to a type of paper other than a photo paper.
9. Select the Borderless printing check box if it is not already checked.
If the borderless paper size and paper type are not compatible, the HP All-in-One
software displays an alert and allows you to select a different type or size.
10. Click OK, and then click Print or OK in the Print dialog box.
NOTE: Do not leave unused photo paper in the input tray. The paper might start
to curl, which could reduce the quality of your printout. Photo paper should be flat
before printing.
Print a photo on photo paper
Print
36 Print from your computer
For high-quality photo printing, HP recommends you use HP Premium Plus Photo
Papers with the HP All-in-One.
Page 40

To print a photo on photo paper
1. Remove all paper from the input tray, and then load the photo paper print side down.
2. On the File menu in your software application, click Print.
3. Make sure the HP All-in-One is the selected printer.
4. Click the button that opens the Properties dialog box.
Depending on your software application, this button might be called Properties,
Options, Printer Setup, Printer, or Preferences.
5. Click the Features tab.
6. In the Basic Options area, select the appropriate photo paper type from the Paper
Type drop-down list.
7. In the Resizing Options area, click the appropriate paper size from the Size list.
If the paper size and paper type are not compatible, the HP All-in-One software
displays an alert and allows you to select a different type or size.
8. In the Basic Options area, select a high print quality, such as Best or Maximum
dpi from the Print Quality drop-down list.
9. In the HP real life technologies area, click the Photo fix drop-down list and select
from the following options:
• Off: applies no HP real life technologies to the image.
• Basic: automatically focuses the image; moderately adjusts image sharpness.
• Full: automatically lightens dark images; automatically adjusts sharpness,
contrast, and focus of images; automatically removes red-eye.
10. Click OK to return to the Properties dialog box.
11. If you want to print the photo in black and white, click the Color tab and select the
Print in grayscale check box.
12. Click OK, and then click Print or OK in the Print dialog box.
NOTE: Do not leave unused photo paper in the input tray. The paper might start to
curl, which could reduce the quality of your printout. Photo paper should be flat before
printing.
Create custom cd/dvd labels
You can create custom labels for your CDs and DVDs on the HP All-in-One by following
the steps below. Or, to create custom CD and DVD labels online, go to
follow the prompts.
To create custom CD/DVD labels
1. Make sure you have CD/DVD tattoo paper loaded in the input tray.
2. On the File menu in your software application, click Print.
3. Make sure the HP All-in-One is the selected printer.
4. Click the button that opens the Properties dialog box.
Depending on your software application, this button might be called Properties,
Options, Printer Setup, Printer, or Preferences.
5. Click the Features tab.
www.hp.com and
Print
Perform special print jobs 37
Page 41

Chapter 7
6. In the Paper Type drop-down list, click More, and then select HP CD/DVD tattoo
paper from the list.
7. Click OK, and then click Print or OK in the Print dialog box.
Print using Maximum dpi
Use Maximum dpi mode to print high-quality, sharp images.
To get the most benefit from Maximum dpi mode, use it to print high-quality images such
as digital photographs. When you select the Maximum dpi setting, the printer software
displays the optimized dots per inch (dpi) that the HP All-in-One will print.
Printing in Maximum dpi takes longer than printing with other settings and requires a
large amount of disk space.
NOTE: If a photo print cartridge is also installed, the print quality is enhanced. A
photo print cartridge can be purchased separately if it is not included with the HP Allin-One.
To print in Maximum dpi mode
1. Make sure you have paper loaded in the input tray.
2. On the File menu in your software application, click Print.
3. Make sure the HP All-in-One is the selected printer.
4. Click the button that opens the Properties dialog box.
Depending on your software application, this button might be called Properties,
Options, Printer Setup, Printer, or Preferences.
5. Click the Features tab.
6. In the Paper Type drop-down list, click More, and then select the appropriate paper
type.
7. In the Print Quality drop-down list, click Maximum dpi.
NOTE: To view the maximum dpi that the HP All-in-One will print, click
Resolution.
8. Select any other print settings that you want, and then click OK.
Related topics
Use a photo print cartridge” on page 70
“
Print on both sides of the page
You can print two-sided pages with the HP All-in-One manually. When printing two-sided
pages, make sure to use paper that is thick enough so that images do not show through
to the other side.
To print on both sides of the page
1. Load paper into the input tray.
2. On the File menu in your software application, click Print.
Print
38 Print from your computer
3. Make sure the HP All-in-One is the selected printer.
Page 42

4. Click the button that opens the Properties dialog box.
Depending on your software application, this button might be called Properties,
Options, Printer Setup, Printer, or Preferences.
5. Click the Features tab.
6. In the Paper saving options area, select Manual from the Two-sided printing drop-
down list.
7. For binding, do one of the following:
• For binding on the top like a notebook or calendar, select the Flip Pages Up check
box.
This causes the odd and even pages of your document to print opposite of each
other top-to-bottom. This ensures that the top of the page is always at the top of
the sheet when you flip the pages up in your bound document.
• For binding on the side like a book or magazine, click to clear the Flip pages
up check box.
This causes the odd and even pages of your document to print opposite of each
other left-to-right. This ensures that the top of the page is always at the top of the
sheet when you turn the pages in your bound document.
8. Click OK, and then click Print or OK in the Print dialog box.
The HP All-in-One begins printing. Wait until all the odd-numbered pages are printed
before removing any of the printed pages from the output tray.
A dialog box displays instructions on the screen when it is time to process the second
side of your job. Do not click Continue in the dialog box until you have reloaded the
paper as instructed.
9. Follow the instructions that appear on your screen for reloading the paper to print on
the second side, and then click Continue.
Related topics
“
Recommended papers for printing and copying” on page 18
Perform special print jobs 39
Print
Page 43

Chapter 7
Print a multiple-page document as a booklet
The HP All-in-One allows you to print your document as a small booklet, which you can
fold and then staple together.
For best results, design your document to fit on a multiple of four pages, such as an 8,
12, or 16-page program for a child's school play or for a wedding.
To print a multiple-page document as a booklet
1. Load paper into the input tray.
The paper should be thick enough that the images do not show through to the other
side.
2. On the File menu in your software application, click Print.
3. Make sure the HP All-in-One is the selected printer.
4. Click the button that opens the Properties dialog box.
Depending on your software application, this button might be called Properties,
Options, Printer Setup, Printer, or Preferences.
5. Click the Features tab.
6. In the Paper saving options area, select Manual from the Two-sided printing drop-
down list.
7. Select the binding edge from the Booklet layout is list, as appropriate for your
language.
• If your language reads left-to-right, click Left edge binding.
• If your language reads right-to-left, click Right edge binding.
The Pages per sheet box is automatically set to two pages per sheet.
8. Click OK, and then click Print or OK in the Print dialog box.
The HP All-in-One begins printing.
A dialog box displays instructions on the screen when it is time to process the second
side of your job. Do not click Continue in the dialog box until you have reloaded the
paper as instructed in the following steps.
9. Wait until the HP All-in-One has stopped printing for several seconds before removing
any of the printed pages from the output tray.
If you remove the pages while the document is still printing, the pages might get out
of order.
Print
40 Print from your computer
Page 44

10. Follow the instructions that appear on your screen for reloading the paper to print on
the second side, and then click Continue.
11. When the entire document has finished printing, fold the stack of paper in half, so that
the first page is on top, then staple the document along the crease.
TIP: For best results, use a saddle stapler, or a heavy-duty stapler with a long
reach to staple the booklet.
Figure 7-1 Left-edge binding for left-to-right languages
Figure 7-2 Right-edge binding for right-to-left languages
Print multiple pages on a single sheet
You can print up to 16 pages on a single sheet of paper.
To print multiple pages on a single sheet
1. Make sure you have paper loaded in the input tray.
2. On the File menu in your software application, click Print.
3. Make sure the HP All-in-One is the selected printer.
4. Click the button that opens the Properties dialog box.
Depending on your software application, this button might be called Properties,
Options, Printer Setup, Printer, or Preferences.
5. Click the Features tab.
6. In the Pages per sheet list, click 2, 4, 6, 8, 9, or 16.
Print
Perform special print jobs 41
Page 45

Chapter 7
7. If you want a border to appear around each page image printed on the sheet of paper,
select the Print page borders check box.
8. In the Page order list, click an appropriate page order option.
The sample output graphic is numbered to show how the pages will be ordered if you
select each option.
9. Click OK, and then click Print or OK in the Print dialog box.
Print a multiple-page document in reverse order
Because of the way the paper feeds through the HP All-in-One, the first page that prints
is print side up at the bottom of the stack. Usually this means you need to put the printed
pages in the correct order.
A better way is to print the document in reverse order so that the pages are stacked
correctly.
TIP: Set this option as a default setting so you do not have to remember to set it
every time you print a multiple-page document.
To print a multiple-page document in reverse order
1. Make sure you have paper loaded in the input tray.
2. On the File menu in your software application, click Print.
3. Make sure the HP All-in-One is the selected printer.
4. Click the button that opens the Properties dialog box.
Depending on your software application, this button might be called Properties,
Options, Printer Setup, Printer, or Preferences.
5. Click the Advanced tab.
Print
42 Print from your computer
Page 46

6. In the Layout Options area, select Front to Back in the Page Order option.
NOTE: If you set your document to print on both sides of the page, the Front to
back option is not available. Your document will automatically print in the correct
order.
7. Click OK, and then click Print or OK in the Print dialog box.
When you are printing multiple copies, each set is printed completely before the next
set is printed.
Reverse an image for iron-on transfers
This feature reverses an image so you can use it for iron-on transfers. This feature is also
useful for transparencies when you want to make notations on the back of the
transparency without scratching the original.
To reverse an image for iron-on transfers
1. On the File menu in your software application, click Print.
2. Make sure the HP All-in-One is the selected printer.
3. Click the button that opens the Properties dialog box.
Depending on your software application, this button might be called Properties,
Options, Printer Setup, Printer, or Preferences.
4. Click the Features tab.
5. In the Paper Type drop-down list, click More, and then select HP Iron-on Transfer
from the list.
6. If the selected size is not what you want, click an appropriate size in the Size list.
7. Click the Advanced tab.
8. In the Printer Features area, select On from the Mirror Image drop-down list.
9. Click OK, and then click Print or OK in the Print dialog box.
NOTE: To prevent jams, manually feed the iron-on transfer sheets into the input
tray one sheet at a time.
Print on transparencies
For the best results, HP recommends you use HP transparency products with the HP Allin-One.
To print on transparencies
1. Load the transparency into the input tray.
2. On the File menu in your software application, click Print.
3. Make sure the HP All-in-One is the selected printer.
4. Click the button that opens the Properties dialog box.
Depending on your software application, this button might be called Properties,
Options, Printer Setup, Printer, or Preferences.
5. Click the Features tab.
Print
Perform special print jobs 43
Page 47

Chapter 7
6. In the Paper Type drop-down list, click More, and then select the appropriate paper
type.
TIP: If you want to make notations on the back of the transparencies and erase
them later without scratching the original, click the Advanced tab, and select
the Mirror Image check box.
7. In the Resizing Options area, click an appropriate size in the Size list.
8. Click OK, and then click Print or OK in the Print dialog box.
The HP All-in-One automatically waits for transparencies to dry before releasing
them. Ink dries slower on film than on plain paper. Make sure you allow enough time
for the ink to dry before handling the transparency.
Print a group of addresses on labels or envelopes
With the HP All-in-One, you can print on a single envelope, a group of envelopes, or label
sheets designed for inkjet printers.
To print a group of addresses on labels or envelopes
1. Print a test page on plain paper first.
2. Place the test page on top of the label sheet or envelope, and hold both up to the
light. Check the spacing for each block of text. Make adjustments as needed.
3. Load the labels or envelopes into the input tray.
CAUTION: Do not use envelopes with clasps or windows. They can get stuck in
the rollers and cause paper jams.
4. If you are printing on envelopes, do the following:
a. Display the print settings, and click the Features tab.
b. In the Resizing Options area, click the appropriate envelope size in the Size list.
5. Click OK, and then click Print or OK in the Print dialog box.
Print
44 Print from your computer
Page 48

Print a poster
You can create a poster by printing a document on multiple pages. The HP All-in-One
prints dotted lines on some pages to indicate where to trim the pages before taping them
together.
To print a poster
1. Make sure you have paper loaded in the input tray.
2. On the File menu in your software application, click Print.
3. Make sure the HP All-in-One is the selected printer.
4. Click the button that opens the Properties dialog box.
5. Click the Advanced tab.
6. Expand the Document Options, and then expand the Printer Features.
7. In the Poster Printing drop-down list, click either 2x2 (4 sheets); 3x3 (9 sheets);
8. Click OK, and then click Print or OK in the Print dialog box.
9. After the poster has printed, trim the edges of the sheets and tape the sheets together.
Depending on your software application, this button might be called Properties,
Options, Printer Setup, Printer, or Preferences.
4x4 (16 sheets); or 5x5 (25 sheets).
This selection tells the HP All-in-One to enlarge your document so that it fits on 4, 9,
16, or 25 pages.
If your original document is multiple pages, each of those pages will be printed on 4,
9, 16, or 25 pages. For example, if you have a one-page original and you select 3x3,
you will get 9 pages; if you select 3x3 for a two-page original, 18 pages will print.
Print a Web page
You can print a Web page from your Web browser on the HP All-in-One.
Print
Perform special print jobs 45
Page 49

Chapter 7
To print a Web page
1. Make sure you have paper loaded in the input tray.
2. On the File menu in your Web browser, click Print.
The Print dialog box appears.
3. Make sure the HP All-in-One is the selected printer.
4. If your Web browser supports it, select the items on the Web page that you want to
include in the printout.
For example, in Internet Explorer, click the Options tab to select options such as As
laid out on screen, Only the selected frame, and Print all linked documents.
5. Click Print or OK to print the Web page.
TIP: To print Web pages correctly, you might need to set your print orientation to
Landscape.
Stop a print job
Although you can stop a print job from either the HP All-in-One or the computer, HP
recommends you stop it from the HP All-in-One for best results.
NOTE: Although most software applications designed for Windows use the
Windows print spooler, your software application might not use the spooler. An
example of a software application that does not use the Windows print spooler is
PowerPoint in Microsoft Office 97.
If you cannot cancel your print job by using one of the following procedures, consult
the instructions for canceling background printing in the online help for your software
application.
To stop a print job from the HP All-in-One
▲ Press Cancel on the control panel. If the print job does not stop, press Cancel again.
It can take a few moments for printing to be cancelled.
To stop a print job from the computer (Windows 2000 users)
1. On the Windows taskbar, click Start, point to Settings, and then click Printers.
2. Double-click the HP All-in-One icon.
TIP: You can also double-click the printer icon in the Windows taskbar.
3. Select the print job you want to cancel.
4. On the Document menu, click Cancel Printing or Cancel, or press the Delete key
on your keyboard.
It can take a few moments for printing to be cancelled.
To stop a print job from the computer (Windows XP users)
1. On the Windows taskbar, click Start, and then click Control Panel.
2. Open the Printers and Faxes control panel.
Print
46 Print from your computer
Page 50

3. Double-click the HP All-in-One icon.
TIP: You can also double-click the printer icon in the Windows taskbar.
4. Select the print job you want to cancel.
5. On the Document menu, click Cancel Printing or Cancel, or press the Delete key
on your keyboard.
It can take a few moments for printing to be cancelled.
Stop a print job 47
Print
Page 51

Chapter 7
Print
48 Print from your computer
Page 52

8 Use the photo features
The HP All-in-One is equipped with memory card slots which enable you to insert a
memory card and begin printing photos from your digital camera without uploading your
photos to a computer first. Additionally, if the HP All-in-One is connected to a computer
with a USB cable, you can also transfer your photos to the computer to print, edit, or
share.
The HP All-in-One supports the memory cards described below. Each type of memory
card can only be inserted in the appropriate slot for that card.
CAUTION: Do not insert more than one memory card at a time. If more than one
memory card is inserted, unrecoverable data loss might occur.
1 xD-Picture Card
2 Memory Stick or Memory Stick Duo (adapter optional, but not necessary)
3 Secure Digital (SD) or MultiMediaCard (MMC)
4 CompactFlash (CF)
Photos
The memory card area also has a Photo light. This light blinks green when a memory
card is being read or when an image is being printed from a card, and stays solid green
when images are ready to be viewed. The Photo light is located near the memory card
slots (below the camera icon).
NOTE: Do not pull out the memory card while the Photo light is flashing. A flashing
light means the HP All-in-One is accessing the memory card. Wait until the light
remains solid. Removing a memory card while it is being accessed might corrupt
information on the card or damage the HP All-in-One and card.
Use the photo features 49
Page 53

Chapter 8
This section contains the following topics:
•
Print photos
Save photos to your computer
•
Edit photos using your computer
•
Share photos with friends and relatives
•
Print photos
Photos
The HP All-in-One enables you to print one borderless or bordered photo per page directly
from your memory card, without first having to transfer the files to a computer.
The HP All-in-One is set to detect the type and size of paper you are using automatically.
This section contains the following topics:
•
Print 10 x 15 cm (4 x 6 inch) photos
Print enlargements
•
Print photos from the HP Photosmart Software
•
Print 10 x 15 cm (4 x 6 inch) photos
You can select specific photos on your memory card to print as 10 x 15 cm (4 x 6 inch)
photos.
To print one or more 10 x 15 cm (4 x 6 inch) photos
1. Insert your memory card into the appropriate slot on the HP All-in-One.
The most recent image on the card appears on the display.
2. Load 10 x 15 cm (4 x 6 inch) photo paper in the input tray.
3. Press the buttons next to the
on your memory card until the photo you want to print appears.
4. Do one of the following:
• For faster printing with slightly reduced resolution, leave the Quality setting at
best resolution (as indicated by the two star icons on the display).
• For maximum resolution, press the Quality button until three star icons appear
on the display.
5. Leave the default Size setting as Borderless.
50 Use the photo features
and icons on the display to scroll through the photos
Page 54

6. Press the Copies button until the number of copies you want to print appears on the
display.
7. Press the Print button.
TIP: While the photo is printing, you can continue scrolling through the photos
on your memory card. When you see a photo you want to print, you can press
the Print button to add that photo to the print queue.
Print enlargements
You can print enlargements of the photos on your memory card on either letter or A4
paper.
To print an enlargement of a photo
1. Insert your memory card into the appropriate slot on the HP All-in-One.
The most recent image on the card appears on the display.
2. Load letter-size or A4 photo paper in the input tray.
3. Press the buttons next to the
on your memory card until the photo you want to print appears.
4. Do one of the following:
• For faster printing with slighty reduced resolution, leave the Quality setting at best
resolution (as indicated by the two star icons on the display).
• For maximum resolution, press the Quality button until three star icons appear
on the display.
5. Do one of the following:
• Press the Size button until Resize to Fit is the selected setting on the display.
Your printed photo will be enlarged and centered to fit the printable area of the
page, and will be either bordered or borderless on all four sides depending on the
aspect ratios of the digital photo and the paper on which you're printing.
• Leave the default Size setting as Borderless.
Your printed photo will be enlarged to fill the entire page size and will be
borderless. This could result in some of the image being cropped.
6. Press the Copies button until the number of copies you want to print appears on the
display.
7. Press the Print button.
Photos
and icons on the display to scroll through the photos
TIP: While the photo is printing, you can continue scrolling through the photos
on your memory card. When you see a photo you want to print, you can press
the Print button to add that photo to the print queue.
Print photos 51
Page 55

Chapter 8
Print photos from the HP Photosmart Software
You can use the HP Photosmart Software installed on your computer to transfer photos
from a memory card to your computer’s hard drive for advanced photo editing, sharing
photos online, and printing from your computer.
Before transferring photos to your computer, you need to remove the memory card from
your digital camera and insert it in the appropriate memory card slot on the HP All-in-One.
NOTE: The HP All-in-One must be connected to a computer that has the
Photos
HP Photosmart Software installed on it.
To print photos
1. Insert a memory card into the appropriate slot on the HP All-in-One.
The software opens on your computer.
2. Click Print, and then follow the onscreen prompts to transfer your photos to the
computer for printing.
Save photos to your computer
You can use the HP Photosmart Software installed on your computer to transfer photos
from a memory card to your computer’s hard drive for advanced photo editing, sharing
photos online, and printing from your computer.
Before transferring photos to your computer, you need to remove the memory card from
your digital camera and insert it in the appropriate memory card slot on the HP All-in-One.
NOTE: The HP All-in-One must be connected to a computer that has the
HP Photosmart Software installed on it.
To save photos
1. Insert a memory card into the appropriate slot on the HP All-in-One.
The software opens on your computer.
2. Click Save, and then follow the onscreen prompts on your computer to save the
photos to your computer.
Edit photos using your computer
You can use the HP Photosmart Software installed on your computer to transfer photos
from a memory card to your computer’s hard drive for advanced photo editing, sharing
photos online, and printing from your computer.
Before transferring photos to your computer, you need to remove the memory card from
your digital camera and insert it in the appropriate memory card slot on the HP All-in-One.
NOTE: The HP All-in-One must be connected to a computer that has the
HP Photosmart Software installed on it.
52 Use the photo features
Page 56

To edit photos
1. Insert a memory card into the appropriate slot on the HP All-in-One.
The software opens on your computer.
2. Click View, and then follow the onscreen prompts to transfer your photos to the
computer for viewing and editing.
Share photos with friends and relatives
You can use the HP Photosmart Software installed on your computer to transfer photos
from a memory card to your computer’s hard drive for advanced photo editing, sharing
photos online, and printing from your computer.
Before transferring photos to your computer, you need to remove the memory card from
your digital camera and insert it in the appropriate memory card slot on the HP All-in-One.
NOTE: The HP All-in-One must be connected to a computer that has the
HP Photosmart Software installed on it.
To share photos
1. Insert a memory card into the appropriate slot on the HP All-in-One.
The software opens on your computer.
2. Click Share, and then follow the onscreen prompts to transfer your photos to the
computer for sharing with friends and relatives.
HP Photosmart Share lets you share photos with friends and family by sending photos
as e-mail, uploading photos to an online photo album, or ordering prints through an
online photo-finishing service.
Photos
Share photos with friends and relatives 53
Page 57

Chapter 8
Photos
54 Use the photo features
Page 58

9 Use the copy features
The HP All-in-One allows you to produce high-quality color and black-and-white copies
on plain or photo paper. You can enlarge or reduce the size of an original to fit a specific
paper size, adjust the copy quality, and make high-quality copies of photos, including
borderless copies.
This section contains the following topics:
•
Make a copy
Change copy speed or quality
•
Make multiple copies of the same original
•
Make a borderless copy of a photo
•
Resize an original to fit onto letter or A4 paper
•
Stop copying
•
Make a copy
You can make quality copies from the control panel.
To make a copy from the control panel
1. Make sure you have paper loaded in the input tray.
2. Load your original print side down on the right front corner of the glass.
3. Press Start Copy Black or Start Copy Color to begin copying.
Use the copy features
Change copy speed or quality
The HP All-in-One, provides three options, indicated by one, two, or three stars, that affect
copy speed and quality:
• One star copies faster than the other two quality settings. On plain paper, the text is
comparable to the quality of two stars, but the graphics might be of lower quality. This
setting uses less ink and extends the life of your print cartridges.
NOTE: This setting is not available when the HP All-In-One detects photo paper.
• Two stars delivers high-quality output and is the recommended setting for most of
your copying. Two stars copies faster than the three stars quality setting.
• Three stars produces the highest quality output for all paper and eliminates the
banding (striping) effect that sometimes occurs in solid areas. Three stars copies
slower than the other quality settings.
To change the copy quality
1. Make sure you have paper loaded in the input tray.
2. Load your original print side down on the right front corner of the glass.
3. Press Quality to select one star, two stars, or three stars.
4. Press Start Copy Black or Start Copy Color.
Use the copy features 55
Page 59

Chapter 9
Make multiple copies of the same original
You can set the number of copies from the control panel of the HP All-in-One or from the
HP Photosmart Software. This task explains how to set the number of copies from the
control panel only.
NOTE: For information on initiating copies from the software, see the software
portion of the HP Photosmart Software Help.
To make multiple copies of an original from the control panel
1. Make sure you have paper loaded in the input tray.
2. Load your original print side down on the right front corner of the glass.
3. Press the Copies button to increase the number of copies. When you reach the
maximum, the setting returns to 1 copy.
TIP: Use the software that you installed with the HP All-in-One to set the number
Use the copy features
of copies higher than supported from the control panel. When the number of
copies is greater than 9, only the last digit of the number of copies is displayed on
the control panel.
4. Press Start Copy Black or Start Copy Color.
In this example, the HP All-in-One makes six copies of the original 10 x 15 cm (4 x 6
inch) photo.
Related topics
Use the HP Photosmart software” on page 9
“
Make a borderless copy of a photo
For the best quality when copying a photo, load photo paper in the input tray.
TIP: You can optimize the quality of the color photos you print and copy with the
HP All-in-One by purchasing a photo print cartridge. Remove the black print cartridge
and insert the photo print cartridge in its place. With the tri-color print cartridge and
photo print cartridge installed, you have a six-ink system, which provides enhanced
quality color photos.
56 Use the copy features
Page 60

To make a borderless copy of a photo from the control panel
1. Load photo paper in the input tray.
NOTE: The HP All-in-One automatically detects the type of paper you are using.
If you do not use photo paper, your copy will include a white border around one
or more edges.
2. Load your original photo print side down on the right front corner of the glass.
3. Press Size to select Borderless.
4. Press Start Copy Color.
The HP All-in-One makes a borderless copy of your original photo, as shown below.
Resize an original to fit onto letter or A4 paper
You can use the Resize to Fit feature to copy an original to fit within the printable margins
of a page without the risk of cropping some of your original. This is useful for reducing or
enlarging an original. For example:
• If you enlarge a 10 x 15 cm (4 x 6 inch) photo to make a borderless full-size copy on
letter or A4 paper, some part of your photo will be cropped. The Resize to Fit feature
will enlarge the photo as much as possible to fit the page without cropping any of your
photo.
• If the image or text on your original fills the entire sheet of paper with no margins, you
can use the Resize to Fit feature to reduce your original and prevent unwanted
cropping of the text or images at the edges of the sheet.
Use the copy features
NOTE: In order to resize your original without changing the proportions or cropping
the edges, the HP All-in-One might leave an uneven amount of white space around
the edges of the paper.
To resize a document from the control panel
1. Make sure you have paper loaded in the input tray.
2. Load your original print side down on the right front corner of the glass.
3. Press the Size button to select Resize to Fit.
4. Press Start Copy Black or Start Copy Color.
Resize an original to fit onto letter or A4 paper 57
Page 61

Chapter 9
Stop copying
To stop copying
▲ Press Cancel on the control panel.
Use the copy features
58 Use the copy features
Page 62

10 Use the scan features
Scanning is the process of converting text and pictures into an electronic format for your
computer. You can scan almost anything (photos, magazine articles, and text documents)
on the HP All-in-One.
You can use the scanning features of the HP All-in-One to do the following:
• Scan text from an article into your word processor, and quote it in a report.
• Print business cards and brochures by scanning a logo and using it in your publishing
software.
• Send photos to friends and relatives by scanning your favorite prints and including
them in e-mail messages.
• Create a photographic inventory of your house or office.
• Archive treasured photos in an electronic scrapbook.
NOTE: If you are using the HP Photosmart Software, the Optical Character
Recognition (OCR) software might not be installed on your computer. To install the
OCR software, you must re-insert the software disk and select OCR under the
Custom installation options.
This section contains the following topics:
•
Scan an image or document
Edit a scanned image
•
Edit a scanned document
•
Stop scanning
•
Scan an image or document
For original documents or images placed on the glass, you can start a scan from your
computer or from the HP All-in-One. This section explains the second option: how to scan
from the control panel of the HP All-in-One to a computer.
To use the scan features, the HP All-in-One and computer must be connected and turned
on. The HP Photosmart Software must also be installed and running on your computer
prior to scanning. To verify that the HP Photosmart Software is running on a Windows
computer, look for the HP Digital Imaging Monitor icon in the system tray at the lower
right side of the screen, near the time.
NOTE: Closing the HP Digital Imaging Monitor icon in the Windows system tray
can cause the HP All-in-One to lose some of its scan functionality. If this happens,
you can restore full functionality by restarting your computer or by starting the
HP Photosmart Software.
Scan
Use the scan features 59
Page 63

Chapter 10
To scan to a computer
1. Load your original print side down on the right front corner of the glass.
2. Ensure that there are no memory cards inserted in the memory card slots on the
HP All-in-One.
3. Press Scan.
A preview image of the scan appears on your computer, where you can edit it. Any
edits that you make apply to the current scan session only.
The HP Photosmart Software has many tools that you can use to edit your scanned
image. You can improve the overall image quality by adjusting the brightness,
sharpness, color tone, and saturation. You can also crop, straighten, rotate, or resize
the image.
4. Make any edits to the preview image, and then click Accept when you are finished.
Related topics
Control panel buttons” on page 8
•“
Load originals” on page 17
•“
Edit a scanned image
You can edit a scanned image, such as a photo or graphic, using the software you
installed with the HP All-in-One. Using this software, you can rotate or crop the image,
as well as adjust the brightness, contrast, and color saturation.
NOTE: If you are using the HP Photosmart Software, the Optical Character
Recognition (OCR) software might not be installed on your computer. To install the
OCR software, you must re-insert the software disk and select OCR under the
Custom installation options.
Related topics
Use the HP Photosmart software” on page 9
“
Edit a scanned document
You can edit a scanned document using your Optical Character Recognition (OCR)
Scan
software. Scanning text using OCR software enables you to bring the content of magazine
articles, books, and other printed matter into your favorite word processor and many other
applications as editable text. Learning to use OCR software correctly is important if you
want to obtain the best results. Do not expect scanned text documents to be letter-perfect
the first time you use your OCR software. Using OCR software is an art that takes time
and practice to master.
NOTE: If you are using the HP Photosmart Software, the Optical Character
Recognition (OCR) software might not be installed on your computer. To install the
OCR software, you must re-insert the software disk and select OCR under the
Custom installation options.
Related topics
Use the HP Photosmart software” on page 9
“
60 Use the scan features
Page 64

Stop scanning
To stop scanning
▲ Press Cancel on the control panel.
Related topics
Control panel buttons” on page 8
“
Stop scanning 61
Scan
Page 65

Chapter 10
Scan
62 Use the scan features
Page 66

11 Maintain the HP All-in-One
The HP All-in-One requires little maintenance. Sometimes you might want to clean the
glass and lid backing to remove surface dust and ensure that your copies and scans
remain clear. You will also need to replace, align, or clean your print cartridges from time
to time. This section provides instructions for keeping the HP All-in-One in top working
condition. Perform these simple maintenance procedures as necessary.
This section contains the following topics:
•
Clean the HP All-in-One
Print a self-test report
•
Work with print cartridges
•
Clean the HP All-in-One
To ensure that your copies and scans remain clear, you might need to clean the glass
and lid backing. You might also want to dust the exterior of the HP All-in-One.
This section contains the following topics:
•
Clean the exterior
Clean the glass
•
Clean the lid backing
•
Clean the exterior
Use a soft cloth or slightly moistened sponge to wipe dust, smudges, and stains off the
case. The interior of the HP All-in-One does not require cleaning. Keep fluids away from
the control panel and the interior of the HP All-in-One.
CAUTION: To avoid damage to the exterior of the HP All-in-One, do not use alcohol
or alcohol-based cleaning products.
Clean the glass
Fingerprints, smudges, hair, and dust on the main glass surface slow down performance
and affect the accuracy of the copy and scan features.
To clean the glass
1. Turn off the HP All-in-One, unplug the power cord, and raise the lid.
2. Clean the glass with a soft cloth or sponge slightly moistened with a nonabrasive
glass cleaner.
3. Dry the glass with a dry, soft, lint-free cloth to prevent spotting.
4. Plug in the power cord, and then turn on the HP All-in-One.
CAUTION: Do not use abrasives, acetone, benzene, or carbon tetrachloride on
the glass, since they can damage it. Do not place or spray liquid directly on the
glass. The liquid might seep under the glass and damage the device.
Maintain the HP All-in-One
Maintain the HP All-in-One 63
Page 67

Chapter 11
Clean the lid backing
Minor debris can accumulate on the white document backing located underneath the lid
of the HP All-in-One.
To clean the lid backing
1. Turn off the HP All-in-One, unplug the power cord, and raise the lid.
2. Clean the white document backing with a soft cloth or sponge slightly moistened with
a mild soap and warm water.
Wash the backing gently to loosen debris. Do not scrub the backing.
3. Dry the backing with a dry, soft, lint-free cloth.
CAUTION: Do not use paper-based wipes, as these might scratch the backing.
4. If further cleaning is needed, repeat the previous steps using isopropyl (rubbing)
alcohol, and wipe the backing thoroughly with a damp cloth to remove any residual
alcohol.
CAUTION: Be careful not to spill alcohol on the glass or exterior of the HP All-
in-One, as this might damage the device.
5. Plug in the power cord, and then turn on the HP All-in-One.
Print a self-test report
Maintain the HP All-in-One
If you are experiencing problems with printing, print a self-test report before you replace
the print cartridges. This report provides useful information on several aspects of your
device, including your print cartridges.
64 Maintain the HP All-in-One
Page 68

To print a self-test report
1. Load letter or A4 unused plain white paper into the input tray.
2. Press and hold the Cancel button and then press the Start Copy Color button.
The HP All-in-One prints a self-test report, which might indicate the source of the
printing problem. A sample of the ink test area of the report is shown below.
3. Make sure the test patterns show a complete grid and the thick color lines are
complete.
• If more than a few lines in a pattern are broken, this might indicate a problem with
the nozzles. You might need to clean the print cartridges.
• If the black line is missing, faded, streaked, or shows lines, this might indicate a
problem with the black or photo print cartridge in the right slot.
• If any of the color lines are missing, faded, streaked, or show lines, this might
indicate a problem with the tri-color print cartridge in the left slot.
Related topics
•“
Clean the print cartridges” on page 72
Replace the print cartridges” on page 67
•“
Align the print cartridges” on page 71
•“
Work with print cartridges
To ensure the best print quality from the HP All-in-One, you will need to perform some
simple maintenance procedures. This section provides guidelines for handling the print
cartridges and instructions for replacing, aligning, and cleaning the print cartridges.
You might also need to check your print cartridges if a message appears on the screen.
Maintain the HP All-in-One
Work with print cartridges 65
Page 69

Chapter 11
This section contains the following topics:
•
Handle the print cartridges
Check the estimated ink levels
•
Replace the print cartridges
•
Use a photo print cartridge
•
Use the print cartridge protector
•
Align the print cartridges
•
Clean the print cartridges
•
Clean the print cartridge contacts
•
Clean the area around the ink nozzles
•
Remove ink from your skin and clothing
•
Handle the print cartridges
Before you replace or clean a print cartridge, you should know the part names and how
to handle the print cartridges.
1 Copper-colored contacts
2 Plastic tape with pink pull tab (must be removed before installing)
3 Ink nozzles under tape
Hold the print cartridges by their black plastic sides, with the label on top. Do not touch
the copper-colored contacts or the ink nozzles.
Maintain the HP All-in-One
NOTE: Handle the print cartridges carefully. Dropping or jarring cartridges can cause
temporary printing problems, or even permanent damage.
66 Maintain the HP All-in-One
Page 70

Check the estimated ink levels
You can easily check the ink supply level to determine how soon you might need to
replace a print cartridge. The ink supply level shows an estimate of the amount of ink
remaining in the print cartridges.
TIP: You can also print a self-test report to see if your print cartridges might need to
be replaced.
NOTE: The HP All-in-One can only detect the ink levels for genuine HP ink. The ink
levels in print cartridges that are refilled or have been used in other devices, might
not register accurately.
To check the ink levels from the HP Photosmart Software
1. In the HP Solution Center, click Settings, point to Print Settings, and then click
Printer Toolbox.
NOTE: You can also open the Printer Toolbox from the Print Properties dialog
box. In the Print Properties dialog box, click the Services tab, and then click
Service this device.
The Printer Toolbox appears.
2. Click the Estimated Ink Level tab.
The estimated ink levels for the print cartridges appear.
Related topics
Troubleshoot print cartridges” on page 83
“
Replace the print cartridges
Follow these instructions when the ink level is low.
NOTE: When the ink level for the print cartridge is low, a message appears on your
computer screen. You can also check the ink levels by using the software installed
with the HP All-in-One.
When you receive a low-ink warning message, make sure you have a replacement print
cartridge available. You should also replace the print cartridges when you see faded text
or if you experience print quality issues related to the print cartridges.
To order print cartridges for the HP All-in-One, go to
prompted, choose your country/region, follow the prompts to select your product, and
then click one of the shopping links on the page.
NOTE: At this time, some portions of the HP Web site are available in English only.
www.hp.com/buy/supplies. If
Maintain the HP All-in-One
Work with print cartridges 67
Page 71

Chapter 11
To replace the print cartridges
1. Make sure the HP All-in-One is on.
CAUTION: If the HP All-in-One is off when you open the print cartridge door to
access the print cartridges, the HP All-in-One will not release the cartridges for
changing. You might damage the HP All-in-One if the print cartridges are not
docked safely when you try to remove them.
2. Make sure you have letter or A4 unused plain white paper loaded in the input tray.
3. Open the print cartridge door.
The print carriage moves to the far right side of the HP All-in-One.
4. Wait until the print carriage is idle and silent, and then lightly press down on a print
cartridge to release it.
If you are replacing the tri-color print cartridge, remove the print cartridge from the
slot on the left.
If you are replacing the black or photo print cartridge, remove the print cartridge from
the slot on the right.
1 Print cartridge slot for the tri-color print cartridge
2 Print cartridge slot for the black and photo print cartridges
Maintain the HP All-in-One
5. Pull the print cartridge toward you out of its slot.
6. If you are removing the black print cartridge in order to install the photo print cartridge,
store the black print cartridge in the print cartridge protector or an airtight plastic
container.
68 Maintain the HP All-in-One
Page 72

7. Remove the new print cartridge from its packaging and, being careful to touch only
the black plastic, gently remove the plastic tape by using the pink pull tab.
1 Copper-colored contacts
2 Plastic tape with pink pull tab (must be removed before installing)
3 Ink nozzles under tape
CAUTION: Do not touch the copper-colored contacts or ink nozzles. Touching
these parts can result in clogs, ink failure, and bad electrical connections.
8. Slide the new print cartridge forward into the empty slot. Then gently push the upper
part of the print cartridge forward until it clicks into the socket.
If you are installing the tri-color print cartridge, slide it into the left slot.
If you are installing a black or photo print cartridge, slide it into the right slot.
Work with print cartridges 69
Maintain the HP All-in-One
Page 73

Chapter 11
9. Close the print cartridge door.
If you installed a new print cartridge, the HP All-in-One prints a print cartridge
alignment page.
10. When prompted, ensure plain white paper is loaded in the input tray, then press the
button next to OK.
NOTE: If you have colored paper loaded in the input tray when you align the print
cartridges, the alignment will fail. Load unused plain white paper into the input
tray, and then try the alignment again.
11. Place the page print side down on the scanner glass and then press the button next
to OK to scan the page.
When the On button stops flashing, the alignment is complete and the page can be
removed.
Related topics
“
Align the print cartridges” on page 71
Use a photo print cartridge
You can optimize the quality of the color photos you print and copy with the HP All-inOne by purchasing a photo print cartridge. Remove the black print cartridge and insert
the photo print cartridge in its place. With the tri-color print cartridge and photo print
cartridge installed, you have a six-ink system, which provides enhanced quality color
photos.
When you want to print regular text documents, swap the black print cartridge back in.
Use a print cartridge protector or an airtight plastic container to keep your print cartridge
secure when it is not being used.
Related topics
•“
Order print cartridges” on page 77
Maintain the HP All-in-One
Replace the print cartridges” on page 67
•“
Use the print cartridge protector” on page 70
•“
Use the print cartridge protector
In some countries/regions, when you purchase a photo print cartridge, you might also
receive a print cartridge protector. In other countries/regions, a print cartridge protector
comes in the box with the HP All-in-One. If neither your print cartridge nor the HP All-in-
70 Maintain the HP All-in-One
Page 74

One came with a print cartridge protector, you can use an airtight plastic container to
protect your print cartridge.
NOTE: If you use a plastic container, make sure the ink nozzles on the print cartridge
do not touch the plastic.
The print cartridge protector is designed to keep a print cartridge secure and prevent it
from drying out when it is not being used. Whenever you remove a print cartridge from
the HP All-in-One with the intention of using it again later, store it in the print cartridge
protector. For example, store the black print cartridge in a print cartridge protector if you
are removing it so you can print high-quality photos with the photo and tri-color print
cartridges.
To insert a print cartridge into the print cartridge protector
▲ Place the print cartridge into the print cartridge protector at a slight angle and snap it
securely into place.
To remove the print cartridge from the print cartridge protector
▲ Press down on the top of the print cartridge protector to release the print cartridge,
then gently remove the print cartridge out of the print cartridge protector.
Align the print cartridges
When a new print cartridge is installed, the HP All-in-One aligns the cartridge. You can
also align the print cartridges at any time from software you installed with the HP All-inOne. Aligning the print cartridges ensures high-quality output.
Maintain the HP All-in-One
Work with print cartridges 71
Page 75

Chapter 11
NOTE: If you remove and reinstall the same print cartridge, the HP All-in-One will
not prompt you to align the print cartridges. The HP All-in-One remembers the
alignment values for that print cartridge, so you do not need to realign the print
cartridges.
To align newly installed print cartridges
1. When prompted, ensure plain white letter or A4 paper is loaded in the input tray, then
press the button next to OK.
NOTE: If you have colored paper loaded in the input tray when you align the print
cartridges, the alignment will fail. Load unused plain white paper into the input
tray, and then try the alignment again.
2. Place the page print side down on the scanner glass and then press the button next
to OK to scan the page.
When the On button stops flashing, the alignment is complete and the page can be
removed.
To align the print cartridges from the HP Photosmart Software
1. In the HP Solution Center, click Settings, point to Print Settings, and then click
Printer Toolbox.
NOTE: You can also open the Printer Toolbox from the Print Properties dialog
box. In the Print Properties dialog box, click the Services tab, and then click
Service this device.
The Printer Toolbox appears.
2. Click the Device Services tab.
3. Click Align the Print Cartridges.
The HP All-in-One prints a print cartridge alignment sheet.
4. When prompted, ensure plain white letter or A4 paper is loaded in the input tray, then
press the button next to OK.
NOTE: If you have colored paper loaded in the input tray when you align the print
cartridges, the alignment will fail. Load unused plain white paper into the input
tray, and then try the alignment again.
5. Place the page print side down on the scanner glass and then press the button next
to OK to scan the page.
When the On button stops flashing, the alignment is complete and the page can be
removed.
Maintain the HP All-in-One
Related topics
“
Control panel buttons” on page 8
Clean the print cartridges
Use this feature when the self-test report shows streaking, white lines through any of the
lines of color or when a color is muddy after installing a print cartridge for the first time.
Do not clean print cartridges unnecessarily, as this wastes ink and shortens the life of the
ink nozzles.
72 Maintain the HP All-in-One
Page 76

To clean the print cartridges from the HP Photosmart Software
1. Load letter, A4, or legal unused plain white paper into the input tray.
2. In the HP Solution Center, click Settings, point to Print Settings, and then click
Printer Toolbox.
NOTE: You can also open the Printer Toolbox from the Print Properties dialog
box. In the Print Properties dialog box, click the Services tab, and then click
Service this device.
The Printer Toolbox appears.
3. Click the Device Services tab.
4. Click Clean the Print Cartridges.
5. Follow the prompts until you are satisfied with the quality of the output, and then
click Done.
If copy or print quality still seems poor after you clean the print cartridges, try cleaning
the print cartridge contacts before replacing the affected print cartridge.
Related topics
Clean the print cartridge contacts” on page 73
•“
Replace the print cartridges” on page 67
•“
Clean the print cartridge contacts
Clean the print cartridge contacts if you get repeated messages on your computer screen
prompting you to check a print cartridge after you already have cleaned or aligned the
print cartridges, or if the Check Print Cartridge light is blinking.
Before cleaning the print cartridge contacts, remove the print cartridge and verify that
nothing is covering the print cartridge contacts, then reinstall the print cartridge. If you
continue to get messages to check the print cartridges, clean the print cartridge contacts.
Make sure you have the following materials available:
• Dry foam rubber swabs, lint-free cloth, or any soft material that will not come apart or
leave fibers.
TIP: Coffee filters are lint-free and work well for cleaning print cartridges.
• Distilled, filtered, or bottled water (tap water might contain contaminants that can
damage the print cartridges).
CAUTION: Do not use platen cleaners or alcohol to clean the print cartridge
contacts. These can damage the print cartridge or the HP All-in-One.
To clean the print cartridge contacts
1. Turn on the HP All-in-One and open the print cartridge door.
The print carriage moves to the far right side of the HP All-in-One.
2. Wait until the print carriage is idle and silent, and then unplug the power cord from
the back of the HP All-in-One.
Work with print cartridges 73
Maintain the HP All-in-One
Page 77

Chapter 11
3. Lightly press down on the print cartridge to release it, and then pull it toward you out
of the slot.
NOTE: Do not remove both print cartridges at the same time. Remove and clean
each print cartridge one at a time. Do not leave a print cartridge outside the HP Allin-One for more than 30 minutes.
4. Inspect the print cartridge contacts for ink and debris buildup.
5. Dip a clean foam rubber swab or lint-free cloth into distilled water, and squeeze any
excess water from it.
6. Hold the print cartridge by its sides.
7. Clean only the copper-colored contacts. Allow the print cartridges to dry for
approximately ten minutes.
1 Copper-colored contacts
2 Ink nozzles (do not clean)
8. Slide the print cartridge back into the slot. Push the print cartridge forward until it clicks
into place.
9. Repeat if necessary for the other print cartridge.
10. Gently close the print cartridge door and plug the power cord into the back of the
HP All-in-One.
Related topics
•“
Clean the area around the ink nozzles” on page 74
Replace the print cartridges” on page 67
•“
Maintain the HP All-in-One
Clean the area around the ink nozzles
If the HP All-in-One is used in a dusty environment, a small amount of debris might
accumulate inside the device. This debris can include dust, hair, carpet, or clothing fibers.
When debris gets on the print cartridges, it can cause ink streaks and smudges on printed
pages. Ink streaking can be corrected by cleaning around the ink nozzles as described
here.
74 Maintain the HP All-in-One
Page 78

NOTE: Clean the area around the ink nozzles only if you continue to see streaks
and smudges on your printed pages after you have already cleaned the print
cartridges by using the software you installed with the HP All-in-One.
Make sure you have the following materials available:
• Dry foam rubber swabs, lint-free cloth, or any soft material that will not come apart or
leave fibers.
TIP: Coffee filters are lint-free and work well for cleaning print cartridges.
• Distilled, filtered, or bottled water (tap water might contain contaminants that can
damage the print cartridges).
CAUTION: Do not touch the copper-colored contacts or ink nozzles. Touching
these parts can result in clogs, ink failure, and bad electrical connections.
To clean the area around the ink nozzles
1. Turn on the HP All-in-One and open the print cartridge door.
The print carriage moves to the far right side of the HP All-in-One.
2. Wait until the print carriage is idle and silent, and then unplug the power cord from
the back of the HP All-in-One.
3. Lightly press down on the print cartridge to release it, and then pull it toward you out
of the slot.
NOTE: Do not remove both print cartridges at the same time. Remove and clean
each print cartridge one at a time. Do not leave a print cartridge outside the HP Allin-One for more than 30 minutes.
4. Place the print cartridge on a piece of paper with the ink nozzles facing up.
5. Lightly moisten a clean foam rubber swab with distilled water.
6. Clean the face and edges around the ink nozzle area with the swab, as shown below.
1 Nozzle plate (do not clean)
2 Face and edges around the ink nozzle area
CAUTION: Do not clean the nozzle plate.
7. Slide the print cartridge back into the slot. Push the print cartridge forward until it clicks
into place.
Work with print cartridges 75
Maintain the HP All-in-One
Page 79

Chapter 11
8. Repeat if necessary for the other print cartridge.
9. Gently close the print cartridge door and plug the power cord into the back of the
HP All-in-One.
Related topics
“
Clean the print cartridges” on page 72
Remove ink from your skin and clothing
Follow these instructions to remove ink from your skin and clothing:
Surface Remedy
Skin Wash the area with an abrasive soap.
White fabric Wash the fabric in cold water and use chlorine bleach.
Color fabric Wash the fabric in cold water and use sudsy ammonia.
CAUTION: Always use cold water to remove ink from fabric. Warm or hot water can
set the ink into the fabric.
Maintain the HP All-in-One
76 Maintain the HP All-in-One
Page 80

12 Shop for printing supplies
You can order HP products, such as recommended types of paper and print cartridges,
online from the HP Web site.
This section contains the following topics:
•
Order paper or other media
Order print cartridges
•
Order other supplies
•
Order paper or other media
To order HP papers and other supplies, such as HP Premium Photo Papers or HP Allin-One Paper, go to
follow the prompts to select your product, and then click one of the shopping links on the
page.
www.hp.com/buy/supplies. If prompted, choose your country/region,
Order print cartridges
For a list of print cartridge numbers, see the printed documentation that came with the
HP All-in-One. You can also use the software that came with the HP All-in-One to find
out the reorder number for all the print cartridges. You can order print cartridges online
from the HP Web site. Additionally, you can contact a local HP reseller to find out the
correct print cartridge reorder numbers for your device and purchase print cartridges.
To order HP papers and other supplies, go to
choose your country/region, follow the prompts to select your product, and then click one
of the shopping links on the page.
NOTE: At this time, some portions of the HP Web site are available in English only.
NOTE: Ordering print cartridges online is not supported in all countries/regions. If it
is not supported in your country/region, contact a local HP reseller for information
about purchasing print cartridges.
To order print cartridges through the HP Photosmart Software
1. In the HP Solution Center, click Settings, point to Print Settings, and then click
Printer Toolbox.
Shop for printing supplies
www.hp.com/buy/supplies. If prompted,
NOTE: You can also open the Printer Toolbox from the Print Properties dialog
box. In the Print Properties dialog box, click the Services tab, and then click
Service this device.
2. Click the Estimated Ink Levels tab.
Shop for printing supplies 77
Page 81

Chapter 12
3. Click Print Cartridge Ordering Information.
The print cartridge reorder numbers appear.
Shop for printing supplies
4. Click Order Online.
HP sends detailed printer information, including model number, serial number, and
ink supply levels, to an authorized online reseller. The supplies you need are
preselected; you can change quantities, add or remove items, and then check out.
Order other supplies
To order other supplies, such as HP Photosmart Software, a copy of the Setup Guide or
other printed documentation, or other customer-replaceable parts, call the phone number
for your country/region.
Country/region Number for ordering
Asia Pacific (except for Japan) 65 272 5300
Australia 1300 721 147
Europe +49 180 5 290220 (Germany)
New Zealand 0800 441 147
South Africa +27 (0)11 8061030
U.S. and Canada 1-800-474-6836 (1-800-HP-INVENT)
+44 870 606 9081 (U.K.)
To order supplies in other countries/regions not listed in the table, go to www.hp.com/
support. If prompted, choose your country/region, and then click Contact HP for
information on calling for technical support.
NOTE: At this time, some portions of the HP Web site are available in English only.
78 Shop for printing supplies
Page 82

13 Troubleshooting
This section contains the following topics:
•
Troubleshooting tips
Hardware setup troubleshooting
•
Software installation troubleshooting
•
Print quality troubleshooting
•
Print troubleshooting
•
Memory card troubleshooting
•
Copy troubleshooting
•
Scan troubleshooting
•
Errors
•
Troubleshooting tips
This section contains the following topics:
•
Communication problems over a USB connection
Information on print cartridges
•
Information on paper
•
Clear paper jams
•
Troubleshoot print cartridges
•
View the Readme file
•
Troubleshooting
Communication problems over a USB connection
If the HP All-in-One and computer are not communicating with each other, try the
following:
• Make sure the print cartridges are installed.
• Make sure you have paper loaded in the input tray.
• Check that the HP All-in-One does not have a paper jam.
• Check that the print carriage is not jammed.
Open the print cartridge door to access the print carriage area. Remove any objects
that are blocking the print carriage, including any packing materials. Turn the HP Allin-One off and then turn it on again.
• Check that the HP All-in-One print queue is not paused. If it is, choose the appropriate
setting to resume printing. For more information about accessing the print queue, see
the documentation that came with the operating system installed on your computer.
• Look at the On button located on the top of the HP All-in-One. If it is not lit, the HP All-
in-One is turned off. Make sure the power cord is firmly connected to the HP All-inOne and plugged into a power outlet. Press the On button to turn on the HP All-inOne.
Troubleshooting 79
Page 83

Chapter 13
Troubleshooting
• Check the USB cable. If you are using an older cable, it might not be working properly.
Try connecting it to another product to see if the USB cable works. If you experience
problems, the USB cable might need to be replaced. Also verify that the cable does
not exceed 3 meters (9.8 feet) in length.
• Make sure your computer is USB ready. Some operating systems, such as Windows
95 and Windows NT, do not support USB connections. Check the documentation that
came with your operating system for more information.
• Check the connection from the HP All-in-One to your computer. Verify that the USB
cable is securely plugged into the USB port on the back of the HP All-in-One. Make
sure the other end of the USB cable is plugged into a USB port on your computer.
After the cable is connected properly, turn the HP All-in-One off and then on again.
• If you are connecting the HP All-in-One through a USB hub, make sure the hub is
turned on. If the hub is on, try connecting directly to your computer.
• Check other printers or scanners. You might need to disconnect older products from
your computer.
• Try connecting the USB cable to another USB port on your computer. After you check
the connections, try restarting your computer. Turn the HP All-in-One off and then on
again.
• If necessary, remove the software you installed with the HP All-in-One and then install
it again.
For more information, see:
•“
Uninstall and reinstall the software” on page 94
Find more information” on page 11
•“
Information on print cartridges
For best results, use HP print cartridges. Refilled print cartridges might damage the
HP All-in-One. The following tips help maintain HP print cartridges and ensure consistent
print quality.
• Keep all print cartridges in the original sealed packages until they are needed.
• Store print cartridges at room temperature (15.6°-26.6° C or 60°-78° F).
80 Troubleshooting
Page 84

• Do not reattach the protective tape once it has been removed from the print cartridge.
Reattaching the plastic tape might damage the print cartridge. Place the print cartridge
in the HP All-in-One immediately after removing the plastic tape. If this is not possible,
store it in a print cartridge protector or airtight plastic container.
• HP recommends that you do not remove the print cartridges from the HP All-in-One
until you have replacement print cartridges available to install.
• Turn off the HP All-in-One from the control panel. Do not turn off the device by turning
off a power strip or unplugging the power cord from the HP All-in-One. If you
improperly turn off the HP All-in-One, the print carriage does not return to the correct
position and the print cartridges can dry out.
• Do not open the print cartridge door unless necessary. This exposes the print
cartridges to air, which reduces the life of the print cartridges.
NOTE: If you leave the print cartridge door open for a long period of time, the
HP All-in-One will recap the print cartridges to protect them from exposure to air.
• Clean the print cartridges when you notice a significant decrease in print quality.
TIP: You might notice a decrease in print quality if the print cartridges have not
been used for a long time.
• Do not clean the print cartridges unnecessarily. This wastes ink and shortens the life
of the cartridges.
• Handle print cartridges carefully. Dropping, jarring, or rough handling during
installation can cause temporary printing problems. If print quality is poor right after
cartridge installation, allow half an hour for the print cartridge to recover.
For more information, see:
“
Troubleshoot print cartridges” on page 83
Troubleshooting
Information on paper
The HP All-in-One is designed to work well with most paper types. Test a variety of paper
types before buying a large quantity. Find a paper type that works well and is easy to
purchase. HP Premium papers are designed for the best quality results. In addition, follow
these tips:
• Do not use paper that is too thin, that has a slick texture, or that stretches easily. It
can feed incorrectly through the paper path, causing paper jams.
• Store photo media in its original packaging inside a resealable plastic bag on a flat
surface in a cool, dry place. When you are ready to print, remove only the paper you
plan to use immediately. When you have finished printing, return any unused photo
paper to the plastic bag.
• Do not leave unused photo paper in the input tray. The paper might start to curl, which
might reduce the quality of your printouts. Curled paper can also cause paper jams.
• Always hold photo paper by the edges. Fingerprints on photo paper can reduce print
quality.
• Do not use paper that is heavily textured. It can cause graphics or text to print
improperly.
Troubleshooting tips 81
Page 85

Chapter 13
Clear paper jams
Troubleshooting
• Do not combine different paper types and paper sizes in the input tray; the entire stack
of paper in the input tray must be the same size and type.
• Store printed photos under glass or in a storage book to prevent bleeding over time
from high humidity. Use HP Premium Plus photo paper for maximum performance.
If the HP All-in-One has a paper jam, first check the rear door.
If the jammed paper is not in the rear rollers, check the front door.
To clear a paper jam from the rear door
1. Press in the tab on the left side of the rear door to release the door. Remove the door
by pulling it away from the HP All-in-One.
2. Gently pull the paper out of the rollers.
CAUTION: If the paper tears when you are removing it from the rollers, check
the rollers and wheels for torn pieces of paper that might be remaining inside the
device. If you do not remove all the pieces of paper from the HP All-in-One, more
paper jams are likely to occur.
3. Replace the rear door. Gently push the door forward until it snaps into place.
4. Press Start Copy Black or Start Copy Color to continue the current job.
To clear a paper jam from the front door
1. If necessary, pull the input tray down to open it. Then, lower the print cartridge door.
82 Troubleshooting
Page 86

2. Gently pull the paper out of the rollers.
CAUTION: If the paper tears when you are removing it from the rollers, check
the rollers and wheels for torn pieces of paper that might be remaining inside the
device. If you do not remove all the pieces of paper from the HP All-in-One, more
paper jams are likely to occur.
3. Close the print cartridge door.
4. Press Start Copy Black to continue the current job.
Troubleshoot print cartridges
If you are experiencing problems with printing, you might have a problem with one of the
print cartridges. Do the following:
To troubleshoot print cartridges
1. Remove the black print cartridge from the slot on the right. Do not touch the ink
nozzles or the copper-colored contacts. Check for possible damage to the coppercolored contacts or ink nozzles.
Make sure the clear plastic tape has been removed. If it is still covering the ink nozzles,
gently remove the clear plastic tape by using the pink pull tab. Make sure you do not
remove the copper colored tape containing the electrical contacts.
1 Copper-colored contacts
2 Plastic tape with pink pull tab (must be removed before installing)
3 Ink nozzles under tape
Troubleshooting
Troubleshooting tips 83
Page 87

Chapter 13
Troubleshooting
2. Reinsert the print cartridge by sliding it forward into the slot. Then push the print
cartridge forward until it clicks into the socket.
3. Repeat steps 1 and 2 for the tri-color print cartridge on the left side.
4. If the problem persists, print a self-test report to determine if there is a problem with
the print cartridges.
This report provides useful information about your print cartridges, including status
information.
5. If the self-test report shows a problem, clean the print cartridges.
6. If the problem persists, clean the copper-colored contacts of the print cartridges.
7. If you are still experiencing problems with printing, determine which print cartridge is
experiencing the problem and replace it.
To check the ink levels from the HP Photosmart Software
1. In the HP Solution Center, click Settings, point to Print Settings, and then click
Printer Toolbox.
NOTE: You can also open the Printer Toolbox from the Print Properties dialog
box. In the Print Properties dialog box, click the Services tab, and then click
Service this device.
The Printer Toolbox appears.
2. Click the Estimated Ink Level tab.
The estimated ink levels for the print cartridges appear.
84 Troubleshooting
Page 88

To print a self-test report
1. Load letter or A4 unused plain white paper into the input tray.
2. Press and hold the Cancel button and then press the Start Copy Color button.
The HP All-in-One prints a self-test report, which might indicate the source of the
printing problem. A sample of the ink test area of the report is shown below.
3. Make sure the test patterns show a complete grid and the thick color lines are
complete.
• If more than a few lines in a pattern are broken, this might indicate a problem with
the nozzles. You might need to clean the print cartridges.
• If the black line is missing, faded, streaked, or shows lines, this might indicate a
problem with the black print cartridge in the right slot.
• If any of the color lines are missing, faded, streaked, or show lines, this might
indicate a problem with the tri-color print cartridge in the left slot.
To clean the print cartridges from the HP Photosmart Software
1. Load letter, A4, or legal unused plain white paper into the input tray.
2. In the HP Solution Center, click Settings, point to Print Settings, and then click
Printer Toolbox.
NOTE: You can also open the Printer Toolbox from the Print Properties dialog
box. In the Print Properties dialog box, click the Services tab, and then click
Service this device.
The Printer Toolbox appears.
3. Click the Device Services tab.
Troubleshooting
Troubleshooting tips 85
Page 89

Chapter 13
4. Click Clean the Print Cartridges.
5. Follow the prompts until you are satisfied with the quality of the output, and then
click Done.
If copy or print quality still seems poor after you clean the print cartridges, try cleaning
the print cartridge contacts before replacing the affected print cartridge.
To clean the print cartridge contacts
1. Turn on the HP All-in-One and open the print cartridge door.
The print carriage moves to the far right side of the HP All-in-One.
2. Wait until the print carriage is idle and silent, and then unplug the power cord from
the back of the HP All-in-One.
3. Lightly press down on the print cartridge to release it, and then pull it toward you out
of the slot.
NOTE: Do not remove both print cartridges at the same time. Remove and clean
each print cartridge one at a time. Do not leave a print cartridge outside the HP Allin-One for more than 30 minutes.
Troubleshooting
4. Inspect the print cartridge contacts for ink and debris buildup.
5. Dip a clean foam rubber swab or lint-free cloth into distilled water, and squeeze any
excess water from it.
6. Hold the print cartridge by its sides.
7. Clean only the copper-colored contacts. Allow the print cartridges to dry for
approximately ten minutes.
1 Copper-colored contacts
2 Ink nozzles (do not clean)
8. Slide the print cartridge back into the slot. Push the print cartridge forward until it clicks
into place.
9. Repeat if necessary for the other print cartridge.
10. Gently close the print cartridge door and plug the power cord into the back of the
HP All-in-One.
86 Troubleshooting
Page 90

To replace the print cartridges
1. Make sure the HP All-in-One is on.
CAUTION: If the HP All-in-One is off when you open the print cartridge door to
access the print cartridges, the HP All-in-One will not release the cartridges for
changing. You might damage the HP All-in-One if the print cartridges are not
docked safely when you try to remove them.
2. Make sure you have letter or A4 unused plain white paper loaded in the input tray.
3. Open the print cartridge door.
The print carriage moves to the far right side of the HP All-in-One.
4. Wait until the print carriage is idle and silent, and then lightly press down on a print
cartridge to release it.
If you are replacing the tri-color print cartridge, remove the print cartridge from the
slot on the left.
If you are replacing the black or photo print cartridge, remove the print cartridge from
the slot on the right.
Troubleshooting
1 Print cartridge slot for the tri-color print cartridge
2 Print cartridge slot for the black and photo print cartridges
5. Pull the print cartridge toward you out of its slot.
6. If you are removing the black print cartridge in order to install the photo print cartridge,
store the black print cartridge in the print cartridge protector or an airtight plastic
container.
Troubleshooting tips 87
Page 91

Chapter 13
Troubleshooting
7. Remove the new print cartridge from its packaging and, being careful to touch only
the black plastic, gently remove the plastic tape by using the pink pull tab.
1 Copper-colored contacts
2 Plastic tape with pink pull tab (must be removed before installing)
3 Ink nozzles under tape
CAUTION: Do not touch the copper-colored contacts or ink nozzles. Touching
these parts can result in clogs, ink failure, and bad electrical connections.
8. Slide the new print cartridge forward into the empty slot. Then gently push the upper
part of the print cartridge forward until it clicks into the socket.
If you are installing the tri-color print cartridge, slide it into the left slot.
If you are installing a black or photo print cartridge, slide it into the right slot.
88 Troubleshooting
Page 92

9. Close the print cartridge door.
If you installed a new print cartridge, the HP All-in-One prints a print cartridge
alignment page.
10. When prompted, ensure plain white paper is loaded in the input tray, then press the
button next to OK.
NOTE: If you have colored paper loaded in the input tray when you align the print
cartridges, the alignment will fail. Load unused plain white paper into the input
tray, and then try the alignment again.
11. Place the page print side down on the scanner glass and then press the button next
to OK to scan the page.
When the On button stops flashing, the alignment is complete and the page can be
removed.
View the Readme file
You might want to refer to the Readme file for information on system requirements and
possible installation problems.
You can access the Readme file by clicking Start, pointing to Programs or All
Programs, pointing to HP, pointing to Photosmart C4200 All-in-One series, and then
clicking Readme.
You can access the Readme file by double-clicking the icon located in the top-level folder
of the HP All-in-One software CD-ROM.
Hardware setup troubleshooting
This section contains hardware troubleshooting information for the HP All-in-One.
Many issues are caused when the HP All-in-One is connected to the computer using a
USB cable before the HP All-in-One software is installed on the computer. If you
connected the HP All-in-One to your computer before the software installation screen
prompts you to do so, you must follow these steps:
Troubleshooting common setup issues
1. Disconnect the USB cable from the computer.
2. Uninstall the software (if you have already installed it).
3. Restart your computer.
Troubleshooting
Hardware setup troubleshooting 89
Page 93

Chapter 13
Troubleshooting
4. Turn off the HP All-in-One, wait one minute, then restart it.
5. Reinstall the HP All-in-One software.
CAUTION: Do not connect the USB cable to the computer until prompted by the
software installation screen.
This section contains the following topics:
•
The HP All-in-One will not turn on
I connected the USB cable, but I am having problems using the HP All-in-One with
•
my computer
The HP All-in-One will not turn on
Cause: The HP All-in-One is not properly connected to a power supply.
Solution:
• Make sure the power cord is firmly connected to both the HP All-in-One and the
power adapter. Plug the power cord into a grounded power outlet, surge protector,
or power strip.
1 Power connection
2 Power cord and adapter
3 Grounded power outlet
• If you are using a power strip, make sure the power strip is on. Or, try plugging
the HP All-in-One directly into a grounded power outlet.
• Test the power outlet to make sure it is working. Plug in an appliance that you
know works, and see if the appliance has power. If not, then there might be a
problem with the power outlet.
• If you plugged the HP All-in-One into a switched outlet, make sure the switch is
on. If it is switched to on but still does not work, then there might be a problem
with the power outlet.
90 Troubleshooting
Page 94

Cause: You pressed the On button too quickly.
Solution: The HP All-in-One might not respond if you press the On button too
quickly. Press the On button once. It might take a few minutes for the HP All-in-One
to turn on. If you press the On button again during this time, you might turn the device
off.
CAUTION: If the HP All-in-One still does not turn on, it might have a mechanical
failure. Unplug the HP All-in-One from the power outlet and contact HP. Go to:
www.hp.com/support. If prompted, choose your country/region, and then click
Contact HP for information on calling for technical support.
I connected the USB cable, but I am having problems using the HP All-in-One with
my computer
Cause: The USB cable was connected before the software was installed.
Connecting the USB cable before prompted can cause errors.
Solution: You must first install the software that came with the HP All-in-One before
connecting the USB cable. During installation, do not plug in the USB cable until
prompted by the onscreen instructions.
Once you have installed the software, connecting your computer to the HP All-in-One
with a USB cable is straightforward. Simply plug one end of the USB cable into the
back of your computer and the other into the back of the HP All-in-One. You can
connect to any USB port on the back of your computer.
Troubleshooting
For more information on installing the software and connecting the USB cable, see
the Setup Guide that came with the HP All-in-One.
Software installation troubleshooting
Use this section to solve any problems you might encounter while setting up the HP Allin-One software.
Software installation troubleshooting 91
Page 95

Chapter 13
Troubleshooting
This section contains the following topics:
•
When I insert the CD-ROM into my computer’s CD-ROM drive, nothing happens
The minimum system checks screen appears
•
A red X appears on the USB connect prompt
•
I received a message that an unknown error has occurred
•
Some of the buttons are missing in the HP Solution Center
•
The registration screen does not appear
•
The HP Digital Imaging Monitor does not appear in the system tray
•
Uninstall and reinstall the software
•
When I insert the CD-ROM into my computer’s CD-ROM drive, nothing happens
Cause: The installation failed to run automatically.
Solution: If the installation does not run automatically, you can start it manually.
To start the installation from a Windows computer
1. From the Windows Start menu, click Run.
2. In the Run dialog box, enter d:\setup.exe, and then click OK.
If your CD-ROM drive is not assigned to drive letter D, enter the appropriate drive
letter.
The minimum system checks screen appears
Cause: Your system does not meet the minimum requirements to install the
software.
Solution: Click Details to see what the specific problem is, and then correct the
problem before attempting to install the software.
A red X appears on the USB connect prompt
Cause: Normally, a green check appears indicating that the plug and play is
successful. A red X indicates that the plug and play failed.
92 Troubleshooting
Page 96

Solution:
To retry the plug and play
1. Verify that the control panel overlay is firmly attached, unplug the HP All-in-One
power cord, and then plug it in again.
2. Verify that the USB cable and power cord are plugged in.
3. Click Retry to retry the plug and play setup. If this does not work, continue to the
next step.
4. Verify that the USB cable is set up properly as follows:
• Unplug the USB cable and plug it in again.
• Do not attach the USB cable to a keyboard or non-powered hub.
• Verify that the USB cable is 3 meters (9.8 feet) or less in length.
• If you have several USB devices attached to your computer, you might want
to unplug the other devices during the installation.
5. Continue with the installation and restart the computer when prompted.
6. Open the HP Solution Center and check for the appropriate buttons for your
device (such as Make Copies). If the buttons do not appear, remove the software
and then reinstall it.
For more information, see:
Uninstall and reinstall the software” on page 94
“
Troubleshooting
I received a message that an unknown error has occurred
Cause: The source of the error is unknown.
Solution: Try to continue with the installation. If that does not work, stop and then
restart the installation, and follow the directions on the screen. If an error occurs, you
might need to uninstall and then reinstall the software. Do not simply delete the HP Allin-One application files from your computer. Make sure to remove them properly using
the uninstall utility provided when you installed the software that came with the HP Allin-One.
Software installation troubleshooting 93
Page 97

Chapter 13
Troubleshooting
For more information, see:
“
Uninstall and reinstall the software” on page 94
Some of the buttons are missing in the HP Solution Center
Cause: The installation might not be complete.
Solution: If the appropriate buttons for your device (such as Make Copies) do not
appear, your installation might not be complete, and you might need to uninstall and
then reinstall the software. Do not simply delete the HP All-in-One application files
from your hard drive. Make sure to remove them properly using the uninstall utility
provided in the HP All-in-One program group.
For more information, see:
“
Uninstall and reinstall the software” on page 94
The registration screen does not appear
Cause: The registration screen did not launch automatically.
Solution: You can access the registration (Sign up now) screen from the Windows
taskbar by clicking Start, pointing to Programs or All Programs, HP, Photosmart
C4200 All-in-One series, and then clicking Product Registration.
The HP Digital Imaging Monitor does not appear in the system tray
Cause: The installation might not be complete.
Solution: If the HP Digital Imaging Monitor does not appear in the system tray
(normally located at the lower-right corner of the desktop), start the HP Solution
Center.
If the appropriate buttons for your device (such as Make Copies) do not appear, your
installation might not be complete, and you might need to uninstall and then reinstall
the software. Do not simply delete the HP All-in-One application files from your hard
drive. Make sure to remove them properly using the uninstall utility provided in the
HP All-in-One program group.
For more information, see:
“
Uninstall and reinstall the software” on page 94
Uninstall and reinstall the software
If your installation is incomplete, or if you connected the USB cable to the computer before
prompted by the software installation screen, you might need to uninstall and then
reinstall the software. Do not simply delete the HP All-in-One application files from your
computer. Make sure to remove them properly using the uninstall utility provided when
you installed the software that came with the HP All-in-One.
94 Troubleshooting
Page 98

To uninstall from a Windows computer, method 1
1. Disconnect the HP All-in-One from your computer. Do not connect the HP All-in-One
to your computer until after you have reinstalled the software.
2. On the Windows taskbar, click Start, Programs or All Programs, HP, Photosmart
C4200 All-in-One series, Uninstall.
3. Follow the onscreen instructions.
4. If you are asked whether you would like to remove shared files, click No.
Other programs that use these files might not work properly if the files are deleted.
5. Restart your computer.
NOTE: It is important that you disconnect the HP All-in-One before restarting
your computer. Do not connect the HP All-in-One to your computer until after you
have reinstalled the software.
6. To reinstall the software, insert the HP All-in-One CD-ROM into your computer’s CD-
ROM drive, and follow the onscreen instructions and the instructions provided in the
Setup Guide that came with the HP All-in-One.
7. After the software is installed, connect the HP All-in-One to your computer.
8. Press the On button to turn the HP All-in-One on.
After connecting and turning on the HP All-in-One, you might have to wait several
minutes for all of the Plug and Play events to complete.
9. Follow the onscreen instructions.
To uninstall from a Windows computer, method 2
NOTE: Use this method if Uninstall is not available in the Windows Start menu.
1. On the Windows taskbar, click Start, Settings, Control Panel.
2. Double-click Add/Remove Programs.
3. Select HP Photosmart All-In-One Driver Software, and then click Change/
Remove.
Follow the onscreen instructions.
4. Disconnect the HP All-in-One from your computer.
5. Restart your computer.
NOTE: It is important that you disconnect the HP All-in-One before restarting
your computer. Do not connect the HP All-in-One to your computer until after you
have reinstalled the software.
6. Insert the HP All-in-One CD-ROM into your computer’s CD-ROM drive and then start
the Setup program.
7. Follow the onscreen instructions and the instructions provided in the Setup Guide that
came with the HP All-in-One.
To uninstall from a Windows computer, method 3
NOTE: Use this method if Uninstall is not available in the Windows Start menu.
Troubleshooting
Software installation troubleshooting 95
Page 99

Chapter 13
1. Insert the HP All-in-One CD-ROM into your computer’s CD-ROM drive and then start
the Setup program.
2. Disconnect the HP All-in-One from your computer.
3. Select Uninstall and follow the onscreen directions.
4. Restart your computer.
NOTE: It is important that you disconnect the HP All-in-One before restarting
your computer. Do not connect the HP All-in-One to your computer until after you
have reinstalled the software.
5. Start the Setup program for the HP All-in-One again.
6. Select Install.
7. Follow the onscreen instructions and the instructions provided in the Setup Guide that
came with the HP All-in-One.
When the software installation is complete, the HP Digital Imaging Monitor icon appears
in the Windows system tray.
To verify that the software is properly installed, double-click the HP Solution Center icon
on the desktop. If the HP Solution Center shows the appropriate buttons for your device
Troubleshooting
(such as Make Copies), the software has been properly installed.
Print quality troubleshooting
If you are having problems with print quality, try the solutions in this section and observe
the following guidelines:
• Replace refilled or empty cartridges.
• Check the device settings to make sure that the print mode and paper selection is
correct for the paper and the task.
For more information, see “
papers for printing and copying” on page 18.
• Print and evaluate a self-test.
For more information, see “
If the self-test shows a defect, try the following:
• Clean the print cartridges automatically. For more information, see “
print cartridges” on page 72.
• If you are missing lines when you print, clean the electrical contacts. For more
information, see “
• Replace the print cartridge. For more information, see “
cartridges” on page 67.
• If the self-test does not show a problem, investigate other causes, such as the image
file or software program.
For additional print cartridge troubleshooting, visit the HP Web site at
support.
This section contains the following topics:
•
Ink is bleeding or smearing
Ink is not filling the text or graphics completely
•
The text edges are jagged
•
Clean the area around the ink nozzles” on page 74.
Set the paper type for printing” on page 31 and “Choose
Print a self-test report” on page 64.
Clean the
Replace the print
www.hp.com/
96 Troubleshooting
Page 100

• The printout has a horizontal band of distortion near the bottom of the page
Colors run into each other on the printout
•
Printouts or copies have horizontal streaks or lines
•
Printouts or copies are faded or have dull colors
•
Printouts or copies seem blurry or fuzzy
•
Printouts or copies have vertical streaks
•
Printouts or copies are slanted or skewed
•
Paper is not picked up from the input tray
•
Ink is bleeding or smearing
Cause: The paper type is not suitable for the HP All-in-One.
Solution: Use HP Premium Papers or any other paper type that is appropriate for
the HP All-in-One.
Cause: The print cartridges need to be cleaned.
Solution: Print a self-test report to determine if there is a problem with the print
cartridges. If the self-test report shows a problem, clean the print cartridges. If the
problem persists, you might need to replace the print cartridges.
For more information on print cartridges, see “
Troubleshoot print cartridges”
on page 83.
Cause: The paper is too close to the print cartridge during printing.
Solution: If the paper is too close to the print cartridge during printing, the ink might
be smeared. This can happen if the paper is raised, wrinkled, or very thick, such as
a mailing envelope. Make sure the paper lays flat in the input tray and is not too
wrinkled.
Ink is not filling the text or graphics completely
Cause: The print cartridges need to be cleaned or might be out of ink.
Solution: Check the estimated ink levels remaining in the print cartridges. If the
print cartridges are low or out of ink, you might need to replace the print cartridges.
If there is ink remaining in the print cartridges, but you are still noticing a problem,
print a self-test report to determine if there is a problem with the print cartridges. If the
self-test report shows a problem, clean the print cartridges. If the problem persists,
you might need to replace the print cartridges.
For more information on print cartridges, see “
Troubleshoot print cartridges”
on page 83.
Cause: The print paper type setting is incorrect.
Solution: Change the paper type setting to match the type of paper loaded in the
input tray. The HP All-in-One automatically detects the paper type for plain and photo
Troubleshooting
Print quality troubleshooting 97
 Loading...