

Page 1

C100_110-160_180.FB -1 Tue Jul 16 06:36:50 1996
Installing the C100/C110 to C160/C180
CPU Upgrade
HP Part No. A4200-90017
E0796
Printed in USA
Page 2

C100_110-160_180.FB 0 Tue Jul 16 06:36:50 1996
Hewlett-Packard Co. 1996
Printing History
First Printing: July 1996
UNIX is a registered trademark in the United States and other countries,
licensed exclusively through X/Open Company Limited.
The information contained in this document is subject to change without
notice.
NOTICE
HEWLETT -PACKARD MAKES NO WARRANTY OF ANY KIND WITH
REGARD TO THIS MATERIAL INCLUDING BUT NOT LIMITED TO
THE IMPLIED WARRANTIES OF MERCHANTABILITY AND FITNESS FOR A PARTICULAR PURPOSE. Hewlett-Packard shall not be liable for errors contained herein or for incidental or consequential damages in
connection with the furnishing, performance or use of this material.
Hewlett-Packard assumes no responsibility for the use or reliability of its
software on equipment that is not furnished by Hewlett-Packard.
This document contains proprietary information that is protected by copyright. All rights reserved. No part of this document may be photocopied,
reproduced or translated to another language without the prior written consent of Hewlett-Packard Company.
RESTRICTED RIGHTS LEGEND. Use, duplication, or disclosure by government is subject to restrictions as set forth in subdivision (c) (1) (ii) of the
Rights in Technical Data and Computer Software Clause at DFARS
252.227.7013. Hewlett-Packard Co., 3000 Hanover St., Palo Alto, CA
94304.
10 9 8 7 6 5 4 3 2 1
Page 3
C100_110-160_180.FB 1 Tue Jul 16 06:36:50 1996
Upgrading your Model C100/110 to a Model C160 or
C180
Your upgrade kit contains a Main Tray Assembly, which, when installed,
upgrades your Model C100/110 to a Model C160/C180.
NOTE: Installing this upgrade in your Model C100 or Model C110 does not affect the
regulatory and safety classifications or approvals. The upgraded system meets all of
the regulatory and safety standards listed in Appendix A of your original Model
C100/110 Owner’s Guide.
The following sections provide step-by-step instructions for removing the
C100/110 main tray and power supply and installing the C160/C180 CPU
main tray and power supply.
Upgrading your Model C100/110 to a Model C160 or C180
The general steps are outlined as follows. See the individual sections for
more detailed instructions.
NOTE: The following steps must be followed in the order in which they appear. Refer to the
individual sections of this guide for the actual step-by-step procedures for upgrading
the C100/110 to a C160/180.
• Update your operating system software to HP-UX 10.20.
• Determine the LAN ID of your system.
• Run the cclass_upgrade program.
• Power off the workstation and any peripherals and unplug the power cords. Disconnect any peripheral cables and remove the floor stand.
• Remove the main tray assembly.
• Remove the memory boards from the CPU board and the option boards from the
main tray and reinstall them onto the new main tray.
• Place the main tray assembly into the workstation chassis.
• Connect power cords and cables, restart the workstation, and enter the LAN ID
when prompted.
1
Page 4
C100_110-160_180.FB 2 Tue Jul 16 06:36:50 1996
Preparing Your Workstation
Preparing Your Workstation
Before starting the upgrade, use the following procedure to prepare the
workstation:
1 The workstation must be running HP-UX 10.20 or later to accommodate the
C160/C180 upgrade. If the workstation is running a version of HP-UX lower than
10.2, update the operating system software before continuing.
2 Determine the workstations LAN ID with the lanscan command by entering the
following command:
/usr/sbin/lanscan
The output is similar to the following:
Hardware Station Dev Hardware Net-Interface NM Encapsulation Mjr
Path Address lu State NameUnit State ID Methods Num
2.0.2 0x08000970ECC0 0 UP lan0 UP 4 ETHER 52
After you install the new CPU board or I/O board and power on the system for
the first time, you are prompted for the LAN ID. Record the information here so
you have a record of it:
EtherLAN ID ___________________-_____________________
You must supply the dash (-) between the first six digits and the last six digits.
3 Logout of your system and enter a no windows command line session as follows:
HP VUE: At the login window, select Options, then select No Windows.
HP CDE: At the login window, select Option, then select
Command Line Login.
2
Page 5
C100_110-160_180.FB 3 Tue Jul 16 06:36:50 1996
4 Next, you need to run the upgrade utility program to automatically convert the
hardware paths stored in the system’s I/O configuration file. You should only run
this utility if you are going to complete the rest of the hardware upgrade described
in this document.
Enter the following command to run the upgrade utility program:
/usr/sam/lbin/cclass_upgrade
The upgrade utility prompts you to confirm that you want to continue, as follows:
Are you ready to perform the upgrade (y/n [n] ) ?
Enter Y.
Preparing Your Workstation
The upgrade utility proceeds to modify the I/O configuration information that is
stored in the files /etc/ioconfig and /stand/ioconfig to be compatible with the
upgraded system. The original I/O configuration information is saved in the
backup file /etc/ioconfig.pre_upgrade.
If the utility detects an A4077A Color Graphics Card or an A4078A Dual Color
Graphics Card in the system, it will inform you to remove them when you perform the hardware portion of this upgrade. Systems with built-in Enhanced
Graphics adapters do not support these optional graphics adapters.
If you have a Visualize48Z (A4444A) graphics adapter installed, the utility may
ask you to identify which slot the card set is installed in. Respond with the highest numbered option slot that the graphics adapter card set resides in.
NOTICE: The cclass_upgrade utility modifies the hardware configuration so that it
is incompatible with a C100 or C110 system. After running the utility, you
must continue with this upgrade or restore the configuration information
from /etc/ioconfig.pre_upgrade to /etc/ioconfig and /stand/ioconfig.
3
Page 6

C100_110-160_180.FB 4 Tue Jul 16 06:36:50 1996
Preparing Your Workstation
5 If your system has an A4070B HCRX-8Z or an A4071B with the A4272A accel-
erator graphics adapter installed enter the following commands to save the current versions of the /etc/ioconfig and /stand/ioconfig files:
mv /etc/ioconfig /etc/ioconfig.old
mv /stand/ioconfig /stand/ioconfig.old
6 Power off your workstation by pressing the power button on the front panel.
When you press the power button, the workstation automatically shuts down the
operating system before it powers off the system.
7 When the workstation has completed shutting down and powering off, power off
the monitor, and any peripheral devices connected to the workstation.
If your system has supported graphics adapters installed, continue with step
8. Otherwise skip to step 12.
8 If a message to press Esc to stop the boot process is displayed, then press Esc.
This stops the boot process and brings you to the Boot Console Handler prompt.
9 At the prompt, enter the following command to enter the information menu:
in
10 Enter the followiong command to display the console setting:
co
The garphics path for the default console device is displayed. Make note of this
information below for later use.
Console Path: ________________________________________
11 Power down the system.
4
Page 7
C100_110-160_180.FB 5 Tue Jul 16 06:36:50 1996
12 Unplug the power cord of the system unit, the monitor, and any peripheral devic-
es from ac wall outlets.
13 Unplug the power cord from the back of the system unit.
WARNING: To avoid electrical shock, make sure you unplug the power cable from
the wall outlet and the system unit before proceeding any further.
CAUTION: The internal components of your workstation are susceptible to mechanical and
electrostatic shock. To prevent such damage from occurring, observe the following
precautions during the installation procedure.
• Stand on a static-free mat
• W ear a static-grounding wrist strap to ensure that any accumulated electrostatic charge
discharges from your body to ground. Attach the static-grounding wrist strap by following the instructions on the package that contains the strap. Be sure to attach one
end of the strap to the system chassis.
Preparing Your Workstation
5
Page 8
C100_110-160_180.FB 6 Tue Jul 16 06:36:50 1996
Preparing Your Workstation
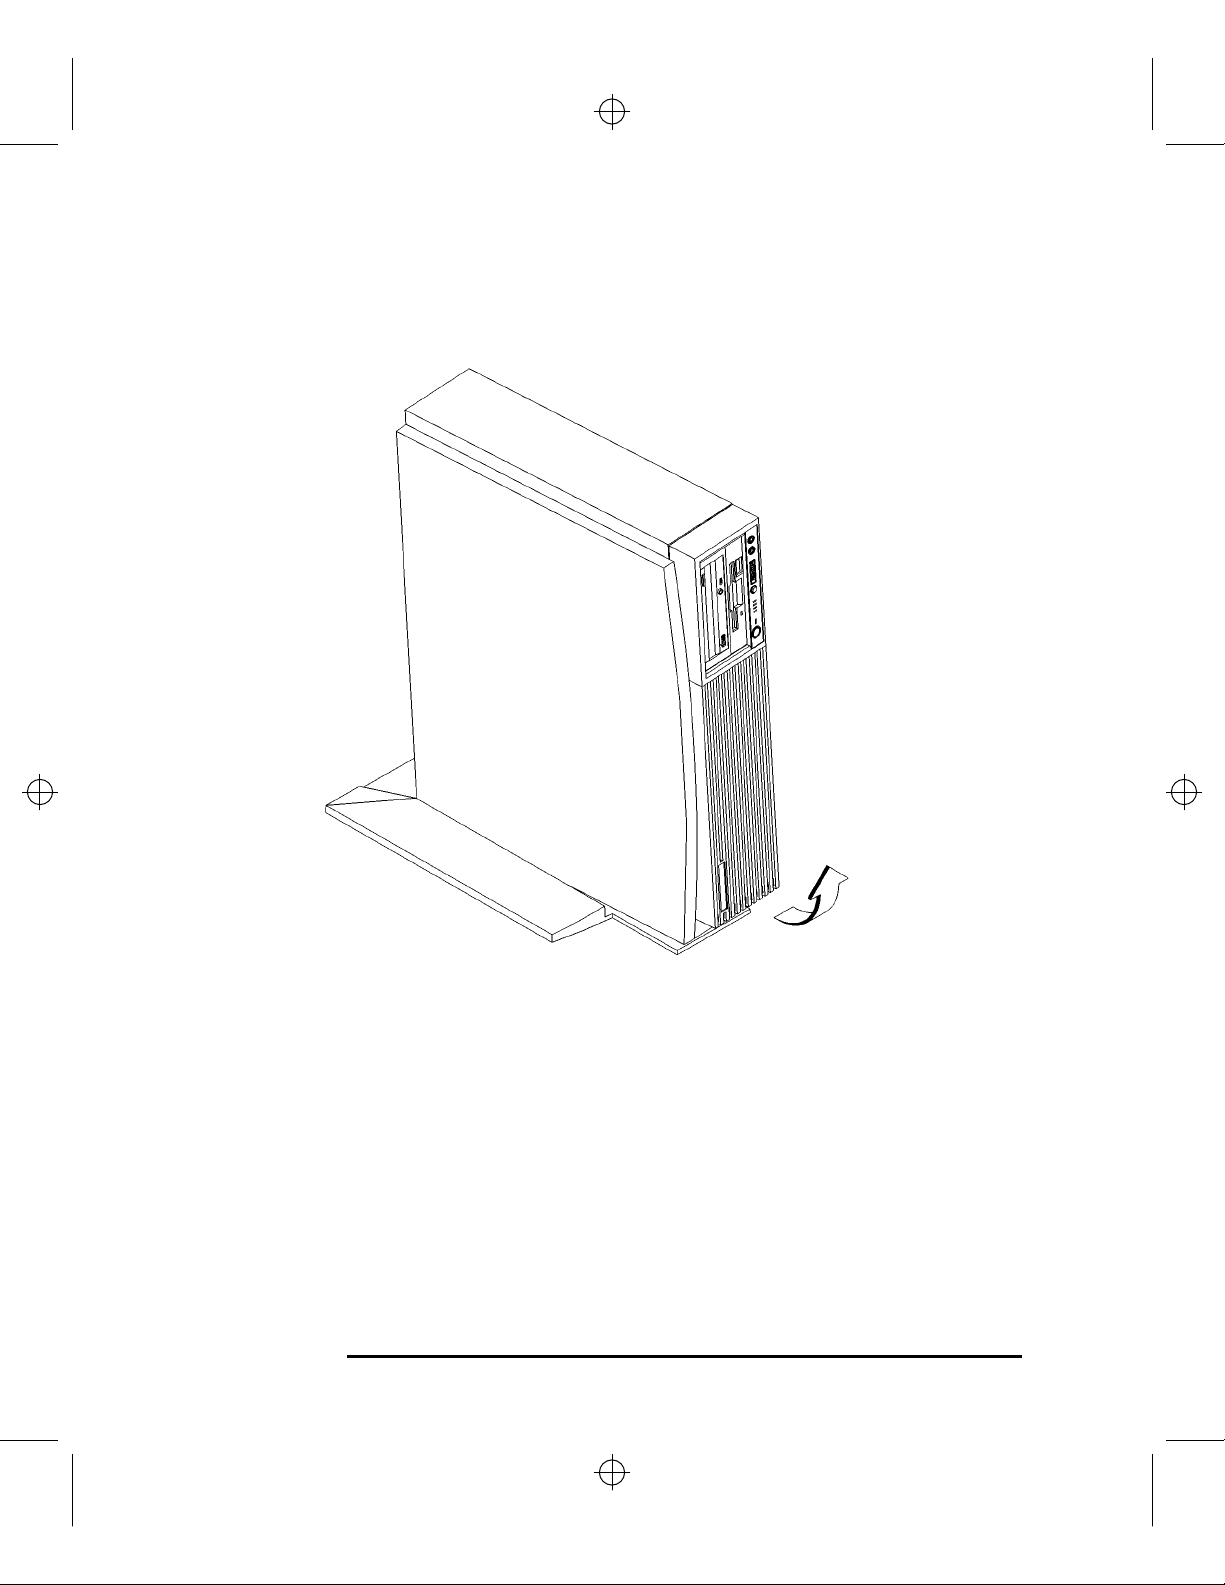
14 Remove the floor stand from the system unit, as shown in Figure 1.
Figure 1 Removing the Floor Stand
15 Lay the system unit on a flat surface, such as a table top.
16 Attach a static-grounding wrist strap to bare metal on the back of the system unit.
6
Page 9
C100_110-160_180.FB 7 Tue Jul 16 06:36:50 1996
Removing the Main Tray Assembly
Once you have prepared the workstation, you need to remove the main tray
from the system unit, as described in the following procedure:
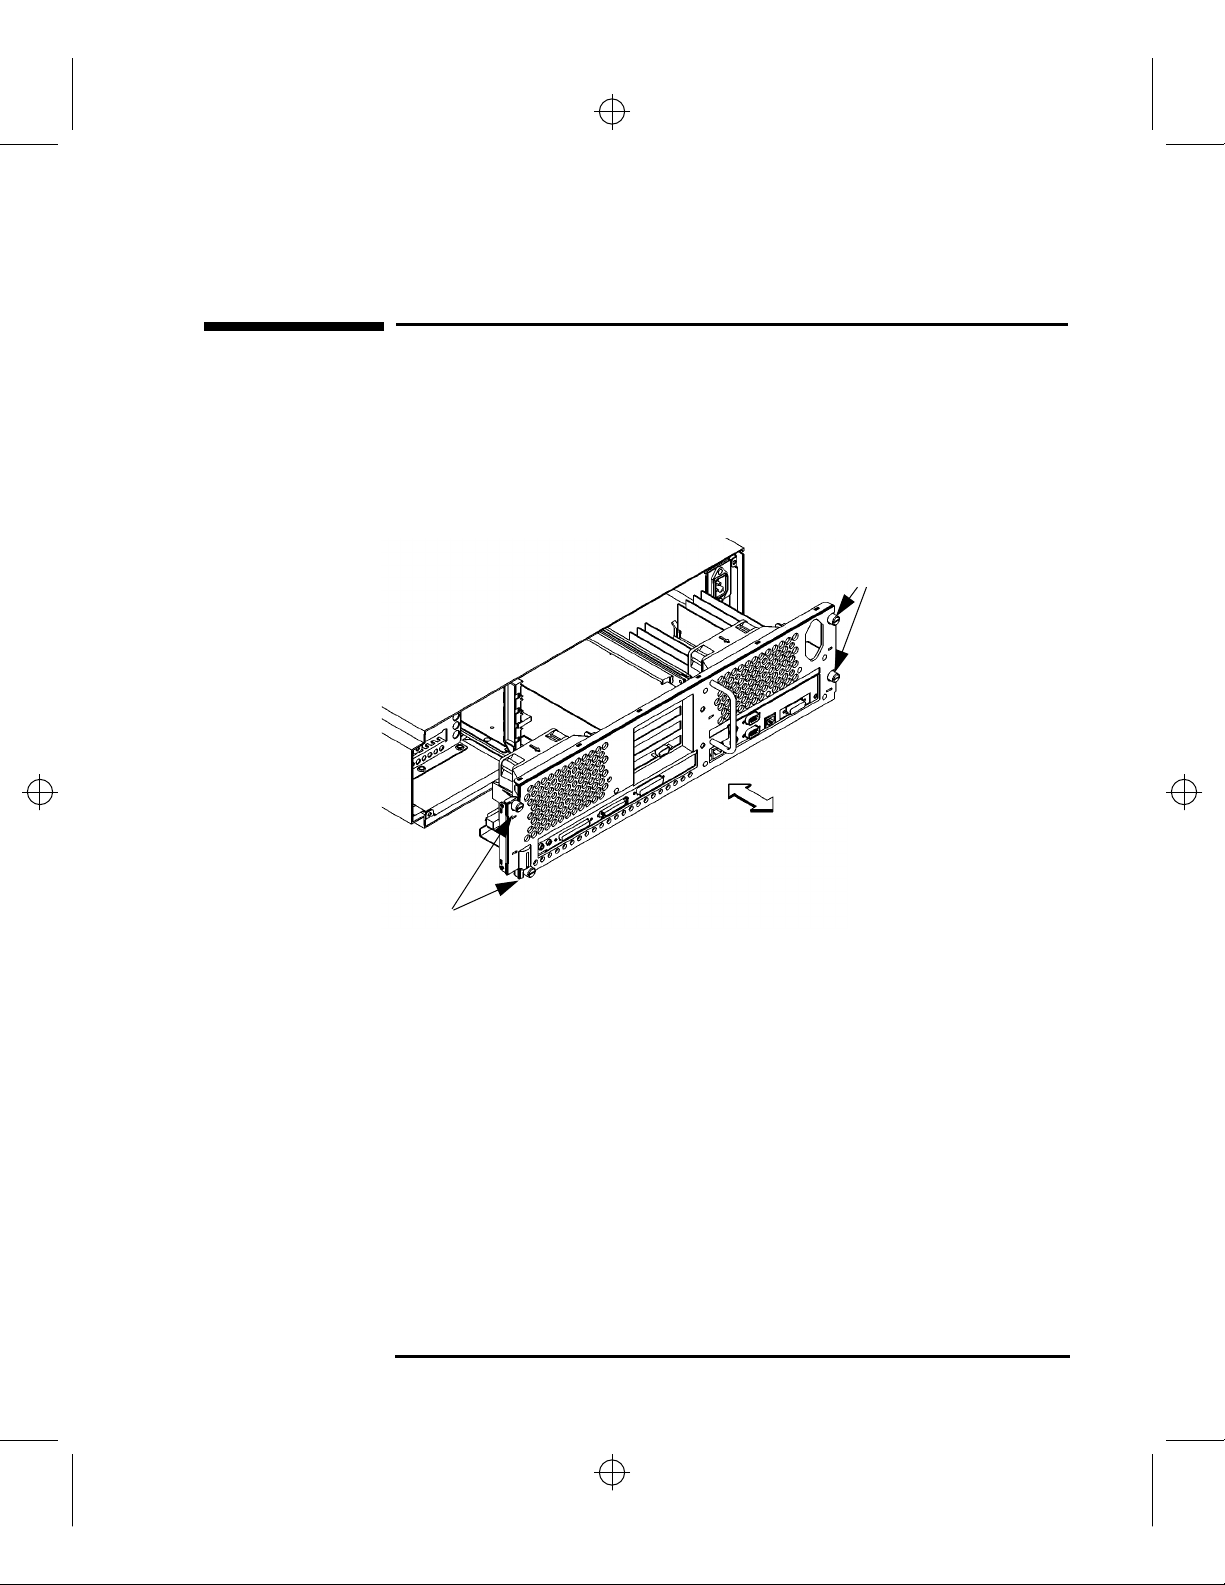
1 Completely loosen the four thumb screws on the rear of the system unit, as shown
in Figure 2.
Removing the Main Tray Assembly
Thumb
Screws
Thumb Screws
Figure 2 Removing Main Tray Assembly
2 Place one hand on the top of the system unit and push, while pulling the handle
on the rear panel with your other hand. See Figure 2.
3 Slide the main tray assembly out of the chassis.
7
Page 10

C100_110-160_180.FB 8 Tue Jul 16 06:36:50 1996
Removing Memory Modules
Removing Memory Modules
After removing the main tray from the system, you must remove the memory modules from the original C100/110 CPU board, as described in the following procedure:
1 Locate the memory modules on the C100/C110 CPU board, as shown in Figure 3.
Rear of Main Tray
Figure 3 Memory Module Location
Memory Connectors
8
Page 11

C100_110-160_180.FB 9 Tue Jul 16 06:36:50 1996
2 To remove a memory module, push the ejector tabs on each side of the module.
Lift the memory module up and out of the connector and place it on a static-free
surface. Figure 4 shows how to remove a memory module.
Removing Memory Modules
Figure 4 Removing a Memory Module
9
Page 12

C100_110-160_180.FB 10 Tue Jul 16 06:36:50 1996
Removing Option Boards
Removing Option Boards
NOTICE: Any option boards that are supported by the new C160/180 system should
be installed in the same slot number in the new main tray.
If your C100/110 system has any option boards installed, you must remove
them from the original C100/110 main tray, as described in the following
procedure:
1 Press the fan release clip and rotate the fan, as shown in Figure 5.
Figure 5 Rotating the Fan
10
Page 13

C100_110-160_180.FB 11 Tue Jul 16 06:36:50 1996
2 Slide the EISA slider to the side to remove it, as shown in Figure 6.
3 Remove the screw from the EISA retainer, as shown in Figure 6
4 Grasp the option board by the edge with both hands and pull it straight out from
its slot. Repeat this step for each option board.
5 Set the option boards aside to be installed in the C160/C180 main tray.
Removing Option Boards
Option Board
EISA Retainer
Figure 6 Removing the EISA Slider and Retainer
EISA Slider
EISA Slider
11
Page 14

C100_110-160_180.FB 12 Tue Jul 16 06:36:50 1996
Installing Memory Modules
Installing Memory Modules
Install the memory modules in the C160/C180 CPU board in the new main
tray, as described in the following procedure:
1 Locate the memory connectors on the C160/C180 CPU board, as shown in Figure
7.
The C160/C180 CPU has 12 memory slots, labeled 0A, 0B through 5A and 5B.
The memory configuration is 32 MB to 768 MB installed in pairs of 16 MB, 32
MB, or 64 MB memory modules.
Memory modules must be installed in pairs of equal capacity.
Always install the largest capacity memory modules in the lowest numbered
memory slots and don’t skip any numbers.
For example, if you have a pair of 16 MB memory modules and a pair of 64 MB
memory modules, first install the pair of 64 MB memory modules in slots 0A
and 0B, then install the 16 MB modules in slots 1A and 1B.
Figure 7 shows the positions of the memory connectors and slot numbering on
the C160/C180 CPU board.
Table 1 shows the memory configurations for the C160/C180 workstation.
0A
4A
Rear of Main Tray
0B
4B
2A
5A
2B
5B
3A
1A
3B
1B
Figure 7 C160/C180 Memory Connectors
12
Page 15

C100_110-160_180.FB 13 Tue Jul 16 06:36:50 1996
Table 1 Model C160/C180 Allowable Memory Configurations
Installing Memory Modules
Config.
No.
1 16 16 32
2 16 16 16 16 64
3 16 16 16 16 16 16 96
4 16 16 16 16 16 16 16 16 128
5 16 16 16 16 16 16 16 16 16 16 160
6 16 16 16 16 16 16 16 16 16 16 16 16 192
7 32 32 64
8 32 32 16 16 96
9 32 32 16 16 16 16 128
10 32 32 16 16 16 16 16 16 160
11 32 32 16 16 16 16 16 16 16 16 192
12 32 32 16 16 16 16 16 16 16 16 16 16 224
13 32 32 32 32 128
14 32 32 32 32 16 16 160
Pair 0 Pair 1 Pair 2 Pair 3 Pair 4 Pair 5
ABABABABABAB
Total
MB
15 32 32 32 32 16 16 16 16 192
16 32 32 32 32 16 16 16 16 16 16 224
17 32 32 32 32 16 16 16 16 16 16 16 16 256
18 32 32 32 32 32 32 192
19 32 32 32 32 32 32 16 16 224
20 32 32 32 32 32 32 16 16 16 16 256
21 32 32 32 32 32 32 16 16 16 16 16 16 288
22 32 32 32 32 32 32 32 32 256
23 32 32 32 32 32 32 32 32 16 16 288
24 32 32 32 32 32 32 32 32 16 16 16 16 320
13
Page 16

C100_110-160_180.FB 14 Tue Jul 16 06:36:50 1996
Installing Memory Modules
Table 1 Model C160/C180 Allowable Memory Configurations
Config.
No.
25 32 32 32 32 32 32 32 32 32 32 320
26 32 32 32 32 32 32 32 32 32 32 16 16 352
27 32 32 32 32 32 32 32 32 32 32 32 32 384
28 64 64 128
29 64 64 16 16 160
30 64 64 16 16 16 16 192
31 64 64 16 16 16 16 16 16 224
32 64 64 16 16 16 16 16 16 16 16 256
33 64 64 16 16 16 16 16 16 16 16 16 16 288
34 64 64 32 32 192
35 64 64 32 32 16 16 224
36 64 64 32 32 16 16 16 16 256
37 64 64 32 32 16 16 16 16 16 16 288
38 64 64 32 32 16 16 16 16 16 16 16 16 320
Pair 0 Pair 1 Pair 2 Pair 3 Pair 4 Pair 5
ABABABABABAB
Total
MB
39 64 64 32 32 32 32 256
40 64 64 32 32 32 32 16 16 288
41 64 64 32 32 32 32 16 16 16 16 320
42 64 64 32 32 32 32 16 16 16 16 16 16 352
43 64 64 32 32 32 32 32 32 320
44 64 64 32 32 32 32 32 32 16 16 352
45 64 64 32 32 32 32 32 32 16 16 16 16 384
46 64 64 32 32 32 32 32 32 32 32 384
47 64 64 32 32 32 32 32 32 32 32 16 16 416
48 64 64 32 32 32 32 32 32 32 32 32 32 448
14
Page 17

C100_110-160_180.FB 15 Tue Jul 16 06:36:50 1996
Table 1 Model C160/C180 Allowable Memory Configurations
Installing Memory Modules
Config.
No.
49 64 64 64 64 256
50 64 64 64 64 16 16 288
51 64 64 64 64 16 16 16 16 320
52 64 64 64 64 16 16 16 16 16 16 352
53 64 64 64 64 16 16 16 16 16 16 16 16 384
54 64 64 64 64 32 32 320
55 64 64 64 64 32 32 16 16 352
56 64 64 64 64 32 32 16 16 16 16 384
57 64 64 64 64 32 32 16 16 16 16 16 16 416
58 64 64 64 64 32 32 32 32 384
59 64 64 64 64 32 32 32 32 16 16 416
60 64 64 64 64 32 32 32 32 16 16 16 16 448
61 64 64 64 64 32 32 32 32 32 32 448
62 64 64 64 64 32 32 32 32 32 32 16 16 480
Pair 0 Pair 1 Pair 2 Pair 3 Pair 4 Pair 5
ABABABABABAB
Total
MB
63 64 64 64 64 32 32 32 32 32 32 32 32 512
64 64 64 64 64 64 64 384
65 64 64 64 64 64 64 16 16 416
66 64 64 64 64 64 64 16 16 16 16 448
67 64 64 64 64 64 64 16 16 16 16 16 16 480
68 64 64 64 64 64 64 32 32 448
69 64 64 64 64 64 64 32 32 16 16 480
70 64 64 64 64 64 64 32 32 16 16 16 16 512
71 64 64 64 64 64 64 32 32 32 32 512
72 64 64 64 64 64 64 32 32 32 32 16 16 544
15
Page 18

C100_110-160_180.FB 16 Tue Jul 16 06:36:50 1996
Installing Memory Modules
Table 1 Model C160/C180 Allowable Memory Configurations
Config.
No.
73 64 64 64 64 64 64 32 32 32 32 32 32 576
74 64 64 64 64 64 64 64 64 512
75 64 64 64 64 64 64 64 64 16 16 544
76 64 64 64 64 64 64 64 64 16 16 16 16 576
77 64 64 64 64 64 64 64 64 32 32 576
78 64 64 64 64 64 64 64 64 32 32 16 16 608
79 64 64 64 64 64 64 64 64 32 32 32 32 640
80 64 64 64 64 64 64 64 64 64 64 640
81 64 64 64 64 64 64 64 64 64 64 16 16 672
82 64 64 64 64 64 64 64 64 64 64 32 32 704
83 64 64 64 64 64 64 64 64 64 64 64 64 768
Pair 0 Pair 1 Pair 2 Pair 3 Pair 4 Pair 5
ABABABABABAB
Total
MB
16
Page 19

C100_110-160_180.FB 17 Tue Jul 16 06:36:50 1996
2 To install a memory module, close the ejector tabs on each side of the memory
connector and line the memory module up with the guides, as shown in Figure 8.
Make sure that the notched end of the memory module is toward the white ejector
tab, or to the rear of the main tray, as shown in Figure 8.
Installing Memory Modules
White Ejector Tab
Figure 8 Installing a Memory Module
3 Press firmly and evenly on the memory module to ensure that it is fully seated.
17
Page 20

C100_110-160_180.FB 18 Tue Jul 16 06:36:50 1996
Installing Option Boards
Installing Option Boards
NOTICE: Any option boards that are supported by the new C160/180 system should
be installed in the same slot number in the new main tray that they were
installed in the old main tray.
If you are installing a graphics adapter, read and understand the information
in the next section titled “Graphics Adapter Considerations”, before continuing. Otherwise skip to the subsection titled “Option Board Installation”.
Graphics Adapter Considerations
If you are installing a graphics option, read the information in this section
first.
Graphics Paths
graphics(0) is the built-in 8-plane graphics adapter.
graphics(1) through graphics(4) are graphics adapters installed in option
slots 1 through 4.
When a dual display graphics adapter (an adapter which has two video out-
put connectors) is installed, the video connector on the left (when looking at
the system from the rear) is graphics(NA), and the video connector on the
right is graphics(NB), where N is the slot number in which the graphics
adapter is installed.
For example, a Dual V isualize Enhanced Graphics Card (A4451A) installed
in option slot 3 would be graphics3A and graphics3B.
18
Page 21

C100_110-160_180.FB 19 Tue Jul 16 06:36:50 1996
Graphics Configuration Restrictions
The system supports only four graphics displays at a time. A “display” is a
video output port or connector. For example, the Dual Visualize Enhanced
Graphics Card (A4451A) is a dual display card. It has two external video
connectors so it accounts for two of the maximum of four displays. If you
installed two of these cards, they would account for the maximum of four
displays supported by the system.
The built-in graphics adapter accounts for one graphics display (graphics0).
If four displays are installed in the option slots, the built-in graphics adapter
is automatically disabled.
You may not install a dual display graphics adapter in option slot 1 and
option slot 3 at the same time. If you do, the graphics adapter in slot 1 will be
disabled.
Installing Option Boards
You may not install a dual display graphics adapter in option slot 2 and
option slot 4 at the same time. If you do, the graphics adapter in slot 2 will be
disabled.
When a Visualize48Z (A4244A) two board graphics adapter is installed,
Only one other graphics adapter may be installed in the option slots. If the
highest numbered slot used by the Visualize 48Z board set is an even numbered slot, then you may only install a graphics card in the remaining odd
numbered slot. If the highest numbered slot used by the Visualize 48Z board
set is an odd numbered slot, then you may only install a graphics card in the
remaining even numbered slot. For example, with the Visualize 48Z board
set installed in slots 1 and 2, slot two is the highest numbered slot used and it
is an even numbered slot. Therefore you may only install an additional
graphics adapter in slot 3, which is the remaining odd numbered slot.
NOTICE: The A4077A Color Graphics Card, A4078A Dual Color Graphics Card,
A4079B HCRX-8Z graphics adapter and the A4071B HCRX-24 graphics
adapter with the A4072A Z Accelerator attached are not supported in the
Model C160/C180.
19
Page 22

C100_110-160_180.FB 20 Tue Jul 16 06:36:50 1996
Installing Option Boards
Option Board Installation
If you removed option boards from the C100/110 main tray, use this procedure to install them in the new C160/C180 main tray. Otherwise, skip to the
next section.
1 Press the fan release clip and rotate the fan, as shown in Figure 9.
Figure 9 Rotating the Fan
20
Page 23

C100_110-160_180.FB 21 Tue Jul 16 06:36:50 1996
2 Remove the screw from the EISA retainer, and remove the EISA retainer, as
shown in Figure 10.
Installing Option Boards
Eisa Slider
Eisa Retainer
Figure 10 Removing the EISA Retainer and EISA Slider
3 Remove the EISA slider, as shown in Figure 10.
21
Page 24

C100_110-160_180.FB 22 Tue Jul 16 06:36:50 1996
Installing Option Boards
4 In the desired option slot, turn the blank plate’s locking knob counter-clockwise
to unlock the plate, as shown in Figure 11.
NOTE: The new main tray assembly contains a blank plate which is held in by a locking
knob. Be sure to remove these components before attempting to install the option
boards.
Locking Knob
Figure 11 Removing a Blank Plate
5 Remove the blank plate from the slot, as shown in Figure 11.
Blank Plate
EISA Slider
22
Page 25

C100_110-160_180.FB 23 Tue Jul 16 06:36:50 1996
6 Slide the option board into the slot. Make sure that the hole in the board’s handle
aligns with the pin on the back panel, as shown in Figure 12.
Installing Option Boards
Figure 12 Installing an Option Board
7 Press in firmly on both ends of the option board at the same time to make sure
that it is firmly seated in the backplane connector.
23
Page 26

C100_110-160_180.FB 24 Tue Jul 16 06:36:50 1996
Installing Option Boards
8 Replace the EISA retainer and its screw, as shown in Figure 13.
9 Replace the EISA slider, as shown in Figure 13
EISA Slider
EISA Retainer
Figure 13 Installing the EISA Retainer and EISA Slider
24
EISA Retainer
Page 27

C100_110-160_180.FB 25 Tue Jul 16 06:36:50 1996
10 Rotate the fan back into place and firmly push it into the rear panel firmly until
the clip snaps into place, as shown in Figure 14.
Installing Option Boards
Figure 14 Securing the Fan
25
Page 28

C100_110-160_180.FB 26 Tue Jul 16 06:36:50 1996
Installing the New Main Tray Assembly
Installing the New Main Tray Assembly
Install the new C160/C180 main tray assembly , as described in the following
procedure:
1 Align the main tray assembly with the chassis and slide it into place, as shown in
Figure 15.
Thumb
Screws
Thumb Screws
Figure 15 Installing the New Main Tray Assembly
2 Slide the main tray in until you feel it make contact with the internal connectors.
3 Push firmly and evenly on the main tray assembly to make sure that all connec-
tors are fully seated.
4 Start all four thumb screws loosely, then tighten them firmly. See Figure 15.
NOTICE: To maintain regulatory agency compliance, verify that the main tray is
fully seated and all four thumb screws are completely tightened.
26
Page 29

C100_110-160_180.FB 27 Tue Jul 16 06:36:50 1996
5 Remove any external SCSI terminators from the rear of the old main tray and in-
stall them on the SCSI connectors on the rear of the system.
6 Use a small flat blade screwdriver to gently pry the old model number label from
the front of the system. Remove the backing from the new C160/180 model number label that came with the upgrade, and press it firmly into place.
Installing the New Main Tray Assembly
Model Number Label
Figure 16 Installing the Model Number Label
27
Page 30

C100_110-160_180.FB 28 Tue Jul 16 06:36:50 1996
Installing the New Main Tray Assembly
7 Replace the system unit in the floor stand, as shown in Figure 17.
Figure 17 Installing the Floor Stand
28
Page 31

C100_110-160_180.FB 29 Tue Jul 16 06:36:50 1996
8 Reconnect the power cables and any other cables that you disconnected when
opening the workstation.
If you do not have a supported graphics adapter, connect your monitor’s 15-pin
connector to the 15-pin connector on the EVC adapter cable which came with
the upgrade kit. Connect the other end of the EVC adapter cable to the built-in
video connector on the rear of the system. Be sure to tighten the thumbscrews on
the connectors. Continue with step 9.
If you do have a supported graphics adapter, connect the 15-pin monitor connector directly to the connector on the graphics adapter. Skip to step 19.
9 Power on the monitor, the system, and any peripherals.
10 If your keyboard connects to the PS/2 connector on your system, wait 2 seconds
after the Num Lock light flashes near the end of the boot sequence, then press Tab
to initiate the automatic monitor selection process.
Installing the New Main Tray Assembly
NOTICE: It takes approximately one to two minutes after powering on the
workstation before the Num Lock light flashes.
If you have a keyboard that connects to the HIL connector on your system, press
T ab every three seconds during the boot sequence to initiate the automatic monitor selection process.
29
Page 32

C100_110-160_180.FB 30 Tue Jul 16 06:36:50 1996
Installing the New Main Tray Assembly
11 The system cycles through all of the available monitor types one at a time. When
you can see a message similar to the following clearly and litigable, select that
monitor type by pressing Enter.
MONITOR INFORMATION
Path Slot Head Type Size Freq Class
----------- ---- ---- ---- ---------- ---- ----GRAPHICS(0) 0 1 n nnnnxnnnn MHz
Press [RETURN] to select this monitor type (type n of n
types).
12 The system queries you to confirm your selection. Press Y to save this monitor
type.
If you press any key other than Y, the following message is displayed:
Monitor type not saved.
If you didn’t press Y, the new monitor type is active, but not saved. Because you
didn’t save the monitor type, the next time you reboot the system the original
monitor type will be used.
Next, the following message is displayed:
To select a new Graphics Monitor Type press the <TAB> key
now, otherwise EXIT by entering any other key (or will time
out in 15 seconds)...
To restart the monitor selection process, press TAB.
If you do not have a (supported) graphics adapter installed in slot 3 or slot 4
continue with step 13. Otherwise skip to step 19.
13 After choosing and saving your monitor type, the following message is displayed:
To select a new Graphics Monitor Type press the <TAB> key
now, otherwise EXIT by entering any other key (or will time
out in 15 seconds)...
Either wait fifteen seconds for the boot process to continue, or press any key
except TAB.
14 If a message to press Esc to stop the boot process is displayed, then press Esc.
This stops the boot process and brings you to the Boot Console Handler prompt.
30
Page 33

C100_110-160_180.FB 31 Tue Jul 16 06:36:50 1996
15 At the prompt, enter the following command to enter the configuration menu:
co
16 Configure the console path for the built-in graphics with the following syntax:
mo graphics(0)
17 Power off the system.
18 Power on the system.
After you install a new CPU board or I/O board and boot the system for the first
time, you are prompted for the LAN ID. Enter the LAN ID you recorded in the
beginning of this document.
Skip to step 25.
Installing the New Main Tray Assembly
19 Power on the monitor, any peripheral devices, and the system unit.
20 If a message to press Esc to stop the boot process is displayed, then press Esc.
This stops the boot process and brings you to the Boot Console Handler prompt.
21 At the prompt, enter the following command to enter the configuration menu:
co
22 Configure the console path for your graphics adapter with the following syntax:
mo graphics(n)
where graphics(n) is the graphics path that you recorded earlier.
23 Power off the system.
24 Power on the system.
After you install a new CPU board or I/O board and boot the system for the first
time, you are prompted for the LAN ID. Enter the LAN ID you recorded in the
beginning of this document.
25 Pack the old main tray in the packaging from the upgrade kit and use the docu-
mentation provided to return it to Hewlett-Packard.
31
Page 34

C100_110-160_180.FB 32 Tue Jul 16 06:36:50 1996
Installing the New Main Tray Assembly
32
 Loading...