

Page 1

front.fm5 Page i Tuesday, December 2, 1997 12:47 PM
User Guide
Getting the Most From Your HP Brio PC
HP
HP PC
http://www.hp.com/go/brio
Page 2

guide.bk : front.fm5 Page ii Monday, December 1, 1997 11:44 PM
Notice
Notice
The information contained in this document is subject to change without notice.
Hewlett-Packard makes no warranty of any kind with regard to this material,
including, but not limited to, the implied warranties of merchantability and
fitness for a particular purpose. Hewlett-Packard shall not be liable for errors
contained herein or for incidental or consequential damages in connection with
the furnishing, performance, or use of this material.
This document contains proprietary information that is protected by copyright.
All rights are reserved. No part of this document may be photocopied,
reproduced, or translated into another language without the prior written
consent of Hewlett-Packard Company.
Microsoft®, MS-DOS® and Windows® are U.S. registered trademarks of
Microsoft Corporation.
Hewlett-Packard France
Small Business Computing Operation
Customer Satsifaction
38053 Grenoble Cedex 9
France
© 1997 Hewlett-Packard Company
ii
Page 3

guide.bk : safety.fm5 Page iii Tuesday, December 2, 1997 8:10 PM
Important Safety Information
It is important that you read the following safety information before you set up
and use your computer.
General Safety Information
If you are in any doubt about whether you can lift the equipment safely, do not
Important Safety Information
try to move it without help.
Always connect the computer equipment to a grounded electrical wall outlet.
Always use a power cord with properly grounded plugs, such as the one
provided with your equipment, or one in compliance with your country’s
regulations. You can disconnect the computer from the power supply by
removing the power cord from the electrical outlet. This means that the
computer must be located close to an easily accessible electrical outlet.
Check that the correct voltage is selected for your country (the voltage is set
during manufacturing and should already be correct).
Never remove the computer’s cover without first removing the power cord and
any connection to a telecommunications network. Always replace the cover
before switching on the computer.
To avoid electric shock, do not open the power supply unit. There are no userserviceable parts inside.
iii
Page 4

guide.bk : safety.fm5 Page iv Tuesday, December 2, 1997 8:10 PM
Important Safety Information
Safety Information for Computers with a CD-ROM
To avoid electric shock and harm to your eyes by laser light from a CD-ROM
drive, do not open the CD-ROM drive enclosure. The drive should be serviced by
qualified personnel only. Do not attempt to make any adjustment to the unit.
The HP PC is a Class 1 laser product. Refer to the label on the CD-ROM drive for
power and wavelength requirements.
Safety Information for Communications and Multimedia Models
Before connecting headphones or speakers, always turn the volume down to
avoid discomfort from unexpected noise or static. Listening to loud sounds for
prolonged periods of time may permanently damage your hearing. Before
putting on headphones, place them around your neck and turn the volume
down. Then, put on the headphones and slowly increase the volume until you
find a comfortable listening level, where the sound is clear, without being too
loud. When you can hear comfortably and clearly, without distortion, leave the
volume control in that position.
Do not attempt to connect this product to the telephone line during a lightning
storm.
Never install telephone jacks in wet locations unless the telephone line has been
disconnected at the network interface.
Never touch uninsulated telephone wires or terminals unless the telephone line
has been disconnected at the network interface.
Use caution when installing or modifying telephone lines.
Avoid using a telephone (other than a cordless type) during a lightning storm.
There may be a risk from lightning.
Do not use the telephone to report a gas leak in the vicinity of the leak.
iv
Page 5

guide.bk : safety.fm5 Page v Tuesday, December 2, 1997 8:10 PM
Never touch or remove the communications card without first removing the
connection to the telephone network.
Analog Telephone Line
To use the HP communication card, you must have an analog telephone line. If
you are not sure if you have an analog telephone line or digital line, have it
verified by the person in charge of your telephone system before you install the
modem.
Important Safety Information
Caution
The modem will be damaged if you use a digital telephone line.
v
Page 6

guide.bk : safety.fm5 Page vi Tuesday, December 2, 1997 8:10 PM
Important Safety Information
vi
Page 7

guide.bk : guide.TOC Page vii Tuesday, December 2, 1997 8:10 PM
Notice ..................................................................................................................ii
Important Safety Information ...........................................................................iii
General Safety Information .........................................................................iii
Safety Information for Computers with a CD-ROM ...................................iv
Safety Information for Communications and Multimedia Models .............iv
Analog Telephone Line .............................................................................v
1. The First Steps... ................................................................................ 1
Understanding Your Desktop... .........................................................................3
The Desktop ..................................................................................................4
The Recycle Bin ........................................................................................4
Icons ..........................................................................................................4
The HP Brio Center ......................................................................................5
The Taskbar ..................................................................................................6
The Start Button .......................................................................................6
Taskbar Buttons ........................................................................................6
Notification Area .......................................................................................6
The HP Brio Enhanced Keyboard .....................................................................7
A Word on Using the Mouse ..............................................................................8
Contents
2. In Business with the HP Brio PC ....................................................... 9
HP Brio Center .................................................................................................10
Registering Your HP Brio PC (only required in North America & Europe) .12
Take a Tour of Your HP Brio PC... ..................................................................14
Finding Information .........................................................................................15
Task Helper ......................................................................................................16
Try it for Yourself! ......................................................................................17
Communicating with Others ............................................................................18
Setting Up Your Communications Software ..............................................19
Setting Up Your Fax Modem ..................................................................19
Setting Up Your Dialing Properties ........................................................19
Sending a Fax .............................................................................................20
Enabling & Disabling Fax Reception .........................................................21
Sending & Reading E-mails ........................................................................21
Accessing the Internet ...............................................................................21
HP Message Sender ....................................................................................22
Sharing Things with Others .............................................................................23
What Does Sharing Mean? .........................................................................23
vii
Page 8

guide.bk : guide.TOC Page viii Tuesday, December 2, 1997 8:10 PM
Contents
Just What Can be Shared? ......................................................................... 23
Disk Drives .............................................................................................. 23
CD-ROMs ................................................................................................ 24
ZIP Drives ............................................................................................... 24
Documents & Folders ................................................................................ 24
Printers ....................................................................................................... 24
Modem ........................................................................................................ 25
Protecting Your Data ....................................................................................... 26
Backing Up Your Work ............................................................................... 27
Backup Utilities ...................................................................................... 27
Scanning for Viruses .................................................................................. 27
Maintaining Your Hard Disk(s) ................................................................. 28
Password Protection .................................................................................. 28
3. Fixing Problems and Getting Support............................................. 31
What to Do First .............................................................................................. 32
What to Do Next .............................................................................................. 33
Online Troubleshooting ................................................................................... 34
Check Your HP Brio PC ............................................................................. 34
Problems Doing a Task? ............................................................................. 35
Find Information ........................................................................................ 35
You Still Have a Problem... ........................................................................ 35
Learn About Your HP Brio PC Support .................................................... 35
Need More Help? ............................................................................................. 36
Tips on Avoiding Potential Problems ............................................................. 37
Take Advantage of Disk Partitions ............................................................ 37
Protect Your HP Brio PC from Power Shortages ..................................... 37
Questions & Answers ...................................................................................... 38
4. Regulatory and License Information ............................................... 45
Physical Characteristics .................................................................................. 46
Regulatory Information ................................................................................... 47
HP Software License Agreement .................................................................... 54
viii
Page 9

guide.bk : firsteps.fm5 Page 1 Tuesday, December 2, 1997 8:10 PM
The First Steps...
1
Now that you have set up your computer (see the Getting Started
guide), you are ready to start using it.
Whether you are an experienced user of computers or more of a
novice to them, this chapter contains some basic information that
will help you become more familiar with your HP Brio PC.
1
Page 10

guide.bk : firsteps.fm5 Page 2 Tuesday, December 2, 1997 8:10 PM
The First Steps...
2
Page 11
guide.bk : firsteps.fm5 Page 3 Tuesday, December 2, 1997 8:10 PM
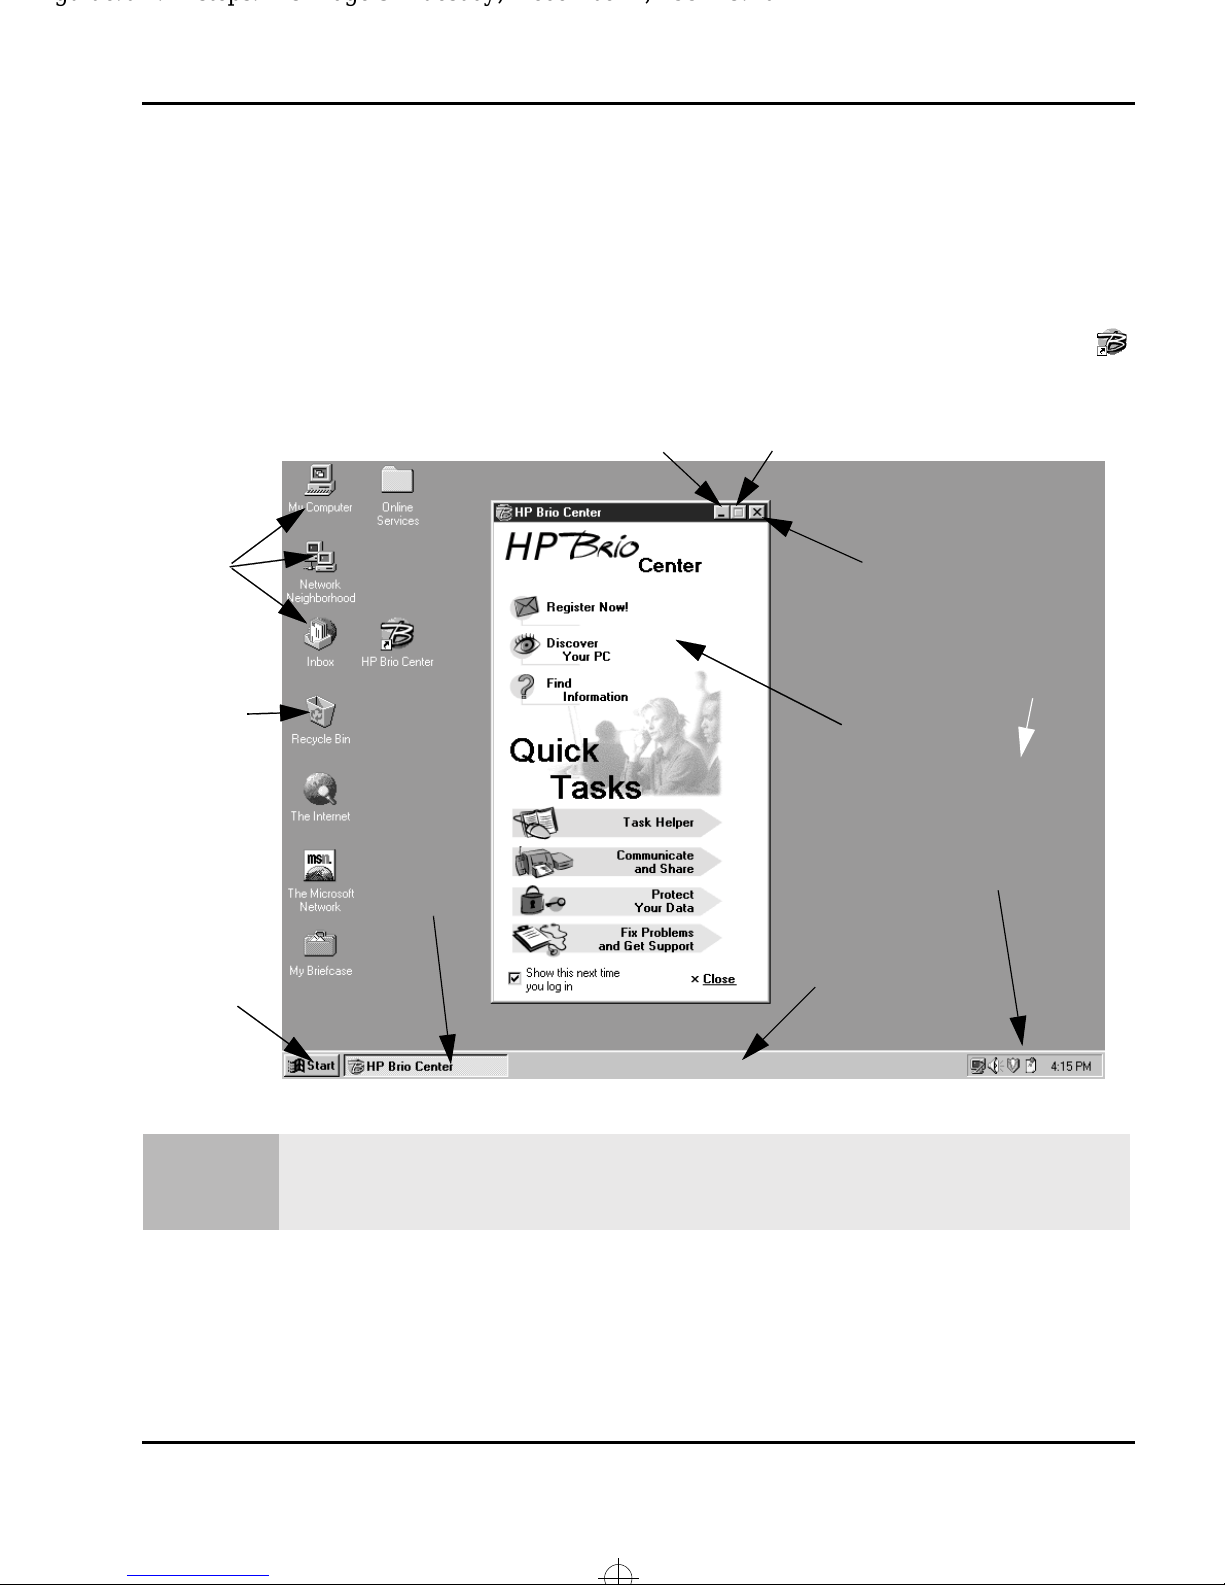
Understanding Your Desktop...
Understanding Your Desktop...
Once the initial Windows Welcome sequence has finished, double-click on the
shortcut on the Desktop. Your screen will be similar to that shown below.
The First Steps...
Various
Icons
Recycle
Bin
Start
Minimize Window
Taskbar
Button
Maximize Window
Close Window
Desktop
HP Brio Center
Notification
Area
Taskbar
Button
All the features described in this section are standard Windows ones. For further details on any of these
Note
features, together with details on general Windows functionality, please refer to the relevant Windows
documentation, or the Windows Help system.
3
Page 12
guide.bk : firsteps.fm5 Page 4 Tuesday, December 2, 1997 8:10 PM
The First Steps...
Understanding Your Desktop...
The Desktop
The desktop is where you can place various things — folders, files and shortcuts
to programs you use. It is also the place where program windows appear, such as
the HP Brio Center window.
The Recycle Bin
This is a temporary storage place for things you have deleted. It fills up
with all the things you have deleted until you decide to empty it. You can
use it to find things you might have deleted by mistake.
Icons
Icons are small graphical objects that represent a particular
feature, area or shortcut of your computer. Double-clicking on
them opens that feature. They can be dragged around the desktop, and they can
be placed in the recycle bin.
4
Page 13
guide.bk : firsteps.fm5 Page 5 Tuesday, December 2, 1997 8:10 PM
Understanding Your Desktop...
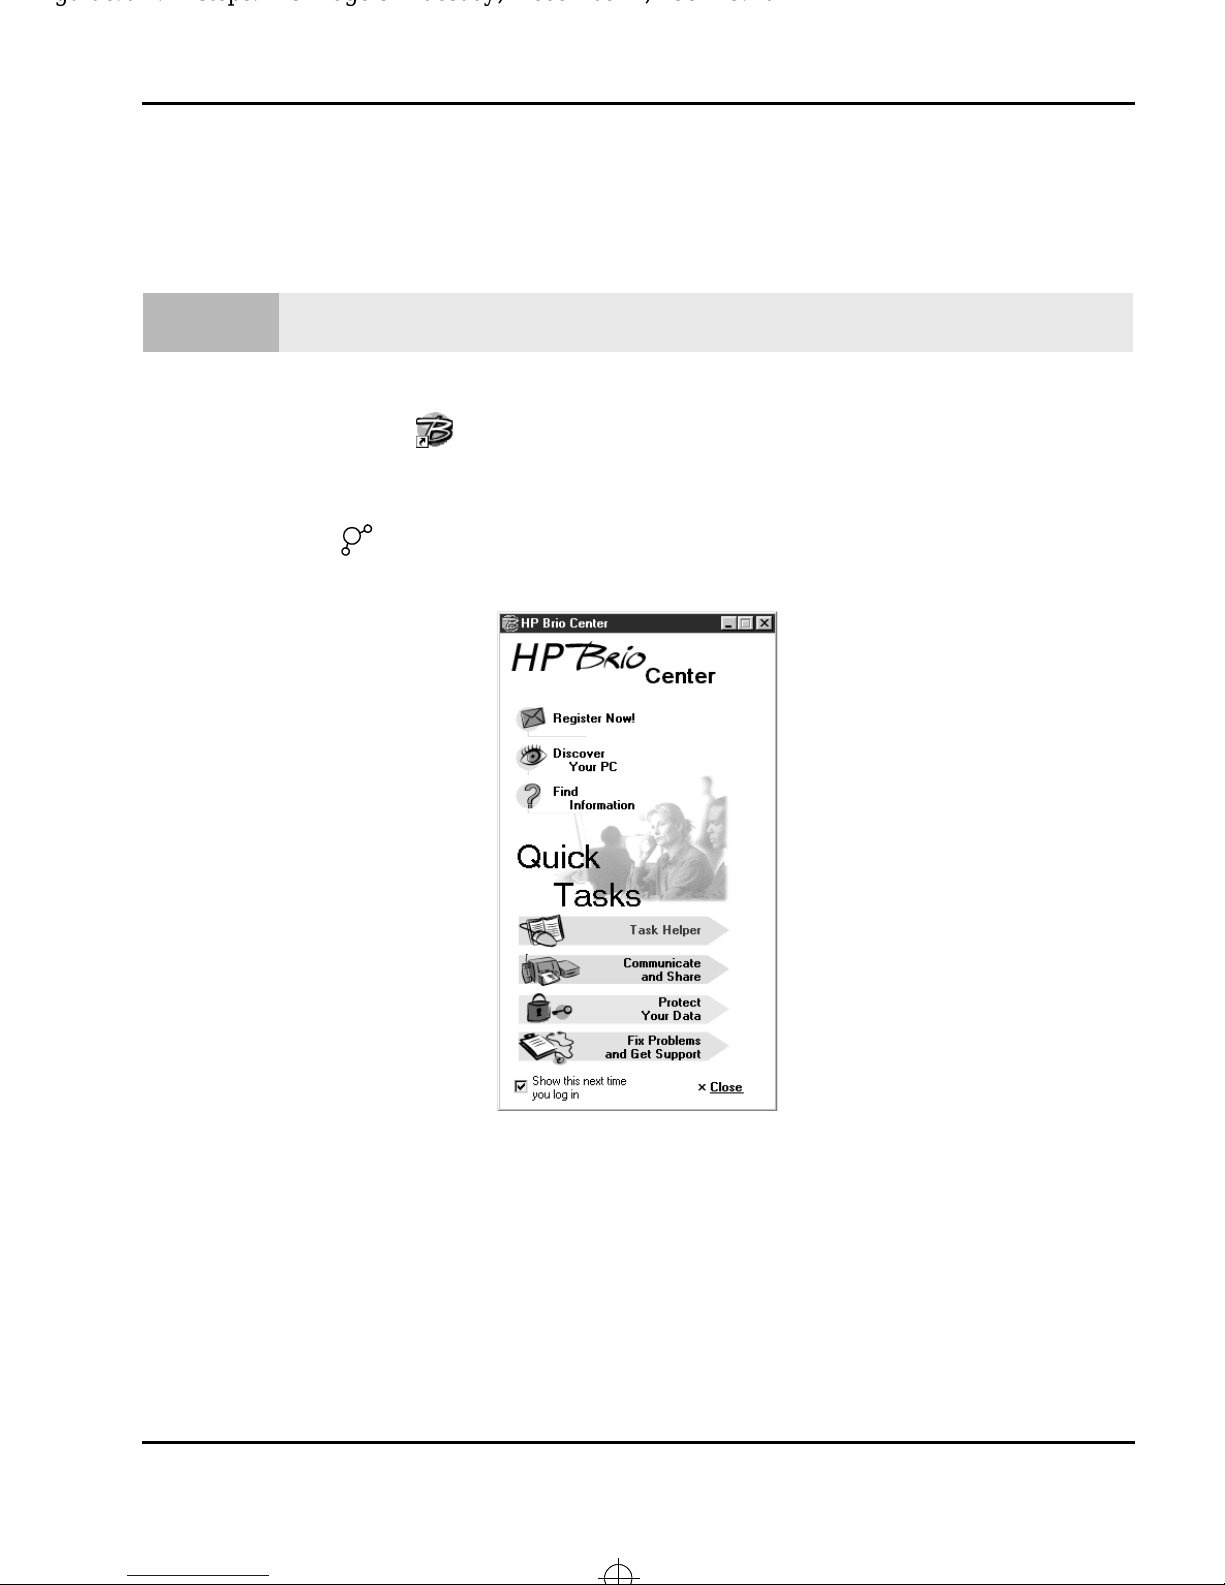
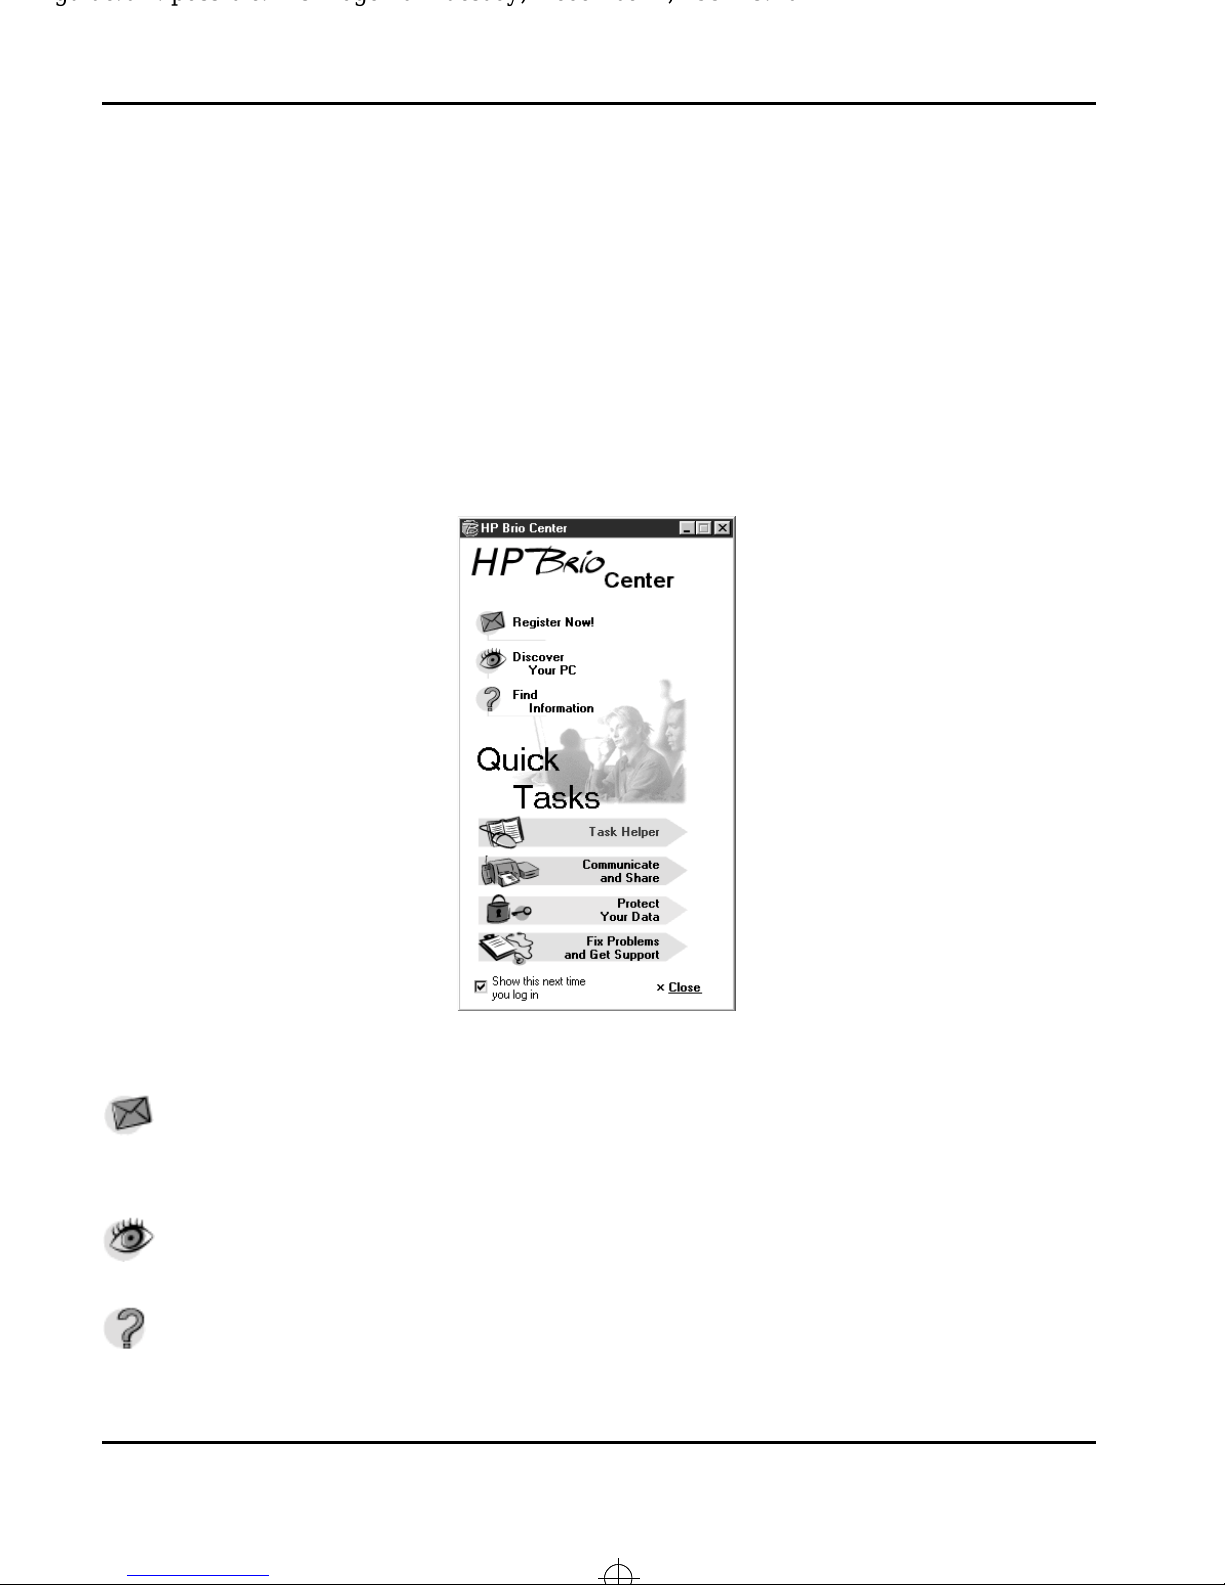
The HP Brio Center
The First Steps...
Note
This window appears by,
double-clicking on on your Desktop,
•
selecting the HP Brio Center shortcut in the Start menu, or,
•
pressing the key on your enhanced keyboard (only available in certain
•
areas)
The HP Brio Center may not be available in all regions.
The window represents HP’s added value software that helps you get the most
out of your PC, quickly and efficiently — letting you concentrate on your
business, while at the same time being your first point of reference to all
questions or problems you might encounter.
The HP Brio Center window and its functions are described in detail on page 10.
5
Page 14
guide.bk : firsteps.fm5 Page 6 Tuesday, December 2, 1997 8:10 PM
The First Steps...
Understanding Your Desktop...
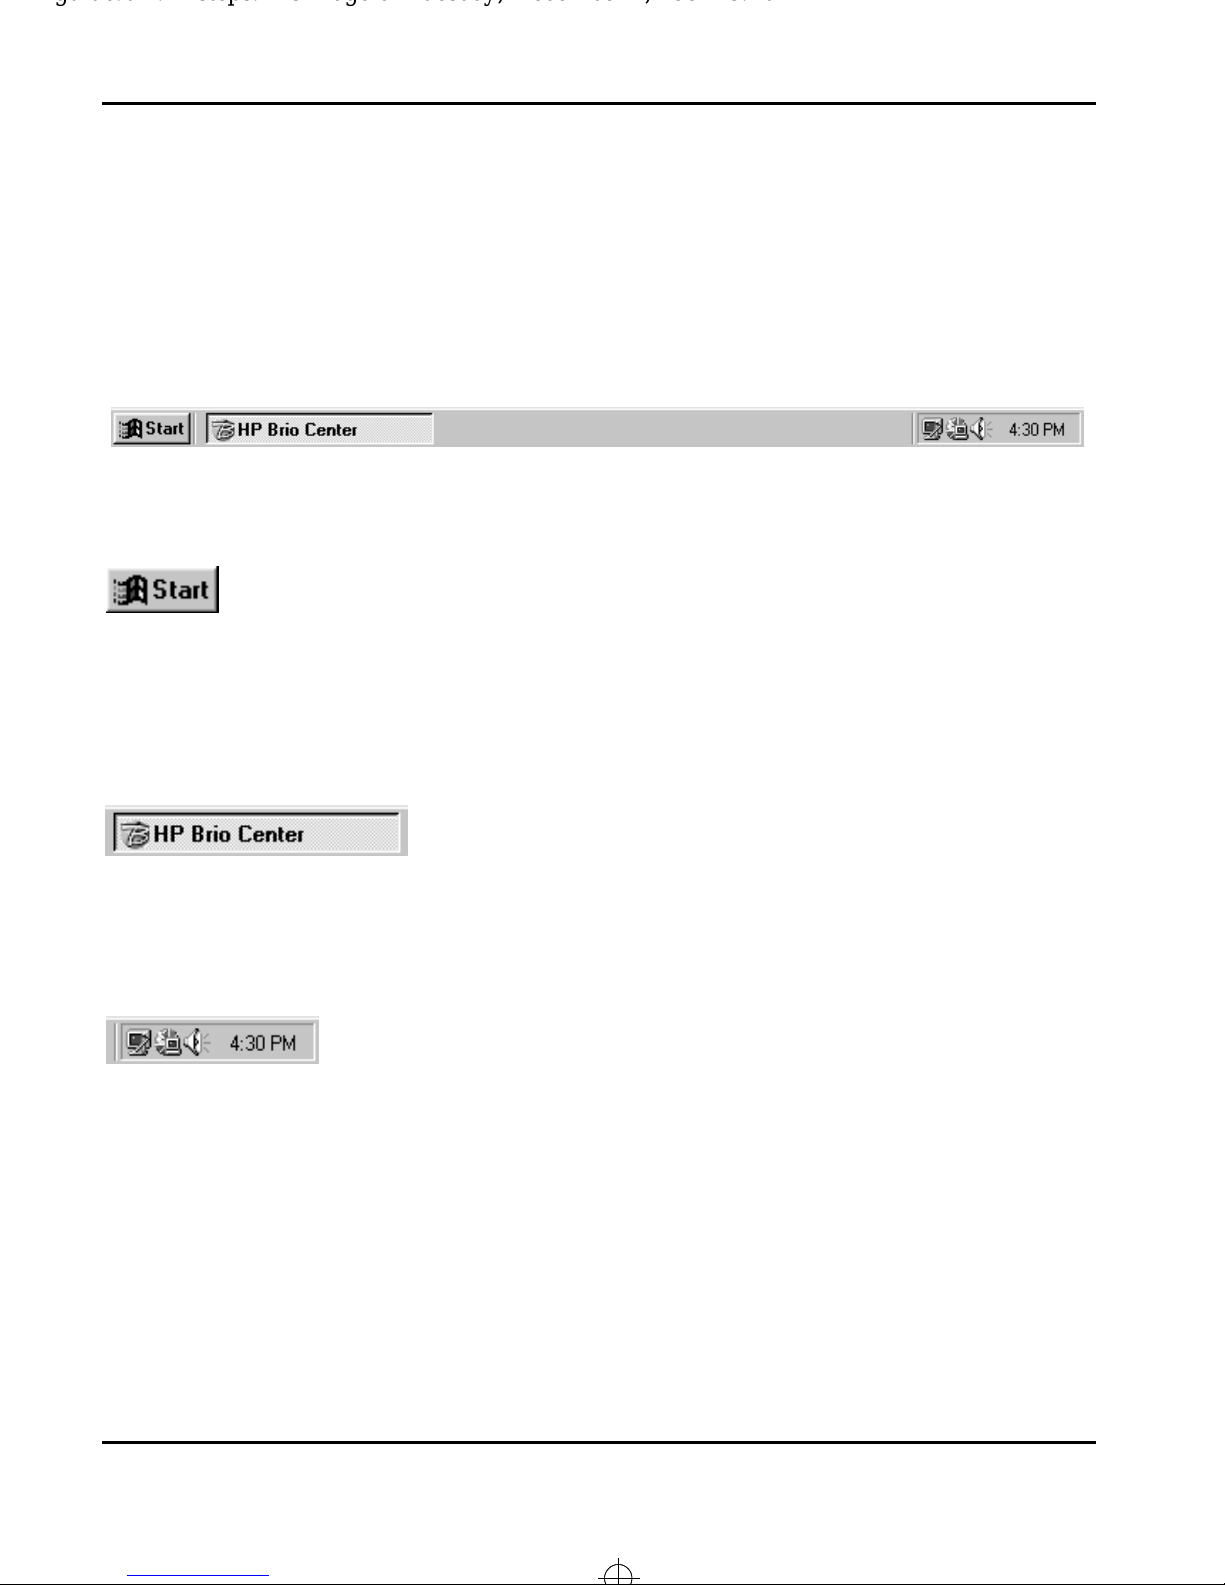
The Taskbar
By default the taskbar is at the bottom of your window. It shows you which
applications you have open — represented by a taskbar button (the taskbar
below shows that the HP Brio Center window is open).
The Start Button
This is the starting point for many things you’ll want to do. When you
click on the start button a menu appears from which you can perform
a multitude of tasks — start programs, open documents, find help, search for
things on your computer, and change settings within your computer.
Taskbar Buttons
Every time you open a program a button for that
program appears on the taskbar. To switch between
programs, simply click on the taskbar button for the program you want.
Notification Area
Depending on what you are working on with your HP Brio
PC, small indicators may appear in the notification area (to
the left of the clock). If you are printing, for example, a small printer indicator
appears. Double-clicking on any of these indicators brings up a window where
you can change some of the settings. Try double-clicking the loudspeaker
indicator, and change your volume settings.
6
Page 15
guide.bk : firsteps.fm5 Page 7 Tuesday, December 2, 1997 8:10 PM
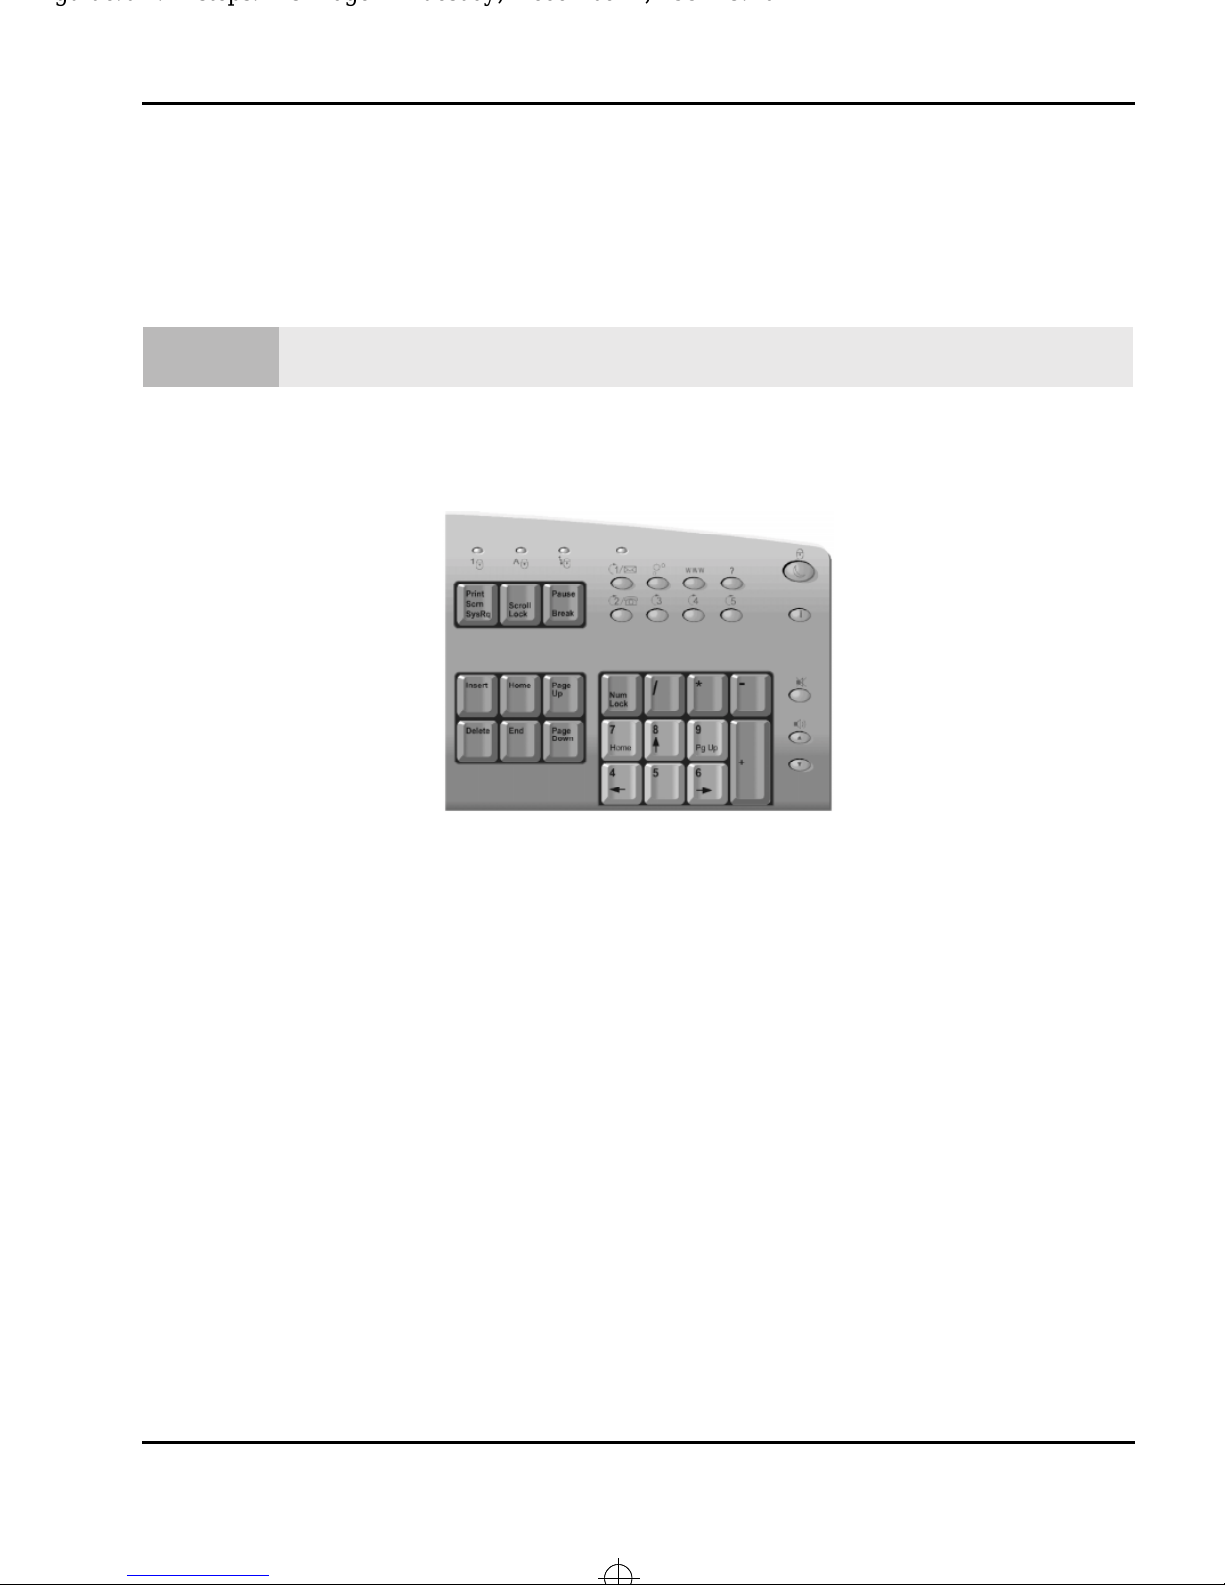
The HP Brio Enhanced Keyboard
The HP Brio Enhanced Keyboard
The First Steps...
Note
The HP Brio enhanced keyboard may not be available in all regions.
The HP Brio enhanced keyboard has an extra set of buttons on the top righthand corner.
These buttons are configured to perform special tasks such as accessing the HP
Brio Center. They can also be re-programmed easily by yourself. You might want
to simplify a sequence of mouse-clicks into one single button press, or have
another launch a program you use regularly, with all your preferences already
there! This saves you time and increases your productivity.
For information on the standard features of the extra buttons, and how to reprogram them, please refer to the Online Reference Guide, which can be found
in the Find Information window in the HP Brio Center.
7
Page 16
guide.bk : firsteps.fm5 Page 8 Tuesday, December 2, 1997 8:10 PM
The First Steps...
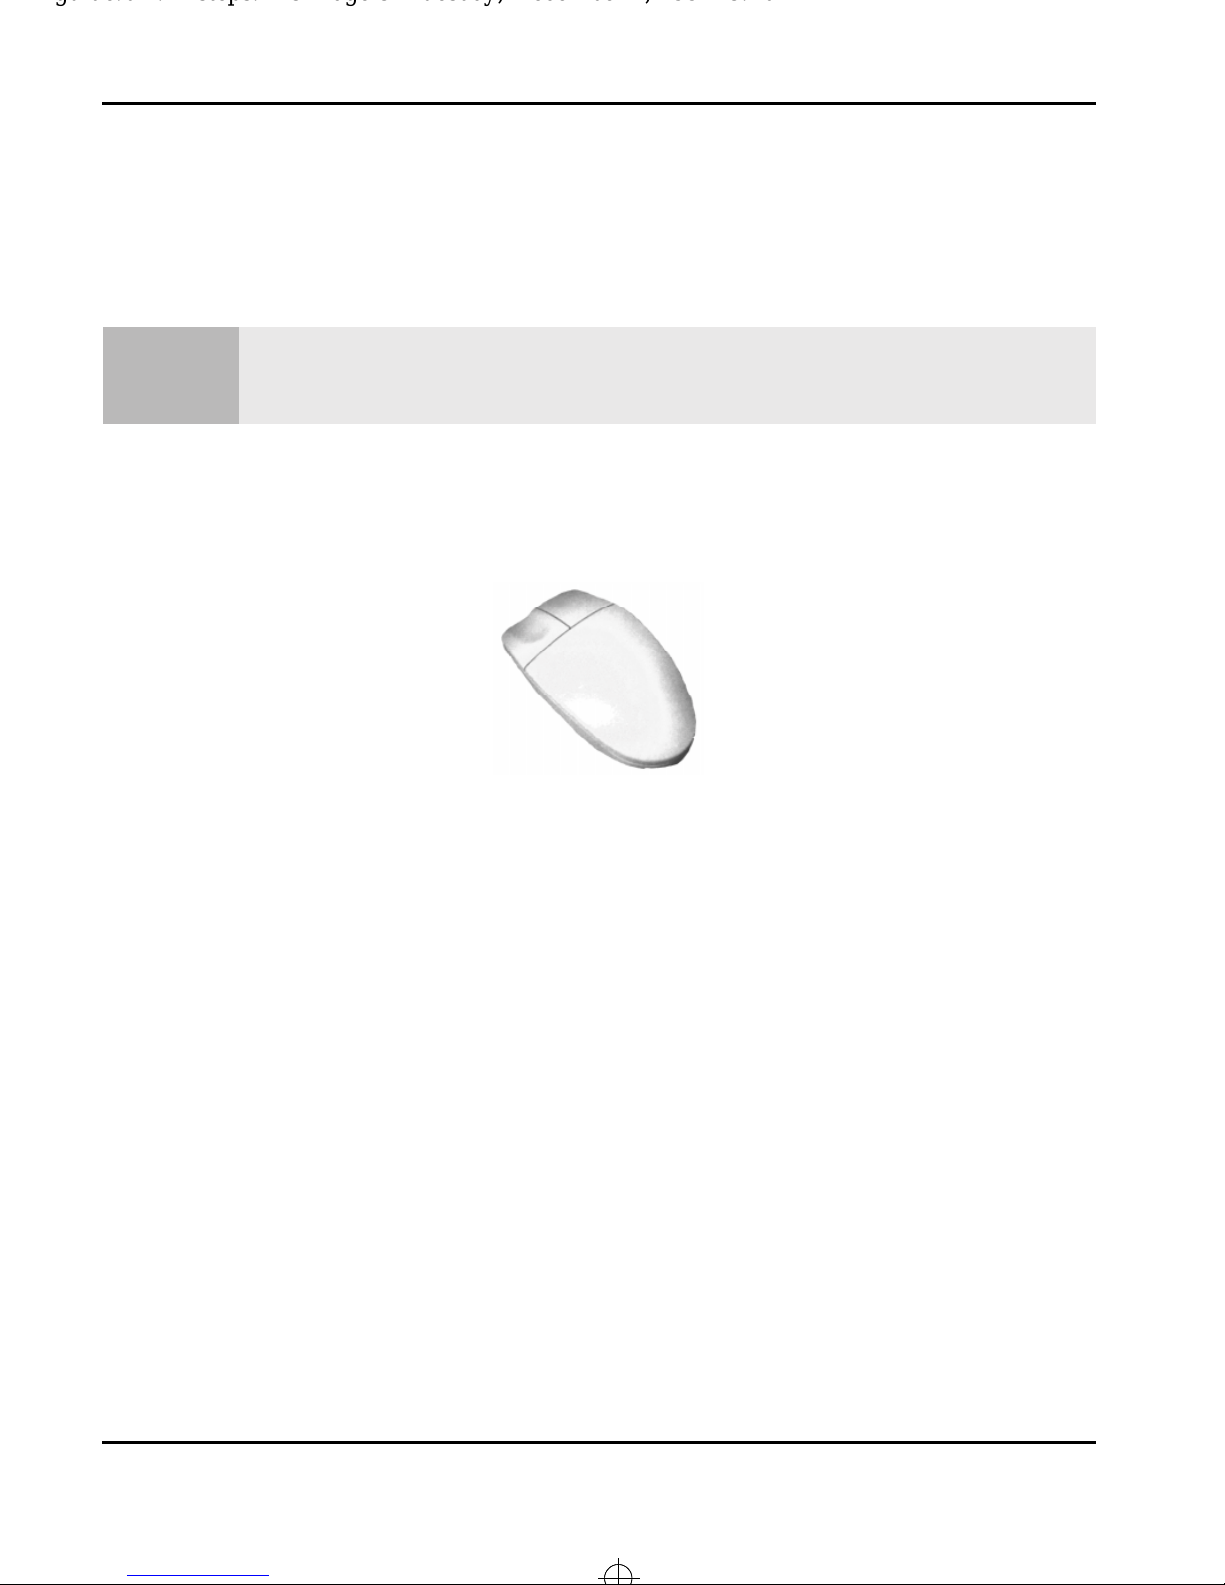
A Word on Using the Mouse
A Word on Using the Mouse
This manual assumes you are right-handed; if you are left-handed you can switch the functionality of left
Note
The mouse should be considered as a tool that lets you communicate with the
programs running on your HP Brio PC — moving the mouse, clicking and
double-clicking its buttons all have a specific meaning.
and right mouse buttons, if you find it easier. Refer to “switching, mouse buttons” in the Windows help
system
Some of these clicking actions always have the same effect, no matter which
program you are using — left-clicking on a menu, for example, always displays
the choices within that menu.
The left mouse button is the “general purpose” button — you use it for selecting,
highlighting, clicking, and for dragging things around your windows (moving the
mouse while holding down the left mouse button on a highlighted item).
The right mouse button can also be used within many programs. The choices
available to you may differ from program to program — right-clicking on the
Start button for example. Try it for yourself, and see what choices are available
by right-clicking in different areas of the taskbar.
8
Page 17

guide.bk : possible.fm5 Page 9 Tuesday, December 2, 1997 8:10 PM
In Business with the
HP Brio PC
2
This chapter explains some of the ways your HP Brio PC can
integrate effortlessly into your business, and keep it running
smoothly.
9
Page 18
guide.bk : possible.fm5 Page 10 Tuesday, December 2, 1997 8:10 PM
In Business with the HP Brio PC
HP Brio Center
HP Brio Center
The HP Brio Center consists of a menu of different things you might want to do
with your HP Brio PC. The choices available to you have been laid out clearly
and simply, allowing you to perform tasks with the minimum of effort. Even if
you are an experienced PC user, you may be surprised how easy and intuitive
the HP Brio Center is.
From the HP Brio Center you can,
register your HP Brio PC electronically and take advantage of the free
screensaver — only if your HP Brio PC has a fitted modem and you are in
North America or Europe. See page 12 for details.
take a guided tour and discover the full potential of your HP Brio PC.
See page 14.
find information — in the form of online help — about how to use your
HP Brio PC.
10
Page 19
guide.bk : possible.fm5 Page 11 Tuesday, December 2, 1997 8:10 PM
perform tasks quickly and with step-by-step help.
See Task Helper on page 16 for details.
communicate and share resources with the world outside your HP Brio
PC — such as sending a fax, accessing the Internet, or sharing a printer.
See page 18 for details.
backup data, check for viruses, perform routine maintenance tasks, or
set up a password.
See page 26 for details.
In Business with the HP Brio PC
HP Brio Center
troubleshoot any problems you may have, or check on how to get
support.
See page 38 for details.
11
Page 20
guide.bk : possible.fm5 Page 12 Tuesday, December 2, 1997 8:10 PM
In Business with the HP Brio PC
Registering Your HP Brio PC (only required in North America & Europe)
Registering Your HP Brio PC
(only required in North America & Europe)
So, you’ve turned on your computer and everything seems to be working fine.
Why should you bother registering?
The main benefit from registering your HP Brio PC is the support you get should
anything go wrong. The support is from the date you purchased your HP Brio
PC, so it’s important to register sooner rather than later! If you register
electronically, you can also get a free screensaver, that will brighten up your HP
Brio PC when you leave it alone!
If your HP Brio PC is fitted with a modem, you can register electronically. The
advantage of this is that all details about your computer are automatically sent to
the support center. So if you ever do need to call, you don’t waste time relaying
details about your HP Brio PC. And that could save you much valuable time!
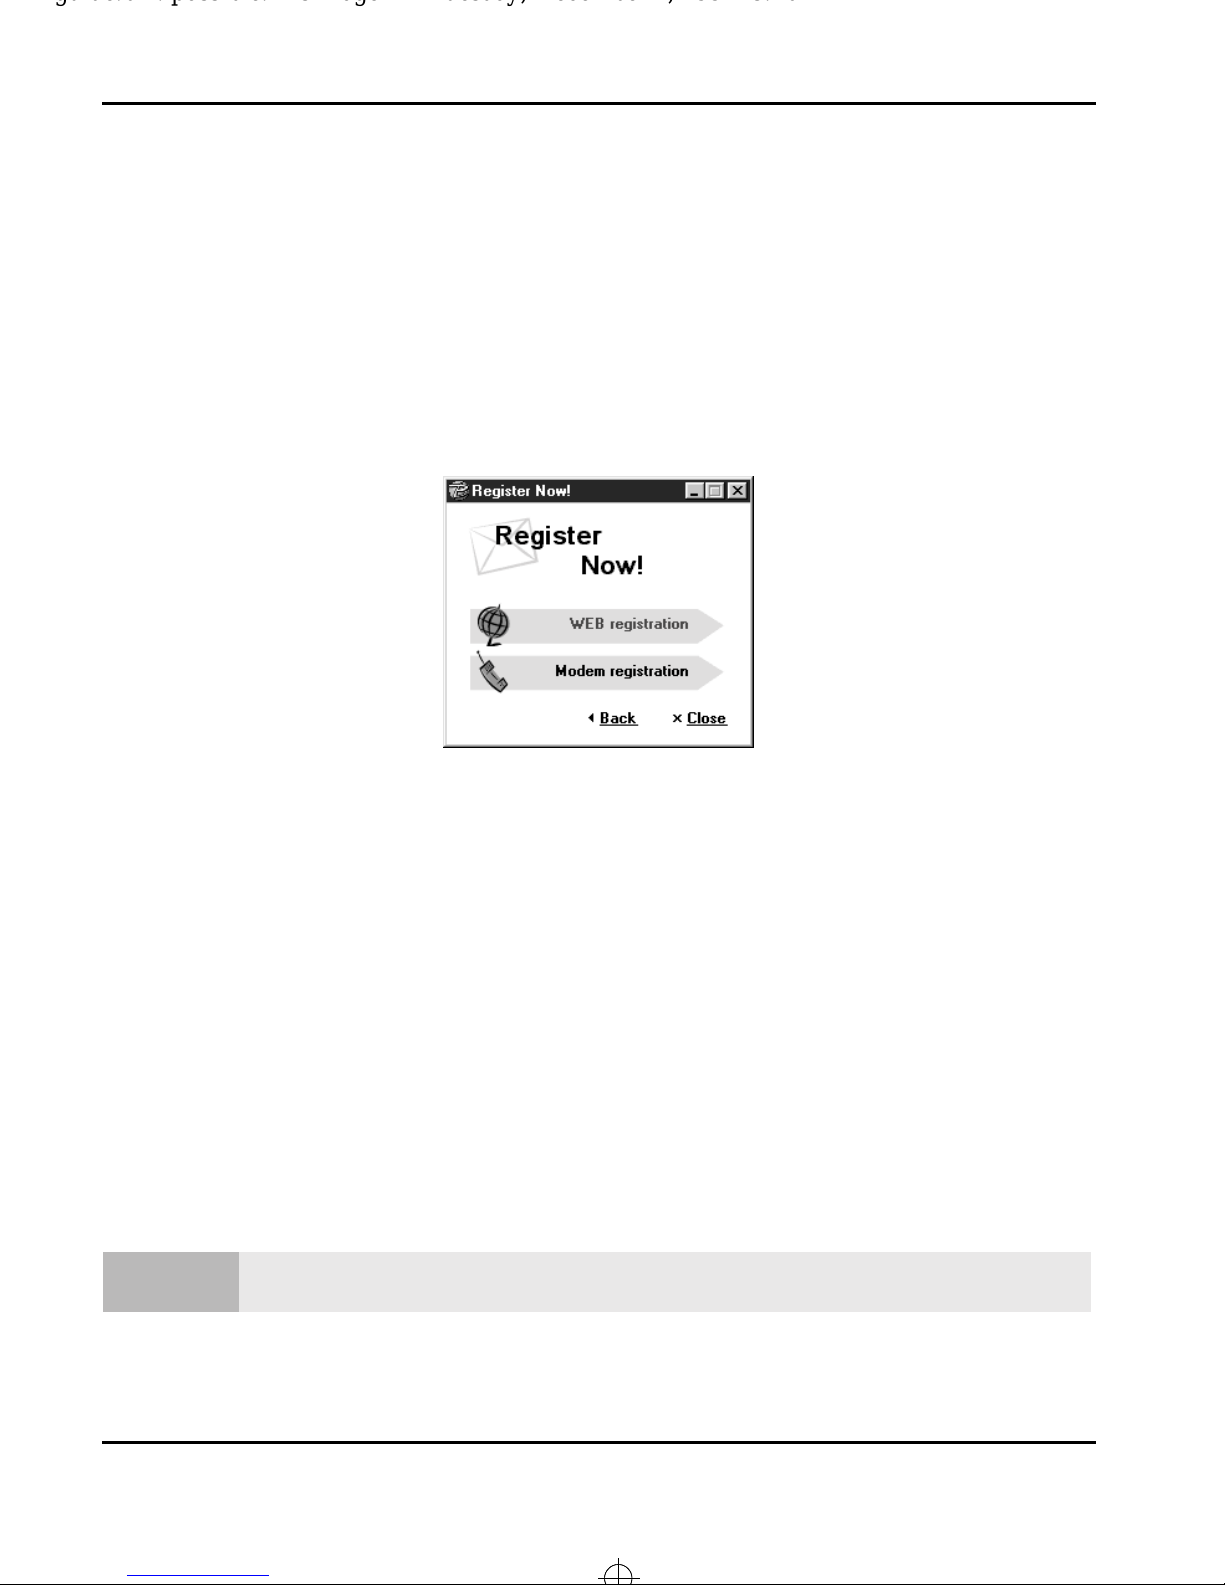
Registering electronically could not be simpler — simply click on the Register
Now! button on the HP Brio Center. Depending on your location, you might also
be able to register electronically via the Internet as well as modem registration.
Note
Once you have registered, the Register Now! option in the HP Brio Center disappears.
12
Page 21

guide.bk : possible.fm5 Page 13 Tuesday, December 2, 1997 8:10 PM
Registering Your HP Brio PC (only required in North America & Europe)
If your HP Brio PC is not fitted with a modem, you register by calling the
appropriate telephone number, given in your support details documentation.
Make sure you have the following information about your HP Brio PC to hand,
the serial number
•
the product number
•
the localization code
•
This information is obligatory in order for you to get your customer support
number. You can find it by,
In Business with the HP Brio PC
1 clicking on Fix Problems and Get Support in the HP Brio Center.
2 then clicking on Check Your Support Details.
13
Page 22

guide.bk : possible.fm5 Page 14 Tuesday, December 2, 1997 8:10 PM
In Business with the HP Brio PC
Take a Tour of Your HP Brio PC...
Take a Tour of Your HP Brio PC...
Why not take a few minutes to explore your new HP Brio PC, and take the
guided tour.
As well as demonstrating how you can get the most out of your HP Brio PC,
you’ll become familiar with much of the hardware and pre-loaded software,
thereby getting you up and running even quicker.
You can also find information on the various accessories available from your HP
Reseller.
To take the guided tour, click on Discover Your PC in the HP Brio Center.
14
Page 23

guide.bk : possible.fm5 Page 15 Tuesday, December 2, 1997 8:10 PM
Finding Information
Your HP Brio PC comes with an extensive on-line library of information that’s
been designed to save you time. Many varied topics can be found here —
background information, guided tours, help on how to do things. You can read
through any of the on-line documentation and then print out what you need.
And all this is just one click away from within the HP Brio Center!
In Business with the HP Brio PC
Finding Information
Once you have reached the main Find Information window, simply click on any
of the areas you want to investigate further.
15
Page 24

guide.bk : possible.fm5 Page 16 Tuesday, December 2, 1997 8:10 PM
In Business with the HP Brio PC
Task Helper
Task Helper
You want to perform a task but don’t know how? No problem! Task Helper helps
you perform many of your most important tasks in a no-frills, no-fuss way —
direct and to the point.
Tasks are grouped into categories on the left-hand side of the window. They
represent the most common areas of concern for many users.
The right-hand section contains information on what the task is — important
information you must know before attempting the task — and a Do it! button
that lets you perform the task right away.
16
Page 25

guide.bk : possible.fm5 Page 17 Tuesday, December 2, 1997 8:10 PM
Try it for Yourself!
So for example, you want to find a file as you’ve forgotten where you placed it.
No problem!
Click on Task Helper in the HP Brio Center.
•
The Task Helper window will appear. In the left-hand side of the window
you’ve got the different areas where you might need help. The task in hand is
most definitely one concerning Working with Documents and Folders.
In Business with the HP Brio PC
Task Helper
Expand the Working with Documents and Folders option.
•
Notice the sub-categories available in this topic.
Click on Finding a File on your PC.
•
The right-hand part of Task Helper now fills with information about how to find
a file and a button that lets you Do It!
Clicking on Do it! brings up a menu where you type in the name of the file you
want to find.
So, in about three easy steps you’ve been able to perform a task that might
otherwise have taken considerably longer, leaving you more time to get on with
those important business issues.
17
Page 26

guide.bk : possible.fm5 Page 18 Tuesday, December 2, 1997 8:10 PM
In Business with the HP Brio PC
Communicating with Others
Communicating with Others
Only HP Brio PCs fitted with a modem card will have access to the communications options in this
Note
One key factor in running a successful business is being a good communicator.
The HP Brio PC provides you with the means to communicate effectively to the
world outside your business, letting you concentrate on the content of your
window.
Only HP Brio PCs fitted with a network card will have access to the network options in this window.
communication.
This section is all about how your HP Brio PC can communicate with others. If
your HP Brio PC does not have any facilities to do this, the Communicate and
Share option in the HP Brio Center will not be available.
18
Page 27

guide.bk : possible.fm5 Page 19 Tuesday, December 2, 1997 8:10 PM
Communicating with Others
Setting Up Your Communications Software
Before you can use the communications features pre-loaded on your HP Brio
PC, you need to configure the fax and e-mail software.
Once you have followed the steps below, and have filled in the personal details
necessary for your fax and e-mail features to work, you can use your HP Brio PC
to communicate with other users, by fax or by e-mail.
Setting Up Your Fax Modem
In Business with the HP Brio PC
To learn how to set up your fax modem, see the appropriate item in Task Helper
in the HP Brio Center. It guides you step-by-step through the process,
prompting you for information as required.
Setting Up Your Dialing Properties
The dialing properties define your current location — that is the country and
area that you are located in, for dialing purposes. All the communications
functions on your computer use this information to establish a connection.
To set the dialing properties,
1 Click the Start button, point to Settings, then click Control Panel.
2 Double-click the Modems icon.
3 In the Modem Properties dialog box, click the Dialing Properties button.
19
Page 28

guide.bk : possible.fm5 Page 20 Tuesday, December 2, 1997 8:10 PM
In Business with the HP Brio PC
Communicating with Others
The Dialing Properties dialog box opens:
Click here to set up a
new location.
Enter your area code
here.
Click here to select the
country you are in, if it
is not already displayed.
Enter the outside line
prefix here, if those
displayed are incorrect.
Sending a Fax
When you have created a document and want to fax it to someone, you can
simply fax it directly from your HP Brio PC. If you have access to a scanner you
could even scan in your signature and paste it into your documents.
When you send a fax, you’ll be prompted to give details on,
recipient’s details — name, fax number etc.,
•
the content of the fax
•
any additional documents you want to attach to the fax (word processor
•
documents, for example)
And then you just send the fax, while you concentrate on the rest of your work.
To learn how to fax a document, see Task Helper in the HP Brio Center.
20
Page 29

guide.bk : possible.fm5 Page 21 Tuesday, December 2, 1997 8:10 PM
Communicating with Others
Enabling & Disabling Fax Reception
Sometimes you may not want the fax modem to automatically answer calls — if
you only have one telephone line, for example, and you’re expecting a telephone
call from a customer, rather than a fax!
The Network and Communications window lets you switch painlessly from
enabling to disabling the fax modem.
To learn how to enable and disable fax reception, see Task Helper in the HP
Brio Center.
In Business with the HP Brio PC
Sending & Reading E-mails
Electronic mail — e-mail — is a system of sending messages from one computer
to another. Your HP Brio PC uses the modem as the means for sending and
receiving e-mails. People use e-mail because it is fast — very fast. While an
express letter might take a day to get from one continent to another, an e-mail
would typically be there in a matter of minutes. And the cost is slashed, to the
price typically of a local telephone call.
To see how to send or receive e-mail, see Task Helper in the HP Brio Center.
Accessing the Internet
The Internet — sometimes called the net, world wide web, or web — has
become almost an indispensable tool for many businesses today. Yet many
people either do not understand it fully. This can mean time wasted, and lost
opportunities.
21
Page 30

guide.bk : possible.fm5 Page 22 Tuesday, December 2, 1997 8:10 PM
In Business with the HP Brio PC
Communicating with Others
A view of the Internet that can work quite well is of a worldwide network (a
world wide web) of computers that have shared files on them. You can read a
file — or web page — on someone else’s computer. Each of these pages can
have links — like a sort of go to button — that send you to another page. This
new page can be on the same computer, or on one in a totally different part of
the world. You are surfing if you are following link after link after link! You can
also copy — or download — files from people’s pages. Software vendors, for
example, often have the latest updates or the newest drivers on their web site (a
collection of common pages, linked to each other).
Use the Internet wisely; otherwise you might find yourself wasting a lot of time
on it — getting side-tracked by following too many links, for example!
If you regard the Internet as essentially the world’s biggest library, jam-packed
with information that is growing by the second, you’re on the right track; on the
one hand it’s an invaluable source of information, but you can’t afford to spend
all day in it if you’ve got a business to run!
To learn about the Internet, see Task Helper in the HP Brio Center.
Once you have learnt how to do this, why not check out the HP Brio PC Internet
site. The address is shown on the front cover of this guide.
HP Message Sender
Want to leave a note for a colleague? Want to be sure they’ll see it? The HP
Message Sender lets you post quick reminder notes (which can contain text and
graphics) to anyone else connected to the network. The note appears on the
recipient’s Desktop, on top of all other windows, ensuring they’ll see it!
To learn how to use the HP Message Sender, see Task Helper.
22
Page 31

guide.bk : possible.fm5 Page 23 Tuesday, December 2, 1997 8:10 PM
Sharing Things with Others
In Business with the HP Brio PC
Sharing Things with Others
Note
The great advantage of being in any sort of network — be it computers, or a
more general company-wide network, is the power to be able to share resources.
Leveraging shared information reduces costs and improves efficiency.
This section is only relevant for users who have installed a network card in their HP Brio PC.
What Does Sharing Mean?
Sharing things over a network means making them available to other users on
the network. A hard disk, for example can be shared; if the disk is on your HP
Brio PC, you tell the computer to share it, and to whom.
Likewise, you can also connect to things other people have shared — the hard
disk, for example. You must tell your HP Brio PC to connect to a resource that
someone else has shared.
The HP Brio PC lets you connect to, and share information, such as folders and
documents, or peripherals such as printers, modems or CD-ROMs, quickly and
easily.
Just What Can be Shared?
Disk Drives
Where large amounts of information should be freely available for everyone in
your business, complete disk drives can be shared. If you need total flexibility,
everyone in your business could share their own disk drive.
23
Page 32

guide.bk : possible.fm5 Page 24 Tuesday, December 2, 1997 8:10 PM
In Business with the HP Brio PC
Sharing Things with Others
Alternatively, if your business really only needs one central place where
colleagues can share information, then share only one disk drive.
To connect to, or share a disk drive, see Task Helper in the HP Brio Center.
CD-ROMs
If not all colleagues in your business have a CD-ROM drive, you can save costs by
sharing the CD-ROM in your HP Brio PC.
To learn how to share a CD-ROM, see Task Helper in the HP Brio Center.
ZIP Drives
If not all colleagues in your business have a ZIP drive, you can save costs by
sharing the ZIP drive in your HP Brio PC.
To learn how to share a ZIP drive, see Task Helper in the HP Brio Center.
Documents & Folders
If you don’t want to share all the information on your hard disk, sharing folders
might be more appropriate. When you share a folder, all documents within it are
automatically shared.
To learn how to connect to and share folders, see Task Helper in the HP Brio
Center.
Printers
A printer is typically something you use every now and then. Minutes, hours, or
even days may go by before you need to use it again.
24
Page 33

guide.bk : possible.fm5 Page 25 Tuesday, December 2, 1997 8:10 PM
A printer is an ideal resource to share over a network. So when you are not
printing, your colleagues can. You can make considerable savings on equipment
costs by sharing just one printer.
To learn how to connect to and share a printer, see Task Helper in the HP Brio
Center.
Modem
In Business with the HP Brio PC
Sharing Things with Others
Wouldn’t it be nice if you could reduce telephone and equipment costs in one
go? With the HP Brio PC you can — by sharing your modem facility between
colleagues!
When you share a modem on a HP Brio PC, you are essentially sharing access to
a fax — anyone in your network can then send a fax!
Note
The fax facility can only be used by one person at any one time.
To learn how to connect to and share a modem, see Task Helper in the HP Brio
Center.
25
Page 34

guide.bk : possible.fm5 Page 26 Tuesday, December 2, 1997 8:10 PM
In Business with the HP Brio PC
Protecting Your Data
Protecting Your Data
The data you have on your HP Brio PC may well be the most important for your
business. So you really do need to think about protecting it, maintaining it, and
making a backup of it. You do all this from Protect Your Data window.
Your HP Brio PC has been preloaded with maintenance, protection, backup and
repair tools so that you can, for example, back up your system and files and
check for computer viruses.
Passwords are an effective way of protecting your HP Brio PC. You can set up a
password for your screensaver — you must type the correct password to get
back to Windows.
To learn how to create different passwords, see page 28.
26
Page 35

guide.bk : possible.fm5 Page 27 Tuesday, December 2, 1997 8:10 PM
Backing Up Your Work
Imagine losing your passport the day before you’re due to fly back home. It’s a
nightmare we all dread, so when we travel we usually keep a pretty close eye on
it. Yet often when we’re working on a computer, we never really consider losing
all our data the day before an important presentation!
It’s a fact of life that computers sometimes go wrong. It’s also a fact of life that
people make mistakes and accidentally delete things, and that natural disasters
occur! If any one of these were to strike, it could spell disaster for your business.
In Business with the HP Brio PC
Protecting Your Data
That’s why you should make backing up your work a fact of life.
Hewlett-Packard realizes the devastating effects the loss of data can have on
smaller businesses, and has integrated several quick, easy-to-use options into
the HP Brio PC. This gives you a peace of mind and security, previously only
available to larger companies with a dedicated backup department.
Backup Utilities
Note
HP offers a number of different solutions for backing up the data on your HP
Brio PC, such as a ZIP drive, tape backup, or a remote backup service. For
further information, refer to the Protect Your Data window, or contact your
local reseller.
The backup utilities available to you depend on your particular configuration of HP Brio PC.
Scanning for Viruses
Imagine your HP Brio PC suddenly began acting strangely, or even worse data
began disappearing! Such events can be caused by a virus.
If you use floppy disks from other people, or download material from the
Internet, there is always the potential for a computer virus to infect your HP Brio
PC.
27
Page 36

guide.bk : possible.fm5 Page 28 Tuesday, December 2, 1997 8:10 PM
In Business with the HP Brio PC
Protecting Your Data
To learn about computer viruses, and how to erase them, see the Protect Your
Data window and Task Helper.
Maintaining Your Hard Disk(s)
Things generally tend to work better and last longer when properly cared for.
This is equally true for your computer’s hard disk(s).
Your HP Brio PC will perform better if you maintain its hard disk(s) and the files
stored on them. Ideally, this maintenance work should be carried out on a
regular basis.
Scan your hard disk for errors — your HP Brio PC comes with a fully featured
•
disk analysis and repair tool that will help you check the integrity of disks,
check folders and file system for damage, and repair both disks and file system,
if necessary.
Optimize your hard disk’s performance — as programs are continually reading
•
or writing to the hard disk, fragmentation eventually occurs, meaning that files
are stored in random parts of the hard disk. Although fragmentation does not
have any effect on the files themselves, the computer does take longer to
access them. When you optimize the hard disk, you defragment data, thereby
consolidating files and improving your hard disk’s access time.
To learn about maintaining hard disks, and how to optimize or scan a disk, see
Maintain Hard Disk(s) in the Protect Your Data window.
Password Protection
Why not protect your HP Brio PC by setting a password on your screensaver. So,
even when you leave your HP Brio PC unattended, you are sure that your work
is secure.
28
Page 37

guide.bk : possible.fm5 Page 29 Tuesday, December 2, 1997 8:10 PM
You can also set up your HP Brio PC to ask for a password right at startup. If the
correct password is not given after 2 attempts, the machine locks up and must
be rebooted. For information on this type of security, refer to the setup program
in the Online Reference Documentation, which you can refer to from the Find
Information window in HP Brio Center.
To find out how to set passwords, see Task Helper in the HP Brio Center.
In Business with the HP Brio PC
Protecting Your Data
29
Page 38

guide.bk : possible.fm5 Page 30 Tuesday, December 2, 1997 8:10 PM
In Business with the HP Brio PC
Protecting Your Data
30
Page 39

guide.bk : problems.fm5 Page 31 Tuesday, December 2, 1997 8:10 PM
Fixing Problems and
Getting Support
3
You should read this chapter if you are having problems with your
HP Brio PC. It has been laid out so that you can easily find
information on how to fix common problems yourself, and how to
get help when this does not work.
Note
If your HP Brio PC has stopped responding, please see either the
(inside the rear cover of this manual) or the
Questions & Answers
Troubleshooting Tree
section on page 38
31
Page 40

guide.bk : problems.fm5 Page 32 Tuesday, December 2, 1997 8:10 PM
Fixing Problems and Getting Support
What to Do First
What to Do First
Don’t panic! Most things that go wrong with computers can be fixed relatively
easily — provided you do not rush into them.
Approach the problem logically and methodically. Ask yourself the following
question:
Is there really a problem with my PC, or do I just not know how to do
•
something?
If you are at all unsure about how to perform a task, refer to the multitude of
helpful advice within the HP Brio Center — such as Task Helper. Or check the
on-line libraries in Find Information.
If, however, you are sure there is a problem with your HP Brio PC, read on.
32
Page 41

guide.bk : problems.fm5 Page 33 Tuesday, December 2, 1997 8:10 PM
Fixing Problems and Getting Support
What to Do Next
OK, so you do have a problem with your HP Brio PC. The next step is to do some
troubleshooting — by yourself — so that you can both eliminate things, and save
yourself time if you need to get technical support.
Go through the following, to see if you can solve the problem.
Take a look at the Troubleshooting Tree inside the rear cover
•
What to Do Next
This gives you a quick overview of some symptoms your HP Brio PC may have,
and solutions on how to overcome them.
Check out the online troubleshooting (assuming your HP Brio PC is still
•
responding to user input) from the HP Brio Center
From the HP Brio Center, you have immediate access to support information.
The information in this window can help you if you have a problem with your
computer. It offers step-by-step troubleshooting help, and powerful diagnostic
tools to help you analyze and fix your problems. To access the window, click
Fix Problems and Get Support from the HP Brio Center.
For more details on this topic, refer to page 34.
Read the Questions & Answers on page 38
•
This lists many of the questions users ask about their PCs, and gives detailed
answers and solutions to common problems.
33
Page 42

guide.bk : problems.fm5 Page 34 Tuesday, December 2, 1997 8:10 PM
Fixing Problems and Getting Support
Online Troubleshooting
Online Troubleshooting
From within the HP Brio Center you have immediate access to support
information. This information can help you if you have a problem with your
computer.
Check Your HP Brio PC
This should probably be the first thing you try if you ever have problems. From
this area you can perform diagnostics on your HP Brio PC, such as scanning the
hard disk(s) for errors, or searching for viruses. It’s simple and intuitive, yet
effective, and can solve many common problems.
34
Page 43

guide.bk : problems.fm5 Page 35 Tuesday, December 2, 1997 8:10 PM
Fixing Problems and Getting Support
Problems Doing a Task?
Not any more! Learn how to easily perform tasks with Task Helper. No-frills
information on what the task entails, clear step-by-step instructions on how to
do it, and an option to Do It!
Find Information
Think of this as your own personal on-line library of information. It lets you
Online Troubleshooting
quickly find information on all areas of your HP Brio PC.
You Still Have a Problem...
OK, you’re still having problems — here’s where you can turn. You’ll be
prompted for a few simple details before you are shown how and where to get
technical support.
Learn About Your HP Brio PC Support
Just what support offerings are out there? How do I get them? All these
questions and more are answered in this section. You’ll find details on the range
of complimentary and fee-based services available to you, and how to get them.
35
Page 44

guide.bk : problems.fm5 Page 36 Tuesday, December 2, 1997 8:10 PM
Fixing Problems and Getting Support
Need More Help?
Need More Help?
HP makes every effort to provide sufficient information to allow you to solve
problems yourself. Before seeking additional support, ensure that your HP Brio
PC and its installed accessories are correctly set up as described in the
documentation.
If you need to call for advice or assistance, you should first contact your reseller
or dealer. Your reseller knows the characteristics of your HP Brio PC and will be
able to provide appropriate advice to solve your problem.
36
Page 45

guide.bk : problems.fm5 Page 37 Tuesday, December 2, 1997 8:10 PM
Fixing Problems and Getting Support
Tips on Avoiding Potential Problems
Tips on Avoiding Potential Problems
Take Advantage of Disk Partitions
Disk partitions let you split your hard disk into separate areas. Each of these
areas appears as a separate drive — for example, C, D, etc. If your HP Brio PC
already has disk partitions, you might consider using one partition (other than
the C drive, as this is where your system files are stored) for your important
data. This has several advantages:
You can easily find files
•
You can make backups more easily
•
If you ever have a problem with your system files (for instance, if a virus has
•
corrupted them), your Recovery CD-ROM will help you recover your PC to its
original state. It will erase the C drive and restore it, but will leave your
important data on the D drive intact.
Protect Your HP Brio PC from Power Shortages
If you plan to use your PC in a permanent way — to receive faxes, for example
— you should really consider adding an Uninterruptible Power Supply (UPS)
unit to your HP Brio PC, so that it is protected against power shortages. Indeed
after a power shortage, your HP Brio PC may not be able to retrieve its original
configuration (network connections, fax reception, etc).
37
Page 46

guide.bk : problems.fm5 Page 38 Tuesday, December 2, 1997 8:10 PM
Fixing Problems and Getting Support
Questions & Answers
Questions & Answers
My HP Brio PC Doesn’t seem to Work...
I get a non-system
disk message.
What is this?
My PC does not
respond. How can I
restart it?
My PC keeps
locking up. What
can I do?
Your computer is trying to start up from a floppy disk that doesn’t
contain the correct startup software. Remove the disk from the
floppy disk drive when the indicator light on the drive is off, then
restart your computer by pressing the
together.
• First try pressing the
dow will display the list of applications currently running. One of
these applications may be marked as not responding. Select the
application and click End Task. Restart your computer by clicking Shut Down from the Start menu, then clicking Restart the
computer?
• If this does not work, hold down the on/off button on the front of
your HP Brio PC for 4 seconds; this shuts off the machine completely. Then turn your HP Brio PC on again.
Run the HP diagnostics tool from the HP Brio Center (click on Fix
Problems and Get Support). If the problem persists, try removing
any added memory. Non-HP memory may not be compatible with
your computer. Remove any additional expansion cards in your
computer to see if this resolves the problem.
CTRL + ALT + DEL
CTRL + ALT + DEL
keys together. A win-
keys
38
Page 47

guide.bk : problems.fm5 Page 39 Tuesday, December 2, 1997 8:10 PM
Fixing Problems and Getting Support
Part of my HP Brio PC Doesn’t Work...
Questions & Answers
I’ve tried installing a
software application,
but it doesn’t work.
My program window
has disappeared.
How do I get it back?
My mouse doesn’t
work correctly.
Consult the guide that accompanies the software or contact the
dealer or manufacturer where the software was purchased. You
can often find the latest information about your third party
software on the Internet. If the software is affecting other parts
of your PC, remove the software. If the software has corrupted
your PC, run the Product Recovery CD-ROM to restore your PC
to its original state. Fee-based support is available in some
countries for many third-party applications.
Sometimes when operating a program, you click outside the
program’s work area and accidently switch to another program.
Don’t worry, your program doesn’t actually disappear, it just
moves behind another window. To get your program back, either
click the program on the Windows taskbar, or press and hold
down the
you highlight your missing program. Release the keys, and your
program will reappear.
Most mouse problems are corrected by cleaning the mouse. To
clean your mouse:
key and then repeatedly press the
ALT
key until
TAB
Shut down your computer.
1
Turn your mouse upside down and remove the mouse-ball
2
cover.
Remove the ball and clean the ball using adhesive tape. Wipe
3
away any dirt from inside the socket.
Replace the ball and replace the mouse-ball cover.
4
Turn on your computer.
5
To change the way your mouse works click, Start ➨ Settings ➨
Control Panel, then click the Mouse icon.
39
Page 48

guide.bk : problems.fm5 Page 40 Tuesday, December 2, 1997 8:10 PM
Fixing Problems and Getting Support
Questions & Answers
My computer is
behaving strangely.
What can I do?
My expansion card is
not working. What is
wrong?
Run the anti-virus program from the Product Recovery CD-ROM
that came with your computer. If you don’t have a CD-ROM
drive, you can find the anti-virus program in the HP Brio Center
(click on Protect Your Data).
Tip: Protect your PC from virus infections by setting the
antivirus program to run permanently.
You can also use your Product Recovery CD-ROM to restore
your computer to its original state.
There may be many reasons for this. Here are some of the things
you should check:
Check that the card has been installed and configured
1
correctly. Windows should do this automatically unless you
have defined a specific configuration.
Check that the card is not using memory, an I/O address, IRQ
2
or DMA channel which is already being used by your PC. Refer
to the instruction manual of the card for details.
Check that the PC has been correctly configured in the Setup
3
program.
40
You should also check with the manufacturer of the card for
specific requirements.
Page 49

guide.bk : problems.fm5 Page 41 Tuesday, December 2, 1997 8:10 PM
Fixing Problems and Getting Support
External Communications Aren’t Working...
Questions & Answers
My MS-DOS program
can’t find the modem.
What do I do?
I can’t dial /
there’s no dial tone.
I can’t receive a fax.
MS-DOS programs and games are not supported by your
Windows modem. You need to upgrade your MS-DOS program
to a Windows one. Note also that Windows 3.1 programs may
also require an upgrade to a newer release.
• Perhaps your telephone line is not connected correctly.
Check that you have connected the cables correctly. You
can also connect a standard handset to the wall socket to
check whether you have a standard dial tone.
• You may, however, have a conflict between the PBX (Private
Branch eXchange) and your modem. Solve this by connecting the modem to a phone line that comes directly from the
telephone operator. By doing this you also benefit by having
maximum speed.
It is likely that your Inbox on your HP Brio PC is not active or
that the auto-answer option is not enabled. Make sure your HP
Brio PC is set up to receive faxes.
Select Communicate and Share in the HP Brio Center.
1
Select Enable/Disable Fax Reception.
2
Configure your fax reception settings.
3
Minimize the Inbox
4
Which 56K technology
do I use (K56 Flex or
X2)? My Internet
access configuration
requires this.
To determine the technology used by your modem:
Run the Diagnostic Toolkit — Start Menu ➨ Programs ➨ PC
1
Doctor ➨ PC Doctor for Windows.
Select System Information
2
Double-click on Modem Information. The Modem
3
Information table shows you your modem’s technology.
41
Page 50

guide.bk : problems.fm5 Page 42 Tuesday, December 2, 1997 8:10 PM
Fixing Problems and Getting Support
Questions & Answers
Other Questions...
I don’t know how to
use my application.
How can I get help?
How do I remove the
Windows password
login screen?
How do I copy files,
set up my printer, or
change my settings?
First check your computer documentation. Your application
has online help that you can access by clicking on the Help
menu or the
To remove the Windows password:
1
Click Start
2
Select
3
Type in the old password, but leave the “new password”
empty.
4
Click OK to leave the password window.
The next time you start the PC, the Windows password screen
will not appear.
These questions are related to your Windows operating system.
You can find the answers to these and many more questions in
Task Helper
that came with your HP Brio PC.
symbol in the menu bar.
?
➨
Settings
Password
(see page 16). or in your Windows documentation
➨
Control Panel.
and then choose
Change Password
.
I’ve accidently deleted
files. How do I get
them back?
Don’t worry. Windows stores the deleted files in the Recycle
Bin on your desktop. To restore your file:
1
2
3
What is a “General
Protection Fault”, or
“Invalid Page Fault”
This is an error message that usually occurs when a program
has temporarily corrupted the memory resources of the PC.
Close your program and restart your PC.
message?
42
Double-click the Recycle Bin icon.
Select the files you want to restore.
Right-click on the files and select Restore.
Page 51

guide.bk : problems.fm5 Page 43 Tuesday, December 2, 1997 8:10 PM
Fixing Problems and Getting Support
Questions & Answers
Does my PC have any
built-in tools to help
me fix problems?
Yes — and they’re all accessible from the HP Brio Center. From
here you can access tools that will help you fix any printing,
sound, video, and communication problems you may have.
43
Page 52

guide.bk : problems.fm5 Page 44 Tuesday, December 2, 1997 8:10 PM
Fixing Problems and Getting Support
Questions & Answers
44
Page 53

guide.bk : legal.fm5 Page 45 Tuesday, December 2, 1997 8:10 PM
Regulatory and
License Information
4
This chapter contains the HP software license agreement and
regulatory product information.
45
Page 54

guide.bk : legal.fm5 Page 46 Tuesday, December 2, 1997 8:10 PM
Regulatory and License Information
Physical Characteristics
Physical Characteristics
The following tables show the physical characteristics of your computer. For
further information on technical specifications, refer to the Online Reference
Guide supplied with your documentation set.
Characteristics (models 83xx) Description
Weight
(excluding keyboard and display)
Dimensions 47.5cm (Depth) by 18.5cm (Width) by 42.5cm (Height)
Footprint 0.088 m
Acoustic noise emission LW
Power supply
Characteristics (models 82xx) Description
Weight
(excluding keyboard and display)
Dimensions 42cm (Depth) by 18cm (Width) by 39cm (Height)
Footprint 0.076 m
13 kilograms (28.6 pounds)
(18.7 inches by 7.3 inches by 16.7 inches)
2
(0.95 sq ft)
≤
40 dBA (as defined by DIN 45635 T.19 and ISO 7779)
• Input voltage: 100-120 VAC and 200-240 VAC
• Input frequency: 50/60 Hz
• Maximum output power: 150 W continuous
12 kilograms (26.4 pounds)
(16.5 inches by 7.1 inches by 15.4 inches)
2
(0.81 sq ft)
Acoustic noise emission LW
Power supply
Note
46
Operating temperature and humidity ranges may vary depending on the mass storage devices installed. High
humidity levels can cause improper operation of disk drives. Low humidity ranges can aggravate static
electricity problems and cause excessive wear of the disk surface.
≤
40 dBA
Input voltage: 100-120 VAC and 200-240 VAC
•
Input frequency: 50/60 Hz
•
Maximum output power: 150 W continuous
•
Page 55

guide.bk : legal.fm5 Page 47 Tuesday, December 2, 1997 8:10 PM
Regulatory Information
DECLARATION OF CONFORMITY
According to ISO/IEC Guide 22 and EN 45014
Regulatory and License Information
Regulatory Information
Manufacturer’s Name:
Manufacturer’s Address:
declares, that the product
Product Name:
Model Number:
conforms to the following Product Specifications:
Safety:
EMC:
Supplementary information:
International: IEC 950: 1991+A1+A2+A3+A4
Europe: EN 60950: 1992+A1+A2+A3
CISPR 22: 1993 / EN 55022:1994 - Class B
EN 50082-1:1992
IEC 801-2: 1992 / prEN 55024-2:1992 - 4kV CD, 8kV AD
IEC 801-3: 1984 / prEN 55024-3:1991 - 3 V/m
IEC 801-4: 1988 / prEN 55024-4:1992 - 0.5 kV Signal Lines
IEC 555-2:1982 +A1:1985 / EN 60555-2:1987
IEC 1000-3-3:1994 / EN 61000-3-3:1995
FCC Title 47 CFR, Part 15 Class B
AS / NZ 3548: 1992
Hewlett-Packard
5 Avenue Raymond Chanas - 38053 Grenoble Cedex 09 - FRANCE
Personal Computer
HP BRIO 83xx /82xx
1 kV Power Lines
1)
2)
/ ICES-003, Issue 2 / VCCI-2
1)
The product herewith complies with the requirements of the following Directives and carries the CE-marking accordingly:
the EMC directive 89/336/EEC amended by the directive 93/68/EEC.
the Low Voltage Directive 73/23/EEC
1) The product was tested in a typical configuration with Hewlett-Packard Personal Computer Systems.
2) This Device complies with Part 15 of the FCC Rules. Operation is subject to the following two conditions:
(1) this device may not cause harmful interference, and (2) this device must accept any interference received, including interference
that may cause
undesired operation.
Grenoble, September 1997 : Jean-Marc JULIA
Quality Manager
Fore Compliance Information ONLY, contact:
USA Contact: Hewlett-Packard Company, Corporate Product Regulations Manager, 3000 Hanover Street, Palo Alto, CA 94304 (Phone:
(415) 857-1501)
47
Page 56

guide.bk : legal.fm5 Page 48 Tuesday, December 2, 1997 8:10 PM
Regulatory and License Information
Regulatory Information
FCC (for USA only)
Federal Communications Commission Radio Frequency Interference Statement
Warning:
This equipment has been tested and found to comply with the limits for a Class B digital device, pursuant to Part 15 of the FCC Rules. These
limits are designed to provide reasonable protection against harmful interference in a residential installation. This equipment generates, uses,
and can radiate radio frequency energy and, if not installed and used in accordance with the instructions, may cause harmful interference to
radio communications. However, there is no guarantee that interference will not occur in a particular installation. If this equipment does cause
harmful interference to radio or television reception, which can be determined by turning the equipment off and on, the user is encouraged to
correct the interference by one or more of the following measures:
• reorient or relocate the receiving antenna,
• increase the separation between the equipment and the receiver,
• connect the equipment into an outlet on a circuit different from that to which the receiver is connected,
• consult the dealer or an experienced radio/TV technician for help.
Hewlett-Packard’s system verification tests were conducted with HP-supported peripheral devices and HP shielded cables, such as those you
receive with your system. Changes or modifications not expressly approved by Hewlett-Packard could void the user’s authority to operate the
equipment.
Notice for Canada
This Class B digital apparatus meets all requirements of the Canadian Interference-Causing Equipment Regulations.
Cet appareil numérique de la Classe B respecte toutes les exigences du Règlement sur le matériel brouilleur du Canada.
Safety Warning for the USA and Canada
If the power cord is not supplied with the computer, select the proper power cord according to your local national electric code.
Si le cordon secteur n’est pas livré avec votre ordinateur, utilisez un cordon secteur en accord avec votre code electrique national.
Etats-Unis d’Amérique: utilisez un cordon secteur “UL listed”‚ de type SVT .
Canada: utilisez un cordon secteur certifié CSA.
Pour votre sécurité, ne jamais retirer le capot de l’ordinateur sans avoir préalablement débranché le cordon secteur et toute connexion à un
réseau de télécommunications. Remettez toujours le capot avant de rebrancher le cordon secteur.
USA: use a UL listed type SVT detachable power cord.
Canada: use a CSA certified detachable power cord. For your safety, never remove the PC’s cover without first removing the power cord and any
connection to a telecommunications network. Always replace the cover before switching on again.
Changing a battery
There is a danger of explosion if the battery is incorrectly installed.
For your safety, never attempt to recharge, disassemble or burn the old battery.
Replace only with the same battery or equivalent type recommended by the manufacturer.
The battery in this PC is a lithium battery which does not contain heavy metals. Nevertheless, in order to protect the environment, do not
dispose of batteries in household waste.
Please return used batteries to the shop from which you bought them, to the dealer from whom you purchased the PC, or to Hewlett Packard, so
that they can either be recycled or disposed of in an environmentally sound way. Returned used batteries will be accepted free of charge.
48
Page 57

guide.bk : legal.fm5 Page 49 Tuesday, December 2, 1997 8:10 PM
Changement de la pile
Il y a danger d’explosion s’il y a remplacement incorrect de la pile.
Pour votre sécurité, ne jamais essayer de recharger, de démonter ou de brûler l’ancienne pile. La remplacer uniquement avec une batterie du
même type ou d’un type équivalent recommandé par le constructeur.
La pile dans cet ordinateur est une pile au lithium qui ne contient pas de métaux lourds; néanmoins, afin de protéger l’environnement, il ne faut
pas jeter les piles dans les ordures ménagères. Il faut rendre les piles au magasin où vous les avez achetées, au revendeur où vous avez acheté
l’ordinateur ou à la société
Hewlett-Packard, pour qu’elles puissent être recyclées ou rangées pour qu’elles ne nuisent pas à l’environnement. Les piles usées seront
acceptées gratuitement.
Warning
Warnung: Wenn die Batterie nicht korrekt eingebaut wird, besteht Explosionsgefahr. Zu lhrer eigenen Sicherheit sollten Sie nicht versuchen die
Batterie wiederaufzuladen, zu zerlegen oder die alte Batterie zu verbrennen. Tauschen Sie die Baterie nur gegen den gleichen oder ähnlichen
Typ aus, der vom Hersteller empfohlen wird. Bei der diesem PC integrierten Batterie handelt es sich um eine Lithium-Batterie, die keine
Schwermetalle enthält. Batterien und Akkumulatoren gehören nicht in den Hausmüll. Sie werden vom Hersteller, Händler oder deren
Beauftragten kostenlos zurückgenommen um sie einer Verwerung bzw. Entsorgung zuzuführen.
Regulatory and License Information
Regulatory Information
Safety Warning for Holland
NL
Bij dit apparaat zijn batterijen geleverd. Wanneer deze leeg zijn, moet U ze niet weggooien maar inleveren als KCA.
Hinweis für Deutschland: Geräuschemission
Lärmangabe nach Maschinenlärmverordnung - 3 GSGV (Deutschland) LpA < 70 db am Arbeitsplattz normaler Betreib nach EN27779: 11.92.
Notice for Japan
Notice for Korea
49
Page 58

guide.bk : legal.fm5 Page 50 Tuesday, December 2, 1997 8:10 PM
Regulatory and License Information
Regulatory Information
Communications Regulatory Information
Notice for the United Kingdom
The HP Brio PC is approved under approval number NS/G/1234/J/100003 for indirect connection to Public
Telecommunication systems within the United Kingdom.
This section contains important information for U.K. users of the HP PC communications board. It provides instructions on the correct
installation and use of the communications board in order to maintain the type approval granted.
Installation of the Communications Board
Electrical Power
Before making connections, check the safety levels on the various interfaces:
•
Telephone line connector = TNV
•
ISA connector = SELV
These indications are classified as per security standard EN 60-950/A2 10/93
•
SELV: Very Low Safety Voltage
•
TNV: Telecommunications Network Voltage, voltages in compliance with standard EN 60950 criteria.
The HP PC communications board is approved only for installation in a ‘host’ computer (PC) and with host attachment, which are either type
approved for such apparatus, or covered by a General Approval.
It is a condition of type approval that the power required by the host and the total of all other adapter cards installed within the host apparatus,
together with any auxiliary apparatus, does not exceed the power specification as stated in the Online Reference Guide.
The equipment is to be installed such that, with the exception of the connections to the host, clearance and creepage distances shown in the
table below are maintained between the board and any other assemblies which use or generate a voltage. The larger distance shown in brackets
applies where the local environment within the host is subject to conductive pollution or non-dry conductive pollution which could become
conductive due to condensation.
Failure to maintain these minimum distances would invalidate the approval.
In case of doubt, please obtain advice from a competent telecommunications safety engineer.
Clearance
(mm)
2.0 2.4 (3.8) Up to 50 Vrms or Vdc
2.6 3.0 (4.8) Up to 125 Vrms or Vdc
4.0 5.0 (8.0) Up to 250 Vrms or Vdc
Creepage
(mm)
Voltage used or generated
4.0 6.4 (10.0) Up to 300 Vrms or Vdc
For a host or other expansion board fitted in the host, using or generating voltages greater than 300 Vrms or Vdc, advice from a competent
telecommunication safety engineer must be obtained before installation of the relevant equipment.
It is a condition of approval that the power required by the host and the total of all adapter boards installed within the host environment,
together with any auxiliary apparatus, does not exceed the power specification as stated in the Online Reference Guide.
50
Page 59

guide.bk : legal.fm5 Page 51 Tuesday, December 2, 1997 8:10 PM
Ensure that only equipment having connection points with the same safety status as identified above is connected to each individual
interconnection point provided by the HP PC communications board.
Always disconnect the host PC from the power supply before removing the cover.
Always disconnect the host PC from any analog telephone circuits before removing any covers.
Failure to install the HP PC communications board in accordance with the instructions provided above will invalidate the approval.
If you have any doubt as to how to safely install the HP PC communications board correctly within a host chassis, please seek advice from a
qualified telecommunications engineer.
Power Consumption of the Communication Card
5V: 340 mA max.
12V: 47mA max.
Regulatory and License Information
Regulatory Information
General Information
Communications Board
The communications card complies with the European Directive 91/263/CEE.
Type Approval Information
The HP PC communications board has been approved for connection to telecommunications systems specified in these instructions for use, and
is subject to the conditions set out in them.
The HP PC communications board has been approved for connection to the Public Switched Telephone Network.
The HP PC communications board is suitable for household, office and similar general indoor use.
The HP PC communications board is not suitable for use as an extension to a payphone.
The HP PC communications board must only be used on telephone lines which provide multifrequency (DTMF) dialing.
Please be aware that it is the HP PC communications board which has been approved, and not the host computer in which it is installed.
There are no adjustments available to the user which could cause the HP PC communications board to no longer conform with the type approval
requirements applied by BABT
For U.S. Only
Notice Regarding the Connection of Telephone Equipment to Telephone Lines
This equipment complies with Part 68 of the FCC Rules. Provided with this equipment is a label that contains, among other information, the
FCC Registration Number and Ringer Equivalence Number (REN) for this equipment. You must, upon request, provide this information to your
telephone company.
The REN is used to determine the quantity of devices you may connect to your telephone line and still have all of those devices ring when your
telephone is called. In most, but not all areas, the sum of the RENs connected to one line should not exceed five (5). To be certain of the number
of devices you may connect to your line, as determined by the REN, you should contact your local telephone company to determine the
maximum REN for your calling area.
If your telephone equipment causes harm to the telephone network, the telephone company may discontinue your service temporarily. If
possible, they will notify you in advance. But if advance notice is not practical, you will be notified as soon as possible. You will be informed of
your right to file a complaint with the FCC.
Your telephone company may make changes in its facilities, equipment, operations or procedures that could affect the proper functioning of
your equipment. If they do, you will be notified in advance to give you an opportunity to maintain uninterrupted telephone service. This product
contains no user serviceable parts or assemblies.
51
Page 60

guide.bk : legal.fm5 Page 52 Tuesday, December 2, 1997 8:10 PM
Regulatory and License Information
Regulatory Information
If you experience trouble with this product, please contact the company whose name appears on the product for information on obtaining
service or repairs. The telephone company may ask that you disconnect this equipment from the network until the problem has been corrected
or until you are sure that the equipment is not malfunctioning.
This equipment may not be used on coin service provided by the telephone company. Connection to party lines is subject to state tariffs.
Check the bottom of your modem card for the FCC 68 number: Ringer Equivalence Number: 0.1B
For Canada Only
The standard connecting arrangement code for this equipment as specified in CP-01, section 1.8 is CA11A.
Canadian Department of Communications Information.
The Canadian Department of Communications Label identifies certified equipment. This certification means that the equipment meets certain
telecommunications network protective, operational and safety requirements. The Department does not guarantee the equipment will operate
to the user’s satisfaction.
Before installing this equipment, users should ensure that it is permissible to be connected to the facilities of the local telecommunications
company. The equipment must also be installed using an acceptable method of connection. In some cases, the company’s inside wiring
associated with a single line individual service may be extended by means of a certified connector assembly (telephone extension cord). The
customer should be aware that compliance with the above conditions may not prevent degradation of service in some situations.
Repairs to certified equipment should be made by an authorized Canadian maintenance facility designated by the supplier. Any repairs or
alterations made by the user to this equipment, or equipment malfunctions, may give the telecommunications company cause to request the
user to disconnect the equipment.
Users should ensure for their own protection that the electrical ground connections of the power utility, telephone lines and internal metallic
water pipe system, if present, are connected together. This precaution may be particularly important in rural areas.
CAUTION: Users should not attempt to make such connections themselves, but should contact the appropriate electric inspection authority, or
electrician, as appropriate.
The Ringer Equivalence Number (REN) assigned to each terminal device provides an indication of the maximum number of terminals allowed to
be connected to a telephone interface. The termination on an interface may consist of any combination of devices subject only to the
requirement that the sum of the Ringer Equivalence Numbers of all the devices does not exceed 5.
The Load Number is located on the bottom of your modem. The Load Number (LN) assigned to each terminal device denotes the percentage of
the total load to be connected to a telephone loop which is used by the device, to prevent overloading. The termination on a loop may consist of
any combination of devices subject only to the requirements that the total of the Load Numbers of all the devices does not exceed 100. An
alphabetic suffix is also specified in the Load Number for the appropriate ringing type (A or B), if applicable. For example, LN=20A designates a
Load Number of 20 and an “A” type ringer.
L’étiquette d’Industrie Canada identifie le matériel homologué. Cette étiquette certifie que le matériel est conforme à certaines normes de
protection, d’exploitation et de sécurité des réseaux de télécommunications, comme le prescrivent les documents concernant les exigences
techniques relatives au matériel terminal. Le Ministère n’assure toutefois pas que le matériel fonctionnera à la satisfaction de l’utilisateur.
Avant d’installer ce matériel, l’utilisateur doit assurer qu’il soit permis de raccorder aux installations de l’entreprise locale de télécommunication.
Le matériel doit également être installé en suivant une méthode acceptée de raccordement. Dans certains cas, les fils intérieurs de l’entreprise
utilisés pour un service individuel à ligne unique peuvent être prolongés au moyen d’un dispositif de raccordement homologué (cordon
rallonge téléphonique interne). L’abonné ne doit pas oublier qu’il est possible que la conformité aux conditions énoncées ci-dessus,
n’empêchent pas la dégradation du service dans certaines situations.
Les réparations de matériel homologué doivent être coordonnées par un représentant désigné par le fournisseur. L’entreprise de
télécommunications peut demander à l’utilisateur de débrancher un appareil à la suite de réparations ou de modifications effect uées par
l’utilisateur ou à cause de mauvais fonctionnement.
Pour sa propre protection, l’utilisateur doit s’assurer que tous les fils de mise à la terre de la source d’énergie électrique, des lignes
téléphoniques et des canalisations d’eau métalliques, s’il y en a, sont racordés ensemble. Cette précaution est particulièrement importante
dans les régions rurales.
AVERTISSEMENT: L’utilisateur ne doit pas tenter de faire ces raccordements lui-même; il doit avoir recours à un service d’inspection
électrique, ou à un électricien, selon le cas.
AVIS: L’indice d’équivalence de la sonnerie (LES) assigné à chaque dispositif terminal indique le nombre maximal de terminaux qui peuvent
être raccordés à une interface. La terminaison d’une interface téléphonique peut consister en une combinaison de quelques dispositifs, à la
seule condition que la somme d’indice d’équivalence de la sonnerie de tous les dispositifs n’excède pas 5.
52
Page 61

guide.bk : legal.fm5 Page 53 Tuesday, December 2, 1997 8:10 PM
If your modem has a EUROPEAN agreement for telecom connection to a PSTN (and not a National one), please consider the following:
The equipment has been approved to CTR 21 for pan-European connection to the Public Switched Telephone Network (PSTN). However, due
to differences between the individual PSTNs provided in different countries (including those countries where there are multiple PSTN
operators), the approval does not, of itself, give an unconditional assurance of successful operation on every PSTN network termination point.
In the event of problems, you should contact your equipment supplier in the first instance.
Regulatory and License Information
Regulatory Information
53
Page 62

guide.bk : legal.fm5 Page 54 Tuesday, December 2, 1997 8:10 PM
Regulatory and License Information
HP Software License Agreement
HP Software License Agreement
Note
CAREFULLY READ THIS LICENSE AGREEMENT BEFORE PROCEEDING TO OPERATE THIS EQUIPMENT. RIGHTS IN THE SOFTWARE
ARE OFFERED ONLY ON THE CONDITION THAT THE CUSTOMER AGREES TO ALL TERMS AND CONDITIONS OF THE LICENSE
AGREEMENT. PROCEEDING TO OPERATE THE EQUIPMENT INDICATES YOUR ACCEPTANCE OF THESE TERMS AND CONDITIONS. IF
YOU DO NOT AGREE WITH THE TERMS OF THE LICENSE AGREEMENT, YOU MUST NOW EITHER REMOVE THE SOFTWARE FROM
YOUR HARD DISK DRIVE AND DESTROY THE MASTER DISKETTES, OR RETURN THE COMPLETE COMPUTER AND SOFTWARE FOR A
FULL REFUND.
PROCEEDING WITH CONFIGURATION SIGNIFIES YOUR ACCEPTANCE OF THE LICENSE TERMS.
UNLESS OTHERWISE STATED BELOW, THIS HP SOFTWARE PRODUCT LICENSE AGREEMENT SHALL GOVERN THE USE OF ALL
SOFTWARE THAT IS PROVIDED TO YOU, THE CUSTOMER, AS PART OF THE HP COMPUTER PRODUCT. IT SHALL SUPERSEDE ANY
NON-HP SOFTWARE LICENSE TERMS THAT MAY BE FOUND ON-LINE, OR IN ANY DOCUMENTATION OR OTHER MATERIALS
CONTAINED IN THE COMPUTER PRODUCT PACKAGING.
Note: Operating System Software by Microsoft is licensed to you under the Microsoft End User License Agreement (EULA) contained in the
Microsoft documentation.
The following License Terms govern the use of the software:
USE.
Customer may use the software on any one computer. Customer may not network the software or otherwise use it on more than one computer.
Customer may not reverse assemble or decompile the software unless authorized by law.
COPIES AND ADAPTATIONS.
Customer may make copies or adaptations of the software (a) for archival purposes or (b) when copying or adaptation is an essential step in the
use of the software with a computer so long as the copies and adaptations are used in no other manner.
Your HP Brio PC contains preinstalled software programs. Please read the Software License Agreement
before proceeding.
OWNERSHIP.
Customer agrees that he/she does not have any title or ownership of the software, other than ownership of the physical media. Customer
acknowledges and agrees that the software is copyrighted and protected under the copyright laws. Customer acknowledges and agrees that the
software may have been developed by a third party software supplier named in the copyright notices included with the software, who shall be
authorized to hold the Customer responsible for any copyright infringement or violation of this Agreement.
PRODUCT RECOVERY CD-ROM.
If your computer was shipped with a product recovery CD-ROM:
(i) The product recovery CD-ROM and/or support utility software may only be used for restoring the hard disk of the HP computer with which
the product recovery CD-ROM was originally provided.
(ii) The use of any operating system software by Microsoft contained in any such product recovery CD-ROM shall be governed by the Microsoft
End User License Agreement (EULA).
TRANSFER OF RIGHTS IN SOFTWARE.
Customer may transfer rights in the software to a third party only as part of the transfer of all rights and only if Customer obtains the prior
agreement of the third party to be bound by the terms of this License Agreement. Upon such a transfer, Customer agrees that his/her rights in
the software are terminated and that he/she will either destroy his/her copies and adaptations or deliver them to the third party.
54
Page 63

guide.bk : legal.fm5 Page 55 Tuesday, December 2, 1997 8:10 PM
HP Software License Agreement
SUBLICENSING AND DISTRIBUTION.
Customer may not lease, sublicense the software or distribute copies or adaptations of the software to the public in physical media or by
telecommunication without the prior written consent of Hewlett-Packard.
TERMINATION.
Hewlett-Packard may terminate this software license for failure to comply with any of these terms provided Hewlett-Packard has requested
Customer to cure the failure and Customer has failed to do so within thirty (30) days of such notice.
UPDATES AND UPGRADES.
Customer agrees that the software does not include updates and upgrades which may be available from Hewlett-Packard under a separate
support agreement.
EXPORT CLAUSE.
Customer agrees not to export or re-export the software or any copy or adaptation in violation of the U.S. Export Administration regulations or
other applicable regulation.
Regulatory and License Information
U.S. GOVERNMENT RESTRICTED RIGHTS.
Use, duplication, or disclosure by the U.S. Government is subject to restrictions as set forth in subparagraph (c)(1)(ii) of the Rights in Technical
Data and Computer Software clause in DFARS 252.227-7013. Hewlett-Packard Company, 3000 Hanover Street, Palo Alto, CA 94304 U.S.A.
Rights for non-DOD U.S. Government Departments and Agencies are as set forth in FAR 52.227-19(c)(1,2).
55
Page 64

guide.bk : legal.fm5 Page 56 Tuesday, December 2, 1997 8:10 PM
Regulatory and License Information
HP Software License Agreement
56
Page 65

guide.bk : rear.fm5 Page iii Monday, December 1, 1997 11:44 PM
Quick Troubleshooting Tree
— to be used when your HP Brio PC is not accessible or does not start properly.
Otherwise, your HP Brio Center contains dedicated information and tools to help
you solve your problems.
PC Does not Start at All
• Series of beeps
• No noise — from fan, etc.
• Garbage messages
• Very slow
PC Behaves Strangely
• General Protection Fault
• Invalid Page Fault
Error Messages
• PC stays inactive and
cannot be woken up
new hardware or software?
• Installed
HP Brio PC “hung”
• PC seems frozen
• programs do not respond
N
Possible Cause:
Possible Causes:
• Your system board or power sup-
ply may be defective
Does your HP Brio
N
PC restart?
• Your HP Brio PC might have de-
tected that a power shortage
has occurred.
Hold down the on/off button on the front of your HP
Brio PC for 4 seconds (to shut it down). Restart your
HP Brio PC.
• Your HP Brio PC might have
been infected by a virus.
Check the you have installed your HP Brio PC
correctly (cable connections, etc.)
Product Recovery CD-ROM
Run the antivirus utilities on the HP
tion.
same time to restart your HP Brio
PC.
the CTRL, ALT and DEL keys at the
• Your operating system detected that
your program made an illegal opera-
Try to close your program. Press
Possible Cause:
installing equipment of different generations.
http://www.hp.com/go/smallbizsupport
Y
Possible Causes:
• Compatibility problems sometimes occur when
• Search our web site for compatibility information:
• some software may have replaced or changed
your system files during installation. This may
prevent other software from working properly.
Try the following:
• Uninstall your hardware or software to see whether this fixes the problem
• Call your 3rd party manufacturer or look at their web site to get support information on
installation. A more recent version of the product may solve the problem.
tation on getting further assistance.
Y
Run Hardware Diagnostics from the HP
Product Recovery CD-ROM
Problem
Solved?
N
Hold down the on/off
button on the front
of your HP Brio PC
for 4 seconds (to
shut it down). Re-
start your HP Brio
PC.
Refer to your support details documen-
Problem
Solved?
N
ROM to restore your system
Use the HP Product Recovery CD-
Problem
Solved?
N
Page 66

guide.bk : rear.fm5 Page iv Monday, December 1, 1997 11:44 PM
this is just some text so that the page is not printed the
wrong way (bug in Frame!)
Paper not bleached with chlorine
Part Number 5966-8286-EN
Printed in
 Loading...