

Page 1

CCI Design & Implementation Guide
for a 100 Blade Deployment
Introduction......................................................................................................................................... 3
Scope ................................................................................................................................................ 3
Server Roles Overview ......................................................................................................................... 4
Active Directory – Group Policy............................................................................................................. 6
Policy Application ............................................................................................................................ 7
Remote Connection .......................................................................................................................... 8
Policy Function: Allow remote connection to the blade ...................................................................... 8
Computer Environment...................................................................................................................... 9
Policy Function: Prevent System Restore functionality ......................................................................... 9
User Environment ........................................................................................................................... 10
Policy Function: Redirects Specific Folder Locations To Alternate Network Location............................. 10
Policy Function: Turn Off Offline Files........................................................................................... 13
Policy Function: Remove Access to Windows Update...................................................................... 14
Policy Function: Remove Access to Local Hard Drives...................................................................... 14
Policy Function: Prevent Unauthorized Application Installation / Upgrades........................................ 15
Policy Function: Start Menu Lockdown........................................................................................... 16
Policy Function: Roaming User Profile Management........................................................................ 16
Troubleshooting ............................................................................................................................. 17
Blade Image ..................................................................................................................................... 19
Blade image checklist ..................................................................................................................... 19
ROM Version............................................................................................................................. 19
Operating System (OS) ............................................................................................................... 20
Blade PC Drivers ........................................................................................................................ 20
Remote Connection..................................................................................................................... 21
System Restore ........................................................................................................................... 21
Local Policy ............................................................................................................................... 21
Local Security Policy ................................................................................................................... 22
Required Services....................................................................................................................... 22
Required Services and Processes - Dynamic SAM Environment......................................................... 22
Unnecessary Services.................................................................................................................. 23
Optional CCI Utilities.................................................................................................................. 23
Optional Tweaks ........................................................................................................................ 24
Installed Software....................................................................................................................... 25
References..................................................................................................................................... 25
1
Page 2

Networking....................................................................................................................................... 26
Server and Blade Infrastructure ........................................................................................................ 27
Static IP Address Assignment Summary............................................................................................. 28
IP Subnet Summary ........................................................................................................................ 29
Network Service Requirements......................................................................................................... 30
Interface IP Infrastructure ................................................................................................................. 31
DHCP Scope Infrastructure........................................................................................................... 32
HP PC Blade Enclosure Infrastructure ................................................................................................ 33
Ethernet Wiring Map .................................................................................................................. 34
Interface IP Infrastructure ............................................................................................................. 35
Considerations........................................................................................................................... 35
Session Allocation Manager (SAM)...................................................................................................... 36
Client login................................................................................................................................ 36
HP SAM Client........................................................................................................................... 37
HP SAM Blade Service................................................................................................................ 37
Using the HP SAM software in CCI .................................................................................................. 38
Creating an account ................................................................................................................... 38
Administrative rights ................................................................................................................... 38
Licensing ................................................................................................................................... 38
Administrative tasks with HP SAM Web Server.................................................................................. 39
Connecting with the PC Session Allocation Client............................................................................... 40
Connecting with the Internet Explorer Client ...................................................................................... 41
Considerations for the IE client ..................................................................................................... 41
Defining the HP SAM Registration Service Configuration File............................................................... 42
Thin Clients ....................................................................................................................................... 44
Appendix ......................................................................................................................................... 45
CCI user environment considerations ................................................................................................ 45
Recommended image capture and creation process........................................................................... 48
SAM terms .................................................................................................................................... 50
2
Page 3

Introduction
This document provides a sample end to end Design and Implementation Guide for a 100
Blade Deployment. It is assumed that you have been through the HP CCI training classes and
understand the fundamental principles of CCI. Further it is expected that you are very familiar
with the design principles of Active Directory and knowledgeable of the Altiris’ management
system: Deployment Server or HP’s Rapid Deployment Pack.
All the suggestions contained herein are based on the current CCI product available at the
time of this writing. In the future, as the solution or its components change the suggestions and
recommendations in this document may need to be updated to take advantage of new
features or updated learnings from the field. Therefore, please ensure that you are working
with the latest revision of this document.
Scope
The scope of this guide is limited to the deployment of 100 blades into a single datacenter
with a basic Active Directory environment. While there are many different configuration and
deployment options for Active Directory this paper will focus on just a single implementation
configuration. This is NOT to say that the recommendations within this paper will fit every
customer which is why you will need to be able to adjust this design to meet your customer’s
needs. The following is a list of the main items that will be covered in this document.
9 Server Configuration Recommendation
9 Active Directory GPO Recommendations
9 Network Recommendations
9 Blade Image
3
Page 4

Server Roles Overview
Within this guide the hardware server models have been identified as DL385 servers. This is
the hardware platform that was chosen for this implementation; however this is not to say that
this is the only server hardware allowed for the CCI solution. You are able to adjust the server
hardware as needed to best fit your customers needs, however it is recommended that you
start with the specifications listed below as a starting point. Severs in this implementation will
perform the following operations; Domain Controller (not PDC but a member server),
HP/Altiris Remote Deployment (RDP), Session Allocation Manager (SAM) (Primary) and
Session Allocation Manager (failover). This server will also contain the Microsoft SQL
database which will be used by SAM and RDP. It is assumed that the current environment will
have an existing Active Directory that will be leveraged for this CCI implementation. Figure 1
contains a high-level overview of the servers and their functions:
4
Page 5

Figure 1.
Tape
5 5
44
Server Roles: User Profile Storage
User Data Storage
Drive Configuration: (Drives 2 – 5) RAID 5
Tape
5 5
44
Server Role: RDP Image Volume
Drive Configuration: (Drives 2 – 5) RAID 5
Tape
5 5
44
Tape
5 5
44
300GB 15k
Ultra 320
300GB 15k
Ultra 320
146GB 15k
Ultra 320
146GB 15k
Ultra 320
3 3
22
3 322
3 322
3 322
21
ch ch
300GB 15k
Ultra 320
300GB 15k
00 11
Ultra 320
Server Role: Domain Controller (Member Server)
Base Operating System:
Windows Server 2003 R2, Enterprise Edition
Drive Configuration:
Drives 0, 1 - RAID 1 (Mirrored)
146GB 15k
Ultra 320
146GB 15k
00 11
Ultra 320
Server Role: RDP
Base Operating System:
Windows Server 2003 R2, Enterprise Edition
Drive Configuration:
Drives 0, 1 - RAID 1 (Mirrored)
00 11
Server Roles: SAM 1
Base Operating System:
Windows Server 2003 R2, Enterprise Edition
Drive Configuration: RAID 1 (Mirrored)
00 11
Server Roles: SAM 2 (failover), SQL
Base Operating System:
Windows Server 2003 R2, Enterprise Edition
Drive Configuration: RAID 1 (Mirrored)
36GB 15k
Ultra 320
36GB 15k
Ultra 320
36GB 15k
Ultra 320
36GB 15k
Ultra 320
36GB 15k
Ultra 320
36GB 15k
Ultra 320
36GB 15k
Ultra 320
36GB 15k
Ultra 320
UID
Duplex
Simplex
21
ch ch
UID
Duplex
Simplex
21
ch ch
UID
Duplex
Simplex
21
ch ch
UID
Duplex
Simplex
Logical ViewPhysical View
264007-B21
DVD-ROM
ATI Video
Gigabit LAN
Gigabit LAN
Kbd/Mouse
Serial
3 x USB
ILO
Hot Plug NA (NEMA)
PS
355892-001
o
H
t
P
l
u
A
N
g
(
N
E
2nd PS
3
5
5
8
9
0
2
0
-
1
Redundant
DL380/5 Fan
Fans
293048-B21
264007-B21
ATI Video
Gigabit LAN
Gigabit LAN
Kbd/Mouse
Serial
3 x USB
ILO
Hot Plug NA (NEMA)
PS
355892-001
u
o
A
H
N
g
t
P
l
(
N
E
2nd PS
3
5
5
8
9
0
2
-
0
1
Redundant
DL380/5 Fan
Fans
293048-B21
264007-B21
ATI Video
Gigabit LAN
Gigabit LAN
Kbd/Mouse
Serial
3 x USB
ILO
Hot Plug NA (NEMA)
PS
355892-001
o
H
t
P
l
(
u
A
N
N
g
E
2nd PS
3
5
5
8
9
0
2
0
-
1
Redundant
DL380/5 Fan
Fans
293048-B21
264007-B21
ATI Video
Gigabit LAN
Gigabit LAN
Kbd/Mouse
Serial
3 x USB
ILO
Hot Plug NA (NEMA)
PS
355892-001
o
H
t
P
l
u
A
N
g
(
N
E
2nd PS
3
5
5
8
9
0
2
0
-
1
Redundant
DL380/5 Fan
Fans
293048-B21
CD-ROM
Floppy
M
CD-ROM
Floppy
M
CD-ROM
Floppy
M
CD-ROM
Floppy
M
Optional
)
A
DVD-ROM
Optional
)
A
DVD-ROM
Optional
)
A
DVD-ROM
Optional
)
A
hp
ProLiant
DL385
1
2
Memory
CPU
1GB (2x512MB)
RAM 376638-B21
1GB (2x512MB)
RAM 376638-B21
AMD O270 2.0GHz-
1MB Dual Core
1st CPU 2nd CPU
393830-B21
1GB (2x512MB)
RAM 376638-B21
1GB (2x512MB)
RAM 376638-B21
AMD O270 2.0GHz-
1MB Dual Core
393830-B21
AMD Opteron 8000 Series Chipset
300GB 10K U320
U320 Disk/Tape Slot
Disk 350964-B22
300GB 10K U320
U320 Disk Slot
Disk 350964-B22
300GB 10K U320
U320 Disk Slot
Disk 350964-B22
300GB 10K U320
U320 Disk Slot
Disk 350964-B22
36GB 15K U320 Disk
U320 Disk Slot
286776-B22
36GB 15K U320 Disk
U320 Disk Slot
286776-B22
hp
ProLiant
DL385
1
2
Memory
CPU
2GB (2x1024MB)
RAM 376639-B21
AMD O270 2.0GHz-
1MB Dual Core
1st CPU 2nd CPU
393830-B21
ProLiant DL385
2ch SmartArray 6i RAID
1 2 3
PCI-X (100/133*)/64
PCI-X 100/64
2GB (2x1024MB)
RAM 376639-B21
AMD O270 2.0GHz-
1MB Dual Core
393830-B21
PCI-X 133/64
* Slot 2 will run
at 133 if slot 1
is left empty
AMD Opteron 8000 Series Chipset
146GB 15K U320
U320 Disk/Tape Slot
Disk 347708-B22
146GB 15K U320
U320 Disk Slot
Disk 347708-B22
146GB 15K U320
U320 Disk Slot
Disk 347708-B22
146GB 15K U320
U320 Disk Slot
Disk 347708-B22
36GB 15K U320 Disk
U320 Disk Slot
286776-B22
36GB 15K U320 Disk
U320 Disk Slot
286776-B22
hp
ProLiant
DL385
1
2
Memory
CPU
2GB (2x1024MB)
RAM 376639-B21
AMD O270 2.0GHz-
1MB Dual Core
1st CPU 2nd CPU
393830-B21
ProLiant DL385
2ch SmartArray 6i RAID
1 2 3
PCI-X (100/133*)/64
PCI-X 100/64
2GB (2x1024MB)
RAM 376639-B21
AMD O270 2.0GHz-
1MB Dual Core
393830-B21
PCI-X 133/64
* Slot 2 will run
at 133 if slot 1
is left empty
AMD Opteron 8000 Series Chipset
ProLiant DL385
U320 Disk/Tape Slot
U320 Disk Slot
U320 Disk Slot
U320 Disk Slot
36GB 15K U320 Disk
U320 Disk Slot
286776-B22
36GB 15K U320 Disk
U320 Disk Slot
286776-B22
hp
ProLiant
DL385
1
2
Memory
CPU
2GB (2x1024MB)
RAM 376639-B21
AMD O270 2.0GHz-
1MB Dual Core
1st CPU 2nd CPU
393830-B21
AMD Opteron 8000 Series Chipset
1 2 3
2ch SmartArray 6i RAID
PCI-X (100/133*)/64
PCI-X 100/64
2GB (2x1024MB)
RAM 376639-B21
AMD O270 2.0GHz-
1MB Dual Core
393830-B21
PCI-X 133/64
* Slot 2 will run
at 133 if slot 1
is left empty
ProLiant DL385
U320 Disk/Tape Slot
U320 Disk Slot
U320 Disk Slot
U320 Disk Slot
36GB 15K U320 Disk
U320 Disk Slot
286776-B22
36GB 15K U320 Disk
U320 Disk Slot
286776-B22
1 2 3
2ch SmartArray 6i RAID
PCI-X (100/133*)/64
PCI-X 100/64
PCI-X 133/64
* Slot 2 will run
at 133 if slot 1
is left empty
5
Page 6

Active Directory – Group Policy
NOTE:
For more detailed information about Group Policy functionality,
please see the white paper "Policy Implementation /
Recommendation Guide for the HP Consolidated Client
Infrastructure" (HP Part Number 379971-003)
The following polices are required for proper operation of the CCI environment and are
strongly recommended. Before putting these policies in place, it is essential for the domain
administrator to examine the current policies to ensure there are no settings that conflict with
each other. Failure to do so could result in real problems for not only CCI users but other
users in the domain. The policies listed below are not the only policies available to the CCI
environment rather they are the minimum policies in order to create a dynamic CCI
infrastructure.
Best Practice:
• In the CCI environment, create at least 2 OUs, one to include all the blade PC systems, at
least one for users. This allows for tighter control of the Group Policy and is easier to manage.
• When naming GPOs, be as descriptive as possible. The name of the GPO should make it
as easy as possible to identify what the GPO is applied to, e.g. a policy that applies to the
Sales group should be named “Sales” or “Sales Department Policy”.
• Use OUs rather than permission restrictions to control who receives which policy. For
example, a policy for an administrator would need to be more relaxed than a general user.
Instead of using one policy and trying to filter who it is applied to, create 2 OUs, create one
policy per OU and apply these to the respective OU.
• Deleting a GPO, Windows will no longer apply the GPO under any circumstances.
Therefore, a GPO must never be deleted until certain it is not used anywhere else. Best
practice is to disable the link to the applicable OU, site or domain, especially if the GPO
applies to other Active Directory Containers.
• To keep a handle on GP complication, minimize the use of settings such as No Override
and Block Policy Inheritance, and customize GPO ACLs (Access Control Lists) only when
absolutely necessary. To keep it simple, use options visible on the GPO Properties, GP tab.
6
Page 7

Policy Application
The polices described above must be linked to the appropriate OU. Below is a diagram
indicating where the policies should be linked:
Figure 2. Policy Placement
Domain
Policies Applied:
CCI Blades
Allow Remote Connection to the Blade
Prevent System Restore Functionality
All polices applied to the CCI Blades OU will automatically
be inherited by any child OU below it in the directory tree.
CCI User Groups
Human Resources
(HR)
IT
Marketing
Policies Applied:
Folder Redirection
Turn off Offline Files
Remove Access to Windows Update
Remove Access to Local Hard Drives
Prevent Unauthorized Application Installation / Upgrade
Start Menu lockdown
Roaming User Profile Management
All polices applied to the CCI User Groups OU will
automatically be inherited by any child OU below it in the
directory tree.
7
Page 8

Remote Connection
Policy Function: Allow remote connection to the blade
Overview
These settings remove all control from the Remote Tab in the System Properties and open the
appropriate ports for a remote connection.
Setting 1: Allow Remote Connection Using Terminal Services
This setting prevents any users, including Administrators, from clearing the “Allow users to
connect remotely to this computer” box, ensuring remote access cannot be turned off:
Computer Configuration > Administrative Templates > Windows Components >
Terminal Services > Allow users to connect remotely using Terminal Services –
Enabled.
Setting 2: Allow Remote Desktop Connection
This setting allows incoming RDP traffic on port 3389, but only
from the specified addresses
or subnets. When set, no users, including Administrators, can change the scope or close the
port:
Computer Configuration > Network > Network Connections > Windows Firewall >
Domain Profile > Windows Firewall: Allow Remote Desktop exception – Enabled. (IP
address or subnet that the incoming requests are coming from, such as 172.16.1.0/24).
Note that by default, only Administrators are allowed remote access to the blade PC.
Therefore, to set permissions to allow other users that same right, use either of the following
methods:
At this point, enter the individual users or user security groups that you want to give access
permissions to, such as. ccidomain\jsmith, ccidomain\cciusers).
NOTE:
The benefit of the previous method is that you can add specific
users. However, maintaining individual user lists can significantly
increase administrative overhead. Wherever possible, security
groups should be used.
To assign permissions to groups, navigate as follows:
Computer Configuration > Windows Settings > Security Settings > Restricted Groups
Right click on the Restricted Groups Icon and select Add Group… . Once selected, these
groups can be added to various built-in groups. Using the Add… button next to the This
group is a member of box, add the groups to the appropriate built-in group. For most users,
this would be “Remote Desktop Users”.
8
Page 9

Computer Environment
Policy Function: Prevent System Restore functionality
Overview
In a highly-managed environment such as a dynamic CCI implementation, System Restore has
limited value, and allowing users to perform this action could create problems. As there is no
personal data on the blade, administrators can simply restore the blade to the original image
using Altiris or other image management solution. The use of System Restore in a static CCI
implementation should be determined by business rules and network administrators. This set of
policies replaces the System Restore tab in System Properties.
Setting 1: Turn Off System Restore
This setting turns off the System Restore function:
Computer Configuration > Administrative Templates > System > System Restore > Turn
off System Restore – Enabled.
Setting 2: Turn Off Creation of System Restore Checkpoints
By default, Windows XP creates System Restore Points when applications are installed. The
following policy setting turns off this function:
Computer Configuration > Administrative Templates > Windows Components >
Windows Installer > Turn off creation of System Restore Checkpoints – Enabled.
Setting 3: System Restore Service
Even if the System Restore Service is already turned off, disabling the service removes any
memory overhead that may still be used, even in the idle state.
Computer Configuration > Windows Settings > Security Settings > System Services >
System Restore Service – Disabled.
NOTE:
This setting requires a system reboot.
9
Page 10
User Environment
Policy Function: Redirects Specific Folder Locations To Alternate Network Location
Overview
In CCI architecture, folders holding user application data, desktop data, documents, and start
menu data can be redirected to a Network Attached Storage (NAS) array.
NOTE:
Although common applications such as Microsoft Office support
redirection, some applications do not. Therefore, testing this
basic functionality with all applications to be used in the CCI
environment is imperative.
Redirection saves space on the blade PC and allows users to access their information and
programs from any access device and blade PC. Redirection is imperative in a dynamic CCI
implementation, but optional in a static environment, where the blade PC is dedicated to a
single user.
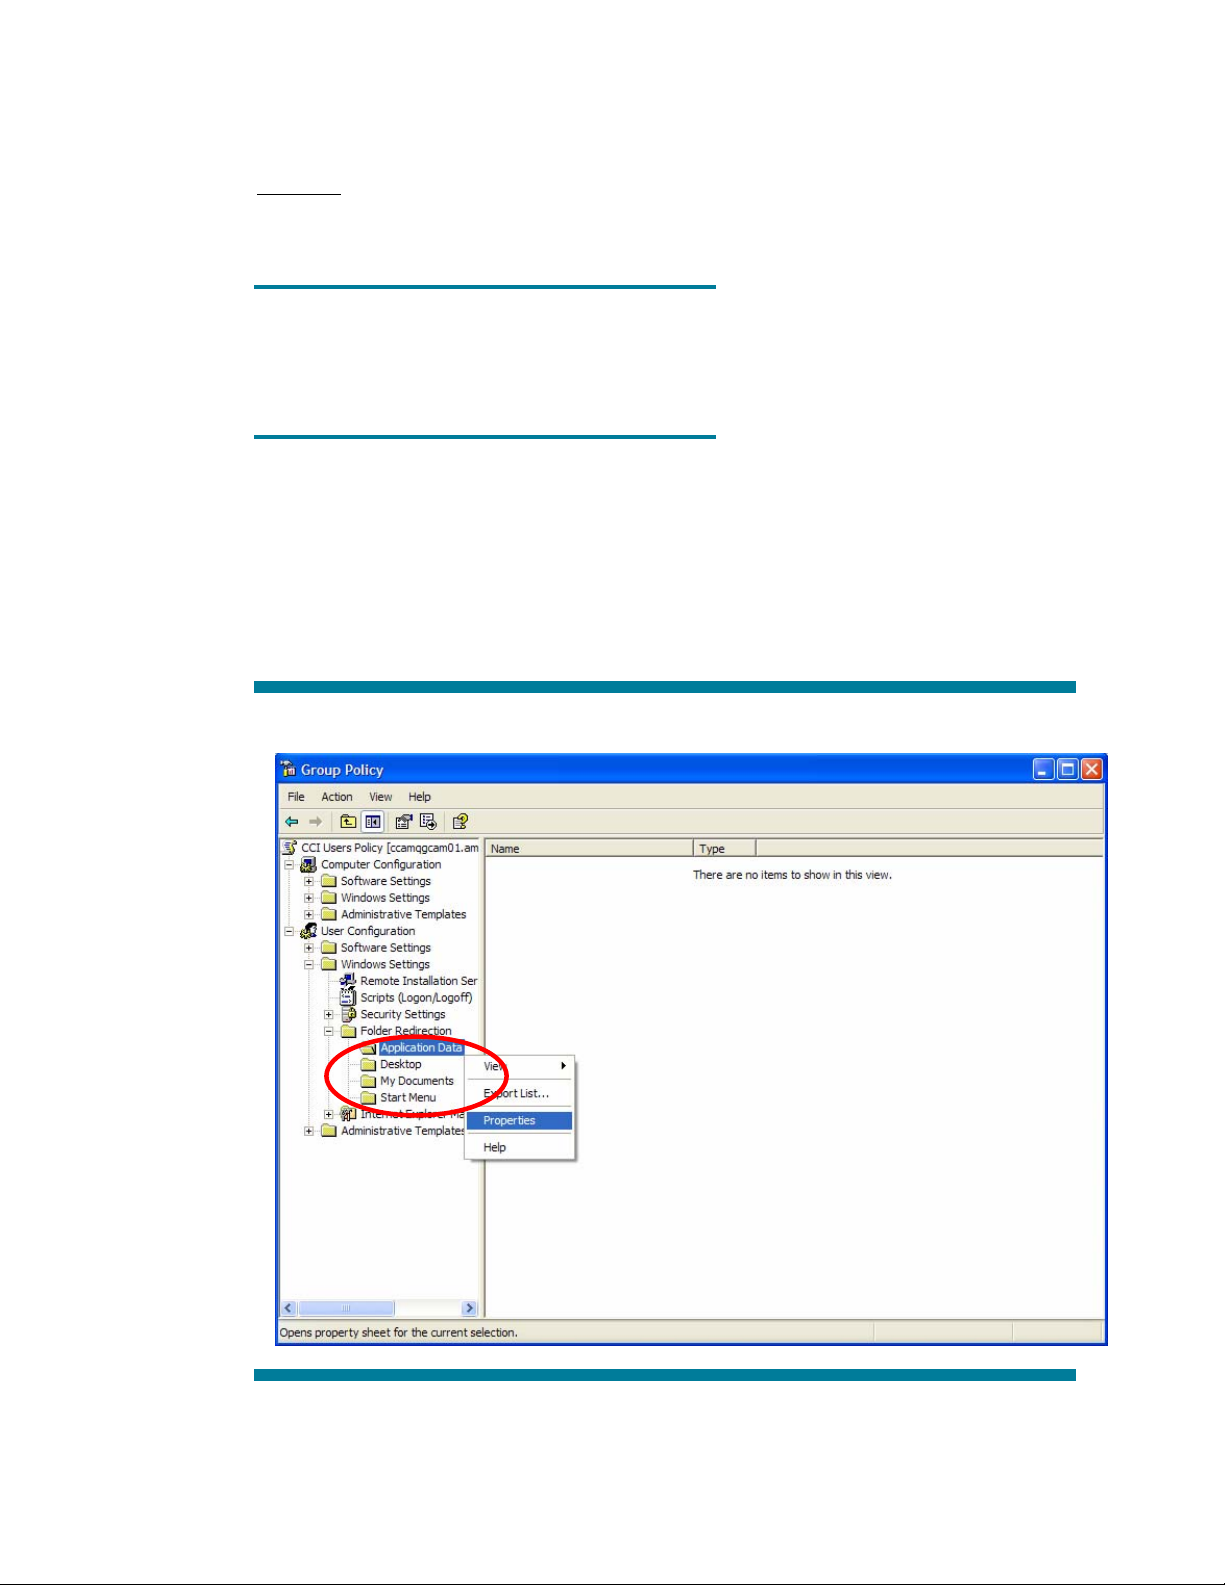
The four folders that can be redirected are found in the User node of Group Policy, as shown
in Figure 3 below:
Figure 3. Group Policy window
10
Page 11

To set the appropriate policy settings, perform the following steps:
1. Navigate to the appropriate folder using one of more of the navigational strings:
Setting 1, User Applications:
User Configuration > Windows Settings > Folder Redirection > Application Data
Setting 2, User Desktop:
User Configuration > Windows Settings > Folder Redirection > Desktop
Setting 3, User Documents:
User Configuration > Windows Settings > Folder Redirection > My Documents
Setting 4, User Start Menu:
User Configuration > Windows Settings > Folder Redirection > Start menu
2. Right-click on the folder to redirect. Selecting Properties from the drop down menu for the
My Documents folder (setting 3) will open the Window as shown in Figure 4.
Figure 4. My Documents Properties window
11
Page 12

3. Entered as a Fully Qualified Domain Name (FQDN). As an example, to redirect My
Documents, the path structure would appear as follows:
\\(Share Name)\(Parent Data Folder)\%USERNAME%\My Documents
Windows Server 2003 fills in the last two parts automatically, so all that needs to be
entered is the Share Name and Parent Data Folder, (e.g. \\CCINAS\UserData\) and
Windows will fill in the rest of the FQDN.
4. To control folder security and User Data movement, click the Settings tab. The settings
window for the My Documents folder appears as shown in Figure 5.
Figure 5. My Documents Properties window
Checking the Grant the user exclusive rights for My Documents sets folder permissions so
that ONLY the user set in the Root Path has access to the My Documents folder. No one
else, including administrators, is able to access the folder.
Checking the Move the contents of My Documents to the new location, will, on the next
boot, move the contents of the My Documents on the machine the user logged into (if they
are stored locally) into the folder determined in the Root Path under the Target tab.
The Policy Removal section determines what happens if and when the policy is removed.
The My Pictures Preferences section determines if the My Pictures folder moves with the
My Documents folder or not.
5. When finished, click OK.
12
Page 13

Policy Function: Turn Off Offline Files
Overview
These policy settings affect the availability of offline files. These policy settings replace the
Offline files tab in Windows Explorer.
Setting 1: Allow or Disallow use of the Offline files
The following setting turns off the Offline files function:
Computer Configuration > Administrative Templates > Network > Offline Files > Allow or
Disallow use of the Offline Files feature – Disabled.
Setting 2: Remove “Make available Offline” feature
Enabling this setting removes the availability of offline files:
Computer Configuration > Administrative Templates > Network > Offline Files >
Remove 'Make Available Offline – Enabled.
Setting 3: Prevent use of Offline files folder
Enabling this setting inhibits the use of offline files:
Computer Configuration > Administrative Templates > Network > Offline Files > Prevent
use of offline files folder – Enabled.
Setting 4: Turn off Remainder Balloons
Enabling this setting removes the use of remainder balloons:
Computer Configuration > Administrative Templates > Network > Offline Files > Turn off
remainder balloons – Enabled.
Setting 5: Redirected Folder Offline Availability
The system automatically makes redirected folders contained in Group Policy available
offline, regardless of the existing Offline Files policy (settings 1-4). Enabling this setting
prevents this action.
Computer Configuration > Administrative Templates > Network > Offline Files > Do not
automatically make redirected folders available offline– Enabled.
NOTE:
Offline folder synchronization takes up large amounts of network
bandwidth, thereby slowing response times for other users.
Unless absolutely necessary based on business need, folder
synchronization should be avoided.
13
Page 14

Policy Function: Remove Access to Windows Update
Overview
These policy settings affect Windows update operation. One of the keys in the CCI
environment is uniformity, that is, all blades PC are the same. This ensures consistent
performance. Allowing users to update machines at their own discretion may result in various
problems such as program incompatibility, version conflicts, etc. Locking this function out
secures uniform blade PC functionality.
These settings replace functions provided by the Automatic Update tab in System Properties
tab, and the Windows Update menu items in the Start Menu in Windows Explorer.
Setting 1: Remove Access to Use All Windows Update Features
This setting inhibits the access to the Windows Update features..
User Configuration > Administrative Templates > Windows Components > Win dows
Update > Remove access to use all Windows Update features – Enabled
Setting 2: Windows Automatic Updates
This setting enables automatic Windows Updates.
User Configuration > Administrative Templates > Windows Components > Win dows
Update > Windows Automatic Updates – Enabled
Setting 3: Remove Links and Access To Window Update
This setting inhibits access to Windows Updates. While settings 1 and 2 disable Windows
update functions, this setting removes all links from the Start menu and taskbar areas so that
the option is not even presented to the user.
User Configuration > Administrative Templates > Windows Components > Win dows
Update > Remove links and access to Windows update– Enabled
Setting 4: Automatic Updates
Although the function of Automatic Updates has already been disabled, turning this service off
has the added benefit of removing any memory overhead being used when the service is idle.
User Configuration > Administrative Templates > Windows Components > Win dows
Update > Automatic updates – Disabled
Policy Function: Remove Access to Local Hard Drives
Overview
These policy settings work together and are appropriate for most installations since all
necessary user-accessible information will be redirected to a network share. If business rules
require the user to access the local hard drive (that is, a static configuration), these two policy
settings must
Setting 1: Hide Specified Drives in My Computer
be disabled.
This setting removes the drive icons from Windows Explorer.
User Configuration > Administrative Templates > Windows Components > Win dows
Explorer > Hide these specified drives in My Computer – Enabled; Restrict C drive only
14
Page 15

Setting 2: Prevent Access to Drives from My Computer
This setting inhibits user access to the drives.
User Configuration > Administrative Templates > Windows Components > Win dows
Explorer > Prevent access to drives from My Computer – Enabled; Restrict C drive only
Policy Function: Prevent Unauthorized Application Installation / Upgrades
Overview
These settings turn off most of the automatic updates that are related to various applications in
Windows XP. This ensures that all applications will maintain the same version, reducing the
possibility of problems that may arise from incompatibility or other issue.
Setting 1: Disable Automatic Install of IE Components
Computer Configuration > Administrative Templates > Windows Components > Internet
Explorer > Disable Automatic Install of Internet Explorer components – Enabled
Setting 2: Disable Periodic Check for IE Software Updates
Computer Configuration > Administrative Templates > Windows Components > Internet
Explorer > Disable Periodic Check for Internet Explorer software updates – Enabled
Setting 3: Disable Windows Installer
Computer Configuration > Administrative Templates > Windows Components >
Windows Installer > Disable Windows Installer – Enabled; for non-managed apps only
Setting 4: Prohibit Rollback
Computer Configuration > Administrative Templates > Windows Components >
Windows Installer > Prohibit rollback – Enabled
Setting 5: Prohibit User Installs
Computer Configuration > Administrative Templates > Windows Components >
Windows Installer > Prohibit User Installs – Enabled; Prohibit User Installs
Setting 6: Prevent Automatic Updates
This setting prevents automatic updates to occur for Windows Media Player.
Computer Configuration > Administrative Templates > Windows Components > Media
Player > Prevent Automatic Updates – Enabled
Setting 7: Prevent Codec Download
This setting prevents a codec download to occur for Windows Media Player.
User configuration > Administrative Templates > Windows Components > Wi ndows
Media Player > Playback > Prevent Codec Download – Enabled
Setting 8: Remove Add or Remove Programs Codec
This setting completely removes the ability to access the Add/Remove Programs page.
User Configuration > Administrative Templates > Control Panel > Add or Remove
Programs > Remove Add or Remove Programs – Enabled
15
Page 16

Policy Function: Start Menu Lockdown
Overview
These settings control user accessibility aspects of the Start menu.
Setting 1: Add Logoff to the Start Menu
User Configuration > Administrative Templates > Start Menu and Taskbar > Add Logoff
to the Start Menu – Enabled
Setting 2: Remove and prevent access to the Shut Down command
Unless specifically required by infrastructure/business rules, the user should never be able to
shutdown the blade PC, since this setting will remove the hardware resource and prevent
others from using it (in addition to forcing someone to physically power the blade PC on). This
also removes the ability of the user to restart the blade, another ability the user does not
require.
User Configuration > Administrative Templates > Start Menu and Taskbar > Remove
and prevent access to the Shut Down command – Enabled
Setting 3: Remove Windows Security item from Start menu
This removes the ability of the user to lock, restart, or shutdown the blade, which in the CCI
environment are functions reserved for the system administrator. The user is still able to lock
their access device and screen saver timeouts are be affected by this setting.
User Configuration > Administrative Templates > Start Menu and Taskbar > Remove
Windows Security item from Start menu – Enabled
Setting 4: Remove Balloon Tips From Start Menu
User Configuration > Administrative Templates > Start Menu and Taskbar > Remove
Balloon tips from Start Menu – Enabled
Setting 5: Remove Run menu from Start menu
This setting requires a good deal of consideration. Allowing the user to use the Run box opens
the possibility of opening a DOS box, which could allow the user to bypass the local drive
lock down by mapping the local drive. Removing the Run menu prevents the user from trying
to bypass any application lockdowns by running through a command line. This setting also
disables the Windows + R key combination.
User Configuration > Administrative Templates > Start Menu and Taskbar > Remove
Run menu from Start menu – Enabled
Policy Function: Roaming User Profile Management
Overview
These settings control user accessibility aspects of the Start menu.
Setting 1: Exclude directories in roaming profile
By default, the folders listed below are included in each users profile, whether it is roaming or
not. As the users' installed applications and documents grow, so does the profile. This results
in large amounts of data being transferred at logon, which could extend the logon time by
quite a few minutes. When any of the folders below are redirected, there is no longer any
need to keep them included in the user profile, hence they can be excluded, thereby lowering
the size of the user profile.
16
Page 17

User Configuration > Administrative Templates > System > User Profiles > Exclude
directories in roaming profile – Enabled; My Documents; Application Data; Desktop; Start
Menu
Setting 2: Delete cached copies of roaming profiles
When a user starts a remote session, their roaming profile is copied down to the blade's local
hard drive. Once the session is finished and the user logs off, the locally cached copy is left
on the blade. While most of the data is written off onto redirected folders, there still may be
some sensitive data in the temporary folders. This setting will delete the entire local copy of
the profile from the local hard drive.
User Configuration > Administrative Templates > System > User Profiles > Delete
cached copies of roaming profiles – Enabled
Note:
Currently this setting works only sporadically and is under
investigation.
Setting 3: Do not detect slow network connections
When a remote connection is made, Windows determines if the network connection is
considered 'slow'. If it is slow, the locally cached copy of the profile would be used, the
intent of which is to keep the user from having to wait to use the blade PC because of a slow
loading profile. However, if the 'Delete cached copies of roaming profiles' is enabled, this
setting must
be enabled as there are no stored profiles on the local machine.
User Configuration > Administrative Templates > System > User Profiles > Do not
detect slow network connections – Enabled.
Setting 4: Wait for remote user profile
User Configuration > Administrative Templates > System > User Profiles > Wait for
remote user profile – Enabled.
Troubleshooting
Unfortunately, it is much easier to break the proper function of group policy than it is to set it
up correctly. This section includes some troubleshooting aids that may be of assistance
Group Policy does not apply to blade PCs
Option 1:
Be sure that the blade PC is located in the correct Active Directory container. When any client
computer is added to a domain, by default it is placed in the Computers OU. This is a generic
OU that does not have any policy attached to it other than the default domain policy. Using
Active Directory Users and Computers (an Altiris script can also be used), move the blade PC
into the OU that has been set up to include all the blades. Once the blade PC is moved into
the correct container it must be rebooted, after which the appropriate policies should be
applied.
17
Page 18

Option 2:
As a security measure each blade PC's clock is checked and compared to the Domain
Controller clock before group policy is applied. If there is a difference of more than 5
minutes, policy is not applied to that blade PC and an entry is made in the event viewer on
the blade PC. If policy is not being applied, check the clock and time zone set on the blade
against the Domain Controller and adjust the blade time if necessary (Administrator rights are
needed to perform this action).
Error when editing Group Policy
There is a known issue with Windows XP Service Pack 2 and Group Policy editors. When
editing a GPO on a Windows 2000, Server 2003 or Windows XP Service Pack 1 machine
the following error may appear: "The following entry in the [strings] section is too long and
has been truncated.” A fix for this error has been posted on the Microsoft website:
http://support.microsoft.com/default.aspx?scid=kb;en-us;842933
using machines with Windows Service Pack 2 or Windows Server 2003 with Service Pack 1
installed.
This does not occur when
Login error following remote session initialization
After a remote session is initiated, the following error is received when the user tries to logon:
"The local policy of this system does not allow you to logon interactively.” This error will occur
when the user does not have the rights to logon to the blade PC. The user must either be
added to the Remote Desktop Users group or given the rights to access the machine via
Terminal Services. For more information, refer to Allow Remote Connection to the Blade in the
Remote Connection Section of this paper.
Locally cached roaming profiles are not deleted upon user logoff.
Occasionally the user session is prevented from completely logging off due to system
processes or applications that maintain connections to registry keys in the user profile. Hence,
even though the user logs off, the session is not actually terminated. This prevents the locally
cached copy of the roaming profile from being deleted from the blade, as it will not be
deleted until it is completely terminated. Microsoft has provided a utility that remains memory
resident on the blade PC and detects these connections and terminates them, thereby allowing
logged off sessions to end properly. The User Profile Hive Cleanup utility can be found at the
following site:
http://www.microsoft.com/downloads/details.aspx?FamilyID=1b286e6d8912-4e18-b570-42470e2f3582&displaylang=en&Hash=3HRVHTC
18
Page 19

Blade Image
While HP supplies a default OEM blade PC image on each pc blade as it ships from HP. HP
understands that many companies will choose to develop their own image internally, with
settings and applications that are appropriate for their operational infrastructure.
It is important to realize that, when this action is taken, HP cannot be held responsible for the
proper operation of this image. Individual images are very much like fingerprints, none are
the same and each one has its own idiosyncrasies. That being said, HP will do what we can
to assist the customer in assuring proper functionality of their image in the CCI environment.
This section outlines the settings that are needed to run an existing OS image within the CCI
environment. It is important to note that there are some settings listed here that are best
practices versus requirements; however HP still recommends that these settings be verified.
Blade image checklist
Below is a check list that can be used to verify the image. It is important to state that once the
blade is introduced into a domain environment, various domain settings, scripts and policies
may change the way the blade PC functions. As this is under the control of the Network
Administrators at the customer site, you may need to verify these settings once the blade is
added to the domain.
ROM Version
Result Details Comment
Open System Information (msinfo32.exe)
Under ‘System Summary’ find BIOS Version/Date
Does installed BIOS matches latest available BIOS
on the bc1500 blade PC
1
support website?
HP recommends keeping the
blades updated with the latest
available BIOS.
19
Page 20

Operating System (OS)
Result Details Comment
Open System Information (msinfo32.exe).
Blade PC Drivers
Result Details Comment
Confirm the following:
Installed OS is Windows XP Professional?
Latest OS Service Pack is installed?
Connect the blade to the Internet, download and
install the Microsoft Baseline Security Analyzer
(found
(NOTE: In order to run properly, the MBSA must be
able to download the latest catalog from the
Internet.)
Open Device Manager
No ‘banged-out’ devices?
(List any ‘banged-out’ devices below)
All drivers are the latest available from the bc1500
blade PC
(List any discrepancies below, both installed driver and
latest available, with version and date)
2
here
)
1
support website?
Windows XP is currently the only
supported OS on blade PCs
HP recommends using
Microsoft’s Baseline Security
Analyzer to verify any image
placed onto the blade.
HP recommends that the latest
available drivers be installed for
the latest bug fixes as well as
optimal performance.
Open Add or Remove Programs
Look for any additional drivers or driver packages
that are not used by the blade PC.
(List these below)
20
Page 21

Remote Connection
Result Details Comment
Open System Properties, select the Remote tab.
Is the “Allow users to connect remotely to this
computer” box checked?
Open the “Select Remote Users…” button.
System Restore
Result Details Comment
Local Policy
Result Details Comment
Does the local administrator have access rights?
Are there any user names or security groups in the
Remote Desktop Users window?
Open System Properties, select the System
Properties tab.
Is the “Turn off System Restore” box checked?
Users and groups may be added
later, either manually, though an
Altiris job or Group Policy.
By turning this setting off through
Group Policy, all ability to turn
System Restore back on from the
local bladePC would be
removed.
Run a Resultant Set of Policy (RSoP) for the local
machine, current user
No resulting Error Information (indicated by a yellow
exclamation triangle)
List any Error Information below
Review RSoP settings, compare to recommended
settings in CCI policy recommendation paper.
Note any significant differences below:
21
Page 22

Local Security Policy
Result Details Comment
Open the Local Security Policy page, note any
unusual issues:
Required Services
The services in this section are required for proper blade functionality, regardless of
environment, and should be considered as mandatory.
Result Details Comment
Open the Services snap-in (Start > Run > services.msc).
The following services should be Started:
Altiris Client Service
Required Services and Processes - Dynamic SAM Environment
The services listed in this section are required when the CCI implementation is using SAM as
the Dynamic Allocation Engine
HP Watchdog Timer
Network Connections
Remote Procedure Call
Server
Terminal Services
Unable to completely verify issues
as most of the Security policy
page is in Chinese. All English
entries are correct.
Result Details Comment
Open the Services snap-in (Start > Run > services.msc).
The following services should be Started:
DHCP Client
DNS Client
HP SAM Registration Service
22
Page 23

Unnecessary Services
The services listed in this section are not part of the normal windows environment and are
usually added by extra programs.
Result Function Comment
Open the Services snap-in (Start > Run > services.msc).
List any unnecessary services below:
Wireless Zero Configuration (Common Service) As the blades are not
Optional CCI Utilities
The processes listed below are provided by HP to improve CCI functionality. While optional,
they are highly recommended to be used where appropriate.
wireless and do not
need this service, HP
recommends that this
service be disabled
to increase available
system memory.
Result Details Comment
Open Task Manager, click on the Processes tab. The
following processes are optional utilities that are
designed to make CCI function more effectively:
HPCCIST.exe (HP CCI Session Timers Software)
Specifically for a dynamic environment, this allows sessions
that have been idle for a certain amount of time to be
terminated and the blade returned to the available resource
pool.
Uphclean.exe (User Profile Hive Cleanup)
Specifically for CCI implementations that use roaming user
profiles, this utility actively looks for any profiles that did not
close properly when the user logged off, which can cause
profile corruption.
23
Page 24

Optional Tweaks
To obtain optimal performance on the blade PCs, various tweaks have been made available
on the bc1500 support website. While these are not required, they do significantly improve
performance on blade PCs in the CCI environment.
Result Details Comment
Open Power Options control panel applet.
In the Power Schemes tab, Power Scheme should
be set to HP_Power_Settings.
Under the Advanced tab, 'When I press the power
button on my computer' should be set to 'Shut
Down'
This indicates the HP provided
script has been run and all
tweaks have been automatically
set.
In the Hibernate tab, the 'Enable hibernation' box
should be cleared.
Open Device Manager; IDE ATA/ATAPI
controllers
All IDE channels should be set to 'DMA if available'
24
Page 25

Installed Software
Result Function Comment
Open Add or Remove Programs
Review installed programs. Look for any programs
that have not been tested with or supported in the
current CCI configuration.
List these programs below:
Open the System Configuration Utility (Start >
Run > msconfig)
Review startup items, looking for anything running
that may not be supported in the CCI environment
(program may not be listed in Add or Remove
Programs)
List these entries below (using separate fields):
References
1
URL for HP bc1500 support page:
http://h20000.www2.hp.com/bizsupport/TechSupport/DriverDownload.jsp?&lang=en&cc=us&pname
OID=1152416&taskId=135&prodTypeId=12454&prodSeriesId=1152415&lang=en&cc=us
2
URL for Microsoft Baseline Security Analyzer:
http://www.microsoft.com/downloads/details.aspx?FamilyID=4B4ABA06-B5F9-4DAD-BE9D7B51EC2E5AC9&displaylang=en
25
Page 26

Networking
The HP CCI solution includes a rack mountable 3U (5.25 inch) HP PC Blade Enclosure that
hosts up to 20 HP blade PCs. Each enclosure has a switch tray which includes an Integrated
Administrator and redundant, hot-pluggable power supplies and cooling fans. Each blade PC
is populated with two Broadcom 5705F Fast Ethernet Embedded 10/100Megabits per
second (Mbps) network controllers. A fully populated HP PC Blade Enclosure can require up
to five Ethernet connections, four of which can be either gigabit copper or fiber, and the fifth
fast Ethernet copper only. A typical 42U rack can house as many as 14 HP PC Blade
Enclosures for a maximum of 280 blade PCs. Without the HP PC Blade Switch, the number of
Ethernet connections within this space can quickly become difficult to manage.
The following information is provided as a guide for the setup of a basic network environment
for CCI. Much like Active Directory and GPOs there are as many different network
configurations as there are customers. There for we will cover the basic fundamentals needed
for a CCI environment and if you need to you can add additional options into your customers
environment as needed.
NOTE:
For more detailed information about Network Considerations,
please see the white paper "Network Considerations"
26
Page 27

Server and Blade Infrastructure
Below is the network configuration for the servers and blades that we will be using as our
starting point.
Figure 6
SW 1
Catalyst 3750
12
1234567891011
1X2X11X
SYST
RPS
MASTR
STAT
DUPLX
SPEED
STACK
MODE
1314151617181920212223
13X
12X
14X
SERIES
24
23X
24X
HP RDP Server
Domain Controller
HP SAM 01
HP SAM 02 / MS SQL
PCI-X
3
2
3
2
3
2
3
2
iLO
SCSI Port 1
SCSI Port 1
SCSI Port 1
SCSI Port 1
21
UID
PCI-X
iLO
21
UID
PCI-X
iLO
21
UID
PCI-X
iLO
21
UID
27
Page 28

Static IP Address Assignment Summary
Corporate Network
• Domain Controller iLo:
• Domain Controller NIC 1:
• Domain Controller NIC 2: n/a
• HP RDP iLo:
• HP RDP NIC 1:
• HP SAM 01 iLo:
• HP SAM 01 NIC 1:
• HP SAM 01 NIC 2: n/a
• HP SAM 02 iLo:
• HP SAM 02 NIC 1:
• HP SAM 02 NIC 2: n/a
• R1E1 IA:
• R1E1 Switch:
• R1E2 IA:
• R1E2 Switch:
• R1E3 IA:
• R1E3 Switch:
• R1E4 IA:
• R1E4 Switch:
• R1E5 IA:
• R1E5 Switch:
28
Page 29

SW 1
Catalyst 3750
12
1234567891011
1X2X11X
SYST
RPS
MASTR
STAT
DUPLX
SPEED
STACK
MODE
1314151617181920212223
13X
12X
14X
IA Management
Corporate
SERIES
24
23X
24X
R1E5
R1E4
R1E3
R1E2
IP Subnet Summary
Corporate Network
Server Subnet
• VLAN ID:
• Network/CIDR:
• Broadcast:
• Gateway:
• Hosts:
• IP Range:
Blade Subnet 1
• VLAN ID:
• Network/CIDR:
• Broadcast:
• Gateway:
• Hosts:
• IP Range:
R1E1
• Device MGMT Subnet
• VLAN ID:
• Network/CIDR:
• Broadcast:
• Gateway:
• Hosts:
• IP Range:
Blade Subnet 2 (If used)
• VLAN ID:
• Network/CIDR:
• Broadcast:
• Gateway:
• Hosts:
• IP Range:
29
Page 30

Network Service Requirements
The following are network requirements for data traffic when working in a routed
environment. If you are working in a flat or single vlan environment you may not need to
worry about opening these ports.
Corporate Network
Server Subnet (VLAN: x)
• DHCP – UDP 67 & 68
• DNS – TCP, UDP 53
• NTP – UDP 123
• SSH – UPD, TCP 22
• Telnet – UDP, TCP 23
• Remote Desktop Protocol
• Altiris Deployment Solution
o Server Agent – TCP 401 (Bidirectional)
o Altiris File Transfer – TCP 1024
o MTFTP – 69
• SAM
o Web Service – TCP 80
o SQL Communication – TCP 1433
o Blade RPC – TCP 139
o Blade Service – UDP 47777
• Other Typical Corporate Services
Device MGMT Subnet (VLAN: x)
• Use Server VLAN
Blade Subnet (VLAN: x)
• DHCP – UDP 67 & 68
• DNS – TCP, UDP 53
• Remote Desktop Protocol
o 1380, 3360-4020 I/O
o RDP Clip – UDP 1024 – 4900
• SAM
o Web Service – TCP 80
o Blade RPC – TCP 139
o Blade Service – UDP 47777
o Other Typical Corporate Services
Blade Subnet 2 (VLAN: x)
• If used
30
Page 31

Interface IP Infrastructure
Domain Controller (Secondary DNS)
FQDN:
iLo
• IP Address/CIDR:
• DDNS:
NIC 1
• IP Address/CIDR:
• DDNS:
NIC 2: n/a
HP RDP Server
FQDN:
iLo
• IP Address/CIDR:
• DDNS:
NIC 1
• IP Address/CIDR:
• DDNS:
NIC 2
• IP Address/CIDR:
• DDNS:
HP SAM 01
FQDN:
iLo
• IP Address/CIDR:
• DNS:
NIC 1
• IP Address/CIDR:
• DDNS:
NIC 2: n/a
HP SAM 02 / MS SQL
FQDN:
iLo
• IP Address/CIDR:
• DDNS:
NIC 1
• IP Address/CIDR:
• DDNS:
NIC 2: n/a
Note:
• The HP RDP Server is multi–homed. When PXE server is installed, NIC 1 must be
selected. This is because the PXE service only supports one IP interface per
installation. If there is a requirement for the PXE service to support multiple IP subnets,
routing will be necessary.
• The secondary network interface controllers are not being used for the initial roll out
and may be reserved for future use. NIC Teaming can be considered for adding
additional performance and/or various degrees of redundancy. Determining which
type of NIC Teaming to use for each server should be based on traffic & needs
analysis after the solution has been in operation for a reasonable amount of time.
31
Page 32

DHCP Scope Infrastructure
Corporate Network
Server Scope
• n/a
Device MGMT Scope
• n/a
Blade Scope 1
Address Range:
Exclusion Range: none
DHCP Standard Options
• 003 Router:
• 006 DNS Servers:
• 015 DNS Domain Name:
• 060 PXEClient
Microsoft Options
• 002 Microsoft Release DHCP On Shutdown
Option: 0x1
32
Page 33

HP PC Blade Enclosure Infrastructure
Figure 2.
SW 1
Catalyst 3750
12
1234567891011
1X2X11X
SYST
RPS
MASTR
STAT
DUPLX
SPEED
STACK
MODE
1314151617181920212223
13X
12X
14X
IA Management
Corporate
SERIES
24
23X
24X
R1E5
R1E4
R1E3
R1E2
R1E1
33
Page 34

Ethernet Wiring Map
R1E1
• e42 –
• e43 –
• e44 –
R1E2
• e42 –
• e43 –
• e44 –
R1E3
• e42 –
• e43 –
• e44 –
R1E4
• e42 –
• e43 –
• e44 –
R1E5
• e42 –
• e43 –
• e44 –
Corporate Network
34
Page 35

Interface IP Infrastructure
Corporate Network
Enclosure R1E1
Integrated Administrator
• FQDN:
• IP Address/CIDR:
• DDNS:
• NTP:
Switch Mgmt Interface
• FQDN:
• IP Address/CIDR:
• DDNS:
• NTP:
Enclosure R1E2
Integrated Administrator
• FQDN:
• IP Address/CIDR:
• DDNS:
• NTP:
Switch Mgmt Interface
• FQDN:
• IP Address/CIDR:
• DDNS:
• NTP:
Enclosure R1E3
Integrated Administrator
• FQDN:
• IP Address/CIDR:
• DDNS:
• NTP:
Switch Mgmt Interface
• FQDN:
• IP Address/CIDR:
• DDNS:
• NTP:
Considerations
• If the above data will be scripted into the IA command line, be sure that the first
command in the script is SET SCRIPT MODE ON
• Successful commands entered into the IA Command Line Interface (CLI) are
automatically saved.
Enclosure R1E4
Integrated Administrator
• FQDN:
• IP Address/CIDR:
• DDNS:
• NTP:
Switch Mgmt Interface
• FQDN:
• IP Address/CIDR:
• DDNS:
• NTP:
Enclosure R1E5
Integrated Administrator
• FQDN:
• IP Address/CIDR:
• DDNS:
• NTP:
Switch Mgmt Interface
• FQDN:
• IP Address/CIDR:
• DDNS:
• NTP:
35
Page 36

Session Allocation Manager (SAM)
SAM was developed specifically for the CCI solution and is designed to integrate into a
customer’s existing Microsoft Windows server environment. SAM is comprised of three
software modules:
¾ HP SAM Web Server
¾ HP SAM Client
¾ HP SAM Blade Service
Below is a step by step walk through of the client login process via SAM
Client login
1. The client sends an HTTP connect request to the SAM web service using port 80 as a
default. The default port can be changed.
2. The SAM web service validates user name against Active Directory.
3. The SAM web service retrieves the user’s roles by connecting to the SQL database using
port 1433. Port 1433 is the default post for Microsoft SQL. If a different port is used, the
configuration must be updated for this change.
4. If the user is in more than one role, the user is prompted to choose a role.
5. The SAM web service returns a blade pointer (new or disconnected) to the client using port
80.
36
Page 37

6. The client connects to the blade allocated using port 3389, which is the default, RDP port.
The blade service sends usage activity (login, disconnected, logoff) back to SAM web service
using port 47777.
HP SAM Client
The SAM client can be installed on a flexible range of hardware.
¾ HP Thin Client—with CE5.0 or Windows XPe (Win32-based)
¾ Desktop or Notebook—XP Pro, XP Home, or Windows 2000 with SP3 or higher.
¾ Remote Desktop Connection must be functional on the client access device.
For a comparison of the characteristics of the operating system on the HP Thin Client, review
this table.
* Depending on when the Thin Client is ordered, after April 2006, for example, it will come
with the HP SAM Client software pre-loaded. If it is not pre-loaded or if a different access
device is used, the SAM Client software can be downloaded and installed on the client. For a
large-scale deployment, a Rapid Deployment Pack (RDP) job can be created to install the
SAM Client on the access devices.
HP SAM Blade Service
The HP SAM Blade Service provides the means in which the Blade PC registers with and is
enabled by the SAM Web Server database. The SAM Web Server database maintains usage
information as well as the information on the role to which the Blade PC belongs.
• There will be a CFG file for each role that is defined for the CCI configuration.
• The CFG file will be part of the image that is defined for that role and deployed by
Rapid Deployment Pack.
• The CFG file can also be deployed manually.
The HP SAM Blade Service software requirements are:
• Windows XP Professional with SP1 or higher
• Terminal service enabled (Remote Desktop)
37
Page 38

Using the HP SAM software in CCI
Creating an account
Prior to installing the HP SAM Web Server, the customer will need to create a domain user
account to execute the HP SAM services on the local server.
• This account name and password should be changed as infrequently as possible to
minimize interruptions to HP SAM.
• The account must also be in the local server administrator group.
Administrative rights
In order to fully install HP SAM, you must have the following:
• Administrative rights on all computing resources (Blade PCs).
• SQL administrative level account and password—only needed during setup.
• Administrative rights on the HP SAM Web server.
Licensing
• The License key is a 5x5 format similar to other Windows-compatible products.
• xxxxx- xxxxx- xxxxx- xxxxx- xxxxx
• One key supports up to 255 seats and one environment can support multiple keys
By default which is, no license key entered, you can run up to100 Blade PCs. This is meant
for evaluation purposes only. There is no expiration date for this evaluation software.
To license the Web Server, click on Enter New Key button to add new key to the HP SAM.
Once entered, the system shows you the information encoded on the key. To delete the key
from the system, check the appropriate key(s) and click the Delete button.
If at any time you get a license message on the HP SAM administrator console, go to this
area to view the details of the license message.
The SKUs for the license packs are:
• 2-year — $26/seat ILP
• 4-year — $39/seat ILP
Upgrade to any release during the 2- or 4-year period.
38
Page 39

Administrative tasks with HP SAM Web Server
Access the HP SAM Web Server console from an Internet Explorer browser. Internet Explorer
is the only browser supported.
You will be required to enter a username and password.
From the console you can:
• Manage the user access lists to add and remove users and update the user roles.
• Add security or organizational units.
• Search for users and resources.
39
Page 40

• Manage resources.
• Filter and view resource information and generate reports on capacity consumption
and utilization.
• Create or update policies for HP SAM Client settings by user roles.
• Configure link to Active Directory services for retrieving user account information.
Connecting with the PC Session Allocation Client
If the access device is a Thin Client, the user will locate and click the PC Session Allocation
Client item.
An enhanced RDC screen will appear. The settings for connection can be set from the GUI or
by editing the HPRDC.SAM file in Notepad as shown here.
Additional settings can be configured from the HPRDC.SAM file. The Gateway=webserverList
and the MyRoles settings will need to be configured as well as the ServicePort configuration.
These are a subset of settings which can be configured. See the HP SAM Administrator User
Guide for a complete list.
Gateways—Edit or add HP SAM Servers.
DefaultPolicy—This is the policy that should be selected by default.
DefaultDomain—Edit this value which will to be loaded in the Domain dropdown box
displayed on the GUI. If this value is not specified, the program attempts to determine
the domain from the user's login information, which may or may not be accurate.
40
Page 41

DefaultUsername—string value. If this value is not specified, the program attempts to
determine the user name from the user's login information, which may or may not be
correct for the CCI solution.
Failover—integer value. When set to 1, this enables the failover capability of the
client. If there are multiple Web servers defined, the client fails over to the next
available computing resource when a connection to one fails. Turning this feature on
limits the user’s ability to type in a new HP SAM server; the user still has the ability to
choose between Web servers defined in the configuration file. Default value is 0 (off).
ConnectionPort—short integer value, in the range 1 to 65535. This is the port on which the
remote desktop service (such as Remote Desktop) listens on. For Remote Desktop, if not
specified, this value defaults to 3389. A value of 0 is ignored.
Considerations for connecting from the client include:
Users with multiple roles can only connect to one role at a time.
Users with multiple roles can connect to one Blade PC per role.
Connecting with the Internet Explorer Client
To use the HP SAM IE browser-based client, enter the server name
http://HPSAMservername in the Internet Explorer address bar.
If the access device is accessing the HP SAM server for the first time, the client needs to install
two ActiveX controls (HP SAM Time Zone Download Control and Remote Desktop Client
Control.) The installed location for these controls is in %SystemRoot%\Downloaded
Program Files\ folder. There are other HP SAM Internet Explorer-based client configuration
settings that you can control from the HP SAM Web server.
Considerations for the IE client
HP recommends that the HP SAM Web server be added to the Trusted Sites list. To
do this, access the Tools Internet Options in the Security tab on the client access
device. If a firewall is installed, make changes to allow the HP SAM server client
through. For example, if HP Sygate Security Agent is installed, add a rule to allow
port 3389 for the application IEXPLORE.EXE.
The HP SAM ActiveX controls are stored as source for distribution on the HP SAM
Web server during the Web server installation process. If the ActiveX controls are
replaced on the HP SAM Web server during an upgrade, the HP SAM client is
automatically upgraded to the newer version the next time the client access device
connects to the HP SAM Web server.
For the HP thin client running Windows XP Embedded, the installation of the ActiveX
components may be repeated every time the access device is rebooted, if it is not
saved as part of the thin client image.
41
Page 42

Defining the HP SAM Registration Service Configuration File
The HP SAM configuration file which is named hpevent.cfg is an INI text file as shown here.
The HP SAM Registration Service tries to locate the configuration file in the order that the
locations are listed.
[WebServerList]
The [WebServerList] section lists one or more HP SAM Web servers. Each HP SAM Web
server (primary and failover) is listed, one per line. The service uses this list in the order
provided. The first HP SAM Web server in the list is the one tried first; if it fails, the service
proceeds to try the remaining HP SAM Web servers in order. If a successful connection is
established, the remaining HP SAM Web servers are not used.
To modify the server line, change just the server1.yourdomain string to the appropriate server
name. Use Web server DNS name or static IP address. For example:
HPSAMservername
0.1.2.3
42
Page 43

[RolesList]
The [RolesList] section lists one or more roles to which the Blade PC can belong. A role is a
functional collection of computing resources (Blade PCs). The first role in the list is the blade
PC’s primary role. All other roles, if any, are considered non-primary. Blade PCs are
allocated to the user in the priority order below:
Available blade PC assigned to this role only
Available blade PC assigned to multiple roles, with this role being primary
Available blade PC assigned to multiple roles, with this role being nonprimary
After the configuration file is edited, the service must be restarted for the changes to take
effect.
The registration service can be started or stopped. It’s listed as HP SAM Registration Service
in the Services list.
43
Page 44

Thin Clients
HP has the most complete thin client product set in the industry and provides multiple ways to
become trained on these products. Due to the multiple Operating Systems, platforms and the
unique requirements of each customer we are not going to cover the thin client training in this
document. However we will provide links to existing thin client training provided by HP.
Go to Learning Center at
training.
• Sales
HP Thin Client Sales Fundamentals – Learn the key points of selling hp thin clients,
target markets and valuable hp differentiators.
• Technical
CE.Net Thin Client Technical WBT
with CE.Net operating system as well as learn to manage them in a deployment
environment
XP Embedded Thin Client Technical WBT
solution with XP Embedded operating system as well as learn to manage them in a
deployment environment
Linux Thin Client Technical WBT
Linux operating system as well as learn to manage them in a deployment environment
• Altiris Deployment Training
Altiris Deployment Systems Training for CE.Net and XP Embedded – go to
www.altiris.com/hptc ; register with your email address and then click on FREE CE.Net
or XPe training on side panel
http://h20181.www2.hp.com/plm/ and search for Thin Client
- Learn how to describe the Thin Client solution
- Learn how to describe the Thin Client
- Learn how to describe the Thin Client solution with
44
Page 45

Appendix
CCI user environment considerations
General considerations when configuring the CCI user environment to support particular
business applications include:
Java support — Windows XP SP1a and newer does not include support for Java
from Sun Microsystems. HP recommends installing the Java Runtime Environment (JRE)
as part of the deployed image.
Antivirus tools — these tools must run with administrator privileges to enable
updates to their signature files. This must be managed at the system level because
normal user accounts will not have the appropriate level of access to install these
updates. Many corporate antivirus solutions provide a framework for this type of
centralized management.
Rapid Deployment Pack
o Altiris PXE boot support must be configured to support PXE boot clients on the
subnet that has NIC 1 configured to PXE boot.
NOTE:
The blade PC will PXE boot only to NIC 1.
Each Altiris managed computer must have the Altiris AClient services installed. They
can be installed manually in the base operating system image or deployed through
Deployment Server. AClient.exe can be found in the eXpress share on the Altiris
server.
45
Page 46

Two PXE boot images are required: one for a new PC and one for a managed PC. A
managed PC is one that Deployment Server has already detected and has
information collected in the database.
The Intel UNDI NIC driver does not fully support multicast image deployment.
o For the HP bc1000 and bc1500 blade PCs, select the Broadcom NetXtreme
Ethernet driver. This driver is not included with Deployment Server. You must
download this driver from www.hp.com\support and import it into
Deployment Server. The instructions to import a driver into Deployment Server
are in the Altiris Deployment Server User Guide.
NOTE:
Duplicate entries in Deployment Server may
exist. Choose either entry.
SAM Blade Service must be installed on every blade. This can be done using RDP or
having the service installed as part of the image.
The SAM Blade Service configuration file must be configured and distributed to each
blade.
If you have a firewall installed on the blade PC, enable the ports below. You can use
GPOs to configure this in Active Directory.
Incoming:
• From Web server (UDP/47777) to blade (UDP/47777)
• From Web server (TCP/ANY) to blade (TCP/139)
• From clients (TCP/ANY) to blade (TCP/3389)
Outgoing:
• From blade (TCP/ANY) to Web server (TCP/80—HTTP)
• From blade (UDP/47777) to Web server (UDP/47777)
Deploying blade PC replacement images — There are two ways to support blade PC
replacement image deployment:
o Manually run the required Altiris events to configure the new blade PC
exactly as the removed blade PC. This is required only when a blade PC is to
be replaced.
46
Page 47

Use one of the following server change rules to run the required Altiris events:
o Select blade PC Properties → Bay → Server Change rule → Re-
Deploy to redeploy the image when the blade PC is changed. This will
execute all the events listed as executed on the blade PC that requires the
database history of jobs to deploy. This history is maintained to include only
the deployment events that are required to rebuild the blade PC. The
deployment history will be lost. This scenario requires maintenance of the
deployment history database for all blade PCs.
Select blade PC Properties → Bay → Server Change rule → Run a
predefined job to redeploy the image when the blade PC is changed. This
scenario requires maintenance of the redeployment job and scripts.
47
Page 48

Recommended image capture and creation process
The following process details the method recommended by HP for creating and managing
CCI images:
Blade PC image
o Set the boot order to PXE boot first. This can be accomplished by setting the
boot order in the blade PC system ROM setup or with Integrated
Administrator firmware 1.5 or later. The enclosure command is:
Set Bay Boot Always PXE 1 - 20
o Configure and test a blade PC image as desired for all users, including
installing all applications and Microsoft hot fixes.
o Install and configure the SAM Blade PC service. Optionally, supply a
configuration file.
o Configure and execute an Altiris event to capture the image from the
configured blade PC.
o Configure and execute an Altiris event to deploy the captured image using a
range of computer names and IP addresses. Deployment Server 6.1 and later
can be configured to use the enclosure and bay location of the blade PC to
assign the computer name and IP address. The deploy image event should
include blade PC dependent settings such as:
Computer name — Must be less than 15 characters
IP configuration for each NIC
o Configure and execute an Altiris event to join the blade PC to the desired
domain.
NOTE:
Application licensing requirements must be fulfilled.
48
Page 49

Thin client image
o Windows XPe
o Windows CE .NET
HP recommends HP Compaq Thin Client t5700 XPe build .28 or
Later
Thin clients with Windows XPe require users to log in because the
administrator account is required for Disk On Key (DOK) use to
installing drivers for local printers and serial port devices at the thin
client.
NOTE:
For more information, refer to the white papers available at:
http://h200005.www2.hp.com/bc/docs/support/UCR/SupportManual/TPM_3399
93-001_rev4_us/TPM_339993-01_rev4_us.pdf
HP Compaq Thin Client t5500
DOK is readable and writeable using the Windows CE .NET image
without any additional actions required by the user
49
Page 50

SAM terms
Client—The access device which sends requests to the HP SAM Web Server to connect to a
Blade PC.
Computing Resource—The Blade PC which provides the desktop session. Description
(Blade)—usually given to the blade by the blade manufacturer. It can be changed in the HP
Web Server console if necessary
Follow-me roaming—Capability for the user to connect and reconnect to the same session
while using different access devices in different locations.
Gateway—Same as Web server. The Gateway is defined in the Client hprdc.sam file to
present on the PC Session Allocation Client screen.
Global Policy—Sets all users' connection environment. It can be overridden by Group or
Individual Policy assignments.
Group Policy—Sets connection environment for a group of users. This policy overrides Global
but can be overridden by individual policy assignment.
Individual Policy—Sets connection environment for a specific user. This policy assignment
overrides group which overrides global policy rules.
OU—Organizational Unit
Policy—The policy is the user experience as defined by the connection settings. It defines the
appearance of the desktop, taskbar, command access, sound availability, and so forth. There
are three levels of policy: global, group, and individual. The global policy defines the user
experience for everyone. The group policy grants additional privileges and access. The
individual policy grants still more privileges and access.
Public—A public role is one that is accessible to all users.
Resource—A managed computer inside the HP SAM configuration which can be provided to
a client for the purpose of logging in via Remote Desktop Protocol. It is also the same as
computing resource, desktop session, or blade PC.
ResourceID—Identification assigned to a specific blade PC by the hardware manufacturer. It
cannot be changed.
Roaming profile—Collection of user settings in Active Directory which can be seamlessly
shared between different blade PCs. It enables the user to have the same end-user experience
when connecting to different blade PCs.
Role—A role is a category that defines a department or major group of users.
SAM—HP PC Session Allocation Manager. The software system described in this design
document.
50
Page 51

Session Persistence—Ability for the user to connect to the same session without having to log
off.
UPN—User Principal Name. A user-friendly name in e-mail address format.
Web server—The HP SAM component responsible for managing the computing resource
pool, providing an administrative user interface, and providing computing resource brokering
services to clients. At the software level, the Web server is composed of an IIS 6.0 Web
server and a SQL 2000 database that may or may not reside on the same physical server
unit.
51
 Loading...