

Page 1

HP OpenView Storage Data Protector
Integration Guide
for
Oracle
SAP
Manual Edition: July 2006
Manufacturing Part Number: B6960-9
Release A.06.00
© Copyright 2006 Hewlett-Packard Development Company, L.P.
6008
Page 2

Legal Notices
©Copyright 2006 Hewlett-Packard Development Company, L.P.
Hewlett-Packard Company makes no warranty of any kind with regard
to this material, including, but not limited to, the implied warranties of
merchantability and fitness for a particular purpose. Hewlett-Packard
shall not be liable for errors contained herein or for incidental or
consequential damages in connection with the furnishing, performance,
or use of this material.
This document contains proprietary information, which is protected by
copyright. No part of this document may be photocopied, reproduced, or
translated into another language without the prior written consent of
Hewlett-Packard. The information contained in this document is subject
to change without notice.
Microsoft® and MS Windows®, Windows® and Windows NT® are U.S.
registered trademarks of Microsoft Corporation.
Oracle® is a registered U.S. trademark of Oracle Corporation, Redwood
City, California.
UNIX® is a registered trademark of The Open Group
Hewlett-Packard Company shall not be liable for technical or editorial
errors or omissions contained herein. The information is provided “as is”
without warranty of any kind and is subject to change without notice.
The warranties for Hewlett-Packard Company products are set forth in
the express limited warranty statements for such products. Nothing
herein should be construed as constituting an additional warranty.
ii
Page 3

Contents
1. Integrating Oracle and Data Protector
In This Chapter . . . . . . . . . . . . . . . . . . . . . . . . . . . . . . . . . . . . . . . . . . . . . . . . . . . . . . . . . 2
Introduction . . . . . . . . . . . . . . . . . . . . . . . . . . . . . . . . . . . . . . . . . . . . . . . . . . . . . . . . . . . . 3
Integration Concept . . . . . . . . . . . . . . . . . . . . . . . . . . . . . . . . . . . . . . . . . . . . . . . . . . . . . . 5
Configuring the Integration . . . . . . . . . . . . . . . . . . . . . . . . . . . . . . . . . . . . . . . . . . . . . . 11
Prerequisites . . . . . . . . . . . . . . . . . . . . . . . . . . . . . . . . . . . . . . . . . . . . . . . . . . . . . . . . . 11
Limitations . . . . . . . . . . . . . . . . . . . . . . . . . . . . . . . . . . . . . . . . . . . . . . . . . . . . . . . . . . 12
Before You Begin . . . . . . . . . . . . . . . . . . . . . . . . . . . . . . . . . . . . . . . . . . . . . . . . . . . . . 13
Cluster-Aware Clients . . . . . . . . . . . . . . . . . . . . . . . . . . . . . . . . . . . . . . . . . . . . . . . . . 14
Linking Oracle with the Data Protector Oracle Integration Media Management
Library (MML) on UNIX . . . . . . . . . . . . . . . . . . . . . . . . . . . . . . . . . . . . . . . . . . . . . . . 14
Linking Oracle with MML on OpenVMS Systems . . . . . . . . . . . . . . . . . . . . . . . . . . . 16
Configuring Oracle Users on UNIX and OpenVMS . . . . . . . . . . . . . . . . . . . . . . . . . . 21
Configuring Oracle Databases . . . . . . . . . . . . . . . . . . . . . . . . . . . . . . . . . . . . . . . . . . . 24
Checking the Configuration . . . . . . . . . . . . . . . . . . . . . . . . . . . . . . . . . . . . . . . . . . . . . 33
Configuring an Oracle Backup . . . . . . . . . . . . . . . . . . . . . . . . . . . . . . . . . . . . . . . . . . . . 36
Creating a New Template . . . . . . . . . . . . . . . . . . . . . . . . . . . . . . . . . . . . . . . . . . . . . . 36
Creating a Data Protector Oracle Backup Specification . . . . . . . . . . . . . . . . . . . . . . 37
Editing the Oracle RMAN Script. . . . . . . . . . . . . . . . . . . . . . . . . . . . . . . . . . . . . . . . . 47
Creating Copies of Backed Up Objects . . . . . . . . . . . . . . . . . . . . . . . . . . . . . . . . . . . . 51
Testing the Integration. . . . . . . . . . . . . . . . . . . . . . . . . . . . . . . . . . . . . . . . . . . . . . . . . 52
Backing Up an Oracle Database . . . . . . . . . . . . . . . . . . . . . . . . . . . . . . . . . . . . . . . . . . . 55
Scheduling a Backup . . . . . . . . . . . . . . . . . . . . . . . . . . . . . . . . . . . . . . . . . . . . . . . . . . 58
Running an Interactive Backup. . . . . . . . . . . . . . . . . . . . . . . . . . . . . . . . . . . . . . . . . . 60
Starting Oracle Backup Using RMAN. . . . . . . . . . . . . . . . . . . . . . . . . . . . . . . . . . . . . 62
Restoring an Oracle Database. . . . . . . . . . . . . . . . . . . . . . . . . . . . . . . . . . . . . . . . . . . . . 70
Prerequisites . . . . . . . . . . . . . . . . . . . . . . . . . . . . . . . . . . . . . . . . . . . . . . . . . . . . . . . . . 72
Restoring Oracle Using the Data Protector GUI . . . . . . . . . . . . . . . . . . . . . . . . . . . . 72
Restoring and Recovering an Oracle Database in Oracle Data Guard Environment 84
Duplicating an Oracle Database . . . . . . . . . . . . . . . . . . . . . . . . . . . . . . . . . . . . . . . . . 85
Restore, Recovery, and Duplicate Options . . . . . . . . . . . . . . . . . . . . . . . . . . . . . . . . . 88
Restoring Oracle Using RMAN . . . . . . . . . . . . . . . . . . . . . . . . . . . . . . . . . . . . . . . . . . 93
Restoring Oracle Using CLI. . . . . . . . . . . . . . . . . . . . . . . . . . . . . . . . . . . . . . . . . . . . 107
Restoring Using Another Device . . . . . . . . . . . . . . . . . . . . . . . . . . . . . . . . . . . . . . . . 108
Disaster Recovery . . . . . . . . . . . . . . . . . . . . . . . . . . . . . . . . . . . . . . . . . . . . . . . . . . . . 109
Monitoring an Oracle Backup and Restore . . . . . . . . . . . . . . . . . . . . . . . . . . . . . . . . . 110
Monitoring Current Sessions . . . . . . . . . . . . . . . . . . . . . . . . . . . . . . . . . . . . . . . . . . . 110
Viewing Previous Sessions . . . . . . . . . . . . . . . . . . . . . . . . . . . . . . . . . . . . . . . . . . . . . 111
iii
Page 4

Contents
Using Oracle After Removing the Data Protector Oracle Integration on UNIX and
OpenVMS Systems. . . . . . . . . . . . . . . . . . . . . . . . . . . . . . . . . . . . . . . . . . . . . . . . . . . . . 112
Removing the Data Protector Oracle Integration Link on HP-UX Systems. . . . . . 112
Removing the Data Protector Oracle Integration Link on Solaris and other UNIX
Systems . . . . . . . . . . . . . . . . . . . . . . . . . . . . . . . . . . . . . . . . . . . . . . . . . . . . . . . . . . . . 113
Removing the Data Protector Oracle Integration Link on OpenVMS Systems . . . 113
Oracle RMAN Metadata and Data Protector Media Management
Database Synchronization. . . . . . . . . . . . . . . . . . . . . . . . . . . . . . . . . . . . . . . . . . . . . . . 114
Troubleshooting . . . . . . . . . . . . . . . . . . . . . . . . . . . . . . . . . . . . . . . . . . . . . . . . . . . . . . . 116
Before You Begin . . . . . . . . . . . . . . . . . . . . . . . . . . . . . . . . . . . . . . . . . . . . . . . . . . . . 116
Using Oracle After Removing the Data Protector
Oracle Integration on UNIX Systems . . . . . . . . . . . . . . . . . . . . . . . . . . . . . . . . . . . . 116
General Troubleshooting . . . . . . . . . . . . . . . . . . . . . . . . . . . . . . . . . . . . . . . . . . . . . . 117
Checking Prerequisites Related to the Oracle Side
of the Integration on UNIX Systems . . . . . . . . . . . . . . . . . . . . . . . . . . . . . . . . . . . . . 117
Checking Prerequisites Related to the Oracle Side
of the Integration on Windows Systems . . . . . . . . . . . . . . . . . . . . . . . . . . . . . . . . . . 121
Configuration Problems on UNIX Systems. . . . . . . . . . . . . . . . . . . . . . . . . . . . . . . . 125
Configuration Problems on Windows Systems . . . . . . . . . . . . . . . . . . . . . . . . . . . . . 127
Backup Problems on UNIX Systems . . . . . . . . . . . . . . . . . . . . . . . . . . . . . . . . . . . . . 129
Backup Problems on Windows. . . . . . . . . . . . . . . . . . . . . . . . . . . . . . . . . . . . . . . . . . 133
Restore Problems . . . . . . . . . . . . . . . . . . . . . . . . . . . . . . . . . . . . . . . . . . . . . . . . . . . . 135
2. Integrating SAP R/3 and Data Protector
In This Chapter . . . . . . . . . . . . . . . . . . . . . . . . . . . . . . . . . . . . . . . . . . . . . . . . . . . . . . . 144
Introduction . . . . . . . . . . . . . . . . . . . . . . . . . . . . . . . . . . . . . . . . . . . . . . . . . . . . . . . . . . 145
Prerequisites and Limitations. . . . . . . . . . . . . . . . . . . . . . . . . . . . . . . . . . . . . . . . . . . . 147
Integration Concept . . . . . . . . . . . . . . . . . . . . . . . . . . . . . . . . . . . . . . . . . . . . . . . . . . . . 149
Data Protector SAP R/3 Configuration File . . . . . . . . . . . . . . . . . . . . . . . . . . . . . . . . . 158
Setting, Retrieving, Listing, and Deleting Data Protector SAP R/3 Configuration
File Parameters Using the CLI . . . . . . . . . . . . . . . . . . . . . . . . . . . . . . . . . . . . . . . . . 161
Configuring the Integration . . . . . . . . . . . . . . . . . . . . . . . . . . . . . . . . . . . . . . . . . . . . . 165
Configuring an SAP R/3 User in Data Protector (UNIX Systems Only) . . . . . . . . . 165
Configuring an SAP R/3 Database Server. . . . . . . . . . . . . . . . . . . . . . . . . . . . . . . . . 167
Configuring an SAP R/3 Backup. . . . . . . . . . . . . . . . . . . . . . . . . . . . . . . . . . . . . . . . . . 179
Creating a New Template . . . . . . . . . . . . . . . . . . . . . . . . . . . . . . . . . . . . . . . . . . . . . 179
Creating a Data Protector SAP R/3 Backup Specification . . . . . . . . . . . . . . . . . . . . 180
SAP R/3 Specific Backup Options . . . . . . . . . . . . . . . . . . . . . . . . . . . . . . . . . . . . . . . 186
Creating or Modifying the Parameter File on the SAP R/3 Database Server . . . . . 190
iv
Page 5

Contents
Backing Up Using Recovery Manager. . . . . . . . . . . . . . . . . . . . . . . . . . . . . . . . . . . . 191
Manual Balancing of Files into Subsets . . . . . . . . . . . . . . . . . . . . . . . . . . . . . . . . . . 193
Creating an SAP /R3 Backup Specification for Manual Balancing . . . . . . . . . . . . . 194
Testing the Integration. . . . . . . . . . . . . . . . . . . . . . . . . . . . . . . . . . . . . . . . . . . . . . . . 195
Backing Up an SAP R/3 Database . . . . . . . . . . . . . . . . . . . . . . . . . . . . . . . . . . . . . . . . 197
Scheduling a Backup . . . . . . . . . . . . . . . . . . . . . . . . . . . . . . . . . . . . . . . . . . . . . . . . . 198
Running an Interactive Backup. . . . . . . . . . . . . . . . . . . . . . . . . . . . . . . . . . . . . . . . . 200
Using SAP R/3 Commands. . . . . . . . . . . . . . . . . . . . . . . . . . . . . . . . . . . . . . . . . . . . . 202
Restoring an SAP R/3 Database . . . . . . . . . . . . . . . . . . . . . . . . . . . . . . . . . . . . . . . . . . 204
Considerations . . . . . . . . . . . . . . . . . . . . . . . . . . . . . . . . . . . . . . . . . . . . . . . . . . . . . . 204
Limitations . . . . . . . . . . . . . . . . . . . . . . . . . . . . . . . . . . . . . . . . . . . . . . . . . . . . . . . . . 205
Finding Information Needed for Restore. . . . . . . . . . . . . . . . . . . . . . . . . . . . . . . . . . 205
Restoring Using the Data Protector GUI . . . . . . . . . . . . . . . . . . . . . . . . . . . . . . . . . 205
Restoring Using the Data Protector CLI . . . . . . . . . . . . . . . . . . . . . . . . . . . . . . . . . . 207
Restoring Using the SAP R/3 Commands . . . . . . . . . . . . . . . . . . . . . . . . . . . . . . . . . 208
Using Another Device. . . . . . . . . . . . . . . . . . . . . . . . . . . . . . . . . . . . . . . . . . . . . . . . . 209
Disaster Recovery . . . . . . . . . . . . . . . . . . . . . . . . . . . . . . . . . . . . . . . . . . . . . . . . . . . . 209
Monitoring an SAP R/3 Backup and Restore . . . . . . . . . . . . . . . . . . . . . . . . . . . . . . . . 212
Monitoring Current Sessions . . . . . . . . . . . . . . . . . . . . . . . . . . . . . . . . . . . . . . . . . . . 212
Viewing Previous Sessions . . . . . . . . . . . . . . . . . . . . . . . . . . . . . . . . . . . . . . . . . . . . . 213
Troubleshooting . . . . . . . . . . . . . . . . . . . . . . . . . . . . . . . . . . . . . . . . . . . . . . . . . . . . . . . 214
Before You Begin . . . . . . . . . . . . . . . . . . . . . . . . . . . . . . . . . . . . . . . . . . . . . . . . . . . . 214
General Troubleshooting . . . . . . . . . . . . . . . . . . . . . . . . . . . . . . . . . . . . . . . . . . . . . . 214
Troubleshooting on Windows Systems . . . . . . . . . . . . . . . . . . . . . . . . . . . . . . . . . . . 215
Troubleshooting on UNIX Systems . . . . . . . . . . . . . . . . . . . . . . . . . . . . . . . . . . . . . . 225
Examples of SAP R/3 Database Restore. . . . . . . . . . . . . . . . . . . . . . . . . . . . . . . . . . . . 239
Preparing the SAP R/3 Database for Restore . . . . . . . . . . . . . . . . . . . . . . . . . . . . . . 239
Example of Full Database Restore and Recovery . . . . . . . . . . . . . . . . . . . . . . . . . . . 241
Example of Partial Restore . . . . . . . . . . . . . . . . . . . . . . . . . . . . . . . . . . . . . . . . . . . . 245
Example of Lost Files Restore . . . . . . . . . . . . . . . . . . . . . . . . . . . . . . . . . . . . . . . . . . 245
Example of Archive Log Files Restore. . . . . . . . . . . . . . . . . . . . . . . . . . . . . . . . . . . . 247
3. Integrating SAP DB/MaxDB and Data Protector
In This Chapter . . . . . . . . . . . . . . . . . . . . . . . . . . . . . . . . . . . . . . . . . . . . . . . . . . . . . . . 250
Prerequisites and Limitations. . . . . . . . . . . . . . . . . . . . . . . . . . . . . . . . . . . . . . . . . . . . 251
Introduction . . . . . . . . . . . . . . . . . . . . . . . . . . . . . . . . . . . . . . . . . . . . . . . . . . . . . . . . . . 252
Integration Concept . . . . . . . . . . . . . . . . . . . . . . . . . . . . . . . . . . . . . . . . . . . . . . . . . . . . 256
Data Protector SAP DB/MaxDB Configuration File . . . . . . . . . . . . . . . . . . . . . . . . . . 259
v
Page 6

Contents
Setting, Retrieving, and Listing Data Protector SAP DB/MaxDB Configuration File
Parameters Using the CLI. . . . . . . . . . . . . . . . . . . . . . . . . . . . . . . . . . . . . . . . . . . . . 260
Configuring the Integration . . . . . . . . . . . . . . . . . . . . . . . . . . . . . . . . . . . . . . . . . . . . . 263
Configuring Users. . . . . . . . . . . . . . . . . . . . . . . . . . . . . . . . . . . . . . . . . . . . . . . . . . . . 263
Configuring an SAP DB/MaxDB Backup . . . . . . . . . . . . . . . . . . . . . . . . . . . . . . . . . 264
SAP DB/MaxDB Specific Backup Options. . . . . . . . . . . . . . . . . . . . . . . . . . . . . . . . . 270
Modifying the Configuration of an SAP DB/MaxDB Instance in Data Protector . . 272
Checking the Configuration of an SAP DB/MaxDB Instance . . . . . . . . . . . . . . . . . 276
Testing the Integration. . . . . . . . . . . . . . . . . . . . . . . . . . . . . . . . . . . . . . . . . . . . . . . . 278
Backing Up an SAP DB/MaxDB Database . . . . . . . . . . . . . . . . . . . . . . . . . . . . . . . . . . 281
Scheduling an Existing Backup Specification. . . . . . . . . . . . . . . . . . . . . . . . . . . . . . 281
Running an Interactive Backup Using the Data Protector GUI . . . . . . . . . . . . . . . 284
Running an Interactive Backup Using the Data Protector CLI. . . . . . . . . . . . . . . . 285
Running an Interactive Backup Using SAP DB/MaxDB Utilities . . . . . . . . . . . . . . 286
Restoring an SAP DB/MaxDB Database . . . . . . . . . . . . . . . . . . . . . . . . . . . . . . . . . . . 290
Restore and Recovery Overview. . . . . . . . . . . . . . . . . . . . . . . . . . . . . . . . . . . . . . . . . 290
SAP DB/MaxDB Migration Prerequisites . . . . . . . . . . . . . . . . . . . . . . . . . . . . . . . . . 294
Restoring Using the Data Protector GUI . . . . . . . . . . . . . . . . . . . . . . . . . . . . . . . . . 295
Restoring Using the Data Protector CLI . . . . . . . . . . . . . . . . . . . . . . . . . . . . . . . . . . 297
Restoring Using SAP DB/MaxDB Utilities . . . . . . . . . . . . . . . . . . . . . . . . . . . . . . . . 299
SAP DB/MaxDB Restore and Recovery Options. . . . . . . . . . . . . . . . . . . . . . . . . . . . 304
Using Another Device. . . . . . . . . . . . . . . . . . . . . . . . . . . . . . . . . . . . . . . . . . . . . . . . . 308
Disaster Recovery . . . . . . . . . . . . . . . . . . . . . . . . . . . . . . . . . . . . . . . . . . . . . . . . . . . . 309
Monitoring an SAP DB/MaxDB Backup and Restore . . . . . . . . . . . . . . . . . . . . . . . . . 310
Monitoring Current Sessions . . . . . . . . . . . . . . . . . . . . . . . . . . . . . . . . . . . . . . . . . . . 310
Viewing Previous Sessions . . . . . . . . . . . . . . . . . . . . . . . . . . . . . . . . . . . . . . . . . . . . . 311
Troubleshooting . . . . . . . . . . . . . . . . . . . . . . . . . . . . . . . . . . . . . . . . . . . . . . . . . . . . . . . 313
Before You Begin . . . . . . . . . . . . . . . . . . . . . . . . . . . . . . . . . . . . . . . . . . . . . . . . . . . . 313
Problems . . . . . . . . . . . . . . . . . . . . . . . . . . . . . . . . . . . . . . . . . . . . . . . . . . . . . . . . . . . 313
SAP DB/MaxDB Cluster-Related Troubleshooting. . . . . . . . . . . . . . . . . . . . . . . . . . 316
Glossary
Index
vi
Page 7

Printing History
Manual updates may be issued between editions to correct errors or
document product changes. To ensure that you receive updated or new
editions, subscribe to the appropriate product support service. See your
HP sales representative for details.
Table 1 Edition History
Part Number Manual Edition Product
B6960-90109 October 2004 Data Protector Release
A.05.50
B6960-9
6008 July 2006 Data Protector Release
A.06.00
vii
Page 8

viii
Page 9

Table 2
Conventions
The following typographical conventions are used in this manual.
Convention Meaning Example
Italic Book or manual
titles, and manual
page names
Provides emphasis You must follow these steps.
Specifies a variable
that you must supply
when entering a
command
Bold New terms The Data Protector Cell
Computer Text and items on the
computer screen
Command names Use the grep command ...
File and directory
names
Process names Check to see if Data
Refer to the HP OpenView
Storage Data Protector
Integration Guide for more
information.
At the prompt type:
rlogin your_name where
you supply your login name.
Manager is the main ...
The system replies: Press
Enter
/usr/bin/X11
Protector Inet is
running.
Window/dialog box
names
Text that you must
enter
Keycap Keyboard keys Press Return.
ix
In the Backup Options
dialog box...
At the prompt, type: ls -l
Page 10
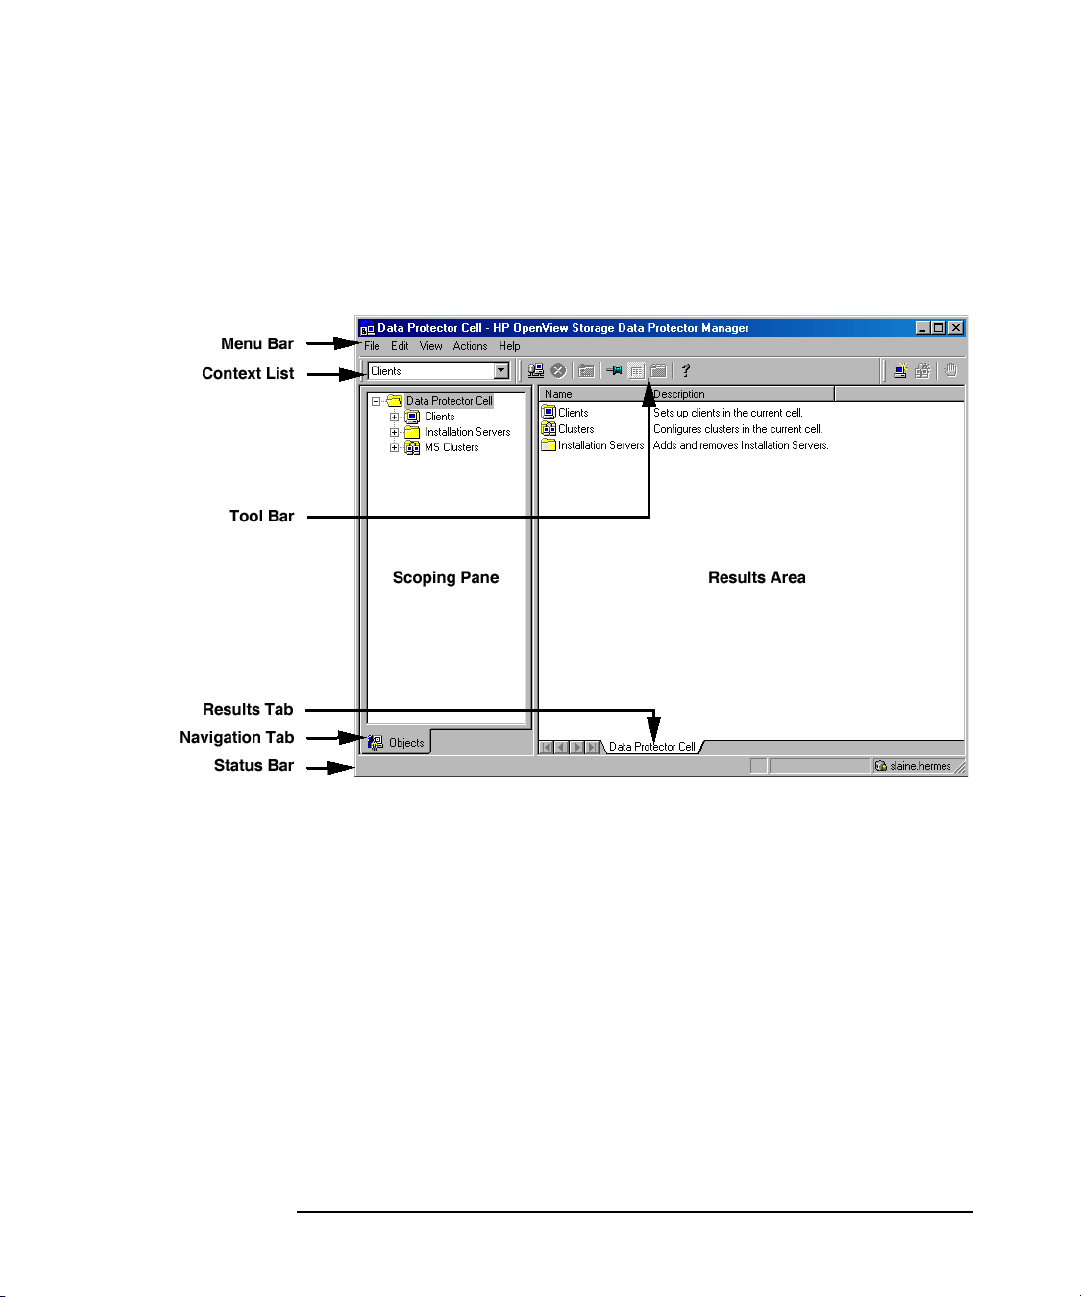
Data Protector provides a cross-platform (Windows and UNIX) graphical
user interface. Refer to the online Help for information about the Data
Protector graphical user interface.
Figure 1 Data Protector Graphical User Interface
x
Page 11

Contact Information
General
Information
Technical Support Technical support information can be found at the HP Electronic
Documentation
Feedback
Training
Information
General information about Data Protector can be found at
http://www.hp.com/go/dataprotector
Support Centers at
http://www.itrc.hp.com
Information about the latest Data Protector patches can be found at
http://www.itrc.hp.com
HP does not support third-party hardware and software. Contact the
respective vendor for support.
Your comments on the documentation help us to understand and meet
your needs. You can provide feedback at
storagedocs.feedback@hp.com
For information on currently available HP OpenView training, see the
HP OpenView World Wide Web site at
http://www.openview.hp.com/training/
Follow the links to obtain information about scheduled classes, training
at customer sites, and class registration.
xi
Page 12

xii
Page 13

Data Protector Documentation
Data Protector documentation comes in the form of manuals and online
Help.
Manuals Data Protector manuals are available in printed format and in PDF
format. Install the PDF files during the Data Protector setup procedure
by selecting the User Interface component on Windows or the
OB2-DOCS component on UNIX. Once installed, the manuals reside in the
<Data_Protector_home>\docs directory on Windows and in the
/opt/omni/doc/C/ directory on UNIX. You can also find the manuals in
PDF format at http://www.hp.com/support/manuals
HP OpenView Storage Data Protector Concepts Guide
This manual describes Data Protector concepts and provides background
information on how Data Protector works. It is intended to be used with
the task-oriented online Help.
HP OpenView Storage Data Protector Installation and Licensing
Guide
This manual describes how to install the Data Protector software, taking
into account the operating system and architecture of your environment.
This manual also gives details on how to upgrade Data Protector, as well
as how to obtain the proper licenses for your environment.
HP OpenView Storage Data Protector Troubleshooting Guide
This manual describes how to troubleshoot problems you may encounter
when using Data Protector.
HP OpenView Storage Data Protector Disaster Recovery Guide
This manual describes how to plan, prepare for, test and perform a
disaster recovery.
xiii
Page 14

HP OpenView Storage Data Protector Integration Guide
This manual describes how to configure and use Data Protector to back
up and restore various databases and applications. It is intended for
backup administrators or operators. There are four versions of this
manual:
• HP OpenView Storage Data Protector Integration Guide for Microsoft
Applications: SQL Server, Exchange Server, and Volume Shadow Copy
Service
This manual describes the integrations of Data Protector with the
following Microsoft applications: Microsoft Exchange Server
2000/2003, Microsoft SQL Server 7/2000/2005, and Volume Shadow
Copy Service.
• HP OpenView Storage Data Protector Integration Guide for Oracle
and SAP
This manual describes the integrations of Data Protector with Oracle,
SAP R3, and SAP DB.
• HP OpenView Storage Data Protector Integration Guide for IBM
Applications: Informix, DB2, and Lotus Notes/Domino
This manual describes the integrations of Data Protector with the
following IBM applications: Informix Server, IBM DB2, and Lotus
Notes/Domino Server.
• HP OpenView Storage Data Protector Integration Guide for Sybase,
Network Node Manager, and Network Data Management Protocol
This manual describes the integrations of Data Protector with
Sybase, Network Node Manager, Network Data Management
Protocol, and VMware.
HP OpenView Storage Data Protector Integration Guide for HP
OpenView
This manual describes how to install, configure, and use the integration
of Data Protector with HP OpenView Service Information Portal, and HP
OpenView Reporter. It is intended for backup administrators. It
discusses how to use the OpenView applications for Data Protector
service management.
xiv
Page 15

HP OpenView Storage Data Protector Integration Guide for HP
OpenView Operations for UNIX
This manual describes how to monitor and manage the health and
performance of the Data Protector environment with HP OpenView
Operations (OVO), HP OpenView Service Navigator, and HP OpenView
Performance (OVP) on UNIX.
HP OpenView Storage Data Protector Integration Guide for HP
OpenView Operations for Windows
This manual describes how to monitor and manage the health and
performance of the Data Protector environment with HP OpenView
Operations (OVO), HP OpenView Service Navigator, and HP OpenView
Performance (OVP) on Windows.
There are two versions of the manual:
• for OVO 7.1x, 7.2x
• for OVO 7.5
HP OpenView Storage Data Protector Zero Downtime Backup
Concepts Guide
This manual describes Data Protector zero downtime backup and instant
recovery concepts and provides background information on how Data
Protector works in a zero downtime backup environment. It is intended
to be used with the task-oriented HP OpenView Storage Data Protector
Zero Downtime Backup Administrator’s Guide and the HP OpenView
Storage Data Protector Zero Downtime Backup Integration Guide.
HP OpenView Storage Data Protector Zero Downtime Backup
Administrator’s Guide
This manual describes how to configure and use the integration of Data
Protector with HP StorageWorks Virtual Array, HP StorageWorks
Enterprise Virtual Array, EMC Symmetrix Remote Data Facility and
TimeFinder, and HP StorageWorks Disk Array XP. It is intended for
backup administrators or operators. It covers the zero downtime backup,
instant recovery, and the restore of filesystems and disk images.
HP OpenView Storage Data Protector Zero Downtime Backup
Integration Guide
This manual describes how to configure and use Data Protector to
perform zero downtime backup, instant recovery, and standard restore of
Oracle, SAP R/3, Microsoft Exchange Server 2000/2003, and Microsoft
xv
Page 16

SQL Server 2000 databases. The manual also describes how to configure
and use Data Protector to perform backup and restore using the
Microsoft Volume Shadow Copy Service.
HP OpenView Storage Data Protector MPE/iX System User Guide
This manual describes how to configure MPE/iX clients and how to back
up and restore MPE/iX data.
HP OpenView Storage Data Protector Media Operations User's
Guide
This manual provides tracking and management of offline storage
media. It is intended for network administrators responsible for
maintaining and backing up systems. It describes the tasks of installing
and configuring the application, performing daily media operations and
producing reports.
HP OpenView Storage Data Protector Product Announcements,
Software Notes, and References
This manual gives a description of new features of HP OpenView Storage
Data Protector A.06.00. It also provides information on supported
configurations (devices, platforms and online database integrations,
SAN, and ZDB), required patches, and limitations, as well as known
problems and workarounds. An updated version of the supported
configurations is available at http://www.hp.com/support/manuals
There are also four other Product Announcements, Software Notes and
References, which serve a similar purpose for the following:
• OVO UNIX integration
• OVO 7.1x/7.2x Windows integration
• OVO 7.5 Windows integration
• Media Operations
Online Help Data Protector provides context-sensitive (F1) Help and Help Topics for
Windows and UNIX platforms.
xvi
Page 17

Documentation Map
Abbreviations
Abbreviations in the documentation map that follows are explained
below. The manual titles are all preceded by the words “HP OpenView
Storage Data Protector”
Abbreviation Manual
CLI Command Line Interface Reference Guide
Concepts Concepts Guide
DR Disaster Recovery Guide
GS Getting Started Guide
Help Online Help
IG-IBM Integration Guide—IBM Applications
IG-MS Integration Guide—Microsoft Applications
IG-O/S Integration Guide—Oracle, SAP R/3, and
SAP DB/MaxDB
IG-OV Integration Guide—HP OpenView Service Information
Portal/OpenView Reporter
IG-OVOU Integration Guide—HP OpenView Operations, UNIX
IG-OVOW Integration Guide—HP OpenView Operations 7.1x,
7.2x, Windows
IG-OVOW Integration Guide—HP OpenView Operations 7.5,
Windows
IG-Var Integration Guide—Sybase, Network Node Manager,
NDMP and VMware
Install Installation and Licensing Guide
MO GS Media Operations Getting Started Guide
MO RN Media Operations Product Announcements, Software
Notes, and References
MO UG Media Operations User Guide
MPE/iX MPE/iX System User Guide
xvii
Page 18

Abbreviation Manual
PA Product Announcements, Software Notes, and
References
Trouble Troubleshooting Guide
ZDB Admin ZDB Administrator's Guide
ZDB Concpt ZDB Concepts Guide
ZDB IG ZDB Integration Guide
Map
The following table shows where to find information of different kinds.
Shaded squares are a good place to look first.
Integration
Guides
HelpGSConcepts
Backup XXX XXXX XXX X
CLI
Concepts/Techniques X
Disaster Recovery X X
Installation/Upgrade X X
Instant Recovery X X X
Licensing X
Limitations X XXXXXXXXX
New features X
Planning strategy X
Procedures/Tasks
Recommendations X X X X
Requirements X XXXXX X XXX
Restore XXX XXXX XX X
Support matrices X
Supported configurations X
Troubleshooting X X
X XXX XXXXXXX XX X
Install
Trouble
DR
PA
MS
O/S
IBM
Var
OV
X XXXXXXXXXX X
X
XX XXX XXX
XX X
XX
XXX
X XXXXX XX
ZDB MO
OVOU
OVOW
Concpt
AdminIGGS
XX
MPE/iX
User
PA
X
CLI
xviii
Page 19

Integrations
Look in these manuals for details of the following integrations:
Integration Guide
HP OpenView Operations (OVO) IG-OVOU, IG-OVOW
HP OpenView Reporter (OVR) IG-OV
HP OpenView Reporter Light IG-OVOW
HP OpenView Service Information Portal
(OVSIP)
HP StorageWorks Disk Array XP all ZDB
HP StorageWorks Enterprise Virtual Array
(EVA)
HP StorageWorks Virtual Array (VA) all ZDB
IBM DB2 UDB IG-IBM
Informix IG-IBM
Lotus Notes/Domino IG-IBM
Media Operations MO User
MPE/iX System MPE/iX
Microsoft Exchange Servers IG-MS, ZDB IG
Microsoft Exchange Single Mailbox IG-MS
Microsoft SQL Servers IG-MS, ZDB IG
Microsoft Volume Shadow Copy Service (VSS) IG-MS, ZDB IG
NDMP Server IG-Var
Network Node Manager (NNM) IG-Var
Oracle IG-O/S
IG-OV
all ZDB
Oracle ZDB ZDB IG
SAP DB IG-O/S
SAP R/3 IG-O/S, ZDB IG
Sybase IG-Var
Symmetrix (EMC) all ZDB
VMware IG-Var
xix
Page 20

xx
Page 21

In This Book
This guide describes how to configure and use Data Protector with
Oracle and SAP applications.
Audience
It is intended for backup administrators responsible for planning, setting
up, and maintaining network backups. It assumes you are familiar with:
• Basic Data Protector functionality
• Database administration
Conceptual information can be found in the HP OpenView Storage Data
Protector Concepts Guide, which is recommended to fully understand the
fundamentals and the model of Data Protector.
xxi
Page 22

Organization
The manual is organized as follows:
Chapter 1 “Integrating Oracle and Data Protector” on page 1.
Chapter 2 “Integrating SAP R/3 and Data Protector” on page 143.
Chapter 3 “Integrating SAP DB/MaxDB and Data Protector” on
page 249.
Glossary Definition of terms used in this manual.
xxii
Page 23

1 Integrating Oracle and Data
Protector
Chapter 1 1
Page 24

Integrating Oracle and Data Protector
In This Chapter
In This Chapter
This chapter explains how to configure and use the Data Protector
Oracle integration.
The chapter is organized into the following sections:
“Introduction” on page 3
“Integration Concept” on page 5
“Configuring the Integration” on page 11
“Configuring an Oracle Backup” on page 36
“Backing Up an Oracle Database” on page 55
“Restoring an Oracle Database” on page 70
“Monitoring an Oracle Backup and Restore” on page 110
“Using Oracle After Removing the Data Protector Oracle Integration
on UNIX and OpenVMS Systems” on page 112
“Oracle RMAN Metadata and Data Protector Media Management
Database Synchronization” on page 114
“Troubleshooting” on page 116
Chapter 12
Page 25

Integrating Oracle and Data Protector
Introduction
Introduction
Data Protector offers offline as well as online backup of the Oracle Server
instances. To enable recovery from an online backup, the respective
Oracle Server instance must operate in the ARCHIVELOG mode.
The online backup concept is widely accepted. It addresses the business
requirements for high application availability, as opposed to the offline
concept. During an online backup, a database remains available for use,
while during an offline backup, the database cannot be used by an
application.
Backup Types Using the Data Protector Oracle integration, you can perform the
following types of backups:
• Online backup of a whole database or parts of it
• Online incremental backup (Oracle differential incremental backup 1
to 4)
• Offline backup of a whole database
• Backup of Archived Redo Logs only
• Backup of the Oracle recovery catalog
• Backup of the Oracle control files
• With Oracle 10g, backup of recovery files residing in the flash
recovery area.
The following recovery files in the flash recovery area are backed up:
— full and incremental backup sets
— control file autobackup (SPFILE included if used)
— archived redo logs
— datafile copies, control file copies
Flashback logs, the current control file, and online redo logs are not
backed up.
•In Oracle Data Guard environment, backup of standby database.
Chapter 1 3
Page 26

Integrating Oracle and Data Protector
Introduction
Restore Types Using the Data Protector Oracle integration, you can restore the
following:
• The whole database or parts of it
• The database to a specific point in time
• From incremental backup
• To a host other than the one where the database originally resided
• A datafile to a location other than its original one
• A catalog before restoring the database
• From a chain of incremental backups
Duplicating a
Database
Using the Data Protector Oracle integration, you can perform
duplication of a production database.
Chapter 14
Page 27

Integrating Oracle and Data Protector
Integration Concept
Integration Concept
The Data Protector Oracle integration links the Oracle database
management software with Data Protector. From the Oracle point of
view, Data Protector represents a media management software. On the
other hand, the Oracle database management system can be seen as a
data source for backup, using media controlled by Data Protector.
Components The software components involved in backup and restore processes are:
• The Oracle Recovery Manager (RMAN)
• The Data Protector Oracle integration software
Integration
Functionality
Overview
How Does the
Integration Work?
The Data Protector Oracle Integration agent (ob2rman.pl) works with
RMAN to manage all aspects of the following operations on the Oracle
target database:
• Backups (backup and copy)
• Recovery (restore, recovery, and duplication)
Ob2rman.pl executes RMAN, which directs the Oracle server processes
on the target database to perform backup, restore and recovery. RMAN
maintains the required information about the target databases in the
recovery catalog, the Oracle central repository of information, and in the
control file of a particular target database.
The main information which ob2rman.pl provides to RMAN is:
• Number of allocated RMAN channels
• RMAN channel environment parameters
• Information on the database objects to be backed up or restored
For backup, ob2rman.pl uses the Oracle target database views to get
information on which logical (tablespaces) and physical (datafiles) target
database objects are available for backup.
For restore, ob2rman.pl uses current control file or recovery catalog (if
used) to get information on which objects are available for restore.
Using the Data Protector integration with RMAN, you can back up and
restore the Oracle control files, datafiles, and Archived Redo Logs.
Chapter 1 5
Page 28

Integrating Oracle and Data Protector
Integration Concept
The interface from the Oracle server processes to Data Protector is
provided by the Data Protector Oracle integration Media Management
Library (MML), which is a set of routines that allows the reading and
writing of data to General Media Agents.
Besides handling direct interaction with the media devices, Data
Protector provides scheduling, media management, network backups,
monitoring, and interactive backup.
Oracle Backup
Types Handled by
the Integration
Using this integration, you can perform the Oracle full and incremental
(up to incremental level 4) backup types.
With Oracle full and incremental level 0 backups all data blocks per
datafile are backed up. With Oracle incremental backup (level 1 or
higher), only the data blocks that have changed since a previous backup
are backed up.
The difference between a full backup and an incremental level 0 backup
is that the incremental 0 is a base for subsequent incremental backups.
Therefore, Data Protector always performs Oracle incremental 0 when
you select the full backup type in a backup specification.
The full backup type is not related to the number of datafiles included in
the backup, and can therefore be performed per single datafile. The data
being backed up, regardless of the backup type (full or incremental), is
selected and controlled by Oracle.
Oracle incremental backups can be differential or cumulative. By
default, Data Protector performs Oracle differential incremental
backups. By changing the default RMAN script created by Data
Protector, you can specify also a cumulative backup. For information on
differential and cumulative Oracle backups, see the Oracle Recovery
Manager User’s Guide.
NOTE Regardless of the Oracle backup type specified, Data Protector always
marks the Oracle backups as full in the Data Protector database, since
the Data Protector incremental backup concept is different from the
Oracle incremental backup concept.
A backup that includes all datafiles and current control file that belong
to an Oracle Server instance is known as a whole database backup.
Chapter 16
Page 29

Integrating Oracle and Data Protector
Integration Concept
These features can be used for online or offline backup of the Oracle
target database. However, you must ensure that the backup objects (such
as tablespaces) are switched into the appropriate state before and after a
backup session. For online backup, the database instance must operate
in the ARCHIVELOG mode; whereas for offline backup, objects need to be
prepared for backup using the Pre-exec and Post-exec options in the
backup specification.
The Data Protector backup specification contains information about
backup options, commands for RMAN, Pre- and Post-exec commands,
media, and devices.
The Data Protector backup specification allows you to configure a backup
and then use the same specification several times. Furthermore,
scheduled backups can only be performed using a backup specification.
Backup and restore of an Oracle target database can be performed using
the Data Protector User Interface, the RMAN utility, or the Oracle
Enterprise Manager utility.
The heart of the Data Protector Oracle integration is MML, which
enables an Oracle server process to issue commands to Data Protector for
backing up or restoring parts or all of the Oracle target database files.
The main purpose is to control direct interaction with media and devices.
Backup Flow A Data Protector scheduled or interactive backup is triggered by the
Data Protector Backup Session Manager, which reads the backup
specification and starts the ob2rman.pl command on the Oracle Server
under a specific user. This user must be defined as the owner of the Data
Protector Oracle backup specification. Further on, ob2rman.pl prepares
the environment to start the backup, and issues the RMAN backup
command. RMAN instructs the Oracle Server processes to perform the
specified command.
The Oracle Server processes initialize the backup through MML, which
establishes a connection to the Data Protector Backup Session Manager.
The Backup Session Manager starts the General Media Agent, sets up a
connection between MML and the General Media Agent, and then
monitors the backup process.
The Oracle Server processes read the data from the disks and send it to
the backup devices through MML and the General Media Agent.
RMAN writes information regarding the backup either to the recovery
catalog (if one is used) or to the control file of the Oracle target database.
Chapter 1 7
Page 30

Integrating Oracle and Data Protector
Integration Concept
Messages from the backup session are sent to the Backup Session
Manager, which writes messages and information regarding the backup
session to the IDB.
The Data Protector General Media Agent writes data to the backup
devices.
Restore Flow A restore session can be started using:
• Data Protector GUI
•RMAN CLI
• Oracle Enterprise Manager GUI
You must specify which objects are to be restored.
A restore from the Data Protector user interface is triggered by the Data
Protector Restore Session Manager, which starts the ob2rman.pl
command. Ob2rman.pl prepares the environment to start the restore,
and issues the RMAN restore command. RMAN checks the recovery
catalog (if one is used) or the control file to gather the information about
the Oracle backup objects. It also contacts the Oracle Server processes,
which initialize the restore through MML. MML establishes a connection
with the Restore Session Manager and passes along the information
about which objects and object versions are needed.
The Restore Session Manager checks the IDB to find the appropriate
devices and media, starts the General Media Agent, establishes a
connection between MML and the General Media Agent, and then
monitors the restore and writes messages and information regarding the
restore to the IDB.
The General Media Agent reads the data from the backup devices and
sends it to the Oracle Server processes through MML. The Oracle Server
Processes write the data to the disks.
The concept of Oracle integration, data and the control flow are shown in
Figure 1-1 on page 9, and the related terms are explained in the
following table.
Chapter 18
Page 31

Integrating Oracle and Data Protector
Figure 1-1 Data Protector Oracle Integration Concept
Integration Concept
Oracle 10g database files can also be part of ASM configuration. They
can reside in the flash recovery area.
Legend:
SM The Data Protector Session Manager, which can be the
Data Protector Backup Session Manager during a
backup session and the Data Protector Restore Session
Manager during a restore session.
RMAN The Oracle Recovery Manager.
Data Protector MML The Data Protector Oracle integration Media
Management Library, which is a set of routines that
enables data transfer between the Oracle Server and
Data Protector.
Backup API The Oracle-defined application programming interface.
Chapter 1 9
Page 32

Integrating Oracle and Data Protector
Integration Concept
IDB The IDB where all the information about Data
Protector sessions, including session messages, objects,
data, used devices, and media is written.
MA The Data Protector General Media Agent, which reads
and writes data from and to media devices.
Chapter 110
Page 33

Integrating Oracle and Data Protector
Configuring the Integration
Configuring the Integration
Prerequisites
• It is assumed that you are familiar with the Oracle database
administration and the basic Data Protector functionality.
• You need a license to use the Data Protector Oracle integration. See
the HP OpenView Storage Data Protector Installation and Licensing
Guide for information about licensing.
• Before you begin, ensure that you have correctly installed and
configured the Oracle Server and Data Protector systems. See the:
— HP OpenView Storage Data Protector Product Announcements,
Software Notes, and References or
http://www.hp.com/support/manuals
supported versions, platforms, devices, and other information.
— HP OpenView Storage Data Protector Installation and Licensing
Guide for instructions on how to install Data Protector on various
architectures and how to install the Data Protector Oracle
integration.
for an up-to-date list of
— Oracle Recovery Manager User’s Guide and References for Oracle
concepts and backup/recovery strategies.
— Oracle Backup and Recovery Guide for the configuration and use
of Recovery Manager, as well as for Oracle backup terminology
and concepts.
— Oracle Enterprise Manager User’s Guide for information about
backup and recovery with the Oracle Enterprise Manager, as well
as information about SQL*Plus.
• The Oracle Server software must be installed and the Oracle target
database must be open or mounted.
• If the Oracle recovery catalog database is used, ensure that it is
properly configured and open.
• Oracle net services must be properly configured and running for the
Oracle target database and the recovery catalog, if you use it.
Chapter 1 11
Page 34

Integrating Oracle and Data Protector
Configuring the Integration
See the Oracle Recovery Manager User’s Guide and References for
more information about different connection options.
See “Troubleshooting” on page 116 for details about how to check the
prerequisites listed above.
Note that the Data Protector Oracle integration uses RMAN for
backup and restore. RMAN connection to a target database requires a
dedicated server process. To ensure that RMAN does not connect to a
dispatcher when the target database is configured for a shared server,
the net service name used by RMAN must include
(SERVER_DEDICATED) in the CONNECT_DATA attribute of the
connection string.
• On Windows, if the Oracle target database and the Oracle recovery
catalog are installed on two different systems, the Data Protector
Inet service account on the system with the Oracle target database
installed must be configured as a domain account that is a member of
the Administrators group on both systems. For information on how to
change the Data Protector Inet service account, see the online
Help index: “changing Data Protector Inet account”.
• On OpenVMS, check the network alias names of the client. It is
recommended to provide the full client name (together with the alias)
to avoid non-detection of the Data Protector Oracle Integration agent.
• To successfully back up the recovery files residing in the flash
recovery area (Oracle 10g only), ensure that you have correctly
configured the flash recovery area.
• In case of Real Application Cluster (RAC), each node must have a
dedicated disk for storing archive logs. Such disks must be NFS
mounted on all other RAC nodes.
However, if the archive logs are not on a NFS mounted disk, you must
modify the archive log backup specification. See “Backup of Archive
Logs on RAC Cannot be Performed” on page 132.
Limitations
•The MAXPIECESIZE RMAN parameter option is not supported because
the restore of multiple backup pieces created during a backup is not
possible using the Data Protector Oracle integration.
Chapter 112
Page 35

Integrating Oracle and Data Protector
Configuring the Integration
• The Data Protector Oracle integration does not support the RMAN
disk backup of a target database to the flash recovery area. The Data
Protector Oracle integration supports only backups from the flash
recovery area to a backup device. However, you can create an RMAN
script that backs up the target database to the flash recovery area
before or after the Data Protector backs up files from the flash
recovery area to a backup device. The script can be set up using the
Pre-exec or Post-exec option when creating a backup specification.
• On an OpenVMS client, you can only configure a Data Protector
admin user with the username <Any> and the group name <Any>.
This limitation is due to the lack of the user group name concept on
OpenVMS.
• Oracle Data Guard:
— You cannot configure only a standby database (without
configuring primary database).
— Only physical standby database backup is supported.
— Recovery catalog database is required for standby configurations.
— The Oracle database identifier (DBID) must be unique for all
databases within a Data Protector cell.
— For other limitations regarding RMAN backup, restore, recovery,
and duplication in Oracle Data Guard environment, see the Oracle
documentation.
Before You Begin
✓ Configure devices and media for use with Data Protector.
✓ Test whether the Oracle Server system and the Cell Manager
communicate properly: Configure and run a Data Protector filesystem
backup and restore on the Oracle Server system.
✓ Identify the Oracle database user that will be used by Data Protector
for backup. This user must have the SYSDBA privilege granted. For
example, it could be the Oracle user sys, which is created during
database creation.
See the Oracle documentation for more information on user privileges
in Oracle.
Chapter 1 13
Page 36

Integrating Oracle and Data Protector
Configuring the Integration
Cluster-Aware Clients
If you intend to use the Data Protector CLI, set the Data Protector
environment variable OB2BARHOSTNAME to the virtual server name. Set
the variable on the Oracle Server system as follows:
Windows: set OB2BARHOSTNAME=<virtual_server_name>
UNIX: export OB2BARHOSTNAME=<virtual_server_name>
RAC: Configure an Oracle database on every node from where you want
to run backups and restores.
HP-UX with RAC: If you want to use virtual hostname, create an
MC/ServiceGuard package containing only the virtual IP and the virtual
hostname parameters and distribute it among the RAC nodes.
Linking Oracle with the Data Protector Oracle Integration Media Management Library (MML) on UNIX
To use the Data Protector Oracle integration, you need to manually link
the Oracle server software and MML on the Data Protector Oracle
Server system.
MML is invoked by the Oracle server when it needs to write to or read
from devices using Data Protector.
IMPORTANT After uninstalling the Data Protector Oracle integration on an Oracle
server system, the Oracle server software is still linked to MML. You
must re-link the Oracle binary to remove this link. If this is not done, the
Oracle server cannot be started after the integration has been removed.
See “Using Oracle After Removing the Data Protector Oracle Integration
on UNIX and OpenVMS Systems” on page 112 for information on
removing the integration link.
MC/ServiceGuard: When linking Oracle with MML, link it on all nodes.
On Oracle Server systems, MML is located in the directory:
HP-UX and Solaris: /opt/omni/lib
Other UNIX: /usr/omni/lib
Chapter 114
Page 37

Integrating Oracle and Data Protector
Configuring the Integration
The filename for MML depends on the platform:
Table 1-1 Filenames for the MML on Different Platforms
Platforms 32-bit 64-bit
HP-UX libob2oracle8.sl libob2oracle8_64bit.sl
HP-UX on IA-64 libob2oracle8.so libob2oracle8_64bit.so
Solaris libob2oracle8.so libob2oracle8_64bit.so
AIX libob2oracle8.a libob2oracle8_64bit.a
Other UNIX libob2oracle8.so libob2oracle8_64bit.so
Proceed as follows:
1. Change to the <ORACLE_HOME>/lib directory:
32-bit Oracle: cd <ORACLE_HOME>/lib
64-bit Oracle 8i: cd <ORACLE_HOME>/lib64
64-bit Oracle 9i/10g: cd <ORACLE_HOME>/lib
2. Perform this step only if the libobk.sl (HP-UX) or libobk.so
(Solaris and other UNIX) file is already created in the
<ORACLE_HOME>/lib directory. Otherwise, skip this step.
Run:
HP-UX: mv libobk.sl libobk.sl.orig
Solaris and other UNIX: mv libobk.so libobk.so.orig
IMPORTANT If you intend to uninstall the Data Protector Oracle integration and to
continue using Oracle on the same system after the integration is
removed, do not delete libobk.sl.orig (HP-UX) or libobk.so.orig
(Solaris and other UNIX).
3. Run:
HP-UX:
• 32-bit:
ln -s /opt/omni/lib/libob2oracle8.sl libobk.sl
Chapter 1 15
Page 38

Integrating Oracle and Data Protector
Configuring the Integration
• 64-bit:
ln -s /opt/omni/lib/libob2oracle8_64bit.sl libobk.sl
Solaris:
• 32-bit:
ln -s /optS/omni/lib/libob2oracle8.so libobk.so
• 64-bit:
ln -s /opt/omni/lib/libob2oracle8_64bit.so libobk.so
Other UNIX:
• 32-bit:
ln -s /opt/omni/lib/libob2oracle8.so libobk.so
• 64-bit:
ln -s /opt/omni/lib/libob2oracle8_64bit.so libobk.so
Linking Oracle with MML on OpenVMS Systems
Example
On Oracle Server systems running on OpenVMS, link the MML
SYS$SHARE:LIBOBK2SHR32_8I.EXE (Oracle8i) or
SYS$SHARE:LIBOBK2SHR32.EXE (Oracle9i) with the Oracle Server.
Linking Oracle8i
1. Run ORAUSER.COM under $ORACLE_HOME/UTIL.
2. Edit the following files:
• ORA_UTIL:RDBMS_RMAN_NOSHARE.OPT
!rdbsm libraries
ora_olb:libvsn8/lib
!ora_rman_mml/lib COMMENT OUT THIS LINE
ora_olb:libwtc8/lib
ora_olb:libclient8/lib
ora_olb:libcommon8/lib
ora_olb:libgeneric8/lib
ora_olb:libclient8/lib
Chapter 116
Page 39

ora_olb:libcommon8/lib
generic8/libgeneric8/lib
• ORA_RDBMS:LORACLE_64.COM
Integrating Oracle and Data Protector
Configuring the Integration
Example
Example
ora_olb:libclient8_64/lib/incl=(kgu),-
‘rdbmslib$$’-
‘plsqllib$$’-
‘rdbmslib$$’-
!ora_rman_mml_64/lib,- COMMENT OUT THIS LINE
ora_olb:libnro8_64/lib,-
‘network$$’-
ora_olb:libtrace8_64/lib,-
‘oracoreSS’-
‘cart64$$’-
ora_olb:libslax8_64/lib,-
‘utl$$’-
‘oracore$$’-
sys$input/options
SYS$SHARE:LIBOBK2SHR32_8I.EXE/SHARE,- ADD THIS LINE
• ORA_UTIL:LOUTL.COM
$nonSharedLink:
$’loutl_link_cmd$$’/alpha/nouserlibrary’dotrace$$”map$$”mape
xtra$$”
image$$’=
‘filename$$’switch$$”userlink$$’/sysexe -
‘p2’,-
ora_olb:libclient8/lib,-
ora_olb:libsql8/lib,-
‘ocis$$’-
‘fastupi$$’-
‘network$$’-
rdbmslib_noshare$$’-
Chapter 1 17
Page 40

Integrating Oracle and Data Protector
Configuring the Integration
‘oracore$$’-
‘network$$’-
‘rdbmslib_noshare$$’-
‘otracelib$$’-
‘oracore$$’-
‘rdbmslib_noshare$$’-
‘oracore$$’-
‘useroption$$’-
sys$input/opt
SYS$SHARE:LIBOBK2SHR32_8I.EXE/SHARE,- ADD THIS LINE
sys$share:decc$shr/share
!Temporary: fixup readonly attributes between compiler
versions
psect_attr = $readonly$,pic,shr
3. Shut down the Oracle database instance on the Oracle Server system.
4. Re-link ORA_RDBMS: executables by invoking
ORA_INSTALL:ORACLEINS:
$@ORA_INSTALL:ORACLEINS
Oracle Installation Startup Menu
Options:
1. Create a new ORACLE system.
2. Upgrade your system from the Oracle distribution tape.
3. Reconfigure existing products, manage the database, or load
demo tables.
4. Exit.
Choose option 3.
NOTE Before upgrading, configuring, or managing the database, or loading
demo tables, run ORA_UTIL:ORAUSER.COM. If you created an instance,
run:
ORA_DB:ORAUSER_<DB_NAME>.COM <SID> <setup_node>.
Chapter 118
Page 41

Integrating Oracle and Data Protector
Configuring the Integration
When you are prompted for the root directory, enter
DISK$ORADISK_ODS5:[ORACLE8.HOME1].
NOTE If loading products from savesets, enter the drive or directory where
savesets are located. If loading from a remote device, do not include
username and password. For more information, see the Oracle
documentation for OpenVMS.
When you are back at the main menu, select the option Software
Installation and Upgrade Menu. The following appears:
Software Installation and Upgrade Menu
1. Select Licensed Products to Load
2. Select Build Configuration Options
3. Load and Build Selected Licensed Products
4. Build Selected Licensed Products
Enter 1.
Select the licensed products from the list by entering the number
assigned to RDBMS.
Exit the menu. You are taken to Software Installation and
Upgrade Menu.
Enter 2 to select build configuration options. You are now at the
Select Configuration Options menu.
Enter the number assigned to RDBMS. Select RDBMS configuration
options as follows:
1. System or Group Installation? [S/G] S
2. ORACLE Image Identifier? [@6] V817
3. Include Distributed database option? [Y/N] Y
4. Include Context option? [Y/N] Y
5. Include Object Support option? [Y/N] Y
6. Include Spatial Data option? [Y/N] Y
7. Include Data Partitioning option? [Y/N] Y
8. Include Parallel Server option? [Y/N] Y
Chapter 1 19
Page 42

Integrating Oracle and Data Protector
Configuring the Integration
9. Include Java Aurora external option? [Y/N] N
The options marked by Y will be selected.
Exit the menu to return to Select Configuration Options. Enter
the number of the product you want to configure (18 corresponds to
RDBMS). In Software Installation and Upgrade Menu, enter 4 to
build the selected licensed products (RDBMS). That will initiate the
relinking process.
NOTE To create known file entries for the linked products using the VMS
INSTALL utility, run ORA_INSTALL:ORA_INSUTL.COM. For details, see the
Oracle documentation for OpenVMS.
After Relinking 1. Start the Oracle database.
2. Configure ORACLE8I using the GUI (see “Configuring Oracle
Databases” on page 24), and then execute the following RMAN script
to test the MML (SBT) interface:
run {
allocate channel ‘dummy’ type ‘SBT_tape’;
release channel ‘dummy’;
}
If the channel allocation through SBT succeeds, relinking was
performed successfully.
Linking Oracle9i
1. Make sure Oracle RMAN is set up and you are able to access it. This
can be achieved by performing a test backup using the following
RMAN script:
{
allocate channel d1 type disk;
backup tablespace system;
release channel d1;
}
You can skip this step if you are already using RMAN for backing up
Oracle.
Chapter 120
Page 43

Integrating Oracle and Data Protector
Configuring the Integration
2. Check the presence of the MML LIBOBK2SHR32.EXE in the
SYS$SHARE: directory.
NOTE The logical definition for SYS$SHARE:LIBOBK2SHR32.EXE is
$DEFINE/SYSTEM DP_SBT SYS$SHARE:LIBOBK2SHR32.EXE.
You are now ready to use the MML with RMAN to perform backups. For
information on how to use RMAN, see the Oracle documentation.
After Relinking To test the MML (SBT) interface, configure Oracle 9i using the GUI (see
“Configuring Oracle Databases” on page 24).
Configuring Oracle Users on UNIX and OpenVMS
On UNIX and OpenVMS, to start an Oracle backup session, a user needs
to perform an operating system logon to the system where an Oracle
Server is running.
If properly configured, this user is allowed to back up or restore an
Oracle database. To start a backup of an Oracle database using Data
Protector, the user must also become the owner of the Data Protector
backup specification.
As the owner of the backup specification, the Oracle user must be added
to the Data Protector admin or operator user group. On OpenVMS,
configure a Data Protector admin user with the username <Any> and the
group name <Any>.
On UNIX, you can identify this user by running the following command
on the Oracle Server system:
ps -ef|grep ora_pmon_<DB_NAME>
or
ps -ef|grep ora_lgwr_<DB_NAME>
Chapter 1 21
Page 44

Integrating Oracle and Data Protector
Configuring the Integration
Figure 1-2 Finding the Oracle User
The example above states that the user ora has sufficient privileges
within the Oracle database to back up and restore the database.
Therefore, this user must be added to the corresponding Data Protector
user group (admin or operator) and must also become the owner of the
backup specification to be able to back up the Oracle database using
Data Protector.
IMPORTANT Additionally, the user root (UNIX only) on the Oracle Server has to be
added to the Data Protector admin or operator user group.
For information on how to add a user to a user group, see the online Help
index: “adding users”.
After the two users are added to the Data Protector admin or operator
user group, Data Protector sessions can be started under the user
account with all the necessary privileges required to perform an Oracle
database backup with Data Protector.
MC/ServiceGuard: In a cluster environment, add both users (Oracle
user and the user root) to the Data Protector admin or operator group
on the virtual server and on every physical and virtual node in the
cluster.
If two or more Oracle users have the same user ID, all of them must be
added to the Data Protector admin or operator user group.
OpenVMS To configure an Oracle user on OpenVMS, proceed as follows:
1. Oracle 9i
Modify the location of ORAUSER.COM and ORATAB files.
• ORAUSER.COM
Depending on the current location of ORAUSER.COM, modify
$PIPE@DKA0:[ORACLE]ORAUSER.COM > NLA0: accordingly. For
example, if ORAUSER.COM is located in DKC0:[ORACLE9i], the
changes will be:
Chapter 122
Page 45

Integrating Oracle and Data Protector
Configuring the Integration
$PIPE@DKC0:[ORACLE9i]ORAUSER.COM > NLA0:
• ORATAB
Depending on the current location of ORATAB, modify
$DEFINE/NOLOG/JOB ORATAB_LOC DKA0:[ORACLE]ORATAB
accordingly. For example, if ORATAB is located in
DKC0:[ORACLE9i], the changes will be:
$DEFINE/NOLOG/JOB ORATAB_LOC DKCF0:[ORACLE9i]ORATAB
Oracle 8i
Execute the OMNI$ROOT:[BIN]DP_ORA8I_RENAME.COM command. This
will update the required Oracle8i executables.
2. Oracle 8i/9i
Uncomment the following lines in OMNI$ROOT:[LOG]LOGIN.COM:
$DEFINE /NOLOG /SYSTEM DP_SBT SYS$SHARE:LIBOBK2SHR32.EXE
$@OMNI$ROOT:[BIN]OMNI$CLI_SETUP.COM
$@OMNI$ROOT:[BIN.PERL]PERL_SETUP.COM
$DEFINE /process PERL_ENV_TABLES "LNM$PROCESS",
"LNM$JOB", "LNM$SERVER", "LNM$GROUP", "LNM$SYSTEM"
3. Oracle 8i/9i
If you run the Media Agent and Data Protector Oracle integration
agents on the same OpenVMS system, modify the group ID of the
omniadmin user as DBA using the MCR AUTHORIZE utility:
a. Log in as a privileged user.
b. Execute:
$set def sys$system
$mcr authorize
UAF>show onmiadmin
UAF>show oracle
c. Compare the accounts for Oracle and omniadmin users. If the
accounts are different, execute:
UAF>modify omniadmin/UIC=UID show
d. Verify the changes of the group ID.
Chapter 1 23
Page 46

Integrating Oracle and Data Protector
Configuring the Integration
4. Oracle 8i/9i
If you use CLI commands for Oracle integration agents, execute
OMNI$ROOT:[LOG]LOGIN.COM.
5. Oracle 8i/9i
Verify that the -key Oracle8 entry is present in
OMNI$ROOT:[CONFIG.CLIENT]ONMI_INFO, for example:
-key oracle8 -desc "Oracle Integration" -nlsset 159 -nlsId
12172 -flags 0x7 -ntpath "" -uxpath "" -version A.06.00
If the entry is not present, copy it from
OMNI$ROOT:[CONFIG.CLIENT]OMNI_FORMAT. Otherwise, the Oracle
integration will not be shown as installed on the OpenVMS client.
TIP To determine the status of processes (OMNI$I*) and subprocesses
(OMNI$ADMIN_*) on your OpenVMS system, use the following command
procedure:
$@OMNI$ROOT:[BIN}OMNI$DIAGNOSE.COM
This command procedure displays the active parent processes, the
session of job name, and the logfile name.
Configuring Oracle Databases
Configuring an Oracle database involves preparing the environment for
starting a backup. The environment parameters such as the Oracle home
directory and the connection string to the database are saved in the Data
Protector Oracle configuration files on the Cell Manager. The database
must be open during the configuration procedure. The configuration
must be done for each Oracle database.
If a recovery catalog has been created and the Oracle target database has
not yet been registered in the recovery catalog database, this will occur
during the configuration procedure.
To configure an Oracle database, use the Data Protector GUI or CLI.
Chapter 124
Page 47

Integrating Oracle and Data Protector
Using the Data Protector GUI
Configure an Oracle database when you create first backup specification
for the database. Start with the procedure “Creating a Data Protector
Oracle Backup Specification” on page 37 and at step 5 proceed as follows:
1. In the Configure Oracle dialog box and in the General page, specify
the pathname of the Oracle Server home directory.
Figure 1-3 Configuring Oracle - General (Windows)
Configuring the Integration
Chapter 1 25
Page 48

Integrating Oracle and Data Protector
Configuring the Integration
Figure 1-4 Configuring Oracle - General (UNIX)
2. In the Primary page, specify the login information to the primary
database.
Note that the user must have the SYSDBA privilege granted.
In Services, type the net service name for the primary database
instance. The backup will be performed on the system where this
database instance resides.
Note that each database instance for which the net service name is
provided must be linked with the Data Protector MML. This means
that the Data Protector Oracle integration software component must
be installed on each system where the specific database instance is
running.
RAC: List all net services names for the primary database separated
by a comma. Each net service name must resolve into a specific
database instance.
NOTE You cannot specify a net service name that uses Oracle Net to distribute
RMAN connections to more than one instance. In any RMAN connection
made through a net service, each net service must specify only one
instance.
Chapter 126
Page 49

Figure 1-5 Configuring Oracle - Primary
3. In the Catalog page, select Use target database control file
instead of recovery catalog to use the primary database control
file.
Integrating Oracle and Data Protector
Configuring the Integration
To use the recovery database catalog as an RMAN repository for
backup history, select Use recovery catalog and specify the login
information to the recovery catalog.
Oracle Data Guard: If you intend to back up a standby database,
you must use the recovery catalog.
The user specified must be the owner of the recovery catalog.
In Services, type the net service name for the recovery catalog.
Chapter 1 27
Page 50

Integrating Oracle and Data Protector
Configuring the Integration
Figure 1-6 Configuring Oracle - Catalog
4. Oracle Data Guard: If you intend to back up a standby database,
configure also the standby database:
In the Standby page, select Configure standby database and
specify the login information to the standby database.
In Services, type the net service name for the standby database
instance.
Note that each database instance for which the net service name is
provided must be linked with the Data Protector MML. This means
that the Data Protector Oracle integration software component must
be installed on each system where the specific database instance is
running.
RAC: List all net services names for the standby database separated
by a comma. Each net service name must resolve into a specific
database instance.
NOTE You cannot specify a net service name that uses Oracle Net to distribute
RMAN connections to more than one instance. In any RMAN connection
made through a net service, each net service must specify only one
instance.
Chapter 128
Page 51

Figure 1-7 Configuring Oracle - Standby
5. Click OK.
The Oracle database is configured. Exit the GUI or proceed with creating
the backup specification at step 6 on page 1-40.
Integrating Oracle and Data Protector
Configuring the Integration
Using the Data Protector CLI
NOTE On OpenVMS, to invoke the Data Protector CLI, run:
$@OMNI$ROOT:[BIN]OMNI$CLI_SETUP.COM
1. UNIX only: Log in to the Oracle Server system as user root or as the
Oracle user that is identified as described in “Configuring Oracle
Users on UNIX and OpenVMS” on page 21.
2. On the Oracle Server system, from the directory:
Windows: <Data_Protector_home>\bin
HP-UX and Solaris: /opt/omni/lbin
Other UNIX: /usr/omni/bin/
OpenVMS: OMNI$ROOT:[BIN]
run:
Chapter 1 29
Page 52

Integrating Oracle and Data Protector
Configuring the Integration
On Windows:
perl -I..\lib\perl util_oracle8.pl -config -dbname
<DB_NAME> -orahome <ORACLE_HOME> <PRIMARY_DB_LOGIN>
[<CATALOG_DB_LOGIN>] [<STANDBY_DB_LOGIN>][-client
<CLIENT_NAME>]
On UNIX and OpenVMS:
util_oracle8.pl -config -dbname <DB_NAME> -orahome
<ORACLE_HOME> <PRIMARY_DB_LOGIN> [<CATALOG_DB_LOGIN>]
[<STANDBY_DB_LOGIN>][-client <CLIENT_NAME>]
where:
PRIMARY_DB_LOGIN is:
-prmuser <PRIMARY_USERNAME>
-prmpasswd <PRIMARY_PASSWORD>
-prmservice
<primary_net_service_name_1>[,<primary_net_service_name_2>,
...]
CATALOG_DB_LOGIN is:
-rcuser <CATALOG_USERNAME>
-rcpasswd <CATALOG_PASSWORD>
-rcservice <catalog_net_service_name>
STANDBY_DB_LOGIN is:
-stbuser <STANDBY_USERNAME>
-stbpasswd <STANDBY_PASSWORD>
-stbservice
<standby_net_service_name_1>[,<standby_net_service_name_2>,
...]
Oracle Data Guard: If you intend to back up a standby database, you
must provide the <STANDBY_DB_LOGIN> information. For standby
database backup, a recovery catalog must be used. Therefore, you must
also provide the <CATALOG_DB_LOGIN> information.
Chapter 130
Page 53

Integrating Oracle and Data Protector
Configuring the Integration
Parameter Description
<CLIENT_NAME> Name of the Oracle Server system with the database
to be configured. It needs to be specified only in a
cluster environment.
RAC: Name of the node or the virtual server of the
Oracle resource group. The latter can only be used on
HP-UX.
Oracle Data Guard: Name of either a primary
system or secondary (standby) system.
<DB_NAME> Name of the database to be configured.
<ORACLE_HOME> Pathname of the Oracle Server home directory.
<PRIMARY_USERNAME> <PRIMARY_PASSWORD> Username and
password for login to the target or primary database.
Note that the user must have the SYSDBA privilege
granted.
<primary_net_service_name_1>
[,<primary_net_service_name_2>, ...] Net services names for
the primary database.
RAC: Each net service name must resolve into a
specific database instance.
<CATALOG_USERNAME> <CATALOG_PASSWORD> Username and
password for login to the recovery catalog. This is
optional and is used only if you use the recovery catalog
database catalog as an RMAN repository for backup
history.
<catalog_net_service_name> Net service name for the recovery
catalog.
<STANDBY_USERNAME> <STANDBY_PASSWORD> This is used in Oracle
Data Guard environment for backing up a standby
database. Username and password for login to the
standby database.
<standby_net_service_name_1>
[,<standby_net_service_name_2>, ...] Net services names for
the standby database.
Chapter 1 31
Page 54

Integrating Oracle and Data Protector
Configuring the Integration
Example The following example represents configuration on HP-UX or Solaris of
an Oracle database and its recovery catalog in Oracle Data Guard
environment.
The following names are used in the example:
database name: oracl
primary user name: system
primary password: manager
primary net service name 1: netservice1
primary net service name 2: netservice2
recovery catalog user name: rman
recovery catalog password: manager
recovery catalog net service name: catservice
standby user name: system
standby password: manager
standby net service name 1: netservicesb1
standby net service name 2: netservicesb2
Syntax /opt/omni/lbin/util_oracle8.pl -config -dbname oracl \
-orahome /app10g/oracle10g/product/10.1.0 -prmuser system \
-prmpasswd manager -prmservice netservice1,netservice2 \
rcuser rman -rcpasswd manager -rcservice catservice \
-stbuser system -stbpasswd manager -stbservice \
netservicesb1,netservicesb2 -zdb_method BACKUP_SET -pfile \
/app10g/oracle10g/product/10.1.0/dbs/pfile.ora
If you need to export some variables before starting SQL*Plus, TNS
listener, or RMAN, these variables must be defined in the Environment
section of the Data Protector Oracle global configuration file or using the
Data Protector GUI.
What Happens After the Configuration?
The util_oracle8.pl command is started on the Oracle server system.
It saves the configuration parameters in the Data Protector Oracle
configuration files.
Chapter 132
Page 55

Integrating Oracle and Data Protector
Configuring the Integration
If the recovery catalog was selected, util_oracle8.pl starts the Oracle
RMAN command, which registers the target database in the recovery
catalog.
Information about the Oracle database’s structure is transferred to the
recovery catalog from the Oracle database’s control files.
Checking the Configuration
You can check the configuration of an Oracle database after you have
created at least one backup specification for the database. If you use the
Data Protector CLI, a backup specification is not needed.
Using the Data Protector GUI
1. In the Context List, select Backup.
2. In the Scoping Pane, expand Backup Specifications and then
Oracle Server. Click the backup specification to display the server
with the database to be checked.
3. Right-click the server and click Check configuration.
IMPORTANT On UNIX, it is possible that although the GUI check returns a successful
result, the backup still fails. This can happen if the backup owner is not
the Oracle user root or the Oracle user that is identified as described in
“Configuring Oracle Users on UNIX and OpenVMS” on page 21.
Using the Data Protector CLI
1. UNIX only: Log in to the Oracle server system as the Oracle user or
as user root.
2. From the directory:
Windows: <Data_Protector_home>\bin
HP-UX and Solaris: /opt/omni/lbin
Other UNIX: /usr/omni/bin/
OpenVMS: OMNI$ROOT:[BIN]
run:
Chapter 1 33
Page 56

Integrating Oracle and Data Protector
Configuring the Integration
On Windows:
perl -I..\lib\perl util_oracle8.pl -CHKCONF -dbname
<DB_NAME>
On UNIX and OpenVMS:
util_oracle8.pl -CHKCONF -dbname <DB_NAME>
Handling Errors If an error occurs, the error number is displayed in
the form *RETVAL*<error_number>.
To get the error description:
Windows: On the Cell Manager, see the file
<Data_Protector_home>\help\enu\Trouble.txt
HP-UX and Solaris: Run:
/opt/omni/lbin/omnigetmsg 12 <error_number>
Other UNIX: Run:
/usr/omni/bin/omnigetmsg 12 <error_number>
OpenVMS: Run:
$@OMNI$ROOT:[BIN]OMNI$CLI_SETUP.COM
$@OMNIGETMSG 12 <error_number>
IMPORTANT On UNIX, it is possible that although you receive a *RETVAL*0, the
backup still fails. This can happen if the backup owner is not the Oracle
user root or the Oracle user that is identified as described in
“Configuring Oracle Users on UNIX and OpenVMS” on page 21.
Using the Data Protector GUI
1. In the Context List, select Backup.
2. In the Scoping Pane, expand Backup Specifications and then
Oracle Server. Click the backup specification to display the server
with the database to be checked.
3. Right-click the server and click Check configuration.
Chapter 134
Page 57

Integrating Oracle and Data Protector
Configuring the Integration
IMPORTANT On UNIX, it is possible that although the GUI check returns a successful
result, you may still receive the error 12:8300 when trying to start a
backup session. Such a backup session will not start. For more
information, see “Troubleshooting” on page 116.
Chapter 1 35
Page 58

Integrating Oracle and Data Protector
Configuring an Oracle Backup
Configuring an Oracle Backup
To configure an Oracle backup, perform the following steps:
1. Configure the devices you plan to use for a backup. See the online
Help index: “configuring devices” for instructions.
2. Configure media pools and media for a backup. See the online Help
index: “creating media pools” for instructions.
3. Create a Data Protector Oracle backup specification. See “Creating a
Data Protector Oracle Backup Specification” on page 37.
OpenVMS On OpenVMS, before performing Data Protector tasks using the CLI,
execute:
$@OMNI$ROOT:[BIN]OMNI$CLI_SETUP.COM
This command procedure defines the symbols needed to invoke the Data
Protector CLI. It gets installed when you chose the CLI option during the
installation. Execute this command procedure from LOGIN.COM for all
CLI users.
Cluster-Aware
Clients
Before you perform an offline backup in a cluster environment, take the
Oracle Database resource offline and bring it back online after the
backup. This can be done using the Oracle fscmd command line interface
commands in the Pre-exec and Post-exec commands for the client
system in a particular backup specification, or by using the Cluster
Administrator.
Creating a New Template
You can use backup templates to apply the same set of options to a
number of backup specifications. By creating your own template, you can
specify the options exactly as you want them to be.
This allows you to apply all the options to a backup specification with a
few mouse clicks, rather than having to specify all the options over and
over again. This task is optional, as you can use one of the default
templates as well.
If you prefer using predefined templates, see “Creating a Data Protector
Oracle Backup Specification” on page 37 for a detailed explanation.
Chapter 136
Page 59

Integrating Oracle and Data Protector
Configuring an Oracle Backup
To create a new backup template, proceed as follows:
1. In the Data Protector Manager, switch to the Backup context.
2. In the Scoping Pane, expand Backup and then Templates, and then
right-click Oracle Server.
3. Click Add Template. Follow the wizard to define the appropriate
backup options in your template.
Creating a Data Protector Oracle Backup Specification
To create an Oracle backup specification, proceed as follows:
1. In the Context List, click Backup.
2. In the Scoping Pane, expand Backup Specifications, right-click
Oracle Server, and click Add Backup.
3. In the Create New Backup dialog box, double-click Blank Oracle
Backup to create a backup specification without predefined options, or
use one of the pre-defined templates given below:
Archive Backs up the Archived Redo Logs.
Archive_Delete Backs up the Archived Redo Logs,
then deletes them after the
backup.
Whole_Online Backs up the database instance
and the Archived Redo Logs.
Whole_Online_Delete Backs up the database instance
and the Archived Redo Logs, and
then deletes the Archived Redo
Logs.
Database_Archive Backs up the database instance
and the Archived Redo Logs.
Database_Switch_Archive Backs up the database instance,
switches the Online Redo Logs
and backs up the Archived Redo
Logs.
Chapter 1 37
Page 60

Integrating Oracle and Data Protector
Configuring an Oracle Backup
Database_Switch_ArchiveDel Backs up the database instance,
switches the Online Redo Logs,
backs up the Archived Redo Logs
and then deletes the Archived
Redo Logs.
Direct_Database Backs up the database instance
and controlfile.
SMB_Proxy_Database Backs up the database instance
and control file in the ZDB (split
mirror or snapshot) mode using
the proxy-copy method.
SMB_BackupSet_Database Backs up the database instance
and control file in the ZDB (split
mirror or snapshot) mode using
the backup set method.
Click OK.
4. In the Client, select the Data Protector Oracle integration client. In
a cluster environment, select the virtual server.
RAC: Select either the node or the virtual server of the Oracle
resource group. The latter can only be selected on HP-UX.
Oracle Data Guard: Select either a primary system or secondary
(standby) system.
In Application database, type the name of the database to be
backed up.
The database name can be obtained as follows:
SQL> select name from v$database;
NOTE In a single-instance configuration, the database name is usually the
same as its instance name. In this case, the instance name can be also
used. The instance name can be obtained as follows:
SQL>select instance_name from v$instance;
RAC: Note that the database name is the same for all instances.
Chapter 138
Page 61

Integrating Oracle and Data Protector
Configuring an Oracle Backup
UNIX only: Type the username and user group of the Oracle user.
See “Configuring Oracle Users on UNIX and OpenVMS” on page 21
for information on how to identify that user.
Figure 1-8 Specifying an Oracle Server System (Windows)
Chapter 1 39
Page 62

Integrating Oracle and Data Protector
Configuring an Oracle Backup
Figure 1-9 Specifying an Oracle Server System (UNIX)
Click Next.
5. If the Oracle database is not configured yet for use with Data
Protector, the Configure Oracle dialog box is displayed. Configure
the Oracle database for use with Data Protector as described in
“Configuring Oracle Databases” on page 24.
6. Select the Oracle database objects to be backed up.
For example, a single tablespace can be separately selected for
backup, but for a complete online backup of the database, the
ARCHIVELOGS must also be selected.
Oracle 10g: The archived logs can reside in the flash recovery area.
In this case, if you select the FLASH RECOVERY AREA to be backed up,
you do not need to select also ARCHIVELOGS.
Oracle Data Guard (10g): If the database is configured with
standby connection, you can back up a control file for the standby
database, which can be used when restoring the standby database.
Chapter 140
Page 63

Integrating Oracle and Data Protector
Configuring an Oracle Backup
NOTE If your database uses a recovery catalog, it is backed up by default after
each database backup, unless otherwise specified in the backup
specification.
Figure 1-10 Selecting Backup Objects
Click Next.
7. Select the device(s) you want to use for the backup. Click Properties
to set the device concurrency, media pool, and preallocation policy. For
more information on these options, click Help.
You can also specify whether you want to create additional copies
(mirrors) of the backup during the backup session. Specify the desired
number of mirrors by clicking the Add mirror and Remove mirror
buttons. Select separate devices for the backup and for each mirror.
For detailed information on the object mirror functionality, see the
online Help index: “object mirroring”.
Click Next to proceed.
Chapter 1 41
Page 64

Integrating Oracle and Data Protector
Configuring an Oracle Backup
8. Set the backup options.
For information on the Backup Specification Options and Common
Application Options, see the online Help.
Oracle Data Guard: To back up a standby database, you must select
Back up standby database in the Application Specific Options
dialog box.
For information on the Application Specific Options (Figure
1-11), see Table 1-2 on page 44 or online Help.
TIP When backing up data from the Oracle 10g flash recovery area to tape,
you can specify the location of the RMAN script that performs backups to
the flash recovery area in the Pre-exec or Post-exec text box. The
script will be executed every time before (Pre-exec) or after (Post-exec)
the Data Protector Oracle integration backup to tape.
Chapter 142
Page 65

Figure 1-11 Oracle Specific Options
Integrating Oracle and Data Protector
Configuring an Oracle Backup
Click Next.
9. Optionally, schedule the backup. For more details, see “Scheduling a
Backup” on page 58.
Click Next.
10.Save the backup specification. It is recommended that you save all
Oracle backup specifications in the Oracle group.
IMPORTANT The word DEFAULT is a reserved word and therefore must not be used for
backup specification names or labels of any kind. Oracle does not allow
full stops in backup piece. Therefore, do not use a punctuation in the
names of backup specifications, since the Oracle channel format is
created from the backup specification name.
Chapter 1 43
Page 66

Integrating Oracle and Data Protector
Configuring an Oracle Backup
Figure 1-12 Saving the Backup Specification
Click OK.
To start the backup, see “Backing Up an Oracle Database” on page 55.
11.On UNIX, after the backup specification is saved, verify that the
owner of the backup specification is the specified Oracle user. See
“Configuring Oracle Users on UNIX and OpenVMS” on page 21 for
details about this user.
12.You can examine the newly-created and saved backup specification in
the Backup context, under the specified group of backup
specifications. The backup specification is stored in the following file
on the Cell Manager:
Windows:
<Data_Protector_home>\Config\server\Barlists\Oracle8\<B
ackup_Specification_Name>
UNIX:
/etc/opt/omni/server/barlists/oracle8/<Backup_Spec_Name>
13.It is recommended to test the backup specification. See “Testing the
Integration” on page 52 for details.
Table 1-2 Oracle Backup Options
Disable
recovery
catalog auto
backup
By default, Data Protector backs up the recovery catalog
in every backup session. Select this option to disable
backup of the recovery catalog.
Chapter 144
Page 67

Table 1-2 Oracle Backup Options
Integrating Oracle and Data Protector
Configuring an Oracle Backup
Disable Data
Protector
managed control
file backup
Back up standby
database
RMAN Script You can edit the Oracle RMAN script section of the Data
By default, Data Protector backs up the Data Protector
managed control file in every backup session. Select this
option to disable backup of the Data Protector managed
control file.
Oracle Data Guard: This option is applicable if the
database is configured with the standby connection. By
default, RMAN backs up the database files and archived
redo logs on the primary system. Select this option to
enable backup of the database files and archive logs on
standby system. However, only the archive logs created
after the standby database was configured can be backed
up at standby site. Archive logs created before the
standby database was configured must be backed up on
the primary database.
Note that the current control file or the control file for
standby will still be backed up from the primary system.
Protector Oracle backup specification. The script is
created by Data Protector during the creation of a backup
specification and reflects the backup specification’s
selections and settings. You can edit the script only after
the backup specification has been saved. For information
on how to edit the RMAN script section, see “Editing the
Oracle RMAN Script” on page 47.
Pre-exec,
Post-exec
Specify a command or RMAN script that will be started
by ob2rman.pl on the Oracle server system before the
backup (pre-exec) or after it (post-exec). RMAN scripts
must have the .rman extension. Do not use double quotes.
For example, you can provide scripts to shut down and
start an Oracle instance. For UNIX, see “Examples of
Pre-Exec and Post-Exec Scripts on UNIX” on page 46.
Provide the pathname of the command or RMAN script.
OpenVMS: Provide the pathname of the command
(OMNI$ROOT:[BIN]).
Chapter 1 45
Page 68

Integrating Oracle and Data Protector
Configuring an Oracle Backup
Examples of Pre-Exec and Post-Exec Scripts on UNIX
Pre-Exec Example The following is an example of a script that shuts down an Oracle
instance:
#!/bin/sh
export ORACLE_HOME=$2
export ORACLE_SQLNET_NAME=$1
if [ -f $ORACLE_HOME/bin/sqlplus ]; then
$ORACLE_HOME/bin/sqlplus << EOF
connect sys/manager@$ORACLE_SQLNET_NAME as sysdba
shutdown
EOF
echo "Oracle database \"$DB_NAME\" shut down."
exit 0
else
echo "Cannot find Oracle SQLPLUS
($ORACLE_HOME/bin/sqlplus)."
exit 1
fi
Post-Exec
Example
The following is an example of a script that starts an Oracle instance:
#!/bin/sh
export ORACLE_HOME=$2
export ORACLE_SQLNET_NAME=$1
if [ -f $ORACLE_HOME/bin/sqlplus ]; then
$ORACLE_HOME/bin/sqlplus << EOF
connect sys/manager@$ORACLE_SQLNET_NAME as sysdba
startup
EOF
echo "Oracle database \"$DB_NAME\" started."
exit 0
else
echo "Cannot find Oracle SQLPLUS
Chapter 146
Page 69

Integrating Oracle and Data Protector
Configuring an Oracle Backup
($ORACLE_HOME/bin/sqlplus)."
exit 1
fi
Editing the Oracle RMAN Script
The RMAN script is used when the Data Protector backup specification
is started to perform a backup of the Oracle objects.
The RMAN script section is not written to the backup specification until
the backup specification is either saved or manually edited by clicking
the Edit button.
You can edit the RMAN script section of only after the Data Protector
Oracle backup specification has been saved.
Limitations When editing the RMAN script sections of the Data Protector backup
specifications, consider the following limitations:
• The Oracle manual configuration convention must be used and not
the Oracle automatic configuration convention (introduced by Oracle
9i).
• Double quotes (") must not be used - single quotes should be used
instead.
• By default, RMAN scripts created by Data Protector contain
instructions for backing up one or more of the following objects:
— Databases, tablespaces, or datafiles (the first backup command)
— Archive logs (the second backup command)
— With Oracle 10g, the flash recovery area (the third backup
command)
— Control files (the last backup command)
The RMAN scripts with all combinations of the above listed backup
objects are recognized by Data Protector as its own scripts and it is
possible to modify the selection of objects that will be backed up in the
Source tab of the Results Area.
Chapter 1 47
Page 70

Integrating Oracle and Data Protector
Configuring an Oracle Backup
If the RMAN script contains additional manually entered backup
commands, for example a second backup command for backing up a
database that is already listed in the first backup command, the
object selection is disabled and it is only possible to browse the
Source tab.
To edit an Oracle RMAN script, click Edit in the Application Specific
Options window (see Figure 1-11 on page 43), edit the script, and then
click Save to save the changes to the script.
See the Oracle Recovery Manager User’s Guide and References for more
information on Oracle RMAN commands.
Data Protector
RMAN Script
Structure
The RMAN script created by Data Protector consists of the following
parts:
• The Oracle channel allocation together with the Oracle
environment parameters’ definition for every allocated channel.
The number of allocated channels is the same as the sum of
concurrency numbers for all devices selected for backup.
NOTE Once the backup specification has been saved, changing the concurrency
number does not change the number of allocated channels in the RMAN
script. This has to be done manually by editing the RMAN script.
IMPORTANT On Windows systems, a maximum of 32 or 64 (if device is local) channels
can be allocated. If the calculated number exceeds this limitation, you
have to manually edit the RMAN script and reduce the number of
allocated channels.
When an Oracle channel is manually defined by editing the RMAN
script, the environment parameters must be added in the following
format:
parms 'ENV=(OB2BARTYPE=Oracle8, OB2APPNAME=<DB_NAME>,
OB2BARLIST=<Backup_Specification_Name>)';
Chapter 148
Page 71

Integrating Oracle and Data Protector
Configuring an Oracle Backup
• Depending on the backup objects selection, an RMAN backup
statement for the backup of the whole database instance,
and/or for any combination of RMAN commands to back up
tablespaces, datafile, or the flash recovery area. The backup
statement consists of the following:
— The Oracle format of the backup file in the following format:
format
'<Backup_Specification_Name><<DB_NAME>_%s:%t:%p>.dbf'
database;
NOTE When an Oracle format of the backup file is manually defined or changed
by editing the RMAN script, any user-defined combination of the Oracle
substitution variables can be added to the %s:%t:%p substitution
variables and <DB_NAME>, which are obligatory.
— The RMAN datafile <tablespace_name>*<datafile_name>
command.
• If the Archived Redo Logs were selected for a backup, an RMAN
backup statement for the backup of Oracle archive logs.
If an appropriate template was selected, or if the statement was
manually added, the RMAN sql statement to switch the Online Redo
Logs before backing up the Archived Redo Logs:
sql 'alter system archive log current';
The backup statement consists of the following:
— The Oracle format of the backup file in the following format:
format
'<Backup_Specification_Name><DB_NAME>_%s:%t:%p>.dbf'
NOTE When an Oracle format of the backup file is manually defined or changed
by editing the RMAN script, any user-defined combination of the Oracle
substitution variables can be added to the obligatory %s:%t:%p
substitution variables and <DB_NAME>.
— The RMAN archivelog all command.
Chapter 1 49
Page 72

Integrating Oracle and Data Protector
Configuring an Oracle Backup
If an appropriate template was selected, or if the statement was
manually added, the RMAN statement to delete the Archived Redo
Logs after they are backed up:
archivelog all delete input;
• If the control file was selected for a backup, an RMAN backup
statement for the backup of Oracle control files. The backup
statement consists of the following:
— The Oracle format of the backup file in the following format:
format
'<Backup_Specification_Name><<DB_NAME>_%s:%t:%p>.dbf'
current controlfile;
NOTE When an Oracle format of the backup file is manually defined or changed
by editing the RMAN script, any user-defined combination of the Oracle
substitution variables can be added to the %s:%t:%p substitution
variables and <DB_NAME>, which are obligatory.
Example of the
RMAN Script
— The RMAN current controlfile command.
The following is an example of the RMAN script section as created by
Data Protector based on the Blank Oracle Backup template, after the
whole database selection:
run {
allocate channel 'dev_0' type 'sbt_tape' parms
'ENV=(OB2BARTYPE=Oracle8,OB2APPNAME=DIPSI,OB2BARLIST=New1)';
allocate channel 'dev_1' type 'sbt_tape' parms
'ENV=(OB2BARTYPE=Oracle8,OB2APPNAME=DIPSI,OB2BARLIST=New1)';
allocate channel 'dev_2' type 'sbt_tape' parms
'ENV=(OB2BARTYPE=Oracle8,OB2APPNAME=DIPSI,OB2BARLIST=New1)';
backup incremental level <incr_level>
format 'New1<DIPSI_%s:%t:%p>.dbf'
database
;
backup format 'New1<DIPSI_%s:%t:%p>.dbf' archivelog all;
Chapter 150
Page 73

Integrating Oracle and Data Protector
Configuring an Oracle Backup
backup format 'New1<DIPSI_%s:%t:%p>.dbf' current controlfile
;
}
Creating Copies of Backed Up Objects
Oracle Duplex
Mode
IMPORTANT If more than one allocated channel is used, it may happen that some
Example If the duplex is set to 2 and the backup runs with 1 allocated channel,
Oracle support the duplex mode, which allows you to create copies of
every backed up object to a separate backup device. To enable the duplex
feature, perform the following steps:
1. Add the following command to the RMAN script before any allocate
channel command:
set duplex=<on | 2 | ... >
original and copied objects are backed up to the same medium. To
prevent this, you should use only one allocated channel when backing up
using the duplex mode.
2. Add the following parameter to every format string used for backup:
%c
3. Set the concurrency of each device used for backup to 1.
4. Set the MIN and MAX load balancing parameters according to the
following formula:
<number of duplex copies>*<number of allocated channels>
then the MIN and MAX parameters should be set to 2.
IMPORTANT If the MIN and MAX load balancing parameters are set to lower values, the
backup will hang.
If the MIN and MAX load balancing parameters are set to higher values,
it may happen that the original and copied objects are backed up to the
same medium.
Chapter 1 51
Page 74

Integrating Oracle and Data Protector
Configuring an Oracle Backup
Testing the Integration
Once you have created and saved a backup specification, you should test
it before running a backup. The test verifies both parts of the integration,
the Oracle side and the Data Protector side. In addition, the
configuration is tested as well.
The procedure consists of checking both the Oracle and the Data
Protector parts of the integration to ensure that communication between
Oracle and Data Protector is established, that the data transfer works
properly, and that the transactions are recorded either in the recovery
catalog (if used) or in the control file.
Details of the test backup, such as media protection, backup user and
backup status are registered in the Data Protector database and in the
Oracle control files. Set the Protection option of your test backup
specification to None.
Testing Using the Data Protector GUI
Follow the procedure below to test the backup of an Oracle backup
specification:
1. In the Data Protector Manager, switch to the Backup context.
2. In the Scoping Pane, expand Backup, then Backup Specifications.
Expand Oracle Server and right-click the backup specification you
want to preview.
3. Click Preview Backup.
Chapter 152
Page 75

Figure 1-13 Previewing a Backup
Integrating Oracle and Data Protector
Configuring an Oracle Backup
Testing Using the CLI
A test can be executed from the command line on the Oracle Server
system or on any Data Protector client system within the same Data
Protector cell, provided that the system has the Data Protector User
Interface installed.
NOTE On OpenVMS, to invoke the Data Protector CLI, execute:
$@OMNI$ROOT:[BIN]OMNI$CLI_SETUP.COM
Run the omnib command with the -test_bar option as follows:
• On Windows: <Data_Protector_home>\bin\omnib
-oracle8_list <backup_specification_name> -test_bar
Chapter 1 53
Page 76

Integrating Oracle and Data Protector
Configuring an Oracle Backup
•On HP-UX and Solaris: /opt/omni/bin/omnib -oracle8_list \
<backup_specification_name> -test_bar
• On other UNIX systems: /usr/omni/bin/omnib -oracle8_list \
<backup_specification_name> -test_bar
•On OpenVMS: $omnib -oracle8_l qist
<backup_specification_name> -test_bar
The ob2rman.pl command is started, which then starts the BACKUP
VALIDATE DATABASE RMAN command.
Chapter 154
Page 77

Integrating Oracle and Data Protector
Backing Up an Oracle Database
Backing Up an Oracle Database
There are two strategies for backing up a database. These are an offline
or consistent database backup, and an online or inconsistent database
backup. The latter is also known as a hot backup. Special attention is
required to reach a consistent state with an online backup.
A decision about your database backup strategy depends on a number of
factors. If the database must be open and available all the time, then
online backup is your only choice. If you can afford to have the database
offline at a certain time, then you are more likely to make periodic offline
backups of the entire database, supplementing them with online backups
of the dynamically changing tablespaces.
Oracle Offline An offline backup of a database is a backup of the datafiles and control
files which are consistent at a certain point in time. The only way to
achieve this consistency is to cleanly shut down the database and then
back up the files while the database is either closed or mounted.
If the database is closed, the offline backup of an Oracle target database
can be performed using a Data Protector filesystem backup specification.
In this case, the Data Protector Disk Agent is used.
If the database is mounted, a Data Protector Oracle backup specification,
based on which Data Protector automatically generates and executes the
RMAN script, can be used. In this case, the Data Protector Oracle
integration software component is used.
Typically, you would perform an offline backup of the entire database,
which must include all datafiles and control files, while the parameter
files may be included optionally.
The whole offline database backup is performed as follows:
1. Shut down the database cleanly.
A clean shutdown means that the database is not shut down using
the ABORT option.
2. Mount the database if you are backing it up using RMAN.
3. Back up all datafiles, control files and, optionally, parameter files.
4. Restart the database in the normal online mode.
Chapter 1 55
Page 78

Integrating Oracle and Data Protector
Backing Up an Oracle Database
Oracle Online As opposed to an offline backup, an online backup is performed when a
database is open.
The backup of an open database is inconsistent, because portions of the
database are being modified and written to disk while the backup is
progressing. Such changes to the database are entered into the online
redo logs as well. A database running in the ARCHIVELOG mode enables
the archiving of the online redo logs. In the case of a restore, this feature
is essential to bring a database to a consistent state as part of the entire
restore process.
When using an online backup, the following must be done in order to
bring the database to a consistent state:
1. Restore the database files (which are inconsistent) to disk.
2. Perform a database recovery, which requires applying the Archived
Redo Logs. This is an Oracle operation.
An Oracle online database backup can be performed using the Oracle
RMAN utility or Data Protector GUI. In the latter case, Data Protector
creates and executes the RMAN script automatically based on data
entered in the Data Protector GUI. During an Oracle online backup, the
Oracle target database is open, while tablespaces, datafiles, control files,
and archived redo logs are being backed up.
The database must operate in the ARCHIVELOG mode so that the current
Online Redo Logs are archived to the Archived Redo Logs.
IMPORTANT Before you run an Oracle online backup, make sure that the database is
really operating in ARCHIVELOG mode. This can be done on the Oracle
server system by starting SQL*Plus and issuing the following command:
archive log list;
If the Oracle target database is not operating in the ARCHIVELOG mode,
proceed as follows:
If SPFILE is used:
1. Shut down the database.
2. Mount the database.
Chapter 156
Page 79

Integrating Oracle and Data Protector
Backing Up an Oracle Database
3. Start SQL*Plus and type:
alter database archivelog;
alter database open;
alter system archive log start SCOPE=SPFILE;
If PFILE is used:
1. Shut down the database.
2. Change PFILE to enable log archiving by setting:
log_archive_start = true
3. Mount the database.
4. Start SQL*Plus and type:
alter database archivelog;
alter database open;
Oracle Data Guard: The archive logs generated after an archive log
backup must be manually cataloged so that they are known to RMAN for
future backups when:
• The primary or standby control file is re-created. The archive logs
must be re-cataloged because RMAN uses the control file to
determine which archive logs must be backed up.
• The primary database role changes to standby after a failover. The
archive logs must be re-cataloged because a change in database role
resets the version time of the mounted control file.
Use the RMAN command CATALOG ARCHIVELOG
'<archive_log_file_name>'; to manually catalog the archived redo
logs.
Now you are ready to run an online backup of the Oracle database, using
any of the following methods:
Backup Methods • Schedule a backup of an existing Oracle backup specification using
the Data Protector Scheduler. See “Scheduling a Backup” on page 58.
• Start an interactive backup of an existing Oracle backup specification
using the Data Protector GUI or the Data Protector CLI. See
“Running an Interactive Backup” on page 60.
Chapter 1 57
Page 80

Integrating Oracle and Data Protector
Backing Up an Oracle Database
• Start a backup on the Oracle server using either Oracle Recovery
Manager or Oracle Enterprise Manager. See “Starting Oracle Backup
Using RMAN” on page 62.
Backup Procedure The following happens when you start a backup using the Data Protector
user interface:
1. Data Protector executes ob2rman.pl on the client. This command
starts RMAN and sends the Oracle RMAN Backup Command Script
to the standard input of the RMAN command.
2. The Oracle RMAN contacts the Oracle Server, which contacts Data
Protector via the MML interface and initiates a backup.
3. During the backup session, the Oracle Server reads data from the
disk and sends it to Data Protector for writing to the backup device.
Messages from the Data Protector backup session and messages
generated by Oracle are logged to the Data Protector database.
A backup of the Oracle recovery catalog is performed automatically
following each Oracle target database backup, unless otherwise specified
in the backup specification. Using the standard Oracle export utility, the
Data Protector ob2rman.pl starts an export of the Oracle recovery
catalog to a file which is then backed up by Data Protector.
Deleting Data from
the Recovery
Catalog
When backing up an Oracle database using the recovery catalog
database, all information about the backup, restore, and recovery of the
database is stored in the recovery catalog. This information is used by
RMAN during the restore. If you overwrite or format the media on which
this data is backed up, Data Protector exports the object from the Data
Protector database. You must manually delete the data from the recovery
catalog while logged on to RMAN. See the Oracle Recovery Manager
User’s Guide and References for detailed information about deleting data
from the recovery catalog.
Scheduling a Backup
For more information on scheduling, see the online Help index:
“scheduled backups”.
A backup schedule can be tailored according to your business needs. If
you have to keep the database online continuously, then you should back
it up frequently, including the backup of the Archived Redo Logs, which
is required in case you need a recovery to a particular point in time.
Chapter 158
Page 81

Integrating Oracle and Data Protector
Backing Up an Oracle Database
For example, you may decide to perform daily backups and make
multiple copies of the online redo logs and the Archived Redo Logs to
several different locations.
An example of scheduling backups of production databases:
• Weekly full backup
• Daily incremental backup
• Archived Log backups as needed
To schedule an Oracle backup specification, proceed as follows:
1. In the HP OpenView Storage Data Protector Manager, switch to
the Backup context.
2. In the Scoping Pane, expand Backup, Backup Specifications, and
then Oracle Server.
3. Double-click the backup specification you want to schedule and click
the Schedule tab.
4. In the Schedule page, select a date in the calendar and click Add to
open the Schedule Backup dialog box.
5. Specify Recurring, Time options, Recurring options, and
Session options.
Note that the backup type can be full or incremental, with the
incremental level as high as Incr 4. See Figure 1-14 on page 60. See
the RMAN documentation for details on incremental backup levels.
Chapter 1 59
Page 82

Integrating Oracle and Data Protector
Backing Up an Oracle Database
Figure 1-14 Scheduling Backups
Click OK and then Apply to save the changes.
Running an Interactive Backup
An interactive backup can be performed any time after a backup
specification has been created and saved. You can use the Data Protector
GUI or CLI.
Starting a Backup Using the GUI
To start an interactive backup of an Oracle database using the Data
Protector GUI, proceed as follows:
1. In the HP OpenView Storage Data Protector Manager, switch to
the Backup context.
2. In the Scoping Pane, expand Backup, Backup Specifications, and
then Oracle Server.
3. Right-click the backup specification and select Start Backup.
In the Start Backup dialog box, select the Backup type and Network
load options. For information on these options, click Help.
Chapter 160
Page 83

Note that the backup type can be full or incremental, with the
incremental level as high as Incr 4. See Figure 1-14 on page 60. See
the RMAN documentation for details on incremental backup levels.
Click OK.
Figure 1-15 Starting an Interactive Backup
Integrating Oracle and Data Protector
Backing Up an Oracle Database
Starting a Backup Using the CLI
1. On an Oracle Server, switch to the directory:
Windows: <Data_Protector_home>\bin
HP-UX and Solaris: /opt/omni/bin
Other UNIX: /usr/omni/bin
OpenVMS: To set up the CLI, run:
$@OMNI$ROOT:[BIN]OMNI$CLI_SETUP.COM
2. Run:
omnib -oracle8_list <backup_specification_name> [-barmode
<Oracle8Mode>][list_options]
Chapter 1 61
Page 84

Integrating Oracle and Data Protector
Backing Up an Oracle Database
You can select among the following list_options:
-protect {none | weeks n | days n | until date | permanent}
-load {low | medium | high}
-crc
-no_monitor
Oracle8Mode = {-full | -incr1 | -incr2 | -incr3 |
-incr4}
See the omnib man page for details.
Example To start a backup using an Oracle backup specification called RONA, run
the following command:
omnib -oracle8_list RONA
Starting Oracle Backup Using RMAN
To start an Oracle backup using RMAN, an Oracle backup specification
must be created.
See “Configuring an Oracle Backup” on page 36 for information on how
to create an Oracle backup specification.
To start an Oracle backup using RMAN:
1. Connect to the Oracle target database specified in the backup
specification:
If you use the recovery catalog, run:
Oracle 9i/10g:
• On Windows: <ORACLE_HOME>\bin\rman target
<Target_Database_Login> catalog
<Recovery_Catalog_Login>
• On UNIX: <ORACLE_HOME>/bin/rman target
<Target_Database_Login> catalog
<Recovery_Catalog_Login>
•On OpenVMS:
a. Run ORAUSER.COM using $@OMNI$ROOT:[LOG]LOGIN.COM.
Chapter 162
Page 85

Integrating Oracle and Data Protector
Backing Up an Oracle Database
b. Execute $rman target <target_connect_string> catalog
<catalog_connect_string>.
Oracle 8i:
Use rcvcat instead of catalog in the above syntax.
If you do not use the recovery catalog:
• On Windows: <ORACLE_HOME>\bin\rman target
<Target_Database_Login> nocatalog
• On UNIX: <ORACLE_HOME>/bin/rman target
<Target_Database_Login> nocatalog
•On OpenVMS:
a. Run ORAUSER.COM using $@OMNI$ROOT:[LOG]LOGIN.COM.
b. Execute $rman target <target_connect_string>
nocatalog.
Target Database
Login
Recovery Catalog
Login
The format of the target database login is
<user_name>/<password>@<service>,
where:
<user_name> is the name by which a user is known to Oracle Server
and to other users. Every user name is associated with a password
and both have to be entered to connect to an Oracle target database.
This user must have been granted Oracle SYSDBA or SYSOPER rights.
<password> must be the same as the password specified in the Oracle
password file (orapwd), which is used for authentication of users
performing database administration.
<service> is the name used to identify an SQL*Net server process
for the target database.
The format of the Recovery Catalog Database login is
<user_name>/<password>@<service>,
where the description of the user name and password is the same as
for the login information to the target database. Note that the Oracle
user specified here has to be the owner of the Oracle Recovery
Catalog.
<service> is the name used to identify SQL*Net server process for
the Recovery Catalog Database.
Chapter 1 63
Page 86

Integrating Oracle and Data Protector
Backing Up an Oracle Database
2. Allocate the Oracle channels.
Allocating a channel tells RMAN to initiate an Oracle Server process
for backup, restore, or recovery on the Oracle target database. For
example:
allocate channel 'dev_0' type 'disk';
or
allocate channel 'dev_1' type 'sbt_tape';
where you specify the backup directly to disk in the first case and
directly to tape in the second case. Note that if Data Protector is
linked with Oracle, Data Protector will perform the backup to the
tape in the second case.
If you specify more than a single allocate channel command,
RMAN will establish multiple logon sessions and conduct multiple
backup sets in parallel. This “parallelization” of backup and restore
commands is handled internally by RMAN.
IMPORTANT On Windows, a maximum of 32 or 64 (if device is local) channels can be
allocated.
To use Data Protector backup media, specify the channel type
SBT_TAPE.
3. Specify the parms operand:
parms'ENV(OB2BARTYPE=Oracle8,
OB2APPNAME=<DB_NAME>,OB2BARLIST=<backup_ specification_name>)';
Note that the RMAN script will not work without the above
parameters being specified in this form.
4. Specify format:
format '<backup_specification><<DB_NAME>_%s:%t:%p>.dbf'
Note that %s:%t:%p and the Oracle database name are required,
whereas the backup specification is recommended.
Chapter 164
Page 87

Integrating Oracle and Data Protector
Backing Up an Oracle Database
For example, if you have created and saved a backup specification
named bspec1 for backing up an Oracle database identified by the
Oracle instance called inst1, you would enter the following string:
format 'bspec1<inst1_%s:%t:%p>.dbf'
See the Oracle Recovery Manager User’s Guide and References for
information on substitution variables. The Oracle channel format
specifies which Oracle backup specification to use for the backup.
5. Optionally, specify backup incremental level.
Note that a Data Protector full backup performs the same operation
as an incremental level 0 backup type in the Oracle RMAN scripts.
They both back up all the blocks that have ever been used.
This option is required if you want to use the backup as a base for
subsequent incremental backups.
To run a backup using RMAN, start RMAN by running the following
command from the <ORACLE_HOME> directory (if you use the recovery
catalog):
Oracle 9i/10g:
• On Windows: bin\rman target <Target_Database_Login>
catalog <Recovery_Catalog_Login>
• On UNIX: bin/rman target <Target_Database_Login> catalog
<Recovery_Catalog_Login>
•On OpenVMS:
1. Run ORAUSER.COM using $@OMNI$ROOT:[LOG]LOGIN.COM.
2. Execute $rman target <target_connect_string> catalog
<catalog_connect_string>.
Oracle 8i:
Use rcvcat instead of catalog in the above syntax.
Chapter 1 65
Page 88

Integrating Oracle and Data Protector
Backing Up an Oracle Database
Examples of the RMAN Scripts
Some examples of RMAN scripts that must be executed from the RMAN>
prompt are listed below:
Backing Up a
Single Channel
Backing Up Three
Channels in
Parallel
To back up the Oracle instance ORACL, using a backup specification
named ora1, enter the following command sequence:
run {
allocate channel 'dev_0' type 'sbt_tape'
parms'ENV=(OB2BARTYPE=Oracle8,OB2APPNAME=ORACL,OB2BARLIST=ora1)';
backup
incremental level 0
format 'oracl1<ORACL_%s:%t>.dbf' database;
}
The RMAN backup script for backing up the database by using three
parallel channels for the same backup specification would look like this:
run {
allocate channel 'dev_0' type 'sbt_tape'
parms'ENV=(OB2BARTYPE=Oracle8,OB2APPNAME=ORACL,OB2BARLIST=ora1)';
allocate channel 'dev_1' type 'sbt_tape'
parms'ENV=(OB2BARTYPE=Oracle8,OB2APPNAME=ORACL,OB2BARLIST=ora1)';
allocate channel 'dev_2' type 'sbt_tape'
parms'ENV=(OB2BARTYPE=Oracle8,OB2APPNAME=ORACL,OB2BARLIST=ora1)';
backup
incremental level 0
format 'ora1<ORACL_%s:%t>.dbf' database;
}
Backing Up All
Archived Logs and
Tablespaces
If you want to back up the Archived Redo Logs and the tablespace
SYSTEM and RONA of the previous database using three parallel
channels and a backup specification named ora1, the RMAN script
should look like this:
run {
allocate channel 'dev_0' type 'sbt_tape'
parms'ENV=(OB2BARTYPE=Oracle8,OB2APPNAME=ORACL,OB2BARLIST=ora1)';
allocate channel 'dev_1' type 'sbt_tape'
parms'ENV=(OB2BARTYPE=Oracle8,OB2APPNAME=ORACL,OB2BARLIST=ora1)';
Chapter 166
Page 89

Integrating Oracle and Data Protector
Backing Up an Oracle Database
allocate channel 'dev_2' type 'sbt_tape'
parms'ENV=(OB2BARTYPE=Oracle8,OB2APPNAME=ORACL,OB2BARLIST=ora1)';
backup
incremental level 0
format 'ora1<ORACL_%s:%t>.dbf'
tablespace SYSTEM, RONA
sql 'alter system archive log current'
format 'ora1<ORACL_%s:%f:%p>.dbf'
archivelog all;
}
Backing Up
Particular
Archived Logs
Backing Up the
Flash Recovery
Area
To back up all Archived Redo Logs from sequence #5 to sequence #105
and delete the Archived Redo Logs after backup of the instance named
ora1 is complete, run the following script:
run {
allocate channel 'dev_0' type 'sbt_tape'
parms'ENV=(OB2BARTYPE=Oracle8,OB2APPNAME=ORACL,OB2BARLIST=ora1)';
allocate channel 'dev_1' type 'sbt_tape'
parms'ENV=(OB2BARTYPE=Oracle8,OB2APPNAME=ORACL,OB2BARLIST=ora1)';
allocate channel 'dev_2' type 'sbt_tape'
parms'ENV=(OB2BARTYPE=Oracle8,OB2APPNAME=ORACL,OB2BARLIST=ora1)';
backup
(archivelog sequence between 5 and 105 delete input
format 'ora1<ORACL_%s:%t:%p>.dbf');
}
If the backup fails, the logs are not deleted.
If you want to back up the Oracle 10g Flash Recovery Area using three
parallel channels and a backup specification named ora1, the RMAN
script should look like this:
run {
allocate channel 'dev_0' type 'sbt_tape'
parms'ENV=(OB2BARTYPE=Oracle8,OB2APPNAME=ORACL,OB2BARLIST=ora1)';
allocate channel 'dev_1' type 'sbt_tape'
parms'ENV=(OB2BARTYPE=Oracle8,OB2APPNAME=ORACL,OB2BARLIST=ora1)';
allocate channel 'dev_2' type 'sbt_tape'
Chapter 1 67
Page 90

Integrating Oracle and Data Protector
Backing Up an Oracle Database
parms'ENV=(OB2BARTYPE=Oracle8,OB2APPNAME=ORACL,OB2BARLIST=ora1)';
backup
format 'ora1<ORACL_%s:%t>.dbf'
recovery area;
}
Including Control
File in a Backup
Specification
Backing Up While
Allowing for Some
Corrupted Blocks
The current control file is automatically backed up when the first
datafile of the system tablespace is backed up. The current control file
can also be explicitly included in a backup, or backed up individually. To
include the current control file after backing up a tablespace named
COSTS, run the following script:
run {
allocate channel 'dev_0' type 'sbt_tape'
parms'ENV=(OB2BARTYPE=Oracle8,OB2APPNAME=ORACL,OB2BARLIST=ora1)';
allocate channel 'dev_1' type 'sbt_tape
'parms'ENV=(OB2BARTYPE=Oracle8,OB2APPNAME=ORACL,OB2BARLIST=ora1)';
allocate channel 'dev_2' type 'sbt_tape'
parms'ENV=(OB2BARTYPE=Oracle8,OB2APPNAME=ORACL,OB2BARLIST=ora1)';
backup
format 'ora1<ORACL_%s:%t>.dbf'
(tablespace COSTS current controlfile);
}
The set maxcorrupt command determines the number of corrupted
blocks per datafile that can be tolerated by RMAN before a particular
backup will fail.
If a backup specification named ora1 backs up the database and allows
for up to 10 corrupted blocks per datafile /oracle/data1.dbs (UNIX
systems) or C:\oracle\data1.dbs (Windows systems), then the
appropriate RMAN script would be:
On UNIX
run {
set maxcorrupt for datafile
'/oracle/data1.dbs' to 10;
allocate channel 'dev_0' type 'sbt_tape'
parms'ENV=(OB2BARTYPE=Oracle8,OB2APPNAME=ORACL,OB2BARLIST=ora1)';
allocate channel 'dev_1' type 'sbt_tape'
Chapter 168
Page 91

parms'ENV=(OB2BARTYPE=Oracle8,OB2APPNAME=ORACL,OB2BARLIST=ora1)';
allocate channel 'dev_2' type 'sbt_tape'
parms'ENV=(OB2BARTYPE=Oracle8,OB2APPNAME=ORACL,OB2BARLIST=ora1)';
backup
incremental level 0
format 'ora1<ORACL_%s:%t>.dbf'
database;
}
On Windows run {
set maxcorrupt for datafile
'C:\oracle\data1.dbs' to 10;
allocate channel 'dev_0' type 'sbt_tape'
parms'ENV=(OB2BARTYPE=Oracle8,OB2APPNAME=ORACL,OB2BARLIST=ora1)';
allocate channel 'dev_1' type 'sbt_tape'
parms'ENV=(OB2BARTYPE=Oracle8,OB2APPNAME=ORACL,OB2BARLIST=ora1)';
allocate channel 'dev_2' type 'sbt_tape'
parms'ENV=(OB2BARTYPE=Oracle8,OB2APPNAME=ORACL,OB2BARLIST=ora1)';
backup
incremental level 0
format 'ora1<ORACL_%s:%t>.dbf'
database;
}
Integrating Oracle and Data Protector
Backing Up an Oracle Database
Chapter 1 69
Page 92

Integrating Oracle and Data Protector
Restoring an Oracle Database
Restoring an Oracle Database
You can restore the database objects using:
• Data Protector GUI. See “Restoring Oracle Using the Data Protector
GUI” on page 72.
• RMAN. See “Restoring Oracle Using RMAN” on page 93.
Restorable Items You can restore the following database objects using both the Data
Protector GUI or RMAN:
• Control files
• Datafiles
• Tablespaces
• Databases
• Recovery Catalog Databases
Duplicating
Databases
MS Cluster Server
Clients
Using the Data Protector GUI, you can also duplicate a production
database. See “Duplicating an Oracle Database” on page 85.
Before you start restoring a cluster-aware Oracle server, take the Oracle
Database resource offline using, for example, the Cluster
Administrator utility. See Figure 1-16.
Chapter 170
Page 93

Integrating Oracle and Data Protector
Figure 1-16 Taking the Oracle Resource Group Offline
Verify that you have set the Prevent Failback option for the Oracle
resource group and Do not restart for the <DB_NAME>.world resource,
which is an Oracle Database resource.
Restoring an Oracle Database
Figure 1-17 Checking Properties
MC/ServiceGuard
Clients
When restoring the database from a backup performed on a virtual host,
you should set OB2BARHOSTNAME environment variable in the RMAN
script. For example:
run {
Chapter 1 71
Page 94

Integrating Oracle and Data Protector
Restoring an Oracle Database
allocate channel dev1 type 'sbt_tape'
parms'ENV=(OB2BARHOSTNAME=virtual.domain.com)';
restore datafile '/opt/ora9i/oradata/MAKI/example02.dbf';
release channel dev1;
}
Prerequisites
• An instance of Oracle must be created on the system to which you
want to restore or duplicate the database.
• The database must be in Mount state if the whole database is being
restored, or in NoMount state if the control file is being restored or a
database duplication is performed.
Restoring Oracle Using the Data Protector GUI
For restore, RMAN scripts are generated with necessary commands,
depending on selections made in the GUI. If you want to perform
additional actions, you cannot edit the RMAN restore script, but you can
perform them manually from RMAN itself.
Restoring Database Items in a Disaster Recovery
In a disaster recovery situation, database objects must be restored in a
certain order. The following list shows you in which order database items
must be restored. Under normal conditions it is possible to restore
database items in any order.
If the recovery catalog was used:
1. Restore the recovery catalog database (if it was lost)
2. Restore the control file
3. Restore the entire database or data items
If the recovery catalog was not used:
•Oracle 8i:
See problem “The Recovery Catalog was lost and the control file
cannot be restored from Data Protector managed backup” on
page 139.
Chapter 172
Page 95

• Oracle 9i/10g:
1. Restore the control file from automatic backup.
If no automatic backup of the control file is available, see problem
“The Recovery Catalog was lost and the control file cannot be
restored from Data Protector managed backup” on page 139.
2. Restore the database or data items.
Changing The Database State
Before you restore any database item or you perform a duplication of a
database, ensure that the database is in the correct state:
Table 1-3 Required Database States
Item to restore Database state
Integrating Oracle and Data Protector
Restoring an Oracle Database
Control file, duplicating a
NoMount (started)
database
All other items
a
Mount
a. When restoring only a few tablespaces or
datafiles, then the database can be open with the
tablespaces or datafiles to be restored offline.
To put the database into the correct state, run:
sqlplus /nolog
SQL>connect <user>/<password>@<service> as sysdba;
SQL>shutdown immediate;
To put the database into NoMount state, run:
SQL>startup nomount;
To put the database into Mount state, run:
SQL>startup mount;
Chapter 1 73
Page 96

Integrating Oracle and Data Protector
Restoring an Oracle Database
Restoring the Recovery Catalog Database
The Oracle recovery catalog database is exported using the Oracle export
utility to a binary file and backed up by Data Protector. This file has to
be restored back to the disk and then imported into the Oracle database
using the Oracle import utility. Data Protector provides a facility to do
this automatically using the Oracle integration.
To restore the recovery catalog database:
1. Ensure that the recovery catalog database is in the Open state.
2. In the Data Protector GUI, switch to the Restore context.
3. Under Restore Objects, expand Oracle Server, expand the client
on which the database, for which you want to restore the recovery
catalog, resides, and then click the database.
4. In the Restore action drop-down list, select Perform RMAN
Repository Restore.
In the Results Area, select RECOVERY CATALOG.
If you want to change the recovery catalog login information,
right-click RECOVERY CATALOG and click Properties. In Recovery
Catalog Settings, specify the login information for recovery catalog.
Chapter 174
Page 97

Figure 1-18 Recovery Catalog Settings Dialog
Integrating Oracle and Data Protector
Restoring an Oracle Database
5. In the Options page:
In User name and User group, specify the user name and password
to the recovery catalog database.
From the Session ID drop-down list, select the Session ID.
For further information, see “Restore, Recovery, and Duplicate
Options” on page 88.
6. Click Restore.
Proceed to restore the control file.
Chapter 1 75
Page 98

Integrating Oracle and Data Protector
Restoring an Oracle Database
Restoring the Control File
The control file contains all the information about the database
structure. If the control file has been lost, you must restore it before you
restore any other part of the database. The database should be in the
NoMount state.
Depending on the type of the control file backup, the following types of
restore are possible when restoring the control file:
• Restoring from Data Protector managed control file backup
(CONTROLFILE FROM DP MANAGED BACKUP)
The control file was backed up automatically by ob2rman.pl at the
end of a backup session, unless the option Disable Data Protector
managed control file backup was selected.
The recovery catalog is not required for this restore option.
The control files (ctrl<DB_NAME>.dbf) are restored to:
Windows: <Data_Protector_home>\tmp
HP-UX and Solaris: /var/opt/omni/tmp
Other UNIX: /usr/opt/omni/tmp
OpenVMS: OMNI$ROOT:[TMP]
After the restore, run the following script:
run {
allocate channel 'dev0' type disk;
restore controlfile from '<TMP_FILENAME>';
release channel 'dev0';
}
Where <TMP_FILENAME> is the location to which the file was restored.
• Restoring from RMAN autobackup (CONTROLFILE FROM RMAN
AUTOBACKUP)
This type of restore is not available with Oracle 8i.
The control file was automatically backed up by RMAN and the
recovery catalog is not available.
Chapter 176
Page 99

Integrating Oracle and Data Protector
Restoring an Oracle Database
IMPORTANT Ensure that you have properly configured the RMAN autobackup and
that the correct backup version is available. If the RMAN autobackup
session is not found during the restore, the procedure is aborted. See the
Oracle 9i/10g documentation on how to set up RMAN AUTOBACKUP.
• Restoring from RMAN backup set (CONTROLFILE FROM RMAN
BACKUPSET)
The recovery catalog is required.
• Oracle Data Guard (10g only): Restoring standby control file from
RMAN backup set (STANDBY CONTROL FILE FROM RMAN BACKUPSET)
If you restore a standby database (not using duplication), you must
restore this type of control file.
This type of restore is available only in Oracle 10g standby
configurations and if you selected the CONTROL FILE FOR STANDBY
database object in the backup specification.
A backup session can contain more than one type of the control file
backup.
To restore the control file:
1. Open the sqlplus window and put the database in the nomount
state. See “Changing The Database State” on page 73.
2. In the Data Protector GUI, switch to the Restore context.
3. Under Restore Objects, expand Oracle Server, expand the client
on which the database, for which you want to restore the control file,
resides, and then click the database.
4. In the Restore Action drop-down list, select Perform RMAN
Repository Restore.
In the Results area, select the control file for restore.
5. In the Options page, from the Client drop-down list, select the client
on which the Data Protector Oracle integration agent (ob2rman.pl)
will be started. To restore the control file to a different database than
it is selected, click Settings and specify the login information for the
target database.
Chapter 1 77
Page 100

Integrating Oracle and Data Protector
Restoring an Oracle Database
Set the other restore options. See “Restore, Recovery, and Duplicate
Options” on page 88 for information.
6. Click Restore.
Proceed with restoring the Oracle database objects.
Restoring Oracle Database Objects
Before you restore Oracle database objects, ensure that you have an
up-to-date version of the recovery catalog database and the control file.
They contain the database structure information. If you do not have
up-to-date versions of these files, restore them as described in“Restoring
the Recovery Catalog Database” on page 74 and “Restoring the Control
File” on page 76.
To restore Oracle database objects:
1. Oracle Data Guard: If you restore a standby database, stop the
managed recovery process (log apply services):
SQL> ALTER DATABASE RECOVER MANAGED STANDBY DATABASE CANCEL;
2. Put the database in the mount state. See “Changing The Database
State” on page 73.
3. In the Data Protector GUI, switch to the Restore context.
4. Under Restore Objects, expand Oracle Server, expand the client
on which the database, for which you restore the database objects,
resides, and then click the database.
5. In the Restore action drop-down list, select the type of restore you
wish to perform. For information on the options, see “Restore,
Recovery, and Duplicate Options” on page 88.
IMPORTANT If you do not select Perform Restore and Recovery or Perform
Recovery Only, you will have to recover the database objects manually
using RMAN. For information, see “Restoring Oracle Using RMAN” on
page 93.
Chapter 178
 Loading...