

Page 1

HP OpenView Storage Data Protector
Administrator’s Guide
Manual Edition: May 2003
Manufacturing Part Number: B6960-90078
Release A.05.10
© Copyright Hewlett-Packard Development Company, L.P.2003.
Page 2

Legal Notices
Hewlett-Packard makes no warranty of any kind with regard to this
manual, including, but not limited to, the implied warranties of
merchantability and fitness for a particular purpose. Hewlett-Packard
shall not be held liable for errors contained herein or direct, indirect,
special, incidental or consequential damages in connection with the
furnishing, performance, or use of this material.
Warranty. A copy of the specific warranty terms applicable to your
Hewlett-Packard product and replacement parts can be obtained from
your local Sales and Service Office.
Restricted Rights Legend. All rights are reserved. No part of this
document may be photocopied, reproduced, or translated to another
language without the prior written consent of Hewlett-Packard
Company. The information contained in this document is subject to
change without notice.
Use, duplication or disclosure by the U.S. Government is subject to
restrictions as set forth in subparagraph (c) (1) (ii) of the Rights in
Technical Data and Computer Software clause at DFARS 252.227-7013
for DOD agencies, and subparagraphs (c) (1) and (c) (2) of the
Commercial Computer Software Restricted Rights clause at FAR 52.22719 for other agencies.
Hewlett-Packard Company
United States of America
Copyright Notices. ©Copyright 1983-2003 Hewlett-Packard
Development Company, L.P. all rights reserved.
Reproduction, adaptation, or translation of this document without prior
written permission is prohibited, except as allowed under the copyright
laws.
©Copyright 1979, 1980, 1983, 1985-93 Regents of the University of
California
This software is based in part on the Fourth Berkeley Software
Distribution under license from the Regents of the University of
California.
©Copyright 1986-1992 Sun Microsystems, Inc.
ii
Page 3

©Copyright 1985-86, 1988 Massachusetts Institute of Technology
©Copyright 1989-93 The Open Software Foundation, Inc.
©Copyright 1986-1997 FTP Software, Inc. All rights reserved
©Copyright 1986 Digital Equipment Corporation
©Copyright 1990 Motorola, Inc.
©Copyright 1990, 1991, 1992 Cornell University
©Copyright 1989-1991 The University of Maryland
©Copyright 1988 Carnegie Mellon University
©Copyright 1991-1995 by Stichting Mathematisch Centrum,
Amsterdam, The Netherlands
©Copyright 1999, 2000 Bo Branten
Trademark Notices. UNIX® is a registered trademark in the United
States and other countries, licensed exclusively through X/Open
Company Limited.
X Window System is a trademark of the Massachusetts Institute of
Technology.
Motif is a trademark of the Open Software Foundation, Inc. in the U.S.
and other countries.
Windows NT™ is a U.S. trademark of Microsoft Corporation. Microsoft®,
MS-DOS®, Windows® and MS Windows® are U.S. registered
trademarks of Microsoft Corporation.
Oracle®, SQL*Net®, and Net8® are registered U.S. trademarks of
Oracle Corporation, Redwood City, California. Oracle Reports™,
Oracle8™, Oracle8 Server Manager™ and Oracle8 Recovery Manager™
are trademarks of Oracle Corporation, Redwood City, California.
Java™ is a U.S. trademark of Sun Microsystems, Inc.
Adobe® and Acrobat® are trademarks of Adobe Systems Incorporated.
ARM® is a registered trademark of ARM Limited.
X/Open® is a registered trademark, and the X device is a trademark of X/
Open Company Ltd. in the UK and other countries.
VisiCalc® is a U.S. registered trademark of Lotus Development Corp.
iii
Page 4

HP-UX Release 11.00 and later (in both 32- and 64-bit configurations) on
all HP 9000 computers are Open Group UNIX 95 branded products.
Netscape and Netscape Navigator are U.S. trademarks of Netscape
Communications Corporation.
OpenView® is a registered U.S. trademark of Hewlett-Packard
Company.
© 2003 Bristol Technology, Inc., Bristol Technology, Wind/U, HyperHelp
and Xprinter are registered trademarks of Bristol Technology Inc.
Other reserved names are trademarks of the respective companies.
iv
Page 5

Contents
1. Introducing Data Protector
In This Chapter . . . . . . . . . . . . . . . . . . . . . . . . . . . . . . . . . . . . . . . . . . . . . . . . . . . . . . . . . 2
The Data Protector Cell Environment . . . . . . . . . . . . . . . . . . . . . . . . . . . . . . . . . . . . . . . 3
How a Backup Session Works . . . . . . . . . . . . . . . . . . . . . . . . . . . . . . . . . . . . . . . . . . . . 4
How a Restore Session Works . . . . . . . . . . . . . . . . . . . . . . . . . . . . . . . . . . . . . . . . . . . . 4
Using the Data Protector User Interface . . . . . . . . . . . . . . . . . . . . . . . . . . . . . . . . . . . . . 6
Graphical User Interface . . . . . . . . . . . . . . . . . . . . . . . . . . . . . . . . . . . . . . . . . . . . . . . . 7
The Command-Line Interface . . . . . . . . . . . . . . . . . . . . . . . . . . . . . . . . . . . . . . . . . . . 11
Data Protector Online Resources. . . . . . . . . . . . . . . . . . . . . . . . . . . . . . . . . . . . . . . . . 12
Using Microsoft Management Console (MMC) . . . . . . . . . . . . . . . . . . . . . . . . . . . . . . 13
Overview of Tasks to Set Up Data Protector . . . . . . . . . . . . . . . . . . . . . . . . . . . . . . . . . 15
2. Configuring and Using Backup Devices
In This Chapter . . . . . . . . . . . . . . . . . . . . . . . . . . . . . . . . . . . . . . . . . . . . . . . . . . . . . . . . 18
Configuring Backup Devices . . . . . . . . . . . . . . . . . . . . . . . . . . . . . . . . . . . . . . . . . . . . . . 20
Configuring Standalone Devices. . . . . . . . . . . . . . . . . . . . . . . . . . . . . . . . . . . . . . . . . . . 23
Configuring File Devices . . . . . . . . . . . . . . . . . . . . . . . . . . . . . . . . . . . . . . . . . . . . . . . . . 26
Configuring Library Devices . . . . . . . . . . . . . . . . . . . . . . . . . . . . . . . . . . . . . . . . . . . . . . 29
Configuring Libraries with Multiple Systems . . . . . . . . . . . . . . . . . . . . . . . . . . . . . . . . 32
Configuring Magazine Devices . . . . . . . . . . . . . . . . . . . . . . . . . . . . . . . . . . . . . . . . . . . . 34
Configuring Stacker Devices . . . . . . . . . . . . . . . . . . . . . . . . . . . . . . . . . . . . . . . . . . . . . . 35
Configuring a Library for Mixed Media . . . . . . . . . . . . . . . . . . . . . . . . . . . . . . . . . . . . . 37
Configuring Devices for Direct Backup. . . . . . . . . . . . . . . . . . . . . . . . . . . . . . . . . . . . . . 38
Configuration Procedure . . . . . . . . . . . . . . . . . . . . . . . . . . . . . . . . . . . . . . . . . . . . . . . 39
Support of New Devices. . . . . . . . . . . . . . . . . . . . . . . . . . . . . . . . . . . . . . . . . . . . . . . . . . 41
Using Several Drive Types in a Library. . . . . . . . . . . . . . . . . . . . . . . . . . . . . . . . . . . . . 42
Shared Devices in the SAN Environment . . . . . . . . . . . . . . . . . . . . . . . . . . . . . . . . . . . 44
Locking Devices Used Exclusively by Data Protector . . . . . . . . . . . . . . . . . . . . . . . . 46
Locking Devices Used by Multiple Applications . . . . . . . . . . . . . . . . . . . . . . . . . . . . . 46
Direct Library Access Concept. . . . . . . . . . . . . . . . . . . . . . . . . . . . . . . . . . . . . . . . . . . 47
Indirect Library Access Concept . . . . . . . . . . . . . . . . . . . . . . . . . . . . . . . . . . . . . . . . . 47
Configuration Overview . . . . . . . . . . . . . . . . . . . . . . . . . . . . . . . . . . . . . . . . . . . . . . . . 47
Shared Devices and MC/ServiceGuard . . . . . . . . . . . . . . . . . . . . . . . . . . . . . . . . . . . . 58
Drive Cleaning . . . . . . . . . . . . . . . . . . . . . . . . . . . . . . . . . . . . . . . . . . . . . . . . . . . . . . . . . 61
Configuring Automatic Drive Cleaning. . . . . . . . . . . . . . . . . . . . . . . . . . . . . . . . . . . . 62
Testing the Drive Cleaning Configuration . . . . . . . . . . . . . . . . . . . . . . . . . . . . . . . . . 63
Busy Drive Handling . . . . . . . . . . . . . . . . . . . . . . . . . . . . . . . . . . . . . . . . . . . . . . . . . . . . 65
Activating Barcode Support . . . . . . . . . . . . . . . . . . . . . . . . . . . . . . . . . . . . . . . . . . . . . . 66
v
Page 6

Contents
Activating Cartridge Memory Support. . . . . . . . . . . . . . . . . . . . . . . . . . . . . . . . . . . . . . 68
Disabling a Backup Device . . . . . . . . . . . . . . . . . . . . . . . . . . . . . . . . . . . . . . . . . . . . . . . 70
Removing a Backup Device . . . . . . . . . . . . . . . . . . . . . . . . . . . . . . . . . . . . . . . . . . . . . . 72
Renaming a Backup Device. . . . . . . . . . . . . . . . . . . . . . . . . . . . . . . . . . . . . . . . . . . . . . . 73
Device Locking . . . . . . . . . . . . . . . . . . . . . . . . . . . . . . . . . . . . . . . . . . . . . . . . . . . . . . . . . 74
Device Concurrency, Segment Size, and Block Size. . . . . . . . . . . . . . . . . . . . . . . . . . . . 76
3. Configuring Users and User Groups
In This Chapter . . . . . . . . . . . . . . . . . . . . . . . . . . . . . . . . . . . . . . . . . . . . . . . . . . . . . . . . 82
Data Protector User Rights. . . . . . . . . . . . . . . . . . . . . . . . . . . . . . . . . . . . . . . . . . . . . . . 83
Predefined Data Protector User Groups. . . . . . . . . . . . . . . . . . . . . . . . . . . . . . . . . . . . . 86
Adding or Deleting a User Group . . . . . . . . . . . . . . . . . . . . . . . . . . . . . . . . . . . . . . . . . . 88
Adding a User Group . . . . . . . . . . . . . . . . . . . . . . . . . . . . . . . . . . . . . . . . . . . . . . . . . . 88
Deleting a User Group . . . . . . . . . . . . . . . . . . . . . . . . . . . . . . . . . . . . . . . . . . . . . . . . . 89
Adding or Deleting a User. . . . . . . . . . . . . . . . . . . . . . . . . . . . . . . . . . . . . . . . . . . . . . . . 90
Modifying a User . . . . . . . . . . . . . . . . . . . . . . . . . . . . . . . . . . . . . . . . . . . . . . . . . . . . . . . 92
Changing User Properties . . . . . . . . . . . . . . . . . . . . . . . . . . . . . . . . . . . . . . . . . . . . . . 92
Moving a User to Another User Group . . . . . . . . . . . . . . . . . . . . . . . . . . . . . . . . . . . . 92
Changing User Group Rights . . . . . . . . . . . . . . . . . . . . . . . . . . . . . . . . . . . . . . . . . . . . . 93
Example User Configurations. . . . . . . . . . . . . . . . . . . . . . . . . . . . . . . . . . . . . . . . . . . . . 94
Allowing Users to Restore Their Own Files . . . . . . . . . . . . . . . . . . . . . . . . . . . . . . . . 94
Enabling Users to Back Up Their Systems. . . . . . . . . . . . . . . . . . . . . . . . . . . . . . . . . 94
4. Managing Media
In This Chapter . . . . . . . . . . . . . . . . . . . . . . . . . . . . . . . . . . . . . . . . . . . . . . . . . . . . . . . . 98
Overview of Data Protector Media Management. . . . . . . . . . . . . . . . . . . . . . . . . . . . . . 99
Media Life Cycle . . . . . . . . . . . . . . . . . . . . . . . . . . . . . . . . . . . . . . . . . . . . . . . . . . . . . 100
Creating a Media Pool . . . . . . . . . . . . . . . . . . . . . . . . . . . . . . . . . . . . . . . . . . . . . . . . . . 102
Properties of a Media Pool . . . . . . . . . . . . . . . . . . . . . . . . . . . . . . . . . . . . . . . . . . . . . 103
Adding Media to a Media Pool. . . . . . . . . . . . . . . . . . . . . . . . . . . . . . . . . . . . . . . . . . . . 107
Formatting Media . . . . . . . . . . . . . . . . . . . . . . . . . . . . . . . . . . . . . . . . . . . . . . . . . . . . . 108
Formatting Media in a Magazine. . . . . . . . . . . . . . . . . . . . . . . . . . . . . . . . . . . . . . . . 110
Recognizing Other Data Formats . . . . . . . . . . . . . . . . . . . . . . . . . . . . . . . . . . . . . . . 111
Importing Media . . . . . . . . . . . . . . . . . . . . . . . . . . . . . . . . . . . . . . . . . . . . . . . . . . . . . . 113
Importing the Catalog from Media . . . . . . . . . . . . . . . . . . . . . . . . . . . . . . . . . . . . . . 114
Importing Media in a Magazine Device. . . . . . . . . . . . . . . . . . . . . . . . . . . . . . . . . . . 115
Appending Backups to Media . . . . . . . . . . . . . . . . . . . . . . . . . . . . . . . . . . . . . . . . . . . . 117
Using a Pre-Allocation List of Media for Backup. . . . . . . . . . . . . . . . . . . . . . . . . . . . . 119
vi
Page 7

Contents
Selecting Media for Backup. . . . . . . . . . . . . . . . . . . . . . . . . . . . . . . . . . . . . . . . . . . . . . 120
Media Selection. . . . . . . . . . . . . . . . . . . . . . . . . . . . . . . . . . . . . . . . . . . . . . . . . . . . . . 120
Setting Data Protection for Media . . . . . . . . . . . . . . . . . . . . . . . . . . . . . . . . . . . . . . . . 122
Recycling Media . . . . . . . . . . . . . . . . . . . . . . . . . . . . . . . . . . . . . . . . . . . . . . . . . . . . . . 123
Moving Media to Another Pool . . . . . . . . . . . . . . . . . . . . . . . . . . . . . . . . . . . . . . . . . . . 124
Exporting Media from Data Protector . . . . . . . . . . . . . . . . . . . . . . . . . . . . . . . . . . . . . 125
Modifying Media Locations . . . . . . . . . . . . . . . . . . . . . . . . . . . . . . . . . . . . . . . . . . . . . . 126
Modifying Media Descriptions. . . . . . . . . . . . . . . . . . . . . . . . . . . . . . . . . . . . . . . . . . . . 127
Verifying Data on a Medium . . . . . . . . . . . . . . . . . . . . . . . . . . . . . . . . . . . . . . . . . . . . . 128
Scanning Media in a Device . . . . . . . . . . . . . . . . . . . . . . . . . . . . . . . . . . . . . . . . . . . . . 129
Checking the Condition of a Medium . . . . . . . . . . . . . . . . . . . . . . . . . . . . . . . . . . . . . . 131
Factors Influencing the Condition of Media . . . . . . . . . . . . . . . . . . . . . . . . . . . . . . . 132
Changing How Media Condition Is Calculated. . . . . . . . . . . . . . . . . . . . . . . . . . . . . 134
Searching for and Selecting a Medium. . . . . . . . . . . . . . . . . . . . . . . . . . . . . . . . . . . . . 135
Entering a Medium into a Device . . . . . . . . . . . . . . . . . . . . . . . . . . . . . . . . . . . . . . . . . 136
Ejecting a Medium from a Device . . . . . . . . . . . . . . . . . . . . . . . . . . . . . . . . . . . . . . . . . 137
Scheduled Eject of Media . . . . . . . . . . . . . . . . . . . . . . . . . . . . . . . . . . . . . . . . . . . . . . 138
Vaulting Media. . . . . . . . . . . . . . . . . . . . . . . . . . . . . . . . . . . . . . . . . . . . . . . . . . . . . . . . 140
Configuring Vaults . . . . . . . . . . . . . . . . . . . . . . . . . . . . . . . . . . . . . . . . . . . . . . . . . . . 141
Moving Media to a Vault . . . . . . . . . . . . . . . . . . . . . . . . . . . . . . . . . . . . . . . . . . . . . . 141
Restoring from Media in a Vault . . . . . . . . . . . . . . . . . . . . . . . . . . . . . . . . . . . . . . . . 141
Copying Media . . . . . . . . . . . . . . . . . . . . . . . . . . . . . . . . . . . . . . . . . . . . . . . . . . . . . . . . 143
Automated Media Copying. . . . . . . . . . . . . . . . . . . . . . . . . . . . . . . . . . . . . . . . . . . . . 145
Detection of Write-Protected Media . . . . . . . . . . . . . . . . . . . . . . . . . . . . . . . . . . . . . . . 147
Using Different Media Format Types . . . . . . . . . . . . . . . . . . . . . . . . . . . . . . . . . . . . . . 148
Modifying Views in the Media Management Window . . . . . . . . . . . . . . . . . . . . . . . . . 149
5. Backup
In This Chapter . . . . . . . . . . . . . . . . . . . . . . . . . . . . . . . . . . . . . . . . . . . . . . . . . . . . . . . 152
Configuring a Backup . . . . . . . . . . . . . . . . . . . . . . . . . . . . . . . . . . . . . . . . . . . . . . . . . . 153
Creating a Backup Specification . . . . . . . . . . . . . . . . . . . . . . . . . . . . . . . . . . . . . . . . 154
Backing Up UNIX Systems . . . . . . . . . . . . . . . . . . . . . . . . . . . . . . . . . . . . . . . . . . . . . . 161
Backing Up UNIX Filesystems . . . . . . . . . . . . . . . . . . . . . . . . . . . . . . . . . . . . . . . . . 161
Backing Up Clients Using Disk Discovery . . . . . . . . . . . . . . . . . . . . . . . . . . . . . . . . 163
Backing Up Disks Using NFS . . . . . . . . . . . . . . . . . . . . . . . . . . . . . . . . . . . . . . . . . . 164
Backing Up UNIX Disks as Disk Image Objects . . . . . . . . . . . . . . . . . . . . . . . . . . . 166
Backing Up Windows Systems . . . . . . . . . . . . . . . . . . . . . . . . . . . . . . . . . . . . . . . . . . . 168
Backing Up Filesystems (Logical Disk Drives). . . . . . . . . . . . . . . . . . . . . . . . . . . . . 168
vii
Page 8

Contents
Backing Up CONFIGURATION . . . . . . . . . . . . . . . . . . . . . . . . . . . . . . . . . . . . . . . . 173
Backing Up Windows Clients Using Disk Discovery . . . . . . . . . . . . . . . . . . . . . . . . 183
Backing Up Windows Shared Disks . . . . . . . . . . . . . . . . . . . . . . . . . . . . . . . . . . . . . 185
Backing Up Windows Disks as Disk Image Objects. . . . . . . . . . . . . . . . . . . . . . . . . 190
Backing Up Novell NetWare Systems. . . . . . . . . . . . . . . . . . . . . . . . . . . . . . . . . . . . . . 194
Backing Up Novell NetWare Filesystems (Volumes) . . . . . . . . . . . . . . . . . . . . . . . . 194
Client Backup with Disk Discovery. . . . . . . . . . . . . . . . . . . . . . . . . . . . . . . . . . . . . . 198
Backing Up NetWare Directory Services (NDS) . . . . . . . . . . . . . . . . . . . . . . . . . . . 199
Backing Up OpenVMS Systems . . . . . . . . . . . . . . . . . . . . . . . . . . . . . . . . . . . . . . . . . . 201
Backing Up OpenVMS Filesystems. . . . . . . . . . . . . . . . . . . . . . . . . . . . . . . . . . . . . . 201
Backing Up in a Direct Backup Environment . . . . . . . . . . . . . . . . . . . . . . . . . . . . . . . 204
Backup Specification Configuration Procedure . . . . . . . . . . . . . . . . . . . . . . . . . . . . 205
Starting Direct Backup Using the CLI . . . . . . . . . . . . . . . . . . . . . . . . . . . . . . . . . . . 206
Scheduling Unattended Backups . . . . . . . . . . . . . . . . . . . . . . . . . . . . . . . . . . . . . . . . . 207
Starting Backups on Specific Dates. . . . . . . . . . . . . . . . . . . . . . . . . . . . . . . . . . . . . . 209
Starting Periodic Backups . . . . . . . . . . . . . . . . . . . . . . . . . . . . . . . . . . . . . . . . . . . . . 209
Editing Your Backup Schedule. . . . . . . . . . . . . . . . . . . . . . . . . . . . . . . . . . . . . . . . . . 210
Skipping Backups During Holidays. . . . . . . . . . . . . . . . . . . . . . . . . . . . . . . . . . . . . . 211
Configuring Backup Options When Scheduling Backups . . . . . . . . . . . . . . . . . . . . 211
Running Consecutive Backups. . . . . . . . . . . . . . . . . . . . . . . . . . . . . . . . . . . . . . . . . . 212
Selecting a Backup Type: Full or Incremental. . . . . . . . . . . . . . . . . . . . . . . . . . . . . . . 213
Using Backup Templates . . . . . . . . . . . . . . . . . . . . . . . . . . . . . . . . . . . . . . . . . . . . . . . 216
Data Protector Default Backup Templates . . . . . . . . . . . . . . . . . . . . . . . . . . . . . . . . 216
Options Offered by Templates . . . . . . . . . . . . . . . . . . . . . . . . . . . . . . . . . . . . . . . . . . 216
Using a Backup Template When Creating a New Backup Specification. . . . . . . . . 218
Applying a Backup Template . . . . . . . . . . . . . . . . . . . . . . . . . . . . . . . . . . . . . . . . . . . 218
Creating a New Template. . . . . . . . . . . . . . . . . . . . . . . . . . . . . . . . . . . . . . . . . . . . . . 220
Modifying an Existing Template . . . . . . . . . . . . . . . . . . . . . . . . . . . . . . . . . . . . . . . . 220
Groups of Backup Specifications. . . . . . . . . . . . . . . . . . . . . . . . . . . . . . . . . . . . . . . . . . 222
Using Backup Options. . . . . . . . . . . . . . . . . . . . . . . . . . . . . . . . . . . . . . . . . . . . . . . . . . 225
Most Frequently Used Backup Options. . . . . . . . . . . . . . . . . . . . . . . . . . . . . . . . . . . 227
List of Data Protector Backup Options . . . . . . . . . . . . . . . . . . . . . . . . . . . . . . . . . . . 236
Device Backup Options. . . . . . . . . . . . . . . . . . . . . . . . . . . . . . . . . . . . . . . . . . . . . . . . 249
Pre- and Post-Exec Commands . . . . . . . . . . . . . . . . . . . . . . . . . . . . . . . . . . . . . . . . . . . 250
Pre- and Post- Exec Commands on Windows Systems. . . . . . . . . . . . . . . . . . . . . . . 251
Pre- and Post- Exec Commands on UNIX Systems . . . . . . . . . . . . . . . . . . . . . . . . . 257
Managing Failed Backups . . . . . . . . . . . . . . . . . . . . . . . . . . . . . . . . . . . . . . . . . . . . . . . 263
Warnings When Backing Up System Disks . . . . . . . . . . . . . . . . . . . . . . . . . . . . . . . 263
viii
Page 9

Contents
Preventing Backup Failure . . . . . . . . . . . . . . . . . . . . . . . . . . . . . . . . . . . . . . . . . . . . 264
Restarting Failed Backups. . . . . . . . . . . . . . . . . . . . . . . . . . . . . . . . . . . . . . . . . . . . . 266
6. Restore
In This Chapter . . . . . . . . . . . . . . . . . . . . . . . . . . . . . . . . . . . . . . . . . . . . . . . . . . . . . . . 268
Restoring Your Data. . . . . . . . . . . . . . . . . . . . . . . . . . . . . . . . . . . . . . . . . . . . . . . . . . . . 269
Standard Restore Procedure . . . . . . . . . . . . . . . . . . . . . . . . . . . . . . . . . . . . . . . . . . . 269
Restoring Disk Images . . . . . . . . . . . . . . . . . . . . . . . . . . . . . . . . . . . . . . . . . . . . . . . . 273
Restoring Your Data to a Shared Disk . . . . . . . . . . . . . . . . . . . . . . . . . . . . . . . . . . . 275
Restoring UNIX Systems. . . . . . . . . . . . . . . . . . . . . . . . . . . . . . . . . . . . . . . . . . . . . . . . 276
Restoring Windows Systems . . . . . . . . . . . . . . . . . . . . . . . . . . . . . . . . . . . . . . . . . . . . . 277
Restoring the Windows CONFIGURATION. . . . . . . . . . . . . . . . . . . . . . . . . . . . . . . 280
Restoring the Windows 2000/XP/Server 2003 System State . . . . . . . . . . . . . . . . . . 281
Restoring the Windows Registry . . . . . . . . . . . . . . . . . . . . . . . . . . . . . . . . . . . . . . . . 282
Restoring Windows 2000/XP/Server 2003 Services . . . . . . . . . . . . . . . . . . . . . . . . . 283
Restoring DFS. . . . . . . . . . . . . . . . . . . . . . . . . . . . . . . . . . . . . . . . . . . . . . . . . . . . . . . 285
Restoring Windows User Profiles and Event Logs . . . . . . . . . . . . . . . . . . . . . . . . . . 285
Restoring Windows TCP/ IP Services . . . . . . . . . . . . . . . . . . . . . . . . . . . . . . . . . . . . 286
Restoring Novell Netware Filesystems. . . . . . . . . . . . . . . . . . . . . . . . . . . . . . . . . . . . . 287
Restoring Namespace Information and Volume Space Restrictions . . . . . . . . . . . . 287
Restoring File Ownerships and Trustees . . . . . . . . . . . . . . . . . . . . . . . . . . . . . . . . . 288
Restoring the Novell NetWare CONFIGURATION . . . . . . . . . . . . . . . . . . . . . . . . . 288
Restoring Novell NDS. . . . . . . . . . . . . . . . . . . . . . . . . . . . . . . . . . . . . . . . . . . . . . . . . 289
Restoring OpenVMS Filesystems . . . . . . . . . . . . . . . . . . . . . . . . . . . . . . . . . . . . . . . . . 291
What is Restored?. . . . . . . . . . . . . . . . . . . . . . . . . . . . . . . . . . . . . . . . . . . . . . . . . . . . 291
Restore Options . . . . . . . . . . . . . . . . . . . . . . . . . . . . . . . . . . . . . . . . . . . . . . . . . . . . . . . 294
List of Restore Options. . . . . . . . . . . . . . . . . . . . . . . . . . . . . . . . . . . . . . . . . . . . . . . . 294
Restore Techniques . . . . . . . . . . . . . . . . . . . . . . . . . . . . . . . . . . . . . . . . . . . . . . . . . . . . 299
Restoring Files to Different Paths . . . . . . . . . . . . . . . . . . . . . . . . . . . . . . . . . . . . . . . 299
Restoring Files in Parallel . . . . . . . . . . . . . . . . . . . . . . . . . . . . . . . . . . . . . . . . . . . . . 300
Viewing Files Not in the IDB. . . . . . . . . . . . . . . . . . . . . . . . . . . . . . . . . . . . . . . . . . . 301
Restoring Files in Use . . . . . . . . . . . . . . . . . . . . . . . . . . . . . . . . . . . . . . . . . . . . . . . . 302
Restoring by Query. . . . . . . . . . . . . . . . . . . . . . . . . . . . . . . . . . . . . . . . . . . . . . . . . . . 302
Skipping Files for Restore . . . . . . . . . . . . . . . . . . . . . . . . . . . . . . . . . . . . . . . . . . . . . 304
Selecting Only Specific Files (Matching) for Restore . . . . . . . . . . . . . . . . . . . . . . . . 304
Restoring Files and Directories Manually. . . . . . . . . . . . . . . . . . . . . . . . . . . . . . . . . 305
ix
Page 10

Contents
7. Monitoring, Reporting, Notifications, and the Event Log
In This Chapter . . . . . . . . . . . . . . . . . . . . . . . . . . . . . . . . . . . . . . . . . . . . . . . . . . . . . . . 308
Monitoring Sessions. . . . . . . . . . . . . . . . . . . . . . . . . . . . . . . . . . . . . . . . . . . . . . . . . . . . 309
Viewing Currently Running Sessions . . . . . . . . . . . . . . . . . . . . . . . . . . . . . . . . . . . . 309
Viewing Finished Sessions. . . . . . . . . . . . . . . . . . . . . . . . . . . . . . . . . . . . . . . . . . . . . 310
Responding to Mount Requests . . . . . . . . . . . . . . . . . . . . . . . . . . . . . . . . . . . . . . . . . 310
Restarting Failed Backups. . . . . . . . . . . . . . . . . . . . . . . . . . . . . . . . . . . . . . . . . . . . . 311
Aborting Running Sessions . . . . . . . . . . . . . . . . . . . . . . . . . . . . . . . . . . . . . . . . . . . . 312
Changing the Amount of Messages Shown. . . . . . . . . . . . . . . . . . . . . . . . . . . . . . . . 312
Monitoring Several Cells Simultaneously . . . . . . . . . . . . . . . . . . . . . . . . . . . . . . . . . . 314
Data Protector Reporting . . . . . . . . . . . . . . . . . . . . . . . . . . . . . . . . . . . . . . . . . . . . . . . 315
Report Types. . . . . . . . . . . . . . . . . . . . . . . . . . . . . . . . . . . . . . . . . . . . . . . . . . . . . . . . . . 317
Backup Specification Reports. . . . . . . . . . . . . . . . . . . . . . . . . . . . . . . . . . . . . . . . . . . 317
Configuration Reports . . . . . . . . . . . . . . . . . . . . . . . . . . . . . . . . . . . . . . . . . . . . . . . . 320
IDB Reports. . . . . . . . . . . . . . . . . . . . . . . . . . . . . . . . . . . . . . . . . . . . . . . . . . . . . . . . . 321
Pools and Media Reports . . . . . . . . . . . . . . . . . . . . . . . . . . . . . . . . . . . . . . . . . . . . . . 324
Sessions in Timeframe Reports . . . . . . . . . . . . . . . . . . . . . . . . . . . . . . . . . . . . . . . . . 326
Single Session Report. . . . . . . . . . . . . . . . . . . . . . . . . . . . . . . . . . . . . . . . . . . . . . . . . 328
Report Formats . . . . . . . . . . . . . . . . . . . . . . . . . . . . . . . . . . . . . . . . . . . . . . . . . . . . . . 329
Report Send Methods. . . . . . . . . . . . . . . . . . . . . . . . . . . . . . . . . . . . . . . . . . . . . . . . . . . 331
Email Send Method . . . . . . . . . . . . . . . . . . . . . . . . . . . . . . . . . . . . . . . . . . . . . . . . . . 331
Broadcast Message Send Method . . . . . . . . . . . . . . . . . . . . . . . . . . . . . . . . . . . . . . . 332
Log to File Send Method. . . . . . . . . . . . . . . . . . . . . . . . . . . . . . . . . . . . . . . . . . . . . . . 332
SNMP Send Method . . . . . . . . . . . . . . . . . . . . . . . . . . . . . . . . . . . . . . . . . . . . . . . . . . 332
External Send Method . . . . . . . . . . . . . . . . . . . . . . . . . . . . . . . . . . . . . . . . . . . . . . . . 334
Configuring Reports Using the Data Protector GUI . . . . . . . . . . . . . . . . . . . . . . . . . . 335
Configuring Report Groups and Adding Reports . . . . . . . . . . . . . . . . . . . . . . . . . . . 335
Running Reports and Report Groups Using the Data Protector GUI. . . . . . . . . . . . . 338
Running Individual Reports. . . . . . . . . . . . . . . . . . . . . . . . . . . . . . . . . . . . . . . . . . . . 338
Running Report Groups . . . . . . . . . . . . . . . . . . . . . . . . . . . . . . . . . . . . . . . . . . . . . . . 338
Running Reports and Report Groups Using the Command-Line Interface . . . . . . . . 339
Data Protector Notifications . . . . . . . . . . . . . . . . . . . . . . . . . . . . . . . . . . . . . . . . . . . . . 342
Notification Types. . . . . . . . . . . . . . . . . . . . . . . . . . . . . . . . . . . . . . . . . . . . . . . . . . . . 342
Notification Send Methods. . . . . . . . . . . . . . . . . . . . . . . . . . . . . . . . . . . . . . . . . . . . . 347
Configuring Notifications . . . . . . . . . . . . . . . . . . . . . . . . . . . . . . . . . . . . . . . . . . . . . . 351
Configuring Reports and Notifications on the Web . . . . . . . . . . . . . . . . . . . . . . . . . . . 353
Copying Data Protector Java Programs to the Web Server . . . . . . . . . . . . . . . . . . . 354
Restricting Access to Web Reporting. . . . . . . . . . . . . . . . . . . . . . . . . . . . . . . . . . . . . 354
x
Page 11

Contents
Generating the Reports . . . . . . . . . . . . . . . . . . . . . . . . . . . . . . . . . . . . . . . . . . . . . . . 355
Configuring Notifications . . . . . . . . . . . . . . . . . . . . . . . . . . . . . . . . . . . . . . . . . . . . . . 355
Configuring Report Groups . . . . . . . . . . . . . . . . . . . . . . . . . . . . . . . . . . . . . . . . . . . . 355
Data Protector Event Log . . . . . . . . . . . . . . . . . . . . . . . . . . . . . . . . . . . . . . . . . . . . . . . 356
8. Manager-of-Managers Environment
In This Chapter . . . . . . . . . . . . . . . . . . . . . . . . . . . . . . . . . . . . . . . . . . . . . . . . . . . . . . . 360
Manager-of-Managers . . . . . . . . . . . . . . . . . . . . . . . . . . . . . . . . . . . . . . . . . . . . . . . . . . 361
Configuring the Manager-of-Managers. . . . . . . . . . . . . . . . . . . . . . . . . . . . . . . . . . . . . 362
Setting Up MoM Manager . . . . . . . . . . . . . . . . . . . . . . . . . . . . . . . . . . . . . . . . . . . . . 363
Importing Data Protector Cells . . . . . . . . . . . . . . . . . . . . . . . . . . . . . . . . . . . . . . . . . 363
Adding a MoM Administrator . . . . . . . . . . . . . . . . . . . . . . . . . . . . . . . . . . . . . . . . . . 364
Restarting Data Protector Services . . . . . . . . . . . . . . . . . . . . . . . . . . . . . . . . . . . . . . 364
Centralized Media Management Database (CMMDB) . . . . . . . . . . . . . . . . . . . . . . . . 366
Configuring a Centralized Media Management Database . . . . . . . . . . . . . . . . . . . . . 368
Configuring the CMMDB on the MoM Manager . . . . . . . . . . . . . . . . . . . . . . . . . . . 369
Configuring the CMMDB on the Client Cell. . . . . . . . . . . . . . . . . . . . . . . . . . . . . . . 370
Centralized Licensing . . . . . . . . . . . . . . . . . . . . . . . . . . . . . . . . . . . . . . . . . . . . . . . . . . 372
Setting Up Centralized Licensing . . . . . . . . . . . . . . . . . . . . . . . . . . . . . . . . . . . . . . . 372
Moving Licenses in the MoM Environment . . . . . . . . . . . . . . . . . . . . . . . . . . . . . . . 375
Deactivating Centralized Licensing. . . . . . . . . . . . . . . . . . . . . . . . . . . . . . . . . . . . . . 376
Working with a MoM Environment . . . . . . . . . . . . . . . . . . . . . . . . . . . . . . . . . . . . . . . 377
Importing and Exporting Data Protector Cells. . . . . . . . . . . . . . . . . . . . . . . . . . . . . 377
Moving Client Systems Among Cells. . . . . . . . . . . . . . . . . . . . . . . . . . . . . . . . . . . . . 378
Distributing the MoM Configuration. . . . . . . . . . . . . . . . . . . . . . . . . . . . . . . . . . . . . 378
Configuring Data Protector Users . . . . . . . . . . . . . . . . . . . . . . . . . . . . . . . . . . . . . . . 379
Managing Devices and Media for a Specific Cell . . . . . . . . . . . . . . . . . . . . . . . . . . . 379
Restoring, Monitoring, and Reporting in an Enterprise Environment. . . . . . . . . . . . 380
9. Managing the Data Protector Internal Database
In This Chapter . . . . . . . . . . . . . . . . . . . . . . . . . . . . . . . . . . . . . . . . . . . . . . . . . . . . . . . 382
About the Data Protector Internal Database . . . . . . . . . . . . . . . . . . . . . . . . . . . . . . . . 383
The IDB Architecture . . . . . . . . . . . . . . . . . . . . . . . . . . . . . . . . . . . . . . . . . . . . . . . . . . 384
Configuring the IDB . . . . . . . . . . . . . . . . . . . . . . . . . . . . . . . . . . . . . . . . . . . . . . . . . . . 388
Allocating Disk Space for Future Use . . . . . . . . . . . . . . . . . . . . . . . . . . . . . . . . . . . . 388
Preparing for IDB Recovery . . . . . . . . . . . . . . . . . . . . . . . . . . . . . . . . . . . . . . . . . . . . 390
Configuring the Database Reports and Notifications. . . . . . . . . . . . . . . . . . . . . . . . 400
Maintaining the IDB . . . . . . . . . . . . . . . . . . . . . . . . . . . . . . . . . . . . . . . . . . . . . . . . . . . 402
xi
Page 12

Contents
Reducing the IDB Growth . . . . . . . . . . . . . . . . . . . . . . . . . . . . . . . . . . . . . . . . . . . . . 405
Reducing the IDB Size . . . . . . . . . . . . . . . . . . . . . . . . . . . . . . . . . . . . . . . . . . . . . . . . 406
Purging Obsolete Filenames . . . . . . . . . . . . . . . . . . . . . . . . . . . . . . . . . . . . . . . . . . . 408
Extending the Database Size. . . . . . . . . . . . . . . . . . . . . . . . . . . . . . . . . . . . . . . . . . . 408
Checking the Database Size . . . . . . . . . . . . . . . . . . . . . . . . . . . . . . . . . . . . . . . . . . . . 410
Checking the Consistency of the Database . . . . . . . . . . . . . . . . . . . . . . . . . . . . . . . 411
Moving the Database to a Different Cell Manager . . . . . . . . . . . . . . . . . . . . . . . . . . 412
Restoring the IDB . . . . . . . . . . . . . . . . . . . . . . . . . . . . . . . . . . . . . . . . . . . . . . . . . . . . . 414
Restoring the IDB to a Temporary Directory . . . . . . . . . . . . . . . . . . . . . . . . . . . . . . 414
Moving the IDB to the Original Location . . . . . . . . . . . . . . . . . . . . . . . . . . . . . . . . . 415
Recovering the IDB . . . . . . . . . . . . . . . . . . . . . . . . . . . . . . . . . . . . . . . . . . . . . . . . . . . . 417
Overview of IDB Recovery Methods . . . . . . . . . . . . . . . . . . . . . . . . . . . . . . . . . . . . . 417
Identifying the Level of Database Corruption . . . . . . . . . . . . . . . . . . . . . . . . . . . . . 419
Performing Guided Autorecovery. . . . . . . . . . . . . . . . . . . . . . . . . . . . . . . . . . . . . . . . 421
Handling Minor Database Corruption in the DCBF Part . . . . . . . . . . . . . . . . . . . . 422
Handling Major Database Corruption in the Filenames Part . . . . . . . . . . . . . . . . . 423
Recovering the IDB Using IDB Recovery File and Changed Device . . . . . . . . . . . . 424
Recovering the IDB Without the IDB Recovery File . . . . . . . . . . . . . . . . . . . . . . . . 426
Recovering the IDB from a Specific IDB Session . . . . . . . . . . . . . . . . . . . . . . . . . . . 428
Replaying IDB Transaction Logs . . . . . . . . . . . . . . . . . . . . . . . . . . . . . . . . . . . . . . . 430
Recovering the IDB to a Different Disk Layout . . . . . . . . . . . . . . . . . . . . . . . . . . . . 431
Updating the IDB by Importing Media . . . . . . . . . . . . . . . . . . . . . . . . . . . . . . . . . . . 433
10. Disaster Recovery
In This Chapter . . . . . . . . . . . . . . . . . . . . . . . . . . . . . . . . . . . . . . . . . . . . . . . . . . . . . . . 436
Introduction . . . . . . . . . . . . . . . . . . . . . . . . . . . . . . . . . . . . . . . . . . . . . . . . . . . . . . . . . . 437
Preparing for a Disaster Recovery . . . . . . . . . . . . . . . . . . . . . . . . . . . . . . . . . . . . . . . . 443
Planning . . . . . . . . . . . . . . . . . . . . . . . . . . . . . . . . . . . . . . . . . . . . . . . . . . . . . . . . . . . 443
Consistent and Relevant Backup. . . . . . . . . . . . . . . . . . . . . . . . . . . . . . . . . . . . . . . . 444
Updating the System Recovery Data (SRD) . . . . . . . . . . . . . . . . . . . . . . . . . . . . . . . 445
Assisted Manual Disaster Recovery of a Windows System . . . . . . . . . . . . . . . . . . . . . 450
Requirements . . . . . . . . . . . . . . . . . . . . . . . . . . . . . . . . . . . . . . . . . . . . . . . . . . . . . . . 451
Limitation . . . . . . . . . . . . . . . . . . . . . . . . . . . . . . . . . . . . . . . . . . . . . . . . . . . . . . . . . . 451
Preparation . . . . . . . . . . . . . . . . . . . . . . . . . . . . . . . . . . . . . . . . . . . . . . . . . . . . . . . . . 451
Recovery . . . . . . . . . . . . . . . . . . . . . . . . . . . . . . . . . . . . . . . . . . . . . . . . . . . . . . . . . . . 456
Disk Delivery Disaster Recovery of a Windows Client . . . . . . . . . . . . . . . . . . . . . . . . 459
Requirements . . . . . . . . . . . . . . . . . . . . . . . . . . . . . . . . . . . . . . . . . . . . . . . . . . . . . . . 459
Limitations . . . . . . . . . . . . . . . . . . . . . . . . . . . . . . . . . . . . . . . . . . . . . . . . . . . . . . . . . 460
xii
Page 13

Contents
Preparation . . . . . . . . . . . . . . . . . . . . . . . . . . . . . . . . . . . . . . . . . . . . . . . . . . . . . . . . . 460
Recovery . . . . . . . . . . . . . . . . . . . . . . . . . . . . . . . . . . . . . . . . . . . . . . . . . . . . . . . . . . . 461
Enhanced Automated Disaster Recovery of a Windows System. . . . . . . . . . . . . . . . . 463
Requirements . . . . . . . . . . . . . . . . . . . . . . . . . . . . . . . . . . . . . . . . . . . . . . . . . . . . . . . 464
Limitations . . . . . . . . . . . . . . . . . . . . . . . . . . . . . . . . . . . . . . . . . . . . . . . . . . . . . . . . . 465
Preparation . . . . . . . . . . . . . . . . . . . . . . . . . . . . . . . . . . . . . . . . . . . . . . . . . . . . . . . . . 466
Recovery . . . . . . . . . . . . . . . . . . . . . . . . . . . . . . . . . . . . . . . . . . . . . . . . . . . . . . . . . . . 470
One Button Disaster Recovery of a Windows System . . . . . . . . . . . . . . . . . . . . . . . . . 472
Requirements . . . . . . . . . . . . . . . . . . . . . . . . . . . . . . . . . . . . . . . . . . . . . . . . . . . . . . . 473
Limitations . . . . . . . . . . . . . . . . . . . . . . . . . . . . . . . . . . . . . . . . . . . . . . . . . . . . . . . . . 474
Preparation . . . . . . . . . . . . . . . . . . . . . . . . . . . . . . . . . . . . . . . . . . . . . . . . . . . . . . . . . 475
Recovery . . . . . . . . . . . . . . . . . . . . . . . . . . . . . . . . . . . . . . . . . . . . . . . . . . . . . . . . . . . 477
Automated System Recovery. . . . . . . . . . . . . . . . . . . . . . . . . . . . . . . . . . . . . . . . . . . . . 480
Requirements . . . . . . . . . . . . . . . . . . . . . . . . . . . . . . . . . . . . . . . . . . . . . . . . . . . . . . . 481
Limitations . . . . . . . . . . . . . . . . . . . . . . . . . . . . . . . . . . . . . . . . . . . . . . . . . . . . . . . . . 482
Preparation . . . . . . . . . . . . . . . . . . . . . . . . . . . . . . . . . . . . . . . . . . . . . . . . . . . . . . . . . 483
Recovery . . . . . . . . . . . . . . . . . . . . . . . . . . . . . . . . . . . . . . . . . . . . . . . . . . . . . . . . . . . 486
Restoring the Data Protector Cell Manager Specifics . . . . . . . . . . . . . . . . . . . . . . . . 487
Making IDB consistent (all methods) . . . . . . . . . . . . . . . . . . . . . . . . . . . . . . . . . . . . 487
Enhanced Automated Disaster Recovery Specifics. . . . . . . . . . . . . . . . . . . . . . . . . . 487
One Button Disaster Recovery Specifics . . . . . . . . . . . . . . . . . . . . . . . . . . . . . . . . . . 488
Automated System Recovery Specifics . . . . . . . . . . . . . . . . . . . . . . . . . . . . . . . . . . . 489
Advanced Recovery Tasks . . . . . . . . . . . . . . . . . . . . . . . . . . . . . . . . . . . . . . . . . . . . . . . 490
Restoring the Microsoft Cluster Server Specifics . . . . . . . . . . . . . . . . . . . . . . . . . . . 490
Restoring Internet Information Server (IIS) Specifics . . . . . . . . . . . . . . . . . . . . . . . 496
Manual Disaster Recovery of an HP-UX Client. . . . . . . . . . . . . . . . . . . . . . . . . . . . . . 498
Concept . . . . . . . . . . . . . . . . . . . . . . . . . . . . . . . . . . . . . . . . . . . . . . . . . . . . . . . . . . . . 498
Using Custom Installation Medium . . . . . . . . . . . . . . . . . . . . . . . . . . . . . . . . . . . . . 499
Using System Recovery Tools. . . . . . . . . . . . . . . . . . . . . . . . . . . . . . . . . . . . . . . . . . . 503
Disk Delivery Disaster Recovery of an UNIX Client . . . . . . . . . . . . . . . . . . . . . . . . . . 507
Limitations . . . . . . . . . . . . . . . . . . . . . . . . . . . . . . . . . . . . . . . . . . . . . . . . . . . . . . . . . 507
Preparation . . . . . . . . . . . . . . . . . . . . . . . . . . . . . . . . . . . . . . . . . . . . . . . . . . . . . . . . . 507
Recovery . . . . . . . . . . . . . . . . . . . . . . . . . . . . . . . . . . . . . . . . . . . . . . . . . . . . . . . . . . . 510
Manual Disaster Recovery of an UNIX Cell Manager . . . . . . . . . . . . . . . . . . . . . . . . 512
Limitation . . . . . . . . . . . . . . . . . . . . . . . . . . . . . . . . . . . . . . . . . . . . . . . . . . . . . . . . . . 512
Preparation . . . . . . . . . . . . . . . . . . . . . . . . . . . . . . . . . . . . . . . . . . . . . . . . . . . . . . . . . 512
Recovery . . . . . . . . . . . . . . . . . . . . . . . . . . . . . . . . . . . . . . . . . . . . . . . . . . . . . . . . . . . 512
Troubleshooting Disaster Recovery on Windows . . . . . . . . . . . . . . . . . . . . . . . . . . . . . 514
xiii
Page 14

Contents
General Troubleshooting . . . . . . . . . . . . . . . . . . . . . . . . . . . . . . . . . . . . . . . . . . . . . . 514
Troubleshooting Assisted Manual Disaster Recovery . . . . . . . . . . . . . . . . . . . . . . . 515
Troubleshooting Disk Delivery Disaster Recovery . . . . . . . . . . . . . . . . . . . . . . . . . . 515
Troubleshooting EADR and OBDR . . . . . . . . . . . . . . . . . . . . . . . . . . . . . . . . . . . . . . 516
11. Customizing the Data Protector Environment
In This Chapter . . . . . . . . . . . . . . . . . . . . . . . . . . . . . . . . . . . . . . . . . . . . . . . . . . . . . . . 522
Global Options File . . . . . . . . . . . . . . . . . . . . . . . . . . . . . . . . . . . . . . . . . . . . . . . . . . . . 523
Most Often Used Variables. . . . . . . . . . . . . . . . . . . . . . . . . . . . . . . . . . . . . . . . . . . . . 523
Using Omnirc Options . . . . . . . . . . . . . . . . . . . . . . . . . . . . . . . . . . . . . . . . . . . . . . . . . . 525
Firewall Support . . . . . . . . . . . . . . . . . . . . . . . . . . . . . . . . . . . . . . . . . . . . . . . . . . . . . . 528
Limiting the Range of Port Numbers . . . . . . . . . . . . . . . . . . . . . . . . . . . . . . . . . . . . 528
Port Usage in Data Protector. . . . . . . . . . . . . . . . . . . . . . . . . . . . . . . . . . . . . . . . . . . 531
Examples of Configuring Data Protector in Firewall Environments. . . . . . . . . . . . 535
12. Troubleshooting
In This Chapter . . . . . . . . . . . . . . . . . . . . . . . . . . . . . . . . . . . . . . . . . . . . . . . . . . . . . . . 548
Before Calling Your Support Representative . . . . . . . . . . . . . . . . . . . . . . . . . . . . . . . . 549
Data Protector Log Files . . . . . . . . . . . . . . . . . . . . . . . . . . . . . . . . . . . . . . . . . . . . . . . . 550
Location of Data Protector Log Files . . . . . . . . . . . . . . . . . . . . . . . . . . . . . . . . . . . . . 550
Format of Data Protector Log Files . . . . . . . . . . . . . . . . . . . . . . . . . . . . . . . . . . . . . . 550
Log Files and Their Contents. . . . . . . . . . . . . . . . . . . . . . . . . . . . . . . . . . . . . . . . . . . 551
Debugging. . . . . . . . . . . . . . . . . . . . . . . . . . . . . . . . . . . . . . . . . . . . . . . . . . . . . . . . . . . . 553
Limiting the Maximum Size of Debugs . . . . . . . . . . . . . . . . . . . . . . . . . . . . . . . . . . . 553
Ways of Debugging . . . . . . . . . . . . . . . . . . . . . . . . . . . . . . . . . . . . . . . . . . . . . . . . . . . 554
Debug Syntax . . . . . . . . . . . . . . . . . . . . . . . . . . . . . . . . . . . . . . . . . . . . . . . . . . . . . . . 555
Trace File Name . . . . . . . . . . . . . . . . . . . . . . . . . . . . . . . . . . . . . . . . . . . . . . . . . . . . . 556
INET Debug on UNIX . . . . . . . . . . . . . . . . . . . . . . . . . . . . . . . . . . . . . . . . . . . . . . . . 557
INET Debug on Windows. . . . . . . . . . . . . . . . . . . . . . . . . . . . . . . . . . . . . . . . . . . . . . 557
CRS Debug on Windows . . . . . . . . . . . . . . . . . . . . . . . . . . . . . . . . . . . . . . . . . . . . . . 557
CRS Debug in the Microsoft Cluster Environment . . . . . . . . . . . . . . . . . . . . . . . . . 558
Sample Debugging . . . . . . . . . . . . . . . . . . . . . . . . . . . . . . . . . . . . . . . . . . . . . . . . . . . 558
Browsing Troubleshooting Messages . . . . . . . . . . . . . . . . . . . . . . . . . . . . . . . . . . . . . . 561
When You Cannot Access Online Troubleshooting . . . . . . . . . . . . . . . . . . . . . . . . . . . 562
Description of Common Problems . . . . . . . . . . . . . . . . . . . . . . . . . . . . . . . . . . . . . . . . . 564
Troubleshooting Networking and Communication . . . . . . . . . . . . . . . . . . . . . . . . . . . 565
Hostname Resolution Problems. . . . . . . . . . . . . . . . . . . . . . . . . . . . . . . . . . . . . . . . . 565
Client Fails with “Connection Reset by Peer” . . . . . . . . . . . . . . . . . . . . . . . . . . . . . . 567
xiv
Page 15

Contents
Troubleshooting Data Protector Services and Daemons . . . . . . . . . . . . . . . . . . . . . . . 569
Problems Starting Data Protector Services on Windows . . . . . . . . . . . . . . . . . . . . . 569
Problems Starting Data Protector Daemons on UNIX. . . . . . . . . . . . . . . . . . . . . . . 571
Data Protector Processes . . . . . . . . . . . . . . . . . . . . . . . . . . . . . . . . . . . . . . . . . . . . . . 573
Troubleshooting Devices and Media . . . . . . . . . . . . . . . . . . . . . . . . . . . . . . . . . . . . . . . 574
Cannot Access Exchanger Control Device on Windows 2000/XP/Server 2003 . . . . 574
Device Open Problem . . . . . . . . . . . . . . . . . . . . . . . . . . . . . . . . . . . . . . . . . . . . . . . . . 575
Using Unsupported SCSI Adapters on Windows . . . . . . . . . . . . . . . . . . . . . . . . . . . 575
Medium Quality Statistics . . . . . . . . . . . . . . . . . . . . . . . . . . . . . . . . . . . . . . . . . . . . . 575
Medium Header Sanity Check . . . . . . . . . . . . . . . . . . . . . . . . . . . . . . . . . . . . . . . . . . 577
Cannot Use Devices After Upgrading to Data Protector A.05.10 . . . . . . . . . . . . . . 578
Other Common Problems . . . . . . . . . . . . . . . . . . . . . . . . . . . . . . . . . . . . . . . . . . . . . . 579
Troubleshooting Backup and Restore Sessions . . . . . . . . . . . . . . . . . . . . . . . . . . . . . . 580
Filenames Are Not Displayed Correctly in GUI . . . . . . . . . . . . . . . . . . . . . . . . . . . . 580
Full Backups Are Performed Instead of Incrementals . . . . . . . . . . . . . . . . . . . . . . . 580
Unexpected Mount Request for a Standalone Device. . . . . . . . . . . . . . . . . . . . . . . . 581
Unexpected Mount Request for a Library Device . . . . . . . . . . . . . . . . . . . . . . . . . . . 582
Unexpected Mounted Filesystems Detected . . . . . . . . . . . . . . . . . . . . . . . . . . . . . . . 583
Data Protector Fails to Start a Scheduled Session . . . . . . . . . . . . . . . . . . . . . . . . . . 584
Data Protector Fails to Start an Interactive Session . . . . . . . . . . . . . . . . . . . . . . . . 585
Poor Backup Performance on Novell NetWare Server . . . . . . . . . . . . . . . . . . . . . . . 585
Data Protector Fails to Start Parallel Restore Media Agent on Novell NetWare Clients
585
Backup Protection Expiration . . . . . . . . . . . . . . . . . . . . . . . . . . . . . . . . . . . . . . . . . . 586
Troubleshooting Application Database Restores . . . . . . . . . . . . . . . . . . . . . . . . . . . 586
Problems with non-ASCII Characters in Filenames . . . . . . . . . . . . . . . . . . . . . . . . 587
Troubleshooting Data Protector Installation . . . . . . . . . . . . . . . . . . . . . . . . . . . . . . . . 588
Problems with Remote Installation of Windows Clients . . . . . . . . . . . . . . . . . . . . . 588
Name Resolution Problems when Installing the Windows Cell Manager. . . . . . . . 589
Troubleshooting User Interface Startup . . . . . . . . . . . . . . . . . . . . . . . . . . . . . . . . . . . 590
Inet Is Not Responding on the Cell Manager . . . . . . . . . . . . . . . . . . . . . . . . . . . . . . 590
No Permissions to Access the Cell Manager . . . . . . . . . . . . . . . . . . . . . . . . . . . . . . . 590
Connection to a Remote System Refused on Windows or Novell NetWare . . . . . . . 591
Connection to Windows 98 Clients Fails . . . . . . . . . . . . . . . . . . . . . . . . . . . . . . . . . . 591
Troubleshooting the IDB . . . . . . . . . . . . . . . . . . . . . . . . . . . . . . . . . . . . . . . . . . . . . . . 592
Problems During the Upgrade of the IDB on Solaris . . . . . . . . . . . . . . . . . . . . . . . . 592
Problems While Running the User Interface . . . . . . . . . . . . . . . . . . . . . . . . . . . . . . 595
Libraries (Executables) Missing . . . . . . . . . . . . . . . . . . . . . . . . . . . . . . . . . . . . . . . . 595
Data Files (Directories) Missing . . . . . . . . . . . . . . . . . . . . . . . . . . . . . . . . . . . . . . . . 596
xv
Page 16

Contents
Temporary Directory Missing . . . . . . . . . . . . . . . . . . . . . . . . . . . . . . . . . . . . . . . . . . 597
Problems During Backup and Import . . . . . . . . . . . . . . . . . . . . . . . . . . . . . . . . . . . . 598
Performance Problems . . . . . . . . . . . . . . . . . . . . . . . . . . . . . . . . . . . . . . . . . . . . . . . . 599
MMDB and CDB Are Not Synchronized . . . . . . . . . . . . . . . . . . . . . . . . . . . . . . . . . . 600
Troubleshooting Reporting and Notifications . . . . . . . . . . . . . . . . . . . . . . . . . . . . . . . 602
Troubleshooting Data Protector Online Help. . . . . . . . . . . . . . . . . . . . . . . . . . . . . . . . 603
Troubleshooting Online Help on Windows . . . . . . . . . . . . . . . . . . . . . . . . . . . . . . . . 603
Troubleshooting Online Help on UNIX . . . . . . . . . . . . . . . . . . . . . . . . . . . . . . . . . . . 603
Check Whether Data Protector Functions Properly . . . . . . . . . . . . . . . . . . . . . . . . . . 605
Data Protector Checking and Maintenance Mechanism . . . . . . . . . . . . . . . . . . . . . 605
The User Check Failed Notification. . . . . . . . . . . . . . . . . . . . . . . . . . . . . . . . . . . . . . 606
Overview of Items to Be Checked . . . . . . . . . . . . . . . . . . . . . . . . . . . . . . . . . . . . . . . 607
13. Integrations with Other Applications
In This Chapter . . . . . . . . . . . . . . . . . . . . . . . . . . . . . . . . . . . . . . . . . . . . . . . . . . . . . . . 612
Cluster Integrations with Data Protector. . . . . . . . . . . . . . . . . . . . . . . . . . . . . . . . . . . 613
Cluster Concepts and Terminology . . . . . . . . . . . . . . . . . . . . . . . . . . . . . . . . . . . . . . 613
Cluster-Aware Databases and Applications . . . . . . . . . . . . . . . . . . . . . . . . . . . . . . . 616
Microsoft Cluster Server Integration . . . . . . . . . . . . . . . . . . . . . . . . . . . . . . . . . . . . . . 617
Cell Manager on Microsoft Cluster Server . . . . . . . . . . . . . . . . . . . . . . . . . . . . . . . . 618
Clients on Microsoft Cluster Server. . . . . . . . . . . . . . . . . . . . . . . . . . . . . . . . . . . . . . 618
Backing Up Data in a Cluster (MSCS) . . . . . . . . . . . . . . . . . . . . . . . . . . . . . . . . . . . 619
Managing Cluster-Aware Backups . . . . . . . . . . . . . . . . . . . . . . . . . . . . . . . . . . . . . . 620
MC/ServiceGuard Integration. . . . . . . . . . . . . . . . . . . . . . . . . . . . . . . . . . . . . . . . . . . . 627
Cell Manager on MC/ServiceGuard. . . . . . . . . . . . . . . . . . . . . . . . . . . . . . . . . . . . . . 627
Clients on MC/ServiceGuard . . . . . . . . . . . . . . . . . . . . . . . . . . . . . . . . . . . . . . . . . . . 637
Backing Up Data in a Cluster (MC/SG) . . . . . . . . . . . . . . . . . . . . . . . . . . . . . . . . . . 638
Veritas Cluster Integration . . . . . . . . . . . . . . . . . . . . . . . . . . . . . . . . . . . . . . . . . . . . . . 640
Clients on Veritas Cluster . . . . . . . . . . . . . . . . . . . . . . . . . . . . . . . . . . . . . . . . . . . . . 640
Novell NetWare Cluster Integration. . . . . . . . . . . . . . . . . . . . . . . . . . . . . . . . . . . . . . . 642
Clients on Novell NetWare Cluster . . . . . . . . . . . . . . . . . . . . . . . . . . . . . . . . . . . . . . 642
Data Source Integration (DSI) . . . . . . . . . . . . . . . . . . . . . . . . . . . . . . . . . . . . . . . . . . . 644
Application Response Measurement (ARM) Integration. . . . . . . . . . . . . . . . . . . . . . . 646
ManageX Integration. . . . . . . . . . . . . . . . . . . . . . . . . . . . . . . . . . . . . . . . . . . . . . . . . . . 648
Access Points for System and Management Applications . . . . . . . . . . . . . . . . . . . . . . 649
Introduction. . . . . . . . . . . . . . . . . . . . . . . . . . . . . . . . . . . . . . . . . . . . . . . . . . . . . . . . . 649
Data Protector Access Points . . . . . . . . . . . . . . . . . . . . . . . . . . . . . . . . . . . . . . . . . . . 649
Examples. . . . . . . . . . . . . . . . . . . . . . . . . . . . . . . . . . . . . . . . . . . . . . . . . . . . . . . . . . . 653
xvi
Page 17

Contents
14. ADIC/GRAU DAS and STK ACS Libraries
In This Chapter . . . . . . . . . . . . . . . . . . . . . . . . . . . . . . . . . . . . . . . . . . . . . . . . . . . . . . . 656
ADIC/GRAU DAS and STK ACS Integrations. . . . . . . . . . . . . . . . . . . . . . . . . . . . . . . 657
Configuration Basics. . . . . . . . . . . . . . . . . . . . . . . . . . . . . . . . . . . . . . . . . . . . . . . . . . 659
Media Management Basics . . . . . . . . . . . . . . . . . . . . . . . . . . . . . . . . . . . . . . . . . . . . 659
The ADIC/GRAU DAS Library Device . . . . . . . . . . . . . . . . . . . . . . . . . . . . . . . . . . . . . 662
Direct Access to the Library: Installation and Configuration . . . . . . . . . . . . . . . . . 662
Connecting Library Drives. . . . . . . . . . . . . . . . . . . . . . . . . . . . . . . . . . . . . . . . . . . . . 662
Preparing for Installation. . . . . . . . . . . . . . . . . . . . . . . . . . . . . . . . . . . . . . . . . . . . . . 662
Installing the DAS Media Agent . . . . . . . . . . . . . . . . . . . . . . . . . . . . . . . . . . . . . . . . 664
Using the Data Protector GUI . . . . . . . . . . . . . . . . . . . . . . . . . . . . . . . . . . . . . . . . . 669
Indirect Access to the DAS Library: Installation and Configuration . . . . . . . . . . . 670
Using Data Protector to Access the ADIC/GRAU Library . . . . . . . . . . . . . . . . . . . . 671
The STK ACS Library Device . . . . . . . . . . . . . . . . . . . . . . . . . . . . . . . . . . . . . . . . . . . . 680
Direct Access to the Library: Installation and Configuration . . . . . . . . . . . . . . . . . 680
Media Management Basics . . . . . . . . . . . . . . . . . . . . . . . . . . . . . . . . . . . . . . . . . . . . 680
Connecting Library Drives. . . . . . . . . . . . . . . . . . . . . . . . . . . . . . . . . . . . . . . . . . . . . 681
Installing the ACS Media Agent to Use the StorageTek Library . . . . . . . . . . . . . . 681
Using Data Protector to Configure the STK ACS Library . . . . . . . . . . . . . . . . . . . . 686
Indirect Access to the Library: Installation and Configuration. . . . . . . . . . . . . . . . 686
Using Data Protector to Access the STK ACS Library. . . . . . . . . . . . . . . . . . . . . . . 687
Troubleshooting Library Installation and Configuration . . . . . . . . . . . . . . . . . . . . . . 697
A. Further Information
In This Appendix . . . . . . . . . . . . . . . . . . . . . . . . . . . . . . . . . . . . . . . . . . . . . . . . . . . . . . .A-2
Backing Up and Restoring UNIX Specifics . . . . . . . . . . . . . . . . . . . . . . . . . . . . . . . . . .A-3
VxFS Snapshot . . . . . . . . . . . . . . . . . . . . . . . . . . . . . . . . . . . . . . . . . . . . . . . . . . . . . . .A-3
Data Protector Commands . . . . . . . . . . . . . . . . . . . . . . . . . . . . . . . . . . . . . . . . . . . . . . .A-7
Performance Considerations . . . . . . . . . . . . . . . . . . . . . . . . . . . . . . . . . . . . . . . . . . . . . .A-8
The Infrastructure . . . . . . . . . . . . . . . . . . . . . . . . . . . . . . . . . . . . . . . . . . . . . . . . . . . .A-8
Configuring Backups and Restores . . . . . . . . . . . . . . . . . . . . . . . . . . . . . . . . . . . . . .A-10
Example of Scheduled Eject of Media. . . . . . . . . . . . . . . . . . . . . . . . . . . . . . . . . . . . . .A-14
Schedule the Report Group . . . . . . . . . . . . . . . . . . . . . . . . . . . . . . . . . . . . . . . . . . . .A-14
Add the Report to the Report Group and Configure It. . . . . . . . . . . . . . . . . . . . . . .A-14
Copy the Script to the Specified Directory . . . . . . . . . . . . . . . . . . . . . . . . . . . . . . . .A-15
Examples of Pre-Exec and Post-Exec Commands for UNIX . . . . . . . . . . . . . . . . . . . .A-20
Disaster Recovery:
Move Kill Links on HP-UX 11.x . . . . . . . . . . . . . . . . . . . . . . . . . . . . . . . . . . . . . . . . . .A-25
xvii
Page 18

Contents
Creating a libaci.o on AIX . . . . . . . . . . . . . . . . . . . . . . . . . . . . . . . . . . . . . . . . . . . . . . .A-26
Example of the Package Configuration File . . . . . . . . . . . . . . . . . . . . . . . . . . . . . . . . .A-28
Example of the Package Control File . . . . . . . . . . . . . . . . . . . . . . . . . . . . . . . . . . . . . .A-38
Data Protector Log Files Example Entries. . . . . . . . . . . . . . . . . . . . . . . . . . . . . . . . . .A-44
debug.log . . . . . . . . . . . . . . . . . . . . . . . . . . . . . . . . . . . . . . . . . . . . . . . . . . . . . . . . . . .A-44
sm.log. . . . . . . . . . . . . . . . . . . . . . . . . . . . . . . . . . . . . . . . . . . . . . . . . . . . . . . . . . . . . .A-46
inet.log. . . . . . . . . . . . . . . . . . . . . . . . . . . . . . . . . . . . . . . . . . . . . . . . . . . . . . . . . . . . .A-46
media.log . . . . . . . . . . . . . . . . . . . . . . . . . . . . . . . . . . . . . . . . . . . . . . . . . . . . . . . . . . .A-46
upgrade.log . . . . . . . . . . . . . . . . . . . . . . . . . . . . . . . . . . . . . . . . . . . . . . . . . . . . . . . . .A-47
Windows Manual Disaster Recovery Preparation Template. . . . . . . . . . . . . . . . . . . .A-49
Changing Block Size on Windows Media Agent. . . . . . . . . . . . . . . . . . . . . . . . . . . . . .A-51
Glossary
Index
xviii
Page 19

Printing History
The manual printing date and part number indicate its current edition.
The printing date will change when a new edition is printed. Minor
changes may be made at reprint without changing the printing date. The
manual part number will change when extensive changes are made.
Manual updates may be issued between editions to correct errors or
document product changes. To ensure that you receive the updated or
new editions, you should subscribe to the appropriate product support
service. See your HP sales representative for details.
Table 1 Edition History
Part Number Manual Edition Product
B6960-90057 August 2002 Data Protector Release
B6960-90078 May 2003 Data Protector Release
A.05.00
A.05.10
xix
Page 20

xx
Page 21

Table 2
Conventions
The following typographical conventions are used in this manual.
Convention Meaning Example
Italic Book or manual
titles, and manual
page names
Provides emphasis You must follow these steps.
Specifies a variable
that you must supply
when entering a
command
Bold New terms The Data Protector Cell
Computer Text and items on the
computer screen
Command names Use the grep command ...
File and directory
names
Process names Check to see if Data
Refer to the HP OpenView
Storage Data Protector
Integration Guide for more
information.
At the prompt type:
rlogin your_name where
you supply your login name.
Manager is the main ...
The system replies: Press
Enter
/usr/bin/X11
Protector Inet is
running.
Window/dialog box
names
Text that you must
enter
Keycap Keyboard keys Press Return.
xxi
In the Backup Options
dialog box...
At the prompt, type: ls -l
Page 22
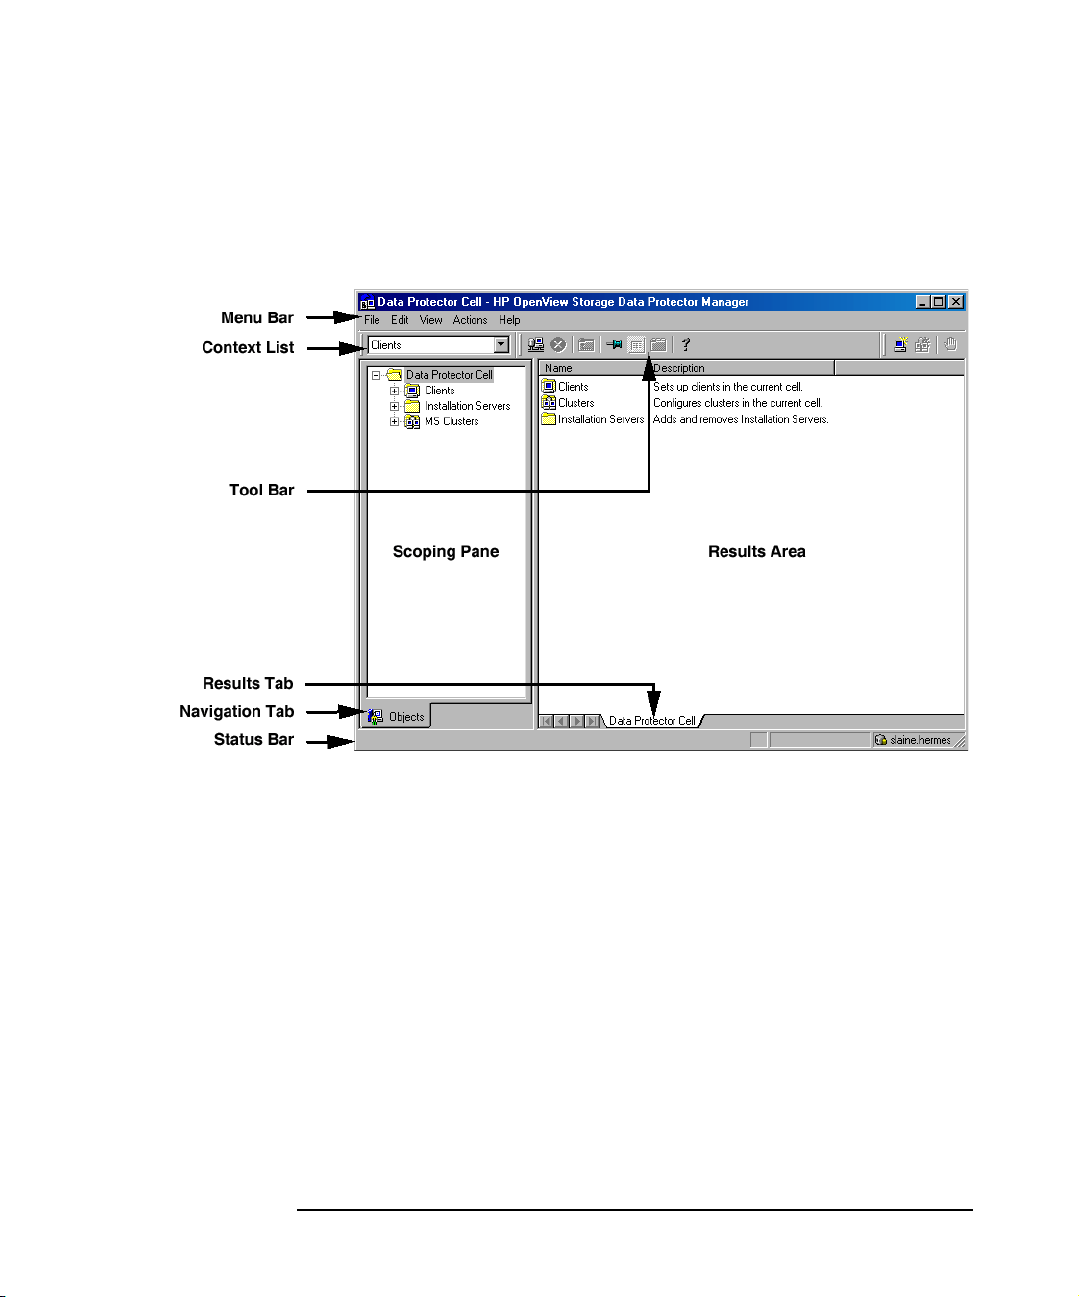
Data Protector provides a cross-platform (Windows and UNIX) graphical
user interface.
Figure 1 Data Protector Graphical User Interface
xxii
Page 23

Contact Information
General
Information
Technical Support Technical support information can be found at the HP Electronic
Documentation
Feedback
Training
Information
General information about Data Protector can be found at
http://www.hp.com/go/dataprotector
Support Centers at
http://support.openview.hp.com/support.jsp
Information about the latest Data Protector patches can be found at
http://support.openview.hp.com/patches/patch_index.jsp
For information on the Data Protector required patches, refer to the HP
OpenView Storage Data Protector Software Release Notes.
HP does not support third-party hardware and software. Contact the
respective vendor for support.
Your comments on the documentation help us to understand and meet
your needs. You can provide feedback at
http://ovweb.external.hp.com/lpe/doc_serv/
For information on currently available HP OpenView training, see the
HP OpenView World Wide Web site at
http://www.openview.hp.com/training/
Follow the links to obtain information about scheduled classes, training
at customer sites, and class registration.
xxiii
Page 24

xxiv
Page 25

Data Protector Documentation
Data Protector documentation comes in the form of manuals and online
Help.
Manuals Data Protector manuals are available in printed format and in PDF
format. Install the PDF files during the Data Protector setup procedure
by selecting the User Interface component on Windows or the
OB2-DOCS component on UNIX. Once installed, the manuals reside in the
<Data_Protector_home>\docs directory on Windows and in the
/opt/omni/doc/C/ directory on UNIX. You can also find the manuals in
PDF format at http://ovweb.external.hp.com/lpe/doc_serv/
HP OpenView Storage Data Protector Administrator’s Guide
This manual describes typical configuration and administration tasks
performed by a backup administrator, such as device configuration,
media management, configuring a backup, and restoring data.
HP OpenView Storage Data Protector Installation and Licensing
Guide
This manual describes how to install the Data Protector software, taking
into account the operating system and architecture of your environment.
This manual also gives details on how to upgrade Data Protector, as well
as how to obtain the proper licenses for your environment.
HP OpenView Storage Data Protector Integration Guide
This manual describes how to configure and use Data Protector to back
up and restore various databases and applications. There are two
versions of this manual:
• HP OpenView Storage Data Protector Windows Integration Guide
This manual describes integrations running the Windows operating
systems, such as Microsoft Exchange, Microsoft SQL, Oracle, SAP
R/3, Informix, Sybase, NetApp Filer, HP OpenView Network Node
Manager, and Lotus Domino R5 Server.
xxv
Page 26

• HP OpenView Storage Data Protector UNIX Integration Guide
This manual describes integrations running on the UNIX operating
system, such as Oracle, SAP R/3, Informix, Sybase, NetApp Filer,
IBM DB2 UDB, HP OpenView Network Node Manager, and Lotus
Domino R5 Server.
HP OpenView Storage Data Protector Concepts Guide
This manual describes Data Protector concepts and provides background
information on how Data Protector works. It is intended to be used with
the task-oriented HP OpenView Storage Data Protector Administrator’s
Guide.
HP OpenView Storage Data Protector EMC Symmetrix
Integration Guide
This manual describes how to install, configure, and use the EMC
Symmetrix integration. It is intended for backup administrators or
operators.
It describes the integration of Data Protector with the EMC Symmetrix
Remote Data Facility and TimeFinder features for Symmetrix Integrated
Cached Disk Arrays. It covers the backup and restore of file systems and
disk images, as well as online databases, such as Oracle and SAP R/3.
HP OpenView Storage Data Protector HP StorageWorks Disk
Array XP Integration Guide
This manual describes how to install, configure, and use the integration
of Data Protector with HP StorageWorks Disk Array XP. It is intended
for backup administrators or operators. It covers the backup and restore
of Oracle, SAP R/3, Microsoft Exchange, and Microsoft SQL.
HP OpenView Storage Data Protector EVA/VA/MSA Integration
Guide
This manual describes how to install, configure, and use the integration
of Data Protector with HP StorageWorks Virtual Array, HP
StorageWorks Enterprise Virtual Array or HP StorageWorks Modular
SAN Array 1000. It is intended for backup administrators or operators.
It covers the backup and restore of Oracle, SAP R/3, Microsoft Exchange,
and Microsoft SQL.
xxvi
Page 27

HP OpenView Storage Data Protector Integration Guide for HP
OpenView
This manual describes how to install, configure, and use the integration
of Data Protector with HP OpenView Service Information Portal, HP
OpenView Service Desk, and HP OpenView Reporter. It is intended for
backup administrators. It discusses how to use the OpenView
applications for Data Protector service management.
HP OpenView Storage Data Protector MPE/iX System User Guide
This manual describes how to install and configure MPE/iX clients, and
how to back up and restore MPE/iX data.
HP OpenView Storage Data Protector Integration Guide for HP
OpenView Operations
This manual describes how to monitor and manage the health and
performance of the Data Protector environment with HP OpenView
Operations (OVO), HP OpenView Service Navigator, and HP OpenView
Performance (OVP).
HP OpenView Storage Data Protector Software Release Notes
This manual gives a description of new features of HP OpenView Storage
Data Protector A.05.10. It also provides information on supported
configurations (devices, platforms and online database integrations,
SAN, and ZDB), required patches, and limitations, as well as known
problems and workarounds. An updated version of the supported
configurations is available at
http://www.openview.hp.com/products/datapro/spec_0001.html
.
Online Help Data Protector provides context-sensitive (F1) help and Help Topics for
Windows and UNIX platforms.
xxvii
Page 28

xxviii
Page 29

In This Book
The HP OpenView Storage Data Protector Administrator’s Guide
describes how to configure and use the Data Protector network backup
product. You must properly install Data Protector before you can
configure it.
NOTE This manual describes Data Protector functionality without specific
information on particular licensing requirements. Some Data Protector
functionality is subject to specific licenses. The related information is
covered in the HP OpenView Storage Data Protector Installation and
Licensing Guide.
Audience
This manual is intended for network administrators responsible for
maintaining and backing up systems on the network.
Conceptual information can be found in the HP OpenView Storage Data
Protector Concepts Guide, which is recommended in order to fully
understand the fundamentals and the model of Data Protector.
xxix
Page 30

Organization
The manual is organized as follows:
Chapter 1 “Introducing Data Protector” on page 1.
Chapter 2 “Configuring and Using Backup Devices” on page 17.
Chapter 3 “Configuring Users and User Groups” on page 81.
Chapter 4 “Managing Media” on page 97.
Chapter 5 “Backup” on page 151.
Chapter 6 “Restore” on page 267.
Chapter 7 “Monitoring, Reporting, Notifications, and the Event
Log” on page 307.
Chapter 8 “Manager-of-Managers Environment” on page 359.
Chapter 9 “Managing the Data Protector Internal Database” on
page 381.
Chapter 10 “Disaster Recovery” on page 435.
Chapter 11 “Customizing the Data Protector Environment” on
page 521.
Chapter 12 “Troubleshooting” on page 547.
Chapter 13 “Integrations with Other Applications” on page 611.
Chapter 14 “ADIC/GRAU DAS and STK ACS Libraries” on page
655.
Appendix A “Further Information” on page A-1.
Glossary Definition of terms used in this manual.
xxx
Page 31

1 Introducing Data Protector
Chapter 1 1
Page 32

Introducing Data Protector
In This Chapter
In This Chapter
This chapter contains some general principles on how Data Protector
works, covered in these sections:
“The Data Protector Cell Environment” on page 3
“Using the Data Protector User Interface” on page 6
“Overview of Tasks to Set Up Data Protector” on page 15
Chapter 12
Page 33

Introducing Data Protector
The Data Protector Cell Environment
The Data Protector Cell Environment
The Data Protector cell is a network environment containing a Cell
Manager, clients, and backup devices. The Cell Manager has the
main Data Protector control software installed and is the central point
from which the cell is administered and backup and restore operations
are controlled. Systems that are to be backed up can be added to the cell
and set up as Data Protector clients. When Data Protector performs a
backup of data from these clients, it saves the data to media (such as
magnetic tapes, or hard disks) contained within backup devices.
The Data Protector Internal Database (IDB) keeps track of the files
backed up, making it is easy to browse and restore them, either singly or
collectively.
The Cell Manager is the main control center for the cell and contains
the IDB. It runs the core Data Protector software and the Session
Manager, which starts and stops backup and restore sessions and writes
session information to the IDB.
Any system within a chosen cell environment can be set up as a Data
Protector client. Essentially, a client is a system that can be backed up,
a system connected to a backup device with which the backup data can
be saved, or both. The role of the client depends on whether it has a Disk
Agent or a Media Agent installed.
A client that will be backed up using Data Protector must have a Disk
Agent installed. Data Protector controls the access to the disk. The Disk
Agent lets you back up information from, or restore information to, the
client system.
A client system with connected backup devices must have a Media
Agent installed. This software controls the access to the backup device.
The Media Agent controls reading from and writing to a backup device’s
media.
A backup device performs the actual recording of backup data to a
recording medium, and the retrieval of restore data from a medium.
The physical object upon which the data is recorded, such as a DAT tape
or a hard disk, is called the backup medium.
Chapter 1 3
Page 34

Introducing Data Protector
The Data Protector Cell Environment
NOTE For further information on these terms, or on the principles of Data
Protector operation, see the HP OpenView Storage Data Protector
Concepts Guide.
How a Backup Session Works
A backup session starts either when a backup is requested through the
user interface, or when a scheduled backup is initiated. During this
session, Data Protector backs up the requested filesystems and disks to
the specified media.
1. The Cell Manager determines the type of session that has been
requested (backup) and starts the appropriate Session Manager.
2. The Session Manager reads the backup specification and determines
what needs to be backed up and which devices to use.
3. The Session Manager then starts a Media Agent for each media drive
that will be used and a Disk Agent for each disk that will be read.
4. The Monitor window appears. This window lets you respond to mount
requests and view the progress of a backup session.
5. The Disk Agents start sending data to the Media Agent.
6. If more than one Disk Agent is used, the Disk Agents send data to the
Media Agent concurrently and the Media Agent places the data on
the medium.
7. As each block of data is written to the medium, the Media Agent
sends information to the Session Manager about what has been
backed up. The Session Manager uses this information to update the
catalog of backed-up files in the IDB.
How a Restore Session Works
A restore session starts when a restore is requested. During this session,
Data Protector performs a restore of requested files and disks from the
media.
1. You specify which filesystems to restore and how to restore them,
using the Data Protector user interface.
Chapter 14
Page 35

Introducing Data Protector
The Data Protector Cell Environment
2. The Cell Manager determines the type of session that has been
requested (restore), and starts the appropriate Session Manager.
3. The Session Manager then determines which filesystems or
directories to restore, which devices to use, and what restore options
have been specified.
4. The Session Manager starts the appropriate Disk Agent and Media
Agent. For example, a Media Agent is started for the media (tape)
drive that will be used and a Disk Agent is started for the disk to
which the data will be restored.
5. The Monitor window appears. This window lets you respond to
mount requests and view the progress of a restore session.
6. The Media Agent starts sending data to the Disk Agent.
7. The Session Manager then updates the IDB and the Disk Agent
writes the data to the disk.
Chapter 1 5
Page 36

Introducing Data Protector
Using the Data Protector User Interface
Using the Data Protector User Interface
There is one Data Protector user interface, available on Windows and
UNIX platforms. It consists of the Data Protector graphical user
interface (GUI) and the command-line interface.
Using the Data Protector user interface, you can perform all Data
Protector tasks.
Figure 1-1 HP OpenView Storage Data Protector Graphical User Interface
Chapter 16
Page 37

Introducing Data Protector
Using the Data Protector User Interface
Graphical User Interface
The Data Protector graphical user interface (GUI) uses features such as
buttons and text boxes to enhance usability. Whenever possible,
drop-down lists are provided to allow you to select from a list instead of
typing in your selection. In addition, a comprehensive online Help
system provides information about each window and each task.
Depending on the user rights, you can either use the GUI to access the
complete Data Protector functionality or to access only specific contexts.
For more information on user rights, refer to “Data Protector User
Rights” on page 83.
For more information on Data Protector contexts, refer to “Context List”
on page 9.
Starting GUI on
Windows
Platforms
Starting GUI on
UNIX Platforms
To start the Data Protector GUI on Windows platforms, do one of the
following:
•Click Start on the Windows desktop and click Data Protector
Manager from the HP OpenView Storage Data Protector program
group to start the GUI for the complete Data Protector functionality.
•Use the manager command to start the GUI for the complete Data
Protector functionality.
Context-specific options for this command enable you to start one or
more Data Protector contexts. For example, the command
manager -backup -restore
starts the Data Protector Backup and Restore contexts.
To specify the Cell Manager you want to connect to, use the following
command: manager -server <Cell Manager_name>.
For more information on these commands, refer to the omnigui man
page.
To use the Data Protector GUI on UNIX platforms, enter:
xomni to start the GUI with the complete Data Protector
functionality
xomniadmin to start the administration (configuration) of clients,
users, reports, and the IDB GUI
xomnibackup to start the backup GUI
Chapter 1 7
Page 38

Introducing Data Protector
Using the Data Protector User Interface
xomnicellmon to start the MoM cell monitoring GUI
xomnimm to start the media and devices management GUI
xomnimonitor to start the monitoring a single cell GUI
xomnirestore to start the restore GUI
xomniinstrec To start the instant recovery GUI. A special license is
needed to start this GUI. Refer to the HP OpenView
Storage Data Protector HP StorageWorks Disk Array
XP Integration Guide for more information on the
instant recovery functionality and to the HP OpenView
Storage Data Protector Installation and Licensing
Guide for more information on Data Protector licenses.
xomnimom to start the Manager-of-Managers GUI
For more information on these commands, refer to the omnigui man
page.
Printing from the Data Protector Graphical User Interface
Data Protector lets you print from the GUI. You can print session
messages, reports, event logs, and various lists (for example, lists of
configured clients and devices). Generally, you can print anything
displayed as a list in the Results Area, and the online Help topics.
However, you are not able to print any of the Properties. Instead, you
can use the Data Protector reporting functionality to configure various
reports about your backup environment. For more information on
reporting, refer to “Data Protector Reporting” on page 315.
Prerequisite You must have a printer already configured on your system.
When you click Print on HP-UX, you can choose among predefined
printers. Note that if you do not have a proper printer driver installed,
you are not able to print. In that case, choose a PS printer and select the
Print to file option. You can then send the generated file to the PS
printer using the UNIX lp command from the UNIX terminal.
On Windows, however, a displayed printer in the Select Printer
window means that the printer is already configured on your system and
you are able to print.
For detailed steps on printing, refer to online Help, index keyword
“printing from GUI”.
Chapter 18
Page 39

Introducing Data Protector
Using the Data Protector User Interface
Elements of the Data Protector Graphical User Interface
For the visual representation of the GUI elements, refer to Figure 1-1 on
page 6.
Context List The Context List is a drop-down list, from which you can select the
management contexts described below:
Clients Controls all of the client systems in
the current Data Protector cell. You
can add, delete, and monitor any
client within the cell.
Users Adds and removes users, user groups
and their rights.
Devices & Media Controls device and media
maintenance and access to media
which store the data.
Backup Controls which data is to be backed
up, where, and how.
Restore Controls which data is to be restored,
where, and how.
Instant Recovery Controls the split mirror instant
recovery processes. A special license
is needed to display this context.
Refer to the HP OpenView Storage
Data Protector HP StorageWorks Disk
Array XP Integration Guide for more
information on the instant recovery
functionality and to the HP
OpenView Storage Data Protector
Installation and Licensing Guide for
more information on Data Protector
licenses.
Reporting Allows you to get information on your
cell configuration, backup
specifications, media and media
pools, as well as on specific sessions
and objects.
Chapter 1 9
Page 40

Introducing Data Protector
Using the Data Protector User Interface
Internal Database Allows you to get information on the
IDB storage capacity, database
objects, and sessions.
Monitor Allows you to monitor sessions that
are in progress.
Scoping Pane The Scoping Pane provides a tree of items that can be selected to open
a view. Selecting an item in the Scoping Pane displays information in the
Results Area.
Results Area Selecting an item in the Scoping Pane displays corresponding
information in the Results Area. If you click Clients in the Scoping
Pane, the Results Area displays a list of all the clients within your cell.
Navigation Tabs Navigation Tabs appear at the bottom of the Scoping Pane. These tabs
allow you to switch between the two possible item list views in the
Scoping Pane: Objects and Tasks. Not every Scoping Pane has these
views.
Tab N ame What the Tab Displays in the Scoping Pane
Objects A hierarchical presentation of data, similar to the
directory tree in Windows Explorer. For example, in
the Devices & Media context, the Scoping Pane will
display the list of devices and media configured with
Data Protector.
Tasks A list of tasks that you can perform. Clicking a task
displays a wizard that will walk you through an entire
task, such as backing up a file.
Results Tab The name on the Results Tab corresponds to the name of the item
currently selected in the Scoping Pane. You can click the Pin icon on the
toolbar to make this view "stick" and keep it available for the future. For
example, if you need to use the GUI to look up some other information,
but you want to continue with the previous view later, you can access
this view by selecting the "pinned" tab.
You can remove one or more tabs by right-clicking the area and selecting
Remove Tab or Remove Other Tabs.
Chapter 110
Page 41

Introducing Data Protector
Using the Data Protector User Interface
The Command-Line Interface
The command-line interface (CLI) follows the standard UNIX format for
commands and options and provides complete Data Protector
functionality. You can use these commands in scripts to speed up your
commonly performed tasks.
The omniintro man page lists all supported Data Protector commands,
as well as differences between commands on the UNIX and Windows
platforms.
See also “Data Protector Commands” on page A-7.
Chapter 1 11
Page 42

Introducing Data Protector
Using the Data Protector User Interface
Data Protector Online Resources
Information about Data Protector is available in this manual and in the
online Help system. This manual contains the information you need to
plan and administer your Data Protector network, and information on
some more commonly performed tasks. The online Help system contains
the information you need to perform all available tasks.
The following Data Protector online resources are available:
Help Topics Online Help with task instructions
and reference information. You can
select topics by using the contents
list, index, or search facility.
Help Navigator Context-sensitive Help that provides
detailed help on the current task.
Online Documentation Online manuals in PDF format that
can be read with the Adobe Acrobat
Reader.
Data Protector on the Web Opens your Web browser to the Data
Protector homepage, where more
information about Data Protector can
be found.
Online Support Opens your Web browser to the HP
OpenView interactive Online Support
service page.
About Displays version and copyright
information for Data Protector, as
well as licensing information.
You can access the online resources by either using the Help drop-down
menu or the Help buttons provided on the Data Protector windows.
Hyperlinks (cross-references) to additional information and definitions
help you navigate through online Help. You click the hyperlinked word
or phrase to jump to the new topic. Hyperlinked words and phrases are
marked with either solid underlining or different color.
Starting and Using the Help Navigator
The Help Navigator provides context-sensitive online Help, which can be
used to find information about the current GUI panel or task.
Chapter 112
Page 43

Introducing Data Protector
Using the Data Protector User Interface
If the GUI concerned is running on Windows, the Help Navigator is
dynamic: Once it is started, its contents automatically change as you go
to the next page of the wizard or to another view in the Data Protector
user interface.
To start the Help Navigator, either:
•Press
•Click Help Navigator from the Help menu, or
• Click the Help Navigator icon (the question mark) on the button bar
Using the Online Manuals
Data Protector provides online manuals in PDF format that can be read
using the Adobe Acrobat Reader. Once installed, the online manuals
reside in the <Data_Protector_home>\docs directory (Windows) or
the /opt/omni/doc/C directory (HP-UX or Solaris) on the Cell Manager
system.
F1
Using Microsoft Management Console (MMC)
On Windows systems, it is possible to integrate the Data Protector GUI
with the Microsoft Management Console.
The Microsoft Management Console (MMC) is a Graphical User
Interface (GUI) that lets you manage and run your administrative tools
within a common interface environment. You can add already installed
software, hardware, or network management applications to the console,
where the primary type of tool that can be added to the console is called a
snap-in.
The Data Protector snap-in, known as OB2_Snap, provides a basic
integration of Data Protector and the MMC. Using OB2_Snap, you can
go to the Data Protector home page or to Data Protector Web/Java
Reporting. You can also start the Data Protector GUI on Windows from
the MMC.
Proceed as follows to add OB2_Snap to the MMC.
1. Download the MMC software from
h
ttp://www.microsoft.com/downloads/.
2. From the Windows desktop, click Start, and then select Run.
Chapter 1 13
Page 44

Introducing Data Protector
Using the Data Protector User Interface
3. In the Open text box, enter mmc to open the Microsoft Management
Console window.
4. From the Console menu, select Add/Remove Snap-in. In the
Standalone property page of the Add/Remove Snap-in window, click
Add.
5. In the Add Standalone Snap-in window, select HP OpenView
Storage Data Protector. Click Close to exit the window, then click
OK to get back to the Microsoft Management Console window.
The HP OpenView Storage Data Protector item will be displayed
under Console Root. Once you have added the applications to MMC,
save the file as <Console_Name>.msc.
Chapter 114
Page 45

Introducing Data Protector
Overview of Tasks to Set Up Data Protector
Overview of Tasks to Set Up Data Protector
Although configuring Data Protector is easy, some advanced planning
will help you configure the environment and optimize your backups. This
section provides an overview of the global tasks to set up a backup
environment.
Depending on the size and complexity of your environment, you may not
need to go through all these steps.
1. Analyze your network and organizational structure. Decide which
systems need to be backed up.
For more information refer to the HP OpenView Storage Data
Protector Concepts Guide.
2. Check whether there are any special applications and databases
which you want to back up, such as Microsoft Exchange, Microsoft
SQL, Oracle, SAP R/3, or others. Data Protector provides specific
integrations with these products.
Refer to the HP OpenView Storage Data Protector Integration Guide
for instructions on how to configure the integrations.
3. Decide on the configuration of your Data Protector cell, such as the
following:
• System to be your Cell Manager
• Systems on which you want to install the user interface
• Type of backup - local backup versus network backup
• Systems to control backup devices
4. Purchase the required Data Protector licenses for your setup. This
way you obtain the passwords you need to have installed.
Alternatively, you can operate Data Protector using an instant-on
password. However, this is valid only for 60 days from the date of
installation. Refer to the HP OpenView Storage Data Protector
Installation and Licensing Guide for details.
5. Decide how you want to structure your backups:
• Which media pools would you like to have, and how will they be
used?
Chapter 1 15
Page 46

Introducing Data Protector
Overview of Tasks to Set Up Data Protector
• Which devices will be used, and how?
• Which user groups do you want to have, and what will they do?
• How many backup specifications do you want to have, and how
should they be grouped?
6. Install the Data Protector Cell Manager and Installation Server(s).
Then use the Data Protector GUI to distribute Data Protector agents
to other systems. Also, connect the devices (tape drives) to the
systems that will control them. See the HP OpenView Storage Data
Protector Installation and Licensing Guide for detailed instructions.
7. Configure the device(s). See Chapter 2, “Configuring and Using
Backup Devices,” on page 17.
8. Configure the pools and optionally prepare the media. See Chapter 4,
“Managing Media,” on page 97.
9. Set up the backup specifications, including scheduling. See Chapter 5,
“Backup,” on page 151.
10.Configure the IDB. See Chapter 9, “Managing the Data Protector
Internal Database,” on page 381.
11.Configure reports, if required. See Chapter 7, “Monitoring, Reporting,
Notifications, and the Event Log,” on page 307.
12.Consider preparing for disaster recovery if your disk fails. See
Chapter 10, “Disaster Recovery,” on page 435.
13.Become familiar with tasks such as:
• How to work with failed backups
• Performing restores
• Testing disaster recovery
• IDB maintenance
Chapter 116
Page 47

2 Configuring and Using Backup
Devices
Chapter 2 17
Page 48

Configuring and Using Backup Devices
In This Chapter
In This Chapter
This chapter includes information on the following topics:
“Configuring Backup Devices” on page 20
“Configuring Standalone Devices” on page 23
“Configuring File Devices” on page 26
“Configuring Library Devices” on page 29
“Configuring Libraries with Multiple Systems” on page 32
“Configuring Magazine Devices” on page 34
“Configuring Stacker Devices” on page 35
“Configuring a Library for Mixed Media” on page 37
“Configuring Devices for Direct Backup” on page 38
“Support of New Devices” on page 41
“Using Several Drive Types in a Library” on page 42
“Configuring Magazine Devices” on page 34
“Shared Devices in the SAN Environment” on page 44
“Drive Cleaning” on page 61
“Busy Drive Handling” on page 65
“Activating Barcode Support” on page 66
“Activating Cartridge Memory Support” on page 68
“Disabling a Backup Device” on page 70
“Removing a Backup Device” on page 72
“Device Locking” on page 74
“Device Concurrency, Segment Size, and Block Size” on page 76
Chapter 218
Page 49

Configuring and Using Backup Devices
In This Chapter
NOTE Backup devices (like tape drives) are subject to specific Data Protector
licenses. See the HP OpenView Storage Data Protector Installation and
Licensing Guide for details.
Chapter 2 19
Page 50

Configuring and Using Backup Devices
Configuring Backup Devices
Configuring Backup Devices
Preparation of a backup device consists of connecting the device to the
system and knowing which of the (working) associated device files (SCSI
address) is to be used. To configure a device:
1. Connect the device to a computer. Refer to the documentation that
comes with the device.
2. Make sure that you have done the following:
UNIX
Systems
Windows
Systems
Create or find the device filename for a device
connected to a UNIX system. For detailed steps, refer
to the online Help index keyword “creating device
filenames” or “finding device filenames”. For further
information, refer to Appendix B of the HP OpenView
Storage Data Protector Installation and Licensing
Guide.
Provide a SCSI II address and load the driver that
will be used with a device connected to a Windows
system.
For tape drives, the Windows native tape driver can
be:
• unloaded (preferred) or
•loaded
The device filename depends on whether a
Windows native tape driver is used with a
particular tape drive.
On how to obtain the SCSI II address, refer to the
online Help index keyword “creating SCSI addresses”.
For further information, refer to Appendix B of the
HP OpenView Storage Data Protector Installation and
Licensing Guide.
Chapter 220
Page 51

Configuring and Using Backup Devices
Configuring Backup Devices
Windows
Robotics
Drivers
On Windows, disable the Removable Storage Service
or Windows medium changer (robotics) driver before
you configure the robotics device with Data Protector.
For detailed steps, refer to the online Help index
keyword “robotics drivers”. For further information,
refer to Appendix B of the HP OpenView Storage Data
Protector Installation and Licensing Guide.
Cartridge
Memory
If your backup device is connected to a Windows
system and uses media with Cartridge Memory, make
sure that your SCSI II card supports execution of
16-byte CDB SCSI II commands. On the UNIX and
Novell platforms, you need a tape driver which
supports the respective SCSI II commands.
3. Boot the system to have the device recognized by the system.
4. Configure the device, as described in the following sections, so that
you can use it with Data Protector.
5. Prepare the media that you want to use with your backups. On how to
format media, refer to “Formatting Media” on page 108.
A default media pool is used with each device so that you do not have
to create one. If you want to create your own media pool, refer to
“Creating a Media Pool” on page 102.
Figure 2-1 shows the relationship between the backup specification,
devices, and media pools. The devices are referred to in the backup
specification, while each device is linked to a default media pool. This
media pool can be changed in the backup specification.
Chapter 2 21
Page 52

Configuring and Using Backup Devices
Configuring Backup Devices
Figure 2-1 How Backup Specifications, Devices, and Media Pools Relate
Chapter 222
Page 53

Configuring and Using Backup Devices
Configuring Standalone Devices
Configuring Standalone Devices
What Are
Standalone
Devices?
How to Configure
a Standalone
Device
TIP You can also let Data Protector automatically configure most common
Standalone devices are simple backup devices with one drive that reads
from or writes to one medium at a time. They are used for small-scale
backups. When a medium is full, the operator has to manually replace it
with a new medium so that the backup can proceed. Standalone devices
are not appropriate for large, unattended backups.
Data Protector provides simple configuration and management of media
used in standalone backup devices.
Once you have prepared the device for configuration as described in
“Configuring Backup Devices” on page 20, configure a standalone device
so that you can use it with Data Protector. In the Devices & Media
context, right-click Devices and click Add Device. In the Add Device
wizard, specify the Standalone device type. Refer to Figure 2-2.
For detailed steps and examples, refer to the online Help index keyword
“configuring standalone devices”.
Data Protector supports a specific set of backup devices. Refer to the HP
OpenView Storage Data Protector Software Release Notes for a detailed
list of supported devices and their corresponding media types.
In case you want to use a device that is not in the list of supported
devices, refer to “Support of New Devices” on page 41.
devices. You still need to prepare the media for a backup session, but
Data Protector determines the name, policy, media type, media policy,
and the device’s SCSI II address or device file. For detailed steps, refer to
the online Help index keyword “autoconfiguring backup devices”.
Chapter 2 23
Page 54

Configuring and Using Backup Devices
Configuring Standalone Devices
Figure 2-2 Specifying Device Type and Name
Configuring
Device Chains
Data Protector allows you to configure standalone devices of the same
type into device chains. When a medium in one device becomes full, the
backup automatically continues on the medium in the next device in the
device chain. Device chains are possible for only one Media Agent, that
is, you can connect a device chain to only one system.
The configuration is the same as for a standalone device, except that you
enter multiple SCSI addresses (on Windows) or device filenames (on
UNIX).
NOTE The order in which the devices are added determines the order in which
Data Protector uses them.
When all of the media in a device chain are full, Data Protector issues a
mount request. The operator must replace the medium in the first device
with a new medium, format it, and then confirm the mount request. Data
Chapter 224
Page 55

Configuring and Using Backup Devices
Configuring Standalone Devices
Protector can immediately use media that are recognized and
unprotected. Data Protector can also use blank media, so that you do not
have to format them.
Chapter 2 25
Page 56

Configuring and Using Backup Devices
Configuring File Devices
Configuring File Devices
What Are File
Devices?
Table 2-1 The Recommended Segment Sizes for Specific Device File Sizes
A file device is a file in a specified directory to which you back up data
instead of writing it to a tape. File devices are available for standalone
devices and Jukebox devices simulation. The file device functionality is
available on the Windows, HP-UX, Solaris, AIX, and Linux operating
systems.
The default capacity of a file device is 100 MB for data and 10 MB for the
catalog. The default segment size (for a 100 MB file device) is 30 MB.
The recommended segment sizes for specific file device sizes is:
File size (GB) Segment size (MB)
< 10 100
< 100 500
< 200 1000
< 300 1500
< 400 2000
< 500 2500
Data Protector never measures the amount of free space on the
filesystem; it takes either the default or the specified capacity as the file
size limit. If the disk on which the file device resides runs out of space,
the backup will fail. The largest capacity specified for a file is 500 GB on
Windows and 4 GB on UNIX systems.
Data Protector does not support using compressed files for file devices.
You can change the default file size by changing the
FileMediumCapacity parameter in the
<Data_Protector_home>\Config\Options\global file on the
Windows Cell Manager or in the /etc/opt/omni/options/global file
on the HP-UX or Solaris Cell Manager.
Chapter 226
Page 57

Configuring and Using Backup Devices
Configuring File Devices
You specify the capacity of a file device when you first format the
medium. When you reformat the medium, you can specify a new size;
however, the originally specified size will be used. You can change the
capacity of a file device only by deleting the file from the system.
The path to a file device can be anywhere, whether it is an internal drive
or an external portable hard drive.
Handling Mount
Requests
Media are handled differently from physical devices. When a standalone
file device (medium) becomes full, Data Protector tries to write to the
same file again. Data Protector does not recognize that any other file
exists, so it issues a mount request.
When the mount request occurs, the existing file has to be moved or
renamed (for example, by exchanging the ZIP media). The original file
should no longer exist after the move. You then need to confirm the
mount request. Data Protector will recreate the original file with the
default file capacity. After the backup is finished, the file created by Data
Protector contains the last part of the backup.
For Jukebox file devices, Data Protector issues a mount request when all
media (files) are full.
Prerequisite Before you configure a file device on a Windows system, disable the file
compression option. This can be done using Windows Explorer.
Right-click the file, select Properties and deselect Compress under
Attributes. If Compress is selected, Data Protector will not be able to
write to the file device.
IMPORTANT Do not use the name of an existing file for configuring a file device,
because the existing file will be overwritten.
Do not use the same filename for configuring several file devices, because
every time a file device accesses the file, it will be overwritten.
How to Configure
File Devices
To create a standalone file device, specify the Standalone device type in
the Add Device wizard. Refer to Figure 2-2. As a device address, specify
a pathname for the file device, for example, C:\My_Backup. Refer to
Figure 2-3. For detailed steps, refer to the online Help index keyword
“configuring file devices”.
Chapter 2 27
Page 58

Configuring and Using Backup Devices
Configuring File Devices
To create a jukebox file device, specify the Jukebox device type in the Add
Device wizard. As device addresses, specify different pathnames that
will simulate jukebox slots. For detailed steps, refer to the online Help
index keyword “configuring file devices”.
Figure 2-3 Specifying a Pathname for a File Device
Chapter 228
Page 59

Configuring and Using Backup Devices
Configuring Library Devices
Configuring Library Devices
What Are Library
Devices?
Slot Number Each slot in the device’s repository holds one medium. Data Protector
Drive Index The drive index identifies the mechanical position of the drive in the
SCSI-II library devices, also called autoloaders, are large backup devices.
They contain a number of media cartridges in a device’s repository and
can have multiple drives handling multiple media at the same time.
Most library devices also allow you to configure automatic drive cleaning,
which is performed by Data Protector when the drive gets dirty. Refer to
“Drive Cleaning” on page 61.
A library device has a SCSI ID for each drive in the device, and one for
the library robotic mechanism. This mechanism moves media from slots
to drives and back again. For example, a library with four drives has five
SCSI IDs, four for the drives and one for the robotic mechanism.
assigns a number to each slot, starting from 1. When managing a library,
you refer to the slots using their numbers. For example, a library with 48
repository slots has slot numbers 1, 2, 3, 4, 5, 6...47, 48.
library. Refer to Figure 2-4.
The index number is relevant for the robotics control. The robot knows
only index numbers and has no information about the SCSI address of
the drive. The drive index is a sequential integer (starting from 1) which
has to be coupled with the SCSI address of this drive. For example, for a
four-drive library, the drive indexes are 1,2,3,4.
Drive SCSI
Address
If you have only one drive in the library, the drive index is 1.
The drive index must match the corresponding SCSI address. This
means that you need to configure the pairs as follows:
SCSI address_A for index 1,
SCSI address_B for index 2, and so on.
Chapter 2 29
Page 60

Configuring and Using Backup Devices
Configuring Library Devices
NOTE It is not necessary to configure all drives for use with Data Protector. You
can configure one media pool for all drives, or have an independent
media pool for each drive. It is recommended that you use the default
media pool when configuring a device.
Figure 2-4 Drive Index to SCSI Address Mapping
How to Configure
a Library Device
Once you have prepared the device for configuration as described in
“Configuring Backup Devices” on page 20, configure a library device,
including its drive(s). The Add Device wizard guides you through both
configurations. For detailed steps and examples, refer to the online Help
index keyword “configuring SCSI libraries”.
TIP You can also have Data Protector automatically configure the library
devices for you. You still need to prepare the media for a backup session,
but Data Protector determines the name, policy, media type, media
Chapter 230
Page 61

Configuring and Using Backup Devices
Configuring Library Devices
policy, and the device file or SCSI address of the device, and also
configures the drive and slots. For detailed steps, refer to the online Help
index keyword “autoconfiguring backup devices”.
To verify the device configuration, right-click the created drive, and
choose Scan Medium. If the device is configured correctly, Data Protector
will be able to load, read, and unload media in the slots.
What’s Next? If you have configured all the backup devices you want to use with Data
Protector, do the following:
• Add media to the media pools that you will use with the newly
configured device. Refer to “Adding Media to a Media Pool” on
page 107.
• If you want to configure a cleaning tape, refer to “Drive Cleaning” on
page 61.
• If your device uses barcodes, refer to “Activating Barcode Support” on
page 66.
• Configure a backup for your data. Refer to Chapter 5, “Backup,” on
page 151.
Chapter 2 31
Page 62

Configuring and Using Backup Devices
Configuring Libraries with Multiple Systems
Configuring Libraries with Multiple Systems
You can configure a library so that each drive receives data from a
different system running a Data Protector Media Agent. The library
robotics control is still performed by one system. This improves
performance in high-end environments by allowing local backup, instead
of having to move the data over the network.
Prerequisites • Each client system that you want to use with the drives in the library
must have the Data Protector Media Agent component installed.
• You need to have connected the backup device to the system, and a
working device file (SCSI address) must exist before you can
configure the device for use with Data Protector.
For more information on multi-drive support, see the HP OpenView
Storage Data Protector Concepts Guide.
How to Configure
Libraries with
Multiple Systems
TIP To verify the device configuration, select a range of slots from the library
What’s Next? If you have configured all the backup devices you want to use with Data
Configure a library as described in “Configuring Library Devices” on
page 29. When you are prompted to configure drives in the library,
specify the client system that you want to use with each drive. For
detailed steps, refer to the online Help index keyword “configuring
libraries for multiple systems”.
and then click Scan from the Actions menu. If the device is configured
correctly, Data Protector will be able to load, read, and unload media
back into the slots.
Protector, do the following:
• Add media to the media pools that you will use with the newly
configured device. See “Adding Media to a Media Pool” on page 107.
• If you want to configure a cleaning tape, see “Drive Cleaning” on
page 61.
• If your device uses barcodes, see “Activating Barcode Support” on
page 66.
Chapter 232
Page 63

Configuring and Using Backup Devices
Configuring Libraries with Multiple Systems
• Configure a backup. See Chapter 5, “Backup,” on page 151.
Chapter 2 33
Page 64

Configuring and Using Backup Devices
Configuring Magazine Devices
Configuring Magazine Devices
What Are
Magazine
Devices?
Prerequisite Create at least one media pool with the Magazine Support option set.
How to Configure
a Magazine Device
TIP You can also let Data Protector automatically configure your device for
Magazine devices group a number of media into a single unit called a
magazine. A magazine allows you to handle large amounts of data more
easily than when using many individual media.
Data Protector allows you to perform media management tasks on
magazines as sets, or on a single medium.
See “Adding Media to a Media Pool” on page 107.
Magazines must be configured as libraries. Select the SCSI-II Library
device type in the Add Device wizard. The media pool to which
magazines belong needs to have the Magazine Support option selected.
For detailed steps, refer to the online Help index keyword “configuring
SCSI libraries”.
you. You still need to prepare the media for a backup session, but Data
Protector determines the name, policy, media type, media policy, and the
device file or SCSI address of the device, and also configures the drive
and slots. For detailed steps, refer to the online Help index keyword
“autoconfiguring backup devices”.
To verify the device configuration, right-click the created drive, and then
choose Scan. If the device is configured correctly, Data Protector will be
able to load, read, and unload media in the slots.
What’s Next? If you have configured all the backup devices you want to use with Data
Protector, do the following:
• If you want to configure a cleaning tape, refer to “Drive Cleaning” on
page 61.
• If your device uses barcodes, refer to “Activating Barcode Support” on
page 66.
• Configure a backup for your data. Refer to Chapter 5, “Backup,” on
page 151.
Chapter 234
Page 65

Configuring and Using Backup Devices
Configuring Stacker Devices
Configuring Stacker Devices
What Are Stacker
Devices?
How to Configure
a Stacker Device?
Stacker Device
Media
Management
Example 1. Manually load the first medium.
A stacker is a single device with one drive and sequentially accessed
media. Using stacker devices requires more human media management
than using a small library. Data Protector provides simple configuration
and management of media used in stacker backup devices.
To create a stacker device, specify the Stacker device type in the Add
Device wizard. For detailed steps, refer to the online Help index keyword
“configuring stacker devices”.
The operations scan, verify, or format have to be run separately on each
medium in a stacker device. When performing these operations, use the
Eject medium after operation option, in order to have each medium
loaded automatically (only the first medium should be loaded manually).
When all the tapes in the stacker magazine are used, the magazine must
be unmounted manually and the next one inserted.
Stackers load media in sequential order, therefore a Loose media
allocation policy is recommended. A Strict policy would require media
to be loaded in the same order as they are to be used.
2. Run format/verify/scan (with Eject after operation enabled) --
(next tape will be loaded automatically).
3. Repeat step 2 until all tapes are finished.
4. When all the tapes in the stacker magazine are used, unmount the
magazine manually and insert the next one.
NOTE If a medium is not properly loaded, Data Protector will abort the medium
session.
Chapter 2 35
Page 66

Configuring and Using Backup Devices
Configuring Stacker Devices
Backup and
Restore with
Stacker Devices
Only the first medium has to be manually loaded. When a tape is full, it
is ejected and the next tape is loaded automatically. When all the tapes
are used in a stacker magazine, the magazine has to be unmounted
manually and the next one has to be inserted. Again the first tape has to
be loaded manually into the drive.
NOTE A backup or restore session will not be aborted if media are not present,
but a mount request will be issued instead. The whole session will not be
aborted if a user does not change stacker magazines within a time out
period.
Chapter 236
Page 67

Configuring and Using Backup Devices
Configuring a Library for Mixed Media
Configuring a Library for Mixed Media
A mixed media library contains media of several types, such as DLT and
magneto-optical. It uses identical robotics to move all the media
(regardless of media type) between slots and drives.
In order to use this library functionality, configure several (sub)libraries:
one library definition per media type.
To take full advantage of this feature, perform the following steps:
• Configure at least one media pool (or use the default pool) per media
type.
• Configure the library robotics once per media type, including the slot
range for that media type. Make sure the robotics control (SCSI path
on Windows systems or device file on UNIX systems) for each of the
library robotic definitions resides on the same host and that they are
identical.
• Configure all the drives for a media type and link them to the related
library robotic and media pool. Make sure the drive index is unique
for each physical device, regardless of media type.
Chapter 2 37
Page 68

Configuring and Using Backup Devices
Configuring Devices for Direct Backup
Configuring Devices for Direct Backup
This section provides the configuration steps for backup devices used in a
direct backup environment. Refer to the HP OpenView Storage Data
Protector Concepts Guide for a more detailed information on direct
backup concepts.
Direct backup is a Data Protector backup solution in a SAN
environment. Please read the section “Shared Devices in the SAN
Environment” on page 44 for general information on SAN environments.
Note that the direct backup device configuration steps differ from the
configuration steps described in the mentioned section, and are given in
this section.
A direct backup environment consists of the following:
• a SAN network
• internal or external Fibre Channel bridge(s) (FC bridge)
• backup device(s) connected to FC bridge(s) (standalone or SCSI-II
library)
• physical XCopy engine(s) (present on an FC Bridge)
• disk array(s) assuring point-in-time stability of data (HP
StorageWorks Disk Array XP or HP StorageWorks Virtual Array)
• application system(s) connected to the disk array original disk(s)
• backup system(s) connected to the disk array mirror disk(s) and
controlling the SCSI-II library robotics and SCSI-II
library/standalone device drives
An internal FC bridge is embedded in the backup device, whereas an
external FC bridge resides at any point in the SAN.
A backup device used in the direct backup environment is identified by
the World Wide Name (WWN) of the Fibre Channel bridge that it is
connected to or embedded in the backup device, and by the device
(standalone device) or drive (SCSI-II library) Logical Unit Number
(LUN) as seen on the SAN. If a SCSI-II library is used, its robotics does
not have to be connected to a FC bridge.
Chapter 238
Page 69

Configuring and Using Backup Devices
Configuring Devices for Direct Backup
Backup Device
Auto-detection
XCopy Engine There can be more than one physical XCopy engine in a direct backup
The XCopy engine must reside on the FC bridge to which the backup
device or drive is connected (external FC bridge), or on the internal FC
bridge. A backup device that is used with direct backup functionality is
auto-detected whenever a direct backup session is started. If
auto-detection is not used, the WWN and the LUN parameters must be
entered manually; the LUN must be reconfigured every time the LUN
changes.
environment. Each of these physical XCopy engines can have more
logical XCopy engines configured and assigned. Which of these logical
XCopy engines will be used in a direct backup session is specified in the
direct backup specification by specifying the backup device(s) to be used
and assigning them a logical XCopy engine. The physical XCopy engine
behind the logical XCopy engine specified in the backup specification
must be configured for the backup system specified in the backup
specification.
The following types of backup devices are supported for a Data Protector
direct backup:
•standalone devices
• SCSI-II libraries
Configuration Procedure
Refer to the following online Help index keywords and perform any
necessary steps before configuring backup devices as described later in
this section:
• online Help index keyword “preparing backup devices”
• online Help index keyword “configuring direct backup environment”
Configuring a backup device for direct backup consists of the following:
1. Configuring a standalone device or SCSI-II library.
2. Configuring XCopy engines.
3. If direct library access will be used, configuring the libtab file.
Chapter 2 39
Page 70

Configuring and Using Backup Devices
Configuring Devices for Direct Backup
Configuring Standalone Devices
Refer to the online Help index keyword “configuring standalone devices
for direct backup” for detailed information on how to configure a
standalone device for a direct backup.
Configuring SCSI-II Libraries
Refer to the online Help index keyword “configuring SCSI-II libraries for
direct backup” for detailed information on how to configure a SCSI-II
library for a direct backup.
Configuring XCopy Engines
Refer to the online Help index keyword “configuring XCopy engine” for
detailed information on how to configure an XCopy engine.
Configuring the libtab File
Configuration of the libtab file is necessary only if direct library access
is to be used.
Refer to the “Manually Configuring the libtab Files” on page 56 for
detailed information on how to configure the libtab file.
Chapter 240
Page 71

Configuring and Using Backup Devices
Support of New Devices
To use a device that is not listed as supported in the HP OpenView
Storage Data Protector Software Release Notes, download the latest
software package for the scsitab file from the HP OpenView World
Wide Web site at http://www.hp.com/go/dataprotector
IMPORTANT Modifying the scsitab file is not supported.
After you have downloaded the scsitab software package, follow the
installation procedure provided with it.
The scsitab file must be located on the system to which the device is
connected, in the following location:
• <Data_Protector_home>\scsitab on Windows platforms
• /opt/omni/scsitab on HP-UX and Solaris platforms
Support of New Devices
.
• /usr/omni/scsitab on other UNIX platforms
If you receive an error message while configuring your device, please
contact HP Support to get information about when the device will be
supported.
Chapter 2 41
Page 72

Configuring and Using Backup Devices
Using Several Drive Types in a Library
Using Several Drive Types in a Library
Using several drive types of a similar technology like DLT
4000/7000/8000 (the same is true within the DDS family) in the same
library can lead to problems when you use the media in any drive, but do
not ensure a common format on all media.
For example, at restore time, a DLT 4000 cannot read a tape that has
been written with a DLT 8000 (highest density). Compressed and
non-compressed media cannot be used interchangeably.
To avoid these kind of problems, you can either use a common density
setting for all your media, or you can separate your media pools. Both of
these solutions are described in the following sections.
Same Density
Setting
Different Media
Pools (on UNIX
and Windows)
This method uses a common format on all media, which allows you to use
all media interchangeably in any drive.
For devices used on Windows systems, consult the drive documentation
for information about using a specific write density.
On UNIX systems, you can set the density for drives by selecting the
related device filenames and using them in the device definitions. The
density must be set at the same value. For example, in case of DLT 4000
and DLT 7000 drives, the DLT 4000 drive density should be set.
Make sure the block size setting of the devices used is the same. This
setting in the device definition must be used at the time the media are
formatted.
The free pool concept can be used as desired.
During a restore, any drive can be used with any media.
On HP-UX, you can set the density of a drive when creating the device
filename. See Appendix B, “Creating the Device Files on HP-UX”, in the
HP OpenView Storage Data Protector Installation and Licensing Guide
for more information.
This method separates the media used by one group of drives from the
media used by another group of drives, allowing you to better optimize
drive and media usage.
Chapter 242
Page 73

Configuring and Using Backup Devices
Using Several Drive Types in a Library
On Windows and UNIX systems, you can configure separate media pools
for different groups of drives. This allows you to use different density
settings for different drive types. For example, you could create a DLT
4000 pool and a DLT 8000 pool.
The related setting in the device definition must be used at the time the
media are formatted. For example, the media in the pool for the DLT
8000 highest density must be formatted by a DLT 8000 in highest
density setting.
The free pool concept cannot be used across such pools. This would not
identify media from the other pool to the devices correctly; they would be
seen as “foreign” media. The free pool concept can at most be used only in
a single pool (like the DLT 8000 pool), in case the same media type (DLT)
is written in an incompatible way.
Care must be taken during restore, since media from a given pool can
only be used with related devices.
To configure new media pools, refer to the online Help index keyword
“configuring media pools”.
To modify media pool settings for a drive, modify the drive properties.
For detailed steps, refer to the online Help index keyword “modifying,
media pools”.
Chapter 2 43
Page 74

Configuring and Using Backup Devices
Shared Devices in the SAN Environment
Shared Devices in the SAN Environment
This section describes some of the basic concepts of Storage Area
Networks (SANs). For further conceptual information, see the HP
OpenView Storage Data Protector Concepts Guide.
The concepts and instructions provided here are the following:
• Device locking when the library is accessed exclusively by Data
Protector
• Using the Data Protector user interface to configure the library
robotics and drives
• Locking library robotics and drives
• Direct versus indirect library access
What Is a SAN? A Storage Area Network (SAN) is a network dedicated to data storage,
based on high-speed Fibre Channel technology. A SAN lets you offload
storage operations from application servers to a separate network. Data
Protector supports this technology by enabling multiple hosts to share
storage devices connected over a SAN, which allows multiple systems to
be connected to multiple devices. This is done by defining the same
physical device multiple times, for example, once on every system that
needs access to the device.
Key Concepts There are some key concepts to consider when using Data Protector in a
SAN environment:
• Each system can have its own (pseudo-)local device, although the
devices are typically shared among several systems. This applies to
individual drives, as well as to the robotics in libraries.
• Take care to prevent several systems from writing to the same device
at the same time. Access to devices needs to be synchronized between
all systems. This is done using locking mechanisms.
• SAN technology provides an excellent way of managing library
robotics from multiple systems. It creates the ability to manage the
robotics directly, as long as the requests sent to the robotics are
synchronized among all the systems involved.
Chapter 244
Page 75

Configuring and Using Backup Devices
Shared Devices in the SAN Environment
Figure 2-5 Multiple System to Multiple Device Connectivity in SAN
Chapter 2 45
Page 76

Configuring and Using Backup Devices
Shared Devices in the SAN Environment
Using FC-AL SANs
with LIP
Using tape devices in Fibre Channel Arbitrated Loops (FC-ALs) may
cause certain anomalies that could abort a backup session. This problem
arises because the FC-AL performs a Loop Initialization Protocol (LIP)
whenever a new FC link is connected or disconnected, or whenever a
system connected to the FC-AL is rebooted. This re-initialization of the
FC-AL causes running backups to be aborted. Such terminated jobs
should be restarted.
When a LIP occurs on the FC-AL Loop, any utility with an active I/O
process shows an I/O error. For backup utilities attempting to use a
shared tape, an I/O error causes failure of the current backup session,
causing active tapes to be rewound and unloaded, and the backup session
to abort.
To avoid these problems, take the following precautions:
• Do not add new devices or remove devices from the Arbitrated Loop
while backup sessions are running.
• Do not touch FC components while backup sessions are running. The
static charge can cause a LIP.
• Do not use discovery on Windows or ioscan on HP-UX system since
these also cause a LIP.
Locking Devices Used Exclusively by Data Protector
If Data Protector is the only application that uses a drive, but that same
drive needs to be used by several systems, Device Locking has to be used.
If Data Protector is the only application that uses a robotics control from
several systems, Data Protector handles this internally, provided that
the library control is in the same cell as all the systems that need to
control it. In such a case, all synchronization of access to the device is
managed by Data Protector internal control.
Locking Devices Used by Multiple Applications
If Data Protector and at least one other application want to use the same
device from several systems, the same (generic) device locking
mechanism has to be used by each application. This mechanism needs to
work across several applications. This mode is not currently supported
by Data Protector. Should this be required, operational rules must
ensure exclusive access to all devices from only one application at a time.
Chapter 246
Page 77

Configuring and Using Backup Devices
Shared Devices in the SAN Environment
Direct Library Access Concept
With direct library access, every system sends control commands directly
to the library robotics. Therefore, a system does not depend on any other
system in order to function.
With direct library access , when multiple systems send commands to the
same library, the sequence of such communication has to be coordinated.
Therefore, every library definition is associated by default with a host
controlling the library robotics. If another host requests that a medium
be moved, Data Protector will first access the system specified in the
library definition for performing the move. If the system is not available,
direct access from the local host to the library robotics is used if the
libtab file is set. All of this is done in a transparent manner within Data
Protector.
Indirect Library Access Concept
With indirect library access, only one system (the default robotics control
system) sends robotic control commands that are initiated from Data
Protector. Any other system that requests a robotics function forwards
the request to the robotics control system, which then sends the actual
command to the robotics. This is the default setting, and is done in a
transparent manner within Data Protector for all requests from Data
Protector.
Configuration Overview
This section provides an overview of the steps involved in configuring
your system. It includes the following topics:
• Configuration goals
This section specifies the mixed SAN environment to be configured.
• Configuration methods
This section outlines the configuration methods that need to be
performed for UNIX, Windows, and mixed SAN environments.
• Autoconfiguring the devices
This section outlines the device autoconfiguration specifics in a SAN
environment.
• Manually configuring the robotics
Chapter 2 47
Page 78

Configuring and Using Backup Devices
Shared Devices in the SAN Environment
This section describes how you can manually configure the library
robotics so that they can be used in a SAN environment.
• Manually configuring the devices
This section describes the steps that need to be performed to
configure the drives. It also explains when Lock Names and direct
access should be used.
• Manually configuring the libtab file
This section describes the purpose and usage of the libtab file.
Examples of libtab files are also provided.
• Simplified configuration using the SANconf tool
This section describes the SANconf tool, which simplifies
configuration on Windows, HP-UX, and Solaris systems in a SAN
environment.
Configuration Goals
The SAN environment can range from one host using a library to several
hosts using several libraries. The hosts can run on several operating
system platforms. In the example below, the SAN environment is made
up of the following systems:
• two Windows NT systems (the Windows NT system dupin is used as
the default host to control the library robotics)
• one Windows 2000 system
• one HP-UX 11.11 system
•one bridge
•one switch
• one library with 4 HP LTO Ultrium drives and 40 slots
Chapter 248
Page 79

Figure 2-6 SAN Environment Configuration
Configuring and Using Backup Devices
Shared Devices in the SAN Environment
Because the library is attached to several systems that can access its
drives directly, you need to configure as many drives on each host as you
want to use from that host. In this case, all four physical drives are to be
used from each host.
From a Data Protector perspective, the goal is as follows.
• On each host that is to share the library robotics, create a library
robotics definition for each host. If there is only one host that is
controlling the robotics, the library definition is created only for the
default robotics control host.
• On each host that is to participate in sharing the same (tape) drives
in the library:
✓ Create a device definition for each device to be used.
Chapter 2 49
Page 80

Configuring and Using Backup Devices
Shared Devices in the SAN Environment
✓ Use a lock name if the (physical) device will be used by another
host as well (shared device).
✓ Optionally, select direct access if you want to use this
functionality. If you use it, ensure that the libtab file is set up on
that host.
Configuration Methods
There are three configuration methods that depend on the platforms that
participate in the SAN configuration:
• You can use the Data Protector device autoconfiguration functionality
to configure devices and libraries in a SAN using the GUI. Device
autoconfiguration is available on the following operating systems:
Windows, HP-UX, Solaris, Linux, NetWare, and Tru64. Refer to
“Device Autoconfiguration” on page 50.
• If your environment consists only of Windows, HP-UX, and Solaris
systems, you can use the SANconf tool for autoconfiguring devices
and libraries using the command line. For more information, refer to
“Configuration Using the SANconf Tool” on page 51.
• If your environment contains systems that do not support device
autoconfiguration, use the manual configuration. For more
information, refer to “Manually Configuring the Library” on page 51.
Device Autoconfiguration
The Data Protector autoconfiguration functionality provides automated
device and library configuration on multiple hosts in a SAN
environment.
Limitations Autoconfiguration cannot be used to configure the following devices in a
SAN environment:
• mixed media libraries
• DAS or ACSLS libraries
•NDMP devices
Data Protector discovers the backup devices connected to your
environment. For library devices, Data Protector determines the number
of slots, the media type, and which drives belong to the library. Data
Chapter 250
Page 81

Configuring and Using Backup Devices
Shared Devices in the SAN Environment
Protector then configures the device by setting up a logical name, a Lock
Name, the media type, and the device file or SCSI address of the device,
as well as the drive and slots.
During the autoconfiguration procedure, you can choose which libraries
and devices you want to be configured on which hosts. In case different
hosts use tape drives in one library, this library will be visible from each
host, multiple hosts can share tape devices, and one host (Control Host)
will control the robotics.
For detailed steps, refer to the online Help index keyword
“autoconfiguring backup devices”.
Configuration Using the SANconf Tool
For the Windows, HP-UX, and Solaris environments, the configuration
task is automated by using the command-line utility, the SANconf tool.
The tool performs:
• configuration of the default robotic control host
• configuration of the devices (tape drives) on all hosts by simply
providing a list of hosts. This includes configuration of Lock Names
and libtab files.
For details about how to use the SANconf tool, refer to the SANconf tool
Readme File, which can be found on the Data Protector Windows
installation CD (\Product_Information\Whitepapers & Service
Deployment\SANconf_tool_readme.pdf).
Manually Configuring the Library
You first need to configure the library robotics control on a host, which
acts as the default robotics control system. This host will be used to
manage media movements, regardless of which other host requests a
media move.
This is done in order to prevent conflicts in the robotics if several hosts
request a media move at the same time. Only if the hosts fail, and direct
access is enabled, is the robotics control performed by the local host
requesting the media move.
Chapter 2 51
Page 82

Configuring and Using Backup Devices
Shared Devices in the SAN Environment
Prerequisite Before configuring Data Protector devices in a SAN environment, the
Data Protector Media Agent must be installed on each host that needs to
communicate with the shared library. See the HP OpenView Storage
Data Protector Installation and Licensing Guide for more information on
installing a Media Agent.
Configuring the
Library Robotics
Configuring the
Library Robotics
in a Cluster
To create the library itself, refer to “Configuring Library Devices” on
page 29 or to the online Help topic “Configuring Devices in a SAN
Environment”.
For robotics control, you can use any host within the SAN; here the
system dupin.company.com is used. The library robotics will be
controlled by that host, unless the host is unavailable and direct access is
enabled as explained in detail in “Enabling Direct Access” on page 55.
If you want the robotic control to be managed by a cluster, you need to
make sure that:
• The robotics control exists on each cluster node.
• The virtual cluster name is used in the library robotics configuration.
• The common robotics and device filenames are installed either using
the mksf command or using the libtab file. For information on how
to configure the libtab file, refer to “Manually Configuring the libtab
Files” on page 56.
After you have configured the library robotics, create the drives.
Manually Configuring the Devices (Drives)
You need to configure each device (tape drive) on each host from which
you want to use the device.
Lock Names must be used to prevent the same device from being used by
several hosts at the same time. Optionally, the “direct access” mode can
be selected.
Configuring Drives As will be seen shortly, it helps to follow a drive naming convention
similar to the following:
LibraryLogicalName_DriveIndex_Hostname, for example
SAN_LIB_2_computer_1.
Chapter 252
Page 83

The drive naming convention shows its benefits during backup
specification creation. Whenever you configure a backup on any host, all
you have to do now is to use the drive that is configured on that host,
since the drive includes the host name in its name.
Table 2-2 Device Locking for Drives
Environment Conditions Required Action
Configuring and Using Backup Devices
Shared Devices in the SAN Environment
Defining Lock
Names
The drive is used by only one system
and Data Protector only
No locking is necessary.
Leave the fields blank, for
example, Lock Name =
blank
The drive is used by several systems
(SAN), Data Protector is the only
application accessing the drive
Use device locking (define a
Lock Name) as described in
the section “Device Locking”
on page 74
The drive is used by several systems
and several applications (not only by
Data Protector)
Use device locking (define a
Lock Name) and ensure
that operational rules
provide exclusive access to
all devices from only one
application at a time
Using Lock Names is necessary in a SAN environment. This prevents
collisions on the device caused by several systems talking to it at the
same time. It is recommended to use the following convention for Lock
Names:
LibraryLogicalName_DdriveIndex, for example SAN_LIB_D1.
Chapter 2 53
Page 84

Configuring and Using Backup Devices
Shared Devices in the SAN Environment
Figure 2-7 Setting Advanced Options
When you are setting the locking name of a drive, use the same lock
name for the same physical drive when using it in the device definition
on another host.
Chapter 254
Page 85

Configuring and Using Backup Devices
Shared Devices in the SAN Environment
Figure 2-8 Summary of Device Definitions Using Lock Names
Enabling Direct
Access
The Direct Access mechanism always uses the default robotics control
host first for media movements, but if this fails, Data Protector uses
direct access, if enabled.
To enable direct access, select the Use direct library access option
(see Figure 2-9 on page 56) and configure the libtab file on every host
on which you want to use direct access.
Chapter 2 55
Page 86

Configuring and Using Backup Devices
Shared Devices in the SAN Environment
Figure 2-9 Selecting Direct Access
Manually Configuring the libtab Files
The purpose of the libtab files is to map the library robotic control
access so that it also works on the “direct access requesting system”,
since here the local control path is likely to be different from the one used
on the default library robotic control system.
You need to create a libtab file for every Windows and UNIX system
client host that needs “direct access” to the library robotics, and is not
identical to the system configured as the default library robotics control
system.
On each system requesting direct access, a plain text file with the
following format must be provided:
<FullyQualifiedHostname> <DeviceFile | SCSIPath>
<DeviceName>
• <FullyQualifiedHostname> is the name of the client host
demanding direct access control for the library robotics. If the host is
part of a cluster, the node name should be used.
Chapter 256
Page 87

Configuring and Using Backup Devices
Shared Devices in the SAN Environment
• <DeviceFile | SCSIPath> is the control path to the library robotic
driver on this client host.
• <DeviceName> is the name of the device definition used on this client
host.
You need one line per device for which you request direct access.
The libtab file is located on:
• <Data_Protector_home>\libtab on Windows systems
• /opt/omni/.libtab on HP-UX and Solaris systems
• /usr/omni/.libtab on other UNIX systems
Example files follow for all systems involved. Definitions are separated
by blank lines, which are ignored. Since the default library robotics are
defined on the host dupin.company.com, no libtab file is needed on this
system.
TIP It is possible to have only one libtab file that includes definitions for all
systems involved and is distributed to all such systems. In this case,
when a specific system needs “direct access” to the library robotic, the
definitions for other systems are ignored and only the definitions for the
system are used.
Example libtab
file on zala
Example libtab
file on oda
Example of the libtab file on host zala.company.com (Windows):
zala.company.com scsi:2:0:2:0 SAN_LIB_1_zala
zala.company.com scsi:2:0:2:0 SAN_LIB_2_zala
zala.company.com scsi:2:0:2:0 SAN_LIB_3_zala
zala.company.com scsi:2:0:2:0 SAN_LIB_4_zala
Example of the libtab file on host oda.company.com (HP-UX):
oda.company.com /dev/spt/lib SAN_LIB_1_computer_2
oda.company.com /dev/spt/lib SAN_LIB_2_computer_2
oda.company.com /dev/spt/lib SAN_LIB_3_computer_2
oda.company.com /dev/spt/lib SAN_LIB_4_computer_2
Chapter 2 57
Page 88

Configuring and Using Backup Devices
Shared Devices in the SAN Environment
Example libtab
file on donat
NOTE If the host is part of a cluster, <FullyQualifiedHostname> must be the
Example of the libtab file on host donat.company.com (Solaris):
donat.company.com /dev/rsst6 SAN_LIB_1_sample
donat.company.com /dev/rsst6 SAN_LIB_2_sample
donat.company.com /dev/rsst6 SAN_LIB_3_sample
donat.company.com /dev/rsst6 SAN_LIB_4_sample
virtual host name, and <DeviceFile | SCSIPath> must refer to the
local node.
Shared Devices and MC/ServiceGuard
If you are using Data Protector with MC/ServiceGuard for clustering,
you can implement the integration in a SAN environment. Since
clustering is based on sharing resources such as network names, disks,
and tapes among nodes, Fibre Channel and SAN are well suited as
enabling technologies for storage device sharing. ATS (Advanced Tape
Services) is an integrated part of HP MC/ServiceGuard 11.05 that
manages tape resources and enables the use of Data Protector in a SAN
environment.
This section explains how to create the necessary device files, how to
configure the virtual host, how to configure static and floating drives,
and how to use the Data Protector GUI to configure the integration for
use in a SAN environment.
Configuration Basics
Nodes in a cluster can share SAN-connected devices in order to perform a
"LAN-free" backup of an application running in a cluster. Cluster-aware
applications can, at any time, run on any node in a cluster since they run
on the virtual host. In order to perform a LAN-free local backup of such
an application, you need to configure the logical device with a virtual
hostname instead of a real node name.
You can configure as many logical devices for a single physical device as
you need, but you have to use the same Lock Name for all devices.
Chapter 258
Page 89

Configuring and Using Backup Devices
Shared Devices in the SAN Environment
In order to share a device among multiple systems, configure one logical
device for each system on which you want to use the device locally.
NOTE Before the ATS component can be configured, the MC/ServiceGuard
configuration has to be completed and a cluster has to exist.
Refer to the following documents for detailed information:
• B3936-90032 Using Advanced Tape Services (MC/ServiceGuard
documentation)
• B3935-90015 MC/ServiceGuard Version A.11.05 Release Notes
• B3936-90026 Managing MC/ServiceGuard, Sixth Edition
Creating the ATS Configuration Files
Run the stquerycl command to gather the configuration of all attached
tape devices and robotic control. This will create the configuration file.
The configuration file includes the following new device file names and a
usage policy for all devices:
• dev/rmt/st#m
for tape device files
• dev/rac/sac#
for robotic control devices
The configuration files should be the same on all nodes for the same
physical device. Both the robotics and drive files should be included.
Configuring Drives
Floating Drives Drives that should be accessible from both hosts, depending on which
host the package is running, have to be configured based on the virtual
host.
Table 2-3 How to Configure a Floating Drive
Hostname node_Appl
Device Control Path /dev/rmt/st3m
Chapter 2 59
Page 90

Configuring and Using Backup Devices
Shared Devices in the SAN Environment
Table 2-3 How to Configure a Floating Drive
Lock Name Libl_Drive_1
Static Drives The drives can still be used in the standard way using the static
hostname and the local device file. (You can use the local HP-UX or ATS
device file.) The local drives should be configured on the node. For
example:
Table 2-4 How to Configure a Static Drive
Hostname Host_A
Device Control Path /dev/rmt/0m
Lock Name Lib1_Drive_1
The previous examples for floating and static drives show the device
identified by /dev/rmt/0m and /dev/rmt/st3m. Both device files refer to
the same physical devices, and therefore the lock name (Lib1_Drive_1)
is identical.
Chapter 260
Page 91

Configuring and Using Backup Devices
Drive Cleaning
Drive Cleaning
There are several methods for cleaning dirty drives:
• Library built-in cleaning mechanism
Some tape libraries have a functionality for cleaning drives
automatically when a drive requests head cleaning. When the library
detects a dirty drive, it automatically loads a cleaning tape. However,
Data Protector is not notified of this action. This interrupts any active
session, causing it to fail.
This hardware-managed cleaning procedure is not recommended,
since it is not compatible with Data Protector. Use automatic drive
cleaning managed by Data Protector instead.
• Automatic drive cleaning managed by Data Protector
Data Protector provides automatic cleaning for most devices using
cleaning tapes. For SCSI-II libraries and magazine devices, you can
define which slots contain cleaning tapes. A dirty drive sends the
cleaning request, and Data Protector uses the cleaning tape to clean
the drive.
This method prevents failed sessions due to dirty drives, provided
that suitable media are available for backup. Refer to “Configuring
Automatic Drive Cleaning” on page 62.
• Manual cleaning
If automatic drive cleaning is not configured, you need to clean the
dirty drive manually. If Data Protector detects a dirty drive, a
cleaning request appears in the session monitor window. You then
have to manually insert a cleaning tape into the drive.
A special tape-cleaning cartridge with slightly abrasive tape is used to
clean the head. Once loaded, the drive recognizes this special tape
cartridge and starts cleaning the head.
Limitations • Data Protector does not support the diagnostic vendor-unique SCSI
command for performing drive cleaning with cleaning tapes stored in
one of the special cleaning tape storage slots. These special cleaning
tape storage slots are not accessible using the normal SCSI
commands, and therefore cannot be used with the automatic drive
cleaning managed by Data Protector. Configure the standard slot(s)
Chapter 2 61
Page 92

Configuring and Using Backup Devices
Drive Cleaning
to store cleaning tape(s).
• Detection and use of cleaning tapes depends on the system platform
where the Media Agent is running. See the HP OpenView Storage
Data Protector Software Release Notes for further information.
• You should not use another kind of device management application if
you configure automatic drive cleaning managed by Data Protector,
as this may cause unexpected results. This is due to the “cleanme”
request being cleared as it is read, depending on the specific device
type and vendor.
• Automatic drive cleaning for logical libraries with a shared cleaning
tape is not supported. Each logical library needs to have its specific
cleaning tape configured.
Conditions for
Automatic
Cleaning
Automatic drive cleaning is supported for libraries with barcode support,
as well as for those without barcode support.
The following conditions must be met for automatic cleaning:
• In a library without barcode support, a cleaning-tape slot has been
configured in the Data Protector device definition and contains a
cleaning-tape cartridge. The cleaning-tape slot must be configured
together with the other library slots.
• In a library with barcode support, the cleaning tape has a barcode
label with “CLN” as its prefix. Further, barcode support must be
enabled. Refer to “Activating Barcode Support” on page 66.
• The configured drive has the Detect Dirty Drive option enabled.
When Data Protector receives notification that the drive needs cleaning,
it automatically loads the cleaning tape, cleans the drive, and then
resumes the session.
All cleaning activities are logged in the following file:
• on Windows: <Data_Protector_home>\log\cleaning.log
• on UNIX: /var/opt/omni/log/cleaning.log
Configuring Automatic Drive Cleaning
The configuration of automatic drive cleaning is performed in two steps:
Chapter 262
Page 93

Configuring and Using Backup Devices
Drive Cleaning
1. Enable dirty drive detection. This needs to be done for all device types
(standalone and libraries). This enables Data Protector to recognize
the event issued by the drive.
2. Configure a slot for the cleaning tape in the library or magazine
device.
Enabling Dirty
Drive Detection
Configuring a Slot
for Cleaning Tape
To enable dirty drive detection, select the Detect dirty drive
advanced option in the Settings property page for the drive. For
detailed steps, refer to the online Help index keyword “configuring drive
cleaning”.
To configure a slot for a cleaning tape in a SCSI-II library, click the
Cleaning Slot option and select an existing slot in the drop-down list in
the Repository property page for the device. For detailed steps, refer to
the online Help index keyword “configuring drive cleaning”.
Testing the Drive Cleaning Configuration
To test if drive cleaning has been successfully configured, do the
following:
Preparation 1. Log on to the system where the Media Agent for the drive is installed.
2. Change to the Data Protector tmp directory:
• on HP-UX and Solaris systems: /var/opt/omni/tmp/
• on other UNIX systems: /usr/omni/tmp/
• on Windows systems: <Data_Protector_home>\tmp\
• on Novell NetWare systems: \usr\omni\tmp\
3. Create an ASCII file named simtab on Windows systems or .simtab
on UNIX systems. Consider the following when creating this file:
• The field separators should be a single ASCII character (tab or
space)
• The logical device name cannot be quoted and cannot contain
spaces (e.g. “test drive”)
The content of the simtab/.simtab file should be the following:
CLEANME <file_name> <drive_name>
Chapter 2 63
Page 94

Configuring and Using Backup Devices
Drive Cleaning
Where <file_name> is the name of the file you will use to simulate a
dirty drive, and <drive_name> is the name of the drive you want to
test.
You can add multiple entries for various drives. Do not add any
directories in front of the name of the file.
Testing the
Configuration
In order to test your configuration, do the following:
1. In the Data Protector tmp directory, create an empty file that will be
used to simulate a dirty drive. Use the same name as in the simtab or
.simtab file.
2. Start a backup using the drive you are testing.
Data Protector behaves as though the selected drive were dirty and
performs the cleaning action.
To stop simulating dirty drive behavior for the specific drive, delete the
file used for simulation.
Chapter 264
Page 95

Configuring and Using Backup Devices
Busy Drive Handling
Busy Drive Handling
Data Protector expects drives to be empty, i.e., there should not be a
medium in the drive unless a restore or backup is currently active.
Several factors can cause a medium to still be in a drive, for instance, if
the medium was used with a different application and not removed, or if
the system writing the data to the tape (Media Agent) failed during the
backup. The next backup using this drive has to deal with this situation.
Data Protector can respond automatically in several ways. The response
is configurable via the library option Busy Drive Handling.
The following options are available:
Abort The backup will be aborted (default).
Eject Data Protector will eject the medium from the drive
and put it in any empty slot.
Eject to mail slot Data Protector will eject the medium from the drive
and put it in the library mailslot (CAP).
If the backup continues automatically, select Eject. Because the tape is
moved to an unknown slot, the library should be scanned before the next
backup.
Chapter 2 65
Page 96

Configuring and Using Backup Devices
Activating Barcode Support
Activating Barcode Support
If a SCSI library device uses media with barcodes, Data Protector can
use barcodes by providing the following support:
• Recognition of cleaning tapes with a CLN prefix.
• Reference to media by their barcodes. Data Protector adds the media
barcode to the Data Protector media label.
• Quickly scanning the media in the slots of the library repository using
media barcodes. This is considerably faster than scanning a
repository without the barcode functionality. In the Action menu,
click Barcode Scan to scan the library repository for media.
Activate barcode support by selecting the Barcode reader support
option from the Control property page of the device. Refer to Figure 2-10
on page 67. For detailed steps, refer to the online Help index keyword
“activating barcode reader support”.
NOTE All barcodes in a cell should be unique, regardless of the type of media or
the fact that there are multiple libraries.
Chapter 266
Page 97

Figure 2-10 Activating Barcode Reader Support
Configuring and Using Backup Devices
Activating Barcode Support
Chapter 2 67
Page 98

Configuring and Using Backup Devices
Activating Cartridge Memory Support
Activating Cartridge Memory Support
Cartridge memory support can be activated for drives with the
LTO-Ultrium media type. It provides the following:
• Updating or changing media management information, such as
medium label, medium location and pool name, and media usage
information. The latter includes date of last access, date of last write,
and number of writes.
• Importing of media that include information stored in Cartridge
Memory.
• Listing all Cartridge Memory contents for the specific medium.
• Reformatting Cartridge Memory of a specific medium from the GUI
and CLI in cases where medium header information in Cartridge
Memory is not synchronized with the medium header on the medium.
• Recognizing media used by other applications.
Activate Cartridge Memory support for a drive by setting the Advanced
options from the Settings property page of the drive. Refer to Figure
2-11.
Limitations Cartridge Memory operations on LTO devices are not supported in the
following cases:
• On Novell NetWare platforms
•On AIX platforms
Chapter 268
Page 99

Configuring and Using Backup Devices
Activating Cartridge Memory Support
Figure 2-11 Cartridge Memory Support Activation for a Drive
Chapter 2 69
Page 100

Configuring and Using Backup Devices
Disabling a Backup Device
Disabling a Backup Device
Disabling a backup device is useful when the device is damaged or in
maintenance mode.
If you disable a backup device, all subsequent backups skip this device.
The next available device defined in the list of devices for the backup
specification is used, provided that load balancing has been selected. All
devices using the same lock name as the disabled device are also
disabled.
This lets you avoid backups that fail due to a device needing service,
while keeping other devices available (and configured) for backup.
How to Disable a
Device
How to Restart the
Device
Disable a backup device by selecting the Disable device option in the
Settings property page of the device or drive. Refer to Figure 2-12. For
detailed steps, refer to the online Help index keyword “disabling backup
devices”.
To resume using the device for backups, deselect the Disable device
option.
Chapter 270
 Loading...