

Page 1

HP 9100C
Digital Sender
User Guide
English
Page 2

Page 3

HP 9100C Digital Sender
User Guide
Page 4

Copyright Information
© Copyright Hewlett-Packard
Company 1998
All Rights Reserved.
Reproduction, adaptation, or
translation without prior written
permission is prohibited, except
as allowed under copyright
laws.
Publication number
C1311-90910
Second Edition, December
2001
Trademark Credits
Adobe, the Adobe logo,
Acrobat, and the Acrobat logo
are trademarks of Adobe
Systems Incorporated.
CompuServe is a U.S.
trademark of CompuServe, Inc.
Microsoft is a U.S. registered
trademark of Microsoft
Corporation. Windows, MS
Windows, and Windows NT are
U.S. registered trademarks of
Microsoft Corporation.
PaperPort is a trademark of
Visioneer, Inc. in the United
States and other countries.
Pentium is a U.S. registered
trademark of Intel Corporation.
LDAP code (libldap client library
and liblber encoding/decoding
library) used courtesy of the
University of Michigan at Ann
Arbor. Copyright 1992-1996
Regents of the University of
Michigan. All rights reserved.
All other products mentioned
herein may be trademarks of
their respective companies.
Warranty
The information contained in
this document is subject to
change without notice.
Hewlett-Packard makes no
warranty of any kind with
respect to this information.
HEWLETT-PACKARD
SPECIFICALLY DISCLAIMS
THE IMPLIED WARRANTY OF
MERCHANTABILITY AND
FITNESS FOR A PARTICULAR
PURPOSE.
Hewlett-Packard shall not be
liable for any direct, indirect,
incidental, consequential, or
other damage alleged in
connection with the furnishing or
use of this information.
NOTICE TO U.S.
GOVERNMENT
USERS: RESTRICTED
RIGHTS COMMERCIAL
COMPUTER SOFTWARE:
“Use, duplication, or disclosure
by the Government is subject to
restrictions as set forth in
subparagraph (c) (1) (ii) of the
Rights in Technical Data Clause
at DFARS 52.227-7013.”
Material scanned by this
product may be protected by
governmental laws and other
regulations, such as copyright
laws. The customer is solely
responsible for complying with
all such laws and regulations.
FCC Radio Frequency
Interference Statement:
This equipment has been tested
and found to comply with the
limits for a Class A digital
device, pursuant to Part 15 of
FCC rules. These limits are
designed to provide reasonable
protection against harmful
interference when the
equipment is operated in a
commercial environment. This
equipment generates, uses, and
can radiate radio frequency
energy. If not installed and used
in accordance with the
instructions, it may cause
harmful interference to radio
communications. Operation of
this equipment in a residential
area is likely to cause harmful
interference, in which case the
user will be required to correct
the interference at his own
expense.
Note: Any changes or
modifications to this equipment
that are not expressly approved
by Hewlett-Packard may cause
harmful interference and void
the user’s authority to operate
the equipment.
Safety Information
WARNING!
Electrical Shock Hazard
To avoid electrical shock, use
only supplied power cords and
connect only to properly
grounded (3-hole) wall outlets.
Hewlett-Packard Company
11311 Chinden Boulevard
Boise, Idaho 83714 U.S.A.
Page 5

Contents
1 Getting started
Introduction . . . . . . . . . . . . . . . . . . . . . . . . . . . . . . . . . . . . . . . . . . .7
Coexistence with an HP Network ScanJet 5 scanner . . . . . . . . . . .8
System requirements . . . . . . . . . . . . . . . . . . . . . . . . . . . . . . . . . . .8
Installing the software . . . . . . . . . . . . . . . . . . . . . . . . . . . . . . . . . .9
After installation . . . . . . . . . . . . . . . . . . . . . . . . . . . . . . . . . .10
Installation troubleshooting . . . . . . . . . . . . . . . . . . . . . . . . . . .11
Uninstalling HP Digital Sender Link and HP Address Book
Manager . . . . . . . . . . . . . . . . . . . . . . . . . . . . . . . . . . . . .11
Your user profile . . . . . . . . . . . . . . . . . . . . . . . . . . . . . . . . . . . . .12
Adding a registered user profile . . . . . . . . . . . . . . . . . . . . . .13
Introducing the HP Address Book Manager . . . . . . . . . . . . . . . .15
Introducing the HP Digital Sender Link . . . . . . . . . . . . . . . . . . . .16
Identifying digital sender parts . . . . . . . . . . . . . . . . . . . . . . . . .17
Identifying control panel features . . . . . . . . . . . . . . . . . . .18
Quick-start tutorial . . . . . . . . . . . . . . . . . . . . . . . . . . . . . . . . . . . .20
Using the ABM to add an e-mail address . . . . . . . . . . . . . . . .20
Loading a document . . . . . . . . . . . . . . . . . . . . . . . . . . . . . . . .22
Logging in to the digital sender . . . . . . . . . . . . . . . . . . . . . . .23
E-mailing a document. . . . . . . . . . . . . . . . . . . . . . . . . . . . . . .24
Sending to a computer . . . . . . . . . . . . . . . . . . . . . . . . . . . . .25
Finding help. . . . . . . . . . . . . . . . . . . . . . . . . . . . . . . . . . . . . . . . . .26
2 Working at the digital sender
Introduction . . . . . . . . . . . . . . . . . . . . . . . . . . . . . . . . . . . . . . . . . .29
What documents you can place in the digital sender . . . . . . . . .30
Guidelines for using the ADF . . . . . . . . . . . . . . . . . . . . . . . . .30
Guidelines for using the glass . . . . . . . . . . . . . . . . . . . . . . . .31
Sending double-sided documents . . . . . . . . . . . . . . . . . . . .31
Loading a document . . . . . . . . . . . . . . . . . . . . . . . . . . . . . . . . . . .32
Logging in . . . . . . . . . . . . . . . . . . . . . . . . . . . . . . . . . . . . . . . . . .34
Taking the next step . . . . . . . . . . . . . . . . . . . . . . . . . . . . . . . . . . .34
Changing settings . . . . . . . . . . . . . . . . . . . . . . . . . . . . . . . . . . . .35
Selecting the Size setting . . . . . . . . . . . . . . . . . . . . . . . . . . . .35
Selecting the Quality setting . . . . . . . . . . . . . . . . . . . . . . . .36
E-mailing documents . . . . . . . . . . . . . . . . . . . . . . . . . . . . . . . . . .37
Faxing documents . . . . . . . . . . . . . . . . . . . . . . . . . . . . . . . . . . . .40
Copying documents . . . . . . . . . . . . . . . . . . . . . . . . . . . . . . . . . . .42
Sending to a computer . . . . . . . . . . . . . . . . . . . . . . . . . . . . . . . .44
Sending to another program . . . . . . . . . . . . . . . . . . . . . . . . . . . .46
EN 3
Page 6

Sending to an HP JetSend-enabled device . . . . . . . . . . . . . . . . .47
Choosing or adding HP JetSend-enabled devices . . . . . . . .47
Sending the next document . . . . . . . . . . . . . . . . . . . . . . . . . . . . .48
3 Using the HP Address Book Manager
Introduction . . . . . . . . . . . . . . . . . . . . . . . . . . . . . . . . . . . . . . . . .49
Introduction to the address books . . . . . . . . . . . . . . . . . . . . . . .50
Your user profile . . . . . . . . . . . . . . . . . . . . . . . . . . . . . . . . . . . . .51
Adding a new registered user profile . . . . . . . . . . . . . . . . . .52
Changing an existing user profile . . . . . . . . . . . . . . . . . . . . .53
Starting the HP Address Book Manager . . . . . . . . . . . . . . . . . . .54
Working in the ABM main window . . . . . . . . . . . . . . . . . . . . . . . .55
Managing your Private Email address book . . . . . . . . . . . . . . . . .56
Adding addresses . . . . . . . . . . . . . . . . . . . . . . . . . . . . . . . . .56
Importing addresses from an e-mail program . . . . . . . . . .57
Importing e-mail addresses from an LDAP server . . . . . . .58
Changing e-mail addresses . . . . . . . . . . . . . . . . . . . . . . . .61
Deleting addresses . . . . . . . . . . . . . . . . . . . . . . . . . . . . . . .62
Managing your private distribution lists . . . . . . . . . . . . . . . . . . . .63
Creating lists . . . . . . . . . . . . . . . . . . . . . . . . . . . . . . . . . . . . .63
Adding and deleting addresses in lists . . . . . . . . . . . . . . . . . .64
Changing addresses in lists . . . . . . . . . . . . . . . . . . . . . . . . .65
Deleting lists . . . . . . . . . . . . . . . . . . . . . . . . . . . . . . . . . . . . .65
Working with fax destinations . . . . . . . . . . . . . . . . . . . . . . . . . . . .66
Adding fax destinations . . . . . . . . . . . . . . . . . . . . . . . . . . . . .66
Changing fax destinations . . . . . . . . . . . . . . . . . . . . . . . . . . .67
Deleting fax destinations . . . . . . . . . . . . . . . . . . . . . . . . . . . .67
Finding names in address books . . . . . . . . . . . . . . . . . . . . . . . . .68
Copying and moving addresses and lists . . . . . . . . . . . . . . . . .69
Using the activity log . . . . . . . . . . . . . . . . . . . . . . . . . . . . . . . . . . .70
Viewing the activity log . . . . . . . . . . . . . . . . . . . . . . . . . . . . .70
Saving or copying the activity log . . . . . . . . . . . . . . . . . . . . . .71
Printing the activity log . . . . . . . . . . . . . . . . . . . . . . . . . . . . .72
Clearing the activity log . . . . . . . . . . . . . . . . . . . . . . . . . . . . .72
Refreshing the view of the activity log. . . . . . . . . . . . . . . . . . .73
Viewing properties . . . . . . . . . . . . . . . . . . . . . . . . . . . . . . . . . . . .73
Controlling the view of the ABM main window . . . . . . . . . . . . . .74
Backing up and restoring private address books . . . . . . . . . . . . .74
Backing up your private address books . . . . . . . . . . . . . . . .74
Restoring your private address books . . . . . . . . . . . . . . . . .75
Changing to the ABM for another digital sender . . . . . . . . . . . . . .76
4 Using the HP Digital Sender Link
Introduction . . . . . . . . . . . . . . . . . . . . . . . . . . . . . . . . . . . . . . . . . .77
Running the HP Digital Sender Link . . . . . . . . . . . . . . . . . . . . . . .78
Using the taskbar icon . . . . . . . . . . . . . . . . . . . . . . . . . . . . . . . . .80
4 Chapter - EN
Page 7

Showing or hiding the icon . . . . . . . . . . . . . . . . . . . . . . . . . . .80
Accessing taskbar icon options. . . . . . . . . . . . . . . . . . . . . . . .81
Configuring default inbox settings . . . . . . . . . . . . . . . . . . . . . . . .82
Choosing the default inbox location . . . . . . . . . . . . . . . . . . .82
Setting receive capabilities . . . . . . . . . . . . . . . . . . . . . . . . . .83
Configuring the target program . . . . . . . . . . . . . . . . . . . . . . . . .84
Choosing the target program . . . . . . . . . . . . . . . . . . . . . . . . .84
Setting automatic start capabilities . . . . . . . . . . . . . . . . . . . .85
5 Troubleshooting
Introduction . . . . . . . . . . . . . . . . . . . . . . . . . . . . . . . . . . . . . . . . . .87
Sources for information about problems . . . . . . . . . . . . . . . . . . . .88
Clearing paper jams . . . . . . . . . . . . . . . . . . . . . . . . . . . . . . . . . . .89
Troubleshooting the digital sender . . . . . . . . . . . . . . . . . . . . . . . .93
General digital sender troubleshooting. . . . . . . . . . . . . . . . . .93
Control panel messages . . . . . . . . . . . . . . . . . . . . . . . . . . . . .97
Activity log messages . . . . . . . . . . . . . . . . . . . . . . . . . . . . . . . . .103
Troubleshooting the software . . . . . . . . . . . . . . . . . . . . . . . . . . .110
General software troubleshooting. . . . . . . . . . . . . . . . . . . . .110
Installation message . . . . . . . . . . . . . . . . . . . . . . . . . . . . . .113
HP Address Book Manager messages. . . . . . . . . . . . . . . . .114
HP Digital Sender Link messages . . . . . . . . . . . . . . . . . . . .118
Appendix A Specifications
Equipment specifications. . . . . . . . . . . . . . . . . . . . . . . . . . . . . . .121
Environmental ranges . . . . . . . . . . . . . . . . . . . . . . . . . . . . . . . . .123
Supported capabilities. . . . . . . . . . . . . . . . . . . . . . . . . . . . . . . . .124
German noise declaration . . . . . . . . . . . . . . . . . . . . . . . . . . . . . .125
French EMC regulation . . . . . . . . . . . . . . . . . . . . . . . . . . . . . . . .125
Declaration of Conformity . . . . . . . . . . . . . . . . . . . . . . . . . . . . . .126
Software license agreement . . . . . . . . . . . . . . . . . . . . . . . . . . . .127
Appendix B Warranty and support information
Hewlett-Packard limited warranty statement . . . . . . . . . . . . . . .129
HP customer support options worldwide. . . . . . . . . . . . . . . . . . .131
HP support . . . . . . . . . . . . . . . . . . . . . . . . . . . . . . . . . . . . . . . . .133
EN 5
Page 8

6 Chapter - EN
Page 9

1Getting started
Introduction
Thank you for purchasing the HP 9100C Digital Sender. This color,
network digital sender helps you quickly and conveniently distribute
paper documents in electronic f ormat. The digital sender works with
other devices and programs so you can:
E-mail — Send a document directly to Internet e-mail
destinations.
Fax — Fax a document to one or more destinations (if your
company has a LAN fax program).
Make copies — Make high-quality copies b y se nding a document
to a network printer.
Send to your computer — Send a document to your computer
where you can file documents, search fo r text, and add text not es.
You can also send documents to e-mail, fax, print, and more.
Send to another program — Send a document to a network folder
so the document is available to a program on the network.
Send to an HP JetSend-enabled device — The digital sender is
an HP JetSend-enabled de vice that can send d ocuments to other
HP JetSend-enabled devices in your office.
The HP Address Book Manager (ABM) is a program on your
computer that manages fax and e-mail destinations you use at the
digital sender. The HP Digital Sender Link (Link) routes documents
sent to your computer to the storage location.
EN Introduction 7
Page 10

Coexistence with an HP Network ScanJet 5 scanner
The HP 9100C Digital Sender and the HP Network ScanJet 5
scanner coexist on the same network without conflict. Documents
sent to your computer from the HP Network ScanJet 5 scanner are
routed using the HP ScanJet Utility, and you can continue to use the
PaperPor t™ software for HP to manage the scanned documents.
Documents sent to your computer from the HP 9100C Digital Sender
are routed using the HP Digital Sender Link.
If you would like, you can use just use one program on your computer
to manage scanned documents. Specify the target program as the
Preferred Inbo x f or the HP Network ScanJet 5 scanner a nd set the file
type to .pdf (if available) or multipage .tif. (See the documentation for
the HP Network ScanJet 5 scanner to set these options.) Documents
are still routed using the HP ScanJet Utility, but they appear in the
target program.
System requirements
To install and use the four included programs and the online
documentation, your computer needs the following:
a Pentium® processor
Microsoft® Windows 9x, or Windows NT 4.0 or 5.0 (Intel PC)
For Windows 9x: 16 MB RAM minimum, 32 MB RAM
recommended.
For Windows NT 4.0 or 5.0: 32 MB RAM minimum, 64 MB RAM
recommended.
a VGA monitor
41 MB of free hard disk space
8 Chapter 1 - Getting started EN
Page 11

Installing the software
The software consists of four components:
HP Digital Sender Link. This program is necessary if you want
to send documents to your computer.
HP Address Book Manager . The ABM program is the means for
adding, changing, and deleting f ax and e-mail dest inations stored
in the digital sender. It is also needed for viewing the activity log.
During the software installation, y ou can accept the def ault installati on
of all components and an electronic copy of the user guide. This is
known as a typical installation. Or, you can choose to install only
certain programs, which is known as a custom installation. Doing a
typical installation is strongly recommended.
You can install the software either from the network or from the
installation compact disc. Bef ore you begin, you n eed to know where
the install program is located (if installing from the network) and
where you want the programs and the data files to reside (if you do
not accept the default). If you cannot find the install program, contact
the administrator for this digital sender (hereafter referred to as the
administrator).
EN Installing the software 9
Page 12

To install on Windows 9x, NT 4.0, or NT 5.0
1 Turn your computer on and quit any open programs.
2 Do one of the following:
• If you get a message from the administrator saying there is
new software available for this product, follow the instructions
in the message for installing it.
• If the softw ar e is b eing inst alled f ro m the network, log in to the
network, click Start and then Run. Type the path the
administrator gave you and click OK.
• If the software is being installed from the compact disc, the
setup program begins as soon as you insert the compact disc.
When prompted, make sure to choose to install the en d-user
software.
3 When the installation program begins, follow the instructions on
the screen. During the installation, you need to specify the
following:
• Which programs to install. By default, all programs are
installed.
• Where to store the programs. You can accept the default
location or choose another location on y our computer.
• The path to the default inbox. The default inbox is the place
where data sent to your computer is stored. You can accept
the default location or choose another location on your
computer or the network.
All the programs you selected will be installed. If an error occurs
during installation, see “Installation troubleshooting” on page 11.
Note The target program receives and displays documents sent to your
computer. To learn more about choosing a target program, see
“Configuring the target program” on page 84.
After installation
After installing the software, you or the administrator needs to
establish your registered user profile to allow you to use all the
capabilities of the digital sender. See “Your user profile” on page 12.
10 Chapter 1 - Getting started EN
Page 13

Installation troubleshooting
Use the following table to help resolve error messages and common
problems encountered while installing software.
Problem or message Description
The software did not install on
Windows 9x.
The computer cannot read the
installation compact disc.
“This machine has been configured by
your network administrator as a digital
sender server. The Link application
cannot work if this service is running.
To be able to receive scanned
documents directly on this PC, the
administrator must disable the digital
sender server. Do you want to
continue?”
All programs except Explorer and Systra y should be closed bef ore
installing software. Press C
open programs, click one and click End Task. Repeat for each
other open program. Then, reinstall the software.
The correct drive might not have been specified. Check for the
proper drive letter. Often, it is D or E for the CD-ROM drive.
Check the compact disc for damage. Try using the compact disc
on another computer, or copy the compact disc f olders to the hard
drive. Then, install from the hard drive.
The computer on which you are trying to install the software has
the HP Digital Sender Service or the upgrade for the HP Network
ScanJet 5 scanner installed already. Contact the administrator
before proceeding.
TRL+ALT+DELETE. If there are other
Uninstalling HP Digital Sender Link and HP
Address Book Manager
To uninstall the HP Digital Sender Link and the HP Address Book
Manager programs: Click Start, point to Programs, then HP 9100C,
and click Uninstall HP 9100C. Follow the instructions on the screen
to complete the uninstall.
EN Installing the software 11
Page 14

Your user profile
There are two different types of users for the digital sender:
registered users and guest users. Registered user must establish a
user profile, and they have full access to all features. Guest users do
not have to establish a user profile, but they also do not have full
access to all features.
Registered users
As a registered user, you have the following privileges.
You can use the digital sender even if the administrator disables
guest usage.
You can send documents to your computer. Without a registered
user profile, you cannot send to your computer.
You can use the ABM program. In the ABM, you will have a
Private Email address book and a Private Distribution Lists
address book, where you can store often-used addresses and
lists for use at the digital sender. (See “Introducing the HP
Address Book Manager” on page 15.)
In the ABM, you have rights to add, change, and delete fax
destinations in the Public Fax address book.
You see information in the activity log under your name. When
using the digital sender as a guest user, you cannot tell your
activity from the activity of any other guest user.
You can have the di gital sender send you e-mail notifications of
the status of faxes or e-mail messages you send from the digital
sender. (Your e-mail and LAN fax prog rams must support
notification.)
To become a registered user, see “Adding a registered user profile”
on page 13.
12 Chapter 1 - Getting started EN
Page 15

Guest users
If you are a guest user, you cannot use the digital sender if the
administrator disables guest usage.
If guest usage is enabled, you can use the digital sender and choose
destinations in the Public Email, Distribution Lists, and Fax address
books. However, you do not have Private Email and Distribution Lists
address books. You also cannot use the ABM to alter information in
any address books or for any other purpose.
As a guest user, you cannot send documents to your computer. And,
you cannot receiv e e-mail notification of the status of faxes or e-mail
messages you send from the digital sender.
Adding a registered user profile
You or the administrator can set up y our user profile . Your profile is set
up and changed in the ABM.
To add a registered user profile
1 On the Windows taskbar, right-click and choose HP Address
Book Manager. The HP 9100C login screen opens.
2 In the Digital Sender name field, type the DNS name or IP
address for the digital send er. If you do not know this info rmation,
ask the administrator.
3 In the User name field, type your name as it will appear at the
digital sender’s cont rol panel. F or consistency, it is recommended
that all users enter their names with the last name first.
4 If you want to protect access to your address books with a
password, type one in the Password field.
Note If you do not set a passw ord, other users migh t be able to log in at the
digital sender using your name, access destinations in your private
address books, and send e-mail messages using your name.
EN Your user profile 13
Page 16

5 Select the New User check box. The dialog box expands.
6 If you typed a password, retype it in the Confirm password field.
7 If you will want to receive confirmations of fax and/or e-mail
transmissions, type your e-mail address in the User e-mail
address field.
8 The ABM automatically detects the address of your computer and
inserts it into the User PC address field. You can modify this
field, but it is not recommended.
9 Click Create.
Note You might receive a message sa ying y ou ha ve been cr eated as a user
and are logged in to the ABM, but that the administrator must enable
your account. If you receive this message, you can work in the ABM
but cannot use destinations at the digital sender unt il the administrator
enables your account.
10 To receive e-mail confirmations of e-mail messages you send:
a Click the user profile you created in the ABM main window.
b On the File menu, click Properties.
c Select the Delivery Notification check box and click OK.
Note T o receive confirmations, y our e-mail server and the links between your
e-mail and the recipient’s e-mail must support Delivery Service
Notification (DSN).
14 Chapter 1 - Getting started EN
Page 17
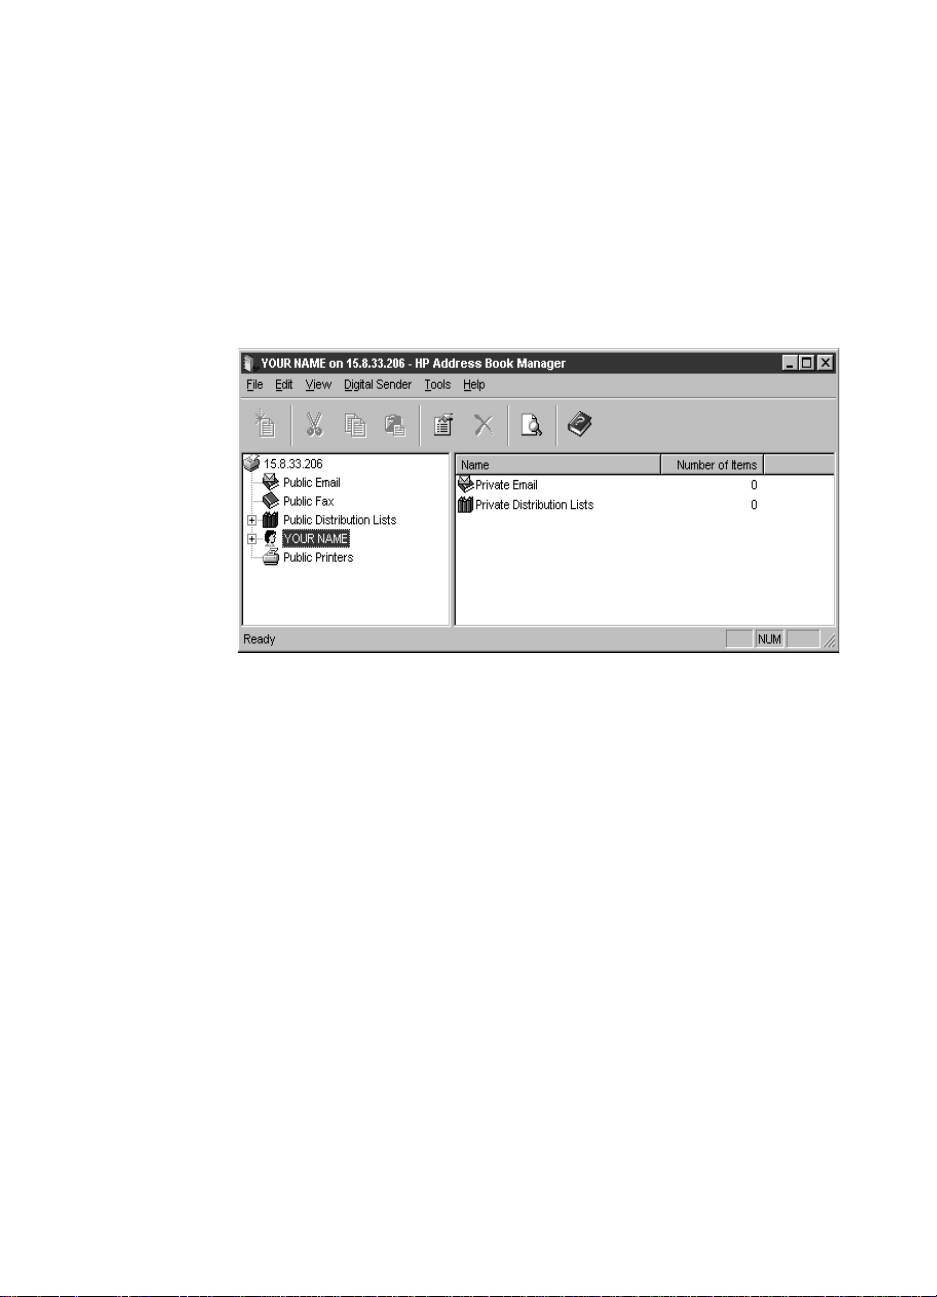
Introducing the HP Address Book Manager
The HP Address Book Manager (ABM) is a program on your
computer that allows you to view and alter address books of e-mail
addresses and fax numbers stored in the digital sender. You access
these destinations at the digital sender when you want to send a
document directly to an e-mail address or fax number. You must be a
registered user to use the ABM.
This is what the ABM main window looks like:
On the left-hand side of the window are the available address books.
The right-hand side of the window displays the contents of the
selected address book.
As a registered user, you can see your Private Email and Distribution
Lists address books. You can view and alter information in both. No
one else but the administr ator can see or access y our priva te address
books.
You can view the contents of the Public Printers address book. You
can view and use the contents of the Public Email, Distribution Lists,
and Fax address books. However, the only public address book you
and other users can alter is the Public Fax address book. Only the
administrator can alter all of the public address books.
The ABM for this digital sender is also the means f or using the act ivity
log and for s witching to view ad dress books f or a nother digital send er .
For more information about the ABM, see chapter 3, “Using the HP
Address Book Manager,” which begins on page 49.
EN Introducing the HP Address Book Manager 15
Page 18
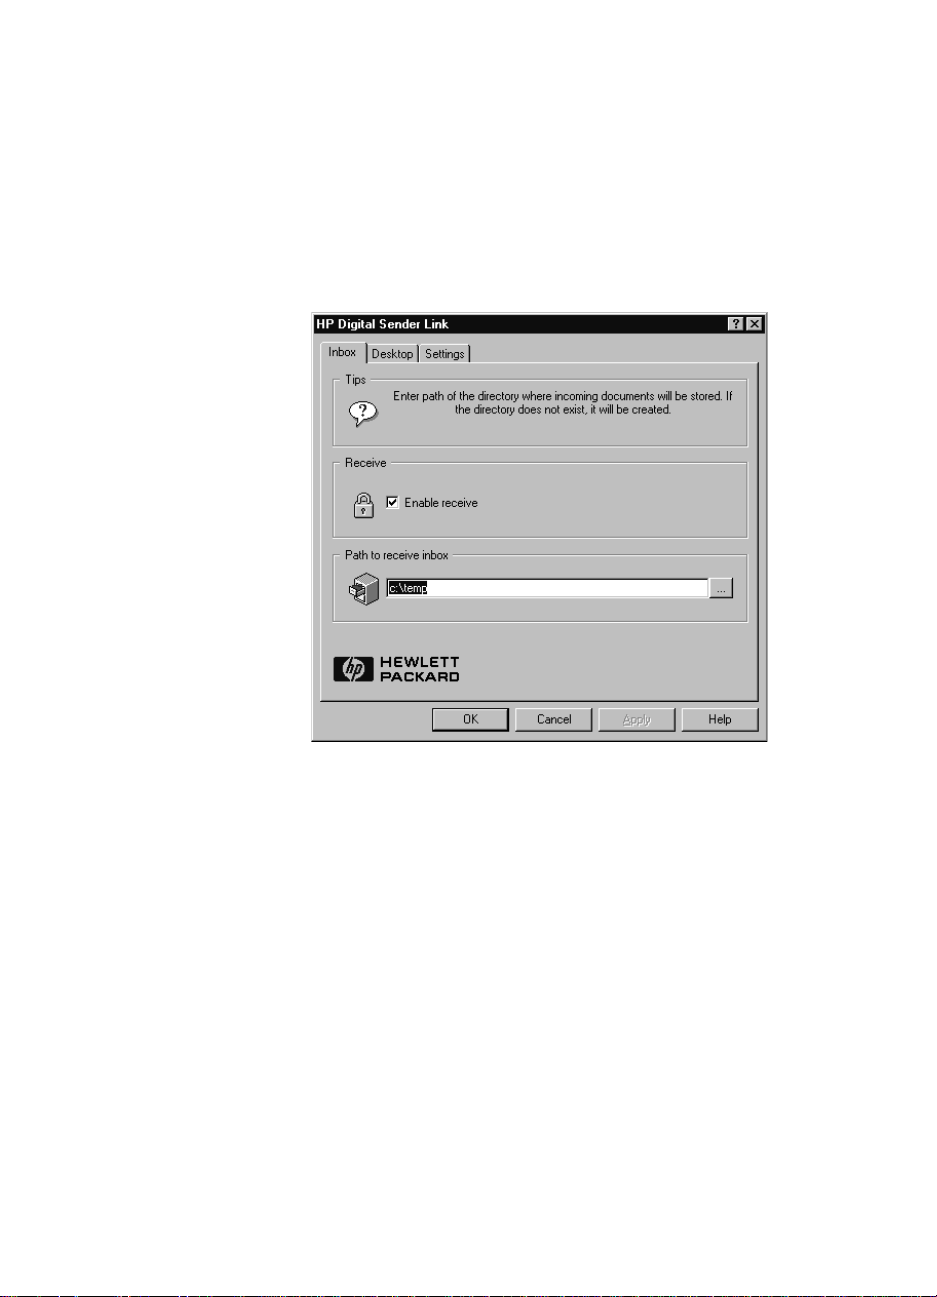
Introducing the HP Digital Sender Link
The HP Digital Sender Link is one of the programs installed with your
software. This program, which must be running when you send
documents to your computer, accepts and routes the scanned
documents. Below is the Control Panel applet f or the program,
showing the Inbox tab:
Using the Control Panel applet, you determine settings for the
program, such as where to store scanned documents until they are
opened in a program on your computer. The storage location is
known as the default inbox location, and the program in which the
documents are opened is known as the target program. From the
Control Panel applet, you also set which program is the target
program.
The target program can be any program capable of accepting .pdf or
multipage .tif files. To learn more about choosing a target program
and other settings, see chapter 4, “Using the HP Dig ital Sender Link,”
beginning on page 77.
16 Chapter 1 - Getting started EN
Page 19
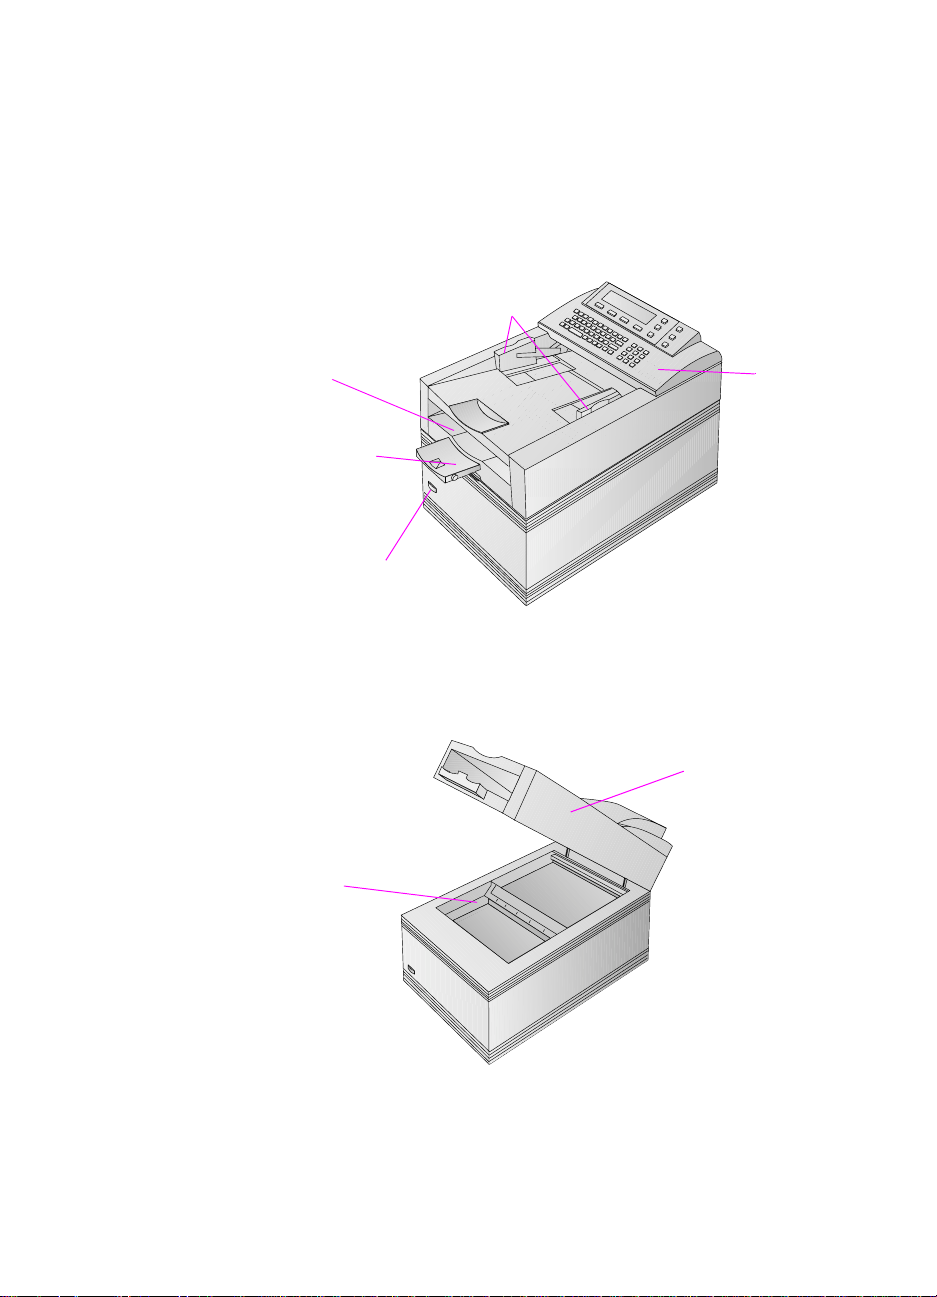
Identifying digital sender parts
Before using the digital sender, use the diagram below to familiarize
yourself with the parts of the digital sender.
Front and top view
Document
guides
Document
output tray
Document
output support
Powe r switch
Front view with ADF unit raised
Glass
Control
panel
ADF unit
(raises to
reveal glass)
EN Identifying digital sender parts 17
Page 20
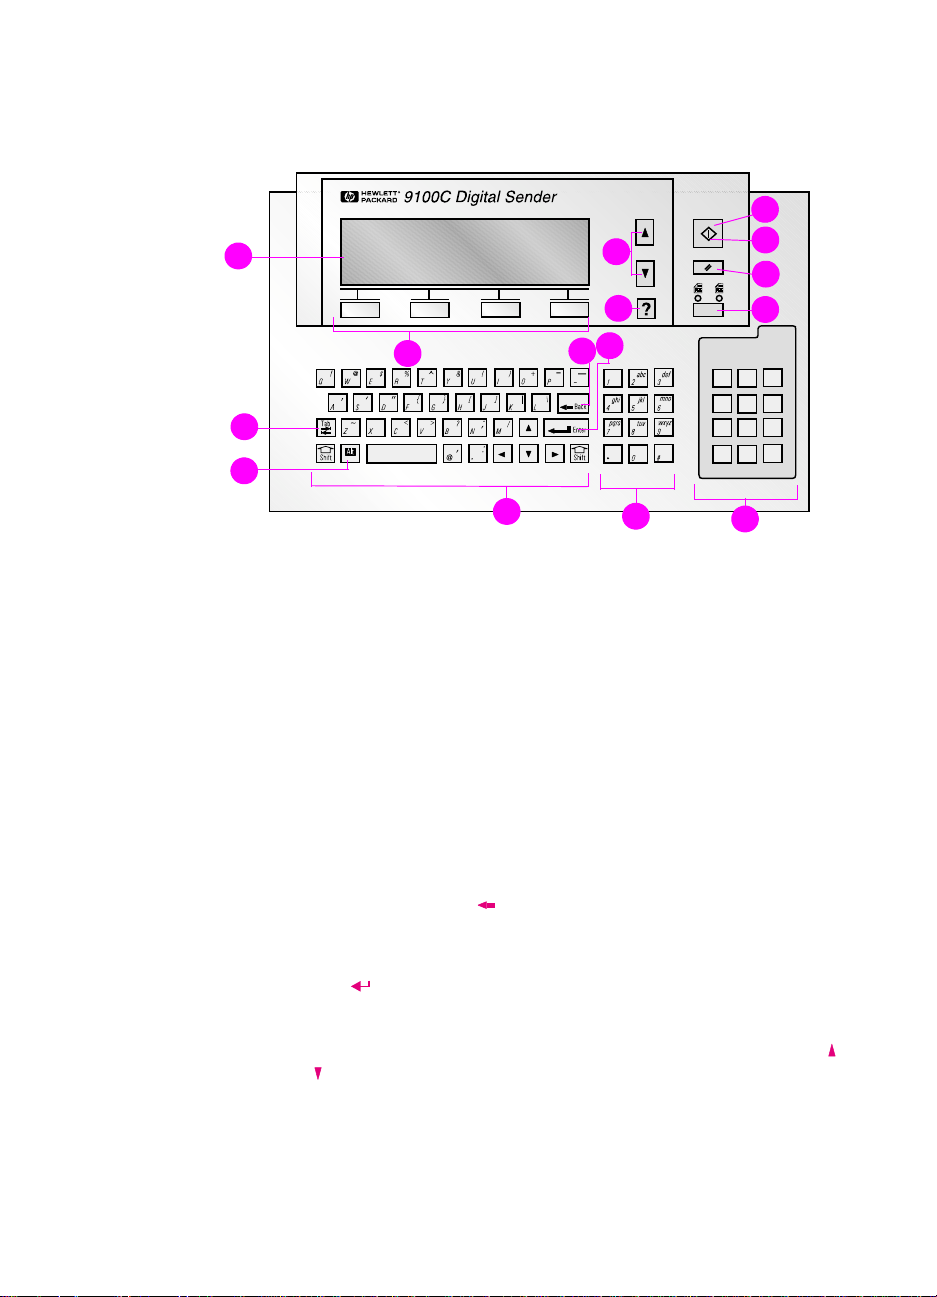
Identifying control panel features
Use the following diagram to locate control panel features:
1
8
12
13
14
9
7
4
2
3
5
1 Control Panel Display — Displays information and messages.
2Tab key — Move between fields on the control panel display.
3Alt key — When used in conjunction with another key, enters the
letter or symbol on the upper right corner of the other key.
4Function keys — Each one performs the function displayed
above the key. In the manuals, these keys are shown in this way:
EY.
K
5 Alphabetic keys — Enter letters and symbols for names,
passwords, and destinations.
6 Back key — Deletes the last ty pe d character or rem oves
destinations from the selection list. In the manuals, this key is
shown as this symbol: .
6
10
15
11
7Enter key — Accepts information on the control panel display or
moves between fields. In the manuals, this key is shown as this
symbol: .
8 Scroll Arrow keys — Scroll up and down or through items in a
field. In the manuals, these keys are shown as these symbols:
and .
18 Chapter 1 - Getting started EN
Page 21

9Help key — Activates the Help window, which offers information
on the selected screen or field. In the manua ls, this key is shown
as this symbol: .
10 Numeric keys — Enter numbers or special characters for y our
language (except English).
11 Special characters sticker — Contains instructions for
accessing the special characters available for your language
(except English).
12 Go key — Sends a document. In the manuals, this key is shown
as this symbol: .
13 Activity light — Indicates the status of the digital sender.
(Appears in the outline of the symbol on the Go key.)
14 Cancel key — Stops sending process or returns to the main
display screen. In the manuals, this key is shown as this symbol:
.
15 Single-sided/double-sided key — Selects single-sided or
double-sided original. In the manuals, this key is shown in this
font: S
INGLE-/DOUBLE-SIDED.
EN Identifying digital sender parts 19
Page 22

Quick-start tutorial
Use this tutorial to get started with some basic tasks: logging in to the
ABM and using it to add an e-mail address, loading a document,
logging in to the digital sender, and e-mailing.
Using the ABM to add an e-mail address
Using the ABM at your computer, you can add e-mail addresses.
These e-mail addresses are available whenever you want to e-mail
documents from the digital sender.
In order to use the ABM, you or the administrator must have
established your user profile. If you have not already done so, see
“Adding a registered user profile” on page 13.
To log in to the ABM
Note The digital sender must be on in order fo r you log in to and use the ABM.
1 On the taskbar, right-click and choose HP Address Book
Manager.
2 If the DNS name or IP address for the digital sender you want is
not in the Digital Sender name field, type it in. Ask the
administrator if you do not know this information.
3 If your user name is not in the User name field, type it in.
4 In the User password field, type your password (if one is
defined).
5 Click OK. If all of the login information is valid, the ABM main
window appears.
6 Go to “To add an e-mail address” below.
20 Chapter 1 - Getting started EN
Page 23

To add an e-mail address
1 In the ABM main window, click the folder for your user name.
2 Click Private Email.
3 On the File menu, click New.
4 In the Name field, type a name for this address.
5 In the E-mail Address field, type the e-mail address.
6 Click Add.
7 When finished, click Close.
EN Quick-start tutorial 21
Page 24
1
2
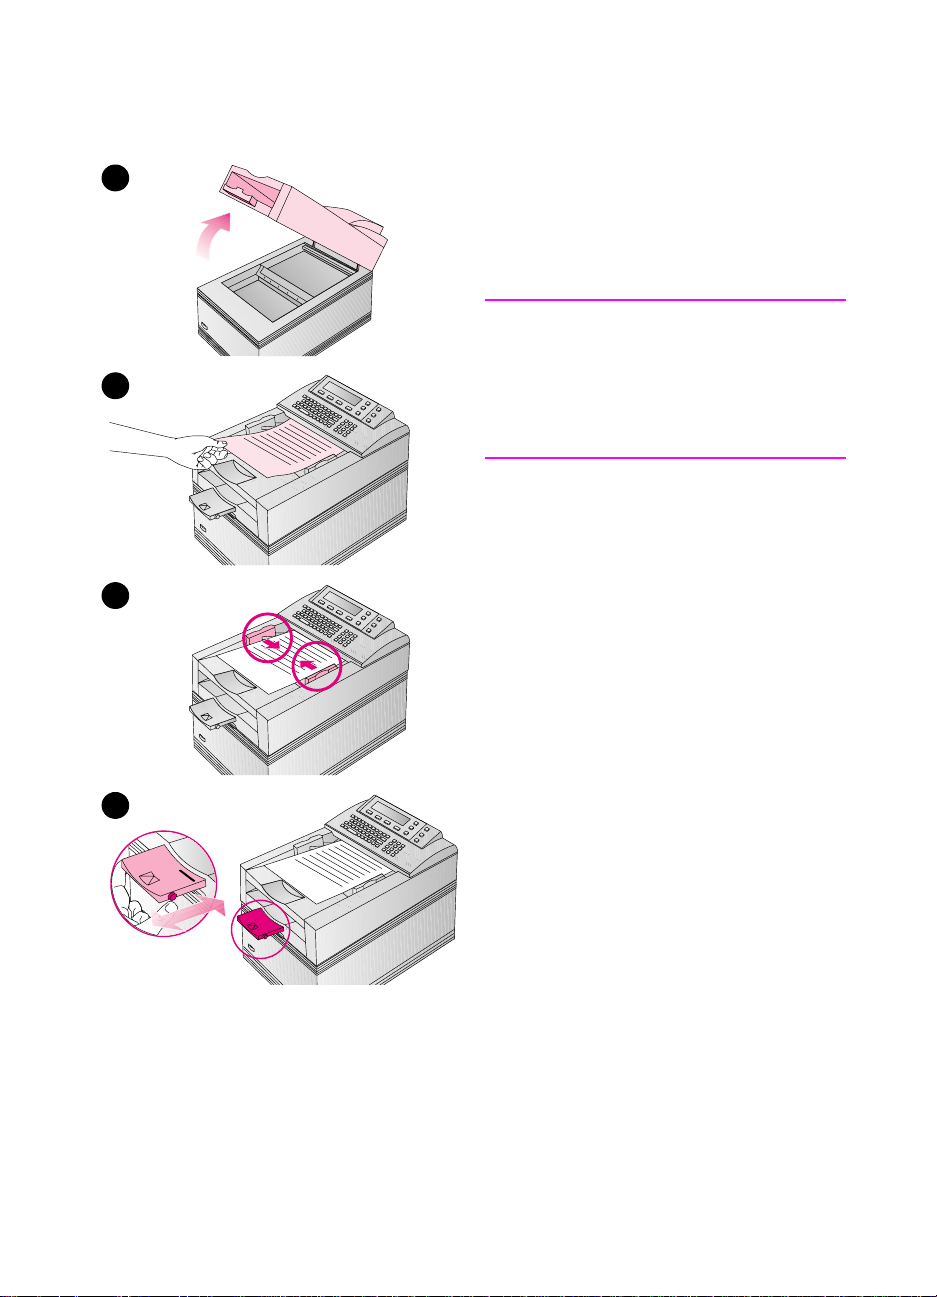
Loading a document
At the digital sender , you can load a
stack of pages in the ADF and t hen send
them to a destination.
CAUTION
Before using the ADF, remove from the
document anything such as selfadhesive notes, paper clips, or staples,
that could get caught in the digital
sender and damage it.
To load a document in the ADF
1 Raise the ADF unit and ensure
nothing is on the glass. Then, close
3
the ADF unit.
2 Slide the document (up to 50 pages)
face up, top first, into the ADF until
the document stops. Center the
document between the document
guides.
3 Adjust the document guides to fit
snugly against the sides of the stack.
4
22 Chapter 1 - Getting started EN
4 If necessary, adjust the output
support to the correct paper size.
5 Go to “Logging in to the digital
sender” on page 23.
Page 25

Logging in to the digital sender
If the main screen appears on the control panel display, guest usage
is enabled and you do not have to log in. You can go to the next
section.
If the Digital Sender login screen appears on the control panel
display, only registered users can use the digital sender. You must log
in as a registered user before pr ocee ding. Depe nd ing on the security
level, your profile might need to be validated by the administrator
before you can use it. If this is the case, you will receive an error
message when you try to log in.
To log in to the digital sender
1 At the HP 9100C Login screen, type your registered user name in
the NAME field and press .
2 If a password is set in your user pr ofile, ty pe it in the PASSWORD
field. Your password is case sensitive and must be typed exactly
as it appears in your user profile.
3 Press .
Once you are logged in as a registered user, you have access to
control panel functions, the public address books, and your private
address books. You can also access more detailed activity log
information using the ABM at your computer.
EN Quick-start tutorial 23
Page 26

E-mailing a document
If you see a function key for e-mail on the main control panel screen,
you can e-mail a document directly from the digital sender. The main
screen is the first screen to appear, or it appears after you log in to the
digital sender.
To e-mail a document
1 Load a document, as described on page 22.
2 Log in (if prompted) and press E-M
3 If your name is not already entered in the FROM field, type in your
user name or your e-mail address.
4 Press .
5 If you are a registered user and your user name is password
protected, a dialog box opens. Type your password and press
.
6 Type a message in the SUBJECT field (optional).
7 Press .
8 In the TO field, type an e-mail address.
- Or -
Type the name for the e-mail address you added in the “Using the
ABM to add an e-mail address” section on page 20.
9 Press . The e-mail address, preceded by “To:”, appears in the
window below the TO field.
10 To CC someone:
a Press T
b In the CC field, type an e-mail address or choose an e-mail
destination from an address book.
c Press . The destination, proceeded by “CC:”, appears in
the window below the CC field.
O. Press to select CC and press OK.
AIL.
11 Press . The document goes to the e-mail destinations you
chose.
24 Chapter 1 - Getting started EN
Page 27

Sending to a computer
Use the procedures below to send a docu ment t o the t arget prog r am.
The first procedure helps you start the HP Digital Sender Link, which
must be running, and the second procedure helps you send the
document from the digital sender.
Note Only registered users can send to their computers.
To start the HP Digital Sender Link
At the computer to which you will be sending, make sure the HP
Digital Sender Link is running and the receive capabilities are
enabled.
If you see the icon like this: , then the program is running and
the receive capabilities are enabled.
If you see the icon like this: , then the program is running but
the receive capabilities are disabled. Right-click the icon and
choose Enable receive.
If you do not see the icon, the program might or might not be
running. To check or start the program, click Start, point to
Programs, then HP 9100C, and then click HP Digital Sender
Link.
To send to the target program
1 At the digital sender, load the docume nt as described on page 22.
2 Log in (if necessary) and press PC.
3 If your user name is not in the NAME field, type it in.
4 Press to start sending.
5 The document goes to your computer and appears as a file in the
targetprogram.
EN Quick-start tutorial 25
Page 28
Finding help
The rest of this user guide is devoted to helping you use the digital
sender, the ABM, and the HP Digital Sender Link. This guide will also
help you troubleshoot if you experience a problem. Additionally , there
are several other sources of help available to you.
Quick reference guide
Find information on how to do the most common tasks in this
convenient booklet.
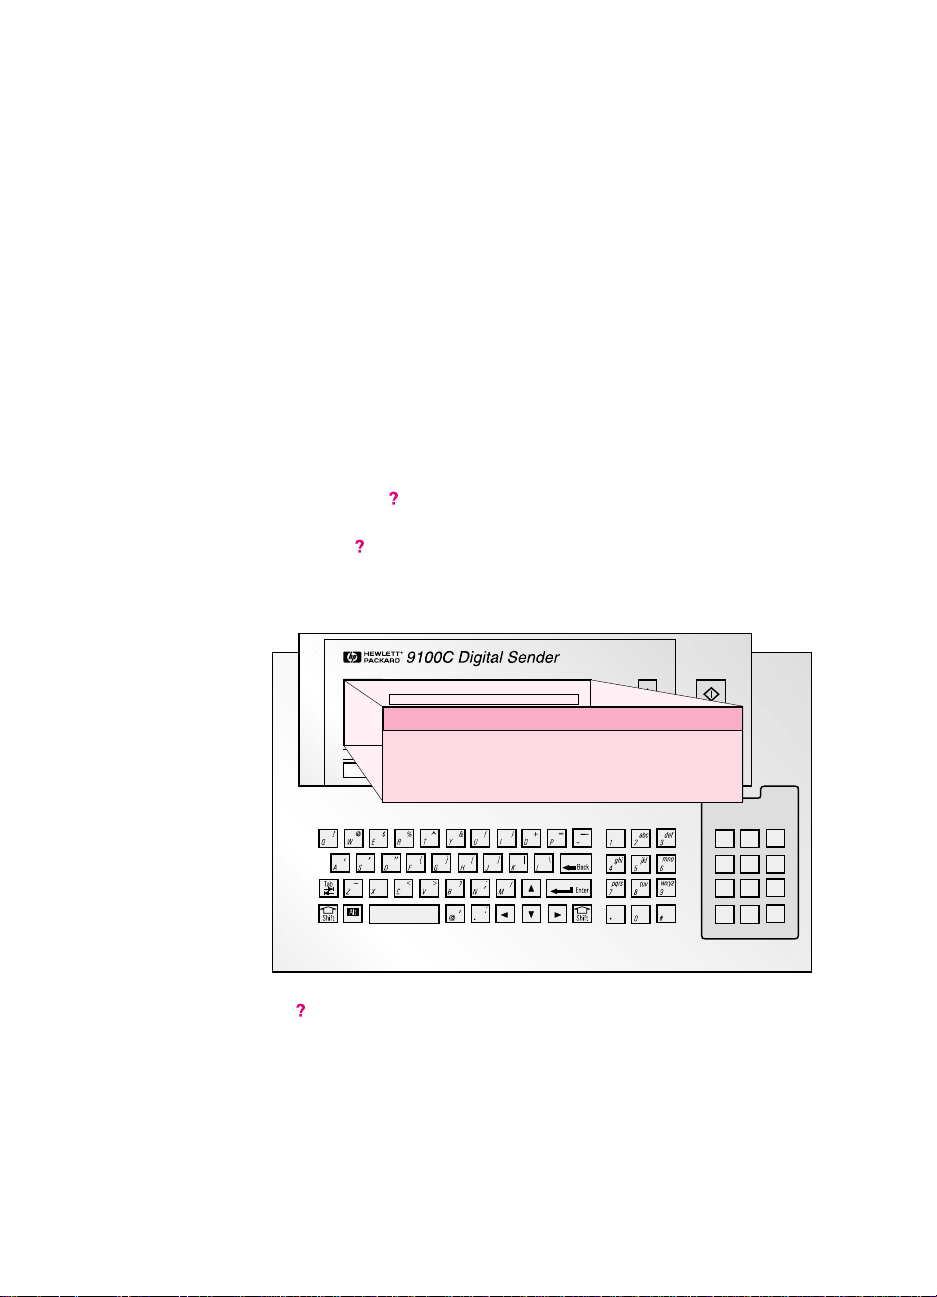
Online help for the digital sender
The online help for the digital sender contains context-sensitive help.
When you press , help appears for the active field on the control
panel display. For example, if you were sending an e-mail message
and pressed while the cursor was in the SUBJECT field, a
message like this would appear:
ENTER YOUR NAME
FROM:
SUBJE
TO:
SUBJECT FIELD: Enter the subject of your
e-mail message here. Press Enter to confirm
the subject.
Press again or press C
LOSE to exit the online help.
Help
26 Chapter 1 - Getting started EN
Page 29

The ABM help
The ABM contains its own help file. To access it, choose a command
from the Help menu in the ABM main window or any window in which
the Help menu appears.
HP Digital Sender Link help
If you need help while altering se ttings in the Control Panel applet for
the HP Digital Sender Link, choose a command fro m the Help menu.
Administrator guide
If you cannot find an answer to a question or the resolution to a
problem in the user guide, quick reference guide, or one of the online
helps, see the administrator guide or contact the administrator.
EN Finding help 27
Page 30

28 Chapter 1 - Getting started EN
Page 31

Working at the digital
2
sender
Introduction
The HP 9100C Digital Sender lets you send a variety of single- and
double-sided documents to several destinations. This chapter details
what types of documents you can place in the digital sender, how to
load them, and how to select settings at the control pane l. Then, you
can send the document to one of the following types of destinations:
e-mail destinations
fax destinations
a printer (to make copies)
your computer
JetSend-enabled devices
If you see function keys for other network destinations or
programs on the digital sender main screen, you can send
documents to those programs also.
EN Introduction 29
Page 32

What documents you can place in the digital
sender
The HP 9100C Digital Sender is both a sheetfed and a flatbed digital
sender. You can insert a stack of pages (single- or double-sided) into
the automatic document feeder (ADF) and quic kly send them. On the
glass, you can place document s tha t you cannot put in the ADF, such
as pages from books, newspaper clippings, and fragile or lightweight
documents.
Guidelines for using the ADF
Using the ADF is a fast, con venien t wa y to send documents . The ADF
accepts documents that meet the following specifications:
Documents on standard Letter, A4, and Legal paper.
Documents can range in size from 148.5 by 210 mm (5.9 by 8.3
in) to 215.9 by 355.6 mm (8.5 by 14 in).
Documents can range in weight from 60 to 13 5 g/m2 (16 to 36 lb).
Documents should be free of tears, perforations, or punch holes.
Documents should be square or rectangular and in good
condition (not fragile or worn).
Documents should be free of glue, correction fluid, or wet ink.
Avoid multipart forms with carbon pages.
Before placing a document in the ADF, prepare the document by
doing the following:
Remove curls or wrinkles.
Remove staples, paper clips, paper sticky notes, and any other
materials from documents.
If your document does not meet these guidelines or you cannot
prepare it as stated abov e, send it using the glass. See “Guidelines
for using the glass” on page 31.
30 Chapter 2 - Working at the digital sender EN
Page 33

Guidelines for using the glass
The glass is the best way to send unusual documents. Examples of
unusual documents include:
documents on media lighter than 60 g/m2 (16 lb) or heavier than
135 g/m
irregular sizes or shapes, such as newspaper clippings, receipts,
or business cards
transparencies
gum-backed paper
multipart forms with carbon pages
old or worn photographs or documents
documents containing tears, perforations, punch holes, wrinkles,
or curls
Place these types of documents on the glass one at a time and send
them.
Note The maximum length the glass can accept is 297 mm (11.7 in). If y our
document is longer but you ne ed to use the glass, send the do cument
in multiple sections.
2
(36 lb)
Sending double-sided documents
You can send double-sided documents using the ADF as long as the
document meets the requirements specified in “Guidelines for using
the ADF” on page 30. When yo u send doub le-sid ed documents usin g
the ADF, all of the odd pages send first, and then all of the even
pages. In the final document, the pages are in correct order.
You can also send double-sided documents using the glass.
See “Loading a document” on page 32 for instructions on loading a
double-sided document. Instructions on how to finish sending a
double-sided document appear at the end of the procedure for
sending to each type of destination.
EN What documents you can place in the digital sender 31
Page 34

Loading a document
1
2
You can load a stack of pages in the ADF
or load one page at a time on the glass.
See “What documents you can place in
the digital sender” on page 30 if you
need help determining which method to
use.
CAUTION
Before using the ADF, remove from the
document anything such as selfadhesive notes, paper clips, or staples,
that could get caught in the digital
sender and damage it.
To load a document in the ADF
1 Raise the ADF unit and ensure
3
nothing is on the glass. Then, close
ADF unit.
2 Slide the document (up to 50 pages)
face up, top first, into the ADF until
the document stops. Center the
document between the document
guides.
3 Adjust the document guides to fit
4
32 Chapter 2 - Working at the digital sender EN
snugly against the sides of the stack.
4 If necessary, adjust the output
support to the correct paper size.
5 Set the digital sender to accept your
single- or double-sided document b y
pressing the S
key until the light under the correct
icon is lit.
6 Go to “Logging in” on page 34.
INGLE-/DOUBLE-SIDED
Page 35

1
To load a document on the
glass
1 Raise the ADF unit to reveal the
glass.
2 Place the page face down on the
glass, top edge toward the back.
3 Align the document in the upper-
2
3
right corner of the glass.
4 Lower the ADF unit.
5 Go to “Logging in” on page 34.
4
EN Loading a document 33
Page 36

Logging in
If the main screen appears on the control panel display, guest usage
is enabled and you do not have to log in. Go to "Taking the next step"
below .
If the HP 9100C Login screen appears on the control panel display,
only registered users can use the digital sender. You must log in as a
registered user before proceeding.
To log in as a registered user
1 At the HP 9100C Login screen, type your registered user name in
2 If a password is set in your user pr ofile, ty pe it in the PASSWORD
3 Press .
Once you are logged in as a registered user, you have access to
control panel functions, the public address books, and your private
address books. You can also access more detailed activity log
information using the ABM at your computer.
the NAME field and press .
field. Your password is case sensitive and must be typed exactly
as it appears in your user profile.
Taking the next step
Before proceeding, read “Changing settings” on page 35 if you are
not familiar with how to set the Size and Quality settings. Then, go to
one of the following sect ions to choose a delivery option:
E-mailing documents
Faxing documents
Copying documents
Sending to a computer
Sending to another program (if enabled by the administrator)
Sending to an HP JetSend-enabled device
34 Chapter 2 - Working at the digital sender EN
Page 37

Changing settings
After you select a destination, the default or current Quality setting
appears in the upper right corner of the control panel display. If this
setting is not correct f or t he document y ou ar e sending, or if y ou ne ed
to check the (paper) Size setting, use the procedures below.
Selecting the Size setting
You can choose Letter, A4, or Legal size. If the document you are
sending is an irregular size, choose the option that most closely
matches.
To select the Size setting
1 Press SETTINGS. The current Quality setting appears.
2 Press until the Size options appear.
3 Using the and keys, choose A4, Letter, or Legal.
4 Press O
K to save the selection and exit the Settings screen.
EN Changing settings 35
Page 38

Selecting the Quality setting
The table below shows the Quality setting options. Choose the option
that most closely matches the type of document you have. For
example, if you were faxing a report containing a color pie chart, you
would choose the Color Document setting. Even though the
document is not faxed in color, it is faxed with the best quality for that
type of document.
Use this setting For this type of document When doing this
function
Color Document The original has a mix of text and images.
Or, the original has a mix of color and black-andwhite areas.
B/W Document The original contains text that must be clearly
transmitted. Or, the original is black and white.
Color-B/W Photo The original is a photograph.
Or, it is most important that the colors or shades of
gray in an image be clear.
Fine Text (OCR) The original contains text that needs to be
converted to editable text using OCR software.
Hi-Res Color-B/W Photo The original is a photograph or graphic that needs
to be reproduced.
E-mailing
Faxing
Copying
Sending to a PC
Sending to another program
Sending to an HP JetSend-
enabled device
E-mailing
Faxing
Copying
Sending to a PC
Sending to another program
Sending to an HP JetSend-
enabled device
E-mailing
Faxing
Copying
Sending to a PC
Sending to another program
Sending to an HP JetSend-
enabled device
Sending to another program
Sending to another program
To select the Quality setting
1 Press SETTINGS. The current Quality setting appears.
2 Using the and keys, choose an option. (If you continue
pressing the , you scroll the options for the Size setting.)
3 Press O
36 Chapter 2 - Working at the digital sender EN
K to save the selection and exit the Settings screen.
Page 39

E-mailing documents
If you see a function key labeled E-MAIL on the main screen, you can
send documents directly to e-mail destinations . When you e-mail from
the digital sender, it creates a message and attaches your document
as a .pdf file.
When you e-mail from the digital sender, the TO, SUBJECT, and
FROM fields appear. You must enter destinations in the TO field, and
you can change to the CC field to enter destinations. You can also
enter a message in the SUBJECT field. If you do not, a default
message set by the administrator might appear in that field.
Depending on the security level set by the administrator, you may be
able to change the text in the FROM field, or it might be filled with a
name you cannot alter.
Hint If you want to add te xt notes to the document bef ore e-mailing it, send
it to the target program first. Then, you can e-mail it from your computer.
See “Sending to a computer” on page 44 for more information.
Choosing e-mail destinations
You can choose e-mail destinations at the digital sender in one or
both of the following ways:
Type the e-mail address manually.
Begin typing the name for an e-mail address or distribution list
stored in the public address books or y our priv ate address bo oks.
As you type, the digital se nder completes the name.
Begin typing an e-mail destination stored on an LDAP server. If
the administrator has configured the digital sender to work with
that LDAP server, the S
EARCH key appears . Press SEARCH and
select the destination from the list that is presented. Or, press
S
HIFT+SEARCH to access advanced search options.
If too many matching entries are found, you receive a message.
Press C
ANCEL to scroll the partial list of addresses found. Or , you
can further narrow the search and try again.
EN E-mailing documents 37
Page 40

To send to e-mail destinations
Note At any time before p ressing to send the document, you can pre ss
or BACK to return to the main screen without saving any settings.
1 Log in (if prompted) and press E-M
AIL.
2 If your name is not already entered in the FROM field, type in your
user name or your e-mail address.
3 Press .
4 If you are a registered user and your user name is password
protected, a dialog opens. Type your password and press .
5 To add a message to the SUBJECT field, type one.
6 Press .
7 To add an e-mail destination or distribution list to the TO field:
• Type the actual address.
• Begin typing the name of an e-mail address or distribution list
stored in an address book. As you type, the digital sender
completes the name.
• Begin typing an e-mail address stored in an LDAP server.
Then, press S
address you need, and press O
EARCH, use the and keys to select the
K.
8 Press . The destination, preceded by “To:”, appears in the
window below the TO field.
9 Repeat steps 6 and 7 until all the destinations y ou want are listed
in the window below the TO field. Use the and keys to view
the list.
Note If you need to remo ve an e-mail destination from the list, press to
enter the list field, select the destination using th e and keys , and
press .
38 Chapter 2 - Working at the digital sender EN
Page 41

10 To CC someone:
a Press T
O. Press to select CC and press OK.
b In the CC field, type an e-mail address or choose an e-mail
destination from an address book.
c Press . The destination, preceded by “CC:”, appe a rs in
the window below the CC field.
11 The current Quality setting is shown in the upper right corner of
the display. For options and instructions on changing this setting
or the (paper) Size setting, see “Changing settings” on page 35.
12 Press to begin sending the document.
• If yo u sent a single-sided document using the ADF, the
process is finished.
• If you sent a double-sided document using the ADF, wait for
the first side to finish. Then, reload the document with the
second side facing up, last page on top, and press again.
• If you used the glass, remove the page when it is finished.
Then, place the next page face down on the glass and press
. After the last page, press S
END.
Note Your company’s e-mail server , not the digital sender, is what validates
the e-mail addresses you are sending to. The digital sender does not
notify you if you sent to an invalid address, but the activity log does.
See “Using the activity log” on page 70.
Reading .pdf file attachments
The recipient of your e-mail message con taining a .pdf file att achment
can read the file using Adobe’s Acrobat Reader. Man y people al ready
have this program. If your recipients do not have Reader, they can
download a free copy of it for Windows or Macintosh from Adobe’s
website at www.adobe.com.
After installing Reader, Windows users can read .pdf files by doubleclicking them. Macintosh users can read .p df files b y opening Reader,
choosing Open on the File menu, and then selecting the file.
EN E-mailing documents 39
Page 42

Faxing documents
If you see a function k ey labeled FAX on the main screen, you can
send documents to fax destinations directly from the digital sender.
You can choose fax destinations in on e or both of the following ways:
Type fax numbers manually.
Begin typing the name for a fax destination stored in the Public
Fax address book. As you type, the digital sender completes the
name.
If you are a registered user, you can also request e-mail notification of
the fax transmission. (This feature only works if your company’s LAN
fax program supports notification and the administrator has enabled
it.)
Hint If a LAN fax program is not installed on your network but you have a
fax program on your computer, send the document to the target
program. Then, you can send the fax from there. (This assumes that
the fax progra m is compatib le with the t arget prog r am.) See “Sending
to a computer” on page 44 for more information.
Also send to the target program if you want to add text notes to a
scanned document before PC faxing it.
To fax documents
Note At any time before p ressing to send the document, you can pre ss
or BACK to return to the main screen without saving any settings.
1 Log in (if prompted) and press F
2 To enter a fax number in the FAX field:
• Type the fax number.
• Type the name of a fax destination stored in the Public Fax
address book. As you type, the digital sender completes the
name.
40 Chapter 2 - Working at the digital sender EN
AX.
Page 43

3 Press . The fax number or destination you chose appears in
the window below the FAX field.
4 Repeat steps 2 and 3 until all the fax numbers you want are liste d
in the window below the FAX field. (You can add a maximum of
64 destinations.) Use the and keys to view the list.
Note T o remov e a fax destinatio n from the list, press to enter the list field,
select the fax destination using the and keys, and press .
5 If you are a registered user and want to receive an e-mail
notification of the fax transmission, press until you enter the
NOTIFY field and type your user name (if it is not already
entered).
6 The current Quality setting is shown in the upper right corner of
the display. For options and instructions on changing this setting
or the (paper) Size setting, see “Changing settings” on page 35.
7 Press to begin sending the document.
• If yo u sent a single-sided document using the ADF, the
process is finished.
• If you sent a double-sided document using the ADF, wait for
the first side to finish. Then, reload the document with the
second side facing up, last page on top, and press again.
• If you used the glass, remove the page when it is finished.
Then, place the next page face down on the glass and press
. After the last page, press S
END.
If fax destinations are b usy, the numbers are retried as many times as
are specified by the LAN fax program.
Note Your company’s LAN fax server , not the digital sender , is what validates
the fax numbers y ou are sending to . The digital sender does not notif y
you if you sent to an invalid address, but the activity log does. See
“Using the activity log” on page 70.
EN Faxing documents 41
Page 44

Copying documents
If you see a function k ey labeled COPY on the main screen, you can
send documents to a network printer to make copies. Convenience
copying works only with printers the administrator has configured for
use with the digital sender.
Keep the following in mind when sending documents to a printer to
make copies:
The HP 9100C Digital Sender can send to only one printer at a
time.
More than one copy of a document can be sent, but the copies
cannot be collated. When sending multiple copies, all the first
pages print, then all of the second pages, and so on.
Only some color printers can print color documents sent from the
digital sender. If you have a color printer, check with the
administrator to see if it can print color documents sent from the
digital sender.
Hint If you want to print collated copies or do not ha ve a color network printer
availab le to print color copies, send the document to the target prog ram
and print it from there. See “Sending to a computer” on page 44.
42 Chapter 2 - Working at the digital sender EN
Page 45

To copy documents
Note At any time before p ressing to send the document, you can pre ss
or BACK to return to the main screen without saving any settings.
1 Log in (if prompted) and press C
OPY.
2 Using the and keys, choose the printer where you want to
print the copies and press .
3 In the Copies field, type the number of copies you want to make.
4 The current Quality setting is shown in the upper right corner of
the display. For options and instructions on changing this setting
or the (paper) Size setting, see “Changing settings” on page 35.
5 Press to begin sending the document.
• If yo u sent a single-sided document using the ADF, the
process is finished.
• If you sent a double-sided document using the ADF, wait for
the first side to finish. Then, reload the document with the
second side facing up, last page on top, and press again.
• If you used the glass, remove the page when it is finished.
Then, place the next page face down on the glass and press
. After the last page, press S
END.
EN Copying documents 43
Page 46

Sending to a computer
If you see a function k ey labeled PC on the main screen, you can
send documents to a computer.
Remember the following important points:
You can send only to computers of users who have registered
user profiles. (For example, if you are not a registered user, you
cannot send a document to your computer.)
The HP 9100C Digital Sender can send to only one person ’s
computer at a time.
The computer to which you are sending must be on and the
Digital Sender Link on it must be running and enabled.
To start the HP Digital Sender Link
At the computer to which you will be sending, make sure the HP
Digital Sender Link is running and the receive capabilities are
enabled.
If you see the icon like this: , then the program is running and
the receive capabilities are enabled.
If you see the icon like this: , then the program is running but
the receive capabilities are disabled. Right-click the icon and
choose Enable receive.
If you do not see the icon, the program might or might not be
running. To check or start the program, click Start, point to
Programs, then HP 9100C, and click HP Digital Sender Link.
If the program is running but the icon is hidden, you can check if
the receive capabilities are enabled by double-clicking the HP
Digital Sender Link icon in Windows Control Panel. Click the
Inbox tab, and make sure the Enable receive check box is
selected.
44 Chapter 2 - Working at the digital sender EN
Page 47

To send to your computer
Note At any time before p ressing to send the document, you can pre ss
or BACK to return to the main screen without saving any settings.
1 At the digital sender, log in (if prompted) and press PC.
2 If your name is in the NAME field, go to the next step.
- Or -
Type your name in the NAME field. (If you want to send to another
user’s computer, type the name of that user.)
3 The current Quality setting is shown in the upper right corner of
the display. For options and instructions on changing this setting
or the (paper) Size setting, see “Changing settings” on page 35.
4 Press to begin sending the document.
• If yo u sent a single-sided document using the ADF, the
process is finished.
• If you sent a double-sided document using the ADF, wait for
the first side to finish. Then, reload the document with the
second side facing up, last page on top, and press again.
• If you used the glass, remove the page when it is finished.
Then, place the next page face down on the glass and press
. After the last page, press S
END.
When the document arrives at y o ur computer, it becomes a saved file
in your defa ult inbo x location. Vie w and wo rk with the document in the
target program or another program that accepts the file type specified
in your user profile.
EN Sending to a computer 45
Page 48

Sending to another program
If function keys are labeled for use with network storage locations,
you can send documents to those destinations and use the
documents with specified programs.
To send to another program
Note At any time before p ressing to send the document, you can pre ss
or BACK to return to the main screen without saving any settings.
1 At the digital sender, log in (if prompted).
2 Press the function key for the destination you want. (It is named
whatev er the admin ist rator chose.) If the destination is not on the
bottom row of the display, use the and keys to move it to the
bottom row.
3 Use the and keys to select a secon dary destination from the
list.
4 The current Quality setting is shown in the upper right corner of
the display. For options and instructions on changing this setting
or the (paper) Size setting, see “Changing settings” on page 35.
5 Press to begin sending the document.
• If yo u sent a single-sided document using the ADF, the
process is finished.
• If you sent a double-sided document using the ADF, wait for
the first side to finish. Then, reload the document with the
second side facing up, last page on top, and press again.
• If you used the glass, remove the page when it is finished.
Then, place the next page face down on the glass and press
. After the last page, press S
46 Chapter 2 - Working at the digital sender EN
END.
Page 49

Sending to an HP JetSend-enabled device
If you see a function k ey labeled JETSEND, you can send documents
to JetSend-enabled devices.
HP JetSend is a communications technology built into printer and
scanner firmware and computer software. HP JetSend-enabled
devices can connect, “talk” to each other, and exchange information
directly from the network. It is server- and program-independent.
The digital sender is an HP JetSend-enabled device. You can use its
HP JetSend capabilities with the following types of devices:
printers on your company intranet that are HP JetSend enabled.
computers with HP JetSend for Windows software installed. You
can download a free copy of the HP JetSend for Windows
software for Windows NT or 95 from the HP JetSend website at
www.jetsend.hp.com.
Both types of devices must also have valid TCP/IP addresses.
Choosing or adding HP JetSend-enabled
devices
When you press JETSEND at the digital sender, a list of HP JetSendenabled devices appears. (The list contains up to 64 devices.) You
can choose a device from the list, or you can add a device.
To add a device to the list
1 Press JETSEND. The list of HP JetSend-enabled devices app ea rs.
2 Press N
3 Type the DNS name or IP address for the HP JetSend-enabled
device you w ant to add. If y ou do not know this inf ormation, check
with the administrator.
4 Press O
Note Once the list contains 64 devices, the NEW key disappears. Before
adding more devices , you must delete at least one e xisting device from
the list. To delete a device, use the and keys to select it and press
DELETE.
EN Sending to an HP JetSend-enabled device 47
EW.
K. The device is added to the list.
Page 50

To send to an HP JetSend-enabled device
Note At any time before p ressing to send the document, you can pre ss
or BACK to return to the main screen without saving any settings.
1 At the digital sender, log in (if prompted).
2 Press J
3 To choose an HP JetSend-enabled device:
• Use the and keys to select a device from the list and
• Add a new device to the list. (See “To add a device to the list”
4 The current Quality setting is shown in the upper right corner of
the display. For options and instructions on changing this setting
or the (paper) Size setting, see “Changing settings” on page 35.
5 Press to begin sending the document.
• If yo u sent a single-sided document using the ADF, the
• If you sent a double-sided document using the ADF, wait for
• If you used the glass, remove the page when it is finished.
ETSEND.
press .
on page 47.)
process is finished.
the first side to finish. Then, reload the document with the
second side facing up, last page on top, and press again.
Then, place the next page face down on the glass and press
. After the last page, press S
END.
Sending the next document
After you have successfully sent a document, the control panel
returns to the function scree n (su ch as e- ma il or fax) that you just
used and displays the current set tings again. If you have another
document to send to the same function, load the document, choose
new destinations, and press .
You can return all settings to the defaults and choose a different
function by pressing . You return to the main screen.
48 Chapter 2 - Working at the digital sender EN
Page 51

Using the HP Address
3
Book Manager
Introduction
You can use the HP Address Book Manager (the ABM) as long as it is
installed on your computer and you have registered user status. Use
the ABM to do the following:
view information in public and your private address books
change information in the Public Fax address book
add or change your registered user profile
change information in your priv ate address books
change the appearance of the ABM on your computer
use the activity log
back up and restore your private address books
use the ABM for another digital sender
EN Introduction 49
Page 52

Introduction to the address books
The the ABM contains the following address books:
Your address book
Inside your address book are y our private e-mail address book
and private address book of e-mail distrib ution lists. No one
except you and the administrator can see or change y our private
address books.
Public Email
Contains e-mail addresses available to any user. Only the
administrator can change information in this address book.
Public Distributi on Lists (e-mail)
Contains predefined groups of e-mail addresses a vailable to any
user. Only the administrator can change information in this
address book.
Public Fax
Contains fax destinations available to any user. You, other
registered users, and the administr ator can chang e inf ormation in
this address book.
Public Printers
Contains the network printers you can access from the digital
sender to make copies of a document. Only the ad ministrator ca n
change information in this address book.
Destinations in the public and your private address books are
accessed at the digital sender when you want to fax or e-mail a
document.
50 Chapter 3 - Using the HP Address Book Manager EN
Page 53

Your user profile
There are two different types of users for the digital sender:
registered users and guest users. Registered user s must establish a
user profile, and they have full access to all features. Guest users do
not have to establish a user profile, but they also do not have full
access to all features.
Registered users
As a registered user, you have the following privileges.
You can use the digital sender even if the administrator disables
guest usage.
You can send documents to your computer. Without a registered
user profile, you cannot send to your computer.
You can use the ABM program. In the ABM, you will have a
Private Email address book and a Private Distribution Lists
address book, where you can store often-used addresses and
lists for use at the digital sender.
In the ABM, you have rights to add, change, and delete fax
destinations in the Public Fax address book.
You see information in the activity log under your name. When
using the digital sender as a guest user, you cannot tell your
activity from the activity of any other guest user.
You can have the di gital sender send you e-mail notifications of
the status of faxes or e-mail messages you send from the digital
sender. (Your e-mail and LAN fax programs must support
notification.)
To become a registered user, see “Adding a new registered user
profile” on page 52.
EN Your user profile 51
Page 54

Guest users
If you are a guest user, you cannot use the digital sender if the
administrator disables guest usage.
If guest usage is enabled, you can use the digital sender and choose
destinations in the Public Email, Distribution Lists, and Fax address
books. However, you do not have Private Email and Distribution Lists
address books. You also cannot use the ABM to alter information in
any address books or for any other purpose.
As a guest user, you cannot send documents to your computer. And,
you cannot receiv e e-mail notification of the status of faxes or e-mail
messages you send from the digital sender.
Adding a new registered user profile
If the administrator has already set up your registered user profile, or
if you have already done it, you do not need to add your registered
user profile again. If you do not alread y hav e a registe red user profile ,
see “Adding a registered user profile” on page 13.
52 Chapter 3 - Using the HP Address Book Manager EN
Page 55

Changing an existing user profile
In your own registered user profile, you can change your password,
the notification status for e-mail messages, and the file format that
documents received to your computer will ha ve. You can also change
your user name, computer address, and e-mail address, but these
changes might require administrator approval before they are
implemented.
Two parts of your user profile, the Account Enable and Add E-mail
Address to Public Address Book chec k boxes, are only available to
the administrator.
Note One of the fields you can change is the Password field. You do not
have to specify a password. However, if you do not have a password,
other users can log in at the digital sender with y our name, access your
private address books, and send e-mail messages us ing your name.
To change an existing user profile
1 Log in to the ABM. (See “Starting the HP Address Book Manager”
on page 54.)
2 In the ABM main window, click the folder for your user name.
3 On the File menu, click Properties.
4 T o set the file type that docu ments sent to the compute r hav e as a
default, type .pdf or .tif in the File Format field.
5 T o receiv e e-mail confirmation of e-mail messages you send from
the digital sender, select the Delivery Notification check box.
Note T o receive confirmations, y our e-mail server and the links between your
e-mail and the recipient’s e-mail must support Delivery Service
Notification (DSN).
6 Make changes to any other fields as necessary.
7 Click Change to confirm the changes.
EN Your user profile 53
Page 56

Starting the HP Address Book Manager
When you start the ABM, a dialog box appears that requires you to
log in. You will need to know the DNS name or Internet protocol (IP)
address of the digital sender you use. In addition, you must be a
registered user.
If you have never used the ABM before, you must add yourself as a
registered user or have the administrator do it. See “Adding a
registered user profile” on page 13.
To start the ABM and log in
Note The digital sender must be on in order fo r you log in to and use the ABM.
1 Start the ABM in one of the following ways:
• Click Start, point to Programs, then HP 9100C, and click HP
Address Book Manager.
• If the HP Digital Sender Link icon is showing in the taskbar,
right-click it and choose HP Address Book Manager.
2 If the DNS name or IP address for the digital sender you want is
not in the Digital Sender name field, type it or choose it from the
list.
3 If your user name is not in the User name field, type it or choose
it from the list.
4 In the User password field, type your password (if one is
defined).
5 Click OK. If all of the login information is valid, the ABM main
window appears.
54 Chapter 3 - Using the HP Address Book Manager EN
Page 57

Working in the ABM main window
Once you have successfully logged in to the ABM, the ABM main
window appears:
The ABM main window sho ws th e folders for both the public and your
private address books. The main window is set up with a splitter bar
showing all the files in the ABM on the left and the contents of a
selected file on the right.
From this screen, you can access and view the public and your
private address books. You can change information in the Public Fax
address book and your private e-mail and distribution lists address
books.
EN Working in the ABM main window 55
Page 58

Managing your Private Email address book
If you are a registered user, e-mail addresses in your Private Email
address book are available when you are e-mailing a document
directly from the digital sender. You can also use these addresses,
along with those in the Public Email address book, to build distribution
lists of people to whom you regularly e-mail the same information.
Note If information for an address in the Public Email address book needs
to change, contact the administr ator. You can view and use information
in the Public Email address book, but you cannot change it.
Adding addresses
As a registered user, you can add up to 256 e-mail addresses to y our
Private Email address book. You might not want to add e-mail
addresses to your Private Email address book if th ey already appear
in the Public Email address book. E-mail addresses in the Public
Email address book are always available for your use.
Note You can also import e-mail addresses from certain e-mail programs or
LDAP servers. See “Importing addresses from an e-mail program” on
page 57 or “Importing e-mail addresses from an LD AP server” on
page 58.
To add addresses manually
1 In the ABM main window, click the + next to the folder for your
user name to expand it.
2 On the left side of the window, click Private Email.
3 On the File menu, click New.
4 In the Name field, type a name for this address.
5 In the Email Address field, type the e-mail address.
6 Click Add.
7 To add more addresses, repeat steps 4 through 6.
8 When finished, click Close to return to the main window.
56 Chapter 3 - Using the HP Address Book Manager EN
Page 59

Importing addresses from an e-mail program
You can import e-mail address from certain e-mail programs into your
Private Email address book. Then, the addresses will be available
when you e-mail directly from the digit al sender, and you can use
them to build distribution lists . In order to be ab le to import addresses,
your e-mail progr a m must be capable of exporting the addresses into
one of the following types of files: comma separated value (CSV),
LDAP Data Interchange Format (LDIF), or Microsoft Exchange 5.0.
To import addresses from an e-mail program
1 Open your e-mail program and do the following:
a Choose the Export command.
b Sav e y o ur address bo ok in a CSV, LDIF, or MS Exchange 5.0
file format. (If you need more help exporting your address
book, see the documentation for your e-mail program.)
c Close your e-mail program.
2 Open the ABM.
3 In the ABM main window, click the + next to the folder for your
user name to expand it.
4 On the left side of the window, click Private Email.
5 On the Tools menu, click Address Book Import.
6 In the Import dialog box, choose the file format in which you
saved your e-mail program’s addresses.
7 Click Import.
8 Select the file you saved in step 1 and click Open.
9 If you selected a CSV file format, another dialog box opens.
Follow the instructions on th e screen to select the correct name
and address line. If there is a first line that only contains the
names of the fields, clear the Import first line check box. Then,
click Import.
The file imports into your Private Email address book.
EN Managing your Private Email address book 57
Page 60

Importing e-mail addresses from an LDAP
server
You can import e-mail addresses located on an LDAP server int o your
Private Email address book.
There are two parts to this procedure: Configuring the directory for
the e-mail addresses, an d then searching for and selecting the e-mail
addresses you want. You only have to configure the directory once.
Then, you can search the directo ry regularly to update the addresses
from the LDAP server to your Private Email address book.
Hint If your administrato r has configured the digital sender to work with the
LDAP server, you can access the addresses on the LDAP server
directly from the digital sender and do n ot need to import them to your
Private Email address book. (See “E-mailing docume nts” on page 37.)
You probably only want to impo rt addresses from the LDAP server into
your Private Email address book if you want to use the addresses in
your private distrib ution lists or your administrator hasn’t configured the
LDAP server to work with the digital sender.
To define directories
Note In order to import e-mail addresses from another location on the
network, you first hav e to let the ABM know where the e-mail addresses
are located by defining a directory.
1 On the Tools menu in the ABM main window, point to Directory
Services, and then click Config.
2 In the Directories Configuration dialog box, click New.
3 In the Directory Name field, type a name for the directory.
4 In the Server Name field, type the DNS name or IP address for
the server that maintains the directory. C onta c t th e ad m inist rator
if you do not know this information.
5 Depending on the server, you may need to typ e th e ba se po in t
from which to start th e sea rc h in th e Search Root field. Contact
the administrator for this information.
58 Chapter 3 - Using the HP Address Book Manager EN
Page 61

6 In the Port Number field, type the TCP/IP number for the
directory server. Contact the administrator for this information.
7 In the Maximum number of hits field, type the maximum number
of results you want the search to return. If the number is set to
zero, the search returns all entries that match the search criteria.
Note Some servers might hav e a default lim it. If the maximum yo u specify is
larger than the server limit, you receive an error message, and the
search returns as many matches as it can. To determine the server
limit, count the number of returned entries or ask the administrator.
8 In the Timeout field, type the amount of time (in minutes) that you
want the search to continue. If this number is set to zero, the
timeout of the server is used.
9 Check with the administrator to see if the directory server
requires an authenticated login. Then, do one of the following.
• If the directory server requires an authenticated login, choose
Password in the Authentication Type field. Enter the User
Name and Password, and then confirm the password by
retyping it in the Confirm field.
• If the directory server does not require an authenticated login,
choose Anonymous in the Aut hentication Type field.
10 Click OK.
11 To begin searching and adding e-mail addresses, go to “To
search a directory and import addresses” on page 60.
- Or -
If you need to change something in the directory configuration
before searching, go to the next procedure.
EN Managing your Private Email address book 59
Page 62

To change or delete directories
1 On the Tools menu in the ABM main window, point to Directory
Services, and then click Config.
2 In the Directories Configuration dialog box, select the directory
you want to change or delete.
3 Do one of the following:
• To change the directory: Click Edit. Make changes in the
Directory Server Configuration dialog box and click OK.
• To delete the directory: Click Delete and then click Yes.
To search a directory and import addresses
1 On the Tools menu in the ABM main window, point to Directory
Services, and click Search.
2 In the In field, select the directory you want to search. You must
have already defined this directory.
3 In the Name and Email Address fields, type any criteria you
want to use for finding destinations. The criteria can be names,
addresses, or both. (You can enter partial names and addresses.)
You can further narrow the search by using “begins with,”
“contains,” “ends with,” or “is.”
4 If you want the search to skip duplicate destinations , click Skip in
the Duplicated Names box.
5 Click Find. Results are listed in the Name/Email Address box.
6 Do one of the following.
• To add all of the found addresses, click Add all.
• To add only some of the addresses, click the first address you
want and click Add. Repeat for each address you want.
• To clear the search results, click Clear and repeat this
procedure.
Unless you cleared the search, the addresses you selected are
imported into your Private Email address book. If you have used
these addresses in your private distribution lists, the addresses are
automatically updated in the lists in which they appear.
60 Chapter 3 - Using the HP Address Book Manager EN
Page 63

Changing e-mail addresses
Once you have added or imported addresses to your Private Email
address book, you can change the name and e-mail information.
Changing this information also changes it in any of your private
distribution lists where it appears.
Renaming addresses can be very time consuming because the ABM
looks for duplicates before renaming.
To change e-mail addresses
1 In the ABM main window, click the + next to the folder for your
user name to expand it.
2 On the left side of the window, click Private Email.
3 Click the e-mail destination you want to change.
4 On the File menu, choose Properties.
5 Change the name, e-mail address, or both items.
6 Click Change.
Note You can also change the name of a destination by clicking on the
destination, changing the name, and pressing ENTER.
EN Managing your Private Email address book 61
Page 64

Deleting addresses
If an e-mail address in your Private Email address book is no longer
useful, you can delete it. Delet ing an address from this address book
also deletes it from any of your private distribution lists where it
appears.
To delete addresses
1 In the ABM main window, click the + next to the folder for your
user name to expand it.
2 On the left side of the window, click Private Email.
3 Click the e-mail destination you want to delete.
4 On the File menu, click Delete.
5 A dialog box appears. Click Yes to confirm the deletion.
62 Chapter 3 - Using the HP Address Book Manager EN
Page 65

Managing your private distribution lists
Your Private Distribution Lists address book contains distribution lists
of e-mail addresses you create. It is useful to build a distribution list if
you regularly send e-mail to the same group of people.
Distribution lists can only consist of e-mail addresses. You cannot
create distribution lists containing both e-mail addresses and fax
destinations or distribution lists of only fax destinations.
Note If information in the Public Distribution Lists address book needs to
change, contact the administrator. You can view and use information
in the Public Distributi on Lists address book, but you ca nnot change it.
Creating lists
In your Private Distribution Lists address book, you can create
distribution lists of e-mail ad dresses y ou use regularly. Y ou can crea te
distribution lists using e-mail addresses from both the Public Email
address book and from your Private Email address book.
You might not want to create a priv ate distribution list if there is one
just like it in the Public Distribution Lists address book. Public
distribution lists are always available for your use.
To create lists
1 In the ABM main window, click the + next to the folder for your
user name to expand it.
2 Click Private Distribution Lists.
3 On the File menu, click New.
4 A new folder called New List appears in List view. In the selected
box, type the name for the distribution list and press E
EN Managing your private distribution lists 63
NTER.
Page 66

Adding and deleting addresses in lists
Once you have created a private distribution list, you can add e-mail
addresses to it or remove e-mail addresses from it.
To add addresses to lists
1 In the ABM main window, open the folder that contains the
addresses you want to add to a list. These addresses can come
from one of your private or the public e-mail or distribution lists
address books.
2 Select the address or addresses you want to add to a distribution
list.
Note To select multiple, consecutive addresses, hold down SHIFT as you
select the first and last addresses of the range you want. Select
multiple, non-consecutiv e addresses by holding down C
each address you want.
3 On the Edit menu, choose Copy.
4 If you are not already in the folder for your user name, click the +
next to it to expand it.
5 Click the + next to Private Distribution Lists to expand it.
TRL as you click
6 Click the distribution list to which you want to add the names.
7 On the Edit menu, choose Paste. The new destinations are
added to the list.
To delete addresses from lists
1 In the ABM main window, click the + next to the folder for your
user name to expand it.
2 Click the + next to Private Distribution Lists to expand it.
3 Click the distribution list you want.
4 Select the address or addresses you want to delete.
5 On the File menu, click Delete.
6 A dialog box appears. Click Yes to confirm the deletion.
64 Chapter 3 - Using the HP Address Book Manager EN
Page 67

Changing addresses in lists
If the information for an addre ss in one of your priv ate distributio n lists
needs to change, it must be chang ed from the e-mail address book
where the address is located.
If the address that needs to change is from your Private Email
address book, see “Changing e-mail addresses” on page 61. If the
address is from the Public Email address book, contact the
administrator to make changes.
Once the address has been changed, it is also autom atically up dated
in any distribution list in which it appears.
Deleting lists
If they are no longer useful, you can delete distribution lists from your
Private Distribution Lists address book.
To delete lists
1 In the ABM main window, click the + next to the folder for your
user name to expand it.
2 Click the + next to Private Distribution Lists to expand it.
3 Click the distribution list you want to delete.
4 On the File menu, click Delete.
5 A dialog box appears. Click Yes to confirm the deletion.
EN Managing your private distribution lists 65
Page 68

Working with fax destinations
If you can see the Pub lic Fax address book in the ABM main window,
then your company has a LAN f ax progr am and it is configured f or use
with the digital sender. You can access the Public Fax address book
and add, change, or delete fax destinations.
Adding fax destinations
If you use certain fax numbers regularly, you can add them to the
Public Fax address book. Then, you ca n fax directly to these
preprogrammed numbers from the digital sender.
Note When adding a new destination, you see an Accounting Code field.
The administrator determines the accounting code, and you cannot see
or change the code. (The accounting code is only supported by a few
LAN fax programs.)
To add fax destinations
1 In the ABM main window, click Public Fax.
2 On the File menu, click New.
3 In the Name field, type a name for the fax destination.
4 In the Phone Number field, type the telephone number for the f ax
destination.
5 Click Add.
6 To add more fax destinations, repeat steps 3 through 5.
7 When finished, click Close.
66 Chapter 3 - Using the HP Address Book Manager EN
Page 69

Changing fax destinations
You can change the names and fax numbers of destinations in the
Public Fax address book, unless the destination has an accounting
code specified. In that case, only the administrator can change
information for that destination.
To change fax destinations
1 In the ABM main window, click Public Fax.
2 Click the destination you want to change.
3 On the File menu, click Properties.
4 Change the name, fax number, or both items.
5 Click Change.
Note You can also change the name of a destination by clicking on the
destination, changing the name, and pressing ENTER.
Deleting fax destinations
You can delete fax destinations from the Public Fax address book,
unless there is an accounting code specified. In that case, only the
administrator can delete the destination.
CAUTION If you can delete destinations, do not delete any that other users might
need. This is a public address book, and removing a fax destination
from it makes the destination unavailable to all users.
To delete fax destinations
1 In the ABM main window, click Public Fax.
2 Click the fax destination you want to delete.
3 On the File menu, click Delete.
4 A dialog box appears. Click Yes to confirm the deletion.
EN Working with fax destinations 67
Page 70

Finding names in address books
If you need to find an e- mail or fax destination in an address book but
do not know where it is, you can use the Find function in the ABM.
The ABM allows you to search for a name in:
the Public Fax address book
the Public Email address book
the Public Distribution Lists address book
your Private Email address book
your Private Distribution Lists ad dress book
You cannot search for e-mail addresses in other users’ private
address books.
To find names in address books
1 In the ABM main window, open the address book in which you
want to search for an e-mail address or fax destination.
2 On the Tools menu, click Find.
3 In the Name field, type the name or part of the name you are
searching for.
4 If you only want to find names that exactly match what you typed,
select the Match whole word only check box.
5 Click Find Next. The first entry that matches your criteria moves
to the top of the address book.
6 Click Cancel to close the dialog box.
68 Chapter 3 - Using the HP Address Book Manager EN
Page 71

Copying and moving addresses and lists
Using the Cut, Copy, and Paste commands, you can do the following
with e-mail addresses:
Copy e-mail addresses from the Public Email address book to
your private e-mail address book.
Copy e-mail addresses from the Public Email address book to
one of your private distribution lists.
Copy distribution lists from the Public Distribution Lists address
book into your Private Distribution Lists address book.
Copy e-mail addresses from your Private Email address book to
one of your private distribution lists.
Move or copy addresses from one of your distribution lists to
another.
You cannot move e-mail addresses from your private e-mail or
distribution list address books into the public address books. Also,
you cannot move fax numbers from the Public Fax address book to
any other address book.
EN Copying and moving addresses and lists 69
Page 72

Using the activity log
The activity log is a record of digital sender use . Every time someone
uses the digital sender, a record is filed in the activity log. You do not
see a record of digital sender usage by other registered users or the
administrator.
You can view the log, save it to a separate file, print it, or clear it.
Viewing the activity log
You can access the activity log to see what you and guest users ha v e
distributed. The activity log contains entries for the last 100 uses.
Note For a description of activity log messages, see “Activity log messa ges”
on page 103.
To view the activity log
1 On the Tools menu in the ABM main window, point to View Log.
2 Click your user name to see only your activity as a registered
user.
- Or -
Click Guest to see the activity of guest users. (If you do not have
to log in at the digital sender, your activity might be included in
this log.)
The activity viewer appears with a record of digital sender activi ty.
The status bar at the bottom of the windo w displays information
about how many messages of a certain type appeared.
3 You can sort the log according to description and severity of the
message, date, or time by clicking the column header.
4 You can keep the activity viewer open while you work in the ABM.
To close the activity viewer, on the File menu, click Exit.
70 Chapter 3 - Using the HP Address Book Manager EN
Page 73

Saving or copying the activity log
You can save the whole acti vity log to a file or copy specific entries to
the Windows clipboard and paste them into a document in another
program.
To save the whole activity log
1 On the Tools menu in the ABM main window, point to View Log,
and click your user na me or Guest.
2 On the File menu in the ABM main window, click Save As.
3 In the Save As dialog box, save the file as one of the following:
• Text (plain) .txt to use the information in general-purpose
programs.
• T ext (tab delimited) .txt or .csv (comma delimited value) for
importing into tables and spreadsheets.
• HTML .html for web publishing and e-mail communications.
4 You can keep the activity viewer open while you work in the ABM.
To close the activity viewer, on the File menu, click Exit.
To copy selected entries to the clipboard
1 On the Tools menu in the ABM main window, point to View Log,
and click your user na me or Guest.
2 Select one or more entries to save.
Note To select multiple, consecutive entries, hold down SHIFT as you select
the first and last entries of the range you want. Select multiple, nonconsecutive entries by holding down C
want.
3 On the Edit menu, click Copy. The selected entries are copied to
the clipboard in tab-delimited format.
4 Open the document into which you want to copy the information
and select the Paste command. If the program supports tables or
is a spreadsheet, you can copy entries into the table or cells by
selecting them and choosing the Paste command.
EN Using the activity log 71
TRL as you click each entry you
Page 74

Printing the activity log
You can print the activity log to keep a written record of it. Printing th e
log does not clear the entries. The entries remain in the log until you
clear it, or until they are overwritten by newer entries.
To print the activity log
1 On the Tools menu in the ABM main window, point to View Log,
and click your user na me or Guest.
2 On the File menu, click Print.
- Or -
Click the Print icon on the toolbar.
3 In the Print dialog box, choose the print options you want and
click OK.
4 You can keep the activity viewer open while you work in the ABM.
To close the activity viewer, on the File menu, click Exit.
Clearing the activity log
If you would like, you can clear the activity log using this procedure,
but it is not necessary. The oldest entries are overwritten as new
entries are added.
To clear the activity log
1 On the Tools menu in the ABM main window, point to View Log,
and click your user na me or Guest.
2 On the Edit menu, click Clear.
3 Click OK to confirm clearing the log.
4 You can keep the activity viewer open while you work in the ABM.
To close the activity viewer, on the File menu, click Exit.
72 Chapter 3 - Using the HP Address Book Manager EN
Page 75

Refreshing the view of the activity log
If you left the log open while you were working, you might need t o
refresh it to see the most curren t information.
Do one of the following:
On the activity log’s Edit menu, click Refresh.
Close the activity log and reopen it.
Viewing properties
The View Properties dialog box allo ws y ou to see the p roperties of a
selected file (such as the type of file , location, co ntents, a nd owner) or
see the file itself. You can view the properties of any file, but you ca n
only change information in your priv ate addres s boo ks and t he Public
Fax address book.
To view properties
1 In the ABM main window, clic k the f older or item whose pr operties
you want to see.
2 On the File menu, click Properties.
3 A dialog with the type, location, size, contents, and owner of the
file appears, or the file opens. View or make any changes to the
file in the properties dialog box.
4 Click OK, Change, or Cancel (whichever applies) to return to the
main window.
EN Viewing properties 73
Page 76

Controlling the view of the ABM main window
The View option on the menu bar lets you customiz e the display of
your ABM main window. Changing the view of the ABM only affects
the view at your computer.
To show or hide the Toolbar: On the View menu, select Toolbar
to check or uncheck it. Whe n checked, the Toolbar shows at the
top of the ABM main window.
To show or hide the Status Bar: On the View men u, select Status
Bar to check or uncheck it . When checked, the Status Bar shows
in the ABM main window.
To refresh the view of the window: On the View menu, click
Refresh.
Backing up and restoring private address books
The administrator can back up all of the address books but does not
have to do it. If you would like, you can backup and restore your own
address books.
Backing up your private address books
Use this procedure to back up your Private Email and Distribution
Lists address books.
To back up your private address books
1 Make sure the HP Digital Sender Link is running.
2 Start the ABM.
3 On the Tools menu, click Backup.
4 In the Backup dialog box, select a location in which you want to
store the backup.
5 In the File name field, type a name for th e file.
6 Click Save to begin the backup.
74 Chapter 3 - Using the HP Address Book Manager EN
Page 77

Restoring your private address books
If you have backed up your private address books, you can use them
to overwrite the current ones. Also, you can use this feature to move
backed up copies of y our priv ate address books f or one digital sender
to another one.
To restore your private address books
1 Start the ABM. If you are movin g copies of the address book for
one digital sender to another one, make sure to log in to the
digital sender you are restoring address books to.
2 On the Tools menu, click Restore.
3 In the Look in field, the last sele cte d folder appears. If this is not
the folder where the backup is stored, select the correct one.
4 Select the backup file.
5 Click Open to begin the restoration.
EN Backing up and restoring private address books 75
Page 78

Changing to the ABM for another digital sender
You can log out from the ABM for the di gital sender you are currently
using and log in to the ABM for ano t her digi ta l sende r. To do this, you
will need to know the other digital sender’s DNS name or IP address.
To change digital senders
1 On the Digital Sender menu in the ABM main window, click
Change.
2 A dialog box similar to the original login screen appears. In the
Digital Sender name field, type the DNS name or IP add ress for
the other digital sender. Or, select it from the list.
3 In the User Password field, type your password (if defined) for
the ABM for the other digital sender.
4 Click OK to log on to the other digital sender.
76 Chapter 3 - Using the HP Address Book Manager EN
Page 79

Using the HP Digital
4
Sender Link
Introduction
The HP Digital Sender Link (Link) is the program on your computer
that accepts scanned documents and places them in the def ault inbo x
location. You use the Control Panel applet for the Link to do the
following:
Change the path to the default inbox location.
Determine whether or not to allow documents to be sent to your
computer.
Change the target program.
Determine whether or not the target program au tomati cally starts
when new data is received to the default inbox location.
EN Introduction 77
Page 80

Running the HP Digital Sender Link
There are two parts to the HP Digital Sender Link: the Control Panel
applet and the program itself. Use the applet to configure settings for
the program. The program itself must be running when you are
sending to the computer.
To start the Control Panel applet
Open the settings dialog bo x in one of the ways listed below.
From Windows Control Panel, double-click the HP Digital Sender
Link icon.
Right-click in the Windows taskbar and choose Settings.
Double-click .
To start the program
Note The program starts automatically when you tu rn the computer on, b ut
you can also start it manually.
1 Click Start, point to Programs, then HP 9100C, and click HP
Digital Sender Link.
2 The program’s receive capabilities must also be enabled when
you want to send to the computer. See “Setting receive
capabilities” on page 83.
78 Chapter 4 - Using the HP Digital Sender Link EN
Page 81

To close the program
Note The program normally does not need to be closed . If you do not want
anyone sending to your computer, you might only want to disable
receive capabilities. See “Setting receive capabilities” on page 83.
Close the program in one of the ways listed below.
Right-click in the Windows taskbar and choose Close
program.
Press CTRL+ALT+DELETE to open the Windows Close Program
dialog box. Click HP Digital Sender Link and click End Task.
EN Running the HP Digital Sender Link 79
Page 82

Using the taskbar icon
The icon for the Link appears in the Windows taskbar and gives you
easy access to Link settings and functions, as well as a shortcut for
opening the ABM.
Showing or hiding the icon
You can determine whether or not the Link icon shows in the
Windows taskbar.
To show or hide the icon
1 In the Windows Control Panel, double-click the HP Digital Sender
Link icon.
2 Click the Settings tab.
3 Do one of the following.
• To show the icon, select the Show icon on taskbar check
box. The icon appears on the taskbar.
• To hide the icon, clear the Show icon on taskbar check box.
Note When the icon is showing, you can hide also by right-clicking it and
choosing Hide icon.
80 Chapter 4 - Using the HP Digital Sender Link EN
Page 83

Accessing taskbar icon options
When you right-click the Link icon in the taskbar, you can access the
options listed in the table below.
Choose this shortcut
menu item
Settings Open the Control Panel applet, where you can
HP Address Book
Manager
Disable Receive
- Or -
Enable Receive
Hide Icon Hide the icon. Hiding the icon does not close the
Close program Close the HP Digital Sender Link. See “Running
About HP Digital Sender
Link
To do this
view and change settings for the HP Digital
Sender Link.
Open the HP Address Book Manager program,
where you can change your user profile, add
destinations to address books, and more. (See
chapter 3 for more information.)
Disable the HP Digital Sender Link without
actually closing it, or enable the program if it is
running but disabled. When disabled, the icon
has a red X through it, and no one can send to
your computer.
HP Digital Sender Link. See “To show or hide the
icon” on page 80 to show the icon again.
the HP Digital Sender Link” on page 78 to restart
it.
View copyright information about the program.
EN Using the taskbar icon 81
Page 84

Configuring default inbox settings
The default inbox location is where documents sent to your computer
are stored before they are routed to the target program. You can
choose where the default inbo x loca tion is and whether o r not to allo w
your computer to receive scanned documents.
Choosing the default inbox location
You can choose a different default inbox location from your current
one using this procedure. The location can be on your computer or
the network, but you must have privileges to write to that location.
To choose your default inbox location
1 In the Control Panel applet, click the Inbox tab.
2 In the Path to receive inbox field, type the path to the location
where you want scanned documents to be stored. If the path you
type does not already exist, it will be created.
- Or -
Click ... to browse folders and find the path to the location.
3 Click OK.
82 Chapter 4 - Using the HP Digital Sender Link EN
Page 85

Setting receive capabilities
The receive capabilities must be enabled if you want to receive
scanned documents. Disable them when you do not want anyone
sending documents to your computer.
You can set the receive capabilities using the Control Panel applet or
the icon.
To set receive capabilities from the Control Panel
applet
1 In the Control Panel applet, click the Inbox tab.
2 Select the Enable receive check box to allow your computer to
receive scanned documents.
- Or -
Clear the check box to prevent your computer from receiving
them.
3 Click OK.
To set receive capabilities from the Link icon
When the icon looks like this: , the program is running and
your computer can receive scanned documents. To prevent y our
computer from receiving, right-click the icon and choose Disable
receive.
When the icon looks like this: , the program is running but the
computer cannot receive scanned documents. To allow your
computer to receive, right-click the icon and choose Enable
receive.
EN Configuring default inbox settings 83
Page 86

Configuring the target program
The target program is the program where documents sent to y our
computer are ultimately received and viewed. You can determine
which program is the target prog r am and whet her or no t that prog r am
starts automatically when data is received.
Choosing the target program
You can choose any program as the target program, but the program
must accept data in .pdf or multipage .tif format.
To choose the target program
1 In the Control Panel applet, click the Desktop tab.
2 In the Path to target application field, type the path to the
program you w ant to use as the t arget progr am. Include the nam e
of the program itself as the last item in the path.
- Or -
Click ... to browse and find the path to the program.
3 In the Target application initial path field, type the drive and first
level folder where the program is located. For example,
c:\target program.
- Or -
Click ... to browse and find the initial path to the program.
4 Click Advanced.
5 Make sure the Start With Document File Name check box is
selected. (This enters %F in the Target Application Parameters
field.) Using this parameter, a newly scanned document will be
displayed automatically when the target program opens.
6 Click OK to save the settings.
7 If you chose a default target program that accepts the multipage
.tif file format instead of .pdf, you must change the file format
setting. See “Changing an existing user profile” on page 53.
84 Chapter 4 - Using the HP Digital Sender Link EN
Page 87

Setting automatic start capabilities
This setting controls whether or not the target program starts
automatically when documents are sent to your computer.
If you enable this setting, the target program automatically starts and
displays a scanned document after the document arrives at the
default inbox location. If you disable this setting, the scanned
document remains in the default inbox location as a saved file and is
displayed in the target program only after you start the program
yourself.
To set automatic start capabilities
1 In the Control Panel applet, click the Desktop tab.
2 To enable the target program to start automatically, select the
Automatic execution check box.
- Or -
To disable the automatic start setting, clear the check box.
3 Click OK.
EN Configuring the target program 85
Page 88

86 Chapter 4 - Using the HP Digital Sender Link EN
Page 89

5Troubleshooting
Introduction
This chapter is your guide for resolving problems that might occur
while you are using the HP 9100C Digital Sender. The chapter is
divided into the following sections:
Sources for information about problems. See page 88.
Clearing paper jams. See page 89.
Troubleshooting the digital sender. See page 93.
Activity log messages. See page 103.
Troubleshooting the software. The software includes the
installation, HP Address Book Manager (the ABM) and the HP
Digital Sender Link. See page 110 to begin.
The digital sender troubleshooting and software troubleshooting
sections are further divided into two parts, one covering problems that
did not generate an error message and another one for problems that
did generate a message.
Typically, messages appear on the control panel, in the activity log, o r
in the program you ar e using when there are problems. These
messages usually require some action before sending can continue.
In this chapter, you can find recommended actions to resolve
problems associated with these error messag es.
EN Introduction 87
Page 90

Sources for information about problems
If you are ex periencing a problem with the digital sender, use the
following sources to obtain more information.
Sources for information about problems
Control panel light A three-color light under the key on the control panel provides
information about operation. See “Control panel messages” on page 97
for a list of messages associated with each condition, and
recommended actions.
Off. The digital sender is in an idle state.
Flashing green and orange. The digital sender is in the process of
starting.
Steady green. The digital sender is ready to send.
Flashing green. The digital sender is processing a job.
Steady red. The digital sender cannot complete a job for some
reason, usually because more information is needed.
Flashing red. A problem has occurred.
Control panel
messages
Messages on the control panel display when there are problems. See
“Control panel messages” on page 97 for a list of messages and
recommended actions.
Activity log The activity log is a record of digital sender use, and is probably your
best tool for troubleshooting. It contains messages (warning, error, or
fatal) that can help you resolve problems. Se e “Activity log messages”
on page 103 for a list of messages and recommended actions.
Messages for
programs
Messages appear in the program you are using when there are
problems. See “Troubleshooting the software” on page 110 for lists of
these messages and recommended actions.
88 Chapter 5 - Troubleshooting EN
Page 91

Clearing paper jams
1
When you have a paper jam, the control
panel displays this message: Paper
jam. Open the cover and remove the
paper. Use the appropriate procedure
below to clear the jam.
To clear jams at the start of a
page
2
1 Raise the control panel.
2 Remove the jammed paper.
3 Push the control panel down
securely.
4 The control panel prompts you to do
one of the following:
3
Reinsert the paper and press
to continue sending.
Stop processing and send the
data to its destination by pressin g
S
END.
Stop sending without saving your
data by pressing .
EN Clearing paper jams 89
Page 92

1
2
3
To clear jams inside the ADF
1 Raise the control panel.
2 Raise the ADF unit.
3 Open the delivery guide by grasping
the small plastic handles on either
side of the delivery guide and pulling
down.
4 Remove the jammed paper.
4
90 Chapter 5 - Troubleshooting EN
Page 93

5
5 Close the delivery guide sheet by
aligning its holes with the small
plastic spindles on the delivery guide
and pressing down.
6 Close the ADF unit.
7 Push the control panel down
securely.
6
8 The control panel prompts you to do
one of the following:
Reinsert the paper and press
to continue sending.
Stop processing and send the
data to its destination by pressin g
S
END.
Stop sending without saving your
data by pressing .
EN Clearing paper jams 91
Page 94

1
To clear jams at the end of a
page
1 Raise the control panel and then the
document tray.
2 Remove the jammed paper.
3 Close the document tray and push
the control panel down securely.
2
3
4 The control panel prompts you to do
one of the following:
Reinsert the paper and press
to continue sending.
Stop processing and send the
data to its destination by pressin g
S
END.
Stop sending without saving your
data by pressing .
92 Chapter 5 - Troubleshooting EN
Page 95

Troubleshooting the digital sender
Troubleshooting for the digital sender is divided into two sections,
General digital sender troubleshooting and Control panel messages.
General digital sender troubleshooting includes problems that might
occur that do not generate erro r messages.
Note As a general rule for all problems, check both the control panel and
activity log for rele vant messages . You can find an explanation of these
messages under “Control panel messages” on page 97 and “Activity
log messages” on page 103.
General digital sender troubleshooting
Use the table below to so lve common problems encountered while
using the digital sender. The control panel does not display a
message for these types o f problems . If the control panel is displa ying
a message, see “Control panel messages” on page 97.
General digital sender troubleshooting
Problem Actions
Digital sender is not
working.
Control panel is not
working.
Digital sender does not
accept your password.
EN Troubleshooting the digital sender 93
Make sure the power cord is securely connected to the digital
sender and is plugged into the power outlet.
Make sure the digital sender is turned on.
Make sure the digital sender is unlocked. If you try to send a
document when the digital sender is locked, it will emit a harsh,
grinding sound.
See if the digital sender has overheated. The digital sender
automatically stops working if environmental conditions cause it to
overheat. If this happens, turn the digital sender off, wait for it to
cool down, and then turn it back on.
Make sure the power cord is plugged into the power outlet.
Make sure the control panel cable is securely connected.
Check the control panel contrast. You can change the contrast if
needed using SHIFT+ALT+ or SHIFT+ALT+.
Verify that you are using the correct password.
Passw ords are case-sensitiv e. Make sure you enter y our pass word
with the correct combination of uppercase and lowercase letters.
Page 96

General digital sender troubleshooting (continued)
Problem Actions
Image quality is poor.
When using the ADF,
the digital sender is
feeding multiple sheets,
skewing pages, or
jamming frequently.
Your private address
books are not
accessible at the
control panel.
An item loaded in the
ADF keeps jamming.
Digital sender is
sending items very
slowly.
If scanned pages are blank, white, or have repeated patterns,
make sure that a page is not already on the glass.
Make sure that the document you are trying to send is placed face
up in the ADF or face down on the glass.
Make sure the glass is clean. If the glass is dirty, clean it with a dry,
soft cloth.
If the problem is with the image quality of jobs sent to a printer,
check the settings at the printer.
Adjust the guides so that they are snug against the stack but not
too tight.
The maximum number of pages the ADF can hold is 50 or fewer,
depending on the type of media being loaded.
The maximum number of pages the output tray can hold is 50 or
fewer. Make sure more pages are not stacking up in the output tray.
The type of media being loaded might not meet the required
specifications.
If users have been feeding unsupported items through the ADF (for
example, carbon copy forms), the rollers might hav e accumulated a
residue or been damaged. See the administrator guide for the
replacement procedure.
When sending an e-mail message, you must type your user name
in the FROM field exactly as it appears in your user profile. You
cannot type your e-mail address and access your private address
books.
Your password must be typed exactly as it appears in your user
profile. Passwords are case-sensitive, so be sure you enter the
correct combination of uppercase and lowercase letters.
If you are sending a document that is too large, it might jam in the
ADF. The largest document you can place in the ADF is 215.9 by
355.6 mm (8.5 by 14 in). Use the glass to send the document.
If you are sending a document that is too small, it might jam in the
ADF. The smallest document you can place in the ADF is 148.5 by
210 mm (5.9 by 8.3 in). Use the glass to send the document.
You might have selected a Quality setting that is making the
document into a large file that is sending slowly (for example,
Color-B/W Photo). To speed up the sending process, try choosing
a different setting (for example, B/W Document).
94 Chapter 5 - Troubleshooting EN
Page 97

General digital sender troubleshooting (continued)
Problem Actions
A document sent to a
computer did not arrive
in the default inbox.
An e-mail transmission
you sent did not arriv e
at the destination e-mail
address.
A fax transmission you
sent did not arrive at
the destination fax
machine.
A document sent to a
printer did not print.
Make sure the destination computer is turned on.
Make sure the HP Digital Sender Link is running. If it is not, start it
by clicking Start, pointing to Programs, then HP 9100C , and
clicking HP Digital Sender Link.
Make sure the Enable Receive setting in the HP Digital Sender
Link is enabled. To check this, click the Receive inbox tab in the
Control Panel applet and verify that the Enable receive check box
is selected.
Using the Control Panel applet of the HP Digital Sender Link, make
sure a path to the receive inbox has been specified and that the
path is correct.
The job might have been lost because of a serious internal
problem. All pending jobs are sometimes lost when this happens.
Resend the document.
If you typed the e-mail address at the control panel, make sure you
typed it correctly.
See if you received a “returned mail” message in your e-mail inbox.
Often, this message explains why the e-mail was not delivered.
The job might have been lost because of a serious internal
problem. All pending jobs are sometimes lost when this happens.
Resend the e-mail message.
The receiving fax machine might be turned off or experiencing an
error condition such as out of paper or toner. Check with the
recipient.
The LAN fax server might be busy sending other faxes or waiting to
redial other faxes. The server might also have reached its
maximum limit of 128 pending fax transmissions. Wait and retry.
Using the ABM, check your activity log to see if the fax reached the
LAN fax server. If a probl em is reported in the log, try turning the
digital sender off and then on again and then resending the fax.
For information about the transmission, check any fax notifications
that might have been returned (for example,
e-mail notifications in your e-mail inbox, or printed transaction
reports, if these reports are possible with your LAN fax product).
The job might have been lost because of a serious internal
problem. All pending jobs are sometimes lost when this happens.
Resend the fax.
Make sure the printer is online and working properly.
Make sure that all cabling is securely connected.
The job might have been lost because of a serious internal
problem. All pending jobs are sometimes lost when this happens.
Resend the document.
EN Troubleshooting the digital sender 95
Page 98

General digital sender troubleshooting (continued)
Problem Actions
E-mail confirmations of
e-mail transmissions
are not being received.
Fax transaction reports
are not printing at a
network printer.
The bottom of a page
that you sent is cut off.
Your company’s e-mail server might not support DSN (Delivery
Status Notification), or one of the links to the receiving e-mail
address does not support DSN.
In the ABM, verify that the e-mail notification check box is selected
and that your e-mail address is correct.
Make sure the printer is turned on and online.
Make sure that all cabling is securely connected.
Your company’s LAN fax product might not support transaction
reports, or the setting has been disabled by your administrator.
Note that you can still see fax transmission information in the
activity log (see “Using the activity log” on page 70).
If sent from the flatbed, the document page might be too long. The
maximum length that the flatbed can handle is 279 mm (11 in). The
ADF can handle pages up to 355.6 mm (14 in) long.
If sent to a printer, the page might be too complex (require too
much memory) for the printer to process. If possible, choose a
printer with more memory.
96 Chapter 5 - Troubleshooting EN
Page 99

Control panel messages
This following t able list s the messages the co ntrol panel might d ispla y
while you are using the digital sender, the cause of the message, and
recommended actions.
Note The messages are listed in alphabetical order. Messages that report
normal status are not included.
Control panel messages
Message Description Action
AB Error codes An internal problem in
accessing address books
has occurred.
Cannot connect to PC. You selected the PC
function, but the
destination computer is
off or the HP Digital
Sender Link is not running
on that computer.
Configuration changed.
Please wait...
The administrator is
updating the digital
sender with changes. The
digital sender is
unavailable for use while
the update takes place.
Turn the digital sender off and then
back on.
If the problem persists, note the
codes and contact the administrator.
Make sure the destination computer
is turned on.
Make sure the HP Digital Sender
Link is running on the destination
computer. If it is not, start it by
clicking Start, pointi ng to Programs,
then HP 9100C, and clicking HP
Digital Sender Link.
Make sure the Enable Receive
setting for the HP Digital Sender Link
is enabled. To check this, click the
Receive inbox tab in the Control
Panel applet and verify that the
Enable receive check box is
selected.
Using the Control Panel applet of the
HP Digital Sender Link, make sure a
path to the receive inbox has been
specified and that the path is correct.
Wait until the message clears.
Device unreachable. You selected the HP
JetSend function, but the
Make sure the destination device is
turned on.
destination device is off.
EN Troubleshooting the digital sender 97
Page 100

Control panel messages (continued)
Message Description Action
Duplicate addressee
exists. Last recipient not
added.
Duplicate fax number
exists. Last fax recipient
not added.
E-mail server not
available. Contact the
administrator.
Errors were found
checking the address
book. Please, check the
log file.
Errors were found when
checking the address
book. Initialize address
book?
Internal error. codes
Digital Sender halted.
Invalid credentials. Check
account name and
password.
Notification message only.
You selected or entered a
duplicate e-mail
destination. The digital
sender uses only the first
one you entered.
Notification message only.
You selected or entered a
duplicate fax destination.
The digital sender uses
only the first one you
entered.
You selected the e-mail
function, but the e-mail
server is turned off or
cannot be reached.
Notification message only.
An internal check of the
address book database
found and removed at
least one problem entry.
Check the activity log for
the number of problem
entries that were
removed.
An internal check of the
address book database
found significant
problems.
Internal problem.
The name and password
that have been configured
for authenticating LDAP
searches are invalid.
No action required.
No action required.
Turn the digital sender off and then
on again.
Make sure all cabling is securely
connected.
If the problem persists, contact the
administrator.
Contact the administrator.
Contact the administrator.
Turn the digital sender off and then
back on.
If the problem persists, note the
codes and contact the administrator.
Contact the administrator.
98 Chapter 5 - Troubleshooting EN
 Loading...