


HP Digital Sender 9100C
Documentation Update
An Addendum for the HP Digital Sender 9100C has been
added to the end of this PDF. The Addendum contains
information regarding digital sender features that have
changed since the User Guide and Administrator Guide were
produced. For product information, setup, and use, please
read all of the documentation.

HP 9100C
Digital Sender
Administrator Guide
English


HP 9100C Digital Sender
Administrator Guide__________

Copyright information
© Copyright Hewlett-Packard
Company 1998
All rights reserved.
Reproduction, adaptation, or
translation without prior written
permission is prohibited, except
as allowed under copyright laws.
Publication number
C1311-90915
Second Edition, December 2001
Trademark credits
Adobe, the Adobe logo, Acrobat,
and the Acrobat logo are
trademarks of Adobe Systems
Incorporated. CompuServe is a
U.S. trademark of CompuServe,
Inc. Microsoft, Windows, and
Windows NT are U.S. registered
trademarks of Microsoft
Corporation. PaperPort is a
trademark of Visioneer, Inc. in
the United States and other
countries. Pentium is a U.S.
registered product of Intel
Corporation.
LDAP code (libldap client library
and liblber encoding/decoding
library) used courtesy of
University of Michigan at Ann
Arbor. Copyright 1992-1996
Regents of the University of
Michigan. All rights reserved.
All other products mentioned
herein may be trademarks of
their respective companies.
Warranty
The information contained in this
document is subject to change
without notice.
Hewlett-Packard makes no
warranty of any kind with respect
to this information. HEWLETTPACKARD SPECIFICALLY
DISCLAIMS THE IMPLIED
WARRANTY OF
MERCHANTABILITY AND
FITNESS FOR A PARTICULAR
PURPOSE.
Hewlett-Packard shall not be
liable for any direct, indirect,
incidental, consequential, or
other damage alleged in
connection with the furnishing or
use of this information.
NOTICE TO U.S.
GOVERNMENT
USERS: RESTRICTED RIGHTS
COMMERCIAL COMPUTER
SOFTWARE: “Use, duplication,
or disclosure by the Government
is subject to restrictions as set
forth in subparagraph (c) (1) (ii)
of the Rights in Technical Data
Clause at DFARS 52.227-7013.”
Material scanned by this product
may be protected by
governmental laws and other
regulations, such as copyright
laws. The customer is solely
responsible for complying with all
such laws and regulations.
FCC radio frequency
interference statement
This equipment has been tested
and found to comply with the
limits for a Class A digital device,
pursuant to Part 15 of FCC rules.
These limits are designed to
provide reasonable protection
against harmful interference
when the equipment is operated
in a commercial environment.
This equipment generates, uses,
and can radiate radio frequency
energy. If not installed and used
in accordance with the
instructions, it may cause
harmful interference to radio
communications. Operation of
this equipment in a residential
area is likely to cause harmful
interference, in which case the
user will be required to correct
the interference at his own
expense.
Note: Any changes or
modifications to this equipment
that are not expressly approved
by Hewlett-Packard may cause
harmful interference and void the
user’s authority to operate the
equipment.
Safety information
WARNING!
Electrical shock hazard
To avoid electrical shock, use
only supplied power cords and
connect only to properly
grounded (3-hole) wall outlets.
Hewlett-Packard Company
Hewlett-Packard Company
11311 Chinden Boulevard
Boise, Idaho 83714 U.S.A.

Contents
1 About the digital sender
Introduction . . . . . . . . . . . . . . . . . . . . . . . . . . . . . . . . . . . . . . . . . . .7
Environments and protocols . . . . . . . . . . . . . . . . . . . . . . . . . . . . . .8
Network operating systems . . . . . . . . . . . . . . . . . . . . . . . . . .8
Client operating systems . . . . . . . . . . . . . . . . . . . . . . . . . . . . .9
Dependency matrix. . . . . . . . . . . . . . . . . . . . . . . . . . . . . . . . . .9
Features . . . . . . . . . . . . . . . . . . . . . . . . . . . . . . . . . . . . . . . . . . . .10
Performance . . . . . . . . . . . . . . . . . . . . . . . . . . . . . . . . . . . . .10
Paper handling . . . . . . . . . . . . . . . . . . . . . . . . . . . . . . . . . . .10
Image processing . . . . . . . . . . . . . . . . . . . . . . . . . . . . . . . . . .11
Sending qualities . . . . . . . . . . . . . . . . . . . . . . . . . . . . . . . . . .12
File formats and sizes. . . . . . . . . . . . . . . . . . . . . . . . . . . . . . .13
Distribution services . . . . . . . . . . . . . . . . . . . . . . . . . . . . . . .15
Security. . . . . . . . . . . . . . . . . . . . . . . . . . . . . . . . . . . . . . . . . .18
Components . . . . . . . . . . . . . . . . . . . . . . . . . . . . . . . . . . . . . . . . .19
Hardware components . . . . . . . . . . . . . . . . . . . . . . . . . . . . .19
Software components . . . . . . . . . . . . . . . . . . . . . . . . . . . . . .21
Specifications . . . . . . . . . . . . . . . . . . . . . . . . . . . . . . . . . . . . . . . .22
Equipment specifications . . . . . . . . . . . . . . . . . . . . . . . . . . . .22
Environmental ranges. . . . . . . . . . . . . . . . . . . . . . . . . . . . . . .24
Supported capabilities . . . . . . . . . . . . . . . . . . . . . . . . . . . . . .25
German noise declaration. . . . . . . . . . . . . . . . . . . . . . . . . . . .26
French EMC regulation. . . . . . . . . . . . . . . . . . . . . . . . . . . . . .26
Declaration of conformity . . . . . . . . . . . . . . . . . . . . . . . . . . . .27
2 Installing and configuring
Introduction . . . . . . . . . . . . . . . . . . . . . . . . . . . . . . . . . . . . . . . . . .29
Installation requirements . . . . . . . . . . . . . . . . . . . . . . . . . . . . . . . .30
Environmental requirements . . . . . . . . . . . . . . . . . . . . . . . . .30
Network system requirements . . . . . . . . . . . . . . . . . . . . . . . .30
Client system requirements . . . . . . . . . . . . . . . . . . . . . . . . . .30
Space requirements . . . . . . . . . . . . . . . . . . . . . . . . . . . . . . . .31
What ships in the box . . . . . . . . . . . . . . . . . . . . . . . . . . . . . . . . . .31
EN 3

The configuration process. . . . . . . . . . . . . . . . . . . . . . . . . . . . . . .32
Fast-track configuration . . . . . . . . . . . . . . . . . . . . . . . . . . . .32
Extended and optional functionality . . . . . . . . . . . . . . . . . . .32
Assigning an IP address to the digital sender. . . . . . . . . . . . .33
Preparing for configuration . . . . . . . . . . . . . . . . . . . . . . . . . . .33
Overview of configuration . . . . . . . . . . . . . . . . . . . . . . . . . . . .35
Fast-track configuration steps . . . . . . . . . . . . . . . . . . . . . . . . . . . .36
Install the unit . . . . . . . . . . . . . . . . . . . . . . . . . . . . . . . . . . . .36
Configure fast-track parameters at the contro l panel . . . . . . .38
Extended and optional configuration steps . . . . . . . . . . . . . . . . . .41
Configure extended and optional parameters at
the control panel. . . . . . . . . . . . . . . . . . . . . . . . . . . . . . . .41
Run the setup program to install the administrative
software . . . . . . . . . . . . . . . . . . . . . . . . . . . . . . . . . . . . . .42
Configure extended and optional parameters using the
HP JetAdmin software . . . . . . . . . . . . . . . . . . . . . . . . . . .45
Configure the HP Address Book Manager . . . . . . . . . . . . . . .52
Distribute the client software to user computers. . . . . . . . . . .55
Test the installation. . . . . . . . . . . . . . . . . . . . . . . . . . . . . . . . .57
Customizing the digital sender to support third-party programs . .58
Coexisting with the HP Network ScanJet 5 scanner. . . . . . . . . . .61
Administrator matters . . . . . . . . . . . . . . . . . . . . . . . . . . . . . . .61
Client matters . . . . . . . . . . . . . . . . . . . . . . . . . . . . . . . . . . . . .61
LAN fax service matters . . . . . . . . . . . . . . . . . . . . . . . . . . . . .62
Uninstalling the software . . . . . . . . . . . . . . . . . . . . . . . . . . . . . . . .63
Troubleshooting the installation. . . . . . . . . . . . . . . . . . . . . . . . . . .63
Function key problems . . . . . . . . . . . . . . . . . . . . . . . . . . . . . .63
Installation problems. . . . . . . . . . . . . . . . . . . . . . . . . . . . . . . .64
Installation messages . . . . . . . . . . . . . . . . . . . . . . . . . . . . . . .66
3 Administering
Introduction . . . . . . . . . . . . . . . . . . . . . . . . . . . . . . . . . . . . . . . . . .69
Administrator activities . . . . . . . . . . . . . . . . . . . . . . . . . . . . . .69
Digital sender parameters. . . . . . . . . . . . . . . . . . . . . . . . . . . .73
Using the configuration menu at the control panel . . . . . . . . . . . .78
Configuration menu keys . . . . . . . . . . . . . . . . . . . . . . . . . . . .78
Configuration menu parameters. . . . . . . . . . . . . . . . . . . . . . .80
Controlling notifications. . . . . . . . . . . . . . . . . . . . . . . . . . . . . . . . .85
Shutting down and restarting. . . . . . . . . . . . . . . . . . . . . . . . . . . . .88
Resetting. . . . . . . . . . . . . . . . . . . . . . . . . . . . . . . . . . . . . . . . . . . .90
Resetting address books . . . . . . . . . . . . . . . . . . . . . . . . . . .90
Resetting network parameters . . . . . . . . . . . . . . . . . . . . . . .91
Resetting to factory defaults . . . . . . . . . . . . . . . . . . . . . . . . .92
Backing up and restoring address books . . . . . . . . . . . . . . . . . . .94
Backing up . . . . . . . . . . . . . . . . . . . . . . . . . . . . . . . . . . . . . .94
Restoring . . . . . . . . . . . . . . . . . . . . . . . . . . . . . . . . . . . . . . .96
4 Contents EN

Creating and maintaining user profiles . . . . . . . . . . . . . . . . . . . . .98
Controlling security . . . . . . . . . . . . . . . . . . . . . . . . . . . . . . . . . . .100
Determining who can use the digital sender . . . . . . . . . . . .100
Changing or setting administrator password . . . . . . . . . . .100
Erasing administrator password . . . . . . . . . . . . . . . . . . . . . .101
Controlling whether the administrator must validate new
or changed user profiles. . . . . . . . . . . . . . . . . . . . . . . . .102
Validating a new or changed user profile . . . . . . . . . . . . . . .103
Working with address books . . . . . . . . . . . . . . . . . . . . . . . . . . . .104
Maintaining the Public Email address book . . . . . . . . . . . . .105
Maintaining the Public Distribution Lists address book . . . .105
Importing e-mail addresses into address books. . . . . . . . . .107
Managing printers . . . . . . . . . . . . . . . . . . . . . . . . . . . . . . . . . . . .111
Using the activity log . . . . . . . . . . . . . . . . . . . . . . . . . . . . . . . . . .113
Displaying the self-test page . . . . . . . . . . . . . . . . . . . . . . . . . . . .116
Changing the contrast level on the control panel . . . . . . . . . . . .119
Upgrading the digital sender firmware. . . . . . . . . . . . . . . . . . . . .120
Maintaining the hardware . . . . . . . . . . . . . . . . . . . . . . . . . . . . . .121
Cleaning the digital sender . . . . . . . . . . . . . . . . . . . . . . . . .121
Replacing the delivery guide sheet. . . . . . . . . . . . . . . . . . . .122
Replacing the lower rollers . . . . . . . . . . . . . . . . . . . . . . . . . .123
Removing and replacing the HP JetDirect print server . . . .124
4 Troubleshooting
Introduction . . . . . . . . . . . . . . . . . . . . . . . . . . . . . . . . . . . . . . . . .127
Sources for information about problems . . . . . . . . . . . . . . . . . . .128
Clearing paper jams . . . . . . . . . . . . . . . . . . . . . . . . . . . . . . . . . .129
Troubleshooting the digital sender . . . . . . . . . . . . . . . . . . . . . . .133
General digital sender troubleshooting. . . . . . . . . . . . . . . . .133
Checking the address book database . . . . . . . . . . . . . . . . .139
Control panel messages. . . . . . . . . . . . . . . . . . . . . . . . . . . .141
Troubleshooting network problems. . . . . . . . . . . . . . . . . . . . . . .157
General network troubleshooting . . . . . . . . . . . . . . . . . . . .157
E-mail service troubleshooting . . . . . . . . . . . . . . . . . . . . . . .157
Fax service troubleshooting . . . . . . . . . . . . . . . . . . . . . . . . .158
HP JetAdmin software troubleshooting. . . . . . . . . . . . . . . . .160
HP JetDirect print server troubleshooting. . . . . . . . . . . . . . .168
Activity log messages . . . . . . . . . . . . . . . . . . . . . . . . . . . . . . . . .170
Troubleshooting the software . . . . . . . . . . . . . . . . . . . . . . . . . . .189
General software troubleshooting. . . . . . . . . . . . . . . . . . . . .189
HP Address Book Manager messages. . . . . . . . . . . . . . . . .190
HP Digital Sender Link messages . . . . . . . . . . . . . . . . . . . .195
Restoring old firmware images . . . . . . . . . . . . . . . . . . . . . . . . . .198
EN 5

5 Warranty and support information
Hewlett-Packard limited warranty statement . . . . . . . . . . . . . . .199
Replacement parts and accessories. . . . . . . . . . . . . . . . . . . . . .201
HP customer support options worldwide. . . . . . . . . . . . . . . . . . .202
HP customer support. . . . . . . . . . . . . . . . . . . . . . . . . . . . . . . . . .204
Worldwide sales and service offices . . . . . . . . . . . . . . . . . . . . . .206
Index
6 Contents EN

About the digital
1
sender
Introduction
The HP 9100C Digital Sender can be directly connected to TCP/IP
networks. It conv erts black-and-white and color documents , dra wings,
and photographs into an electronic form and distributes them directly
to several kinds of destinations:
Internet e-mail addresses
fax numbers (if one of th e supported LAN fax products is installed
on your network)
personal computers (PCs)
programs
printers
HP JetSend-enabled devices
The unit includes a flatbed scanner as well as an automatic documen t
feeder (ADF) that can accept up to 50 pages.
A companion program called the HP Address Book Manager (ABM)
lets users create their own address books of e-mail address and fax
destinations, and combine e-mail addresses into private distribution
lists. The destinations and distribution lists can then be selected at
the digital sender control panel. The administrator also has the ability
to create public destinations and e-mail distribution lists and make
them available to all users.
Users have the ability to send documents directly from the digital
sender to specified programs on their computers. They can then print
the documents, send them as e-mail attachments, or use included
software to annotate, organize, and distribute them.
EN Introduction 7

The HP 9100C Digital Sender supports LDAP (Lightweight Directory
Access Protocol), which allows you to find and use e-mail addresses
located on directory servers located elsewhere on a netw ork (such as
the Internet) over a TCP/IP connection. See t he HP di gital sender
website for a list of global e-ma il address books:
http://www.digitalsender.hp.com
Installing the digital sender is simply a matter of connecting it to your
network, configuring network and distribution parameters, and
installing the software from the compact disc that comes with the
digital sender . The digital sender o perates as a standalone unit on th e
network and does not require network privileges to administer.
The HP JetDirect print server that comes installed in the digital
sender handles all protocol support for TCP/IP and SMTP
automatically.
The HP 9100C Digital Sender is fully compatible with the LAN fax
capabilities found in the HP Network ScanJet 5 scanner. When you
install the digital sender, you do not need to upgrade your LAN fax
product.
Environments and protocols
Network operating systems
The HP 9100C Digital Sender can be directly connected to TCP/IP
networks, and operates independently within the network operating
environments listed below (some f eatur es might not be a v ailable in all
environments—see the dependency matrix on page 9):
Microsoft® Windows NT 4.0 and 5.0 workstation and server
(TCP/IP only)
LAN Server 3.1 and 4.1 and OS/2 Warp Server (TCP/IP only)
NetWare 3.x and 4.x with IPX and TCP/IP
Ethernet and Toke n Ring connections are provided by the
HP JetDirect print server that comes installed in the digital sender:
Fast Ethernet 100Base-TX, Ethernet 10Base-T, or 10Base-2
(BNC).
Token Ring 4/16 Mbps. Source routing is supported.
Note Network servers are needed only to connect LAN fax and other
programs. No network servers are needed to support the remaining
features.
8 Chapter 1 - About the digital sender EN

Client operating systems
The following client operating systems are supported:
Windows NT 4.0 and 5.0 workstation and server (TCP/IP only)
Windows 9x (TCP/IP only)
The HP 9100C Digital Sender works correctly with the Microsoft
TCP/IP protocol provided as part of these operating systems.
Dependency matrix
The following table shows the HP 9100C Digital Sender services that
are available and their dependencies.
Dependency matrix
Service Dependencies
Send to e-mail An e-mail SMTP-MIME server directly connected to a
TCP/IP network that can be reached from the digital
sender (not a dial-up connection).
Send to fax A Windows NT 4.0/5.0 server or workstation available
on the network, plus a supported LAN fax product.
Send to PC A computer on the network connected by TCP/IP,
running one of the supported client operating systems
(Windows NT 4.0/5.0 or Windows 9x).
Send to printer A printer on the network with an HP JetDirect print
server.
Send to another
program
Send to HP
JetSend device
EN Environments and protocols 9
A Windows NT 4.0/5.0 server or workstation available
on the network.
At least one HP JetSend device (computer or printer) as
a receiver.

Features
Performance
The HP 9100C Digital Sender maintains the following speeds after
the first document begins scanning (n umbers ref er to scanni ng speed
only and not to document delivery speed). For compound documents
(text and image), resolution and bits/pixel depend on page content.
Scanning speed
Pages/minute Page size Resolution Bit/pixel
15 Letter 300 dpi 1
15 Letter 300 dpi 8
8.5 Letter 300 dpi 24
2.5 Letter 600 dpi 24
Paper handling
The HP 9100C Digital Sender supports multiple paper sizes:
Letter: 215.9 by 279 mm (8.5 by 11 in)
A4: 210 by 297 mm (8.3 by 11.7 in)
Legal (from the ADF only): 215.9 by 355.6 mm (8.5 by 14 in)
2
Paper weight: 60 to 135 g/m
(16 to 36 lb).
Up to 50 sheets of letter , A4, or legal paper can be stack ed in the ADF
(maximum height of 6 mm, or 0.2 in).
ADF paper sizes
Item Width Length
Maximum paper size 215.9 mm (8.5 in) 355.6 mm (14 in)
Minimum paper size 148.5 mm (5.9 in) 210 mm (8.3 in)
Minimum paper guide spacing 135 mm (5.3 in) Not applicable
10 Chapter 1 - About the digital sender EN

Image processing
Image processing features include:
one-touch operation by means of predefined settings to obtain
the best output for the t ype of destination (e-mail, fax, computer,
printer, other programs, or HP JetSend-enabled device)
different file format depending on intended use
optimized image processing for full-color images using color
optimization and gamma correction
smart auto-thre sholding to get the best 300-dpi, 1 bit/pixel image
ready for OCR (optical character recognition)
compression method to optimize file size and transmission time
(JPEG for 24-bit/pixel color images, and G4 and RLE for 1-bit/
pixel, black-and-white images)
perfect images and text in the smallest file size possible using
advanced HP Smart Compression Imaging Technology for best
treatment of compound (text and image) pages
EN Features 11

Sending qualities
The digital sender offers a choice of sen ding qualities at the control
panel. You can choose the most suitable quality for each type of job.
Sending qualities and destinations
Sending quality Type of document Destinations
B/W Document The original contains text that must be
clearly transmitted.
-OrThe original is black and white.
Color Document The original has a mix of text and
images.
-OrThe original has a mix of color and
black-and-white areas.
Fine Text (OCR) The original contains text that needs to
be converted to text that can be edited
using OCR (optical character
recognition) software.
Color-B/W Photo The original is a photograph.
-OrIt is most important that the colors or
shades of gray in an image be clear.
Hi-Res Color-B/W Photo The original is a high quality photograph
or graphic that needs to be reproduced.
E-mail
Fax
Computer
Convenience copy
HP JetSend device
Third-party program
E-mail
Fax
Computer
Convenience copy
HP JetSend device
Third-party program
Third-party program
E-mail
Fax
Computer
Convenience copy
HP JetSend device
Third-party program
Third-party program
12 Chapter 1 - About the digital sender EN

File formats and sizes
See the table below f or inf ormation about file f ormats and sizes. Note
that file size increases with resolution.
File formats and typical sizes
Send to Sending quality File format Description
E-mail B/W Document PDF 300 dpi, 1 bit, G4 60–90
Color Document Text: 300 dpi, 1 bit, G4
Picture: 150 dpi, 24 bit, JPEG
Color-B/W Photo 150 dpi, 24 bit, JPEG 150–200
Fax * B/W Document MTIFF 200 or 300 dpi, 1 bit, G4 50–90
Color Document 100–200
Color-B/W Photo 100–200
B/W Document PCL
Color Document 700–1000
Color-B/W Photo 700–1000
B/W Document PCL RLE 200 or 300 dpi, 1 bit, RLE 100–200
Color Document 150–300
Color-B/W Photo 150–300
* You can configure either 200-dpi or 300-dpi resolution in the HP JetAdmin
software using the Configuration/Fax page.
PC B/W Document PDF 300 dpi, 1 bit, G4 60–90
Color Document Text: 300 dpi, 1 bit, G4
uncompressed
200 or 300 dpi, 1 bit, G4 700–1000
Picture: 150 dpi, 24 bit, JPEG
Typical file
size (KB)
90–150
90–150
Color-B/W Photo 150 dpi, 24 bit, JPEG 150–200
B/W Document MTIFF 300 dpi, 1 bit, G4 60–90
Color Document 150 dpi, 24 bit,
uncompressed
Color-B/W Photo 150 dpi, 24 bit,
uncompressed
EN Features 13
~ 6000
~ 6000

File formats and typical sizes (continued)
Send to Sending quality File format Description
Convenience
copy
Another
program
HP JetDirect PCL 5 printers
B/W Document —— 150–200
Color Document —— 200–300
Color-B/W Photo —— 200–300
HP Color LaserJet 4500 printer
B/W Document —— 800–1800
Color Document —— 900–2500
Color-B/W Photo —— 800–2500
B/W Document PDF 300 dpi, 1 bit, G4 60–90
Color Document Text: 300 dpi, 1 bit, G4
Picture: 150 dpi, 24 bit, JPEG
Color-B/W Photo 150 dpi, 24 bit, JPEG 150–200
Fine Text (OCR) 600 dpi, 1 bit, G4 80–120
Hi-Res Color-B/W
Photo
B/W Document PCL5 300 dpi, 1 bit, RLE 100–200
Color Document 300 dpi, 1 bit, RLE 150–300
Color-B/W Photo 300 dpi, 1 bit, RLE 150–300
Fine Text (OCR) 600 dpi, 1 bit, RLE 250–350
600 dpi, 24 bit, JPEG 1500–
Typical file
size (KB)
90–150
3000
HP JetSend
device
Hi-Res Color-B/W
Photo
B/W Document MTIFF 300 dpi, 1 bit, G4 60–90
Color Document 150 dpi, 24 bit,
Color-B/W Photo 150 dpi, 24 bit,
Fine Text (OCR) 600 dpi, 1 bit, G4 80–120
Hi-Res Color-B/W
Photo
File format and size are the result of the negotiation between the sender and
receiver.
600 dpi, 1 bit, RLE 300–500
~ 6000
uncompressed
~ 6000
uncompressed
600 dpi, 1 bit, G4 100–200
14 Chapter 1 - About the digital sender EN

Distribution services
The digital sender is capable of distributing documents to the
following types of destinations:
Internet e-mail addresses
fax phone numbers
computers on the network
printers on the network (for convenience copying)
HP JetSend-enabled devices on the network
third-party programs installed in computers on the network
E-mail destinations
The digital sender can send MIME-compliant e-mail messages to
Internet addresses. It uses SMTP-MIME to deliver these messages.
SMTP is independent of the network operating system on which your
e-mail server is running. The e-mail service is also compatible with
the DSN (Delivery Status Notification) standard.
ESMTP (Extended SMTP) is used if your server supports it. This
capability is automatically detected and no specific configuration
steps are necessary.
The document that you scan at the digital sender becomes an
attachment to your e-mail message. Portable Document Format
(.pdf) is the file format most often used for the attachments, which
gives recipients the ability to both view and print them. Yo u can obtain
a free copy of t he Adobe
Incorporated website (http://www.adobe.com). Or, you can install the
Reader program on you r network with the digital sender setup
program.
®
Acrobat® Reader from the Adobe Systems
Users can specify e-mail destinations at the control panel in several
ways:
select e-mail addresses from public or private address books
already loaded in the digital sender
use a special search feature to select e-mail addresses from an
LDAP (Lightweight Directory Access Protocol) server, if one has
been configured for use by the administrator
type e-mail addresses manually
EN Features 15

Fax destinations
Users can send faxes directly from the digital sender. They have the
ability to select destinations from a Public Fax address book already
loaded in the digital sender, or type them at the control panel. The
same document can be sent to multiple fax numbers.
To support this service, the digital sender comes with software for a
number of third-party LAN fax products. This software runs on
Windows NT computers only.
Visit the HP digital sender website (http://www.digitalsender.hp.com)
for a list of the LAN fax products that are currently supported.
Computer destinations
Users can send documents from the digital sender directly to a
computer on the network. This process is accomplished through
peer-to-peer transmission. The addresses of destination computers
are predefined in registered user profiles. Users can choose t he
format for the documents and the program on their computer that is
used to view and work with them.
Printer destinations
You can enable convenience copying by setting up one or more
printers on the network for use with the digital sender. The printers
you designate must be connected to the network by means of
HP JetDirect print servers.
Only one destination can be selected per job. Collated copying is not
supported.
Color printing is supported for the HP Color LaserJet 4500 printer.
HP JetSend destinations
HP JetSend is a communications technology built into printer and
scanner firmware and computer software. HP JetSend-enabled
devices can connect, “talk” to each other, and exchange information
directly through the network. The capability is independent of servers
and programs, and uses simple addressing such as TCP/IP
addresses and host names.
16 Chapter 1 - About the digital sender EN

The digital sender is an HP JetSend-enabled device. You can use it
to send documents to the following types of devices:
printers on your company intranet that are HP JetSend-enabled
computers with HP JetSend for Windows software installed (you
can download a free copy of the HP JetSend for Windows
software for Windows NT or 95 from the HP JetSend website at
http://www.jetsend.hp.com)
Both types of devices must have a valid TCP/IP address.
Third-party programs installed on computers on the
network
You can customize the HP 9100C Digital Sender to support thirdparty programs being used in your office. Users then have the ability
to distribute documents from the digital sender direct ly to these
programs.
EN Features 17

Security
The HP 9100C Digital Sender operates as a standalone unit on the
network. You administer each digital sender independently of any
other device on the network under a password that applies only to
that digital sender.
The digital sender accepts three types of users:
registered users
Individuals who have been set up to use the digital sender by
means of a user profile. You must be a registered user to use the
HP Address Book Manager. Only registered users have private
address books that are accessible at the digital sender.
guest users
Individuals who are not registered users and who do not have
user profiles. Guest users can use the digital se nder and all
public address books. However, they cannot see or use private
address books, nor can they use t he ABM. The administ rator ca n
entirely disable guest user access.
administrator for the digital sender
The individual (referred to as the “administrator” in this guide)
who performs administrator activities for the digital sender.
Because the digital sender is a standalone unit on the network,
these activities can be performed independent ly of any other
network activity. Administrator privileges for the digital sender do
not require network privileges. Activities include such things as
establishing the level of security for the digital sender and
maintaining the public address books. The administrator has
access to all private address books, as well as the activity log for
each user.
The administrator controls digital sender security in several ways:
By determining who can use the digital sender (registered users
and guest users, or only registered users).
By requiring passwords. Passwords are available at two levels:
administrator and registe red us ers . Bot h are opt ional. Passw ord s
control what each type of user can see and do at the digital
sender.
By determining whether new or changed user profiles require
administrator validation before they take effect. If validation is
required, users do not have access to certain information at the
digital sender until their profile has been authorized by the
administrator.
18 Chapter 1 - About the digital sender EN
Components
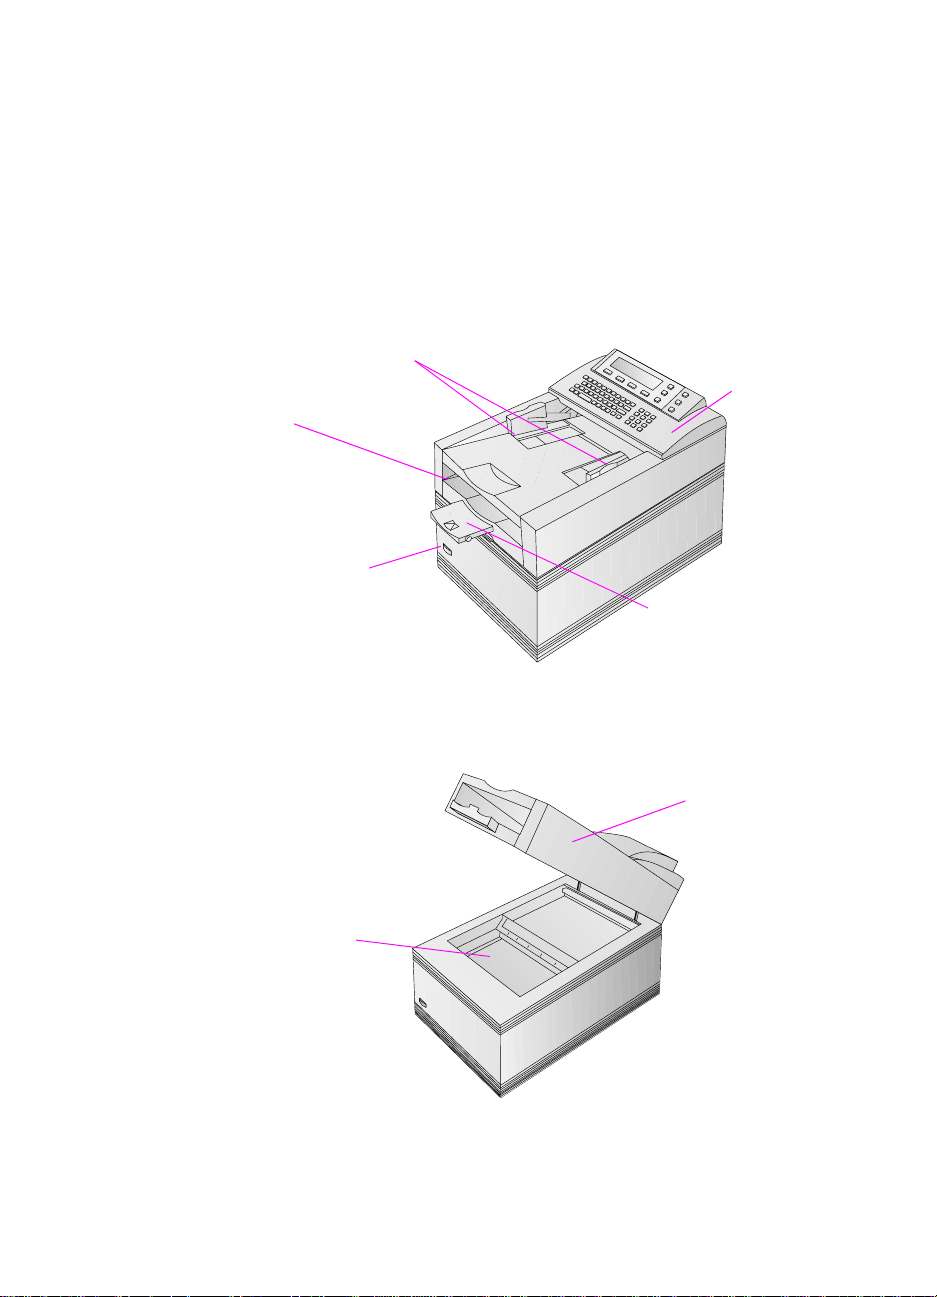
Hardware components
The following illustrations show the digital sender hardware
components.
Front and top view
Document
output tray
Document guides
1
Power switch
Control
panel
Document output
support
Front view with ADF unit raised
ADF unit
(raises to
reveal glass)
Glass
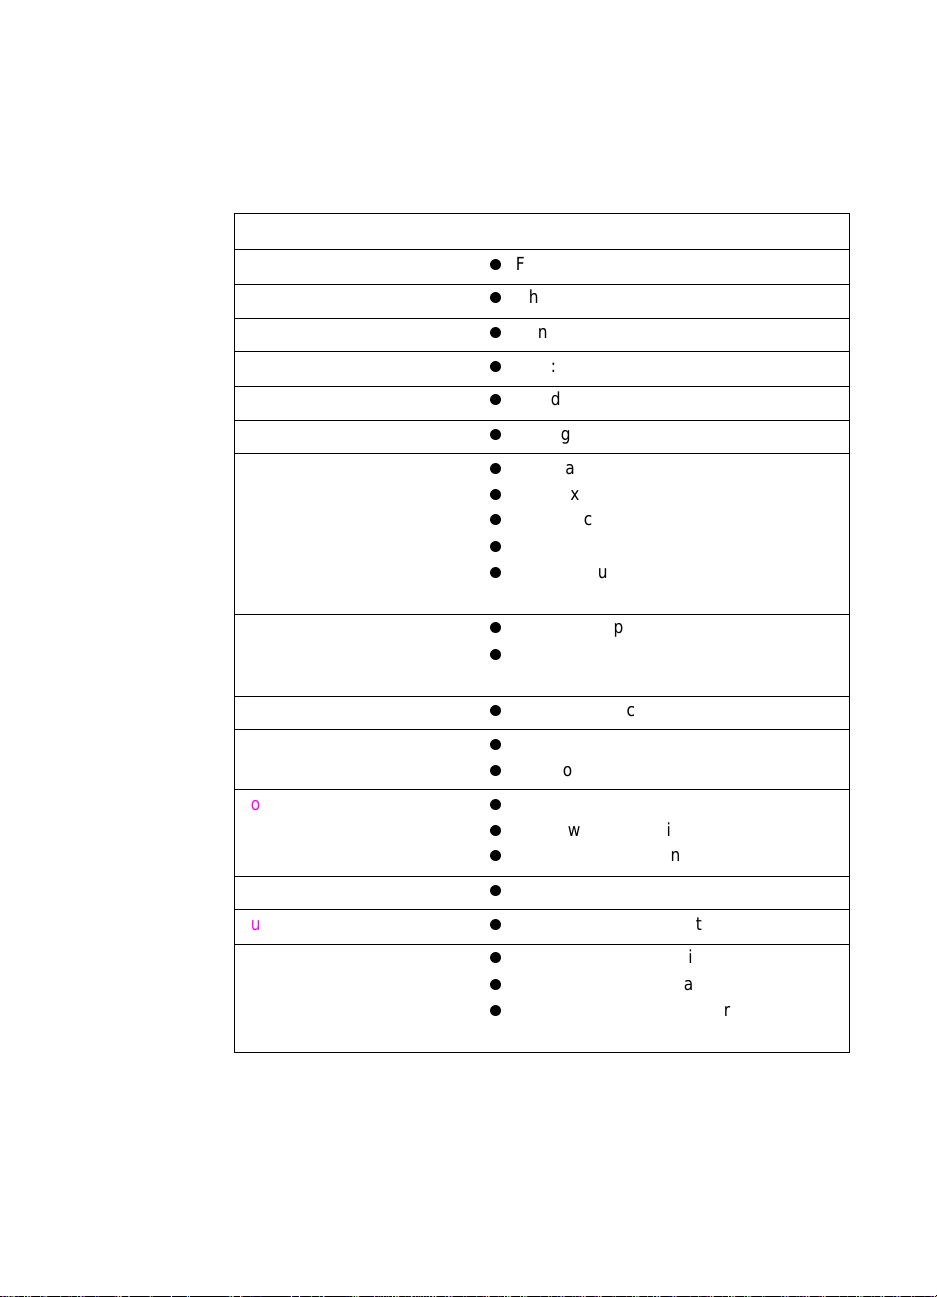
EN Components 19

Rear view
ADF connector cable
ADF connector socket
Control panel Control panel
connector cable
Control
panel
connector
socket
Preinstalled HP JetDirect
print server (interface card)
with network connector
socket
Po wer connector
socket
20 Chapter 1 - About the digital sender EN

Software components
The HP 9100C Digital Sender comes with the following software
components:
HP JetAdmin software
A Windows program that lets you remotely configure, monitor,
and control HP network peripherals such as printers, plotter s, and
scanners. You use it for the digital sender to do the following:
• configure, disable, and enable digital sender distribution
services (such as e-m ail an d fax)
• configure network parameters (such as DNS and WINS name
resolution)
• configure security parameters
• monitor the status of the digital sender on the network
• troubleshoot problems
The HP JetAdmin software includes online help.
HP Address Book Manager (ABM)
Used to set up user profiles, as well as pub lic and private addre ss
books for sending documents to e-mail or f ax destinations directly
from the digital sender. Also used to configure printers for use
with the digital sender and to customize the control panel. The
ABM maintains a log of all digital sender activities , which is useful
in monitoring and troubleshooting. The ABM includes online
help.
HP Digital Sender Link
Moves documents from the digital sender to designated folders
on the network. Any kind of program can then use the
information. The HP Digital Sender Link includes online help.
HP Digital Sender Service
Supplied with the digital sender to provide support for LAN fax
products and for customizing interfaces with other third-party
programs. This software can be installed only on Windows NT
computers.
Online documentation
You can choose to install online versions of the user guide and
administrator guide. The Adobe
also be installed to view these online documents if it is not
already installed on your network or computer.
®
Acrobat® Reader program can
EN Components 21
Specifications
Equipment specifications
Feature Description
Product type
Scanning element
Light source
Interface
Optical resolution
Maximum scanning speed
Image processing
Compression
AC line voltage
Power consumption
Noise levels
Flatbed and sheetfed
Charged-coupled device
Xenon lamp
LAN: Ethernet or Token Ring
600 dpi (dots per inch)
15 pages per minute (text quality)
Black-and-white documents
Fine text (intended for OCR)
Color documents
Color and black-and-white photographs
High-resolution color and black-and-white
photographs
Hardware: optimized JPEG
Software: G4 and HP Smart
Compression Imaging Technology
100 to 240 Vac, 50 to 60 Hz
33 W idle
70 W operating
35 dB idle
50 dB when operating the flatbed
55 dB when operating the ADF
Weight
Duty cycle
Control panel display
16.0 kg (35.27 lb)
10,000 pages per month
240-by-64 pixel graphic LCD
Blue dots on silver-gray background
CCFL (Cold Cathode Fluorescent Lamp)
backlit
22 Chapter 1 - About the digital sender EN
Feature Description
Keypads
Scan engine
Automatic document feeder
(ADF)
40-key alphabetic keypad
12-key numeric keypad
Help key
Simplex/duplex ke y for single-sided or
double-sided scanning
Green “go” button and red “stop” button
4 context-sensitive function keys
Full-color and grayscale ADF (automatic
document feeder) and flatbed scans
Image calibration
Color and tonal adjustment
Data scaling and enhancement
Data conversion to different data types
(text, halftone, and color draft modes)
50-page capacity
High feeding accuracy and reliability
High-speed scans
Variety of paper sizes and weights
Correct order output
Automatic start and stop at any speed
EN Specifications 23

Environmental ranges
Temperature
Operating 5 to 40° C (41 to 104° F)
Storage -30 to 60° C (-22 to 140° F)
Humidity
Operating 10 to 80% noncondensing (10 to 32.5° C)
10 to 45% noncondensing (32.5 to 40° C)
Storage 10 to 85% (0 to 40° C)
10 to 50% (40 to 60° C)
CAUTION The operating environment should be stable, with no abrupt changes
in temperature or humidity, or your digital sender might be damaged.
If you mov e the digital sender from a cold to a w arm environment, w ait
about two hours before using it.
24 Chapter 1 - About the digital sender EN

Supported capabilities
Operating capabilities
Description Maximum
Multiple selections at control panel (combination of each
individual e-mail address and each distribution list)
Destinations for an e-mail message (combination of all
individual e-mail addresses and all addresses in
selected distribution lists)
Destinations for a fax transmission 64
Pending fax transmissions 128
Characters in a telephone number 80
128
1,024
Memory capabilities
Description Maximum
Users 512
Public e-mail addresses 200,000
Public fax addresses 1,024
Public e-mail distribution lists 512
Public printers 256
Private e-mail addresses for each user 256
Private distribution lists for each user 100
Entries in an e-mail distribution list 512
Entries in the activity log for each user 100
Entries in the activity log for the administrator 200
Function keys that can be customized 11
Destinations that can be configured for each customized
function key
EN Specifications 25
512

German noise declaration
Geräuschemission
LpA <70 dB
am Arbeitsplatz
normaler Betrieb
nach EN 27779
Die Daten sind die Ergebnisse von Typprüfungen.
French EMC regulation
NOTE: Réglementation Française - Déclaration d'installation et
d'utilisation d'un produit ATI de Classe A.
L'utilisateur d'un appareil de traitement de l'information (ATI) de
Classe A suivant la norme de compatibilité électroma- gnétique
NFEN 55022, doit être déclaré auprès de la préfecture du
département ou l'appareil est installé et utilisé ainsi qu'au Ministère
des Telecommunications.
Le formulaire de déclaration a utiliser est disponible auprès des
services de la Préfecture.
26 Chapter 1 - About the digital sender EN

Declaration of conformity
EC Declaration of Conformity
According to ISO/IEC Guide 22 and EN 45014
Manufacturer’s Name: Hewlett-Packard Italiana S.p.A.
Manufacturer’s Address: Viale Europa, 2
Declares that the product
Product Name: HP 9100C Digital Sender
Model Numbers: C1313A, C1314A, C1315A, C1316A
Product Options: All
Conforms to the following specifications:
24040 Stezzano (BG)
ITALY
SAFETY IEC 950:1991 +A1+A2+A3+A4 / EN 60950:1992 +A1+A2+A3+A4
EMC CISPR 22:1993+A1 / EN 55022:1994 Class A
Supplementary information:
The product herewith complies with the requirements of the Low Voltage Directive 73/23/EEC and
the EMC Directive 89/336/EEC and carries the CE-marking accordingly.
The product was tested in a typical configuration with Hewlett-Packard test systems.
Bergamo, 30 June 1998
European Contact: Your local Hewlett-Packard Sales and Service Office or Hewlett-Packard GmbH, Department
HQ-TRE, Herrenberger Straße 130, D71034 Böblingen (Fax: +49-7031-3134 )
Australian Contact: Product Regulation Mana ger, Hewlett -Packard A ustralia Ltd., 31-41 Joseph Street, Blackburn, Victoria
3130 - Australia
IEC 825-1:1993 / EN 60825-1:1994 Class 1
EN 50082-1:1992
IEC 801-2:1991 / prEN 55024-2:1992 ± 4 KV CD; ± 8 KV AD
IEC 801-3:1984 / prEN 55024-3:1991 3 V/m
IEC 801-4:1988 / prEN 55024-4:1992 ± 0.5 KV signal lines
± 1.0 KV power lines
IEC 1000-4-3:1995 / EN 61000-4-3:1996 3 V/m
IEC 1000-4-5:1995 / EN 61000-4-5:1996 ± 1.0 KV differential
± 2.0 KV common
IEC 1000-3-2:1995 / EN 61000-3-2:1995
IEC 1000-3-3:1994 / EN 61000-3-3:1995
AS/NZS 3548:1992 / CISPR 22:1993 + A1 Class A
__________________________________
Tiberio Tesi - Quality Assurance Manager
EN Specifications 27

28 Chapter 1 - About the digital sender EN

Installing and
2
configuring
Introduction
Installing and configuring the HP 9100C Digital Sender for the first
time consists of:
physically installing the unit
configuring network and security parameters
installing the software
configuring users
setting up public e-mail and fax destinations
designating the printers that can be used with the digital sender
Each HP 9100C Digital Sender exists on the network independently
of any other digital sender. However, once you have configured one
digital sender , yo u can replicate that configu ration f or an y other digital
sender on the same network.
At any time after initial configuration, you can change what you have
set up. Depending on what you want to do, you use one of the
following methods (explained in chapter 3 on monitoring and
maintaining the digital sender).
digital sender control panel
HP JetAdmin software
HP Address Book Manager
HP Digital Sender Link
Note If your network includes an HP Network ScanJet 5 scanner, see
“Coexisting with the HP Network ScanJet 5 scanner” on page 61 for
special considerations.
EN Introduction 29

Installation requirements
Environmental requirements
stable environment with no temperature or humidity changes
room temperature of 5 to 40° C (41 to 104° F)
relative humidity of 10 to 80% noncondensing
sturdy, level surface
well-ventilated room with no exposure to chemicals or direct
sunlight
location free of constant vibrations
Network system requirements
One of the following operating environments:
Microsoft Windows 9x
Windows NT 4.0 or 5.0 (Intel PC) workstation and server
Network:
Microsoft TCP/IP protocol stack or compatible
SMTP-MIME e-mail server that can be reached by the digital
sender through a dedicated connection (the digital sender does
not support dial-up connections)
Administrator:
Pentium® processor
Windows 9x: 16 MB of RAM minimum, 32 MB recommended
Windows NT: 32 MB of RAM minimum, 6 4 MB recommended
25 MB of hard disk space
VGA monitor
Client system requirements
Windows 9x, or Windows NT 4.0 or 5.0 (Intel PC) workstation and
server
Pentium proce ssor
Windows 9x: 16 MB of RAM minimum, 32 MB recommended
Windows NT: 32 MB of RAM minimum, 6 4 MB recommended
41 MB of hard disk space
VGA monitor
30 Chapter 2 - Installing and configuring EN

Space requirements
The following figure illustrates the space requirements for the HP
9100C Digital Sender.
What ships in the box
The following illustration shows what ships in the box with HP 9100C
Digital Sender.
Control panel and
automatic document
feeder (ADF)
Digital
sender
EN What ships in the box 31
Documentation (includes optional
language stick er for keypad and
HP JetSend sticker)
Compact disc
Power cable
Cable collar

The configuration process
Fast-track configuration
After you hav e ph ysically insta lled the digital send er, you only need to
configure a few parameters at the control panel to begin using the
digital sender right away. After you have configured these “fast-track”
parameters, you will be able to:
discover the digital sender over the network
send e-mail messages
use e-mail addresses located on an LDAP server of your
choosing
send documents to HP JetSend-enab led devices on your netw ork
Extended and optional functionality
Once you have established the digital sender on the network and
enabled basic functionality, you can extend functionality for the
services you wish to implement. You can also configure optional
parameters for the services you have already set up.
In general, the extended and optional feature s consist of the
following:
security preferences
DNS and WINS name resolution
ability to send faxes from the digital sender
ability to send documents from the digital sender to other
computers on your network
ability to send documents from the digital sender to printers on
your network
See “Digital sender parameters” on page 73 for a list of all the
parameters you ca n configure for the digital sender and where you
configure them.
32 Chapter 2 - Installing and configuring EN

Assigning an IP address to the digital sender
The easiest and recommended method f or assigning an IP addr ess to
the digital sender is by entering it directly at the control panel. Sev er al
alternate methods exist:
assign using the HP JetAdmin software
You can use the HP JetAdmin software at your computer to
assign or change the IP address for the digital sender.
assign using a DHCP or BOOTP server
You might be more familiar with assigning IP addresses to
network devices from a DHCP or BOOTP server. In this scenario,
you prepare the de vice attached to the netwo rk, make an entry for
it on the DHCP or BOOTP se rver, and then turn the device on.
The HP JetDirect print server inside the HP 9100C Digital Sender
picks up its IP information from the DHCP or BOOTP server.
Note You can let the digital sender time out to a default IP address. In fact,
this happens automatically if you do not man ually assign an IP address
at the control panel within the timeout period of 2 minutes.
The default IP address is not a valid address. You must change the
address to one of your ow n assignment. You can use the control panel
or the HP JetAdmin software to do this at any time.
Preparing for configuration
Before yo u start configuring the HP 9100C Digital Sender for the first
time, take a few minutes to prepare so that you can complete the
steps without interruption. Use the checklist on the following page.
EN The configuration process 33

Configuration Checklist
Decisions needed for installation
Method you want to use to assign IP address to the digital sender: manually at
the control panel (recommended), or from a DHCP or BOOTP server.
Method you want to use for installing client software: from the installation
compact disc, from a shared network folder, or from a website. If from a
shared network folder or website, decide where you want to locate the files.
Information needed for fast-track configuration
IP address for the digital sender ________________________________
IP subnet mask ______________________ __________
IP gateway ________________________________
E-mail server address ________________________________
E-mail default from (e-mail address) ________________________________
If you choose to enable the LDAP directory service (optional)
LDAP server address ________________________________
LDAP search root ________________________________
HP JetSend device addresses (optional) ________________________________
________________________________
Decisions and information needed f or extended functionality
Do you want to enable the fax service?
Fax product name ________________________________
IP address of the server where you plan to
install the required HP Digital Sender Service ________________________________
Path of workarea folder used by the product ________________________________
Do you want to enable convenience copying?
Type and network address of printers ________________________________
________________________________
Do you want to enable DNS or WINS name resolution?
IP address of the DNS server ________________________________
IP address of the DNS server domain ________________________________
IP address of the WINS server ___________________________ _____
Do you want to set up registered users at this time?
For each user, you will need: user name, user computer address, user e-mail address
34 Chapter 2 - Installing and configuring EN

Overview of configuration
Follow the steps in the order shown in the illustration below. Detailed
steps follow the illustration. See “Troubleshooting the installation” on
page 63 if you encounter any problem.
Overview of the configuration process
FAST-TRACK CONFIGURATION
Install the unit
Configure fast-track parameters
at the control panel
EXTENDED AND OPTIONAL CONFIGURATION
Configure extended and optional
parameters at the control panel
Run the setup program to install
the administrative software
Configure extended and optional
parameters using the HP JetAdmin software
Configure the HP Address Book Manager
Distribute the client software to
user computers
Test the installation
EN The configuration process 35

Fast-track configuration steps
e
Install the unit
1
3
4
ADF
cable
Control
panel cabl
Network
cable
Power
cable
1 Unpack the digital sender:
Lift the digital sender out of its
box and remove all shipping
bags.
Remove all tape from the ADF
(automatic document feeder).
Save the carton and all
packaging material for
repackaging.
2 If you have a Token Ring network
with 4-Mbps operation, remove the
HP JetDirect print server (J3112A
interface card), set the data-rate
switch to 4 Mbps, and reinstall the
print server. See “Removing and
replacing the HP JetDirect print
server” on page 124 for details.
3 Unlock the digital sender:
Lift the ADF clear of the digital
sender and place it on a clean,
stable surface.
Unlock the digital sender by
rotating the locking screw 90
degrees clockwise.
Reinstall the ADF.
4 Install the cables:
CAUTION If you ever need to move
the digital sender to
another location, make
sure that you lock it first.
Moving the digital sender
when it is unlocked will
damage the unit.
ADF cable
control panel cable
network cable (not provided)
power cable
5 Plug the power cable into a
grounded power outlet.
36 Chapter 2 - Installing and configuring EN

6
6 Clamp the cable collar around the
network cable as close as possible
to the digital sender end. This collar
prevents electromagnetic
interference (EMI) with the digital
sender.
7 If you are using a language other
than English, place the language
7
sticker on the control panel.
8 If you choose to enable the
HP JetSend service, place the
HP JetSend sticker on the digital
sender.
9 Turn the digital sender on. The
power switch is located on the lower
part of the front side.
Language sticker
8
HP JetSend sticker
9
EN Fast-track configuration steps 37

Configure fast-track parameters at the contr ol panel
After you have physically installed the digital sender, y ou only need
to configure a few par ameters at the control pa nel to begin using the
digital sender right awa y. After y ou hav e configured these “fast-track”
parameters, you will be able to send e-mail messages, use
e-mail addresses located on an LDAP server of your choosing, and
send documents to HP JetSend-enabl ed devices on your network.
The “fast-track” parameters consist of the following (see
“Configuration menu parameters” on page 80 for more detailed
explanations):
IP configuration (to specify how the digital sender is to receiv e
its TCP/IP configuration—manually or from a DHCP or BOOTP
server)
IP Address (of the digital sender)
IP Subnet Mask (if you use subnets)
IP Gateway (IP address of the gateway server used to send
packets off the local network)
E-mail Server Addr. (IP address of the SMTP-MIME e-mail
server)
E-mail Default From (default e-mail address f or the FR OM field
of e-mail messages from the digital sender)
Administrator Password (recommended—not required)
LDAP Server Address (IP address of the server that hosts the
LDAP server—not required)
LDAP Search Root (basepoint from which to start searches for
names on the LDAP server—required if you configure an LDAP
server address)
JetSend (either enabled or disabled—not required)
38 Chapter 2 - Installing and configuring EN

Control panel keys used for the configuration menu
Use this key To do this
Up/down arrows Scroll through the choices in a list.
and In the configuration menu
Scroll through the list of parameters.
In the dialog for a parameter
Move between fields; increase or decrease values.
ANCEL
C
(function key)
LEAR
C
(function key)
E
XIT
(function key)
K
O
(function key)
S
AVE
(function key)
In the dialog for a parameter
Cancel any changes made and close the dialog.
In the dialog for a parameter
Delete the contents of a field.
In the configuration menu
Close the configuration menu and discard all changes you made.
In the configuration menu
Open the dialog for the parameter you have selected to make changes.
In the dialog for a parameter
Confirm the value and close the dialog.
In the configuration menu
Close the configuration menu and save the values you have changed.
To configure parameters at the control panel
1 If you have not already done so, turn the digital sender on. The
first time you configure the digit al sender, the configur at ion menu
appears.
Note You can reach the configuration menu at any time by pressing
S
HIFT+ALT+ . Make sure the digital sender is in an idle state
beforehand (the green light under the button is off).
2 Scroll to each parameter you want and configure it. See the table
on the next page for information on how to use the keys.
3 When finished, press S
4 At this point you can do either of the following:
end installation and begin using the digital sender immediately
with e-mail, LDAP, and HP JetSend functionality
continue installation and configure extended and optional
capabilities
EN Fast-track configuration steps 39
AVE.

To configure HP JetSend-enabled devices (optional)
This section applies if you enabled the HP JetSend service. As a
convenience for your users, you can configure the addresses of
HP JetSend-enabled devices commonly used in your office. Then,
users can select from a list of devices at the control panel instead of
having to manually enter an IP address or DNS name.
To add a device to the list:
1 At the control panel, press J
ETSEND.
2 Type the IP address or DNS name for the HP JetSend-en abled
device you want to add, and then press O
K. The device is added
to the list.
3 If you want to add another device, press N
EW and repeat step 2.
The list can contain up to 64 devices
40 Chapter 2 - Installing and configuring EN

Extended and optional configuration steps
Configure extended and optional parameters at the control panel
Listed below are the additional parameters you can configure at the
control panel for extended and optional functionality (see
“Configuration menu parameters” on page 80 for more detailed
explanations of all parameters):
Date, Time (of the digital sender)
Paper Size (default size for the scanning area)
Language (for the control panel, if other than English)
Admin Full Name (full name of the administrator)
Administrator E-mail (e-mail address of the administrator used
by the digital sender to send e-mail notifications)
E-mail Default Subject (default text for the SUBJECT field in
e-mail messages sent by the digital sender)
LDAP Service Port, LDAP Account Name, LDAP Password
(additional parameters for configuring the LDAP directory
service)
DNS Server Address, DNS Domain (for DNS name resolution)
WINS Server Address (for WINS name resolution)
To configure extended and optional functionality
1 In the configuration menu at the control panel, scroll to each
parameter you want and then press O
2 Configure the parameters. See the table on page 39 for
information on how to use the keys.
3 When finished, press S
EN Extended and optional configuration steps 41
AVE.
K.

Run the setup program to install the administrative software
The setup program installs all the software that is necessary to use
the digital sender (see the table on t he next page).
The software needed b y client com put e rs is dist ributed to users in a
later step, which either you or users can do (see “Distribute the clie nt
software to user computers” on page 55).
During the setup program, you decide h ow y ou want to la ter distribute
the client software to user computers:
installation compact disc
Users can install client software using the same setup program
on the installation compact disc that is used in this step.
shared network f o lder or website
If you choose one of these options, the setup program gives you
the opportun ity to plac e the files wh er e you want.
If the setup program finds that a particular software component has
already been installed, it issues a message asking if you want to
overwrite the existing file(s) and continue. When you overwrite a
component, the setup program installs the new version in t he same
folder—you do not have the opportunity to change the location. This
means that the first person who installs the software sets the target
folder for all later installations.
There are special considerations if you are installing the software on a
Windows NT computer and plan to share it with both an HP 9100C
Digital Sender and an HP Network ScanJet 5 scanner. See
“Coexisting with the HP Network ScanJet 5 scanner” on page 61.
42 Chapter 2 - Installing and configuring EN

Administrative software installed by the setup program
Software Purpose
HP JetAdmin Utilities The core HP JetAdmin software that is used to
remotely configure, monitor, and control HP
network peripherals.
HP JetAdmin Extension Add-on HP JetAdmin software that supports th e
digital sender.
HP Address Book
Manager
HP Digital Sender Link The software that moves scanned documents
HP Digital Sender Service Installed only on Windows NT computers and
Online documentation Online versions of documentation in .pdf format
Adobe Acrobat Reader Needed only if you install the online guides and
Used to set up user profiles, as well as e-mail
and fax destinations for sending e-mail
messages and faxes directly from the digital
sender. Also used to configure printers for use
with the digital sender and to customize the
control panel.
from the digital sender to the default inbox
locations on the network or user computers.
Used if you have not installed the HP Digital
Sender Service (the HP Digital Sender Link and
the HP Digital Sender Service cannot be running
on the same computer).
only if you want to use the digital sender fax
service with an installed LAN fax product or want
to customize an interface with a third-party
program. This is the software supplied with the
digital sender to provide this support.
(administrator guide, user guide, quick
reference, and getting started guide).
you do not already have the Acrobat Reader or
Acrobat Exchange program installed. Used to
read the .pdf files for the documentation.
EN Extended and optional configuration steps 43

To run the setup program
1 Turn your computer on. If the computer is already on, close any
programs that are running.
2 Insert the installation compact disc into the CD-ROM drive. The
setup program starts autom a tica lly wi th a welcome pa ge.
3 Click Next on the welcome page, and then follow the instructions
on the screens that follow.
Notes about the choices:
We recommend that you choose Before Installing before
starting the install.
You can change the language of the setup program using the
choices fo r Setup Language.
For this installation, choose HP Digital Sender Administrator
and then Administrator Software.
Choose HP Digital Sender Service only if you are installing
on a Windows NT computer and want to use the digital sender
fax service with an installed LAN fax product.
The HP JetAdmin software has two parts: Utilities and
Extension. Be sure to select both.
Select Client Software Distribution if you plan to distribute
the digital sender software to client computers from the
network (a later step, described under “Distribute the client
software to user computers” on page 55). During the install,
you are asked where on the network you want to place the
client software.
4 Be sure to register the digital sender when the registration
window appears. (However, you can register the digital sender at
any time later by double-clicking the registration icon in the
HP 9100C program group.)
5 When the installation is complete, restart the computer.
44 Chapter 2 - Installing and configuring EN

Configure extended and optional parameters using the HP JetAdmin software
Using the configuration pages in the HP JetA dmin soft w are that you
installed in the previous step, configure any of the information listed
below. Note that you might already have configured some of the
parameters at the control panel. See “Configuration menu
parameters” on page 80 for more detailed explanations of all
parameters.
digital sender description (General page)
TCP/IP information—if you have not configured this information
at the control panel (TCP/IP page)
Domain Name Service (DNS) and Windows Internet Name
Services (WINS) parameters (DNS/WINS page)
security preferences (Security page)
e-mail service parameters (E-mail page)
fax service parameters (Fax page)
LDAP directory service parameters (LDAP page)
There are two ways to navigate through the configuration pages in the
HP JetAdmin software.
interview mode
Takes you through the configuratio n pages one at a time, asking
for information in a fixed order. You move to the next question by
pressing Next and move back to previous questions by pressing
Back. Everything takes effect at once when you click Finish at
the end of the interview mode session.
expert mode
Displays the Configuration window with tabs for all the
configuration pages. You select the page you want and fill in the
information. You can move between pages at will. Information
takes effect whenever you click OK at the bottom of the window.
When the HP JetAdmin software is first installed, the interview mode
is active by default. You can change the mode at any time using the
steps below.
EN Extended and optional configuration steps 45

To change configuration mode
1 Start the HP JetAdmin software. The main window appears.
2 Click the Options menu and note the Interview Mode check box.
Interview mode is enabled when a check mark appears in the
check box.
3 To change to expert mode, clear the Interview Mode check box.
To select the digital sender you want to configure
1 Start the HP JetAdmin software. The main window appears. The
digital sender should be listed in the device list with the IP
address you assigned (or a symbolic name , if applicable).
2 In the device list, click the digital sender you want to configure.
3 On the Device menu, click Modify.
Note If you do not see the digital sender in the device list, on the Device
menu, click Find. In the Find a device dialog box, type the IP address
you assigned and click Find.
Use a different method if the digital sen der has been assigned a default
IP address. First, at the control panel, display the self-test page by
pressing
parameters. Then, in the HP JetAdmin software, click Device and then
New to get the list of unconfigured devices. You should be able to
identify the digital sender by the MAC address. Select the de vice and
then click Configure. You can then assign IP information.
SHIFT+ALT+ . Find the MAC address in the list of
To move through the configuration pages
You move differently through information, depending on mode:
Interview mode: Click Next to move to the next question,
click Back to move to previous questions.
Click Finish at the end of all questions to
commit the information you have entered.
Expert mode: Click the tab for the configuration page you
want. Click OK at the bottom of the
Configuration window at any time to commit
the information you have entered so far.
46 Chapter 2 - Installing and configuring EN

1 General page.
Optional. Type a Description if one is missing, or change the
existing description. The description might include such
information as type of device and location.
2TCP/IP page. Used to configure TCP/IP information if you have
not already done so at the control panel.
Choose the method by which the digital sender receives its
TCP/IP configuration (manual, DHCP, or BOOTP).
If you choose manua l, type the required information in the
TCP/IP Address, Subnet Mask, and Default Gateway fields.
3 DNS/WINS page. The digital sender uses DNS and WINS to
resolve symbolic network names into IP addresses. This feature
must be used if you identify e-mail an d fax servers, printers, and
computer names by network name inst ead of by IP address.
Enable the name resolution you want. You can select both
Enable Domain Name System (DNS) and Enable Windows
Internet Naming Service (WINS) at the same time. When you
enable both, the digital sender attempts to resolve network
names using WINS first, and then DNS.
For DNS. Type the Default search domain. In the DNS
Server Search Order field, you can specify up to five DNS
servers for use in resolving DNS names. At least one DNS
server is required if you enable DNS. Enter each as an IP
address. To resolve network names, the digital sender
contacts DNS servers in the order you specify in the list.
The digital sender uses the Default search domain to build
fully qualified network names. For example, if the default
search domain is “hp.com” and you specify the e-mail server
as “email_gw,” the digital sender tries to contact the computer
identified by the fully qualified network name
“email_gw.hp.com.” Usually the default search domain
corresponds to the network domain where the digital sender is
installed. If you do not specify a default, all the network names
used by the digital sender must be fully qualified ones.
Otherwise, they cannot be resolved.
For WINS. Type an IP address for the Primary WINS Server
(required when WINS is enabled) and a Secondary WINS
Server (optional).
EN Extended and optional configuration steps 47

Optional. The digital sender maintains a history (cache) of
previous name resolutions. Using this cache improves
response times, since the digital sende r does n ot t hen h ave to
repeat the query every time the same name needs to be
resolved. If y ou wish t o use t he cache feature, clic k Advanced
and then click the check box next to Enable WINS/DNS
Name-to-IPAddress cache.
4Security page. Used to configure the administrator profile and
digital sender security preferences.
If you did not enter the information at the control panel, type
the administrator E-mail Address, Full Name, and Company
Name. The e-mail address is used by the digital sender to
notify the administrator when events that require attention
have occurred.
If you did not enter an administrator password at the control
panel or want to change it, click Change password. Type the
existing password (if there is one) in the Old field. Type the
new password in the New field and then again in the Confirm
new field. Click OK. Note that the administrator password is
case-sensitive. A password change is not committed until you
choose to exit the configuration pages and save the changes
by clicking Finish (or OK if in expert mode).
Select your preference for Notify me through e-mail when
events that require my attention occur. This controls
whether the administrator receives these notifications. (See
“Controlling notifications” on page 85 for more information
about notifications.)
Select your preference for Administrator must always
validate creation/changes of registered user profiles. This
controls whether the administrator must validate new user
profiles and changes to existing user profiles before they can
take effect.
Select your preference for Allow guest usage. This
determines who can use the digital sender: registered users
(those with a user profile), guest users, or both.
48 Chapter 2 - Installing and configuring EN

5E-mail page. Used to enable and configure the ability to send
Internet e-mail from the digital sender . You might have configured
some of this information at the control panel already.
Type the e-mail SMTP serve r address in the IP Address or
Network Name box. If you enter a network name, make sure
that you have enabled either DNS or WINS name resolution on
the DNS/WINS page.
Type the defaults for Default FROM, Default Full Name, and
Default Message SUBJECT. The digital sender uses these
defaults for the envelope information of e-mail messages.
If you hav e configured the e- mail service at the control panel, a
check mark already appears f or Enable Internet E-mail. If
there is no check mark, select the field. This makes the e-mail
service available to users at the cont rol panel. When disabled,
the service becomes suspended but remains configured.
Optional. To configure advanced features for the e-mail
service, click Advanced and select your preferences for the
following.
Break apart
messages larger
than
Attachment file
type
Message text
language
SMTP servers sometimes have a
maximum size for e-mail attachments. Use
this field to break large documents into
multiple messages that fit the size
limitations of your SMTP server.
Select the file format you want for the
e-mail attachments that are created by the
digital sender.
Users can provide a subject line at the
control panel, but the digital sender
provides a standard text message in the
language specified here.
EN Extended and optional configuration steps 49

6Fax page. Enables and configures the fax service. To use this
service, the HP Digital Sender Service must already be installed
on a Windows NT computer on your network. A LAN fax product
must also be installed.
In the IP Address or Network Name field, type the I P address
or network name of the computer where the HP Digital Sender
Service is installed. If you enter a network name, make sure
that you have enabled either DNS or WINS name resolution on
the DNS/WINS page.
Select your fax product from the Product Name list.
In the MailboxID field (if available), type the ID corresponding
to the digital sender account configured in the LAN fax server
administrative software.
Select your preferences for Notifications. The digital service
works with some fax products to provide notifications for fax
transmissions. If supported by your fax product, select your
preferences for how you want noti fications distributed.
You set the printer for fax transaction reports in the ABM (see
“Managing printers” on page 1 11 ).
Click the Enable Fax chec k bo x to enable the f ax service. This
makes the fax service available to users at the control panel.
When disabled, the service becomes suspended but remains
configured.
Optional. To configure advanced f eatures for the fax product
you have selected, click Advanced and select your
preferences f or t he following. Each product has its o w n default
values; some can be changed and some cannot.
Exchange File
Format
File format for sending data to the fax
server.
Resolution Sending resolution.
Max. Trans. Speed Maximum fax transmission speed.
ECM Error Correction Mode (enabled or
disabled).
Retry Maximum number of retries for each fax
transmission.
Interval Number of minutes between retries.
Default Accounting
Code
Used to add an identifier to fax
transmissions for billing purposes.
50 Chapter 2 - Installing and configuring EN

7LDAP page. Used to configure the ability to query LDAP
directory services for e-mail addresses and to import addresses
from an LDAP directory into address books.
In the LDAP Server IP Address or Network Name field, type
the IP address or network name of the LDAP server. If you
enter a network name, make sure that you have enabled either
DNS or WINS name resolution on the DNS/WINS page.
Required. The Search root field restricts searching to a
specific area of the LDAP directory information tree.
Directories are often represented in a hierarchical wa y using a
tree. In this field, enter the basepoint (root) from which to start
the search for e-mail addresses. This basepoint can be a
country, an organization, or other type of group.
Optional. Used to specify the account used by the digital
sender to access the LDAP server directory when the server
requests authentication. If not used, the digital sender logs in
to the LDAP server using anonymous rights. Select the
Authenticate transactions with the server check box when
the digital sender must log in to the LDAP server. Type
Account name. Type a Password and then type it again in
the Confirm password field.
Click the Enable Directory Services check box to enable the
LDAP directory service. This selection makes the S
EARCH key
available to users at the control panel when entering the TO
field of an e-mail message. When disabled, the service
becomes suspended but remains configu red.
Optional. To configure advanced features for the LDAP
directory service, click Advanced and select your pref er ences
for the following.
Port number Port at which the LDAP server is listening.
The default is 389.
Search time-out Number of seconds the digital sender waits
for an answer to a search from the LDAP
server. The default is 5 seconds; 0 means
the timeout is dictated by the LDAP server.
Maximum
number of hits
Maximum number of entries matching the
query to be returned by the LDAP server.
The default is 15; 0 means the maximum
number is dictated by the LDAP server.
EN Extended and optional configuration steps 51

Configure the HP Address Book Manager
Use the HP Address Book Manager (ABM) to configure any of the
following at this time.
registered users
Public Email address book
Public Fax address book
a public distribution list for the Public Distribution Lists address
book
printers to be available for convenience copying
administrator preferences for user profile validation and
notifications
This section leads you through the steps for setting up users, public
destinations, public distribution lists, printers, and administrator
preferences for the digital sender. You can continue or change this
configuration at any time. Note that users have the ability to register
themselves as users once they have access to the digital sender.
To create registered users and add them as
destinations to the Public Email address book
1 Start the ABM at your computer. To do this, click Start, point to
Programs, then HP 9100C, and click HP Address Book
Manager.
2 In the ABM main window, click Users.
3 On the File menu, click New.
4 Complete the information in the New User Profile dialog box and
then click Add.
Click Delivery Notification if you want the user to receive
e-mail notifications regarding e-mail transmissions. Note that
this feature works only if y our system sup ports DSN and if you
supply an e-mail address for the user in this profile.
Click Add E-mail address to Public Address Book to add
the user to the Public Email address book.
Make sure you select the Account Enabled check box.
5 Repeat step 4 for each registered user you want to add.
6 When finished, click Close.
52 Chapter 2 - Installing and configuring EN

To add fax destinations to the Public Fax address
book
1 Start the ABM.
2 In the ABM main window, click Public Fax.
3 On the File menu, click New.
4 Complete the information in the New Fax dialog box and click
Add.
5 Repeat step 4 for each fax destination you want to add.
6 When finished, click Close.
To create a public distribution list for the Public
Distribution Lists address book
Creating a public distribution list at this tim e is optional. Ho w ever, you
might want to create one or more to contain the registered users in
different workgroups in your office.
1 Start the ABM.
2 In the ABM main window, click Public Distribution Lists.
3 On the File menu, click New. The words “New List” appear.
4 Type over the words “New List” with the name for the distribution
list.
5 Press E
NTER.
To add e-mail destinations to a public distribution list
Use this procedure to add e-mail addresses to the public distribution
list you just created above. Distribution lists contain only e-mail
destinations. The steps assume y ou are adding e-mail addresses that
you have already set up in the Public Email address book.
1 Start the ABM.
2 In the ABM main window, click Public Email.
3 Select the addresses you want to add.
Note To select a continuous set of e-mail addresses, click the first one, hold
down S
To select more than one individual address, click the first one, hold
down C
addresses you select are highlighted.
EN Extended and optional configuration steps 53
HIFT, and click the last one y ou want; the entire set is highlighted.
TRL, and click the others that you want, one at a time; the

4 On the Edit menu, click Copy.
5 Click Public Email.
6 On the Edit menu, click Paste. The destinations are added to the
list.
To add printers to the Public Printers address book
for convenience copying
The first printer you configure becomes the default printer for fax
transaction reports (if you have configured the fax service to print
these reports, which is one of the options available through the Fax
page in the HP JetAdmin software).
1 Start the ABM.
2 In the ABM main window, click Public Printers.
3 On the File menu, click New.
4 Complete the information in the New Printer dialog box and clic k
Add.
5 Repeat step 4 for each printer you want to add.
6 When finished, click Close.
To set administrator preferences for user profile
validation and notifications
You might already have set administrator preferences on the
HP JetAdmin software Security page. If so, skip this section.
Here you decide two things:
whether you want to control user profiles by personally validating
them when users create or change them
whether you want to be notified by e-mail when events that
require your attention occur
For further information about security controls, see “Security” on
page 18. For further information about notifications, see “Controlling
notifications” on page 85.
1 Start the ABM.
2 On the Digital Sender menu, click Security.
3 Complete the information in the Security level dialog box.
4 When finished, click OK.
54 Chapter 2 - Installing and configuring EN

Distribute the client software to user computers
In this step, you distribute the software listed below to the user
computers (clients) that will be accepting documents from the digital
sender and using the HPAddress Book Manager.
HP Address Book Manager
HP Digital Sender Link
Online user guide
The client software must be installed at each user computer. The
digital sender user guide contains the same steps found in this
section—either you or your users can perform them.
If users install the client software, you need to tell them what method
to use:
installation compact disc
shared network folder
website
Client software installed by the setup program
Software Purpose
HP Address Book Manager Used to set up user profiles, as well as e-mail and fax
destinations for sending e-mail messages and faxes directly
from the digital sender. Also used to configure printers for use
with the digital sender and to customize the control panel.
HP Digital Sender Link This is the software that moves scanned documents from the
digital sender to the default inbox locations on the network or
user computers. Used if you have not installed the HP Digital
Sender Service (the HP Digital Sender Link and the HP Digital
Sender Service cannot be running on the same computer).
Online user guide Online version of the user guide in .pdf f o rmat.
Adobe Acrobat Reader Needed only if you install the online user guide and you do not
already have the Acrobat Reader or Acrobat Exchange program
installed. Used to read the .pdf file for the guide.
EN Extended and optional configuration steps 55

To install the client software
1 Turn the client computer on. If the compute r is al ready on, close
any programs that are running.
2 If the software is being installed from the network, log in to the
network, click Start and then Run, type the path to the folder
where you placed the installation files, and click OK.
- Or If the software is being installed from the compact disc , insert it in
the CD-ROM drive. The set up program begins automatically.
- Or If the software is being installed from a website, open the site
where you placed the installation files. Click the download button
to download and launch the installation.
3 Follow the instructions on the screen. During the installation, you
need to specify the following:
which programs to install (by default, all programs are
installed)
where to store the programs (you can accept the default
location or choose another location on the computer )
path to the default inbox where the data sent to the computer
by the digital sender is stored (you can accept the default
location or choose another location on the or the network)
4 When the installation is finished, restart the computer.
All the programs you selected are installed. If you installed the
HP Digital Sender Link you can choose which program is the target
program, as explained in the user guide in the chapter on the HP
Digital Sender Link.
56 Chapter 2 - Installing and configuring EN

Test the installation
Use the following steps to verify that all is working as it should. See
“Troubleshooting the installation” on page 63 if you experience a
problem.
To test the installation
1 Check the control panel. There should be a f unction key for each
functionality that you configured.
2 Display the self-test page to verify that the HP JetDirect print
server is successfully linked to the network. The TCP/IP status
parameter should read “READY.” To display the page, at the
control panel press
S
HIFT+ALT+
3 For Fast Ethernet (10/100Base-TX) networks only (HP J3113A
print server): Check the LEDs on the interface card. Either the
10-Mbps or 100-Mbps LED (depending on your network) should
be lit.
4 Test the e-mail service to confirm that the digital sender can
communicate through Internet e-mail.
If you configured the IP address using the control panel, send
a test e-mail message to yourself. Check your e-mail inbox to
verify that it was delivered.
If you configured the IP address usin g the HP JetAdmin
software, check your e-mail inbox for the message that the
digital sender generates when you have configu red the e-mail
server correctly. (This assumes that you have configured an
administrator e-mail address for the digital sender.)
5 Test the PC service by sendin g a test document to a computer
you configured. Note that the HP Digital Sende r Link must be
running on that computer (one of the programs installed on the
client computer), and the receive capability must be enabled (see
the user guide for details).
6 Test the fax service by sending a test fax.
7 Test the con venience copy service by sending a test docu ment to
a printer you configured.
EN Extended and optional configuration steps 57

Customizing the digital sender to support thirdparty programs
You can customize the HP 9100C Digital Sender to support thirdparty programs being used in your office. Users then have the ability
to distribute documents from the digital sender direct ly to these
programs.
Note Customizing for third-party support is an advanced feature of the digital
sender. The int erface with the third-party program is not auto matic and
requires special programming.
Three steps are involved:
1 Using the HP Address Book Manager, you assign a name for the
third-party program to a func tio n key; this is the name that
appears on the control panel f or users to select. The assignme nts
appear under Customized Function Keys in the ABM main
window. Up to 11 function keys can be customized in this way.
2 Then, still in the ABM, you configure at least one destination for
the customized function key. You can assign up to 512
destinations to each function key. The destinations appear in the
hierarchy under Customized Function Keys in the ABM main
window. Each destination you configure is independent of the
others. This means that you can have different settings for each
(such as destination network address and file format).
3 Prepare the third-party program to accept and use the data from
the digital sender. For specific information on how to do this, see
the digital sender website (http://www.digitalsender.hp.com).
Once this work has been completed, users can select the third-party
program they want by pressing the co rrespondin g functio n key on the
control panel at the digital sender. A list of the preconfigured
destinations appears at the control panel and they choose the
destination they want.
The table on page 59 explains the items in the ABM that you
configure for each function key. Steps for configuring this feature
begin on page 60.
58 Chapter 2 - Installing and configuring EN

Items to configure for each function key assignment
Item Description
Name Name of the third-party program that you want to
appear on the function key at the control panel. This
name can be up to 31 characters, but only the first
nine display on the control panel.
Scanning Mode Scanning mode you w ant for documents delivered to
the program (see “Sending qualities” on page 12 for
information about sending modes):
CP (control panel) OVERWRITE
BW DOCUMENT
FINE TEXT
COLOR DOCUMENT
COLOR/BW PHOTO
HIGH RESOLUTION PHOTO
If you choose CP OVERWRITE, the setting at the
control panel is always used. In all other cases, the
setting here overrides anything selected at the
control panel.
File Format Format in which the document is delivered to the
program. All files are multipage (that is, all pages in a
document are stored as a single file).
PDF
Multipage TIFF—G4 compression for black-andwhite data
PCL5—PackBits (RLE) compression
Destination’s Network
Address
IP address or symbolic name (DNS/WINS) of the
destination on the network where the digital sender
document is delivered. Either the HP Digital Sender
Link or the HP Digital Sender Service must be
installed at this destination.
Inbox Path Path to the folder at the network destination where
the documents are stored. This folder can be a
network folder, or one that is local to the computer
where the HP Digital Sender Link or HP Digital
Sender Service is installed. If you choose a network
folder, the HP Digital Sender Link must have write
access to that folder.
Additional
Information
A generic parameter string that is specific to each
third-party program. The string can be up to 127
characters.
EN Customizing the digital sender to support third-party programs 59

To customize a function key
1 Start the ABM.
2 In the ABM main window, click Customized Function Keys.
3 On the File menu, click New. The words “New Keyword” appear.
4 Type over the words “New Keyword” with the name of the third-
party program as you want it to appear at the control panel f or th e
function key.
5 Press E
NTER.
To delete a customized function key
1 Start the ABM.
2 In the ABM main window, clic k Customized Function K eys, and
then click the function key you want to delete.
3 On the File menu, click Delete.
To configure a function key destination
1 Start the ABM.
2 In the ABM main window, under Customized Function Keys,
click the function key you want to configure.
3 On the File menu, click New. The New Function Ke y Item dialog
box appears.
4 Complete the fields in the dialog box and then clic k Add. (See the
table on page 59 for explanations of the fields.)
5 Repeat step 4 for each destination you want to add.
6 When finished, click Close.
60 Chapter 2 - Installing and configuring EN

Coexisting with the HP Network ScanJet 5 scanner
Administrator matters
The HP 9100C Digital Sender and the HP Network ScanJet 5
scanner coexist on the same network without conflict.
The two devices do not use the same resources.
You do not overwrite or erase anything by installing the digital
sender software.
The version of the HP JetAdmin software that comes with the
digital sender can manage both the digital sender and the HP
Network ScanJet 5 scanner. (Howe ver, previous versions of the
HP JetAdmin software do not work with the digital sender.)
Client matters
The client software for the HP 9100C Digital Sender and the HP
Network ScanJet 5 scanner can coexist on the same computer, and
in fact can interact.
HP Network ScanJet 5 scanner
Documents sent to the computer from the HP Network ScanJet 5
scanner are routed using the HP ScanJet Utility . You can continue
to use the PaperPort™ software for HP to manage them. All this
software can work independently of the clie nt software for the
digital sender.
HP 9100C Digital Sender
Documents sent to the computer from the digital sender are
routed using the HP Digital Sender Link. The HP Address Book
Manager is an additional software component for the digita l
sender.
To use one program to manage all documents
It is possible to use just one program on the computer to manage all
scanned documents. Users can do this by specifying a program as
the preferred inbox for the HP Network ScanJet 5 scanner and setting
the file type to .pdf (if available) or multipage .tif (see the
documentation for the HP Network ScanJet 5 scanner for information
on setting these options). Documents are still routed using the HP
ScanJet Utility, but they appear in the target program.
The reverse is not possible. That is, you cannot use the PaperPort
software with the digital sender.
EN Coexisting with the HP Network ScanJet 5 scanner 61

When you install the client software on the user computer, the setup
program detects if there is an HP Network ScanJet 5 scanner on the
network. It gives y ou the opp ortunity to designate a target prog ram as
the preferred inbox for documents scanned with the HP Network
ScanJet 5 scanner.
To move e-mail addresses from the HP Network
ScanJet 5 scanner to the digital sender
Yo u can export e-mail addresses in the HP ScanJet Utility to the
digital sender HP Address Book Manager. In the HP ScanJet Utility,
export the e-mail addresses in .csv (comma-separa ted value) format.
Then use the ABM import procedure to import th em for use with the
digital sender.
Note The e-mail feature w as added to the HP Network ScanJet 5 scanner
with firmware version 2.0. The ability to export e-mail addresses
assumes you have upgraded to firmware version 2.0.
LAN fax service matters
This section applies only when you plan to enable the digital sender
fax service on a Windows NT server and you have already installed
the HP Network ScanJet 5 scanner on that server.
If you do not plan to use the HP Network ScanJet 5 scanner any
longer, uninstall it before you install the digital sender. The reason for
this is that the digital sender comes with tw o vers ions of the HP Digital
Sender Service that supports the fax functionality—one to handle
networks with just the digital sender, and a more extensive one to
handle networks with both the digital sender and the HP Network
ScanJet 5 scanner. If the setup program detects a n HP Network
ScanJet 5 scanner on the network, it installs the more extensive
service. This more extensive service places a larger load on your
network than the service for the digital sender alone.
If you plan to use both the HP Network ScanJet 5 scanner and the
digital sender on the same network, make sure that all the software
for the HP Network ScanJet 5 scanner is currently installed before
you install the digital sender.
The HP Digital Sender Service is installed as a service associated
with an existing user account. The account must have the following
characteristics:
user password never expires
user is part of the administrator group
user has rights set to “Logon as service”
62 Chapter 2 - Installing and configuring EN

Uninstalling the software
You can uninstall software components in two ways:
Click the uninstall icon for the component in the program group.
Click the Add/Remove Programs icon in the Windows Control
Panel.
Troubleshooting the installation
Use the information in this section to help resolve common problems
encountered while installing the digital sender.
Function key problems
You should see a function key on the control panel for each
functionality that you configured. See the table below if you do not see
a function key.
Function keys on the control panel
If you do not see Do this
EMAIL
AX
F
P
C
OPY
C
ETSEND
J
Any function key
EN Uninstalling the software 63
In the configuration menu at the control panel or
the HP JetAdmin software, make sure that all the
required e-mail parameters are configured
(e-mail server address, e-mail default from).
On the HP JetAdmin software E-mail page,
make sure that the Enable Internet E-mail
check box is selected.
On the HP JetAdmin software Fax page, make
sure that the Enable Fax check box is selected.
Make sure that the HP Digital Sender Service is
installed.
In the ABM, make sure that you have configured
at least one user profile.
In the ABM, make sure that you have defined at
least one network printer.
In the configuration menu at the control panel,
make sure the JetSend parameter is set to “on.”
Try the actions listed above for individual keys.
Use the other information in this installation
troubleshooting section.

Installation problems
Installation problems
Problem Actions
Software will not install.V erify that your network operating system and computer hardware
support the HP 9100C Digital Sender (see “Installation
requirements” on page 30).
All programs except Systray and Explorer should be closed. To
check, press CTRL+ALT+DELETE. If there are other open programs,
click one, and then click End Task. Repeat for each open
program. Then reinstall the software.
If the problem persists, contact HP customer support.
HP JetAdmin software
did not install.
If the HP JetAdmin software fails to install, the setup program
stops. Check the result code in the file called JAResult.ini in your
Windows\System folder to verify the problem. The result is 1 if the
HP JetAdmin software installed and exited as expected, and 0 if a
problem with the software exists.
Try reinstalling the software. If the problem persists, contact
HP customer support.
The computer cannot
read the installation
compact disc.
You cannot exit the
configuration menu at
the control panel.
After changing the
default language, the
control panel shows all
the messages in
English regardless of
the language you
selected.
The correct drive might not have been specified. Check for the
proper drive letter. Often, it is D or E for the CD-ROM driv e.
Check the compact disc for damage. Try using the compact disc
on another computer, or copy the compact disc or disk folders to
the hard drive. Then install from the hard drive.
If the problem persists, contact HP customer support.
The HP JetDirect print server is unconfigured (does not have a
valid IP address). Use the control panel to assign an IP address.
The digital sender is not using the localized messages stored on
the hard drive. Contact HP customer support.
64 Chapter 2 - Installing and configuring EN

Installation problems (continued)
Problem Actions
A newly configured
digital sender does not
appear in the
HP JetAdmin software
device list.
The digital sender does
not have a valid IP
address.
The digital sender is not
working after you have
installed a new
JetDirect card.
The discovery process can sometimes take a while. Wait a few
minutes.
In the HP JetAdmin software, refresh the database with F5. Or,
click Device and then click Find. In the Find a device dialog box,
type the IP address you assigned and then click Find.
Force a complete new discovery by pressing F7. This might take a
long time if you have a large number of devices on your network.
Then repeat the Device/Find steps.
Go to Options/Preferences on the TCP/IP Discovery page. Add
the IP address to the list of devices for which to search. Click OK
and then press
In the HP JetAdmin software, click View and then click Details.
F7 again.
Choose to show the IP address column by clicking View and then
Columns and then adding the IP address to the selected
headings. Click OK to return to the main window device list and
see if the digital sender is listed with its IP address.
If the digital sender was assigned a default IP address or you did
not assign an IP address (either manually at the control panel or
through DHCP or BOOTP), display the self-test page and note the
MAC address (see “Displaying the self-test page” on page 116). In
the HP JetAdmin software, click Device and then click New. You
should see the MAC address for the digital sender listed. Click the
device, click Configure, and then configure an IP address. You
should be able to see the digital sender when you return to the
main window device list.
Try to display the self-test page (see “Displaying the self-test
page” on page 116). If you cannot display the page, there is a
problem between the digital sender and the HP JetDirect print
server (interface card). If you can display the page, verify that the
TCP/IP status parameter reads “READY.”
Ensure that you have installed the interface card correctly.
Make sure that all cabling is securely connected.
Turn the digital sender off and then back on.
For Fast Ethernet (10/100Base-TX) networks only (HP J3113A):
Check the LEDs on the interface card. Depending on your
network, either the 10-Mbps or 100-Mbps LED should be lit. If not,
check that the jumper positions match your network (see “HP
JetDirect print server troubleshooting” on page 168 for details).
For Token Ring (IEEE 802.5) networks only (HP J3112A): Make
sure the network data rate on the interface card is set correctly
(either 4 Mbps or 16 Mbps). See “Removing and replacing the
HP JetDirect print server” on page 124 for details.
If the problem persists, contact HP customer support.
EN Troubleshooting the installation 65

Installation messages
This table contains the error messages that might appear when you
are installing the software and actions to take to resolve the problem.
Note Messages are listed in alphabetical order.
Installation messages
Message Description Actions
Attention, If you remove this
service, you will not be able
to use HP 9100C Digital
Sender and HP Network
ScanJet 5 with this
computer.
Domain or user name
specified during installation
does not exist or user does
not have Administrator
rights. Check correctness of
Domain and User Name. Do
you want to retry?
Error in removing/
uninstalling the service.
Error starting the service. If
on this PC there is a HP
Digital Sender Link up and
running there will be a
conflict and the service
cannot start.
A service used by both the
digital sender and the HP
Network ScanJet 5 scanner is
installed on the Windows NT
computer. If you remove the
service, you also remove
support for the HP Network
ScanJet 5 scanner.
The domain name or user
name you entered during
installation does not exist.
This message occurs if the
HP Digital Sender Service that
you are trying to uninstall is not
installed. If the service is
running, it is stopped before
the uninstall.
A conflict exists with a running
copy of the HP Digital Sender
Link.
Decide if you want to remove
the service or not and then
continue with installation.
Verify the accuracy of the
domain name and user name
you entered, and then try
again.
Try again.
Make sure the HP Digital
Sender Service is installed.
If the HP Digital Sender Link
is running, disable it.
Error stopping the service. There was an error in stopping
the HP Digital Sender Service.
Make sure the HP Digital
Sender Service is installed
and running.
66 Chapter 2 - Installing and configuring EN

Installation messages (continued)
Message Description Actions
Setup has found a Digital
Sender Client Link installed
in your system. The Digital
Sender Service and the
Digital Sender Link can not
ran at the same time. If you
continue all private PC
users will lose their “Send to
PC” functionality unless the
service is stopped. Do you
want to continue?
Setup has found a HP
Network Scanner Service
installed in your system. Do
you want to install a new
service that will replace it
and that will be able to
manage both HP Network
ScanJet 5 and HP 9100C?
On this PC the Digital
Sender Service has been
installed by the
Administrator. The Digital
Sender Link cannot work if
the service is running. To be
able to receive documents
directly on this PC, the
administrator must disable
the service. Do you want to
continue?
The HP Digital Sender Service
and the HP Digital Sender Link
cannot run at the same time on
the same computer. If you
continue to install the HP
Digital Sender Service while
the HP Digital Sender Link is
running, users will not be able
to receive documents from the
digital sender at their
computers. Also, although
installed, the HP Digital
Sender Service will not start.
If you install the HP Digital
Sender Service that comes
with the digital sender, it
replaces the service that was
installed for the HP Network
ScanJet 5 scanner. The digital
sender service can manage
both the digital sender and the
HP Network ScanJet 5
scanner. If you do not install
the HP Digital Sender Service,
the digital sender will not work
on the Windows NT computer.
The HP Digital Sender Service
is running on the computer.
The HP Digital Sender Link
cannot run unless you stop the
service. Without the HP Digital
Sender Link, the client cannot
receive documents arriving
from the digital sender.
Close the HP Digital Sender
Link if you want to install the
HP Digital Sender Service.
Decide if you want to install
the HP Digital Sender Service
or not and continue with the
installation.
See “Coexisting with the HP
Network ScanJet 5 scanner” on
page 61 for further information.
Disable the HP Digital Sender
Service on the computer if
you want to install the HP
Digital Sender Link.
Setup was not able to install
it. Check if the service is
already installed.
Error installing the HP Digital
Sender Service.
Make sure the HP Digital
Sender Service has not
already been installed.
If the HP Digital Sender
Service is installed, uninstall
and then install it again.
EN Troubleshooting the installation 67

Installation messages (continued)
Message Description Actions
The service cannot be
installed with the specified
parameters. Its installation
will be stopped.
The specified Domain
Name is too long. Do you
want to retry?
The specified Password is
too long. Do you want to
retry?
The Specified User
associated to the service
has not a valid Name. Type
user name again. Do you
want to retry?
The specified User Name is
too long. Do you want to
retry?
You don’t ha ve
Administrator rights or user
Information is not available.
Check if the current user i s
part of the local
administrator group. Do you
want to retry?
The installation command is
issuing an invalid parameter as
part of the command string.
The domain name you entered
is too long.
The password you entered is
too long.
The user name you entered is
invalid.
The user name you entered is
too long.
You do not have administrator
rights, or user information is
not available.
Contact HP customer
support.
Check the accuracy of the
domain name and type it
again.
Check the accuracy of the
password and type it again.
Check the accuracy of the
user name and type it again.
Check the accuracy of the
user name and type it again.
Make sure you are part of the
local administrator group.
68 Chapter 2 - Installing and configuring EN

3Administering
Introduction
Administrator activities
The table beginning on page 70 lists typical administrator activities.
Procedures in this chapter expla in ho w to perform these activities. As
the table shows, you perform most of the activities in three places.
Sometimes you can do the same thing in more than one place.
control panel
Used to change configuration parameters and to perform certain
administrator activities. Only the administrator has access to the
configuration menu for performing these activities.
HP Address Book Manager (ABM)
Used to maintain user profiles, public address books, printers for
use with the digital sender, and security, and to back up and
restore address books.
HP JetAdmin software
Used to configure, monitor, and control network devices such as
the digital sender, and to troubleshoot network problems.
The activity log is an important tool for monitoring all digital sender
activities—those initiated by users as well as the administrator. You
view this log using the HP Address Book Manager (see “Using the
activity log” on page 113).
EN Introduction 69

Administrator activities and where performed
Activity
Where performed
Control panel ABM HP JetAdmin
Shutdown and restart activities
Shut the digital sender down
remotely without restarting
Shut the digital sender down
and restart remotely (reboot)
Shut the digital sender down at
the control panel
Configuration menu/
OOLS
T
Configuration/
Tools page
Configuration/
Tools page
Reset activities
Reset address books Configuration/
Tools page
Reset network parameters Configuration/
Tools page
Reset the digital sender to
factory defaults
Configuration menu/
OOLS
T
Configuration/
Tools page
Backup and restore activities
Back up address books Tools menu
Restore address books Tools menu
Restore old firmware images SHIFT+ALT+F0
(F0 = left function key)
Security and user profile activities
Change administrator password Configuration menu Digital Sender
menu/Security
Erase administrator password S
Determine who can use the
digital sender (registered and
guest users or only registered
users)
Create and maintain registered
user profiles
Change the need for registered
user profile validation
Validate registered user profiles Main menu/Users
HIFT+ALT+r
Main menu/Users
Digital Sender
menu/Security
Configuration/
Security page
Configuration/
Security page
Configuration/
Security page
70 Chapter 3 - Administering EN

Administrator activities and where performed (continued)
Activity
Where performed
Control panel ABM HP JetAdmin
Address book activities
Maintain the Public Email
address book
Maintain the Public Distribution
Lists address book
Maintain the Public Fax address
book
Import e-mail addresses from
another e-mail program
Configure an LDAP directory
server for e-mail address
searches
Import e-mail address from an
LDAP directory server
Check address books Configuration menu/
Clear address books Edit menu/Clear
Configuration menu Tools menu/
OOLS
T
Main menu/Public
Email
Main menu/Public
Distribution Lists
Main menu/Public
Fax
Tools menu/
Address Book
Import
Directory
Tools menu/
Address Book
Import
Tools menu/
Check Address
Books
Address Books
Configuration/
LDAP page
Notification activities
Control e-mail notifications
when important events occur
Control fax notifications Configuration/
Digital Sender
menu/Security
Configuration/
Security page
Fax page
Miscellaneous activities
Use the activity log Tools menu/View
Log
Designate the network printers
that can be used with the ABM
Designate the printer for fax
transaction reports
Display the self-test page
HIFT+ALT+
S
EN Introduction 71
Main menu/Public
Printers
Main menu/Public
Printers

Administrator activities and where performed (continued)
Activity
Where performed
Control panel ABM HP JetAdmin
Change the contrast level on
the control panel
Change default paper size for
scanning
Change control panel language Configuration menu Properties/
Assign an asset number to the
digital sender
SHIFT+ALT+
HIFT+ALT+
S
Configuration menu Configuration/
Page Setup
page
Advanced page
Properties/
Advanced page
72 Chapter 3 - Administering EN

Digital sender parameters
The following table lists parameters that determine how the digital
sender works and where you can find them.
Administrator parameters and where found
Parameter
Network parameters
Control
panel
Where found
ABM
HP
JetAdmin
Other
Method for obtaining TCP/IP
configuration
IP address of digital sender Configuration
IP subnet mask Configuration
Default IP gateway Configuration
DNS (Domain Name System)
enabled/disabled
DNS server Configuration
Additional DNS servers and
default search domai n
WINS (Windows Internet
Naming Service) enabled/
disabled
WINS primary server Configuration
WINS secondary server Configuration/
WINS/DNS name-to-address
cache enabled/disabled
Configuration
menu
menu
menu
menu
Configuration
menu
(server
address)
menu
Configuration
menu
(server
address)
menu
Configuration/
TCP/IP page
Configuration/
TCP/IP page
Configuration/
TCP/IP page
Configuration/
TCP/IP page
Configuration/
DNS/WINS
page
Configuration/
DNS/WINS
page
Configuration/
DNS/WINS
page
Configuration/
DNS/WINS
page
Configuration/
DNS/WINS
page
DNS/WINS
page
Configuration/
DNS/WINS
page
EN Introduction 73

Administrator parameters and where found (continued)
Where found
Parameter
Control
panel
ABM
Administrator and security parameters
HP
JetAdmin
Other
Administrator name and e-mail
address
Administrator password Configuration
Administrator company Configuration/
Preference for requirement to
validate new and changed user
profiles
Preference for e-mail
notification when events that
require attention occur
Access rights at the control
panel
Configuration
menu
menu
Digital
Sender/
Security
Digital
Sender/
Security
Digital
Sender/
Security
Configuration/
Security page
Configuration/
Security page
Security page
Configuration/
Security page
Configuration/
Security page
Configuration/
Security page
User parameters
User profiles (includes user
password, e-mail address, and
IP address of computer)
Main menu/
Users
Product parameters
Digital sender description Configuration/
General page
Current date and time Configuration
menu
Control panel contrast level S
Control panel language Configuration
Default paper size for scanning Configuration
Digital sender asset number Properties/
HIFT+ALT+
SHIFT+ALT+
menu
menu
Properties/
Advanced
page
Properties/
Page Setup
page
Advanced
page
74 Chapter 3 - Administering EN

Administrator parameters and where found (continued)
Where found
Parameter
Control
panel
ABM
HP
JetAdmin
Other
Customized function keys and
their destinations (ABM)
Main menu/
Customized
Function
Keys
E-mail service parameters
Enabled/disabled Configuration
menu (IP
address)
E-mail SMTP server IP
address
Network name of e-mail SMTP
server (instead of IP address)
Default contents of SUBJECT
and FROM fields for
transmissions
Default Full Name associated
with the default FROM field
Language for the body of
e-mail messages
Whether to break apart
messages to fit SMTP server
size limitations
Attachment file type Configuration/
Destinations in the Public
Email address book
Configuration
menu
Configuration
menu
Main menu/
Public Email
Configuration/
E-mail page
Configuration/
E-mail page
Configuration/
E-mail page
Configuration/
E-mail page
Configuration/
E-mail page
Configuration/
E-mail page
Configuration/
E-mail page
E-mail page
LDAP directory service
enabled/disabled
LDAP server IP address Configuration
LDAP server network name
(instead of IP address)
LDAP service port number Configuration
EN Introduction 75
Configuration
menu (server
address)
menu
menu
Configuration/
LDAP page
Configuration/
LDAP page
Configuration/
LDAP page
Configuration/
LDAP page

Administrator parameters and where found (continued)
Where found
Parameter
Control
panel
ABM
HP
JetAdmin
Other
LDAP search root, service
port, account name,
password
LDAP authentication
requirement for transactions
with server enabled/disabled
LDAP search timeout and
maximum number of hits
Configuration
menu
Configuration/
LDAP page
Configuration/
LDAP page
Configuration/
LDAP page
Fax service parameters
Enabled/disabled Configuration/
Fax page
IP address or network name of
the computer where the
HP Digital Sender Service is
installed
LAN fax product name Configuration/
Preferences for fax
notifications
Default printer for fax
transaction reports
LAN fax workarea Setup
File format for data sent to the
fax server
Main menu/
Public
Printers
Configuration/
Fax page
Fax page
Configuration/
Fax page
program or
Windows
Control Panel
Services
Configuration/
Fax page
Fax resolution Configuration/
Fax page
Maximum fax transmission
speed
Maximum number of retries for
each fax transmission
Time interval between retries Configuration/
Configuration/
Fax page
Configuration/
Fax page
Fax page
76 Chapter 3 - Administering EN

Administrator parameters and where found (continued)
Where found
Parameter
Control
panel
ABM
HP
JetAdmin
Other
ECM (Error Correction Mode)
transmission enabled/disabled
Default accounting code Configuration/
Destinations in the Public Fax
address book
Main menu/
Public Fax
Configuration/
Fax page
Fax page
Send to computer parameters
Enabled or disabled HP Digital
Sender Link
IP addresses of receiving
computers
Default receive inbox HP Digital
Path to the working folder HP Digital
Target program used to view
and work with sent documents
Preference for whether the
send also launches the target
program
File format for sending to the
computer
User profiles
Sender Link
Sender Link
HP Digital
Sender Link
HP Digital
Sender Link
User profiles
Convenience copy parameters
Network printers available for
convenience copying
EN Introduction 77
Main menu/
Public
Printers

Using the configuration menu at the control panel
The table on page 80 lists the parameters you can configure using t he
configuration menu at the control panel.
Note The configuration menu is available only to the administrator if an
administrator pass word has been configured. See “Changing or sett ing
administrator password” on page 100 for information on how to set or
change this password.
Configuration menu keys
While in the configuration menu, you use both keypad keys and
labeled function keys to move through, select, and save value s. The
following two tables explain these keys.
Keypad keys
Use this key To do this
SHIFT+ALT+ At the control panel
Open the configuration menu.
The digital sender must be idle before using (green light
under is off).
and
In the configuration menu
Scroll through the list of parameters.
In the dialog for a parameter
Move between fields.
Increase or decrease values.
TAB and
S
HIFT+TAB and
S
HIFT+BACK In the dialog for a parameter
Up and down arrow
keys
In the dialog for a parameter
Accept the value in the current field and move to the
next field.
In the dialog for a parameter
Accept the value in the current field and move to the
previous field .
Delete the contents of the active field.
In the dialog for a parameter
Confirm the value and close the dialog (same as using
K function key).
the O
Scroll through the choices in a list.
78 Chapter 3 - Administering EN

Function keys
Use this key To do this
CANCEL In the dialog for a parameter
Cancel any changes made and close the dialog.
C
LEAR In the dialog for a parameter
Delete the contents of a field.
For some parameters, set the default value.
E
XIT In the configuration menu
Close the configuration menu and discard all changes you
made.
O
K In the configuration menu
Open the dialog for the parameter you selected so that
you can make changes.
In the dialog for a parameter
Confirm the value and close the dialog.
AVE In the configuration menu
S
Close the configuration menu and save the values you
entered.
OOLS In the configuration menu
T
Display a list with the following choices: Shutdown,
Factory defa ul t s, and Check Address Books.
EN Using the configuration menu at the control panel 79

Configuration menu parameters
See the followin g table for an explanation of the parameters in t he
configuration menu.
Parameters that use an IP address can show only the numeric
address, even when a symbolic name has been assigned to a device.
Configuration parameters on the control pane l
Parameter Description
Date Current date.
CLEAR sets the date to Jan 1, 1980.
Time Current time (24-hour clock).
CLEAR sets the time to midnight (0:0).
Paper Size Default size for the scanning area. Users can override
this setting at the control panel.
Choices: Letter, A4, or Legal.
Language Language in which keys and messages appear at the
control panel.
Choices: English, French, German, Italian, or Spanish.
The language changes as soon as you select a
different language.
IP Configuration To specify how the digital sender HP JetDirect print
server obtains its TCP/IP configuration. Choices:
MANUAL. From the control panel or using
management software such as the HP JetAdmin
software (you then use the IP Address, IP Subnet
Mask, and IP Gateway parameters).
BOOTP (Boot Protocol) or DHCP (Dynamic Host
Configuration Protocol). Automatically from the
network (the IP Address, IP Subnet Mask, and IP
Gateway par ameters are ignored). A corresponding
server must be running and properly configured.
The next time you open the configuration menu, you
see the values that the HP JetDirect print server
automatically discovered. See “Assigning an IP
address to the digital sender” on page 33 for details.
Two things happen if you configured the IP address
using BOOTP or DHCP and later change the IP
address at the control panel or in the HP JetAdmin
software: (1) the IP address that was assigned is
released and (2) the setting for this parameter changes
to MANUAL.
Changing this value causes the digital sender to shut
down and restart.
80 Chapter 3 - Administering EN

Configuration parameters on the control panel (continued)
Parameter Description
IP Address Unique TCP/IP network address of the HP JetDirect
print server in the digital sender. Required for the
digital sender to work.
LEAR sets the address to 00.00.00.00.
C
Changing this value causes the digital sender to shut
down and restart.
IP Subnet Mask If subnets are used, the filter used to identify the
subnet of the HP JetDirect print server in the digital
sender.
LEAR sets the address to 00.00.00.00.
C
Changing this value causes the digital sender to shut
down and restart.
IP Gateway IP address of the gateway server used to send packets
off the local network.
LEAR sets the address to 00.00.00.00.
C
Changing this value causes the digital sender to shut
down and restart.
Administrator Full
Name
Full name of the administrator.
Up to 32 characters are allowed.
Administrator
Password
Passw ord for this digital sender.
You can have a different password for each digital
sender. Up to 15 characters are allowed. The pass word
is case-sensitive.
Administrator E-mail Administrator e-mail address.
This address is used by the digital sender to send
e-mail notifications. Up to 255 characters are allowed.
E-mail Server
Addr.
IP address of the e-mail SMTP-MIME server.
LEAR sets the address to 00.00.00.00.
C
If left blank or cleared, the e-mail service is disabled.
Both the E-mail Server Addr. and Email Default From
parameters must be enabled for the e-mail service to
work.
EN Using the configuration menu at the control panel 81

Configuration parameters on the control panel (continued)
Parameter Description
Email Default From Default e-mail address for the FROM field in
e-mail messages from the digital sender. This default
address is used only when:
users have not registered at the control panel and
send an e-mail message without entering anything
in the FROM field
registered users do not have an e-mail address in
their profile and send an e-mail message
Up to 255 characters are allowed.
If left blank or cleared, the e-mail service is disabled.
Both the E-mail Server Addr. and Email Default From
parameters must be enabled for the e-mail service to
work.
Note:
You must provide a default e-mail address to
prevent users from sending anonymous e-mail
messages.
Email Default
Subject
Default text for the SUBJECT field in e-mail messages
sent by the digital sender.
This default text is used only when users do not
provide a subject of their own directly from the control
panel keypad.
Up to 128 characters are allowed.
E-mail Quality Default image quality used for documents sent by
e-mail.
Choices: B/W Document, Color Document,
Color-B/W Photo.
LDAP Server
Address
IP address of the server that hosts the LDAP
(Lightweight Directory Access Protocol) directory for
e-mail address searches.
LEAR sets the address to 00.00.00.00.
C
If left blank or cleared, the function is disabled.
LDAP Search Root Basepoint (root) from which to start searches for
names on the LDAP directory server. Directories are
often represented in a hierarchical way using a tree.
The basepoint might be a country, an organization, or
other type of group. Not all servers require this
information.
Up to 512 characters are allowed.
See the digital sender website for examples
(http://www.digitalsender.hp.com).
LDAP Service Port TCP/IP port number on which the LDAP directory
server is listening. The default port is 389.
82 Chapter 3 - Administering EN

Configuration parameters on the control panel (continued)
Parameter Description
LDAP Account
Name
Account name used when the LDAP server requires an
authenticated login. Up to 512 characters are allowed.
LDAP Password Password associated with the LDAP Account Name.
PC Quality Default image quality used for documents sent to
computers.
Choices: B/W Document, Color Document,
Color-B/W Photo.
JetSend Used to enable the JetSend service.
The setting is either on or off.
DNS Server
Address
IP address of the DNS server. Used for DNS (Domain
Name System) symbolic name resolution if you identify
servers and devices on your network by network name
instead of by IP address.
LEAR sets the address to 00.00.00.00.
C
If left blank or set to 00.00.00.00, the function is
disabled.
Notes:
You can use the HP JetAdmin software to specify
up to four more DNS servers for use in resolving
DNS names. Configure this on the DNS/WINS
page.
On the DNS/WINS page, you can enable both DNS
and WINS at the same time. When both are
enabled, the digital sender attempts to resolve
network names using WINS first, and then DNS.
DNS Domain If DNS name resolution is used, the IP address of the
domain for the DNS server. Up to 256 characters are
allowed.
If left blank, the function is disabled.
WINS Server
Address
IP address of the WINS server. Used for WINS
(Windows Internet Naming Service) symbolic name
resolution if you identify servers and devices on your
network by network name instead of by IP address.
LEAR sets the address to 00.00.00.00.
C
If left blank or set to 00.00.00.00, the function is
disabled.
Note:
You can use the HP JetAdmin software to specify a
secondary WINS server . Configure this on the DNS/
WINS page.
EN Using the configuration menu at the control panel 83

To configure parameters at the control panel
1 Make sure the digital sender is idle (the green light under the
button is off).
2 At the control panel, press S
HIFT+ALT+.
3 If an administrator password is required, the HP 9100C Login
dialog box appears. Type the password and press O
K.
4 When the configuration menu appears, select the parameter you
want.
5 Make your changes. (See “Configuration menu keys” on page 78
for inf ormation on how to ent er and change v alues f or the diff eren t
parameters.)
6 When finished, return to the configuration menu and press S
AVE.
84 Chapter 3 - Administering EN

Controlling notifications
The digital sender notifies administrators and users of events in
several ways:
control panel messages
These messages report status and error conditions. See “Control
panel messages” on page 141 for a list and description of
messages.
activity log entries
The activity log is a record of digital sender use and system
activities. See “Activity log messages” on page 170 for a list and
description of entries. See “Using the activity log” on page 113
for information on how to access the activity log.
e-mail welcome message for new user profile
Every time you or a user creates a user profile, the digital send er
sends a “welcome” message to the owner of the profile. The
message serves the following purposes:
• notifies to which digital sender the profile has been added
• notifies that the profile is active and available at the control
panel
• validates correctness of the “from” information in the profile
• provides a printed copy of the user profile contents
e-mail message when important events occur
The administrator can choose to receive e-mail messages for
important events that occur—for example, if there is a change to
a user profile. See “To control whether you receive e-mail
messages when important events occur using the ABM” on
page 86 or “To control whether you receive e-mail messages
when important events occur using th e HP JetAdmin softwa re” on
page 86.
fax transmission notifications
Printed reports and e-mail messages with information about fax
transmissions are provided if your LAN fax product supports
notifications and if you have configured the digital sender for
them. See the description of notification s on the HP JetAd min
software Fax page under “To move through the configuration
pages” on page 46.
notification of e-mail delivery (DSN)
Users can enable or disable the Delivery Status Notification
(DSN) feature in their user profiles if DSN is supported by your
system. If the feature is enabled, the user receives a notification
of e-mail delivery, but not a return copy of the message.
EN Controlling notifications 85

Notes about notifications:
E-mail notifications require that the recipients have an e-mail
address configured in their user profile.
Your system might support DSN, but not all systems do. The
route to an e-mail destination might include a node that does not
support DSN. If DSN is not sup po rted through the entire path, a
return notification might not occur.
All pending notifications are lost when you reset network
parameters and when f atal errors occur in operation. If anyone
turns the digital sender off, the no tification f or the job tha t was last
submitted might also get lost (ho wever, you can ch ec k the activity
log to see if that particular transmission was successful).
To control whether you receive e-mail messages
when important events occur using the ABM
1 Start the ABM.
2 On the Digital Sender menu, click Security.
3 Select your pref erence for Notify me through e-mail when
events that require my attention occur.
4 Click OK.
To control whether you receive e-mail messages
when important events occur using the HP JetAdmin
software
1 Start the HP JetAdmin software.
2 On the device list, select the digital sender you want.
3 Click Device and then click Modify.
4 In the Configuration window, click Security.
5 Select your pref erence for Notify me through e-mail when
events that require my attention occur.
6 Click OK.
86 Chapter 3 - Administering EN

To control printed transaction reports and e-mail
messages for fax transmission
1 Start the HP JetAdmin software.
2 On the device list, click the digital sender you want.
3 Click Device and then click Modify.
4 In the Configuration window, click Fax.
5 Select your preferences for notifications.
6 Click OK.
EN Controlling notifications 87

Shutting down and restarting
Use the shutdown procedure for the following reason:
to prepare the digital sender to be physically turned off (for
example, when you need to replace a part)
Notes about the procedure:
Shutdown locks the digital sender from use until you restart it.
The procedure does not turn the power off . Jo bs in process might
be interrupted.
Yo u can shu t th e dig ita l se nder d own at the control panel, or do it
remotely using the HP JetAdmin software.
You cannot discover the digital sender on the network using the
HP JetAdmin software until you restart it.
To shut down using the control panel
1 Make sure the digital sender is idle (the green light under the
button is off).
2 At the control panel, press S
HIFT+ALT+.
3 If an administrator password is required, the HP 9100C Login
dialog box appears. Type the password and press O
4 When the configuration menu appears, press T
5 Select Shutdown and press O
6 Press O
K to confirm that you want to shut down.
K.
K.
OOLS.
88 Chapter 3 - Administering EN

To shut down and (optionally) restart using the HP
JetAdmin software
1 Make sure that no one is using the digital sender. The shutdown
interrupts any job in process.
2 Start the HP JetAdmin software.
3 In the device list, click the digital sender you want to shut down.
4 Click Device and then click Modify.
5 In the Configuration window, click Tools.
6 Click one of the following:
Shutdown Shut down without restarting
Re-boot Shut down and then restart
7 Click OK.
8 Click OK to confirm that you want to shut down.
EN Shutting down and restarting 89

Resetting
Resetting address books
Use this procedure for the following reasons:
when you want to clear the e-mail addresses of all address books
and reenter the addresses (for example, if significant changes to
e-mail addresses in your company have occurred)
as a general practice before you restore address books, so that
the database is clean (described under “Restoring” on page 96)
when instructed to do so by troubleshooting steps or
HP customer support
Resetting address books does the following:
erases the administrator password
locks the digital sender from use until the reset is complete
erases the contents of all public and private address books
erases all activity logs
CAUTION This action cannot be undone.
To reset address books
1 Make sure that no one is using the digital sender. The shutdown
interrupts any job in process.
2 Start the HP JetAdmin software.
3 In the device list, click the digital sender you want to reset.
4 Click Device and then click Modify.
5 In the Configuration window, click Tools.
6 Click Reset address book, and then click OK.
7 Click OK to confirm that you want to reset.
90 Chapter 3 - Administering EN

Resetting network parameters
Use this procedure for the following reasons:
when you move the digital sender from one network to another
network
when instructed to do so by troubleshooting steps or
HP customer support
Resetting network parameters does the following:
locks the digital sender from use until the reset is complete
erases the configuration for TCP/IP, DNS/WINS, security (except
the administrator password), e-mail, fax, and LDAP settings
erases all pending fax notifications
removes the digital sender from the list of devices in the
HP JetAdmin software (since the digital sender is no longer a
configured device), which means that it can no longer be
discovered over the network
Notes about the procedure:
The procedure does not touch address books in the ABM.
After you reset the netw ork parameters , neither y ou nor any users
can use the digital sender again until you have reconfigured it,
starting with the steps under “Configure fast-track parameters at
the control panel” on page 38.
CAUTION This action cannot be undone.
To reset network parameters
1 Make sure that no one is using the digital sender. The shutdown
interrupts any job in process.
2 Start the HP JetAdmin software.
3 In the device list, click the digital sender you want to reset.
4 Click Device and then click Modify.
5 In the Configuration window, click Tools.
6 Click Reset network parameters, and then click OK.
7 Click OK to confirm that you want to reset.
EN Resetting 91

Resetting to factory defaults
Use this procedure for the following reasons:
when you want to completely reconfigure the digital sender and
all address books
when instructed to do so by troubleshooting steps or
HP customer support
Resetting the digital sender to fact ory defaults is a combination of
resetting address books and resetting network parameters. It does
the following:
erases the administrator password
locks the digital sender from use until the reset is complete
erases the configuration for TCP/IP, DNS/WINS, security, e-mail,
fax, and LDAP settings
erases all pending fax notifications
erases the contents of all public and private address books
removes the digital sender from the list of devices in the
HP JetAdmin software (since the digital sender is no longer a
configured device), which means that it can no longer be
discovered over the network
Notes about the procedure:
After you reset the digital sender to the factory defaults, neither
you nor any users can use the digi tal sende r again unt il y ou have
reconfigured it, starting with the steps under “Configure fast-tr ac k
parameters at the control panel” on page 38.
Yo u can use either the contro l panel or the HP Jet Admin softw are
to reset the digital sender to the factory defaults.
CAUTION This action cannot be undone.
92 Chapter 3 - Administering EN

To reset to factory defaults using the control panel
1 Make sure the digital sender is idle (the green light under the
button is off).
2 At the control panel, press S
HIFT+ALT+.
3 If an administrator password is required, the HP 9100C Login
dialog box appears. Type the password and press O
4 When the configuration menu appears, press T
5 Select Factory defaults and press O
6 Press O
K to confirm that you want to shut down.
K.
K.
OOLS.
To reset to factory defaults using the HP JetAdmin
software
1 Make sure that no one is using the digital sender. The shutdown
interrupts any job in process.
2 Start the HP JetAdmin software.
3 In the device list, click the digital sender you want to reset.
4 Click Device and then click Modify.
5 In the Configuration window, click Tools.
6 Click Reset to factory defaults, and then click OK.
7 Click OK to confirm that you want to reset.
EN Resetting 93

Backing up and restoring address books
Backing up
Use this procedure for the following reasons:
as a part of your regular routine for backing up important
information
before you make a large number of changes in the HP Address
Book Manager
to make a copy of information so that you can replicate it on
another digital sender
when instructed to do so by troubleshooting steps or
HP customer support
Notes about the procedure:
The administrator and users can both bac k up address books , but
they have different capabilities:
• administrator
Can save a copy of all public and private addre ss books, user
profiles, printer assignments, and function key assignments.
• users
Can save a copy of only their private address books.
The procedure does not back up any configuration performed at
the control panel or through the HP JetAdmin software.
The complete activity log is included in the backup.
You can save the backup file only on a computer where the
HP Digital Sender Link has write access.
Backup requires from 10 to 20 minutes (depending on t he amount
of information being backed up).
The backup creates 1 9 files . W e recommend th at y ou store these
backup files in an otherwise empty folder.
Backup requires an average of 50 to 100 MB of fre e hard disk
space.
Do not delete, rename, or make any changes to the backup files.
If you do, the complete set becomes unusa ble.
Backing up locks the digital sender and the ABM from use until
the backup is complete.
94 Chapter 3 - Administering EN

The backup creates a Notify.dat file that contains one of the codes
shown in the following table. You can find this file in the folder you
choose to place the backup.
Status information in the Notify.dat file
Code Action
OK The backup completed successfully. No action required.
FAIL01 Retry. If the problem persists, note the code and contact
HP customer support.
FAIL02 Retry. If the problem persists, note the code and contact
HP customer support.
FAIL04 Note the code and contact HP customer support.
FAIL05 Retry. If the problem persists, note the code and contact
HP customer support.
FAIL06 Retry. If the problem persists, note the code and contact
HP customer support.
To back up
1 Make sure that no one is using the digital sender. The backup
interrupts any job in process.
2 Make sure the HP Digital Sender Link is running on th e computer
on which you will be storing the backup.
3 Start the ABM.
4 On the Tools menu, click Backup.
5 For the Backup Directory field, click Browse to select the folder
in which you want to store the backup.
6 Click Start.
You cannot stop the backup once you have started it. Clicking
Cancel only closes the window that monitors the operation.
7 A dialog box appears if the folder you chose already contains
files. You can either delete the files and continue the backup, or
return to step 5.
8 Check the status of the backup in the following places when it has
finished:
Activity log (see “Using the activity log” on page 113)
Notify.dat file (see the description in this section)
EN Backing up and restoring address books 95

Restoring
Use this procedure for the following reasons:
to replace the address book information in a digital sender
to copy the address books from one digital sender to another
digital sender (these digital senders do not have to be on the
same network)
when instructed to do so by troubleshooting steps or
HP customer support
Notes about the procedure:
Restoring destroys the previous version of address books on the
computer that is receiving the restore.
The digital sender you rest ore the information to does not hav e to
be the same one that was backed up .
A restore requires from 10 to 20 minutes (de pending on the
amount of information being restored.)
Restoring locks the digital sender and the ABM from u se until t he
restore is complete.
Restoring also includes the activity log.
The restore creates a Notify.dat file that contains one of the codes
shown in the following table. You can find this file in the restore folder.
Status information in the Notify.dat file
Code Action
OK The restore completed successfully. No action required.
FAIL01 Retry. If the problem persists, note the code and contact
HP customer support.
FAIL02 Retry. If the problem persists, note the code and contact
HP customer support.
FAIL04 Note the code and contact HP customer support.
FAIL05 Retry. If the problem persists, note the code and contact
HP customer support.
FAIL06 Retry. If the problem persists, note the code and contact
HP customer support.
96 Chapter 3 - Administering EN

To restore
1 Make sure that no one is using the digital sender. The restore
interrupts any job in process.
2 Make sure the HP Digital Sender Link is running on th e computer
that is to receive the restored files.
3 Start the ABM.
4 On the Tools menu, click Restore.
5 For the Restore Directory field, click Browse to locate the folder
that contains backup files.
6 Click Start.
You cannot stop the restore once you ha ve started it. Clicking
Cancel only closes the window that monitors the operation.
7 Click OK to confirm that you want to continue the restore.
8 Check the status of the restore in the following places when it has
finished:
Activity log (see “Using the activity log” on page 113)
Notify.dat file (see the description in this section)
EN Backing up and restoring address books 97
 Loading...