

Page 1

HP Smart Wi-Fi Display
User Manual
Manuel de l'utilisateur
Revision 1.0
Page 2

Page 3

FCC Compliance Statement..........................................................3
What’s in the Box......................................................................4
Getting Started .........................................................................5
Remote Control .........................................................................6
Description of Buttons ............................................7
General Navigation ..............................................9
Rotating Pictures ...................................................9
ENGLISH
Picture Frame ......................................................................... 11
Initial Frame Setup................................................................... 13
Description of Main Menu ......................................................... 18
Viewing Photos .......................................................................22
Configuring Access to Online Content...........................................24
Quadrant Display.................................................9
Single Display ...................................................10
Standby ...........................................................10
Top View .......................................................... 11
Left Side........................................................... 11
Right Side ......................................................... 12
Back ...............................................................12
Clock Info.........................................................13
Setup Wizard ....................................................13
Running the Wireless Network Configuration Wizard on
your Computer (optional) ......................................15
Local Settings ....................................................17
Frame Content ................................................... 18
Internet Content..................................................19
Home Network .................................................. 19
Favorites .......................................................... 19
Time................................................................20
Network Signal Icon............................................21
Photo/Picture Slide Show......................................22
Photo Viewing Options.........................................23
Printing a Photo..................................................23
Setting Up your www.hpframe.com Account ..............24
1
Page 4

Adding Another Frame to your www.hpframe.com
Account ...........................................................27
Managing your www.hpframe.com Account ..............28
Online Services..................................................29
Recent Updates..................................................33
Streaming Media from your PC to your HP Smart Wi-Fi Display ...........34
Enabling Windows Media Player 11 UPnP.................34
Connecting your HP Smart Wi-Fi Display to your Computer with the USB
Cable ..................................................................................38
Using Headphones or Speakers with your HP Smart Wi-Fi Display........38
Resetting the Frame..................................................................39
Cleaning and Care Tips ............................................................39
Cleaning the screen ............................................39
Cleaning the frame and backing ............................39
Feedback..............................................................................40
Feedback about this User Manual ...........................40
Getting Help..........................................................................40
Specifications .........................................................................42
Frequently Asked Questions .......................................................43
Troubleshooting ......................................................................45
ENGLISH
2
Page 5

FCC Compliance Statement
Note: This equipment has been tested and found to comply with the limits for a
Class B and Class C digital device, pursuant to Part 15 of the FCC Rules. These limits
are designed to provide reasonable protection against harmful interference in a
residential installation. This equipment generates, uses, and can radiate radio
frequency energy and, if not installed and used in accordance with the instructions,
may cause harmful interference to radio communications. However, there is no
guarantee that interference will not occur in a particular installation.
ENGLISH
If this equipment does cause harmful interference to radio or television reception,
which can be determined by turning the equipment off and on, the user is
encouraged to try to correct the interference by one of the following measures:
• Reorient or relocate the receiving antenna.
• Increase the separation between the equipment and receiver.
• Connect the equipment into an outlet on a circuit different from that to which the
receiver is connected.
• Consult the dealer or an experienced radio/TV technician for help.
FCC Caution: To assure continued compliance, use only shielded interface cables
when connecting to computer or peripheral devices. Any changes or modifications
not expressly approved by the party responsible for compliance could void the user’s
authority to operate this equipment.
This device complies with Part 15 of the FCC Rules. Operation is subject to the
following two conditions: (1) this device may not cause harmful interference, and (2)
this device must accept any interference received, including interference that may
cause undesired operation.
3
Page 6
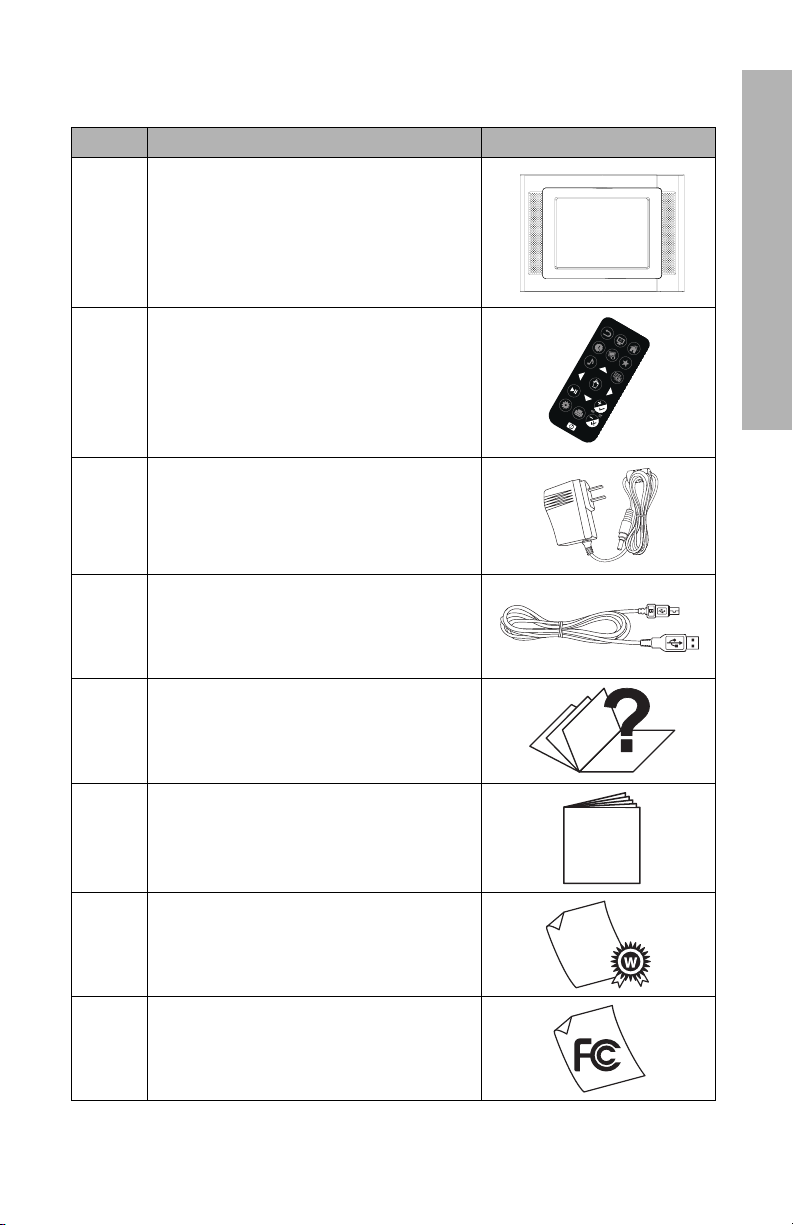
What’s in the Box
Qty Item Image
1HP Smart Wi-Fi Display
ENGLISH
1
1Universal Power Adapter
1USB 2.0 Cable
1User Manual
1Quick Start Guide
1Warranty Document
Remote Control
(Replacement Battery = CR2025)
1 Declaration of Conformity
4
Page 7

Getting Started
1. Connect the adapter into a power outlet and then plug the power cord into the
DC input of the HP Smart Wi-Fi Display.
ENGLISH
2. Unfold the attached stand to its extended position and rotate 90°, then slide the
Power switch on the back of the HP Smart Wi-Fi Display to the ON position.
5
Page 8
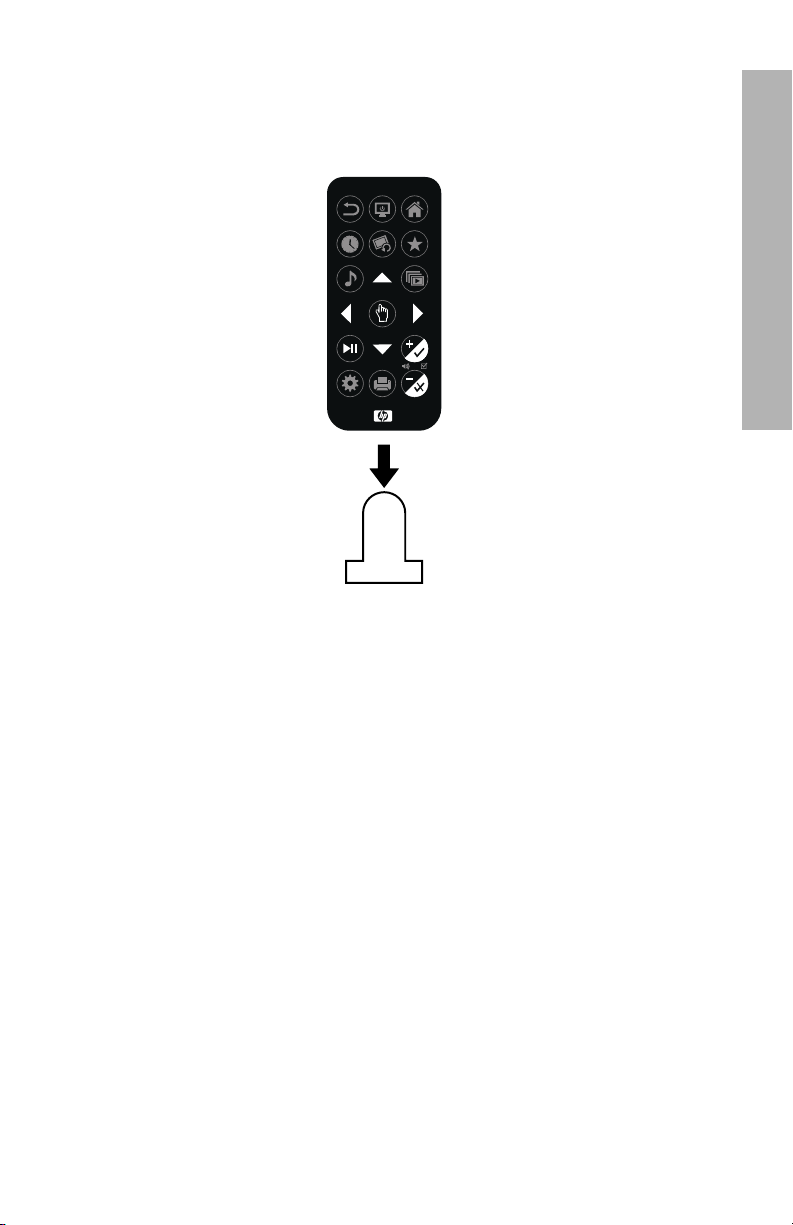
Remote Control
Before you start, pull the tab from the remote control to activate it.
Note: If a replacement battery is required, purchase battery #CR2025.
ENGLISH
6
Page 9
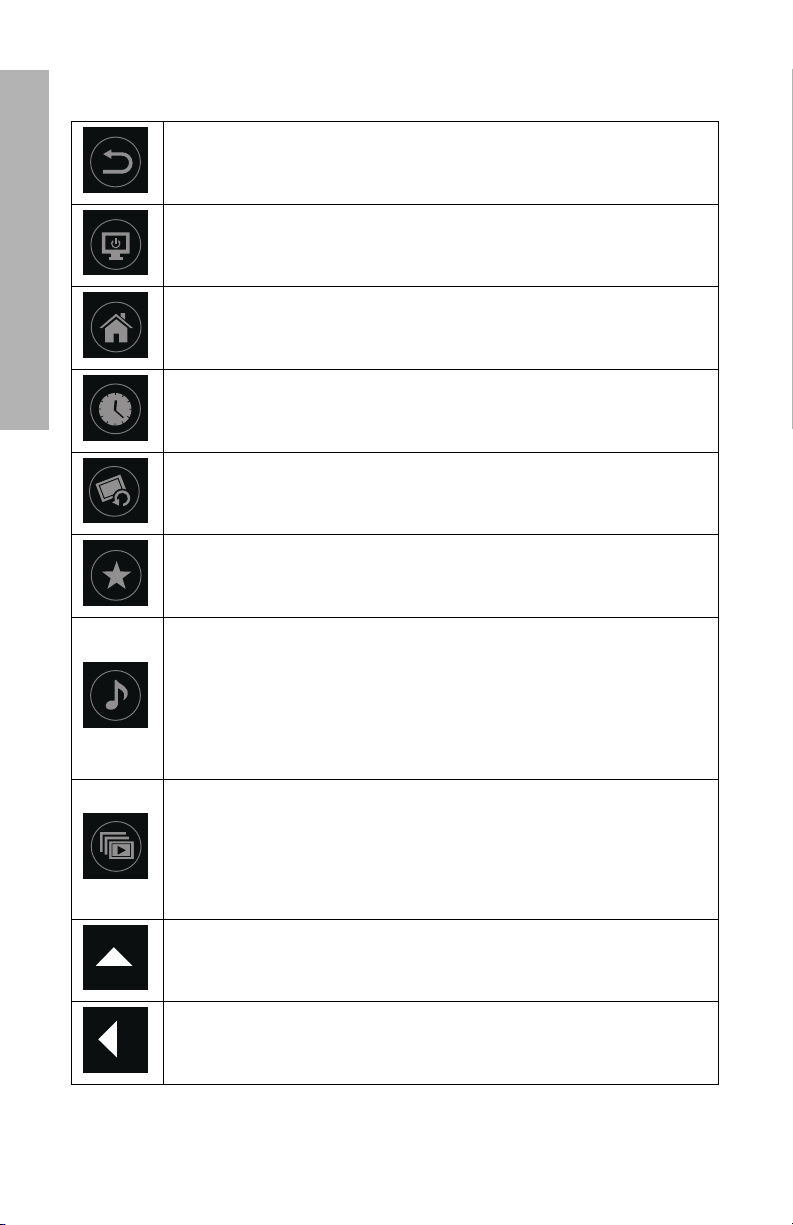
Description of Buttons
Back: Press to return to previous menu screen.
Standby: Press to put the display into standby mode or take it out of
standby mode.
ENGLISH
Home: Press to return to Main Menu.
Time: Press to display Time menu.
Photo Rotate: Press to rotate photo 90° counter clockwise.
Favorites: Press to display Favorites menu.
Music: Toggles between different selections, as follows.
Press once: shows ”now playing” (if something is playing)
Press again: goes to local frame content
Press again: goes to Internet radio menu
Press again: goes to home network music menu
Note: Internet radio and home network music will not be accessed if
the frame is not connected to the network.
Slideshow: Toggles between different selections, as follows.
Press once: shows local frame content
Press again: goes to Internet photos menu
Press again: goes to home network photos menu
Note: Internet photos and home network photos will not be
accessed if the frame is not connected to the network.
Up: Press to move up.
Left: Press to move left.
7
Page 10
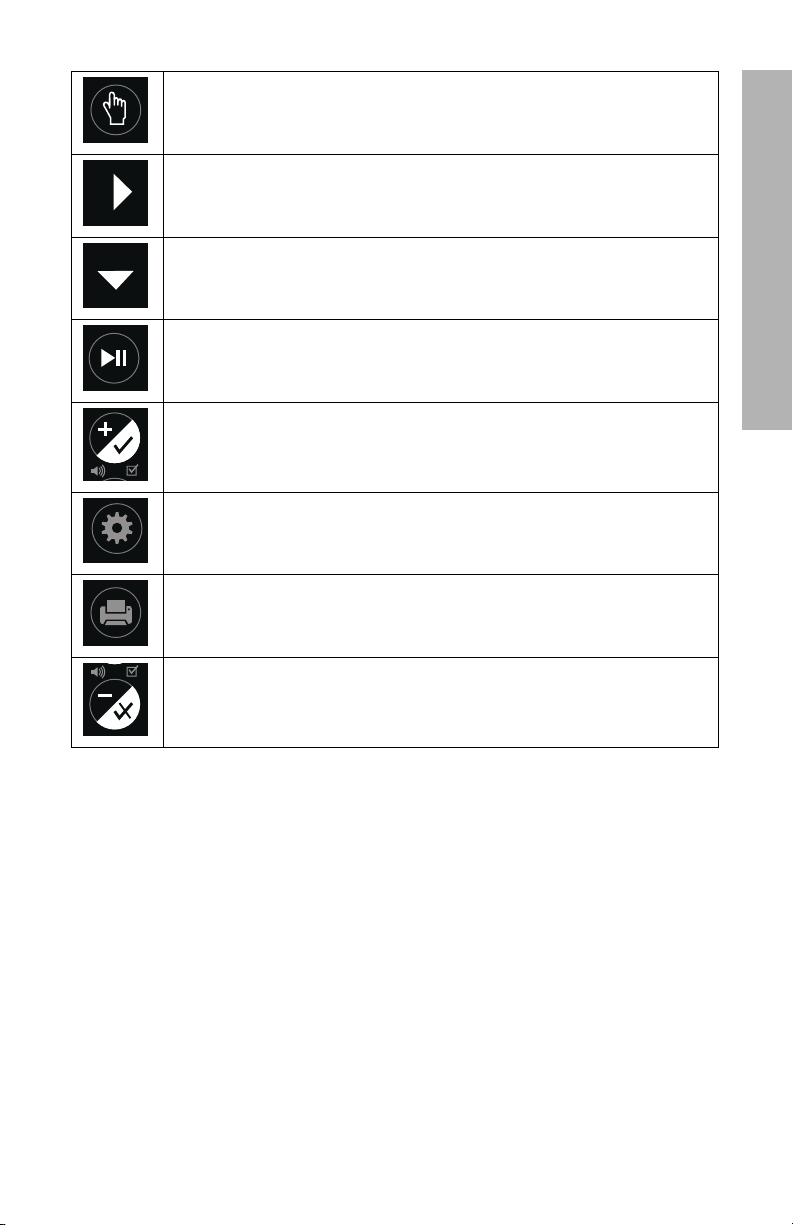
Select: Press to select highlighted item.
Right: Press to move right.
Down: Press to move down.
Play/Pause: Press to play or pause music, video or slide shows.
Volume Up/Mark: Press to increase volume, or, depending on
the active screen, to mark a menu item.
Options: Press to display available options.
Print: Press to print photo to compatible printer.
Volume Down/Unmark: Press to decrease volume, or,
depending on the active screen, to unmark a menu item.
ENGLISH
8
Page 11

General Navigation
In most cases you can use the navigation buttons (Up, Down, Left, Right) and the
Select button to navigate through the different menus. Sometimes, however, it may
be quicker to use one of the specific menu buttons, such as the Home, Favorites,
or Music buttons, which take you to the menu you want with a single press.
Note that, as the HP Smart Wi-Fi Display has to communicate with 3rd party
websites, as well as hpframe.com, there are times when the frame may be busy with
this communication, and it can cause delays in responding to the remote control.
ENGLISH
Rotating Pictures
To rotate pictures, press the Photo Rotate button.
Quadrant Display
When viewing a slide show, you can either choose to view photos one at a time or
in a Quadrant display.
There are two ways to enable the Quadrant display:
1. From the Setup menu, choose Local Settings, then change Slideshow
Mode to Quadrant. For more information, see “Local Settings” on page 17.
2. During slide show playback, press the Options button on the remote, and
change Slideshow Mode to Quadrant. Press the Back button to return to
the slide show.
When the Quadrant option is chosen, the screen is divided into four, and the top
two quarters display images in a slide show fashion, while the bottom two quarters
display the clock and calendar.
You can navigate the quadrants using the remote, as follows:
1. Press the Select button on the remote control. This will highlight the upper-left
quadrant.
2. Use the navigation buttons to select one of the four quadrants.
3. Press the Select button again to display a list of items that can be displayed in
that quadrant. Choose which item you wish to be displayed, and press Select
again.
Note: If you wish to keep this setup for next time, press the Options button and
choose Save Quadrant Setup.
9
Page 12

Single Display
By default, the HP Smart Wi-Fi Display will show photos in Single display mode,
meaning that the slide show will display one photo at a time. If you have changed to
Quadrant display and would now like to return to viewing one photo at a time, then
you can return to single display.
There are two ways to enable Single display:
1. From the Setup menu, choose Local Settings, then change Slideshow
Mode to Single. For more information, see “Local Settings” on page 17.
2. During slide show playback, press the Options button on the remote, and
change Slideshow Mode to Single. Press the Back button to return to the
slide show.
Standby
To stop the current frame function and turn off the display, simply press the Standby
button. To turn off the HP Smart Wi-Fi Display completely, you must use the power
switch on the back of the display.
ENGLISH
10
Page 13
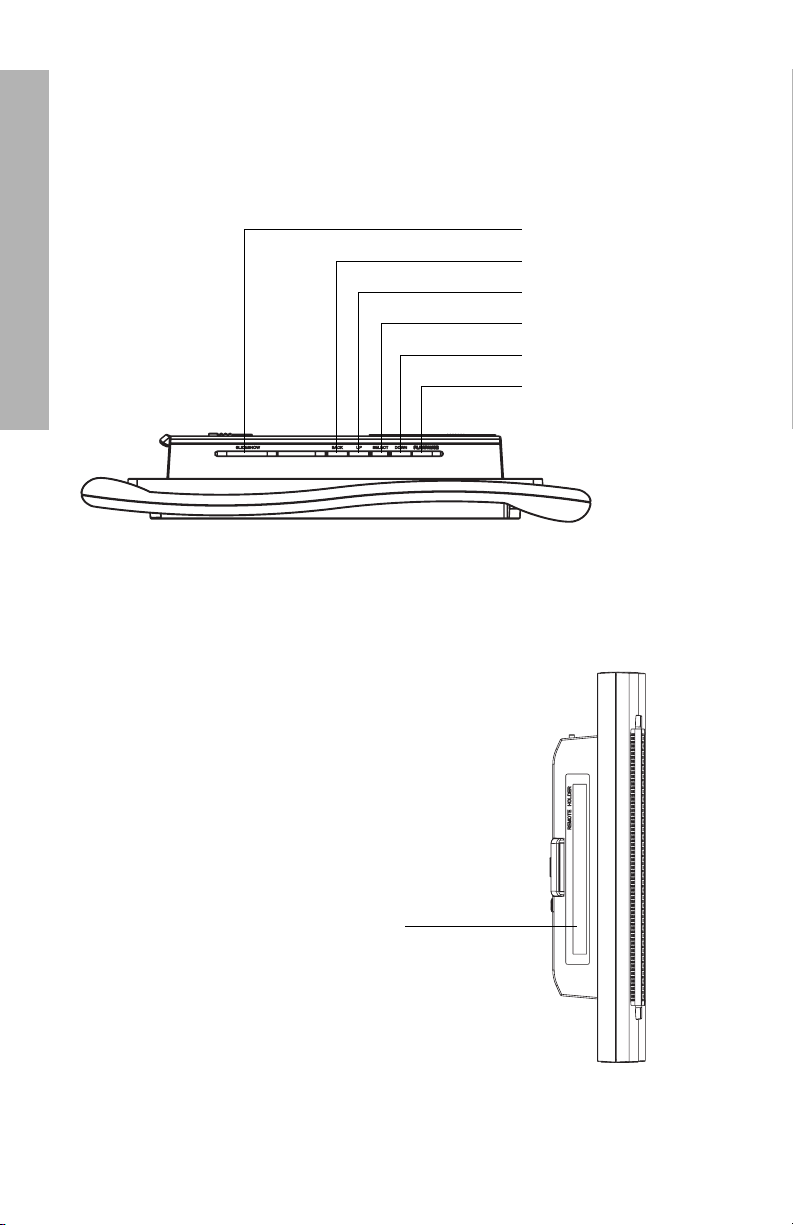
Picture Frame
Top View
ENGLISH
Left Side
Slideshow
Back
Up
Select
Down
Play/Pause
Remote control holder
11
Page 14
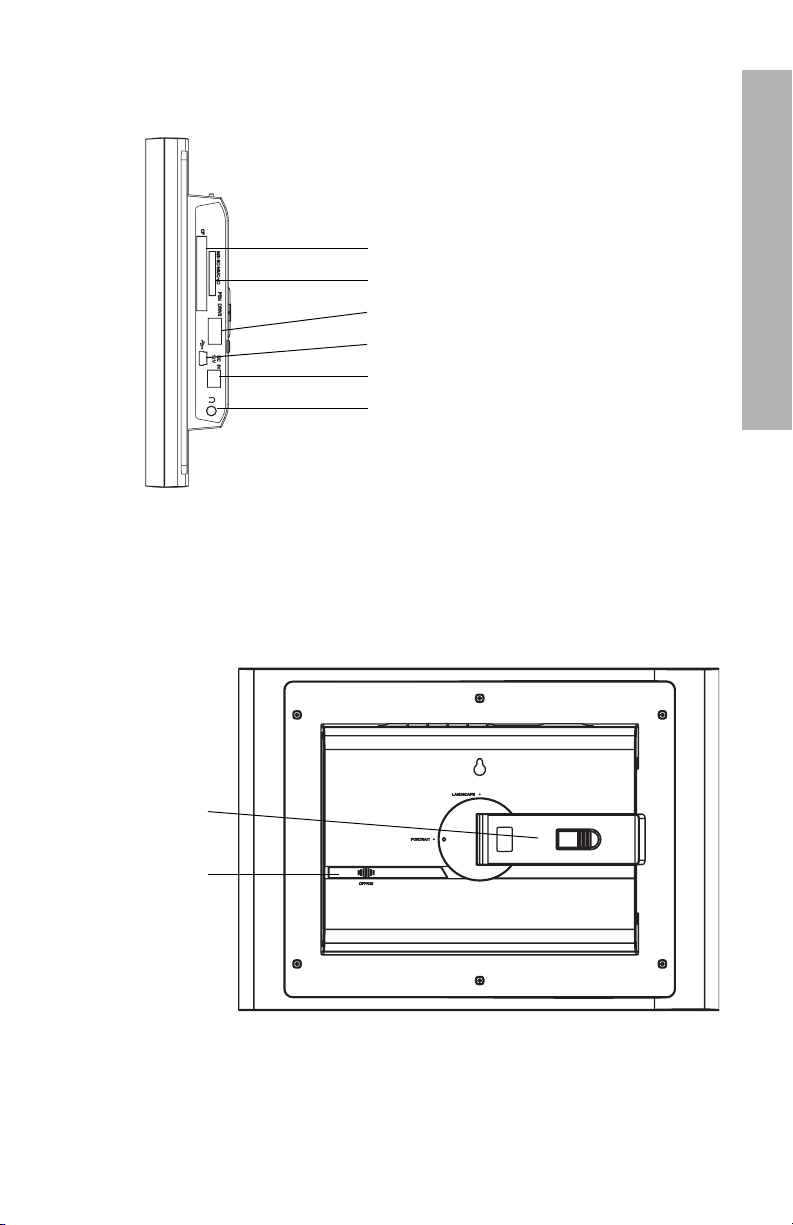
Right Side
Back
ENGLISH
CF Card Slot
MS/SD/MMC/xD Card Slot
USB connector
Mini-USB connector
Power Input
Headphone jack
Stand
Power switch
12
Page 15

Initial Frame Setup
The following instructions are shown using the remote control unit. Some of these
functions can also be accessed via the control keys located on the back of the HP
Smart Wi-Fi Display.
Clock Info
The date and time are automatically set when your HP Smart Wi-Fi Display connects
to the Internet.
ENGLISH
The time zone, and daylight savings options are derived from the ZIP Code that you
enter when setting up your www.hpframe.com account.
If you are not connected to a wireless network, you can also manually adjust the
time. See “Manually setting the date and time” on page 20 for more information.
Setup Wizard
The Setup Wizard helps you get your HP Smart Wi-Fi Display up and running
and will run automatically when the frame is powered on for the first time, or if the
frame has been reset to factory default settings. In this case, you can skip to step 2
below.
1. From the Setup menu, navigate to Setup Wizard and press the Select
button.
2. The welcome screen appears, which will guide you through the setup procedure.
Note: At any stage, press the Select button to go to the next screen.
3. The tutorial begins, and explains the buttons on the remote control. Follow the on-
screen instructions to learn about the remote control buttons and their functions.
4. Follow the prompts to display the Network Setup screen.
5. Use the Up or Down buttons to highlight your wireless network name (note that
you may need to scroll down if more networks are available than can fit on the
screen), then press the Select button to select.
Note: If you are connecting to a non-broadcasting wireless network, then
choose Setup Hidden Network WEP, Setup Hidden Network WPA,
or Setup Hidden Network Open, depending on which security is used by
your network. If necessary, you will then be offered the chance to enter the
network SSID manually by using the remote control to move through the letters
on the virtual keyboard. If required, use the Mark button to cycle through the
virtual keyboards.
13
Page 16

Note: Alternatively, you can configure your HP Smart Wi-Fi Display using
Windows Connect Now (WCN) technology. To do so, run the Wireless
Network Configuration Wizard on your computer and insert the WCN
USB flash disk into the HP Smart Wi-Fi Display once the wizard is complete. For
more information on running the Wireless Network Configuration
Wizard on your computer, see “Running the Wireless Network Configuration
Wizard on your Computer (optional)” on page 15.
6. If required, enter security details, such as the password, using the remote control
to move through the letters on the virtual keyboard. If required, use the Mark
button to cycle through the virtual keyboards. This step is not necessary if the
wireless network does not have security.
Note: You can exit Network Setup by pressing the Home button. Your HP
Smart Wi-Fi Display will still work, but you will not have network/Internet access
until you go through Network Setup again.
7. When finished, press the Play/Pause button to enter the password.
8. You will now see a screen with information required to complete the setup
process online. This information includes the website address you should visit
from your computer, your Device ID and your Authorization Code. Keep a
note of these details, as you will need them to set up your www.hpframe.com
account. For more information on the online setup process, see “Setting Up your
www.hpframe.com Account” on page 24.
Note: The authorization code changes over time, or if you go through the
Setup Wizard again. The current code can always be found by going to
Setup > System Information.
ENGLISH
14
Page 17

Running the Wireless Network Configuration Wizard on your Computer (optional)
As an alternative to manually entering Wi-Fi details into your HP Smart Wi-Fi
Display, you can use the Wireless Network Configuration Wizard on your computer.
Windows XP (Service Pack 2 or later)
1. On your computer, click Start > Control Panel
2. Double-click Wireless Network Setup Wizard.
ENGLISH
3. The Wireless Network Setup Wizard begins. Click Next.
4. If the wireless network you wish to connect to has not previously been set up on
your computer, check the check box beside Set up a new wireless
network. Click Next.
Alternatively, if the wireless network you wish to connect to has previously been
set up on your computer, check the check box beside Add new computers
or devices to the **** network, where “****” refers to the name of your
wireless network. Click Next.
5. If you have chosen Set up a new wireless network in the previous step,
you will now be asked to enter the Network name (SSID), choose whether to
have Windows assign a network key automatically (check the box beside
“Automatically assign a network key”), or enter one manually (check the box
beside “Manually assign a network key”), and finally choose whether to check
the box beside “Use WPA encryption instead of WEP” depending on which type
of security your network uses. Click Next.
6. If you have chosen to enter the network key manually in the previous step, you
will be asked to do so now (then click Next). If you have chosen to have
Windows assign a network key automatically, then this step is skipped.
7. Check the check box beside Use a USB flash drive (recommended). Click
Next.
8. Plug your USB flash drive into any USB port on your computer and then wait for
the drive letter to appear in the “Flash drive” field. Click Next.
9. When advised to do so, remove the USB flash drive and plug it into your HP
Smart Wi-Fi Display to finish the set up of the Wi-Fi connection.
10. Once the Smart Wi-Fi Display Wi-Fi connection is set up, unplug the USB flash
drive and plug it back into your computer. Click Next.
11 . Click Finish.
15
Page 18

Windows Vista
1. On your computer, click Start > Network. The Network folder opens.
2. Click Add a wireless device. The Add a wireless device to the
Network screen is displayed.
3. Click I want to add a wireless device or computer that is not on the
list, using a USB flash drive.
4. Click Add the device or computer using a USB flash drive.
5. From the list that appears, select your network name (SSID), then click Next.
6. If the User Account Control screen appears, click Continue (you may need
to repeat this).
7. Connect your USB flash drive to the computer, confirm that the drive name is
displayed, then click Next.
8. Once this step is complete, remove the USB flash drive from the computer, then
click Close.
9. Plug the USB flash drive into your HP Smart Wi-Fi Display to finish the set up of
the Wi-Fi connection.
ENGLISH
16
Page 19

Local Settings
The Local Settings menu lets you configure various settings on your HP Smart WiFi Display.
From the Setup menu, navigate to Local Settings and press the Select button.
The following options are displayed. Use the navigation buttons to highlight the
option you wish to change, then use the Select button to change the setting.
• Set Wake/Sleep/Alarm - Set the wake time, sleep time, or alarm. See
ENGLISH
“Setting Wake/Sleep/Alarm times” on page 20 for more information.
• Slideshow Mode - Choose between [Single] or [Quadrant]. [Quadrant]
divides the screen into four, and shows photos in the top two quadrants and the
clock and calendar in the bottom two during slide shows. You can also customize
what is displayed in Quadrant mode. See “Quadrant Display” on page 9 for
more details.
• Slideshow Shuffle - Displays photos in random order during slide show.
• Slideshow Repeat - Repeats the slide show once the last photo is displayed.
• Slideshow Interval - Lets you set the amount of time each photo is displayed
during slide shows.
• Music Shuffle - Plays music in random order.
• Music Repeat - Repeats music once the last track is finished.
• Music Autoplay - Automatically plays music during slide shows when music
files are present in the same folder at the photo files.
• Photo Autoplay - Automatically starts a slide show when the HP Smart Wi-Fi
Display is switched on and a memory card or USB storage device is inserted.
• USB Mode - Choose whether to use the mini-USB port to connect to a computer
or a printer (using the included mini-USB to USB cable).
• Photo Mode - Choose whether to see photos at an optimized size [Optimal] or
in its original size [Original]. When [Optimal] is chosen, the photo size may be
increased to fit the height or width of the screen.
• Photo Effect - Choose to see your photos in their original color [Normal], Black
& White [Black & White], or with an old-fashioned look [Old-Fashioned].
• Photo Auto-Compress - Choose whether or not to automatically compress
the photo file size.
17
Page 20
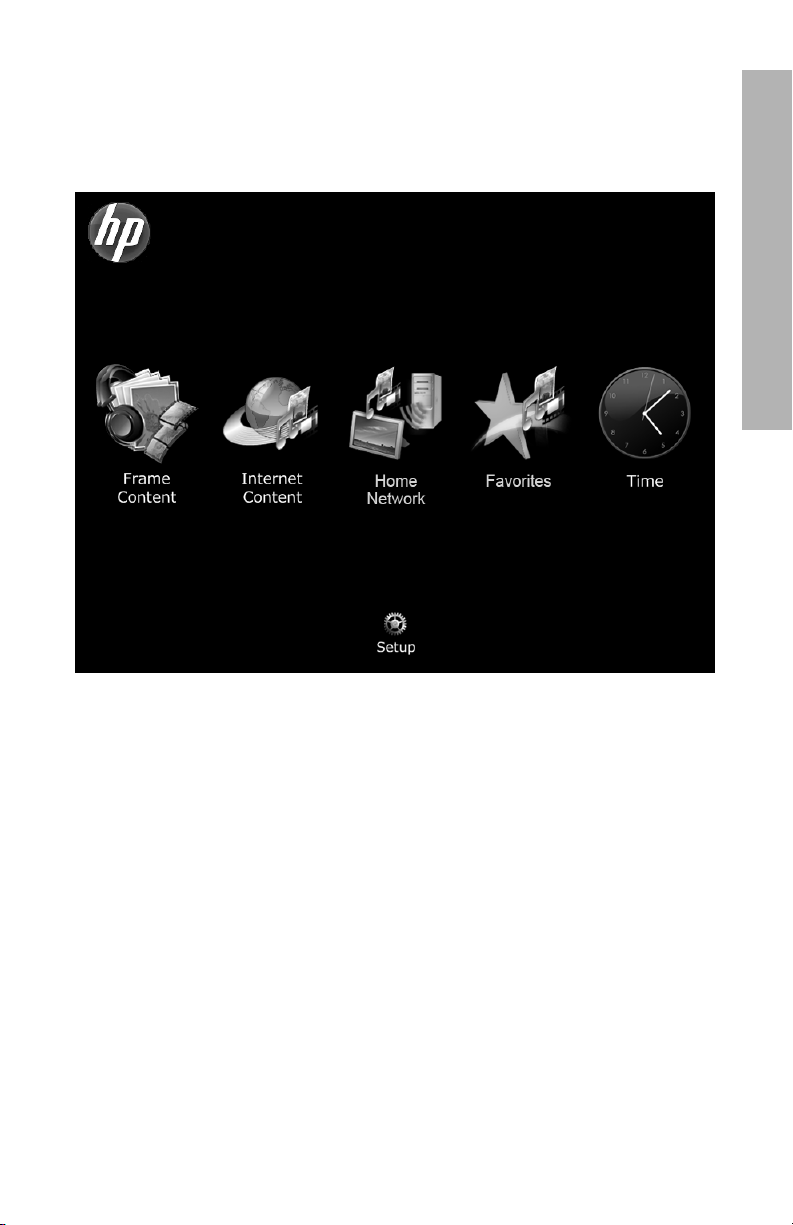
Description of Main Menu
The Main Menu can be accessed by pressing the Home button on the remote
control.
ENGLISH
To navigate through the menu, use the directional buttons on the remote control, then
press the Select button to choose the highlighted item.
The Main Menu has six main icons: Frame Content, Internet Content,
Home Network, Favorites, Time, and Setup.
Other icons sometimes appear on this screen, such as the network signal icon in the
top right corner (see “Network Signal Icon” on page 21 for more information) and
the recent updated icons in the bottom right corner (see “Recent Updates” on
page 33 for more information).
Frame Content
Frame Content describes the content which is available on the HP Smart Wi-Fi
Display itself, including any connected memory cards/USB flash drives. You can
access lists of available photos, music, or videos, or browse manually by folder.
18
Page 21

Internet Content
Internet Content describes the content which is available to you through the
Internet. Before you use the Internet Content features on your HP Smart Wi-Fi
Display, you should set up your www.hpframe.com account. For more information
see “Setting Up your www.hpframe.com Account” on page 24.
On your HP Smart Wi-Fi Display, from the Main Menu, navigate to Internet
Content and press the Select button. The Internet Content menu appears, with
a list of the content you have set up online, such as Internet radio, photo hosting sites
ENGLISH
or gadgets like the weather forecast. Any time you change this list online, the
Internet Content list will automatically update soon after. Navigate to the item
you are interested in and then press the Select button.
Home Network
Home Network refers to the computers or home servers on the same network as
your HP Smart Wi-Fi Display that are set up to share photos, music and video with
your device. Before you use the Home Network features on your HP Smart Wi-Fi
Display, you should set up your computer(s) to share media content. For more
information, see “Streaming Media from your PC to your HP Smart Wi-Fi Display” on
page 34.
On your HP Smart Wi-Fi Display, from the Main Menu, navigate to Home
Network and press the Select button. A list of available computers/servers
appears. Navigate to the server you are interested in and then press the Select
button. A list of available shared content is displayed. Navigate to the item you are
interested in and then press the Select button.
Favorites
The Favorites menu lists the HP Smart Wi-Fi Display features you use most. Often it
is quicker to go to the Favorites than to navigate through several menus. You can
add items to the Favorites list by highlighting an item, pressing the Options
button, and then choosing Add to Favorites.
See below for an example of adding a photo from an inserted USB flash drive to
favorites:
1. From the Main Menu, select Frame Content.
2. Select Photos.
3. Select USB Card.
4. Select All Photos.
19
Page 22

5. Navigate to the photo you would like to add to favorites and press the Options
button on the remote control.
6. Select Add to Favorites.
You can now access this photo directly by going to Main Menu > Favorites >
Photos, where you will find a direct link to the photo.
Time
The Time menu lists several time and date options.
Automatically setting the date and time
By default, when you connect to the Internet, your HP Smart Wi-Fi Display configures
the time and date according to the ZIP Code that you entered when you set up your
www.hpframe.com account.
Manually setting the date and time
To adjust the date or time manually, select Set Date/Time from the Clock menu.
Use the navigation buttons and Select to change the values.
Note: This option is only available when you are not connected to the network.
Setting Wake/Sleep/Alarm times
You can program your HP Smart Wi-Fi Display to turn itself on and off at times you
pick during the day. You can also set up your HP Smart Wi-Fi Display to alert you
with an alarm. To set up these three options, choose Set Wake/Sleep/Alarm
from the Clock menu. Use the navigation buttons and Select to change the values.
Displaying the clock
ENGLISH
To display the clock, from the Clock menu, select Current Time.
Displaying the calendar
To display the calendar, from the Clock menu, select Calendar.
20
Page 23

Network Signal Icon
When you have access to a wireless network, the network signal icon appears in the
top right corner of the Main Menu and is shown below.
It consists of three bars, each of which can be gray or blue. The more blue bars
ENGLISH
appear, the stronger the signal, so three blue bars would indicate a strong signal.
Lower signal strength can lead to delays from additional network retransmissions.
Moving the frame closer to the router/access point can improve signal strength.
21
Page 24

Viewing Photos
Photo/Picture Slide Show
Slide show modes
Slide show mode will begin automatically a few seconds after the HP Smart Wi-Fi
Display is powered on if an external memory card/USB flash drive is inserted. If
more than one memory card or USB flash disk is inserted, then the contents of the
most recently inserted one will be shown. There are two slide show modes, one with
background music and the other without.
• Slide show with music – This is possible with photos/pictures and music files
on an external memory card or USB flash drive. The default setting is for the HP
Smart Wi-Fi Display to play music during the slide show. You can change this
preference in settings.
You can also manually start music playback and then navigate to (and start)
photo playback. This works for Frame Content, Home Network, and Internet
Content. For example, you can listen to music from a USB flash drive while
viewing photos from an online photo host, such as Facebook, as follows:
1. Navigate to Frame Content > Music > USB Card > Tracks, and
choose a song to play.
2. While the song is playing, press the Home button on the remote.
3. Navigate to Internet Content > Photos > Facebook, and choose an
album for the slide show.
ENGLISH
• Slide show without music – This is possible with photos/pictures on either
internal or external memory sources.
You can also choose to start a slide show manually at any time. To do so, go to
Frame Content, Internet Content, or Home Network then navigate to start
photo playback.
22
Page 25

Photo Viewing Options
There are two ways to choose photo viewing options:
• Setup menu
Navigate to the Setup menu and then Local Settings. For more information,
see “Local Settings” on page 17.
• Options button
Press the Options button while viewing photos. You will be given most of the
ENGLISH
same options as in Local Settings, with the addition of Copy File. This
function allows you to copy a photo from a memory card and paste it to internal
memory, for example. After choosing Copy File, you will be given a list of
destinations on the frame. Simply choose the destination you prefer and the file
will be pasted there.
Printing a Photo
You can print a photo to any PictBridge-compatible printer.
First make sure that you have connected a PictBridge-compatible printer to your HP
Smart Wi-Fi display using the supplied USB to mini-USB connector. The USB
connector should be attached to the printer, and the mini-USB connector should be
attached to your HP Smart Wi-Fi Display.
Note: Make sure that USB Mode is set to Printer, according to the instructions in
“Local Settings” on page 17.
While viewing a photo that you would like to print, press the Print button on the
remote control. You will be asked to confirm that you want to print the photo.
Navigate to Yes and press the Select button.
23
Page 26
Configuring Access to Online Content
The HP Smart Wi-Fi Display can stream media from the Internet, including photos
from various photo hosting sites, video from YouTube, Internet radio, the weather,
and Tweets from Twitter. The streamed media can then be accessed on your frame
by going to the Main Menu and then selecting Internet Content.
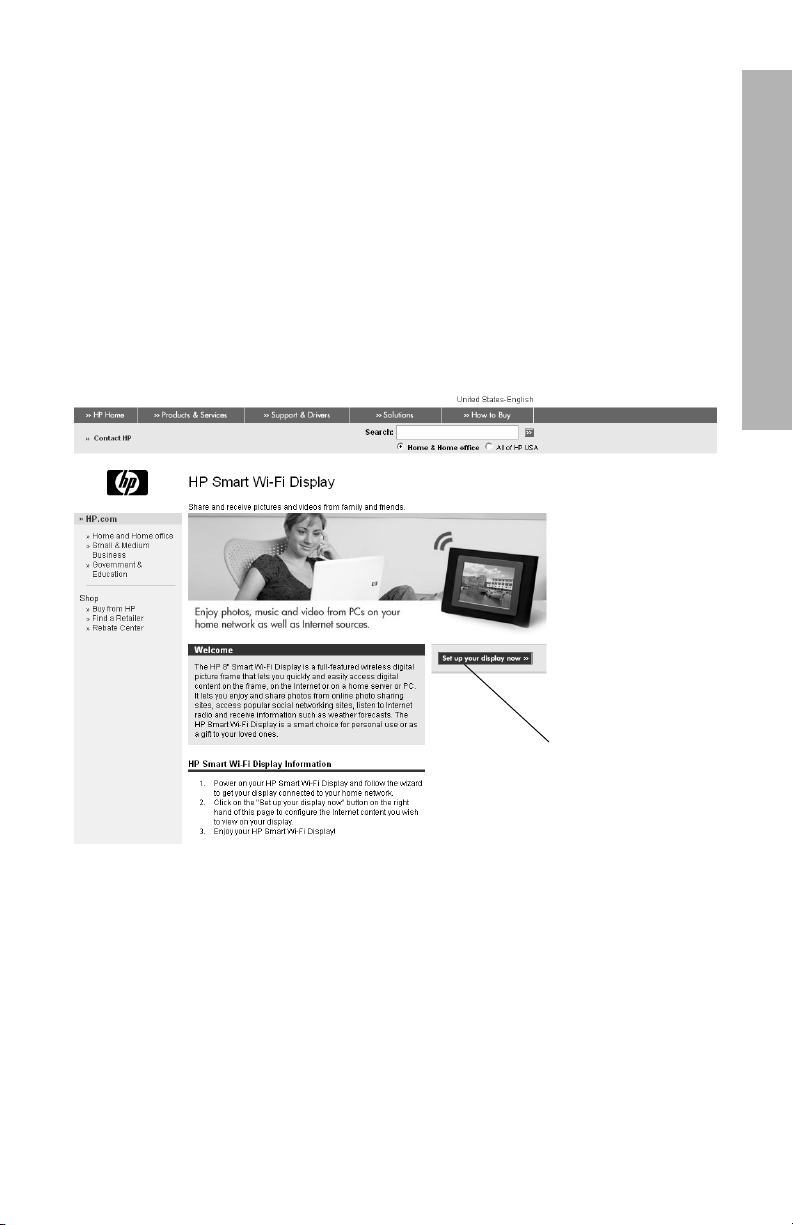
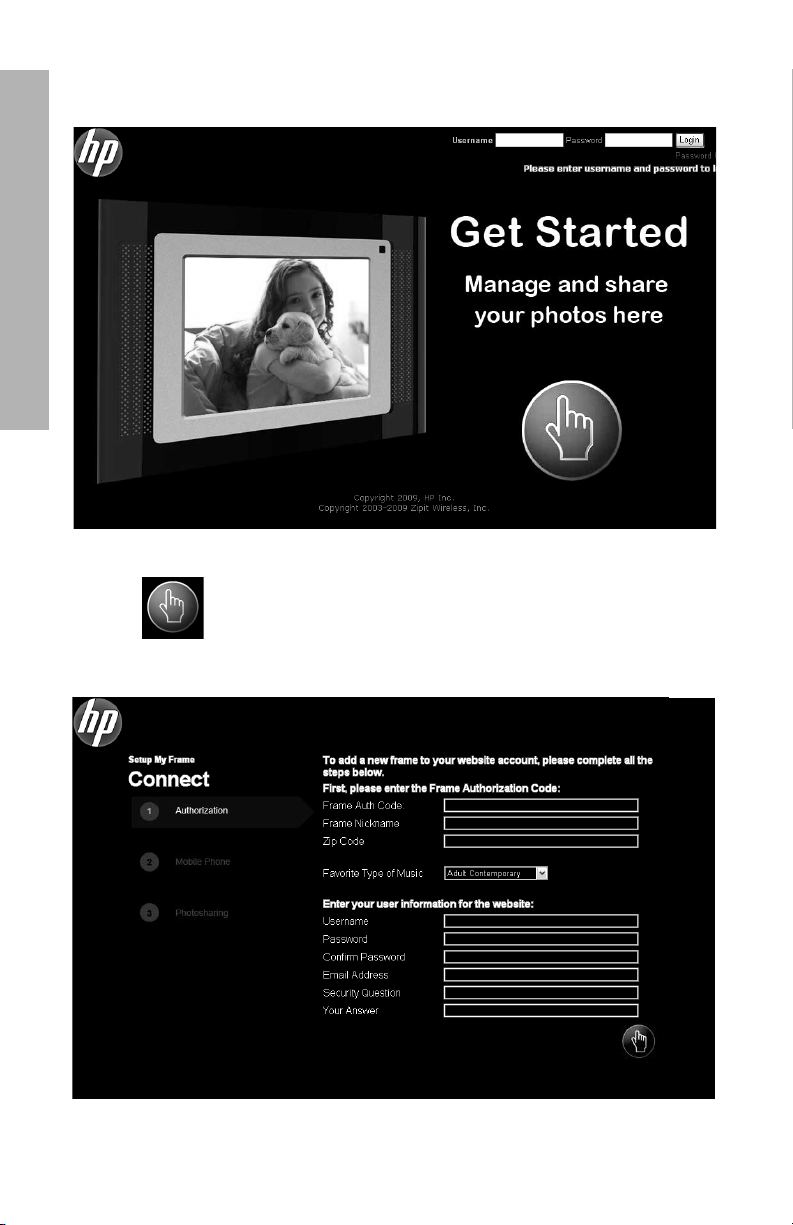
Setting Up your www.hpframe.com Account
To stream Internet content to your HP Smart Wi-Fi Display, you must first set up an
account via the http://www.hpframe.com website, as follows:
1. On your computer, go to http://www.hpframe.com.
You will see a web page similar to the following:
ENGLISH
24
click here to proceed
Page 27
2. Click Set up your display now to proceed. You will now see the following
screen:
ENGLISH
3. Click to continue.
4. The following screen appears:
25
Page 28
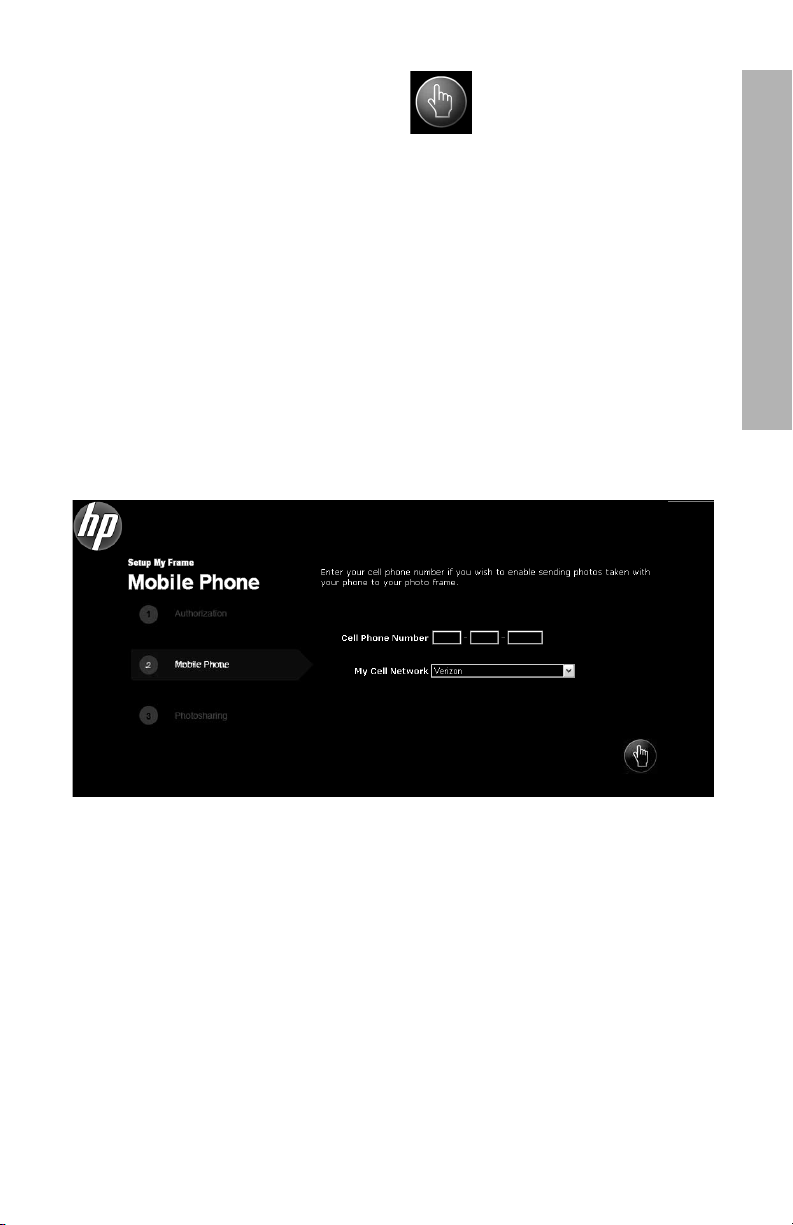
5. Fill in the required information and click to continue.
Note: One item you will need to enter on this page is the Frame
Authorization Code. This is displayed when you complete the Setup
Wizard on your HP Smart Wi-Fi Display. See “Setup Wizard” on page 13 for
more details. If you have misplaced this code, then you can go to Setup >
System Information to see it again.
Also note that the authorization code changes over time, or if you go through the
Setup Wizard again, so it is worth checking System Information to make
sure that you have the latest code.
Another item on this page asks for your favorite type of music. This is used to
provide your HP Smart Wi-Fi Display with an initial playlist of suitable Internet
radio stations. For more information on customizing this playlist, see “Internet
Radio” on page 29.
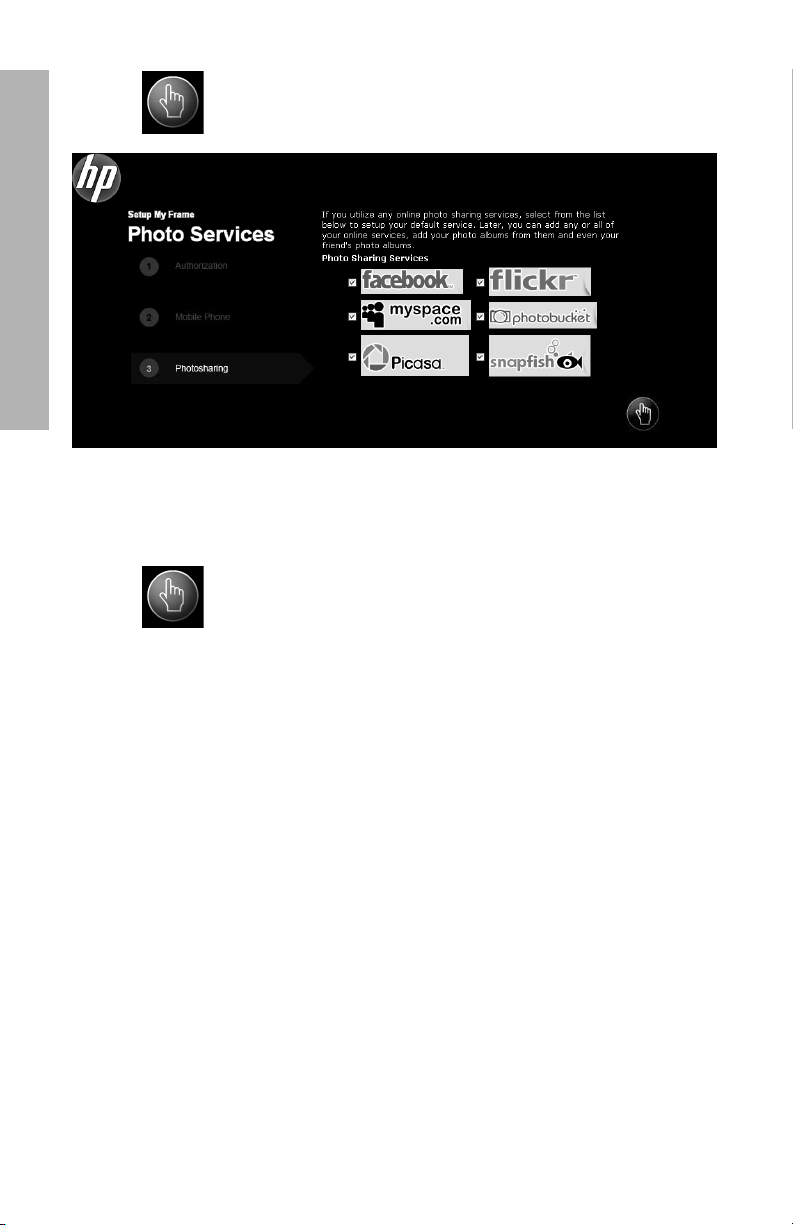
6. The following screen appears:
ENGLISH
7. To send photos from your or another person’s cell phone to your HP Smart Wi-Fi
Display, enter the cell phone number. If you do not wish to use this feature, leave
it blank.
Note: Only cell phones that support sending pictures via MMS can be used.
26
Page 29
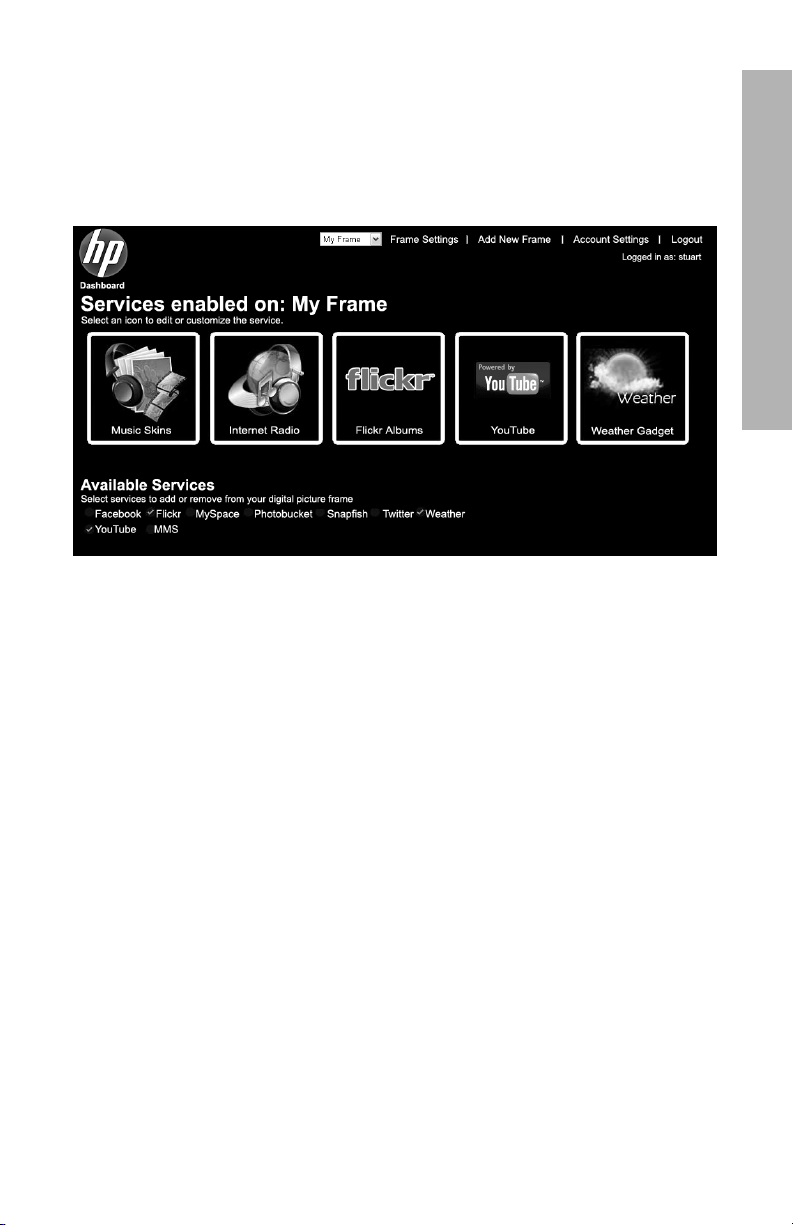
8. Click to continue. The following screen appears:
ENGLISH
9. Choose the online photo sharing services you use and would like to view on your
HP Smart Wi-Fi Display. You can also change this list after your
www.hpframe.com account is set up.
10. Click to continue. Your www.hpframe.com account is now set up.
Adding Another Frame to your www.hpframe.com Account
You can set up more than one HP Smart Wi-Fi Display on the same
www.hpframe.com account. After the first one is set up, simply click on Add New
Frame (at the top of the web page) and enter the new frame’s details.
27
Page 30
Managing your www.hpframe.com Account
You can manage your www.hpframe.com account via a computer at any time by
going to http://www.myframemanager.com and logging in using the user name
and password you specified when setting up your www.hpframe.com account.
Once logged in, you will see a screen similar to the following:
In the upper portion of the screen, you will see which services you have already
selected. You may need to configure or customize these further before they appear
on your HP Smart Wi-Fi Display. Click on the icons to configure or customize the
service(s) you have chosen. For more information, see “Online Services” on
page 29.
ENGLISH
In the lower portion of the screen, you will see the list of additional services
available. To add any of these services, check the box beside the one(s) you want.
Similarly, if you wish to remove any services, simply uncheck the box in this portion
of the screen.
28
Page 31

Online Services
Music Skins
To customize the look of the music player on your HP Smart Wi-Fi Display, click on
Music Skins in your www.hpframe.com account. You will see various different
styles available. Click add below the one you prefer and in a few moments the look
of your HP Smart Wi-Fi Display’s music player will be updated. Note that you can
only choose one skin at a time, but you can change it as often as you need.
Internet Photos
ENGLISH
You can stream photo albums from photo hosting sites such as Snapfish, Picasa,
Flickr, Photobucket, Facebook, and MySpace to your HP Smart Wi-Fi
Display. Simply add the sites you would like to use, via your www.hpframe.com
account. For more information on adding photo sharing sites to your
www.hpframe.com account, see “Managing your www.hpframe.com Account” on
page 28.
Note: You need to have already set up an account at any photo hosting sites you
wish to add.
Once added and configured via your www.hpframe.com account, you can view
online photos on your HP Smart Wi-Fi Display by navigating to Internet Content
> Photos.
Internet Radio
You can stream online radio to your HP Smart Wi-Fi Display, as follows:
1. Click on the Internet Radio icon in your www.hpframe.com account, as
shown below:
2. A new screen will appear. On the left of the screen you will see a list of available
radio stations. Above this list are drop-down menus to change the Country,
City, Genre and Language, which will change the list of radio stations
offered to you. On the right of the screen you will see which stations have
already been added to your HP Smart Wi-Fi Display’s playlist.
29
Page 32

3. To add a station, simply click add beside the station(s) you like. The station(s)
will be added to the playlist on the right of the screen, and a few moments later
the list of radio stations will be updated on your HP Smart Wi-Fi Display.
Note: To listen to Internet radio on your HP Smart Wi-Fi Display navigate to
Internet Content > Radio.
Internet Video (YouTube)
If you have an account with YouTube, you can stream videos to your HP Smart
Wi-Fi Display, as follows:
1. Ensure that you have added YouTube to your list of enabled services (see
“Managing your www.hpframe.com Account” on page 28 for more
information).
2. Once the YouTube service appears in your list of enabled services, click on its
icon, which is shown below:
ENGLISH
3. On the page which appears, log into your YouTube account.
4. Once logged in, click Allow Access.
Note: To access YouTube videos on your HP Smart Wi-Fi Display, navigate to
Internet Content and choose Videos, then YouTube.
30
Page 33

Allowing specific cell phones to send you pictures
You can receive pictures from specific cell phones on your HP Smart Wi-Fi Display.
To set up the SMS/MMS photo service, click the SMS/MMS Photos icon in your
www.hpframe.com account, as shown below:
ENGLISH
You will then see the following screen:
Enter the cell phone number of the cell phone you wish to have permission to send
photos to your HP Smart Wi-Fi Display, choose the cell phone provider from the pulldown selection, and click Add. The cell phone details will then appear in a list
below. The cell phone can be removed at any time by clicking Delete, which is
found to the left of the phone number.
Note: You can add more than one phone number to the list.
Note: Only cell phones that support sending pictures via MMS can be used.
A message will be sent to the phone number(s) you have added, with a message
similar to the following:
“Congrats! U can now send ur pics to username’s HP Smart Wi-Fi Display! Send to:
username-ID@dpfmms.com”.
When a photo is sent to your HP Smart Wi-Fi Display, you will see an SMS/MMS
icon in the bottom right of the Main Menu. To see the new photo, navigate to
Internet Content > Recent Updates, or Internet Content > Photos
thereafter.
31
Page 34

Internet Gadgets
You can add gadgets, such as the weather, to your HP Smart Wi-Fi Display.
Weather Gadget
To set up the weather gadget, click the Weather icon in your www.hpframe.com
account, as shown below:
You can enter up to three ZIP Codes and choose whether to display temperatures in
Fahrenheit or Celsius.
To view the Weather gadget on your HP Smart Wi-Fi Display, navigate to Internet
Content > Gadgets > Weather.
Note: If you have entered more than one ZIP Code, then the HP Smart Wi-Fi
Display will show the weather for the first one for approximately one minute before
moving on to the next one. To change between the screens instantly, click the Right
or Left buttons on the remote control.
ENGLISH
32
Page 35

Twitter
If you have an account with Twitter, you can stream Tweets to your HP Smart
Wi-Fi Display, as follows:
1. Ensure that you have added Twitter to your list of enabled services (see
“Managing your www.hpframe.com Account” on page 28 for more
information).
2. Once the Twitter service appears in your list of enabled services, click on its icon,
ENGLISH
which is shown below:
3. On the page which appears, log into your Twitter account and click Allow to
allow access.
Note: To view Twitter on your HP Smart Wi-Fi Display, navigate to Internet
Content > Gadgets > Twitter.
Recent Updates
Any time you make updates to your www.hpframe.com account, or new content is
available, you will see an icon in the bottom right-hand corner of your HP Smart WiFi Display. This icon is usually in the form of the feature which has been updated. For
example, if you have just added the Facebook feature, then a small Facebook icon
will appear in the bottom right corner of the Main Menu a few moments later. You
can then navigate to Internet Content and then Recent Updates to see what
has been updated. Once you have opened the items on this list, the small icons will
disappear from the bottom right of the Main Menu.
33
Page 36

Streaming Media from your PC to your HP Smart Wi-Fi Display
Your HP Smart Wi-Fi Display can play the media files (photos, music, and video)
stored on your PC or network attached storage device. The HP Smart Wi-Fi Display
uses the Universal Plug and Play (UPnP) A/V streaming protocol to automatically find
your PCs and servers, and will coordinate the streaming process between your PC/
server and the HP Smart Wi-Fi Display.
Media streaming on your home network requires four conditions:
• Your must have a PC or network attached storage device that provides a
Universal Plug and Play (UPnP) A/V media server. For example, a Windows PC
running Windows Media Player 11, or an HP MediaSmart Server will provide
this media server functionality.
• Only media files are available for media streaming. The types of files that are
considered "media" are: photographs, music (audio), and video. Non-media
files, such as Microsoft Word documents, are not available for streaming.
• The media files stored on the PC or server must be of a type supported by the HP
Smart Wi-Fi Display.
Note: For the types of media files that are supported by the HP Smart Wi-Fi
Display, see “Specifications” on page 42
• The UPnP A/V streaming method supports streaming of unprotected media files.
Some files may be protected by a Digital Rights Management system, which may
prevent the streaming of those files. Media files purchased and downloaded from
an online Internet store are most likely protected.
ENGLISH
Enabling Windows Media Player 11 UPnP
Note: The following section applies to Windows Media Player version 11.
Windows Media Player 11 is bundled with Microsoft Windows Vista and is also
available as a Microsoft Windows XP update.
The HP Smart Wi-Fi Display supports media streaming from a PC on the same home
network with Windows Media Player 11 installed. Once you have installed
Windows Media Player 11 on the PC, you need to have media (photos, music,
video) in the library. You then need to configure Windows Media Player 11 to share
media from the Tools/Options menu as described in the following screens.
34
Page 37

In Windows Media Player 11, select Tools from the menu bar and then select
Options from the Tools menu.
Note: If the menu bar is not visible, right-click on a blank area of the options menu
and choose Tools, then Options from there.
options menu
ENGLISH
Select the Library
tab
Select Configure
Sharing
Select the Library tab and then select Configure Sharing.
If this is the first time that you have used this option, the following screen should be
displayed when you select Configure Settings.
35
Page 38

Click to place a checkmark next to Share my media, then click OK. You will now
see the following screen.
Note: If Windows Media Player has detected the HP Smart Wi-Fi Display, it may list
it as an unknown device.
Select Settings
You may have to select the device and then
click the Allow button on the screen
Selecting Settings from the above screen will then open up the Default Settings
for Windows Media Player 11.
ENGLISH
Selecting this box will enable Windows Media Player
to share media with all new devices.
36
Page 39

If you have multiple HP Smart Wi-Fi Display devices, you can enable Windows
Media Player 11 to automatically share the music with all of them or you can enable
it to share the music individually. If you select the Allow new devices... check
box, the following message will be displayed. Click Yes.
ENGLISH
Your HP Smart Wi-Fi Display will now discover the photos, music and video in the
Home Network menu.
37
Page 40

Connecting your HP Smart Wi-Fi Display to your Computer with the USB Cable
You can connect your HP Smart Wi-Fi Display to your computer with the mini-USB to
USB cable, as follows.
1. Ensure that the HP Smart Wi-Fi Display is correctly configured for PC connection
by going to Setup > Local Settings > USB Mode, and setting it to PC. For
more information on this setting, see “Local Settings” on page 17.
2. Connect the mini-USB end of the cable to the mini-USB connector on the HP
Smart Wi-Fi Display.
3. Connect the USB end of the USB cable to an available USB connector on your
computer. The computer will recognize the HP Smart Wi-Fi Display and any
connected memory cards or USB flash memory drives and they will appear in the
My Computer directory on your computer. You can now copy and paste files
to or from these drives just like you would with any other external memory.
Using Headphones or Speakers with your HP Smart Wi-Fi Display
To use headphones or external speakers, plug them into the headphone jack on the
right side of the HP Smart Wi-Fi Display. For the exact location of the headphone
jack, see “Right Side” on page 12. The internal speakers are disabled while the
headphone jack is in use.
ENGLISH
38
Page 41

Resetting the Frame
You can reset your HP Smart Wi-Fi Display to factory default settings, as follows:
1. From the Main Menu, navigate to Setup and press the Select button.
2. Navigate to Factory Defaults and press the Select button.
3. You will be asked to confirm that you want to reset your HP Smart Wi-Fi Display.
Select Yes.
ENGLISH
4. The frame will reboot once it is reset.
WARNING: Setting your HP Smart Wi-Fi Display to factory default settings will
remove its details from the website, and you will need to add the frame again with
the new authorization code that you will see after going through the setup wizard.
For more information on the setup wizard, see “Setup Wizard” on page 13. For
information on adding a new frame, see “Adding Another Frame to your
www.hpframe.com Account” on page 27.
Cleaning and Care Tips
Please power off the HP Smart Wi-Fi Display before cleaning.
DO NOT push on the screen too firmly.
DO NOT spray or pour liquid cleaning agents directly on the screen or frame.
DO NOT use ammonia, alcohol, or abrasive detergent cleaning agents.
Cleaning the screen
1. Wipe screen with a clean, soft, lint-free cloth to remove dust and loose particles.
2. If further cleaning is required, apply an appropriate cleaning agent (approved
for LCD displays) to a clean, soft, lint-free cloth and wipe the screen.
Note: Do not apply too much pressure on the screen to avoid damaging it.
Cleaning the frame and backing
1. Use a clean, soft, lint-free cloth to remove dust and loose particles.
2. If desired, apply an appropriate cleaning agent to a clean, soft, lint-free cloth
and wipe the appropriate surfaces.
39
Page 42

Feedback
Feedback about this User Manual
If you find an error in this user manual or just have a suggestion, send an e-mail to
manuals@hp.com. The information you send is used to help to develop future
revisions of this manual. You will not get a response to your e-mail. If you require
customer support, go to the website www.hp.com/support.
Getting Help
Should you have a technical support question or your HP Digital Picture frame
require service within the warranty period, please contact the original point of
purchase or an authorized HP reseller in your country. If service is not available at
those locations, please contact an HP Branded Product warranty agent from the
support contact list provided below. A service agent will work with you to
troubleshoot your issue and if necessary, issue a Return Material Authorization
(RMA) number in order to replace your HP Branded Product. For warranty claims,
you will be required to provide a copy of your original dated sales receipt as proof
of purchase and the issued RMA number. You will be responsible for shipping
charges when shipping the product to the service center. The service agent will
provide you with an address and you will also be responsible for any shipping
charges to the warranty service center. Once your product is received by this service
center, a replacement unit will be shipped back to you typically within 5 business
days.
ENGLISH
Email Support:
Language Email Address
Dutch hollands@hpodd.com
Chinese
English english@hpodd.com
Français francais@hpodd.com
Deutsch deutsch@hpodd.com
Italiano italiano@hpodd.com
Japanese nippon@hpodd.com
Korean korean@hpodd.com
Portuguese portugues@hpodd.com
Español espanol@hpodd.com
Svenska svensk@hpodd.com
simp.chinese@hpodd.com
trad.chinese@hpodd.com
40
Page 43

Contact/phone Support:
Country Language Number
Europe Region (EMEA)
België Dutch and German + 32 2700 1724
FRANCE French + 33 171230454
DEUTSCHLAND German + 49 6950073896
IRELAND English + 353 1850882016
ENGLISH
ITALIA Italian + 39 269682189
NETHERLANDS Dutch + 31 202015093
ESPAÑA Spanish + 34 914533458
SWITZERLAND
UK English + 44 2073652400
North America
United States English 1.866.694.7633
Canada English and French 1.866.694.7633
German/French/
Italian
+ 41 18009686
41
Page 44

Specifications
Panel Specification
Size 8”
Aspect ratio 4:3
Resolution 800x600 pixels
Contrast ratio 400:1
Power
External Power Adapter 12V, 1.2A
Audio
Internal speakers Stereo
External headphone/speaker connector 3.5 mm stereo jack
Connectivity
USB Ports 2 (STD 2.0 Host, Mini B Device)
Storage/Media
Internal memory 512 MB
Memory cards supported:
CF – CompactFlash
MS – Memory Stick Pro™ Yes
MMC – MultiMedia Card Yes
SDTM – Secure Digital Yes
SDHC™ – High Capacity Secure Digital Yes
xD – xD Picture Card™ Yes
Memory cards slot 1 SD/MMC/MS/xD
Memory cards slot 2 CF
Media Files Supported:
Video file formats
Photo file formats
Audio file formats MP3, WMA
User Interface/Control
Buttons at the Top of Smart Wi-Fi Display Yes
Remote control Yes
®
Yes
MP4 (ISO MP4 SP/ASP ; .mp4,
.avi, xVid), MJPEG.
JPEG - (Baseline and extendedsequential JPEG)
ENGLISH
42
Page 45

Frequently Asked Questions
Question Answer
How far away can I use the remote
control?
Why can’t I display some of my
Photos?
ENGLISH
Why can’t I play some of my music
tracks?
Why can’t I play some of my video
clips?
Can I delete photos from external
memory cards, flash drives, or internal
memory?
How can I switch to the internal
memory?
I have lost or damaged my remote
and/or power adapter. Can I order
replacements?
How can I find the latest information/
FAQs about my HP Smart Wi-Fi
Display?
How to I display photos and listen to
music at the same time?
2.5 meters
Some photo/image file formats are
not supported. Please refer to the
specifications.
Some music file formats are not
supported. Please refer to the
specifications.
Some video file formats are not
supported. Please refer to the
specifications.
Yes, you can. With the photo file name
highlighted, press the Options button
on the remote, and choose Delete
Photo.
If multiple memory types are available,
the HP Smart Wi-Fi Display will ask
you to specify the memory source.
Choose Internal.
Yes. Visit www.hp.com/support for
more details.
Visit www.hp.com/support for more
details and the latest information.
1. Start the music playing first
(Internet radio, home network
content, frame content).
2. Navigate to the photo(s) you want
to view (Frame Content, Home
Network, Internet Content) and
start a slideshow.
43
Page 46

Some .DB and .BAK files have
appeared on the memory card I
inserted into my HP Smart Wi-Fi
Display that weren’t there previously.
What are these?
When I insert a memory card or USB
flash drive into the HP Smart Wi-Fi
Display, it sometimes takes a long time
before I can view any photos or listen
to music. Why is this?
What should I do if the network
connection is lost while playing
Internet Radio, YouTube video, web
photo albums, etc?
When you insert a memory card or
USB flash drive into your HP Smart
Wi-Fi Display, it will create database
(.DB) files and backup database files
(.BAK). These are nothing to be
worried about and should not be
deleted. However, if they are deleted
by accident, don’t worry. The HP
Smart Wi-Fi Display will simply
recreate them next time.
Note: If the card has very little free
space, it may not be able to fully
create the database, which can lead
to some functions not working correctly
(e.g. the ability to view photos based
on date taken, etc.)
When you insert a memory card or
USB flash drive, the HP Smart Wi-Fi
Display needs to build its internal
database. For example, it may take 2
or 3 minutes to build a database for
an SD card with 400 pictures. During
that time, you won’t be able view any
photos.
Try turning the frame off and on again
using the power switch at the back. It
should reconnect to the network and
you can browse to the online content
again.
ENGLISH
44
Page 47

Troubleshooting
I can’t switch my HP Smart Wi-Fi Display on
The power supply may not be correctly connected. Ensure that it is connected to a
working power outlet, and that the other end is connected to the DC-in connector on
the HP Smart Wi-Fi Display.
The HP Smart Wi-Fi Display power switch might be in the off position. Ensure that
this switch is in the on position.
ENGLISH
I can't play certain photos/music/video files
The HP Smart Wi-Fi Display can only access files that are stored using a FAT/FAT32
file system. Some drives are formatted using the Windows NTFS file system, and
cannot be accessed by the display.
My HP Smart Wi-Fi Display cannot print images
The printer cable may not be correctly connected. Ensure that the printer cable is
connected to the mini-USB port on your HP Smart Wi-Fi Display and the USB port on
the printer.
The printer may not be PictBridge compatible. If this is the case, then it will not be
possible to print images from the HP Smart Wi-Fi Display.
The mini-USB port may not be correctly configured on your HP Smart Wi-Fi Display.
Ensure that USB Mode is set to Printer in Local Settings. See “Local Settings”
on page 17 for more information.
45
Page 48

When I connect my frame to my PC, the PC doesn’t show any drive
letters, or the frame appears as a “PTP/MTP Device”
Your frame may be configured for a PictBridge printer connection instead of a PC
connection. To correct this, follow these steps:
1. Disconnect the frame from your computer,
2. Go to the Main Menu of the frame, select Setup, then Local Settings. Make
sure that USB Mode is set to PC and not Printer.
3. Using the Power switch on the back of the frame, switch the frame off and on
again (for the location of the Power switch, see “Back” on page 12)
4. Re-connect the frame to your computer.
My wireless network doesn’t appear on the list of available
networks
The wireless network access point may not be working correctly or may not be
properly configured. Ensure that other devices can connect to the network to rule out
this possibility.
The signal from the wireless network may not be strong enough. Try moving the
location of the access point or the HP Smart Wi-Fi Display for better signal
reception.
ENGLISH
Your network’s SSID may not be broadcasting. In this case, use the Setup Hidden
Network WEP, Setup Hidden Network WPA or Setup Hidden Network
Open option on the list of available networks.
I can’t access my Internet Content
Your wireless network connection may not be working correctly. Ensure that you are
connected to the wireless network and that it has access to the Internet.
I can’t remember the settings for my wireless router
Consult your router documentation on how to access your router’s configuration
parameters. As a last resort, most routers have a mechanism to reset itself back to
factory defaults.
46
Page 49

I can’t remember the password for my wireless network
Consult your router documentation to determine how to find the network name and
password.
I am using an ASCII key for WEP security on my wireless network
The HP Smart Wi-Fi Display only supports WEP key entry as hex digits (0 through 9,
ENGLISH
A through F). If you entered an ASCII passphrase in your router, consult your router
documentation to access its configuration pages. From there, find the router
configuration for WEP keys, and try temporarily changing the setting from “ASCII” to
“Hex”. The router should then display your ASCII key as a hex value. Write down
this value and use it on the HP Smart Wi-Fi Display, and then you can switch the
router setting back to ASCII mode.
The frame sometimes has delays when responding to remote control
buttons
The HP Smart Wi-Fi Display has to communicate with 3rd party websites as well as
hpframe.com. There are times when the frame is busy with this communication, and
it can cause delays in responding to the remote control.
While on the www.hpframe.com website, if you accidentally put in
the wrong password for a 3rd party site (Snapfish, etc), it may be
difficult to return to the login screen in order to be able to provide
the correct username/password.
Close all web browser windows, and then go back to the www.hpframe.com
website to try again.
47
Page 50

If you are already connected to a wireless network, then go into
Setup > Networking, and exit the network configuration process before
it is complete, you will be taken back to the Main Menu, but the
network may be disconnected. In order to correct this, try one of the
following:
• Go back into the networking configuration screen and complete the network
setup, or
• Using the Power switch on the back, switch the HP Smart Wi-Fi Display off and
then on again (it will re-connect upon starting up again).
When you press the Photo Rotate button on the remote control, the
image does not rotate immediately.
When you press the Photo Rotate button, the image will be rotated and then
displayed as the next slide transition a few seconds later.
The HP Smart Wi-Fi Display cannot connect through a network proxy
The HP Smart Wi-Fi Display does not support network proxy configurations. Because
of this issue, users in a business/corporate environment may not be able to properly
communicate with Internet content sources.
ENGLISH
I’m having problems connecting my HP Smart Wi-Fi Display to my
wireless network.
Please verify that the firmware in your router is the latest version.
48
Page 51

Déclaration de conformité de la FCC ............................................ 51
Contenu de l'emballage............................................................52
Mise en route.........................................................................53
Télécommande .......................................................................54
Description des boutons........................................55
Nagivation générale ...........................................57
Rotation des photos .............................................57
Écran Quadrant .................................................57
Écran Unique.....................................................58
Veille...............................................................58
Cadre photo ..........................................................................59
Vue de dessus....................................................59
Vue de gauche ..................................................59
Vue de droite.....................................................60
Précédent .........................................................60
Installation initiale du cadre ....................................................... 61
Info de l'horloge................................................. 61
Assistant d'installation.......................................... 61
Lancement de l'assistant de configuration réseau sans fil
sur votre ordinateur (optionnel)...............................63
Paramètres locaux...............................................65
Description du menu principal.....................................................66
Contenu du cadre...............................................66
Contenu Internet .................................................67
Réseau à domicile ..............................................67
Favoris.............................................................67
Heure..............................................................68
Icône du signal réseau.........................................69
Afficher les photos ...................................................................70
Diaporama photo/image......................................70
FRANÇAIS
Configurer l'accès au contenu en ligne..........................................72
Options d'affichage des photos ..............................71
Imprimer une photo.............................................71
Configurer votre compte www.hpframe.com...............72
49
Page 52

Ajouter un autre cadre à votre compte
www.hpframe.com..............................................75
Gérer votre compte www.hpframe.com.....................76
Services en ligne ................................................77
Mises à jour récentes...........................................81
Tranmission de contenu multimédia en continu de votre ordinateur vers
votre HP Smart Wi-Fi Display......................................................82
Activer Windows Media Player 11 UPnP ...................82
Connexion de votre HP Smart Wi-Fi Display à votre ordinateur avec le
câble USB.............................................................................86
Utiliser les écouteurs ou les haut-parleurs avec votre HP Smart Wi-Fi
Display.................................................................................86
Réinitialiser le cadre.................................................................87
Astuces de nettoyage et d'entretien ..............................................87
Nettoyage de l'écran...........................................87
Nettoyage du cadre et du support...........................87
Commentaires ........................................................................88
Commentaire à propos de ce manuel de l'utilisateur ....88
Obtenir de l'aide ....................................................................88
Spécifications .........................................................................90
Questions fréquemment posées ...................................................91
Dépannage ...........................................................................93
50
FRANÇAIS
Page 53

Déclaration de conformité de la FCC
Remarque: Cet appareil a été testé et déclaré conforme avec les limites d'un
appareil numérique de Classe B et de Classe C, en accord avec la Partie 15 des
Règles de la FCC. Ces limites sont conçues pour fournir une protection raisonnable
contre les interférences nuisibles dans une installation résidentielle. Cet appareil
génère, utilise, et peut rayonner des fréquences radio, et s'il n'est pas installé et
utilisé en accord avec les instructions, peut causer des interférences nuisibles aux
communications radio. Cependant, il n'y a aucune garantie que ces interférences ne
se produiront pas dans une installation particulière.
Si cet appareil ne cause pas d'interférences nuisibles sur la réception de la radio/
télévision, ce qui peut être déterminé en éteignant et en rallumant l'appareil,
l'utilisateur est encouragé à essayer de corriger ces interférences de l'une des façons
suivantes:
• Réorienter ou déplacer l'antenne de réception.
• Augmenter la distance entre l'appareil et le récepteur.
• Connecter l'appareil à une prise de courant d'un circuit électrique différent de
celui auquel le récepteur est connecté.
• Demander l'assistance d'un vendeur ou d'un technicien radio/TV agréé.
Avertissement de la FCC: Pour garantir la conformité de votre installation,
utilisez des câbles d'interface blindés pour la connexion à un ordinateur ou à des
périphériques. Tout changement ou modification non expressément approuvé par la
partie responsable de la conformité pourra annuler le droit de l'utilisateur d'opérer
cet appareil.
Cet appareil est conforme à la Partie 15 des Règles de la FCC. Son fonctionnement
est sujet aux deux conditions suivantes: (1) cet appareil ne risque pas de causer des
interférences nuisibles, et (2) cet appareil doit accepter toute interférence reçue, y
compris les interférences qui peuvent causer un fonctionnement indésirable.
FRANÇAIS
51
Page 54

Contenu de l'emballage
Qté Article Image
1HP Smart Wi-Fi Display
1
1 Adaptateur d'alimentation universel
1Câble USB 2.0
1 Manuel de l'utilisateur
1 Guide de démarrage rapide
1Document de garantie
Télécommande
(Pile de rechange = CR2025)
FRANÇAIS
1 Déclaration de conformité
52
Page 55

Mise en route
1. Connectez l'adaptateur à la prise de courant et branchez le cordon
d'alimentation à l'entrée CC du HP Smart Wi-Fi Display.
2. Déployez le support du cadre et faites le pivoter de 90 degrés, puis positionnez
l'interrupteur à l'arrière du HP Smart Wi-Fi Display sur la position MARCHE.
FRANÇAIS
53
Page 56

Télécommande
Avant de commencer, tirez sur l'onglet de la télécommande pour l'activer.
Remarque: Si une pile de rechange est nécessaire, achetez une pile CR2025.
54
FRANÇAIS
Page 57

Description des boutons
Précédent: Pour revenir au menu précédent.
Veille: Pour mettre l'écran en mode veille ou pour le « réveiller » du
mode veille.
Accueil: Pour revenir au menu principal.
Heure: Pour afficher le menu de l'heure.
Pivoter photo: Pour la rotation d'une photo de 90 degrés dans le
sens contraire des aiguilles d'une montre.
Favoris: Pour afficher le menu des favoris.
Musique: Pour choisir parmi différentes sélections, comme suit.
Appuyez une fois: Programme en cours ”Maintenant” (si un
programme est en cours)
Appuyez à nouveau: va au contenu du cadre local
Appuyez à nouveau: va au menu radio Internet
Appuyez à nouveau: va au menu de musique du réseau à domicile
Remarque: La radio Internet et la musique du réseau à domicile ne
seront pas accessibles si le cadre n'est pas connecté au réseau.
Diaporama: Pour choisir parmi différentes sélections, comme suit.
Appuyez une fois: affiche le contenu du cadre local
Appuyez à nouveau: va au menu de photos Internet
Appuyez à nouveau: va au menu de photos du réseau à domicile
Remarque: La radio Internet et la musique du réseau à domicile ne
seront pas accessibles si le cadre n'est pas connecté au réseau.
FRANÇAIS
Haut: Déplacement vers le haut.
Gauche: Déplacement vers la gauche.
55
Page 58

Sélectionner: Pour sélectionner l'élément en surbrillance.
Droite: Pour déplacer vers la droite.
Bas: Pour déplacer vers le bas.
Lecture/Pause: Pour lire ou mettre en pause la musique, la vidéo
ou les diaporamas.
Volume+/Cocher: Pour augmenter le volume, ou, suivant l'écran
actif, pour sélectionner l'élément d'un menu.
Options: Pour afficher les options disponibles.
Imprimer: Pour imprimer des photos avec une imprimante
compatible.
Volume-/Décocher: Pour baisser le volume, ou, suivant l'écran
actif, pour désélectionner l'élément d'un menu.
56
FRANÇAIS
Page 59

Nagivation générale
Dans la plupart des cas vous pouvez utiliser les boutons de navigation (Haut, Bas,
Gauche, Droite) et le bouton Sélectionner pour naviguer à travers les différents
menus. Parfois, cependant, il peut être plus rapide d'utiliser l'un des boutons de
menu spécifique, comme les boutons Accueil, Favoris, ou Musique, ouvrant le
menu souhaité d'un simple appui.
Notez que, comme le HP Smart Wi-Fi Display doit communiquer avec des sites web de
tierce partie, ainsi que hpframe.com, il y a des fois où le cadre risque d'être occupé par
cette communication, causant des retards de réponse à la télécommande.
Rotation des photos
Pour faire pivoter des photos, appuyez sur le bouton Pivoter photo.
Écran Quadrant
Lors de l'affichage d'un diaporama, vous pouvez choisir d'afficher les photos une
par une ou avec l'écran Quadrant.
Il y a deux façons d'activer l'écran Quadrant:
1. À partir du menu Installation, choisir Paramètres locaux, puis changer le
Mode Diaporama en Quadrant. Pour plus d'informations, voir ”Paramètres
locaux” en page 65.
2. Pendant la lecture du diaporama, appuyez sur le bouton Options de la
télécommande, et changer le Mode Diaporama en Quadrant. Appuyez sur
le bouton Précédent pour revenir au diaporama.
Quand l'option Quadrant est sélectionnée, l'écran se divise en quatre, et les deux
quarts du haut affichent les images d'un diaporama, alors que les deux quarts du
bas affichent l'horloge et le calendrier.
Vous pouvez naviguer d'un cadran à l'autre en utilisant la télécommande, comme suit:
1. Appuyez sur le bouton Sélectionner de la télécommande. Ceci mettra en
surbrillance le quadrant supérieur gauche.
2. Utilisez les boutons de navigation pour sélectionner l'un des quatre quadrants.
3. Appuyez de nouveau sur le bouton Sélectionner pour afficher la liste des
FRANÇAIS
éléments qui peuvent être affichés dans ce quadrant. Choisissez l'élément que
vous souhaitez afficher, et appuyez de nouveau sur Sélectionner.
Remarque: Si vous souhaitez conserver cette configuration pour la prochaine
fois, appuyez sur le bouton Options et choisissez Enregistrer la Config. du
Quadrant.
57
Page 60

Écran Unique
Par défaut, le HP Smart Wi-Fi Display affichera les photos en mode écran Unique,
signifiant que le diaporama affichera une photo à la fois. Si vous êtes en mode
écran Quadrant et souhaitez revenir à l'affichage des photos une par une, alors
vous pouvez revenir à l'écran unique.
Il y a deux façons d'activer l'écran Unique:
1. À partir du menu Installation, choisir Paramètres locaux, puis changer le
Mode Diaporama en Unique. Pour plus d'informations, voir ”Paramètres
locaux” en page 65.
2. Pendant la lecture du diaporama, appuyez sur le bouton Options sur la
télécommande, et changer le Mode Diaporama en Unique. Appuyez sur le
bouton Précédent pour revenir au diaporama.
Veille
Pour arrêter la fonction du cadre en cours et éteindre l'écran, appuyez simplement
sur le bouton Veille. Pour éteindre complètement le HP Smart Wi-Fi Display, vous
devez utiliser l'interrupteur d'alimentation à l'arrière de l'écran.
58
FRANÇAIS
Page 61

Cadre photo
Vue de dessus
Vue de gauche
Diaporama
Précédent
Haut
Sélectionner
Bas
Lecture/Pause
Support de la télécommande
FRANÇAIS
59
Page 62

Vue de droite
Précédent
Logement de carte CF
Logement de carte SD/MMC/MS/xD
Connecteur USB
Connecteur mini-USB
Entrée d'alimentation
Prise pour écouteur
Support
Interrupteur
d'alimentation
FRANÇAIS
60
Page 63

Installation initiale du cadre
Les instructions suivantes s'affichent en utilisant la télécommande. L'accès à certaines
de ces fonctions est possible au moyen des touches de contrôle situées à l'arrière du
HP Smart Wi-Fi Display.
Info de l'horloge
La date et l'heure sont automatiquement définies quand vous connectez votre HP
Smart Wi-Fi Display à Internet.
Le fuseau horaire et les options d'économie d'énergie sont dérivées du code postal
que vous entrez lors de la configuration de votre compte www.hpframe.com.
Si vous n'êtes pas connecté à un réseau sans fil, vous pouvez régler l'heure
manuellement. Voir ”Configurer manuellement la date et l'heure” en page 68 pour
plus d'informations.
Assistant d'installation
L'Assistant d'installation vous aide à installer et à utiliser votre HP Smart Wi-Fi
Display automatiquement quand le cadre est mis sous tension la première fois, ou si
le cadre a été réinitialisé aux paramètres d'usine par défaut. Dans ce cas, vous
pouvez ignorer l'étape 2 ci-dessous.
1. À partir du menu Installation, allez à l'Assistant d'installation et appuyez
sur le bouton Sélectionner.
2. L'écran de bienvenue apparaît pour vous guider à travers la procédure
d'installation.
Remarque: À tout moment, appuyez sur le bouton Sélectionner pour passer
à l'écran suivant.
3. Le tutorial commence, et explique les fonctions des boutons de la télécommande.
Suivez les instructions à l'écran pour découvrir les boutons de la télécommande
et leurs fonctions.
4. Suivez les fenêtres qui s'affichent sur l'écran Installation du Réseau.
5. Utilisez les boutons Haut ou Bas pour mettre le nom du réseau en surbrillance
(notez que vous pouvez avoir besoin de défiler vers le bas si plus de réseaux
adaptés sont disponibles à l'écran), puis appuyez sur le bouton Sélectionner
pour sélectionner.
FRANÇAIS
Remarque: Si vous vous connectez à un réseau sans fil sans diffusion, alors
choisissez Installation WEP réseau caché, Installation WPA réseau
caché, ou Installation ouverture réseau caché, en fonction de la sécurité
utilisée par votre réseau. Si nécessaire, il vous sera proposé d'accéder
manuellement au SSID du réseau en utilisant la télécommande pour parcourir les
lettres du clavier virtuel. Si nécessaire, utilisez le bouton Cocher pour consulter
les clavier virtuels.
61
Page 64

Remarque: Autrement, vous pouvez configurer votre HP Smart Wi-Fi Display
en utilisant la technologie Windows Connect Now (WCN). Pour cela,
lancez l'Assistant de configuration de réseau sans fil sur votre
ordinateur et insérez la clé USB WCN dans le HP Smart Wi-Fi Display une fois
que vous avez terminé avec l'assistant. Pour plus d'informations à propos du
lancement de l'Assistant de configuration de réseau sans fil sur votre
ordinateur, voir ”Lancement de l'assistant de configuration réseau sans fil sur
votre ordinateur (optionnel)” en page 63.
6. Si nécessaire, entrez les informations de sécurité, comme le mot de passe, en
utilisant la télécommande pour parcourir les lettres sur le clavier virtuel. Si
nécessaire, utilisez le bouton Cocher pour parcourir les clavier virtuels. Cette
étape n'est pas nécessaire si le réseau sans fil n'a pas de sécurité.
Remarque: Vous pouvez quitter l'Installation du Réseau en appuyant sur
le bouton d'Accueil. Votre HP Smart Wi-Fi Display fonctionnera toujours, mais
vous n'avez pas accès au réseau ou à Internet tant que vous n'avez pas exécuter
l'Installation du Réseau à nouveau.
7. Une fois terminée, appuyez sur le bouton Lecture/Pause pour accéder au mot
de passe.
8. Un écran apparaît avec les informations requises pour compléter la procédure
d'installation en ligne. Ces informations incluent l'adresse du site web à visiter
depuis votre ordinateur, votre ID Appareil et votre Code Authentification.
Conservez ces informations, car vous en aurez besoin lors de la configuration de
votre compte www.hpframe.com. Pour plus d'informations à propos de la
procédure d'installation en ligne, voir ”Configurer votre compte
www.hpframe.com” en page 72.
Remarque: Le code d'authentification change avec le temps, ou si vous
exécutez l'Assistant d'installation à nouveau. Le code actuel peut toujours
être trouvé en allant à Installation > Information du système.
62
FRANÇAIS
Page 65

Lancement de l'assistant de configuration réseau sans fil sur votre ordinateur (optionnel)
Une solution alternative à la saisie manuelle des informations du Wi-Fi dans votre HP
Smart Wi-Fi Display, vous pouvez utiliser l'assistant de configuration réseau sans fil
sur votre ordinateur.
Windows XP (Service Pack 2 ou supérieur)
1. Sur votre ordinateur, cliquez sur Démarrer > Panneau de configuration.
2. Cliquez deux fois sur l'Assistant d'installation de réseau sans fil.
3. L'Assistant d'installation de réseau sans fil commence. Cliquez sur
Suivant.
4. Si le réseau sans fil auquel vous souhaitez vous connecter n'a pas été
précédemment installé sur votre ordinateur, cochez la case Installer un
nouveau réseau sans fil. Cliquez sur Suivant.
Autrement, si le réseau sans fil auquel vous souhaitez vous connecter n'a été
précédemment installé sur votre ordinateur, cochez la case Ajouter des
nouveaux ordinateurs ou périphériques au réseau **** , où “****”
correspond au nom de votre réseau sans fil. Cliquez sur Suivant.
5. Si vous avez choisi Installer un nouveau réseau sans fil dans l'étape
précédente, il vous sera demandé d'entrer le nom du réseau (SSID), choisissez si
Windows doit assigner une clé réseau automatiquement (cochez la case
“Assigner automatiquement une clé réseau”), ou entrez-en une manuellement
(cochez la case “Assigner manuellement une clé réseau”), et choisissez
finalement si vous souhaitez cocher la case “Utiliser le cryptage WPA au lieu de
WEP” en fonction du type de sécurité utilisée par votre réseau. Cliquez sur
Suivant.
6. Si vous avez choisi d'entrer la clé réseau manuellement dans l'étape précédente,
il vous sera demandé de le faire maintenant (cliquez ensuite sur Suivant). Si
vous avez choisi que Windows assigne une clé réseau automatiquement, alors
cette étape sera ignorée.
7. Cochez la case Utiliser une clé USB (recommandé). Cliquez sur
Suivant.
8. Branchez votre clé USB sur un port USB de votre ordinateur puis attendez que la
lettre du lecteur apparaisse dans le champ “Mémoire flash”. Cliquez sur
Suivant.
9. Quand vous êtes invité à le faire, retirez la clé USB et branchez-la sur le HP
FRANÇAIS
Smart Wi-Fi Display pour terminer l'installation de la connexion Wi-Fi.
10. Une fois que la connexion Wi-Fi du HP Smart Wi-Fi Display est configurée,
débranchez la clé USB et branchez-la à l'arrière de votre ordinateur. Cliquez sur
Suivant.
11 . Cliquez sur Terminer.
63
Page 66

Windows Vista
1. Sur votre ordinateur, cliquez sur Démarrer > Réseau. Le dossier Réseau
s'ouvre.
2. Cliquez sur Ajouter un nouveau périphérique sans fil. L'écran Ajouter
un périphérique sans fil au réseau s'affiche.
3. Cliquez sur Je souhaite ajouter un périphérique sans fil ou un
ordinateur qui n'est pas dans la liste, en utilisant une clé USB.
4. Cliquez sur Ajouter le périphérique ou l'ordinateur en utilisant une
clé USB.
5. Dans la liste qui apparaît, sélectionnez votre nom de réseau (SSID), puis cliquez
sur Suivant.
6. Si l'écran Contrôle du compte utilisateur apparaît, cliquez sur Continuer
(vous devrez peut-être être répété cette action).
7. Connectez votre clé USB à l'ordinateur, vérifiez que le nom du lecteur s'affiche,
puis cliquez sur Suivant.
8. Une fois que cette étape est terminée, retirez la clé USB de l'ordinateur, puis
cliquez sur Fermer.
9. Branchez la clé USB sur votre HP Smart Wi-Fi Display pour terminer l'installation
de la connexion Wi-Fi.
64
FRANÇAIS
Page 67

Paramètres locaux
Le menu Paramètres locaux vous permet de configurer les divers paramètres de
votre HP Smart Wi-Fi Display.
À partir du menu Installation, allez à l'Assistant d'installation et appuyez sur
le bouton Sélectionner. Les options suivantes s'affichent. Utilisez les boutons de
navigation pour mettre en surbrillance l'option que vous souhaitez changer, puis
utiliser le bouton Sélectionner pour changer la paramètre.
• Réglez Eveil/Veille/Réveil - Réglez l'heure d'éveil, la durée de veille, ou
l'alarme. Voir ”Configuration des heures d'Eveil/Veille/Réveil” en page 68 pour
plus d'informations.
• Mode Diaporama - Pour choisir le mode [Unique] ou [Quadrant]. [Quadrant]
divise l'écran en quatre, et affiche les photos dans les deux quarts du haut et
l'horloge et le calendrier dans les deux du bas pendant les diaporamas. Vous
pouvez également personnaliser ce qui est affiché en mode Quadrant. Voir
”Écran Quadrant” en page 57 pour plus de détails.
• Diaporama Aléatoire - Affichage des photos dans un ordre aléatoire
pendant le diaporama.
• Diaporama Répété - Répétition du diaporama une fois que la dernière photo
a été affichée.
• Intervalle du diaporama - Vous permet de définir la durée d'affichage de
chaque photo pendant le diaporama.
• Musique Aléatoire - Lecture de la musique dans un ordre aléatoire.
• Musique Répétée - Répétition de la musique une fois que la dernière piste a
été jouée.
• Lecture automatique de la musique - Lit automatiquement la musique
pendant le diaporama quand les fichiers de musique sont présents dans le même
dossier que les fichiers photos.
• Lecture automatique des photos - Commence automatiquement la lecture
d'un diaporama quand le HP Smart Wi-Fi Display est allumé et une carte
mémoire ou un périphérique de stockage USB inséré.
• Mode USB - Pour choisir d'utiliser le port mini-USB pour la connexion à un
ordinateur ou une imprimante (en utilisant le câble mini-USB vers USB fourni).
• Mode Photo - Pour choisir de visualiser les photos avec une taille optimisée
[Maxi] ou la taille originale [Original]. Quand [Maxi] est choisi, la taille de la
photo peut être augmentée pour s'adapter à la hauteur/largeur de l'écran.
• Effet Photo - Pour choisir de voir vos photos avec leurs couleurs d'origine
FRANÇAIS
[Normal], noir et blanc [Noir et blanc], ou avec un effet rétro [Démodé].
• Auto-compression de photo - Pour choisir si vous souhaitez ou non la
compression automatique des fichiers photos.
65
Page 68

Description du menu principal
L'accès au menu principal est possible en appuyant sur le bouton d'Accueil sur la
télécommande.
Pour parcourir le menu, utilisez les boutons directionnels sur la télécommande, puis
appuyez sur le bouton Sélectionner pour choisir l'élément mis en surbrillance.
Le Menu principal a six icônes principales: Contenu du cadre, Contenu
Internet, Réseau à domicile, Favoris, Heure, et Installation.
D'autres icônes apparaissent parfois sur cet écran, comme l'icône du signal du
réseau dans le coin supérieur droit (voir ”Icône du signal réseau” en page 69 pour
plus d'informations) et les icônes mis à jour récemment dans le coin inférieur droit
(voir ”Mises à jour récentes” en page 81 pour plus d'informations).
Contenu du cadre
Contenu du cadre décrit le contenu qui est disponible dans le HP Smart Wi-Fi
Display, y compris les périphériques de cartes mémoire/clé USB. Vous pouvez
accéder aux listes des photos, musique, ou vidéos disponibles, ou consulter
manuellement les dossiers.
66
FRANÇAIS
Page 69

Contenu Internet
Contenu Internet décrit le contenu disponible via l'Internet. Avant d'utiliser les
fonctions du Contenu Internet de votre HP Smart Wi-Fi Display, vous devez
configurer votre compte www.hpframe.com. Pour plus d'informations, voir
”Configurer votre compte www.hpframe.com” en page 72.
Sur votre HP Smart Wi-Fi Display, à partir du Menu principal, allez au Contenu
Internet et appuyez sur le bouton Sélectionner. Le menu Contenu Internet
apparaît, avec la liste de contenu que vous avez configuré en ligne, comme la radio
Internet, les sites d'hébergement de photos ou les gadgets tels que les prévisions
météo. Chaque fois que vous changer cette liste en ligne, la liste du Contenu
Internet sera automatiquement mis à jour rapidement après. Naviguez parmi les
éléments qui vous intéresse et appuyez sur le bouton Sélectionner.
Réseau à domicile
Réseau à domicile fait référence aux ordinateurs ou serveurs à domicile sur le
même réseau que votre HP Smart Wi-Fi Display qui sont configurés pour partager
les photos, la musique et la vidéo avec votre appareil. Avant d'utiliser les fonctions
de Réseau à domicile sur votre HP Smart Wi-Fi Display, vous devez configurer
vos ordinateurs pour partager les contenus multimédia. Pour plus d'informations, voir
”Tranmission de contenu multimédia en continu de votre ordinateur vers votre HP
Smart Wi-Fi Display” en page 82.
Sur votre HP Smart Wi-Fi Display, à partir du Menu principal, naviguez vers le
Contenu Internet et appuyez sur le bouton Sélectionner. Une liste
d'ordinateurs/serveurs disponibles apparaît. Naviguez vers le serveur qui vous
intéresse et appuyez sur le bouton Sélectionner. Une liste de contenu partagé
disponible s'affiche. Naviguez parmi les éléments qui vous intéresse et appuyez sur
le bouton Sélectionner.
Favoris
Le menu Favoris liste les fonctions HP Smart Wi-Fi Display que vous utilisez le plus.
Parfois, il est plus rapide d'accéder aux Favoris que de naviguer à travers les divers
menus. Vous pouvez ajouter les éléments à la liste des Favoris en mettant en
surbrillance un élément, en appuyant sur le bouton Options, puis en choisissant
Ajouter aux favoris.
Voir ci-dessous l'exemple de l'ajout d'une photo à partir de la clé USB aux favoris:
FRANÇAIS
1. À partir du Menu principal, sélectionnez Contenu du cadre.
2. Sélectionner Photos.
3. Sélectionner Carte USB.
67
Page 70

4. Sélectionner Toutes les photos.
5. Allez sur la photo que vous souhaitez ajouter aux favoris et appuyez sur le
bouton Options de la télécommande.
6. Sélectionnez Ajouter aux favoris.
Vous pouvez maintenant accéder à cette photo en allant au Menu principal >
Favoris > Photos, où vous trouverez un lien direct avec la photo.
Heure
Le menu Heure liste plusieurs options pour l'heure et la date.
Configurer automatiquement la date et l'heure
Par défaut, quand vous vous connectez à Internet, votre HP Smart Wi-Fi Display
configure l'heure et la date en fonction du code postal que vous avez entrées lors de
la configuration de votre compte www.hpframe.com.
Configurer manuellement la date et l'heure
Pour régler la date ou l'heure manuellement, sélectionnez Régler la date/heure
à partir du menu Horloge. Utilisez les boutons de navigation et Sélectionner
pour changer les valeurs.
Remarque: Cette option n'est disponible que lorsque vous n'êtes pas connecté au
réseau.
Configuration des heures d'Eveil/Veille/Réveil
Vous pouvez programmer votre HP Smart Wi-Fi Display afin qu’il s’allume et
s’éteigne à des heures choisies de la journée. Vous pouvez également configurer
votre HP Smart Wi-Fi Display pour qu'il vous alerte au moyen d'une alarme. Pour
configurer ces trois options, choisissez Réglez Eveil/Veille/Réveil à partir du
menu Horloge. Utilisez les boutons de navigation et Sélectionner pour changer
les valeurs.
Afficher l'horloge
Pour afficher l'horloge, à partir du menu Horloge, sélectionnez Heure actuelle.
Afficher le calendrier
Pour afficher le calendrier, à partir du menu Horloge, sélectionnez Calendrier.
68
FRANÇAIS
Page 71

Icône du signal réseau
Quand vous accédez à un réseau sans fil, l'icône du signal réseau apparaît dans le
coin supérieur droit du menu principal et est illustré ci-dessous.
Il se compose de trois barres, chacune pouvant être grise ou bleue. Plus la barre est
bleue, plus fort est le signal, donc trois barres bleues indiquent un fort niveau de
signal. Un signal plus faible peut entraîner des retards des retransmissions réseaux
supplémentaires. Rapprocher le cadre du routeur ou du point d'accès peut améliorer
la force du signal.
FRANÇAIS
69
Page 72

Afficher les photos
Diaporama photo/image
Modes de diaporama
Le mode de diaporama commencera automatiquement quelques secondes après
que le HP Smart Wi-Fi Display ait été allumé si une carte mémoire externe/clé USB
est insérée. Si plus d'une carte mémoire ou clé USB sont insérées, alors le contenu
de la carte la plus récemment insérée s'affichera. Il y a deux modes de diaporama,
un avec fond musical et l'autre sans.
• Diaporama avec musique – C'est possible avec des photos/images et des
fichiers de musique ou une carte mémoire externe/mémoire flash USB. La
configuration par défaut du HP Smart Wi-Fi Display est le diaporama avec fond
musical. Vous pouvez changer cette préférence dans les paramètres.
Vous pouvez également démarrer manuellement la lecture de la musique puis
aller à (et démarrer) la lecture des photos. Ceci fonctionne pour le Contenu du
cadre, Réseau à domicile, et le Contenu Internet. Par exemple, vous pouvez
écouter de la musique à partir d'une clé USB tout en affichant des photos sur un
site d'hébergement en ligne, comme Facebook, comme suit:
1. Allez à Contenu du cadre > Musique > Carte USB > Pistes, et
choisissez un morceau à jouer.
2. Pendant la lecture du morceau, appuyez sur le bouton d'Accueil de la
télécommande.
3. Allez à Contenu Internet > Photos > Facebook, et choisissez un album
pour le diaporama.
• Diaporama sans musique – C'est possible avec les photos/images de
mémoire interne/externe.
Vous pouvez également choisir de démarrer un diaporama manuellement à tout
moment. Pour cela, allez au Contenu du cadre, Contenu Internet, ou
Réseau à domicile puis naviguez pour démarrer la lecture de photo.
70
FRANÇAIS
Page 73

Options d'affichage des photos
Il y a deux façons de choisir les options d'affichage des photos:
• Le menu Installation.
Naviguez vers le menu Installation puis Paramètres locaux. Pour plus
d'informations, voir ”Paramètres locaux” en page 65.
• Bouton Options.
Appuyez sur le bouton Options pendant l'affichage des photos. Les mêmes
options vous seront offertes que dans Paramètres locaux, ainsi que Copier
le fichier. Cette fonction vous permet de copier une photo à partir d'une carte
mémoire et de la copier dans la mémoire interne, par exemple. Après avoir
choisi Copier le fichier, une liste des destinations s'affichera sur le cadre.
Choisissez simplement la destination préférée et le fichier y sera copié.
Imprimer une photo
Vous pouvez imprimer une photo sur n'importe quelle imprimante compatible
PictBridge.
Vérifiez d'abord que l'imprimante PictBridge est connectée à votre HP Smart Wi-Fi
Display en utilisant le connecteur USB vers mini-USB fourni. Le connecteur USB doit
être connecté à l'imprimante, et le connecteur mini-USB doit être connecté à votre
HP Smart Wi-Fi Display.
Remarque: Vérifiez que le Mode USB est configuré sur Imprimante,
conformément aux instructions dans ”Paramètres locaux” en page 65.
Pendant l'affichage d'une photo que vous souhaitez imprimer, appuyez sur le
bouton Imprimer de la télécommande. Il vous sera demandé de confirmer
l'impression de la photo. Naviguez vers Oui et appuyez sur le bouton
Sélectionner.
FRANÇAIS
71
Page 74

Configurer l'accès au contenu en ligne
Le HP Smart Wi-Fi Display peut transmettre des contenus multimédia en continu
(streaming) à partir d'Internet, y compris des photos provenant des divers sites
d'hébergement de photos, vidéo de YouTube, radio Internet, météo, et Tweets de
Twitter. Les contenus multimédia transmis sont consultables sur votre cadre en allant
au menu principal puis en sélectionnant Contenu Internet.
Configurer votre compte www.hpframe.com
Pour transmettre un contenu Internet vers votre HP Smart Wi-Fi Display, vous devez
d'abord configurer un compte via le site web http://www.hpframe.com, comme
suit:
1. Sur votre ordinateur, allez à http://www.hpframe.com.
Vous verrez une page web similaire à:
72
cliquez ici pour continuer
FRANÇAIS
Page 75

2. Cliquez sur Configurer votre écran maintenant pour continuer. Vous
verrez alors l'écran suivant:
3. Cliquez sur pour continuer.
4. L'écran suivant apparaît:
FRANÇAIS
73
Page 76

5. Remplissez les informations requises et cliquez sur pour continuer.
Remarque: Un élément que vous devez entrer sur cette page est le Code
Authentification du Cadre. Il s'affiche quand vous terminez l'Assistant
d'installation sur votre HP Smart Wi-Fi Display. Voir ”Assistant d'installation”
en page 61 pour plus de détails. Si vous avez perdu ce code, alors vous pouvez
aller dans Installation > Informations du système pour le consulter.
Notez également que le code d'authentification change avec le temps, ou si
vous accédez à nouveau à l'Assistant d'installation, alors il est utile de
vérifier les Informations du système pour garantir c'est bien le dernier
code.
Un autre élément sur cette page vous demande votre type favori de musique.
Ceci est utilisé pour fournir à votre HP Smart Wi-Fi Display une sélection initiale
de stations radio Internet. Pour plus d'informations à propos de la
personnalisation de la sélection, voir ”Radio Internet” en page 77.
6. L'écran suivant apparaît:
7. Pour envoyer des photos à partir de votre téléphone ou de celui d'une autre
personne vers votre HP Smart Wi-Fi Display, entrez le numéro de téléphone
portable. Si vous ne souhaitez pas utiliser cette fonction, laissez le champ vide.
Remarque: Seuls les téléphones qui prennent en charge l'envoi de photos via
MMS peuvent être utilisés.
74
FRANÇAIS
Page 77

8. Cliquez sur pour continuer. L'écran suivant apparaît:
9. Choisissez les services de partage de photos en ligne que vous utilisez et
souhaitez afficher sur votre HP Smart Wi-Fi Display. Vous pouvez également
changer cette liste une fois que votre compte est configuré www.hpframe.com.
10. Cliquez sur pour continuer. Votre compte www.hpframe.com est
maintenant configuré.
Ajouter un autre cadre à votre compte www.hpframe.com
Vous pouvez configurer plus d'un HP Smart Wi-Fi Display sur le même compte
www.hpframe.com. Une fois que le premier est configuré, cliquez simplement sur
Ajouter un nouveau cadre (en haut de la page web) et entrez les informations
du nouveau cadre.
FRANÇAIS
75
Page 78

Gérer votre compte www.hpframe.com
Vous pouvez gérer votre compte www.hpframe.com au moyen d'un ordinateur en allant
à http://www.myframemanager.com et en vous connectant avec le nom de l'utilisateur
et le mot de passe que vous avez spécifiés lors de la configuration de votre compte
www.hpframe.com. Une fois connecté, vous verrez un écran similaire à:
Dans la portion supérieure de l'écran, vous verrez quels sont les services que vous
avez déjà sélectionnés. Vous devrez peut-être configurer ou personnaliser ces
services avant qu'ils n'apparaissent sur votre HP Smart Wi-Fi Display. Cliquez sur les
icônes pour configurer ou personnaliser les service(s) que vous avez choisi. Pour plus
d'informations, voir ”Services en ligne” en page 77.
Dans la portion inférieure de l'écran, vous verrez la liste des services
supplémentaires disponibles. Pour ajouter l'un de ces services, cochez la ou les
cases souhaitées.
De la même façon, si vous souhaitez supprimer un service, décochez simplement la
case dans cette portion de l'écran.
76
FRANÇAIS
Page 79

Services en ligne
Habillage musical
Pour personnaliser l'apparence du lecteur de musique de votre HP Smart Wi-Fi
Display, cliquez sur Habillage musical dans votre compte www.hpframe.com.
Vous verrez différents styles disponibles. Cliquez sur ajouter en dessous de celui
que vous préférez et, en un instant, l'apparence de votre lecteur de musique HP
Smart Wi-Fi Display sera mis à jour. Notez que vous ne pouvez choisir qu'un seul
habillage à la fois, mais vous pouvez le changer aussi souvent que vous le
souhaitez.
Photos Internet
Vous pouvez transmettre des albums photo de sites d'hébergement de photos
comme Snapfish, Picasa, Flickr, Photobucket, Facebook, et MySpace sur
votre HP Smart Wi-Fi Display. Ajoutez simplement les sites que vous souhaitez
utiliser, via votre compte www.hpframe.com. Pour plus d'informations sur l'ajout des
sites de partage de photos sur votre compte www.hpframe.com, voir ”Gérer votre
compte www.hpframe.com” en page 76.
Remarque: Vous devrez avoir déjà configuré un compte sur les sites
d'hébergement de photos que vous souhaitez ajouter.
Une fois ajoutés et configurés via votre compte www.hpframe.com, vous pouvez
afficher des photos en ligne sur votre HP Smart Wi-Fi Display en allant à Contenu
Internet > Photos.
Radio Internet
Vous pouvez transmettre en continu la radio en ligne sur votre HP Smart Wi-Fi
Display, comme suit:
1. Cliquez sur l'icône Radio Internet dans votre compte www.hpframe.com,
comme illustré ci-dessous:
FRANÇAIS
77
Page 80

2. Un nouvel écran apparaîtra. À gauche de l'écran vous verrez une liste de
stations radio disponibles. Au-dessus de cette liste se trouvent les menus
déroulants pour changer le Pays, la Ville, le Genre et la Langue, modifiant
la liste des stations radio qui vous sont offertes. À droite de l'écran vous verrez
les stations que vous avez déjà ajoutées à la sélection de votre HP Smart Wi-Fi
Display.
3. Pour ajouter une station, cliquez simplement sur ajouter à côté de la station que
vous aimez. Les stations seront ajoutées à la sélection à droite de l'écran, et peu
après, la liste des stations radio sera mise à jour sur votre HP Smart Wi-Fi
Display.
Remarque: Pour écouter la radio Internet sur votre HP Smart Wi-Fi Display, allez à
Contenu Internet > Radio.
Vidéo Internet (YouTube)
Si vous avez un compte sur YouTube, vous pouvez transmettre en continu des vidéos
vers votre HP Smart Wi-Fi Display, comme suit:
1. Assurez-vous d'avoir ajouté YouTube à votre liste de services activés (voir
”Gérer votre compte www.hpframe.com” en page 76 pour plus d'informations).
2. Une fois que le service YouTube apparaît dans votre liste de services activés,
cliquez sur son icône, illustrée ci-dessous:
3. Sur la page qui apparaît, connectez-vous à votre compte YouTube.
4. Une fois connecté, cliquez sur Autoriser l'accès.
Remarque: Pour accéder aux vidéos de YouTube sur votre HP Smart Wi-Fi Display,
allez à Contenu Internet et choisissez Vidéos, puis YouTube.
78
FRANÇAIS
Page 81

Autoriser des téléphones portables spécifiques pour l'envoi de vos
photos
Vous pouvez recevoir des photos provenant de téléphones portables spécifiques sur
HP Smart Wi-Fi Display. Pour configurer le service photo SMS/MMS, cliquez sur
l'icône Photos SMS/MMS dans votre compte www.hpframe.com, comme illustré
ci-dessous:
Vous verrez alors l'écran suivant:
Entrez le numéro de téléphone portable duquel vous souhaitez avoir la permission
d'envoyer des photos vers votre HP Smart Wi-Fi Display, choisissez le fournisseur de
téléphone portable à partir du menu déroulant, et cliquez sur Ajouter. Les
informations du téléphone portable apparaîtront alors dans la liste ci-dessous. Le
téléphone portable peut être supprimé à tout moment en cliquant sur Supprimer, à
gauche du numéro de téléphone.
Remarque: Vous pouvez ajouter plus d'un numéro de téléphone à la liste.
Remarque: Seuls les téléphones qui prennent en charge l'envoi de photos via
MMS peuvent être utilisés.
Un message sera envoyé aux numéros de téléphone que vous avez ajoutés, avec un
message similaire à:
“Félicitations! Vous pouvez maintenant envoyer vos photos au nom d'utilisateur du
FRANÇAIS
HP Smart Wi-Fi Display! Envoyer à: nom d'utilisateur-ID@dpfmms.com”.
Quand une photo est envoyée à votre HP Smart Wi-Fi Display, vous verrez une icône
SMS/MMS en bas à droite du Menu principal. Pour voir la nouvelle photo, allez
à Contenu Internet > Mise à jour récente, ou Contenu Internet > Photos
ci-après.
79
Page 82

Gadgets Internet
Vous pouvez ajouter des gadgets, comme la météo, à votre HP Smart Wi-Fi Display.
Gadget météo
Pour configurer le gadget météo, cliquez sur l'icône Météo dans votre compte
www.hpframe.com, comme illustré ci-dessous:
Vous pouvez entrer jusqu'à trois codes postaux et choisir d'afficher les températures
en Fahrenheit ou Celsius.
Pour afficher le gadget météo sur votre HP Smart Wi-Fi Display, allez à Contenu
Internet > Gadgets > Météo.
Remarque: Si vous avez entré plus d'un code postal, alors le HP Smart Wi-Fi
Display affichera la météo du premier pendant environ une minute, puis passera au
suivant. Pour changer instantanément les écrans, cliquez sur les boutons Droit ou
Gauche sur la télécommande.
80
FRANÇAIS
Page 83

Twitter
Si vous avez un compte Twitter, vous pouvez transmettre en continu des vidéos vers
votre HP Smart Wi-Fi Display, comme suit:
1. Assurez-vous d'avoir ajouté YouTube à votre liste de services activés (voir
”Gérer votre compte www.hpframe.com” en page 76 pour plus d'informations).
2. Une fois que le service Twitter apparaît dans votre liste de services activés,
cliquez sur son icône, qui est montrée ci-dessous:
3. Sur la page qui apparaît, connectez-vous à votre compte Twitter et cliquez sur
Autoriser pour autoriser l'accès.
Remarque: Pour afficher Twitter sur votre HP Smart Wi-Fi Display, allez à
Contenu Internet > Gadgets > Twitter.
Mises à jour récentes
À chaque fois que vous faites des mises à jour sur votre compte www.hpframe.com,
ou qu'un nouveau contenu est disponible, vous verrez une icône dans le coin en bas
à droite de votre HP Smart Wi-Fi Display. Cette icône est généralement sous la forme
d'une fonction qui a été mise à jour. Par exemple, si vous avez ajouté la fonction
Facebook, alors une petite icône Facebook apparaîtra dans le coin en bas à droite
du Menu principal quelques instants plus tard. Vous pouvez alors aller à
Contenu Internet puis Mise à jour récente pour voir ce qui a été mis à jour.
Une fois que vous avez ouvert les éléments sur cette liste, les petites icônes
disparaîtront du coin en bas à droite du Menu principal.
FRANÇAIS
81
Page 84

Tranmission de contenu multimédia en continu de votre ordinateur vers votre HP Smart Wi-Fi Display
Votre HP Smart Wi-Fi Display peut lire des fichiers multimédia (photos, musique, et
vidéos) stockés sur votre ordinateur ou périphérique de stockage connecté au
réseau. Le HP Smart Wi-Fi Display utilise le protocole de streaming A/V Plug & Play
Universel (UPnP) pour trouver automatiquement vos ordinateurs et serveurs, et
coordinera le process de streaming entre votre ordinateur/serveur et le HP Smart
Wi-Fi Display.
La transmission de contenu multimédia en continu (media streaming) sur votre réseau
à domicile requiert quatre conditions:
• Vous devez avoir un ordinateur ou un périphérique de stockage connecté au
réseau qui fournit un serveur multimédia A/V Plug & Play Universel (UPnP). Par
exemple, un ordinateur Windows exécutant Windows Media Player 11, ou un
serveur HP MediaSmart fournira cette fonctionnalité de serveur multimédia.
• Seuls les fichiers multimédia sont disponibles pour la transmission de contenu
multimédia en continu. Les types de fichiers considérés comme « multimédia »
sont: les photographies, la musique (audio), et les vidéos. Les fichiers non
multimédia, tels que les documents Microsoft Word documents, ne sont pas
disponibles pour la transmission de contenu multimédia en continu.
• Les fichiers multimédia stockés sur l'ordinateur ou le serveur doivent être d'un
type compatible avec le HP Smart Wi-Fi Display.
Remarque: Pour les types de fichiers multimédia compatibles du HP Smart
Wi-Fi Display, voir ”Spécifications” en page 90.
• La méthode de streaming A/V UPnP prend en charge le streaming des fichiers
multimédia non protégés. Certains fichiers sont peut-être protégés par un système
de gestion des droits numériques ou GDN (en anglais Digital Rights
Management - DRM), qui peut empêcher le streaming de ces fichiers. Les fichiers
multimédia achetés et téléchargés à partir d'un magasin Internet en ligne sont
généralement protégés.
Activer Windows Media Player 11 UPnP
Remarque: La section suivante s'applique à Windows Media Player 11. Windows
Media Player 11 est fourni avec Microsoft Windows Vista et également disponible
avec la mise à jour de Microsoft Windows XP.
Le HP Smart Wi-Fi Display prend en charge le streaming d'un ordinateur du même
réseau à domicile avec Windows Media Player 11 installé. Une fois Windows
Media Player 11 installé sur l'ordinateur, vous devez avoir des fichiers multimédia
(photos, musique, vidéo) dans la bibliothèque. Ensuite vous devez configurer
Windows Media Player 11 pour partager le média à partir du menu Outils/
Options comme décrit dans les écrans suivants.
82
FRANÇAIS
Page 85

Dans Windows Media Player 11, sélectionnez Outils à partir de la barre de menu
puis sélectionnez Options dans le menu Outils.
Remarque: Si la barre de menu n'est pas visible, cliquez-droit dans une zone vide
du menu options et choisissez Outils, puis Options à partir de là.
menu des
options
Sélectionnez
l'onglet
Bibliothèque
Sélectionnez
Configurer le
partage
Sélectionnez l'onglet Bibliotheque puis sélectionnez Configurer le partage.
Si c'est la première fois que vous utilisez cette option, l'écran suivant s'affichera
quand vous sélectionnez Configurer les paramètres.
FRANÇAIS
83
Page 86

Cliquez pour cocher Partager mon média, puis cliquez sur OK. Vous verrez
alors l'écran suivant:
Remarque: Si Windows Media Player a détecté le HP Smart Wi-Fi Display, il peut
le lister en tant que périphérique inconnu.
Sélectionnez les
Paramètres
Vous pouvez sélectionner l'appareil puis
cliquez sur le bouton Autoriser à l'écran
La sélection de Paramètres à partir de l'écran ci-dessus ouvrira les Paramètres
par défaut de Windows Media Player 11.
Sélectionner cette case permettra à Windows Media Player
de partager les contenus multimédia avec tous les nouveaux
appareils.
84
FRANÇAIS
Page 87

Si vous avez plusieurs appareils HP Smart Wi-Fi Display, vous pouvez activer
Windows Media Player 11 pour partager la musique automatiquement avec tous les
appareils ou vous pouvez l'activer pour partager la musique individuellement. Si
vous sélectionnez Autoriser les nouveaux appareils... cochez la case, le
message suivant s'affichera. Cliquez sur Oui.
Votre HP Smart Wi-Fi Display trouvera les photos, la musique et la vidéo dans le
menu Réseau à domicile.
FRANÇAIS
85
Page 88

Connexion de votre HP Smart Wi-Fi Display à votre ordinateur avec le câble USB
Vous pouvez connecter votre HP Smart Wi-Fi Display à votre ordinateur avec le
câble mini-USB vers USB, comme suit.
1. Vérifiez que le HP Smart Wi-Fi Display est correctement configuré pour la
connexion à l'ordinateur en allant à Installation > Paramètres locaux >
Mode USB, et en le configurant sur PC. Pour plus d'informations à propos de
cette configuration, voir ”Paramètres locaux” en page 65.
2. Connectez l'extrémité du câble au connecteur mini-USB sur le HP Smart Wi-Fi
Display.
3. Connectez l'extrémité USB du câble USB à un connecteur USB de votre
ordinateur. L'ordinateur reconnaîtra le HP Smart Wi-Fi Display et les cartes
mémoire ou mémoire flash USB connectées et elles apparaîtront dans le Poste
de travail de votre ordinateur. Vous pouvez maintenant copier/coller les
fichiers sous ou depuis ces lecteurs comme vous le feriez avec d'autres mémoires
externes.
Utiliser les écouteurs ou les haut-parleurs avec votre HP Smart Wi-Fi Display
Pour utiliser les écouteurs ou les haut-parleurs externes, branchez-les dans la prise
pour écouteur sur le côté droit du HP Smart Wi-Fi Display. Pour l'emplacement exact
de la prise pour écouteur, voir ”Vue de droite” en page 60. Les haut-parleurs
internes sont désactivés tant que la prise pour écouteur est utilisée.
86
FRANÇAIS
Page 89

Réinitialiser le cadre
Vous pouvez réinitialiser votre HP Smart Wi-Fi Display aux paramètres d'usine par
défaut, comme suit:
1. À partir du Menu principal, allez à Installation et appuyez sur le bouton
Sélectionner.
2. Allez à Paramètres par défaut et appuyez sur le bouton Sélectionner.
3. Il vous sera demandé de confirmer la réinitialisation de votre HP Smart Wi-Fi
Display. Sélectionnez Oui.
4. Le cadre redémarrera une fois qu'il est réinitialisé.
AVERTISSEMENT: Configurer votre HP Smart Wi-Fi Display aux paramètres
d'usine par défaut supprimera ses informations du site web, et vous devrez à
nouveau ajouter le cadre avec le nouveau code d'authentification qui apparaîtra à
la fin de l'assistant d'installation. Pour plus d'informations à propos de l'assistant
d'installation, voir ”Assistant d'installation” en page 61. Pour des informations à
propos de l'ajout d'un nouveau cadre, voir ”Ajouter un autre cadre à votre compte
www.hpframe.com” en page 75.
Astuces de nettoyage et d'entretien
Veuillez éteindre le HP Smart Wi-Fi Display avant de le nettoyer.
NE PAS appuyez trop fort sur l'écran.
NE PAS vaporiser ou renverser un agent de nettoyage liquide directement sur l'écran
ou le cadre.
NE PAS utiliser d'ammoniac, alcool, ou agents de nettoyage abrasifs.
Nettoyage de l'écran
1. Essuyez l'écran avec un chiffon propre, doux, et non pelucheux pour retirer la
poussière et les particules.
2. Si un nettoyage supplémentaire est requis, appliquez un agent de nettoyage
approprié (approuvé pour les écrans LCD) sur un chiffon propre, doux, et non
pelucheux, et nettoyez l'écran.
Remarque: N'appliquez pas une pression trop forte sur l'écran pour éviter de
l'endommager.
FRANÇAIS
Nettoyage du cadre et du support
1. Utilisez un chiffon propre, doux, et non pelucheux pour retirer la poussière et les
particules.
2. Si vous le souhaitez, appliquez un agent de nettoyage approprié sur un chiffon
propre, doux, et non pelucheux, et essuyez les surfaces souhaitées.
87
Page 90

Commentaires
Commentaire à propos de ce manuel de l'utilisateur
Si vous trouvez une erreur dans ce manuel de l'utilisateur ou si vous avez des
suggestions, envoyez un email à manuals@hp.com. Vos informations seront utilisées
pour développer les futures révisions de ce manuel. Vous ne recevrez pas de
réponse à votre email. Si vous avez besoin d'assistance, allez au site web
www.hp.com/support.
Obtenir de l'aide
Si vous avez besoin d'une assistance technique ou que votre cadre photo numérique
HP nécessite une maintenance pendant la période de garantie, veuillez contacter le
point de vente d'origine ou un revendeur agréé de votre pays. Si la maintenance
n'est pas possible dans ces endroits, veuillez contacter un agent de garantie des
produits HP dans la liste de contacts fournie ci-dessous. Un agent de maintenance
vous aidera à solutionner vos problèmes et si nécessaire, donnera un numéro RMA
d'autorisation de renvoi du matériel afin de remplacer votre produit HP. Pour
l'application de la garantie, vous aurez besoin de fournir une copie de la preuve
d'achat d'origine et le numéro RMA fourni. Vous serez responsable des frais de port
lors de l'envoi de votre produit au centre de services. L'agent de services vous
donnera une adresse et vous serez également responsable des frais de port au
centre de services de garantie. Une fois que votre produit est reçu par ce centre de
service, un appareil de remplacement vous sera renvoyé dans les 5 jours ouvrables.
Email de contacts pour vous assister:
Langue Adresse email
Hollandais hollands@hpodd.com
Chinois
Anglais english@hpodd.com
Français francais@hpodd.com
Allemand deutsch@hpodd.com
Italien italiano@hpodd.com
Japonais nippon@hpodd.com
Coréen korean@hpodd.com
Portugais portugues@hpodd.com
Espagnol espanol@hpodd.com
Suédois svensk@hpodd.com
simp.chinese@hpodd.com
trad.chinese@hpodd.com
88
FRANÇAIS
Page 91

Contact/téléphone pour
vous assister:
Pays Langue Numéro
Région Européenne (EMEA)
Belge
FRANCE Français + 33 171230454
ALLEMAGNE Allemand + 49 6950073896
IRLANDE Anglais + 353 1850882016
ITALIE Italien + 39 269682189
PAYS-BAS Hollandais + 31 202015093
ESPAGNE Espagnol + 34 914533458
SUISSE
ROYAUME-UNI Anglais + 44 2073652400
Amérique du nord
Etats-Unis Anglais 1.866.694.7633
Canada Anglais et français 1.866.694.7633
Hollandais et
allemand
Allemand/Français/
Italien
+ 32 2700 1724
+ 41 18009686
FRANÇAIS
89
Page 92

Spécifications
Spécifications du panneau
Dimension 8”
Format d'écran 4:3
Résolution 800x600 pixels
Rapport de contraste 400:1
Alimentation
Adaptateur d'alimentation externe 12V, 1,2A
Audio
Haut-parleurs internes Stéréo
Connecteur pour écouteur/haut-parleurs
externes
Connectivité
Ports USB 2 (STD 2.0 Host, appareil Mini B)
Stockage/Multimédia
Mémoire interne 512 Mo
Cartes mémoire compatibles:
CF – CompactFlash
MS – Memory Stick Pro™ Oui
MMC – MultiMedia Card Oui
SDTM – Secure Digital Oui
SDHC™ – High Capacity Secure Digital Oui
xD – xD Picture Card™ Oui
Logement cartes mémoire 1 SD/MMC/MS/xD
Logement cartes mémoire 2 CF
Fichiers multimédia compatibles
Formats de fichier vidéo
Formats de fichier photo
Formats de fichier audio MP3, WMA
Interface utilisateur/Contrôle
Boutons au-dessus du Smart Wi-Fi
Display
Télécommande Oui
®
Prise stéréo 3,5 mm
Oui
MP4 (ISO MP4 SP/ASP ; .mp4,
.avi, xVid), MJPEG.
JPEG - (Baseline et extendedsequential JPEG)
Oui
FRANÇAIS
90
Page 93

Questions fréquemment posées
Question Réponse
Jusqu'à quelle portée puis-je utiliser la
télécommande?
Pourquoi est-ce que je ne peux pas
afficher certaines de mes photos?
Pourquoi est-ce que je ne peux pas lire
certains de mes morceaux de musique?
Pourquoi est-ce que je ne peux pas lire
certains de mes clips vidéo?
Puis-je supprimer des photos sur les
cartes mémoires externes, mémoire
flash, ou mémoire interne?
Comment puis-je commuter vers la
mémoire interne?
J'ai perdu ou endommagé ma
télécommande et/ou l'adaptateur
d'alimentation. Puis-je commander une
rechange?
Où puis-je trouver les dernières
informations/FAQ à propos de mon
HP Smart Wi-Fi Display?
Comment puis-je afficher mes photos et
écouter de la musique en même temps?
FRANÇAIS
2,5 mètres
Certains format de fichier photo/
image ne sont pas pris en charge.
Veuillez vous référer aux
spécifications.
Certains formats de fichier audio ne
sont pas pris en compte. Veuillez vous
référer aux spécifications.
Certains formats de fichier audio ne
sont pas pris en compte. Veuillez vous
référer aux spécifications.
Oui, vous pouvez. Avec le nom de
fichier photo en subrillance, appuyez
sur le bouton Options de la
télécommande, et choisissez
Supprimer la photo.
Si plusieurs types de mémoire sont
disponibles, le HP Smart Wi-Fi Display
vous demandera de spécifier la source
mémoire. Choisissez Interne.
Oui. Visitez le site
www.hp.com/support pour plus de
détails.
Visitez www.hp.com/support pour
plus d'informations et les informations
les plus récentes.
1. Démarrez d'abord la lecture de la
2. Naviguez sur la ou les photos que
musique (radio Internet, contenu du
réseau à domicile, contenu du
cadre).
vous souhaitez afficher (Contenu
du cadre, Réseau à domicile,
Contenu Internet) et lancez un
diaporama.
91
Page 94

Certains fichiers .DB et .BAK sont
apparus dans la carte mémoire insérée
dans mon HP Smart Wi-Fi Display et ils
ne s'y trouvaient pas auparavant.
Quels sont ces fichiers?
Quand j'insère une carte mémoire ou
mémoire flash USB dans le HP Smart
Wi-Fi Display, cela prend parfois du
temps avant de pouvoir afficher des
photos ou d'écouter de la musique.
Pourquoi?
Que dois-je faire si la connexion du
réseau est interrompue pendant la
lecture de radio Internet, vidéo
YouTube, albums photo web, etc?
Quand vous insérez une carte
mémoire ou une mémoire flash USB
dans votre HP Smart Wi-Fi Display,
des fichiers (.DB) de base de données
et de sauvegarde (.BAK) seront créés.
Ces fichiers ne doivent pas vous
inquiéter et ne doivent pas être
supprimés. Cependant, s'ils sont
supprimés par accident, ne vous
inquiétez pas. Le HP Smart Wi-Fi
Display les créera à nouveau la
prochaine fois.
Remarque: Si la carte a très peu
d'espace mémoire disponible, elle ne
pourra peut-être pas créer
complètement la base de données,
risquant d'engendrer le
disfonctionnement de certaines
fonctions (ex: l'affichage des photos
en fonction de la date de capture, etc.)
Quand vous insérez une carte
mémoire ou mémoire flash USB, le HP
Smart Wi-Fi Display a besoin de
construire sa propre base de données
interne. Par exemple, cela peut
prendre 2 à 3 minutes pour
reconstruire la base de données d'une
carte SD contenant 400 photos.
Pendant ce temps, vous ne pourrez
pas afficher de photos.
Essayez d'éteindre le cadre et de le
rallumer en utilisant l'interrupteur
d'alimentation à l'arrière. Il devrait se
reconnecter au réseau et vous pourrez
consulter le contenu en ligne à
nouveau.
FRANÇAIS
92
Page 95

Dépannage
Je ne peux pas allumer mon HP Smart Wi-Fi Display
L'alimentation n'est peut-être pas bien connectée. Assurez-vous qu'elle est branchée
à une prise de courant, et que l'autre extrémité est branchée au connecteur d'entrée
CC (DC-in) sur le HP Smart Wi-Fi Display.
L'interrupteur d'alimentation du HP Smart Wi-Fi Display est peut être sur la position
arrêt. Vérifiez que l'interrupteur est sur la position marche.
Je ne peux pas lire certains fichiers photos/musique/vidéo
Le HP Smart Wi-Fi Display peut uniquement accéder aux fichiers qui sont stockés en
utilisant un système de fichiers FAT/FAT32. Certains disques sont formatés en
utilisant le système de fichiers NTFS de Windows, et l'écran n'y a pas accès.
Mon HP Smart Wi-Fi Display ne peut pas imprimer des images
Le câble d'imprimante n'est peut-être pas bien connecté. Vérifiez que le câble
d'imprimante est connecté au port mini-USB de votre HP Smart Wi-Fi Display et le
port USB à l'imprimante.
L'imprimante n'est peut-être pas compatible de PictBridge. Dans ce cas, il ne sera
pas possible d'imprimer des images à partir du HP Smart Wi-Fi Display.
Le port mini-USB n'est peut-être par correctement configuré sur HP Smart Wi-Fi
Display. Vérifiez que le Mode USB est configuré sur l'Imprimante dans
Paramètres locaux. Voir ”Paramètres locaux” en page 65 pour plus
d'informations.
FRANÇAIS
93
Page 96

Quand je connecte mon cadre à mon ordinateur, l'ordinateur
n'affiche aucune lettre de lecteur, ou le cadre apparaît comme un
“Périphérique PTP/MTP”
Votre cadre peut-être configuré pour une connexion d'imprimante PictBridge au lieu
d'une connexion d'ordinateur. Pour corriger cela, suivez les étapes suivantes:
1. Déconnectez le cadre de votre ordinateur,
2. Allez au menu principale du cadre, sélectionnez Installation, puis
Paramètres locaux. Vérifiez que le Mode USB est configuré sur PC et non
sur Imprimante.
3. En utilisant l'interrupteur d'alimentation à l'arrière du cadre, éteignez et rallumez
le cadre (pour l'emplacement de l'interrupteur d'alimentation, voir ”Précédent”
en page 60).
4. Reconnectez le cadre à votre ordinateur.
Mon réseau sans fil n'apparaît pas dans la liste des réseaux
disponibles
Le point d'accès du réseau sans fil ne fonctionne peut-être pas correctement ou n'est
pas bien configuré. Vérifiez que les autres appareils peuvent se connecter au réseau
pour écarter cette possibilité.
Le signal du réseau sans fil n'est peut-être pas suffisant fort. Essayez de changer
l'emplacement du point d'accès ou du HP Smart Wi-Fi Display pour une meilleure
réception du signal.
Votre SSID du réseau n'émet peut-être pas. Dans ce cas, utilisez l'option
Installation WEP réseau caché, Installation WPA réseau caché ou
Installation ouverture réseau caché parmi la liste de réseau disponible.
Je n'arrive pas à accéder à mon contenu Internet
Votre connexion au réseau sans fil ne fonctionne peut-être pas correctement. Vérifiez
que vous êtes connecté au réseau sans fil et qu'il a accès à Internet.
Je ne me rappelle pas les paramètres de mon routeur sans fil
Consultez la documentation de votre routeur pour savoir comment accéder aux
paramètres de configuration de votre routeur. En dernier ressort, la plupart des
routeurs ont un mécanisme pour se réinitialiser aux paramètres d'usine par défaut.
94
FRANÇAIS
Page 97

Je ne me rappelle pas le mot de passe de mon routeur sans fil
Consultez la documentation de votre routeur pour déterminer comment trouver le
nom du réseau et le mot de passe.
J'utilise une clé ASCII pour la sécurité WEP sur mon réseau sans fil
Le HP Smart Wi-Fi Display prend en charge uniquement la saisie de la clé WEP avec
des digits hexadécimaux (0 à 9, A à F). Si vous entrez une phrase de passe ASCII dans
votre routeur, consultez la documentation de votre routeur pour accéder aux pages de
configuration. À partir de là, trouvez la configuration du routeur pour les clés WEP, et
essayez de changer temporairement la configuration de “ASCII” à “Hex”. Le routeur
affichera alors la clé ASCII en valeur hexadécimale. Notez cette valeur et utilisez-la sur
le HP Smart Wi-Fi Display, puis repassez le routeur en mode ASCII.
Parfois, le cadre présente des retards de réponse aux boutons de la
télécommande
Le HP Smart Wi-Fi Display doit communiquer avec des sites web de tierce partie,
ainsi que hpframe.com. Il y a des fois où le cadre risque d'être occupé par cette
communication, et cela peut causer des retards de réponse à la télécommande.
Lorsque vous êtes sur le site web www.hpframe.com, si vous
saisissez accidentellement le mauvais mot de passe pour un site de
tierce partie (Snapfish, etc.), il sera difficile de revenir à l'écran de
connexion pour entrer le bon nom d'utilisateur/mot de passe.
Fermez toutes les fenêtres du navigateur, puis revenez au site web
www.hpframe.com pour réessayer.
FRANÇAIS
95
Page 98

Si vous êtes déjà connecté à un réseau sans fil, allez dans Installation >
Réseau, et quittez la procédure de configuration du réseau avant
qu'elle soit terminée, vous serez alors ramené au Menu principal,
mais le réseau risque d'être déconnecté. Afin de corriger ceci,
essayez l'une des choses suivantes:
• Retournez à l'écran de configuration et terminez l'installation du réseau, ou
• En utilisant le commutateur d'Alimentation à l'arrière, éteignez puis rallumez
le HP Smart Wi-Fi Display (il se reconnectera lors du redémarrage).
Quand vous appuyez sur le bouton Pivoter photo de la télécomande,
l'image ne pivote pas immédiatement.
Quand vous appuyez sur le bouton Pivoter photo, l'image pivotera puis s'affichera
comme la prochaine transition de diapositive quelques secondes plus tard.
Le HP Smart Wi-Fi Display ne peut pas se connecter à travers un
réseau proxy
Le HP Smart Wi-Fi Display ne prend pas en charge les configurations de réseau
proxy. À cause de ce problème, les utilisateurs dans un environnement d'affaires ou
d'entreprise risquent de ne pas pouvoir communiquer correctement avec les sources
de contenu Internet.
J'ai des problèmes pour connecter mon HP Smart Wi-Fi Display à
mon réseau sans fil.
Veuillez vérifier que le micrologiciel dans votre routeur est la version la plus récente.
96
FRANÇAIS
Page 99

Page 100

7525C00047A
 Loading...