

Page 1

hp media center pc
updated hp media
center pc information
Page 2

The information in this document is subject to change without
notice.
®
Hewlett-Packard
regard to this material, including, but not limited to, the implied
warranties of merchantability and fitness for a particular purpose.
HP shall not be liable for errors contained herein or for incidental
or consequential damages in connection with the furnishing,
performance, or use of this material. THE WARRANTY TERMS
CONTAINED IN THIS STATEMENT, EXCEPT TO THE EXTENT
LAWFULLY PERMITTED, DO NOT EXCLUDE, RESTRICT OR MODIFY
AND ARE IN ADDITION TO ANY MANDATORY STATUTORY
RIGHTS APPLICABLE TO THE SALE OF THIS PRODUCT OR
SERVICE TO YOU.
HP assumes no responsibility for the use or reliability of its software
on equipment that is not furnished by HP.
This document contains proprietary information that is protected by
copyright. All rights are reserved. No part of this document may be
photocopied, reproduced, or translated to another language
without the prior written consent of HP.
Company makes no warranty of any kind with
Hewlett-Packard Company
Home Products Division
P.O. Box 4010
Cupertino, CA 95015-4010
USA
© 2003 Hewlett-Packard Development Company, L.P.
All rights reserved.
Hewlett-Packard is a registered trademark of Hewlett-Packard
Company in the United States of America and other
countries/regions.
Other brand or product names are trademarks of their respective
holders.
Page 3

Contents
Updated HP Media Center PC
Information ..........................................1
Setting PC Location for Television Program Guide .....2
Changing the Program Lineup in Media Center ........3
Setting Parental Controls ........................................3
Setting Closed Captioning .....................................4
Installing Speakers ................................................4
Connecting Altec Lansing Speakers .....................4
About Installing 5.1 Speakers............................. 5
Installing Multi-channel Audio Speakers ............... 5
Understanding the 6-In-1 Memory Card Reader........ 8
Recording Data to CDs and DVDs...........................9
Recording with RecordNow................................ 9
Recording with MyDVD .....................................9
Recording with the CD Writing Wizard ............. 10
Installing DLA Software ....................................11
Playing Video CD Slideshows............................... 13
Playing Recorded TV Programs............................. 13
Safeguarding Your Recorded TV Programs......... 13
Copying Recorded TV Programs to DVD................ 21
Standby Mode and Scheduled Recordings............. 22
Switching Display Devices ...................................23
Updated Information about Software Programs ...... 23
Capturing Analog Home Video ............................ 24
Using Application Recovery and
System Recovery................................................. 29
Creating Recovery CDs/DVDs.......................... 32
Using HP PC Recovery CD-DVD Creator ............ 34
Using HP Recovery Tools CD............................ 35
System Restore ............................................... 36
Application Recovery ......................................37
System Recovery............................................. 38
System Recovery Using Recovery Discs.............. 40
Updated HP Media Center PC Information
iii
Page 4

Updated HP Media Center PC Information
iv
Page 5

Updated HP Media Center PC Information
This document contains updated information
about your Media Center PC. Please review this
information and keep it with your hardware and
software guides. The information describes:
■
Setting PC location for television program
guide
■
Changing the program lineup in Media Center
■
Setting parental controls
■
Setting closed captioning
■
Installing speakers
■
Understanding the 6-In-1 memory card reader
■
Recording data to CDs and DVDs
■
Playing video CD slideshows
■
Playing recorded TV programs
■
Copying recorded TV programs to DVD
■
Standby mode and scheduled recordings
■
Switching display devices
■
Updated information about software programs
■
Capturing analog home video
■
Using Application Recovery and System
Recovery
Updated HP Media Center PC Information
1
Page 6

Setting PC Location for
Television Program Guide
During the initial setup of the PC, you specify
your PC country/region location. Media Center
uses this information to select the country/region
for the television program guide.
To resolve this problem, set the location for your
PC in the Control Panel first and then in the
Media Center Settings window.
To set the PC location
1 Click Start on the taskbar, and then click
Control Panel.
Important:
The Media Center program lists United States as
the PC location by default. If you did not select
your correct location and if this location does not
match the ZIP Code or postal code location you
entered in the Media Center program guide
setting, an error message may appear. You may
also see No data available in the television
program guide, or you may not be able to get
the correct television program guide.
Updated HP Media Center PC Information
2
Make sure the PC has a connection to the
Internet and that you have completed the Media
Center Setup Wizard before you try to download
your television program guide.
2 Click Date, Time, Language, and
Regional Options.
3 Click Regional and Language Options.
4 Click the Regional Options tab.
5 In the Location box near the bottom of the tab,
select your country/region (for example,
Canada) from the drop-down list.
6 Click Apply, and then click OK.
Page 7

Changing the Program
Setting Parental Controls
Lineup in Media Center
Important: Make sure you are connected to the Internet
before you try to download the Electronic Program
Guide or before you change the settings of the
Guide in Media Center.
1 Click Start, and then click Media Center.
2 In the Media Center Start menu, click
Settings.
3 Click TV/DVD.
4 Click Guide setup.
5 Click Change lineup, and follow the
onscreen instructions. When you enter your
postal code, do not leave any spaces. For
example, for Canadian postal code R2M 3Z4
you would enter R2M3Z4.
If you see an Invalid message, there is no
guide for your area.
If you set Media Center to block unrated
channels, an error could occur. It is
recommended that you make sure this option is
not selected.
To do this:
1 Click Start and then click Media Center.
2 Click Settings, TV/DVD, and then click
Parental control.
3 Enter your PIN number.
4 Select TV Ratings.
5 Make sure that Block unrated TV
programs is not selected.
6 If desired, you can select the Maximum
allowed TV rating setting, select a rating,
and then click OK. Selecting this setting does
not cause an error.
Updated HP Media Center PC Information
3
Page 8

Setting Closed Captioning
If you set Media Center to display closed
captions while in window mode (not full-screen
mode), the window or the closed-caption text
may flash as the text scrolls in the window. To fix
this problem, change the display to full-screen
mode or turn off the closed-captioning option.
To turn off the closed-captioning option:
1 Click Start and then click Media Center.
2 Click Settings and then click Audio.
3 Click plus sign (+) to disable Caption display.
Installing Speakers
Connecting Altec Lansing Speakers
If your PC model came with the Altec Lansing
Speakers System Model 251, use the following
procedure to connect the speakers to a Sound
Blaster Audigy Audio Card on the back of the
PC. Also, refer to the setup information that came
with your PC and your speaker system.
Note:
Your speaker system has a yellow plug that does
not match the color of the corresponding
connector on the back of the PC.
1 Plug this yellow tip of the subwoofer cable into
2 Plug the other two tips of the audio cable into
3 Follow the speaker system documentation to
If your PC uses an integrated 5.1 audio solution
(no audio card), refer to the section titled “Installing
multi-channel audio speakers” and disregard this
notice.
the orange audio card connector on the back
of your PC.
their matching color-coded connectors on the
back of the PC.
connect the other speakers to the subwoofer.
Updated HP Media Center PC Information
4
Page 9

About Installing 5.1 Speakers
Your PC may have a sound card with connectors
on the back of the PC for analog and digital
audio outputs (Line out -1, Line out -2, and
Line out -3), a microphone, and an audio input
(Line in). The example illustration below shows a
sound card that includes a game port connector
on the left. If your PC has a sound card with
these connectors, perform the procedures in the
next section.
Installing Multi-channel
Audio Speakers
If your PC has multi-channel speakers capability
(select models only), you can connect speakers
for 4-channel or 6-channel output. You must
connect your speaker system to the PC, and then
configure the audio software for sound output.
Your PC may include the Multi-channel Sound
Manager or the Creative SoundBlaster Audigy
sound manager. Refer to the correct procedure to
configure your multi-channel speakers.
Note:
Some PCs have the multi-channel audio
capability that uses the microphone, Audio (Line)
Multi-channel audio uses the Microphone,
Audio (Line) In, and Audio (Line) Out connectors
on the back of the PC to connect the multi-channel
speakers system to the PC.
In, and Audio (Line) Out connectors on the back
of the PC. If your PC has these connectors, you
can connect and install a multi-channel audio
speaker system. To do this, follow the procedures
in the next section.
Updated HP Media Center PC Information
5
Page 10

To connect your multi-channel
speaker system to the PC
1 Turn off the PC.
2 Connect the three audio cable plugs from the
speaker system to the connectors on the back
of the PC (see the table).
Connect speaker
channels (plugs) To PC back connector
Front speakers Audio (Line) Out
(lime-green)
Rear speakers Audio (Line) In (blue)
Center/subwoofer
speakers
Mic-1 (pink)
3 Turn on the PC.
4 Turn on your speaker system.
5 Configure the multi-channel audio output;
refer to the next procedure.
To configure multi-channel audio
output for PCs with Multi-channel
Sound Manager
1 Click Start on the taskbar.
2 Choose All Programs.
3 Choose Multi-channel Sound Manager,
and then click Multi-channel Sound
Manager again. The Multi-channel Audio
Configuration window opens.
Note:
If you do not see the Speaker Configuration tab,
your PC may not have the multi-channel option.
4 Click the Speaker Configuration tab. (Your
speakers may need to be plugged in to see
this tab.)
5 Select the option describing the number
of speakers in your system, for example,
6/5.1 speaker mode. You can click the
Speaker Test tab and then click each speaker
to test it.
Updated HP Media Center PC Information
6
6 Click OK.
Page 11

To configure multi-channel audio
output for PCs with Creative
SoundBlaster Audigy
1 Click Start on the taskbar.
2 Choose All Programs.
3 Choose Creative, Sound Blaster Audigy,
and then click Creative AudioHQ.
4 Double-click the Speaker icon.
5 Click the drop-down menu and then select
5.1 speakers. You can click the Test button
to test it. If you don’t hear sound during the
test, check each speaker connection and then
check the volume controls.
To configure multi-channel audio
output for Media Center
Note:
You need to perform this procedure if you have
Creative SoundBlaster Audigy sound manager or
the Multi-channel Sound Manager.
1 Click Start on the taskbar and then select
Media Center.
2 Click Settings, TV/DVD, and then
click DVD.
3 Click Audio.
4 Select 6 speaker mode (5.1 channel).
5 Click Apply, and then click OK.
Updated HP Media Center PC Information
7
Page 12
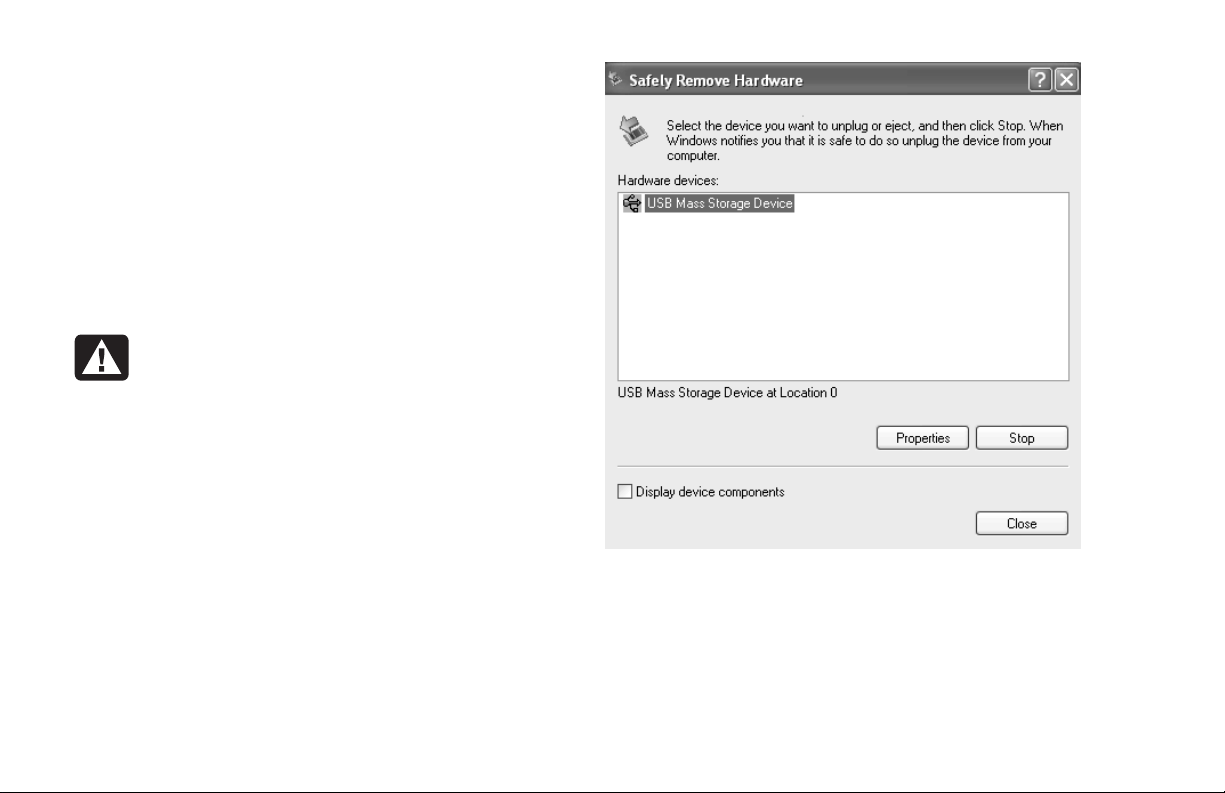
Understanding the
6-In-1 Memory Card Reader
The 6-In-1 memory card reader can read from
and write to six types of memory cards and to the
IBM Microdrive
Special note about the
Safely Remove Hardware utility
™
disk drive.
Warning:
Remove Hardware window while the USB
Mass Storage Device is selected. Doing so
removes the operating system recognition
of the 6-In-1 memory card reader from
your PC. You must restart the PC to use
your reader again.
Do not click Stop in the Safely
Updated HP Media Center PC Information
8
If you inadvertently open the Safely Remove
Hardware window, click Close.
Page 13

Understanding the in-use light
Recording with RecordNow
The 6-In-1 memory card reader in-use light turns
on when you insert media into a slot. The light
blinks when the memory card reader reads from
or writes to the media.
Warning:
media when the in-use light is blinking.
Doing so may cause data loss.
Do not insert or remove
Recording Data to CDs
and DVDs
You can record data to blank or appendable
CD-R, CD-RW, DVD+R or DVD+RW discs in
different ways: Open a recording program, use
the CD Writing Wizard, or use the DLA (Drive
Letter Access) program drag-and-drop method.
Important: The
your PC, but you can get it from the HP Web site;
see “Installing DLA Software” in this document.
DLA program is not preinstalled on
Use RecordNow to record data and music files
to CDs and DVDs.
You can put data files on a DVD to store them
or transfer them to another PC. However, data
files on a DVD do not play in a DVD player.
Note:
To copy a recorded TV show to DVD to view on a
home DVD player, see “Copying Recorded TV
Programs to DVD.”
To open RecordNow, click Start on the taskbar,
choose All Programs, RecordNow, and then
click RecordNow. Follow the onscreen
instructions.
Recording with MyDVD
Use Sonic MyDVD to record video files to CDs
and DVDs. MyDVD writes files to DVD that can
play in a DVD player.
To open MyDVD, click Start on the taskbar,
choose All Programs, Sonic, MyDVD, and
then click Start MyDVD. Follow the onscreen
instructions.
Updated HP Media Center PC Information
9
Page 14

Recording with the
CD Writing Wizard
Use the Microsoft CD Writing Wizard to record
data or music files to CDs only. The CD Writing
Wizard cannot write data to DVDs.
To copy data to a blank or appendable CD by
using the CD Writing Wizard:
1 Copy your files to a writeable CD drive in My
Computer by doing one of the following:
■
Dragging a file from a Windows Explorer
window to the writeable CD drive icon.
Or
■
Selecting Save As from within certain
programs, and then saving the file to the
drive.
Or
■
Right-clicking a file, selecting Send To, and
then selecting the drive.
2 When you are ready to record your files to a
CD, click Start on the taskbar, and then click
My Computer.
3 Double-click your writeable CD drive icon.
The files you have copied to the drive should
appear in the drive window.
Important:
The files displayed in the drive window are
not recorded to the CD yet. You must complete the
following steps to finish the recording process.
4 Insert a blank or an appendable CD.
5 Click Write these files to CD in the CD
Writing Tasks section of the drive window. The
CD Writing Wizard opens.
6 Type the name of the CD, and then
click Next.
7 Click Next. The files are being recorded to
your CD.
8 When your files have finished recording, a
message appears telling you the files have
been successfully recorded. Click Finish.
Updated HP Media Center PC Information
10
Page 15

Installing DLA Software
Recording with DLA
The DLA software is not preinstalled on your PC.
Important:
Installing the DLA program disables the
CD Writing Wizard program.
DLA allows you to use your DVD Writer/
CD Writer drive as you would a diskette drive,
by copying files to disc or by using a drag-anddrop method.
To get and install the DLA program:
1 Go to the Web site:
http://www.hp.com/cposupport
2 Type your model number into the Search box
(for example, Media Center 863n).
3 Click drivers and downloads for your
model. Click applications, if it is present.
4 Choose DLA, and then follow the onscreen
instructions to download and install the
program.
Important:
Format a blank CD or DVD before copying
files directly to a CD or DVD. If you don’t, a
message appears telling you to format the disc or
telling you that your drive is not accessible.
1 Press the Eject button on the drive and insert
the blank disc.
2 Click Start, and then click My Computer.
3 Right-click the drive icon and select Format.
4 Under Volume Label, type in the title of
the disc.
5 Under Format type, select Full or Quick
(erase). You must select the quick format for
all CD-R or DVD+R discs. You must select the
full format for a CD-RW or a DVD+RW disc the
first time you format it.
Note:
Full format can take up to 45 minutes. Quick
format usually takes less than a minute.
Updated HP Media Center PC Information
11
Page 16

6 Click Start to format the disc.
7 Click Yes to the message that all files on the
disc will be erased.
8 Click OK.
When the disc formatting is complete,
you can copy your files directly to the disc
in My Computer by:
■
Dragging a file from a Windows Explorer
window to your drive icon.
Or
■
Selecting Save As from within some
programs, and then saving the file to your
drive.
Or
■
Right-clicking a file, selecting Send To, and
then selecting your drive.
After you record your files, if you want to read
the DLA-formatted disc on most other CD-ROM
drives, you must make the disc compatible: Insert
your disc into your drive, right-click the DVD
Writer/CD Writer drive icon, and then select
Make Compatible.
The Make Compatible feature in DLA makes
uncompressed CD-R and DVD+R discs readable
by most read-only CD and DVD drives, even if
DLA is not installed in the PC. When you make a
disc compatible, DLA closes the session on your
disc. This means:
■
With a DVD+R, you are not able to add data
to the disc.
■
With a CD-R, you are able to add more data
in another recording session, but you need to
select Make Compatible again after you
add the files.
Updated HP Media Center PC Information
12
Page 17

Playing Video CD
Slideshows
Note:
To copy a recorded TV show to DVD to view
on a home DVD player, see “Copying Recorded
TV Programs to DVD.”
Slideshows that are recorded onto video CDs
(VCDs) cannot be played in Windows Media
Center. You can play them in the InterVideo
WinDVD program.
Windows Media Center can play your recorded
DVDs and VCDs that don’t have slideshows.
Playing Recorded TV
Programs
Most television broadcasters do not encrypt
programs, so a recording can be played on any
Media Center PC. A recording of a broadcasterencrypted TV program, though, can be played
only on the PC that recorded it. To protect your
ability to play recorded TV programs, follow the
instructions in “Safeguarding Your Recorded TV
Programs” in this document.
For information on playing recorded TV
programs on other devices, go to the Web site:
http://www.hp.com/go/mediacenterpc
Safeguarding Your Recorded
TV Programs
When you record TV programs using Media
Center, the TV program broadcaster may have
an encryption code that Microsoft includes as a
special code in the recorded files. This code is
keyed to your PC and is required to play
broadcaster-encrypted TV programs previously
recorded to your hard disk drive, copied to DVD,
or copied to other media. When you perform a
system recovery or replace the hard disk drive in
your PC, you lose the special code.
Updated HP Media Center PC Information
13
Page 18

You can safeguard your capability to play
recorded TV programs by making a backup
CD and using it as described in the procedures
provided here. Make the backup CD now, before
you need it, so that you can use the CD after you
perform a system recovery, or replace the hard
disk drive in your PC. If you do not have the
backup CD after you perform a system recovery
or replace the hard disk drive, you will not be
able to play any previously recorded TV
programs that are broadcaster-encrypted.
The procedures that follow describe how to
prepare your PC, make the backup files you
need, copy the file to CD, and use the backup
CD to restore the files to your PC after a system
recovery.
To prepare the code key files
Note:
The code key files and backup CD you make can
be used in your PC only.
1 After you set up your PC and turn it on,
complete the initial Microsoft Windows setup.
Open Media Center and complete its setup.
2 Record at least one TV program.
3 Close Media Center.
4 Open the Microsoft Backup utility: Click Start
on the taskbar, choose All Programs,
Accessories, System Tools, and then click
Backup. The Backup or Restore Wizard
opens.
Updated HP Media Center PC Information
14
Page 19

5 Click the Advanced Mode link near the
middle of the window.
7 Click the Exclude Files tab.
6 At the top of the Backup Utility window, click
Tools and select Options.
Updated HP Media Center PC Information
8 In the Files excluded for all users box, put your
cursor over the vertical line between Filename
and Application in the title bar, and then click
and drag the line to the right to see the full
entries.
15
Page 20

10 Click Remove.
11 Click Apply.
12 Click OK. The Options window closes.
13 In the Backup Utility window, click the
Backup tab.
9 Scroll down the list to see and then click the
entry: C:\Documents and Settings\All
Users\DRM\*
Updated HP Media Center PC Information
16
Page 21

14 In the left box, click the plus sign (+) for
HP Pavilion (C). The file tree expands. Click
the plus sign (+) for Documents and Settings,
click the plus sign (+) for All Users, and then
click the DRM box so a check mark appears
(as shown in the next figure).
15 Scroll down the list and click the System
State box so a check mark appears (as
shown in the next figure).
Updated HP Media Center PC Information
17
Page 22

16 At the bottom of the window, beneath Backup
media or filename, click Browse. Because a
diskette is too small to save the backup file on,
you will need to save the file to the desktop
portion of the hard disk drive before writing
the file to CD. If the message Insert a disk into
drive A appears, click Cancel.
17 The Save as window opens. In the Save in
box, select Desktop from the drop-down list.
In the Save as box, use the default name
(Backup.bkf) or type in a file name with the
extension .bkf and then click Save. The
window closes.
18 Click Start Backup in the Backup Utility
window. The Backup Job Information window
opens.
19 Click Start Backup. The Backup Progress
window opens. When the process finishes, the
window displays the message The backup is
complete.
20 Click Close.
21 Close the Backup Utility window.
Continue with the next procedure.
To make the backup CD
1 Click Start on the taskbar, choose All
Programs, RecordNow, and then click
RecordNow again. The RecordNow window
opens.
2 Click Make a Data Disc.
3 Insert a blank CD.
4 Click Next.
5 Click Add Files and Folders. The Select
files and folders to add window opens.
6 In the Look in box, select Desktop from the
drop-down list.
7 Click the backup file (for example Backup.bkf)
so it appears in the File name box. Click Add.
The window closes.
Updated HP Media Center PC Information
18
Page 23

8 On the RecordNow window, click Next. If a
warning window opens, click OK.
To use the code key
backup CD after System Recovery
9 Wait while the program writes to the CD and
the disc tray ejects.
10 Remove the CD, label it, and store it in a
safe place for use with the next procedure.
Click Done.
11 Close the RecordNow window.
12 Because you do not need the backup file you
created, drag the file to the Recycle Bin on the
desktop. This deletes the copy of the file that
was on the hard disk drive.
Important:
After performing a system recovery
procedure, use the CD you made to restore the
backup code key files before using Media Center
to record TV programs.
Warning:
procedure before recording TV. If you
open Media Center and use it to record
TV programs before completing this
procedure, you cannot play those TV
programs after you complete this
procedure.
You must perform this
1 Insert the backup CD you made into a drive.
The drive window opens and shows the disc
contents.
Or
If the window doesn’t open automatically, click
Start, My Computer, and then right-click
the drive icon to view the contents of your
backup disc.
Updated HP Media Center PC Information
19
Page 24

2 Double-click the backup file (for example
Backup.bkf). The Backup or Restore Wizard
opens.
3 Click Next.
4 Choose Restore files and settings, and
then click Next.
5 The What to restore window opens. Click
Browse, and the browse window shows the
A drive. Click Browse again, and the
window shows Select file to catalog. Click the
drop-down menu arrow and click the optical
drive with the backup CD. Click the backup
file name. Click Open and then click OK.
7 Click Next.
6 In the Items to restore box, click the plus sign
(+) for the backup file name. The file tree
expands. Click the C box so a check mark
appears. Click the System State box so a
check mark appears. (The next figure shows
the boxes checked.)
Updated HP Media Center PC Information
20
8 The Backup or Restore Wizard window shows
the message You have created the following
restore settings. In the window, click the
Advanced button. Click Next.
9 A warning message window opens. Click OK
in the Warning window.
Page 25

10 Select Replace existing files and then click
Next. Click Next again. Click Finish. The
Restore Progress window opens.
Copying Recorded
TV Programs to DVD
11 Wait until the process completes, and then
click Close in the Restore Progress window.
12 A Backup Utility message window opens. Click
Yes to restart the PC. Wait until the restart
completes.
Open Media Center and complete the setup. You
can now play previously recorded TV programs
that are broadcaster-encrypted.
You can use Sonic MyDVD to copy your recorded
TV shows to DVD (select models only) for viewing
and playing in a home DVD player.
Your MyDVD program has an icon called
Get Recorded TV Shows.
When you click this icon, the Shared
Documents folder on the hard disk
drive (C drive) opens and lists your
recorded TV shows by name.
The recording quality determines the size of the
file created for the recorded program. Best is the
pre-set recording quality setting. A two-hour
program recorded at Best quality produces a
large file that will not fit on one DVD. The
following table lists the recording quality and
the estimated number of minutes that fit onto
one DVD.
Updated HP Media Center PC Information
21
Page 26

Recording quality Minutes on one DVD (est.)
Best 80
Better 95
Good 110
Fair 190
The MyDVD program shows
you the available DVD space.
MyDVD displays a message you when you’ve
selected too many shows (or the required space
is too large) to go onto the DVD. In this case, use
the MyDVD program to “tip and tale” trim the
file, creating two smaller files to store onto two
independent DVDs.
You cannot change the recording quality of
a program after it is recorded.
To change the Recording Quality setting:
1 Click Start, and then click Media Center.
2 Click Settings, TV/DVD, Recorder, and
then click Defaults.
3 Select the Quality option, and then change the
setting to Good. Click OK, and then click OK
again to enter the change.
Standby Mode and
Scheduled Recordings
You should always close Media Center before
you manually place the PC in Standby mode to
avoid file corruption and other recording
problems.
Note:
If Live TV or other media is playing in Media
Center, the PC won’t go into Standby mode
automatically.
Updated HP Media Center PC Information
22
Page 27

Switching Display Devices
When you connect more than one display device
(CRT monitor, flat panel monitor, TV, etc.) to the
PC, you can quickly change where the PC
desktop appears by pressing Alt+F5. Each time
you press the Alt+F5 key combination, the PC
display appears on the next device.
If Alt+F5 does not work, restart the PC and
try again.
Updated Information
about Software Programs
The following information updates software
program information in your Hardware Guide:
■
InterVideo WinDVD lets you watch
DVD movies and video by using an
interactive menu.
■
www.myhpclub.com is a special Web site
for HP Pavilion home PC owners, including
owners of Media Center PC. You will find fun
projects, important product notices, support
updates, tips, and special offers from HP; just
press the HP button on the keyboard or enter
the address in your Internet Web browser.
■
GameChannel is a Web site where you
can play cool 3-D games from WildTangent.
It provides the best online gaming experience
available today, and the games are updated
all the time.
■
Quicken 2003 New User Edition is a
program for new users that is available on
your PC. Start organizing your finances with
Quicken: balance your checkbook quickly, pay
bills easily, track spending, and save time!
Updated HP Media Center PC Information
23
Page 28

Capturing
Analog Home Video
The TV tuner card of your PC allows you to
play television programs in Media Center. The
TV tuner card also allows you to connect a VCR,
a camcorder, or another analog video device
to the PC, and then capture your home video as
a file.
You cannot play a television program and
capture analog video at the same time: Your
PC will automatically restart or experience other
problems.
To connect the analog home video
source and record
1 Open Media Center. Click Start and then
click Media Center.
Click My TV, Recorded TV, and then click
Scheduled. Select any program scheduled
for the same time as you are capturing your
video, and then click Don’t Record.
3 Close Media Center. You can now safely use
your analog capture feature in ArcSoft
ShowBiz.
4 Click Start, click Turn Off Computer, and
then click Turn Off.
5 Use a coaxial cable or S-video cable to
connect your analog home video source
(VCR or camcorder) to the TV in connector or
S-VID IN connector on the back of the PC. If
necessary, first disconnect the cables for the TV
signal from your antenna or set-top box.
S-VID IN
TV
2 Cancel any TV programs recording or
scheduled for recording during this capture
procedure:
Updated HP Media Center PC Information
24
Left
audio
in
Right
audio
in
S-VID IN
(S-Video)
TV in
Page 29

Important:
Also, plug audio cables (not provided) from
If you use a composite video cable
(RCA style), connect the cable to the S-video to
composite video adapter, included in your PC box,
and then connect the adapter to the S-VID IN
(S-video) connector on the back of the PC.
your VCR into the right audio in (red) connector
and the left audio in (white) connector on the back
of the PC.
6 Press the On button on the front of the chassis
to turn on the PC.
7 Turn on your analog home video source
device.
8 On the PC desktop, click Start, choose All
Programs, ArcSoft ShowBiz, and then
click ShowBiz.
9 Click the Capture button in the ShowBiz
window.
Note:
The preview window in ShowBiz is dark until
you begin playing your VCR or camcorder.
Updated HP Media Center PC Information
25
Page 30

10 In the ShowBiz capture window, click the
Device drop-down list and select the source for
video; choose based on your card type:
■
Emuzed EvcapMaui Device
Or
■
Hauppauge WinTV PVR PCI II
11 Select the same item from the Audio drop-
down list; choose:
■
Emuzed EvcapMaui Device
Or
■
Hauppauge WinTV PVR PCI II
12 Click the Video Input button, and click a
selection based on the cable connection you
made in step 3:
■
S-video
■
Composite Video — for the S-video to
composite video adapter
■
TV Tuner — for the coaxial cable connector
Updated HP Media Center PC Information
26
Page 31

13 Click the Audio Input button and click a
selection based on the cable connection you
made in step 3:
■
Tuner In — for both S-video and coaxial
cable
■
Line In — when you used the S-video to
composite video adapter and connected
audio cables to the audio in connectors
14 Press the play button or otherwise start your
VCR or camcorder.
15 In the ShowBiz capture window, click the
red-dot (record) button and type the file name
for the video. To capture the video from the
beginning, rewind your VCR or camcorder
and begin play again.
16 Click the square (stop) button to stop
capturing video. Your file is stored in the My
Videos folder with the file name you typed in
step 15.
With the video file, you can:
■
Edit the video file by using ArcSoft ShowBiz.
■
Store your video file on DVD by using the
Sonic MyDVD program in the Start/All
Programs menu.
■
View your video file using Media Center
(copy or move the video file into the Shared
Videos folder to allow all users on the PC to
view it).
Updated HP Media Center PC Information
27
Page 32

17 When done capturing video, follow the steps
in the next procedure to disconnect your
device and return to the original signal source
setup.
To disconnect the analog home video
source
1 Turn off your analog home video device.
2 On the PC desktop, close any open programs.
3 Click Start, click Turn Off Computer, and
then click Turn Off.
4 Disconnect your analog home video source
(VCR or camcorder) cable from the connectors
on the back of the PC.
5 Reconnect the original TV signal cables to the
back of the PC.
6 Press the On button on the front of the chassis
to turn on the PC.
7 Open Media Center and reschedule recording
for any TV programs you canceled during this
capture procedure.
8 From the Media Center start menu click My
TV, and then click Guide. Find the show you
canceled and then select it.
Or
If the show is a part of a recorded series, click
Recorded TV from the Media Center start
menu, and then click Recording errors. Find
the show you canceled and then select it.
9 Click Record for a future show or click the
Record icon (red circle) if the show is
currently playing.
10 Close Media Center
Important:
HP supports lawful use of technology and
does not endorse or encourage the use of our
products for purposes other than those permitted by
national copyright law.
Updated HP Media Center PC Information
28
Page 33

Using Application Recovery
and System Recovery
The PC uses the operating system and installed
software programs during normal operation. If
your PC works improperly or stops because of
the software, you may be able to repair it.
You need recovery discs (CDs or DVDs) for some
repairs that use the HP Application Recovery
program or the HP PC System Recovery program.
The PC does not include recovery discs in the
accessory box, but you can make your own
recovery CDs or DVDs; see “Using HP PC
Recovery CD-DVD Creator.”
Caution:
create your recovery CDs or DVDs before
you need them.
It is strongly recommended you
You should also make the Recovery Tools CD.
This CD contains utilities that allow you to make
changes to your hard disk drive, including
removing the recovery partition. See “Using
HP Recovery Tools CD.”
HP and Microsoft provide several methods to fix
your PC, including using the System Recovery
program. Try these methods in the order
listed here:
■
Restart When you restart the computer, the
PC starts over using the operating system and
software in its memory. This is the simplest
repair for your PC: Just click Start, choose
Turn Off Computer, and then click
Restart.
Updated HP Media Center PC Information
29
Page 34

■
Turn Off Computer When you turn off the
computer and then turn it on again, you force
the PC to copy the operating system into its
memory and to clear some tracking
information. This may eliminate some problems
that can remain after performing a Restart.
■
Driver Rollback This Microsoft Windows
XP feature is part of the Windows Installer
program used with the Add or Remove
Programs utility in the Control Panel. It can
revert to the previous version of a driver
program if an installation fails when you are
installing a new version of the driver program.
For more information, type Rollback into the
Search box in Help and Support.
■
System Restore This Microsoft Windows
XP feature creates a restore point where it
records the PC settings at that time and date.
You can later return the PC to the settings
recorded at the restore point. You can create a
specific restore point, or have the operating
system create a restore point. For example,
when you use Add Programs to add a
software program, the operating system
automatically creates a restore point before it
adds the software. Use System Restore to
return the PC to the settings the PC had before
you installed the program. For more
information, type System Restore into the
Search box in Help and Support.
Updated HP Media Center PC Information
30
Page 35

■
Application and Driver Recovery If the
problem with the PC seems to be with only one
program or one driver, it may be that the
application program or the driver program is
damaged. You can reinstall individual factoryinstalled application programs and driver
programs using the HP Application Recovery
program (select models only).
■
System Recovery Use the HP System
Recovery program as a last resort to reinstall
the software. Perform System Recovery using
the hard disk drive partition first; see “System
Recovery.” If necessary, next perform System
Recovery using the recovery CDs or DVDs and
choose Standard Recovery; see “Starting
System Recovery using recovery discs.” Finally,
if necessary, perform System Recovery using
the recovery CDs or DVDs and choose Full
System Recovery.
Before using the HP PC System Recovery
program or the HP Application Recovery
program, use System Restore.
Note:
Your PC hard disk drive contains the System
Recovery image in a partition area of the disk
drive. The PC does not include recovery discs in
the accessory box, but you can make your own
recovery CDs or DVD; see “Creating Recovery
CDs/DVDs.”
Updated HP Media Center PC Information
31
Page 36

Creating Recovery CDs/DVDs
1 You can recover (bring back) the operating system and programs that were included on your hard
disk drive just as they were when you bought the computer.
Note:
A hard drive is a disk inside the computer that stores the operating system, programs, and data.
2 You recover the operating system and programs directly from your hard disk drive, where a copy was
placed for your convenience.
We call this part of your hard drive the “recovery partition.”
The recovery partition takes up some space on your hard drive.
3 You can copy the information of this recovery partition onto CDs or DVDs.
4 Then, if you would like to make extra space available on your hard drive, you can delete the recovery
partition using a special software tool.
5 Do not delete your hard drive partition unless you have made recovery CDs or DVDs.
Updated HP Media Center PC Information
32
Page 37

Updated HP Media Center PC Information
33
Page 38

The recovery discs can be used only with the
specified PC model. The discs are licensed for
use only with your HP Pavilion home PC. The
recovery discs can install the operating system
and software on your PC hard disk drive if the
software becomes corrupted or is accidentally
erased.
You can use this program to make only one set of
recovery CDs or a DVD for your PC. The
recovery discs you create can be used only on
your PC. To use this program, your PC must have
a CD-RW drive, DVD Writer drive, or other drive
that can write to the CDs or DVDs. If necessary,
purchase a Windows XP-compatible drive from
your local PC or electronics store.
Using HP PC Recovery CD-DVD
Creator
Make recovery CDs or DVDs (select models only)
for your PC by using HP Recovery CD-DVD
Creator before you experience any problem.
The recovery discs set is a complete image of the
original HP Pavilion home PC hard disk drive
contents and is matched to your PC model
number. The discs set contains the operating
system, drivers, and application software that
were originally installed on the PC at the factory.
Updated HP Media Center PC Information
34
The number of CDs or DVDs in the recovery set
depends on your PC model. The program tells
you the number of blank discs needed to make
the set. The process takes some time, including
up to 15 minutes per disc to verify that the
information written on the disc is correct.
You can quit the process at any time. The next
time you run the program, it begins where you
left off.
Page 39

To run HP PC Recovery CD-DVD Creator
Using HP Recovery Tools CD
1 Close any open programs. To close
programs, click X in the upper-right
corner of each window.
2 Click Start on the taskbar.
3 Choose All Programs.
4 Choose Hewlett-Packard.
5 Choose hp pavilion pc tools.
6 Click hp pc recovery CD-DVD creator.
The creator window appears.
7 Follow the onscreen instructions. Label
each disc as you make it.
Store the recovery discs in a safe place.
Your PC allows you to create (burn) a Recovery
Tools CD. After you make the HP Recovery Tools
CD, you can use it to:
■
Read instructions to use each utility on the
Recovery Tools CD.
■
Start the System Recovery program from the
recovery partition.
■
Remove the System Recovery partition from
your PC hard disk drive to increase space
for data.
■
Create a new data partition on your PC hard
disk drive.
■
Start the Microsoft Recovery Console (a utility
from Microsoft that can perform operating
system diagnostics and repairs).
Updated HP Media Center PC Information
35
Page 40

Warning:
Recovery Tools CD to change your hard
disk drive, make System Recovery discs
for your PC by using the HP PC Recovery
CD-DVD Creator program. You cannot
make System Recovery CDs after your
remove the System Recovery partition.
Before using the HP PC
To create or to start the HP PC Recovery
Tools CD
1 Click Start on the taskbar.
2 Choose All Programs.
3 Choose Hewlett-Packard.
4 Choose hp pavilion pc tools.
5 Click hp pc recovery tools CD.
Follow the onscreen instructions.
System Restore
Warning:
using the HP System Recovery program.
If software on your hard disk drive accidentally
gets erased or damaged, first use the Microsoft
System Restore feature in Windows XP to restore
the PC system and program settings.
System Restore returns the PC settings
to a selected restore point without affecting
user programs or document files. For more
information, type System Restore into the
Search box in Help and Support.
Try System Restore before
Updated HP Media Center PC Information
36
Page 41

Application Recovery
Note: Not all models include the Application
Recovery program. Perform steps 3 through 7
of the following procedure. If HP Application
Recovery appears in the folder, your PC includes
the program.
If an individual factory-installed application or
driver accidentally gets erased or damaged,
you can reinstall the software using the
HP Application Recovery program.
Note:
To start Application Recovery:
Do not use the Application Recovery program to
reinstall software programs that came on CDs
or DVDs included in the PC box. Reinstall these
programs directly from the CDs or DVDs.
5 Choose Hewlett-Packard.
6 Choose hp pavilion pc tools.
7 Click hp application recovery.
8 Click Application Installation or
Driver Installation, and then click Next.
9 Select the driver or application program to
install, and then click Install.
10 Follow the onscreen instructions.
11 Repeat steps 8 through 10 to install other
drivers or applications.
12 When you have finished recovering
applications or drivers, close the Application
Recovery program. Then click Start, click
Turn Off Computer, and click Restart to
restart the PC.
1 Close all applications and folders.
2 Uninstall the existing (damaged) application.
3 Click Start on the taskbar.
4 Choose All Programs.
Updated HP Media Center PC Information
Warning:
You must restart the PC when you are
finished recovering applications or
drivers.
Do not skip this last step!
37
Page 42

System Recovery
When other methods of repairing your
system software (like System Restore or
Application Recovery) fail, you may want to
use the HP System Recovery program as a
last resort to reinstall the software.
When necessary, you can reinstall the operating
system and the application software that was
originally installed on the PC at the factory by
using the System Recovery program.
Warning:
program will delete any data or
programs that you installed after
purchase. Be sure to back up any
data that you want to keep onto a
removable disc.
The System Recovery program uses a special
recovery partition on the hard disk drive that
stores an image of the original software.
The HP System Recovery
Note:
The System Recovery image is in a partition area
of the hard disk drive and takes up part of the total
drive space. This disk space is not usually
available for your use.
In the unlikely event that you replace the hard
disk drive, or somehow damage the data in
the special recovery partition on the hard disk
drive, use recovery discs to reinstall the operating
system and software to the hard disk drive. See
“System Recovery Using Recovery Discs.”
Make your own recovery discs (CDs or DVD)
before you need them; see “Using HP PC
Recovery CD-DVD Creator.” You can also make
the Recovery Tools CD. This CD contains utilities
that allow you to make changes to your hard disk
drive; see “Using HP Recovery Tools CD.”
Updated HP Media Center PC Information
38
Page 43

To start System Recovery if the PC
is responding
To start System Recovery if the PC
is not responding
1 Turn off the PC. Disconnect all peripheral
devices from the PC except the monitor, the
keyboard, and the mouse. Turn on the PC.
2 Click Start on the taskbar, choose All
Programs, choose Hewlett-Packard,
choose hp pavilion pc tools, and click
hp pc system recovery.
3 Wait until the System Recovery window
appears asking Do you really want to start
System Recovery?
4 Click Yes to continue with the recovery
process. If you created recovery discs, you
may be directed to insert recovery disc #1.
5 The PC starts the recovery; wait for the
onscreen instructions to display, and then
follow those instructions.
6 Complete the PC startup, and finish
the registration process. Then reconnect
all peripheral devices.
1 Turn off the PC. If necessary, press and hold
the On button until the PC turns off.
2 Disconnect all peripheral devices from the
PC except the monitor, the keyboard, and the
mouse.
3 Press the On button to turn the PC on.
4 During the startup, do the following to enter
the System Recovery program:
When the blue screen with the HP Invent logo
appears, press the F10 key on the keyboard.
(You have only a few seconds to press the
F10 key before the normal startup process
continues.)
5 The PC starts the recovery; wait for the
onscreen instructions to display, and then
follow those instructions.
6 Complete the PC startup, and finish
the registration process. Then reconnect all
peripheral devices.
Updated HP Media Center PC Information
39
Page 44

System Recovery
Using Recovery Discs
Make your own recovery CDs or DVDs before
you need them; recovery discs are not included
with your PC. See “Creating Recovery
CDs/DVDs.”
Starting System Recovery
using recovery discs
The recovery discs provide two recovery options:
■
Standard Recovery: This option recovers
factory-shipped programs, drivers, and the
operating system without affecting any data
files that you may have created since
purchasing this PC. Some data files may be
difficult to find after the System Recovery, so it
is best to back up all hard disk drive files
before performing a System Recovery.
■
Full System Recovery: This recovery
function completely erases and reformats the
hard disk drive. The program performs a full
System Recovery to reinstall the operating
system, programs, and drivers from the
recovery discs. However, you must reinstall
any software that was not installed on the PC
at the factory. This includes software that came
on CDs included in the PC accessory box, and
software programs you installed since your
purchase.
Note:
If your PC has a blank or corrupted hard disk
drive, you will see only the full System Recovery
option.
Updated HP Media Center PC Information
40
Page 45

To run the System Recovery
program using recovery discs
1 If the PC works, back up all data files that you
want to save onto removable media, such as
CD-RW or diskette. Remove the backup CD or
diskette you’ve made.
2 Press the Eject button on the top CD-ROM
drive, and wait for the tray to open. Insert
Recovery disc #1 and close the tray.
3 Turn off the PC:
■
If the PC works: Click Start on the taskbar,
click Turn Off Computer, and then click
Turn Off.
5 Press the On button to turn on the PC.
6 The PC starts the recovery; wait for the
onscreen instructions to display, and then
follow those instructions.
■
For standard recovery, press R. Click Next
to proceed with the System Recovery. Click
Yes to start the recovery. Insert the
remaining recovery discs when directed.
Or
■
For full System Recovery, press F. Click Yes
to perform a full System Recovery. Confirm
that you want to create a recovery partition.
Insert the remaining discs when directed.
Or
■
Press and hold the On button approximately
5 seconds until the PC turns off.
4 Disconnect all peripheral devices from the
PC except the monitor, the keyboard, and
the mouse.
Updated HP Media Center PC Information
Or
■
If your PC hard disk drive is blank or
corrupted, press R to perform a full System
Recovery. Confirm that you want to create a
recovery partition. Insert the remaining
recovery discs when directed.
41
Page 46

7 When the recovery program finishes, click
Restart to restart the PC.
8 Before the PC restarts, the drive tray ejects.
Remove the disc.
9 After the PC restarts, a series of startup screens
appears. To proceed with the initial Microsoft
Windows setup, you must answer a few
questions.
10 Complete the registration process, and then
reconnect all peripheral devices.
11 Reinstall software not originally installed on the
PC by the factory.
12 Copy data files that you saved on the backup
CD or diskette you made to your hard disk
drive.
Updated HP Media Center PC Information
42
Page 47

Updated HP Media Center PC Information
43
Page 48

 Loading...