

Page 1
快速入门
Quick Start
HP Photosmart 8700 series
Page 2
打开 HP Photosmart 打印机的包装
1
Unpack the HP Photosmart printer
a
i
h
g
f
b
c
d
e
简体中文
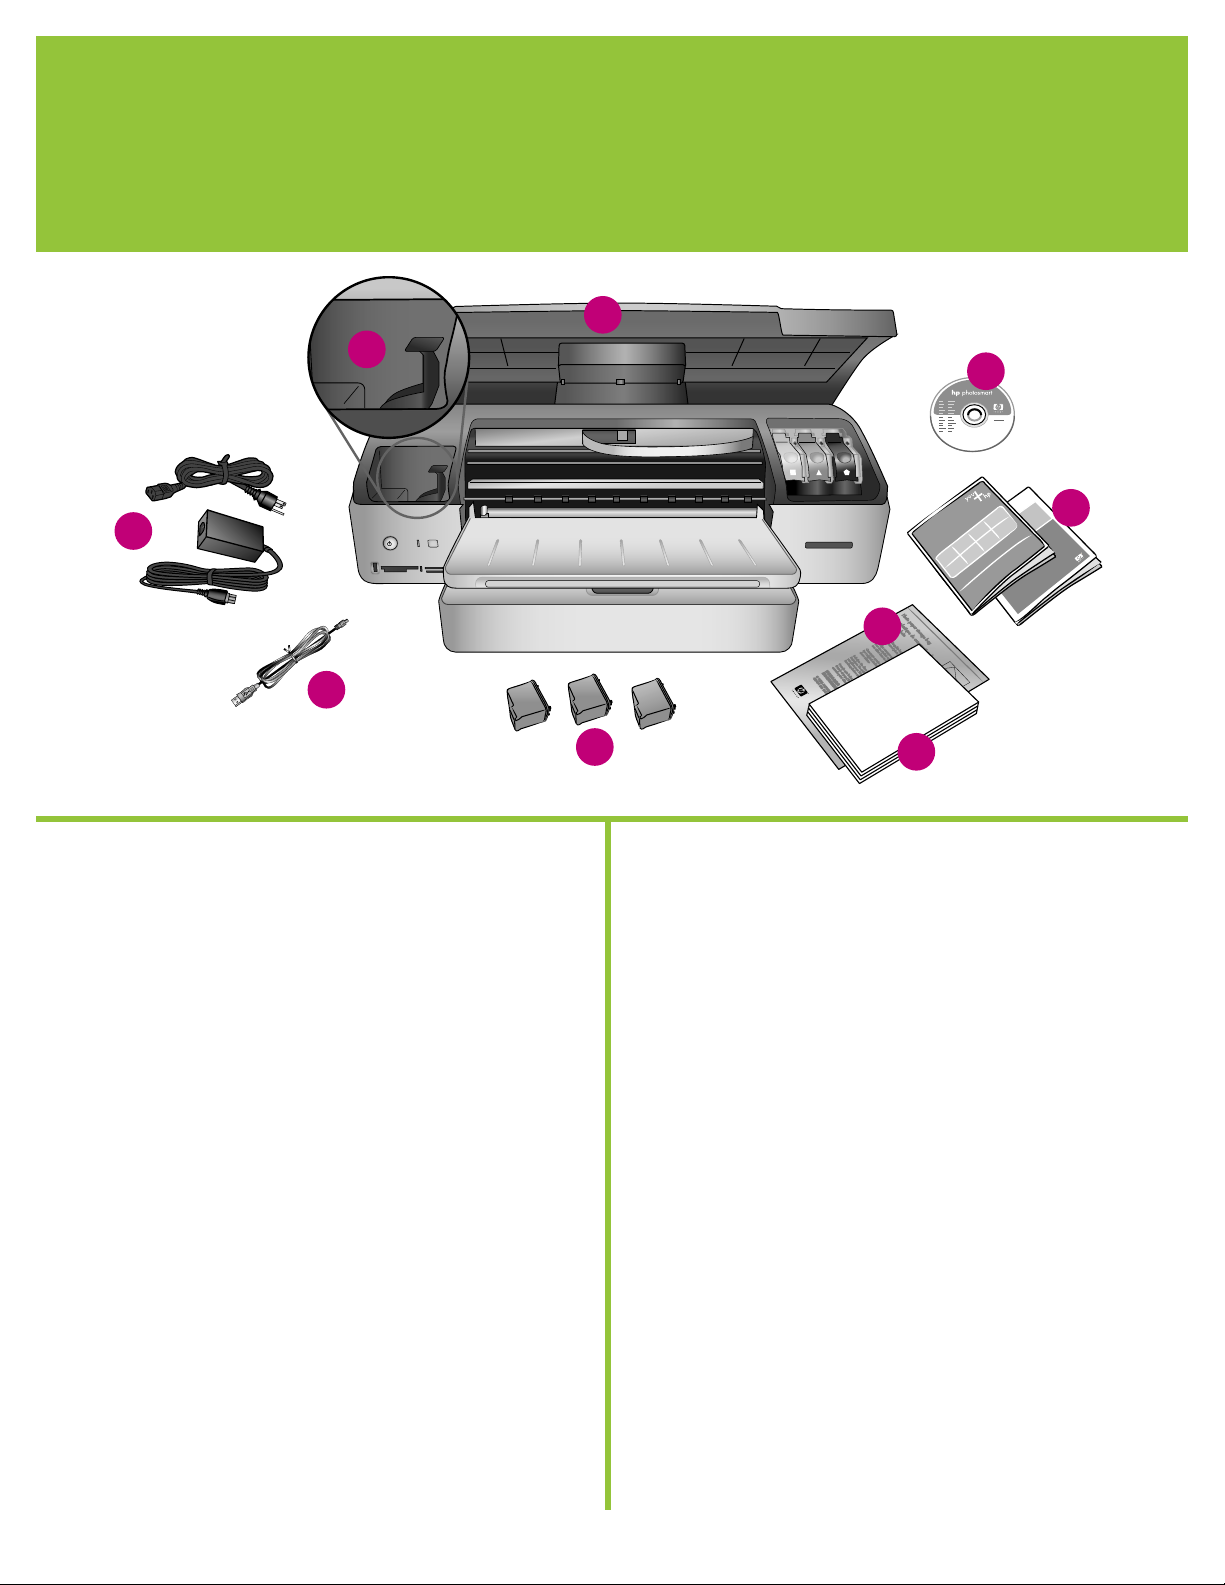
感谢您购买 HP Photosmart 打印机!请仔细阅读本册子和其他附随的
文档来帮助您开始使用您的打印机以及获得打印机的最佳性能。
1. 除去打印机上的包装胶带及纸板。
2. 检查包装箱内的物品:
a. HP Photosmart 8700 series 打印机
b. HP Photosmart 软件 CD
c. 用户文档
d. 相片纸储存袋
e. 纸张样品
f. 打印墨盒
g. USB 电缆
h. 电源和电源适配器
i. 打印墨盒保护器
English
Thank you for purchasing an HP Photosmart printer! Read this
booklet and other accompanying documentation to help you get
started and get the most out of your printer.
1. Remove the tape and cardboard packaging from inside and
around the printer.
2. Check the contents of the box:
a. HP Photosmart 8700 series printer
b. HP Photosmart software on CD
c. User documentation
d. Photo paper storage bag
e. Paper sampler
f. Print cartridges
g. USB cable
h. Power supply and power adapter
i. Print cartridge protector
2
Page 3
接通电源、设置语言
2
Connect the power and set your language
c
b
a
简体中文
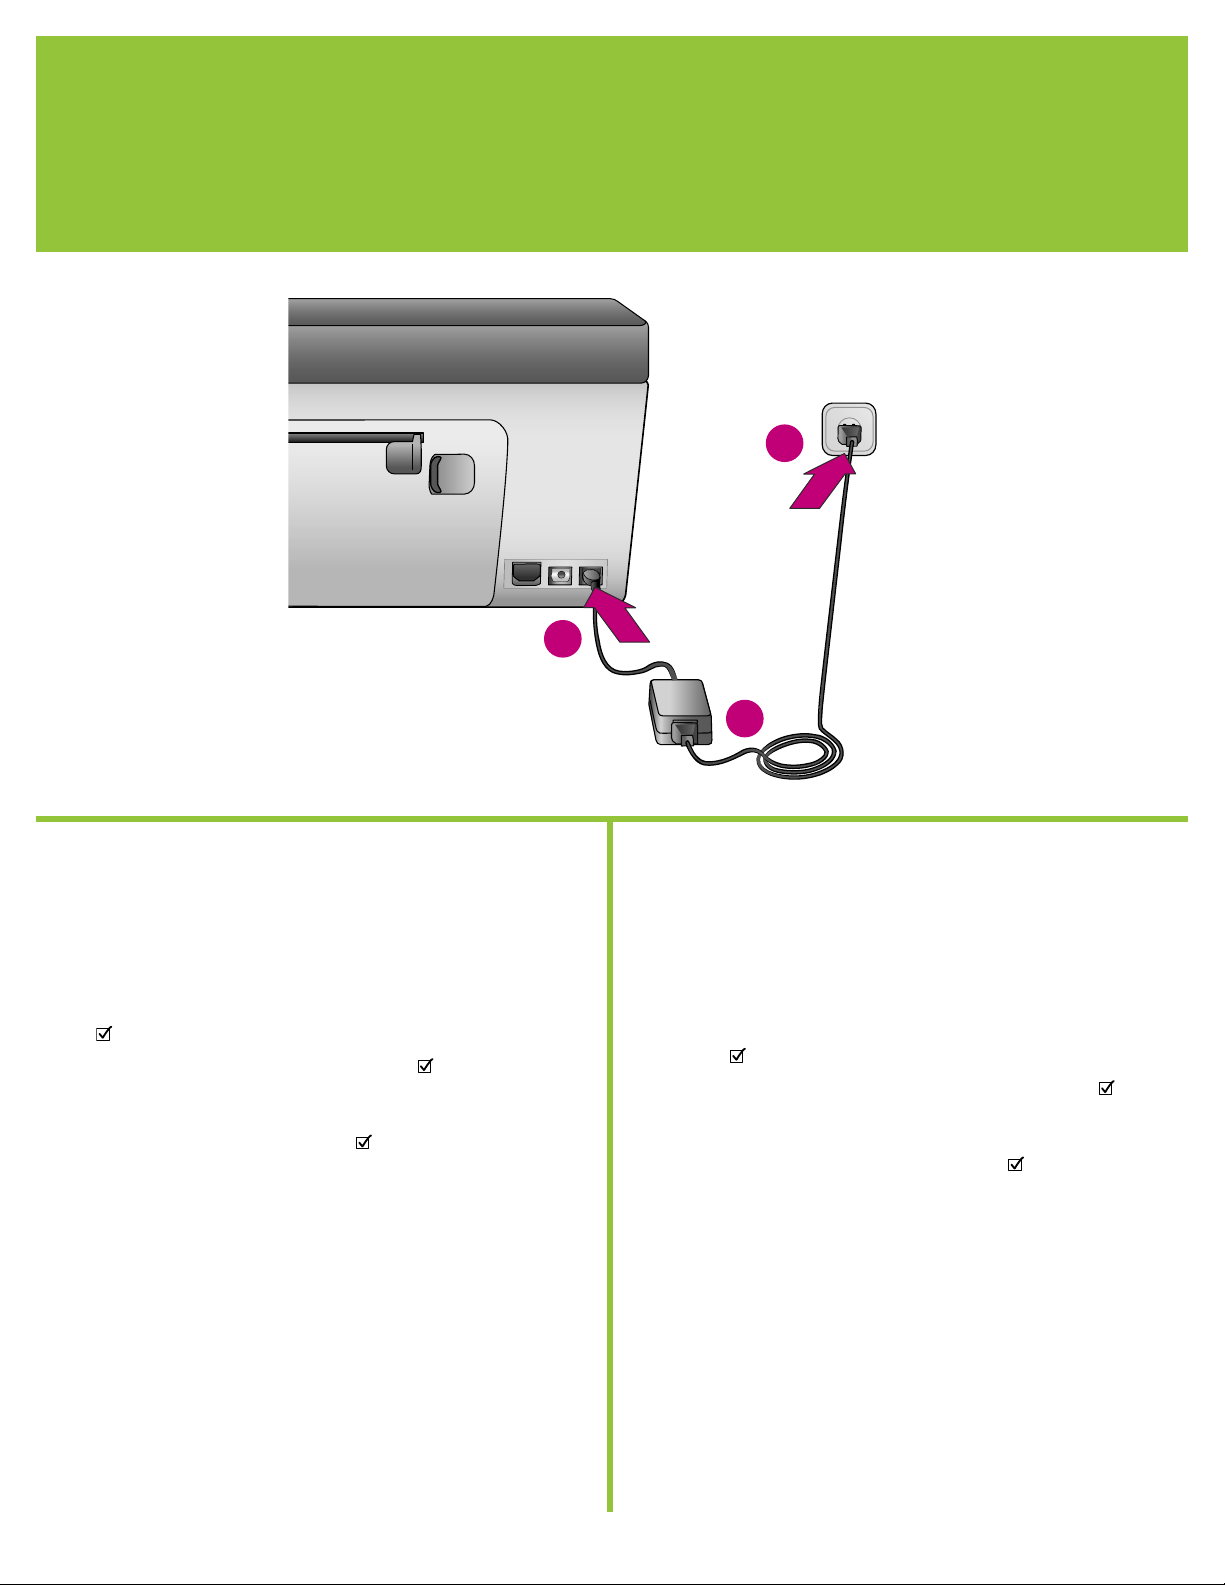
1. 将电源线连接到打印机和墙上插座。
重要!软件安装期间,请勿在没有提示的情况下连接 USB 电缆。
2. 打开打印机电源。
3. 打印机屏幕上出现“Select Language”(选择语言)时,按 或
以突出显示您的语言。
4. 按下 以选择您的语言。
5. 按或以突出显示“Yes”(是),然后按下 。确认屏幕将会
出现。
6. 打印机屏幕上出现“Select Country/Region”(选择国家/地区)
时,突出显示您的国家/地区,然后按下 。确认屏幕将会出现。
English
1. Connect the power cord to the printer and to a wall outlet.
Important! Do not connect the USB cable until you are prompted
during software installation.
2. Turn on the printer.
3. When Select Language appears on the printer screen, press
or to highlight your language.
4. Press to select your language.
5. Press or to highlight Yes to confirm, then press . A
confirmation screen appears.
6. When Select Country/Region appears on the printer screen,
highlight your country/region, then press . A confirmation
screen appears.
3
Page 4
装入普通纸
3
Load plain paper
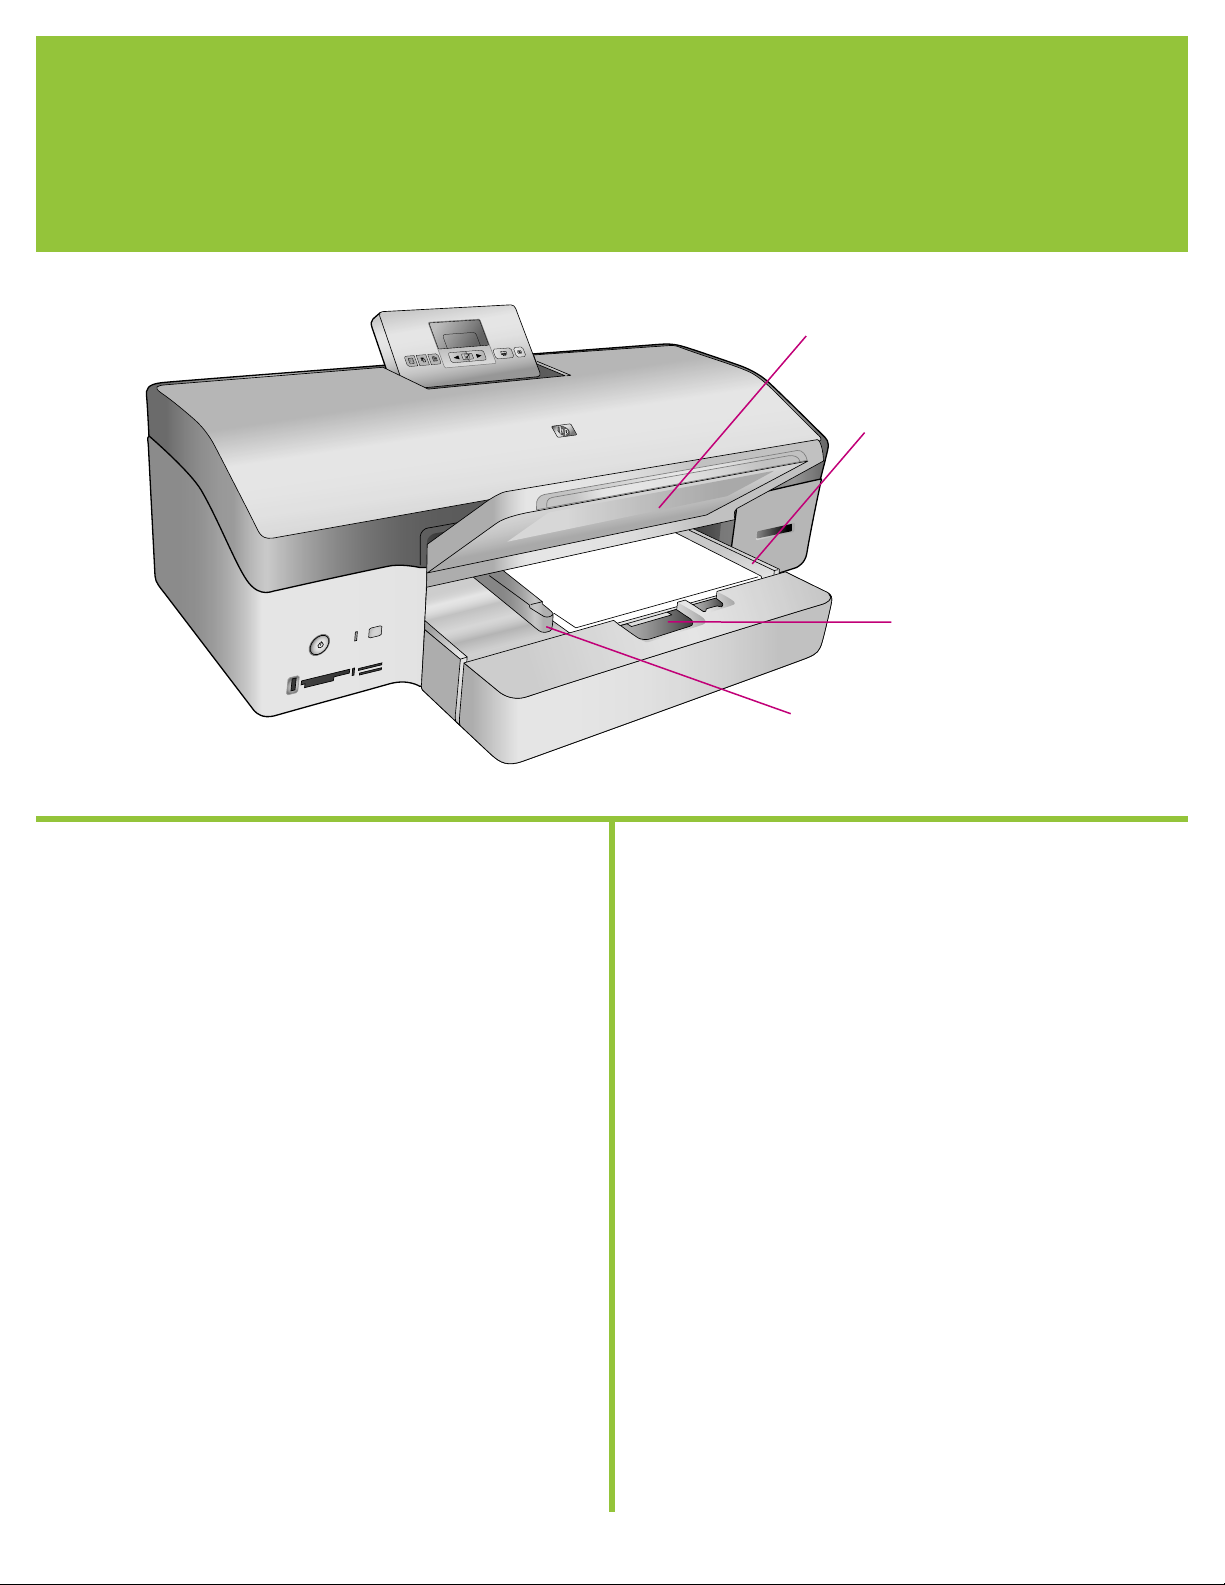
输出纸盘
Output tray
主纸盘
Main tray
主纸盘释放杆
Main tray release
纸张宽度导板
Paper-width guide
简体中文
将普通纸装入主纸盘以准备校准打印墨盒。
1. 抬起输出纸盘,然后将纸张宽度导板和主纸盘释放杆滑到它们最远
的位置。
2. 将一叠普通 letter 纸(约 50 张)装入主纸盘。
3. 将纸张宽度导板和主纸盘释放杆向内滑入直到它们停止在纸张的边
缘。
4. 放下输出纸盘。
有关装入相片纸和打印相片的信息,请参阅《用户指南》。
English
Load plain paper in the Main tray in preparation for print cartridge
alignment.
1. Raise the Output tray and slide the paper-width guide and Main
tray release to their outermost positions.
2. Place a stack of plain letter paper (approximately 50 sheets) in
the Main tray.
3. Slide the paper-width guide and Main tray release inward until
they stop at the edges of the paper.
4. Lower the Output tray.
For information about loading photo paper and printing photos,
see the User's Guide.
4
Page 5
安装打印墨盒
4
Install the print cartridges
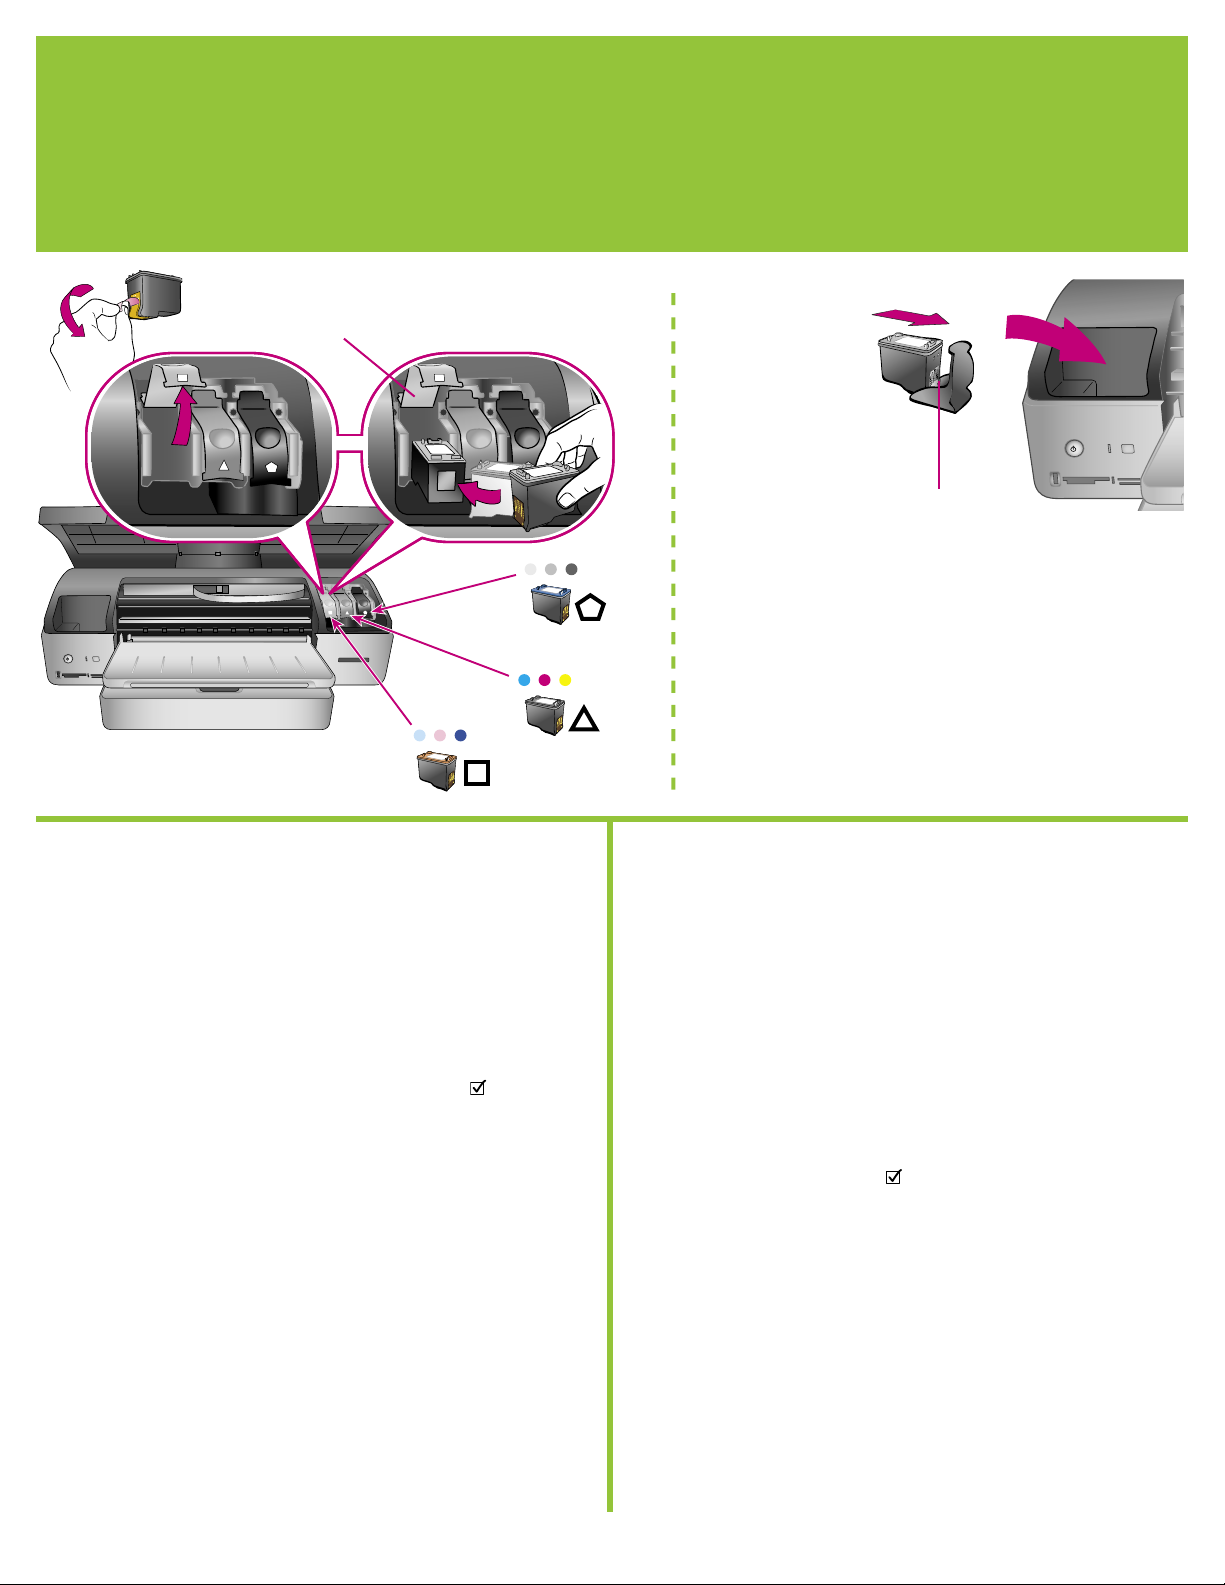
打印墨盒闩锁
Print cartridge latch
打印墨盒和保护器*
Print cartridge and protector*
安装打印墨盒时,请用墨盒和墨盒闩锁上的符号来比配墨盒类型。
When installing print cartridges, use the symbols on the cartridge and
cartridge latch to match up cartridge types.
简体中文
1. 抬起打印机的顶盖,向下推打印墨盒闩锁,然后向外拉。
2. 打开蓝色照片打印墨盒的包装,然后拉起粉色标签,撕掉透明胶
带。请勿触摸墨水喷嘴或铜色触点面。
3. 拿住墨盒,使铜色触点面先进入打印机。将墨盒推入金属棒下面的
底座左侧。推墨盒,直到卡入到位。
4. 向下推墨盒闩锁,直到锁住为止。
5. 重复执行这些程序以安装三色和灰色打印墨盒。
6. 放下顶盖。当打印机屏幕提示您打印校准页时,请按下 。
7. 安装软件以继续设置打印机。选择第 6-11 页上的其中一个选项以
在 Macintosh 或 Windows 计算机上设置以太网或 USB 连接。
* 不使用可选打印墨盒时将它存放在保护器中。有关您的打印机可用
的可选打印墨盒的信息,请参阅《用户指南》。
English
1. Raise the printer's top cover, and push down and pull out the
print cartridge latch.
2. Unwrap the Blue Photo print cartridge, and pull the pink tab to
remove the clear tape. Do not touch the ink nozzles or copper-
colored contacts.
3. Hold the cartridge so the copper-colored contacts go into the
printer first. Slide the cartridge into the left side of the cradle
under the metal bar. Push the cartridge until it snaps into place.
4. Push down on the cartridge latch until it locks.
5. Repeat this process to install the Tri-color and Gray Photo print
cartridges.
6. Lower the top cover. Press on the control panel when the
printer screen prompts you to print an alignment page.
7. Install the software to continue setting up the printer. Choose
one of the options on pages 6–11 to set up an Ethernet or USB
connection on a Macintosh or Windows computer.
* Store an optional print cartridge in the protector when not in
use. See the User’s Guide for information about optional print
cartridges that are available for your printer.
5
Page 6

M a
c
in to s
h
以太网软件安装 (Macintosh)
5
Ethernet software installation (Macintosh)
仅限于 Macintosh
简体中文
Macintosh® OS X v10.1.5-v10.3
关于 Macintosh USB 的安装详情,请参阅第 10 页。
注:将《用户指南》的“联网”附录随时准备好以便在安装期间作为
参考。
要将打印机连接到网络,您需要以下设备:
• 一条带 RJ-45 插头的 5 类以太网电缆。(它与 USB 电缆或一般的
电话线不一样,使用后者的任何一种将会损坏打印机或其他网络设
备。)
• 网络接入设备(如带开放端口的集线器、路由器或交换器)。
连接网络电缆
1. 将以太网电缆的一端连接到打印机的背面。
2. 将以太网电缆的另一端连接到集线器、路由器或交换器上的空闲端
口。
请勿使用以太网电缆将打印机直接连接到计算机。不支持对等网络连
接。
打印网络配置页
按照《用户指南》的“联网”附录的说明打印网络配置页。 在软件安
装期间您可能需要用到该页显示的信息。
安装打印机软件
您必须在每一台要打印至 HP Photosmart 打印机的计算机上安装软件。
1. 将 HP Photosmart CD 放入计算机,然后连按桌面上的 HP
Photosmart CD 图象。
2. 连按“HP Photosmart Installer”(HP Photosmart 安装器)图象,
然后按照屏幕说明进行操作。
3. 输入鉴定名称和密码,然后点按“好”。
4. 按照屏幕说明进行操作。当 HP Photosmart 安装器窗口显示时,点
按“Install”(安装)。
5. 在选择设备窗口中,选择“TCP/IP (Network)”(TCP/IP(网
络))。安装器将会搜索网络上的打印机。
如果未找到打印机:
• 确定已将网络电缆连接到打印机。
• 查找在网络配置页上列出的 IP 地址。
• 点按“Find”(查找),输入 IP 地址,然后点按“Save”(保
存)。
6. 选择 HP Photosmart 8700 series 打印机,然后点按“Utilities”(实
用程序)。注册打印机。
7. 在“打印”对话框中选择打印机。 如果该打印机没有显示,请选
择“Edit Printer List”(编辑打印机列表)以添加该打印机。
8. 在“打印机列表”窗口中,点按“添加”,然后从下拉列表选
择“Rendezvous”。
9. 从列表选择打印机,然后点按“添加”。
6
Page 7

Macintosh only
English
Macintosh® OS X v10.1.5–v10.3
For Macintosh USB installation, see page 10.
Note: Keep the Networking appendix of the User's Guide nearby
to use as a reference during installation.
You need the following to connect the printer to the network:
• A CAT-5 Ethernet cable with an RJ-45 plug. (This is not the same
as a USB cable or a regular phone wire, the use of which can
damage the printer or other network devices.)
• A network access point such as a hub, router, or switch with an
open port.
Connect the network cable
1. Connect one end of the Ethernet cable to the back of the printer.
2. Connect the other end of the Ethernet cable to an empty port on
the hub, router, or switch.
Do not connect the printer directly to a computer using an Ethernet
cable. Peer-to-peer networking is not supported.
Print a network configuration page
Follow the instructions in the Networking appendix of the User's
Guide to print a network configuration page. You may need the
information on that page during software installation.
Install the printer software
You must install the software on every computer that will print to the
HP Photosmart printer.
1. Insert the HP Photosmart CD into the computer, then double-click
the HP Photosmart CD icon on the desktop.
2. Double-click the HP Photosmart Installer icon, and follow the
onscreen instructions.
3. Enter the Authentication Name and Password, and click OK.
4. Follow the onscreen instructions. When the HP Photosmart
Installer window appears, click Install.
5. In the Select Device window, choose TCP/IP (Network). The
installer searches for printers on the network.
If the printer is not found:
• Make sure the network cable is connected to the printer.
• Locate the IP address listed on the network configuration
page.
• Click Find, enter the IP address, and click Save.
6. Choose the HP Photosmart 8700 series printer, then click
Utilities. Register the printer.
7. Select the printer in the Print dialog box. If the printer does not
appear, select Edit Printer List to add the printer.
8. In the Printer List window, click Add, and select Rendezvous from
the drop-down list.
9. Select the printer from the list, then click Add.
7
Page 8

W
in do ws
以太网软件安装 (Windows)
5
Ethernet software installation (Windows)
仅限于 Windows
简体中文
Windows® 98、Me、2000 Professional、XP Home、XP Professional
关于 Windows USB 的安装详情,请参阅第 11 页。
注:将《用户指南》的“联网”附录随时准备好以便在安装期间作为
参考。
要将打印机连接到网络,您需要以下设备:
• 一条带 RJ-45 插头的 5 类以太网电缆。(它与 USB 电缆或一般的
电话线不一样,使用后者的任何一种将会损坏打印机或其他网络设
备。)
• 网络接入设备(如带开放端口的集线器、路由器或交换器)
连接网络电缆
1. 将以太网电缆的一端连接到打印机的背面。
2. 将以太网电缆的另一端连接到集线器、路由器或交换器上的空闲端
口。
请勿使用以太网电缆将打印机直接连接到计算机。不支持对等网络连
接。
打印网络配置页
按照《用户指南》的“联网”附录的说明打印网络配置页。 在软件安
装期间您可能需要用到该页显示的信息。
安装打印机软件
您必须在每一台要打印至 HP Photosmart 打印机的计算机上安装软件。
1. 将 HP Photosmart 软件 CD 放入计算机然后按照屏幕上的说明进行
操作。
2. 在连接类型屏幕上,选择“Through the network”(通过网络),
然后单击“Next”(下一步)。“搜索”屏幕将会出现。
3. 选择打印机以进行安装:
如果出现“Printer Found”(找到打印机)屏幕,选择“Yes”
(是),安装此打印机,然后单击“Next”(下一步)。
如果出现“Printer Not Found”(找不到打印机)屏幕,单
击“Next”(下一步)然后按照屏幕上的说明查找打印机。
如果出现“Check Cable Connection”(检查电缆连接)屏幕,请参
阅《用户指南》的“联网”附录以获得详细的网络安装说明以及指
定静态 IP 地址的说明。
4. 出现提示时,单击“Finish”(完成)以退出安装。
8
Page 9

Windows only
English
Windows® 98, Me, 2000 Professional, XP Home, XP Professional
For Windows USB installation, see page 11.
Note: Keep the Networking appendix of the User's Guide nearby
to use as a reference during installation.
You need the following to connect the printer to the network:
• A CAT-5 Ethernet cable equipped with an RJ-45 plug. (This is
not the same as a USB cable or a regular phone wire, the use of
which can damage the printer or other network devices.)
• A network access point such as a hub, router, or switch with an
open port.
Connect the network cable
1. Connect one end of the Ethernet cable to the back of the printer.
2. Connect the other end of the Ethernet cable to an empty port on
the hub, router, or switch.
Do not connect the printer directly to a computer using an Ethernet
cable. Peer-to-peer networking is not supported.
Print a network configuration page
Follow the instructions in the Networking appendix of the User's
Guide to print a network configuration page. You may need the
information on that page during software installation.
Install the printer software
You must install the software on every computer that will print to the
HP Photosmart printer.
1. Insert the HP Photosmart software CD into the computer and
follow the onscreen instructions.
2. On the Connection Type screen, select Through the network,
then click Next. The Searching screen appears.
3. Select a printer to install:
If the Printer Found screen appears, select Yes, install this printer
and click Next.
If the Printer Not Found screen appears, click Next and follow
the onscreen instructions to locate the printer.
If the Check Cable Connection screen appears, refer to the
Networking appendix of the User's Guide for detailed network
installation instructions and for instructions on assigning a static
IP address.
4. When prompted, click Finish to exit the installation.
9
Page 10

M a
c
in to s
h
USB 软件安装 (Macintosh)
5
仅限于 Macintosh Macintosh only
简体中文
Macintosh® OS X v10.1.5-v10.3
关于 Macintosh 以太网的安装详情,请参阅第 6-7 页。
重要!请勿连接 USB 电缆直到以下的步骤 4 中提示您这么做。
1. 将 HP Photosmart CD 放入计算机。
2. 连按桌面上的 HP Photosmart CD 图象。
3. 连按“HP Photosmart Installer”(HP Photosmart 安装器)图象。
按照屏幕说明进行操作。
4. 当HP 安装助手的选择设备屏幕出现时,将 USB 电缆连接到计算机
和打印机。
5. 点按“Rescan USB”(重新扫描 USB)。
6. 当您的设备名称出现在设备列表中时,点按“Next”(下一步)。
7. 点按“Finish”(完成)。
8. 出现祝贺屏幕时,点按“Finish”(完成)。“HP 注册页”会在您
的浏览器中打开。
注:如果您在安装期间遇到问题,请参阅第 12 页的“故障排除”。
USB software installation (Macintosh)
English
Macintosh® OS X v10.1.5–v10.3
For Macintosh Ethernet installation, see pages 6–7.
Important! Do not connect the USB cable until you are prompted in
step 4 below.
1. Insert the HP Photosmart CD into the computer.
2. Double-click the HP Photosmart CD icon on the desktop.
3. Double-click the HP Photosmart Installer icon. Follow the
onscreen instructions.
4. When the HP Setup Assistant Select Device screen appears,
connect the USB cable to the computer and to the printer.
5. Click Rescan USB.
6. When your device name appears in the device list, click Next.
7. Click Finish.
8. When the Congratulations screen appears, click Done. The
HP Registration page opens in your browser.
Note: If you experience problems during installation, see
Troubleshooting on page 13.
USB 连接
USB connection
10
Page 11

W
in do ws
USB 软件安装 (Windows)
5
USB software installation (Windows)
仅限于 Windows Windows only
简体中文
Windows® 98、Me、2000 Professional、XP Home、XP Professional
关于 Windows 以太网的安装详情,请参阅第 8-9 页。
重要!请勿连接 USB 电缆直到提示您这么做。
1. 将 HP Photosmart CD 放入计算机然后按照屏幕上的说明进行操作。
如果没出现指示,请查找并双击 CD 上的 setup.exe 文件。
2. 选择安装类型。“Minimum”(最低)安装包含您的打印机需要的
设备驱动程序和软件。“Typical”(典型)安装包含可用来查看、
编辑、管理和共享图像的 HP Image Zone 软件。
3. 出现提示时,连接 USB 电缆。 可能需要几分钟的时间复制文件,
而在旧的系统上可能需时更久。
4. 出现祝贺页面时,单击“Print a demo page”(打印演示页)。
注:如果您在安装期间遇到问题,请参阅第 12 页的“故障排除”。
English
Windows® 98, Me, 2000 Professional, XP Home, XP Professional
For Windows Ethernet installation, see pages 8–9.
Important! Do not connect the USB cable until you are prompted.
1. Insert the HP Photosmart CD into the computer and follow the
onscreen instructions. If instructions do not appear, locate and
double-click the setup.exe file on the CD.
2. Choose the installation type. The Minimum installation includes
device drivers and the software required by your printer. The
Typical installation includes the HP Image Zone software for
viewing, editing, managing, and sharing images.
3. When prompted, connect the USB cable. It may take several
minutes to copy files and possibly longer on older systems.
4. When the Congratulations page appears, click Print a demo
page.
Note: If you experience problems during installation, see
Troubleshooting on page 13.
USB 连接
USB connection
11
Page 12

软件安装故障排除
Installation troubleshooting
简体中文
如果打印机软件安装失败,或安装软件后打印机与计算机无法正常通
信,请在此页寻找解决方案。
请检查打印机与计算机之间的所有电缆连接,并确保所用的打印机软
件为最新版本。您可以浏览 HP 的支持网站:www.hp.com/support 以
获得最新的软件更新。
如果仍需帮助,请查看打印机文档或联系 HP 客户服务中心。
仅限于 Macintosh
问题:安装打印机软件后,“Print Center”(打印中心)内的所有打
印机消失。
解决方案:卸载然后重新安装打印机软件。将打印机添加到“Print
Center”(打印中心)前先重新启动计算机。
仅限于 Windows
问题:放入 CD 时安装软件没有自动启动。
解决方案:从 Windows“开始”菜单,选择“运行”。 选择“浏
览”,然后浏览到您放入 HP Photosmart 软件 CD 的 CD 驱动器。 双
击 setup.exe 文件。
问题:计算机在软件安装过程中停止响应。
解决方案:可能是由于后台正在运行防毒软件或其他软件程序,因此
减慢了安装进度。等待软件完成文件复制,此过程可能会占用几分
钟。如果几分钟过后,计算机仍没有响应,请重新启动计算机,然后
暂停或禁用所有运行中的防毒软件,并退出其他所有软件程序,再重
新安装打印机软件。注:计算机重启后,防毒软件会自动重新打开。
Windows 和 Macintosh
问题:系统要求对话框在安装过程中出现。
解决方案:计算机系统的其中一个组件不符合最低系统要求。 升级该
组件以使之达到最低系统要求,然后重新安装打印机软件。
问题:计算机不能读取 HP Photosmart CD。
解决方案:确保 CD 没有污迹或划痕。 如果其他 CD 均能正常工作,
只有 HP Photosmart CD 例外,则该 CD 可能已损坏。您可以要求 HP
客户服务中心更换一张新的 CD。如果其他 CD 也不能工作,则可能需
要维修 CD 驱动器。
问题:“Found New Hardware Wizard”(找到新硬件向导)成功打
开但未能识别打印机。
解决方案:您可能在完成软件安装前连接 USB 电缆。 拔下 USB 电
缆。将软件 CD 放入您的 CD 驱动器,然后按照屏幕上的说明进
行操作。若未出现指示,请查找并双击 CD 上的 setup.exe 文件
以重新启动安装。 如果出现一则信息说明软件已成功安装,请选
择“Uninstall”(卸载),然后按照说明重新安装软件。 只有在软件
安装过程中出现相应提示时才重新连接 USB 电缆。
问题:系统要求的检查指出,计算机运行的 Internet Explorer 版本已
过时。
解决方案:按下键盘上的 Ctrl + Shift,然后在系统要求对话框中单击
Cancel(取消)以略过该提示并完成软件安装。安装 HP Photosmart 软
件后必须立即更新 Internet Explorer,否则 HP 软件将不能正常工作。
注:更新 Internet Explorer 后,不必重新安装 HP 软件。
12
Page 13

English
If the printer software did not install successfully, or if the printer
and computer are not communicating properly after software
installation, check this page for possible solutions.
Check all cable connections between the printer and computer,
and be sure you are using the most recent version of the printer
software. You can acquire the latest software updates by visiting
HP's support Web site at www.hp.com/support. If you still need
help, check the printer documentation or contact HP Customer
Care.
Macintosh only
Problem: All of the printers in Print Center disappear after printer
software installation.
Solution: Uninstall then reinstall the printer software. Restart the
computer before adding the printer in Print Center.
Windows only
Problem: The computer stops responding during software
installation.
Solution: Virus protection software or another software program
may be running in the background and slowing down the
installation process. Wait while the software finishes copying files;
this may take several minutes. If the computer is still not responding
after several minutes, restart the computer, pause or disable any
active virus protection software, quit all other software programs,
and then reinstall the printer software. Note: Your virus protection
software will turn back on automatically when you restart the
computer.
Windows and Macintosh
Problem: The System Requirements dialog box appears during
installation.
Solution: A component of the computer system does not meet
minimum system requirements. Upgrade the component to the
minimum system requirement and then reinstall the printer software.
Problem: The installation software does not start automatically
when the CD is inserted.
Solution: From the Windows Start menu, select Run. Click Browse,
and navigate to the CD drive where you inserted the HP Photosmart
software CD. Double-click the setup.exe file.
Problem: The Found New Hardware Wizard opens but does not
recognize the printer.
Solution: You may have connected the USB cable before
completing the software installation. Disconnect the USB cable.
Insert the software CD into your CD drive, and follow the onscreen
instructions. If instructions do not appear, locate and double-click
the setup.exe file on the CD to restart the installation. If a message
appears saying the software has already been successfully
installed, then select Uninstall, and follow the instructions to reinstall
the software. Reconnect the USB cable only when prompted during
software installation.
Problem: The system requirements check indicates that the computer
is running an outdated version of Internet Explorer.
Solution: Press Ctrl + Shift on the keyboard and click Cancel in
the System Requirements dialog box to bypass the block and
complete the software installation. You must update Internet
Explorer immediately after installing the HP Photosmart software,
or the HP software will not work properly. Note: You do not have to
reinstall the HP software after updating Internet Explorer.
Problem: The computer could not read the HP Photosmart CD.
Solution: Make sure the CD is not dirty or scratched. If other
CDs work but the HP Photosmart CD does not, you may have a
damaged CD. You can request a new CD from HP Customer Care.
If other CDs do not work, you may need to service the CD drive.
13
Page 14

数码摄影
Digital photography
简体中文
常见问题集
您的 HP 软件提供可改进照片质量的高级颜色管理选项。或者,您可以关
闭这些选项来让您的照片编辑软件管理颜色。
有关颜色管理的详细信息,请参阅《用户指南》。
我如何打开打印机软件中的颜色管理设置?
打开您要打印的文件。
Windows:选择“文件”>“打印”,在“打印”对话框中单击“属
性”,然后单击“Color”(颜色)选项卡。 从“Color Management”
(颜色管理)菜单选择一个设置。
Macintosh:选择“文件”>“打印”,然后在打印驱动程序窗口中选
择“Paper Type/Quality”(纸张类型/质量)。 点按“Paper”(纸张)
选项卡,然后从“Color”(颜色)菜单选择一个设置。
我如何关闭打印机软件中的颜色管理设置?
若要获得最高等级的颜色控制,请关闭打印机软件中的颜色管理设置,然
后让您的应用程序来处理颜色管理。
Windows:选择“文件”>“打印”,在打印对话框中单击“属性”,然
后单击“Color”(颜色)选项卡。 从“Color Management”
(颜色管理)菜单选择“Managed by Application”(由应用程序管
理)。
Macintosh:选择“文件”>“打印”,然后在打印驱动程序窗口中选
择“Paper Type/Quality”(纸张类型/质量)。 点按“Paper”(纸张)
选项卡,然后从“Color”(颜色)菜单选择“Application Managed
Colors”(由应用程序管理的颜色)。
English
Frequently Asked Questions
Your HP software offers advanced color management options to
improve photo quality. Or, you can turn these options off to let your
photo-editing software manage colors.
For more information about color management, see the User’s Guide.
How do I turn on the color management settings in the printer
software?
Open the file you want to print.
Windows: Select File>Print, click Properties in the Print dialog box,
then click the Color tab. Choose a setting from the Color management
menu.
Macintosh: Select File>Print, then select Paper Type/Quality in the
print driver window. Click the Paper tab, then choose a setting from
the Color menu.
How do I turn off the color management settings in the printer
software?
For the greatest level of color control, turn off color management
settings in the printer software and let your application handle color
management.
Windows: Select File>Print, click Properties in the Print dialog box,
then click the Color tab. Choose Managed by Application from the
Color management menu.
Macintosh: Select File>Print, then select Paper Type/Quality in the
print driver window. Click the Paper tab, then choose Application
Managed Colors from the Color menu.
我如何打印出专业质量的黑白照片?
在灰度模式中打印可获得专业质量的黑白照片。 要获得最佳效果,请确
定您使用 HP 灰色照片打印墨盒以及正确的纸张类型。
14
How do I print professional-quality black-and-white photos?
Print in Grayscale mode for professional-quality black-and-white
photos. Be sure to use the HP Gray Photo print cartridge and the
correct paper type for optimal results.
Page 15

剪贴簿和工艺品
Scrapbooking and crafts
简体中文
常见问题集
您的 HP 打印机和软件提供无边框照片打印、大幅面模板,以及其他布局
选项来满足您的创意需要。
有关详情,请参阅《用户指南》。
我如何从打印机控制面板打印无边框照片?
插入含照片的存储卡,然后选择要打印的照片。 在打印机控制面板上,
按下“Layout”(布局)按钮选择“每页一张照片,无边框”图标,然后
按下“Print”(打印)。
有关如何从您的 Windows 或 Macintosh 计算机打印无边框照片的说明,
请参阅《用户指南》。
我如何选择大幅面模板?
大幅面模板包含一个全白的背景以及许多固定的照片框,您可以将照片拖
放到这些框中。照片框会自动裁剪照片。您可以在照片框中调整照片的大
小并移动它们。
Windows:在 HP Image Zone 中的“Projects”(项目)选项卡上,单
击“Album Pages”(相册页)。在工作区,单击一个页面尺寸和主题,
然后单击大幅面模板。从“My Images”(我的图像)选项卡选择照片,
然后将每张照片从选择托盘拖动到模板中所需的照片框内。
Macintosh:从 Dock 内的 HP Photosmart 菜单选择“HP Image Print”
(HP 图像打印)。在“Print Style”(打印样式)菜单中选择“Album
Page”(相册页)。点按选择模板箭头以选择大幅面模板。点按“+”按
钮将相片添加到“Drawer”(抽屉)(如果没有看到 Drawer,请点
按“Drawer”)。将每张照片从“Drawer”(抽屉)拖动到模板中所需
的照片框内。
English
Frequently Asked Questions
Your HP printer and software offer borderless photo printing, largeformat templates, and other layout options to meet your creative
needs.
For more information, see the User’s Guide.
How do I print a borderless photo from the printer control panel?
Insert a memory card with photos, then choose a photo to print. On
the printer control panel, press the Layout button to select the One
photo per sheet, borderless icon, then press Print.
See the User's Guide to find out how to print borderless photos from
your Windows or Macintosh computer.
How do I choose a large-format template?
Large-format templates consist of a plain white background with
fixed picture holders into which you can drag photos. Photos are
automatically cropped by the picture holders. You can resize the
photos and move them around within the picture holder.
Windows: On the Projects tab in HP Image Zone, click Album Pages.
In the Work area, click a page size and a theme, then click a largeformat template. Select photos from the My Images tab, then drag
each photo from the selection tray into the desired photo holder in the
template.
Macintosh: Choose HP Image Print from the HP Photosmart Menu in
the Dock. Choose Album Page in the Print Style menu. Click the Select
Template arrows to select a large-format template. Add photos to the
Drawer by clicking the + button (if the Drawer is not visible, click the
Drawer button). Drag each photo from the Drawer onto the desired
photo holder in the template.
15
Page 16

需要更多信息?
Need more information?
请阅读《用户指南》以获得关于打印机功能的说明、软件和硬件的故障排除信息,以及如何使用您的全新
HP Photosmart 打印机执行特殊打印任务的说明。
Read the User's Guide for a description of the printer features, software and hardware troubleshooting
information, and explanations of how to perform specific printing tasks using your new HP Photosmart
printer.
查阅“屏幕上的 Photosmart 帮助”以获得打印机随附软件的使用信息。
Check the Onscreen Photosmart Help for information about using the software that came with your
printer.
让 HP 的得奖支持与服务,为您提供每周 7 天,每天 24 小时开放的在线和电话援助。
HP 支持网站与电子支持:www.hp.com/support
介质与打印耗材:www.hpshopping.com
Let HP's award-winning support and services show you the way with assistance online or over the phone,
24 hours a day, 7 days a week.
HP support Web site and E-support: www.hp.com/support
Media and printing supplies: www.hpshopping.com
www.hp.com
*Q5745-90171*
*Q5745-90171*
Q5745-90171
新加坡印刷,2005 年 1 月 • 1.0.1 版
© 2005 年 Hewlett-Packard Development Company, L.P.
Printed in Singapore 1/05 • v1.0.1
© 2005 Hewlett-Packard Development Company, L.P.
 Loading...