Page 1
HP 85062A
3.5 mm
Electronic Calibration Kit
Operating and Service Manual
SERIAL
This manual applies directly to any HP 85062A Calibration Kit
having serial prefix US3444 and above.
HEWLETT
PACKARD
HP Part Number:
Printed in USA
First Edition
0
Copyright 1995 Hewlett-Packard Company
85062-90001
1995
NUMBERS
Page 2

CERTIFICATION
Hewlett-Packard Company certifies that this product met its published specifications at the time of
shipment from the factory. Hewlett-Packard further certifies that its calibration measurements are
traceable to the United States National Institute of Standards and Technology (NIST, formerly NBS), to
the extent allowed by the institutes calibration facility, and to the calibration facilities of other
International Standards Organization members.
WARRANTY
This Hewlett-Packard instrument product is warranted against defects in material and workmanship for
a period of one year from date of delivery. During the warranty period, Hewlett-Packard will, at its
option, either repair or replace products which prove to be defective. For warranty service or repair, this
product must be returned to a service facility designated by HP. Buyer shall prepay shipping charges
HP and HP shall pay all shipping charges to return the product to Buyer. However, Buyer shall pay all
shipping charges, duties, and taxes for products returned to HP from another country. HP warrants that
its software and firmware designated by HP for use with an instrument will execute its programming
instructions when properly installed on that instrument. HP does not warrant that the operation of the
instrument, or software, or firmware will be uninterrupted or error free.
LIMITATION OF WARRANTY
to
I
The foregoing warranty shall not apply to defects resultin,
Buyer-supplied software or interfacing, unauthorized modification or misuse, operation outside of the
environmental specifications for the product, or improper site preparation or maintenance.
NO OTHER WARRANT
IMPLIED WARRANTIE
PURPOSE. EXCLUSIVE REMEDIES THE REMEDIES PROVIDED HEREIN ARE BUYER’S
SOLE AND EXCLUSIVE REMEDIES. HP SHALL NOT BE LIABLE FOR ANY DIRECT,
INDIRECT, SPECIAL, INCIDENTAL, OR CONSEQUENTIAL DAMAGES, WHETHER BASED
ON CONTRACT, TORT, OR ANY OTHER LEGAL THEORY.
Y IS EXPRESSED OR IMPLIED. HP SPECIFICALLY DISCLAIMS THE
S
OR MERCHANTABILITY AND FITNESS FOR A PARTICULAR
0 from improper maintenance by Buyer,
ASSISTANCE
Product maintenance agreements and other customer assistance agreements are available for HewlettPackard Products. For any assistance, contact your nearest Hewlett-Packard Sales and Service Office.
Addresses are provided at the back of this manual.
Page 3
Chapter 1 General Information
CALIBRATIONKITOVERVIEW
AvailableOptions
...........................................................
EQUIPMENT REQUIRED BUT NOT SUPPLIED
SERIALNUMBERS..
INCOMING INSPECTION
..........................................................
.........................................................
PREVENTIVEMAINTENANCE
............................................
.....................................
.................................................
Chapter 2 Specifications and Characteristics
SPECIFICATIONS TERMINOLOGY
Definitions
.................................................
References to Connector Sex
ENVIRONMENTAL SPECIFICATIONS
Operating Temperature and Accuracy Enhancement
Barometric Pressure and Relative Humidity
MECHANICAL CHARACTERISTICS
Center Conductor Protrusion and Pin Depth
ConnectorTorque
...........................................................
SUPPLEMENTAL CHARACTERISTICS
...............................................
....................................................
............................................
.................................
........................................
..............................................
........................................
............................................
..~...............2-
..~...l- 1
..l- 1
.1-l
..l- 2
l-3
..l- 3
.2- 1
1
.2- 1
-2-2
-2-2
.2-3
-2-3
.2-3
..2-
4
-2-4
Chapter 3 User Information
THE CALIBRATION DEVICES AND THEIR USE
Design, Construction, and Functionality
CALIBRATIONCONSTANTS
PERFORMINGCALIBRATIONS
...................................................
.................................................
CHANGING THE CALIBRATION DATA
...........................................
...........................................
....................................
Chapter 4 Preparation For Use - Gaging and Making Connections
OPERATINGPRECAUTIONS
Handling and Storage
...................................................
Electrostatic Discharge
VISUALINSPECTION
...................................................
Obvious Defects or Damage
Mating Plane Surfaces
ConnectorWear
.......................................................
..................................................
CLEANINGCONNECTORS
Periodically Check for Alcohol Contamination
GENERAL CLEANING PROCEDURES
GAGING DEVICES IN THIS KIT
Gage intent
...........................................................
.............................................
.................................................
.............................................
...............................................
...............................
.....................................
...........................................
..3- 1
..3- 1
_......
. . . . . . .
..-....
.._....
. . . . . . .
._._...
. . . . . . .
. . . . . . .
. . . _ . . .
. . . . . . .
. . . . . . .
. . . . . . .
.3-l
.3- 1
-3-l
4-l
4-l
4-l
4-2
4-2
4-2
4-2
4-3
4-3
4-3
4-4
4-4
HP
8506ZA
Contents-l
Page 4
GageAccuracy................................................................4-
When to Gage Connectors
CONNECTOR GAGES
Types
.............
...........................................................
ZEROING THE CONNECTOR GAGE
GAGING TECHNIQUES
Male 3.5 mm (Push-on Type Gage).
Male 3.5 mm (Screw-on Type Gage)
Female 3.5 mm (Push-on Type Gage)
Female 3.5 mm (Screw-on Type Gage)
MAKING CONNECTIONS
InitialConnection
...........................................................
......................................................
..-.......................................................4-
..............................................
.........................................................
..............................................
.............................................
.............................................
............................................
.......................................................
FinalConnection -...............................-.............................4-1
WEAR
...............
..--............-.........................-...........--..4-13
Chatder 5 Performance Verification
4
.4-4
.4-5
5
.4-6
.4-7
-4-7
.4-9
.4- 10
-4-11
.4- 12
..4-12
2
WHAT RECERTIFICATION PROVIDES
............................................
HOWO~NTORECERTIFY.....................................-...............5-
WHERE TO SEND A KIT FOR RECERTIFICATION
..................................
HOW HEWLETT-PACKARD VERIFIES THE DEVICES IN THIS KIT
Chapter 6 Troubleshooting
RETURNINGAKITORDEVICETOHP
MORE INFORMATION
..........................................................
.........................................
Chapter 7 Replaceable Parts
...................
.5- 1
-5-2
-5-2
.-.6-l
.6- 1
1
Contents-2
HP 85062A
Page 5
Figure l-l. Typical Calibration Kit Serial Number Label . . _ . _ . _ . _ . . . . . . . . . . _ . _ . . . . . . . . . . .
.l-2
Figure 2-1. Connector Protrusion and Recession. . . _ . _ . . . . . . . . . . . . . . . . . . . . . _ _ . . . . . . . . . _
Figure
4-l.
Typical 3.5 mm Connector Gage
Figure 4-2. Gaging a 3.5 mm Male Connector Using a Push-on Type Gage
Figure 4-3. Gaging a 3.5 mm Male Connector Using a Screw-on Type Gage
Figure 4-4. Gaging a 3.5 mm Female Connector Using a Push-on Type Gage
Figure 4-5. Gaging a 3.5 mm Female Connector Using a Screw-on Type Gage
Figure 4-6. Using the Torque Wrench
..............................................
........................................
................
...............
..............
.............
.2-3
.
.4-5
.
.4-8
.
.4-9
.
.4-10
.
.4-11
.
.4-13
Figure 6- 1. Troubleshooting Flow Diagram . . . . . . . . . . . . . . . . . . . . . . . . . . . . . . . . . . . . . . . _ . . . .6-2
Figure
7-l. HP
85062A, Option 001, Replaceable Parts
..................................
Figure 7-2. HP 85062A, Option 00 1 and Option OOM, Replaceable Parts
Figure 7-3. HP 85062A, Option 001 and Option OOF, Replaceable Parts
Table
l- 1.
Serial Numbers of Individual Calibration Devices
Table 2- 1. Environmental Specifications
..............................................
Table 2-2.3.5 mm Connector Pin Depth Limits
Table 2-3. Electrical Characteristics
Table 2-4. Mechanical Characteristics
.................................................
................................................
........................................
. . . . . . . . . . . . . . - . . . . . . . . . . . . _ . .
....................
.....................
.7-2
.7-3
.7-4
l-3
.2-2
.2-4
-2-4
-2-4
Table
7-l.
Replaceable Parts . . . . . . . . . . . . . . . . . . . . . . . . . . . . . _ . . . . . _ . . . . . . . _ . _ . . . . . . . . . .7-l
HP 85062A
Contents-3
Page 6

Page 7
Chapter 1
General Information
CALIBRATION
KIT
OVERVIEW
The HP 85062A 3.5 mm Electronic Calibration Kit is designed to work with the HP 8506OC Electronic
Calibration (ECal) Control Unit to calibrate network analyzer systems (such as the HP 85 10) for measurement of components with 3.5 mm connectors up to 26.5 GHz. See the Operating, Programming, and Service Manual for the HP 8506OC control unit for specific network analyzer models.
The calibration kit consists of the following:
l
A 1 to 26.5 GHz Calibration Module (Option 001 adds a 45 MHz to 2 GHz Calibration Module)
.
A Specification
l
An Operating and Service Manual
l
A 5116 inch, 90
l
A Female-to-Female Adapter (not included with Option OOF or Option OOM)
l
A Male-to-Male Adapter (not included with Option OOF or Option OOM)
/
Verification Program Disk
N-cm (8
in-lb) torque wrench for use on the 3.5 mm connectors
This manual describes the HP 85062A Electronic Calibration Kit and provides replacement part numbers,
specifications, and procedures for using, maintaining, and troubleshooting the kit. The available calibration types, the best application for each type, and the associated calibration procedures are found in the
Operating, Programming, and Service Manual for the HP 8506OC control unit.
This manual assumes you know proper connector care. If not, refer to
“Principles of Microwave Connector Care-Quick Reference Card”, located in the back of this manual.
Refer to Chapter 7, “Replaceable Parts”, for the HP part number if another copy is needed.
Note
Or, contact your nearest HP sales office for the customer training course:
“Understanding Connectors Used With Network Analyzers”.
43P
8505OA
4-J.P 8505OA
+ 24A (on-site)
+ 24D (at HP sales office)
Available Options
l
Option 001 adds a low band (45 MHz to 2 GHz) calibration module.
l
Option OOM replaces the standard 3.5 mm insertable module with a non-insertable male module.
l
Option OOF replaces the standard 3.5 mm insertable module with a non-insertable female module.
Options may be combined. For example, ordering Option 001 with Option OOF would provide both a high
band and a low band calibration module with non-insertable female connectors.
EQUIPMENT REQUIRED BUT NOT SUPPLIED
Connector gage sets are required for measuring connector pin depth. Gages and various connector cleaning
supplies are not provided in this kit. Refer to Chapter 7,
HP 85062A
“Replaceable Parts”, for ordering information.
General information
l-1
Page 8
SERIAL NUMBERS
A serial number label is attached to this calibration kit. The serial number is in the form; 0000000000. The
first six digits form the serial number prefix (the first two digits are a country code, the next
four
are a year/
week designation). The last four digits form the suffix (a simple counting sequence).
)
The contents
of
this manual apply directly to calibration kits having the serial number prefix(es) listed un-
der SERIAL NUMBERS on the title page.
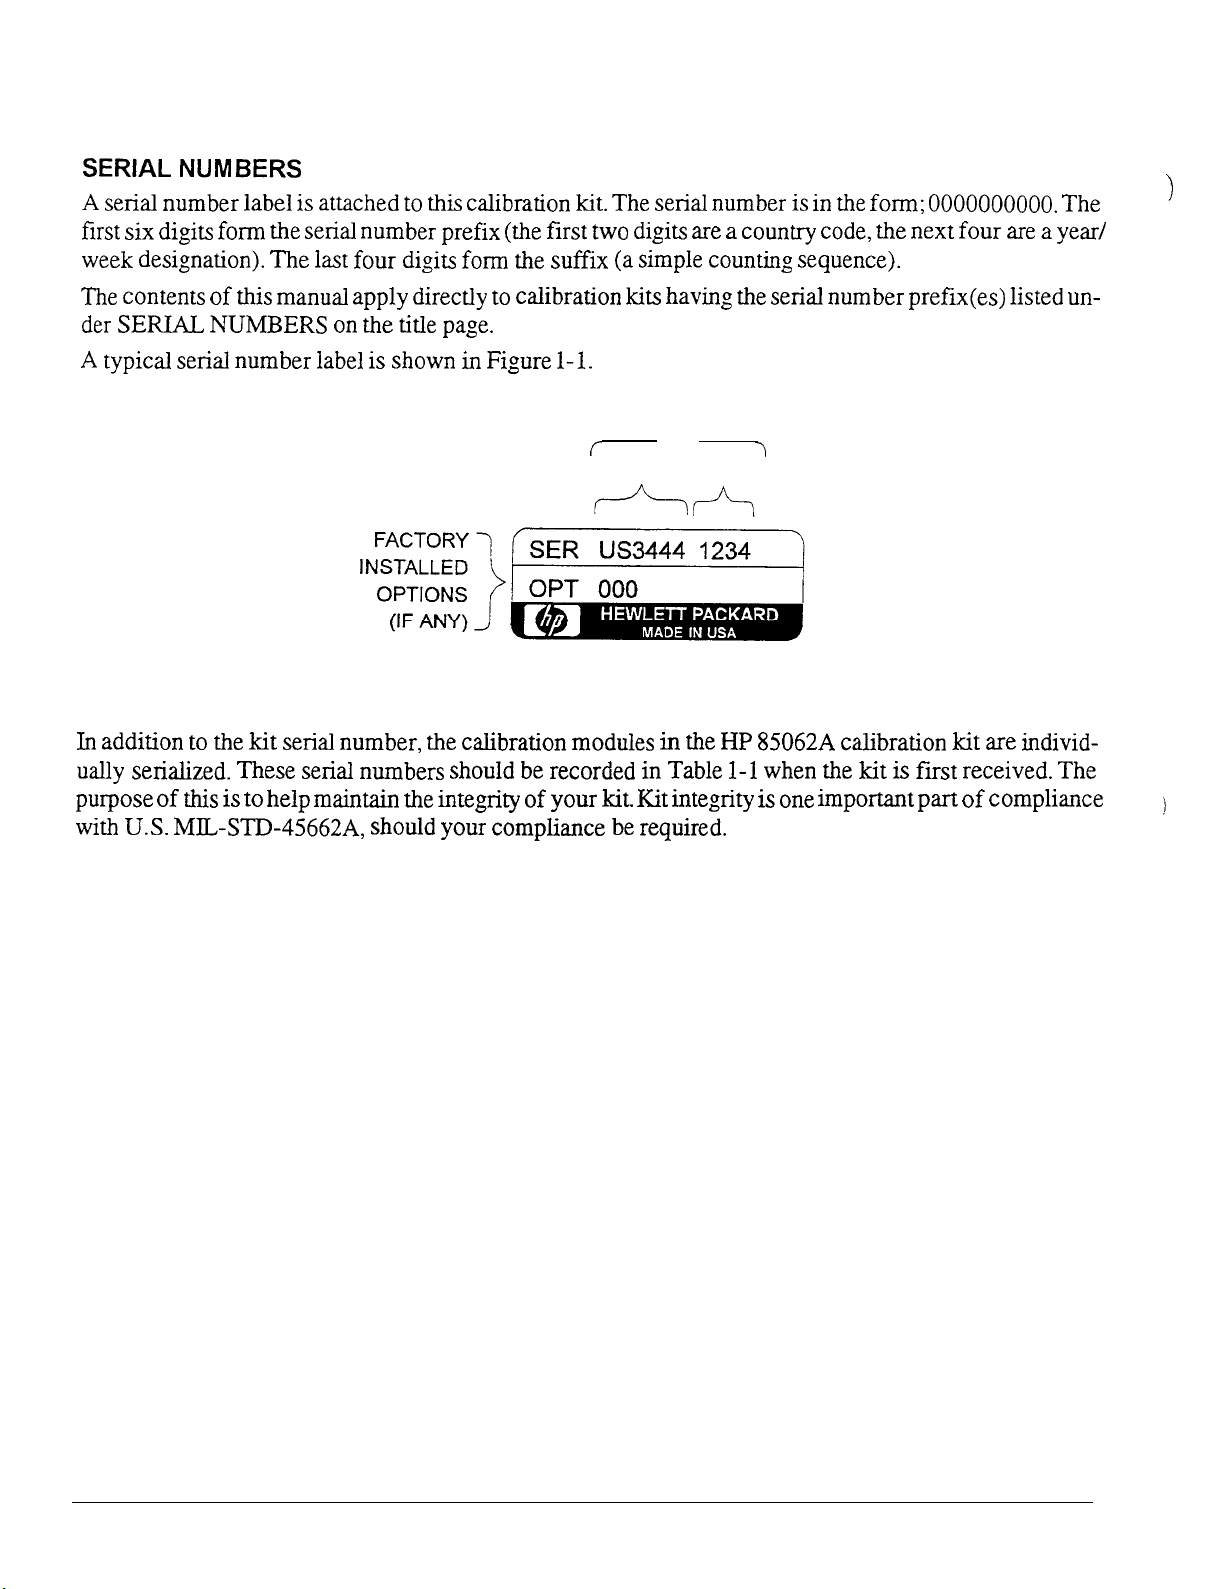
A typical serial number label is shown in Figure l-l.
SERIAL NUMBER
f
PREFIX SUFFIX
Figure I-1. Typical Calibration Kit Serial Number Label
-l
In addition to the kit serial number, the calibration modules in the HP 85062A calibration kit are individually serialized. These serial numbers should be recorded in Table l-l when the
purpose
with U.S.
of
this is to help maintain the integrity
MLSTD-45662A,
should your compliance be required.
of
your kit. Kit integrity is one important part
kit is
first received. The
of
compliance
1-2
General Information
HP 85062A
Page 9
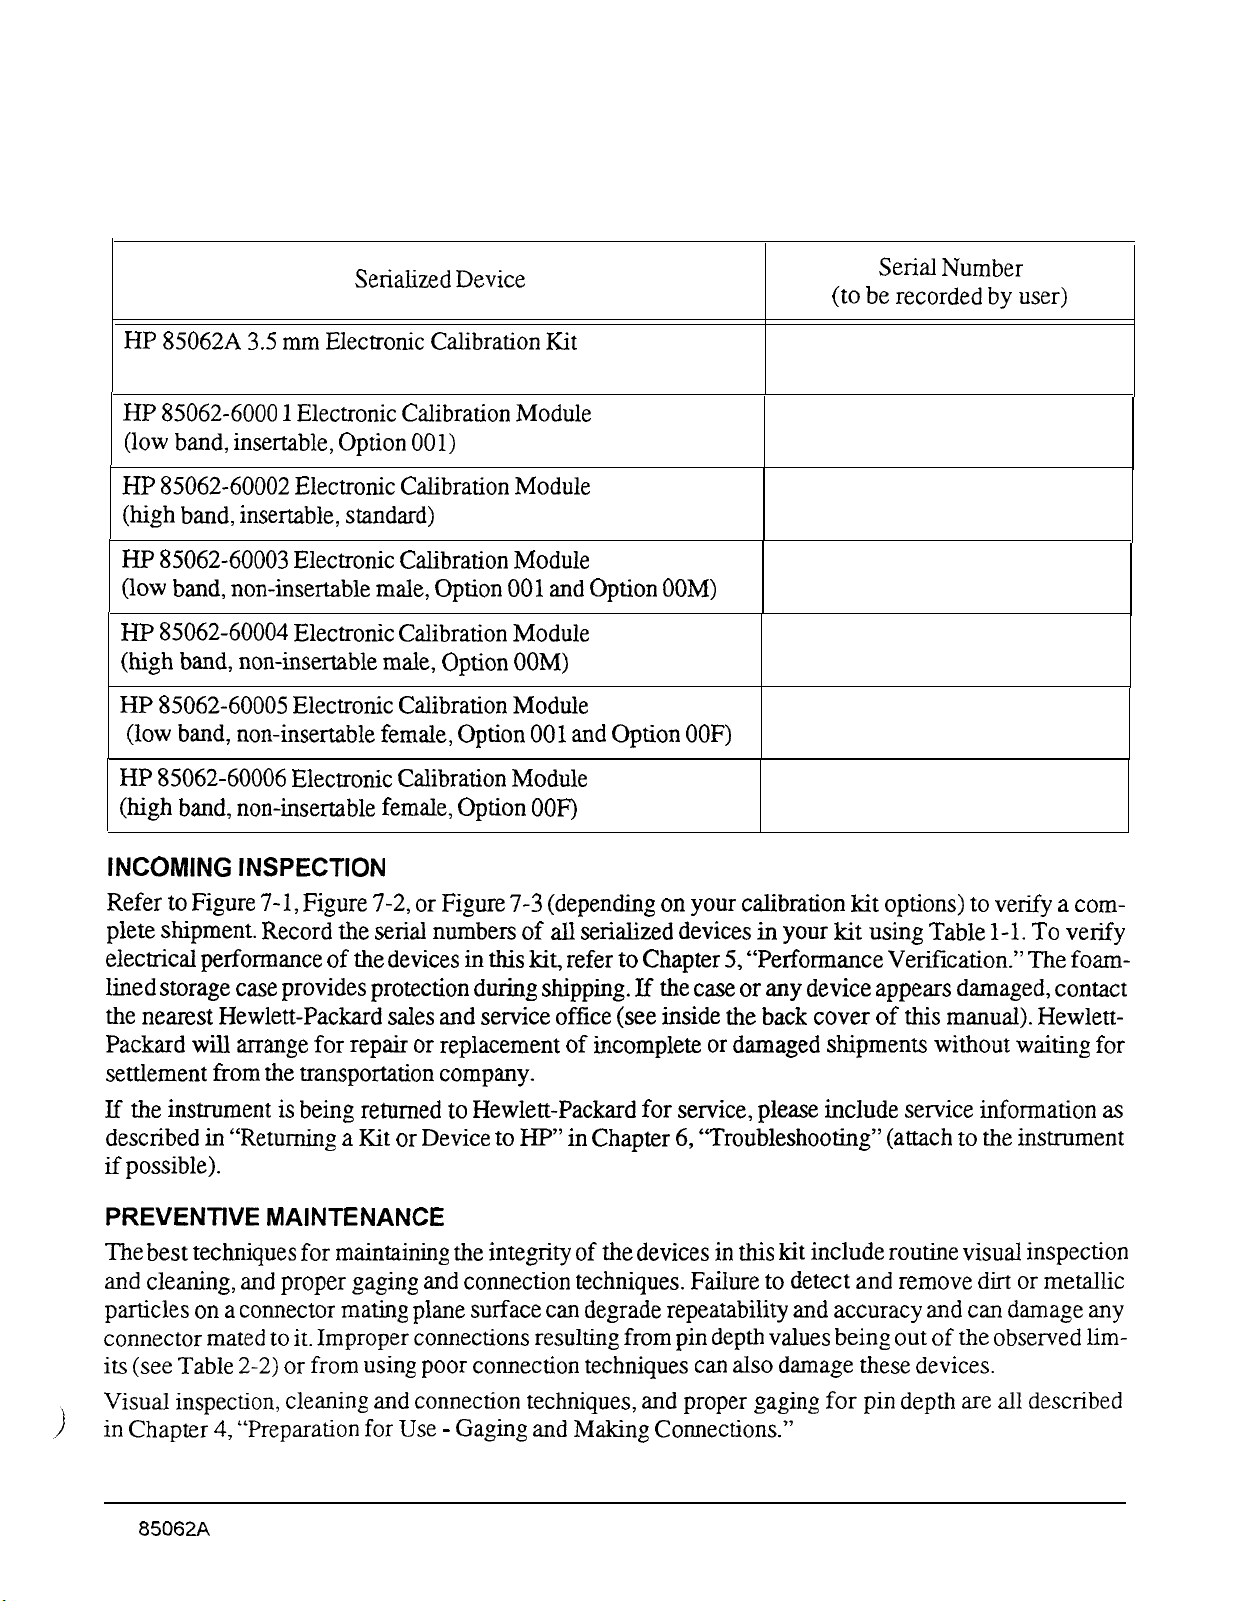
Table I-I. Serial Numbers of Individual Calibration Devices
Serialized Device
HP 85062A 3.5 mm Electronic Calibration Kit
HP 85062-6000 1 Electronic Calibration Module
(low band, insertable, Option 001)
HP 85062-60002 Electronic Calibration Module
(high band, insertable, standard)
HP 85062-60003 Electronic Calibration Module
(low band, non-insertable male, Option 001 and Option OOM)
HP 85062-60004 Electronic Calibration Module
(high band, non-insertable male, Option OOM)
HP 85062-60005 Electronic Calibration Module
(low band, non-insertable female, Option 001 and Option OOF)
HP 85062-60006 Electronic Calibration Module
(high band, non-insertable female, Option OOF)
Serial Number
(to be recorded by user)
INCOMING INSPECTION
Refer to Figure 7-1, Figure 7-2, or Figure 7-3 (depending on your calibration
plete shipment. Record the serial numbers of all serialized devices in your
electrical performance
of
the devices in this
kit,
refer to Chapter 5, “Performance Verification.” The foam-
kit
options) to verify a com-
kit
using Table l-l. To verify
lined storage case provides protection during shipping. If the case or any device appears damaged, contact
the nearest Hewlett-Packard sales and service office (see inside the back cover of this manual). HewlettPackard will arrange for repair or replacement of incomplete or damaged shipments without waiting for
settlement from the transportation company.
If
the instrument is being returned to Hewlett-Packard for service, please include service information as
described in “Returning a Kit or Device to HP” in Chapter 6, “Troubleshooting” (attach to the instrument
if possible).
PREVENTWE MAINTENANCE
The best techniques for maintaining the integrity of the devices in this kit include routine visual inspection
and cleaning, and proper gaging and connection techniques. Failure to detect and remove dirt or metallic
particles on a connector mating plane surface can degrade repeatability and accuracy and can damage any
connector mated to it. Improper connections resulting from pin depth values being out
of
the observed lim-
its (see Table 2-2) or from using poor connection techniques can also damage these devices.
Visual inspection, cleaning and connection techniques, and proper gaging for pin depth are all described
in Chapter 4, “Preparation for Use - Gaging and Making Connections.”
HP 85062A
General Information l-3
Page 10

Page 11
Chapter 2
SPECIFICATIONS TERMINOLOGY
Definitions
Specifications and Characteristics
The definitions explained here help to clarify the terms used in the remainder of this chapter. These definitions refer to the HP 85062A 3.5 mm Electronic Calibration Kit only and are not necessarily valid definitions for other HP products.
Operating Temperature Range.
This is the temperature range over which the calibration standards main-
tain performance to their specifications.
Accuracy-Enhanced Temperature Range.
This is the allowable network analyzer ambient temperature
drift during measurement calibration and during measurements when the network analyzer correction is
turned on. It is also the range over which the network analyzer maintains its specified performance while
correction is turned on.
If
this temperature range is exceeded, the accuracy-enhanced performance of the
network analyzer will be degraded.
Measurement Calibration.
This is the calibration performed to determine the corrections necessary for
accuracy-enhanced (correction on) measurements.
Connector Pin Depth VaZues.
Refer to Figure
2-l
and Table 2-2. Pin depth is a relative measurement be-
tween the center conductor and outer conductor mating surfaces. All references to pin depth in this manual
treat positive (+) values as protrusions, and negative (-) values as recessions.
References to Connector Sex
In this manual, adapters, calibration modules, and gage masters are referred to by the sex of their connector. For example, a male adapter has a male connector. A gage is referred to by the sex of the connector
that
it
measures. For example, a male gage
measures
male connectors; a male gage has a female connector.
HP 85062A
Specifications and Characteristics
2-1
Page 12
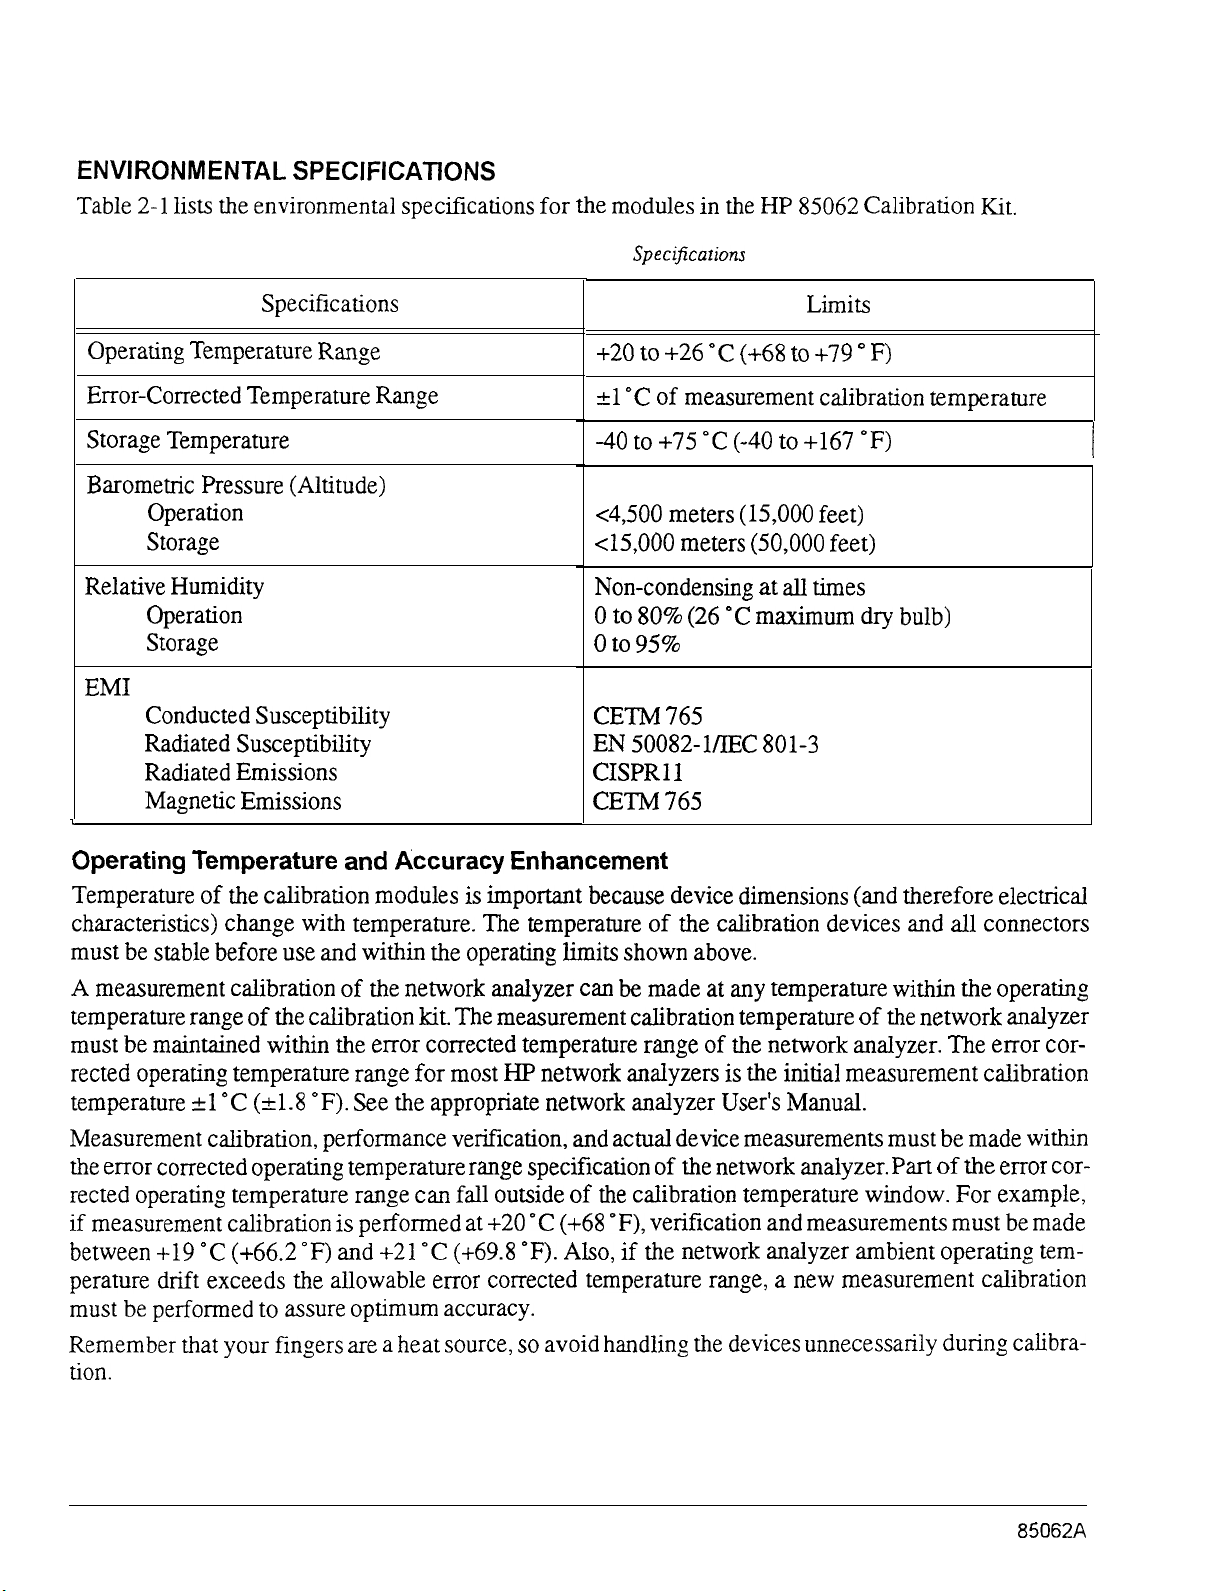
ENVIRONMENTAL SPEClFlCATlONS
Table 2-l lists the environmental specifications for the modules in the HP 85062 Calibration Kit.
Table 2-1. Environmental Speci$ications
Specifications
Operating Temperature Range
Error-Corrected Temperature Range
Storage Temperature
+20 to +26 “C (+68 to +79 o F)
*l “C of measurement calibration temperature
-40 to +75 “C (-40 to +167 OF)
Barometric Pressure (Altitude)
Operation
Storage
Relative Humidity
Operation
Storage
<4,500 meters (15,000 feet)
<15,000 meters (50,000 feet)
Non-condensing at all times
0 to 80% (26 “C maximum dry bulb)
0 to 95%
EM1
Conducted Susceptibility
Radiated Susceptibility
Radiated Emissions
Magnetic Emissions
i
Operating Temperature and Accuracy Enhancement
CETM 765
EN 50082-l/IEC 801-3
CISPRl
CETM 765
Limits
/
1
Temperature of the calibration modules is important because device dimensions (and therefore electrical
characteristics) change with temperature. The temperature of the calibration devices and all connectors
must be stable before use and within the operating limits shown above.
A measurement calibration of the network analyzer can be made at any temperature within the operating
temperature range
of
the calibration kit. The measurement calibration temperature of the
network
analyzer
must be maintained within the error corrected temperature range of the network analyzer. The error corrected operating temperature range for most HP network analyzers is the initial measurement calibration
temperature &l “C (21.8 “F). See the appropriate network analyzer User’s Manual.
Measurement calibration, performance verification, and actual device measurements must be made within
the error corrected operating temperature range specification of the network analyzer. Part
of
the error corrected operating temperature range can fall outside of the calibration temperature window. For example,
if
measurement calibration is performed at +20 “C (+68 “F), verification and measurements must be made
between t-19 “C (+66.2 OF) and +21 “C (+69.8 “F). Also,
if
the network analyzer ambient operating temperature drift exceeds the allowable error corrected temperature range, a new measurement calibration
must be performed to assure optimum accuracy.
Remember that your fingers are a heat source, so avoid handling the devices unnecessarily during calibration.
2-2
Specifications and Characteristics
HP
85062A
Page 13

Barometric Pressure
and
Relative Humidity
Barometric pressure and relative humidity also effect device performance. Air exists between the inner and
outer conductors
Refer to Table
MECHANICAL CHARACTERISTICS
of
these devices and the dielectric constant
2-l
for environmental specifications including barometric pressure.
of
air varies as pressure and humidity change.
Center
Conductor Protrusion
and Pin Depth
Mechanical characteristics such as center conductor protrusion and pm depths are not performance specifications. They are, however, important supplemental characteristics related to electrical performance.
Hewlett-Packard verifies the mechanical characteristics of the devices in this kit with special gaging processes and electrical testing. This ensures that the device connectors do not exhibit any center conductor
protrusion and have proper pin depth when the kit leaves the factory.
Note that center conductor protrusion or recession is referenced to the connector mating surface.
Chapter 4, “Preparation for Use - Gaging and Making Connections”, explains how to use gages to determine
if
the
kit
devices have maintained their mechanical integrity (refer to Table 2-2 for typical pin depth
limits).
MALE
FEMALE
Ad
OUTER
CONDUCTORS
CENTER
CONDUCTORS
OUTER CONDUCTOR
MATING PLANE
--j
Zero pm depth is when Ad = zero.
A protruding center conductor is when Ad is a positive (+) value.
A recessed center conductor is when Ad is a negative (-) value.
Figure 2-l. Connector Protrusion and Recession
HP
85062A
OUTER CONDUCTOR
MATING PLANE
Specifications and Characteristics
2-3
Page 14

Table 2-2. 3.5 mm Connector Pin Depth Limits
Measurement
Device
Typical Pin Depth
micrometers
Uncertainty a
micrometers
Observed Pin Depth
Limits micrometers
( 1 OA inches)
(1 Om4 inches)
3.5
mm
Electronic
ibration Module (-10.0 to -20.0)
3.5
mm
Adapter
Cal-
-25.4 to -50.8
-2.5 to -13.0
+1.3 to -1.3
(+0.5 to -0.5)
+1.3to-1.3
(- 1 .o to -5.0) (+0.5 to -0.5)
a. Approximately +2 sigma to -2 sigma of gage uncertainty based on studies performed at the factory using
gages according to recommended procedures.
Connector Torque
Torque all 3.5 mm connectors to 90
90 N-cm *lo%
SUPPLEMENTAL CHARACTERISTICS
(kg.0 N-cm).
N-cm (8
Table 2-3. Electrical Characteristics
in-lb). Accuracy of the torque wrench supplied in this kit is
(1 OT4 inches)
-24.1to
-52.1
(-9.5 to -20.5)
-1.2to
-14.3
(-0.5 to -5.5)
analog
Characteristic Limit
Frequency Range
Standard
Option 001
1 Maximum RF Input Power
Characteristic
Net Weight
Standard
Option 001
Shipping Weight
Standard
Option 001
Dimensions (length x width x height)
l-26.5 GHz
0.045-2 GHz
+20 dBm
Table 2-4. Mechanical Characteristics
I
1,172 grams (2.6 lbs)
1,623 grams (3.6 lbs)
1,893 grams (4.2 lbs)
2,360 grams (5.2 lbs)
350 x 200
x
67 mm (13.8 x 7.9 x 2.6 inches)
Limit
I
I
2-4
Specifications and Characteristics
HP 85062A
Page 15

Chapter 3
User Information
THE CALIBRATION DEVICES AND
THEIR USE
The HP 85062A 3.5 mm Electronic Calibration Kit contains a high band (1 to 26.5 GHz) electronic calibration module, Option 001 adds a low band (45 MHz to 2 GHz) electronic calibration module. Other options are described in Chapter 1.
The following briefly describes the design, construction, and functionality of an electronic calibration
module.
Design, Construction,
Electronic calibration is achieved using a two part system consisting
and
Functionality
of an HP
8506OC Electronic Calibration Control Unit and various two-port electronic calibration modules. The control unit houses a computer
with built-in firmware and controls the entire calibration process. The calibration modules are solid-state
devices with programmable repeatable impedance states. These modules are characterized at Hewlett-
Packard and are used to transfer the factory calibration accuracy to the customer.
The microwave circuitry in the module uses semiconductor PIN diode switches which shunt the transmis-
sion lines to ground. The number
ments. A multitude
of
reflection coefficients are generated by applying various combinations
of
diodes, and their location, vary depending upon the frequency require-
of
the shuntsWithout shunts, the network acts as a low-loss transmission line. High isolation between the ports is obtained by driving several of the PIN diode shunts simultaneously. Control logic within the module is programmed to drive the PIN diodes to their various states.
The factory measured S-parameter data
of
each of the various impedance states is stored inside
of
the module. This factory data is compared to the measured data, collected during the calibration process, and error
terms are calculated.
CALIBRATION CONSTANTS
The HP 85062A Electronic Calibration Kit is unlike our standard mechanical calibration kits. There are
no calibration constants to be loaded into the network analyzer. All of the calibration data for each individual electronic calibration module is stored within the module, and is traceable to NIST (National Insti-
tute of Standards and Technology). This calibration data is read by the HP 8506OC Electronic Calibration
Control Unit each time a calibration is performed.
PERFORMING CALIBRATIONS
The calibration type and procedure to be used depends on the type and accuracy of measurement required
for the device-under-test. The operating, programming, and service manual for the HP 8506OC Electronic
Calibration Control Unit provides information regarding the available calibration types, the best applica-
tion for each type, and describes the calibration procedures in detail.
For information regarding specific network analyzers, refer to the appropriate network analyzer user’s
manual or Hewlett-Packard application notes.
CHANGING THE CALIBRATION
DATA
The calibration data stored in each electronic calibration module is unique to that module and can only be
changed when the module is recertified or repaired. This recertification or repair can only be performed at
Hewlett-Packard or at Hewlett-Packard authorized service centers.
HP
85062A
User Information 3-l
Page 16

Page 17

Chapter 4
OPERATING PRECAUTIONS
Preparation For Use - Gaging and Making Connections
There are several precautions that must be observed to protect the devices in this kit and the instruments
being used.
Handling and
Storage
Handle and store these calibration devices with great care; their continued performance and accuracy de-
pend on maintaining very precise mechanical tolerances of the connectors.
When the calibration modules are not in use, replace their protective end caps and store them in the foam
lined storage case. The storage case lid is detachable so that the case can be stored in a shallow drawer.
Electrostatic Discharge
The human body almost always has some static charge. You are usually not aware of this charge because
CAUTION
the
human threshold for the perception of static discharge shock is approximately 3,000 volts. ESD as low
as 60 volts can destroy sensitive microcircuits. Always wear a grounding wrist strap connected to a
conductive bench mat when working near this and other sensitive equipment.
When you clean or inspect connectors attached to any static sensitive circuits, either on the calibration
module or on any instruments, it is essential to protect against electrostatic discharge (ESD). Static electricity builds up on the body and can easily damage sensitive internal circuit elements when discharged by
contact with the
l
Always have a grounded antistatic mat in front of your test equipment and wear a grounded wrist
center
conductor of the RF connector or the center contacts of the 25 pm D-Sub connector.
strap attached to it.
l
Ground yourself before you clean, inspect, or make a connection to a static-sensitive device or test
port. You can, for example, grasp the grounded outer shell of the test port briefly to discharge static
from your body.
.
.
Discharge static electricity from a device before connecting it: touch the device briefly (through a
resistor
of at
least 1 megohm) to either the outer shell
of
the test port
connector or to
another exposed
ground. This discharges static electricity and protects test equipment circuitry.
Refer to Chapter 7,
HP 85062A
“Replaceable Parts”, for information about ordering supplies for ESD protection.
Preparation For Use - Gaging and Making Connections
4-l
Page 18

VISUAL INSPECTION
Visual inspection and, if necessary, cleaning should be done every time a connection is made. Metal particles from the connector threads may fall into the connector when it is disconnected. One connection made
with a dirty or damaged connector can damage both connectors beyond repair.
In some cases, magnification is necessary to see damage on a connector. The use of a microscope with a
magnification of 10x or more is recommended to detect this type
of
damage. Not all defects that are visible
under magnification will affect the electrical performance of the connector. Use the following guidelines
when evaluating the integrity of a connector.
Obvious Defects or Damage
Examine the connectors first for obvious defects or damage: badly worn plating, deformed threads or bent,
broken, or misaligned center conductors. Connector nuts should move smoothly and be free
of
burrs, loose
metal particles, and rough spots.
Any connector that has obvious defects should be discarded or repaired before continuing.
Mating Plane
Flat contact
nection.
Look
Surfaces
between the connectors at all points on their mating plane surfaces is required for a good con-
especially for deep scratches
or
dents, and for dirt and metal particles on the connector mat-
ing plane surfaces.
Also, look for bent or rounded edges on the mating plane surfaces of the center and outer conductors and
for signs of damage due to excessive or uneven wear or misalignment.
Light burnishing
marks distributed more or less uniformly
of
the mating plane surface is normal, and is evident as light scratches
over
the mating plane surfaces. Other small defects and cosmetic
or
shallow circular
imperfections are also normal. None of these affect electrical or mechanical performance.
If a connector shows deep scratches or dents, particles clinging to the mating plane surfaces, or uneven
wear, clean and inspect it again. Damaged connectors should be discarded or sent for repair. Try to determine the cause of damage before connecting a new, undamaged connector in the same configuration.
Connector Wear
Connector wear eventually degrades performance. The more use a connector gets, the faster it wears and
degrades. This is especially true with electrically characterized devices such as ECal modules. The wear
is greatly accelerated when connectors are not kept clean. Calibration devices should have a long life if
their use is on the order of a few times per week. The test port connectors on the network analyzer test
set
may have many connections each day, and are therefore more subject to wear. It is recommended that an
adapter be used as a test port saver to minimize the wear on the test set’s test port connectors. Replace all
worn connectors.
i
4-2
Preparation For Use - Gaging and Making Connections
HP 85062A
Page 19

CLEANING CONNECTORS
For long, reliable connector life, carefully clean all connectors. Refer to Chapter 7, “Replaceable Parts”,
for information on ordering recommended cleaning supplies.
Periodically Check for Alcohol Contamination
1.
Let a few drops of your cleaning alcohol evaporate on a clean glass plate or microscope slide.
2.
Examine the glass in reflected light.
It
should be perfectly clean and free of residue.
If
not, do not
use alcohol from that container.
To keep your main supply of alcohol free from contamination, pour a small amount into a clean container
and use that as your cleaning supply. Safely discard any remaining alcohol in the small container and clean
the container.
CAUTION
GENERAL CLEANING PROCEDURES
Warning
1.
wed
If you must use a solvent, use only isopropyl alcohol. Use the least amount of alcohol possible, and avoid
wetting any plastic parts in the connectors.
Always use protective eyewear when using compressed air or nitrogen. This procedure
assumes you have taken the necessary ESD precautions.
Air or m.
Use compressed air or nitrogen to loosen particles on the
connector mating plane surfaces. Clean air cannot damage a connector, or leave particles or residues
behind.
You can use any source of clean, dry, low-pressure compressed air or nitrogen that has an effective oilvapor filter and liquid condensation trap placed just before the outlet hose. Ground the hose nozzle to
prevent electrostatic discharge, and set the air pressure to a very low velocity; 60 psi or less. High velocity air can cause electrostatic effects when directed into a connector.
2.
CleaTl.
For dirt or stubborn contaminants on a connector that you cannot
remove with compressed air or nitrogen, try a cleaning swab or lint-free cleaning cloth moistened
with isopropyl alcohol:
a.
Apply a small amount of isopropyl alcohol to a cleaning swab or lint-free cleaning cloth.
b.
Clean the connector threads.
c.
Let the alcohol evaporate, then blow the threads dry with a gentle stream of clean, low- pressure
compressed air or nitrogen.
3. -suPlane.
u
Apply a small amount of isopropyl alcohol to a new
cleaning swab and clean the mating plane and interior surfaces.
If
the connector has a center conductor, use very short horizontal or vertical strokes (across the connector), and the least pressure possible, especially when cleaning a female connector (to avoid snagging the swab on the center conductor contact fingers). An illuminated magnifying glass helps.
4.
Dry the Connector. After cleaning, blow the connector dry with a gentle stream of clean compressed
air or nitrogen. Always completely dry a connector before you reassemble or use it.
5.
w.
residues remain.
HP 85062A
Inspect the connector again under a magnifyin, o
Preparation For Use - Gaging and Making Connections 4-3
0 Olass
to be sure that no particles or
Page 20

GAGING DEVICES IN THIS
Gage
Intent
KIT
Gages are intended for preventive maintenance and troubleshooting purposes only. They are effective in
detecting center conductor protrusion or excessive recession and preventing connector damage on DUT’s,
test accessories, and the calibration kit devices. Do not use gages for precise pin depth measurements.
While performing pin depth measurements, use different orientations of the gage within the connector.
Note
Gage
Accuracy
Averaging a minimum of three readings, each taken after a quarter-turn rotation of the gage, reduces
measurement variations that result from the gage or the connector face not being exactly perpendicular to
the center axis.
Connector gages are only capable of performing coarse measurements. They do not provide the degree of
accuracy necessary to precisely measure the pin depth
of
the kit devices. This is partially due to the repeat-
ability uncertainties that are associated with the measurement. Only the factory, through special gaging
processes and electrical
testing,can accurately verify the mechanical characteristics of the devices.
With proper technique, however, the gages are useful in detecting gross pin depth errors on device connectors. To achieve maximum accuracy, random errors must be reduced by taking the average of at least
three measurements having different gage orientations on the connector. Even then, the resultant average
can be in error by as much as &HMO1 inch due to systematic (biasing) errors usually resulting from worn
gages and gage masters, therefore, these systematic errors were not included in the uncertainty analysis.
As the gages endure more use, the systematic errors could become more significant in the accuracy of the
measurement.
When to
Gage Connectors
Gage a connector at the following times:
l
Before you use it for the first time. It is recommended that you record the initial pin depth measurement of your device to compare with future readings. This serves as a good troubleshooting tool when
you suspect damage may have occurred to the device.
l
If either visual inspection or electrical performance suggests that the connector interface may be out
of typical range (due to wear or damage, for example).
l If
a calibration device is used by someone else or on another system or piece of equipment.
l As
a matter of routine: initially after every 100 connections, and after that as often as experience sug-
gests.
4-4
Preparation For Use - Gaging and Making Connections
HP 85062A
Page 21

CONNECTOR
GAGES
Types
Each type of connector uses a different connector gage.
l
There are push-on type gages and screw-on type gages
l
Every connector gage requires a gage calibration block (to zero the gage).
l
A gage is referred to by the sex of the connector it measures.
For
example, a male gage
connectors; a male gage has a female connector.
measures
male
Figure
4-l
shows a typical 3.5 mm connector gage.
BLACK MINUS SIGN
(RECESSION)
RED PLUS SIGN
(NOT USED)
LIMIT POINTER
DIAL INDICATOR
FEMALE
3.5
mm
CONNECTOR
GAGE
hV.ZK
(PROTRUSION)
. RED MINUS SIGN
(NOT USED)
GAGE INCREMENl
0.0001
’
ZERO SET KNOa
GAGE SER!.AL NUMBER
PLUS SIGN
INCH
HP
85062A
“M:$kii$
.---EL
Figure
4-l.
Typical 3.5 mm Connector Gage
GAGE
MASTER
SERLAL NUMBER
Preparation For Use - Gaging and Making Connections
4-5
Page 22

ZEROING THE CONNECTOR GAGE
Hold a connector gage by the gage barrel, below the dial indicator. This gives the best stability, and
Note
1.
Select the proper gage for your connector. Always use gages which are intended for 3.5 mm pin
improves measurement accuracy (cradling the gage in your hand or holding it by the dial applies stress to
the gage plunger mechanism through the dial indicator housing).
depth measurements.
2.
Inspect and clean the gage:
a.
Inspect the connector gage and gage master carefully, exactly as you inspected the connector
itself.
b.
Clean or replace the gage and gage master if necessary. Dirt on either the gage or the gage
master makes gage measurements inaccurate, and can damage a connector.
3. Zero the connector gage:
a.
While holding the gage by the plunger barrel, use the connecting knurl to screw on the gage
master
b.
Use the torque wrench supplied with the kit to tighten the connecting nut of the gage master.
c.
As you watch the gage pointer
pointer should line up exactly with the zero mark on the gage.
just
until you meet resistance.
,
gently tap the barrel of the gage to settle the reading. The gage
If
not, clean and inspect both the
gage and gage master. If the gage and gage master are clean and free from defects, adjust the
zero set knob until the gage pointer exactly lines up with zero.
Note
Check gages often to make sure that the zero setting has not changed. Generally, when the pointer on a
recently zeroed gage does not line up exactly with the zero mark, the gage or gage master needs cleaning.
Clean both of these carefully and check the zero setting again.
4-6
Preparation For Use - Gaging and Making Connections
HP 85062A
Page 23

GAGING TECHNIQUES
Male 3.5 mm
1.
Refer to Figure 4-2. Find the male 3.5 mm connector gage (usually marked M) which has a circular
(Push-on
Type Gage)
metal bushing surrounding the gage plunger.
2.
Use the protruding end of the gage calibration block (also usually marked M).
3.
Slip the calibration block into the outer bushing so that the bushing comes to rest on the outer, flat
area of the calibration block. When you measure a connector, the gage outer bushing rests on the
outer conductor mating plane inside the connector.
4.
Follow the instructions as described above for “Zeroing the Connector Gage.”
5.
Measure the connector:
a.
Carefully center and insert the gage into the male connector; the flat outer part of the gage
bushing rests on the outer conductor (the male contact pin slips into the hole in the gage plunger
for this purpose).
b.
Gently rock the connector gage within the connector to make sure the gage and the outer
conductor
c.
When the gage pointer settles consistently at a reading, read the connector gage dial.
mate
flatly.
HP 85062A
Preparation For Use - Gaging and Making Connections
4-7
Page 24

0 Use
male
0
Zero gage
connector goge (hos circular bushing)
using
recessed
end of goge
colibrotion
insert gage
Mole pin slips
into
connector.
into gage plunger
0.00s
A
Figure 4-2. Gaging a 3.5 mm Male Connector Using a Push-on Type Gage
4-8
Preparation For Use - Gaging and Making Connections
HP 85062A
Page 25

Male
3.5
mm
(Screw-on Type Gage)
1. Refer to Figure 4-3.
2.
Follow the instructions as described above for “Zeroing the Connector Gage.”
3.
While holding the gage by the barrel, screw on the connector of the calibration module to be
measured. Without turning the gage or calibration module, connect the nut finger-tight.
4.
Torque the connector onto the gage to 90 N-cm (8 in-lb) using the supplied
5/l 6
in. torque wrench
or equivalent.
5.
Gently tap the barrel of the gage with your finger to settle the reading.
6.
Read the gage indicator dial.
7.
For maximum accuracy, measure the connector a minimum of three times and take an average of
the readings.
0
Use
screw-on
mole connector gage
0
Zero gage
0
Screw the device onto the gags. Torque the
Connecting nut. Tap
gage. Read recession or protrusion from the gage.
Figure 4-3. Gaging a 3.5 mm Male Connector Using a Screw-on Type Gage
using
calibration block
the
device to settle the
HP 85062A
Preparation For Use - Gaging and Making Connections
4-9
Page 26

Female
1.
2.
3.5 mm
(Push-on
Type
Gage)
Refer to Figure 4-4. Find the female 3.5 mm connector gage (usually marked F).
Using the flat end of the gage calibration block (also usually marked F), follow the instructions as
described above for “Zeroing the Connector Gage.”
3. Measure the connector:
Carefully center and insert the gage into the connector; the gage plunger rests on the outer end
a.
of
the female contact fingers-
Gently rock the connector gage within the connector to make sure the gage and the outer
b.
conductor mate flatly.
When the gage pointer settles consistently at a reading, read the gage indicator dial.
c.
0 use
l Zero gage
0
femole
Insert
Plunger rests on fiat
connector gcge
using
gag*
into connector.
fiat
(has no circular
end
of goge calibration block
end
of
female contatc
bushing)
fingers.
0.OO.h
4-10
Figure 4-4. Gaging a 3.5 mm Female Connector Using a Push-on Type Gage
Preparation For Use - Gaging and Making Connections
HP 85062A
Page 27

Female
1.
2.
3.
3.5 mm
(Screw-on
Type
Gage)
Refer to Figure 4-5.
Follow the instructions as described above for “Zeroing the Connector Gage-”
While holding the gage by the barrel, screw on the connector of the calibration module to be
measured. Without turning the gage or calibration module, connect the nut finger-tight.
4.
Torque the connector onto the gage to 90 N-cm (8 in-lb) using the supplied 5/16 in. torque wrench
or equivalent.
5.
Gently tap the barrel of the gage with your finger to settle the reading.
6.
Read the gage indicator dial.
7.
For maximum accuracy, measure the connector a minimum of three times and take an average of
the readings.
0 Use screw-an femoie
0
Zero goge
Screw the device onto the gage. Torque
connecting
gage.
using
nut. Tap
Reod
recession or protrusion from the
connector
cotibratian black
the device to aettle the
gogt
the
gage.
HP 85062A
Figure 4-5. Gaging a 3.5 mm Female Connector Using a Screw-on Type Gage
Preparation For Use - Gaging and Making Connections
4-l 1
Page 28

MAKING CONNECTIONS
Good connections require a skilled operator. Because of instrument sensitivity and coaxial connector mechanical tolerances, slight errors in operator technique can significantly affect measurements and measurement uncertainties.
Initial Connection
CAUTION
1.
Carefully align the connectors. As you bring one connector up to the other, and as you make the
This procedure assumes that you have taken the necessary ESD precautions, and you have already cleaned
and inspected (visually and mechanically) the connectors.
actual connection, be sure the connectors align perfectly. The male connector center pin must slip
concentrically into the contact fingers of the female connector. If not, stop and begin again.
2.
Push the connectors straight together. Do not twist or screw them together. As the center conductors
mate, you may feel a slight resistance.
3.
Engage the connector nut over the threads on the second connector. Turn only the connector nut. Let
the connector nut pull the two connectors straight together.
Final Connection
CAUTION
1.
Hand tighten the connection to be torqued.
2.
Hold the torque wrench with your thumb and index finger behind the groove in the handle.
3.
Tighten the connection until the handle begins to break loose.
When making connections with the calibration modules, turn the nut on the connector, never turn the
module itself. Doing so may cause damage to the module or to the attaching connector.
It is
not necessary to fully break the
handle of the torque wrench to reach the specified torque (Figure 4-6).
When making connections with these devices, use an open end wrench to hold one device stationary while
Note
4.
Reverse the order to disconnect the connection.
4-12 Preparation For Use - Gaging and Making Connections
torquing the nut on the other device/cable connector. Also, remember that the setting of the torque wrench
can change with use. Re-calibrate at a schedule appropriate to the amount of use.
HP 85062A
Page 29

HANDLE BEGINS TO BREAK
(CORRECT POINT TO STOP)
HOLD HERE
HANDLE FULLY BROKEN
(NOT RECOMMENDED)
Figure 4-6. Using the Torque Wrench
. .
.
.
..-_.. .’
TORQUEING
DIRECTION
HP
85062A
Preparation For Use - Gaging and Making Connections
4-l 3
Page 30

Page 31

Chapter 5
Performance Verification
The performance of your calibration kit can only be verified by returning the kit to Hewlett-Packard or at
Hewlett-Packard authorized service centers. The equipment and calibration standards required to verify
the specification limits
of
the devices internal to the kit have been specially manufactured and are not com-
mercially available.
Hewlett-Packard recognizes its responsibility to provide you with procedures to reconfirm the published
specifications of any product offered. That commitment applies equally to the HP 85062A 3.5 mm Elec-
tronic Calibration Kit.
If it is
imperative that the performance test processes for this kit be explained or
made available to you, contact the nearest Hewlett-Packard sales and service office listed inside the back
cover
of
this manual.
WHAT RECERTIFICATION PROVIDES
The following will be provided with a recertified kit:
l
New calibration sticker affixed to the case
l
Certificate
l
List of NIST (United States National Institute of Standards and Technology) traceable numbers
l
A calibration report for each traceable device in the kit listing values, specifications, and uncertainties
l
A new set of S-Parameter data (embedded in module memory)
of
Calibration
The following is available on request:
l
IvIlL-STD-45662A or equivalent certification
For more information, contact the nearest Hewlett-Packard sales and service office listed inside the back
cover of this manual.
HOW
OFTEN TO
RECERTIFY
The suggested initial interval for recertification is 12 months or sooner. The actual need for recertification
depends on use
of
the kit. After reviewing the results
of
the initial recertification, you may establish a dif-
ferent recertification interval that reflects the usage and wear of the kit.
Note
In some cases, a kit may be not used for some time after the actual recertification date. The recertification
interval should begin on the date the kit is first used.
HP
85062A
Performance Verification
5-l
Page 32

WHERE TO
Contact the nearest Hewlett-Packard sales and service office listed inside the back cover
SEND A
KIT
FOR
RECERTIFICATION
of
this manual for
information on where to send your kit for recertification. When you return the kit, please include service
information as described in “Returning a Kit or Device to HP” in Section 6, “Troubleshooting” (attach to
the instrument if possible).
HOW
HEWLETT-PACKARD VERIFIES THE DEVICES IN THIS
KIT
Hewlett-Packard verifies the specifications of these devices as follows:
The residual microwave error terms of the test system are verified with precision airlines and shorts, or
low frequency resistance. The resistance is traceable to NIST (United States National Institute of Standards and Technology). The airline and short characteristics are developed from mechanical measurements. The mechanical measurements and material properties are carefully modeled to give a very
accurate electrical representation. The mechanical measurements are traceable to NIST through various
plug and ring gages and other mechanical measurements.
Each calibration device is electrically tested on this test system to the specifications listed in this manual.
These two steps establish a traceable link to NIST for Hewlett-Packard to the extent allowed by the Insti-
tute’s calibration facility. The devices in this kit are traceable to NIST through Hewlett-Packard.
1
5-2
Performance Verification
HP 85062A
Page 33

Chapter 6
Troubleshooting
If you suspect a bad calibration, or if your network analyzer does not pass performance verification, follow
the steps in Figure 6- 1.
RETURNING A
If
your calibration kit or device requires service, contact the HP office nearest you for information on
KIT OR
DEVICE TO
HP
where to send it (sales and service offices are listed inside the back cover of this manual).
If
the instrument is being returned to HP for service, please include the following service information (at-
tach to the instrument if possible):
a. Company Name
b. Company Address
c. Technical Contact Person
d.
Telephone Number and Extension
e. Model Number
f. Serial Number
g. Purchase Order Number
h. Date
i.
Accessories Returned With Instrument
j.
Type of Service Required. Please describe the problem(s) as specifically as possible.
k. Any Other Applicable Information.
MORE INFORMATION
This manual contains limited information about network analyzer system operation. For complete information, refer to the instrument documentation.
If
you need additional information, contact your local Hewlett-Packard representatives. Sales and service
offices are listed inside the back cover
of
this manual.
HP 85062A
Troubleshooting
6-1
Page 34

ALL CONNECTIONS
PROPERLY MADE?
RECALIBRATE
SYSTEM
I
-
l
6-2
Troubleshooting
FINISH SMDOTH B
RETURN MODULE(S) TO
HP FOR
REPAIR OR
REPLACEMENT
Figure
6-l.
TORQUE DRIICES:
3.5 mm TO 90 N-an
(8 in-lb)
REPAIR OR
RECERTIN
MODULE(S)
CONNEiT&i
t-i
Troubleshooting Flow Diagram
b
I
HP 85062A
Page 35

Chapter 7
Table
7-l
lists the replacement part numbers for the contents of the
Replaceable Parts
HP
85062A
calibration kit and
for or.h-
er parts which are not included in the kit. To order a listed part, note the description, HP part number, and
the quantity desired. Telephone or send your order to the HP office nearest you (sales and service offices
are listed inside the back cover of this manual).
Table 7-1. Replaceable Pans
DESCRIPTION
High Band Calibration Modules
Insertable (Standard)
Non-Insertable Male (Option OOM)
Non-Insertable Female (Option OOF)
Low Band Calibration Modules
Insertable (Option 001)
Non-Insertable Male (Option 001 and Option
Non-Insertable Female (Option 001 and Option
Adapter?
3.5 mm Female-to-Female Adapter
3.5 mm Male-to-Male Adapter
Protective End Caps
DB-25 Multi-pin Connector
3.5 mm Female Connector
3.5 mm Male Connector
Cleaning Supplies
Compressed Air
99.5% Isopropyl Alcohol (8 oz.)
99.5% Isopropyl Alcohol (30 ml)
Cleaning Swabs
Alcohol Wipes
Lint-free Cleaning Cloth
OOM)
OOF)
Qn
1
1
1
1
1
1
1
1
1 per 1252-4690
connector
1
8 oz.
3oml
100
1 box
1
85062-60002
85062-60004
85062-60006
85062-60001
85062-60003
85062-60005
85052-60012
85052-60014
1401-0245
1401-0246
8500-5262
8500-0559
8500-5344
9300-1243
92193N
9310-4242
HP PART NUMBER
ESD Supplies
Grounding Wrist Strap
5 ft. Wrist-strap to Table-mat Grounding Cord
2 x 4 ft. Conductive Table Mat with 15 ft. Ground Wire
ESD Heel Strap
Hard-surface Conductive Floor Mat
4 x 5 ft.
3
x4ft.
Soft Surface Conductive Floor Mat (4 x 8 ft.)
Other
Speciiication I Verification Program Disk
Operating and Service Manual
5/16
in., 90 N-cm (8 in-lb) Torque Wrench
Connector Care Quick Reference Card
a. Not included in kit with Option OOM or OOF
HP
85062A
1
1
1
1
1
1
1
1
1
1
1
9300-1367
9300-0980
9300-0797
9300- 1126
92175A
92175C
92175B
08510-10033
85062-90001
8710-1765
08510-90360
Replaceable Parts
7-1
Page 36

HEWLETT
&!!a
PACKARD
85062-60002
ELECTRONIC
CALlBRATiON
5116
INCH TORQUE WRENCH
(90 N-cm / 8 in-lb)
DB-25 PROTECTIVE END CAP
(1 PER MODULE)
i
l-26.5
Gliz
MODULE
IZIID
f
Ii
HEWLETT
PACKARD
85062-50001
ELECTRONIC CALIBRATION MODULE
45
MHz-2
3.5 mm ADAPTER
vtof)
3.5 mm ADAPTER
(m to m)
GHz
CAUllON: +20
AVOID STATIC DISCHARGE
3.5 mm MALE OR FEMALE
PROTECTIVE END CAPS
(ONE PER CONNECTOR)
Not shown:
Operating and Service Manual, Storage Case, Specification / Verification Program Disk.
Notes:
Low band module shown is included only with Option 001.
Serial numbers are located on opposite side of modules.
dBm MAX
/
/
1
1
/ PORT A 1 / PORT B j
I
I
CAUTION:
AVOID
IA
!
i
I
Figure 7-1. HP 85062A, Option 001, Replaceable Parts
I I
i20 dBm
5TATlC
DISCHARGE
MAX
I
I
I-
-
I,
i
7-2
Replaceable Parts
HP 85062A
Page 37

5116
INCH TORQUE WRENCH
(90 N-cm I8 in-LB)
DB-25 PROTECTIVE END CAP
(1 PER MODULE)
/
r
I
l m
I
HEWLETT
PACKARD
85062-60004
ELECTRONIC CALlBRATlON MODULE
cAunoN:+2odBmMAx
AVOID
STATKZ DISCWRGE
3.5 mm MALE
PROTECTIVE END CAPS
(ONE PER CONNECTOR)
l-26.5 GH2
1’
,I
/
\
\
\
’
\
\
I
HEWLETT
PACKARD
85062-60003
ELECTRONIC CALIBRATION MODULE
45 MHz-2
I
GHz
CAUTION:
AVOID STATIC
!
n
Not shown:
Operating and Service Manual, Storage Case, Specification / Verification Program Disk.
Notes:
Low band module shown is included only with Option 001.
Serial numbers are located on opposite side of modules.
Figure 7-2. HP 85062A, Option 001 and Option OOM, Replaceable Parts
HP 85062A
t20
dBm MAX
DWXARGE
Replaceable Parts
7-3
Page 38

5116
INCH TORQUE WRENCH
(90 N-cm / 8 in-LB)
T-------T-------
I
1
HEWLETT
PACKARD
85062-60006
I-
ELECTRONIC CALlBRATlON MODULE
CAUTKIN: +20
AVOD
PROTECTIVE END CAPS
(ONE PER CONNECTOR)
dBm MAX
STATIC DISCHARGE
3.5 mm FEMALE
I
/
l-26.5 GHi
DB-25 PROTECTIVE END CAP
(1 PER MODULE)
\
HEWLETT
PACKARD
8506260005
ELECTRONIC CALlBRATlON MODULE
I
45 MHz-2
GHz
CAUTION:
AVOID STATIC DISCHARGE
‘A
Not shown:
Operating and Service Manual, Storage Case, Specification /Verification Program Disk.
Notes:
Low band module shown is included only with Option 001.
Serial numbers are located on opposite side of modules.
Figure 7-3. HP 85062A, Option 001 and Option OOF, Replaceable Parts
7-4 Replaceable Parts
+20
dBm MAX
HP 85062A
Page 39

Principles of Microwave Connector Care-- Quick Reference Card
HP
0851
O-90360
Printed June 1993
NQTE
Before You Start:
Proper connector care and connection techniques are
critical for accurate, repeatable measurements.
Refer to the calibration kit documentation for
care infromation. Prior to making connections to the
network analyzer, carefully review the information about
inspecting, cleaning, and gaging connectors.
Having good connector care and connection techniques
extends the life of these devices. In addition, you obtain
the most accurate measurements.
This type of information is typically located in Chapter 3
of the calibration kit manuals.
For additional connector care instruction, contact your
local Hewlett-Packard Sales and Service Office about
course numbers HP 85050A+24A and HP 85050A+24D.
See the reverse side of this notice for quick reference
tips about connector care.
comector
Page 40

Principles of Microwave Connector Care-- Quick Reference Card
I
f
l Keep connectors clean
. Extend sleeve or connector nut
f
l Use plastic end caps during storage
f
l Inspect all connectors carefully
before every connection
l Look for metal particles, scratches,
and dents
l Try compressed air first
l Use isopropyl alcohol
l Clean connector threads
Do
Do
Do
Handling and Storage
Visual Inspection
Connector Cleaning
Do Not
l Touch mating-plane surfaces
l Set connectors contact-end down
Do Not
l Use a damaged connector--ever
I
l Use any abrasives
l Get liquid into plastic support beads
Do Not
/
Y
1
-
IJO
l Clean and zero the gage before use
l Use the correct gage type
l Use correct end of calibration block
l Gage all connectors before first use
F
Do
l Align connectors carefully
l Make preliminary connection lightly
l Turn only the connector nut
l Use a torque wrench for final connect
Gaging Connectors
Making Connections
Do Not
l Use an out-of-spec connector
:
Do Not
l Apply bending force to connection
l Overighten preliminary connection
l Twist or screw any connection
l Tighten past torque wrench “break”
point
 Loading...