

Page 1
8500, 8500 N, 8500 DN Printer
English
Page 2

Page 3

HP Color LaserJet
8500, 8500 N,
8500 DN Printer
Quick Reference
Guide
Page 4

Copyright Information
© 1997 Hewlett-Packard
Company
All Rights Reserved.
Reproduction, adaptation,
or translation without
prior written permission
is prohibited, except as
allowed under the
copyright laws.
Part number:
C3983-90919
First Edition:
October, 1997
Warranty
The information
contained in this
document is subject to
change without notice.
Hewlett-Packardmakes
no warranty of any kind
with respect to this
information.
HEWLETT-PACKARD
SPECIFICALLY
DISCLAIMS THE
IMPLIED WARRANTY
OF
MERCHANTABILITY
AND FITNESS FOR A
PARTICULAR
PURPOSE.
Hewlett-Packardshallnot
be liable for any direct,
indirect, incidental,
consequential, or other
damage alleged in
connection with the
furnishing or use of this
information.
Trademark Credits
CompuServeTMis a U.S.
trademark of
CompuServe, Inc.
All other products
mentioned herein may be
trademarks of their
respective companies.
Page 5

Contents
1 Common Messages
Printer Control Panel Messages . . . . . . . . . . . . . . . . . 1-1
2 Loading Media
Media Specifications . . . . . . . . . . . . . . . . . . . . . . . 2-1
Loading the Input Trays . . . . . . . . . . . . . . . . . . . . . 2-3
ConfiguringMediaType in the Printer ControlPanel . . . . . . 2-6
3 Media Jams
Removing Jammed Media . . . . . . . . . . . . . . . . . . . . 3-1
A Service and Support Information
Take a look at all HP Support has to offer! . . . . . . . . . . . . A-1
EN Contents i
Page 6
Finding Information About the Printer
Getting Started Guide providesinformationon
installing the hardware andsoftwarefor the
printer.
Quick Reference Guide (this guide)provides
information at the printer on media jams,
loading media, and common printer control
panel messages.
Online Help provides informationat your
computer about the printer softwareand printer
drivers.
Online User’sGuideprovides information at
your computer on the printer hardware,
troubleshooting,andcustomer service.
ii Finding Information About the Printer EN
Page 7
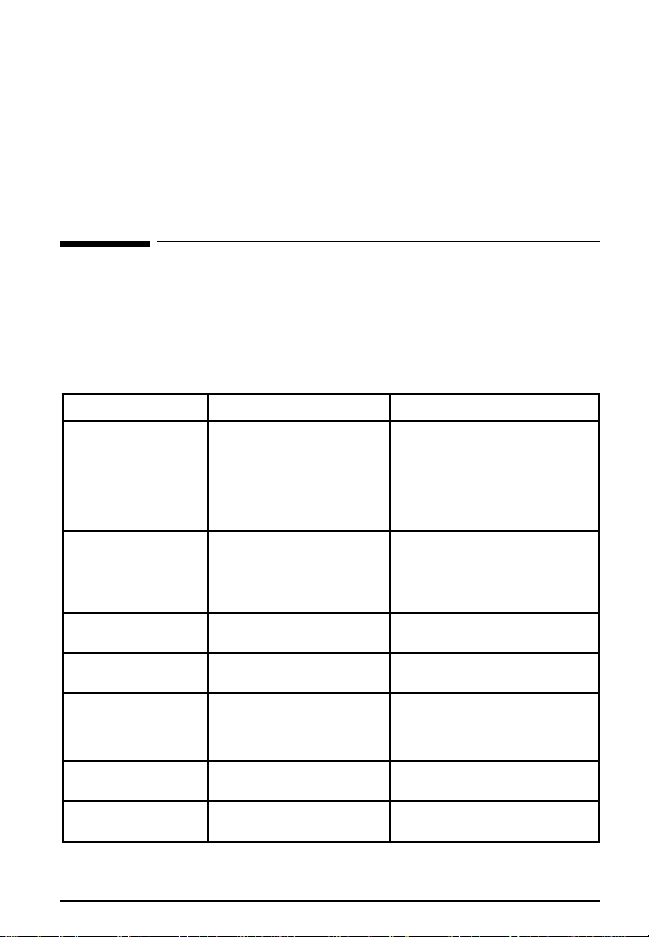
Common Messages
Printer Control Panel Messages
The following are common printer control panel messages for
conditions thatwillcause theprinter to stop working. For a more
complete list of messages, see the online user’s guide, or contact the
system administrator.
Control Panel Message Description Recommended Action
41.3 UNEXPECTED
PAPER SIZE
LOAD TRAY 1
<Type> <Size>
41.5 UNEXPECTED
PAPER TYPE
LOAD TRAY <X>
<Type> <Size>
CLEAR DUPLEX JAM
LOWER LEFT DOOR
CLEAR FUSER JAM
LOWER LEFT DOOR
CLEAR INPUT JAM The printer senses a media jam
CLEAR
MAILBOX JAM
CLEAR OUTPUT JAM
UPPER LEFT DOOR
Tray 1 is configured for one
media size, but the printer
detects thata different sizehas
been fedfrom tray 1.
<Type> and <Size>are the
media type andsize specified in
the printer driver or application.
The printer was expecting one
type of media to be fedfrom an
input trayand another typewas
fed.
The printer senses a media jam
in the duplexunit.
The printer senses a media jam
in the fuserarea.
in an inputtray
The printer senses a media jam
in the multi-bin mailbox.
The printer senses a media jam
in the topoutput bin.
Load the proper-size media in tray1
or reconfiguretray 1 forthe media
size it contains.
Open andclose the front door. The
printer should feed the page through
the printer. Verify thatthe printer
control panel configuration and
media are correct.
See “To clear jams fromthe optional
duplexer”in chapter 3.
See “To clear jams fromthe fuser
area” in chapter 3.
See “To clear jams intray 1,” “To
clear jams in trays 2 and 3,”and “To
clear jams in the optional tray4” in
chapter 3.
See “To clear jams fromthe optional
multi-bin mailbox”in chapter 3.
See “To clear topoutput bin and
upper leftdoor jams” in chapter 3.
1
EN Common Messages 1-1
Page 8

Control Panel Message Description Recommended Action
CLEAR PAPER JAM The printer sensesa media jam. Openthe printer to locateand clear
CLEAR TRANSFER
JAM
CLEAR TRAY 4 JAM The printer senses a media jam
CLEAR UNEXPECTED
PAPER SIZE JAM
THEN LOAD TRAY 1
<Type> <Size>
CLEARING PAPER
FROM PRINTER
CLOSE
<Location> DOOR
DRUM ERROR
REPLACE DRUM KIT
DRUM LIFE LOW
REPLACE DRUM KIT
DRUM LIFE OUT
REPLACE DRUM KIT
DUPLEX ERROR
CHECK DUPLEXER
FACE UP
OUTPUT BIN FULL
FUSER LIFE LOW
REPLACE KIT
The printer senses a media jam
in the transfer drum area.
in tray4.
The printer senses a media jam
in tray1.
The printer is attempting to
remove unusable media (such
as media damagedin a media
jam).
The printer senses that one of
the printerdoors is not closed
properly.
<Location> isone of the printer
doors.
The printer has detected an
error in the imaging drum.
The imaging drumis almost
past its specified life.
The imaging drumis past its
specified life.
The printer has detected an
error in the duplexer preventing
two-sided printing.
The top output bin of the
multi-bin mailboxis full.
The fuser is almost past its
specified life.
the jam.For more information, see
chapter 3,“Media Jams.”
See “To clearregistration and
transferarea jams” in chapter 3.
See “To clearjams in the optional
tray 4” in chapter 3.
See “To clearjams in tray 1”in
chapter 3.
No action is required.
Close the door indicated in the
message.After all printer doorsare
closed, theprinter control panel
might displaythe message WARMING
UP.
Printing cannot continueuntil the
drum kit has been replaced. See the
installation guideincluded with the
drum kit.
Although printingcan continue, the
drum kit should be replaced for
optimum printeroperation. See the
installation guideincluded with the
drum kit.
Printing cannot continueuntil the
drum kit has been replaced. See the
installation guideincluded with the
drum kit.
Remove theduplexer.Check forand
remove any jammed media from the
duplexerand reinstall the duplexer.
Remove all mediafrom the top
output binon the multi-bin mailbox.
Although printingcan continue, the
fuser should be replaced for optimum
printer operation.See the installation
guide includedwith the fuser kit.
1-2 Common Messages EN
Page 9

Control Panel Message Description Recommended Action
FUSER LIFE OUT
REPLACE KIT
INPUT DEVICE
PAPER PATH OPEN
INSTALL <Color> TONER One or more ofthe four toner
INSTALL FUSER
LOWER LEFT DOOR
INSTALL IMAGING
DRUM
OPEN FRONT DOOR
INSTALL
TRANSFER DRUM
OPEN RIGHT DOOR
LOCK TONER LEVER The bluelever inside the clear
MAILBOX X
OUTPUT BIN FULL
MAILBOX NOT
ATTACHED
MANUALLY FEED
<Type> <Size>
OFFLINE The printer is offline and there
POWERSAVE ON The printer is in power save
The fuser and paper rollers are
past theirspecified life.
The media transfer door on tray
4 is open.
cartridges are either not
installed or not correctly
installed in theprinter.
<Color> can becyan, magenta,
yellow,or black.
The printer has detected that
the fuser is not installed.
The printer has detected that
the imaging drumis not installed.
The printer has detected that
the transferdrum is not installed.
door is not locked.
A mailbox on the multi-bin
mailbox is full (
1 through 8).
The multi-binmailbox is not
correctly attached tothe printer.
The printer is requesting that a
sheet ofmedia or an envelope
be manually fed.
are no error messages pending.
mode.
X
can be mailbox
Replace the fuser kit and reset the
fuser counterbefore attempting to
print.See the installation guide
included with thefuser kit.
Close the media transfer door.
Insert the cartridge ormake sure the
installed cartridge isfully seated in
the printer.
Install the fuser and verify thatit is
properly seated in the printer before
attempting toprint. See the
installation guideincluded with the
fuser kit.
Install the imaging drum before
attempting toprint. See the getting
started guide orthe installation guide
included with thedrum kit.
Install the transfer drum before
attempting toprint. See the getting
started guide orthe installation guide
included with thetransfer kit.
Open thefront door of theprinter,
open the clear door, swingthe blue
leverto the left tolock it, and close
the clear door and the front door.
Remove all media from the mailbox.
Push the mailbox up against the
printer.Verifythat the wheelson the
multi-bin mailboxare not preventing
the mailboxfrom attaching to the
printer.
Load the proper type and sizemedia
into tray1.
Press [Go] to bring the printer online.
Clear this message by pressing any
key orby sending a printjob to the
printer.
1
Messages
EN Common Messages 1-3
Page 10

Control Panel Message Description Recommended Action
PROCESSING
COPY <X> OF <Y>
SEPARATOR
OUTPUT BIN FULL
STACKER
OUTPUT BIN FULL
TONER LOW
REPLACE <Color>
TONER OUT
REPLACE <Color>
TOP
OUTPUT BIN FULL
TRANSFER KIT LOW
REPLACE KIT
TRANSFER KIT OUT
REPLACE KIT
TRAY 1 CONTAINS
UNKNOWN MEDIA
TRAY 1 LOAD
<Type> <Size>
TRAY X EMPTY
<Type> <Size>
TRAY X LOAD
<Type> <Size>
CHECK CONTROL
PANEL SETTING
The printer is processing a proof
and print or mopy print job.
The multi-binmailbox output
bins are full.
The multi-binmailbox output
bins are full.
The printer is almost out of the
specified toner.
<Color> can becyan, magenta,
yellow,or black.
The printer is out of the
specified colorof toner.
<Color> can becyan, magenta,
yellow,or black.
The top output bin on the printer
is full.
The transferdrum, transfer belt,
cleaning roller, and filtersare
almost pasttheir specified life.
The transferdrum, transfer belt,
cleaning roller, and filtersare
past theirspecified life.
Media was stackedin tray 1 for
continuous manualfeed printing
and the job has been
completed.However,media
remains in tray 1.Tray 1 is
considered to benot configured.
There is a user request for a
media size that is not currently
installed in tray 1.
A traynot currently selected has
run out ofmedia.
There is a user request for a
media size that is not currently
installed in theprinter.
-OrThe trayhas run out ofmedia.
No action is required.
Remove all mediafrom the output
bins on the multi-bin mailbox.
Remove all mediafrom the output
bins on the multi-bin mailbox.
Although printingcan continue, the
toner cartridge should be replaced
for optimum printer operation.See
the installationguide included with
the tonercartridge.
Printing cannot continueuntil the
specified tonercartridge has been
replaced.See the installationguide
included withthe toner cartridge.
Remove all mediafrom the top
output bin.
Although printingcan continue, the
transferkit should be replaced for
optimum printeroperation. See the
installation guideincluded with the
transferkit.
Replace the transfer kit and reset the
transfercounter before attempting to
print.See the installation guide
included withthe transfer kit.
Configure themedia type fortray 1 or
removethe remaining media.To
configure the media type for tray1,
see the instructions in chapter 2,
“Loading Media.”
Load the media type and size
specified on thedisplay.After loading
the tray, the printer brings itself online.
Load the media type and size
specified on thedisplay.
Load the media specified on the
display, and configure the input tray
in the printercontrol panel. After the
tray is loaded, the printer brings itself
online.
Pressing [Go] will cause the printer to
attempt toprint the page on the
default size media.
1-4 Common Messages EN
Page 11

Loading Media
Media Specifications
The table below contains informationaboutloadingmedia including
special types such as transparencies, envelopes,labels, and
prepunched media. For more complete information on media
specificationsfor this printer, see the online user’s guide.
2
Location Media Type &
Tray 1 Paper
* SS = single-sidedprinting; DS = double-sidedprinting; L&F= letterhead and preprintedforms
**HP recommends using5 mils (0.13 mm) thick transparencieswith this printer.
EN Loading Media 2-1
Size
Heavy paper(28
to 58 lb;105 to
216 g/m
Letter
A4
Executive
Legal
11-by-17 inch
A3
A5
Custom sizes:
minimum 3.9
by 7.5inch
maximum 12
by 18.5inch
Prepunched
media
Letter
A4
Transparencies
Letter
A4
Media
Weight
16 to 58 lb
(60 to 216
2
)
g/m
16 to 58 lb
(60 to 216
g/m
4 to 5 mils
(0.10 to
0.13 mm)
thick**
Orientation* Maximum Capacity
SS:Face up
DS: Face down
2
) bond
L&F: Short edge(top)
toward the rear of tray
Letter/A4:Long
edge towardthe
printer
SS:Face up, with the
) bond
holes towardprinter
DS: Face down, with
the holes away from
printer
Face up, with the
long edgetoward
the printer
2
100 sheets of 20 lb
2
) bond
(75 g/m
Limit to media-fillmark
on the media width
guides
100 sheets of 20 lb
2
) bond
(75 g/m
Limit to media-fillmark
on the media width
guides
Limit to media-fillmark
on the media width
guides
Page 12

Location Media Type &
Tray 1
(continued)
Trays 2and 3
(and optional
Tray 4 )
Trays 2and 3
(only)
* SS = single-sidedprinting; DS = double-sided printing;L&F = letterhead and preprinted forms
**HP recommends using5 mils (0.13 mm) thick transparencies with this printer.
Size
Envelopes
Double postcard
(JPOSTD)
B5
Commercial #10
C5
DL
Monarch
Labels
Letter
A4
Paper
Letter
A4
Executive
Legal
Trays3 and 4
only
11-by-17 inch
A3
Prepunched
media
Letter
A4
Transparencies
Letter andA4
Media
Weight
Maximum of
24 lb (90
g/m
— Face up, with the
16 to 28 lb
(60 to 105
g/m
16 to 28 lb
(60 to 105
g/m
4 to 5 mils
(0.10 to
0.13 mm)
thick**
Orientation* Maximum Capacity
Faceup, with the short
)
SS:Face down
DS: Face up
)
L&F:Short edge(top)
SS:Face down, with
)
DS: Face up, with the
edge towardthe
printer
long edgetoward
the printer
toward the rear of tray
the holesto the right
holes to the left
2
2
2
Facedown Limit tomedia-fill mark
Approximately10
Limit tomedia-fill mark
on themedia width
guides
Limit tomedia-fill mark
on themedia width
guides
500 sheets of20 lb
2
) bond (trays 2
(75 g/m
and 3)
2,000 sheetsof 20 lb
2
) bond (tray 4)
(75 g/m
Limit tomedia-fill mark
on themedia width
guides
500 sheets of20 lb
2
) bond (trays 2
(75 g/m
and 3)
2,000 sheetsof 20 lb
2
) bond (tray 4)
(75 g/m
Limit tomedia-fill mark
on themedia width
guides
on themedia width
guides
2-2 Loading Media EN
Page 13

Loading the Input Trays
To load the input trays, first adjust the media guides and then load
the media. When you have finished loading the media, configure the
input tray in the printer control panel.
Follow the proceduresbelow to adjust the media guides and load
media into the inputtrays. Forcomplete instructions on loading and
configuringinputtrays, see the online user’s guide.
Caution To avoid media jams, never add or remove media while the printer is
printing and never overload an input tray.
Loading media (including envelopes) into tray 1
2
Loading Media
Note The default mode for tray 1 is First mode. When tray 1 is in First
Figure 2-1
Note Do not fill the tray above the media-fill mark.
EN Loading Media 2-3
mode, the printer will look for media loaded in tray 1 first. If media
is loaded in tray 1, the printer will print from tray 1.
1 Open tray 1. (Use the tray extension if the media is longer than the
tray.)
2 Slide the media widthguides tothe size that matches the media.
3 Place the media in the tray and slide it into the printer as far as it will
go (until the leading edge rests lightly against the printer).
4 Configure the media type and size in the PAPER HANDLING MENU in
the printer control panel.
Page 14

Figure 2-2
Figure 2-3
Loading media into trays 2 and 3
1 Open tray 2 or 3.
2 To load media that is a different size from the media previously
loaded in the tray, move the two media guides (A and B) to the
correct positions.
3 Load media up to the media-fill marks. Forexample, 500 sheets of
20 lb (75 g/m
Note Do not fill the tray above the media-fill mark.
2
) bond media will fit in the tray.
4 Push the tray into the printer.
5 Configure the media typein the PAPER HANDLING MENU in the
printer control panel.
2-4 Loading Media EN
Page 15

Figure 2-4
Figure 2-5
Loading media into (optional) tray 4
2
Loading Media
1 Open tray 4.
2 To load media that is a different size from the media previously
loaded in the tray, move the three media guides (A, B, and C) to the
correct positions. Move theleft media guide (C) to the back of the
tray to load 11-by-17 inch paper.
3 Load media into the rightside of the tray up to the media-fill mark.
For example, 2,000 sheets of 20 lb (75 g/m
the tray. Push down on all four corners of the media.
Note Do not place anything in tray 4 to the left of the media guides (D).
Also, do not fill the tray above themedia-fill mark.
4 Push the tray into the printer.
5 Configure the media type in the PAPER HANDLING MENU in the
printer control panel.
EN Loading Media 2-5
2
) bond media will fit in
Page 16

Configuring Media Type in the Printer
Control Panel
Configure the printerto recognize thetype of media in each of the
input trays. If the media type is correctly configuredfor each tray,
the printer will print based on the type and size of media you choose
in the printer driver andwill automatically use the correct input tray.
Note If the media type is not set correctly, then the printermight not print
Note TRAY 1 TYPE = willonlyappear iftray 1 is in Cassette mode.
on the correct media or at the correct speed for the media type,
which can result in poor print quality.
To configure input trays
1 Press [Menu] until PAPER HANDLING MENU appears on the printer
control panel display.
2 Press [Item] until TRAY <number> TYPE = appears on the display.
3 Press [–]Value]+] until the correct media type appears on the display.
4 Press [Select] to save the selection. An asterisk (*) appears next to
the selection.
Note Tray 2, tray 3, and the optional tray 4 automatically sense the media
2-6 Loading Media EN
size. To configure media size for tray 1 in Cassette mode, continue
with step 5. Otherwise, proceed to step 8.
5 Press [Item] until TRAY 1 SIZE = appears on the display.
6 Press [–[Value]+] until the correct media size appears on the display.
7 Press [Select] to savethe selection. An asterisk (*) appears to the
right of the selection.
8 Repeat steps 2 through 4 to configure media type in other trays.
-OrPress [Go] to bring the printer online.
For more informationaboutFirstand Cassette modes fortray 1 and
about input tray configuration, see the online user’s guide.
Page 17

Media Jams
Removing Jammed Media
The procedures on the followingpages explain how to clear the most
commonly occurring jams.After alljammedmedia have been
removed, the printer will warm up and resume printing.
The printer control panel displays messages aboutwhere jams occur
and which doors to open to clear jams. As a first step, try opening
and then closing the front door of the printer. The printer will attempt
to clear a jam from the paper path and send the page to an output bin.
If the printer does not clear the jam, try the following:
• Remove all portions of the jammed media fromthe printer.
• After removing media that has jammed in one area of the printer,
check other areas to make sure all media has been removed.
Solving Repetitive Media Jams
If the printer continues to jam, try the following:
• Use only media that meets the media specifications detailed in
chapter 2, “Loading Media.”
• Make sure that the media is correctly loaded in the input trays and
that all media width guides are correctlyset.
• Make sure the tray is not overloaded with media.
• Do not use media that is torn, worn, or irregular.
• Turn over the stack of media in the tray.
• Print heavy media from tray 1.
If the printer continues to jam, contact a local authorizedHP service
provider. For more information on solving repetitivejams, see the
online user’s guide.
3
EN Media Jams 3-1
Page 18

Figure 3-1
Figure 3-2
To clear jams from the lower right door
1 Open the lower right door.
2 Remove anyjammedmedia.
3 At the left side of the opening, pull the green tab down to lower the
bar, removeany jammed media, and release the tab.
4 Close the lower right door.
To clear jams in tray 1
1 Remove media from tray 1.
2 Gently removeanyjammedmedia.
3 Load media back into tray 1 and resume printing.
Note If the media does not come out easily,see “To clear registration and
3-2 Media Jams EN
transfer area jams” later in this chapter.
Page 19

Figure 3-4
To clear jams in trays 2 and 3
1 Open tray 2 or tray 3.
2 Remove anyjammed media. Youmight have to remove the tray, by
lifting it slightly and pulling it out, and look into the openingto
locate the jammed media.
3 Close the tray.
Figure 3-3
To clear jams in the optional tray 4
1 Open tray 4.
2 Remove anyjammed media.
3 Open the media transfer door and remove anymedia.
4 Lift the green bar, remove any jammed media, and release the bar.
5 Close the media transfer door and tray 4.
EN Media Jams 3-3
3
Media Jams
Page 20

Figure 3-5
To clear jams from the fuser area
1 Open the lower left door.
2 Gently removeanyjammedmedia fromthe inside of the door or
from between the rollers near the top of the opening.
If an optional duplexer is installed, continuewith step 3; otherwise,
proceed to step 6.
3 Press the green tab on the right side of the duplexer and pull the
duplexer out of the printer.
4 Remove anyjammedmedia fromthe duplexer.
5 Lift the green guide, remove any media, and lower the green guide.
WARNING! Do not touch the fuser; it might be very hot and could cause burns.
6 On the left side of the fuser, pull downon the green tab, carefully
remove anymedia, and release the tab.
Repeated jams in the fuser area indicate that the fuser might be
installed improperly. Complete steps 7 through 9 if you experience
repeated jams in the fuser area; otherwise, proceed to step 10.
7 Press down on the large green leveron the right side of the fuser to
ensure that it is in its proper position.
8 On each side of the fuser, rotate the blue leversdown slightly.
9 Rotate the bluelevers back up until they snap into place.
10 If an optional duplexerwas removedfrom the printer, slide the
duplexer back into the printeruntil it clicks into place.
11 Close the lower leftdoor.
3-4 Media Jams EN
Page 21

Figure 3-6
To clear transfer drum jams
1 Open the front door, press the white button on the lower (green)
lever, and swing the lever to the right.
2 Open the upper right door.
3 Using the handles, gently pull out the transfer drum untilit stops.
4 From the front of the printer, remove any jammed media.
5 Lift the transfer drum out of the printer and remove anymedia
wrapped around the drum.
6 Align the arrows on ends of the transfer drum with the matching
arrows on the tracks inside the printer.
7 Push the transfer drum into the printer.
8 Close the upper right door.
3
Media Jams
Note If the upper right door does not close, the transfer drum might not be
Note If the lever does not returnto its original position, the transfer drum
EN Media Jams 3-5
all the way in the printer.
9 In the front of the printer,swing the lower (green) lever back to the
left, making sure it clicks into place.
might not be all the way in the printer.
10 Close the front door.
Page 22

Figure 3-7
To clear registration and transfer area jams
1 Open the front door,press the white buttonon the lower (green)
lever, and swing the lever to the right.
2 Open the upper right door.
3 Using the handles, gently pull out the transfer drum until it stops.
4 Remove jammed media frominside the opening.
If the entire page can be removed easily, without forcing it out,
continue to step 7. If only one edge of the media can be removed
easily, do not force the other edge out.
5 In the front of the printer, turn the blue knob counterclockwise to
feed the jammed media into the printer.
6 From the front of the printer, remove the jammed media.
7 Push the transfer drum into the printer.
8 Close the upper right door.
Note If the upper right door does not close, the transfer drum might not be
all the way in the printer.
9 In the front of the printer, swing the lower(green) lever back to the
left, making sure it clicks into place.
Note If the lever does not return to its original position,the transfer drum
might not be all the way in the printer.
10 Close the front door.
3-6 Media Jams EN
Page 23

Figure 3-8
Figure 3-9
To clear jams from the optional duplexer
1 Open the lower left door.
2 Remove anyjammed media from the duplexer.
3 Press the green tab on the right side of the duplexer, and pull the
duplexer out.
4 Lift the green guide, remove anymedia,and lower the green guide.
5 Slide the duplexerback into the printer until it clicks into place.
6 Close the lower left door.
3
Media Jams
To clear top output bin and upper left door jams
1 Slowly remove any jammed media from the top output bin.
2 Open the upper left door.
3 Gently remove any jammed media.
4 Close the upper left door.
EN Media Jams 3-7
Page 24

Figure 3-10
To clear jams from the optional multi-bin mailbox
1 Remove the leftoutput bin, remove any jammed media, and replace
the left output bin.
2 Pull the multi-binmailboxaway from the printer.
3 Remove anyjammedmedia frombetween the mailbox and printer.
4 Push the multi-bin mailboxback towardthe printer.
3-8 Media Jams EN
Page 25

Service and Support
Information
Take a look at all HP Support has to
offer!
Thank you for your purchase. Along with your product, you receive
a variety of support services from Hewlett-Packardand our support
partners designed to give youthe resultsyou need, quickly and
professionally.
A
Online
Services: for
24-hour access
to information
over your
modem, we
suggest these
services.
EN Service and Support Information A-1
WorldWide Web URL—Printer drivers, updated HP printer software, plus product
and support informationmay be obtained from the followingURLs:
in the U.S.: http://www.hp.com
in Europe: http://www2.hp.com
Printer driversmay be obtained fromthe following sites:
in Japan: ftp://www.jpn.hp.com/drivers/
in Korea: http://www.hp.co.kr
inTaiwan: http://www.hp.com.tw or from a local driver website of
HP Bulletin Board Service—Our electronic download service provides
convenientaccess to HP printer drivers,updated HP printer software, product
information, and troubleshooting hints.Set yourcommunication software toN, 8, 1
and dial oruse:
in the U.S. and Canada: (1) (208) 344-1691
inTaiwan: (886)(2) 923-3233
in Korea: HITEL or CHOLIAN (Go HPK)
in Australia: (61) (3) 9890 0276
in New Zealand: (64) (9) 356 3660
in China: (86) (10) 6261-4172
European BulletinBoard Service numbers arelisted at http://www2.hp.com
America OnLine—(America OnLine/Bertelsmannis available in France,
Germany, and the UK)—Printer drivers, updated HPprinter software, and support
documentation are available tohelp answer questions on HP products. Use
KeywordHP to start your tour or call (1) (800) 827-6364and ask for
representative#1118 to subscribe.
http://www.dds.com.tw.
Page 26

Online
Services
(continued)
Obtaining
Software
Utilities and
Electronic
Information:
For U.S.and
Canada:
For Asia-Pacific
Countries/
Regions:
For Australia,
New Zealand,
and India:
For European
English:
HP Direct
Ordering for
Accessories
and Supplies
HP Support
Assistant
compact disc:
HP Service
Information:
HP Service
Agreements:
CompuServe—Printer drivers,updated HP printer software,and interactive
sharing of technical information with othermembers are available on
CompuServe’sHP User’s forums (GOHP), or call (1) (800)524-3388 and ask for
representative#51 to subscribe.(CompuServe is also available in the UK,France,
Belgium, Switzerland, Germany, and Austria.)
Phone: (1)(970) 339-7009 Mail: Hewlett-Packard Co.
Fax: (1) (970) 330-7655 P.O.Box 1754
Contact Fulfill Plus at(65) 740-4477 (HongKong, Indonesia, Malaysia,
Philippines, or Singapore). For Korea, call (82)(2) 3270-0805 or (82)(2)
3270-0893.
For Australia and New Zealand, call (61) (2) 565-6099. ForIndia, call (91) (11)
682-6035.
Call (44) (142)986-5511.
Call (1) (800)538-8787 (U.S.) or (1) (800) 387-8164 (Canada).
This support tooloffers a comprehensive onlineinformation system designed to
provide technicaland product informationon HP products.Tosubscribe to this
quarterly service in theU.S.or Canada, call (1) (800) 457-1762.In Hong Kong,
Indonesia, Malaysia, or Singapore, call Fulfill Plus at (65) 740-4477.
To locate HP-authorizeddealers, call (1)(800) 243-9816 (U.S.)or (1) (800)
387-3867 (Canada).
Call (1) (800)446-0522 (U.S.) or (1) (800) 268-1221 (Canada).
Greeley, CO 80632USA
A-2 Service and Support Information EN
Page 27

HP FIRST:HP FIRST Fax will deliver detailed troubleshootinginformation on common software and
troubleshootingtips for yourHP product. Call fromany touch-tone phone and request up to three
documents per call. These documentswill be sent to thefax of yourchoice.
Australia
Austria
Belgium
(Dutch)
Belgium
(French)
Canada
China
Denmark
English
(outside of
UK)
Finland
France
Germany
Hong Kong
Hungary
India
Indonesia
Italy
Japan
(61) (3) 9272-2627
(43) (1) 0660-8128
(32) (2) 0800-1-1906
(32) (2) 0800-1-7043
(1) (800) 333-1917
(86) (10) 6505-5280
(45) 8001-0453
(31) (20) 681-5792
(358) (9) 0800-13134
(01) (43) 623-444
(49) (13) 081-0061
(852) 2506-2422
(36) (1) 252-4647
(91) (11) 682-6035
(62) (21) 352-2044
(39) (2) 1678-59020
(81) (3) 3335-8622
Korea
Malaysia
Netherlands
New Zealand
Norway
Philippines
Portugal
Singapore
Spain
Sweden
Switzerland
(German)
Switzerland
(French)
Taiwan
Thailand
United
Kingdom
United States
(82) (2) 769-0543
(60) (3) 298-2478
(31) (20) 0800-22-2420
(64) (9) 356-6642
(47) 800-11319
(65) 291-7951
(351) (1) 0505-313342
(65) 275-7251
(34) (90) 099-3123
(46) (2) 079-5743
(41) (1) 0800-551527
(41) (1) 0800-551526
(886) (2) 719-5589
(66) (2) 661-3511
(44) (134) 0800-960271
(1) (800) 333-1917
Customer Support Options Worldwide
In addition to the phone numbers listedbelow, appendix E of the
online user’s guide, “Warrantyand Support Information,”contains
worldwide salesandservice addresses andphone numbers for
countries/regions notlistedhere.
Customer
Support &
Product
Repair
Assistance for
the U.S.and
Canada:
EN Service and Support Information A-3
Call (1) (208) 323-2551 Monday through Friday from 6 amto 6 pm (Mountain
free of charge during the WarrantyPeriod.However,your standard
Time)
long-distance phonecharges still apply.
calling.
Post-warrantytelephone assistance is available toanswer yourproduct questions.
Call (1) (900) 555-1500 ($2.50* per minute, U.S.only) or call (1)(800) 999-1148
($25* per call, Visa or MasterCard,U.S.and Canada).
you connectwith a support technician. *Prices subject to change.
Have yourserial number ready when
Charges begin only when
Appendix
A
Page 28

European Customer Support Center Language and In-Country Options Available
HP provides afree telephone support service during the warranty period.By calling a telephone
number listedbelow, youwill be connected toa responsive team waiting to help you.If you require
support after yourwarranty has expired,you can receive supportfor a feethrough the same
telephone number. The fee is chargedon a per-incidentbasis. Whencalling HP, please have the
followinginformation ready: product name and serial number, date ofpurchase, and description of
the problem.
Danish: Denmark (45) 3929-4099 German: Austria (43) (1) 0660-6386
Dutch: Belgium (32) (2) 626-8806 Germany (49)(180) 525-8143
Netherlands (31) (20) 606-8751 Italian: Italy (39) (2) 264-10350
English: Ireland (353) (1) 662-5525 Norwegian: Norway (47) 2211-6299
UK (44) (171)512-5202 Portuguese: Portugal (351)(1) 441-7199
International (44) (171)512-5202 Spanish: Spain (34)(90) 232-1123
Finnish: Finland (358) (9) 0203-47288 Swedish: Sweden (46) (8) 619-2170
French: Belgium (32) (2) 626-8807
France (01) (43)623-434
Switzerland (41) (84) 880-1111
If yourequire support after yourwarranty has expiredor additional product repair services, or if your
country/region is notlistedbelow,seethe“WorldWide SalesandService”sectioninappendixEof
the onlineuser’sguide.
Argentina
Australia
Brazil
Canada
China
Czech Republic
Greece
Hong Kong
Hungary
India
Indonesia
Japan
Korea
Open Monday-Friday8:30-18:00 CET
In-country/region SupportNumbers
(54) (1) 781-4059
(54) (1) 781-4069
(61) (3) 272-8000
(55) (11) 709-1444
(1) (208) 323-2551
(86) (10) 6261-4174
(86) (10) 6261-4175
(86) (10) 6261-4176
(86) (10) 6262-5666
(42) (2) 471-7321
(30) (1) 689-6411
(852) 800-7729
(36) (1) 343-0310
(91) (11) 682-6035
(91) (11) 682-6069
(62) (21) 350-3408
(81) (3) 3335-8333
(82) (2)3270-0700;
outside Seoul, call (82)
(80) 999-0700
Malaysia
México D.F.
México Guadalajara
México Monterey
Middle East/Africa
New Zealand
Philippines
Poland
Portugal
Russia
Singapore
Switzerland
Taiwan
Thailand
Turkey
(60) (3) 295-2566
(52) (5) 326-4600
(52) (3) 669-9500
(52) (83) 378-4240
(41) (22) 780-7111
(64) (9) 356-6640
(63) (2) 894-1451
(48) (22) 37-5065
(351) (1) 301-7330
(7) (95) 923-5001
(65) 272-5300
(41) (1) 753-7111
(886) (2) 717-0055
(66) (2) 661-4011
(66) (2) 661-4012
(90) (1) 224-5925
A-4 Service and Support Information EN
Page 29

Page 30

Copyright© 1997
Hewlett-PackardCo.
Printed in USA 10/97
Manual Part No.
C3983-90919
*C3983-90919*
*C3983-90919*
C3983-90919
 Loading...