

Page 1

HP LaserJet 8000, 8000 N, 8000 DN
and HP Mopier 240 Printers
Getting Started Guide _______
Page 2

© Copyright Hewlett-Packard
Company 1998
All Rights Reserved.
Reproduction, adaptation, or
translation without prior written
permission is prohibited, except
as allowed under the cop yright
laws.
Publication number
C4085 90901
First Edition, May 1998
Warranty
The information contained in
this document is subject to
change without notice.
Hewlett-Packard makes no
warranty of any kind with
respect to this information.
HEWLETT-PACKARD
SPECIFICALLY DISCLAIMS
THE IMPLIED WARRANTY OF
MERCHANTABILITY AND
FITNESS FOR A PARTICULAR
PURPOSE.
Hewlett-Packard shall not be
liable for any direct, indirect,
incidental, consequential, or
other damage alleged in
connection with the furnishing or
use of this information.
Trademark Credits
PostScript is a trademark of
Adobe Systems Incorporated
which may be registered in
certain jurisdictions.
Arial, Monotype, and Times
New Roman, are U.S. registered
trademarks of the Monotype
Corporation.
CompuServe is a U.S.
trademark of CompuServe, Inc.
Helvetica, Palatino, Times, and
Times Roman are trademarks of
Linotype AG and/or its
subsidiaries in the U.S. and
other countries.
Microsoft, MS Windows,
Windows and Windows NT are
U.S. registered trademarks of
Microsoft Corporation.
TrueType is a U.S. trademark of
Apple Computer, Inc.
NERGY STAR
E
is a U.S.
registered service mark of the
U.S. EPA.
Hewlett-Packard Company
11311 Chinden Boulevard
Boise, Idaho 83714 U.S.A.
Page 3

Contents
Printer Setup
Installation Checklist . . . . . . . . . . . . . . . . . . . . . . . . . . . . . . . . . . . .2
Step 1
Step 2
Step 3
Step 4
Step 5
Step 6
Step 7
Step 8
Step 9
Step 10
Step 11
Step 12
Step 13
Step 14
Step 15
Prepare Printer Location. . . . . . . . . . . . . . . . . . . . . . . .3
Check Package Contents . . . . . . . . . . . . . . . . . . . . . . .5
Remove Internal Packaging . . . . . . . . . . . . . . . . . . . . .6
Locate Printer Parts . . . . . . . . . . . . . . . . . . . . . . . . . . .7
Install Accessories . . . . . . . . . . . . . . . . . . . . . . . . . . . .8
Install Toner Cartridge. . . . . . . . . . . . . . . . . . . . . . . . . .9
Load Trays 2 and 3. . . . . . . . . . . . . . . . . . . . . . . . . . .11
Load Tray 1 (Optional) . . . . . . . . . . . . . . . . . . . . . . . .13
Attach Power Cord . . . . . . . . . . . . . . . . . . . . . . . . . . .15
Install or Change the Control Panel Overlay
(Optional) . . . . . . . . . . . . . . . . . . . . . . . . . . . . . . . . . . . . .16
Configure the Control Panel Display Language
(Optional) . . . . . . . . . . . . . . . . . . . . . . . . . . . . . . . . . . . . .17
Test the Printer . . . . . . . . . . . . . . . . . . . . . . . . . . . . .18
Connect Printer Cables. . . . . . . . . . . . . . . . . . . . . . .19
Install Printing Software . . . . . . . . . . . . . . . . . . . . . .23
Verify Printer Setup. . . . . . . . . . . . . . . . . . . . . . . . . .26
EN
iii
Page 4

iv
EN
Page 5

Printer Setup
Congratulations on your purchase of the HP LaserJet 8000 or the HP
Mopier 240 series printer! This printer is available in four
configurations:
HP LaserJet 8000 printer
The HP LaserJet 8000 printer is a 24 ppm laser printer that comes
standard with a 100-sheet multi-purpose Tray 1, two 500-sheet trays,
and 8 MB of memory. It is designed for workgroups and can print on
paper sizes up to A3 and 11 x 17.
HP LaserJet 8000 N printer
The HP LaserJet 8000 N printer is a 24 ppm laser printer that comes
standard with a 100-sheet multi-purpose Tray 1, two 500-sheet trays,
16 MB of memory , and an HP JetDirect 600N for 10/100Base-TX print
server. It is designed for network users and can print on paper sizes
up to A3 and 11 x 17.
EN
HP LaserJet 8000 DN printer
The HP LaserJet 8000 DN printer is a 24 ppm laser printer that
comes standard with a 100-sheet multi-purpose T ra y 1, two 500-sheet
trays, 24 MB of memory, an HP JetDirect 600N for 10/100Base-TX
print server, and a duplex er. The printer is designed for network users
and can print on paper sizes up to A3 and 11 x 17.
HP Mopier* 240
The HP Mopier 240 printer with advanced paper handling devices,
such as the 2000-sheet Input Tray and 5-bin Mailbox with Stapler,
enables you to easily produce multiple sets of multipage
documents—collated, duplexed, and stapled—directly from your
desktop and without having to walk to the photocopier.
* Available through HP-qualified distribution.
1
Page 6

Installation Checklist
y
g
This guide will help you set up and install the new printer. For proper
installation, please complete each section in order:
●
Unpack the printer
●
Install the printer
●
Connect the printer cables
●
Install printing software
●
Verify printer setup
steps 1-4
steps 5-12
step 13
step 14
step 15
WARNING!
Note
The printer is heav
. HP recommends that four people move it.
To learn about all the features and capabilities of the printer, see the
printer user
uide and the help menus in the printer drivers (available
after you install the printing software).
2 Printer Setup
EN
Page 7
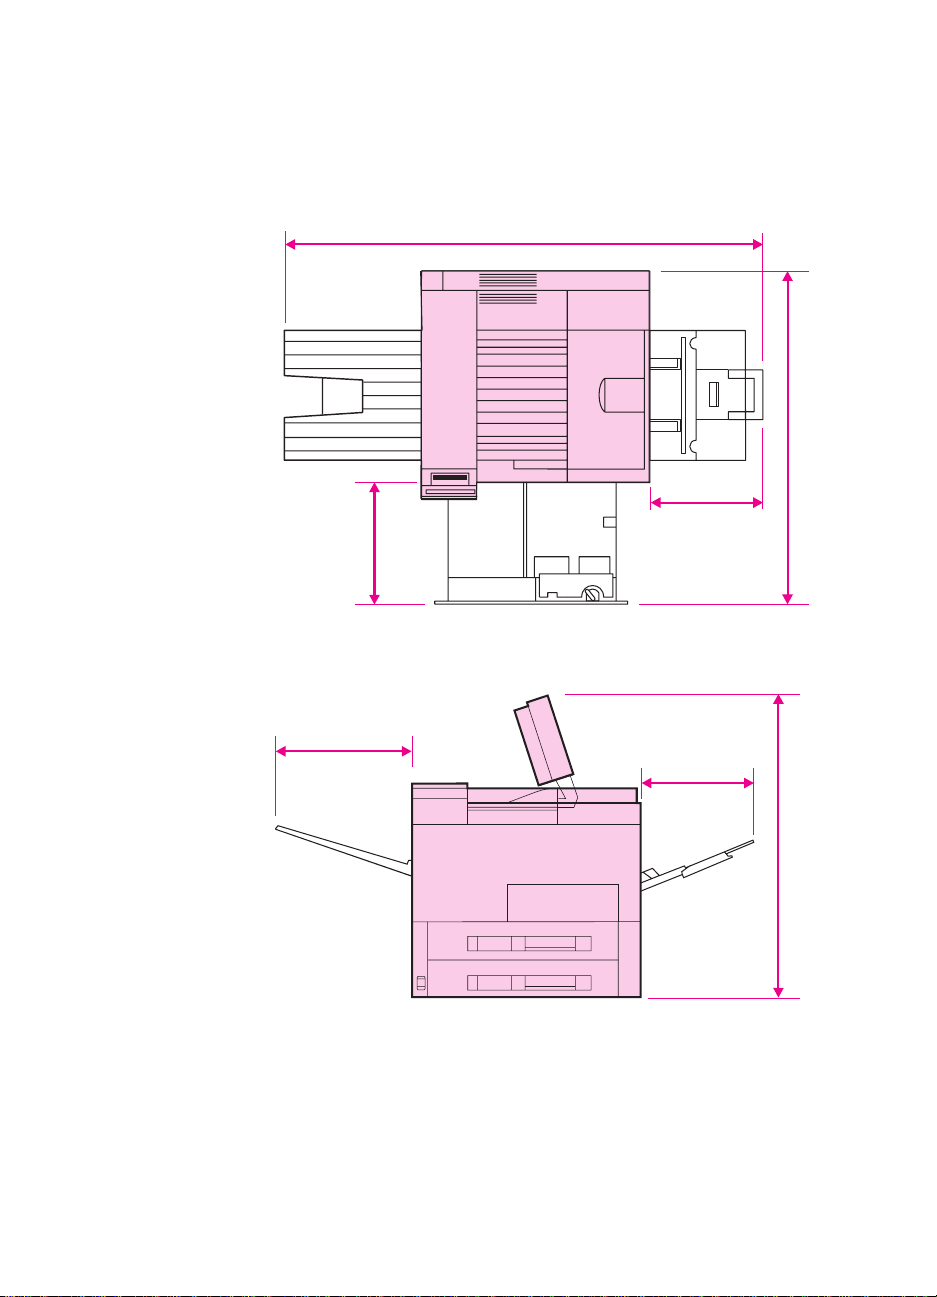
Step 1 Prepare Printer Location
35 in (889 mm)
46.75 in (1187 mm)
11.5 in
(292 mm)
14.5 in
(368 mm)
13.75 in
(350 mm)
11.5 in
(292 mm)
29.5 in (749 mm)
Printer Size
EN
HP LaserJet 8000 Printer Dimensions (Top and Side Views)
Prepare Printer Location
3
Page 8

Location requirements for the printer
●
A sturdy, level surface for
●
Adequate power supply
placement
●
A stable environment—no
●
Space allowance around the
printer
●
A well ventilated room
●
No exposure to direct sunlight
or chemicals, including
abrupt temperature or humidity
changes
●
Relative humidity 20% to 80%
●
Room temperature 50° to 91° F
(10° to 32.5° C)
ammonia-based cleaning
solutions
Printer Weight (without toner cartridge)
●
HP LaserJet 8000 and 8000 N printers: 48 kg (106 lbs)
●
HP LaserJet 8000 DN printer: 51 kg (113 lbs)
4 Printer Setup
EN
Page 9

Step 2 Check Package Contents
g
Power Cord
Printer Software
Compact Disc
Toner
Cartridge
Control
Panel
Overlay
Printer
Documentation
Holder for Ready
Reference Guide
Printer
Note
EN
Package Contents
A printer cable is not included in the packa
user guide for ordering information.
e contents. See the printer
Check Package Contents
5
Page 10

Step 3 Remove Internal Packaging
1
Note
Save all packing material. You may need
to repack the printer at a later date.
WARNING!
This printer weighs 48 kg (106 lbs). HP
recommends that four people move it.
2
1 Remove all external packing tape
from the printer.
2 Remove packing material from
standard output bin and protective
film from display.
3 Open the top cover.
3
4 Remove packing material and tape
and close top cover.
5 Open the left-side door and remove
the two packing spacers. Close the
door.
4
5
6 Printer Setup
EN
Page 11

Step 4 Locate Printer Parts
The following illustrations give the location and names of the
important printer parts.
Left Output Bin
1
Control Panel
2
Standard Output Bin
3
Adjustable Paper Stop
4
Top Cover
5
EN
Printer Parts (front and rear views)
Tray 1 (multipurpose)
6
Tray 1 extensions
7
Tray 1 paper width guides
8
Tray 2
9
Tray 3
10
Powe r Switch
11
Front Door
12
Parallel Cable Connector
13
C-Link Connector
14
Power Cord Connector
15
Locate Printer Parts
7
Page 12

Step 5 Install Accessories
7-bin Tabletop
Mailbox
Duplexer
Envelope Feeder
Stand for 7-bin
Tabletop Mailbox
Printer Stand
2 x 500-sheet
Input Tray
2000-sheet
Input Tray
Multibin
Mailbox (8-Bin)
Multibin Mailbox (5-Bin
with Stapler)
Install any accessories that you have purchased with the printer. Use
the installation instructions that are packaged with the accessories.
8 Printer Setup
Optional Accessories
EN
Page 13

Step 6 Install Toner Cartridge
Open the printer’s top cover.
1
1
Remove the toner cartridge from its
2
packaging. (Save packaging for
possible cartridge storage.)
Note
To prevent damage to the toner
cartridge, do not expose it to light for
more than a few minutes.
Rotate the cartridge and gently
3
shake it from side to side to
distribute the toner evenly inside the
cartridge.
Locate the sealing tape tab on the
4
end of the cartridge. Carefully bend
the tab back and forth until it
separates from the cartridge.
Continued on the next page.
EN
Install Toner Cartridge
9
Page 14

5 Firmly pull the tab straight out from
the cartridge to remove the entire
length of tape. Avoid touching any
black toner on the tape.
Note
If the tab separates from the tape, grasp
the tape and pull it out of the cartridge.
6
Note
If toner gets on your clothing, wipe it off
with a dry cloth and wash clothing in cold
water. (Hot water sets toner into fabric.)
6 Position the cartridge as shown with
the arrow pointing into the printer.
7
7 Slide the cartridge into the printer as
far as it will go.
8 Close the top cover.
8
10 Printer Setup
EN
Page 15

Step 7 Load Trays 2 and 3
1
2
3
Note
The paper size setting is set to a default
size at the factory. The default for the
United States is letter-size, while in
Europe it is A4. If you would like to use a
different default paper size, reconfigure
the paper tray setting.
Open Tray 2.
1
Remove the packing spacer and
2
tape.
If you wish to load paper that is
3
different than the default size, turn
the green tray lock that is located in
the front of the tray to the unlocked
position.
Slide the front tray guide to the
4
desired paper size.
Push and turn the tray lock to lock
5
the trays.
Continued on the next page.
EN
4
5
Load Trays 2 and 3
11
Page 16

6 Remove the left-side paper tray
6
7
8
9
guide by pushing in and lifting.
7 Move the guide to the desired
position and reinstall. Make certain
the guide is secure at the front of the
tray.
8 Insert paper as shown in the
illustration. Press along the edges to
ensure that the paper is under the
tabs. Do NOT overfill the paper tray.
Fill to the bottom of the arrows
shown on the indicator.
9 Place the label corresponding to the
paper size you loaded onto a tab
and place the tab in the slot on the
tray as shown.
10 Push Tray 2 into the engine. Repeat
steps 1 through 8 to load paper into
Tray 3.
Note
See the printer user guide for
instructions on loading and printing on
custom-size paper.
10
12 Printer Setup
EN
Page 17

Step 8 Load Tray 1 (Optional)
y
g
1
Tray 1 is a multi-purpose tray and holds
up to 100 sheets of paper or 100
envelopes.
Tra
1 provides a convenient way to print
envelopes, transparencies, custom-size
paper, labels, or other types of media
without havin
Note
Paper loaded in Tray 1 will be printed first
unless the Tray 1 setting is changed from
the printer control panel. To change the
order in which trays will be printed from,
see the printer user guide.
Open Tray 1 by pulling down on the
1
top center of the door.
Pull out the tray extension until it
2
clicks into place. Pull out the second
tray extension if the paper is longer
than the first tray extension.
Adjust the guides to the desired
3
paper size.
to unload the other trays.
Load paper. The paper should fit
4
under the tabs on the guides.
Continued on next page.
EN
Load Tray 1 (Optional)
13
Page 18

5 Load letter or A4 paper with the long
edge toward the printer.
6 Load legal, 11 x 17, or A3 paper with
the short edge toward the printer.
Note
See the sections on letterhead,
envelopes, and duplexing in the printer
user guide for proper orientation of
specific jobs.
14 Printer Setup
EN
Page 19

Step 9 Attach Power Cord
1
2
Locate the power switch on the front
1
of the printer. Make sure the printer
is turned off.
Connect the power cord to the
2
printer and a grounded power strip
or an AC outlet.
Tu rn the printer on. After the printer
3
warms up, the
should appear on the control panel
display and the Ready light should
remain on. If the
does not appear, see the problem
solving chapter in the
READY
READY
message
message
user guide.
3
READY
EN
Attach Power Cord
15
Page 20

Step 10 Install or Change the Control Panel
Overlay (Optional)
1
2
3
To change the overlay to a language
other than English:
1 Locate the overlay you wish to install
and remove it from its bag.
Note
Make certain the power switch is off.
2 Gently lift up on each side of the
installed overlay.
3 Insert your thumbnail or a thin, rigid
object in front of the overlay and
press toward the back of the printer.
Lift to remove.
4 To install the new overlay, position it
over the control panel, rear-side first.
5 Snap the overlay firmly onto the
control panel. Ensure that the
overlay is flat.
4
5
16 Printer Setup
EN
Page 21

Step 11 Configure the Control Panel Display
guag
y, y
Language (Optional)
1
To configure the control panel to display
a language other than English:
Press and hold S
1
ELECT
while
simultaneously pushing the power
switch ON. Hold S
LANGUAGE
S
ELECT
appears, then release
.
2 LANGUAGE=ENGLISH
2
LANGUAGE=
ENGLISH
3
Use the V
ALUE
- and V
select the desired language.
4
Press S
to make your
ELECT
until
ELECT
will display.
+ keys to
ALUE
SELECT
selection. The control panel display
will indicate the printer is ready to
use.
Note
3
LANGUAGE=
ENGLISH
If the new lan
the displa
S
ELECT
to save your new selection.
e does not appear in
ou may not have pressed
EN
4
LANGUAGE=
ENGLISH
Configure the Control Panel Display Language (Optional)
17
Page 22

Step 12 Test the Printer
1
READY
Print a configuration page to make sure
the printer is operating correctly.
1 Make sure the printer is on and the
READY message is displayed.
2 Press M
until the display reads
ENU
INFORMATION MENU.
3 Press I
2
INFORMATION MENU
PRINT CONFIGURATION.
4 Press S
until the display reads
TEM
to print the
ELECT
configuration page.
5 The configuration page shows the
printer’s current configuration.
Note
An HP JetDirect network configuration
3
PRINT
CONFIGURATION
page will also print for the networked
printers.
4
PRINT
CONFIGURATION
5
18 Printer Setup
EN
Page 23

Step 13 Connect Printer Cables
C-Link
Connector
LocalTalk
Connector
RJ-45
Connector
Parallel
Connector
For printers equipped with an optional HP JetDirect 600N Print
Server, a twisted-pair cab le network connection is provided through a
10/100Base-TX (RJ-45) connector. Connection to an Apple LocalTalk
network is available through the printer’s LocalTalk port.
EN
Location of Interface Ports
Connect Printer Cables
19
Page 24

Connecting Parallel Cable
To ensure reliability, use an IEEE-1284 bi-directional parallel cable.
(These cables are clearly marked with “IEEE-1284.”) Only IEEE-1284
cables support all of the printer’s advanced features.
1
2
3
1 Make sure the printer and your
computer are turned off.
2 Connect the parallel cable to the
printer parallel port. Press the
locking release levers in while
connecting the cable.
Note
The cable should install easily. If
installation is difficult, check the cable
orientation.
3 Connect the other end of the cable
to the proper connector on the
computer.
Note
See the printer user guide for information
on ordering a two or three meter IEEE1284 parallel cable.
20 Printer Setup
EN
Page 25

Connecting to Apple LocalTalk Network
Use the LocalTalk port to connect to an Apple LocalTalk network.
CAUTION
Make sure the printer is turned off before connecting to the LocalTalk
port.
EN
LocalTalk Interface Cable Connection
Carefully check the orientation of the pins on the LocalTalk cable
●
with the LocalTalk port.
Connect the cable to the port.
●
Connect the other end of the cable to the proper connector on the
●
computer.
Connect Printer Cables
21
Page 26

Connecting to Ethernet 10/100Base-TX Network
Use the RJ-45 port to connect the printer to an Ethernet 10/100BaseTX network.
CAUTION Make sure the printer is turned off before connecting to the RJ-45 port.
Ethernet 10/100Base-TX Network Interface Cable Connection
●
●
22 Printer Setup
Connect a twisted-pair network cable to the RJ-45 port on the
HP JetDirect 600N Print Server.
Connect the other end of the cable to the network.
EN
Page 27

Step 14 Install Printing Software
The printer comes with printing software on a compact disc. The
printer drivers on this compact disc must be installed to take full
advantage of the printer features. If your computer does not have a
CD-ROM drive, but y ou ha v e access to one, y ou can copy the printing
software from the compact disc onto diskettes for installation on your
computer.
If you do not have access to a CD-ROM drive, a diskette is provided
with the basic printer drivers. (The diskette does not have all of the
software available on the compact disc.) The most recent drivers are
availab le on the Internet. Depending on the configuration of Windowsdriven computers, the installation program for the printer software
automatically checks the computer for Internet access to obtain the
latest software.
See the HP Support pages at the front of the printer user guide and
the Readme file on the diskette for additional information or to order
diskettes if you do not have Internet access.
EN
Install Printing Software
23
Page 28

Installing Windows Printing Software (CD)
g
g sy
g
For Windows 95 and Windows NT 4.0
1 Close all running applications.
2 Insert the compact disc into the CD-ROM drive. (Depending on
the computer configuration, the installation program may
automatically start.)
3 Click Start.
4 Click Run.
5 Type D:\SETUP (or the appropriate drive directory letter) in the
command line box and click OK.
6 Follow the instructions on the computer screen.
Note
For Windows 3.1x and Windows 3.11
1 Close all running applications.
2 Insert the compact disc into the CD-ROM drive.
3 In the Windows Program Manager screen, click the File menu.
4 Click Run.
5 Type D:\SETUP (or the appropriate drive directory letter) in the
command line box and click OK.
6 Follow the instructions on the computer screen.
*
Installing Network Software
If the printer is to be used on a network, install and confi
network operatin
system before individual users install the printing software.
1. Select a Custom install to install the printing system software. Be
sure to install the HP JetAdmin software.
2. Use HP JetAdmin to confi
the printer for your network. You also can use HP Web JetAdmin
to configure your printer with your web browser. For information
on using HP Web JetAdmin, see HP’s web site at http://
www.hp.com
stem software on the network administrator’s
ure the HP JetDirect print server and
ure the
24 Printer Setup
* Includes only PostScript Level 2 Emulation (or Level 1 Emulation
for Windows 3.1x) and FontSmart.
EN
Page 29

Installing Macintosh Printing Software
Quit all open applications.
1
Insert the compact disc into the CD-ROM drive.
2
Double-click the
3
screen.
Open the
4
Click the
5
your Macintosh dealer.
If you are on a network with multiple zones, select the z one in the
6
AppleTalk Zones
unknown, ask your network administrator.
Double-click the desired printer. An icon should appear.
7
Close the
8
upper left corner.
Apple LaserWriter
Installer
Chooser
box where the printer is located. If this is
Chooser
icon and follow the instructions on the
from the
by clicking the Go-Away (Close) box in the
menu.
Apple
icon. If the icon is not there, contact
EN
Install Printing Software
25
Page 30

Step 15 Verify Printer Setup
The easiest way to verify that the installation has been completed
successfully is to print a document from a software application.
1 Open a software application of your choice and open or create a
simple document.
2 Make sure the correct printer name appears.
3 Print the document.
If the document prints, installation is complete. If nothing prints or if
the document does not print correctly, see the problem solving
chapter in the printer user guide.
Congratulations, the printer setup is complete!
26 Printer Setup
EN
 Loading...