


Troubleshooting 1
Introduction 1-2
Phone Support 1-2
Which Firmware Version Relates to Which Ink System 1-2
Troubleshooting System Error Codes 1-2
Performing a Service Test on a Failed Assembly 1-3
Performing the Necessary Service Calibrations 1-3
Troubleshooting Calibration Error Codes 1-3
Troubleshooting Ink Supplies Error Codes 1-4
Troubleshooting Initialization - Self Diagnostic Errors 1-4
Solving Image Quality Problems 1-4
The Printer does not Power ON 1-5
ALL the Front-Panel LEDs are Lit but Nothing Else Happens 1-6
Troubleshooting Media Jams/Printhead Crashes 1-6
Troubleshooting Shutdowns - User Message "W arning: Switch Power Off" 1-7
Problems with Vacuum 1-10
Vacuum suction much lower at high altitudes 1-10
Printhead Crashes/Smears on High Den sity Pri nts Using Coate d Media 1-11
Color differences in different HP DesignJet Printers 1-11
Banding at variable extreme environmental conditions 1-12
Banding with unsupported Media 1-12
Banding due to Ink Cartridge replacement while printing 1-12
Hue shift on HP Colorfast Adhesive Vinyl media 1-13
Black Smearing on HP Photo Imaging Gloss 1-13
Magenta Bleeding on HP Photo Imaging G loss when usin g the T a ke-Up Reel 1-13
Loss of Gloss on HP Photo Imaging Gloss when using the Take-Up Reel 1-14
Wrinkles and sc ratches (cockle) on HP Coated and Heav yweight Coated Media. 1-15
Dry Cockle on High Density Prints Using Paper Based Media 1-14
Worm marks (cockle) on part of plots on paper based media 1-15
Drying Time Too Long for HP Studio Canvas 1-16
Media Skew when Printing a Banner Plot 1-16
User message "Media loaded incorrectly. Remove media" 1-16
User message "Warning: Incorrect type of tubes system" 1-17
User message "Power Supply Error #1" 1-17
Cutter Assembly Problems 1-19
Carriage and Scan-Axis Problems 1-20
Media-Axis Problems 1-20
Electronics Problems 1-21
Language Selection is blocked in a brand new printer 1-23
Firmware Upgrade Does Not Work Through the Parallel Port 1-23
Typical Failures After Exchanging the Ink Tubes 1-24
Solving Media-Handling Problems 1-25
How to Navigate through the Front Panel Menus 1-26
Service Configu ration Print 1-37
General Printer Information 1-39
Troubleshooting Take-Up-Reel Problems 1-40
HP DesignJet 5000 Series Printers Service Manual
1-1

Troubleshooting
Guide to Troubleshooting the Printer
Introduction
This chapter will guide you through the relevant steps to take when
troubleshooting the Printer.
Phone Support
In certain circumstances, a Call Agent can try and troubleshoot the
Printer by requesting the Customer to perform a Service Calibration,
Test or Utility via the phone. Using this process, it can be
determined whether the Printer requires any on-site maintenance.
Which Firmware Version Relates to Which Ink System
A.01.XX - This firmware revision allows the Printers to only use
Imaging Inks.
A.02.XX - This firmware revision allows the Printers to use both
the Imaging Inks and the UV Inks.
Troubleshooting System Error Codes
Chapter 2 - System Error Codes - contains a list of system error
codes and their respective descriptions and recommended corrective
actions. Only try one recommended action at a time and check if the
error code has disappeared.
If you have an error code which is not documented in this Service
Manual or you have an error which you cannot resolve, then report
the error to the HP Response Center or the nearest HP Support Office.
NOTE When reporting the System Error Code, make sure that you
supply the full Error Code (inclu ding the last 8 numb ers where
applicable) and the firmware version as well as the status of the
Printer when the Error occurred (was it printing, calibrating,
processing, etc...). Without this information, HP Support
Personnel cannot help you.
NOTE When reporting the Error Code, make sure that you supply the
full Error Code and the firmware ve rsion (d ispl ayed durin g the
initialization process when powering ON the Printer or available
in the User’s Printer Setup ⇒ Utilities ⇒ Statistics menu).
1-2
HP DesignJet 5000 Series Printers Service Manual

Troubleshooting
Performing a Service Test on a Failed Assembly
If possible, always perform a Service Test on the component/
assembly that you are about to replace, just to make sure that is the
component/assembly that has failed.
NOTE If the test on that component/assembly passes, you should NOT
replace it.
For information on the Service Tests and how to use them see
Chapter 4, Service Tests and Utilities.
Performing the Necessary Service Calibrations
Is the Printer calibrated correctly after replacing a component?
Refer to the table on Page 5-2 to determine when a calibration is
required.
NOTE Remember that certain Calibrations are required even if an
Assembly has been disassembled to gain access to another
Assembly or Component.
For information on the Service Calibrations and how to use them
see 5, Service Calibrations.
Troubleshooting Calibration Error Codes
Chapter 5 - Service Calibrations - contains a list of Error Codes that
are reported when a Calibration fails.
Calibration error codes consist of a four digit number [XXXX].
If you have an error code which is not documented in this Service
Manual or you have an error which you cannot resolve, then report
the error to the HP Response Center or the nearest HP Support
Office.
HP DesignJet 5000 Series Printers Service Manual
1-3

Troubleshooting
Troubleshooting Ink Supplies Error Codes
Chapter 3, HP Ink Supplies Tr oubleshooting, contains a list of Error
Codes that are reported for Ink Supplies i.e. Ink Cartridges,
Printheads and Printhead Cleaners. The error codes are described
and recommended corrective actions are provided. Only try one
recommended action at a time and check if the error code has
disappeared.
Ink Supplies error codes consist of a four digit number [XXXX].
Troubleshooting Initialization - Self Diagnostic Errors
Chapter 4 - Service Tests and Utilities - describes the Printer
initialization sequence and reports errors that may be reported when
Printer initialization is performed.
Self Diagnostic error codes consist of seven alphanumeric
characters [XXXXXXX].
If you have an error code which is not documented in this Service
Manual or you have an error which you cannot resolve, then report
the error to the HP Response Center or the nearest HP Support
Office. When reporting the error, have the following information
ready:
n Which firmware revision the Printer is using.
n The complete error number.
Solving Image Quality Problems
Whenever an Image Quality problem appears, it is advisable to print
the Diagnostic Print. This will help you differentiate between
possible Printhead errors and other problems such as incorrect frontpanel selection, driver or RIP configuration or mechanical
problems. For information on solving Image Quality problems see
Chapter 6, Print Quality.
1-4
HP DesignJet 5000 Series Printers Service Manual

Troubleshooting
The Printer does not Power ON
1. Check that the Power Cord is connected correctly to the Printer and
to the Power Socket.
2. Check that the Power Switch on the BACK of the Printer is in the
ON position.
3. Remove the DIMM’ s Cover (See
⇒ Page 8-75) and check the green
and red Status LED’s on the Main PCA. If they are both NOT lit,
replace the Power Supply Unit ⇒ Page 8-83.
Status
LED’s
4. Check that the Front-Panel Cable is correctly connected to the
Electronics Module. Also make sure that the Front-Panel Cable is
not damaged.
HP DesignJet 5000 Series Printers Service Manual
1-5

Troubleshooting
ALL the Front-Panel LEDs are Lit but Nothing Else Happens
The BootROM DIMM is NOT correctly installed or is th e wrong ty pe.
1. Power OFF the Printer from the back and disconnect the Power
Cord. Reseat the BootROM DIMM (looking from the rear of the
Printer, the first slot from the left - See
that it is installed correctly.
⇒ Page 8-75) making sure
NOTE
2. If the problem persists replace the BootROM DIMM
For more information, refer to “Electronics Problems” on page 1-21.
⇒ Page 8-75.
Troubleshooting Media Jams/Printhead Crashes
NOTE If using HP Coated Media when problem occurred, please also
refer to Page 1-11.
The failure modes “media jam” and “head crash” are grouped
together because in many c ases a me dia ja m cause s the m edia to li ft
up into the carriage path and cause a head crash, thus causing many
media jam failures to be reported as head crashes.
1. Did the media jam occur when loading media?
n If the client has had media jams, it is common for pieces of media
to get stuck in the media path. Clear the media path.
NOTE When clearing a media jam, sometimes media is stuck in the
paper path. T o clear this, you must lift the media lever and insert
thicker media into the paper path to push out the media that is
still stuck there.
1-6
2. Is the customer using non-HP media?
n
The use of non-HP media can easily be the cause of media jams and
head crashes (especially head crashes because HP media is
specially formulated to avoid cockle, one of the primary causes of
head crashes). If the media is not HP approved, advise the customer
to use HP media and check to see if the problem is now solved.
3. The Carriage is at the incorrect height in relation to the Center
Platen. Adjust the carriage to the correct height ⇒ Page 5-18 and try
to load the media again.
4. Check that the Vacuum Fans work correctly - Refer to Page 1-10,
Problems with Vacuum .
HP DesignJet 5000 Series Printers Service Manual

Troubleshooting
Troubleshooting Shutdowns - User Message "Warning: Switch Power Off"
If a shutdown occurs, you will get the message “Warning: Switch
Power Off” followed by:
n Check Printhead Cleaner Path.
n Check Paper Path.
n Check Printhead Path (followed by (1), (2) or (3)).
A shutdown in each path will require different steps to resolve the
problem as explained as follows.
WARNING In each case, make sure that you power OFF the Printer be fore
attempting any procedures to resolve the problem.
Check Printhead Cleaner Path
This message appears whenever the Service Station Carriage does
not move, either because of a bad cable connection, a defective
motor or because of some obstacle inside the Service Station.
n
If the Printer is
new
, check that the Service Station cable (which is
the grey flat cable with the grey connector) is plugged into the Main
PCA. Make sure that the clips of the conn ector are closed
completely. Check also that the Service Station cable is not damaged.
n In already used Printers, power OFF the Printer and try to move
the Service Station backwards and forwards to see whether it is
blocked. Possible causes are: Printhead Cleaners incorrectly
positioned, damaged or, even, pieces of paper within the Service
Station. Remove the Printhead Cleaners or the pieces of paper
and check whether the problem persists.
n
If the problem disappears without the Print head Cleaners, reinsert them
into the Service Station and see whether the problem reappears. If the
problem reappears, replace the complete set of Printhead Cleaners.
n
If the problem persists even without the Printhead Cleaners, then
replace the Service Station (⇒ Page
8-67
) and recalibrate the Printer.
HP DesignJet 5000 Series Printers Service Manual
1-7

Troubleshooting
Check Paper Path
This warning appears whenever the friction on the Paper -A xis is too
high: the electrical current needed by the Paper-Axis Motor to move
the paper is too high, so before burning the motor or the Main PCA,
this warning appears. The commo n reason for this error is a n internal
paper jam or at the end of a roll of media the paper is glued to the
media core. It can also be due to a defective motor or Main PCA.
n Check that there are no pieces of paper left inside the Printer,
especially if it happens after a paper jam.
NOTE One way to verify this easily is to take a rigid sheet of paper and
move it along the paper path with the media load lever lifted.
n Also, check that the customer has inserted the spindle hubs
completely, otherwise they may rub against the side plate and
increase the friction.
n If the error still persists, check that the Paper-Axis Motor cables
are connected correctly and that they are not damaged.
n
If the Printer st ill fails , repla ce the Pape r -Axis M otor ⇒ Page
NOTE Turn the Drive Roller by hand once the motor is removed to
8-100
verify that it turns smoothly . Also, after replacing the Paper -Axis
Motor,
the values are within the given limits
n If the Printer still fails, replace the Main PCA ⇒ Page 8-79.
perform th e Medi a-Axis Test (⇒ Page
.
4-12) and check that
Check Printhead Path (1)
This warning appears whenever friction on the Scan-Axis is too
high: the electrical current needed by the Scan-Axis Motor to move
the Carriage is too high, so before burning the motor or the Main
PCA, this warning appears. The usual reason for this error is an
internal paper jam, an obstacle in the Printhead path, a broken belt,
badly installed Ink Supply Tubes, etc.
n Apply Oil along the complete axis of the Slider Rods with the
User’s Slider Rods Lubrification Kit ⇒ Page 9-8.
n Also, switch OFF the Printer and move the Carriage from side to
side to verify that it moves smoothly.
.
1-8
n
If the Printer still fails, check that the Scan-Axis motor is connected
correctly to the Main PCA and that the cable is not damaged.
n If the error remains, replace the Belt (⇒ Page 8-46) or the Scan-
Axis Motor ⇒ Page 8-55.
HP DesignJet 5000 Series Printers Service Manual

Troubleshooting
NOTE
Also, after re placing the Scan -Axis Motor, perform the Sc an-Axis Test
(⇒ Page
n If the Printer still fails, replace the Main PCA ⇒ Page 8-79.
Check Printhead Path (2)
4-10) and check that the values are within the given limits.
This is a safety shutdown and occurs whenever there is a discontinuity
in the Printhead path, because of an obstacle, oil drops on the Encoder
Strip, the Carriage cover touching the tube guides, etc.
n Switch OFF the Printer and move the Carriage from side to side
to verify that it moves smoothly.
n If it still fails, check the Encoder Strip and, if necessary, clean it.
Check Printhead Path (3)
This is always caused by high friction in the Printhead path. Only in
very special cases, when it happens inside the Left Hand Cover,
incorrect assembly of the tube system causes it.
n Apply Oil along the complete axis of the Slider Rods with the
User’s Slider Rods Lubrification Kit
⇒ Page 9-8.
Replace Message "xx15 Replace" and "xx16 Replace"
In certain circumstances (e.g. Printhead crash without Printer
shutdown), the message "xx15 Replace" or "xx16 Replace" may
appear on the front panel. This is due to a temporal disconnection
between the Printhead and the flex circuit in the Carriage Assembly.
n
Clean the Printheads and the Carriage interconnects (refer to page
Carriage Interconnect Wiper
9-6,
) and reseat the failing Printheads.
HP DesignJet 5000 Series Printers Service Manual
1-9

Troubleshooting
Problems with Vacuum
If you have problems loading either Roll or Sheet Media, then there
could be a problem with the Vacuum Fan or Booster Fan. To verify
if there really is a problem with Vacuum, try the following:
1. With the Printer ON, open the Window of the Printer and place a
sheet of HP High Gloss Photo Paper (must be D-Size), aligned with
the blue lines on the Center Platen. If the Vacuum holds the sheet in
place, and then loads it correctly , then the Fans function correctly. If
the Vacuum does not hold the sheet in place (no suction), then try
the following:
n Check that the holes in the Center Platen are NOT blocked.
n
Clean the Overdrive using the Platen Cleaning Utility ⇒ Page
n Check that the Vacuum and Booster Fans are installed correctly.
n Replace the Vacuum Fan ⇒ Page 8-98.
n Replace the Booster Fan ⇒ Page 8-103.
2. If the Vacuum held the sheet in place, but couldn’t correctly load it,
then there could be a problem with the Overdrive. In this case,
replace the Center Platen Assembly ⇒ Page 8-112.
9-9
.
Vacuum suction much lower at high altitudes
At altitudes above 2,000 meters, the vacuum force holding down the
media will be lower, therefore the media will not be held in place
properly causing:
n Ink Smearing on the Media.
n Printhead crashes against the Media.
n Cut Sheet loading problems (high probability).
n Roll Media loading problems (low probability).
To solve the problem, try the following:
n Using the “1.3 Altitude Setup” in the Service Utilities, set the
altitude to “1.3.2 2000 m or more” (see Altitude Setup 4-23).
1-10
HP DesignJet 5000 Series Printers Service Manual

Troubleshooting
Printhead Crashes/Smears on High Density Prints Using Coated Media
High density prints can cause cockle mainly on HP Coated Media.
This causes two main problems:
1. Cockling in the borders - Because the Printer places too much ink
on the Coated Media, the borders of the print become raised,
causing the Printhead to crash against the media. To solve the
problem, try the following:
n Try using Heavy Weight Coated Media instead of Coated Media.
n Change the paper margins to “Extended” in the Printer Setup
menu/Page Format/Margins or in the Driver. If the customer is
printing PostScript images, send them a PPD file containing the
extended margins.
n Use the Deflectors.
n Upgrade the Firmware ⇒ Page 9-11.
2. Cockling within the print - If the Printer places too much ink within
the print, the media starts to ripple, causing the Printhead to smear
against the media. To solve the problem, try the following:
n Never use HP Coated Media for High Density prints. As a
substitute use HP Heavy Weight Coated or Heavy We ight Coated
(Economy) Media.
Color differences in different HP DesignJet Printers
Color differences between one image printed on the HP DesignJet
5000 Series and the rest of the DesignJet platforms are due to the
different chemistry of the 5000 series inks compared with the rest of
the inks for other printers. This color variability among different HP
DesignJet Series Printers has been always present. You can try to
achieve consistent colors with the following:
n Select the same color emulation settings in your Postscript Driver
as the one used by the printer you want to emulate.
n Select the correct Ink Emulation from the Printer Setup Menu/
Internal RIP Settings.
HP DesignJet 5000 Series Printers Service Manual
1-11

Troubleshooting
Banding at variable extreme environmental conditions
The Accuracy Calibration has been done at normal environmental
conditions, therefore printing in extreme environmental conditions
will cause banding because the advance of the Drive Roller does not
correspond to the same conditions that the calibration was done in.
To solve the problem, try the following:
n Perform the Accuracy Calibration in the new environmental
conditions (Refer to the User’s Guide - Media Solutions).
Banding with unsupported Media
The Accuracy Calibration has not been done for the Media now
loaded. Banding may occur because the advance of the Drive Roller
does not correspond to the same conditions that the calibration was
done in. To solve the problem, try the following:
n Select the Media loaded in the “Media Options” menu and
perform the Accuracy Calibration (Refer to the User’s Guide Media Solutions).
Banding due to Ink Cartridge replacement while printing
A user has removed the Ink Cartridge while the Printer was printing,
which has caused the Printer to stop. If the user does not replace the
Ink Cartridge immediately, when the Printer starts to print again, a
band will appear in the position where the pri nting resta rted. This is
because the wet ink interacts with the dried ink on the media
causing the band to appear. To solve the problem, try the following:
n Do NOT remove the Ink Cartridge while the Printer is Printing.
Only replace/remove Ink Cartridges in between Prints.
n If the Ink Cartridge was replaced due to the “Empty” status on the
Front Panel, then advise the customer to replace the Ink Cartridge
when the “Very Low” status is showing on the Front Panel.
1-12
HP DesignJet 5000 Series Printers Service Manual

Troubleshooting
Hue shift on HP Colorfast Adhesive Vinyl media
Under high humidity conditions (approx. >65%) the colors tend to
fade over time, particularly colors that require Magenta. To solve
the problem, try the following:
n Reduce the level of humidity (<65%) that the Printer is working
in. To find the humidity level, print the Service Configuration
Print (Printer Setup Menu / Utilities / Test prints / Service config).
n Laminate the prints.
Black Smearing on HP Photo Imaging Gloss
Narrow black lines can smear on this type of media, particularly if
the lines are narrow and have white gaps in between them. Try the
following:
n Increase the Dry Time using the Front Panel (Refer to the User’s
Guide).
n Laminate the prints.
Magenta Bleeding on HP Photo Imaging Gloss when using the Take-Up Reel
Under high humidity conditions (approx. >70%) this media reduces
its capacity to absorb Magenta because of this color’s particular
characteristics. When an area fill with magenta is printed and then
rolled onto the Take-Up Reel the ink that is not completely dry
moves laterally on the media. To solve the problem, try the
following:
n Reduce the level of humidity (<70%) that the Printer is working
in. To find the humidity level, print the Service Configuration
Print (Printer Setup Menu / Utilities / Test prints / Service config).
n Increase the Dry Time using the Front Panel (Refer to the User’s
Guide).
n Do not use the Take-Up Reel or Bin for this media when
humidity levels are high.
HP DesignJet 5000 Series Printers Service Manual
1-13

Troubleshooting
Loss of Gloss on HP Photo Imaging Gloss when using the Take-Up Reel
Under high humidity conditions (approx. >70%) the polymer chain
in the coating of this media relaxes and the drying rate decreases. If
the printed media is rolled onto a Take-Up Reel or is covered by
another print, the contact between the two surfaces could cause
blotches in the gloss. Try the following:
n Reduce the level of humidity (<70%) that the Printer is working
in. To find the humidity level, print the Service Configuration
Print (Printer Setup Menu / Utilities / Test prints / Service config).
n Increase the Dry Time using the Front Panel (Refer to the User’s
Guide).
n Do not use the Take-Up Reel or Bin for this media when
humidity levels are high.
Dry Cockle on High Density Prints Using Paper Based Media
High density prints can cause dry cockle mainly on Paper Based
Media.
To solve the problem do the following:
n Use the Take-Up Reel and Take-Up Reel deflectors.
n Set the Printer to Productivity mode to reduce the ink density.
n Select Coated media modes
If the problem persists, try the following:
n Laminate the prints.
n Use a heavier media that is more suitable to high ink density,
such as HP Paper based Semi-Gloss or HP Poster Paper.
1-14
HP DesignJet 5000 Series Printers Service Manual

Troubleshooting
Wrinkles and scratches (cockle) on HP Coated and Heavyweight Coated Media.
Images may be damaged if prints are not handled with care,
particularly when handling wide plots. This can happen when
images are placed on top of one another and there is movement
between them, causing friction and loss of ink from the surface if it
is not completely attached. Also, if plots are rolled up, wrinkles can
occur. To avoid this problem try the following:
n Always handle plots with care.
n Use of the Take-Up Reel eliminates handling and avoids
wrinkles.
n Use heavier media.
n For Heavyweight Coated media, select faster print modes such as
Heavyweight Coated (Economy) for Media selection, and/or
Productivity Print mode.
n If damage is slight, Lamination will help towhead’ defects.
n Use of Fixative Sprays immediately after printing may protect the
image.
Worm marks (cockle) on part of plots on paper based media
At high temperatures and under dry conditions, worm marks may
occur on initial parts of plots when printing solid fill areas in
medium tone colors. Try the following:
n Advance the media manually by 15 mm.
n Select Heavy Coated for Media setting.
n Select Productivity mode to reduce ink density.
HP DesignJet 5000 Series Printers Service Manual
1-15

Troubleshooting
Drying Time Too Long for HP Studio Canvas
Under conditions of high humidity (> 70%) HP Studio Canvas
retains a high amount of water and takes too long to dry, also
creating problems in using the Take-Up Reel and Bin. To solve the
problem try the following:
n Reduce the level of humidity (<70%) that the Printer is working
in. To find the humidity level, print the Service Configuration
Print (Printer Setup Menu / Utilities / Test prints / Service config).
n Increase the drying time using the Front Panel settings (Refer to
the User’s Guide).
n Do not use the Take-Up Reel or Bin under conditions of high
humidity.
Media Skew when Printing a Banner Plot
When printing banners, media skew occurs. This is particularly
noticeable in the first plot when media is not perfectly aligned. To
solve this problem do the following:
n Use extended margins for banner plots (Refer to the User’s
Guide).
User message "Media loaded incorrectly. Remove media"
This message appears when the media sensor has detected media,
but the line sensor has not detected the leading edge of the media at
all or has found it in an incorrect position.
There are three possible situations when this message comes up:
1. The paper is in the incorrect position because the Printer was turned
OFF in the middle of a print. It should only happen in printers
without the Take-Up Reel (42" model), because with the Take-Up
Reel installed the Printer will not search for the leading edge after
the Printer has been powered-up or after activating the media load
lever. The Printer simply continues to print wherever it stopped.
n To verify this setting, check in "Printer Setup Menu > Device
setup > TUR installed". It should be set as No for the 42" model
Printers and Yes for the 60" model Printers.
1-16
HP DesignJet 5000 Series Printers Service Manual

Troubleshooting
2. The media sensor is defective. T o verify this, remove the media and
re-boot the Printer. If the message comes up during initialization,
the media sensor is defective. To solve this, try the following:
n Check that the media sensor cable is connected correctly
n Check that the media sensor cable is not damaged and that the
media sensor is clipped correctly.
n Replace the Media Sensor ⇒ Page 8-104.
3.
The Line Sensor does not detect the leading edge of the media. To
verify this, load media (ideally white media such a s Coated or Pho toGloss) into the Printer. If the message comes up during the loading
process, the Lens Cover Assemb ly is either n ot installed correctly o r
it is dirty . In this case, replace the L ens Cover Assembly
If this fails, replace the Carriage Assembly ⇒ Page
8-46
⇒
.
Page
9-5
User message "Warning: Incorrect type of tubes system"
.
This error message appears if the electrical connector of the Ink
Tubes System is not connected correctly (especially after the Tubes
have been replaced). Other causes are defective EEROM in the Ink
Tubes System or ISS PCA.
n Switch OFF the printer, open the rear left cover and connect or
re-connect the Electrical Cable (the colored flat cable) that is
connected to the rear of the Ink cartridge Tube Connector.
n If the problem persists, check that the Electrical Cable is
connected correctly to the ISS PCA.
n Replace the ISS PCA (
Page
8-25).
⇒
Page
8-86) or the Ink Tubes system (
⇒
User message "Power Supply Error #1"
This error indicates a short in the 24V electronics circuits. Do not
replace the Power Supply; This message only indicates the failure,
and is not the cause. Usually this message appea rs after the inserti on
of a Trailing Cable into the connectors. This message means that the
Trailing cable is incorrectly connected, and it is creating a short on
the 24V circuit.
n
To isolate the problem, remove the Trailing Cable from the back of
the Printer and check whether the Printers powers up correctly.
n
If the Printer powers up correctly, the problem could have been a bad
HP DesignJet 5000 Series Printers Service Manual
1-17

Troubleshooting
Trailing Cable connection, so just reconnect the Trailing Cable again
to double-check that the Printer now works. If, after reconnecting the
cable, the error appears again, either the Carriage PCA or the
Trailing Cable is defective. In this case, first try replacing the
Trailing Cable and then the Carriage Asse mbly.
n
If the Printer did not initialize correctly, even after removi ng the
Trailing Cable, the problem is e ither in the Main PCA or the ISS
PCA. So, once again, to isolate the failure, disconnect first the ISS
cable and check whether the Prin ter works. If it does, reconnect the
cable again to verify the failure and then, if necessary, replace either
the ISS cable or the ISS PCA.
n
If the Printer still does not initialize, even after removing the Trailing
Cable and the ISS cable, replace the Main PCA.
1-18
HP DesignJet 5000 Series Printers Service Manual

Troubleshooting
Cutter Assembly Problems
1. The Printer does not cut (even when using the Form Feed & Cut
option in the Front Panel).
In this case it is very likely that the cutter is disabled in the EEROM.
This can happen whenever the Diagnostic Print is cancelled in the
middle of the print, or if the Printer was turned OFF in the middle of
the Diagnostic Print.
n T o re-activate the Cutter , print the Diagnostic Print again and this
time letting it finish to the end without any interruptions.
n If the Cutter still doesn’t cut after re-printing the Diagnostic
Print, replace the Cutter Assembly ⇒ Page 8-58.
NOTE This problem is solved in any A.02.xx firmware release.
2. The Cutter does not cut thick paper (Canvas & Non-HP Media).
As in all DesignJets, the Cutter can only cut media up to a certain
thickness (such as Heavy Coated or Photo paper). Thicker media or
special media (such as Canvas) cannot be cut.
n Taking this into consideration, when Canvas is selected on the
front panel, the cutter is automatically disabled, but there is
nothing wrong with the cutter.
3. The Printer hangs while cutting.
The Printer hangs and the Carriage stops if the window is opened
during the cutting operation. In addition, when pressing any key , the
Error Code ffff ffff 03450097 may appear on the front panel.
n Re-boot the Printer and make sure the customer does not open the
window while the Printer is cutting.
NOTE This problem is solved in any A.02.xx firmware release.
HP DesignJet 5000 Series Printers Service Manual
1-19

Troubleshooting
Carriage and Scan-Axis Problems
1. Printhead continuity problems.
When installing the Ink Tubes System, it is possible that the crane
(the part of the Tubes System that is connected to the front of the
Carriage) is not clipped properly . This can cause Printhead continuity
problems afterwards, especially in the light cyan and light magenta
Printheads (XX16 REPLACE message appears for these Printheads).
n Whenever there is a Printhead continuity problem, always check
that the crane is completely clipped to the front of the carriage.
2. Unknown Line Sensor ID.
When performing the Scan-Ax is Cali bra tion , the Pri nte r asks fo r th e
Line Sensor ID. But there is no label on the Line Sensor indicating it.
n If the Line Sensor ID is not indicated on the Line Sensor, use the
default value which is "0". In the future, if the LED’s are
modified, a sticker will be included with the new Line Sensor ID.
3. Line Sensor is shown as "Not calibrated" in the Service
Configuration Print.
This is a firmware bug. It is possible that the Line Sensor is
calibrated even though the Service Configuration Print indicates
that the Calibration has not been performed.
n Just ignore this information about the Line Sensor calibration.
n If there are any errors related to the Line Sensor, perform the
Scan-Axis calibration to make sure that the Line Sensor
calibration is completed.
Media-Axis Problems
1. Printer unloads media (it suddenly starts to rewind and unloads the
media)
If the window was raised at exactly the same moment when the
Printer moved the media (e.g. during media loading) from that
moment onwards the Printer will always reject the media unless the
Printer is turned OFF and then back ON again.
n Problem disappears after re-booting the Printer.
NOTE This problem is solved in any A.02.xx firmware release.
1-20
HP DesignJet 5000 Series Printers Service Manual

Troubleshooting
Electronics Problems
1. The Printer hangs with the front panel completely blank and the
three Image Quality LED’s lit.
The firmware has a bug that creates this situation whenever the
Printer is receiving data from an external RIP.
n The customer should print using the HP Driver to check that the
Printer is printing without any problems.
n The only solution to this problem will be to upgrade to the
firmware for the UV inks (A.02.XX) when it is available.
NOTE This problem is solved in any A.02.xx firmware release.
2. The Printer hangs at "Initializing Please Wait".
The Printer hangs showing the following front panel message for
more than 5 minutes: "Initializing Please Wait, Code Rev. xxxx,
Boot ROM. xxx, etc".
The cause for this failure could be either a print sent through the
Parallel or LAN port during initialization, or a defective I/O card.
n Power OFF the Printer, disconnect the Parallel and/or the
Network cable and power ON the Printer again to see if the
Printer hangs again.
n If the Printer did not hang again, then the problem was due to the
Printer receiving data through the ports while the Printer was
initializing. Before connecting the cables again, make sure that
all the pending print jobs are purged.
n If the Printer did hang again, then power OFF the Printer, remove
the I/O card and power ON the Printer again to see if the Printer
still hangs.
– If the Printer did not hang again, install the I/O card in the
second slot and check whether it works there. If the I/O card
causes the Printer to hang again, replace the I/O card. If the
Printer continues to hang, even with a new I/O card, then
replace the Main PCA
⇒ Page
8-79
.
HP DesignJet 5000 Series Printers Service Manual
1-21

Troubleshooting
3.
The Printer is printing slower compared to another HP DesignJet 5000.
It is important first to determine whether the differences are during
receiving/processing, during printing or once the print is finished.
1. The time the printer takes to start printing is longer.
n Check that the "Start printing option" is set the same for all
Printers.
NOTE
NOTE
NOTE
For troub leshooting purpose s, set this option to "A fter Processi ng".
In this way the time reported is the tim e needed to receive the data
and to proce ss it and the printing time is not taken i nt o acc o unt.
n If there are differences still, it is probably due to the customer’s
network configuration.
Make sur e that the P rinter is n ot proc essing or pr inting anoth er job
while doing thi s tes t, because this might have affect the outcome.
n Once finished, return the Printer to the recommended setting,
which is "Optimized".
2. The actual printing time is slower.
This may be due to the Carriage stopping at the end of each swath,
one Printer making more passes or the Carriage moving slower.
n Check that the dry time is turned off.
If the dry time is turned ON, the Carriage might stop at the end of
each swath, because the Printer uses the dry time (i.e. the humidity
and temperature reading) to adjust the printing speed. This is
necessary to ensure that the print is completely dry before it can
either touch the Media Bin or is rolled up with the Take-Up Reel.
n Check that the Image Quality setting on the front panel (while the
Printer is printing) is the same for all Printers.
NOTE The setting while the Printer is in the stand -by mode might be
different to the actual LED that lights up during printing.
n Check that the Image Quality setti ng in the Driver is the same for
all the Printers.
n Check that the memory size, shown on the front panel, is the
same for the Printers that are being compared. (Standard
configuration: 192Mbyte for C6096A and 128Mbytes for
C6090A/C6091A/C6095A).
1-22
HP DesignJet 5000 Series Printers Service Manual

3. The dry time at the end of the print is longer.
Normally the Printer uses the temperature and the humidity reading
from the ISS PCA to calculate the dry time, which is required for
the print to dry before being cut. The specification of these readings
is +/- 15%, so a variation in the calculated dry time of up to 30% is
within specification.
n To check the correct functioning of the sensor, print the "Service
Configuration Print" and check that both the temperature and
humidity readings are correct (i.e. within the specification). If
not, replace the ISS PCA ⇒ Page
n As an alternative solution, turn OFF the dry time, and then all the
8-86
.
Printers should finish the print at the same time.
n Another alternative is to set the dry time manually on all the
Printers.
NOTE This dry time will be applied to all the prints.
Troubleshooting
Language Selection is blocked in a brand new printer
Normally the user has about 2 minutes (initialization time) to select
the language in the Front Panel. If the language is not selected
within this time period, the Front Panel is locked.
n To recover from this problem, just re-boot the Printer and select
the language within the specified time (2 minutes).
Firmware Upgrade Does Not Work Through the Parallel Port
With firmware revisions A. 01.10, 11 & 12, the Printer will remain at
90% when doing a Firmware upgrade via the parallel port.
n For the customer, recommend using the network to print and to
perform the Firmware upgrade.
n For Service Engineers:
– Keep the "Top Arrow" key on the Front panel pressed down
when turning the Printer ON, and release it once the "Boot
Menu" appears.
– Select "Upgrade Firmware" in the Boot Menu.
– Send the firmware through the parallel port.
NOTE This problem is solved in any A.02.xx firmware release.
HP DesignJet 5000 Series Printers Service Manual
1-23
Troubleshooting
Failure Description Solution
Typical Failures After Exchanging the Ink Tubes
The following table contains typical failures that could appear after
changing the Ink Tubes:
After completing the
initialization process, the Front
Panel displays:
WARNING
Incorrect type of Tubes
System
Switch power off
When you try to print, the
Front Panel displays:
System Error
0a0000 00000002
Contact HP Representative
When you try to insert an Ink
Cartridge, you keep getting the
following message for one or
more Ink Cartridge:
XX02 Reseat
When you try to insert a
Printhead, you keep getting the
following message for one or
more Printhead:
XX02 Reseat
The electrical
connector has not
been correctly
connected to the Ink
Cartridge connector.
The air tube has not
been correctly
connected to the Ink
Cartridge connector.
The three latches at
the rear of the Ink
Cartridge tube
connector have not
been locked correctly.
The Printhead tube
connector has
not been
correctly connected to
the Carriage Assembly.
1 Switch OFF the Printer.
2
Connect the electrical
connector into the Ink
Cartridge tube connector.
3 Switch ON the Printer.
1 Switch OFF the Printer.
2
Connect the air tube into the
Ink Cartridge tube connector.
3 Switch ON the Printer.
1 Remove the Ink Cartridges.
2
Open the door at the back of
the Left Hand Cover.
3 Correctly lock the 3 latches.
4 Close the door and insert the
Ink Cartridges.
1 Remove any Printhead(s).
2
Make sure the Printhead tube
connector is fully connected
to the Carriage Assembly.
3 Insert the Printheads.
When you try to insert a
Printhead, you keep getting the
following message for one or
more Printhead:
XX11 Reseat
After you have inserted the
Printhead Cleaners, the Front
Panel displays the following
message:
XX05 Replace
1-24
Normal Printhea ds are
being inserted BUT
the Printer requires
Setup Printheads to
prime the Ink Tubes.
The wrong type of
Printhead Cleaners
have been inserted for
the type of Ink System
installed in the Printer.
HP DesignJet 5000 Series Printers Service Manual
1 Insert the Setup Printheads
provided with the HP
Upgrade Kit that allows
automatic printing.
1 Remove the Printhead
Cleaners.
2
Make sure that they are of the
same type as the rest of the
consumables (No.81 or
No.83).
3 Replace the incorrect ones.

Troubleshooting
Solving Media-Handling Problems
NOTE HP Designjet Printers minimum media size is A3 in portrait
mode.
The Front Panel Keeps Indicating that Media Is Misaligned or
Incorrectly Positioned
Roll media n The roll may be loaded the wrong way. The paper should load
over the roll toward you.
n The media may be crumpled or warped or have irregular edges.
n The paper may be loaded at an angle. The right-hand edge must
be parallel to the blue line on the paper entry roller.
WARNING Ensure that the paper is wrapped tightly on the roll. This is a
very important step to remember because if this is not done, the
media may be loaded at an angle, causing the media to be
rejected.
n Perform the manual alignment procedure (Refer to the User’s
Guide).
n Check that the paper is correctly loaded onto the spindle.
Sheet media n It must be loaded with the right-hand edge against the blue
perforated line on the Printer.
n Align the media against the trailing edge coming out of the
Printer.
n The media may be crumpled or warped or may have irregular
edges.
n If you are using hand-cut media, the edges may not form a right-
angle or they may be rough. Do not use hand-cut media. Use only
purchased sheet media.
n If the media you are trying to load is very slippery, hold the
media with both hands, and gently push the media into the Printer
until it buckles upwards in the middle, this will help the P rinter to
load it.
n If the Overdrive is covered in dust, it will have problems picking
up the sheet media during the load process. Clean the Overdrive
using the Platen Cleaning Utility ⇒ Page 9-7.
Prints Do Not Stack
Properly in the
Media Bin
n The Printer may be too close to the end of the roll. The natural
curl near the end of the roll can cause stacking problems. Load a
new roll or remove prints manually as they are completed.
n If you are mixing prints or nesting sets of several different sizes,
you may have stacking problems because of the different sizes of
media in the bin.
HP DesignJet 5000 Series Printers Service Manual
1-25
Troubleshooting
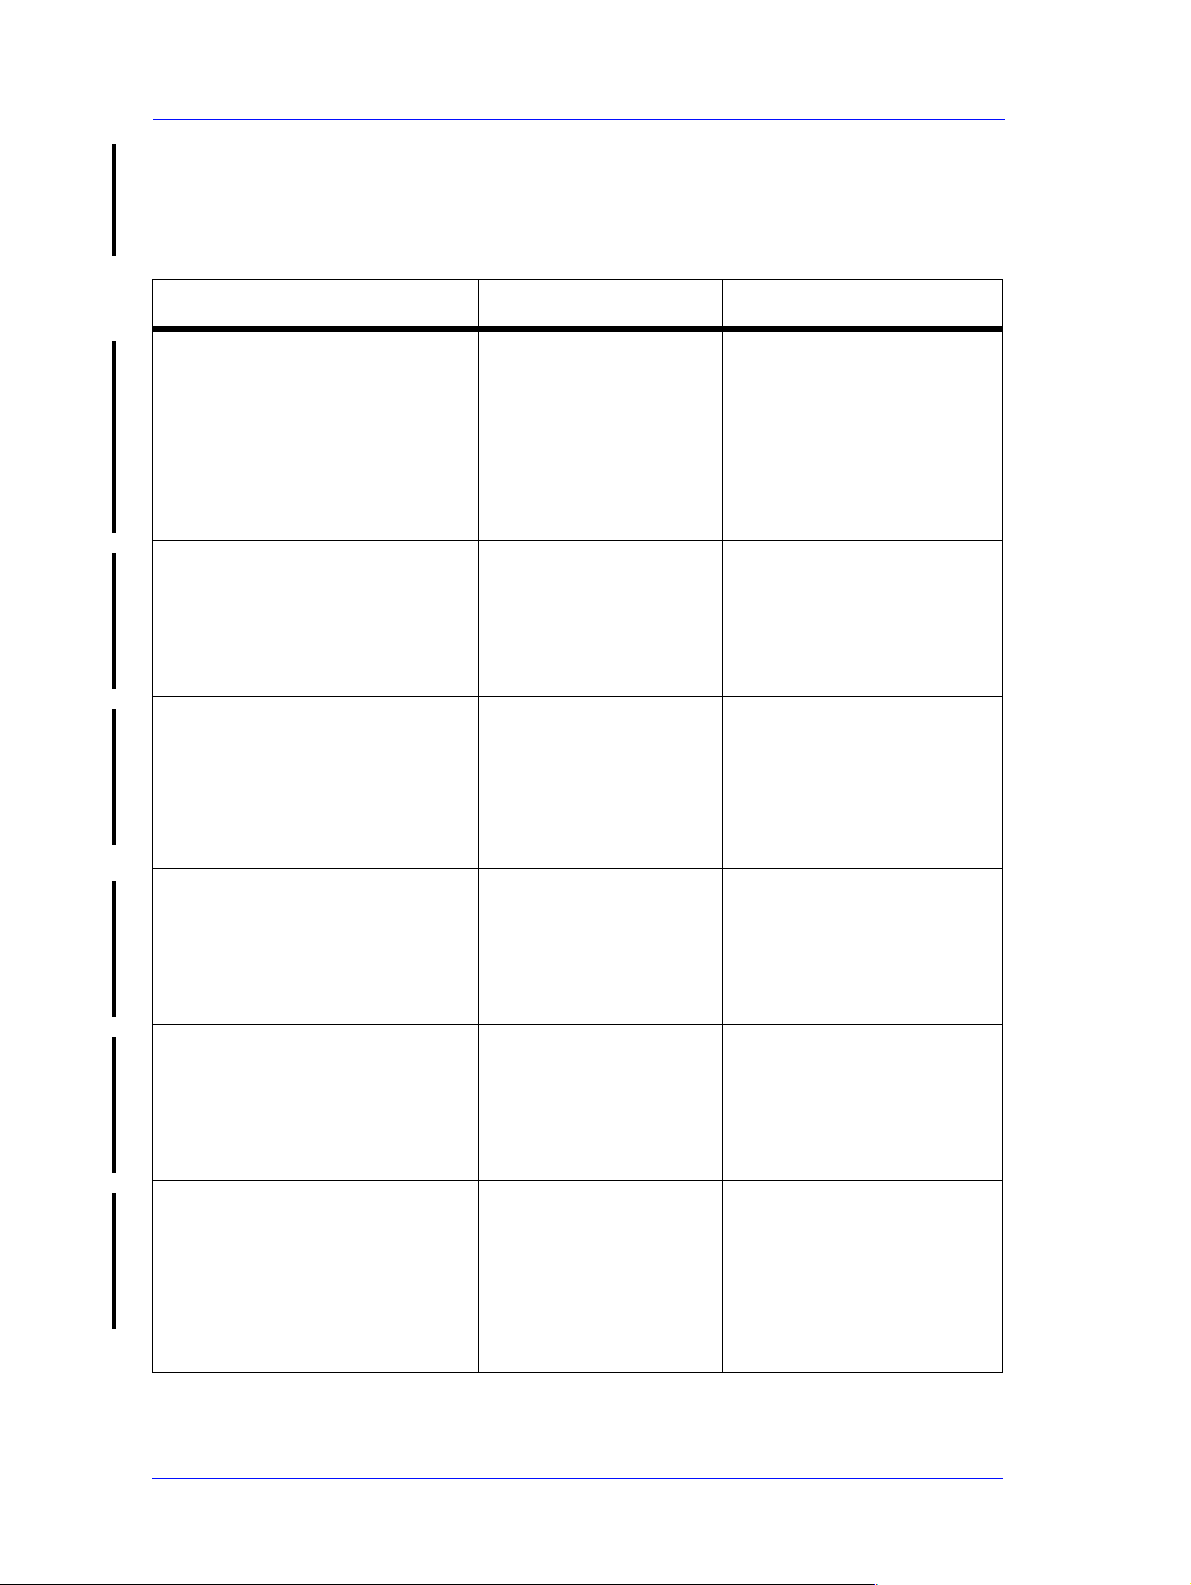
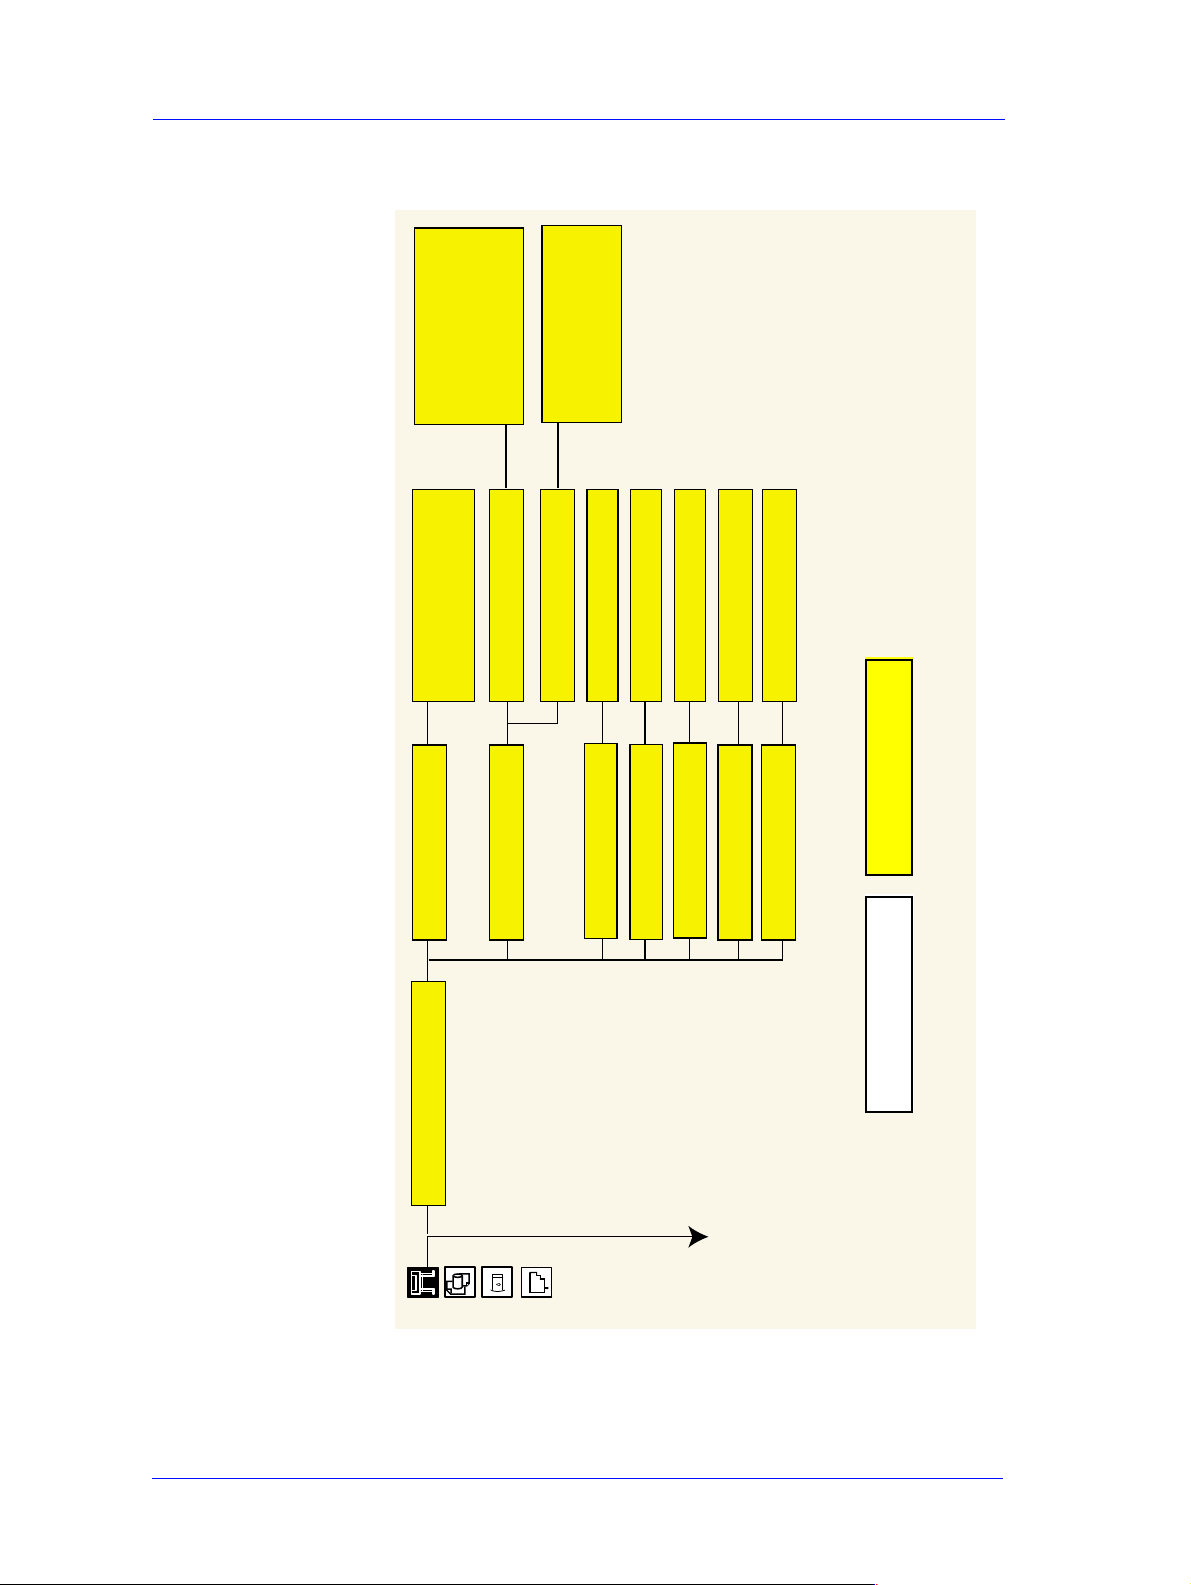
How to Navigate through the Front Panel Menus
Shaded boxes always appear in the front panel. White boxes appear
only in Full menu mode.
I/O Setup Menu
I/O setup
No I/O card found
Card ID
Card ID
Card Setup
Card Setup
I/O timeout
Only Appear in
Full Menu Mode
Configuration
Advanced
0.5 min .. 30 min
Always Appear
Reset Card
@
PostScript Only
1-26
HP DesignJet 5000 Series Printers Service Manual
Troubleshooting
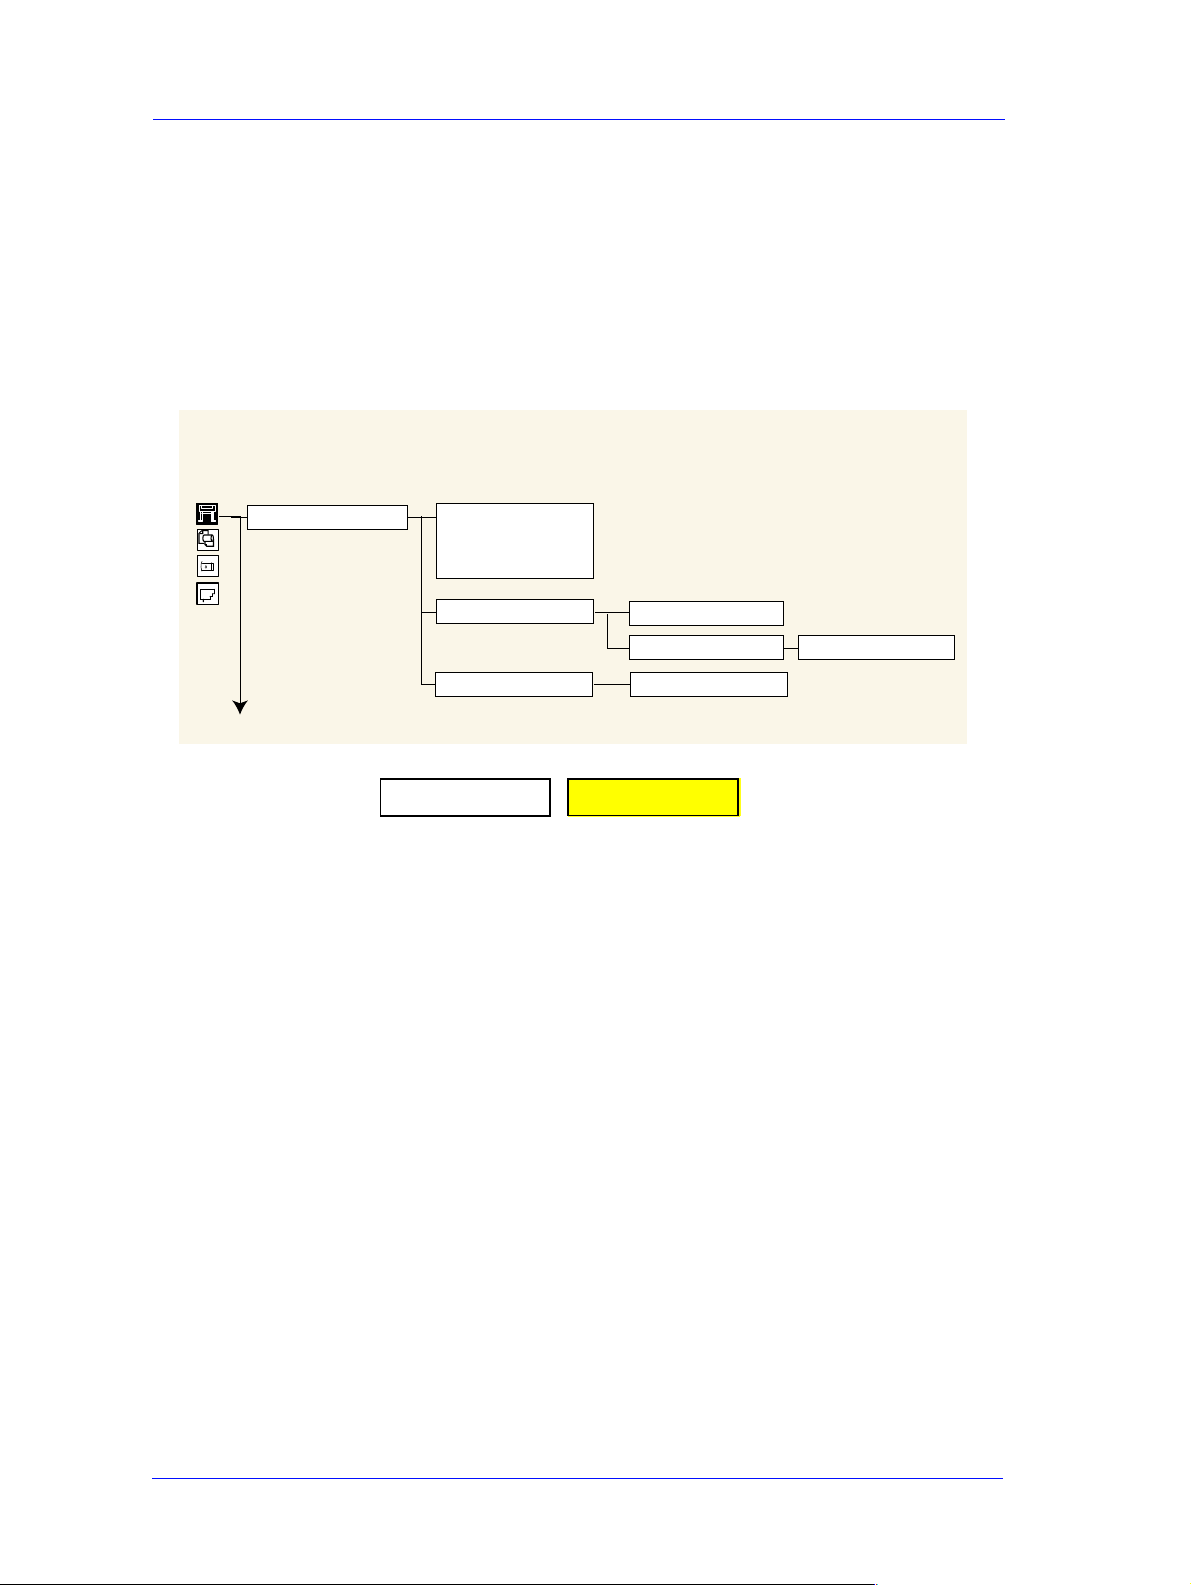
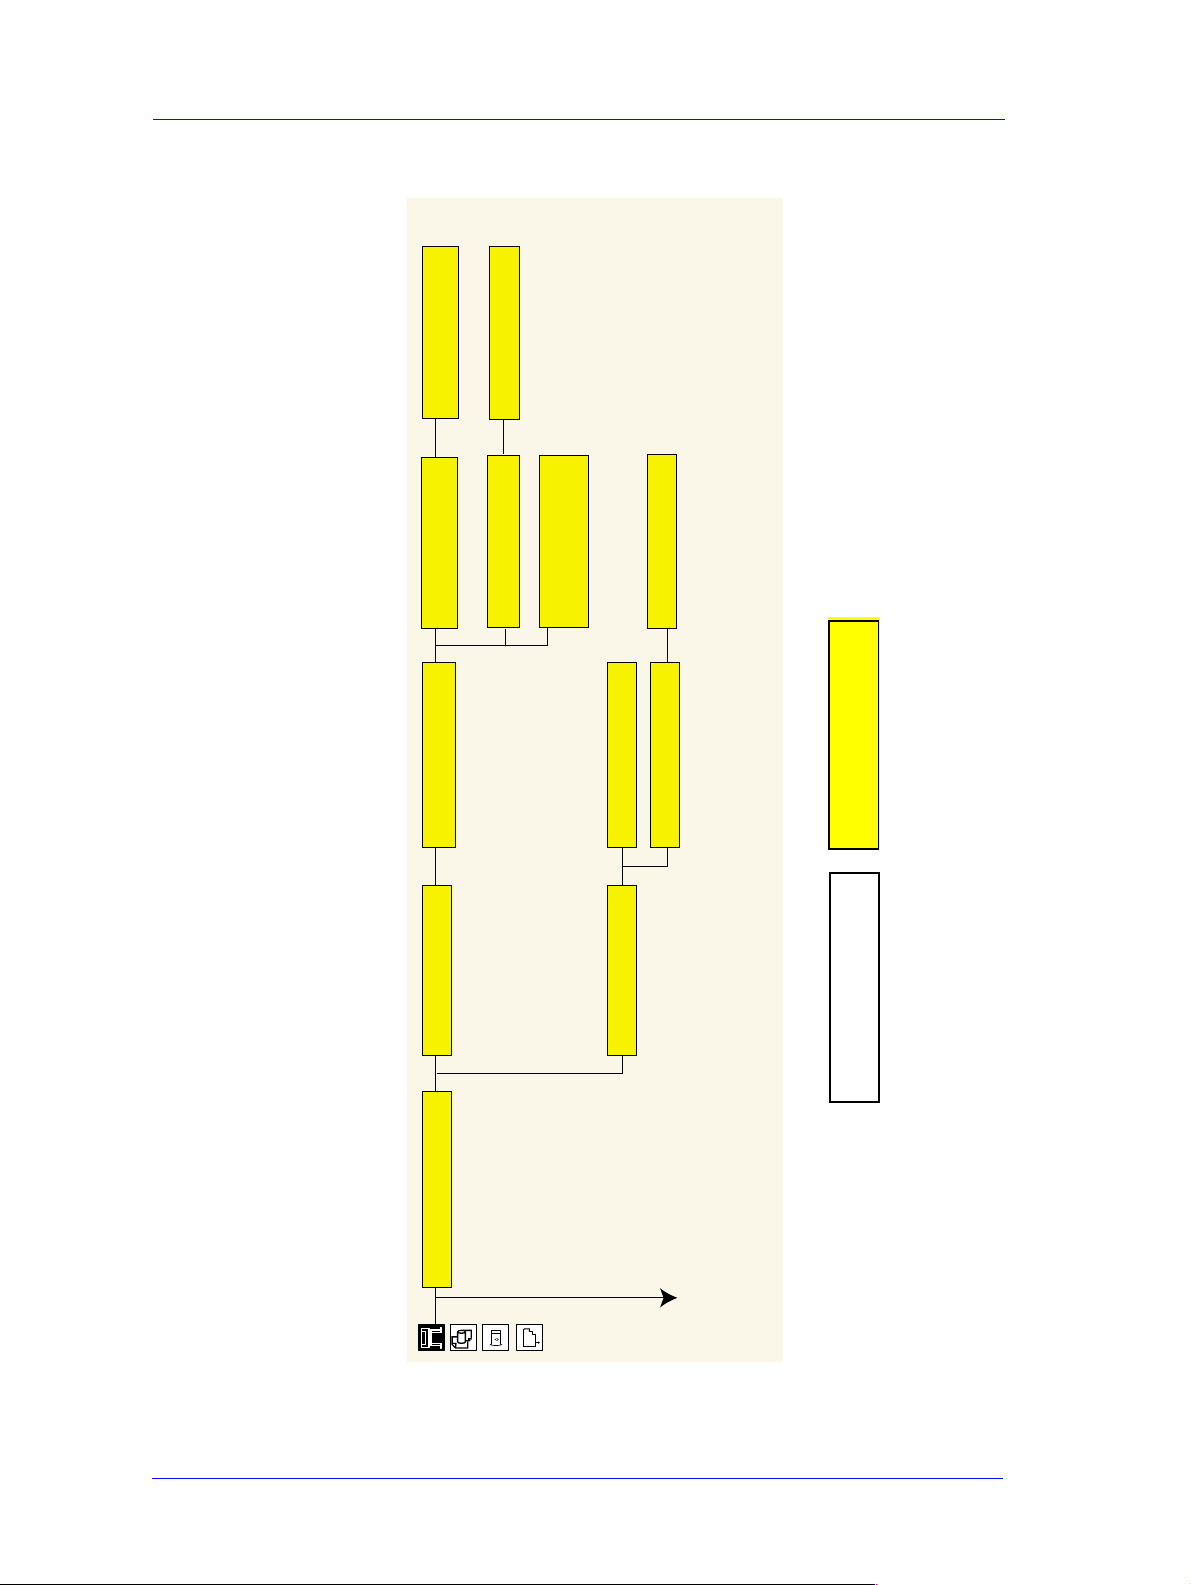
Device Setup Menu
PostScript Only
@
255 .. 2, 1 min
On, Off
TUR Installed NO,YES
Cutter
Device Setup
On, Off
Reduced Margins
HP-GL/2
PostScript@, Automatic
Lang
Automatic, None
Manual
Drying Time
Only Appear if TUR is
Only Appear if TUR
is Not Loaded
Only Appear in
Full Menu Mode
installed and Loaded
Always Appear
1-27
HP DesignJet 5000 Series Printers Service Manual
Troubleshooting
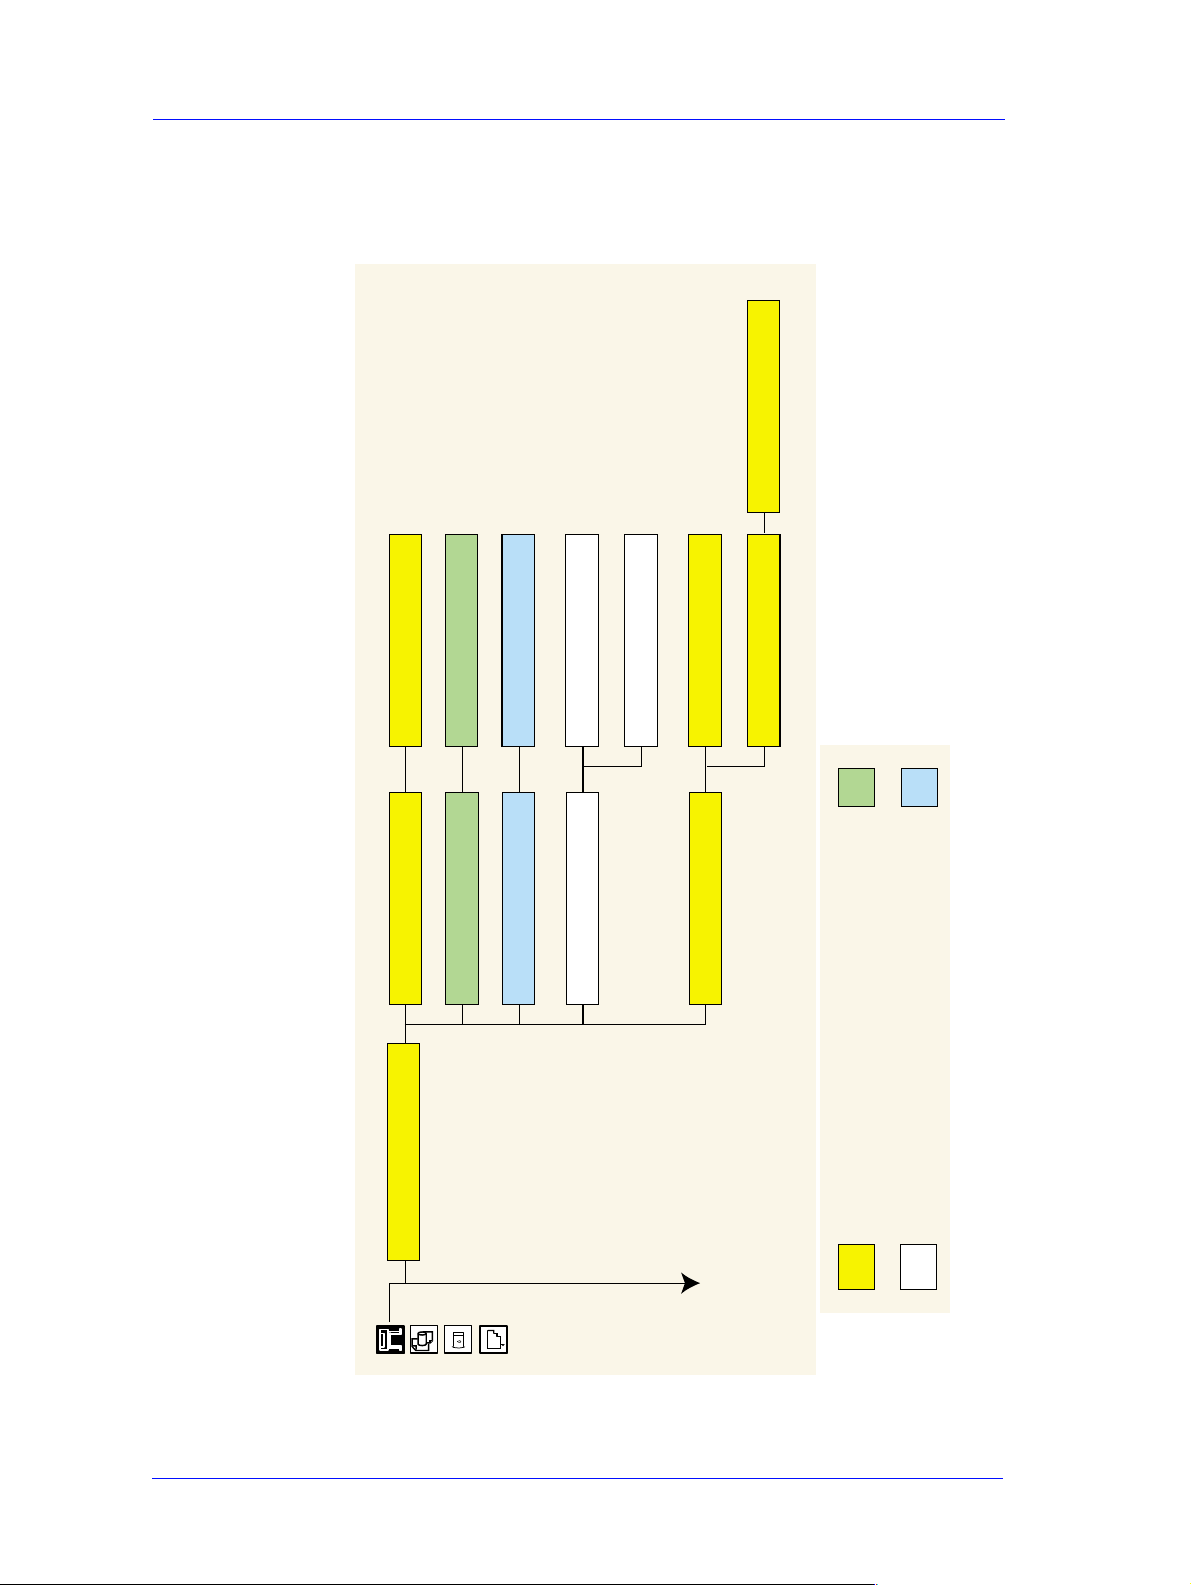
Utilities Menu
Create Pattern
Measure Pattern
Restore factory
Recalibrate
Automatic, Manual
No (Continue), Yes (Replace)
Replace Ink System
Utilities
Print usage, View usage
Yes, No
Track Media Length
Usage
Short, Full
Menu Mode
Printhead alignment,
Calibrations
Accuracy
Color Calibration
Reset Web Svr Passwd
Service config.
HP-GL/2 config
Test Prints
Usage report
Print Quality
Ram present, Service ID
Hard Disk, Code Rev.
Statistics
Up, Down
PS Code Rev, PS Font code
Default Menu
Automatic clean On, Off
Clean now …
Display Contrast
Clean Platen
Lens Maintenance
1-28
HP DesignJet 5000 Series Printers Service Manual
Troubleshooting
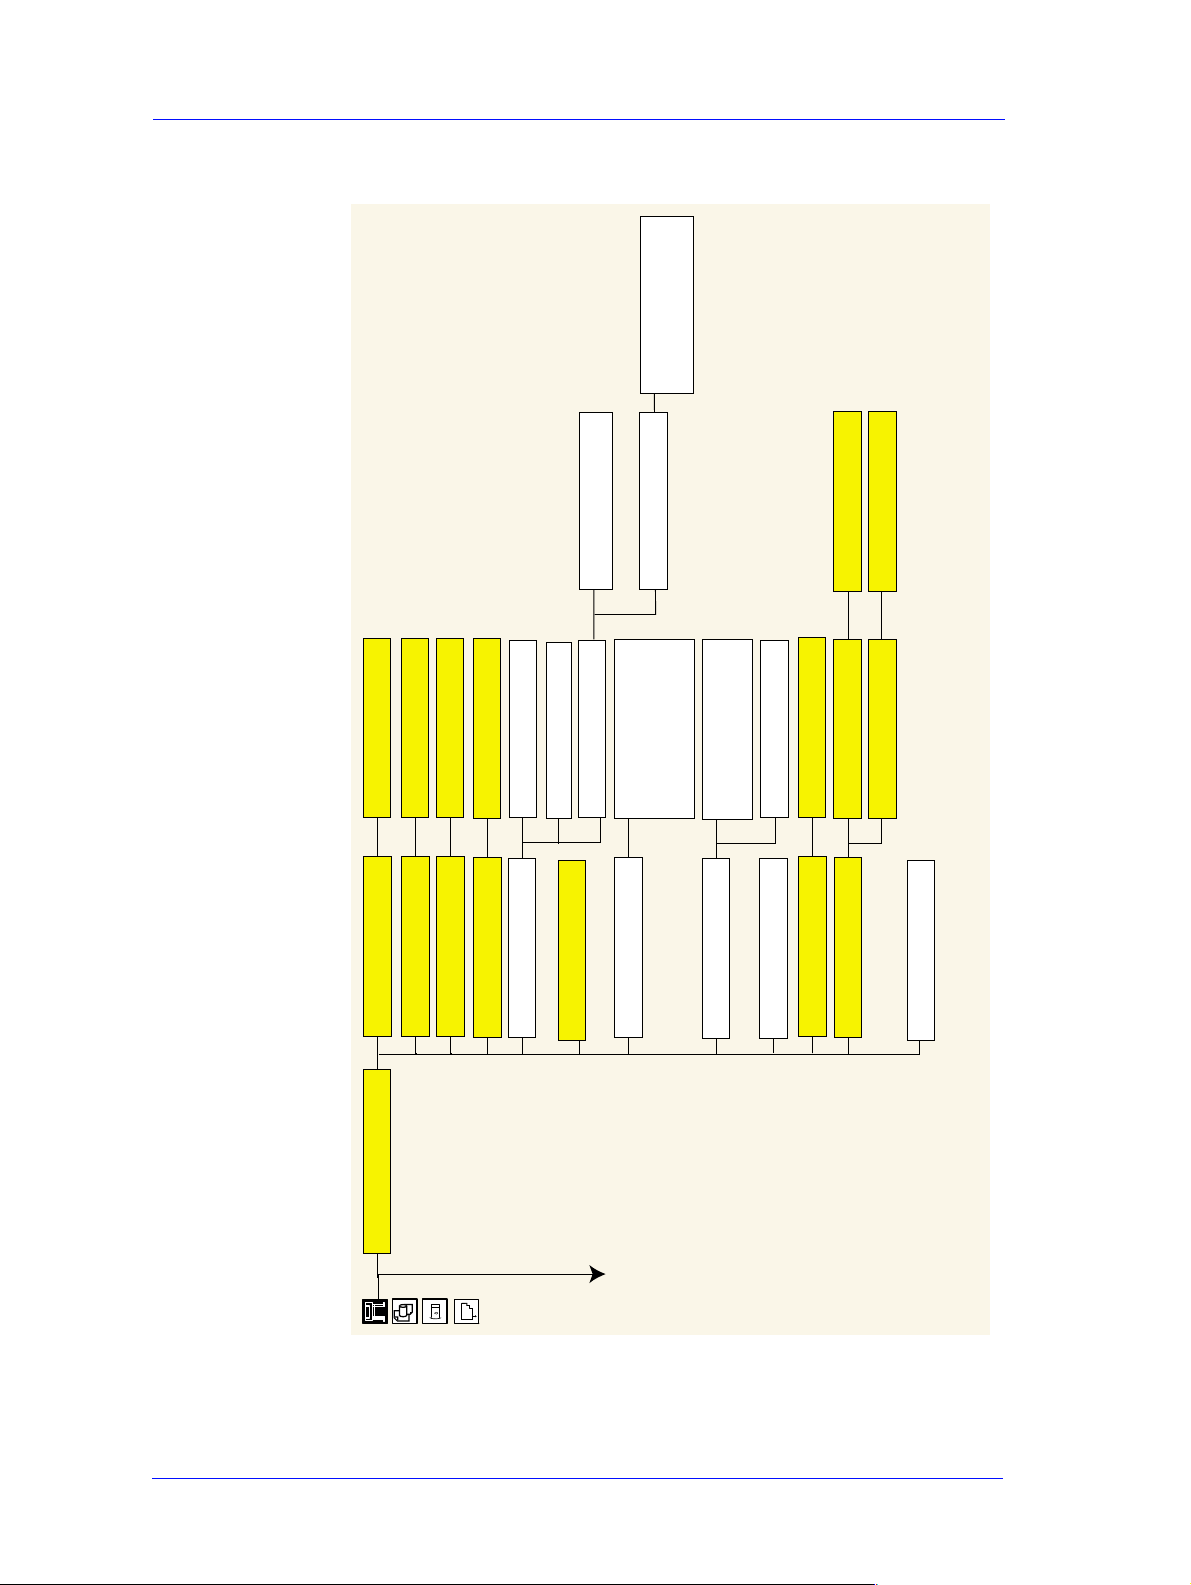
Internal RIP Settings Menu
@
Native, sRGB,
Apple RGB,
Adobe RGB,
ColorMatch RGB
Optimized, Immediately
RGB@
After processing
@
@
Native, EuroScale,
SWOP, TOYO,
DIC
@
@
CMYK
Off,On
Off,On
Off,On
@
@
@
100% .. 419%, Fit to page
Software, Binary, ASCII
@
@
PostScript Only
Start printing
Internal RIP Settings
Ink Emulation
Color calibration
Enhanced res
Black Replacement
PS scale
PS encoding
Always Appear
Only Appear in
Full Menu Mode
1-29
HP DesignJet 5000 Series Printers Service Manual
Troubleshooting
Queuing and Nesting Menu
99 .. 1,0
Copies
Statistics width, Length
Move to top,
Delete Page
@
PostScript Only
99 .. 2, 1 min
# ....
Queue mgmt
Nesting
Nest Off
In order ...
Always Appear
Only Appear in
Full Menu Mode
1-30
HP DesignJet 5000 Series Printers Service Manual

HP-GL/2 Settings Menu
0.13 ... 12.0mm
255 .. 1, 0
Width
Width
Troubleshooting
@
Pen no. 0 … 15
Pen no. 0 … 15
Palette A, Palette B
Software, Factory, Palette A, B
Palette
Factory
On/Off
Define Palette
Merge
PostScript Only
Always Appear
Only Appear in
Full Menu Mode
HPGL/2 settings
HP DesignJet 5000 Series Printers Service Manual
1-31

Troubleshooting
Page Format Menu
1.0X1.4m
42inX59in 44X62in
1.2X1.7m 52X73in
54X76 60X100in
Over A2, Over A1
Extrawide
Oversize
Best JIS B, JIS B4..B1
Best ARCH, ARCH A.. E1
Arch
JIS
Best ANSI, ANSI A ..E
Best ISO A, ISO A4 .. A0
0 .. 270
ISO
ANSI
30 .. 5, 0 mm
Normal, Extended
Manual
Automatic
@
PostScript Only
On, Off
Size Inked Area, Software
Page Format
Rotate
Margins
Nest Spacing
Mirroring
Always Appear
Only Appear in
Full Menu M ode
1-32
HP DesignJet 5000 Series Printers Service Manual

Demos Menu
Troubleshooting
@
PostScript Only
Samples
Demos
Palette
Menu
Always Appear
Only Appear in
Full Menu Mode
HP DesignJet 5000 Series Printers Service Manual
1-33

Troubleshooting
Media Menu
Vendor Name
Type of Media
Width
Printable Area
Profile Revision
HW Coated (Economy)
HW Coated
Coated Paper
Photo Imaging Gloss
Colorfast Vinyl
Paper Semi-Gloss
Poster Paper
Studio Canvas
*HW Coated (Economy)
*HW Coated
*Coated Paper
*Photo Imaging Gloss
and more.......
*Colorfast Vinyl
*Paper Semi-Gloss
*Poster Paper
Yes, No
*Studio Canvas
and more.......
Yes, No
Roll/Sheet Info.
Media Selection
Delete Media
Move Media
Form Feed & Cut
TUR Loaded=
1-34
HP DesignJet 5000 Series Printers Service Manual

Ink Cartridge Menu
Troubleshooting
HP No. 81 Ink Cartridge
Ink Level
Capacity
Part Number
Manufacture Date
Light Cyan cart Info
Light Magenta cart Info
Yellow cart. Info
Cyan cart Info
Magenta cart Info
Black cart Info
Yes, No
Replace Ink Cartridge
HP DesignJet 5000 Series Printers Service Manual
1-35

Troubleshooting
Printhead Menu
Printhead Info
Recover Printheads
Replace Printheads
Light Cyan Info
Light Magenta Info
Yellow Info
Cyan Info
Magenta Info
Black Info
All Printheads
Cyan
Magenta
Yellow
Black
Light C
Light M
Yes, No
1-36
HP DesignJet 5000 Series Printers Service Manual

Troubleshooting
Service Configuration Print
The Service Configuration Print is a useful tool for troubleshooting
the Printer. The Service Configuration Print contains the following
information about the Printer:
n General Configuration
n Printhead Info.
n Ink Cartridge Info.
n Operating Conditions.
n Calibrations.
n Maintenance.
n I/O Configuration.
How to Print the Service Configuration Print
1. Load media (Roll media or at least an A0 Sheet) into the Printer.
2. Once the message “Ready” is displayed on the front-panel, scroll to
the “Printer Setup Options” icon and press the Enter key.
Ready
Roll
Hewlett Packard
Photo Imaging Gloss
Ink OK
Printheads OK
Printer Setup Options
3. Once inside the “Printer Setup Options” menu, use the Arrow keys
to scroll to the “Utilities” menu display and press the Enter key.
Printer setup options
Device setup...
I/O setup...
Utilities...
Internal RIP settings...
Queueing & Nesting...
HP-GL/2 settings...
Top
Back
↑
↓
Enter
Make Selection
Press Enter
HP DesignJet 5000 Series Printers Service Manual
1-37

Troubleshooting
4. Once inside the “Utilities” menu, use the Arrow keys to scroll to the
“Test prints” menu display and press the Enter key.
Utilities
Utilities
Display Contrast ...
Calibrations ...
Reset WebAccess paswd
Contrast ...
Test Prints
Statistics ...
...
Default menu
Test Prints ...
Display contrast . . .
Top
Back
↑
↓
Enter
Press Up
and Enter
5. Use the Arrow keys to scroll to “Service Config.” and press the
Enter key to print the Service Configuration Print.
How to Use the Service Configuration Print
The Service Configuration Print is divided into 7 different areas
where you can find information to troubleshoot the Printer.
n General Configuration - In this area you can find information
regarding the general configuration of the Printer, for example,
the firmware version, amount of memory installed or the capacity
of the Hard Disk Drive.
n Printhead Info - In this area you can find all the information
regarding the Printheads, for example, the part number, the
manufacturing date or the number of times a certain Printhead
has been inserted in the carriage. This information is useful for
troubleshooting Printhead problems and even knowing if the
Printheads have been used with Non-HP Ink Cartridges.
n Cartridge Info - In this area you can find all the information
regarding the Ink Cartridges, for example, the part number, the
manufacturing date or the ink level. This area also shows you if
the customer is using Non-HP Ink Cartridges.
n Operating Conditions - In this area you can find the level of
humidity and the temperature that the Printer is working in.
n Calibrations - In this area you can find information on certain
calibrations that have been performed on the Printer. It will also
tell you if a required calibration was performed or not.
n Maintenance - In this area you can find information relating to
maintenance, for example, the number times the Printer has been
powered ON, the number of Carriage cycles or the last System
Error Code that was triggered.
n I/O Configuration - In this area you can find information on the
configuration of the JetDirect Card.
1-38
HP DesignJet 5000 Series Printers Service Manual

Troubleshooting
General Printer Information
1. Interaction between start printing and nesting.
Of the four possible combinations between "Start Printing =
Optimized or After processing" and "Nesting = In order or OFF"
only two are possible. For example, if you have nesting set to "In
order" and you change start printing to "Optimized" the Printer will
automatically change nesting to "Off". Likewise, if you have start
printing set to "Optimized" and you change nesting to "In order" the
Printer will automatically set start printing to "After Processing".
n There is no problem. This is the way the Printer operates.
2. Printhead crashes and ink smearing with Coated Paper.
HP Coated Paper is very prone to Printhead crashes especially in
high humidity conditions and high-density prints. The HP
recommendation is as follows:
n HP Coated Paper - For presentation-quality images: For a
variety of everyday uses. Produces excellent line and color
quality for medium ink-density illustrations and graphics,
working comps, proofs and renderings.
n
HP Heavywei ght Coated Pape r
- For durable, presentationquality images; Designed for high ink-density and rugged use, and
for final pre s entations and signs that are mounted and laminated.
3. Throughput
Maximum Throughput given in the Technical Data Sheet for HP
Coated Paper is:
n Print Mode Max Speed (60 inch model): 569 sqft/hour*
n Print Mode Max Speed (42 inch model): 499 sqft/hour*
NOTE These are maximum mechanical printing speeds and do not
include, for example, printhead servicing a t the begi nning/end o f
the print, dry time at the end of the print, etc. So, t he average
throughput when you are printing a run of several plots will be
lower.
n If you only want to maximize throughput, the following settings
are recommended:
– Dry time: NONE
– Internal RIP settings > Start printing > Immediately
– Print orientation: if possible use Landscape instead of Portrait
to reduce Carriage stops.
– Printhead status: OK to reduce servicing at the beginning/end
HP DesignJet 5000 Series Printers Service Manual
1-39

Troubleshooting
Issue Main Reason Action/Check
of the print. Perform a manual recovery if the Printhead status
is (XX20) RECOVER/ (XX21) REPLACE.
n With longer plots, average productivity will increase (i.e. same
area is printed in less prints > reduction of servicing at the
beginning/end of the print).
Troubleshooting Take-Up-Reel Problems
Right Hand (RH)
Module LED is OFF
RH Module LED is
RED
RH Module LED is
blinking REDGREEN
Media is not being
rolled
The Printer is not
connected or switched
ON
The Spindle LOCK
Lever is not closed
Problem with the RH
Module Sensor
connection
TUR is ON but is not setup correctly
Media is not supported
or it is not set-up
correctly in the TUR and
the Media skew is
causing problems
Check that the TUR power cord is connected
Check that the switch located at the rear side of
the RH Module is ON
Check that the TUR Spindle is inserted on the
TUR and the automatic lock is closed
Check that the LED turns from RED to GREEN
when manually closing the Spindle Lock Lever
Check that the sensor cable is well connected to
the Sensor Assembly
If the problem persists, call an HP representative
Check that the RH Module LED is ON (and
GREEN)
Check that the TUR Spindle is inserted and the
Spindle Lock Lever is closed
Check that the media weights are being used, set to
the media size used and the blue flanges are inserted
on the media weight
Check that the media is stuck to the Spindle as
parallel as possible to prevent skew
Media is being cut
after each print
1-40
The TUR is not set-up in
the Front Panel Menu
Check that the Deflector Bar is correctly installed
and that the Media routing is OK
Check that the media is HP supported.
Transparent media are not supported for being
used with the TUR
Check that the TUR ON option is activated on the
Front Panel (Devices Menu)
HP DesignJet 5000 Series Printers Service Manual

System Error Codes 2
System Error Codes 2-3
Introduction 2-3
Continuable and Non-Continuable Error Codes 2-4
System Error Groups 2-4
ffff ffff xxxxxxxx (General Firmware Error) 2-5
ffff ffff 02b301b0 2-5
ffff ffff 030d0170 or ffff ffff 030d0171 2-6
ffff ffff 031609xx 2-6
ffff ffff 03450097 2-7
ffff ffff 036000bd 2-7
ffff ffff 036e0136 2-7
01002D (Non-Continuable) 2-7
010023 (Non-Continuable) 2-8
010030 034c095e 2-8
010040 2-8
010041 2-9
010042 2-9
010090 (Continuable) 2-10
010091 (Continuable) 2-10
010092 (Continuable) 2-10
011000 2-10
040000 01E603D9 2-11
050000 (Continuable) 2-11
050001 (Continuable) 2-11
06030C 2-12
06040C 2-12
0A0000 2-13
0A0010 2-13
0A0020 2-13
0A0030 2-14
0A0040 2-14
0A0050 (Non-Continuable) 2-15
0A0060 (Non-Continuable) 2-15
0A0070 (Continuable) 2-15
0B0000 2-15
0B0001 2-16
HP DesignJet 5000 and 5500 Series Printers Service Manual
2-1

System Error Codes
0B0002 2-16
0B0003 2-16
0B0004 2-17
0B0005 2-17
0B0006 2-17
0B000X 2-18
0B0010 xxxxxxxx (Non-Continuable) 2-18
0B000A 2-18
0B000B 2-19
0B000C 2-19
0B000D 2-19
0B000E 2-19
0B000F (Continuable) (Only applicable to DesignJet 5500 Series) 2-20
0C0030 2-20
0C0032 (Continuable) 2-21
0C0040 2-21
0C00FF 2-22
0C1000 2-22
0C1001 2-22
0D0000 (Continuable) 2-23
0D0000 033f019C 2-23
0D0002 (Continuable) 2-23
0D0003 xxxxxxxx (Non-Continuable) 2-23
0D0004 xxxxxxxx (Non-Continuable) 2-23
0D0005 03180382 (Non-Continuable) 2-24
0FXXXX (Non-Continuable) 2-24
0F0200 00b007bc 2-24
0F0200 00b007E5 2-24
0F0200 01E603d2 2-25
0F0100 03180382 (Non-Continuable) 2-25
1f500XX (Boot Failed) 2-25
e50000 2-26
2-2
HP DesignJet 5000 and 5500 Series Printers Service Manual

System Error Codes
System Error Codes
Introduction
NOTE Before troubleshooting System Errors, if possible, repeat the
procedure performed when the error was reported.
NOTE When reporting the System Error Code, make sure that you
supply the full Error Code and the firmware version (displayed
during the initialization process when powering ON the Printer
or available in the User’s Printer Setup ⇒ Utilities ⇒ St at i st i cs
menu).
The following pages contain a list of System Error Codes and their
respective descriptions and recommended corrective actions. Only
try one recommended action at a time and check if the Error Code
has disappeared.
System Error Codes consist of two groups of alpha numerics:
[XXXXXX]-[YYYYZZZZ]
The first set of 6 alphanumeric characters consists of the System
Error and the second set of 8 digits, when present, refer to the
internal error data.
NOTE If the YYYY digits in the second set of 8 characters are zero
[0000ZZZZ], this indicates a LAN Card System Error. The last
four digits [ZZZZ] of the Error Code must be reported to the
vendor support organization:
n For HP JetDirect Cards, this error code must be reported to
the iIPS Division Support.
n For 3rd party LAN Cards, the HP support organization s hould
communicate to the customer that they should address it
through the 3rd party vendor support structure.
HP DesignJet 5000 and 5500 Series Printers Service Manual
2-3

System Error Codes
If you have an error code which is not documented in this Service
Manual or you have an error which you cannot resolve, then report
the error to the HP Response Center or the nearest HP Support
Office. When reporting the error, have the following information
ready:
n Which firmware revision the Printer is using.
n The complete error number.
n Which software application the customer is using (name, version,
etc.).
Continuable and Non-Continuable Error Codes
Some of the Error Codes are continuable, which means you can
press Enter on the front-panel and continue working with the
Printer. Non-Continuable Error Codes do not allow you to continue
working with the Printer , in this case power the Printer OFF and ON
again and see if the System Error disappears. If the Error Code
reappears, then the Printer requires an on-site visit in order to
resolve the problem.
NOTE Even though the customer can continue working with a
Continuable Error Code, an on-site visit should still be planned
to troubleshoot the problem.
System Error Groups
The System Errors are organized in groups as follows:
n Group 01 - Hardware Test Group.
n Group 04 - Intelligent I/O (Jetdirect) Errors.
n Group 06 - Line Sensor Errors.
n Group 08 - Pen Energy and Thermal Management Errors.
n Group 09 - Hard Disk Drive Errors.
n Group 0A - Ink Delivery System Errors.
n Group 0B - Hardware Initialization Errors.
n Group 0C - Drop Detection/Nozzle Recovery Related Errors.
n Group 0D - Miscellaneous Errors.
n Group 0F - Firmware/Software Errors.
2-4
HP DesignJet 5000 and 5500 Series Printers Service Manual

System Error: ffff ffff xxxxxxxx (General Firmware Error)
System Error Codes
Problem
Description:
All ffff ffff errors are general firmware errors. This
that the firmware has failed, but that the firmware (as a piece of
software) has experienced an internal crash and before doing
anything incorrectly it displays this error . We can compare this to the
"blue-screen" that appears in the Windows operating system when
there is a software problem. These errors also mean a system crash.
Usually, the errors are sporadic and appear very randomly . The best
solution is just to switch the Printer OFF and ON and check if the
problem has disappeared (as in Windows). Frequently, the problem
will disappear.
However, somet imes the same system error appears quite often or it
is permanent. Its root cause (as explained above) may not
necessarily be a firmware problem; it could also be related to the Ink
Supplies, Electronics Module, etc.
In this situation, please take note of the Firmware version, the
situation where the problem can be reproduced and the
COMPLETE system error code and report it to the division.
Corrective Action: Try the following:
n Power-cycle the Printer and to check whether it still fails.
does not
mean
n If it still fails, upgrade to the latest Firmware revision (as the
newer revisions are more stable and solve many of the problems)
and check whether it still fails.
n If it still fails, report the error to the division. In this case, it is
important to report the firmware revision the printer is using, the
complete error number, which software application the customer
is using (name, version, etc.) and as much information as possible
about when it occurred.
System Error: ffff ffff 02b301b0
Problem
Description:
Corrective Action:
This error usually appears at the beginning of Printhead Alignment
due to a firmware bug.
If the error appears frequently, upgrade to firmware release A.02.xx.
NOTE This problem is solved in any A.02.xx firmware release.
HP DesignJet 5000 and 5500 Series Printers Service Manual
2-5

System Error Codes
System Error: ffff ffff 01dcxxxx
Problem
Description:
Corrective Action: Try the following:
There is a problem with the I/O Card (happens during power-up).
n Disconnect the Network Cable and check if the error still appears
during power-up.
n If the error does not appear again, then the problem may have
been that the Printer was receiving some informa tion t hroug h the
port while powering-up.
n
If the error
does
remove the I/O Card from the back of the Printer and power ON
the Printer again. Check if the error still appears during power-up.
– If the error does appear again, replace the Main PCA ( ⇒ Page
8-81) or the Hard Disk Drive (⇒ Page 8-74).
– If the error
does not
the I/O Card), then try inserting the I/O card in the second slot to
check if it works. If it doe sn’t work in the second slot, then replace
the I/O Card. If the new I/O ca rd also fa ils, replac e t he M ain PCA
( ⇒ Page
8-81
appear again, then power OFF the Printer,
appear again (powers-up correctly withou t
) or the Hard Disk Drive (⇒ Page
8-74
).
System Error: ffff ffff 030d0170 or ffff ffff 030d0171
Problem
Description:
Corrective Action: Try the following:
At power-up, the Printer thinks it is smaller than 42 inches.
n Check that there are no obstacles in the Scan-Axis which stops
the Carriage from reaching the end-stops on both sides.
n Check that the Carriage moves freely from side to side.
n Check that the IDS Crane is installed correctly on top of the
Carriage and that the Carriage Cover is clipped on correctly.
System Error: ffff ffff 031609xx
Problem
Description:
This error code only appears if the Main PCA was replaced without
removing the media from the Printer, because the firmware tries to
find the last media information in the EEROM. Since the
information cannot be found, this error code is displayed.
Corrective Action: Remove the media and re-boot the Printer. This error code should
not appear again.
2-6
HP DesignJet 5000 and 5500 Series Printers Service Manual

System Error: ffff ffff 03450097
System Error Codes
Problem
Description:
If the Window is opened during the cutting operation, the Printer
hangs and the Carriage suddenly stops. Also, if you press any key
on the front panel this error code (ffff ffff 03450097) may be
displayed.
Corrective Action: Re-boot the Printer and make sure that the W indow is never opened
during the cutting operation.
NOTE This problem is solved in any A.02.xx firmware release.
System Error: ffff ffff 036000bd
Problem
Description:
This firmware error code is related to the detection of the Printhead
cleaners by the line sensor. It always happens during initialization,
while checking the Printhead Cleaners. In most case, it is a problem
of incorrectly inserted Printhead Cleaners, but it can also be caused
by an incorrectly assembled Service Station.
Corrective Action: Try the following:
n Remove the Printhead Cleaners and reinsert them again.
n If the error still persists, perform the Service Station Calibration
⇒ Page 5-11.
n If the error still persists, an onsite visit is necessary to repeat the
calibration or to change the Service Station assembly or the
Carriage Assembly.
System Error: ffff ffff 036e0136
Problem
Description:
This is an internal general error code which can appear during the
Printhead Alignment process. The chance of this error appearing is
less than 0.5% and there is nothing wrong with the Printer.
Corrective Action: Re-boot the Printer and the error code should not appear again.
System Error: 01002D (Non-Continuable)
Problem
Description:
Corrective Action: Try the following:
The Main PCA cannot communicate with the Carriage.
n Check the Trailing Cable is connected correctly.
n Replace the Trailing Cable ⇒ Page 8-36.
n Replace the Carriage Assembly ⇒ Page 8-46.
HP DesignJet 5000 and 5500 Series Printers Service Manual
2-7

System Error Codes
System Error: 010023 (Non-Continuable)
Problem
Description:
Corrective Action: n Replace the Main PCA ⇒ Page 8-81.
EEROM Test failure.
NOTE After replacing the Main PCA, make sure you perform the
Backup EEROM ⇒ Page 4-30, making sure that you select
"Main PCA" when prompted.
System Error: 010030 034c095e
Problem
Description:
This error code appears when the power supply detects a low spike
(e.g. due to a temporary loss of tension). There is nothing wrong
with the Printer.
Corrective Action: Re-boot the Printer and the error code should not appear again.
NOTE If the error code appears again, try connecting the Printer to a
different power socket.
System Error: 010040
Problem
Description:
Corrective Action: Try the following:
Error in Paper-axis Encoder quadrature.
n Check that the Paper-Axis Motor cable is NOT broken or
damaged.
n Check that the Paper-Axis Motor cable is correctly connected.
n Replace the Paper-Axis Motor ⇒ Page 8-105.
n If the Error Code continues, replace the Main PCA ⇒ Page 8-81.
WARNING Only replace one component at a time and check if the error has
gone before replacing another component. Using this procedure
you will be able to determine exactly which component failed.
2-8
HP DesignJet 5000 and 5500 Series Printers Service Manual

System Error: 010041
System Error Codes
Problem
Description:
Corrective Action: Try the following:
Error in Scan-axis Encoder quadrature.
n Check that the Encoder Strip is NOT broken or damaged.
n Replace the Encoder Strip ⇒ Page 8-34.
n Replace the Carriage Assembly ⇒ Page 8-46.
n If the Error Code continues, replace the Main PCA ⇒ Page 8-81.
WARNING Only replace one component at a time and check if the error has
gone before replacing another component. Using this procedure
you will be able to determine exactly which component failed.
System Error: 010042
Problem
Description:
Corrective Action: Try the following:
Error in Service Station-axis Encoder quadrature.
n Check that the Service Station Encoder-Cable is NOT broken or
damaged.
n Check that the Service Station Encoder-Cable is correctly
connected.
n Replace the Service Station ⇒ Page 8-69.
n If the Error Code continues, replace the Main PCA ⇒ Page 8-81.
WARNING Only replace one component at a time and check if the error has
gone before replacing another component. Using this procedure
you will be able to determine exactly which component failed.
HP DesignJet 5000 and 5500 Series Printers Service Manual
2-9

System Error Codes
System Error: 010090 (Continuable)
Problem
Description:
Corrective Action: Try the following:
Error in Paper-axis Motor Encoder
n Check that the Paper-Axis Motor cable is NOT broken or
damaged.
n Check that the Paper-Axis Motor cable is correctly connected.
n Replace the Paper-Axis Motor ⇒ Page 8-105.
n If the Error Code continues, replace the Main PCA ⇒ Page 8-81.
WARNING Only replace one component at a time and check if the error has
gone before replacing another component. Using this procedure
you will be able to determine exactly which component failed.
System Error: 010091 (Continuable)
Problem
Description:
Corrective Action: Refer to System Error Code 010090.
Error in Paper-axis Motor Encoder
System Error: 010092 (Continuable)
Problem
Description:
Corrective Action: Try the following:
Mark Encoder position not detected on Drive Roller.
n Replace the Lens Cover ⇒ Page 9-5.
n Clean the Mark Encoder on the Drive Roller using the Turn
DRIVE ROLLER Utility ⇒ Page 4-17.
System Error: 011000
Problem
Description:
Corrective Action: Power the Printer OFF and ON again using the Power Switch at the
NIB Crash.
back of the Printer.
2-10
HP DesignJet 5000 and 5500 Series Printers Service Manual

System Error: 040000 01E603D9
System Error Codes
Problem
Description:
This is an error that is related to the Parallel Port. It happens no rmally
in New Printers and only once (it is unlikely to appear again). Even if
the error appears again, there is nothing wrong with the Printer.
Corrective Action: Try the following:
n Recommend to the customer to print via the Network Card
because the transmission time via the Parallel Port is very slow.
n If the customer insists on printing via the Parallel Port, ask them
to check the Parallel Port settings on the PC (that was used when
the error occurred). The Parallel Port setting in the PC BIOS
should be in the ECP mode. This configuration should decrease
the frequency of the error.
System Error: 050000 (Continuable)
Problem
Description:
Corrective Action: Try the following:
Lens has problems reading the Mark Encoder on the Drive Roller.
n Clean the Mark Encoder on the Drive Roller using the Turn
DRIVE ROLLER Utility ⇒ Page 4-17
n Replace the Lens Cover Assembly ⇒ Page 9-5.
System Error: 050001 (Continuable)
Problem
Description:
Corrective Action: Refer to System Error Code 050001.
Lens has problems reading the Mark Encoder on the Drive Roller.
HP DesignJet 5000 and 5500 Series Printers Service Manual
2-11

System Error Codes
System Error: 06030C
Problem
Description:
Corrective Action: Try the following:
Bad Line Sensor.
n Replace the Line Sensor ⇒ Page 8-53.
n Replace the Carriage Assembly ⇒ Page 8-46.
n Replace the Trailing Cable ⇒ Page 8-36.
n Replace the Main PCA ⇒ Page 8-81.
WARNING Only replace one component at a time and check if the error has
gone before replacing another component. Using this procedure
you will be able to determine exactly which component failed.
System Error: 06040C
Problem
Description:
Corrective Action: Try the following:
Line Sensor not connected correctly.
n Check/reconnect the Line Sensor.
n Replace the Line Sensor ⇒ Page 8-53.
n Replace the Carriage Assembly ⇒ Page 8-46.
WARNING Only replace one component at a time and check if the error has
gone before replacing another component. Using this procedure
you will be able to determine exactly which component failed.
2-12
HP DesignJet 5000 and 5500 Series Printers Service Manual

System Error: 0A0000
System Error Codes
Problem
Description:
Corrective Action: Try the following:
APS Failure.
n Check all the cables of the APS and make sure they are correctly
connected and are NOT damaged.
n Check all the tubes of the APS and Tubes System and make sure
they are correctly connected and are NOT pinched or damaged.
n Check that the Air Tube from the APS is correctly connected to
the Tubes System.
n Replace ONE Ink Cartridge at a time, checking if the System
Error Code disappears.
n Faulty APS. Replace the APS ⇒ Page 8-67.
WARNING Only replace one component at a time and check if the error has
gone before replacing another component. Using this procedure
you will be able to determine exactly which component failed.
System Error: 0A0010
Problem
Description:
Corrective Action: Refer to System Error Code 0A0000.
System Error: 0A0020
Problem
Description:
Corrective Action: Try the following:
APS Failure.
Error in Calibrating the APS Sensor.
n Check the APS Sensor and the valve cables, making sure that
they are NOT damaged and connected correctly.
n Replace the APS ( ⇒ Page 8-67) or the ISS PCA ( ⇒ Page 8-91).
HP DesignJet 5000 and 5500 Series Printers Service Manual
2-13

System Error Codes
System Error: 0A0030
Problem
Description:
Corrective Action: Try the following:
Problem in Depressurizing Air System.
n Check the APS for any signs of Ink. Also inspect ALL Ink
Cartridges for any signs of leaking (the bottom valve of the Ink
Cartridge will contain ink).
n If there is ink leakage, replace ALL Ink Cartridges, the APS ( ⇒
Page 8-67) and the Tubes System ( ⇒ Page 8-25).
WARNING Only replace one component at a time and check if the error has
gone before replacing another component. Using this procedure
you will be able to determine exactly which component failed.
System Error: 0A0040
Problem
Description:
Corrective Action: Try the following:
APS Failure.
n Check all the cables of the APS and make sure they are correctly
connected and are NOT damaged.
n Check all the tubes of the APS and Tubes System and make sure
they are correctly connected and are NOT pinched or damaged.
n Replace ONE Ink Cartridge at a time, checking if the System
Error Code disappears.
n Faulty APS. Replace the complete APS ⇒ Page 8-67.
WARNING Only replace one component at a time and check if the error has
gone before replacing another component. Using this procedure
you will be able to determine exactly which component failed.
2-14
HP DesignJet 5000 and 5500 Series Printers Service Manual

System Error: 0A0050 (Non-Continuable)
System Error Codes
Problem
Description:
Corrective Action: Try the following:
The Printer has detected a leak in the Tubes System - Should ONLY
appear in printers with the Ink Leak Detector installed.
n Check for ink in the Ink Leak Detector and, if present, replace the
complete Tubes System ⇒ Page 8-25.
n The Ink Leak Detector could have been triggered due to
condensation in the Printer. Power OFF the Printer and allow the
Printer to dry for 15 minutes. Power ON and check if the System
Error Code has disappeared.
n Replace the ISS PCA ⇒ Page 8-91.
WARNING Only replace one component at a time and check if the error has
gone before replacing another component. Using this procedure
you will be able to determine exactly which component failed.
System Error: 0A0060 (Non-Continuable)
Problem
Description:
The Printer has detected a leak in the Tubes System - Should ONLY
appear in printers with the Ink Leak Detector installed.
Corrective Action: Refer to System Error Code 0A0050.
System Error: 0A0070 (Continuable)
Problem
Description:
Corrective Action: Try the following:
The Backup EEROM contents stored in the Hard Disk Drive are not
consistent with the ones required by the firmware.
n Perform Backup EEROM ⇒ Page 4-30 and ALL calibrations.
Perform EEROM Setup ⇒ Page 4-23 to reconfigure the Printer.
System Error: 0B0000
Problem
Description:
Corrective Action: Try the following:
Bad Ambient Temperature measured.
n Make sure that the Ambient temperature is within the allowed
range (between 0 and 55 Degrees Centigrade).
n Replace the Main PCA ⇒ Page 8-81.
HP DesignJet 5000 and 5500 Series Printers Service Manual
2-15

System Error Codes
System Error: 0B0001
Problem
Description:
Corrective Action: Try the following:
Bad Humidity Read
n Replace the ISS PCA ⇒ Page 8-91.
n Replace the Main PCA ⇒ Page 8-81.
WARNING Only replace one component at a time and check if the error has
gone before replacing another component. Using this procedure
you will be able to determine exactly which component failed.
System Error: 0B0002
Problem
Description:
Corrective Action: Try the following:
Bad IDS pressure read.
n Check that the cable from the Ink Supply Station (ISS) PCA to
the Ink Supply Station is correctly connected.
n Check that the Air Pressurization System Sensor Cable is
correctly connected and is NOT damaged.
n Check all the tubes of the APS and make sure they are NOT
pinched or damaged.
n Faulty APS. Replace the APS ⇒ Page 8-67.
n If the error code continues, replace the Main PCA ⇒ Page 8-81.
WARNING Only replace one component at a time and check if the error has
gone before replacing another component. Using this procedure
you will be able to determine exactly which component failed.
System Error: 0B0003
Problem
Description:
Corrective Action: Replace the Main PCA ⇒ Page 8-81.
ADC0 Internal channels check Failure.
2-16
HP DesignJet 5000 and 5500 Series Printers Service Manual

System Error: 0B0004
System Error Codes
Problem
Description:
Corrective Action: Try the following:
APS Failure.
n Check that the cable from the Ink Supply Station (ISS) PCA to
the Ink Supply Station is correctly connected.
n Faulty APS. Replace the APS ⇒ Page 8-67.
n If the error code continues, replace the Main PCA ⇒ Page 8-81.
WARNING Only replace one component at a time and check if the error has
gone before replacing another component. Using this procedure
you will be able to determine exactly which component failed.
System Error: 0B0005
Problem
Description:
Corrective Action: Refer to System Error Code 0B0004.
APS Failure.
System Error: 0B0006
Problem
Description:
Corrective Action: Try the following:
The Trailing Cable has been incorrectly connected.
n Power the Printer OFF disconnect the Trailing Cable. Replace the
Trailing Cable if the ends are not flat or are damaged. Reconnect
the Trailing Cable correctly, making sure it is pushed in firmly
(refer to the instructions on page ⇒ Page 8-36). Power ON the
Printer and check if the Error Code has disappeared.
n If the Error Code continues, replace the Main PCA ⇒ Page 8-81
taking care when connecting the Trailing Cable.
HP DesignJet 5000 and 5500 Series Printers Service Manual
2-17

System Error Codes
System Error: 0B000X
Problem
Description:
Corrective Action: Try the following:
Unable to detect Fan (X = 7 - Vacuum, 8 - Cooling, 9 - Aerosol).
n Make sure that the Fan is connected correctly to the Main PCA.
n
Turn the Printer OFF and disconnect the Fan from the Main PCA.
New
Connect a
the
New
Fan functions correctly without any Error Codes then
remove the
n If the New Fan does not function correctly either, then replace the
Fan to the Main PCA and power ON the Printer . If
Old
Fan from the Printer and install the
Main PCA ⇒ Page 8-81.
System Error: 0B0010 xxxxxxxx (Non-Continuable)
Problem
Description:
This firmware error code is related to the detection of the Printhead
cleaners by the line sensor. It always happens during initialization,
while checking the Printhead Cleaners. In most case, it is a problem
of incorrectly inserted Printhead Cleaners, but it can also be caused
by an incorrectly assembled Service Station.
Corrective Action: Try the following:
New
one.
n Remove the Printhead Cleaners and reinsert them again.
n If the error still persists, perform the Service Station Calibration
⇒ Page 5-11.
n If the error still persists, an onsite visit is necessary to repeat the
calibration or to change the Service Station assembly or the
Carriage Assembly.
System Error: 0B000A
Problem
Description:
Corrective Action: Try the following:
Primer Shutdown Error.
n
Check that the Service Station Cable (the grey flat cable with the
grey connector) is plugged into the Main PCA, and that the clips of
the connector are closed. Also check that the cable is not damaged.
n Replace the Service Station ⇒ Page 8-69.
2-18
HP DesignJet 5000 and 5500 Series Printers Service Manual

System Error: 0B000B
System Error Codes
Problem
Description:
Corrective Action: Try the following:
APS Failure.
n Check that the cable from the Ink Supply Station (ISS) PCA to
the Ink Supply Station is correctly connected.
n Check that the Air Pressurization System Sensor Cable is
correctly connected and is NOT damaged.
n Check all the tubes of the APS and make sure they are NOT
pinched or damaged.
n Faulty APS. Replace the APS ⇒ Page 8-67.
n If the error code continues, replace the Main PCA ⇒ Page 8-81.
System Error: 0B000C
Problem
Description:
Corrective Action: Replace the Main PCA ⇒ Page 8-81.
Serial Device ADC test failure.
System Error: 0B000D
Problem
Description:
Corrective Action: Replace the Main PCA ⇒ Page 8-81.
System Error: 0B000E
Problem
Description:
Corrective Action: Try the following:
24 V source test failure.
At power-up, the Printer thinks it is smaller than 42 inches.
n Check that there are no obstacles in the Scan-Axis which stops
the Carriage from reaching the end-stops on both sides.
n Check that the Carriage moves freely from side to side.
n Check that the IDS Crane is installed correctly on top of the
Carriage and that the Carriage Cover is clipped on correctly.
HP DesignJet 5000 and 5500 Series Printers Service Manual
2-19

System Error Codes
System Error: 0B000F (Continuable) (Only applicable to DesignJet 5500 Series)
Problem
Description:
Corrective Action: Try the following:
Unable to detect the Heater - If this error appe ars, all settings related
to the heater will disappear from the front Panel.
n Check that the cable from the Heater to the Main PCA is
correctly connected and is NOT damaged.
n Replace the Heater ⇒ Page 8-120.
System Error: 0C0030
Problem
Description:
Corrective Action: Try the following:
Drop Detector Failure.
n Check that the Drop Detector Cable is NOT broken or damaged.
n Check that the Drop Detector cable is correctly connected to the
Service Station Cable.
n Remove the Drop Detector and make sure that there are no
obstacles inside which are blocking the sensor.
n Replace the Drop Detector Assembly ⇒ Page 8-72.
n If the System Error Code continues, replace the Main PCA ⇒
Page 8-81.
WARNING Only replace one component at a time and check if the error has
gone before replacing another component. Using this procedure
you will be able to determine exactly which component failed.
2-20
HP DesignJet 5000 and 5500 Series Printers Service Manual

System Error: 0C0032 (Continuable)
System Error Codes
Problem
Description:
Corrective Action: Try the following:
Drop Detector not calibrated or the calibration settings have been lost.
n Perform the EEROM Backup from the HDD to the Main PCA
(select Main PCA replaced).
n Switch the printer Off and ON again.
n If the System Error Code continues:
– Perform the Service Station Calibration ⇒ Page 5-11.
– Replace the Drop Detector Assembly ⇒ Page 8-72.
– Replace the Service Station Assembly ⇒ Page 8-69.
WARNING Only replace one component at a time and check if the error has
gone before replacing another component. Using this procedure
you will be able to determine exactly which component failed.
System Error: 0C0040
Problem
Description:
Error in Printhead Drop Detection. This error code appears when the
Printer detects that the same area of nozzles do not work in different
Printheads. The possible causes are either fibres or a piece of paper
in the Drop Detector or that the Scan-Axis reference is incorrect.
Corrective Action: Try the following:
n Manually recover the Printheads ( ⇒ Page 6-15) and check
whether the error still appears.
n If the
error
does
pieces of paper in the Drop Detector.
n
If the error
does not
stop of the Carriage is not deformed too much (some slight
deformation of upto 0.5 m m is norm al , bu t if it is bi gg er th an th at,
then replace the Carriage Assembly and recalibrate the Printer).
n If the Scan-Axis is OK also, then replace the Drop Detector ( ⇒
Page 8-72) or the Service Station Assembly (⇒ Page 8-69) and
recalibrate the Printer.
appear again, then check that there no fibres or
appear again, then check that the Scan-Axis
HP DesignJet 5000 and 5500 Series Printers Service Manual
2-21

System Error Codes
System Error: 0C00FF
Problem
Description:
Print Mask could not be generated. The mask generation algorithm
could not generate the print mask. Possible causes are memory
corruption, print mode definition incompatible with mask
restrictions (if using an external RIP). The cause is not likely to be
the Printhead because if it was, the Printhead would be marked as
XX21 REPLACE.
Corrective Action: Try the following:
n Re-boot the Printer and the error code should not appear again.
n If the problem continues to appear and the customer is using an
external RIP, ask them to try one of the internal print modes by
printing from the HP Driver. If the problem disappears, then the
RIP print mode was causing the problem and the customer should
contact the RIP vendor.
n Check whether there is a printhead in the XX21 REPLACE
status. If there is, replace that Printhead.
n If there is no Printhead in the XX21 REPLACE status, print the
Diagnostic Print to find the Printhead with the failing nozzles.
System Error: 0C1000
Problem
Description:
Corrective Action: Try the following:
System Error: 0C1001
Problem
Description:
Corrective Action: Try the following:
Primer not calibrated or the calibration settings have been lost.
n Perform the Service Station Calibration ⇒ Page 5-11.
n Replace the Service Station Assembly ⇒ Page 8-69.
Primer Shutdown Error.
n Check that the Primer Stepper-Motor Cable is NOT broken or
damaged and that the Primer Arm moves freely from side to side.
n Replace the Service Station ⇒ Page 8-69.
n If the Error Code continues, replace the Main PCA ⇒ Page 8-81.
WARNING Only replace one component at a time and check if the error has
gone before replacing another component. Using this procedure
you will be able to determine exactly which component failed.
2-22
HP DesignJet 5000 and 5500 Series Printers Service Manual

System Error: 0D0000 (Continuable)
System Error Codes
Problem
Description:
Corrective Action: Download a media profile for the ink type being used.
System Error: 0D0000 033f019C
Problem
Description:
Corrective Action: If you upgrade the firmware while media is loaded, you will get the
No Media Profiles Available.
No Media Profiles Available.
system error "0d0000 033f019C". In this case, press Enter and you
will get the message "no media profiles available". The solution is
to unload the media and switch the Printer ON and OFF again.
NOTE This problem only appears when you try to upgrade from Non-
UV ink firmware to UV ink firmware while the media is loaded.
System Error: 0D0002 (Continuable)
Problem
Description:
Insufficient Memory to Initialize HPGL2/RTL.
Corrective Action:
The minimum memory required is 96 Mbytes so verify memory installed
on the printer usin g the Statisti cs menu (refer to th e U s e r’s Guide).
System Error: 0D0003 xxxxxxxx (Non-Continuable)
Problem
Description:
Corrective Action:
System Error: 0D0004 xxxxxxxx (Non-Continuable)
Problem
Description:
This error usually appears at the beginning of Printhead Alignment
due to a firmware bug.
If the error appears frequently, upgrade to firmware release A.02.xx.
This is an internal general error code which can appear during the
Printhead Alignment process. The chance of this error appearing is
less than 0.5% and there is nothing wrong with the Printer.
Corrective Action: Re-boot the Printer and the error code should not appear again.
HP DesignJet 5000 and 5500 Series Printers Service Manual
2-23

System Error Codes
System Error: 0D0005 03180382 (Non-Continuable)
Problem
Description:
Corrective Action: Try the following:
After cutting the media, the Printer cannot deactivate the Cutter.
n Check the Cutter and the Carriage Assembly to make sure that
they are installed correctly.
System Error: 0FXXXX (Non-Continuable)
Problem
Description:
Corrective Action: Refer to System Error Code ffff ffff xxxxxxxx.
System Error: 0F0200 00b007bc
Problem
Description:
Corrective Action: Try the following:
A Firmware Error has occurred.
This is an error related to an internal crash involving media profiles
and memory.
n This error is sporadic and very rare; just switching the Printer
OFF and ON again will cause it to disappear.
n If the customer has this problem frequently, recommend
upgrading the firmware revision to A.02.xx in order to lower the
frequency of the error.
NOTE This problem is solved in any A.02.xx firmware release.
System Error: 0F0200 00b007E5
Problem
Description:
Refer to System Error Code 0F0200 00b007bc.
2-24
HP DesignJet 5000 and 5500 Series Printers Service Manual

System Error: 0F0200 01E603d2
System Error Codes
Problem
Description:
This is an error that is related to the Parallel Port. It happens no rmally
in New Printers and only once (it is unlikely to appear again). Even if
the error appears again, there is nothing wrong with the Printer.
Corrective Action: Try the following:
n Recommend to the customer to print via the Network Card
because the transmission time via the Parallel Port is very slow.
n If the customer insists on printing via the Parallel Port, ask them
to check the Parallel Port settings on the PC (that was used when
the error occurred). The Parallel Port setting in the PC BIOS
should be in the ECP mode. This configuration should decrease
the frequency of the error.
System Error: 0F0100 03180382 (Non-Continuable)
Problem
Description:
Corrective Action: Try the following:
After cutting the media, the Printer cannot deactivate the Cutter.
n Check the Cutter and the Carriage Assembly to make sure that
they are installed correctly.
System Error: 1f500XX (Boot Failed)
Problem
Description:
Corrective Action: Try the following:
This is an error related to the Hard Disk Drive, eithe r the connections
are bad or the Hard Disk Drive or the Main PCA are defective.
n Unplug the Printer, remove the HDD cover and check that the
two cables (a flat one and the power cable) are connected. Also
check that the flat cable connector is clipped in correctly. If the
problem persists, replace the Hard Disk Drive ⇒ Page 8-74.
n If the problem continues, check that the Green and Orange LED’s
on the Main PCA are ON. If they are not ON, probably the PWS
or its connections are defective. If the two LED’s are ON and the
error continues, replace the Main PCA ⇒ Page 8-81.
HP DesignJet 5000 and 5500 Series Printers Service Manual
2-25

System Error Codes
System Error: e50000
Problem
Description:
Corrective Action: Try the following:
This is an error that is related to the Hard Disk Drive, either the connections
are bad or that the Hard Disk Drive or the Main PCA are defective.
n Unplug the Printer, remove the HDD cover and check that the
two cables (a flat one and the power cable) are connected. Also
check that the flat cable connector is clipped in correctly. If the
problem persists, replace the Hard Disk Drive ⇒ Page 8-74.
n If the problem continues, check that the Green and Orange LED’s
on the Main PCA are ON. If they are not ON, probably the PWS
or its connections are defective. If the two LED’s are ON and the
error continues, replace the Main PCA ⇒ Page 8-81.
2-26
HP DesignJet 5000 and 5500 Series Printers Service Manual

HP Ink Supplies Troubleshooting
What are HP Ink Supplies? 3-2
Ink Cartridges 3-2
Printheads and Printhead Cleaners 3-2
Identifying the Com pone n ts 3-3
General Information About HP Ink Supplies 3-3
Some General Precautions When Handling HP Ink Supplies 3-4
Priming a Brand New Ink System 3-5
When Should You Replace the HP Ink Supplies? 3-5
The Front Panel Display 3-6
Obtaining Ink Cartridge Information 3-7
Obtaining Printhead In formation 3-8
Status Codes and Messages 3-10
Status Messages 3-11
Error Status Messages 3-12
Printhead Errors 3-13
Ink Cartridge Errors 3-16
Printhead Cleaner Errors (First Digit = A, B or *) 3-18
Replace Message "xx15 Replace" and "xx16 Replace" 3-18
Replace Message "xx15 Replace" and "xx16 Replace" 3-18
Replace Message "xx16 Replace" for ALL P rintheads During R eplacement 3-19
Refill Information (DesignJet 5500 Series Only) 3-19
Ink-Level Sensing (ILS) Out of Control 3-19
Ink Cartridge Delivers Too Much Ink 3-19
Risks with the Ink Cartridge Delivering Too Much Ink 3-20
Non-HP Hardware Detected in the Ink Delivery System 3-21
Risks with Using Non-HP Hardware 3-22
ILS Out of Control Detection 3-22
ILS Out of Control Warranty Statement 3-23
3
HP DesignJet 5000 and 5500 Series Printers Service Manual
3-1

HP Ink Supplies Troubleshooting
What are HP Ink Supplies?
For each of the six colors used in the Printer, there are three separate
components. The Printhead and the Printhead Cleaner are supplied
together, the Ink Cartridge is supplied separately. All of these
components are called the HP Ink Supplies. They are coded with an
HP selection number to help you re-order the correct replacement
supplies.The Printhead and the Printhead Cleaner are supplied
together, and the Ink Cartridge is supplied separately. These
consumables are designed with a lock-out feature that will allow
only one color to be inserted into a given slot.
n No.81 - HP Selection Number for Dye Ink Supplies.
n No.83 - HP Selection Number for UV Ink Supplies.
Ink Cartridges
The HP Ink Cartridges for the HP DesignJet 5000 and 5500 Series
Printers require no maintenance or cleaning. As long as each Ink
Cartridge is inserted correctly into its slot, the ink will flow to the
Printheads.
The front panel displays the status of the Ink Cartridges. With the
front panel, detailed information can be checked on the Ink
Cartridges.
Printheads and Printhead Cleaners
The HP Printheads for the HP DesignJet 5000 and 5500 series are
extremely durable and do not need to be replaced every time an Ink
Cartridge is replaced. They are independent of the Ink Cartridges
and will continue giving excellent image quality results even if the
Ink Cartridges are low on ink. See page 3-5, When Should You
Replace the HP Ink Supplies?
If you notice a decline in print quality such as lines or dots missing
from text / graphics, go to page 6-1, Print Quality .
The HP Printhead Cleaners keep the Printheads in good condition
and they prevent them from being damaged when the Printer is not
active. They service the Printheads, making sure they are always
ready to be used.
3-2
HP DesignJet 5000 and 5500 Series Printers Service Manual

HP Ink Supplies Troubleshooting
Identifying the Components
The following illustration will help you identify the components of
the HP Ink Supplies.
Printhead
Ink Cartridge
Printhead Cleaner
Printhead and Printhead Cleaner
are supplied together
General Information About HP Ink Supplies
For optimum results from the Printer and modular ink delivery
system always follow these guidelines when handling the HP Ink
Supplies:
n Always install the Ink Cartridges, Printheads and Printhead
Cleaners before the expiration date, which is on the packaging.
n Install a new Printhead Cleaner every time you change a
Printhead.
n Allow the Printer and Printhead Cleaners to automatically clean
the Printheads.
n Ink Cartridges, Printheads and Printhead Cleaners are designed
with lock-outs that only allow their installation in their colorcoded slots; they must not be forced.
n Follow the instructions on the Front Panel of the Printer during
installation.
HP DesignJet 5000 and 5500 Series Printers Service Manual
3-3

HP Ink Supplies Troubleshooting
n Avoid unnecessary removal of the Ink Cartridges and Printheads.
n When turning off the Printer always use the soft-power Off
button on the Front Panel. The Printheads are then stored
correctly which prevents them from drying out.
n The Ink Cartridges should never be removed while the Printer is
printing. They should only be removed when the Printer is ready
for you to replace them. The Front Panel will guide you through
the removal and installation procedure. See page 3-5, When
Should You Replace the HP Ink Supplies?
Some General Precautions When Handling HP Ink Supplies
CAUTION
Do not touch, wipe or attempt to clean the Printhead nozzles. This can
damage the Printhead.
Do not touch, wipe or attempt
to clean the Printhead nozzles.
This can damage the Printhead.
Handle the HP Ink supplies with care. In particular the Printhead,
which is a high precision device and must be handled carefully.
n Do not touch the Printhead nozzles.
n Do not put the Printhead down on the nozzles.
n Do not be rough when handling the Printheads. Always set them
down gently.
n Do not drop the Printheads.
n Proper handling will assure optimum performance throughout the
Printhead life.
n The Printhead Cleaner should always be handled and stored
upright to avoid a potential spillage of ink.
n Do not touch the end of the Ink Cartridge which is inserted into
the Printer as there may be a small amount of ink on the
connection.
n Avoid storing partially used Ink Cartridges on their ends.
3-4
HP DesignJet 5000 and 5500 Series Printers Service Manual

HP Ink Supplies Troubleshooting
Priming a Brand New Ink System
When the customer first receives the Printer, it is suppli ed with a set
of six Setup Printheads pre-installed in the Carriage Assembly.
These Setup Printheads are used for the priming of the tubes in the
modular ink delivery system. The customer must not remove the
setup Printheads from the Carriage Assembly without following the
procedures in the Setup Guide.
When the Printer is powered ON for the first time, the Printer will
automatically perform the priming process. Without the priming
process, the customer will NOT be able to use the Printer.
Why does the Printer require priming:
n The Tubes System is empty when the customer receives the
Printer.
n The Tubes System has to be pressurized and filled with ink,
ejecting any air bubbles.
CAUTION If the Printing Printheads are installed in the Carriage during
the priming process, th ey will be rejected and the front panel will
show the "(XX11)Replace" message (Refer to 3-12, Error Status
Messages ).
When Should You Replace the HP Ink Supplies?
When to change the HP Ink supplies is mostly determined by you
with guidance from the front panel. In conjunction with the
messages displayed in the front panel and the message explanations
in this chapter, you will be able to choose for yourself when is the
right time to change the HP Ink supplies.
The Printer will also display the ink level and will tell you when the
ink supply is low, very low or empty. This means you have
constantly updated information about the HP Ink supplies.
Printhead life is anticipated to be 700ml or twelve months in the
Printer, whichever occurs first, provided that the Printhead is used
under normal operating conditions (using HP Ink Cartridges only)
and its “install before date” has not lapsed. However results vary
depending on the print quality setting being used.
HP DesignJet 5000 and 5500 Series Printers Service Manual
3-5

HP Ink Supplies Troubleshooting
The Front Panel Display
The front panel display has a dedicated area to report the status of
your HP Ink supplies. Status messages consist of a code and an
action message
Printhead Status
Ready
Roll
Hewlett Packard
Photo Imaging Gloss
Ink OK
Printheads (1421) REPLACE
Action
Message
Ink Cartridge Status
n Ink displays information on the Ink Cartridges.
n Printheads displays information on the Printheads and the
Status Code
Printhead Cleaners
n The Status code indicates the exact nature of the HP Supplies
problem (see 3-10, Status Codes and Messages ).
n The Action Message provides instructions to return to normal
status i.e. OK (see 3-10, Status Codes and Messages ).
To view information for a specific Ink Cartridge color or Printhead
you must access the cartridge and Printhead menus (See 3-7,
Obtaining Ink Cartridge Information and 3-8, Obtaining Printhead
Information ). The overlay indicates the color related to the Ink
Cartridge and Printhead menu information.
Press ENTER for
cartridges menu
LIGHT CYAN
LIGHT MAGENTA
YELLOW
CYAN
MAGENTA
BLACK
Ink
LOW
3-6
overlay colors
The Ink Cartridges Menu
HP DesignJet 5000 and 5500 Series Printers Service Manual

HP Ink Supplies Troubleshooting
Obtaining Ink Cartridge Information
1. To get information on the Ink Cartridges press the Top key on the
front panel to go to the main menu.
Ink info.
Ready
Light Cyan cart. info...
Roll
Light Magenta cart. info...
Hewlett Packard
Photo Imaging Gloss
Ink OK
Magenta cart info...
Printheads OK
Black cart info...
2. Press the ↑ or ↓ key to select the cartridges icon and view status
bars indicating ink levels in the Ink Cartridges.
Press ENTER for
cartridges menu
LIGHT CYAN
LIGHT MAGENTA
YELLOW
CYAN
MAGENTA
BLACK
Ink
LOW
Ink Cartridges Menu
The front panel displays six horizontal bars. These bars represent
how much ink is remaining in the Ink Cartridges: as ink is used up
the bars get shorter in length. The Ink Cartridge color on the overlay
indicates the Ink Cartridge color related to each bar.
Press the Enter key to view the Ink Cartridges menu.
3. Press the ↑ or ↓ key until the front panel highlights the color that
you want to see information on. Press the Enter key.
Ink cartridge info.
Light Magenta cart. info...
Yellow cart. info...
Cyan cart info...
Magenta cart info...
Black cart info...
Replace ...
HP DesignJet 5000 and 5500 Series Printers Service Manual
3-7

HP Ink Supplies Troubleshooting
4. The front panel displays information on the selected Ink Cartridge.
Yellow cart. info
HP No.81 ink cartridge
Ink level=87%
Capacity=680ml
Part number=C4934A
Part number=C4934A
Mfg.month=12/1999
Mfg. month=5/1999
The information supplied is:
n
The make of the Ink Cartridge (
Unknown Ink C ar trid ge m ay me a n the use of refilled Ink Cartridges.
n The percentage of how much ink is remaining.
n Original capacity of the Ink Cartridge in milliliters.
n Re-order part number of the Ink Cartridge.
n The month and year that the Ink Cartridge was manufactured.
No.81
for Dye and
No.83
for UV Ink).
Obtaining Printhead Information
1. To get information on your Printheads, press the Top key on the
front panel to go to the main menu.
Ink cartridge info.
Ready
Light Cyan cart. info...
Roll
Light Magenta cart. info...
Hewlett Packard
Photo Imaging Gloss
Ink OK
Magenta cart info...
Printheads OK
Black cart info...
2. Press the ↑ or ↓ key to select the Printheads icon and view
information on the Printheads.
Press ENTER for
LIGHT CYAN
LIGHT MAGENTA
YELLOW
CYAN
MAGENTA
BLACK
printheads menu
OK
OK
(1421) REPLACE
OK
OK
OK
Printheads
Printhead Menu
3-8
HP DesignJet 5000 and 5500 Series Printers Service Manual

HP Ink Supplies Troubleshooting
3. Press ↑ or ↓ key until the front panel highlights “Printhead info”.
Press Enter to view the Printheads information.
Printhead info
Printhead info...
Recover printheads
Replace printheads
4. Press the ↑ or ↓ key until the front panel highlights the color that
you want to see information on. Press the Enter key.
Printhead info.
Light Cyan cart. info...
Light Magenta cart. info...
Yellow cart. info...
Cyan cart info...
Magenta cart info...
Black cart info...
5. The front panel displays information on the selected Printhead.
Cyan printhead info
HP No.81 printhead
Status=OK
IN Warranty
Part Number=C4821A
Usage time=50h
Ink consume d=3ml
Mfg. month=5/1998
The information supplied is:
n The make of the Printheads
n The current status of the Printhead.
n The Printhead warranty status.
n Re-order part number of the Printhead.
n The time (hours) the Printhead has been operating in the Printer.
n How much ink has been consumed by the Printhead. Note: It is
(
No.81
for Dye and
No.83
for UV Ink)
possible for a Printhead to consume more than one Ink Cartridge.
.
n The year and the month that the Printhead was manufactured.
HP DesignJet 5000 and 5500 Series Printers Service Manual
3-9

HP Ink Supplies Troubleshooting
PH
O
N
E
S
U
PPO
R
T
Status Codes and Messages
NOTE Most problems with Ink Supplies will be solved by the user
simply following the instructions in the action message.
If a problem persists, a Call Agent can try and troubleshoot
Consumables problems by requesting the HP Status code from the
Customer via the phone. Using this process, it can be determined
whether the Printer requires any on-site maintenance.
Press ENTER for
LIGHT CYAN
LIGHT MAGENTA
YELLOW
CYAN
MAGENTA
BLACK
14
printheads menu
OK
OK
OK
OK
(1421) REPLACE
OK
21
Printheads
Printhead Menu
HP ID Code
Status Number Action Message
HP Status Code
The HP Status Code is made up of 4 digits: the first two digits are
the HP ID Code that identify the consumable and its color. The last
two digits are the status number indicating the nature of the
problem.
The tables in the next few pages describe the messages and status
codes for HP Ink Supplies.
3-10
HP DesignJet 5000 and 5500 Series Printers Service Manual

HP Ink Supplies Troubleshooting
Status Messages
These messages provide only an action message for the user to
perform. For information on accessing detailed information on
consumables refer to 3-7, Obtaining Ink Cartridge Information and
3-8, Obtaining Printhead Information .
Status Description Procedure
OK The ink consumable is working
correctly
Insert There is no consumable installed Insert the correct consumable.
Setup The setup message is displayed
when new tubes have been installed
into the Printer and you have
installed the correct setup
Printheads.
Low Ink Cartridge Level has reached it’s
low limit (100 ml.). This is an early
warning.
Very
Low
Empty Ink Cartridge is empty. The Printer
Ink Cartridge Level has reached it’s
very low limit (50 ml.)
stops.
None
In the case of the Printhead, if the
correct consumable is inserted,
check the Carriage Tube Co nnector
is correctly connected to the
Carriage.
When the setting up of the tube
system is complete, the front panel
will display a message
(XX04)Replace asking you to
remove them and replace them
with ‘normal Printheads’.
New supplies should be obtained
ready to replace the particular color
Overnight printing should not be
attempted.
Priming of the Ink Tubes should
not be attempted.
A new Ink Cartridge is strongly
recommended to prevent the
Printer from interrupting a print.
A new Ink Cartridge is required.
Check image quality of prints in
progress.
HP DesignJet 5000 and 5500 Series Printers Service Manual
3-11

HP Ink Supplies Troubleshooting
Error Status Messages
Error status messages consist of the HP Status Code and the action
message. The following tables group error messages according to
the consumable, the action message (i.e. all Replace errors are
grouped together), and then the status number i.e. last two digits.
The first digit in the HP ID code (see table below), identifies the
consumable and/or provides specific consumables information.
Status Code
First Digit
0 HP No.81 Printhead in warranty
1 HP No.81 Printhead out of warranty
2 HP No.83 Printhead in warranty
3 HP No.83 Printhead out of warranty
4 Setup Printhead
5 Printhead Smartchip error
A HP No.81 Printhead Cleaner
B HP No.83 Printhead Cleaner
*
6 HP No.81 Ink Cartridge
7 HP No.83 Ink Cartridge
8 Ink Cartridge Unknown
Printhead Cleaner Detection Error
Part / Information
3-12
The second digit identifies the color (see table below), for the
Printhead, Printhead Cleaner or cartridge.
Status Co de
Second Digit
5 Light Cyan
4 Light Magenta
3 Yellow
2Cyan
1 Magenta
0 Black
HP DesignJet 5000 and 5500 Series Printers Service Manual
Color

HP Ink Supplies Troubleshooting
Printhead Errors
NOTE If you think your Printer is requesting you to replace your
Printheads too frequently you can check Printhead nozzle status
by printing the Diagnostic Print ⇒ Refer to 6, Print Quality.
NOTE Do not touch, wipe or attempt to clean the Printhead nozzles.
This can damage the Printhead and reduce print quality (See
Page 9-6 for Maintenance Procedures).
NOTE When replacing Printheads:
n Ensure that you have the correct Printhead.
n Ensure that the Printhead is the correct color for that slot.
n Ensure that the protective cap is removed from the
Printhead.
n Check the empty slots to see if they need cleaning. In extreme
circumstances, when a Printhead is inserted, it is possible that
the Printer will not recognize it due to the build-up of ink on
the electrical connection between the Printhead and the
Printhead carriage. To clean the build-up of ink, use the User
Maintenance Kit.
NOTE If all 6 Printheads present the same error message, check the
following:
n All Printheads installed are NOT wrong type i.e. wrong
model, Setup Printheads instead of normal etc.
n If you replace or reseat Printheads one at a time and the
error persists for all Printheads, this indicates a hardware
failure. Do the following:
1 Check that the Carriage Tube Connector is correctly connected
to the Carriage.
2 Check that the Trailing Cable connections between the
Carriage Assembly and the Main PCA and if the cable is
damaged, replace it ⇒ Page 8-36.
3 Replace the Carriage Assembly ⇒ Page 8-46.
4 Replace the Main PCA ⇒ Page 8-81.
HP DesignJet 5000 and 5500 Series Printers Service Manual
3-13

HP Ink Supplies Troubleshooting
Status
Numbers
XX02 Reseat
XX06 Reseat
XX08 Reseat
XX10 Reseat Electrical failure.
XX03 Replace Printhead smartchip failure. Replace Printheads.
XX04 Replace Setup Printhead installed. Install normal Printheads.
XX05 Replace Used setup Printheads
XX09 Replace Electrical failure. 1. Replace the Printhead(s).
XX11 Replace Incorrect type of Printhead
XX12 Replace Printhead does not match the
Printhead Information
XX13 Replace Printhead smart chip failure. Replace the Printhead(s).
XX14 Replace The Printhead has an internal
XX15 Replace
XX16 Replace The Printer was printing:
XX17 Replace
XX18 Replace The Printhead smartchip
XX20 Recover The Printhead has detected
XX21 Replace The Printhead has detected a
Error Description Procedure
Continuity problem between
the Printhead and the
Carriage Assembly.
installed.
installed.
rest of the ink consumables.
electric al failure .
Printhead short
detects an unapproved
manufacturer.
nozzle failure.
significant number of bad
nozzles that affects print
quality.
Try the following (verify if the message returns to
OK after each one).
1. Reseat the Printhead.
2. Remove the Printhead and clean the
interconnect, refer to 9-6, Carriage Interconnect
Wiper .
3. Replace the failing Printhead.
4. Check the Carriage Tube Connector is correctly
connected to the Carriage.
5. Check Trailing Cable connections between the
Carriage Assembly and the Main PCA and replace
the Trailing Cable if damaged ⇒ Page 8-36.
6. Replace the Carriage Assembly ⇒ Page 8-46.
If priming Tubes install new Setup Printheads
otherwise install normal Printheads.
2. Check Trailing Cable connections between the
Carriage Assembly and the Main PCA and replace
the Trailing Cable if damaged ⇒ Page 8-36.
3. Replace the Carriage Assembly ⇒ Page 8-46.
4. Replace the Main PCA ⇒ Page 8-81.
If Tubes system is priming: install Setup
Printhead(s)
Ensure that you have genuine HP Printheads
installed.
Ensure that all the ink consumables are HP.
1. Replace the Printhead(s).
2. Replace the Carriage Assembly ⇒ Page 8-46.
Select YES to replace Printheads or NO to finish
print job without the failed Printhead (print quality
is affected). You must replace the Printhead after
the print job.
Install genuine HP Printheads.
1. You can continue using the Printhead unless the
(XX21)Replace message is displayed (the affect
on print quality depends on the print mode).
2. Perform the Recovery procedure ⇒ Page 6-15.
Select YES to replace Printheads or NO to finish
the print job without the failed Printhead (print
quality may be affected).
The message will be displayed for every print job
until you replace the Printhead.
1. Attempt the Recovery procedure ⇒ Page 6-15.
2. If the message persists replace the Printhead(s).
3-14
HP DesignJet 5000 and 5500 Series Printers Service Manual

HP Ink Supplies Troubleshooting
Printhead Recovery Procedure
The Printer regularly performs a series of controls on the health of
the Printheads and when they start to degrade the Printer will
prompt the user to recover the Printhead [(XX20)Recover].
Ready
LIGHT CYAN
LIGHT MAGENTA
YELLOW
CYAN
MAGENTA
BLACK
Printheads
(1520) RECOVER
OK
OK
OK
OK
OK
At this stage, the customer should obtain new Printheads.
Depending on the print mode being used (Max. Quality,
Productivity or Max. Speed) the Printer may still be able to print
with an acceptable print quality. Refer to Page 6-15 for details on
performing Printhead recovery.
If the Printer is printing a job and the Printhead health degrades to a
significant degree [(XX16) and (XX17)REPLACE], the front panel
will display a warning.
Warning! Printhead
quality degrading select
YES to replace failing
printhead(s)
YES (Replace)
NO (Continue )
Press the ↓ or ↑ down key to select YES or NO and press the Enter
key. If you select YES the print job will be cancelled and Printhead
replacement will be started. If you select NO, the Printer will finish
the current print job.
NOTE This message will be displayed each time you send a print job to
the Printer until you replace the failing Printhead(s).
WARNING If you select NO the Printer finishes the current print job
WITHOUT using the failed Printhead i.e. without using that
color.
HP DesignJet 5000 and 5500 Series Printers Service Manual
3-15

HP Ink Supplies Troubleshooting
Ink Cartridge Errors
NOTE When replacing Ink Cartridges:
n Use the Replace item in the Ink Cartridges menu. This will
release all air from the Ink Cartridge and avoid problems in
its removal.
n Ensure that you have the correct Ink Cartridge.
n Ensure that the Ink Cartridge is the correct color for that
slot.
n Ensure that the Ink Cartridge is th e c orrect orient at ion, wit h
the color coded label at the top.
NOTE If all 6 Ink Cartridges present the same error message, check the
following:
n All Ink Cartridges installed are NOT of the wrong type i.e.
wrong model.
n If you replace or reseat Ink Cartridges one at a time and the
error persists for all cartridges, this indicates a hardware
problem. Do the following:
1 Check ISS cable connections on the rear of the Ink Supply
Station and the ISS PCA.
2 Remove the Backplate and check that the connections on the
floaters are clean and check that the floaters move freely.
3 Replace the Ink Tubes System ⇒ Page 8-64.
4 Replace the ISS PCA ⇒ Page 8-91.
3-16
HP DesignJet 5000 and 5500 Series Printers Service Manual

HP Ink Supplies Troubleshooting
Status Numbers Error Description Procedure
XX03 Replace The Ink Cartridge has a leak which
prevents the ink pumping to the
Printer.
WARN ING: If the Ink Bag in the
Ink Cartridge is leaking, the
Tubes may be damaged.
Ink Cartridge Information
XX04 Replace Smart chip error. You can not
continue to use this Ink Cartridge.
XX05 Replace Incorrect Ink Cartridge Check correct Ink Cartridge is installed.
XX06 Replace The Printer detects that the Ink
Cartridge does not match th e rest of
the Ink System already installed.
XX08 Unkn own The Ink Cartridge smart chip
indicates that the Ink Cartridge
installed is not supported by HP.
XX02 Reseat Continuity problem between Ink
Cartridge and Ink Supply Station.
1. Remove the Ink Cartridge immediately.
2. Open the Door at the rear of the Left
Cover and check the Air Tubes for Ink and
do the following:
3. If there is no ink in the Air Tubes:
a) Replace the Ink Cartridge and, if the
XX03Replace error reappears for any Ink
Cartridge, go to step 5.
4. If there is ink in the Air Tubes:
a) Remove all the Ink Cartridges to allow
the ink to drain from the Tubes.
b) Replace the faulty Ink Cartridge and
reinsert the other Ink Cartridges.
If the XX03Replace error reappears for any
Ink Cartridge, do the following:
5. Remove the Ink Cartridge and check for
ink on the Air Connector on the rear of the
Ink Cartridge.
6. If there is ink present, do the following:
a) Press the sides of the Ink Cartridge to see
if ink is leaking from the Air Connector and
replace the Ink Cartridge if it is faulty.
b) If the Ink Cartridge is not faulty, replace
the Ink Tubes System ⇒ Page 8-64.
7. If there is no ink present, do the
following:
a) Verify ISS cable connections.
b) Remove the Backplate and check that the
slots and connections on the floaters are
clean.
c) Replace the Ink Tubes System ⇒ Page 8-
64.
d) Replace the ISS PCA ⇒ Page 8-91.
1. Remove the Ink Cartridge and
reinstall.
2. Replace the Ink Cartridge
Replace with approved Ink Cartridge.
Ensure that the Printheads and the Ink
Cartridges are genuine HP.
1. Press Enter to continue or:
2. Replace with a genuine HP Ink Cartridge.
This error only appears in Refill situations.
1. Remove the Ink Cartridge and reinsert.
2. Replace the Ink Cartridge.
3. Remove the Ink Supply Statio n and check
contacts on floaters.
HP DesignJet 5000 and 5500 Series Printers Service Manual
3-17

HP Ink Supplies Troubleshooting
Printhead Cleaner Errors (First Digit = A, B or *)
NOTE When replacing Printhead Cleaners:
n Ensure that you have the correct Printhead Cleaner.
n Ensure that the Printhead Cleaner is the correct color for
that slot.
n Ensure that the Printhead Cleaner is the correct orientation.
NOTE If all 6 Printhead Cleaners present the same error message,
check the following:
n All Printhead Cleaners installed are NOT wrong type i.e.
wrong model, unapproved etc.
n Replace Printhead Cleaners when Printheads are replaced.
NOTE
The messa ge status for Pr inthead Cl eaners wi ll not chan ge until the
door is closed; there is no sensor detecting removal and insertion.
Status Numbers Printhead Cleaner Error
Description
*X03 Replace
XX05 Replace The Printhead detects that the
XX06 Replace The Printer detects an incorrect
Printhead Cleaner Information
There is a Printhead Cleaner detection
failure (you may continue to use the
Printhead Cleaner)
Printhead Cleaner does not match the
rest of the ink system already installed.
Printhead Cleaner
Replace Message "xx15 Replace" and "xx16 Replace"
In certain circumstances (e.g. Printhead crash without Printer
shutdown), the message "xx15 Replace" or "xx16 Replace" may
appear on the front panel. This is due to a temporal disconnection
between the Printhead and the flex circuit in the Carriage Assembly.
Procedure
Try the following:
1. Ensure that genuine HP Printhead
Cleaners are installed.
2. Reseat the Printhead Cleaner.
3. Check the lens is clean and perform
Lens Maintenance if required
4. Replace the Printhead Cleaner.
Ensure that you have replaced the
Printhead Cleaner together with the
Printhead.
Ensure that genuine HP Printhead
Cleaners are installed.
⇒
Page
9-5
.
3-18
n
Clean the Printheads and the Carriage interconnects (refer to page
9-6,
Carriage Interconnect Wiper
n Check that the crane
(the part of the Tubes System that is
connected to the front of the Carriage)
) and reseat the failing Printheads.
is completely clipped to the
front of the Carriage.
HP DesignJet 5000 and 5500 Series Printers Service Manual

HP Ink Supplies Troubleshooting
Replace Message "xx16 Replace" for ALL Printheads During Replacement
During Printhead replacement, the message "xx16 Replace" can
appear for ALL the Printheads due to a firmware bug.
n
Clean the Printheads and the Carriage interconnects (refer to page
9-6,
Carriage Interconnect Wiper
) and reseat the failing Printheads.
Refill Information (DesignJet 5500 Series Only)
Ink-Level Sensing (ILS) Out of Control
Two situations exist that could trigger an ILS Out of Control:
n HP Ink Cartridges deliver more ink than the expected 680cc
– Ink Cartridges refilled with non-hp ink.
– ILS coils become stuck (rare).
n Non-hp hardware detected in the Ink Delivery System.
,QN
&DUWULGJH
PDUNHG
HPSW\
EHIRUH
UHPRYDO
Each one of these situations could potentially damage the printer’s
Ink-Tube System and Printheads. However, since we cannot tell for
sure if damage to the printer will occur we cannot prevent a
customer from printing. What we can do is warn the customer of
possible damage, but not stop the printing altogether.
Ink Cartridge Delivers Too Much Ink
The following information explains the front panel message flow:
µ2XWRI&RQWUROµ
$IWHUSULQWHUGHWHFWV,/6
RXWRIFRQWUROVLWXDWLRQ
War ning! Suppl y n Ink Level ?
Err or cod e 8n09.
See user manual
Select YES to repl ace (Y/N)
12
<(6 12
HP is not responsi ble
for damage from use
of no n - HP ink.
Select YES to repl ace (Y/N)
(QDEOH
(QDEOH
WKH3+,&DQGLQNWXEHVPDUW
WKH3+,&DQGLQNWXEHVPDUW
FKLSV
FKLSV
8SGDWH6HUYLFH&RQILJSULQW,QN
8SGDWH6HUYLFH&RQILJSULQW,QN
OHYHOVHQVHDQGQRQKSLQNILHOG
OHYHOVHQVHDQGQRQKSLQNILHOG
RQWXEHVSULQWKHDGDQGLQN
RQWXEHVSULQWKHDGDQGLQN
FDUWULGJH
FDUWULGJH
,QNFDUWULGJHEDUIRUWKDWVSHFLILF
,QNFDUWULGJHEDUIRUWKDWVSHFLILF
FRORUUHSODFHGE\WKHHUURU´"
FRORUUHSODFHGE\WKHHUURU´"
;µ
;µ
,QNFDUWULGJHLQIRPHQXZLOO
,QNFDUWULGJHLQIRPHQXZLOO
VKRZ´8QNQRZQ,QN&DUWULGJHµ
VKRZ´8QNQRZQ,QN&DUWULGJHµ
:HEDFFHVVZLOOVKRZ´,QN
:HEDFFHVVZLOOVKRZ´,QN
VXSSO\LQIRQRWDYDLODEOHµ
VXSSO\LQIRQRWDYDLODEOHµ
µ2XWRI&RQWUROµ
µ2XWRI&RQWUROµ
µ2XWRI&RQWUROµ
ELWLQ
ELWLQ
HP DesignJet 5000 and 5500 Series Printers Service Manual
3-19

HP Ink Supplies Troubleshooting
Error Message
Description
Recovery Action
Warning!... supply ink level? (Error code 8x09) See user manual
If you choose to continue printing with this ink supply you will
not have an ink level indicator. You may not know when the ink
supply is running low or empty. Printing with an empty ink
supply may seriously damage your printhead, ink tubes, and
printer. See below for a complete listing of features that will not
be available with continued use of this ink supply. Any damage
resulting from use of this supply or non-Hewlett-Packard ink is
not covered under your printer warranty.
The following features will not be available as a result of using
this supply.
n In the Ink Cartridge menu:
– Ink level indicator
– Percentage of ink remaining
n In WebAccess:
– Ink Cartridges status
– Ink Level
Select "Yes" to replace the Ink Cartridge with a genuine HP No.
81/83 Ink Cartridge, or "No" to continue.
Risks with the Ink Cartridge Delivering Too Much Ink
n Meeting Point Refills: If the customer refills within the ink
meeting point zone, then the ink cartridge will operate
“normally.” If the customer refills after the meeting point, then an
ink cartridge error will appear. Therefore, no major issues in
regards to printer damage are anticipated.
n
Frozen Coils Refills: The major risk of hardware failure in these
kind of systems is printhead dry fire and probable empty ink tubes.
Since the coil signal is blocked, the ILS will never detect an out of
ink situation which could allow the printer to print without ink.
n In either case customers loose the unattendedness of the printer
since they have to perform frequent ink ca rtridges re fills to avoi d
the previously mentioned issues.
n Image quality, printhead performance, ink/media compatibility
cannot be guaranteed with the use of non-hp ink. Customer
acceptance depends on their preferences.
3-20
HP DesignJet 5000 and 5500 Series Printers Service Manual

HP Ink Supplies Troubleshooting
Non-HP Hardware Detected in the Ink Delivery System
The following information explains the front panel message flow:
µ2XWRI&RQWUROµ
1RQ+3KDUGZDUH
LVGHWHFWHG
HP is not responsi ble
f or damage fr om use
of non- H P i nk.
Select YES to replace (Y/N)
12
<(6
6WD\VLQWKHVWDWXVLWZDV
SULRUWRWKHQRQKSKDUGZDUH
(QDEOH
(QDEOH
8SGDWH6HUYLFH&RQILJSULQWQRQKS
8SGDWH6HUYLFH&RQILJSULQWQRQKS
,QNFDUWULGJHEDUVIRUDOOFRORUVZLOO
,QNFDUWULGJHEDUVIRUDOOFRORUVZLOO
:KHQWKHUHLVDQ\DFWLRQRQWKHLQN
:KHQWKHUHLVDQ\DFWLRQRQWKHLQN
µ2XWRI&RQWUROµ
µ2XWRI&RQWUROµ
µ2XWRI&RQWUROµ
3+DQGLQNWXEHVVPDUWFKLSV
3+DQGLQNWXEHVVPDUWFKLSV
LQNILHOGRQWXEHV3+DQG,&
LQNILHOGRQWXEHV3+DQG,&
FRQWLQXHZRUNLQJEXWWKH\ZLOOEH
FRQWLQXHZRUNLQJEXWWKH\ZLOOEH
VHPLWUDQVSDUHQWQRWVROLG
VHPLWUDQVSDUHQWQRWVROLG
FDUWULGJHVWKH)3ZLOOVKRZ
FDUWULGJHVWKH)3ZLOOVKRZ
ELWLQWKH
ELWLQWKH
Error Message
Description
Recovery Action
:HEVHUYHUZLOOVKRZJUD\,&EDUV
:HEVHUYHUZLOOVKRZJUD\,&EDUV
XX08 Unknown
Use genuine HP components for excellent image quality from your
printer. If you choose to continue printing with this ink supply you
may not have a properly functioning or reliable ink level indicator.
The solid bar showing the ink level will be replaced by a patterned
bar. You may not know when the ink supply is running low or
empty. Printing with an empty ink supply may seriously damage
your printhead, ink tubes, and printer. Any damage resulting from
use of this supply or non-HP ink is not covered under your printer
warranty.
Select "Yes" to replace the Ink Cartridge with a genuine HP No. 81/
83 Ink Cartridge, or "No" to continue.
HP DesignJet 5000 and 5500 Series Printers Service Manual
3-21

HP Ink Supplies Troubleshooting
Risks with Using Non-HP Hardware
The risks in using non-hp hardware refill systems are:
n Printhead dry fire.
n Probable empty ink tubes.
These issues can be caused by:
n Cartridge not refilled to 100%. A customer could perform a
counter reset when the cartridge was not refilled to 100%. If so,
the printer thinks the IC is 100% full when, in fact, it could be
80% full. When the ink is depleted, the printer may continue
printing without ink.
n Uninstalling non-hp hardware. While the non-hp hardware is
installed, the ink cartridge smartchip is not updated. Therefore,
an IC can be marked at 80% full when, in fact, it’s only 70% full.
If the non-hp hardware is uninstalled the printer thinks there is
more ink available than there really is. Thus, the printer may
continue to print without ink.
n Not performing the reset process. If customer is not performing
the reset, the initial status of the quantity of ink will not be 100%
when it really is 100%.
ILS Out of Control Detection
&XUUHQW3ULQWKHDGNLW
&XUUHQW3ULQWKHDGNLW
LQIR
LQIR
&KDQJHV
WR<(6
7KHSULQWKHDGORDGHGLQWKH
7KHSULQWKHDGORDGHGLQWKH
SULQWHULVRUZDVXVLQJQRQKSLQN
SULQWHULVRUZDVXVLQJQRQKSLQN
3ULQWHU+LVWRU\
3ULQWHU+LVWRU\
&XUUHQW,QNFDUWULGJH
&XUUHQW,QNFDUWULGJH
LQIR
LQIR
&KDQJHV
WR<(6
7KHLQNFDUWULGJHORDGHGLQWKH
7KHLQNFDUWULGJHORDGHGLQWKH
SULQWHULVXVLQJQRQKSLQN
SULQWHULVXVLQJQRQKSLQN
1RWRQWKH
FDVHRI
QRQKSKZ
LQVWDOOHG
&KDQJHV
WR<(6
3-22
7KHLQNWXEHV\VWHPORDGHGLQWKHSULQWHULV
7KHLQNWXEHV\VWHPORDGHGLQWKHSULQWHULV
RUZDVXVLQJQRQKSLQN
RUZDVXVLQJQRQKSLQN
HP DesignJet 5000 and 5500 Series Printers Service Manual

HP Ink Supplies Troubleshooting
ILS Out of Control Warranty Statement
n Printhead and cleaner warranty: Until the “end of warranty” date
printed on the product is reached, or 700 cc of HP ink is deli vered
through the printhead, whichever occurs first.
n Ink Cartridge warranty: Until the genuine HP ink is depleted as
indicated by the printer, or the “end of warranty” date printed on
the product is reached, whichever occurs first.
n For HP printer products, the use of a refilled or non-original HP
consumable product (ink, printhead or ink cartridge) does not
affect either the warranty to the customer or any HP support
contract with the customer . However, if printer failure or damage
is attributable to the use of a non-HP or refilled ink cartridge, HP
will charge its standard time and materials charges to service the
printer for the particular failure or damage.
HP DesignJet 5000 and 5500 Series Printers Service Manual
3-23

HP Ink Supplies Troubleshooting
3-24
HP DesignJet 5000 and 5500 Series Printers Service Manual

Service Tests and Utilities
4
Introduction 4-2
Diagnostics - Self Test 4-2
The Printer hangs and nothing else happens 4-3
Error Memory Config:X 4-3
Error Memory Test 4-3
Power Supply Error #1 4-3
BootROM checksum failed 4-3
Boot Failed:1f500XX 4-4
Boot FAILED 4-4
BOOTROM ERROR: 4-4
COMPONENT MISMATCH: 4-4
Service Tests (Diagnostics) 4-5
Entering the Service Tests Menu 4-6
Scan Axis Test 4-9
Media Axis Test 4-11
Service Utilities 4-13
Entering the Servic e Utilities Menu 4-14
Turn DRIVE ROLLER 4-17
Prime TUBES 4-1 8
Altitude Setup 4-22
EEROM Setup 4-23
Reset Life Counters 4-28
Backup EEROM 4-30
Image Quality Warning 4-32
Diagnostic Print 4-33
Sleep Mode (DesignJet 5500 Series Only) 4-34
HP DesignJet 5000 and 5500 Series Printers Service Manual
4-1

Service Tests and Utilities
P
H
O
N
E
S
U
P
P
O
R
T
Introduction
This chapter explains how to use the built-in Service Tests and
Service Utilities and what to do if any of the Service Tests fail. If
possible, always perform a Service Test on the component that you
are about to replace, just to make sure that is the component that has
failed. If the test on that component passes, there is no need to
replace it.
Phone Support
In certain circumstances, a Call Agent can try and troubleshoot the
Printer by requesting the Customer to perform a Service Test or
Utility via the phone. Using this process, it can be determined
whether the Printer requires any on-site maintenance. In Phone
Support the user will have access to a limited number of Service
Tests or Utilities.
Diagnostics - Self Test
Initialization Sequences
Whenever the Printer is switched ON, it automatically performs a
series of internal self tests and mechanical initialization sequences.
If any of the parts fail, an error code will appear. Below is a
description of the initialization sequence, describing front panel
messages and the sequence of the Print Quality LEDs, the error
messages and error codes that may appear, and the corrective action.
NOTE Because of the speed at which the initialization sequence is
performed, some of the steps described in the intialization
process may not be visible unless they are interrupted by an
error code.
NOTE Before troubleshooting error codes try the following:
n Check that the BootROM DIMM, the DRAM DIMM’s and
the Hard Disk Drive are correctly installed.
n Try powering the Printer Off and On to see if the error code
disappears.
4-2
HP DesignJet 5000 and 5500 Series Printers Service Manual

Service Tests and Utilities
Max. Quality
Productivity
Max. Speed
Max. Quality
Productivity
Max. Speed
Max. Quality
Productivity
Max. Speed
Max. Quality
Productivity
Max. Speed
WARNING Only replace one component at a time and check if the error has
gone before replacing another component. If the error is still
present after replacing a component, remember to REINSTALL
the component that was first removed before replacing another
component.
Self Diagnostics - Initialization Sequence
LED’s Front Panel Message Printer Error - Error
Message/Code
The Printer hangs and
nothing else happens
Self Test
Please Wait
End Self Test
Initializing Po wer Su pp ly Erro r
Error Memory
Config:X
(sometimes only the
error code is
displayed)
Error Memory Test Replace the DRAM DIMM’s ⇒ Page 8-77.
#1
Contact HP
Representative
Corrective Action
Install the BootROM or replace it if already
installed ⇒ Page 8-77.
If X = 7 reseat the DRAM DIMM’s,
otherwise
replace the DRAM DIMM’s ⇒ Page 8-77.
The Trailing Cable is not connected
correctly. Reconnect the Trailing Cable ⇒
Page 8-36.
Initializing IO devs BootROM checksum
failed
HP DesignJet 5000 and 5500 Series Printers Service Manual
Replace the BootROM ⇒ Page 8-77.
4-3

Service Tests and Utilities
Max. Quality
Productivity
Max. Speed
Max. Quality
Productivity
Max. Speed
Max. Quality
Productivity
Max. Speed
Max. Quality
Productivity
Max. Speed
Self Diagnostics - Initialization Sequence
LED’s Front Panel M e ssage Printer Error - Error
Message/Code
Spinning up disk Boot Failed:1f500XX
This is an error related
to the Hard Disk
Drive, either the
connections are bad or
the Hard Disk Drive or
the Main PCA are
defective.
Spinning up disk...OK
Loading
firmware.fmw
Initializing
Initializing L2C
Boot FAILED
Corrective Action
n Unplug the Printer, remove the HDD
cover and check that the two cables (a
flat one and the power cable) are
connected. Also check that the flat
cable connector is clipped in correctly.
If the problem persists, replace the Hard
Disk Drive ⇒ Page 8-74.
n If the problem continues, check that the
Green and Orange LED’s on the Main
PCA are ON. If they are not ON,
probably the PWS or its connections are
defective. If the two LED’s are ON and
the error continues, replace the Main
PCA ⇒ Page 8-81.
Download the Firmware file to the Printer
⇒ Page 9-13.
Initializing CLK
Initializing IO
BOOTROM ERROR:
Current Version:XXX
Necessary
Version:XXX
Replace and Restart
COMPONENT
MISMA TCH:
You are running a
XXX printer with a
XXX disk
Insert XXX disk and
restart.
Initializing
Please Wait
Code rev:XXXXXX
BootROM:XXXXX
RAM present:XXX MB
Hard Disk:XXXX MB
PS Code rev:XXXXX (Only in PS Unit)
Ready or
Ready for Media
The BootROM versio n does not support the
firmware installed on the HDD. Replace
the BootROM.
The firmware installed on the HDD and the
BootROM personality does not match.
Make sure both parts are either RTL or PS
and make sure you do NO T mix them (See
Parts List for Part Numbers).
4-4
HP DesignJet 5000 and 5500 Series Printers Service Manual

Service Tests (Diagnostics)
The following is a list of all internal Service Tests available in the
Printer. Instructions for entering the Service Tests menu are given
on Page 4-6.
1. Scan Axis Test ⇒ Page 4-9
The purpose of this Service Test is to verify the correct functioning
of parts relating to Carriage movement along the Printer axis.
2. Media Axis Test ⇒ Page 4-11
The purpose of this Service Test is to verify the correct functioning
of parts relating to Media movement through the Printer.
Service Tests and Utilities
HP DesignJet 5000 and 5500 Series Printers Service Manual
4-5

Service Tests and Utilities
O
N
-
S
I
TE
R
E
P
A
I
R
Entering the Service Tests Menu
1. Once the message "Ready" is displayed on the front-panel, scroll to
the "Printer Setup Options" icon and press the Enter key.
Ready
Roll
Hewlett Packard
Photo Imaging Glos s
Ink OK
Printheads OK
Top
Back
↑
↓
Enter
Make Selection
Press Enter
For On-Site Engineers accessing the complete list of Service Tests
a Once inside the "Printer Setup Options" menu, use the Arrow keys
to scroll to the "Utilities" menu and press the Enter key.
Printer setup options
Device setup...
I/O setup...
Utilities...
Internal RIP settings...
Queueing & Nesting...
HP-GL/2 settings...
Top
Back
↑
↓
Enter
Make Selection
Press Enter
b Once inside the "Utilities" Menu, press the following key
combination to access the complete list of Service Test menus.
Utilities
Usage ...
Menu Mode = Full
Calibrations ...
Reset WebAccess paswd
Test Prints ...
Statistics ...
Top
Back
↑
↓
Enter
Press Up
and Enter
Together
4-6
HP DesignJet 5000 and 5500 Series Printers Service Manual

Service Tests and Utilities
P
H
O
N
E
S
U
P
P
O
R
T
For Call Agents request ing the User to acces s a limit ed number of Service Tests
a Once inside the "Printer Setup Options" menu and the "Device
setup" menu is highlighted, press the following key combination:
Printer setup options
Device setup...
I/O setup...
Utilities...
Internal RIP settings...
Queueing & Nesting...
HP-GL/2 settings...
Top
Back
↑
↓
Enter
Press Down
and Enter
Together
2 The message below is displayed. Select Yes to continue.
Warning!
This mode should NOT be
used without having the
guidance of a HP
representative perso n
Yes...
No
Top
Back
↑
↓
Enter
Press Enter
3. You are now in the Service Menu. Use the Arrow keys to scroll to
the "3 Service Tests" menu and press the Enter key.
Top
Service Menu
Back
1 Service Utilities...
2 Service
3 Service Tests...
3 Service Tests...
Calibrations...
↑
↓
Enter
Make Selection
Press Enter
4. Use the Arrow keys to scroll through the "Service T ests" selections.
Top
3 Service Tests
Back
↑
3.1 Scan Ax i s
3.2 Media Axis
↓
Enter
Make Selection
Press Enter
5. Press the Enter key to begin a specific operation when the required
Service Test is highlighted.
HP DesignJet 5000 and 5500 Series Printers Service Manual
4-7

Service Tests and Utilities
If your Firmware does not support Service Tests, the following
message is displayed. You should press Enter to exit. If you need
the Service Tests, download the latest Firmware and repeat the
whole procedure to enter the Service Tests menu.
3. Service Tests
Error!!
Svs Test not available.
Upgrade Firmware rev.
Press Ent er to continue
Top
Back
↑
↓
Enter
Press Enter
NOTE If the Printer is not used for 3 minutes, the Printer exits the
Service Tests Menu and you must repeat the above steps to enter
Service Tests again.
NOTE In some cases a quick press of a button may n ot be recognized by
the Printer. When pressing a button, be sure to press it
deliberately and all the way to the bottom of its travel.
NOTE If the Printer hangs up during an operation, switch the Printer
OFF and restart from step 1.
4-8
HP DesignJet 5000 and 5500 Series Printers Service Manual

Service Tests and Utilities
P
H
O
N
E
S
U
P
P
O
R
T
Scan Axis Test
The purpose of this test is to verify:
n Carriage movement along the Printer axis.
n Scan-Axis motor.
This test measures the maximum and the average current required to
move the Scan Axis parts in order to verify if parts are moving
freely or not.
Perform the Scan Axis Test as follows:
1. In the "3 Service Tests" menu, scroll to "3.1 Scan Axis" and press
Enter.
Top
3 Service Tests
Back
↑
3.1 Scan Ax i s
3.2 Media Axis
↓
Enter
Make Selection
Press Enter
2. The test will start and the following message will appear on the
front panel as the test is performed.
Top
3.1 Scan Axis
Max. PWM: Avg. PWM:
xxx
Analyzing Data...
xxx
Back
↑
↓
Enter
3. When the test has completed, the Maximum and Average Pulse
Modulation Values are displayed for each direction (left and right).
Press Enter to return to the Service Tests menu.
Top
3.1 Scan Axis
Max. PWM: Avg. PWM:
xxx
xxx
Press ENTE R to contin ue
xxx
xxx
Back
↑
↓
Enter
Press Enter
HP DesignJet 5000 and 5500 Series Printers Service Manual
4-9

Service Tests and Utilities
NOTE Report the values to the nearest HP Response Center or HP
Support Office to determine whether values are within the
accepted range.
When reporting the values, have the following information
ready:
n Model and Serial Number of the Printer.
n All values reported in the test.
n The Service Configuration Print ⇒ Page 1-37.
To check if the values displayed after the test are within the limits,
refer to the following table:
Forwards (<==) Backwards (==>)
Maximum PWM 225 230
Average PWM 205 200
If values are not within the accepted ranges, turn the Printer OFF
and perform the following steps and repeat the test after each one:
1.
Clean the Slider Rods and Apply Oil along the complete axis of the
Slider Rods using the content of the Users Maintenance Kit.
2. Check the Encoder Strip and clean it if it is dirty.
3. Replace the Scan-Axis Motor ⇒ Page 8-57.
4. Replace the Tensioner Assembly ⇒ Page 8-42.
5. Check the Carriage Belt for excessive wear. If necessary , replace the
Carriage Belt ⇒ Page 8-46.
4-10
HP DesignJet 5000 and 5500 Series Printers Service Manual
 Loading...