

Page 1
HP
Apollo
9000
Model
425s
and
425t
HP
Apollo
Owner's
for
HP-UX
9000
Series
Guide
Users
400
Computers
ABCDE
HP
Part No. A2100-90600
Printed in USA
Edition 1
August 1991
E0791
Page 2
Notices
Information
Hew
lett-Packar
but
not
particular
herein
the
furnishing,
W
arran
A
gr
e
ement
soft
ware
and
conditions
Op
er
ating
If
y
ou
pro
duct
A
cop
y
product
Service
Cop
yrigh
This
do
All
righ
written permission is prohibited, except as allow
in
this
d
makes
limited
or
t
y.
do
for
of
and replacemen
Oce.
cument
ts
purp
direct,
Please
and
are
oered
the
not
a
the
c
t
are
to, the
ose.
indirect,
p
erformance,
read
Limite
of
the
pr
o
duct indic
agree
full
refund.
sp
ecic
1991
contains
reserv
do
cumen
Hewlett-P
d
only
License
to
Hewlett-P
ed.
t
no
warr
implied
sp
ecial,
the
enclosed
Warr
on
the
ates
the
License
w
arran
t
parts
information whic
Repro
is
sub
ject
anty
warr
anties
ac
k
ard
inciden
or
use
of
Hewlett-Packar
anty
b
efore
condition
Agreemen
your
Agreemen
t
y
terms
can
b
ac
k
ard
Compan
duction,
to
change
of
any
kind
of
mer
shall
not
tal
this
material.
op
erating
that
t.
ac
c
eptanc
applicable
e
obtained
hhas
adaptation,
or
t,
b
e
y
y
without notice.
ab
out this
chantability
e
liable
for
consequen
d Softwar
this
pro
the
customer
of
these
terms
ou
may
return
to
y
our
from
y
our
been
protected b
or translation
ed
under the cop
manual, including,
and
tness
errors
tial
damages
ePr
o
duct.
accepts
and
the
Hewlett-P
lo
cal
Sales
ycop
for
con
tained
about
duct
Lic
Righ
ts in
all
c
onditions.
un
used
ac
kard
and
yrigh
without
yrightla
a
ense
the
terms
t.
prior
ws.
c
Copyright
Copyright
1985.
This softw
Software Distribution under license
California.
AT&T, Inc. 1980, 1984, 1986
c
The Regen
are and documen
ts
of the Univ
tation is based inpart on the F
ersity of California 1979, 1980, 1983,
from the Regen
ts of the Univ
ourth Berk
ersity of
ely
Page 3

R
estricte
Use,
restrictions
Data
d
duplication
and
R
ights
L
or
as
set forth
Computer
e
gend
disclosure
in subparagraph
Soft
w
are
b
y
the
clause
United
(c) (1)
at
F
ARs
States
Go
(ii) of
52.227.7013.
v
ernment
the
Righ
is sub
ts
in
ject to
T
ec
hnical
Hewlett-P
Op
erating
3404
East Harmon
F
ort
Collins,
ac
k
ard
Systems
Colorado
Compan
Soft
w
y Road
80525
y
are
Division
Page 4
Printing
History
This man
prin
ting
date
made
at reprin
will
c
hange
Man
ual
up
pro
duct
c
you
should subscrib
Hewlett-P
August,
This
Safety
The
Note
1991
edition applies
follo
wing
ual's
prin
ting
will
c
hange
t without
when
extensiv
dates
ma
hanges.
ac
Symbols
k
ard
Edition
con
Notes
T
Sales
v
en
y
b
e
o
ensure
eto
Represen
1
to
HP
and
tions
con
date
and
when
changing
e
c
hanges
issued
that
the
appropriate
9000,
Conv
are
tain
a
b
tativ
used
imp
part
new
et
y
Series
n
um
edition
the prin
o
ccur.
w
een
editions
ou receiv
pro
e
for
details.
425s/t
entions
throughout
ortan
t
information
b
er
is prin
ting
e these
duct
sho
w
its
curren
ted. Minor
date.
The
to
correct
updates
supp
ort
computers
this
man
set o
man
errors or
or
service.
only
ual:
from the
t
edition.
changes
ual
new
.
part
n
documen
editions,
See
y
text.
The
may
um
our
b
e
b
er
t
Caution
Warning
iv
Caution messages
could
result
pro
ceed
b
ey
ond
are fully
Warning messages indicate procedures or practices which, if
not
beyond a W
understood and met.
understoo
observed, could result in personal injury
ARNING sign until the indicated conditions are fully
in
loss of
a
indicate pro
data or
CA
UTION
d
and
met.
cedures
damage to
sign
un
whic
til
h,
if
not
observ
equipment.
the
indicated conditions
. Do not proceed
Do
ed,
not
Page 5
F
CC
Statement
The
F
ederal Comm
20780)
users
W
energy
man
tested
pursuan
reasonable protection
en
cause
tak
has
of
this
arning.
and if
ual,
ma
and
t
vironmen
in
terference
e
whatev
sp
pro
This
y
found
to
Subpart
t.
er
unications Commission
ecied
duct.
equipmen
not installed
cause
to
Operation
in
measures
(For
that
the
t
generates,
in
terference
comply
J
of
Part
against suc
of this
whic
h
ma
U.S.A.
follo
wing
and used
to
with
the
15
of
h
equipment
case
the
y
b
e
required
Only)
notice
uses,
in
accordance
radio
comm
limits
F
CC
in
terference
user
(in Subpart
b
e
brough
and
can radiate
unications.
for a
rules,
whic
when
in a
residen
at
his
o
wn exp
to
correct
with
Class A
h
are
op
tial
the
Jof
P
art
15,
Do
t
to
the
atten
radio frequency
the
instructions
It
has
b
een
computing device
designed
erated
area
ense will
in
terference.
to
in
a
commercial
is
lik
be
ely
required
tion
pro
c
to
k
et
vide
of
the
to
Manufacturers
Hiermit
Bestimm
Bundesp
Berec
eingeraum
wird
ungen
ost wurde
h
tigung
t.
b
esc
zur
heinigt,
der
Ub
Declaration
Herstel
da
dieses
P
ostv
erf
ugung
das In
verk
ehrbringen dieses
erpr
ufung
der
(Germany
lerb
escheinigung
Ger
at
1046/84
Serie
auf
Ub
ereinstimm
in
funk
en
tst
Ger
Einhaltung
Only)
ort
ates
ung
ist.
Der
angezeigt
der
Bestimm
mit
den
Deutsc
und
ungen
hen
die
v
Page 6
V
CCI
Statement
(Japan
Only)
Laser
(F
or
The
Departmen
Standard according
This means
laser
housings
during
vi
Safety
computers
CD
R
OM
t
of
that
ligh
t
emitted inside
and
any
phase
with
driv
Health
the
external
Statement
a
CD
R
OM
e
is
certied as
and
Human
of
to the
user
device
co
v
op
R
adiation
do
the device
ers,
the laser
eration.
es
(For
disk
a Class
Services
not
U.S.A.
drive
installed.)
1
laser
(DHHS)
Contr
ol
for
pro
duce
hazardous
is completely
beam
cannot escap
Only)
pro
duct
Radiation
He
alth
conned
under
and
laser
e from
P
Safety
radiation.
within
the
U.S.
erformance
A
ct
of
Since
protectiv
the mac
hine
1968.
e
Page 7
W
arning
Use
of
controls,
different
hazardous invisible
mechanisms
or
from
field-replaceable
adjustments,
those
within
or
specified
laser radiation
the
mass
parts.
in
storage
performing
this
manual
exposure. None
system
procedures
ma
y
result in
contain
of the
customer
The CD
when
exposure
laser radiation
the
ROM driv
disassembled.
to
CD
R
OM
e becomes
the
invisible
could result
drive
for
a
Class
3B
laser
mechanism
If
the
CD
ROM
driv
e
is
disassembled,
laser
beam
and
hazardous invisible
in
any
blindness.
r
e
ason.
Do
NOT
disassemble
vii
Page 8
Laser
T
urv
L
aserturval
Luok
Klass 1
HP
laitteensis
p
a
Safety
allisuusyhteen
an
1
Laser Apparat
9000
Mo
alaitteena
lisuus
Laserlaite
del
425
ainen
CD-R
toimiva
Statement
veto
tietok
oneeseen
OM-levy
tietok
asema,
one
(For
v
oidaan
k
atsotaan
Finland
asen
joka
on laserlaite.
laserlaitteeksi.
taa
Only)
m
uistilaitteeksi
Tall
oin
m
y
os
Kyseinen
laserlaite.
p
aasyn
HP
laserturv
h
yv
m
a
aritett
825
s
ateily
Aallonpituus
T
eho
Luokan
CD-R
Normaalissa
laitteen
9000
Mo
allisuuden
aksyn
t
an
y
m
ukaisesti.
ominaisuuksista:
0,4
mW
1
laser
OM-livyasema
ulk
opuolelle.
del
425
osalta
umero
v
altioneuv
780
TSH
Tiedot
nm
k
ayt
tietok
oneen
T
222/6019/90.
oston
CD-R
on
k
oss
a
levy
on
yosuo
jeluhallitus, T
p
a
at
oksen
OM-levy
aytt
aj
aseman
t
yyppih
Laitteiden
N:o
asemassa
an
k
annalta
suo
yv
aksyn
472/1985
turv
jak
otelo
yt
Suomessa
y
osuo
jeluhallituksen
turv
allisuusluokk
ja
k
aytett
allinen
est
a
a lasers
standardin
av
an
laserdio
luok
an
ateen
aon
SFS-IEC
din
1
viii
Page 9
Contents
1.
Product
Y
our
HP
Mo
del
Mo
del
F
eatures
Memory
Graphics
425s/t
SCSI
RS-323
HP
HP-HIL
LAN In
In
ternal
Op
erating
2.
Using
Chapter
Finding
Y
Installation
Conguration
Op
eration
Solving Problems
Description
Ap
ollo
9000
425t
.
.
425s
.
.
.
.
.
. .
.
.
.
.
Built-In
In
terface
Serial
P
arallel
our
Conten
Do
In
In
terface
terfaces .
Mass
Storage
Systems
Man
uals
ts
cuments
.
.
.
.
Mo
del
.
.
.
.
.
.
.
.
.
.
.
.
.
.
.
.
.
.
. .
In
terfaces
.
.
.
In
terface
terface
.
.
.
.
Devices
.
.
.
.
.
.
for Sp
ecic T
.
.
.
.
. .
.
.
.
.
.
.
. . . . . . .
425s
.
.
.
.
. .
.
.
.
.
.
.
.
.
.
.
.
.
.
.
.
. .
.
.
.
.
.
.
.
. .
and
425t
Computer
.
.
.
.
. .
.
.
.
.
.
. .
. .
. .
.
.
.
.
. .
. .
.
.
.
.
.
.
.
.
.
.
.
.
.
.
.
.
.
.
.
.
.
.
.
.
.
.
.
.
.
.
.
.
.
.
.
.
.
.
.
.
.
.
.
. .
.
.
.
.
.
.
.
.
.
.
.
.
.
.
.
.
.
.
.
.
. .
. .
.
.
.
.
.
.
.
.
. .
.
.
.
.
.
.
.
.
asks .
.
.
.
.
.
.
.
.
.
. .
. .
. .
.
.
.
.
.
. .
.
.
.
.
.
.
. . . . . . . . . . . . . 2-4
.
. .
.
.
. .
.
.
.
.
.
.
.
.
.
.
.
. .
.
.
.
.
.
.
.
.
. .
.
.
.
. .
.
.
.
.
.
.
. .
.
.
.
.
.
.
. .
.
.
.
.
.
.
.
.
.
.
.
.
. .
.
.
.
.
.
. .
.
.
.
.
.
.
.
.
.
.
.
.
.
.
. .
.
.
. .
.
.
.
.
.
.
.
.
.
.
.
.
.
.
.
.
. .
.
1-1
.
1-2
.
1-2
.
1-2
. 1-4
.
1-5
.
1-5
. 1-8
.
1-8
.
1-8
.
1-8
.
1-9
.
1-9
.
1-10
. 2-1
.
2-2
.
2-2
2-3
.
2-4
Contents-1
Page 10
3. Starting
Chapter
Using
Logging In
Logging
Creating
Setting
Sh
4.
Op
Chapter
Using
Using
Using
Instan
VUE
utting Do
erating
HP
Op
ening
Manipulating
Using
Files
Viewing,
Getting
F
or
More
VUE
Finding and
Y
our
Con
ten
t
with
F
unctions
Out .
a
New
a
New
wn with
Y
our
Conten
Visual
a
Windo
HP
VUE
and
Editing
Prin
Information
System
System
ts
Ignition .
P
ts .
Directories
ter
Running an
for
.
.
HP
VUE
on
the
. .
. .
User
Accoun
assw
ord
VUE .
System
. .
User
En
w
Your
Windo
Help
and
Information
Applications
the
.
.
.
. .
.
Con
trol
. .
t
.
.
with
.
.
vironmen
.
.
.
ws
.
.
with
Prin
ting
.
.
Application
First
.
. .
.
.
.
.
HP
.
.
. .
.
.
.
. .
.
.
P
.
.
.
.
.
. .
.
.
VUE
.
.
t .
.
.
.
.
. .
HP
Files
. .
.
.
.
Time
. .
.
anel
.
.
.
.
.
.
VUE
.
.
.
.
.
.
.
. .
.
.
. .
.
.
.
.
.
.
.
. .
.
.
.
.
.
.
.
.
.
.
.
.
. .
.
.
.
.
. .
.
.
. .
.
.
. .
.
.
.
.
.
.
.
.
. .
.
.
.
.
.
.
. .
.
.
.
.
.
.
.
.
.
.
. .
.
.
.
.
.
. .
.
.
.
.
.
.
.
.
. .
.
.
.
.
.
.
.
. .
.
.
.
.
.
.
.
.
.
.
. .
.
.
.
.
.
.
.
.
.
.
.
.
.
.
.
.
.
.
.
.
.
.
.
. .
.
.
.
.
.
.
.
.
.
.
.
. .
.
. .
.
.
.
.
.
.
. .
.
.
.
.
.
.
.
. .
.
.
.
.
.
.
.
.
.
.
.
.
.
.
.
.
.
. 3-4
.
.
.
.
. .
.
.
.
.
.
. 4-1
.
.
.
.
.
.
.
.
. .
.
.
.
.
.
.
.
.
.
.
3-1
3-2
3-9
3-15
3-17
3-32
3-33
4-2
4-3
4-4
4-5
4-6
4-10
4-12
4-12
4-13
4-13
5.
Starting
Chapter Con
Using
Setting T
Setting Up a User Accoun
Selecting a P
Logging Out without VUE .
Shutting Do
Contents-2
Y
our
System
tents
the
Command
Logging
Selecting
T
Setting Up the
Running the passwd Command .
Exiting T
Exiting for an Extended P
in
Without
erminal
a
V
alue for
erm
En
vironmen
assword . . .
emporarily .
wn Without HP VUE
Without
. .
.
Line
HP
Characteristics
the TERM
t
V
Special Device Files with mknod
HP
.
.
.
.
to
Log In
VUE
.
ariable Settings
t.
. . . . . . . . . . .
. . . . . . . . . . . . . . . . 5-7
. . . . . . . .
. . . . . . . . . . . . . . . . . . 5-9
eriod .
VUE
.
.
.
.
.
.
.
.
.
.
.
.
. .
. .
. .
. .
.
.
.
.
.
.
.
.
.
.
.
.
. .
. .
. .
. .
.
.
.
.
.
.
.
.
.
.
.
.
.
Variable
. . . . . . . . . . . . . 5-8
. . . . . . . . .
. . . . . . . . . . . . . . 5-10
for
.
.
.
.
.
.
.
.
the
425s/t:
. . . . . . . . 5-9
.
.
.
. . . . . 5-3
. . . . . 5-5
. . . . 5-9
5-1
.
5-2
5-2
.
5-3
.
5-3
.
5-3
Page 11

6. Using
Chapter
The
Running Commands
W
orking
Basics
Shell
Determining
Using
Accessing
For
Using
Creating
Mo
Cop
Remo
Viewing
Prin
Using
Starting
P
erforming
P
ositioning
Sa
Lea
F
or More
the
Command
Con
ten
ts
Command
with
of Shells:
F
eatures
T
emporarily
P
ermanen
Key
More Information
Files
ving
ying
ving
and
ting a
the
Leaving
ving
ving
Line
Shells
Y
our
Changing Y
tly
Changing
Shell:
On-Line
and
Directories
Directories
and
Cop
Files
. .
Files
and
Prin
ting
File
with
vi
T
ext
Editor
vi
.
.
Editing
T
ext
Mo
the
Cursor .
Y
our
W
ork
vi
.
.
Information on
Line
.
.
.
.
.
.
.
.
Prompt .
.
.
.
.
.
Characteristics, Cho
.
.
.
.
Login
Visual
Command
.
.
.
ying
Files
. .
.
Directories
Files
lp
.
.
.
.
.
.
F
unctions
de
.
.
.
.
.
.
.
. .
.
.
.
.
.
.
.
. .
.
.
.
.
Shell
Y
Help
.
with
.
.
.
.
.
.
.
. .
.
.
vi .
.
our Shell
our
Shell
for
Help:
.
.
.
Command Lines
.
.
.
b
et
w
een
.
.
.
.
.
.
.
.
.
.
. .
. .
.
.
.
.
.
.
.
.
. .
.
. .
.
.
.
.
the
. .
. .
. .
. .
.
.
.
.
. .
. .
osing and
.
.
.
.
.
.
.
.
.
.
.
.
.
.
Korn
man
pages
.
.
.
.
.
.
.
.
Directories
.
.
.
.
.
.
.
.
.
.
.
.
.
.
.
.
.
.
.
.
.
.
. .
.
.
.
.
.
.
.
.
. .
.
.
. .
. .
.
.
.
.
.
.
.
.
. .
.
.
.
. .
.
.
Shell
.
.
.
.
.
.
.
.
.
.
. .
. .
.
. .
.
.
.
.
.
.
. .
.
Using .
.
. .
. .
.
.
.
.
.
.
.
.
.
.
.
.
. .
.
. .
.
.
.
.
.
.
. .
.
.
.
.
.
.
.
.
.
. .
.
.
.
.
.
.
.
.
.
.
.
.
. .
.
.
.
.
.
.
.
. .
. .
.
.
.
.
.
.
. .
.
.
.
.
.
.
.
.
.
.
.
. .
.
.
.
.
.
6-1
.
.
.
.
6-2
.
.
. .
.
.
.
.
.
. .
.
.
.
.
.
.
.
.
.
.
.
.
.
.
.
.
.
.
.
.
.
.
.
.
.
.
.
.
.
.
.
.
. .
.
.
.
.
.
.
.
.
.
.
.
.
.
. .
.
.
.
.
.
.
. .
.
.
.
6-2
.
6-3
.
6-3
. 6-4
.
6-5
.
6-5
.
6-5
.
6-6
.
6-7
. 6-7
.
6-8
.
6-8
.
6-9
.
6-10
.
6-10
.
6-12
.
6-12
.
6-14
.
6-14
.
6-15
. 6-16
.
6-16
.
6-17
.
6-17
.
6-18
7.
Bac
king
Chapter Con
Backing Up Y
Archiving Y
Backing Up
Doing a P
Creating a Reco
To create a reco
cartridge drive: . . . . . . . . . . . . . . . . . . . 7-8
Up,
Installing,
tents .
our System and Soft
our En
Selected Files Using SAM .
artial Bac
very System
and
Up
. . .
tire File System
very system tap e on a HP-IB (9144-t ype)
. . . . . . . . . . . . . . . . . 7-1
kup to a Cartridge or DDS Drive
dating
.
Y
our Soft
ware . . . . . . . . . . . 7-2
. . . . .
. . . . . . . . . . . . . . . 7-6
w
are
. . . . . . . 7-3
. . . . . . . . . . 7-5
. . . . 7-5
Contents-3
Page 12
Restoring
Restoring
Reco
Installing
Recreating
Updating
8.
Conguring
Chapter
Preparing
Conguring
Conguring
To
create
Restoring
Restoring Selected
F
or More
v
ering
Remo
Preparing
Installation
F
or
Finding
Using
Formatting
Building
Moun
T
esting
Setting
1.
The
2.
The Blo
Using
Finding the Status of Existing SCSI Bus Addresses
Reconguring the Kernel .
Adding the scsi Device Driver
Adding the cdfs
Rebuilding the Kernel .
Testing Y
Mounting the New CD R
Removing and Inserting a Disk . . . . . . . . . . . . . . 8-15
a
reco
Y
our
File
All
Y
our
Op
Information .
Y
our
ving
the
HP-UX F
to
Do
Pro
an
Instan
from a
More
Information
HP-UX
Con
ten
for
Installation
the
Status
for
a
mkno
d
Your
a File
ting
a
Hard
Y
our
Installation
for a
Up
the Device
Character
c
k
mkno
d
our Installation .
v
ery
system
System
Y
our Files
Files
erating
Disk
Space
\Instan
Net
ts
Hard
to
System
CD
Device
to
t
rom Cartridge
an
Up
cedure
t
Ignition
w
ork
for
New
.
.
.
of
Existing SCSI
Disk
Set
Up
Disk
Disk
R
OM
Device
File
Set
Up
Congurable File System
tap
e
.
.
Using SAM
Using
System:
Ignition"
date
.
Serv
.
.
Device
.
on
Driv
Files .
Device
SAM
. .
. .
.
.
or
Installation
.
.
.
Disk
er
. .
. .
Driv
es
.
.
.
.
.
.
Driv
e
Files
.
.
.
Y
our
e .
.
.
.
Driv
e
(425s
File
.
.
.
Files
. . . . . . . . . . . . . . . . 8-12
. . . . . . . . . . . . . .
.
. . . . . . . . . . . . . . . 8-14
OM Drive
on
a
DDS-F
.
.
.
.
.
.
.
.
.
.
.
T
o
olset
Tap
e
or
.
.
.
from
CD
.
.
.
.
.
.
.
. .
.
.
.
Bus
.
.
.
.
.
Disk
. .
. .
.
.
.
only)
. .
. .
.
.
.
.
.
.
. . . . . . .
. . . . . . . . . . . . 8-14
ormat
.
.
. .
. .
. .
.
.
.
.
.
. .
.
.
.
.
.
.
.
. .
CD
R
from
.
.
.
R
OM
.
.
.
.
.
.
. .
.
.
.
Addresses
.
.
. .
.
.
.
.
.
.
.
.
.
.
.
.
.
. .
.
.
.
.
.
. .
.
.
. .
.
. .
tap
e
driv
. .
. .
. .
.
.
.
.
.
.
.
.
.
.
.
. .
. .
. .
.
.
.
.
.
.
.
.
. .
. .
. .
. .
.
OM
.
.
.
.
.
.
.
.
.
.
.
.
. . . . . . . . 8-13
.
.
.
a
CD
R
OM
.
. .
.
.
.
.
.
.
.
.
.
.
.
.
.
.
.
.
.
.
.
.
.
.
.
.
.
.
.
.
.
.
.
.
.
.
.
.
.
.
.
.
.
.
.
.
.
.
.
.
.
.
.
.
.
.
. .
. .
. .
.
.
.
.
.
.
.
.
.
.
. .
. .
.
. .
. .
. .
.
.
.
.
.
. . . . . 8-12
. . . . . . 8-12
. . . 8-13
e.
.
.
.
.
.
.
.
.
. .
.
.
.
.
.
.
.
. .
. .
.
.
.
.
.
.
.
.
.
.
.
. 8-6
.
.
.
.
.
.
.
.
.
.
.
.
.
. 8-11
.
.
7-9
7-10
7-10
7-11
7-12
7-13
7-14
7-14
7-15
7-15
7-16
7-21
7-22
7-23
8-1
8-2
8-2
8-4
8-6
8-6
8-7
8-9
8-10
8-11
8-11
8-12
Contents-4
Page 13
For
More
Conguring
Adding
Adding
Rebuilding
Inserting
W
For
9.
Installing Additional
Chapter
Precautions
Determining
RAM
Supp
Determining
Removing
V
erifying the
the
Setting Up
the
The
Raw
Using
Using
Finding
riting
and
More Information
Con
Board
orted
and Installing
Information
for
a
DDS-F
DDS-F
the
Device
Device File
the
Unit
mkno
d
to
the Status
the
Kernel
and
Remo
Reading
ten
ts
.
.
.
.
Existing
Memory
Memory
Ho
w
to
Upgrade
.
.
.
ormat
ormat Driv
Device
Num
Congure
Driv
Files
Set
Memory
.
.
.
.
. .
b
er
.
Up
Device
of Existing
.
.
.
ving
Cassettes
Data
. .
.
Memory
Installation
Congurations
.
.
.
.
.
RAM
.
. .
.
.
.
.
.
.
.
.
.
.
Driv
e
.
e .
. .
er
.
.
.
.
.
.
.
. .
.
.
.
.
.
.
Files
SCSI Bus
.
.
.
.
.
.
.
.
.
.
.
.
.
.
.
.
.
.
.
.
.
.
.
.
.
.
Requirements
.
New
Memory
Boards
.
.
.
.
.
.
.
.
.
. .
.
.
. .
.
.
.
.
.
Addresses
.
.
.
.
.
.
.
.
.
.
. .
.
.
.
.
.
.
.
.
.
.
.
.
. .
.
.
.
.
.
.
.
.
. .
.
.
.
.
.
.
.
.
.
.
.
. .
.
.
.
.
.
.
.
.
.
.
.
.
. .
.
.
. .
.
.
.
.
. .
.
.
.
.
.
.
.
.
.
.
.
.
.
.
. .
.
.
.
.
.
.
.
.
.
.
.
.
. .
.
.
. .
.
. .
.
.
. .
.
.
.
.
.
. .
.
.
.
.
.
.
.
. .
.
.
.
.
.
.
.
.
.
.
.
.
. .
.
.
.
.
. .
.
.
. .
. .
.
.
.
.
.
.
.
.
.
.
.
.
.
.
.
.
.
. .
.
.
.
.
.
.
.
.
. 8-16
. 8-17
.
8-17
. 8-17
.
8-18
.
8-18
. 8-19
.
8-19
.
8-20
.
8-21
.
8-22
. 8-23
8-23
.
9-1
.
9-2
.
9-3
.
9-5
.
9-5
.
9-8
.
9-9
.
9-9
10. Dealing
Chapter
In
Interpreting
Problems
Logging in When All Else F
Handling a Boot F
with Problems
Con
ten
terpreting
Chec
Dealing with P
For more information . . .
Understanding the Bo ot Program .
Step 1:
Step 2: Boot Program Loads a Secondary Loader Program .
Boot Program nds the WR
Error
the
with
VUE
king
Y
our
Boot Program Initializes Hardw
ts
.
. .
. .
. .
. .
.
.
.
.
.
.
.
.
Messages
LED
Indicators
. .
Error
ossible Installation Problems
ailure . . . . . . . . . . . . . . . . .
. .
Logs
During
ails .
Bo
ot
.
.
During
. .
. .
. . . . . . . . . . .
ONG
Bo
ot
.
.
.
.
.
.
.
.
.
.
.
.
.
. . . . . . . . . . . . . . 10-9
. . . . . . .
are .
secondary loader . . . . 10-11
.
.
.
. .
.
.
.
.
.
.
.
.
.
.
.
.
. . . . . . . . 10-7
. . . . . 10-8
. . . . . 10-10
. . . . . . . 10-10
.
.
. .
.
.
.
.
.
. .
.
.
10-1
. 10-2
.
.
10-4
.
.
10-7
.
10-7
. 10-10
10-10
Contents-5
Page 14
Step 3:
Secondary
P
ossible
Secondary Loader
Step
4:
Step
5: HP-UX
Reco
v
ering
Determining
Dealing
Step
Step
Step
Step 3b:
Step
Step
Step
Step
F
or
F
urther
Hard
Disk
Driv
Status
Status
In
terpreting
DDS-F
Interpreting
Dealing
Indications During
Indications
ormat
with
Secondary
Loader
Problem
HP-UX
from
a
System
Wh
y
with a
1:
Record
2:
Categorize
3a:
Reco
File system
3c:
LAN
3d:
Reco
4:
Reb
o
5:
Monitor
Information
e:
In
the
DDS-F
F
ault
the
CD
Net
work
Loader
Program
Areas .
Program
Lo
cates
Begins Running
the
System
System P
the
v
ery
comm
v
ery
oting
the system
terpreting
During
ormat
Conditions
R
OM
Failures
Program
a
Ro
P
anic
anic .
Message.
the
panic
from
Hardw
problem
unication
from
other
y
our
system
.
.
.
the
P
o
w
Op
eration
Busy
Busy
can't
Finds
P
er
Ligh
. .
nd
. .
. .
W
ot
File
. .
.
.
.
anics
.
.
.
.
message.
are
reco
problem .
situations
.
closely .
.
.
.
Status
Up
.
Ligh
t
.
.
.
t
Indicators
. .
Loads
HP-UX
HP-UX
. .
rong
HP-UX
System
. .
.
.
.
.
.
.
.
.
.
.
.
.
.
F
ailure
v
ery:
.
.
.
.
.
. .
Indicators
.
.
.
.
.
.
Indicators
.
.
.
.
.
.
.
.
.
. .
.
.
.
.
. .
.
.
.
.
.
. .
.
.
.
. .
.
.
.
.
.
.
.
.
.
.
.
.
.
.
.
.
.
.
.
. .
.
.
.
.
.
.
.
.
.
.
.
.
. .
.
.
.
.
.
.
.
. .
.
. .
.
.
.
.
.
.
.
.
.
.
.
.
.
.
.
.
.
.
.
.
.
. .
.
.
.
.
.
.
.
.
.
.
.
.
.
.
.
.
.
.
.
.
.
. .
.
. .
.
.
.
. .
.
.
.
.
.
.
.
.
.
.
.
.
.
.
.
.
.
.
.
.
.
. 10-13
.
.
. 10-15
.
.
.
.
.
.
.
.
. 10-17
.
.
.
.
. .
.
.
.
.
.
.
.
.
.
.
.
.
.
.
.
.
.
.
.
.
10-11
10-11
10-12
10-12
10-13
10-16
10-16
10-16
10-16
10-17
10-18
10-18
10-18
10-19
10-20
10-21
10-21
10-22
10-23
10-25
10-26
10-27
A.
Hardw
App
CD
Setting the Hard Disk Drive Conguration Jumpers .
Contents-6
are Conguration
endix
Con
ten
ts
ROM
Driv
e
Conguration
Setting
Setting the PR
Setting the Self-Seek,
Setting the SCSI Bus Address Jumpers
the
SCSI
TY, ARBT and TEST Switc
Computer Data Mo de .
for In
.
.
.
Bus
Address
Parity and W
ternal Driv
.
.
.
. .
Switc
Switc
. . . . . . . . . . . . . . . . A-3
es
. .
. .
.
hes
.
.
.
.
hes
.
.
. .
hes . . . . . . . A-3
ait/Spin Jumpers
. . . . . . . . . . A-5
.
.
.
.
.
.
.
.
.
. .
. .
. A-2
.
.
.
.
.
.
. . .
. . A-4
. . . . A-5
A-1
A-2
Page 15
B. Conguring
App
endix
Using
the
Modifying
Conguring
Setting
C.
Using
Using
F
Keyb
App
Using
Key
Key
Glossary
Index
Bo
Auto
or More
oard
endix Con
the
Lab
Label
the
Bo
ot
R
Con
ten
ts
.
Bo
ot R
OM Conguration
I/O
Conguration
for
Op
erating
the Op
Congurations
ITF
erating System
ot
Mo
de
Selection
System
Information .
tents
el
Dierences
Comparisons
or
. .
PC101
Selection
OM
.
Keyb
Bet
.
.
.
System
.
. .
.
.
.
w
een
and
.
.
. .
Mode
Information
Selection
Mode
.
.
.
.
oard .
Con
.
.
.
.
the
v
ersions
.
.
.
.
Directly .
ITF
.
.
.
.
. .
. .
.
.
.
.
and
. .
.
.
.
.
. .
.
. .
.
.
.
. .
.
.
the
.
. .
.
.
.
.
.
.
.
.
.
. .
.
.
.
.
. .
PC-101
.
.
.
.
.
.
.
B-1
.
.
.
.
.
.
B-2
.
.
.
.
.
.
B-3
.
. .
. .
. B-6
.
.
.
.
.
.
B-6
.
. .
. .
. B-7
. .
.
.
.
B-10
.
.
.
.
.
.
B-12
.
.
.
.
.
. C-1
.
.
.
.
.
.
C-2
.
.
.
C-2
.
.
.
.
.
.
C-3
Contents-7
Page 16
Figures
1-1. Mo
1-2.
1-3.
3-1.
4-1.
4-2.
6-1. Key
6-2.
6-3.
6-4.
9-1.
10-1.
del 425s
Mo
del
425t
Mo
del
425s
Mo
del
425s/t
Op
ening
Creating a
Shell Softk
Creating
Displa
Creating
P
Diagnostic
o
w
ying
er-Up
Computer
Computer
Computer
P
a
T
erminal
New File
the
\pro
an
Existing
a
New
Display
LEDs
o
w
ey
File
er
Switches
Windo
.
Displa
jects"
.
.
.
-
Mo
(left)
Rear
P
Rear
w
.
.
.
y
.
Directory
File
.
.
.
.
.
.
.
del
425s
and
Mo
anel
P
anel
(arrows)
.
.
.
.
.
.
.
.
.
.
.
.
and
del
.
.
.
.
.
.
.
.
.
425t
.
.
.
.
.
. .
.
.
.
425t
.
.
.
.
. .
.
.
.
.
.
.
. .
.
.
.
.
.
.
(righ
Computer
.
.
.
.
. .
.
.
. .
.
.
.
.
.
. .
.
.
.
.
.
.
.
.
.
.
.
.
.
.
. .
.
.
.
.
.
.
.
.
t)
.
. .
.
.
.
1-1
.
.
.
.
.
1-6
.
.
.
.
.
1-7
.
.
.
.
.
3-3
. .
. .
.
.
.
.
.
.
.
.
.
.
.
.
.
.
.
.
.
.
.
.
.
.
.
.
.
.
4-4
.
4-6
.
6-6
.
6-9
.
6-14
. 6-15
.
9-4
.
10-4
Contents-8
Page 17
T
ables
1-1.
1-2.
6-1.
9-1.
9-2.
10-1.
10-2.
10-3.
10-4.
10-5.
10-6.
10-7.
10-8.
10-9.
A-1.
A-2.
A-3.
A-4.
B-1.
C-1. PC-101
Mo
del
425
Graphics
Mo
del
425s/t
Comparison
T
otal
RAM
Existing Memory
Conguration
Conguration
Normal
Diagnostic
Installation
Hard
Disk
DDS-F
DDS-Format
Problems
CD
SCSI
Hard
HP
Built-In
ormat
R
OM
ID
Disk Driv
A2071A
HP-UX
of Shell
vs.
Mo
Mo
LED
Displa
LED
Problems
Driv
e
Indicators
Indicators
with
the
Driv
e
Addresses
e Conguration
SCSI
In
terface
to ITF
System
Op
F
eatures
Slot
Num
vs.
Upgraded
de
Entry
de
Exit
y
During
Displa
Status
Net
Conguration
and
Bus
Default
Key Comparisons
Choices
erating
.
b
ers
and
Error Messages
Error Messages
HP-UX
y
During
. .
.
.
Indicators
for
Normal
for
F
ault
w
ork .
Switc
Switc
h
Settings
Addresses
V
alues
.
Systems
.
.
.
Board
Memory
Op
Bo
ot
.
.
.
.
Op
Conditions
. .
.
h
F
Jumper
and
Jump
.
.
.
.
.
.
.
and
.
.
.
Sizes
.
.
. .
. .
eration
.
.
.
.
.
.
.
.
. .
eration
.
.
.
unctions
.
.
Functions
er
.
.
.
.
.
.
.
.
. .
Languages
.
.
.
.
.
. .
.
.
.
.
.
.
.
.
.
.
.
.
.
.
.
.
.
.
.
.
.
.
.
.
.
.
.
.
.
.
.
.
.
.
.
.
.
.
.
.
.
.
.
.
Settings .
.
.
.
.
.
.
.
.
. .
.
. .
.
.
.
. .
.
.
.
.
.
.
. .
.
.
. .
.
.
.
.
.
.
.
.
.
.
.
.
.
.
. .
.
.
. .
.
. .
.
.
.
. .
.
.
.
.
.
.
. .
.
.
. .
.
.
1-5
1-10
.
6-4
9-6
.
9-8
.
10-2
.
10-3
10-4
.
10-5
.
10-7
.
10-22
.
10-24
.
10-25
.
10-27
A-2
.
A-3
.
A-5
. A-6
B-4
.
C-3
Contents-9
Page 18

Page 19

1
1
Product
Y
our
HP
The
HP
w
orkstations
ob
ject-co
computers. Most
Both
the
oating
p
Description
Apollo
Ap
ollo
based
de
compatibilit
425t
and
oin
t copro
9000
400x
9000
Series
on
the
systems
the
425s
cessor.
Model
400
is
Motorola MC68030
y
is
main
ma
use
the
a
family
tained
y
b
25
425s
e
MHz
and
of
high
and MC68040
with
most
upgraded
MC68040
425t
p
erformance
earlier
to
425x
pro
Computer
graphics
processors.
Series
systems.
cessor
300 and
with
Full
400
a
built-in
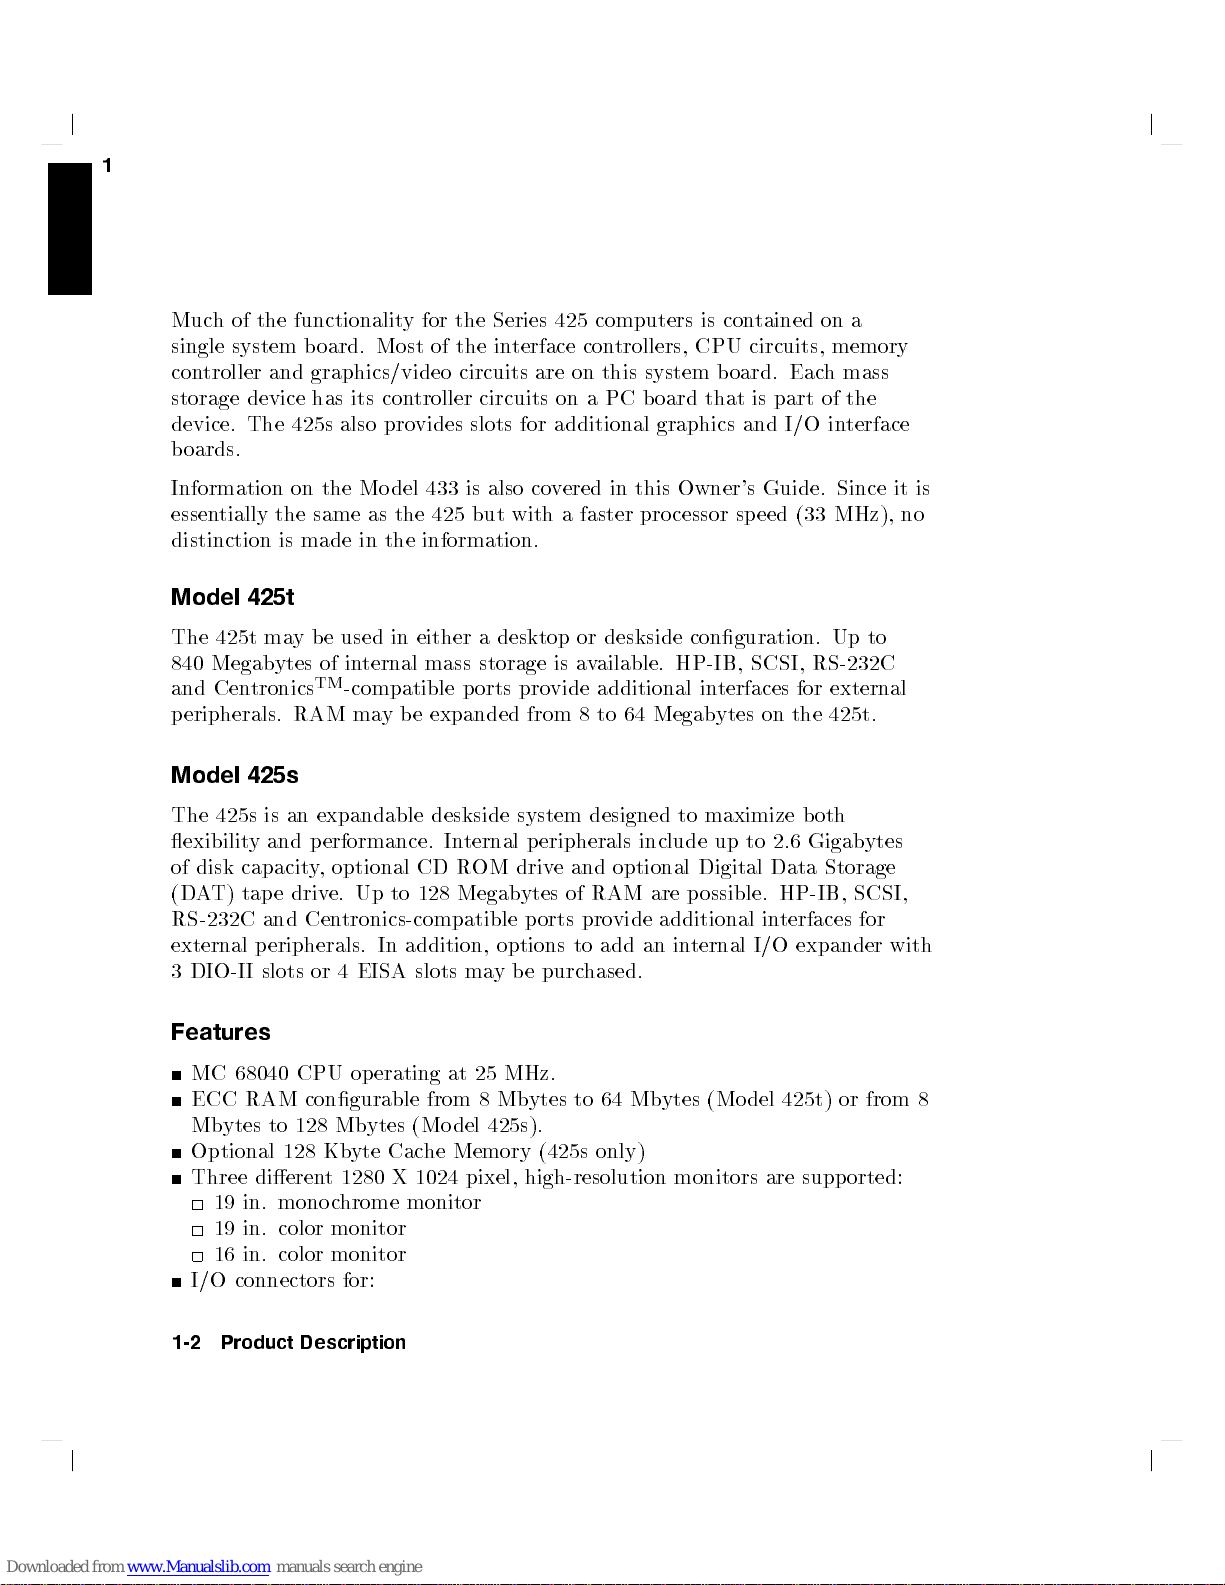
Figure 1-1. Model 425s Computer (left) and Model 425t Computer
Product Description 1-1
Page 20
1
Much
single
con
storage device
device.
b
Information on
essen
distinction
Model 425t
The
840
and
p
Model
The
exibilit
of
(D
RS-232C
external
3
of
the
system
troller
The
oards.
tially
425t
ma
Megabytes
Cen
tronics
eripherals.
425s
425s
is
y
disk
capacit
A
T)
tap
and
p
DIO-I
I
slots
functionalit
and
425s
the
is
y
RAM
an
and
e
driv
eripherals.
y
for
the
Series
b
oard.
Most
of
the
in
graphics/video circuits
has
its
con
troller
also
pro
vides
the Mo
same
made
b
e
of in
TM
expandable
p
erformance.
y
,
e.
Centronics-compatible
or
del 433
as
the
in
the
used
in
ternal mass
-compatible
ma
y
b
e
optional
Up
to
In
addition,
4
EISA
either
CD
128
slots
circuits
slots
is also
425
but
information.
a
storage
p
orts
expanded
deskside
In
ternal p
R
OM
Megab
ma
y
425
computers
terface
for
with
desktop
pro
system
driv
ytes
options
b
con
are on
co
from
eripherals include
ports
e
purc
this system
on
a
additional
v
ered
a
faster
or
is
a
v
ailable.
vide
additional
8
to
designed
e
and
of
RAM
provide
to
add
hased.
trollers,
PC
b
oard
graphics
in
this
pro
deskside
64
Megab
optional
are
additional
an
is
con
tained
CPU
circuits, memory
board.
that
is
and I/O
Owner's
cessor
conguration.
HP-IB,
in
to
Digital Data
p
ossible.
internal
Guide.
sp
eed
SCSI,
terfaces
ytes
on
maximize
up
to
in
I/O expander
on
Eac
part
of
(33
RS-232C
for
the
b
oth
2.6
Gigab
HP-IB,
terfaces
a
h
mass
the
interface
Since
MHz),
Up
to
external
425t.
ytes
Storage
SCSI,
for
it
is
no
with
Features
MC
68040
ECC RAM congurable
Mbytes to 128 Mb
Optional 128 Kb
Three dieren
19 in. monoc
19 in. color monitor
16 in. color monitor
I/O connectors for:
1-2 Product Description
CPU
op
erating
ytes (Mo del 425s).
yte Cac
t 1280 X 1024 pixel, high-resolution monitors are supp orted:
hrome monitor
at
25 MHz.
from 8 Mb
he Memory
ytes to 64 Mb
(425s only)
ytes (Mo del 425t) or from 8
Page 21
9-pin
RS-232
25-pin
Self-terminating
cable
HP-HIL
Ethernet IEEE
HP-IB
Tw
Up to
Mo
Model
Mo
Tw
HP-UX
Domain op
o
del
210
420
660
1.3
DDS
del
CD-R
o
op
HP
is
remo
p
32
bit
tw
o
425t
Mb
Mb
425s
Mb
Gb
(D
425s/t
OM
erating
op
p
ort
mass
yte
serial
P
arallel
v
ed)
ort
802.3 ThinMA
DIO-I
storage
yte
hard
yte
hard
F
ull
yte
hard disk
disk
A
T)
tap
Half
disk driv
systems
erating
erating
I/O
p
ort
SCSI
I
Graphics
disk
disk
Heigh
driv
e
driv
Heigh
e
system,
system,
p
ort,
(Cen
Typ
e2
devices,
driv
driv
t
devices
drive
e
e
t
devices
are
a
v
factory
expandable
tronics
port
Uand
Board
selected
e
e
ailable:
user
installed.
to
3
in
LAN
the
or
terfaces
p
orts
follo
user
installed.
TM
)
(external terminator
AUI
slots
(425s only)
from
installed
wing:
not
required
1
when
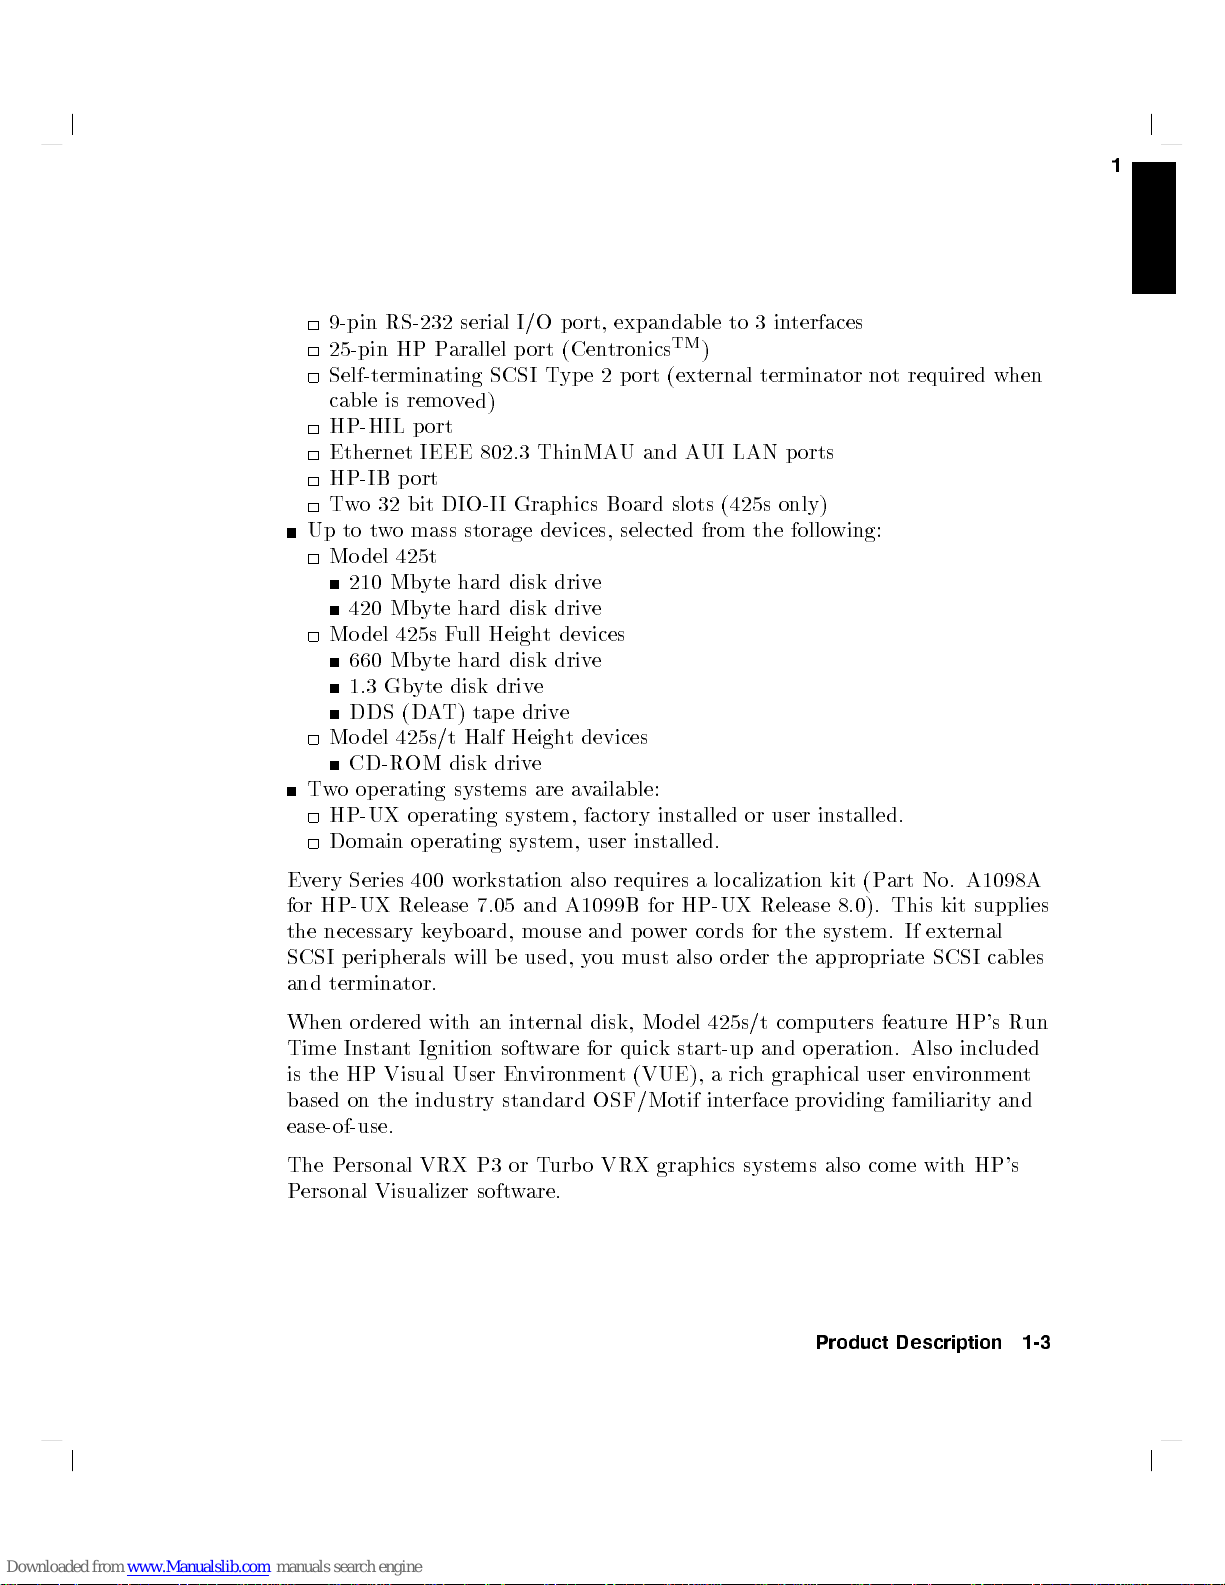
Ev
ery
Series
for
HP-UX
the
necessary
SCSI
p
and
terminator.
When
Time
is
based on the industry standard OSF/Motif in
ease-of-use.
The P
Personal Visualizer softw
ordered with
Instan
the
HP
ersonal VRX P3 or T
400
Release
k
eripherals
t Ignition
Visual
w
orkstation
eyb
oard,
will
User
7.05 and
mouse
b
e
used,
an in
ternal
softw
En
vironmen
are.
also
requires
A1099B for
and
p
y
ou
m
disk,
are for
urbo VRX graphics systems also come with HP's
quick
t
(VUE),
a
HP-UX Release
o
w
er cords
ust
also
Mo
del
425s/t
start-up and
lo
calization
for the
order
the
computers
aric
h
graphical
terface pro
kit
(P
art
No.
A1098A
8.0).
This
kit
supplies
system. If
appropriate
operation.
viding
Product Description 1-3
external
SCSI
feature
user
familiarity and
HP's
Also included
en
vironmen
cables
Run
t
Page 22
1
Memory
User-installable
and
32 Mb
abilit
16 Mb
RAM
four
t
w
t
w
t
w
only)
F
or example,
require
in
the
yte
y
.
Standard
ytes expandable
boards
b
oard
o
4
o
8
o
16
eigh
pairs.
Mb
yte
Mbyte
Mb
four
t
are used
yte
to obtain
16
so
RAM
blo
b
b
Mb
c
k
c
ks.
RAM
RAM
oards
oards
RAM
yte
ets.
b
oards
They
ha
is
8
Mb
to 128
in
pairs.
Upgrades
that add
that
add
b
oards
the
maxim
RAM
provide
v
e
an
ytes,
Mb
ytes
There
an 8
a
that
Board
the 425
Error
expandable
for
are
are
a
v
ailable
Mb
yte
16
Mb
yte
add
a
um
64
pairs
Chec
the
eigh
blo
blo
32
Mb
yte
(i.e.
Mb
with RAM
king
and
to
64 Mb
425s.
t
so
c
k
ets
as
follo
c
k
of
memory
c
k
of
memory
yte
blo
of
RAM
eight
8
in incremen
Correcting
ytes for
on
the
ws:
.
.
c
kof
memory (for
for
the
Mb
yte
system
425t
b
oards)
ts
of
(ECC)
the 425t
b
oard
w
ould
inserted
8,
and
425s
16
for
1-4 Product Description
Page 23
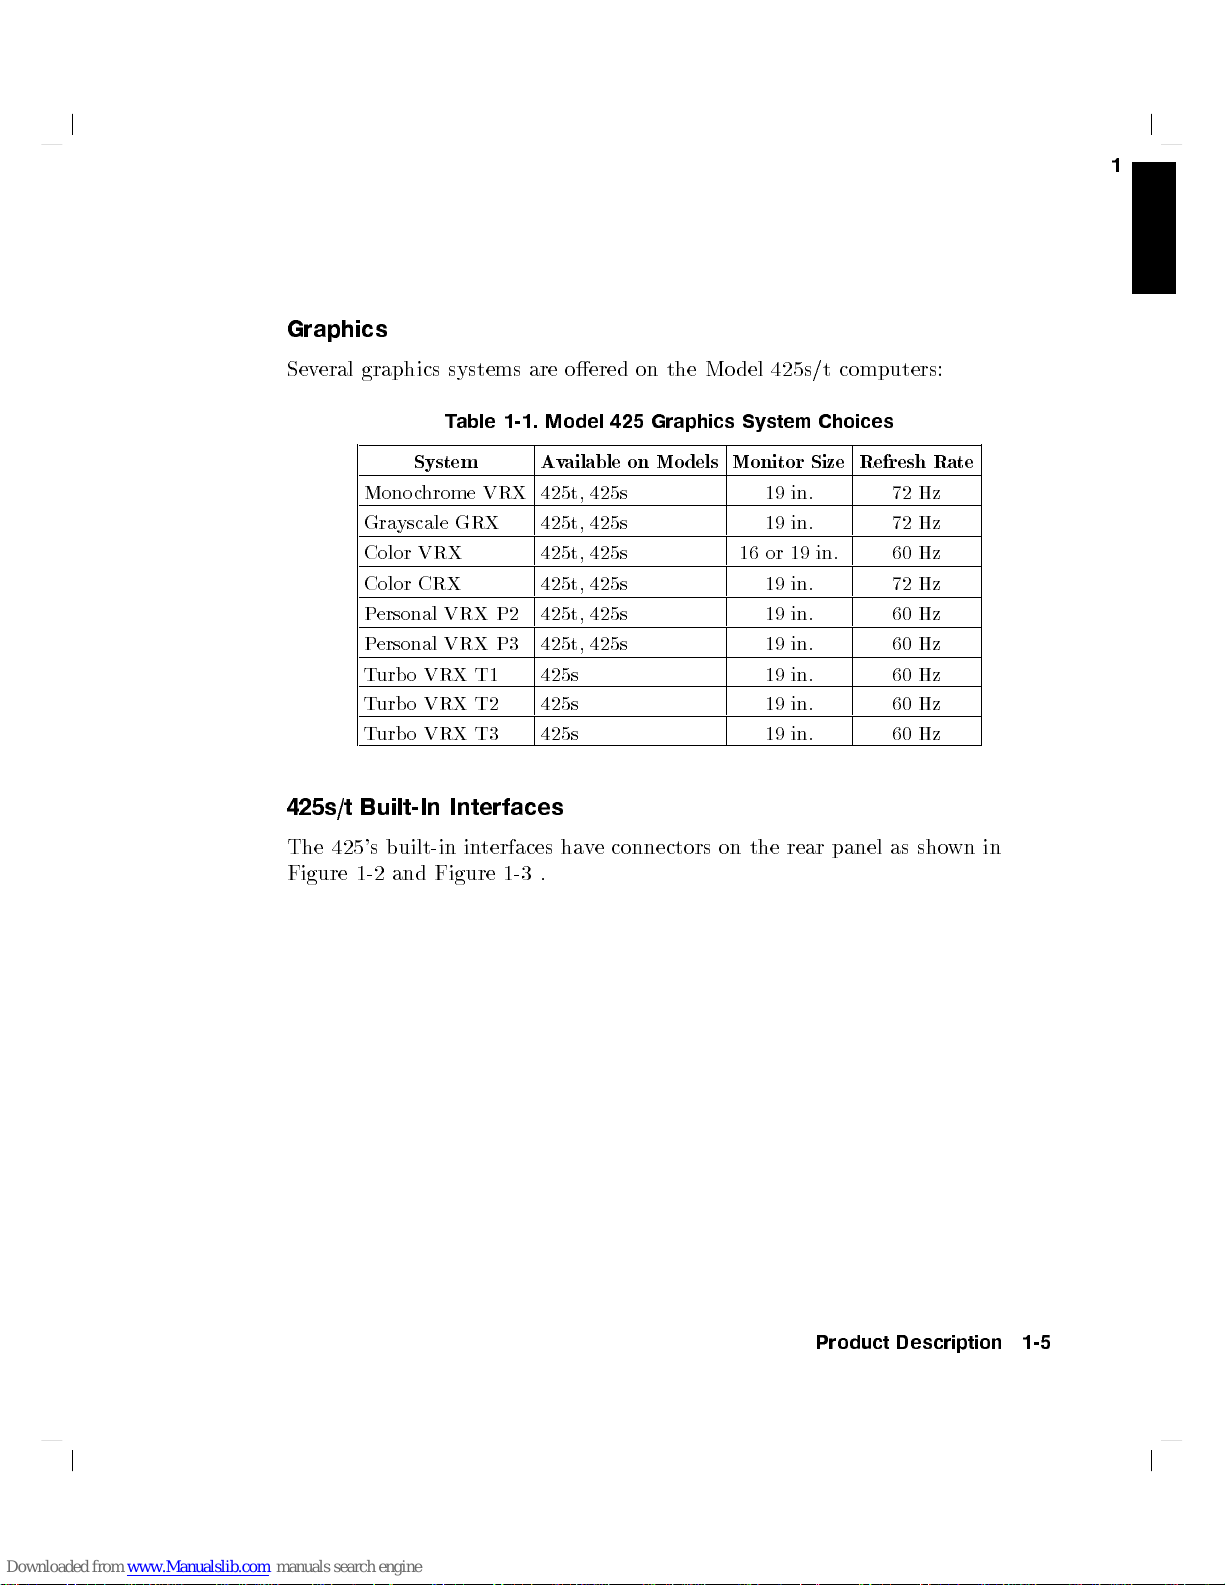
Graphics
Sev
eral
graphics
systems
T
able
are oered
1-1.
Model
on the
425
Model
Graphics
425s/t computers:
System
Choices
1
425s/t
The
425's
Figure
System Av
Mono
c
hrome
Gra
yscale
Color
VRX
Color
CRX
Personal
P
ersonal
T
urb
o
VRX
Turb
oVRX
T
urb
o
VRX
Built-In
built-in
1-2
and
VRX
GRX
VRX P2
VRX
P3
T1
T2
T3
Interfaces
in
terfaces
Figure
1-3
ailable on
425t,
425s
425t,
425s
425t,
425s
425t,
425s
425t, 425s 19 in. 60 Hz
425t,
425s
425s 19
425s 19 in. 60 Hz
425s 19
ha
v
e
.
Models
connectors
Monitor
16
on
the rear
19
19
or
19
19
in.
in.
19
in.
in.
in.
in.
Size
in.
panel as
Refresh
72
72
60
72
60
60
60
Hz
Hz
Hz
Hz
Hz
Hz
Hz
sho
Rate
wn
in
Product Description 1-5
Page 24
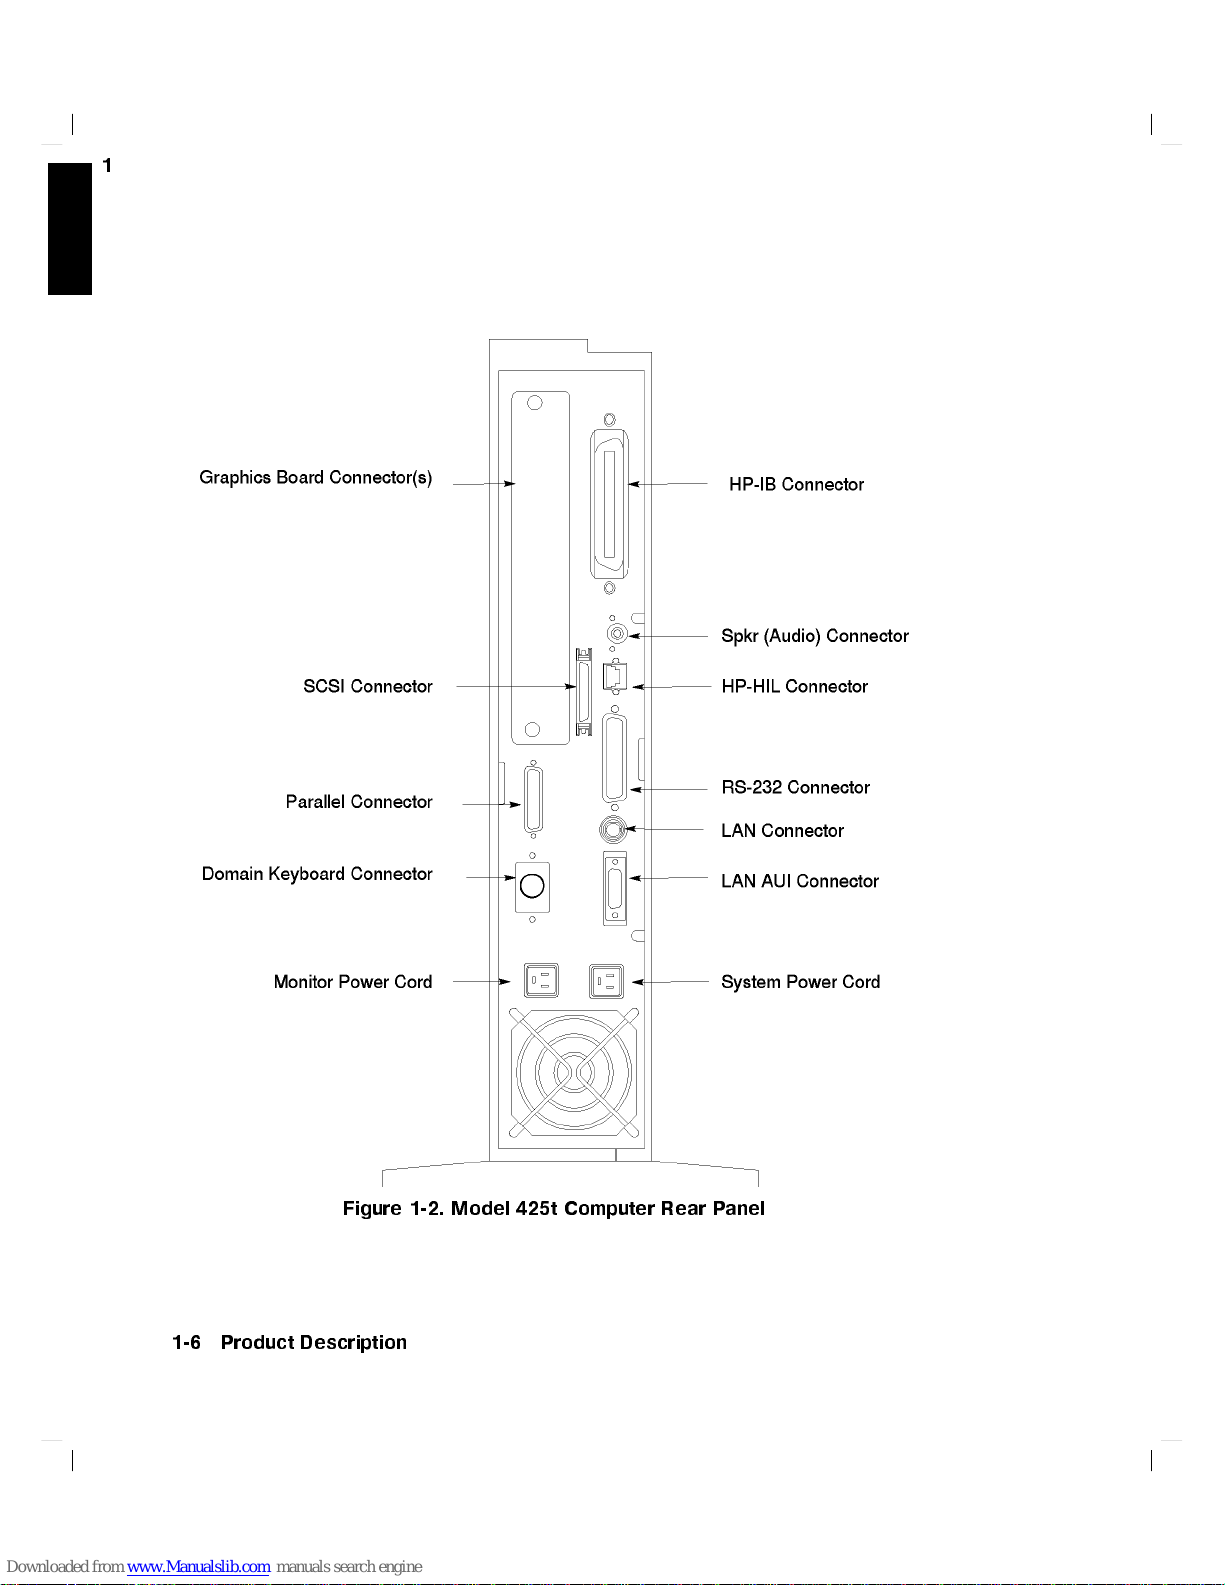
1
Figure 1-2. Model 425t
1-6 Product Description
Computer Rear P
anel
Page 25
1
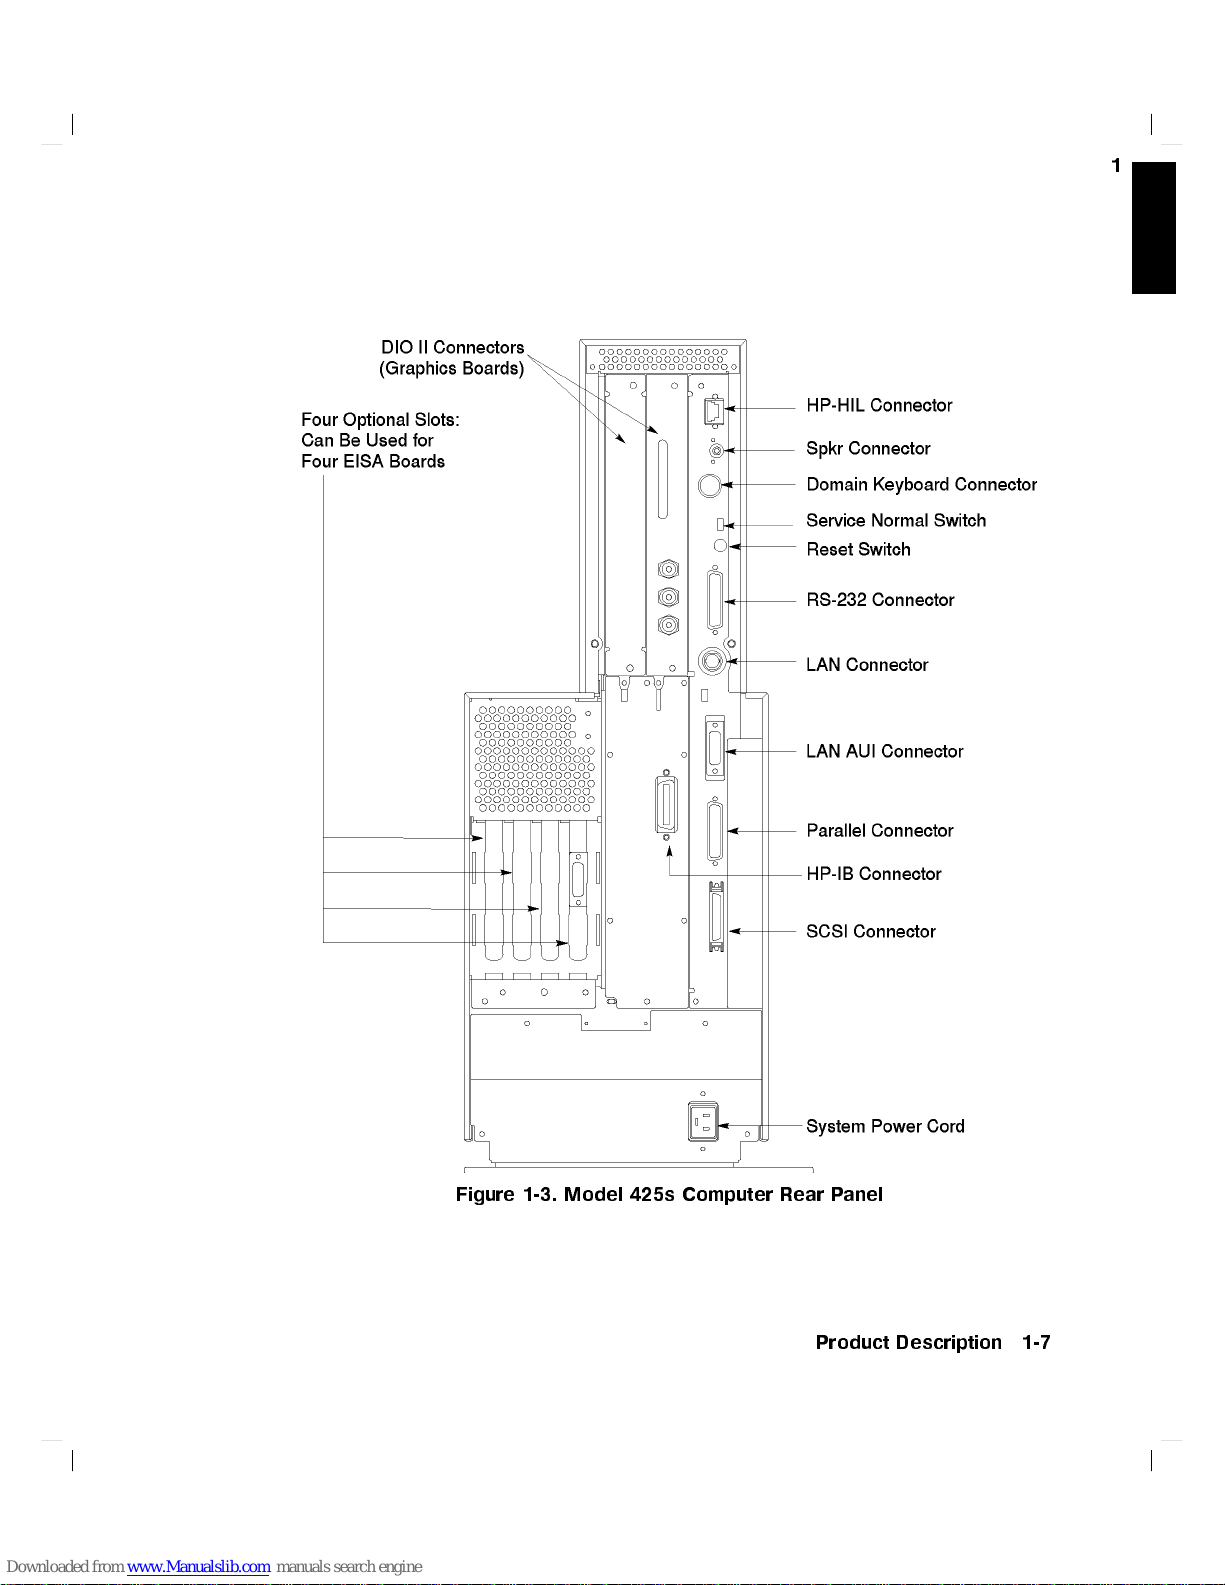
Figure 1-3. Model 425s Computer Rear P
Product Description 1-7
anel
Page 26
1
SCSI Interface
The
SCSI in
with
external
optional
not
require
with
all
terface
mass
mass
storage devices.
a
terminator
425t
systems.
uses
a
storage
(it
high-densit
devices.
If no
is
in
ternally
y
,
shielded
In
ternally
SCSI devices
,
terminated).
external
a
ribb
are attac
connector
on
cable connects
hed,
A
terminator
the
for
use
to the
425s
is
included
do
es
RS-323
A
computers,
under
Terminals
connectors.
manages
HP
A
is
Some conguration
Conguration
HP-HIL
The
devices
of these
systems:
Serial
single
9-pin
Bo
ot
are not
the
P
arallel
25-pin
compatible
HP
HP
HP
Interface
HP-HIL
(k
eyb
keyb
46021B
A1429A
Interface
RS-232
the
RS-232
R
OM
The
graphics
RS-232
Interface
Parallel
with
Mode
connector
oard,
oards are
In
tegrated
P
ersonal
serial
in
terface
con
trol.
supp
orted
circuit
in
terface
in
terface
most
devices
parameters
for
in
ternal
on
mouse,
av
ailable
T
Computer
in
terface
In
terface
as
remote
and
p
ort
using
are
the
rear
etc.).
and
erminal
p
for
the
v
alues
pro
vides video
do
es
is
pro
a
v
ailable
in
terfaces.
panel
Keyb
oards
supp
F
ormat
(PC101)
ort
is
Mo
del
suc
consoles
not
vided
Cen
tronics
accepts
orted
(ITF)
pro
vided.
425s/t
h
as
on
for monitors.
pro
vide
with
TM
under
a
are
normally
only
Keyb
Keyb
oard.
Unlik
e
cannot
remote/local
these
for
all
in
terface
Bo
ot
v
ariet
with
oard.
b
RS-232
terminal
425s/t
R
OM
yof
HP-HIL input
connected
HP-UX
other
e
congured
are not
in
terface
A
Utilit
con
trol.
mo
dels.
proto
cols.
con
trol
op
Series
used.
y
Chip
It
in
and
b
erating
400
oth
Note
Other HP-HIL devices ma
connector.
1-8 Product Description
Overlays are used on the HP A1429A Keyboard to iden
certain k
eys for use with the HP-UX operating
y also be connected to the k
tify
system.
eyboard or HP-HIL
Page 27
LAN Interfaces
A
standard IEEE
p
orts:
802.3
Ethernet
Lo
cal
Area
Net
w
ork
(LAN)
is
a
v
ailable
to
1
t
w
o
ThinMA
used.
A
UI
is
Either
LAN
con
trol
Internal
The
connected to
as
w
disk
T
o
increase
Mb
yte
210
420
A
A second
U
LAN
required
port
in
terface
in
Conguration
Mass
Mo
del
ell
as
disk
driv
e
ba
driv
Mb
yte
Mb
yte
second
uses the
uses
the
for use
is activ
v
alues
Storage
425t
computer
the
in
ed
congurations.
y
tted
memory
eis
added.
Hard
Hard
210
Mb
420 Mb
BNC connector.
15-pin
on the
ated b
can
ternal
with
size
Disk
Disk
yte
yte Hard
y
Mo
SCSI
up
Mo
Driv
Driv
Hard
b
a
del
connector.
netw
the
e
congured
de.
Devices
ma
y
210
to
425t
e
e
Disk
Disk
An in
An
ork.
system
use
in
or
the
b
oard's
b
y
up
to
terface.
Standard disk
420
Mb
optional
mass
storage
Driv
e
Driv
e
ternal attac
external
LAN
k
eyb
oard
t
w
o
in
ternal
The
computer
ed
yte
preformatted
840
Mb
options
hmen
t
attachmen
jump
er
p
osition.
en
try
under
mass
storage devices
is
a
v
ailable
congurations
hard disk
ytes,
a
second
include:
unit
t unit
Bo
ha
210
in
terface
interface
Some
ot
R
in
diskless
v
e
their
driv
or
is
OM
hard
e.
420
On the
full-heigh
maxim
the disk. The 425s can support
The second full-heigh
storage devices installed. These can b e com
425s, a
t
device
um.
As
Full-height devices are:
660 Mbyte Hard Disk Drive
1.3 Gb
DDS (D
yte Hard Disk Drive
AT)
standard
and
an
option,
t
Tape Drive
660
Mb
yte
a
second one
the
HP-UX
two full-heigh
peripheral ba
or
1.3
Gb
may
be
op
erating system
y can ha
yte
disk
is
added
binations of:
to
ac
tandt
ve one of sev
wo half-heigh
installed
hiev
e
may
eral optional mass
Product Description 1-9
as
a
the
2.6
be
preloaded on
tmec
Gb
yte
hanisms.
Page 28
1
Half-heigh
CD
Operating
HP-UX
oers
the
internal
immediately
systems
Op
erating
Windo
Languages: C,
User
in
R
OM
and
Instan
and
system:
w
system:
terface:
t
devices
Disk
Systems
Domain/OS
t
Ignition
hard disk
after
languages
Model
are:
Driv
hardw
425s/t HP-UX
whic
driv
a
e
are
b
oth
h
pre-loads the
e.
This
are
installation.
v
ailable
HP-UX
HP-UX
X
Windo
P
ascal,
Visual
supp
orted
on
operating
allo
ws
users
T
able
for
the
Model
T
able
1-2.
Operating Systems
7.05
or
later
complies
w
User
System
F
OR
En
vironmen
with
V
TRAN,
X
ersion
Ada,
the
Mo
del
425s/t.
system and
to
start
using
their
1-2
lists
the
HP-UX
425s/t computer.
and Languages
Open,
and POSIX
11
(X11)
Release
t
(HP
Common
VUE)
LISP
2.01 or
HP-UX
HP VUE
w
orkstations
op
erating
sp
ecications.
4
,
C++
later
8.0
on
Net
w
ork
proto
cols
supported
S.25
SNA
RJE
TCP-IP
HP Diskless
1-10 Product Description
by
the
425s/t
include:
Page 29
2
2
Using
Chapter Contents
In
various
9000
F
or
If
y
Ap
425t
If
y
Chapter
computer (see
If
y
skip
usage.
Y
this
c
hapter
installation,
Model
troublesho
ou
need
ollo
9000 Series
and
HP
ou
ha
v
e
3.
ou
ha
v
e installed
to
Chapter
our
Manuals
y
ou will
425s/t and
oting
help
with
P
art
not
y
et
F
or
detailed
ab
o
3
conguration,
information,
400
No.
installed y
v
e).
for
nd
references
its asso
system
Instal
A1421-9000l
help,
your
system
HP
VUE
to
and
op
ciated devices.
please
hardw
are
installation,
lation
our
see
usage
Guide
for
system
the
appropriate
and
w
and/or
the
an
sp
eration
see
HP
and
t
ecic
man
tasks
Chapter
P
art
425s.
need
to
get
Chapter
10.
please
No.
basic
Instal
on
with
uals
to
help
for
the
HP
see
y
A1630-90001
guidance,
lation
5
Guide
using
for
command line
our
it,
y
ou
Ap
ollo
HP
see
for
please
with
for
the
y
our
Using Your Manuals 2-1
Page 30

2
Finding
This section
install
Installation
425s/t
Monitor
Additional external
CD
R
Additional
Net
w
Replacemen
Documents
describ
and
start
T
o
install/connect
Computer,
OM,
Hard Disk,
RAM
ork
connections
t
clo
es
using
Keyb
peripherals
c
k
battery
where
y
our
this:
oard,
DDS (D
for
Specific
to
nd
w
orkstation.
Mouse,
AT)
driv
the
and
es
T
asks
information
Refer
Y
our
applicable
A1630-90001
(425s).
HP-UX Instal
Chapter
Owner's
Chapter
Y
our
A1630-90001
(425s).
Y
our
A1630-90001
(425s).
8
and
Guide
9
in
applicable
applicable
y
ou
ma
y
need
to
this
Instal
lation
(425t)
or
A1421-9000l
ling Peripher
Appendix
this
Owner's
Instal
lation
(425t)
or
A1421-9000l
Instal
lation
(425t)
or
A1421-9000l
to
manual:
Guide
als
Ain
Guide
Guide
Guide
prop
this
erly
2-2 Using Your Manuals
Page 31

Configuration
2
T
o
do
this
conguration
Conguring
Conguring
LAN
En
tering
address
Creating
Setting
Setting
Setting
Managing/Conguring
b
o
your
system
New User
or
c
hanging
p
ermissions
Swap
Space
ot
R
OM
computer for
name
Accounts
passwords
and
HP
task:
IP
VUE
App
endix
y
our
Instal
9000
Series 300,
Networking
A
dministrating
Chapter
and
Chapter
Chapter
A
System
HP
Visual
and
Administr
y
our
Be
ginner's
Visual
HP
3
Instal
3or
3
Administr
User
Visual
ation
Refer
B
in
this
Owner's
lation Guide
400 and
Overview
LAN
and
Chapter
lation
Chapter 5
or
Chapter
Guide
ation T
User
Envir
Envir
onment
User
Manual
to
this
for
;
and
10
Guide
in this
5in
to
HP-UX
onment
Envir
man
Guide
this
800
Computers
Instal
in
this
.
this
asks
User's
Congur
onment
ual:
computer;
ling
and
Owner's
Owner's
Owner's
Guide
ation
System
HP
Guide
Guide
Guide
,
Guide
,
HP
,
Using Your Manuals 2-3
Page 32

2
Operation
T
o
do
Logging
Using
Sh
in
Sh
without
Setting
HP
Setting
without
Setting
En
En
VUE
Using
HP
Using
without
Using a
Viewing
Viewing
Editing
System bac
System securit
HP VUE
utting
HP
utting
VUE
tering
tering
the
VUE
the
in
and
do
wn
VUE
do
wn
HP
VUE
or
c
hanging
or
c
hanging
HP
VUE
p
ermissions
commands
commands
directory/le
directory/le
HP
VUE
shell
a
le
a
le
a
le
kup/restoration
this
out
y
our
y
our
in HP
without
y
op
eration,
w
w
passw
passw
in
without
orkstation
orkstation
ords
ords
HP
VUE
system
system
VUE
HP
VUE
Chapter
Chapter
User
Chapter
Chapter
Chapter
in
Chapter
A
Be
Chapter
Chapter
HP
Be
ginner's
Chapter
in
Chapter
Be
ginner's
Chapter 6
Guide to
Chapter
Chapter
A
Be
Guide
Chapter 7 in this
HP-UX System Se
HP-UX
Refer
3
in
this
4in
this
Environment
3
in
this
5
in
this
3
in
this
5
in
this
ginner's
ginner's
to
Guide
4
in
this
6
in
this
Guide
4
in
this
6
in
this
Guide
in this
HP-UX
4
in
this
6
in
this
Guide
the
vi
to
this
Owner's
Owner's
User's Guide
Owner's
Owner's
Owner's
Owner's
Owner's
Owner's
to
Owner's Guide
Owner's
to
Owner's
,
and
Owner's
Owner's
and
Owner's Guide
curityorABe
Guide
Guide
Guide
Guide
Guide
Guide
to HP-UX
Guide
Guide
HP-UX
Guide
HP-UX
Guide
Shel
Guide
Guide
to
HP-UX
ex
T
ext
man
ual.
and
,
and
,
and
,
A
Be
ls:
User's
and
The
Editors
ginner's Guide to
HP
A
A
ginner's
Guide
Ultimate
Visual
Solving Problems
For tr
oubleshooting
2-4 Using Your Manuals
common problems, se
e Chapter 10
.
Page 33

3
3
Starting
Chapter Contents
Using
Starting Up
Logging
Logging
Setting
Sh
utting Do
This
chapter
HP
VUE
HP
VUE
Instan
In
Out
Up
.
See
.
Y
our
t
Ignition
with
a
User
wn
giv
es
Chapter
HP
information
System
VUE
Accoun
5
t
on
for
information
for
using
the
y
our
system
on starting
First
for
y
our
Time
the
rst
system
time,
without
with
Starting Your System for the First Time 3-1
Page 34

Using
Instant
Ignition
If you
scr
3
If
ov
when
b
appropriately:
After
information
time:
have
e
en,
go
y
our
system
er the
e
The
The
single-w
The
This
255.32.3.10
this
po
y
ou
ask
ed
for
time
System name
ord
net
w
consists
information.
y
ou
alr
on
wer
rst
zone
ork
ha
ready
e
to
sev
name
.
v
e
has
turn
ady
lo
the
next
HP-UX
switc
h
the
eral
pieces
where
(host name)
with
address
of
four
Y
ou
may
assem
b
efore
ade
d
se
on
p
y
our
n
um
address
bled
your
system
ction.
preloaded
y
our
425s/t),
o
w
er
on.
of
information needed
computer
eigh
t
or few
b
er,
elds
need to
the
hardw
y
ou
turn
During
for
also
consult
are
on
on
y
our
er c
called
separated
the
and
you
its
disk (this
HP-UX
this
is
lo
cated.
w
orkstation;
haracters.
an
with
for y
our
p
o
w
have
the
is indicated
will
automatically
installation
to congure
IP
n
um
ber,
b
y
p
erio
y
our
system
system,
er
to
y
our
VUE
windows
pro
cess,
your
an
y
alphan
for y
our
ds:
for
example,
administrator
then
ha
computer
by
load
you
system
umeric,
w
v
e
the
for
on
your
a lab
el
itself
will
orkstation.
for
ab
o
v
e
the rst
3-2 Starting Your System for the First Time
Page 35

3
Figure
1.
T
urn
on
the
p
2. En
ter the
If y
ou do
when
y
this
information
typing:
/etc/set_parms
The displa
whichy
T
o review the steps of the Instan
appropriate
information when
not ha
ou
are
prompted
y will then prompt y
ou
may need to re-en
Installation Guide
o
w
v
e
at
er
the
another
3-1.
Model
for
y
our
system
for
it,
time.
systemname
425s/t
computer
your
name,
you
ou for an
ter.
t Ignition process in detail, please see the
for this pro duct.
P
o
w
er
Switches
and
displa
system
net
can use
Y
ou
Starting Your System for the First Time 3-3
displa
y
w
ork
i.d.,
the default
w
ould
en
ter
y information whic
y
.
requests
and
time
v
alues
the
information
(arro
ws)
it.
zone
no
h
is missing or
w
information
and
en
ter
later
by
Page 36

Logging
In
with
HP
VUE
Once HP-UX
accustomed
y
ou as
3
pro
p
attac
If y
from
information on
Note
odd,
cess
ersons
hed to
ou c
hoose
the
During
N
N
N
N
N
N
N
N
NN
N
N
N
N
Help
The
help
information
to
especially
of
logging
from
a net
VUE
the
button.
dialog
is
running
w
orking
in
using
y
work.
not
to
login
logging in
Selecting
familiar
Chapter
login
pro
b
o
after
on
if y
is
one
our
system.
use
HP
screen,
with
6.
cess,
x
that
login,
on
y
our
single-user
ou
are
of
the
VUE,
at
this time.
from
the
NN
NN
NN
No
the
ho
if
y
ou
app
ears
push
system,
the
only
w
a
ys
This
y
ou
command
N
N
N
N
N
N
N
N
N
N
N
N
N
N
Windows
w
to
read
need
will
the
Help
p
ersonal
that
is esp
can
N
N
N
NN
NN
NN
NN
help
refresh y
Manager
y
ou
m
ust
computers,
user
of
HP-UX
ecially imp
select
In
that
line.
N
option
and
edit
logging
log
in.
If
this
y
our
mac
hine.
prev
en
ts
ortant
N
N
N
N
N
N
NN
NN
NN
N
N
N
N
N
N
N
N
N
N
in,
go
If
clic
N
to
that
y
k
Options
case,
assumes
les.
our memory
question
y
ou
are
may
strike
Ho
w
ev
unauthorized
if y
our
N
N
N
N
N
N
NN
NN
NN
No Windows
and
Chapter
y
ou
are
ou
are
not, review
the
login screen
.
F
or
more
mark
icon
er,
system
N
N
N
N
N
N
N
N
N
N
N
N
N
5
for
already
N
N
N
NN
?
.
the
N
N
N
is
N
N
N
N
3-4 Starting Your System for the First Time
Page 37

1
After
y
our
computer
app
ears.
This
means
b
o
oted.
app
ear,
d a
Y
see
our
y
our
HP
Chapter
has
hardw
VUE
10,
b
o
oted HP-UX,
are
installation
has
also
or
con
loaded
tact
y
our
the login
w
as
successful
and
started.
designated
screen sho
and
HP-UX
If
this
screen
service
represen
wn
b
elo
has
do
tativ
w
es not
e.
3
c b
Starting Your System for the First Time 3-5
Page 38

2
Y
ou
m
ust
rst
login
as
root
.
T
o
login
as
root
,
typ
e:
root
(The
4
Return
3
d a
c b
4
Return
5
k
ey
5
5
on
some
k
is
lab
eled
4
Enter
eyb
oards.)
T
o
correct
(
7
,
6
If
y
ou
step 4.
3-6 Starting Your System for the First Time
)
to edit
ha
v
Otherwise,
e
an
giv
en
try
the b
en
,
ox.
your
go
use
on
the
4
Backspace
Or
start
the
workstation
to
step
login
a hostname
3.
king
5
,
and
r
N
N
N
Clear
on
unknown,
N
N
arro
N
N
NN
w
k
eys
NN
NN
NN
N
.
skip
to
5
,
4
Insert
o
5
v
er
,
4
Delete cha
b
y
clic
other than
Page 39
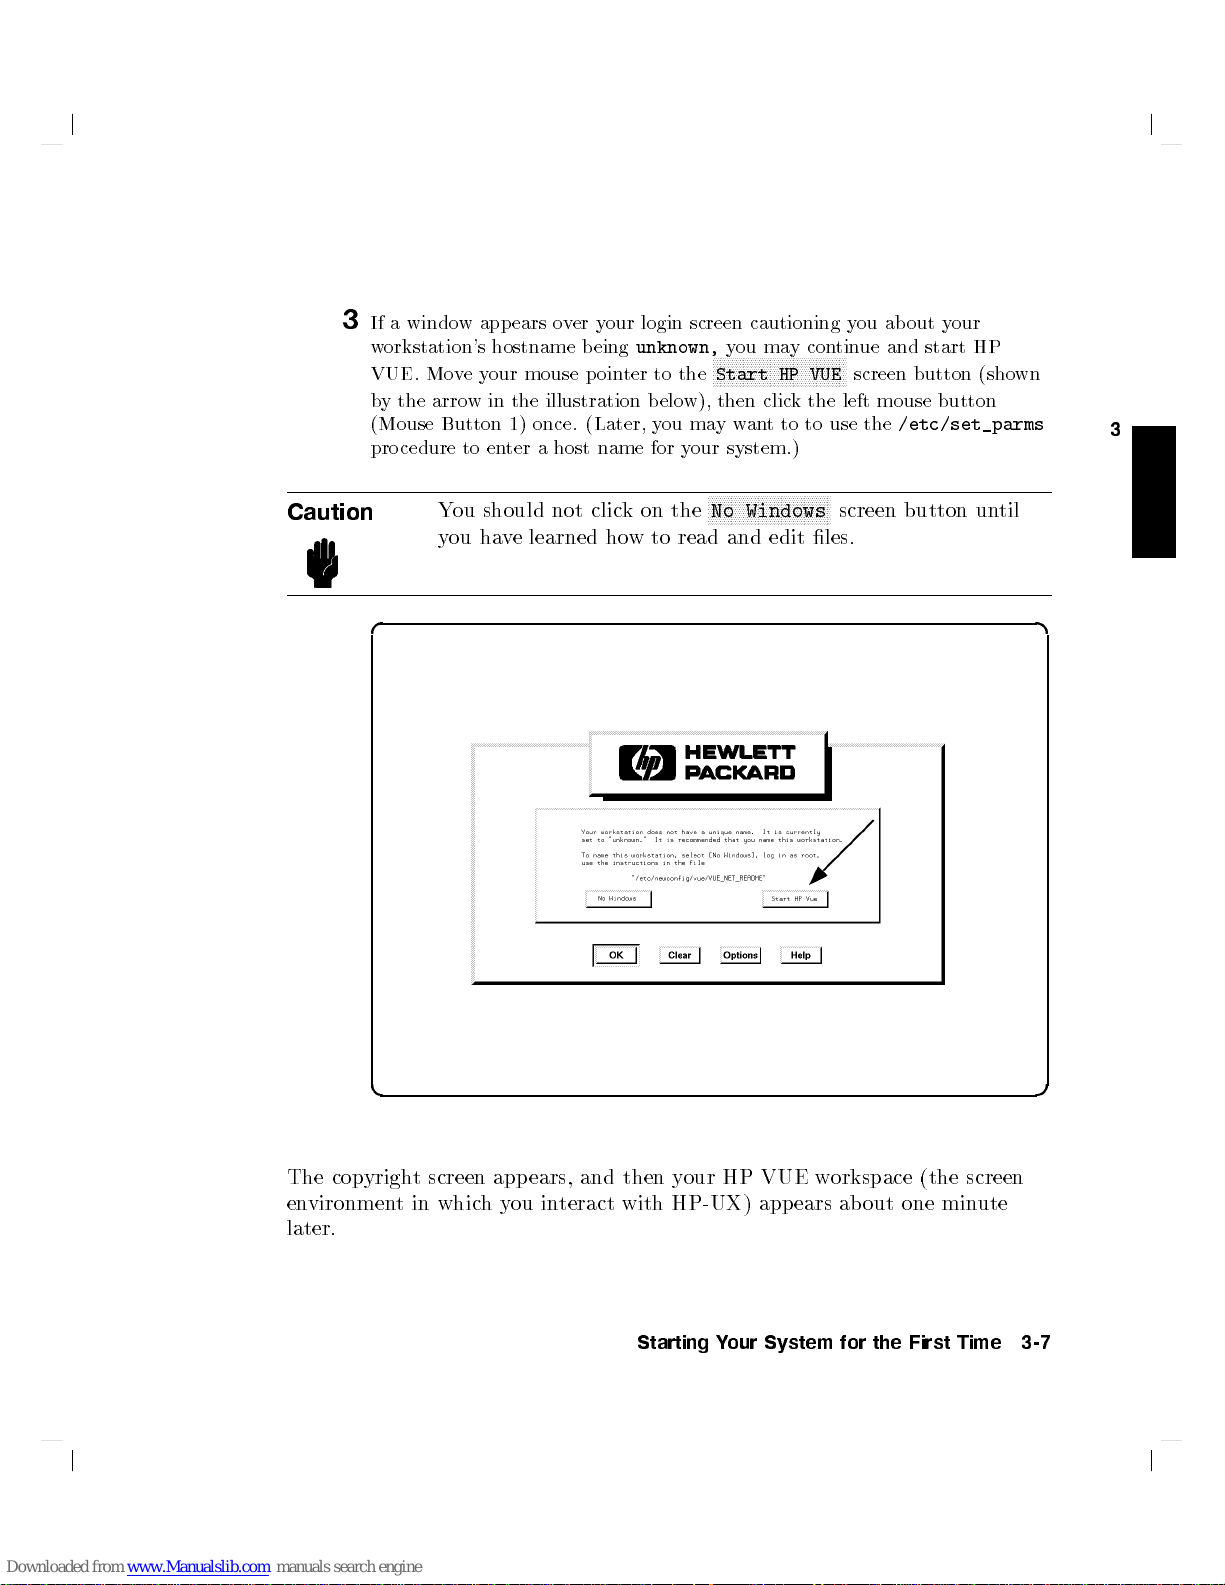
3
Caution
If
a
windo
w
app
ears
o
v
er
y
our
login
screen
w
orkstation's
VUE.
Mo
b
y
the
arro
(Mouse
pro
cedure
d a
v
e
y
w
Button
to
Y
ou
should
y
ou
ha
hostname
our
mouse
in
the
illustration
1)
once.
en
ter
a
v
e
learned
b
eing
p
oin
(Later,
host name
not
clic
k
ho
unknown,
ter
to
the
b
elo
y
ou ma
for y
on
the
w
to
read
w), then
cautioning
y
ou
ma
N
N
N
N
N
N
N
N
N
N
N
N
N
N
N
N
N
click
ant
N
N
N
N
N
N
N
N
N
N
N
N
N
N
NN
Windows
and edit
NN
HP
to to
NN
Start
yw
our system.)
N
N
N
No
y
con
NN
NN
NN
NN
N
N
N
y
tin
N
N
N
N
N
N
N
N
N
N
VUE
screen
the left
use
N
N
N
N
N
N
screen
les.
ou ab
out y
ue and
the
start HP
button
mouse button
/etc/set_parms
button
our
(sho
un
wn
til
3
c b
The cop
environmentinwhic
later.
yright screen app ears, and then y
hy
ou in
teract with HP-UX)
Starting Your System for the First Time 3-7
our HP VUE w
appears about one min
orkspace (the screen
ute
Page 40

4
The
HP
VUE
w
orkspace
and
the
W
orkspace
Con
trol
P
anel
or
\Dash
d a
3
lo
oks
Manager.
b
oard").
like
(The
this, with
W
orkspace
a Console
Manager is
Icon,
a
File
also kno
Manager,
wn as
the
c b
Opening
3-8 Starting Your System for the First Time
Screen
Page 41

VUE
Functions
A
t
the
b
ottom
the
HP
VUE
c b
on
the
of
y
our
Workspace
Control
screen
Manager
y
ou
Panel
will
see the
following
buttons with
icons on
3
Starting Your System for the First Time 3-9
Page 42
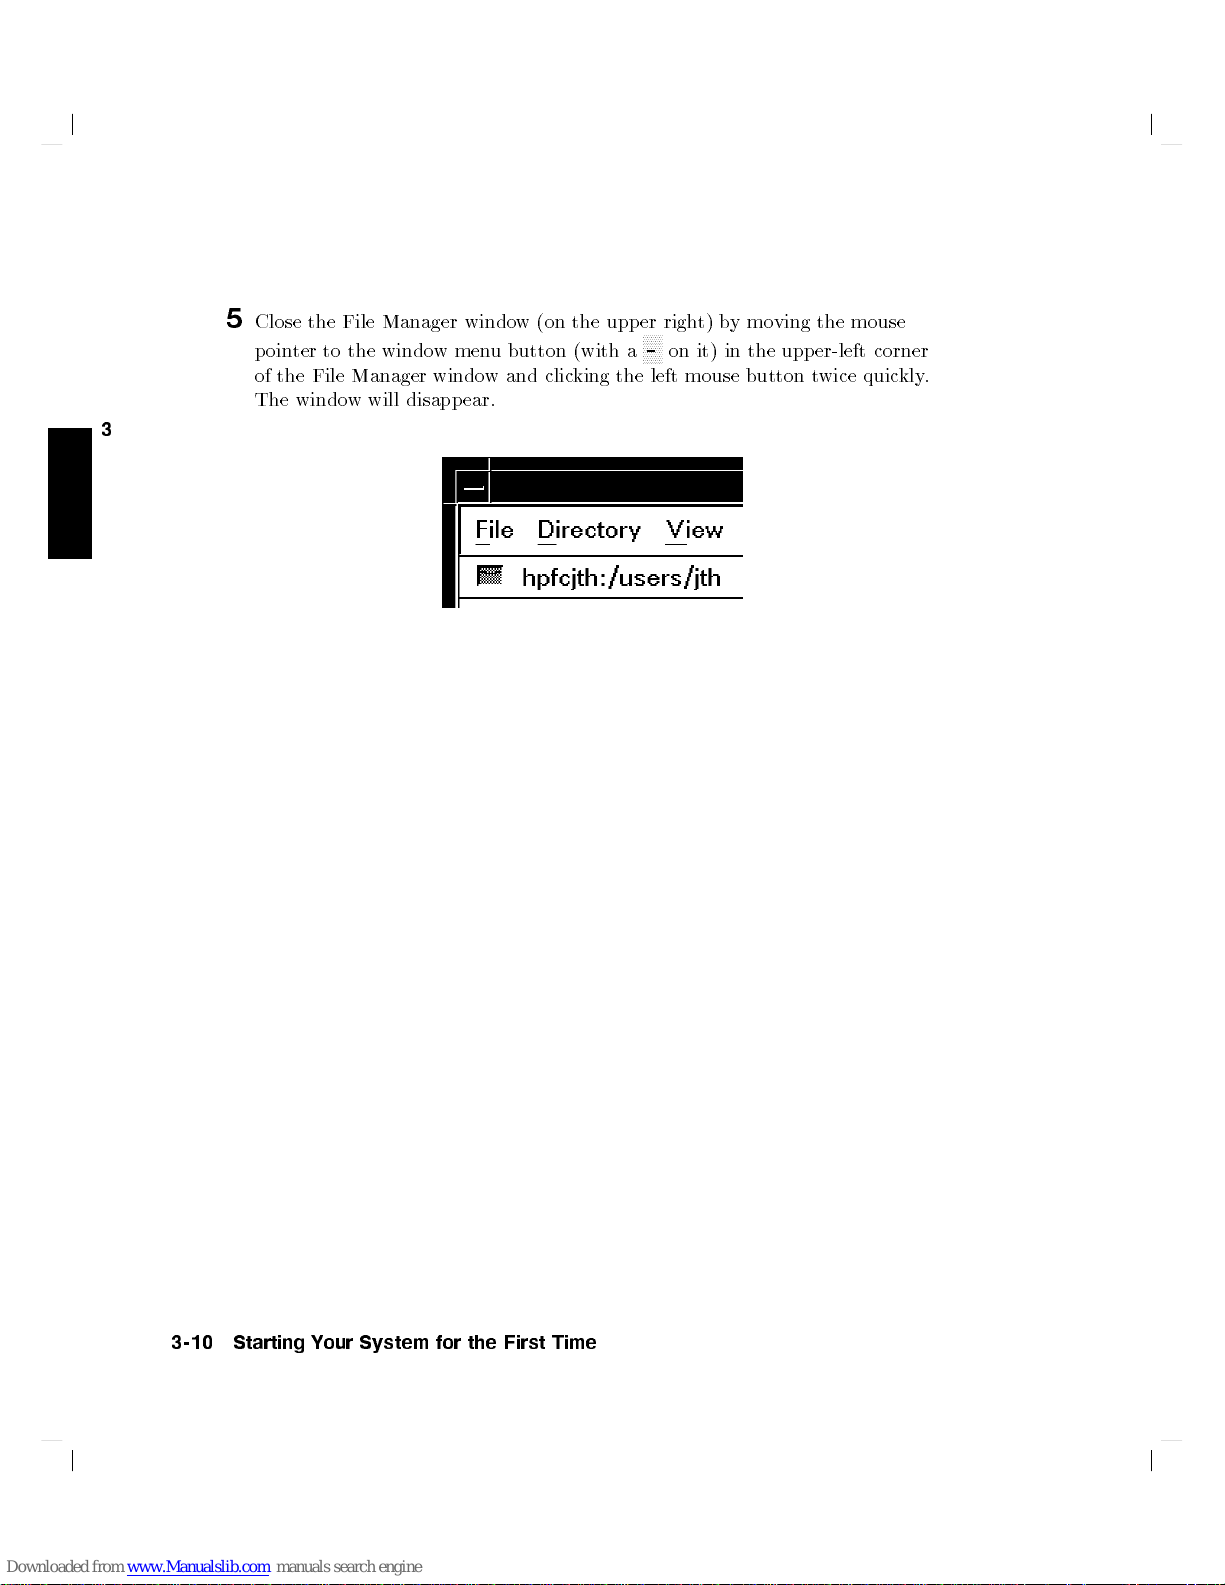
5
Close
the
File
Manager
poin
ter to
the windo
of
the
File
Manager
The
windo
w will
3
windo
w
men
windo
disappear.
w
u
button
w
and clic
(on
the upp
(with
king the
er righ
NN
NN
N
-
on
a
left mouse
t) b
it) in
y
mo
the upp
button t
ving
the
mouse
er-left
wice
corner
quic
kly
.
3-10 Starting Your System for the First Time
Page 43

6
Op
en
a
terminal
T
erminal
windo
Button
w
will
c b
app
windo
in
ear
the
after
w
b
y
W
orkspace
a
clic
few
king
the
Manager
seconds.
left
mouse
panel
button
at
the
once
b
ottom. A
on the
terminal
3
Starting Your System for the First Time 3-11
Page 44

7
No
w
y
ou
will
use
another
Help
System.
ab
out
HP
Mo
v
e
the
3
screen, on
it.
Clic
kthe
d a
Through
VUE.
p
oin
ter
the
W
left mouse
to
orkspace
feature of
in
teraction
the
Help
Manager
button once.
screen
the HP
with
button.
panel,
Visual User
the
Help
It's
and
System, y
also
it
has
En
at
the
a
question
vironmen
ou ma
y learn
bottom
mark
t:
of y
NN
?
the
NN
our
N
on
c b
3-12 Starting Your System for the First Time
Page 45
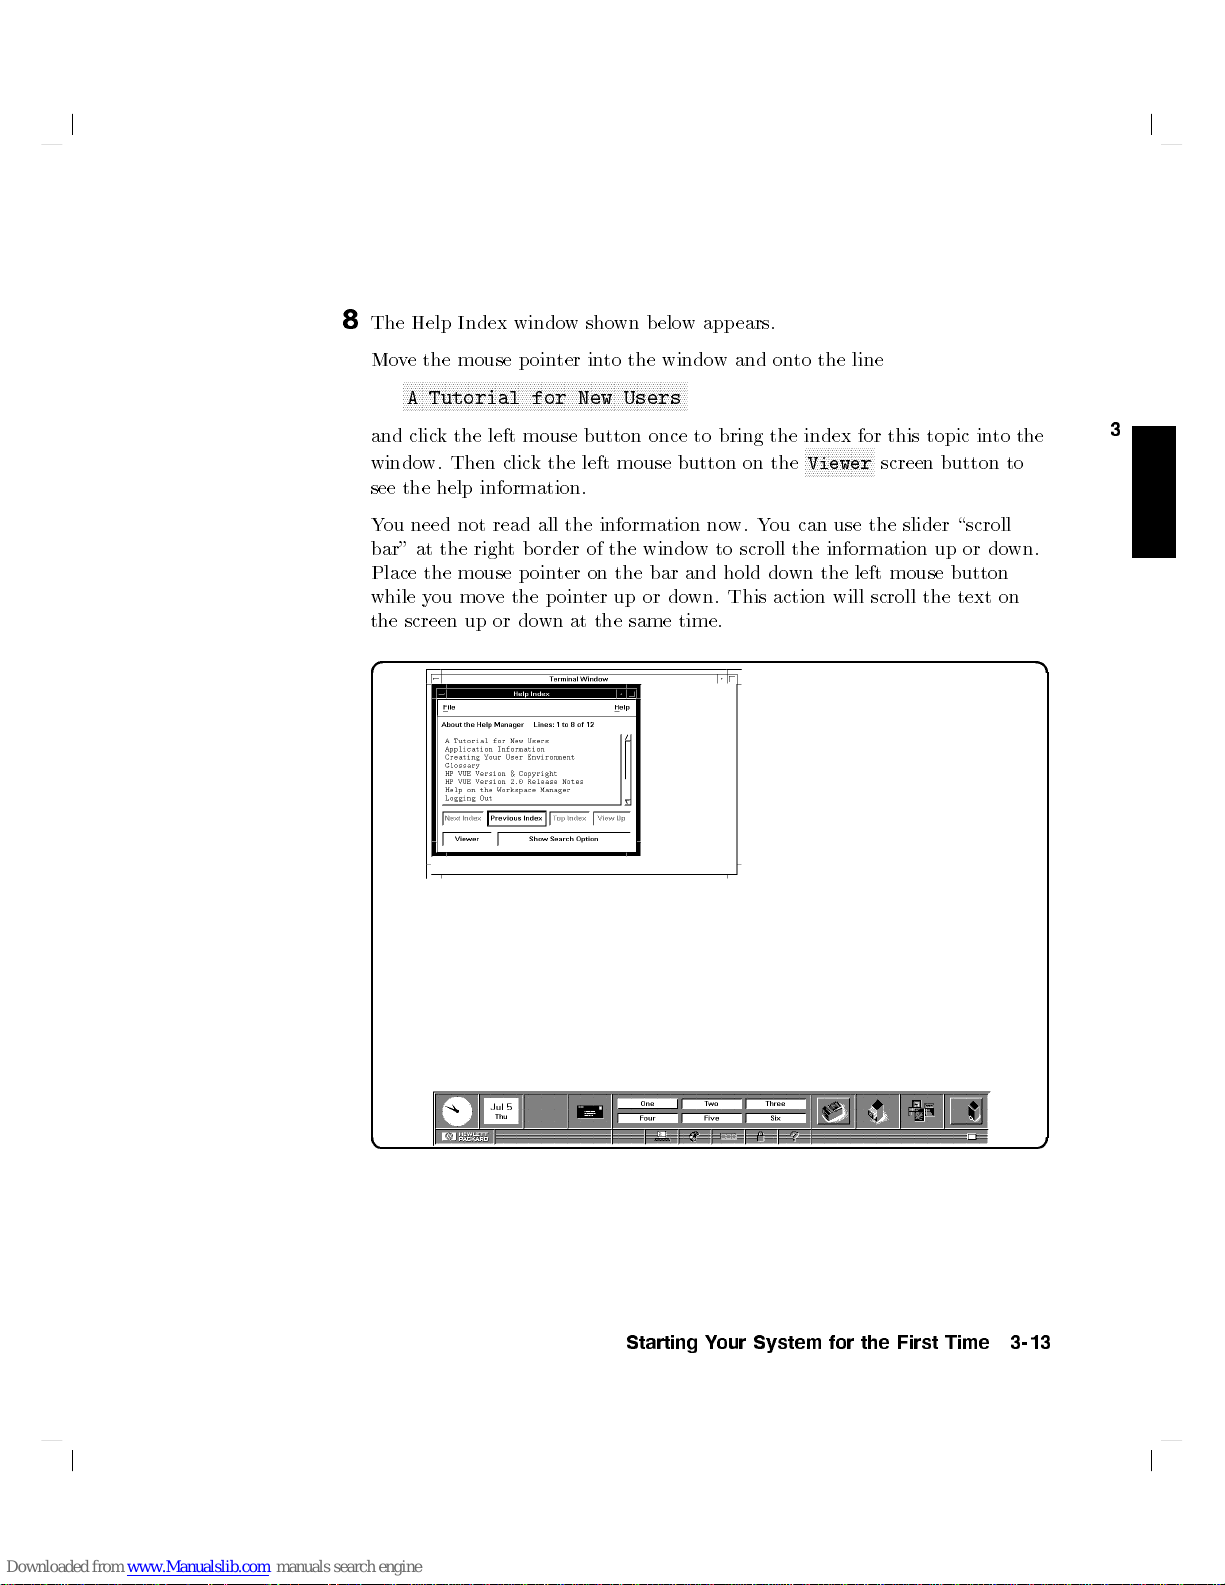
8
The
Help
Index
windo
w
sho
wn
b
elo
w
app
ears.
Mo
ve
the
mouse
N
N
N
N
N
N
N
N
N
N
N
N
N
N
N
A
Tutorial
and
clic
k
the
windo
w.
Then
see
the
help
Y
ou
need not
bar"
at
the
Place
the
mouse
while
y
ou
the
screen
d a
p
oin
N
N
NN
NN
NN
NN
N
N
N
N
N
N
N
N
N
left
mouse
clic
k
information.
read all
righ
tb
p
oin
mo
v
e
the
up
or
do
ter
in
to
N
N
N
N
N
N
N
N
NN
NN
NN
NN
N
N
N
N
N
N
for
the
order of
ter on
p
oin
wn
N
New
button once
left
mouse
the information
the
the
ter
up
at
the
the
N
N
N
N
N
N
N
N
N
N
Users
windo
bar
or
same
windo
NN
NN
NN
N
to bring
button
w
and
down.
time.
w
and
on the
no
w.
Y
to
scroll
hold
This action
on
to
the
the index
N
N
N
N
N
N
N
Viewer
ou
can
the
information
do
wn
the
line
for this
N
N
N
N
NN
NN
NN
N
screen
use
the
left
mouse
will scroll
topic
slider
up
the text
in
button
\scroll
or
button
to
do
on
the
to
wn.
3
c b
Starting Your System for the First Time 3-13
Page 46

9
T
o
see
all
of
a
windo
w
that's
b
ehind
another
onto
the
windo
w
y
ou
w
an
t
to
see,
then
Now,
bring
the
Help
windo
w
to
the
fron
To
close
the
Help
windo
w,
mo
v
e
the
quic
mouse
corner
kly
3
button
clic
d a
(the
-
)
in
the
upp
er
left-hand
k
the
left
mouse
button
t
wice
clic
t.
.
k
p
windo
the
oin
ter
of
the
left
w,
mo
mouse
to
the
Help
v
e
the
button
Windo
windo
w.
p
ointer
w
Then
once.
Menu
c b
3-14 Starting Your System for the First Time
Page 47

Logging
1
T
This
mouse
w
d a
Out
o
logout,
bar
orking.
mo
v
e
the
p
oin
ter
on
to
the con
is
called
the
logout
p
oin
ter
c
hanges
to
a
dash
button
in
.
a
Clic
circle,
trol panel's
k
the
left
indicating
low
mouse
the logout
er righ
t-hand
button once.
bar.
process
The
is
3
c b
Starting Your System for the First Time 3-15
Page 48

2
This
conrmation
mouse p
mouse button.
Ab
3
d a
out
a
oin
min
ter
b
in
to
The logout
ute
later,
o
x
will
the
the login
b
o
app
x,
to
process
ear.
T
o
the
button
will
screen will
conrm
mark
pro
ceed.
reappear.
y
ed
our
logout,
NN
N
N
N
N
N
OK
,
and
mo
clic
ve
the logout
k
the
left
c b
3-16 Starting Your System for the First Time
Page 49

Creating
1
T
o
y
ou
Then,
Caution
2
Activate
on
click
d a
a
create
are
log
the
the left
New
a
not,
in
root
only
the Help
W
orkspace
User
new
clic
as
status
log in
mouse
user
k
on
root
as
System b
Manager
button
Account
accoun
t,
the
logout
.
en
tails
root
y
panel
once.
rst
button,
sp
ecial
to
mo
mak
e
as
privileges and
do
system
ving
the
(on
the b
sure
you
are logged
describ
p
oin
ed
administration
ter
to
the
ottom, mark
in as
in the
previous section.
dangers. Y
tasks.
Help
screen
ed with
root
.
ou should
button
N
N
N
N
N
?
).
Then
a
If
3
c b
Starting Your System for the First Time 3-17
Page 50

3
When
the
Help
Index
windo
w
app
ears,
mo
v
e
y
our
p
oin
ter on
to
N
N
N
N
N
N
N
N
N
NN
NN
NN
NN
N
N
N
N
N
N
N
N
N
N
N
N
N
N
N
N
N
NN
NN
NN
NN
N
N
N
N
N
N
N
N
N
N
N
N
N
N
N
N
N
NN
NN
NN
NN
N
N
N
N
N
N
N
N
N
N
N
N
N
N
N
System
You
may
3
Tasks.
Then
clic
d a
Administration
need to
k
the
left
use
mouse
the
scroll
button once.
bar
Tasks
or
N
arro
ws
to
see
System
Administration
c b
3-18 Starting Your System for the First Time
Page 51

4
When
select
N
N
Creating
N
N
N
the
and
N
N
N
N
N
N
N
N
NN
System
clic
k
NN
NN
NN
N
N
N
N
N
N
Administration
on
N
N
N
N
N
N
N
N
N
N
N
NN
NN
NN
NN
N
N
N
N
N
N
N
a
New
N
User
N
N
N
N
N
N
N
N
N
NN
Account
Tasks
Help
T
opic windo
NN
NN
NN
N
N
N
N
N
N
N
N
N
N
N
N
wapp
ears,
d a
c b
3
Starting Your System for the First Time 3-19
Page 52

5
When
y
ou
ha
v
e
nished
button
pictured
d a
3
at
on
the
righ
it.
t
of
reading the
the
con
instructions, clic
trol panel.
This button
kon
the
has sheets
application
of pap
er
c b
3-20 Starting Your System for the First Time
Page 53

6
Y
ou
To
open
folder
will
see
the
icon,
a
le
manager
NN
NN
NN
NN
N
N
N
N
N
N
N
N
N
N
N
N
clic
N
k
N
system_apps
then
N
N
N
N
NN
NN
NN
the
left mouse
windo
folder,
w
similar
mov
to
e the
button t
this
one.
p
oin
ter
wice quic
on
to
kly.
NN
NN
NN
NN
N
system_apps
the
N
N
N
N
N
N
N
N
N
N
N
N
N
N
N
N
N
NN
NN
NN
d a
c b
3
Starting Your System for the First Time 3-21
Page 54

7
Y
ou
Open
mouse
will
the
button
see
a
system
NN
NN
N
N
N
N
N
N
N
N
N
N
N
sys_admin
twice.
N
N
N
N
N
N
NN
NN
N
applications
folder
b
y
putting
window
the
similar to
p
oin
ter
this one.
on
it
and
clic
king
the
left
3
d a
c b
3-22 Starting Your System for the First Time
Page 55

8
This
Mo
clic
system
ve
kthe
y
our
p
left
administration
oin
ter
on
to
the
mouse
button
windo
SAM
t
wice.
w
app
(System
ears.
Administration
Manager)
icon
and
d a
c b
3
Starting Your System for the First Time 3-23
Page 56

9
SAM
to
mo
press
the
is
an
v
e
a
softk
mouse
application
the
highligh
ey
,
to
clic
that
is
designed
t
bar
to
another
y
ou
ma
y
either
use
k
on
the
softk
eys
in
item,
the
the
to
run
on
y
ou m
function k
SAM
terminal windo
text
ust use
eys on
terminals.
the cursor
your
keyb
w.
If
oard
y
ou
keys.
wish
or
T
use
o
3
With
this item
N
N
N
N
N
N
N
N
N
N
N
N
Users
mo
ve
the
mouse
d a
button
N
N
NN
NN
NN
->
mouse
highligh
NN
N
N
N
N
once.
p
oin
ter
ted,
to
the
N
NN
NN
N
N
N
N
N
N
N
Select
N
N
N
N
N
N
N
N
N
N
N
N
NN
NN
NN
N
N
Item
softk
ey
and
clic
k
the
left
c b
3-24 Starting Your System for the First Time
Page 57

10
When
this
windo
w
app
ears,
this
line
will
b
e
highligh
N
N
N
N
N
N
N
N
N
NN
NN
NN
NN
N
N
N
N
N
N
N
N
N
N
N
N
N
N
N
N
N
NN
NN
NN
NN
N
N
N
N
N
N
N
N
N
N
N
N
N
N
N
N
N
NN
NN
NN
NN
N
N
N
N
N
N
N
N
N
N
N
N
N
N
N
N
N
NN
NN
NN
NN
N
N
NN
NN
Item
System
NN
N
N
N
N
N
N
N
N
N
N
N
Add
a
New
User Account
Mo
v
e
the
mouse
mouse
d a
button once.
p
oin
ter
to
the
to the
N
N
N
N
N
N
N
N
N
N
N
Select
N
N
N
N
NN
N
N
N
N
N
N
softk
ted:
N
N
N
N
N
N
N
ey
and
clic
k
the
left
3
c b
SAM Main
Starting Your System for the First Time 3-25
Menu
Page 58

11
T
yp
e
the
login
name
y
ou w
ant
to use
for
normal
wizard
Mak
e
sure
y
ou
ll
in
al
l
the
elds
y
ou
w
an
later
will
3
Then
Some
d a
require
click
items
the left
are
set
remo
ving
this
mouse button
to
their
user
default
and
on the
v
alues
re-adding
N
N
N
NN
Perform
and
tat
NN
NN
NN
N
w
ork,
this time.
it
N
N
N
N
N
N
N
N
N
N
N
N
N
N
N
N
Task
normally
for
example:
Changing elds
to
c
hange
NN
NN
NN
N
softk
ey.
will
not
eld
b
e
v
alues.
c
hanged.
c b
3-26 Starting Your System for the First Time
Page 59

12
T
yp
e
in
\Setting
F
or example:
the
a
passw
New
P
assw
ord
for
ord"
y
our
for
new
the
login
rules
accoun
for
selecting
t.
(See
a
password.)
the later
section
123four
N
N
N
N
N
N
N
N
N
N
N
N
N
Done
softk
ey
then
press
the
d a
4
Return
5
k
ey
or
clic
k
on
the
.
3
c b
Starting Your System for the First Time 3-27
Page 60

N
NN
NN
NN
N
N
N
N
N
N
u
See
the
using
and
as
the
if
y
Done
select
the
ou
login
later
need
softkey
section
help
.
name,
in
with
13
Reenter
The
3
Note
d a
the passw
new
user
Y
ou
SAM
N
N
N
N
N
Change a
and
this
selecting
N
NN
NN
.T
will
can
odo
NN
NN
N
N
N
N
N
N
N
enter
c
hapter,
ord,
then
press
b
e
added
to
the
also
create
so,
N
N
N
N
N
N
N
N
N
N
NN
NN
user's password
a passw
\Setting
passw
return
NN
NN
N
N
N
N
N
N
N
ord, when
ords.
N
N
a
N
N
N
N
passw
to
N
N
N
N
NN
a
4
Return
system.
the
NN
NN
NN
N
N
N
New
5
or clic
ord
for
Main
N
N
N
N
N
N
N
.En
requested.
P
assw
kon
root
Men
ter
ord",
root
c b
3-28 Starting Your System for the First Time
Page 61
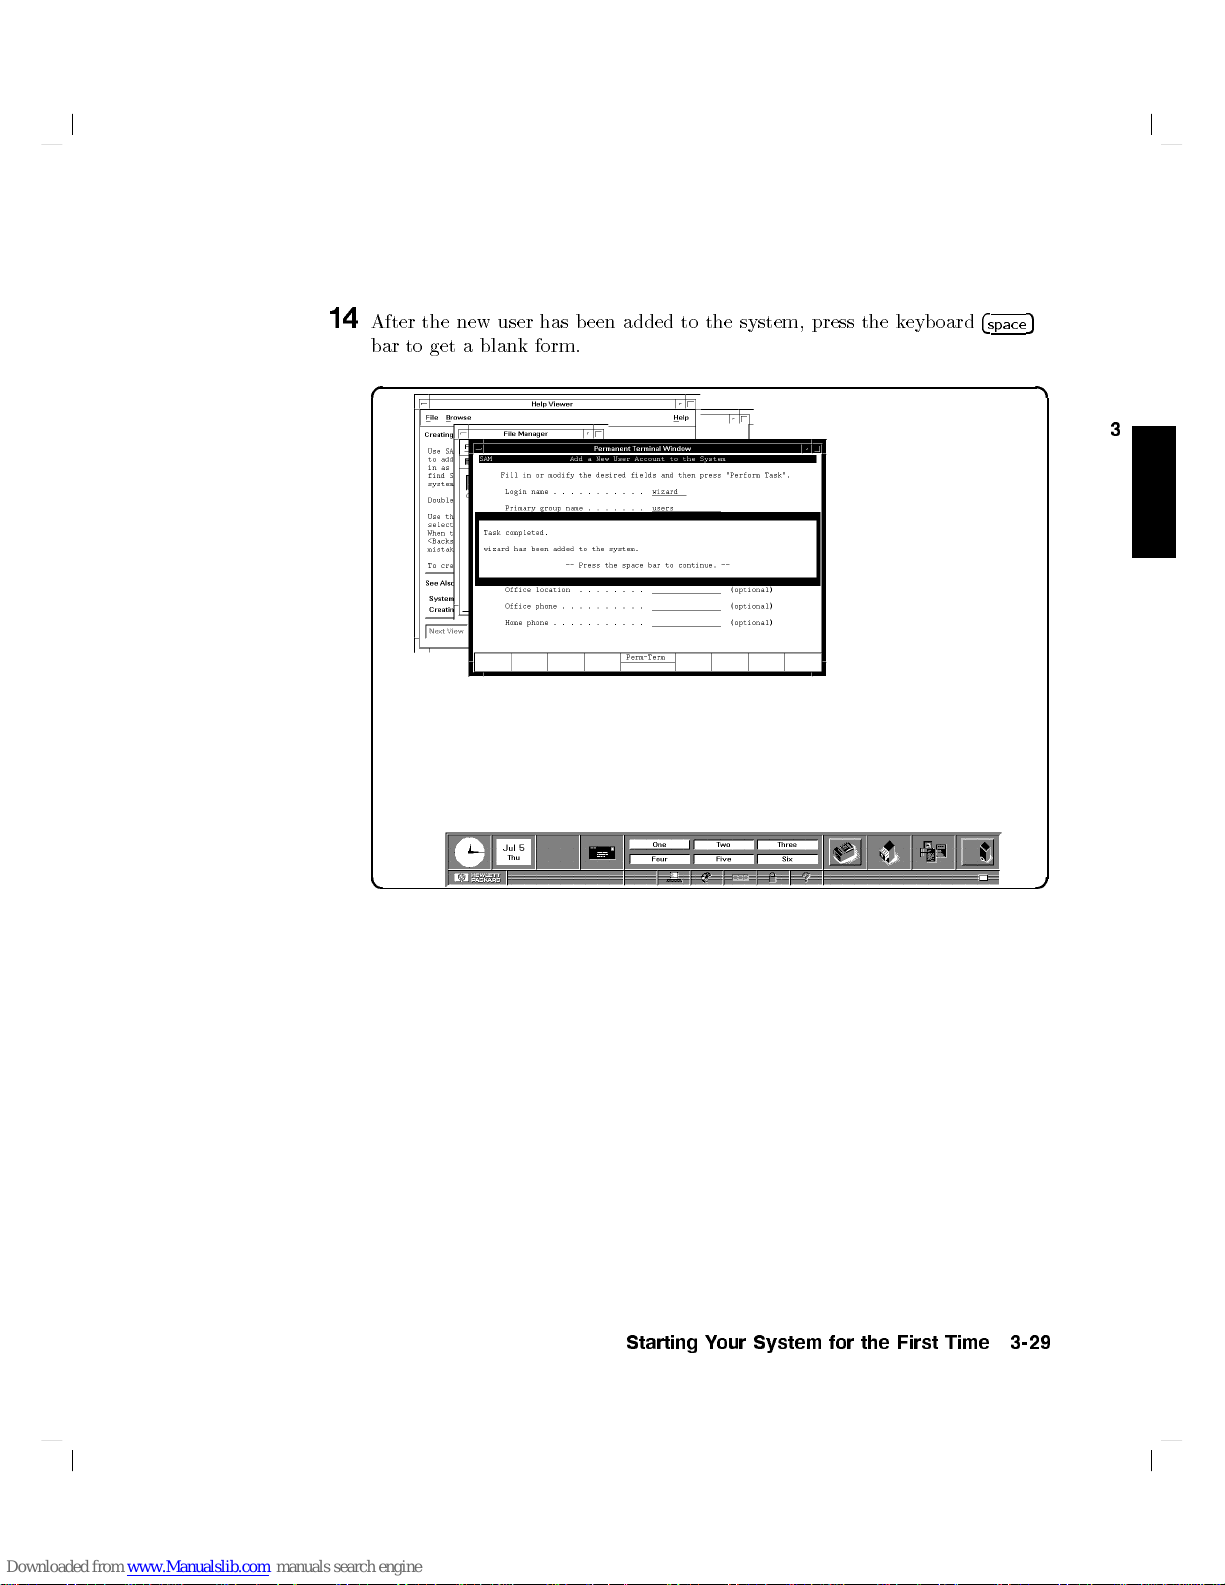
14
After
the
new
user
has
b
een
added to
bar
to
get
a
blank
form.
d a
c b
the system,
press the
k
eyb
oard
4
space
5
3
Starting Your System for the First Time 3-29
Page 62

N
NN
NN
NN
N
N
N
N
N
N
N
N
N
N
N
N
N
N
N
N
N
Menu
N
softk
ey.
N
15
Click
on the
d a
3
c b
Main
3-30 Starting Your System for the First Time
Page 63
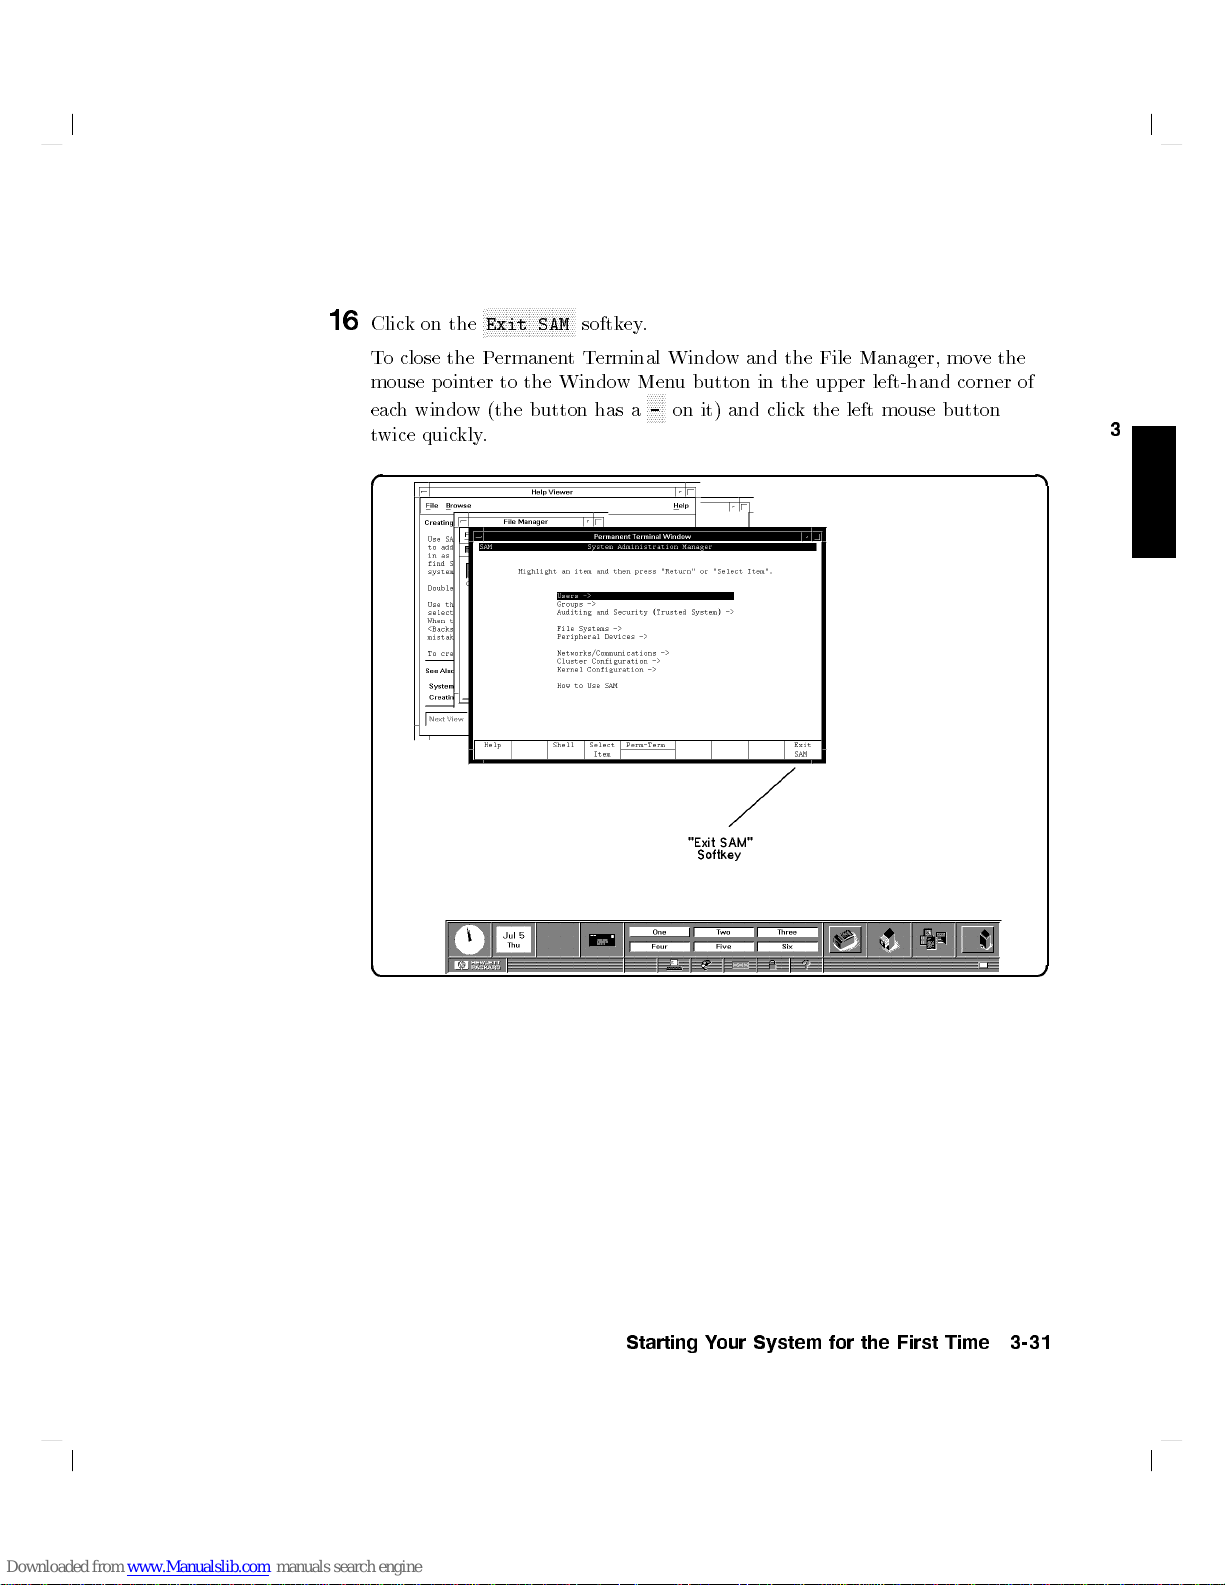
N
NN
NN
NN
N
N
N
N
N
N
N
N
N
N
N
N
N
N
N
SAM
the
Windo
button
N
softk
ey.
t
T
erminal Windo
w
Menu
N
N
N
-
has
a
N
N
on
wand
button in
it)
and
the File
the upp
clic
k
Manager, mo
er left-hand
the
left
mouse
corner
button
N
16
Click
on the
T
o
close
mouse
eac
h
windo
twice
quic
d a
Exit
the
P
ermanen
p
oin
ter
to
w
(the
kly
.
v
e
the
of
3
c b
Starting Your System for the First Time 3-31
Page 64

Setting
a
New
P
assw
ord
In addition
will
w
3
securit
A passw
Con
A
t
least
A
t
least
or
other
Dier
Y
our passw
passw
the
rst
T
o
set
1.
Clic
displa
2.
Double-clic
3.
Double-clic
4.
Double-click
5.
T
yp
What
6.
V
erify
to
an
t
to
c
hange
y practice.
ord m
tain
at
least
t
w
o
one c
punctuation
from y
ord
ord
?secret
eigh
t
a
password
k
the
applications
y
the
e
your
y
ou
t
y
our
setting
ust meet
c
our previous
is
c
haracters
applications
kthe
k
new passw
yp
new
a
y
our
four criteria
six
c
haracters.
haracters
haracter
mark).
case-sensitiv
.
Y
our
using
N
N
N
N
N
N
N
N
N
N
system_apps
N
N
N
NN
NN
N
N
N
sys_admin
the
N
N
N
N
N
N
N
N
N
N
PASSWORD
the
e
do
esn't
passw
passw
ord
passw
m
ust b
m
ust
passw
e,
password
are
c
hec
VUE:
directory
directory
N
NN
N
N
N
N
N
N
N
N
N
N
N
N
N
N
N
N
N
N
N
N
N
N
N
N
N
N
N
N
N
N
N
NN
NN
N
N
N
N
N
N
N
N
N
N
ord after
app
ord,
as
when
ord from
e alphab
b
e
a
n
ord
so
the
can also
k
ed.
button
N
N
N
N
N
N
N
N
N
folder to
N
N
N
folder.
icon
to start
the
ear
on the
requested,
to
um
.
New
y
ou
set
time to
b
e
v
alid:
etic.
b
er
(0-9)
b
y
at
least
passw
ord
b
e
on
the
op
en
that application.
password
screen.
b
y
ret
up
a
time as
or
three
?Secret
as
long
W
orkspace
that
yping
regular
a matter
a
sp
ecial
c
haracters.
as
sub
prompt
it
user
c
haracter
is
dieren
y
ou
w
an
Manager to
directory
and
and
pressing
accoun
of
go
t
from
t,
but
.
press
t,
o
d
(/,
only
4
Return
4
Return
y
ou
?,
the
!,
5
.
5
.
Use
the
same
pro
cedure
If
you
already ha
passw
ord.
3-32 Starting Your System for the First Time
ve
to
one, y
ou
c
hange
will
an
old
b
e
prompted
passw
ord
appropriately
as
to
add
a
for
new
the
password.
old
Page 65

Shutting
Caution
1
First mak
button,
root
2
Click
(with
c b
Do
wn
with
T
urning o
the
sh
utdo
disk.
Alw
e
sure
as describ
.
the
left
mouse
pages represen
wn
a
ys
y
ou
ed
VUE
the p
ow
pro
cedure
execute
are
logged
previously
button
ted
on
it).
er for
once
the
in
as
in
Chapter
on
y
ma
sh
our
y
ut-do
root
the
computer
result
in
damage
wn pro
.
If
y
ou
are
3
\Logging
Applications
without
cess to
not,
Out."
File
rst
doing
to
data
on
y
completion rst.
clic
k
on
the
logout
Then,
log
in
Manager
button
our
as
3
Applications
Starting Your System for the First Time 3-33
W
orkspace Manager
Page 66
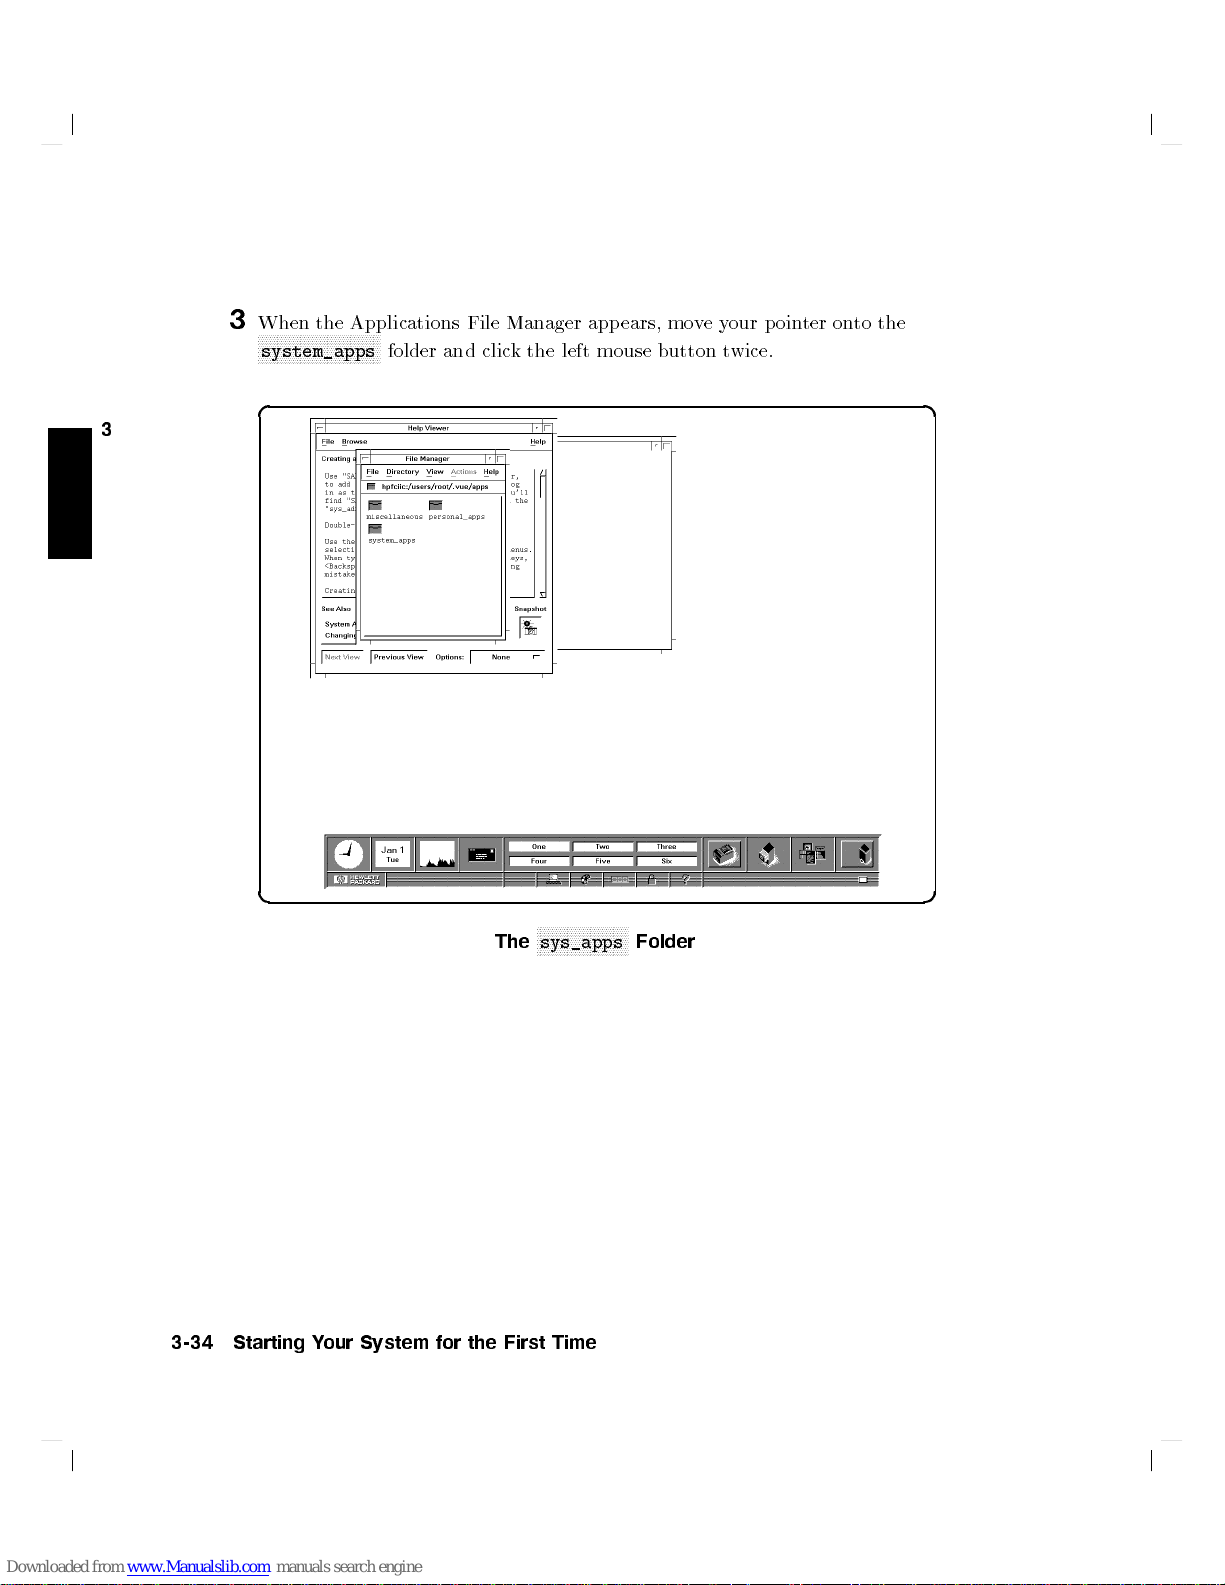
3
When
the
N
N
N
N
N
N
N
N
N
N
Applications
N
N
NN
NN
NN
N
N
N
N
N
folder
NN
N
N
N
N
N
N
N
system_apps
d a
3
c b
and
File
clic
Manager
k
the
N
N
sys_apps
The
app
ears,
mo
v
e
y
our
p
oin
ter
onto
the
left
mouse
N
N
N
N
N
N
NN
NN
NN
N
N
N
N
N
N
N
N
N
N
Folder
button
t
wice.
3-34 Starting Your System for the First Time
Page 67

4
When
the
N
N
N
N
N
N
N
N
N
NN
system_apps
NN
NN
N
N
folder
N
N
N
N
N
N
N
N
N
sys_admin
d a
c b
icon,
windo
and
The
w
app
clic
k
the
N
N
N
N
N
N
sys_admin
N
N
NN
NN
ears,
left
NN
N
N
N
N
N
N
N
N
N
mov
mouse
N
N
N
Folder
ey
our p
button.
oin
ter
on
to
the
3
Starting Your System for the First Time 3-35
Page 68

5
When
the
File
N
N
N
N
N
N
N
N
N
N
N
N
N
N
N
N
N
N
HALTSYS
3
NN
d a
c b
N
button,
Manager
and
clic
for
k
sys_admin
the
left
mouse
N
N
N
N
N
N
N
N
N
N
N
N
N
N
HALTSYS
N
N
N
NN
app
NN
Button
ears, mo
button
ve
t
wice.
your
p
oin
ter
on
to
the
6
When
the Halt
N
N
N
N
N
N
N
N
N
N
N
N
Are
If
y
ou
press
sh
ut
do
If y
ou press
To observ
by clic
king on it. W
...
NNNNNN
NNNNNNNNNNNNNNNNNNNNNNNNN
Halted, you may now cycle power.
7
You can now safely turn o the power for your computer.
3-36 Starting Your System for the First Time
N
N
N
N
N
NN
you
wn.
e the
NN
NN
NN
System windo
N
N
N
N
N
N
N
N
N
N
N
N
N
N
N
N
N
NN
NN
NN
sure
n
and
y
and
shutdown
NNNNNNNNNNNNNNNNNNNNNNNNN
NN
you
4
Return
4
Return
ait for the
w
app
ears,
N
N
N
N
N
N
N
N
N
N
N
N
N
N
N
N
N
NN
NN
NN
NN
N
want
5
,
y
5
, the sh
messages, bring the
NNNNNNNNNNNNNNNNNNNNNNNNN
N
to
halt
ou
can
utdown process starts.
following message to app ear on y
y
ou
N
N
N
N
N
N
N
N
N
N
N
N
N
N
N
NN
the system?
con
tin
ue and
NNNNNNNNNNNNNNNNN
will
get
a
question:
NN
NN
NN
N
N
N
N
N
N
N
N
N
N
N
N
N
N
N
N
N
NN
NN
NN
NN
N
N
N
N
N
N
N
N
N
N
N
N
N
N
N
N
N
(y/n)
your
workstation
Console Window to the fron
will not
our screen:
t
Page 69

4
Operating
Chapter Contents
Using
Using HP
Using
Viewing
Using
See
line,
HP
Files
and
HP
Chapter
within
Visual
VUE
and
Prin
VUE
6
for
windo
Y
our
User
Help
Directories
ting
System
information
ws.
System
En
vironment
Files
Applications
on
using
with
HP-UX
HP
b
y
w
orking from
VUE
the
command
4
Operating Your System with HP VUE 4-1
Page 70

Using
If
the
workstation.
\Op
If
1. Op
4
2.
3.
4.
Y
our
F
or
Envir
HP
y
our
system
HP
Visual
ening
y
ou
ha
en the
Searc
respawn
Deactiv
a. Searc
b.
Change
This
Sa
v
e
HP
VUE
general
onment
Visual
has
User
In that
a
Windo
v
e
loaded
le
/etc/inittab
h
for
the
.
ate
the
h
for
the
the
should
the
/etc/inittab
will
information
User's
User
b
een
loaded
En
vironmen
case, y
w."
your
system from
line
that
console
second eld
matc
start
Guide
getty
line
that
h
the
automatically
on
using
.
Environment
with
Instan
t
(VUE)
ou can
b
egins
le.
with
vue:
.
b
egins
to
3
second
HP
skip
the
tape,
y
our
.
with
.This
eld
the
VUE,
In
t
Ignition,
installed
next
activate
text
pro
this
line,
init:
c
hanges
in
the
next
time
please
y
ou
and running
steps
and
HP
VUE
cessor.
c
hange
.
the
default
line
that
y
our
see
the
HP
will
already
go
directly
as
the
run
b
egins with
system
Visual
on y
follo
w
ord
lev
b
o
our
ws:
el
ots.
User
ha
to
off
to
vue:
v
e
to
3
.
.
4-2 Operating Your System with HP VUE
Page 71

Opening
After
W
orkspace Manager
a
File
your
conguration
T
o
op
W
orkspace
The
T
o
c
hange
clic
k
a
Windo
logging
Manager
work
en
windo
the
in,
session and
at
a
windo
Manager
w
will
the
left
mouse
d a
w
y
ou will
at
in
the
the
next
w,
mo
panel
appear
Console
button
the
upp
then
v
e
in
icon
see an
b
ottom,
er-righ
log
login.
the
mouse
at
a
few
to
t
wice
HP VUE
t
corner.
out,
the
bottom
seconds.
awindo
rapidly
a
Console
HP
VUE
p
oin
w, mo
.
screen as
icon
If
y
ou op
will
ter
to the
and clic
ve
in
the
in
the
en or
restore
Terminal
k the
left
the mouse
illustration,
upp
er
left
close windo
the
same
button on
mouse
p
oin
ter
button
to
with
corner,
ws during
w
orkspace
the
once.
it
and
a
and
4
c b
Operating Your System with HP VUE 4-3
Page 72

Note
Although
is
used
some of
It
is
advisable
to
your
y
ou
displa
work
can
w
y
system
area, should
to
op
en
ork
a
in
error
T
the
Console
messages
a
erminal
system
Windo
Windo
whic
error
w
to
w,
this
hma
yo
condition
do
normal
windo
w
verwrite
o
ccur.
w
ork.
Manipulating Y
Op
en
a
T
4
at the
As
and
panel
windo
prompt.
bottom
c b
with
all
the activit
blinks,
w
app
T
o
mo
v
the
top
left
mouse button
will
sho
Release the button to bring up the windo
our Windo
erminal
ethe
inside
w
Windo
of
y
actions-in-progress,
y ligh
while
ears.
Y
window
b
order
y
ou
where
our
Figure
t
the
ou
to drag
w
screen.
at
pro
can
from its
(the
the
by
4-1.
the
cess
no
ws
moving
Clic
Opening
lo
w
is
w
en
\Title
the
windo
the mouse
k
the
the
mouse
er
righ
t
taking
ter
HP-UX
default lo
Bar":
windo
w
w
will
p
left
mouse
a
T
erminal
p
oin
ter
corner
place. After
lo
of
the
commands
cation,
see
to
cate, while
mo
Figure
the
desired
win thenewlo
oin
ter
button
Windo
c
hanges
W
afew
v
e
4-2
y
ou
to
the
once.
w
to
an
orkspace
seconds the
at
the
the
mouse
)
and
p
osition.
are
dragging
cation.
terminal
hour
Manager
command-line
p
hold do
(Outlines
glass
oin
ter
wn the
it).
icon
to
Toiconize
right corner of the windo
To restore an iconized windo
icon.
4-4 Operating Your System with HP VUE
a window, clic
k the left mouse button on the dot at the upper
w b order.
w, clic
k the left mouse button t
wice on the
Page 73

T
o
close
Windo
w
a
T
Men
erminal
u
button
windo
N
N
N
-
(
w,
clic
k
the
left
N
N
)
at
the
upp
mouse
er-left
corner
button
of
the
twice
windo
on the
w
b
order.
Using
Y
ou can
Clic
Cho
Clic
The
Workspace
index
hierarc
T
o
get
1.
Clic
2.
When
index
3.
When
the
righ
Dep
expand
text.
the left
an
HP
VUE Help
get help
N
N
N
k
on
ose
k
on
starts
h
y
the
k
on
en
index to
t
b
ending
Y
appropriate
?
the
an
item
N
N
N
N
NN
NN
Help
a
at
the
lik
e
the
help
index
the
help
the
index app
try
.
y
ou
get
view
order
of
on
the
righ
ou
can
mouse button,
on an
yHP
N
N
Help
button
from
an
NN
N
N
N
N
button
Manager help
top
table
to
the
the
ho
wy
t
side
do
this
width,
application's
in
lev
el
of
con
from
the
button
ears,
index
information
window
ou windo
of
y
b
y
and dragging
and
VUE
application
in
the
W
a
dialog
index giv
of
help topics
ten
ts
in
Workspace
N
NN
NN
?
on
the
clic
k
on
a
or
sub-index
ab
out
to scroll
whas
our
windo
\grabbing"
the
windo
in
the
follo
orkspace Manager.
Help
men
u.
bo
x.
es y
ou
the
most
and is
a
b
o
ok.
Manager:
w
orkspace
topic.
the
the
b
een
w
to
the
the outline
w
will
organized in
manager.
Y
ou
ma
for
the
en
topic.
information
formatted,
see the
righ
Y
entire
t
b
order,
righ
assume
ou
y
try
wing
w
a
ys:
generic
also
,
clic
can
up
y
ou
pressing
t.
that dimension.
help.
a topic-subtopic
nd
a
subtopic
k
on
[Viewer]
use
the
slider
or
do
wn.
ma
y
ha
v
line length
and
Release
the
e
The
to
of the
holding
button
at
4
in
the
at
See
Chapter
information.
5
in the
HP Visual
User Envir
Operating Your System with HP VUE 4-5
onment User's
Guide
for
detailed
Page 74

Using
Your
w
that
hold
Files
orkstation
les
and
and
Directories
uses
les
other
to
hold
directory
with
data.
folders.
HP
VUE
Directories,
in
HP
VUE,
are
\folders"
Creating
1.
4
a
Clic
k
the
example,
New
File
your
File
Manager
home directory
button
to
open
les migh
the File
t
lo
ok
Manager windo
lik
e
this:
w. As
an
2.
Create a le in this directory b
3. T
ype in a name, for example, T
appears.
4-6 Operating Your System with HP VUE
Figure 4-2. Creating a New File
NNNNNNNNNNN
New
y clic
king on
ext, in the New Data File bo
in the
NNNNNNNNNNNNNN
File
menu.
x whic
h
Page 75

4.
F
ollo
called
w
y
our
Text
en
in
try
the
with
curren
4
Return
t
directory
NN
N
N
N
N
N
N
OK
5
or
clic
k
on
.
.
This
creates
an
empt
y
le
Creating a
1.
Clic
kon
dialog b
2.
Clic
k
3.
T
yp
e
4.
F
ollo
w
directory
New Directory
N
N
N
N
N
NN
NN
NN
NN
N
N
N
N
New
.
en
try
named
N
New...
ox.
on
the
mydir
y
our
N
N
from the
Directory
with
4
Return
\m
ydir"
N
N
N
N
N
NN
NN
NN
NN
N
N
N
Directory
Name
5
or
under
the
N
N
N
N
N
b
clic
N
N
N
N
N
N
N
N
menu
o
x
to
k
on
curren
to op
displa
N
N
N
N
N
N
N
N
OK
.
t
directory
y
the
This
en the
text
creates
.
New
Directory
insertion cursor.
an
empt
y
4
Operating Your System with HP VUE 4-7
Page 76

Moving
1.
2.
4
Files
Press
le
manager.
the
center
While
whic
h the
Button
and hold
button on
still
holding
N
NN
NN
NN
mydir
2)
o
v
er an
down
(Mouse
NN
N
N
N
N
N
N
N
N
Mouse Button
Button
a 3-button
do
wn
Button
directory is
empty
area.
2
is
mouse.)
2,
displa
b
2
oth
drag
y
ed
on
the
buttons
the
and
N
N
N
N
N
Text
le
drop
NN
NN
NN
NN
N
le icon
on
a 2-button
to
the
the
File
icon
in the
mouse. It
Manager
(b
y
releasing
original
is
in
3. Drop the le (release Mouse Button 2).
Copying a File to Another Directory
1. Make a le, for example
4-8 Operating Your System with HP VUE
text2
,inyour home directory.
Page 77

2.
Mo
v
ethe
3. Press
4.
5.
6.
and
Press
and
Drag the
Manager windo
While
stil
mouse p
hold
do
hold
do
text2
w.
l
holding
ointer
wn
4
CTRL
wn
Mouse Button
le
o
v
er
down
o
v
5
an
4
CTRL
er
.
empt
the
5
,
text2
y
area
drop
2.
the
le
in
the
le
icon.
N
N
mydir
b
y
N
NN
NN
NN
NN
N
N
N
N
N
N
releasing
directory File
Mouse
Button
2.
(If
y
ou
release
copied.)
7.
Release
to
Renaming
1.
Clic
2.
Cho
dialog
3.
Double-clic
4.
T
yp
5.
Press
Remo
1.
Press
2.
Drag
3. Drop the le. The le is remo
N
N
N
N
N
N
N
N
N
N
NN
mydir
k
on
ose
b
e
the
4
Return
ving
and
the
4
5
CTRL
NN
NN
N
directory
a
File
the
test1
N
N
N
NN
N
N
N
N
N
N
N
N
N
N
Rename...
o
x.
k
the
new
5
or
a
File
hold
le
o
4
CTRL
.
The le
N
N
N
N
N
N
N
N
N
N
N
N
N
N
New
name
clic
do
wn
v
er
5
and no
le
N
N
N
from
N
N
N
N
NN
N
N
N
of
N
k
the
b
efor
e
test2
in
y
the
N
N
N
N
N
N
N
N
N
N
N
N
File
the
N
N
N
N
N
N
N
NN
NN
NN
[OK]
Mouse
\trash
Mouse
w resides
our
N
N
N
N
N
Name
le,
.
Button
has
b
een
in
N
N
N
N
N
N
N
N
N
NN
NN
N
N
myname
N
N
N
NN
N
N
N
N
N
N
N
N
N
File
men
N
N
N
NN
N
N
N
N
N
N
N
b
o
x.
sa
y
text3
Button
can" in
ved
2
from the File Manager displa
2,
the
copied
b
oth.
N
N
N
N
N
directory
u
to
displa
.
o
v
er
the W
N
the
orkspace Manager
le
from
.
N
N
NN
NN
NN
text3
is
mo
v
ed
instead of
N
N
N
NN
N
N
N
N
N
N
N
N
N
N
N
N
N
N
N
N
N
N
N
N
N
icon.
N
N
N
N
N
N
N
N
N
N
N
File
panel.
y area.
directory
N
N
N
N
N
N
NN
N
N
N
N
N
myname
the
N
N
N
NN
Rename
y
the
NN
N
N
N
N
N
N
le
4
You can also remo
choosing
Trashed les can be restored.
NN
NNNNNNNNNNNNNNNNNNNNNNNNN
Trash File(s)
ve
the le b
NNNNNNNNNNNNNN
y clic
from the
king on it with the left mouse button, then
le manager's
Operating Your System with HP VUE 4-9
NN
NNNNNNNNNNNN
File
menu.
Page 78

To
1.
2.
3.
4.
restore
Clic
k
NN
NN
N
N
N
N
N
N
N
N
N
Trash
Clic
k
Cho
ose
is
restored
Cho
ose
a
file:
on
the
T
rash
N
N
N
N
N
N
NN
NN
the
from
NN
NN
NN
N
N
button
w.
NN
NN
N
N
N
N
N
from
le
the
N
N
N
N
manager
N
N
N
N
N
N
N
N
NN
NN
NN
NN
Can
windo
N
N
N
N
N
N
N
N
N
N
N
/users/myname/text3
on
N
N
N
N
N
N
N
N
N
N
N
N
N
NN
Restore
in
N
N
N
N
N
N
N
N
N
N
N
N
N
N
Exit
N
N
N
the
N
N
T
in
N
N
N
NN
NN
rash
NN
NN
T
N
rash
the
w
N
N
N
N
N
N
N
N
in
display
Can
orkspace
the
Can
windo
area.
windo
manager to
T
rash
w's
N
N
File
w's
Can
N
N
N
N
N
N
Edit
N
N
N
N
N
N
N
N
N
list
N
N
N
N
N
N
men
N
N
N
N
N
open
area.
men
u.
u.
the
The
N
N
N
N
N
N
N
N
N
N
N
text3
N
N
NN
NN
le
4
Restored
Caution
Viewing,
T
o
view
1. Clic
highligh
2.
Clic
Manager
3.
Clic
le.
4.
Clic
displa
To
edit a file from a File Manager directory display:
1.
If y
les
are
returned
Y
ou
can
session.
Editing
a
file
k
the
left
ted.
k
the
the
windo
k
the
left
Use
the
k
the
left
y
to
close
ou w
ant to edit that le, clic
and Printing
from
a
File
mouse
left
mouse button
w.
mouse
5
4
bar
Space
mouse button
that
to
the
restore
They will
Manager
button
button
to
scroll
le
and windo
directory
les
be
Files
directory
on
the
on
NN
NN
VIEW
on
do
N
N
N
Close
on
kon
from
or
directories
permanently
displa
item
y
N
N
N
N
N
N
N
N
N
N
N
N
N
N
Actions
N
N
N
N
N
N
N
N
N
N
.
A
wn
through
N
N
N
N
N
N
N
N
N
N
N
N
N
N
,
on
w.
NNNNNNNNNNNNN
EDIT
ou
w
N
N
N
NN
NN
N
N
,
windo
the
N
in the
whic
h
only
remo
y:
an
t.
on
the
w
app
the
bottom
NNNNNNNNNNNNN
Actions
they
during
v
ed
The
top
ears
le.
w
ere
when
icon
border
displa
border
NNNNNNNNNN
remo
the
curren
y
ou
will
of the
ying
of the
menu.
v
log
b
ecome
ed.
t
out.
File
that
le
login
2. Mak
3. An editor windo
4-10 Operating Your System with HP VUE
e sure y
will b e the default specication, if y
our
preferred editor is specied in y
w will appear with that le
ou ha
ve just set up y
our
.profile
opened in it.
(thevieditor
our accoun
t).
Page 79

To
print
a
file
from
a
File
Manager
1.
Select
N
Actions
or
2.
T
to
Prin
c b
By
N
N
N
N
N
NN
NN
NN
NN
N
o
prin
drag
ter
default,
pr
lename
(highlight)
N
N
N
N
N
N
N
N
men
u.
t
a
le
a
le
icon from
icon.
the
prin
from
ter
|
lp
ale
the
uses
icon b
W
a File
directory
y
clic
orkspace
Manager displa
the
HP-UX
displa
y:
king
on
it;
then,
Manager panel,
y
area
command
k
N
on
drop
clic
use Mouse
and
N
N
N
N
NN
NN
NN
NN
N
PRINT
Button 2
it
on
N
N
N
in the
to
the
4
Ho
w
ev
er,
y
ou
\Adv
anced Customizing",
further
Clic
the
double-clic
information.
k
the
prin
status
of
k
ter
prin
on
can
customize
button
ters
the windo
this
in
HP
on the
connected
w
men
to
suit
y
our
sp
ecic
needs.
Visual User
Workspace
to
y
our
u
button
Operating Your System with HP VUE 4-11
Envir
Manager to
w
orkstation.
N
N
NN
N
-
).
(
onment
T
User's
op
en
o
close the
See
a
windo
the c
hapter
Guide
w
sho
window,
for
wing
Page 80

Getting
Y
ou
icon
doing
information:
d a
Printer
4
-------------------
system
scheduler
can
in the
this,
Printer
get
printer
W
orkspace
a
windo
Information
default
is
Information
information b
Manager
w
app
ears
destination:
running
and
with
ymo
ving the
clic
king
something
lp2
mouse
the
left
similar
p
oin
mouse
to
the follo
ter
to
button.
the
wing
prin
After
lp
ter
status
printer
no
entries
hpfcjth:
For
More
See
System
information
queue
Information
A
on
for
lpnet:
dministr
prin
ready
ation
ting
lpnet
and waiting
T
asks
les
while
for
in
more
information on
VUE,
see
the
HP
lp
VUE
.
F
or
User's
more
Guide
.
4-12 Operating Your System with HP VUE
Page 81

Using
VUE
System
Applications
The applications
the
applications
see
HP Visual
Finding
1.
Click
W
orkspace
directory
folders.
administration
2.
Double
Occasionally
the
application
Once
y
ou
sev
eral
w
Double clic
Drag
a
bac
kdrop.
Select
the application
User Envir
and
Running
the Application
Manager
.
This will
The
clic
k
ha
v
e
a
ys:
k
le
icon
a
le
of
directory
a
v
ailable
latter
utilities.
on
the
,
y
ou
icon.
the
application
on
the
from
the
from
,
myname/.vue/apps
on
y
our
onment System
an
Application
Directory button
to
displa
displa
y
a
giv
es y
ou suc
folder
may
icon.
le
the
need to
the
t
yp
con
icon
le
manager and
e
asso
N
N
N
N
N
N
NN
NN
NN
Actions
w
orkstation.
y
a
le
c
hoice
h functions
taining
op
en
on
ciated
NN
N
N
N
N
N
N
N
N
N
men
,
giv
For
Administr
(represen
manager
N
N
N
personal_apps
of
the
sev
eral
screen,
with
u
view
N
N
N
N
N
NN
N
N
N
N
N
N
N
N
N
N
as edit,
application
lev
you
drop it
the
application and
in
the
es
y
ou
a
w
a
y
to
easily
customization information,
ation
Manual
ted
b
y
N
N
N
N
N
N
N
N
N
N
els
of
can
on
le
manager.
of
N
N
N
NN
N
N
N
prin
y
folders
start
the
\pages")
the
application
N
N
N
or
t,
and
ou
w
the
w
orkspace
on
y
our
N
N
N
N
N
N
N
N
NN
N
N
N
N
N
N
N
N
N
N
N
N
N
N
N
N
N
run.
y
ou
N
hoose
system_apps
system
an
t
to
b
efore
application
then c
access
N
N
N
N
N
NN
get
in
4
to
Operating Your System with HP VUE 4-13
Page 82

Page 83

5
Starting
Chapter Contents
Using
Setting T
Setting
Selecting
Logging
Sh
utting
the
Command
erminal
Up
a
Out.
Do
Y
our
Characteristics.
a
User Accoun
P
assw
ord.
wn.
System
Line
to
Log In.
t.
Without
HP
VUE
5
Starting Your System Without HP VUE 5-1
Page 84

Using
Follo
wing
use
HP
Chapter
the
are
VUE.
6.
Command
the
pro
cedures
F
or
details
on
Line
y
ou
op
erating
w
to
ould
Log
y
In
use
for
logging
our system
in
if
y
ou
without HP
c
hoose
VUE, skip
not
to
to
Logging
Y
ou
windo
no
windo
T
o
log
1.
Clic
5
2.
3.
4.
5.
Cho
T
Press
If
y
Y
b
later
ma
ws,
yp
y
ou
our
ou
egin
in
Without
y
ha
v
e
a
command-line
ws.
in
without
NN
NN
NN
N
N
N
N
N
N
N
N
Options
k
N
N
N
N
N
N
N
N
N
No
ose
e
y
our
login
4
Return
ha
v
e
passw
ord
will
no
using
in
this
reason
windows:
N
N
N
N
N
N
N
N
N
on
N
N
N
N
N
N
N
N
N
N
NN
NN
N
N
Windows
name
5
.
set
a
passw
follo
w
get
a
the
system.
c
hapter.
HP
to
the
N
N
N
N
N
N
N
.
w
ed
system
VUE
b
ypass
prompt
login
(or
root
ord then,
b
y
4
Return
prompt
See
HP
VUE
app
screen.
)
at
when
5
\Setting
ears
the
(
#
at
on
login:
the
for
Up
login.
the
passw
ro
ot,
a
User
When
displa
prompt.
ord
or
$
for
Accoun
y
ou
y
,but
prompt
user) and
t
Without
log in
no HP
app
without
VUE
ears,
y
ou
VUE",
t
yp
can
and
e
in
5-2 Starting Your System Without HP VUE
Page 85

Setting
If y
ou
log
en
ter
y
our
T
erminal
in
without
terminal
Characteristics
HP
VUE,
the
default
t
yp
e
as
follo
ws. Y
ou can
lo
cal
login
simply resp
script
ond with
prompts
4
Return
y
ou
to
5
:
TERM
Pressing
This
tak
dieren
Selecting
HP-UX
HP-UX
to
When you
cr
e
t
ypical
T
erm
Setting
For
For
4
value
e
full
adv
t
v
supp
ho
TERM
, the
ating
the
settings,
Environment
ksh
export TERM=hp425s
csh
= (hp)
5
Return
alue
for
sets
w
orks
with
an
tage
sets
a
V
alue
orts
man
w
to
comm
v
alue
b
o
ot
HP-UX
appr
opriate
should
the 1280x1024
users:
users:
5
4
Return
the
Hewlett-P
of
y
our
the
TERM
for
y
unicate
m
ust
Variable
TERM
environmen
ac
k
terminal
en
vironmen
the
TERM
terminal
equal
on
terminal
y
ou
t
yp
with
eac
a
v
alue
your
425s/t,
settings.
need
to
Settings for
resolution: (equiv
(or 425t)
ard
terminals,
or
graphics
V
ariable
es.
The
h
terminal
in
the
use
them
the
tv
ariable to
displa
t
v
ariable to
/usr/lib/terminfo
the
terminfo
b
o
ot
pr
Ho
w
ev
for
425s/t:
alen
hp
but
it
y features.
that
t
yp
e.
o
c
ess
er,
the
a
recongured
t
to
98550
,
the
default
ma
y
not
v
alue.
When
database.
should
follo
y
wing
en
v
alue.
let
y
ou
Entering
database tells
ou
assign
take
c
ar
e
giv
es
some
system.
try)
a
of
a
value
5
setenv TERM
Setting Up the Special Device Files with mknod
The sp ecial device le for the in
b
e set up correctly as
exist, is deleted for some reason, or does not allo
the hardw
The
bet
ween the SPU and the in
are, use the information
mknod
command
hp425s
/dev/crt
creates a special device le whic
(or
425t)
ternal VRX graphics hardw
by the system b oot code. If
w the device driv
below to create a new
ternal graphics. Superuser status is required to
Starting Your System Without HP VUE 5-3
are should already
/dev/crt
er
access to
/dev/crt
h is used to comm
:
does not
unicate
Page 86

set up
information
The
the
sp
ecial
correct
in
ternal En
device
on
the
mknod
try Lev
les.
See
mknod
command
command.
el VRX
the
HP-UX
syn
tax
to
create
graphics hardw
R
efer
an
are
enc
SGC
is:
e
,
section
bus
special
1M,
for
more
device le
for
mknod
5
/dev/crt
c
12
0x000300
^
^
^
^
^
|
|
|
|
+->
|
|
|
+--->
||
|
+------------>
+----->
+---------->
00
03
00
12
c
=Not
=
SGC
=
SGC
=Gr
=
Char
used
bus
slot
numb
aphics devic
acter
b
ase
er
e
d
devic
e
5-4 Starting Your System Without HP VUE
Page 87

Setting
Y
our
can use
a
new
user
If
y
ou
aren't
T
o start
Up
accoun
SAM:
a
User
SAM
(System
t.
already
Account
Administration Manager),
logged
in
as
root
,
t
yp
e
exit
without HP
5
4
Return
and
log
VUE,
in
as
to
root
add
.
1.
As
root
,
t
yp
e
sam
A
SAM
men
u
will
app
d a
Highlight
Add
Remove
View/Modify
Deactivate
Reactivate
c b
When
and
4
From no
Delete
running
do
wn
cha
r
w on, the pro cedure is the same as in HP
an
item
a
New
User
a
User
a
aUser
a
SAM
,
the
men
us.
5
for correcting
User
use
5
4
Return
ear.
and
Account
Account
User's
Account ...
Account
the
\
When
mistakes.
.
then
to
from
Account
Opening
"
"and
t
yping,
press
the
...
\
"Return" or
system
the system
Information
SAM
Screen
#
"k
eys to
use
the
\
...
mo
"
...
v
e
and
VUE:
"Select Item".
...
the
selection
\
!
"k
eys,
highligh
4
Backspace
t
up
5
,
and
5
Starting Your System Without HP VUE 5-5
Page 88

To
create
1.
2.
3.
4. If
5.
5
6. Reen
7.
8.
9.
10.
a
Highligh
softk
ey
Highlight
already)
T
yp
e
the
you
wan
the
optional
N
N
N
N
N
N
N
N
N
N
N
N
N
N
N
N
NN
N
N
N
N
yp
a
N
N
N
N
N
N
N
N
ter
ter the
eat
ey
e
NN
New
N
N
N
N
N
a
in
the
the
exit
Add
N
N
N
Perform
En
section
HP-UX
Press
Rep
softk
Press
T
new
account:
N
N
N
N
N
N
N
N
N
N
N
Users
t
or press
N
N
NN
NN
NN
NN
N
Add a
and press
login
t
to
information
NN
N
N
N
N
N
N
N
N
N
N
N
N
N
N
User
NN
N
N
N
N
N
N
N
N
N
N
N
N
N
N
Task
passw
ord
this
passw
ord.
passw
space
steps
4
to
stop.
N
N
N
N
N
N
NN
N
N
N
[Exit
at
the
N
N
N
N
N
N
N
NN
NN
NN
->
4
Return
N
N
N
N
N
N
N
N
N
N
N
N
N
New User
the
name
c
hange
N
N
N
N
N
NN
NN
NN
N
N
Account
N
N
softk
for
c
hapter,
ord
bar
through
N
N
N
N
N
N
N
N
N
N
N
N
N
SAM]
#
NN
(if
it
5
.
N
N
N
NN
NN
NN
NN
N
N
N
N
N
NN
[Select
for the
an
N
N
N
N
N
N
N
N
N
N
N
N
N
ey
.
the
\Selecting
and
to
return
7
N
N
N
N
N
N
N
N
softk
prompt
isn't
N
N
N
N
N
N
N
N
N
N
N
N
N
N
N
Account
NN
NN
NN
N
N
N
N
N
N
N
N
new user.
y
of
the
press
N
N
N
N
NN
NN
NN
N
N
N
N
N
to
new
login accoun
press
to a
for
eac
ey
,
to
already)
NN
NN
NN
NN
N
N
N
N
N
N
N
N
N
N
N
N
N
N
N
N
NN
NN
NN
Item]
default
5
4
Return
N
N
N
N
N
N
N
N
N
N
N
N
N
N
NN
the
System
a
P
4
Return
blank form.
h
new
to
return
log
out
and
N
N
N
N
N
N
N
N
N
N
NN
NN
to
the
NN
N
N
N
N
N
softk
information
and
NN
NN
N
N
N
N
N
N
N
N
N
assw
ord"
5
.
user
to
of
root
press
NN
NN
N
N
N
N
N
N
N
N
N
N
N
System...
ey or
con
tin
N
N
N
form.
tand
for
or
press
the
command
.
N
N
[Select
the
N
N
N
N
N
N
NN
NN
NN
NN
N
N
N
press
or
ue
lling
Otherwise,
press
4
Return
help
the
N
N
N
N
N
N
N
N
N
N
N
N
N
(if
4
Return
en
ter
out
with
NN
NN
N
[Main
N
N
N
N
N
N
N
N
NN
it
5
an
the
press
5
.
creating
N
N
N
N
N
N
N
N
N
N
line
NN
NN
NN
N
N
N
N
N
N
N
N
N
Item]
isn't
.
y
of
the
See
the
N
N
N
N
N
N
N
N
N
N
NN
NN
N
Menu]
prompt.
N
N
N
N
N
N
N
N
N
next
an
N
N
5-6 Starting Your System Without HP VUE
Page 89

Selecting
a
P
assw
ord
After y
passw
Cho
According
Also,
When
you
y
ou
ords
ose
y
The passw
c
haracters
A
t
least
A
t
least
Numeric
Sp
ecial (neither
foo-bar
upp
foo-bar
y
ou
c
hose.
our
les.
ha
v
at
our
new
ord m
are
t
w
o
one c
to these
ercase
c
ho
If
e
set
up
a
later
passw
ust con
signican
c
haracters
haracter
(the
digits
rules,
$money$
and
Foo-Bar
ose
a
someone
a
user
time
for
ord
according
tain at
t
to
m
ust b
m
ust
0
through
letters nor
the
lo
w
ercase
passw
ord,
kno
ws
accoun
securit
least
the
computer).
e letters
b
e
either
9
n
umeric|for
follo
wing
Number_9
letters
FOO-BAR
y
ou
w
y
our
passw
t
and
y
reasons.
to
six
).
are
are
an
t
of
to
passw
ord,
these rules:
c
haracters
(uppercase
the
follo
example,
all
v
alid
@rophy
dieren
ord,
t.
ensure
that
y
(only
or
wing:
passw
Th
that
p
erson
ou
-
us,
no
lo
,
ma
y
the
w
ercase).
_
,
or
ords:
these
one can
ma
y
wan
rst
$
are
log
tto
).
eigh
all
guess
in
and
change
t
dieren
what
access
5
t:
Starting Your System Without HP VUE 5-7
Page 90

Running
the
passwd
Command
When
After y
these
1.
2.
5
3.
No
y
ou'v
$
passwd
ou've
steps:
If
y
ou
ha
password,
Changing
Old
When
will
Next,
w,
y
ou
not
New
y
ou
Re-enter
when
e
chosen
entered
v
en't
already set
passwd
password
password:
see
the
ec
ho
what
password:
need
to
your
y
ou
log
in
your
new passw
the
passwd
prompts
for
follo
wing prompt,
y
ou
t
yp
invisible
re-en
ter
new
password:
again,
command,
a passw
y
ou
to
leslie
e.)
p
asswor
the
new
use
y
our new
ord, set
ord, skip
en
ter
it.
Your
Enter
enter
d
passw
invisible
passw
it
b
the
program
this
username
your
ord
y
running
step.
your
new
to
v
erify it:
p
asswor
ord.
curr
passw
passwd
leads
If
y
app
ent
d
y
ou
have
e
ars
p
assword.
ord.
:
ou
her
(The
through
set
a
e.
screen
5-8 Starting Your System Without HP VUE
Page 91

Logging
Out
without
VUE
With command
temp
orarily
log
out of
Exiting
If
y
ou
can
use
lock
Key:
Again:
LOCKED
Now
Enter
Exiting
P
erhaps
the
exit
lea
your
T
emporarily
w
an
t
to
the
lock
invisible
invisible
the
keyb
the
p
for
an
the
most
command:
lines,
y
ving
y
our
current
lea
v
e
y
our
command.
p
asswor
p
asswor
o
ar
d
c
asswor
d
Extended
common
ou
can
w
work
w
annot
to
unlo
either
orkstation
session
orkstation
Y
ou
will
d
d
b
e
use
d
ck
the
P
eriod
w
a
y
to
log
use
the
(and
en
tirely
for
b
e
ask
system
out from
screen-lo
lea
.
a
short
ed to
ve
c
king
feature
processes
time
enter
the command
running), or
without logging
a
passw
ord:
line is
for
b
y
you
out, y
using
can
ou
5
$
exit
Starting Your System Without HP VUE 5-9
Page 92

Shutting
Caution
T
o
shut
down
1.
Log
in
2.
En
ter
the
as
Do
root
wn
T
urning o
the
disk.
using the
follo
wing:
Without
sh
utdo
wn
Alw
a
ys
command
the p
pro
execute
HP
ow
er for
cedure
line:
VUE
y
our
ma
y
shutdown
computer
result
to
completion
in
damage
without
to
rst.
rst
data
doing
on
y
our
shutdown
The
-h
option
y
our
5
3.
4.
system
sav
e
w
ork
En
tering
min
ute
and
with
the
If
y
our
system
message
SYSTEM
You
will see
Do
you want
a.
If
y
ou
sh
ut
b. If y
W
ou pressyand
ait for the follo
Halted, you may now cycle power.
-h
will
will
b
efore
shutdown
reb
system
including
BEING
a
question:
press
do
wn.
cause
the
system
ha
v
e
a
grace
p
the
system
with
o
ot in
single
running
runs
a
clustered
net
w
BROUGHT
to
continue?
n
and
4
Return
4
Return
wing message to app ear on y
no
.
ork
halts.
option
user
ed
DOWN
5
,
5
, the
users:
y
to
halt.
erio
d
of
one
Y
ou
will
cause
state.
net
(y/n)
ou can
It
w
ork,
IN
ONE
contin
shutdown process starts.
can
is
the
MINUTE
You
or an
min
ute
then
turn
the
system
not
safe
shutdown
ue and
our screen
y
one
to stop
o
to
turn
process
y
our
w
net
w
processes
the
p
o
w
to
halt
o
the
broadcasts
orkstation
ork
er.
after
ed
and
p
ower
will
to
one
a
not
5. Y
ou can no
5-10 Starting Your System Without HP VUE
w safely turn o the po
wer for y
our computer.
Page 93
6
Using
Chapter Contents
The
Running Commands
W
orking with
Shell
Determining
Using
Accessing
Mo
Using
Creating
Mo
Remo
Viewing
Prin
Using
the
Command
F
eatures
Key Shell:
On-Line
ving
Within
Files
Directories
ving
and
ving
and
ting
a
the
vi
Command
Line
Shells
Y
our
Login
Visual Help
Command
the
HP-UX
and
Directories
Cop
ying
Files
and
Directories
Printing
File
with
lp
text
Editor
Prompt
Shell
Files
Files
Line
for
the
Help:
Directory
with
Command
b
et
w
een
Korn
Shell
man
pages
Structure
Lines
Directories
6
Using the Command Line 6-1
Page 94
The
Command
Line
Prompt
When y
HP
commands.
line
prompt
command
Running
T
o run
4
Return
the
6
If
up
(T
at
VUE,
prompt
5
prompt
$
whoami
leslie
$
y
ou
and
o
mak
the
.
mak
end
ou
are
w
orking
whenev
ev
ery
line.
Commands
a command,
The
e
correct
e
examples
of
er
If y
ou are
is
either
time
command
reapp
ears.
4
Return
a
mistak
it.
eac
h
within
y
ou
see
logged in
$
or
%
it
nishes
typ
e the
then
F
or
5
Y
our
Then
e
when t
as
clear
command
a
windo
the
command
as
,
dep
ending
pro
cessing
command's
will
b
egin
example,
user
the
c
yping
as
p
ossible,
line.)
w,
or
with
line
user
(as
opp
on
y
our
the information
name
running. When
run
the
name
app
ears
ommand
a
command,
line
this
the
prompt, y
osed
shell.
after
follo
wing
here.
pr
use
b
o
ok will
No
Windows
ou can
to
r
o
ot
HP-UX
entered
the
prompt
the command
whoami
ompt
r
e
the
4
Back
not
)
app
sho
,
option
begin
the
command
displa
ys
on the
and
command
e
ars.
5
k
the
ey
4
space
w
of
typing
the
press
nishes,
no
to
bac
5
Return
w:
k
k
ey
6-2 Using the Command Line
Page 95

W
orking
with
Shells
Whenever
whic
a
shell
When y
dieren
amoun
Korn, Key
y
ou
get
Basics
HP-UX
run:
c
haracteristics,
in
teract
features
F
or
details
HP-UX
h
the
in
.
ts
y
terprets
ou log
t
shells
of
,and
when
of
giv
es
Bourne,
with
of
the
and
ou
en
that
in, y
whic
in
teractiv
C Shells.
y
ou
Shells:
y
ou
and
HP-UX
shell
on
shell
the
Shel
ter
a
command
command
ou are
h
rst
y
our
Korn,
features
said
to
b
eha
v
e
in
e
supp
ort
Y
our
log
in,
and
Characteristics,
y
ou
inside
of
ls:
choice
y
Key
,
can
our
User's
of sev
and
increase
windows
c
hoice.
and
y
ou
for
HP-UX.
b
e
sligh
at
your
system
y
ou
eral
C
Shells.
b
eha
Guide
are
making
The
\in"
a
shell
tly
dieren
display
administrator
ha
v
e
the
Choosing
dieren
Eac
the
sp
eed
if
y
ou
learn
vior,
please see
.
use
command
.
HP-UX
t
w
a
ys and
. These
option
and Using
t
shell-t
h
of
these
and
eciency
to
of
a
command
interpreter
supp
give
are
called
determines
of
c
hanging
yp
es
whic
shells
use
some
the
Be
ginner's
in
orts
sev
you
varying
the
Bourne,
whic
shells
h
y
ou
has dieren
with
whic
of
the
built-in
Guide
terpreter
is called
eral
h
shell
later.
can
t
h
y
ou
to
6
Using the Command Line 6-3
Page 96

Shell
Belo
whic
Features
w
are
listed
h shell
w
ould
some of
b
e
b
Table
the features
est
for
the
kind
6-1. Comparison
which
of
w
may
ork
y
ou
of Shell
help
y
are
Features
ou
mak
doing:
e
a
decision
on
F
eatures
Command
history
Line
editing
File
name
completion
alias
6
command
Restricted
shells
Job
con
trol
A
feature
stored
in
reused.
The
ability
previous
editor.
The
abilit
t
yping
le
A
feature
commands,
command
command
A
security
en
vironmen
T
o
ols
for
pro
cesses
See
Shel
Description Bourne Korn
allo
wing
commands
a
buer,
to mo
command lines
y
to
names
allo
options,
lines.
feature
t
trac
that
ls: User's
then
dify
automatically
in
wing
users
automatically
or
pro
with
limited
king
and accessing
run
in
Guide
the
command
abbreviate
viding
the
to
mo
died
curren
with a
text
nish
lines.
to
rename
include
a
con
capabilities.
background.
b
e
and
t
or
long
trolled
No Y
No Y
No Y
No Y
Y
es
No Y
Key
es
es
es
es
Y
es
es
C
Y
No
Y
Y
No
Y
es
es
es
es
6-4 Using the Command Line
Page 97

Determining
The
command
when
you
logged
Y
our
echo
in.
Login
$SHELL
Shell
displays
the le
name of
the shell
y
ou
en
tered
$echo
/bin/sh
$
T
emporarily
Unless
using
shellname
where
T
emp
the name
correct
y
our
original
P
ermanently
T
op
ermanently
in),
use
chsh
where
(e.g.,
command,
F
or
example,
command reads:
$SHELL
Changing
y
ou
are
this
command:
name
shel
l
orarily
username
/bin/ksh
c
of
the
prompt
shell
Changing
the
chsh
username
you
hanging
if
in
a
is
shell
is
displa
b
c
hange
(
ch
is
)
of
must
terry
Y
our
restricted
the
name
y
our
y
ou
w
y
ed.
y
t
yping
Your
y
our
ange
sh
shellname
ful
l
y
our user
the
shell
log
out
c
hanges
Shell
shell,
y
ou
of
the
shell
shell
lets
y
ou
an
t
to
run,
After
experimen
either
Shell
ell) command:
y
and
exit
lo
gin
shel
name and
ou
w
an
t
log
in
the
default
can
temp
(for
exp
y
ou
invoke
or
4
CTRL
l
(the
shell
as
y
our default.
again
login
orarily c
example,
erimen
ting
in
5
-
default
p
ath
for
the
shell
t
in
(en
the
5
.
4
D
shell
name
c
to the
hange
sh
other
ter)
new
y
is
After y
hange
,
or
shells. By
that
shell,
ou
get
the
ou use
to
Korn
y
our
ksh
).
shell,
return
when
full
path name
take
Shell,
shell
and
y
the
eect.
the
b
y
typing
the
to
ou
log
chsh
6
$ chsh terry /bin/ksh
$
Using the Command Line 6-5
Page 98

Using
Key
displa
from
hav
The
pro
sequence.
Key
Shell
ying softk
these
e mastered
Key Shell
vide
a
Shell:
giv
es
you
ey
and
let
the commands
gives
\men
u"
Y
ou
will
Visual
help on
command-names
Key
y
ou
of
basic
rst
Help
most HP-UX
Shell
build
and
softk
ey
Korn
see
a status
displa
Shell
for the
commands in
and
options
y
our
command
command
ys
at
commands,
line lik
Korn Shell
in
sequence.
lines
syn
tax
of
the
b
ottom
along
ethe
follo
wing
Korn
Shell
Y
ou
\in English"
HP-UX.
of
y
our
screen
with
their
b
y
can
select
before
whic
options
you
h
in
Figure
Y
ou
can
en
ter
commands
en
ter
6
standard
commands,
men
u
options in
corresponds
the
softk
eys
successiv
When
y
ou'v
Key Shell
bac
After y
command line in \English," just as it appeared
correct order and spacing.
e
k
to
ely
y
ou
already
the
ou mak
HP-UX
the
Key
the softk
to a
softk
in
to
groups
b
y
pressing
w
an
t
to
c
hosen,
to
displa
rst,
if
e a selection b
see
y
y
Shell
ey
the
ou
6-1. Key
from the
commands
will
ey
lab
N
N
N
N
N
N
N
N
f1
,
of four.
the
corresp
more
commands,
press
the
next
press
y pressing a softkey
Key
as
often
el
area
through
You
NN
NN
N
N
N
--More--
\bank"
NN
NN
NN
NN
f8
rep
Shell Softk
Shell
usual.
displa
y
at
the
N
N
N
N
N
N
N
N
f8
.
may
onding
or
N
N
N
N
N
N
N
N
N
N
N
N
N
N
NN
NN
of
softk
eatedly
ey
Displa
softk
ey
men
If
y
ou
en
ter
an
appropriate
b
ottom
The
select
softk
more options
N
softk
eys
.
of
N
N
N
N
N
N
N
N
N
N
N
N
NN
NN
N
N
N
y
or
.
NN
NN
N
N
f8
,
in
sequence,
our c
N
N
N
.
hoice will
hpterm
an
ey
ey
,y
in the softkey displa
y
u
or
standard
left-to-righ
y
our
screen.
at
the cen
none
of
to go
This
even
y
ou
can
HP-UX
t
Eac
ter
separates
the
options
with a
will
command
cause
tually cycling
appear on the
y, with the
set
the
of
h
lab
el
6-6 Using the Command Line
Page 99

Accessing
The
man
(
man
description
ma
y
displa
system
F
man
After
T
Note
les
or example,
command
$
man
man
a
few
The
message
view
ed
11%
screen-full of
quit.
Note
that
o
learn
more
$
man
ls
On-Line
ual) command
of the
y
command
examples
used, related
in command-line
itself.
seconds,
--More--(11%)
of
text or
y
ou
ab
If
man
icon
N
NN
Man
functions.
T
an
the
le,
can
only
out
the
y
ou
command
at
NN
N
N
N
N
N
N
N
N
N
N
Pages
of
yp
are
N
N
N
Command
displays
and
command
commands, diagnostics,
e:
information
and
t
yp
e
4
Return
mo
v
ls
command,
using
the
b
ottom
N
N
N
N
NN
NN
NN
N
from
Help:
a command's
its
options
usage
mode,
89%
e
information
displa
at
the
remains.
5
to
forwar
the
VUE
of
the
you
b
scroll up
d
y
initial
and
can
y
ottom
through
t
yp
application,
our
man
and
app
T
yp
e:
b
y
clic
VUE
men
pages
argumen
pro
vide
and p
use
man
ears.
of the
e
4
one
a
king on
W
u,
syntax
Space
line
le.
orkspace
and
plus
ts
(if
an
other information
ossible problems.
to
learn
more
screen means
5
to
scroll
at
a
time.
you
can also
VUE Help,
Manager.
use
the
index and
a
detailed
y).
you'v
to
the
T
access
Also,
ab
out
yp
e
the
Select
man
such
the
e
next
5
4
q
N
N
N
N
N
?
search
as
to
6
For
More
Your shell has man
To learn about shells in detail, also refer to
to
Shells: User's Guide
Information
y pro ductivit
.
y-enhancing capabilities
ABe
ginner's Guide to HP-UX
Using the Command Line 6-7
you may nd useful.
and
Page 100

Using
If y
ou
thing,
Guide
Files
c
ho
ose
not
using
command
to HP-UX
and
Directories
to
use
lines.
.
HP
VUE,
If
y
ou
the
need
with
follo
more
Command
wing
tasks
information,
will
accomplish
Lines
see
A
the
same
Beginner's
Creating
The
mkdir
create
directories
curren
$
T
ov
erify that
commands
directory
$
myfile
6
$
myfile
Figure
Directories
(mak
e
directory)
a
directory
underneath
tw
orking directory
mkdir projects
names
ls
lsf
6-2
sho
,
you
it
w
ork
displa
y
to
projects
projects/
ws
the
the
dieren
can mo
it.
F
or
named
ed,
y
ou
new
directory
tiate
List
It
The
resulting
command
v
e
les
example,
projects
can
use
them
les,
dir
worke
d!
lsf
c
ommand
directory
in
either
,
but
from
e
creates
to
to
ctories
a
it,
and
create
,t
yp
e:
the
ls
lsf
app
le
names.
in
app
ends
structure.
new
directory
y
ou
can
a
sub-directory
or
lsf
ends a
your
F
curr
a
slash
slash
or
.
After y
ev
en
create
in
command.
(
/
)
example:
ent
working
to
dir
e
y
to
ctory
ou
more
our
Both
the
dir
end
of
e
ctory.
names.
6-8 Using the Command Line
 Loading...