

Page 1

D7504A
D7505A
HP 10/100 3Com 3C905B-TX
Network Interface Card
Installation Guide
Network Interface Card
Installationsanleitung
Guide d’installation de la
carte d’interface réseau
Guía de Instalación de la
Tarjetade Interfaz de Red
Léase esto primero
*
Guida di installazione della
scheda di interfaccia di rete
Page 2

HP 10/100 3Com 3C905B-TX Network Interface Card Installation Guide
Notice
Notice
The information contained in this document is subject to change without notice.
Hewlett-Packard makes no warranty of any kind with regard to this material,
including, but not limited to, the implied warranties of merchantability and
fitness for a particular purpose. Hewlett-Packard shall not be liable for errors
contained herein or for incidental or consequential damages in connection with
the furnishing, performance, or use of this material.
Hewlett-Packard assumes no responsibility for the use or reliability of
its hardware or software on equipment that is not furnished by
Hewlett-Packard or equipment for which it is not intended.
This document contains proprietary information that is protected by copyright.
All rights are reserved. No part of this document may be photocopied,
reproduced, or translated to another language without the prior written
consent of Hewlett-Packard Company.
®
Acrobat
be registered in certain jurisdictions.
3Com
3Com Corporation.
Magic Packet
Microsoft
Microsoft Corporation.
and Adobe® are trademarks of Adobe Systems Incorporated and may
®,
EtherLink® and EtherDisk® are U.S. registered trademarks of
TM
and PCnetTM are U.S. trademarks of AMD Corporation.
®
, Windows®, and Windows NT® are U.S. registered trademarks of
Hewlett-Packard France
Commercial Computing Division
5 Avenue Raymond Chanas
38053 Grenoble Cedex 9
France
1999 Hewlett-Packard Company
Excerpted material reprinted with permission from 3Com Corporation.
1998 3Com Corporation
2 English
Page 3

HP 10/100 3Com 3C905B-TX Network Interface Card Installation Guide
What’s in the Network Kit?
The Network Kit includes the following items:
Quantity in Network Kit
Component
D7504A D7505A
What’s in the Network Kit?
HP 10/100 3Com 3C905B-TX network
interface card (NIC)
LAN driver diskettes 3 3
Remote Wake-Up cable 1 10
This Installation Guide 11
110
Installation Requirements
Supported Operating Systems
Windows 95 SR2 or later
•
Windows 98
•
Windows NT 4.0 and Service Pack 3 or 4
•
The driver installation diskettes contain drivers for other network
operating systems. For more information on installing these drivers,
refer to the Readme files provided on the installation diskettes. The
latest drivers are available on HP’s Web site.
English 3
Page 4

HP 10/100 3Com 3C905B-TX Network Interface Card Installation Guide
Installation Requirements
Supported Platforms
To find out in which PCs you can install a 3C905B-TX card, go to one of
the following HP Web sites:
For Vectra Corporate PCs
•
http://www.hp.com/go/vectraaccessories
For Brio Business PCs
•
http://www.hp.com/go/brioaccessories
For Kayak PC Workstations
•
http://www.hp.com/go/kayakaccessories
NT Service Pack
If an NT service pack is already installed on the PC, it must be
re-installed after the card and software have been installed. When
using the HP preloaded NT 4.0 software, the latest service pack can be
found in the C:\I386\SP
x
directory.
On some platforms you also have to reinstall certain drivers after you
install the Service Pack. Refer to your PC documentation for more
information.
Operating System Master Diskettes
During the software installation you will need to have your operating
system master diskettes or CD-ROM available.
When using HP preloaded operating system software, the master files
can be found in the following directories:
C:\I386 (Windows NT 4.0)
•
C:\WINDOWS\OPTIONS\CABS (Windows 95 and Windows 98)
•
4 English
Page 5

HP 10/100 3Com 3C905B-TX Network Interface Card Installation Guide
Supported Network Drivers
The following network drivers are supported by HP:
Installation Requirements
Network Operating System
Windows 95
(Microsoft and NetWare clients)
Windows 95 NDIS 2 W95NDIS.TXT EL90X.DOS
Windows 98
(Microsoft and NetWare clients)
Windows NT 3.51
(Microsoft and NetWare clients)
Windows NT 4.0
(Microsoft and NetWare clients)
NetWare client for DOS, Windows
3.1, and Windows for Workgroups
Windows for Workgroups
(NetWare)
Windows for Workgroups (NDIS 2) WFWNDIS.TXT EL90X.DOS
Windows for Workgroups (NDIS 3) WFWNDIS.TXT EL90X.386
Microsoft LAN Manager LANMAN.TXT EL90X.DOS
README
(for driver installation)
W95NDIS.TXT EL90XND3.SYS
WIN98.TXT EL90XND5.SYS
WINNT.TXT EL90XND3.SYS
WINNT.TXT EL90XND4.SYS
AUTOLINK.TXT
(AUTOLINK directory)
WFWNETWR.TXT 3C90X.COM
Network Driver Name
EL90XND4.SYS
3C90X.COM
English 5
Page 6

HP 10/100 3Com 3C905B-TX Network Interface Card Installation Guide
Overview of the Installation Procedure
Non-Supported Network Drivers
The following network drivers are provided on the
EtherDisk
®
diskettes but are not supported by HP:
Network Operating
System
Banyan VINES BANYAN.TXT EL90X.DOS
Artisoft LANtastic LANTASTK.TXT EL90X.DOS
IBM LAN SERVER (DOS) LANSRVR.TXT EL90X.DOS
IBM LAN SERVER (OS/2) LANSRVR.TXT EL90X.OS2
DEC PATHWORKS PATHWORK.TXT EL90X.DOS (DOS) and
README (for driver
installation)
Network Driver Name
3C90X.COM (Netware)
Overview of the Installation Procedure
CAUTION Your PC and network interface card can be permanently damaged by
static electricity. Before handling the card, touch the unpainted part of
your PC’s metal chassis. Maintain grounding by wearing a wrist strap
attached to the chassis. Handle the card by its backplate and top edge.
Do not touch the edge connector.
Installing the 3C905B-TX NIC is a 4-step process. You need to:
Install the card in your PC.
•
Connect the card to the network.
•
Update LAN-specific fields in the HP PC Setup utility.
•
Install the driver software.
•
After you complete the installation, you can use the NIC Doctor software
to troubleshoot any problems.
6 English
Page 7
HP 10/100 3Com 3C905B-TX Network Interface Card Installation Guide
Installing the Network Interface Card
Installing the Network Interface Card
WARNING For your safety, never remove the PC’s cover without first
removing the power cord, data cables and any connection to a
telecommunications network. Always replace the cover before
switching on again.
For complete information on how to install an accessory card, refer to
your PC’s documentation. This is available from your PC’s support web
site (refer to page 18.) The following steps are given as a guide:
With the PC turned off, disconnect the power cord and any connection
1
to a telecommunications network, and then remove the cover.
Choose an empty PCI slot. If you do not know how to identify a PCI
2
slot, refer to your PC’s documentation.
Remove the metal slot cover.
3
Depending on the PC model, you may need to remove the accessory
4
slot’s retaining bracket. Refer to your PC’s documentation, if
necessary.
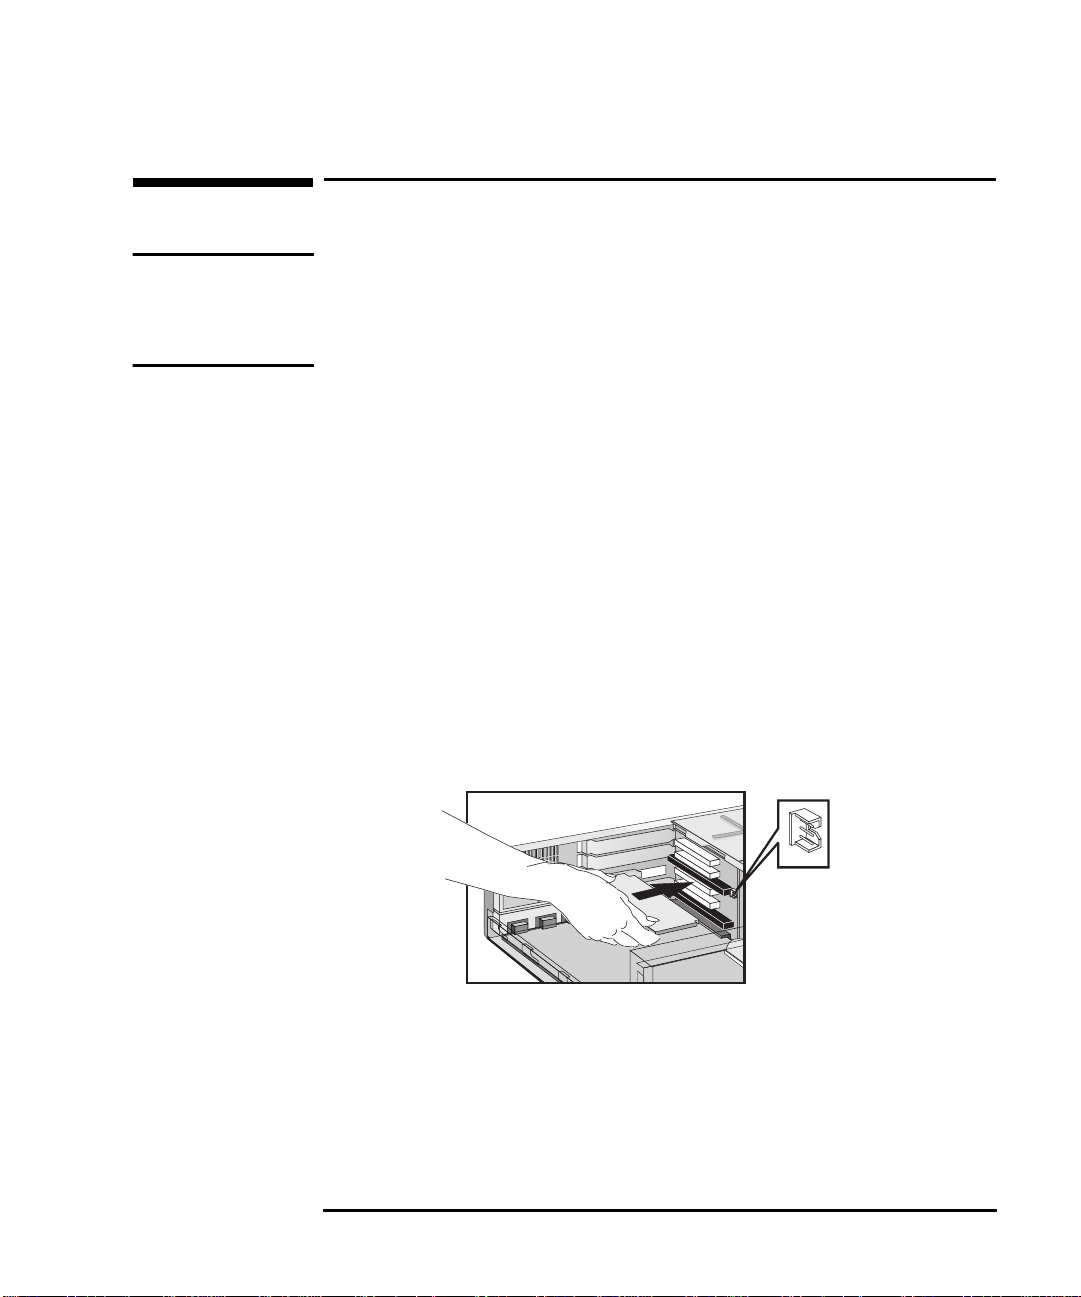
Insert the card into the accessory slot without bending it.
5
Example position of
WOL connector.
Connect the Remote Wake-Up cable to the connector on the card
6
and to connector on the system board or backplane.
For the position of the Remote Wake-Up connector, refer to
“3C905B-TX NIC Specifications” on page 19.
Refer to your PC’s documentation for the position of the connector
on the system board or backplane.
English 7
Page 8

HP 10/100 3Com 3C905B-TX Network Interface Card Installation Guide
Connecting to the Network
7 Secure the card by replacing the slot cover screw or the retaining
bracket and its screw, as appropriate.
8 Replace the cover. Reconnect the power cord and any connection to
a telecommunications network.
Connecting to the Network
Connect the network cable to the RJ-45 UTP (Unshielded Twisted
Pair) LAN connector. The LAN card supports both 10 Mbits/s and 100
Mbits/s operation.
RJ-45 UTP
Connector
Remote Wake-Up
The network interface card is able to wake the PC from a sleep state if
it receives a special sequence (known as a Magic Packet
network.
8 English
TM
) from the
Page 9

HP 10/100 3Com 3C905B-TX Network Interface Card Installation Guide
Updating LAN-specific Fields in the HP PC Setup Utility
Updating LAN-specific Fields in the HP PC Setup Utility
You need to check that the BIOS is configured to use your network
card’s features. To do this, use the HP PC Setup utility.
Starting the HP PC Setup
Utility
Restart the PC.
1
Press
2
F2 when
F2=Setup
is displayed on the screen during startup.
The opening window of the HP PC Setup utility is displayed.
Which Fields Need
Updating?
Enable Plug-and-Play for
Windows 95 and Windows
98
Disable Plug-and-Play for
Windows NT 4.0
Update the LAN Settings Configure any Setup settings for the LAN interface using the following
You need to check, and update if necessary, all the fields that are
LAN-related. On some PCs you may need to enable the LAN features.
If you are using Windows 95 SR2 or Windows 98 you need to ensure
that the Plug-and-Play Operating System setting of the BIOS is
enabled. If the Main menu has
another item to select the operating system, set it to
Running Windows 95, Plug and Play OS or
Yes or Enabled.
If you are using Windows NT 4.0 you need to ensure that the
Plug-and-Play Operating System setting of the BIOS is disabled. If the
Main menu has
select the operating system, set it to
Running Windows 95, Plug and Play OS or another item to
No or Other.
information as a guide. The names used in your version of the Setup
program may be different to those shown.
If you want to boot from the network (refer to “Frequently Asked
Questions” on page 16):
Check that
•
Change the boot order so that Network appears first (Advanced ➜
•
Advanced CMOS Setup ➜ 1st Boot Device <Network>).
Security
Boot Devices Security
➜
Start from Network
➜
is enabled.
If you want to wake-up your PC from the network:
Check that the PC can be woken from the network (Power ➜ Suspend
•
Wakeup
➜ Network [Enabled]).
If you want to power-on your PC from the network:
Check that the PC can be powered-on from the network (Power ➜
•
Power-On ➜ Network [Enabled]).
English 9
Page 10

HP 10/100 3Com 3C905B-TX Network Interface Card Installation Guide
Software Installation Procedure
Software Installation Procedure
CAUTION Make sure that you have installed the network interface card before you
install the network driver software.
Software Installation on a Windows 95 or Windows 98 System
Windows 95 Users To install the network driver when your PC is running Windows 95:
Start the PC. Windows 95 will automatically detect a new
1
Controller
Insert EtherDisk
2
The
3
will be automatically found, click on
.
®
diskette #1 in your drive and click on Next.
3Com Fast Etherlink XL 10/100Mb TX Ethernet NIC (3C905B-TX) driver files
Finish to complete the driver
PCI Ethernet
installation.
If prompted to insert EtherDisk
4
Files From
diskette #2 and press E
Follow the onscreen instructions. If prompted, enter the location of
5
prompt and press E
NTER
the Windows 95 files (CAB files) then click on
®
diskette #1, type A:\ at the Copy
. Similarly, insert EtherDisk®
NTER
when prompted.
OK. On HP Windows
95 preloaded systems, the path is C:\WINDOWS\OPTIONS\CABS.
Click on
6
If Windows prompts you to reboot, remove your driver diskette and
7
click on
Finish to complete the network component installation.
Yes. The software installation is complete. Follow the
instructions on page 11 to confirm your installation.
Windows 98 Users To install the network driver when your PC is running Windows 98:
Start the PC. Windows 98 will automatically detect a new
1
Controller
. Click on
Next
to begin the installation.
PCI Ethernet
Select
2
Select
3
drive and click on
10 English
Search for the Best Driver and click on Next.
Floppy Disk Drives only, insert EtherDisk
Next
.
®
diskette #1 in your
Page 11

HP 10/100 3Com 3C905B-TX Network Interface Card Installation Guide
Software Installation Procedure
4 The 3Com Fast Etherlink XL 10/100Mb TX Ethernet NIC (3C905B-TX) driver files will
be automatically found, click on
5 If prompted to insert EtherDisk
Files From
diskette #2 and press E
prompt and press E
NTER
Next
to begin the driver installation.
®
diskette #1, type A:\ at the Copy
. Similarly, insert EtherDisk®
NTER
when prompted.
6 Follow the remaining onscreen instructions and enter the location of
the Windows 98 files (CAB files) when prompted, then click on
OK.
On HP Windows 98 preloaded systems, the path is
C:\WINDOWS\OPTIONS\CABS.
Checking the Driver
Installation
7 Click on
Finish to complete the network component installation.
8 When prompted to reboot, remove your driver diskette and click on
Yes. The software installation is complete.
Confirming Installation
To confirm that the network interface card driver is properly installed
in a PC running Windows 95 or Windows 98:
1 Double-click on the
icon.
Panel
2 Double-click on the
3 Click on the
Device Manager
type.
4 Finally, double-click on
network interface card appears:
If this name does not appear or if a yellow exclamation mark appears
next to it, follow this troubleshooting procedure:
a In the
b Click on
c Click on
Device Manager
PCI Ethernet Controller or the duplicate 3C905B-TX NIC entry.
Remove.
d Restart your PC.
My Computer icon, then double-click on the Control
System icon. The System Properties box appears.
tab. A list of devices appears, arranged by
Network Adapters. The name of the installed
3Com EtherLink XL Adapter (3C905B)
window, double-click on Other Devices.
.
Checking the Network
Settings
Follow these steps to confirm that your network setting are correct on
a PC running Windows 95 or Windows 98:
1 In the
English 11
Control Panel
window, double-click on the
Network
icon.
Page 12

HP 10/100 3Com 3C905B-TX Network Interface Card Installation Guide
Software Installation Procedure
2 Ensure that you have the correct Client and Protocols installed. You
may need to contact your MIS manager for this information.
3 Finally, double-click on each of your installed protocols and ensure
that your settings are correct for your PC’s connection to the LAN.
You may need to contact your MIS manager for this information.
Software Installation and Update on a Windows NT 4.0 System
Windows NT 4.0 Users This section describes how to install the network driver in a PC running
Windows NT version 4.0 without the networking components installed.
You will need the following information from your MIS department:
Whether you are on a LAN or are connecting to one through a
•
modem
The protocol used in the Microsoft Windows Network (typically
•
TCP/IP or NetBEUI)
The name of the Windows NT server domain or workgroup you
•
belong to
Your IP address if you are using TCP/IP without DHCP
•
Installing the Driver from the
EtherDisk
®
diskettes
To install the network driver in a PC running Windows NT version 4.0:
1 Restart the PC and start Windows NT.
2 Double-click on the
icon.
Panel
3 In the
Control Panel window, double-click on Network.
4 When prompted to install Windows NT Networking, click on
If you do not receive this prompt and the
My Computer icon, then double-click on the Control
Yes.
Network
control panel
window appears, Windows NT Networking is already installed. You
will need to add the adapter manually: click on the
click on
5 In the
on
12 English
Add... and follow the instructions from step 7 onwards.
Network Setup Wizard window, select Wired to the Network and click
Next.
Adapter tab, then
Page 13

HP 10/100 3Com 3C905B-TX Network Interface Card Installation Guide
Software Installation Procedure
6 When prompted to start searching for a network adapter, click on
Select from List...
7 In the
8 Insert EtherDisk
prompt, then press E
9 In the
BusMaster NIC
Network
Select Network Adapter window, click on Have Disk...
®
diskette #1 in your drive and type A:\ at the
.
NTER
OEM Option window, highlight 3Com Fast Etherlink/Etherlink XL PCI
and click on OK, then click on Next. If you are in the
control panel window, click on
Close
and follow the
instructions from step 14 onwards.
10 Select the Network Protocols that are used by your LAN and click on
Next
.
11 Select the Network Services that should be used by your PC when
connected to your LAN and click on
12 Click on
Next to begin the software installation with the settings you
Next.
have provided.
13 Follow the onscreen instructions, if you are prompted for network
information, enter the information supplied by your MIS department.
14 Enter the location of the Windows NT 4.0 files (CAB files) when
prompted, then click on
systems, the path is
OK. On HP Windows NT 4.0 preloaded
C:\i386
.
15 When prompted to reboot, remove your driver diskette and click on
Yes. The driver and network software installation is complete.
CAUTION If a service pack was already installed on the PC before the network
interface card was installed, the service pack must be reinstalled. This
will overcome the
At Least One Service Failed to Start error when Windows NT
is started.
On some platforms you also need to reinstall certain drivers after
installing the Service Pack. Refer to your PC documentation for more
information.
English 13
Page 14

HP 10/100 3Com 3C905B-TX Network Interface Card Installation Guide
Software Installation Procedure
Installing the Driver from the Hard Disk (Advanced Users)
To install the network driver in a PC running Windows NT version 4.0
from driver files on the hard disk:
1 Restart the PC and start Windows NT.
2 Create a folder for the drivers, for example,
®
3 Insert EtherDisk
diskette #1 in your drive and copy the entire
C:\LAN3COM
.
contents to your new folder.
4 Insert EtherDisk
®
diskette #2 in your drive and copy the entire
contents to your new folder. If you are prompted to overwrite any
files click on
Yes.
5 Perform the installation from step 2 onwards of “Installing the Driver
from the EtherDisk® diskettes” on page 12. At step 8, specify the
folder that you copied the files to, for example,
C:\LAN3COM\WINNT.
Updating the Driver
If you already have the 3C905B-TX network driver and want to update
it, follow the instructions provided below.
1 Double-click on the
icon.
Panel
2 In the
3 In the
4 Highlight
Control Panel
Network window, click on the Adapter tab.
3Com Fast EtherLink XL NIC (3C905B-TX) and click on Update.
5 Insert EtherDisk
prompt, then press E
My Computer icon, then double-click on the Control
window, double-click on
®
diskette #1 in your drive and type
. The driver will be automatically updated.
NTER
Network
.
A:\
at the
6 Close the
Network window and restart the computer when prompted.
CAUTION If a service pack was already installed on the PC before the network
interface card was installed, the service pack must be reinstalled. This will
overcome the
At Least One Service Failed to Start error when Windows NT is
started.
On some platforms you also need to reinstall certain drivers after installing
the Service Pack. Refer to your PC documentation for more information.
14 English
Page 15

HP 10/100 3Com 3C905B-TX Network Interface Card Installation Guide
Checking the Installation
Checking the Installation
Test whether the card functions on the network by finding another
network device or performing a network operation. If it does not work
correctly, refer to “Troubleshooting” on page 17.
Using the NIC Doctor
You can use the NIC Doctor application to obtain information about
your NIC and to diagnose problems with your card or network
connection.
To start the NIC Doctor, click on the
3Com NIC Utilities
by
and then
3Com NIC Doctor
You will be presented with the NIC Doctor
Start icon, then Programs, followed
.
General screen. This screen
displays general information about your card and allows you to select
the appropriate NIC if there is more than one installed in your PC. Use
the labeled tabs to select the different functions:
Configuration Tab — enables you to change certain configuration
•
settings for your card.
Statistics Tab — provides statistical information about your card and
•
the LAN connection.
Diagnostics Tab — can be used to run different tests on your card
•
and network connection, including a test of the card itself.
Support Tab — provides information about contacting the support
•
services for your card.
Click on the
Help button at any time to find out more about using the
NIC Doctor.
English 15
Page 16

HP 10/100 3Com 3C905B-TX Network Interface Card Installation Guide
Frequently Asked Questions
Frequently Asked Questions
Q. Which PCI slot is best for my NIC.
A. The 3Com PCI NIC is designed to work in any PCI slot.
Q. Which PCI slot(s) are “bus mastering” in my PC?
A: All PCI slots on the supported HP PCs support Bus Master.
Q. Where do I find the driver installation Readme files?
A. The various Readme files can be found in the \HELP directory of
EtherDisk
Q. Can I use the NIC instead of the integrated LAN supplied on my PC?
A. Yes, but you will need to deactivate the integrated LAN. Your PC’s
User’s Guide will tell you how to do this. You might not be able to use
the Remote Power-On feature of your NIC because some PCs with an
integrated LAN do not have a remote wake-up connector.
Q. How do I remove the software that comes with the NIC from my system?
A. You can remove the 3Com NIC Diagnostics Program from your
system at any time by running the uninstaller in the Add/Remove
Programs Control Panel. This will remove the diagnostics program and
the 3Com tray Icon. If you remove all the Fast EtherLink XL/EtherLink
XL NICs from the Network control panel the uninstall program will be
run automatically.
®
diskette #3.
Q. Does the NIC support shared interrupts?
A. The PCI NIC and the drivers supplied support shared interrupts.
However, because there is no industry-standard way of implementing
shared interrupts, other NICs may support them differently, or not at
all. If you have another PCI NIC that does not support shared
interrupts, either contact the manufacturer for a shared interrupt
driver or try to manually assign it a different interrupt. Additionally,
your Operating System may not properly support shared interrupts.
16 English
Page 17

HP 10/100 3Com 3C905B-TX Network Interface Card Installation Guide
Troubleshooting
Q. Can the NIC be configured to boot from the network?
A. Yes, but you can only boot a PC from the network if it has boot ROM
integrated in its BIOS (for example, the HP Vectra VL Series 8 PC) or if
a boot ROM chip is installed on the NIC. This component can be
ordered from 3Com. To configure the card for remote boot, use your
PC’s Setup program.
Troubleshooting
The 3C905B-TX Card Does Not Work
If your network interface does not work, try the following:
Check that:
1
The card is correctly installed (refer to “Installing the Network
•
Interface Card” on page 7.)
The LAN-specific fields in the HP PC Setup utility are correctly
•
set (refer to “Updating LAN-specific Fields in the HP PC Setup
Utility” on page 9.)
The software installation steps have been followed (refer to
•
“Software Installation Procedure” on page 10.)
Check the network cables. In particular, check that the network
2
cable connections are secure and that the cables are not damaged. If
you find any loose connections or damaged cables, fix them and then
see if your PC can communicate on the network.
Check that either the 10 LNK or 100 LNK green LED on the
3
3C905B-TX NICs rear panel is on (refer to “3C905B-TX NIC
Specifications” on page 19.) The green LED on the card’s rear panel
is off when there is no network link, for example, when the LAN
cable is not connected to the network hub.
For NT 4.0 systems, check that your Service Pack has been
4
reinstalled. In case of doubt, reinstall the Service Pack. On some
platforms you also need to reinstall certain drivers after installing the
Service Pack. Refer to your PC documentation for more information.
English 17
Page 18

HP 10/100 3Com 3C905B-TX Network Interface Card Installation Guide
HP Support Services
The PC Cannot Be Started or Woken-Upfrom the Network
If the PC has been powered off (for example, due to an electrical
1
power failure, or because the power cord has been removed), the
Remote Power On (RPO) will not work. To enable the RPO, you must
first power on the PC, allow the Operating System to boot, then shut
down the PC.
Check that the WOL connector cable is connected to the network
2
interface card and to the PC’s system board.
Check that the LAN-specific fields in the HP PC Setup utility are
3
correctly set (refer to refer to “Updating LAN-specific Fields in the
HP PC Setup Utility” on page 9.)
NOTE RPO is only supported under Windows 95, Windows 98 and Windows
NT 4.0.
HP Support Services
The latest drivers and utilities are available on HP’s Web site at:
For HP Vectra PCs www.hp.com/go/vectrasupport
For HP Brio PCs www.hp.com/go/briosupport
For HP Kayak PC
Workstations
18 English
www.hp.com/go/kayaksupport
Page 19

HP 10/100 3Com 3C905B-TX Network Interface Card Installation Guide
3C905B-TX NIC Specifications
Physical Layout
LAN Connector
TX
3C905B-TX NIC Specifications
Remote Wake-Up
Connector
ACT LED
10 LNK LED
100 LNK LED
Refer to “LAN Connection Status LEDs”
on page 20 for more information
Specifications
Network Interface
Physical Dimensions
Environmental
Operating Range
Power
Requirements
DATA
ACT
10
L
N
100
K
•
10 Mbps Ethernet 10BASE-T: Ethernet IEEE 802.3 industry standard
for a 10 Mbps baseband CSMA/CD local area network.
• 100 Mbps Ethernet 100BASE-TX: Ethernet IEEE 802.3u industry
standard for a 100 Mbps baseband CSMA/CD local area network.
•
Height: 8.57 cm (3.75 in.)
• Length: 12.07 cm (4.75 in.)
•
Operating temperature: 0° to 70° C (32° to 158° F)
• Humidity: 10 to 90% noncondensing
•
Operating voltage: +5 V ± 5% @650 mA max
English 19
Page 20

HP 10/100 3Com 3C905B-TX Network Interface Card Installation Guide
3C905B-TX NIC Specifications
LAN Connection Status LEDs
There are three LEDs on the rear of the 3C905B-TX NIC that indicate
the LAN connection status as follows:
LED Description Flashing Steady Off
10 LNK Green:
Link integrity
100 LNK Green:
Link integrity
ACT Yellow:
Port traffic for
either speed
Reversed polarity Good 10BASE-T
connection
between NIC and
hub
Reversed polarity Good
100BASE-TX
connection
between NIC and
hub
Network traffic
present
Heavy network
traffic
No connection
between NIC and
hub
No connection
between NIC and
hub
No traffic
20 English
Page 21

HP 10/100 3Com 3C905B-TX Network Interface Card Installation Guide
Regulatory Information
DECLARATION OF CONFORMITY
According to ISO/IEC Guide 22 and EN 45014
Regulatory Information
Manufacturer’s Name:
Manufacturer’s Address:
Declares that the product: Product Name:
Conforms to the following Product Specifications:
Supplementary information:
The EMC directive 89/336/EEC and the Low Voltage Directive 73/23/EEC, both amended by the directive 93/68/EEC.
1)
The product was tested in a typical configuration with Hewlett-Packard Personal Computer Systems.
2)
This Device complies with Part 15 of the FCC Rules. Operation is subject to the following two conditions: (1) this device may not cause harmful
interference, and (2) this device must accept any interference received, including interference that may cause undesired operation.
Grenoble
January 1999 Quality Manager
HEWLETT-PACKARD
5 Avenue Raymond Chanas
38053 Grenoble Cedex 09
FRANCE
Model Number:
SAFETY
EMC
The product herewith complies with the requirements of the following Directives and carries the CE-marking accordingly:
International: IEC 60950:1991 +A1+A2+A3+A4 / GB4943-1995
Europe: EN 60950:1992 +A1+A2+A3+A4
CISPR 22:1993+A1+A2 / EN 55022:1994 Class B
GB9254-1988
EN 50082-1:1992
IEC 801-3:1984 / prEN 55024-3:1991 - 3V/m
IEC 801-4:1988 / prEN 55024-4:1992 - 0.5 kV Signal Lines,
IEC 555-2:1982+A1:1985 / EN60555-2:1987
IEC 1000-3-3:1994 / EN61000-3-3:1995
FCC Title 47 CFR, Part 15 Class B
VCCI-B
AS / NZ 3548:1992
Jean-Marc JULIA
HP 10/100 3Com 3C905B-TX Network Interface Card
D7504A & D7505A
1)
IEC 801-2:1992 / prEN 55024-2:1992 - 4kV CD, 8kV AD
1 kV Power Lines
2)
/ ICES-003, Issue 2
For Compliance Information ONLY, contact:
Hewlett-Packard Company, Corporate Product Regulations Manager,
3000 Hanover Street, Palo Alto, CA 94304. (Phone: (415) 857-1501)
English 21
Page 22

HP 10/100 3Com 3C905B-TX Network Interface Card Installation Guide
Hardware Warranty
FCC (for USA only)
Federal Communications Commission Radio Frequency Interference Statement
War ni ng:
This equipment has been tested and found to comply with the limits for a Class B digital device, pursuant to Part
15 of the FCC Rules. These limits are designed to provide reasonable protection against harmful interference in
a residential installation. This equipment generates and uses, and can radiate radio frequency energy and, if not
installed and used in accordance with the instructions, may cause harmful interference to radio
communications. However, there is no guarantee that interference will not occur in a particular installation. If
this equipment does cause harmful interference to radio or television reception, which can be determined by
turning the equipment off and on, the user is encouraged to correct the interference by one or more of the
following measures:
• reorient or relocate the receiving antenna
• increase the separation between the equipment and the receiver
• connect the equipment into an outlet on a circuit different from that to which the receiver is connected
• consult the dealer or an experienced radio/TV technician for help.
Hewlett-Packard’s FCC Compliance Tests were conducted with HP-supported peripheral devices and HP
shielded cables, such as those you receive with your system. Changes or modifications not expressly approved
by Hewlett-Packard could void the user’s authority to operate the equipment.
Notice for Canada
This Class B digital apparatus with the Canadian ICES-003 Regulations.
Cet appareil numérique est conforme à la norme NMB-003 du Canada.
Notice for Japan
Hardware Warranty
This HP accessory is covered by a limited hardware warranty for a period of one year
from the date of purchase by the original end-user. The type of service provided is
return to an HP or repair-authorized reseller service-center.
At Hewlett-Packard's discretion, a defective accessory will be repaired or replaced by a
new unit, either of the same type or of an equivalent model.
If this accessory is purchased and used together with an HP Vectra or HP Brio personal
computer or HP Kayak PC Workstation, it will be covered by the warranty of this
computer or workstation, under the same conditions of service and duration.
Please, refer to the warranty statement provided with your HP personal computer or PC
workstation for warranty limitations, customer responsibilities and other terms and conditions.
FOR CONSUMER TRANSACTIONS IN AUSTRALIA AND NEW ZEALAND: THE
WARRANTY TERMS CONTAINED IN THIS STATEMENT, EXCEPT TO THE EXTENT
LAWFULLY PERMITTED, DO NOT EXCLUDE, RESTRICT OR MODIFY AND ARE IN
ADDITION TO THE MANDATORY STATUTORY RIGHTS APPLICABLE TO THE SALE OF
THIS PRODUCT TO YOU.
22 English
Page 23

HP 10/100 3Com 3C905B-TX Network Interface Card Installation Guide
HP Software Warranty
HP Software Warranty
THIS WARRANTY STATEMENT TAKES PRECEDENCE OVER ANY OTHER SOFTWARE WARRANTY
STATEMENT INCLUDED WITH THIS PRODUCT.
Ninety-Day Limited Software Warranty
HP warrants for a period of NINETY (90) DAYS from the date of the purchase that the software product will
execute its programming instructions when all files are properly installed. HP does not warrant that the
software will be uninterrupted or error free. HP does not warrant to the performance of usefulness of any
software provided with your computer product. Unless otherwise expressly provided by HP, it is your own
responsibility to obtain the latest version of any software and support directly from the software owner or
authorized distributor. In the event that this software product fails to execute its programming instructions
during the warranty period, Customer’s remedy shall be a refund or repair. Should HP be unable to replace the
media within a reasonable amount of time, Customer’s alternate remedy shall be a refund of the purchase price
upon return of the product and all copies.
Removable Media (If supplied)
HP warrants the removable media, if supplied, upon which this product is recorded to be free from defects in
materials and workmanship under normal use for a period of NINETY (90) DAYS from the date of purchase. In
the event the media proves to be defective during the warranty period, Customer’s remedy shall be to return the
media to HP for replacement. Should HP be unable to replace the media within a reasonable amount of time,
Customer’s alternate remedy shall be a refund of the purchase price upon return of the product and destruction
of all other nonremovable media copies of the software product.
Notice of Warranty Claims
Customer must notify HP in writing of any warranty claim not later than thirty (30) days after the expiration of
the warranty period.
The above warranty shall not apply to defects resulting from: misuse; unauthorized modification; operation or
storage outside the environmental specifications for the product; in-transit damage; improper maintenance; or
defects resulting from use of non-HP software, accessories, media, supplies, consumables, or such items not
designed for use with the product.
HP MAKES NO OTHER EXPRESS WARRANTY, WHETHER WRITTEN OR ORAL WITH RESPECT TO THIS
PRODUCT. ANY IMPLIED WARRANTY OF MERCHANTABILITY OR FITNESS FOR A PARTICULAR
PURPOSE IS LIMITED TO THE DURATION OF THE EXPRESS WARRANTY SET FORTH ABOVE. SOME
STATES OR PROVINCES DO NOT ALLOW LIMITATIONS ON HOW LONG AN IMPLIED WARRANTY LASTS,
SO THE ABOVE LIMITATIONS OR EXCLUSION MAY NOT APPLY TO YOU.
This warranty gives specific legal rights, and you may also have other rights which vary from state to state, or
province to province.
Limitation of Liability and Remedies
THE REMEDIES PROVIDED ABOVE ARE CUSTOMER’S SOLE AND EXCLUSIVE REMEDIES. IN NO EVENT
SHALL HP BE LIABLE FOR ANY DIRECT, INDIRECT, SPECIAL, INCIDENTAL OR CONSEQUENTIAL
DAMAGES (INCLUDING LOST PROFIT) WHETHER BASED ON WARRANTY, CONTRACT, TORT OR ANY
OTHER LEGAL THEORY. Some states or provinces do not allow the exclusion or limitation of incidental or
consequential damages, so the above limitation or exclusion may not apply to you.
English 23
Page 24

HP 10/100 3Com 3C905B-TX Network Interface Card Installation Guide
HP Software License Agreement
HP Software License Agreement
CAREFULLY READ THIS LICENSE AGREEMENT BEFORE PROCEEDING TO OPERATE THE HP
ACCESSORY. RIGHTS IN THE SOFTWARE ARE OFFERED ONLY ON THE CONDITION THAT THE
CUSTOMER AGREES TO ALL TERMS AND CONDITIONS OF THIS LICENSE AGREEMENT. PROCEEDING
TO INSTALLING AND USING THE ACCESSORY INDICATES YOUR ACCEPTANCE OF THESE TERMS AND
CONDITIONS. IF YOU DO NOT AGREE TO THE LICENSE AGREEMENT, YOU MUST NOW DESTROY ANY
MASTER DISKETTES OR CD-ROMS, OR RETURN THE COMPLETE ACCESSORY AND SOFTWARE FOR A
FULL REFUND.
UNLESS OTHERWISE STATED BELOW, THIS HP SOFTWARE PRODUCT LICENSE AGREEMENT SHALL
GOVERN THE USE OF ALL SOFTWARE THAT IS PROVIDED TO YOU, THE CUSTOMER, AS PART OF THE
HP ACCESSORY. IT SHALL SUPERSEDE ANY NON-HP SOFTWARE LICENSE TERMS THAT MAY BE FOUND
ON-LINE, OR IN ANY DOCUMENTATION OR OTHER MATERIALS CONTAINED IN THE ACCESSORY
PRODUCT PACKAGING.
Note: Operating System Software by Microsoft is licensed to you under the Microsoft End User License
Agreement (EULA) contained in the Microsoft documentation.
The following License Terms govern the use of the software:
USE. Customer may use the software on any one computer. Customer may not network the software or
otherwise use it on more than one computer. Customer may not reverse assemble or decompile the software
unless authorized by law.
COPIES AND ADAPTATIONS. Customer may make copies or adaptations of the software (a) for archival
purposes or (b) when copying or adaptation is an essential step in the use of the software with a computer so
long as the copies and adaptations are used in no other manner.
OWNERSHIP. Customer agrees that he/she does not have any title or ownership of the software, other than
ownership of the physical media. Customer acknowledges and agrees that the software is copyrighted and
protected under the copyright laws. Customer acknowledges and agrees that the software may have been
developed by a third party software supplier named in the copyright notices included with the software, who
shall be authorized to hold the Customer responsible for any copyright infringement or violation of this
Agreement.
TRANSFER OF RIGHTS IN SOFTWARE. Customer may transfer rights in the software to a third party only as
part of the transfer of all rights and only if Customer obtains the prior agreement of the third party to be bound
by the terms of this License Agreement. Upon such a transfer, Customer agrees that his/her rights in the
software are terminated and that he/she will either destroy his/her copies and adaptations or deliver them to the
third party.
SUBLICENSING AND DISTRIBUTION. Customer may not lease, sublicense the software or distribute copies or
adaptations of the software to anyone in physical media or by telecommunication without the prior written
consent of Hewlett-Packard.
TERMINATION. Hewlett-Packard may terminate this software license for failure to comply with any of these
terms provided Hewlett-Packard has requested Customer to cure the failure and Customer has failed to do so
within thirty (30) days of such notice.
UPDATES AND UPGRADES. Customer agrees that the software does not include updates and upgrades which
may be available from Hewlett-Packard under a separate support agreement.
EXPORT CLAUSE. Customer agrees not to export or re-export the software or any copy or adaptation in
violation of the U.S. Export Administration regulations or other applicable regulation.
U.S. GOVERNMENT RESTRICTED RIGHTS. Use, duplication, or disclosure by the U.S. Government is subject
to restrictions as set forth in subparagraph (c)(1)(ii) of the Rights in Technical Data and Computer Software
clause in DFARS 252.227-7013. Hewlett-Packard Company. 3000 Hanover Street, Palo Alto, CA 94304 U.S.A.
Rights for non-DOD U.S. Government Departments and Agencies are as set forth in FAR 52.227-19(c)(1,2).
(9 Nov 1998)
24 English
Page 25

Page 26

*
Paper not bleached with chlorine
*HP. Et tout devient possible.
Part number: D7504-90027
Printed 02/99
 Loading...