

Page 1

HP ProtectTools for Small Business
Security Software, Version 5.10
User Guide
Page 2

© Copyright 2010 Hewlett-Packard
Development Company, L.P. The
information contained herein is subject to
change without notice.
Microsoft, Windows and Windows Vista are
either trademarks or registered trademarks
of Microsoft Corporation in the United States
and/or other countries.
The only warranties for HP products and
services are set forth in the express warranty
statements accompanying such products
and services. Nothing herein should be
construed as constituting an additional
warranty. HP shall not be liable for technical
or editorial errors or omissions contained
herein.
This document contains proprietary
information that is protected by copyright. No
part of this document may be photocopied,
reproduced, or translated to another
language without the prior written consent of
Hewlett-Packard Company.
HP ProtectTools for Small Business
Security Software Version 5.10 User
Guide
HP Business PC
Second Edition: May 2010
Document Part Number: 610663-002
Page 3

About This Book
This guide provides information on HP ProtectTools for Small Business Security Software.
WARNING! Text set off in this manner indicates that failure to follow directions could result in bodily
harm or loss of life.
CAUTION: Text set off in this manner indicates that failure to follow directions could result in damage
to equipment or loss of information.
NOTE: Text set off in this manner provides important supplemental information.
ENWW iii
Page 4

iv About This Book ENWW
Page 5

Table of contents
1 Introduction to security .................................................................................................................................. 1
HP ProtectTools features ..................................................................................................................... 2
2 Easy Setup Guide for the most useful options ............................................................................................ 4
Getting started ...................................................................................................................................... 4
Credential Manager for HP ProtectTools (Password Manager) ........................................................... 6
Viewing and managing the saved authentications in Credential Manager .......................... 7
File Sanitizer for HP ProtectTools ...................................................................................................... 10
Device Access Manager for HP ProtectTools .................................................................................... 13
Drive Encryption for HP ProtectTools ................................................................................................. 15
3 Benefits of HP ProtectTools for Small Business ....................................................................................... 17
Accessing HP ProtectTools for Small Business Security Software .................................................... 17
Achieving key security objectives ....................................................................................................... 17
Restricting access to sensitive data ................................................................................... 17
Preventing unauthorized access from internal or external locations ................................. 18
Creating strong password policies ..................................................................................... 18
Additional security elements ............................................................................................................... 18
Assigning security roles ..................................................................................................... 18
Managing HP ProtectTools passwords .............................................................................. 19
Creating a secure password ............................................................................. 19
Backing up credentials and settings .................................................................................. 20
4 HP ProtectTools Security Manager Administrative Console .................................................................... 21
About HP ProtectTools Administrative Console ................................................................................. 21
Using the Administrative Console ...................................................................................................... 21
Getting Started with the Setup Wizard ............................................................................................... 22
Configuring your system ..................................................................................................................... 22
Enabling security features ................................................................................................. 23
Defining Security Manager authentication policies ............................................................ 23
Logon tab .......................................................................................................... 23
Session tab ....................................................................................................... 23
Defining Settings ................................................................................................................ 24
ENWW v
Page 6

Managing Users ................................................................................................................. 24
Adding a user .................................................................................................... 24
Removing a user ............................................................................................... 25
Checking user status ......................................................................................... 25
Configuring Applications Settings ....................................................................................................... 25
Encrypting Drives ............................................................................................................................... 25
Managing Device Access ................................................................................................................... 26
5 HP ProtectTools Security Manager ............................................................................................................. 27
Managing passwords ......................................................................................................................... 27
Setting credentials .............................................................................................................................. 27
Changing your Windows password ................................................................................... 27
Shredding or bleaching files ............................................................................................................... 28
Viewing drive encryption status .......................................................................................................... 28
Viewing device access ....................................................................................................................... 28
Adding applications ............................................................................................................................ 29
Setting preferences ............................................................................................................................ 29
Backup and Restore ........................................................................................................................... 29
Backing up your data ......................................................................................................... 29
Restoring your data ........................................................................................................... 30
Changing your Windows user name and picture ................................................................................ 30
6 Drive Encryption for HP ProtectTools ........................................................................................................ 31
Setup procedures ............................................................................................................................... 32
Opening Drive Encryption .................................................................................................. 32
General tasks ..................................................................................................................................... 32
Activating Drive Encryption ................................................................................................ 32
Deactivating Drive Encryption ............................................................................................ 32
Logging in after Drive Encryption is activated .................................................................... 32
Advanced tasks .................................................................................................................................. 32
Managing Drive Encryption (administrator task) ................................................................ 32
Encrypting or decrypting individual drives ......................................................... 32
Backup and recovery (administrator task) ......................................................................... 33
Creating backup keys ........................................................................................ 33
7 Credential Manager for HP ProtectTools (Password Manager) ................................................................ 34
Adding logons ..................................................................................................................................... 35
Editing logons ..................................................................................................................................... 35
Using the Logons menu ..................................................................................................................... 36
Organizing logons into categories ...................................................................................................... 36
Managing your logons ........................................................................................................................ 37
Assessing your password strength ..................................................................................................... 37
Password Manager Icon settings ....................................................................................................... 37
vi ENWW
Page 7

8 File Sanitizer for HP ProtectTools ............................................................................................................... 38
Setup procedures ............................................................................................................................... 39
Opening File Sanitizer ....................................................................................................... 39
Setting a free space bleaching schedule ........................................................................... 39
Setting a shred schedule ................................................................................................... 39
Selecting or creating a shred profile .................................................................................. 40
Selecting a predefined shred profile .................................................................................. 40
Customizing an advanced security shred profile ............................................................... 40
Customizing a simple delete profile ................................................................................... 41
General tasks ..................................................................................................................................... 41
Using a key sequence to initiate shredding ....................................................................... 41
Using the File Sanitizer icon .............................................................................................. 42
Manually shredding one asset ........................................................................................... 42
Manually shredding all selected items ............................................................................... 42
Manually activating free space bleaching .......................................................................... 43
Aborting a shred or free space bleaching operation .......................................................... 43
Viewing the log files ........................................................................................................... 43
9 Device Access Manager for HP ProtectTools ............................................................................................ 44
Starting background service ............................................................................................................... 44
Simple configuration ........................................................................................................................... 44
Device class configuration (advanced) ............................................................................................... 45
Adding a user or a group ................................................................................................... 45
Removing a user or a group .............................................................................................. 45
Denying or allowing access to a user or group .................................................................. 45
User access settings (advanced) ....................................................................................................... 46
Adding a user or group ...................................................................................................... 46
Removing a user or group ................................................................................................. 46
Allowing or Denying Permissions ...................................................................................... 46
Glossary ............................................................................................................................................................. 47
Index ................................................................................................................................................................... 49
ENWW vii
Page 8

viii ENWW
Page 9

1 Introduction to security
HP understands that your time is extremely valuable, and you need to concentrate on running and
growing your business – not on worrying about the appropriate security software to protect your PC,
your data, and your business.
It is important that you proactively consider security solutions that are easy to use but provide strong
protection to your business assets. Security is not a “nice to have” – it’s a “must!”
HP provides protection that is easy to implement and simple to use…it’s called HP ProtectTools for
Small Business.
HP ProtectTools for Small Business is security software that provides features to help protect against
unauthorized access to the computer and critical data. Enhanced security functionality is provided by
the various HP ProtectTools software modules.
HP ProtectTools for Small Business provides two versions that can be utilized: HP ProtectTools Security
Manager Administrative Console and HP ProtectTools Security Manager (for general users). Both
Administrator and user versions are available in the Start > All Programs menu.
Function Features
HP ProtectTools Security Manager Administrative
Console
HP ProtectTools Security Manager (for general users)
Requires Microsoft Windows system administrator rights to
●
access
Access to modules to be configured by an administrator and not
●
available to the general user
Allows initial security setup and configures options or
●
requirements for all users
Allows users to configure options provided by an administrator
●
Can restrict access and only allow a user limited controls of some
●
HP ProtectTools modules
HP ProtectTools software modules may be preinstalled, preloaded, or available as a configurable option
or as an after market option. Visit
http://www.hp.com for more information.
ENWW 1
Page 10

HP ProtectTools features
The following table details the key features of HP ProtectTools for Small Business modules:
Module Key features
HP ProtectTools Security Manager Administrative
Console
HP ProtectTools Security Manager (for general
users)
Credential Manager for HP ProtectTools (Password
Manager)
The Security Manager setup wizard is used by administrators to
●
set up and configure levels of security and security logon methods.
Configure options hidden from basic users.
●
Configure Device Access Manager configurations and user
●
access.
Administrator tools are used to add and remove HP ProtectTools
●
users and view user status.
Organize, set up and change user names and passwords.
●
Configure and change user credentials such as Windows
●
password and Smart Card.
Configure and change File Sanitizer Shred, Bleaching, and
●
Settings.
View settings for Device Access Manager.
●
Configure Preferences and Backup and Restore options.
●
Is designed to save, organize, and protect your user names and
●
passwords.
Allows you to set up the logon screens of websites and programs
●
for quick and secure access.
As you access various websites and you want to save your user
●
name and passwords, enter them into Password Manager so that
you won’t have to remember them again. The next time you visit
this site, Password Manager will fill in and submit the data
automatically.
Allows you to create stronger passwords that you don't have to
●
write down or remember, and keeps your accounts more secure.
Drive Encryption for HP ProtectTools
Provides complete, full-volume hard drive encryption.
●
Forces pre-boot authentication in order to decrypt and access the
●
data on the hard drive.
Helps you comply with legal or industry requirements for
●
protecting confidential and sensitive data.
Protects your data from unauthorized access by encrypting the
●
entire hard drive. If the PC is ever stolen and the drive is removed
from the original system and placed in a different system, the data
will not be compromised.
2 Chapter 1 Introduction to security ENWW
Page 11

Module Key features
File Sanitizer for HP ProtectTools
Device Access Manager for HP ProtectTools
Deleting data in Windows does not completely remove the
●
contents from your hard drive. Windows only deletes the reference
to the data. The data still remains on the hard drive until another
file overwrites that same area on the hard drive with new
information. However, with File Sanitizer, you can completely and
automatically erase documents, web browser history, temp files,
etc.
Allows you to securely erase (or shred) critical files and folders
●
(personal information or files, historical or Web-related data, or
other data components) on your computer and periodically bleach
(write over data previously deleted) your hard drive.
Can be used to control access to media drives, USB, and other
●
hardware devices based on user profiles.
Allows you to limit a user's ability to store critical data.
●
Prevents users from using external storage devices, such as a
●
personal music player, to copy data from a PC or from your
network.
Prevents users from introducing viruses into the system from
●
external media.
Allows you to selectively disable a group of devices (such as USB
●
keys, writeable devices, personal music players, etc.) by user or
group of users. The person with an administrator password can
log on and copy information from the PC, but other users can not.
ENWW HP ProtectTools features 3
Page 12
2 Easy Setup Guide for the most useful
options
This Easy Setup Guide is designed to demonstrate the basic steps to activate the most common and
useful options within HP ProtectTools for Small Business. There are numerous tools and options
available in this software that will allow you to fine tune your preferences and set your access control.
The Easy Setup Guide will focus on getting each module running with the least amount of setup effort
and time. For additional information, just select the module you are interested in and click the “?” or Help
button in the upper right corner. This button will automatically provide information to help you with the
currently displayed window.
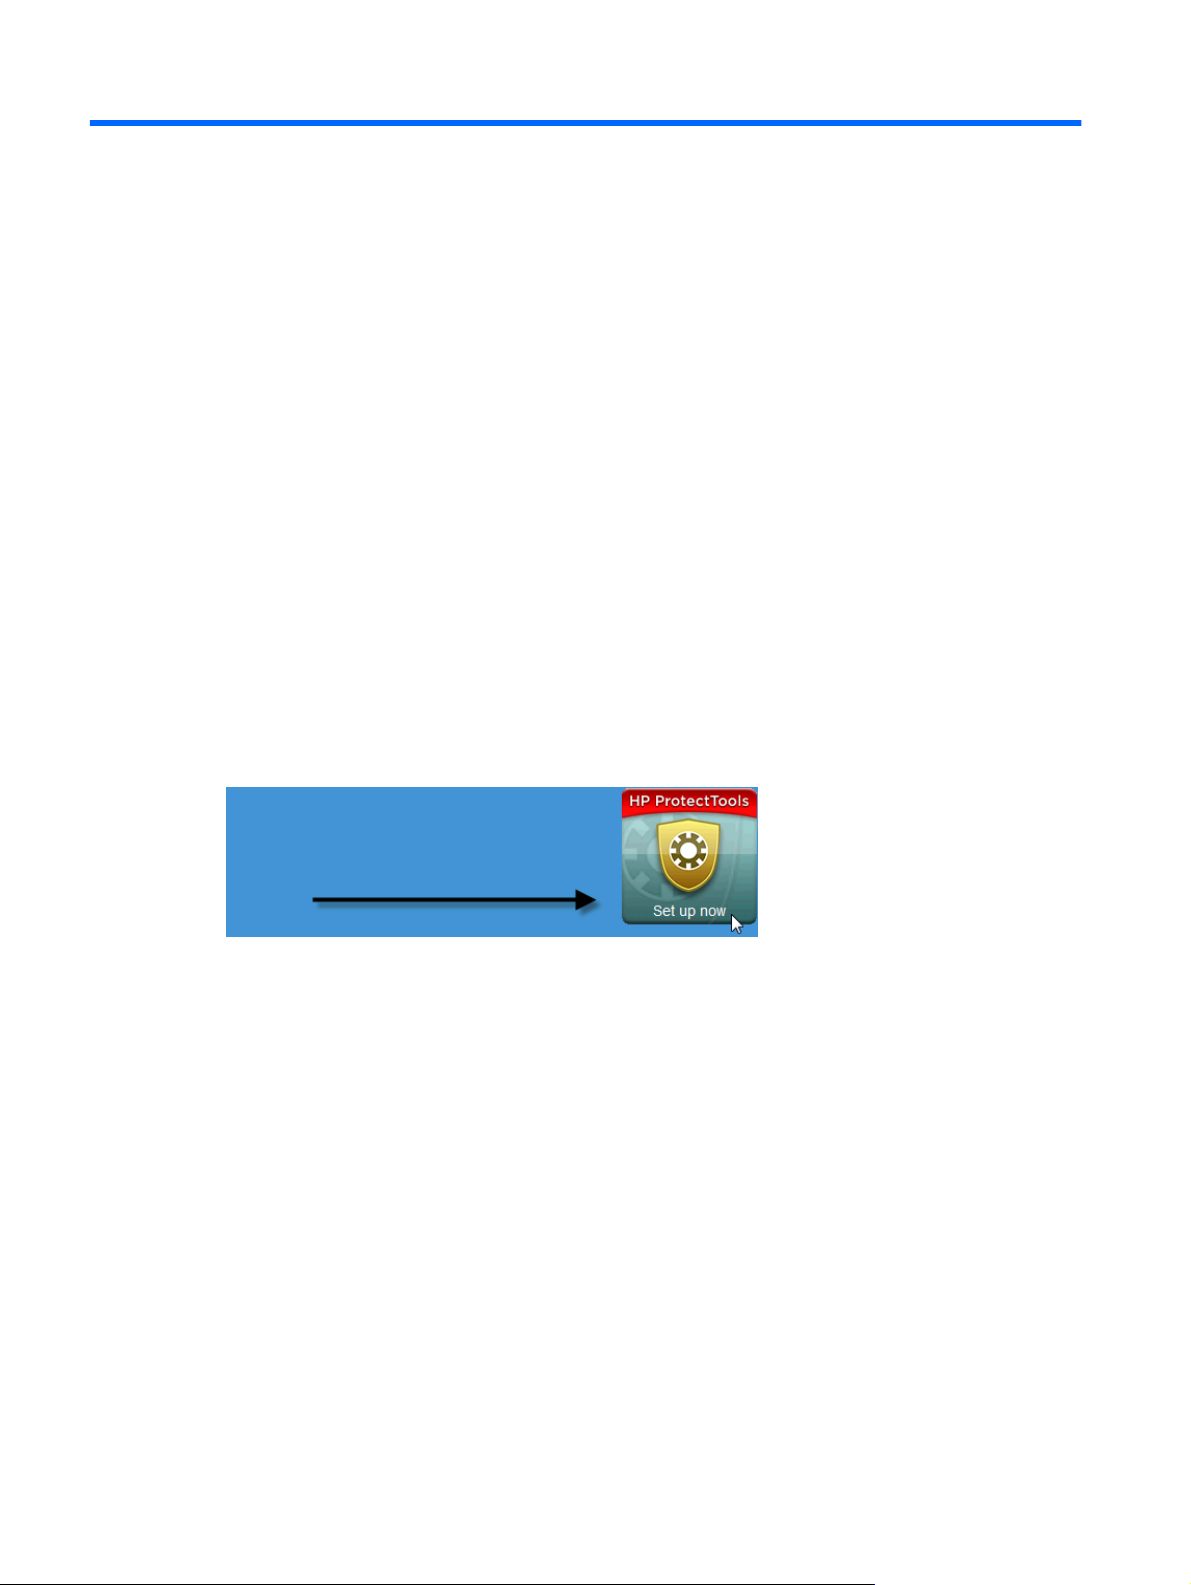
Getting started
1. Open HP ProtectTools Security Manager from the Gadget icon, task bar icon (gold shield), or click
Start > All Programs > HP.
4 Chapter 2 Easy Setup Guide for the most useful options ENWW
Page 13
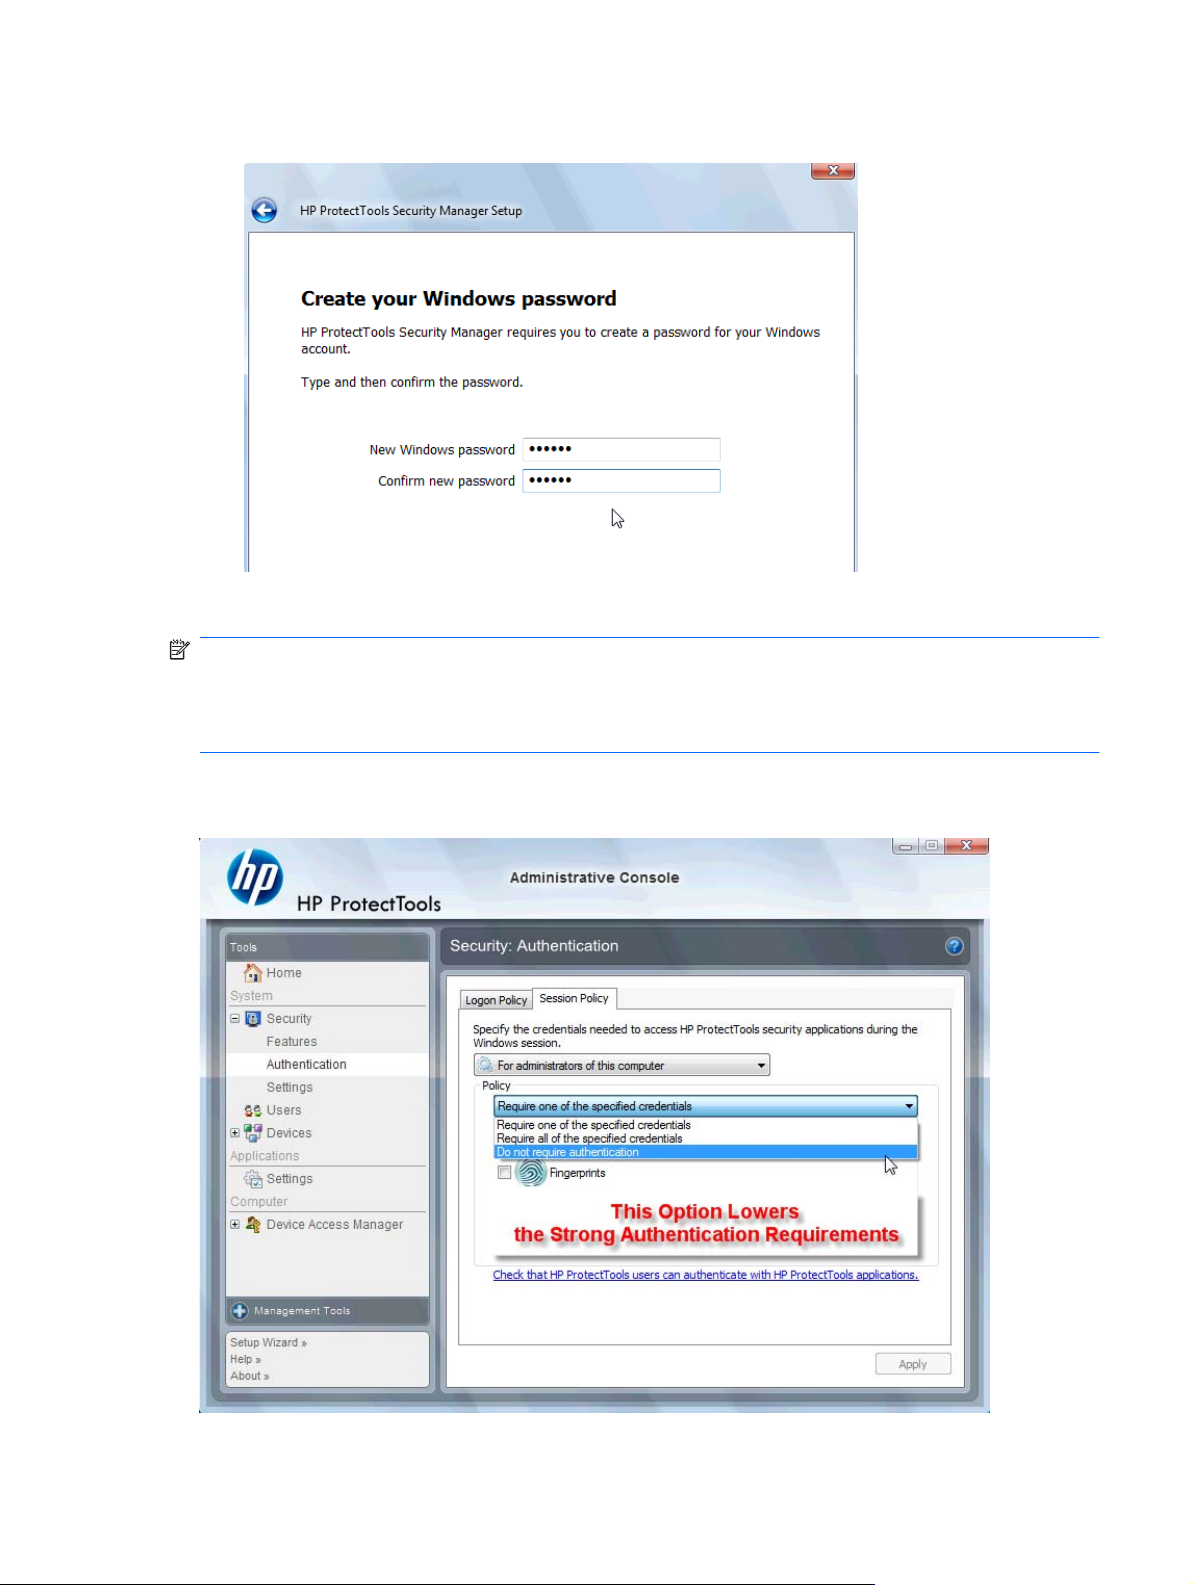
2. Enter your Windows password or create a Windows password.
3. Complete the setup wizard.
NOTE: By default, HP ProtectTools Security Manager is set to Strong Authentication Policy.
This setting is designed to prevent unauthorized access while logged into Windows and should be used
when high security is needed or if users are away from their systems frequently throughout the day. If
you would like to change this setting, click on the Session Policy tab, and make your selections.
To configure HP ProtectTools Security Manager to only use the initial Windows login for the entire
session, change the following configuration.
ENWW Getting started 5
Page 14
To have HP ProtectTools Security Manager authenticate only once during the Windows login:
1. Click Start > All Programs > HP > HP ProtectTools Administrative Console.
2. In the left Tools pane, select Authentication from the Security group.
3. Click the Session Policy tab and select Do not require authentication from the drop-down menu
under Policy.
4. Click the Apply button when complete.
Credential Manager for HP ProtectTools (Password Manager)
Passwords! We all have quite a number of them – especially if you regularly access websites or use
applications that require you to log in. The normal user either uses the same password for every
application and website, or gets really creative and promptly forgets which passwords goes with which
application.
Wouldn’t it be nice to have software automatically remember your passwords to sites that are not critical
or give you the ability to discern which sites to remember and which to omit? Credential Manager for
HP ProtectTools is the answer. Credential Manager is the password manager that provides you with
that capability. Once you sign on to the PC, Credential Manager will provide your passwords or
credentials as needed.
When you access any application or website requiring credentials, Credential Manager will automatically
recognize the site, and will ask if you want the software to remember your information. If you accept,
you will never need to remember that password again. You can decline the request to remember your
information if you want to exclude certain sites.
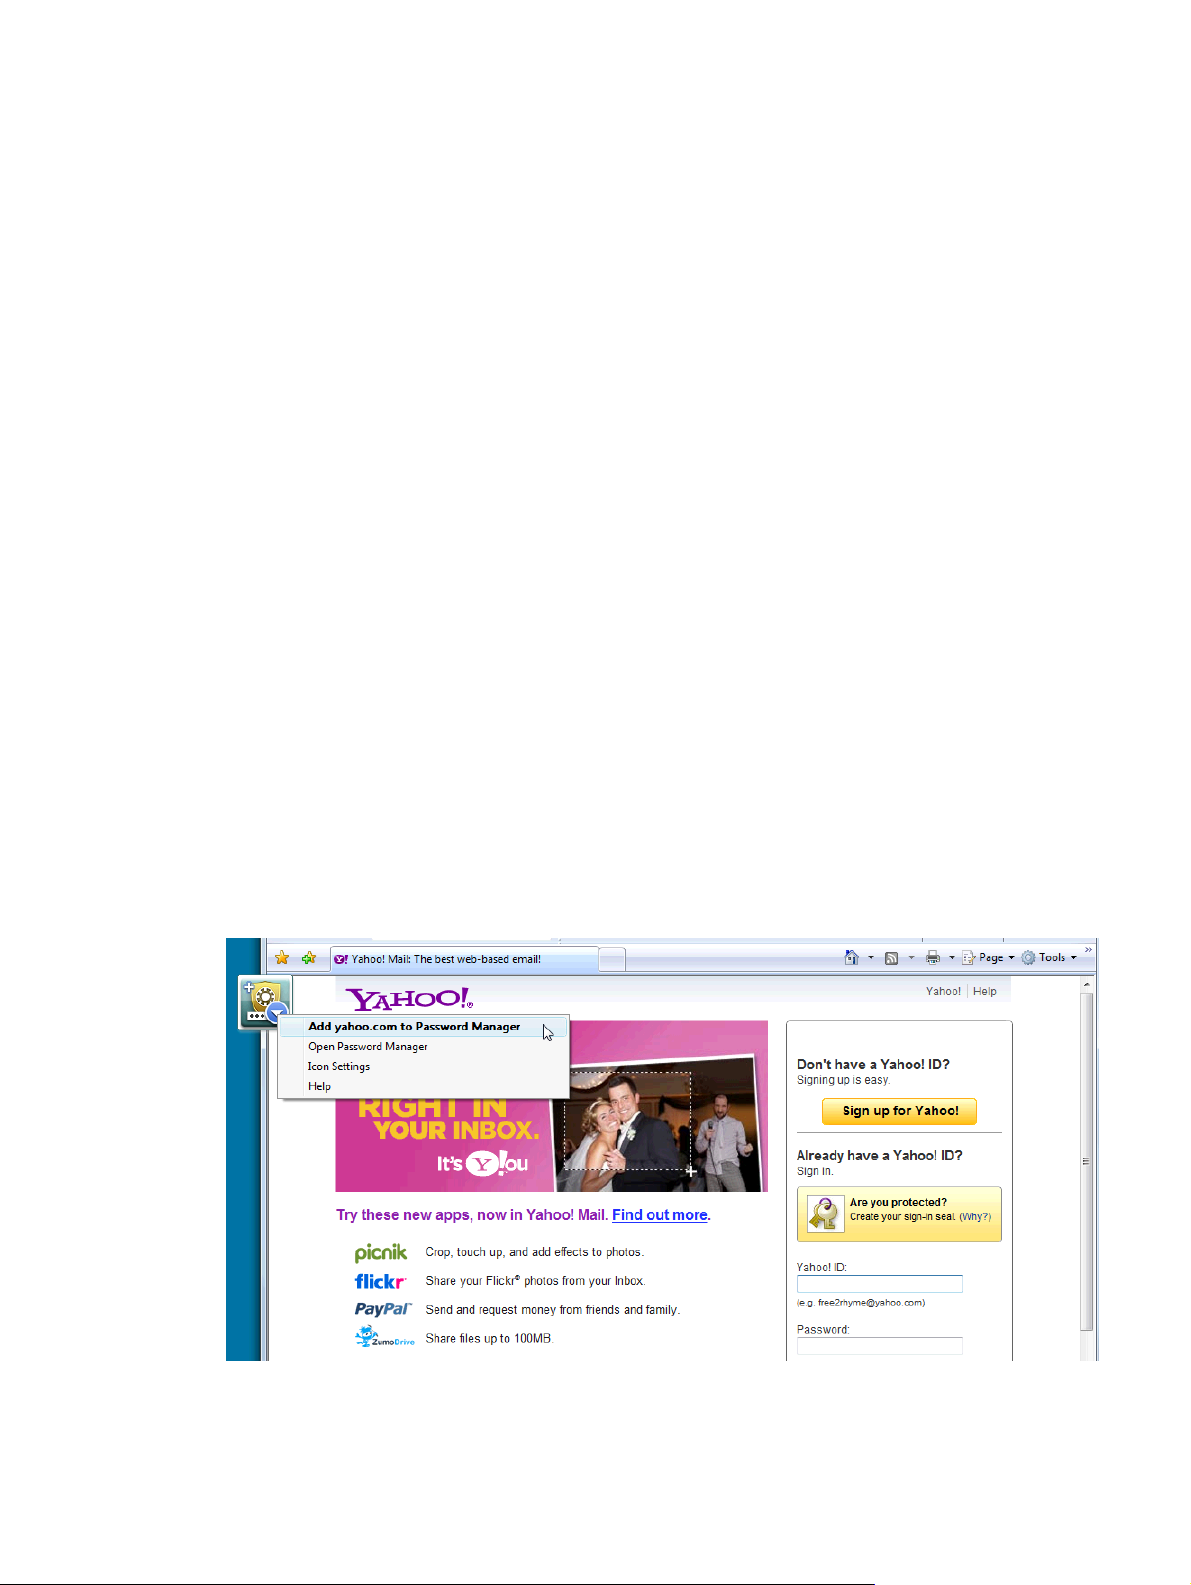
To Start saving web locations, user names, and passwords:
1. As an example, navigate to your web mail account and tell Credential Manager (click on the icon)
to add the web authentication.
6 Chapter 2 Easy Setup Guide for the most useful options ENWW
Page 15
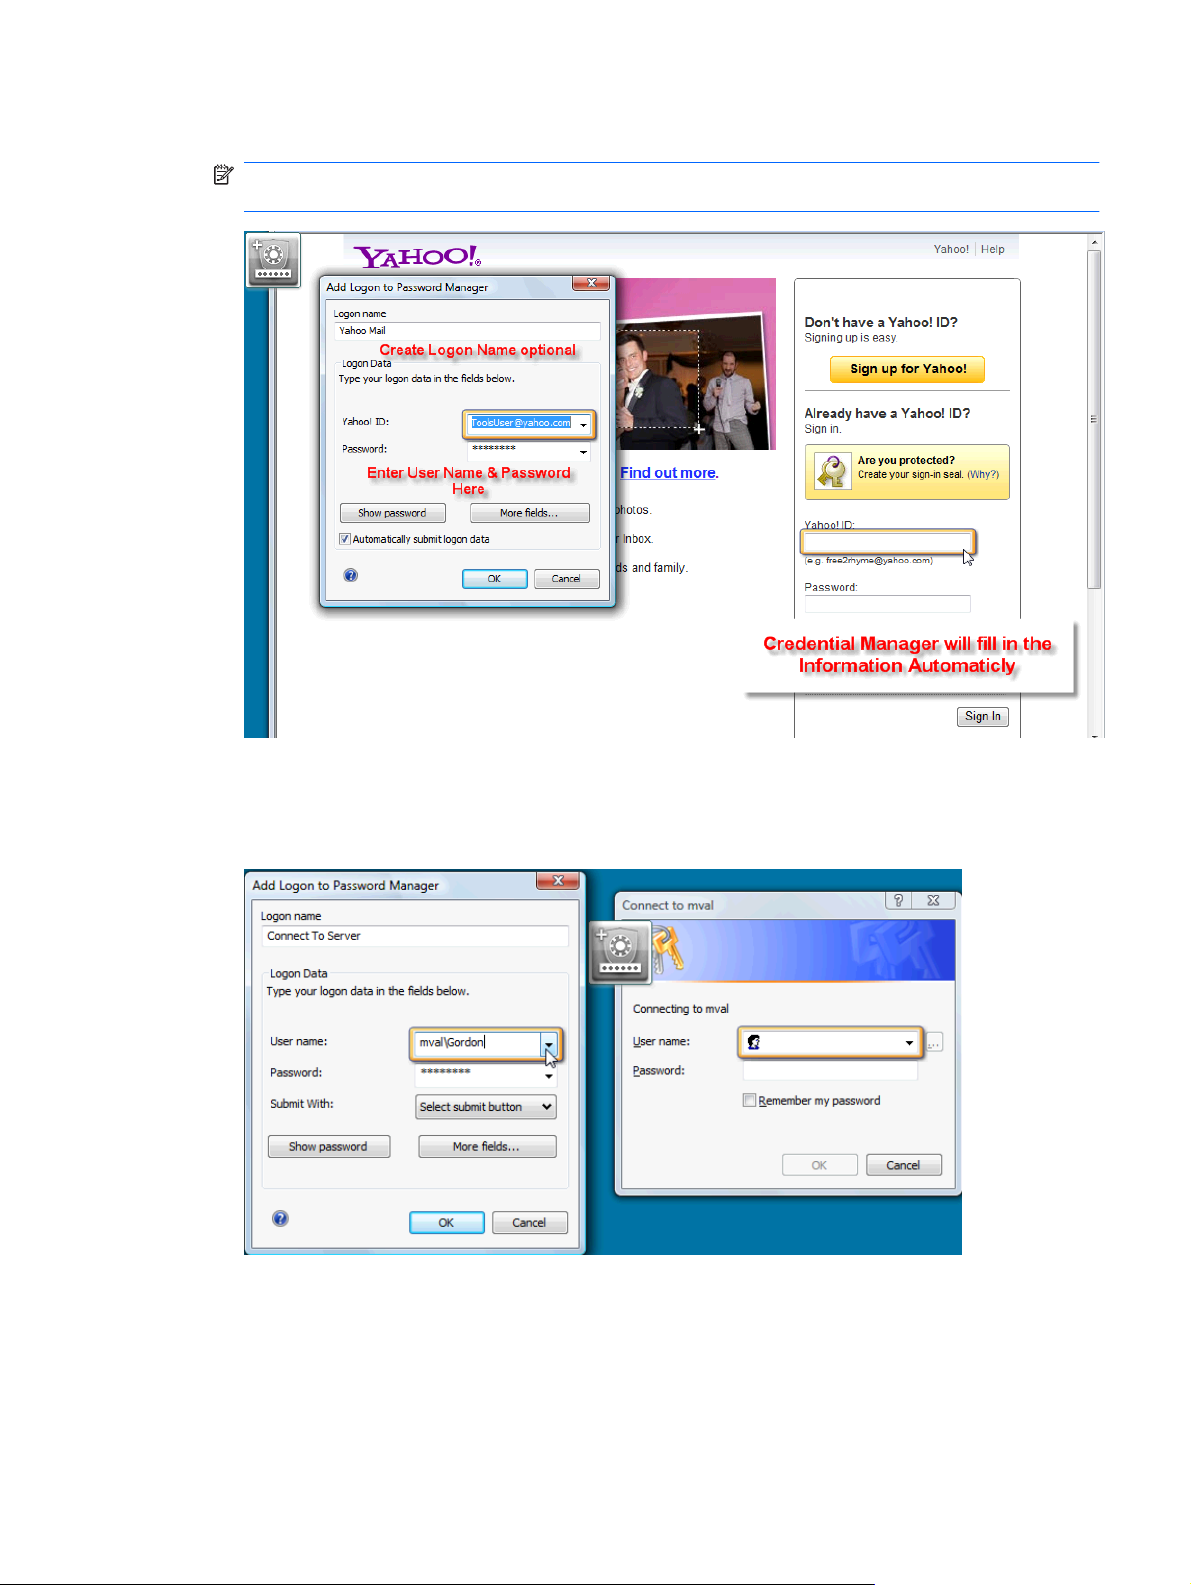
2. Name the link (optional) and enter a user name and password into Credential Manager.
NOTE: The web page will highlight the areas Credential Manager will use now and for subsequent
visits.
3. When complete, click the OK button.
4. Credential Manager can also save your user name and passwords for network shares or mapping
network drives.
Viewing and managing the saved authentications in Credential Manager
The advantages of Credential Manager are you can view, manage, back up, and launch your
authentications from a central location. Credential Manager will also support the launching of saved
sites from Windows.
ENWW Credential Manager for HP ProtectTools (Password Manager) 7
Page 16
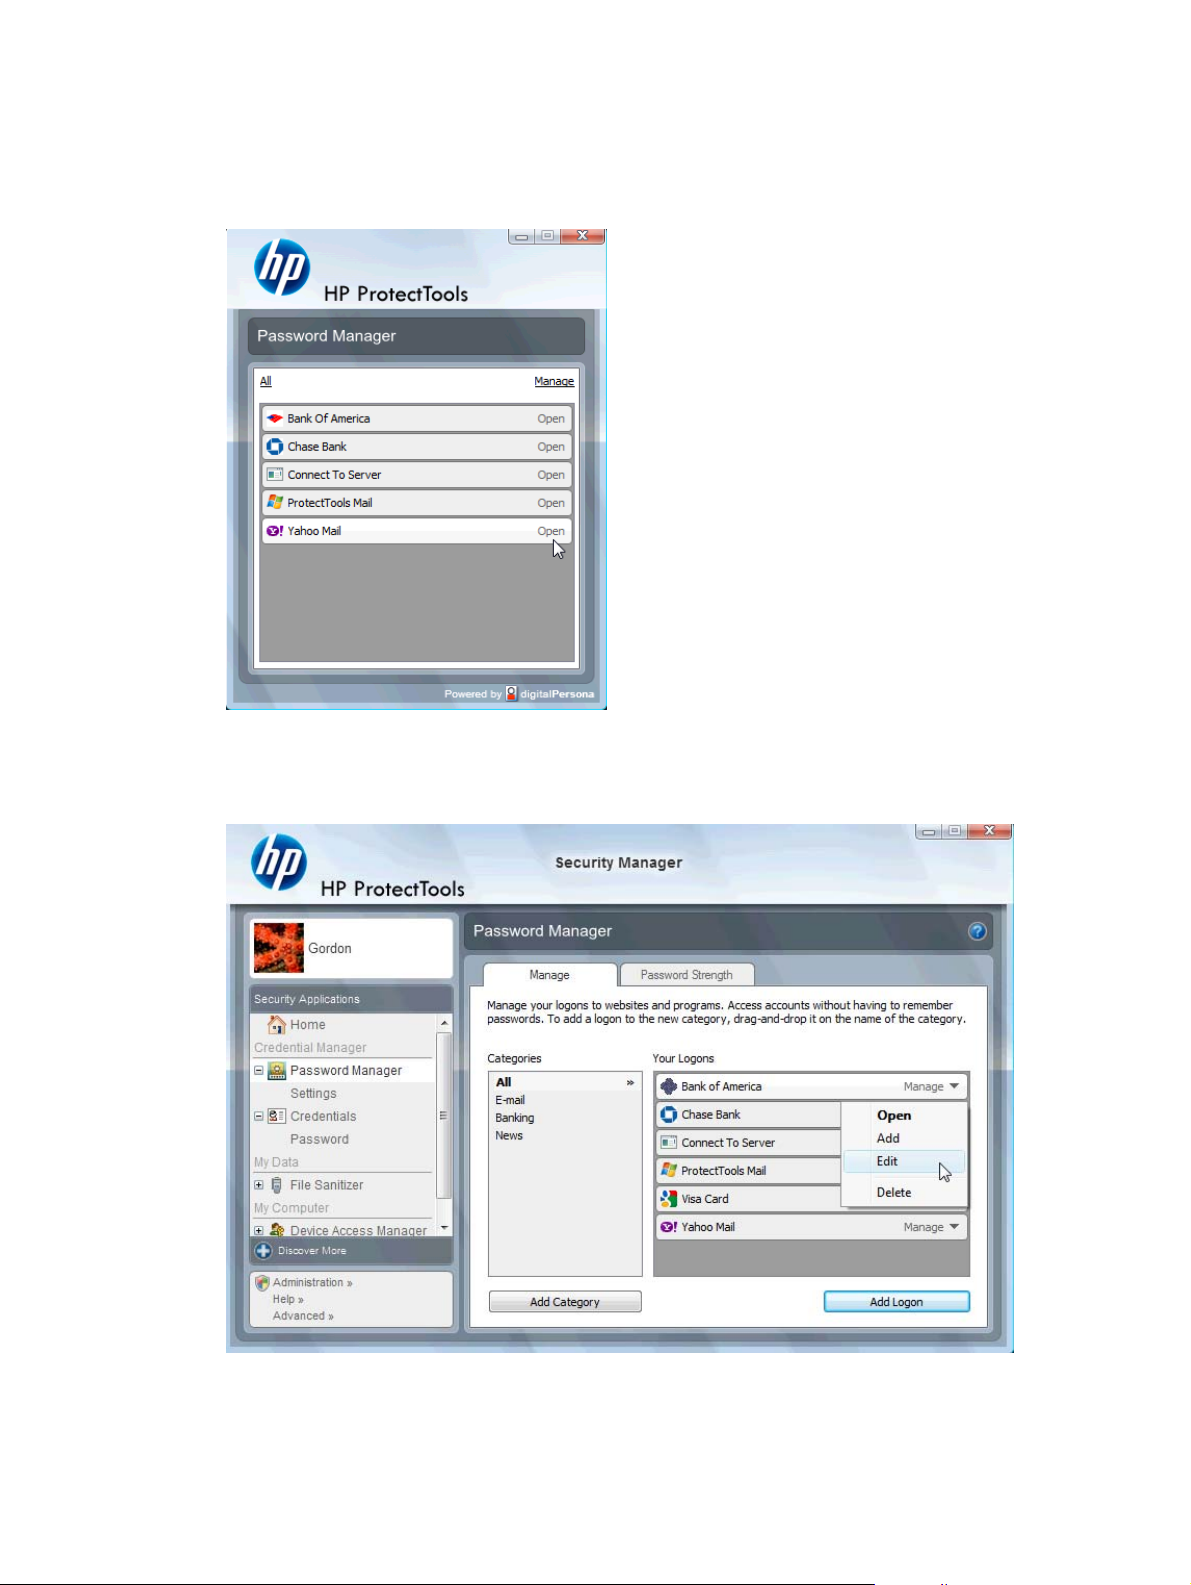
To open Password Manager, use one of the following two methods:
Use the keyboard combination of Ctrl + Windows + H to open the Password Manager. Selecting
●
Open will quick launch and authenticate the saved shortcut.
OR
Select the Manage tab in Password Manager to open HP ProtectTools Security Manager where
●
the credentials can be edited.
8 Chapter 2 Easy Setup Guide for the most useful options ENWW
Page 17
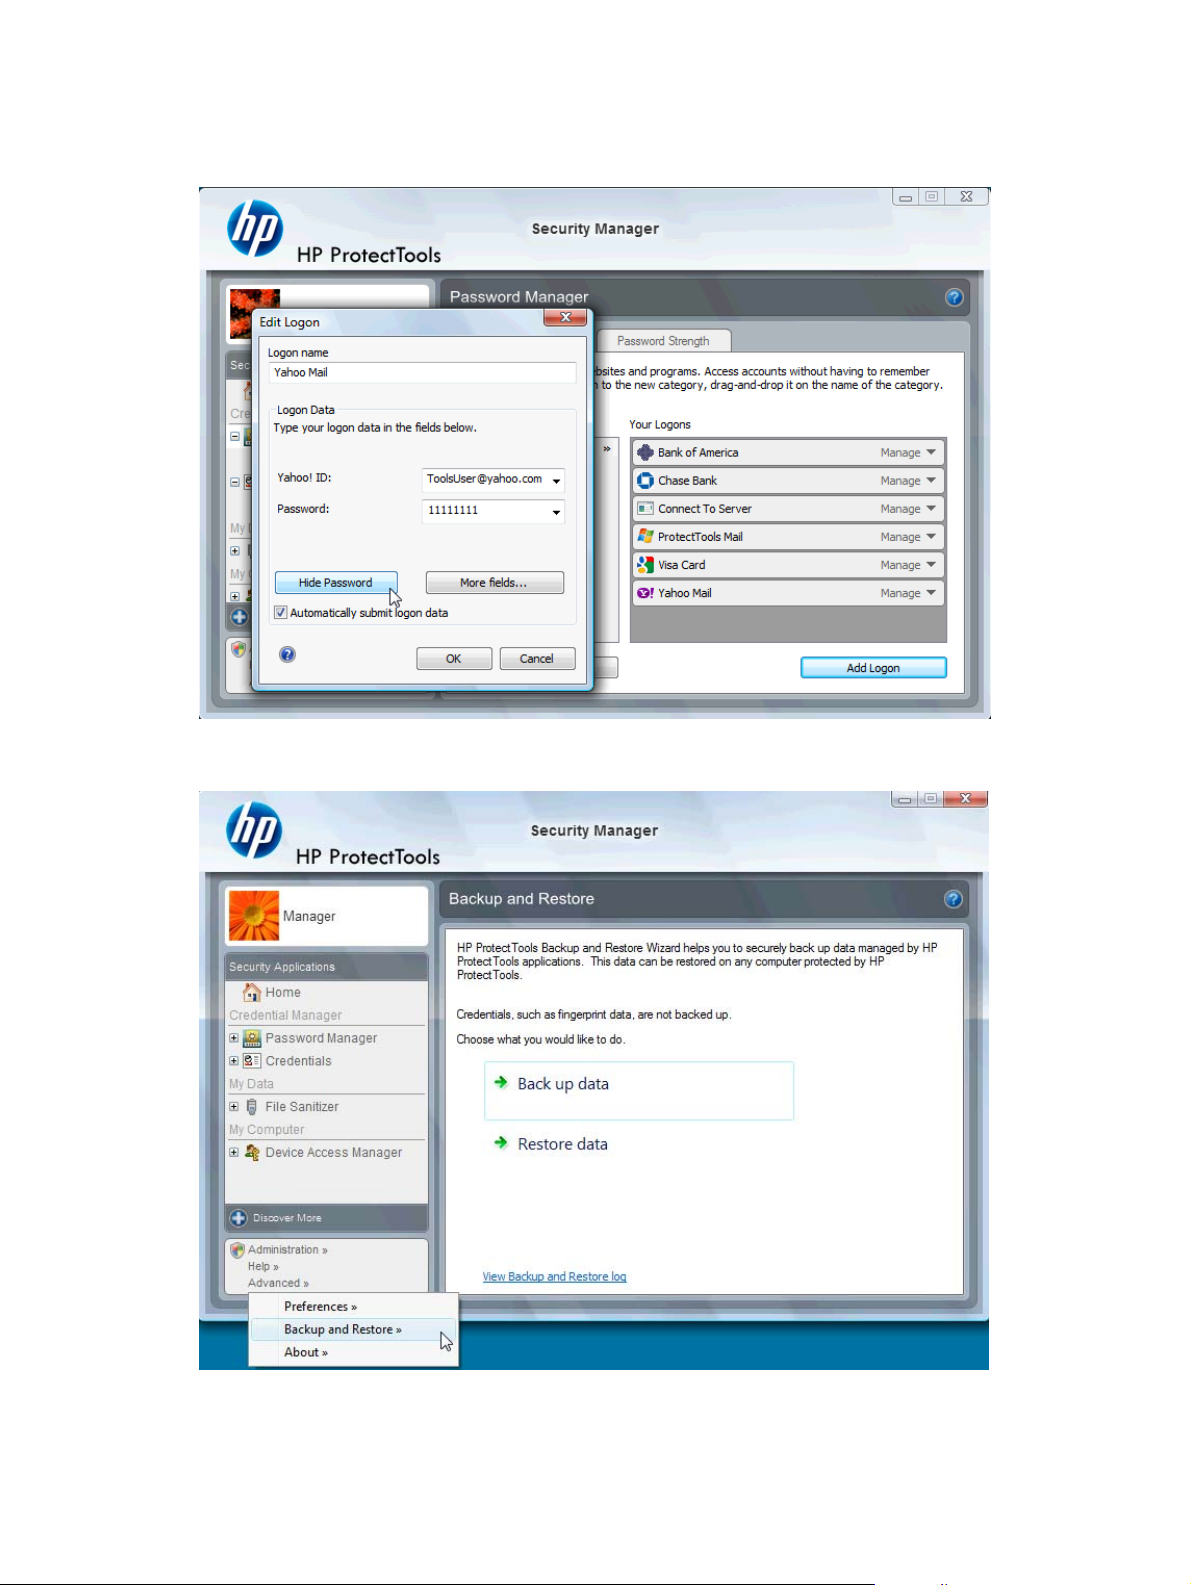
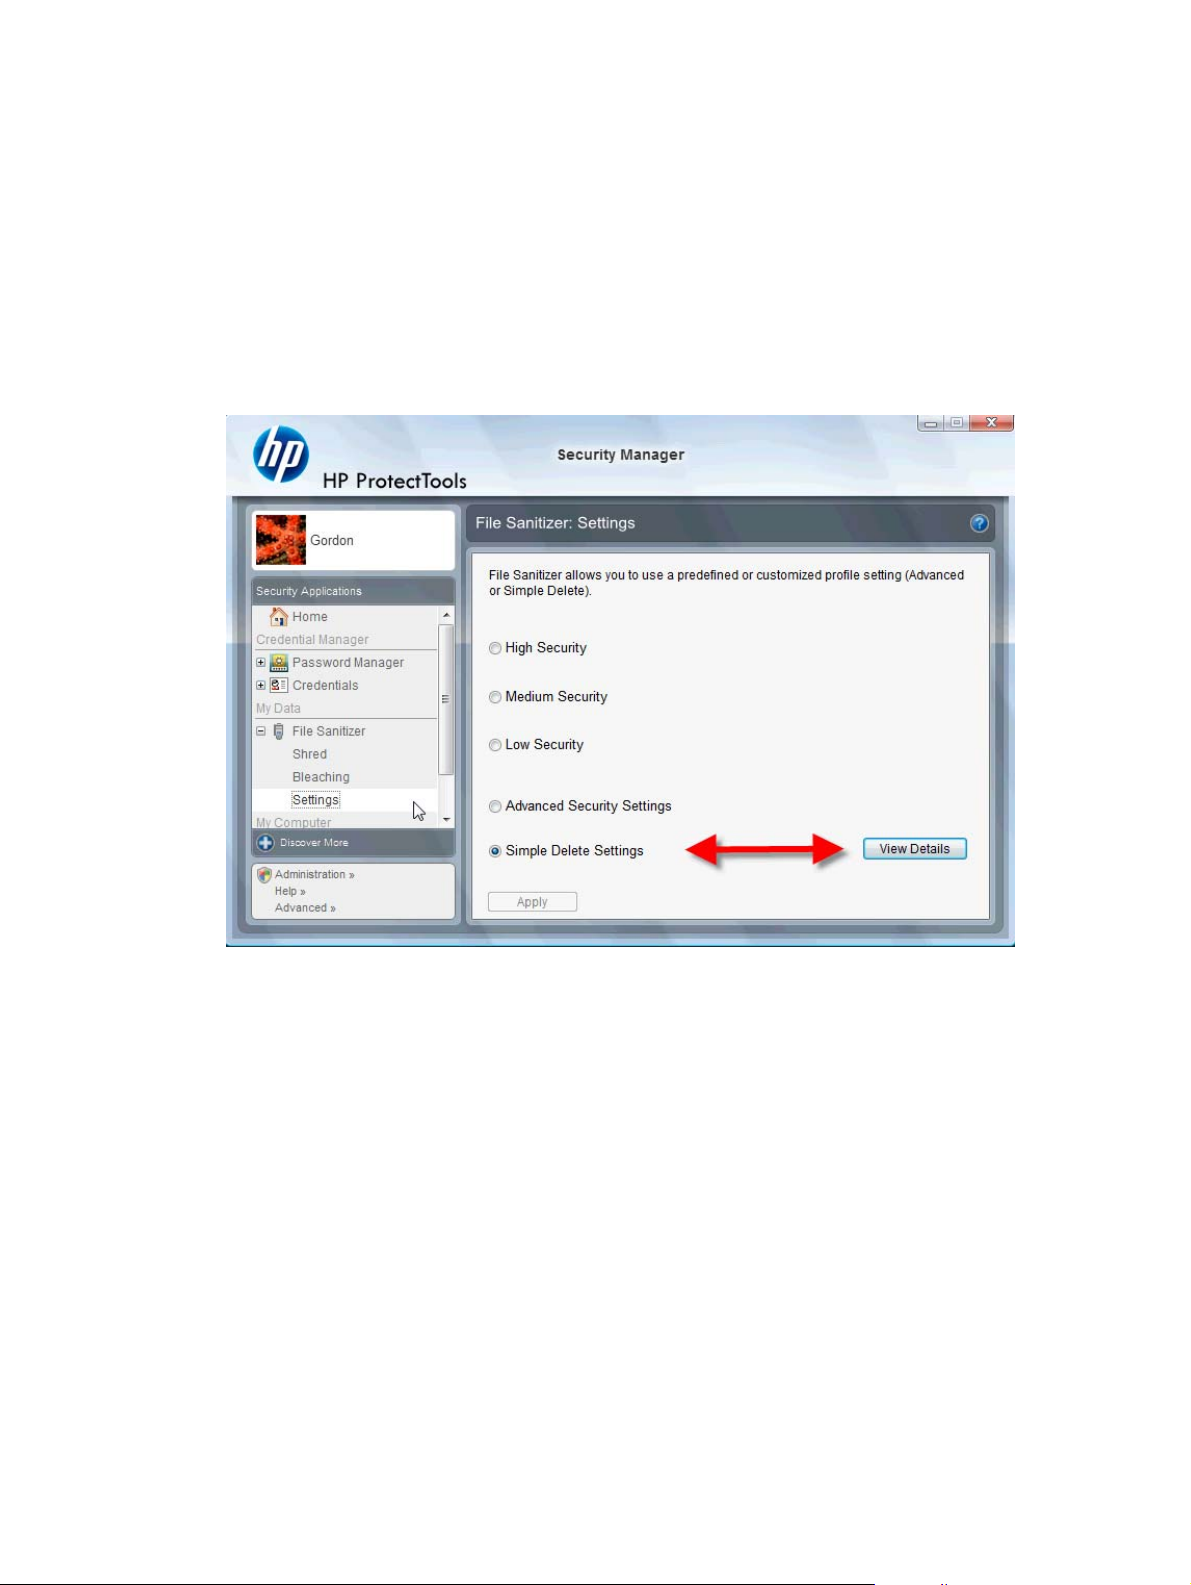
Credential Manager’s Edit option will allow you to view and modify the name, login name, and even
reveal the passwords.
HP ProtectTools for Small Business will allow all credentials and settings to be backed up and/or copied
to another PC.
ENWW Credential Manager for HP ProtectTools (Password Manager) 9
Page 18
File Sanitizer for HP ProtectTools
File Sanitizer is designed to make it very difficult for an unauthorized person to recover data you have
deleted. There are multiple options available to you to manually erase or to establish a regular schedule
to erase selected files and folders including browser history.
Below are some simple configuration settings.
To start permanently erasing your deleted data, select the file or folders you no longer need.
1. Navigate to Security Manager > File Sanitizer > Settings. Select Simple Delete Settings and
click the View Details button.
10 Chapter 2 Easy Setup Guide for the most useful options ENWW
Page 19

2. Select the items on the right side of the Simple Delete Settings window that you want to permanently
delete on a regular basis and click the <-Add button to move the selected items to the Delete side.
3. Start with Recycle Bin and add other items you may want to erase by Shredding.
4. Click the Apply button when you have selected everything you want permanently erased
ENWW File Sanitizer for HP ProtectTools 11
Page 20

5. Navigate to the Shred option and configure when you want the action to take place. The Shred
Now button will immediately erase the items selected in the Simple Delete Settings window you
just configured.
6. A small popup bubble will appear in the task bar each time the Shred is started and complete.
12 Chapter 2 Easy Setup Guide for the most useful options ENWW
Page 21

Device Access Manager for HP ProtectTools
Device Access Manager can be used to restrict the use of various internal and external storage devices
so your data will remain secured on the hard drive and not walk out the door of your business. An
example would be to allow a user access to your data but block them from copying it to a CD, personal
music player, or USB memory device. Below is an easy way to set this up.
1. Click Start > All Programs > HP > Administrative Console > Device Access Manager > Simple
Configuration.
2. Select the hardware devices you want to restrict and click the Apply button to finish the process.
3. The next step below is to select who will continue to have access while everyone else is blocked.
4. Navigate to and select My Computer, right-click and select Manage > Computer
Management > System Tools > Local Users and Groups > Users.
5. Double-click the user (in this example “Manager”) that you want to retain access to the blocked
hardware.
ENWW Device Access Manager for HP ProtectTools 13
Page 22

6. Under the Member Of tab, click the Add button.
7. In the Select Groups window you can either use the Advanced option or just type in “Device
Administrators” group. Click the OK button and finish closing the windows by clicking the OK
buttons. You must log off and log back on to get the permissions.
Now all the internal and external storage drives including CD drives, USB drives, personal music players,
etc. will not function except for the person(s) included in the “Device Administrators” group.
14 Chapter 2 Easy Setup Guide for the most useful options ENWW
Page 23

Drive Encryption for HP ProtectTools
Drive Encryption for HP ProtectTools is software that is used to protect your data by encrypting the entire
hard drive. The data on your hard drive will stay protected if your PC is ever stolen and/or if the hard
drive is removed from the original system and placed in a different system.
A further security benefit is that Drive Encryption will require you to properly authenticate using your
user name and password before the system will boot. This process is called PreBoot Authentication.
To make it easy for you, Windows users, domains, Credential Manager for HP ProtectTools, and HP
ProtectTools Security Manager all interface with Drive Encryption to allow easy password
synchronization.
Use the following simple steps to activate Drive Encryption for HP ProtectTools.
1. Click Start > All Programs > HP > HP ProtectTools Administrative Console > Management
Tools > Setup Wizard. The following screen is displayed
2. Select Next in the Welcome! screen.
3. Windows password is required to start the activation wizard > Next.
4. Check the Drive Encryption box and select Next.
ENWW Drive Encryption for HP ProtectTools 15
Page 24
5. The Drive Encryption configuration window below displays the drives available to be encrypted and
will require a USB flash drive to store the encryption recovery key. Keep this recovery key safe and
secure because it is used to recover data or access the drive if the pre-boot password is lost or
fails.
6. Select Next, complete the process, and select Finish. When prompted, remove the USB flash
drive and reboot the system when ready.
7. When the system boots to the hard drive, Drive Encryption will request your Windows password.
Enter the password and click OK.
NOTE: The computer may appear to run slowly while the drive is encrypting. Once totally
encrypted, the system will return to normal. As data on the drive is accessed, it will be encrypted
or decrypted as needed.
Also note that Drive Encryption authentication will “chain” through Credential Manager Windows
login directly to the desktop without having to enter your password twice.
16 Chapter 2 Easy Setup Guide for the most useful options ENWW
Page 25

3 Benefits of HP ProtectTools for Small
Business
Accessing HP ProtectTools for Small Business Security Software
To access HP ProtectTools Security Manager from the Windows Start menu:
In Windows, click Start, click All Programs, and then click HP ProtectTools Security Manager.
▲
To access HP ProtectTools Security Manager Administrative Console from the Windows Start menu:
In Windows, click Start, click All Programs, and then click HP ProtectTools Administrative
▲
Console.
Achieving key security objectives
The HP ProtectTools modules can work together to provide solutions for a variety of security issues,
including the following key security objectives:
Restricting access to sensitive data
●
Preventing unauthorized access from internal or external locations
●
Creating strong password policies
●
Restricting access to sensitive data
Suppose a contract auditor is working on site and has been given computer access to review sensitive
financial data; you do not want the auditor to be able to print the files or save them to a writeable device
such as a CD. The following feature helps restrict access to data:
Device Access Manager for HP ProtectTools allows administrators to restrict access to writeable devices
so sensitive information cannot be printed or copied from the hard drive onto removable media. See
Device class configuration (advanced) on page 45.
ENWW Accessing HP ProtectTools for Small Business Security Software 17
Page 26

Preventing unauthorized access from internal or external locations
Unauthorized access to an unsecured business PC presents a very tangible risk to critical data such as
information from financial services, an executive, or R&D team, and to private information such as patient
records or personal financial records. The following features help prevent unauthorized access:
The pre-boot authentication feature, if enabled, helps prevent access to the operating system. See
●
the following chapters:
Credential Manager for HP ProtectTools (Password Manager) on page 34
◦
Drive Encryption for HP ProtectTools on page 31
◦
Credential Manager for HP ProtectTools helps ensure that an unauthorized user cannot get
●
passwords or access to password-protected applications. See the following chapter
Credential Manager for HP ProtectTools (Password Manager) on page 34
◦
Device Access Manager for HP ProtectTools allows administrators to restrict access to writeable
●
devices so sensitive information cannot be copied from the hard drive. See the following chapter:
Device Access Manager for HP ProtectTools on page 44
◦
File Sanitizer allows you to securely delete data by shredding critical files and folders or bleaching
●
the hard drive (write over data that has been previously deleted but is still present on the hard drive
in order to make recovery of the data more difficult). See the following chapter:
File Sanitizer for HP ProtectTools on page 38
◦
Creating strong password policies
If you require the use of strong password policy (a complicated password that is difficult to hack) for
dozens of Web-based applications and databases, Credential Manager for HP ProtectTools provides a
protected repository for passwords and Single Sign On convenience. See the following chapter:
Credential Manager for HP ProtectTools (Password Manager) on page 34
●
Additional security elements
Assigning security roles
To properly protect the data, one important practice is to divide responsibilities and rights among various
types of administrators and users.
NOTE: In a small organization or for individual use, these roles may all be held by the same person.
For HP ProtectTools for Small Business, the security duties and privileges can be divided into the
following roles:
Administrator—Applies and manages the security features. Can also enable and disable some
●
features.
User—Uses the security features.
●
18 Chapter 3 Benefits of HP ProtectTools for Small Business ENWW
Page 27

Managing HP ProtectTools passwords
Most of the HP ProtectTools Security Manager features are secured by passwords. The following table
lists the commonly used passwords, the software module where the password is set, and the password
function.
The passwords that are set and used by administrators only are indicated in this table as well. All other
passwords may be set by regular users.
HP ProtectTools password Set in this HP ProtectTools
Password Manager logon
password
Computer Setup password
NOTE: Also known as BIOS
administrator, F10 Setup, or
Security Setup password
Power-on password BIOS Protects access to the computer contents
Windows Logon password Windows Control Panel Can be used for manual logon.
Creating a secure password
module
Password Manager This password offers 2 options:
BIOS, by administrator Protects access to the Computer Setup
Function
It can be used in a separate logon to
●
access Password Manager after
logging on to Windows.
It can be used in place of the Windows
●
logon process, allowing access to
Windows and Password Manager
simultaneously.
utility.
when the computer is turned on, restarted,
or restored from hibernation.
When creating passwords, you must first follow any specifications that are set by the program. In
general, however, consider the following guidelines to help you create strong passwords and reduce
the chances of your password being compromised:
Use passwords with more than 6 characters, preferably more than 8.
●
Mix the case of letters throughout your password.
●
Whenever possible, mix alphanumeric characters and include special characters and punctuation
●
marks.
Substitute special characters or numbers for letters in a key word. For example, you can use the
●
number 1 for letters I or L.
Combine words from 2 or more languages.
●
Split a word or phrase with numbers or special characters in the middle, for example,
●
“Mary2-2Cat45.”
Do not use a password that would appear in a dictionary.
●
Do not use your name for the password, or any other personal information, such as birth date, pet
●
names, or mother's maiden name, even if you spell it backwards.
ENWW Additional security elements 19
Page 28

Change passwords regularly. You might change only a couple of characters that increment.
●
If you write down your password, do not store it in a commonly visible place very close to the
●
computer.
Do not save the password in a file, such as an e-mail, on the computer.
●
Do not share accounts or tell anyone your password.
●
Backing up credentials and settings
Use the Backup and Recovery tool in HP ProtectTools Security Manager as a central location from
which you can back up and restore security credentials from installed HP ProtectTools modules.
20 Chapter 3 Benefits of HP ProtectTools for Small Business ENWW
Page 29

4 HP ProtectTools Security Manager
Administrative Console
About HP ProtectTools Administrative Console
Administration of HP ProtectTools Security Manager is provided through the Administrative Console.
Using the console, the local administrator can:
Enable or disable security features
●
Manage users of the computer
●
Adjust device-specific parameters
●
Configure Security Manager applications
●
Add additional Security Manager applications
●
Using the Administrative Console
The Security Manager Administrative Console is the central location for administering HP ProtectTools
Security Manager.
To open the console:
Select Start > All Programs > HP ProtectTools Administrative Console, or
●
Click the Administration link in the lower-left corner of the Security Manager console.
●
The Administrative Console consists of two panes: a left pane and a right pane. The left pane contains
the administrative tools. The right pane contains the working area for configuring the tools.
The Administrative Console left pane consists of the following:
Home - Provides easy access to commonly used tasks, including enabling security features,
●
specifying security credentials, and managing users.
System - Manages configuration of system-wide security features, users, and authentication
●
devices such as smart card readers.
Applications - Includes tools for configuring the behavior of Security Manager and its applications.
●
Data - Provides tools for backing up and recovering encryption keys.
●
ENWW About HP ProtectTools Administrative Console 21
Page 30

Computer - Provides advanced security options to selectively disallow various types of devices
●
that could compromise PC security and set access permissions for various users and groups.
Management Tools - Opens your default browser to a web page where you can discover additional
●
management applications and tools that extend the features of Security Manager as well as a
means to stay notified when new applications and updates are available.
Links - Provides the following:
●
Setup Wizard - Launches the Setup Wizard, which guides you through the initial configuration
◦
of Security Manager.
Help - Opens the help file, which provides information about Security Manager and its
◦
applications.
About - Displays information about Security Manager, including the version number and
◦
copyright notice.
Getting Started with the Setup Wizard
Administration of HP ProtectTools Security Manager requires administrative privileges.
The HP ProtectTools Security Manager Setup Wizard guides you through setting up the security
features. However, there is a wealth of additional functionality available through the HP ProtectTools
Security Manager Console. The same settings found in the wizard, as well as additional security
features, can be configured through the console, accessed from the Windows Start menu or from a link
within the Administrative console. These settings apply to the computer and all users who share the
computer.
The first time that you log on to Windows, you will be prompted to set up HP ProtectTools Security
Manager. Click OK to launch the Security Manager Setup wizard, which will guide you through the basic
steps in configuring the program.
NOTE: You can also launch the Security Wizard by clicking Security Wizard in the bottom section of
the left pane on the Administrative Console.
Follow the on-screen instructions in the Setup Wizard until setup is complete.
If you do not complete the wizard, it will launch automatically until you click Do not show this wizard
again.
To use the HP ProtectTools Security Manager applications, launch HP ProtectTools Security Manager
from the Start menu or by right-clicking the Security Manager icon in the taskbar notification area
(system tray). The Security Manager console and its applications are available to all users who share
this computer.
Configuring your system
The System group of applications is accessed from the Tools menu on the left side of the Administrative
Console.
By using the applications included in this group, you can configure and manage the policies and settings
for this computer, its users and devices.
22 Chapter 4 HP ProtectTools Security Manager Administrative Console ENWW
Page 31

The following applications are included in the System group.
Security - Manage security features, authentication policies and other settings that govern how
●
users authenticate when logging on to the computer or HP ProtectTools applications.
Users - Set up, manage and enroll users of this computer.
●
Devices - Manage settings for security devices built-in or connected to the computer.
●
Enabling security features
The security features enabled here apply to all users of this computer.
1. In the left pane of the Administrative Console, expand Security, and click on Features.
2. To enable a security feature, click the corresponding check box next to Windows Logon
Security and/or Drive Encryption.
Windows Logon Security - protects your Windows account(s) by requiring the use of specific
●
credentials for access.
Drive Encryption - protects your data by encrypting your hard drive(s), making the
●
information unreadable by those without proper authorization.
3. Click the Next button.
4. Click the Apply button.
Defining Security Manager authentication policies
Security Manager authentication policies for this computer are defined on two tabs, Logon and Session,
which specify the credentials required to authenticate each class of user when accessing the computer
and HP ProtectTools applications during a user session.
Logon tab
To specify the credentials required to access the computer and log on to Windows:
1. In the left pane of the Administrative Console, expand Security and click on Authentication.
2. On the Logon tab, select a category of user from the drop-down list.
3. In the Policy section, specify the authentication credential(s) required for the selected category of
user by clicking the check box or boxes next to the listed credentials. You must specify at least one
credential.
4. In the Policy section drop-down list, choose whether ANY (only one) of the specified credentials
are required, or if ALL of the specified credentials are required in order to authenticate a user.
5. Click the Apply button.
Session tab
To define policies governing the credentials required to authenticate a user when logging on to
HP ProtectTools applications during a Windows session:
1. In the left pane of the Administrative Console, expand Security and click on Authentication.
2. On the Session tab, select a category of user.
ENWW Configuring your system 23
Page 32

3. In the Policy section, specify the authentication credential(s) required for the selected category of
user by clicking the check box or boxes next to the listed credentials. You must specify at least one
credential.
4. In the Policy section drop-down list, choose whether ANY (only one) of the specified credentials
are required, or if ALL of the specified credentials are required in order to authenticate a user.
5. Click the Apply button.
Defining Settings
You can specify which advanced security settings to allow. To edit the settings:
1. In the left pane of the Administrative Console, expand Security and click on Settings.
2. Click the appropriate check box to enable or disable a specific setting.
3. Click the Apply button to save the changes.
NOTE: The Allow One Step logon setting allows users of this computer to skip Windows logon if
authentication was performed at the BIOS level.
Managing Users
Within the Users application, Windows administrator can manage this computer's users and the policies
that affect them. To access the Users application in the Administrative Console, click on Users.
The HP ProtectTools users are listed and verified against the authentication policies set through Security
Manager and against the credentials required to meet those policies.
To view the policies in force for a specific user, select the user from the list and click the View
Policies button.
To supervise a users while they enroll credentials, select the user from the list and click the Enroll button.
Adding a user
This process adds users to the logon list. Before you add a user, that user must already have a Windows
user account on the computer and must be present during the following procedure to provide the
password.
To add a User to the users list:
1. Click Start, click All Programs, and then click HP ProtectTools Administrative Console.
2. In the Administrative Console left pane, click User.
3. Click the Add button. The Select Users dialog box opens
4. Click the Advanced button and then click the Find Now button to search for users to add.
5. Click a user to be added to the list and then click OK.
6. Click OK in the Select Users dialog box.
7. Type the Windows password for the selected account, and then click Finish.
NOTE: You must use an existing Windows account and type it exactly. You cannot modify or add
a Windows user account using this dialog box.
24 Chapter 4 HP ProtectTools Security Manager Administrative Console ENWW
Page 33

Removing a user
NOTE: This procedure does not delete the Windows user account. It only removes that account from
Security Manager. To completely remove the user, you must remove the user from both Security
Manager and Windows.
1. Click Start, click All Programs, and then click HP ProtectTools Administrative Console.
2. In the Administrative Console left pane, click User.
3. Click the user name for the account you want to remove, and then click Delete.
4. In the confirmation dialog box, click Yes.
Checking user status
The User section of the Administrative Console shows the current status of each user:
Green check mark - Indicates that the user has configured the required security login method(s).
●
Red X - Indicates that the user has not configured a required security login method and will be
●
locked out of the computer when trying to log in. The user must run the setup wizard to configure
the required login method(s).
Blank - Indicates that a security login method is not required.
●
Configuring Applications Settings
The Settings window includes tools for configuring the behavior of Security Manager and its applications.
To modify the settings:
1. Click Start, click All Programs, and then click HP ProtectTools Administrative Console.
2. In the Administrative Console left pane, click Settings.
3. On the General tab, choose the general settings for HP ProtectTools Security Manager, then click
the Apply button.
4. On the Applications tab, select the applications you want to enable or disable, then click the
Apply button.
NOTE: Enabling or disabling an application may not take effect until the computer is restarted.
Encrypting Drives
Drive Encryption for HP ProtectTools allows you to encrypt computer hard drives, making the hard drive
unreadable and inaccessible to any unauthorized person who might try to access it even if the drive has
been removed from the computer or sent to a data recovery service.
To enable or disable Drive Encryption, click on the Setup Wizard in the Administrative Console.
CAUTION: It is important that you back up encryption keys to a USB flash drive and store the device
in a safe place. If you forget your password, this device provides your only access to your hard drive.
For more information on using Drive Encryption for HP ProtectTools, refer to Drive Encryption for
HP ProtectTools on page 31.
ENWW Configuring Applications Settings 25
Page 34

Managing Device Access
Device Access Manager for HP ProtectTools provides advanced security options to selectively disallow
various types of devices that can compromise the security of your PC. For more information on using
Device Access Manager for HP ProtectTools, refer to
on page 44.
Device Access Manager for HP ProtectTools
26 Chapter 4 HP ProtectTools Security Manager Administrative Console ENWW
Page 35

5 HP ProtectTools Security Manager
HP ProtectTools Security Manager allows you to significantly increase the security of your computer.
Through the use of Security Manager applications, you can:
Manage your logon and passwords
●
Easily change your Windows password
●
Set up authentication credentials, including a smart card
●
Shred or bleach your hard drive
●
View drive encryptions status
●
View device access settings
●
Back up and restore Security Manager data
●
Managing passwords
Credential Manager for HP ProtectTools (Password Manager) creates and manages logons, which allow
you to launch and log on to websites and programs by authenticating with your enrolled credentials.
For more information on managing passwords, refer to
(Password Manager) on page 34.
Setting credentials
You use your Security Manager Credentials to verify that you are really you. The administrator of this
computer can set up which credentials may be used to prove your identity when logging onto your
Windows account, websites, or programs.
Available credentials can vary depending on the security device built in or connected to the computer.
Each supported credential will have an entry in the Credentials group.
Changing your Windows password
Security Manager makes changing your Windows password simpler or quicker than doing it through the
Windows Control panel.
To change your Windows password:
1. In HP ProtectTools Security Manager, click Credentials in the left pane.
Credential Manager for HP ProtectTools
2. Click Windows Password.
ENWW Managing passwords 27
Page 36

3. Type your current password in the Current Windows password box.
4. Type your new password in the New Windows password and Confirm new password boxes.
5. Click Change.
Shredding or bleaching files
File Sanitizer for HP ProtectTools deletes files by overwriting them with meaningless data. This process,
referred to as “shredding,” greatly enhances information security by making the deleted files very difficult
to recover. File Sanitizer further enhances information security by overwriting previously used space on
the hard drive using a process referred to as “bleaching.” Files deleted using File Sanitizer cannot be
recovered by the Operating System or other commonly available file recovery software.
For more information on using File Sanitizer for HP ProtectTools, refer to
HP ProtectTools on page 38.
Viewing drive encryption status
Drive Encryption is set up by the Windows Administrator in the Administrative Console. Users can view
their encryptions status in Security Manager.
To view drive encryption status:
1. Click Start, click All Programs, and then click HP ProtectTools Security Manager.
2. In the Security Manager left pane, click Encryption Status. The Encryption Status page shows if
drive encryption is active or inactive and which drives are encrypted or not encrypted.
Viewing device access
Device Access is set up by the Windows Administrator in the Administrative Console. Users can view
their device access setting in Security Manager.
To view device access settings:
1. Click Start, click All Programs, and then click HP ProtectTools Security Manager.
2. In the Security Manager left pane, expand Device Access Manager.
File Sanitizer for
3. To view which devices are denied access, click Simple Configuration. Devices with a check mark
next to them are denied access.
4. To view which users or groups are denied access, click Device Class Configuration.
5. Click on a device to see which users or groups are denied or allowed access to a device.
28 Chapter 5 HP ProtectTools Security Manager ENWW
Page 37

Adding applications
Additional applications may be available to add new features to this program.
1. Click Start, click All Programs, and then click HP ProtectTools Security Manager.
2. In the Security Manager left pane, click Discover More.
NOTE: If there is no Discover More link, it has been disabled by the administrator of your
computer.
3. On the Add Applications tab, browse for additional applications.
4. On the Updates and Messages tab, you can stay informed about new applications and updates
by clicking the Keep me informed about new applications and updates check box and setting
a number of days to check for updates, or you can click the Check Now button to immediately
check for updates.
Setting preferences
The Preferences page allows you to select the Show icon on the taskbar check box to display the
Security Manager icon in the taskbar notification area (system tray).
To access the Preferences page:
1. Click Start, click All Programs, and then click HP ProtectTools Security Manager.
2. In the Security Manager left pane, click Advanced, and then click Preferences.
3. Check or uncheck the Show icon on the taskbar check box and click Apply.
Backup and Restore
It is a good practice to backup your Security Manager data on a regular basis. How often you back it up
depends on how often the data changes. For instance, if you regularly add new logons on a daily basis,
you should probably back up your data daily.
Backups can also be used to migrate from one computer to another, also sometimes called importing
and exporting. Remember though, that only the data is backed up by this feature.
If you restore the backup file to another computer, or to the same computer after reinstalling the operating
system, the system must have HP ProtectTools Security Manager already installed before restoring the
data from the backup file.
Backing up your data
When you back up your data, you are saving your logons and credential information to an encrypted
file, protected by a password that you enter.
To back up your data:
1. Click Start, click All Programs, and then click HP ProtectTools Security Manager.
2. In the Security Manager left pane, click Advanced, and then click Backup and Restore.
3. Click Back up data.
ENWW Adding applications 29
Page 38

4. Select the modules that you want to include in the backup. In most cases, you will want to select
them all. Click Next.
5. Enter your password to verify your identity, then click the arrow button.
6. Enter a path and name for the storage file. By default, the file will be saved to your Documents
folder. Click Browse to specify a different location. Click Next.
7. Enter and confirm a password to protect the file.
8. Click Finish.
Restoring your data
You restore your data from a password-protected, encrypted file that was previously created through
Security Manager's Backup and Restore feature.
To restore your data:
1. Click Start, click All Programs, and then click HP ProtectTools Security Manager.
2. In the Security Manager left pane, click Advanced, and then click Backup and Restore.
3. Click Restore data.
4. Enter the path and name for the storage file or click Browse and select the file.
5. Enter the password used to protect the file and click Next.
6. Select the modules whose data you want to restore. In most cases, this would be all of the modules
listed. Click Next.
7. Click Finish.
Changing your Windows user name and picture
Your Windows user name and a picture are displayed in the upper left corner of Security Manager.
To change your user name and/or picture:
1. Click on the upper left section of Security Manager with your user name and picture.
2. To change your user name, type a name in the Windows user name box.
3. To change your picture, click the Choose Picture button and browse to select a picture.
4. Click the Save button to save your changes.
30 Chapter 5 HP ProtectTools Security Manager ENWW
Page 39

6 Drive Encryption for HP ProtectTools
NOTE: Drive Encryption for HP ProtectTools is available on some models only.
In today’s world, a computer belonging to you or anyone on your staff could be stolen, and critical
information about your company could be seriously compromised. Encrypting everything on your
computer hard drive makes it unreadable and inaccessible to any unauthorized person who might try
to access it even if the drive has been removed from the computer or sent to a data recovery service.
Drive Encryption for HP ProtectTools software provides complete data protection by encrypting your
hard drive. When Drive Encryption is activated, you must log in at the Drive Encryption login screen,
which is displayed before Windows starts up.
Drive Encryption does not prevent unauthorized access during the same windows session. Once the
PC is booted and you enter your user name and password, the data on the hard drive is still encrypted,
but it is available to any user of the system. Be sure to password protect your windows session when
away from your computer.
NOTE: Drive Encryption for HP ProtectTools can be enabled through the Setup Wizard in the
HP ProtectTools Administrative Console only.
NOTE: Drive Encryption is not supported on 64 bit operating systems when configured with RAID on
systems that use an AMD processor.
NOTE: Drive Encryption does not support Dictionary Attack prevention.
Drive Encryption:
Allows you to encrypt everything on your internal hard drives
●
Gives you easy password access and pre-boot authentication
●
Supports Microsoft Windows XP, Windows Vista, and Windows 7
●
Various tasks can be performed in Drive Encryption for HP ProtectTools:
Manage Drive Encryption
●
Encrypt or decrypt individual drives
◦
Backup and Recovery
●
Create backup keys
◦
Perform a recovery
◦
CAUTION: It is important that you back up encryption keys to a USB flash drive and store the device
in a safe place. If you forget your password, this device provides your only access to your hard drive.
ENWW 31
Page 40

CAUTION: If you decide to uninstall the Drive Encryption module or if you are using a backup and
restore solution, you must first decrypt all encrypted drives. If you do not, you will not be able to access
the data on encrypted drives. Reinstalling the Drive Encryption module will not enable you to access
the encrypted drives.
Setup procedures
Opening Drive Encryption
1. Click Start, click All Programs, and then click HP ProtectTools Administrative Console.
2. Click Drive Encryption.
General tasks
Activating Drive Encryption
Use the HP ProtectTools Administrative Console Setup Wizard to activate Drive Encryption.
Deactivating Drive Encryption
Use the HP ProtectTools Administrative Console Setup Wizard to deactivate Drive Encryption.
Logging in after Drive Encryption is activated
When you turn on the computer after Drive Encryption is activated and your user account is enrolled,
you must log in at the Drive Encryption logon screen:
NOTE: If the Windows administrator has enabled Pre-boot Security in the HP ProtectTools
Administrative Console, you will log in to the computer immediately after the computer is turned on,
rather than at the Drive Encryption logon screen.
NOTE: If you use a recovery key to log in at the Drive Encryption logon screen, you will also be
prompted to select your Windows user name and type your password at the Windows logon screen.
Advanced tasks
Managing Drive Encryption (administrator task)
The Drive Encryption window allows Windows administrators to view and change the status of Drive
Encryption (active or inactive) and to view the encryption status of all of the hard drives on the computer.
Encrypting or decrypting individual drives
1. In the Administrative Console left pane, expand Drive Encryption, and click Encryption
Management.
2. Click the Change Encryption button.
3. In the Change Encryption dialog box, select or clear the check box next to each hard drive you
want to encrypt or decrypt, and then click OK.
32 Chapter 6 Drive Encryption for HP ProtectTools ENWW
Page 41

NOTE: When the drive is being encrypted or decrypted, the progress bar shows the time remaining
to complete the process during the current session. If the computer is shut down or initiates Sleep or
Hibernation during the encryption process and then restarts, the Time Remaining display resets to the
beginning, but the actual encryption resumes where it last stopped. The time remaining and progress
display will change more quickly to reflect the previous progress.
Backup and recovery (administrator task)
The Drive Encryption: Backup and Recovery window allows Windows administrators to back up and
recover encryption keys.
Creating backup keys
CAUTION: Be sure to keep the storage device containing the backup key in a safe place, because if
you forget your password, this device provides your only access to your hard drive.
1. In the Administrative Console left pane, expand Drive Encryption, and click Backup and
Recovery.
2. Click the Backup Keys button.
3. On the “Select Backup Disk” page, click the name of the device where you want to back up your
encryption key, and then click Next.
4. Read the information on the next page that is displayed, and then click Next.
The encryption key is saved on the storage device you selected.
5. Click OK when the confirmation dialog box opens.
NOTE: Refer to the Drive Encryption for HP ProtectTools Help file for information on managing and
performing a recovery.
ENWW Advanced tasks 33
Page 42

7 Credential Manager for HP ProtectTools
(Password Manager)
Logging on to Windows, websites and programs is easier and more secure when you use the Password
Manager.
Password Manager allows you to set up the logon screens of websites and programs for quick and
secure access. First, Password Manager learns about your logons and the specific data as you type in
the input boxes of each logon screen. Then, once you are at a logon screen, after verifying your identity,
Password Manager fills in and submits the data automatically.
For even faster access, you can display a menu of your logons by simply using a configurable Hot key
combination (Ctrl+Windows+H is the default). On the menu, simply select a logon, and Password
Manager will launch the website or program, navigate to the logon screen and log you in automatically.
To verify your identity you will use your HP ProtectTools for Small Business credentials, such as your
Windows password. This means that you will use the same credentials to log on to all logon screens
you have set up. You can therefore create stronger passwords that you don't have to write down or
remember, and keep your accounts more secure.
Password Manager lets you see at a glance whether any of your passwords are a security risk and can
automatically generate a strong, complex password to use for new sites.
With Password Manager you can view your logons and passwords, and edit them at any time. Many
Password Manager features are also available from the Password Manager icon that displays whenever
the focus is on the logon screen of a program that has been set up or on any website logon screen.
Clicking on the icon displays a context menu where you can choose from among the following options.
For web pages or programs where a logon has not yet been created:
The following options are shown on the context menu.
Add [somedomain.com] to the Password Manager - Use to add a logon for the current logon screen.
●
Open Password Manager - Launches Security Manager on the Password Manager page.
●
Password Manager Icon settings - Allows you to specify conditions under which the Password
●
Manager Icon displays.
Help - Displays online help for the Password Manager application.
●
For web pages or programs where a logon has already been created:
34 Chapter 7 Credential Manager for HP ProtectTools (Password Manager) ENWW
Page 43

The following options are shown on the context menu.
Fill in logon data - places your logon data in the logon fields and then submits the page (if
●
submission was specified when the logon was created or last edited).
Edit logon - Allows you to edit your logon data for this website.
●
Add logon - Use to add another logon for the same website or program.
●
Open Password Manager - Launches the Security Manager dashboard on the Password Manager
●
page.
Help - Displays online help for the Password Manager application.
●
Adding logons
To add a logon:
1. Open the logon screen for a website or program.
2. Click the arrow on the Password Manager icon, and then select one of the following, depending
on whether the logon screen is for a website or a program.
For a website - select Add [domain name] to Password Manager.
●
For a program - select Add this logon screen to Password Manager.
●
3. Enter your logon data. Logon fields on the screen, and their corresponding fields on the dialog are
identified with a bold orange border. Other options for displaying this dialog are available, such as
selecting Add Logon from the Password Manager Manage tab. Some options depend on the
security devices connected to the computer; for example using the Ctrl-H Hot Key or inserting a
smart card.
Click the arrows to the right of a logon field to populate it with one of several preformatted
●
choices.
Optionally, click Choose other fields to add additional fields from the screen to your logon.
●
Deselect Submit logon data if you want the logon fields filled in but do not want them
●
submitted.
If you want to view the password for this logon, click Show password.
●
4. Click OK. The plus sign is removed from the Password Manager icon, letting you know that the
logon has been created
Now, every time that you go to that website or launch that program, the Password Manager icon will
appear, indicating that you can use your registered credential(s) to log on.
Editing logons
To edit a logon:
1. Open the logon screen for a website or program.
2. Click the arrow on the Password Manager icon, and select Edit logon to display a dialog where
you can edit your logon information. Logon fields on the screen, and their corresponding fields on
the dialog, are identified with a bold orange border.
ENWW Adding logons 35
Page 44

3. Edit your logon information.
Click the arrows to the right of a logon field to populate it with one of several preformatted
●
choices.
Optionally, click Choose other fields to add additional fields from the screen to your logon.
●
Deselect Submit account data if you want the logon fields filled in but do not want them
●
submitted.
If you want to view the password for this logon, click Show password.
●
4. Click OK.
Using the Logons menu
Password Manager provides a fast, easy way to launch the websites and programs that you have
created logons for. Simply double-clicking a program or website logon from the Logons menu, or on the
Manage tab in Password Manager, will launch its logon screen and fill in your logon data. By default,
the information is also immediately submitted to the website, although you can choose not to do so by
deselecting Submit account data when initially setting up or editing the logon.
When you create a logon, it is automatically added to your Password Manager Logons menu.
To display the Logons menu, press the Password Manager Hot Key combination. Ctrl-H is the default,
but you can change the Hot Key combination from Password Manager > Settings.
Organizing logons into categories
Use categories to keep your logons in order. It's a simple matter of creating one or more categories and
drag-and-dropping your logons into the desired categories.
To add a category:
1. In the Security Manager left pane, select Password Manager.
2. Select the Manage tab, and click Add Category.
3. Enter a name for the category.
4. Click OK.
To add a logon to a category:
1. Place your mouse pointer over the desired logon.
2. Press and hold the left mouse button.
3. Drag the logon into the list of categories. Categories will become highlighted as you move your
mouse over them.
4. Release the mouse button when the desired category is highlighted.
Your logons are not moved to the category, but only copied to the selected category. That means that
you can add the same logon to more than one category. And, you can always see all of your logon by
clicking All.
36 Chapter 7 Credential Manager for HP ProtectTools (Password Manager) ENWW
Page 45

Managing your logons
Password Manager makes managing your logon information - user names, passwords and multiple
logon accounts - painless and intuitive, from one central location.
Your logons are listed on the Manage tab. Whenever multiple logons have been created for the same
website, each logon is then listed under the website name and indented in the logon list.
To manage your logons:
In the Security Manager left pane, select Password Manager and click the Manage tab.
Add a logon - Click Add Logon and follow the on-screen instructions.
●
Edit a logon - Select a logon and click Edit. Then change the logon data as desired.
●
Delete a logon - Select a logon and click Delete.
●
To add an additional logon for a website or program:
1. Launch the logon screen for the website or program.
2. Click the Password Manager icon to display its shortcut menu.
3. Select Add additional logon and follow the on-screen instructions.
Assessing your password strength
Using strong passwords for logon to your websites and programs is an important aspect of protecting
your identity.
Password Manager makes monitoring and improving your security easy with instant and automated
analysis of the strength of each of the passwords used to log on to your to websites and programs. You
can check the strength of the passwords you use for your logons on the Password Manager Password
Strength tab.
Password Manager Icon settings
Password Manager attempts to identify logon screens for websites and programs. When it finds a logon
screen that you have not created a logon for, Password Manager will prompt you to add a logon for the
screen by displaying the Password Manager icon with a "+" sign.
The following settings are configurable:
Always prompt - Select this option to have Password Manager prompt you to add a logon whenever
●
a logon screen displays that does not already have a logon set up for it.
Do not prompt for this screen - Select this option so that Password Manager will not prompt you
●
again to add a logon for this specific logon screen.
Never prompt - Select this option to ensure that Password Manager never prompts you for logon
●
screens that have not been set up.
ENWW Managing your logons 37
Page 46

8 File Sanitizer for HP ProtectTools
File Sanitizer is a tool that allows you to securely erase critical files and folders (personal information or
files, historical or Web-related data, or other data components) on your computer and periodically bleach
your hard drive.
NOTE: File Sanitizer currently operates only on the hard drive.
About shredding
Deleting files and/or folders in Windows does not completely remove the contents from your hard drive.
Windows only deletes the reference. The content still remains on the hard drive until another file
overwrites that same area on the hard drive with new information.
Shredding is different than a standard Windows delete (also known as a simple delete in File Sanitizer)
because when you shred data it is virtually impossible to retrieve that data.
When you choose a shred profile (High Security, Medium Security, or Low Security), a predefined list
of files and/or folders and an erase method are automatically selected for shredding. You can also
customize a shred profile, which allows you to specify the number of shred cycles, which files to include
for shredding, which files to confirm before shredding, and which files to exclude from shredding.
You can set up an automatic shred schedule, and you can also manually shred files and/or folders
whenever you want.
About free space bleaching
Free space bleaching allows you to securely write random data over deleted files, preventing users from
viewing the original contents of the deleted file.
NOTE: Free space bleaching is for those files that you delete using the Windows Recycle Bin or when
you manually delete a file. Free space bleaching provides no additional security to shredded files.
You can set an automatic free space bleaching schedule or you can manually activate free space
bleaching using the HP ProtectTools icon in the notification area, at the far right of the taskbar.
38 Chapter 8 File Sanitizer for HP ProtectTools ENWW
Page 47

Setup procedures
Opening File Sanitizer
To open File Sanitizer:
1. Click Start, click All Programs, and then click HP ProtectTools Security Manager.
2. In the Security Manager left pane, click File Sanitizer.
– or –
Double-click the File Sanitizer icon.
●
– or –
Right-click the HP ProtectTools icon in the notification area, at the far right of the taskbar, highlight
●
File Sanitizer, and then click Open File Sanitizer.
Setting a free space bleaching schedule
To set a free space bleaching schedule:
1. In the Security Manager left pane, expand File Sanitizer and click Bleaching.
2. Select the Activate Scheduler check box, enter your Windows password, and then enter a day
and time to bleach your hard drive.
3. Click the Save icon.
NOTE: The free space bleaching operation can take a long time. Even though free space
bleaching is performed in the background, your computer may run slower due to increased
processor usage.
Setting a shred schedule
1. In the Security Manager left pane, expand File Sanitizer and click Shred.
2. Select a shred option:
Windows shutdown — Choose this option to shred all selected files when Windows shuts
●
down.
NOTE: When this option is selected, a dialog box is displayed at shutdown asking if you
want to continue with shredding the selected files or if you want to bypass the procedure. Click
Yes to bypass the shred procedure or click No to continue with shredding. The Yes or No
option must be selected quickly because Windows will close the software in preparation for
shutting down and produce an error. If you select No in order to continue shredding, Windows
may produce an error screen indicating that File Sanitizer is not responding. Allow File
Sanitizer to complete the shred, then initiate the shutdown again.
Web browser open — Choose this option to shred all selected Web-related files, such as
●
browser URL history, when you open a Web browser.
Web browser quit — Choose this option to shred all selected Web-related files, such as
●
browser URL history, when you close a Web browser.
ENWW Setup procedures 39
Page 48

Key sequence — Choose this option to initiate shredding using a key sequence.
●
Scheduler — Select the Activate Scheduler check box, enter your Windows password, and
●
then enter a day and time to shred selected files.
3. Click the Save icon.
Selecting or creating a shred profile
You can specify a method of erasure and select the files and/or folders to shred by selecting a predefined
profile or by creating your own profile.
Selecting a predefined shred profile
When you choose a predefined shred profile (High Security, Medium Security, or Low Security), a
predefined erasure method and list of files are automatically selected. You can click the View Details
button to view the predefined list of files that are selected for shredding.
To select a predefined shred profile:
1. In the Security Manager left pane, expand File Sanitizer and click Settings.
2. Click a predefined shred profile.
3. Click View Details to view the list of files that are selected for shredding.
4. Under Shred the following, select the check box next to each file that you want to confirm before
shredding.
5. Click Apply.
Customizing an advanced security shred profile
When you create a shred profile, you specify the number of shred cycles, which files to include for
shredding, which files to confirm before shredding, and which files to exclude from shredding:
1. In the Security Manager left pane, expand File Sanitizer, click Settings, select Advanced
Security Settings, and then click View Details.
2. Specify the number of shred cycles.
NOTE: The selected number of shredding cycles will be performed for each file. For example, if
you choose 3 shred cycles, an algorithm that erases the data is executed 3 different times. If you
choose the higher security shred cycles, shredding may take a significant length of time; however,
the higher the number of shred cycles you specify, the more secure the computer is.
3. Select the assets you want to shred:
a. Under Available shred options, click a file, and then click Add.
b. To add a custom file, click Add Custom Option, enter or browse to a file name or folder name,
and then click OK. Click the custom file, and then click Add.
NOTE: To delete a file from the available shred options, click the file, and then click
Delete.
4. Under Shred the following, select the check box next to each file that you want to confirm before
shredding.
40 Chapter 8 File Sanitizer for HP ProtectTools ENWW
Page 49

NOTE: To remove a file from the shred list, click the file, and then click Remove.
5. Under Do not shred the following, click Add to select the specific files that you want to exclude
from shredding.
6. When you finish configuring the shred profile, click Apply.
Customizing a simple delete profile
The simple delete profile performs a standard file delete without shredding. When you customize a
simple delete profile, you specify which files to include for a simple delete, which files to confirm before
a simple delete is executed, and which files to exclude from a simple delete:
NOTE: It is highly recommended that you run free space bleaching regularly if you use the simple
delete option.
1. In the Security Manager left pane, expand File Sanitizer, click Settings, select Simple Delete
Settings, and then click View Details.
2. Select the files you want to delete:
a. Under Available delete options, click a file, and then click Add.
b. To add a custom file, click Add Custom Option, enter or browse to a file name or folder name,
and then click OK. Click the custom file, and then click Add.
NOTE: To delete a file from the available delete options, click the file, and then click
Delete.
3. Under Delete the following, select the check box next to each file that you want to confirm before
deleting.
NOTE: To remove a file from the delete list, click the file, and then click Remove
4. Under Do not delete the following, click Add to select the specific files that you want to exclude
from shredding.
5. When you finish configuring the simple delete profile, click Apply.
General tasks
Using a key sequence to initiate shredding
To specify a key sequence, follow these steps:
1. In the Security Manager left pane, expand File Sanitizer and click Shred.
2. Select the Key sequence check box.
3. Enter a character in the available box, and then select the CTRL, ALT, or SHIFT box, or select all
three.
For example, to initiate automatic shredding using the S key and Ctrl+Shift, enter S in the box, and
then select the CTRL and SHIFT options.
NOTE: Be sure to select a key sequence that is different from other key sequences you have
configured.
ENWW General tasks 41
Page 50

To initiate shredding using a key sequence:
1. Hold down the Ctrl, Alt, or Shift key (or whichever combination you specified) while pressing your
chosen character.
2. If a confirmation dialog box opens, click Yes.
Using the File Sanitizer icon
CAUTION: Shredded files cannot be recovered. Carefully consider which items you select for manual
shredding.
1. Navigate to the document or folder you want to shred.
2. Drag the file to the File Sanitizer icon on the desktop.
3. When the confirmation dialog box opens, click Yes.
Manually shredding one asset
CAUTION: Shredded files cannot be recovered. Carefully consider which items you select for manual
shredding.
1. Right-click the HP ProtectTools icon in the notification area, at the far right of the taskbar, highlight
File Sanitizer, and then click Shred One.
2. When the Browse dialog box opens, navigate to the file you want to shred, and then click Open.
NOTE: The file you select can be a single file or folder.
3. When the confirmation dialog box opens, click Yes.
– or –
1. Right-click the File Sanitizer icon on the desktop, and then click Shred One.
2. When the Browse dialog box opens, navigate to the file you want to shred, and then click OK.
3. When the confirmation dialog box opens, click Yes.
– or –
1. In the Security Manager left pane, expand File Sanitizer and click Shred.
2. Click the Browse button.
3. When the Browse dialog box opens, navigate to the file you want to shred, and then click Open.
4. When the confirmation dialog box opens, click Yes.
Manually shredding all selected items
1. Right-click the HP ProtectTools icon in the notification area, at the far right of the taskbar, highlight
File Sanitizer, and then click Shred Now.
2. When the confirmation dialog box opens, click Yes.
42 Chapter 8 File Sanitizer for HP ProtectTools ENWW
Page 51

– or –
1. Right-click the File Sanitizer icon on the desktop, and then click Shred Now.
2. When the confirmation dialog box opens, click Yes.
Manually activating free space bleaching
1. Right-click the HP ProtectTools icon in the notification area, at the far right of the taskbar, highlight
File Sanitizer, and then click Bleach Now.
2. A notification bubble will appear verifying that a bleach operation has begun.
– or –
1. In the Security Manager left pane, expand File Sanitizer and click Bleaching.
2. Click Bleach Now.
3. A notification bubble will appear verifying that a bleach operation has begun.
Aborting a shred or free space bleaching operation
When a shred or free space bleaching operation is in progress, a message above the HP ProtectTools
Security Manager icon in the notification area is displayed. The message provides details on the shred
or free space bleaching process (percentage complete), and gives you the option to abort the operation.
To abort the operation:
Click the message, and then click Stop to cancel the operation.
▲
Viewing the log files
Each time a shred or free space bleaching operation is performed, log files of any errors or failures are
generated. The log files are always updated according to the latest shred or free space bleaching
operation.
NOTE: Files that are successfully shredded or bleached do not appear in the log files.
One log file is created for shred operations and another log file is created for free space bleaching
operations. Both log files are located on the hard drive at:
C:\Program Files\Hewlett-Packard\File Sanitizer\[Username]_ShredderLog.txt
●
C:\Program Files\Hewlett-Packard\File Sanitizer\[Username]_DiskBleachLog.txt
●
ENWW General tasks 43
Page 52

9 Device Access Manager for
HP ProtectTools
This security tool is available to administrators only. Device Access Manager for HP ProtectTools has
the following security features that protect against unauthorized access to devices attached to your
computer system:
Device profiles that are created for each user to define device access
●
Device access that can be granted or denied on the basis of group membership
●
NOTE: Device Access Manager uses Windows Local Users and Groups to manage access. Windows
Home versions do not support Local Users and Groups, therefore Device Access Manager will not
function properly. However, Device Access Manager will work in Microsoft Windows Vista Home version
if you use DOS commands for the user setup. Refer to the Device Access Manager help file for
instructions.
Starting background service
For device profiles to be applied, the HP ProtectTools Device Locking/Auditing background service must
be running. When you first attempt to apply device profiles, HP ProtectTools Administrative Console
opens a dialog box to ask if you would you like to start the background service. Click Yes to start the
background service and set it to start automatically whenever the system boots.
Simple configuration
Device Access Manager creates a new User Group during initialization called Device Administrators for
accessing or exploring devices as an administrator. Place users in this group that you want to have
administrative access to the devices you control through Device Access Manager Simple Configuration.
This feature allows you to deny access to the following classes of devices:
USB devices for all non-Device Administrators
●
All removable media (floppy disks, personal music players, pen drives, etc.) for all non-Device
●
Administrators
All DVD/CD-ROM drives for all non-Device Administrators
●
All serial and parallel ports for all non-Device Administrators
●
44 Chapter 9 Device Access Manager for HP ProtectTools ENWW
Page 53

To deny access to a class of device for all non-Device Administrators:
1. Click Start, click All Programs, and then click HP ProtectTools Administrative Console.
2. In the left pane, click Device Access Manager, and then click Simple Configuration.
3. In the right pane, select the check box of a device to deny access.
4. Click the Save icon.
NOTE: If background service is not running, it attempts to start now. Click Yes to allow it.
5. Click OK.
Device class configuration (advanced)
More selections are available to allow specific users or groups of users to be granted or denied access
to types of devices.
Adding a user or a group
1. Click Start, click All Programs, and then click HP ProtectTools Administrative Console.
2. In the left pane, expand Device Access Manager, and then click Device Class Configuration.
3. In the device list, click the device class that you want to configure.
4. Click Add. The Select Users or Groups dialog box opens.
5. Click Advanced, and then click Find Now to search for users or groups to add.
6. Click a user or a group to be added to the list of available users and groups, and then click OK.
7. Click OK.
Removing a user or a group
1. Click Start, click All Programs, and then click HP ProtectTools Administrative Console.
2. In the left pane, expand Device Access Manager, and then click Device Class Configuration.
3. In the device list, click the device class that you want to configure.
4. Click the user or group you want to remove, and then click Remove.
Denying or allowing access to a user or group
1. Click Start, click All Programs, and then click HP ProtectTools Administrative Console.
2. In the left pane, expand Device Access Manager, and then click Device Class Configuration.
3. In the device list, click the device class that you want to configure.
4. Under User/Groups, click the user or group to be denied access.
5. Click Deny next to the user or group to be denied access.
6. Click the Save icon, and then click OK.
ENWW Device class configuration (advanced) 45
Page 54

User access settings (advanced)
User Access Settings allows administrators to specify which users and groups are allowed to use the
Simple Configuration and Device Class Configuration views.
A user or group must be granted View (Read-only) Configuration Settings access in order to view
the Simple Configuration and Device Class Configuration information.
A user or group must be granted Change Configuration Settings access in order to change the Simple
Configuration and Device Class Configuration information.
A user or group must be granted Full User Administrator Rights access in order to modify the settings
in the Simple Configuration and Device Class Configuration view.
Adding a user or group
1. Click Start, click All Programs, and then click HP ProtectTools Administrative Console.
2. In the left pane, expand Device Access Manager, and then click User Access Settings.
3. Click Add. The Select Users or Groups dialog box opens.
4. Click Advanced, and then click Find Now to search for users or groups to add.
5. Click a user or a group to be added to the list of available users and groups, and then click OK.
6. Click OK.
7. Click the Save icon.
Removing a user or group
1. Click Start, click All Programs, and then click HP ProtectTools Administrative Console.
2. In the left pane, expand Device Access Manager, and then click User Access Settings.
3. Click the user or group you want to remove, and then click Remove.
4. Click the Save icon.
Allowing or Denying Permissions
1. Click Start, click All Programs, and then click HP ProtectTools Administrative Console.
2. In the left pane, expand Device Access Manager, and then click User Access Settings.
3. In the Group or user names box, select a user or group name.
4. In the Permissions box, select the Allow or Deny check boxes for the appropriate permissions.
5. Click the Save icon.
46 Chapter 9 Device Access Manager for HP ProtectTools ENWW
Page 55

Glossary
administrator.
See Windows administrator.
asset.
A data component consisting of personal information or files, historical and Web-related data, and so on, which is
located on the hard drive.
authentication.
Process of verifying whether a user is authorized to perform a task such as accessing a computer, modifying
settings for a particular program, or viewing secured data.
automatic shredding.
Scheduled shredding that the user sets in File Sanitizer for HP ProtectTools.
Automatic Technology Manager (ATM).
Allows network administrators to manage systems remotely at the BIOS level.
Bleaching.
see free space bleaching.
credentials.
Method by which a user proves eligibility for a particular task in the authentication process, such as user name
and password.
domain.
Group of computers that are part of a network and share a common directory database. Domains are uniquely
named, and each has a set of common rules and procedures.
free space bleaching.
The secure writing of random data over deleted files on the hard drive to distort the contents of the deleted files,
making recovery of the data more difficult.
key sequence.
A combination of specific keys that, when pressed, initiates an automatic shred—for example, Ctrl+Alt+S.
manual shred.
Immediate shredding of an asset or selected assets, which bypasses the automatic shred schedule.
network account.
Windows user or administrator account, either on a local computer, in a workgroup, or on a domain.
power-on authentication.
Security feature that requires some form of authentication, such as a password, when the computer is turned on.
reboot.
Process of restarting the computer.
ENWW Glossary 47
Page 56

security logon method.
The method used to log in to the computer.
shred cycle.
The number of times the shred algorithm is executed on each asset. The higher the number of shred cycles you
select, the more secure the computer is.
shred profile.
A specified erasure method and list of assets.
Shred.
The execution of an algorithm that obscures the data contained in an asset.
simple delete.
Securely delete sensitive information including files, historical or web-related content, or other confidential data.
Windows administrator.
A user with full rights to modify permissions and manage other users.
Windows user account.
Profile for an individual authorized to log on to a network or to an individual computer.
48 Glossary ENWW
Page 57

Index
A
access
controlling 44
preventing unauthorized 18
accessing HP ProtectTools
Security 17
advanced tasks
Device Access Manager 45
B
background service, Device Access
Manager 44
backup and restore 29
BIOS administrator password 19
C
changing Windows password 27
Computer Setup
administrator password 19
configuring users 22
controlling device access 44
Credential Manager for
HP ProtectTools (Password
Manager)
adding logons 35
easy setup 6
editing logons 35
features 2
icon settings 37
logon categories 36
logon password 19
managing logons 37
password strength 37
using logons menu 36
viewing and managing saved
authentications 7
D
data, restricting access to 17
decrypting a drive 31
Device Access Manager for
HP ProtectTools
background service 44
device class configuration 45
easy setup 13
features 3
simple configuration 44
user or group, adding 45
user or group, denying access
to 45
user or group, removing 45
Drive Encryption for
HP ProtectTools
activating 32
backup and recovery 33
creating backup keys 33
deactivating 32
decrypting individual drives 32
easy setup 15
encrypting individual drives 32
logging in after Drive Encryption
is activated 32
managing Drive Encryption 32
opening 32
E
Easy Setup Guide 4
encrypting a drive 31
F
F10 Setup password 19
features, HP ProtectTools 2
File Sanitizer 41
File Sanitizer for HP ProtectTools
aborting a shred or free space
bleaching operation 43
bleaching 38
easy setup 10
features 3
manually activating free space
bleaching 43
manually shredding all selected
items 42
manually shredding one
asset 42
opening 39
predefined shred profile 40
setting a bleaching
schedule 39
setting a shred schedule 39
setup procedures 39
shred profile 40
shred profile, selecting or
creating 40
shredding 38
simple delete profile 41
using key sequence to initiate
shredding 41
using the File Sanitizer
icon 42
viewing log files 43
G
Getting started 4
H
HP ProtectTools features 2
HP ProtectTools Security Manager
adding applications 29
backup and restore 29
changing Windows user
name 30
changing your picture 30
device access 28
drive encryption status 28
features 2
managing passwords 27
overview 1
preferences 29
ENWW Index 49
Page 58

setting credentials 27
shredding or bleaching
files 28
HP ProtectTools Security Manager
Administrative Console
configuring application
settings 25
configuring your system 22
disallowing device access 26
drive encryption 25
features 2
managing users 24
overview 1
HP ProtectTools Security,
accessing 17
I
initial setup 22
K
key security objectives 17
O
objectives, security 17
shred profile
customizing 40
predefined 40
selecting or creating 40
simple delete profile
customizing 41
U
unauthorized access,
preventing 18
W
Windows Logon
password 19
P
password
guidelines 19
HP ProtectTools 19
managing 19
policies, creating 18
secure, creating 19
power-on password
definition 19
R
restricting
access to sensitive data 17
device access 44
S
security
key objectives 17
levels 22
login methods 22
roles 18
setup wizard 22
security setup password 19
setup wizard
administrators 22
50 Index ENWW
 Loading...