

Page 1

HP 20b Business Consultant
HP 30b Business Professional
Financial Calculator User’s Guide
HP Part Number: NW238-90001
Edition 1, December 2009
i
Page 2

Legal Notice
This manual and any examples contained herein are provided "as is" and are subject to
change without notice. Hewlett-Packard Company makes no warranty of any kind with regard
to this manual, including, but not limited to, the implied warranties of merchantability, noninfringement and fitness for a particular purpose. In this regard, HP shall not be liable for
technical or editorial errors or omissions contained in the manual.
Hewlett-Packard Company shall not be liable for any errors or for incidental or consequential
damages in connection with the furnishing, performance, or use of this manual or the
examples contained herein.
Copyright © 2009 Hewlett-Packard Development Company, L.P.
Reproduction, adaptation, or translation of this manual is prohibited without prior written
permission of Hewlett-Packard Company, except as allowed under the copyright laws.
Hewlett-Packard Company
16399 West Bernardo Drive
MS 66M-785
San Diego, CA 92127-1899
USA
ii
Page 3
HP 20b Business Consultant
iii
Page 4
HP 30b Business Professional
iv
Page 5

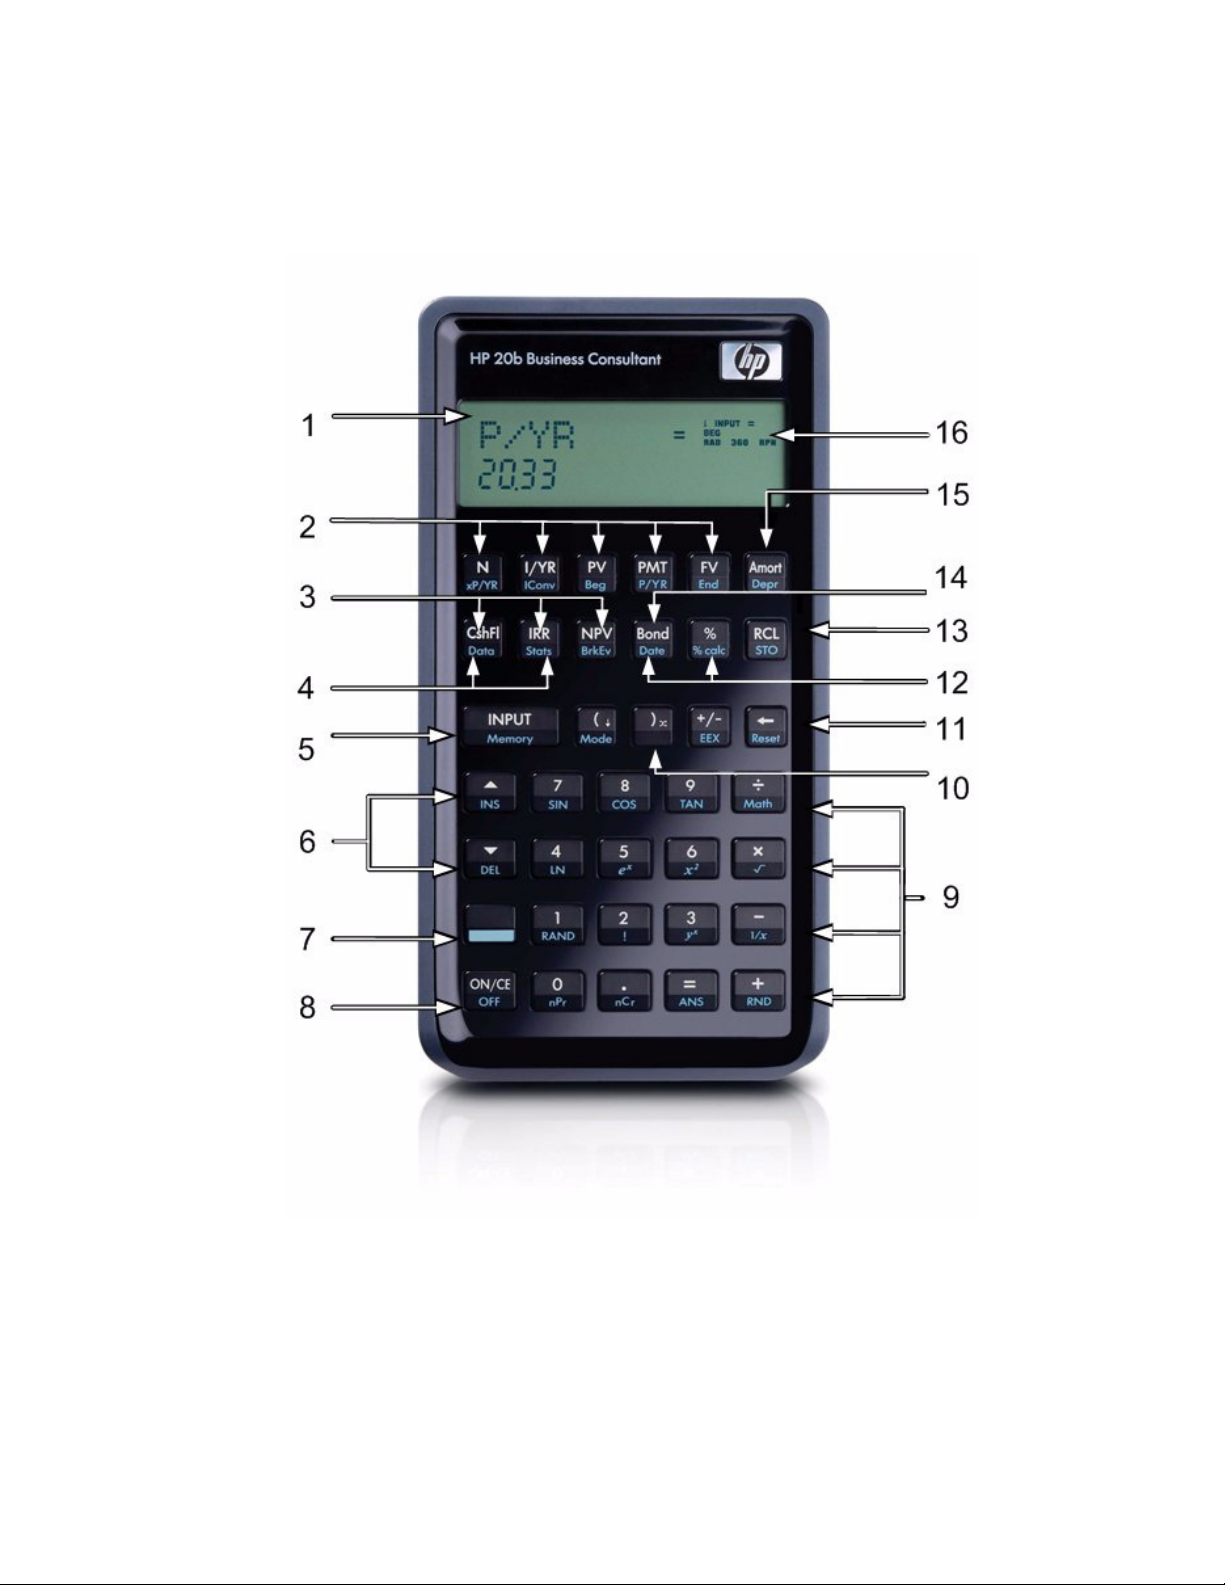
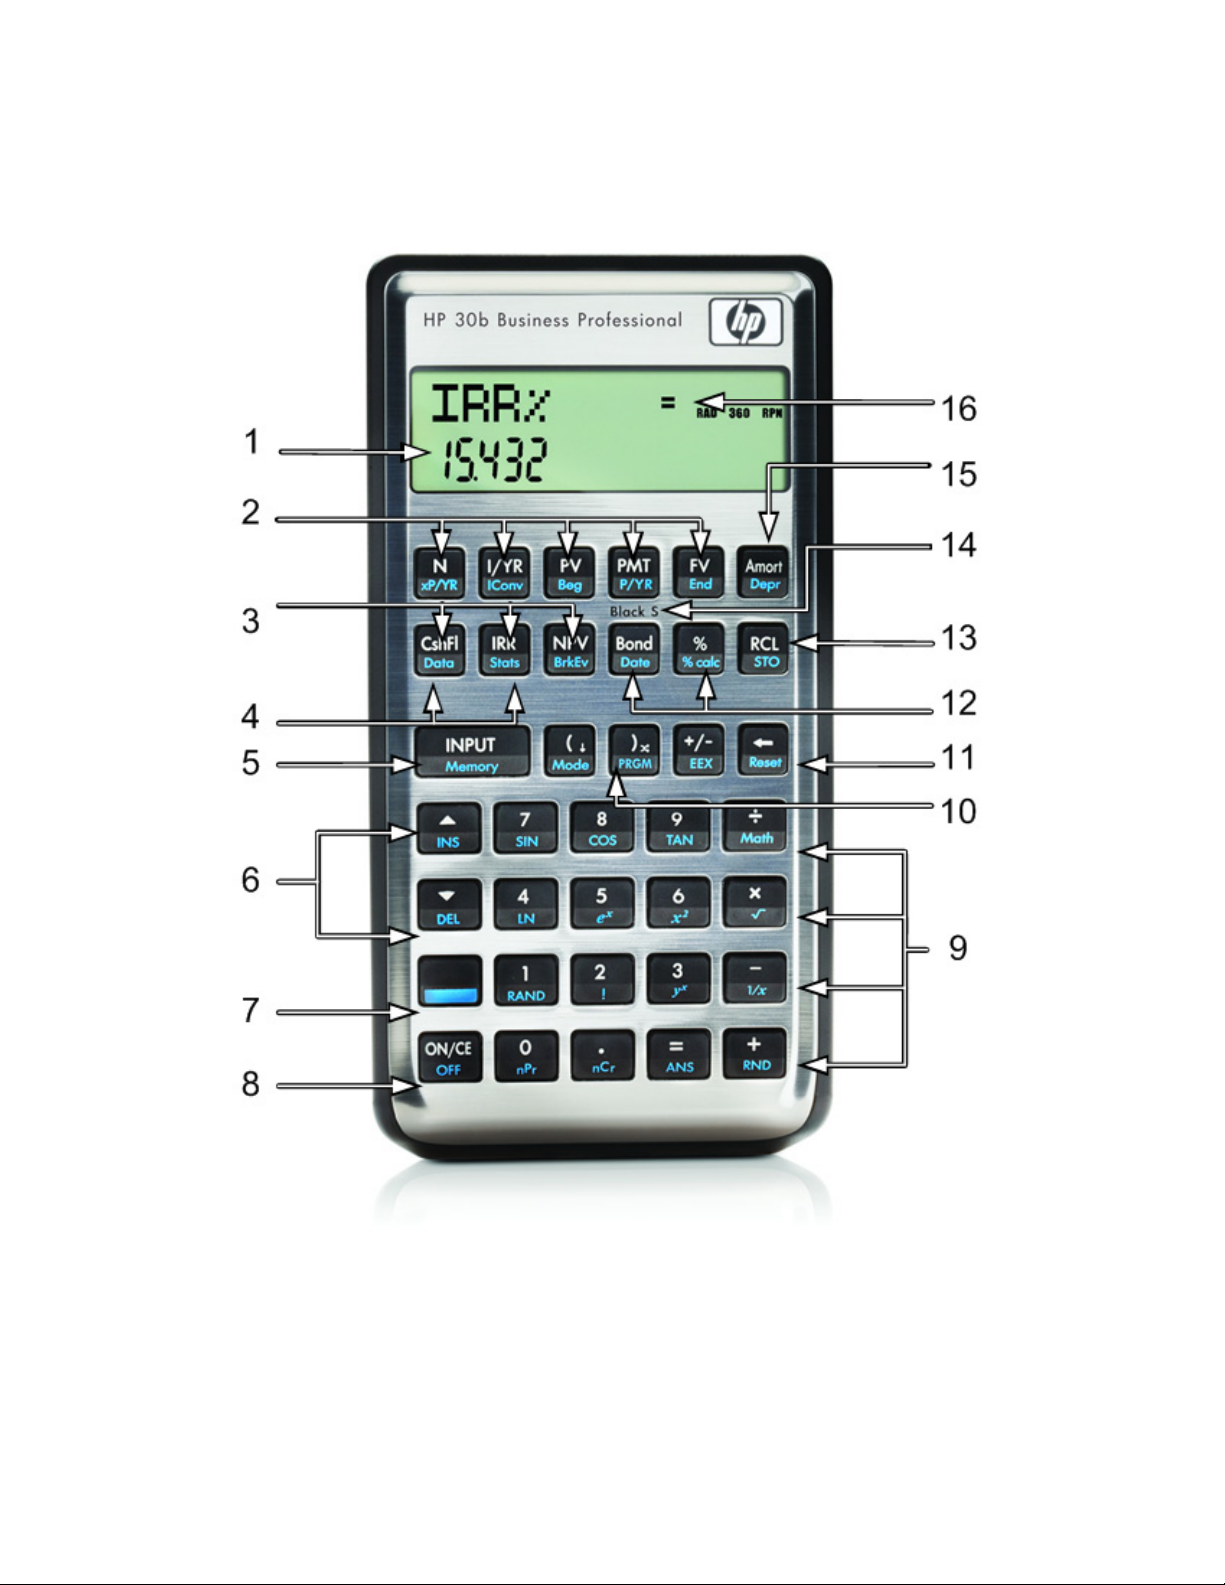
Keyboard Map Legend
Number Feature Number Feature
1 2-line, alphanumeric scrolling
2 Time Value of Money keys
3 Cash Flow, IRR and NPV keys 11 Backspace key/Reset menu
4 Data and Statistics menus 12 Percent/Percent calculation
5 Input key and Memory menu 13 Recall and Store
6 Insert and Delete/scroll (up
7 Shift key 15 Amortization/Depreciation
8 On/Off/Cancel 16 Annunciators
* Only applies to HP 30b.
**Does not apply to the HP 20b.
display screen
(TVM)
and down)
9 Common Mathematical
functions and Math (Math)
menu
10 Program menu*
RPN Swap/Close parenthesis
(business) and Date menus
14 Black-Scholes** and Bond
menus
menus
v
Page 6

vi
Page 7

Table of Contents
Legal Notice.............................................................................................................ii
HP 20b Business Consultant ......................................................................................iii
HP 30b Business Professional .................................................................................... iv
Keyboard Map Legend.............................................................................................. v
1 Basic Features ......................................................................................................... 1
Welcome to your new HP Financial Calculator .............................................................1
Turning the Calculator On and Off..............................................................................1
Selecting a Language ................................................................................................1
Adjusting the Display Contrast ....................................................................................1
Cursor .....................................................................................................................2
Two Line Display.......................................................................................................2
The Mode Menu: Setting Preferences...........................................................................2
Changing the Calculation Mode .................................................................................4
Key Presses, the Shift Key, Secondary, and Tertiary Functions*.......................................4
Annunciators ............................................................................................................6
The Input Key ...........................................................................................................6
The Equals Key .........................................................................................................6
Using the Input and Equals Keys .................................................................................6
Editing and Clearing Entries .......................................................................................7
The On/CE Key........................................................................................................7
The Reset Menu ........................................................................................................7
Notes about Special Menus .......................................................................................8
Memory and the Memory Menu..................................................................................8
Accessing Menus and Menu Maps..............................................................................8
2 Mathematical Calculations ..................................................................................... 11
Mathematical Functions ...........................................................................................11
Number Entry and Display.......................................................................................11
Chain Mode...........................................................................................................12
Algebraic Mode .....................................................................................................12
Reverse Polish Notation (RPN) Mode .........................................................................13
The RPN Stack........................................................................................................13
Last Number...........................................................................................................14
One-Number Functions and the Math Menu ...............................................................18
Random number .....................................................................................................19
The Math Menu ......................................................................................................19
The Probability Sub-menu.........................................................................................21
Binomial Functions ..................................................................................................23
Two-Number Functions ............................................................................................23
Storing and Recalling Numbers ................................................................................24
Recall Arithmetic .....................................................................................................24
Storing and Recalling with Time Value of Money (TVM) Keys .......................................24
Recalling a Menu Item Value in a Menu.....................................................................25
Recalling and Storing Values in the Data and Cash Flow Menus...................................25
Rounding Numbers .................................................................................................25
Percentages............................................................................................................25
3 Time Value of Money............................................................................................. 27
Time Value of Money (TVM) Keys..............................................................................27
i
Page 8

Amortization.......................................................................................................... 29
Interest Conversion Menu ........................................................................................ 33
4 Canadian Mortgages: TVM Canada........................................................................35
Canadian Mortgage Example.................................................................................. 36
5 Cash Flows ............................................................................................................37
Cash Flow Example ................................................................................................ 38
Sample Cash Flow Diagrams ................................................................................... 46
6 Bonds....................................................................................................................47
The Bond Menu...................................................................................................... 48
7 Black-Scholes Calculation Menu* ............................................................................51
The Black-Scholes Menu ..........................................................................................52
8 Date Calculation ....................................................................................................57
The Date Calculation Menu...................................................................................... 57
9 Break-even ............................................................................................................59
The Break-even Menu..............................................................................................59
10 Business Problems................................................................................................61
The Percent Calculation Menu.................................................................................. 61
11 Depreciation ........................................................................................................65
The Depreciation Menu ........................................................................................... 66
12 Statistical Operations ...........................................................................................69
The Data and Stats Menus ....................................................................................... 70
13 Programming.......................................................................................................75
Programming the HP 30b ........................................................................................ 75
Key Presses for Program Instructions.......................................................................... 75
Programming Example ............................................................................................ 77
Program Step 0...................................................................................................... 78
Reassigning Menu Functions ....................................................................................79
The Program Menu and Program Editing ................................................................... 80
Tests and Jump Functions......................................................................................... 81
Long Programs and Battery Life ................................................................................ 82
Sub-Function Call.................................................................................................... 82
Other Programming Functions .................................................................................. 83
Messages..............................................................................................................84
Debugging a Program.............................................................................................85
Saving, Restoring, and Modifying Mode Settings ....................................................... 86
Solve .................................................................................................................... 87
14 Error Messages ....................................................................................................89
Error Messages and Calculator Status ....................................................................... 89
15 Warranty, Regulatory, and Contact Information ....................................................91
Replacing the Batteries............................................................................................91
HP Limited Hardware Warranty and Customer Care................................................... 91
Contact Information ................................................................................................ 95
ii
Page 9

1Basic Features
Welcome to your new HP Financial Calculator
This manual is designed to familiarize you with the many features available on your new HP
Business and Financial calculators. It includes menu maps, cash flow diagrams, and example
problems and solutions with key presses and screen shots. Also included are sections which
list the error messages, a chapter about programming, and an explanation of how Reverse
Polish Notation (RPN) works. Refer to the Table of Contents for quick access to various topics.
If you need more information about your calculator or calculator operation, please refer to the
training materials available at: www.hp.com/calculators.
This manual describes in detail the features available on both the HP 20b and the HP 30b
calculators. In addition to all of the features found on the HP 20b, the HP 30b includes the
Black-Scholes option pricing model, Modified Internal Rate of Return (MIRR), Financial
Management Rate of Return (FMRR), and programming capabilities. When features apply
only to a particular model, they will be identified throughout the manual with an asterisk*.
Turning the Calculator On and Off
To turn on your calculator, press O. To turn it off, press :a.
Turning the calculator off does not erase any data. The calculator automatically turns itself off
after approximately five minutes to conserve energy. If you see the low battery symbol ( )
in the display, replace the batteries. See the Chapter 15, Warranty, Regulatory, and Contact
Information for instructions on replacing the batteries.
Selecting a Language
English is the default language for messages displayed on the screen. To select a language
other than English:
1. P r e s s
2. Press
3. Press
4. Press O to return to the default calculator screen.
5. For more information on accessing menus and changing calculator settings, refer to the
:u to access the Mode menu. FIX displays on the top line of the screen.
<
repeatedly until English displays on the screen.
I until the desired language is displayed. The displayed language is the
active setting.
section below titled, The Mode Menu: Setting Preferences.
Adjusting the Display Contrast
To adjust the contrast of the display, press and hold O while pressing the + or -
keys. Each press of the + or - keys slightly increases or decreases the contrast of the
display.
Basic Features
1
Page 10
Cursor
When you enter a number, the cursor (_) blinks in the display and indicates you are in number
entry mode.
Two Line Display
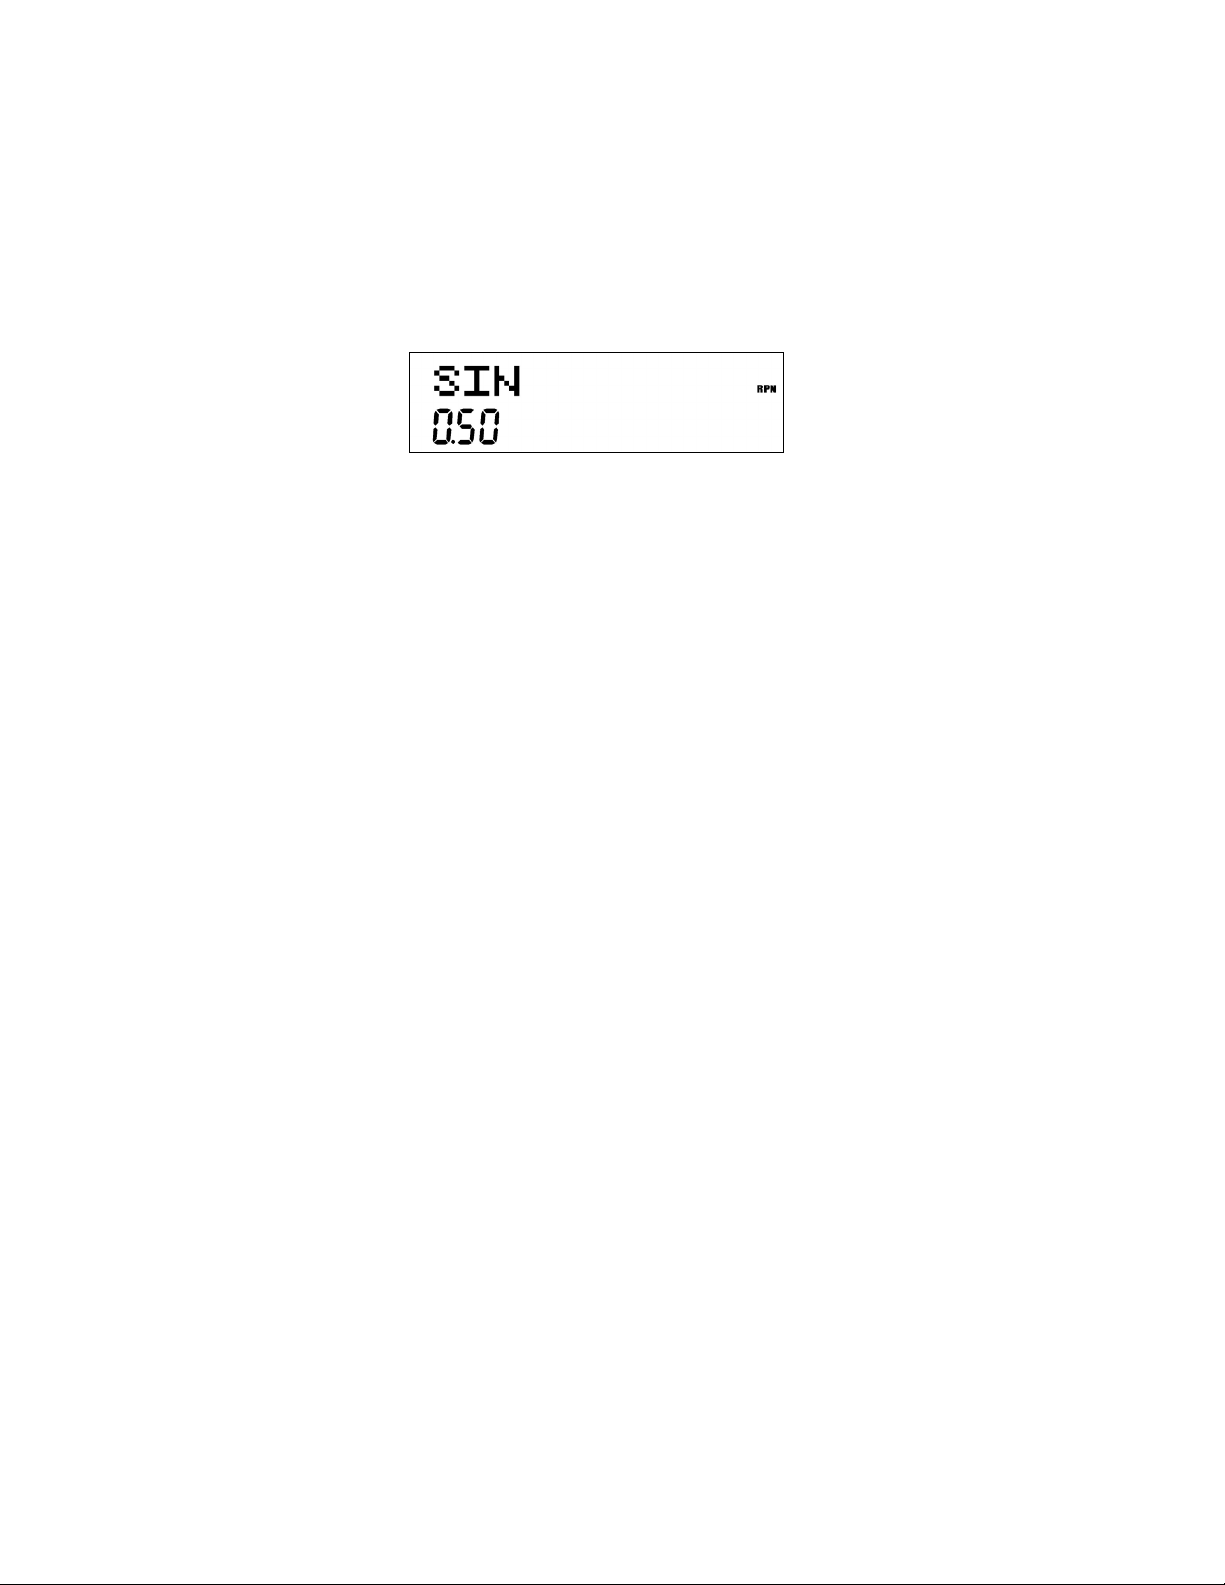
There are two lines in the display screen as shown in Figure 1.
Figure 1 Display Screen
The top line of the screen displays operation status, operator symbols, annunciators, and
abbreviations of the variables and menu names. Throughout this manual, this line is referred
to as the top line. In Figure 1, SIN is on the top line. The bottom line displays numbers you
have entered, or results. Throughout this manual, this line is referred to as the bottom line.
When no operations have been entered and no operations are pending, the bottom line of
the screen displays 0.00. This state of the calculator is referred to as the default calculator
screen.
The Mode Menu: Setting Preferences
The Mode menu allows you to customize the calculator. To access the Mode menu, press
:u. Press < or > repeatedly to scroll through the menu starting with FIX=2
(the number of digits displayed to the right of the decimal point). Once an item is displayed,
press I to cycle through the other options for that setting. To exit the Mode menu,
press O. Table 1-1 lists the items in the Mode menu.
Basic Features2
Page 11

Table 1-1 Mode Menu Settings
Setting (top line) Description
FIX= 2 Display precision (number of digits displayed to the right of the decimal point).
Default is 2.
Key in the number of digits you want and press I, or press = until the
number of digits you want is displayed.
The display precision can be any number from 0-11. If you specify –1, the calculator
displays numbers with the most appropriate number of digits after the decimal point.
If you find you need to change the FIX setting often, use the following shortcut:
1. P r e s s
2. Press : again, and, without releasing it, press a key, 0 through 9 that
Degree or Radian Angular mode in degrees or radians for trigonometric functions.
Default is Degree.
Pressing I toggles between these options.
Date:
mm.ddyyyy or
dd.mmyyyy
1. 23 or 1,2 3 Selects point or comma as decimal separator.
Format for dates. December 3, 2010 is entered as 12 .0 32 010 in mm.ddyyyy format, or
3.122010 in dd.mmyyyy format. Note the (.) in both formats separating the first and second
groups. The valid range of dates is October 15, 1582 to December 31, 9999.
Default is mm.ddyyyy format.
Pressing
Note that when a date is displayed, a number between 1 and 7 also displays at the right of
the screen. This number indicates the day of the week corresponding to that date. Monday
is 1, and Sunday is 7.
NOTE: in 360-day calendar mode (Cal.360), days of the week are displayed only if the
date is valid.
Default is decimal point, 1.23 .
: and release it. Check that the secondary function indicator is displayed.
corresponds to the desired FIX setting. FIX settings for 10 and 11 are not available using
this shortcut. If you press
. instead of a numbered key, FIX= –1 is selected.
I toggles between these options.
Pressing
1000.00, 1,000.00,
1000,00 or 1.000,00
Chain, Algebraic, or RPN Calculation mode. For more information, refer to Chapter 2, Mathematical Calculations.
English, Français,
Deutch, or Español
Selects thousands separator.
Default is none, 1000 .00
Pressing I toggles between these options.
NOTE: the 1000.00 and 1,000.00 options are only available if the decimal separator is
set for point (.); 1000,00 and 1.000,00 are available only if the decimal separator is set
for comma (,).
Pressing
Language setting for the messages displayed on the screen.
Default is English.
Pressing
I toggles between these options.
I cycles through these options.
I cycles through these options.
Basic Features
3
Page 12
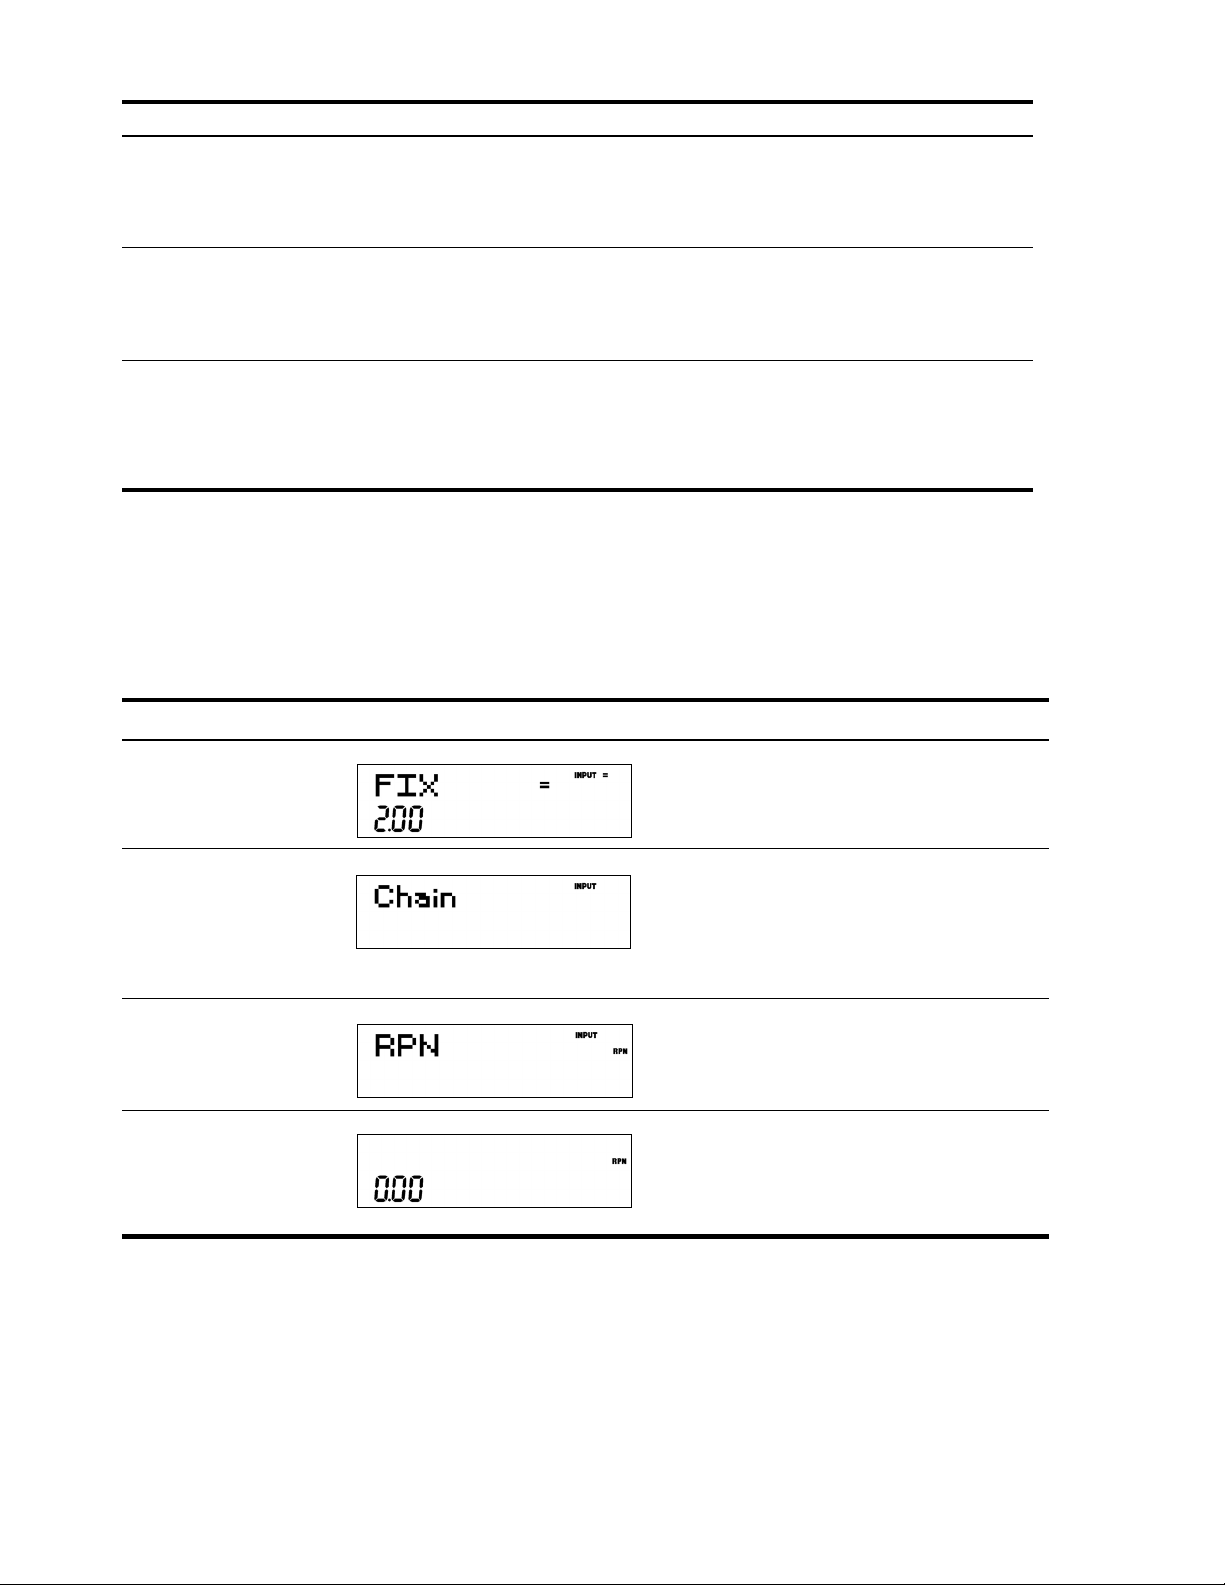
Table 1-1 Mode Menu Settings
Setting (top line) Description
Actual or Cal.360 Calendar options for bonds and date calculations.
Default is Actual.
Pressing I toggles between these options.
Annual or Semiannual Bond type.
Default is Annual.
I toggles between these options.
I toggles between these options.
TVM Standard or TVM
Canada
Pressing
Activate or deactivate the compounding per year (C/YR) option in time value of money
(TVM) calculations. This option is primarily used for Canadian mortgage calculations. See
Chapter 4, Canadian Mortgages: TVM Canada for more information.
Pressing
Changing the Calculation Mode
After viewing the default settings, suppose you want to change the calculation mode from
Chain to RPN. See Table 1-2.
Table 1-2 Changing the Calculation Mode
Keys Display Description
:u
<<<
Opens the Mode menu, starting with first setting
option, FIX, the number of digits displayed to the
right of the decimal point.
Scrolls to the current setting for the calculation
mode, Chain.
<<
(Press five times)
II
(Press two times)
O
Key Presses, the Shift Key, Secondary, and Tertiary Functions*
To execute the function associated with a key, press and release the desired key. However,
most of the calculators’ keys have more than one function: the first, or primary function, the
shifted, or secondary function, and, in some cases, a third, or tertiary function (see Figure 2).
* Tertiary functions do not apply to the HP 20b.
Selects RPN as the active setting. Note the RPN
annunciator to the right.
Exits the Mode menu and returns you to the
default calculator screen.
Basic Features4
Page 13

• The primary function is printed on the top of the key.
B
Primary
Function
Shifted
(secondary)
Function
Black S
Tertiary function:
(press SHIFT and
the function key
simultaneously)
• The secondary function is printed on the bevel of the key. To activate the secondary function of a key,
press and release
• The third, or tertiary functions are printed above specific keys on the keyboard. To activate the
tertiary function of a key, press and hold
function. Release both keys.
In this manual, key symbols of the commands are provided throughout the manual so you can
follow along with the examples.
• The primary functions are represented by the key symbol with the primary function.
: followed by the key with the secondary function printed on the bevel.
: and simultaneously press the key below the printed
Figure 2 Primary, Secondary, and Tertiary Key Functions
When : is active, the down arrow annunciator appears on screen, indicating that the
next key pressed will execute the secondary function of the key. To cancel an accidental press
of :, simply press : a second time.
Key commands for example problems are provided throughout the text and in tables. Key
symbols are placed in the order they are to be pressed, from left to right.
* Does not apply to the HP 20b.
• The secondary key functions are represented by the shift key symbol,
with the secondary function. For example, to execute sine, press
portion of the key is highlighted, while the
of the key that will be activated in a given command.
• Commands with a tertiary function are represented by the shift key symbol,
term (HOLD), followed by the key with the tertiary function. For example, to activate the Black-Scholes
feature shown above, press
:(HOLD) B*.
7 is grayed out. This highlighting focuses on the function
:, followed by the key
:p. Note how the SIN
:, followed by the
Basic Features
5
Page 14
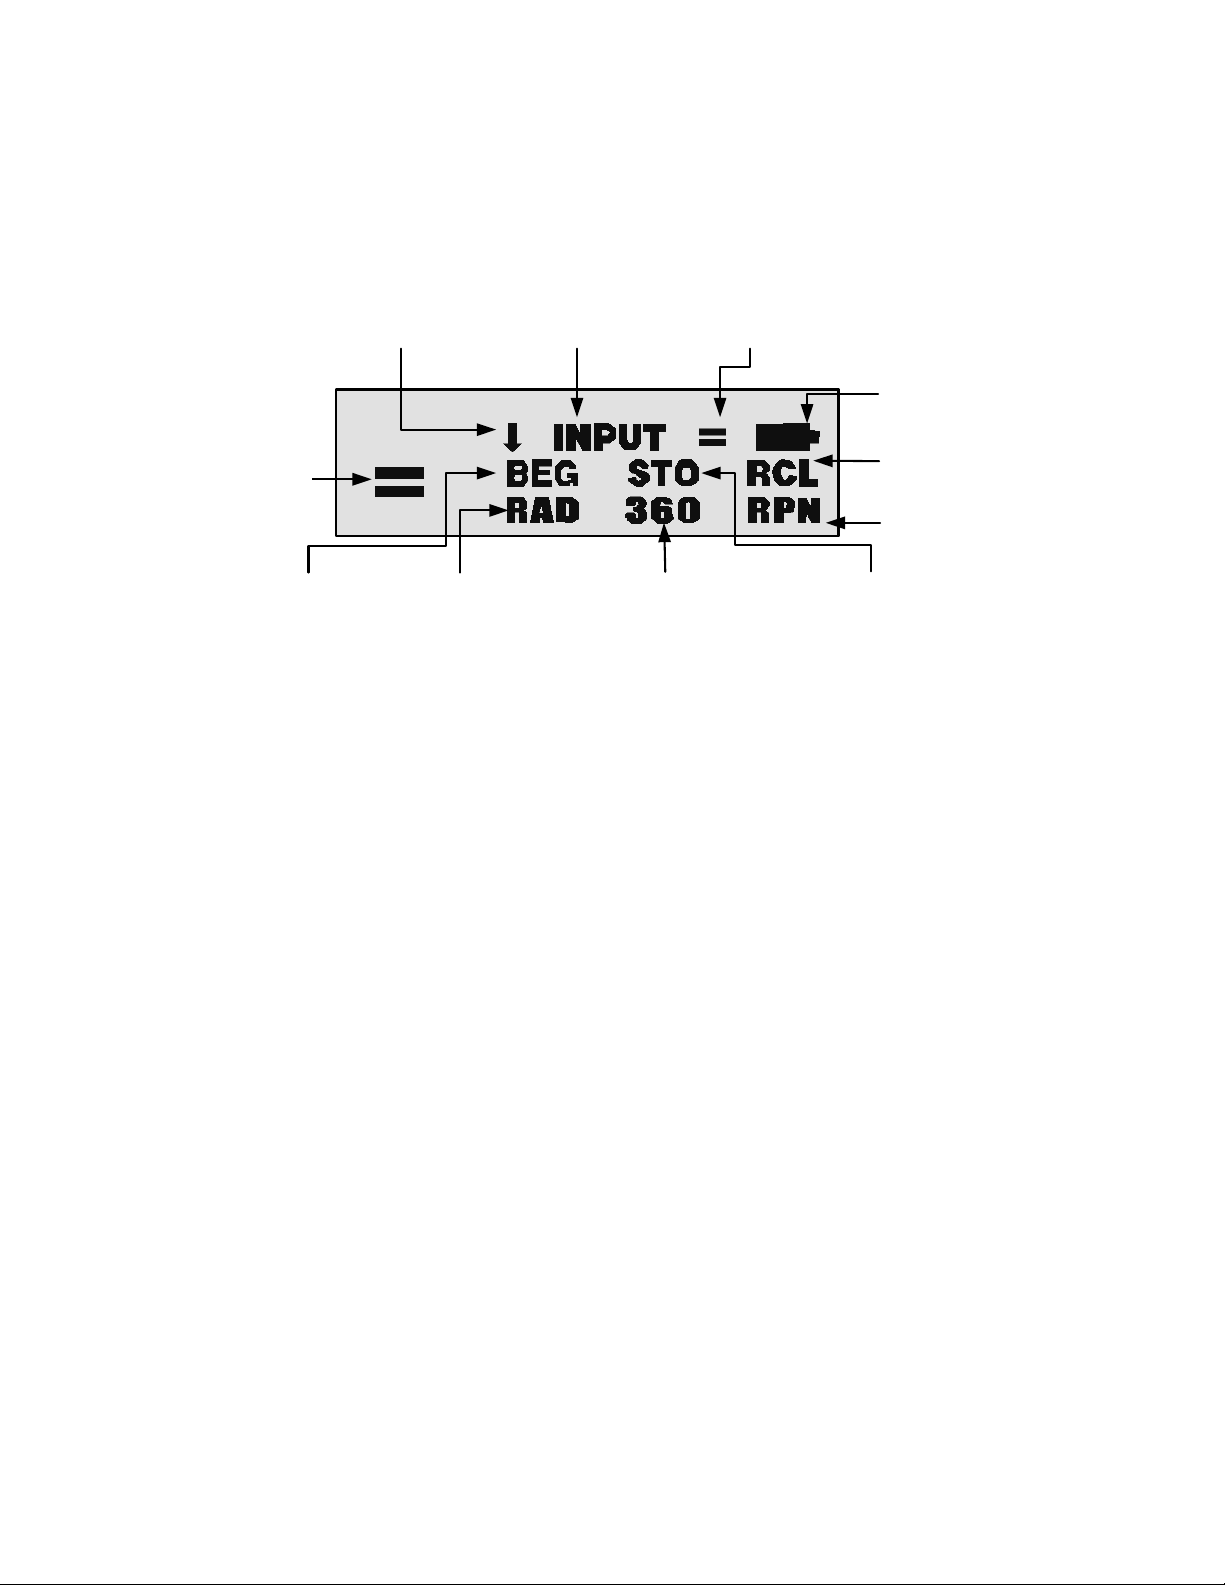
Annunciators
Valid item for the
Input
key
Secondary
function active
Valid item for
the Equals
key
RPN mode
active
Number recall
active
Low batteries
Radians active
Begin mode
active
Number storage
active
360 day-count calendar active
Assigned value
Annunciators are symbols that appear in the display as messages, or after certain keys or key
combinations have been pressed. Annunciators are special symbols indicating a specific
status in the calculator. Figure 3 illustrates the annunciator symbols in the display.
Figure 3 Annunciator Symbols in the Screen Display
The Input Key
The I key is used to input values for variables and execute menu items.
The I key is also used in Reverse Polish Notation (RPN) mode to enter a number on
the stack or duplicate it.
The Equals Key
The = key is used at the end of a mathematical operation to calculate the final result. For
example, 1+2= returns a final result of 3.
The
= key, when pressed outside of a mathematical operation, also allows you to request
a calculation for the value of an item. This request only applies to items that can be calculated.
Using the Input and Equals Keys
Suppose you wanted to calculate the effective interest rate for a 12% nominal interest rate with
12 payments per year in the Interest Conversion (IConv) menu. To open the IConv menu, press
:&. Nom %= displays on the top line, and the current value assigned to the nominal
Basic Features6
Page 15

interest rate is displayed on the bottom line. With this screen displayed, press
12I to input a new value for the nominal rate. Press < followed by
= to calculate the value for the effective rate. See Figure 4.
Figure 4
When an item for which the = key is valid displays, the small annunciator (=) is displayed
on the top line at the right of the screen. Do not confuse this small annunciator (=) with the
larger annunciator (
When an item for which the I key is valid displays, the INPUT annunciator is
displayed on the top line at the right of the screen.
Editing and Clearing Entries
The On/CE Key
) found to the right of a variable.
=
Pressing O one time cancels current number entries, mathematical operations, or a menu
selection, in that order.
Pressing O repeatedly when performing multiple operations cancels one operation at a
time, from the latest to the earliest.
The Reset Menu
The Reset menu allows you to reset some, or all, of the menu items, variables, and registers to
their default values.
To open the Reset menu, press :x. TVM displays on the top line. Press < or >
repeatedly to scroll to a specific item. To validate a choice and reset the selected items, press
I. Press O to cancel. If you select the command to reset the cash flow (Cash Flow),
statistics (Stats ), programs (Prgm)* or all values (All ) items, you will be prompted to confirm
your choice. At the Del. All?, Del. Data?, Del. Prgm?*, and Del. CF? prompts, press
again to confirm the reset, or
O to cancel. While working within a specific menu, pressing
:x takes you directly to the item of the Reset menu that allows you to reset that specific
I
menu. For example, if you are working in the Bond menu and you wish to reset all your entries
in the Bond menu, with any item of the Bond menu displayed, press
on screen. At this prompt, pressing
item you were working with in the Bond menu.
* Only applies to the HP 30b.
I resets the Bond menu and returns you to the last
:x. Bond displays
Basic Features
7
Page 16

Notes about Special Menus
The Mode, Memory, Math and Reset menus are unique menus; they allow you to work in
another menu simultaneously without having to exit. For example, if you were working in the
Bond menu prior to entering one of these menus, pressing O to exit returns you to your
previous work in the Bond menu.
Memory and the Memory Menu
The Memory menu contains the following items: memories 1–9 (Mem 1–9) and 0 (Mem 0),
Cash Flow, Statistics (Stats), programs (Prgm)*, and Memory. To enter the menu, press
:t. Press < or > repeatedly to scroll through the items starting with
memory 1 (Mem 1).
When a memory item is displayed, you can key in a new number and modify the value of
the memory by pressing
For more information about storing and recalling numbers, refer to the section titled, Storing
and Recalling Numbers in Chapter 2.
The Cash Flow and Statistics data share the same memory and are limited to a combined total
of 50 memory slots. The number displayed with Memory refers to the number of remaining
memory slots. When the cash flow or statistics items are displayed, a number also appears
on the bottom line. This number indicates the number of memory slots used by the cash flow
or statistical data.
290 bytes are available for programs. The Prgm* menu item displays the number of bytes
used.
Press I on the Cash Flow, Statistic, or Prgm* menu item to erase the associated data.
Since entering data in these menus can represent a significant amount of work, you will be
asked to confirm your choice. At the Del.Data?, Del. Prgm?*, or Del.CF? prompts, press
I.
I to confirm, or O to cancel.
Accessing Menus and Menu Maps
Many of the calculator's functions are located within menus. To access a menu, press the key,
or secondary-function, key combination for the menu in which you wish to work. To exit a
menu, press
For example, to access the Break-even menu, press : .
* Only applies to the HP 30b.
Basic Features8
O.
Page 17

Once opened, you can scroll through the items in the menu by pressing < or >
repeatedly. In most menus, when you arrive at the last item in a menu, pressing < returns
you to the first item. Similarly, pressing > once on the first menu item scrolls to the last
item in the menu.
Most items consist of two parts: a name and an associated number. For example, the Fixed
item in the Break-even menu (Figure 7) is displayed in Figure 5.
Figure 5
The large (=) annunciator shows that the value assigned to Fixed is 120,000. For example, if
you perform a calculation with the operating mode set to RPN with this item displayed by
pressing 1I2+, Fixed is still selected as the current item, but the large
(=) annunciator is now turned off, indicating that the 3 is not the value assigned to Fixed (see
Figure 6).
Figure 6
At this point, to return to the display of the Fixed menu item shown in Figure 5, press O.
Some menus have sub-menus. If an item represents a sub-menu, pressing I with that
menu item displayed opens the sub-menu. Once the menu sub-menu is open, use
> and
< to navigate through the items of the sub-menu, unless otherwise directed.
In this manual, diagrams called Menu Maps are included at the beginning of each section to
assist you with navigating through the menus described in that section. For an example of a
menu map, see Figure 7 below. Once opened, use the
through the menu items of the Break-even menu. The downward arrows in the map indicate
you press
a sub-menu, the word INPUT appears in the arrow(s). For examples of menu maps with sub-
menus, see chapters 10-12. The return arrows direct you to the next item displayed after the
< to scroll to the next item. If a press of the I key is required to open
> and < keys to navigate
last item in a menu. For example, in Figure 7, pressing
returns you to the FIXED item.
< on the last item in the menu
Basic Features
9
Page 18
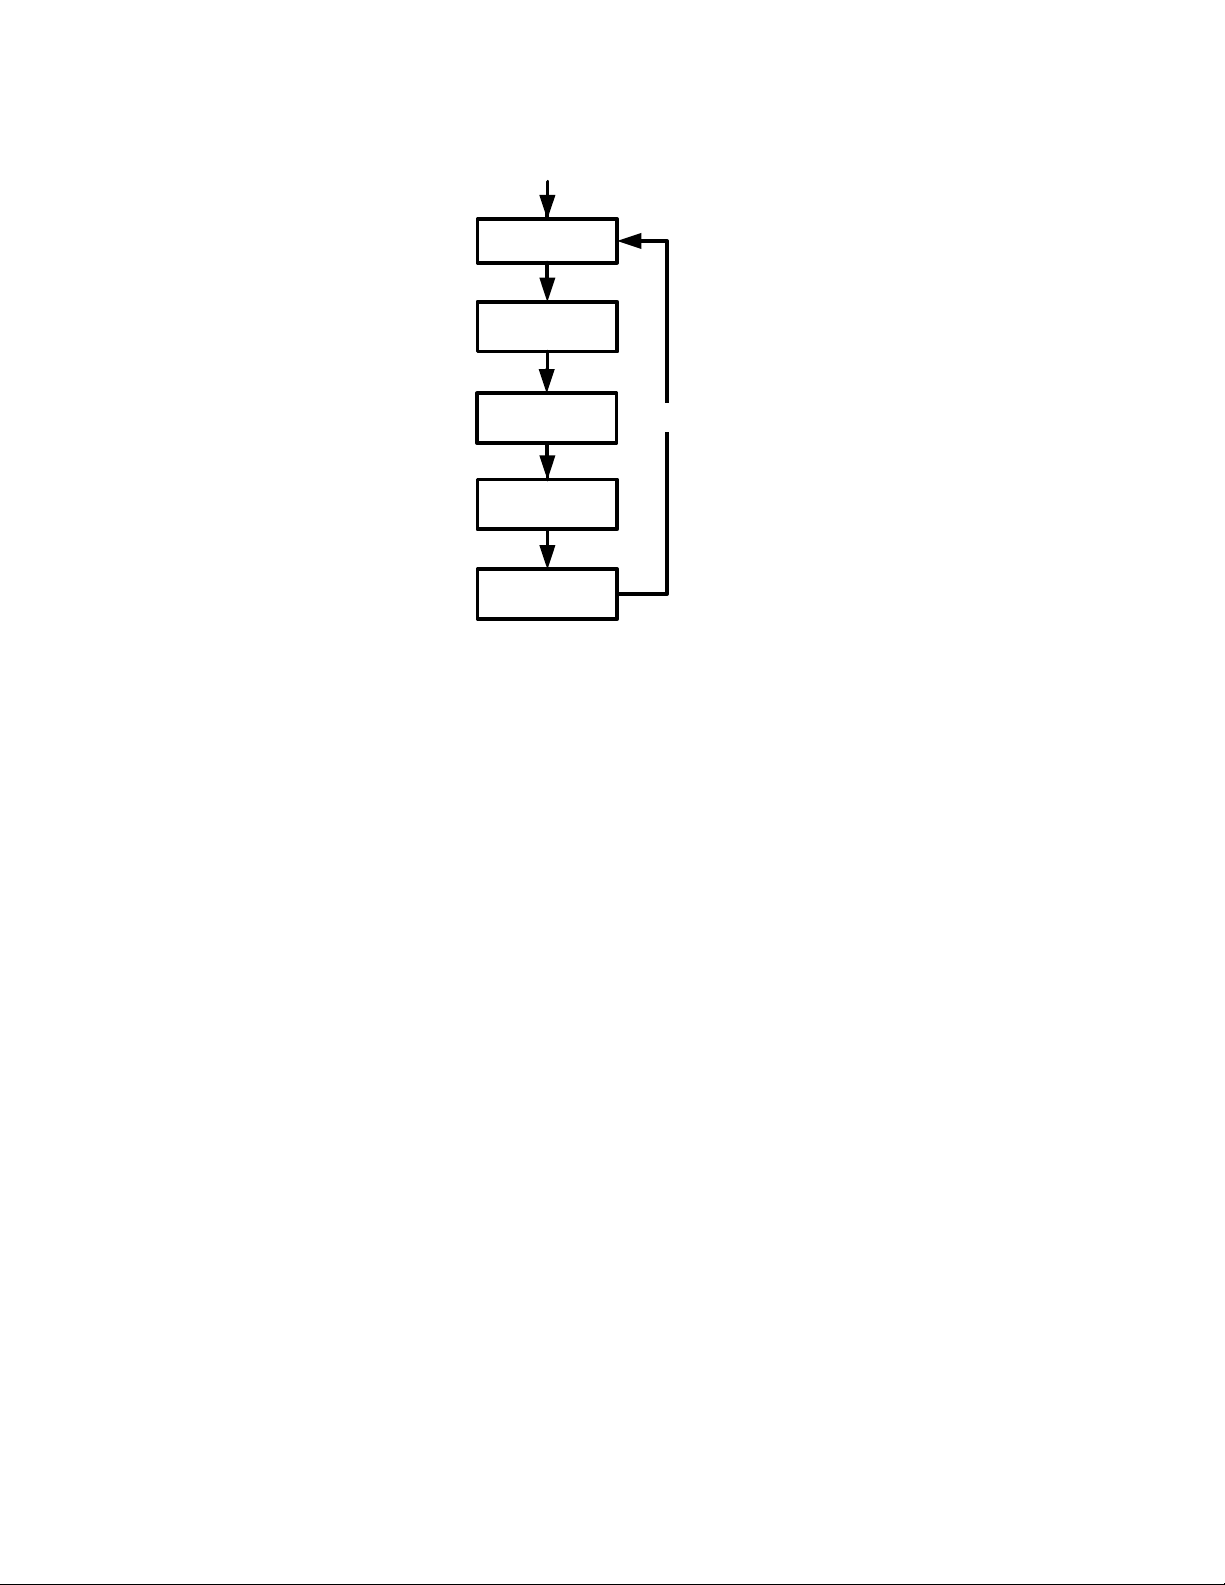
There are four types of menu items:
:P
Fixed
DWN
Cost
Price
Profit
Quantity
1. Read/write. Read/write menu items, such as Fixed in the Break-even menu shown
2. Read-only. Read-only items such as Internal Rate of Return (IRR% ) in the IRR menu are
3. Write-only. Write-only items, such as investment interest rate (Inv. I% ) in the Net Present
Figure 7 Menu Map of the Break-even menu
above, are easily recognizable, because when they are selected, both the INPUT and
small (=) annunciators are lit. When lit, these annunciators indicate that keying in a
number and pressing I will store the entered number in the displayed menu
item. Pressing = (outside of a mathematical operation) calculates the value for that
item based on available data.
display-only; they are values computed internally by the calculator.
Value (NPV) menu, are similar to read/write items in that the INPUT annunciator is lit
when these items are selected, indicating that keying in a number and pressing
I stores that number in that menu item. However, the = key does not
calculate a value for that item.
Basic Features10
4. Special items. Special items, such as the Degree/Radian option in the Mode menu, the
items of the Reset menu, and the items of the Percent Calculation (%calc ) menu perform
an action when I is pressed. Depending on the menu, this action can be the
selection of a sub-menu (%calc), changing a mode or setting (Mode menu), or erasing
data (Reset menu)
Page 19

2 Mathematical Calculations
Mathematical Functions
Mathematical functions are located:
• On keys, such as, +-*/, etc.
• On shifted, or secondary functions, such as,
• In the Math menu, :s
:p
Number Entry and Display
Numbers are entered by pressing:
• Numbered keys, 0–9
• The decimal point .
•The } key
•The
To correct a number entry, press the backspace key, {. Each press of { erases the last
digit or symbol you entered.
To enter a number in the display, press the number digits successively. A number can have up
to 12 digits.
:w keys
To change the sign of a number from positive to negative, press }.
Use scientific notation to enter very large and very small numbers. For example, to enter the
number 1.23x 10
127
in scientific notation, first enter the mantissa (1.2 3) and then press
:w and enter the number (127 ) representing the exponent. The exponent must have a
value between –499 and +499. If an expression has more than 12 digits, or if an operation
returns a result with more than 12 digits, the calculator automatically displays scientific
notation.
Figure 1 Scientific Notation in FIX=2 Mode
Mathematical Calculations
11
Page 20
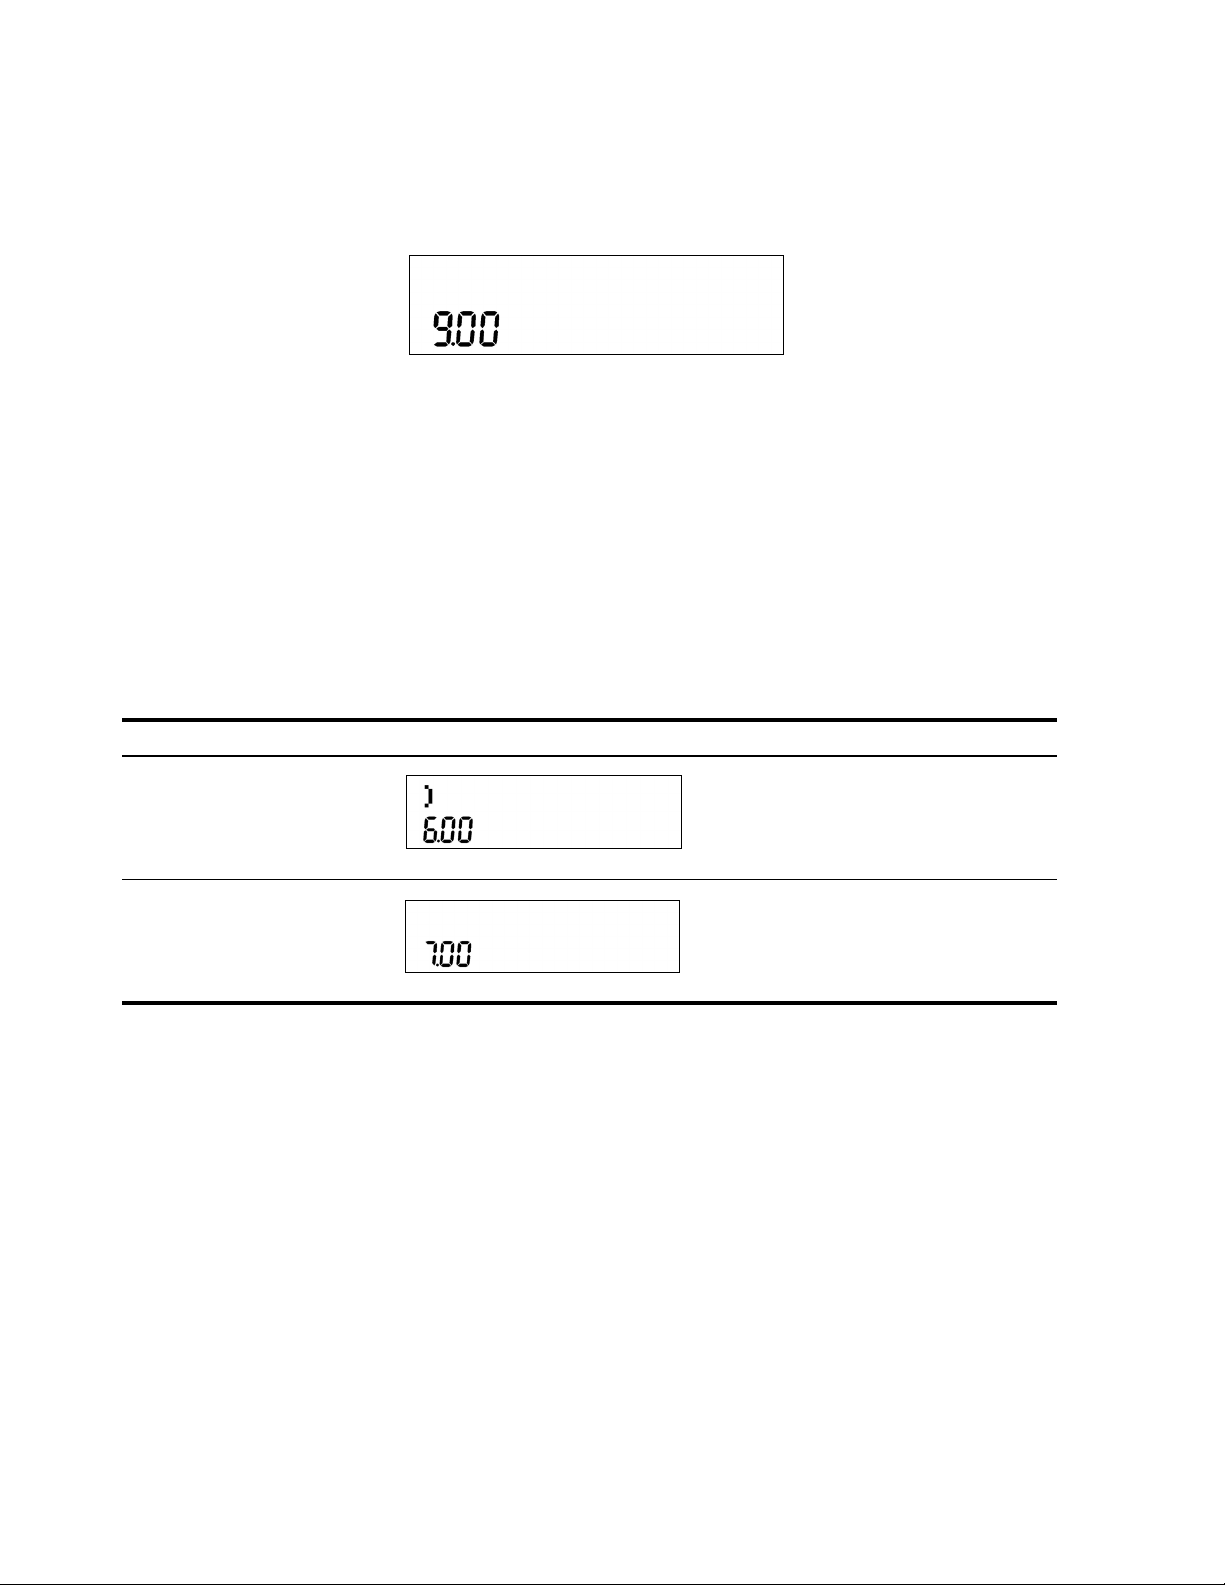
Chain Mode
Calculations in Chain mode are interpreted in the order in which they are entered. For
example, entering the following numbers and operations as written from left to right,
1+2*3=, returns 9. See Figure 2.
Figure 2 Calculation in Chain Mode
NOTE: if you press an operator key, +-*/, after =, the calculation is
continued using the currently displayed value.
In Chain mode, if you wish to override the left to right order of entry, use parentheses
(D to prioritize operations.
For example, to calculate 1 + (2 x 3), you may enter the problem as written from left to right,
with parentheses to prioritize the multiplication operation. See Table 2-1 below.
Table 2-1 Simple Arithmetic Calculations in Chain Mode
Keys Display Description
Sets operational priority, inputs numbers,
1+
and multiplies 2 and 3.
(2*3D
Adds 1 to 6 and returns 7.0 0 on the bottom
=
Algebraic Mode
To set the calculator in Algebraic mode, refer to the section titled, The Mode Menu: Setting
Preferences in Chapter 1.
In Algebraic mode, multiplication and division have a higher priority than addition and
subtraction. For example, in Algebraic mode, pressing
returns a result of 7.0 0. In Chain mode, the same key presses return a result of 9.00.
line as the final result.
1+2*3=
In Algebraic mode, operations between two numbers have the following priority:
• Highest priority: the power function ( y x )
• Second priority: combinations and permutations
• Third priority: multiplication and division
• Lowest priority: addition and subtraction
Mathematical Calculations12
Page 21

For example, key in 1 + 2 x 5 nPr 22 in Algebraic mode by pressing:
Stack Level 4
Stack Level 1
Stack Level 3
-15
12
Stack Level 2 41
23
1+2*5:b2:m=. The result is 241.
NOTE: the calculator is limited to 12 pending operations. An operation is pending when it
is waiting for the input of a number or the result of an operation of higher priority.
Reverse Polish Notation (RPN) Mode
To set the calculator in RPN mode, refer to the section titled, The Mode Menu: Setting
Preferences in Chapter 1. In RPN mode, numbers are keyed in first, separated by pressing
I or =, followed by an operation key.
NOTE: pressing I or = is optional after keying in a number, if the next key
pressed is an operation.
Each time you press an operation or function key in RPN, the answer is calculated immediately
and displayed. For example, suppose you wanted to add two numbers in RPN, 1 and 2. Press
1I2+. The result, 3.00, is calculated and displayed immediately on the
bottom line along with the (+) symbol on the top line.
The RPN Stack
NOTE: in RPN mode, when you are in a menu for which I or = are valid,
pressing these keys enters the number, but it also performs the action associated with the key
for the menu item, which is generally saving the number in the variable or calculating the
item's value.
RPN works by placing numbers in storage registers called the stack. The RPN stack has four
levels numbered 1– 4. The levels are stacked on top of one another. See Figure 3.
Figure 3 The RPN Stack
Mathematical Calculations
13
Page 22

In Figure 3, the stack contains four numbers, 23, 41, 12, and –15. Each level (1– 4) contains
-15
-15
12
64
1.23 56.123+()
56.123()
--------------------------------------
one number. When a number is typed and entered into the stack by pressing I, this
new number is "pushed" into level one of the stack, and each number already in the stack
moves up one level. The number in Level 4, –15, is pushed out and is lost.
When an operation is performed on the stack, addition
"pops" or moves the two numbers from the bottom levels (Levels 1 and 2) out of the stack,
performs the operation, and "pushes" the results back into the stack.
With the numbers entered into the stack as shown in Figure 3, pressing
stack as shown in Figure 4. Note that when the numbers are "popped" out to add 23 and 41,
Level 4 of the stack remains unchanged.
(+) for instance, the calculator
+ changes the
Last Number
Each time you perform a mathematical operation, the content of Level 1 of the stack is saved.
Pressing
key press, or if you want to reuse a number, such as 56.123 in the expression:
See Table 2-2 for an example using the last number function.
Mathematical Calculations14
:d recalls that number. This functionality can be used to undo an erroneous
Figure 4 The RPN Stack of Figure 3 Shown After the Addition Operation
Page 23
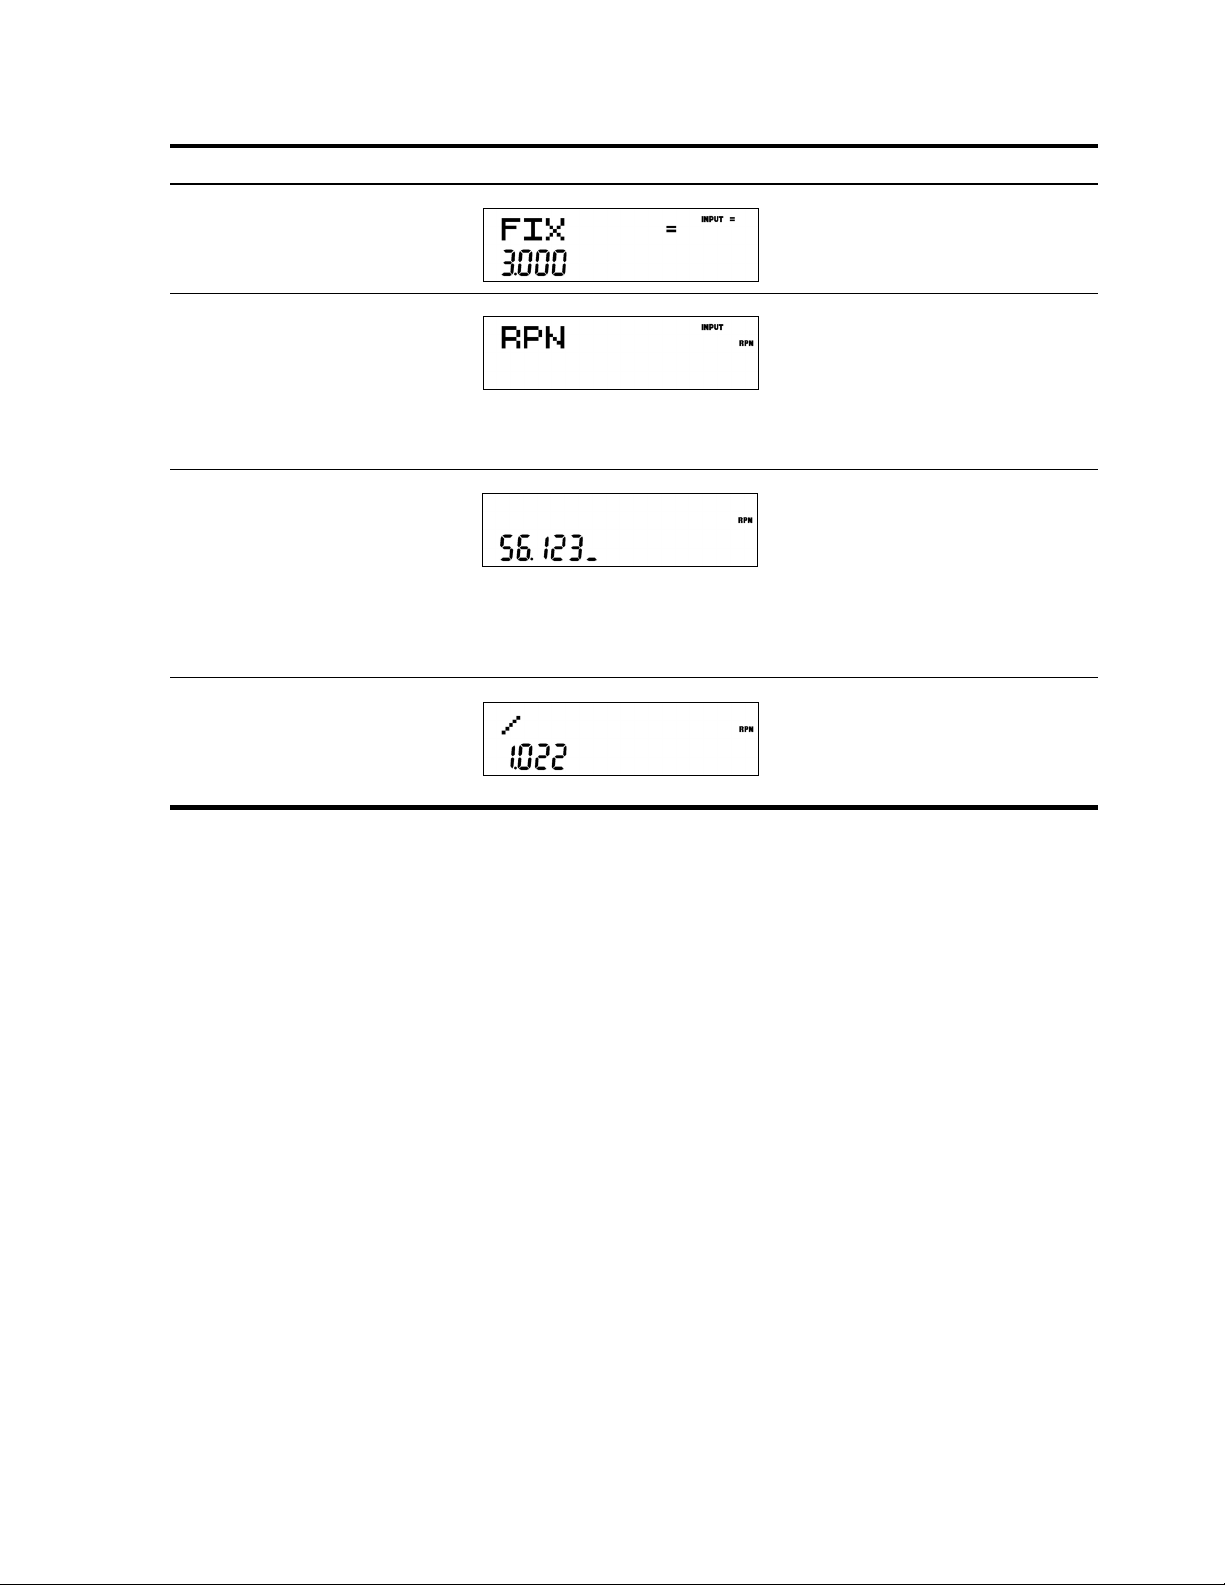
Table 2-2 Last Number
Keys Display Description
Sets FIX= to 3.000
:u3I
Selects RPN as the operating mode.
<<<<
<
II
Inputs 1.23 and 56.123
O1c23
I56c
1
23
Adds 1.23 and 56.123, then divides
+:d/
the sum by the last number, 56.123.
Returns results in the selected display
format.
For more complex problems requiring two or more operations, you do not need to enter
parentheses to set operational priority. Key in numbers and operations inside the parentheses
first, followed by those outside of the parentheses. If a problem has more than one set of
parentheses, start by working with the operations and numbers in the innermost parentheses
and work out. For example, calculate:
(3 + 4) x (5 + 6)
One way to calculate this problem is to key in the numbers and operations within the
parentheses first, followed by the operation outside of the parentheses. See Table 2-3.
Mathematical Calculations
15
Page 24
Table 2-3 Simple Arithmetic Calculations in RPN Mode
Previous
Value
Previous
Value
Previous
Value
7
Previous
Value
Previous
Value
7
11
Previous
Value
Previous
Value
Previous
Value
77
Keys Display Description RPN Stack
Inputs the numbers and the
3I4
+
5I6
+
operation in the first set of
parentheses. Intermediate
results are displayed. Note
the (+) and (RPN)
annunciators.
Inputs the numbers and the
operation in the second set
of parentheses.
Intermediate results are
displayed. Note the (+)
annunciator.
Finishes the operation and
*
displays the results.
Pressing I or = when you are not entering a number duplicates the number on
Level 1. That is, the number on Level 1 is pushed on the stack, making Levels 1 and 2 equal.
In the example above, pressing
I after * duplicates 77 on the stack, making
Levels 1 and 2 equal. See Figure 5.
Mathematical Calculations16
Page 25
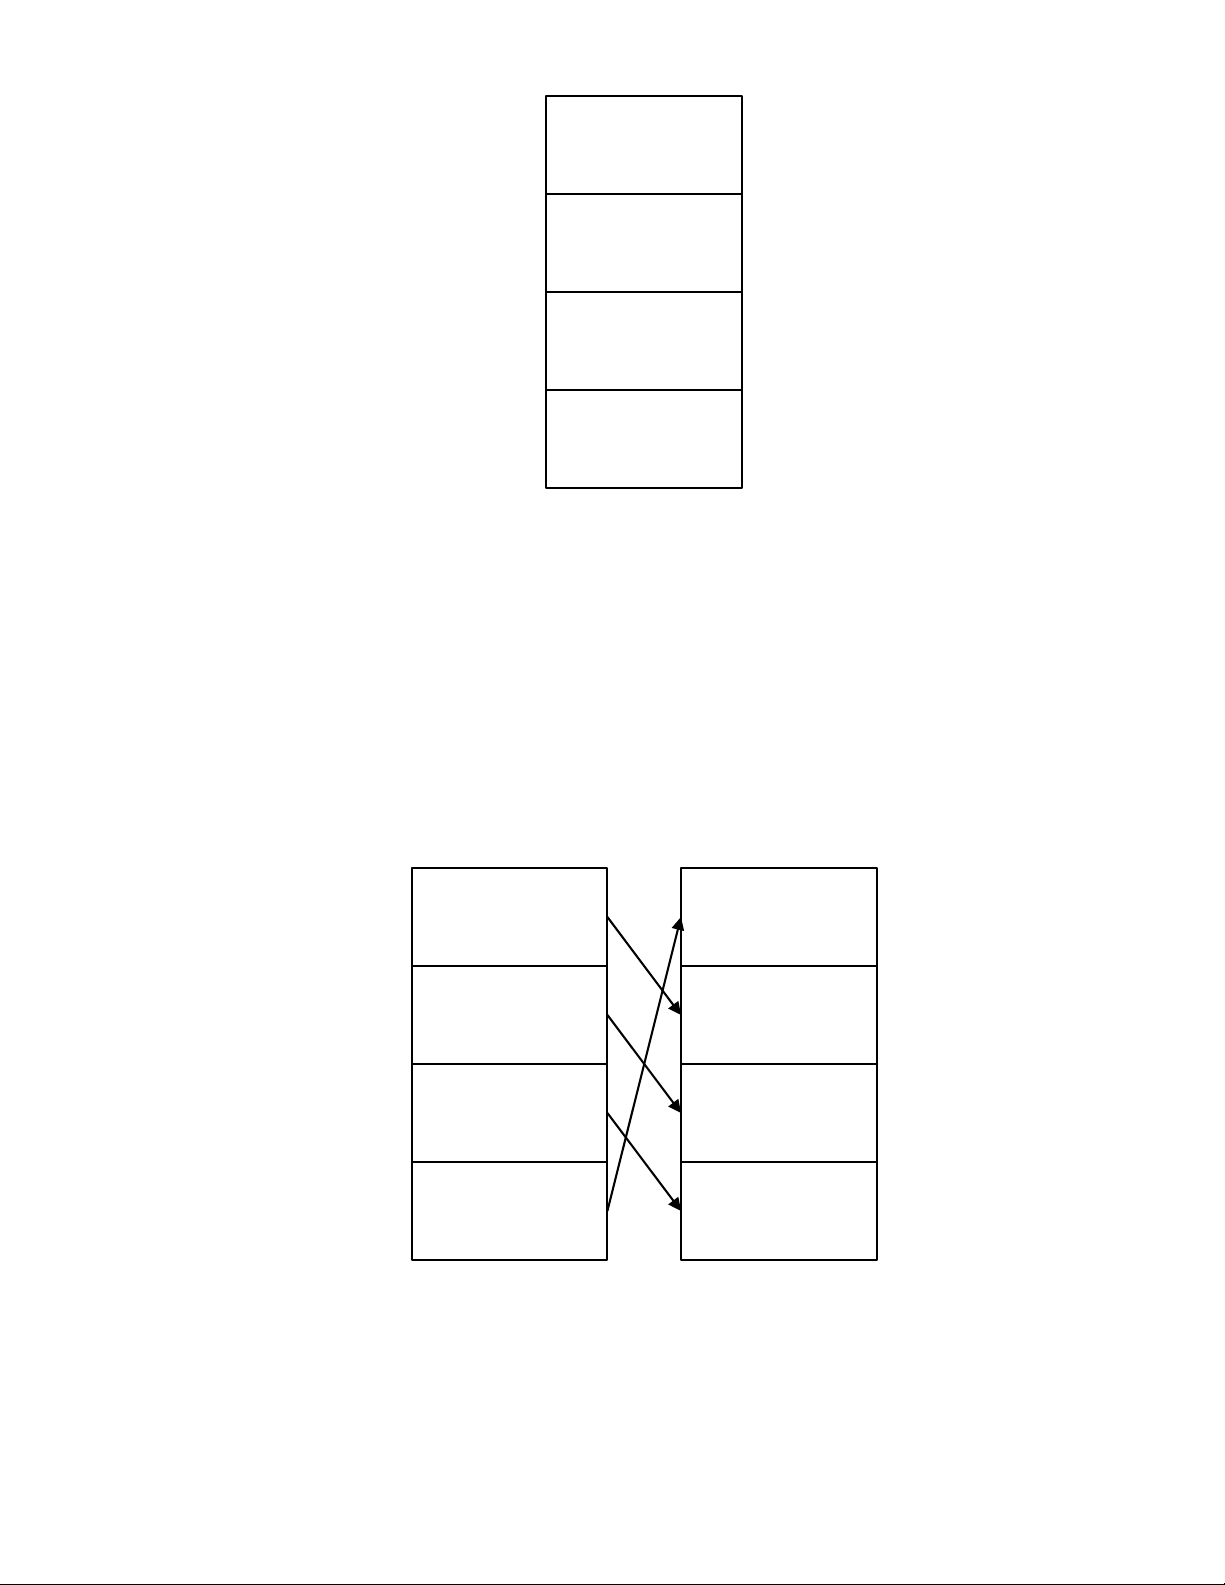
Figure 5 Duplicating a Number on the Stack
Previous Value
Previous Value
77
77
-15
12
41
23
23
-15
12
41
In RPN, the parentheses keys (D manipulate the stack. Pressing ( performs a roll
down of the stack. A roll down causes the stack to roll towards the bottom of the stack, during
which the number in Level 2 to moves down to Level 1, the number in Level 3 to moves down
to Level 2, the number in Level 4 to moves down to Level 3, and the number of Level 1 to moves
up to Level 4. The ( key has a small down arrow on it to indicate the roll down feature.
With the numbers entered into the stack shown in the left column in Figure 6, pressing (
performs the roll down of the stack shown in the right column.
Figure 6 The RPN Stack and the Roll Down Operation
Mathematical Calculations
17
Page 26
Pressing D performs a swap. A swap operation exchanges the numbers on Levels 1 and 2
-15
-15
23
41
-15
12
41
23
6
of the stack. The
D key has a small symbol to the right of the parenthesis symbol to indicate
the swap feature. With the numbers entered into the stack shown in the left column in Figure 7,
pressing D performs a swap to the stack as shown in the right column.
Figure 7 The RPN Stack and the Swap Operation
NOTE: when no menu is selected, the < key performs the same function as the ( key.
The > key performs the inverse operation called, roll up.
One-Number Functions and the Math Menu
The key presses for the one-number mathematical functions listed in Table 2-4 below apply to
all modes, Chain, Algebraic, and RPN. To execute one-number functions, with a number
displayed, press the key or key combination corresponding to the operation you wish to
execute. The result is displayed on the bottom line.
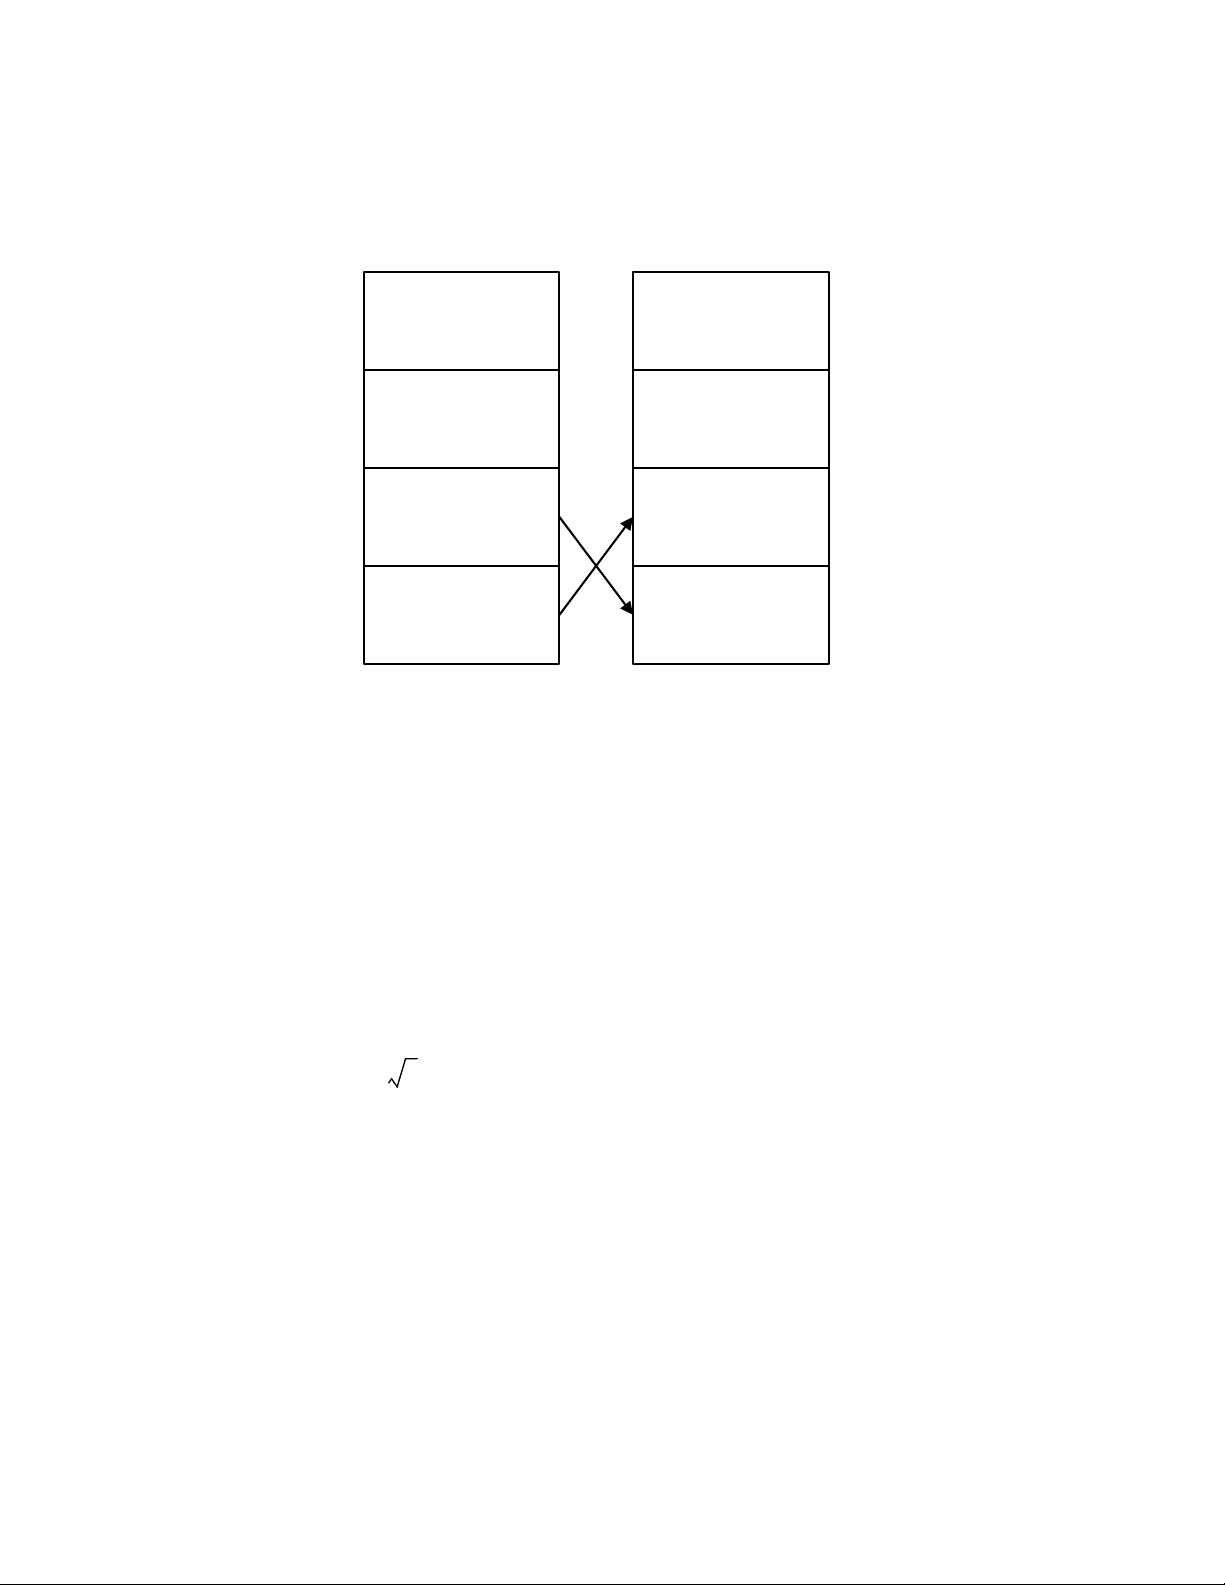
For example, to calculate , press 6:n. The result of 2.45 is calculated
immediately and displayed on the bottom line. Note the square root symbol appears on the
top line.
NOTE: before doing any trigonometric calculations in the Math menu, check whether the
angle mode is set for degrees (Degree) or radians (Radian). You will need to change the
setting if the active mode is not what your problem requires. For more information on the
Mode menu and calculator settings, refer to the section titled, The Mode Menu: Setting
Preferences in Chapter 1. Table 2-4 lists one-number functions along with their corresponding
keys.
Mathematical Calculations18
Page 27

Table 2-4 Shifted Function Mathematical Operations
Keys Description
:p
:q
:r
:k
:l
:m
:n
:f
:g
:i
Calculates sine.
Calculates cosine.
Calculates tangent.
Calculates natural log.
Calculates natural exponent to the power of x.
Calculates square of x.
Calculates square root.
Executes the Random function. Returns a random number in the range 0 < x <1.
<
Calculates factorial of x (where –253 < x
calculate x! for non-integers or negative numbers.
Calculates the reciprocal.
253). The Gamma function is used to
:d
:e
In Chain or Algebraic mode, recalls the result of the last operation. In RPN mode,
returns the content of the Last Number variable.
Rounds x to the number specified by the display format.
Random number
Press :f to generate a randomly distributed number between 0 and 1.
Type a number and press
generation.
:$:f to store a new seed for random number
The Math Menu
There are additional functions available in the Math menu. To open the Math menu, press
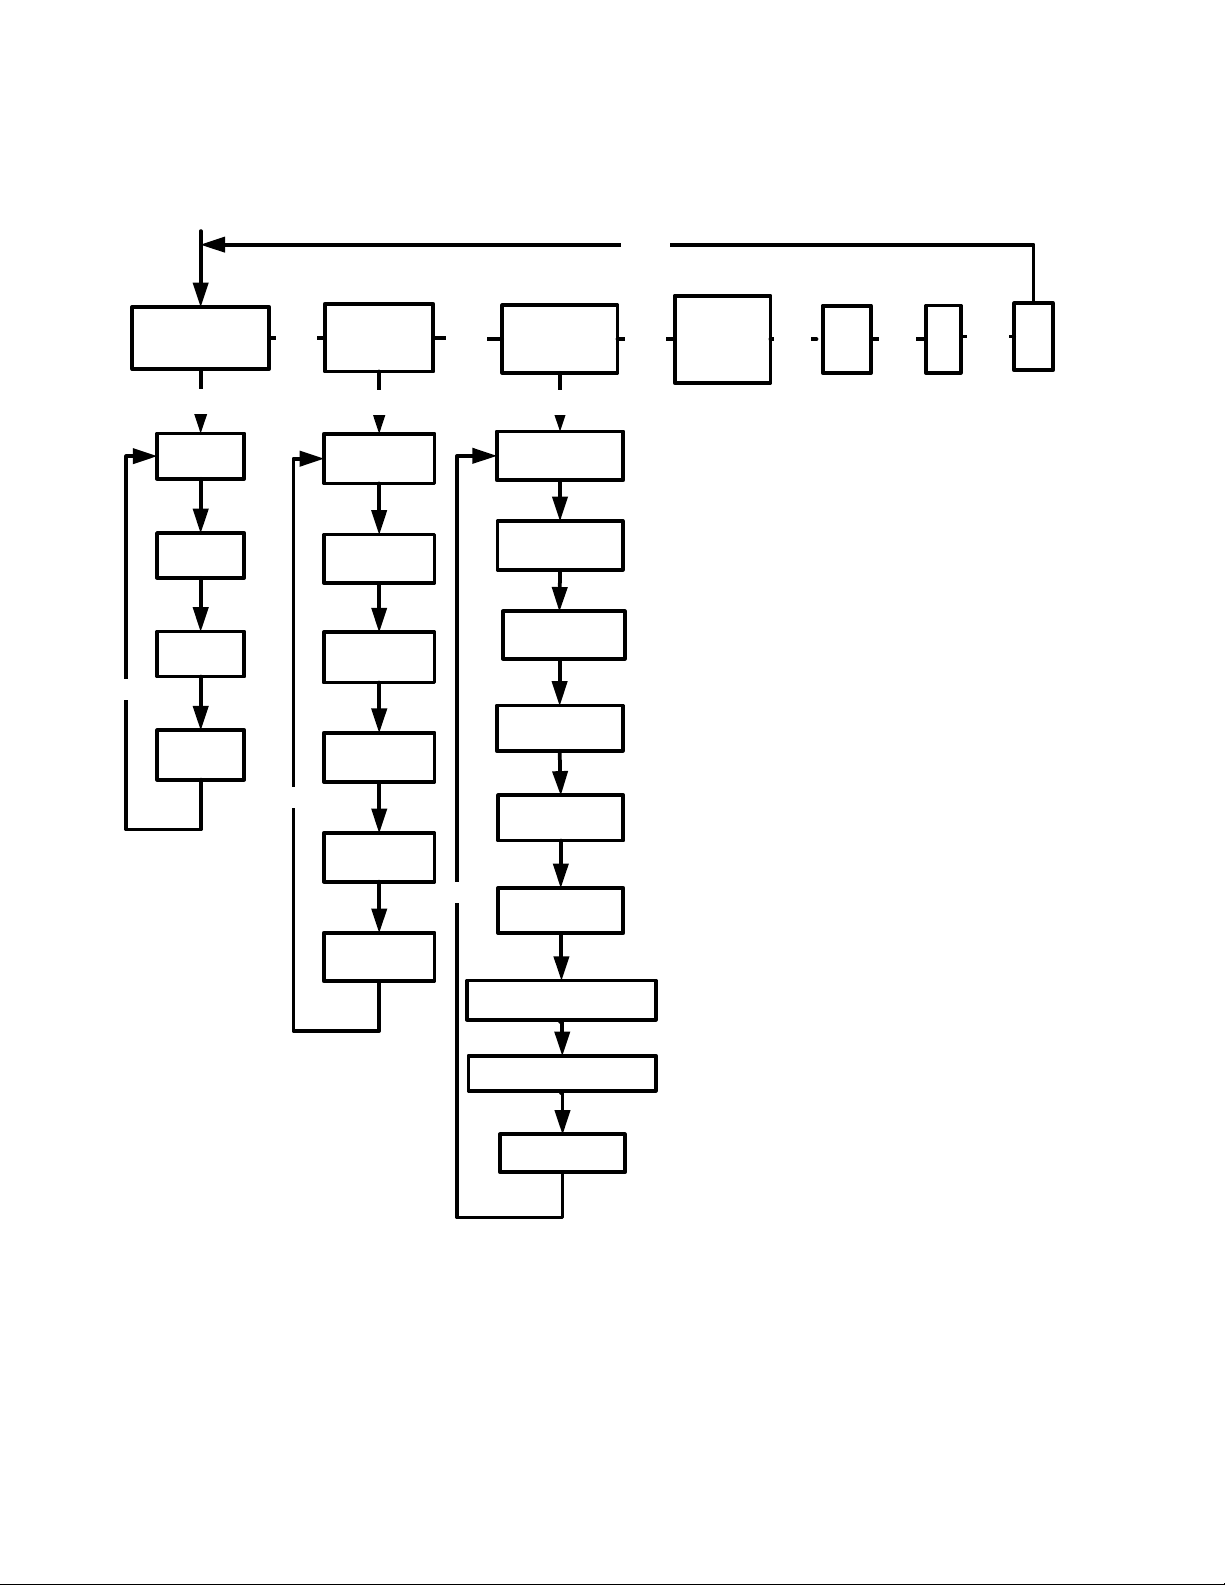
:s. See Figure 8 for the menu map of the Math menu.
Mathematical Calculations
19
Page 28
DWN
DWN
INPUT
:s
Trigonometry
Hyperbolic
Probability
ABS
(Absolute
Value)
PI
SIN
-1
SINH
COSH
TANH
LTND
LTND
-1
LOG
INPUT
DWN
COS
-1
DWN
TAN
-1
TANH
-1
SINH
-1
COSH
-1
DWN
DWN
INPUT
DWN
Student
Student
-1
Chi
2
Chi
2-1
F—Distribution
F-1—Distribution
DWN
Binomial
IP
*
DWN
FP
*
DWN
Press < to scroll through the menu items, starting with Trigonometry. The Trigonometry,
Figure 8 The Menu Map for the Math Menu
Hyperbolic, and Probability items have sub-menus. Press
access the functions within the sub menus. Press < to scroll through the functions.
* IP and FP functions are not available on the HP 20b.
I on any of these items to
Mathematical Calculations20
Page 29
Press O to cancel the Math menu and return to current work. Press :s to return
χ
to the top of the Math menu.
–1
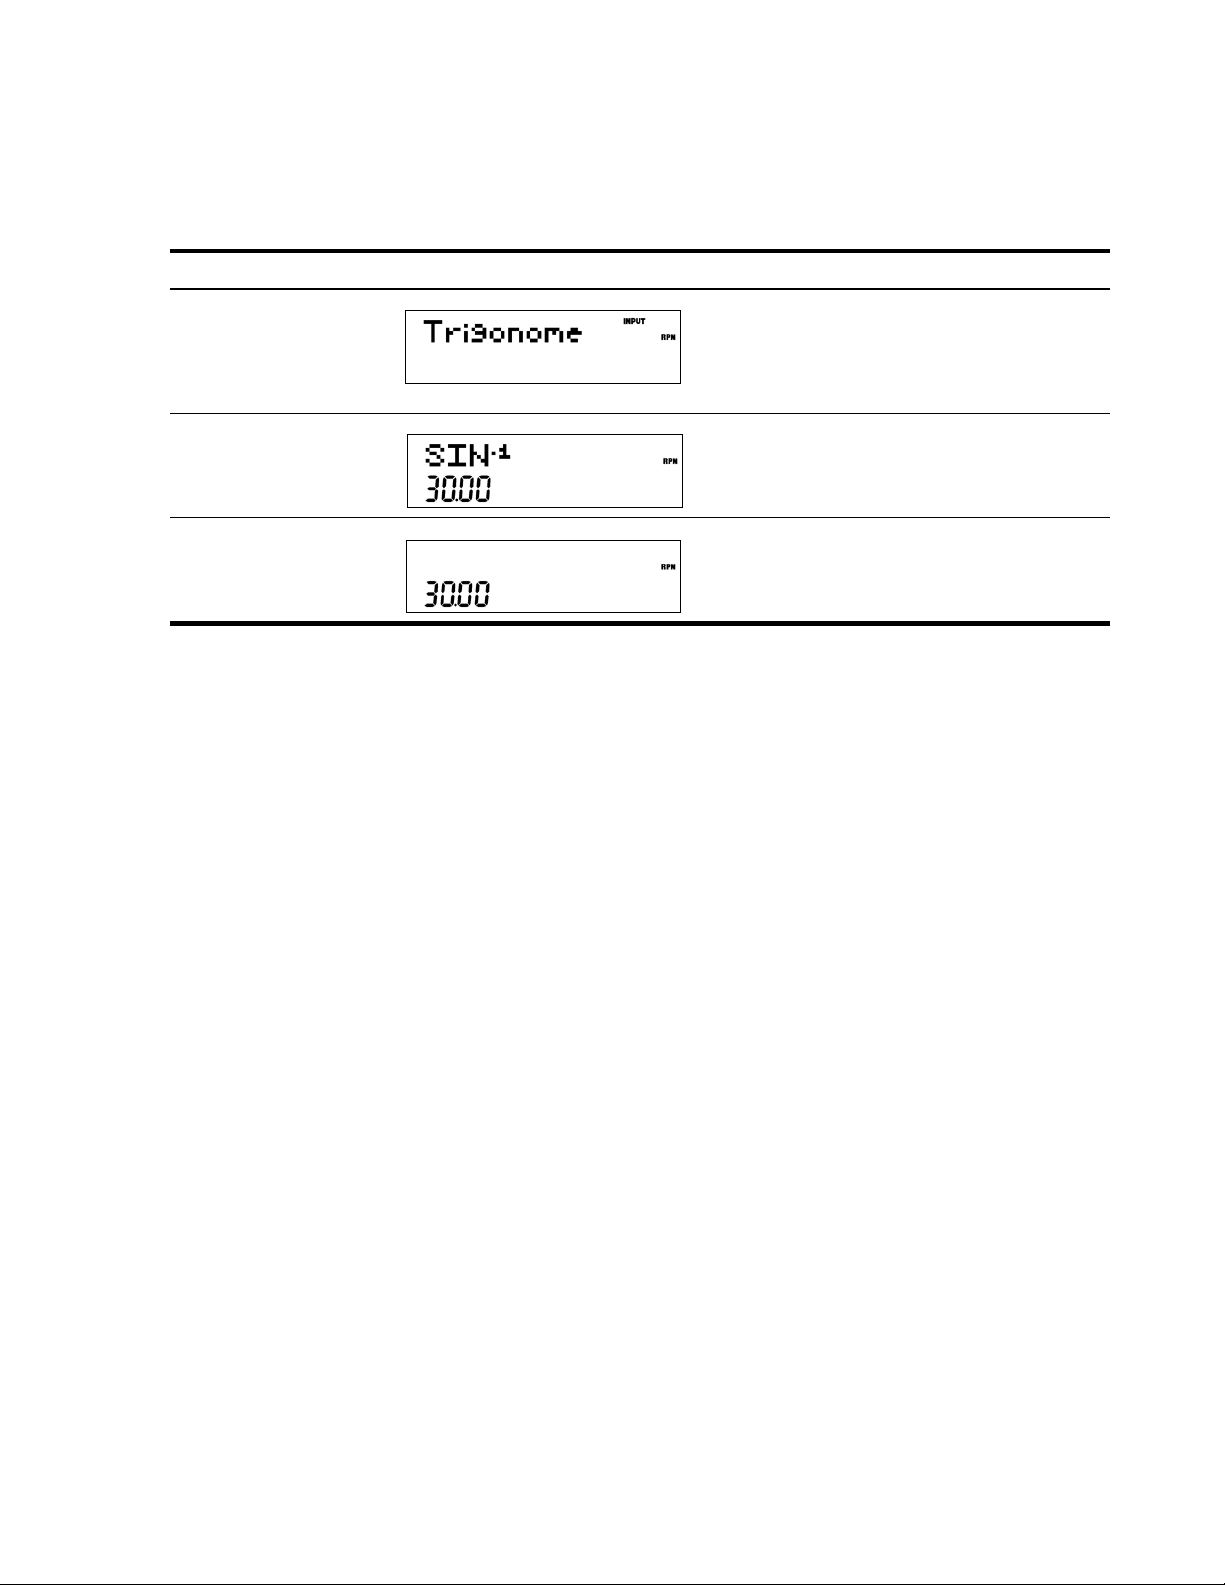
For example, using the math menu calculate Sin
Table 2-5 Math Menu Example
Keys Display Description
.5I
(0.5), see Table 2-5.
Enters 0.5 and opens the Math menu starting
with Trigonometry.
:s
Selects the Trigonometry sub-menu and scrolls to
I<
-1
. Note the value for Sin-1 is calculated
Sin
immediately and displayed.
Validates the result.
I or =
In the Math menu, PI does not perform calculations; it enters PI for calculations. You may start
an operation, use the Math menu to execute a function, and continue calculating with your
original operation without losing your work.
The Probability Sub-menu
Lower Tail Normal Distribution (LTND) calculates the probability for a normally distributed,
random variable to be less than the input.
Inverse Lower Tail Normal Distribution (LTND-1) is the inverse function for LTND; it calculates
the value (V) for which the probability of a normally distributed, random variable to be less
than V is the given input. Student, Inverse Student, Chi2 (2), Inverse Chi2, F-Distribution and
Inverse F-Distribution perform similar operations for Student, Chi2, and F-Distributions.
2
Student, Chi
require more than one number as input. Student and Chi2 require (N), the number of degrees
of freedom, and F-Distribution requires (N1) and (N2), two degrees of freedom.
To perform Student and Chi
1. Enter the number of degree(s) of freedom by typing the number and pressing I
or =.
2. Type the number for which you want to calculate the probability, or, for the inverse, the
probability for which you want the number.
3. Navigate to the appropriate function in the Probability sub-menu of the Math menu.
, and F-Distribution and their inverse operations are special cases, as they
2
operations or their inverse:
To perform F-Distribution operations or their inverse:
Mathematical Calculations
21
Page 30
1. Enter the two degrees of freedom by typing each number followed by I or
=.
2. Type the number for which you want to calculate the probability, or, for the inverse, the
probability for which you want the number.
3. Navigate to the appropriate function in the Probability sub-menu of the Math menu. See
Table 2-6. Note: the examples below are calculated with Chain set as the operating
mode.
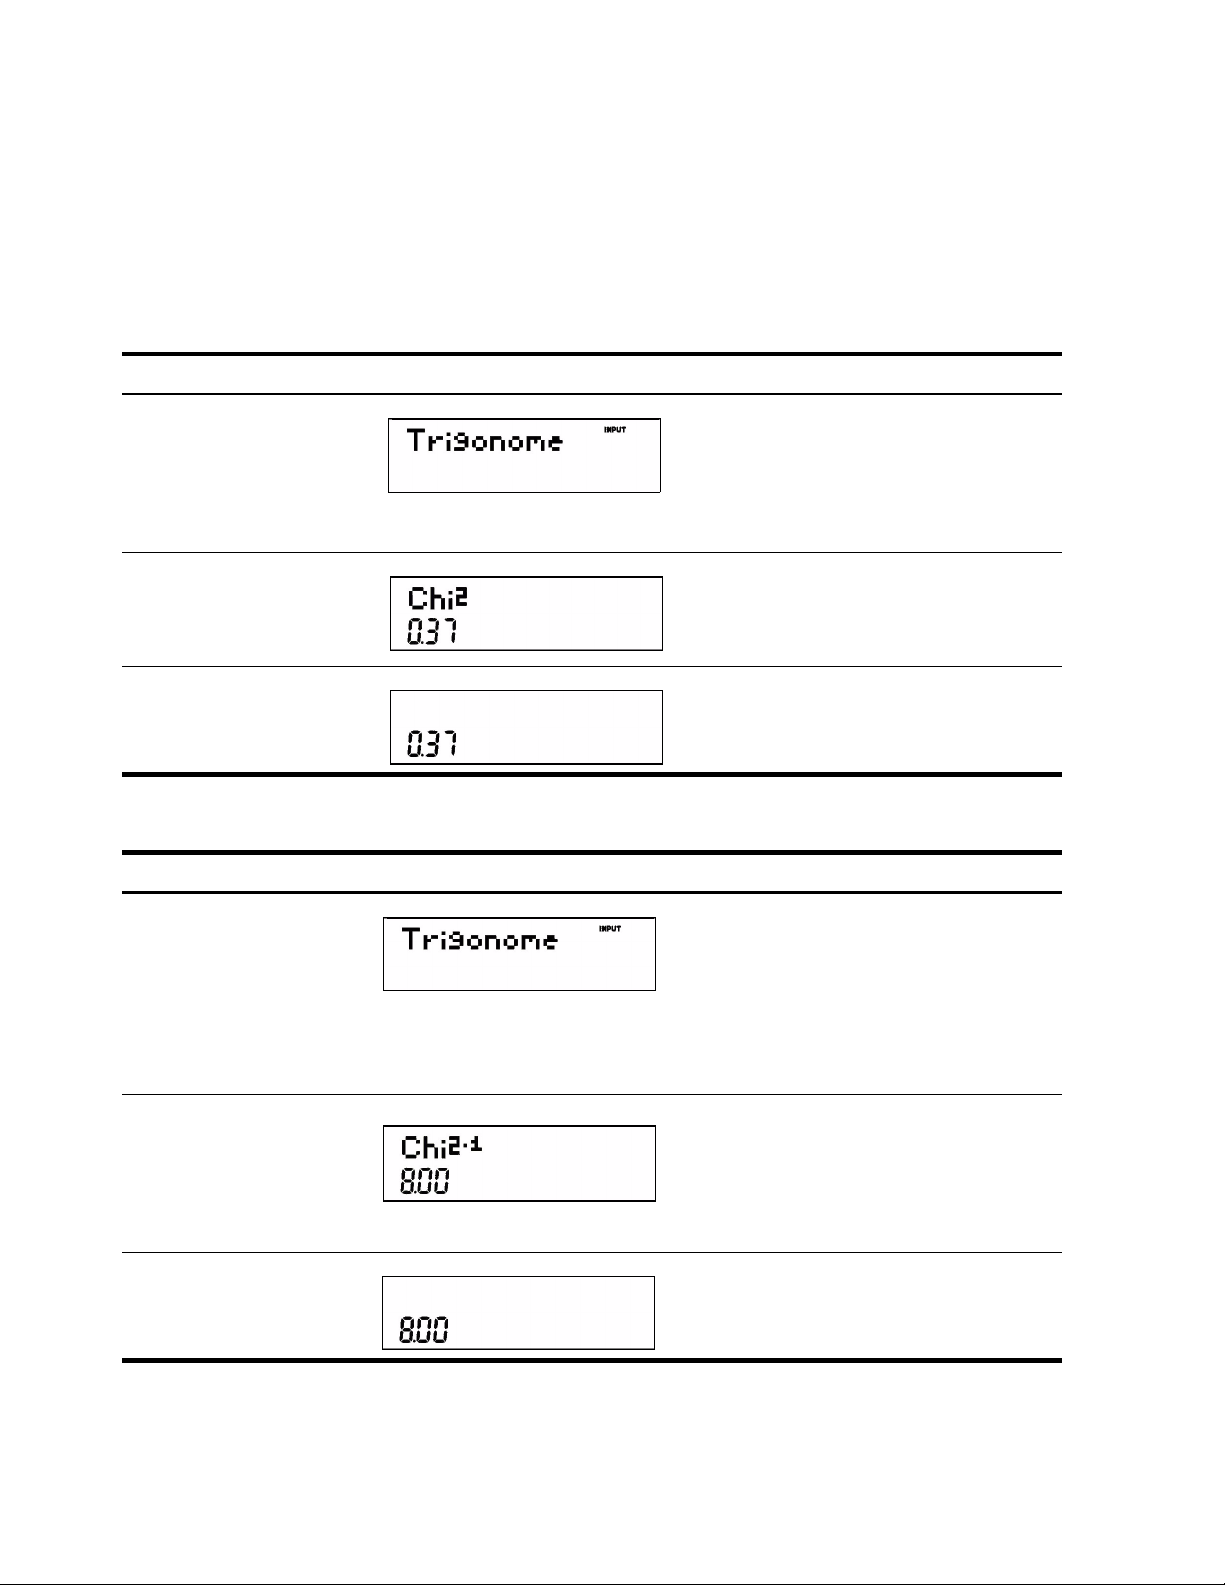
Table 2-6 Probability Example
Keys Display Description
Enters 10 degrees of freedom and the number
10I
8I
:s
<<I
<<<<
for which probability is to be calculated.
Opens the Math menu.
Selects the Probability menu item and scrolls to
Chi2..
Validates the result.
I or =
Table 2-7 Inverse Probability Example
Keys Display Description
Enters 10 degrees of freedom and the
10I
probability. Opens the Math menu.
0.37
12I
:s
Selects the Probability menu item. Scrolls to
<<I
Chi
2-1
.
<<<<
<
I or =
Mathematical Calculations22
Validates the result.
Page 31

Binomial Functions
n!
r! nr–()!
----------------------
n!
nr–()!
------------------
The binomial function calculates the probability of having up to k successes out of n throws,
when the probability of success is p. Enter n and p each followed by = and type k and
navigate to the binomial function in the math menu.
Two-Number Functions
Apart from +-*/, the three additional two-number functions accessible on
the keyboard are:
x
•y
•nCr
•nPr
x
is the power function, nCr stands for the number of combinations of n items taken r at a
y
time, and nPr stands for the number of permutations of n items taken r at a time.
Combination=
Permutation=
Perform calculations with these functions in the same way you would perform calculations with
+-/ and *, but press : to access the secondary function key. For
example, to calculate 153 :
1. P r e s s 15.
2. Press :h.
3. Press 3=. The result is shown in Figure 9.
Figure 9
In RPN mode, key in the numbers first, followed by I, then press the function key. For
example, for the power function example above, in RPN press:
15I3:h.
Mathematical Calculations
23
Page 32

Storing and Recalling Numbers
The calculator has ten memories available for use during calculations. These memories are
numbered from 1–9 and 0. To store a number in a memory, press :$, followed by
the key representing the memory number. To recall a number stored in a memory, press L
followed by the key representing the memory number. You can use the store and recall
functions for these memories any time a number is displayed, or when you wish to enter a
number.
For example, to store 15 in memory 1, press 15:$1.
To recall the number in memory 1, press
You can also perform operations to numbers stored in memories. For example, press
L1.
5:$2 to store 5 in memory 2. To add 12 to the value of memory 2, press
12:$+2. Later on, during a calculation, you can press L2
to recall memory 2. Note how the current value now stored in memory 2 is 17, (5 +12).
+-* and / are valid mathematical operations for memories.
To view the stored values in memories 1–9 and 0, press :t, followed by <
or > repeatedly to scroll through each memory starting with memory 1 (Mem 1). Note
that in the Memory menu, you can change the value of any memory by selecting the memory
and typing a number followed by the t key.
Recall Arithmetic
In RPN, typing L+2 adds the value of memory 2 to the first level of the stack, but
it will not modify the stored value of memory 2. This is useful, as it "saves" one stack level.
You can also use -* and / after L.
Storing and Recalling with Time Value of Money (TVM) Keys
To store the current number in the Time Value of Money (TVM) variables, press :$
followed by the desired TVM key.
To recall the stored value of a TVM variable, press
TVM variable.
Note: pressing
Mathematical Calculations24
L does not calculate the variable; it recalls the current value.
L followed by the key of the desired
Page 33

Recalling a Menu Item Value in a Menu
In a menu, you can recall the current value of a menu item. For example, open the Interest
Conversion menu (IConv) by pressing :&. With Nom.% displayed, pressing
2*L== calculates 2 times the nominal rate. This feature is useful when
you need to insert the contents of a menu item into an algebraic operation.
Recalling and Storing Values in the Data and Cash Flow Menus
If you store an index (i) from 0 to 99 in the variable 0, you can then use the store/recall
features to store a number in the Data and Cash Flow menus. Press either :$ or L,
followed by the CashFlow key C, to either store or recall a number, as desired, in the
CF(i/2) (if i is even) or #CF((i-1)/2) if i is odd.
In addition, you can store or recall x(i/2+1) if i is even, or y((i+1)/2) if i is odd, as desired,
by pressing the Data key
:y instead of the CashFlow key, C, as shown above.
Rounding Numbers
All calculations are performed internally with 15-digit precision and are rounded to 12 digits
when returning the results. In certain instances, calculations are performed internally with
greater than 15-digit precision.
When displayed, a number is further rounded to the number of digits after the decimal point
set by the FIX item in the Mode menu. The default setting is two digits to the right of the
decimal point. For more information, refer to the section titled, The Mode Menu: Setting
Preferences in Chapter 1.
NOTE: the FIX setting only affects the display; it does not affect the actual numbers.
Percentages
In Algebraic or Chain modes, pressing % divides a number by 100. For example, pressing
25% returns 0.25.
To find a percentage of a given number, key in the number and multiply it by the desired
percentage, followed by =. For example, to find 25% of 200, press
200*25%= to return a result of 50.
To add or subtract a percentage of a number, key in the first number, followed by + or
- and the percentage followed by %. Finish your calculation with =. For example,
to add 10% to 50, press
50+10%= to return a result of 55.
Mathematical Calculations
25
Page 34

In RPN mode, the % key calculates x % of the number on Level 2 of the stack, when x is
the number on Level 1 of the stack. It does not modify the number on Level 2 of the stack, and
thus allows you to perform addition or subtraction after pressing
from the number.
For example,
2 of the stack, and pressing
200I25% returns 50, but 200 is still on Level
- returns 15 0, or 200-25%.
% to add or subtract x %
Mathematical Calculations26
Page 35

3 Time Value of Money
(PV) Loan amount-
money received is
positive
(FV) Final loan
value
(if any)
PMT
3
PMT
6
PMT
4
PMT
2
PMT
1
PMT
5
(PMT) Amount paid out in
equal payments at regular
intervals
Q (P/YR) Payments per year
(N) Number of payments
or compounding periods
(Beg) (End) For payments occurring at the
beginning or end of the compounding period
The examples in the following sections are calculated with the Mode menu preferences in their
default settings, unless otherwise noted. For more information about basic features and setting
preferences, see Chapter 1, Basic Features.
Time Value of Money (TVM) Keys
Cash flow diagrams are useful tools for analyzing financial situations, as they help you
identify the TVM functions needed to resolve your problem. A cash flow diagram is a drawing
with a set of vertical arrows arranged on a horizontal line. The horizontal line represents the
period of time from the beginning of the financing to the end. The vertical arrows represent
the money or cash flows at certain times throughout the period. The arrows' length is
proportional to the cash flow amount each arrow represents; a longer arrow indicates a larger
amount, a shorter arrow, a smaller amount. Each arrow's position on the line represents the
time at which the cash flow occurs. The orientation of the arrow, up or down, represents the
"direction" of the cash flow: up for money received, down for money paid out. See Figure 1.
The TVM functions of the calculator can solve problems with at least one cash flow, and
problems in which all the cash flows, except the first and last, are of the same value. To solve
other types of cash flows, refer to Chapter 4, Canadian Mortgages: TVM Canada, or Chapter
5, Cash Flows.
Figure 1 Cash Flow Diagram Example with Corresponding TVM Keys
Time Value of Money
27
Page 36

Figure 1 illustrates a cash flow diagram and how the data in the diagram corresponds to the
TVM keys. For a complete list of keys used for TVM problems, along with their descriptions,
see Table 3-1.
To save values for the TVM variables, enter the desired number, followed by the
corresponding TVM key. To calculate an unknown value, enter all known values and press the
key of the item you want solved.
Table 3-1 TVM Keys
Keys Description
N
:^
Y
V
M
:[
F
:?
:]
Stores or calculates the number of payments or compounding periods.
Multiplies a value by the number of payments per year and stores as N.
Stores or calculates the nominal, annual interest rate.
Stores or calculates the present value (PV). To a lender or borrower, PV is the amount of a
loan; to an investor, PV is the initial investment. PV always occurs at the beginning of the first
period.
Stores or calculates the amount of each periodic payment.
Stores the number of payments or compounding periods per year. This value is 12 by default,
but it maintains its current entered value when TVM Reset is used.
Stores or calculates the future value (FV), a final cash flow. FV always occurs at the end of the
last compounding period.
Sets Begin mode (BEG). Payments occur at the beginning of each compounding period.
Sets End mode (END). Payments occur at the end of each compounding period.
Calculating Payments on a Loan
You borrow 140,000.00 for 30 years (360 months) at 6.5% annual interest, compounded
monthly. What is your monthly payment to the lender? Note: the following example is
calculated with RPN set as the operating mode.
At the end of the 30 years, you expect to have a zero balance (FV=0). The example is
calculated with RPN set as the operating mode
Time Value of Money28
Page 37

Table 3-2 TVM Example
Keys Display Description
12:[
360N
6.5Y
1400
00V
0F
M
Inputs 12 as the number of payments per year,
or compounding periods per year.
Inputs 360 as the number of payments over 30
years.
Inputs 6.5% as the nominal interest rate
percentage per year.
Inputs the present value of the loan at the time
of the first payment. This value is positive (+); it
is money you receive.
Inputs 0 as the future value of the loan (the
remaining balance).
Returns the monthly payment. This result is
negative (–); it is money you pay out.
To reset the TVM variables to their default values, press :x. Press < or >
repeatedly until TVM displays. Press I to reset the TVM values, or press O to
cancel. Note: the value for P/YR is not reset; it maintains its current entered value when TVM
Reset is used.
Amortization
Refer to Figure 2 for a menu map of the Amortization menu (Amort). Table 3-3 lists the keys
and variables of the Amortization menu. To open the menu, press
menu calculations are based on values stored in the following TVM registers: N, Y,
A. The Amortization
V, M and [.
To enter values for the TVM variables, enter a number followed by the corresponding key.
For an amortization example, see Table 3-4.
Time Value of Money
29
Page 38

Figure 2 The Menu Map for the Amortization Menu
A
Nb Per
Start
Balance
DWN
Principal
Interest
Table 3-3 Amortization Menu Items
Menu Item/Key Description
A
Nb Period Number of periods to group together in the amortization calculation. The
Start Period on which to start amortization. Default is 1. If you want to amortize for
Balance The loan balance at the end of the assigned amortized period.
Principal Amount of the loan payment applied to the principal at the end of the
Interest Amount of the loan payment applied to the interest at the end of the amortized
Opens the Amortization menu (Amort).
default value is the number of payments per year defined by the
the second year with 12 payments per year, enter 13 (the second year starts at
th
the 13
payment with 12 payments per year).
amortized period.
period.
[ key.
Enter the values for the TVM keys for the example below. Press A followed by < or
> to view the amortization schedule.
Time Value of Money30
Page 39

Creating an Amortization Schedule
You borrow 140,000.00 for 360 months at 10% interest. Create an amortization schedule for
the loan. How much interest did you pay for the first year? What is the balance of your loan
after the first year? See Table 3-4. The example below is calculated with Chain set as the
operating mode, but it can be performed in RPN, Chain, or Algebraic.
Table 3-4 Amortization Example
Keys Display Description
12:[
30:^
10Y
1400
00V
0F
M
Inputs 12 as the number of payments per year.
This value is 12 by default, but it maintains its
current entered value when TVM Reset is used.
Inputs 360 (30 times 12 payments per year) as the
number of payments for the 30-year loan.
Inputs 10 as the interest rate percentage per year.
Inputs the value of the loan at the time of the first
payment.
Inputs 0 as the future value of the loan (zero
balance).
Calculates the monthly payment.
A
<
<
<
Displays the number of periods to group together
in the amortization schedule. Default is the current
value of P/YR.
Displays the first period of the group of periods to
amortize.
Displays the current balance remaining after the
first year.
Displays the current amount of the principal
applied towards the loan for the first year.
Time Value of Money
31
Page 40

Table 3-4 Amortization Example
Keys Display Description
<
<
Displays the amount of interest paid on the loan
for the first year. The amount of your payments
applied towards interest for the first year is about
14,000.00.
Displays the first payment in the next period to
amortize (the second year). Note that the
calculator automatically updates Start to the next
group of periods to amortize.
To reset the menu items to their default values, with any item of the Amortization menu
displayed press :x. With TVM displayed, press I. At the TVM Reset prompt,
I to reset, or O to cancel.
press
Time Value of Money32
Page 41

Interest Conversion Menu
:&
Nom.%
Eff.%
C/YR
DWN
Figure 3 The Menu Map for the Interest Conversion Menu
To open the Interest Conversion menu (IConv) press :&.
Table 3-5 Interest Conversion Menu Items
Item Description
Nom.% Nominal interest rate: the stated annual interest rate compounded as represented by
C/YR, such as 18% compounded monthly (C/YR=12 ).
Eff.% Effective annual interest rate taking compounding into account.
C/YR Compounding periods per year. Default is 12.
Time Value of Money
33
Page 42

Using the Interest Conversion Menu
Find the effective rate of a 36.5% nominal rate compounded daily. See Table 3-6. See
Figure 3 for help with navigating through the menu.
Table 3-6 Interest Rate Conversion Example
Keys Display Description
:&
36.
5I
>
360
I
>=
Opens the IConv menu, starting with the current
value of the nominal percentage rate
Inputs 36.5 as the nominal percentage rate.
Scrolls to compounding periods per year, C/YR.
Default value is 12.
Inputs 360 as the value for the number of
compounding periods per year.
Scrolls to the variable for the effective rate and
calculates it. A 36.5% nominal rate
compounded daily equals an effective rate of
44.02%.
Note: in TVM Standard, C/YR is the same number as P/YR in TVM calculations, since most
interest calculations are based on the same number of payments and compounding periods
per year, and interest rate conversions are commonly linked to a subsequent TVM calculation.
This feature is provided for your convenience, but this means modifying one number also
modifies the other when you are calculating in TVM Standard.
The IConv menu permits you to solve for C/YR, but the result is not always a positive integer.
TVM calculations, however, require C/YR to be an integer larger than zero. If you attempt to
perform a TVM calculation without a valid value for C/YR or P/YR, an invalid P/YR error (ER:
Invalid P/YR) will occur.
If you set C/YR to 0, the resulting interest conversions are calculated assuming a continuous
compounding. As stated above, 0 is not a valid value for P/YR or C/YR when used in TVM
calculations, and you will have to reset it to a valid value before performing TVM calculations.
To reset the menu items to their default values, with any item of the Interest Conversion menu
displayed press
cancel. To exit the menu, press
:x. With IConv displayed, press I to reset, or O to
O once again.
Time Value of Money34
Page 43

4 Canadian Mortgages: TVM Canada
:[
P/YR
C/YR
DWN
Figure 1 The Menu Map for the P/YR Menu
In Canada, interest rates for mortgages are, by law, given as a nominal interest rate,
compounded twice yearly. This means that the compounding period for the per-period interest
rate calculation differs from the compounding period when payments are made.
By default, the calculator performs calculations assuming that the number of compounding
periods always equals the number of payments per year. You can, however, enable the TVM
Canada option in the Mode menu, which enables you to select the number of compounding
periods per year. For more information, refer to Chapter 1, Basic Features.
To open the P/YR menu, press :[. Note the following change in features with TVM
Canada enabled:
1. The P/YR key opens a menu with two items: P/YR and C/YR in which you can specify
the number of payments and compounding periods per year. See Figure 1.
2. In the Interest Conversion menu, the C/YR item is the same value as the C/YR item in the
P/YR menu, and it no longer affects P/YR. However, note how if you now change the
value of P/YR, the calculator automatically sets C/YR so it equals your new value
assigned to P/YR. This means that if you modify P/YR, you also need to modify C/YR, if
P/YR and C/YR are different values in your TVM problem.
Canadian Mortgages: TVM Canada
35
Page 44

Canadian Mortgage Example
Calculate the monthly payment for a 25-year (N=300) Canadian mortgage valued at
350,000.00, if the nominal interest rate is 6.0%, compounded twice yearly (C/YR=2) with 12
payments per year (P/YR). The example is calculated with RPN set as the operating mode.
Table 4-1 Canadian Mortgage Example
Keys Display Description
:u
>I
O
:[12
I<2
I
O300
N6Y35
Opens the Mode menu, starting with the
current FIX value (number of digits to the
right of the decimal point).
Scrolls to TVM mode and sets mode to
TVM Canada.
Returns to default calculator screen.
Opens P/YR menu. Inputs 12 for P/YR
and 2 for C/YR.
Exits menu and inputs values for N, I/YR,
and PV.
0000
V
M
To reset the menu, press
prompt, press
again. With the menu in its default settings, P/YR and C/YR are both set to 12 payments/
compounding periods per year.
I to reset, or O to cancel. To exit the menu, press O once
:x. With TVM displayed, press I. At the TVM Reset
Calculates the monthly payment as
required by the example.
Canadian Mortgages: TVM Canada36
Page 45

5Cash Flows
0
10
2
4
5
CF (0)
-80,000.00
1
3
6 7 8 9
CF (6)
115,000.00
CF (1)
5,000.00
CF (2)
4,500.00
CF (3)
0.00
CF (4)
4,000.00
CF (5)
5,000.00
Figure 1 Cash Flow Diagram
In the calculator, a cash flow list is a set of numbered pairs, CF(n) and #CF(n), where n is the
index of the cash flow list. Each pair represents one or more cash flows in a cash flow
diagram. As with TVM problems, it helps to sketch a cash flow diagram as a first step in
solving cash flow problems. For some examples of cash flow diagrams, see Figure 3 at the
end of this chapter.
CF(n) represents the monetary value of the cash flow; #CF(n) is the number of consecutive
occurrences of that cash flow. By default, #CF(n) is equal to 1, as most cash flows occur only
once. However, in cases where a cash flow is repeated multiple times, using #CF(n) instead
of entering the cash flow value multiple times saves calculation time and memory space in the
calculator.
To enter a cash flow list, press
For each cash flow item, first enter the monetary value followed by I, then enter the
number of occurrences followed by
If a cash flow occurs once, you do not need to type
or < as 1 is the default.
C to open the cash flow menu.
I.
1I. Simply press I
Cash Flows
37
Page 46

To erase a cash flow list, with any cash flow displayed press :x. The number of cash
flows in the list is displayed on the bottom line, along with Cash Flow=. At this prompt, press
I. You will be asked to confirm your choice. Either press I to confirm the
reset, or
Table 5-1 lists the keys used for cash flow problems. For a cash flow example, see Table 5-2.
Table 5-1 Cash Flow Keys
Key Description
C
I
><
o
j
RP
O to cancel.
Opens the cash flow list.
Inputs new values for variables in the cash flow list, the Net Present Value
(NPV) menu, and the Internal Rate of Return (IRR) menu.
Scrolls up and down.
Inserts cash flows into a cash flow list.
Removes cash flows from a cash flow list.
Opens the Internal Rate of Return (IRR) and Net Present Value (NPV) menus.
Cash Flow Example
After an initial investment of 80,000.00, CF (0), you expect returns over the next five years as
follows:
Cash Flow
Number
1 5,000.00 1
2 4,500.00 1
30.00 1
4 4,000.00 1
5 5,000.00 5
6 115,000.00 1
Given this information, calculate the total of the cash flows and the internal rate of return (IRR)
of the investment. Calculate net present value (NPV) and net future value (NFV), assuming an
annual investment interest rate of 10.5%. See Figure 1 for the cash flow diagram and
Table 5-2 for how to enter the cash flows. The example is calculated with RPN as the active
operating mode.
Cash Flow Amount Occurrences
Cash Flows38
Page 47

Table 5-2 Cash Flow Example
Keys Display Description
C
8000
0}I
I
5000
I
I
4500
I
Opens the cash flow list.
Inputs -80000 as the monetary value of the
initial cash flow. Note: the sign of the cash
outflow is negative.
Accepts 1 as the number of occurrences for
CF(0). Displays the current monetary value
of CF(1).
Inputs 5000 as the monetary value of
CF(1). Displays the current value, 1, for the
number of times CF(1) occurs.
Accepts 1 as the number of occurrences for
CF(1). Displays the current monetary value
of CF(2).
Inputs 4500 as the monetary value of
CF(2). Displays the current value, 1, for the
number of times CF(2) occurs.
I
I
I
4000
I
I
Accepts 1 as the number of occurrences for
CF(2). Displays the current monetary value
of CF(3).
Accepts 0 as the monetary value of CF(3).
Displays the current value, 1, for the
number of times CF(3) occurs.
Accepts 1 as the number of occurrences for
CF(3). Displays the current monetary value
of CF(4).
Inputs 4000 as the monetary value of
CF(4). Displays the current value, 1, for the
number of times CF(4) occurs.
Accepts 1 as the number of occurrences for
CF(4). Displays the current monetary value
of CF(5).
Cash Flows
39
Page 48

Table 5-2 Cash Flow Example
Keys Display Description
5000
I
5I
1150
00I
I
Inputs 5000 as the monetary value of
CF(5). Displays the current value, 1, for the
number of times CF(5) occurs.
Inputs 5 for the number of occurrences for
CF(5). Displays the current monetary value
of CF(6).
Inputs 11 5 0 0 0 as the monetary value of
CF(6). Displays the current value, 1, for the
number of times CF(6) occurs.
Accepts 1 as the number of occurrences for
CF(6).
Cash Flows40
Page 49

Analyzing Cash Flows
The various functions used to analyze cash flows are located in the NPV P and IRR R
menus. If you press
R or P before entering cash flows, you will be redirected to the
cash flow menu to enter values into the cash flow list. The menu maps for the IRR and NPV
menus are shown in Figure 2. Table 5-3 describes the items within these menus. The results
shown in Table 5-4 are based on the values entered in the cash flows as shown in Table 5-2.
Table 5-3 Analyzing Cash Flows
Item Description
Inv. l% Investment or discount rate. Enter the investment rate or discount rate for the cash
flow followed by
menus.*
NetPV Net Present Value. Shows the value of the cash flows at the time of the initial cash
flow, discounting the future cash flows by the value set for Inv. I%.
NetFV Net Future Value. Shows the value of the cash flows at the time of the last cash flow,
discounting the earlier cash flows by the value set for Inv. I%.
NetUS Net Uniform Series. Shows the per-period payment of a regular, periodic cash flow
of equivalent present value to the cash flow list.
Payback Payback. Shows the number of periods for the investment to return value.
I. This rate must be entered in both the NPV and IRR
Discounted Payback Discounted Payback. Shows the number of periods required for the investment to
return value if the cash flows are discounted using the value set in Inv. I%.
Total The sum of all the cash flows, equivalent to NPV if Inv. I% is 0.
#CF/Yr The number of cash flows per year. The default is 1.
IRR% Internal Rate of Return. This is the discount rate that returns a Net Present Value for
the entered cash flows.
Safe I%*
MIRR* Modified Internal Rate of Return. Used primarily when there is more than one sign
FMRR* Financial Management Rate of Return. Used primarily when there is more than one
Safe Interest Rate. Enter the safe investment rate followed by
change in a series of cash flows to evaluate the overall profitability of an
investment.
sign change in a series of cash flows to evaluate the overall profitability of an
investment.
I.
*Does not apply to the HP 20b.
Cash Flows
41
Page 50

P
Inv. I%
Net PV
Net FV
DWN
Net US
Payback
Discounted
Payback
Total
#CF/Yr
R
IRR %
Inv. I%*
Safe I%*
DWN
MIRR*
FMRR*
#CF/Yr
*Does not apply to the HP 20b.
Figure 2 The Menu Maps for the NPV and IRR Menus
Cash Flows42
Page 51

Table 5-4
Keys Display Description
P
10.
5I
>1
I
<<
<
<
Opens the NPV menu.
Inputs 10.5 for investment rate.
(Optional) Verifies one cash flow list per year, as
per the example.
Displays the NPV of the cash flow with the given
Inv. I%.
Displays the NFV of the cash flow with the given
Inv. I%.
Displays the Net US of the cash flow with the
given interest rate.
<
<<
R
Displays the number of periods required for the
cash flow to repay the investment
Scrolls to the total value of the cash flow.
Displays the IRR for the cash flow.
Cash Flows
43
Page 52

Editing Cash Flows
In the cash flow list, you can view and modify the current monetary value of a specific cash
flow, or cash flows. Press
displayed entry, type a new number and press
< or > repeatedly to scroll through the list. To modify the
I. For example, to change the current
monetary value of the cash flow three, CF(3), in the example in Table 5-2 from 0 to 200, with
CF(3)= displayed, press 200 followed by I.
You can also modify the number of occurrences of a cash flow in the same manner with #CF(n)
displayed. Pressing
Pressing
:o inserts a cash flow into the list before the displayed cash flow.
:j with a cash flow displayed erases the displayed cash flow.
Note that the values for the number of cash flows occurring for a given year, (#CF/Yr)
Investment interest rate, (Inv. I%), and safe interest rate (Safe I%) can be entered in both the
NPV and IRR menus*. Key in the desired number or rate followed by I with the item
displayed. The other items are then calculated internally.
Modified Internal Rate of Return (MIRR) and Financial Management Rate of Return (FMRR)*
For the cash flow example you entered in Table 5-2, edit the cash flows using the cash flow
amounts and number of occurrences shown in Table 5-5 below. For the initial cash flow, CF(0),
enter -1,250,000. In the IRR menu, enter 8% for investment interest rate, and 5% as a safe rate.
Verify the number of cash flows per year, #CF/Yr, is set to 1. The results for MIRR and FMRR
are shown in Table 5-6. This example was calculated in Algebraic mode.
Table 5-5
Cash Flow
Number
1 -300,000.00 1
2 200,000.00 1
3 450,000.00 1
4 -200,000.00 1
5700,000.00 1
6 300,000.00 1
7 500,000.00 1
Cash Flow Amount Occurrences
*Does not apply to the HP 20b.
Cash Flows44
Page 53

Table 5-6
Keys Display Description
R
>1
I
<<8
I
<5
I
<
Opens the IRR menu. Displays the IRR for the
cash flow.
(Optional) Verifies one cash flow list per year, as
per the example.
Inputs 8% for investment rate.
Inputs 5% for the safe investment rate.
Displays MIRR%.
<
Displays FMRR%.
Cash Flows
45
Page 54

Sample Cash Flow Diagrams
Figure 3 Sample Cash Flow Diagrams
Cash Flows46
Page 55

6Bonds
B
Set.Date
Mat.Date
CPN%
Call
Yield%
Price
Accrued
Actual/Cal.360
Annual/
Semi-annual
DWN
Mod.
Duration*
Macaulay
Duration*
*Does not apply to the HP 20b.
Figure 1 The Menu Map for the Bond Menu
Bonds
47
Page 56

The Bond Menu
Before you enter the Bond menu, be sure to verify the date format is set appropriately for your
problem. The default setting is mm.ddyyyy, but it can be set for dd.mmyyyy. The range of
acceptable dates is October 15, 1582 to December 31, 9999. Bond day counts (360/365)
and annual or semiannual coupon payment schedules may be set from either the Mode menu
or the Bond menu. For more information on setting the preferences in the Mode Menu, see
the section titled, The Mode menu: Setting Preferences in Chapter 1.
To open the Bond menu, press B.
< or > repeatedly to scroll through the items shown in Figure 1.
Press
To change the value of the displayed item, key in a number or a date and press I.
Once you have entered all known data, Press < or > repeatedly to scroll to an
unknown item, and press
= to calculate it.
Table 6-1 lists the items in the Bond menu.
Table 6-1 Bond Menu Items
Variable Description
Settlement Date Settlement date. Displays the current settlement date. Note: input only.
Maturity Date Maturity date or call date. The call date must coincide with a coupon date. Displays the current
maturity. Note: input only.
CPN% Coupon rate stored as an annual %. Note: input only.
Call Call value. Default is set for a call price per 100.00 face value. A bond at maturity has a call
value of 100% of its face value. Note: input only.
Yield% Yield% to maturity or yield% to call date for given price. Note: input/output.
Price Price per 100.00 face value for a given yield. Note: input/output.
Accrued Interest accrued from the last coupon or payment date until the settlement date for a given yield.
Note: this item is Read-only.
Mod. Duration* Modified duration for the bond. This is a measure of bond price sensitivity to yield changes.
Macaulay D.* Macaulay Duration for the bond. This is a measure of bond price sensitivity to yield changes.
Actual/Cal.360 Actual (365-day calendar) or Cal.360 (30-day month/360-day year calendar). Press
I to toggle between these options.
Annual/Semiannual
*Does not apply to the HP 20b.
Bonds48
Bond coupon (payment) frequency. Press
I to toggle between these options.
Page 57

Bond Calculation Example
What price should you pay on April 28, 2010 for a 6.75% U.S. Treasury bond maturing on June 4,
2020, if you want a yield of 4.75%? Assume the bond is calculated on a semiannual coupon payment
on an actual/actual basis. See Table 6-2. The example below is calculated with RPN as the active
operating mode.
Table 6-2 Bond Calculation Example
Key Display Description
B
>
I
<4.2
82010
I
<6.0
42020
Opens the Bond menu.
Scrolls to bond coupon (payment)
frequency.
Selects semiannual coupon payment,
as required by the example.
Inputs April 28, 2010 for the
settlement date (mm.ddyyyy format).
Inputs June 4, 2020 for the maturity
date.
I
<6.7
5I
<
<4.7
5I
<=
Inputs 6.75% for the value for CPN%.
Displays current call value. Default is
100 . Note: if Call requires another
value, key in the number followed by
I.
Inputs 4.75% for Yield%.
Calculates the current value for Price.
Bonds
49
Page 58

Table 6-2 Bond Calculation Example
Key Display Description
:$1
<
=L1+
To reset the menu items to their default values, with any item of the Bond menu displayed press
Stores 11 5 . 8 9 in memory 1.
Displays the current value for
accrued interest.
Returns the result for total price (value
of price + value of accrued interest)
in RPN mode. If calculating in Chain
or Algebraic modes, at this point,
+L1=.
press
The net price you should pay for the
bond is 11 8 . 5 8 .
:x. With Bond displayed, press I to reset the menu, or O to cancel. Press
O again to exit the menu.
Bonds50
Page 59

7 Black-Scholes Calculation Menu*
:(HOLD)B
Stock price
Strike price
Time to
maturity
Risk-free %
Volatility %
Dividend %
Call price
Put price
DWN
Figure 1 The Menu Map the Black-Scholes menu
*Does not apply to the HP 20b.
Black-Scholes Calculation Menu*
51
Page 60

The Black-Scholes Menu
To open the Black-Scholes menu (the Black-Sholes key is : (HOLD) B). To open the
menu:
1. Press and hold the
2. Press the
3. Release both keys.
In other words, press on the : and B keys simultaneously and hold both keys, just as
you would when accessing a shifted-function on a PC keyboard. If you press and release
B (the Black-Sholes key).
: key.
: and then press on the B (Black-Sholes key), you will enter the Date menu.
To change the value of the displayed item, key in a number and press
have entered all known data, the unknown items are calculated automatically. Press < or
I. Once you
> repeatedly to scroll to view the items.
An option is a contract between two parties giving party A the option to buy or sell an asset
from/to party B at a given price.
The Black-Scholes model is used to calculate an estimated fair market price for that option,
meaning that it calculates the fair price that someone would pay to buy or sell the option to
later buy or sell an asset at a given price!
The asset or stock that the option refers to is often called the “underlying asset.”
The Black-Scholes calculation is based on the contract terms (i.e., the price and date at which
the underlying asset can be sold or bought), the quality of the asset itself, its price, volatility
and return on investment, and the other available alternatives, such as storing your asset in a
safe investment account, for example.
Intuitively, if the option is to buy a stock at 10, and the stock is already worth 30 and has little
volatility, the value of the option is close to 30-10=20, plus or minus other risk factors. Table 71 lists the Black-Scholes menu items along with their descriptions.
Black-Scholes Calculation Menu*52
Page 61

Table 7-1
Item Description
Stock price (input) Current underlying asset price
Strike price (input) Predetermined price at which the option agrees to buy or sell the underlying
asset at maturity.
Time to maturity (input) Time remaining until expiration of the option in years.
Risk free% (input) Current risk-free interest rate (for example, the current US Treasury Bond rate).
Volatility % (input) Degree of unpredictable change of the stock price. This is usually approximated
by the standard deviation of the variation of the stock price.
Dividend % (input) Estimation of the average dividend yield of the stock as a percentage of its price.
Call price (output) Estimated fair market value for a call option at expiration (a call option is the
right to purchase the asset at a given price).
Put price (output) Estimated fair market value for a put option at expiration (a put option is the right
to sell the asset at a given price).
Note that if you enter a history of the underlying asset price and its yield in the data menu,
pressing the = key on the Volatility % menu item automatically calculates the standard
deviation of the variation of the asset price based on the given data. Pressing = in the
Dividend % menu item automatically calculates the average dividend as a percent of the asset
price.
Black-Scholes Calculation Menu*
53
Page 62

Black-Scholes Example
The historic prices for an asset and their dividends are listed in Table 7-2 below. Given this
data, calculate the call and put prices for the asset. The example is calculated with RPN set
as the operating mode.
First, enter the historical asset prices and the dividend as ordered pairs in the Data menu. Enter
the historical prices for the x values, and the dividend for each y value. For more information
about entering data in the Data menu, see Chapter 12, Statistical Operations.
Table 7-2
Historical Asset
Price (x)
80 3
85 5
78 1
72 0
Dividend (y)
Open the Black-Scholes menu. Use the arrow keys, < or >, to scroll through the menu.
With the menu item displayed, key in the value in the right column of the table followed by
I:
Table 7-3
Menu item Value
Stock Price 74
Strike Price 72
Time to Maturity 0.3 (years)
Risk Free% 5
Volatility% 8.21
Dividend% 2.73
Black-Scholes Calculation Menu*54
Page 63

Table 7-4 Black-Scholes Example
Keys Display Description
:y
80I
3I
85I
5I
78I
1I
72I
0I
:(HOLD) B
Opens the Data menu.
Inputs 80 for x and 3 for y.
Inputs 85 for x and 5 for y.
Inputs 78 for x and 1 for y.
Inputs 72 for x and 0 for y.
Opens Black-Scholes menu.
74I
<
72I
<
.3
I<
5I<
Inputs 74 for Stock Price. Scrolls to Strike
Price.
Inputs 72 for Strike Price. Scrolls to Time
to Maturity.
Inputs 0.3 years for Time to Maturity.
Scrolls to Risk Free%.
Inputs 5 for Risk-Free%. Scrolls to
Volatility.
Black-Scholes Calculation Menu*
55
Page 64

Table 7-4 Black-Scholes Example
Keys Display Description
Calculates the standard deviation of the
=
Press < to scroll to the
next item.
price of the underlying asset based on the
historical data entered in the Data menu.
If you have not entered the historical data,
you can enter the standard deviation of
the price of the underlying asset directly
by typing the number and pressing
I. Press < to scroll to the
next item.
Calculates the average dividend return as
=
Press < to scroll to the
next item.
a percentage of the underlying asset cost
based on the historical data entered in
the Data menu. If you have not entered
the historical data, enter the average
dividend return as a percentage of the
underlying asset cost directly by typing
I.
<
<
the number and pressing
Scrolls to Call Price.
Scrolls to Put Price.
To reset the menu items to their default values, with any item of the Black-Scholes menu
displayed press :x. With Black-Scholes displayed, press I to reset the menu,
or O to cancel. Press O again to exit the menu.
Black-Scholes Calculation Menu*56
Page 65

8 Date Calculation
:@
Date 1
DWN
Date 2
Days
Between
Actual/
Cal.360
Figure 1 The Menu Map for the Date Calculation Menu
The Date Calculation Menu
Date Calculation Example
The Date Calculation menu is used to calculate the number of days between two dates, or a
second date given a number of days from an initial, or final date. To open the Date
Calculation menu, press :@. Press < or > repeatedly to scroll through the
items shown in Figure 1. Before you enter dates, verify the date is set in the format required
for your problem. Date and calendar formats may be set in the Mode menu. The range of
acceptable dates is October 15, 1582 to December 31, 9999. For more information on setting
the preferences in the Mode Menu, see the section titled, The Mode menu: Setting Preferences
in Chapter 1.
To change the value of a displayed item, key in a number or a date and press
Once you have entered all known data, press < or > repeatedly to scroll to the
unknown item and press
How many days remain in the 2010 fiscal year if today's date is June 4, 2010? Assume the
= to calculate it.
I.
fiscal year ends on October 31st, and you wish to calculate the actual number of days
(Actual).
Date Calculation
57
Page 66

Table 8-1 Date Calculation Example
Key Display Description
:@
6.04
Opens the Date Calculation menu.
NOTE: 2 in the right of the display
represents the day of the week. 2 represents
Tuesday.
Inputs the starting date in the selected
format.
2010
I
<10.
Inputs the ending date in the selected
format.
3120
10I
<=
To reset the menu items to their default values, with any item of the Date menu displayed press
Calculates the number of actual days
between the starting and ending dates.
:x. With Date displayed, press I to reset the menu, or O to cancel. Press
O again to exit the menu.
Date Calculation58
Page 67

9Break-even
:P
Fixed
DWN
Cost
Price
Profit
Quantity
The Break-even Menu
Break-even Example
Figure 1 The Menu Map for the Break-even Menu
To open the Break-even menu, press :y. To change the value of the displayed item,
key in a number and press I. Once you have entered all known data, press <
or > repeatedly to scroll to the unknown item and press = to calculate it.
The break-even function allows you to study problems involving a profit, when a quantity of
items, with a cost to manufacture and a fixed price to develop and market, is sold at a given
price (see Figure 1).
The sale price of an item is 300.00, the cost is 250.00, and the fixed cost is 150,000.00.
How many units would have to be sold to make a profit of 10,000.00?
Break-even
59
Page 68

Table 9-1 Break-even Example
Keys Display Description
:y
1500
00I
<250
I
<300
I
<100
00I
<=
Opens the Break-even menu starting with
the current value for fixed costs.
Inputs 150,000.00 for fixed cost.
Inputs 250.00 for variable cost per unit.
Inputs 300.00 for price.
Inputs 10,0 00.0 0 for profit.
Calculates the current value for the
unknown item. 3200 units would have to
be sold to return a profit of 10,000.00.
To reset the menu items to their default values, with any item of the Break-even menu displayed
press :x. With BrkEven displayed, press I to reset the menu, or O to
cancel. Press O again to exit the menu.
Break-even60
Page 69

10 Business Problems
DWN DWN
INPUT
DWN
:#
Mkup.%C Mkup.%P
Part%
Tot.
%Change
Cost
Price
Cost
Price
Mkup.%P
Total
Part
Part%
Tot.
Old
New
%Change
INPUT
INPUT
INPUT
DWN
Mkup.%C
DWN
Nb Period
DWN
DWN
DWN
Figure 1 The Menu Map for the Percent Calculation (%calc) Menu
The Percent Calculation Menu
Press :# to open the menu. There are four items in this menu:
1. Markup as a percentage of cost (Mkup. %C)
2. Markup as a percentage of price (Mkup. %P)
3. Part as a percentage of total (Part%Tot.)
4. Percent change (%Change).
These items allow you to access sub-menus. Press
desired sub-menu, then press I to open it (see Figure 1).
To change the value of a displayed item, key in a number and press I. Once you
have entered all known data, press
< or > repeatedly to scroll to the
< or > repeatedly to scroll to the unknown item
and press = to calculate it.
Business Problems
61
Page 70

To return to the percent calculation menu, from anywhere within the menu or sub-menus, press
:#.
To exit the menu, press O.
NOTE: for business problems, margin is based on price; markup is based on cost. The
examples below are calculated with RPN as the active operating mode.
Percent Calculation Examples
See the tables below for examples of calculations in the %calc menu.
1. Find the markup on an item if the cost price is 15.00 and the selling price is 22.00.
Table 10-1 Markup Example
Keys Display Description
:#
I
15I
<22
I
<=
Opens the %Calc menu.
Opens the Mkup.%C sub-menu.
Inputs 15 for Cost.
Inputs 22 for Price.
Calculates the value of Mkup.%C for the
given data.
Business Problems62
Page 71

2. Find the percent change between 20 and 35 with no compounding.
Table 10-2 Percent Change Example
Keys Display Description
:#
<<<
I
20I
<35
I
<=
Opens the %Calc menu.
Scrolls to %Change.
Opens the %Change sub-menu.
Inputs 20 for Old.
Inputs 35 for New.
Calculates the current value of %Change
for the given data.
NOTE: although the example in Table 10-2 calls for no compounding, you may specify the
number of compounding periods used in calculations with the Nb Period item in the
%Change sub-menu. Nb Period is the number of compounding periods used in calculations
between the old value and new value. The default is 1, but to change the setting, key in a
number with Nb Period displayed, followed by
After calculating the example above with no compounding, say, for example, you wish to
calculate the percent change over six compounding periods:
I
.
Business Problems
63
Page 72

Table 10-3 Percent Change Example with Compounding
Keys Display Description
The current value of %Change for the given
data.
<6I
>=
3. 30 is what % of 80?
Table 10-4 Part % of Total Example
Keys Display Description
:#
<<
Inputs 6 for the number of compounding
periods.
Calculates the percent change between the
old value and the new value over six
compounding periods.
Opens the %Calc menu.
Scrolls to the Part %Total menu item.
I
80I
<30
Opens the Part as %Total sub-menu.
Inputs 80 for Total.
Inputs 30 for Part.
I
<=
To reset the menu items to their default values, with any item of the %calc menu displayed
press :x. With %Calc displayed, press I to reset the menu, or O to
cancel. Press
O
to exit the menu.
Calculates the value of Part%Total for
the given data.
Business Problems64
Page 73

11 D e p r e c i a t i o n
:\
Life
Start
Cost
Salvage
Factor
Year
(auto-increment)
Press I to scroll through the options:
Sline
SOYD
DecBal
DBXover
French Sl
Amort F
Depreciation
R. Book Value
R. Depreciable
Value
DWN
Figure 1 The Menu Map for the Depreciation Menu
Depreciation
65
Page 74

The Depreciation Menu
Press :\ to open the Depreciation menu. To select a depreciation method, press
I. See Figure 1. Input the values required for the calculation:
•Asset life
• Starting date or month of the depreciation
• Cost and salvage values
• Declining balance factor (DecBal and DBXover only)
• The first year for which you want to view the depreciation schedule
Scroll through the items of the sub-menu for the selected depreciation method by pressing
<or > repeatedly. To change the value of the displayed item, key in a number and
I. For the Start item, enter either a number or an actual date, depending on
press
the type of depreciation selected. Press < repeatedly to view the depreciation schedule.
NOTE: pressing
< on the last item of a sub-menu returns you to the Year item and
increments it (see Figure 1).
Brief descriptions of the methods used to calculate depreciation are provided in Table 11-1.
Table 11-2 describes the items found in the depreciation sub-menus. For an example
calculating depreciation using the straight-line method, see Table 11-3 .
Table 11-1 Depreciation Methods
Depreciation Method Description
Sline Straight line is a method of calculating depreciation presuming an asset loses a
certain percentage of its value annually at an amount evenly distributed
throughout its useful life.
SOYD Sum-of-the-years' digits is an accelerated depreciation method.
In SOYD, the depreciation in year y is (Life-y +1)/SOY of the asset, where SOY is
the sum-of-the-years for the asset, or, for an asset with a 5-year life,
5+4+3+2+1=15.
DecBal Declining balance is an accelerated depreciation method that presumes an
asset will lose the majority of its value during the first few years of its useful life.
DBXover Declining balance crossover is an accelerated depreciation method that
presumes an asset will lose the majority of its value in the first few years of its
useful life, but that it will revert to a consistent depreciation during the latter part
of its life, which is then calculated using the straight line method.
French SL Straight line French. This method of depreciation is similar to the Straight line
method, except an actual calendar date in mm.dd format is entered in for
Start= to indicate when the asset was first placed into service.
Amort F French amortization. This method is an accelerated depreciation method with a
crossover to the French Straight Line method.
Depreciation66
Page 75

Table 11-2 Depreciation Menu Items
Item Description
Life The expected useful life of the asset in years.
Start Start refers to the date or month in which the asset is first placed into service.
Depending on the type of depreciation, this can be the month (1-12), or, in the
case of French Straight-line and Amort F, the actual date in the selected format.
Note: for non-French depreciations, if the asset was placed into service in the
middle of March, for example, enter 3.5 for Start.
Cost The depreciable cost of the asset at acquisition.
Salvage The salvage value of the asset at the end of its useful life.
Factor The declining balance factor as a percentage. This is used for declining
balance and declining balance crossover methods only.
Yea r Year for which you want to calculate the depreciation.
Depreciation Depreciation in the given year.
R.Book Value Remaining book value at the end of the given year.
R.Depreciable Value Remaining depreciable value at the end of the given year.
Depreciation Example
A metalworking machine, purchased for 10,000.00, is to be depreciated over five years. Its
salvage value is estimated at 500.00. Using the straight-line method, find the depreciation
and remaining depreciable value for each of the first two years of the machine's life. See
Table 11- 3.
Table 11-3 Straight Line Depreciation Example
Key Display Description
:\
<5I
<
Opens the Depreciation menu starting with
the straight line method.
Inputs 5 for the useful life.
Displays the current value of Start. 1
(January) is the default value. For this
example, this value remains unchanged,
since the depreciation of the machine starts
January 1
st
(1.0 0 ).
<100
00I
<500
I
Inputs 10,0 00.0 0 for the cost of the item.
Inputs 500.00 for the salvage value of the
item.
Depreciation
67
Page 76

Table 11-3 Straight Line Depreciation Example
Key Display Description
<
<
<
<
<
Year for which to calculate the
depreciation. Year 1 is the default value.
To calculate for a year other than 1, type a
number and press I.
Depreciation of the asset in year one.
Remaining book value after year one.
Remaining depreciable value after year
one.
The next year for which to calculate the
depreciation. To calculate for a year other
than 2, type a number and press
I.
<
<
<
To reset the menu items to their default values, with any item of the Depreciation menu
displayed press
or
O to cancel. Press O to exit the menu.
:x. With Depreciation displayed, press I to reset the menu,
Depreciation of the asset in year two.
Remaining book value after year two.
Remaining depreciable value after year
two.
Depreciation68
Page 77

12 Statistical Operations
:z
Press
I
to
select:
2 Vars, 1
Var, or 1
Freq.
Descriptive
(y items 2 Vars
Only)
Predictions
(2 Vars Only)
Sums
(y items 2
Vars Only)
DWN
DWN
INPUT
INPUT
INPUT
DWN DWN
DWN
Nb Item
x Mean
y Mean
x Std. Dev.
y Std. Dev.
x Population
y Population
S.E. Samp. x
S.E. Samp. y
Press I to select:
a*x+b
a*Ln(x) +b
b*e
(a*x)
b*x
a
b*a
x
a/x+b
ax
2
+bx+c*
Sigma x
DWN
Sigma y
Sigma x
2
Sigma y
2
Sigma xy
Quartiles*
(y items 2
Vars Only)
x Min
x Q1
x Median
x Q3
x Max
y Min
y Q1
y Median
y Q3
y Max
DWN
DWN
INPUT
Pred x
Pred y
a
C
(ax2+bx+c only)*
Correlation
(Not
ax2+bx+c)*
b
Covariance
(Not
ax2+bx+c)*
DWN
*ax2+bx+c and Quartiles do not apply to the HP 20b.
Figure 1 The Menu Map for the Statistics Menu
Statistical Operations
69
Page 78

The Data and Stats Menus
X
Y
Statistics analysis functions are located in the Data and Statistics menus accessible with the
:y and :z keys. See Figure 1 for assistance with navigating through the
menus.
:y to open the Data menu. In this menu, enter a list of x values for one-variable
Press
statistics, a list of pairs, (x, F) for one-variable statistics with frequency, or a list of pairs, (x, y)
for two-variable statistics. To enter data, key in a number and press
Press :z to analyze the data. If you attempt to open the Statistics (Stats) menu before
entering data, you will be redirected to the Data menu. When opened, the Stats menu
displays 2 Vars for two-variable statistics. Press I repeatedly to select the type of
statistical operations desired, two-variable, (2 Vars), one-variable, (1 Var), or one-variable
with frequency (1 Freq).
After selecting the type of statistical operation you want, select a sub-menu by pressing <
or >, and press I to open it. Once in a sub-menu, press < or >
repeatedly to view the results. To return from the sub-menu to the Statistics menu, press
I.
:z.
NOTE: in one-variable modes, there are no items for y, and the Predictions sub-menu is not
available.
Pressing I with the Predictions sub-menu displayed opens a sub-menu, in which you
can choose among seven different types of regression lines. See Figure 1. To select a specific
type of regression line in the Predictions sub-menu, press I to cycle through the
options.
NOTE: if you press =, the calculator automatically selects the curve that is the best fit for
your data.
Once you select a regression line, press < to see the regression line parameters and
perform predictions.
Table 12-1 The Statistics Menu Items
Menu Item Description
Nb Item Number of items.
Mean
Mean
x Std. Dev Standard deviation for x: a measure of how dispersed the x data values are about
Average of
Average of
the mean.
x values.
y values.
Statistical Operations70
Page 79

Table 12-1 The Statistics Menu Items
Σx
Σy
Σx2Σy
2
Σxy
Menu Item Description
y Std. Dev Standard deviation for y: a measure of how dispersed the y data values are about
the mean.
x Population Dev Population Standard deviation for x: a measure of how dispersed the x data values
are about the mean, assuming the data constitutes a complete set of data.
y Population Dev Population Standard deviation for y: a measure of how dispersed the y data values
are about the mean, assuming the data constitutes a complete set of data.
S.E.Samp.
S.E.Samp.
Pred
Pred
x Standard error for the sample x: a measure of the dispersion of x mean, assuming
the data is a sampling of a large, more complete data set.
y Standard error for the sample y: a measure of the dispersion of y mean, assuming
the data is a sampling of a large, more complete data set.
x Predicts x for a given hypothetical value of y, based upon the model calculated to fit
the data.
y
Predicts y for a given hypothetical value of x, based upon the model calculated to fit
the data.
a The a coefficient for the chosen regression model, which is the slope for a linear
model.
b The b coefficient for the chosen regression model, which is the y-intercept for a linear
model.
c
Correlation
Covariance A measure of how much two variables change in relation to one another.
The c coefficient for the chosen regression model, applies only for ax
The correlation coefficient for the given (
number in the range -1 through 1 that measures how closely the calculated line fits
the data.
x, y) data. The correlation coefficient is a
2
+bx+c.
The sum of the
The sum of the
Quartiles* The boundaries of a given frequency distribution divided into four parts.
Median* The middle value in a given frequency distribution.
Maximum* The largest value in a given frequency distribution.
Minimum* The lowest value in a given frequency distribution.
*Does not apply to the HP 20b.
The sum of the squares of the
The sum of the squares for the
The sum of the products of the
x values.
y values.
x values.
y values.
x and y values.
Statistical Operations
71
Page 80

Statistics Example
Sales for the last five months are represented by the pairs of values shown below, with the month
number as x, and the sales values as
Predictions, predict sales for month seven. What is the linear regression line? What is the sum of all
the
y values? See Table 12-2 and Table 12-3.
Table 12-2 Statistics Example Months and Sales Values
y. Enter these into the Data menu. Using the Statistics menu for
Month Sales Values
1150
2165
3160
4175
5170
Statistical Operations72
Page 81

Table 12-3 Statistics Example
Keys Display Description
:y
1I1
50I
2I1
65I
3I1
60I
4I1
75I
5I1
Opens Data menu.
Inputs values for x(1) and y(1).
Inputs values for x(2) and y(2).
Inputs values for x(3) and y(3).
Inputs values for x(4) and y(4).
Inputs values for x(5) and y(5).
70I
:z
<I
<<
:z<<
I
<7I
Opens Stats menu.
Opens Descriptive sub-menu.
Displays average y.
Opens Predictions sub-menu.
NOTE: this example performs calculations
based on a linear
Inputs 7 as the Prediction x value (month 7).
(a*x+b) regression line.
<=
Calculates Prediction y value (sales at
month 7).
Statistical Operations
73
Page 82

Table 12-3 Statistics Example
Keys Display Description
<
<
<
:z<<
Displays value for a: the slope of the
regression line.
Displays current value for b: the y-intercept
of the regression line.
Displays value for Correlation.
Opens Sums sub-menu. Displays the sum of
all y values (Sigma
y).
<I<
To reset the menu items to their default values, with any item of the Data or Statistics menus
displayed press
pressing I.
:x. At the prompt, Stats, press I. Confirm your choice by
Statistical Operations74
Page 83

13 Programming
Programming the HP 30b
This chapter applies only to the HP 30b, and explains how to program specifically on the HP
30b. If you are unfamiliar with the basics of programming, you may have trouble
understanding some of the following information. Reviewing the material and practicing the
concepts illustrated below will help you understand how this feature works on the HP30b.
The HP 30b Business Professional is a powerful business calculator, but it may lack a function
important to you. The HP 30b programming functions allow you to create up to ten programs
to fulfill your needs. In order to keep the calculator keyboard clear and consistent, the
programming functions are not written on the keyboard.
However, included in the calculator package, you should find an overlay which shows the
programming functions. This is designed to be placed on the top surface of the calculator and
left in place for the life of the calculator. If you are interested in programming the calculator,
you will need to place the overlay on your keyboard before getting started.
Key Presses for Program Instructions
Enter the Program menu by pressing : followed by E. The instructions specific to
programming (illustrated on the overlay) are inserted by pressing : and simultaneously
pressing the key with the desired programming instruction. Then release both keys before
pressing any additional keys for your program. In the following chapter, this combination is
represented in the following manner:
(HOLD)
This sequence is identical to using the shift key on a computer keyboard to invoke the shiftedfunction.
For reference, the table on the following page lists the keys along with their associated
programming instructions.
Programming
75
Page 84

Table 13-1
Programming Key Instructions
(HOLD)
Equal to
(HOLD)
GOTO
(HOLD)
Display
(HOLD)
Not equal to
(HOLD)
GOTO if True
(HOLD)
Less than
(HOLD)
GOTO if False
(HOLD)
Run/Stop
(HOLD)
Less than or equal to
(HOLD)
Decrement,
skip if
(HOLD)
Greater than or
equal to
(HOLD)
Label
(HOLD)
Increment,
skip if
(HOLD)
Greater than
(HOLD)
Stop
: >or<
(HOLD)
Debug
(HOLD)
Call
(HOLD)
Return
(HOLD)
Message
All programming key combinations listed in the above table require you to press the
key and (HOLD) it while simultaneously pressing the desired program instruction. The
instructions are described in more detail in the following pages.
Almost any function you perform with the calculator can be programmed. A program allows
you to repeat an algorithm or sequence of commands without having to retype all the keys
each time you want to use that particular function.
(HOLD)
Solve
Programming76
Page 85

Programming Example
4
3
---
πr
3
The following programming example, and all examples in this chapter, were written with
Chain or Algebraic set as the operating mode. Since a program executes the keys exactly as
if you were manually pressing them, the current operating mode affects how the program
executes. If you normally operate in RPN, verify your operating mode is set to either Chain or
Algebraic before proceeding so you can follow along with the examples below.
For more information about setting the operating mode, refer to the section titled, The Mode
Menu: Setting Preferences in Chapter 1, Basic Features.
The volume of a sphere is represented by the equation, . We will create a program that
can calculate the volume of a sphere without having to retype all the keys each time you wish
to calculate the volume of a given sphere. Verify your FIX setting is set for three digits to the
right of the decimal point. For more information on the FIX setting, refer to the section titled,
The Mode Menu: Setting Preferences in Chapter 1, Basic Features.
Table 13-2
Keys Display Description
Enters program mode. The first program is
:E
selected.
I
:h3*
4/3*
:sI
I=
:(HOLD)
Starts editing program 0. Note the
counter shows your current position in the
program.
We have entered a program that takes
the currently displayed number, raises it to
the 3rd power, and multiplies it by 4/3 of
PI.
The STOP instruction tells the calculator
that the program is ending. Note that to
enter that special instruction, you need to
press and hold the shift key, then press the
L key (STOP) before releasing both
keys.
Programming
77
Page 86

Keys Display Description
Quits program editing mode. Note that
:E
5==
program 0 uses 13 bytes and has a
checksum of 104. Checksum is a number
that verifies the program data is correct.
You must b e set in FIX 3 or higher to see
the full checksum. If your number does not
match that shown, verify your FIX setting
is set for 3 or higher. If three digits are
showing and the number differs from that
shown, the program has been keyed in
incorrectly.
Enters the number 5 (the sphere radius)
and executes program 0. The result, the
volume of the sphere, is 523.6. We press
= twice: the first press completes the
entry of the 5 (after all, we could have
been in the process of entering an
equation, such as 5*2). The second press
runs the program.
Program Step 0
Programs start at step 1, however, if you edit a program by pressing I with the
program displayed and press the up key >, you will find there is a step 0. Press any key
with step 0 displayed and that key becomes a shortcut for the program. You may also assign
any : (HOLD) key combination as well.
For example, with the sphere example shown in Table 13-2, after your program has calculated
the solution, press :E to open the program menu once again. Prgm 0 is displayed,
Figure 1
the program used for the sphere example (Figure 1). Press I, followed by > to
select step 0. Press
:followed by k(assuming you are not interested in using the
k key). Exit the program by pressing O, key in a number, 5, and then press
:k and you will see the your program was executed with the same results as shown
in the table!
Programming78
Page 87

If you assign a program to a shift key and there is no :(HOLD) function on that key, the
standard function will be executed by pressing the
you still have the option of using the standard shifted function of the key should you need it.
Press O to clear your screen before the next section.
:(HOLD) option of that key. This way
Reassigning Menu Functions
Often, the best use for a program is to bring a function you use frequently out onto the
keyboard. For example, if you use SIN frequently, you may want to have ASIN available
directly on the keyboard as well. Having the ability to assign keys permits you to do this easily.
Table 13-3 below illustrates how to reassign a menu function to the keyboard.
Table 13-3 Reassigning Menu Functions
Keys Display Description
Opens Program menu. Scrolls to step 1 of
:E
Program 9.
>I
Press the keys to enter the steps of the
:sI
:(HOLD) <
=
program. Note: to enter the scroll down
command as an instruction, you must
press and hold
key as shown.
: and the <
:
(HOLD)
<>
:(HOLD)
O.5
(HOLD)
:
Scroll to step 0.
The ASIN function is now assigned to the
SIN key.
Exits the program menu, keys in .5,
executes the program and returns results
for ASIN.
Programming
79
Page 88

The Program Menu and Program Editing
Now that we have been through some short examples, let us look at some of the programming
details.
The Program menu displays a list of the ten programs that are in the calculator. Use the >
< keys to scroll through the program menu. For each program, the number displayed
and
at the bottom is the memory space used/occupied by the program and a checksum value of
that program. For example, program 0 for the sphere uses 13 bytes and has a checksum of
104 (see Figure 2).
Figure 2
There are 290 bytes of program space available.
To erase all the programs, open the Reset menu (press :x) from
mode. In the reset menu, select Prgm. The number at the bottom of the display represents the
amount of programming steps in use. Press I twice to erase all programs.
To erase a specific program, go to the program menu, select the program with the < or
outside
of program
> keys, and press :xI to erase that specific program.
To execute a program, select the program in the program menu and press =.
To edit or modify an existing program, select the program in the program menu and press
I:
1. Review your program by pressing the
2. Delete the currently displayed instruction by pressing {.
3. Exit the program by pressing
4. Any other key that you press will be inserted as an instruction in the program.
5. Insert an >, <,O, or { instruction by pressing : (HOLD) and >,
O or :E.
< or > keys.
<,O, or {.
Note: you can
to a specific label.
Programming80
(HOLD)
(HOLD)
followed by a label number to go
Page 89

Tests and Jump Functions
When creating a program, there is often a need for the conditional execution of an instruction
based on a specific condition, as well as the repetition of a set of instructions.
This is handled on the HP 30b using the GOTO, LBL (label) and Test instructions. LBL is an
instruction that does not do anything by itself, but it acts as a marker for Jump instructions.
1. To enter a label or GOTO instruction, press and hold
GOTO, GOTOT, or GOTOF key, then release both keys.
2. Type a number between 00 and 99 (for numbers smaller than 10, you must type the 0
first, such as 03).
3. For example, (HOLD) creates label 03 in your program. You can
then use a GOTO 03 instruction to jump to that label from any location in your program
to the position of the label. GOTOT (Go To If True) and GOTOF (Go To If False) will only
jump if the current displayed number is non-0 (true) for GOTOT or 0 (false) for GOTOF.
Used together, these instructions allow you to create programs like the following:
8=
LBL 01
DISP 5
- 1=
GOTOT 01
STOP
: and simultaneously press the
Use the following keystrokes to enter the program:
(HOLD)
1.
2.
3.
4.
(HOLD)
(HOLD)
program counts from eight to zero displaying each number 1 second.
(HOLD)
. This program has 13 bytes, and the checksum is 234. This
Programming
81
Page 90

Note:
• Label numbers must be unique. Only one label with a given number can exist in the
calculator.
• You can jump from one program to another if you know that there is a specific label
number in another program.
• Use the tests ? , ? , ? , ? , ? and ? (the top row of keys) to verify
if two numbers are equal, different, and strictly, or not strictly, greater or smaller.
These are dual operator-operands and are used in the same way as addition or
multiplication ( in Algebraic and Chain modes, number1 ?= number2 =, and in
RPN mode, number1 I number2 ?= ) are used, in that they return 0 if false,
and 1 if true. Note that in RPN mode, the tests do not remove the arguments from
the stack, but do push a 0 or 1.
Long Programs and Battery Life
Although it is possible to create programs on the HP 30b that can run for a long period of
time (calculating PI to 700 decimal places, for example) this is not something that we advise,
as it will drain the batteries in less than a day.
Programming on the HP 30b was designed to create small programs to perform a function
not present in the calculator, or to automate a task requiring many keystrokes and then run
relatively quickly. If a program takes more than one second to run, the CPU speed will be
reduced in order to preserve battery life.
Sub-Function Call
It is often useful in a program to have the option to reuse a sub-program from various locations.
To avoid having to retype these sub-programs each time they are necessary, you can use the
(HOLD)
CALL, followed by a label number, will jump to the specified label, in the same way a GOTO
instruction does, but, when the RETURN instruction is encountered, the program will continue
execution just after the CALL function. This is equivalent to you temporarily pausing in an
activity to answer a phone call, and then returning to your prior activity after the call. Up to
four calls can be nested at the same time. Another way to picture this might be going to turn
off your stove, while you are answering the doorbell that rang while you were answering your
phone, while you were writing an email… it's hard for us, but computers are good at stacking
tasks in this way.
and (HOLD) functions.
Enter a call function the same way you enter a GOTO function.
Programming82
Page 91

Other Programming Functions
(HOLD) DISP: takes a number that represents 1/5 of a second. DISP5 is
thus one second.
(HOLD) STOP: Stops the execution of the program. This instruction should be
placed at the end of every program.
(HOLD) R/S: Pauses the program execution and returns to the normal system.
You can then resume program execution by pressing again. This can be used,
for example, when you need to enter a number.
(HOLD) DSE ( ) and (HOLD) ISG ( ), followed by 1 digit (0
to 9): Loop control function. Place a number of the form ccccc.eeeii where cccc is the counter,
eee is the end value for the counter and ii is the increment in variable 1. For example, DSE 1
will decrement the counter part of the variable by ii (if ii is 0, it decrements by 1) and, if cccc
is less or equal to eee, it will skip the next instruction (usually a GOTO).
For example, to loop from 0 to 50, incrementing by 3 each loop, use 0.05003 as start the
value and the ISG instruction. The following program will loop from 0-50, incrementing by 3
each loop and pause shortly at each loop to show the counter. At the end, it will leave 12
with a blinking cursor. Once in Program mode, select an unused program number and press:
.05003:$1
(HOLD)
(HOLD)
(HOLD) (HOLD)
(HOLD)
This program has 22 bytes, and the Checksum is 146.
Programming
83
Page 92

Messages
The MSG function is used to display messages on screen; it is especially useful when used
before halting the program with (HOLD) , as it allows you to display messages
on the screen for the user.
To enter a message while creating a program:
Press :(HOLD) . Release both keys. You can now enter messages.
In this mode, you may press > or < to select a character and : (HOLD) >
or < to jump 10 characters at a time. Once you have found the desired character, press
t to validate and move to the next character. Press { to remove the last character.
There are also shortcuts for commonly used characters:
• 0-9 selects the corresponding numeric character
• . selects ?
• = selects =
• /*+- are shortcuts for the corresponding mathematical operator signs
• } selects space
Once the character appears, press
If you want to modify a message that has been entered in a program, select the message and
press
:(HOLD) message mode.
As an example using the message mode, let’s return to our sphere calculation program:
t to validate. Press O to exit message entry.
1. :EI opens the Program menu, and you are now at step 1 of Program
0. To insert a message at step 1 and push everything else down, simply begin editing at
step 1. If you want to delete the current step, press
2. Press
Programming84
:(HOLD) .
{.
Page 93

3. Press > until the letter R appears, and then press I. Press . and the
screen should display a ?.
4. Press Oto exit.
5. Press
6. Now enter program mode again by pressing :E. The display will show R? in
: (HOLD) . Then press Oto exit.
video inverse. Since program 0 has a message as the first command, it is now named
R?. The video inverse signifies that it is assigned to a key, in this case k. Press
Oto exit.
7. N ow p ress :k. Notice R? appears, and the program pauses to wait for input.
Type 5= and press : (HOLD) to resume. The program continues and
calculates the volume.
Debugging a Program
At times, programs do not work as expected. You can debug your programs by pressing the
: (HOLD) > or : (HOLD) < keys as follows:
Open the Program menu and select the program you want to debug. To execute the first
instruction, press : (HOLD) <. Press this key combination repeatedly to execute your
program one instruction at a time. The current instruction is displayed as long as the <
key is pressed.
If you want to see the next instruction without executing it, press
same manner.
If you want to let the program continue by itself, press : (HOLD) . If you want to
start debugging a program in the middle, place a run/stop (R/S) instruction where you want
to start debugging the program, run the program and start debugging using
: (HOLD) > in the
: (HOLD)
> or < when the program stops due to the R/S.
Programming
85
Page 94

Saving, Restoring, and Modifying Mode Settings
Often, programs are designed to run in a specific mode (for example, FIX 4 or RPN). You can
use L:u to recall the current mode, save it, modify the settings, either by going in
the menu, or using the
1. L:u$1 recalls and stores the current mode settings in Memory 1.
2. :u4IO selects FIX=4.
3. Your program:
were at the beginning of the program.
4. Lu returns a 12 digit number: CactdmrvAOff. See Table 13-4 for a description of
each digit.
Table 13-4
Digit Description
A is “1” for radian mode, “2” for degree mode.
a is “1” in Semi-annual mode, “2” in Annual mode.
C is “1” in Standard TVM mode, “2” in Canadian TVM mode.
c is “1” in Actual day count mode, “2” in 360 day count mode.
$:u function and then restoring it. For example:
L1:$:u restores the mode settings to what they
d is “1” if the decimal separator is “.”, 2 for “,”
ff is “00” to “11” or “13” and indicates the FIX setting (13 is for FIX=-1).
m is “1” for “mm.ddyyyy” mode, “2” for “dd.mmyyyy” mode.
O is “1” for Chain mode, “2” for Algebraic mode, and “3” for RPN mode.
r
t is “1” if thousands separators are not visible, “2” if they are visible.
v is “1” for 2 variable statistics, “2” for 1 variable, and “3” for 1 variable frequency.
When using :$:u, any illegal value is ignored and this setting will not
change. For example:
defines the regression line type. “1” for a*x+b, “2” for a*ln(x)+b, “3” for b*e
for b*x
a
, “5” for b*ax, “6” for a/x+b and “7” for ax2+bx+c.
(ax)
, “4”
314:$:u will switch to RPN mode. No other setting will
change.
Programming86
Page 95

Solve
The solve key is not programmable, but it is a powerful addition to the calculator functionality.
The solve function utilizes HP Solve, a feature unique to HP calculators, which allows you to
find a number for a variable that will cause a program to return a 0. This can be used to solve
complex equations.
x
For example, if you want to solve x
1.
:E<<I (select and edit program 2)
-y=0.
2. L1:hL1-L2=
(enter program var1
3. Press O to exit. Store 3 into variable 2 by pressing 3:$1. Press
var1
-var2=)
(HOLD)
:E and note that Prgrm 2 is selected, as the calculator displays the program
that was last edited. For verification, this program has 11 bytes, and the checksum, 199.
4. Press :(HOLD) 2 to solve for variable 2. The calculator will attempt to
find what value in variable 2 would cause the program to result in 0. In this case, the
result is 27.
5. Now store 10 into variable 2: 10:$2. Since Prgrm 2 was the last
program selected in the program menu, you can use the SOLVE feature directly. Press
:(HOLD) 1 to solve for variable 1, such that the result of the program is
0. The result this time is 2.506184..., since you stored 10 into variable 2.
6. You can verify this is correct by pressing
see that 10 is returned.
L1:hL1= and
Programming
87
Page 96

Programming88
Page 97

14 E r ro r M ess ag es
∞
∞
∞
x
∞
∞
∞
∞
∞
∞
≤
∞
Error Messages and Calculator Status
Table 14-1 Error Messages
Error Message Status
ER: Underflow The calculation generated an underflow (result of 0).
ER: x/0 Division by zero.
ER: 0/0 Zero divided by zero.
ER: *0
ER: / Infinite divided by infinite.
ER: /(x<0)
ER: LN (0) LN of 0.
ER: LN (x<0) LN of a negative number.
ER: ATrig( >1)
ER: 1
^
ER: (x<0)
ER: ^0
ER: ^(Frac) Attempted calculation of +/-^ (non-integer y).
ER: (x<0)^(Frac) Attempted calculation of (-x) ^ (non-integer y).
ER: Out of Bounds Input out of bounds.
ER: Invalid P/YR Returned by TVM functions if payments per year are invalid (0 or
ER: Invalid Input Returned if arguments are invalid for any reason.
^
Infinite multiplied by zero.
Square root of a negative number.
ASIN or ACOS of a number for which the absolute value is > 1.
Attempted calculation of 1^+/–Infinite
Attempted calculation of the infinite power of a negative number.
Attempted calculation of +/-^0.
non-integer).
ER: Invalid I%
ER: No Solution Returned when there is no solution to the problem.
ER: Many or No Solutions Returned if there is no solution, or more than one solution to the
ER: Many Solutions Returned when there are many solutions to the problem.
ER: Invalid N Returned by TVM/Amort if N is invalid.
ER: User Abort Returned by long functions if user stops the calculation prior to
ER: Result Returned if the result is infinite.
ER: Insufficient Data Returned by statistics functions if there is insufficient data for
ER: No Payback Returned by payback function if there is no payback on this
Returned by finance functions if I is 100%.
problem.
completion.
analysis.
problem.
Error Messages
89
Page 98

Table 14-1 Error Messages
Error Message Status
ER: Unique solution to IRR Not Found Returned if IRR tries to calculate a solution but cannot find it. User
should supply a new guess…
ER: Stack Stack overflow when performing calculations with more than 12
pending operations.
ER: Parenthesis: An error linked to use of parentheses: unmatched, too many, etc.
ER: Insufficient Memory Insufficient memory to complete the operation.
ER: No Solution Found No solution found.
Error Messages90
Page 99

15 Warranty, Regulatory, and Contact Information
Replacing the Batteries
Use only fresh batteries. Do not use rechargeable batteries. The calculator takes two, 3-volt
CR2032 lithium batteries. To install a new battery:
1. With the calculator turned off, slide the back cover off.
2. Remove one of the old batteries and replace it with a new battery with the positive
polarity symbol facing outward.
3. Remove the second battery and replace it with a new battery with the positive polarity
symbol facing outward.
4. Replace the back cover.
Warning! There is danger of explosion if the battery is incorrectly replaced. Replace only
with the same or equivalent type recommended by the manufacturer. Dispose of used
batteries according to the manufacturer's instructions. Do not mutilate, puncture, or dispose
of batteries in fire. The batteries can burst or explode, releasing hazardous chemicals.
HP Limited Hardware Warranty and Customer Care
This HP Limited Warranty gives you, the end-user customer, express limited warranty rights
from HP, the manufacturer. Please refer to HP's Web site for an extensive description of your
limited warranty entitlements. In addition, you may also have other legal rights under
applicable local law or special written agreement with HP.
Limited Hardware Warranty Period
Duration: 12 months total (may vary by region, please visit www.hp.com/support for latest
information)
General Terms
HP warrants to you, the end-user customer, that HP hardware, accessories and supplies will
be free from defects in materials and workmanship after the date of purchase, for the period
specified above. If HP receives notice of such defects during the warranty period, HP will, at
its option, either repair or replace products which prove to be defective. Replacement products
may be either new or like-new.
HP warrants to you that HP software will not fail to execute its programming instructions after
the date of purchase, for the period specified above, due to defects in material and
workmanship when properly installed and used. If HP receives notice of such defects during
the warranty period, HP will replace software media which does not execute its programming
instructions due to such defects.
HP does not warrant that the operation of HP products will be uninterrupted or error free. If
HP is unable, within a reasonable time, to repair or replace any product to a condition as
warranted, you will be entitled to a refund of the purchase price upon prompt return of the
product with proof of purchase.
Warranty, Regulatory, and Contact Information
91
Page 100

HP products may contain remanufactured parts equivalent to new in performance or may
have been subject to incidental use.
Warranty does not apply to defects resulting from the following:
a. improper or inadequate maintenance or calibration
b. software, interfacing, parts or supplies not supplied by HP
c. unauthorized modification or misuse
d. operation outside of the published environmental specifications for the product
e. improper site preparation or maintenance.
HP MAKES NO OTHER EXPRESS WARRANTY OR CONDITION WHETHER WRITTEN OR
ORAL. TO THE EXTENT ALLOWED BY LOCAL LAW, ANY IMPLIED WARRANTY OR
CONDITION OF MERCHANTABILITY, SATISFACTORY QUALITY, OR FITNESS FOR A
PARTICULAR PURPOSE IS LIMITED TO THE DURATION OF THE EXPRESS WARRANTY SET
FORTH ABOVE. Some countries, states or provinces do not allow limitations on the duration
of an implied warranty, so the above limitation or exclusion might not apply to you. This
warranty gives you specific legal rights and you might also have other rights that vary from
country to country, state to state, or province to province.
TO THE EXTENT ALLOWED BY LOCAL LAW, THE REMEDIES IN THIS WARRANTY
STATEMENT ARE YOUR SOLE AND EXCLUSIVE REMEDIES. EXCEPT AS INDICATED ABOVE,
IN NO EVENT WILL HP OR ITS SUPPLIERS BE LIABLE FOR LOSS OF DATA OR FOR DIRECT,
SPECIAL, INCIDENTAL, CONSEQUENTIAL (INCLUDING LOST PROFIT OR DATA), OR
OTHER DAMAGE, WHETHER BASED IN CONTRACT, TORT, OR OTHERWISE. Some
countries, States or provinces do not allow the exclusion or limitation of incidental or
consequential damages, so the above limitation or exclusion may not apply to you.
The only warranties for HP products and services are set forth in the express warranty
statements accompanying such products and services. HP shall not be liable for technical or
editorial errors or omissions contained herein.
FOR CONSUMER TRANSACTIONS IN AUSTRALIA AND NEW ZEALAND: THE WARRANTY
TERMS CONTAINED IN THIS STATEMENT, EXCEPT TO THE EXTENT LAWFULLY PERMITTED,
DO NOT EXCLUDE, RESTRICT OR MODIFY AND ARE IN ADDITION TO THE MANDATORY
STATUTORY RIGHTS APPLICABLE TO THE SALE OF THIS PRODUCT TO YOU.
Regulatory Information
Federal Communications Commission Notice
This equipment has been tested and found to comply with the limits for a Class B digital
device, pursuant to Part 15 of the FCC Rules. These limits are designed to provide reasonable
protection against harmful interference in a residential installation. This equipment generates,
uses, and can radiate radio frequency energy and, if not installed and used in accordance
with the instructions, may cause harmful interference to radio communications. However, there
is no guarantee that interference will not occur in a particular installation. If this equipment
Warranty, Regulatory, and Contact Information92
 Loading...