

Page 1
hp LaserJet 3020
hp LaserJet 3030
use
Page 2

Page 3

hp LaserJet 3020 all-in-one and
hp LaserJet 3030 all-in-one
User Guide
Page 4

Copyright Information
© 2003 Copyright Hewlett-Packard
Development Company, L.P.
Reproduction, adaptation or translation
without prior written permission is prohibited,
except as allowed under the copyright laws.
The information contained herein is subject
to change without notice.
The only warranties for HP products and
services are set forth in the express warranty
statements accompanying such products
and services. Nothing herein should be
construed as constituting an additional
warranty. HP shall not be liable for technical
or editorial errors or omissions contained
herein.
A user of the Hewlett-Packard product
associated with this user guide is granted a
license to: a) print hard copies of this user
guide for PERSONAL, INTERNAL or
COMPANY use subject to the restriction not
to sell, re-sell or otherwise distribute the hard
copies; and b) place an electronic copy of
this user guide on a network server, provided
access to the electronic copy is limited to
PERSONAL, INTERNAL users of the
Hewlett-Packard product associated with
this user guide.
Part number: Q2665-90902
Edition 1, 10/2003
Trademark Credits
Adobe® and PostScript® are trademarks of
Adobe Systems Incorporated.
Microsoft®, Windows®, and Windows NT®
are U.S. registered trademarks of Microsoft
Corporation.
UNIX® is a registered trademark of The
Open Group.
All other products mentioned herein may be
trademarks of their respective companies.
Hewlett-Packard Development Company, L.P.
20555 S.H. 249
Houston, TX 77070
Page 5

Table of contents
1 Getting to know your device
Identifying the hp LaserJet 3020 all-in-one and hp LaserJet 3030 all-in-one ...........................2
Package contents of the hp LaserJet 3020 all-in-one ........................................................2
Package contents of the hp LaserJet 3030 all-in-one ........................................................3
Device features of the hp LaserJet 3020 all-in-one and the hp LaserJet 3030 all-in-one ........4
Identifying the hardware components .......................................................................................5
HP LaserJet 3020 all-in-one hardware components ..........................................................5
HP LaserJet 3030 all-in-one hardware components ..........................................................5
Identifying the device control panel components of the hp LaserJet 3020 all-in-one ...............6
Identifying the device control panel components of the hp LaserJet 3030 all-in-one ...............7
Identifying the software components ........................................................................................8
Supported operating systems .............................................................................................8
Print-media specifications .........................................................................................................9
Supported paper weights and sizes ...................................................................................9
2 Changing the settings by using the hp toolbox or the device control
panel
Using the hp toolbox (Windows) .............................................................................................12
Supported operating systems ...........................................................................................12
Supported browsers .........................................................................................................12
To view the hp toolbox ......................................................................................................12
The hp toolbox sections ....................................................................................................13
Using the device control panel ................................................................................................15
Printing a configuration page ............................................................................................15
Printing a device control panel menu map .......................................................................15
Restoring the factory-set defaults .....................................................................................15
Changing the device control panel display language .......................................................16
Changing the default media size ......................................................................................16
Using the device volume controls .....................................................................................16
3 Printing
Printing by using manual feed .................................................................................................20
To print by using manual feed ..........................................................................................20
Stopping or canceling a print job .............................................................................................21
Printer drivers ..........................................................................................................................22
Changing print settings .....................................................................................................22
Understanding print-quality settings ........................................................................................24
To temporarily change print-quality settings ....................................................................24
To change print-quality settings for all future jobs ............................................................24
To use EconoMode (to save toner) ..................................................................................25
Optimizing print quality for media types ..................................................................................26
To gain access to the optimizing feature ..........................................................................26
Device media specifications ....................................................................................................27
Guidelines for using media .....................................................................................................28
ENWW iii
Page 6

Paper ................................................................................................................................ 28
Common media problems table .......................................................................................28
Labels ............................................................................................................................... 28
Transparencies .................................................................................................................2 9
Envelopes .........................................................................................................................29
Card stock and heavy media ............................................................................................30
Selecting media for the automatic document feeder (ADF) ....................................................32
Automatic document feeder (ADF) specifications ............................................................32
Printing on envelopes .............................................................................................................. 33
To print on one envelope ..................................................................................................33
To print on multiple envelopes .........................................................................................34
Printing on transparencies and labels .....................................................................................36
To print on transparencies or labels .................................................................................36
Printing on letterhead and preprinted forms ...........................................................................38
To print on letterhead and preprinted forms .....................................................................38
Printing on custom-sized media or card stock ........................................................................39
To print on custom-sized media or card stock .................................................................39
Printing on both sides of the media (manual duplexing) .........................................................40
To manually duplex ..........................................................................................................40
Printing multiple pages on a single sheet of media ................................................................42
To print multiple pages on a single sheet (Windows) .......................................................42
To print multiple pages on a single sheet (Macintosh) .....................................................42
Printing booklets ......................................................................................................................43
To print booklets ...............................................................................................................43
Printing watermarks ................................................................................................................ 45
To use the watermark feature ...........................................................................................45
4 Copying
Loading originals to copy ........................................................................................................48
To load originals onto the flatbed scanner .......................................................................48
To load originals into the automatic document feeder (ADF) input tray ...........................48
Starting a copy job ..................................................................................................................50
Canceling a copy job ...............................................................................................................50
Adjusting the copy quality .......................................................................................................51
To adjust the copy quality for the current job ...................................................................51
To adjust the default copy quality .....................................................................................51
Adjusting the lighter/darker (contrast) setting .........................................................................52
To adjust the lighter/darker setting for the current job ......................................................52
To adjust the default lighter/darker setting .......................................................................52
Reducing or enlarging copies .................................................................................................53
To reduce or enlarge copies for the current job ...............................................................54
To change the default copy size .......................................................................................54
Changing the copy-collation setting ........................................................................................56
To change the copy-collation setting for the current job ..................................................56
To change the default copy-collation setting ....................................................................56
Changing the number of copies ..............................................................................................57
To change the number of copies for the current job ........................................................57
To change the default number of copies ..........................................................................57
Copying photos, two-sided originals, or books .......................................................................58
To copy a photo ................................................................................................................5 8
To copy a multiple-page stack of two-sided originals .......................................................58
To copy a book .................................................................................................................59
5 Scanning
Loading originals to scan ........................................................................................................62
iv ENWW
Page 7

Loading originals onto the flatbed scanner ......................................................................62
Loading originals into the automatic document feeder (ADF) input tray ..........................62
Understanding scanning methods ..........................................................................................64
Scanning from the device control panel (Windows) ...............................................................65
Programming the device Scan to button ..........................................................................65
Scanning to e-mail ............................................................................................................65
Scanning to a folder ..........................................................................................................65
Canceling a scan job ...............................................................................................................67
Scanning by using hp LaserJet Scan software (Windows) .....................................................68
Scanning to e-mail ............................................................................................................68
Scanning to a file ..............................................................................................................69
Scanning to another software program ............................................................................69
Scanning to the Readiris OCR software ...........................................................................70
Scanning from the device and hp Director (Macintosh) ..........................................................71
Scanning to e-mail ............................................................................................................71
Scanning to a file ..............................................................................................................71
Scanning to a software program ......................................................................................72
Using page-by-page scanning ..........................................................................................72
Scanning by using TWAIN-compliant and WIA-compliant software .......................................73
Using TWAIN-compliant and WIA-compliant software .....................................................73
Scanning a photo or a book ....................................................................................................74
Scanning a photo ..............................................................................................................74
Scanning a book ...............................................................................................................74
Scanning by using OCR ..........................................................................................................76
Readiris .............................................................................................................................76
Scanner resolution and color ..................................................................................................77
Resolution and color guidelines .......................................................................................77
Color .................................................................................................................................78
6 Faxing
.................................................................................................................................................. 79
7 Cleaning and maintenance
Cleaning the outside of the device ..........................................................................................82
To clean the exterior .........................................................................................................82
To clean the glass ............................................................................................................82
To clean the lid backing ....................................................................................................83
Cleaning the media path .........................................................................................................84
To clean the media path ...................................................................................................84
Replacing the automatic document feeder (ADF) pickup roller assembly ..............................85
8 Troubleshooting
Device does not turn on ..........................................................................................................90
Is power reaching the device? ..........................................................................................90
The device control panel display has black lines or dots, or becomes blank .........................91
Was the device exposed to an electric or magnetic field? ...............................................91
Pages print but are totally blank ..............................................................................................92
Is the sealing tape still in the print cartridge? ...................................................................92
Does the document contain blank pages? .......................................................................92
Does the configuration page print? ..................................................................................92
Is the original loaded correctly? ........................................................................................92
Pages did not print ..................................................................................................................93
Does a message appear on your computer screen? .......................................................93
Is media being pulled into the device correctly? ..............................................................93
ENWW v
Page 8

Are media jams present? ..................................................................................................93
Is the parallel or USB Device Cable (A/B) working, and is it connected correctly? .........93
Are other devices running on your computer? .................................................................93
Pages printed, but a problem exists ........................................................................................94
Is the print quality poor? ...................................................................................................94
Is the printed page different from what appears onscreen? .............................................94
Are the device settings appropriate for the print media? .................................................94
Onscreen error messages appear ..........................................................................................95
Printer not responding/error writing to LPT1 ....................................................................95
Cannot access port (in use by another application) .........................................................95
Paper-handling problems exist ...............................................................................................96
Print is skewed (crooked) .................................................................................................96
More than one sheet feeds at one time ............................................................................96
Device does not pull media from the media input tray .....................................................96
Media curls when fed through device ...............................................................................96
Printed page is different from what appears onscreen ...........................................................97
Is the text garbled, incorrect, or incomplete? ...................................................................97
Are graphics or text missing? Are there blank pages? ....................................................97
Is the page format different from the format on another printer? .....................................98
Is the quality of graphics poor? ........................................................................................98
Media jams occur in the printer ...............................................................................................99
To clear a media jam ........................................................................................................99
To clear other media jams ..............................................................................................101
Tips to avoid media jams ................................................................................................101
Print quality is unacceptable .................................................................................................102
Light print or fade ............................................................................................................102
Toner specks ..................................................................................................................102
Dropouts .........................................................................................................................103
Vertical lines ...................................................................................................................103
Gray background ............................................................................................................104
Toner smear ...................................................................................................................104
Loose toner .....................................................................................................................105
Vertical repetitive defects ...............................................................................................105
Misformed characters .....................................................................................................106
Page skew ......................................................................................................................106
Curl or wave .................................................................................................................... 107
Wrinkles or creases ........................................................................................................107
Toner scatter outline .......................................................................................................108
Device control panel error messages appear .......................................................................109
Resolving common error messages ...............................................................................109
Critical error messages ...................................................................................................109
Alert messages ...............................................................................................................110
Warning messages .........................................................................................................110
No copy came out .................................................................................................................112
Is media loaded in the input tray? ..................................................................................112
Is the original loaded correctly? ......................................................................................112
Copies are blank, or images are missing or faded ...............................................................113
Has the sealing tape been removed from the print cartridge? .......................................113
Is the print cartridge low on toner? .................................................................................113
Is the original of poor quality? ........................................................................................113
Does the original have a colored background? ..............................................................113
Copy quality is unacceptable ................................................................................................114
Preventing problems .......................................................................................................114
Media jams occur in the automatic document feeder (ADF) ................................................115
Typical automatic document feeder (ADF) jam locations ..............................................115
To clear a media jam from the automatic document feeder (ADF) ................................115
vi ENWW
Page 9

Copy defects are apparent ....................................................................................................118
Vertical white or faded stripes ........................................................................................118
Blank pages ....................................................................................................................118
Wrong original was copied .............................................................................................118
Too light or dark ..............................................................................................................118
Unwanted lines ...............................................................................................................119
Black dots or streaks ......................................................................................................119
Unclear text .....................................................................................................................119
Reduced size ..................................................................................................................119
Scanned image is of poor quality ..........................................................................................120
Is the original a second-generation photo or picture? ....................................................120
Is the image quality better when the document is printed? ............................................120
Is the image skewed (crooked)? ....................................................................................120
Does the scanned image show blotting, lines, vertical white stripes, or any other
defect? ............................................................................................................................120
Do graphics look different from the original? ..................................................................120
Part of the image did not scan ..............................................................................................121
Was the original loaded correctly? .................................................................................121
Does the original have a colored background? ..............................................................121
Is the original longer than 381 mm (15 inches)? ............................................................121
Is the original too small? .................................................................................................121
Are you using HP Director? (Macintosh only) ................................................................121
Is the media size correct? ...............................................................................................121
The scan takes too long ........................................................................................................122
Is your resolution or color level set too high? .................................................................122
Is your software set to scan in color? .............................................................................122
Did you send a print job or copy job before you tried to scan? ......................................122
Is your computer set for bidirectional communication? ..................................................122
Error messages appear .........................................................................................................123
Common scanning error messages ...............................................................................123
Scan quality is unacceptable ................................................................................................124
Preventing problems .......................................................................................................124
Blank pages ....................................................................................................................124
Too light or dark ..............................................................................................................125
Unwanted lines ...............................................................................................................125
Black dots or streaks ......................................................................................................125
Unclear text .....................................................................................................................125
Appendix A Specifications
HP LaserJet 3020/3030 all-in-one series specifications .......................................................129
HP LaserJet 3020/3030 all-in-one series specifications ................................................129
HP LaserJet 3030 all-in-one fax specifications .....................................................................131
HP LaserJet 3020/3030 all-in-one series battery ..................................................................132
Appendix B Regulatory Information
................................................................................................................................................ 133
FCC regulations ....................................................................................................................134
Telephone consumer protection act (United States-hp LaserJet 3030 all-in-one only) .......136
IC CS-03 requirements (hp LaserJet 3030 all-in-one only) ..................................................136
Regulatory information for the European Union countries/regions (hp LaserJet 3030
all-in-one only) .......................................................................................................................137
Safety statements .................................................................................................................138
Laser safety statement ...................................................................................................138
Canada DOC regulations ...............................................................................................138
Laser statement for Finland ............................................................................................139
ENWW vii
Page 10

Korean EMI statement ....................................................................................................139
Australia ..........................................................................................................................140
Declaration of Conformity .....................................................................................................141
Environmental product stewardship program .......................................................................142
Protecting the environment .............................................................................................142
Ozone production ...........................................................................................................142
Energy consumption .......................................................................................................142
Toner consumption .........................................................................................................142
Paper use .......................................................................................................................142
Plastics ...........................................................................................................................142
HP LaserJet printing supplies .........................................................................................143
HP printing supplies returns and recycling program information ...................................143
U.S. returns ..................................................................................................................... 143
Non-U.S. returns .............................................................................................................143
Paper .............................................................................................................................. 143
Material restrictions ........................................................................................................143
Nederlands .....................................................................................................................144
For more information ......................................................................................................144
Material safety data sheets ...................................................................................................145
Appendix C HP limited warranty statement
HP LaserJet 3020 / 3030 all-in-one series ONE-YEAR LIMITED WARRANTY ..................147
Appendix D HP parts and accessories
Ordering hp parts and accessories .......................................................................................150
HP parts and accessories charts ....................................................................................150
HP LaserJet print cartridges .................................................................................................152
HP policy on non-hp print cartridges ..............................................................................152
To install a print cartridge ...............................................................................................152
Storing print cartridges ...................................................................................................152
Print cartridge life expectancy ........................................................................................152
Recycling print cartridges ...............................................................................................153
Saving toner ....................................................................................................................153
Appendix E Service and support
Obtaining hardware service ..................................................................................................156
To obtain hardware service ............................................................................................156
Extended warranty ................................................................................................................158
Service information form .......................................................................................................159
Glossary
Index
viii ENWW
Page 11

1
Getting to know your device
Use these topics to acquaint yourself with your new HP LaserJet 3020 all-in-one or
HP LaserJet 3030 all-in-one:
Identifying the hp LaserJet 3020 all-in-one and hp LaserJet 3030 all-in-one
●
Device features of the hp LaserJet 3020 all-in-one and the hp LaserJet 3030 all-in-one
●
Identifying the hardware components
●
Identifying the device control panel components of the hp LaserJet 3020 all-in-one
●
Identifying the device control panel components of the hp LaserJet 3030 all-in-one
●
Identifying the software components
●
Print-media specifications
●
ENWW 1
Page 12
Identifying the hp LaserJet 3020 all-in-one and hp LaserJet 3030 all-in-one
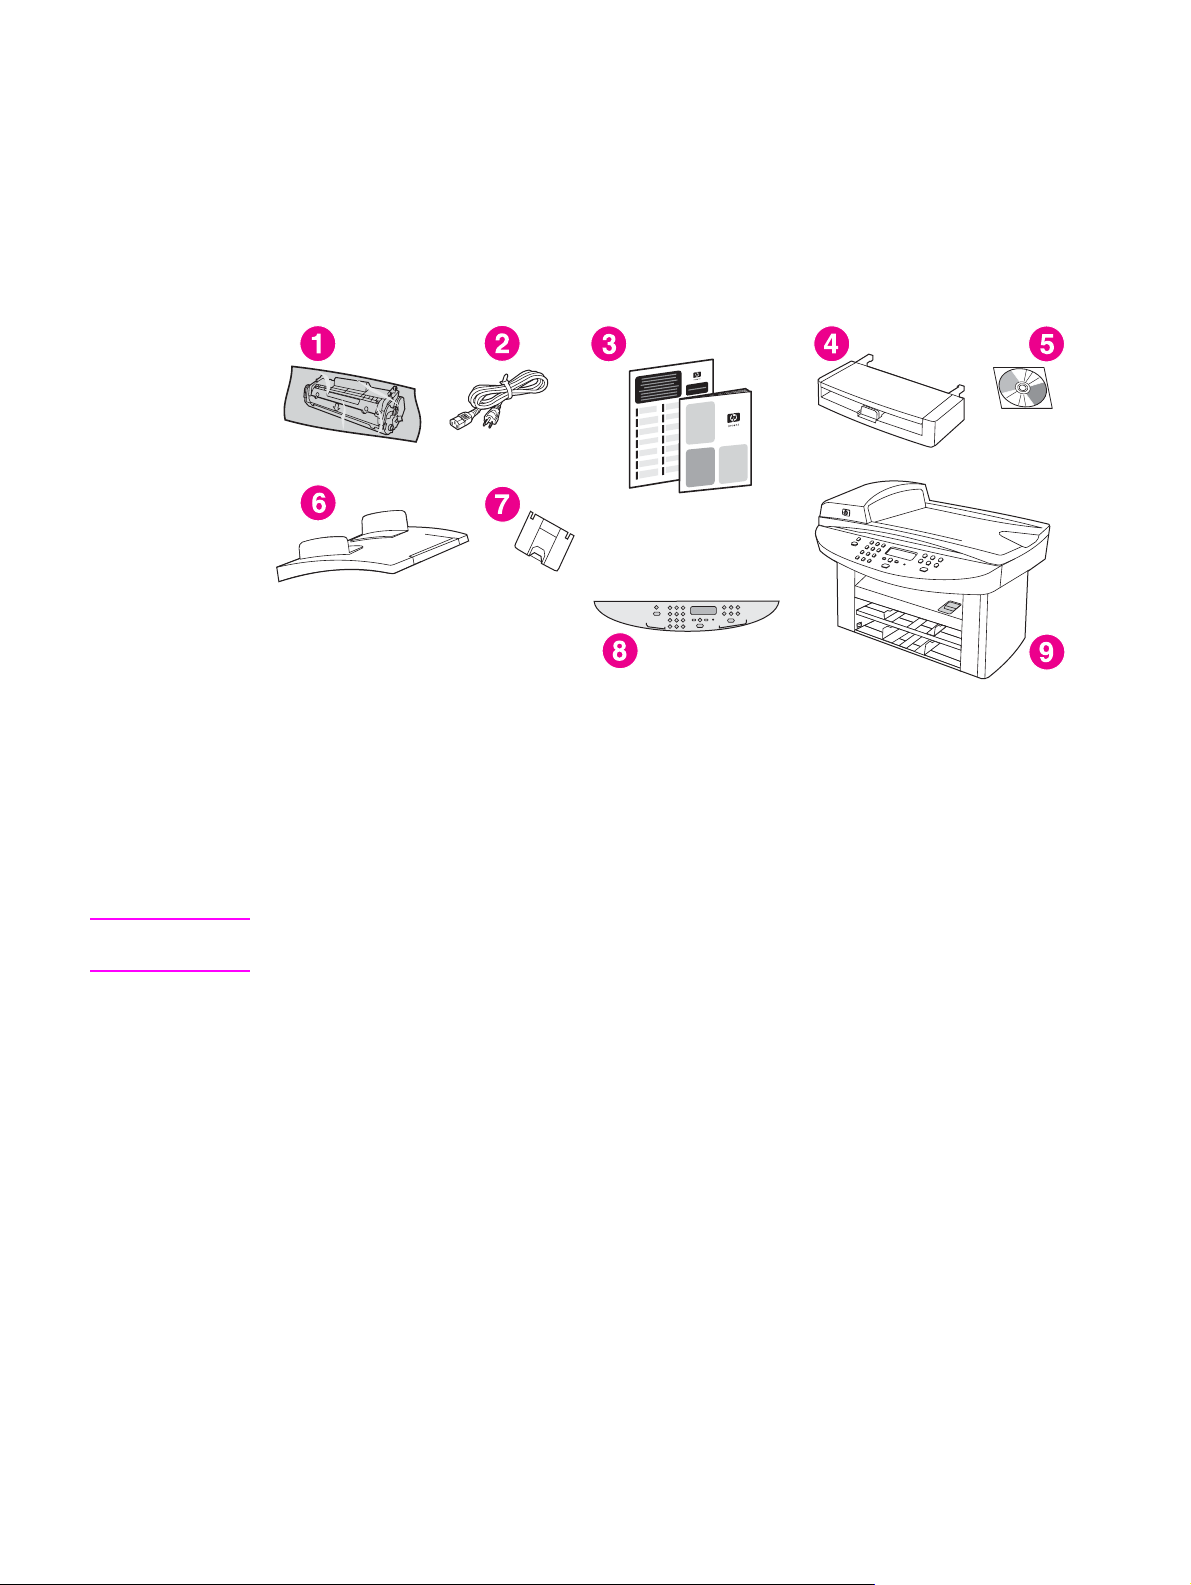
Use the following illustrations to make sure that the package contents are complete.
Package contents of the hp LaserJet 3020 all-in-one
Note
1 Print cartridge
2 Power cord
3 Getting started guide and support flyer
4 150-sheet media input tray
5 CD-ROMs containing device software and electronic user guide
6 Automatic document feeder (ADF) input tray
7 Output bin support
8 Device control panel cover
9 HP LaserJet 3020 all-in-one
Use the power cord that came with the device. Using other power cords can adversely affect
the performance of the device.
2 Chapter 1 Getting to know your device ENWW
Page 13
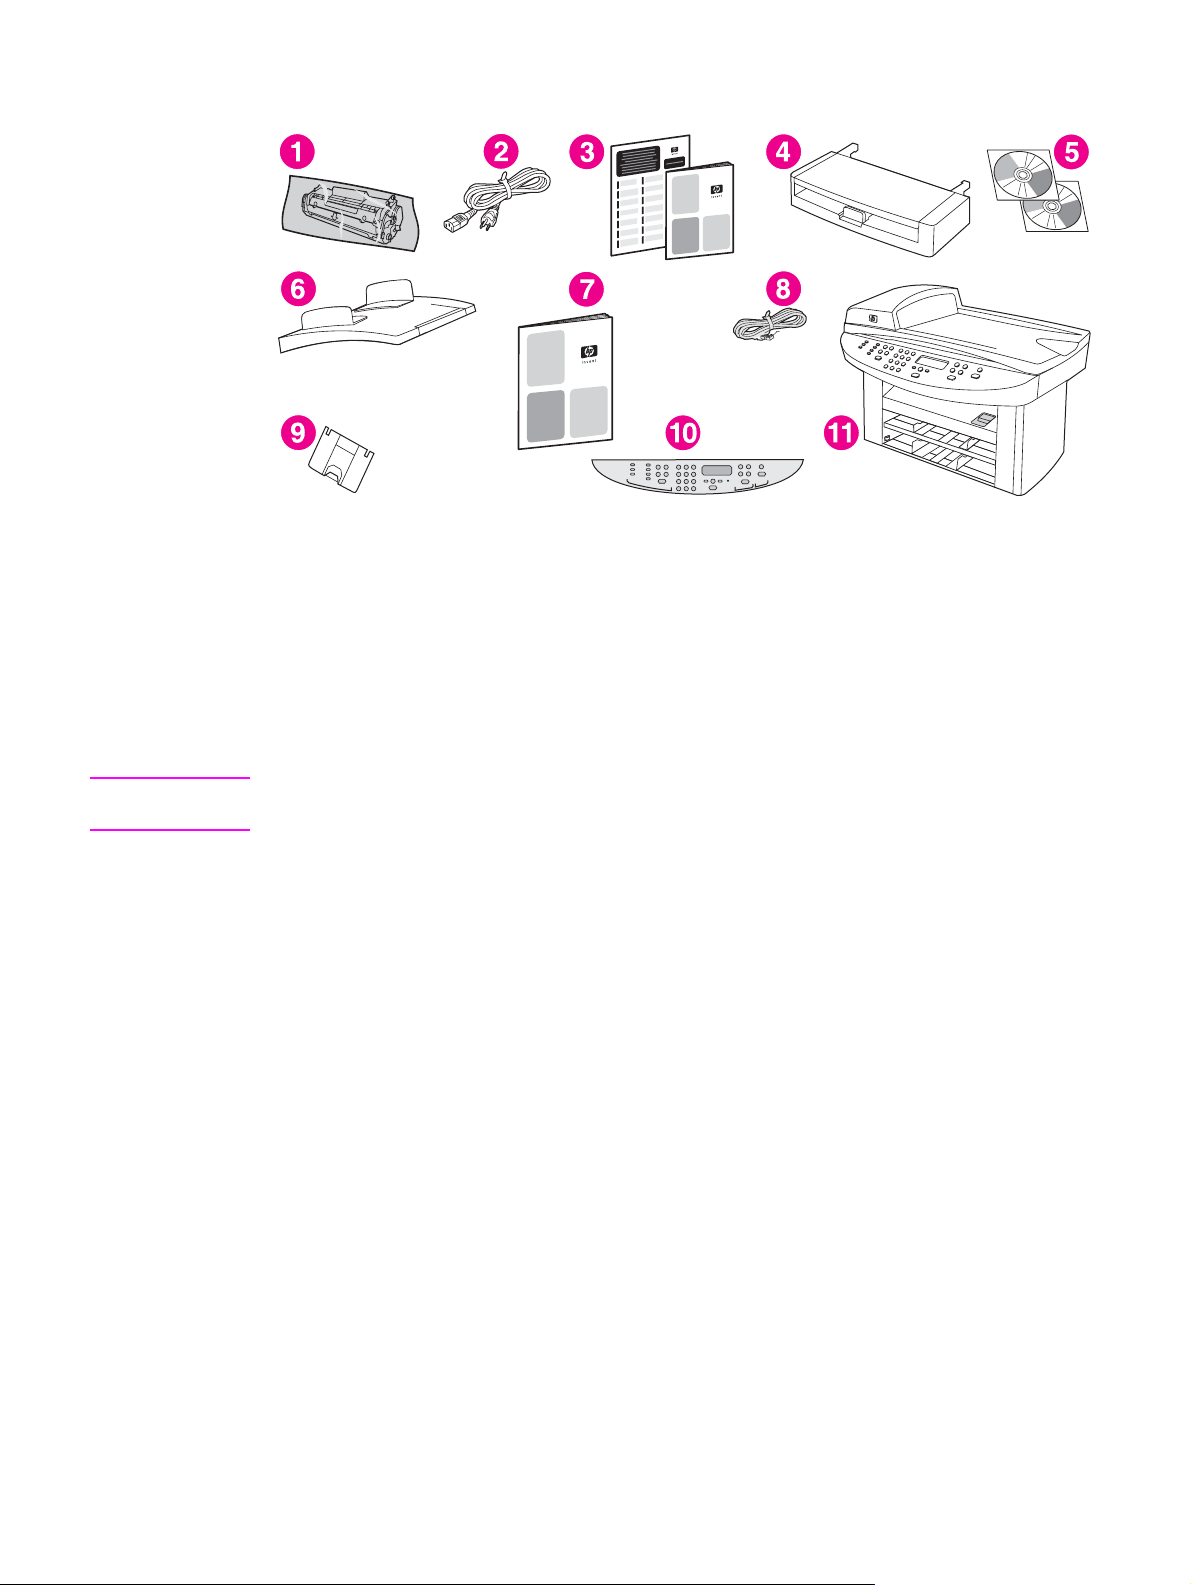
Package contents of the hp LaserJet 3030 all-in-one
1 Print cartridge
2 Power cord
3 Getting started guide and support flyer
4 150-sheet media input tray
5 CD-ROMs containing device software and electronic user guide
6 Automatic document feeder (ADF) input tray
7 Fax guide
8 Phone cord
9 Output bin support
10 Device control panel cover
11 HP LaserJet 3020 all-in-one
Note
Use the phone cord and the power cord that came with the device. Using other phone cords
or power cords can adversely affect the performance of the device.
ENWW Identifying the hp LaserJet 3020 all-in-one and hp LaserJet 3030 all-in-one 3
Page 14

Device features of the hp LaserJet 3020 all-in-one and the hp LaserJet 3030 all-in-one
Speed ●
Paper handling ●
Memory ●
Connectivity ●
Fax (HP LaserJet 3030 allin-one only)
Prints and copies up to 15 pages per minute (ppm)
A flatbed scanner, a 50-page automatic document feeder (ADF), a
150-sheet media input tray, and a 10-sheet priority input slot
32 megabytes (MB) of random-access memory (RAM) (9 MB for the
system and 23 MB of RAM available to the user)
A universal serial bus (USB) port (compatible with 2.0
specifications) and an IEEE 1284-B parallel port
●
Full-functionality fax capabilities with a V.34 fax, including a phone
book, fax polling, and delayed-fax features
4 Chapter 1 Getting to know your device ENWW
Page 15
Identifying the hardware components
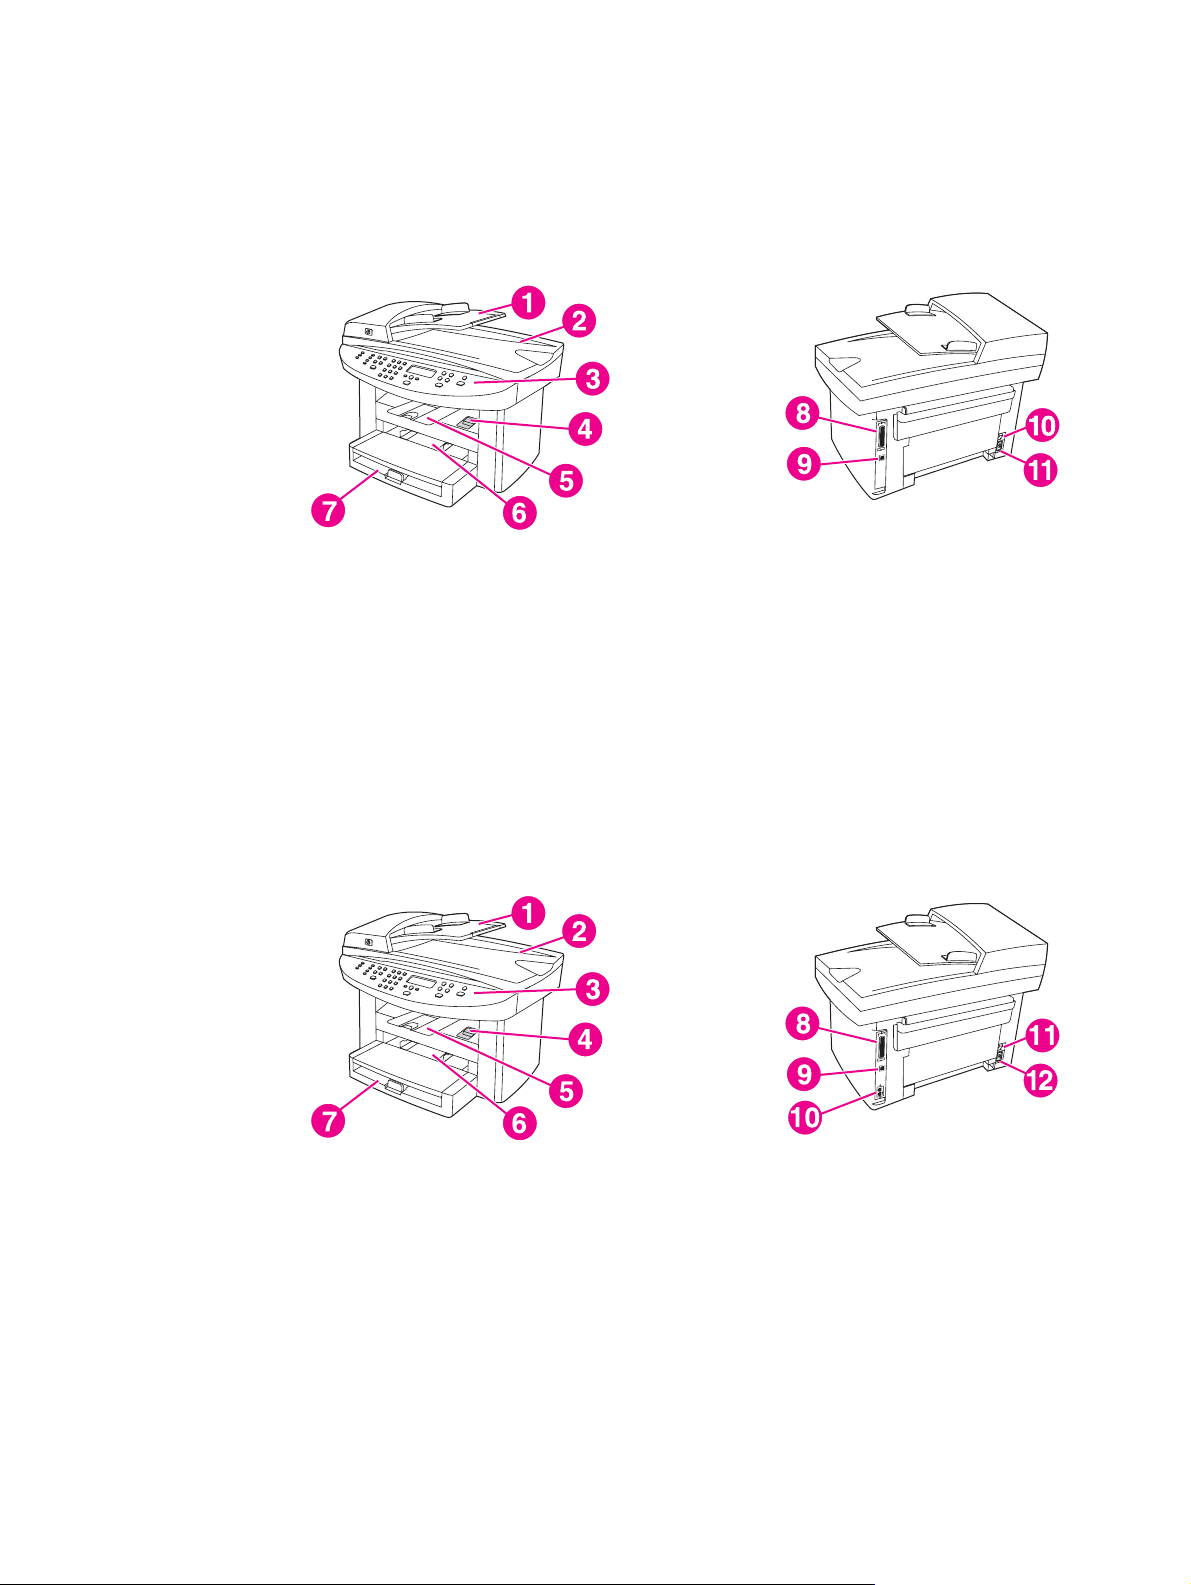
Use the following illustrations to identify the hardware components of your device:
HP LaserJet 3020 all-in-one hardware components
1 Automatic document feeder (ADF) input tray
2 Flatbed scanner lid and ADF output bin
3 Device control panel
4 Print-cartridge-door release
5 Output bin
6 Priority input tray
7 Media input tray
8 Parallel port
9 USB port
10 Power switch
11 Power receptacle
HP LaserJet 3030 all-in-one hardware components
1 Automatic document feeder (ADF) input tray
2 Flatbed scanner lid and ADF output bin
3 Device control panel
4 Print-cartridge-door release
5 Output bin
6 Priority input tray
7 Media input tray
8 Parallel port
9 USB port
10 Fax interface ports
11 Power switch
12 Power receptacle
ENWW Identifying the hardware components 5
Page 16
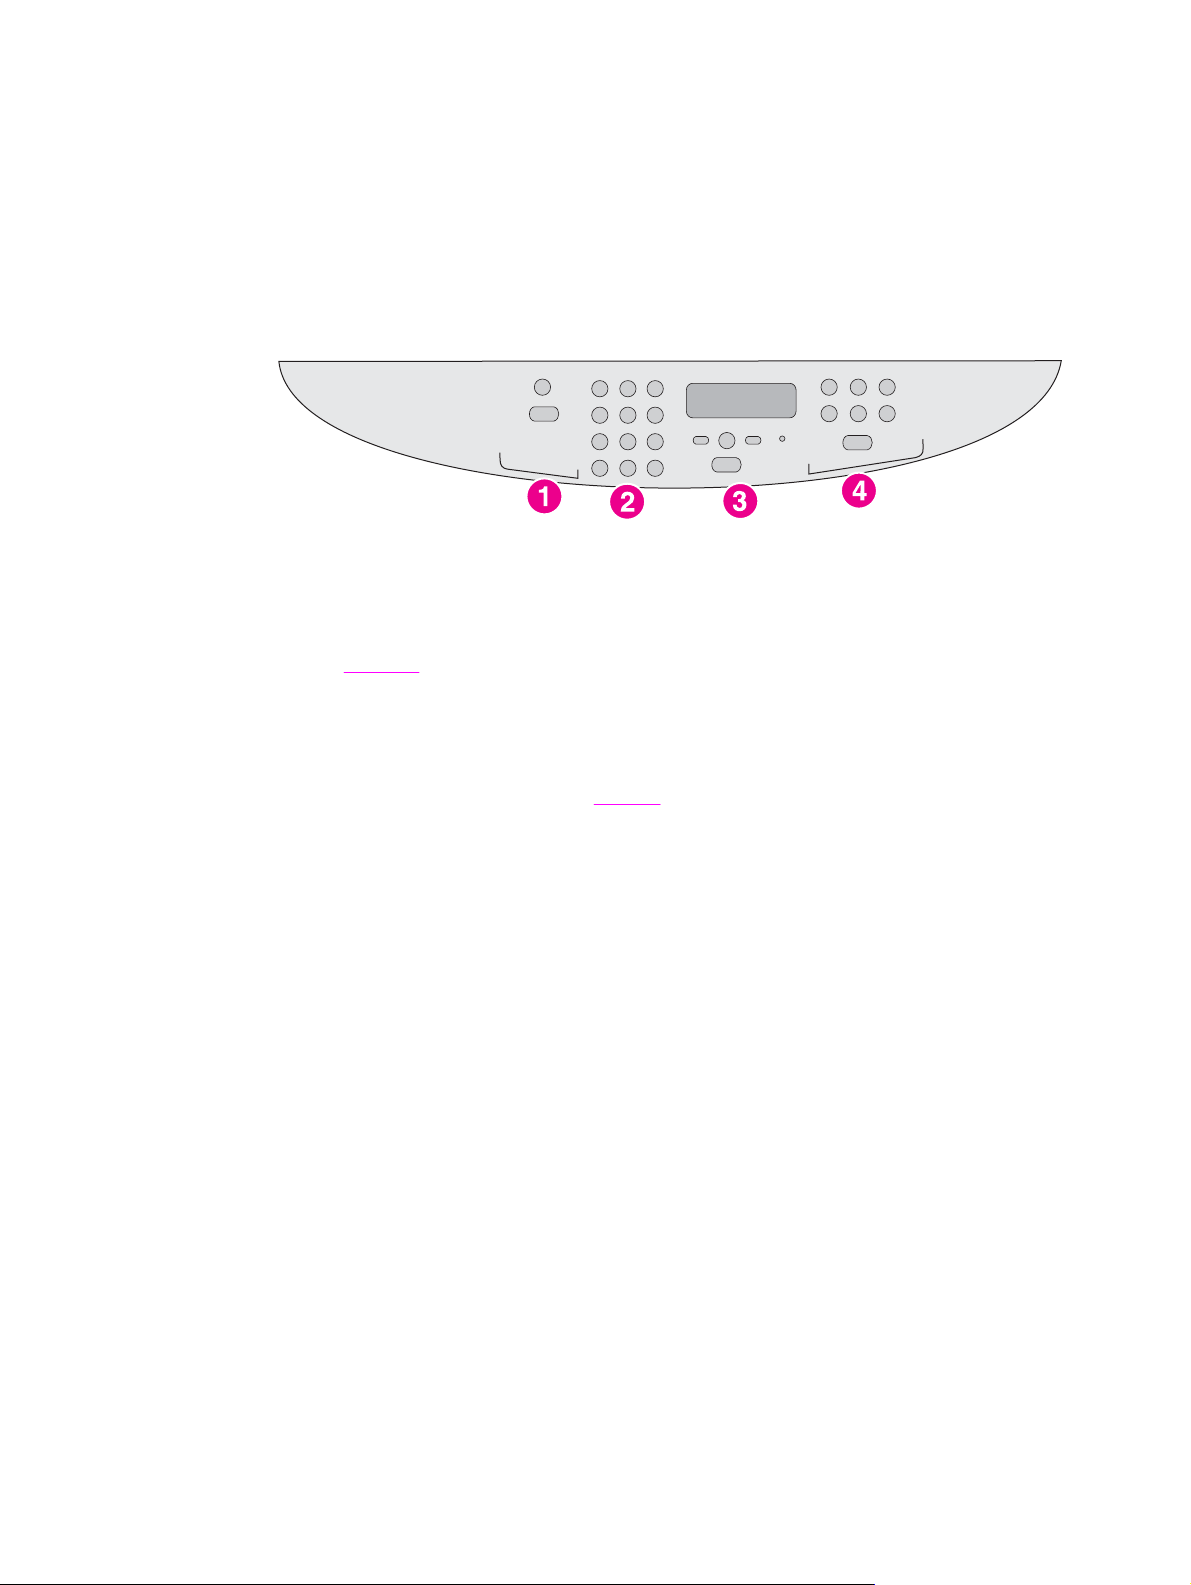
Identifying the device control panel components of the hp LaserJet 3020 all-in-one
Use the following illustration to identify the device control panel components.
1 Scan controls. Use these controls to scan to e-mail or a folder. For instructions about scanning,
see
Scanning.
2 Alphanumeric buttons. Use the alphanumeric buttons to type data into the device control panel
display.
3 Menu and cancel controls. Use these controls to select menu options, determine the device
status, and cancel the current job.
4 Copy controls. Use these controls to change commonly used default settings and to start copying.
For instructions about copying, see
Copying.
6 Chapter 1 Getting to know your device ENWW
Page 17
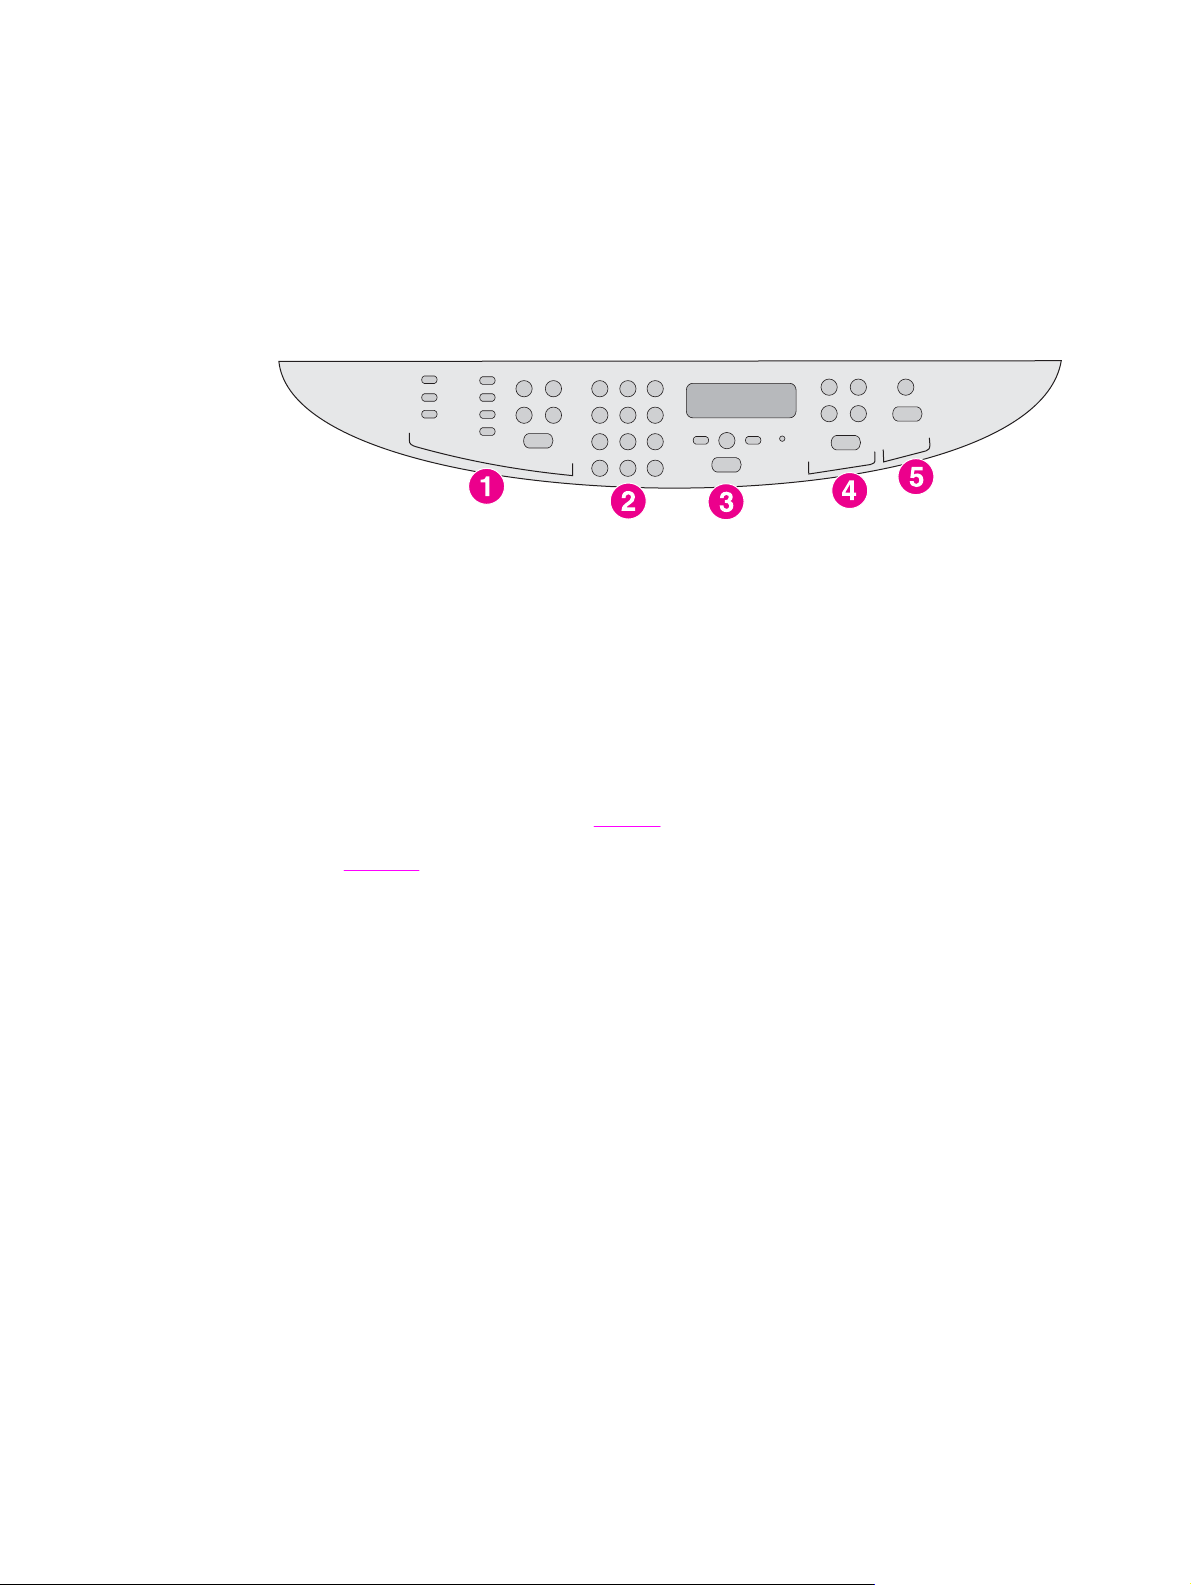
Identifying the device control panel components of the hp LaserJet 3030 all-in-one
Use the following illustration to identify the device control panel components.
1 Fax controls. Use the fax controls to change commonly used fax settings. For information about
using the fax controls, see the fax guide.
2 Alphanumeric buttons. Use the alphanumeric buttons to type data into the device control panel
display and dial phone numbers for faxing. For information about using alphanumeric key
characters, see the fax guide.
3 Menu and cancel controls. Use these controls to select menu options, determine the device
status, and cancel the current job.
4 Copy controls. Use these controls to change commonly used default settings and to start copying.
For instructions about copying, see
5 Scan controls. Use these controls to scan to e-mail or to a folder. For instructions about scanning,
see
Scanning.
Copying.
ENWW Identifying the device control panel components of the hp LaserJet 3030 all-in-one 7
Page 18

Identifying the software components
Note
Note
The software components that are installed depend on the operating system (OS) and the
installation type. See the start guide for more information.
The following software items are included with the device:
● HP toolbox
● HP LaserJet Scan software
● TWAIN or WIA Scan Driver (WIA is available for Windows XP only)
● HP LaserJet Fax (HP LaserJet 3030 all-in-one device only)
● Readiris OCR (not installed with other software; separate installation is required)
● Installer/uninstaller
● Printer drivers (PCL 6, PCL 5e, PostScript Level 2 emulation)
● HP Director (Macintosh)
● HP All-in-One Setup Assistant (Macintosh)
The PCL 6 printer driver is installed by default. The PCL 5e printer driver is available through
the printer wizard. The PostScript driver is available through custom installation.
Supported operating systems
The HP LaserJet 3020 all-in-one and the HP LaserJet 3030 all-in-one support the following
operating systems.
Note
Not all device features and functions are available for all operating systems.
● Windows 98, Windows 2000, Windows Me, Windows XP, and Windows NT 4.0
● Macintosh OS 10.2.x, Macintosh 9.1, and Macintosh 9.2.x
8 Chapter 1 Getting to know your device ENWW
Page 19

Print-media specifications
For optimum results, use conventional 75 to 90 g/m2 (20 to 24 lb) photocopy paper. Verify that
the paper is of good quality and is free of cuts, nicks, tears, spots, loose particles, dust,
wrinkles, curls, and bent edges.
Note
The printer supports a wide range of standard and custom sizes of print media. The capacity
of trays and bins can vary depending on media weight and thickness and environmental
conditions. Smoothness—100 to 250 (Sheffield).
Use only transparencies that are designed for use with HP LaserJet printers.
Supported paper weights and sizes
Media input tray paper sizes
Media input tray Dimensions Weight or thickness Capacity
Minimum-size paper 76 by 127 mm
(3 by 5 in)
Maximum-size paper 216 by 356 mm
(8.5 by 14 in)
Minimum-size glossy
paper
Maximum-size glossy
paper
Minimum-size
transparencies
76 by 127 mm
(3 by 5 in)
216 by 356 mm
(8.5 by 14 in)
76 by 127 mm
(3 by 5 in)
60 to 163 g/m
(16 to 43 lb bond)
60 to 163 g/m
(16 to 43 lb bond)
75 to 120 g/m
(20 to 32 lb bond)
75 to 120 g/m
(20 to 32 lb bond)
0.10 to 0.13 mm thick
(4 to 5 mils thick)
2
2
2
150 sheets
(60 g/m
2
; 16 lb bond)
150 sheets
(60 g/m
2
; 16 lb bond)
Maximum stack height:
18 mm (0.7 in)
2
Maximum stack height:
18 mm (0.7 in)
75 sheets
Maximum-size
transparencies
Minimum-size
envelopes
Maximum-size
envelopes
216 by 356 mm
(8.5 by 14 in)
90 by 160 mm
(3.5 by 6.3 in)
178 by 254 mm
(7 by 10 in)
Minimum-size label 76 by 127 mm
(3 by 5 in)
Maximum-size label 216 by 356 mm
(8.5 by 14 in)
Minimum-size card
stock
Maximum-size card
stock
76 by 127 mm
(3 by 5 in)
216 by 356 mm
(8.5 by 14 in)
0.10 to 0.13 mm thick
(4 to 5 mils thick)
75 to 105 g/m
2
(20 to 28 lb bond)
75 to 105 g/m
2
(20 to 28 lb bond)
60 to 216 g/m
2
(22 to 80 lb cover)
60 to 216 g/m
2
(22 to 80 lb cover)
135 to 157 g/m
2
(36 to 42 lb bond)
135 to 157 g/m
2
(36 to 42 lb bond)
75 sheets
15 envelopes
15 envelopes
60 sheets
60 sheets
60 sheets
60 sheets
ENWW Print-media specifications 9
Page 20

Priority input slot paper sizes
Priority input slot Dimensions Weight or thickness Capacity
Minimum-size paper 76 by 127 mm
(3 by 5 in)
Maximum-size paper 216 by 356 mm
(8.5 by 14 in)
Minimum-size glossy
paper
Maximum-size glossy
paper
Minimum-size
transparencies
Maximum-size
transparencies
Minimum-size
envelopes
Maximum-size
envelopes
76 by 127 mm
(3 by 5 in)
216 by 356 mm
(8.5 by 14 in)
76 by 127 mm
(3 by 5 in)
216 by 356 mm
(8.5 by 14 in)
76 by 127 mm
(3 by 5 in)
216 by 356 mm
(8.5 by 14 in)
Minimum-size label 76 by 127 mm
(3 by 5 in)
Maximum-size label 216 by 356 mm
(8.5 by 14 in)
60 to 163 g/m
2
(16 to 43 lb bond)
60 to 163 g/m
2
(16 to 43 lb bond)
75 to 120 g/m
2
(20 to 32 lb bond)
75 to 120 g/m
2
(20 to 32 lb bond)
0.10 to 0.13 mm thick
(4 to 5 mils thick)
0.10 to 0.13 mm thick
(4 to 5 mils thick)
60 to 90 g/m
2
(16 to 24 lb bond)
60 to 90 g/m
2
(16 to 24 lb bond)
60 to 216 g/m
2
(22 to 80 lb cover)
60 to 216 g/m
2
(22 to 80 lb cover)
10 sheets
(75 g/m
2
; 20 lb bond)
10 sheets
(75 g/m
2
; 20 lb bond)
Maximum stack height:
1.5 mm (0.06 in)
Maximum stack height:
1.5 mm (0.06 in)
5 sheets
5 sheets
Individual envelopes
Individual envelopes
4 sheets
4 sheets
Minimum-size card
stock
Maximum-size card
stock
76 by 127 mm
(3 by 5 in)
216 by 356 mm
(8.5 by 14 in)
135 to 163 g/m
(36 to 43 lb bond)
135 to 163 g/m
(36 to 43 lb bond)
2
2
4 sheets
4 sheets
Automatic document feeder (ADF) paper sizes
ADF Dimensions Weight or thickness Capacity
Minimum-size paper 127 by 127 mm
(5 by 5 in)
Maximum-size paper 216 by 381 mm
(8.5 by 15 in)
60 to 90 g/m
(16 to 24 lb bond)
60 to 90 g/m
(16 to 24 lb bond)
2
50 sheets
(75 g/m
2
50 sheets
(75 g/m
2
; 20 lb bond)
2
; 20 lb bond)
10 Chapter 1 Getting to know your device ENWW
Page 21

Changing the settings by using
2
Note
Note
the hp toolbox or the device
control panel
The HP toolbox information in this chapter is for Windows operating systems only. For
information about HP toolbox for Macintosh, see the online Help in the HP toolbox for
Macintosh.
You can change the settings for the device by using the HP toolbox or the device control
panel. Often, the easier method for changing the device settings is to use the HP toolbox.
The following table lists some of the settings that you can change by using the HP toolbox and
the device control panel. For information about how to use the HP toolbox to change settings,
see the HP toolbox Help. You can open the HP toolbox Help by clicking How Do I on the left
side of the HP toolbox window. (See
to gain access to the Toolbox.) For information about how to use the device control panel to
change the device settings, review the information in this chapter.
Settings that are established in the software program take precedence over printer-driver
settings. Printer-driver settings override the HP toolbox and device control panel settings.
Using the hp toolbox (Windows) for information about how
Setting or feature HP toolbox Device control
panel
Restore the factory-set defaults. X X
Print information pages, such as the configuration
page, device control panel menu map, and usage
page.
Change the device control panel display language. X X
Change the HP toolbox language. X
Set up status alerts. X
Configure the fax-send and fax-receive settings.
View or forward faxes that have been received to the
computer.
Configure the scan to e-mail or a folder setting. X
Change the copy settings X X
Add, delete, or modify the destinations in the Fax
Phone Book.
Gain access to the online user guide. X
1
1
X X
1
X X
X
X X
Check the device status remotely. X
1
Fax features are available for the HP LaserJet 3030 all-in-one only.
ENWW 11
Page 22

Using the hp toolbox (Windows)
The HP toolbox is a Web application that you can use for the following tasks.
Note
Note
The HP LaserJet 3020 all-in-one does not include faxing capabilities.
● Monitor the device status.
● View and configure the device settings for print, fax, copy, and scan.
● View troubleshooting and "How do I" information.
● View online documentation.
● Provide access to fax and scan software capabilities.
● View alerts about a particular event or condition on the device.
You can view the HP toolbox when the device is directly connected to a computer, or when the
device is connected to a network. You must have performed a complete software installation
to use the HP toolbox.
You do not need Internet access to open and use the HP toolbox. However, if you click a link
in the Other Links area, you must have Internet access to go to the site associated with the
link. For more information, see
Other links.
Supported operating systems
The HP toolbox is supported for the following operating systems:
● Windows 98, Windows 2000, Windows Millennium Edition (Me), and Windows XP
Note
The transmission control protocol/Internet protocol (TCP/IP) must be installed in the operating
system for the HP toolbox to function.
Supported browsers
To use the HP toolbox, you must have one of the following browsers:
● Microsoft Internet Explorer 5.5 or later
● Netscape Navigator 6.2 or later
● Opera 7.0
All pages can be printed from the browser.
To view the hp toolbox
Open the HP toolbox in one of the following ways:
●
On the computer desktop, double-click the HP toolbox icon
● On the Start menu, point to Hewlett-Packard, select hp LaserJet 3020 or hp LaserJet
3030, and then select hp Toolbox.
The HP toolbox opens in a Web browser.
.
Note
12 Chapter 2 Changing the settings by using the hp toolbox or the device control panel ENWW
After you open the URL, you can bookmark it so that you can return to it quickly in the future.
Page 23

The hp toolbox sections
The HP toolbox contains the following sections:
● Status tab
● Fax tab (available for the HP LaserJet 3030 all-in-one only)
● Scan to... tab
● Troubleshooting tab
● Documentation tab
Other links
Each page in the HP toolbox contains links to the HP website for device registration and
device support, and links for ordering supplies. You must have Internet access to use any of
these links. If you use a dial-up connection and did not connect when you first opened the HP
toolbox, you must connect before you can view these websites.
Status tab
The Status tab has links to the following main pages:
● Device Status. View device status information. This page indicates device conditions
such as a media jam or an empty input tray. After you correct a problem with the device,
click Refresh to update the device status.
Note
● Set up Status Alerts. Use alerts to configure the device to notify you automatically of
device alerts. From this page you can turn alerts on or off, specify when the device sends
an alert, and select the type of alert (either a pop-up message or a taskbar icon) that you
want to receive. To activate status alert settings, click Apply.
● View Configuration. View settings available for the device. This page also displays any
accessories that have been installed, such as DIMMs. The View Configuration page
displays the same information that is shown on the configuration page.
● Print Info pages. Print the configuration page and other information pages that are
available for the device.
Fax tab
The HP LaserJet 3020 all-in-one does not include faxing capabilities.
The Fax tab has links to the following main pages:
● Fax Tasks
● Fax Phone Book
● Fax Send Log
● Fax Data Properties
● Fax Reports
● Detailed Fax Settings
Note
ENWW Using the hp toolbox (Windows) 13
For more information about fax functions and features, see the fax guide.
Page 24

Scan to... tab
The Scan to... tab has links to the following main pages:
● Scan to E-mail or a Folder
● Scan Preferences
Note
The scan preferences apply to only Scan to E-mail or a Folder.
Troubleshooting tab
The Troubleshooting tab has links to various device troubleshooting information, such as how
to clear a media jam; how to resolve print-quality problems; and how to resolve fax, copy, or
scan problems.
Documentation tab
The Documentation tab contains links to the following information sources:
● User Guide. The user guide contains information about using the device, warranty,
specifications, and support. The user guide is available in both HTML and PDF format.
● Late Breaking News. This document contains late-breaking information about the
device. It is available in English only.
14 Chapter 2 Changing the settings by using the hp toolbox or the device control panel ENWW
Page 25

Using the device control panel
You can also configure settings at the device control panel. This section describes how to
perform the following tasks:
Printing a configuration page
●
Printing a device control panel menu map
●
Restoring the factory-set defaults
●
Changing the device control panel display language
●
Changing the default media size
●
Using the device volume controls
●
Printing a configuration page
You can see which device settings are currently selected by printing a configuration page.
To print a configuration page
1. Press
2. Use the < or the > button to select Reports, and then press
3. Use the < or the > button to select Config report, and then press
The device exits the menu settings and prints the report.
MENU/ENTER
.
MENU/ENTER
.
MENU/ENTER
.
Printing a device control panel menu map
You can see all of your device control panel menu options by printing a device control panel
menu map.
To print a device control panel menu map
1. On the device control panel, press
2. Use the < or the > button to select Reports, and then press
3. Use the < or the > button to select Menu structure, and then press
A menu map prints, showing all of the device control panel menu options.
MENU/ENTER
.
MENU/ENTER
.
MENU/ENTER
.
Restoring the factory-set defaults
Restoring the factory-set defaults returns all of the settings to the factory defaults. For the
HP LaserJet 3030 all-in-one, it also clears the fax header name and phone number. (See the
fax guide for information about how to add your information to the fax header.) This procedure
clears fax numbers and names that are associated with one-touch keys and speed-dial
codes, and deletes any pages that are stored in the memory. The procedure then
automatically restarts the device.
ENWW Using the device control panel 15
Page 26

To restore the factory-set defaults
Note
1. Press
2. Use the < or the > button to select Service, and then press
3. Use the < or the > button to select Restore defaults, press
MENU/ENTER
MENU/ENTER
.
again to confirm your selection.
MENU/ENTER
MENU/ENTER
.
, and then press
The device automatically restarts.
Changing the device control panel display language
Use this procedure to have reports print in, and messages on the the device control panel
display appear in, a language other than the default for your country/region.
The Demo page prints only in English.
To change the device control panel display language
1. Press
2. Use the < or the > button to select Common settings, and then press
3. Use the < or the > button to select Language, and then press
4. Use the < or the > button to select the language that you want.
5. Press
MENU/ENTER
MENU/ENTER
.
to save your selection.
MENU/ENTER
MENU/ENTER
.
.
The device automatically restarts.
Changing the default media size
The media size should be set to the size of media that you normally load in the media input
tray. The device uses this setting for copying, printing reports, printing faxes, and determining
autoreduction for incoming faxes.
To change the default media size
1. Press
2. Use the < or the > button to select Common settings, and then press
3. Use the < or the > button to select Def. paper size, and then press
4. Use the < or the > button until the size of paper that you have loaded appears. You can
5. Press
MENU/ENTER
.
select Letter, Legal, or A4.
MENU/ENTER
to save your selection.
MENU/ENTER
MENU/ENTER
.
.
Using the device volume controls
You can control the volume of the following sounds:
● The alarm sound that the device emits when it requires attention, such as when the device
door is open.
● The beeps that are emitted when you press the device control panel buttons.
16 Chapter 2 Changing the settings by using the hp toolbox or the device control panel ENWW
Page 27

● The phone line sounds for outgoing faxes (HP LaserJet 3030 all-in-one only).
● The ring volume for incoming faxes (HP LaserJet 3030 all-in-one only).
To change the alarm volume
The alarm sounds when the device is presenting an alert or critical error message. The alarm
duration length is either one or three seconds, depending on the type of error.
Note
Note
1. Press
MENU/ENTER
2. Use the < or the > button to select Common settings, and then press
3. Use the < or the > button to select Volume settings, and then press
4. Press
MENU/ENTER
.
to select Alarm volume.
MENU/ENTER
MENU/ENTER
.
5. Use the < or the > button to select Off, Soft, Medium, or Loud.
6. Press
MENU/ENTER
to save your selection.
The factory-set default for the alarm volume is Soft.
To change the volume for the fax (hp LaserJet 3030 all-in-one only)
This setting determines the volume of various fax sounds that occur when the device is
sending or receiving fax jobs.
VOLUME
1. Press
2. Use the < or the > button to select Off, Soft, Medium, or Loud.
3. Press
The factory-set default is Soft.
.
MENU/ENTER
to save your selection.
.
Note
To change the ring volume of the fax (hp LaserJet 3030 all-in-one only)
The fax ring sounds when the device is initially sending or receiving a call. The ring duration
length depends on the local telecom ring-pattern length.
1. Press
MENU/ENTER
2. Use the < or the > button to select Common settings, and then press
3. Use the < or the > button to select Volume settings, and then press
4. Press the < or the > button once to select Ring volume, and then press
.
MENU/ENTER
MENU/ENTER
MENU/ENTER
.
.
.
5. Use the < or the > button to select Off, Soft, Medium, or Loud.
6. Press
MENU/ENTER
to save your selection.
The factory-set default is Soft.
To change the device control panel key-press volume
The key-press volume controls the sound that is made when a device control panel button is
pressed.
1. Press
MENU/ENTER
2. Use the < or the > button to select Common settings, and then press
.
MENU/ENTER
.
ENWW Using the device control panel 17
Page 28

3. Use the < or the > button to select Volume settings, and then press
MENU/ENTER
.
Note
4. Use the < or the > button to select Key Press volume, and then press
5. Use the < or the > button to select Off, Soft, Medium, or Loud.
6. Press
MENU/ENTER
to save your selection.
The factory-set default for the device control panel key-press volume is Soft.
MENU/ENTER
.
18 Chapter 2 Changing the settings by using the hp toolbox or the device control panel ENWW
Page 29

3
Printing
Use the following information to perform printing tasks with the device:
Printing by using manual feed
●
Stopping or canceling a print job
●
Printer drivers
●
Understanding print-quality settings
●
Optimizing print quality for media types
●
Device media specifications
●
Guidelines for using media
●
Selecting media for the automatic document feeder (ADF)
●
Printing on envelopes
●
Printing on transparencies and labels
●
Printing on letterhead and preprinted forms
●
Printing on custom-sized media or card stock
●
Printing on both sides of the media (manual duplexing)
●
Printing multiple pages on a single sheet of media
●
Printing booklets
●
Printing watermarks
●
ENWW 19
Page 30

Printing by using manual feed
Use manual feed when printing on mixed media (for example, printing on an envelope, then
printing a letter, then an envelope, and so on). Load an envelope in the priority input tray and
load the letterhead in the media input tray.
To print by using manual feed
1. Open the device properties or printer setup (printer driver) in the software program.
2. On the Paper tab or the Paper/Quality tab, select Manual Feed (Tray 1) from the Source
is: or Paper Source drop-down list. (For instructions about opening the printer driver from
your computer, see
3. Send the print job.
4. After you have changed the setting, wait until Manual feed appears on the device control
panel, and then press
Understanding print-quality settings.)
MENU/ENTER
to print each job.
20 Chapter 3 Printing ENWW
Page 31

Stopping or canceling a print job
CAUTION
If your print job is currently printing, you can cancel it by pressing
CANCEL
on the device control
panel.
Pressing
CANCEL
clears the job that the device is currently processing. If more than one
process is running (for example, the device is printing a document while receiving a fax),
CANCEL
pressing
clears the process that currently appears on the device control panel.
You can also cancel a print job from a software program or a print queue.
To stop the print job immediately, remove the remaining print media from the device. After
printing stops, use one of the following options:
CANCEL
● Device control panel: To cancel the print job, press and release
on the device
control panel.
● Software program: Typically, a dialog box appears briefly on the computer screen,
allowing you to cancel the print job.
● Windows print queue: If a print job is waiting in a print queue (computer memory) or
print spooler, delete the job there. Go to the Printer screen in Windows 98, Windows Me,
Windows 2000, and Windows XP. Click Start, Settings, and Printers. Double-click the
device icon to open the window, select your print job, and then click Delete.
● Desktop print queue (Macintosh): Open the print queue by double-clicking the device
icon in the Finder. Then highlight the print job and click Trash.
ENWW Stopping or canceling a print job 21
Page 32

Printer drivers
When you installed the device software, you selected one of the following printer drivers:
PCL 6 driver (default driver): Use the PCL 6 driver to take full advantage of the device
features. Unless complete backward compatibility with previous printer control language
(PCL) drivers or older printers is necessary, the PCL 6 driver is recommended.
PCL 5e driver: Use the PCL 5e driver if you need print results to look consistent with those
from older HP LaserJet printers. Certain features (FastRes 1200 and 300 dpi) are not available
in this driver. (Do not use the PCL 5e driver that is provided with this device with older
printers.)
PS driver: Use the PostScript® (PS) driver for compatibility with PS needs. Certain features
(manual duplexing, printing booklets, watermarks, and printing more than four pages per
sheet) are not available with this driver.
Note
Note
The device automatically switches between PS emulation and PCL printer languages
depending on the driver that you have selected. The PS emulation emulates Adobe®
PostScript Level 2. For information about gaining access to your printer driver see
print settings.
Changing
Changing print settings
After installation, you can gain access to print settings from the device printer driver or from
another software program. These settings do not affect other users on a network.
Use one of the following methods to change the print settings.
You can also change some of the printer settings through the HP toolbox. For more
information about the HP toolbox, see
To change default settings across all programs (Windows)
Windows 98, Windows Me, and Windows XP Home: From the Start menu, point to
Settings, and then click Printers. Right-click the device icon, and then click Properties. Make
the necessary changes to the settings, and then click OK.
Windows NT 4.0, Windows 2000, and Windows XP Professional: From the Start menu,
point to Settings, and then click Printers. For Windows 2000, right-click the device icon, and
then click Printing Preferences. For Windows NT 4.0, right-click the device icon, and then
click Document Defaults. Make the necessary changes to the settings, and then click OK.
Using the hp toolbox (Windows).
Note
The actual steps can vary; these are the most common methods.
To change default settings across all programs (Macintosh)
Macintosh OS X:
Note
22 Chapter 3 Printing ENWW
For a list of supported Macintosh operating systems, see Supported operating systems.
1. Open a document in a text-editing application.
2. Select File, and then select Print.
3. Make the appropriate changes to the default settings.
Page 33

4. On the settings options, click Save Custom Setting.
5. To invoke the settings when printing a document, select the Custom option in the Saved
Settings section.
Note
Note
The steps for Macintosh Classic might vary.
To change settings for a print job (Windows)
On the File menu, click Print. In the Print dialog box, click Properties. Change the settings
that you want to apply for the current print job, and then click OK.
To change settings for a print job (Macintosh)
On the File menu, select Print. Use the Print dialog box to set print options.
The actual steps can vary; these are the most common methods.
ENWW Printer drivers 23
Page 34

Understanding print-quality settings
Print-quality settings affect how light or dark the print is on the page and the style in which the
graphics are printed. You can also use the print-quality settings to optimize the print quality for a
specific media type. See
You can change the settings in the device properties to accommodate the types of jobs that
you are printing. The following settings are available, depending on the printer driver that you
are using:
● Best Quality (FastRes 1200): The resolution is rendered differently so that the job can
print faster. This is the default setting.
● 600 dpi
● 300 dpi
● Custom: This setting produces the same resolution as the Faster Printing setting, but you
can change the scale patterns.
● EconoMode (Save Toner): Text is printed with less toner. This setting is useful when you
are printing drafts. You can use this setting independently of other print-quality settings.
Optimizing print quality for media types for more information.
Note
Note
Changing the resolution can change the formatting of your text.
To temporarily change print-quality settings
To change the print-quality settings only for the current software program, open the properties
through the Print Setup menu in the program that you are using to print. See
settings for more information.
Changing print
To change print-quality settings for all future jobs
For Macintosh instructions, see Changing print settings for more information.
For Windows 98, Windows 2000, and Windows Me:
1. In the Windows system tray, click Start, select Settings, and then click Printers.
2. Right-click the device icon.
3. Click Properties (in Windows 2000, you can also click Printing Preferences).
4. Change the settings, and click OK.
For Windows XP:
1. In the Windows system tray, click Start, select Settings, and then click Printers and
Faxes.
2. Right-click the device icon.
3. Click Properties, or click Printing Preferences.
4. Change the settings, and click OK.
24 Chapter 3 Printing ENWW
Page 35

To use EconoMode (to save toner)
EconoMode is a feature that allows the printer to use less toner per page. Selecting this option
extends the life of the toner supply and reduces the cost per page. However, it also reduces
print quality. The printed image is lighter, but it is adequate for printing drafts or proofs.
Hewlett-Packard does not recommend full-time use of EconoMode. If EconoMode is used
full-time when the average toner coverage is significantly less than five percent, it is possible
that the toner supply will outlast the mechanical parts in the print cartridge. If print quality
begins to degrade under these circumstances, you will need to install a new print cartridge,
even if toner remains in the cartridge.
Note
Note
Not all device features are available for all printer drivers or operating systems. See the device
properties (driver) online Help for information about available features for the driver.
1. To enable EconoMode, open the device properties (or printing preferences in Windows
2000 and Windows XP). See
2. On the Paper/Quality tab or the Finishing tab (the Paper Type/Quality tab for some
Macintosh drivers), select the EconoMode check box.
See To change print-quality settings for all future jobs for instructions about using the
EconoMode setting for all future print jobs.
Changing print settings for more information.
ENWW Understanding print-quality settings 25
Page 36

Optimizing print quality for media types
Media-type settings control the temperature of the device fuser. You can change the settings
for the media that you are using to optimize the print quality. The following are the media types
that you can optimize for:
● plain paper
● preprinted paper
● prepunched paper
● letterhead
● transparency
● labels
● bond paper
● recycled paper
● color paper
●
light paper (less than 75 g/m
●
heavy paper (90 to 105 g/m
●
card stock (105 to 176 g/m
2
or 20 lb)
2
or 24 to 28 lb)
2
or 28 to 47 lb)
Note
● envelope
● rough paper
To gain access to the optimizing feature
You can gain access to the optimizing feature on the Paper tab or the Paper/Quality tab in
the device properties (printer driver). For more information, see
settings.
Printing speeds might vary depending on the type and size of media used.
You might need to change the setting back to optimize for the type of media on which you
normally print.
Understanding print-quality
26 Chapter 3 Printing ENWW
Page 37

Device media specifications
HP LaserJet devices produce excellent print quality. The device prints on a variety of media,
such as cut-sheet paper (including recycled paper), envelopes, labels, transparencies, and
custom-sized media. Properties such as weight, grain, and moisture content are important
factors affecting device performance and output quality.
The device can use a variety of paper and other print media in accordance with the guidelines
in this user guide. Media that does not meet these guidelines might cause the following
problems:
● poor print quality
● increased media jams
● premature wear on the device, requiring repair
For best results, use only HP-brand paper and print media. Hewlett-Packard Company cannot
recommend the use of other brands. Because they are not HP products, HP cannot influence
or control their quality.
It is possible for media to meet all of the guidelines in this user guide and still not produce
satisfactory results. This might be the result of improper handling, unacceptable temperature
and humidity levels, or other variables over which Hewlett-Packard has no control.
Before you purchase a large quantity of media, make sure that it meets the requirements
specified in this user guide and in the HP LaserJet Printer Family Print Media Guide. (See
Ordering hp parts and accessories for more information about ordering the guidelines.) Always
test media before you purchase a large quantity.
CAUTION
Note
Using media that does not meet Hewlett-Packard specifications might cause problems for the
device, requiring repair. This repair is not covered by the Hewlett-Packard warranty or service
agreements.
For information about supported media sizes, weights, and other specifications, see Print-
media specifications.
ENWW Device media specifications 27
Page 38

Guidelines for using media
Use the guidelines in this section when selecting and using print media.
Paper
For best results, use conventional paper. Make sure that the paper is of good quality and free
of cuts, nicks, tears, spots, loose particles, dust, wrinkles, voids, and curled or bent edges.
If you are unsure about what type of paper you are loading (such as bond or recycled), check
the label on the package.
Some paper causes print quality problems, jamming, or damage to the device.
Note
Do not use letterhead that is printed with low-temperature inks, such as those used in some
types of thermography.
Do not use raised letterhead.
The device uses heat and pressure to fuse toner to the media. Make sure that any colored
media or preprinted forms use inks that are compatible with the device temperature (200° C or
392° F for 0.1 second).
Common media problems table
Symptom Problem with media Solution
Poor print quality or toner
adhesion, or problems with
feeding.
Dropouts, jamming, or curl. Media has been stored
Increased gray background
shading.
Excessive curl, or problems with
feeding.
Too moist, too rough, too
smooth, or embossed.
Faulty media lot.
improperly.
The media weight is too heavy. Use lighter media.
Too moist, wrong grain direction,
or short-grain construction.
Try another kind of media
between 100 and 250 Sheffield
and 4 to 6 percent moisture
content.
Store media flat in its moistureproof wrapping.
Use long-grain media.
Jamming, or damage to device. Cutouts or perforations. Do not use media with cutouts or
perforations.
Problems with feeding. Ragged edges. Use good-quality media.
Labels
Note
28 Chapter 3 Printing ENWW
For best results, use only HP-brand labels. To order HP supplies, visit http://www.hp.com.
Page 39

When selecting labels, consider the quality of the following factors:
● Adhesives: The adhesive material should be stable at 200° C (392° F), the device
maximum temperature.
● Arrangement: Use only labels that have no exposed backing between them. Labels can
peel off sheets that have spaces between the labels, causing serious jams.
● Curl: Before printing, labels must lie flat with no more than 13 mm (0.5 inch) of curl in any
direction.
● Condition: Do not use labels that have wrinkles, bubbles, or other indications of
separation. Never use a sheet of labels that has already been run through the device.
Transparencies
Transparencies must be able to withstand 200° C (392° F), the device maximum temperature.
Envelopes
When selecting envelopes, consider the quality of the following factors.
Envelope construction
Envelope construction is critical. Envelope fold lines can vary considerably, not only between
manufacturers, but also within a box from the same manufacturer. Successful printing on
envelopes depends on the quality of the envelopes, which includes the following factors:
●
Weight: The weight of the envelope paper should not exceed 105 g/m
might result.
● Construction: Before printing, envelopes should lie flat with less than 6 mm (0.25 inch)
curl and should not contain air. Envelopes that trap air might cause problems.
● Condition: Make sure that the envelopes are not wrinkled, nicked, or otherwise
damaged.
● Sizes: Supported envelope sizes range from 90 by 160 mm (3.5 by 6.3 inches) to 178 by
254 mm (7 by 10 inches).
2
(28 lb), or jamming
ENWW Guidelines for using media 29
Page 40

Envelopes with double-side seams
An envelope with double-side-seam construction has vertical seams at both ends of the
envelope rather than diagonal seams. This style is more likely to wrinkle during printing. Make
sure that the seam extends all the way to the corner of the envelope as shown in the following
illustration:
Envelopes with adhesive strips or flaps
Note
Envelopes with a peel-off adhesive strip or with more than one flap that folds over to seal
must use adhesives that are compatible with the heat and pressure in the device (200° C or
392° F). The extra flaps and strips might cause wrinkling, creasing, or jams.
Envelope storage
Proper storage of envelopes contributes to good print quality. You should store envelopes flat.
If air is trapped in an envelope, creating an air bubble, the envelope might wrinkle during
printing.
Card stock and heavy media
You can print on many types of card stock from the input trays, including index cards and
postcards. Some card stock performs better than others because the construction is better
suited for feeding through a laser device.
2
For optimum device performance, do not use media heavier than 157 g/m
is too heavy might cause misfeeds, stacking problems, media jams, poor toner fusing, poor
print quality, or excessive mechanical wear.
You might be able to print on heavier media if you do not fill the input trays to capacity and if
you use media with a smoothness rating of 100 to 180 Sheffield.
(42 lb). Media that
Card stock construction
●
Smoothness: 135 to 157 g/m
of 100 to 180 Sheffield. 60 to 135 g/m
rating of 100 to 250 Sheffield.
● Construction: Card stock should lie flat with less than 5 mm (0.2 inch) of curl.
30 Chapter 3 Printing ENWW
2
(36 to 42 lb) card stock should have a smoothness rating
2
(16 to 36 lb) card stock should have a smoothness
Page 41

● Condition: Make sure that the card stock is not wrinkled, nicked, or otherwise damaged.
● Sizes: Use card stock that is within the following size ranges only:
● Minimum: 76 by 127 mm (3 by 5 inches)
● Maximum: 216 by 356 mm (8.5 by 14 inches)
Card stock guidelines
Set margins at least 2 mm (0.08 inch) away from the edges.
ENWW Guidelines for using media 31
Page 42

Selecting media for the automatic document feeder (ADF)
Use the following guidelines when selecting media for the ADF.
Automatic document feeder (ADF) specifications
●
Input capacity: The ADF holds up to 50 sheets of flat, 60 to 90 g/m
copier-grade paper.
● Media size: Use copier-grade paper that is within the following size ranges only:
● Minimum: 127 by 127 mm (5 by 5 inches)
● Maximum: 215.9 by 381 mm (8.5 by 15 inches)
2
(16 to 24 lb),
Note
Use the flatbed scanner for faxing (HP LaserJet 3030 all-in-one only), copying, and scanning
if the media is fragile, thin, or thick. The flatbed scanner provides the best fax, copy, and scan
quality. The ADF is recommended for paper faxing, copying, and scanning.
32 Chapter 3 Printing ENWW
Page 43

Printing on envelopes
Use one of the following methods to print on envelopes.
To print on one envelope
●
To print on multiple envelopes
●
To print on one envelope
Use only envelopes that are recommended for laser printers. See Device media specifications
for more information.
Note
Use the priority input tray for printing on one envelope. Use the media input tray for printing on
multiple envelopes.
1. Before loading the envelope, slide the media guides outward so that they are slightly
wider than the envelope.
2. If the envelope has a flap that folds along the long edge, place the flap-fold edge to the
left, with the side to be printed on facing up. If the envelope has a flap that folds along the
short edge, feed that edge into the device first, with the side to be printed on facing up.
3. Adjust the media guides to the width of the envelope.
ENWW Printing on envelopes 33
Page 44

4. For Windows printer drivers, on the Paper tab or the Paper/Quality tab, select Envelope
from the Type is: drop-down list.
For Macintosh printer drivers, on the Paper/Quality tab or the Paper tab (the Paper
Type/Quality tab for some Macintosh drivers), select Envelope as the media type.
Note
Note
Not all device features are available for all printer drivers or operating systems. See the device
properties (driver) online Help for information about the available features for the driver.
5. Print on the envelope.
To print on multiple envelopes
Use only envelopes that are recommended for laser printers. See Device media specifications
for more information.
Use the priority input tray for printing on one envelope. Use the media input tray for printing on
multiple envelopes.
1. Open the media input tray and remove any media.
2. Before loading the envelopes, slide the media guides outward so that they are slightly
wider than the envelopes.
3. If the envelopes have a flap that folds along the long edge, place the flap-fold edge to the
left, with the side to be printed on facing up. If the envelopes have a flap that folds along
the short edge, feed that edge into the device first, with the side to be printed on facing
up.
34 Chapter 3 Printing ENWW
Page 45

4. Adjust the media guides to the length and width of the envelopes.
5. For Windows printer drivers, on the Paper tab or the Paper/Quality tab, select Envelope
from the Type is: drop-down list.
For Macintosh printer drivers, on the Paper/Quality tab or the Paper tab (the Paper
Type/Quality tab for some Macintosh drivers), select Envelope as the media type.
Note
Not all device features are available for all printer drivers or operating systems. See the device
properties (driver) online Help for information about the available features for the driver.
6. Print on the envelopes.
ENWW Printing on envelopes 35
Page 46

Printing on transparencies and labels
Use only transparencies and labels that are recommended for use in laser printers, such as
HP transparency film and HP laser-quality labels. See
information.
Device media specifications for more
CAUTION
CAUTION
Inspect the media to make sure that it is not wrinkled or curled and that it does not have any
torn edges or missing labels. Do not send the labels through the device more than once. The
adhesive can damage the device.
To print on transparencies or labels
Be sure to set the correct media type in the device settings (printer driver) as instructed in the
following procedure. The device adjusts the fuser temperature according to the media type
setting. When printing on special media such as transparencies or labels, this adjustment
prevents the fuser from damaging the media as it passes through the device.
1. Load a single page in the priority input tray or load multiple pages in the media input tray.
Make sure that the top of the media is forward and the side to be printed on (the rough
side of transparencies) is facing up.
2. Adjust the media guides.
36 Chapter 3 Printing ENWW
Page 47

3. For Windows printer drivers, on the Paper tab or the Paper/Quality tab, select the correct
media type from the Type is: drop-down list.
For Macintosh printer drivers, on the Paper/Quality tab or the Paper tab (the Paper
Type/Quality tab for some Macintosh drivers), select the correct media type.
Note
Not all device features are available for all printer drivers or operating systems. See the device
properties (driver) online Help for information about the available features for the driver.
4. Print the document. Remove the media from the output bin as it exits to prevent it from
sticking together, and place the printed pages on a flat surface.
ENWW Printing on transparencies and labels 37
Page 48

Printing on letterhead and preprinted forms
Only use letterhead or preprinted forms that are recommended for use in laser printers, such
as HP laser-quality letterhead and preprinted forms. See
information.
Use these instructions to print documents on letterhead or preprinted forms.
To print on letterhead and preprinted forms
1. Load the print media with the top forward and the side to be printed on facing up.
2. Adjust the media guides to fit the width of the print media.
3. Print the document.
Device media specifications for more
Note
To print a single-page cover letter on letterhead, followed by a multiple-page document, load
the standard media in the media input tray first, and then load the letterhead into the priority
input tray. The device automatically prints from the priority input tray first.
38 Chapter 3 Printing ENWW
Page 49

Printing on custom-sized media or card stock
The device can print on custom-sized media and card stock that is between 76 by 127 mm (3
by 5 inches) and 216 by 356 mm (8.5 by 14 inches) in size. Depending on the media, you can
print on up to 10 sheets from the priority input tray. Use the media input tray for printing on
more than 10 sheets.
Note
Note
Make sure that the sheets are not stuck together before you load them.
To print on custom-sized media or card stock
1. Load the media with the narrow side forward and the side to be printed on facing up.
Adjust the side and rear media guides to fit the media.
2. For Windows printer drivers, on the Paper tab or the Paper/Quality tab, click Custom.
Specify the dimensions of the custom-sized media.
For Macintosh printer drivers, on the Paper/Quality tab or the Paper tab (the Paper
Type/Quality tab for some Macintosh drivers), select the custom size option. Specify the
dimensions of the custom-sized media.
Not all device features are available for all printer drivers or operating systems. See the device
properties (driver) online Help for information about the available features for the driver.
3. If printing on card stock, do one of the following:
For Windows printer drivers, on the Paper tab or the Paper/Quality tab, select Cardstock
from the Type is: drop-down list.
For Macintosh printer drivers, on the Paper/Quality tab or the Paper tab (the Paper
Type/Quality tab for some Macintosh drivers), select Cardstock.
4. Print the document.
ENWW Printing on custom-sized media or card stock 39
Page 50

Printing on both sides of the media (manual duplexing)
To print on both sides of the media (manual duplexing), you must send the media through the
device twice.
Manual duplexing can cause the device to become dirty, which reduces print quality. If the
device becomes dirty, see
Cleaning and maintenance for instructions.
Note
Note
Note
Manual duplexing is not supported for Macintosh.
To manually duplex
The printer driver also contains instructions and graphics for manually duplexing.
1. In the software program, open the device properties (printer driver). For instructions, see
To change settings for a print job (Windows).
2. On the Finishing tab, select Print on Both Sides.
If the Print on Both Sides option is dimmed or unavailable, open the device properties
(printer driver). For instructions, see
(Windows). On the Device Settings tab or the Configure tab, select Allow Manual
Duplexing, and then click OK. Repeat steps 1 and 2.
3. Print the document.
4. After side one has been printed, remove the remaining media from the input tray, and set
it aside until after you finish your manual duplexing job.
To change default settings across all programs
5. Gather the printed pages, keep the printed side facing down, and straighten the stack.
40 Chapter 3 Printing ENWW
Page 51

6. Place the stack of media in the input tray again. Side one should be facing down with the
top edge feeding into the device first.
7. Click OK (on the computer screen), and then wait for side two to print.
ENWW Printing on both sides of the media (manual duplexing) 41
Page 52

Printing multiple pages on a single sheet of media
You can select the number of pages that you want to print on a single sheet of media. If you
choose to print more than one page per sheet, the pages appear smaller and are arranged on
the sheet in the order that they would otherwise be printed. You can specify up to 9 pages per
sheet of media for Macintosh, or up to 16 for Windows.
To print multiple pages on a single sheet (Windows)
1. In the software program, open the device properties (printer driver). See Changing print
settings for instructions.
2. On the Finishing tab under Pages per Sheet, select the number of pages per sheet that
you want to print. You can select up to 16 pages per sheet.
3. Select the check box for page borders if you want the printed pages to have borders. Use
the drop-down list to select the order in which pages are printed on the sheet.
To print multiple pages on a single sheet (Macintosh)
1. In the General drop-down list, select Layout.
2. In the Pages Per Sheet drop-down list, select the number of pages per sheet that you
want to print. You can select up to nine pages per sheet.
42 Chapter 3 Printing ENWW
Page 53

Printing booklets
Note
Note
Printing booklets is not supported for Macintosh.
You can print booklets on letter, legal, or A4 print media.
To print booklets
1. Load the print media in the media input tray.
2. In the software program, open the device properties (printer driver). For instructions, see
To change settings for a print job (Windows) or To change settings for a print job
(Macintosh).
3. On the Finishing tab (the Paper Type/Quality tab for some Macintosh drivers), select
Print on Both Sides.
If the Print on Both Sides option is dimmed or unavailable, open the device properties
(printer driver). For instructions, see
(Windows) or To change default settings across all programs (Macintosh). On the Device
Settings tab or the Configure tab, select the option to allow manual duplexing, and then click
OK. Repeat steps 2 and 3.
To change default settings across all programs
Not all device features are available for all printer drivers or operating systems. See the device
properties (driver) online Help for information about the available features for the driver.
4. Set the number of pages per sheet to two. Select the appropriate binding option, and click
OK.
5. Print the booklet.
6. After side one has been printed, remove the remaining paper from the input tray, and set
it aside until your booklet job is complete.
ENWW Printing booklets 43
Page 54

7. Gather the printed pages, turn the printed side down, and straighten the stack of paper.
8. Place the pages from side one in the input tray again. Side one should be facing down
with the top edge feeding into the device first.
9. Click OK (on the computer screen), and wait for side two to print.
10. Fold and staple the pages.
44 Chapter 3 Printing ENWW
Page 55

Printing watermarks
Note
Printing watermarks is not supported for Macintosh OS X.
You can use the watermark option to print text “underneath” (in the background) of an existing
document. For example, you might want to have large gray letters that spell Draft or
Confidential printed diagonally across the first page or all of the pages of a document.
To use the watermark feature
1. In the software program, open the device properties (printer driver). See Changing print
settings for instructions.
2. On the Effects tab (Windows) or the Watermark/Overlay screen (Macintosh), select the
watermark that you want to print on the document. To print the watermark on only the first
page of the document, select the First Page Only check box.
ENWW Printing watermarks 45
Page 56

46 Chapter 3 Printing ENWW
Page 57

4
Copying
Use these instructions to perform copying tasks with the device:
Loading originals to copy
●
Starting a copy job
●
Canceling a copy job
●
Adjusting the copy quality
●
Adjusting the lighter/darker (contrast) setting
●
Reducing or enlarging copies
●
Changing the copy-collation setting
●
Changing the number of copies
●
Copying photos, two-sided originals, or books
●
Note
Many of the functions that are described in this chapter also can be performed by using the HP
toolbox. For instructions about using the HP toolbox, see
the online Help in HP toolbox for Macintosh.
Using the hp toolbox (Windows), or
ENWW 47
Page 58

Loading originals to copy
Use these instructions to load originals into your device for copying. For the best quality
copies, use the flatbed scanner. See
(ADF) for information about choosing original documents for copying.
To load originals onto the flatbed scanner
1. Make sure that the automatic document feeder (ADF) contains no media.
2. Lift the flatbed scanner cover.
3. Place the original document face-down on the flatbed scanner with the top, left corner of
the document at the lower-right corner of the glass.
4. Gently close the lid.
5. The document is ready to be copied.
Selecting media for the automatic document feeder
CAUTION
Note
To prevent damaging the device, do not allow the scanner lid to fall onto the flatbed scanner
surface. Always close the scanner lid when the device is not in use.
To load originals into the automatic document feeder (ADF) input tray
The ADF capacity is up to 50 sheets of 75 g/m2 (20 lb) media.
The minimum size for media in the ADF is 127 by 127 mm (5 by 5 inches). For smaller sizes,
use the flatbed scanner. The maximum size for media in the ADF is 216 by 381 mm (8.5 by 15
inches).
1. Make sure that the flatbed scanner contains no media.
2. Close the flatbed scanner cover and put the top end of the stack of originals into the ADF
input tray, with the media stack face-up and the first page to be copied on top of the
stack.
3. Slide the stack into the ADF until it does not move any farther.
48 Chapter 4 Copying ENWW
Page 59

4.
Adjust the media guides until they are snug against the media.
5. The document is now ready to be copied.
CAUTION
To prevent damaging the device, do not use an original that contains correction tape,
correction fluid, or staples.
ENWW Loading originals to copy 49
Page 60

Starting a copy job
To make copies with the device, use the following instructions.
1. Load your original document onto the flatbed scanner face-down (one page at a time) with
the top, left corner of the document located in the lower-right corner of the glass.
OR
Load your original document face-up into the automatic document feeder (ADF) input
tray.
2. If you are using the HP LaserJet 3020 all-in-one, you can press
output size to Letter, Legal, or A4.
3. Press
START/COPY
4. Repeat the process for each copy.
For more detailed instructions about loading originals onto the flatbed scanner or into the ADF
input tray, see
Note
If originals are loaded in the ADF input tray and are also on the flatbed scanner, the device
automatically scans from the ADF regardless of whether an original has been placed on the
flatbed scanner.
Canceling a copy job
To cancel a copy job, press
running, pressing
display.
Note
If you cancel a copy job, clear the original document from the flatbed scanner or from the
automatic document feeder (ADF).
on the device control panel to start copying.
Loading originals to copy.
CANCEL
on the device control panel. If more than one process is
CANCEL
clears the process that currently appears on the device control panel
PAPER SIZE
to set the copy
50 Chapter 4 Copying ENWW
Page 61

Adjusting the copy quality
The factory-set default for copy quality is Text. This setting is the best for items that contain
mostly text.
When making a copy of a photo or graphic, you can select the Photo setting to increase the
quality of your copy, or select the Best Photo setting for the highest photo quality.
If you want to conserve toner, and the copy quality is not as important, select Draft.
To adjust the copy quality for the current job
Note
1. On the device control panel, press
QUALITY
to see the current quality setting for the copy.
2. Use the < or the > button to scroll through the quality setting options.
3. Select a resolution setting, and then press
immediately start the copy job, or press
MENU/ENTER
START/COPY
to save the selection and
to save the selection without starting
the job.
The change in the setting remains active for about two minutes after the copy job has been
completed. During this time, Settings=Custom appears on the device control panel display.
To adjust the default copy quality
1. On the device control panel, press
2. Use the < or the > button to select Copy setup, and then press
3. Press
MENU/ENTER
to select Default Quality.
4. Use the < or the > button to scroll through the choices.
5. Press
MENU/ENTER
to save the selection.
MENU/ENTER
.
MENU/ENTER
.
ENWW Adjusting the copy quality 51
Page 62

Adjusting the lighter/darker (contrast) setting
The lighter/darker setting affects the lightness or darkness (contrast) of the copy. Use the
following procedure to change the contrast for the current copy job only.
To adjust the lighter/darker setting for the current job
Note
Note
1. On the device control panel, press
LIGHTER/DARKER
to see the current contrast setting.
2. Use the < or the > button to adjust the setting. Move the slider to the left to make the copy
lighter than the original, or move the slider to the right to make the copy darker than the
original.
3. Press
ENTER
START/COPY
to save the selection without starting the job.
to save the selection and immediately start the copy job, or press
MENU
The change in the setting remains active for about two minutes after the copy job has been
completed. During this time, Settings=Custom appears on the device control panel display.
To adjust the default lighter/darker setting
The default lighter/darker setting affects all copy jobs.
1. On the device control panel, press
2. Use the < or the > button to select Copy setup, and then press
3. Use the < or the > button to select Def. Light/Dark, and then press
4. Use the < or the > button to adjust the setting. Move the slider to the left to make all of the
copies lighter than the original, or move the slider to the right to make all of the copies
darker than the original.
5.
Press
MENU/ENTER
to save the selection.
MENU/ENTER
.
MENU/ENTER
MENU/ENTER
.
.
/
52 Chapter 4 Copying ENWW
Page 63

Reducing or enlarging copies
The device can reduce copies to as little as 25 percent of the original or enlarge copies to as
much as 400 percent of the original. It can also make the following reductions or enlargements
automatically:
● Original=100%
● Lgl > Ltr=78%
● Lgl > A4=83%
● A4 > Ltr=94%
● Ltr > A4=97%
● Full Page=91%
● Fit to page
● 2 pages/sheet
● 4 pages/sheet
● Custom: 25-400%
Note
When using the Fit to page setting, copy from the flatbed scanner only.
When using the 2 pages/sheet or 4 pages/sheet setting, copy from the automatic document
feeder (ADF) only. Also, after selecting the 2 pages/sheet or 4 pages/sheet option, you must
select the page orientation (portrait or landscape).
ENWW Reducing or enlarging copies 53
Page 64

To reduce or enlarge copies for the current job
To reduce or enlarge copies for the current job only, use the following instructions.
1. On the device control panel, press
REDUCE/ENLARGE
.
2. Select the size to which you would like to reduce or enlarge the copies in this job. You can
select one of the following sizes:
● Original=100%
● Lgl > Ltr=78%
● Lgl > A4=83%
● A4 > Ltr=94%
● Ltr > A4=97%
● Full Page=91%
● Fit to page
● 2 pages/sheet
● 4 pages/sheet
● Custom: 25-400%
If you select Custom: 25-400%, type a percentage by using the alphanumeric buttons.
If you select 2 pages/sheet or 4 pages/sheet, select the orientation (portrait or
landscape).
3. Press
ENTER
START/COPY
to save the selection without starting the job.
to save the selection and immediately start the copy job, or press
MENU
/
Note
Note
The change in the setting remains active for about two minutes after the copy job has been
completed. During this time, Settings=Custom appears on the device control panel display.
You must change the default media size in the media input tray to match the output size, or
part of your copy might be cut off. For instructions, see
Changing the default media size.
To change the default copy size
The default copy size is the size to which copies are normally reduced or enlarged. If you keep
the factory default size setting of Original=100%, all copies will be the same size as the
original document.
1. Press
MENU/ENTER
2. Use the < or the > button to select Copy setup, and then press
3. Use the < or the > button to select Def. Redu/Enlrg, and then press
.
MENU/ENTER
.
MENU/ENTER
.
54 Chapter 4 Copying ENWW
Page 65

4. Use the < or the > button to select the option for how you normally want to reduce or
enlarge copies. You can select one of the following options:
● Original=100%
● Lgl > Ltr=78%
● Lgl > A4=83%
● A4 > Ltr=94%
● Ltr > A4=97%
● Full Page=91%
● Fit to page
● 2 pages/sheet
● 4 pages/sheet
● Custom: 25-400%
If you select Custom: 25-400%, type in the percentage of the original size that you
normally want for copies.
If you select 2 pages/sheet or 4 pages/sheet, select the orientation (portrait or
landscape).
5. Press
MENU/ENTER
to save your selection.
ENWW Reducing or enlarging copies 55
Page 66

Changing the copy-collation setting
You can set the device to automatically collate multiple copies into sets. For example, if you
are making two copies of three pages and the automatic collation is on, the pages print in this
order: 1,2,3,1,2,3. If automatic collation is off, the pages print in this order: 1,1,2,2,3,3.
To use the automatic collation, the original document must fit into the memory. If it does not,
the device makes only one copy and a message appears notifying you of the change. If that
happens, use one of the following methods to finish the job:
● Split the job into smaller jobs that contain fewer pages.
● Make only one copy of the document at a time.
● Turn off the automatic collation.
● If using the Best Photo quality setting, try using the Photo setting instead.
The collation setting you select is in effect for all copies until you change the setting.
The collation setting can also be changed from the device software. For instructions about
changing settings from the device software, see
To change the copy-collation setting for the current job
Changing print settings.
Note
Note
If you are using the HP LaserJet 3020 all-in-one, you can press the
COLLATION
button to turn the
copy-collation setting On or Off for the current job.
The change in the setting remains active for about two minutes after the copy job has been
completed. During this time, Settings=Custom appears on the device control panel display.
To change the default copy-collation setting
1. On the device control panel, press
2. Use the < or the > button to select Copy setup, and then press
3. Press
MENU/ENTER
to select Def. Collation.
4. Use the < or the > button to select On or Off.
5. Press
MENU/ENTER
to save your selection.
The factory-set default for automatic copy collation is On.
MENU/ENTER
.
MENU/ENTER
.
56 Chapter 4 Copying ENWW
Page 67

Changing the number of copies
You can choose to have the default number of copies be any number from 1 to 99.
To change the number of copies for the current job
Note
Note
1. On the device control panel, press # OF
COPIES
and use the < or the > button to increase or
decrease the quantity that appears on the device control panel display.
OR
Use the alphanumeric buttons to type the number of copies (between 1 and 99) that you
want to make for your current job.
2. Press
START/COPY
to begin copying your job.
The change in the setting remains active for about two minutes after the copy job has been
completed. During this time, Settings=Custom appears on the device control panel display.
To change the default number of copies
1. On the device control panel, press
2. Use the < or the > button to select Copy setup, and then press
3. Use the < or the > button to select Def. # of copies, and then press
4. Use the alphanumeric buttons to type the number of copies (between 1 and 99) that you
want as the default.
5. Press
MENU/ENTER
to save your selection.
The factory-set default for the number of copies is 1.
MENU/ENTER
.
MENU/ENTER
.
MENU/ENTER
.
ENWW Changing the number of copies 57
Page 68

Copying photos, two-sided originals, or books
To copy a photo
1. Place the photo on the flatbed scanner with the picture-side down and the top, left corner
of the photo in the lower-right corner of the glass.
2. Gently close the lid.
3. You are now ready to copy the photo by using one of the scanning methods. See
Understanding scanning methods for more information.
To copy a multiple-page stack of two-sided originals
1. Load the stack of originals to be copied into the automatic document feeder (ADF) with the
first page facing up, and with the top of the page leading into the ADF.
2. Press
3. Remove the stack from the ADF output tray and reload the stack with the last page facing
START/COPY
up, and with the top of the page leading into the ADF.
. The odd-numbered pages are copied and printed.
58 Chapter 4 Copying ENWW
Page 69

4. Press
START/COPY
. The even-numbered pages are copied and printed.
5. Collate the odd- and even-numbered printed copies.
To copy a book
1. Lift the lid and place the book on the flatbed scanner with the page that you want to copy
at the lower-right corner of the glass.
2. Gently close the lid.
3. Gently press down on the lid to press the book to the flatbed scanner surface.
4. Press
START/COPY
, or use one of the other scanning methods to copy the book. See
Understanding scanning methods for more information.
ENWW Copying photos, two-sided originals, or books 59
Page 70

60 Chapter 4 Copying ENWW
Page 71

5
Scanning
Use the following instructions to perform scanning tasks:
Loading originals to scan
●
Understanding scanning methods
●
Scanning from the device control panel (Windows)
●
Canceling a scan job
●
Scanning by using hp LaserJet Scan software (Windows)
●
Scanning from the device and hp Director (Macintosh)
●
Scanning by using TWAIN-compliant and WIA-compliant software
●
Scanning a photo or a book
●
Scanning by using OCR
●
Scanner resolution and color
●
ENWW 61
Page 72

Loading originals to scan
Use these instructions to load originals into your device for scanning. For the best quality
scans, use the flatbed scanner. See
(ADF) for guidelines on choosing original documents for scanning.
Loading originals onto the flatbed scanner
1. Make sure that the automatic document feeder (ADF) input tray is free of media.
2. Lift the flatbed scanner lid.
3. Place the original document face-down on the flatbed scanner with the top, left corner of
the document at the lower-right corner of the glass.
4. Gently close the lid.
5. The document is ready to be scanned.
Selecting media for the automatic document feeder
CAUTION
Note
To prevent damaging the device, do not allow the scanner lid to fall onto the flatbed scanner
surface. Always close the scanner lid when the device is not in use.
Loading originals into the automatic document feeder (ADF) input tray
The ADF capacity is up to 50 sheets of 75 g/m2 (20 lb) media (depending on the thickness of
the media), or fewer sheets if the stack fills the ADF.
The minimum size for media in the ADF is 127 by 127 mm (5 by 5 inches). For smaller sizes
use the flatbed scanner. The maximum size for media in the ADF is 215.9 by 381 mm (8.5 by
15 inches).
1. Make sure that the flatbed scanner contains no media.
2. Close the flatbed scanner cover and put the top end of the stack of originals into the ADF
input tray, with the media stack face-up and the first page to be scanned on top of the
stack.
3. Slide the stack into the ADF input tray until it does not move any farther.
62 Chapter 5 Scanning ENWW
Page 73

4.
Adjust the media guides until they are snug.
5. The document is now ready to be scanned.
CAUTION
To prevent damaging the device, do not use an original that contains correction fluid,
correction tape, or staples.
ENWW Loading originals to scan 63
Page 74

Understanding scanning methods
You can scan an item in the following ways.
● Scan from the device: Start scanning directly from the device by using the device
control panel scan buttons. The
(Windows only) or to scan to e-mail. For more information, see
control panel (Windows).
SCAN TO
button can be programmed to scan to a folder
Scanning from the device
Note
● Scan from hp LaserJet Scan software (Windows): Press
control panel to start the HP LaserJet Scan software. Pressing
START SCAN
START SCAN
on the device
to start the HP
LaserJet Scan software is not supported when the device is connected to a network.
(Direct-connect only.) You can also start the HP LaserJet Scan software directly from the
computer. See
Scanning by using hp LaserJet Scan software (Windows).
● Scan from hp Director (Macintosh): Insert an original into the automatic document
feeder (ADF) input tray to open the HP Director window. You can also start the HP
Director by clicking the Dock alias (Macintosh OS X only) or desktop alias on the
computer desktop. See
Scanning from the device and hp Director (Macintosh).
● Scan from TWAIN-compliant or WIA-compliant software: The device is TWAIN-
compliant and WIA-compliant and works with Windows-based and Macintosh-based
programs that support TWAIN-compliant or WIA-compliant scanning devices. The device
scanning software is also TWAIN-compliant and WIA-compliant. For more information, see
Scanning by using TWAIN-compliant and WIA-compliant software.
To learn about and use optical character recognition (OCR) software, install the Readiris
program from the software CD-ROM.
64 Chapter 5 Scanning ENWW
Page 75

Scanning from the device control panel (Windows)
Note
Note
Note
Macintosh users: For information about starting a scan from the device control panel, see
Scanning from the device and hp Director (Macintosh).
Use the following instructions to scan directly from the device control panel.
For the best scan quality, place your originals onto the flatbed scanner, rather than loading
them into the automatic document feeder (ADF) input tray.
The computer that is connected to the device must be turned on.
Programming the device Scan to button
To program the device
HP toolbox and click the Scan to... tab. For more information, see the HP toolbox Help.
SCAN TO
button, you must gain access to the device settings. Open the
Scanning to e-mail
To scan to e-mail by using the
instructions.
To use this feature in Windows, an e-mail recipient must be programmed in the Scan to... tab.
Programming the device Scan to button. For Macintosh, set up this function from the
See
Monitor Device tab. See the HP Director online Help.
SCAN TO
button on the device control panel, use the following
1. Load the originals that are to be scanned face-up in the automatic document feeder (ADF)
input tray. Adjust the media guides to hold the originals in place.
OR
Lift the flatbed scanner lid and load the original that is to be scanned face-down on the
flatbed scanner with the top, left corner of the document at the lower-right corner of the
glass. Gently close the lid.
2. Press
SCAN TO
on the device control panel.
3. Use the < or the > button to select an e-mail recipient.
4. Press
START SCAN
or
MENU/ENTER
. The scanned item is attached to an e-mail message,
which is then sent automatically to the e-mail recipient that you selected in step 3.
Scanning to a folder
To scan to a folder by using the
instructions.
SCAN TO
button on the device control panel, use the following
ENWW Scanning from the device control panel (Windows) 65
Page 76

Note
To use this feature in Windows, a folder must be set up in the Scan to... tab prior to use. See
Programming the device Scan to button.
1. Load the originals that are to be scanned face-up in the automatic document feeder (ADF)
input tray, with the top of the document forward, and adjust the media guides.
OR
Lift the flatbed scanner lid and load the original that is to be scanned face-down on the
flatbed scanner with the top, left corner of the document located in the lower-right corner
of the glass. Gently close the lid.
2. Press
SCAN TO
on the device control panel.
3. Use the < or the > button to select a folder.
4. Press
START SCAN
or
MENU/ENTER
. The document is scanned to a file, which is then saved in
the folder that you selected in step 3.
66 Chapter 5 Scanning ENWW
Page 77

Canceling a scan job
To cancel a scan job, use one of the following procedures.
● Press
● Click the Cancel button in the onscreen dialog box.
If you cancel a scan job, remove the original document from the flatbed scanner or from the
automatic document feeder (ADF) input tray.
CANCEL
on the device control panel.
Note
These procedures vary with Macintosh operating systems.
ENWW Canceling a scan job 67
Page 78

Scanning by using hp LaserJet Scan software (Windows)
Use the HP LaserJet Scan software program to scan an item to any of the following:
● e-mail
● a folder
● another software program that you specify
● the Readiris OCR program, if it is installed on the computer
For more detailed instructions about loading original documents into the automatic document
feeder (ADF) input tray, see
Scanning to e-mail
1. Load the originals that are to be scanned face-up in the automatic document feeder (ADF)
input tray. Adjust the media guides to hold the originals in place.
OR
Lift the flatbed scanner lid and load the original that is to be scanned face-down on the
flatbed scanner with the top, left corner of the document at the lower-right corner of the
glass. Gently close the lid.
2. On the computer, click Start, select Hewlett-Packard, select hp LaserJet 3030 or hp
LaserJet 3020, and then select Scan.
Loading originals to scan.
Note
Note
OR
START SCAN
Press
Pressing
device is connected to a network. (Direct-connect only.)
3. In the HP LaserJet Scan dialog box, select Send it through e-mail.
4. Click Settings.
5. Set the scanning options that you want, and then click OK to return to the HP LaserJet
Scan dialog box.
You can save the settings using the Quick Sets option on the General tab. If you then select
the check box after saving the Quick Set, the saved settings will be the default settings the
next time you scan to e-mail.
6. Click Scan. The original is scanned, attached to a new e-mail message, and sent
automatically.
If no e-mail recipient is entered on the E-mail tab, the original is scanned and attached to a
new e-mail message, but is not sent. You can then enter an e-mail recipient, add text or other
attachments, and then send the message.
The options that you set in step 5 are for the current job only, unless you save them as a
Quick Set.
START SCAN
on the device. HP LaserJet Scan software opens on the computer.
to start the HP LaserJet Scan software is not supported when the
68 Chapter 5 Scanning ENWW
Page 79

Scanning to a file
1. Load the originals that are to be scanned face-up in the automatic document feeder (ADF)
input tray. Adjust the media guides to hold the originals in place.
OR
Lift the flatbed scanner lid and load the original that is to be scanned face-down on the
flatbed scanner with the top, left corner of the document at the lower-right corner of the
glass. Gently close the lid.
2. On the computer, click Start, select Hewlett-Packard, select hp LaserJet 3030 or hp
LaserJet 3020, and then select Scan.
OR
Note
Note
START SCAN
Press
Pressing
START SCAN
on the device. HP LaserJet Scan software opens on the computer.
to start the HP LaserJet Scan software is not supported when the
device is connected to a network. (Direct-connect only.)
3. In the HP LaserJet Scan dialog box, select Send it to a file.
4. Click Settings.
5. Set the scanning options that you want, and then click OK to return to the HP LaserJet
Scan dialog box.
You can save the settings using the Quick Sets option on the General tab. If you then select
the check box after saving the Quick Set, the saved settings will be the default settings the
next time you scan to e-mail.
6. Click Scan. If prompted, enter a file name.
The options that you set in step 5 are for the current job only, unless you save them as a
Quick Set.
Scanning to another software program
Scanning to another software program allows you to scan to a program that is not TWAINcompliant or WIA-compliant.
1. Load the originals that are to be scanned face-up in the automatic document feeder (ADF)
input tray. Adjust the media guides to hold the originals in place.
OR
Lift the flatbed scanner lid and load the original that is to be scanned face-down on the
flatbed scanner with the top, left corner of the document at the lower-right corner of the
glass. Gently close the lid.
2. On the computer, click Start, select Hewlett-Packard, select hp LaserJet 3030 or hp
LaserJet 3020, and then select Scan.
OR
START SCAN
Press
Pressing
START SCAN
on the device. HP LaserJet Scan software opens on the computer.
to start the HP LaserJet Scan software is not supported when the
device is connected to a network. (Direct-connect only.)
3. In the HP LaserJet Scan dialog box, select Send it to another software application.
4. Click Settings.
ENWW Scanning by using hp LaserJet Scan software (Windows) 69
Page 80

5. Set the options that you want. On the Other Applications tab, click Browse to locate the
program's executable file, which has the file extension ".exe." You can also type the
location of the executable file.
Note
Note
You can save the settings using the Quick Sets option on the General tab. If you then select
the check box after saving a Quick Set, the saved settings will be the default settings the next
time you scan to another software program.
6. Select the file type that is supported by this program.
7. Click OK to return to the HP LaserJet Scan dialog box.
8. Click Scan.
The options that you set in step 5 are for the current job only, unless you save them as a
Quick Set.
Scanning to the Readiris OCR software
1. Load the originals that are to be scanned face-up in the automatic document feeder (ADF)
input tray. Adjust the media guides to hold the originals in place.
OR
Lift the flatbed scanner lid and load the original that is to be scanned face-down on the
flatbed scanner with the top, left corner of the document at the lower-right corner of the
glass. Gently close the lid.
2. On the computer, click Start, select Hewlett-Packard, select hp LaserJet 3030 or
hp LaserJet 3020, and then select Scan.
Note
OR
START SCAN
Press
Pressing
START SCAN
on the device. HP LaserJet Scan software opens on the computer.
to start the HP LaserJet Scan software is not supported when the
device is connected to a network. (Direct-connect only.)
3. In the HP LaserJet Scan dialog box, select Send it to the Readiris OCR software.
4. Click Scan.
Readiris must be installed on the computer before the device can scan to the Readiris OCR
program. The software CD-ROM that came with the device includes the Readiris OCR
program.
70 Chapter 5 Scanning ENWW
Page 81

Scanning from the device and hp Director (Macintosh)
The procedures described in this section are for Macintosh OS X. Procedures for Macintosh
OS Classic might vary.
For more information about tasks and settings described in this section, see the HP Director
online Help.
For more detailed instructions about loading original documents onto the flatbed scanner or
into the automatic document feeder (ADF) input tray, see
Scanning to e-mail
1. Load the originals that are to be scanned face-up in the automatic document feeder (ADF)
input tray. Adjust the media guides to hold the originals in place.
OR
Lift the flatbed scanner lid and load the original that is to be scanned face-down on the
flatbed scanner with the top, left corner of the document at the lower-right corner of the
glass. Gently close the lid.
Loading originals to scan.
Note
2. Press
3. Use the < or the > button to select an e-mail program such as Apple Mail.
4. Press
If you start the scan by clicking Scan to Email in HP Director, the original is scanned to the
default e-mail program.
5. Enter an e-mail recipient, add text or other attachments, and then send the message.
SCAN TO
START SCAN
that you selected in step 3 opens on the computer. A blank e-mail message opens with
the scanned document as an attachment.
on the device control panel.
on the device control panel. The original is scanned. The e-mail program
Scanning to a file
1. Load the originals that are to be scanned face-up in the automatic document feeder (ADF)
input tray. Adjust the media guides to hold the originals in place.
OR
Lift the flatbed scanner lid and load the original that is to be scanned face-down on the
flatbed scanner with the top, left corner of the document at the lower-right corner of the
glass. Gently close the lid.
2. If the device is connected directly to your computer, the HP Director opens after you
insert an item into the ADF input tray.
OR
If you are scanning from the flatbed scanner (or if the HP Director does not automatically
open), double-click the desktop alias for the HP Director.
3. In the HP Director, click HP Scan. A preview scan of the original appears.
4. Click the Save As icon.
5. Enter a name for the file and a file type.
ENWW Scanning from the device and hp Director (Macintosh) 71
Page 82

6. Click Save. The original is scanned and saved.
7. Click Done to close HP Scan.
Scanning to a software program
To scan to a software program, you scan an item using the program itself. Any TWAINcompliant program can scan an image. If the program you are using is not TWAIN-compliant,
you can save the scanned image to a file and then place, open, or import the file in the
software program. For more information, see
compliant software.
Scanning by using TWAIN-compliant and WIA-
Using page-by-page scanning
Note
For best results, load originals in the automatic document feeder (ADF) input tray, not the
flatbed scanner.
1. Load the originals that are to be scanned face-up in the ADF input tray. Adjust the media
guides to hold the originals in place.
2. If the device is connected directly to your computer, the HP Director opens after you
insert an item into the automatic document feeder ADF input tray. If the HP Director does
not automatically open, double-click the desktop alias for the HP Director.
3. To open the HP Scan dialog box, click the HP Scan button in the HP Director.
4. Specify an image type.
5. Click Scan.
6. After the scan process has finished, click Scan next page.
7. Repeat step 6 for each page of the original.
8. After all of the pages have been scanned, click Send Now!.
OR
Click the Save As icon to save the pages to a file.
72 Chapter 5 Scanning ENWW
Page 83

Scanning by using TWAIN-compliant and WIA-compliant software
The device is TWAIN-compliant and Windows Imaging Application (WIA)-compliant. The
device works with Windows-based and Macintosh-based programs that support TWAINcompliant or WIA-compliant scanning devices.
Note
Note
If the software program you are using is not TWAIN-compliant or WIA-compliant, see
Scanning to another software program.
Using TWAIN-compliant and WIA-compliant software
While you are in a TWAIN-enabled or WIA-enabled program, you can gain access to the
scanning feature and scan an image directly into the open program. For more information, see
the Help file or the documentation that came with your TWAIN-compliant or WIA-compliant
software program.
Scanning from a TWAIN-enabled program
The Macintosh device software complies with TWAIN version 1.9 requirements.
Generally, a software program is TWAIN-enabled if it has a command such as Acquire, File
Acquire, Scan, Import New Object, Insert from, or Scanner. If you are unsure whether the
program is compliant or you do not know what the command is called, see the software
program Help or documentation.
When scanning from a TWAIN-enabled program, the HP LaserJet Scan software program
might start automatically. If the HP LaserJet Scan program starts, you can make changes
while you are previewing the image. If the program does not start automatically, the image
goes to the TWAIN-enabled program immediately.
To scan from a TWAIN-enabled program
Start the scan from within the TWAIN-enabled program. See the software program Help or
documentation for information about the commands and steps to use.
Scanning from a WIA-enabled program (Windows XP only)
WIA is another way to scan an image directly into a software program, such as Microsoft®
Word. WIA uses Microsoft software to scan, instead of HP LaserJet Scan software.
Generally, a software program is WIA-enabled if it has a command such as Picture/From
Scanner or Camera in the Insert or File menu. If you are unsure whether the program is
WIA-enabled, see the software program Help or documentation.
To scan from a WIA-enabled program
Start the scan from within the WIA-enabled program. See the software program Help or
documentation for information about the commands and steps to use.
OR
In the Cameras and Scanner folder, double-click the device icon. This opens the standard
WIA-enabled software program, which enables you to scan to a file.
ENWW Scanning by using TWAIN-compliant and WIA-compliant software 73
Page 84

Scanning a photo or a book
Use the following procedures to scan a photo or a book.
Scanning a photo
1. Place the photo on the flatbed scanner with the picture-side down and the top, left corner
of the photo in the lower-right corner of the glass.
2. Gently close the lid.
3. You are now ready to scan the photo by using one of the scanning methods. See
Understanding scanning methods for more information.
Scanning a book
1. Lift the lid and place the book on the flatbed scanner with the page that you want to copy
at the lower-right corner of the glass.
2. Gently close the lid.
74 Chapter 5 Scanning ENWW
Page 85

3. Gently press down on the lid to press the book to the flatbed scanner surface.
4. You are now ready to scan the book by using one of the scanning methods. See
Understanding scanning methods for more information.
ENWW Scanning a photo or a book 75
Page 86

Scanning by using OCR
You can use OCR software to import scanned text into your preferred word-processing
program for editing.
Readiris
The software CD-ROM includes the Readiris OCR program. If you want to use the Readiris
program, install it from the software CD-ROM, and then follow the instructions in the online
Help.
76 Chapter 5 Scanning ENWW
Page 87

Scanner resolution and color
If you are printing a scanned image, and the quality is not what you expected, you might have
selected a resolution or color setting in the scanner software that does not match your needs.
Resolution and color affect the following features of scanned images:
● Image clarity
● Texture of gradations (smooth or rough)
● Scan time
● File size
Resolution is measured in dots per inch (dpi). Color, grayscale, and black and white define the
number of colors possible. You can adjust the scanner hardware resolution to up to 600 dpi.
The software can perform an enhanced resolution up to 9,600 dpi. You can set color and
grayscale at 1 bit (black and white), or at 8 bit (256 levels of gray) to 24 bit (true color).
The resolution and color guidelines table lists simple tips that you can follow to meet your
scanning needs.
Note
Note
Setting the resolution and color to a high value can create large files that take up disk space
and slow the scanning process. Before setting the resolution and color, determine how you are
going to use the scanned image.
The best resolution for color and grayscale images is achieved by scanning from the flatbed
scanner rather than from the automatic document feeder (ADF).
Resolution and color guidelines
The following table describes the recommended resolution and color settings for different
types of scan jobs.
Intended use Recommended resolution Recommended color settings
Fax (HP LaserJet 3030 all-inone only)
E-mail 150 dpi ● Black and White, if the
150 dpi ● Black and White
image does not require
smooth gradation
● Grayscale, if the image
requires smooth gradation
● Color, if the image is in color
Edit text 300 dpi ● Black and White
Print (graphics or text) 600 dpi for complex graphics, or
if you want to significantly
enlarge the document
300 dpi for normal graphics and
text
150 dpi for photos
● Black and White for text and
line art
● Grayscale for shaded or
colored graphics and
photos
● Color, if the image is in color
ENWW Scanner resolution and color 77
Page 88

Intended use Recommended resolution Recommended color settings
Display on screen 75 dpi ● Black and White for text
● Grayscale for graphics and
photos
● Color, if the image is in color
Color
You can set the color values to the following settings when scanning.
Setting Recommended use
Color Use this setting for high-quality color photos or
documents in which the color is important.
Black and White Use this setting for text documents.
Grayscale Use this setting when file size is an issue or when
you want a document or photograph to be
scanned quickly.
78 Chapter 5 Scanning ENWW
Page 89

6
Faxing
For instructions about using the device fax functionality, see the fax guide that came with the
device.
Note
The fax guide describes fax features for the HP LaserJet 3030 all-in-one device only. The
HP LaserJet 3020 all-in-one device does not include faxing capabilities.
ENWW 79
Page 90

80 Chapter 6 Faxing ENWW
Page 91

7
Cleaning and maintenance
Use the topics below to learn about basic cleaning and maintenance tasks:
Cleaning the outside of the device
●
Cleaning the media path
●
Replacing the automatic document feeder (ADF) pickup roller assembly
●
ENWW 81
Page 92

Cleaning the outside of the device
To clean the exterior
Use a soft, damp, lint-free cloth to wipe dust, smudges, and stains off of the exterior of the
device.
To clean the glass
Dirty glass, from fingerprints, smudges, hair, and so on, slows down performance and affects
the accuracy of special features such as fit-to-page and copy.
Note
CAUTION
If streaks or other defects appear only on copies produced using the automatic document
feeder (ADF), clean the scanner strip (step 3). It is not necessary to clean the scanner glass.
1. Turn off the device, unplug the power cord from the electrical socket, and raise the lid.
2. Clean the glass by using a soft cloth or sponge that has been moistened with nonabrasive
glass cleaner.
Do not use abrasives, acetone, benzene, ammonia, ethyl alcohol, or carbon tetrachloride on
any part of the device; these can damage the device. Do not place liquids directly on the
glass. They might seep under it and damage the device.
3. Clean the scanner strip by using a soft cloth or sponge that has been moistened with
nonabrasive glass cleaner.
4. To prevent spotting, dry the glass by using a chamois or cellulose sponge.
82 Chapter 7 Cleaning and maintenance ENWW
Page 93

To clean the lid backing
Minor debris can accumulate on the white document lid backing that is located underneath the
device lid.
1. Turn off the device, unplug the power cord from the electrical socket, and raise the lid.
Note
CAUTION
Turn the power switch to the off position.
2. Clean the white document lid backing by using a soft cloth or sponge that has been
moistened with a mild soap and warm water.
3. Wash the backing gently to loosen debris; do not scrub the backing.
4. Dry the backing by using a chamois or soft cloth.
Do not use paper-based wipes because they might scratch the backing.
5. If this does not clean the backing well enough, repeat the previous steps and use
isopropyl alcohol to dampen the cloth or sponge, and then wipe the backing thoroughly
with a damp cloth to remove any residual alcohol.
ENWW Cleaning the outside of the device 83
Page 94

Cleaning the media path
If you are experiencing toner specks or dots on the printouts, clean the media path.
To clean the media path
1. Press
MENU/ENTER
.
2. Use the < or the > button to find the Service menu.
3. Press
MENU/ENTER
.
4. Use the < or the > button to find Cleaning Mode.
5. Press
6. Press
MENU/ENTER
MENU/ENTER
.
again to confirm and begin the cleaning process.
84 Chapter 7 Cleaning and maintenance ENWW
Page 95

Replacing the automatic document feeder (ADF) pickup roller assembly
If your automatic document feeder (ADF) has trouble feeding paper, you can replace the ADF
pickup roller assembly. See
assembly. To remove the existing assembly, use the following procedure:
1. Turn off the device and unplug the power cord.
2. Remove the input tray and open the automatic document feeder (ADF) cover.
Ordering hp parts and accessories to order an ADF pickup roller
3. Press the round green button while lifting the green lever. Rotate the green lever until it
stops in the open position. The old pickup roller assembly should remain on the black
surface.
4. Remove the old assembly and put the new one in exactly the same place. The largest
roller goes in back, and the gear side is away from you.
ENWW Replacing the automatic document feeder (ADF) pickup roller assembly 85
Page 96

5. Lower the green lever with the flat green part fitting in between the rollers. Press down on
the green lever until you hear a snap.
6. To check for proper installation, lift the green lever until it remains open. The new pickup
roller assembly should be secured to the lever assembly and should not fall out.
7. Make sure that both sides of the assembly are secured by the green hooks.
86 Chapter 7 Cleaning and maintenance ENWW
Page 97

8. Lower the green lever assembly and close the automatic document feeder (ADF) lid.
Reinstall the input tray.
Note
If you are experiencing jams in the ADF, contact your local HP authorized service provider.
Service and support.
See
9. Plug the device in, and then turn the power switch to the on position.
ENWW Replacing the automatic document feeder (ADF) pickup roller assembly 87
Page 98

88 Chapter 7 Cleaning and maintenance ENWW
Page 99

8
Troubleshooting
Use this section to find tips for solving problems with the device:
Device does not turn on
●
The device control panel display has black lines or dots, or becomes blank
●
Pages print but are totally blank
●
Pages did not print
●
Pages printed, but a problem exists
●
Onscreen error messages appear
●
Paper-handling problems exist
●
Printed page is different from what appears onscreen
●
Media jams occur in the printer
●
Print quality is unacceptable
●
Note
Device control panel error messages appear
●
No copy came out
●
Copies are blank, or images are missing or faded
●
Copy quality is unacceptable
●
Media jams occur in the automatic document feeder (ADF)
●
Copy defects are apparent
●
Scanned image is of poor quality
●
Part of the image did not scan
●
The scan takes too long
●
Error messages appear
●
Scan quality is unacceptable
●
Many of the functions that are described in this chapter also can be performed by using the HP
toolbox. For instructions about using the HP toolbox, see
hp toolbox or the device control panel.
Changing the settings by using the
ENWW 89
Page 100

Device does not turn on
Try the tips in this section if the device does not turn on.
Is power reaching the device?
● If you are using a power strip, make sure that the power strip is turned on. Or, try plugging
the device directly into the power outlet.
● Test the power outlet to make sure that it is working.
● If you have plugged the device into a switched outlet, make sure that the switch is on.
● Make sure that the power is turned on.
WARNING!
If the problem persists after you try the preceding remedies, the device might be experiencing a
mechanical failure. Unplug the device from the power outlet and contact HP. See the support
flyer that came with the device for information about contacting HP.
90 Chapter 8 Troubleshooting ENWW
 Loading...