

Page 1

User Guide
Page 2

© Copyright 2018 HP Development Company, L.P.
HDMI, the HDMI Logo and High-Definition
Multimedia Interface are trademarks or registered
trademarks of HDMI Licensing LLC.
The information contained herein is subject to
change without notice. The only warranties for HP
products and services are set forth in the express
warranty statements accompanying such products
and services. Nothing herein should be construed
as constituting an additional warranty. HP shall not
be liable for technical or editorial errors or
omissions contained herein.
Product notice
This guide describes features that are common to
most models. To access the latest user guide, go to
http://www.hp.com/support
, and select your country .
Select Find your product, and then follow the onscreen instructions.
Second Edition: April 2018
First Edition: March 2018
Document Part Number: L16680-002
Page 3

About This Guide
This guide provides information on monitor features, setting up the monitor, and technical
specifications.
WARNING! Indicates a hazardous situation that, if not avoided, could result in death or
serious injury.
CAUTION: Indicates a hazardous situation that, if not avoided, could result in minor or
moderate injury.
NOTE: Contains additional information to emphasize or supplement important points of the
main text.
TIP: Provides helpful hints for completing a task.
This product incorporates HDMI technology.
ii
Page 4

Contents
1. Getting Started . . . . . . . . . . . . . . . . . . . . . . . . . . . . . . . . . . . . . . . . . . . . 1
Important safety information . . . . . . . . . . . . . . . . . . . . . . . . . . . . . . . . . . . . . . . . . . . . . 1
Product features and components . . . . . . . . . . . . . . . . . . . . . . . . . . . . . . . . . . . . . . . . 2
Features . . . . . . . . . . . . . . . . . . . . . . . . . . . . . . . . . . . . . . . . . . . . . . . . . . . . . . . . . . . . . . . . . . . . . . . . 2
Rear components . . . . . . . . . . . . . . . . . . . . . . . . . . . . . . . . . . . . . . . . . . . . . . . . . . . . . . . . . . . . . . . . . 3
Front bezel controls . . . . . . . . . . . . . . . . . . . . . . . . . . . . . . . . . . . . . . . . . . . . . . . . . . . . . . . . . . . . . . . 4
Setting up the monitor. . . . . . . . . . . . . . . . . . . . . . . . . . . . . . . . . . . . . . . . . . . . . . . . . . 5
Installing the monitor stand. . . . . . . . . . . . . . . . . . . . . . . . . . . . . . . . . . . . . . . . . . . . . . . . . . . . . . . . . . 5
Connecting the cables . . . . . . . . . . . . . . . . . . . . . . . . . . . . . . . . . . . . . . . . . . . . . . . . . . . . . . . . . . . . . 5
Adjusting the monitor . . . . . . . . . . . . . . . . . . . . . . . . . . . . . . . . . . . . . . . . . . . . . . . . . . . . . . . . . . . . . . 7
Turning on the monitor . . . . . . . . . . . . . . . . . . . . . . . . . . . . . . . . . . . . . . . . . . . . . . . . . . . . . . . . . . . . . 8
Installing a security cable . . . . . . . . . . . . . . . . . . . . . . . . . . . . . . . . . . . . . . . . . . . . . . . . . . . . . . . . . . . 8
2. Using the Monitor . . . . . . . . . . . . . . . . . . . . . . . . . . . . . . . . . . . . . . . . . . 9
Downloading the monitor drivers. . . . . . . . . . . . . . . . . . . . . . . . . . . . . . . . . . . . . . . . . . 9
Using the On-Screen Display (OSD) menu. . . . . . . . . . . . . . . . . . . . . . . . . . . . . . . . . . 9
Reducing Blue Light . . . . . . . . . . . . . . . . . . . . . . . . . . . . . . . . . . . . . . . . . . . . . . . . . . 10
3. Support and troubleshooting . . . . . . . . . . . . . . . . . . . . . . . . . . . . . . . . 11
Solving common problems . . . . . . . . . . . . . . . . . . . . . . . . . . . . . . . . . . . . . . . . . . . . . 11
Button lock . . . . . . . . . . . . . . . . . . . . . . . . . . . . . . . . . . . . . . . . . . . . . . . . . . . . . . . . . 12
Product support. . . . . . . . . . . . . . . . . . . . . . . . . . . . . . . . . . . . . . . . . . . . . . . . . . . . . . 12
Preparing to call technical support . . . . . . . . . . . . . . . . . . . . . . . . . . . . . . . . . . . . . . . 12
Locating the serial number and product number. . . . . . . . . . . . . . . . . . . . . . . . . . . . . 13
4. Maintaining the monitor . . . . . . . . . . . . . . . . . . . . . . . . . . . . . . . . . . . . 14
Maintenance guidelines . . . . . . . . . . . . . . . . . . . . . . . . . . . . . . . . . . . . . . . . . . . . . . . 14
Cleaning the monitor. . . . . . . . . . . . . . . . . . . . . . . . . . . . . . . . . . . . . . . . . . . . . . . . . . 14
Shipping the monitor. . . . . . . . . . . . . . . . . . . . . . . . . . . . . . . . . . . . . . . . . . . . . . . . . . 14
A. Technical specifications . . . . . . . . . . . . . . . . . . . . . . . . . . . . . . . . . . . 16
27q . . . . . . . . . . . . . . . . . . . . . . . . . . . . . . . . . . . . . . . . . . . . . . . . . . . . . . . . . . . . . . . . . . . . . . . . . . . 16
iii
Page 5

27qi . . . . . . . . . . . . . . . . . . . . . . . . . . . . . . . . . . . . . . . . . . . . . . . . . . . . . . . . . . . . . . . . . . . . . . . . . . . 16
Preset display resolutions. . . . . . . . . . . . . . . . . . . . . . . . . . . . . . . . . . . . . . . . . . . . . . 17
B. Accessibility . . . . . . . . . . . . . . . . . . . . . . . . . . . . . . . . . . . . . . . . . . . . . 18
Supported assistive technologies. . . . . . . . . . . . . . . . . . . . . . . . . . . . . . . . . . . . . . . . 18
Contacting support . . . . . . . . . . . . . . . . . . . . . . . . . . . . . . . . . . . . . . . . . . . . . . . . . . . 18
iv
Page 6

1. Getting Started
Important safety information
An AC power cord is included with the monitor . If anothe r cord is used, use only a power source
and connection appropriate for this monitor. For information on the correct power cord set to use
with the monitor, refer to the Product Notices provided in your documentation kit.
WARNING! To reduce the risk of electric shock or damage to the equipment:
• Plug the power cord into an AC outlet that is easily accessible at all times.
• Disconnect power from the computer by unplugging the power cord from the AC outlet.
• If provided with a 3-pin attachment plug on the power cord, plug the cord into a grounded
(earthed) 3-pin outlet. Do not disable the power cord grounding pin, for example, by att aching
a 2-pin adapter. The grounding pin is an important safety feature.
For your safety, do not place anything on power cords or cables. Arrange them so that no one
may accidentally step on or trip over them.
To reduce the risk of serious injury, read the Safety & Comfort Guide. It describes proper
workstation, setup, posture, and health and work habits for computer users, and provides
important electrical and mechanical safety information. This guide is located on the Web at
http://www.hp.com/ergo.
CAUTION: For the protection of the monitor , as well as the computer, connect all power cords for
the computer and its peripheral devices (such as a monitor, printer, scanner) to some form of
surge protection device such as a power strip or Uninterruptible Power Supply (UPS). Not all
power strips provide surge protection; the power strips must be specifically labeled as having
this ability. Use a power strip whose manufacturer offers a Damage Replacement Policy so you
can replace the equipment, if surge protection fails.
Use the appropriate and correctly sized furniture designed to properly support your HP LCD
monitor.
WARNING! LCD monitors that are inappropriately situated on dressers, bookcases, shelves,
desks, speakers, chests, or carts may fall over and cause personal injury.
Care should be taken to route all cords and cables connected to the LCD monitor so that they
cannot be pulled, grabbed, or tripped over.
Be sure that the total ampere ratin g o f th e p roduc ts connected to the AC outlet does not exceed
the current rating of the outlet, and that the total ampere rating of the products connected to the
cord does not exceed the rating of the cord. Look on the power label to determine the ampere
rating (AMPS or A) for each device.
Install the monitor near an AC outlet that you can easily reach. Disconnect the monitor by
grasping the plug firmly and pulling it from the AC outlet. Never disconnect the monitor by pulling
the cord.
Do not drop the monitor or place it on an unstable surface.
NOTE: This product is suitable for entertainment purposes. Consider placing the monitor in a
controlled luminous environment to avoid interference from surrounding light and bright surfaces
that may cause disturbing reflections from the screen.
1 Getting Started 1
Page 7

Product features and components
Features
The monitors include the following features:
• 68.58 cm (27-inch) diagonal viewable screen area with 2560 × 1440 resoluti on, plus fullscreen support for lower resolutions; includes custom scaling for maximum image size wh ile
preserving original aspect ratio
• Anti-Glare panel with an LED backlight
• Wide viewing angle to allow viewing from a sitting or standing position, or when moving from
side to side
• Tilt capability
• DP (DisplayPort) video input
• DVI video input
• HDMI (High-Definition Multimedia Interface) video input
• Plug-and-play capability if supported by your operating system
• Security cable slot provision on rear of monitor for optional security cable
• On-Screen Display (OSD) adjustments in several languages for easy setup and screen
optimization
• HDCP (High-Bandwidth Digital Content Protection) copy protection on all digital inputs
• Energy saver feature to meet requirements for reduced power consumption
NOTE: For safety and regulatory information, refer to the Product Notices provided in your
documentation kit. To locate updates to the user guide for your product, go to
http://www.hp.com/ support to download the latest versions of HP programs and drivers.
2 1 Getting Started
Page 8
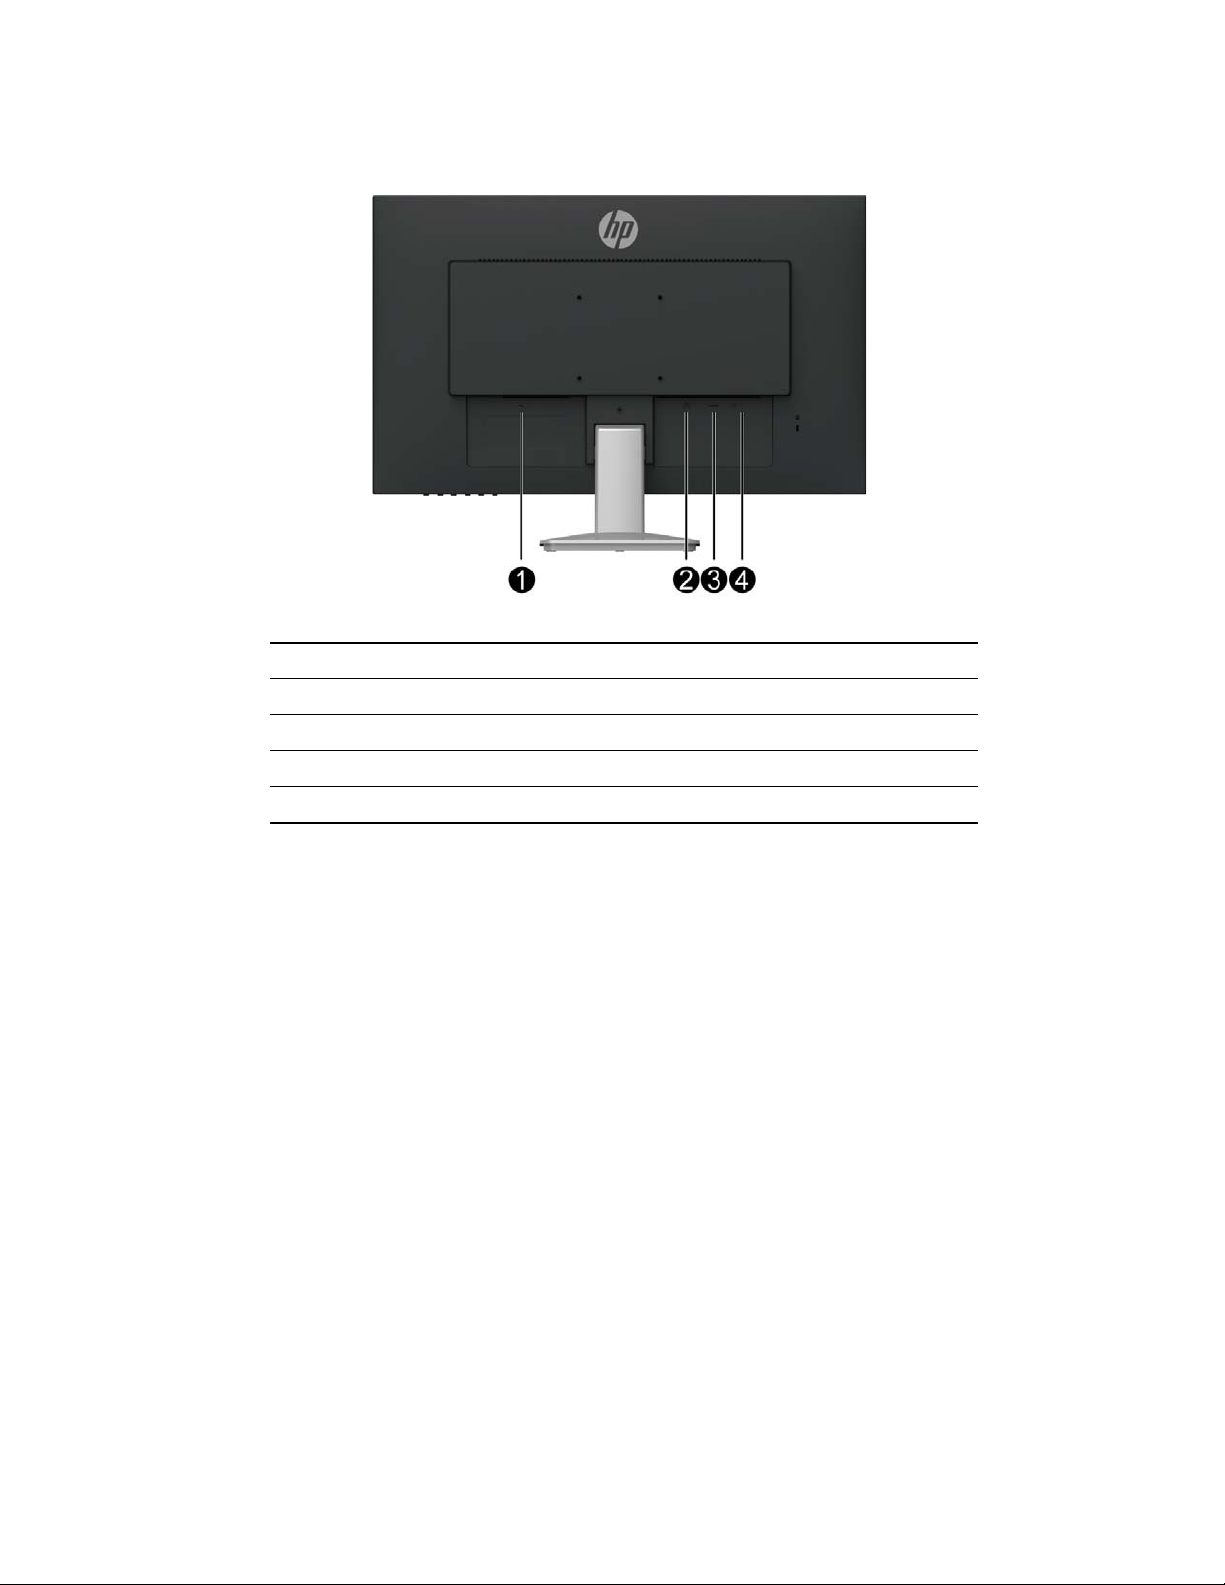
Rear components
Component Function
1 Power connector Connects the power cable to the monitor
2 DVI-D connector Connects the DVI cable to the monitor
3 HDMI connector Connects the HDMI cable to the monitor
4 DP connector Connects the DP cable to the monitor
1 Getting Started 3
Page 9
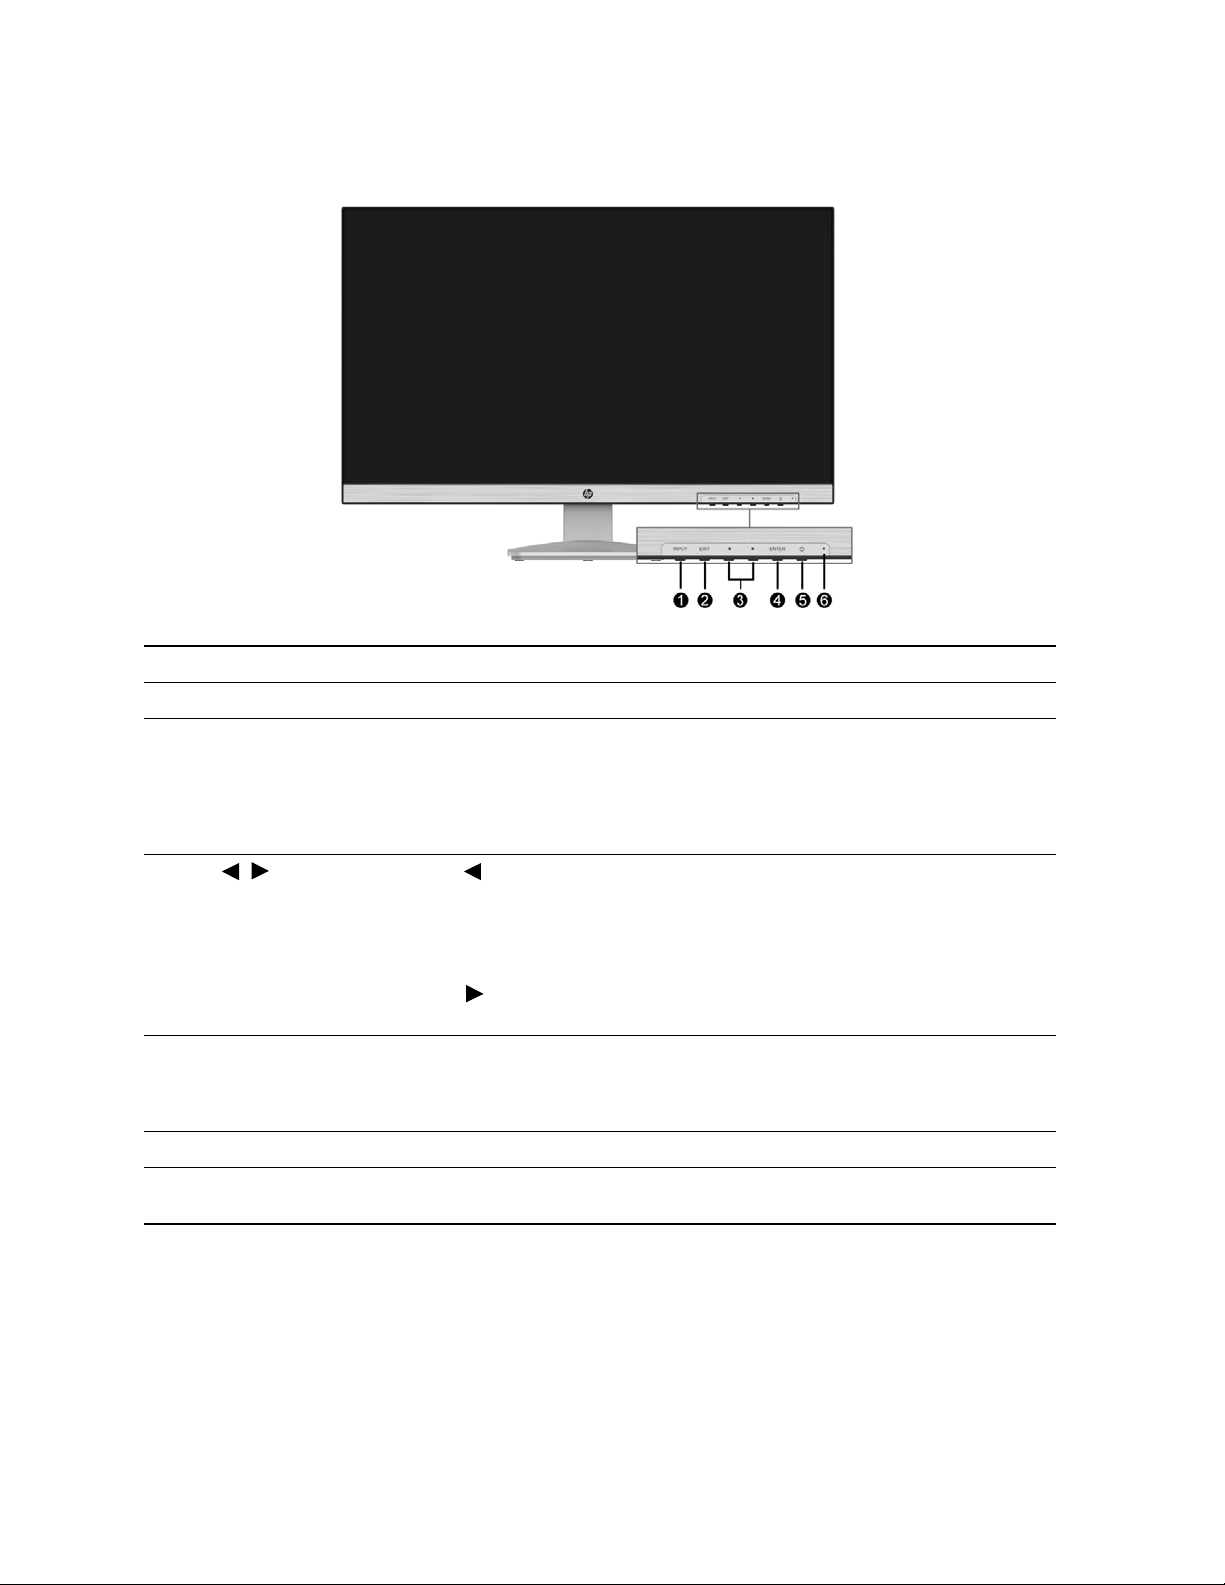
Front bezel controls
Control Function
1 INPUT Press to bring out the signal selection menu.
2 EXIT If the OSD menu is on, press to save any changes made, and exit
the OSD menu.
If the OSD menu is off, pressing this button will bring out the i-Style
Color OSD menu.
If the OSD menu is off, pressing and holding this button for 1-2
seconds will bring out the Blue Light Reducer OSD menu.
3
4 ENTER Opens the OSD menu and activates the selected OSD menu.
5 Power button Turns the monitor on or off.
6 Power light White: The monitor is on.
/ : If the OSD menu is on, press to navigate backward through the
OSD menu and decrease adjustment levels.
If the OSD menu is off, pressing this button will bring out the ECO
Mode OSD menu.
If the OSD menu is off, pressing and holding this button for 10
seconds will lock/unlock the Power button.
: If the OSD menu is on, press to navigate forward through the
OSD menu and increase adjustment levels.
If the OSD menu is off, pressing and holding this button for 10
seconds will lock/unlock the all the function buttons except for the
Power button.
Orange: The monitor is in standby mode.
4 1 Getting Started
Page 10
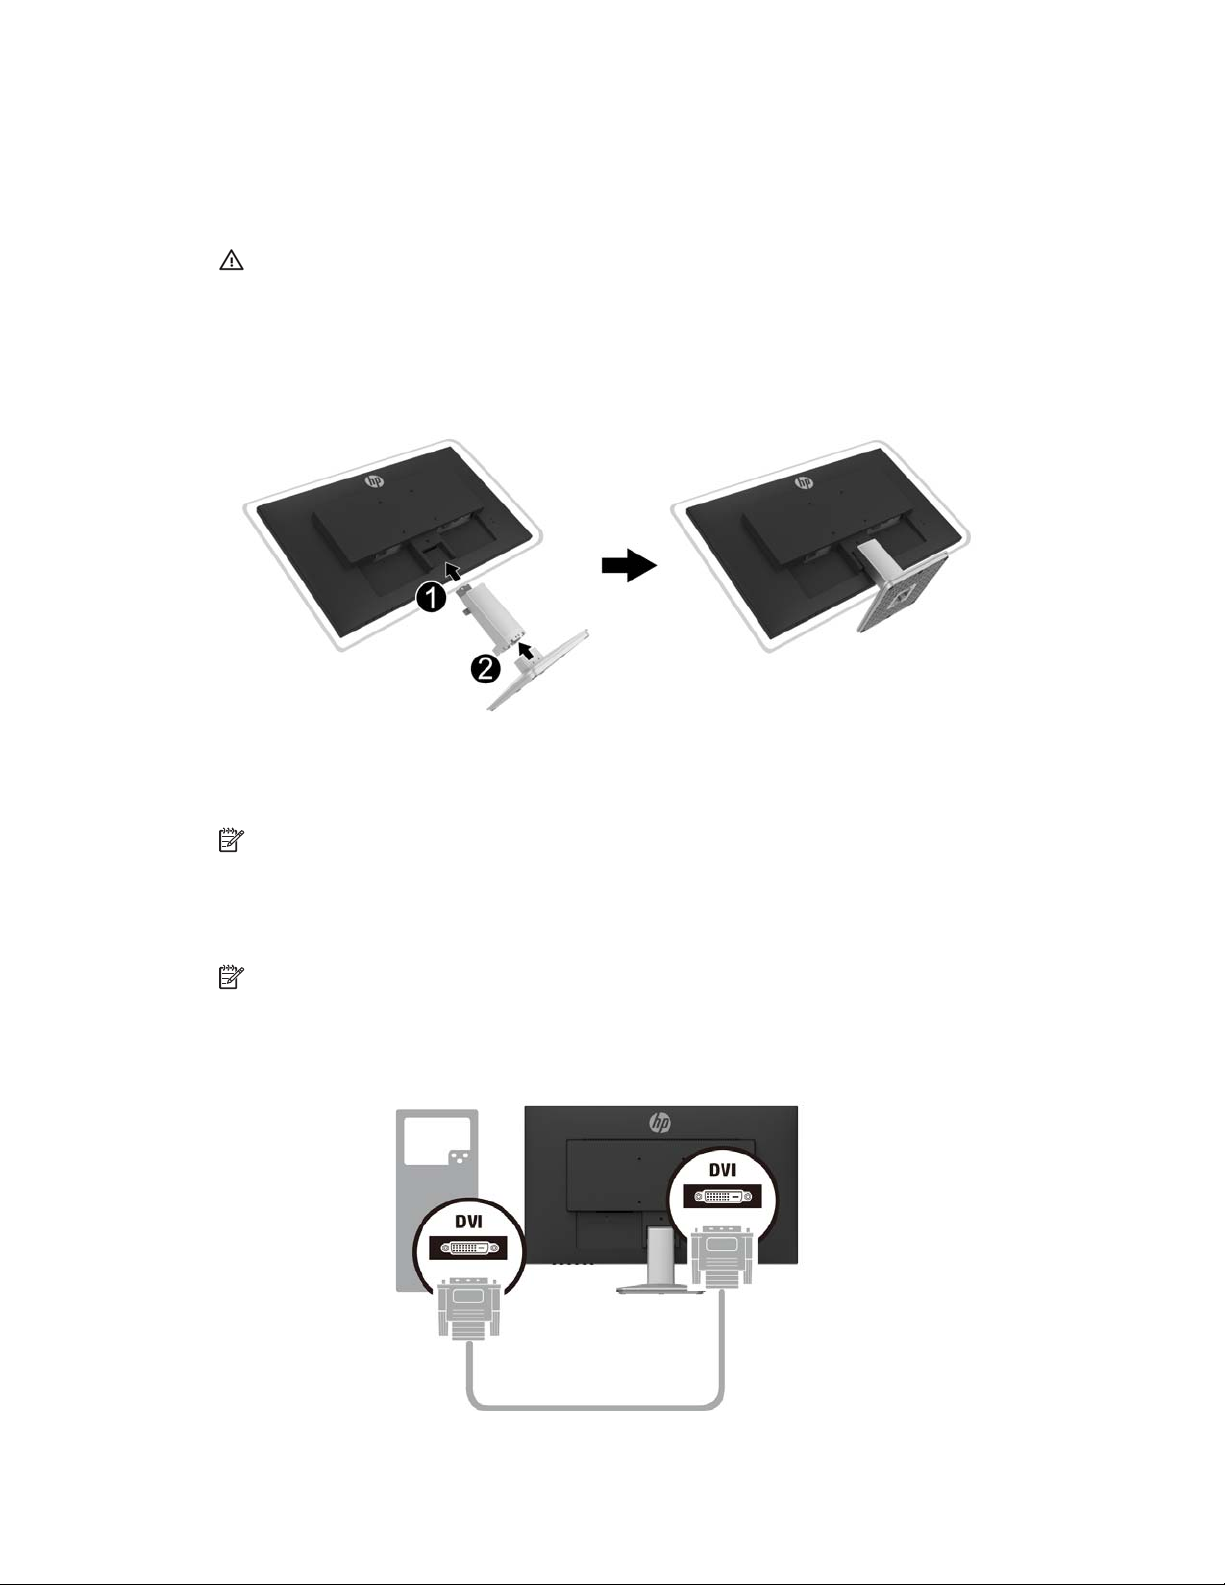
Setting up the monitor
Installing the monitor stand
CAUTION: Do not touch the surface of the LCD panel. Pressure on the panel may cause non-
uniformity of color or disorientation of the liquid crystals. If this occurs, the screen will not recover
to its normal condition.
1. Place the monitor face down on a flat and clean surface.
2. Insert the stand riser (1) into the monitor, and then insert the base (2) into the stand.
3. The stand and base are well installed when there is click sound.
Connecting the cables
NOTE: The monitor ships with select cables. Not all cables shown in this section are included
with the monitor.
1. Place the monitor in a convenient, well-ventilated location near the computer.
2. Connect a video cable.
NOTE: The monitor will automatically determine which inputs have valid video signals. The
inputs can be selected by pressing the INPUT button to access the Input Select (OSD) menu.
• Connect one end of a DVI cable to the DVI connector on the rear of the monitor and the other
end to a DVI connector on the source device.
1 Getting Started 5
Page 11
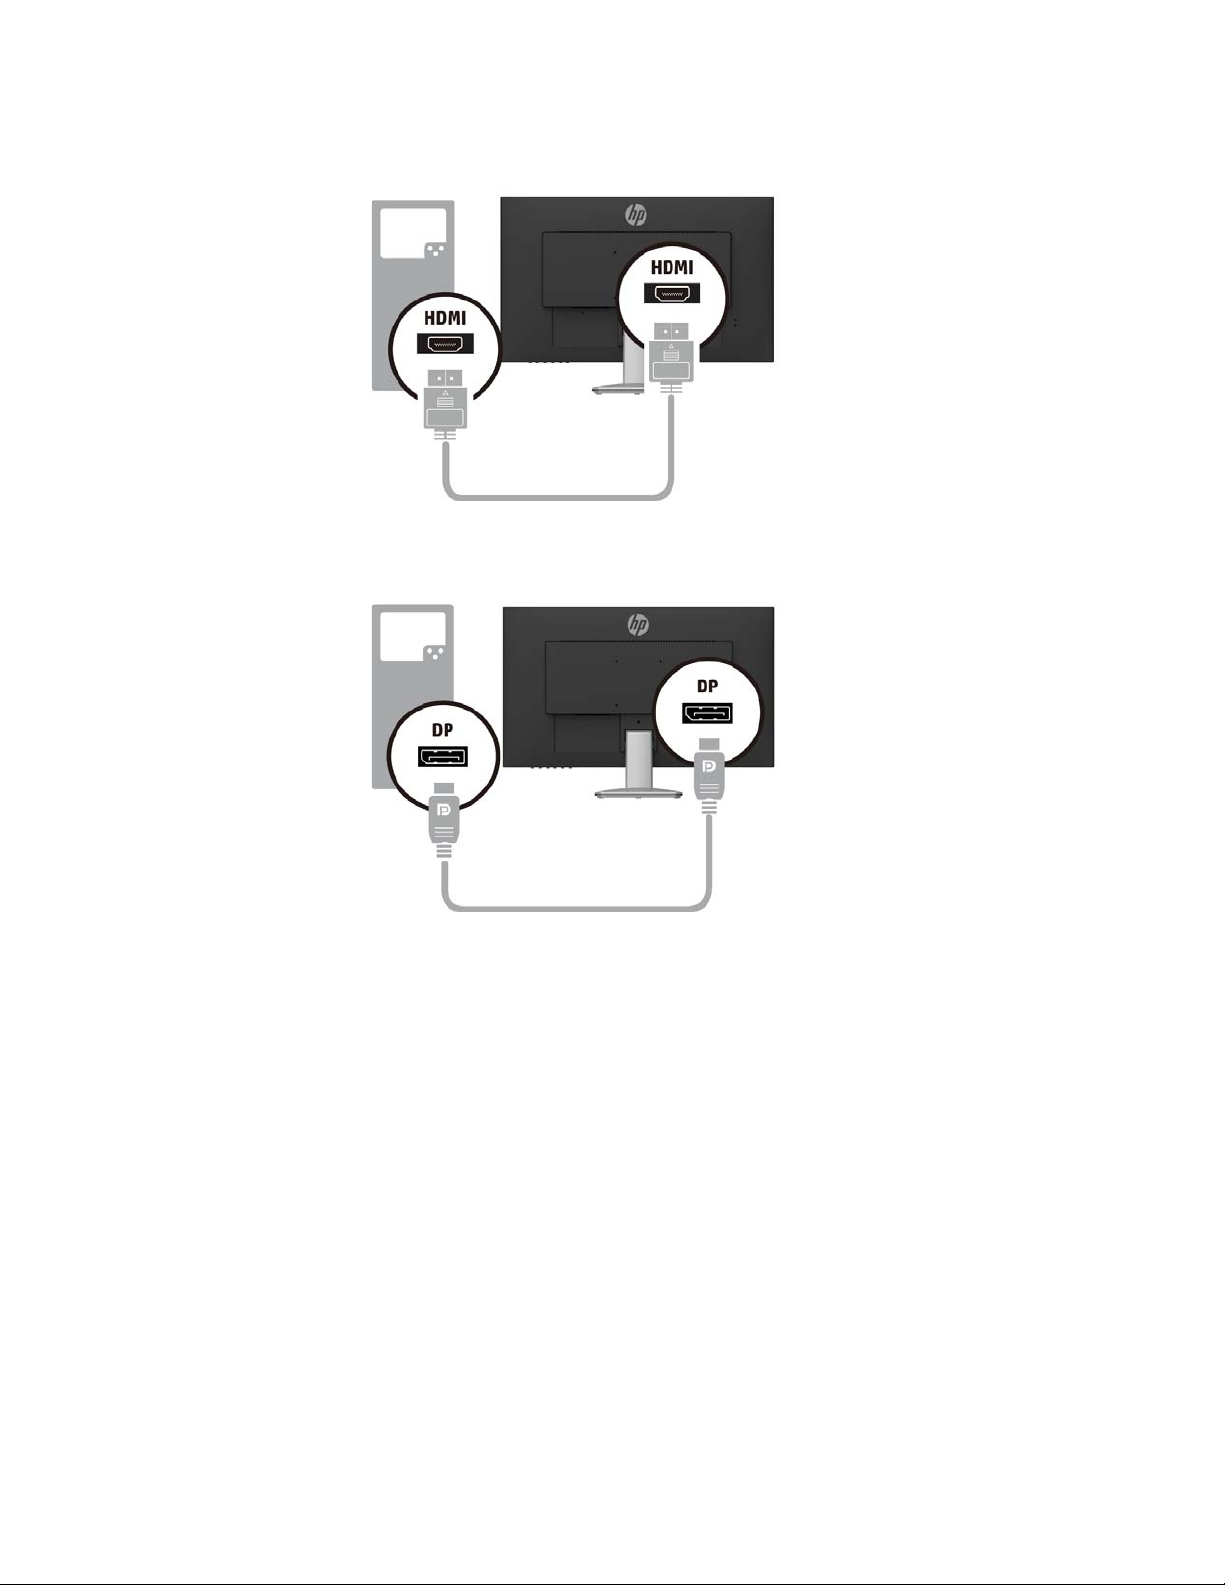
• Connect one end of an HDMI cable to the HDMI connector on the rear of th e monitor and the
other end to an HDMI connector on the source device.
• Connect one end of a DP cable to the DP connector on the rear of the monito r a nd the other
end to the DP connector on the source device.
6 1 Getting Started
Page 12
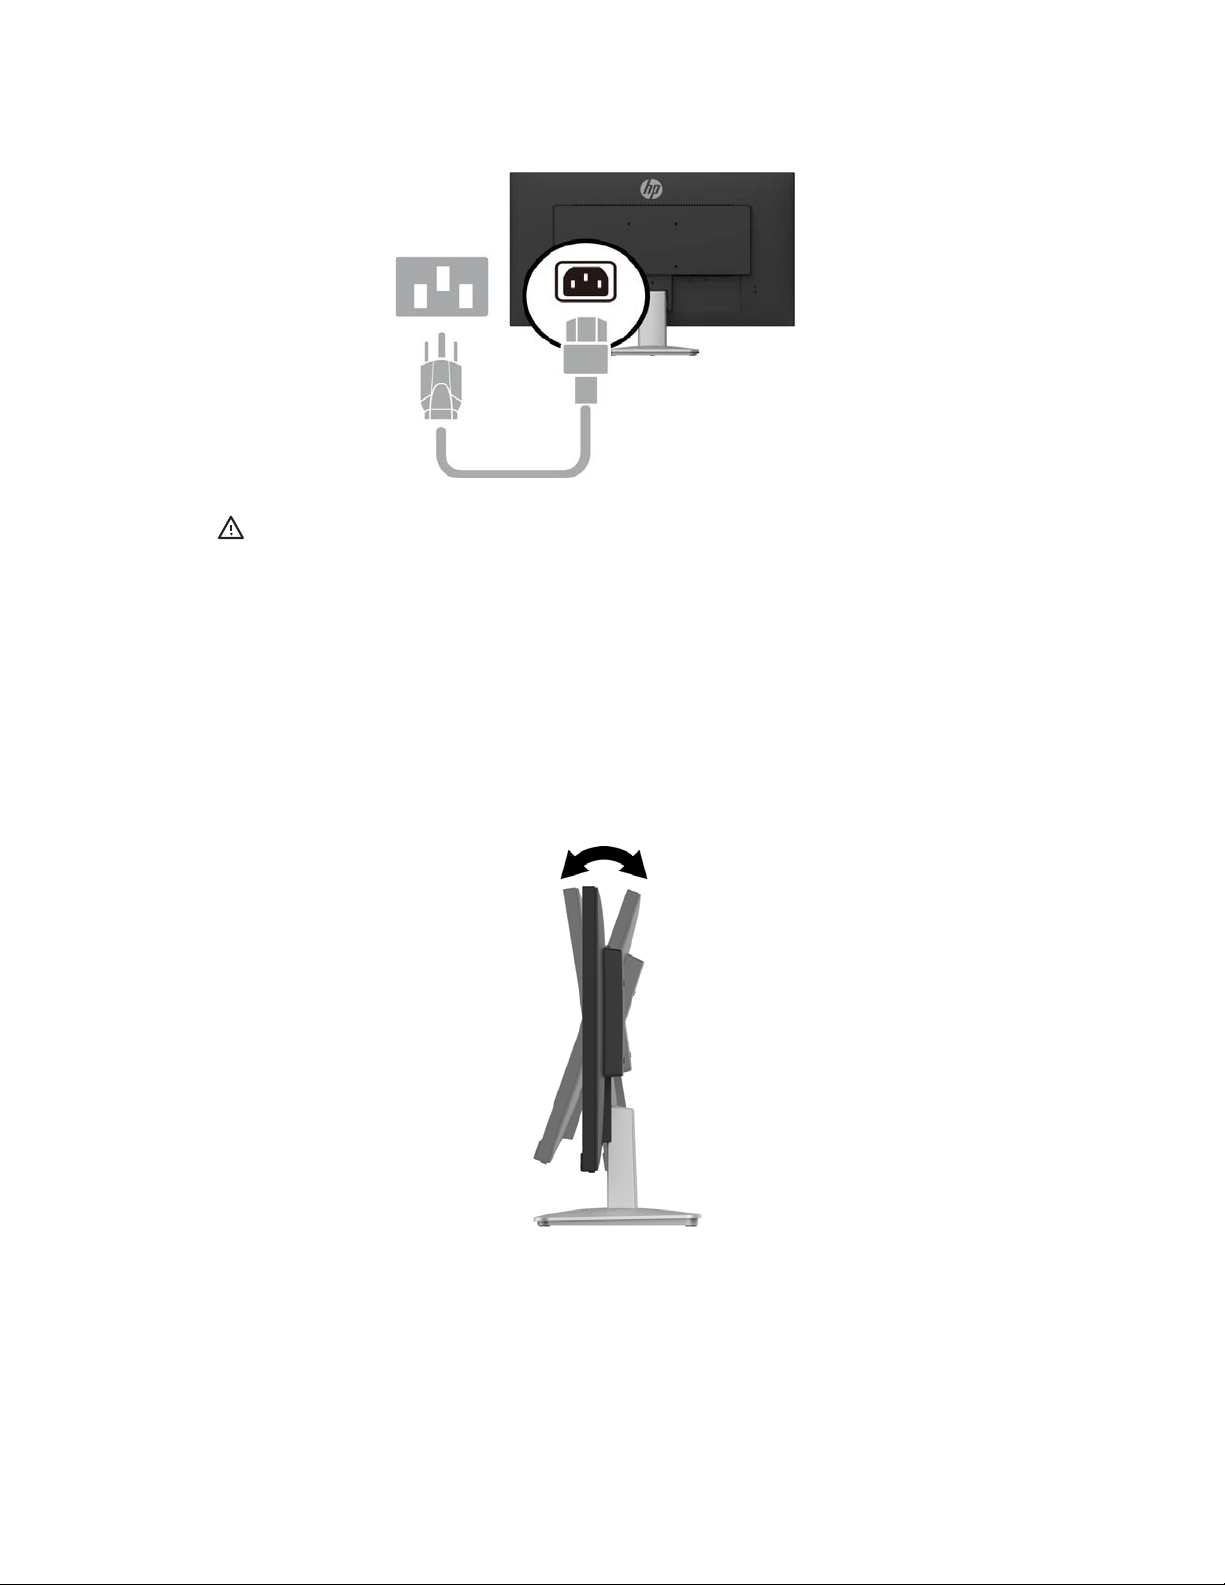
3. Connect one end of the power cord to the monitor and the other end to a grounded AC outlet.
WARNING! To reduce the risk of electric shock or damage to the equipment:
Do not disable the power cord grounding plug. The grounding plug is an important safety
feature. Plug the power cord into a grounded (earthed) AC outlet that is easily accessible at all
times.
Disconnect power from the equipment by unplugging the power cord from the AC outlet.
For your safety, do not place anything on power cords or cables. Arrange them so that no one
may accidentally step on or trip over them. Do not pull on a cord or cable. When unplugging the
power cord from the AC outlet, grasp the cord by the plug.
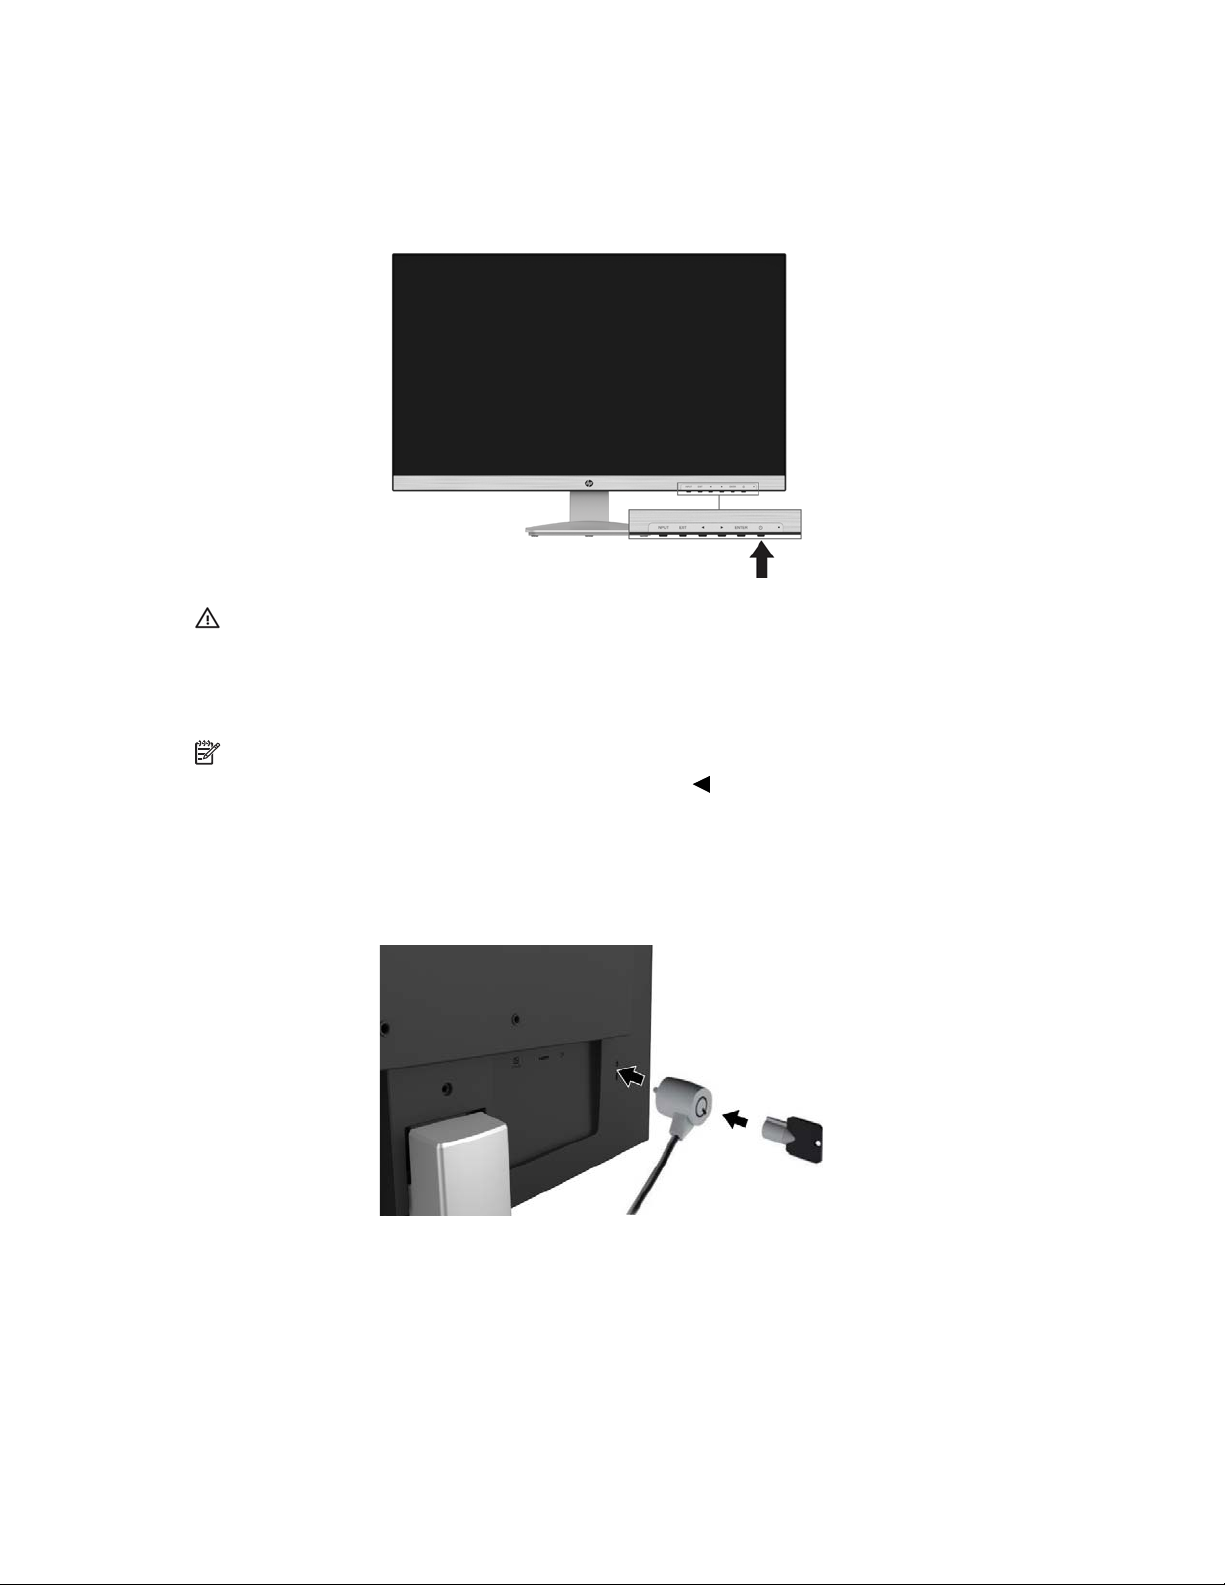
Adjusting the monitor
Tilt the display head forward or backward to set it to a comfortable eye level.
1 Getting Started 7
Page 13
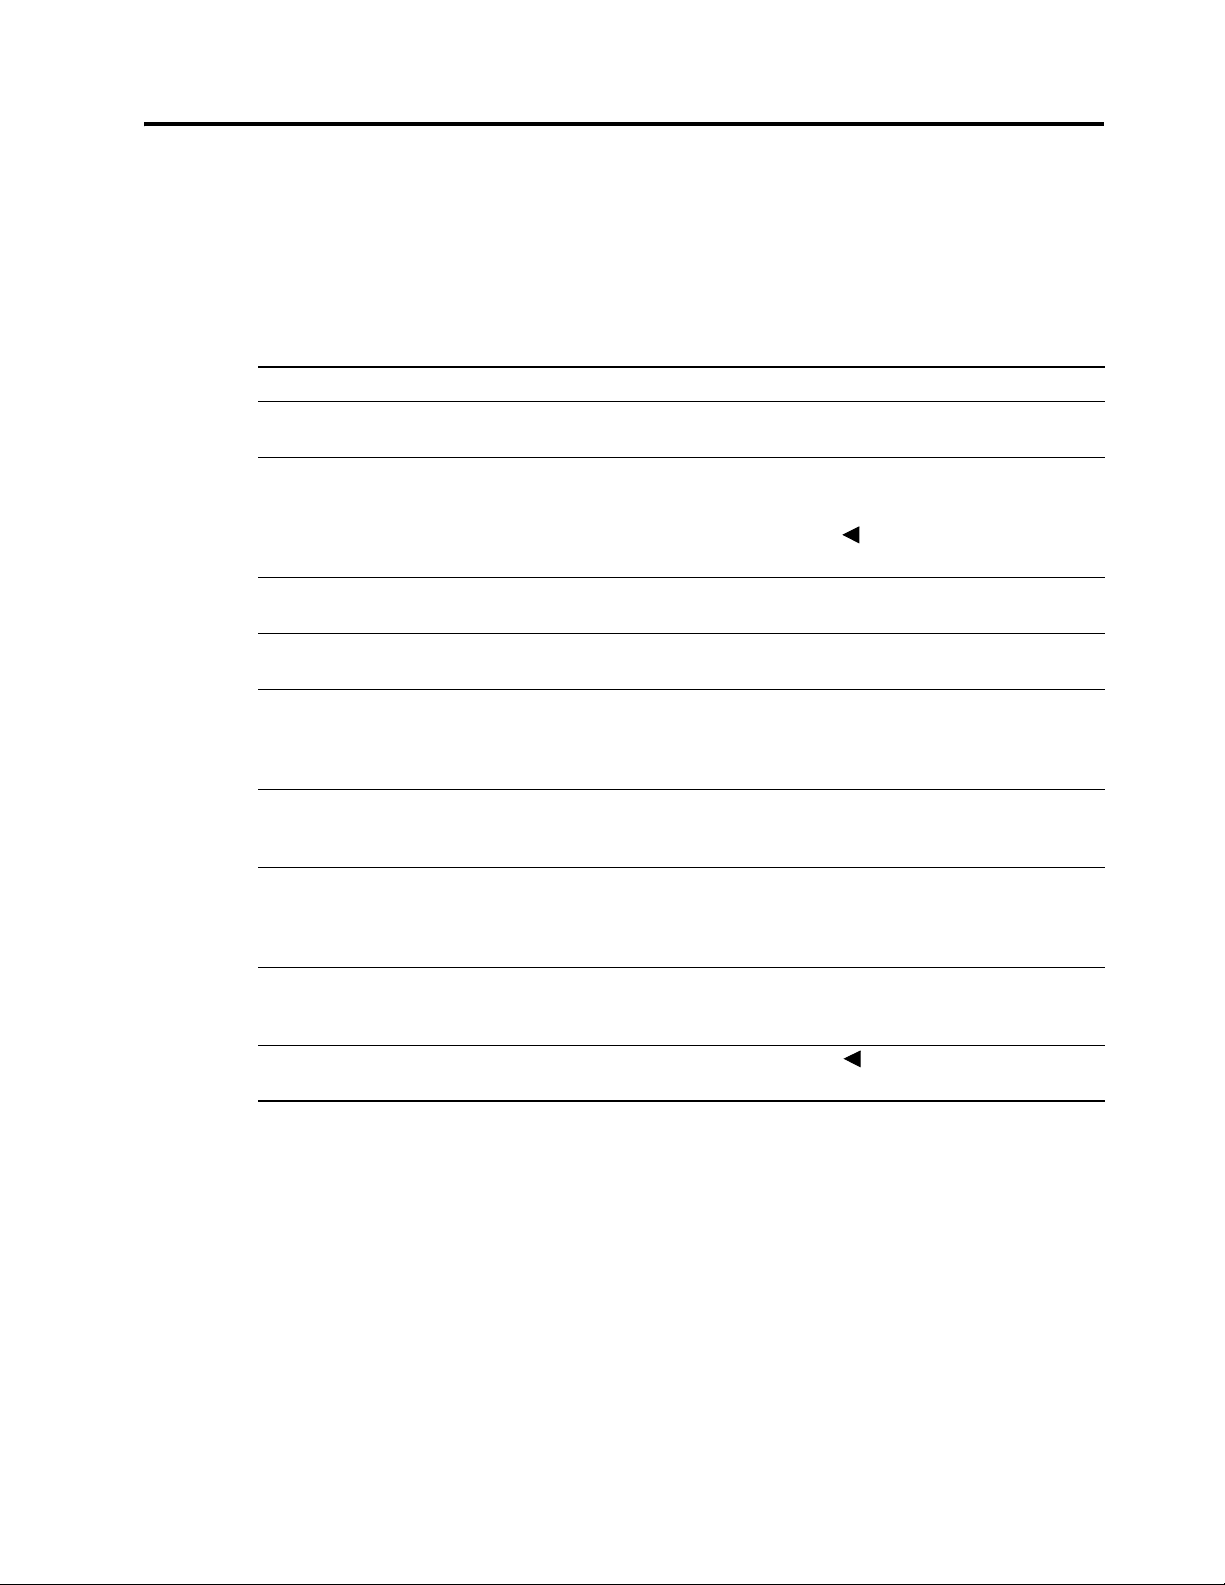
Turning on the monitor
1. Press the Power button on the computer to turn it on.
2. Press the Power button on the bottom of the monitor to turn it on.
CAUTION: Burn-in image damage may o ccu r o n m onitors that d isp lay the sa me static image on
the screen for 12 or more consecutive hours of nonuse. To avoid burn-in image damage on the
monitor screen, you should always activate a screen saver application or turn of f the monitor
when it is not in use for a prolonged period of time. Image rete ntion is a conditi on that may occur
on all LCD screens. A burned-in image is not covered under the HP warranty.
NOTE: If pressing the Power button has no effect, the Power Button Lockout feature may be
enabled. To disable this feature, press and hold the button for 10 seconds.
Installing a security cable
You can secure the monitor to a fixed object with an optional cable lock available from HP.
8 1 Getting Started
Page 14

2. Using the Monitor
Downloading the monitor drivers
You can download the latest version of .INF and .ICM files from the HP monitors support Web
site.
1. Go to http://www.hp.com/support.
2. Select Get software and drivers.
3. Follow the on-screen instructions to download the software.
Using the On-Screen Display (OSD) menu
Use the On-Screen Display (OSD) menu to adjust the monitor screen image based on your
preferences. You can access and make adjustments in the OSD menu using the buttons on the
bottom side of the monitor’s front bezel.
To access the OSD menu and make adjustments, do the following:
1. If the monitor is not already on, press the Power button to turn on the monitor.
2. To access the OSD menu, press the ENTER button on the bottom side of the monitor’s front
bezel to open the OSD.
3. Use the function buttons ( / , ENTER) to navigate, select, and adjust the menu choices.
4. To close the OSD menu and save changes, press EXIT.
The following table lists the menu selections in the OSD menu.
Main Menu Description
Picture Adjust Adjusts picture quality.
Input Select Selects the video input signal.
Color Adjust Adjusts color temperature, i-Style Color mode, and user color preference.
Image Adjust Adjusts the image sharpness and aspect ratio.
Language Selects the language in which the OSD menu is displayed.
The factory default is English.
Setup Adjusts the on-screen display (OSD) settings, and Auto Power status.
Display Information Displays important information about the monitor.
Reset Resets all the settings to the default factory values.
2 Using the Monitor 9
Page 15

Reducing Blue Light
Decreasing the blue light emitting from the display reduces the blue light exposure to your eyes.
The monitor provides a setting to reduce blue light output and create a more relaxing and less
stimulating image while reading content on the screen. To make this adjustment,
1. Press and hold the EXIT button for 1-2 seconds to bring out the Blue Light Reducer menu.
(You can also press the ENTER button, and select Picture Adjust > Blue Light Reducer.)
2. Select a preferred mode.
NOTE: To reduce the risk of serious injury, read the Safety & Comfort Guide. It describes proper
workstation setup, posture, health, and work habits for computer users. The Safety & Comfort
Guide also provides important electrical and mechanical safety information. The Safety &
Comfort Guide also available on the web at http://www.hp.com/ergo.
10 2 Using the Monitor
Page 16
3. Support and troubleshooting
Solving common problems
The following table lists possible problems, the possible cause of each problem, and the
recommended solutions.
Problem Possible Cause Solution
Screen is blank or video
is flashing.
Image appears blurred,
indistinct, or too dark.
Out of Range is
displayed on screen.
OSD Locked is
displayed.
Power cord is
disconnected.
Monitor is off. Press the Power button.
Video cable is
improperly connected.
System is in sleep
mode.
Monitor video cable is
disconnected.
Brightness is too low. Open the OSD menu and select Picture Adjust >
Video resolution and/or
refresh rate are set
higher than what the
monitor supports.
The monitor’s OSD lock
function is enabled.
Connect the power cord.
NOTE: If pressing the Power button has no effect,
press and hold the button for 10 seconds to disable the Power button lockout feature.
Connect the video cable properly. See Connecting
the cables on page 5 for more information.
Press any key on the keyboard or move the mouse
to exit sleep mode.
Connect the appropriate video signal cable
between the computer and monitor. Be sure that
the computer power is off while you connect the
video cable.
Brightness to adjust the brightness scale as
needed.
Change the settings to a supported setting. See
Preset display resolutions on page 17 for more
information.
Press and hold the ENTER button on the bottom
side of the front bezel for 10 seconds to disable the
OSD lock function.
Power Button Locked
is displayed.
The monitor’s power
button is locked.
Press and hold the button for 10 seconds to disable the power button lock function.
3 Support and troubleshooting 11
Page 17

Button lock
Holding down the ENTER button for ten seconds will lock out the functionalities of the control
buttons including INPUT, EXIT , / , and ENTER. You can restore the functionalities by ho lding
the ENTER button down again for ten seconds.
Holding down the button for ten seconds will lock out the functionalities of the Power button.
You can restore the functionality by holding the button down again for ten seconds.
Perform the lock functionality only when the monitor is powered on, displaying an active signal,
and the OSD is not active.
Product support
For additional information on using your monitor, go to http://www.hp.com/support. Select Find
your Product, and then follow the on-screen directions.
Here you can:
• Chat online with an HP technician
NOTE: When support chat is not available in a particular language, it is available in English.
• Locate an HP service center
Preparing to call technical support
If you cannot solve a problem using the troubleshooting tip s in this section, you may nee d to call
technical support. Have the following information available when you call:
• Monitor model number
• Monitor serial number
• Purchase date on invoice
• Conditions under which the problem occurred
• Error messages received
• Hardware configuration
• Name and version of the hardware and software you are using
12 3 Support and troubleshooting
Page 18
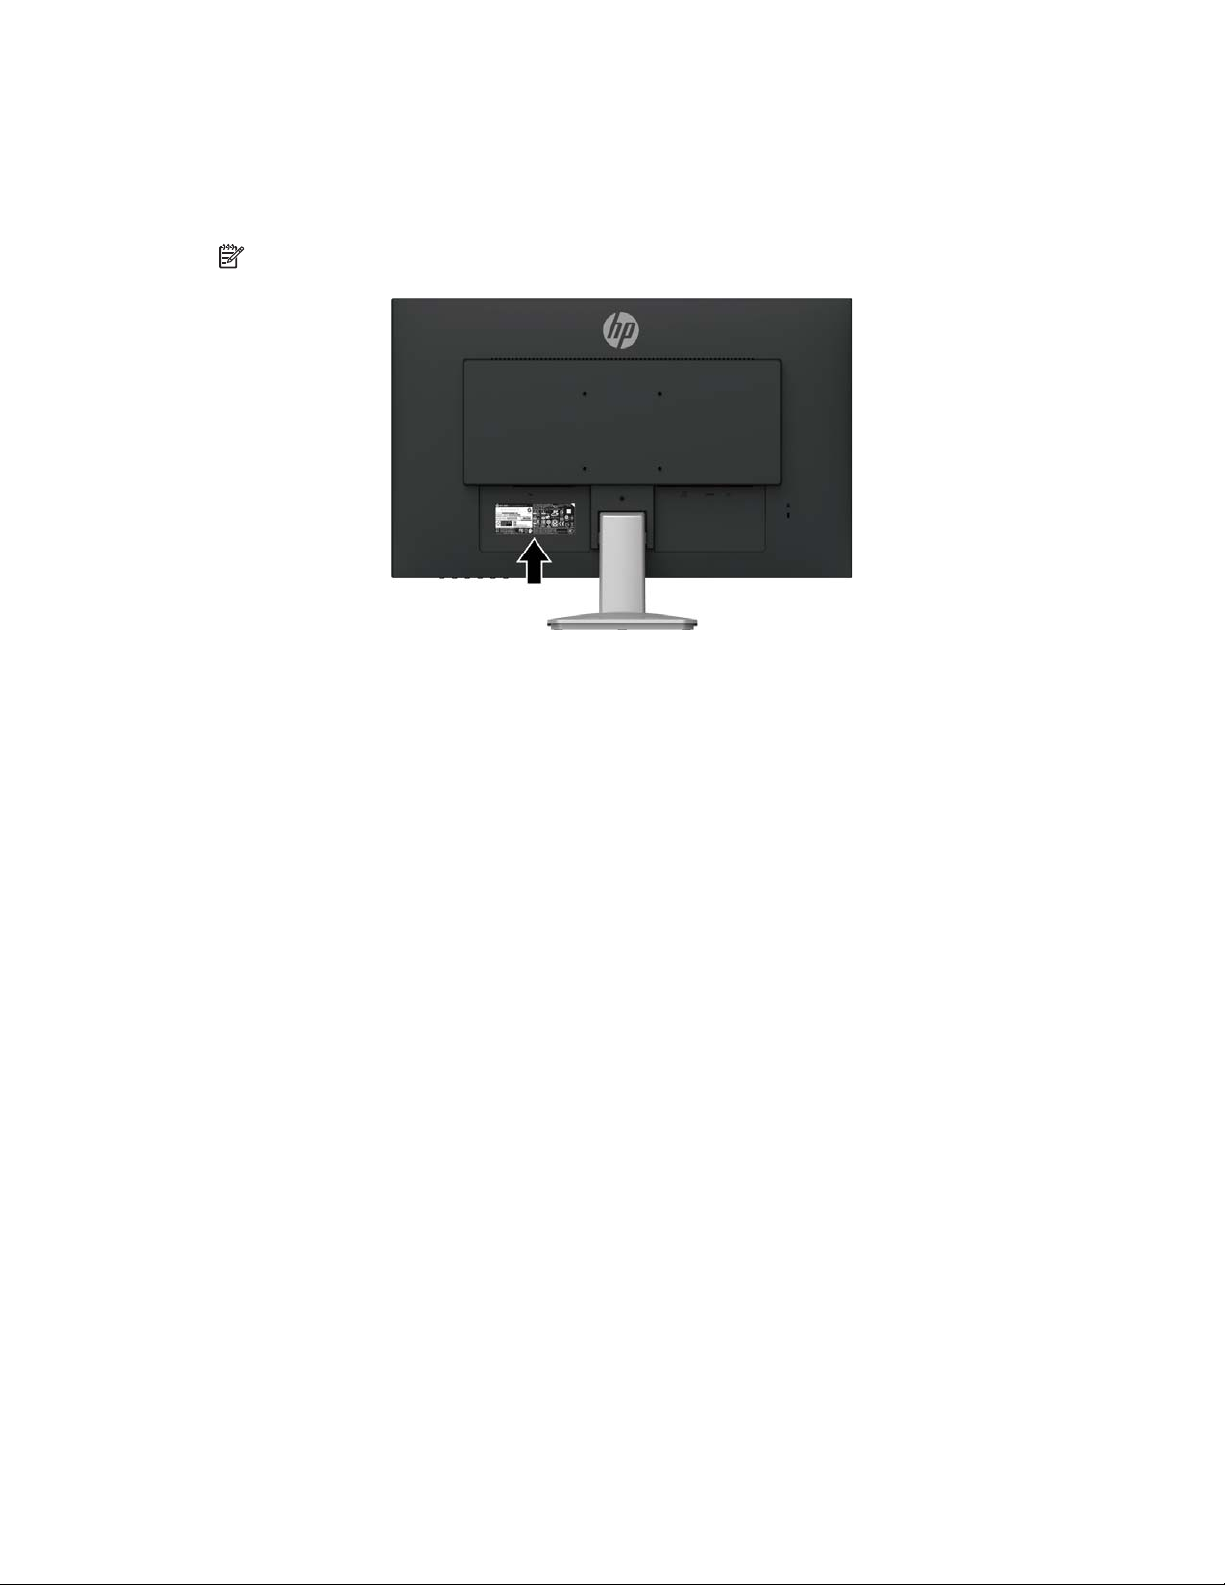
Locating the serial number and product number
The serial number and product number are located on a label on the back of the display. You
may need these numbers when contacting HP about the monitor model.
NOTE: You may need to partially pivot the display head to read the label.
3 Support and troubleshooting 13
Page 19

4. Maintaining the monitor
Maintenance guidelines
• Do not open the monitor cabinet or attempt to service this product yourself. Adjust only those
controls that are covered in the operating instructions. If the monitor is not opera ting properly
or has been dropped or damaged, contact an authorized HP dealer, reseller, or service
provider.
• Use only a power source and connection appropriate for this monitor, as indicated on the
label/back plate of the monitor.
• Turn the monitor off when no t in use. You can substantially increase the life expectancy of the
monitor by using a screen saver program and turning off the monitor when not in use.
NOTE: Monitors with a “burned-in image” are not covered under the HP warranty.
• Slots and openings in the cabinet are provided for ventilation. These openings must not be
blocked or covered. Never push objects of any kind into cabinet slots or other openings.
• Keep the monitor in a well-ventilated area, away from excessive light, heat, or moisture.
• When removing the monitor stand, you must lay the monitor facedown on a soft area to
prevent it from getting scratched, defaced, or broken.
Cleaning the monitor
1. Turn off the monitor and disconnect power from the computer by unplugging the power cord
from the AC outlet.
2. Dust the monitor by wiping the screen and the cabinet with a soft, clean antistatic cloth.
3. For more difficult cleaning situations, use a 50/50 mix of water and isopropyl alcohol.
CAUTION: Spray the cleaner onto a cloth and use the damp cloth to gently wipe the screen
surface. Never spray the cleaner directly on the screen surface. It may run behind the bezel and
damage the electronics.
CAUTION: Do not use cleaners that contain any petroleum-based materials such as benze ne,
thinner, or any volatile substance to clean the monitor screen or cabinet. These chemicals may
damage the monitor.
Shipping the monitor
Keep the original packing box in a storage area. You may need it later if you move or ship the
monitor.
14 4 Maintaining the monitor
Page 20
A. Technical specifications
NOTE: The product specifications provided in the user guide might have changed between the
time of manufacturing and delivery of your product.
For the latest specifications or additional specifications on this product, go to
http://www.hp.com/go/quickspecs/ and search for your specific monitor model to find the modelspecific QuickSpecs.
27q
Display 68.6 cm wide screen 27-inch wide screen
Viewable Image Size 68.6 cm diagonal 27-inch diagonal
Maximum Weight (Unpacked) 4.45 kg 9.81 lb
Dimensions (include base)
Height 44.07 cm 17.35 inches
Depth 21.69 cm 8.54 inches
Width 61.36 cm 24.16 inches
Maximum graphic resolution 2560 × 1440
Optimum graphic resolution 2560 × 1440
Environmental Requirements
Temperature
Operating Temperature 5 to 35° C 41 to 95° F
Storage Temperature -34 to 60° C -29 to 140° F
Power Source 100–240 VAC 50/60 Hz
Input Terminal DVI dual link connector
HDMI connector
DisplayPort connector
27qi
Display 68.6 cm wide screen 27-inch wide screen
Viewable Image Size 68.6 cm diagonal 27-inch diagonal
Maximum Weight (Unpacked) 5.47 kg 12.06 lb
Dimensions (include base)
Height 44.17 cm 17.39 inches
Depth 21.69 cm 8.54 inches
Width 61.12 cm 24.06 inches
Maximum graphic resolution 2560 × 1440
Optimum graphic resolution 2560 × 1440
Environmental Requirements
Temperature
Operating Temperature 5 to 35° C 41 to 95° F
Storage Temperature -34 to 60° C -29 to 140° F
Power Source 100–240 VAC 50/60 Hz
Input Terminal DVI dual link connector
HDMI connector
DisplayPort connector
A Technical specifications 16
Page 21

Preset display resolutions
The display resolutions listed below are the most commonly used modes and are set as factory
defaults. The monitor automatically recognizes these preset modes and they will appear
properly sized and centered on the screen.
Preset Pixel Format Horz Freq (kHz) Vert Freq (Hz)
01 640 x 480 31.47 59.94
02
03 1024 x 768 48.36 60.00
04 1280 x 720 45 60
05
06
07 1440 x 900 55.935 59.887
08 1600 x 900-R 60 60
09 1600 x 1200 75.00 60.00
10
1 1 1920 x 1080 67.5 60
12 1920 x 1200-R 74.04 59.95
13 1920 x 1200 74.56 59.89
14 2560 x 1440 88.787 59.951
800 x 600 37.88 60.32
1280 x 800 49.702 59.81
1280 x 1024 63.98 60.02
1680 x 1050 65.29 59.95
17 A Technical specifications
Page 22

B. Accessibility
HP designs, produces, and markets products and services that can be used by everyone,
including people with disabilities, either on a stand-alone basis or with appropriate assistive
devices.
Supported assistive technologies
HP products support a wide variety of operating system assistive technologies and can be
configured to work with additional assistive technologies. Use the Search feature on your source
device that is connected to the monitor to locate more information about assistive features.
NOTE: For additional information about a particular assistive technology product, contact
customer support for that product.
Contacting support
We are constantly refining the accessibility of our products and services and welcome feedback
from users. If you have an issue with a product or would like to tell us about accessibility features
that have helped you, please contact us at (888) 259-5707, Monday through Friday, 6 a.m. to 9
p.m. Mountain Time. If you are deaf or hard-of-hearing and use TRS/VRS/WebCapTel, contact
us if you require technical support or have accessibility questions by calling (877) 656-7058,
Monday through Friday, 6 a.m. to 9 p.m. Mountain Time.
B Accessibility 18
 Loading...