

Page 1

HP
2500C/CM
Professional Series Color Printer
USER’S GUIDE
Page 2

Acknowledgments
HP ColorSmart II, HP PhotoREt II and HP ZoomSmart Scaling
Technology are trademarks of Hewlett-Packard Company.
Microsoft is a U.S. registered trademark of Microsoft Corporation.
Windows is a trademark of Microsoft Corporation.
Adobe is a U.S. registered trademark of Adobe Systems Incorporated.
PostScript 3 is a trademark of Adobe Systems Incorporated.
Notice
The information contained in this document is subject to change
without notice.
Hewlett-Packard makes no warranty of any kind with regard to this
material, including, but not limited to, the implied warranties of
merchantability and fitness for a particular purpose.
Hewlett-Packard shall not be liable for errors contained herein or for
incidental or consequential damages in connection with the
furnishing, performance, or use of this material.
No part of this document may be photocopied, reproduced, or
translated to another language without the prior written consent of
Hewlett-Packard Company.
Edition 1 – February 1999
©Copyright 1999 by Hewlett-Packard Company
450 Alexandra Road
Singapore 119960
Singapore
Page 3

HP
CONTENTS
2500C/CM
Printer Basics
System Requirements 1
Printer Features and Benefits 1
Printer Parts and Locations 2
Control Panel Layout 2
Control Panel Keys 3
LEDs 3
Setting Up
Step 1 - Unpack the Printer 4
Step 2 - Remove All Tapes from the Printer 5
Step 3 - Connect Cables 5
Step 4 - Set LCD language Preference 6
Step 5 - Install Ink Cartridges 7
Step 6 - Install Printheads 8
Step 7 - Load Paper in Tray 2 9
Step 8 - Load Paper in Tray 3 11
Step 9 - Align Printheads 12
Step 10 - Install the Printer Software 13
Basic Printing Tasks
Loading the Trays 15
Loading Media in Tray 1 15
Loading Media in the Rear Manual Feed 16
Monitoring and Replacing Ink Cartridges 16
Replacing Printheads 17
Using the HP 2500C Series Printer Software 18
PCL Printer Software Components 18
Changing Print Settings 19
Changing Print Options 19
Using the Printer on a Network 19
Printing with Special Features and Options 19
Maintaining the Printer
Clean Printheads 21
Align Printheads 21
Calibrate Color 22
Contents
Page 4

Installing the PostScript Module 22
Installing Additional Memory 25
LCD Messages
Control Panel Menus 27
Overview 27
Paper Handling Menu 28
Diagnostics Menu 29
Information Menu 29
Self Test Menu 30
Print Quality Menu 30
Printing Menu 31
IO Menu 32
Resets Menu 32
Configuration Menu 33
MIO Menu 33
PostScript Menu 33
Understanding Printer Messages 34
Troubleshooting
General Troubleshooting Tips 37
Non-Recoverable Error 38
Troubleshooting Feature in Toolbox 38
To use the troubleshooting feature in the HP 2500C
Series Toolbox in Windows 95, 98 and NT 4.0 38
To use the troubleshooting feature in the
HP 2500C Series Toolbox in Windows 3.1x 38
Printer does not Print 39
Partial or Blank Page Printed 39
Bad or Poor Print Quality 40
Text or Graphics are Cut Off 40
Garbage Printed 41
Clearing Paper Jams 41
Tips for Avoiding Paper Jams 42
Printhead Diagnostics 42
Understanding the Diagnostic Test 44
Customer Support 45
HP Supplies and Accessories 48
Printer Specifications 50
Minimum Printing Margins 54
Hewlett-Packard Limited Warranty Statement 55
Declaration of Conformity 57
Regulatory Notices 59
Page 5

HP
2500C/CM
Congratulations on your purchase of an HP 2500C/CM Professional Series
Color Printer.
System Requirements
Please ensure that you have the following computer setup:
Minimum: Windows 3.1x: 486DX-66, 8MB RAM
Windows 95/98: 486DX-100, 8MB RAM
Windows NT 4.0/5.0: 486DX-100, 16MB RAM
Macintosh System 7.5.3 or later: 68040, 8MB RAM
Recommended: Windows 3.1x: Pentium 150/166, 16MB RAM
Windows 95/98, Pentium 150/166, 16MB RAM
Windows NT 4.0, Pentium 150/166, 32MB RAM
Macintosh System 8 or later: Power PC, 16MB RAM
50MB Free HardDisk space for 11” x 17” or A3 size
printing.
Graphics intensive files may require more disk space.
Printer Features and Benefits
Seamless Workgroup Integration with Robust Network Features
• The HP 2500C/CM Color Printer supports all major networking
operating systems and protocol.
• Easy printer setup, configuration and network printing
management with HP JetAdmin and WebJetAdmin.
• The HP 2500CM Printer supports Adobe PostScript 3 for true
document portability.
• User-friendly LCD and Key Panel for easy printer configuration,
status and error messaging and reduced MIS intervention.
Printer Basics
1
Page 6
Significant Cost Savings and Speed Gains with HP’s New Modular Ink
Delivery System (MIDS).
• New half-inch printheads print larger swathes to achieve
significant speed gains of up to 9.5 ppm black, 7.5 ppm color.
• HP’s new Modular Ink Delivery System communicates with a smart
chip built into each printhead and ink cartridge to monitor ink
levels and printhead life.
• Printing in color becomes more affordable with lower costs per page.
Exceeds your Workgroup’s Color Expectations with HP PhotoREt II (up to 13”x19”)
• PhotoREt II uses the smallest ink drop size to create more shades
of color, smoother transitions between tones, and crisper-looking
output on any paper.
• Prints up to 13”x19” / A3 oversize when you need it.
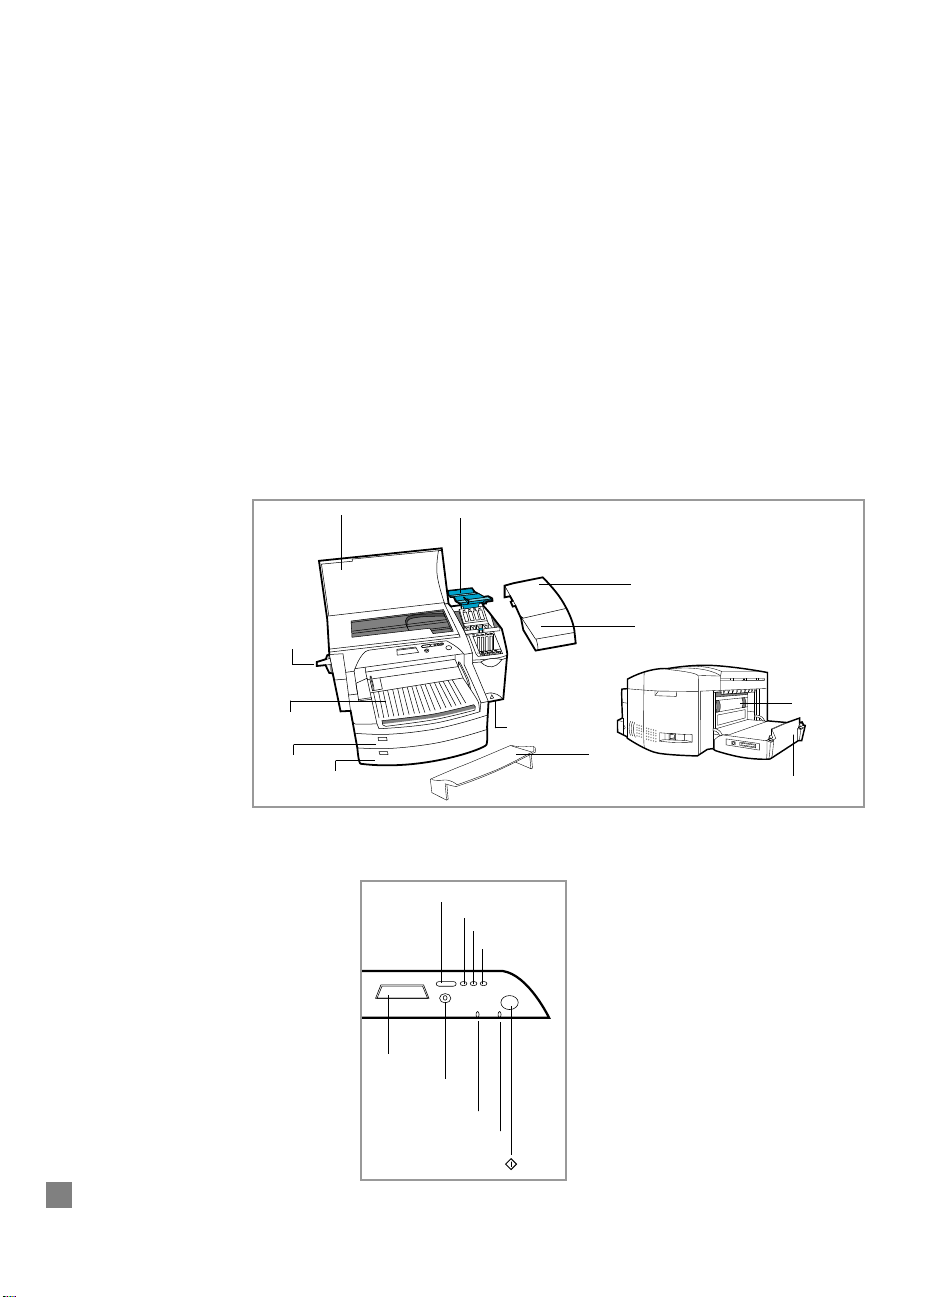
Printer Parts and Locations
Paper
Knob
Tray 1/
Output Tray
Tray 2
Top C ov er
Tray 3
Printhead Latch
Power
Button
Extended
Tray Cover
Printhead
Access Cover
Ink Cartridge
Door
Back Panel
Rear Access
Door
Control Panel Layout
Menu Button
Item Button
Value Button
Select Button
LCD Panel
Cancel Job
Button
Attention (Red)
Ready (Green)
(Go)
2
Page 7
Control Panel Keys
(Go) • Places the printer either online or offline.
• Allows the printer to resume printing after being offline. Clears
most printer messages and places the printer online.
• Allows the printer to continue printing with a warning message
such as TRAY x LOAD [TYPE] [SIZE] or UNEXPECTED PAPER SIZE.
• Exits the Control Panel menus. (To save a selected Control Panel
setting, first press the [Select] button.)
• Displays non-recoverable error codes.
[Cancel Job] Cancels the print job that the printer is processing. The time it takes
to cancel depends on the size of the print job. (Press it only once.)
[Menu] Cycles through the Control Panel menus. To print a menu map from
the Control Panel:
1. Press [Menu] until SELF TEST MENU appears.
2.Press [Item] until PRINT MENU MAP appears.
3. Press [Select] to print the menu map.
For information on each menu item, see LCD Messages.
[Item] Cycles through the selected menu’s items.
[Value] Cycles through the selected menu item’s values.
[Select] • Saves the selected value for that item. An asterisk (*) appears next
to the selection, indicating that it is the new default. Default
settings remain when the printer is switched off or reset unless
you reset all factory defaults from the [RESETS] menu.
• Prints the selected printer information page from the Control Panel.
LEDs
There are 2 lights or LEDs on the printer:
Led Indicators Color Function
Ready LED Green Is lit up when the printer is printing, in
normal state, OR when it is online.
Attention LED Red Blinks when the printer is in an error state,
OR requires attention.
For more information, see Troubleshooting section.
3
Page 8
h, i
HP
2500C/CM
Step 1 - Unpack the Printer
1. Check that the following items are included with the printer:
d
g
f
e
a
b
c
a. Power Cord
b. Four HP No. 10 Ink Cartridges
(black, cyan, magenta and yellow)
c. Four HP No. 10 Printheads
(black, cyan, magenta and yellow)
d. Extended Tray Cover
e. Setup Poster
f. Getting Started Guide
g. Quick Reference Guide
h. Starter CD
i. HP JetDirect CD (HP 2500CM printer only)
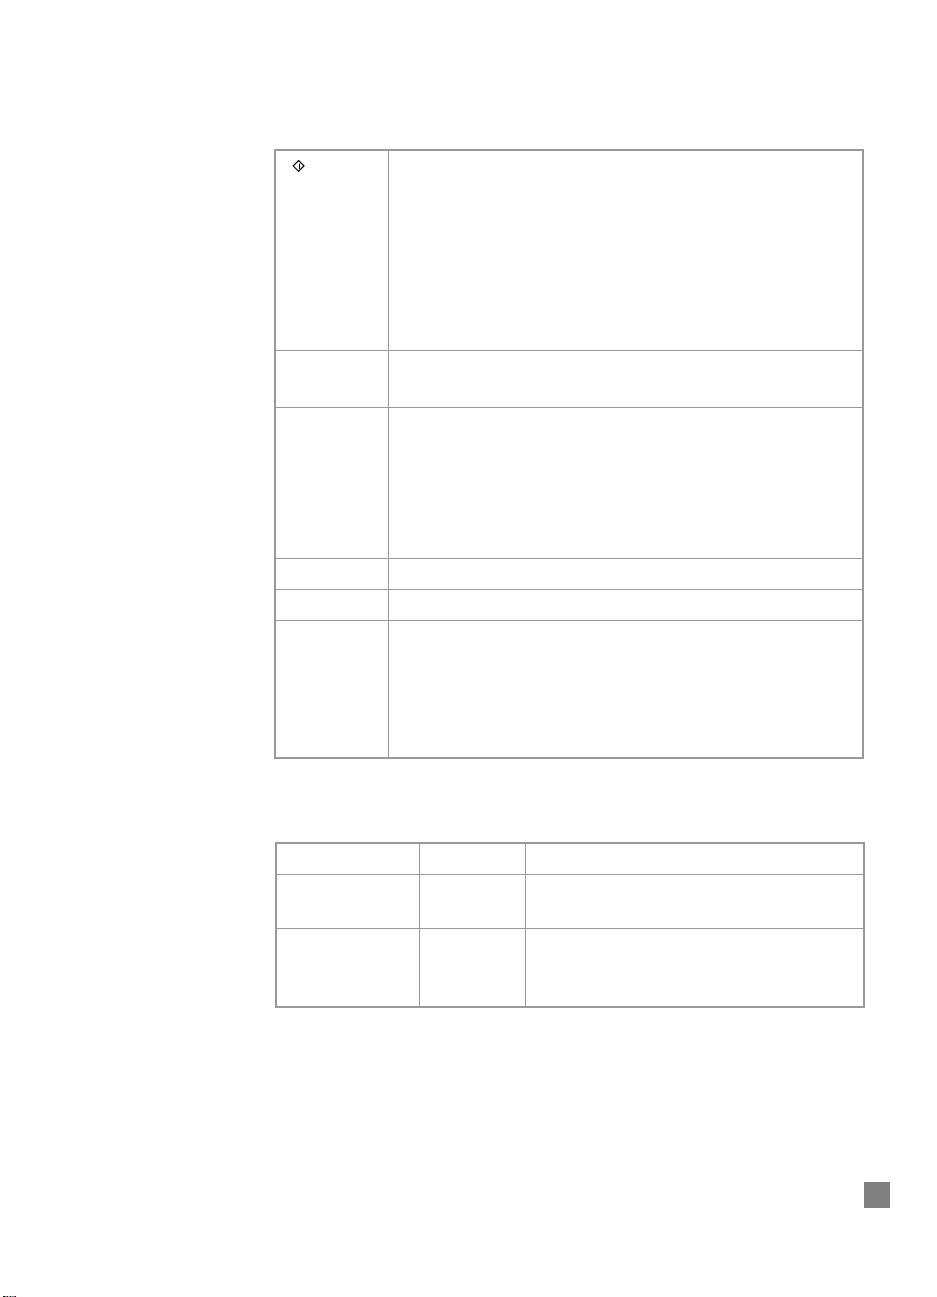
2. Prepare printer location.
The location requirements for the printer are:
• A sturdy, level surface for placement
• Space allowance around the printer
745 mm
• A well ventilated room
• No exposure to direct sunlight or chemicals, including ammonia
based cleaning solutions
• Adequate power supply
• A stable environment – no abrupt temperature or humidity
685 mm
changes
• Relative humidity 20% to 80%
• Room temperature 59° to 95°F (15° to 35°C)
337 mm
532 mm
4
Page 9
HP
2500C/CM
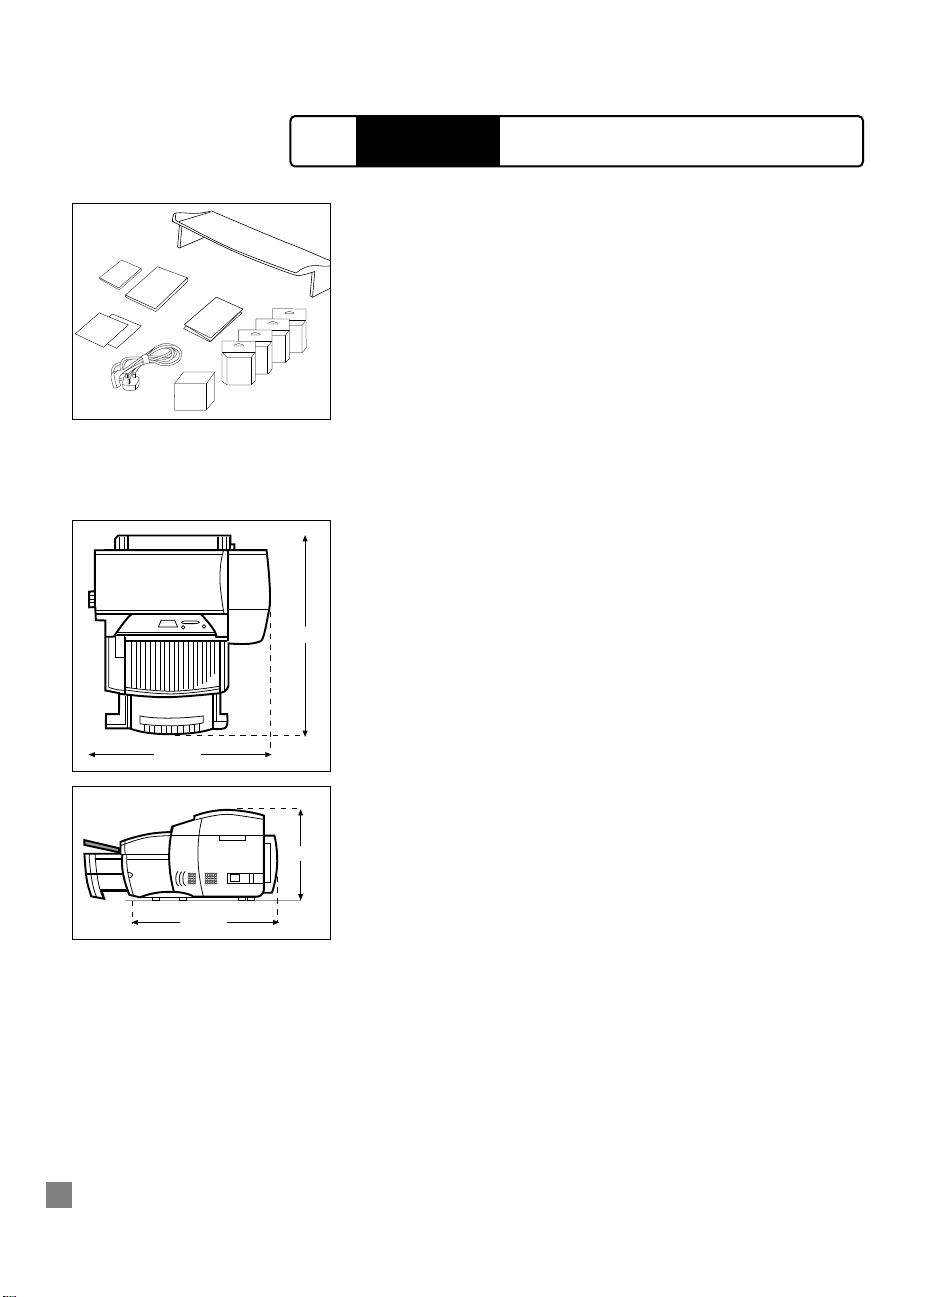
1. Remove the four tapes securing the printer. Open the top cover and
remove the fifth tape from the inside of the printer.
Step 2 - Remove All Tapes from the Printer
HP
2500C/CM
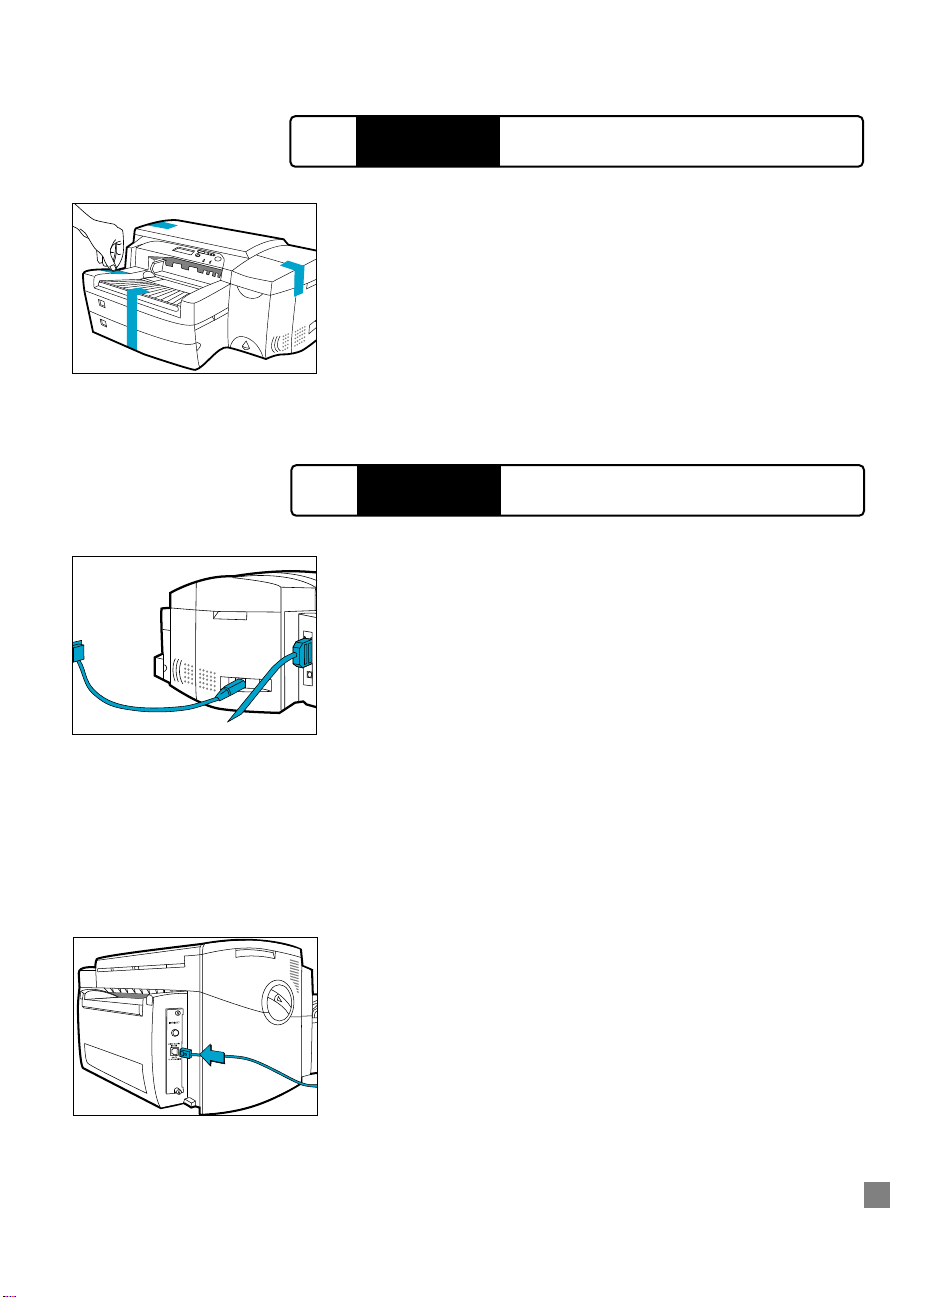
1. Ensure that the computer is turned off.
2. Plug the power connector firmly into the printer’s power socket.
3. Plug the power plug into an electrical outlet.
To connect the printer directly to the computer:
1. Connect the printer end of the parallel cable firmly to the parallel
port on the printer.
2. Snap both clips onto the notches on the connector.
3. Connect the computer end of the parallel port on your computer and
tighten the screws on the connector.
The HP 2500CM Professional Series Color Printer comes with a built-in
HP JetDirect internal print server.
To connect the HP 2500CM printer to the network, plug the network cable
into the network port on the print server. For more information on
configuring the printer in a network environment, refer to the Network
Guide which is available on your HP 2500C/CM Starter CD.
Step 3 - Connect Cables
5
Page 10

HP
2500C/CM
You can set the LCD Panel to display printer messages in one of the
following languages:
• English • Norwegian
• German • Finnish
• French • Swedish
• Dutch • Danish
• Portuguese • Polish
• Italian • Czech
• Spanish • Russian
To do so:
1. Ensure that the printer is turned off.
2. Press and hold [Menu] and turn on the printer.
3. Continue to hold down [Menu] until the LCD displays “LANG = X”
(where “X” is the current language setting).
4. Press [Value] to scroll through the language list.
5. Press [Select] to choose and confirm your language selection.
Step 4 - Set LCD Language Preference
6
Page 11
HP
2500C/CM
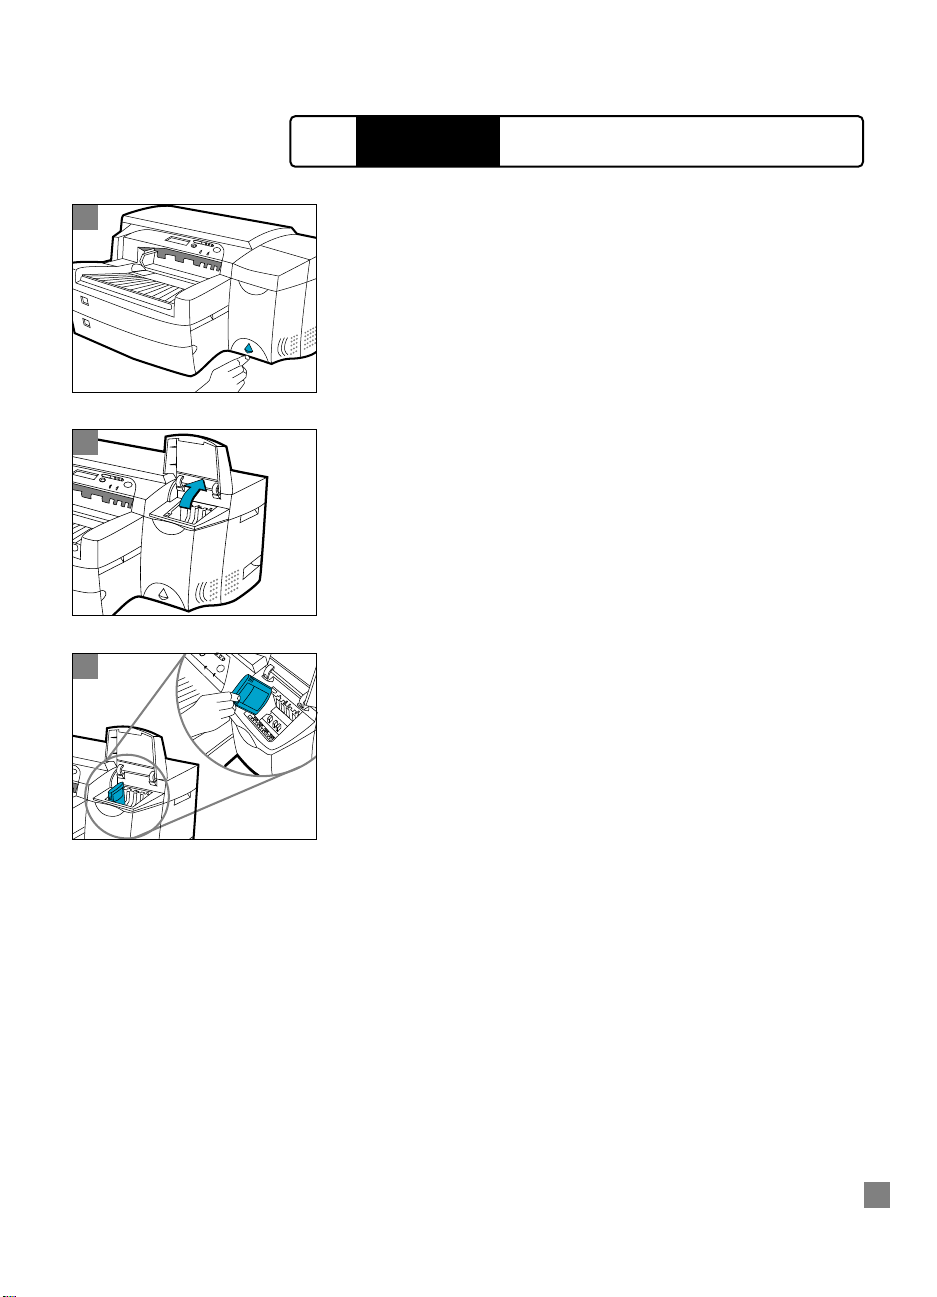
Step 5 - Install Ink Cartridges
1
2
3
1. Press the Power button to turn on the printer.
2. Lift to open the Ink Cartridge door.
3. Remove all four ink cartridges from their packaging and insert each ink
cartridge into its own color-coded slot. Make sure that each cartridge
is pressed firmly into place.
7
Page 12
HP
2500C/CM
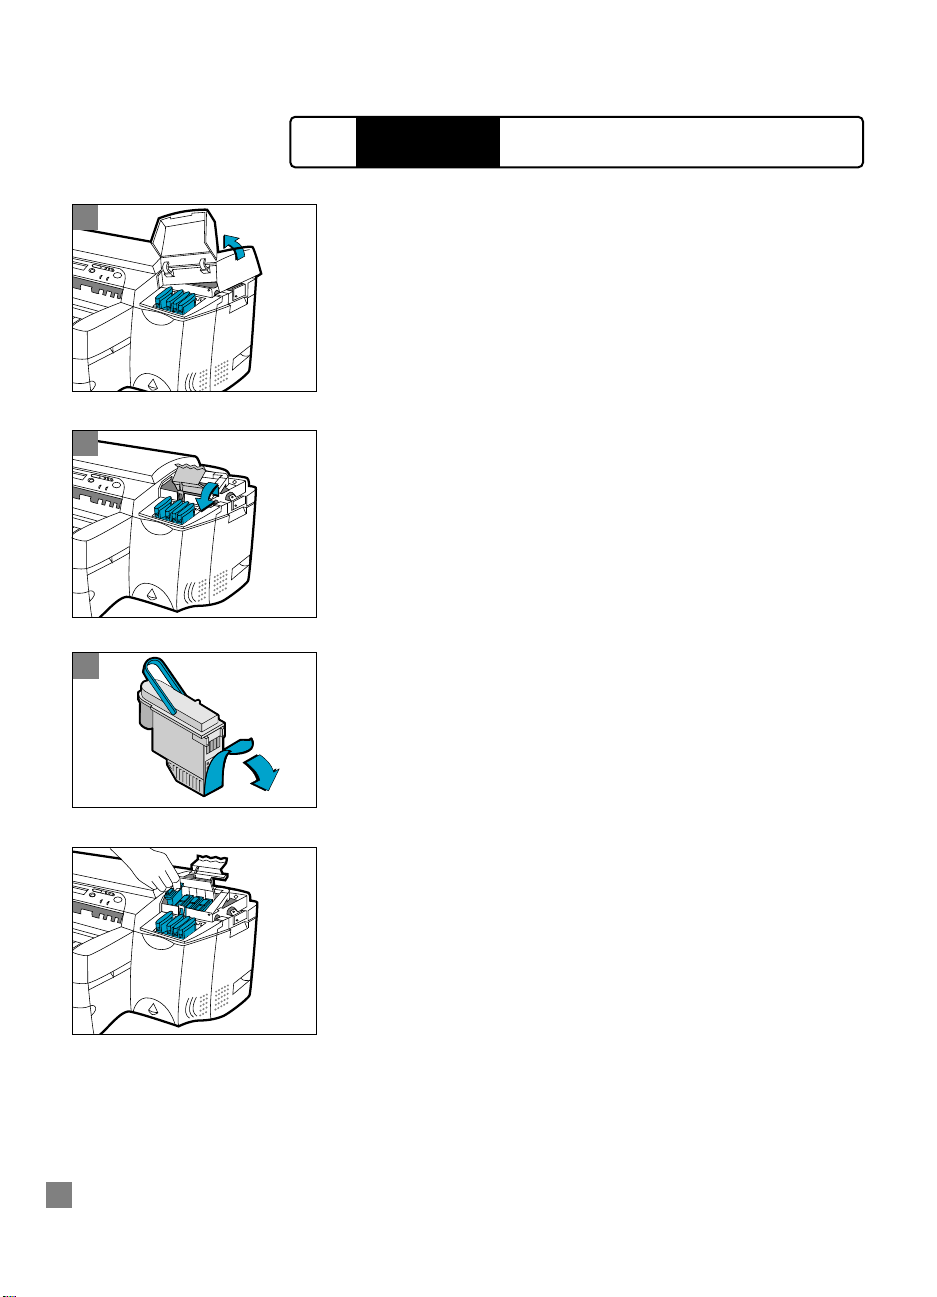
Step 6 - Install Printheads
1
1. Make sure that the Ink Cartridge Door is open. Grasp the side of the
Printhead Access Cover and lift up firmly to snap the cover open and
completely remove it from the printer. You may have to use some force
to open the cover.
Note: If the cradle cannot be found under the cover, it means that the tape
securing the cradle has not been removed. Open the Top Cover, remove the tape
securing the cradle, turn off the printer and turn on again.
2
2. Make sure the printer is turned ON.
The cradle will move away slightly. Open the purple printhead latch by
lifting the latch from the rear. Pull the latch forward and down to
release the latch hook from the purple carriage lock. Then lift and
push the latch toward the back of the printer.
3
3. Remove each printhead from its package.
Remove the protective tape from each printhead.
Insert each printhead into its own color-coded socket.
Push the printheads down firmly.
8
Page 13
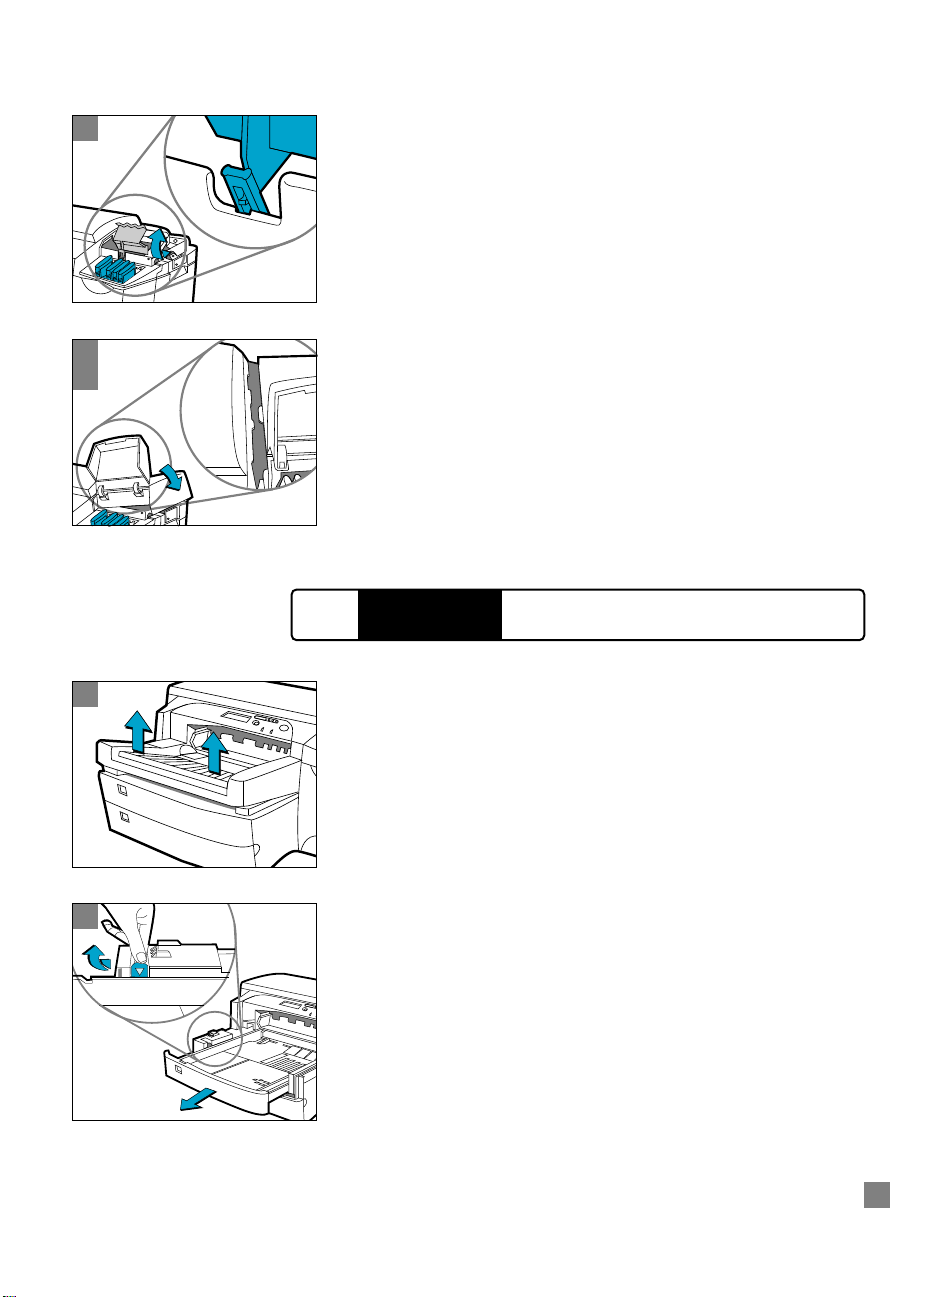
4
4. Close the printhead latch. Be sure that the hook on the printhead latch
catches the carriage lock.
Note: You may have to use some force to close the printhead latch.
5
6
5. Ensure that the Ink Cartridge Door is lifted. Align the tabs of the cover
with the tabs on the printer.
6. Lower and snap to close the cover.
7. Close the Ink Cartridge Door.
HP
1
2500C/CM
Note: Tray 2 is a fixed tray. Tray 1 has to be removed before Tray 2 can be accessed.
Tray 2 is designed to hold up to 150 sheets of paper and can accomodate paper
sizes such as Letter, A4, Legal, B4, A3, 11” x 17”, 13” x 19” and 330 x 483 mm.
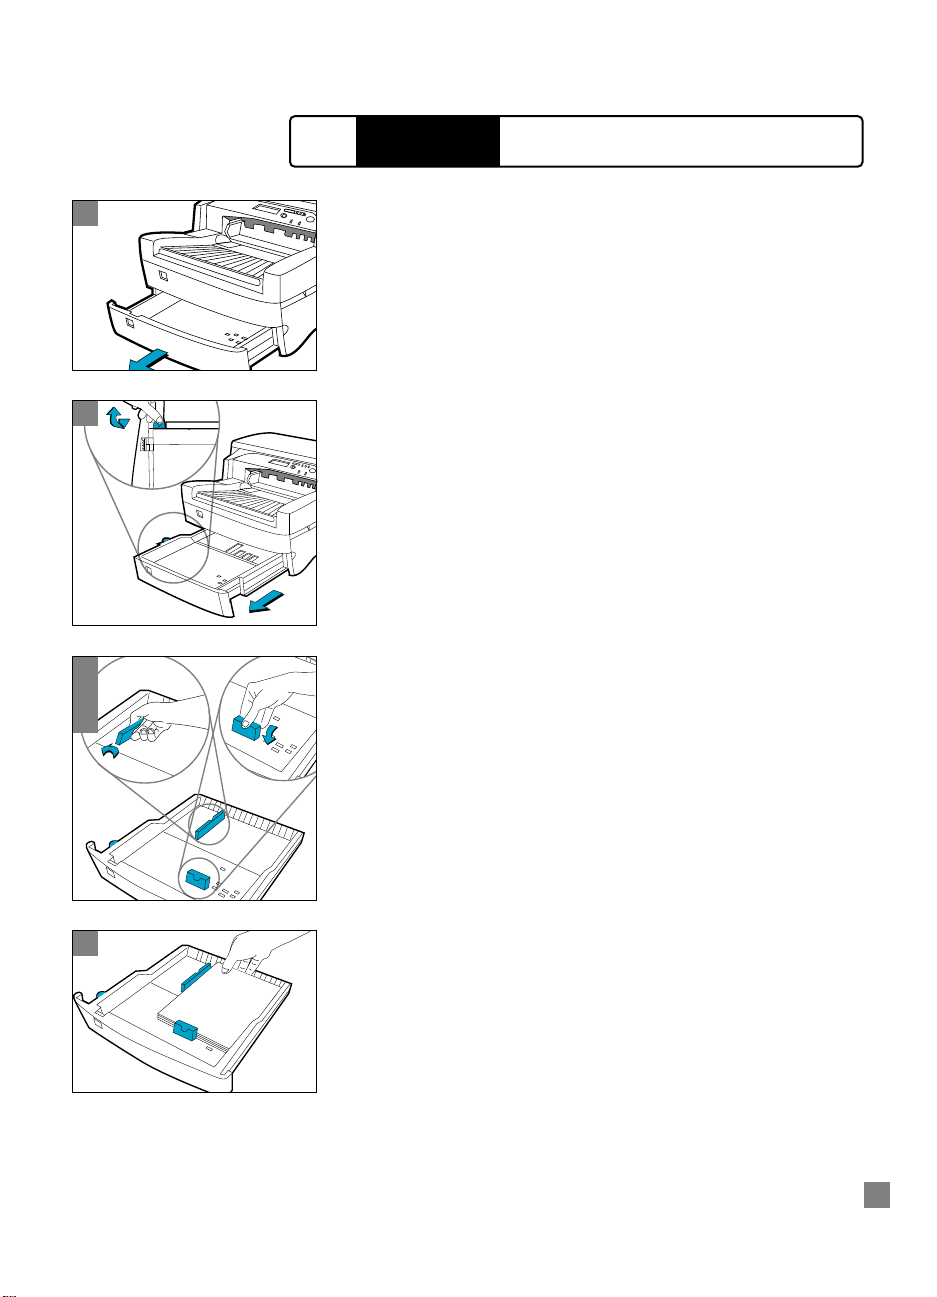
Step 7 - Load Paper in Tray 2
1. Remove Tray 1 and set it aside.
2
2. If you are loading paper sizes such as B4, A3, 11” x 17” and
330 x 483 mm, unlock the tray lock, extend the tray and re-lock the
tray lock.
9
Page 14
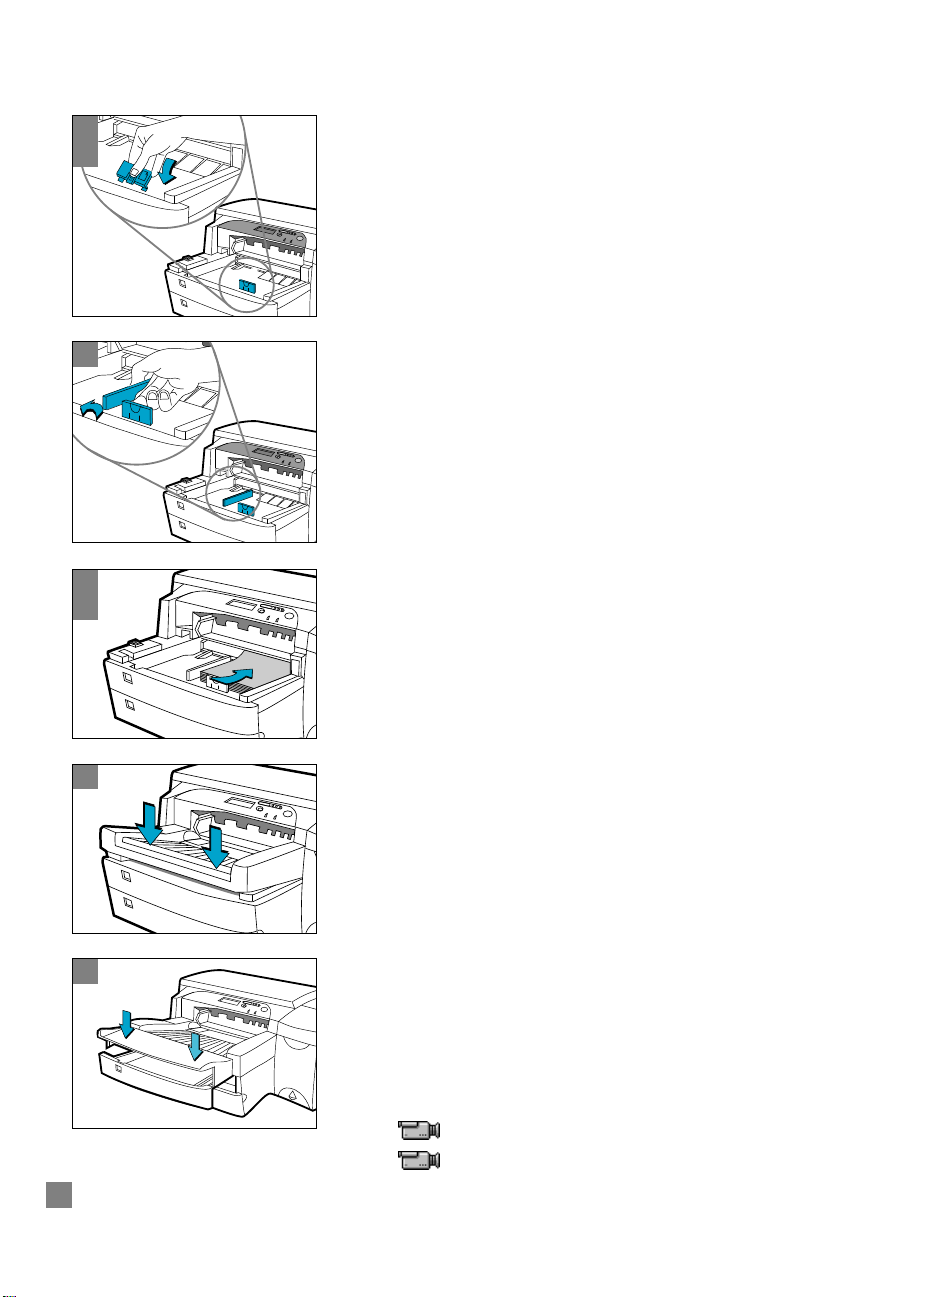
2
3
4
3. Unpack the Paper Length and Width guides.
4. Insert the Paper Length guide into the slot of the paper size you wish
to load.
5
5. Insert the Paper Width guide into the slot of the paper size you wish
to load.
6
7
6. Insert paper, print side down into the printer.
7. Tap the left side of the stack of paper to ensure that it is flush against
the right side of the tray.
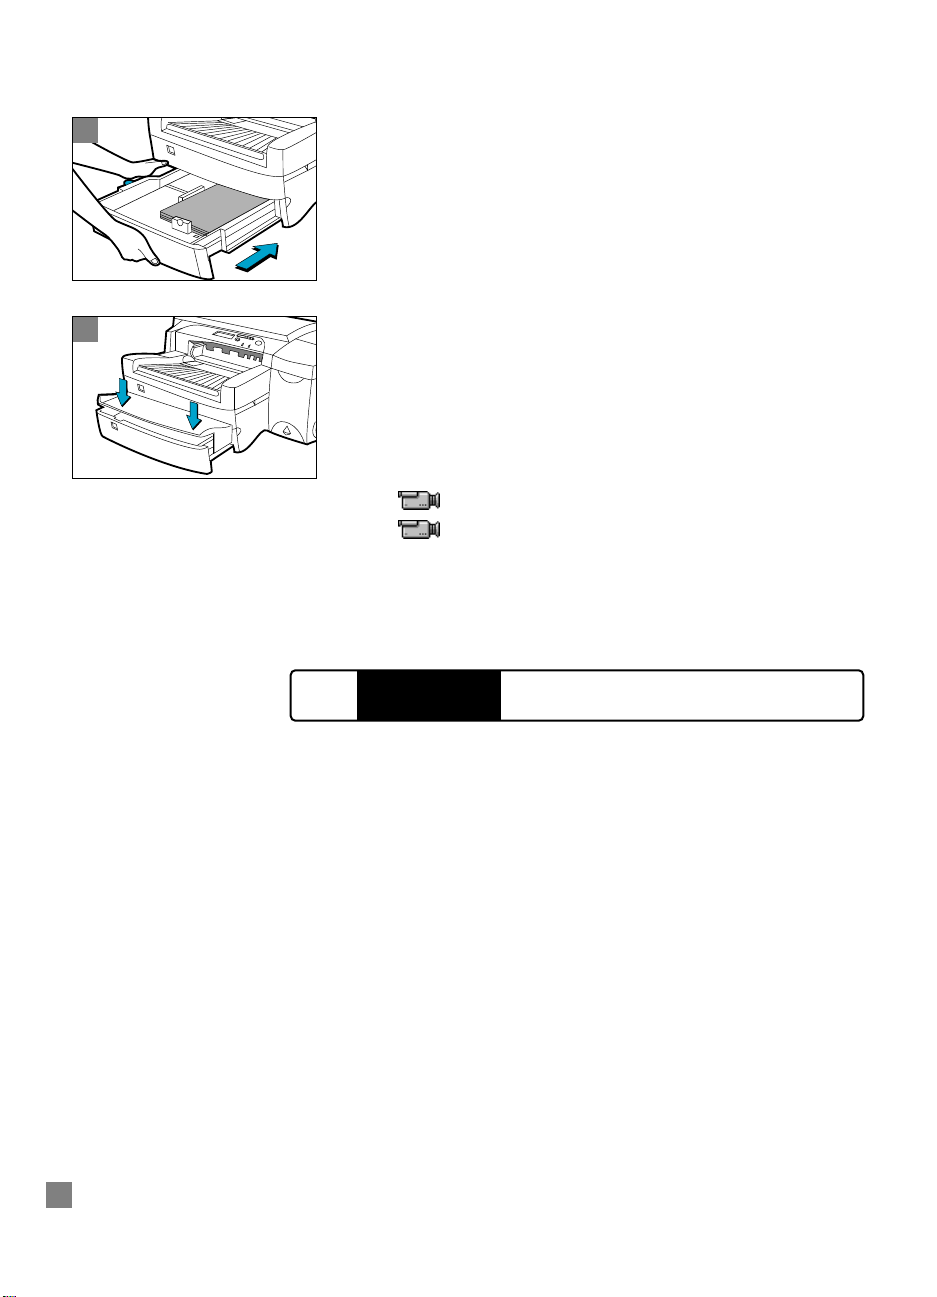
8
8. Replace Tray 1.
9
9. If Tray 2 is extended, place the Extended Tray Cover over the tray.
10. On the Control Panel, press [Menu] until PAPER HANDLING
MENU appears.
11. Press [Item] to select TRAY 2 TYPE=
12. Press [Value] to select the media type you have loaded into the tray
and press [Select].
Click to see a video clip of the load Letter, A4 or Legal paper.
Click to see a video clip of the load B4, A3, 11” x 17”, 13” x 19”
10
or 330 x 483 mm paper.
Page 15
HP
2500C/CM
Step 8 - Load Paper in Tray 3
1
Note: Tray 3 is designed to hold up to 250 sheets of paper and can accommodate
paper sizes such as Letter, A4, Legal, B4, A3, 11” x 17”, 13” x 19” and
330 x 483 mm.
1. Grasp the sides of Tray 3 and pull it out of the printer.
2
2. If you are loading paper sizes such as B4, A3, 11” x 17” and
330 x 483 mm, unlock the tray lock, extend the tray and re-lock the
tray lock.
3
4
5
3. Unpack the Paper Length and Width guides.
4. Insert the Paper Length guide into the slot of the paper size you wish
to load.
5. Insert the Paper Width guide into the slot of the paper size you wish
to load.
6
6. Load paper by aligning the paper edge to the Paper Length guide
first. Tap the other end of the paper to ensure that the paper is
properly loaded. Tap the left side of the stack of paper to ensure that
it is flush against the right side of the tray.
11
Page 16
7
7. Re-insert Tray 3 into the printer.
8
8. If Tray 3 is extended, place the Extended Tray Cover over the tray.
9. On the Control Panel, press [Menu] until PAPER HANDLING MENU
appears.
10. Press [Item] to select TRAY 3 TYPE=
11. Press [Value] to select the media type you have loaded into the tray
and press [Select].
Click to see a video clip of the load Letter, A4 or Legal paper.
Click to see a video clip of the load B4, A3, 11” x 17”, 13” x 19”
HP
2500C/CM
Step 9 - Align Printheads
1. Press [Menu] until DIAGNOSTICS MENU appears.
2. Press [Item] until ALIGN PRNT-HDS appears.
3. Press [Select]
4. The printer will print a page with 5 sets of alignment patterns.
5. In each set (A, B, C, D, or E) select the most aligned (straightest) pair
of lines (1, 2, 3, 4 or 5).
6. Enter the corresponding numbers in the Control Panel by pressing
[Value].
7. When you have entered a value for a set, press [Item] to move to the
next.
8. When you have finished entering the values, press [Select].
9. The printer will print a confirmation page consisting of 2 squares and
a cross.
10. Check the confirmation page to see if the lines on the squares and
the cross are aligned.
11. Re-align the printheads if the confirmation page is not satisfactory.
12
Page 17

HP
2500C/CM
Before you can use the printer, you must install the printer software. To
install the printer software, you need at least 8 MB of RAM and Microsoft
Windows 3.1x, 95 or 98 installed in your computer.
To install the printer software in Windows NT 4.0, you need at least 16 MB of
RAM and Windows NT 4.0 installed in your computer.
Installing the PCL Printer Software from the Starter CD into a PC
Note: The Starter CD includes a utility to easily copy the HP 2500C/CM software to
3.5-inch high-density diskettes as well as to copy files to a server. This allows you to
use the diskettes to install the software on systems that do not have a CD-ROM drive.
1. Start Microsoft Windows and make sure no other Windows
applications are running.
2. Insert the Starter CD into your CD-ROM drive. The installation
program will run automatically.
3. Click the Printer Driver option followed by Install in the CD menu to
install your printer software or Download to download the printer
software to either a hard disk, network drive or floppy disks. If
installation does not automatically run, follow the instructions below.
Installing PCL Printer Software from Floppy Disks (or the Starter CD,
if the installation program does not run automatically)
1. Start Microsoft Windows and make sure no other Windows
applications are running.
2. Insert Disk 1 into your computer’s floppy drive (or the CD into the
CD-ROM drive).
3. Select File, Run in Windows 3.1 or select Start, Run in Windows
95/98/NT 4.0.
4. At the Command Line Box,
• For floppy disk installation, type the letter of your computer’s
floppy disk drive followed by :\SETUP (for example, a:\setup).
• For CD installation, type the letter of your computer’s CD-ROM
drive followed by :\INSTALL (for example, d:\install).
5. Follow the instructions that appear on the screen to complete
installation.
Step 10 - Install the Printer Software
Customizing the Printer Software
You may choose to customize the printer software so that certain items or
features such as Toolbox and bi-directional printing will be disabled the
next time you install the printer software. This feature is useful if you want
to install a customized configuration on several computers in a network.
13
Page 18

To do this:
1. Download the printer software. During download, you will be asked if
you wish to customize the printer software. If you choose not to, you
may run the Installer Configuration Utility later by double-clicking
on the HPINSCFG.EXE icon in the driver directory of the Starter CD.
2. Choose the options you wish to install.
3. Click OK.
4. The printer software will be installed according to this configuration
the next time you run SETUP.EXE
Installing the PostScript Printer Software into a PC
Note: The PostScript Printer Software is available when you purchase a HP 2500CM
Printer or the HP 2500C PostScript upgrade kit. For more information, see HP
Supplies and Accessories.
1. Start Microsoft Windows and make sure no other Windows
applications are running.
2. Insert the PostScript CD into your CD-ROM drive.
3. Select File, Run in Windows 3.1 or select Start, Run in Windows
95/98/NT4.0.
4. At the Command Line Box, type the letter of your computer’s
CD-ROM drive followed by: \INSTALL (for example, d:\install).
5. Follow the instructions that appear on the screen to complete
instructions.
14
Page 19
HP
2500C/CM
Basic Printing Tasks
Loading the Trays
The HP 2500C/CM Professional Series Color Printer has 3 paper trays and
1 Rear Manual Feed for superior paper handling capabilities.
Tray 1 - This tray holds up to 10 sheets of paper. It is recommended that
you use this tray for media types and sizes that are seldom used.
Tray 2 - This tray holds up to 150 sheets of paper. It is recommended that
you use this tray to hold paper that is commonly used.
For instructions on how to load paper into Tray 2, see Step 7 in the Setting Up
section.
Tray 3 - This tray holds up to 250 sheets of paper. It is recommended that
you use this tray to hold paper that is commonly used.
For instructions on how to load paper into Tray 3, see Step 8 in the Setting Up
section.
Rear Manual Feed - The Rear Manual Feed is designed to provide a
straight paper path for printing on thicker media (up to 0.3mm) such as
cardstock or labels without bending. This paper path allows you to print
only 1 sheet at a time.
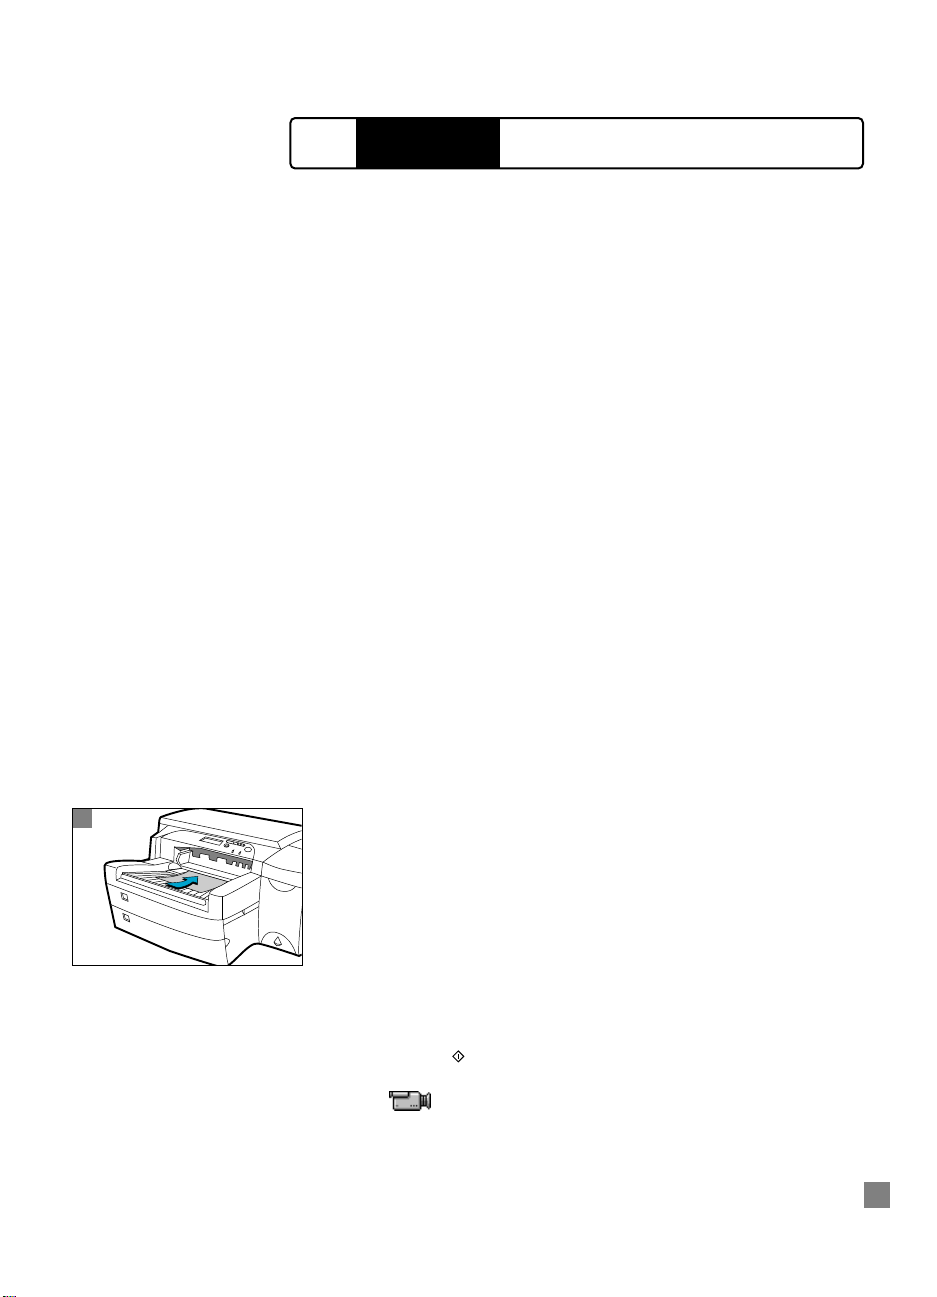
Loading Media in Tray 1
1. Set your printer software to pick paper from Tray 1 and print your
1
document.
For more information on how to set your print settings, please refer to
section on Changing Print Settings.
2. After sending your print job to the printer, the LCD panel will display
the message "TRAY 1 LOAD [TYPE] [SIZE]" where [TYPE] and [SIZE] are
the media type and size as specified in your printer software.
3. Slide the paper width guide to its outermost position.
4. Insert up to 10 sheets of paper along the right side of Tray 1, print side
down, until it stops.
5. Slide the paper width guide in until it stops at the edge of the paper.
6. Press the button to print.
Click to see a video clip of the above procedure.
15
Page 20
Loading Media in the Rear Manual Feed
1
1. Set your printer software to pick paper from Rear Manual Feed and
print your document.
For more information on how to set your print settings, please refer to the
section on Changing Print Settings.
2. After sending your print job to the printer, the LCD panel will display
the message "MNL FEED LOAD [TYPE] [SIZE]" where [TYPE] and [SIZE]
are the media type and size as specified in your printer software.
3. Insert the media into the Rear Manual Feed at the back of the printer,
making sure that the edge of the sheet is aligned with the alignment
mark on the left side of the slot. Wait for the printer to grip the media
before releasing it.
4. Press to start printing.
Click to see a video clip of the above procedure.
Monitoring and Replacing Ink Cartridges
The printer monitors and shows the amount of ink left in each ink cartridge
on the LCD. When the ink in a particular ink cartridge is about to be used
up, a warning message will appear on the LCD Panel. At this point, your
ink cartridge will still have enough ink left in it for a few more print jobs.
However, it is recommended that you get a replacement ready as soon as
this warning message appears.
When the ink in a particular ink cartridge has fully run out, the LCD will
display a message [X INK OUT, REPLACE CART] (where X is the color of the
cartridge). When this happens, you will not be able to print until the
corresponding cartridge is replaced.
To do this:
1
2
1. Lift to open the Ink Cartridge Door.
2. Remove the ink cartridge from its packaging and insert it into its own
color-coded slot.
3. Push down the ink cartridge firmly.
Click to see a video clip of the above procedure.
Note:
Use only original No. 10 HP ink cartridges. The use of incompatible cartridges may
disrupt the intricate printing system, potentially resulting in reduced print quality
and even damaging the printer. HP does not guarantee non-HP cartridges or damage
16
to the printer resulting from the use of non-HP cartridges. For more information on
HP Supplies and Accessories, refer to page 48.
Page 21

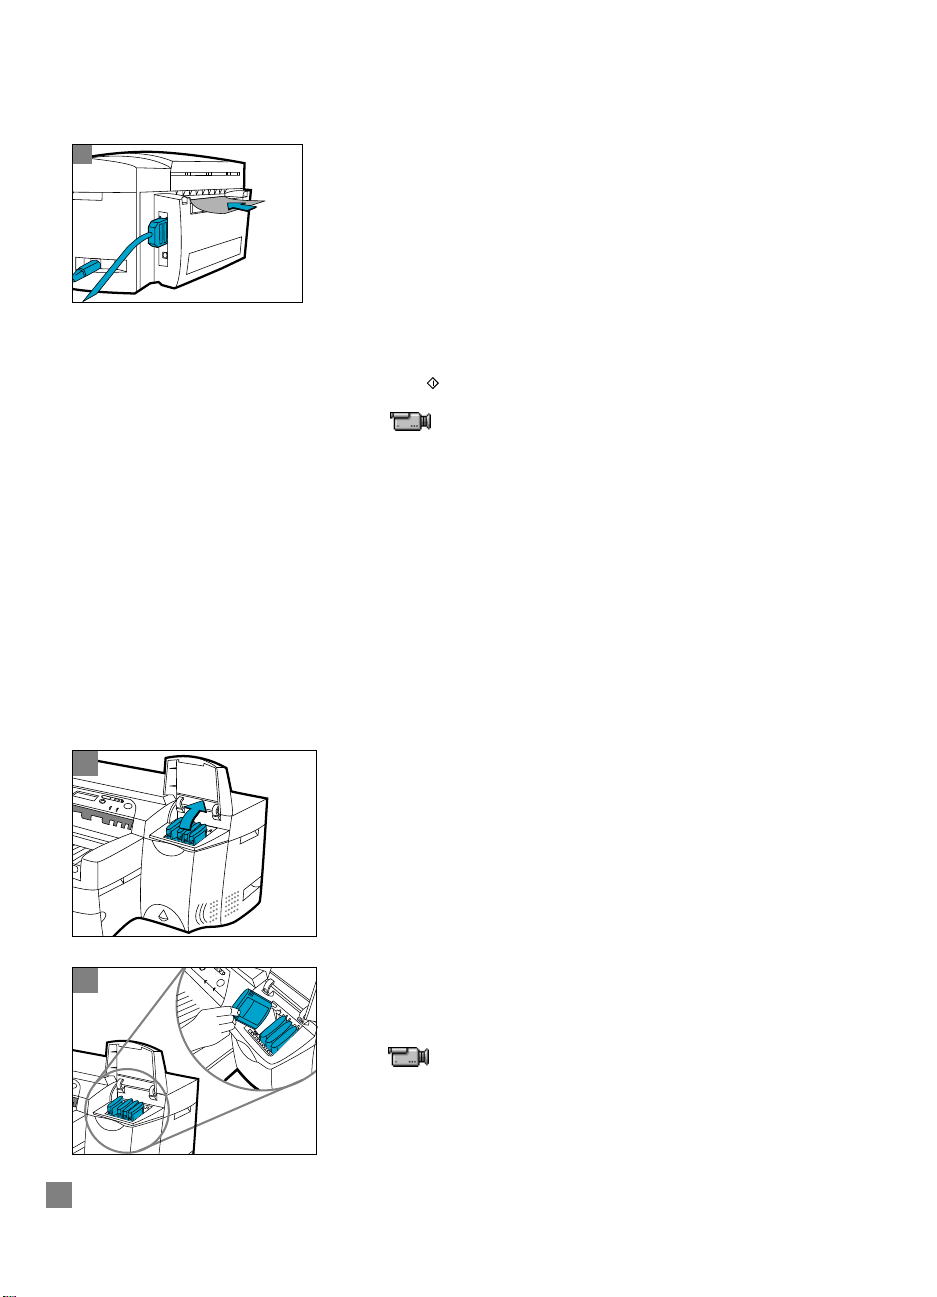
Replacing Printheads
If the printheads are faulty, the printer will show an error message and the
printer will stop printing. When this happens, replace the printhead.
For more information, refer to the Troubleshooting section.
1
2
3
1. Ensure that the printer is on.
2. Open the Ink Cartridge Door.
3. Grasp the side of the Printhead Access Cover and lift firmly to snap the
cover open and remove it from the printer. You may have to use some
force to open the cover.
4
5
4. Release the printhead latch by pulling it towards you to unhook. Once
unhooked, bring the latch towards the back of the printer.
5. Remove the damaged printhead by lifting it out of its socket.
6
7
8
9
6. Remove the new printhead from its package.
7. Remove the protective tape from the printhead.
8. Insert the new printhead into its color-coded slot.
9. Push the printhead down firmly.
17
Page 22

10
10. Close the printhead latch. Be sure that the hook on the printhead latch
catches the carriage lock. You may have to use some force to close the
printhead latch.
11
12
11. Ensure that the Ink Cartridge Door is lifted. Align the tabs of the
cover with the tabs on the printer.
12. Lower and snap to close the cover.
13. Close the Ink Cartridge Door.
14. Align the printheads.
Click to see a video clip of the above procedure.
Refer to Step 9 – Align Printheads on page 12.
Using the HP 2500C Series Printer Software
The HP 2500C Series color printer comes with 2 printer software that make
printing from Windows-based programs faster and easier. The PCL driver is
available for both the HP 2500C and the HP 2500CM printers. The
PostScript driver is available for the HP 2500CM printer and is also found
in the HP 2500C PostScript Upgrade Kit.
PCL Printer Software Components
The HP 2500C printer driver comes with the following components:
• Toolbox program provides access to all the information you need
when using the printer. It also provides printer status information such
as current print job and current print settings and the ability to
cancel your print job.
• Uninstaller provides an easy and efficient way to uninstall the printer
software and remove all entries pertaining to the printer software from
the Windows registry.
• Access HP Web Site provides links to HP web sites for the latest
printer software, product and support information.
• WebReg is an internet registration utility that allows you to register
your printer through the Internet. Registration entitles you to receive
prompt information about software upgrades and future HP products.
18
Page 23

Changing Print Settings
Select Your Printer
To use your HP 2500 Series color printer, make sure that it is selected as
the default printer.
In Windows 95, 98 or NT 4.0:
1. Click Start, select Settings followed by Printers.
2. Click the HP 2500C Series Printer icon to select it.
3. From the File menu, select Set As Default, then close the window.
In Windows 3.1
1. In the Program Manager, open the Main program group.
2. Double-click Control Panel to open it, then double-click Printers.
3. Select the HP 2500C Series Printer from the Installed Printers list,
and then click Set As Default Printer.
4. Click Close and exit the Control Panel.
Changing Print Options
The HP 2500C Print Settings dialog box allows you to select printing
options such as paper type and print quality that are not provided by the
software application.
You can change the print settings for the current documents from your
software program. This procedure will vary depending on the software
program you are using.
1. Select either Print, Print Setup or Printer Setup from the File menu.
2. Click Printer, Setup, Options or Properties depending on your
software application.
3a. If you click Printer in step 2, you will need to click Options, then Setup.
3b. If you click Setup, you will either see the HP Print Settings right
away, or you will need to click Options.
3c. If you click Options, you will need to click Setup.
3d. If you click Properties, you will see the HP 2500C Print Settings
dialog box right away.
4. Change the settings in the HP 2500C Print Settings dialog box.
Using the Printer on a Network
The HP 2500C Professional Series Color Printer has a slot where you may
install one of the supported HP 2500C JetDirect MIO print servers.
Note:
• For a list of supported JetDirect MIO Print Servers, please refer to our web site
at www.hp.com/go/hp2500.
Printing with Special Features and Options
The HP 2500C Series PCL printer driver allows you to create exciting and
impactful documents easily. These features and options will help you to
produce professional-looking documents like direct mailers, brochures,
large spreadsheets, newsletters and extra large posters from your desktop.
19
Page 24

HP ZoomSmart Scaling Technology
Allows you to automatically enlarge or reduce your printout.
Watermark
Allows you to create light-colored text that appears “behind” the
document’s main text. When you print, the text appears faintly on the
printout like the watermarks found on elegant stationery.
Mirror Image
Allows you to print a laterally inverted image of your page.
Print Page Border
Allows you to print dotted lines on the border of your document for
cropping or marking purposes.
Billboard
Allows you to enlarge your page and prints sections of that page onto
several sheets of paper to form a large poster. You may also use this
feature to print a C or A-2 size document on 2 pieces of 11” x 17” or A3 size
media by choosing the 1 x 2 option.
Handouts
Enables you to print 2, 4 or 8 pages of your document onto a single sheet
of paper.
Booklet
Enables you to print 2 pages onto a single larger sheet and reorders the
page sequencing so that the printouts can be folded in half to form a
booklet.
2-sided Printing
Allows you to print on both sides of a page.
Select a Special Feature
1. Click on the Features tab in the print settings.
Settings.
See Changing Print
2. Select the required feature or option. You may only select one
feature at a time and a combination of options.
Note: Click on Help for explanations and descriptions of the various features
and options.
3. Change the necessary print settings and proceed to print your
document.
Note: For more information on printing using these special features, see the
topic “Print with Special Features” on the “How Do I? ” tab in the HP 2500C
series Toolbox on your computer desktop.
20
Page 25

HP
2500C/CM
This section contains information on utilities for maintaining the printer.
They include:
• Cleaning Printheads
• Aligning Printheads
• Calibrating Color
Clean Printheads
Whenever print quality noticeably decreases it is a good idea to perform
the “ Clean Printheads” utility either through the HP 2500C Toolbox on
your computer or from the Control Panel on the printer.
Maintenance Tab of the Toolbox if you wish to clean the printheads from the
Toolbox.
The “Clean Printheads” utility consists of 3 levels of cleaning. Each level of
cleaning uses some ink to clear the printheads. It is recommended that
you start with Level 1 before proceeding to subsequent levels. Note that
Level 3 takes the longest and uses the most ink.
To run the “Clean Printheads” utility through the Control Panel:
1. Press [Menu] until DIAGNOSTICS MENU appears.
2. Press [Item] to select either CLEAN PRNT-HDS LEVEL 1, 2 or 3.
3. Press [Select] to clean printheads.
Align Printheads
Although you may not notice misalignment in your printouts, it is
recommended that you run the “Align Printheads” utility whenever the
LCD displays the message "PRNT-HDS NOT ALIGNED". This ensures that
you have the best possible print quality.
Maintaining the Printer
Please refer to the
You may align the printheads either through the Toolbox or from the
Control Panel. Please refer to the Maintenance Tab of the Toolbox if you
wish to align the printheads from the Toolbox.
To run the “Align Printheads” utility through the Control Panel:
1. Press [Menu] until DIAGNOSTICS MENU appears.
2. Press [Item] until ALIGN PRNT-HDS appears.
3. Press [Select].
4. The printer will print a page with 5 sets of alignment patterns.
5. In each set (A, B, C, D or E) select the most aligned (straightest) pair of
lines (1, 2, 3, 4 or 5).
6. Enter the corresponding numbers in the Control Panel by pressing
[Value].
7. When you have entered a value for a set, press [Item] to move to the next.
21
Page 26

8. When you have finished entering the values press [Select].
9. The printer will print a confirmation page consisting of 2 squares and a cross.
10. Check the confirmation page to see if the lines on the squares and the
cross are aligned.
11. Re-align the printheads if the confirmation page is not satisfactory.
Calibrate Color
If the color tints of your documents have shifted towards yellow, magenta
or blue, run the “Calibrate Color” utility to balance the color tints. It is not
advisable to calibrate color unless the shifts in color tints are visible.
To run the “Calibrate Color” utility:
1. Double-click on the HP 2500C Toolbox icon on your computer
desktop.
2. Click on Maintenance tab.
3. Click on Calibrate Color and follow the instructions on the screen.
HP
1
2500C/CM
The HP 2500CM Color Printer comes with the PostScript 3 module
pre-installed. The HP 2500C Color Printer can be upgraded to a
PostScript printer by installing the HP 2500C PostScript Upgrade Kit.
See Supplies and Accessories.
PostScript Printing Memory Requirements
The HP 2500C Color Printer has 4 MB of memory installed. After you
install the PostScript Module, you will get an additional 8MB of memory.
1. Put on the anti-static wrist strap and clip the other end to a grounded
metal piece.
Note: Failure to do so may damage the printer or the memory module.
Installing the PostScript Module
22
Page 27

2
2. Switch off your printer and remove all cables from the back of the
printer.
3
4
5
3. Lift up the 2 rear door latches to open the Rear Access Door.
4. Loosen the 4 screws on the metal panel to remove it.
5. Remove the PostScript 3 Module from its package. DO NOT touch the
metal connection points.
6
6. Position the PostScript 3 Module as shown in the illustration, and
insert it into Slot 1 or 2.
23
Page 28

7
7. Push in the PostScript 3 Module until the 2 clips snap into place.
8
9
10
PS FW VER
8. Lift the plastic flap, place the metal panel on the Rear Access Door
and fasten the screws.
9. Reconnect all cables to the back of the printer and power ON the
printer.
10. To verify installation of the PostScript 3 Module select the PostScript
Firmware Version option in the Information Menu from the keypanel.
11
11. The installed PostScript Firmware Version is displayed on
the LCD panel.
X.X.X
24
Page 29

7
12. Install the PostScript 3 software from the accompanying CD. Refer to
the back of the CD jacket for installation instructions.
HP
2500C/CM
Professional Series Color Printer
PostScript CD
HP
2500C/CM
Installing Additional Memory
If your printer has the PostScript module installed, you may install up to
64 MB of additional memory.
See Supplies and Accessories
To do so:
1
1. Put on the anti-static wrist strap and clip the other end to a grounded
metal piece.
Note: Failure to do so may damage the printer or the memory module.
2
2. Switch off your printer and remove all cables from the back of the
printer.
3
3. Lift up the 2 rear door latches to open the Rear Access Door.
25
Page 30

4
4. Loosen the 4 screws on the metal panel to remove it.
5
6
7
5. Insert the SIMM into SLOT 3 or 4 at a 45° angle.
6. Rotate the top of the SIMM until it is upright and clicks into position.
7. Lift the plastic flap, place the metal panel on the Rear Access Door
and fasten the screws.
8
8. Reconnect all cables to the back of the printer and power ON the
printer.
9. Press [MENU] until INFORMATION MENU appears. Press [ITEM] until
CHECK TOTAL RAM SIZE appears and press [SELECT]. The LCD
display should show the total amount of memory installed.
26
Page 31

HP
2500C/CM
Control Panel Menus
Overview
You can perform most routine printing tasks from the computer through
the printer driver. This is the most convenient way to change settings on
the printer. See the Help files associated with the printer software, or for
more information,
You can also change the printer settings from the printer’s Control Panel.
The following table lists the Menu items and possible values for the
printer. Additional menu items can appear in the Control Panel,
depending on the hardware modules installed in the printer.
refer to the Windows Printing section.
LCD Messages
27
Page 32

Paper Handling Menu
Item Values Explanation
TRAY 2 TYPE=PLAIN PLAIN Set the value to correspond with the
HP INKJET/HEAVY paper type currently loaded in Tray 2.
HP PHOTO
TRNSPRNCY/IRON PLAIN: Plain Paper
RAPID TRNSPRNCY
HP INKJET/HEAVY: HP Premium Inkjet Paper
or HP Premium Inkjet Heavyweight Paper
HP PHOTO: HP Premium Photo Paper
TRNSPRNCY/IRON: HP Premium Transparency
Film or HP Iron-on T-shirt Transfers
RAPID TRNSPRNCY: HP Premium Inkjet
Rapid-Dry Transparencies.
Note: It is not advisable to load the following
combination of paper types in Tray 2 and Tray 3
at the same time:
• HP Premium Inkjet Paper and HP Premium
Inkjet Heavyweight Paper
• HP Premium Transparency Film and HP
Iron-on T-shirt Transfer
TRAY 3 TYPE=PLAIN PLAIN Set the value to correspond with the paper
HP INKJET/HEAVY type currently loaded in Tray 3.
HP PHOTO
TRNSPRNCY/IRON
RAPID TRNSPRNCY PLAIN: Plain Paper
HP INKJET/HEAVY: HP Premium Inkjet Paper
or HP Premium Inkjet Heavyweight Paper
HP PHOTO: HP Premium Photo Paper
TRNSPRNCY/IRON: HP Premium
Transparency Film or HP Iron-on T-shirt
Transfers
Note: It is not advisable to load the following
combination of paper types in Tray 2 and Tray 3
at the same time:
• HP Premium Inkjet Paper and HP Premium
Inkjet Heavyweight Paper
• HP Premium Transparency Film and HP
Iron-on T-shirt Transfer
28
Page 33

Diagnostics Menu
Item Explanation
ALIGN PRNT-HDS This item aligns the printheads to ensure the printout is of the best
possible print quality.
For more information see section on Align Printheads.
CLEAN PRNT-HD: This item cleans the printheads. Level 1 is the basic level and should
LEVEL 1 be performed first.
For more information see section on Clean Printheads.
CLEAN PRNT-HD: This item cleans the printheads. Level 2 is more thorough than Level 1,
LEVEL 2 but it should be performed only when Level 1 cleaning does not solve
the print quality problem.
Printheads.
For more information see section on Clean
CLEAN PRNT-HD: This item cleans the printheads. Level 3 is most thorough, but it
LEVEL 3 should be performed only when Level 2 cleaning does not solve the
print quality problem as it uses the most ink.
see section on Clean Printheads.
For more information
PERFORM TRAY 2 This item performs a paper path test on Tray 2. When this is selected,
PAPER PATH TEST the printer will pick paper from Tray 2 until all the paper has been
ejected.
PERFORM TRAY 3 This item performs a paper path test on Tray 3. When this is selected,
PAPER PATH TEST the printer will pick paper from Tray 3 until all the paper has been
ejected.
PERFORM TRAY 1 This item performs a paper path test on Tray 1. When this is selected,
PAPER PATH TEST the printer will pick paper from Tray 1 until all the paper has been
ejected.
Information Menu
Item Explanation
CHECK INK LEVEL This item displays the amount of ink remaining in each ink cartridge.
BASE FW VER This item displays the firmware version of the printer.
PS FW VER This item displays the PostScript firmware version of the printer.
MIO FW VER This item displays the MIO print server firmware version.
CHECK TOTAL This item displays the total amount of RAM installed in the printer.
RAM SIZE
SERVICE ID This item displays the Service Identification Number of the printer.
This number is needed when you call the HP Customer Care Center
for support.
29
Page 34

Self Test Menu
Item Explanation
PRINT MENU MAP The Menu Map shows the layout of the Control Panel menu items.
PRINT PS FONT LIST The PS Font List shows all the PS fonts currently available to the printer.
PRINT DIAGNOSTIC The Diagnostic Page shows general printer information and current
PAGE network parameters.
PRINT EXT The Extended Diagnostic Page shows printer information that is useful
DIAGNOSTIC PAGE for troubleshooting.
Print Quality Menu
Item Values Explanation
PRINT QUALITY= NORMAL NORMAL: Normal mode delivers high quality
NORMAL ECONOFAST output and is the recommended setting for
BEST speed and quality. Normal mode is the
default setting for most paper types.
ECONOFAST: Draft quality printing.
EconoFast mode prints faster than Normal
mode and delivers comparable output.
Using EconoFast will also cut down on the
frequency of replacing your ink cartridges
because it uses less ink. EconoFast
printing is available only when you select
plain paper or transparency as the paper type.
BEST: High quality printing. Best mode
produces the highest print quality for all
paper types. However, Best mode prints
more slowly than Normal mode for most
documents.
30
Page 35

Printing Menu
Item Values Explanation
PAPER=LETTER LETTER Set the paper size.
LEGAL
13 x 19
A4
A3
11 x 17
JISB4
ORIENTATION= PORTRAIT Determine the default orientation of print
PORTRAIT LANDSCAPE on the page.
Note: It is best to set the page orientation from
the printer software or software application
APPEND CR TO LF= NO Select YES to append a carriage return to a
YES line feed encountered in backward-compatible
PCL jobs (pure text, no job control). Some
environments indicate a new line using only
the line feed control code. This option
allows the user to append the required
carriage return to each line feed.
.
31
Page 36

IO Menu
Item Values Explanation
IN JOB TIMEOUT= 5 to 300 Select the amount of time (in seconds) that
15 the printer will wait within a print job before
ending it. When the data from a print job
fails to be sent to the printer completely,
the printer will wait for the specified number
of seconds. After that, it will abort the job
and carry on to process the next print job.
Press [Value] once to change the setting by
increments of 1 or hold down [Value] to scroll.
OUT JOB TIMEOUT= 0 to 300 Select the amount of time (in seconds) that
15 the printer will wait for the next print job
before switching to another port. This is
useful especially when your printer is
connected to 2 different ports such as the
parallel port and the network port.
Press [Value] once to change the setting by
increments of 1 or hold down [Value] to scroll.
I/O CHANNEL 0 to 300 Select the amount of time (in seconds) that
TIMEOUT=120 the printer will receive data from a port
before switching to the next port. When
the printer is connected to different ports
with data being sent to it simultaneously
from these ports, the printer will be able to
toggle between ports so that jobs sent
through all ports will be given similar priority.
Press [Value] once to change the setting by
increments of 1 or hold down [Value] to scroll.
Resets Menu
Item Explanation
RESET TO FACTORY This item performs a simple reset and restores most of the factory
SETTINGS (default) settings. This item also clears the input buffer for the active I/O.
RESET ACTIVE I/O This item performs a simple reset and clears the input and output
CHANNEL buffers (for the active I/Os only).
RESET ALL I/O This item performs a simple reset and clears the input and output
CHANNELS buffers for all I/Os.
RESET MIO TO This item resets the MIO print server and restores most of the
FACTORY SETTINGS factory (default) settings.
32
Page 37

Configuration Menu
Item Values Explanation
PERSONALITY= AUTO Select the default printer language
AUTO PCL (personality).
PS Possible values are determined by which
valid languages are installed in the
printer. For example, if you have the PS
module installed, you will be able to
select between AUTO, PCL or PS.
Normally you should not change the
printer language (the default is AUTO). If
you change it to a specific printer
language, the printer will not automatically
switch from one language to another
unless specific software commands are
sent to the printer.
MIO Menu
The MIO print server that is installed controls this menu and it varies accordingly. Please refer to
the documentation that comes with the print server for more information.
PostScript Menu (for HP 2500CM printer or with the HP 2500C PostScript Upgrade Kit only)
Item Values Explanation
PRINT PS ERRORS= OFF Select ON to print the PS error page when
OFF ON PS errors occur.
JAM RECOVERY= AUTO Determine how the printer behaves when a
AUTO ON paper jam occurs.
OFF
AUTO: The printer automatically selects the
best mode for printer jam recovery (usually
ON). This is the default setting.
ON: The printer automatically reprints pages
after a paper jam is cleared.
OFF: The printer does not reprint pages
following a paper jam. Printing performance
might be increased with this setting.
COPIES=1 1 to 99 Set the default number of copies by
selecting any number from 1 to 99. Press
[Value] once to change the setting by
increments of 1 or hold down [Value] to scroll.
33
Page 38

Understanding Printer Messages
Note: [ ] in the Message column indicate variables.
Message Explanation Solution
OFFLINE The printer is offline. Press to set the printer online.
CANCELING JOB The printer is canceling
the current print job.
[COLOR] INK OUT, One of the ink cartridges Replace the appropriate cartridge.
REPLACE CART (black, cyan, magenta
or yellow) is out of ink.
[COLOR] CART One of the ink cartridges Replace the appropriate cartridge.
FAULTY, REPLACE (black, cyan, magenta
or yellow) is faulty.
[COLOR] CART One of the ink cartridges Insert the appropriate cartridge.
MISSING, INSERT (black, cyan, magenta or
yellow) is missing.
[COLOR] PRNT-HD One of the printheads Replace the appropriate printhead.
FAULTY, REPLACE (black, cyan, magenta
or yellow) is faulty.
[COLOR] PRNT-HD One of the printheads Insert the appropriate printhead.
MISSING, INSERT (black, cyan, magenta
or yellow) is missing.
PRNT-HD ACCESS The Printhead Access Close the cover and press to resume
COVER OPEN Cover is open. printing.
TOP COVER OPEN The Top Cover is open. Close the cover and press to resume
printing.
PAPER JAM, OPEN There is paper jammed Open the Top Cover to remove paper.
TOP COVER in the printer. When finished, close the Top Cover and
press to resume printing.
CARRIAGE JAM, The Carriage is jammed. Open the Top Cover to clear obstruction.
OPEN TOP COVER When finished, close the Top Cover and
press to resume printing.
CARRIAGE JAM, The Carriage is jammed. Open the Printhead Access Cover to
OPEN ACC COVER remove obstruction. When finished, close
the Printhead Access Cover and align
printheads.
34
Page 39

LEFT BACK PANEL The left side of the Back Open the Rear Access Door and ensure
OUT Panel has not been that the left side of the panel is
inserted properly. properly installed.
RIGHT BACK The right side of the Open the Rear Access Door and ensure
PANEL OUT Back Panel has not that the right side of the panel is
been inserted properly. properly installed.
TRAY 2 PAPER One of the Paper Guides Insert the missing Paper Guide back into
GUIDE REMOVED in Tray 2 has been removed. Tray 2.
TRAY 3 OPEN OR Tray 3 is either open or one Ensure that both the Paper Guides are
GUIDE REMOVED of its Paper Guides has properly installed and that Tray 3
been removed. is inserted into the printer.
TRAY 1 LOAD You have chosen to print Load the paper type and size as
[TYPE] [SIZE] from Tray 1 or the media specified in the LCD panel and press
you have selected differs to continue printing. You may
from those in Trays 2 and 3. set the printer to print with existing
media in Tray 2 or Tray 3 by either
pressing [Value] or without loading
media in Tray 1.
MNL FEED LOAD You have chosen to print Load the paper type and size as
[TYPE] [SIZE] through the Rear Manual specified in the LCD panel into the
Feed. Rear Manual Feed located at the back
of the printer and press to continue
printing.
TRAY [NUMBER] The specified tray is empty. Load the paper size and type which
EMPTY, LOAD & this tray has been set up for. If you
PRESS wish to change the paper size setting of
this tray, please
Paper.
refer to section on Load
USE [TYPE] The media you have chosen Press to print or [Value] to select
[SIZE] INSTEAD? differs from those in Trays 2 other options.
and 3 and you have either
pressed [Value] or without
loading media in Tray 1.
PRESS TO To continue your present
CONTINUE task, press the button.
MEDIA IN TRAY 1, The media in Tray 1 may Remove the media in Tray 1 and press
REMOVE not be the type or size the button to resume printing.
that is specified in your
current print job. If you wish to print through Tray 1, set
your print setting to pick from Tray 1
and send the print job before putting
media in Tray 1.
35
Page 40

WRONG MEDIA The media type which the Do one of the following:
TYPE, [ACTION] printer has detected is not • Press to continue printing.
the type specified in your • Load the correct media and press .
print settings. • Cancel the current print job by
pressing the [Cancel Print] button.
UNEXPECTED The specified paper size Reload the correct media into the tray
PAPER SIZE is different from the and print again.
paper size in the selected
input tray. The output was
truncated to fit the paper
in the printer. Some output
may have been lost.
PRNT-HDS NOT The printheads have not Align the printheads.
ALIGNED been aligned. For best
For instructions see Align Printheads.
print quality, align the
printheads before the
next print job.
NON HP [COLOR] A non-HP ink cartridge Use original HP ink cartridges.
CART has been detected. HP
does not guarantee
non-HP cartridges.
The use of incompatible
cartridges may disrupt the
intricate printing system,
potentially resulting in
reduced print quality and
even damaging the printer.
[COLOR] CART One of the ink cartridges Be prepared to replace the mentioned
NEAR EXPIRY (black, cyan, magenta or color ink cartridge.
yellow) is near expiry.
To obtain optimum print
quality, it is recommended
that you do not use expired
ink cartridges.
[COLOR] PRNT-HD One of the printheads Be prepared to replace the mentioned
NEAR EXPIRY (black,cyan, magenta or printhead.
yellow) is near expiry. To
obtain optimum print
quality, it is recommended
that you do not use expired
printheads.
[COLOR] INK LOW One of the ink cartridges Be prepared to replace the mentioned
(black, cyan, magenta or color ink cartridge.
yellow) is low on ink. You
may still continue to print
with this cartridge until the
ink has totally run out.
36
Page 41

ROTATE, REINSERT The printer has finished Remove the stated number of
[NUMBER] PG TO printing one side of a pages from Tray 1, rotate the pages
TRAY [NUMBER] 2-sided document. The and reload them into the specified
pages need to be reloaded tray, print side. Press to continue
for printing to resume. printing. You can set the printer to
pick from Tray 1 by loading the paper
into Tray 1 and pressing .
REINSERT The printer has finished Remove the stated number of pages
[NUMBER] PG TO printing one side of a from Tray 1 and reload them
TRAY [NUMBER] 2-sided document. The into the specified tray, print side down.
pages need to be reloaded Press to continue printing. You can
for printing to resume. set the printer to pick from Tray 1 by
loading the paper into Tray 1 and
pressing .
HP
LCD Error Type Example Function
Recoverable Offline,
Non-Recoverable ERROR CODE: Your printer may have a hardware
2500C/CM
This chapter documents the different troubleshooting tools and steps that
can be used to assist you in diagnosing and solving most printer problems.
General Troubleshooting Tips
1. Check the printer LCD panel. If the printer LCD panel displays a
Recoverable error message
instructions on how to resolve the problem.
INK LOW, etc. for information on how to resolve such
XXXX problem. Turn off the printer wait for a
2. Check the LEDs on the printer. If the red LED is blinking, this means
that the printer is in an error state or it requires attention. If both the
LEDs are blinking, the printer is in a non-recoverable error state.
Troubleshooting
refer to Understanding Printer Messages for
Refer to Understanding Printer Messages
errors.
few seconds and then turn it on again.
If the message persists, call HP.
37
Page 42

Non-Recoverable Error
If the LCD panel displays a non-recoverable error message or if the printer
is in a non-recoverable error state:
1. Turn off your printer by pressing the Power button. Remove all
cables and wait for about 10 seconds. Reconnect the cables and
power on the printer.
2. If the printer powers on and recovers from the error state, you
should see the message “READY” on the LCD panel.
3. Make sure that the tapes covering the ink nozzles and electrical
contacts on all the printheads have been removed.
For information on how to remove the tapes, see section on Replacing Printheads.
4. If the error persists we recommend that you call HP for assistance.
Please have the following information ready:
• the model
• the printer serial number
• the error code number
Troubleshooting Feature in Toolbox
If a printing problem occurs, you can use the online troubleshooting
feature built into your HP 2500C Series Toolbox. In the Toolbox, click the
Troubleshooting tab. The troubleshooting information in the HP 2500C
Series Toolbox is designed to help you diagnose and solve most printing
problems that can occur.
To use the troubleshooting feature in the HP 2500C Series Toolbox in
Windows 95, 98 and NT 4.0:
1. Double-click the HP 2500C Series Toolbox icon on your computer
desktop or click on Start, select Programs, followed by HP 2500C
Series program group, followed by HP 2500C Toolbox.
2. Click on the Troubleshooting tab, then follow the instructions on
your computer screen.
To use the troubleshooting feature in the HP 2500C Series Toolbox in
Windows 3.1x:
1. Double-click the HP 2500C Series Toolbox icon in the HP 2500C
Series Printer program group.
2. Click on the Troubleshooting tab, then follow the instructions on
your computer screen.
38
Page 43

The following is a summary of the troubleshooting tips found in the Toolbox:
Printer does not Print
• Check the power
Make sure the power cord is connected firmly to the printer and to a
working outlet, and that the printer is turned ON. The green Ready LED
should be lit and the LCD should display “READY”.
• Check printer setup
Make sure your HP 2500C Series printer is selected as the current or
default printer.
• Check printer port selection
Make sure that the correct port is selected and that the printer is
connected to your printer properly. If your printer is connected to a
switch box, make sure that you have selected the correct switch. If your
printer is on a network, ensure that you have mapped to the correct port.
• Print a Diagnostic Page
Printing a Diagnostic Page will verify if the printer is functioning
properly. To print the diagnostic page:
1. Press [Menu] until SELF TEST MENU appears
2. Press [Item] until PRINT DIAGNOSTIC PAGE appears.
3. Press [Select] to print the diagnostic page.
• Check network setup
If your printer is shared on a network, make sure that it is properly
setup in the network environment. See the Network Guide as well as
the documentation provided by your network vendors.
• Check for paper feed problem
Make sure that paper is loaded correctly in the trays and that paper is
not jammed in the printer. Check the printer LCD panel for paper jam
messages.
See section on Load Paper.
If paper is jammed in the printer, see section on Clearing Paper Jams.
Partial or Blank Page Printed
• Check the printhead for tape
New printheads are shipped with a protective tape that covers the
nozzles. Make sure that the protective tape covering each printhead is
removed.
• Check printer setup
Make sure your HP 2500C Series printer is selected as the current or
default printer.
39
Page 44

• Tray 3 pulled out during printing.
If Tray 3 is pulled out of the printer when it is printing, the job will be
canceled and the page will be ejected. Wait until the page has been
printed and ejected from the printer before removing the tray.
Bad or Poor Print Quality
• Check print quality setting
Check the printer setting which you have selected for this print job in the
printer software. While the EconoFast settings print faster and uses less ink,
it may cause text to appear faded or colors to appear dull. Select Normal
or Best Print Quality in the HP print settings dialog box.
See “Change print settings” on the “How do I?” tab in the HP 2500C Series
Printer Toolbox.
• Check paper type setting
When printing on transparencies or other special media types, select the
corresponding media type in the HP print settings dialog box.
See “Print on various paper types and sizes” on the “How do I?” tab in the
HP 2500C Series Printer Toolbox.
• Clean printheads
Whenever print quality deteriorates, it is advisable to clean the printheads.
See section on Clean Printheads for instructions.
Text or Graphics are Cut Off
• Check margin settings
If the text or graphics are cut off at the edges of the page, make sure the
margin settings for the document do not exceed the printable area of
your printer.
paper sizes see Minimum Printing Margins.
For information on the printer margins for the various supported
40
• Check page orientation
The page orientation that you have selected may not be correct for the
document you are printing. Check your print settings and try printing again.
• Tray 3 pulled out during printing.
If Tray 3 is pulled out of the printer when it is printing, the job will be
canceled and the page will be ejected. Wait until the page has been
printed and ejected from the printer before removing the tray.
Page 45

Garbage Printed
• Check cable connection
Check that the printer and/or network cables are securely connected to
the printer. If you are using a parallel cable, ensure that it is also firmly
connected to the computer.
• Check printer setup
Make sure your HP 2500C Series printer is selected as the current or
default printer.
• Check document file
Your document may be corrupted. Try printing another file from the
same software application.
• Disable bi-directional communication or stop sharing printer port
with another device
A probable cause for this problem is that there is a conflict between
the printer and other port sharing devices such as zip drives or
scanners.
If you are running Windows 3.1, do not share the printer port with
another device.
If you are running Windows 95, 98 or NT 4.0, disable bi-directional
printing.
Clearing Paper Jams
If paper is jammed in the printer, follow these instructions to clear the jam:
1
1. Remove all media from trays 1, 2 and 3. Pull out any paper that is
visibly stuck.
2
2. Lift the Top Cover and pull out any paper that may be stuck.
41
Page 46

3
3. If you are unable to free the jammed paper, pull out the handle of the
Paper Knob, pull the knob away from the printer and rotate to remove
the paper.
3
4
4. If the LCD still reports a paper jam, go to the back of the printer and
lower the Rear Access Door by lifting the two rear door latches.
5. Remove the Back Panel by pressing the two catches inwards.
6. Pull out any paper that may be stuck inside.
7. Replace the Back Panel and make sure it fits securely.
8. Close the Rear Access Door and turn on the printer.
Click to see a video clip of the above procedure.
Tips for Avoiding Paper Jams
• Make sure nothing is blocking the paper paths.
• Do not overload the trays. Tray 1 holds up to 10 sheets of paper;
Tray 2 holds up to 150 sheets and Tray 3 holds up to 250 sheets.
• Load the paper correctly.
• Do not use paper that is curled or crumpled.
Printhead Diagnostics
When the LCD Panel displays the message "PRNT-HD DIAG PRESS ", it
means that one or more of the printheads may be faulty. You will need to
diagnose which printhead is faulty and replace it before you can continue
printing.
This process requires you to remove all the printheads and then
re-inserting one printhead at a time in the sequence of black, cyan,
magenta and yellow.
42
Page 47

To diagnose the faulty printhead:
1. Open the Printhead Access Cover and unlock the printhead latch.
2. Remove the cyan, magenta and yellow printheads and close the
Printhead Access Cover.
3. The LCD Panel will display the message "DETECTING..." as it checks
the printhead.
4. If the message "B PRNT-HD FAULTY, PRESS " appears, it means that
the black printhead is faulty. If this happens, press the button.
Remove the Printhead Access Cover and replace with a new black
printhead. Fasten the printhead latch and close the Printhead Access
Cover to verify that the new printhead is working.
If the message "B PRNT-HD OK, PRESS " appears, it means that the
black printhead is working.
5. Follow the sequence found in step 4 with each of the remaining
printheads to verify functionality.
6. Isolate the faulty printhead by this method, and replace it with a new
one.
43
Page 48

HP
2500C/CM
The Diagnostic Test page is a valuable tool for troubleshooting. This will
help verify if the printer is working.
To print a Diagnostic Test:
1. Press [Menu] until SELF TEST MENU appears
2. Press [Item] until PRINT DIAGNOSTIC PAGE appears.
3. Press [Select] to print the diagnostic page.
The Diagnostic Test page looks like this:
Understanding the Diagnostic Test
44
Page 49

The Diagnostic Test page is divided into four sections:
Item Description
1 Printer Information shows general printer information such
as Firmware version number, Model and Service ID.
2 Built-in Bitmap Fonts shows the type of fonts that is resident
in your printer. This is different from the TrueType fonts that
are installed in your computer.
3 Printhead Information monitors and displays the status of
your printhead. If these bars are printed properly, it shows that
the printheads are in working order.
4 Ink Cartridge Information displays the amount of ink left in
each ink cartridge.
HP
2500C/CM
HP FIRST
HP FIRST is an automated information fax retrieval service which provides
toll-free, 24-hour technical information to you by fax. Call HP FIRST at the
following telephone numbers:
For US and Canada (800) 333-1917
For customers in Europe:
U.K. 0800 96 02 71
For service in English outside U.K. + 31 20 681 5792
Austria 0600 8128
Belgium (Dutch) 0800 11906
Belgium (French) 0800 17043
Denmark 800 10453
Finland 800 13134
France 0800 905900
Germany 0130 810061
Italy 1678 59020
Norway 800 11 319
Portugal 05 05 31 33 42
Spain 900 993123
Sweden 020 795743
Switzerland (French) 0800 551 526
Switzerland (German) 0800 551 527
The Netherlands 0800 022 2420
Customer Support
45
Page 50

For customers in Asia-Pacific
Australia 613 9272 2627
China 86 10 6564 5735
Hong Kong 2506 2422
India 9111 622 6420
Indonesia 21-352 2044
Korea 822 769 0543
Malaysia 03 298 2478
New Zealand 64 09 356 6642
Philippines (65) 275 7251
Singapore 275 7251
Taiwan (02) 719 5589
Thailand 662 661 3511
The HP Customer Care Center can be reached at any of the following numbers.
For U.S. (208) 323-2551
For Canada (905) 206-4663
For Latin America
Argentina (541) 787 4061/69
Brazil 55 11 709 1444
Chile 562 800 360999
Mexico city 01-800-22147000/1-800-9052900
Mexico Guadalajara (525) 264 2075
Mexico Monterey 91800 22147
Venezuela 582 239 5664
For Europe
Africa/Middle East 41 22/780 71 11
Austria 0660 6386
Belgium (Dutch) 02 6268806
Belgium (French) 02 6268807
Czech Republic 42 (2) 471 7327
Denmark 3929 4099
Finland 203 47288
France 01 43 62 34 34
Germany 180 5258 143
Greece 0168 96 411
Hungary 36 (1) 252 4505
Ireland 01662 5525
Italy 02 264 10350
Norway 22 11 6299
Poland 48 22 37 50 65
Portugal 01 441 7199
Russia 7095 923 50 01
46
Page 51

Spain 902 321 123
Sweden 08 619 2170
Switzerland 0848 80 11 11
The Netherlands 020 606 8751
Turkey 90 1 224 59 25
United Kingdom 0171 512 5202
For Asia-Pacific
Australia (61-3) 9272-8000
China 86 10 6564 5959
Hong Kong 800 96 7729
India 9111 682 6035
Indonesia 21 350 3408
Korea (82-2) 3270-0700
Malaysia 03 295 2566
New Zealand 09 356-6640
Philippines 2 867 3551
Singapore 272 5300
Taiwan 866-2-7170055
Thailand 02 661 4011
Vietnam 8823 4530
47
Page 52

HP
2500C/CM
Number Description
Accessories
C3289A HP 2500C PostScript Upgrade Kit
C2950A IEEE 1284-Compliant Parallel Cable 2m
C2951A IEEE 1284-Compliant Parallel Cable 3m
C4543A HP 64 MB (2 x 32 MB) 60ns EDO SIMM
C3648A HP 32 MB (2 x 16 MB) 60ns EDO SIMM
C3647A HP 16 MB (2 x 8 MB) 60ns EDO SIMM
Any HP JetDirect MIO print server cards
Printheads
C4800A HP Black No.10 Printhead
C4801A HP Cyan No.10 Printhead
C4802A HP Magenta No.10 Printhead
C4803A HP Yellow No.10 Printhead
Ink Cartridges
C4844A HP No.10 Large Black Ink Cartridge
C4841A HP No.10 Cyan Ink Cartridge
C4842A HP No.10 Yellow Ink Cartridge
C4843A HP No.10 Magenta Ink Cartridge
HP Supplies and Accessories
HP Bright White Inkjet Paper
C1857A US B-size, 200 sheets: 11 x 17 in.
C1858A A3, 200 sheets: 297 x 420 mm
C1824A US Letter, 500 sheets: 8.5 x 11 in.
C1825A A4, 500 sheets: 210 x 297 mm
HP Premium Inkjet Paper
C1855A US B-size, 100 sheets: 11 x 17 in.
C1856A A3, 100 sheets: 297 x 420 mm
51634Y US Letter, 200 sheets: 8.5 x 11 in.
51634Z A4, 200 sheets: 210 x 297 mm
HP Premium Inkjet Heavyweight Paper
C1852A US Letter, 100 sheets: 8.5 x 11 in.
C1853A A4, 100 sheets: 210 x 297 mm
48
Page 53

HP Premium Photo Paper
C6058A US B-size, 100 sheets: 11 x 17 in.
C6059A A3, 20 sheets: 297 x 420 mm
C6039A US Letter, 15 sheets: 8.5 x 11 in.
C6040A A4 (European ), 15 sheets: 210 x 297 mm
C6043A A4 (Asian ), 15 sheets: 210 x 297 mm
HP Premium Transparency Film
C3834A US Letter, 50 sheets: 8.5 x 11 in.
C3828A US Letter, 20 sheets: 8.5 x 11 in.
C3835A A4, 50 sheets: 210 x 297 mm
C3832A A4, 20 sheets: 210 x 297 mm
HP Premium Inkjet Rapid-Dry Transparencies
C6051A US Letter, 50 sheets: 8.5 x 11 in.
C6053A A4, 50 sheets: 210 x 297 mm
HP Iron-On T-Shirt Transfers
C6049A US Letter, 10 sheets: 8.5 x 11 in.
C6050A A4, 10 sheets: 210 x 297 mm
HP Greeting Card Paper
C1812A US Letter, 20 sheets, 20 envelopes
C6042A A4, 20 sheets, 20 envelopes
HP White Labels
92296A 1” x 2
92296B 1
5
/8” Addressing Labels
1
/3” x 4” Addressing Labels
92296C 1” x 4” Addressing Labels
92296D 2” x 4” Shipping Labels
92296E 3
92296F
92296K 8
1
/3” x 4” Shipping Labels
1
/2” x 1 3/4” Return Address Labels
1
/2” x 11” White Full Sheet Labels
92296L 99.1 x 38.1 mm Addressing Labels
92296M 99.1 x 33.8 mm Addressing Labels
92296N 63.5 x 38.1 mm Addressing Labels
92296P 100 x 51 mm Addressing Labels
92296R 199.6 x 289 mm, Full Sheet Labels
C4296A 99.1 x 67.7 mm, Parcel Labels
C4297A 63.5 x 46.6 mm Addressing Labels
49
Page 54

HP
2500C/CM
Printer Specifications
Print Method Plain paper drop on-demand thermal inkjet printing
Print Speed
1
Black Black Text Letter / A4 11 x 17 / A3
Econofast Mode 9.5 ppm 5.5 ppm
Normal Mode 8 ppm 4 ppm
Best Mode 8 ppm 4 ppm
Print Speed
1
Color Color Highlights Letter / A4 11 x 17 / A3
Econofast Mode 9.5 ppm 5 ppm
Normal Mode 6.5 ppm 3.8 ppm
Best Mode 6 ppm 3.4 ppm
Mixed Text & Graphics Letter / A4 11 x 17 / A3
Econofast Mode 7.5 ppm 4.5 ppm
Normal Mode 3.5 ppm 2 ppm
Best Mode 1.4 ppm 1 ppm
Full Page Color Highlights Letter / A4 11 x 17 / A3
Econofast Mode 3.5 ppm 1.5 ppm
Normal Mode 1.8 ppm 0.8 ppm
Best Mode 0.4 ppm 0.3 ppm
1
Approximate figures. Exact speed is dependent on the system
configuration, software program, and document complexity
Black Resolution Up to 600x600 dpi
Color Resolution PhotoREt II for photo quality
Printhead Nozzles 304 black, 912 color (304 per color printhead)
Printer Command HP PCL 3 enhanced
Language Adobe
®
PostScript®3™ (with HP 2500CM only)
Font Capability HP FontSmart v2.5 (110 TrueType fonts for Windows)
HP FontSmart software provides easy-to-use font management
capabilities
136 PostScript fonts with Adobe PostScript 3 (Euro $ symbol
supported)
Memory HP 2500C
4 MB standard RAM
HP 2500CM
12 MB standard RAM
Two 72-pin SIMM slots for additional memory (EDO, 60ns)
expansion up to a total of 76 MB
50
Page 55

Connectivity / Network HP 2500C
Management Network-capable printer for DOS and Windows environments
HP PCL 3 Windows Driver Support for Windows NT 4.0,
Windows 3.1x/95/98
Centronics parallel, IEEE 1284 compliant
One network interface slot accepts optional HP MIO Print Servers
with support for Novell Netware, Microsoft LAN Manager, Windows
for Workgroups, Windows NT, IBM LAN Server, Unix environment
HP2500CM
Network-ready printer for DOS and Windows environments.
HP PCL 3 Windows Driver Support for Windows NT 4.0,
Windows 3.1x/95/98
Centronics parallel, IEEE 1284 compliant
HP MIO 10/100T/BNC print server with support for Novell
Netware Microsoft LAN Manager, Windows for Workgroups,
Windows NT, IBM LAN Server, Unix environment
Supports networking protocols IPX/SPX, TCP/IP, DLC/LLC,
and NetBEUI
Adobe PostScript 3 drivers for Windows
Automatic switching between languages and ports.
HP JetAdmin printer management software provides easy
printer setup, configuration and management. Latest versions
available from HP’s web site (http://www.hp.com/go/jetadmin)
HP WebJetAdmin printer management software available from
HP’s web site ( http://www.hp.com/go/webjetadmin ) for simple
installation, configuration and management from a common
web browser.
Paper Handling Standard input capacity of 400 sheets through two trays of 150
sheet and 250 sheet capacity.
Standard output capacity of 150 sheets (face-up)
Rear Manual Feed – single sheet only
Tray 1 (Input / Output Tray) – Sheets: up to 10, Cards: up to 4
Tray 2 (Upper Tray) – Sheets: up to 150, Cards: up to 60
Tray 3 (Lower Tray) – Sheets: up to 250
All input paths handle standard media sizes (as listed on page 15)
up to 13” x 19” (Super A3)
Additionally, Tray 1 and the Rear Manual Feed support media sizes
from 4” x 6” (101.6 mm x 152.4 mm) to 13” x 19” (330 mm x 483 mm)
Built-in media size sensors prevents printing on the wrong media
size.
51
Page 56

Paper Size Handling Minimum Width: 76.2 mm (4 in.) x 127.0 mm (6 in.)
Maximum Width: 330 mm (13 in.) x 483 mm (19 in.)
Maximum Print PCL: 320 mm (12.61 in.) x 470 mm (18.49 in.) on 13 in. x 19 in. media
Area PostScript: 289.56 mm (11.4 in.) x 441.96 mm (17.4 in.) or 302.26 mm
(11.9 in.) x 426.72 mm (16.8 in.) on 13 in. x 19 in. media.
Recommended All input paths handle the following paper weights with the rear
Media Weight straight-through paper path handling up to 0.3mm thickness of paper
Paper: 60 to 135 g/m
Cards: 110 to 200 g/m
2
(16 to 36 lb. Bond)
2
(110 lb. Index)
Straight-through path: up to 0.3 mm thickness (0.012 in.) or
2
220 g/m
(110 lb. Index)
Smart Software Built-in printer software features:
Features HP ZoomSmart scaling technology, Billboard, Handout (N-up printing),
Mirror, Watermark, Print Preview, Quick Sets, laserJet Margin
Emulation, 2-sided Printing, Booklet
Media Size/Type Paper: Super B 13 x 19 in. (330 x 483 mm ), U.S. Tabloid 11 x 17 in., U.S.
Legal 8.5 x 14 in., U.S. Letter 8.5 x 11 in., Executive 7.25 x 10.5 in.*,
Statement 5.5 x 8.5 in.*, European Super A3 330 x 493 mm*,
European A3 297 x 420 mm, A4 210 x 297 mm, European A5 148.5 x
210 mm*, European A6 105 x 148.5 mm*, B4 257 x 364 mm, European B5
182 x 257 mm*, Custom*
Transparencies: U.S. Letter 8.5 x 11 in., European A4 210 x 297 mm
Cards: U.S. Index card 4 x 6 in., Index card 5 x 8 in.; European A6
card 105 x 148.5 mm; Postcard 100 x 148 mm
Labels: U.S. Labels, 8.5 x 11 in.; European A4 labels, 210 x 297 mm
* These media sizes are only supported in Tray 1 and the Rear
Manual Feed
Control Panel Intuitive operation and complete, easy-to-understand messages
Two-line LCD display and 2 LEDs
Buttons: (Go), Job Cancel, Menu, Item, Value, Select
Indicators: Attention, Ready
Messages can be displayed in 14 languages: English, French,
Italian, German, Spanish, Portuguese, Dutch, Norwegian, Finnish,
Swedish, Danish, Polish, Czech and Russian
Operating Operating temperature: 5
Environment Recommended operating conditions: 15
Storage temperature: -40
o
to 40oC (41oto 104oF)
o
to 60oC (-4oto 140oF)
o
to 35oC (59oto 95oF)
Relative Humidity: 20 to 80% RH non-condensing
Noise levels per ISO 9614-1: Sound Pressure, LwAM 62 dB(A)
52
Page 57

Power Supply Built-in Universal Power Supply
Power Requirements Input Voltage 100 – 240 AC (±10%), 50/60 Hz (±3 Hz)
Power Consumption Less than 2 watts when off, 8 watts maximum non-printing,
35 watts average printing, 65 watts printing
Dimensions With paper tray closed
685 mm (26.97 in.) W x 610 mm (24.02 in.) D x 337 mm (13.27 in.) H
With paper tray fully extended
685 mm (26.97 in.) W x 745 mm (29.33 in.) D x 337 mm (13.27 in.) H
Desk Space Required
685 mm (26.97 in.) W x 532 (20.94 in.) D
Weight 26.5 kg (58.48 lb.) without ink cartridges and printheads
27.0 kg (59.2 lb.) with ink cartridges and printheads
Reliability & Estimated 12,000 pages/month
Usage
System Requirements Minimum: Windows 3.1x: 486DX-66, 8 MB RAM
Windows 95/98: 486DX-100, 8 MB RAM
Windows NT 4.0: 486DX-100, 16 MB RAM
Recommended: Windows 3.1x: Pentium 150/166, 16 MB RAM
Windows 95/98, Pentium 150/166, 16 MB RAM
Windows NT 4.0, Pentium 150/166, 32 MB RAM
50 MB Free HardDisk space for 11 x 17 or A3 size printing.
Graphics intensive files may require more disk space.
Warranty 1 year on site warranty
Year 2000 Compliance HP 2500C series printers are Year 2000 compliant
Product Certifications Safety Certifications: CCIB (China), CSA (Canada), PSB
(Singapore), UL (USA), NOM1(Mexico), TUV-GS (Germany), SABS
(South Africa), JUN (Korea), LS (Lithuania), EEI (Estonia)
EMI Certifications: FCC Class B when used with a Class B computing
device (USA), FCC Part 15B Class A when connected to Local Area
Network (LAN) Devices, CTICK (Australia & New Zealand), VCCI
(Japan), CE (European Union), B mark (Poland), GOST (Russia),
BCIQ (Taiwan), RRL (Korea)
Pantone Calibrated
53
Page 58

HP
Paper Size Left Margin Right Margin Top Margin Bottom Margin
US Letter 0.25” 0.25” 0.117” 0.5”
11” x 17” 0.26” 0.26” 0.117” 0.5”
A4 0.133” 0.133” 0.117” 0.5”
A3 0.205” 0.205” 0.117” 0.5”
B4 0.205” 0.205” 0.117” 0.5”
Legal 0.25” 0.25” 0.117” 0.5”
Executive 0.252” 0.252” 0.117” 0.5”
A5 0.127” 0.127” 0.117” 0.5”
B5 0.128” 0.128” 0.117” 0.5”
4” x 6” Index Card 0.133” 0.133” 0.117” 0.5”
5” x 8” Index Card 0.127” 0.127” 0.117” 0.5”
A6 Card 0.133” 0.133” 0.117” 0.5”
13” x 19” 0.207” 0.207” 0.117” 0.5”
Statement 0.203” 0.203” 0.117” 0.5”
Custom
(3.94” x 5.83” to 13” x 19”)
or (100 x 148mm to 0.137” 0.137” 0.117” 0.5”
330 x 483mm) 3.48mm 3.48mm 2.97mm 12.7mm
2500C/CM
The following are the minimum printer margins for the various supported paper
sizes when printing with the PCL driver. Please note that these margins are based
on portrait orientation.
6.35mm 6.35mm 2.97mm 12.7mm
6.6mm 6.6mm 2.97mm 12.7mm
3.38mm 3.38mm 2.97mm 12.7mm
5.2mm 5.2mm 2.97mm 12.7mm
5.2mm 5.2mm 2.97mm 12.7mm
6.25mm 6.25mm 2.97mm 12.7mm
6.4mm 6.4mm 2.97mm 12.7mm
3.2mm 3.2mm 2.97mm 12.7mm
3.23mm 3.23mm 2.97mm 12.7mm
3.38mm 3.38mm 2.97mm 12.7mm
3.2mm 3.2mm 2.97mm 12.7mm
3.38mm 3.38mm 2.97mm 12.7mm
5.26mm 5.26mm 2.97mm 12.7mm
5.25mm 5.25mm 2.97mm 12.7mm
Minimum Printing Margins
54
Page 59

Note:
The minimum printer margins when printing with the PostScript driver is the same as that
of the PCL driver except for the following:
Paper Size Left Margin Right Margin Top Margin Bottom Margin
13” x 19” 0.8” 0.8” 0.8” 0.8”
20.32mm 20.32mm 20.32mm 20.32mm
330 x 483mm 0.55” 0.55” 1.1” 1.1”
13.97mm 13.97mm 27.94mm 27.94mm
Custom 0.137” 0.137” 0.117” 0.5”
3.48mm 3.48mm 2.97mm 2.97mm
HP
2500C/CM
HP Product Duration of Limited Warranty
Software 90 Days
Ink Cartridges 90 Days
Printheads 1 Year
Printer 1 Year
A. Extent of Limited Warranty
1. Hewlett-Packard (HP) warrants to the end-user customer that the HP
products specified above will be free from defects in materials and
workmanship for the duration specified above, which duration begins
on the date of purchase by the customer.
Customer is responsible for maintaining proof of date of purchase.
2. For software products, HP’s limited warranty applies only to a failure to
execute programming instructions. HP does not warrant that the
operation of any product will be uninterrupted or error free.
3. HP’s limited warranty covers only those defects which arise as a result
of normal use of the product, and do not apply to any:
a. Improper or inadequate maintenance or modification;
b. Software, interfacing, media, parts, or supplies not provided or
supported by HP; or
c. Operation outside the product’s specifications.
4. For HP printer products, the use of a non-HP ink cartridge or a refilled
ink cartridge does not affect either the warranty to the customer or any
HP support contract with the customer. However, if printer failure or
damage is attributable to the use of a non-HP or refilled ink cartridge,
HP will charge its standard time and materials charges to service the
printer for the particular failure or damage.
Hewlett-Packard Limited Warranty Statement
55
Page 60

5. If HP receives, during the applicable warranty period, notice of a defect
in any software, media, or ink cartridge product which is covered by HP’s
warranty, HP shall replace the defective product. If HP receives, during
the applicable warranty period, notice of a defect in any hardware
product which is covered by HP’s warranty, HP shall either repair or
replace the defective product, at HP’s option.
6. If HP is unable to repair or replace, as applicable, a defective product
which is covered by HP’s warranty, HP shall, within a reasonable time
after being notified of the defect, refund the purchase price for the
product.
7. HP shall have no obligation to repair, replace, or refund until the
customer returns the defective product to HP.
8. Any replacement product may be either new or like-new, provided that
it has functionality at least equal to that of the product being replaced.
9. HP’s limited warranty is valid in any country where the covered HP
product is distributed by HP except for the Middle-East, Africa,
Argentina, Brazil, Mexico, Venezuela, and France’s “Départements
D’Outre-Mer”; for those excepted areas, the warranty is valid only in the
country of purchase. Contracts for additional warranty services, such as
on-site service, may be available for any authorized HP service facility
where the listed HP product is distributed by HP or an authorized
importer.
B. Limitations of Warranty
1. TO THE EXTENT ALLOWED BY LOCAL LAW, NEITHER HP NOR ITS THIRD
PARTY SUPPLIERS MAKE ANY OTHER WARRANTY OR CONDITION OF
ANY KIND, WHETHER EXPRESS OR IMPLIED, WITH RESPECT TO THE HP
PRODUCTS, AND SPECIFICALLY DISCLAIM THE IMPLIED WARRANTIES
OR CONDITIONS OF MERCHANTABILITY, SATISFACTORY QUALITY,
AND FITNESS FOR A PARTICULAR PURPOSE.
C. Limitations of Liability
1. To the extent allowed by local law, the remedies provided in this
Warranty Statement are the customer’s sole and exclusive remedies.
2. TO THE EXTENT ALLOWED BY LOCAL LAW, EXCEPT FOR THE
OBLIGATIONS SPECIFICALLY SET FORTH IN THIS WARRANTY
STATEMENT, IN NO EVENT SHALL HP OR ITS THIRD PARTY
SUPPLIERS BE LIABLE FOR DIRECT, INDIRECT, SPECIAL, INCIDENTAL,
OR CONSEQUENTIAL DAMAGES, WHETHER BASED ON CONTRACT,
TORT, OR ANY OTHER LEGAL THEORY AND WHETHER ADVISED OF
THE POSSIBILITY OF SUCH DAMAGES.
56
Page 61

D. Local Law
1. This Warranty Statement gives the customer specific legal rights. The
customer may also have other rights which vary from state to state in
the United States, from province to province in Canada, and from
country to country elsewhere in the world.
2. To the extent that this Warranty Statement is inconsistent with local law,
this Warranty Statement shall be deemed modified to be consistent with
such local law. Under such local law, certain disclaimers and limitations
of this Warranty Statement may not apply to the customer. For example,
some states in the United States, as well as some governments outside
the United States (including provinces in Canada), may:
a. Preclude the disclaimers and limitations in this Warranty Statement
from limiting the statutory rights of a consumer
(e.g. the United Kingdom);
b. Otherwise restrict the ability of a manufacturer to enforce such
disclaimers or limitations; or
c. Grant the customer additional warranty rights, specify the duration of
implied warranties which the manufacturer cannot disclaim, or not
allow limitations on the duration of implied warranties.
3. FOR CONSUMER TRANSACTIONS IN AUSTRALIA AND NEW ZEALAND,
THE TERMS IN THIS WARRANTY STATEMENT, EXCEPT TO THE EXTENT
LAWFULLY PERMITTED, DO NOT EXCLUDE, RESTRICT, OR MODIFY, AND
ARE IN ADDITION TO, THE MANDATORY STATUTORY RIGHTS
APPLICABLE TO THE SALE OF HP PRODUCTS TO SUCH CUSTOMERS.
57
Page 62

HP
2500C/CM
Declaration of Conformity
DECLARATION OF CONFORMITY
according to ISO/IEC Guide 22 and EN 45014
Manufacturer's Name: Hewlett-Packard Singapore (Pte) Ltd
Manufacturer's Address: Asia Hardcopy Manufacturing Operation
20 Gul Way, Singapore 629196
declares, that the product
Product Name: HP2500C, HP2500Cse, HP2500Cxi, HP2500CM*
Model Number: C2684A, C2686A, C2687A, C2685A
Product Options: All
conforms to the following Product Specifications:
Safety: IEC 950: 1991 + A1 + A2 + A3 + A4/ EN 60950: 1992 + A1 + A2 + A3 + A4
IEC825-1: 1993 / EN 60825-1:1994 class I for LEDs
EMC: CISPR 22: 1993 Class B / EN 55022: 1994 Class B
CISPR 22: 1993 Class A / EN 55022: 1994 Class A*
IEN 50082-1: 1992
IEC 801-2: 1991 / prEN 55024-2: 1992, 4kV CD, 8kV AD
IEC 801-3: 1984 / prEN 55024-3: 1991, 3 V/m
IEC 801-4: 1988 / prEN 55024-4: 1992, 0.5kV Signal Lines, 1kV Power Lines
IEC 1000-3-2: 1995 / EN61000-3-2: 1995
IEC 1000-3-3: 1994 / EN61000-3-3: 1995
FCC Title 47 CFR, Part 15 Class B / VCCI-2
FCC Title 47 CFR, Part 15 Class A / VCCI-1*
AS / NZS 3548:1995/ ICES-003, Issue 2
Supplementary Information:
(1) The product herewith complies with the requirements of the Low Voltage Directive 73/23/EEC
and the EMC Directive 89/336/EEC, and carries the CE Marking accordingly.
(2) The product was tested in a typical configuration with Hewlett Packard personal computer systems.
(3)This Device complies with Part 15 of the FCC Rules. Operation is subject to the following two
conditions: (1) this device may not cause harmful interference, and (2) this device must accept
any interference received, including interference that may cause undesired operation.
*This printer contains Local Area Network (LAN) options. When the interface cable is attached
to either of the IEEE802.3 connectors, the printer meets the requirements of CISPR 22: 1993 Class
A /EN 55022: 1994 Class A
Singapore, August 1998 Chan Kum Yew, Quality Manager
Australia Contact: Product Regulations Manager, Hewlett-Packard Australia Ltd, 31-41 Joseph Street,
Blackburn,Victoria 3130, Australia
European Contact: Your Local Hewlett-Packard Sales and Service Office or Hewlett-Packard Gmbh, Department
HQ-TRE / Standards Europe, Herrenberger Straße 130, D-71034 Böblingen (FAX: +49-7031-14-3143)
USA Contact: Corporate Product Regulations Manager, Hewlett-Packard Company, 3000 Hanover Street,
58
Palo Alto, CA 94304 (Phone: 415-857-1501)
Page 63

HP
2500C/CM
Regulatory Notices
Power Cord Statement
The power cord cannot be repaired. If it is defective it should be discarded
or returned to the supplier.
LEDs Classification
Energy Consumption
Energy Star is a US registered service
mark of United States Environmental
Protection Agency
Safety Information
Always follow basic safety precautions when
using this product to reduce risk of injury
WARNING
from fire or electric shock.
1. Read and understand instructions in the User’s Guide.
2. Observe all warnings and instructions marked on the product.
3. Unplug this product from wall outlets before cleaning.
4. Do not install product or use this product near water, or when you are wet.
5. Install the product securely on a stable surface.
6. Install the product in a protected location where no one can step on or
trip over the line cord, and the line cord will not be damaged.
7. If the product does not operate normally, see “Troubleshooting” section
in the User’s Guide.
59
Page 64

Page 65

©Copyright 1999
Hewlett-Packard Company
450 Alexandra Road
Singapore 119960
Singapore.
http://www.hp.com/go/hp2500
 Loading...