

Page 1

PDA WIRELESS PATCH INSTRUCTIONS FOR HP IPAQ 2490
Windows Mobility 5.0
The following documentation provides a step by step set of directions for the process of updating and
installing patches the HP IPAQ 2490B PDA. Your administrator was given the PDA by either the STS
or Professional Development departments.
Although the PDA, in the original configuration, will allow the user to connect to most wireless access
points, like “Hot Spots”, non-secured or secured connections, these patches must be installed to allow
the user to connect to the Polk County wireless systems (pcsb b-g).
You must perform this patching process on the administrator’s computer where the PDA is
currently connected through the USB cable and cradle.
The steps in this patching process are as follows:
1. Download PDA Wireless Patch Files to Desktop - Step #1
2. Performing a HARD reset on the PDA and Initial Setup after reset – Step #3
3. Copying Files, Configuring the Menu on the PDA, Installing the Daylight Savings Time Patch –
Step #7
4. Installing the Wireless Patch – Step #10
5. Running the REG EDIT Patch – Step #13
6. Setting Up the Proxy Setting – Step #19
7. Initial Login to the Network – Step #23
Additional Software Installation
There is now an Adobe Reader for Windows Mobility.
Click the link to download.
http://www.polk-fl.net/staff/technology/helpdesk/AdbeRdr20_ppc_enu.exe
When the download is complete, double click on the icon and follow the installation directions.
Using the Proxy Settings
The Polk county Wireless requires the use of a Proxy address. If you attempt to connect at home
or in a location OTHER than a school facility, you have to UNCHECK the proxy settings.
To access the Proxy Settings for the PDA:
Tap START>SETTINGS>CONNECTIONS TABCONNECTIONS>EDIT or SETUP MY
PROXY SERVER
PROXY ADDRESS: 204.122.254.9 PORT: 2804
Created by Polk County Schools Help Desk 519-8042 or 51586
Updated: 07/24/08
Page 2

PDA Wireless Patch Instructions - Windows Mobility 5.0
Steps Screen Displayed Procedures
1
STEP #1: Download PDA Wireless
Patch Files to Desktop.
• Click on link below
http://www.polkfl.net/staff/technology/helpdesk/ne
tworkmanagers.htm
• Click on PDA Wireless Patch…
link
• Click Save button
• Click on Desktop Icon
2
• Click on Save button
• Zip file appears on Desktop
• Double Click on Zip File Icon to
unzip files
• Select and Copy Four Files to the
Desktop
Created by Polk County Schools Help Desk 519-8042 or 51586
Updated: 07/24/08
2
Page 3
PDA Wireless Patch Instructions - Windows Mobility 5.0
Steps Screen Displayed Procedures
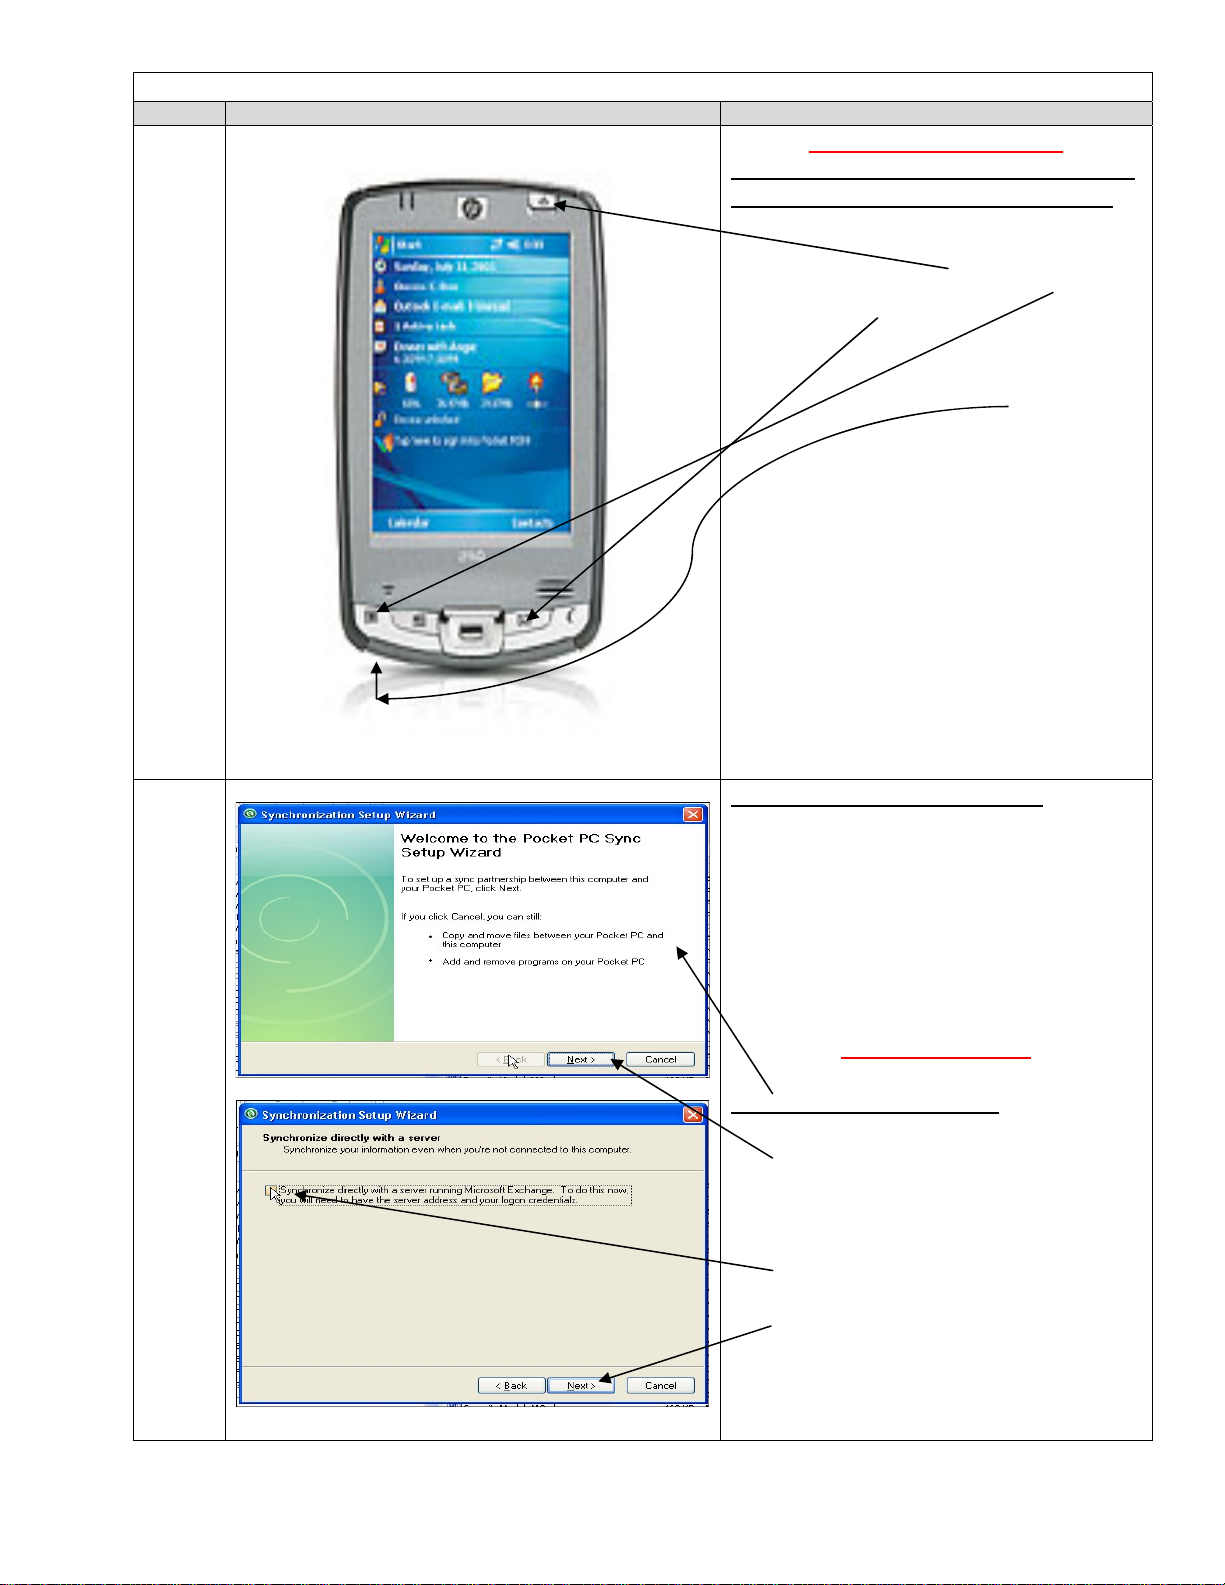
3
PDA OUT OF CRADLE
STEP #2: Performing a HARD reset on
the PDA and Initial Setup after reset.
• Remove the PDA from the cradle
• Hold down the Power, Message,
and Calendar buttons at the same
time.
• While holding down the three
buttons, Press the Stylus Pen into
the small hole on the bottom left
side and Hold until you see the
screen go black,
• Release the buttons and remove
the stylus
Note: After screen begins to rest, you
should see a message at the bottom of the
screen: “Formatting PS……”. If
message does not appear, retry the Hard
Reset procedure again.
4
Performing initial setup items.
Before putting the PDA back into the
cradle, the initial setup must be
completed.
• Follow the onscreen prompts
• When completed, place the PDA
in the Cradle
PDA IN CRADLE
Welcome Screen Appears.
• Click Next button
• Uncheck Synchronize box
• Click Next button
Created by Polk County Schools Help Desk 519-8042 or 51586
Updated: 07/24/08
3
Page 4
PDA Wireless Patch Instructions - Windows Mobility 5.0
Steps Screen Displayed Procedures
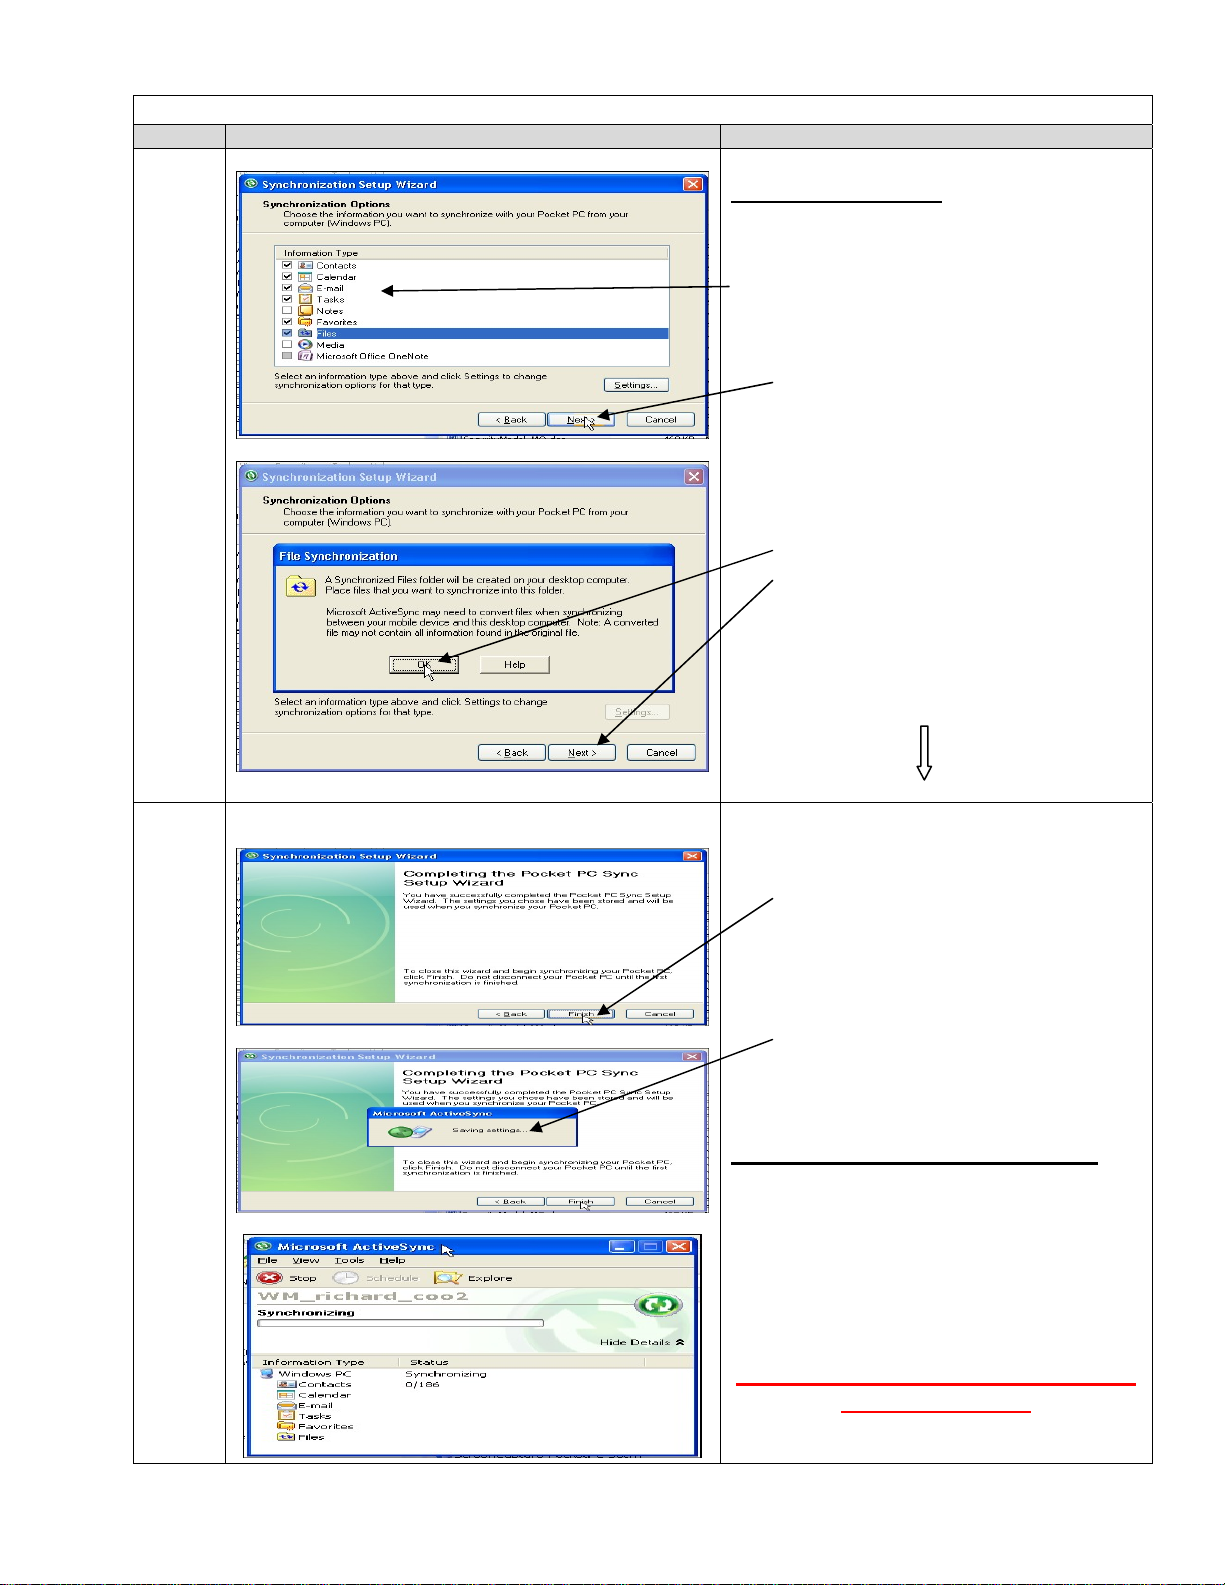
5
Selecting Sync Items
If the PDA had previously setup, some of
the boxes might already be checked.
Check with your administrator to
determine which items should be synced.
• Click the Next button
If you had or have selected the FILES to
sync:
• Click the OK button
• Click the Next button
Otherwise
• Go to Step #6 (Next box below)
6
\
• Click Finish button
• Saving Setting message appears
Synchronizing 2window will appear
When synchronizing is complete, the
window will show:
Connected
Synchronized
DO NOT REMOVE THE PDA FROM
THE CRADLE!!!!
Created by Polk County Schools Help Desk 519-8042 or 51586
Updated: 07/24/08
4
Page 5
PDA Wireless Patch Instructions - Windows Mobility 5.0
Steps Screen Displayed Procedures
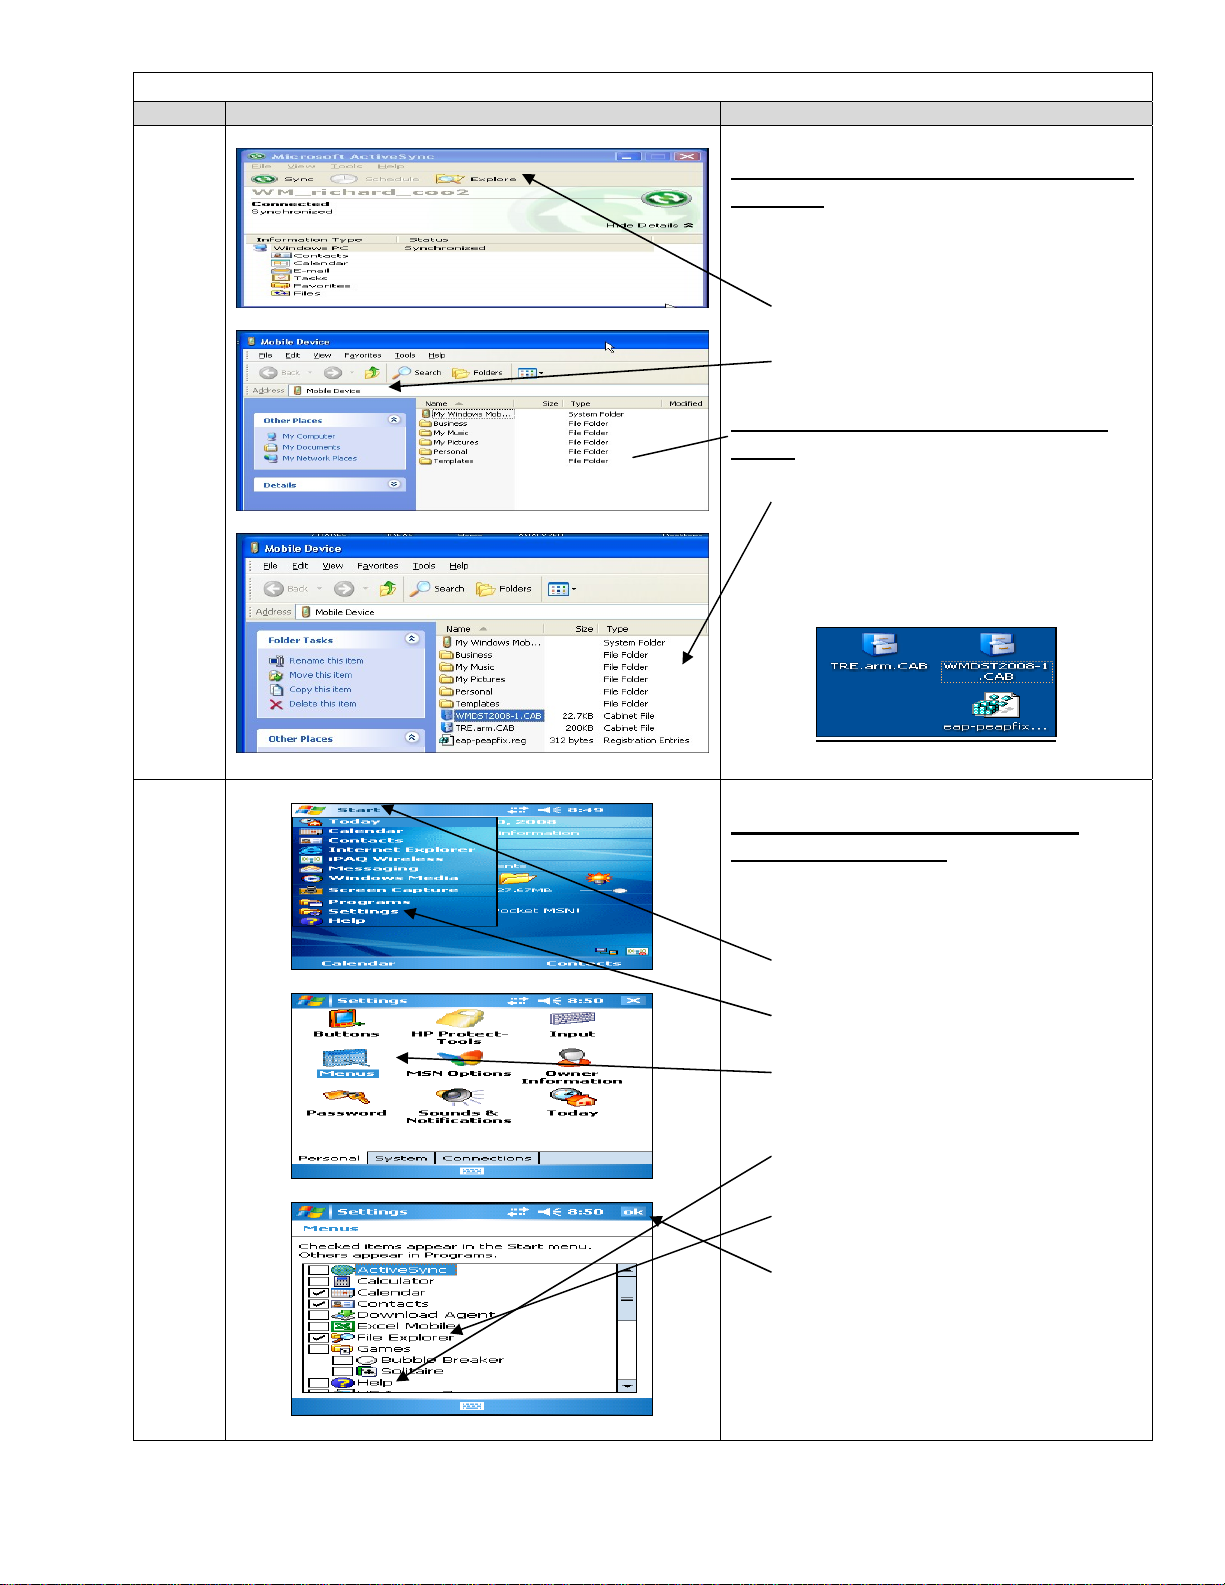
7
Step #3: Copying the required files into
the PDA.
• Click on Explore
• MOBILE DEVICE
The Mobile Device Window explorer
opens.
• Click and Drag TRE.arm.CAB,
WMDST2008-1.CAB, and
eapppeapfix.reg from your
DESKTOP into this Folder.
8
Setting up the menu items for File
Explorer on the PDA
Use the Stylus to perform all operations!
• Click Start button
• Click Settings
• Click Menus icon
• Uncheck Help box
• Check File Explorer box
• Click OK to close Settings
Window
• Repeat clicking OK or “X” to
return to main screen
Created by Polk County Schools Help Desk 519-8042 or 51586
Updated: 07/24/08
5
Page 6

PDA Wireless Patch Instructions - Windows Mobility 5.0
Steps Screen Displayed Procedures
9
Installing the Windows Daylight
Savings Time Patch.
• Tap the WMDST2008-1 file
• Installation screen and progress
bar will appear.
• When installation is complete,
the PDA will shut down and
then restart.
10
Created by Polk County Schools Help Desk 519-8042 or 51586
Updated: 07/24/08
Step #4: Installing the HP Wireless
Patch
• Double click on the sp34029.exe
on your Desktop
• Click the Run button
• Click the Check Box to accept the
license agreement
• Click the Next button
6
Page 7

PDA Wireless Patch Instructions - Windows Mobility 5.0
Steps Screen Displayed Procedures
11
Installing the HP Wireless Patch
(cont’d)
• Accept the default location of
installation files
• Click the Next button
• Click the OK button
12
Installing the HP Wireless Patch
(cont’d)
• Installation screen appears on the
PDA
• Select the Device option
• Tap the Install button
• Installation progress screen
appears
• When installation is complete, the
Setup Completed message may
or may not appear. If the Setup
Complete window appears, Click
OK and the PDA will shut down
and then restart.
Created by Polk County Schools Help Desk 519-8042 or 51586
Updated: 07/24/08
7
Page 8

PDA Wireless Patch Instructions - Windows Mobility 5.0
Steps Screen Displayed Procedures
13
PDA OUT OF CRADLE
Step #5: Running the REG EDIT Patch.
• Tap Start button
• Tap File Explorer
• File Explorer window opens
• If My Documents is not visible,
Tap Drop Down Arrow and Tap
My Documents
• Tap Tre.arm
14
• Installation screen appears on the
PDA
• Select the Device option
• Tap the Install button
• Tap OK when Installation
Competition Screen appears
Created by Polk County Schools Help Desk 519-8042 or 51586
Updated: 07/24/08
8
Page 9

PDA Wireless Patch Instructions - Windows Mobility 5.0
Steps Screen Displayed Procedures
15
Running the REG EDIT Patch
(Cont’d).
• Tap Start button
• Tap Programs
• Programs window opens
• Tap Tre.arm
16
• Registry Import Window Opens
• Tap File
• Tap Import Registry
Created by Polk County Schools Help Desk 519-8042 or 51586
Updated: 07/24/08
9
Page 10

PDA Wireless Patch Instructions - Windows Mobility 5.0
Steps Screen Displayed Procedures
17
Running the REG EDIT Patch
(Cont’d).
• Tap eap-peapfix
• Registry importing message
appears
• Tap OK button
18
• Tap X button to return to the Main
Screen
• PDA main window appears
Created by Polk County Schools Help Desk 519-8042 or 51586
Updated: 07/24/08
10
Page 11

PDA Wireless Patch Instructions - Windows Mobility 5.0
Steps Screen Displayed Procedures
19
Step #6: Configuring Proxy Settings
and Initial Network Login.
• Tap Start button
• Tap Settings button
20
• Tap Connections tab
• Tap Connections Icon
• Tap Setup or Edit My Proxy
Server
Note: you might see “Set up my proxy
server” rather than “Edit my proxy
server”.
Created by Polk County Schools Help Desk 519-8042 or 51586
Updated: 07/24/08
11
Page 12

PDA Wireless Patch Instructions - Windows Mobility 5.0
Steps Screen Displayed Procedures
21
Configuring Proxy Settings and Initial
Network Login (Cont’d).
• Tap both check boxes
• Type 204.122.254.9 in the address
box
• Tap the Advanced button
• Tap on the HTTP line
22
• Tap on the Port box
• Type 2804 in the box
• Tap OK button
• Tap OK button
• Continue to Tap OK or X button
until you see the main START
screen
Created by Polk County Schools Help Desk 519-8042 or 51586
Updated: 07/24/08
12
Page 13

PDA Wireless Patch Instructions - Windows Mobility 5.0
Steps Screen Displayed Procedures
23
Initial Network Login – Step #7.
Note: A red “X” in the Wireless Icon
mean that the Wireless is turned off.
To Start your wireless connection:
• Tap the Wireless Icon
24
• Tap the X to close this window
• Tap the WIFI button to Turn on
the wireless system
• Tap the Work button
• Tap the Connect button
Created by Polk County Schools Help Desk 519-8042 or 51586
Updated: 07/24/08
13
Page 14

PDA Wireless Patch Instructions - Windows Mobility 5.0
Steps Screen Displayed Procedures
25
Initial Network Login (Cont’d).
• Type your Network Login Name
first.last
• Type your Network (Email)
password
• Type polk-fl for Domain
• Check the Save Password box
• Tap OK button
26
• The WIFI button will turn green
when you are connected.
• Tap OK button to Close the
Wireless window
To turn off the wireless system:
• Tap the WIFI button once
Or
• Tap the ALL OFF button
NOTE: You know your wireless is
working when the RED “X” is not on in
the Wireless Icon.
Created by Polk County Schools Help Desk 519-8042 or 51586
Updated: 07/24/08
14
 Loading...