

Page 1
HP 2101nw Wireless G USB Print Server
User Guide
Page 2

© Copyright 2008 Hewlett-Packard Development Company, L.P.
Hewlett-Packard Company notices
The information contained in this document is subject to change without notice.
All rights reserved. Reproduction, adaptation, or translation of this material is prohibited without prior written permission of Hewlett-Packard,
except as allowed under copyright laws.
The only warranties for HP products and services are set forth in the express warranty statements accompanying such products and services.
Nothing herein should be construed as constituting an additional warranty. HP shall not be liable for technical or editorial errors or omissions
contained herein.
Page 3

Contents
1Welcome
Contents of the package . . . . . . . . . . . . . . . . . . . . . . . . . . . . . . . . . . . . . . . . . . . . . . . . . . . . . . . . . . . . . . . . . . . . 5
Lights and ports of the print server. . . . . . . . . . . . . . . . . . . . . . . . . . . . . . . . . . . . . . . . . . . . . . . . . . . . . . . . . . . 6
2 Set up your print server
Attach to an existing wireless network. . . . . . . . . . . . . . . . . . . . . . . . . . . . . . . . . . . . . . . . . . . . . . . . . . . . . . . . . . . 7
Windows. . . . . . . . . . . . . . . . . . . . . . . . . . . . . . . . . . . . . . . . . . . . . . . . . . . . . . . . . . . . . . . . . . . . . . . . . . . . 7
Install the print server software . . . . . . . . . . . . . . . . . . . . . . . . . . . . . . . . . . . . . . . . . . . . . . . . . . 7
Install the printer software and connect to the printer . . . . . . . . . . . . . . . . . . . . . . . . . . . . . . . . . . . 7
Mac . . . . . . . . . . . . . . . . . . . . . . . . . . . . . . . . . . . . . . . . . . . . . . . . . . . . . . . . . . . . . . . . . . . . . . . . . . . . . . . 8
Install the print server software . . . . . . . . . . . . . . . . . . . . . . . . . . . . . . . . . . . . . . . . . . . . . . . . . . 8
Install the printer software and connect to the printer . . . . . . . . . . . . . . . . . . . . . . . . . . . . . . . . . . . 8
Connect to the printer using Connection Manager . . . . . . . . . . . . . . . . . . . . . . . . . . . . . . . . . . . . . . . . . . . . . . . . . . 9
Windows. . . . . . . . . . . . . . . . . . . . . . . . . . . . . . . . . . . . . . . . . . . . . . . . . . . . . . . . . . . . . . . . . . . . . . . . . . . . 9
Mac . . . . . . . . . . . . . . . . . . . . . . . . . . . . . . . . . . . . . . . . . . . . . . . . . . . . . . . . . . . . . . . . . . . . . . . . . . . . . . . 9
Attach directly to computer with no existing network. . . . . . . . . . . . . . . . . . . . . . . . . . . . . . . . . . . . . . . . . . . . . . . . 10
Windows. . . . . . . . . . . . . . . . . . . . . . . . . . . . . . . . . . . . . . . . . . . . . . . . . . . . . . . . . . . . . . . . . . . . . . . . . . . 10
Install the print server software . . . . . . . . . . . . . . . . . . . . . . . . . . . . . . . . . . . . . . . . . . . . . . . . . 10
Install the printer software and connect to the printer . . . . . . . . . . . . . . . . . . . . . . . . . . . . . . . . . . 10
Mac . . . . . . . . . . . . . . . . . . . . . . . . . . . . . . . . . . . . . . . . . . . . . . . . . . . . . . . . . . . . . . . . . . . . . . . . . . . . . . 11
Install the print server software . . . . . . . . . . . . . . . . . . . . . . . . . . . . . . . . . . . . . . . . . . . . . . . . . 11
Install the printer software and connect to the printer . . . . . . . . . . . . . . . . . . . . . . . . . . . . . . . . . . 11
Contents
3 Using the Print Server
Use the Connection Manager . . . . . . . . . . . . . . . . . . . . . . . . . . . . . . . . . . . . . . . . . . . . . . . . . . . . . . . . . . . . . . . 13
Access the Connection Manager . . . . . . . . . . . . . . . . . . . . . . . . . . . . . . . . . . . . . . . . . . . . . . . . . . . . . . . . . . 13
Connection Manager icons . . . . . . . . . . . . . . . . . . . . . . . . . . . . . . . . . . . . . . . . . . . . . . . . . . . . . . . . . . . . . . 13
Cancel a print job. . . . . . . . . . . . . . . . . . . . . . . . . . . . . . . . . . . . . . . . . . . . . . . . . . . . . . . . . . . . . . . . . . . . . 13
Change printers . . . . . . . . . . . . . . . . . . . . . . . . . . . . . . . . . . . . . . . . . . . . . . . . . . . . . . . . . . . . . . . . . . . . . . 13
Restart the Connection Manager. . . . . . . . . . . . . . . . . . . . . . . . . . . . . . . . . . . . . . . . . . . . . . . . . . . . . . . . . . . 14
Use Advanced Setup . . . . . . . . . . . . . . . . . . . . . . . . . . . . . . . . . . . . . . . . . . . . . . . . . . . . . . . . . . . . . . . . . . . . . 15
4Troubleshooting
Cannot detect print server during installation. . . . . . . . . . . . . . . . . . . . . . . . . . . . . . . . . . . . . . . . 17
Can print from most software applications, but the HP software (HP Director or HP Solution Center) does
not seem to work (cannot scan or read memory cards) . . . . . . . . . . . . . . . . . . . . . . . . . . . . . . . . 17
Installation completed but still cannot print . . . . . . . . . . . . . . . . . . . . . . . . . . . . . . . . . . . . . . . . . 17
5 Technical information
Specifications . . . . . . . . . . . . . . . . . . . . . . . . . . . . . . . . . . . . . . . . . . . . . . . . . . . . . . . . . . . . . . . . . . . . . . . . . . 19
Environmental product stewardship program . . . . . . . . . . . . . . . . . . . . . . . . . . . . . . . . . . . . . . . . . . . . . . . . . . . . . 19
Protecting the environment . . . . . . . . . . . . . . . . . . . . . . . . . . . . . . . . . . . . . . . . . . . . . . . . . . . . . . . . . . . . . . . 19
Plastics . . . . . . . . . . . . . . . . . . . . . . . . . . . . . . . . . . . . . . . . . . . . . . . . . . . . . . . . . . . . . . . . . . . . . . . . . . . . 19
Material safety data sheets . . . . . . . . . . . . . . . . . . . . . . . . . . . . . . . . . . . . . . . . . . . . . . . . . . . . . . . . . . . . . . 19
Hardware recycling program . . . . . . . . . . . . . . . . . . . . . . . . . . . . . . . . . . . . . . . . . . . . . . . . . . . . . . . . . . . . . 19
Limited warranty statement . . . . . . . . . . . . . . . . . . . . . . . . . . . . . . . . . . . . . . . . . . . . . . . . . . . . . . . . . . . . . . . . . 20
Regulatory information . . . . . . . . . . . . . . . . . . . . . . . . . . . . . . . . . . . . . . . . . . . . . . . . . . . . . . . . . . . . . . . . . . . . 21
Disposal of Waste Equipment by Users in Private Households in the European Union . . . . . . . . . . . . . . . . . . . . . . 21
Regulatory model identification number . . . . . . . . . . . . . . . . . . . . . . . . . . . . . . . . . . . . . . . . . . . . . . . . . . . . . . 21
FCC statement . . . . . . . . . . . . . . . . . . . . . . . . . . . . . . . . . . . . . . . . . . . . . . . . . . . . . . . . . . . . . . . . . . . . . . . 21
Notice to users in Brazil . . . . . . . . . . . . . . . . . . . . . . . . . . . . . . . . . . . . . . . . . . . . . . . . . . . . . . . . . . . . . . . . 21
Notice to users in Argentina. . . . . . . . . . . . . . . . . . . . . . . . . . . . . . . . . . . . . . . . . . . . . . . . . . . . . . . . . . . . . . 22
Notice to users in Indonesia . . . . . . . . . . . . . . . . . . . . . . . . . . . . . . . . . . . . . . . . . . . . . . . . . . . . . . . . . . . . . . 22
Notice to users in Korea . . . . . . . . . . . . . . . . . . . . . . . . . . . . . . . . . . . . . . . . . . . . . . . . . . . . . . . . . . . . . . . . 22
Notice to users in Japan . . . . . . . . . . . . . . . . . . . . . . . . . . . . . . . . . . . . . . . . . . . . . . . . . . . . . . . . . . . . . . . . 22
Notice to users in Mexico . . . . . . . . . . . . . . . . . . . . . . . . . . . . . . . . . . . . . . . . . . . . . . . . . . . . . . . . . . . . . . . 22
Notice to users in Pakistan . . . . . . . . . . . . . . . . . . . . . . . . . . . . . . . . . . . . . . . . . . . . . . . . . . . . . . . . . . . . . . . 22
Notice to users in Russia . . . . . . . . . . . . . . . . . . . . . . . . . . . . . . . . . . . . . . . . . . . . . . . . . . . . . . . . . . . . . . . . 22
Contents
3
Page 4

Notice to users in Singapore . . . . . . . . . . . . . . . . . . . . . . . . . . . . . . . . . . . . . . . . . . . . . . . . . . . . . . . . . . . . . 23
Notice to users in South Africa . . . . . . . . . . . . . . . . . . . . . . . . . . . . . . . . . . . . . . . . . . . . . . . . . . . . . . . . . . . . 23
Notice to users in the U.S. . . . . . . . . . . . . . . . . . . . . . . . . . . . . . . . . . . . . . . . . . . . . . . . . . . . . . . . . . . . . . . . 23
Notice to users in Canada . . . . . . . . . . . . . . . . . . . . . . . . . . . . . . . . . . . . . . . . . . . . . . . . . . . . . . . . . . . . . . . 23
European Union Regulatory Notice . . . . . . . . . . . . . . . . . . . . . . . . . . . . . . . . . . . . . . . . . . . . . . . . . . . . . . . . . 24
Notice to users in Taiwan. . . . . . . . . . . . . . . . . . . . . . . . . . . . . . . . . . . . . . . . . . . . . . . . . . . . . . . . . . . . . . . . 24
Notice to users in China . . . . . . . . . . . . . . . . . . . . . . . . . . . . . . . . . . . . . . . . . . . . . . . . . . . . . . . . . . . . . . . . . . . 25
Declaration of Conformity . . . . . . . . . . . . . . . . . . . . . . . . . . . . . . . . . . . . . . . . . . . . . . . . . . . . . . . . . . . . . . . . . . 26
4Contents
Page 5
1Welcome
Congratulations on the purchase of your Wireless G USB Print Server. The Print Server was designed to provide a simple
and efficient wireless solution for connecting to your HP printer or all-in-one. With supported HP printers, you can print
using the print server and with All-in-One devices you can print, scan, and fax (if your device has fax capability).
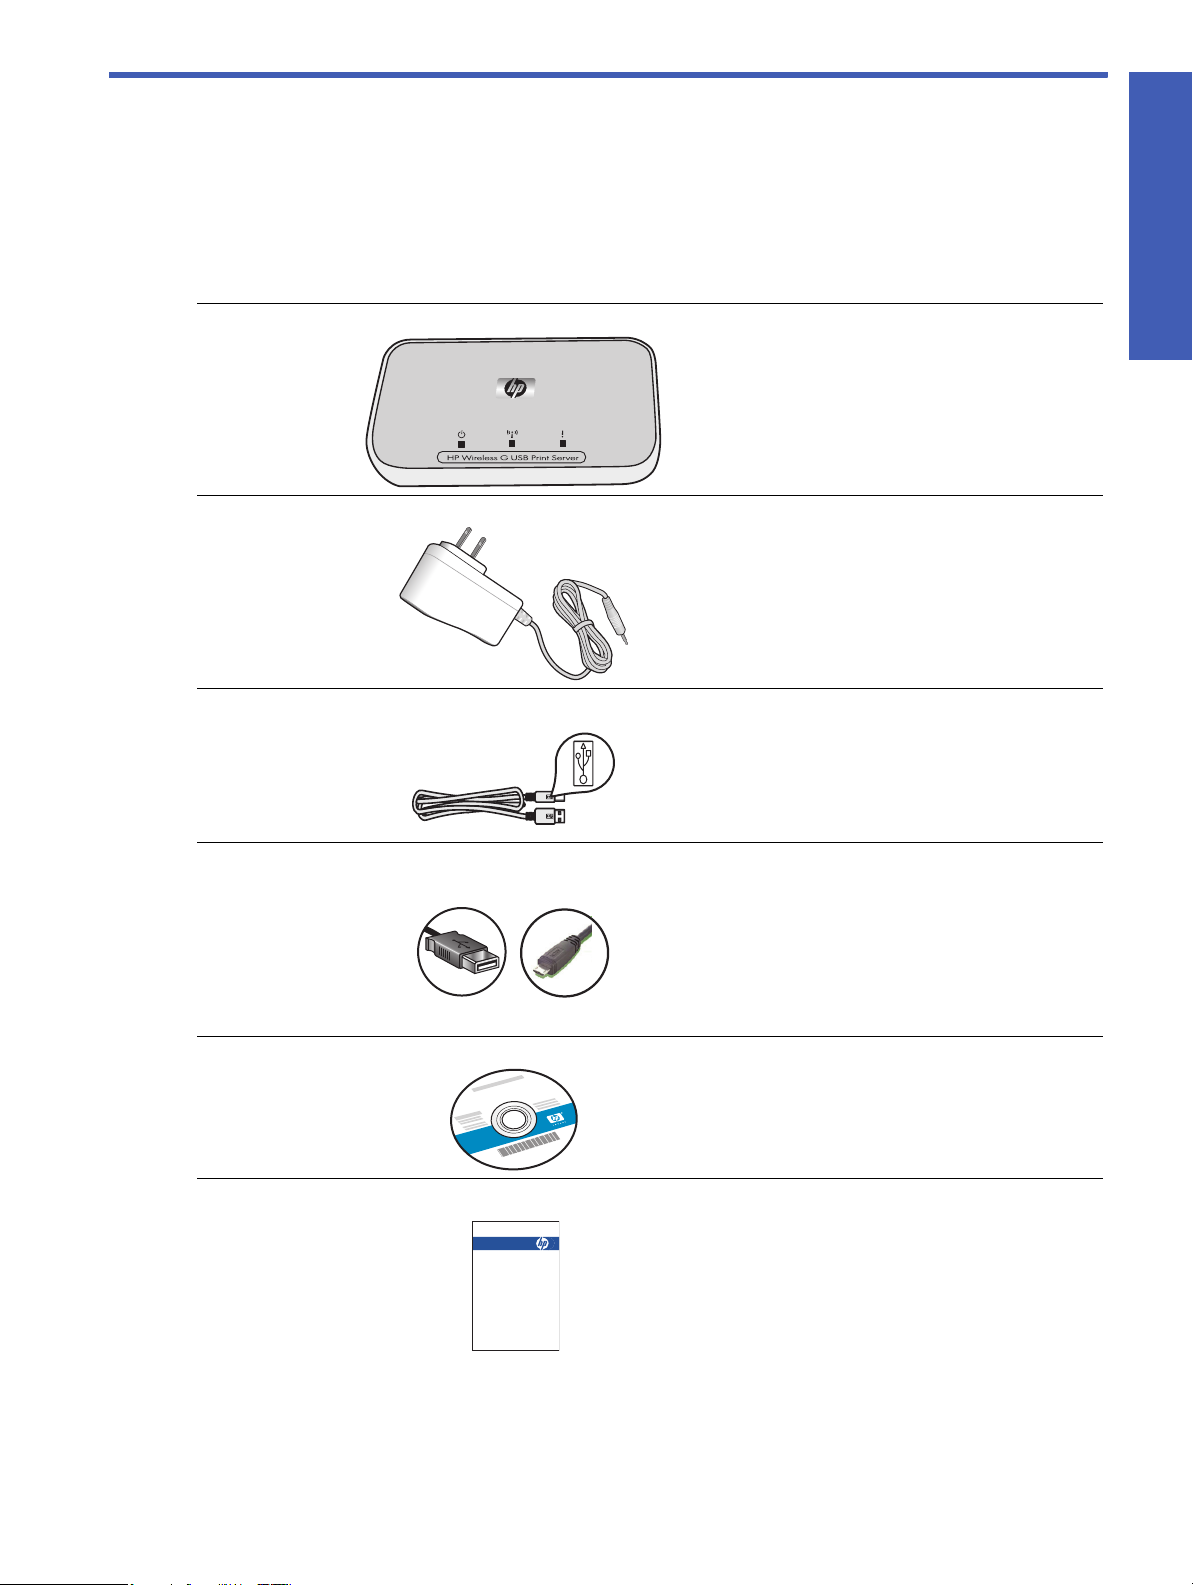
Contents of the package
The Wireless G Print Server includes the following items.
1 Print server
Welcome
2 Power cord for print server
HP Lorem Ipsum Dolar
Start Here!
Démarrer ici
Iniziare da qui
Erste Schritte
Empiece en este punto
Comece aqui!
Begin hier!
Rozpocznij tutaj!
Начните отсюда!
⬅ℸᓔྟʽ
겑녆
เริ่มต้นใช้งาน
ࠌشԵΜ
3 USB cable for print server
4 micro USB cable for set up
5 Print server software CD
6 Setup guide
Contents of the package
5
Page 6
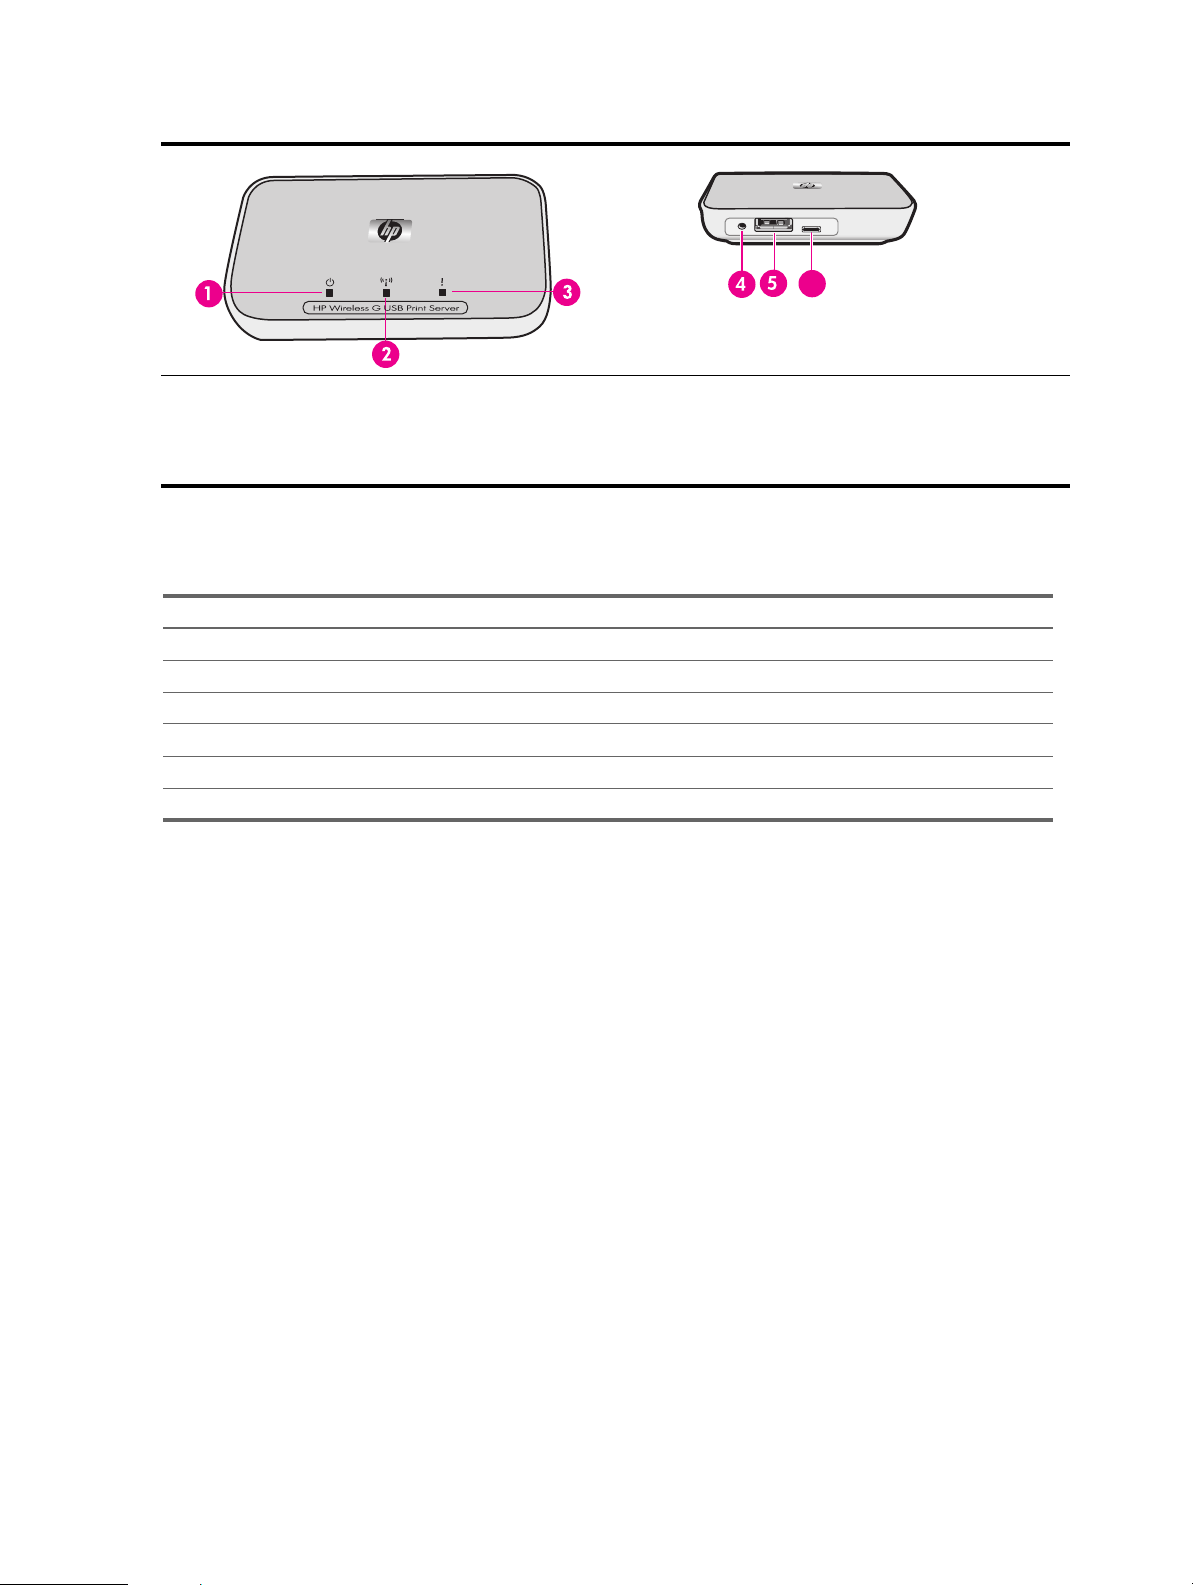
Lights and ports of the print server
6
1 Power light (green)
2 Wireless light (blue)
3 Attention light (amber)
4 Power connector
5 USB port
6 Micro USB port for setup cable
The meanings of the patterns of the lights are as follows.
Power Wireless Attention
Power Off Off Off Off
Power On On Off Off
Ready On On Off
Data transmitting On Blinking Off
No printer connected On On Blinking
Error On On or Off On
Welcome6
Page 7

2 Set up your print server
If you misplace your Setup Guide, you can use these instructions to initially set up your print server. During the initial
installation, you will make a temporary connection between the print server and the computer using the micro-USB setup
cable.
Attach to an existing wireless network
If you already have a wireless network, use these instructions to connect your printer to the wireless network using the
Wireless USB print server.
Windows
Install the print server software
IMPORTANT: Do not connect the print server to the printer until the software instructs you to do so.
1. Make sure your computer is connected to your network.
TIP: For the easiest setup, connect your PC wirelessly to your network.
2. Close other software programs, especially HP software such as the HP Solution Center, Toolbox, or HP Director.
3. Insert the Wireless Print Server CD.
4. Click Install to install the software.
Follow the directions on the screen.
5. When the screen directs you to “Connect Print Server to PC”, use the setup cable with the micro-USB connector to
connect the print server to your computer.
6. Plug in the power cord for the print server.
After a few seconds the computer recognizes the print server, and you can click Next.
7. Follow the instructions on your screen.
Set up your print server 2
NOTE: You may need the SSID and password for your network. If necessary, get these from the person who
set up your network.
8. When the software directs you, remove the setup cable from the print server and computer and click Next.
9. Attach the print server to the printer using the standard USB cable.
10. Make sure the printer and print server are both on.
After a few seconds the computer recognizes the printer and you can click Next.
11 . Click Finish to complete the installation.
TIP: Leave the “For best results, allow all users full printer access.” box checked. If this box is unchecked,
only an administrator can restart the printer if it pauses due to out of paper or other causes.
Install the printer software and connect to the printer
If the printer software is already installed on this computer, go to “Connect to the printer using Connection Manager”
on page 9.
If you need to install the printer software use the directions immediately following.
1. Leave your printer attached to the print server.
2. Insert the printer software CD or start the downloaded driver installation.
3. When the software asks you to plug in the USB cable, do the following:
a. Right-click the Connection Manager icon in the system tray (lower-right corner of your screen).
b. Select Connect.
The icon will change to show a successful connection.
Attach to an existing wireless network
7
Page 8

Mac
Install the print server software
IMPORTANT: Do not connect the print server to the printer until the software instructs you to do so.
1. Make sure your computer is connected to your network.
TIP: For the easiest setup, connect your Mac wirelessly to your network.
2. Close other software programs, especially HP software such as the HP Photosmart Studio, Device Manager, or
HP Director.
3. Insert the Wireless Print Server CD.
4. Open the CD and double-click the HP Installer to install the software.
Follow the directions on the screen.
5. If an empty “Select Printer” screen appears, check the My device is not listed box and click Next.
6. When the screen directs you to “Connect Print Server to PC”, use the setup cable with the micro-USB connector to
connect the print server to your Mac.
7. Plug in the power cord for the print server.
After a few seconds the computer recognizes the print server, and you can click Next.
8. Follow the instructions on your screen.
NOTE: You may need the SSID and password for your network. If necessary, get these from the person who
set up your network.
9. When the software directs you, remove the setup cable from the print server and computer and click Next.
10. Attach the print server to the printer using the standard USB cable.
11 . Make sure the printer and print server are both on.
After a few seconds the computer recognizes the printer and you can click Next.
12 . Click Finish to complete the installation.
TIP: Leave the “For best results, allow all users full printer access.” box checked. If this box is unchecked,
only an administrator can restart the printer if it pauses due to out of paper or other causes.
Install the printer software and connect to the printer
If the printer software is already installed on this computer, go to “Connect to the printer using Connection Manager”
on page 9.
If you need to install the printer software use the directions immediately following.
Leave your printer attached to the print server.
1. Make sure the printer is connected to the network. The Connection Manager icon in the Dock will have the green
checkmark as shown below.
2. From the printer software CD or downloaded driver, double-click the HP Installer.
Follow the instructions on the screen.
Set up your print server8
Page 9

Connect to the printer using Connection Manager
If you already have the printer software installed on this computer follow these instructions.
Windows
1. Right-click the Connection Manager icon in the system tray (lower-right corner of your screen).
2. Click Connect.
The icon will change to show a successful connection.
Mac
1. Click the Connection Manager icon in the Dock.
2. Click Connect.
The icon will change to show a successful connection.
Set up your print server 2
Connect to the printer using Connection Manager
9
Page 10

Attach directly to computer with no existing network
You can still use your printer wirelessly even if you do not have a wireless network already set up. Follow these
instructions to attach your printer.
Windows
Install the print server software
1. Turn on the wireless radio (wireless card) on your computer. Consult your computer documentation if you need
more information.
2. Close other software programs, especially HP software such as the HP Solution Center, Toolbox, or HP Director.
3. Insert the Wireless Print Server CD.
4. Click Install to install the software.
Follow the directions on the screen.
5. When the screen directs you to “Connect Print Server to PC”, use the setup cable with the micro-USB connector to
connect the print server to your computer.
6. Plug in the power cord for the print server.
After a few seconds the computer recognizes the print server, and you can click Next.
7. When the screen directs you to “Add Print Server to the network”, choose Direct wireless connection to the printer
without a router.
Follow the instructions on your screen. You are now creating a wireless printer network for your printer.
8. Write down the name and any password you create for your new printer network.
9. When the screen directs you to “Run Wireless configuration utility to connect your PC to _____ network”, you
must use the network utility you use to manage wireless networks and connect to the network before clicking
Next. The following instructions are for the Windows utility.
a. Right-click the Wireless Network Connection icon in the System Tray (bottom right corner of your screen)
and select View Available Wireless Networks.
b. Select the name of the network you just created and click Connect.
IMPORTANT: It may take some time for the wireless network to fully configure. If it fails initially, click
Refresh.
c. Click Next.
10. When the software directs you, remove the setup cable from the print server and computer and click Next.
11 . Attach the print server to the printer using the standard USB cable.
12 . Make sure the printer and print server are both on.
After a few seconds the computer recognizes the printer and you can click Next.
13 . Click Finish to complete the installation.
TIP: Leave the “For best results, allow all users full printer access.” box checked. If this box is unchecked,
only an administrator can restart the printer if it pauses due to out of paper or other causes.
Install the printer software and connect to the printer
If the printer software is already installed on this computer, go to “Connect to the printer using Connection Manager”
on page 9.
If you need to install the printer software use the directions immediately following.
1. Leave your printer attached to the print server.
2. Insert the printer software CD or start the downloaded driver installation.
3. When the software asks you to plug in the USB cable, do the following:
a. Right-click the Connection Manager icon in the system tray (lower-right corner of your screen).
b. Select Connect.
The icon will change to show a successful connection.
Set up your print server10
Page 11

Mac
Install the print server software
IMPORTANT: Do not connect the print server to the printer until the software instructs you to do so.
1. Close other software programs, especially HP software such as the HP Photosmart Studio, Device Manager, or
HP Director.
2. Insert the Wireless Print Server CD.
3. Open the CD and double-click the installer icon to install the software.
Follow the directions on the screen.
4. When the screen directs you to “Connect Print Server to PC”, use the setup cable with the micro-USB connector to
connect the print server to your Mac.
5. Plug in the power cord for the print server.
After a few seconds the computer recognizes the print server, and you can click Next.
6. When the screen directs you to “Add Print Server to the network”, choose Direct wireless connection to the printer
without a router.
Follow the instructions on your screen. You are now creating a wireless printer network for your printer.
7. Write down the name and any password you create for your new printer network.
8. When the screen directs you to “Run Wireless configuration utility to connect your PC to _____ network”, follow
these instructions.
a. Turn on the Airport on your Mac. Consult Mac Help for instructions if necessary.
b. Click the icon again and select the wireless printer network you just created
c. Click Next on the Print Server dialog.
9. When the software directs you, remove the setup cable from the print server and computer and click Next.
10. Attach the print server to the printer using the standard USB cable.
11 . Make sure the printer and print server are both on.
After a few seconds the computer recognizes the printer and you can click Next.
12 . Click Finish to complete the installation.
Set up your print server 2
TIP: Leave the “For best results, allow all users full printer access.” box checked. If this box is unchecked,
only an administrator can restart the printer if it pauses due to out of paper or other causes.
Install the printer software and connect to the printer
If the printer software is already installed on this computer, go to “Connect to the printer using Connection Manager”
on page 9.
If you need to install the printer software use the directions immediately following.
Leave your printer attached to the print server.
1. Make sure the printer is connected to the network. The Connection Manager icon will have the green checkmark
as shown below.
2. From the printer software CD or downloaded driver, double-click the HP Installer.
Follow the instructions on the screen.
Attach directly to computer with no existing network
11
Page 12

Set up your print server12
Page 13

3 Using the Print Server
For most everyday tasks, you will use your printer or all-in-one device just like you always have. Occasionally you may
want to use the Connection Manager or Advanced Setup utility.
Use the Connection Manager
You can use the Connection Manager to perform the following tasks.
• Check the status.
• Change printers.
• Access the Print Queue.
• Connect or Disconnect.
Access the Connection Manager
Windows
Right-click the icon in the System Tray.
Mac
Click the icon in the Dock.
Connection Manager icons
The Connection Manager has a number of icons to tell you the status of the print server. The three common ones are
described below.
Cancel a print job
Use the Print Queue to cancel or pause a print job. If you get a message that the print job has failed, you should cancel
the job to delete it from the print queue.
While the job is printing the print queue can be opened by clicking the printer icon in the System Tray (Windows) or
Dock (Mac). To open the print queue when the printer icon is not available follow these instructions.
Windows
1. Right-click the Connection Manager and select Print Queue.
2. Right-click the print job in the Print Manager and select Cancel.
Mac
1. Open the Connection Manager.
2. Select Print Queue from the Information and Settings pop-up menu.
3. Select the print job in the Status pane and click Delete.
The printer or all-in-one device is connected and ready to use.
The print server can detect the printer or all-in-one but it is not currently connected. The device will be
automatically reconnected if a print job is sent. If you want to scan or use the memory card slots, for
example, you will need to manually reconnect the device.
S To manually reconnect, right-click (Windows) or click (Mac) the icon and select Connect.
The print server cannot detect the printer.
Check to see if all cables are connected between the printer and printer and that both are plugged
in and have power.
Using the Print Server
Change printers
If you have more than one printer using a USB print server on your network, you can change the printer that your
computer is connected to.
Windows
Use the Connection Manager
13
Page 14

1. Right-click the Connection Manager icon and select Select Printer...
2. Select a different printer and click Select.
Mac
1. Open the Connection Manager.
2. Select Select Printer from the Information and Settings pop-up menu.
3. Select a different printer and click Select.
Restart the Connection Manager
If the icon does not appear, you need to restart the Connection Manager.
Windows
S Go to Start --> All Programs --> HP Wireless Print Server--> Restart connection manager.
Mac
S Go to Applications: HP Print Server and double-click Connection Manager.
Using the Print Server14
Page 15

Use Advanced Setup
The Advanced Setup screen allows you to discover your SSID and IP addresses and, if necessary for your network,
manually change the IP address.
1. Use the micro USB setup cable to connect the print server to the computer before starting Advanced Setup.
2. Windows: Go to Start --> All Programs --> HP Wireless Print Server--> Advanced Setup
Mac: Double-click Applications:HP Print Server:Advanced Setup or select Advanced Setup from the Information
and Settings pop-up menu in the Connection Manager.
3. Click OK to verify that the printer server is connected to the computer.
4. Select the type of network you have set up and click Next.
•Select: Connect to an existing network if you have a router. Then follow the appropriate instructions below.
•Select: Direct wireless connection to the printer without a router if you do not have a router. Then follow the
appropriate instructions below.
Connect to an existing network
a. Select your wireless network and click Next.
b. The Security Setting screen will display. Verify or change the SSID then click Next.
NOTE: If you change the SSID, you may no longer be able to connect to your network. If you want to
change security settings, the must be changed on your router.
a. Choose one of the following.
1. Select Obtain IP Address automatically if you have a DHCP server on your LAN
2. Click Next.
OR
1. If you do not have a DHCP server on your LAN, you must select Use the following IP Address.
2. Either accept the suggested IP address or enter a new one.
The IP Subnet Mask and Default Gateway must match your LAN and will be filled in for you.
3. Click Next.
d. Confirm your IP settings and click Apply.
• Click Back to go to the previous screen and change the IP address.
• Click Cancel to exit without making any changes.
e. When the software directs you, remove the setup cable from the print server and computer and click Finish
Direct wireless connection to the printer without a router
a. The Security Setting screen will display. Verify or change the SSID, Channel, and Security setting then click
Next.
b. Verify the settings and click Apply.
c. When the screen directs you to “Run Wireless configuration utility to connect your PC to _____ network”,
run the network utility you use to manage wireless networks and connect to the network before clicking
Next.
Windows:
1. Right-click the Wireless Network Connection icon in the System Tray (bottom right corner of your
screen) and select View Available Wireless Networks.
Using the Print Server
2. Select the name of the network you just created and click Connect.
IMPORTANT: It may take some time for the wireless network to fully configure. If it fails initially, click
Refresh.
Mac:
1. Turn on the Airport on your Mac. Consult Mac Help for instructions if necessary.
2. Click the icon again and select the wireless printer network you just created.
IMPORTANT: It may take some time for the wireless network to fully configure. If it fails initially, click
Refresh.
c. When the software directs you, remove the setup cable from the print server and computer and click Finish.
Use Advanced Setup
15
Page 16

Using the Print Server16
Page 17

4Troubleshooting
Cannot detect print server during installation.
Cause
Either the printer or print server has no power or a cable is unplugged.
Solution
Check the power cords and cable between the print server and printer. Unplug and replug the print server.
Cause
In a corporate environment, the firewall may be configured to never allow access and may not give any messages.
Solution
Consult with your IT department and ask them to grant access to the print server.
Cause
Your print server is on a different subnet.
Solution
The print server must be on the same subnet as your computer. Move the print server.
Can print from most software applications, but the HP software (HP Director or HP Solution Center) does not seem to work (cannot scan or read memory cards)
Cause
The wrong printer instance is selected in the HP software.
Solution
If you had previously installed the printer on this computer, a second instance of your printer was created when the
Network Printer Adapter software was installed. You now have, for example, HP Deskjet 5940 and HP Deskjet 5940
(copy 1). Make sure the new version of the printer is selected in the HP software. Check the online help for the HP
Director or the HP Solution center for instructions on selecting the printer.
Cause
Windows: This is a known problem with some older HP drivers for All-in-Ones.
Solution
If you are not having problems printing, we recommend that you use Windows or other applications for scanning and
reading memory cards.
1. Open My Computer.
Under Name you will see listings for the scanner and memory card slots (if your device has them).
For example, if you have an HP Officejet 7310, you will have the following devices listed.
7310 Memory (E:) Removable Disk
HP Officejet 7300 series... Image scanner
With some printers, the memory card slot may simply be named “Removable Disk”.
2. To access images on a memory card, double-click the device memory name (for example, 7310 Memory).
The images will be displayed as if it was a disk drive.
3. To scan using the Windows applications, right-click the name next to “Image scanner” (for example, HP Officejet
7300 series...) and select Scan.
Installation completed but still cannot print
Troubleshooting
Cause
Connection between print server and network has not been established.
Solution
Check the Print Server icon. If it does not have a green checkmark, then the connection has been lost. Try the following.
17
Page 18

• Reconnect to the printer.
• If that does not work after a minute or so, then try exiting the Connection Manager and starting it again.
See “Use the Connection Manager” on page 13.
Cause
Printer software is very old or not completely installed.
Solution
1. Verify that you can print using a USB cable.
2. Download the latest printer driver from www.hp.com/support and install all components.
Troubleshooting18
Page 19

5 Technical information
This chapter contains technical information, regulatory information, and environmental information about your print
server.
Specifications
General
• 802.11g
• Printer Adapter: USB 1.1
Security
• WEP
• WPA-PSK
• WPA2-PSK
Power Consumption
3.3 V at 900 mA
Antenna
• Internal PIFA antenna
• Peak Gain: 0.75 dB
Environmental
• Operating Temperature: 0° C – 40° C
• Storage Temperature: –15° C – 40° C
• Operating Humidity: 10 – 80% RH
• Storage Humidity: 5 – 95% RH
Environmental product stewardship program
This section provides information on protecting the environment; ozone production; energy consumption; paper use;
plastics; material safety data sheets; and recycling programs.
This section contains information about environmental standards.
Protecting the environment
Hewlett-Packard is committed to providing quality products in an environmentally sound manner. This product has been
designed with several attributes to minimize impacts on our environment.
For more information, visit HP’s Commitment to the Environment website at:
www.hp.com/hpinfo/globalcitizenship/environment/index.html
Plastics
Plastic parts over 25 grams are marked according to international standards that enhance the ability to identify plastics
for recycling purposes at the end of the product’s life.
Material safety data sheets
Material safety data sheets (MSDS) can be obtained from the HP website at:
www.hp.com/go/msds
Customers without Internet access should contact their local HP Customer Care Center.
Hardware recycling program
HP offers an increasing number of product return and recycling programs in many countries, as well as partnering with
some of the largest electronic recycling centers throughout the world. HP also conserves resources by refurbishing and
reselling some of its most popular products.
For information regarding recycling of HP products, please visit: www.hp.com/recycle.
For assistance, call 1-800-HP-INVENT (North America only) or go to the Customer Care website at www.hp.com/
support.
Technical information
Specifications
19
Page 20

Limited warranty statement
A. Extent of Limited Warranty
1 Hewlett-Packard (“HP”) warrants to the end-user customer (“Customer”) that each HP accessory product (“Product”) shall be free
from defects in material and workmanship for twelve months after the date of purchase.
2 For each software Product, HP’s limited warranty applies only to a failure to execute programming instructions. HP does not
warrant that the operation of any Product shall be uninterrupted or error free.
3 HP’s limited warranty covers only those defects which arise as a result of normal use of a Product, and does not cover any other
problems, including those which arise as a result of:
a Improper use, maintenance, or modification;
b Software, media, parts, accessories, or supplies not provided or supported by HP; or,
c Operation outside a Product’s specifications.
4 If HP receives, during the applicable warranty period, notice of a defect in a Product, HP shall at its option either repair or replace
the defective Product.
5 If HP cannot repair or replace a defective Product that is covered by HP’s limited warranty, HP shall, within a reasonable time
after being notified of the defect, refund the purchase price for the Product.
6 HP shall have no obligation to repair, replace, or refund until Customer returns the defective Product to HP.
7 Any replacement product may be new or like-new, provided it has functionality at least equal to that of the Product being replaced.
8 A Product may contain remanufactured parts, components, or materials equivalent to new in performance.
9 HP’s limited warranty for a Product is valid in any country or locality where HP has a support presence for the Product and has
marketed the Product. The level of warranty service may vary according to local standards. Upgraded warranty services, such as
next day exchange, on-site service, and accident protection, may be available from HP if separately documented by HP and on
additional terms or conditions designated by HP.
B. Limitations of Warranty
TO THE EXTENT ALLOWED BY LOCAL LAW, NEITHER HP NOR ITS THIRD PARTY SUPPLIERS MAKE ANY OTHER WARRANTY OR
CONDITION OF ANY KIND, WHETHER EXPRESS OR IMPLIED, WITH RESPECT TO A PRODUCT, AND SPECIFICALLY DISCLAIM THE
IMPLIED WARRANTIES OR CONDITIONS OF MERCHANTABILITY, SATISFACTORY QUALITY, AND FITNESS FOR A PARTICULAR
PURPOSE.
C. Limitations of Liability
1 To the extent allowed by local law, the remedies provided in this Limited Warranty Statement (“LWS”) are Customer’s sole and
exclusive remedies.
2 TO THE EXTENT ALLOWED BY LOCAL LAW, EXCEPT FOR THE OBLIGATIONS SET FORTH IN THIS LWS, IN NO EVENT SHALL HP
OR ITS THIRD PARTY SUPPLIERS BE LIABLE FOR DIRECT, INDIRECT, SPECIAL, INCIDENTAL, OR CONSEQUENTIAL DAMAGES,
WHETHER BASED ON CONTRACT, TORT, OR ANY OTHER LEGAL THEORY AND WHETHER ADVISED OF THE POSSIBILITY OF
SUCH DAMAGES.
D. Local Law
1 This LWS gives Customer specific legal rights. Customer may also have other rights that vary from state to state in the United
States, from province to province in Canada, and from country to country elsewhere in the world.
2 To the extent this LWS is inconsistent with local law, this LWS shall be deemed modified to be consistent with local law. Under
local law, certain disclaimers and limitations of this LWS may not apply to Customer. For example, the federal government of the
United States, some states in the United States, and some governments outside the United States (including provinces in Canada)
may:
a Grant Customer additional warranty rights;
b Preclude the disclaimers and limitations in this LWS from limiting the statutory rights of a consumer (e.g. the United Kingdom);
c Otherwise restrict the ability of a manufacturer to enforce such disclaimers or limitations;
d Specify the duration of implied warranties that the manufacturer cannot disclaim; or,
e Disallow limitations on the duration of implied warranties.
3 For consumer transactions in the United States, any implied warranties imposed by law are limited in duration to the express
warranty period.
4 FOR CONSUMER TRANSACTIONS IN AUSTRALIA AND NEW ZEALAND, THE TERMS IN THIS LWS, EXCEPT TO THE EXTENT
LAWFULLY PERMITTED, DO NOT EXCLUDE, RESTRICT, OR MODIFY, AND ARE IN ADDITION TO, THE MANDATORY STATUTORY
RIGHTS APPLICABLE TO THE SALE OF A PRODUCT TO SUCH CUSTOMERS.
Technical information20
Page 21

Regulatory information
Disposal of Waste Equipment by Users in Private Households in the European Union
Disposal of Waste Equipment by Users in Private Households in
the European Union
This symbol on the product or on its packaging indicates that this product
must not be disposed of with your other household waste. Instead, it is your
responsibility to dispose of your waste equipment by handing it over to a designated
collection point for the recycling of waste electrical and electronic equipment. The
separate collection and recycling of your waste equipment at the time of disposal will
help to conserve natural resources and ensure that it is recycled in a manner that protects human health and the environment. For more information about where you can
drop o your waste equipment for recycling, please contact your local city o ce, your
household waste disposal service or the shop where you purchased the product.
Regulatory model identification number
For regulatory identification purposes, your product is assigned a Regulatory Model Number. The Regulatory Model Number for your
product is SDCAB-0801. This regulatory number should not be confused with the marketing name (HP 2101nw Wireless G USB Print
Server) or product number (Q6301A).
FCC statement
FCC statement
The United States Federal Communications Commission (in 47 CFR 15.105) has specified
that the following notice be brought to the attention of users of this product.
This equipment has been tested and found to comply with the limits for a Class B digital
device, pursuant to Part 15 of the FCC Rules. These limits are designed to provide reasonable protection against harmful interference in a residential installation. This equipment
generates, uses and can radiate radio frequency energy and, if not installed and used in
accordance with the instructions, may cause harmful interference to radio communications.
However, there is no guarantee that interference will not occur in a particular installation.
If this equipment does cause harmful interference to radio or television reception, which can
be determined by turning the equipment off and on, the user is encouraged to try to correct
the interference by one or more of the following measures:
· Reorient the receiving antenna.
· Increase the separation between the equipment and the receiver.
· Connect the equipment into an outlet on a circuit different from that to which the
receiver is connected.
· Consult the dealer or an experienced radio/TV technician for help.
For further information, contact:
Manager of Corporate Product Regulations
Hewlett-Packard Company
3000 Hanover Street
Palo Alto, Ca 94304
(650) 857-1501
Modifications (part 15.21)
The FCC requires the user to be notified that any changes or modifications made to this
device that are not expressly approved by HP may void the user's authority to operate the
equipment.
This device complies with Part 15 of the FCC Rules. Operation is subject to the following
two conditions: (1) this device may not cause harmful interference, and (2) this device must
accept any interference received, including interference that may cause undesired
operation.
Technical information
Notice to users in Brazil
Aviso aos usuários no Brasil
Este equipamento opera em caráter secundário, isto é, não tem direito à proteção
contra interferência prejudicial, mesmo de estações do mesmo tipo, e não pode causar
interferência a sistemas operando em caráter primário. (Res.ANATEL 282/2001).
Regulatory information
21
Page 22

Notice to users in Argentina
CNC xxxxxx
Notice to users in Indonesia
06396/POSTEL/
2008
Notice to users in Korea
Notice to users in Japan
Notice to users in Mexico
SCT xxxxxxxx
Notice to users in Pakistan
Notice to users in Russia
Technical information22
Page 23

Notice to users in Singapore
Complies with
IDA Standards
DB100427
Notice to users in South Africa
TA-2007/683
APPROVED
Notice to users in the U.S.
Exposure to radio frequency radiation
Caution The radiated output power of this device is far below the FCC radio
frequency exposure limits. Nevertheless, the device shall be used in such a manner
that the potential for human contact during normal operation is minimized. This
product and any attached external antenna, if supported, shall be placed in such
a manner to minimize the potential for human contact during normal operation. In
order to avoid the possibility of exceeding the FCC radio frequency exposure
limits, human proximity to the antenna shall not be less than 20 cm (8 inches)
during normal operation.
Notice to users in Canada
Notice to users in Canada/Note à l'attention des utilisateurs canadiens
For Indoor Use. This digital apparatus does not exceed the Class B limits for radio noise
emissions from the digital apparatus set out in the Radio Interference Regulations of the
Canadian Department of Communications. The internal wireless radio complies with RSS
210 and RSS GEN of Industry Canada. Operation is subject to the following two
conditions: (1) this device may not cause interference, and (2) this device must accept any
interference, including interference that may cause undesired operation of the device.
Utiliser à l'intérieur. Le présent appareil numérique n'émet pas de bruit radioélectrique
dépassant les limites applicables aux appareils numériques de la classe B prescrites dans
le Règlement sur le brouillage radioélectrique édicté par le ministère des Communications
du Canada. Le composant RF interne est conforme a la norme RSS-210 and RSS GEN
d'Industrie Canada. Operation is subject to the following two conditions: (1) this device may
not cause interference, and (2) this device must accept any interference, including interference that may cause undesired operation of the device.
Technical information
Regulatory information
23
Page 24

European Union Regulatory Notice
European Union Regulatory Notice
Products bearing the CE marking comply with the following EU Directives:
• Low Voltage Directive 2006/95/EC
• EMC Directive 2004/108/EC
CE compliance of this product is valid only if powered with the correct CE-marked AC
adapter provided by HP.
If this product has telecommunications functionality, it also complies with the essential
requirements of the following EU Directive:
• R&TTE Directive 1999/5/EC
Compliance with these directives implies conformity to harmonized European standards
(European Norms) that are listed in the EU Declaration of Conformity issued by HP for this
product or product family. This compliance is indicated by the following conformity
marking placed on the product.
The wireless telecommunications functionality of this product may be used in the following
EU and EFTA countries:
Austria, Belgium, Bulgaria, Cyprus, Czech Republic, Denmark, Estonia, Finland, France,
Germany, Greece, Hungary, Iceland, Ireland, Italy, Latvia, Liechtenstein, Lithuania,
Luxembourg, Malta, Netherlands, Norway, Poland, Portugal, Romania, Slovak Republic,
Slovenia, Spain, Sweden, Switzerland and United Kingdom.
Products with 2.4-GHz wireless LAN devices
France
For 2.4 GHz Wireless LAN operation of this product certain restrictions apply: This
product may be used indoor for the entire 2400-2483.5 MHz frequency band (channels
1-13). For outdoor use, only 2400-2454 MHz frequency band (channels 1-9) may be used.
For the latest requirements, see http://www.art-telecom.fr.
Italy
License required for use. Verify with your dealer or directly with the General Direction for
Frequency Planning and Management (Direzione Generale Pianificazione e Gestione
Frequenze).
Notice to users in Taiwan
Technical information24
Page 25

Notice to users in China
ḍЁlj⬉ᄤֵᙃѻક∵ᶧࠊㅵ⧚ࡲ⊩NJ
᳝↦᳝ᆇ⠽䋼㸼
᳝↦᳝ᆇ⠽䋼ܗ㋴
䳊ӊᦣ䗄
ᠬⲬ
ࠋ⬉䏃ᵓ ;
䚼⬉⑤ ;
⬉㒓
ܝⲬ
⬉∴ᵓ
ᰒ⼎఼
㞾ࡼঠ䴶ᠧ㋏㒳
㔥㒰䜡ӊ ;
0˖ᣛℸ䚼ӊⱘ᠔᳝ഛϔᴤ䋼Ёࣙⱘ䖭⾡᳝↦᳝ᆇ⠽䋼ˈ䞣ԢѢ SJ/T11363-2006 ⱘ䰤ࠊ
X˖ᣛℸ䚼ӊՓ⫼ⱘഛϔᴤ䋼Ё㟇ᇥ᳝ϔ⾡ࣙⱘ䖭⾡᳝↦᳝ᆇ⠽䋼ˈ䞣催Ѣ SJ/T11363-2006 ⱘ䰤ࠊ
⊼˖⦃ֱՓ⫼ᳳ䰤ⱘখ㗗䆚পއѢѻકℷᐌᎹⱘ⏽ᑺᑺㄝᴵӊ
*ҹϞা䗖⫼ѢՓ⫼䖭ѯ䚼ӊⱘѻક
䪙 ∲ 䬝 ݁ӋḐ ⒈㘨㣃 ⒈㘨㣃䝮
Technical information
Notice to users in China
25
Page 26

Declaration of Conformity
Supplier's Name: Hewlett-Packard Company
Supplier's Address:
declares, that the product
Product Name and Model:
Regulatory Model Number:
Product Options: All
Conforms to the following Product Specications and Regulations:
EMC: Class B
EN 301489-1 V1.4.1
EN 301489-17 V1.2.1
FCC CFR 47 Part 15 / ICES-003 Issue 4: 2004
Safety :
EN 60950-1:2001
IEC 60950-1:2001
EU: 1999/519/EC (Health)
Telecom:
EN 300 328 V1.7.1
DECLARATION OF CONFORMITY
according to ISO/IEC 17050-1 and EN 17050-1
8000 Foothills Blvd., Roseville CA 95747-5731
2)
Q6301A/Q6302A Windows G Network Server
1)
SDCAB-0801
10-1080-BACDS :# CoD
This device complies with part 15 of the FCC Rules. Operation is subject to the following two conditions: (1) This device
may not cause harmful interference, and (2) this device must accept any interference received, including interference that
may cause undesired operation.
The product herewith complies with the requirements of the Low Voltage Directive 2006/95/EC, the EMC Directive
2004/108/EC and the R&TTE Directive 99/5/EC, and carries the CE-marking accordingly.
Additional Information:
1) This product is assigned a Regulatory Model Number which stays with the regulatory aspects of the design. The
Regulatory Model Number is the main product identifier in the regulatory documentation and test reports, this number
should not be confused with the marketing name or the product numbers.
2) This product was tested as a module in a stand-alone environment outside of any host.
Roseville, CA, USA
reganaM ,nnamtrO evetS 7002 ,51 rebmevoN
ytivitcennoC
Local contact for regulatory topics only:
EMEA: Hewlett-Packard GmbH, HQ-TRE, Herrenberger Strasse 140, 71034 Boeblingen, Germany
U.S.: Hewlett –Packard, 3000 Hanover St., Palo Alto 94304, U.S.A. 650-857-1501
Technical information26
 Loading...