

Page 1

hp LaserJet
1150 1300 1300n
use
Page 2

Page 3

hp LaserJet 1150 and
hp LaserJet 1300 series printer
user guide
Page 4

Copyright Information
Copyright Hewlett-Packard Company 2003
All Rights Reserved. Reproduction,
adaptation, or translation without prior written
permission is prohibited, except as allowed
under the copyright laws.
A user of the Hewlett-Packard printer
associated with this user guide is granted a
license to: a) print hard copies of this user
guide for PERSONAL, INTERNAL or
COMP ANY use subject to the restriction not to
sell, re-sell or otherwise distribute the hard
copies; and b) place an electronic copy of this
user guide on a network server, provided
access to the electronic copy is limited to
PERSONAL, INTERNAL users of the
Hewlett-Packard printer associated with this
user guide.
Part number: Q1334-90909
First Edition: April 2003
Warranty
The information contained in this document is
subject to change without notice.
Hewlett-Packard makes no warranty of any
kind with respect to this information.
HEWLETT-PACKARD SPECIFICALLY
DISCLAIMS THE IMPLIED WARRANTY
OF MERCHANTABILITY ANDFITNESS FOR
A PARTICULAR PURPOSE.
Hewlett-Packard shall not be liable for any
direct, indirect, incidental, consequential,
or other damage alleged in connection with
the furnishing or use of this information.
Trademark Credits
Microsoft®, Windows®, and Windows NT®
are U.S. registered trademarks of Microsoft
Corporation.
Energy Star® and the Energy Star logo® are
U.S. registered marks of the United States
Environmental Protection Agency.
Netscape is a U.S. trademark of Netscape
Communications Corporation.
®
UNIX
is a registered trademark of The Open
Group.
All other products mentioned herein may be
trademarks of their respective companies.
Hewlett-Packard Company
11311 Chinden Boulevard
Boise, Idaho 83714 U.S.A.
Page 5

Contents
1 Printer basics
Quick access to more information . . . . . . . . . . . . . . . . . . . . . . . . . . . . . . . . . . . . . . . . . . . . . . 2
WWW links for drivers, software, and support . . . . . . . . . . . . . . . . . . . . . . . . . . . . . . . . . . 2
User guide links . . . . . . . . . . . . . . . . . . . . . . . . . . . . . . . . . . . . . . . . . . . . . . . . . . . . . . . . . 2
Where to look for more information . . . . . . . . . . . . . . . . . . . . . . . . . . . . . . . . . . . . . . . . . . 2
Printer configurations . . . . . . . . . . . . . . . . . . . . . . . . . . . . . . . . . . . . . . . . . . . . . . . . . . . . . . . . 3
hp LaserJet 1150 . . . . . . . . . . . . . . . . . . . . . . . . . . . . . . . . . . . . . . . . . . . . . . . . . . . . . . . . 3
hp LaserJet 1300 . . . . . . . . . . . . . . . . . . . . . . . . . . . . . . . . . . . . . . . . . . . . . . . . . . . . . . . . 4
hp LaserJet 1300n . . . . . . . . . . . . . . . . . . . . . . . . . . . . . . . . . . . . . . . . . . . . . . . . . . . . . . . 4
Printer features . . . . . . . . . . . . . . . . . . . . . . . . . . . . . . . . . . . . . . . . . . . . . . . . . . . . . . . . . . . . 5
Print with excellent quality . . . . . . . . . . . . . . . . . . . . . . . . . . . . . . . . . . . . . . . . . . . . . . . . . 5
Save time. . . . . . . . . . . . . . . . . . . . . . . . . . . . . . . . . . . . . . . . . . . . . . . . . . . . . . . . . . . . . . 5
Save money. . . . . . . . . . . . . . . . . . . . . . . . . . . . . . . . . . . . . . . . . . . . . . . . . . . . . . . . . . . .5
Create professional documents . . . . . . . . . . . . . . . . . . . . . . . . . . . . . . . . . . . . . . . . . . . . . 5
Walk around . . . . . . . . . . . . . . . . . . . . . . . . . . . . . . . . . . . . . . . . . . . . . . . . . . . . . . . . . . . . . . . 6
hp LaserJet 1150 printer and hp LaserJet 1300 series printer. . . . . . . . . . . . . . . . . . . . . . 6
Printer control panel . . . . . . . . . . . . . . . . . . . . . . . . . . . . . . . . . . . . . . . . . . . . . . . . . . . . . . . . . 8
Media paths . . . . . . . . . . . . . . . . . . . . . . . . . . . . . . . . . . . . . . . . . . . . . . . . . . . . . . . . . . . . . . . 9
Main input tray . . . . . . . . . . . . . . . . . . . . . . . . . . . . . . . . . . . . . . . . . . . . . . . . . . . . . . . . . . 9
Priority input tray . . . . . . . . . . . . . . . . . . . . . . . . . . . . . . . . . . . . . . . . . . . . . . . . . . . . . . . . 9
Printer media guides . . . . . . . . . . . . . . . . . . . . . . . . . . . . . . . . . . . . . . . . . . . . . . . . . . . . . 9
Straight-through output path . . . . . . . . . . . . . . . . . . . . . . . . . . . . . . . . . . . . . . . . . . . . . . 10
Output bin. . . . . . . . . . . . . . . . . . . . . . . . . . . . . . . . . . . . . . . . . . . . . . . . . . . . . . . . . . . . . 10
Print cartridge access. . . . . . . . . . . . . . . . . . . . . . . . . . . . . . . . . . . . . . . . . . . . . . . . . . . . . . . 11
Print cartridge door. . . . . . . . . . . . . . . . . . . . . . . . . . . . . . . . . . . . . . . . . . . . . . . . . . . . . . 11
Printer software . . . . . . . . . . . . . . . . . . . . . . . . . . . . . . . . . . . . . . . . . . . . . . . . . . . . . . . . . . . 12
Supported operating systems . . . . . . . . . . . . . . . . . . . . . . . . . . . . . . . . . . . . . . . . . . . . . 12
Installing printer software. . . . . . . . . . . . . . . . . . . . . . . . . . . . . . . . . . . . . . . . . . . . . . . . . 12
Printer properties (driver) . . . . . . . . . . . . . . . . . . . . . . . . . . . . . . . . . . . . . . . . . . . . . . . . . 13
Print setting priorities . . . . . . . . . . . . . . . . . . . . . . . . . . . . . . . . . . . . . . . . . . . . . . . . . . . .14
Printer properties online help . . . . . . . . . . . . . . . . . . . . . . . . . . . . . . . . . . . . . . . . . . . . . . 14
Software for Windows. . . . . . . . . . . . . . . . . . . . . . . . . . . . . . . . . . . . . . . . . . . . . . . . . . . . . . .15
Software for Macintosh computers. . . . . . . . . . . . . . . . . . . . . . . . . . . . . . . . . . . . . . . . . . . . . 17
hp LaserJet 1150 printer . . . . . . . . . . . . . . . . . . . . . . . . . . . . . . . . . . . . . . . . . . . . . . . . . 17
hp LaserJet 1300 series printer . . . . . . . . . . . . . . . . . . . . . . . . . . . . . . . . . . . . . . . . . . . . 18
Accessing the print driver (Mac OS 9.x). . . . . . . . . . . . . . . . . . . . . . . . . . . . . . . . . . . . . . 18
PostScript Printer Description files (PPDs) . . . . . . . . . . . . . . . . . . . . . . . . . . . . . . . . . . . 18
Software for network installations only . . . . . . . . . . . . . . . . . . . . . . . . . . . . . . . . . . . . . . . . . . 19
Printer connections . . . . . . . . . . . . . . . . . . . . . . . . . . . . . . . . . . . . . . . . . . . . . . . . . . . . . . . . 20
USB connections . . . . . . . . . . . . . . . . . . . . . . . . . . . . . . . . . . . . . . . . . . . . . . . . . . . . . . . 20
Parallel connections. . . . . . . . . . . . . . . . . . . . . . . . . . . . . . . . . . . . . . . . . . . . . . . . . . . . . 21
Network connections . . . . . . . . . . . . . . . . . . . . . . . . . . . . . . . . . . . . . . . . . . . . . . . . . . . . 22
Wireless connections . . . . . . . . . . . . . . . . . . . . . . . . . . . . . . . . . . . . . . . . . . . . . . . . . . . . 22
ENWW Contents iii
Page 6

2 Media
Choosing paper and other media . . . . . . . . . . . . . . . . . . . . . . . . . . . . . . . . . . . . . . . . . . . . . 24
Media to avoid . . . . . . . . . . . . . . . . . . . . . . . . . . . . . . . . . . . . . . . . . . . . . . . . . . . . . . . . .25
Media that may damage the printer . . . . . . . . . . . . . . . . . . . . . . . . . . . . . . . . . . . . . . . . . 25
Optimizing print quality for media types . . . . . . . . . . . . . . . . . . . . . . . . . . . . . . . . . . . . . . . . . 26
Loading media into the input trays . . . . . . . . . . . . . . . . . . . . . . . . . . . . . . . . . . . . . . . . . . . . . 27
Main input tray . . . . . . . . . . . . . . . . . . . . . . . . . . . . . . . . . . . . . . . . . . . . . . . . . . . . . . . . .27
Priority input tray . . . . . . . . . . . . . . . . . . . . . . . . . . . . . . . . . . . . . . . . . . . . . . . . . . . . . . .27
Specific types of media . . . . . . . . . . . . . . . . . . . . . . . . . . . . . . . . . . . . . . . . . . . . . . . . . . 27
Printing on transparencies or labels . . . . . . . . . . . . . . . . . . . . . . . . . . . . . . . . . . . . . . . . . . . 28
Printing on envelopes . . . . . . . . . . . . . . . . . . . . . . . . . . . . . . . . . . . . . . . . . . . . . . . . . . . . . . 29
Printing one envelope . . . . . . . . . . . . . . . . . . . . . . . . . . . . . . . . . . . . . . . . . . . . . . . . . . . 29
Printing multiple envelopes . . . . . . . . . . . . . . . . . . . . . . . . . . . . . . . . . . . . . . . . . . . . . . . 31
Printing on letterhead and preprinted forms . . . . . . . . . . . . . . . . . . . . . . . . . . . . . . . . . . . . . 33
To print letterhead or preprinted forms. . . . . . . . . . . . . . . . . . . . . . . . . . . . . . . . . . . . . . . 33
Printing on custom-sized media and cardstock . . . . . . . . . . . . . . . . . . . . . . . . . . . . . . . . . . . 34
3 Printing tasks
Manual feed . . . . . . . . . . . . . . . . . . . . . . . . . . . . . . . . . . . . . . . . . . . . . . . . . . . . . . . . . . . . . . 36
Printing watermarks . . . . . . . . . . . . . . . . . . . . . . . . . . . . . . . . . . . . . . . . . . . . . . . . . . . . . . . . 37
Accessing the watermark feature. . . . . . . . . . . . . . . . . . . . . . . . . . . . . . . . . . . . . . . . . . . 37
Printing multiple pages on a single sheet of paper (N-up printing). . . . . . . . . . . . . . . . . . . . . 38
Accessing the multiple pages per sheet feature . . . . . . . . . . . . . . . . . . . . . . . . . . . . . . . 38
Printing on both sides of the paper (manual duplexing) . . . . . . . . . . . . . . . . . . . . . . . . . . . . . 39
Manual duplex using the top output bin . . . . . . . . . . . . . . . . . . . . . . . . . . . . . . . . . . . . . . 39
Manual duplex on heavy media or card stock . . . . . . . . . . . . . . . . . . . . . . . . . . . . . . . . . 41
Printing booklets. . . . . . . . . . . . . . . . . . . . . . . . . . . . . . . . . . . . . . . . . . . . . . . . . . . . . . . . . . . 42
Canceling a print job. . . . . . . . . . . . . . . . . . . . . . . . . . . . . . . . . . . . . . . . . . . . . . . . . . . . . . . . 44
Understanding print quality settings . . . . . . . . . . . . . . . . . . . . . . . . . . . . . . . . . . . . . . . . . . . . 45
Using EconoMode (Saves toner) . . . . . . . . . . . . . . . . . . . . . . . . . . . . . . . . . . . . . . . . . . . . . . 46
4 Maintenance
Using HP print cartridges . . . . . . . . . . . . . . . . . . . . . . . . . . . . . . . . . . . . . . . . . . . . . . . . . . . .48
HP policy on non-HP print cartridges. . . . . . . . . . . . . . . . . . . . . . . . . . . . . . . . . . . . . . . . 48
Storing print cartridges . . . . . . . . . . . . . . . . . . . . . . . . . . . . . . . . . . . . . . . . . . . . . . . . . . . . . 49
Print cartridge life expectancy . . . . . . . . . . . . . . . . . . . . . . . . . . . . . . . . . . . . . . . . . . . . . . . . 50
Saving toner . . . . . . . . . . . . . . . . . . . . . . . . . . . . . . . . . . . . . . . . . . . . . . . . . . . . . . . . . . . . . . 51
Redistributing toner . . . . . . . . . . . . . . . . . . . . . . . . . . . . . . . . . . . . . . . . . . . . . . . . . . . . . . . . 52
Changing the print cartridge . . . . . . . . . . . . . . . . . . . . . . . . . . . . . . . . . . . . . . . . . . . . . . . . . 53
Cleaning the printer . . . . . . . . . . . . . . . . . . . . . . . . . . . . . . . . . . . . . . . . . . . . . . . . . . . . . . . . 55
Cleaning the print cartridge area . . . . . . . . . . . . . . . . . . . . . . . . . . . . . . . . . . . . . . . . . . . 55
Cleaning the printer media path. . . . . . . . . . . . . . . . . . . . . . . . . . . . . . . . . . . . . . . . . . . . 56
5 Managing the printer
Printer information pages . . . . . . . . . . . . . . . . . . . . . . . . . . . . . . . . . . . . . . . . . . . . . . . . . . .58
Demo page. . . . . . . . . . . . . . . . . . . . . . . . . . . . . . . . . . . . . . . . . . . . . . . . . . . . . . . . . . . .58
Configuration page . . . . . . . . . . . . . . . . . . . . . . . . . . . . . . . . . . . . . . . . . . . . . . . . . . . . . 58
Using the hp toolbox. . . . . . . . . . . . . . . . . . . . . . . . . . . . . . . . . . . . . . . . . . . . . . . . . . . . . . . . 59
Supported operating systems . . . . . . . . . . . . . . . . . . . . . . . . . . . . . . . . . . . . . . . . . . . . . 59
Supported browsers. . . . . . . . . . . . . . . . . . . . . . . . . . . . . . . . . . . . . . . . . . . . . . . . . . . . . 59
To view hp toolbox . . . . . . . . . . . . . . . . . . . . . . . . . . . . . . . . . . . . . . . . . . . . . . . . . . . . . . 59
hp toolbox sections . . . . . . . . . . . . . . . . . . . . . . . . . . . . . . . . . . . . . . . . . . . . . . . . . . . . . 60
Other links . . . . . . . . . . . . . . . . . . . . . . . . . . . . . . . . . . . . . . . . . . . . . . . . . . . . . . . . . . . . 60
Status tab. . . . . . . . . . . . . . . . . . . . . . . . . . . . . . . . . . . . . . . . . . . . . . . . . . . . . . . . . . . . . 61
Troubleshooting tab . . . . . . . . . . . . . . . . . . . . . . . . . . . . . . . . . . . . . . . . . . . . . . . . . . . . . 61
iv Contents ENWW
Page 7

Alerts tab . . . . . . . . . . . . . . . . . . . . . . . . . . . . . . . . . . . . . . . . . . . . . . . . . . . . . . . . . . . . . 62
Documentation tab. . . . . . . . . . . . . . . . . . . . . . . . . . . . . . . . . . . . . . . . . . . . . . . . . . . . . . 62
Advanced Printer Settings window. . . . . . . . . . . . . . . . . . . . . . . . . . . . . . . . . . . . . . . . . . 63
Network window. . . . . . . . . . . . . . . . . . . . . . . . . . . . . . . . . . . . . . . . . . . . . . . . . . . . . . . . 63
Using the embedded Web server . . . . . . . . . . . . . . . . . . . . . . . . . . . . . . . . . . . . . . . . . . . . . . 64
To open the embedded Web server. . . . . . . . . . . . . . . . . . . . . . . . . . . . . . . . . . . . . . . . . 64
Information tab . . . . . . . . . . . . . . . . . . . . . . . . . . . . . . . . . . . . . . . . . . . . . . . . . . . . . . . . .65
Settings tab . . . . . . . . . . . . . . . . . . . . . . . . . . . . . . . . . . . . . . . . . . . . . . . . . . . . . . . . . . . 65
Networking tab . . . . . . . . . . . . . . . . . . . . . . . . . . . . . . . . . . . . . . . . . . . . . . . . . . . . . . . . . 66
Other links . . . . . . . . . . . . . . . . . . . . . . . . . . . . . . . . . . . . . . . . . . . . . . . . . . . . . . . . . . . . 66
Wireless printing. . . . . . . . . . . . . . . . . . . . . . . . . . . . . . . . . . . . . . . . . . . . . . . . . . . . . . . . . . . 67
IEEE 802.11b standard . . . . . . . . . . . . . . . . . . . . . . . . . . . . . . . . . . . . . . . . . . . . . . . . . . 67
Bluetooth . . . . . . . . . . . . . . . . . . . . . . . . . . . . . . . . . . . . . . . . . . . . . . . . . . . . . . . . . . . . . 67
6 Problemsolving
Finding the solution . . . . . . . . . . . . . . . . . . . . . . . . . . . . . . . . . . . . . . . . . . . . . . . . . . . . . . . . 70
Status light patterns . . . . . . . . . . . . . . . . . . . . . . . . . . . . . . . . . . . . . . . . . . . . . . . . . . . . . . . . 72
Common Macintosh problems . . . . . . . . . . . . . . . . . . . . . . . . . . . . . . . . . . . . . . . . . . . . . . . . 74
Selecting an Alternate PostScript Printer Description (PPD)
for the hp LaserJet 1300 series printer . . . . . . . . . . . . . . . . . . . . . . . . . . . . . . . . . . . 78
Renaming the Printer (hp LaserJet 1300 series only) . . . . . . . . . . . . . . . . . . . . . . . . . . . 78
Troubleshooting PostScript (PS) errors . . . . . . . . . . . . . . . . . . . . . . . . . . . . . . . . . . . . . . . . . 79
Paper handling problems . . . . . . . . . . . . . . . . . . . . . . . . . . . . . . . . . . . . . . . . . . . . . . . . . . . . 80
Printed page is different than what appeared on screen . . . . . . . . . . . . . . . . . . . . . . . . . . . . 82
Printer software problems. . . . . . . . . . . . . . . . . . . . . . . . . . . . . . . . . . . . . . . . . . . . . . . . . . . .84
Improving print quality . . . . . . . . . . . . . . . . . . . . . . . . . . . . . . . . . . . . . . . . . . . . . . . . . . . . . . 85
Light print or faded . . . . . . . . . . . . . . . . . . . . . . . . . . . . . . . . . . . . . . . . . . . . . . . . . . . . . . 85
Toner specks . . . . . . . . . . . . . . . . . . . . . . . . . . . . . . . . . . . . . . . . . . . . . . . . . . . . . . . . . .85
Dropouts. . . . . . . . . . . . . . . . . . . . . . . . . . . . . . . . . . . . . . . . . . . . . . . . . . . . . . . . . . . . . . 85
Vertical lines. . . . . . . . . . . . . . . . . . . . . . . . . . . . . . . . . . . . . . . . . . . . . . . . . . . . . . . . . . . 85
Gray background . . . . . . . . . . . . . . . . . . . . . . . . . . . . . . . . . . . . . . . . . . . . . . . . . . . . . . . 86
Toner smear. . . . . . . . . . . . . . . . . . . . . . . . . . . . . . . . . . . . . . . . . . . . . . . . . . . . . . . . . . .86
Loose toner . . . . . . . . . . . . . . . . . . . . . . . . . . . . . . . . . . . . . . . . . . . . . . . . . . . . . . . . . . .86
Vertical repetitive defects. . . . . . . . . . . . . . . . . . . . . . . . . . . . . . . . . . . . . . . . . . . . . . . . . 86
Misformed characters. . . . . . . . . . . . . . . . . . . . . . . . . . . . . . . . . . . . . . . . . . . . . . . . . . . . 87
Page skew . . . . . . . . . . . . . . . . . . . . . . . . . . . . . . . . . . . . . . . . . . . . . . . . . . . . . . . . . . . .87
Curl or wave. . . . . . . . . . . . . . . . . . . . . . . . . . . . . . . . . . . . . . . . . . . . . . . . . . . . . . . . . . .87
Wrinkles or creases . . . . . . . . . . . . . . . . . . . . . . . . . . . . . . . . . . . . . . . . . . . . . . . . . . . . . 87
Toner scatter outline . . . . . . . . . . . . . . . . . . . . . . . . . . . . . . . . . . . . . . . . . . . . . . . . . . . . 88
Clearing jams . . . . . . . . . . . . . . . . . . . . . . . . . . . . . . . . . . . . . . . . . . . . . . . . . . . . . . . . . . . . . 89
Removing a jammed page . . . . . . . . . . . . . . . . . . . . . . . . . . . . . . . . . . . . . . . . . . . . . . . . 90
Changing the pickup roller . . . . . . . . . . . . . . . . . . . . . . . . . . . . . . . . . . . . . . . . . . . . . . . . . . .92
Cleaning the pickup roller . . . . . . . . . . . . . . . . . . . . . . . . . . . . . . . . . . . . . . . . . . . . . . . . . . .95
Changing the printer separation pad . . . . . . . . . . . . . . . . . . . . . . . . . . . . . . . . . . . . . . . . . . . 96
Appendix A Printer specifications
Specifications . . . . . . . . . . . . . . . . . . . . . . . . . . . . . . . . . . . . . . . . . . . . . . . . . . . . . . . . . . . 100
FCC compliance . . . . . . . . . . . . . . . . . . . . . . . . . . . . . . . . . . . . . . . . . . . . . . . . . . . . . . . . .104
Environmental product stewardship program . . . . . . . . . . . . . . . . . . . . . . . . . . . . . . . . . . . 105
Protecting the environment . . . . . . . . . . . . . . . . . . . . . . . . . . . . . . . . . . . . . . . . . . . . . . 105
Material safety data sheet . . . . . . . . . . . . . . . . . . . . . . . . . . . . . . . . . . . . . . . . . . . . . . . . . . 107
Regulatory statements . . . . . . . . . . . . . . . . . . . . . . . . . . . . . . . . . . . . . . . . . . . . . . . . . . . . . 108
Declaration of Conformity. . . . . . . . . . . . . . . . . . . . . . . . . . . . . . . . . . . . . . . . . . . . . . . . 108
Declaration of Conformity. . . . . . . . . . . . . . . . . . . . . . . . . . . . . . . . . . . . . . . . . . . . . . . . 109
Laser safety statement. . . . . . . . . . . . . . . . . . . . . . . . . . . . . . . . . . . . . . . . . . . . . . . . . . 110
Canadian DOC regulations . . . . . . . . . . . . . . . . . . . . . . . . . . . . . . . . . . . . . . . . . . . . . . 110
ENWW Contents v
Page 8

Korean EMI statement . . . . . . . . . . . . . . . . . . . . . . . . . . . . . . . . . . . . . . . . . . . . . . . . . . 110
VCCI statement (Japan). . . . . . . . . . . . . . . . . . . . . . . . . . . . . . . . . . . . . . . . . . . . . . . . . 110
Laser statement for Finland . . . . . . . . . . . . . . . . . . . . . . . . . . . . . . . . . . . . . . . . . . . . . . 111
Appendix B Media specifications
Printer media specifications . . . . . . . . . . . . . . . . . . . . . . . . . . . . . . . . . . . . . . . . . . . . . . . . . 114
Supported media sizes . . . . . . . . . . . . . . . . . . . . . . . . . . . . . . . . . . . . . . . . . . . . . . . . . . . . 115
Guidelines for using media . . . . . . . . . . . . . . . . . . . . . . . . . . . . . . . . . . . . . . . . . . . . . . . . . 116
Paper . . . . . . . . . . . . . . . . . . . . . . . . . . . . . . . . . . . . . . . . . . . . . . . . . . . . . . . . . . . . . . . 116
Labels. . . . . . . . . . . . . . . . . . . . . . . . . . . . . . . . . . . . . . . . . . . . . . . . . . . . . . . . . . . . . . . 117
Transparencies . . . . . . . . . . . . . . . . . . . . . . . . . . . . . . . . . . . . . . . . . . . . . . . . . . . . . . . 117
Envelopes . . . . . . . . . . . . . . . . . . . . . . . . . . . . . . . . . . . . . . . . . . . . . . . . . . . . . . . . . . . 118
Card stock and heavy media . . . . . . . . . . . . . . . . . . . . . . . . . . . . . . . . . . . . . . . . . . . . . 119
Appendix C Warranty and licensing
Hewlett-Packard software license agreement . . . . . . . . . . . . . . . . . . . . . . . . . . . . . . . . . . . 122
Hewlett-Packard limited warranty statement . . . . . . . . . . . . . . . . . . . . . . . . . . . . . . . . . . . . 123
Limited warranty for print cartridge life . . . . . . . . . . . . . . . . . . . . . . . . . . . . . . . . . . . . . . . . 124
Hardware service . . . . . . . . . . . . . . . . . . . . . . . . . . . . . . . . . . . . . . . . . . . . . . . . . . . . . . . . . 125
Extended warranty . . . . . . . . . . . . . . . . . . . . . . . . . . . . . . . . . . . . . . . . . . . . . . . . . . . . . . . .126
Guidelines for repacking the printer . . . . . . . . . . . . . . . . . . . . . . . . . . . . . . . . . . . . . . . . . . . 127
How to contact HP . . . . . . . . . . . . . . . . . . . . . . . . . . . . . . . . . . . . . . . . . . . . . . . . . . . . . . . .128
Appendix D Ordering supplies and accessories
Ordering supplies and accessories . . . . . . . . . . . . . . . . . . . . . . . . . . . . . . . . . . . . . . . . 129
10/100 networking and wireless print servers . . . . . . . . . . . . . . . . . . . . . . . . . . . . . . . . 131
Appendix E Network configuration
Installing a shared printer on Windows 98 and Millennium . . . . . . . . . . . . . . . . . . . . . . 133
Installing a shared printer on Windows 2000. . . . . . . . . . . . . . . . . . . . . . . . . . . . . . . . . 134
Installing a shared printer on Windows XP . . . . . . . . . . . . . . . . . . . . . . . . . . . . . . . . . . 135
Appendix F Memory
Installing a memory DIMM (1300 series only) . . . . . . . . . . . . . . . . . . . . . . . . . . . . . . . . . . . 138
Testing the DIMM installation . . . . . . . . . . . . . . . . . . . . . . . . . . . . . . . . . . . . . . . . . . . . . . . . 140
Removing a DIMM . . . . . . . . . . . . . . . . . . . . . . . . . . . . . . . . . . . . . . . . . . . . . . . . . . . . . . . . 141
Appendix G Working with the print server
Installing the print server . . . . . . . . . . . . . . . . . . . . . . . . . . . . . . . . . . . . . . . . . . . . . . . . . . .144
Printing a configuration page . . . . . . . . . . . . . . . . . . . . . . . . . . . . . . . . . . . . . . . . . . . . . . . . 144
Using the print server’s embedded Web server . . . . . . . . . . . . . . . . . . . . . . . . . . . . . . . . . 145
Changing the IP address . . . . . . . . . . . . . . . . . . . . . . . . . . . . . . . . . . . . . . . . . . . . . . . . . . . 145
Troubleshooting the print server. . . . . . . . . . . . . . . . . . . . . . . . . . . . . . . . . . . . . . . . . . . . . . 146
Installed print server stops working . . . . . . . . . . . . . . . . . . . . . . . . . . . . . . . . . . . . . . . . 146
Print server status light. . . . . . . . . . . . . . . . . . . . . . . . . . . . . . . . . . . . . . . . . . . . . . . . . . 147
Restoring the factory default settings . . . . . . . . . . . . . . . . . . . . . . . . . . . . . . . . . . . . . . . . . . 148
vi Contents ENWW
Page 9

1
Printer basics
This chapter provides information on the following topics:
● Quick access to more information
● Printer configurations
● Printer features
● Walk around
● Printer control panel
● Media paths
● Print cartridge access
● Printer software
● Printer connections
ENWW Printer basics 1
Page 10

Quick access to more information
WWW links for drivers, software, and support
If you need to contact HP for service or support, use one of the following links:
hp LaserJet 1150 printer
● In the United States, see http://www.hp.com/support/lj1150
● In other countries/regions, see http://www.hp.com
hp LaserJet 1300 series printer
● In the United States, see http://www.hp.com/support/lj1300
● In other countries/regions, see http://www.hp.com
User guide links
● Walk around (location of printer components)
● Changing the print cartridge
● Problemsolving
● Ordering supplies and accessories
● Index
Where to look for more information
● CD user guide: Detailed information on using and troubleshooting the printer. Available on
the CD-ROM that came with the printer.
● Online Help: Information on printer options that are available from within printer drivers. To
view a Help file, access the online Help through the printer driver.
● HTML (online) user guide: Detailed information on using and troubleshooting the printer.
Available at http://www.hp.com/support/lj1150
connected, select Manuals.
or http://www.hp.com/support/lj1300. Once
2 Chapter 1 ENWW
Page 11

Printer configurations
Below are the standard configur ations for the HP LaserJet 1150 and 1300 series printers.
hp LaserJet 1150
● 18 ppm for letter-size paper, 17 p pm for A4-size paper
● First page out in less than 10 seconds
● 600 x 2 dpi (FastRes 1200) resolution
● 250-sheet enclosed input tray
● 10-sheet priority input tray
● 8 MB RAM
● 2500-page print cartridge
● PCL 5e
● Host-based printing
● USB
● 1284-B parallel port
● Windows 98, Me, 2000, XP
● Mac OS 9.x
● Mac OS X v10.1 and v10.2
● Network and wireless printing optio ns
● Power switch
● HP toolbox provides printer status information, troubleshooting information, and printer
configuration information
● 26 PCL fonts
ENWW Printer configurations 3
Page 12

hp LaserJet 1300
● 20 ppm for letter-size paper, 19 ppm for A4-size paper
● First page out in less than 10 seconds
● 1200 dpi (ProRes 1200) resolution
● 250-sheet enclosed input tray
● 10-sheet priority feed tray
● Optional additional 250-sheet input tray
● 16 MB RAM
● Memory is upgradeable to 80 MB
● 4000- or 2500-page print cartridge
● PCL 6 and PCL 5e and PostScript® 2 emulation
● USB
● 1284-B parallel port (through LIO connectivity card)
● Windows 98, Me, 2000, XP
● Mac OS 9.x
● Mac OS X v10.1 and v10.2
● Internal LIO network and wireless printing options
● Power switch
● 45 PCL fonts
● 35 PS fonts
hp LaserJet 1300n
The HP LaserJet 1300n printer includes all the features of the 1300 model, plus an HP Jetdirect
print server network card .
4 Chapter 1 ENWW
Page 13

Printer features
Congratulations on the purchase of your new product. The HP LaserJet 1150 and
HP LaserJet 1300 series printers provide the following benefits.
Print with excellent quality
● Print 1200 dots per inch.
● For the HP LaserJet 1150 printer, host-based and PCL 5e drivers are available.
● For the HP LaserJet 1300 series printer, PCL 5e, PCL 6, and PS drivers are available.
● The printer automatically determines and switches to the appropriate language for the print
job.
Save time
● Fast printing at up to 18 pages per minute (ppm) for the HP LaserJet 1150 printer and up to
20 ppm for the HP LaserJet 1300 series printer.
● No waiting. The first page is out in less than 10 seconds.
Save money
● Use EconoMode to save toner.
● Print multiple pages on a single sheet of paper (N-up printing).
Create professional documents
● Use watermarks, such as Confidential, to protect your documents.
● Print booklets. You can use this feature to easily print the pages in the order require d to create
cards or books. Once printed, all you have to do is fold and staple the pages.
● Print the first page on differ ent media than the rest of the pages.
ENWW Printer features 5
Page 14
Walk around
hp LaserJet 1150 printer and hp LaserJet 1300 series printer
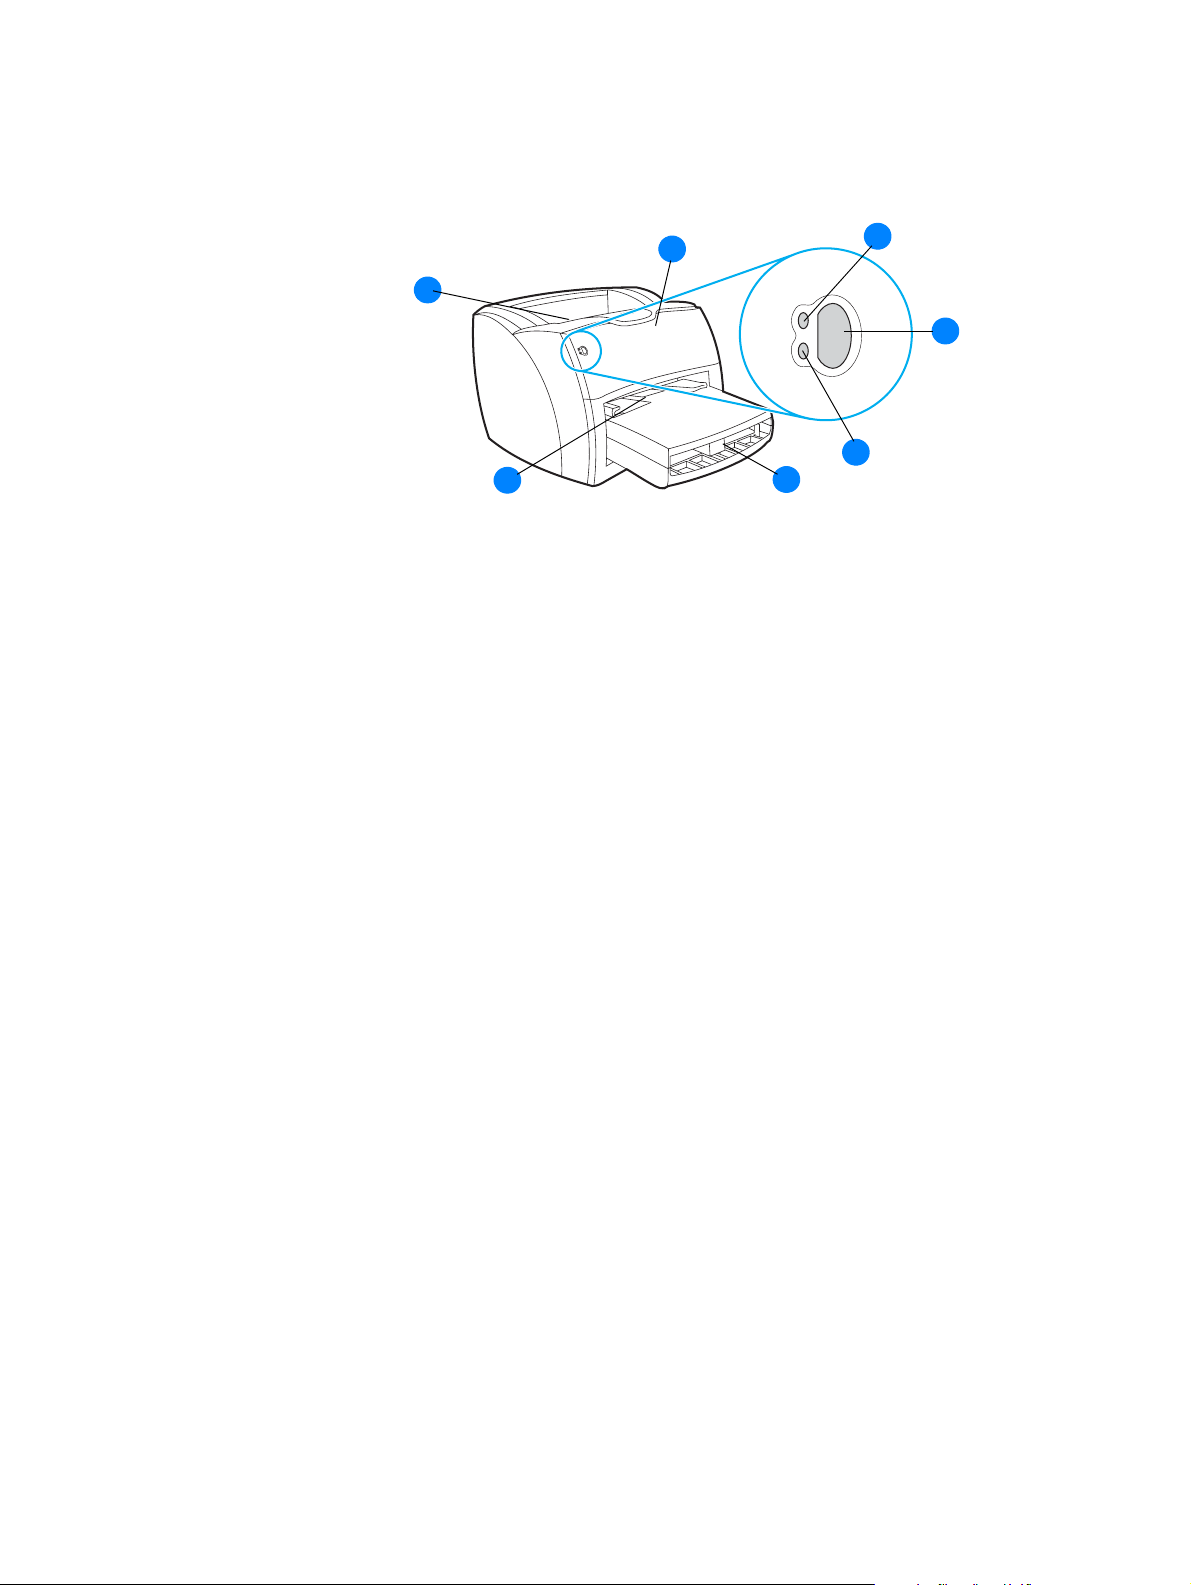
6
1 Ready light
2 Go button and light
3 Attention light
4 Main input tray
5 Priority input tray
6 Output bin
7 Print cartridge door
7
5
4
1
2
3
6 Chapter 1 ENWW
Page 15
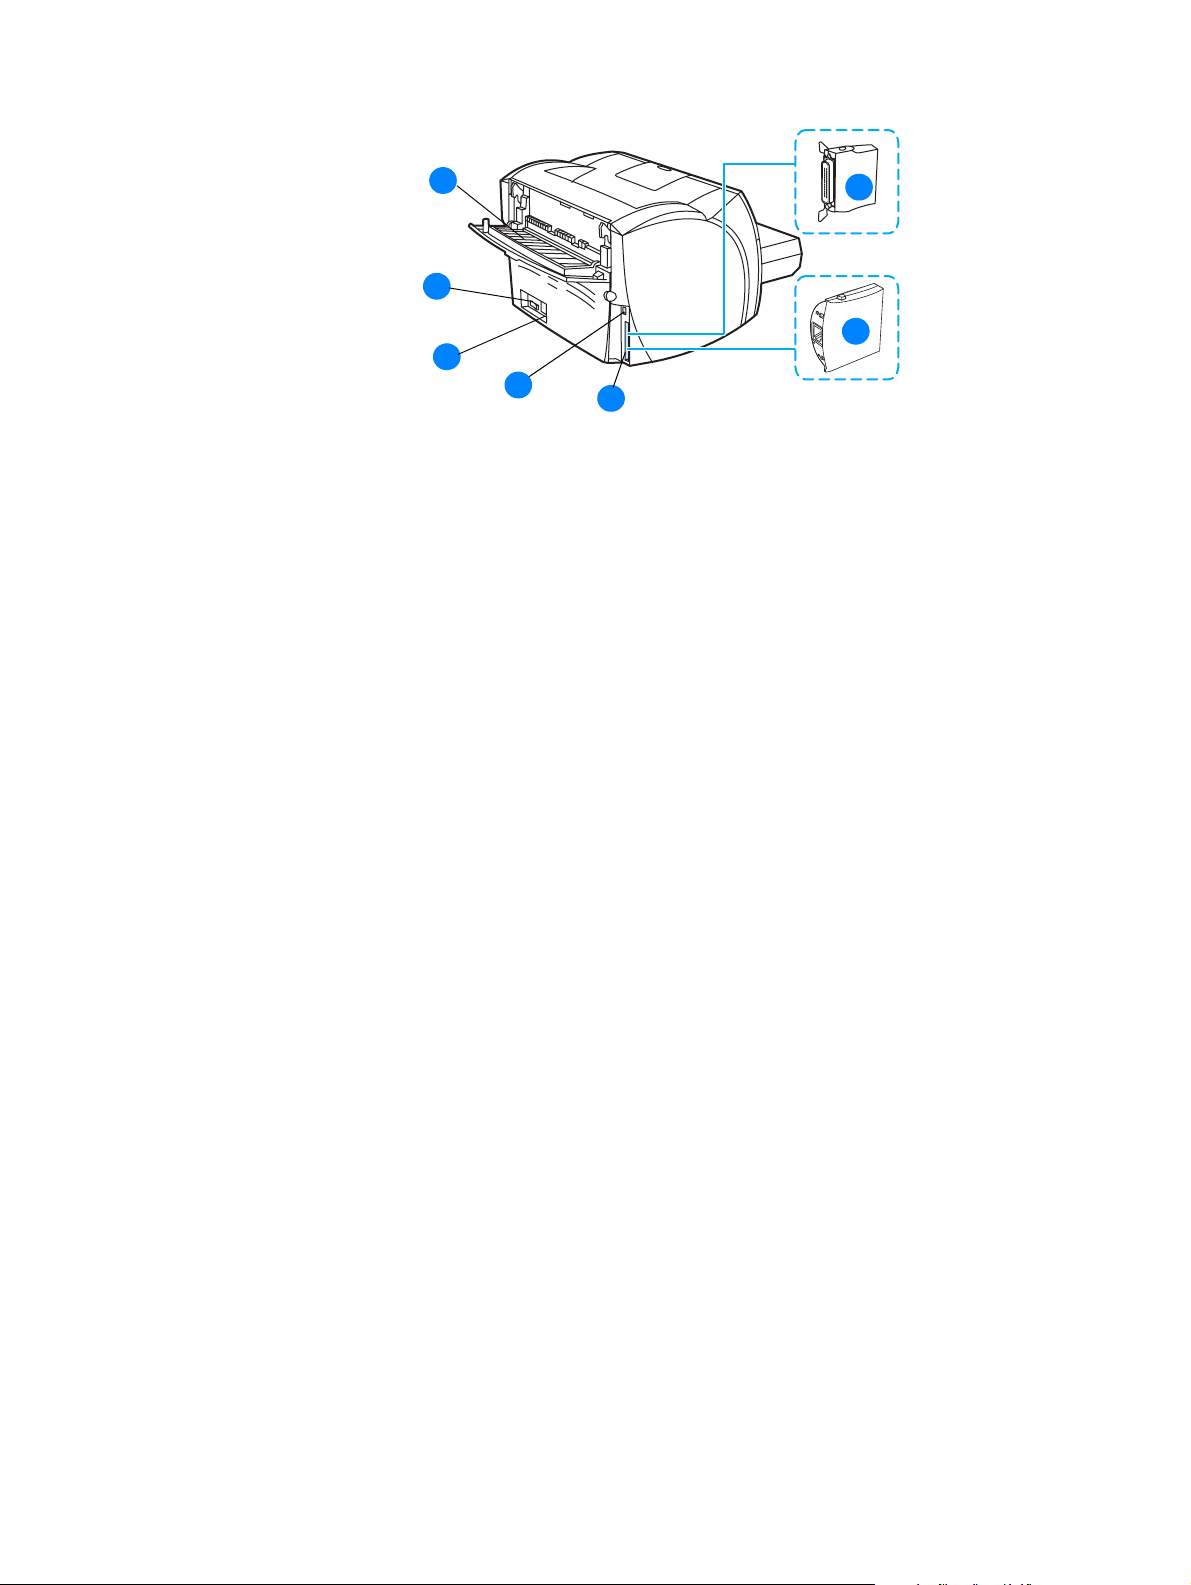
1
2
3
4
5
1 Straight-through output door
2 On/off switch
3 Power receptacle
4 USB port
5 Parallel port (HP LaserJet 1150 printer)
LIO connectivity slot (HP LaserJet 1300 series)
6 HP Jetdirect print server (HP LaserJet 1300n printer only)
7 Parallel LIO adaptor (HP LaserJet 1300 series only)
7
6
ENWW Walk around 7
Page 16

Printer control panel
The printer control panel is comprised of two lights and one lighted button. These lights produce
patterns that identify your printer’s status.
1 Ready light: Indicates that the printer is ready to print.
2 Go button and light: To print a demo page or to continue printing while in manual f eed mod e,
press and release the Go button. To print a configuration page, press and hold the Go b utton
for 5 seconds.
1
2
3
3 Attention light: Indicates printer media input tray is empty, print cartridge door is open, print
cartridge is missing, or other errors.
Note See Status light patterns for a description of the light patterns.
8 Chapter 1 ENWW
Page 17

Media paths
Main input tray
The enclosed main input tray, located in front of the printer, holds up to 250 sheets of 20 lb paper,
multiple envelopes, or other media.
Priority input tray
You should use the priority input tray when f e eding up to 1 0 sheets of 20 lb paper or when printing
single envelopes, postcards, labels, or transparencies. You can also use the priority input tray to
print the first page on different media than the rest of the document.
Note The printer automatically prints from the priority input tray before printing from the main input tray.
See Media
for more information about media types.
Printer media guides
Both input trays have side media guides. The main input tray also has a rear media guide. Media
guides ensure that the media is correctly fed into the printer and that the print is not skewed
(crooked on the media). When loading media, adjust the media guides to match the width and
length of the media that you are using.
ENWW Media paths 9
Page 18

Straight-through output path
The straight-through output pa th is useful when y o u are printing e nvelopes, tra nsparencies , h ea vy
media, or any media that tends to cu rl when printed. Printed media ex its in re v erse order when th e
straight-through output door is open.
Note Printed media does not stack when you use the straight-through output path. The media drops to
the surface belo w unless you remove each sheet as it exits the printer.
Output bin
The output bin is located on the top of the printer. Printed media is collected here in the correct
sequence when the straight-through output door is closed. Use the output bin when printing
normal and large, collated documents.
10 Chapter 1 ENWW
Page 19

Print cartridge access
Print cartridge door
The print cartridge door is located on the front of the printer. You must open the print cartridge door
to access the print cartridge, clear jams, and clean the printer. To open the print cartridge door,
firmly grasp the left and right sides and pull the print cartridge door toward you.
Note Y ou will f eel some resistance when opening the print cartridge door. Opening the print cartridge door
conveniently lifts the print cartridge for easy removal.
ENWW Print cartridge access 11
Page 20

Printer software
Supported operating systems
For easy printer setup and access to the full range of printer features, HP strongly recommends
that you install the software provided. Not all software is available in all languages. Install the
software before setting up the printer. See the Readme for the latest software information.
The most recent drivers, additional drivers, and other software are available from the Internet and
other sources.
The printer comes with software for the followin g operating systems:
● Windows 98
● Windows Me
● Windows 2000
● Windows XP (32-bit)
● Mac OS 9.x
● Mac OS X v10.1 and v10.2 (Apple encourages OS X v10.0 users to upgrade to v10.1)
Installing printer software
To install printer software for Windows 95 and Windows NT 4.0
To install the printer software for Windows 95 and Windows NT 4.0, you m ust use the Add Printer
Wizard.
1 Click Start, and then point to Settings.
2 Click Printers.
3 Double-click Add Printer.
4 Select the port that the printer is connected to, and click Next.
5 Click Have Disk. Click Browse.
6 On the CD-ROM, browse to the driver you want to install as follows:
a Select your language from the directory list, and double-click.
b Select drivers from the directory list, and double-click.
c Select your operating system from the directory list, and double-click.
d Select the driver from the directory list, and double-click.
e Click OK to select the INF file.
f Click the HP LaserJet 1150 or HP LaserJet 1300 series printer, and click OK to begin the
installation.
7 Follow the on-screen instructions to complete the software installation.
To install printer software for all other operating systems
Insert the software CD that came with the printer into the computer CD-ROM drive. Follow the
on-screen installation instructions.
Note If the Welcome screen does not open, click Start on the Windows task bar, click Run, type Z:\setup
(where Z is your CD drive letter), and click OK.
12 Chapter 1 ENWW
Page 21

Printer properties (driver)
Printer properties control the printer. You can change the default settings, such as media size
and type, printing multiple pages on a single sheet of media (N-up printing), resolution,
and watermarks. You can access the printer properties in the following ways:
● Through the software application that you are using to print. This only changes the settings
for the current software application.
● Through the Windows
print jobs.
Note Because many software applications use a different method of accessing the printer properties,
the following section describes the most common methods used in Windows 98, 2000, Millennium,
and Windows XP.
To only change the settings for the current software application
Note Although the steps can vary between software applications, this is the most common method.
1 From the File menu in the software application, click Print.
2 On the Print dialog, click Properties.
3 Change the settings, and click OK.
®
operating system. This changes the default settings for all fu ture
To change the default settings for all future print jobs in Windows 98, 2000,
and Millennium
1 In the Windows system tray, click Start, select Settings, and click Printers.
2 Right-click the HP LaserJet 1150 or HP LaserJet 1300 series printer icon.
3 Click Properties, (in Windows 2000, you can also click Printing Preferences).
4 Change the settings, and click OK.
Note In Windows 2000, many of these features are available from the Printing Preferences menu.
To change the default settings for all future print jobs in Windows XP
1 In the Windows system tray, click Start, and click Control Panel.
2 Double-click Printers and Other Hardware.
3 Click Printers and Faxes.
4 Right-click the HP LaserJet 1150 or HP LaserJet 1300 series printer icon.
5 Click Properties, or click Printing Preferences.
6 Change the settings, and click OK.
ENWW Printer software 13
Page 22

Print setting priorities
There are three ways to change print settings for this printer: in the software application, in the
printer driver , and in the HP toolbox. For the HP LaserJet 1300 series printer , y ou can a lso change
print settings through the embedded Web server. Changes made to print settings are prioritized
according to where the changes are made, as follows:
● Changes made in the software applicat ion override settings changed anywhere else. Within a
software application, changes made in the Page Setup dialog box override changes made in
the Print dialog box.
● Changes made in the printer driver (Printer Properties dialog box) override settings in the
HP toolbox. Changes made in the printer driver do not override settings in the software
application.
● Changes made in the HP toolbox and the embedded Web ser ver have the lowest priority.
If a particular print setting can be changed in more than one of the ways listed above, use the
method that has the highest pr iority.
Printer properties online help
The printer properties (driver) online help includes specific information about the functions in the
printer properties. This online help guides you through the process of changing your printer’s
default settings . For some drivers, online Help gives instructions on using context-sensitive Help.
Context-sensitive Help describes the options for the driver feature you are currently accessing.
To access the printer properties online help
1 From the software application, click File, and then click Print.
2 Click Properties, and then click Help.
14 Chapter 1 ENWW
Page 23

Software for Windows
When you install the software for Windows, you can directly connect the printer to a computer
using a USB cable, par allel cab le, or using wireless technolog y. For the HP LaserJet 1300n printer ,
you can connect the printer to the network using an HP Jetdirect print server card.
The following software is available to all users of the printer, whet her you connected the printer
directly to a computer using a USB cable, parallel cable, wireless technology, or whether you
connected the printer to the network using an HP Jetdirect print server card.
Printer drivers
A printer driver is the software component that provides access to printer features and provides
the means for the computer to commun icate with the printer. Choose a printer driver based on the
way you use the printer.
● Use the host-based printer driver to optimize performance. (HP LaserJet 1150 printer only).
● Use the PCL 5e printer driver if you need print results to look consistent with those from older
HP LaserJet printers. Certain features are not available in this printer driver. (Do not use the
PCL 5e driver for this printer with older printers.)
● Use the PCL 6 printer driver to take full advantage of the printer features. Unless complete
backward compatibility with previous PCL drivers or older printers is necessary, the PCL 6
driver is recommended (HP LaserJet 1300 series only).
● Use the PS printer driver for compatibility with PostScript® needs. Certain printer features are
not available in this printer driver (HP LaserJet 1300 series only).
The printer automatically switches between PS and PCL printer languages depending on the
driver you have selected.
Available printer drivers
The following printer drivers are included with the printer.
Available printer drivers
HP LaserJet 1150 printer HP LaserJet 1300 series printer
● host-based
● PCL 5e
● PCL 5e
● PCL 6
● PS
ENWW Software for Windows 15
Page 24

hp toolbox
You can view the HP toolbox when the printer is directly connected to your computer or when it is
connected to a network. You must have performed a complete software installation to use the
HP toolbox.
The HP toolbox is a Web application that you can use for the following tasks:
● Check the printer status.
● Configure the printer settings.
● View troubleshooting information.
● View online documentation.
See Using the hp toolbox
for more information.
Embedded Web server (hp LaserJet 1300 series only)
The embedded Web server is available for HP LaserJet 1300 series printers with LIO network
connections.
With the embedded Web server, you can gain access to the printer settings and information by
typing an IP address or hostname of the printer in a Web browser (such as Netscape Na viga tor
or Microsoft Internet Explorer) on any computer. You can use the embedded Web server to
configure the printer, view status information, and obtain troubleshooting information.
The embedded Web server works with the following supported web browsers:
● Internet Explorer 5.0 (and late r)
● Netscape Navigator 4.75 (and later)
See Using the embedded Web server
for more information.
TM
16 Chapter 1 ENWW
Page 25

Software for Macintosh computers
hp LaserJet 1150 printer
Accessing the print driver (Mac OS 9.x)
1 From the Apple menu, select the Chooser.
2 Click the HP LaserJet icon in the left side of the Chooser dialog box.
3 Select either USB or AppleTalk, depending on how the computer and printer are conn ec te d.
Note If you are using AppleTalk, you might also need to select the correct Zone from the second men u list.
4 Click the HP LaserJet 1150 printer name in the right side of the Chooser dialog box.
5 Do one of the follo wing, depending on how the computer and the printer are connected:
• USB: Go to step 6.
• AppleTalk: Click Setup, and then select the correct printer type.
6 Close the Chooser.
Accessing the print driver (Mac OS X v10.1)
1 Click the hard drive icon on the desktop.
2 Click Applications, and then click Utilities.
3 Click Print Center.
4 Click Add Printer. The Add Printer List dialog box appears.
5 Select USB or AppleTalk from the top menu.
Note If you are using AppleTalk, you might also need to select the correct Zone from the second men u list.
6 Select the printer name from the printer list.
7 Click Add.
Accessing the print driver (Mac OS X v10.2)
Follow the steps for v10.1 above. In step 5, select Directory Services to use the “Rendezvous”
feature.
ENWW Software for Macintosh computers 17
Page 26

hp LaserJet 1300 series printer
Accessing the print driver (Mac OS 9.x)
1 Click the hard drive icon on the desktop.
2 Click Applications, and then click Utilities.
3 Launch the Desktop Printer utility.
4 Click Printer (USB).
5 In the Printer USB section of the dialog box, click Change.
6 Select the HP LaserJet 1300 printer.
7 Click Auto Setup.
8 Click Create at the bottom of the Window.
9 Click Save.
Accessing the print driver (Mac OS X v10.1)
1 Click the hard drive icon on the desktop.
2 Click Applications, and then click Utilities.
3 Click Print Center.
4 Click Add Printer. The Add Printer List dialog box appears.
5 Select USB or AppleTalk from the top menu.
Note If you are using AppleTalk, you might also need to select the correct Zone from the second menu list.
6 Select the printer name from the printer list.
7 Click Add.
Accessing the print driver (Mac OS X v10.2)
Follow the steps for v10.1 above. In step 5, select Directory Services to use the “Rendezvous”
feature.
PostScript Printer Description files (PPDs)
PPDs, in combination with the Apple printer driver, access the printer features and allow the
computer to communicate with the printer. An installation prog ram for the PPDs is provided on the
HP LaserJet 1300 series printer CD.
18 Chapter 1 ENWW
Page 27

Software for network installations only
This software is available only when the printer is connected to a network.
hp Web Jetadmin
HP Web Jetadmin is intended for printer management in commercial and enterprise networks.
While the embedded Web server is used to manage a sin gle printer, HP Web Jetadmin is used to
manage groups of printers and other devices. Download this software from the HP w ebsite at
http://www.hp.com/go/webjetadmin
software in many languages.
HP Web Jetadmin is available only if the printer is connected to an IP-based network. This
browser-based software can be installed on one of the following supported platforms:
● Microsoft Windows NT 4.0, XP, or 2000
● HP-UX
● Sun Solaris
● Red Hat Linux
● SuSE Linux
Starting hp Web Jetadmin
Once you install the HP Web Jetadmin software, you can start it in a supported Web browser on
any computer by typing one of the following URLs:
. The HP Web Jetadmin website provides HP Web Jetadmin
● http://server.domain:port/
where “server.domain” is the server hostname and “port” is the port number that you entered
during installation. (The default port is 8000.) This information is available in the url.txt file,
which is stored in the folder where HP Web Jetadmin is installed.
● http://ipaddress:port/
where “ipaddress” is the IP address of the computer where HP Web Jetadmin is located.
For settings that appear in both the printer driver and HP Web Jetadmin, changes made in the
printer driver override changes made in HP Web Jetadmin.
ENWW Software for network installations only 19
Page 28
Printer connections
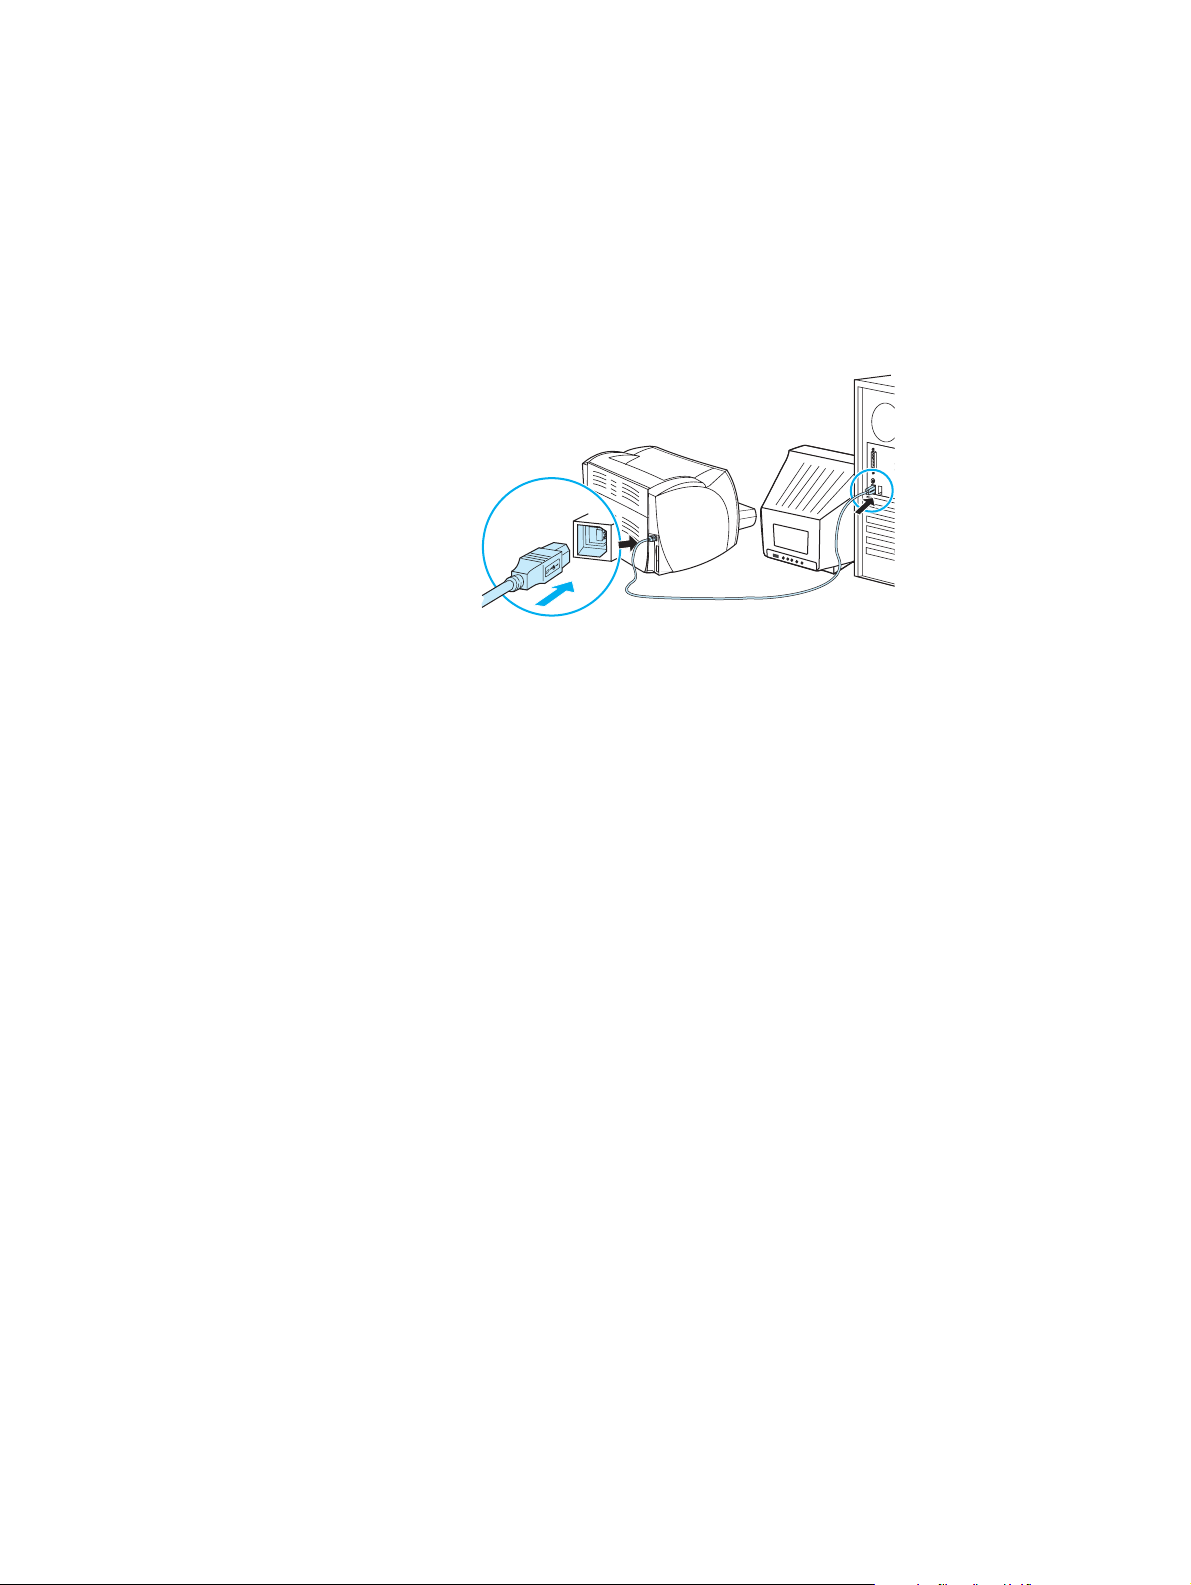
USB connections
All HP LaserJet 1150 and HP LaserJet 1300 series printer models support USB connections. The
USB port is on the back of the printer.
Connecting the USB cable
Plug the USB cable into the printer. Plug the other end of the USB cable into the computer.
20 Chapter 1 ENWW
Page 29

Parallel connections
All HP LaserJet 1150 and HP LaserJet 1300 series printer models support parallel connections.
For the HP LaserJet 1300 series printer, the parallel port is in a low-cost input/output (L IO) adaptor
that connects to the back of the printer. Use an IEEE 1284-compliant parallel cable.
Connecting the parallel cable for the hp LaserJet 1150 printer
Connect the parallel cable to the printer. Connect the other end of the parallel cable to the
computer.
Connecting the parallel cable for the hp LaserJet 1300 series printer
1 Insert the parallel LIO adap to r int o the LIO c onne ct i vity slo t on the back of the pr in te r.
2 Connect the parallel cable to the adaptor. Connect the other end of the parallel cable to the
computer.
ENWW Printer connections 21
Page 30

Network connections
The HP LaserJet 1300n printer also supports network connections with an HP Jetdirect print
server. This print server is option al for the HP LaserJet 1300 printer. To order the print server, see
Ordering supplies and accessories
Connecting to the network
1 Insert the HP Jetdirect print server into the LIO connectivity slot on the back of the printer.
2 Connect one end of a network cable to the print server, and connect the other end to the
network. Be sure to install the printer driver on all computers that connect to the network.
.
Wireless connections
The HP LaserJet 1150 and HP LaserJet 1300 series printer models also support the
IEEE 802.11b standard for wireless networking and Bluetooth wireless connectivity options. The
availab le HP Jetdirect wireless print servers and HP Bluetooth printer adaptors attach on the back
of the printer to either the USB port, the parallel port, or the LIO connectivity slot (for the
HP LaserJet 1300 series).
For a complete list of av ailable HP Jetdirect wireless print servers and HP Bluetooth adaptors, see
Ordering supplies and accessories
For more information about wireless printing, see Wireless printing
.
.
22 Chapter 1 ENWW
Page 31

2
Media
This chapter provides information on the following topics:
● Choosing paper and other media
● Optimizing print quality for media types
● Loading media into the input trays
● Printing on transparencies or labels
● Printing on envelopes
● Printing on letterhead and preprinted forms
● Printing on custom-sized media and cardstock
ENWW Media 23
Page 32

Choosing paper and other media
HP LaserJet printers produce excellent print quality documents. You can print on a variety of
media, such as paper (including up to 100% recycled fiber content paper), envelopes , labels,
transparencies, and custom-sized media. The following are the supported media sizes:
● Minimum: 76 by 127 mm (3 by 5 in.)
● Maximum: 216 by 356 mm (8.5 by 14 in)
Properties such as weight, grain, and moisture content are important factors that affect printer
performance and quality. To achieve the best possible print quality, only use high-quality media
designed for laser printers . See Printer media specifications
specifications.
Note Always test a sample of the media before you pur chase large quantities. Your media supplier should
understand the requirements specified in the HP LaserJet printer family print media guide (HP part
number 5963-7863). See Printer media specifications for more information.
for detailed paper and media
24 Chapter 2 ENWW
Page 33

Media to avoid
The HP LaserJet 1150 and 1300 series printers can handle many types of media. Use of media
outside the printer’s specifications will cause a loss of print quality and increase the chance of
paper jams occurring.
● Do not use paper that is too rough.
● Do not use paper with cutouts or perforations other than standard 3-hole punched paper.
● Do not use multipart forms.
● Do not use paper with a watermark if you are printing solid patterns.
Media that may damage the printer
In rare circumstances media can damage the printer. The following media must be avoided to prevent possible damage:
● Do not use media with staples attached.
● Do not use transparencies designed for inkjet printers or othe r low temperature printers. Use
only transparencies that are specified for use with HP LaserJet printers.
● Do not use photo paper intended for inkjet printers.
● Do not use paper that is embossed or coated and is not designed for the temperatures of the
printer’s image fuser. Select media that can tolerate temperatures of 200° C (392° F) for 0.1
second. HP produces a selection of media that is designed for the HP LaserJet 1150 and
1300 series printers.
● Do not use letterhead paper with low temperature dyes or thermography. Preprinted forms or
letterhead must use inks that can tolerate temperatures of 200° C (392° F) for 0.1 second.
● Do not use any media that produces hazardous emissions, or that melts, offsets, or discolors
when exposed to 200° C (392° F) for 0.1 second.
To order HP Lase rJet printing supplies, go to http://www.hp.com/go/ljsupplies
http://www.hp.com/ghp/buyonline.html
worldwide.
in the U.S. or to
ENWW Choosing paper and other media 25
Page 34

Optimizing print quality for media types
Media type settings control the temper ature of y our p rinter’ s f user. You can change the settings for
the media that you are using to optimize the print quality.
You can access the optimizing feature from the Paper tab in your printer driver or from
HP Toolbox.
Printing speeds are automatically reduced when printing special-sized media.
26 Chapter 2 ENWW
Page 35

Loading media into the input trays
Main input tray
The main input tray holds up to 250 pag es of 20 lb paper or fewer pages of hea vier med ia (25 mm
or less stack). Load media with the top forward and the side to be printed facing up. To prevent
jams and skewing, always adjust the side and rear media guid es.
Priority input tray
The priority input tray holds up to 10 pages of 20 lb paper or one envelope, transparency, or card.
Load media with the top forward and the side to be printed facing up. To prevent jams and
skewing, always adjust the side media guides.
CAUTION If you try to print on media that is wrinkled, folded, or damaged in any way, a jam might occur. See
Printer media specifications for mo re information.
Note When you add new media, make sure that you remove all of the media from the input tray and
straighten the stac k of new media. This helps pre vent multiple shee ts of media from feeding th rough
the printer at one time, reducing media jams.
Specific types of media
● Transparencies and labels: Load transparencies and labels with the top forward and the
side to be printed facing up. See Printing on transparencies or labels
● Envelopes: Load envelopes with the narrow, stamp side forward and the side to be printed
facing up. See Printing on envelopes
● Letterhead or preprint ed fo r m s: Load with the top forward and the side to be printed facing
up. See Printing on letterhead and preprinted forms
● Cards and custom-sized media: Load with the narrow side forward and the side to be
printed facing up. See Printing on custom-sized media and cardstock
for more information.
for more information.
for more information.
for more information.
ENWW Loading media into the input trays 27
Page 36

Printing on transparencies or labels
Only use transparencies and labels that are recommended for use in laser printers, such as
HP transparency film and HP LaserJet labels. See Printer media specifications
information.
CAUTION Be sure to set the correct media type in the printer settings as instructed belo w. The printer adjusts
the fuser temperature according to the media type setting. When printing on sp ecial media such as
transparencies or labels, this adjust ment prevents the fuser f rom damaging the media as it passes
through the printer.
CAUTION Inspect the media to make sure that it is not wrinkled or curled and that it does not have any torn
edges or missing labels.
To print transparencies or labels
1 Open the straight-through output door.
2 Load a single page in the priority input tra y or lo ad mu ltiple p ages in the m ain inpu t tr ay. Make
sure that the top of the media is forward and the side to be printed (rough side) is facing up.
3 Adjust the media guides.
4 Access the printer properties (or printing preferences in Windows 2000 and XP). See Printer
properties (driver) for instructions.
for more
5 On the Paper/Quality tab or the Paper tab (the Paper Type/Quality tab for some Mac
drivers), choose the correct media type.
Note Not all printer features are a vailable fr om all drivers or operating systems . See the printer properties
(driver) online Help for information about availability of features for that driver.
6 Print the document. Remove the media from the back of the printer as it prints to prevent it
from sticking together and place the printed pa g es on a flat su rface.
28 Chapter 2 ENWW
Page 37

Printing on envelopes
Printing one envelope
Only use envelopes that are recommended for laser printers. See Printer media specifications for
more information.
Note Use the priority input tray for printing one envelope. Use the main input tray for printing multiple
envelopes.
1 To prevent the envelopes from curling as they print, open the straight-through output door.
2 Before loading the envelopes, slide the media guides outward to slightly wider than the
envelopes.
ENWW Printing on envelopes 29
Page 38

3 Place the enve lope with t he side t o be p rinted facing up and the top edge alo ng the le ft med ia
guide.
Note If the envelope has a flap on the short edge, feed that edge into the printer first.
4 Adjust the media guides to the length and width of the envelope.
5 Access the printer properties (or printing preferences in Windows 2000 and XP). See Printer
properties (driver) for instructions.
6 On the Paper/Quality tab or the Paper tab (the Paper Type/Quality tab for some Mac
drivers), select Envelope as the media type.
Note Not all printer features are a vailable fr om all drivers or operating systems . See the printer properties
(driver) online Help for information about availability of features for that driver.
30 Chapter 2 ENWW
Page 39

Printing multiple envelopes
Only use envelopes that are recommended for laser printers. See Printer media specifications for
more information.
Note Use the priority input tray for printing one envelope. Use the main input tray for printing multiple
envelopes.
1 To prevent the envelopes from curling as they print, open the straight-through output door.
2 Before loading the envelopes, slide the media guides outward to slightly wider than the
envelopes.
3 Place the envelo pes with the side to be printed f aci ng up and the top edge a long the left media
guide. Stack up to 30 envelopes.
Note If the envelopes have a flap on the short edge, feed that edge into the printer first.
ENWW Printing on envelopes 31
Page 40

4 Adjust the media guides to the length and width of the envelopes.
5 Access the printer properties (or printing preferences in Windows 2000 and XP). See Printer
properties (driver) for instructions.
6 On the Paper/Quality tab or the Paper tab (the Paper Type/Quality tab for some Mac
drivers), select Envelope as the media type.
Note Not all printer features are a vailable fr om all drivers or operating systems . See the printer properties
(driver) online Help for information about availability of features for that driver.
7 Replace the priority input tray.
32 Chapter 2 ENWW
Page 41

Printing on letterhead and preprinted forms
To print letterhead or preprinted forms
1 Load the paper with the top forward and the side to be printed facing up. Adjust the media
guides to fit the width of the paper.
2 Print the document.
Note To print a single-page cover letter on letterhead, followed by a m ultiple-page document, load the
letterhead in the priority input tray and load the standard paper in the main input tray. The printer
automatically prints from the priority input tray first.
ENWW Printing on letterhead and preprinted forms 33
Page 42

Printing on custom-sized media and cardstock
The HP LaserJet 1150 and 1300 series printers can print on custom-sized media or cardstock
between 76 by 127 mm (3 by 5 inches) and 216 by 356 mm (8.5 by 14 inches). Depending on the
media, you can print up to 10 sheets from the priority input tray . Use the main input tr ay f or multiple
sheets.
CAUTION Make sure that the sheets are not stuck together before you load them.
To print on custom-sized media or cardstock
1 Open the straight-through output door.
2 Load the media with the narrow side forward and the side to be printed facing up.
Adjust the side and rear media guides to fit the media.
3 Select the correct size in the printer settings. (Software settings can override printer
properties.
4 Access the printer properties (or printing preferences in Windows 2000 and XP). See Printer
properties (driver) for instructions.
5 On the Paper/Quality tab or the Paper tab (the Paper Type/Quality tab for some Mac
drivers), select the custom size option . Specify the dimensions of the custom-sized media.
Note Not all printer features are a vailable fr om all drivers or operating systems . See the printer properties
(driver) online Help for information about availability of features for that driver.
6 Print the document.
34 Chapter 2 ENWW
Page 43

3
Printing tasks
This chapter provides information on the following topics:
● Manual feed
● Printing watermarks
● Printing multiple pages on a single sheet of paper (N-up printing )
● Printing on both sides of the paper (manual duplexing)
● Printing booklets
● Canceling a print job
● Understanding print quality settings
● Using EconoMode (Saves toner)
ENWW Printing tasks 35
Page 44

Manual feed
Yo u can use man ual f eed when printing mixed media, fo r e xample , an en v elope , then a le tter, then
an envelope , and so on. Load an envelope in the priority input tray and load letterhead in the main
input tray. You can also use manual f e ed to pro tect your privacy when printing to a network printer.
To print using manual feed, access the printer properties or printer setup in your software
application, and select Manual Feed from the Source Tray drop-down list. See Printer properties
(driver) for instructions. After you have enabled the setting, press the Go button (blinking) each
time to print.
36 Chapter 3 ENWW
Page 45

Printing watermarks
You can use the watermark option to print text ”underneath” (in the background) of an existing
document. For example, you might want to have large gray letters re ading Draft or Confidential
printed diagonally across the first page or all of the pages of a document.
Accessing the watermark feature
1 From your software application, access the printer properties (or printing preferences in
Windows 2000 and XP). See Printer prop erties (driver)
2 On the Effects tab (the Watermark/Overlay tab for some Mac drivers), select the watermark
you want to use.
for instructions.
Note Not all printer features are a vailable from all driv ers or operating systems . See the printer properties
(driver) online Help for information about availability of features for that driver.
ENWW Printing watermarks 37
Page 46

Printing multiple pages on a single sheet of paper (N-up printing)
Yo u can select the n umber of pages tha t you w ant to print on a single sh eet of paper. If y ou choose
to print more than one page per sheet, the pages appear smaller and are arra nged on the sheet in
the order that they would otherwise be printed.
Accessing the multiple pages per sheet feature
1 From your software application, access the printer properties (or printing preferences in
Windows 2000 and XP). See Printer properties (driver)
2 On the Finishing tab (the Layout tab for some Mac drivers), select the correct number of
pages per sheet.
for instructions.
Note Not all printer features are a vailable fr om all drivers or operating systems . See the printer properties
(driver) online Help for information about availability of features for that driver.
3 There is also a check box for page borders and a pull-down menu to specify the order of
pages printed on the sheet.
38 Chapter 3 ENWW
Page 47

Printing on both sides of the paper (manual duplexing)
To print on both sides of the pap er (man ual duplexing), you must run the paper thro ugh the printer
twice. You can print using the media output bin or the straight-through output path.
Hewlett-P ac kard recommends that y ou use the m edia output bin f or lightweigh t paper and use the
straight-through output path for any heavy media or media that curls when printed.
Note Manual duplexing can cause the printer to become dirty, reducing print quality. See Cleaning the
printer for instructions if the printer becomes dirty.
Manual duplex using the top output bin
1 Make sure that the straight-through output door is closed.
2 Access the printer properties (or printing preferences in Windows 2000 and XP). See Printer
properties (driver) for instructions.
3 On the Device Settings tab, select the opt ion to allow manual duplexing.
4 On the Finishing tab (the Paper Type/Quality tab f or so me Mac drivers), select the option to
Print on Both Sides. Ensure that Straight Paper Path is not checke d.
5 Print the document.
Note Not all printer features are a vailable f rom all drivers or operating system s. See the printer properties
(driver) online Help for information about availability of features for that driver.
ENWW Printing on both sides of the paper (manu a l dup l ex ing ) 39
Page 48

6 After side one has printed, remove the remaining paper from the input tray, and set it aside
until after you finish your manual duplexing job.
7 Gather the printed pages, and straighten the stack.
8 Place the stack back in the input tray. Side one should be facing down with the bottom edge
feeding into the printer first. Replace the priority input tray.
Click OK (on screen), and wait for side two to print.
40 Chapter 3 ENWW
Page 49

Manual duplex on heavy media or card stock
For heavy med ia, such as card stock, use the straight-through output path.
1 Load the media, and open the straight-through output door.
2 Access the printer properties (or printing preferences in Windows 2000 and XP). See Printer
properties (driver) for instructions.
3 On the Device Settings tab, select the option to allow manual duplexing.
4 On the Finishing tab (the Paper Type/Quality tab for some Mac drivers), select the option to
Print on Both Sides. Ensure that Straight Paper Path is checked.
5 Print the document.
Note Not all printer features are a vailable from all driv ers or operating systems . See the printer properties
(driver) online Help for information about availability of features for that driver.
6 After side one has printed, remove the remaining paper from the input tray and set it aside
until after you finish your manual duplexing job.
7 Gather the printed pages, turn the printed side down, and str aighten the stac k bef ore placing it
back in the input tray. Side one should be facing down with the bottom edge feeding into the
printer first.
Click OK (on screen), and wait for side two to print.
ENWW Printing on both sides of the paper (manual duplexing) 41
Page 50

Printing booklets
You can print booklets on letter, legal, executive, or A4 paper.
1 Load the paper, and make sure that the straight-through output door is closed.
2 Access the printer properties (or printing preferences in Windows 2000 and XP). See Printer
properties (driver) for instructions.
3 On the Device Settings tab, select the opt ion to allow manual duplexing.
4 On the Finishing tab (the Paper Type/Quality tab for some Mac drivers), select the opti on to
Print on Both Sides. Ensure that Straight Paper Path is not checke d.
5 Set the number of pages per sheet to tw o . Select the appropriate bind ing option, and clic k OK.
Print the document.
Note Not all printer features are a vailable fr om all drivers or operating systems . See the printer properties
(driver) online Help for information about availability of features for that driver.
6 After side one has been printed, remove the remaining paper from the input tray, and set it
aside until your booklet job is complete.
42 Chapter 3 ENWW
Page 51

7 Gather the printed pages, turn the printed side down, and straighten the stack of paper.
8 Place the pages from side one back in the inp ut tr ay. Side one should be facing down with the
bottom edge feeding into the printer first.
Click OK (on screen), and wait for side two to print.
9 Fold and staple the pages.
ENWW Printing booklets 43
Page 52

Canceling a print job
You can cancel a print job from a software application or a print queue.
To stop the printer immediat ely, remove the remaining paper from the printer. After the printer
stops, use one of the following options.
● Printer control panel: To cancel the p rint job, press and release the Go button o n t he p rinter
control panel.
● Software application: Typically, a dialog box appears briefly on your screen, allowing you to
cancel the print job.
● Windows print queue: If a print job is waiting in a print queue (computer memory) or print
spooler, d elete t he job there. Go to the Printer screen in Windo ws 98, Me, 2000, and XP click
Start, Settings, and Printers. Double-click the HP LaserJet 1150 or the HP LaserJet 1300
icon to open the window, select your print job, and click Delete.
● Desktop print queue (Mac OS): Open the printer queue by double-clicking on the printer’s
icon in the Finder. Then highlight the print job and click Trash.
If the status lights on the control panel continue to blink after you cancel a print job, the computer
is still sending the job to the printer. Either delete the job from the print queue or wait until the
computer finishes sending data. The printer will return to the Ready state.
44 Chapter 3 ENWW
Page 53

Understanding print quality settings
Print quality settings affect ho w light or dark the print is on the page a nd the style that the gr aphics
are printed. You can also use the print quality settings to optimize the print quality for a specific
media type. See Optimizing print quality for media types
You can change the settings in the printer properties to accommodate the types of jobs you are
printing. The following ar e the settings:
● 600 dpi: This is the default setting.
● FastRes 1200: This setting provides bett er print quality, but jobs take longer to print.
● ProRes 1200: This setting is available for the HP LaserJet 1300 series printer. It provides the
best print quality.
● EconoMode (Saves Print Cartridges): Text is printed using less toner. This setting is useful
when you are printing drafts. You can turn on this option independently of other print quality
settings.
1 Access the printer properties (or printing preferences in Windows 2000 and XP). See Printer
properties (driver) for instructions.
2 On the Paper/Quality tab or the Finishing tab (the Paper Type/Quality tab for some Mac
drivers), select the print quality setting you want to use.
Note Not all printer features are a vailable from all driv ers or operating systems . See the printer properties
(driver) online Help for information about availability of features for that driver.
for more information.
Note To change the print qualit y sett ings for all future print jobs , acce ss th e properties through the Start
menu in the Windows system tra y. T o change the print quality setting s only f or the curren t softw are
application’s use, access the properties through the Print Setup menu in the application you are
using to print. See Printe r pr op e rtie s (d rive r) for more information.
ENWW Understanding print quality settings 45
Page 54

Using EconoMode (Saves toner)
An excellent way to extend the life of your print cartridge is by using EconoMode. EconoMode
uses substantially less toner than normal printing. The printed image is much lighter, but it is
adequate for printing drafts or proofs.
1 To enable EconoMode, access the printer properties (or printing preferences in
Windows 2000 and XP). See Printer properties (driver)
2 On the Paper/Quality tab or the Finishing tab (the Paper Type/Quality tab for some Mac
drivers), select the EconoMode checkbox.
Note Not all printer features are a vailable fr om all drivers or operating systems . See the printer properties
(driver) online Help for information about availability of features for that driver.
Note See Printer properties (driver) for instructions on enabling EconoMode for all future jobs.
for instructions.
46 Chapter 3 ENWW
Page 55

4
Maintenance
This chapter provides information on the following topics:
● Using HP print cartridges
● Storing print cartridges
● Print cartridge life expectancy
● Saving toner
● Redistributing toner
● Changing the print cartridge
● Cleaning the printer
ENWW Maintenance 47
Page 56

Using HP print cartridges
HP policy on non-HP print cartridges
Hewlett-Packard Company cannot recommend the use of non-HP print cartridges, either new,
refilled, or remanufactured. Since they are not HP products, Hewlett-Packard cannot influence
their design or control their quality. Service or repair that is required as a result of using non-HP
print cartridges will not be covered under the printer warranty.
Note The warranty does not apply to def ects resulting from soft ware, inte rfacing, or parts not supplied by
Hewlett-Packard.
48 Chapter 4 ENWW
Page 57

Storing print cartridges
Do not remove the print cartridge from its package until you are ready to use it. The shelf life of a
print cartridge in an unopened package is approximately 2.5 years. The shelf life of a print
cartridge in an opened package is approximately 6 months.
CAUTION To prevent damage to the print cartridge, minimize its exposure to direct light.
ENWW Storing print cartridges 49
Page 58

Print cartridge life expectancy
The life of the print cartridge depends on the amount of toner that your print jobs require. When
printing text at 5 percent coverage, the print cartridge lasts for the following average amounts:
● HP LaserJet 1150 printer: 2,500 pages
● HP LaserJet 1300 series printer: 2,500 pages (a replacement cartridge that lasts for
4,000 pages is also available)
This life expectancy assumes that you set the print density to 3 and turn EconoMode off. (These
are the default settings.)
50 Chapter 4 ENWW
Page 59

Saving toner
While in EconoMode, the printer uses less toner on each page. Selecting this option will extend
the life of the print cartridge and reduce your cost per page, but it will reduce print quality. See
Using EconoMode (Saves toner)
for more information.
ENWW Saving toner 51
Page 60

Redistributing toner
When toner is low, faded or light areas appear on the printed page. You might be able to
temporarily improve print quality b y red istributi ng the toner, which means that y ou might be able t o
finish the current print job before replacing the print cartridge.
Note You will feel some resistance when you open the print cartridge door. Opening the print cartridge
door conveniently lifts the print cartridge for removal.
1 Open the print cartridge door, and remove the print cartridge from the printer.
CAUTION To prevent damage, do not expose the print cartridge to light. Cover it with a sheet of paper.
2 To redistribute the toner, gently shake the print cartridge from side to side.
CAUTION If toner gets on your clothing, wipe it off with a dry cloth and wash the clothing in cold water. Hot
water sets toner into the fabric.
3 Reinsert the print cartridge into the printer, and close the p rint cartridge door.
If the print is still light, install a new print cartridge. See Changing the print cartridge
instructions.
52 Chapter 4 ENWW
for
Page 61

Changing the print cartridge
Note You will feel some resistance when you open the print cartridge door. Opening the print cartridge
door conveniently lifts the print cartridge for removal.
1 Open the print cartridge door, and remove the old print cartridge. See the recycling
information inside the print cartridge box.
CAUTION To prevent damage, do not expose the print cartridge to light. Cover it with a piece of paper.
2 Remove the new print cartridge from the packaging, and gently shake it from side to side to
distribute the toner evenly inside the cartridge.
3 Bend the tab on the right side of the cartridge to break it loose.
ENWW Changing the print cartridge 53
Page 62

4 Pull the tab until all the tape is removed from the cartridge. Put the tab in the print cartridge
box to return for recycling.
5 Insert the print cartridge in the printer, making sure that the print cartridge is in position. Close
the print cartridge door.
CAUTION If toner gets on your clothing, wipe it off with a dry cloth and wash the clothing in cold water. Hot
water sets toner into the fabric.
54 Chapter 4 ENWW
Page 63

Cleaning the printer
Clean the outside of the printer with a clean, damp cloth when necessary.
CAUTION Do not use ammonia-based cleaners on or around the printer.
During the printing process, paper, toner, and dust particles can accumulate inside the printer.
Over time, this buildup can cause print quality problems, such as toner specks or smearing. To
correct and prev ent these types of prob lems , yo u can clean th e print cartridge area and the printer
media path.
Cleaning the print cartridge area
You do not need to clean the print cartridge area often. However , cleaning this area can improve
the quality of your printed sheets.
WARNING! Before cleaning the printer , turn the printer off b y unplugging the pow er cord, and wait f or the printer
to cool.
1 Open the print cartridge door, and remove the print cartridge.
CAUTION To pre v ent damage, do not e xpose the print cartridge to light. Cover the print cartridge if necessary .
Also, do not touch the b lack sponge transf er rolle r inside th e printer. By doing so , you can damage
the printer.
2 With a dry, lint-free cloth, wipe any residue from the media pat h area and the print cartridge
cavity.
ENWW Cleaning the printer 55
Page 64

3 Replace the print cartridge, and close the print cartridge door.
4 Plug the power cord bac k into the printer.
Cleaning the printer media path
If you are experiencing toner specks or dots on the printouts, clean the printer media path. This
process uses a transparency to remove dust and toner from the media path. Do not use bond or
rough paper.
Note For best results use a sheet of transparency. If you do not have any transparencies, you can use
copier grade media (18 to 24 lb. or 70 to 90 g/m2) with a smooth surface.
1 Make sure that the printer is idle and the Ready light is on.
2 Load the media in the input tray.
3 Print a cleaning page using one of the following methods:
• Access the HP toolbox. See Using the hp toolbox
Troubleshooting tab, and click Print Quality Tools. Select the cleaning page.
Or
• On the printer control panel, press and hold the Go button until all three lights come on
(about 10 seconds). When all three lights come on, release the Go button.
for instructions. Click the
Note The cleaning process takes approximately 2 minutes . The cleaning page will stop periodically during
the cleaning process. Do not turn the printer off until the cleaning process has finished. You might
need to repeat the cleaning process several times to thoroughly clean the printer.
56 Chapter 4 ENWW
Page 65

5
Managing the printer
This chapter provides information on the following topics:
● Printer information pages
● Using the hp toolbox
● Using the embedded Web server
● Wireless printing
ENWW Managing the printer 57
Page 66

Printer information pages
Special pages reside within the memory of the printer. These pages help you to diagnose and
solve problems with the printer.
Demo page
To print the Demo page, press GO when the printer is ready (Ready light on) and not printing.
Configuration page
The Configuration page lists current settings and prope rties of the printer. It also cont ains a status
log report. You can print a Configuration report from the printer, the embedded web server, or the
HP Toolbox.
To print the Configuration page from the printer, press Go for 5 seconds when the printer is in the
ready state. When the Go light turns on, release the Go button.
Note Yo u can also get the inf ormation contained in t he Event lo g and the Configur ation page throu gh the
HP Toolbox without printing the pages. See Using the hp toolbox for more information.
58 Chapter 5 ENWW
Page 67

Using the hp toolbox
The HP toolbox is a Web application that you can use for the following tasks:
● Check the printer status.
● Configure the printer settings.
● View troubleshooting information.
● View online documentation.
You can view the HP toolbox when the printer is directly connected to your computer or when it is
connected to a network. You must have performed a complete software installation to use the
HP toolbox.
Note You do not hav e to hav e Internet access to open and use the HP toolbox. Howe ver , if y ou click a link
in the Other Links area, you must have I nternet access in order to go to the site associated with
the link. See Other links for more information.
Supported operating systems
HP toolbox is supported for the following operating systems:
● Windows 98, 2000, Me, and XP
● Mac OS X v10.1 and v10.2
Supported browsers
To use the HP toolbox, you must have one of the following browsers:
● Microsoft Internet Explorer 5 or later
● Netscape Navigator 6 or later.
All pages can be printed from the browser.
To view hp toolbox
1 On the Start menu, point to Programs, point to HP LaserJet 1150 or HP LaserJet 1300, and
choose the HP toolbox.
2 The HP toolbox opens in a Web browser.
Note Once you open the URL, you can bookmark it so that you can return to it quickly in the future.
ENWW Using the hp toolbox 59
Page 68

hp toolbox sections
The HP toolbox software contains these sections:
● Status tab
● Troubleshooting tab
● Alerts tab
● Documentation tab
● Advanced Printer Settings window
● Network window (av ailab l e only for the HP LaserJet 1300 series printer and only when an LI O
card is installed)
Other links
Each page in the HP toolbox contains links to the HP website for product registration, product
support, and for ordering supplies. You must have Internet access in order to use any of these
links. If you use a dial-up connection and did not connect when you first ope ned the HP toolbox,
you must connect before you can visit these websites.
60 Chapter 5 ENWW
Page 69

Status tab
The Status tab has links to these main pages:
● Device Status. View printer status information. This page will indicate printer conditions such
as a paper jam or an empty tray. After you correct a problem with the printer, click the Refresh
button to update the device status.
● Supplies Status. This page is available for the HP LaserJet 1300 series printer only. View
detailed supplies status such as the percent of toner remaining in the print cartridge and the
number of pages printed with the current print cartridge. This page also has links to order
supplies and to find recycling information.
● Print Info pages. Print the configuration page and various other info rmation pages that are
available for the printer.
Troubleshooting tab
The Troub leshooting tab pr ovides links to v arious printer troubleshooting information. F or e xample,
these pages provide information on how to clear a jam, how to resolve print quality problems , ho w
to interpret the control panel lights, and how to resolve other problems with the printer.
ENWW Using the hp toolbox 61
Page 70

Alerts tab
The Alerts tab allows you to configure the printer to automatically notify you of printer alerts. The
Alerts tab has links to these main pages:
● Set up status alerts
● Set up e-mail alerts
● Administrative settings
Set up status alerts
On the Set up status alerts page you can choose to turn alerts on or off, specify when the printer
should send an alert, and choose from two diff erent types of alerts:
● a pop-up message
● a task bar icon
Click Apply to activate the settings.
Set up e-mail alerts
This page allows you to designate up to two e-mail addresses to notify of printer status alerts.
Follow the instructions on the screen to set up e-mail alerts.
Administrative settings
This page allows you to set the frequency of how often the HP toolbox checks for printer alerts.
Three settings are available:
● once per minute (every 60 seconds)
● twice per minute (every 30 seconds)
● twenty times per minute (every 3 seconds)
If you want to reduce network I/O traffic, reduce the frequency that the printer checks for alerts.
Documentation tab
The Documentation tab contains links to these information sources:
● User Guide. Contains the information about the printer usage, warranty, specifications, and
support that you are currently reading. The user guide is available in both .html and .pdf
format.
● Read Me. Contains information discovered after other documentation such as the user guide
was developed.
● Late Breaking News. Contains late-breaking information about the printer. In English only.
62 Chapter 5 ENWW
Page 71

Advanced Printer Settings window
When you click the Advanced Printer Settings link, a new window opens. The Advanced Printer
Settings window has two tabs:
● Information tab
● Settings tab
Information tab
The Information tab provides quick links to the following information:
● Device status
● Configuration
● Supplies status (HP LaserJet 1300 series printer only)
● Event log
● Print Info pages
Settings tab
The Settings tab has links to several pages that allow you to view and change the printer’s
configuration.
Note Software settings can override settings made in the HP toolbox.
● Device Information. View basic information about the printer.
● Paper Handling. View and change the settings for the printer’s input tray.
● Printing. View and change the default printer job settings.
● PCL. View and change the PCL font information.
● PostScript. This page is availab le for the HP LaserJet 1300 series printer only. View and
change the settings for PS errors and timeout.
● Print Quality. View and change the print quality settings.
● Print Modes. View and change the print modes for various media types.
● System Setup. View and change system information.
● I/O. View and change the I/O timeout setting.
● Resets. Change all the printer settings back to the factory default settings.
Network window
Note This option is only available for the HP LaserJet 1300 series printer and only when an LIO card is
installed.
When you click the Network link on the Advanced Printer Settings page, a new window opens.
Use this section to configure network settings.
ENWW Using the hp toolbox 63
Page 72

Using the embedded Web server
The embedded Web server is available for HP LaserJet 1300 series printers with LIO network
connections. The embedded Web server provides the same functions as the Advanced Printer
Settings section of the HP toolbox. The main differences between using t he embedded Web
server and using the HP toolbox are the following:
● You do not need to install any software on the computer. You only need to have a supported
Web browser. To use the embedded Web server, you must have Microsoft Internet Explorer
5.0 or later or Netscape Navigator 4.75 or later.
● The embedded Web server is available in English only.
● The embedded Web server does not provide e-mail or status alerts.
● The embedded Web server is sup ported by more operating systems than the HP toolbox,
including Windows 95, Windows NT, Linux, and UNIX
The embedded Web server allows you to view printer and network status and to manage printing
functions from your computer instead of from the printer control panel. Below are examples of
what you can do using the embed ded Web server:
● view printer status information
● view and print internal pages
● determine the remaining life on all supplies and order new ones
● set the type of paper loaded in each tray
● view and change tray configurations
● view and change the printer default configuration settings
● view and change network configuration
®
.
The embedded Web server works when the printer is connected to an IP-based network. The
embedded Web server does not support IPX- or AppleTalk-based printer connections.
Note You do not have to have Internet access to open and use the embedded Web server. However, if
you click a link in the Other Links area, you must have Internet access in order to go to the site
associated with the link.
To open the embedded Web server
1 In a supported Web browser, type the IP address or hostname for the printer. To find the IP
address, print a Configuration page at the printer by pressing and holding Go for 5 seconds.
Note Once you open the URL, you can bookmark it so that you can return to it quickly in the future.
2 The embedded Web server has three tabs that contain settings and information about the
printer: the Information tab, the Settings tab, and the Networking tab. Click the tab that y o u
want to view.
64 Chapter 5 ENWW
Page 73

Information tab
The Information pages group consists of the following pages.
● Device Status. This page displays the printer status and shows the life remaining of HP
supplies. This page also displays product information such as the network name, network
address, and model information.
● Configuration. This page shows the information found on the printer Configuration page.
● Supplies Status. This page shows the life remaining of HP supplies and provides supplies
part numbers. T o order new supplies, click Order Supplies in the Other Links area on the left
side of the window. To visit any web site, you must have Internet access.
● Event log. This page shows a list of all printer events and errors.
● Print Info Pages. This page has links that allow you to print the various information pages that
reside within the memory of the printer.
Settings tab
This tab allows you to configur e the printer from y our computer. If this printer is net work ed, alw ays
consult with the printer administrator before changing settings on this tab.
The Settings tab contains the following pages.
● Device Information. View and change basic information about the printer.
● Paper Handling. View and change the settings for the printer’s input tray.
● Printing. View and change the default printer job settings.
● PCL. View and change the PCL font information.
● PostScript. View and change the settings for PS errors and timeout.
● Print Quality. View and change the print quality settings.
● Print Modes. View and change the print modes for various media types.
● System Setup. View and change system information.
● I/O. View and change the I/O timeout setting.
● Service. Complete service tasks in the printer, such as changing all the printer settings back
to the factory default settings.
ENWW Using the embedded Web server 65
Page 74

Networking tab
This tab allows the network administrator to control n etwo rk-related settin gs for the printer when it
is connected to an IP-based network.
Other links
This section contains links that connect y ou to the Internet. You must have Internet access in order
to use any of these links. If you use a dial-up connection and did not connect when you first
opened the embedded Web server, you must connect before you can visit these w eb sites.
Connecting might require that you close the embedded Web server and reopen it.
● Product Registration. Connects you to the product registration page on the HP web site.
● Order Supplies. Click this link to connect to the HP web site and order genuine HP supplies,
such as print cartridges and paper.
● Product Support. Connects to the support site for the HP LaserJet 1300 series printer. You
can search for help regarding general topics.
66 Chapter 5 ENWW
Page 75

Wireless printing
Wireless networks offer a safe, secure, and cost-effective alternative to traditional wired network
connections. See Ordering supplies and accessories
IEEE 802.11b standard
With the wireless HP Jetdirect 802.11b print server, HP peripherals can be placed a nywhere in the
office or home and connected to a wireless network running Microsof t, App le, Netware, UNIX, or
Linux network operating systems . This wireless technology provides a high-quality printing
solution without the physical const raints of wiring. Peripherals can be conveniently placed
anywhere in an office or home and can be easily moved without changing network cables.
Installation is easy with the HP Install Network Printer Wizard.
HP Jetdirect 802.11b print servers are available for USB and parallel connections.
Bluetooth
Bluetooth™ wireless technology is a lo w-power, short-range radio technology that can be used to
wirelessly connect computers, printers, personal digital as sistants, cell phone s, and ot her de vices.
Unlike infra-red technology, Bluetooth's reliance on radio signals means that devices do not have
to be in the same room, office, or cubicle with an unobstructed line of sight in order to
communicate. This wireless technology increases portability and efficiency within business
network applications.
for a list of available wireless print servers.
The HP LaserJet 1150 and 1300 series printers have incorporated Bluetooth wireless technology.
Bluetooth adaptors are available for USB and parallel connections.
ENWW Wireless printing 67
Page 76

68 Chapter 5 ENWW
Page 77

6
Problemsolving
This chapter provides information on the following topics:
● Finding the solution
● Status light patterns
● Common Macintosh problems
● Troubleshooting PostScript (PS) errors
● Paper handling problems
● Printed page is different than what appeared on screen
● Printer software problems
● Improving print quality
● Clearing jams
● Changing the pickup roller
● Cleaning the pickup roller
● Changing the printer separation pad
ENWW Problemsolving 69
Page 78

Finding the solution
You can use this section to find the solution to common printer problems.
Step 1: Is the printer set up correctly?
●
Is the printer plugged into a power outlet th at is known to wor k?
●
Is the on/off switch in the on position?
●
Is the print cartridge properly installed? See Changing the print cartridge.
●
Is paper properly loaded in the input tray? See
Yes: If you answered yes to the questions above, go to Step 2: Is the Ready light on?
No: If the printer will not turn on, Contact HP support.
Step 2: Is the Ready light on?
Do the control panel lights look like this picture?
Loading media into the input trays
.
Yes:Go to Step 3: Can you print a demo pag e?
No: If the control panel lights do not look like the picture above, see Status light patterns.
If you are unabl e to resolve the problem, Contact HP support
.
Step 3: Can you print a demo page?
Press the Go button to print a demo page.
Yes: If the demo page printed, go to Step 4: Is the print quality acceptable?
No: If no paper came out, see Paper handling problems.
If you are unabl e to resolve the problem, Contact HP support
.
70 Chapter 6 ENWW
Page 79

Step 4: Is the print quality acceptable?
Yes: If the print quality is acceptable, go to Step 5: Is the printer communicating with the
computer?
No: If the print quality is poor, see Improving print quality.
Verify that the print settings are correct fo r the media you are using.
See the Media chapter for information on adjusting the settings for various types of media.
If you are unable to resolve the problem, Contact HP support
.
Step 5: Is the printer communicating with the computer?
Try printing a document from a software application.
Yes: If the document prints, go to Step 6: Does the printed page look like you expected?
No: If the document does not print, see Printer software problems.
If you are using a Macintosh computer, see Common Macintosh problems
If you are using a PS driver, see Troubleshooting PostScript (PS) errors
If you are unable to resolve the problem, Contact HP support
.
.
.
Step 6: Does the printed page look like you expected?
Yes: The problem should be resolved. If it is not resolved, Contact HP support.
No:See Printed page is different than what appeared on screen
If you are unable to resolve the problem, Contact HP support
Contact HP support
● In the United States, see http://www.hp.com/support/lj1150 for the HP LaserJet 1150 printer,
or see http://www.hp.com/support/lj1300
● In other locations, see http://www.hp.com
for the HP LaserJet 1300 series printer.
.
.
ENWW Findin g th e solu tio n 71
Page 80

Status light patterns
Light status legend
Symbol for “light off”
Symbol for “light on”
Symbol for “light blinking”
Control panel light message
Light status Condition of the printer Action
Ready
The printer is ready to print.
Processing
The printer is receiving or
processing data.
Manual feed or out of memory
The printer is in manual feed
mode or out of memory. You
can continue printing.
No action is necessary. To print a configuration page,
press and release the Go button on the printer control
panel.
Wait for the job to print.
Make sure that you have loaded the correct media. To
continue printing, press and release the Go button.
The software controls manual feed. If you do not want to
be in manual feed mode, change the setting from your
printer properties. See Printer properties (driver)
information.
The page being printed might be too complex for the
printer’s memory capacity.
● To continue printi ng , press and release the Go
button.
● Lower the resolution. See Understanding print quality
settings for more information.
● Add more memory. See Installing a memory DIMM
(1300 series only) for more information.
for more
Door open, media out, no print
cartridge, or media jam
The printer is in an error state
that requires operator
intervention or help.
Check the following:
● The print cartridge door is completely closed.
● Media is loaded. See Loading media into the input
trays for instructions.
● The print cartridge is correctly installed in the printer.
See Changing the print cartridge
● There is a media jam. See Clearing jams for
instructions.
● The left side panel is completely closed.
for instructions.
72 Chapter 6 ENWW
Page 81

Control panel light message (continued)
Light status Condition of the printer Action
Printer initialization/Cancel
Job/Cleaning Mode
A printer initialization is taking
place. If all lights blink for 1/2 of
a second or longer in a
sequence:
● the printing is initializing
● all previously sent print jobs
are being purged
● a cleaning page is being
printed
Fatal error
All lights are on.
Accessory error
All lights are blinking.
No action is necessary.
● Turn the printer off and then back on.
● Unplug the printer for 5 minutes, and then plug it back
in.
● If the printer still has an error, Contact HP support.
● Remove the DIMMs and replace if necessary. See
Installing a memory DIMM (1300 series only)
for
instructions.
● Contact HP support.
Return to Finding the solution
.
ENWW Status light patterns 73
Page 82

Common Macintosh problems
Choose the item that best describes the problem:
● Problems in the Chooser
● Printing Errors
● USB Problems
● OS X problems
Symptom Possible Cause Solution
Problems in the Chooser
LaserWriter icon does not
appear in the Chooser.
(HP LaserJet 1300 series)
The HP LaserJet printer
driver icon does not appear
in the Chooser.
(HP LaserJet 1150 printer)
Printer name does not
appear in the printer list.
Software not installed
correctly.
The software was not
installed properly.
The LaserWriter 8 driver should be present as a
part of the Mac OS. Make sure that the
LaserWriter driver is in the Extensions folder
within the systems folder. If not, install the
LaserWriter driver from your Mac OS CD.
Reinstall the software.
Make sure the cables are connected correctly, the
printer is on, and the Ready light is on.
Verify that the printer driver is installed.
Make sure the correct printer driver has been
selected in the Chooser.
Use the HP LaserJet driver for the HP LaserJet
1150 printer.
Use the LaserWriter 8 driver for the HP LaserJet
1300 series printer.
Make sure AppleTalk is on. (The button next to
Active is selected in the Chooser.)
If the printer resides on a network with multiple
zones, make sure the correct zone is selected in
the “AppleTalk Zones” box in the Chooser.
The printer driver does not
automatically set up your
selected printer even
though you clicked Auto
Setup in the Chooser.
(HP LaserJet 1300 series)
Reinstall the printer software.
Select an alternate PPD.
74 Chapter 6 ENWW
Page 83

Symptom Possible Cause Solution
Printing Errors
A print job was not sent to
your desired printer.
You cannot use the
computer while the printer
is printing.
An encapsulated
PostScript (EPS) file does
not print with the correct
fonts.
Your document is not
printing with New York,
Geneva, or Monaco fonts.
Another printer with the
same or similar name may
have received your print
job.
Background Printing has
not been selected.
This problem occurs with
some software
applications.
Check the AppleT alk name of the printer display ed
on the configuration page.
LaserWriter 8.3
Turn Background Printing on in the Chooser.
Status messages will now be redirected to the
Print Monitor allowing you to continue working
while the computer is processing data to be sent
to the printer.
LaserWriter 8.4 and higher
Turn Background Printing on by selecting File,
Print Desktop, and Background Printing.
Try downloading the fonts contained in the EPS
file to the printer before printi ng.
Send the file in ASCII format instead of binary
encoding.
Select Options in the Page Setup dialog box to
deselect substituted fonts.
ENWW Common Macintosh problems 75
Page 84

Symptom Possible Cause Solution
USB Problems
Unable to print from a
third-party USB card.
A USB-connected
HP LaserJet printer does
not appear in the Chooser.
This error occurs when the
software for USB printers
is not installed.
This problem is caused by
either a software or
hardware component.
When adding a third-party USB card, you might
need Apple's USB Adapter Card Support
software. The most current version of this
software is available from Apple’s web site.
Software troubleshooting
● Check that your Macintosh supports USB.
● Verify if your Macintosh has Mac OS 8.6 or
later.
Hardware troubleshooting
● Check that the printer is turned on.
● Verify that the USB cable is properly
connected.
● Check that you are using the appropriate
high-speed USB cable.
● Ensure that there are not too many USB
devices drawing power from the chain.
Disconnect all devices from the chain and
connect the cable directly to the USB port on
the host computer.
● Check to see if there are more than two
non-powered USB hubs in a row on the chain.
Disconnect all devices from the chain and
connect the cable directly to the USB port on
the host computer.
Note
The iMac keyboard is a non-powered USB hub.
The LaserWriter driver
does not display USB
devices in the Chooser.
For the HP LaserJet 1300 series printer, use the
Apple Desktop utility to set up the printer.
76 Chapter 6 ENWW
Page 85

Symptom Possible Cause Solution
OS X problems
Printer features do not
appear.
When using OS X v10.2,
the printer is not using
“Rendezvous” (mDNS)
Tray 2 does not appear as
an installed option, even
though it is installed on the
printer.
(HP LaserJet 1300 series
only)
The wrong PPD is
selected for the printer.
Verify which PPD is selected as follows:
In the Print dialog box, click Summary. Verify that
the “PPD for:” setting is correct.
If the PPD setting is incorrect, delete the printer in
the Print Center and add it again. Y ou might need
to manually select the PPD.
You might need to upgrade your HP Jetdirect card
to a version that supports Rendezvous.
The ability to manually select installable options is
supported only in Mac OS X v10.2 and later.
ENWW Common Macintosh problems 77
Page 86

Selecting an Alternate PostScript Printer Description (PPD) for
the hp LaserJet 1300 series printer
Mac OS 9.x
1 Open the Chooser from the Apple menu.
2 Click the LaserWriter icon.
3 If you are on a network with multip le zon es, select the z one in the Ap pleTalk Zones box where
the printer is located.
4 Click the printer name you want to use in the Select a PostScript Printer box. (Double-clicking
will immediately generate the next few steps.)
5 Click Setup... (This button may read Create for first-time setup.)
6 Click Select PPD....
7 Find the desired PPD in the list and click Select. If the desired PPD is not listed, choose one
of the following options:
• Select a PPD for a printer with similar features.
• Select a PPD from another folder.
• Select the generic PPD by clicking Use Generic. The generic PPD allows you to print, but
limits your access to printer features.
8 In the Setup dialog box, click Select, and then click OK to return to the Chooser.
Note If you manually select a PPD, an icon might not appear next to the selected printer in the Select a
PostScript Printer box. In the Chooser , click Setup, click Printer Info , and then click Upda te Info to
bring up the icon.
9 Close the Chooser.
Mac OS X
1 Delete the printer from the Print Center.
2 Add the printer again using the option to manually select the PPD.
Renaming the Printer (hp LaserJet 1300 series only)
If you are going to rename the printer, do this before selecting the printer in the Chooser. If you
rename the printer after selecting it in the Chooser, you will have to go back into the Chooser and
reselect it.
Use the Set Printer Name feature in the HP LaserJet Utility to rename the printer.
Return to Finding the solution
.
78 Chapter 6 ENWW
Page 87

Troubleshooting PostScript (PS) errors
The following situations are PS language specific and may occur when several printer languages
are being used.
Note To receive a printed or screen displayed message when PS errors occur, open the Print Options
dialog box and click the desired selection next to the PS Errors se ction. Yo u can also access this
from the embedded Web server.
PS Errors
Symptom Possible Cause Solution
The job prints in Courier (the
printer’s default typeface)
instead of the typeface you
requested.
A legal page prints with
clipped margins.
A PS error page prints. Print job may not be PS. Make sure the print job is a PS job. Check
Limit Check Error Print job is too complex. You may need to print your job at 600 dots
VM Error Font Error Select unlimited downloadable fonts from
Range Check Font Error Select unlimited downloadable fonts from
The requested typeface is not
downloaded. A personality
switch may have been
performed to print a PCL job
just before the PS printing job
was received.
Print job too complex. You may need to print your job at 600 dots
Download the desired font and send the
print job again. Verify the type and location
of the font. Download to printer if
applicable. Check with the software
documentation.
per inch, reduce the complexity of the
page, or install more memory.
to see whether the software application
expected a setup or PS header file to be
sent to the printer.
per inch, reduce the complexity of the
page, or install more memory.
printer driver.
printer driver.
Return to Finding the solution
ENWW Troubleshooting PostScript (PS) errors 79
.
Page 88

Paper handling problems
Choose the item that best describes the problem:
● Paper jam
● Print is skewed (crooked)
● More than one sheet of media feeds t hrough the printer at one time
● Printer does not pull media from the media input tray
● Printer curled the media
● The printed media does not exit to the correct path
● Print job is extremely slow
Media handling problems
Problem Solution
Paper jam ● See Clearing jams for more information.
● Make sure that you are printing with media that meets specifications.
See Printer media specifications for more information.
● Make sure that you are printing with media that is not wrinkled, folded,
or damaged.
● Make sure that the printer is clean. See Cleaning the printer for more
information.
● If you are printing to the straight-through output path, close and open
the door again to make sure that the green release levers are closed.
Print is skewed (crooked) ● See Page skew for more information.
● Adjust the media guides to the width and length of the media that you
are using and try reprinting. See Printer media guides or Loading media
into the input trays for more information.
More than one sheet of media
feeds through the printer at
one time
● The media input tray might be too full. See Loading media into the input
trays for more information.
● Make sure that the media is not wrinkled, folded, or damaged.
● The printer separation pad might be worn. See Changing the printer
separation pad for more information.
Printer does not pull media
from the media input tray
● Make sure that the printer is not in manual feed mode. See Status light
patterns for more information.
● The pickup roller might be dirty or damaged. See Cleaning the pickup
roller or Changing the pickup roller for instructions.
Printer curled the media
The printed media does not exit
to the correct path
● See Curl or wave for more information.
● Open the straight-through output door to print straight through.
See Media paths
or Media for more information.
Open or close the straight-through output door to reflect the output path that
you want to use. See Media paths
for more information.
80 Chapter 6 ENWW
Page 89

Media handling problems (continued)
Problem Solution
Print job is extremely slow The maximum speed of the printer is up to 18 pages per minute for the
HP LaserJet 1150 printer and up to 20 pages per minute for the
HP LaserJet 1300 series printer. Your print job might be very complex. Try
the following:
● Reduce the complexity of your document (for example, reduce the
number of multiple graphics).
● In the printer driver, set the media type to plain paper.
• This may cause toner to fuse improperly if using heavy
media.
● Add printer memory. See Installing a memory DIMM (1300 series only)
● Narrow media or heavy media will slow printing. Use normal media.
Return to Finding the solution
.
ENWW Paper handling problems 81
Page 90

Printed page is different than what appeared on screen
Choose the item that best describes the problem:
● Garbled, incorrect, or incomplete text
● Missing graphics or text, or blank pages
● Page format is different than on another printer
● Graphics quality
Printed page problems
Problem Solution
Garbled, incorrect, or
incomplete text
Missing graphics or text, or
blank pages
The parallel or USB cable might be loose or defective. Try the
following:
● Disconnect the cable and reconnect it at both ends.
● Try printing a job that you know works.
● If possible, attach the cable and printer to another
computer, and try printing a job that you know works.
● Try using a new IEEE-1284 compliant parallel or USB
cable. See Ordering supplies and accessories
.
The wrong printer driver might have been selected when the
software was installed. Make sure that the HP LaserJet 1150
or HP LaserJet 1300 is selected in the printer properties.
There might be a problem with your software application. Try
printing from another software application.
● Make sure that your file does not contain blank pages.
● The sealing tape might still be in the print cartridge.
Remove the print cartridge, and pull out the sealing tape.
Reinstall the print car tridge. See Changing the print
cartridge for instructions. To check the printer, print a
demo page by pressing the Go button.
● The graphic settings in the printer properties might not be
correct for the type of job that you are printing. Try a
different graphic setting in the printer properties. See
Printer properties (driver)
● The printer driver might not work for the type of job that
for more information.
you are printing. Try using a different printer driver
(software), such as the printer driver for the
HP LaserJet III.
Note
If you use a different printer driver, you will lose access to
some product features.
82 Chapter 6 ENWW
Page 91

Printed page problems (continued)
Problem Solution
Page format is different than on
another printer
If you used an older or different printer driver (printer software)
to create the document or the printer properties settings in the
software are different, the page format might change when
you try to print using your new printer driver or settings. To
help eliminate this problem, try the following:
● Create documents and print them using the same printer
driver (printer software) and printer property settings
regardless of which HP LaserJet printer you use to print
them.
● Change the resolution, paper size, font settings, and other
settings. See Printer properties (driver) for more
information.
Graphics quality The graphics settings might be unsuitable for your print job.
Try the following:
● Check the graphic settings, such as resolution, in the
printer properties and adjust them as necessary. See
Printer properties (driver)
● Try using a different printer driver (software), such as the
for more information.
printer driver for the HP LaserJet III.
Note
If you use a different printer driver, you will lose access to
some product features.
Return to Finding the solution
.
ENWW Printed page is different than what appeared on screen 83
Page 92

Printer software problems
Printer software problems
Problem Solution
A printer driver for the
HP LaserJet 1150 or the
HP LaserJet 1300 printer is not
visible in the Printer folder
An error message was
displayed during the software
installation
● Reinstall the printer software. In the Windows system tray, click Start,
select Programs, and select HP LaserJet 1150 or HP LaserJet 1300
and click Uninstall. Turn the printer off. Install the printer software
from the CD-ROM. Turn the printer back on.
Note
Close any applications that are running. To close an application that
has an icon in the system tray, right-click the icon and select Close or
Disable.
● Try plugging the USB cable into a different USB port on the PC.
● If you are trying to print to a shared printer, in the Windows system
tray, click Start, select Settings, and select Printers. Double-click the
Add Printer icon. Follow the instructions in the Add Printer Wizard.
● Reinstall the printer software. In the Windows system tray, click Start,
select Programs, and select HP LaserJet 1150 or HP LaserJet 1300
and click Uninstall. Turn the printer off. Install the printer software
from the CD-ROM. Turn the printer back on.
Note
Close any applications that are running. To close an application that
has an icon in the system tray, right-click the icon and select Close or
Disable.
● Check the amount of free space on the drive where you are installing
the printer software. If necessary, free up as much space as you can,
and reinstall the printer software.
● If necessary, run the Disk Defragmenter, and reinstall the printer
software.
The printer is in Ready mode,
but nothing prints
Return to Finding the solution
● Reinstall the printer software. In the Windows system tray, click Start,
select Programs, and select HP LaserJet 1150 or HP LaserJet 1300
and click Uninstall. Turn the printer off. Install the printer software
from the CD-ROM. Turn the printer back on.
Note
Close any applications that are running. To close an application that
has an icon in the system tray, right-click the icon and select Close or
Disable.
● Print a Demo page. Press the Go button to print a Demo page.
.
84 Chapter 6 ENWW
Page 93

Improving print quality
This section provides information about identifying and correcting print defects.
Light print or faded
Toner specks
● The toner supply is low. See Redistributing toner for more
information.
● The media might not meet Hewlett-Packard’s media
specifications (for example, the media is too moist or too rough).
See Printer media specifications for more information.
● If the whole page is light, the print density adjustment is too light
or EconoMode might be turned on. Adjust the print density and
disable EconoMode in the printer properties. See Saving toner
for more information.
● The media might not meet Hewlett-Packard’s media
specifications (for example, the media is too moist or too rough).
See Printer media specifications
● The printer might need to be cleaned. See Cleaning the printer
or Cleaning the printer media path
for more information.
for instructions.
Dropouts
● A single sheet of media might be defective. Try reprinting the job .
● The media’s moisture content is uneven or the media has moist
spots on its surface. Try printing with new media. See Printer
media specifications for more information.
● The media lot is bad. The manufacturing processes can cause
some areas to reject toner. Try a different type or brand of media.
● The print cartridge might be defective. See Changing the print
cartridge for more information.
Note If these steps do not correct the pro blem, contact an HP- authorized dealer or service representative.
Vertical lines
● Make sure that the priority input tray is in place.
● The photosensitive drum inside the print cart ridge has probably
been scratched. Install a new HP print cartridge. See Changing
the print cartridge for instructions.
ENWW Improving print quality 85
Page 94

Gray background
Toner smear
● Make sure that the priority input tray is in place.
● Decrease the print density setting through HP Toolbox or the
embedded web server. This decreases the amount of
background shading. See Using the hp toolbox.
● Change the media to a lighter basis weight. See Printer media
specifications for more information.
● Check the printer’s environment. Very dry (low humidity)
conditions can increase the amount of background shading.
● Install a new HP print cartridge. See Changing the print cartridge
for instructions.
● If toner smears appear on the leading edge of the media, the
media guides might be dirty. Wipe the media guides with a dry,
lint-free cloth. See Cleaning the printer for more information.
● Check the media type and quality.
● Try installing a new HP print cartridge. See Changing the print
cartridge for instructions.
● The fuser temperature might be too low. In your printer driver,
make sure the appropriate media type is selected.
Loose toner
● Clean the inside of the printer. See Cleaning the printer for
● Check the media type and quality. See Printer media
● Try installing a new HP print cartridge. See Changing the print
● In your printer driver, make sure the appropriate media type is
● Plug the printer directly into an AC outlet instead of into a power
Vertical repetitive defects
● The print cartridge might be damaged. If a repetitive mark
● The internal parts might have toner on them. See Cleaning the
● In your printer driver, make sure the appropriate media type is
instructions.
specifications for more information.
cartridge for instructions.
selected.
strip.
occurs at the same spot on the page, install a new HP print
cartridge. See Changing the print cartridge
printer for more information. If the defects occur on the back of
the page, the problem will probably correct itself after a few
more printed pages.
selected.
for instructions.
86 Chapter 6 ENWW
Page 95

Misformed characters
Page skew
Curl or wave
● If characters are improperly formed, producing hollow images,
the media stock might be too slick. Try a different media. See
Printer media specifications
● If characters are improperly formed, producing a wavy effect, the
printer might need service. Print a configuration page. If the
characters are improperly formed, contact an HP-authorized
dealer or service representative. See How to contact HP
more information.
● Make sure that the media is loaded correctly and the media
guides are not too tight or too loose against the media stack.
See Loading media into the input trays for more information.
● The input bin might be too full. See Loading media into the input
trays for more information.
● Check the media type and quality. See Printer media
specifications for more information.
for more information.
for
Wrinkles or creases
● Check the media type and quality. Both high temperature and
humidity cause media to curl. See Printer media specifications
for more information.
● The media might have been in the input tray too long. Turn over
the stack of media in the tray. Also , try rotating the media 180° in
the input tray.
● Open the straight-through output door and try printing straight
through. See Media paths
● The fuser temperature might be too high. In your printer driver,
make sure the appropriate media type is selected. If the problem
persists, select a media type that uses a lower fuser
temperature, such as transparencies or light media.
● Make sure that media is loaded properly. See Loading media
into the input trays for more information.
● Check the media type and quality. See Printer media
specifications for more information.
● Open the straight-through output door and try printing straight
through. See Media paths
● Turn over the stack of media in the tray. Also, try rotating the
media 180° in the input tray.
for more information.
for more information.
ENWW Improving print quality 87
Page 96

Toner scatter outline
Return to Finding the solution.
● If large amounts of toner have scattered around the characters,
the media might be resisting the toner. (A small amount of toner
scatter is normal for laser printing.) Try a different media type.
See Printer media specifications
● Turn over the stack of media in the tray.
● Use media designed for laser printers. See Printer media
specifications for more information.
for more information.
88 Chapter 6 ENWW
Page 97

Clearing jams
Occasionally, media becomes jammed during a print job. Some of the causes include the
following:
● The input trays are loaded improperly or too full. See Loading media into the input trays for
more information.
● The media does not meet HP specifications. See Printer media specifications for more
information.
Note When you add new media, always remove all of the media from the input tray and straighten the
stack of new medi a. This helps pre ven t multiple sheets of media from f eeding through the printer at
one time, reducing media jams.
You are notified of a media jam by an error in the software and t he printer control pan el lights . See
Status light patterns
Typical media jam locations
for more information.
● Print cartridge area: See Removing a jammed page for instructions.
● Input tray areas: If the page is still sticking ou t of the input tra y, gently try to remove it from the
input tray without tearing the page. If you feel resistance, see Removing a jammed page
for
instructions.
● Output paths: If the page is sticking out of the output bin, gently try to remove it without
tearing the page. If you feel resistance, see Removing a jammed page
for instructions.
Note There might be loose toner in the printer after a media jam . This ton er clear s up aft er a few sheets
print.
ENWW Clearing jams 89
Page 98

Removing a jammed page
CAUTION Media jams might result in loose toner on the page . If y ou get any toner on y our clothes , wash t hem
in cold water. Hot water will permanently set the toner into the fabric.
1 Open the print cartridge door and the straight-through output door.
2 Rotate the green pressure release levers downward. If you can remove the media without
removing the print cartridge, do so, and continue with step 4.
CAUTION To prevent damage to the print cartridge, minimize its exposure to direct light.
3 Remove the print cartri dg e, and place it as ide.
90 Chapter 6 ENWW
Page 99

4 With both hands, grasp the side of the media that is most visible (this includes the middle),
and carefully pull it free from the printer.
5 If no media is visible, g rasp the tab on the right-hand side of the upper me dia g uide a nd p ull it
forward. Carefully pull the media up and out of the printer.
6 When you have removed the jammed media, replace the print cartridge, and close the print
cartridge door and the straight-through output door.
Note The pressure release levers automatically close when you close the straight-through output door.
After clearing a media jam, you might need to turn the printer off and turn it back on.
Note When you add new media, remove all of the media from the input tray and straighten the stack of
new media.
Return to Finding the solution
ENWW Clearing jams 91
.
Page 100

Changing the pickup roller
If the printer regularly mispicks (no media feeds through or more than one sheet f eeds through),
you might need to change or clean the pickup roller . See Ordering supplies and accessories
order a new pickup roller.
CAUTION Failure to complete this procedure might damage the printer.
1 Unplug the power cord from the printer, and allow the printer to cool.
2 Open the print cartridge door, and remove the print cartridge.
to
3 Find the pickup roller.
92 Chapter 6 ENWW
 Loading...