

Page 1
Page 2

table of contents
product overview ...................................................................................................................................10
Key fea tures .........................................................................................................................................10
Optional Accessories .........................................................................................................................10
Target customers.................................................................................................................................10
Street price...........................................................................................................................................10
key selling points.....................................................................................................................................11
Efficiency ..............................................................................................................................................11
Productivity ..........................................................................................................................................11
Cost-Saving ..........................................................................................................................................11
unique product features.......................................................................................................................12
product positioning statement............................................................................................................13
product sku..............................................................................................................................................15
representation of price vs quality........................................................................................................16
localization...............................................................................................................................................17
CD1........................................................................................................................................................17
CD2........................................................................................................................................................17
the printer.................................................................................................................................................18
front of the printer...................................................................................................................................19
printing supplies area.............................................................................................................................21
rear of the printer....................................................................................................................................22
auto-duplex unit .....................................................................................................................................23
specifications...........................................................................................................................................24
hardware accessories ...........................................................................................................................25
hp media types.......................................................................................................................................26
upgrades..................................................................................................................................................27
consumable part numbers ...................................................................................................................28
value added services............................................................................................................................30
Internet..................................................................................................................................................30
hp instant support web site...............................................................................................................30
MyPrintMileage ...................................................................................................................................30
Embedded Web Server.....................................................................................................................30
education and training.........................................................................................................................31
service and support ...............................................................................................................................32
Support..................................................................................................................................................32
Online support.....................................................................................................................................32
Telephone support..............................................................................................................................32
regional repair strategy.........................................................................................................................33
warranty period ......................................................................................................................................34
Repair and warranty information ....................................................................................................34
hardware setup requirements..............................................................................................................37
contents of the box................................................................................................................................38
overall setup proc edure........................................................................................................................40
install tray 2 ..............................................................................................................................................42
Tray 2 .....................................................................................................................................................42
install auto-duplex un it ..........................................................................................................................43
Auto-duplex unit..................................................................................................................................43
Installing hp JetDirect print server .......................................................................................................44
install ink cartridg es................................................................................................................................45
expiration dates..................................................................................................................................45
install ink cartridg es ............................................................................................................................45
maintenance guidelines for ink cartridges....................................................................................45
Page 3

install printheads.....................................................................................................................................47
expiration dates..................................................................................................................................47
install printheads .................................................................................................................................47
maintenance guidelines for printheads.........................................................................................48
guidelines for loading paper................................................................................................................49
print a demo page.................................................................................................................................50
contents of software CD ROM.............................................................................................................52
startup page of the CD browser for Windows ..................................................................................53
browse documentation ........................................................................................................................54
register product ......................................................................................................................................55
customization utility................................................................................................................................56
optional software....................................................................................................................................64
connectivity options ..............................................................................................................................65
USB cable .............................................................................................................................................65
Parallel cable.......................................................................................................................................65
LIO..........................................................................................................................................................65
types of network connections .............................................................................................................66
peer-to-peer network ........................................................................................................................66
client-server network..........................................................................................................................66
install the printer software for Windo ws - Direct ...............................................................................67
Installing using the Installer on a Parallel port ...............................................................................67
Installing using Microsoft's New Hardware Found Wizard...........................................................74
Installing using Add Printer................................................................................................................74
install the printer software for Windo ws - Network...........................................................................82
install toolbox...........................................................................................................................................96
startup page of the CD browser for Macintosh .............................................................................102
install the Macintosh printer software - direct.................................................................................103
test software installation......................................................................................................................108
summary of driver configurations under different install methods..............................................109
Components installed......................................................................................................................109
Features available............................................................................................................................109
uninstall printer software for Windows..............................................................................................110
uninstall printer software for Macintosh ...........................................................................................114
web deployment of drivers ................................................................................................................115
paper size matrix...................................................................................................................................116
paper capacity and weight matrix..................................................................................................117
printer features overview ....................................................................................................................120
Print server card ................................................................................................................................121
Sensors.................................................................................................................................................121
canceling a print job...........................................................................................................................122
LED indications ......................................................................................................................................123
print tabs ................................................................................................................................................126
loading media into trays.....................................................................................................................132
Loading envelopes...........................................................................................................................133
auto-duplexing......................................................................................................................................134
Duplex printing ..................................................................................................................................134
manua l duplexing ................................................................................................................................136
media ease of use strategy................................................................................................................138
Media ease of use user settings.....................................................................................................138
upgrading ..............................................................................................................................................140
overview of printer software features...............................................................................................141
printing on special media...................................................................................................................142
Page 4

Envelopes or cards ...........................................................................................................................142
Transparencies...................................................................................................................................142
Photographs ......................................................................................................................................144
Custom-size media: ..........................................................................................................................144
navigating the user in terface in Windows - Paper/Quality tab ..................................................147
hp digital photography...................................................................................................................149
Red Eye Removal..............................................................................................................................149
Contrast ..............................................................................................................................................149
Digital Flash ........................................................................................................................................150
Sharpness............................................................................................................................................150
SmartFocus.........................................................................................................................................150
Smoothing..........................................................................................................................................151
navigating the user interface in Windows - Finishing tab.............................................................152
navigating the user in terface in Windows - Effects tab................................................................153
navigating the user in terface in Windows - Basics tab.................................................................155
navigating the user in terface in Windows - Color tab ..................................................................157
navigating the user in terface in Windows - Services tab .............................................................158
overview of the Windows toolbox.....................................................................................................161
Printer status tab ...............................................................................................................................161
Information tab .................................................................................................................................163
myPrintMileage .................................................................................................................................164
hp instant support.............................................................................................................................165
Printer Services...................................................................................................................................167
Color calibration...............................................................................................................................168
Align printheads ................................................................................................................................168
changing default software settings in Windows ............................................................................169
For Windows:......................................................................................................................................169
navigating the user in terface in Macintosh ....................................................................................170
Viewing hp Inkjet Utility panels.......................................................................................................170
changing default software settings in Macintosh..........................................................................183
For Macintosh:...................................................................................................................................183
embed ded Web server.......................................................................................................................184
Gaining access to the embedded Web server..........................................................................185
Embedded Web server pages.......................................................................................................186
print a configuration page.................................................................................................................187
print a diagnostic page ......................................................................................................................189
born-on date.........................................................................................................................................191
serial number.........................................................................................................................................192
setup issues.............................................................................................................................................194
Software setup issues........................................................................................................................194
Hardware/f irmware setup issues....................................................................................................194
ink cartridge insertion issues................................................................................................................196
printhead insertion issues.....................................................................................................................197
cleaning the printer .............................................................................................................................198
Guidelines for cleaning the printer................................................................................................198
Steps to clean the printer................................................................................................................198
cleaning and maintaining printheads .............................................................................................199
Checking printheads .......................................................................................................................199
Cleaning printheads ........................................................................................................................199
Aligning printheads...........................................................................................................................199
troubleshooting u sage issues..............................................................................................................201
troubleshooting paper-related problem .........................................................................................202
Page 5

paper jam clearance..........................................................................................................................204
troubleshooting print quality related problems..............................................................................206
low or excess use of ink in printouts...................................................................................................207
incorrect color printouts......................................................................................................................208
firmware flashing or upgrades...........................................................................................................211
controls ...................................................................................................................................................212
driver architecture for windows.........................................................................................................213
OS Interface.......................................................................................................................................213
Print Engine.........................................................................................................................................213
Advantages of Using PCL3 GUI ......................................................................................................214
installer....................................................................................................................................................215
Goldstone has following advantages:.........................................................................................215
Limitations of Goldstone..................................................................................................................216
I/O............................................................................................................................................................217
crew/user-replaceable parts.............................................................................................................218
repackaging by cu stomer to return to hp.......................................................................................219
Repac kaging by hp to return t o customer......................................................................................220
The requirements for the field replacement unit:.......................................................................220
repackaging kit/courier assist instructions: setup the exchanged unit......................................221
specific limitations and resolut ions....................................................................................................222
product escalation path by region ..................................................................................................223
print tab page.......................................................................................................................................226
configuration page..............................................................................................................................229
serial number.........................................................................................................................................231
born-on date.........................................................................................................................................233
print jet server configuration page...................................................................................................234
Use of the JetDirect Configuration page.....................................................................................235
align printhead test page...................................................................................................................236
Aligning printheads...........................................................................................................................237
clean printhead....................................................................................................................................239
Clean Printheads ..............................................................................................................................239
color calibration test page.................................................................................................................241
Color Calibration...............................................................................................................................242
skew test page......................................................................................................................................243
Skew Test.............................................................................................................................................243
customer service checklist..................................................................................................................244
Before the tear down.......................................................................................................................244
Once the printer is fixed ..................................................................................................................244
exploded view ......................................................................................................................................245
repair flowchart ....................................................................................................................................247
tools for repair........................................................................................................................................248
crew parts ..............................................................................................................................................249
non V-coded parts(CREW) .................................................................................................................250
ASSY - MAIN ACCESS DOOR C8124-67007 ...................................................................................250
ASSY - ACCESS IDS DOOR C8124-67008........................................................................................250
ASSY - MAIN PAPER CASSETTE SVC C8124-67012.........................................................................251
ASSY - FRONT, I/P TRAY COVER C8124-67013...............................................................................251
ASSY - OUTPUT TRAY SVC C8124-67014..........................................................................................252
ASSY - 2ND PAPER CASSETTE SVC C8124-67016...........................................................................252
ASSY - PICK ROLLER SVC C8124-67017..........................................................................................253
ASSY - AUTO DUPLEXOR SVC C8124-67022...................................................................................253
RUBBER FOOT SVC C8214-67028.....................................................................................................254
Page 6

ASSY - POWER MODULE SVC C8124-67031...................................................................................254
COVER - LIO SVC C8124-40045 ......................................................................................................255
LOCK - CARRIAGE SVC C8124-40016............................................................................................255
SUPPORT – PAPER CASSETTE SVC C8124-40041............................................................................256
non V-coded parts(FRU)......................................................................................................................257
ASSY - COVER REAR SVC C8124-67004 .........................................................................................257
COVER - FRONT LEFT SVC C8124-67005 ........................................................................................257
COVER - FRONT RIGHT SVC C8124-67006.....................................................................................258
CASE - MAIN SVC C8124-67009......................................................................................................258
ASSY - WINGFRAME, RT and LT SVC C8124-67018 and C8124-67019.......................................259
ASSY - PUSHER RAIL SVC C8124-67020...........................................................................................260
ASSY - PEN LATCH W/CG ARM C8124-67024................................................................................261
ASSY - SERVICE STATION SVC C8124-67025 ..................................................................................261
ASSY - REPLACEABLE IDS SVC C8124-67026..................................................................................262
ASSY - INK SUPPLY STATION SVC C8124-67027..............................................................................263
PCA - DOOR SENSOR SVC C8124-67029.......................................................................................263
ASSY – CONTROL PANEL C8124-67032...........................................................................................264
ENCODER STRIP SVC C6436-80010.................................................................................................265
ASSY – SS SPONGE (SPITTOON) C6436-80011................................................................................265
PCA – DUPLEXER INTERCON SVC C6426-60058 ...........................................................................266
troubleshooting strategy.....................................................................................................................267
Completing the Quick Checkup...................................................................................................267
Troubleshooting Tools.......................................................................................................................267
Diagnostic Tools .................................................................................................................................267
quick checkup......................................................................................................................................268
Check the ink cartridge and printheads .....................................................................................268
Check Diagnostic Page ..................................................................................................................269
troubleshooting u sing LED...................................................................................................................270
troubleshooting initialization...............................................................................................................272
Carriage does not move out of home position..........................................................................272
Carriage assembly moves out of home position, but control panel indicates bad
printheads ..........................................................................................................................................272
troubleshooting paper feed problems.............................................................................................273
Speci al Media does not Pull In.......................................................................................................273
Paper does not Pull In ......................................................................................................................273
Paper does not Eject Properly........................................................................................................273
troubleshooting two sided printing problems .................................................................................274
troubleshooting blank pages.............................................................................................................275
troubleshooting u sing technical diagnostic page.........................................................................276
troubleshooting poor print quality.....................................................................................................278
Faded or dull colors..........................................................................................................................278
Bleeding colors..................................................................................................................................278
Ink smears...........................................................................................................................................279
Incomplete text.................................................................................................................................279
Jagge d text .......................................................................................................................................279
troubleshooting a short ink cartridge / printhead life ...................................................................280
troubleshooting u nexpected results .................................................................................................281
Text or graphics cut off....................................................................................................................281
Meaningless characters printed....................................................................................................281
Wrong fonts printing .........................................................................................................................281
Wrong colors printing .......................................................................................................................282
troubleshooting printout pr oblems....................................................................................................283
Page 7

troubleshooting power-on problems................................................................................................286
troubleshooting print media problems.............................................................................................289
troubleshooting paper eject problems............................................................................................291
troubleshooting unusual noises..........................................................................................................292
Page 8

table of contents
product overview ..............................................................................................................................10
key selling points................................................................................................................................11
unique product features..................................................................................................................12
product positioning statement.......................................................................................................13
product sku.........................................................................................................................................15
representation of price vs quality...................................................................................................16
localization..........................................................................................................................................17
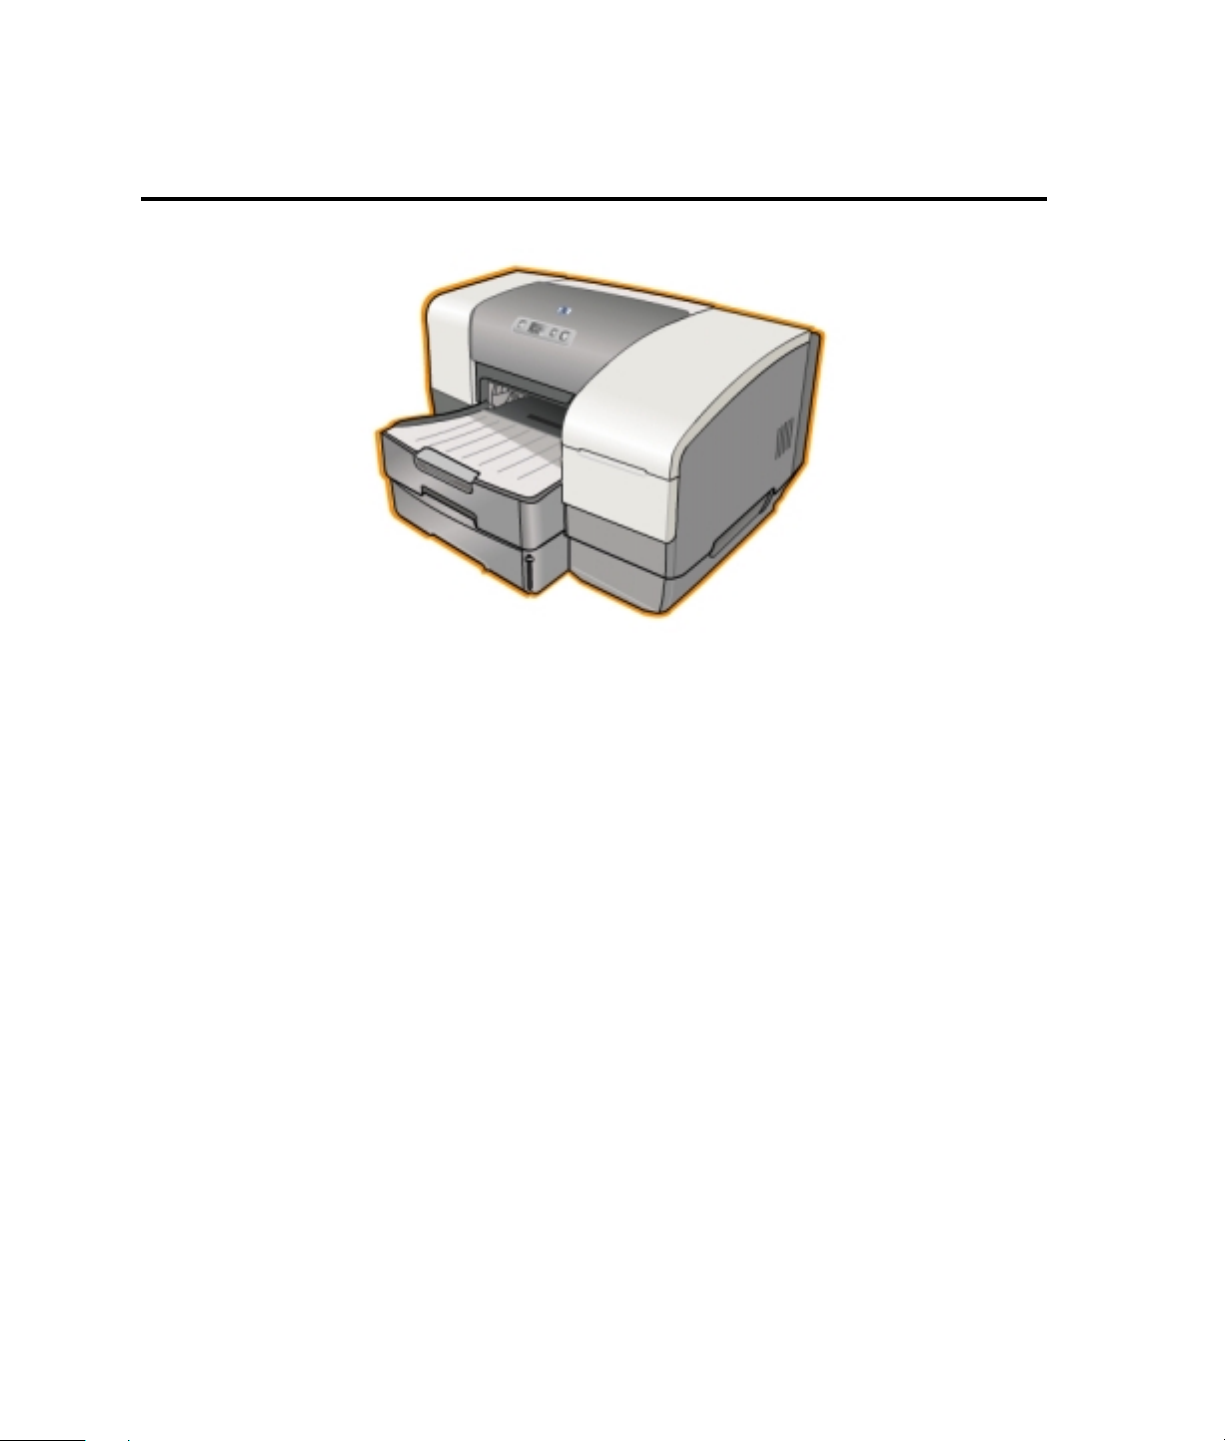
the printer............................................................................................................................................18
front of the printer..............................................................................................................................19
printing supplies area........................................................................................................................21
rear of the printer...............................................................................................................................22
auto-duplex unit ................................................................................................................................23
specifications......................................................................................................................................24
hardware accessories ......................................................................................................................25
hp media types..................................................................................................................................26
upgrades.............................................................................................................................................27
consumable part numbers ..............................................................................................................28
value added services.......................................................................................................................30
education and training....................................................................................................................31
service and support ..........................................................................................................................32
regional repair strategy....................................................................................................................33
warranty period .................................................................................................................................34
Page 9

table of figures
The Printer............................................................................................................................................10
Product Positioning Statement .......................................................................................................13
front of the printer..............................................................................................................................19
Printing Supplies Area.......................................................................................................................21
Rear of the printer..............................................................................................................................22
Auto-duplex unit ................................................................................................................................23
Page 10
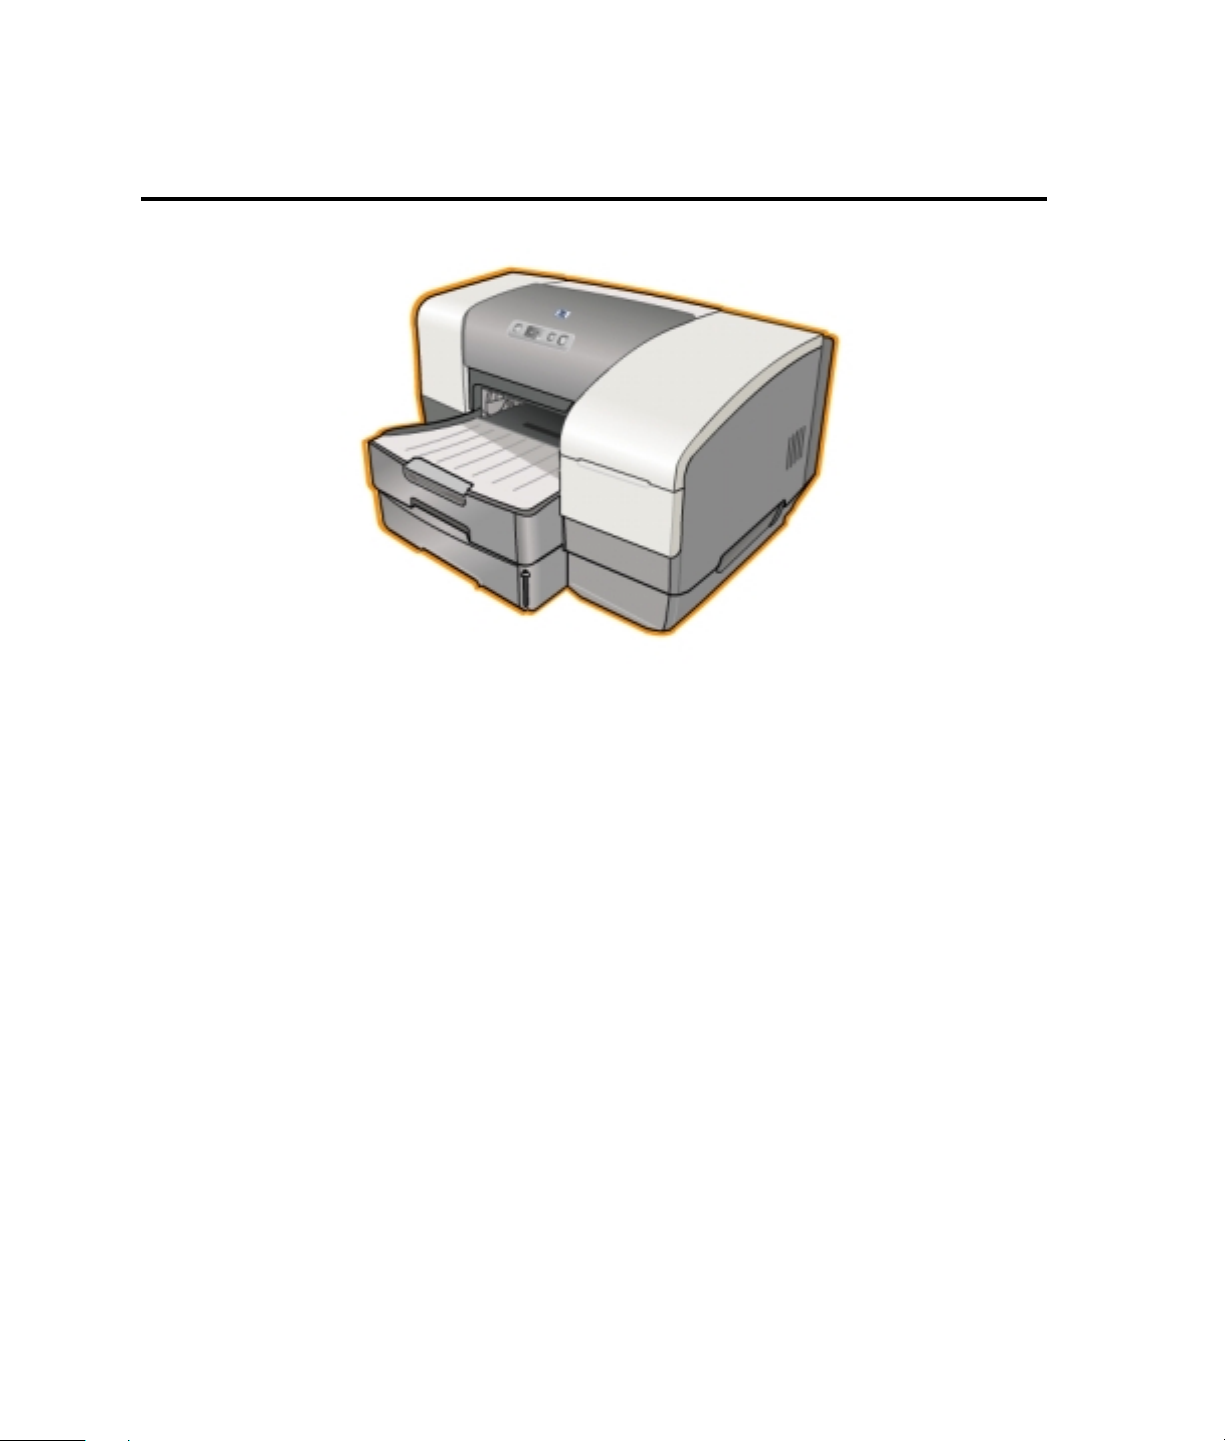
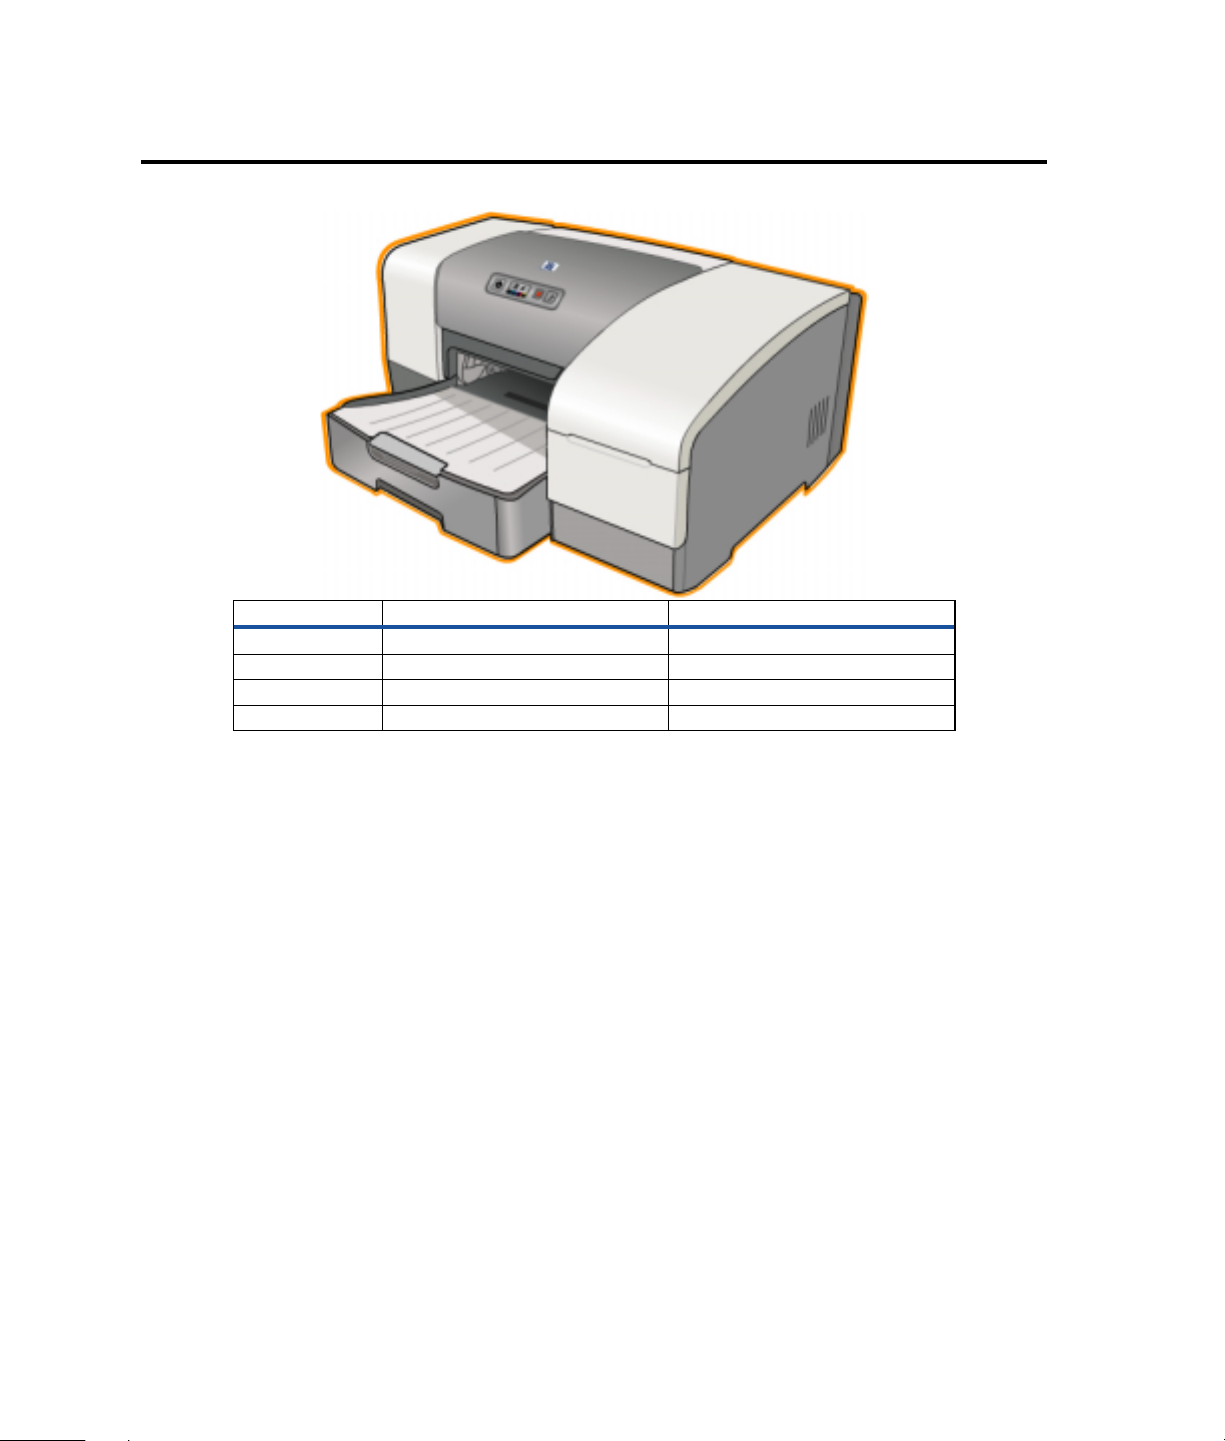
product overview
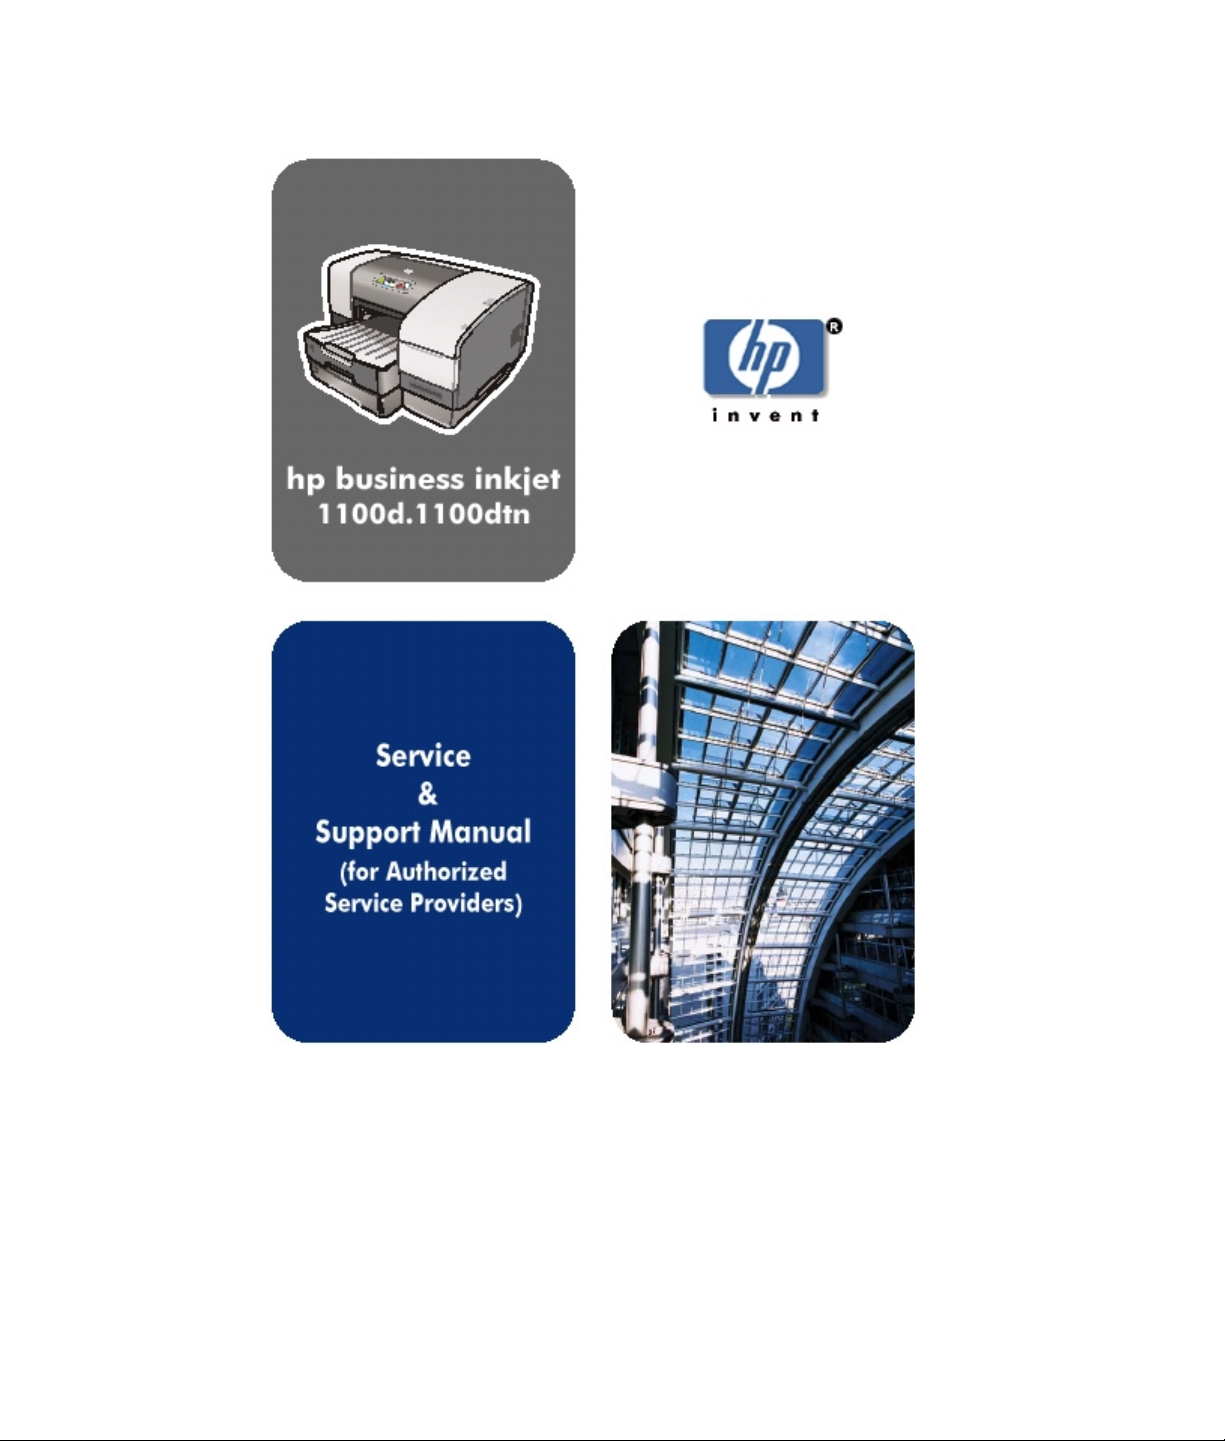
The Printer
Key features
• Drop on-demand thermal inkjet printing
• High-speed color printing on any media up to 8.5 inches x 14 inches with
uncompromised print quality
• Robust network solutions with Internet capabilities, such as JetDirect 200
network card.
• Prints a lot more for a lot less (the cost per page for the printer is 9.2 cents)
• Duty Cycle of 6250 pages per month
• Create professional business and photo-quality printing output (up to 4800 x
1200 dpi)
• Laser quality speed - print speed (up to 23 ppm black/20 ppm mixed text
color/6.5 ppm full page color) in draft mode
• Archives true to life photo-quality printing using hp photoRet 3 technology
• Cost-effective and easy maintenance
Optional Accessories
• Paper tray2 can hold 250 sheets
• Print server to allow other users to share the printer
Target customers
• Entrepreneur, home business, or small business environment
• Shared desktops
Street price
• US $199 (Base) and US $ 299 (bundled)
• Product launch date:
• August 1, 2003(US/AP)
• September 15, 2003(Europe)
Page 11
key selling points
Efficiency
Print speed
• 23 ppm black/20 ppm mixed text color/6.5 ppm full page color (draft mode)
• 7.5 ppm black/7 ppm mixed text color /1.6 ppm full page color (Normal
mode)
Printer Memory: 8MB built in RAM
Productivity
Improved network performance - using hp Jetdirect 200m print server card
• Duty cycle of 6250 pages per month
• Auto-duplex Unit: Printing on both sides of media
Range of media size
• 3 x 5 inches wide to 8.5 x 14 inches long
High capacity trays
• Tray 1: 150 sheets of plain paper, 22 envelopes, 5 greeting cards, 30
transparencies, and 30 sheets of labels (letter or A4 size only)
• Tray 2: 250 sheets of plain paper (Optional)
Cost-Saving
• Has separate ink cartridges - Cyan, Magenta, Yellow, and Black.
Page 12

unique product features
• Ink Delivery System
• 4 separate ink tanks
• Print speed
• Speed draft black/color - 23/20 ppm
• Speed normal black/color - 7.5/7 ppm
• Print quality
• 4800 dpi
• Double sided printing
• Low total cost of ownership
• No of pages in normal black printing - 1750 (at 5% coverage)
• Cost per page - 9.2 cents
• Shared desktop
• Multiple users can share the printer resource in a desktop environment
or peer-to-peer network.
Page 13
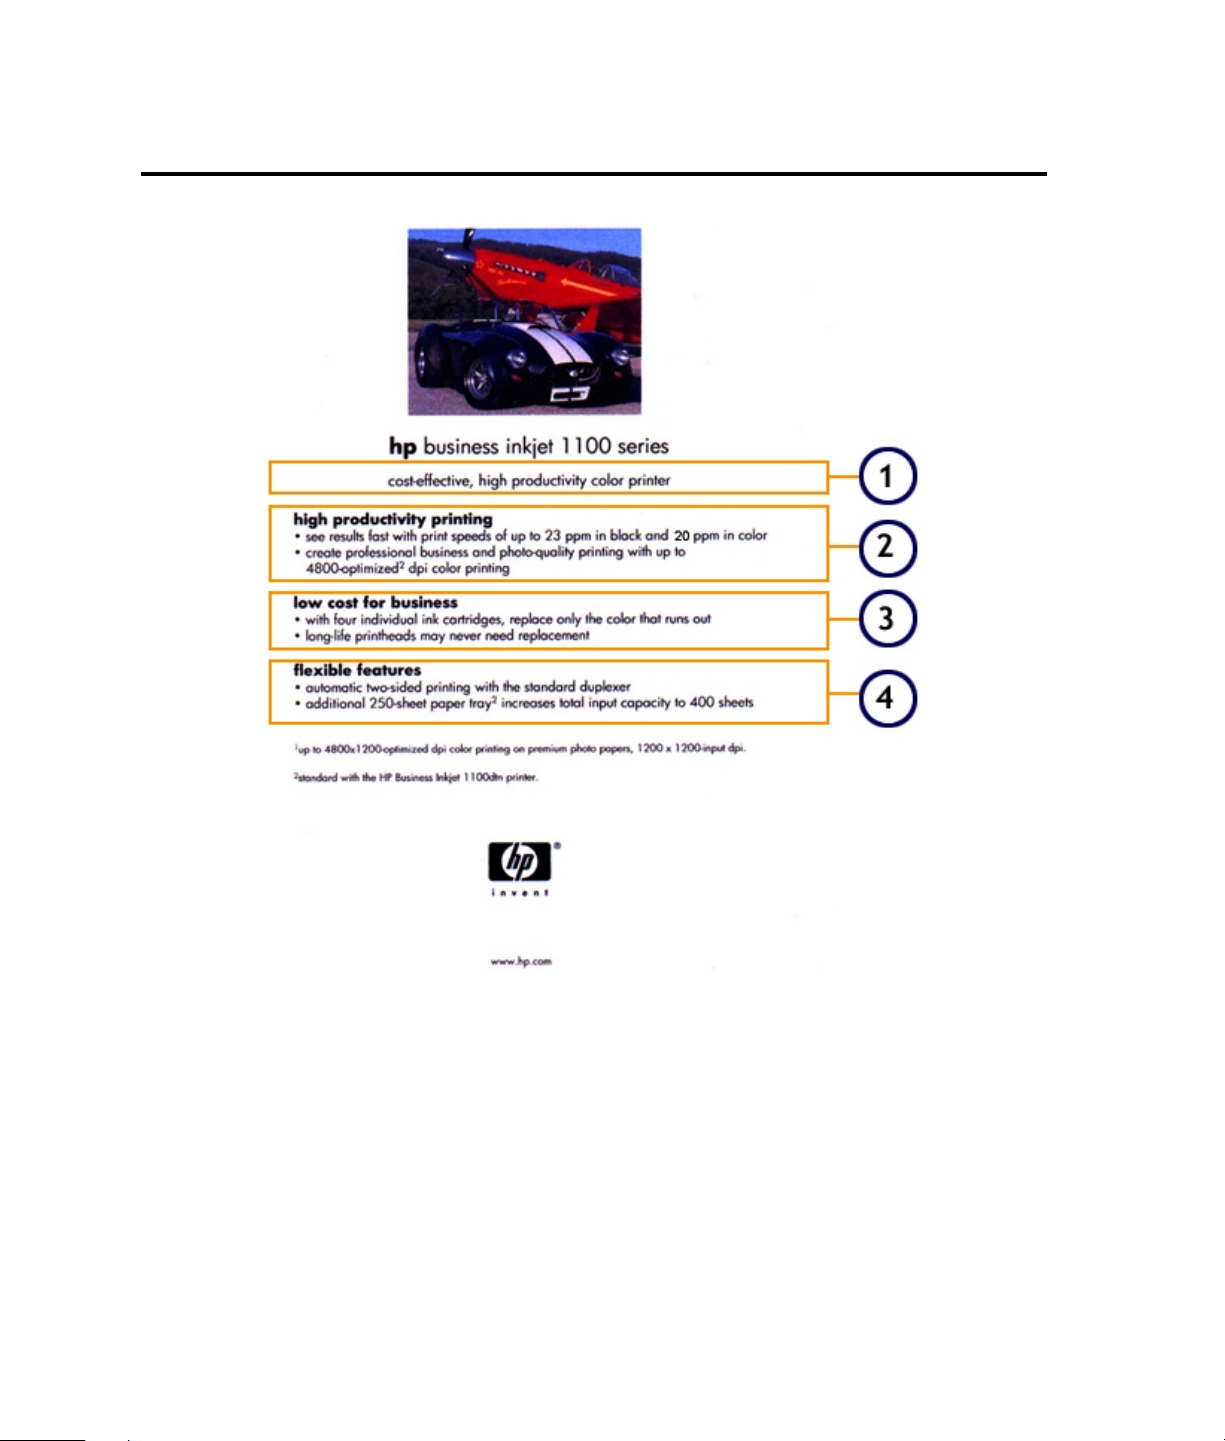
product positioning statement
Product Positioning Statement
The following are the key messages for the printer:
1. The hp business inkjet 1100 series is a complete office printing solution for
cost-effective, high-quality and high productive color printing.
2. High productive printing
Fast print speeds of upto 23 ppm in black and 20 ppm in color
Helps create professional business and photo-quality prints with upto 4800optimized dpi color printing
3. Low cost of business
Has four individual ink cartridges, replacement of only the color that runs
out
The printheads have a long life and may never require replacement.
4. Flexible features
Supports automatic two-sided printing with a standard duplexer.
Additional 250 sheets second tray increases the total inpur capacity to 400
sheets.
Page 14

Note
tray2 - standard with the hp business inkjet 1100dtn printer.
Page 15

product sku
hp business inkjet 1100d hp business inkjet 1100dtn
Part number: c8124a Part number: c8135a
Street price: (US$) 199,(Euro) 199 Street price: (US$) 299,(Euro) 299
Contents of the box:
• hp business inkjet1100d
• Power cord
• Power module
• Driver (1 CD)
• Getting started guide
• Setup poster
• Support flyer
• Auto-duplex unit
• hp no. 10 black ink Cartridge
• hp no. 11 Cyan, Magenta,
Yellow ink Cartridges
• Parallel printer cable
(optional in North America)
• USB printer cable
• 1284 dongle (optional in
North America)
Table comparing hp business inkjet 1100d and 1100dtn
Contents of the box:
• hp business inkjet1100dtn
• Power cord
• Power module
• Driver (1 CD)
• Getting started guide
• Setup poster
• Support flyer
• Auto-duplex unit
• hp no. 10 black ink Cartridge
• hp no. 11 Cyan, Magenta, Yellow ink
Cartridges
• USB printer cable
• hp JetDirect 200m print server card
• Tray 2 which can hold 250 sheets
Note
The printer ships with 26.5cc Black, and 14cc Cyan, Magenta and Yellow ink as
"Starter Kits".
Page 16

representation of price vs quality
Table of comparison of various hp printers
Printer Price (US$) Speed
hp business Inkjet 1100 Series 199 23/20
hp color inkjet printer cp1160 17/16
hp business inkjet 2230 (PCL3) 199 15/14
Page 17

localization
The following topics are available for all languages:
• Setup Poster (Graphics)
• Getting Started Guide
• User Guide
• Win CD Browser
• Win Driver
• Win Toolbox
• Win Installer
• Win Readme
The content of CD2 supports Asian languages and CD1 supports the rest of the languages.
CD1
Language Win
Acrobat
US English Y Y Y Y Y Y Y Y Y
Brazilian Portuguese N Y Y Y N Y Y Y Y
Euro-Spanish N Y Y Y N Y Y Y Y
French N Y Y Y N Y Y Y Y
German N Y Y Y N Y Y Y Y
Italian N Y Y Y N Y Y Y Y
Dutch N Y Y Y N Y Y Y Y
Swedish N Y Y Y N Y Y Y Y
Czech N Y Y N N N N N N
Danish N Y Y N N N N N N
Finnish N Y Y N N N N N N
Norwegian N Y Y N N N N N N
Polish N Y Y N N N N N N
Russian N Y Y N N N N N N
Hungarian N N Y N N N N N N
Greek N Y Y N N N N N N
Hebrew N N N N N N N N N
Turkish N Y Y N N N N N N
Table displaying the localization support for hp business inkjet 1100 series in CD1
DJCP
(Web)
DJCP
Guide
(Web)
Mac
CD
Browser
Mac
Acrobat
Mac
Read
me
Mac
HTML
Mac
Driver /
Installer
Mac
DeskJet
Utility
CD2
Language Win
Acrobat
US English Y Y Y Y Y Y Y Y Y
Arabic N N Y N N N N N N
Korean N N Y N N N N N N
Simplified Chinese N Y Y N N N N N N
Traditional Chinese N Y Y N N N N N N
Table displaying the localization support for hp business inkjet 1100 series in CD2
DJCP
(Web)
DJCP
Guide
(Web)
Mac
CD
Browser
Mac
Acrobat
Mac
Read
me
Mac
HTML
Mac
Driver /
Installer
Mac
DeskJet
Utility
Page 18
the printer
Dimension 1100d 1100dtn
Width 19.5 inches or 495 mm 19.5 inches or 495 mm
Height 8.5 inches or 215 mm 11 inches or 278 mm
Depth 18 inches or 457 mm 18 inches or 457 mm
Weight 16.5 lb or 7.5 kilograms 20.9 lb or 9.5 kilograms
Page 19
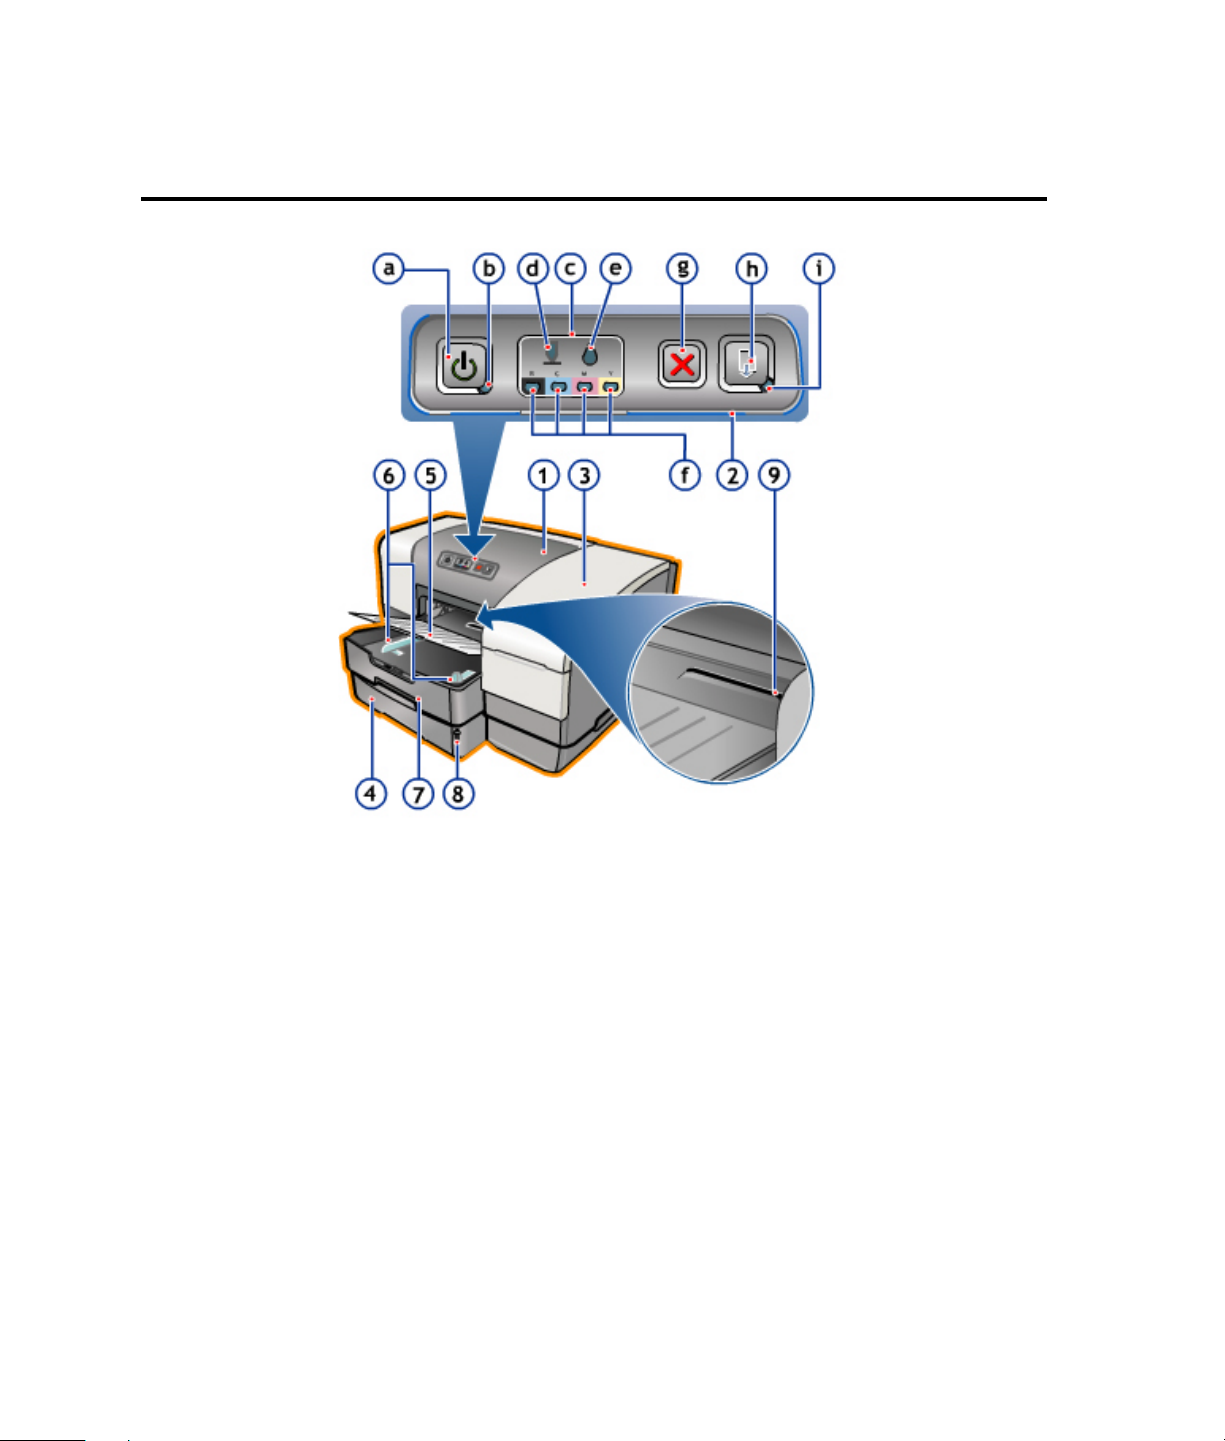
front of the printer
front of the printer
The following are the components located at the front of the printer:
1. Top Cover
Top cover is the top flap of the printer under which the printhead prints. If
the top cover is left open, the printer will not print.
2. Control Panel
The buttons and LED present on the printer are used for input and
troubleshooting the printer.
1. Power Button: To bring the printer to operations mode and to switch
off.
2. Power Light (green): A signal to indicate whether the printer is
on/off, where green indicates on or when a job is bein processed
Power LED blinks.
3. Printing Supplies lights: Indicates the status of ink cartridges and
printheads
4. Printhead light
5. Ink cartridge light
6. Color indicator lights
7. Cancel button: Cancels the current print job.
8. Resume button: To resume the printing process, which had been
interrupted.
9. Resume Light: The light blinks in the following situations
• While a printed page is drying
• While the printer is printing a manual duplex job and waiting for
the job to be turned
Page 20

• When there is a jam
• When the printer is out of paper
3. Printing Supplies Cover
The flap over the ink cartridges and the printheads are present when
printer is not printing. The printer will not print if this cover is open.
4. Tray 2
This tray holds 250 sheets of paper. It is included with the hp business inkjet
1100dtn printer, available as an accessory for the hp business inkjet 1100d
printer.
5. Output Tray
This tray is the location for collecting output.
6. Paper guides
Align the stacked paper in the tray for input in the printer.
7. Tray 1
This tray holds 150 sheets of paper.
8. Paper Stack Indicator
The point in tray2 displaying the amount of paper left in tray2.
9. Envelope Slot
Manual feed for printing envelope.
Page 21
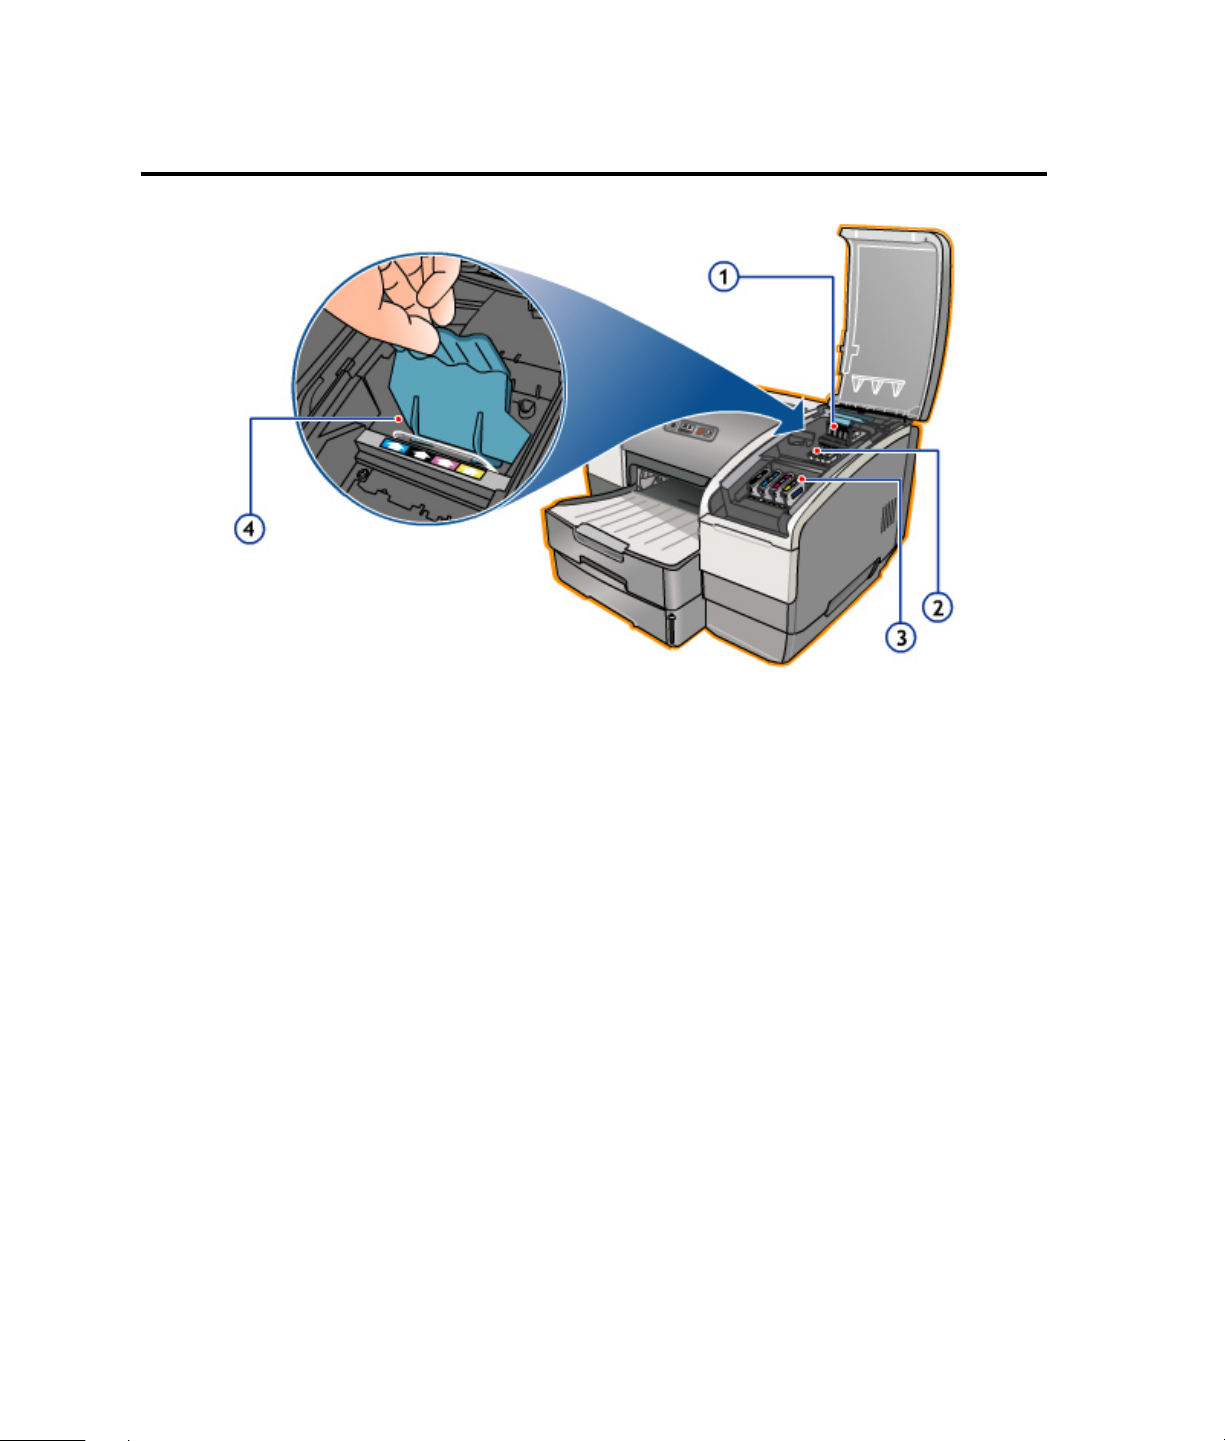
printing supplies area
Printing Supplies Area
The following are the components located at the printing supplies area:
1. Printhead latch
The printhead latch provides access for installing or removing printheads
from their color-coded slots.
2. Printheads
Each printhead must be placed in its color - coded slot.
3. Ink cartridges
Each ink cartridge must be placed in its color - coded slot.
4. Metal catch bar
The metal catch bar secures the hook and engages the printhead latch.
Page 22
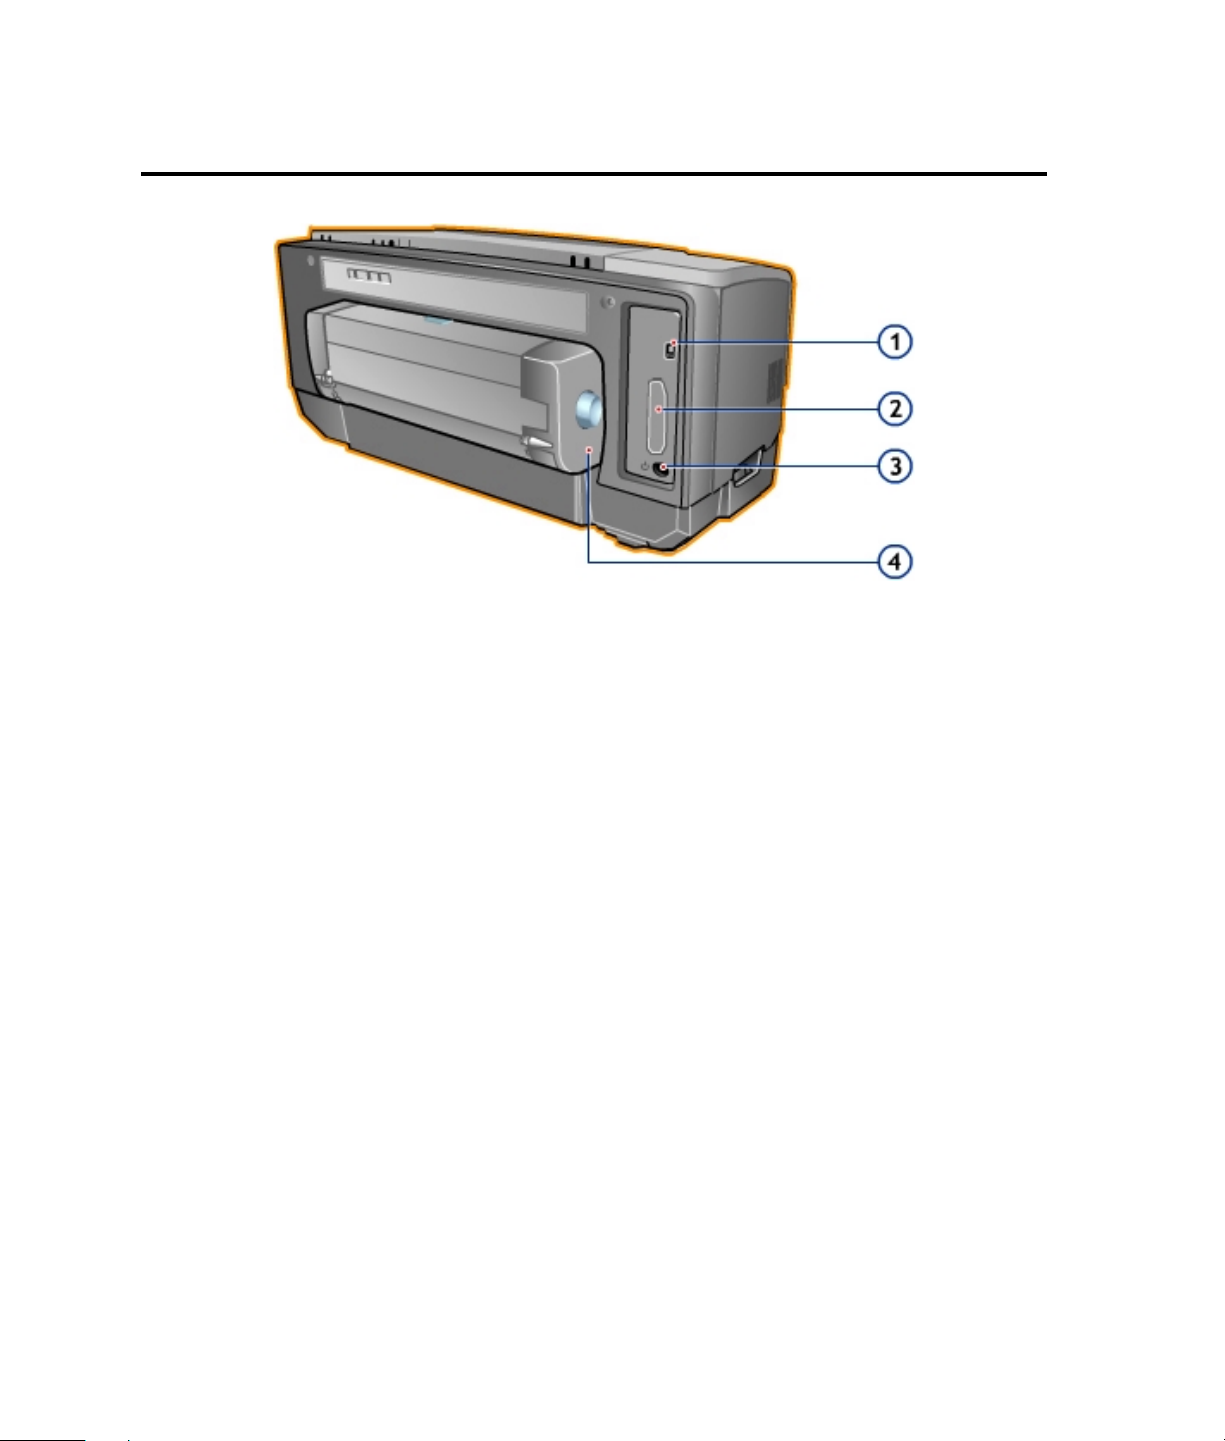
rear of the printer
Rear of the printer
The following are the components located at the rear of t he printer:
1. USB Connector
The Universal Serial Bus connector is used for plug and play printing support.
2. Connection Slot
a. This slot holds the hp Jetdirect print server card for internal networking
(included with the hp business inkjet 1100dtn printer).
b. It can also hold the 1284 dongle (optional for North America; included
for the rest of the world in the hp business inkjet 1100d printer).
3. Power Input
The required power input for the printer.
4. Auto-duplex unit
It is the unit that provides automatic printing on both sides of a sheet of
paper.
Page 23
auto-duplex unit
Auto-duplex unit
The following are the components located at the auto-duplex unit:
1. Buttons
To remove the auto-duplex unit, press both buttons (right and left corners
of the unit) and pull it out.
2. Top Flap Button
Press the button to open the top flap. The button used to clearing paper
jams if the paper is stuck in the auto-duplex unit.
Page 24

specifications
Table displaying the datasheet for hp business inkjet 1100 series
Parameters Values
Print speeds • Draft- 23/20 ppm
• Normal- 7.5/7 ppm
• Best- 4/4 ppm
Resolution Maximum of 4800 by 1200 dpi
Media handling Paper (plain, inkjet, photo, and banner), envelopes, transparencies,
labels, iron-on transfers and greeting cards.
I/O interface USB and LIO (either a IEEE 1284-compliant parallel connection or
network connection model)
Duty cycle 6250 pages per month
Software
Compatibility
Memory 8 MB built-in RAM
Microsoft Windows 98, Windows ME, Windows NT 4.0, Windows 2000,
Windows XP, Mac OS 9 and above
Page 25

hardware accessories
Table giving the printer accessories available:
Accessories Part
Tray 2 - 250sheet input tray (included with the hp business inkjet
1100dtn)
Parallel port connector hp IEEE-1284 A-B Parallel Cable (2 meter) C2950A
Parallel port connector hp IEEE-1284 A-B Parallel Cable (3 meter) C2951A
hp USB A-B (2 meter) C6518A
hp Jetdirect 200m print server/Internet connector (LIO module;
included with the hp Business Inkjet 1100dtn)
hp Jetdirect 250m print server/Internet connector (LIO module;
Fast Ethernet)
hp Jetdirect 280m print server/Internet connector (LIO module;
Fast Ethernet; 802.11b Wireless Ethernet)
hp Jetdirect 175X external print server via USB (Fast Ethernet) J6035B
hp Jetdirect 310X external print server via USB (Fast Ethernet) J6038B
number
C8236A
J6039B
J6042A
J6044A
Page 26

hp media types
The compatible hp media types are Copier, bond, recycled, multipurpose,
premium inkjet, premium inkjet heavy weight, premium transparency, premium
photo paper, photo paper, professional brochure (matte and glossy), banner,
statement, cards, and envelopes.
Refer to data sheet for:
• Compatible hp media types and details
• Ordering information
Page 27

upgrades
• Model upgrades
The model upgrades for the hp business inkjet 1100d printer are:
• Tray 2
• JetDirect network card
• Software upgrades
Upgrade the printer software by using the following URL:
http://www.hp.com/support/businessinkjet1100
New upgrades will be introduced 6 months after introduction.
Note
The hp business inkjet 1100 series will go Mask ROM three months after product MR.
Where necessary, pre-Mask ROM hp business inkjet 1100 series can be flashed with
a new firmware.
Page 28
consumable part numbers
Consumables of hp business inkjet 1100 series are:
• Ink Cartridge hp No. 10 Black (26.5 ml) - C4840A
• Ink Cartridge hp No. 10 Black (69 ml) - C4844A
• Ink Cartridge hp No. 11 Cyan - C4836A
• Ink Cartridge hp No. 11 Magenta - C4837A
• Ink Cartridge hp No. 11 Yellow - C4838A
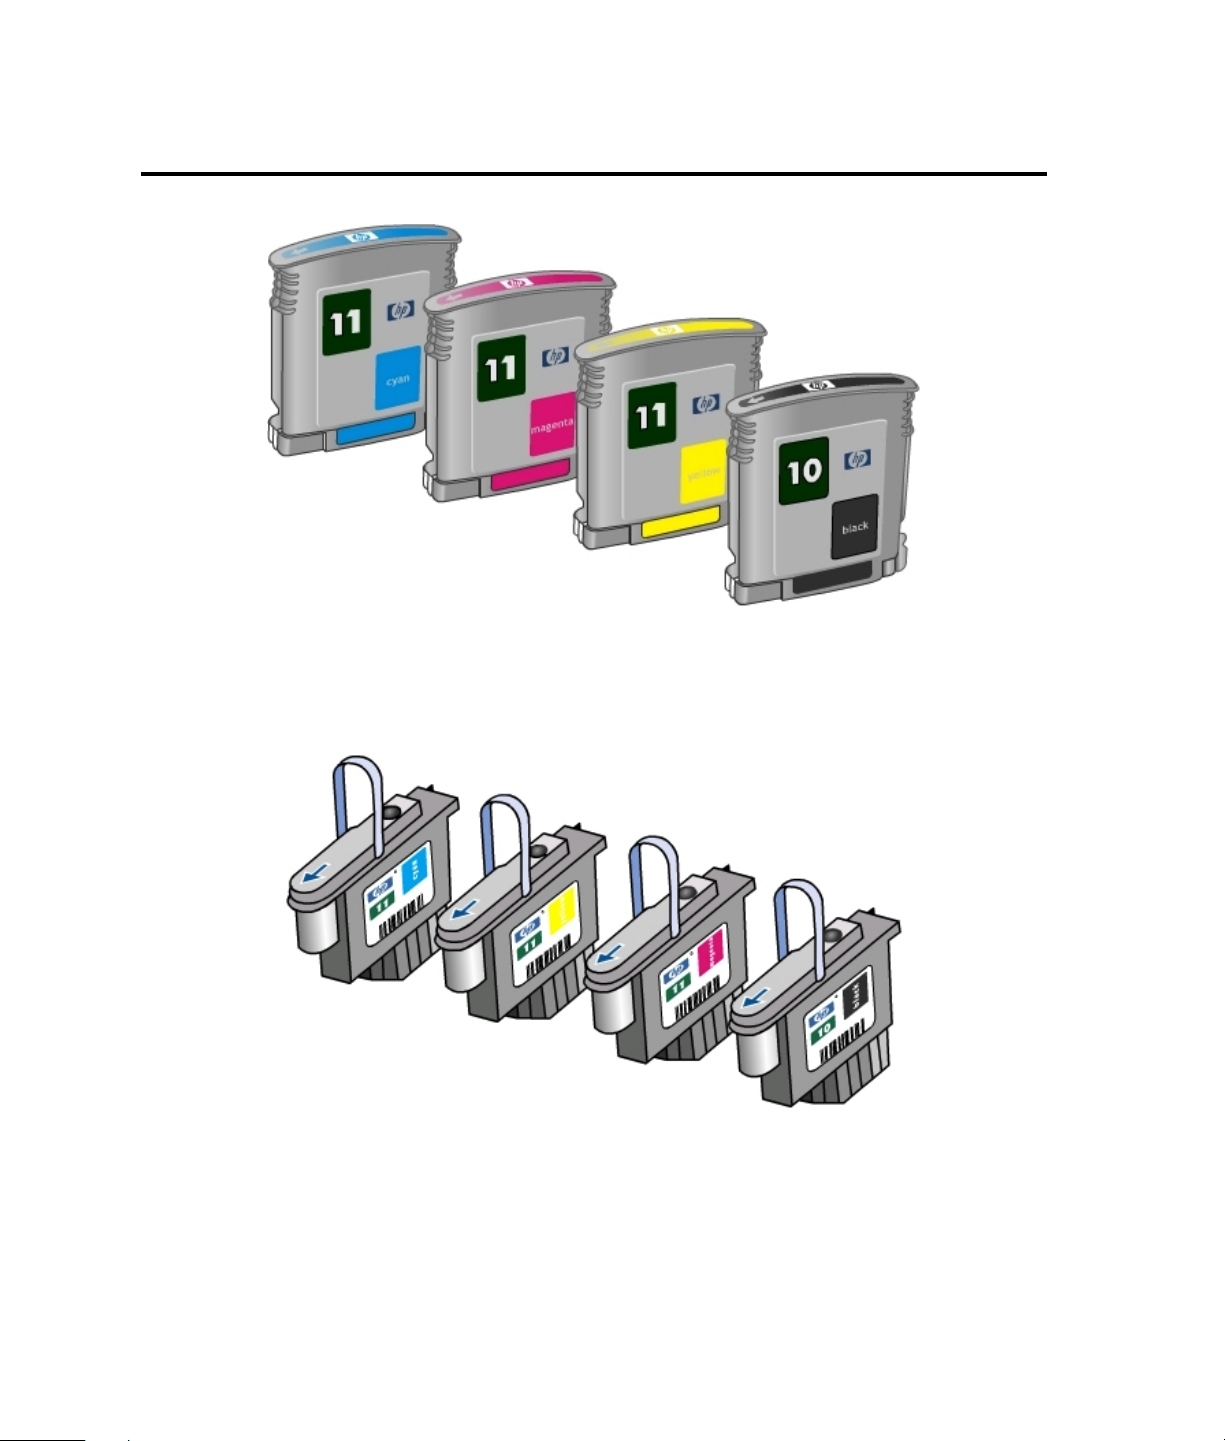
• Printhead hp No. 11 Black - C4810A
• Printhead hp No. 11 Cyan - C4811A
• Printhead hp No. 11 Magenta - C4812A
• Printhead hp No. 11 Yellow - C4813A
Page 29
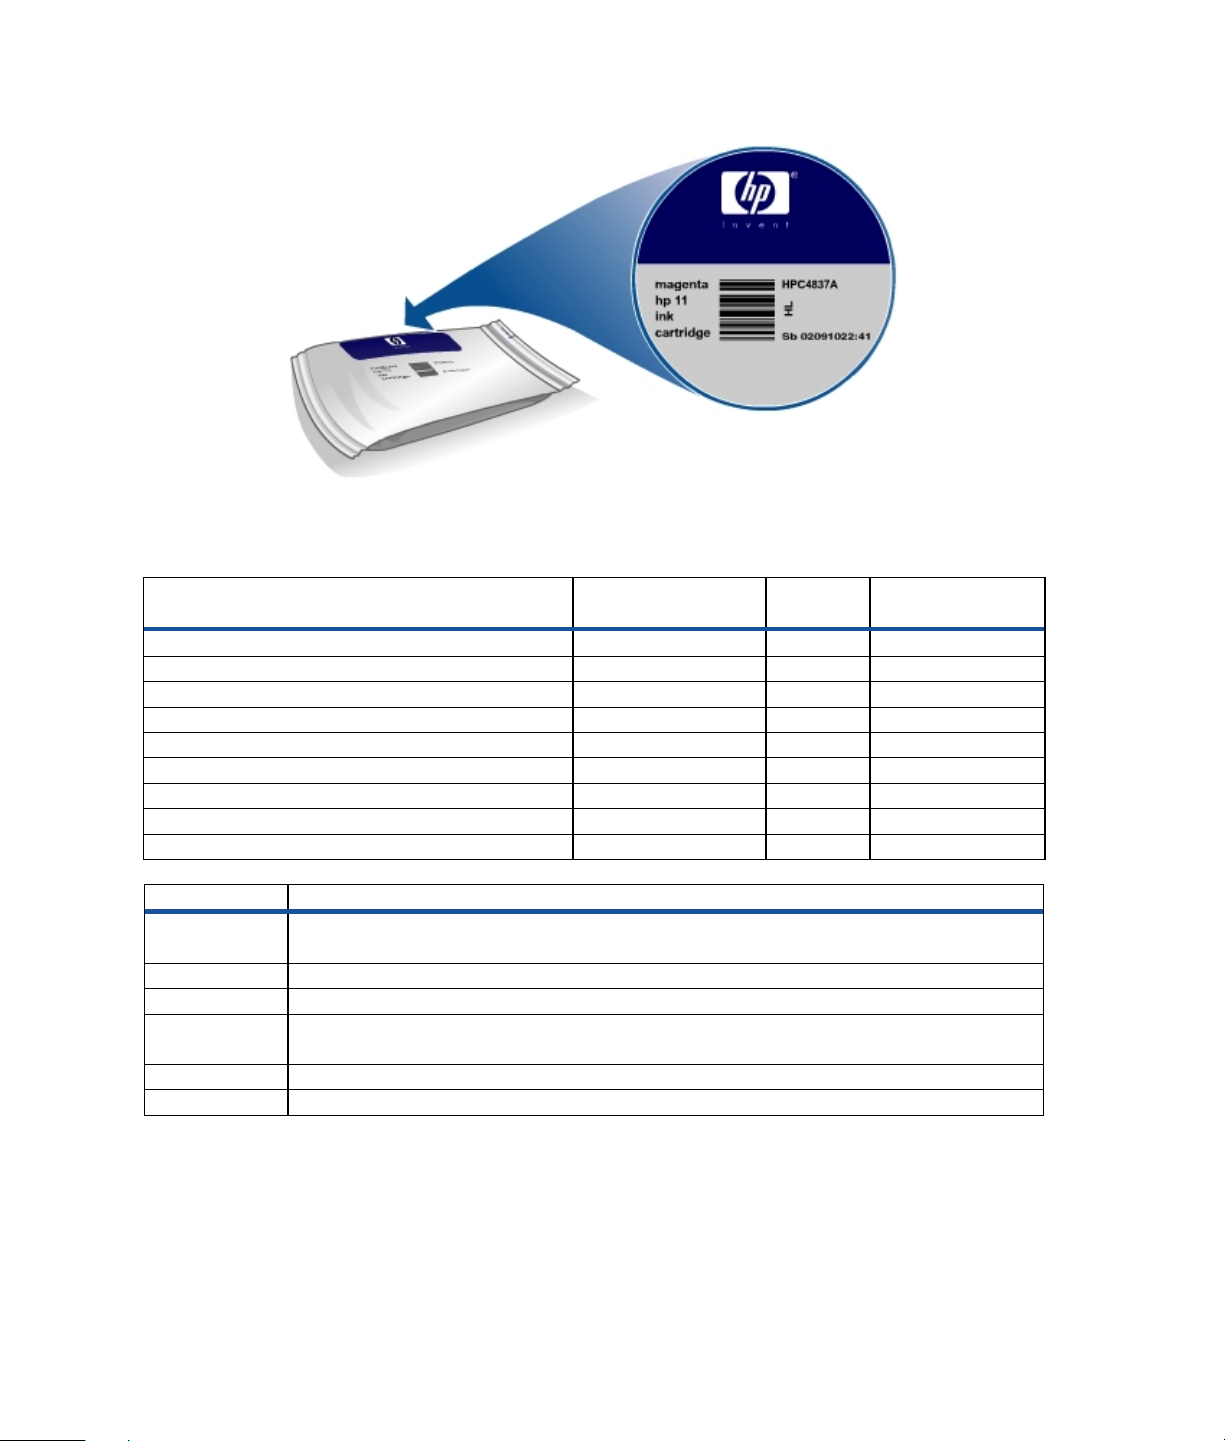
Image showing the ink cartridge cover giving the Manufacture Date.
Example: Sb 01010607:00
Denotes that pouching has been done in Singapore site on Jan 6, 2001, 7 am.
The following table contains the names of the consumables for the printer:
Description Yield (at 5 %
coverage)
Ink Cartridge hp No. 10 Black (26.5 ml) C4840A
Ink Cartridge hp No. 10 Black (69 ml) 1750 $33.99 C4844A
Ink Cartridge hp No. 11 Cyan (26.5 ml) 1750 $33.99 C4836A
Ink Cartridge hp No. 11 Magenta (26.5 ml) 1750 $33.99 C4837A
Ink Cartridge hp No. 11 Yellow (26.5 ml) 1750 $33.99 C4838A
Printhead hp No. 11 Black 24000 $33.99 C4810A
Printhead hp No. 11 Cyan 24000 $33.99 C4811A
Printhead hp No. 11 Magenta 24000 $33.99 C4812A
Printhead hp No. 11 Yellow 24000 $33.99 C4813A
On-line product marking is formatted as follows: CI yymmddhh: mm
Character(s) Description
C A single character Country of Origin code as described in IJBU's World Wide
Bulk Packaging Site of Origin Designator Standards.
I Uniquely Designates the production line used to fill the Oasis ink carriage.
yy The last two digits of the production year.
mm A decimal representation of the production month such that 1= January,
9=September, 10=October, ... 12=December.
dd The two-digit, zero padded, Production Date.
hh:mm The pouched time
Example: Sb 01010607:00
The above denotes that pouching has been done in Singapore site on Jan 6, 2001,
7 am.
Street
Price
Part Number
Page 30

value added services
The value added services that hp provides with the hp business inkjet 1100 series
are:
• Internet
• hp instant support web site
• MyPrintMileage
• Embedded Web Server (EWS)
Internet
hp provides several resources on the Web for troubleshooting.
For help regarding:
• Latest printer software /driver
• Product information
• Support Information
Access the URL
• http://www.hp.com/cposupport
• http://www.hp.com/support/businessinkjet1100
hp instant support web site
This Web site hosts a set of dynamic Web resources for printers. The hp Instant
Support Web site helps in managing the printer and planning the purchase of
consumables.
Access the hp instant support Web site to view the following information:
• Printer usage pattern
• Error alerts
• On-line troubleshooting tips
MyPrintMileage
MyPrintMileage keeps track of the printer usage information.
It consists of two parts:
• MyPrintMileage website
• MyPrintMileage Agent, which is a utility installed with the Toolbox on the
computer.
Embedded Web Server
The EWS is provided with hp business Inkjet 1100dtn with the LIO card. The EWS has
limited number of features.
Page 31

education and training
Documentation/training Information Purpose
Setup Poster Setup poster provides information about the
setup of the printer.
Users Guide Onscreen user's guide provides information
about the setting up, completing basic tasks
and solving printer problems.
Printer Web Site It is a web location that provides self-help
and troubleshooting tips.
Table displaying the various methods of education
Printer Setup
Diagnose and
solve printer
problems
Diagnose and
solve printer
problems
Page 32

service and support
hp offers various support services to troubleshoot and diagnose printer problems
and provides instructions for service and repair. hp also provides documentation
and online and telephone support for troubleshooting. The various support services
are:
Support
• Return and Repair
• Support packs available
• Free repair during 1-year warranty (worldwide)
Online support
hp provides several resources on the Web for troubleshooting. Access the URL
http://www.hp.com/support/businessinkjet1100 or
http://www.hp.com/cposupport for help regarding the following parameters:
• Setting up and using the printer
• Downloading printer drivers
• Access hp instant support
• Solving a problem
• Ordering a product
Customers can also find product information on the following Web site:
http://www.hp.com
Telephone support
• Available worldwide
• Available free during the warranty period
Representatives at Customer Care Center answer questions regarding the setup,
configuration, installation, and operation of the printer. They also help troubleshoot
and diagnose printer problems and provide instructions for service and repair.
Before calling a Customer Care Center representative, the customer should have
the following information:
• Print of a configuration page
• Brand and model of the computer
• Operating system of the computer
• Printer driver installed
Page 33

regional repair strategy
The regional repair strategy includes:
• US - Unit Exchange (2-3 days)
• Europe - Return to bench (3-5 days)
• AP - Return to bench (3-5 days)
Page 34

warranty period
hp product duration of limited warranty
Printer software 1 year
Accessories 1 year
Ink cartridges 90 days
Printhead 1 year
Printer 1 year
Duration of warranty for hp business inkjet 1100 series parts
Repair and warranty information
" Hewlett-Packard warrants that t he hp product will be free from defects for the
specified duration from the date of purchase. hp limited warranty covers those
defects that arise due to normal use."
Page 35

table of contents
hardware setup requirements.........................................................................................................37
contents of the box...........................................................................................................................38
overall setup procedure...................................................................................................................40
install tray 2 .........................................................................................................................................42
install auto-duplex unit .....................................................................................................................43
Installing hp JetDirect print server ..................................................................................................44
install ink cartridges...........................................................................................................................45
install printheads................................................................................................................................47
guidelines for loading paper...........................................................................................................49
print a demo page............................................................................................................................50
contents of software CD ROM........................................................................................................52
startup page of the CD browser for Windows .............................................................................53
browse documentation ...................................................................................................................54
register product .................................................................................................................................55
customization utility...........................................................................................................................56
optional software...............................................................................................................................64
connectivity options .........................................................................................................................65
types of network connections ........................................................................................................66
install the printer software for Windo ws - Direct ..........................................................................67
install the printer software for Windo ws - Network......................................................................82
install toolbox......................................................................................................................................96
startup page of the CD browser for Macintosh ........................................................................102
install the Macintosh printer software - direct............................................................................103
test software installation.................................................................................................................108
summary of driver configurations under different install methods.........................................109
uninstall printer software for Windows.........................................................................................110
uninstall printer software for Macintosh ......................................................................................114
web deployment of drivers ...........................................................................................................115
paper size matrix..............................................................................................................................116
paper capacity and weight matrix.............................................................................................117
Page 36

table of figures
Contents of the box for hp business inkjet 1100d.............................................................................38
Contents of the box for hp business inkjet 1100dtn .........................................................................39
Overall setup poster for Rest of World ................................................................................................40
Overall setup poster for Rest of World ................................................................................................40
Auto-Duplex Unit.....................................................................................................................................43
install ink cartridg es................................................................................................................................45
install printheads.....................................................................................................................................47
install printheads.....................................................................................................................................48
guidelines for loading paper................................................................................................................49
Demo Page .............................................................................................................................................50
Startup Page of the CD Browser..........................................................................................................53
Browse Documentation.........................................................................................................................54
Register Product......................................................................................................................................55
Optional software...................................................................................................................................64
Startup Page of the CD Browser........................................................................................................102
Uninstall Printer Software.....................................................................................................................111
Page 37

hardware setup requirements
The hp business inkjet 1100 series can be installed on the following operating
systems:
• Windows 98
• Windows ME
• Windows XP, 32 bit
• Windows NT 4.0
• Windows 2000
• Mac OS 9.x
• Mac OS X
The following are the minimum and recommended configurations required to install the
printer software:
operating system minimum operating system
requirements
Windows 98 • Pentium 90 MHZ
• 16 MB RAM
• 60 MB hard disk space
Windows ME • Pentium 150 MHZ
• 32 MB RAM
• 60 MB hard disk space
Windows XP, 32 bit • Pentium 233 MHZ
• 64 MB RAM
• 60 MB hard disk space
Windows NT 4.0 • Pentium 100 MHZ
• 32 MB RAM
• 60 MB hard disk space
Windows 2000 • Pentium 300 MHZ
• 64 MB RAM
• 60 MB hard disk space
Mac OS 9.x • iMac 333 MHZ or G3 350
MHZ
• 16 MB RAM
Mac OS X • G3 (except original
PowerBook G3)
• 128 MB RAM
For further details, refer to:
1. The support URL for the hardware setup requirements. The URL is
http://www.hp.com/support/businessinkjet1100
2. User Guide
recommended operating
system requirements
• Pentium 266 MHZ
• 32 MB RAM
• 100 MB hard disk space
• Pentium 266 MHZ
• 32 MB RAM
• 100 MB hard disk space
• Pentium 300 MHZ
• 128 MB RAM
• 100 MB hard disk space
• Pentium 266 MHZ
• 64 MB RAM
• 100 MB hard disk space
• Pentium 300 MHZ
• 64 MB RAM
• 100 MB hard disk space
• iMac 333 MHZ or G3 350
MHZ
• 128 MB RAM
• G4 800 MHZ
• 256 MB RAM
Page 38

contents of the box
Contents of the box for hp business inkjet 1100d
Page 39

Contents of the box for hp business inkjet 1100dtn
The hp business inkjet 1100 series is packaged with the following components:
S. No. Components North
America
1100d 1100dtn 1100d 1100dtn 1100d 1100dtn
1 Printer Yes Yes Yes Yes Yes Yes
2 Power cord Yes Yes Yes Yes Yes Yes
3 Power module Yes Yes Yes Yes Yes Yes
4 Driver (1 CD) Yes Yes Yes Yes Yes Yes
5 Getting started guide Yes Yes Yes Yes Yes Yes
6 Setup poster Yes Yes Yes Yes Yes Yes
7 Support flyer Yes Yes Yes Yes Yes Yes
8 4 printheads Yes Yes Yes Yes Yes Yes
9 4 ink cartridges Yes Yes Yes Yes Yes Yes
10 Duplexer Yes Yes Yes Yes Yes Yes
11 1284 dongle Yes No Yes No Yes No
12 250 sheet 2nd tray No Yes No Yes No Yes
13 200m JetDirect card No Yes No Yes No Yes
North
America
Europe Europe Asia
pacific
Asia
pacific
Page 40

overall setup procedure
The setup procedure for hp business inkjet 1100 series is as follows:
Overall setup poster for Rest of World
Overall setup poster for Rest of World
Page 41

step
g
number
1 Check the contents of the
2 Unpack the printer and its
3 Install the auto-duplex unit To install the auto-duplex unit, hold the auto-duplex unit
4 Install the printer tray 2 • Remove the tape on the tray 2 base.
5 Connect the power cord Connect the power adapter to the power cord and to the
6 Load paper Slide up the input tray extension. Load media into the input
7 Turn on the printer Press the Power button to turn on the printer.
8 Install and align the ink
9 Install the printheads • Lift the supply cover.
10 Install the software. Install the printer software from the Starter CD before you
setup procedure steps
Check the contents of the box.
box
components
upright and connect it at the back of the printer. To remove
the auto-duplex, press the 2 buttons on the side of the autoduplex unit and pull it away from the printer.
printer. Plug in the power cord and make sure the power
supply is turned on.
tray. The input tray supports up to 30 sheets of plain paper or
a stack of media no more than 0.2 in (5 mm) thick. Slide the
paper guide snugly against the edge of the media.
cartridges.
connect the parallel or USB cable.
• Unpack the printer and the auto-duplex unit.
• Remove the packing tape and shipping materials
from the printer.
• Position the tray 2 base in the location where the
printer needs to be placed. The printer is desi
fit directly on top of the base.
• Lift the printer and align it with the pin on the tray 2
base.
• Set the printer on top of the tray 2 base.
• Place the tray 2 cover towards the end of the tray.
• Align tray 2 with the opening in the tray 2 base, and
then slide the tray into the base until it snaps into
place.
• Lift the supply cover.
• Remove each ink cartridge from its package.
• Align the colored arrows and insert each ink
cartridge into its respective color-coded socket.
• Press in each ink cartridge to ensure proper contact.
• Pull the latch forward and down to release the hook
from the metal latch.
• Lift and push the latch toward the rear of the printer.
• Remove each printhead from its package and
remove the protective tape and blue printhead
cover from each printhead.
• Insert each printhead into its respective color-coded
socket.
• Press in each printhead to ensure proper contact.
• Lift the latch forward so that the hook catches the
metal latch.
• Push the latch towards the rear of the printer.
• Close the supply covers.
ned to
Page 42

install tray 2
Tray 2
Tray 2 is an optional accessory available by default in hp business inkjet 1100dtn
printer only. This tray supports only plain paper.
The steps to install tray 2 are as follows:
1. Remove the tape on the tray 2 base.
2. Position the tray 2 base in the location where the printer needs to be
placed. The printer is designed to fit directly on top of the base.
3. Lift the printer and align it with the pin on the tray 2 base.
4. Set the printer on top of the tray 2 base.
5. Place the tray 2 cover towards the end of the tray.
6. Align tray 2 with the opening in the tray 2 base, and then slide the tray into
the base until it snaps into place.
To test the installation of tray 2, print a test page from the tray 2. To do this, either
keep the tray 1 empty or change the settings from the printer properties to print
using tray 2.
Page 43

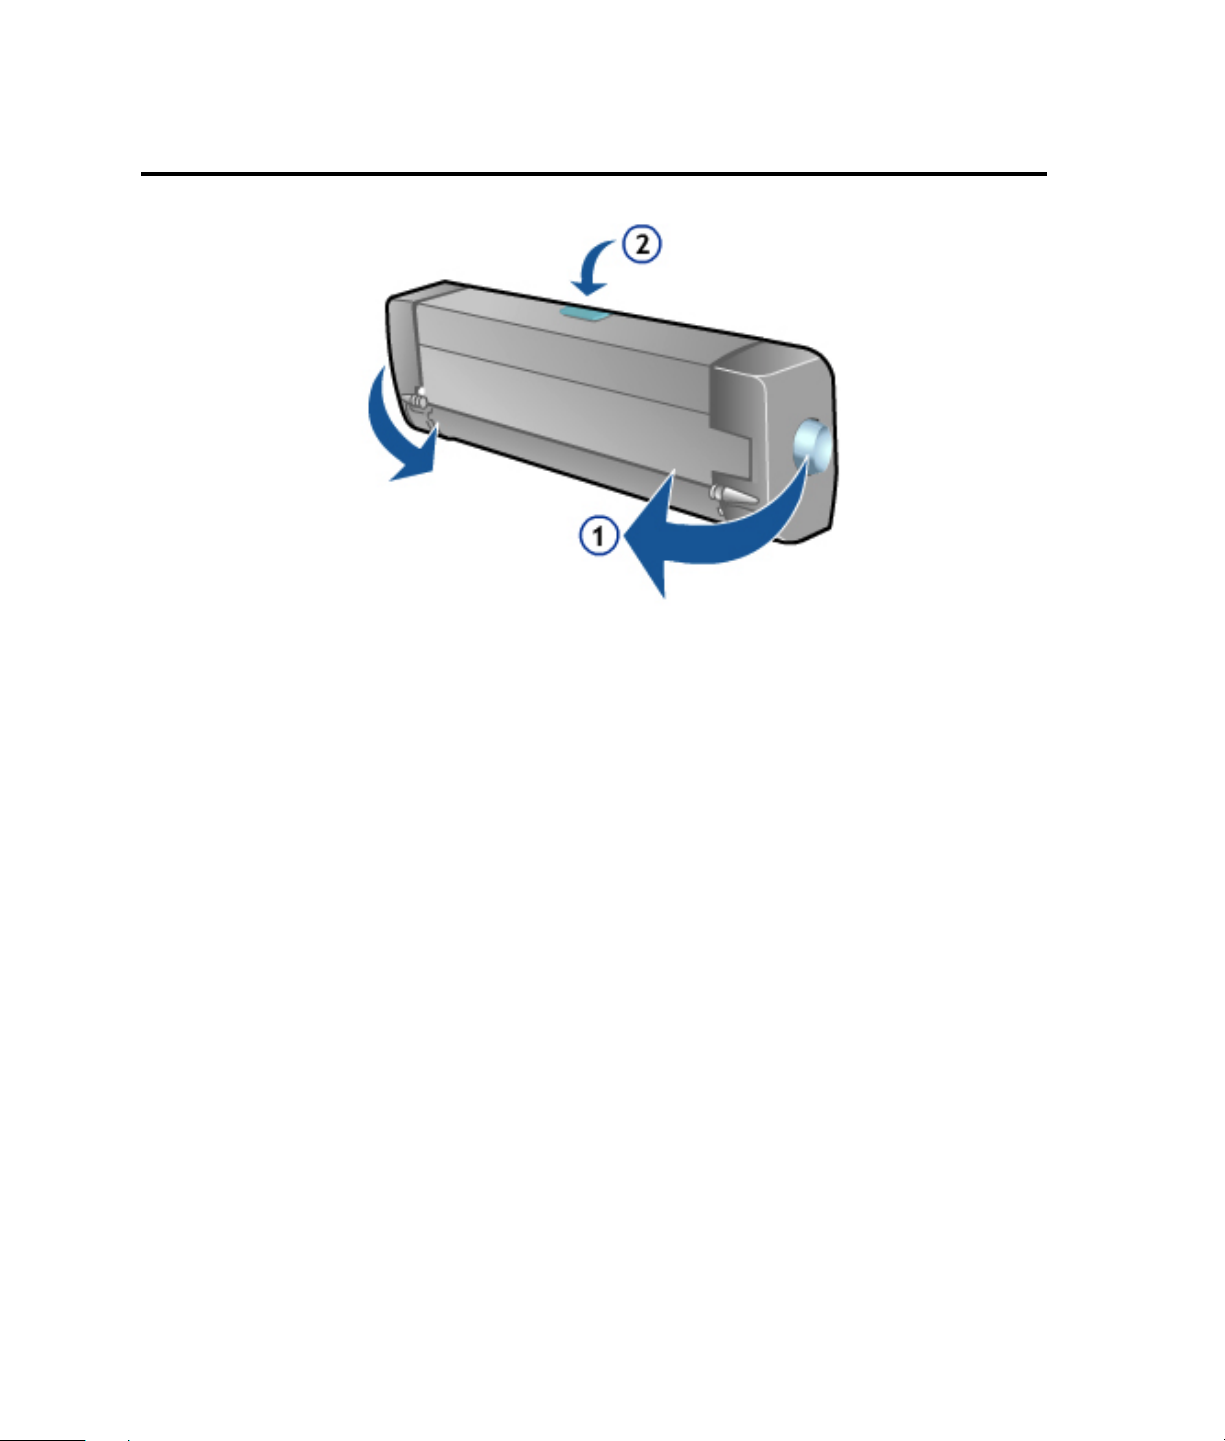
install auto-duplex unit
Auto-Duplex Unit
Auto-duplex unit
The auto-duplex unit is used for printing on both sides. In the hp business inkjet 1100
series, the auto-duplex unit is used to pick media, as there is no cleanout trough
present in the hp business inkjet 1100 series. The auto-duplex feature is turned on
by default when two-sided printing is selected.
To install the auto-duplex unit, follow these steps:
1. Turn off the printer.
2. Hold the auto-duplex unit upright with the button facing up.
3. Connect it at the back of the printer.
To remove the auto-duplex from the printer, press the 2 buttons on the side of the
auto-duplex unit and pull it away from the printer.
Page 44

Installing hp JetDirect print server
The hp Business Inkjet 1100dtn in the hp business inkjet 1100 series comes with an
hp Jetdirect print server 200m. The print server comes with factory default settings.
If you need to configure the print server after the printer software has been
installed, see the user guide for the hp Jetdirect print server. This guide is available
on the Starter CD. It can also be downloaded from the hp Web site at
http://www.hp.com. If an hp JetDirect print server card is used, a parallel card
cannot be used.
Caution
The steps to install the hp Jetdirect print server card are as follows:
1. Remove the LIO slot cover from the back of the printer.
2. Insert the print server until it clicks.
3. Connect a network cable between the print server and the network.
4. Press the Test button on the print server. The printer prints a configuration
page for the print server.
To test the installation of the hp Jetdirect print server card, print a print server
configuration page.
The hp Jetdirect LIO print server contains electronic components that can be
damaged by static electricity. To prevent the build up of static electricity: Maintain
contact with a bare sheet metal surface on the printer. Wear a grounding wrist
strap. Handle the print server with caution. Avoid touching the electronic
components or circuit paths.
Page 45

install ink cartridges
The table below lists the names, part numbers, code names, pages printed and
the ink capacities of ink cartridges:
part number code name name pages out ink capacity
c4844a hp 11 Black 1750 69 ml
c4836a hp 11 Cyan 1750 28 ml
c4837a hp 11 Magenta 1750 28 ml
c4838a hp 11 Yellow 1750 28 ml
The starter kit includes 26 cc Black and 14 cc CMY cartridges.
expiration dates
• Install-by date: The Install-by date is printed on the retail box for ink cartridges.
Install the ink cartridges before the date given in the Install-by date for
optimized performance.
• End-of-Warranty date: The End-of-Warranty date is printed on the ink
cartridges. The End-of-Warranty date specifies the date by which the
warranty period for the ink cartridges end.
install ink cartridges
install ink cartridges
The steps to install ink cartridges are:
1. Lift the supply cover.
2. Remove each ink cartridge from its package.
3. Align the coloured arrows and insert each ink cartridge into its respective
color-coded socket. Make sure that the arrow on the top of the printer
points towards the printer arrow.
4. Press in each ink cartridge to ensure proper contact.
To test the installation of the ink cartridges, print a test page.
maintenance guidelines for ink cartridges
• Replace any low or empty ink cartridges. Low ink levels can also cause
incomplete characters, missing lines, or dots on the printouts.
• Do not clean the ink cartridges unless necessary; cleaning the ink cartridges
uses ink and shortens the life of the ink cartridges.
Page 46

• To reduce water vapor loss: Keep the ink cartridges sealed in the original
packaging until ready to use.
• To reduce water vapor loss: Keep the opened ink cartridges in the printer or
sealed in a plastic bag.
• Store ink cartridges at room temperature.
• Use a first-in first-out inventory process to avoid having expired ink cartridges in
stock.
• Install ink cartridges before the Install-By Date to maximize warranty.
Note
The printer ships with 26.5cc Black, and 14cc Cyan, Magenta and Yellow ink as
"Starter Kits".
Page 47

install printheads
The table below lists the names, part numbers, code names, and the pages
printed capacities of printheads:
part number code name name pages out
c4810a hp 10 Black Up to 16,000
c4811a hp 11 Cyan Up to 24,000
c4812a hp 11 Magenta Up to 24,000
c4813a hp 11 Yellow Up to 24,000
expiration dates
• Install-by date: The Install-by date is printed on the retail box for printheads.
Install the printheads before the date given in the Install-by date for
optimised performance.
• End-of-Warranty date: The End-of-Warranty date is printed on the ink
cartridges. The End-of-Warranty date specifies the date by which the
warranty period for the ink cartridges end.
install printheads
install printheads
To install printheads, follow these steps:
1. Lift the supply cover.
2. Lift and push the latch toward the rear of the printer to ensure that the
hook is released from metal catch bar.
3. Remove each printhead from its package and remove the protective
tape and blue printhead cover from each printhead.
4. Insert each printhead into its respective color-coded socket.
5. Press in each printhead to ensure proper contact.
Page 48

install printheads
6. Lift the latch forward so that the hook catches the metal latch.
7. Push the latch towards the rear of the printer.
8. Close the supply cover.
To test the installation of the printheads, print a test page.
maintenance guidelines for printheads
• Keep the printheads sealed in the original packaging until ready to use.
• Keep the printheads that are open in the printer or sealed in a plastic bag
separately. Each printhead should have its own bag.
• Store printheads at room temperature.
• Power off the printer by pressing the Power button. Powering off with the
Power button ensures the Carriage is at the Service Station position. The
Service Station caps the printhead ink nozzles to prevent them from drying.
• Install printhead by Install-By Date to maximize warranty.
• The printer performs auto pen alignment whenever any printhead is being
replaced.
Page 49

guidelines for loading paper
While loading paper, these guidelines should be followed:
guidelines for loading paper
1. Always use paper that conforms to the printer specifications.
2. Do not use paper that is too thin, has a slick texture, or stretches easily. The
paper can feed improperly through the printer's paper path.
3. Do not use paper that is heavily textured or does not accept ink well.
4. Do not use media that is damaged, curled, or wrinkled.
5. Do not use paper with cutouts, perforations, or paper that is heavily
textured or embossed. These types of media can cause jams and other
problems.
6. Load only one type of media at a time into the input tray to prevent
multiple picks and paper jams.
7. Always remove the existing media and realign the new media after
loading when adding media.
8. To prevent media feed problems, fan the media stack.
9. Always load media print-side up, aligned squarely against the alignment
guide. The paper guide should be snug, but not tight, against the media.
10. Make sure the output tray extension is fully extended.
11. Do not load more than 150 sheets of paper in tray 1.
12. Insert media vertically. To print horizontally, make the selection through
your printer driver.
Page 50

print a demo page
Note
Demo Page
A demo page is used to check the printer setup. A demo page can be printed
without connecting the printer to the computer.
The demo page does not ensure that the computer and printer are properly
connected because they are independent of each other.
A demo page can be printed through the toolbox and through the LED control
panel.
The steps to print a demo page through the toolbox are as follows:
1. Open the hp business inkjet 1100 series Toolbox dialog box.
2. In the Printer Services tab, click the Print a Demo Page button.
Page 51

3. In the Print a Demo Page, click the Print button.
To print a demo page through the LED panel, hold the Power button down and
press the Resume button once.
Note
However, to verify that the printer is connected to the computer correctly, or that
the printer software is working correctly, print a test page.
Page 52

contents of software CD ROM
The following are the contents of the software CD ROM for Windows
9X/ME/NT4/2000 users:
• Printer driver installer - this is used to install the printer driver.
• Documentation - this is used to refer to the printer documentation.
• Release notes
• Getting started guide
• User’s guide
• Setup poster
• Printer Web site
• Register product - this is used to register the printer on the hp Web site.
• Customization utility - this is used to create a customized installer.
• Optional software - this is used to install any optional software.
• hp Web JetAdmin
• hp File Expansion Utility - this is used to uncompress the Windows 9x driver to a
temporary location on your hard disk.
• Scrubber Utility - this is used to clean the system in case of a failed or unclean
uninstallation.
The following are the contents of the software CD ROM for Macintosh users:
• Driver installer - this is used to install the printer driver.
• Hp JetDirect User's guide - this is used to refer to the printer documentation for
the JetDirect server card.
• User Guide - this is used to refer to the printer documentation.
• Setup poster - this is used to setup the printer.
• Product Website - this is used to access the hp Web site.
• Product registration - this is used to register the printer on the hp Web site.
Page 53

startup page of the CD browser for Windows
Note
Startup Page of the CD Browser
The startup page of the CD browser for Windows consists of the following options:
1. Install Printer Driver: This option is used to install the necessary software onto
the computer for printing to the computer.
2. Browse Documentation: This option is used to browse the latest
documentation for the available for the printer.
3. Register Product: The printer is registered by using this option.
4. Customization Utility: This option is used to create a custom software
installer that can be copied to the local hard drive, floppy disks, or the
network drive.
5. Optional software: This option is used to install additional software for the
printer, such as hp Web JetAdmin that is available for the printer.
The Optional Software page only provides a Web link to download the hp Web
JetAdmin from the hp Web site.
Page 54

browse documentation
Browse Documentation
Click the option Browse Documentation in the startup page of the CD browser to
open the Browse Documentation page. The Browse Documentation option is used
to browse the latest documentation available for the printer. The following
documentation can be accessed using the CD browser:
1. Release Notes: This button is used to view the release notes. The release
notes contains installation and latest information.
2. User’s Guide: This button is used to determine how to:
1. Use the printer
2. Maintain it
3. Troubleshoot when a problem occurs
4. Get help
3. HP JetDirect Guide: This button is used to view the getting Started Guide
that helps in determining the steps to setup the printer.
4. Setup Poster: This button is used to view the illustration of the printer setup
steps.
5. Printer Web site: This button is used to access the printer Web site. This Web
site contains the latest information and software. Click the Printer Web Site
button to access the following Web site: http://www.hp.com.
Page 55

register product
The printer can be registered by clicking the Register Product button in the startup
page of the CD browser. The following Web site can be used for registering the
product:
http://register.hp.com
Register Product
Perform the following activities by accessing the hp registration Web site:
• Create a profile
• Update a profile
Access the following information on the hp registration Web site:
• Enhanced customer service
• Fast expert technical support
• Timely notices of product and software upgrades
• Free newsletters with exclusive guidelines
• Special offers specific to your requirements
Page 56

customization utility
The customization utility can be used to create a custom software installer that
can be copied to floppy disks, local hard drives, or network drives.
To create the customization utility, follow these steps:
1. Start Windows and ensure that no other Windows applications are running.
2. Insert the Starter CD into the CD-ROM drive. The System Setup Wizard runs
automatically.
3. Click Customization Utility from the CD Browser menu.
4. Click Next at the Welcome screen.
5. Click Next after the selecting the language for installing the printer
software.
Page 57

6. Select the type of printer port and click Next.
7. Select the connector type that your computer will use to communicate
with the printer and click Next. The parallel port is selected by default. This
step allows the selection of parallel, USB, or any other port.
Page 58

8. Click Next after selecting the program features that need to be installed.
9. Scroll to read the agreement and click Next after agreeing to do autoupload.
Page 59

10. Specify a name for the printer in Printer Name text box and click Next.
11. If the printer needs to be shared, then click the Share as, radio button and
specify a share name. Otherwise, go to the next step by clicking Next.
Page 60

12. Specify a location of the printer in the network and provide an optional
comment. Click Next.
13. Specify the directory where the customized installer needs to be copied.
Click Change... to browse and select another location. Click Install to start
the installation.
Page 61

14. Click View readme file to view the readme files. Click Finish to end the
installation.
Access the customization utility option to perform the following activities:
Page 62

1. Copy printer Drivers only - Use this option to copy the printer driver to a
selected media. The resulting files can be used with Add Printer Wizard of
Microsoft.
2. Create Customized Installer - Use this option to create an interactive
installer customized by language, operating system, model, and
components.
3. Copy Entire Printing System Installer - Use this option to copy the printing
system installer for the selected language and operating system to media
other than floppy disks, for example shared network location.
The following is a flow chart depicting the steps to create the customization utility:
Page 63

Page 64

optional software
Note
Optional software
Click the option Optional Software in the startup page of the CD browser to open
the Optional Software page. In the Optional Software page, the optional software
that is available for this printer is hp Web JetAdmin. This software is used to install
the hp Web JetAdmin software as a Web browser-based network printer
management tool.
The Optional Software page only provides a Web link to download the hp Web
JetAdmin from the hp Web site.
Page 65

connectivity options
USB cable
Use a USB cable to connect the printer to the computer if the computer has a USB
port and any one of the following operating systems:
• Windows 98
• Windows ME
• Windows 2000
• Windows XP
If the computer does not meet the specifications, use a parallel cable to connect
the printer to the computer.
In most cases, after installing the printer software and connecting the printer to the
computer, install additional printers with USB cables without reinstalling the printer
software.
Warning
Ensure to connect the USB cable only when prompted by the computer.
Parallel cable
Use a parallel cable to connect the printer to the computer if the computer has a
parallel port and any one of the following operating systems:
• Windows 98
• Windows ME
• Windows NT 4.0
• Windows 2000
• Windows XP
LIO
Use a LIO card to connect the printer to the computer if the computer needs to
be connected on a network as a server and if the computer has any one of the
following operating systems:
• Windows 98
• Windows ME
• Windows NT 4.0
• Windows 2000
• Windows XP
Page 66

types of network connections
The hp JetDirect print server can be used in client-server peer-to-peer and clientserver network configurations.
peer-to-peer network
In a peer-to-peer network, the printer software is installed on each computer, and
the system is configured to send print jobs directly to the printer. Each individual
computer manages its own print jobs. Peer-to-peer printing is more suitable for
smaller networks.
client-server network
On a client-server network, client computers send print jobs to dedicated server
computers that control the use of each printer. Client-server printing is normally
used in small work groups where dedicated computer servers manage the printing
needs of many users. Access the hp JetDirect Print Server Administrator guide on
the starter CD for information to set up the printer on a network.
The hp JetDirect Print Server Administrator guide provides the following
information:
• hp Software Solutions for hp Jetdirect print servers:
• hp Web JetAdmin, a web-based tool for managing network
peripherals
• hp IP/IPX Printer Gateway for NDPS
• hp LaserJet Utility to set up printers on AppleTalk networks
• TCP/IP Configurations
Page 67

install the printer software for Windows - Direct
The methods through which the printer software can be installed directly on
Windows are:
• Using the software installer
• Using Microsoft New Hardware Found Wizard
• Using Add Printer
The following software are needed to install the printer driver in the respective
connections:
Software Needed Connection
• Windows
printer
driver
• Macintosh
printer
driver
Windows printer
driver
USB
Parallel
Note
Note
Note
It is recommended to install software first before connecting the printer. Only
connect the printer when prompted by the software installer. The printer needs to
be physically connected when prompted by the installer software.
Before installing the printer software on a computer
running Windows XP 64-bit, download the printer
software from
http://www.hp.com/support/businessinkjet1100.
Installing using the Installer on a Parallel port
The printer can be installed using the Installer in the following steps:
1. Start Windows and ensure that no other applications are running.
2. Insert the Starter CD in t he CD-ROM drive. The System Setup Wizard runs
automatically.
If the System Setup Wizard does not run automatically, select the Start -> Run menu
command. Type <CD ROM drive>:\SETUP in the command line box. For example,
type D:\SETUP if the D: is the CD ROM drive.
3. Click Install Printer Driver from the CD Browser menu.
Page 68

4. Click OK after selecting the language for installing the printer software.
5. Click Next at the Welcome screen.
Page 69

6. Click Next to install the printer directly to the computer.
7. Select the connector type and click Next.
Page 70

8. Select Typical Installation to install the most common drivers and
components. Click Next.
9. Select I agree to do auto upload to let myPrintMileage Agent send printer
usage information to the myPrintMileage website, where you can view
your customized printer usage analysis.
Page 71

10. Click Next to proceed to the next step.
11. Specify a name for the printer in Printer Name text box and click Next.
12. If the printer needs to be shared, then click the Share as radio button and
specify a share name. Otherwise, go to the next step by clicking Next.
Page 72

13. Select the additional drivers that need to be installed and click Next. These
additional drivers help automatic driver downloads to clients with different
operating systems.
14. Specify the location of the printer in the Location text box and click Next.
This information is used to specify the physical location of the printer.
Page 73

15. Click Install to begin the installation.
16. Click Finish to complete the installation of the printer software.
Page 74

Installing using Microsoft's New Hardware Found Wizard
Note
The operating system enables The New Hardware Found Wizard when a USB device
(for Win 98 and above) or a Parallel device (Win XP) is connected to the system
If the USB cable is connected to the ports on the computer and the printer before
installing the printer software, the Found New Hardware wizard appears on the
computer screen.
• Click Next in the Found New Hardware wizard.
• Click Search for the best driver for your device and click Next .
• Insert the Starter CD into the CD-ROM drive. If the CD menu appears, click Exit
twice to close the CD menu.
• Select Specify a location . Click Browse to locate the installation files
depending on the operating system and click OK .
• Click Next . Follow the instructions on the screen.
• Click Next and click Finish .
Installing using Add Printer
The printer can be installed using the Add Printer method by the following steps:
1. Click Printers in the Settings menu to open the Printers Window.
2. Double-click the Add Printer icon to open the Add Printer Wizard.
3. In the Add Printer Wizard, click Next.
Page 75

4. Click Next again. Make sure that the Automatically detect and install my
Plug and Play check box is unchecked.
5. Select LPT1 as the printer port and click Next.
Page 76

6. In the next screen, click Have Disk.
7. Locate the driver INF file by clicking Browse.
Page 77

8. Select the hpf1100k.inf file. Click Open to select the file.
9. Click OK to copy the INF file.
10. Select hp business inkjet 1100 series and click Next.
Page 78

11. In the next screen, type the name of the printer, select the Yes radio
button to make it the default printer and click Next.
12. For the printer to be shared, type a share name and click Next.
Page 79

13. Click Next after specifying the location of the printer. This information is
used to specify the physical location of the printer.
14. Check the Yes radio button to print a test page and click Next.
Page 80

15. Click Finish to complete the installation.
To test the installation of the printer, print a test page.
Page 81

Note
After the completion of the hardware-first installation process, The Found New
Hardware wizard automatically launches the setup program. This provides the
option to install non-driver components such as the Toolbox.
Note
Note
Note
Except for Windows NT, all other Operating systems from Microsoft support plug and
play feature.
hp recommends software first installation
Take note of issues with wrong driver language installed. This is an OS behavior and
happens intermittently if the user clicks on "Recommend.." instead of specifically
selecting the printer INF file from the CD.
Page 82

install the printer software for Windows - Network
The methods through which the printer software can be installed on a network on
Windows are:
• Using the Installer (peer-to-peer and client/server)
• Using Add Printer
Note
Before installing the printer software on a computer running Windows XP 64-bit,
download t he printer software from http://www.hp.com/support/businessinkjet1100.
The printer can be installed using the Installer on a peer-to-peer connection in the
following steps:
1. Start Windows and ensure that no other applications are running.
2. Insert the Starter CD in the CD-ROM drive. The System Setup Wizard runs
automatically.
3. Click Install Printer Driver from the CD Browser menu.
4. Click OK after selecting the language for installing the printer software.
5. Click Next at the Welcome screen.
6. Check the Connected via the network radio button and click Next.
Page 83

7. Click Next for a basic network setup that creates a network port for a
printer directly connected to a network.
8. Click Next to search the printer from a list of detected printers. Otherwise,
specify a printer by address.
Page 84

9. Select the desired printer from the list of printers and click Next.
10. Click Next to allow the Installer to configure the network settings.
11. To view the network settings, click the View Network Settings button.
Otherwise click Next.
Page 85

12. Select Typical Installation to install the most common drivers and
components. Click Next.
13. Select I agree to do auto upload to let myPrintMileage Agent send printer
usage information to the myPrintMileage website, where you can view
your customized printer usage analysis. Click Next.
14. Specify a name for the printer in Printer Name text box and click Next.
Page 86

15. If the printer needs to be shared, then click the Share as radio button and
specify a share name. Otherwise, go to the next step by clicking Next.
16. Select the additional drivers that need to be installed and click Next. These
additional drivers help automatic driver downloads to clients with different
operating systems.
Page 87

17. Specify the location of the printer in the Location text box and click Next.
This information is used to specify the physical location of the printer.
18. Click Install to begin the installation.
Page 88

19. Click Finish to complete the installation of the printer software.
The printer can be installed using the Installer on a client/server connection in the
following steps:
1. Start Windows and ensure that no other applications are running.
Page 89

2. Insert the Starter CD in t he CD-ROM drive. The System Setup Wizard runs
automatically.
3. Click Install Printer Driver from the CD Browser menu.
4. Click OK after selecting the language for installing the printer software.
5. Click Next at the Welcome screen.
6. Check the Connected via the network radio button and click Next.
Page 90

7. Select the Client setup for client-server printing radio button to connect to
a printer that is managed by a server. Click Next.
8. Provide the network path of the printer in the Network Path or Queue
Name: text box and click Next.
Page 91

9. Select Typical Installation to install the most common drivers and
components. Click Next.
10. Select I agree to do auto upload to let myPrintMileage Agent send printer
usage information to the myPrintMileage website, where you can view
your customized printer usage analysis. Click Next.
Page 92

11. Click Install to begin the installation.
12. Click Finish to complete the installation of the printer software.
Page 93

The printer can be installed using the Add Printer method on a network by the
following steps:
1. Click Printers in the Settings menu to open the Printers Window.
2. Double-click the Add Printer icon to open the Add Printer Wizard.
3. In the Add Printer Wizard, click Next.
4. Click the Network printer radio button. Click Next again.
Page 94

5. Click the Connect to a printer on the Internet or on your intranet radio
button for quickly locating the printer.
6. Type the address of the printer in the URL text box and click Next.
7. Click Next to keep this printer as the default printer.
Page 95

8. Click Finish to complete the installation.
Page 96

install toolbox
The Toolbox, which is available only to Windows users, provides status and
maintenance information about your printer. It also gives you step-by-step
guidance for basic printing tasks and provides help solving printer problems.
The Toolbox can be installed from the Starter CD. The steps to install the Toolbox
are:
1. Start Windows and ensure that no other Windows applications are running.
2. Insert the Starter CD into the CD-ROM drive. The System Setup Wizard runs
automatically.
3. Click Install Printer Driver from the CD Browser menu.
4. Click OK after the selecting the language for installing the printer software.
5. Click Next at the Welcome screen.
6. Click Next at the next screen.
Page 97

7. Select the Custom Installation radio button and click Next.
8. Select the hp business inkjet 1100 series Toolbox option and click Next.
Page 98

9. Select I agree to do auto upload to let myPrintMileage Agent send printer
usage information to the myPrintMileage website, where you can view
your customized printer usage analysis. Click Next to proceed to the next
step.
10. Specify a name for the printer in Printer Name text box and click Next.
Page 99

11. If the printer needs to be shared, then click the Share as, radio button and
specify a share name. Otherwise, go to the next step by clicking Next.
12. Select the drivers that need to be installed and click Next.
Page 100

13. Specify the location of the printer in the Location text box and click Next.
14. Click Install to begin the installation.
 Loading...