

Page 1
HP
LaserJet
1100
User
Guide
Page 2

Page 3

HP LaserJet 1100 Printer
User Guide _________________
Page 4

© Copyright HewlettPackard Company 2002
All Rights Reserved.
Reproduction,
adaptation, or translation
without prior written
permission is prohibited,
except as allowed under
the copyright laws.
Publication number:
C4224-90967
Second Edition: January,
2002
Warranty
The information
contained in this
document is subject to
change without notice.
Hewlett-Packard makes
no warranty of any kind
with respect to this
information.
HEWLETT-PACKARD
SPECIFICALLY
DISCLAIMS THE
IMPLIED WARRANTY
OF MERCHANTABILITY
AND FITNESS FOR A
PARTICULAR
PURPOSE.
Hewlett-Packard shall not
be liable for any direct,
indirect, incidental,
consequential, or other
damage alleged in
connection with the
furnishing or use of this
information.
Trademark Credits
Adobe is a trademark of
Adobe Systems
Incorporated.
CompuServe is a U.S.
trademark of
CompuServe, Inc.
Windows and Windows
NT are U.S. registered
trademarks of Microsoft
Corporation.
E
NERGY STAR
is a U.S.
registered service mark
of the U.S. En vironmental
Protection Agency.
Hewlett-Packard Company
11311 Chinden Boulevard
Boise, Idaho 83714 U.S.A.
Page 5

Contents
1 Getting to know the printer
Printer features and benefits. . . . . . . . . . . . . . . . . . . . . . . . . . . . . .2
Print with excellent quality. . . . . . . . . . . . . . . . . . . . . . . . . . . . .2
Save money . . . . . . . . . . . . . . . . . . . . . . . . . . . . . . . . . . . . . . .2
Create professional documents . . . . . . . . . . . . . . . . . . . . . . . .2
Printer components . . . . . . . . . . . . . . . . . . . . . . . . . . . . . . . . . . . . .3
Printer control panel . . . . . . . . . . . . . . . . . . . . . . . . . . . . . . . . .4
Printer paper input trays . . . . . . . . . . . . . . . . . . . . . . . . . . . . . .5
Printer paper guides . . . . . . . . . . . . . . . . . . . . . . . . . . . . . . . . .5
Printer paper output paths . . . . . . . . . . . . . . . . . . . . . . . . . . . .6
Printer door. . . . . . . . . . . . . . . . . . . . . . . . . . . . . . . . . . . . . . . .7
Choosing paper and other media . . . . . . . . . . . . . . . . . . . . . . . . . .8
Loading paper into the printer . . . . . . . . . . . . . . . . . . . . . . . . . . . . .9
Specific types. . .. . . . . . . . . . . . . . . . . . . . . . . . . . . . . . . . . . . .9
Turning the power off . . . . . . . . . . . . . . . . . . . . . . . . . . . . . . . . . .10
Voltage conversions . . . . . . . . . . . . . . . . . . . . . . . . . . . . . . . . . . .10
Accessing printer properties (driver) and help. . . . . . . . . . . . . . . .11
Printer properties (driver) . . . . . . . . . . . . . . . . . . . . . . . . . . . .11
Printer online help. . . . . . . . . . . . . . . . . . . . . . . . . . . . . . . . . .12
Printing a self-test page. . . . . . . . . . . . . . . . . . . . . . . . . . . . . . . . .13
EN
2 Printing media
Printing transparencies . . . . . . . . . . . . . . . . . . . . . . . . . . . . . . . . .16
Printing envelopes. . . . . . . . . . . . . . . . . . . . . . . . . . . . . . . . . . . . .17
Printing labels . . . . . . . . . . . . . . . . . . . . . . . . . . . . . . . . . . . . . . . .18
Printing letterhead . . . . . . . . . . . . . . . . . . . . . . . . . . . . . . . . . . . . .19
Printing cards . . . . . . . . . . . . . . . . . . . . . . . . . . . . . . . . . . . . . . . .20
Contents i
Page 6

3 Printing tasks
Printing with manual feed . . . . . . . . . . . . . . . . . . . . . . . . . . . . . . .22
Printing on both sides of the paper (manual duplexing) . . . . . . . .23
Manual duplex using the paper output bin (standard). . . . . . .24
Manual duplex (special) heavy-media, card stock . . . . . . . . .25
Printing watermarks. . . . . . . . . . . . . . . . . . . . . . . . . . . . . . . . . . . .26
Accessing the watermark feature . . . . . . . . . . . . . . . . . . . . . .26
Printing multiple pages on a single sheet of paper
(N-up printing) . . . . . . . . . . . . . . . . . . . . . . . . . . . . . . . . . . . . . . . .27
Accessing the multiple pages per sheet feature . . . . . . . . . . .27
Printing booklets . . . . . . . . . . . . . . . . . . . . . . . . . . . . . . . . . . . . . .28
Canceling a print job . . . . . . . . . . . . . . . . . . . . . . . . . . . . . . . . . . .30
Changing print quality settings . . . . . . . . . . . . . . . . . . . . . . . . . . .31
Print using EconoMode (save toner). . . . . . . . . . . . . . . . . . . . . . .31
4 Managing the toner cartridge
HP toner cartridges . . . . . . . . . . . . . . . . . . . . . . . . . . . . . . . . . . . .34
HP policy on non-HP toner cartridges. . . . . . . . . . . . . . . . . . .34
Toner cartridge storage. . . . . . . . . . . . . . . . . . . . . . . . . . . . . .34
Toner cartridge life expectancy. . . . . . . . . . . . . . . . . . . . . . . .34
Recycling toner cartridges . . . . . . . . . . . . . . . . . . . . . . . . . . .34
Saving toner . . . . . . . . . . . . . . . . . . . . . . . . . . . . . . . . . . . . . .34
Redistributing toner . . . . . . . . . . . . . . . . . . . . . . . . . . . . . . . . . . . .35
Changing the toner cartridge. . . . . . . . . . . . . . . . . . . . . . . . . . . . .36
ii Contents
5 Troubleshooting the printer
Finding the solution . . . . . . . . . . . . . . . . . . . . . . . . . . . . . . . . . . . .38
Pages did not print . . . . . . . . . . . . . . . . . . . . . . . . . . . . . . . . .38
Pages printed; however . . . . . . . . . . . . . . . . . . . . . . . . . . . . .38
Printer light patterns . . . . . . . . . . . . . . . . . . . . . . . . . . . . . . . .39
Error messages on screen . . . . . . . . . . . . . . . . . . . . . . . . . . .41
Paper handling problems . . . . . . . . . . . . . . . . . . . . . . . . . . . .43
Printed page is different than what appeared on screen . . . .44
Improving print quality. . . . . . . . . . . . . . . . . . . . . . . . . . . . . . . . . .46
Image defect examples. . . . . . . . . . . . . . . . . . . . . . . . . . . . . .46
Correcting print defects. . . . . . . . . . . . . . . . . . . . . . . . . . . . . .48
Cleaning the printer. . . . . . . . . . . . . . . . . . . . . . . . . . . . . . . . . . . .51
Cleaning the toner cartridge area . . . . . . . . . . . . . . . . . . . . . .52
Cleaning the printer paper path . . . . . . . . . . . . . . . . . . . . . . .53
Clearing printer paper jams. . . . . . . . . . . . . . . . . . . . . . . . . . . . . .54
Removing a jammed page . . . . . . . . . . . . . . . . . . . . . . . . . . .55
Paper jam: removing torn pieces of paper . . . . . . . . . . . . . . .57
Changing the pickup roller . . . . . . . . . . . . . . . . . . . . . . . . . . .58
Cleaning the pickup roller . . . . . . . . . . . . . . . . . . . . . . . . . . . .60
Resetting the printer . . . . . . . . . . . . . . . . . . . . . . . . . . . . . . . . . . .61
EN
Page 7

6 Service and support
Availability . . . . . . . . . . . . . . . . . . . . . . . . . . . . . . . . . . . . . . . . . . .64
Obtaining hardware service. . . . . . . . . . . . . . . . . . . . . . . . . . . . . .64
Guidelines for repacking the printer . . . . . . . . . . . . . . . . . . . . . . .65
Service information form . . . . . . . . . . . . . . . . . . . . . . . . . . . . . . . .66
HP Support . . . . . . . . . . . . . . . . . . . . . . . . . . . . . . . . . . . . . . . . . .67
Customer Support and product repair assistance
(U.S. and Canada) . . . . . . . . . . . . . . . . . . . . . . . . . . . . . . . . .67
European Customer Support Center . . . . . . . . . . . . . . . . . . .68
Online services . . . . . . . . . . . . . . . . . . . . . . . . . . . . . . . . . . . .71
Obtaining software utilities and electronic information . . . . . .72
HP direct ordering for accessories or supplies . . . . . . . . . . . .73
HP Support Assistant compact disc . . . . . . . . . . . . . . . . . . . .73
HP service information . . . . . . . . . . . . . . . . . . . . . . . . . . . . . .73
HP SupportPack . . . . . . . . . . . . . . . . . . . . . . . . . . . . . . . . . . .73
HP FIRST . . . . . . . . . . . . . . . . . . . . . . . . . . . . . . . . . . . . . . . .73
Worldwide sales and service offices . . . . . . . . . . . . . . . . . . . . . . .75
Appendix A Printer specifications
Specifications . . . . . . . . . . . . . . . . . . . . . . . . . . . . . . . . . . . . . . . .80
FCC compliance . . . . . . . . . . . . . . . . . . . . . . . . . . . . . . . . . . . . . .82
Environmental Product Stewardship Program . . . . . . . . . . . . . . .83
Protecting the Environment. . . . . . . . . . . . . . . . . . . . . . . . . . .83
Material safety data sheet . . . . . . . . . . . . . . . . . . . . . . . . . . . . . . .85
Regulatory statements . . . . . . . . . . . . . . . . . . . . . . . . . . . . . . . . .86
Declaration of Conformity. . . . . . . . . . . . . . . . . . . . . . . . . . . .86
Laser safety statement . . . . . . . . . . . . . . . . . . . . . . . . . . . . . .87
Canadian DOC regulations. . . . . . . . . . . . . . . . . . . . . . . . . . .87
Korean EMI statement . . . . . . . . . . . . . . . . . . . . . . . . . . . . . .87
Laser statement for Finland . . . . . . . . . . . . . . . . . . . . . . . . . .88
EN
Appendix B Paper specifications
Printer paper specifications. . . . . . . . . . . . . . . . . . . . . . . . . . . . . .90
Supported paper sizes (printer). . . . . . . . . . . . . . . . . . . . . . . . . . .90
Guidelines for using paper . . . . . . . . . . . . . . . . . . . . . . . . . . . . . .91
Labels . . . . . . . . . . . . . . . . . . . . . . . . . . . . . . . . . . . . . . . . . . .92
Transparencies. . . . . . . . . . . . . . . . . . . . . . . . . . . . . . . . . . . .92
Envelopes. . . . . . . . . . . . . . . . . . . . . . . . . . . . . . . . . . . . . . . .93
Card stock and heavy media . . . . . . . . . . . . . . . . . . . . . . . . .95
Appendix C Memory (DIMMs)
Installing DIMMs (memory) . . . . . . . . . . . . . . . . . . . . . . . . . . . . . .98
Test DIMM installation. . . . . . . . . . . . . . . . . . . . . . . . . . . . . . . . .100
Removing DIMMs . . . . . . . . . . . . . . . . . . . . . . . . . . . . . . . . . . . .101
iii
Page 8

Appendix D Warranty and licensing
Hewlett-Packard software license agreement. . . . . . . . . . . . . . .104
Hewlett-Packard limited warranty statement. . . . . . . . . . . . . . . .106
Limited warranty for toner cartridge life. . . . . . . . . . . . . . . . . . . .108
Appendix E Accessories and ordering information
Index
iv Contents
EN
Page 9

Getting to know the
1
Note For installation instructions, see the “HP LaserJet Quick Reference
printer
This chapter provides information on the following topics:
●
Printer features and benefits
●
Printer components
●
Choosing paper and other media
●
Loading paper into the printer
●
Turning the power off
●
Voltage conversions
●
Accessing printer properties (driver) and help
●
Printing a self-test page
Guide” that came with your printer.
EN
1
Page 10

Printer features and benefits
Congratulations on the purchase of your new printer. You can . . .
Print with excellent quality
●
Print at 600 dots per inch (dpi) with Resolution Enhancement
technology (REt).
Save money
●
Use EconoMode to save toner.
●
Print on both sides of the paper to save paper (manual
duplexing).
●
Print multiple pages on a single sheet of paper to save paper
(N-up printing).
Create professional documents
●
Protect your documents by using Watermarks such as
“confidential.”
●
Print Booklets. This feature enables you to easily print the pages
required to create cards or books. Once printed, all you have to
do is fold and staple the pages.
●
Print the first page on different paper/media than the following
pages.
2 Chapter 1 Getting to know the printer
EN
Page 11
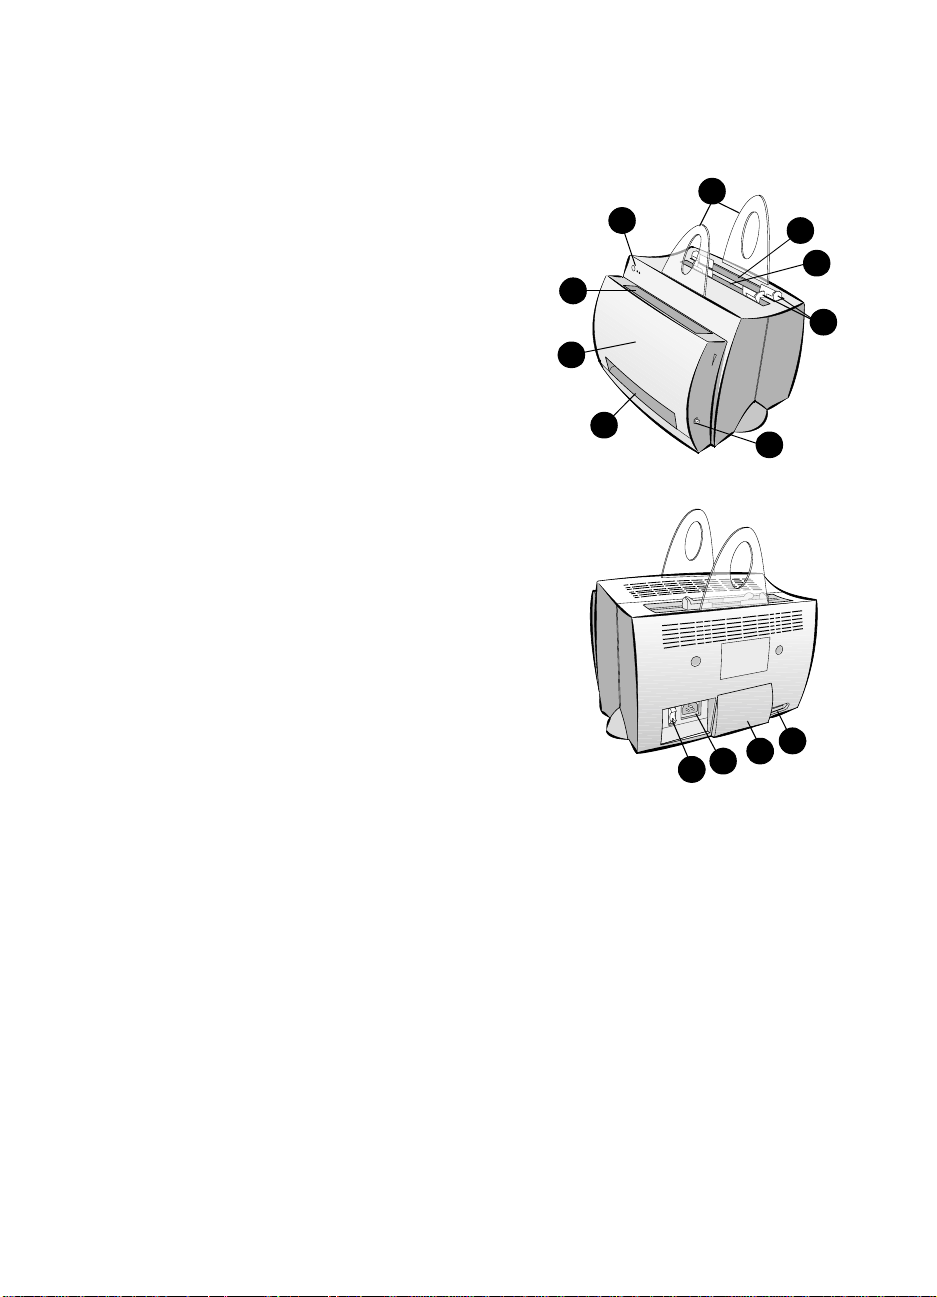
Printer components
1. Printer control panel
2. Paper supports
3. Paper input tray
4. Single-sheet paper input tray (prior ity feed)
5. Paper guides
6. Paper-output lever
7. Straight-through output path
8. Printer door
9. Paper output bin
1. Power switch (220-240 volt printers)
2. Power receptacle
3. Memory door
4. Parallel port
2
1
9
8
7
3
4
5
6
EN
4
3
2
1
Printer components 3
Page 12
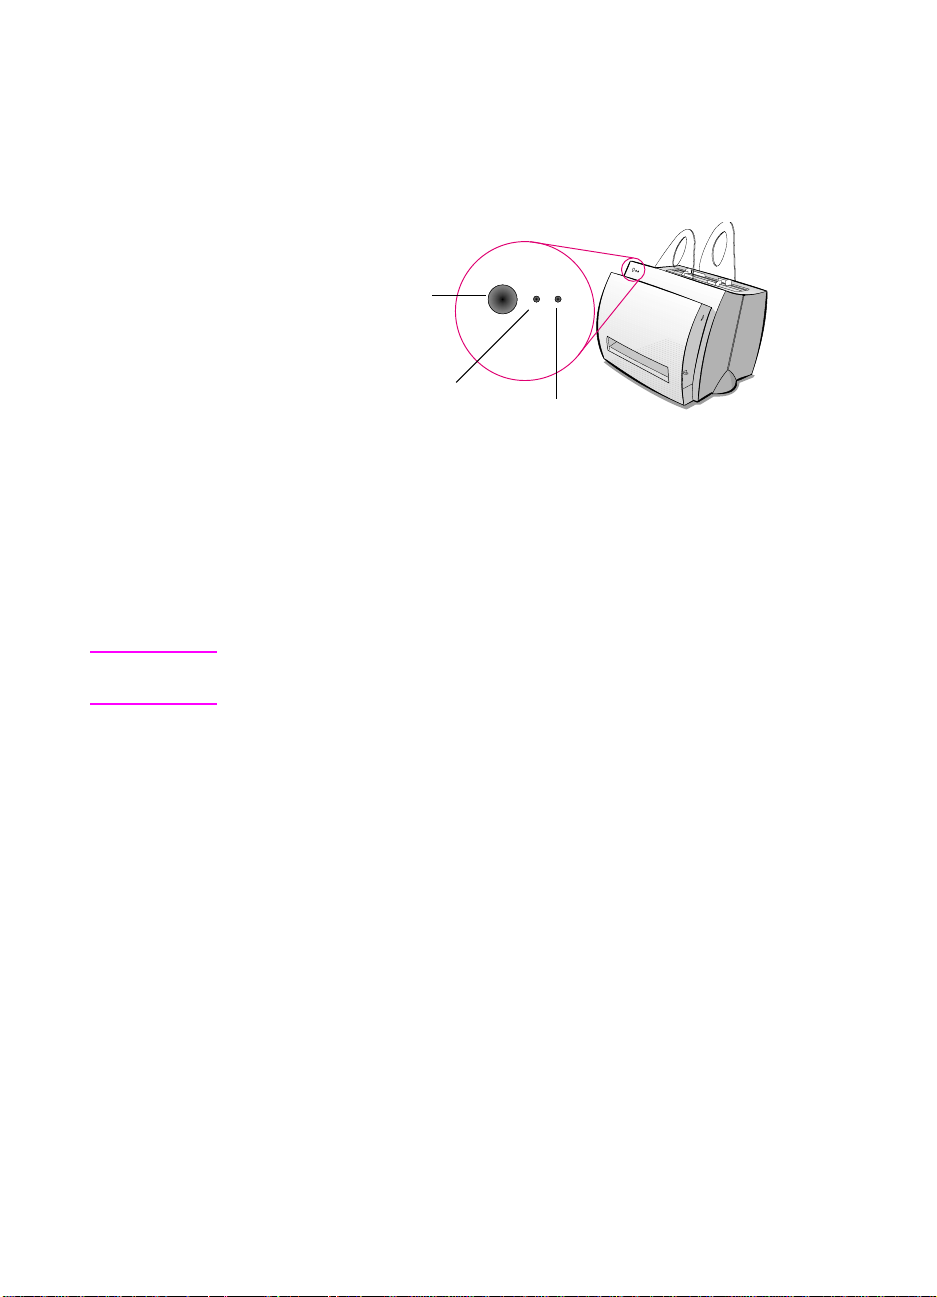
Printer control panel
The printer control panel is comprised of two lights and one lighted
button. These lights produce patterns that identify the status of your
printer.
Go button and light
Ready light
Attention light
●
Go button and light: Press and release to print a self-test page
or when in manual-feed mode, or press and hold for 5 seconds to
reset the printer.
●
Ready light: Indicates the printer is ready to print.
●
Attention light: Indicates printer initialization, reset, and errors.
Note See “Printer light patterns” for functional descriptions of all the light
patterns.
4 Chapter 1 Getting to know the printer
EN
Page 13
Printer paper input trays
Rear paper input tray
The paper input tray located closest to the back of the printer can hold
up to 125 sheets of 20 lb. paper or it can hold multiple envelopes.
Front (single-sheet) paper input tray
The single-sheet paper input tray should be used when feeding single
pages or media such as envelopes. You can print the first page on
different media than the rest using the single-sheet paper input tray.
Note The printer will automatically (priority feed) print from the single-sheet
paper input tray before printing from the paper input tray.
EN
Printer paper guides
Both input trays have paper guides. Paper guides are used to ensure
the paper is correctly fed into the printer and that the print is not
skewed (crooked text on the page). When loading paper, adjust the
paper guides to match the width of the paper being printed.
Printer components 5
Page 14
Printer paper output paths
Paper output bin
The paper output bin is located on the front of the printer. Printed
paper will be collected here in the correct sequence when the paperoutput lever is in the up position. Use the output bin when printing
large, collated documents or when copying documents s o that the
original is separated from the copies.
Straight-through paper output path
The straight through paper output path is useful when printing
envelopes, transparencies, heavy media, or anything that tends to
curl when printed. Printed paper will stack in rev erse order with the
paper-output lever down.
6 Chapter 1 Getting to know the printer
EN
Page 15
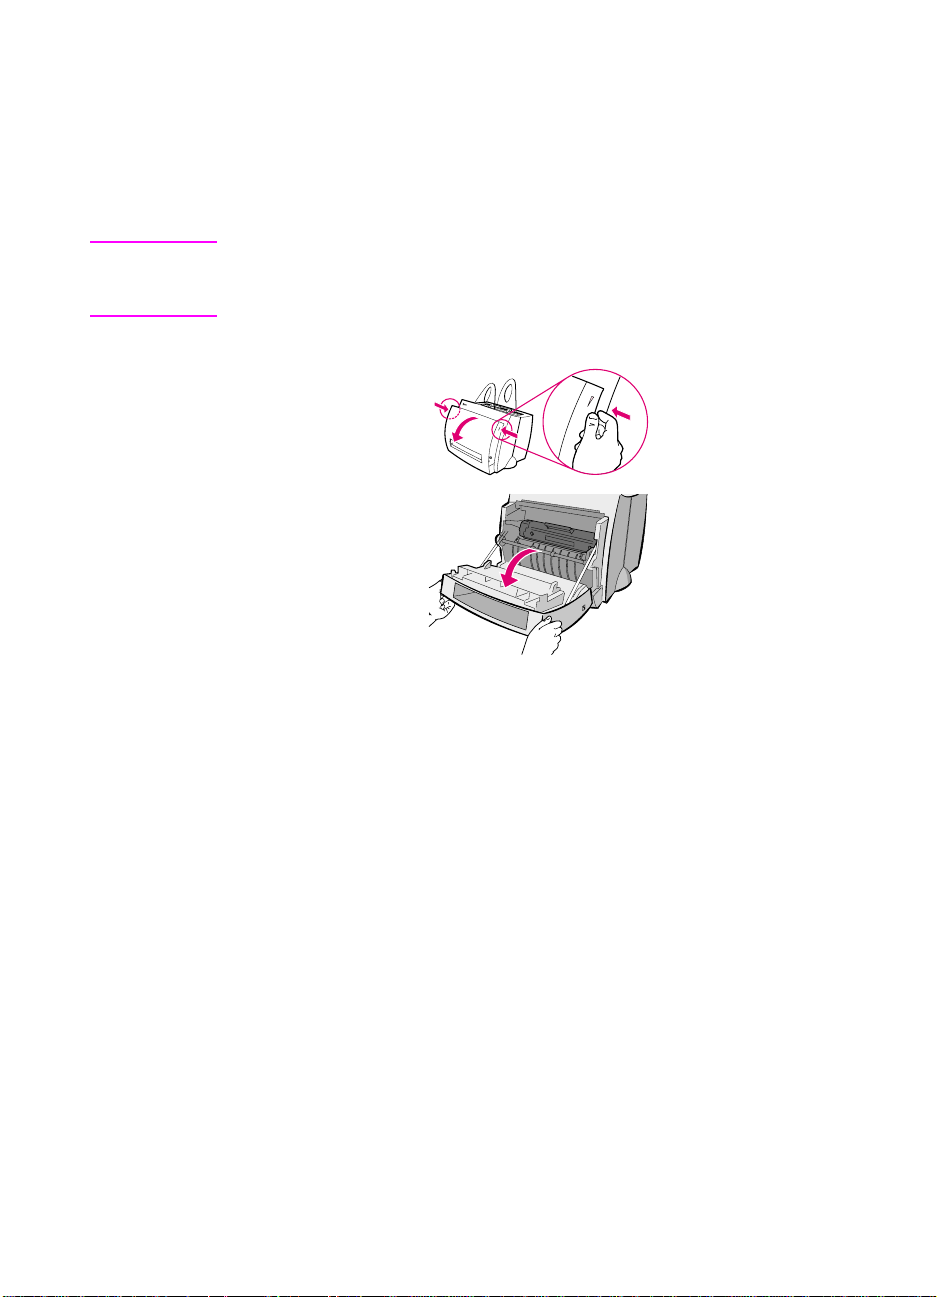
Printer door
Open the printer door to access the toner cartridge, clear jams, and
clean the printer. The printer door is located on the front of the printer.
Open and close the printer door by firmly grasping the top left and
right sides of the printer door and pulling it towards you.
Note If the scanner is attached, it may be necessary to move the printer to
the edge of your workstation before opening the printer door in order
to get the full range of motion.
EN
Printer components 7
Page 16

Choosing paper and other media
HP LaserJet printers produce excellent print quality documents. You
can print on a variety of print media, such as paper (including up to
100% recycled fiber content paper), envelopes, labels,
transparencies, and custom-sized media. Properties such as weight,
grain, and moisture content are important factors, affecting printer
performance and quality. To achieve the best possible print quality ,
use only high-quality paper designed for laser printers. See “Printer
paper specifications” for detailed paper and media specifications.
Note Always test a s ample of paper before pur chasing large quantities.
Your paper supplier should understand the requirements specified in
the HP LaserJet Printer Family Paper Specification Guide (HP part
number 5021-8909). See “Printer paper specifications.”
●
Maximum supported paper size: 216 by 356 mm (8.5 by 14 in.)
●
Minimum supported paper size: 76 by 127 mm (3 by 5 in.)
8 Chapter 1 Getting to know the printer
EN
Page 17

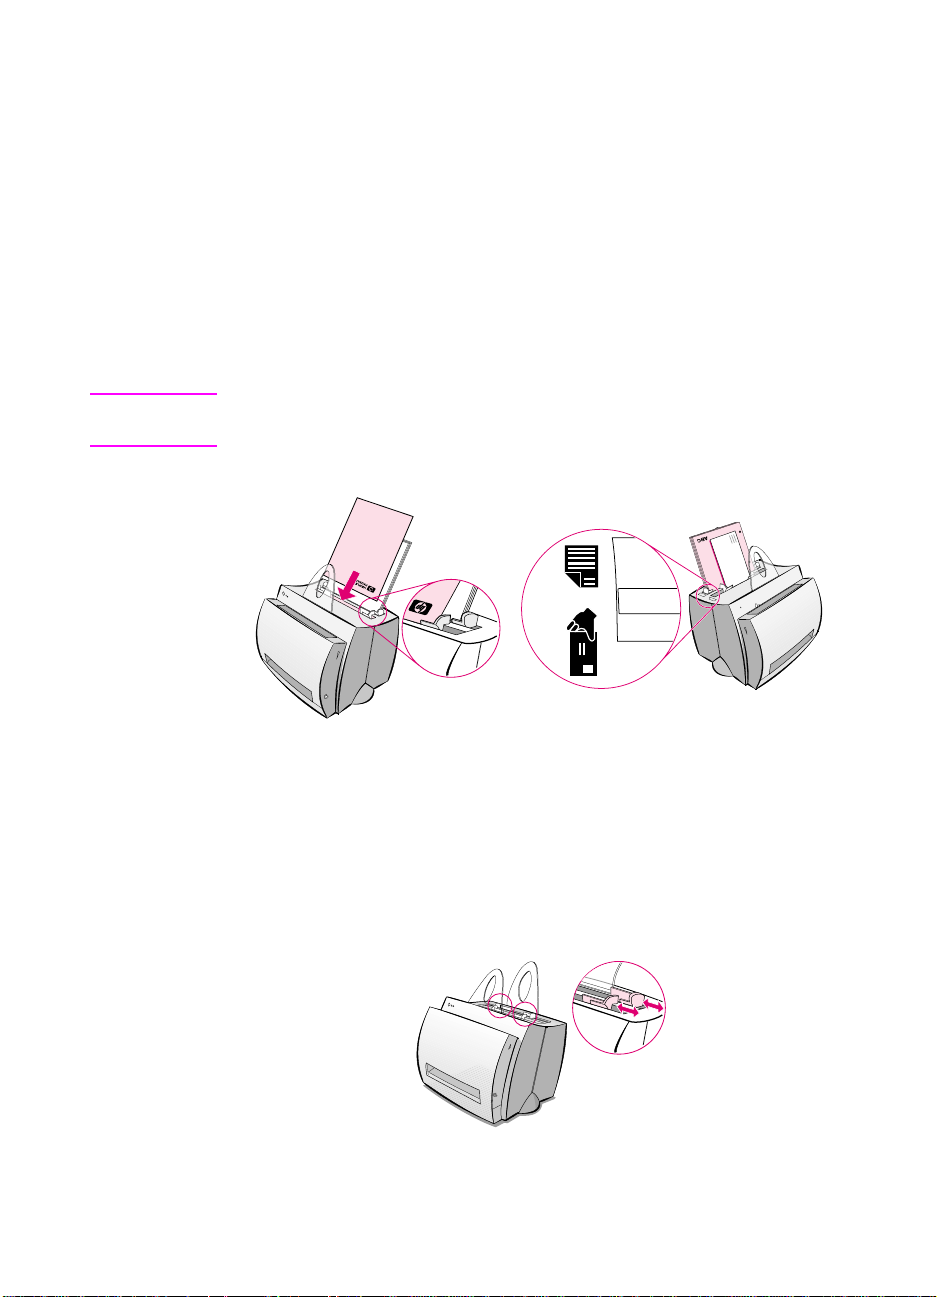
Loading paper into the printer
Paper should be loaded with the top down and the side-to-be printed
facing forward. Always adjust the paper guides to prevent jams and
skewing.
CAUTION Attempting to print on paper that is wrinkled, folded, or damaged in any
way may cause a jam to occur. See “Printer paper specifications.”
Note Always remo ve all paper from the paper input tra y and straighten
the stack when new paper is added. This helps prevent multiple
sheets of paper from feeding through the printer at one time and
reduces paper jams. See the sticker which you placed on the printer
while setting up the hardware.
Specific types. . .
●
Transparencies: Load transparencies with the top down and the
side-to-be-printed facing toward the front of the printer. See
“Printing transparencies.”
●
Envelopes: Load with the narrow, stamp side down and the side-
to-be-printed facing toward the front of the printer. See “Printing
envelopes.”
●
Labels: Load with the top down and the side-to-be-printed facing
toward the front of the printer. See “Printing labels.”
●
Letterhead: Load with the top down and the side-to-be-printed
facing toward the front of the printer. See “Printing letterhead.”
●
Cards: Load with the narrow side down and the side-to-be-
printed facing toward the front of the printer. See “Printing cards.”
EN
Loading paper into the printer 9
Page 18
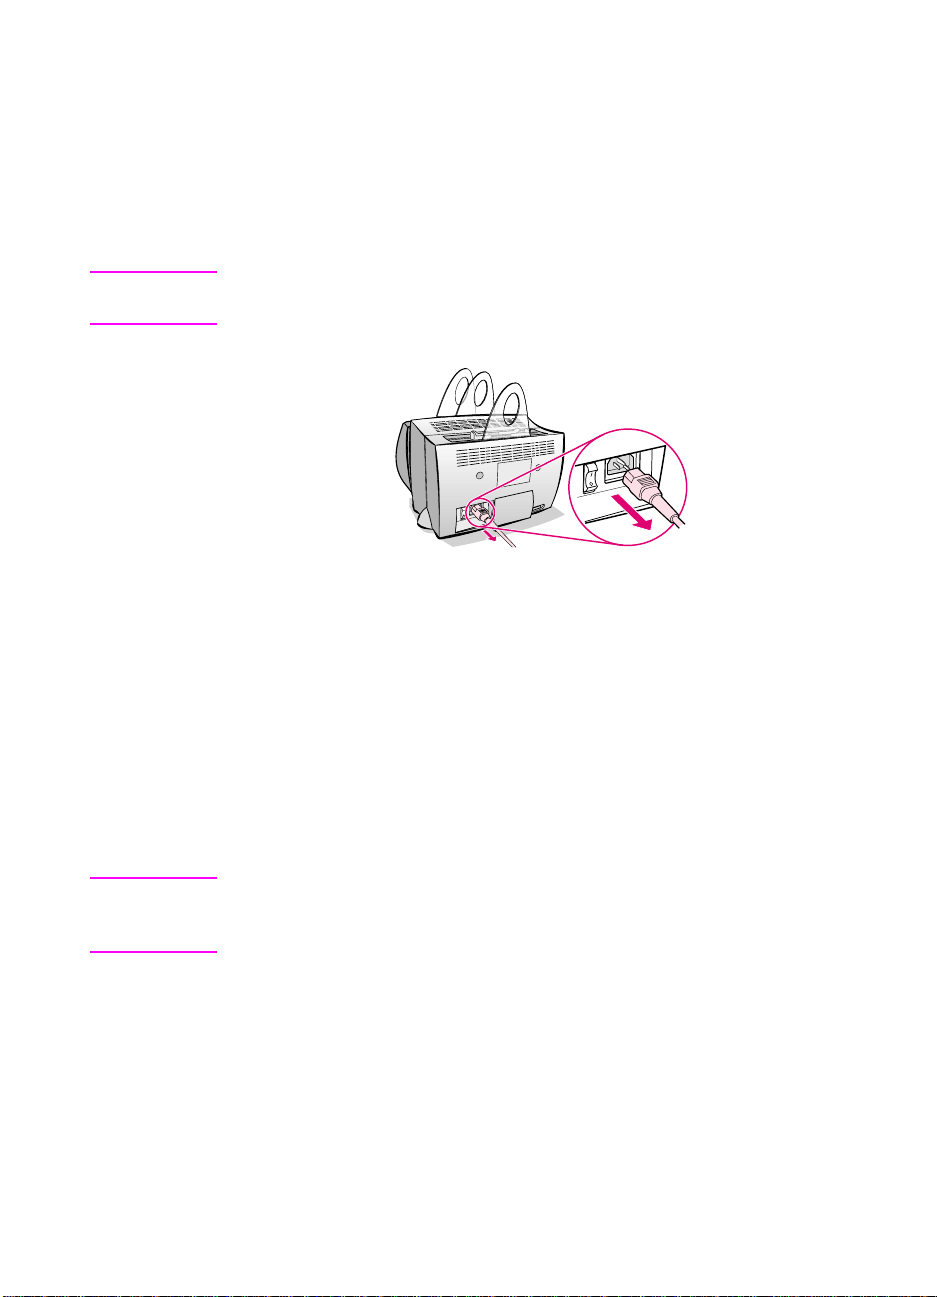
Turning the power off
Printers that require 100-127 volts of power must be unplugged to
turn the power off. Printers that require 220-240 volts can be switched
off (the switch is located on the left side of the power plug) or
unplugged.
Note To ensure safety when working inside the printer for any reason, it is
best to unplug the printer.
Voltage conversions
HP LaserJet printers are manufactured to different specifications for
different countries. Because of these differences, HP does not
recommend transporting products sold within the United States to
another country.
In addition to the concerns about the differing power system voltages,
the country of final destination may have different import and export
restrictions, power frequencies, and regulatory requirements.
Note The HP LaserJet family printers must be serviced by an authorized
repair depot or reseller within the country where the printer was
originally purchased.
Because of the different specifications and warranty coverage
limitations, Hewlett-Packard does not offer a conversion, or support
the conversion, of U.S. v er s i on HPLaserJet fam i ly p rint er s for fore ig n
use. We advise those customers planning to transport equipment
outside the United States to purchase the products in the country of
final destination.
10 Chapter 1 Getting to know the printer
EN
Page 19

Accessing printer properties (driver) and help
This section provides information on the following topics:
●
Printer properties (driver)
●
Printer online help
Printer properties (driver)
Printer properties control the printer and allow you to change default
settings, such as paper size, printing on both sides of the page
(manual duplexing), printing multiple pages on a single sheet of paper
(N-up printing), resolution, watermarks, and printer memory. You can
access the printer properties in two ways:
●
Through the software application from which you are printing.
(Change settings for current software application use.)
●
Using the Windows® operating system. (Change default settings
for all future print jobs.)
Note Because many software applications use a different method of
accessing the printer properties, we will describe common methods
used in Windows 9x & NT® 4.0, and Windows 3.1x.
EN
Windows 9x & NT 4.0
●
Change settings for current software application use: From
the File menu within the software application, click Print, and
then click Properties. (The steps can vary between software
applications; this is the most common method.)
●
Change defaults for all future print jobs: Click the Start button,
click Settings, and then click Printers. Right-click the printer icon
for which you would like to change properties, and then choose
Properties. Many of the features in Windows NT are also located
on the Document Defaults menu.
Windows 3.1x
●
Change settings for current software application use: From
the File menu within the software application, click Print,
Printers, and then click Options. (The steps can vary between
software applications; this is the most common method.)
●
Change defaults for all future print jobs: From the Windows
control panel, double-click Printers, highlight the printer, and then
click Setup.
Accessing printer properties (driver) and help 11
Page 20

Printer online help
Printer properties online help
The printer properties (driver) online help includes information
specific to the functions within the printer properties. This online help
will guide you when changing default settings for your printer.
Access the printer properties help system by opening the printer
properties and then clicking on the Help button.
Online help
The HP LaserJet 1100 online help includes information for all of the
printing, copying, and scanning software applications.
To access the HP LaserJet 1100 Online Help, use any of the three
methods below:
●
Program Group:
• Windows 9x & NT 4.0: Click Start, Programs, HP LaserJet
1100, and then LaserJet 1100 Online Help.
• Windows 3.1x: From the Program Manager, double-click the
HP LaserJet 1100 icon, and then double-click LaserJet 1100
Online Help.
Note The Document Assistant is not available for Windows 3.1x operating
systems.
●
Document Assistant: Click Tools, and then click Help.
●
LaserJet Document Desktop: Click Help from the main menu.
12 Chapter 1 Getting to know the printer
EN
Page 21
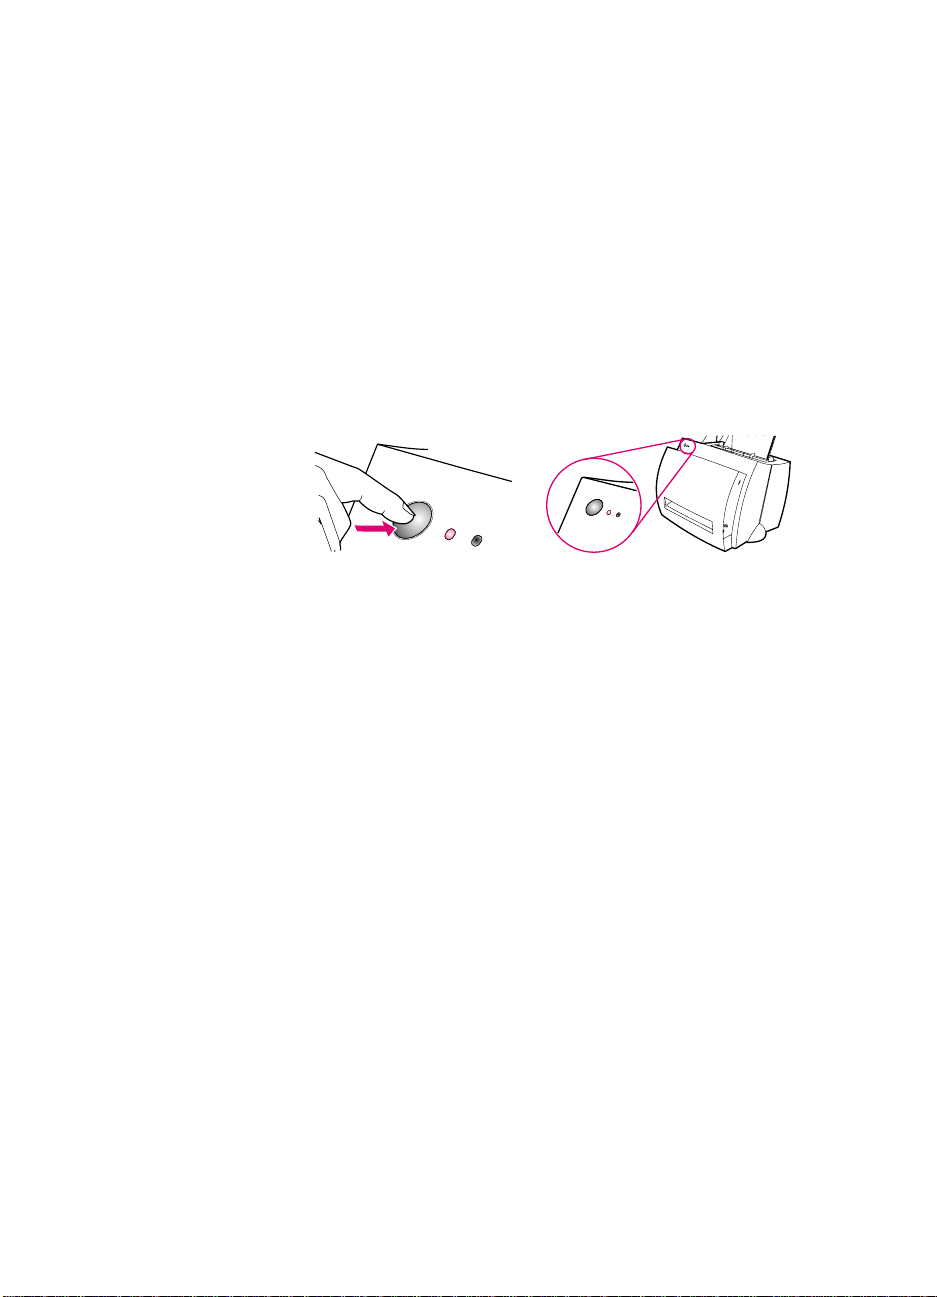
Printing a self-test page
Among other items, a self-test page provides all of the printer
configuration settings, scanner attachment verification, a sample of
the print quality, and provides information for printer page counts as
well as scan and copy page counts. A self-test page can also help
you verify the printer is printing correctly.
To print a self-test page, press and release the Go button on the
printer control panel while the printer is in the Ready state. If the
printer is in PowerSave mode, press and release the Go button once
to awaken it, and then press and release the Go button a second
time.
EN
Printing a self-test page 13
Page 22

14 Chapter 1 Getting to know the printer
EN
Page 23

2
Printing media
This chapter provides information on the following topics:
●
Printing transparencies
●
Printing envelopes
●
Printing labels
●
Printing letterhead
●
Printing cards
EN
15
Page 24

Printing transparencies
Only use transparencies recommended for use in laser printers, such
as HP transparency film. See “Printer paper specifications.”
CAUTION Inspect the transparencies to ensure they are not wrinkled or curled,
and that they do not have any torn edges.
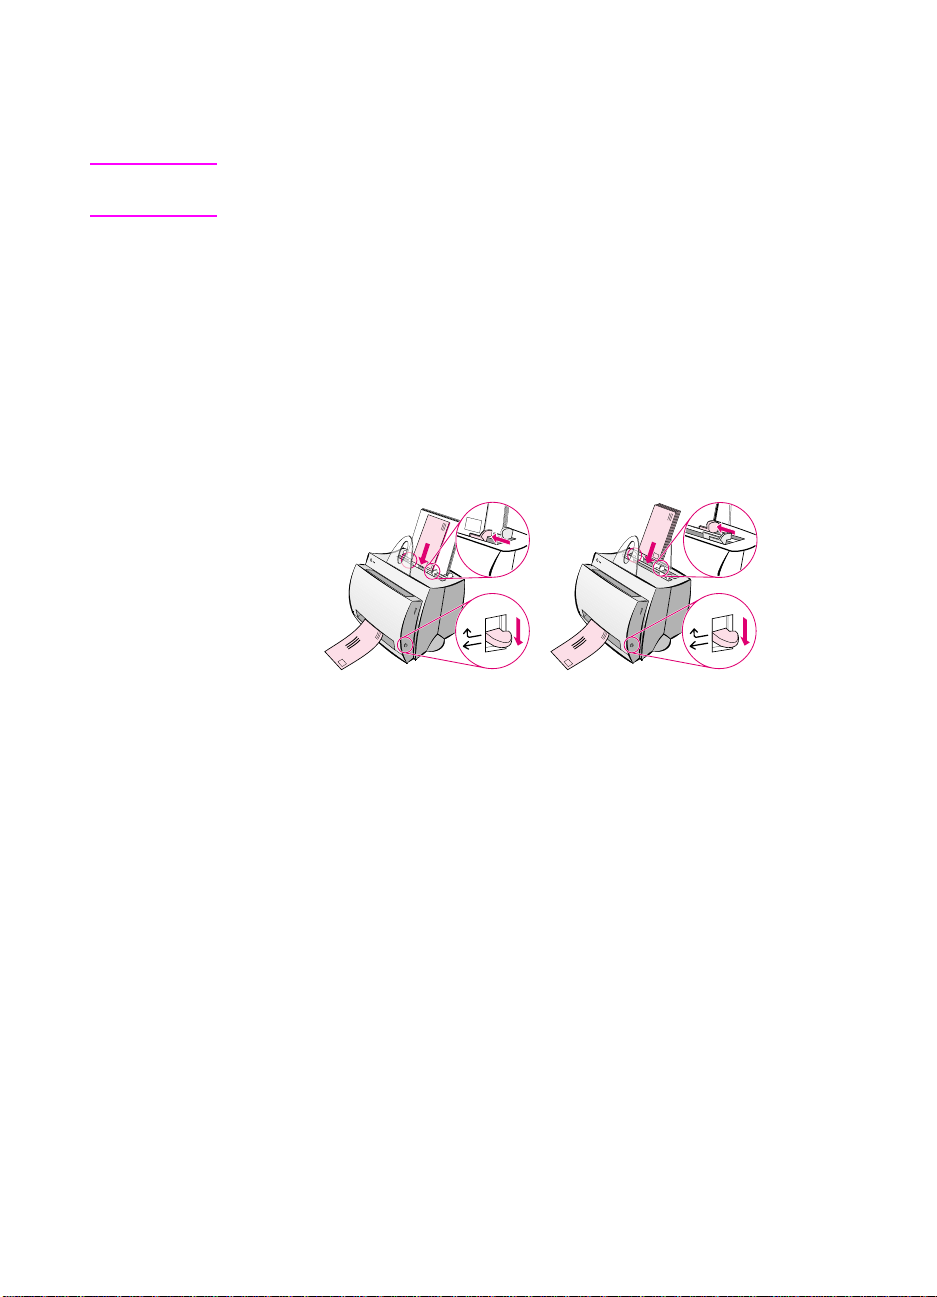
1 Adjust the paper-output lever to the down position.
2 Load with the top down and the side-to-be-printed (rough side)
facing toward the front of the printer. Adjust the paper guides.
3 Print, and then remove the transparencies from the front of the
printer to prevent them from sticking together. Place the printed
transparencies on a flat surface.
16 Chapter 2 Printing media
EN
Page 25
Printing envelopes
CAUTION Only use envelopes recommended for laser printers. See “Printer paper
specifications.”
1 Adjust the paper output-lev er to the down position.
2 Load with the narrow, stamp-side down and the side-to-be -
printed facing toward the front of the pr inter. Adjust the
paper guides to fit the envelope.
3 Select the correct envelope size in the software application. This
setting can be accessed through the printer properties. See
“Printer properties (driver).”
4 Print.
EN
Printing envelopes 17
Page 26
Printing labels
Only use labels recommended for laser printers, such as HP LaserJet
labels. See “Printer paper specifications.”
CAUTION Do not use labels that are separating from the backing sheet, wrinkled,
or damaged in any way . Do not feed a sheet of labels through the printer
twice. The adhesive backing is designed for one pass through the
printer. Also, do not use continuous feed labels or labels that require
moisture to stick.
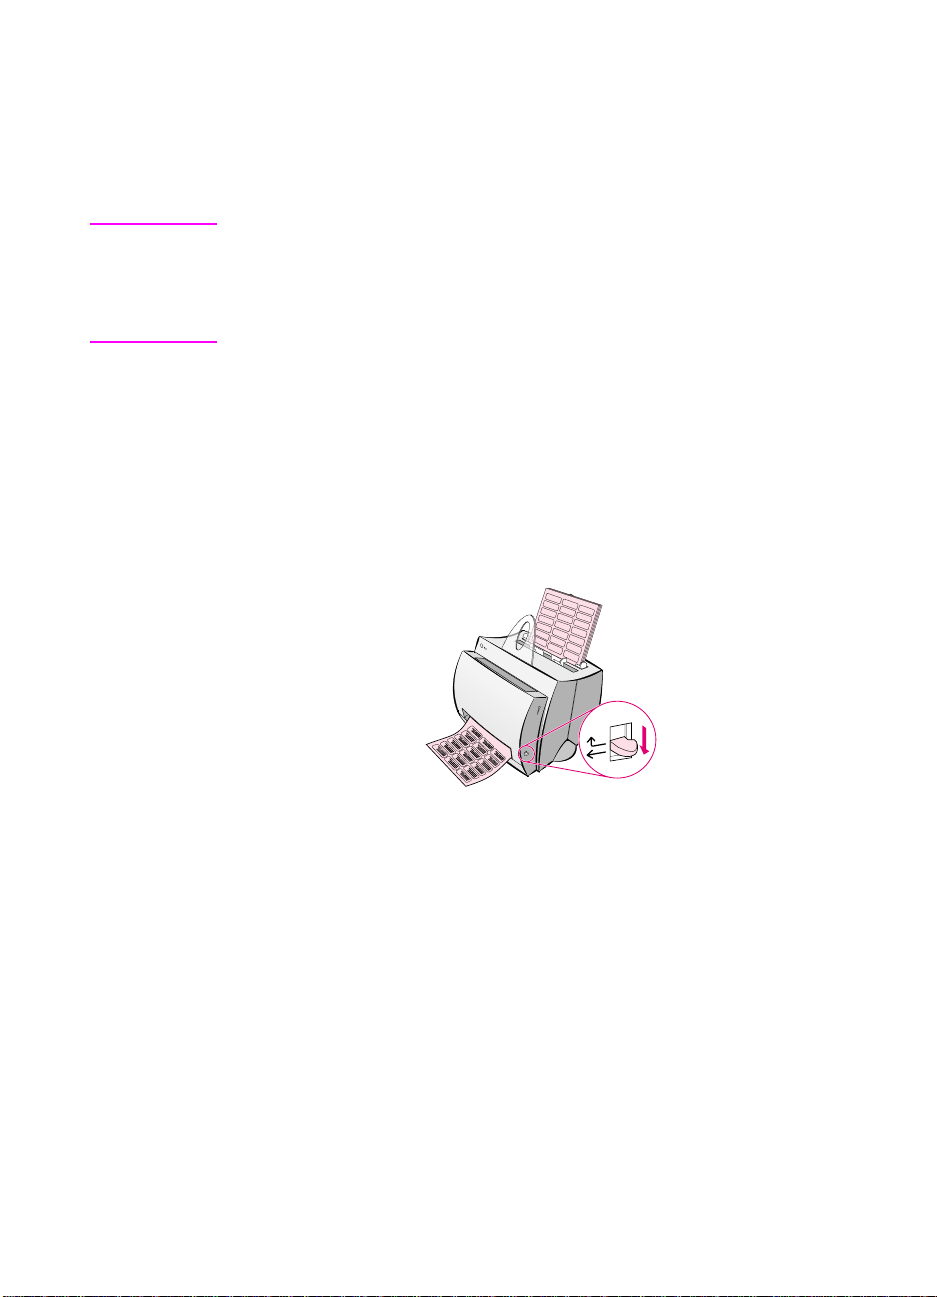
1 Adjust the paper output-lev er to the down position.
2 Load with the top down and the side-to- be-pr inted facing
toward the front of the printer. Adjust the paper guides to fit
the width of the label sheet.
3 Print, and then remove the printed label sheets from the front of
the printer as they are printed to prevent them from sticking
together.
18 Chapter 2 Printing media
EN
Page 27
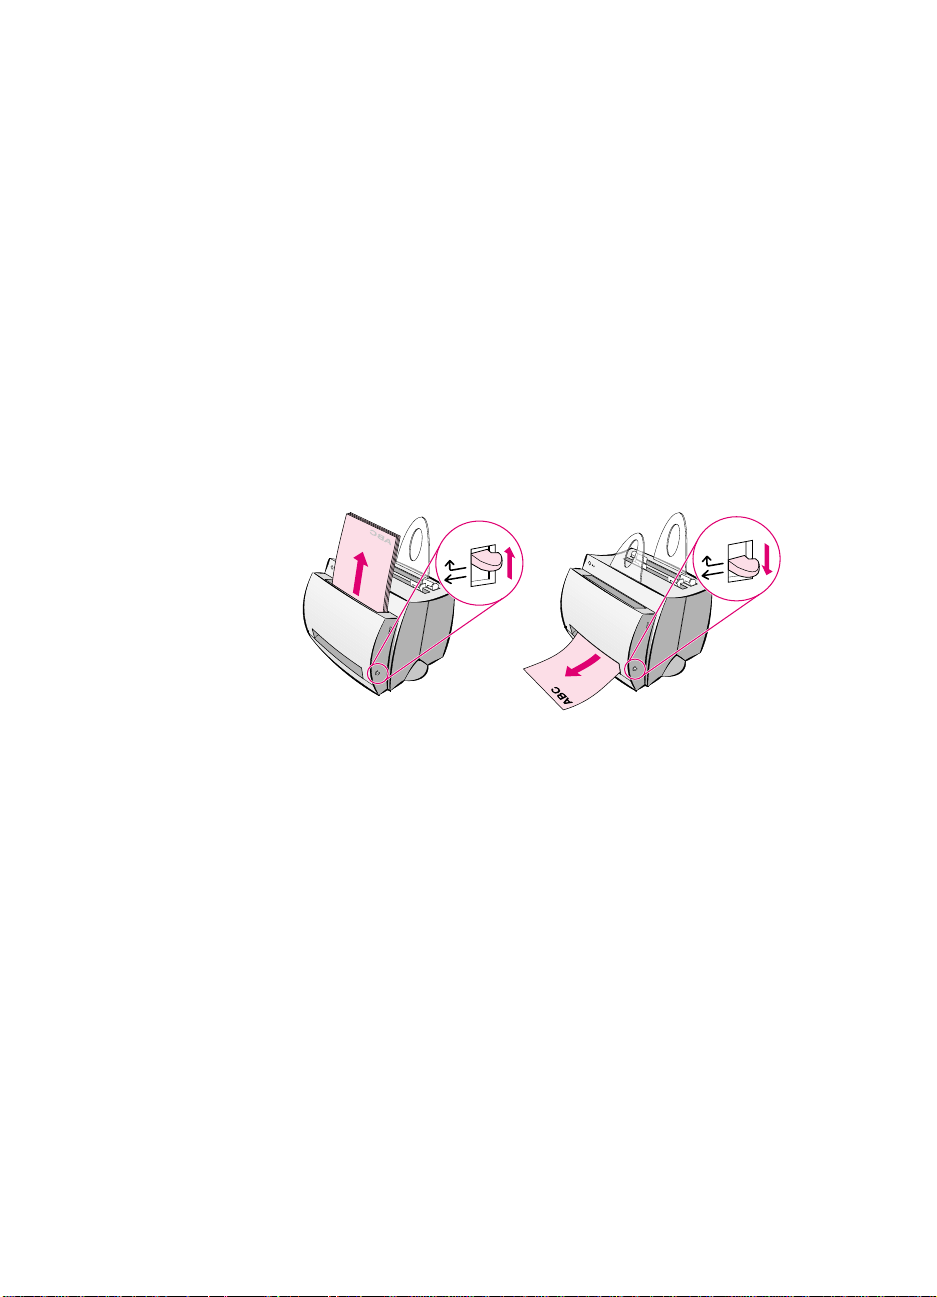
Printing letterhead
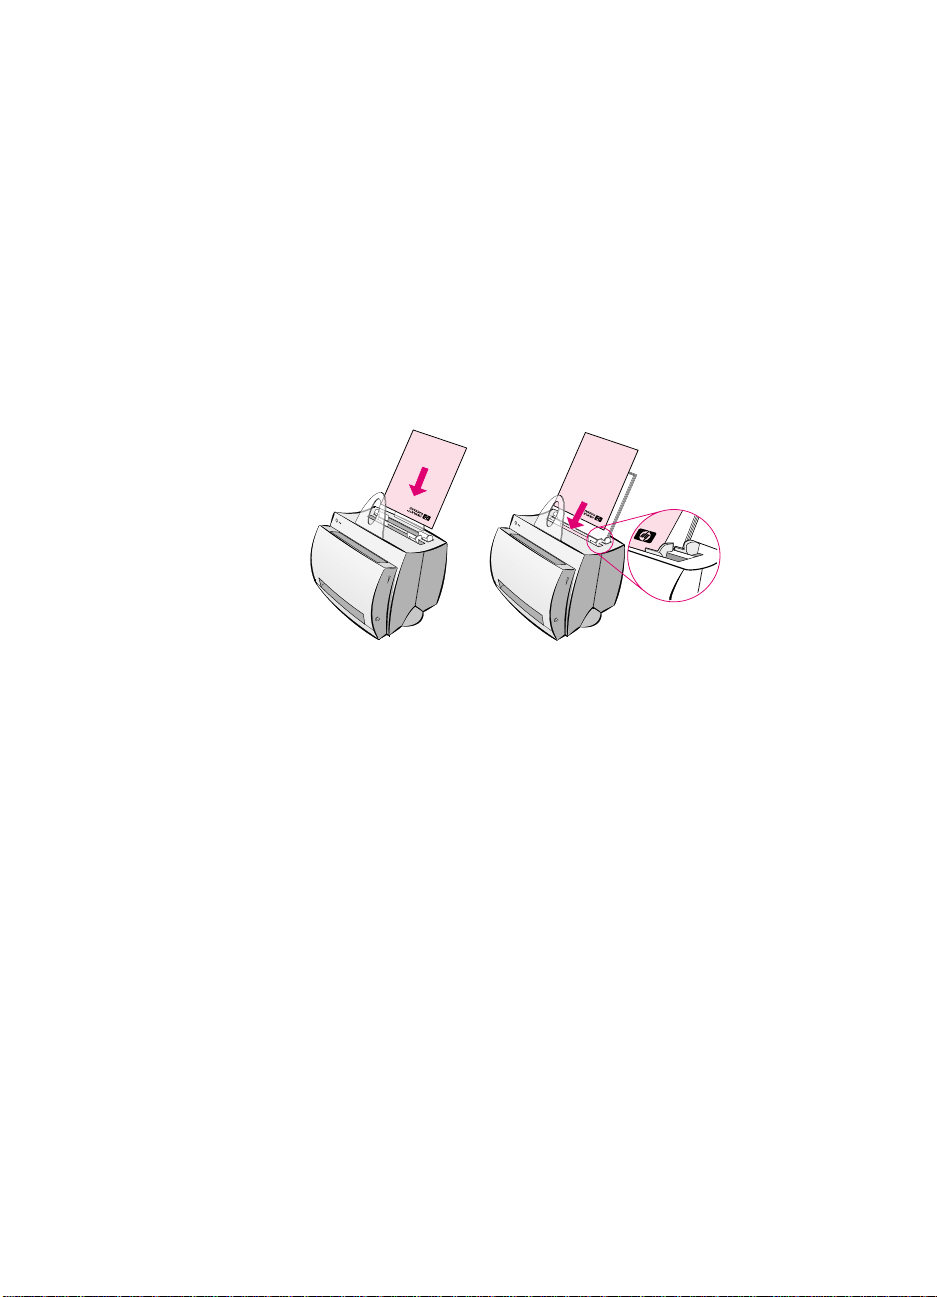
1 Load with the top down and the side-to-be-printed facing toward
the front of the printer. Adjust the paper guides to fit the width of
the paper.
2 Print.
To print a single page cover letter, using letterhead, followed by a
multi-page document, load the letterhead in the single-sheet paper
input tray and load the standard paper in the multi sheet paper input
tray. By default, the printer prints from the single sheet paper input
tray first.
Cover letter followed b y document.
Use both input trays.
EN
Printing letterhead 19
Page 28
Printing cards
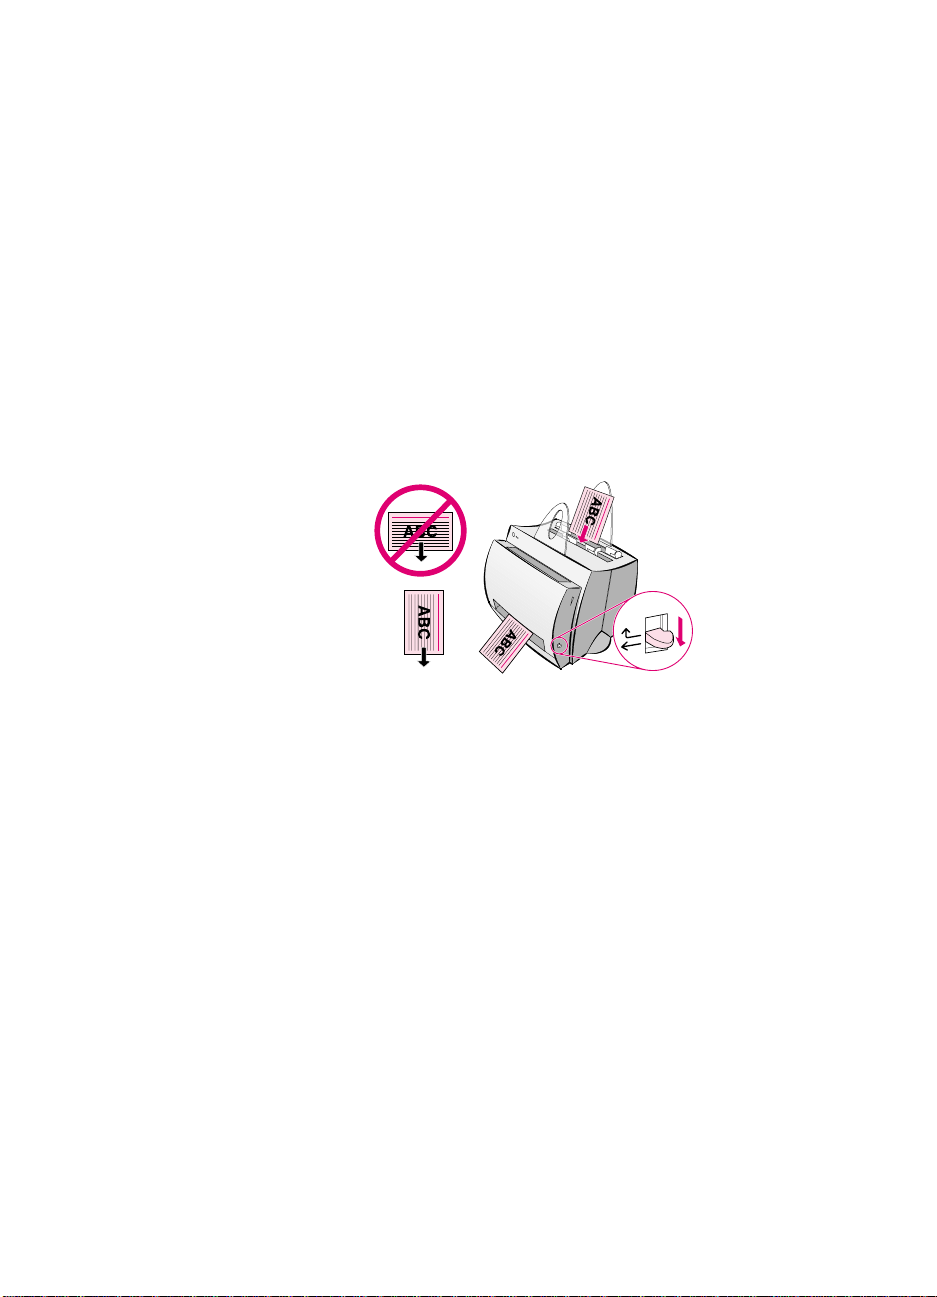
The HP LaserJet 1100 does not support paper smaller than 76 by
127 mm (3 by 5 in.). Verify cards are not stuck together before
loading.
1 Adjust the paper output-lev er to the down position.
2 Load with the nar row side down and t he side- to-be- prin ted
fa c in g tow ar d th e fr o nt of th e pri nt e r. Adjust the paper guides
to fit the card.
3 Select the correct card size in the software application being
used. (Software settings can override printer properties.)
4 Print.
20 Chapter 2 Printing media
EN
Page 29

3
Printing tasks
This chapter provides information on the following topics:
●
Printing with manual feed
●
Printing on both sides of the paper (manual duplexing)
●
Printing watermarks
●
Printing multiple pages on a single sheet of paper
(N-up printing)
●
Printing booklets
●
Canceling a print job
●
Changing print quality settings
●
Print using EconoMode (save toner)
EN
21
Page 30
Printing with manual feed
Use manual feed when printing mixed media; for example, an
envelope, then a letter, then an envelope, and so forth. Load an
envelope in the single sheet paper input tray and load letterhead in
the multiple-page paper input tray. Also, use manual feed to protect
your privacy when printing to a network printer.
To print using manual feed, you must access the printer properties or
printer setup in your software application and select Manual Feed
from the Source drop do wn li st. See “Printer properties (driver).” After
the setting has been enabled, you must press the Go button (blinking)
each time to print.
22 Chapter 3 Printing tasks
EN
Page 31

Printing on both sides of the paper
(manual duplexing)
To print on both sides of the paper (manual duplexing), you must run
the paper through the printer twice. You can print using the paper
output bin or the straight-through output path. HP recommends using
the paper output bin for light-weight paper. Use the straight-through
output path for any heavy media or media that tends to curl when
printed, such as envelopes an d card stock.
●
Manual duplex using the paper output bin (standard)
●
Manual duplex (special) heavy-media, card stock
Note Manual duplexing can cause the printer to become dirty more quickly
and reduce print quality. See “Cleaning the printer” if the printer
becomes dirty.
EN
Printing on both sides of the paper (manual duplexing) 23
Page 32

Manual duplex using the paper output bin (standard)
1
2
3
1 Adjust the paper-output lever to the
up position.
2 Access the printer properties. See
“Printer properties (driver).” On the
Finishing tab, click Manual Duplex
(standard), and then click OK. Print
the document.
3 After side one has been printed,
remove the remaining paper from
the paper input tray and set it aside
until after you finish your manual
duplexing job.
4 Gather up the printed pages fro m
side one, rotate the stack clockwise,
and then straighten the stack before
placing it back in the paper input tray .
Once reloaded, page one should be
oriented upside down and located
closest to the back of the printer.
(The printed side should be facing
toward the back of the printer.)
4
24 Chapter 3 Printing tasks
Click OK (on screen), and then wait
for the pages to print.
EN
Page 33

Manual duplex (special)
heavy-media, card stock
For heavy media (card stock, etc.), use
the straight-through output path.
1
2
3
1 Adjust the paper-output lever to the
down position.
2 Access the printer properties. See
“Printer properties (driver).” On the
Finishing tab, click Manual Duplex
(special), and then click OK. Print
the document.
3 After side one has been printed,
remove the remaining paper from
the paper input tray and set it aside
until after you finish your manual
duplexing job.
4 Gather up the printed pages fro m
side one, flip the stack, and then
straighten the stack before placing it
back in the paper input tray. Once
reloaded, page one should be
oriented upside down and located
closest to the front of the printer.
(The printed side should be facing
toward the back of the printer.)
Click OK (on screen), and then wait
for the pages to print.
EN
4
Printing on both sides of the paper (manual duplexing) 25
Page 34

Printing watermarks
The watermark option allows you to print text “underneath” (in the
background) of an existing document. For example, you may want to
have large gray letters reading “draft” or “confidential” printed
diagonally across the first page or all pages of a document.
Accessing the watermark feature
1 From your software application, access the printer properties.
See “Printer properties (driver).”
2 On the Finishing tab, you can specify the type of Watermark you
would like to have printed on your document.
26 Chapter 3 Printing tasks
EN
Page 35

Printing multiple pages on a single sheet of paper
(N-up printing)
You can select the number of pages you want to print on a single
sheet of paper. If you choose to print more than one page per sheet,
the pages will appear decreased in size and will be arranged on the
sheet in the order that they would otherwise be printed. Specify up to
9 pages per sheet of paper.
Accessing the multiple pages per sheet feature
1 From your software application, access the printer properties.
See “Printer properties (driver).”
EN
2 On the Finishing tab and Document Options, you can specify
the number of Pages per sheet that you would like to have
printed.
Printing multiple pages on a single sheet of paper (N-up printing) 27
Page 36

Printing booklets
You can print booklets on letter, legal,
executive, or A4 size paper.
1
2
3
1 Load the paper, and then adjust the
paper-output lever to the up position.
2 From your software application,
access the printer properties. See
“Printer properties (driver).” On the
Finishing tab click Booklet
printing, and then click OK. Print
the document.
3 After side one has been printed,
remove the remaining paper from
the paper input tray, and set it aside
until your booklet job is complete.
4 Gather up the pages from side one,
rotate them clockwise, and then
straighten the stack of paper.
Continued on next page.
4
28 Chapter 3 Printing tasks
EN
Page 37

5
5 Place the pages from side one back
in the paper input tray. The printed
text should be oriented sideways
and facing toward the back of the
printer. Click OK (on screen). The
printer will finish printing.
6 Fold and staple the pages.
6
EN
Printing booklets 29
Page 38

Canceling a print job
A print job can be canceled from a software application or a print
queue:
●
Remove remaining paper from the printer: This will stop the
printer immediately. Use either of the next two options after the
printer is stopped.
●
Software application: Typically, a dialog box will briefly appear
on your screen allowing you the option to cancel the print job.
●
Print queue: If a print job is waiting in a print queue (PC memory)
or print spooler, delete the job there. Go to your Printer screen,
either though the Windows Control Panel (Windows 3.1x) or
through Start, Settings, Printers in Windows 9x & NT 4.0. Double-
click on the HP LaserJet 1100 icon to open the window, select
your print job, and then press Delete.
If the control panel status lights continue to blink after a print job has
been canceled, the computer is still sending the job to the printer.
Either delete the job from the print queue or wait until the computer
has finished sending data. The printer will return to the Ready state.
30 Chapter 3 Printing tasks
EN
Page 39

Changing print quality settings
Print quality settings affect such things as how light or dark the print
on the page is and the style in which you would like graphics printed.
You can change the settings in printer properties to accommodate the
types of jobs you are printing. The possible settings are as follows:
●
Best Quality
●
Faster Printing
●
LaserJet III Compatibility
●
Custom
●
EconoMode (Save Toner)
These settings can be accessed on the Finishing tab under Print
Quality settings in the printer properties.
Note To change the print quality settings for all future print jobs, access the
properties through the Start menu in your system tray. To change the
print quality settings only for the current software application use,
access the properties through the Print Setup menu in the application
from which you are printing. See “Printer properties (driver).”
Print using EconoMode (save toner)
An excellent way to extend the life of your toner cartridge is by using
EconoMode. EconoMode uses substantially less toner than normal
printing. The printed image is much lighter, but is adequate for
printing drafts or proofs.
To enable EconoMode, access the printer Properties. On the
Finishing tab under Print Quality, click EconoMode.
Note To enable EconoMode for all future jobs, see “Printer properties
(driver).”
EN
Changing print quality settings 31
Page 40

32 Chapter 3 Printing tasks
EN
Page 41

Managing the toner
4
cartridge
This chapter provides information on the following subjects:
●
HP toner cartridges
●
Redistributing toner
●
Changing the toner cartridge
EN
33
Page 42

HP toner cartridg es
HP policy on non-HP toner cartridges
Hewlett-Packard Company cannot recommend use of non-HP toner
cartridges, either new, refilled, or remanufactured. Since they are not
HP products, HP cannot influence their design or control their quality.
Note Warranty does not apply to defects resulting from software, interfacing,
parts, or supplies not supplied by HP.
Toner cartridge storage
Do not remove the toner cartridge from its package until you are
ready to use it. The shelf life of a cartridge in an unopened package is
approximately 2.5 years. The shelf life of a cartridge in an opened
package is approximately 6 months.
CAUTION To prevent damage to the toner cartridge, do not expose it to light for
more than a few minutes.
Toner cartridge life expectancy
The life of the toner cartridge depends on the amount of toner that
print jobs require. When printing text at 5% coverage, an
HP LaserJet 1100 toner cartridge lasts an average of 2,500 pages.
This assumes the print density is set to 3 and EconoMode is off.
(These are the default settings.)
Recycling toner cartridges
To install a new HP toner cartridge, see “Changing the toner
cartridge” or follow the instructions included in the toner cartridge
box. Also, see the recycling information on the toner cartridge box
and “HP Cartridge Recycling Program information.”
Saving toner
To save toner, select the EconoMode option in your printer properties
settings. EconoMode (Save Toner) allows the printer to use less toner
on each page. Selecting this option will extend the life of the toner
cartridge and reduce your cost per page, but will reduce print quality.
See “Print using EconoMode (save toner).”
34 Chapter 4 Managing the toner cartridge
EN
Page 43

Redistributing toner
When toner is low, faded or light areas
may appear on a printed page. You may
be able to temporarily improve print
quality by redistributing the toner. The
following procedure may allow you to
finish the current print job before
replacing the toner cartridge.
Note
If the scanner is attached, it may be
necessary to move the printer to the
edge of the work space before opening
the printer door in order to get the full
range of motion.
1
2
3
1 Open the printer door and remove
the toner cartridge from the printer.
CAUTION
To prevent damage, do not expose the
toner cartridge to light for more than a
few minutes. Co ver it with a sheet of
paper.
2 Gently shake the toner cartridge
from side-to-side to redistribute the
toner.
CAUTION
If toner gets on your clothing, wipe it off
with a dry cloth and wash clothing in cold
water. Hot water sets toner into fabric.
3 Reinsert the toner cartridge into the
printer and close the printer door.
If the print remains light, install a new
toner cartridge. See “Changing the t oner
cartridge.”
EN
Redistributing toner 35
Page 44

Changing the toner cartridge
1
2
3
To change the toner cartridge, follow the
instruction s bel ow:
Note
If the scanner is attached, it may be
necessary to move the printer to the
edge of the work space before opening
the printer door in order to get the full
range of motion.
1 Open the printer door and remove
2 Remove the new toner cartridge
the old toner cartridge. See
“Recycling toner cartridges” for
recycling informatio n.
from the packaging, and then gently
shake it from side to side in order to
distribute the toner evenly inside the
cartridge.
4
5
36 Chapter 4 Managing the toner cartridge
CAUTION
To prevent damage, do not expose the
toner cartridge to light for more than a
few minutes. Co ver it with a piece of
paper.
3 Bend the tab on the right side of the
cartridge to break it loose.
CAUTION
If toner gets on your clothing, wipe it off
with a dry cloth and wash clothing in cold
water. Hot water sets toner into fabric.
4 Pull the tab until all the tape is
removed from the cartridge.
5 Insert the toner cartridge in the
printer. Be certain that the toner is
firmly in position, and then close the
printer door.
EN
Page 45

Troubleshooting the
5
Note See HP’s Web site for software and printer driver updates, frequently
printer
This chapter provides information on the following subjects:
●
Finding the solution
●
Improving print quality
●
Cleaning the printer
●
Clearing printer paper jams
●
Resetting the printer
asked questions, and additional troubleshooting information. See
“Online services” for your specific Web address.
EN
37
Page 46

Finding the solution
Use this section to find the solution to common printer problems.
Pages did not print . . .
●
Light patterns: What light pattern is displayed on the printer
control panel? See “Printer light patterns.”
●
Error messages on screen: Is there a message on the screen?
See “Error messages on screen.”
●
Paper handling: Is paper being pulled into the printer
incorrectly? Are there paper jams? See “Paper handling
problems.”
Pages printed; however . . .
●
The print quality was poor: See “Improving print quality.”
●
The printed pages do not always appear the same as the
screen (print preview): See “Printed page is different than what
appeared on screen.”
38 Chapter 5 Troubleshooting the printer
EN
Page 47

Printer light patterns
Light status legend
Symbol for “light off”
Symbol for “light on”
Symbol for “light blinking”
Control panel light messages
Light status Condition of the printer Action
Po werSave mode
(or the printer is off)
The printer uses PowerSave
mode to conserve energy.
Ready
The printer is ready to print.
Processing
The printer is receiving or
processing data.
Pressing the Go button on the print er control
panel or printing will awaken the printer from
PowerSave mode. Check the power cord if
the above actions do not generate a
response (and the power switch if your
printer is powered with 220-240 volts).
No action is necess ary; howe v er, if you press
and release the Go button on the printer
control panel, a self-test page will print.
Wait for the job to print.
EN
Buffered data
The printer memory is retaining
unprinted data.
Manual feed
The printer is in manual feed
mode.
Press and release the Go button on the
printer control panel to print the remaining
data.
Check that you have loaded the correct
paper, then press and release the Go button
on the printer control panel to print. Manual
feed is controlled by the software. If you do
not want to be in manual feed mode, change
the setting from your printer properties. See
“Printer properties (driver).”
Finding the solution 39
Page 48

Control panel light messages (continued)
Light status Condition of the printer Action
Door open, no toner cartridge,
or paper jam
The printer is in an error state.
Paper out
The printer is out of paper.
Memory out
The printer ran out of memory in
the middle of a print job.
Reset/Printer initialization
The printer memory is being
reset and all previously sent
print jobs are being purged. Or,
a printer initialization is taking
place. All lights blink for 1/2 of a
second or longer if initializing.
Check the following:
● The printer door is closed.
● The toner cartridge is correctly installed
in the printer. See “Changing the toner
cartridge.”
● There are no paper jams. See “Clearing
printer paper jams.”
Load paper into the printer. See “Loading
paper into the printer.”
The page being printed may have been too
complex for the memory capacity of the
printer.
● See “Memory (DIMMs)” to add memory.
● Press and release the Go button to print.
No action is necessary. However, you can
reset the printer if you p ress an d hold th e Go
button for 5 seconds.
Fatal error
All lights are on.
40 Chapter 5 Troubleshooting the printer
● Reset the printer.
● Turn the printer off and then back on.
● Contact HP Support. See “HP Support.”
EN
Page 49

Error messages on screen
Error messages on screen
Error Message Solution
Printer not responding/
error writing to LPT1
Cannot access port (in
use by another
application)
Verify the following:
● Ready light is on.
● Power cord and parallel cable are correctly
connected.
Try the following:
● Disconnect and reconnect the power cord
and parallel cable at both ends.
● Use another IEEE-1284 compliant parallel
cable.
There is a device conflict. This can occur if
another printer connected to your computer is
running status software. The status software
dominates the parallel port on the computer and
will not allow the HPLaserJet 1100 to access the
port.
Try the following:
● Disable all status windows for other printers.
● Verify the port setting is correct for the
printer. Access the printer properties; see
“Printer properties (driver).” The port settings
can be accessed under the properties
Details tab in the Printer Properties screen.
EN
Finding the solution 41
Page 50

Error messages on screen (continued)
Error Message Solution
Illegal operation/General
protection fault/Spool 32
error
This error indicates that a problem occurred in
Windows with your computer system resources
(memory or hard disk).
To clear this error, restart your PC.
To help prevent this error from occurring in the
future, use some or all of the following
recommendations:
● Run fewer applications at the same time.
Close (rather than minimize) the applicat io ns
that you are not using at the current time.
Programs such as screen savers, virus
checkers, status software, fax/answering
software, and menu programs use the
resources that you might need in order to
print.
● Avoid performing memory intensive tasks
such as sendin g a fax or running a video clip
while printing.
● Delete all temp (“file_name.tmp”) files from
the Temp subdirectories. For example, the
subdirectory C:\Windows\Temp.
● Pr int at 300 dpi rather than 600 dpi.
● Us e an alternate print driver (printer
software), such as software for the
HP LaserJet III. Note: Using a different driver
will remov e acc es s to some product features.
42 Chapter 5 Troubleshooting the printer
EN
Page 51

Paper handling problems
Paper handling problems
Problem Solution
Pap er jam ● Verify you are printing with paper that meets
specifications. See “Pri nter paper
specifications.”
● Verify you are printing with paper that is not
wrinkled, folded, or damaged.
● See “Clearing printer paper jams.”
Print is skewed
(crooked )
More than one sheet of
paper feeds through
the printer at one time
Printer does not pull
paper from the paper
input tray
Printer made my paper
curl
The printer does not
output the printed
paper to the correct
path
● Adjust the paper guides to the width of the
paper being printed and tr y reprinting. See
“Printer paper guides” or “Loading paper into
the printer.”
● See “Page skew. ”
● The paper input tray may be overfilled. See
“Loading paper into the printer.” V erify the paper
is not wrinkled, folded, or damaged.
● Verify the printer is not in Manual Feed mode.
See “Printer light patterns.”
● The pickup roller ma y be dirty or damaged. See
“Cleaning the pickup roller” or “Changing the
pickup roller.”
● Adjust the paper output lever to the down
position to print using the straight-through
output path. See “Printer paper output paths” or
“Printing media.”
● See “Curl or wav e.”
Adjust the paper output lever to reflect your desired
paper output path. See “Printer paper output paths.”
EN
Finding the solution 43
Page 52

Printed page is different than what appeared on screen
Printed page problems
Problem Solution
Print job prints
extremely slow
Garbled,
incorrect, or
incomplete text
The maximum spee d of the printer is 8 pages per minu te,
which cannot be e xceeded . This speed is m easured using
“Letter” sized paper. “Letter” is a U .S. s tandard paper siz e,
which is smaller than Europea n A4. Your print job may be
very complex. Try the following:
● Reduce the complexity of your document (reduce the
number of multiple graphics, and etc.).
● Change setting in the printer properties to “Faster
Printing.” See “Printer properties (driver).”
● Add printer memory. See “Installing DIMMs
(memory).”
The parallel cable may be loose or defective. Try the
following:
● Disconnect the parallel cable and reconnect it.
● Try printing a print job that you know works.
● If possible, attach the cable and printer to another
computer and try printing a print job that you know
works.
● Try using a new IEEE-1284 compliant parallel cable.
See “Accessories and ordering information.”
The wrong printer driver may have been selected while
installing the software. Verify the HP LaserJet 1100 is
selected in the printer properties.
The software application may be malfunctioning. Try
printing from another software application.
44 Chapter 5 Troubleshooting the printer
EN
Page 53

Printed page problems (continued)
Problem Solution
Missing graphics
or text
Page format
changed
The file may have blank pages. Try the following:
● Check the file to make sure that your file does not
contain blank pages.
The graphic settings in the printer properties may not be
correct for the type of job you are printing:
● T ry a different graphic settin g in t he printer prop erties.
To access the printer properties, see “Printer
properties (driver).”
The printer driver may not work for the ty pe of j ob you are
printing.
● Try using a different printer driver (software) such as
the driver for the HP LaserJet III. Note: Using a
different driver will remove access to some product
features.
If the document was created while using an older or
different printer driver (printer software) or the printer
properties settings in the software are different, the page
format may change when trying to print using your new
printer driver or settings. To help eliminate this problem,
try the following:
● Create documents and print them using the same
printer driver (printer software) and printer property
settings regardless of the HP LaserJet printer to
which you are printing.
● Change your printer property settings. Try changing
resolution, paper size, font settings, and other
settings. See “Printer properties (driver).”
EN
Graphics quality The graphics sett ings ma y be uns uitab le f or y our print job .
● Check graphic settings in the printer properties and
adjust them as necessary, such as resolution. See
“Printer properties (driver).”
● Try using a different printer driver (software) such as
the driver for the HP LaserJet III. Note: Using a
different driver will remove access to some product
features.
Finding the solution 45
Page 54

Improving print quality
This section provides information on the following topics:
●
Image defect examples
●
Correcting print defects
Image defect examples
Light print or fade DropoutsToner specks
46 Chapter 5 Troubleshooting the printer
Toner smearGray backgroundVertical lines
EN
Page 55

Loose toner
Vertical repetitive
defects
Misformed
characters
Page skew Curl or wave Wrinkles or
creases
EN
Improving print quality 47
Page 56

Correcting print defects
Light print or fade
●
The toner supply is low. You may be able to temporarily extend
the toner cartridge life. See “Managing the toner cartridge.”
●
The paper may not meet HP’s paper specifications (for example,
the paper is too moist or too rough). See “Printer paper
specifications.”
●
If the whole page is light, the print density adjustment is too light
or EconoMode may be on. Adjust the print density and disable
EconoMode within the printer properties. See “Print using
EconoMode (save toner).”
Toner specks
●
The paper may not meet HP’s paper specifications (for example,
the paper is too moist or too rough). See “Printer paper
specifications.”
●
The printer may need to be cleaned. See “Cleaning the printer” or
“Cleaning the printer paper path.”
Dropouts
●
A single sheet of paper may be defective. Try reprinting the job.
●
The moisture content of the paper is uneven or the paper has
moist spots on its surface. Try printing with new paper. See
“Printer paper specifications.”
●
The paper lot is bad. The manufacturing processes can cause
some areas to reject toner. Try a different kind or brand of paper.
●
The toner cartridge may be defective. See “Managing the toner
cartridge.”
Note If these steps do not correct the problem, contact an HP-authorized
dealer or service representative.
Vertical lines
●
48 Chapter 5 Troubleshooting the printer
The photosensitive drum inside the tone r cartridge has pro bably
been scratched. Install a new HP toner cartridge. See “Changing
the toner cartridge.”
EN
Page 57

Gray background
●
Decrease the print density setting. This will decrease the amount
of background shading. Access this setting under “Printer
properties (driver).”
●
Change the paper to a lighter basis weight. See “Printer paper
specifications.”
●
Check the printer’s environment; very dry (low humidity)
conditions can increase the amount of background shading.
●
Install a new HP toner cartridge. See “Cha nging the tone r
cartridge.”
Toner smear
●
If toner smears appear on the leading edge of the paper, the
paper guides may be dirty. Wipe the paper guides with a dry, lint-
free cloth. See “Pr i nte r co mpo nent s” or “Cleaning the printer.”
●
Check the paper type and quality.
●
Try installing a new HP toner cartridge. See “Changing the toner
cartridge.”
Loose toner
●
Clean the inside of the printer. See “Cleaning the printer.”
●
Check the paper type and quality. See “Printer paper
specifications.”
●
Try installing a new HP toner cartridge. See “Changing the toner
cartridge.”
EN
Vertical repetitive defects
●
The toner cartridge may be damaged. If a repetitive mark occurs
at the same spot on the page, install a new HP toner cartridge.
See “Changing the toner cartridge.”
●
Internal parts may have toner on them. See “Cleaning the
printer.” If the defects occur on the back of the page, the problem
will likely be corrected after a few more printed pages.
Improving print quality 49
Page 58

Misformed characters
●
If characters are improperly formed, producing hollow images, the
paper stock may be too slick. Try a different paper. See “Printer
paper specifications.”
●
If characters are improperly formed, producing a wavy effect, the
laser scanner may need service. Verify that characters are
improperly formed on a self-test page. If so, contact an HP-
authorized dealer or service representative. See “Service and
support.”
Page skew
●
Make sure the paper or other media is loaded correctly and that
the guides are not too tight or too loose against the paper stack.
See “Loading paper into the printer.”
●
The paper input bin may be too full. See “Loading paper into the
printer.”
●
Check the paper type and quality. See “Printer paper
specifications.”
Curl or wave
●
Check the paper type and quality. Both high temperature and
humidity will cause paper to curl. See “Printer paper
specifications.”
●
The paper may have sat for too long in the paper input tray. Turn
over the stack of paper in the tray. Also, try rotating the paper
180° in the paper input tray.
●
Try printing using the straight-through output path. See “Printer
paper output paths.”
Wrinkles or creases
●
50 Chapter 5 Troubleshooting the printer
Make sure that paper is loaded properly. See “Loading paper into
the printer.”
●
Check the paper type and quality. See “Printer paper
specifications.”
●
Try printing using the straight-through output path. See “Printer
paper output paths.”
●
Turn over the stack of paper in the tray or try rotating the paper
180° in the input tray.
EN
Page 59

Cleaning the printer
During the printing process, paper, toner , and dust particles can
accumulate inside the printer. Over time, this buildup can cause print
quality problems, such as toner specks or smearing. The printer has
two cleaning modes that can correct and prevent these types of
problems:
●
Cleaning the toner cartridge area
●
Cleaning the printer paper path
EN
Cleaning the printer 51
Page 60

Cleaning the toner cartridge area
1
2
3
Cleaning the toner cartridge area is not
necessary on a regular basis. Before
cleaning, look for excessive toner in the
compartment.
WARNING!
Before cleaning the printer, turn the
printer off by unplugging the power cord,
and then wait for the printer to cool.
1 Turn the printer off by unplugging it,
and then wait for the printer to cool.
2 Open the printer door and remove
the toner cartridge.
CAUTION
To prevent damage, do not expose the
toner cartridge to light for more than a
few minutes. Co ver it if necessary. Also,
do not touch the black-sponge, transfer
roller inside the printer. By doing so, you
can damage the printer.
4
5
52 Chapter 5 Troubleshooting the printer
3 With a dry, lint-free cloth, wipe any
residue from the paper path area
and the toner cartridge cavity.
4 Replace the toner cartridge and
close the printer door.
5 Plug the power cord back into the
printer.
EN
Page 61

Cleaning the printer paper path
This process uses copier-grade paper to remove dust and toner from
the paper path. Do not use bond or rough paper. Use this process if
you are experiencing toner specks or dots on printouts. This process
will produce a page with toner debris, which should be discarded.
1 Ensure the printer is loaded with paper.
2 Ensure the printer is in the Ready state.
3 Press and hold the GO button for 20 seconds (if released before
20 seconds the printer will perform a reset). Paper will feed
through the printer.
Note After holding the GO button for 20 seconds, each of the three printer
lights will blink until the cleaning process is complete.
EN
Cleaning the printer 53
Page 62

Clearing printer paper jams
Occasionally , paper becomes jammed during a print job. Some of the
causes include the following:
●
The paper input trays are loaded improperly or overfilled. See
“Loading paper into the printer.”
●
The paper output path is changed during rather than before a
print job.
●
Media that does not meet HP specifications is used. See “Printer
paper specifications.”
Note Always remo ve all paper from the paper input tra y and straighten
the stack when new paper is added. This helps prevent multiple
sheets of paper from feeding through the printer at one time and
reduces paper jams. See the sticker which you placed on the printer
while setting up the hardware.
You will be notified of a paper jam by an error in the software and the
printer control panel lights. See “Printer light patterns.”
Typical paper jam locations
●
Toner cartridge area: See “Removing a jammed page.”
●
Paper input tray areas: If the page is still sticking out of the
paper input tray, pull the page from the paper input tray until it is
fully removed. If the page cannot be removed in this way, see
“Removing a jammed page.”
●
Paper output path s: If the page is sticking out of the paper
output bin or path, pull it until it is fully removed. If the page
cannot be removed in this way, see “Removing a jammed page.”
Note Loose toner may remain in the printer after a paper jam. This will clear
after a few sheets have printed.
54 Chapter 5 Troubleshooting the printer
EN
Page 63

Removing a jammed page
If the scanner is attached to the printer,
you may need to pull the printer to the
edge of the work space so the door
hangs over the edge to enable full door
extension.
1
2
1 Open the printer door. If the paper
can be removed without removing
the toner cartridge, do so; see step
3. Otherwise, continue with step 2.
2 Remove the toner cartridge and
place it aside, covering it with a
sheet of paper.
CAUTION
Paper jams in this area may result in
loose toner on the page. If you get any
toner on your clothes, wash them in cold
water. Hot water will permanently set the
toner into fabric.
CAUTION
To prevent damage to the toner
cartridge, do not expose it to light for
more than a few minutes. Cover it with a
sheet of paper.
Continued on next page.
EN
Clearing printer paper jams 55
Page 64

3
3 With both hands, grasp the side of
the paper that is most visible (this
includes the middle) and then
carefully pull it free from the printer.
Note
If the paper tears, see “Paper jam:
removing torn pieces of paper.”
4
4 When the jammed paper has been
removed, replace the toner cartridge
and close the printer door.
Note
If you had to move the printer to the edge
of the desk to accommodate the
scanner, check the printer cable and
power connections to ensure they are
securely fastened.
You may need to reset the printer after
clearing a paper jam. See “Resetting the
printer.”
Note
Remove all paper from the paper input
tray and straighten the stack when new
paper is added.
56 Chapter 5 Troubleshooting the printer
EN
Page 65

Paper jam: removing torn pieces of paper
1
2
Sometim es a piec e of jamm ed paper c an
tear when being removed. Use the
following procedure to remove any small
pieces of paper left in the printer.
1 Make sure the toner cartridge is
installed and the printer door is
closed.
2 Turn the printer off and then back on.
As the printer restarts, the rollers will
advance the piece(s) of paper.
Note
Printers powered by 220-240 volts can
be turned off and on with the switch. See
“Turning the power off.”
3
4
5
3 Open the printer door and remove
the toner cartridge.
4 Remove the piece(s) of paper.
5 Reinstall the toner cartridge and
close the printer door.
If the paper does not come out, repeat
steps 1 through 5.
EN
Clearing printer paper jams 57
Page 66

Changing the pickup roller
If the printer regularly mispicks (no paper
is fed through or more than one sheet
feeds through), you may need to change
or clean the pickup roller. See
“Accessories and ordering information”
to order a new pickup roller.
1
2
3
1 Unplug the power cord from the
printer, and then allow the printer to
cool.
2 Open the door and remove the toner
cartridge.
3 Locate the pickup roller.
4 Rotate the bottom of the pickup roller
towards the front of the printer.
Continued on next page.
4
58 Chapter 5 Troubleshooting the printer
EN
Page 67

5
5 Gently pull the pickup roller straight
out.
6 Position the new part within the slot
of the old pickup roller.
7 Rotate the bottom of the new pickup
roller towards the back of the printer
until it snaps into place.
6
8 Use the eraser end of a pencil to
press the spring arm behind the
white cam roller.
WARNING!
Failure to complete this procedure can
cause damage to the printer.
7
9 Reinstall the toner cartridge and
close the printer door.
Note
Plug the printer in to turn it back on.
8
EN
9
Clearing printer paper jams 59
Page 68

Cleaning the pickup roller
If you wish to clean the pickup roller
rather than replace it, follow the
instruction s bel ow:
Remove the pickup roller as described in
“Changing the pickup roller.”
1
2
3
1 Dab a lint- free cloth in isopropyl
alcohol, and then scrub the roller.
WARNING!
Alcohol is flammable. Keep the alcohol
and cloth away from open flame. Allow
alcohol to dry completely before closing
the printer and plugging in the power
cord.
2 Using a dry, lint-free cloth, wipe the
pickup roller to remove loosened
dirt.
3 Allow the pickup roller to completely
dry before reinstalling it in the
printer.
60 Chapter 5 Troubleshooting the printer
EN
Page 69

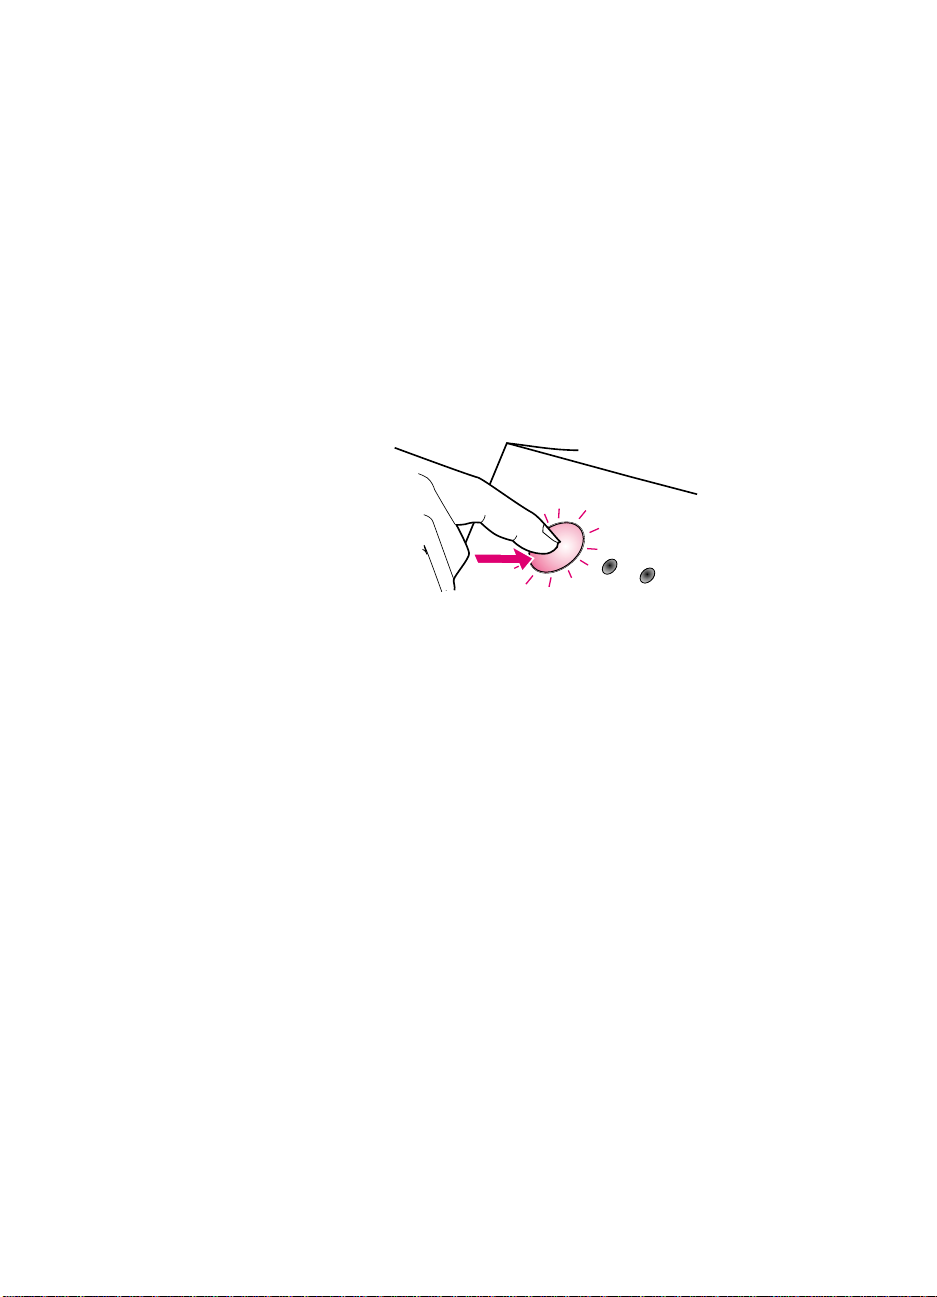
Resetting the printer
To reset the printer, press and hold the Go button on the printer
control panel for 5 seconds.
EN
Resetting the printer 61
Page 70

62 Chapter 5 Troubleshooting the printer
EN
Page 71

6
Service and support
This chapter provides information on the following topics:
●
Availability
●
Obtaining hardware service
●
Guidelines for repacking the printer
●
Service infor m a tio n form
●
HP Suppor t
●
Worldwide sales and service offices
EN
63
Page 72

Availability
HP provides a variety of service and support options around the
world. Availability of these programs will vary depending upon your
location.
Obtaining hardware service
If your hardware should fail during the warranty period, HP offers the
following support options:
●
HP repair services: HP will arrange to pick up the unit, repair it,
and return it to you within 5-10 days, depending on your location.
●
HP authorized service provider: You can return the unit to a
local authorized service dealer.
●
Express Exchange: HP provides a reconditioned permanent
replacement printer to you on the next working day for calls
received before 2 p.m. Pacific Standard Time (U.S. and Canada
only).
64 Chapter 6 Service and support
EN
Page 73

Guidelines for repacking the printer
●
If possible, include print samples and 5-10 sheets of paper or
other media that did not print correctly.
●
Remove and retain any DIMMs (memory) installed in the printer.
See “Removing DIMMs.”
●
Remove the scanner.
●
Remove and retain any cables and optional accessories installed
in the printer.
CAUTION Static electricity can damage DIMMs. When handling DIMMs, either
wear a grounded antistatic wrist strap or frequently touch the surface
of the DIMMs’ antistatic package, then touch bare metal on the printer.
●
Remove and retain the toner cartridge.
CAUTION To prevent damage to the toner cartridge, store the cartridge in its
original packing material or store it so that it is not exposed to light.
●
Use the original shipping container and packing material, if
possible. Shipping damage as a result of inadequate packing is
your responsibility. If you have already disposed of the printer’s
packing material, contact a local mailing service for information
on repacking the printer.
●
Include a completed copy of the Service information form. See
“Service information form.”
●
HP recommends insuring the equipment for shipment.
EN
Guidelines for repacking the printer 65
Page 74

Service information form
Service information form
Who is returning the equipment?
Person to contact:
Alternate contact:
Return shipping address:
What is being sent? Model number:
Date:
Phone:
Phone:
Special shipping
instructions:
Serial number:
Please attach any relevant printouts when returning equipment. Do not ship
accessories that are not required to complete the repair (manuals, cleaning supplies,
etc.)
What needs to be done?
1. Describe the conditions of the failure (What was the failure? What were you doing
when the failure occurred? What software were you running? Can you make the
failure reoccur?)
2. If the failure is intermittent, how much time elapses between failures?
3. Is the unit connected to any of the following? (Please provide manufacturer and
model numbers.)
Personal Computer: Modem: Network:
4. Additional comments:
66 Chapter 6 Service and support
EN
Page 75

HP Support
Thank you for your purchase. Along with your product, you receive a
variety of support services from Hewlett-Packard and our support
partners that are designed to give you the results you need, quickly
and professionally.
Please have the model number, serial number, date of purchase, and
description of the problem ready for your HP Support representative.
The following support information is available:
●
●
●
●
●
●
●
●
●
Customer Support and product repair assistance (U.S. and
Canada)
European Customer Support Center
Online services
Obtaining software utilities and electronic information
HP direct ordering for accessories or supplies
HP Support Assistant compact disc
HP service information
HP Suppor tPack
HP FIRST
EN
Customer Support and product repair assistance (U.S. and Canada)
Call (1) (208) 323-2551 Monday through Friday from 6 am to 10 pm
and Saturday from 9 am to 4 pm (Mountain Time) free of charge
during the warranty period. However, your standard long-distance
phone charges still apply. Have your system nearby and your serial
number ready when calling.
Post-warranty telephone assistance is available to answer your
product questions. Call (1) (900) 555-1500 ($2.50* per minute,
maximum charge of $25.00 per call, U.S. only) or call 1-800-999-1148
($25* per call, Visa or MasterCard, U.S. and Canada) Monday
through Friday from 6 am to 10 pm and Saturday from 9 am to 4 pm
(Mountain Time). Charges begin only when you connect with a
support technician. *Prices subject to change.
HP Support 67
Page 76

European Customer Support Center
language and in-country options available
Open Monday through Friday 8:30–18:00 CET
HP provides a free telephone support service during the warranty
period. By calling a telephone number listed below, you will be
connected to a responsive team waiting to help you. If you require
support after your warranty has expired, you can receive support for a
fee through the same telephone number. The fee is charged on a
per-incident basis. When calling HP, have the following information
ready: product name and serial number, date of purchase, and
description of the problem.
English
Ireland: (353) (1) 662-5525
U.K.: (44) (171) 512-5202
Dutch
International: (44) (171) 512-5202
Belgium: (32) (2) 626-8806
Netherlands: (31) (20) 606-8751
French
France: (33) (01) 43-62-3434
Belgium: (32) (2) 626-8807
Switzerland: (41) (84) 880-1111
German
Germany: (49) (180) 525-8143
Austria: (43) (1) 0660-6386
Norwegian
Norway: (47) 2211-6299
Danish
Denmark: (45) 3929-4099
Finnish
Finland: (358) (9) 0203-47288
Swedish
Sweden: (46) (8) 619-2170
68 Chapter 6 Service and support
EN
Page 77

Italian
Italy: (39) (2) 264-10350
Spanish
Spain: (34) (90) 232-1123
Portuguese
Portugal: (351) (1) 441-7199
In-country/region support numbers: If you require support after
your warranty has expired, additional product repair services, or if
your country/region is not listed below, see “Worldwide sales and
servi ce offi ces.”
Argentina 787-8080
Australia (61) (3) 272-8000
Brazil 022-829-6612
Canada (1) (905) 206-4663
China (86) (10) 65053888-5959
Chile 800-360999
Czech Republic (42) (2) 471-7321
Greece (30) (1) 689-6411
EN
Hong Kong (852) 800-96-7729
Hungary (36) (1) 343-0310
India (91) (11) 682-6035
(91) (11) 682-6069
Indonesia (62) (21) 350-3408
Korea (82) (2) 3270-0700
Korea outside Seoul, call (82) (080) 999-0700
Malaysia (60) (3) 295-2566
Mexico (Mexico City) 01 800-22147
Mexico (outside Mexico City) 01 800-90529
New Zealand (64) (9) 356-6640
Philippines (63) (2) 894-1451
Poland (48) (22) 37-5065
Portugal (351) (1) 301-7330
HP Support 69
Page 78

Russia (7) (95) 923-5001
Singapore (65) 272-5300
Taiwan (886) (02) 717-0055
Thailand 66 (2) 661-4 011- 4
Turkey (90) (212) 224-5925
70 Chapter 6 Service and support
EN
Page 79

Online services
For 24-hour access to information over your modem, we suggest
these services:
World Wide Web URL
Printer drivers, updated HP printer software, plus product and support
information may be obtained from the following URLs:
in the U.S. http://www.hp.com/support/lj1100
in Europe http://www2.hp.com
Printer drivers may be obtained from the following sites:
in Korea http://www.hp.co.kr
in Taiwan http://www.hp.com.tw
or the local driver website http://www.dds.com.tw
America Online
America Online/Bertelsmann is available in the U.S., France,
Germany , and U.K. - Printer drivers, updated HP printer software, and
support documentation to help answer your questions about which
HP products are available. Use Keyword HP to start your tour or call
1-800-827-6364 preferred customer # 1118 to subscribe. In Europe,
call the appropriate number below:
EN
Austria 0222 58 58 485
France ++353 1 704 90 00
Germany 0180 531 31 64
Switzerland 0848 80 10 11
United Kingdom 0800 279 1234
CompuServe
Printer drivers, updated HP printer software, and interactive sharing
of technical information with other members is available on
CompuServe’s “HP User’s foru ms ” (GO HP), or call 1-800-524-3388
and ask for representative #51 to subscribe. (CompuServe is also
available in the U.K., France, Belgium, Switzerland, Germany, and
Austria.)
tm
HP Support 71
Page 80

Obtaining software utilities and electronic information
Obtain printer drivers.
U.S. and Canada
Phone: (1) (805) 257-5565
Mail: Hewlett-Packard Co.
P.O. Box 9 07
Santa Clara, CA 91380-9007
U.S.A.
Asia-Pacific countries/regions
Contact Fulfill Plus at (65) 740-4477 (Hong Kong, Indonesia,
Philippines, Malaysia, or Singapore). For Korea, call (82) (2)
3270-0805 or (82) (2) 3270-0893.
Australia, New Zealand, and India
For Australia and New Zealand, call (61) (2) 565-6099.
For India, call (91) (11) 682-6035.
Europe
Call (44) (142) 986-5511.
72 Chapter 6 Service and support
EN
Page 81

HP direct ordering for accessories or supplies
Call 1-800-538-8787 (U.S.) or 1-800-387-3154 (Canada).
HP Support Assistant compact disc
This support tool offers a comprehensive online information system
designed to provide technical and product information on HP
products. To subscribe to this quarterly service in the U.S. or Canada,
call 1-800-457-1762. In Hong Kong, Indonesia, Malaysia, or
Singapore, call Fulfill Plus at (65) 740-4477.
HP service information
To locate HP-Authorized Service Providers, call 1-800-243-9816
(U.S.) or 1-800-387-3867 (Canada).
HP SupportPack
Call 1-800-835-4747 (U.S. only)
All other locations, contact your authorized dealer.
HP FIRST
EN
HP FIRST fax will deliver detailed troubleshooting information on
common software and troubleshooting tips for your HP product. Call
from any touch tone phone and request up to three documents per
call. These documents will be sent to the fax of your choice.
Australia (61) (0) 3 9272 2627
Austria 0660-8128
Belgium (Dutch) 0800 1 1906
Belgium (French) 0800 1 7043
Canada 1-800-333-1917
China +86 (0) 10 6505 5280
Denmark 800-10453
English (outside of U.K.) +31 20 681 5792
Finland 800-13134
France 0800-905900
Germany 0130-810061
HP Support 73
Page 82

Hong Kong (852) 2506-2422
Hungary (36) (1) 252-4647
India +91 (0) 11 682 6031
Indonesia +62 (0) 21 352 2044
Italy 1678-59020
Korea +82 (0) 02 769 0543
Malaysia +60 (0) 3 298 2478
Netherlands 0800-0222420
New Zealand +64 (0) 09 356 6642
Norway 800-11319
Portugal 05 05 3133 42
Philippines +65 275 7251
Singapore +65 275 7251
Spain 900-993123
Sweden 020-79-5743
Switzerland (German) 0800-551527
Switzerland (French) 0800-551526
Taiwan (886) (2) 719-5589
Thailand +66 (0) 2 661 3511
United Kingdom 0800-960271
United States 1 (800) 333-1917
74 Chapter 6 Service and support
EN
Page 83

Worldwide sales and service offices
Before calling an HP Sales and Service office, be sure to contact the appropriate
Customer Support Center number listed in the “HP Support” section. Products should
not be returned to the following offices.
Argentina
Hewlett-Packard Argentina S.A.
Montañeses 2140/50/60
1428 Buenos Aires
Phone: (54) (1) 787-7100
Fax: (54) (1) 787-7213
Australia
Hewlett-Packard Australia Ltd.
31-41 Joseph Street
Blackburn, VIC 3130
Phone: (61) (3) 272-2895
Fax: (61) (3) 898-7831
Hardware Repair Center:
Phone: (61) (3) 272-8000
Extended Warranty Support:
Phone: (61) (3) 272-2577
Customer Information Center:
Phone: (61) (3) 272-8000
Austria
Hewlett-Packard GmbH
Lieblgasse 1
A-1222 Vienna
Phone: (43) (1) 25000-555
Fax: (43) (1) 25000-500
Belgium
Hewlett-Packard Belgium S.A. NV
Boulevard de la Woluwe-Woluwedal 100102
B-1200 Brussels
Phone: (32) (2) 778-31-11
Fax: (32) (2) 763-06-13
Brazil
Edisa Hewlett-Packard SA
Alameda Rio Negro 750
06454-050 Alphaville - Barueri-SP
Phone: (55) (11)- 7296-8000
Canada
Hewlett-Packard (Canada) Ltd.
17500 Trans Canada Highway
South Service Road
Kirkland, Québec H9J 2X8
Phone: (1) (514) 697-4232
Fax: (1) (514) 697-6941
Hewlett-Packard (Canada) Ltd.
5150 Spectrum Way
Mississauga, Ontario L4W 5G1
Phone: (1) (905) 206-4725
Fax: (1) (905) 206-4739
Chile
Hewlett-Packard de Chile
Avenida Andres Bello 2777 of. 1
Los Condes
Santiago, Chile
China
China Hewlett-Packard Co. Ltd.
Level 5, West Wing Office
China World Trade Center
No. 1, Jian Guo Men Wai Avenue
Beijing 100004
Phone: (86) (10) 6505-3888,x. 5450
Fax: (86) (10) 6505-1033
Hardware Repair Center and Extended
Warranty Support:
Phone: (86) (10) 6262-5666x. 6101/2
(86) (10) 6261-4167
Colombia
Hewlett-Packard Colombia
Calle 100 No. 8A -55
Torre C Oficina 309
Bogotá, Colombia
EN
Worldwide sales and service offices 75
Page 84

Czech Republic
Hewlett-Packard s. r. o.
Novodvorská 82
CZ-14200 Praha 4
Phone: (42) (2) 613-07111
Fax: (42) (2) 471-7611
Germany
Hewlett-Packard GmbH
Herrenberger Straße 130
71034 Böblingen
Phone: (49) (180) 532-6222
(49) (180) 525-8143
Fax: (49) (180) 531-6122
Denmark
Hewlett-Packard A/S
Kongevejen 25
DK-3460 Birkerød
Denmark
Phone: (45) 3929 4099
Fax: (45) 4281-5810
Far East Region
Hewlett-Packard Asia Pacific Ltd.
17-21/F Shell Tower, Times Square
1 Matheson Street, Causeway Bay
Hong Kong
Phone: (852) 2599-7777
Fax: (852) 2506-9261
Hardware Repair Center:
Phone: (852) 2599-7000
Extended Warranty Support:
Phone: (852) 2599-7000
Customer Information Center:
Phone: (852) 2599-7066
Finland
Hewlett-Packard Oy
Piispankalliontie 17
FIN-02200 Espoo
Phone: (358) (9) 887-21
Fax: (358) (9) 887-2477
France
Hewlett-Packard France
42 Quai du Point du Jour
F-92659 Boulogne Cedex
Phone: (33) (146) 10-1700
Fax: (33) (146) 10-1705
Greece
Hewlett-Packard Hellas
62, Kifissias Avenue
GR-15125 Maroussi
Phone: (30) (1) 689-6411
Fax: (30) (1) 689-6508
Hungary
Hewlett-Packard Magyarország Kft.
Erzsébet királyné útja 1/c.
H-1146 Budapest
Phone: (36) (1) 461-8111
Fax: (36) (1) 461-8222
Hardware Repair Center:
Phone: (36) (1) 343-0312
Customer Information Center:
Phone: (36) (1) 343-0310
India
Hewlett-Packard India Ltd.
Paharpur Business Centre
21 Nehru Place
New Delhi 110 019
Phone: (91) (11) 647-2311
Fax: (91) (11) 646-1117
Hardware Repair Center and Extended
Warranty Support:
Phone: (91) (11) 642-5073
(91) (11) 682-6042
Italy
Hewlett-Packard Italiana SpA
Via Giuseppe di Vittorio, 9
Cernusco Sul Naviglio
I-20063 (Milano)
Phone: (39) (2) 921-21
Fax: (39) (2) 921-04473
76 Chapter 6 Service and support
EN
Page 85

Korea
Hewlett-Packard Korea
25-12,
Yoido-dong, Youngdeungpo-ku
Seoul 150-010
Phone: (82) (2) 769-0114
Fax: (82) (2) 784-7084
Hardware Repair Center:
Phone: (82) (2) 3270-0700
(82) (2) 707-2174
(82) (2) 3270-0710
Extended Warranty Support:
Phone: (82) (2) 3770-0365
(82) (2) 769-0500
(DeskJet)
(Hardware)
(Bench)
(Onsite)
New Zealand
Hewlett-Packard (NZ) Limited
Ports of Auckland Building
Princes Wharf, Quay Street
P.O. Box 3860
Auckland
Phone: (64) (9) 356-6640
Fax: (64) (9) 356-6620
Hardware Repair Center and Extended
Warranty Support:
Phone: (64) (9) 0800-733547
Customer Information Center:
Phone: (64) (9) 0800-651651
Latin American
Headquarters
5200 Blue Lagoon Drive Suite 950
Miami, FL 33126,USA
Phone: (1) (305) 267-4220
México
Hewlett-Packard de México, S.A. de C.V.
Prolongación Reforma No. 700
Lomas de Santa Fe
01210 México, D.F.
Phone: 01-800-22147
Outside Mexico City
Phone: 01 800-90529
Middle East/Africa
ISB HP Response Center
Hewlett-Packard S.A.
Rue de Veyrot 39
P.O. Box 364
CH-1217 Meyrin - Geneva
Switzerland
Phone: (41) (22) 780-4111
Netherlands
Hewlett-Packard Nederland
BV Startbaan 16
NL-1187 XR Amstelveen
Postbox 667
NL-1180 AR Amstelveen
Phone: (31) (020) 606-87-51
Fax: (31) (020) 547-7755
Norway
Hewlett-Packard Norge A/S
Postboks 60 Skøyen
Drammensveien 169
N-0212 Oslo
Phone: (47) 2273-5600
Fax: (47) 2273-5610
Poland
Hewlett-Packard Polska
Al. Jerozolimskic 181
02-222 Warszawa
Phone: (48-22) 608-77-00
Fax: (48-22) 608-76-00
Russia
AO Hewlett-Packard
Business Complex Building #2
129223, Moskva, Prospekt Mira VVC
Phone: (7) (95) 928-6885
Fax: (7) (95) 974-7829
Singapore
Hewlett-Packard Singapore
(Sales) Pte Ltd
450 Alexandra Road
Singapore (119960)
Phone: (65) 275-3888
Fax: (65) 275-6839
Hardware Repair Center and Customer
Information Center:
Phone: (65) 272-5300
Extended Warranty Support:
Phone: (65) 272-5333
EN
Worldwide sales and service offices 77
Page 86

Spain
Hewlett-Packard Española, S.A.
Carretera de la Coruña km 16.500
E-28230 Las Rozas, Madrid
Phone: (34) (1) 626-1600
Fax: (34) (1) 626-1830
Sweden
Hewlett-Packard Sverige AB
Skalholtsgatan 9
S-164 97 Kista
Phone: (46) (8) 444-2000
Fax: (46) (8) 444-2666
Switzerland
Hewlett-Packard (Schweiz) AG
In der Luberzen 29
CH-8902 Urdorf/Zürich
Phone: (41) (084) 880-11-11
Fax: (41) (1) 753-7700
Taiwan
Hewlett-Packard Taiwan Ltd.
8th Floor
337, Fu-Hsing North Road
Taipei, 10483
Phone: (886) (02) 717-0055
FAX: (886) (02) 514-0276
Hardware Repair Center, call:
North (886) (02) 717-9673
Central (886) (04) 327-0153
South (886) (080) 733-733
Extended Warranty Support Contact:
Phone: (886) (02) 714-8882
Turkey
Hewlett-Packard Company
Bilgisayar Ve ölçüm Sistemleri A S
19 Mayis Caddesi Nova
Baran Plaza Kat: 12
80220 Sisli-Istanbul
Phone: (90) (212) 224-5925
Fax: (90) (212) 224-5939
United Kingdom
Hewlett-Packard Ltd.
Cain Road
Bracknell
Berkshire RG12 1HN
Phone: (44) (134) 436-9222
Fax: (44) (134) 436-3344
United States
Hewlett-Packard Company
11311 Chinden Blvd.
Boise, ID 83714
USA
Phone: (208) 323-2551
HP FIRST fax: (800) 333-1917 or (208)
334-4809
Authorized repair: (800) 243-9816
Venezuela
Hewlett-Packard de Venezuela S.A.
Los Ruices Norte
3A Transversal
Edificio Segre Caracas 1071
Phone: (58) (2) 239-4244
Fax: (58) (2) 239-3080
Thailand
Hewlett-Packard (Thailand) Ltd.
23-25/f Vibulthani Tower II
3199 Rama 4 Rd, Klongtan
Klongtoey, Bangkok 10110
Thailand
Phone: (66) (2) 661-3900-34
Fax: (66) (2) 661-3935-37
Hardware Repair Center:
Phone: (66) (2) 661-3900 ext. 6001/ 6002
Customer Information Center:
Phone: (66) (2) 661-3900 ext. 3211, 3232
78 Chapter 6 Service and support
EN
Page 87

A
Printer specifications
This chapter provides information on the following topics:
●
Specifications
●
FCC compliance
●
Environmental Product Stewardship Program
●
Material safety data sheet
●
Regulator y statements
EN
79
Page 88

Specifications
Printer specifications
Environmental specifications
Operating environment Printer plugged into an AC outlet:
● Temperature: 10 °C to 32.5 °C (50 °F to 90.5 °F)
● Humidity: 20%–80% (no condensation)
Storage environment Pr inter unplugged from an AC outlet:
● Temperature: 0 °C to 40 °C (32 °F to 104 °F)
● Humidity: 10%–90% (no condensation)
Acoustics
Noise level During printing: 6.1 Bels sound power level
(per ISO 9296)(HP LaserJet 1100 tested at 8 ppm)
● Sound pressure level (bystander position): 46 dB
● Sound pressure level (operator position): 55 dB
During standby and sle ep mo de: silent
Electrical specifications
Power requirements ● 100-120v (+/-10%), 50/60 Hz (+/-2); 127v, 60Hz NOM
or
● 220v (+/-10%), 50/60 Hz (+/-2 Hz)
● 220-240v (+/-10%), 50 Hz (+/-2 Hz)
Power consumption
Minimum recommended circuit
● Dur i ng printing: 170 watts (average)
● During standby and power save: 6 watts
4.5A @ 115v; 2.3A @ 230v
capacity
80 Appendix A Printer specifications
EN
Page 89

Printer specifications (continued)
Physical specifications
Dimensions ● Width: 367 mm (14.5 in.)
● Depth: 325 mm (12.8 in.)
● Height: 378 mm (14.9 in.)
Weight (cartridge installed) 7.3 kg (16.1 lb)
Printer capacities and ratings
Print speed 8 pages per minute (“letter” size paper)
Paper input bin capacity
125 sheets of regular w eight 20 l b (75 g/m2) paper or up to 10
envelopes
Paper output bin capacity
125 sheets of regular weight 20 lb (75 g/m
2
) paper
Minimum paper size 76 x 127 mm (3 x 5 in.)
Maximum paper size 216 x 356 mm (8.5 x 14 in.)
Base memory 4 MB of ROM and 2 MB of RAM
Upgrade memory expansion One DIMM slot available for a 4, 8, or 16 MB RAM DIMM
Print resolution 600 dots per inch (dpi)
Duty cycle 7,000 single-sided pages per month
EN
Specifications 81
Page 90

FCC compliance
This equipment has been tested and found to comply with the limits
for a Class B digital device, pursuant to Part 15 of the FCC rules.
These limits are designed to provide reasonable protection against
harmful interference in a residential installation. This equipment
generates, uses, and can radiate radio frequency energy. If it is not
installed and used in accordance with the instructions, it may cause
harmful interference to radio communications. However, there is no
guarantee that interference will not occur in a particular installation. If
this equipment does cause harmful interference to radio or television
reception, which can be determined by turning the equipment off and
on, the user is encouraged to try to correct the interference by one or
more of the following measures:
●
Reorient or relocate the receiving antenna.
●
Increase separation between equipment and receiver.
●
Connect equipment to an outlet on a circuit different from that to
which the receiver is located.
●
Consult your dealer or an experienced radio/TV technician.
Note Any changes or modifications to the printer that are not expressly
approved by HP could void the user’s authority to operate this
equipment.
Use of a shielded interface cable is required to comply with the Class B
limits of Part 15 of FCC rules.
82 Appendix A Printer specifications
EN
Page 91

Environmental Product Stewardship Program
Protecting the Environment
Hewlett-Packard Company is committed to providing quality products
in an environmentally sound manner. This HP LaserJet printer has
been designed with several attributes to minimize impacts on our
environment.
This HP LaserJet printer eliminates:
Ozone production
The printer uses charging rollers in the electrophotographic process
and therefore generates no appreciable ozone gas (O
This HP LaserJet printer design reduces:
Energy consumption
Energy usage drops to as little as 6 W while in low-power
(PowerSave) mode. Not only does this save natural resources, but it
also saves money without affecting the high performance of this
printer. This product qualifies for E
voluntary program established to encourage the development of
energy-efficient office products. E
service mark of the U.S. EPA.
NERGY STAR
NERGY STAR
. E
is a U.S. registere d
).
3
NERGY STAR
is a
EN
As an E
determined that this product meets E
energy efficiency.
Toner consumption
EconoMode uses significantly less toner which may extend the life of
the toner cartridge.
Paper use
Depending on the type of software program in use, you can request
for a number of pages of your document to be printed on one page of
paper. This N-up printing practice and the printer’s manual duplexing
feature, which provides two-sided printing, can reduce paper usage
and the resulting demands on natural resources.
NERGY STAR
partner, Hewlett-Packard Company has
NERGY STAR
Environmental Product Stewardship Program 83
Guidelines for
Page 92

The design of this HP LaserJet printer facilitates the
recycling of:
Plastics
Plastic parts have markings according to international standards that
enhance the ability to identify plastics for recycling purposes at the
end of the printer’s life.
HP toner cartridges
In many countries/regions, this product’s toner cartridge/drum can be
returned to HP thro ugh the HP Planet Partner s Toner Cartridge
Recycling Program. This easy to use program is available in over 20
countries/regions. Multi-lingual program information and instructions
are included in every new HP Toner Cartridge box.
HP Cartridge Recycling Program information
Since 1990, the HP LaserJet T oner Cartridge Recycling Program has
collected more than 12 million used toner cartridges that otherwise
may have been discarded in the world’s landfills. The HP LaserJet
toner cartridges go to a collection center and then they are bulk
shipped to our recycling partners who disassemble the cartridge
parts for recycling. After a thorough quality inspection, minor parts
such as nuts, screws, and clips are reclaimed for use in new
cartridges. Remaining materials are separated and converted into
raw materials for use by other industries to make a variety of useful
products. Over 95% by weight of each returned cartridge is reclaimed
for recycling. For more information in the U.S., call (1) (800) (340-
2445) or visit the HP LaserJet Supplies website at http://
www.ljsupplies.com/planetpartners/. Non-US customers can call the
local HP Sales and Service Office for further information regarding
the HP Planet Partners LaserJet Toner Cartridge Recycling Program.
Paper
This printer is suited for the use of recycled papers when the paper
meets the gu idel ines outli ned i n the HP LaserJet Printer F amily Paper
Specifications Guide. See “Accessorie s and or dering information” for
HP LaserJet Printer Family Paper Specifications Guide orderi ng
information. This printer is suitable for the use of recycled paper
according to DIN 19 309.
84 Appendix A Printer specifications
EN
Page 93

Material safety data sheet
The Toner Cartridge/Drum MSDS can be obtained by contacting the
HP LaserJet Supplies website at http://www.ljsupplies.com/
planetpartners/datasheets.htm. If you do not have access to the
internet, try calling the U.S. HP FIRST (Fax Information Retrieval
Support Technology) at (1) (800) 231-9300. Use Index number 7 for a
listing of the Toner Cartridge/Drum Material/Chemical Safety Data
Sheets. Non-US customers should refer to the front of this manual for
appropriate phone numbers and infor ma tio n.
EN
Material safety data sheet 85
Page 94

Regulatory statements
Declaration of Conformity
according to ISO/IEC Guide 22 and EN45014
Manufacturer's Name: Hewlett-Packard Company
Manufacturer's Address: 11311 Chinden Boulevard
Boise, Idaho 83714-1021, USA
declares that the product
Product Name: HP LaserJet 1100
Model Number:
Product Options: ALL
conforms to the following Produc t Specifications:
Safety: IEC 950:1991+A1+A2+A3+A4 / EN 60950:1992+A1+A2+A3+A4
IEC 825-1:1993 / EN 60825-1:1994 Class 1 (Laser/LED)
EMC: CISPR 22:1993+A1 / EN 55022:1994 Class B
EN 50082-1:1992
IEC 801-2:1991 / prEN 55024-2:1992 - 4 kV CD, 8 kV AD
IEC 801-3:1984 / prEN 55024-3:1991 - 3 V/m
IEC 801-4:1988 / prEN 55024-4:1992 - 0.5 kV Signal Lines
IEC 1000-3-2:1995 / EN61000-3-2:1995
IEC 1000-3-3:1994 / EN61000-3.3:1995
FCC Title 47 CFR, Part 15 Class B2) / ICES-003, Issue 2 / VCCI-2
AS / NZS 3548:1992 / CISPR 22:1993 Class B
Supplementary Information:
The product herewith complies with the requirements of the following Directives and carries the CEmarking accordingly:
the EMC directive 89/336/EEC
the Low-Voltage Directive 73/23/EEC
The product was tested in a typical configuration with Hewlett-Packard Personal Computer Systems.
This Device complies with P art 15 of the FCC Rules. Operation is subject to the f ollowing two conditions:
(1) this device may not cause harmful interference, and (2) this device must accept any interference
received, including interference that may cause undesired operation.
C4224A
1
1.0 kV Power Lines
1)
1)
For Compliance Information ONLY, contact:
Australia Contact: Product Regulations Manager, Hewlett-P ackard Australia Ltd.,
31-41 Joseph Street, Blackburn, Victoria 3130, Australia
European Contact: Your Local Hewlett-Pac kard Sales and Service Office or
Hewlett-Pac k ard GmbH, Department HQ-TRE / Standards
Europe, Herrenberger Straße 130, D-71034 Böblingen
(FAX:+49-7031-14-3143)
USA Contact: Product Regulations Manager, He wlett -Packard Company,
PO Box 15 Mail Stop 160, Boise, ID 83707-0015
(Phone: 208-396-6000)
86 Appendix A Printer specifications
EN
Page 95

Laser safety statement
The Center for Devices and Radiological Health (CDRH) of the U.S.
Food and Drug Administration has implemented regulations for laser
products manufactured since August 1, 1976. Compliance is
mandatory for products marketed in the United States. The printer is
certified as a “Class 1” laser product under the U.S. Department of
Health and Human Services (DHHS) Radiation Performance
Standard according to the Radiation Control for Health and Safety Act
of 1968.
Since radiation emitted inside the printer is completely confined within
protective housings and external covers, the laser beam cannot
escape during any phase of normal user operation.
WARNING! Using controls, making adjustments, or performing procedures other
than those specified in this user’s guide may result in exposure to
hazardous radiation.
Canadian DOC regulations
Complies with Canadian EMC Class B requirements.
«Conforme á la classe B des normes canadiennes de compatibilité
électromagnétiques. «CEM».»
EN
Ko rean EMI statement
Regulatory statements 87
Page 96

Laser statement for Finland
LASERTURVALLISUUS
LUOKAN 1 LASERLAITE
KLASS 1 LASER APPARAT
HP LaserJet 1100 -laserkirj oit in on käyttäjän kannalta turvallinen
luokan 1 laserlaite. Normaalissa käytössä kirjoittimen suojakotelointi
estää lasersäteen pääsyn laitteen ulkopuolelle.
Laitteen turvallisuusluokka on määritetty standardin EN 60825-1
(1993) mukaisesti.
VAROITUS!
Laitteen käyttäminen muulla kuin käyttöohjeessa mainitulla tavalla
saattaa altistaa käyttäjän turvallisuusluokan 1 ylittävälle
näkymättömälle lasersäteilylle.
VARNING!
Om apparaten används på annat sätt än i bruksanvisning
specificerats, kan användaren utsättas för osynlig laserstrålning, som
överskrider gränsen för laserklass 1.
HUOLTO
HP LaserJet 1100 -kirjoittimen si sällä ei ole käyttäjän huollettavissa
olevia kohteita. Laitteen saa avata ja huoltaa ainoastaan sen
huoltamiseen koulutettu henkilö. Tällaiseksi huoltotoimenpiteeksi ei
katsota väriainek as et in vaihtamista, pap eriradan puhdistusta tai
muita käyttäjän käsikirjassa lueteltuja, käyttäjän tehtäväksi
tarkoitettuja ylläpitotoimia, jotka voidaan suorittaa ilman
erikoistyökaluja.
VARO!
Mikäli kirjoittimen suojakotelo avataan, olet alttiina näkymättömälle
lasersäteilylle laitteen ollessa toiminnassa. Älä katso säteeseen.
VARNING!
Om laserprinterns skyddshölje öppnas då apparaten är i funktion,
utsättas användaren för osynlig laserstrålning. Betrakta ej strålen.
Tiedot laitteessa käytettävän laserdiodin säteilyominaisuuksista:
Aallonpituus 770-7 95 nm
Teho 5 mW
Luokan 3B laser
88 Appendix A Printer specifications
EN
Page 97

B
Paper specifications
This chapter provides information on the following topics:
●
Printer paper specifications
●
Supported paper sizes (printer)
●
Guidelines for using paper
EN
89
Page 98

Printer paper specifications
HP LaserJet printers produce excellent print quality. This printer
accepts a variety of media, such as cut-sheet paper (including
recycled paper), envelopes, labels, transparencies, vellum, and
custom-size paper. Properties such as weight, grain, and moisture
content are important factors affecting printer performance and output
quality.
The printer can use a variety of paper and other print media in
accordance with the guidelines in this manual. Paper that does not
meet these guidelines may cause the following problems:
●
Poor print quality
●
Increased paper jams
●
Premature wear on the printer, requiring repair
For best results, use only HP brand paper and print media. HewlettPackard Company cannot recommend the use of other brands.
Because they are not HP products, HP cannot influence or control
their quality.
It is possible for paper to meet all of the guidelines in this manual and
still not produce satisfactory results. This might be the result of
improper handling, unacceptable temperature and humidity levels , or
other variables over which Hewlett-Packard has no control.
Before purchasing a large quantity of paper, make sure it meets the
requirements specified in this user guide and in the HP LaserJet
Printer Family Paper Specification Guide. (To order the guide, see
“Accessories and ordering information.”) Always test paper before
purchasing a large quantity.
CAUTION Using paper outside HP specifications may cause problems for the
printer, requiring repair. This repair is not covered by the HewlettPackard warranty or service agreements.
Supported paper sizes (printer)
●
Maximum supported paper size: 216 by 356 mm (8.5 by 14 in.)
●
Minimum supported paper size: 76 by 127 mm (3 by 5 in.)
90 Appendix B Paper specifications
EN
Page 99

Guidelines for using paper
For best results, use conventional 20 lb (75 g/m2) paper. Make sure
the paper is of good quality, and free of cuts, nicks, tears, spots, loose
particles, dust, wrinkles, voids, and curled or bent edges.
If you are unsure what type of paper you are loading (such as bond or
recycled), check the label on the package of paper.
Some paper causes pri nt quality problems, jamming, or damage to
the printer.
Symptom Problem with Paper Solution
Poor print quality or toner
adhesion.
Problems with feeding.
Dropouts, jamming, curl. Stored improperly. Store paper flat in its moisture-
Increased gray background
shading.
Excessive curl.
Problems with feeding.
Jamming, damage to printer. Cutouts or perforations. Do not use paper with cutouts
Problems with feeding. Ragged edges. Use good quality paper.
Too moist, too rough, too
smooth, or embossed; faulty
paper lot.
Too heavy. Use lighter paper.
Too moist, wrong grain
direction or short-grain
construction.
Try another kind of paper,
between 100-250 Sheffield,
4-6% moisture content.
proof wrapping.
Use long-grai n paper.
Print using the straightthrough ouput path.
or perforations.
Note Do not use letterhead paper that is printed with low-temperature inks,
such as those used in some types of thermography.
EN
Do not use raised letterhead.
The printer uses heat and pressure to fuse toner to the paper. Make
sure that any colored paper or preprinted forms use inks that are
compatible with the printer temperature (392 °F or 200 °C for
0.1 second).
Guidelines for using paper 91
Page 100

Labels
Label construction
When selecting labels, consider the quality of each component:
●
Adhesives: The adhesive material should be stable at 392 °F
(200 °C), the printer’s maximum temperature.
●
Arrangement: Only use labels with no exposed backing between
them. Labels can peel off sheets with spaces between the labels,
causing serious jams.
●
Curl: Prior to printing, labels must lie flat with no more than 13
mm (0.5 in.) of curl in any direction.
●
Condition: Do not use labels with wrinkles, bubbles, or other
indications of separation.
Transparencies
Transparencies used in the printer must be able to withstand 392 °F
(200 °C), the printer’s maximum temperature.
92 Appendix B Paper specifications
EN
 Loading...