

Page 1

Combinato frigo/freezer
Installazione e uso
Fridge/freezer combined
Installation and use
C
ombinado frigorífico-congelador
Instalação e uso
Koel-vriescombinatie
Installatie en gebruik
Page 2

MBAA 4531 CV
MBAA 4533 CV
Combinato frigo/freezer 1
I
Istruzioni per l'installazione e l'uso
Fridge/freezer combined 13
GBGB
GB
GBGB
Instructions for installation and use
Combinado frigorífico-congelador 25
PP
P
PP
Instruções para a instalação e o uso
Koel-vriescombinatie 37
NL
Gebruiksaanwijzingen voor plaatsing en gebruik
Per garantire l’efficienza e la sicurezza di questo elettrodomestico:
- rivolgetevi esclusivamente a centri di assistenza tecnica autorizzati
- richiedete sempre l’utilizzo di parti di ricambio originali
To maintain the EFFICIENCY and SAFETY of this appliance, we recommend:
- call only the Service Centers authorized by the manufacturer
- always use original Spare Parts
Para garantir a eficiência e a segurança deste electrodoméstico:
- dirija-se exclusivamente a centros de assistência técnica autorizados
- solicite sempre a utilização de peças originais
Om de doelmatigheid en veiligheid van dit toestel te garanderen raden wij u aan:
- voor reparaties alleen de Service Centers te bellen die door de fabrikant gemachtigd zijn
- altijd gebruik te maken van originele onderdelen
Page 3

La sicurezza, una buona abitudine
ATTENZIONE
Leggete attentamente le avvertenze contenute nel presente libretto in quanto forniscono importanti indicazioni riguardanti la sicurezza di installazione, d’uso e di manutenzione.
Questa apparecchiatura è conforme alle seguenti Direttive Comunitarie:
- 73/23/CEE del 19/02/73 (Basse Tensioni) e successive
modificazioni;
- 89/336/CEE del 03/05/89 (Compatibilità Elettromagnetica)
e successive modificazioni.
1. Questo apparecchio non va installato all’aperto, nemmeno se lo spazio è riparato da una tettoia; è molto pericoloso
lasciarlo esposto alla pioggia e ai temporali.
2. Deve essere usato soltanto da adulti ed esclusivamente
per conservare e congelare i cibi, seguendo le istruzioni d’uso
scritte in questo manuale.
3. Non toccate né manovrate mai l’apparecchio a piedi nudi
o con le mani o i piedi bagnati.
4. Sconsigliamo di ricorrere a prolunghe e prese multiple. Se
il frigorifero è installato tra i mobili, controllate che il cavo
non subisca piegature o compressioni pericolose.
5. Non tirate mai il cavo né il frigorifero per staccare la spina
dalla presa a muro: è molto pericoloso.
6. Non toccate le parti interne raffreddanti soprattutto con
le mani bagnate poiché potreste ustionarvi o ferirvi. Né met-
tete in bocca cubetti di ghiaccio appena estratti dal freezer
poiché rischiate di ustionarvi.
7. Non fate né pulizia né manutenzione senza aver prima
staccato la spina; non basta, infatti, portare le manopole
per la regolazione della temperatura sulla posizione " "
per eliminare ogni contatto elettrico.
8. Prima di farvi ritirare il vecchio frigorifero, mettete fuori
uso l’eventuale serratura per evitare che i bambini, giocando, possano rimanere chiusi dentro l’apparecchio.
9. In caso di guasto, prima di chiamare il servizio-assistenza,
controllate al capitolo “C’è qualche problema?” per verificare se è possibile eliminare l’eventuale inconveniente. Non
tentate di riparare il guasto, cercando di accedere alle parti
interne.
10. In caso di sostituzione del cavo di alimentazione rivolgersi ai nostri Centri di Assistenza. In alcuni casi le connessioni sono eseguite con terminali speciali, in altri è richiesto
l’uso di un utensile speciale per accedere ai collegamenti.
11. Non usate apparecchi elettrici all'interno dello scomparto conservatore di cibi, se questi non sono del tipo raccomandato dal costruttore.
12. Al termine della vita funzionale dell'apparecchio, contenente gas ciclopentano nella schiuma isolante ed eventualmente gas R600a (isobutano) nel circuito refrigerante, lo stesso dovrà essere messo in sicurezza prima dell'invio in discarica. Per questa operazione rivolgetevi al vostro negoziante
o all'Ente Locale preposto.
Installazione
Per garantire un buon funzionamento e un consumo
contenuto di elettricità è importante che l’installazione sia eseguita correttamente.
L’aerazione
Il compressore ed il condensatore emettono calore e richiedono perciò una buona aerazione. Sono poco adatti ambienti con una non perfetta ventilazione. L’apparecchio va
quindi installato in un ambiente servito da un’apertura (finestra o portafinestra) che assicuri il necessario ricambio dell’aria e che non sia troppo umido.
Fare attenzione, durante l'installazione, a non coprire od
ostruire le griglie che permettono la buona ventilazione dell'apparecchio.
Per una buona aerazione dell'apparecchio occorre lasciare:
- una distanza di almeno 10 cm tra la parte superiore ed
eventuali mobili sovrastanti;
- una distanza di almeno 5 cm tra le fiancate ed eventuali
mobili/pareti laterali.
Lontano dal calore
Evitare di posizionare l'apparecchio in un luogo direttamente esposto alla luce solare, accanto alla cucina elettrica o
similari.
In piano
L'apparecchio deve essere ben in piano; se il pavimento non
è livellato, è possibile intervenire con gli appositi piedini regolabili posti anteriormente.
Collegamento elettrico e messa a terra
Prima di procedere al collegamento elettrico, controllare che
il voltaggio indicato sulla targhetta caratteristiche, posta in
basso a sinistra accanto alla verduriera, corrisponda a quello del vostro impianto di casa, e che la presa sia dotata di
una regolare messa a terra, come prescrive la legge sulla
sicurezza degli impianti 46/90. Se manca la messa a terra, la
Casa Costruttrice declina ogni responsabilità. Non usate prese multiple o adattatori.
Posizionare l’apparecchio in modo che la presa, a cui è
collegato, sia accessibile.
La potenza è insufficiente?
La presa elettrica deve essere in grado di sopportare il carico
massimo di potenza dell’apparecchio, indicato sulla targhetta
caratteristiche posta in basso a sinistra accanto alla verduriera.
Prima di collegarlo elettricamente
Dopo il trasporto posizionare l’apparecchio verticalmente
ed attendere almeno 3 ore prima di collegarlo alla presa per
consentire un corretto funzionamento.
1
I
Page 4
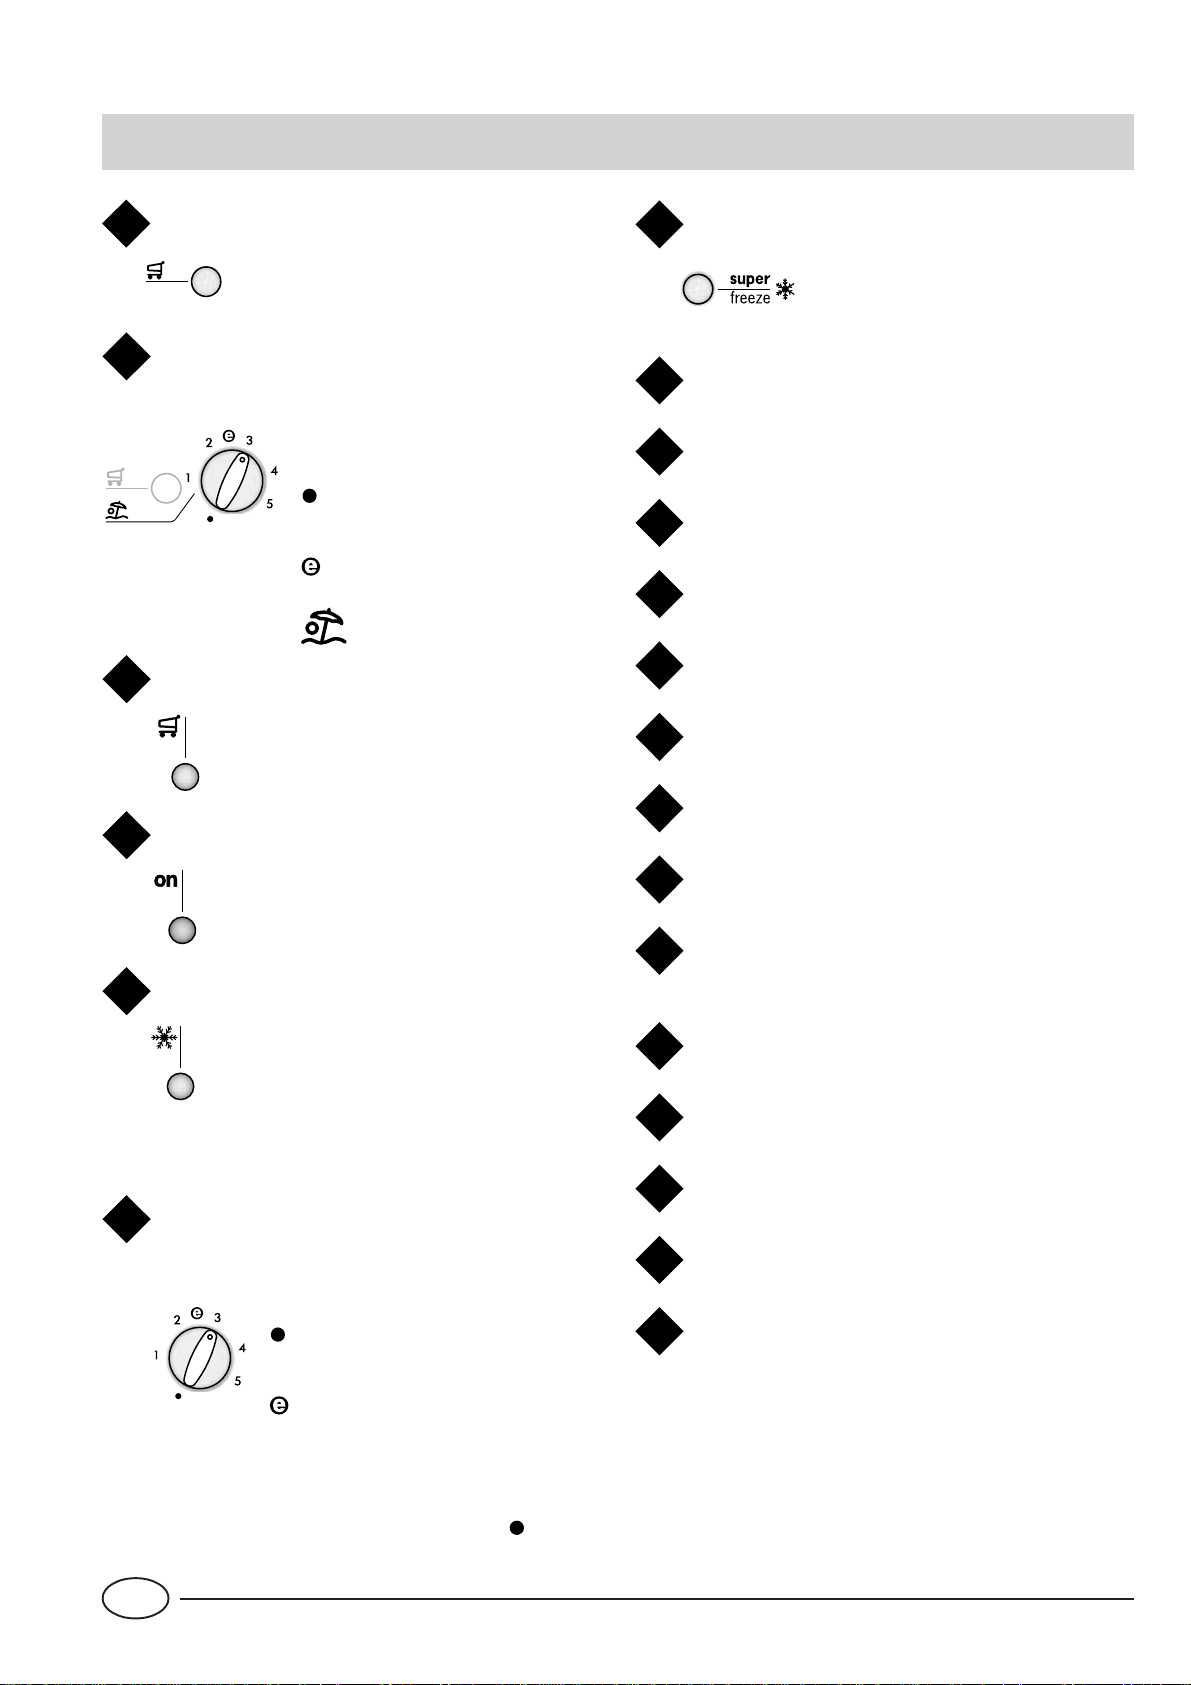
Visto da vicino
Pulsante per il raffreddamento rapido
A
Premuto (si accende la spia gialla "C")
permette di abbassare al minimo la
temperatura nel vano frigo.
Manopola per la regolazione della temperatura
B
dello scomparto frigorifero
Questa manopola consente di regolare la temperatura del frigorifero su
diverse posizioni:
il frigo è spento;
1 meno freddo;
5 più freddo;
temperatura ottimale a bassi
consumi:
funzione vacanza attivata.
Spia gialla di raffreddamento rapido
C
Questa spia gialla si accende quando si
attiva il raffreddamento rapido premendo il
pulsante "A"
Pulsante per il congelamento rapido
G
Premuto (si accende la spia gialla
"E") permette il congelamento di
cibi freschi.
Balconcino estraibile con coperchio
H
Scatola burro
I
Balconcini portalattine
J
Balconcini intermedi
K
Balconcino bottiglie
L
Bacinelle per la produzione di ghiaccio
M
Spia verde
D
Quando questa spia verde è accesa vuol dire
che l'apparecchio è collegato alla rete di alimentazione.
Spia di congelamento rapido
E
Questa spia gialla si accende quando si
preme il pulsante di congelamento rapido
"G".
Nota: queste tre spie servono anche per segnalare un
anomalo aumento di temperatura nel vano congelatore (vedi paragrafo "Allarmi sonori e visivi").
Manopola per la regolazione della temperatura
F
dello scomparto congelatore
Questa manopola consente di regolare la temperatu-
ra del congelatore su diverse posizioni:
il frigo è spento;
1 meno freddo;
5 più freddo;
temperatura ottimale a bassi
consumi:
Piedini di regolazione
N
Vani per la conservazione
O
Vano utilizzabile per il congelamento e la
P
conservazione
Cassetto per frutta e verdura
Q
Scomparto "Fresh box" per carni e pesci
R
Scatola scorrevole per formaggi e salumi
S
Ripiani estraibili e regolabili in altezza
T
"A.I.R. System"
U
(Ariston Integrated Refrigeration)
Ricordate, inoltre, che potete interrompere il funzionamento di tutto l'apparecchio (frigo compreso) portando questa manopola nella posizione " ".
I
2
Page 5
U
T
S
R
Q
A
B C
D
E
F G
H
I
J
K
L
P
O
WATER LEVEL
MAX
WATER LEVEL
MAX
M
NN
3
I
Page 6
Come avviare il combinato
ATTENZIONE
Dopo il trasporto, posizionare l’apparecchio verticalmente ed attendere circa 3 ore prima di collegarlo alla
presa di corrente per favorire un buon funzionamento.
Prima di mettere gli alimenti nel frigorifero pulite bene l’interno con acqua tiepida e bicarbonato.
Tempo protezione motore.
Questo modello è provvisto di un controllo
salvamotore, pertanto se all’installazione il compressore non parte immediatamente non preoccupatevi
perché si attiverà automaticamente dopo circa 8 minuti. Così accadrà dopo ogni interruzione dell’alimentazione, sia a causa di un black-out che per uno spegnimento da voi impostato (ad esempio per la pulizia o lo
sbrinamento del freezer).
Dopo aver collegato la spina alla presa di corrente accertarvi
che la spia verde "D" sia accesa e che la manopola del conge-
latore "F" non sia nella posizione di "
Scomparto frigorifero
Ruotate la manopola "B" su una posizione media e dopo
qualche ora potrete mettere i cibi nel frigorifero.
Scomparto congelatore
Ruotate la manopola "F" su una posizione media e premete
il pulsante "G" del congelamento rapido (la spia gialla "E"
si accenderà). Quando il congelatore avrà raggiunto la temperatura ottimale, la spia gialla "E" si spegnerà. A questo
punto potrete introdurre nel congelatore i surgelati.
".
Come utilizzare al meglio il reparto frigorifero
La temperatura all'interno del reparto frigorifero si regola
automaticamente in base alla posizione della manopola per
la regolazione della temperatura.
1 = meno freddo
5 = più freddo
Il reparto frigorifero del suo apparecchio è dotato di un dispositivo di "A.I.R. System" (Ariston Integrated Refrigeration)
che consente un'ottima conservazione degli alimenti ed un
utilizzo semplificato dell'apparecchio grazie a:
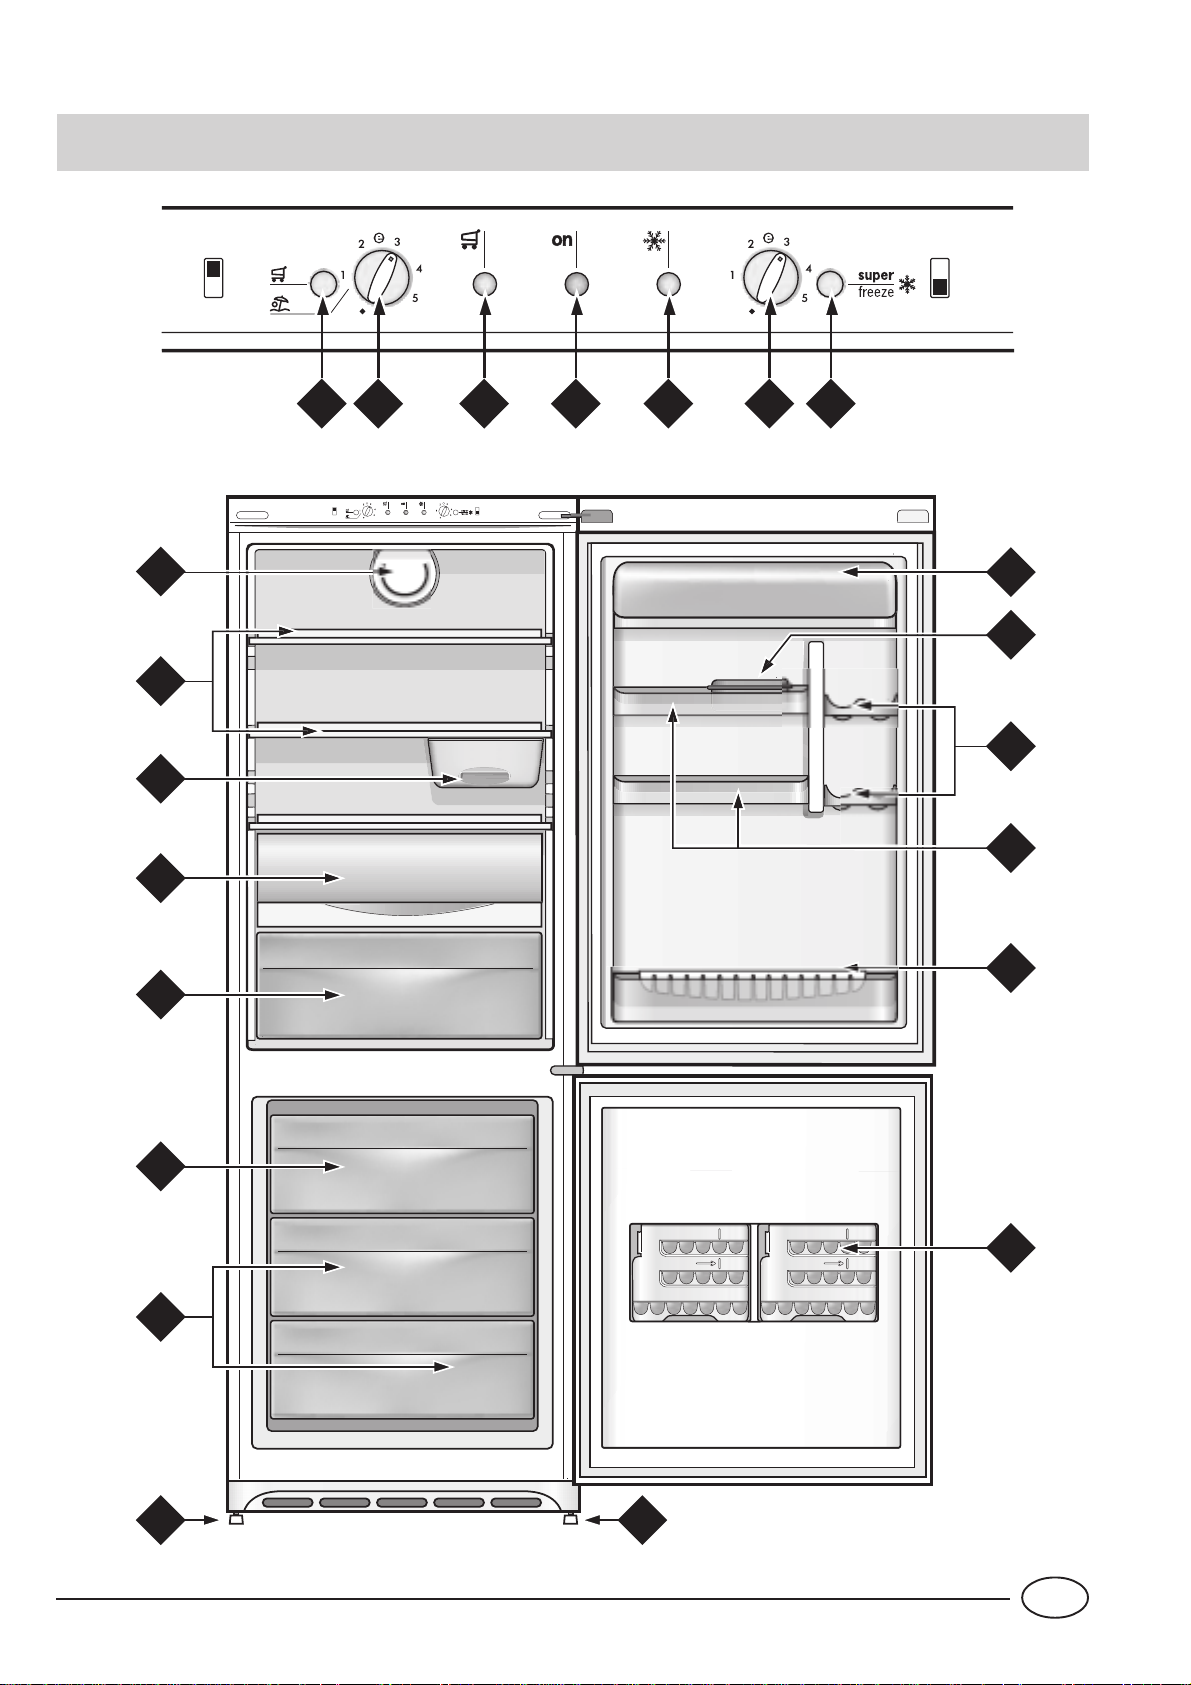
- un ripristino veloce della temperatura: dopo l'apertura della porta le temperature raggiungono valori ottimali velocemente, per una migliore conservazione.
- una distribuzione omogenea della temperatura che consente di riporre alimenti in qualsiasi ripiano.
B
B
B
Seguite attentamente i nostri consigli sulla durata massima
della conservazione: qualsiasi cibo, anche il più fresco, non
rimane intatto molto a lungo.
Contrariamente a quanto si crede, i cibi cotti non si mantengono più a lungo di quelli crudi.
Lo scomparto frigorifero è dotato di pratici ripiani estraibili e
regolabili in altezza grazie alle apposite guide (Fig. 1). Per
questo è possibile inserire anche grandi contenitori e cibi di
notevoli dimensioni. La forma innovativa dei ripiani consente la regolazione in altezza senza estrarre completamente il
ripiano.
Inserite soltanto alimenti freddi o, al massimo, appena tiepidi, evitando di inserire quelli caldi: alzerebbero subito la temperatura interna costringendo il compressore ad un surlavoro
che spreca tanta energia elettrica.
Non inserite i liquidi in recipienti scoperti perché provocherebbero l’aumento di umidità all’interno del frigorifero e di
conseguenza la formazione di brina.
A
A - Aria soffiata che si raffredda a contatto della parete fredda
B - Aria più calda aspirata
Quando il vano frigo viene riempito dopo una grossa spesa,
utilizzate la funzione Raffreddamento rapido (attivata premendo il pulsante "A") in modo da raggiungere rapidamente
un'ottima condizione di funzionamento. Una volta trascorso il tempo necessario la funzione si disattiva automaticamente.
A
I
1
2
Fig. 1
4
Page 7
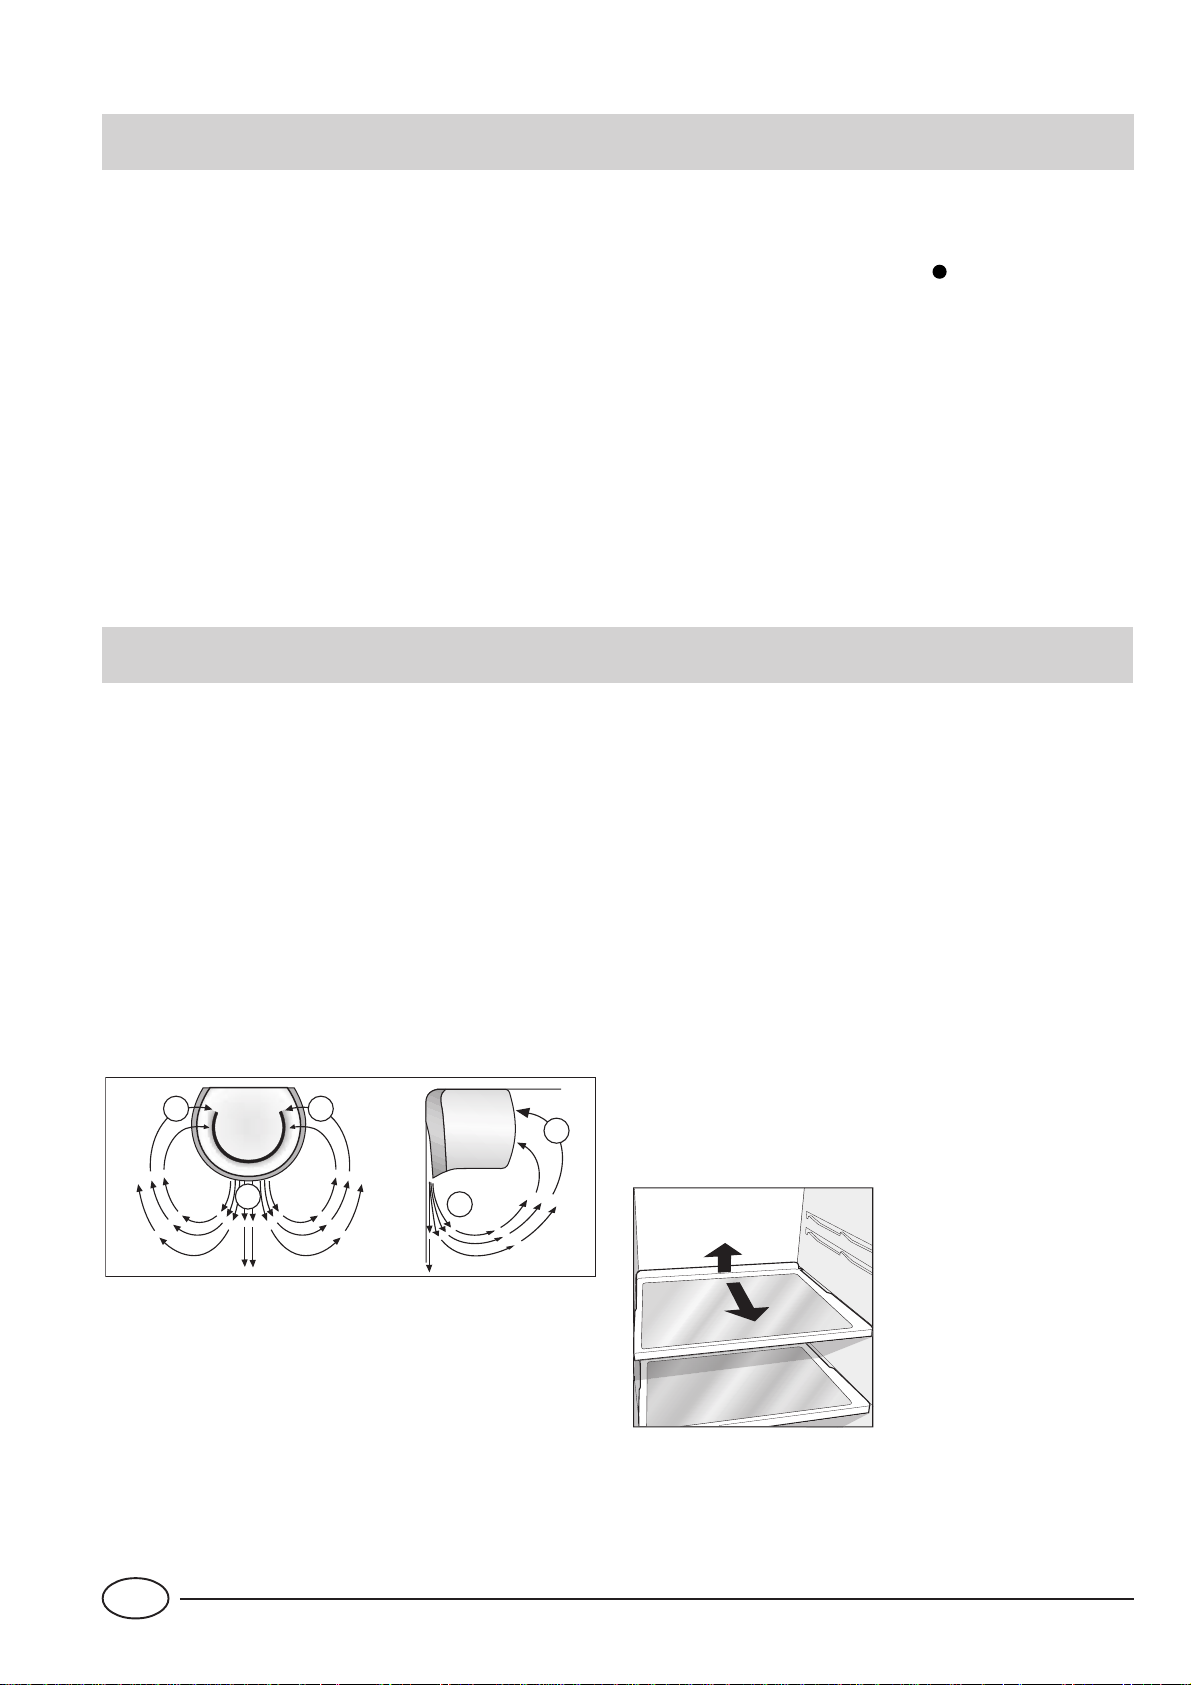
La scatola formaggie salumi appesa per essere utilizzata va
estratta dal ripiano. La stessa, per ottimizzare lo spazio secondo necessità, può essere spostata in senso laterale (Fig.2).
La presenza del portalattine (Fig. 3) sulla controporta dà la
possibilità di riporre non solo lattine ma anche jogurt, burro
ed altri contenitori, sfuttandolo a seconda delle vostro necessità.
Uso dello scomparto "Fresh box" per carni e
pesci
Questo scomparto è stato studiato per poter consentire tempi
di conservazione più lunghi per la carne ed il pesce freschi
(anche fino ad una settimana).
Ciò è possibile in quanto all’interno di questo vano è disponibile la temperatura più fredda di tutto il frigorifero
Lo sportello trasparente protettivo dello scomparto evita i
fenomeni di ossidazione o di annerimento caratteristici della
carne e del pesce esposti alla circolazione di aria.
Lo scomparto "Fresh box", inoltre, può anche essere usato
per poter raffreddare piatti che normalmente si consumano
“freddi”; prosciutto e melone, fichi e prosciutto, mozzarelle
e pomodori.
Fig. 2
Fig. 2
Come utilizzare al meglio il reparto congelatore
Per la preparazione dei cibi da congelare consultare
un manuale specializzato.
Un alimento scongelato, anche solo parzialmente, non deve
mai essere ricongelato: lo dovete cuocere per consumarlo
(entro 24 ore) oppure per ricongelarlo.
Gli alimenti freschi da congelare non devono essere posti a
contatto con quelli già congelati o surgelati ma vanno messi
nel vano superiore "Q" dove la temperatura scende sotto i
-18°C ed è l'ideale per congelar bene i cibi. Non bisogna
infatti dimenticare che la buona conservazione degli alimenti
congelati dipende dalla velocità di congelazione.
La quantità massima giornaliera da congelare è indicata sulla targhetta caratteristiche posta all'interno dello scomparto frigorifero.
La prima volta, o dopo che il congelatore è stato inattivo,
potete congelare i cibi solo dopo aver fatto funzionare al
massimo l’apparecchio.
Quando l'apparecchio è già in funzione la congelazione può
essere fatta in due modi:
1. Per piccole quantità, inferiori alla capacità massima indicata sulla targhetta caratteristiche, premete semplicemente
il pulsante di congelamento "G" (lampada gialla "E" accesa) e introducete i cibi da congelare. Dopo 24 ore, o una
volta raggiunte le temperature ottimali, la funzione di congelamento rapido si disinserisce automaticamente (lampada gialla "E" spenta).
2. Per grossi quantitativi di cibi da congelare (fino al carico
massimo indicato nella targhetta delle caratteristiche) tenete premuto il pulsante di congelamento "G" fino a quando
la lampada gialla "E" non inizia a lampeggiare velocemente. Dopo 24 ore la lampada gialla cesserà di lampeggiare
(luce fissa); a questo punto potete introdurre i cibi da congelare. Dopo altre 24 ore il pulsante si disinserisce automaticamente (lampada gialla spenta).
Durante il congelamento evitate di aprire la porta del freezer.
Per ottenere una conservazione e un successivo
scongelamento ottimali è consigliabile dividere i cibi in piccole porzioni così da poterli congelare rapidamente e in modo
omogeneo. Sulle confezioni riportate le indicazioni sul contenuto e sulla data di congelamento.
Al fine di ottenere un spazio maggiore nel reparto freezer
potete togliere il cassetto centrale, sistemando gli alimenti
direttamente sulla piastra evaporante. Verificare, dopo l'introduzione del carico, che la porta chiuda correttamente.
Non aprite la porta del freezer in caso di mancanza di corrente o di un guasto, ritarderete così l’aumento della temperatura al suo interno. In questo modo i surgelati e i congelati si conserveranno senza alterazioni per circa 9-14 ore.
Non mettete nel congelatore bottiglie piene: potrebbero rompersi poiché, gelandosi, tutti i liquidi aumentano di volume.
5
I
Page 8
Bacinelle ghiaccio
Questo nuovo concetto di bacinelle ghiaccio, è un brevetto
esclusivo Merloni. Il fatto di essere poste sulla controporta
del vano freezer assicura maggiore ergonomia e pulizia: il
ghiaccio non viene più a contatto con i cibi riposti nel vano
freezer; inoltre si evita lo sgocciolamento dell’acqua nella
fase di caricamento (in dotazione anche il coperchio per chiudere il foro dopo l’operazione di carico dell’acqua).
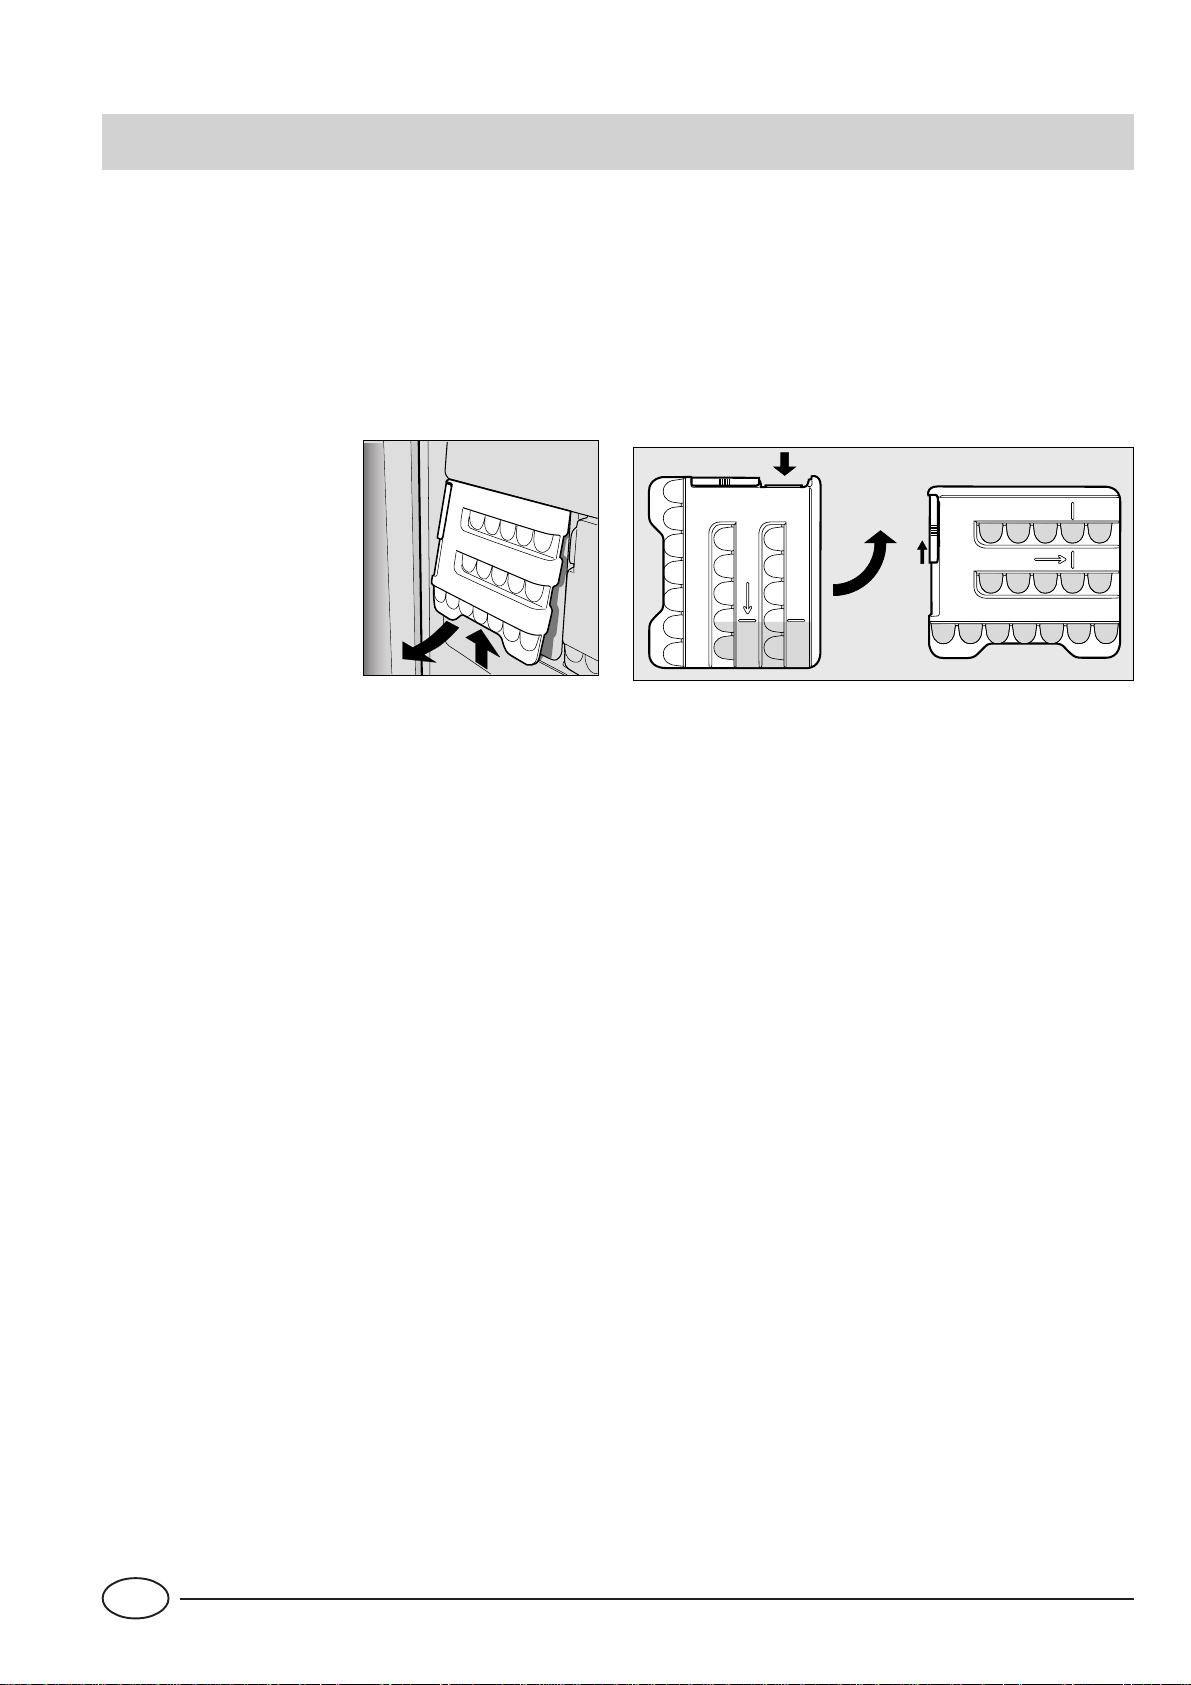
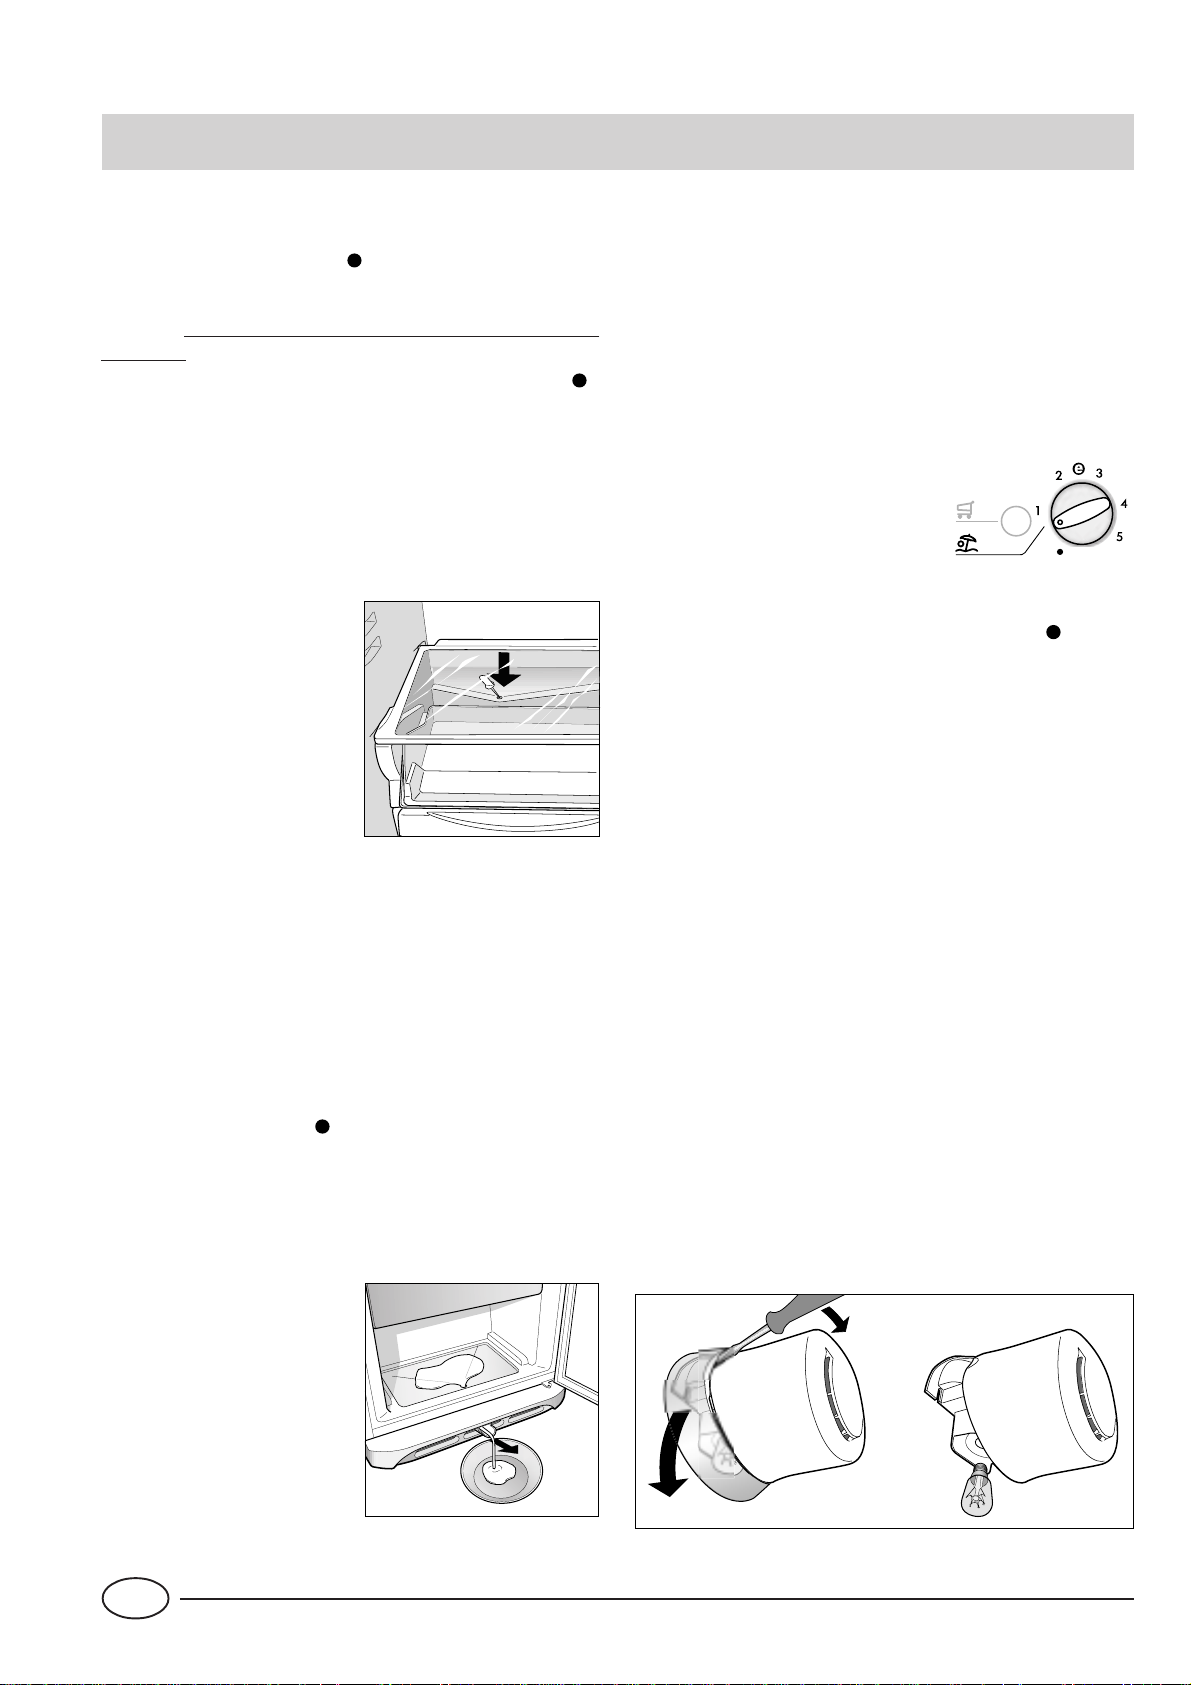
Per estrarre le bacinelle
ghiaccio dalla loro sede, spingere la bacinella verso l'alto
e poi estrarre (fig. 4). Per riporre la bacinella, inserire la
parte superiore nell'apposita
sede e, una volta messa in
verticale, lasciarla ricadere.
Dopo che il ghiaccio si sarà formato, basterà battere la bacinella su una superficie dura affinché i ghiaccioli si stacchino
dalle loro sedi e siano fatti uscire dallo stesso foro da cui è
stata introdotta l’acqua. Per migliorare l’uscita dei ghiaccioli
bagnare con acqua l’esterno della bacinella.
ATTENZIONE: ogni volta che si effettua il caricamento con
acqua, verificare che la bacinella sia completamente vuota e
non siano presenti residui di ghiaccio.
Il tempo minimo necessario per una ottimale formazione di
ghiaccio è circa 8 ore.
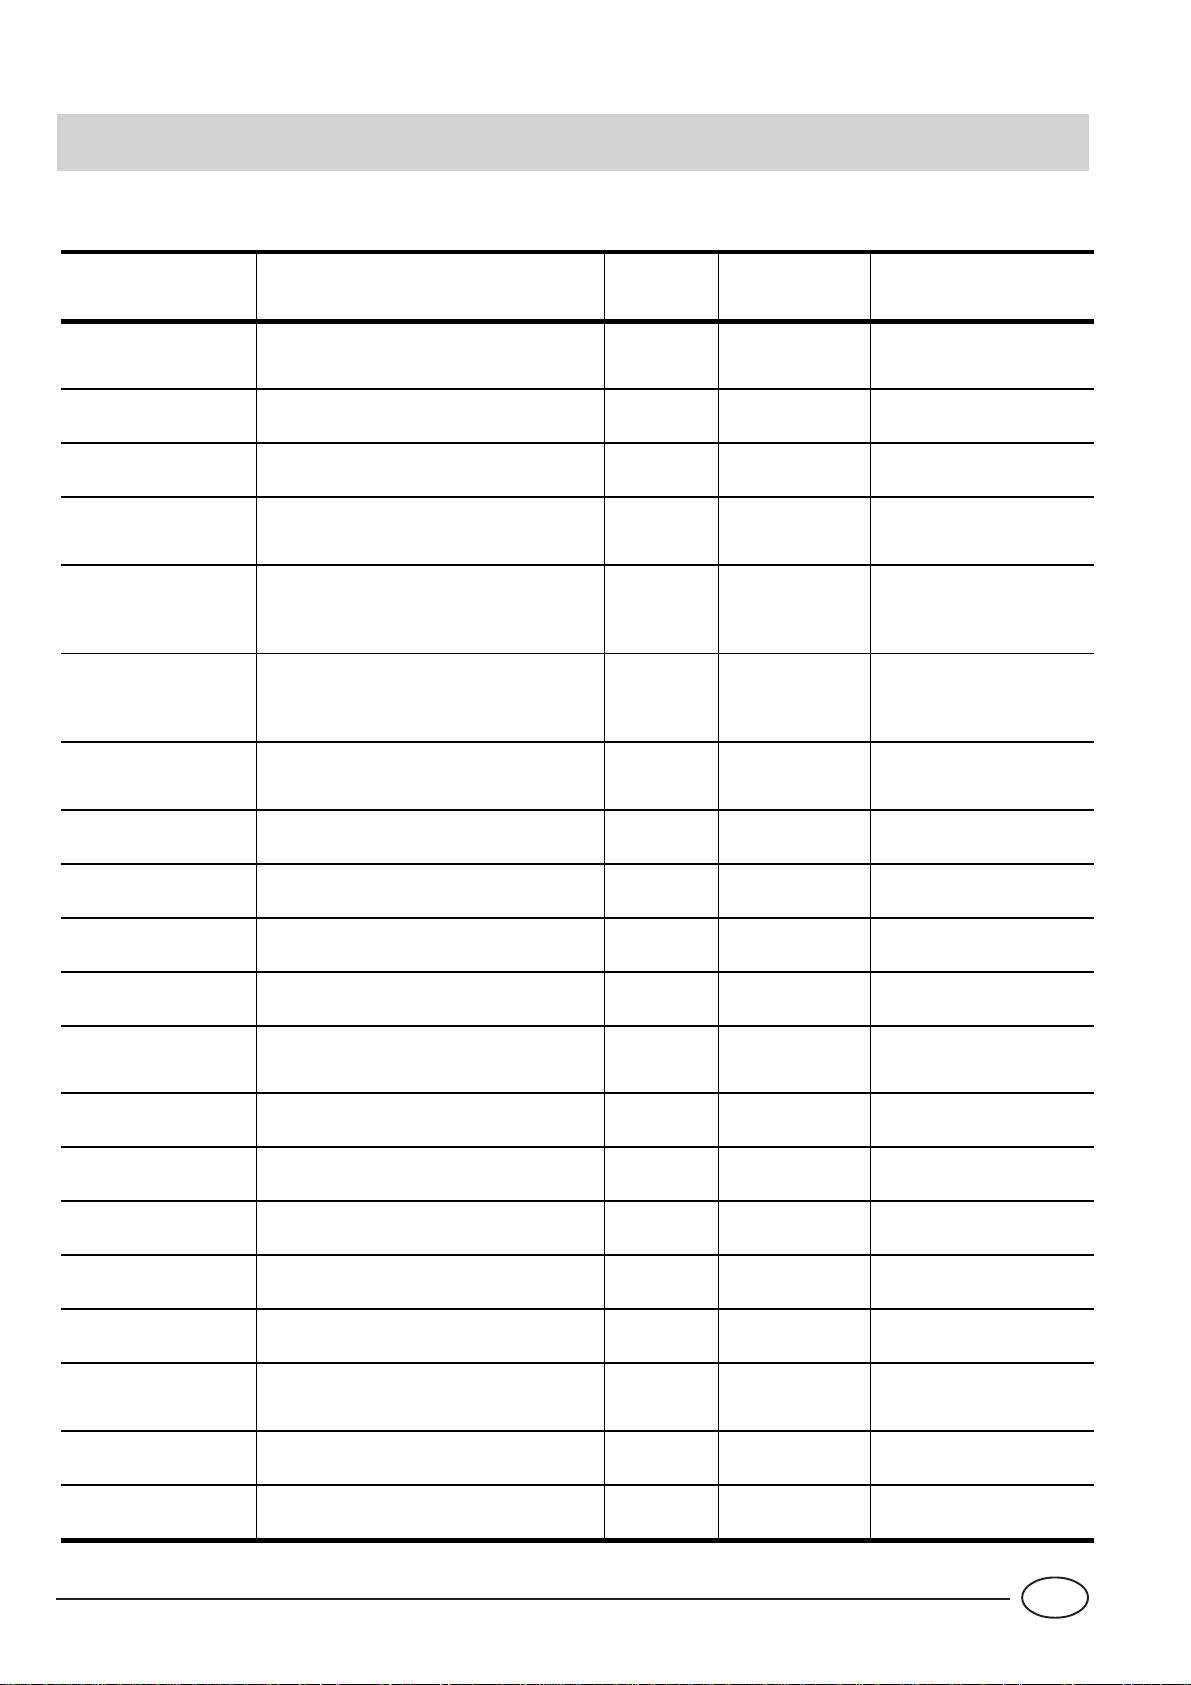
WATER LEVEL
MAX
MAX
WATER LEVEL
Fig. 4
Modalità d’uso (Fig. 5)
Riempite la bacinella con acqua attraverso l’apposito foro
fino al livello indicato (MAX WATER LEVEL), prestando attenzione a non superarlo: l’inserimento dell’acqua in quantità superiore a quella necessaria, comporterà una tale formazione di ghiaccio che potrebbe ostacolare la fuoriuscita
dei ghiaccioli.
Nel caso in cui abbiate utilizzato una quantità eccessiva di
liquido, bisognerà attendere che il ghiaccio si sciolga, svuotare la bacinella, e ripetere l’operazione di carico.
Una volta effettuata l’operazione di carico attraverso il foro
indicato, ruotate la bacinella di 90°. Per il principio dei vasi
comunicanti l’acqua va a riempire le apposite forme,
dopodichè si potrà chiudere il foro con l’apposito tappo ed
allocare la bacinella nella controporta.
Fig. 5
I
6
Page 9
Guida all'utilizzo del reparto freezer
Carni e pesci
Tipo Confezionamento
Arrosto e bollito di
manzo
Agnello Avvolto in foglio di alluminio 1 / 2 6 Non necessario
Arrosto di maiale Avvolto in foglio di alluminio 1 6 Non necessario
Arrosto e bollito di
vitello
Bistecche e braciole
di maiale
Fettine e cotolette di
agnello o manzo
Carne macinata
Cuore e fegato In sacchetti di politene 3 Non necessario
Avvolto in foglio di alluminio 2 / 3 9 / 10 Non necessario
Avvolto in foglio di alluminio 1 8 Non necessario
Ogni fetta avvolta in politene e quindi in
foglio di alluminio in numero di 4-5
Ogni fetta avvolta in politene e quindi in
foglio di alluminio in numero di 4-5
In contenitori di alluminio ricoperti con
politene
Frollatura
(giorni)
Freschissi-
ma
Conservazione
(mesi)
6 Non necessario
6 Non necessario
2 Lentamente in frigorifero
Scongelamento
Salsicce In fogli di politene o alluminio 2 A seconda dell’uso
Polli e tacchini Avvolti in fogli di alluminio 1 / 3 9 Lentamente in frigorifero
Anatre e oche In fogli di alluminio 1 / 4 6 Lentamente in frigorifero
Anatre selvatiche,
fagiani e pernici
Conigli e lepri In fogli di alluminio 3 / 4 6 Lentamente in frigorifero
Cervo e capriolo In fogli di alluminio o politene 5 / 6 9 Lentamente in frigorifero
Pesci grossi In fogli di alluminio o politene 4 / 6 Lentamente in frigorifero
Pesci piccoli In buste di politene 2 / 3 Non necessario
Crostacei In buste di politene 3 / 6 Non necessario
Molluschi
Pesci cotti In fogli di alluminio o politene 12 In acqua calda
In fogli di alluminio 1 / 3 9 Lentamente in frigorifero
In contenitori di alluminio o plastica
ricoperti con acqua e sale
3 Lentamente in frigorifero
Pesci fritti In sacchetti di politene 4 / 6 Direttamente in padella
7
I
Page 10
Frutta e verdura
Tipo Preparazione
Mele e pere
Albicocche, pesche,
ciliege e prugne
Fragole, more e
mirtilli
Frutta cotta
Succhi di frutta
Cavolfiori
Cavolo e cavolini
Piselli Sbucciare e lavare 2’ In sacchetti di politene 12 Non necessario
Fagiolini
Sbucciare e tagliare a
pezzetti
Snocciolare e pelare 1’ / 2’
Pulire, lavare e lasciare
asciugare
Tagliare, cuocere e
passare
Lavare, tagliare e
schiacciare
Spezzettare e scottare
in acqua e succo di
limone
Pulire e lavare
(spezzettare)
Lavare e tagliare a
pezzetti
Scottatura
(min)
2’
2’ In sacchetti di politene 12 Non necessario
1’ / 2’ In sacchetti di politene 10 / 12 A temperatura ambiente
2 In sacchetti di politene 10 / 12 Non necessario
Confezionamento
In contenitori ricoperti di
sciroppo
In contenitori ricoperti di
sciroppo
In contenitori ricoperti di
zucchero
In contenitori,
aggiungere 10% di
zucchero
In contenitori, zucchero
a piacere
Conservazione
(mesi)
12 Lentamente in frigorifero
12 Lentamente in frigorifero
10 / 12 Lentamente in frigorifero
12 Lentamente in frigorifero
10 / 12 Lentamente in frigorifero
Scongelamento
Carote, peperoni e
rape
Funghi e asparagi Lavare e tagliare 3’ / 4’ In sacchetti o contenitori 6 A temperatura ambiente
Spinaci Lavare e tagliuzzare 2’ In sacchetti di politene 12 A temperatura ambiente
Verdure varie per
minestra
Cibi vari Preparazione Scottatura Confezionamento
Pane In sacchetti di politene 4
Torte In fogli di politene 6
Panna In contenitori di plastica 6
Burro
Cibi cotti,
minestrone
Tagliare a fette,
pelare, lavare
Lavare e tagliare a
pezzetti
3’ / 4’ In sacchetti di politene 12 Non necessario
3’
In sacchetti in piccole
porzioni
Nel suo incarto originale
avvolto in alluminio
Suddiviso in contenitori
di plastica o vetro
6 / 7 A temperatura ambiente
Conservazione
(mesi)
6 In frigorifero
3 / 6
Scongelamento
A temperatura ambiente o
nel frigorifero
A temperatura ambiente e
cuocere a 100/200°C
A temperatura ambiente o
nel frigorifero
A temperatura ambiente e
in acqua calda
Uova
I
Congelare senza guscio
in piccoli contenitori
8
10
A temperatura ambiente o
nel frigorifero
Page 11
Consigli per risparmiare
- Installatelo bene
E cioè lontano da fonti di calore, dalla luce diretta del sole,
in un locale ben aerato e con le distanze indicate nel paragrafo "Installazione/L'aerazione".
- Il freddo giusto
Il troppo freddo fa aumentare i consumi
- Non riempitelo troppo
Per conservare bene i cibi il freddo deve circolare liberamente all’interno del frigorifero. Riempirlo troppo significa im-
pedire questa circolazione facendo lavorare di continuo il
compressore.
- A porte chiuse
Aprite il vostro frigorifero il meno possibile perché ogni volta
che lo fate va via gran parte dell’aria fredda. Per ristabilire la
temperatura il motore deve lavorare a lungo consumando
molta energia.
Allarmi sonori e visivi
Allarme per porta aperta
Nel caso in cui la porta del frigorifero rimane aperta per un
tempo superiore ai due minuti viene emesso un segnale acustico. Il suono cessa alla chiusura della porta.
Allarme per riscaldamento anomalo del
freezer
1. Per segnalare un eccessivo riscaldamento del freezer vie-
ne emesso un segnale acustico ed iniziano a lampeggiare
le due spie gialle "C" e "E" a segnalare un pericoloso
riscaldamento. Per non far ricongelare il cibo, il freezer si
manterrà ad una temperatura intorno a 0°C, permettendovi di consumare gli alimenti entro le 24 ore o di
ricongelarli previa cottura. Tramite l'apposita procedura
di tacitazione allarme (aprire e chiudere la porta del frigo)
si può spegnere il segnale acustico. Per tornare al normale funzionamento si dovrà invece portare la manopola
del freezer "F" nella posizione " " (frigorifero spento) e
successivamente riaccendere il prodotto.
- Occhio alle guarnizioni
Mantenetele efficienti e pulite in modo che aderiscano bene
alle porte; solo così non lasceranno uscire nemmeno un po’
di freddo.
- Niente cibi caldi
Una pentola calda messa nel frigorifero alza immediatamente
la temperatura di diversi gradi, lasciatela raffreddare a temperatura ambiente prima di introdurla nel frigorifero.
- Brina nel freezer
Controllate lo spessore della brina sui ripiani del freezer ed
effettuate subito lo sbrinamento se lo strato è diventato troppo spesso (Vedi più avanti “Come tenerlo in forma”).
2. Se la temperatura continua a salire verso valori eccessiva-
mente alti viene emesso nuovamente il segnale acustico
ed iniziano a lampeggiare le due spie gialle "C" e "E"
insieme a quella verde "D" a segnalare l'eccessivo riscaldamento. Si consiglia di verificare lo stato del cibo, potrebbe essere necessario gettarlo. In ogni caso il cibo non
va ricongelato se non dopo cottura. Per non far ricongelare
il cibo, il freezer verrà mantenuto ad una temperatura
intorno a 0°C. Tramite l'apposita procedura di tacitazione
allarme (aprire e chiudere la porta del frigo) si può spegnere il segnale acustico. Per tornare al normale funzionamento si dovrà invece portare la manopola del freezer
"F" nella posizione " " (frigorifero spento) e successivamente riaccendere il prodotto.
Riscaldamento
pericoloso
+ segnale acustico
+ segnale acustico
9
Riscaldamento
eccessivo
I
Page 12
Come tenerlo in forma
Prima di procedere a qualsiasi operazione di pulizia o
sbrinamento staccare l'apparecchio dalla rete di alimentazione (posizionare su " " la manopola "F" e poi
disinserire la spina). Nel caso in cui tale procedura non
sia eseguita, si potrebbe verificare una condizione di
allarme. ATTENZIONE: tale allarme non è sintomo di
anomalia. Per ripristinare il corretto funzionamento del
prodotto portare la manopola "F" nella posizione " "
e successivamente nella posizione voluta.
Sbrinamento
ATTENZIONE: non danneggiare il circuito refrigerante.
Fare attenzione a non usare dispositivi meccanici o altri utensili per accelerare il processo di sbrinamento,
oltre a quelli raccomandati dal costruttore.
Come sbrinare il reparto frigorifero.
Questo apparecchio ha lo
sbrinamento automatico e
l’acqua viene convogliata verso la parte posteriore da un apposito scarico (fig. 6) dove il calore prodotto dal compressore
la fa evaporare. L’unico inter-
vento che dovete fare periodicamente consiste nel pulire il
foro di scarico affinché l’acqua
passi regolarmente.
Come sbrinare lo scomparto congelatore
- Eliminate ogni tanto la brina con l’apposito raschietto in
dotazione (niente coltelli od oggetti metallici).
- Se la brina ha superato i 5 mm bisogna fare un vero e proprio
sbrinamento. Procedete così: un giorno prima premere il pulsante di congelamento "G" fino all'accensione della lampada
gialla "E"; serve a dare agli alimenti un salutare “colpo di
freddo” in più. Dopo 24 ore la funzione di congelamento si
disinserisce automaticamente ma potete disinserirla voi premendolo di nuovo il pulsante. Portate la manopola del termostato "F" nella posizione " ". ATTENZIONE: questa operazione spegne tutto l'apparecchio (reparto frigorifero compreso).
Avvolgete tutti i surgelati e i congelati in carta da giornale mettendoli o in un altro frigorifero o in un luogo fresco. Lasciate
aperta la porta in modo che la brina si sciolga del tutto, aiutandola con dei contenitori pieni di acqua tiepida.
L'apparecchio è dotato di un
apposito sistema che permette la raccolta dell'acqua di
sbrinamento in un contenitore da porre sotto l'apparecchio
(agire come illustrato nella figura 7).
Pulire ed asciugare con cura prima di riavviare l'apparecchio.
Ricordatevi che il motore
non parte immediatamente
ma dopo circa 8 minuti.
Fig. 6
Fig. 7
Pulizia e manutenzioni particolari
FUNZIONE VACANZE. Quello delle muffe e cattivi odori che si formano all'interno del frigorifero spento quando si parte per le vacanze, non è più un problema: basta attivare la funzione Holiday (posizionando opportunamente la manopola "B"). In questo modo, con un
basso consumo, si mantiene la temperatura nel vano
frigo nell'intorno di 15°C (potete conservare ad esempio trucchi e cosmetici) e si lascia funzionare il congelatore al minimo, indispensabile
per la conservazione dei cibi.
Un doppio breve segnale acustico vi confermerà l'attivazione
della funzione, mentre la
disattivazione sarà indicata da
uno singolo.
Prima di pulire il frigorifero posizionare su " " la manopola "F" e successivamente disinserire la spina.
- I materiali con i quali è stato fabbricato il vostro apparecchio sono igienici e non trasmettono odori ma per mantenere queste qualità è necessario che i cibi vengano sempre
protetti e ben chiusi, per evitare macchie difficilmente rimovibili o la creazione di cattivi odori.
- Solo acqua e bicarbonato. Per pulire sia l’interno che l’ester-
no usate una spugnetta con acqua tiepida e bicarbonato di
sodio che, tra l’altro, è anche un buon disinfettante. Se non
l’avete in casa potete impiegare del sapone neutro (quello
di Marsiglia ad esempio).
- Cosa non usare. Mai abrasivi, mai candeggina, mai ammoniaca. Proibitissimi i solventi e altri prodotti simili.
- Tutto ciò che si può togliere, mettetelo a bagno in acqua
calda con sapone o detersivo per i piatti. E prima di rimetterlo a posto, risciacquatelo e asciugatelo bene.
- E per il retro? Qui la polvere si ferma e si concentra provocando qualche problema al buon funzionamento dell’appa-
recchio. Usate la bocchetta lunga del vostro aspirapolvere,
alla potenza media per eliminarla. E con molta delicatezza!
- Quando sta fermo a lungo. Se decidete di fermare il frigorifero durante il periodo estivo, bisogna pulire l’interno e lasciare
le porte aperte.
- Per sostituire la lampada di illuminazione dello scomparto
frigorifero staccate l'apparecchio dalla rete di alimentazione
e cambiate la lampada avariata con un'altra di potenza non
superiore a 15 W operando come illustrato in figura 8.
Fig. 8
I
10
Page 13
C'è qualche problema?
La spia verde non si accende
Avete controllato se:
· l’interruttore generale dell’appartamento è disinserito;
· la spina non è correttamente inserita nella presa di corren-
te;
· la presa non è efficiente; provate a collegare la spina ad
un'altra presa del locale.
Il motore non parte
Avete controllato se:
· sono trascorsi 8 minuti dopo l’accensione?
Questo modello, infatti, è dotato di un controllo salvamotore
che lo fa avviare solo dopo circa 8 minuti dall’accensione.
Le spie sono debolmente accese
Provate a invertire la spina nella presa, ruotandola
Il frigorifero e il congelatore raffreddano poco
Avete controllato se:
· le porte non chiudono bene o le guarnizioni sono rovinate;
· le porte vengono aperte molto spesso;
· le manopole di regolazione della temperatura non sono in
posizione corretta;
· il frigorifero o il congelatore sono stati riempiti eccessivamente.
Sul fondo del frigorifero c'è dell'acqua
Avete controllato se:
· Il foro dello scarico dell'acqua di sbrinamento è otturato
Se, nonostante tutti i controlli, l’apparecchio non funziona e
l’inconveniente da voi rilevato continua ad esserci, chiamate
il Centro di Assistenza più vicino, comunicando queste informazioni: il tipo di guasto, la sigla del modello (Mod.) e i
relativi numeri (S/N) scritti sulla targhetta delle caratteristiche posta in basso a sinistra, accanto alla verduriera (vedi
esempi nelle figure seguenti).
75
Test
P.S-I.
TI
Net
Util
Utile
Pressure
HIGH-235
LOW 140
RG 2330
Mod.
220 - 240 V- 50 Hz 150 W
340
Total
Gross
Bruto
Brut
Compr.
Syst.
Kompr.
Made in Italy 13918
Gross
Bruto
Brut
R 134 a
kg 0,090
Non ricorrete mai a tecnici non autorizzati e rifiutate
sempre l’installazione di pezzi di ricambio non originali.
93139180000 S/N 704211801
Cod.
Gross
Bruto
Brut
W
Fuse
A
Freez. Capac
Poder de Cong
kg/24 h
4,0
Max 15 w
Class
Clase
N
Classe
Nel frigorifero gli alimenti si gelano troppo
Avete controllato se:
· la manopola di regolazione della temperatura non è in
posizione corretta;
· gli alimenti sono a contatto con la parte posteriore, la più
fredda.
Il motore funziona di continuo
Avete controllato se:
· l'interruttore di congelamento è stato premuto (lampada
gialla accesa o lampeggiante);
· la porta non è ben chiusa o è stata aperta di continuo;
· la temperatura esterna è molto alta;
· lo spessore della brina supera i 2-3 mm.
L’apparecchio emette troppo rumore.
Avete controllato se:
· Il frigorifero non è posto ben in piano:
· è stato installato tra mobili o oggetti che vibrano ed emet-
tono rumori;
· il gas refrigerante interno produce un leggero rumore anche quando il compressore è fermo (non è un difetto).
11
I
Page 14

I
12
Page 15

Safety - a good habit to get into.
ATTENTION
Read your manual carefully since it contains instructions
which will ensure safe installation, use and maintenance of
your appliance.
Your Refrigerator is built to International safety standards
(EN60) ans has been awarded the European approval mark
(IMQ) for compliance with UK electrical safety requirements.
It also meets the EC standards on the prevention and elimination of readio interference (EC directive 87/308 - 02.06.89).
1. This appliance must not be installed outdoors - not even in
an area protected by a roof. It is extremely dangerous to leave
it exposed to rain or storms.
2. It must only be used by adults and exclusively to refrigerate
and freeze foodstuffs, following the instructions for use contained in this manual.
3. Do not ever touch or handle the appliance with bare feet or
with wet hands or feet.
4. It is highly recommended that you do not use extension cords
or multiple socket adapters. If the refrigerator is installed between cabinets, make sure that the cord is not bent or dangerously pinched or compressed.
5. Never pull on the cord or the refrigerator to remove the plug
from the wall socket - this is very dangerous.
6. Never touch the cooling components within the appliance,
especially with wet hands because this could result in injury.
Never put ice cubes just removed from the freezer into your
mouth because they could stick to your mouth and cause burns.
7. Do not carry out any cleaning or maintenance operations
without first having disconnected your appliance from the mains
power supply (by unplugging it or turning off the cut-out switch
in your home); turning the thermostat knob to " " is not
enough to eliminate all electric contacts.
8. Before having your old refrigerator picked up for disposal,
remove or make inoperable any locking devices to prevent children who might play in or around the appliance from being
locked inside.
9. Before calling for service/assistance in the case of malfunction, consult the chapter entitled “Is There a Problem? to determine whether it is possible to eliminate the problem. do not try
to repair the problem by trying to access the internal components of the appliance.
10. If damaged, the power supply cord on this appliance must
necessarily be replaced by our service centre because special
tools are required for replacement.
11. Do not use electric appliances inside the compartment for
food storage, if these are not those recommended by the
manufacturer.
12. At the end of the functional life of your appliance –
containing cyclopentane gas in the insulation foam and perhaps
gas R600a (isobutane) in the refrigeration circuit – the latter
should made safe before being sent to the dump.
For this operation, please contact your dealer or the Local
Organisation in charge of waste disposal.
Installation
Proper installation of the appliance is essential to ensure the best and most efficient performance of your
appliance.
Ventilation
The compressor and condenser generate heat and, therefore, need to be ventilated properly. Rooms with less than
perfect ventilation are not very suited for installation of the
appliance. Therefore, it should be installed in a room with
an opening (window or French window) that provide the
appropriate amount of air re-circulation. It is also important
that the room not be too humid.
During installation, make sure not to cover or obstruct the
grates that allow for proper ventilation of the appliance.
For proper ventilation of the appliance, you must leave:
- a space of at least 10 cm between the top part and any
cabinets above it;
- a space of at least 5 cm between the sides of the appliance
and any adjacent cabinets/walls.
Away from Heat
Avoid positioning the appliance in a place where it is directly
exposed to sunlight or near an oven, cook top or the like.
Levelling
The floor should be perfectly level; if not, you can adjust the
feet at the front of the appliance.
Earthing
Before making the electrical connection, check that the voltage shown on the data plate, that you will find on the bottom left hand side of the appliance next to the crisper, corresponds to that of your home and that the socket is earthed
in compliance with all current electrical regulations. If the
system is not earthed, the manufacturer declines all liability
for consequent damages or losses. Do not use adapters or
multiple sockets.
Position the appliance in such a way that you can access
the socket where it is plugged in.
Check the power load
The electrical socket must support the maximum power load
of the appliance shown on the data plate (on the bottom
left hand side of the appliance next to the crisper).
Before plugging the appliance to the mains
Stand the appliance upright and wait at least 3 hours before
plugging the appliance into the mains to ensure proper performance.
13
GB
Page 16
Close-up view
Quick cool button
A
Press it (yellow indicator light "C" comes on)
to lower the temperature of the refrigerator
compartment to its minimum setting.
Temperature regulator knob for the fridge
B
compartment
This knob allows you to adjust the
fridge temperature to different
positions;
the fridge is switched off;
1 minimum refrigeration setting;
5 maximum refrigeration setting.
optimal temperature at low
consumption levels;
Holiday function enabled.
Quick cool yellow indicator light
C
This yellow indicator light comes on when
the quick cool is enabled by pressing button
"A".
Rapid freezing button
G
Press it (yellow indicator light "E"
comes on) to freeze fresh food.
Removable lidded shelf
H
Butter dish
I
Beverage can shelves
J
Intermediate shelves
K
Removable door shelf for bottles
L
Ice tray
M
Green indicator light
D
When this green indicator light is on, it
indicates that the appliance is connected to
the electricity network.
Rapid freezing indicator light
E
This yellow indicator light comes on when
you press the rapid freezing button "G".
Note: these three indicator lights also signal an abnormal
increase in the temperature of the freezer compartment
(see "Alarm buzzers and visual warnings" paragraph).
Temperature regulator knob for the freezer
F
compartment
This knob allows you to adjust the freezer
temperature to different positions:
the fridge and freezer are switched off;
1 minimum refrigeration setting;
5 maximum refrigeration setting.
optimal temperature at low consumption levels;
Adjustable feet
N
Compartment for storing frozen foods
O
Compartment for freezing fresh foods and
P
storing frozen foods
Fruit and Vegetable Crisper
Q
"Fresh box" compartment for meat and fish
R
Sliding box for cheese and cold cuts
S
Removable/Adjustable Shelves
T
"A.I.R." Sysrem
U
(Ariston Integrated Refrigeration)
Remember that you can also interrupt the operation
of the whole appliance (fridge included) by setting
the knob to position " ".
GB
14
Page 17

U
T
S
R
Q
A
B C
D
E
F G
H
J
K
L
I
P
O
15
WATER LEVEL
MAX
WATER LEVEL
MAX
M
NN
GB
Page 18

How to Start the Appliance
NOTICE
After the appliance has been delivered, stand it in the
upright position and wait approximately 3 hours before connecting it to the electrical outlet to guarantee
that it operates properly.
Before placing foodstuffs in the refrigerator or freezer, clean
the interior well with warm water and baking soda.
Motor protection delay
This model is provided with a motor protection control
system. Therefore, if the compressor does not start
immediately upon installation, do not worry as it will
start automatically after approximately 8 minutes.
This is also what will happen every time the power
supply is interrupted, both due to a power failure or
should you switch it off yourself (to clean or defrost
your freezer, for example).
After having plugged the appliance in, make sure that pilot
lamp "D" is lit. If not, make sure that the freezer knob "F" is not
on position "
Refrigerator compartment
Set knob "B" onto a medium position and you can place
food in the fridge after only a few hours.
Freezer compartment
Set knob "F" to a medium position and press the rapid
freezing button "G" (indicator light "E" will come on and a
temperature of -35°C will appear on the freezer display).
When the freezer has reached the optimum temperature,
yellow indicator light "E" will come off. Now you can place
frozen food in the freezer.
".
How to use the refrigerator compartment...
The thermostat automatically regulates the temperature inside the appliance
1 = less cold
5 = colder
It is recommended that a medium setting be used.
The refrigerator compartment of your appliance is equipped with
"Aircooler" which makes it possible to achieve optimal food
storage while simplifying the use of the refrigerator thanks to
the following features:
- Fast temperature reset: after the doors heve been opened,
the internal temperatures return to optimal values faster,
improving food storage.
- More uniform temperature distribution: this makes it
possible to place any type of food on any shelf.
- Higher humidity level: this allows you to store food longer.
Remember to follow our instructions on the storage life of
foods: If not stored correctly, even the freshest food will
deteriorate quite quickly.
Contrary to popular belief, cooked foods do not keep longer
than fresh food.
The refrigerator compartment of your appliance is fitted with
practical removable shelves (Fig. 1) whose height can be
adjusted to allow storage of large containers. This shelves
can also be tilted for storage of opened bottles.
Remember to cool hot food before storing otherwise the
temperature inside the appliance will increase, causing the
compressor to work harder and use more energy.
Do not store liquids in unsealed containers since this will
increase the humidity and lead to the formation of frost in
the refrigerator.
B
A
A - Blown air which is cooled when it comes into contact
with the refrigeration panel
B - Hotter air is drawn in
When the fridge compartment is filled up after a heavy
shopping spree, use the Quick Cool function (press button
"A" to enable it) in order to reach optimum operating
conditions quickly. Once the necessary time has elapsed, the
function is disabled automatically.
B
B
A
GB
1
2
Fig. 1
16
Page 19

To use the cold cuts/cheese box, unhook it and remove it
from the shelf. To optimise space according to your needs,
the same can be moved laterally (Fig. 2).
The can rack (Fig. 3) on the inner door allows you to store
not only cans, but also yoghurt, butter and other containers,
according to your requirements.
Using the "Fresh box" compartment for meat
and fish
This compartment was designed to allow for longer
preservation times for fresh meat and fish (for as long as a
week).
This is possible as the coldest temperature of the entire fridge
is available inside this specific compartment.
The clear protective door to open the compartment avoids
any oxidation or blackening to occur, which are typical of
meat and fish when exposed to air.
Moreover, the "Fresh box" compartment can also be used
to cool dishes that are normally eaten "cold", such as melon
and Parma ham, figs and ham, mozzarella and tomatoes.
Fig. 2
Fig. 3
How to use the freezer compartment...
For the preparation of food to be frozen, please consult a specialized manual.
Food that has be thawed, even partially, must not be refrozen: you must cook it in order to consume it (within 24
hours) or to freeze it once again.
When freezing fresh foods, remember that they should not
touch other previously frozen or deep frozen foods. Place
the food that you wish to freeze in the top compartment
"Q" where the temperature will fall below -18°C, which is
ideal for freezing food properly. Remember that proper conservation depends on the speed of freezing.
The maximum amount of food you can freeze per day is
indicated on the data plate situated inside the refrigerator
compartment.
The first time, or after the freezer has been inactive, you can
only freeze food after having let the appliance function at
maximum.
When the appliance is already on, freezing can be done in
two ways:
1. for small quantities, less than the maximum capacity
indicated on the data plate, just press the freezing button
“G” (yellow lamp “E” lit) and insert the food to be frozen.
After 24 hours, or once the optimum temperatures have
been reached, the rapid freezing function will switch itself
off automatically (yellow lamp “E” off).
2. For large quantities of food to be frozen (up until the
maximum load indicated on the data plate), keep the freezing
button “G” pressed down until the yellow lamp starts flashing
quickly. After 24 hours, the yellow lamp will stop flashing
(permanently lit); you can now insert the food to be frozen.
After 24 hours, the button will switch itself off automatically
(yellow lamp off).
During the freezing process, avoid opening the door of the
freezer.
In order to freeze and then thaw foods optimally, it is recommended that you divide food into small portions so that
they freeze quickly and uniformly. The packages should be
clearly marked with the content and the date they were
frozen.
In order to obtain a larger amount of space in the freezer
compartment, you can remove the central drawer, and place
the food directly onto the evaporator plate. Make sure that,
after having inserted the load, the door closes correctly.
Do not open the freezer door in the event of a power failure
or malfunction. This precaution will slow the rise in temperature within the compartment. If the door is not opened,
frozen and fast-frozen foods will remain in their current state
for approximately 9-14 hours.
Do not place full bottles in the freezer: they could easily
burst because all liquids increase in volume when they freeze.
17
GB
Page 20

Ice trays
This new concept of ice trays is an exclusive Merloni patent.
The fact that they are situated on the inner door of the
freezer compartment ensures greater ergonomics and
cleanliness: the ice no longer comes into contact with the
food placed inside the freezer compartment; furthermore,
the dripping of the water during filling is avoided (a lid to
cover up the hole after filling with water is also provided).
To remove the ice trays from
their housings, push the tray
upwards and then pull it out
(fig. 4). To put the tray back
in place, insert the top part
into the special housing and,
once in a vertical position,
just let it drop into place.
Once the ice has formed, all you need to do is to knock the
tray against a hard surface so that the ice cubes come away
from their housing and come out of the same hole used to
fill the tray with water. To make it easier for the ice cubes to
come out, wet the outside of the tray.
WARNING: every time you fill up the ice tray with water ,
make sure that the same is completely empty and that there
are no traces of ice left inside it.
The minimum time required for ice to form well is
approximately 8 hours.
WATER LEVEL
MAX
MAX
WATER LEVEL
Fig. 4
Instructions for use (Fig. 5)
Fill up the tray with water via the special hole up to the level
indicated (MAX WATER LEVEL), taking care not to exceed it:
inserting more water than is necessary will lead to the
formation of ice which could obstruct the exit of the ice cubes.
If you have used an excessive amount of water, you will have
to wait until the ice has melted, empty out the tray and re-fill
it with water.
Once you have filled the ice tray up with water through the
hole indicated, turn it by 90 °. Thanks to the connected
compartments, the water fills up the special shapes, after
which you can cover the hole up with the special cap and
place the ice tray in the inner door of the freezer
compartment.
Fig. 5
GB
18
Page 21

Guide to Using the Freezer
Meat and Fish
Food Wrapping
Beef Roast Tinfoil 2 / 3 9 / 10 Not required.
Lamb Tinfoil 1 / 2 6 Not required.
Pork Roast Tinfoil 1 6 Not required.
Veal Roast Tinfoil 1 8 Not required.
Veal/Pork Chops
Veal/Lamb Cutlets
Minced Meat
Heart and Liver Plastic Baggies 3 Not required.
Each piece wrapped in cling wrap and then
in tinfoil (4 to 6 slices)
Each piece wrapped in cling wrap and then
in tinfoil (4 to 6 slices)
In aluminium containers covered with cling
wrap.
Tenderising
(days)
Freshly
minced
Storage
(months)
6 Not required.
6 Not required.
2 Slowly in refrigerator.
Thawing Time
Sausages Cling Wrap or Tinfoil 2 As necessary.
Chicken and Turkey Tinfoil 1 / 3 9 Very slowly in refrigerator.
Duck and Goose Tinfoil 1 / 4 6 Very slowly in refrigerator.
Pheasant, Partrige and
Wild Duck
Hare and Rabbit Tinfoil 3 / 4 6 Very slowly in refrigerator.
Venison Tinfoil or Cling Wrap 5 / 6 9 Very slowly in refrigerator.
Large Fish Tinfoil or Cling Wrap 4 / 6 Very slowly in refrigerator.
Small Fish Plastic Baggies 2 / 3 Not required.
Crustaceans Plastic Baggies 3 / 6 Not required.
Shellfish
Tinfoil 1 / 3 9 Very slowly in refrigerator.
Store in salted water in aluminium
containers or plastic containers.
3 Very slowly in refrigerator.
Boiled Fish Tinfoil or Cling Wrap 12 In hot water.
Fried Fish Plastic Baggies 4 / 6 Directly in pan.
19
GB
Page 22

Fruits and Vegetables
Food Preparation
Apples and Pears Peel and cut into slices. 2’
Apricots, Peaches,
Cherries and Plums
Strawberries
Blackberries and
Raspberries
Cooked Fruit Cut, cook and strain.
Fruit Juice Wash, cut and crush.
Cauliflower
Cabbage and Brussel
Sprouts
Peas Shell and wash. 2’ Plastic Baggies 12 Not required.
Peel and pit. 1’ / 2’
Rinse and fry.
Remove leaves, cut head into
small pieces and blanch in
water and a little lemon
juice.
Wash and cut into small
pieces.
Blanching
Time
2’ Plastic Baggies 12 Not required.
1’ / 2’ Plastic Baggies 10 / 12 At room temperature.
Wrapping
In Containers (cover
with syrup)
In Containers (cover
with syrup)
In Containers (cover
with sugar)
In Containers (add
10% sugar)
In Containers (sugar
to taste)
Storage
(months)
12
12
10 / 12
12
10 / 12
Thawing Time
In refrigerator very
slowly.
In refrigerator very
slowly.
In refrigerator very
slowly.
In refrigerator very
slowly.
In refrigerator very
slowly.
French Beans Wash and slice if required. 2 Plastic Baggies 10 / 12 Not required.
Carrots, Peppers and
Turnips
Mushrooms and
Asparagus
Spinach Wash and mince. 2’ Plastic Baggies 12 At room temperature.
Vegetable for Soups
Various Foods Preparation
Bread Plastic Baggies 4
Cakes Plastic Baggies 6
Cream Plastic Containers 6
Butter
Peel, wash and slice if
necessary.
Wash, peel and cut up. 3’ / 4’
Wash and cut up in small
pieces.
3’ / 4’ Plastic Baggies 12 Not required.
3’
Blanching
Time
Plastic Baggies or
Containers
Plastic Baggies or
Containers
Wrapping
In original wrapping
or tinfoil
6 At room temperature.
6 / 7 Not required.
Storage
(months)
6 In refrigerator.
Thawing time
At room temperature
and in the oven.
About 10 minutes at
room temperature, cook
at 100/200°C.
At room temperature or
in refrigerator.
Boiled Food or
Vegetable Soup
Eggs
GB
Plastic or Glass
Containers
Freeze without shells
in small containers
20
3 / 6
10
At room temperature or
in hot water.
At room temperature or
in refrigerator.
Page 23

Tips on Saving Energy
- Install it well
And therefore far from heat sources, from direct sunlight, in
a well aired place and according to the distances indicated
in the section on "Installation/Aeration".
- Just the right cold
Too cold a compartment increases energy consumption.
- Do not Overfill
To conserve food properly, the cold air must circulate freely
within the refrigerator. If it is overfilled, this will prevent proper
air circulation, forcing the compressor to work continuously.
- Close the Doors
Open your refrigerator as little as possible because each time
you do so you loose much of the cold air. To raise the temperature to the proper level again, the motor must work for
a long time, consuming energy.
- Keep an Eye on the Seals
Keep the seals clean and make sure that they adhere well to
the door. This alone will ensure that no cold air escapes.
- No Hot Foods
A hot pot or pan placed in the refrigerator immediately raises
the temperature several degrees. Let hot cookware and food
cool to ambient temperature before placing them in the refrigerator.
- Defrost the Freezer
Check the thickness of the frost on the walls of the freezer
and immediately defrost it if the layer of frost is too thick.
(see the section entitled, “Keeping your Appliance in Shape”).
Alarm buzzers and visual warnings
Door open alarm
If the refrigerator door is left open for more than two
minutes, a buzzer will sound. The buzzer will stop sounding
when you shut the door.
Abnormal freezer heating alarm
1. To signal an excessive heating on the part of the freezer,
a buzzer will sound and the two yellow indicator lights
"C" and "E" will start flashing to indicate a dangerous
state of overheating. To prevent food from refreezing,
the freezer will try to maintain a temperature of 0°C, thus
allowing you to use up the food within 24 hour or to
refreeze it after cooking it. Using the special alarm
silencing procedure (open and shut the refrigerator door),
you can turn off the buzzer. To go back to normal
operating conditions, set the freezer knob "F" to position
" " (refrigerator off) and then turn the appliance back
on.
2. If the temperature inside the freezer continues to rise to
excessively high values, the buzzer will sound yet again
and the two yellow indicator lights "C" and "E" together
with the green one "D" will start flashing to indicate an
excessive heating. We recommend you check the
conditions of the food, as it may be necessary to throw it
away. In all cases, food should not be refrozen unless you
cook it first. To prevent food from refreezing, the freezer
will maintain a temperature of 0°C. Using the special alarm
silencing procedure (open and shut the refrigerator door),
you can turn off the buzzer. To go back to normal
operating conditions, set the freezer knob "F" to position
" " (refrigerator off) and then turn the appliance back
on.
+ buzzer
Dangerous
overheating
+ buzzer
21
Excessive
heating
GB
Page 24

Keeping Your Appliance in Shape
Prima di procedere a qualsiasi operazione di pulizia o
sbrinamento staccare l’apparecchio dalla rete di alimentazione (posizionare su “ ” la manopola “F” e poi
disinserire la spina). Nel caso in cui tale procedura non
sia eseguita, si potrebbe verificare una condizione di
allarme. ATTENZIONE: tale allarme non è sintomo di
anomalia. Per ripristinare il corretto funzionamento del
prodotto portare la manopola “F” nella posizione “ ”
e successivamente nella posizione voluta.
Defrosting
WARNING: do not damage the refrigeration circuit.
Do not use mechanical devices or other tools to speed
up the defrosting process, unless they have been recommended by the manufacturer.
How to Defrost the Refrigerator
This appliance defrosts automatically and the water is channeled to the back toward the drain installed for this purpose
(fig. 6). Here, the heat produced by the compressor will make
it evaporate. The only thing you must do is to periodically
check and clean the hole of the drain, which is located behind
the vegetable crispers, so that the water drains properly.
How to defrost the freezer compartment
- Remove the frost from time to time with the aid of the
special scraper provided (do not use knives or metal objects).
- If the frost is more than 5 mm thick, then you must defrost
the freezer completely. Proceed as follows: one day
beforehand, press the freezing button "G" until the yellow
lamp "E" comes on; it helps give the food a healthy extra
"cold shock". After 24 hours, the button switches itself off
automatically, yet you can switch it off yourself just be
pressing it again. Set the thermostat knob "F" on position
" ". WARNING: this operation switches off the whole
appliance (including the fridge compartment).
Wrap all frozen foods in newspaper and place them either
in another refrigerator or in a cool place. Leave the door
open, so as to allow all the frost to melt completely, helping
it along with containers filled with lukewarm water.
The unit is provided with a system which allows the defrost
water to be collected in a container to be placed beneath
the unit (proceed as illustrated in fig. 7).
Clean and dry thoroughly before restarting the appliance.
Remember that the motor will not start immediately,
but rather after approximately 8 minutes.
Cleaning and maintenance
HOLIDAY FUNCTION. Mould and bad odours forming
inside your unused fridge when you go on holiday need
no longer be a problem: just enable the Holiday
function (by setting knob "B" accordingly). This way,
with limited energy consumption, the temperature of
the refrigerator compartment is kept at around 15°C
(you can store your make up and beauty products in it,
for example) and the freezer is operated at its minimum
setting, which is essential for food preservation.
A brief double buzzer will sound
to confirm the function has been
enabled, whereas a single buzzer
indicates it has been disabled.
Prima di pulire il frigorifero posizionare su “ ” la manopola “F” e successivamente disinserire la spina.
- Your appliance is manufactured with hygienic odourless
materials. To preserve these characteristics, always use sealed
containers for strong smelling foods to avoid the formation
of odours that are difficult to remove.
- Use only a water and bicarbonate solution: Clean the
internal and exterior of your appliance with a sponge soaked
with a warm water and sodium bicarbonate solution, which
is also a good disinfectant. If you do not have any sodium
bicarbonate at home, use neutral detergent.
- What not to use: Do not use abrasive detergents, bleach or
detergents containing ammonia. Never use solvent based
products.
- All the removable parts can be cleaned by soaking in hot
soapy water or detergent. Remember to dry thoroughly
before replacing them.
- What about the back panel? Dust may deposit on the back
panel and affect the proper running of the appliance. To
remove dust, vacuum away the dust very carefully using the
appropriate vacuum cleaner accessory.
- When the appliance is left unused for an extended amount of
time. If you decide to switch your appliance off during the summer
months, clean it on the inside and leave the doors open.
- Replacing the light bulb.
When replacing the lamp, disconnect the appliance from
the mains, unscrew the burned out lamp and replace it with
another following the steps illustrated in figure 8. Make sure
that the wattage is not greater than 15W.
Fig. 6
GB
Fig. 7
Fig. 8
22
Page 25

Is There a Problem?
Green LED does not light up
Have you checked whether:
• The main switch for the electricity to the apartment or
home has been turned off;
• The plug is properly inserted in the outlet;
• The outlet is adequate; try inserting the plug into another
outlet in the room.
The motor does not start
Have you checked whether:
· 8 minutes have passed since you switched the appliance
on?
This model is in fact provided with a motor protection control
system which means that it will only start approximately 8
minutes after being switched on.
Warning lights are weak
Check that:
· Invert the plug in the outlet to see if this still happens.
The refrigerator and the freezer do not cool
properly.
Have you checked whether:
• The doors do not close well or the seals are faulty;
• The doors are left open too long;
• The thermostat knob is not on the proper setting;
• The refrigerator or freezer is overfilled.
The food in the refrigerator becomes too cold.
The appliance makes too much noise.
The gas refrigerant produces a slight noise even when the
compressor is not running (this is not a defect).
Have you checked whether:
• The refrigerator is level.
• The appliance was installed between cabinets or objects
that vibrate and make noise.
There is water on the bottom of the refrigerator.
Have you checked whether:
• The hole for draining the water from the frost is clogged.
If after all the checks, the appliance still does not operate or
the problem persists, call the nearest Service Centre and
inform them of: the type of problem, the abbreviation of
the model name (Mod.) and the relative numbers (S/N) written on the rating plate located at the bottom left next to
the vegetable crisper (see example in the figure below).
75
Test
P.S-I.
TI
Net
Util
Utile
Pressure
HIGH-235
LOW 140
RG 2330
Mod.
220 - 240 V- 50 Hz 150 W
340
Total
Gross
Bruto
Brut
Compr.
Syst.
Kompr.
Made in Italy 13918
Gross
Bruto
Brut
R 134 a
kg 0,090
93139180000 S/N 704211801
Cod.
Gross
Bruto
Brut
W
Fuse
A
Freez. Capac
Poder de Cong
kg/24 h
4,0
Max 15 w
Class
Clase
N
Classe
Have you checked whether:
• The thermostat knob is on the proper setting;
• The food is in contact with the back wall - which is the
coldest part.
The motor runs continuously.
Have you checked whether
· the freezer switch has been pressed (yellow lamp lit or
flashing);
• The doors are not closed well or have remained open too
long;
• The ambient temperature is too high;
• The thermostat knob is not on the proper setting.
Never call on unauthorized technicians and always
refuse spare parts which are not originals.
23
GB
Page 26

GB
24
Page 27

A segurança, um bom hábito
ATENÇÃO
Ler atentamente as advertências mencionadas neste livro de
instruções dado que fornecem importantes indicações relativas à segurança da instalação, à utilização e à manutenção.
Este aparelho foi concebido segundo as normas internacionais de segurança criadas fundamentalmente para a protecção do consumidor.
Na realidade, este aparelho obteve o certificado de homologação IMQ passado pelos técnicos do Instituto Italiano de
Qualidade, certificado que só é atribuido aos aparelhos que
cumpram as normas do CEI, Comitato Elettrotecnico Italiano.
1. Este aparelho não deve ser instalado ao ar livre, mesmo se a
área estiver protegida por uma cobertura; é muito perigoso
deixá-lo exposto à chuva e às intempéries.
2. Deve ser utilizado somente por adultos e exclusivamente
para conservar e congelar alimentos, de acordo com as
instruções de utilização contidas neste manual.
3. Nunca tocar nem manusear este aparelho com os pés descalços ou com as mãos ou os pés molhados.
4. Não é aconselhável a utilização de extensões e fichas múltiplas. Se o frigorífico for instalado entre móveis, controlar que o
cabo de alimentação não se dobre nem seja pressionado de
maneira perigosa.
5. Nunca puxar o cabo de alimentação nem o frigorífico para
soltar a ficha da tomada de parede : é muito perigoso.
6. Não tocar as partes internas de refrigeração, sobretudo com
as mãos molhadas, porque poderá sofrer queimaduras ou ferirse. Também não colocar na boca cubos de gelo recém retirados
do congelador porque podem provocar queimaduras.
7. Não limpar nem efectuar manutenção sem ter previamente
retirado a ficha da tomada; de facto não basta colocar o
manípulo para a regulação da temperatura na posição " "
para interromper todos os contactos eléctricos.
8. Antes de desfazer-se do seu velho frigorífico, desmontar o
seu fecho para evitar que crianças a brincar possam ficar
trancadas dentro do aparelho.
9. No caso de avaria, antes de chamar o serviço de assistência
técnica, controlar no capítulo “Há um problema” para verificar
se é possível resolver a eventual anomalia. Não tente proceder
à reparação, mexendo nas partes internas do aparelho.
10. No caso de dano, o cavo de alimentação eléctrica deste
aparelho deve ser trocado obrigatoriamente pelo nosso Serviço
de Assistência Técnica, porque é necessário utilizar ferramentas
especiais.
11. não use aparelhos eléctricos no interior do compartimento
para guardar alimentos, excepto os de tipo recomendado pelo
fabricante.
12, No final da vida útil do aparelho – que contém gás
ciclopentano na espuma de isolamento e eventualmente gás
R600a (isobutano) no circuito de refrigeração – é necessário
colocar o mesmo em segurança, antes de mandar eliminá-lo.
Para esta operação, entre em contacto com o seu revendedor
ou com o organismo local encarregado.
Instalação
Para garantir um bom funcionamento e um consumo
reduzido de electricidade é importante que a instalação seja efectuada correctamente.
A ventilação
O compressor e o condensador emitem calor e portanto precisam de uma boa ventilação. São pouco adequados os ambientes com ventilação imperfeita. Portanto o aparelho deve ser
instalado num ambiente dotado de uma abertura (janela ou
porta externa) para assegurar a necessária renovação de ar. O
ambiente também não deve ser demasiado húmido.
Ter cuidado, durante a instalação, para não cobrir ou obstruir
as grelhas que permitem a boa ventilação do aparelho.
Para uma boa ventilação do aparelho é preciso deixar :
- uma distância de pelo menos 10 cm. entre a sua parte superior e móveis que eventualmente encontrem-se acima;
- uma distância de pelo menos 5 cm. entre as suas laterais e
móveis e paredes que eventualmente encontrem-se aos lados.
Para uma instalação entre móveis, siga as indicações
do folheto anexo
Afastado do calor
Evitar de posicionar o aparelho num ligar directamente exposto à luz solar, ao lado do fogão eléctrico ou similar.
Nivelado
O aparelho deve ser instalado bem nivelado; se o piso não
for nivelado, é possível proceder com os apropriados pés
reguláveis anteriormente colocados.
Ligação eléctrica e ligação à terra
Antes de proceder à ligação eléctrica, controlar se a tensão
indicada na placa de características, colocada embaixo à esquerda, junto ao recipiente para verduras, corresponde a
tensão da instalação eléctrica da casa e se a tomada está
equipada com uma ligação à terra regular, na maneira
indicada pelas leis relativas à segurança das instalações N°.
46/90. Se não houver uma ligação à terra, o Fabricador declina toda e qualquer responsabilidade. Não utilizar fichas
múltiplas ou adaptadores. Posicione o aparelho de modo
que haja acesso à tomada em que estiver ligada.
A potência é insuficiente ?
A tomada eléctrica deve ser capaz de suportar a máxima carga
de potência do aparelho, indicada na placa de características,
colocada embaixo à esquerda, junto ao recipiente para verduras.
Antes da ligação eléctrica
Depois do transporte, colocar o aparelho verticalmente e
aguardar pelo menos 3 horas antes de ligá-lo na tomada,
para permitir o seu funcionamento correcto.
25
P
Page 28

Descrição do aparelho
Botão para congelamento rápido.
A
Se for pressionado (acende-se a luz
amarela "C"), possibilita abaixar ao
mínimo a temperatura no compartimento frigorífero.
B
Botão para a regulação da temperatura do
compartimento frigorífero
Este botão possibilita regular a temperatura do frigorífico em diversas
posições:
o frigorífico está desligado;
1 menos frio;
5 mais frio
Temperatura ideal com baixos consumos
Função férias activada.
Luz amarela de refrigeração rápida
C
Esta luz amarela acende-se quando for
activada a refrigeração rápida pressionado o
botão "A"
Botão para congelamento rápido
G
Se for carregado (acende-se a lâmpada amarela "E"), possibilita o congelamento de alimentos frescos.
Prateleira extraível com tampa
H
Manteigueira
I
Prateleira para enlatados
J
Prateleiras intermediarias
K
Prateleira para garrafas
L
Contenitores para a produção de gelo
M
Lâmpada verde
D
Quando estiver acesa indica que o aparelho
está ligado à rede de alimentação
E
Sinalizador de congelação rápida
Este indicador luminoso amarelo acende-se
quando for carregado o botão de congelamento rápido "G"
Observação: estas três luzes também servem para avisar
um aumento anormal da temperatura do compartimento
congelador (veja o parágrafo "Alarmes sonoros e visuais").
Manípulo para regulação da temperatura do
F
compartimento congelador
Este botão possibilita regular a temperatura
do congelador em diferentes posições:
o frigorífico e o congelador estão desli-
gados;
1 menos frio;
5 mais frio
Temperatura ideal com baixos consumos
Pezinhos de regulação
N
Compartimentos para a conservação
O
Compartimento que se utilizam para congelar
P
e a conservação
Gaveta para frutas e verduras
Q
Compartimento "Fresh box" para carnes e
R
peixe
Caixa corrediça para enchidos e queijos
S
Prateleiras extraíveis e de altura regulável
T
"A.I.R. System"
U
(Ariston Integrated Refrigeration)
Além disso, lembre-se que é possível interromper o
funcionamento do inteiro aparelho (inclusive o frigorífico) se o botão for colocado na posição " ".
P
26
Page 29

U
T
S
R
Q
A
B C
D
E
F G
H
J
K
L
I
P
O
27
WATER LEVEL
MAX
WATER LEVEL
MAX
M
NN
P
Page 30

Como pôr em funcionamento o aparelho
ATENÇÃO
Depois do transporte, colocar o aparelho verticalmente
e aguardar cerca de 3 horas antes de ligá-lo na tomada
eléctrica, para assegurar o seu bom funcionamento.
Antes de guardar alimentos no frigorífico ou no congelador,
limpar bem o seu interior com água morna e bicarbonato de
sódio.
Tempo de protecção do motor
Este modelo é dotado de um controlo de protecção do
motor, portanto se depois de ligado o compressor não
partir imediatamente, não se preocupe porque se
activará automaticamente depois de aproximadamente
8 minutos. Será assim depois de cada interrupção da
alimentação, quer por causa de um corte na rede, quer
desligue-o de propósito (por exemplo para limpeza ou
degelo do congelador).
Depois de ter ligado a ficha na tomada de corrente, certifique-se que o indicador luminoso verde "D" esteja aceso; se
não estiver, certifique-se que o botão do congelador "F"
não esteja na posição " ".
Compartimento frigorífero
Gire o botão "B" para a posição média e depois de algumas
horas será possível guardar alimentos no frigorífico.
Compartimento congelador
Gire o botão "F" para a posição média e carregue o botão
"G" do congelamento rápido (o indicador luminoso amarelo "E" acende-se). Nesta altura é possível guardar alimentos
congelados no congelador.
Como utilizar melhor o repartição frigorífica
O termostato regula automaticamente a temperatura dentro do aparelho.
1 = frio mínimo
5 = frio máximo
Entretanto é aconselhável uma posição intermediária.
A repartição frigorífica do seu aparelho está equipada com
um dispositivo
Refrigeration)
alimentos e um emprege simplificado do aparelho graças a:
- Ao restabelecinento rápido da temperatura: após a abertura
das portas as temperaturas alcançam antes os valores ideais
e os alimentos se conservam malhor.
- Uma distribuição homogénea da temperatura que permite
colocar as alimentos em qualquer prateleira.
- Um grau de umidade mais alto para poder conservar os
alimentos por mais tempo.
B
A - Ar soprado que se enfria em contacto com a parede
esfriante
B - Ar mais quente aspirada
"A.I.R. System" (Ariston Integrated
que permite uma ótima conservação dos
B
B
A
A
Quando o compartimento frigorífero for enchido depois de
muitas compras, utilize a função Refrigeração rápida
(activada se carregar no botão "A") para chegar rapidamente
a uma óptima condição de funcionamento. Depois que passar o tempo necessário, esta função se desactivará automaticamente.
Leia atentamente os nossos conselhos relativos ao tempo
máximo de conservação: qualquer alimento, mesmo que
muito fresco, não deve ficar muito tempo no frigorífico.
Contrariamente ao que se possa pensar, os alimentos cozinhados não se mantêm em bom estado de conservação mais
tempo que os alimentos crus.
O compartimento frigorífico está dotado de grelhas amovíveis
e reguláveis em altura, graças ao e inclinabili seu sistema de
guias (Fig. 1). Assim é possível arrumar no sea interior reservatórios grandes e garrafas de grandes dimenções assim
como alimentos de grande volume.
Só guarde no frigorífico alimentimentos frios ou, no máximo, alimentos tépidos; nunca coloque os alimentos enquanto
estiverem quentes: o aumento súbito da temperatura interna obrigará fortemente o consumo de energia eléctrica.
Não guarde os líquidos em
recipientes abertos porque
provocará o aumento da
humidade no interior do frigorífico e consequentemente
a formação de gelo.
2
P
Fig. 1
28
Page 31

Para utilizar a caixa de enchidos/queijos de pendurar, é
necessário tirá-la da prateleira. Para optimizar o espaço em
função das necessidades, esta caixa poderá ser deslocada
lateralmente (Fig. 2).
Há um porta latinhas (Fig. 3) na contra porta para guardar
não somente latinhas, mas também iogurte, manteiga e
outros recipientes, use-o como precisar.
Utilização do compartimento "Fresh box"
para carnes, peixe e queijo
Este compartimento foi concebido para possibilitar prazos
de conservação mais longos para carnes e peixe frescos (até
mesmo uma semana).
Isto é possível porque no interior deste compartimento há a
temperatura mais fria do inteiro frigorífico.
A portinhola transparente protectora do compartimento evita
fenómenos de oxidação ou de escurecimento, características
da carne e do peixe expostos à circulação de ar.
Além disso, o compartimento "Fresh box" também poderá
ser utilizado para esfriar pratos que normalmente são
comidos "frios"; como melão com presunto, figos com presunto, mozarela e tomate.
Fig. 2
Fig. 3
Como utilizar melhor o compartimento congelador
Para confeccionar alimentos a serem congelados, consulte um manual especializado.
Um alimento descongelado, ainda que só parcialmente, não
deve voltar a ser congelado: deverá cozinhá-lo para o consumir (dentro de 24 horas) ou para o congelar.
Os alimentos frescos a serem congelados não devem ser
colocados em contacto com os que já estão congelados mas
sim no compartimento superior "Q" onde a temperatura
desce abaixo dos -18°C, temperatura ideal para congelar
bem os alimentos. Não deve esquecer que a boa conservação dos alimentos congelados depende da rapidez com que
se processa a congelação.
A quantidade máxima quotidiana a ser congelada é indicada
na placa das características situada no interior do compartimento frigorífero.
A primeira vez que o ligar, ou depois que o congelador tiver
estado inactivo, é possível congelar alimentos somente depois de ter deixado o aparelho a funcionar no máximo e que
o indicador luminoso vermelho "B" tiver-se apagado.
Depois que o aparelho já estiver a funcionar, é possível congelar de duas maneiras:
1. para pequenas quantidades, inferiores à capacidade
máxima indicada na placa das características, é suficiente
carregar no botão de congelamento “D” (luz amarela “E”
acende-se) e guardar dento os alimentos a serem congelados.
Depois de 24 horas ou depois de chegar às temperaturas
ideais, a função de congelamento rápido activa-se automaticamente (luz amarela “E” apaga-se).
2. Para congelar grandes quantidades de alimentos (até a
carga máxima indicada na placa das características)
mantenha pressionado o botão de congelamento “G” até a
luz amarela “E” começar a piscar rapidamente. Depois de
24 horas a luz amarela deixará de piscar (luz acesa fixa);
nesta altura é possível guardar dentro os alimentos a serem
congelados. Depois de mais 24 horas o botão desactiva-se
automaticamente (luz amarela apagada).
Durante a congelação, evitar abrir a porta do congelador.
Para obter uma congelação e uma sucessiva descongelação
ideal é aconselhável separar os alimentos em pequenas porções porque assim congelam-se rapidamente e de maneira
homogénea. Nas confecções indicar o conteúdo e a data de
congelação.
A fim de obter um espaço maior no compartimento congelador, é possível tirar a gaveta central e guardar os alimentos directamente na chapa de evaporação. Verifique, depois
de ter guardado os alimentos, que a porta feche correctamente.
Não abrir a porta do congelador em caso de falta de energia
eléctrica ou de avaria, assim adiará o aumento da temperatura no seu interior. Deste modo, os alimentos comprados
congelados e os congelados por si conservar-se-ão sem alterações durante cerca de 9 - 14 horas.
Não colocar no congelado garrafas cheias : poderão partirse, dado que ao congelarem-se todos os líquidos aumentam de volume.
29
P
Page 32

Recipientes para gelo
Este novo conceito de recipientes para gelo, é uma patente
exclusiva da Merloni. O facto de ser colocado na parte interior
da porta do compartimento congelador, assegura maior
ergonomia e higiene : o gelo já não entra mais em contacto
com os alimentos guardados no compartimento congelador;
evita-se também que a água respingue-se na altura em que
carregar (também é fornecida a tampa para fechar a entrada,
depois de ter deitado a água dentro).
Para tirar os contentores de
gelo do lugar, empurre o
contentor para cima e, em
seguida, tire-o (fig. 4). Para
colocar novamente o
contentor no lugar, coloque
a parte superior na própria
sede e, depois de colocar na
vertical, deixe descer.
Depois que gelo tiver se formado, será suficiente bater o
recipiente numa superfície dura, para que os cubos de gelo
soltem-se das formas e possam sair através do mesmo furo
por onde a água foi deitada. Para facilitar a saída dos cubos
de gelo, molhe com água a parte de fora do recipiente.
ATENÇÃO: todas as vezes que for deitar água no recipiente,
assegure-se antes que o mesmo esteja inteiramente vazio e
não haja dentro restos de gelo.
O prazo mínimo necessário para a melhor formação de gelo
é de aproximadamente 8 horas.
WATER LEVEL
MAX
MAX
WATER LEVEL
Fig. 4
Modalidade de emprego (Fig. 5)
Encha o recipiente de água através do furo de entrada, até
o nível marcado (MAX WATER LEVEL - NÍVEL MÁXIMO
D'ÁGUA), tome cuidado para não ultrapassá-lo: se for deitada
uma quantidade de água superior à necessária, haverá um
formação de gelo que poderá impedir que os cubos de gelo
sejam tirados.
Se tiver sido deitada água demais, será necessário aguardar
o gelo derreter-se, esvaziar o recipiente e deitar água
novamente.
Depois de ter deitado água através do furo indicado, rode
90° o recipiente. Pelo princípio dos vasos comunicantes, a
água irá encher as apropriadas formas, em seguida pode-se
fechar o furo com a apropriada tampa e guardar o recipiente
na parte interior da porta.
Fig. 5
P
30
Page 33

Guia para utilização do compartimento de congelação
Parne e peixe
Tipo de alimentos Acondicionamento
Vaca assada e cozida Envolta em folha de aluminio 2 / 3 9 / 10 Não necessária
Carneiro Envolto em folha de aluminio 1 / 2 6 Não necessária
Porco assado Envolto em folha de aluminio 1 6 Não necessária
Vitela assada ou cozida Envolta em folha de aluminio 1 8 Não necessária
Bifes ou costeletas de
porco ou vitela
Fatias ou costeletas de
carneiro ou vaca
Carne picada
Coração e figado Em saquetas de polietileno 3 Não necessária
Salsichas
Cada peça envolta em película de
polietileno e em seguida em folha de
aluminio, em conjuntos de 4 e 6
Cada peça envolta em pelicula de
polietileno e em seguida em folha de
aluminio, em conjuntos de 4 e 6
Em sacos de aluminio, coberto com
pelicula de polietileno
Envolto em folha de aluminio ou pelicula
de polietileno
Maturação
(dias)
Fresquíssima 2 Lentamente no frigorífico
Conservação
(meses)
6 Não necessária
6 Não necessária
2 Em função do uso
Descongelação
Frango e perú Envolto em folha de aluminio 1 / 3 9 Lentamente no frigorífico
Pato e ganso Envolto em folha de aluminio 1 / 4 6 Lentamente no frigorífico
Pato bravo, faisão,
perdiz, (caça)
Coelho e lebre Envolto em folha de aluminio 3 / 4 6 Lentamente no frigorífico
Veado, cabrito
Peixe grande (grosso)
Peixe miúdo Em sacos de polietileno 2 / 3 Não necessária
Crustáceos En sacos de polietileno 3 / 6 Não necessária
Molúscos
Peixes cozidos
Envolto em folha de aluminio 1 / 3 9 Lentamente no frigorífico
Envolto em folha de aluminio ou pelicula
de polietileno
Envolto em folha de aluminio ou pelicula
de polietileno
Em embalagens de aluminio ou plástico,
cobertos com água salgada
Envolto em folha de aluminio ou pelicula
de polietileno
5 / 6 9 Lentamente no frigorífico
4 / 6 Lentamente no frigorífico
3 Lentamente no frigorífico
12 Em água quente
Peixes fritos Em saquetas de polietileno 4 / 6 Directamente na frigideira
31
P
Page 34

Fruta e verdura
Tipo Preparação Fervura Acondicionamento
Maçãs e peras
Alperces, pêssegos,
cerejas e ameixas
Morangos, amoras e
mirtilo
Fruta cozida
Sumos de frutos
Couve flor
Couves e grelos Arranjar e lavar 1' / 2' Em sacos de polietileno 10 / 12 À temperatura ambiente
Ervilhas Descascar e lavar 2' Em sacos de polietileno 12 Não necessária
Feijão verde
Descascar e cortar em
pedaços
Tirar os caroços e a
pele
Tirar o pé, lavar e
deixar secar
Cortar, cozer e coar a
água
Lavar, cortar e
espremer os frutos
Cortar em pedaços e
escaldar em água e
sumo de liimão
Lavar e cortar em
pedaços
2'
1' / 2'
2' Em sacos de polietileno 12 Não necessária
2 Em sacos de polietileno 10 / 12 Não necessária
Em recipientes, cobertas
de calda de açúcar
Em recipientes, cobertas
de calda de açúcar
Em recipientes, cobertas
de calda de açúcar
Em recipientes, adicionar
10% de açúcar
Em recipientes, juntar
açúcar a gosto
Conservação
(meses)
12
12
10 / 12
12
10 / 12
Descongelação
Lentamente no
frigorífico
Lentamente no
frigorífico
Lentamente no
frigorífico
Lentamente no
frigorífico
Lentamente no
frigorífico
Cenouras, pimentos
e nabos
Cogumelos e
espargos
Espinafres
Legumes diversos
para sopa
Outros alimentos Preparação Fervura Acondicionamento
Pão Em sacos de polietileno 4
Bolos
Natas
Manteiga
Alimentos cozidos,
sopa
Cortar em tiras,
descascar e lavar
Lavar e cortar 3' / 4' Em sacos ou recipientes 6 À temperatura ambiente
Lavar e cortar em
pedaços
Lavar e cortar em
pedaços
3' / 4' Em sacos de polietileno 12 Não necessária
2' Em sacos de polietileno 12 À temperatura ambiente
3'
Em sacos com
pequenas porções
Em pelicula de
polietileno
Em recipientes de
plástico
Na embalagem envolto
em aluminio
Repartido por recipientes
de plastico ou vidro
6 / 7 À temperatura ambiente
Conservação
(meses)
3 / 6
Descongelação
À temperatura ambiente
e no forno
6
6
6 No frigorífico
À temperatura ambiente
e cozer a 100/200°C
À temperatura ambiente
ou no frigorífico
À temperatura ambiente
ou em água quente
Ovos Congelar sem casca 10
P
32
À temperatura ambiente
ou no frigorífico
Page 35

Conselhos para poupar energia
- Instale-o bem.
Ou seja, longe das fontes de calor, da luz directa do sol,
num local bem ventilado e com as distâncias indicadas no
parágrafo "Instalação/A ventilação"
- O frio justo.
Demasiado frio aumenta os consumos
- Não o encher demasiado
Para conservar bem os alimentos, o ar frio deve circular livremente no interior do frigorífico. Enchê-lo muito significa
impedir esta circulação o que obriga o compressor a trabalhar continuamente.
- A porta fechada
Abra o seu aparelho o menor número de vezes possível,
porque cada vez que o faça sai para o exterior grande parte
do ar frio. Para restabelecer a temperatura o compressor
terá que trabalhar durante muito tempo, consumindo muita energia.
Alarmes sonoros e visuais
- Cuidado com as guarnições
(borrachas de vedação das portas). Mantenha-as elásticas e
limpas de modo a que adiram bem às portas; só assim vedaro
completamente no deixando sair o ar frio.
- Não guarde alimentos quentes
Um recipiente com alimentos quentes metido no frigorífico
faz subir imediatamente a temperatura de diversos graus;
deixe arrefecer os alimentos à temperatura ambiente antes
de os introduzir no frigorífico.
- Gelo no congelador
Controlar a espessura do gelo nas paredes do congelador e
efectuar logo a descongelação se a camada estiver demasiado espessa (Ver a seguir : “Como mantê-lo em forma” ).
Alarme da porta aberta
Se a porta do frigorífico permanecer aberta durante mais
de dois minutos, tocará um aviso sonoro. Pára de tocar quando a porta for fechada.
Alarme de aquecimento anómalo do
congelador
1. Para avisar um excessivo aquecimento do congelador,
toca um aviso sonoro e começam a piscar as duas luzes
amarelas "C" e "E" para avisar do perigo de aquecimento.
Para não congelar novamente os alimentos, o congelador
mantém-se a uma temperatura ao redor de 0°C, para
possibilitar-lhe os alimentos dentro de 24 horas ou para
cozê-los e congelá-los. Mediante o processo apropriado
de desactivação (abrir e fechar a porta do frigorífico) é
possível desligar o alarme sonoro. Por outro lado, para
voltar ao funcionamento normal, será necessário colocar
o selector do congelador "F" na posição " " (frigorífico
desligado) e em seguida ligá-lo novamente.
2. Se a temperatura continuar a subir para valores
excessivamente altos, tocará novamente o alarme sono-
ro e começarão a piscar as duas luzes amarelas "C" e
"E" junto com a verde "D" para avisar o aquecimento
excessivo. É aconselhável verificar o estado dos alimentos,
pode ser necessário jogá-los fora. Em todo o caso, os
alimentos não devem ser novamente congelados, se ainda
não estiverem cozidos. Para não deixar congelar os
alimentos novamente, o congelador será mantido a uma
temperatura ao redor de 0°C. Mediante o processo
apropriado de desactivação (abrir e fechar a porta do
frigorífico) é possível desligar o alarme sonoro. Por outro
lado, para voltar ao funcionamento normal, será
necessário colocar o selector do congelador "F" na posição
" " (frigorífico desligado) e em seguida ligá-lo
novamente.
Aquecimento
perigoso
+ alarme sonoro
Aquecimento
excessivo
+ alarme sonoro
33
P
Page 36

Como conservar o aparelho
Antes de realizar quaisquer operações de limpeza ou
de degelo, desligue o aparelho da rede eléctrica (coloque
em “ ” o selector “F” e em seguida tire a ficha da
tomada). Se não fizer isto, poderá haver uma condição
de alarme.
anomalia. Para restabelecer o correcto funcionamento
do aparelho, coloque o selector “F” na posição “
em seguida na posição que quiser.
Descongelamento
ATENÇÃO: não estrague o circuito de refrigeração.
Ter cuidado para não utilizar dispositivos mecânicos ou
outros instrumentos para tornar mais veloz o processo de
descongelação, além dos recomendados pelo fabricador.
Como descongelar o compartimento frigorífico
Este aparelho tem descongelação automática e a água proveniente da descongelação é captada através de uma calha
que a conduz para a parte posterior do aparelho através de
uma descarga própria (fig. 6) onde o calor produzido pelo
compressor a faz evaporar. A unica intervenção que deve fazer
periodicamente, consiste em limpar o furo de descarga afim
de permitir que a água passe livremente.
Como descongelar o compartimento congelador
- Remova de vez em quando o gelo formado nas paredes,
mediante a apropriada pazinha fornecida (não utilize facas
nem objectos metálicos).
- Se o gelo ultrapassar 5 mm. , será preciso realizar um verdadeiro desgelo. Realize as seguintes operações: na véspera car-
regue o botão de congelamento "G" até acender a lâmpada
amarela "E"; isto serve para fornecer aos alimentos um conveniente "golpe de frio" adicional. Depois de 24 horas o botão
desactiva-se automaticamente, mas é possível ser desactivado
antes se for carregado de novo. Coloque o botão do termostato
"F" na posição "
aparelho (inclusive o compartimento frigorífero).
Embrulhe todos os congelados em papel de jornal, coloque-os
ou noutro frigorífico ou num lugar fresco. Deixe a porta aberta
para que o gelo derreta totalmente; para ajudar a operação,
coloque dentro recipientes com água morna.
O aparelho é equipado com um apropriado sistema que possibilita a colecta da água do desgelo num recipiente a ser colocado embaixo do aparelho (do modo ilustrado na Fig. 7).
Limpe e enxugue com cuidado, antes de colocar o aparelho
novamente em funcionamento. Lembre-se que o motor não
partirá imediatamente, mas depois de aproximadamente 8 minutos.
ATENÇÃO: este alarme não é sintoma de uma
” e
". ATENÇÃO: esta operação desliga todo o
Limpeza e manutenção
FUNÇÃO FÉRIAS. O mofo e os maus cheiros que se
formam no interior do frigorífico desligado quando se
parte em férias, já não é mais um problema: é suficiente
activar a função Holiday (colocado no respectivo lugar
o selector "B"). Desta maneira, com um baixo consumo,
mantém-se a temperatura do compartimento frigorífico
ao redor de 15° C (é possível guardar dentro, por
exemplo produtos de maquilhagem e cosméticos) e
deixa-se a funcionar o congelador no mínimo
indispensável para a conservação dos alimentos.
Um duplo breve sinal acústico
tocará para confirmar a activação
da função, já a desactivação será
indicada por apenas um sinal.
Antes de limpar o frigorífico, coloque em “ ” o selector
“F” e em seguida tire a ficha da tomada.
- Os materiais com que foi fabricado o seu aparelho são
higiênicos e não transmitem odores. No entanto, para manter
esta qualidade, é necessário que os alimentos estejam sempre
protegidos e bem fechados em recipientes, de modo a que os
odores não se transmitam e não se criem incrustações e manchas dificilmente removíveis ou a criação de maus odores.
- Para limpar, quer o interior, quer o exterior do aparelho,
utilize uma esponja macia embebida em água tépida e bicarbonato de sódio que, é também um bom desinfectante. Também poderá utilizar um sabão neutro.
- O que não deve utilizar: Nunca utilize produtos abrasivos, lixívia
ou amoníaco . É proibido utilizar solventes ou productos similares.
- As peças que podem ser removidas devem ser lavadas com
água quente e sabão ou detergente para louça. Antes de
colocar as peças no aparelho, enxugue-as muito bem.
- E a parte de trás ? Aqui vai para e acumular-se o pó, isto
provoca alguns problemas para o bom funcionamento do aparelho. Utilizar um bocal longo no seu aspirador de pó, com uma
potência média, para tirar o pó. Mas com muita delicadeza!
- Quando está desligado durante muito tempo- Durante as
férias, se decidir desligar o aparelho é preciso limpar o seu
interior e deixar as portas abertas para evitar a formação de
maus odores e bolor.
-
Para a sua troca, desligar o aparelho da rede eléctrica,
desenroscar a lâmpada avariada e substituí-la com outra com
a mesma potência, não superior a 15 W., da maneira ilustrada na figura 8..
Fig. 6
P
Fig. 7
Fig. 8
34
Page 37

O que fazer se ocorrer alguma anomalia?
O sinalizador verde não acende
Deve verificar se:
· O interruptor geral do apartamento está desligado
·
A ficha está correctamente inserida na tomada de corrente
· A tomada de corrente não está eficiente: experimente li-
gar a ficha a uma outra tomada de corrente
O motor não parte
Controlou se:
· passaram 8 minutos desde que o ligou?
De facto, este modelo é dotado de um controlo de protecção
de motor que deixa-o iniciar somente aproximadamente
depois de 8 minutos depois de ligado.
Os sinalizadores têm uma intensidade luminosa muito fraca
Experimente inverter la ficha na tomada de corrente, rodando-a de 180°.
O frigorífico e o congelador arrefecem pouco
Deve verificar se:
· As portas fecam bem e se as guarnições (borrachas de
vadação) estão em bom estado
· As portas sã abertas com muita frequência
· Os manípulos de regulação da temperatura estão na
posicão correcta
· O frigorífico ou congelador não estão excessivamente car-
regados (cheios)
No frigorífico, os alimentos não arrefecem o
suficiente
Deve verificar se:
· O manípulo de regulação da temperatura está na posição
correcta
· Os alimentos estão em contacto com a parede posterior.
O compressor funciona continuamente
Deve verificar se:
· O manípulo "E" ficou na posição "5 Super", e
consequentemente está sempre em congelação rápida
· A porta não está bem fechada ou se é aberta com muita
frequência
· A temperatura exterior é muito elevada
· A camada de gelo è superior 2-3 mm
O aparelho emite muito ruído
Deve verificar se:
· O aparelho está bem nivelado
· Está instalado entre móveis ou objectos que vibram e
emitem ruídos
· O gás refrigerante que circula no interior do circuíto de
refrigeração pode provocar um ligeiro ruído (gorgojar) ,
mesmo quando o compressor não está em funcionamento.
Não se preocupe, não é um defeito, trata-se de uma situação normal.
Existência de água no fundo do frigorífico
Deve verificar se:
· O furo de saida da agua do descongelamento não é obs-
truido.
Se, apesar de todos os controlos, o aparelho não funcionar
e a anomalia que notou continuar a verificar-se, chamar o
Centro de Assistência Técnica mais próximo, comunicando
as seguintes informações : o tipo de avaria, a sigla do modelo (Mod.) e os respectivos números (S/N) escritos na placa de
características colocada embaixo à esquerda, junto ao recipiente para verduras. (ver os exemplos nas figuras seguintes).
75
Test
P.S-I.
TI
Net
Util
Utile
Pressure
HIGH-235
LOW 140
RG 2330
Mod.
220 - 240 V- 50 Hz 150 W
340
Total
Gross
Bruto
Brut
Compr.
Syst.
Kompr.
Made in Italy 13918
Gross
Bruto
Brut
R 134 a
kg 0,090
Nunca recorrer a técnicos não autorizados e recusar
sempre a instalação de peças sobresselentes não originais.
93139180000 S/N 704211801
Cod.
Gross
Bruto
Brut
W
Fuse
A
Freez. Capac
Poder de Cong
kg/24 h
4,0
Max 15 w
Class
Clase
N
Classe
35
P
Page 38

P
36
Page 39

De veiligheid, een goede gewoonte
BELANGRIJK
Lees de inhoud van deze gebruiksaanwijzing aandachtig door
aangezien hij belangrijke instructies bevat betreffende de
veiligheid van installeren, gebruik en onderhoud.
Deze combinatie is vervaardigd volgens de internationale
veiligheidsnormen die gericht zijn op het beschermen van de
gebruiker. Dit apparaat heeft het merkteken IMQ verworven,
dat door het Italiaanse Instituut van Kwaliteit alleen wordt
uitgereikt aan apparaten die voldoen aan de normen van de
CEI, de Italiaanse Elektrotechnische Commissie.
1. Dit apparaat mag niet buiten worden geïnstalleerd, zelfs
niet onder een dakje; het is uiterst gevaarlijk het bloot te
stellen aan regen en onweer.
2. Het mag alleen door volwassenen worden gebruikt en
alleen voor het bewaren van etenswaren, volgens de gebruiksaanwijzingen in dit handboekje.
3. Raak het apparaat nooit aan als u blootsvoets bent of
met natte handen of voeten.
4. Wij raden het gebruik van verlengsnoeren en dubbelstekkers af. Als de koelkast tussen meubelen in wordt geïnstalleerd, controleer dan dat de kabel niet krom of onder
gevaarlijke druk ligt.
5. Trek nooit aan de kabel of aan de koelkast zelf om de
stekker uit het stopcontact te halen: dit is uiterst gevaarlijk.
6. Raak de verkoelingselementen binnen in de koelvriescombinatie nooit aan, vooral niet met natte handen; u kunt
zich branden of verwonden. Stop geen ijsblokje in uw mond
zodra het uit de freezer komt; u riskeert zich te branden.
7. Sluit altijd eerst de stroom af voordat u overgaat tot reinigen of onderhoud (trek de stekker eruit of zet de hoofdschakelaar van uw woning op 'uit'); voor het verbreken van
ieder elektrisch contact is het niet voldoende de thermostaatknoppen op " " te zetten.
8. Voordat u uw oude koelkast weg laat halen, maak het
slot onklaar om te vermijden dat spelende kinderen erin
opgesloten worden.
9. Voordat u er de technische dienst bij haalt als er een storing optreedt, controleer eerst in het hoofdstuk “Is er een
probleem?” of het mogelijk is dit probleem te verhelpen.
Probeer niet zelf de reparatie uit te voeren door te trachten
toegang te krijgen tot de interne onderdelen.
10. Als uw voedingskabel vervangen moet worden, moet u
zich tot onze Technische Dienst wenden. In sommige gevallen zijn de aansluitingen uitgevoerd met speciale contacten;
in andere gevallen is het noodzakelijk een speciaal gereedschap te gebruiken teneinde toegang te krijgen tot de verbindingen.
11. Gebruik geen elektrische apparaten in het bewaarvak
van de etenswaren tenzij van het soort dat door de fabrikant
wordt aangeraden.
12. Als het apparaat op is moet het veilig worden gemaakt
voordat het definitief wordt weggedaan, aangezien het
isolerende piepschuim cyclopentaangas bevat en zich
eventueel R600a gas (isobutaan) in het koelcircuit bevindt.
Wendt u zich voor deze ingreep tot uw handelaar of tot de
betreffende plaatselijke authoriteit.
Het installeren
Voor het goed functioneren en zuinig energieverbruik
is het belangrijk dat het installeren op de juiste wijze
wordt uitgevoerd.
Ventilatie
De compressor en de condensator geven warmte af en vragen dus om een goede ventilatie. Het apparaat moet dus geplaatst worden in een vertrek met een raam of buitendeur,
die de nodige luchtvervanging garanderen. Het vertrek mag
niet vochtig zijn.
Let erop gedurende het installeren dat de ventilatieroosters
van het apparaat niet bedekt of verstopt worden.
Voor goede ventilatie van het apparaat is het noodzakelijk te
laten:
- een afstand van minstens 10 cm tussen de bovenkant en
een eventueel kastje erboven;
- een afstand van minstens 5 cm tussen de zijkanten eventuele meubelen ernaast.
Ver van de hitte
Plaats het apparaat niet op een zonnige plek, naast het fornuis of dergelijke.
Waterpas
Het apparaat moet goed horizontaal staan; als de vloer niet
vlak is kunnen de stelschroeven vooraan het apparaat geregeld worden.
Electrische aansluiting en aarding
Controleer om te beginnen of de gegevens op het typeplaatje,
linksonder naast de groentenlade, overeenkomen met die van
het electrische net van uw woning en of het stopcontact voorzien is van een aardleiding zoals voorgeschreven door de wet
voor de veiligheid van installaties 46/90. Als de aardleiding
ontbreekt wijst de Fabrikant iedere aansprakelijkheid af. Gebruik geen dubbelstekkers of adapters.
op zodanige wijze dat het stopcontact waarmee het
is verbonden gemakkelijk bereikbaar is.
Plaats het apparaat
Is het vermogen voldoende?
Het stopcontact moet in staat zijn de maximum lading van
het vermogen van het apparaat te verdragen; deze is aangegeven op het typeplaatje linksonder naast de groentenlade.
Voor de electrische aansluiting
Houd het apparaat vertikaal gedurende het vervoer en,voor
het goed functioneren, wacht minstens 3 uren voordat u het
aansluit.
37
NL
Page 40

Van dichtbij gezien
Knop voor snel afkoelen
A
Als deze is ingedrukt (het gele controlelampje
"C" aan) is het mogelijk de temperatuur in
de koelkast tot minimum te verlagen.
Knop voor het regelen van de temperatuur van
B
de koelkast-afdeling
Met deze knop regelt u de temperatuur van de koelkast op verschillende standen:
de koelkast is uit;
1 minder koud;
5 kouder
optimale temperatuur voor het
conserveren van etenswaren met
laag energieverbruik;
Vakantie-functie geactiveerd.
Geel controlelampje voor snel afkoelen
C
Dit gele controlelampje gaat aan als het 'snel
afkoelen' wordt geactiveerd door op de
knop "A" te drukken.
Groen controlelampje
D
Controlelampje voor het snel invriezen
G
Dit ingedrukt (het gele lampje "E"
gaat aan) kunt u verse etenswaren
invriezen
Uitneembaar vak met eierrek en boterdoos
H
Botervloot
I
Blikjesrek
J
Uitneembaar vak
K
Flessenrek
L
Ijsbakjes
M
Als dit aan is betekent het dat de stroom is
aangesloten
Controlelampje snel invriezen
E
Dit gele controlelampje gaat aan als u de
snelle-invriesknop "F" indrukt.
N.B.: deze drie controlelampjes dienen ook
voor het signaleren van abnormale
temperatuurverhoging in de vrieskast (zie
paragraaf "Geluids- en visieve storingssignalen").
Knop voor het regelen van de temperatuur in
F
de vrieskast-afdeling
Met deze knop regelt u de temperatuur
van de vrieskast op verschillende standen:
de koel en vrieskast zijn uit;
1 minder koud;
5 kouder;
optimale temperatuur voor het
conserveren van etenswaren met laag
energieverbruik;
Verder kunt u het hele apparaat afzetten (inclusief
koelkast) door de knop op de stand " " te zetten.
Stelvoeten
N
Vakken voor conserveren
O
Vakken voor invriezen en conserveren
P
Fruit en groentebakken
Q
Afdeling "Fresh box" voor vlees, vis en kaas
R
Doos voor vleeswaren en kaas
S
Uitneembare en regelbare rekken
T
"A.I.R. System"
U
(Ariston Integrated Refrigeration)
NL
38
Page 41

U
T
S
R
Q
A
B C
D
E
F G
H
J
K
L
I
P
O
39
WATER LEVEL
MAX
WATER LEVEL
MAX
M
NN
NL
Page 42

Het inschakelen van het apparaat
1
2
BELANGRIJK
Houd na het transport het apparaat vertikaal geplaatst
en wacht, voor het goed functioneren, ongeveer 3 uren
voordat u het aansluit.
Voordat u etenswaren in de koelkast of freezer plaatst, moet
de binnenkant met lauw water en soda gewassen worden.
Tijdsduur motorprotectie
Dit model is voorzien van een motorbeschermende
controle, zodat, als bij het installeren de compressor
niet onmiddelijk start, u zich geen zorgen hoeft te
maken omdat deze na ongeveer 8 minuten automatisch
aanslaat. Dit is het geval na iedere onderbreking van
de stroomvoorziening, zowel bij een black-out als bij
het uitschakelen voor b.v. reinigen of ontdooien van
de freezer.
Als u de stroom heeft aangesloten moet het groene lampje
"D" aangaan; indien dit niet het geval is moet u controleren
of de knop "F" niet op de " "-stand staat.
Koelkast-afdeling
Zet de knop "B" op een gemiddelde stand; na enkele uren
kunt u de etenswaren in de koelkast zetten.
Vrieskast-afdeling
Zet de knop "F" op een gemiddelde stand en druk op de
knop "G" van snel invriezen (het gele controlelampje "E" gaat
aan). Als de vrieskast de optimale temperatuur heeft bereikt
gaat het gele controlelampje "E" gaat uit. Nu kunt u de
diepvriesproducten in de vrieskast plaatsen.
De beste gebruikmaking van de koelafdeling
De temperatuur in de koelkast regelt zichzelf automatisch
naar gelang de stand van de thermostaatknop:
1 = meno freddo
5 = più freddo
De koelkast van uw apparaat is voorzien van een
System" (Ariston Integrated Refrigeration)
conservatie van de voedingswaren en vereenvoudigd gebruik
van het apparaat mogelijk maakt:
- Snelle temperatuursverlaging: nadat de deuren open zijn
geweest worden de optimale temperaturen sneller bereikt,
voor betere conservatie.
- Gelijkmatige e verdeling van de temperatuur, die het mogelijk maakt de voedingswaren op ieder rek te plaatsen.
- Hogere vochtigheidsgraad voor een langere conservatie van
de voedingswaren.
B
B
, dat optimale
"A.I.R.
B
Volg onze aanwijzingen voor de maximum conservatietijd
zorgvuldig: geen enkel type voedsel, hoe vers ook, blijft heel
lang goed.
In tegenstelling tot wat over het algemeen geloofd wordt,
blijven gekookte etenswaren niet langer goed dan rauwe
etenswaren.
De praktische uittrekbare rekken (afb.1) kunnen ook in
hoogte worden geregeld dankzij de gleuven aan de zijkanten, zodat ook grotere bakken, dozen enz. geplaatst kunnen worden. De nieuwe vormgeving van de rekken maakt
het ook mogelijk de rekken in hoogte te verstellen zonder
ze geheel eruit te trekken.
Plaats alleen koude of heel lauwe etenswaren en nooit
warme: dit zou meteen de binnentemperatuur laten stijgen
met overwerk voor de compressor en energieverkwisting.
Laat geen onafbedekte vloeistoffen in de koelkast staan
aangezien deze de vochtigheid verhogen en dus ijsvorming
bevorderen.
A
A - Uitgeblazen lucht die afkoelt in contact met de koeling-
wand
B - Opgezogen warmere lucht
Als de koelkast wordt ingeladen met veel etenswaren, gebruik
dan de functie Snel Afkoelen (door op de knop "A" te
drukken) zodat de beste conditie voor het functioneren snel
wordt bereikt. Als de hiervoor nodige tijd verlopen is wordt
deze functie automatisch gedeactiveerd.
A
NL
Afb. 1
40
Page 43

De vleeswaren/kaas-doos moet uit het rek worden getrokken
voor gebruik. Hij kan ook, om meer ruimte te scheppen, aan
de zijkant worden geplaatst (afb.2).
Op de bliksjesrekken in de deur van de koelkast (afb. 3)
kunnen niet alleen blikjes worden geplaatst, maar ook yoghurt, boter enzovoorts.
Gebruik afdeling "Fresh box" per vlees, vis
en kaas
Deze afdeling is bedoeld voor het langer conserveren van
vlees en verse vis (zelfs tot een week). Dit is mogelijk omdat
in dit vak de temperatuur het koudst is.
De doorzichtige protectieklep van het vak vermijdt oxidatie
of donker worden van het vlees en de vis, die bloot zijn
gesteld aan luchtcirculatie.
De afdeling "Fresh box" kan bovendien worden gebruikt
voor het afkoelen van borden voor gerechten die hierom
vragen, b.v. prociutto en meloen, vijgen en prociutto, mozzarella en tomaten.
Afb. 2
Afb. 3
Invriezen
Raadpleeg een gespecialiseerd boekje voor de voorbereiding van in te vriezen etenswaren.
Reeds ontdooide etenswaren, ook al zijn ze slechts gedeeltelijk ontdooid, mogen niet meer ingevroren worden: u moet
het koken en opeten (binnen 24 uren) of weer invriezen.
In te vriezen verse etenswaren moeten niet in contact staan
met reeds ingevroren of diepvriesproducten, maar moeten
geplaatst worden in het bovenste vak waar de temperatuur
daalt tot -18°C hetgeen ideaal is voor goed invriezen. Vergeet niet dat een goede conservatie afhangt van de snelheid waarmee wordt ingevroren.
De maximum hoeveelheid die men dagelijks kan invriezen is
aangegeven op het typeplaatje binnenin de koelkast.
Bij het eerste gebruik of na een periode dat de vrieskast niet
is gebruikt kunt u pas weer invriezen nadat het apparaat op
maximum heeft gefunctioneerd.
Als het apparaat reeds in werking is kan het invriezen op
twee manieren worden gedaan:
1. Voor kleine hoeveelheden, minder dan de capaciteit
aangegeven op het typeplaatje, drukt u op de invriesknop
“G” (gele lampje “E” gaat aan) en laadt u de in te vriezen
etenswaren in. Na 24 uur, of nadat de optimale temperatuur
bereikt is, slaat de functie invriezen automatisch af (gele
lampje “E” uit).
2. Voor grotere hoeveelheden etenswaren (tot aan het
maximum aangegeven op het typeplaatje) houdt u de
invriesknop “G” ingedrukt totdat het gele lampje snel begint
te knipperen. Na 24 uur houdt het gele lampje op met
knipperen (lampje constant); nu kunt u de etenswaren
inladen. Na nog eens 24 uur slaat de knop automatisch af
(gele lampje uit).
Open de deur van de freezer niet gedurende het invriezen.
Voor de beste resultaten van invriezen en ontdooien raden
wij aan de etenswaren in kleine porties te verdelen zodat ze
snel en gelijkmatig bevriezen. Zet de datum en de inhoud
op de verpakking.
Teneinde meer ruimte te creëren in de vries-afdeling kunt u
de middenla verwijderen en de etenswaren rechtstreeks op
de verdampingsplaat zetten. Let erop dat de deur goed dicht
is.
Mocht de stroom uitvallen, open dan de deur van de freezer
niet teneinde de temperatuur binnenin niet te verhogen.
Op deze manier blijven de diepvriesproducten voor ongeveer 12-14 uren zonder verandering geconserveerd.
Zet geen volle flessen in de freezer: alle vloeistoffen zetten
uit bij het invriezen en de flessen kunnen dus breken.
41
NL
Page 44

Ijsbakjes
Dit nieuwe type ijsbakjes is een exclusief Merloni patent.
Het feit dat ze in de deur van de freezer zitten zorgt voor
een ergonomisch en hygiënisch gebruik: de ijsblokjes komen
niet meer in contact met de etenswaren in de freezer:
bovendien wordt water knoeien tijdens het opvullen
vermeden (ook de deksel voor het afsluiten van het gat na
het opvullen is bijgeleverd).
Voor het verwijderen van de
ijsbakjes moet u het bakje
naar boven duwen en dan
eruit trekken (afb. 4). Voor
het terugzetten schuift u de
bovenkant in zijn behuizing
en, eenmaal vertikaal gezet,
laat het zakken.
Afb. 4
Gebruik (Afb. 5)
Vul het ijsbakje door het gat met water tot het aangegeven
niveau (MAX WATER LEVEL) en let op dat u dit niet
overschrijdt: teveel water kan een zodanige ijsvorming
veroorzaken dat het naar buiten komen van de ijsblokjes
erdoor belemmerd wordt.
In het geval dat u de maximum hoeveelheid water heeft
overschreden moet u wachten tot het ijs gesmolten is, het
bakje leeg gieten en weer opnieuw opvullen.
Als het bakje is bijgevuld draait u het 90°. Volgens het principe van communicerende vaten worden de vakjes gevuld,
waarna het gat kan worden afgesloten met de deksel en
het bakje kan in de deur van de freezer worden geplaatst.
Als het ijs zich heeft gevormd slaat u het bakje op een harde
oppervlakte zodat de ijsblokjes los komen en door het gat
naar buiten komen. U kunt het bakje even onder de kraan
houden voor het gemakkelijker loskomen van de ijsblokjes.
BELANGRIJK: als u het bakje opvult met water moet u erop
letten dat het helemaal leeg is en er geen ijsresten zijn
achtergebleven.
Het invriezen van ijsblokjes neemt ongeveer 8 Fig. 2uren.
WATER LEVEL
MAX
Afb. 5
MAX
WATER LEVEL
NL
42
Page 45

Gids voor het klaarmaken en invriezen
Vlees en vis
Soorten Verpakken
Runderbraadstuk Gewikkeld in aluminium folie 2 / 3 9 / 10 Niet nodig
Lamsvlees Gewikkeld in aluminium folie 1 / 2 6 Niet nodig
Varkensbraadstuk Gewikkeld in aluminium folie 1 6 Niet nodig
Kalfsbraadstuk Gewikkeld in aluminium folie 1 8 Niet nodig
Biefstukjes en
varkenslap
Lams- en
varkenscoteletten
Gehaktvlees In aluminium met plastic er omheen Zeer vers 2 Langzaam in koelkast
Hart en lever In plastic zakjes 3 Niet nodig
Worstjes In plastic of aluminium folie 2 Volgens gebruik
Ieder afzonderlijk in plastic folie en dan 4-6
samen in aluminium folie
Ieder afzonderlijk in plastic folie en dan 4-6
samen in aluminium folie
Besterven
(dagen)
Conservatie
(in maanden)
6 Niet nodig
6 Niet nodig
Ontdooien
Kip en kalkoen Gewikkeld in aluminium folie 1 / 3 9 Langzaam in koelkast
Eend en gans Gewikkeld in aluminium folie 1 / 4 6 Langzaam in koelkast
Wilde eend, fazant en
patrijs
Konijn en haas Gewikkeld in aluminium folie 3 / 4 6 Langzaam in koelkast
Hert en ree In aluminium of plastic folie 5 / 6 9 Langzaam in koelkast
Grote vissen In aluminium of plastic folie 4 / 6 Langzaam in koelkast
Kleine vissen In plastic zakjes 2 / 3 Niet nodig
Schaaldieren In plastic zakjes 3 / 6 Niet nodig
Weekdieren
Gekookte vis In aluminium of plastic folie 12 In warm water
Gewikkeld in aluminium folie 1 / 3 9 Langzaam in koelkast
In aluminium of plastic bakken met water
en zout
3 Langzaam in koelkast
Gebakken vis In plastic zakjes 4 / 6 Rechtstreeks in pan
43
NL
Page 46

Fruit en groenten
Soot Preparatie
Appel
Abrikozen, perziken,
kersen en pruimen
Aardbeien, moerbeien
en bosbessen
Gekookt fruit
Vruchtensap
Bloemkool
Kool en spruitjes
Erwtjes Doppen en wasser 2’ In plastic zakjes 12 Niet nodig
Sperziebonen Wassen en in stukjes 2 In plastic zakjes 10 / 12 Niet nodig
Schillen en in stukjes
snijden
Ontpitten en schillen 1’ / 2’ In bakjes, in siroop 12 Langzaam in koelkast
Wassen en laten
drogen
Snijden, koken en
zeven
Wassen, snijden en
persen
In stukjes in water
met citroen dompelen
Reinigen en wassen
(in stukjes)
In heet
water
2’ In bakjes, in siroop 12 Langzaam in koelkast
2’ In plastic zakjes 12 Niet nodig
1’ / 2’ In plastic zakjes 10 / 12 Kamertemperatuur
Voorbereiding
In bakjes, met suiker
bedekt
In bakjes, 10% suiker
toevoegen
In bakjes, suiker naar
smaak
Conservatie
(in maanden)
10 / 12 Langzaam in koelkast
12 Langzaam in koelkast
10 / 12 Langzaam in koelkast
Ondtooien
Wortels, paprika’s en
knolraap
Paddestoelen en
asperges
Spinazie Wassen en fijn snijden 2’ In zakjes of bakjes 12 Kamertemperatuur
Soepgroenten
Diversen Preparatie
Brood In plastic zakjes 4
Taarten In plastic folie 6
Room In plastic bakjes 6
Boter
Gekookt voedsel en
groentescep
In schijven, schillen en
wasser
Wassen en snijden 3’ / 4’ In zakjes of bakjes 6 Kamertemperatuur
Wassen en in stukjes
snijden
3’ / 4’ In plastic zakjes 12 Niet nodig
3’ In zakjes, in kleine porties 6 / 7 Kamertemperatuur
In heet
water
Voorbereiding
In de originele verpakking
met aluminium eromheen
Onderverdeeld in plastic
of glazen bakjes
Conservatie
(in maanden)
6 In de koelkast
3 / 6
Ondooien
Op kamertemperatuur
en in de oven
Op kamertemperatuur
en koken op 100/200°C
Op kamertemperatuur
of in de koelkast
Op kamertemperatuur
of in warm water
Eieren
NL
Invriezen zonder guscio in
kleine bakjes
44
10
Op kamertemperatuur
of in de koelkast
Page 47

Raadgevingen voor energiebesparing
- Installeer hem op de juiste wijze
Ver verwijderd van warmtebronnen, niet in de zon, in een
goed geventileerd vertrek en met in achtneming van de afstanden die zijn aangegeven in de paragraaf "Het installeren/De ventilatie".
- De juiste temperatuur
Te koud verbruikt meer energie.
- Laad hem niet te vol
Teneinde de etenswaren goed te conserveren moet de koude
lucht vrijelijk circuleren binnen in de koelkast. Hem te vol
laden betekent dat u de circulatie belemmert terwijl u de
compressor voortdurend laat werken.
- Met dichte deuren
Open uw koelkast zo min mogelijk omdat iedere keer een
hoeveelheid koude lucht ontsnapt. De motor moet weer
werken om de temperatuur op peil te brengen en dit kost
energie.
- Let op de afdichtingen
Houd ze schoon en efficiënt zodat ze goed aan de deur aansluiten; zo laten ze geen koude ontsnappen.
- Geen warme gerechten
Een warme pan in de koelkast verhoogt de temperatuur
onmiddelijk met een paar graden; laat de pan afkoelen voordat u hem in de koelkast plaatst.
- Ijs in de freezer
Controleer de dikte van het ijslaagje op de wanden van de
freezer en ontdooi hem meteen als het ijslaagje te dik is (zie
verderop “Hoe onderhoud ik hem”).
Geluids- en visieve storingssignalen
Alarm open deur
Als de deur van de koelkast langer dan twee minuten open
staat hoort u een geluidssignaal. Dit geluid houdt op als u
de deur dicht doet.
Alarm abnormale temperatuurverhoging in
de freezer
1. Als de temperatuur in de freezer te hoog stijgt hoort u
een geluidssignaal en beginnen de twee gele
controlelampjes "C" en "E" te knipperen. Om de
etenswaren niet weer te bevriezen blijft de temperatuur
ongeveer op 0°C, zodat u ze binnen de 24 uur kunt opeten
of na ze gekookt te hebben weer in te vriezen. Door het
alarmsysteem af te zetten (openen en dicht doen van de
deur van de koelkast) kunt u het geluidssignaal laten
ophouden. Om weer naar het normaal functioneren terug
te keren moet u de knop "F" van de freezer in de positie
" " zetten (koelkast uit) en vervolgens de koelkast weer
inschakelen.
2. Als de tempertuur doorgaat met verhogen en overmatig
hoog aan wordt, dan hoort u opnieuw het geluidssignaal
en beginnen de twee gele controlelampjes "C" en "E" te
knipperen, tegelijk met het groene controlelampje "D";
dit geeft de oververhitting aan. Controleer hoe de
etenswaren er aan toe zijn, het kan noodzakelijk zijn ze
weg te gooien. In ieder geval mogen ze niet weer worden
ingevroren, tenzij ze eerst gekookt zijn. Teneinde de
etenswaren niet weer te bevriezen blijft de freezer op
een temperatuur van ongeveer 0°C. Door het
alarmsysteem af te zetten (openen en dicht doen van de
deur van de koelkast) kunt u het geluidssignaal laten
ophouden. Om weer naar het normaal functioneren terug
te keren moet u de knop "F" van de freezer in de positie
" " zetten (koelkast uit) en vervolgens de koelkast weer
inschakelen.
+ geluidssignaal
Gevaarlijke
temperatuurverhoging
+ geluidssignaal
45
Overmatige
temperatuurverhoging
NL
Page 48

Hoe onderhoud ik hem
Voordat u enige handeling uit gaat voeren zoals
reinigen of ontdooien moet de stroom worden
afgesloten (zet de knop “F” op “ ” en trek dan de
stekker uit het stopcontact). Als u dit niet doet kan
een signaal aan gaan. BELANGRIJK: dit signaal geeft
niet een storing aan. Voor het herstellen van de
correcte functie zet u de knop “F” in de positie “” en
vervolgens in de gewenste positie.
Ontdooien
BELANGRIJK: let erop dat u het koelcircuit niet beschadigt.
Gebruik geen mechanische middelen of andere voorwerpen om het ontdooiingsproces te versnellen, maar
alleen die door de fabrikant worden aanbevolen.
Hoe ontdooi ik de koelkast.
Dit apparaat ontdooit automatisch en het water wordt opgevangen en naar de afvoer aan de achterkant gevoerd
(afb.8) waar de warmte van de compressor het verdampt.
Het enige dat u regelmatig moet doen is het afvoergat
schoonmaken; dit bevindt zich achter de groentenlade.
Hoe ontdooi ik de freezer
- Verwijder af en toe de ijslaag met het bijgeleverde
schrapertje (geen messen of metalen voorwerpen).
- Als het ijs een dikte van 5 mm heeft bereikt is het tijd om
de kast te ontdooien. Ga als volgt te werk: druk een dag
tevoren op de invriesknop "G" totdat het gele lampje "E"
aangaat.; dit dient ervoor de etenswaren extra koud te
maken. Na 24 uur schakelt de knop zichzelf automatisch
uit, of u kunt zelf de knop nogmaals indrukken. Zet de
thermostaatknop "F" op " " .
BELANGRIJK: dit schakelt het hele apparaat uit (inclusief de
koel-afdeling).
Wikkel alle diepvriesproducten en ingevroren voedsel in krantenpapier en plaats ze of in een andere koelkast ofwel op
een koele plaats. Laat de deur openstaan zodat al het ijs
kan ontdooien en plaats een bak met lauw water in de vrieskast om het ontdooien te bevorderen.
Het apparaat is voorzien van een systeem dat het dooiwater
opvangt; plaats de bak zoals aangegeven in de afbeelding (Afb.
9), en droog en reinig dan de binnenkant van de vrieskast
Reinig en droog grondig voordat u het apparaat weer
aan zet.
VAKANTIE-FUNCTIE. Het zich vormen van schimmel en
muffe lucht in de koelkast terwijl u met vakantie bent
is geen probleem meer: activeer de functie Holiday
(door middel van de knop "B"). Op deze manier blijft
de temperatuur in de koelkast ongeveer 15°C met
minimum energieverbruik (u kunt b.v. make up en
andere cosmetische producten erin bewaren); de
koelkast functioneert op minimum, juist genoeg voor
het conserveren van etenswaren.
Het activeren van deze functie
wordt aangegeven met een kort
dubbel geluidssignaal, en het
deactiveren wordt aangegeven
met een enkel geluidssignaal.
Voordat u de koelkast gaat reinigen zet u de knop “F”
op “ ” en vervolgens trekt u de stekker uit het
stopcontact.
- De materialen van de vries-koelkast zijn van hygiënisch
materiaal gemaakt en geven geen geuren af, maar om dit
zo te houden moeten de etenswaren altijd goed afgedekt
zijn om eventuele vlekken of luchtjes te vermijden.
- Alleen water en soda. Zowel voor de buitenkant als voor
de binnenkant gebruikt u een spons met lauw water en soda,
hetgeen bovendien een goede ontsmetter is. Als u dit niet in
huis heeft kunt u een neutrale zeep gebruiken.
- Wat niet te gebruiken. Nooit schuurmiddelen, nooit bleekwater, nooit ammoniak. Ten strengste verboden zijn oplosmiddelen.
- Leg alle onderdelen die verwijderd kunnen worden in een
lauw sop. Goed spoelen en afdrogen vòòr het weer op hun
plaats zetten.
- En de achterkant? Hier verzamelt zich stof, hetgeen de
goede functionering van het apparaat kan belemmeren.
Gebruik de slang van uw stofzuiger op midden-sterkte voor
het verwijderen van de stof. Ga voorzichtig te werk!
- Bij langdurig niet in gebruik zijn. Als u besluit de koelkast
uit te schakelen, maak dan de binnenkant schoon en laat de
deuren open staan, ander kunnen zich luchtjes en schimmel
ontwikkelen.
- Hoe vervang ik het lampje. Sluit de stroom af, schroef het
doorgebrande lampje los en vervang het met een nieuw
lampje van niet meer dan 15 W, zoals aangegeven in afbeelding 8.
Afb. 6
NL
Afb. 7
Afb. 8
46
Page 49

Er is een probleem
De koelkast functioneert niet.
Heeft u gecontroleerd of:
• de zekering is doorgeslagen;
• de stekker niet goed in het stopcontact zit;
• het stopcontact niet werkt; probeer de stekker in een an-
der stopcontact.
De motor start niet.
Heeft u gecontroleerd of:
• de 8 minuten na het aanzetten zijn verlopen?
Dit model is voorzien van een motorbeschermende
controle die het apparaat pas doet starten 8 minuten na
het aanzetten.
De koelkast en de freezer zijn niet koud genoeg.
Heeft u gecontroleerd of:
• de deuren niet goed sluiten of de afdichtingen versleten
zijn;
• de deuren langdurig open zijn geweest;
• de temperatuurknop niet op de juiste positie staat;
• de koelkast of de freezer te vol zijn.
De etenswaren in de koelkast bevriezen.
Er is water op de bodem van de koelkast.
Heeft u gecontroleerd of:
• het afvoergat verstopt is.
Als ondanks alle controles het apparaat niet functioneert en
het door u geconstateerde gebrek er nog steeds is, wend u
zich dan tot een erkende installateur met deze informatie:
het soort gebrek, het codenummer van het model (Mod.)
en de betreffende nummers (S/N) op het typeplaatje dat zich
linksonder naast de groentenlade bevindt (zie de hiervolgende voorbeelden).
75
Test
P.S-I.
TI
Net
Util
Utile
Pressure
HIGH-235
LOW 140
RG 2330
Mod.
220 - 240 V- 50 Hz 150 W
340
Total
Gross
Bruto
Brut
Compr.
Syst.
Kompr.
Made in Italy 13918
Gross
Bruto
Brut
R 134 a
kg 0,090
Wend u zich nooit tot een niet-erkende installateur en
weiger niet-originele onderdelen.
93139180000 S/N 704211801
Cod.
Gross
Bruto
Brut
W
Fuse
A
Freez. Capac
Poder de Cong
kg/24 h
4,0
Max 15 w
Class
Clase
N
Classe
Heeft u gecontroleerd of:
• de temperatuurknop niet op de juiste positie staat;
• de etenswaren tegen de achterwand aan staan, die het
koudst is.
De motor blijft functioneren.
Heeft u gecontroleerd of:
· De schakelaar van het invriezen ingedrukt is (gele lampje
aan of knipperend)
• de deuren niet goed gesloten zijn of lang opengelaten;
• de buitentemperatuur hoog is;
• de temperatuurknop niet op de juiste positie staat.
Het apparaat maakt teveel lawaai.
Het verkoelende gas produceert een licht geluid ook als de
compressor stil staat (dit is geen gebrek).
Heeft u gecontroleerd of:
• de koelkast niet goed horizontaal staat;
• naast meubelen of voorwerpen staat die trillen of geluid
maken.
47
NL
Page 50

.
Page 51

Page 52

Via Aristide Merloni, 47
60044 Fabriano (AN) Italj
tel. +39 0732 6611
www.merloni,com
11/2003 - 195036648.01
 Loading...