

Page 1
LD 20
LD 20
I
GB
Lavastoviglie
Istruzioni per linstallazione e luso
Dishwasher
Instructions for installation and use
Page 2

Page 3
Page 4

Page 5
Guida rapida per la
lavastoviglie
Questo manuale ti racconta in maniera piacevole tutto
quello che può offrirti il tuo nuovo elettrodomestico.
In più, scoprirai curiosità e piccole astuzie per lavare
meglio con la tua lavastoviglie e farla durare di più.
1. Installazione e trasloco (p.8)
L'installazione, dopo la consegna o un trasloco, è l'operazione più importante per il buon funzionamento della tua lavastoviglie. Verifica sempre:
1. Che l'impianto elettrico sia a norma;
2. Che i tubi di carico e scarico dell'acqua siano collegati correttamente;
3. Che la lavastoviglie sia a livello. Ne vale la pena: per la durata e il
corretto funzionamento della lavastoviglie.
AVASTOVIGLIE
L
L
2. Quadro comandi ai tuoi ordini (p.2)
Impara a conoscere le parti da cui è composta la lavastoviglie, la
userai meglio. Qui trovi la descrizione dettagliata dei comandi e
delle parti interne.
3. Come si caricano le stoviglie (p. 3)
In questa pagina trovi consigli utili per caricare correttamente la
lavastoviglie e sfruttare al meglio i suoi spazi.
4. Come avviare la lavastoviglie (pp. 4-5)
Dopo avere caricato la lavastoviglie, devi fornirle alcune informazioni
perchè possa scegliere il programma più adatto. Immetti correttamente detersivo e brillantante. Leggere queste pagine ti aiuterà in tutte le fasi
del lavaggio.
8. Sicurezza per te e la tua famiglia (p. 9)
Leggi questo capitolo con attenzione, ti darà informazioni utili sulla sicurezza di installazione l'uso e la manutenzione. Per evitare brutte sorprese.
9. Cura e manutenzione particolari (p. 10)
Ogni tanto, una volta al mese, dedica un po' di attenzione al gruppo filtrante e ai bracci irroratori. Qui imparerai come fare.
10. Tenere in forma la lavastoviglie (p. 10)
5. Il sale: un importante alleato (p. 6)
Rispetta le poche regole che leggi qui, il risultato sarà una lava-
Usare il sale giusto e nella giusta quantità ti aiuta a conservare in
ottimo stato la lavastoviglie, per lavare meglio ed evitare i possibili danni del calcare.
stoviglie sempre in ottima forma.
11. Caratteristiche tecniche (p.2)
Tutti i dati tecnici del tuo elettrodomestico, sempre a norma di
legge.
6. Consigli e suggerimenti, anche per
risparmiare (p. 7)
12. Ariston Digital (p. 11)
Qui trovi piccoli consigli per lavare meglio le tue stoviglie e per
risparmiare .
La nuova generazione di elettrodomestici predisposti per collegarsi tra
loro e con il Centro Servizi Digital di Merloni Elettrodomestici.
7. Problemi e soluzioni (p. 9)
Prima di chiamare il tecnico, guarda qui: moltissimi problemi
possono avere una soluzione immediata. Se poi non riesci a risolvere chiama il numero dell'assistenza Ariston e in poco tempo,
se possibile, qualsiasi guasto sarà riparato.
13. Ariston ti è vicina anche dopo lacquisto
Ariston sostiene i suoi prodotti con servizi e supporto anche dopo
l'acquisto offrendoti garanzie speciali, assistenza professionale,
ricambi e accessori di qualità. Per informazioni telefona al Numero Verde Ariston.
LAVASTOVIGLIE ARISTON - Istruzioni per l’installazione e l’uso
(p.12)
1
Page 6
AVASTOVIGLIE
E
G
F
H
I
K
L
J
M
P
MLN
O
I
R
ST
U
L
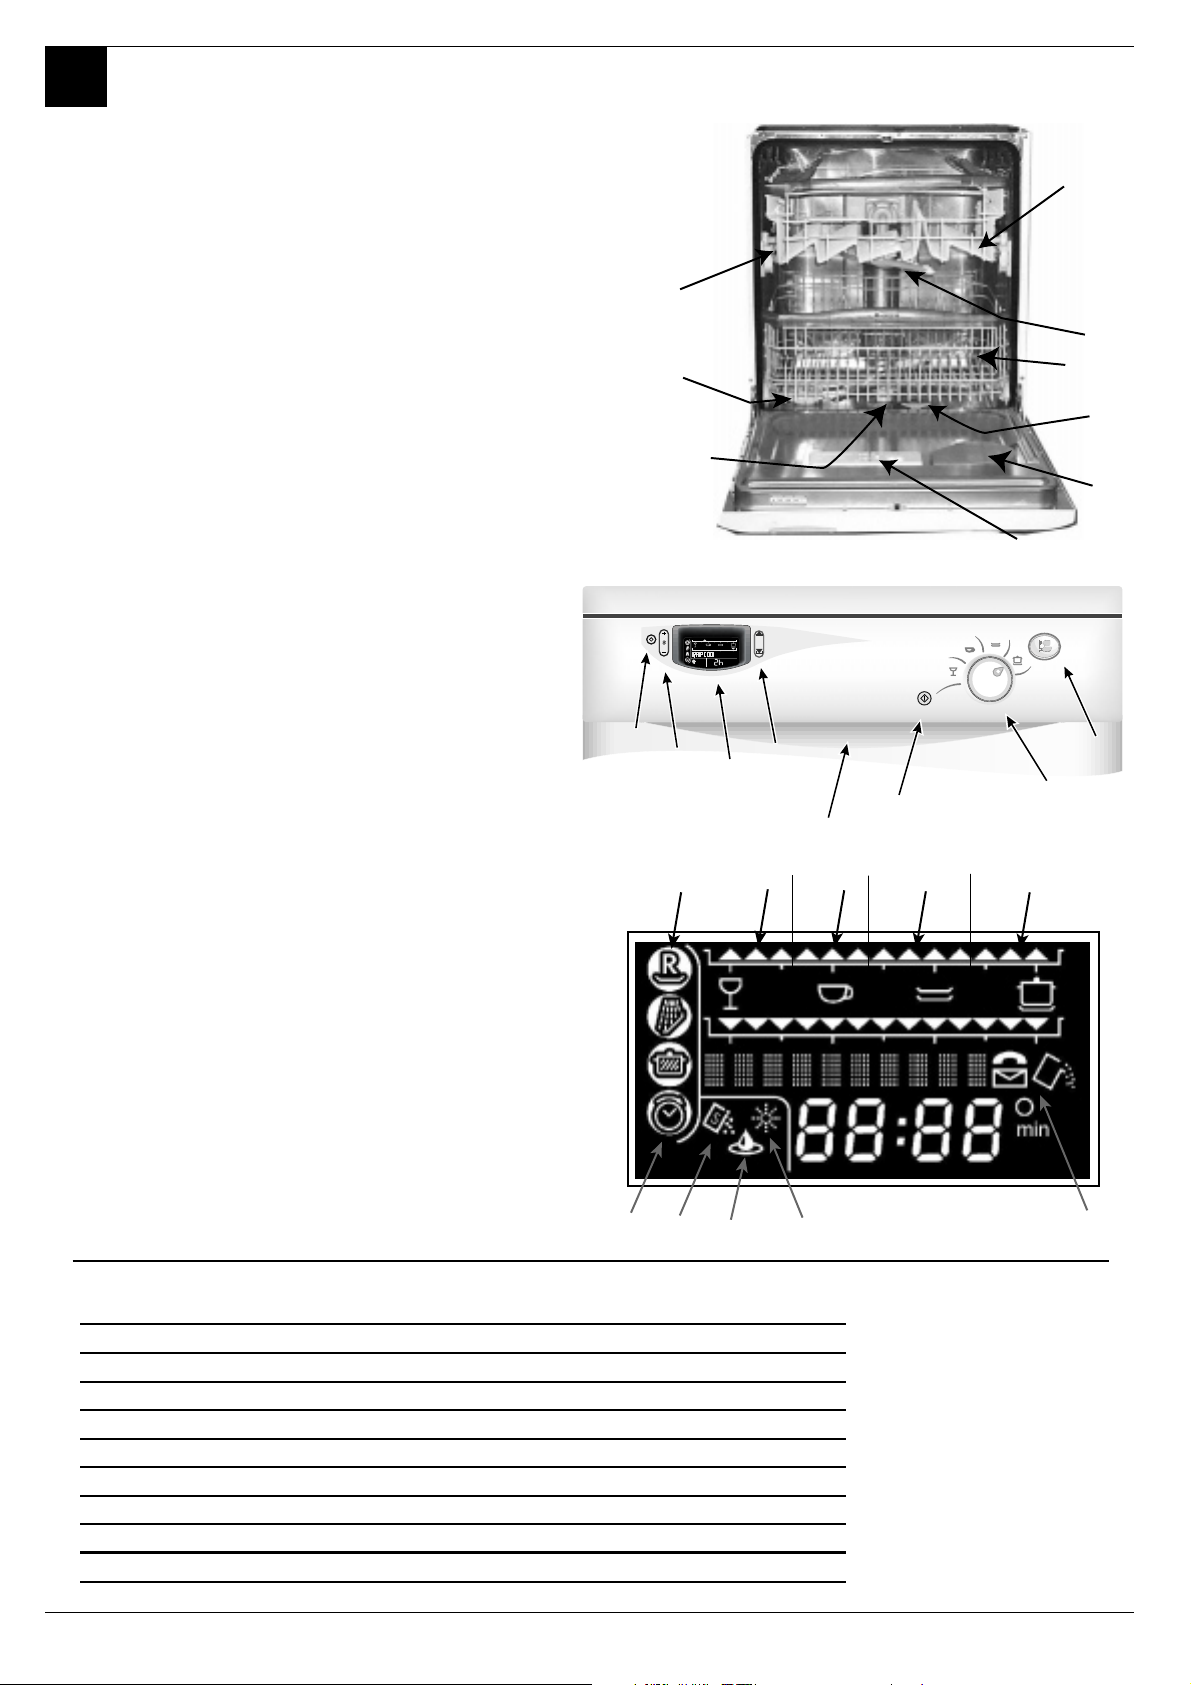
Apriamo insieme la tua lavastoviglie
Come è fatta?
Imparare a conoscere le parti da cui è composta
la lavastoviglie ti aiuterà ad usarla meglio
E. Cestello superiore
F. Irroratore superiore
G. Regolazione altezza
cestello
H. Cestello inferiore
I. Irroratore inferiore
Quadro comandi ai tuoi ordini
J. Tappo contenitore sale
K. Filtro lavaggio
L. Contenitore detersivo e
brillantante
M. Ventilatore Turbo Dry
A. Pulsante ON-OFF
Premi questo pulsante
per accendere la macchina.
B. Pulsante START/RESET
Con START si avvia il
programma di lavaggio
con Reset annulli tutte le
impostazioni.
C. Manopola selezione tipo
stoviglia
Scegli il settore di lavaggio in base al carico più
delicato.
D. Maniglia apertura porta
Serve ad aprire la porta
della lavastoviglie.
E. Display
Visualizza i programmi
speciali, opzioni e
messaggi
F. Pulsante selezione
programmi standard
Premi per selezionare il
programma tradizionale
desiderato.
G. Pulsanti selezione
cestello superiore e
inferiore
Puoi scegliere su quale
cesto fare il lavaggio.
H. Pulsante impostazione
delay timer
Serve a posticipare da 1
a 24 ore lavvio del
programma di lavaggio
e anche per escludere il
turbo-dry
I. Indicatore luminoso
delay timer
Si illumina per indicare
che è stata impostata la
partenza ritardata
L. Programmi standard
Si illumina per indicare
Rapido, Ammollo, Super
Intensivo
M. Spia mancanza sale
Si illumina per avvisarti
che devi aggiungere il
sale.
N. Spia intervento
acquastop
Segnala una perdita
dacqua.Chiama
lassistenza tecnica.
O. Spia mancanza
brillantante
Si illumina per avvisarti
che devi aggiungere il
brillantante.
P. Simbolo telefono o
messaggio
Si attivano solo se in
casa è stato installato il
sistema Ariston Digital.
R. Settore pentole
Indicatore alta intensità
di lavaggio.
S. Settore piatti
Indicatore media
intensità di lavaggio.
T. Settore tazze
Indicatore moderata
intensità di lavaggio.
U. Settore cristalli
Indicatore ciclo delicato
per cristalli.
F
H
G
E
B
A
C
D
Caratteristiche Tecniche
Larghezza cm. 60
Profondità cm. 60
Altezza cm. 85
Capacità 12 coperti standard
Pressione acqua alimentazione 20 KPa÷ 1MPa (0,2 ÷10 bar)
Tensione di alimentazione Vedi targhetta caratteristiche
Potenza totale assorbita Vedi targhetta caratteristiche
Fusibile Vedi targhetta caratteristiche
2
LAV ASTOVIGLIE ARISTON- Istruzioni per l’installazione e l’uso
Caratteristiche tecniche
Questa lavastoviglie è
conforme alle
seguenti Direttive
Comunitarie:
73/23/CEE del
19/02/73 (Basse
Tensioni)
e successive
modificazioni;
89/336/CEE del
03/05/89
(Compatibilità
Elettromagnetica)
e successive
modificazioni.
Page 7
AVASTOVIGLIE
L
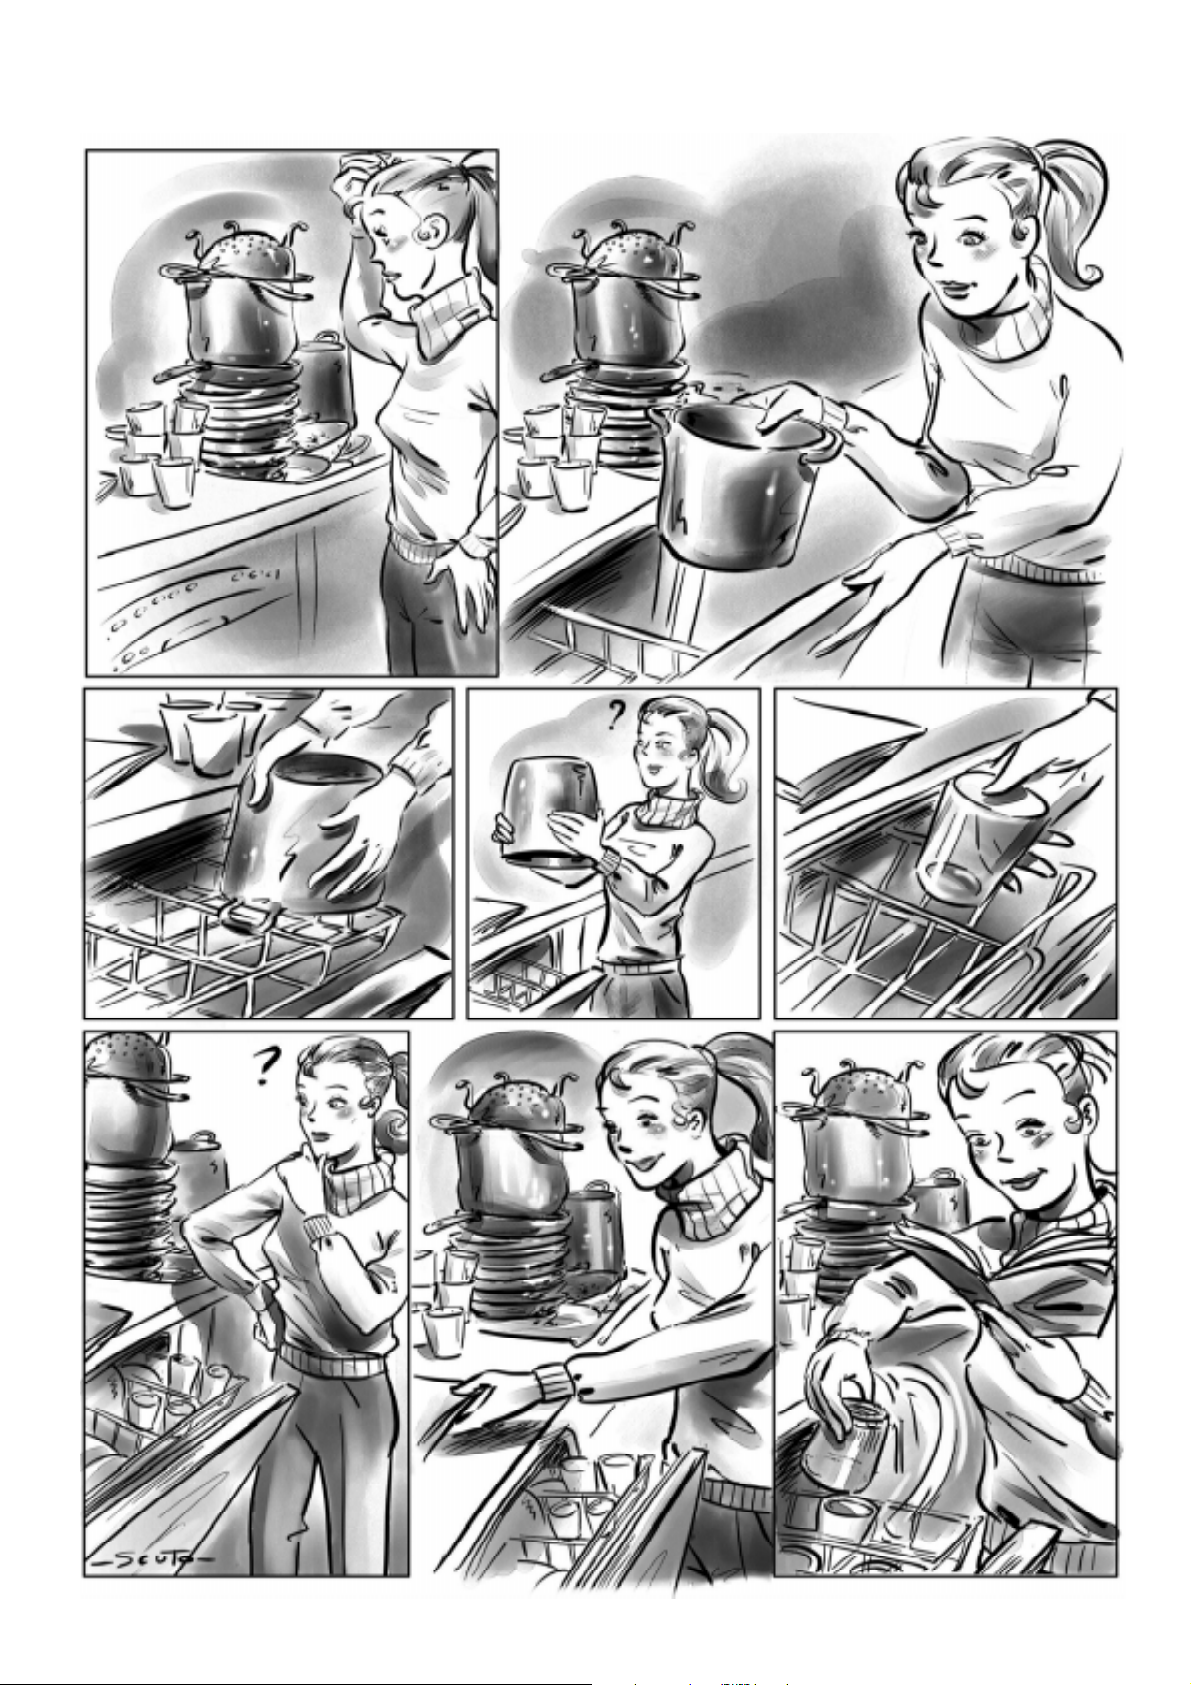
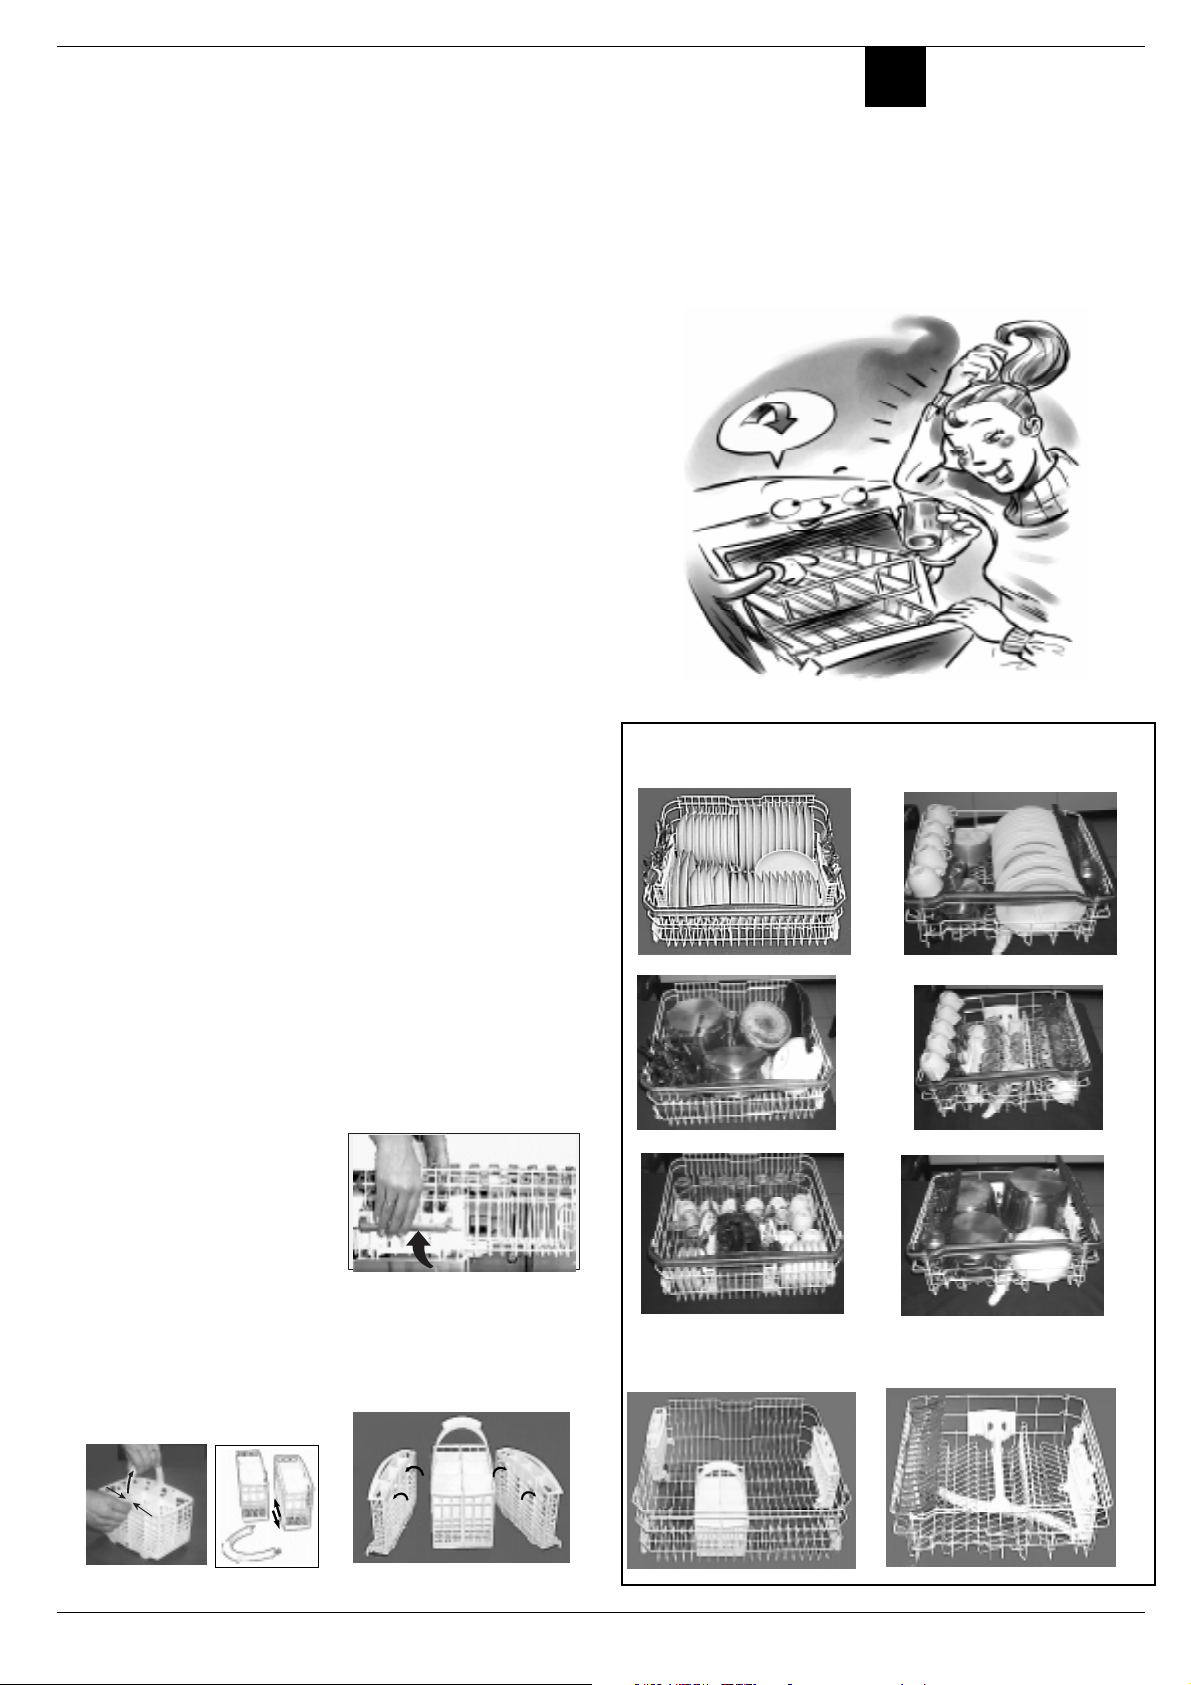
Come si caricano le stoviglie?
Prima di lavare, piccoli gesti possono aiutarti a lavare meglio e a conservare più a lungo la
tua lavastoviglie. Asporta i residui più grossi di cibo, metti a bagno le pentole e le padelle
più incrostate. Dopo avere caricato le stoviglie controlla che le pale dellirroratore girino
bene. Non sovrapporre bicchieri e tazze, controlla che i piatti non si tocchino.
Prima di tutto.
Prima di disporre le stoviglie nei
cestelli, asporta i residui più grossi
di cibo, eviterai così di intasare i
filtri riducendo lefficacia del lavaggio.
Se le pentole e le padelle sono molto incrostate, mettile a bagno in
attesa del lavaggio. Per facilitare
loperazione di carico delle stoviglie estrai i cesti.
Cesti multisystem
Questo modello di lavastoviglie è
dotato di cestino per le posate e di
cesti superiore e inferiore di nuova
e più moderna concezione. La loro
struttura consente infatti grande
flessibilità di carico delle stoviglie
per renderli più adatti a soddisfare
le tue esigenze.
Cosa va nel cestello
inferiore?
Nel cestello inferiore ti consigliamo di mettere le stoviglie più difficili da lavare: pentole, coperchi,
piatti piani e fondi, ma anche: tazze , tazzine e bicchieri. (nelle foto
trovi esempi di carico).
Piatti da portata e coper-
chi grandi: sistemali ai lati del
cesto.
Pentole, insalatiere: devo-
no essere sempre capovolte
Stoviglie molto fonde: si-
stemale in posizione obliqua,
così lacqua potrà defluire per
lavarle meglio
Bicchieri e tazze: sistemali
come indicato nella figura.
Sistemale in modo che non si tocchino fra di loro.
In questo modello il cestino posate
è dotato di due settori laterali che
puoi staccare, come nella figura A1
e agganciare sia al cestello superiore che a quello inferiore.
Cosa va nel cestello
superiore?
Nel cestello superiore carica le stoviglie delicate e leggere: bicchieri,
tazze da tè e caffè, piattini - ma
anche piatti - insalatiere basse, padelle, pentole e tegami bassi poco
sporchi (nelle foto puoi trovare
esempi di carico).
Sistema le stoviglie leggere in modo
che non vengano spostate dai getti
dacqua.
In dotazione possono essere fornite una o due ribaltine sulle quali
sistemare tazze e tazzine ma anche coltelli lunghi e acuminati e
posate di servizio.
Dopo avere caricato la lavastoviglie, ricordati di controllare che le
pale dellirroratore ruotino liberamente, senza scontrarsi con le stoviglie.
Regolazione del cestello
superiore.
Puoi regolare il cestello superiore
in posizione alta o bassa per poter
collocare le tue stoviglie senza difficoltà.
cestello inferiore
Esempi di caricamenti
cestello superiore
Il cestino per le posate è sdoppiabile
in due parti sfilando la maniglia
(vedi le figure A e B) quando hai
poche posate da lavare puoi utilizzare solo metà cestino.
Inserisci le posate ad una ad una
nelle feritoie, con i manici rivolti
verso il basso.
A
B
Ai lati del cestello superiore si
trovano due manopole: con quelle
puoi regolarne l’altezza
A1
Dove mettere le varie parti del cesto posate
LAVASTOVIGLIE ARISTON - Istruzioni per l’installazione e l’uso
3
Page 8
AVASTOVIGLIE
L
Avviare la lavastoviglie
Pronti, via!
Hai caricato la lavastoviglie e ora devi avviarla,
leggi le istruzioni. Bastano pochi minuti per
imparare
Lo sapevi che....?
Ariston Dialogic è una lavastoviglie intelligente, dotata di in
software sofisticato che le consente di valutare il grado di sporco e il
tipo di stoviglie da lavare. Può lavare in modo diverso sui cestelli,
devi solo dirle il grado di delicatezza delle tue stoviglie e su quale
cesto le hai caricate. Sarà lei a scegliere il programma di lavaggio più
adatto e la temperatura ottimale
dellacqua.
Tieni docchio il diplay, è il mezzo
con cui la tua lavastoviglie entra in
dialogo con te e ti invia dei semplici messaggi per informarti su cosa
sta facendo. Può chiederti di compiere alcune brevi operazioni oppure ti segnala eventuali dimenticanze.
Prima di tutto.
Apri completamente il rubinetto
dellacqua e premi il pulsante ONOFF A: la scritta che compare
sul display E indica il settore di
lavaggio su cui è posizionata la
manopola.
Valuta le tue esigenze e
scegli tra queste
diverse possibilità:
Lavaggio a pieno carico su
entrambi i cestelli, con stoviglie miste.
Ti è richiesto solo di identificare il
grado di delicatezza delle stoviglie
che hai caricato. Ruota la manopola e scegli il settore di lavaggio
che ritieni più adatto alle stoviglie
caricate. Nellambito di ogni settore, ruotando in senso orario, aumenta lintensità di lavaggio.
R. Settore pentole
3 posizioni di alta
intensità di lavaggio.
S.
Settore piatti
4 posizioni di media
intensità di lavaggio.
Settore tazze
T.
3 posizioni di
moderata intensità di
lavaggio.
U.
Settore cristalli
3 posizioni per il
ciclo delicato per
cristalli.
Avvia la macchina seguendo le
istruzioni contenute nel paragrafo
Avvio. Non devi pensare ad altro,
la tua lavastoviglie imposta da sola
il programma di lavaggio, le temperature più idonee, la durata dei
cicli e tutto ciò che occorre per un
risultato perfetto.
Hai esigenze di carico e di
lavaggi particolari .
(per esempio molti biccheri e piatti).
La tua lavastoviglie ti dà la possibilità di lavare tutto contemporaneamente con un solo programma ma
devi dirle in questo ordine:
- qual è il cesto che hai caricato .
- che tipo di stoviglie deve lavare
Guarda a destra del display, ci sono
due pulsantini a forma di freccia.
Premendo il pulsante
il cesto superiore. Ora ruota la ma-
nopola fino a scegliere cristalli
Osserva come queste operazioni
sono visualizzate contemporaneamente sul display.
Premi ora il pulsante
zionare il cesto inferiore, ruota la
manopola e seleziona piatti.
Avvia con START.
Vuoi fare il mezzo carico?
Hai poche stoviglie da lavare e decidi di caricarle tutte su un solo
cesto per risparmiare acqua ed
energia elettrica.
Se vuoi fare il lavaggio solo sul cesto superiore tieni premuto per po-
chi secondi il tasto
Seleziona con la manopola il settore di lavaggio che ritieni più adatto
al grado di delicatezza delle stoviglie che hai caricato (per esempio
tazze).
Sul display scorrono le scritte
tazze - solo cesto superiore . Un
triangolino luminoso si muove indicando il cesto e il settore di lavaggio selezionato.
Hai sbagliato a
selezionare il cesto ?
Tieni premuto per circa 2 secondi
la freccia relativa al cesto escluso.
Ricorda che se vuoi
lavare su un solo
cesto devi dimezzare
la quantità di
detersivo in entrambe
le vaschette.
selezioni
per sele-
Ora ripeti la selezione in modo corretto.
Avvio
Premi il pulsante di START B ,
un breve segnale acustico ti indica
che la macchina ha iniziato il lavaggio. Non devi più fare nulla, il
display ti dirà che fase è in corso
(prelavaggio, lavaggio, risciacquo,
asciugatura) e dopo pochi secondi
il numeratore indicherà il tempo residuo alla fine del programma. Non
aspettarti un preciso conto alla rovescia ma tieni conto che è una
macchina intelligente e quindi parte con una tempo stimato. A misura che il programma avanza questo tempo si aggiorna perchè la
macchina acquisisce e valuta i molti parametri che le consentono di
ottimizzare il ciclo di lavaggio (temperatura e durezza dellacqua, grado di sporco, tipo di stoviglie ecc.).
Programmi di lavaggio
tradizionali
Guarda a sinistra del display, trovi
il pulsante F, premendolo puoi
scegliere in successione uno di questi 3 programmi di lavaggio:
Sul display compare la scritta del
programma selezionato e si colora
in blù lo sfondo del simbolo corrispondente.
Sono programmi tradizionali . Non
ti è richiesto di usare la manopola
ma se hai poche stoviglie puoi fare
il mezzo carico . Premi il pulsante
Start per lavvio. Riceverai le solite informazioni sulla durata del ciclo e sulla successione delle fasi.
Rapido
Ammollo
Super Intensivo
Se hai annullato un
programma in corso
ricorda che allavvio di
un nuovo programma
viene sempre
effettuato uno scarico
dellacqua. Controlla se
il detersivo è stato
scaricato con lacqua
di lavaggio. In questo
caso aggiungilo di
nuovo.
Se vuoi saperne di più su questi programmi leggi la tabella a pag. 5.
Modifica delle
impostazioni a
programma avviato.
Ti accorgi che hai selezionato sul
cesto superiore le pentole anzichè
i cristalli? Conviene comunicarlo
alla macchina altrimenti il tipo di
lavaggio potrebbe essere troppo
forte e danneggiare i bicchieri. Tieni premuto il pulsante di RESET
B per alcuni secondi. Senti un bre-
ve segnale acustico, sul display
compare la scritta reset e subito
dopo il nome del settore di lavaggio su cui è posizionata la manopola. Ora puoi re-impostare in modo
corretto.
Hai aperto la porta? Cè
stata una interruzione di
corrente?
Niente paura, il programma riprende appena hai chiuso la porta o è
ritornata la corrente.
Finito?
La fine del ciclo di lavaggio è segnalata da un doppio segnale acustico e sul display scorre la scritta
Lavaggio terminato. spegni la
macchina con il pulsante ON-OFF.
Attendi alcuni minuti prima di togliere le stoviglie: scottano!
4
LAV ASTOVIGLIE ARISTON- Istruzioni per l’installazione e l’uso
Page 9
Ritardare la partenza
AVASTOVIGLIE
L
Via, ma non subito!
Se hai posticipato
lavaggio, durante il
La tua lavastoviglie é pronta ma se vuoi puoi farla partire quanto ti è
più comodo. Niente di più facile, leggi le istruzioni qui sotto.
Decidi tu quando partire.
Hai caricato la lavastoviglie e le
hai dato le informazioni perchè
possa decidere il lavaggio più adatto per un risultato perfetto. Ora, se
vuoi, puoi scegliere anche quando
farla partire. Guarda sul display,
contrassegnati dalla lettera H ci
sono due piccoli pulsanti, servono
per impostare le ore di ritardo partenza. Con il + puoi scegliere da 1 a
24 ore, con il - torni indietro se hai
sbagliato. Sul display compare la
scritta Delay.
Dopo pochi secondi lora impostata è accettata e puoi premere il
pulsante di START : senti un
breve segnale acustico, si illumina lo sfondo della spia di delay
I e scorre la scritta tempo alla
partenza. Sul numeratore è iniziato il conto alla rovescia del
tempo di attesa.
È andata via la luce?
Hai aperto la porta
della macchina?
Il conteggio del tempo si interrompe e poi riprende quando torna la luce o quando chiudi la porta. È tutto sotto controllo!
Hai scelto un programma
tradizionale ?
Questa tabella ti informa
Vuoi escludere la turbo
asciugatura?
Puoi farlo prima di
impostare il ritardo
partenza.
Per escludere la fase di turbo
asciugatura dai programma che
desideri avviare premi il pulsante
per alcuni secondi. Sul display
insieme con la descrizione del programma scorrerà la scritta No turbo dry.
Ricorda che non puoi escludere
lasciugatura dai programmi Rapido e Ammollo.
Scegliendo uno di questi
programmi tradizionali
escludi la manopola ma se
hai poche stoviglie puoi
lavare solo su un cesto.
tasto B di Avvio/
premuto per circa
2 secondi: sentirai
acustico e tutte le
vengono annullate.
le varie operazioni
la partenza del
tempo di attesa è
meglio non
modificare nulla.
Se proprio devi
farlo, premi il
Reset e tieni
un breve segnale
impostazioni
Ora puoi ripetere
di selezione.
Scegli il programma giusto per le tue stoviglie.
Ricorda che puoi fare anche il mezzo carico.
3URJUDPPD ,QGLFD]LRQLSHU
ODVFHOWDGHL
SURJUDPPL
&LFO RHFRQRP LF RH
YHORFHGD
XWLOL]]DUHSHU
VWRYLJOLHSRFR
VSRUFKHVXELWR
/DYDJJLR
5DSLGR
$PPROOR
GRSROXV R6HQ] D
DVFLXJ DWXU D
/DYDJJLR
SUHO LP LQDU HGL
SHQWRO HHVW RYL JO L H
LQDWWHVDGL
FRPSOHWDUHLO
FDULFRDOSDVWR
VXFFHVVLYR
%UHYHODYDJJLRD&
5LVFL DFTXRI UHGGR
%UHYHO DYDJ JL RIUH GGRSHU
LPSH GLU HO H VVL FD] LRQHGHL UH VL GXL
GLFLERVXOOHVWRYLJOLH
'HVFUL]LRQH
GHOFLFOR
Puoi impostare il delay per
una partenza ritardata.
'HWHUVLYR
YDVFKHW W H
SUHODYDJ JLR
ODYDJJLR
JU
%ULOODQW
DQWH
/DYDJJLR
6XSHU
,QWHQVLYR
6WRYLJOLHHSHQWROH
PROWRVSRUFKHGD
QRQXVDUHSHU
SH]]LGHOLFDWL
3UHODY DJJL FRQDFTXDIU HGGD
/DYDJJL RSUROXQJ DWRD &
1ULVF LDF TXLFRQDF TXDFDOGD
$VFLXJDWXUD
LAVASTOVIGLIE ARISTON - Istruzioni per l’installazione e l’uso
JU
*
5
Page 10

AVASTOVIGLIE
L
Detersivo e brillantante
Usa solamente detersivo specifico per lavastoviglie. Versa il detersivo nel
distributore che trovi allinterno della porta. Prima dellinizio del ciclo di
lavaggio!
Il detersivo
Caricamento del detersivo
Per aprire il coperchio A, premi il pulsante B. Il detersivo va
inserito nelle 2 vaschette fino al
bordo.
Ora puoi chiudere il coperchio: premi finché senti lo scatto.
Se decidi di utilizzare il detersivo in
compresse mettine una nella
vaschetta D e chiudi il coperchio.
Il brillantante.
Il brillantante rende le tue stoviglie più brillanti perché ne migliora
lasciugatura. Il serbatoio del
brillantante è posto allinterno della porta. Dovrai riempirlo quando
si illumina la spia mancanza
brillantante Oe sul display scorre
la scritta aggiungere brillantante
Mai senza sale
Non si chiude!
Controlla che sui bordi della
vaschetta non ci siano residui di
detersivo. È colpa loro se il coperchio non riesce a chiudersi. Eliminali e vedrai che si chiuderà.
Caricamento del brillantante.
Per aprire il contenitore ruota in
senso antiorario il tappo C. Fai attenzione quando versi il brillantante
per evitare che fuoriesca. Puoi
adattare la quantità di brillantante
utilizzato dalla lavastoviglie: regola con un giravite o con una moneta agendo sul regolatore F che vedi
sotto il coperchio C.
A
D
25
gr.
5
gr.
F
Puoi scegliere tra sei posizioni.
Normalmente è tarato sul 4.
Consigli utili
Dosa la giusta
quantità di
detersivo: se
eccedi non
otterrai stoviglie
più pulite, solo
un maggiore
C
inquinamento
ambientale.
Tieni detersivo
e brillantante in
luoghi asciutti,
lontano dalla
B
portata dei
bambini
La regolazione
della quantità di
brillantante usato
lasciugatura.
Se sulle stoviglie
C
macchie, ruota il
regolatore verso i
numeri più alti.
Se invece le tue
presentano delle
striature bianche,
regolatore verso i
numeri più bassi.
migliora
noti gocce
dacqua o
stoviglie
ruota il
Acqua di casa tua
La durezza dellacqua varie a seconda delle località. Se lacqua di casa tua è dura,
senza decalcificazione si formerebbero incrostazioni sulle stoviglie. La tua
lavastoviglie ha un decalcificatore che utilizza sale speciale ed elimina il calcare
dallacqua.
Caricamento del sale.
Utilizza sempre sale specifico per
lavastoviglie.
Il serbatoio del sale è sotto il
cestello inferiore, riempilo così:
1. Estrai il cesto inferiore, svita
e togli il tappo del serbatoio
2. È la prima volta che carichi il
sale? Prima riempi dacqua il
serbatoio (la prossima volta
non dovrai più farlo)
3. Metti limbuto della lavastoviglie sul foro e introduci circa
due chili di sale. È normale vedere uscire un po dacqua dal
serbatoio.
4. Riavvita con cura il tappo.
Quando devo caricare il
sale?
Il serbatoio del sale va riempito
quando si illumina la spia mancanza sale M e sul display scorre la
scritta aggiungere sale
Sale intelligente.
La tua lavastoviglie regola da sola
il consumo del sale a seconda della
durezza dellacqua di casa tua. Preleverà il giusto quantitativo
ottimizzando e personalizzando il
consumo del sale (nè troppo nè troppo poco). Al termine del lavaggio
se la tua lavastoviglie rileva una
durezza dellacqua inferiore ad una
soglia prestabilita, visualizzerà il
messaggio non usare sale.
formazione di
ruggine, carica il
iniziare un ciclo
Per evitare la
sale prima di
di lavaggio.
6
LAV ASTOVIGLIE ARISTON- Istruzioni per l’installazione e l’uso
Page 11

AVASTOVIGLIE
L
Impostazione lingua
e programma dimostrativo
Le funzioni messaggi, ora, data sono disponibili se hai installato nella tua abitazione il
sistema Ariston Digital presente con il nodo GSM. A pagina 13 troverai maggiori dettagli
su questo sistema.
Accesso al menù
Se tieni premuto contemporaneamente per circa 3 secondi questi
due tasti
Ora puoi scegliere di impostare alcune funzioni.
Il tasto
consente di scorrere tra le opzioni
del menù.
ll tasto
consente di selezionare la scelta
visualizzata dal display.
Il tasto
consente di tornare al livello superiore di menù; premendolo più volte puoi uscire dal menù e tornare in
modalità normale. Segui lo schema per scegliere lopzione desiderata.
Digital anche se è
spenta il display
visualizza sempre
entri nel menù.
funziona da Mode: ti
funziona da Select: ti
funziona da Canc: ti
Se la tua
lavastoviglie è
collegata al
sistema Ariston
rimane acceso e
lora corrente.
visualizzazione
-
MESSAGGI
+
+
+
LINGUA
+
DEMO MODE
+
normale
ORA
DATA
Scelta della lingua
E stata preimpostata la lingua inglese ma puoi cambiarla, tramite
il pulsante
lingue disponibili: inglese, francese, tedesco, spagnolo, portoghese,
-
olandese, turco.
Segui questo schema per selezionare la lingua desiderata.
, scegliendo fra le 8
-
LINGUA
-
-
lingua aggiornata
-
-+ -
1-8
INGLESE
+
8-8
TURCO
-
Attivazione demo
Entra nel menù tenendo premuti
per circa 3 secondi i tasti:
quindi scorri le voci con il tasto
fino a demo mode, seleziona
con il tasto
scorri demo on e demo off.
Effettua la scelta con il tasto
e con il tasto
In modalità demo se premi il pulsante di START dopo aver impostato un qualunque programma di
lavaggio, parte un programma dimostrativo della durata di circa 45
secondi. Sul display scorre la scritta demo mode e si succedono le
fasi di un normale lavaggio.Per
disattivare il demo è sufficiente
selezionare demo off oppure, in
alternativa, spegnere la macchina,
premere il tasto START/RESET e
tenerlo premuto mentre si
riaccende: un beep confermerà la
disattivazione. Segui questo schema per attivare il programma dimostrativo.
DEMO MODE
-
-+ -
.
DEMO ON
+
DEMO OFF
Suggerimenti e consigli per te.
Come conservare e riparare le stoviglie a cui tieni
■ Quasi tutta largenteria si può
lavare in lavastoviglie. Ci sono
due eccezioni: largenteria antica e quella decorata con un agente ossidante. Lacqua calda può
allentare i manici di quella antica e far sparire i motivi ornamentali dellaltra.
Non mettere mai l'argenteria
a contatto con altri metalli:
eviterai macchie ed
annerimento.
Oltre a farti
risparmiare tempo
e fatica, la
lavastoviglie
disinfetta le
stoviglie,
lavandole ad
unalta
temperatura.
■ Piatti e vassoi dargento vanno
lavati immediatamente dopo
luso, soprattutto se sono stati
a contatto con sale, uova, olive, senape, aceto, succhi di frutta e verdure cotte.
■ Per stoviglie particolarmente
delicate, utilizza il lavaggio specifico presente nella tua lavastoviglie.
Risparmiare si può
Un uso intelligente degli elettrodomestici ti
fa risparmiare e fa bene allambiente
Massimo carico.
Per ottimizzare i consumi, attiva la lavastoviglie
possibilmente a pieno carico. Se per riempirla
passa un po di tempo, utilizza il ciclo ammollo,
eviterai la formazioni di cattivi odori e di
incrostazioni.
Mezzo carico.
Ricordati che in caso di necessità la tua
lavastoviglie ti consente anche di lavare a
mezzo carico (solo su un cestello).
Ricordati di usare metà dose di detersivo.
LAVASTOVIGLIE ARISTON - Istruzioni per l’installazione e l’uso
7
Page 12

AVASTOVIGLIE
L
Installazione e trasloco
È arrivata la tua lavastoviglie
Appena acquistata o spostata in unaltra casa, linstallazione fatta bene
ti assicura il buon funzionamento della tua lavastoviglie
Scegli il punto dove sistemare la
tua lavastoviglie, puoi farla aderire
con i fianchi o con lo schienale ai
mobili adiacenti o alla parete. La
lavastoviglie è munita di tubi per
lalimentazione e lo scarico dellacqua che possono essere orientati
verso destra o verso sinistra per
consentire la migliore installazione.
Livellamento.
Una volta posizionata la macchina, agisci sui piedini avvitandoli o
svitandoli a seconda se desideri
variare la sua altezza e per livellarla in modo che venga a trovarsi
orizzontale. Assicurati che non sia
inclinata di oltre 2 gradi. Un buon
livellamento assicurerà il corretto
funzionamento della tua lavastoviglie.
Incassabilità
Questo modello di lavastoviglie
può essere facilmente incassato
sotto ad un piano di lavoro continuo. In dotazione ti forniamo un kit
di montaggio completo di foglio
istruzioni.
Collegamento alla presa
dacqua fredda.
Allaccia il tubo di carico ad una
presa dacqua fredda con bocca
filettata da 3/4 gas, avendo cura di
avvitarlo strettamente al rubinetto. Se i tubi dellacqua sono nuovi o
sono rimasti per lungo tempo inattivi, prima di fare l'allacciamento,
assicurati, facendola scorrere, che
lacqua diventi limpida e sia priva
Se la presa di
corrente alla
quale colleghi la
macchina non
corrisponde alla
spina,
sostituiscila con
una spina adatta;
non impiegare
adattatori o
deviatori,
potrebbero
provocare
riscaldamenti o
bruciature.
di impurità. Senza questa precauzione, cè il rischio che il punto dove
entra lacqua si intasi, danneggiando la tua lavastoviglie.
Collegamento alla presa
dacqua calda.
La lavastoviglie può essere alimentata con acqua calda di rete (se hai
un impianto centralizzato con termosifoni) che non superi la temperatura di 60° C.
In questo caso il tempo di lavaggio
sarà abbreviato di circa 15 minuti
e lefficacia del lavaggio lievemente ridotta.
Dovrai effettuare il collegamento
alla presa dacqua calda, nello stesso modo descritto per il collegamento alla presa dacqua fredda.
Sicurezza
antiallagamento
La tua lavastoviglie è dotata di un
sistema che interrompe lingresso
dellacqua in caso di perdite all'interno della macchina. E inoltre
provvista di tubo entrata acqua che
sopporta pressioni molto alte e che
in caso di rottura diventa color rosso intenso. La sicurezza in caso di
allagamenti è garantita dal secondo tubo esterno che lo contiene e
che essendo trasparente si colora
di un rosso intenso. E molto importante controllarlo periodicamente e se lo vedi diventare colore
rosso intenso sai che devi al più
presto sostituirlo. Chiama lassistenza tecnica autorizzata per lintervento.
Se si accende la spia N di intervento del sistema di acquastop
chiudi il rubinetto dellacqua, togli
corrente alla macchina e chiama
lassistenza tecnica. Se sei collegato al nodo TLI la chiamata sarà
inoltrata automaticamente e si illuminerà il simbolo del telefono
P
Collegamento al tubo di
scarico.
Inserisci il tubo di scarico in una
conduttura di scarico che abbia un
diametro minimo di cm. 4 oppure
appoggialo al lavandino. Evita strozzature o curvature eccessive. Puoi
metterlo in maniera ottimale utilizzando lo speciale gomito in plastica in dotazione (figura). La parte
del tubo da cui esce lacqua (la parte libera) deve essere ad una altezza compresa tra 40 e 100 cm. e
non deve essere immerso nellacqua.
A
Lo speciale
gomito in
plastica deve
essere fissato
saldamente al
muro per evitare
che il tubo di
scarico si muova
e versi lacqua
fuori dallo
scarico.
Collegamento elettrico.
Prima di tutto verifica che i valori
della tensione e della frequenza di
rete corrispondano a quelli riportati sulla targhetta situata sulla
controporta inox della macchina e
che l'impianto elettrico al quale la
colleghi sia dimensionato per la
corrente massima indicata sulla
targhetta.
Terra: sicurezza
indispensabile.
Solo a questo punto inserisci la spina in una presa di corrente munita
di un efficiente collegamento a terra (la messa a terra dellimpianto è
una garanzia di sicurezza prevista
dalla legge, assicurati che il tuo
impianto ce labbia).
Se il cavo di
alimentazione
elettrica è
danneggiato chiama
il Centro di
Assistenza Tecnica
autorizzato per
farlo sostituire!
8
LAV ASTOVIGLIE ARISTON- Istruzioni per l’installazione e l’uso
Page 13

AVASTOVIGLIE
Problemi e soluzioni
L
Se hai un problema, leggi qui
Può accadere che la lavastoviglie non funzioni o funzioni male. In molti casi si tratta di problemi che puoi
risolvere senza dover chiamare il tecnico. Prima di telefonare allassistenza, memorizza i messaggi che
compaiono sul display.
La lavastoviglie non
parte
■ Il rubinetto dellacqua è aper-
to?
■ Il rubinetto dellacqua è colle-
gato bene al tubo?
■ Manca lacqua in casa?
■ Lacqua arriva con sufficiente
pressione?
■ Il tubo è piegato?
■ Il filtro del tubo di alimentazio-
ne dellacqua è intasato?
■ La porta della lavastoviglie è
aperta?
Le stoviglie non sono
pulite.
■ Hai messo la giusta dose di de-
tersivo?
■ Il programma di lavaggio sele-
zionato è idoneo alle stoviglie
che hai caricato?
■ Filtro e microfiltro sono puliti?
■ Gli irroratori sono liberi?
La lavastoviglie non
scarica.
■ Il tubo di scarico è piegato?
Nella lavastoviglie
rimangono depositi
calcarei o una patina
bianca.
■ Il tappo del contenitore sale è
chiuso bene?
■ Il dosaggio di brillantante è re-
golato bene?
Messaggi di errore.
La tua lavastoviglie è dotata di un
sistema di sicurezza in grado di rilevare eventuali anomalie di funzionamento.
1) Se la macchina non si avvia e dopo circa 10 minuti compa-
re il codiceH2Oe inizia a scorrere la scritta Controllare il rubinetto dellacqua significa che hai dimenticato di aprire il rubinetto. Verifica: dopo averlo aperto, la macchina partirà.
2) Se si verifica un guasto
che impedisce il funzionamento della lavastoviglie il
programma di lavaggio si interrompe, sul display compare il codi-
ce relativo al guasto e scorre un
messaggio che ne spiega la natura
insieme alla scritta contattare assistenza tecnica.
3) Se invece il guasto non
impedisce il funzionamento
del programma,la lavastoviglie
lo porta a termine e ti segnala,
circa ogni 30 secondi, il cattivo
funzionamento, con un codice ed
un messaggio specifico.
Nei casi 2 e 3 per recuperare la
completa funzionalità della macchina devi comunicare al centro di
assistenza il messaggio ed il codice di errore comparsi sul display.
Provvederanno loro a mandarti un
tecnico per la riparazione.
Se la lavastoviglie è collegata ad un sistema digital che
comprende anche il nodo telefono
TLI (Telephone Link Interface), al
verificarsi del guasto o del
malfunzionamento la macchina
provvede da sola a d effettuare una
chiamata telefonica al Centro Ser-
vizi Tecnici Ariston e sul display si
illumina il simbolo del telefono P
Il display non si accende
o manda dei messaggi
confusi ?
Chiama il centro assistenza autorizzato più vicino a casa tua e ricordati di comunicare:
il tipo di guasto
la sigla del modello (Mod....) e il
numero di serie (S/N ....) che puoi
trovare sulla targhetta applicata
nella parte laterale della
controporta.
Non ricorrere
mai a tecnici
non autorizzati
e rifiuta
sempre
linstallazione
di pezzi di
ricambio non
originali
La sicurezza in casa tua
La tua lavastoviglie è stata costruita seguendo le più severe norme internazionali di sicurezza. Tutelano
te e la tua famiglia. Leggi attentamente le avvertenze e le informazioni contenute in questo libretto: ti
daranno molte notizie utili sulla sicurezza d'installazione, luso e la manutenzione. Per non avere brutte
sorprese.
1. Elimina con cura il materiale
dell'imballaggio (segui le
istruzioni sulla raccolta differenziata che ti ha fornito il Comune di residenza)
2. Una volta tolto limballaggio,
verifica lintegrità dell'apparecchio. Se hai dei dubbi, rivolgiti a personale professionalmente qualificato.
3. La tua lavastoviglie verrà usata solo da adulti e per il lavaggio di stoviglie ad uso domestico, secondo le istruzioni
scritte in questo manuale. Non
toccare la macchina a piedi
nudi o con le mani e i piedi
bagnati
4. Ti sconsigliamo di ricorrere a prolunghe e prese multiple. Se il cavo di alimentazione elettrica non è abbastanza lungo, fallo sostituire con uno della giusta
lunghezza e ricorda che non
deve avere pieghe o compressioni pericolose.
5. In caso di funzionamento anomalo o di lavori di manutenzione disinserisci lapparecchio dalla rete elettrica (stacca la spina!).
6. Tieni lontano i bambini dai
detersivi e dalla lavastoviglie quando è aperta.
7. La tua lavastoviglie non va
installata allaperto, nemmeno se lo spazio è riparato da una tettoia: è molto
pericoloso lasciarla esposta a pioggia e temporali.
8. Non toccare la resistenza
durante e subito dopo un
ciclo di lavaggio.
9. Non appoggiarti e non sederti sullo sportello aperto, potresti ribaltare la lavastoviglie.
10. In caso di guasto, chiudi il rubinetto di entrata acqua ed
estrai la spina dalla presa a
muro. Poi prova a consultare
il capitolo Se hai un problema, leggi qui.
Voglio solo un tecnico specializzato
e autorizzato con ricambi originali
garantiti Ariston!
11 . Gli apparecchi fuori uso devo-
no essere resi inutilizzabili:
taglia il cavo di alimentazione
e danneggia il blocco della
porta.
LAVASTOVIGLIE ARISTON - Istruzioni per l’installazione e l’uso
9
Page 14

AVASTOVIGLIE
L
Cura e manutenzione
Pulizia e manutenzione particolari
Il gruppo filtrante
Se vuoi avere sempre buoni risultati di lavaggio, è necessario pulire il
gruppo filtrante.
Lacqua di lavaggio viene pulita dai
residui di cibo e rimessa in circolo
perfettamente filtrata. Per questo,
dopo ogni lavaggio, è meglio rimuovere i residui più grossi che trovi
trattenuti dal bicchiere C e dal
filtro semicircolare A; per estrarli
tira il manico del bicchere verso
lalto. Basterà sciacquarli sotto lacqua corrente.
Una volta al mese è necessario
pulire accuratamente tutto il gruppo filtrante: bicchiere C + filtro
semicircolare A + filtro cilindrico
B. Il filtro B si estrae ruotandolo
in senso antiorario.
Per la pulizia aiutati con uno spazzolino non metallico.
Rimetti insieme i pezzi (come indicato nella figura) e reinserisci il
gruppo nella lavastoviglie. Posizionalo nel suo alloggiamento facendo una pressione verso il basso.
La lavastoviglie non deve essere
usata senza filtri. Se non inserisci
correttamente i filtri si ridurrà lefficacia di lavaggio, e si potrebbe
anche danneggiare la lavastoviglie.
1
B
2
C
Pulizia degli irroratori.
Può succedere che alcuni residui
di cibo di attacchino agli irroratori
ostruendo i fori da cui deve uscire
lacqua. Controllali e puliscili ogni
tanto (lettere F e I Come è fatta.
A
Ogni tanto, una
volta al mese,
dedica un po di
attenzione al
gruppo filtrante e
agli irroratori
Tieni in forma la tua lavastoviglie
Rispettare poche regole ti assicura di avere sempre
una compagna di lavoro affidabile.
Dopo ogni lavaggio.
Quando il ciclo di lavaggio è finito ricordati sempre di chiudere il rubinetto dellacqua e lascia socchiusa la porta. Non ristagneranno lumidità e non si
formeranno cattivi odori.
Stacca la spina.
Prima di fare qualsiasi pulizia o
manutenzione della macchina,
stacca sempre la spina elettrica. Ti eviterà qualsiasi pericolo.
Niente solventi!
Niente abrasivi!
Per pulire lesterno e le parti in
gomma della tua lavastoviglie
non occorre usare né solventi
né abrasivi, usa solo un panno
imbevuto di acqua tiepida e di
sapone.
Se vedi delle macchie sulla superficie della vasca, utilizza un
panno imbevuto di acqua e aceto bianco (ne basta poco) oppure usa un prodotto specifico
per la pulizia della lavastoviglie.
Vai in vacanza?
Quando ti assenti per lunghi
periodi, ti consigliamo di eseguire queste operazioni:
fai un lavaggio a vuoto
chiudi il rubinetto di ingres-
so dellacqua
lascia socchiusa la porta
Facendo così le guarnizioni
dureranno più a lungo e allinterno non si formeranno odori
sgradevoli.
Trasloco.
In caso di trasloco è meglio tener l'apparecchio in posizione
verticale. Se fosse necessario,
puoi inclinarla sul lato posteriore.
Le guarnizioni.
Uno dei responsabili dei cattivi
odori allinterno della lavastoviglie è il ristagno di cibo che
rimane nelle guarnizioni. Basterà che tu le pulisca di tanto in
tanto con una spugnetta inumidita.
La tua lavastoviglie non è un
tritarifiuti!
Non preoccuparti di rimuovere ogni
minimo residuo di cibo dalle stoviglie,
ma elimina ossa, bucce e altri eventuali
avanzi prima di riporle nei cestelli.
Vuota bicchieri e coppe dei liquidi
rimasti.
10
LAV ASTOVIGLIE ARIST ON- Istruzioni per l’installazione e l’uso
Page 15

AVASTOVIGLIE
L
Ariston Digital è la nuova generazione di elettrodomestici
completamente predisposti per collegarsi tra di loro e con il Centro Servizi Digital di Merloni Elettrodomestici.
La rete domestica
Gli elettrodomestici e gli accessori della linea Ariston
Digital utilizzano la tecnologia WRAP (Web Ready
Appliances Protocol) per generare una serie di informazioni relative al loro funzionamento e scambiarle utilizzando sistemi di comunicazione standard: ciò significa
che lelettrodomestico che
ha appena acquistato è predisposto per dialogare con
gli altri componenti del sistema Ariston Digital utilizzando la rete elettrica, con laggiunta di un opportuno accessorio.
Non è pertanto necessario
collegare cavi aggiuntivi ed
ogni nuovo elettrodomestico Ariston Digital collegato
ad una presa di corrente entra subito a far parte della
sua rete domestica.
I servizi
La possibilità di dialogare
consente a questi elettrodomestici di sfruttare i nuovi
servizi offerti da Merloni
Elettrodomestici:
Gestione Consumi. Gli
elettrodomestici possono
comunicare tra di loro e con
alcuni accessori della linea
Ariston Digital (Misuratore di
Corrente e Digital Adapter) ,
regolare i consumi nella tua
casa evitando il rischio di un
black-out dovuto al sovraccarico.
Teleassistenza. Gli elettrodomestici possono comunicare, mediante laccessorio
TeleLink della linea Ariston
Digital, con il Centro Servizi
Digital per segnalare immediatamente i malfunzio
namenti ed anticipare eventuali problemi.
Ariston Digital è una nuova
linea di elettrodomestici, accessori e servizi per la sicurezza tua e della tua casa.
Per ulteriori informazioni
puoi:
contattare il
numero verde 800-448844
inviare una e-mail a
digital@merloni.com
oppure visitare il sito
www.aristonchannel.com
LAVASTOVIGLIE ARISTON - Istruzioni per l’installazione e l’uso
11
Page 16

AVASTOVIGLIE
L
Ariston ti è vicina anche
dopo lacquisto
Grazie per averci scelto, ma vogliamo rimanere
sempre vicino a te e al tuo elettrodomestico
Registra il tuo acquisto
Partecipa al concorso Rispondi e vinci inviando il questionario
che troverai in allegato alla documentazione del tuo elettrodomestico,
potrai usufruire di una serie di servizi riservati ai clienti Ariston.
Aderisci subito ai servizi speciali
Da cliente speciale a cliente privilegiato.
Ti puoi garantire anni ed anni di totale tranquillità per i tuoi nuovi elettrodomestici.
Troverai in allegato le modalità per l'adesione, da effettuare entro 30
giorni dalla data di acquisto..
Assistenza
specializzata
Rivolgiti al numero 199 199 199
risponderà il centro di Assistenza Ariston, più vicino a casa tua, 7 giorni su 7.
Quando chiami questo numero per una richiesta di assistenza, ricambi e/o accessori, ricordati di fornire le
seguenti informazioni:
- natura del guasto
- la sigla del modello (Mod..)
e il numero di serie (S/N)
riportati riportati sullapparecchio e nel certificato di garanzia.
Ricambi
originali
Accessori
garantiti
12
LAV ASTOVIGLIE ARIST ON- Istruzioni per l’installazione e l’uso
Page 17

Quick guide to your
dishwasher
This manual explains pleasantly all your new
electric household appliance has to offer. In
addition, you will discover a world of useful
hints and handy tips to help you get a better
wash from your dishwasher and to make it last
longer.
1. Installation and moving (p.20)
Installation, after delivery or your moving house, is the most important
procedure for the correct operation of your dishwasher. Always check:
1. That the electricity system is in accordance with norms;
2. That the water inlet and outlet hoses are connected correctly;
3. That the dishwasher is level on the ground. It is worth it: for the
longer life span and the correct operation of your dishwasher.
ISHWASHER
D
D
2. Control panel at your orders (p.14)
Learn to get to know the parts which make up your dishwasher, you
will use it better for it. This is where you will find the description of the
controls and the internal parts.
3. How to load your dishes (p.15)
8. Safety for you and your family (p.21)
This page includes useful tips to help you load your dishwasher correctly
and make the most of all the available space.
Read this chapter carefully, as it will provide you with useful information
on installation, use and maintenance safety. To avoid nasty surprises.
4. How to start your dishwasher (pages 16-17)
9. Special care and maintenance (p.22)
Once you have loaded your dishes into the dishwasher, the latter requires
some information from you in order to select the most suitable wash
cycle. Pour in the detergent and rinse aid correctly. Reading these pages
will help you through all the wash phases.
5. Salt: an important ally (p.18)
Using the right salt and in the right quantity will help you maintain your
dishwasher in top condition, to wash better and to avoid possible damage
caused by limescale.
Once in a while, once a month, spend a little time on the filter assembly
and the sprayer arms. This is where you can learn how.
10. Keeping your dishwasher in shape (p.22)
Respect the few rules you will find here, and the result will be an enduring
top-shape dishwasher.
11. Technical characteristics (p.14)
6. Advice and suggestions to help you make
savings as well (p.19)
All your appliance's technical data, in accordance with norms and
regulations as always.
This is where you will find small tips on how to wash your dishes better
and to help make savings.
7. Troubleshooting (p.21)
Before calling for a technician, have a look here: a lot of problems can
have an immediate solution. If you can't manage to solve it yourself,
then call the Ariston helpline and any problem will be solved as quickly
as possible.
12. Ariston is still with you after purchase (p.23)
Ariston supports its products by means of after-sales services and
assistance, offering you special guarantees, professional assistance as
well as quality spare parts and accessories. To find out more, call the
Ariston Freefone Number.
ARISTON DISHWASHER - Instructions for installation and use
13
Page 18

ISHWASHER
D
Let's open up your dishwasher together
How is it made?
Learn to get to know the parts which make up
your dishwasher, you will use it better for it.
E. Upper rack
F. Top sprayer arm
G. Rack height adjuster
H. Lower rack
I. Bottom sprayer arm
Control panel under your
command
A. ON-OFF Button
Press this button to turn
the appliance on.
B.START/RESET Button
With START, the wash
cycle begins, whereas all
the settings are cleared
with RESET.
C. Dish type selector knob
Choose the wash sector.
D.Door opening handle
Use this handle to open
the dishwasher door.
E.Display
Displays the special
wash cycles, options
and messages.
F.Standard cycle select
button
Press this button to select the desired traditional wash cycle
G.Upper or lower rack se-
lect button
You can select which
rack to perform the
wash cycle on.
H.Timer delay setting
button
Use it to delay the start
of the wash cycle by 1
to 24 hours and to exclude the turbo-dry.
I. Timer delay indicator
It lights up to indicate
that a delayed start has
been set.
J. Salt container cap
K . Washing filter
L. Detergent and rinse
aid dispenser
M ."Turbo Dry" Fan
L. Standard wash cycles
It lights up to indicate
Quick wash, Soak
cycle, Super Intensive.
M .Low salt indicator
light
It lights up to warn you
that it's time to add
more salt.
N. Aquastop indicator
light
Indicates a water leak.
Call for technical
assistance.
O. Low rinse aid
indicator light
It lights up to warn you
that it's time to add
more rinse aid.
P. Telephone or message
symbol
Only active if the
Ariston Digital system
has been installed in
your home.
R. Saucepans sector
High wash intensity
indicator.
S. Plates sector
Medium wash intensity
indicator.
T. Cups sector
Moderate wash
intensity indicator.
U. Crystal sector
Delicate crystal cycle
indicator.
E
G
F
J
I
F
H
G
E
B
H
K
M
L
A
C
D
U
ST
R
I
MLN
Technical Characteristics
Technical characteristics
Width cm. 60
Depth cm. 60
Height cm. 85
Capacity 12 standard place settings
M ains water pressure 20 KPa÷ 1M Pa (0,2 ÷10 bar)
Power voltage See data plate
Total absorber power See data plate
Fuse See data plate
14
ARISTON DISHWASHER - Instructions for installation and use
O
P
This dishwasher
conforms to the
following European
Community
Directives:
73/23/EEC of 19/
02/73 (Low
Voltage) and
subsequent
modifications;
89/336/EEC of
03/05/89
(Electromagnetic
Compatibility) and
subsequent
modifications.
Page 19

ISHWASHER
D
How to load your dishes.
Before washing, a few small steps can help you get a better wash and keep your dishwasher for
longer. Remove the largest scraps of food left over on your plates, soak saucepans and frying
pans with tough incrustations. After loading your dishes, make sure the blades on the sprayer
arm turn well. Do not place glasses and cups on top of one another, and make sure the dishes
are not touching.
First of all.
Before placing the dishes in the
racks, remove the largest scraps of
food left over on your plates, you
will thus avoid blocking the filter,
which would reduce the efficacy
of the wash.
If the saucepans and frying pans
are very dirty, allow them to soak
before being washed. To make it
easier to load your dishes, pull the
racks out.
Multisystem racks
This dishwasher model is fitted with
newer and more modern upper and
lower racks and a cutlery basket.
They are made to provide greater
flexibility in loading dishes, making
them more suitable to meet your
specific needs.
What goes into the
lower rack?
We recommend you place the most
difficult dishes to wash into the
lower rack: saucepans, lids, soup
dishes and plates, but also: mugs,
cups and glasses. (see photos for
load examples).
Serving dishes and large lids:
place them on the sides of the
rack.
Saucepans, salad bowls: must
always be placed upside down.
Very deep dishes: place them
obliquely, thus allowing water
to run down them and cleaning
them better.
Glasses and cups: position
them as indicated in the figure.
Position them so that they don't
touch.
In this specific model, the cutlery
basket is fitted with two
detachable side compartments, as
shown in figure A1, which can be
hooked on either to the upper or
lower rack, as required.
What goes into the
upper rack?
Place delicate and lightweight
dishes in the upper rack: glasses,
tea cups and coffee cups, saucers but plates too - shallow salad bowls,
slightly dirty frying pans and
shallow pans.
Position lightweight dishes in such
a way as to avoid their being moved
by the spray of water.
The appliance can also be equipped
with one or two tip-up
compartments onto which you can
place mugs and cups, as well as
long sharp knives and serving
cutlery.
After loading the dishes, remember
to check that the blades on the
sprayer arms can turn freely
without hitting against any dishes.
Adjusting the height of
the upper rack.
The upper rack can be set in high
or low position to enable you to
organise your dishes effortlessly.
Load examples
upper racklower rack
The cutlery basket can be split up
into two just by removing the
handle (see figures A and B), so you
can use just half a basket when you
only have little cutlery to wash.
Insert the cutlery one by one into
the slots, with the handles at the
bottom.
A
B
There are two handles on the sides of
the upper rack: use these to adjust its
height
A1
Where to put the different parts of
ARISTON DISHWASHER - Instructions for installation and use
the cutlery basket
15
Page 20

ISHWASHER
D
Starting the dishwasher
Ready, steady, go!
You have loaded your dishes into the appliance, and
you want to know how to start it? Just read on. You
only need a few minutes to learn how
Did you know that?
Ariston Dialogic is an intelligent
dishwasher, equipped with sophisticated software that allows
it to assess how dirty the dishes
are and the type of dishes to
wash. The appliance can wash
the racks differently, all you
need to do is tell it how delicate the dishes are and which
rack you have loaded them on.
The appliance will do the rest:
selecting the most suitable
wash cycle and the optimal water temperature.
Keep an eye on the display, it's
your dishwasher's means of
communications with you
where it can send you simple
messages to inform you as to
what it's doing. It can even request that you carry out a few
simple tasks, and it can signal
any oversights on your part.
First of all.
Turn on the water tap completely and press ON-OFF button "A". the wording that appears on display "E" indicates
the wash sector onto which the
knob is set.
Assess your needs and
choose from the following possibilities:
Full load wash on both
racks, with mixed dishes.
You only need to identify how
delicate the dishes you have
loaded are. Turn the knob and
set it to the wash sector you
deem most suitable for the
dishes loaded. Within each individual sector, turn the knob
clockwise to increase the wash
intensity.
Saucepans sector
R.
3 high wash
intensity positions.
Plates sector
S.
4 medium wash
intensity positions.
Cups sector
T.
3 moderate wash
intensity positions.
U. Crystal sector
3 positions for the
delicate crystal
cycle.
Start the appliance, following
the instructions in the "Starting the dishwasher" paragraph.
You need not do anything else,
as your dishwasher will set the
wash cycle by itself, along with
the most suitable temperatures,
the duration of the cycles and
everything deemed necessary
for a perfect result.
You have special load and
wash requirements.
(lots of glasses and plates, for
example).
Your dishwasher offers you the
possibility of washing everything at the same time with just
one wash cycle, but you need
to tell it, in the following order:
- which rack you have loaded
them on;
- what type of dishes need to
be washed
Look on the right-hand side of
the display, there are two small
arrow-shaped buttons. Press
button
rack. Now set the knob to the
"Crystal" setting. Observe how
these operations are indicated
at the same time on the display.
Now press button
the lower rack, and set the
knob to the "plates" setting.
Start the dishwasher using
START.
You want to wash just half
a load?
Have you only got a few dishes
that need washing? If so, load
them all on a single rack to save
on water and electricity.
If you intend to wash on the
upper rack only, keep button
Use the knob to select the wash
sector you deem most suitable
for the degree of delicacy of the
dishes you have loaded (such
as cups for example).
The wording "cups" - "only upper basket" will scroll along the
display. A luminous triangle
moves, indicating the rack and
the wash sector selected.
Have you selected the
wrong rack?
Keep the arrow corresponding
to the rack excluded pressed
for approximately 2 seconds.
Now make the correct selection.
Remember that if you
want to wash on just
one rack, you need to
halve the quantity of
detergent in both
dispensers.
to select the upper
to select
pressed for a few seconds.
Starting the dishwasher
Press the START button "B",
and a short beep will indicate
the appliance has begun washing. You need do nothing else,
the display will inform you
which phase is under way (prewash, wash, rinses, drying) and
after a few seconds the counter will indicate the amount of
time left until the end of the
wash cycle. Don't expect a precise countdown, but keep in
mind that this is an intelligent
appliance and therefore starts
with an estimated time. As the
wash cycle progresses, this time
is updated because the appliance acquires and assesses
many parameters which allow
it to optimise the wash cycle
(water hardness and temperature, degree of soil, type of
dishes, etc.).
Traditional wash cycles
Look on the left-hand side of
the display, you will see button
"F". Press it to select one of the
following 3 wash cycles, in sequence:
The wording for the selected
wash cycle appears on the display and the background of the
corresponding symbol turns
blue.
These are traditional wash cycles. You are not required to
use the knob, but if you only
have a few dishes to wash, then
run a half-load. Press the
START button to make the dishwasher strt washing. You will
be given the usual information
as to the duration of the wash
cycle and the sequence of the
Rapid
Soaking
Super Intensive
If you have cancelled a
wash cycle under way,
remember that water is
always drained when a
new wash cycle is
started. Check whether
the detergent was
unloaded together with
the wash water. In this
case, add some more.
phases. To find out more about
these wash cycles, read the table on page 17.
Changing the settings
when the cycle is under
way.
Have you just realised you selected the saucepans on the upper rack instead of crystal? You
had better inform the appliance, otherwise the type of
wash could be too intensive,
thus damaging your glasses.
Press RESET button "B" and
keep it pressed down for a few
seconds. You will hear a short
beep and the word "reset" will
appear on the display, followed
by the name of the wash sector
on which the knob is set. Now
you can re-set everything correctly.
Have you opened the appliance door? Has there
been a power failure?
Not to worry, the wash cycle
will start up again as soon as
you shut the door or the power
has returned.
Finished?
The end of the wash cycle is
signalled by a double beep, and
a flashing "Washing finished"
comes up on the display. Turn
the appliance off by pressing
the ON-OFF button.
Wait a few minutes before unloading the dishes: they are very
hot!
16
ARISTON DISHWASHER - Instructions for installation and use
Page 21

Delay the start
ISHWASHER
D
Go, but not just yet!
delayed the start
Your dishwasher is ready, but if you wish, you can make it start
when it best suits you. Nothing is easier, just read the instructions
below.
You decide when it
starts.
You have loaded your dishes into
the appliance and provided the
same with all the information
necessary for it to decide on the
most suitable wash cycle for
perfect results. Now, if you wish,
you can select when to start it. Look
at the display: there are two small
buttons marked by the letter "H".
These are necessary to set the
delayed start time. Use the + to
select from 1 to 24 hours, and the to go back if you have made a
mistake. The word "Delay" appears
on the display.
After a few seconds, the time
set is accepted and you can press
the "START" button: you will
hear a short beep and the
background of the delay indicator
light "I" will light up and the
words "time to start" will scroll
across. On the counter, the
countdown to the delayed start
has begun.
There's been a
power failure? Have
you opened the
dishwasher door?
The countdown stops and then
restarts when the electricity
comes back on or when you shut
the door. Everything is under
control!
You want to exclude the
turbo dry?
You can do so before
you set the delayed
start.
To exclude the turbo dry phase from
a wash cycle you wish to run, press
button
wording "No turbo dry" will scroll
across the display along with the
wash cycle description.
Please remember that you cannot
exclude the drying phase from the
Rapid wash and Soak cycles.
for a few seconds. The
cycle, it is best if
you do not modify
anything while you
If you really have
to, though, press
approximately 2
seconds: you will
hear a short beep
and all the settings
will be cancelled.
repeat the various
Have you chosen a traditional wash cycle?
If you have
of your wash
wait during the
countdown.
the Start/Reset
button "B" and
keep it pressed
down for
You can now
selecting
operations.
This table informs you of all you need to know
Select the right wash cycle for your dishes. Please remember that
you can run just half a load.
&\F OH &\FOH
VH OHFWLRQ
LQVWUXFWLRQV
(FRQRPLFDQG
IDVWF\FOHWREH
XVHGIRUVOLJKWO\
GLUW\GLVKHV5XQ
F\FOH
LPPHGLDWHO\
DIWHUXVH1R
5DSLG
6RDNLQJ
6XSHU
,QWHQVLYH
:D V K
GU\LQJ
3UHOLPLQDU\
ZDVKF\FOHIRU
GLVKHVDQGSDQV
DZDLWLQJ
FRPSOHWLRQRI
WKHORDGZLWKWKH
GLVKHVIURP WKH
QH[ W PH DO
9HU\ GLUW\GLVKHV
DQGSDQVQRWWR
EHXVHGIRU
GHOLFDWH LWHPV
6KRUWZDVKDW &
&ROGULQVH
6KRUWFROGZDVKWR SUHYHQWIRRGIURP
GU\LQJRQWRWKHGLVKHV
SUHZDVKHVZLWKFROG ZDWHU
([WHQGHGZDVKDW &
ULQVHVZLWKKRWZDWHU
'U\LQJ
&\FOHGHVFULSWLRQ 'HWHUJHQW
IR U SUH
ZD V K
ZD V K
FRQWDLQH UV
J
J
5LQVH$LG
If you select
one of these
traditional
wash cycles,
the knob is
excluded, but
if you only
have a few
dishes, you
can wash them
on one rack
only.
You can set
the delay for a
delayed start.
ARISTON DISHWASHER - Instructions for installation and use
17
Page 22

ISHWASHER
D
Detergent and rinse aid
Only use specific dishwasher detergents. Pour the detergent into the
dispenser on the inside of the door. Before the wash cycle starts!
The detergent
Loading the detergent
To open lid A, press button B. The
detergent should be poured into
the two containers up to the rim.
Now you can close the lid: press it
down until you hear it click.
If you prefer to use the detergent
in tablet form, then place one
inside the container "D" and close
the lid.
The rinse aid.
This product makes dishes sparkle
more as it improves their drying.
The rinse aid container is situated
on the inside of the door. You
should fill it up when the low rinse
aid indicator light "O" lights up on
and the words "add rinse aid" scroll
across the display.
Never without salt
It won't close!
Check whether there is any
detergent residue on the edges of
the dispenser. It is due to this residue that the lid won't close. Get
rid of it and you'll see that it closes.
Loading the rinse aid.
To open the dispenser, turn cap C
anticlockwise. Take care when
you pour in the rinse aid to avoid
it overflowing. You can adapt the
amount of rinse aid used by the
dishwasher: use a screwdriver or
a coin to adjust the dosage
adjuster F situated underneath
the lid C.
A
D
25
gr.
5
gr.
B
F
C
You can choose from six different
positions. It is normally set to 4.
Useful tips
Use the right
amount of
detergent: if you
use too much, you
will not get cleaner
dishes, but just
more
C
environmental
pollution.
Keep your
dishwasher
detergent and rinse
aid in a cool, dry
place and away
from children.
Proper dosage of
the rinse aid
improves drying.
If drops of water
remain on the
dishes or spotting
occurs, turn the
dosage adjuster to
a higher setting.
If, on the other
hand, the dishes
have white
streaks, then turn
the dosage
adjuster down to a
lower setting.
Water in your home
Water hardness varies according to where you live. If the water in
your home is hard, without water softening, incrustations would
form on your dishes. Your dishwasher is fitted with a water softener
which uses special salt to get rid of limescale in the water.
Loading the salt.
Always use salt which is intended
for dishwasher use.
The salt container is situated
underneath the lower rack, fill it
up as follows:
1. Pull out the lower rack
completely, unscrew and
remove the container cap
2. Is it the first time you load the
salt? First fill the container up
with water (you won't have to
do this again next time)
3. Put the dishwasher funnel on
the hole and pour in
approximately two kilos of
salt. It is normal that some
water comes out of the
container.
4. Screw the cap back in place
carefully.
When should I load the
salt?
The salt container should be filled
up when the low salt indicator
light "M" lights up and the words
"add salt" scroll across the display.
Intelligent salt.
Your dishwasher can adjust its salt
consumption according to the
hardness of the water in your
home. It will add the correct
quantity to the wash cycle, thus
optimising and customising the
salt consumption (not too much
nor too little). At the end of the
wash cycle, if your dishwasher
detects a water hardness which is
below the default threshold, the
message "do not use any salt" will
appear.
To prevent rust
from forming,
load the salt just
before beginning
a wash cycle.
18
ARISTON DISHWASHER - Instructions for installation and use
Page 23

ISHWASHER
D
Language setting
and demo programme
The messages, time and date functions are available if you have had the Ariston Digital
system with the GSM node installed in your home.
Access to the menu
Keep these two buttons
pressed together for approximately
3 seconds to enter the menu.
Now you can set a few functions.
The
button works as the "Mode"
button: to allow you to scroll along
the menu options.
The
"Select" button: to allow you to
select the selection shown by the
display.
The
button: to allow you to go back to
the last menu level; press it
repeatedly to quit the menu and go
back to normal mode. Follow the
diagram to select the desired
option.
button works as the
button works as the "Canc"
If your
dishwasher is
linked up to the
Ariston Digital
system, even if it
is switched off
the display stays
on and indicates
the correct time.
-
normal
display
MESSAGGES
+
TIME
+
DATE
+
LANGUAGE
+
DEMO MODE
+
Language selection
Your dishwasher is factory-set to
English, but you can change the
setting, using button ,selecting
-
-
one of the 7 languages available:
Italian, French, German, Spanish,
Portuguese, Dutch and Turkish.
Follow this diagram to select the
desired language.
-
LANGUAGE
-
-
language updated
Demo mode
Enter the menu by pressing the
buttons for approximately
3 seconds, then scroll through the
wording using the
you reach "demo mode", select the
latter using the
scroll through "demo-on" and
-
-+ -
1-8
ENGLISH
+
8-8
TURKCE
button until
button and then
"demo-off" using the
Use button
selection.
In "demo mode", if you press the
"START" button after setting a wash
cycle, a demo programme starts
and lasts approximately 45
seconds. The wording "demo
mode" scrolls across the display and
the phases of a normal wash cycle
follow one another in succession.
To disable the "demo", just select
"demo off" or turn the machine off,
even, by pressing the START/
RESET button and keeping it
pressed while it comes back on: a
beep will confirm it has been
disabled. Follow this diagram to
enable the demo programme.
DEMO MODE
-
button.
to make your
DEMO ON
+
DEMO OFF
-+ -
Suggestions and advice for you.
How to look after and protect the dishes you hold dear
■ Almost all silverware can be
cleaned in a dishwasher. There
are two exceptions: old
silverware and silverware
decorated with an oxidising
agent. Hot water can loosen the
handles on old silverware and
wear off the decorations on the
other.
Never let silverware come into
contact with other metals: you
will thus avoid stains and
blackening.
Apart from
making you save
time and energy,
your dishwasher
disinfects your
dishes, washing
them at a high
temperature.
■ Silver plates and serving dishes
should be washed immediately
after use, especially if they have
contained salt, eggs, olives,
mustard, vinegar, fruit juices
and cooked vegetables.
■ For particularly delicate dishes,
we recommend you use the
specific wash cycle offered by
your dishwasher.
Savings are easy
Using your electric household
appliances wisely helps you make
savings and is good for the environment.
Maximum load.
To optimise consumption levels, try to use
the dishwasher with a full load only. If it
takes quite some time to fill up your
dishwasher, use the soaking cycle to avoid
the formation of bad odours and caked-on
food.
Half load.
Remember that, if need be, your dishwasher
also allows you to wash half a load (using
one rack only).
Remember to use half the amount of
detergent.
ARISTON DISHWASHER - Instructions for installation and use
19
Page 24

ISHWASHER
D
Installation and moving
Your dishwasher has arrived
After having bought or moved your dishwasher to another
home, a correct installation ensures that your dishwasher
will operate smoothly and efficiently.
Choose where you want to install
your dishwasher, you can even
place it so that its sides or back
panel are side by side with furniture
or up against the wall. The
dishwasher is provided with water
supply and drain hoses, which can
be directed towards the left or right
to facilitate appropriate
installation.
Levelling.
Once the appliance is positioned,
adjust the feet by screwing them
in or out depending on how high
you want it and level it so that it is
horizontal. Make sure that it is not
inclined more than 2 degrees. If the
appliance is level, it will help ensure
its correct operation.
Easy to build-in
This dishwasher model can be builtin under a single worktop easily.
The dishwasher comes with an
assembly kit complete with an
instructions sheet.
Cold water connection.
Connect the cold water supply
hose to a 3/4 gas threaded
connection, taking care to screw it
tightly onto the tap. If the water
hoses are new or have been out of
use for an extended period of time,
let the water run to make sure it is
clear and free of impurities before
making the connection. If this
precaution is not taken, the water
inlet could get blocked, causing
damage to your dishwasher.
Hot water connection.
Your dishwasher can be supplied
with hot water from the mains
supply (if you have a central heating
system with radiators) at a temperature of no more than 60°C.
In this case, the wash cycle time
will be about 15 minutes shorter
and the wash will be slightly less
effective.
The connection must be made to
the hot water supply following the
same procedures as those indicated
for the cold water connection.
Anti-flooding protection.
Your dishwasher is provided with a
special system which blocks the
water supply in the event of leaks
inside the appliance. It is further
equipped with a water inlet hose
that can withstand extremely high
pressures and that turns bright red
in the event of breakage. Safety in
the event of flooding is ensured by
the second clear hose that contains
the former and thus highlights the
latter when it has turned bright red.
It is vital that you check it on a
regular basis: if you see it has turned
bright red, then you know you have
to replace it as soon as possible.
Call for an authorised technical
engineer to come and replace it.
If the indicator light "N"
corresponding to the aquastop
system comes on, turn off the
water tap, unplug the appliance and
call for technical assistance. If you
are linked up to the TLI telephone
node, the call will be forwarded to
our service centre automatically
and the telephone symbol "P" will
light up.
Drain hose connection.
Fit the drain hose into a drain line
with a minimum diameter of 4 cm
or place it over the sink. Avoid
restricting or bending it. Use the
special plastic elbow provided (see
figure) to position it in the best
possible way. The free end of the
hose should be between 40 and 100
cm above the ground and should
not be immersed in water.
A
Electrical connection.
First of all, check that the mains
voltage and frequency values
correspond to those stated on the
rating plate located on the stainless
steel inner door of the appliance
and that the electrical system to
which the dishwasher is connected
is sized for the maximum current
indicated on said rating plate.
Earth: indispensable
safety.
Only now can you plug the
appliance into a socket provided
with an efficient earth connection
(the system's earthing is a
guarantee of safety provided for by
law, make sure your system has
it).
If the power
socket to which
the appliance is
connected is not
compatible with
the plug, replace
it with a suitable
plug rather than
using adapters or
multiple plugs as
these could cause
overheating or
burns.
20
ARISTON DISHWASHER - Instructions for installation and use
The special
plastic elbow
should be
fastened firmly
onto the wall to
prevent the drain
hose from
moving and
allowing water to
spill outside the
drain.
If the power
supply cable is
damaged, call an
authorised After-
Sales Service
Centre and have it
replaced!
Page 25

ISHWASHER
D
Troubleshooting
If you have a problem, read this
Your dishwasher may not work or not function properly. In many cases, these are problems
which can be solved without having to call for a technician. Before calling for assistance,
make a note of the messages that appear on the display.
The dishwasher won't
start
■ Is the water supply tap turned
on?
■ Is the water supply tap con-
nected to the hose properly?
■ Has the water in your home
been cut off?
■ Is the pressure of the water sup-
ply sufficient?
■ Is the hose bent?
■ Is the filter on the water supply
hose blocked?
■ Is the dishwasher door open?
The dishes are not
clean.
■ Have you put the right amount
of detergent into the dispenser?
■ Is the wash cycle suitable for
the dishes you have placed inside the appliance?
■ Are the filter and microfilter
clean?
■ Can the sprayer arms turn
freely?
The dishwasher won't
drain.
■ Is the drain hose bent?
Limescale deposits or a
white film form on the
dishes.
■ Is the lid on the salt container
closed properly?
■ Is the rinse aid dosage correct?
Error messages.
Your dishwasher is equipped with
a safety system which is able to
detect any operating anomalies.
1) If the appliance does not
start and after approximately 10
minutes the code "H2O" appears
and the words "Check water inlet"
scroll across the screen, this means
you have forgotten to turn on the
tap. Check: after it's been turned
on, the appliance will start.
2) If there is a malfunction
which prevents the appliance
from operating, the wash cy-
cle is interrupted, the code relative
to that particular malfunction appears on the display and a message
scrolls across explaining the nature
of the malfunction, along with the
words "contact service".
3) If, on the other hand, the
malfunction does not prevent the appliance from
operating,the dishwasher fin-
ishes the wash cycle and indicates,
at 30 second intervals, that it is
operating incorrectly, by means of
a specific code and message.
In cases number 2 and 3 above, to
get your appliance fully functional
again, inform the service centre as
to the message and the error code
which appeared on the display.
The service centre will send out a
technician for the repairs.
If the dishwasher is connected to a digital system
which also includes the TLI
telephone node (Telephone Link
Interface), when the malfunction
occurs, the appliance itself
makes a phone call to the Ariston
Technical Service Centre and the
telephone symbol "P" lights up on
the display.
The display doesn't
come on or sends out
confused messages?
Call an authorised service centre
near you and remember to mention:
the type of malfunction
the model type no. (Mod.) and
the serial number (S/N.) indicated
on the rating plate located on the
inner door, to one side.
Never call upon
the services of
unauthorised
technicians and
always refuse
spare parts
that are not
originals.
Safety within your home
Your dishwasher was built in accordance with the strictest international safety regulations. They protect
you and your family. Read the instructions and information contained in this manual: they will provide
you with useful hints as to installation, use and maintenance safety. To avoid nasty surprises.
1. Dispose of the packaging
material carefully (follow the
instructions on how to divide
your rubbish up provided by your
local Council)
2. After removing the packaging,
check to make sure your
appliance is intact. If in doubt,
contact a qualified professional.
3. Your dishwasher must only be
used by adults and for washing
household dishes, according to
the instructions included in this
manual. Do not touch the
appliance with wet hands or feet
or barefoot.
4. We discourage the use of
extension leads and multiple
plugs. If the electricity supply
wire is not long enough, then
have it replaced with one of the
correct length and remember
that it should be free of bends
or dangerous kinks.
5. If the appliance is not operating
properly or if maintenance
operations are necessary,
disconnect the dishwasher from
the mains power supply (unplug
it!).
6. Keep children away from the
dishwasher when it is open and
keep detergents out of their
reach.
7. Your dishwasher is not to be
installed outdoors, not even if
the area is covered by a roof: it
is extremely dangerous to leave
it exposed to rain and
thunderstorms.
8. Do not touch the heating
element during or straight after
a wash cycle.
9. Do not lean or sit on the door
when it is open, as this could
overturn the dishwasher.
10.If the appliance malfunctions,
turn off the water inlet tap and
disconnect the plug from the
wall socket. Then try consulting
the "If you have a problem, read
this" chapter.
I only want an authorised
specialised technician with
original Ariston guaranteed
spare parts.
11.Once taken out of use,
appliances must be made
inoperable: cut the power supply
wire and damage the door lock.
ARISTON DISHWASHER - Instructions for installation and use
21
Page 26

ISHWASHER
D
Care and maintenance
Cleaning and special maintenance
The filter assembly
If you want consistent good results
from your dishwasher, you need to
clean the filter assembly.
The food particles are removed
from the wash water, allowing it to
be recirculated during the cycle,
filtered perfectly. For this reason,
it is a good idea to remove the larger
food particles trapped inside the
semi-circular filter A and cup "C"
after each wash; to remove the filter assembly, pull the cup handle
upwards. All you need to do is rinse
them under running water.
The entire filter assembly should
be cleaned thoroughly once a
month: cup C + semi-circular filter
A + cylindrical filter B. To remove
filter "B", turn it anti-clockwise.
Use a small non-metallic brush for
cleaning.
Reassemble the filter parts (as
shown in the figure) and reinsert
the whole assembly into the dishwasher. Position it into its housing
and press downwards.
The dishwasher is not to be used
without filters. Improper replacement of the filters may reduce the
efficiency of the wash and even
damage your dishwasher.
1
B
2
C
Cleaning the sprayer
arms.
Food residue may become
encrusted onto the sprayer arms
and block the holes where water
comes out. Check the sprayer arms
regularly and clean them once in a
while (letters F and I in the "How is
it made?" chapter).
A
Keep your dishwasher in shape
Once in a while,
once a month,
spend a little time
on the filter
assembly and the
sprayer arms
Respecting these few rules ensures you will always
have a reliable work companion by your side.
After every wash.
When the wash cycle has ended,
always remember to turn off the
water supply tap and to leave the
appliance door ajar. This way,
moisture and bad odours will not
be trapped inside.
Unplug the appliance.
Before carrying out any cleaning
or maintenance on the dishwasher,
always remove the plug from the
electricity socket. Do not run risks.
No solvents! No
abrasives!
To clean the exterior and rubber
parts of your appliance, do not use
solvents or abrasive cleaning
products. Use a cloth dampened
with lukewarm soapy water only.
If there are any stains on the
surface of the appliance interior,
use a cloth dampened with water
and a little white vinegar, or a
cleaning product specifically made
for dishwashers.
Going on holiday?
When you go away for an extended
period of time, we recommend you
do the following:
run a cycle with the dishwasher
empty
turn off the water inlet tap.
leave the appliance door ajar
This will help the seals last longer
and prevent unpleasant odours
from forming inside the appliance.
Moving the appliance.
Should the appliance have to be
moved, try to keep it in a vertical
position. If absolutely necessary, it
can be positioned on its back.
The seals.
One of the factors that cause
unpleasant odours to form inside
the dishwasher is food that remains
trapped in the seals. Periodic
cleaning using a damp sponge will
prevent this from occurring.
Your dishwasher is not a waste
Do not worry about removing every
single bit of food residue from your
dishes, but do get rid of bones, peel and
rind and any other left-overs before
placing them in the racks. Empty out
all glasses and cups.
disintegrator!
22
ARISTON DISHWASHER - Instructions for installation and use
Page 27

Stay in touch
THANK YOU for choosing an Ariston appliance. We are confident
you have made a good choice and that your new appliance will give
many years of excellent service.
And we're there when you need us.
Register your purchase
now
This will confirm your entitlement to free spare parts for five years,
and you could also be lucky enough to recover the cost of your purchase
in our quarterly prize draw.
Simply complete and return the Registration Form supplied with
the appliance documents, using the FREEPOST envelope supplied.
Or call the Registration Hotline on 0870 010 4305.
ISHWASHER
D
Enjoy complete peace of mind. By registering now, you automatically
qualify for a full year's guarantee on parts and labour PLUS free
functional parts cover for a further 4 years, provided they are
genuine Ariston spare parts fitted by an Ariston Service Engineer.
We're as close to you as your telephone
For direct access to Genuine Ariston Spare Parts and Accessories,
call 0870 558 5850 and speak to our skilled staff who can help you to identify and purchase the item you require.
For a Rapid Response to a problem with your appliance, call 0870 607 0805. We're open from Monday to
Saturday (8am - 5.30pm weekdays, 9am - 5pm Saturday). We have our own department of highly trained Ariston
service staff. For most calls, our Service Engineer can fix the problem on the first visit.
Please have the following details to hand when you ring us:
The nature of the problem, the Model Number and the Serial Number.
These numbers can be found on the appliance and on the portion of the Registration Card which you retain.
ARISTON DISHWASHER - Instructions for installation and use
23
Page 28

Merloni Elettrodomestici
Viale Aristide Merloni 47 - 60044 Fabriano (Italy)
Tel +39 0732 6611
Fax +39 0732 662501
www.merloni.com
10/2001 - 195032533.00 - Xerox Business Services - DocuTech
 Loading...