

Page 1
Istruzioni per luso
LAVABIANCHERIA
I
Italiano,1
DE
Deutsch,43
LBE 129
FR
English,15GBFrançais,29
Sommario
I
Installazione, 2-3-4-5
Disimballo e livellamento, 2
Collegamenti idraulici ed elettrici, 2-3
Primo ciclo di lavaggio, 3
Dati tecnici, 3
Istruzioni per linstallatore, 4-5
Descrizione della lavabiancheria, 6-7
Pannello di controllo, 6
Spie, 7
Avvio e Programmi, 8
In breve: avviare un programma, 8
Tabella dei programmi, 8
Personalizzazioni, 9
Impostare la temperatura, 9
Impostare la centrifuga, 9
Funzioni, 9
Detersivi e biancheria, 10
Cassetto dei detersivi, 10
Preparare la biancheria, 10
Capi particolari, 10
Woolmark Platinum Care, 10
Precauzioni e consigli, 11
Sicurezza generale, 11
Smaltimento, 11
Risparmiare e rispettare lambiente, 11
Manutenzione e cura, 12
Escludere acqua e corrente elettrica, 12
Pulire la lavabiancheria, 12
Pulire il cassetto dei detersivi, 12
Curare oblò e cestello, 12
Pulire la pompa, 12
Controllare il tubo di alimentazione dellacqua, 12
Anomalie e rimedi, 13
Assistenza, 14
Estensione di garanzia Airbag, 14
1
Page 2

Installazione
È importante conservare questo libretto per poterlo
I
consultare in ogni momento. In caso di vendita, di
cessione o di trasloco, assicurarsi che resti insieme
alla lavabiancheria per informare il nuovo proprietario
sul funzionamento e sui relativi avvertimenti.
Leggere attentamente le istruzioni: ci sono
importanti informazioni sullinstallazione, sulluso
e sulla sicurezza.
Disimballo e livellamento
Disimballo
1. Disimballare la lavabiancheria.
2. Controllare che la lavabiancheria non abbia
subìto danni nel trasporto. Se fosse danneggiata
non collegarla e contattare il rivenditore.
3. Rimuovere le quattro
viti di protezione per il
trasporto e il gommino
con il relativo distanziale, posti nella parte
posteriore (vedi figura).
4. Chiudere i fori con i tappi di plastica in dotazione.
5. Conservare tutti i pezzi: qualora la lavabiancheria
debba essere trasportata, dovranno essere
rimontati.
Gli imballaggi non sono giocattoli per bambini.
Un accurato livellamento dà stabilità alla macchina
ed evita vibrazioni, rumori e spostamenti durante il
funzionamento. In caso di moquette o di un tappeto,
regolare i piedini in modo da conservare sotto la
lavabiancheria uno spazio sufficiente per la ventilazione.
Collegamenti idraulici ed elettrici
Collegamento del tubo di alimentazione
dellacqua
1. Inserire la guarnizione
A nellestremità del tubo
di alimentazione e
avvitarlo a un rubinetto
A
3. Fare attenzione che nel tubo non ci siano né
pieghe né strozzature.
dacqua fredda con
bocca filettata da 3/4
gas (vedi figura).
Prima di allacciare, far
scorrere lacqua finché
non sia limpida.
2. Collegare il tubo di
alimentazione alla
lavabiancheria
avvitandolo allapposita
presa dacqua, nella
parte posteriore in alto a
destra (vedi figura).
Livellamento
1. Installare la lavabiancheria su un pavimento piano
e rigido, senza appoggiarla a muri, mobili o altro.
2. Se il pavimento non
fosse perfettamente
orizzontale, compensare
le irregolarità svitando o
avvitando i piedini
anteriori (vedi figura);
langolo di inclinazione,
misurato sul piano di
lavoro, non deve superare i 2°.
2
La pressione idrica del rubinetto deve essere
compresa nei valori della tabella Dati tecnici
(vedi pagina a fianco).
Se la lunghezza del tubo di alimentazione non
fosse sufficiente, rivolgersi a un negozio specializzato
o a un tecnico autorizzato.
Page 3
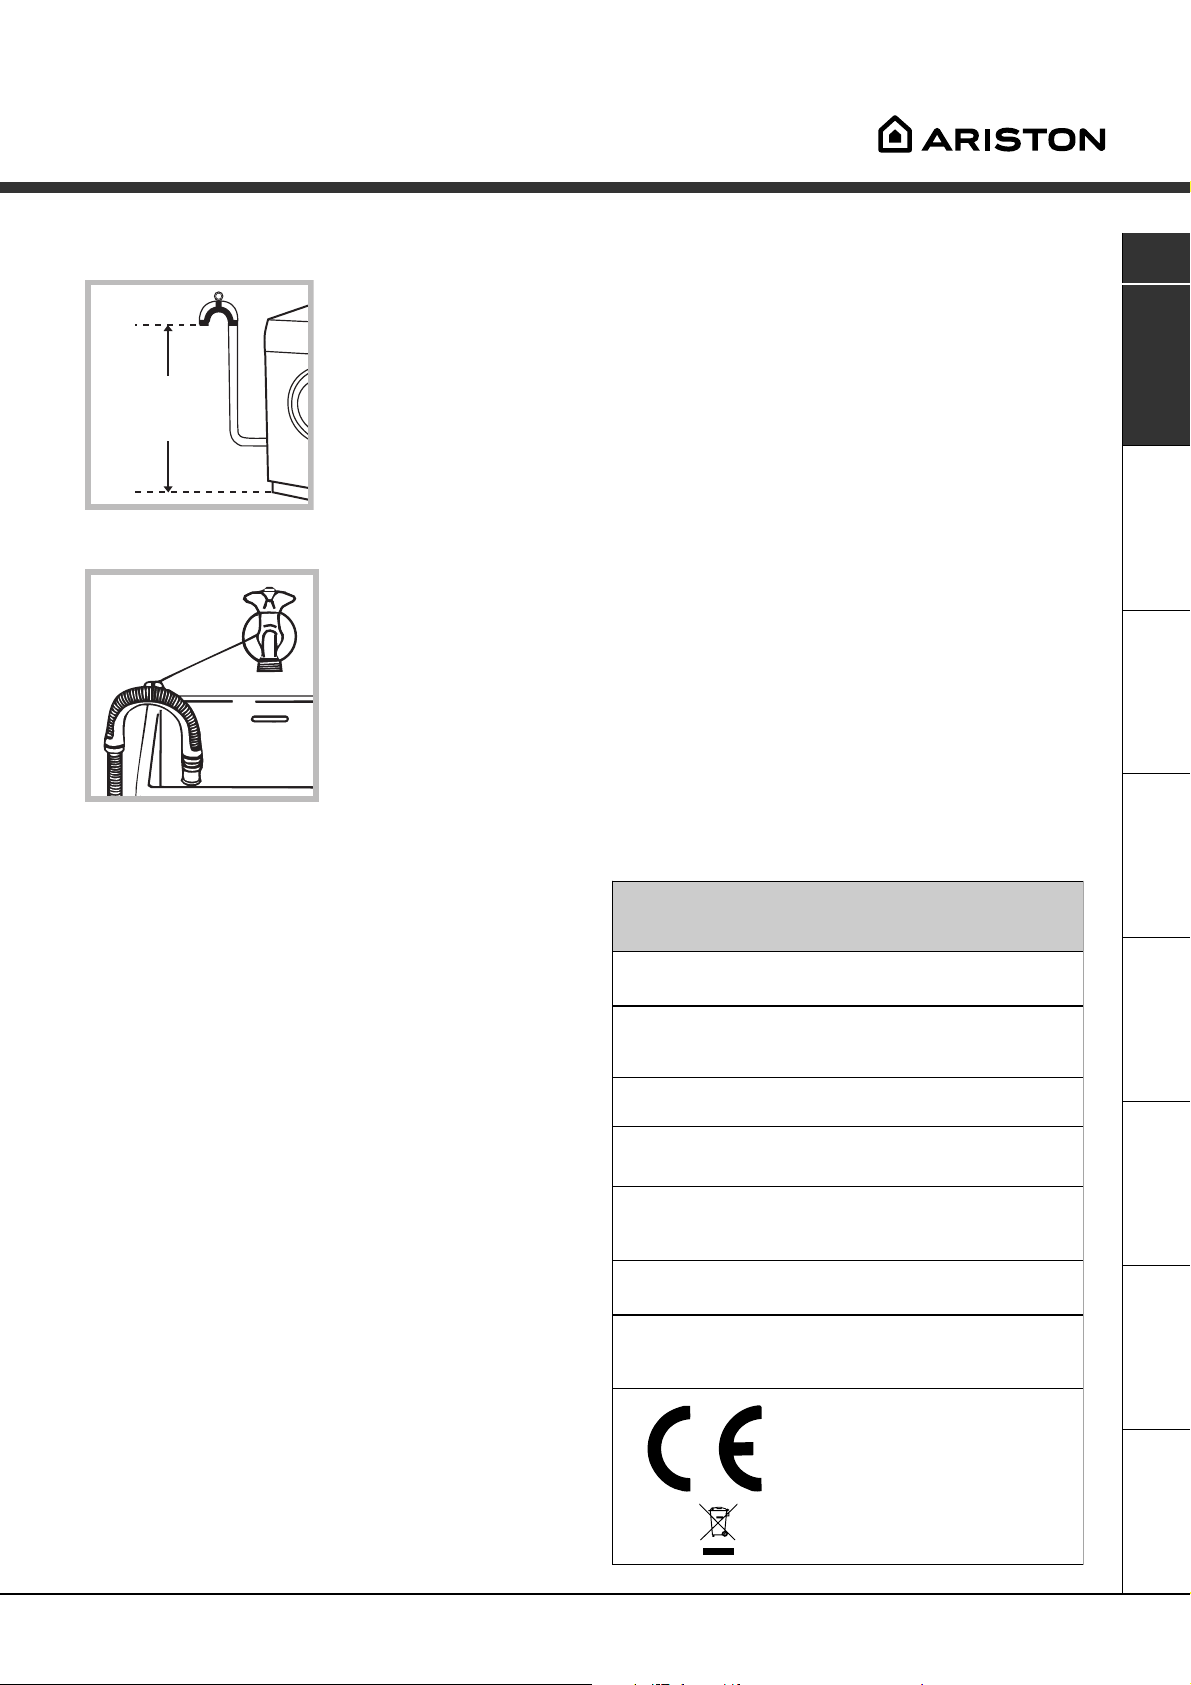
Collegamento del tubo di scarico
Collegare il tubo di
scarico, senza piegarlo,
a una conduttura di
scarico o a uno scarico
a muro posti tra 65 e
65 - 100 cm
100 cm da terra;
Non usare prolunghe e multiple.
I
Il cavo non deve subire piegature o compressioni.
Il cavo di alimentazione deve essere sostituito solo
da tecnici autorizzati.
Attenzione! Lazienda declina ogni responsabilità
qualora queste norme non vengano rispettate.
Primo ciclo di lavaggio
oppure appoggiarlo al
bordo di un lavandino o
di una vasca, legando
la guida in dotazione al
rubinetto (vedi figura).
Lestremità libera del
tubo di scarico non
deve rimanere immersa
nellacqua.
È sconsigliato usare tubi di prolunga; se indispen-
sabile, la prolunga deve avere lo stesso diametro del
tubo originale e non superare i 150 cm.
Collegamento elettrico
Prima di inserire la spina nella presa della corrente,
accertarsi che:
la presa abbia la messa a terra e sia a norma
di legge;
Dopo linstallazione, prima delluso, effettuare un
ciclo di lavaggio con detersivo e senza biancheria
impostando il programma a 90°C senza prelavaggio.
Dati tecnici
Modello
Dimensioni
Capacità
LBE 129
larghezza cm 59,5
altezza cm 81,5
profondità cm 54
da 1 a 5 kg
la presa sia in grado di sopportare il carico
massimo di potenza della macchina, indicato nella
tabella Dati tecnici (vedi a fianco);
la tensione di alimentazione sia compresa nei
valori indicati nella tabella Dati tecnici (vedi a
fianco);
la presa sia compatibile con la spina della
lavabiancheria. In caso contrario sostituire la
presa o la spina.
La lavabiancheria non va installata allaperto,
nemmeno se lo spazio è riparato, perché è molto
pericoloso lasciarla esposta a pioggia e temporali.
A lavabiancheria installata, la presa della corrente
deve essere facilmente raggiungibile.
Collegamenti
elettrici
Collegamenti
idrici
Velocità di
centrifuga
Programmi di
controllo secondo
la norma IEC456
tensione a 220/230 Volt 50 Hz
potenza massima assorbita 1850 W
pressione massima 1 MPa (10 bar)
pressione minima 0,05 MPa (0,5 bar)
capacità del cesto 46 litri
sino a 1200 giri al minuto
programma 3; temperatura 60°C;
effettuato con 5 kg di carico.
Questa apparecchiatura è conforme
alle seguenti Direttive Comunitarie:
- 73/23/CEE del 19/02/73 (Bassa
Tensione) e successive modificazioni
- 89/336/CEE del 03/05/89
(Compatibilità Elettromagnetica) e
successive modificazioni
- 2002/96/CE
AssistenzaAnomaliePrecauzioni ManutenzioneProgrammi DetersiviInstallazione Descrizione
3
Page 4

Istruzioni per linstallatore
I
Applicazione del pannello in legno alla porta e
inserimento della macchina nei mobili:
Nel caso in cui, dopo il montaggio del pannello in legno,
sia necessario spedire la macchina per l'installazione
finale, consigliamo di lasciarla nel suo imballo originale. A
questo scopo l'imballo è stato realizzato in modo da
permettere il montaggio del pannello di legno sulla
macchina senza disimballare completamente il prodotto
(vedi figure sottostanti).
Il pannello di legno che copre la facciata non deve essere
di spessore inferiore a 18 mm e può essere incernierato
sia sul lato destro che sinistro. Per ragioni di praticità
d'uso della macchina consigliamo lo stesso senso di
apertura dell'oblò con le cerniere applicate sul lato
sinistro.
Accessori montaggio portina (Fig. 1-2-3-4-5).
N° 2 Supporti cerniera
Fig. 1
N° 1 Magnete N° 1 Riscontro magnete
Fig. 3 Fig. 4
Fig. 2
N° 2 cerniere
A
C
Tur seite
E
B
D
N° 1 Tassello in gomma
Fig. 5
- n° 6 viti autofilettanti l = 13 mm "tipo A".
- n° 2 viti metriche testa svasata l = 25 mm "tipo B"; per
il fissaggio del riscontro magnete al mobile.
- n° 4 viti metriche l = 15 mm "tipo C"; per il montaggio
dei supporti cerniera al mobile.
- n° 4 viti metriche l = 7 mm "tipo D"; per il montaggio
delle cerniere ai supporti.
Montaggio dei particolari sulla facciata della macchina.
- Montare i supporti cerniera alla facciata posizionando il
foro indicato da una freccia nella fig. 1 verso linterno della
facciata, utilizzando le viti tipo C.
- Montare il riscontro magnete dalla parte opposta in alto
utilizzando le due viti tipo B.
- Interporre tra la facciata della macchina e il riscontro
magnete, il distanziale indicato in fig. 4/B.
N° 1 Distanziale
Fig. 4/B
4
Page 5
Uso della maschera di foratura.
- Per tracciare le posizioni dei fori sul lato sinistro del
pannello, allinerare la maschera di foratura al lato superiore e sinistro del pannello facendo riferimento alle linee
tracciate alle estremità.
- Per tracciare le posizioni dei fori sul lato destro del
pannello, allinerare la maschera di foratura al lato superiore e destro del pannello.
- Con una fresa di adeguate dimensioni realizzare le
quattro sedi che dovranno alloggiare le due cerniere, il
tassello di gomma e il magnete.
Montaggio dei particolari sul pannello di legno (Antina).
- Inserire le cerniere nelle sedi predisposte (la parte
mobile della cerniera deve trovarsi verso lesterno del
pannello) e fissarle con 4 viti del tipo A.
- Inserire il magnete nella sede in alto dalla parte opposta
alle cerniere e fissarlo con due viti tipo B.
- Inserire il tassello in gomma nella sede in basso.
Il pannello è ora pronto per essere montato sulla macchina.
Montaggio del pannello alla macchina.
Inserire il nasello della cerniera indicato dalla freccia nella
fig. 2 nella sede del supporto cerniera spingere il pannello
verso la facciata della macchina e fissare le due cerniere
con le due viti tipo D.
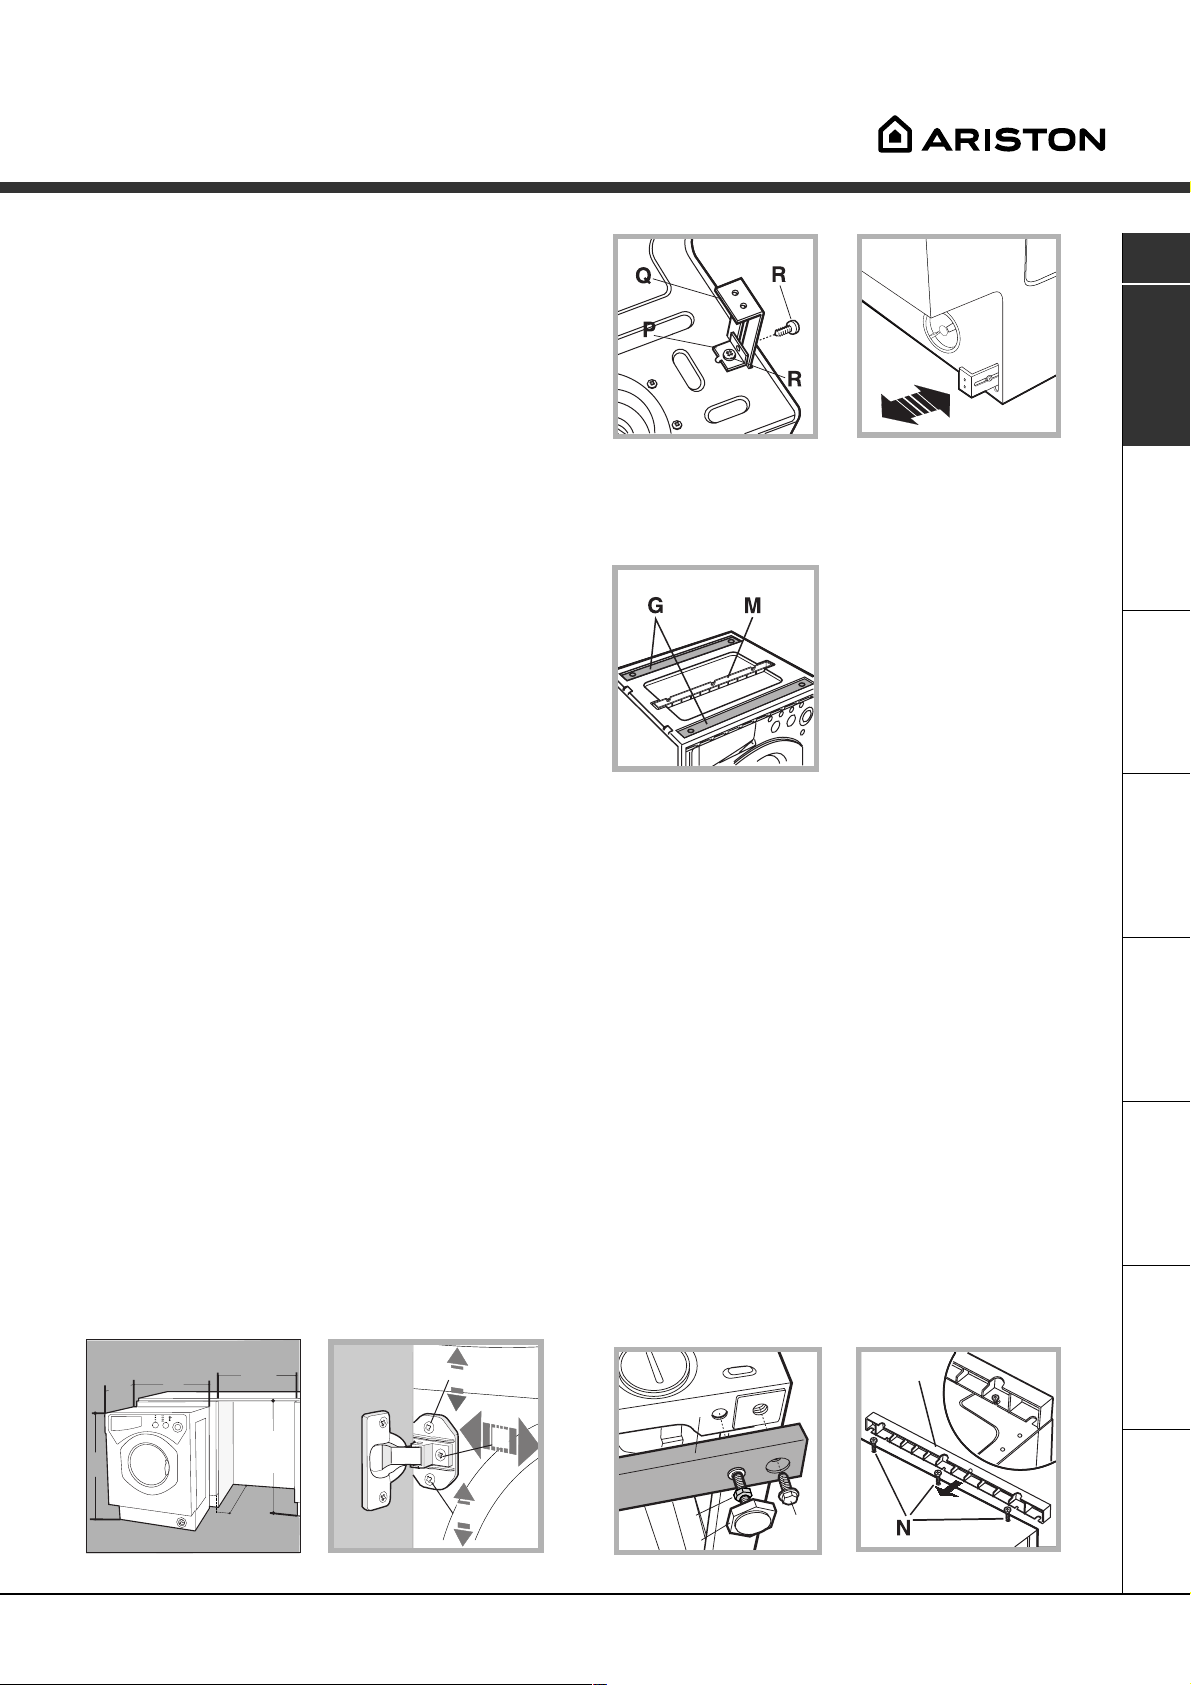
Fissaggio della guida zoccolo.
Se la macchina è installata ad una estremità della cucina
componibile montare una o entrambe le guide zoccolo
come indicato in fig. 8, regolandone la profondità in
funzione della posizione dello zoccolo e se necessario
fissarlo alle stesse (fig. 9).
Per montare la guida zoccolo agire cone segue (fig. 8):
Fissare la squadretta P con la vite R, infilare la guida
zoccolo Q nellapposita asola e una volta posizionata nel
punto desiderato bloccarla alla squadretta P con la vite R.
Inserimento della macchina nei mobili.
- Spingere l'apparecchio nellapertura allineandola con gli
altri mobili (fig. 6).
- Agire sui piedini di regolazione per portare la macchina
allaltezza desiderata.
- Per regolare la posizione del pannello in legno in senso
verticale ed orizzontale, agire sulle viti C e D come
indicato in fig. 7.
Importante: chiudere la parte inferiore della facciata con
lo zoccolo a battuta sul pavimento.
I
Fig. 8 Fig. 9
Accessori in dotazione per la regolazione in altezza.
Alloggiate nel coperchio di polistirolo (fig. 10) si trovano:
2 traverse (G); 1 listello (M)
allinterno del cestello si trovano:
4 piedini supplementari (H)
4 viti (I)
4 viti (R)
4 dadi (L)
2 guide zoccolo (Q)
Fig. 10
Regolazione in altezza della macchina.
La macchina può essere regolata in altezza (da 815 mm a
835 mm) agendo sui 4 piedini.
Se si desidera portarla ad unaltezza superiore a quella
sopraindicata, arrivando fino a 870 mm, occorre utilizzare i
seguenti accessori:
le 2 traverse (G); i 4 piedini (H); le 4 viti (I); i 4 dadi (L), quindi
agire come segue (fig. 11):
togliere i 4 piedini originali, posizionare una traversa G nella
parte anteriore della macchina, fissarla con le viti I (avvitandole
nei fori dove erano montati i piedini originali) quindi inserire i
nuovi pedini H.
Ripetere la stessa operazione nella parte posteriore della macchina.
A questo punto regolando i piedini H la macchina può essere
abbassata o alzata da 835 mm a 870 mm.
Una volta raggiunta laltezza desiderata bloccare i dadi L alla
traversa G.
Per regolare la macchina ad unaltezza compresa tra 870 mm e
900 mm occorre montare il listello M regolando i piedini H fino
allaltezza desiderata. Per inserire il listello agire come segue:
allentare le tre viti N poste nella parte anteriore della coper-
tura Top, inserire il listello M come indicato nella fig. 12,
quindi bloccare le viti N.
595
540
815
Fig. 6 Fig. 7
600 min
570
min
820 ÷ 900
C
M
G
D
AssistenzaAnomaliePrecauzioni ManutenzioneProgrammi DetersiviInstallazione Descrizione
C
Fig. 11 Fig. 12
L
H
I
5
Page 6
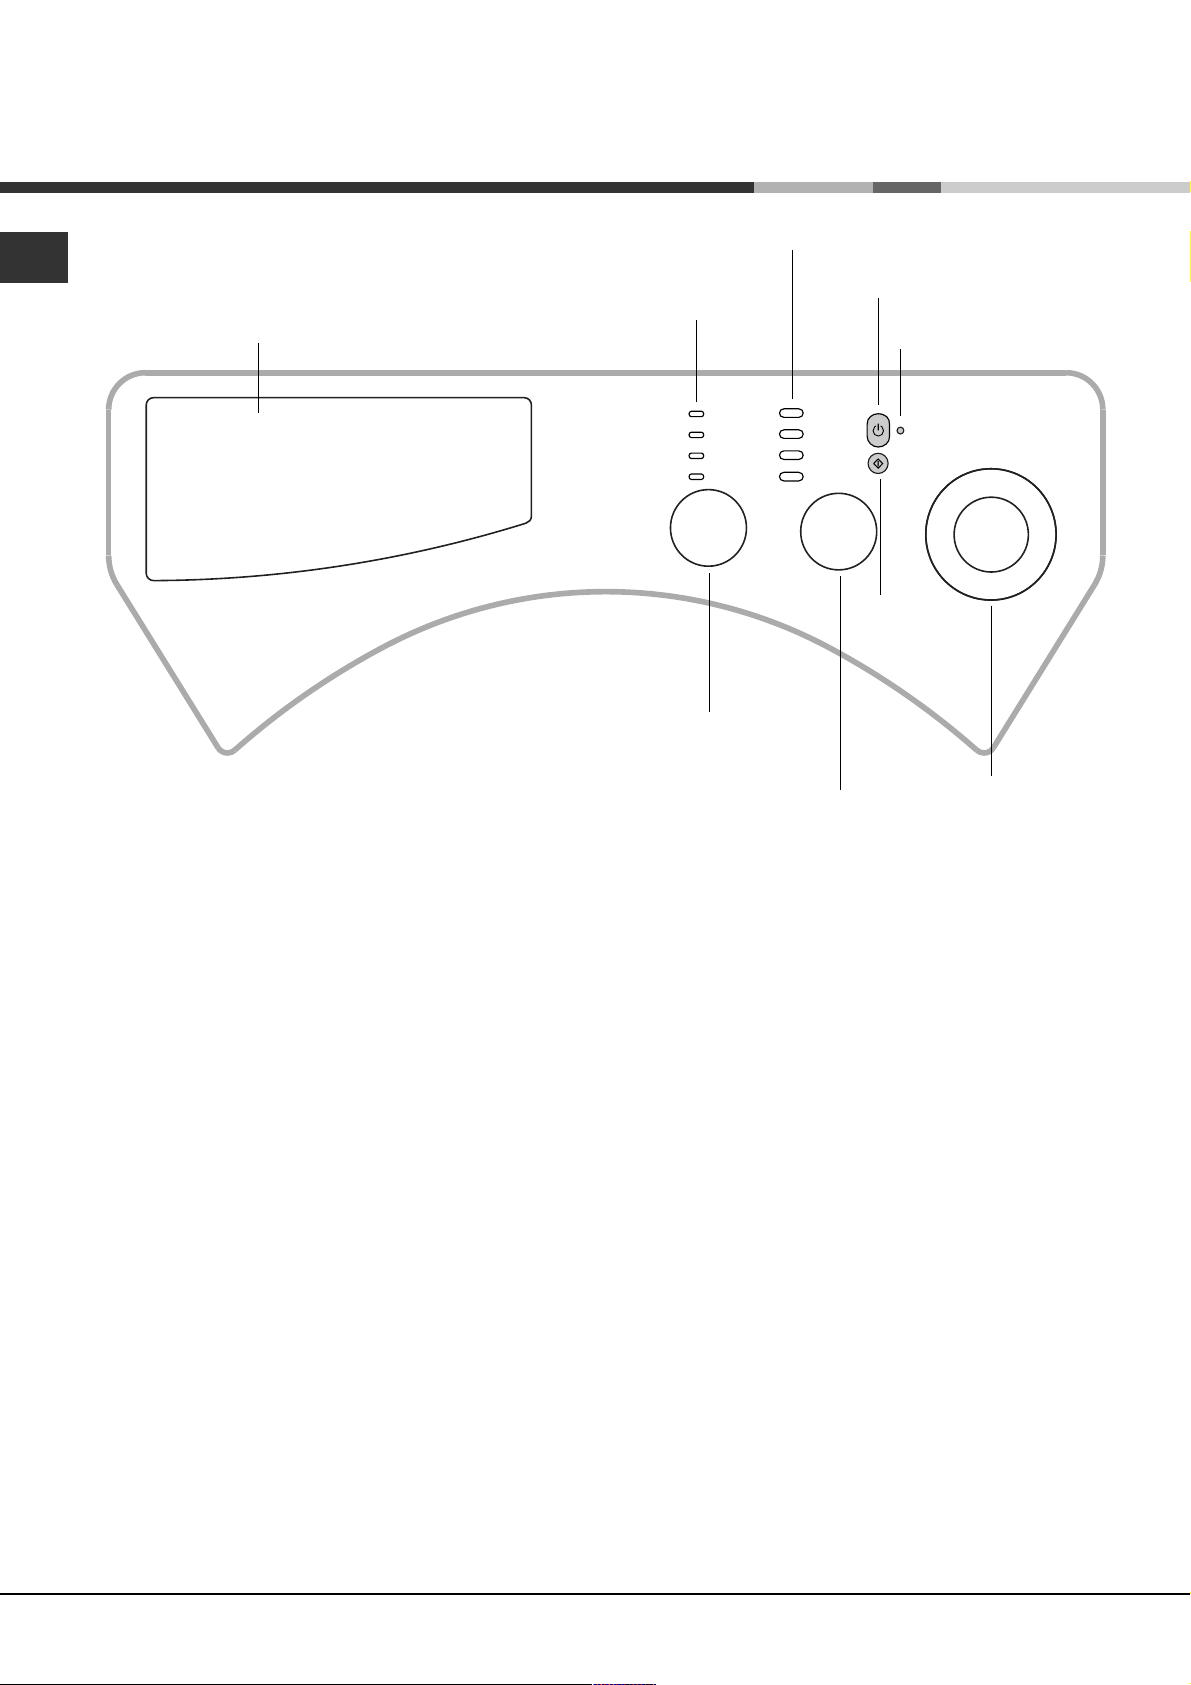
Descrizione della lavabiancheria
Pannello di controllo
I
Cassetto dei detersivi
Spie
Manopola
CENTRIFUGA
Tasti
FUNZIONE
Tasto
ACCENSIONE/
SPEGNIMENTO
Tasto
START/
RESET
M
Manopola
TEMPERATURA
Spia
ACCENSIONE/
OBLÒ BLOCCATO
Manopola
PROGRAMMI
Cassetto dei detersivi per caricare detersivi e
additivi (vedi pag. 10).
Spie per seguire lo stato di avanzamento del programma di lavaggio.
Se è stata impostata la funzione Delay Timer, indicheranno il tempo mancante allavvio del programma (vedi pag. 7).
Manopola CENTRIFUGA per impostare la centrifuga
o escluderla (vedi pag. 9).
Tasti FUNZIONE per selezionare le funzioni disponibili. Il tasto relativo alla funzione selezionata rimarrà
acceso.
Manopola TEMPERATURA per impostare la tempera-
tura o il lavaggio a freddo (vedi pag. 9).
Tasto ACCENSIONE/SPEGNIMENTO per accendere e spegnere la lavabiancheria.
Tasto START/RESET per avviare i programmi o
annullare quanto erroneamente impostato.
Spia ACCENSIONE/OBLÒ BLOCCATO per capire
se la lavabiancheria è accesa e se loblò è apribile
(vedi pag. 7).
Manopola PROGRAMMI per impostare i programmi
(vedi pag. 8). La manopola è del tipo a scomparsa:
per estrarla premerla leggermente al centro.
Durante il programma la manopola resta ferma.
6
Page 7
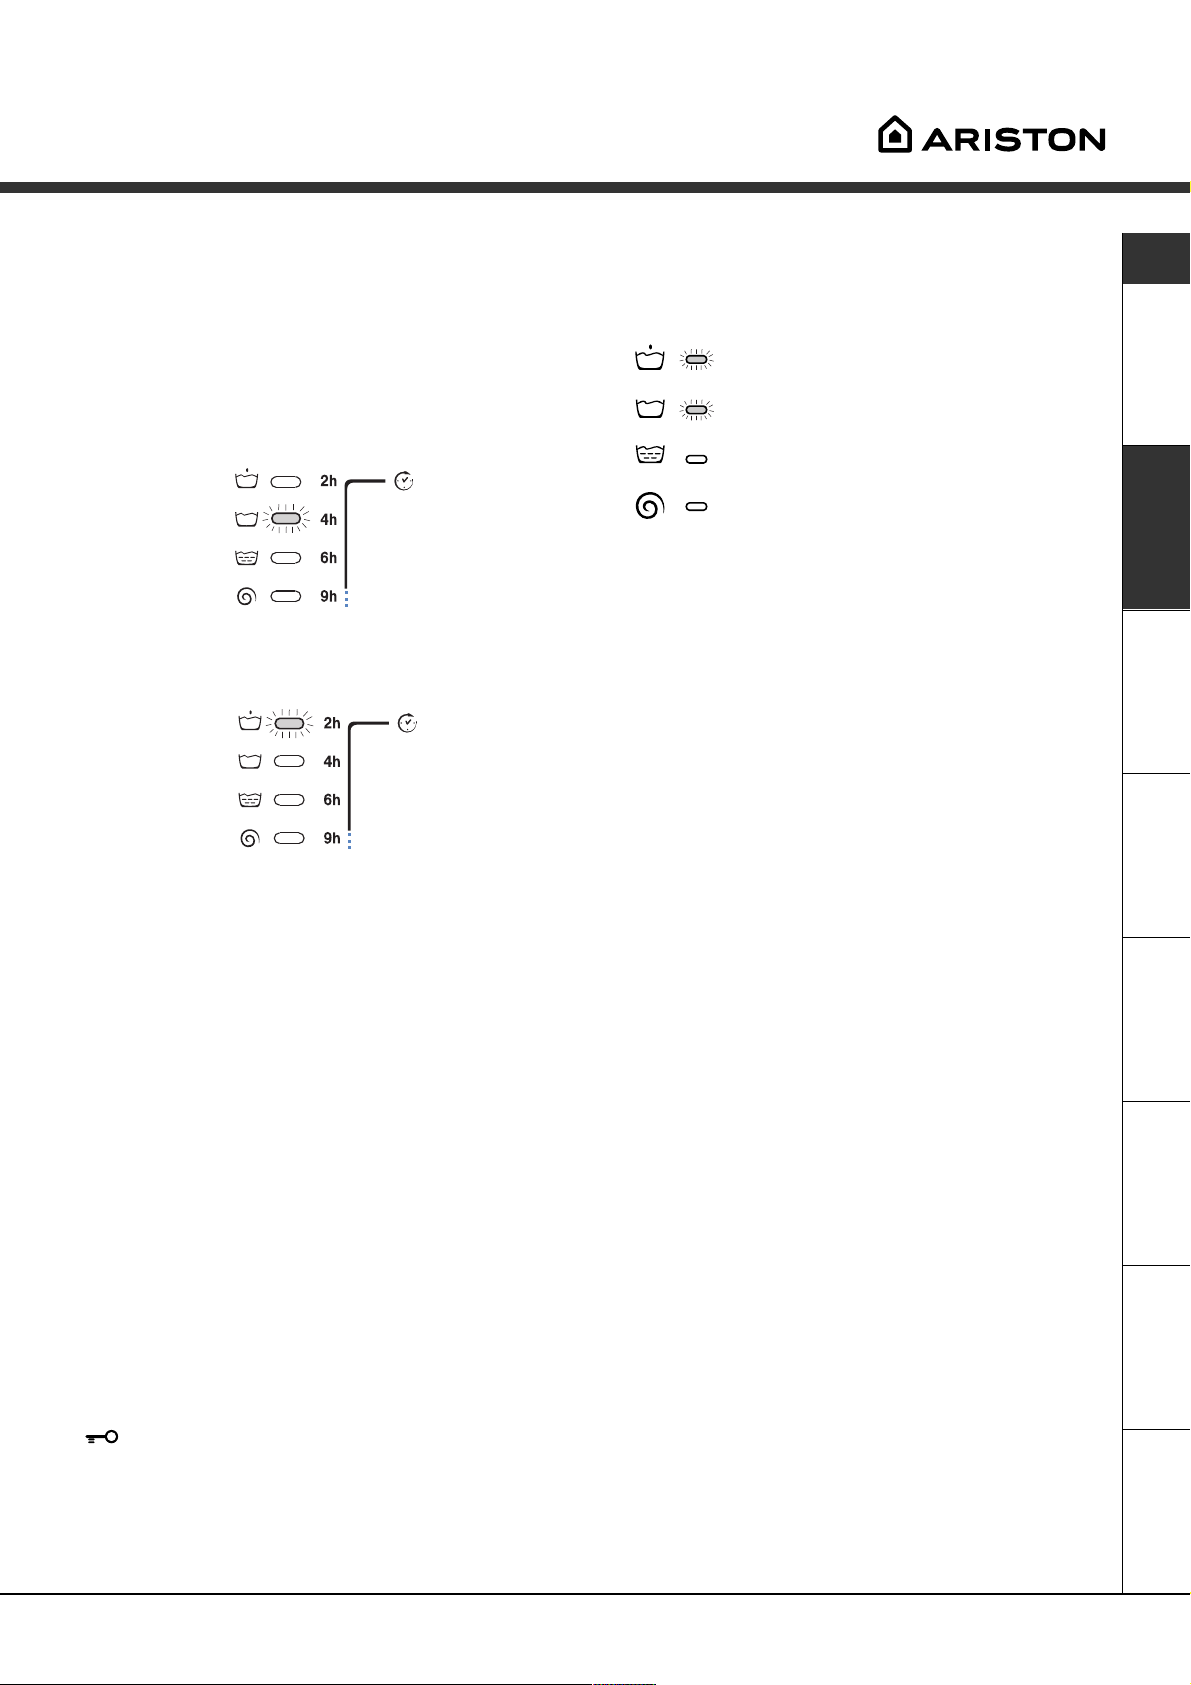
Spie
Le spie forniscono informazioni importanti.
Ecco che cosa dicono:
Fase in corso:
Durante il ciclo di lavaggio le spie si accenderanno
progressivamente per indicarne lo stato di avanzamento:
I
Ritardo impostato:
Se è stata attivata la funzione Delay Timer (vedi pag. 9),
dopo avere avviato il programma, inizierà a lampeggiare
la spia relativa al ritardo selezionato:
Col trascorrere del tempo verrà visualizzato il ritardo
residuo con il lampeggio della spia relativa:
Trascorso il ritardo selezionato la spia lampeggiante
si spengnerà e avrà inizio il programma impostato.
Prelavaggio
Lavaggio
Risciacquo
Centrifuga
Nota: durante la fase di scarico si illuminerà
la spia relativa alla fase Centrifuga.
Tasti funzione
I TASTI FUNZIONE fungono anche da spie.
Selezionando una funzione il relativo tasto si illuminerà.
Se la funzione selezionata non è compatibile con il
programma impostato il tasto lampeggerà e la
funzione non verrà attivata.
Nel caso venga impostata una funzione incompatibile con unaltra precedentemente selezionata rimarrà
attiva solo lultima scelta.
Spia ACCENSIONE/OBLÒ BLOCCATO:
La spia accesa indica che loblò è bloccato per impedire aperture accidentali; per evitare danni è necessario
attendere che la spia lampeggi prima di aprire loblò.
Il lampeggio veloce della spia ACCENSIONE/OBLÒ BLOCCATO contemporaneo a quello di almeno unaltra
spia segnala unanomalia. Chiamare lAssistenza Tecnica.
AssistenzaAnomaliePrecauzioni ManutenzioneProgrammi DetersiviInstallazione Descrizione
7
Page 8

Avvio e Programmi
In breve: avviare un programma
I
1. Accendere la lavabiancheria premendo il tasto .
Tutte le spie si accenderanno per qualche
secondo, poi si spengono e la spia ACCENSIONE/
OBLÒ BLOCCATO inizierà a lampeggiare.
2. Caricare la biancheria e chiudere loblò.
3. Impostare con la manopola PROGRAMMI il
programma desiderato.
4. Impostare la temperatura di lavaggio (vedi pag. 9).
5. Impostare la velocità di centrifuga (vedi pag. 9).
6. Versare detersivo e additivi (vedi pag. 10).
7. Avviare il programma premendo il tasto
START/RESET.
Per annullare il ciclo impostato premere il tasto
START/RESET per 2 secondi.
8. Al termine del programma la spia ACCENSIONE/
OBLÒ BLOCCATO lampeggerà indicando che
loblò è apribile. Estrarre la biancheria e lasciare
loblò socchiuso per far asciugare il cestello.
Spegnere la lavabiancheria premendo il tasto
Tabella dei programmi
Natura dei tessuti
e dello sporco
Programmi
Te m p e ratura
Detersivo
prelav. lavag.
Ammorbi-
dente
Cotone
Bianchi estremamente sporchi
(lenzuola, tovaglie, ecc.)
Bianchi estremamente sporchi
(lenzuola, tovaglie, ecc.)
Bianchi e colorati resistenti
molto sporchi
Bianchi poco sporchi e colori
delicati (camice, maglie, ecc.)
Colorati delicati poco sporchi
1
2
3
4
5
90°C 137
90°C 120
60°C 105
40°C 72
30°C 65
Sintetici
Colori resistenti molto sporchi
(biancheria per neonati, ecc.)
Colori resistenti (biancheria di tutti i
tipi leggermente sporca)
Colori resistenti molto sporchi
(biancheria per neonati, ecc.)
Colori delicati (biancheria di tutti i
tipi leggermente sporca)
Colori delicati (biancheria di tutti i
tipi leggermente sporca)
6
6
7
8
9
60°C 77
40°C 62
50°C 73
40°C 58
30°C 30
Delicati
Lana
Tessuti molto delicati (tende, seta,
viscosa, ecc.)
PROGRAMMI PARZIALI
Risciacquo Risciacqui e centrifuga
Risciacquo delicato Risciacqui, antipiega o scarico
Centrifuga Scarico e centrifuga energica
Centrifuga delicata Scarico e centrifuga delicata
Scarico Scarico
10
11
40°C 50
30°C 45
Durata
del ciclo
(minuti)
Descrizione del ciclo di lavaggio
Prelavaggio, lavaggio, risciacqui,
centrifughe intermedie e finale
Lavaggio, risciacqui,
centrifughe intermedie e finale
Lavaggio, risciacqui,
centrifughe intermedie e finale
Lavaggio, risciacqui,
centrifughe intermedie e finale
Lavaggio, risciacqui,
centrifughe intermedie e finale
Lavaggio, risciacqui,
antipiega o centrifuga delicata
Lavaggio, risciacqui,
antipiega o centrifuga delicata
Lavaggio, risciacqui,
antipiega o centrifuga delicata
Lavaggio, risciacqui,
antipiega o centrifuga delicata
Lavaggio, risciacqui,
e centrifuga delicata
Lavaggio, risciacqui e centrifuga
delicata
Lavaggio, risciacqui,
antipiega o scarico
.
Note
Per la descrizione dellantipiega:
vedi Stira meno, pagina a fianco. I dati riportati nella tabella hanno valore indicativo.
Programma speciale
Giornaliero 30' (programma 9 per Sintetici) è studiato per lavare capi leggermente sporchi in poco tempo: dura solo
30 minuti e fa così risparmiare energia e tempo. Impostando il programma (9 a 30°C) è possibile lavare insieme tessuti
di diversa natura (esclusi lana e seta) con un carico massimo di 3 kg. Si consiglia l'uso di detersivo liquido.
8
Page 9
Personalizzazioni
Impostare la temperatura
Ruotando la manopola TEMPERATURA si imposta la temperatura di lavaggio (vedi Tabella dei programmi a pag. 8).
La temperatura si può ridurre sino al lavaggio a freddo (
).
Impostare la centrifuga
Ruotando la manopola CENTRIFUGA si imposta la velocità di centrifuga del programma selezionato.
Le velocità massime previste per i programmi sono:
Programmi Velocità massima
Cotone 1200 giri al minuto
Sintetici 800 giri al minuto
Lana 600 giri al minuto
Seta no
La velocità di centrifuga può essere ridotta, oppure esclusa selezionando il simbolo
La macchina impedirà automaticamente di effettuare una centrifuga maggiore a quella massima prevista per
ogni programma.
.
Funzioni
Le varie funzioni di lavaggio previste dalla lavabiancheria permettono di ottenere la pulizia e il bianco desiderati.
Per attivare le funzioni:
1. premere il tasto relativo alla funzione desiderata, secondo la tabella sottostante;
2. laccensione del tasto relativo segnala che la funzione è attiva.
Nota: Il lampeggio veloce del tasto indica che la funzione relativa non è selezionabile per il programma impostato.
I
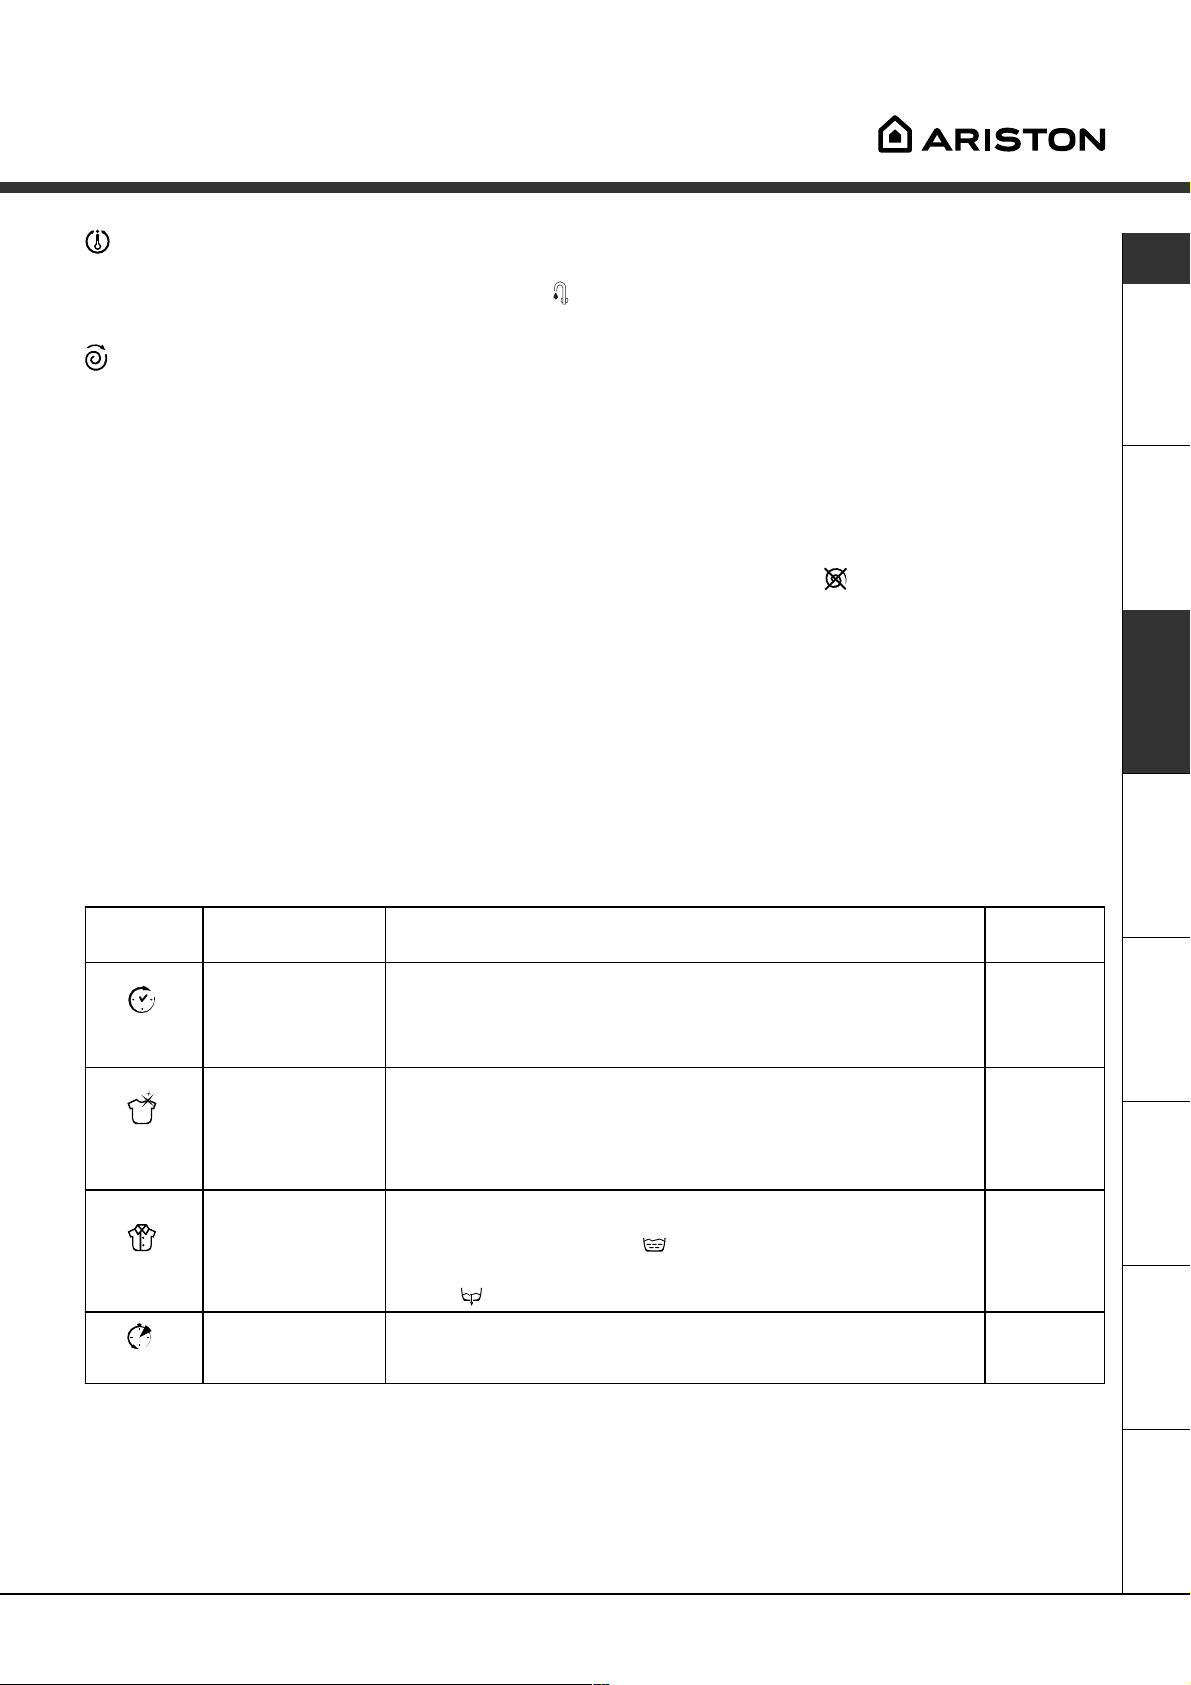
Funzioni Effetto Note per l'uso
Premere più volte il tasto fino a far acccendere la spia relativa al ritardo
desiderato.
Alla quinta pressione del tasto la funzione si disattiverà.
N.B.: Una volta premuto il tasto Start/Reset, si può modificare il
valore del ritardo solo diminuendolo.
Non è compatibile con l'opzione RAPIDO.
Impostando questa funzione, i programmi 6, 7, 8, 11 e Risciacquo
delicato si interromperanno con il bucato in ammollo (Antipiega) e
la spia della fase Risciacquo lampeggerà:
- per completare il ciclo premere il tasto START/RESET;
- per effettuare solo lo scarico posizionare la manopola sul simbolo
relativo e premere il tasto START/RESET.
Non è compatibile con l'opzione SUPER WASH.
Delay Timer
Su per
Was h
St ira men o
Ra pido
Ritarda l'avvio
della macchina
sino a 9 ore.
Consente un
pulito impeccabile,
visibilmente
più bianco dello
standard
in
Classe A
Riduce le pieghe
sui tessuti,
agevolando
la stiratura.
Riduce del 30%
circa la durata del
ciclo di lavaggio.
.
Attiva con i
programmi:
Tutti
1, 2, 3, 4,
5, 6, 7, 8.
Tutti
tranne
1, 2, 9, 10,
Scarico.
1, 2, 3, 4,
5, 6, 7, 8
AssistenzaAnomaliePrecauzioni ManutenzioneProgrammi DetersiviInstallazione Descrizione
9
Page 10

Detersivi e biancheria
Cassetto dei detersivi
I
Il buon risultato del lavaggio dipende anche dal
corretto dosaggio del detersivo: eccedendo non si
lava in modo più efficace e si contribuisce a incrostare le parti interne della lavabiancheria e a inquinare lambiente.
Estrarre il cassetto dei
detersivi e inserire il
detersivo o ladditivo
come segue.
1
3
vaschetta 1: Detersivo per prelavaggio
(in polvere)
vaschetta 2: Detersivo per lavaggio
(in polvere o liquido)
Il detersivo liquido va versato solo prima dellavvio.
vaschetta 3: Additivi (ammorbidente, ecc.)
Lammorbidente non deve fuoriuscire dalla griglia.
2
Non usare detersivi per il lavaggio a mano, perché
formano troppa schiuma.
Preparare la biancheria
Capi particolari
Tende: piegarle e sistemarle dentro una federa o un
sacchetto a rete. Lavarle da sole senza superare il
mezzo carico. Utilizzare il programma 11 che esclude in automatico la centrifuga.
Piumini e giacche a vento: se limbottitura è
doca o danatra si possono lavare nella
lavabiancheria. Rivoltare i capi e fare un carico
massimo di 2-3 kg, ripetendo il risciacquo una o due
volte e utilizzando la centrifuga delicata.
Scarpe da tennis: pulirle dal fango. Si possono
lavare con i jeans e i capi resistenti, ma non con i
capi bianchi.
Lana: per ottenere i migliori risultati utilizzare un
detersivo specifico e non superare 1kg di carico.
Woolmark Platinum Care
Delicato come il lavaggio a mano.
Ariston ha introdotto un nuovo standard di
prestazioni superiori riconosciuto da The
Woolmark Company con il prestigioso marchio
Woolmark Platinum Care. Se sulla lavabiancheria cè
il logo Woolmark Platinum Care, si possono lavare
con risultati eccellenti i capi in lana recanti letichetta
Lavare a mano (M.0303):
Impostare il programma 10 per tutti i capi con
Lavare a mano, facendo uso di detersivi
specifici.
Suddividere la biancheria secondo:
- il tipo di tessuto / il simbolo sulletichetta.
- i colori: separare i capi colorati da quelli bianchi.
Vuotare le tasche e controllare i bottoni.
Non superare i valori indicati, riferiti al peso della
biancheria asciutta:
Tessuti resistenti: max 5 kg
Tessuti sintetici: max 2,5 kg
Tessuti delicati: max 2 kg
Lana: max 1 kg
Quanto pesa la biancheria?
1 lenzuolo 400-500 gr.
1 federa 150-200 gr.
1 tovaglia 400-500 gr.
1 accappatoio 900-1.200 gr.
1 asciugamano 150-250 gr.
10
Page 11

Precauzioni e consigli
La lavabiancheria è stata progettata e costruita in
conformità alle norme internazionali di sicurezza.
Queste avvertenze sono fornite per ragioni di
sicurezza e devono essere lette attentamente.
Sicurezza generale
Questo apparecchio è stato concepito esclusiva-
mente per un uso di tipo domestico.
La lavabiancheria deve essere usata solo da
persone adulte e secondo le istruzioni riportate
in questo libretto.
Non toccare la macchina a piedi nudi o con le
mani o i piedi bagnati o umidi.
Non staccare la spina dalla presa della corrente
tirando il cavo, bensì afferrando la spina.
Non aprire il cassetto dei detersivi mentre la
macchina è in funzione.
Non toccare lacqua di scarico, che può
raggiungere temperature elevate.
Non forzare in nessun caso loblò: potrebbe
danneggiarsi il meccanismo di sicurezza che
protegge da aperture accidentali.
In caso di guasto, in nessun caso accedere ai
meccanismi interni per tentare una riparazione.
Controllare sempre che i bambini non si avvicinino
alla macchina in funzione.
Durante il lavaggio loblò tende a scaldarsi.
Se devessere spostata, lavorare in due o tre
persone con la massima attenzione. Mai da soli
perché la macchina è molto pesante.
Per ulteriori informazioni, sulla corretta dismissione
degli elettrodomestici, i detentori potranno rivolgersi
al servizio pubblico preposto o ai rivenditori.
Risparmiare e rispettare lambiente
Tecnologia a servizio dellambiente
Se nelloblò si vede poca acqua è perché con la
nuova tecnologia Ariston basta meno della metà
dellacqua per raggiungere il massimo pulito: uno
scopo raggiunto per rispettare lambiente.
Risparmiare detersivo, acqua,
energia e tempo
Per non sprecare risorse bisogna utilizzare la
lavabiancheria con il massimo carico. Un carico
pieno al posto di due mezzi fa risparmiare fino al
50% di energia.
Il prelavaggio è necessario solo per biancheria
molto sporca. Evitarlo fa risparmiare detersivo,
tempo, acqua e tra il 5 e il 15% di energia.
Trattando le macchie con uno scioglimacchia o
lasciandole in ammollo prima del lavaggio, si
riduce la necessità di lavare ad alte temperature.
Un programma a 60°C invece di 90°C o uno a
40°C invece di 60°C, fa risparmiare fino al 50% di
energia.
Dosare bene il detersivo in base alla durezza
dellacqua, al grado di sporco e alla quantità di
biancheria evita sprechi e protegge lambiente:
pur biodegradabili, i detersivi contengono elementi
che alterano lequilibrio della natura. Inoltre evitare
il più possibile lammorbidente.
I
Prima di introdurre la biancheria controlla che il
cestello sia vuoto.
Smaltimento
Smaltimento del materiale di imballaggio:
attenersi alle norme locali, così gli imballaggi
potranno essere riutilizzati.
La direttiva Europea 2002/96/CE sui rifiuti di
apparecchiature elettriche ed elettroniche, prevede
che gli elettrodomestici non debbano essere
smaltiti nel normale flusso dei rifiuti solidi urbani. Gli
apparecchi dismessi devono essere raccolti
separatamente per ottimizzare il tasso di recupero
e riciclaggio dei materiali che li compongono ed
impedire potenziali danni per la salute e l'ambiente.
Il simbolo del cestino barrato è riportato su tutti i
prodotti per ricordare gli obblighi di raccolta separa
ta.
Effettuando i lavaggi dal tardo pomeriggio fino alle
prime ore del mattino si collabora a ridurre il
carico di assorbimento delle aziende elettriche.
La funzione Delay Timer (vedi pag. 9) aiuta molto
a organizzare i lavaggi in tal senso.
Se il bucato deve essere asciugato in un
asciugatore, selezionare unalta velocità di
centrifuga. Poca acqua nel bucato fa rispamiare
tempo ed energia nel programma di asciugatura.
AssistenzaAnomaliePrecauzioni ManutenzioneProgrammi DetersiviInstallazione Descrizione
11
Page 12
Manutenzione e cura
Escludere acqua e corrente elettrica
I
Chiudere il rubinetto dellacqua dopo ogni
lavaggio. Si limita così lusura dellimpianto
idraulico della lavabiancheria e si elimina il pericolo
di perdite.
Staccare la spina della corrente quando si
pulisce la lavabiancheria e durante i lavori di
manutenzione.
Pulire la lavabiancheria
La parte esterna e le parti in gomma possono
essere puliti con un panno imbevuto di acqua tiepida
e sapone. Non usare solventi o abrasivi.
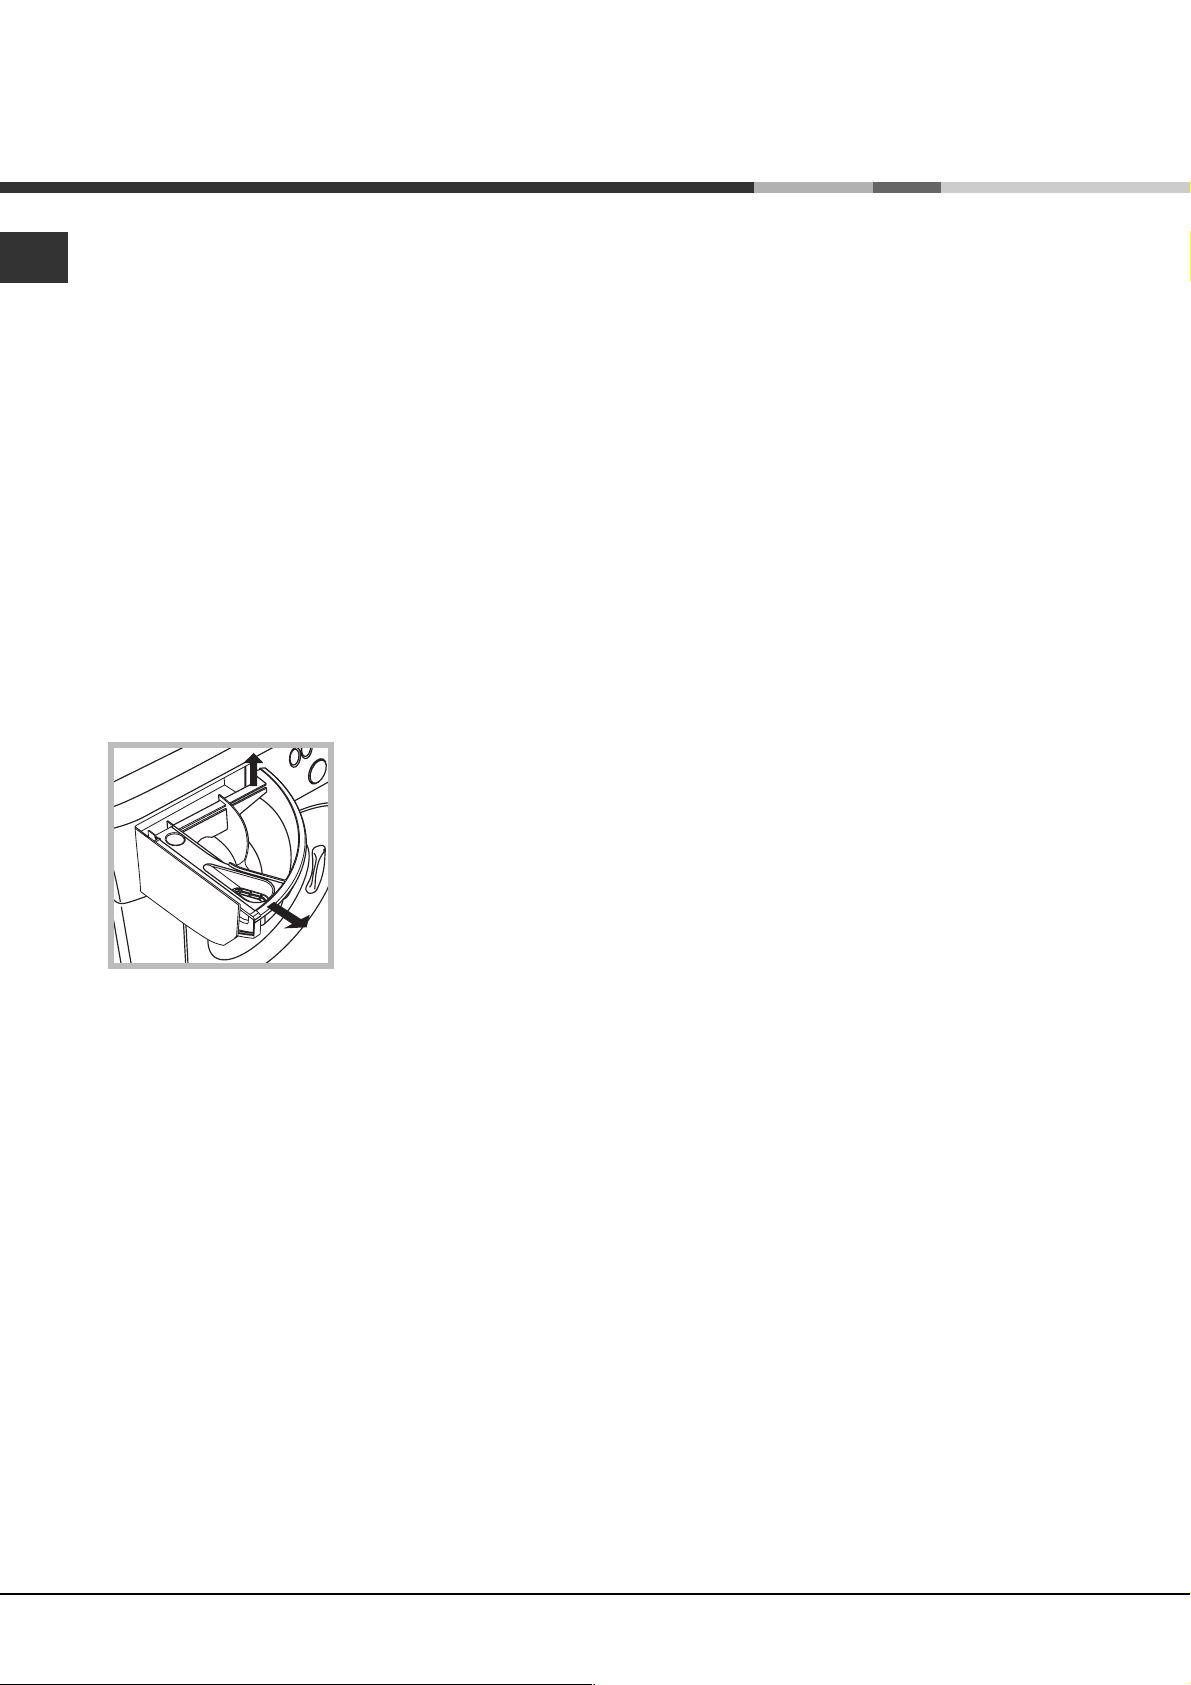
Pulire il cassetto dei detersivi
1
Sfilare il cassetto sollevandolo e tirandolo
verso lesterno (vedi
figura).
Lavarlo sotto lacqua
corrente; questa pulizia
va effettuata
frequentemente.
2
Curare oblò e cestello
Lasciare sempre socchiuso loblò per evitare che
si formino cattivi odori.
Pulire la pompa
La lavabiancheria è dotata di una pompa
autopulente che non ha bisogno di manutenzione.
Controllare il tubo di alimentazione
dellacqua
Controllare il tubo di alimentazione almeno una volta
allanno. Se presenta screpolature e fessure va
sostituito: durante i lavaggi le forti pressioni potrebbero provocare improvvise spaccature.
Non utilizzare mai tubi già usati.
12
Page 13

Anomalie e rimedi
Può accadere che la lavabiancheria non funzioni. Prima di telefonare allAssistenza (vedi pag. 14), controllare
che non si tratti di un problema facilmente risolvibile aiutandosi con il seguente elenco.
Anomalie:
La lavabiancheria
non si accende.
Il ciclo di lavaggio
non inizia.
La lavabiancheria non carica
acqua.
La lavabiancheria carica e
scarica acqua di continuo.
Possibili cause / Soluzione:
La spina non è inserita nella presa della corrente, o non abbastanza
da fare contatto.
In casa non cè corrente.
Loblò non è ben chiuso
Il tasto
Il tasto START/RESET non è stato premuto.
Il rubinetto dellacqua non è aperto.
Si è impostato un ritardo sullora di avvio (Delay Timer, vedi pag. 9).
Il tubo di alimentazione dellacqua non è collegato al rubinetto.
Il tubo è piegato.
Il rubinetto dellacqua non è aperto.
In casa manca lacqua.
Non cè sufficiente pressione.
Il tasto START/RESET non è stato premuto.
Il tubo di scarico non è installato fra 65 e 100 cm da terra (vedi pag. 3).
Lestremità del tubo di scarico è immersa nellacqua (vedi pag. 3).
Lo scarico a muro non ha lo sfiato daria.
Se dopo queste verifiche il problema non si risolve, chiudere il rubinetto
dellacqua, spegnere la lavabiancheria e chiamare lAssistenza. Se
labitazione si trova agli ultimi piani di un edificio, è possibile che si
verifichino fenomeni di sifonaggio, per cui la lavabiancheria carica e
scarica acqua di continuo. Per eliminare linconveniente sono disponibili in commercio apposite valvole anti-sifonaggio.
non è stato premuto.
I
La lavabiancheria non scarica
o non centrifuga.
La lavabiancheria vibra
molto durante la centrifuga.
La lavabiancheria perde acqua.
La spia ACCENSIONE/OBLÒ
BLOCCATO lampeggia in modo
veloce contemporaneamente
ad almeno unaltra spia.
Si forma troppa schiuma.
Il programma non prevede lo scarico: con alcuni programmi occorre
avviarlo manualmente (vedi pag. 8).
È attiva la funzione Stira meno: per completare il programma
premere il tasto START/RESET (vedi pag. 9).
Il tubo di scarico è piegato (vedi pag. 3).
La conduttura di scarico è ostruita.
Il cestello, al momento dellinstallazione, non è stato sbloccato
correttamente (vedi pag. 2).
La lavabiancheria non è in piano (vedi pag. 2).
La lavabiancheria è stretta tra mobili e muro (vedi pag. 2).
Il tubo di alimentazione dellacqua non è ben avvitato (vedi pag. 2).
Il cassetto dei detersivi è intasato (per pulirlo vedi pag. 12).
Il tubo di scarico non è fissato bene (vedi pag. 3).
Chiamare lAssistenza perché sta segnalando unanomalia.
AssistenzaAnomaliePrecauzioni ManutenzioneProgrammi DetersiviInstallazione Descrizione
Il detersivo non è specifico per lavabiancheria (deve esserci la
dicitura per lavatrice, a mano e in lavatrice, o simili).
Il dosaggio è stato eccessivo.
13
Page 14
Assistenza
I
Prima di contattare lAssistenza:
Verificare se lanomalia può essere risolta da soli (vedi pag. 13);
Riavviare il programma per controllare se linconveniente è stato ovviato;
In caso negativo, contattare il Numero Unico 199.199.199*;
Non ricorrere mai a tecnici non autorizzati.
Comunicare:
il tipo di anomalia;
il modello della macchina (Mod.);
il numero di serie (S/N);
Queste informazioni si trovano sulla targhetta applicata nella parte posteriore della lavabiancheria.
*
Assistenza Attiva 7 giorni su 7
Se nasce il bisogno di assistenza o manutenzione basta chiamare il Numero Unico 199.199.199* per
essere messi subito in contatto con il Centro Assistenza Tecnica più vicino al luogo da cui si chiama.
È attivo 7 giorni su 7, sabato e domenica compresi, e non lascia mai inascoltata una richiesta.
Estensione di garanzia AIRBAG
Ad integrazione della garanzia legale, Ariston offre lestensione di garanzia AIRBAG: una formula che con
una minima spesa iniziale, garantisce al cliente 5 anni di assistenza tecnica qualificata. In caso di guasto,
il cliente che abbia aderito al programma Airbag avrà diritto gratuitamente a:
lintervento entro 48 ore dalla chiamata;
il contributo per spese di trasferta del Tecnico;
la manodopera;
le parti di ricambio originali;
il trasporto dellelettrodomestico non riparabile in loco;
La garanzia prevede inoltre la sostituzione dellelettrodomestico non riparabile con una franchigia a carico
del cliente (in relazione allanzianità dellelettrodomestico).
Per maggiori informazioni rivolgersi al numero unico 199.199.199*.
Assistenza
14
* Al costo di 14,25 centesimi di Euro al minuto(iva inclusa) dal Lun. al Ven. dalle 08:00 alle 18:30, il Sab. dalle 08:00 alle
13:00 e di 5,58 centesimi di Euro al minuto (iva inclusa) dal Lun. al Ven. dalle 18:30 alle 08:00, il Sab. dalle 13:00 alle 08:00
e i giorni festivi, per chi chiama da telefono fisso.
Per chi chiama da radiomobile le tariffe sono legate al piano tariffario delloperatore telefonico utilizzato.
Page 15

Instructions for use
WASHING MACHINE
GB
English
LBE 129
Contents
GB
Installation, 16-17-18-19
Unpacking and levelling, 16
Electric and water connections, 16-17
The first wash cycle, 17
Technical details, 17
Instructions for the fitter, 18-19
Washing machine description, 20-21
Control panel, 20
Leds, 21
Starting and Programmes, 22
Briefly: how to start a programme, 22
Programme table, 22
Personalisations, 23
Setting the temperature, 23
Setting the spin cycle, 23
Functions, 23
Detergents and laundry, 24
Detergent dispenser, 24
Preparing your laundry, 24
Special items, 24
Woolmark Platinum Care, 24
Precautions and advice, 25
General safety, 25
Disposal, 25
Saving energy and respecting the environment, 25
Care and maintenance, 26
Cutting off the water or electricity supply, 26
Cleaning your appliance, 26
Cleaning the detergent dispenser, 26
Caring for your appliance door and drum, 26
Cleaning the pump, 26
Checking the water inlet hose, 26
Troubleshooting, 27
Service, 28
Before calling for Assistance, 28
15
Page 16
Installation
GB
Keep this instruction manual in a safe place for
future reference. Should the appliance be sold,
transferred or moved, make sure the instruction
manual accompanies the washing machine to inform
the new owner as to its operation and features.
Read these instructions carefully: they contain vital
information on installation, use and safety.
Unpacking and levelling
Unpacking
1. Unpack the washing machine.
2. Check whether the washing machine has been
damaged during transport. If this is the case, do not
install it and contact your retailer.
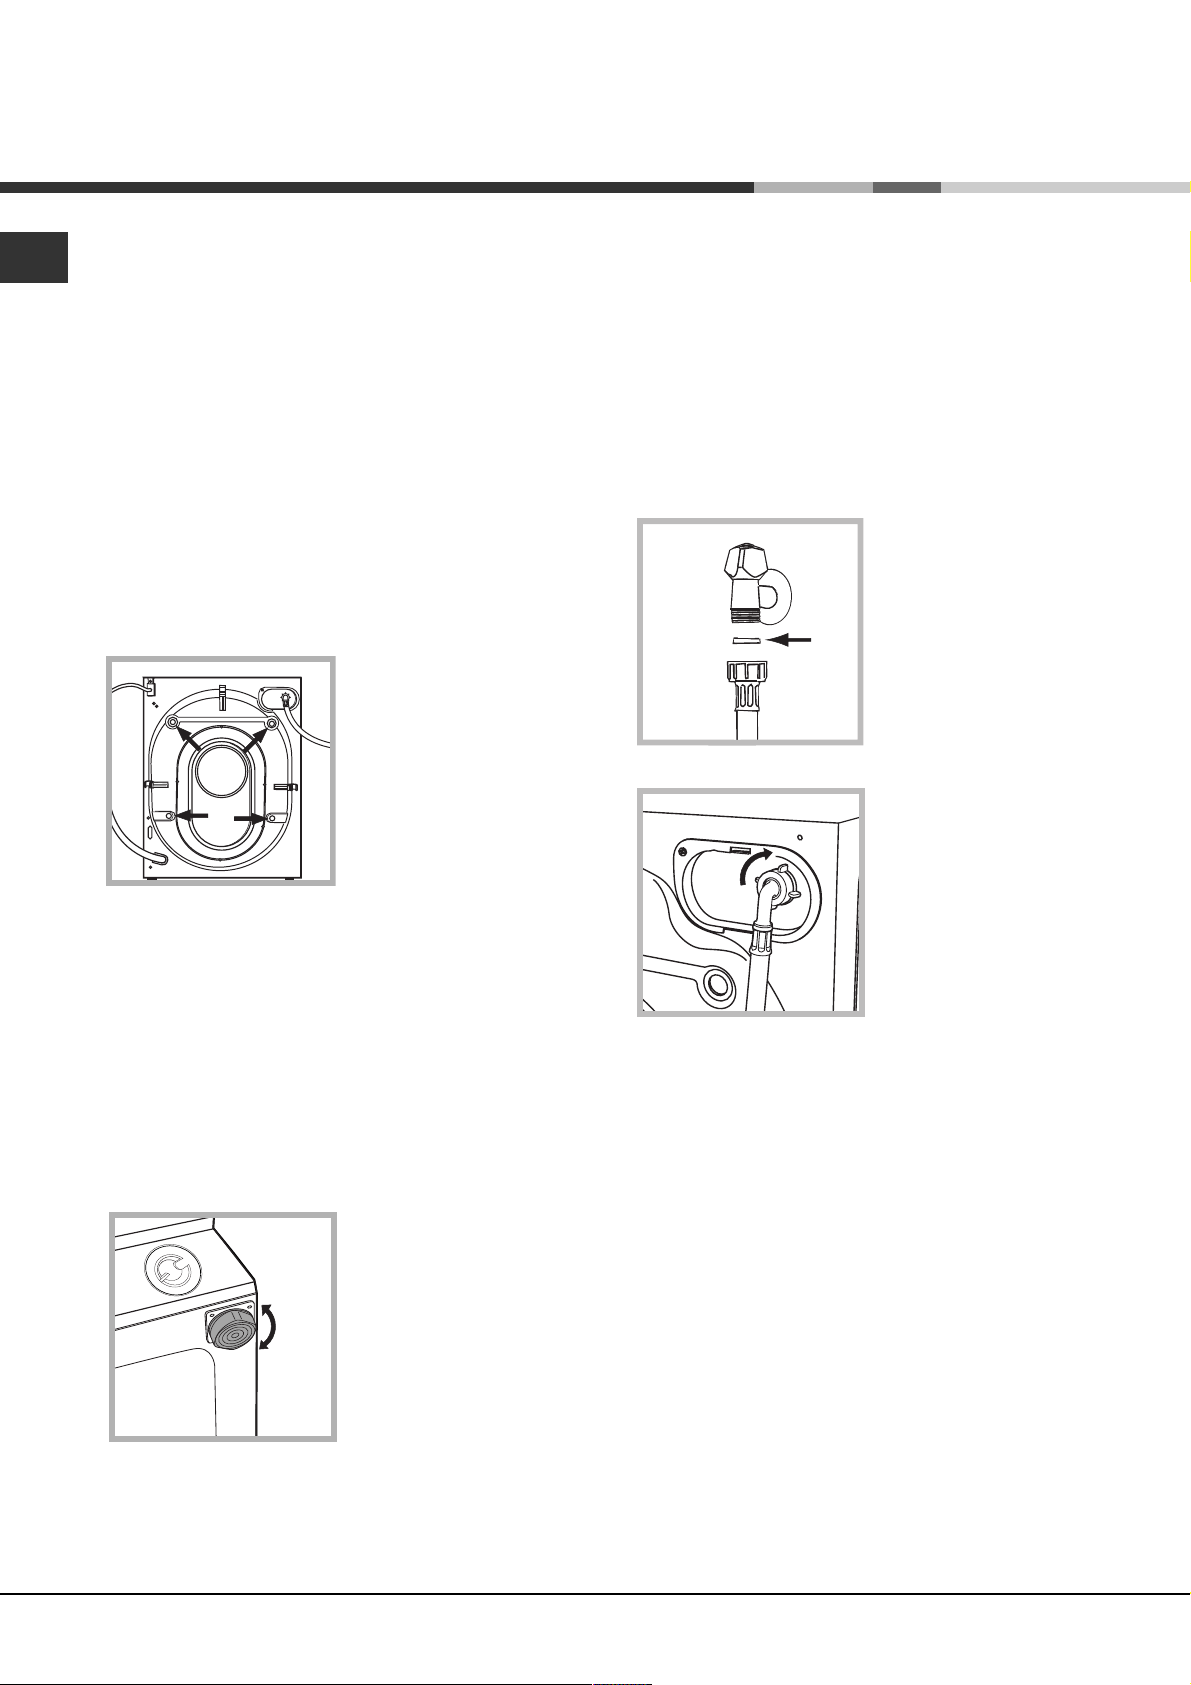
3. Remove the four
protective screws and
the rubber washer with
the respective spacer,
situated on the rear of
the appliance (see
figure).
4. Seal the gaps using the plastic plugs provided.
5. Keep all the parts: you will need them again if the
washing machine needs to be moved to another
location.
Levelling your appliance correctly will provide it with
stability and avoid any vibrations, noise and shifting
during operation. If it is placed on a fitted or loose
carpet, adjust the feet in such a way as to allow
enough room for ventilation beneath the washing
machine.
Electric and water connections
Connecting the water inlet hose
1. Insert seal A into the
end of the inlet hose
and screw the latter
onto a cold water tap
A
with a 3/4 gas threaded
mouth (see figure).
Before making the
connection, allow the
water to run freely until
it is perfectly clear.
2. Connect the other end
of the water inlet hose to
the washing machine,
screwing it onto the
appliance's cold water
inlet, situated on the top
right-hand side on the
rear of the appliance
(see figure).
Packaging materials are not children's toys.
Levelling
1. Install the washing machine on a flat sturdy floor,
without resting it up against walls, furniture cabinets
or other.
2. If the floor is not
perfectly level, compensate for any unevenness
by tightening or
loosening the adjustable
front feet (see figure);
the angle of inclination,
measured according to
the worktop, must not
exceed 2°.
16
3. Make sure there are no kinks or bends in the
hose.
The water pressure at the tap must be within the
values indicated in the Technical details table
(on the next page).
If the water inlet hose is not long enough, contact
a specialist store or an authorised serviceman.
Page 17
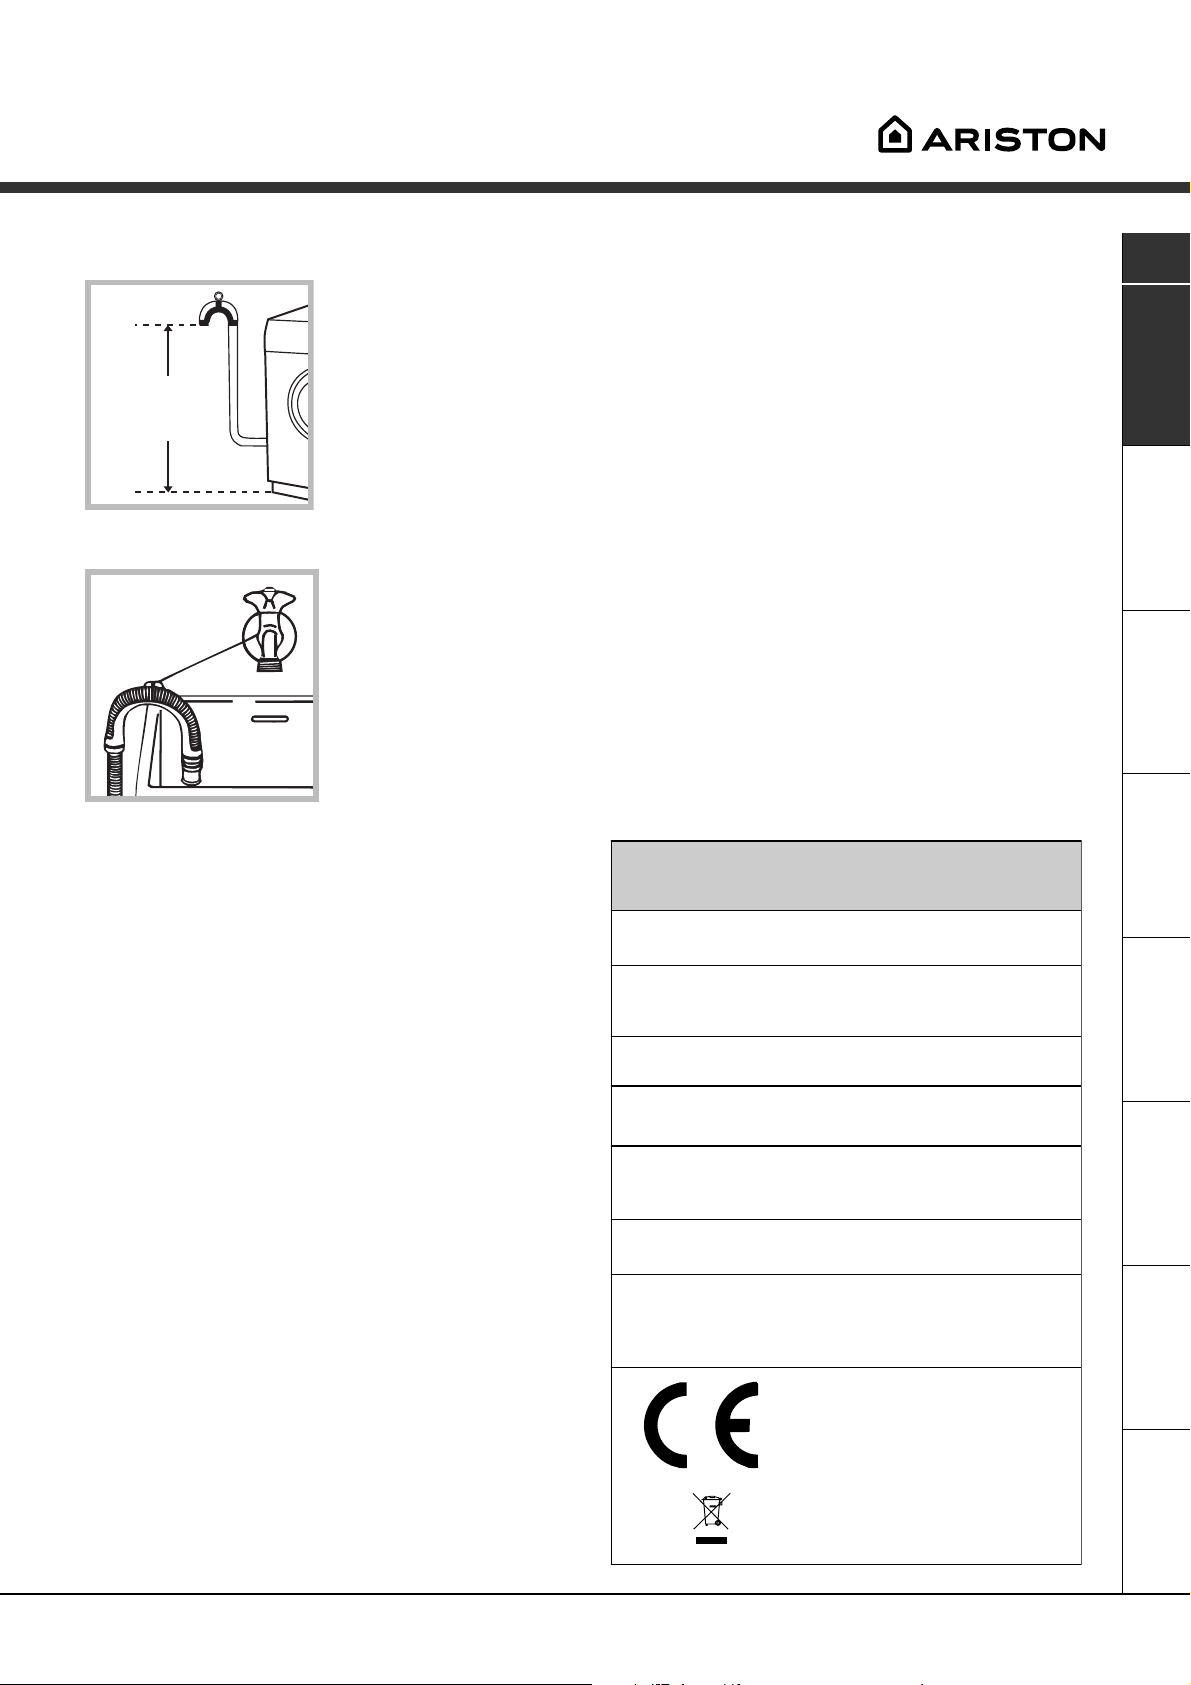
Connecting the drain hose
65 - 100 cm
Connect the drain hose,
without bending it, to a
draining duct or a wall
drain situated between
65 and 100 cm from the
floor;
Do not use extensions or multiple sockets.
GB
The power supply cable must never be bent or
dangerously compressed.
The power supply cable must only be replaced by
an authorised serviceman.
Warning! The company denies all liability if and when
these norms are not respected.
The first wash cycle
alternatively, place it
over the edge of a
basin, sink or tub,
fastening the duct
supplied to the tap (see
figure). The free end of
the hose should not be
underwater.
We advise against the use of hose extensions; in
case of absolute need, the extension must have the
same diameter as the original hose and must not
exceed 150 cm in length.
Electric connection
Before plugging the appliance into the mains socket,
make sure that:
the socket is earthed and in compliance with the
applicable law;
the socket is able to sustain the appliance's
maximum power load indicated in the Technical
details table (on the right);
the supply voltage is included within the values i
ndicated on the Technical details table
(on the right);
the socket is compatible with the washing
machine's plug. If this is not the case, replace the
socket or the plug.
The washing machine should not be installed in an
outdoor environment, not even when the area is
sheltered, because it may be very dangerous to
leave it exposed to rain and thunderstorms.
When the washing machine is installed, the mains
socket must be within easy reach.
Once the appliance has been installed, and before
you use it for the first time, run a wash cycle with
detergent and no laundry, setting the 90°C
programme without a pre-wash cycle.
Technical details
Model
Dimensions
Capacity
Electric
connections
Wat er
connections
Spin speed
Control
programmes
according to
IEC456 directive
LBE 129
59.5 cm wide
81,5 cm high
54 cm deep
from 1 to 5 kg
voltage 220/230 Volts 50 Hz
maximum absorbed power 1850 W
maximum pressure 1 MPa (10 bar)
minimum pressure 0.05 MPa (0.5 bar)
drum capacity 46 litres
up to 1200 rpm
programme 3; temperature 60°C;
run with a load of 5 kg.
This appliance is compliant with the
following European Community
Directives:
- 73/23/CEE of 19/02/73 (Low
Voltage) and subsequent amendments
- 89/336/CEE of 03/05/89
(Electromagnetic Compatibility) and
subsequent amendments
- 2002/96/CE
ServiceTroubleshootingPrecautions CareProgrammes DetergentsInstallation Description
17
Page 18

GB
Instructions for the fitter
Mounting the wooden panel onto the door and
inserting the machine into cabinets:
In the case where the machine must be shipped for final
installation after the wooden panel has been mounted, we
suggest leaving it in its original packaging. The packaging
was designed to make it possible to mount the wooden
panel onto the machine without removing it completely
(see figures below).
The wooden panel that covers the face of the machine
must not be less than 18 mm in thickness and can be
hinged on either the right or left. For the sake of
practicality when using the machine, we recommend that
the panel be hinged on the same side as the door for the
machine itself - the left.
Door Mounting Accessories (Fig. 1-2-3-4-5).
N° 2 Hinge Supports
Fig. 1
N° 1 Magnet N° 1 Magnet plate
Fig. 3 Fig. 4
Fig. 2
N° 2 Hinges
A
C
Tur seite
E
B
D
N° 1 Rubber plug
Fig. 5
- No. 6 type A self-threading screws, l =13 mm.
- No. 2 type B metric, countersunk screws, l =25; for
fastening the magnet plate to the cabinet.
- No. 4 type C metric screws, l =15 mm; for mounting the
hinge supports to the cabinet.
- No. 4 type D metric screws, l =7 mm; for mounting the
hinges on the supports.
Mounting the Parts onto the Face of the Machine.
- Mount the hinge supports onto the face of the machine,
positioning the hole indicated by the arrow in fig. 1 towards
the inside of the face and using the type C screws.
- Mount the magnetic plate on the opposite side, at the
top, using the two type B screws.
- Place the spacer illustrated in fig. 4/B between the
appliance front and the magnet receiver.
Fig. 4/B
N° 1 Spacer
18
Page 19

Using the Drilling Template.
- To trace the positions of the holes on the left-hand side
of the panel, align the drilling template to the top left side
of the panel using the lines traced on the extremities as a
reference.
- To trace the positions of the holes on the right-hand
side of the panel, align the drilling template to the top
right side of the panel.
- Use an appropriately sized router to mill the holes for
the two hinges, the rubber plug and the magnet.
Mounding the Parts onto the Wooden Panel (Door).
- Insert the hinges into the holes (the movable part of the
hinge must be positioned facing away from the panel) and
fasten them with the 4 type A screws.
- Insert the magnet into the top hole on the opposite side
of the hinges and fasten it with the two type B screws.
- Insert the rubber plug into the bottom hole.
The panel is now ready to be mounted onto the machine.
Mounting the Panel into the machine.
Insert the nib of the hinge (indicated by the arrow in fig. 2)
into the hole for the hinge and push the panel towards the
front of the machine. Fasten the two hinges with the type
D screws.
Fastening the plinth guide.
If the machine is installed at the end of a set of modular
cabinets, mount either one or both of the guides for the
base molding (as shown in fig. 8). Adjust them for depth
based on the position of the base molding, and, if
necessary, fasten the base to the guides (fig. 9).
This is how to assemble the plinth guide (fig. 8):
Fasten angle P using screw R, insert plinth guide Q into
the special slot and once it is in the desired position, lock
it in place using angle P and screw R.
Inserting the machine into the Cabinet.
- Push the machine into the opening, aligning it with the
cabinets (fig. 6).
- Regulate the adjustable feet to raise the machine to the
appropriate height.
- To adjust the position of the wooden panel in both the
vertical and horizontal directions, use the C and D
screws, as shown in fig. 7.
Important: close the lower part of the appliance front by
ensuring that the plinth rests against the floor.
GB
Fig. 8 Fig. 9
Accessories provided for the height adjustment.
The following can be found inside the polystyrene lid (fig. 10):
2 crossbars (G), 1 strip (M)
the following can be found inside
the appliance drum:
4 additional feet (H),
4 screws (I),
4 screws (R),
4 nuts (L),
2 plinth guides (Q)
Fig. 10
Adjusting the appliance height.
The height of the appliance can be adjusted (from 815 mm
to 835 mm), by turning the 4 feet.
Should you require the appliance to be placed higher than
the above height, you need to use the following accessories
to raise it to up to 870 mm:
the two crossbars (G); the 4 feet (H); the 4 screws (I); the 4
nuts (L) then perform the following operations (fig. 11):
remove the 4 original feet, place a crossbar G at the front of
the appliance, fastening it in place using screws I (screwing
them in where the original feet were) then insert the new feet H.
Repeat the same operation at the back of the appliance.
Now adjust feet H to raise or lower the appliance from 835
mm to 870 mm.
Once you have reached the desired height, lock nuts L onto
crossbar G.
To adjust the appliance to a height between 870 mm and
900 mm, you need to mount strip M, adjusting feet H to the
required height.
Insert the strip as follows:
loosen the three screws N situated at the front of the Top
cover of the appliance, insert strip M as shown in fig. 12,
then fasten screws N.
595
540
815
Fig. 6 Fig. 7
600 min
570
min
820 ÷ 900
C
M
G
D
ServiceTroubleshootingPrecautions CareProgrammes DetergentsInstallation Description
C
Fig. 11 Fig. 12
L
H
I
19
Page 20

Washing machine description
GB
Control panel
Detergent dispenser
Leds
SPIN SPEED
Knob
FUNCTION
Buttons
START/
RESET
Button
M
TEMPERATURE
Knob
START/STOP
Button
ON-OFF/DOOR LOCK
Led
PROGRAMME
Knob
l
Detergent dispenser: to add detergent and fabric
softener (see page 24).
LEDS: to find out which wash cycle phase is under
way.
If the Delay Timer function has been set, the time
left until the programme starts will be indicated (see
page 21).
SPIN SPEED knob: to set the spin speed or exclude
the spin cycle completely (see page 23).
FUNCTION buttons: to select the functions
available. The button corresponding to the function
selected will remain on.
TEMPERATURE knob: to set the temperature or
the cold wash cycle (see page 23).
START/STOP button: to turn the washing machine
on and off.
START/RESET button: to start the programmes or
cancel any incorrect settings.
ON-OFF/DOOR LOCK Led: to find out whether the
washing machine is on and if the appliance door can
be opened (see page 21).
PROGRAMME knob: to select the wash
programmes. The retractable control knob: press
the centre of the knob for it to pop out. The knob
stays still during the cycle.
20
Page 21

Leds
The LEDS provide important information.
This is what they can tell you:
Delay set:
If the Delay Timer function has been enabled (see
page. 23), once you have started the programme,
the LED corresponding to the delay set will begin to
flash:
As time passes, the remaining delay will be
displayed, and the corresponding LED will flash:
Cycle phase under way:
During the wash cycle, the LEDs gradually illuminate
on to indicate the cycle phase under way:
Prewash
Wash
Rinse
Spin cycle
Note: during draining, the LED corresponding to the
Spin cycle phase will be turned on.
Function buttons
The FUNCTION BUTTONS also act like LEDS.
When a function is selected, the corresponding
button is illuminated.
If the function selected is incompatible with the
programme set, the button will flash and the
function will not be enabled.
If you set a function that is incompatible with
another function you selected previously, only the
last one selected will be enabled.
GB
Once the set delay is complete, the flashing LED will
turn off and the programme set will start.
ON-OFF/DOOR LOCK led:
If this LED is on, the appliance door is locked to prevent it from being opened accidentally; to avoid any
damages, wait for the LED to flash before you open the appliance door.
ServiceTroubleshootingPrecautions CareProgrammes DetergentsInstallation Description
The rapid flashing of the ON-OFF/DOOR LOCK Led together with the flashing of at least one other LED
indicates there is an abnormality. Call for Technical Assistance.
21
Page 22

Starting and Programmes
GB
Briefly: starting a programme
1. Switch the washing machine on by pressing button .
All the LEDS will light up for a few seconds and
the ON-OFF/DOOR LOCK Led will begin to flash.
2. Load your laundry into the washing machine and
shut the appliance door.
3. Set the PROGRAMME knob to the programme
required.
4. Set the wash temperature (see page 23).
5. Set the spin speed (see page 23).
Programme table
Type of fabric and degree of soil
Programmes
Was h
temperat.
Detergent
Pre-
wash
6. Add the detergent and any fabric softener (see
page 24).
7. Start he programme by pressing the START/RESET
button.
To cancel it, keep the START/RESET button pressed
for at least 2 seconds.
8. When the programme is finished, the ON-OFF/
DOOR LOCK Led will flash to indicate that the
appliance door can be opened. Take out your
laundry and leave the appliance door ajar to allow
the drum to dry thoroughly. Turn the washing
.
Wash
machine off by pressing button
Fabric
softener
Cycle
length
(minutes)
Descr iption of wash cycle
Cottons
Extremely soiled whites
(sheets, tablecloths, etc.)
Extremely soiled whites
(sheets, tablecloths, etc.)
Heavily soiled whites and fast
colours
Slightly soiled whites and delicate
colours (shirts, jumpers, etc.)
Slightly soiled delicate colours
1
2
3
4
5
90°C 137
90°C 120
60°C 105
40°C 72
30°C 65
Pre-wash, wash cycle, rinse cycles,
intermediate and final spin cycles
Wash cycle, rinse cycles, intermediate
and final spin cycles
Wash cycle, rinse cycles, intermediate
and final spin cycles
Wash cycle, rinse cycles, intermediate
and final spin cycles
Wash cycle, rinse cycles, intermediate
and final spin cycles
Synthetics
Heavily soiled fast colours
(baby linen, etc.)
Fast colours (all types of slightly
soiled garments)
Heavily soiled fast colours
(baby linen, etc.)
Delicate colours (all types of
slightly soiled garments)
Delicate colours (all types of
slightly soiled garments)
6
6
7
8
9
60°C 77
40°C 62
50°C 73
40°C 58
30°C 30
Wash cycle, rinse cycles, anti-crease or
delicate spin cycle
Wash cycle, rinse cycles, anti-crease or
delicate spin cycle
Wash cycle, rinse cycles, anti-crease or
delicate spin cycle
Wash cycle, rinse cycles, anti-crease or
delicate spin cycle
Wash cycle, rinse cycles and delicate
spin cycl
e
Delicates
Wool
Very delicate fabrics
(curtains, silk, viscose, etc.)
PARTIAL PROGRAMMES
Rinse Rinse cycles and spin cycle
Delicate rinse cycle Rinse cycles, anti-crease or draining
Spin cycle Draining and heavy duty spin cycle
Delicate spin cycle Draining and delicate spin cycle
Draining Draining
10
11
40°C 50
30°C 45
Wash cycle, rinse cycles and delicate
spin cycle
Wash cycle, rinse cycles, anti-crease or
draining cycle
Notes
For the anti-crease function: see Easy iron, opposite page. The information contained in the table is purely indicative.
Special programme
Daily 30' (programme 9 for Synthetics) is designed to wash lightly soiled garments in a short amount of time: it only
lasts 30 minutes and allows you to save on both time and energy. By setting this programme (9 at 30°C), you can
wash different fabrics together (except for woollen and silk items), with a maximum load of 3 kg.
We recommend the use of liquid detergent.
22
Page 23

Personalisations
Setting the temperature
Turn the TEMPERATURE knob to set the wash temperature (see Programme table on page 22).
The temperature can be lowered, or even set to a cold wash (
).
Setting the spin speed
Turn the SPIN SPEED knob to set the spin speed for the programme selected.
The maximum spin speeds for each programme are as follows:
Programmes Maximum spin speed
Cottone 1200 rpm
Synthetics 800 rpm
Wool 600 rpm
Silk no
The spin speed can be lowered, or the spin cycle can be excluded altogether by selecting symbol
The washing machine will automatically prevent you from selecting a spin speed higher than the maximum
speed for each programme.
.
Functions
To enable a function:
1. press the button corresponding to the desired function, according to the table below;
2. the function is enabled when the corresponding button is illuminated.
Note: The rapid flashing of the button indicates that the corresponding function cannot be selected for the
programme set.
GB
Function Effect Comments
Press the button repeatedly until the LED corresponding to the
desired delay is turned on.
The fifth time the button is pressed, the function will be disabled.
N.B.: Once you have pressed the Start/Reset button, the delay
can only be decreased if you wish to modify it.
This function is incompatible with the RAPID function.
When this function is set, programmes 6, 7, 8, 11 and Delicate
rinse will end with the laundry left to soak (Anti-crease) and the
Rinse cycle phase LED will flash.
- to conclude the cycle, press the START/RESET button;
- to run the draining cycle alone, set the knob to the relative
symbol and press the START/RESET button.
This function is incompatible with the SUPER WASH function.
Delay Timer
Su per
Was h
Eas y iron
Ra pid
Delays the start
of the wash by
up to 9 hours.
Allows for an
impeccable wash,
visibly whiter
than a standard
Class A
This option
reduces the
amount of
creasing on
fabrics, making
them easier to
iron.
Cuts the duration
of the wash cycle
by 30%.
wash.
Enabled with
programmes:
All
1, 2, 3, 4,
5, 6, 7, 8
All
programmes
except for
1, 2, 9, 10
and Draining.
1, 2, 3, 4,
5, 6, 7, 8
ServiceTroubleshootingPrecautions CareProgrammes DetergentsInstallation Description
23
Page 24

Detergents and laundry
GB
Detergent dispenser
Good washing results also depend on the correct
dose of detergent: adding too much detergent won't
necessarily make for a more efficient wash, and may
in fact cause build up on the interior of your
appliance and even pollute the environment.
Open up the detergent
dispenser and pour in
the detergent and fabric
softener, as follows.
1
3
compartment 1: Detergent for pre-wash
(powder)
compartment 2: Detergent for the wash cycle
(powder or liquid)
Liquid detergent should only be poured in
immediately prior to the wash cycle start.
compartment 3: Additives (fabric softeners, etc.)
The fabric softener should not overflow from the grid.
Do not use hand wash detergent because it may
form too much foam.
2
Special items
Curtains: fold curtains and place them in a pillow
case or mesh bag. Wash them separately without
exceeding half the appliance load. Use programme
11 which excludes the spin cycle automatically.
Quilted coats and windbreakers: if they are
padded with goose or duck down, they can be
machine-washed. Turn the garments inside out and
load a maximum of 2-3 kg, repeating the rinse cycle
once or twice and using the delicate spin cycle.
Trainers: remove any mud. They can be washed
together with jeans and other tough garments, but
not with whites.
Wool: for best results, use a specific detergent,
taking care not to exceed a load of 1 kg.
Woolmark Platinum Care
As gentle as a hand wash.
Ariston sets a new standard of superior
performance that has been endorsed by
The Woolmark Company with the prestigious
Woolmark Platinum Care brand. Look for the
Woolmark Platinum Care logo on the washing
machine to ensure you can safely and effectively
wash wool garments labelled as "hand wash"
(M.0303):
Set programme 10 for all "Hand wash"
garments, using the appropriate detergent.
Preparing your laundry
Divide your laundry according to:
- the type of fabric/the symbol on the label.
- the colours: separate coloured garments from
whites.
Empty all pockets and check for loose buttons.
Do not exceed the weight limits stated below,
which refer to the weight when dry:
Sturdy fabrics: max 5 kg
Synthetic fabrics: max 2.5 kg
Delicate fabrics: max 2 kg
Wool: max 1 kg
How much does your laundry weigh?
1 sheet 400-500 g
1 pillow case 150-200 g
1 tablecloth 400-500 g
1 bathrobe 900-1,200 g
1 towel 150-250 g
24
Page 25

Precautions and advice
The washing machine was designed and built in
compliance with the applicable international safety
regulations. The following information is provided for
your safety and should consequently be read carefully.
General safety
This appliance has been designed for non-
professional, household use and its functions must
not be changed.
This washing machine should only be used by
adults and in accordance with the instructions
provided in this manual.
Never touch the washing machine when barefoot
or with wet or damp hands or feet.
Do not pull on the power supply cable to unplug
the appliance from the electricity socket. Pull the
plug out yourself.
Do not open the detergent dispenser while the
appliance is in operation.
Do not touch the drain water as it could reach
very high temperatures.
Never force the washing machine door: this could
damage the safety lock mechanism designed to
prevent any accidental openings.
In the event of a malfunction, do not under any
circumstances touch internal parts in order to
attempt repairs.
Always keep children well away from the
appliance while in operation.
The appliance door tends to get quite hot during
the wash cycle.
Should it have to be moved, proceed with the
help of two or three people and handle it with the
utmost care. Never try to do this alone, because
the appliance is very heavy.
Before loading your laundry into the washing
machine, make sure the drum is empty.
Disposal
Disposing of the packaging material:
observe local regulations, so the packaging can
be re-used.
The European Directive 2002/96/EC on Waste
Electrical and Electronic Equipment, requires that
old household electrical appliances must not be
disposed of in the normal unsorted municipal waste
stream. Old appliances must be collected
separately in order to optimise the recovery and
recycling of the materials they contain and reduce
the impact on human health and the environment.
The crossed out "wheeled bin" symbol on the
product reminds you of your obligation, that when
you dispose of the appliance it must be separately
collected.
Consumers should contact their local authority or
retailer for information concerning the correct
disposal of their old appliance.
Saving energy and respecting the
environment
Environmentally-friendly technology
If you only see a little water through your appliance
door, this is because thanks to the latest Ariston
technology, your washing machine only needs less
than half the amount of water to get the best
results: an objective reached to respect the
environment.
Saving on detergent, water,
energy and time
To avoid wasting resources, the washing machine
should be used with a full load. A full load instead
of two half loads allows you to save up to 50% on
energy.
The pre-wash cycle is only necessary on
extremely soiled garments. Avoiding it will save on
detergent, time, water and between 5 and 15%
energy.
Treating stains with a stain remover or leaving
them to soak before washing will cut down the
need to wash them at high temperatures. A
programme at 60°C instead of 90°C or one at
40°C instead of 60°C will save up to 50% on
energy.
Use the correct quantity of detergent depending
on the water hardness, how soiled the garments
are and the amount of laundry you have, to avoid
wastage and to protect the environment: despite
being biodegradable, detergents do contain
ingredients that alter the natural balance of the
environment. In addition, avoid using fabric
softener as much as possible.
If you use your washing machine from late in the
afternoon until the early hours of the morning, you
will help reduce the electricity board's peak load.
The Delay Timer option (see page 23) helps to
organise your wash cycles accordingly.
If your laundry has to be dried in a tumble dryer,
select a high spin speed. Having the least water
possible in your laundry will save you time and
energy in the drying process.
GB
ServiceTroubleshootingPrecautions CareProgrammes DetergentsInstallation Description
25
Page 26

Care and maintenance
GB
Cutting off the water or electricity
supply
Turn off the water tap after every wash. This will
limit the wear of your appliance's water system
and also prevent leaks.
Unplug your appliance when cleaning it and
during all maintenance operations.
Cleaning your appliance
The exterior and rubber parts of your appliance can
be cleaned with a soft cloth soaked in lukewarm
soapy water. Do not use solvents or abrasives.
Cleaning the detergent dispenser
1
Remove the dispenser
by raising it and pulling it
out (see figure).
Wash it under running
water; this operation
should be repeated
frequently.
2
Caring for your appliance door and
drum
Always leave the appliance door ajar to prevent
unpleasant odours from forming.
Cleaning the pump
The washing machine is fitted with a self-cleaning
pump that does not require any maintenance.
Checking the water inlet hose
Check the water inlet hose at least once a year. If
you see any cracks, replace it immediately: during
the wash cycles, water pressure is very strong and
a cracked hose could easily split open.
Never use hoses that have already been used.
26
Page 27

Troubleshooting
Your washing machine could fail to work. Before calling for Assistance (see page 28), make sure the problem
can't easily be solved by consulting the following list.
Problem
The washing machine won't
start.
The wash cycle won't start.
The washing machine fails to
load water.
The washing machine
continuously loads and unloads
water.
Possible causes/Solution:
The appliance is not plugged into the socket, or not enough to
make contact.
There has been a power failure.
The appliance door is not shut properly.
The
The START/RESET button has not been pressed.
The water tap is not turned on.
A delayed start has been set (using the Delay Timer, see page 23).
The water inlet hose is not connected to the tap.
The hose is bent.
The water tap is not turned on.
There is a water shortage.
The water pressure is insufficient.
The START/RESET button has not been pressed.
The drain hose is not fitted between 65 and 100 cm from the floor
The free end of the hose is underwater (see page 17).
The wall drainage system doesn't have a breather pipe.
If the problem persists even after these checks, turn off the water tap,
switch the appliance off and call for Assistance. If the dwelling is on one of
the upper floors of a building, there may be drain trap problems causing the
washing machine to load and unload water continuously. In order to avoid
such an inconvenience, special anti-drain trap valves are available in shops.
button has not been pressed.
(see page 17).
GB
The washing machine does not
drain or spin.
The washing machine vibrates
too much during the spin cycle.
The washing machine leaks.
The ON-OFF/DOOR LOCK Led
flashes rapidly at the same
time as at least one other LED.
There is too much foam.
The programme does not foresee the draining: some programmes
require enabling the draining manually (see page 22).
The Easy iron option is enabled: to complete the programme, press
the START/RESET button (see page 23).
The drain hose is bent (see page 17).
The drain duct is clogged.
The drum was not unblocked correctly during installation (see page 16).
The washing machine is not level (see page 16).
The washing machine is closed in between furniture cabinets and
the wall (see page 16).
The water inlet hose is not screwed on correctly (see page 16).
The detergent dispenser is obstructed (to clean it, see page 26).
The drain hose is not secured properly (see page 17).
Call for Assistance because this means there is an abnormality.
The detergent is not suitable for machine washing (it should bear
the definition "for washing machines" or "hand and machine wash",
or the like).
You used too much detergent.
ServiceTroubleshootingPrecautions CareProgrammes DetergentsInstallation Description
27
Page 28

Service
GB
Before calling for Assistance:
Check whether you can solve the problem on your own (see page 27);
Restart the programme to check whether the problem has been solved;
If this is not the case, contact an authorised Technical Service Centre on the telephone number
provided on the guarantee certificate.
Always request the assistance of authorised servicemen.
Notify the operator of:
the type of problem;
the appliance model (Mod.);
the serial number (S/N).
This information can be found on the data plate situated on the rear of the washing machine.
Service
28
Page 29

Mode d'emploi
LAVE-LINGE
F
Français
LBE 129
Sommaire
F
Installation, 30-31-32-33
Déballage et mise à niveau, 30
Raccordements hydrauliques et électriques, 30-31
Premier cycle de lavage, 31
Caractéristiques techniques, 31
Instructions pour l'installateur, 32-33
Description du lave-linge, 34-35
Bandeau de commandes, 34
Voyants, 35
Mise en marche et Programmes, 36
En bref: démarrage d'un programme, 36
Tableau des programmes, 36
Personnalisations, 37
Sélection de la température, 37
Sélection de l'essorage, 37
Fonctions, 37
Produits lessiviels et linge, 38
Tiroir à produits lessiviels, 38
Triage du linge, 38
Pièces de linge particulières, 38
Woolmark Platinum Care, 38
Précautions et conseils, 39
Sécurité générale, 39
Mise au rebut, 39
Economies et respect de l'environnement, 39
Entretien et soin, 40
Coupure de l'arrivée d'eau et de courant, 40
Nettoyage du lave-linge, 40
Nettoyage du tiroir à produits lessiviels, 40
Entretien du hublot et du tambour, 40
Nettoyage de la pompe, 40
Contrôle du tuyau d'arrivée de l'eau, 40
Anomalies et remèdes, 41
Assistance, 42
Consultation à tout moment, 42
29
Page 30

Installation
Conservez ce mode d'emploi pour pouvoir le
F
consulter à tout moment. En cas de vente, de cession
ou de déménagement, veillez à ce qu'il suive toujours
le lave-linge pour que son nouveau propriétaire soit
informé sur son mode de fonctionnement et puisse
profiter des conseils correspondants.
Lisez attentivement les instructions: elles fournissent
d'importantes informations sur l'installation, l'utilisation
et la sécurité.
Déballage et mise à niveau
Déballage
1. Déballez le lave-linge.
2. Contrôlez que le lave-linge n'a pas été endommagé
pendant le transport. S'il est abîmé, ne le raccordez
pas et contactez votre revendeur.
3. Enlevez les quatre vis
de protection pour le
transport, le
caoutchouc et la cale,
placés dans la partie
arrière (voir figure).
4. Bouchez les trous à l'aide des bouchons plastique
fournis.
5. Conservez bien toutes ces pièces: il faudra les
remonter en cas de transport du lave-linge.
Une bonne mise à niveau garantit la stabilité de la
machine et évite qu'il y ait des vibrations, du bruit et
des déplacements en cours de fonctionnement. Si la
machine est posée sur de la moquette ou un tapis,
réglez les petits pieds de manière à ce qu'il y ait
suffisamment d'espace pour assurer une bonne
ventilation.
Raccordements hydrauliques et
électriques
Raccordement du tuyau d'arrivée de l'eau
1. Montez le joint A sur
l'extrémité du tuyau
d'alimentation et vissezle à un robinet d'eau
A
froide à embout fileté 3/4
gaz (voir figure).
Faites couler l'eau
jusqu'à ce qu'elle soit
limpide et sans
impuretés avant de
raccorder.
2. Raccordez le tuyau
d'alimentation au lavelinge en le vissant à la
prise d'eau prévue, dans
la partie arrière en haut
à droite (voir figure).
Les emballages ne sont pas des jouets pour enfants.
Mise à niveau
1. Installez le lave-linge sur un sol plat et rigide, sans
l'appuyer contre des murs, des meubles ou autre.
2. Si le sol n'est pas
parfaitement horizontal,
vissez ou dévissez les
petits pieds avant (voir
figure) pour niveler
l'appareil; son angle
d'inclinaison, mesuré
sur le plan de travail, ne
doit pas dépasser 2°.
30
3. Faites attention à ce que le tuyau ne soit ni plié ni
écrasé.
La pression de l'eau doit être comprise entre les
valeurs indiquées dans le tableau des
Caractéristiques techniques (voir page ci-contre).
Si la longueur du tuyau d'alimentation ne suffit pas,
adressez-vous à un magasin spécialisé ou à un
technicien agréé.
Page 31

Raccordement du tuyau de vidange
Raccordez le tuyau
d'évacuation, sans le
plier, à un conduit
d'évacuation ou à une
évacuation murale
65 - 100 cm
placés à une distance
du sol comprise entre
65 et 100 cm;
N'utilisez ni rallonges ni prises multiples.
F
Le câble ne doit être ni plié ni écrasé.
Le câble d'alimentation ne doit être remplacé que
par des techniciens agréés.
Attention! Nous déclinons toute responsabilité en cas
de non respect des normes énumérées ci-dessus.
Premier cycle de lavage
ou bien accrochez-le à
un évier ou à une
baignoire, dans ce cas,
fixez le support en
plastique fourni avec
l'appareil au robinet
(voir figure). L'extrémité
libre du tuyau
d'évacuation ne doit
pas être plongée dans
l'eau.
L'utilisation de tuyaux de rallonge est absolument
déconseillée, si vous ne pouvez vraiment pas faire
autrement vous devrez utiliser un tuyau de même
diamètre et de longueur maximum de 150 cm.
Branchement électrique
Avant de brancher la fiche dans la prise de courant,
contrôlez que:
la prise dispose de mise à la terre et est conforme
aux normes;
la prise est bien apte à supporter la puissance
maximale de la machine indiquée dans le tableau
des Carcatéristiques techniques (voir ci-contre);
la tension d'alimentation est bien comprise entre les
valeurs figurant dans le tableau des
Caractéristiques techniques (voir ci-contre);
la prise est bien compatible avec la fiche du lave-
linge. Autrement, remplacez la prise ou la fiche.
Votre lave-linge ne doit pas être installé dehors,
même à l'abri, car il est très dangereux de le laisser
exposé à la pluie et aux orages.
Après installation du lave-linge, la prise de courant
doit être facilement accessible.
Avant la première utilisation de la machine, effectuez
un cycle de lavage avec un produit lessiviel mais
sans linge et sélectionnez le programme à 90°C
sans prélavage.
Caractéristiques techniques
Modèle
Dimensions
Capacité
Raccordements
électriques
Raccordements
hydrauliques
Vitesse
d'essorage
Programmes de
contrôle selon la
norme IEC456
LBE 129
largeur 59,5 cm
hauteur 81,5 cm
profondeur 54 cm
de 1 à 5 kg
tension 220/230 Volt 50 Hz
puissance maximale absorbée 1850 W
pression maximale 1 MPa (10 bar)
pression minimale 0,05 MPa (0,5 bar)
capacité du tambour 46 litres
jusqu'à 1200 tours minute
programme 3; température 60°C;
effectué avec une charge de 5 kg.
Cet appareil est conforme aux
Directives Communautaires suivantes:
- 73/23/CEE du 19/02/73 (Basse
Tension) et modifications suivantes
- 89/336/CEE du 03/05/89
(Compatibilité électromagnétique) et
modifications suivantes
- 2002/96/CE
Bac produits
AssistanceAnomaliesPrécautions EntretienProgrammesInstallation Description
31
Page 32

Instructions pour l'installateur
F
Application du panneau d'habillage en bois sur
la porte et montage du machine à laver à
l'intérieur des éléments:
Au cas où, après le montage du panneau en bois, il faudrait
expédier la machine pour son installation finale, nous vous
conseillons de la laisser dans son emballage d'origine.
L'emballage a été justement réalisé de manière à permettre
le montage du panneau en bois sur la machine sans
déballer complètement le produit (voir figures ci-dessous).
Le panneau en bois couvrant la façade ne doit pas avoir
plus de 18 mm d'épaisseur, il peut être articulé tant à
droite qu'à gauche. Pour plus de facilité d'emploi, nous
conseillons d'adopter le même sens d'ouverture que pour
le hublot dont les charnières sont montées sur le côté
gauche.
Accessoires montage porte (Fig.1-2-3-4-5).
N°2 Supports charnière
Fig. 1
N°1 Aimant N°1 Butoir aimant
Fig. 3 Fig. 4
Fig. 2
N°2 Charnière
A
C
Tur seite
E
B
D
N°1 Cheville en
caoutchouc
Fig. 5
- 6 vis autotaraudeuses l = 13 mm "type A".
- 2 vis métriques à tête évasée l = 25 mm "type B"; pour
fixation du butoir aimant au meuble.
- 4 vis métriques l = 15 mm "type C"; pour montage des
supports charnière au meuble.
- 4 vis métriques l = 7 mm "type D"; pour montage des
charnières aux supports.
Montage des pièces sur la façade de la machine.
- Montez les supports de charnière sur la façade en
positionnant le trou indiqué par la flèche fig. 1 côté interne
de la façade, utilisez les vis de type C.
- Montez le butoir de l'aimant du côté opposé, en haut, en
vous servant des deux vis B.
- Intercalez entre la façade de la machine et le berceau de
l'aimant, l'entretoise illustrée fig. 4/B.
N°1 Entretoise
Fig. 4/B
32
Page 33

Utilisation du gabarit de forage.
- Pour marquer l'emplacement des trous sur le côté du
panneau, alignez le gabarit de perçage avec le côté
supérieur gauche du panneau en vous servant des lignes
tracées aux extrémités.
- Pour marquer l'emplacement des trous sur le côté droit
du panneau, alignez le gabarit de perçage avec le côté
supérieur droit du panneau.
- Réalisez à l'aide d'une fraise appropriée les quatre
emplace-ments où devront trouver place les deux
charnières, la cheville en caoutchouc et l'aimant.
Montage des pièces sur le panneau en bois (Porte).
- Montez les charnières aux emplacements prévus (la
partie mobile de la charnière doit se trouver vers l'extérieur
du panneau) et fixez-les à l'aide de 4 vis type A.
- Montez l'aimant à son emplacement en haut, à l'opposé
des charnières et fixez-le au moyen de deux vis type B.
- Montez la cheville en caoutchouc à sa place en bas.
Le panneau est à présent prêt, vous pouvez le monter sur
la machine.
Montage du panneau sur la machine.
Introduisez l'ergot de la charnière indiqué par la flèche fig. 2
dans le logement du support charnière, poussez le panneau
vers la façade de la machine et fixez les deux charnières à
l'aide des deux vis type D.
Fixation du support de la base.
Si la machine est installée à une extrémité de la cuisine
intégrée, montez une ou les deux glissières du socle
comme illustré fig. 8 en réglant leur profondeur en
fonction de la position du socle et, au besoin, fixez-le à
ces dernières fig. 9. Pour monter le support de la base,
procédez comme suit (fig. 8): Fixez l'équerre P à l'aide de
la vis R, insérez le support de la base Q dans la fente
prévue et après l'avoir dûment positionné bloquez-le à
l'aide de l'équerre d'assemblage P et de la vis R.
Montage de la machine à l'intérieur des éléments.
- Poussez la machine à travers l'ouverture en l'alignant
aux autres meubles (fig. 6).
- Servez-vous des pieds de réglage pour amener la
machine à la hauteur désirée.
- Pour régler la position du panneau en bois à la verticale et à
l'horizontale, servez-vous des vis C et D comme illustré fig. 7.
Important: fermez la partie inférieure de la façade, la base
touchant au sol.
Fig. 8 Fig. 9
Accessoires fournis pour le réglage de la hauteur.
Vous trouverez à l'intérieur du couvercle en polystyrène (fig. 10):
2 traverses (G); 1 listel (M);
et à l'intérieur du tambour :
4 pieds supplémentaires (H),
4 vis (I),
4 vis (R),
4 écrous (L),
2 supports pour la base (Q)
Fig. 10
Réglage de la machine en hauteur.
La machine peut être réglée en hauteur (de 815 mm à 835
mm) à l'aide de ses 4 pieds.
Si vous souhaitez l'amener à une hauteur supérieure à celle
qui est indiquée plus haut, c'est à dire jusqu'à 870 mm,
utilisez les accessoires suivants :
les 2 traverses (G); les 4 pieds (H); les 4 vis (I); les 4 écrous
(L) puis procédez comme suit (fig. 11):
démontez les 4 pieds originaux, positionnez une traverse G
dans la partie avant de la machine, fixez-la à l'aide des vis I
(en les vissant dans les trous où étaient fixés les pieds
originaux) puis montez les nouveaux pieds H.
Procédez de même dans la partie arrière de la machine.
Vous pouvez alors régler les pieds H pour élever ou abaisser
la machine de 835 mm à 870 mm.
Après avoir atteint la hauteur désirée, bloquez les écrous L à
la traverse G.
Pour régler la machine à une hauteur comprise entre 870
mm et 900 mm, montez le listel M et réglez les pieds H
jusqu'à la hauteur souhaitée.
Pour monter le listel, procédez comme suit:
desserrez les trois vis N situées dans la partie avant du couvercle,
montez le listel M comme illustré fig. 12 et serrez les vis N.
F
Bac produits
595
540
815
Fig. 6 Fig. 7
600 min
570
min
820 ÷ 900
C
M
G
D
AssistanceAnomaliesPrécautions EntretienProgrammesInstallation Description
C
Fig. 11 Fig. 12
L
H
I
33
Page 34

Description du lave-linge
Bandeau de commandes
F
Tiroir à produits lessiviels
Voyants
Bouton
ESSORAGE
Touches
FONCTION
Touche
MISE EN MARCHE/
ARRET
Touche
START/
RESET
M
Bouton
TEMPÉRATURE
Voyant
ALLUMAGE/
HUBLOT VERROUILLE
Bouton
PROGRAMMES
Tiroir à produits lessiviels: chargement des
produits lessiviels et additifs (voir page 38).
Voyants: suivi du stade d'avancement du
programme de lavage.
Si la fonction Départ différé a été sélectionnée,
indiquent le temps résiduel avant le démarrage du
programme (voir page 35).
Bouton ESSORAGE: sélection de l'essorage ou
exclusion (voir page 37).
Touches FONCTION: sélection des fonctions
disponibles. La touche correspondant à la fonction
sélectionnée restera allumée.
Bouton TEMPÉRATURE: sélection de la
température ou lavage à froid (voir page 37).
Touche MISE EN MARCHE/ARRET: mise en
marche ou arrêt du lave-linge.
Touche START/RESET: démarrage des
programmes ou annulation (en cas d'erreur).
Voyant ALLUMAGE/HUBLOT VERROUILLE: pour
comprendre si le lave-linge est branché et si le
hublot peut être ouvert (voir page 35).
Bouton PROGRAMMES: choix des programmes
(voir page 36). Le bouton est escamotable: pour le
faire sortir, pressez légèrement au centre.
En cours de lavage, le bouton ne bouge pas.
34
Page 35

Voyants
Les voyants fournissent des informations importantes.
Voilà ce qu'ils signalent:
Phases en cours:
Pendant le cycle de lavage, les voyants s'allument
progressivement pour indiquer son stade
d'avancement:
F
Retard programmé:
Si la fonction Départ différé a été activée (voir page
37) et après avoir sélectionné le programme, le
voyant correspondant au retard programmé
commence à clignoter:
Au fur et à mesure que le temps passe, le retard
résiduel est affiché avec clignotement du voyant
correspondant:
Une fois que le retard sélectionné touche à sa fin, le
voyant clignotant s'éteint et le programme
sélectionné démarre.
Prélavage
Lavage
Rinçage
Essorage
Remarque: pendant la phase de vidange, le voyant
correspondant à la phase Essorage s'allume.
Touches fonction
Les TOUCHES FONCTION servent aussi de voyants.
La sélection d'une fonction entraîne l'allumage du
voyant correspondant.
Si la fonction sélectionnée est incompatible avec le
programme sélectionné, la touche clignote et la
fonction n'est pas activée.
En cas de sélection d'une fonction incompatible
avec une autre précédemment sélectionnée, la
seule à être activée sera la dernière validée.
Bac produits
Voyant ALLUMAGE/HUBLOT VERROUILLE:
Le voyant allumé indique que le hublot est verrouillé pour empêcher toute ouverture accidentelle; attendez que
le voyant cesse de clignoter avant d'ouvrir le hublot, vous risqueriez d'endommager l'appareil.
Le clignotement rapide du voyant ALLUMAGE/HUBLOT VERROUILLE en même temps qu'un autre signale
une anomalie. Appelez Service-après-vente.
AssistanceAnomaliesPrécautions EntretienProgrammesInstallation Description
35
Page 36

Mise en marche et Programmes
En bref: démarrage d'un programme
F
1. Pour allumer le lave-linge appuyez sur la touche .
Tous les voyants s'allument pendant quelques
secondes puis s'éteignent et le voyant ALLUMAGE/
HUBLOT VERROUILLE commence à clignoter.
2. Chargez le lave-linge et fermez le hublot.
3. Sélectionnez à l'aide du bouton PROGRAMMES
le programme désiré.
4. Sélectionnez la température de lavage (voir page 37).
Tableau des programmes
Nature des tissus et degré de
salissure
Coton
Blancs extrêmement sales
(draps, nappes, etc.)
Blancs extrêmement sales
(draps, nappes, etc.)
Blancs et couleurs résistantes
très sales
Blancs peu sales et couleurs
délicates (chemises, pulls, etc.)
Couleurs délicates peu sales
Synthétiques
Couleurs résistantes très sales
(linge de bébé, etc.)
Couleurs résistantes (linge en
tout genre légèrement sale)
Couleurs résistantes très sales
(linge de bébé, etc.)
Couleurs délicates (linge en tout
genre légèrement sale)
Couleurs délicates (linge en tout
genre légèrement sale)
Délicats
Laine
Tissus particulièrement délicats
(rideaux, soie, viscose, etc.)
PROGRAMMES PARTIAUX
Rinçage Rinçages et essorage
Rinçage délicat
Essorage Vidange et essorage énergique
Essorage délicat Vidange et essorage délicat
Vidange Vidange
Programmes
1
2
3
4
5
6
6
7
8
9
10
11
5. Sélectionnez la vitesse d'essorage (voir page 37).
6. Versez le produit lessiviel et les additifs (voir page 38).
7. Appuyez sur la touche START/RESET pour lancer
le programme.
Pour annuler, poussez sur la touche START/RESET
pendant 2 secondes au moins.
8. A la fin du programme de lavage, le voyant ALLUMAGE/
HUBLOT VERROUILLE clignote pour indiquer que le
hublot peut être ouvert. Sortez le linge et laissez le hublot
entrouvert pour faire sécher le tambour. Eteignez le lavelinge en appuyant sur la touche
Te m p .
lavage
90°C 137
90°C 120
60°C 105
40°C 72
30°C 65
60°C 77
40°C 62
50°C 73
40°C 58
30°C 30
40°C 50
30°C 45
Lessive
prélav. lavage.
Assouplis-
sant
Durée du
cycle
(minutes)
.
Description du cycle de lavage
Prélavage, lavage, rinçages,
essorages intermédiaires et finaux
Lavage, rinçages, essorages
intermédiaires et finaux
Lavage, rinçages, essorages
intermédiaires et finaux
Lavage, rinçages, essorages
intermédiaires et finaux
Lavage, rinçages, essorages
intermédiaires et finaux
Lavage, rinçages, anti-froissement
ou essorage délicat
Lavage, rinçages, anti-froissement
ou essorage délicat
Lavage, rinçages, anti-froissement
ou essorage délicat
Lavage, rinçages, anti-froissement
ou essorage délicat
Lavage, rinçages et essorage
délicat
Lavage, rinçages et essorage
délicat
Lavage, rinçages, anti-froissement
ou vidange
Rinçages, anti-froissement ou
vidange
Remarque
Pour la fonction anti-froissement: voir Repassage facile, page ci-contre. Les données reportées dans le tableau sont à titre indicatif.
Programme spécial
Quotidien 30' (programme 9 pour Synthétiques) spécialement conçu pour laver du linge peu sale en un rien de temps:
il ne dure que 30 minutes et permet ainsi de faire des économies d'énergie et de temps. Choisissez le programme (9 à
30°C), vous pourrez laver ensemble des textiles différents (sauf laine et soie) en ne dépassant pas 3 kg de charge.
Nous vous conseillons d'utiliser des lessives liquides.
36
Page 37

Personnalisations
Sélection de la température
Tournez le bouton TEMPERATURE pour sélectionner la température de lavage (voir Tableau des programmes page 36).
Vous pouvez réduire la température jusqu'au lavage à froid (
).
Sélection de l'essorage
Tournez le bouton ESSORAGE pour sélectionner la vitesse d'essorage du programme sélectionné.
Les vitesses maximales prévues pour les programmes sont:
Programmes Vitesse maximale
Coton 1200 tours minute
Synthétiques 800 tours minute
Laine 600 tours minute
Soie no
Vous pouvez réduire la vitesse d'essorage ou bien même supprimer ce dernier en sélectionnant le symbole
.
La machine interdira automatiquement tout essorage à une vitesse supérieure à la vitesse maximale prévue pour
chaque programme.
Fonctions
Les différentes fonctions de lavage prévues par le lave-linge permettent d'obtenir la propreté et le blanc souhaités.
Pour activer les fonctions:
1. appuyez sur la touche correspondant à la fonction désirée, d'après le tableau ci-dessous;
2. l'allumage de la touche correspondante signale que la fonction est activée.
F
Bac produits
Remarque: Le clignotement rapide de la touche signale que la fonction correspondante n'est pas disponible pour le
programme sélectionné.
Fonctions Effet Mode d'emploi
Appuyez plusieurs fois de suite sur la touche jusqu'à ce que le
voyant correspondant au retard souhaité s'allume.
A la cinquième pression sur la touche, la fonction se désactive.
N.B: Après avoir appuyé sur la touche Start/Reset, vous ne
pouvez modifier le retard programmé que pour le diminuer.
Elle est incompatible avec la fonction PEU SALE.
Si cette fonction est sélectionnée, les programmes 6, 7, 8, 11 et
Rinçage délicat s'arrêteront en laissant le linge tremper dans l'eau
(Anti-froissement) et le voyant de la phase Rinçage se mettra à
clignoter:
- pour compléter le cycle appuyez sur la touche START/RESET;
- pour n'effectuer que la vidange amenez le bouton sur le symbole
correspondant et appuyez sur la touche START/RESET.
Elle est incompatible avec la fonction SUPER LAVAGE.
Départ
différé
Su per
Lavage
Repassage
facile
Peu sale
Pour différer la mise
en marche de votre
machine jusqu'à 9
heures.
Pour obtenir un linge
d'une propreté
impeccable, visiblement
plus blanc par rapport
au standard de lavage
de la
Classe A
Pour moins froisser
les tissus et
simplifier leur
repassage.
Pour réduire de 30%
environ la durée du
cycle de lavage.
.
Activée avec les
programmes:
To us
1, 2, 3, 4,
5, 6, 7, 8.
To us s a u f
1, 2, 9, 10,
Vidange.
1, 2, 3, 4,
5, 6, 7, 8
AssistanceAnomaliesPrécautions EntretienProgrammesInstallation Description
37
Page 38

Produits lessiviels et linge
Tiroir à produits lessiviels
F
Un bon résultat de lavage dépend aussi d'un bon
dosage de produit lessiviel: un excès de lessive ne
lave pas mieux, il incruste l'intérieur de votre lave-linge
et pollue l'environnement.
Sortez le tiroir à produits
lessiviels et versez la
lessive ou l'additif
comme suit.
1
3
bac 1: Lessive prélavage
(en poudre)
bac 2: Lessive lavage
(en poudre ou liquide)
Versez la lessive liquide juste avant la mise en marche.
bac 3: Additifs (adoucissant, etc.)
L'assouplissant ne doit pas déborder de la grille.
2
N'utilisez pas de lessives pour lavage à la main,
elles génèrent trop de mousse.
Triage du linge
Triez correctement votre linge d'après:
- le type de textile / le symbole sur l'étiquette.
- les couleurs: séparez le linge coloré du blanc.
Videz les poches et contrôlez les boutons.
Ne dépassez pas les valeurs indiquées correspon-
dant au poids de linge sec:
Textiles résistants: 5 kg max.
Textiles synthétiques: 2,5 kg max.
Textiles délicats: 2 kg max.
Laine: 1 kg max.
Pièces de linge particulières
Rideaux: pliez-les bien et glissez-les dans une taie
d'oreiller ou dans un sac genre filet. Lavez-les seuls
sans dépasser la demi-charge. Sélectionnez le programme 11 qui supprime automatiquement l'essorage.
Doudounes et anoraks: s'ils sont en duvet d'oie ou
de canard, ils peuvent être lavés à la machine. Lavez
les vêtements sur lenvers. La charge ne doit pas
excéder 2-3 kg. Prévoyez 2, voire 3 rinçages et un
essorage léger.
Chaussures de tennis: débarrassez-les de la
boue. Lavez-les en même temps que jeans et
vêtements résistants, jamais avec du linge blanc.
Laine: pour obtenir d'excellents résultats utilisez un
produit lessiviel spécial et ne dépassez pas une
charge de 1kg.
Woolmark Platinum Care
Délicat comme le lavage à la main.
Ariston a introduit un nouveau standard de
performances supérieures, reconnu par The
Woolmark Company qui lui a attribué le prestigieux
label Woolmark Platinum Care. Si le logo Woolmark
Platinum Care est appliqué sur votre lave-linge, vous
pouvez laver avec d'excellents résultats vos vêtements en laine portant l'étiquette "laver à la main"
(M.0303):
Sélectionnez le programme 10 pour tous les
vêtements portant l'étiquette "Laver à la
main" et utilisez un produit lessiviel spécial.
Combien pèse le linge ?
1 drap 400-500 g
1 taie d'oreiller 150-200 g
1 nappe 400-500 g
1 peignoir 900-1.200 g
1 serviette éponge 150-250 g
38
Page 39

Précautions et conseils
Ce lave-linge a été conçu et fabriqué conformé-
ment aux normes internationales de sécurité. Ces
avertissements sont fournis pour des raisons de
sécurité, lisez-les attentivement.
Sécurité générale
Cet appareil a été conçu pour une utilisation
domestique, non professionnelle et ses fonctions
ne doivent pas être altérées.
Ce lave-linge ne doit être utilisé que par des
adultes en suivant les instructions reportées dans
ce mode d'emploi.
Nutilisez pas lappareil si vous êtes pieds nus.
ne touchez jamais lappareil si vous avez les pieds
ou les mains humides.
Ne tirez jamais sur le câble pour débrancher la
fiche de la prise de courant.
N'ouvrez pas le tiroir à produits lessiviels si la
machine est en marche.
Ne touchez pas à l'eau de vidange, elle peut
atteindre des températures très élevées.
Ne forcez pas pour ouvrir le hublot: le verrouillage
de sécurité qui protège contre les ouvertures
accidentelles pourrait s'endommager.
En cas de panne, n'essayez en aucun cas
d'accéder aux mécanismes internes pour tenter
de la réparer.
Veillez à ce que les enfants ne s'approchent pas
de la machine pendant son fonctionnement.
Pendant le lavage, le hublot a tendance à se
réchauffer.
Deux ou trois personnes sont nécessaires pour la
déplacer en faisant très attention. Ne jamais la
déplacer seul car la machine est très lourde.
Avant d'introduire votre linge, contrôlez si le
tambour est bien vide.
Mise au rebut
les composent et réduire l'impact sur la santé
humaine et l'environnement. Le symbole de la
''poubelle barrée'' est apposée sur tous les
produits pour rappeler les obligations de collecte
séparée.
Les consommateurs devront contacter les
autorités locales ou leur revendeur concernant la
démarche à suivre pour l'enlèvement de leur vieil
appareil.
Economies et respect de l'environnement
La technologie au service de l'environnement
Si vous voyez peu d'eau à travers le hublot c'est
parce que grâce à la nouvelle technologie Ariston, il
suffit de moins de la moitié d'eau pour obtenir une
propreté impeccable: un but atteint pour protéger
l'environnement.
Economie de produit lessiviel, d'eau, d'électricité et de temps
Pour ne pas gaspiller de ressources, utilisez le
lave-linge à sa charge maximale. Mieux vaut une
pleine charge que deux demies, vous économiserez jusqu'à 50% d'électricité.
Un prélavage n'est nécessaire qu'en cas de linge
très sale. S'en passer permet de faire des économies de produit lessiviel, de temps, d'eau et entre
5 et 15% d'électricité.
Si vous traitez les taches avec un produit déta-
chant ou si vous les laissez tremper avant de les
laver, vous éviterez d'avoir à laver à de hautes
températures. Un programme à 60°C au lieu de
90°C ou un à 40°C au lieu de 60°C, fait économiser jusqu'à 50% d'électricité.
Bien doser la quantité de produit lessiviel en
fonction de la dureté de l'eau, du degré de
salissure et de la quantité de linge à laver évite les
gaspillages et protège l'environnement: bien que
biodégradables, les produits lessiviels contiennent
des éléments qui altèrent l'équilibre de la nature.
Evitez le plus possible l'utilisation d'assouplissant.
F
Installation Description
Bac produits
Mise au rebut du matériel d'emballage:
se conformer aux réglementations locales de manière
à ce que les emballages puissent être recyclés.
La Directive Européenne 2002/96/EC sur les
Déchets des Equipements Electriques et Electroniques, exige que les appareils ménagers usagés
ne soient pas jetés dans le flux normal des déchets municipaux. Les appareils usagés doivent
être collectés séparément afin d'optimiser le taux
de récupération et le recyclage des matériaux qui
Effectuer ses lavages tard dans l'après-midi et
jusqu'aux premières heures du matin permet de
réduire la charge d'absorption des opérateurs
énergétiques. L'option Départ différé (voir page 37)
aide à mieux organiser les lavages en ce sens.
Si le linge doit être séché dans un sèche-linge,
sélectionnez une haute vitesse d'essorage. Du linge
qui contient moins d'eau fait écomiser du temps et
de l'électricité dans le programme de séchage.
AssistanceAnomaliesPrécautions EntretienProgrammes
39
Page 40

Entretien et soin
Coupure de l'arrivée d'eau et de courant
F
Fermez le robinet de l'eau après chaque
lavage: vous limiterez ainsi l'usure de l'installation
hydraulique de votre lave-linge et éliminerez le
danger de fuites.
Débranchez la fiche de la prise de courant quand
vous nettoyez votre lave-linge et pendant tous vos
travaux d'entretien.
Nettoyage du lave-linge
Pour nettoyer l'extérieur et les parties en caoutchouc,
utilisez un chiffon imbibé d'eau tiède et de savon.
N'utilisez ni solvants ni abrasifs.
Nettoyage du tiroir à produits
lessiviels
1
Pour sortir le tiroir,
soulevez-le et tirez-le
vers vous (voir figure).
Lavez-le à l'eau
courante, effectuez
cette opération assez
souvent.
2
Entretien du hublot et du tambour
Quand vous nutilisez pas votre lave-linge, laissez
toujours le hublot entrouvert pour éviter la
formation de mauvaises odeurs.
Nettoyage de la pompe
Le lave-linge est équipé d'une pompe
autonettoyante qui n'exige aucune opération
d'entretien.
Contrôle du tuyau d'arrivée de l'eau
Contrôlez le tuyau d'alimentation au moins une fois
par an. Remplacez-le dès que vous remarquez des
craquèlements et des fissures: les fortes pressions
subies pendant le lavage pourraient provoquer des
cassures.
N'utilisez jamais de tuyaux usés.
40
Page 41

Anomalies et remèdes
Il peut arriver que le lave-linge ne fonctionne pas bien. Avant de appelez le Service après-vente (voir page 42),
contrôlez s'il ne s'agit pas d'un problème facile à résoudre grâce à la liste suivante.
Anomalies:
Le lave-linge ne s'allume pas.
Le cycle de lavage ne démarre
pas.
Il n'y a pas d'arrivée d'eau.
Le lave-linge prend l'eau et
vidange continuellement.
Causes / Solutions possibles:
La fiche n'est pas branchée dans la prise de courant ou mal branchée.
Il y a une panne de courant.
Le hublot n'est pas bien fermé.
La touche
La touche START/RESET n'a pas été actionnée.
Le robinet de l'eau n'est pas ouvert.
Un départ différé a été sélectionné (Départ différé, voir page 37).
Le tuyau d'arrivée de l'eau n'est pas raccordé au robinet.
Le tuyau est plié.
Le robinet de l'eau n'est pas ouvert.
Il y a une coupure d'eau.
La pression n'est pas suffisante.
La touche START/RESET n'a pas été actionnée.
le tuyau de vidange n'est pas installé à une distance du sol
comprise entre 65 et 100 cm (voir page 31).
L'extrémité du tuyau de vidange est plongée dans l'eau (voir page 31).
L'évacuation murale n'a pas d'évent.
Si après ces vérifications, le problème persiste, fermez le robinet de l'eau, éteignez
la machine et appelez le service Assistance. Si vous habitez en étage dans un
immeuble, il peut y avoir des phénomènes de siphonnement qui font que votre
lave-linge prend et évacue l'eau continuellement. Pour supprimer cet inconvénient,
vous pouvez trouver dans le commerce des valves spéciales anti-siphonnement.
n'a pas été actionnée.
F
Bac produits
Votre lave-linge ne vidange pas
et n'essore pas.
Votre lave-linge vibre beaucoup
pendant l'essorage.
Le lave-linge a des fuites.
Le voyant ALLUMAGE/HUBLOT
VERROUILLE clignote
rapidement en même temps
qu'un autre voyant.
Il y a un excès de mousse.
Le programme ne prévoit pas de vidange: pour certains
programmes, il faut intervenir pour la faire démarrer (voir page 36).
L'option Repassage facile est activée: pour compléter le
programme, appuyez sur la touche START/RESET (voir page 37).
Le tuyau de vidange est plié (voir page 31).
La conduite de l'installation de vidage est bouchée.
Le tambour n'a pas été débloqué (comme indiqué page 30) lors de
l'installation du lave-linge.
Le lave-linge n'est pas posé à plat (voir page 30).
Le lave-linge est coincé entre des meubles et le mur (voir page 30).
Le tuyau d'arrivée de l'eau n'est pas bien vissé (voir figure page 30).
Le tiroir à produits lessiviels est bouché (pour le nettoyer voir pag. 40).
Le tuyau de vidange n'est pas bien fixé (voir page 31).
Appelez le Service-après-vente car une anomalie est signalée.
AssistanceAnomaliesPrécautions EntretienProgrammesInstallation Description
Le produit de lavage utilisé n'est pas une lessive spéciale machine
(il faut qu'il y ait l'inscription "pour lave-linge", "main et machine", ou
autre semblable).
La quantité utilisée est excessive.
41
Page 42

Assistance
F
Avant d'appeler le service après-vente:
Vérifiez si vous ne pouvez pas résoudre vous-même le problème (voir page 41);
Remettez le programme en marche pour contrôler si dysfonctionnement a disparu;
Autrement, appelez le Service après-vente de votre revendeur;
Ne vous adressez jamais à des techniciens non agréés.
Communiquez:
le type de panne;
le modèle de la machine (Référence);
le numéro de série (S/N);
Vous trouverez tous ces renseignements sur la plaquette signalétique située sur le panneau arrière de
votre lave-linge.
Consultation à tout moment
Pour toute demande concernant nos produits, nhésitez pas à contacter notre Service Consommateurs
0.825.05.44.44.
Assistance
42
Page 43

Bedienungsanleitungen
WASCHVOLLAUTOMAT
DE
Deutsch
LBE 129
INHALTSVERZEICHNIS
DE
Installation, 44-45-46-47
Auspacken und Aufstellen, 44
Wasser- und Elektroanschlüsse, 44-45
Erster Waschgang, 45
Technische Daten, 45
Anleitungen für den Installateur, 46-47
Beschreibung des
Waschvollautomaten, 48-49
Schalterblende, 48
Kontrollleuchten, 49
Inbetriebnahme und Programme, 50
Kurz zusammengefasst: Waschprogramm starten, 50
Programmtabelle, 50
Individualisierungen, 51
Einstellen der Temperatur, 51
Einstellen der Schleuder, 51
Funktionen, 51
Waschmittel und Wäsche, 52
Waschmittelschublade, 52
Vorsortieren der Wäsche, 52
Besondere Wäscheteile, 52
Woolmark Platinum Care, 52
Vorsichtsmaßregeln und Hinweise, 53
Allgemeine Sicherheit, 53
Entsorgung, 53
Energie sparen und Umwelt schonen, 53
Reinigung und Pflege, 54
Wasser- und Stromversorgung abstellen, 54
Reinigung des Gerätes, 54
Reinigung der Waschmittelschublade, 54
Pflege der Gerätetür und Trommel, 54
Reinigung der Pumpe, 54
Kontrolle des Wasserzulaufschlauchs, 54
Störungen und Abhilfe, 55
Kundendienst, 56
Bevor Sie sich an den Kundendienst wenden, 56
43
Page 44

Installation
DE
Es ist äußerst wichtig, diese Bedienungsanleitung
sorgfältig aufzubewahren, um sie jederzeit zu Rate ziehen
zu können. Sorgen Sie dafür, dass sie im Falle eines
Umzugs oder Übergabe an einen anderen Benutzer das
Gerät stets begleitet, damit auch der neue Inhaber die
Möglichkeit hat, diese zu Rate zu ziehen.
Lesen Sie bitte folgende Hinweise aufmerksam durch,
sie liefern wichtige Informationen hinsichtlich der Installation, dem Gebrauch und der Sicherheit.
Auspacken und Aufstellen
Auspacken
1. Gerät auspacken.
2. Sicherstellen, dass der Waschvollautomat keine Transportschäden erlitten hat. Im Falle einer Beschädigung Gerät bitte
nicht anschließen, sondern den Kundendienst anfordern.
3. Die vier Transportschutzschrauben ausschrauben und das an
der Rückwand befindliche Gummiteil nebst
entsprechendem
Distanzstück abnehmen
(siehe Abbildung).
4. Die Löcher mittels der mitgelieferten Kunststoffstöpsel
schließen.
5. Sämtliche Teile aufbewahren: Sollte der Waschvollautomat erneut transportiert werden müssen, müssen
diese Teile wieder eingesetzt werden.
Verpackungsmaterial ist kein Spielzeug für Kinder
Standfläche
1. Der Waschvollautomat muss auf einem ebenen, festen
Untergrund aufgestellt werden, ohne ihn an Wände, Möbelteile
oder ähnliches anzulehnen.
2. Sollte der Boden nicht
perfekt eben sein, müssen die Unebenheiten
durch An- bzw. Ausdrehen der vorderen Stellfüße
ausgeglichen werden
(siehe Abbildung), der auf
der Arbeitsfläche zu
ermittelnde Neigungsgrad
darf 2° nicht überschreiten.
Eine präzise Nivellierung verleiht dem Gerät die erforderliche
Stabilität, durch die Vibrationen, Betriebsgeräusche und ein
Verrücken des Gerätes vermieden werden. Bei Teppichböden müssen die Stellfüße so reguliert werden, dass ein
ausreichender Freiraum zur Belüftung unter dem Waschvollautomaten gewährleistet ist.
Wasser- und Elektroanschlüsse
Anschluss des Zulaufschlauches
1. Legen Sie die Gummidichtung A in das
Anschlussstück des
Zulaufschlauches ein und
A
vor dem Anschluss so lange auslaufen, bis klares
Wasser austritt.
3. Der Schlauch darf hierbei nicht eingeklemmt oder
abgeknickt werden.
Der Wasserdruck muss innerhalb der Werte liegen,
die in der Tabelle der Technischen Daten angegebenen
sind (siehe nebenstehende Seite).
Sollte der Zulaufschlauch nicht lang genug sein, dann
wenden Sie sich bitte an einen Fachhändler oder an
einen autorisierten Fachmann.
drehen Sie dieses an
einen mit
Gewindeanschluss von ¾
G versehenen Kaltwasserhahn (siehe Abbildung).
Lassen Sie das Wasser
2. Schließen Sie das
andere Ende des Schlauches an den oben rechts
am Rückteil des Waschvollautomaten befindlichen Wasseranschluss
an (siehe Abbildung).
44
Page 45

Anschluss des Ablaufschlauches
Schließen Sie den Ablaufschlauch, ohne ihn dabei
zu krümmen, an eine
Ablaufleitung, oder an
einen in der Wand in einer
65 - 100 cm
Mindesthöhe von 65 - 100
cm angelegten Ablauf an;
Verwenden Sie bitte keine Verlängerungen oder
Mehrfachstecker.
Das Kabel darf nicht gebogen bzw. eingeklemmt
werden.
Das Versorgungskabel darf nur durch autorisierte
Fachkräfte ausgetauscht werden.
Achtung! Der Hersteller weist jede Haftung zurück, falls
diese Vorschriften nicht eingehalten werden sollten.
DE
oder hängen Sie ihn in ein
Becken oder eine Wanne
ein; befestigen Sie ihn in
diesem Falle mittels der
mitgelieferten Führung an
dem Wasserhahn (siehe
Abbildung). Das freie
Ablaufschlauchende darf
nicht unter Wasser
bleiben.
Verlängerungsschläuche sollten nicht eingesetzt
werden, sollte dies jedoch absolut unvermeidlich sein,
muss die Verlängerung denselben Durchmesser des
Originalschlauchs aufweisen und 150 cm nicht überschreiten.
Elektronschluss
Vor Einfügen des Steckers in die Steckdose ist sicherzustellen, dass:
die Steckdose über eine normgerechte Erdung
verfügt;
die Steckdose die in nebenstehender Datentabelle
angegebene Höchstlast des Gerätes trägt;
die Stromspannung den in nebenstehender Daten-
tabelle aufgeführten Werten entspricht;
Erster Waschgang
Lassen Sie nach der Installation bzw. vor erstmaligem
Gebrauch erst einen Waschgang (mit Waschmittel) ohne
Wäsche durchlaufen. Stellen Sie hierzu das 90°CWaschprogramm ohne Vorwäsche ein.
Technische Daten
Modell
Abmessungen
Fassungsvermögen
Elektroanschlüsse
Wasseranschlüsse
LBE 129
Breite 59,5 cm
Höhe 81,5 cm
Tiefe 54 cm
1 bis 5 kg
Spannung 220/230 Volt 50 Hz
max. Leistungsaufnahme 1850 W
Höchstdruck 1 MPa (10 bar)
Mindestdruck 0,05 MPa (0,5 bar)
Trommelvolumen 46 Liter
Waschprogramme WaschmittelInstallation Beschreibung
Wartung und
Pflege
der Stecker in die Steckdose passt. Andernfalls muss
der Stecker (oder die Steckdose) ersetzt werden.
Der Waschvollautomat darf nicht im Freien installiert
werden, auch nicht, wenn es sich um einen geschützten
Platz handelt. Es ist gefährlich, Ihren Vollwaschautomaten
Gewittern und Unwettern auszusetzen.
Die Steckdose sollte nach installiertem Gerät leicht
zugänglich sein.
Schleudertouren
Prüfprogramme
gemäß IEC456
bis zu 1200 U/min.
Programm 3; Temperatur 60°C;
bei einer Lademenge von 5 kg.
Dieses Gerät entspricht den
folgenden EG-Richtlinien:
- 73/23/EWG vom 19.02.73
(Niederspannung)
und nachfolgenden Änderungen
- 89/336/EWG vom 03.05.89
(elektromagnetische Verträglichkeit)
und nachfolgenden Änderungen
- 2002/96/CE
KundendienstStörungenVorsichtsmaßregeln
45
Page 46

DE
Anleitungen für den Installateur
Montage des Holzpaneels auf die Tür und Einfügen der maschine in die Möbel:
Falls nach der Montage des Holzpaneels eine Versendung
zur End-Installation der Maschine notwendig ist, empfehlen
wir, die Maschine in ihrer ursprünglichen Verpackung zu
belassen. Die Verpackung ist deshalb so beschaffen, daß
eine Anbringung des Holzpaneels auf die Maschine möglich
ist, ohne dabei die Verpackung ganz entfernen zu müssen
(siehe untere Abbildung).
Die Stärke des die Frontseite bedeckenden Holzpaneels darf
18 mm nicht unterschreiten und das Paneel kann sowohl auf
der rechten als auch auf der linken Seite montiert werden.
Aus praktischen Gründen empfehlen wir eine Montage in
derselben Öffnungsrichtung wie die des Einfüllfensters, d.h.
mit auf der linken Seite montierten Scharnieren.
Montagezubehör für die Tür (Abb. 1-2-3-4-5).
N° 2 Scharnierhalterung
Abb. 1
Abb. 2
N° 2 Scharnier
A
C
B
D
N° 1 Magnet
Abb. 3 Abb. 4
N° 1 Gummidübel
Abb. 5
- 6 selbsteinschneidende Schrauben l = 13 mm Typ A.
- 2 metrische Senkkopfschrauben l = 25 mm Typ B; zur
Befestigung des Magnetan-schlags am Gehäuse.
- 4 metrische Schrauben l = 15 mm Typ C; zur Anbringung
der Scharnierhalterungen am Gehäuse.
- 4 metrische Schrauben l = 7 mm Typ D; zur Anbringung
der Scharniere an den Halterungen.
N° 1 Magnetanschlag
N° 1 Distanzstück
Abb. 4/B
46
Montage der Einzelteile auf die Maschine-nvorderseite.
- Montieren Sie die Scharnierha-lterungen auf die Vorderseite
mit den Schrauben C, indem Sie das in der abb.1 von einem
Pfeil angezeigte Loch in Richtung Innenseite der Vorderfront
anbringen.
Tur seite
E
- Den Magnetanschlag mit den beiden Schrauben B von der
entgegengesetzten Seite oben montieren.
- Zwischen Maschinenfront und Magnetanschlag ist das auf
abb. 4/B veranschaulichte Distanzstück einzusetzen.
Page 47

Gebrauch der Bohrschablone.
a) Zur Positionsmarkierung der Bohrungen auf der linken
Seite des Paneels, legen Sie die Bohrmaske oben links am
Paneel an und halten Sie sich an die an den Enden markierten Linien. b) Zur Positionsmarkierung der Bohrungen auf
der rechten Seite des Paneels, legen Sie die Bohrmaske
oben rechts am Paneel an. c) Mit einem Fräser von entsprechender Größe die vier Sitze fräsen, die die zwei Scharniere,
den Gummidübel und den Magnet aufnehmen sollen.
Montage der Einzelteile auf das Holzpaneel (Tür).
- Setzen Sie die Scharniere in die vorgesehenen Sitze ein
(das bewegliche Scharnierteil muß auf die Außenseite des
Scharniers weisen) und befestigen Sie sie mit den 4 Schrauben des Typs A.
- Setzen Sie den Magnet in den Sitz ein, und zwar oben von
der den Scharnieren entgegensetzten Seite und befestigen
Sie ihn mit zwei Schrauben den Typs B.
- Setzen Sie den Gummidübel in den Sitz unten ein.
Das Paneel kann nun auf die maschine montiert werden.
Montage des Paneels auf die maschine.
Setzen Sie die von dem Pfeil in abb. 2 angegebene Scharnier-
nase in den Sitz der Scharnierhalterung ein, drücken Sie das
Paneel gegen die Frontseite der maschine und befestigen Sie
die beiden Scharniere mit den Schrauben des Typs D.
Befestigung der Sockelführung
Wenn die maschine am Ende einer Küchenzeile installiert
werden soll, montieren Sie eine oder beide Sockelführungen
wie in abb. 8 angegeben, passen Sie deren Tiefe der
Sockelposition an und wenn nötig, befestigen Sie den
Sockel an denselben (abb. 9). Zur Montage der Sockelführung verfahren Sie wie folgt (Abb. 8): Befestigen Sie das
Winkelstück P mittels der Schraube R, setzen Sie die
Sockelführung Q in den entsprechenden Schlitz ein, bringen
Sie diese in die gewünschte Lage und befestigen Sie sie
daraufhin mittels der Schraube R an dem Winkelstück P.
Einfügen der maschine in das Möbel.
- Schieben Sie die maschine in die Öffnung und passen Sie
sie der Möbelfront an (abb. 6).
- Regulieren Sie die verstellbaren Füße auf die gewünschte
Höhe der maschine.
- Drehen Sie die Schrauben C und D wie in abb. 7 angege-
ben, um die Position des Holzpaneels in vertikaler und
horizontaler Richtung einzustellen.
Wichtig: Schließen Sie den unteren Teil der Frontseite durch den
Sockel, und zwar so, dass letzterer mit dem Boden abschließt.
Abb. 8 Abb. 9
Beiliegendes Zubehör zur Höhenregulierung.
Im Polystyroldeckel (Abb. 10) befinden sich folgende Teile:
2 Querstreben (G); 1 Leiste (M)
In der Wäschetrommel befinden sich:
4 zusätzliche Stellfüße (H),
4 Schrauben (I),
4 Schrauben (R),
4 Schraubenmuttern (L),
2 Sockelführungen (Q)
Abb. 10
Höhenregulierung des Waschvollautomaten.
Mit Hilfe der 4 Stellfüße kann die Höhe des Gerätes reguliert
werden (von 815 mm bis 835 mm). Sollte diese Höhe jedoch
nicht ausreichen, kann das Gerät durch Einsatz nachfolgenden
Zubehörs bis auf eine Höhe von 870 mm gebracht werden:
2 Querstreben (G); 4 Stellfüße (H); 4 Schrauben (I); 4 Schraubenmuttern (L), Verfahren Sie hierzu wie folgt (Abb. 11):
Nehmen Sie die 4 ursprünglich montierten Stellfüße ab, legen Sie
eine Querstrebe G am Vorderteil des Gerätes an und befestigen
Sie dieses mittels der Schrauben I (schrauben Sie diese in die
Löcher ein, in denen sich die ursprünglich montierten Stellfüße
befanden), setzen Sie daraufhin die neuen Stellfüße H ein.
Verfahren Sie auf gleiche Weise am hinteren Teil des Gerätes.
Durch Einstellen der Füße H kann das Gerät nun auf eine Höhe
von 835 mm bis 870 mm gebracht werden.
Nach Erreichen der gewünschten Höhe befestigen Sie die
Schraubenmuttern L an der Querstrebe G.
Zur Einstellung des Gerätes auf eine Höhe von 870 mm bis 900
mm ist die Leiste M anzubringen, regulieren Sie daraufhin die
Stellfüße H bis auf die gewünschte Höhe.
Die Leiste wird wie folgt eingesetzt:
Lösen Sie die drei an der vorderen Deckelblende befindlichen
Schrauben N, setzen Sie die Leiste M so wie auf Abb. 12
veranschaulicht ein und ziehen Sie die Schrauben N wieder an.
DE
Waschprogramme WaschmittelInstallation Beschreibung
Wartung und
Pflege
595
540
815
Abb. 6 Abb. 7
600 min
570
min
820 ÷ 900
C
M
G
D
C
Abb. 11 Abb. 12
L
H
I
47
KundendienstStörungenVorsichtsmaßregeln
Page 48

Beschreibung des
Waschvollautomaten
DE
Schalterblende
Waschmittelschublade
Kontrollleuchten
Wahlschalter
SCHLEUDER
Taste
FUNKTIONEN
Taste
EIN/AUS
Kontrollleuchte
ON/FÜLLFENSTER
GESPERRT
Taste
START/
RESET
M
Wahlschalter
PROGRAMME
Wahlschalter
TEMPERATUR
Waschmittelschublade: für Waschmittel und
Zusätze (siehe Seite 52).
Kontrollleuchten: Zur Kontrolle des Wasch-
programmablaufs.
Wurde die Funktion Startvorwahl eingestellt, wird die
bis zum Start noch verbleibende Zeit
Angezeigt (siehe Seite 49).
Wahlschalter SCHLEUDER: Zur Einstellung oder zum
völligen Ausschalten der Schleuder (siehe Seite 51).
Tasten FUNKTIONEN: Zur Einstellung der verfügbaren
Funktionen. Die gewählte Einstellung der entsprechenden Funktionstaste bleibt eingeschaltet. (sie leuchtet)
Wahlschalter TEMPERATUR: Zur Einstellung der
Waschtemperatur oder der Kaltwäsche (siehe Seite 51).
Taste "EIN/AUS": zur Ein- und Ausschaltung des
Waschvollautomaten
Taste "START/RESET": um die Programme zu
starten bzw. zu löschen, falls unkorrekt eingestellt.
Kontrollleuchte ON/FÜLLFENSTER GESPERRT: Um
Erkennen zu können, ob die Maschine eingeschaltet
ist und demnach das Füllfenster nicht geöffnet werden
kann (siehe Seite 49).
Wahlschalter PROGRAMME: zur Programmwahl Die
Wahlschalter sind flächenbündig angebracht: Durch
leichten Druck auf die Knopfmitte können Sie herausgezogen werden. Während des Programmablaufs
bleibt der Schalter feststehend.
48
Page 49

Kontrollleuchten
Die Kontrollleuchten liefern wichtige Hinweise.
Sie signalisieren:
Laufende Programmphase:
Während des Waschprogrammablaufs leuchten die
Kontrollleuchten nach und nach auf und zeigen so den
jeweiligen Stand an.
DE
Startvorwahl erfolgt:
Wurde die Startvorwahl-Funktion Delay Timer (siehe
Seite 51) aktiviert, und das Programm in Gang gesetzt,
schaltet die Kontrollleuchte, die der eingestellten
Zeitverschiebeung entspricht, auf Blinklicht:
Nach und nach wird die bis zum effektiven Start
noch verbleibende Zeit eingeblendet, die entsprechende Kontrollleuchte blinkt:
Nach Ablauf der vorgewählten Zeit erlischt die
Kontrollleuchte und das gewählte Waschprogramm
startet.
Vorwäsche
Hauptwäsche
Spülen
Schleudern
Anmerkung: Während des Abpumpens leuchtet die
entsprechende Kontrollleuchte für die Schleuder auf.
Tasten FUNKTIONEN
Die Funktionstasten fungieren auch als
Kontrollleuchten.
Bei Wahl einer Funktion leuchtet die entsprechende
Taste auf.
Ist die gewählte Funktion nicht vereinbar mit dem
eingestellten Programm, schaltet die Taste auf Blinklicht und die Funktion wird nicht aktiviert.
Wird eine Funktion eingestellt, die zu der bereits
eingestellten nicht zugeschaltet werden kann, bleibt
nur die zuletzt gewählte aktiv.
Waschprogramme WaschmittelInstallation Beschreibung
Kontrollleuchte ON/FÜLLFENSTER GESPERRT:
Ist diese Kontrollleuchte eingeschaltet, bedeutet dies, dass das Füllfenster gesperrt ist. Um ungewolltes Öffnen zu
vermeiden, warten Sie, bis die Leuchte auf Blinklicht umschaltet, bevor Sie das Fenster öffnen, um Schäden zu
vermeiden.
Ein gleichzeitiges, rasches Blinken der Kontrollleuchte ON/FÜLLFENSTER GESPERRT mit einer beliebigen anderen
Kontrollleuchte signalisiert einen Fehler. Fordern Sie den Kundendienst an.
49
Wartung und
Pflege
KundendienstStörungenVorsichtsmaßregeln
Page 50

Inbetriebnahme und
Programme
DE
Kurz zusammengefasst:
Waschprogramm starten
1. Schalten Sie den Waschvollautomaten durch Druck
auf die Taste
ein. Alle Kontrollleuchten leuchten für
einige Sekunden auf, und erlöschen kurz darauf
wieder. Die Kontrollleuchte ON/FÜLLFENSTER
GESPERRT schaltet auf Blinklicht.
2. Wäsche einfüllen und Füllfenster schließen.
3. Stellen Sie das gewünschte Programm mittels des
Wahlschalters PROGRAMME ein.
4. Einstellen der Waschtemperatur (siehe Seite 51).
Programmtabelle
Gewebeart und Verschmutzungsgrad
Baumwolle
Stark verschmutzteKochwäsche
(Bettücher, Tischdecken usw.)
Stark verschmutzteKochwäsche
(Bettücher, Tischdecken usw.)
Widerstandsfähige, stark
verschmutzte Weiß- und Buntwäsche
Leicht verschmutzte Weißwäsche
und empfindliche Buntwäsche
(Oberhemden, Maschenwareusw.)
Leicht verschmutzte empflindliche
Buntwäsche
Synthetik
Stark verschmutzte, farbechte
Buntwäsche (Babywäsche usw.)
Waschechte Farben (leicht
verschmutzte Wäsche jeder Art).
Stark verschmutzte, farbechte
Buntwäsche (Babywäsche usw.)
Zarte Farben (leicht verschmutzte
Wäsche jeder Art).
Zarte Farben (leicht verschmutzte
Wäsche jeder Art).
Woll e/ seide
Wolle
Sehr zarte Feinwäsche (Gardinen,
Seide, Viskose, usw.)
TEILPROGRAMME
Spülen Spülen und Schleudern
Sanftes Spülen
Schleudern
Sanftes Schleudern Abpumpen und sanftes Schleudern
Abpumpen Abpumpen
Was chprogramme
10
11
Te m p e ratur
1
2
3
4
5
6
6
7
8
9
90°C 137
90°C 120
60°C 105
40°C 72
30°C 65
60°C 77
40°C 62
50°C 73
40°C 58
30°C 30
40°C 50
30°C 45
Waschmittel
Vorw. Ha up tw .
5. Einstellen der Schleudergeschwindigkeit (siehe Seite 51).
6. Waschmittel und Zusätze einfüllen (siehe Seite 52).
7. Programm durch Druck auf die Taste START/RESET
in Gang setzen.
Um dieses zu löschen, Taste START/RESET für
mindestens 2 Sekunden gedrückt halten.
8. Ist das Waschprogramm abgelaufen schaltet die
Kontrollleuchte ON/FÜLLFENSTER GESPERRT auf
Blinklicht, was anzeigt, dass das Fenster geöffnet
werden kann. Nehmen Sie die Wäsche heraus und
lassen Sie das Füllfenster leicht offen stehen, damit
die Trommel trocknen kann. Die Waschmaschine
nun durch Druck auf die Taste
Weich-
macher
ProgrammDauer
(Minuten)
Beschreibung des Waschprogramms
Vorwäsche, Hauptwäsche, Spülen,
Zwischen- und Endschleudern
Hauptwäsche, Spülen, Zwischenund Endschleudern
Hauptwäsche, Spülen, Zwischenund Endschleudern
Hauptwäsche, Spülen, Zwischenund Endschleudern
Hauptwäsche, Spülen, Zwischenund Endschleudern
Hauptwäsche, Spülen, Knitterschutz
oder sanftes Schleudern
Hauptwäsche, Spülen, Knitterschutz
oder sanftes Schleudern
Hauptwäsche, Spülen, Knitterschutz
oder sanftes Schleudern
Hauptwäsche, Spülen, Knitterschutz
oder sanftes Schleudern
Hauptwäsche, Spülen und sanftes
Schleudern
Hauptwäsche, Spülen und sanftes
Schleudern
Hauptwäsche, Spülen, Knitterschutz
oder Wasser abpumpen
Spülen, Knitterschutz oder
Abpumpen
Abpumpen und energisches
Schleudern
ausschalten.
Anmerkungen
Zum Knitterschutz: siehe "Bügelleicht", auf nebenstehender Seite. Bei den in der Tabelle aufgeführten Daten handelt
es sich um Richtwerte.
Spezialprogramm
Kurzprogramm 30' (Programm 9 für Kunstfasern) Kurzprogramm für die tägliche Wäsche leicht verschmutzter Teile:
in nur 30 Minuten, zur Einsparung von Zeit und Energie. Stellen Sie dieses Waschprogramm (9 bei 30°C) ein, dann
können, bei einer maximalen Lademenge von 3 kg, Gewebe unterschiedlicher Art (mit Ausnahme von Wolle und
Seide) zusammen gewaschen werden. Es ist ratsam, flüssige Waschmittel einzusetzen.
50
Page 51

Individualisierungen
Einstellen der Temperatur
Durch Drehen des Wahlschalters TEMPERATUR wird die Waschtemperatur eingestellt. (siehe Programmtabelle auf Seite 50).
Die Temperatur kann bis auf Kaltwäsche (
Einstellen der Schleuder
Durch Drehen des Wahlschalters SCHLEUDER wird die Schleudergeschwindigkeit des gewählten Waschprogramms
eingestellt.
Folgende Höchstgeschwindigkeiten sind für die einzelnen Programme vorgesehen:
Waschprogramme Höchstgeschwindigkeit
Baumwolle 1200 U/min
Kunstfasern 800 U/min
Wolle 600 U/min
Seide no
) herabgesetzt werden.
DE
Die Schleudergeschwindigkeit kann herabgesetzt; durch Wahl des Symbols
kann die Schleuder gänzlich ausgeschlossen werden.
Der Waschvollautomat verhindert automatisch ein höheres Schleudern, falls die für das entsprechende Programm
vorgeschriebene Schleuderdrehzahl überstiegen wird.
Funktionen
Die verschiedenen Waschfunktionen, die Ihnen Ihr Waschvollautomat bietet, ermöglichen es Ihnen, hygienisch
saubere und weiße Wäsche zu erhalten, die Ihren Wünschen entsprechen. Aktivierung der Funktionen:
1. Die Taste der gewünschten Funktion gemäss untenstehender Tabelle drücken;
2. Das Einschalten bzw. Aufleuchten der entsprechenden Taste zeigt an, dass die Funktion aktiviert wurde.
Anmerkung: Sollte die Taste jedoch auf Blinklicht schalten, bedeutet dies, dass die Funktion zu dem eingestellten
Programm nicht zugeschaltet werden kann.
Funktionen Wirkung Anleitungen zur Anwendung
Drücken Sie die Taste so oft, bis die Kontrollleuchte der
gewünschten Zeitverschiebung aufleuchtet.
Ein fünfter Tastendruck deaktiviert die Funktion.
NB: Ist die Taste START/RESET einmal gedrückt, kann der
gewählte Zeitverschiebungswert nur noch herabgesetzt werden.
Nicht mit der Funktion KURZ zu kombinieren.
Delay Timer
(Startvorwahl)
Super Wash
Start kann bis zu 9
Std. verschoben
werden.
Für einwandfrei
saubere, sichtbar
weißere Wäsche des
Klasse A-Standards.
Aktiv mit den
Programmen:
Alle
1, 2, 3, 4,
5, 6, 7, 8
Waschprogramme WaschmittelInstallation Beschreibung
Wartung und
Pflege
Bügelleicht
Kurz
Reduziert die
Knitterbildung und
erleichtert so das
Bügeln.
Verkürzt die Dauer
des
Waschvorgangs
um ca. 30%.
Wurde diese Funktion eingestellt, werden die Programme 6, 7, 8,
11 und Sanftes Spülen unterbrochen, das Wasser wird nicht
abgepumpt, die Wäsche bleibt im Wasser liegen (Knitterschutz),
und die Kontrollleuchte der Spülphase schaltet auf Blinklicht:
- um den Waschgang zu beenden, Taste START/SELECT drücken;
- nur das Wasser abpumpen: Knopf auf das entsprechende Symbol
drehen und die Taste START/RESET drücken.
Nicht mit der Funktion SUPER WASH zu kombinieren.
Alle, mit
Ausnahme
1, 2, 9, 10,
Abpumpen.
1, 2, 3, 4,
5, 6, 7, 8
KundendienstStörungenVorsichtsmaßregeln
51
Page 52

Waschmittel und Wäsche
DE
Waschmittelschublade
Ein gutes Waschergebnis hängt auch von einer korrekten
Waschmitteldosierung ab: Eine zu hohe Dosierung
bedeutet nicht unbedingt reinere Wäsche, sie trägt nur
dazu bei, die Maschineninnenteile zu verkrusten und die
Umwelt zu belasten.
Schublade herausziehen
und Waschmittel oder
Zusätze wie folgt einfüllen:
1
3
In Kammer 1: Waschpulver für die Vorwäsche
(kein Flüssigwaschmittel)
In Kammer 2: Waschmittel für die Hauptwäsche (Waschpulver oder Flüssigwaschmittel)
Flüssigwaschmittel nur kurz vor dem Start einfüllen.
In Kammer 3: Zusätze (Weichspüler usw.)
Der Weichspüler darf das Gitter nicht übersteigen.
2
Verwenden Sie keine Handwaschmittel, sie verursa-
chen eine zu hohe Schaumbildung.
Vorsortieren der Wäsche
Sortieren Sie die Wäsche nach:
- Gewebeart / Waschetikettensymbol
- und Farben: Buntwäsche von Weißwäsche
trennen.
Entleeren Sie alle Taschen.
Das angegebene Gewicht, das sich auf die maximale
Ladung an Trockenwäsche bezieht, sollte nicht
überschritten werden:
Widerstandsfähige Gewebe: max 5 kg
Kunstfasergewebe: max 2,5 kg
Feinwäsche: max 2 kg
Wolle: max 1 kg
Wie schwer ist Wäsche?
Besondere Wäscheteile
Gardinen:Gardinen zusammengefaltet in einem
Kissenbezug oder in einem netzartigen Beutel waschen. Waschen Sie diese allein, ohne das Gesamtgewicht für halbe Füllung zu übersteigen. Stellen Sie das
Programm 11 ein, das ein automatisches Ausschließen
der Schleuder vorsieht.
Skijacken und Anoraks: Sind diese mit Gänseoder Daunenfedern gefüttert, können sie im Waschvollautomaten gewaschen werden. Ziehen Sie die Teile
auf links, achten Sie auf eine maximale Beladung von
2/3 kg, wiederholen Sie 2/3 Spülgänge und stellen Sie
die Schleuder auf Schonschleudern ein.
Tennisschuhe: Entfernen Sie Schlammreste. Tennis-
schuhe können zusammen mit Jeans oder sonstigen
widerstandsfähigen Teilen, nicht jedoch mit Weißwäsche, gewaschen werden.
Wolle: Verwenden Sie Spezialwaschmittel; Lademenge von 1 kg bitte nicht überziehen.
Woolmark Platinum Care
Schonend wie Waschen von Hand.
Ariston hat einen neuen Standard hochwerti-
ger Leistungen geschaffen, der von The
Woolmark Company mit dem prestigevollen Warenzeichen Woolmark Platinum Care zugelassen wurde.
Befindet sich auf Ihrem Waschvollautomaten das Logo
Woolmark Platinum Care, können Teile aus Schurwolle, die mit dem Pflegeetikett "Handwäsche" ausgezeichnet sind, darin gewaschen werden (M.0303):
Verwenden Sie für alle mit "Handwäsche"
ausgezeichneten Teile das Programm 10 und
Spezialwaschmittel.
1 Bettuch 400-500 gr
1 Kissenbezug 150-200 gr
1 Tischdecke 400-500 gr
1 Bademantel 900-1.200 gr
1 Handtuch 150-250 gr
52
Page 53

Vorsichtsmaßregeln
und Hinweise
Der Waschvollautomat wurde nach den strengsten
internationalen Sicherheitsvorschriften entworfen und
gebaut. Nachstehende Hinweise werden aus Sicherheitsgründen geliefert und sollten aufmerksam gelesen werden.
Allgemeine Sicherheit
Dieses Gerät wurde für den nicht professionellen Einsatz
im privaten Haushalt konzipiert und seine Funktionen
dürfen nicht verändert werden.
Der Waschvollautomat darf nur von Erwachsenen und
gemäß den Anleitungen dieses Handbuchs bedient
werden.
Berühren Sie das Gerät nicht, wenn Sie barfuß sind, und
auch nicht mit nassen oder feuchten Händen oder Füßen.
Ziehen Sie den Gerätestecker nicht am Kabel aus der
Steckdose, sondern nur am Stecker selbst.
Öffnen Sie die Waschmittelschublade nicht, wenn das
Gerät in Betrieb ist.
Berühren Sie nicht das Ablaufwasser, es kann sehr heiß sein.
Öffnen Sie das Füllfenster nicht mit Gewalt: Der
Sicherheits-Schließmechanismus könnte hierdurch
beschädigt werden.
Bei etwaigen Störungen versuchen Sie bitte nicht,
Innenteile selbst zu reparieren.
Verpflichtung, dass Elektrohaushaltsgeräte gesondert
entsorgt werden müssen.
Endverbraucher können sich an Abfallämter der Gemeinden wenden, um mehr Informationen über die
korrekte Entsorgung ihrer Elektrohaushaltsgeräte zu
erhalten.
Energie sparen und Umwelt schonen
Technologie im Dienste der Umwelt
Glauben Sie, durch das Füllfenster hindurch wenig Wasser
zu sehen? Dank der neuen Ariston-Technik genügt die halbe
Wassermenge für eine maximale Sauberkeit: eine Maßnahme die zum Schutze der Umwelt angestrebt wurde.
Waschmittel, Wasser, Energie und Zeit sparen
Verschwendung von Strom, Wasser, Waschmittel und Zeit
kann man vermeiden, indem man die Waschmaschine mit
der empfohlenen Höchstwäschemenge benutzt. Bei einer
vollen Auslastung Ihres Waschvollautomaten können Sie
bis zu 50% Energie sparen.
Vorwäsche ist nur bei stark verschmutzter Wäsche
erforderlich. Durch Vermeidung einer solchen kann
Waschmittel, Zeit, Wasser und 5-15% Energie gespart
werden.
DE
Waschprogramme WaschmittelInstallation Beschreibung
Halten Sie Kinder stets von dem in Betrieb befindlichen
Gerät fern.
Während des Waschgangs kann das Füllfenster sehr
heiß werden.
Muss der Waschvollautomat versetzt werden, sollten
hierfür mindestens 2/3 Personen verfügbar sein. (Vorsich-
tig vorgehen). Versuchen Sie es niemals allein, das Gerät
ist äußerst schwer.
Vergewissern Sie sich, dass die Trommel völlig leer ist,
bevor Sie die Wäsche einfüllen.
Entsorgung
Entsorgung des Verpackungsmaterials:
Befolgen Sie die lokalen Vorschriften, Verpackungs-
material kann wiederverwertet werden.
Gemäß der Europäischen Richtlinie 2002/96/EC über
Elektro- und Elektronik-Altgeräte dürfen Elektro-
haushalts-Altgeräte nicht über den herkömmlichen
Haushaltsmüllkreislauf entsorgt werden. Altgeräte
müssen separat gesammelt werden, um die Wiederver-
wertung und das Recycling der beinhalteten Materialien
zu optimieren und die Einflüsse auf die Umwelt und die
Gesundheit zu reduzieren. Das Symbol durchgestri-
chene Mülltonne auf jedem Produkt erinnert Sie an Ihre
Flecken sollten mit einem Fleckenmittel vorbehandelt
werden, oder weichen Sie die Wäsche vor der Wäsche
ein. Hierdurch können hohe Waschtemperaturen vermieden werden. Ein 60°C-Programm anstelle eines 90°CProgramms, oder ein 40°C-Programm anstelle eines
60°C-Programms hilft bis zu 50% Energie zu sparen.
Dosieren Sie Waschmittel sparsam je nach Wasserhärte,
Verschmutzungsgrad und Wäschemenge, um die Umwelt
nicht über Gebühr zu belasten: obwohl sie biologisch
abbaubar sind, beinhalten Sie dennoch Stoffe, die die
Umwelt belasten. Auch Weichmacher sollten höchst
sparsam eingesetzt werden.
Waschen Sie am späten Nachmittag oder in den ersten
Morgenstunden, hierdurch tragen sie dazu bei, die
Belastung der Elektrizitätswerke zu mindern.
Die Funktion Startvorwahl' (siehe Seite 51) hilft Ihnen
in dieser Hinsicht außerordentlich.
Soll die Wäsche in einem Wäschetrockner getrocknet
werden, dann stellen Sie eine hohe Schleudergeschwindigkeit ein. Je trockener die Wäsche geschleudert wird, desto niedriger ist der zum Trocknen
erforderliche Energieverbrauch.
Wartung und
Pflege
KundendienstStörungenVorsichtsmaßregeln
53
Page 54

Reinigung und Pflege
DE
Wasser- und Stromversorgung abstellen
Wasserhahn nach jedem Waschvorgang zudrehen.
Hierdurch wird der Verschleiß der Wasseranlage
verringert und Wasserlecks vorgebeugt.
Ziehen Sie den Stecker aus der Steckdose, bevor Sie
Ihren Waschvollautomaten reinigen.
Reinigung des Gerätes
Die Gehäuseteile und die Teile aus Gummi können mit
einem mit warmer Spülmittellauge angefeuchteten Tuch
gereinigt werden. Vermeiden Sie Löse- und Scheuermittel.
Reinigung der Waschmittelschublade
1
Heben Sie die Schublade
leicht an und ziehen Sie
sie nach vorne hin heraus
(siehe Abbildung).
Spülen Sie diese regelmäßig unter fließendem
Wasser gründlich aus.
2
Pflege der Gerätetür und Trommel
Lassen Sie die Füllfenstertür stets leicht offen
stehen, um die Bildung unangenehmer Gerüche zu
vermeiden.
Reinigung der Pumpe
Ihr Gerät ist mit einer selbstreinigenden Pumpe ausge-
rüstet, eine Wartung ist demnach nicht erforderlich.
Kontrolle des Wasserzulaufschlauchs
Kontrollieren Sie den Zulaufschlauch mindestens einmal
im Jahr. Weist er Risse bzw. Brüche auf, muss er
ausgetauscht werden. Der starke Druck während des
Waschprogramms könnte zu plötzlichem Platzen
führen.
Verwenden Sie niemals bereits gebrauchte Schläuche.
54
Page 55

Störungen und Abhilfe
Es kann immer einmal vorkommen, dass Ihr Waschvollautomat nicht funktioniert. Bevor Sie sich an den Technischen Kundendienst wenden (siehe Seite 56), vergewissern Sie sich zuerst, ob es sich nicht um eine Kleinigkeit handelt, die Sie selbst beheben
können. Ziehen Sie hierzu nachstehendes Verzeichnis zu Rate.
DE
Störungen:
Der Waschvollautomat schaltet
sich nicht ein.
Der Waschgang startet nicht.
Der Waschvollautomat lädt kein
Wasser.
Der Waschvollautomat lädt
laufend Wasser und pumpt es
laufend ab.
Mögliche Ursachen / Lösungen:
Der Stecker steckt nicht in der Steckdose, oder nicht so, dass der Kontakt
hergestellt wird.
Der Strom ist ausgefallen.
Das Füllfenster ist nicht richtig geschlossen.
Die Taste wurde nicht gedrückt.
Die Taste START/RESET wurde nicht gedrückt.
Der Wasserhahn ist nicht auf.
Es wurde ein verzögerter Start gewählt (Startvorwahl', siehe Seite 51).
Der Zufuhrschlauch ist nicht am Wasserhahn angeschlossen.
Der Schlauch ist geknickt.
Der Wasserhahn ist nicht auf.
Es ist kein Wasser da.
Der Druck ist unzureichend.
Die Taste START/RESET wurde nicht gedrückt.
Der Ablaufschlauch befindet sich nicht auf der vorgeschriebenen Höhe, d.h.
65 - 100 cm vom Boden (siehe Seite 45).
Das Schlauchende liegt unter Wasser (siehe Seite 45).
Der Mauerablauf wurde nicht mit einer Entlüftungsöffnung versehen.
Konnte die Störung durch diese Kontrollen nicht behoben werden, dann drehen
Sie den Wasserhahn zu, schalten das Gerät aus und fordern den Kundendienst
an. Falls Sie in einer der obersten Etagen eines Gebäudes wohnen, kann es
vorkommen, dass sich im Syphon ein Vakuum bildet, und der Waschvollautomat
ständig Wasser ansaugt und wieder abpumpt. Zur Lösung dieser Probleme
bietet der Handel spezielle Syphonventile.
Waschprogramme WaschmittelInstallation Beschreibung
Der Waschvollautomat pumpt
nicht ab und schleudert nicht.
Der Waschvollautomat vibriert
zu stark während des Schleuderns.
Der Waschvollautomat ist undicht.
Die Kontrollleuchte ON/FÜLLFENSTER GESPERRT und mindestens eine weitere Kontrollleuchte
blinken in raschen Abständen.
Es bildet sich zu viel Schaum.
Das Programm siehe kein Abpumpen vor: bei einigen Programmen muss
diese Funktion manuell gestartet werden (siehe Seite 50).
Die Option Bügelleicht' wurde eingestellt: zur Beendung des Programms
Taste START/RESET drücken (siehe Seite 51).
Der Ablaufschlauch ist geknickt (siehe Seite 45).
Die Ablaufleitung ist verstopft.
Die Trommel wurde bei der Installation nicht korrekt befreit (siehe Seite 44).
Der Waschvollautomat steht nicht eben (siehe Seite 44).
Der Waschvollautomat steht zu eng zwischen der Wand und einem Möbel
(siehe Seite 44).
Der Zulaufschlauch wurde nicht ordnungsgemäß aufgeschraubt (siehe Seite 44).
Die Waschmittelschublade ist verstopft (zur Reinigung siehe Seite 54).
Der Ablaufschlauch wurde nicht ordnungsgemäß befestigt (siehe Seite 45).
Fordern Sie den Kundendienst an, denn das Gerät signalisiert einen Fehler.
Das Waschmittel ist für Waschmaschinen nicht geeignet (es muss mit der
Aufschrift "Für Waschmaschinen", "Für Handwäsche und Waschmaschinen"
usw. versehen sein.
Es wurde zu hoch dosiert.
Wartung und
Pflege
KundendienstStörungenVorsichtsmaßregeln
55
Page 56

Kundendienst
195043776.01
03 /2005 - Xerox Business Services
DE
Bevor Sie sich an den Kundendienst wenden:
Kontrollieren Sie zuerst, ob das Problem nicht allein gelöst werden kann (siehe Seite 55);
Starten Sie das Programm erneut, um sicherzustellen, dass die Störung auch wirklich behoben wurde;
Ist dies nicht der Fall, dann kontaktieren Sie den autorisierten Kundendienst unter der auf dem Garantie-
schein aufgedruckten Telefonnummer.
Wenden Sie sich auf keinen Fall an nicht autorisierte Techniker.
Geben Sie bitte Folgendes an:
die Art der Störung;
das Maschinenmodell (Mod.);
die Seriennummer (S/N).
Diese Daten entnehmen Sie bitte dem auf der Rückseite der Maschine befindlichen Typenschild.
Kundendienst
56
 Loading...