

Page 1
Operating Instructions
Contents
RSGB
English, 1 РУССКИЙ,12
FR
Français, 23
Installation, 2-3
Positioning and levelling
Electrical connections
Technical data
Description of the appliance, 4
Overall view
Control panel
Start-up and use, 5-8
Starting the oven
Cooking modes
Electronic timer
Oven cooking advice table
COOKER AND OVEN
GB
C3VM5R /HA
Using the glass ceramic hob, 9
Switching the cooking zones on and off
Cooking zones
Precautions and tips, 10
General safety
Disposal
Respecting and conserving the environment
Care and maintenance, 11
Switching the appliance off
Cleaning the oven
Replacing the oven light bulb
Cleaning the glass ceramic hob
Assistance
Page 2
Installation
GB
Before operating your new appliance please read
this instruction booklet carefully. It contains
important information concerning the safe installation
and operation of the appliance.
Please keep these operating instructions for future
reference. Make sure that the instructions are kept
with the appliance if it is sold, given away or moved.
The appliance must be installed by a qualified
professional according to the instructions provided.
Any necessary adjustment or maintenance must be
performed after the appliance has been
disconnected from the electricity supply.
Positioning and levelling
It is possible to install the appliance alongside
cupboards whose height does not exceed that of the
hob surface.
Make sure that the wall in contact with the back of
the appliance is made from a non-flammable, heatresistant material (T 90°C).
To install the appliance correctly:
Place it in the kitchen, the dining room or the bed-
sit (not in the bathroom).
If the top of the hob is higher than the cupboards,
the appliance must be installed at least 200 mm
away from them.
If the cooker is
HOOD
Min. mm.
600
mm.
420
Min.
420
Min. mm.
Do not position blinds behind the cooker or less
than 200 mm away from its sides.
Any hoods must be installed according to the
instructions listed in the relevant operating manual.
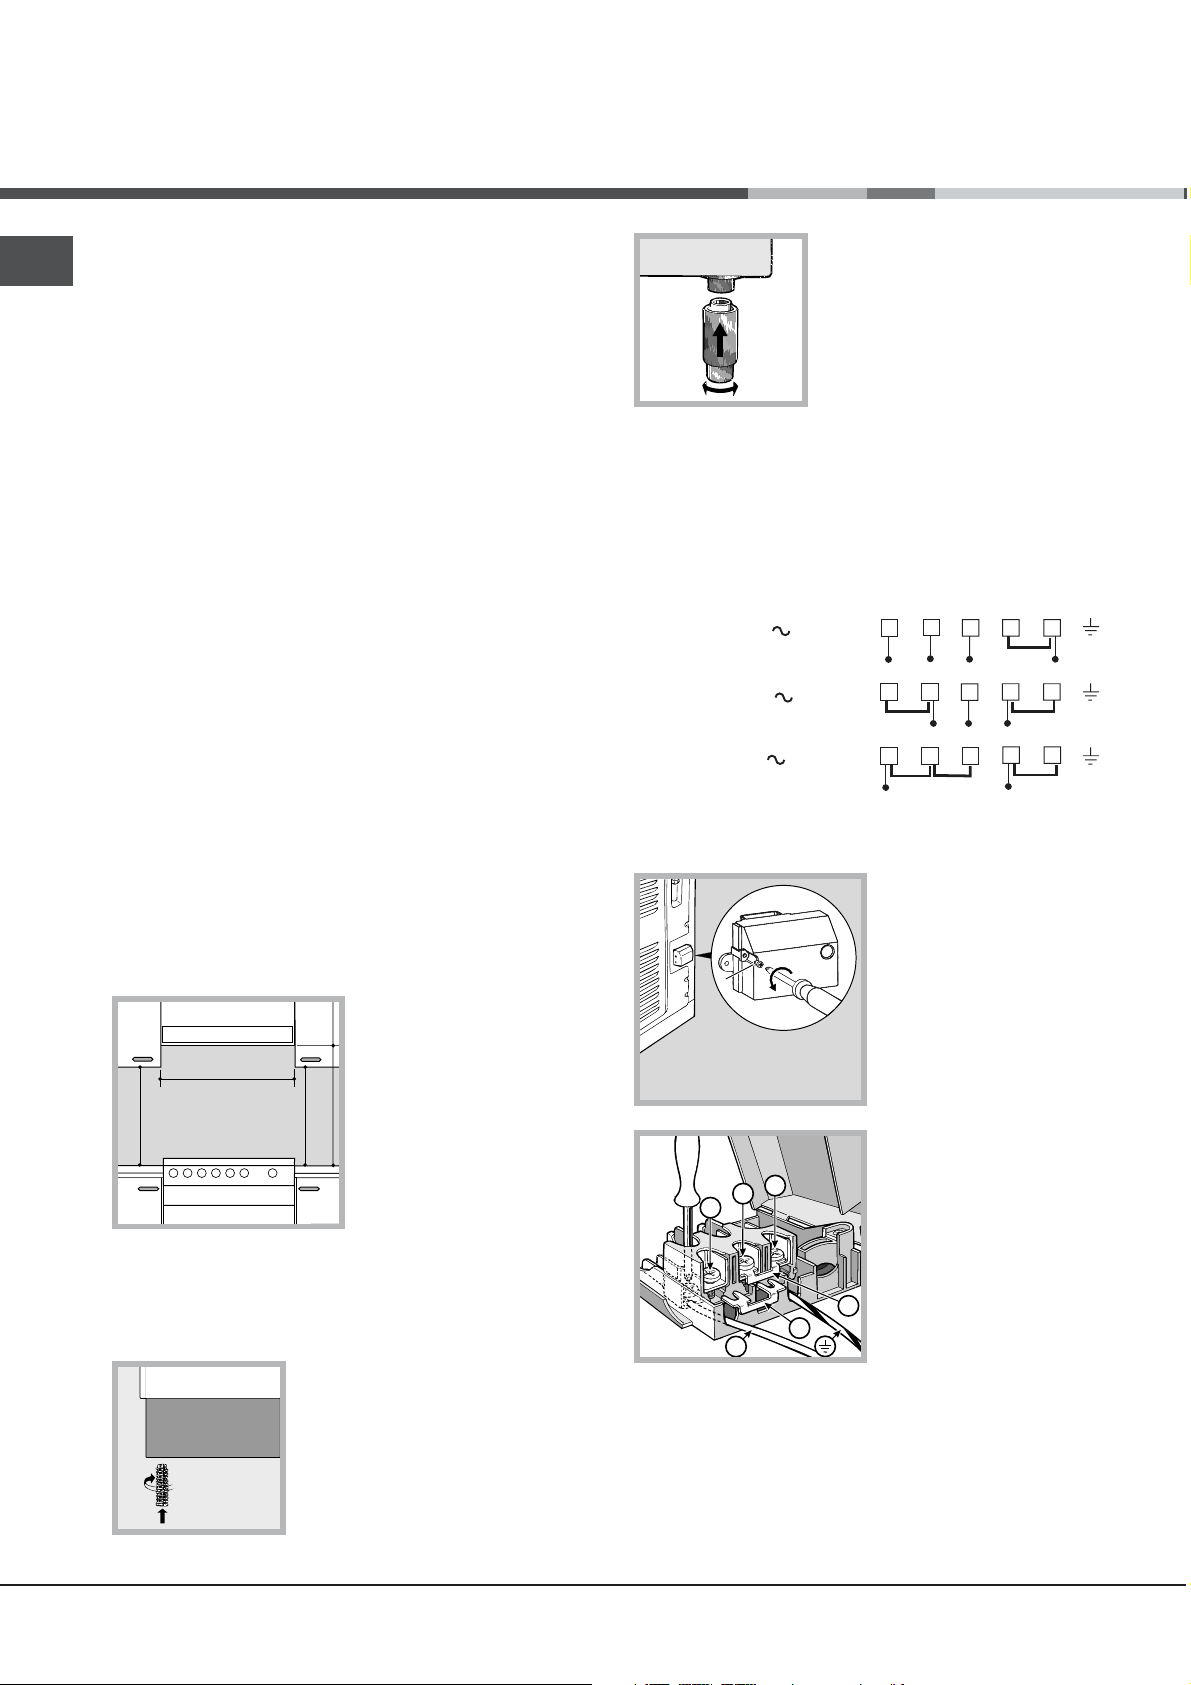
Levelling
installed underneath a wall
cabinet, there must be a
minimum distance of 420
mm between this cabinet
mm. with hood
and the top of the hob.
mm. without hood
650
700
This distance should be
min.
min.
increased to 700 mm if
the wall cabinets are
flammable (see figure).
If it is necessary to level the
appliance, screw the
adjustable feet* into the
places provided on each
corner of the base of the
cooker (see figure).
The legs* provided with the
appliance fit into the slots on
the underside of the base of
the cooker.
Electrical connections
Fitting the power supply cable
The cable should be suited to the type of electrical
connection used, according to the following
connection diagram:
H05RR-F 5x2.5 CEI-UNEL 35363
400 3N
400V 2N
H05RR-F 4x4 CEI-UNEL 35363
230V
H05RR-F 3x4 CEI-UNEL 35363
1 2
S
R
12345
R
1
2
R
To install the power supply cable correctly:
1. Loosen the screw V
in the terminal board
and pull the cover to
open it (see figure).
V
2. Position the connection
3
2
1
support A (see figure)
according to the
connection diagram shown
above. The terminal board
is designed for singlephase 230 V connection:
B
N
A
terminals 1, 2 and 3 are
connected to each other;
jumper 4-5 is located in the
lower area of the terminal board.
3. Position wires N and
6 according to the diagram
(see figure) and perform the connection by
tightening the terminal board screws as much as
possible.
4. Position the remaining wires on terminals 1-2-3
and tighten the screws.
4
3
T
S
3
5
N
N
4
5
N
2
Page 3
5. Fix the power supply cable in place by fastening
the cable clamp screw.
6. Close the terminal board cover by tightening the
screws V.
Connecting the supply cable to the mains
Install a standardised plug corresponding to the
load indicated on the data plate located on the
appliance.
The appliance must be directly connected to the
mains using an omnipolar circuit-breaker with a
minimum contact opening of 3 mm installed between
the appliance and the mains. The circuit-breaker
must be suitable for the charge indicated and must
comply with current electrical regulations (the
earthing wire must not be interrupted by the circuitbreaker). The supply cable must be positioned so
that it does not come into contact with temperatures
higher than 50°C at any point.
Before connecting the appliance to the power
supply, make sure that:
The appliance is earthed and the plug is compliant
with the law.
The socket can withstand the maximum power of
the appliance, which is indicated by the data
plate.
The voltage is in the range between the values
indicated on the data plate.
The socket is compatible with the plug of the
appliance. If the socket is incompatible with the
plug, ask an authorised technician to replace it.
Do not use extension cords or multiple sockets.
TECHNICAL DATA
Oven dimensions
(HxWxD)
Volume
Useful
measurements
relating to the oven
compartment
Power supply
voltage and
frequency
Ceramic hob
Front Left
Back Left
Back Right
Front Right
Max. ceramic hob
consumption
ENERGY LABEL
34x38x41 cm
53 l
width 42 cm
depth 44 cm
height 17 cm
see data plate
1200 W
1800 W
1200 W
1800 W
6000 W
Directive 2002/40/EC on the label of
electric ovens. Standard EN 50304
Energy consumption for Natural
convection heating mode:
Declared energy consumption for
Forced convection Class heating
>
mode:
EC Directives: 73/23/EEC dated
19/02/73 (Low Voltage) and subsequent
amendments
89/336/EEC dated 03/05/89
(Electromagnetic Compatibility) and
subsequent amendments
93/68/EEC dated 22/07/93 and
subsequent amendments
2002/96/EC.
Fan-assisted.
=
Static;
GB
Once the appliance has been installed, the power
supply cable and the electrical socket must be
easily accessible.
The cable must not be bent or compressed.
The cable must be checked regularly and replaced
by authorised technicians only.
The manufacturer declines any liability should
these safety measures not be observed.
Only available in certain models.
*
3
Page 4
Description of the
appliance
GB
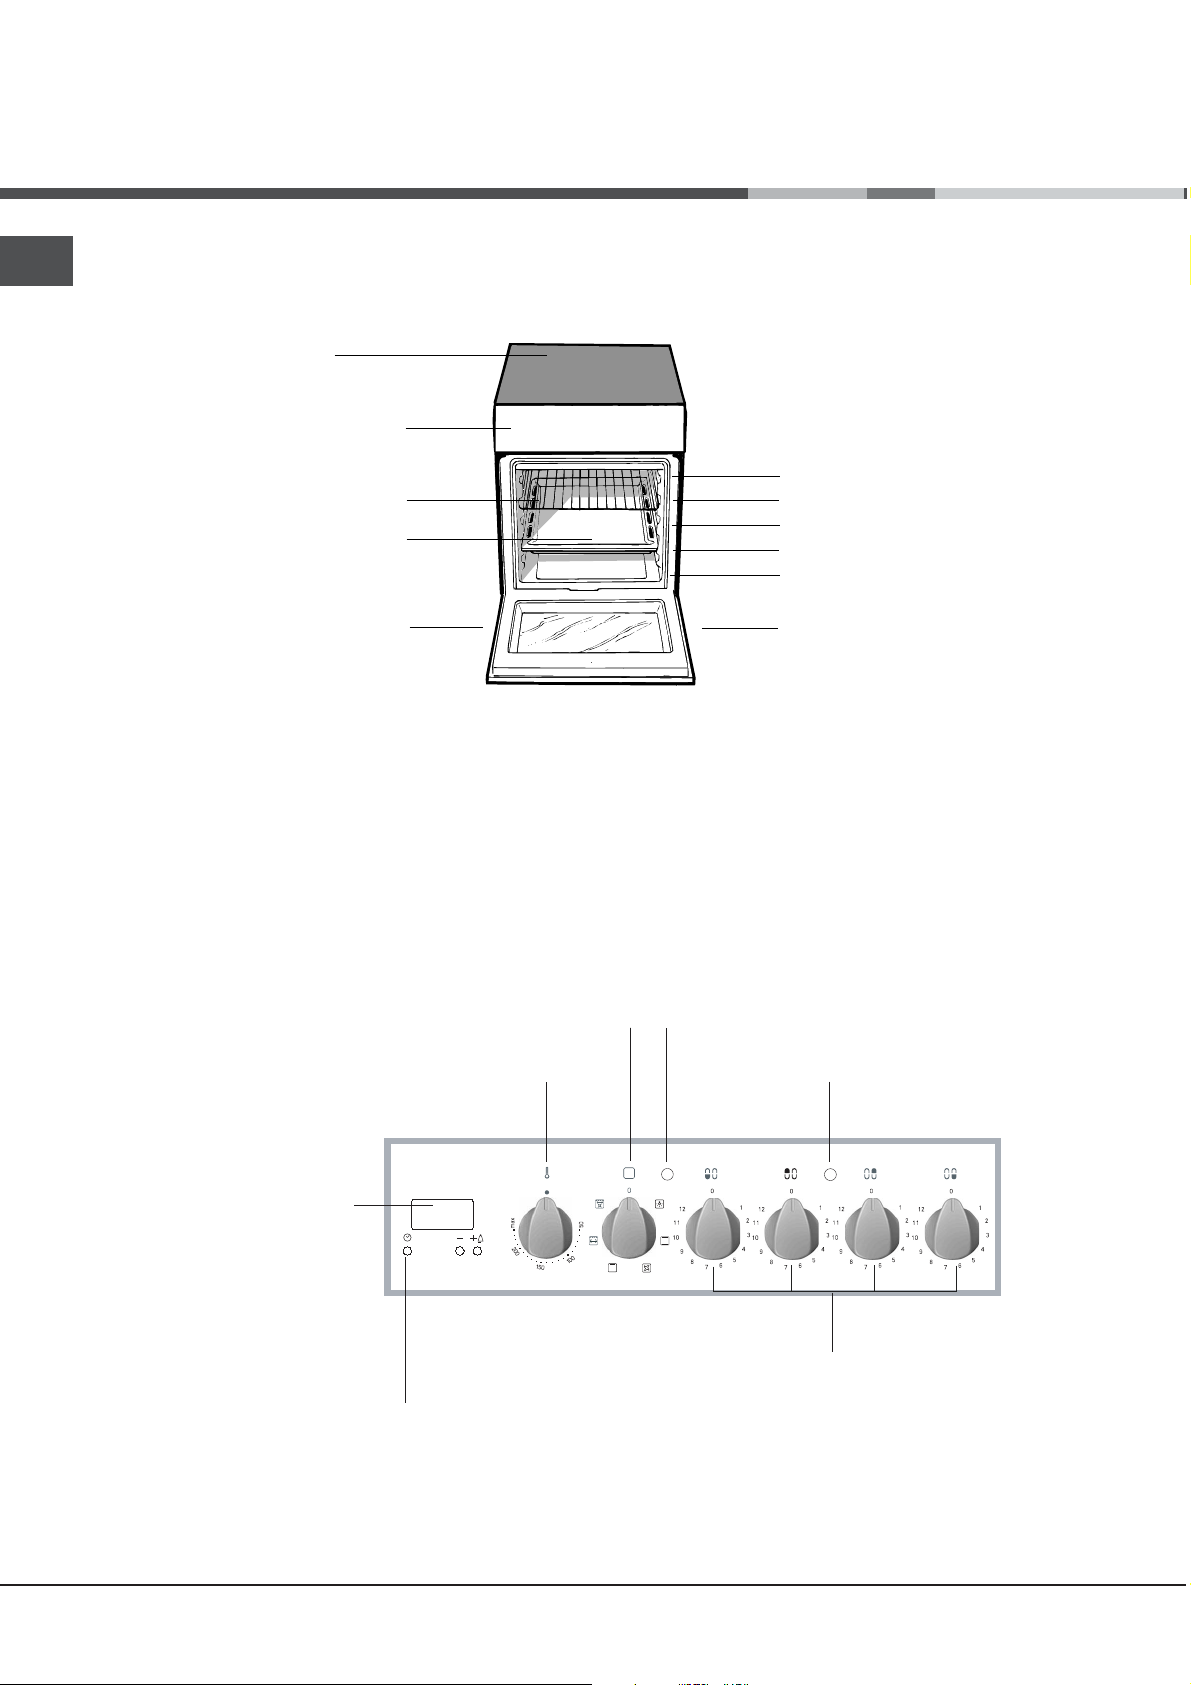
Overall view
Glass
ceramic hob
Control panel
GRILL rack
DRIPPING PAN
Adjustable foot
GUIDE RAILS
for the sliding racks
position 5
position 4
position 3
position 2
position 1
Adjustable foot
Control panel
Electronic
timer
THERMOSTAT
TIMER
button
SELECTOR
knob
knob
THERMOSTAT
indicator light
ACTIVE HOTPLATE
indicator light
HALOGEN
hotplate knobs
4
Page 5
Start-up and use
The first time you use your appliance, heat the
empty oven with its door closed at its maximum
temperature for at least half an hour. Ensure that the
room is well ventilated before switching the oven off
and opening the oven door. The appliance may emit
a slightly unpleasant odour caused by protective
substances used during the manufacturing process
burning away.
Before operating the product, remove all plastic
film from the sides of the appliance.
Starting the oven
1. Select the desired cooking mode by turning the
SELECTOR knob.
2. Select the recommended temperature for the
cooking mode or the desired temperature by turning
the THERMOSTAT knob.
A list detailing cooking modes and suggested
cooking temperatures can be found in the relevant
table (see Oven cooking advice table).
During cooking it is always possible to:
Change the cooking mode by turning the
SELECTOR knob.
Change the temperature by turning the
THERMOSTAT knob.
Set the total cooking time and the cooking end
time (see below).
Stop cooking by turning the SELECTOR knob to
the 0 position.
THERMOSTAT indicator light
When this is illuminated, the oven is generating
heat. It switches off when the inside of the oven
reaches the selected temperature. At this point the
light illuminates and switches off alternately,
indicating that the thermostat is working and is
maintaining the temperature at a constant level.
Oven light
This is switched on by turning the SELECTOR knob
to any position other than 0. It remains lit as long
as the oven is operating. By selecting
knob, the light is switched on without any of the
heating elements being activated.
with the
8
GB
Never put objects directly on the bottom of the
oven; this will avoid the enamel coating being
damaged. Only use position 1 in the oven when
cooking with the rotisserie spit.
Always place cookware on the rack(s) provided.
5
Page 6

GB
Cooking modes
A temperature value can be set for all cooking modes
between 50°C and Max, except for the following modes
GRILL and DOUBLE GRILL (recommended: set
only to MAX power level).
FAN-ASSISTED DOUBLE GRILL (recommended:
do not exceed 200°C).
elements through forced circulation of the air
throughout the oven. This prevents the food from
burning on top by enabling heat to penetrate into the
food more effectively; it is therefore an ideal way of
cooking food quickly under the grill or for grilling large
pieces of meat without having to use the turnspit.
The GRILL, DOUBLE GRILL and FAN-ASSISTED
DOUBLE GRILL cooking modes must be performed
with the oven door shut.
STATIC OVEN mode
a
Both the top and bottom heating elements will be
activated. When using this traditional cooking mode,
it is best to use only one rack at a time, otherwise
the heat will not be distributed evenly.
FAN OVEN mode
b
The top and bottom heating elements will switch on
and the fan will begin to operate. Since the heat
remains constant throughout the oven, the air cooks
and browns food in a uniform manner. A maximum
of two racks may be used at the same time.
GRILL mode
c
The central part of the top heating element is
switched on. The high and direct temperature of the
grill is recommended for food that requires a high
surface temperature (veal and beef steaks, fillet
steak and entrecôte). This cooking mode uses a
limited amount of energy and is ideal for grilling
small dishes. Place the food in the centre of the
rack, as it will not be cooked properly if it is placed
in the corners.
DOUBLE GRILL mode
2
The top heating element and the rotisserie spit will
be activated.
This provides a larger grill than the normal grill
setting and has an innovative design that improves
cooking efficiency by 50% and eliminates the cooler
corner areas. Use this grilling mode to achieve a
uniform browning on top of the food.
DOUBLE GRILL mode
T
The top heating element and the turnspit are
activated and the fan begins to operate. This
combination of features increases the effectiveness of
the unidirectional thermal radiation of the heating
When using the GRILL and DOUBLE GRILL cooking
modes, place the rack in position 5 and the dripping pan
in position 1 to collect cooking residues (fat and/or
grease). When using the FAN-ASSISTED DOUBLE GRILL
cooking mode, place the rack in position 2 or 3 and the
dripping pan in position 1 to collect cooking residues.
Electronic timer
This function displays the time and works as a timer
which counts down to zero.
All functions will be implemented approximately 7
seconds after they have been set.
Resetting the clock
After the appliance has been connected to the power
supply, or after a power cut, the clock display will
begin to blink, showing the figure: 0:00
Press button
the exact time. Press and hold the buttons to
quicken the count upwards.
Any necessary modifications can be made by
repeating the above process.
Timer feature
This function may be accessed by pressing the
button, after which the display will show the symbol
G and then buttons - and + to set
n
n. Every time the + button is pressed it corresponds
to a time increase of 10 seconds, until it reaches 99
minutes and 50 seconds. After this point, each press
of the button represents an increase of one minute,
up to a maximum of 10 hours.
Pressing the
After the time period has been set, the timer will
begin to count down. When the timer reaches zero,
the buzzer will sound (this may be stopped by
pressing any button).
The time may be displayed by pressing the
button, and the n symbol indicates that the timer
function has been set. After approximately 7 seconds,
the display will automatically revert to the timer.
- button reduces the time.
G
6
Page 7
Cancelling a time that has already been set
Press the button until the display shows 0:00.
Adjusting the buzzer volume
After selecting and confirming the clock settings,
use the
buzzer.
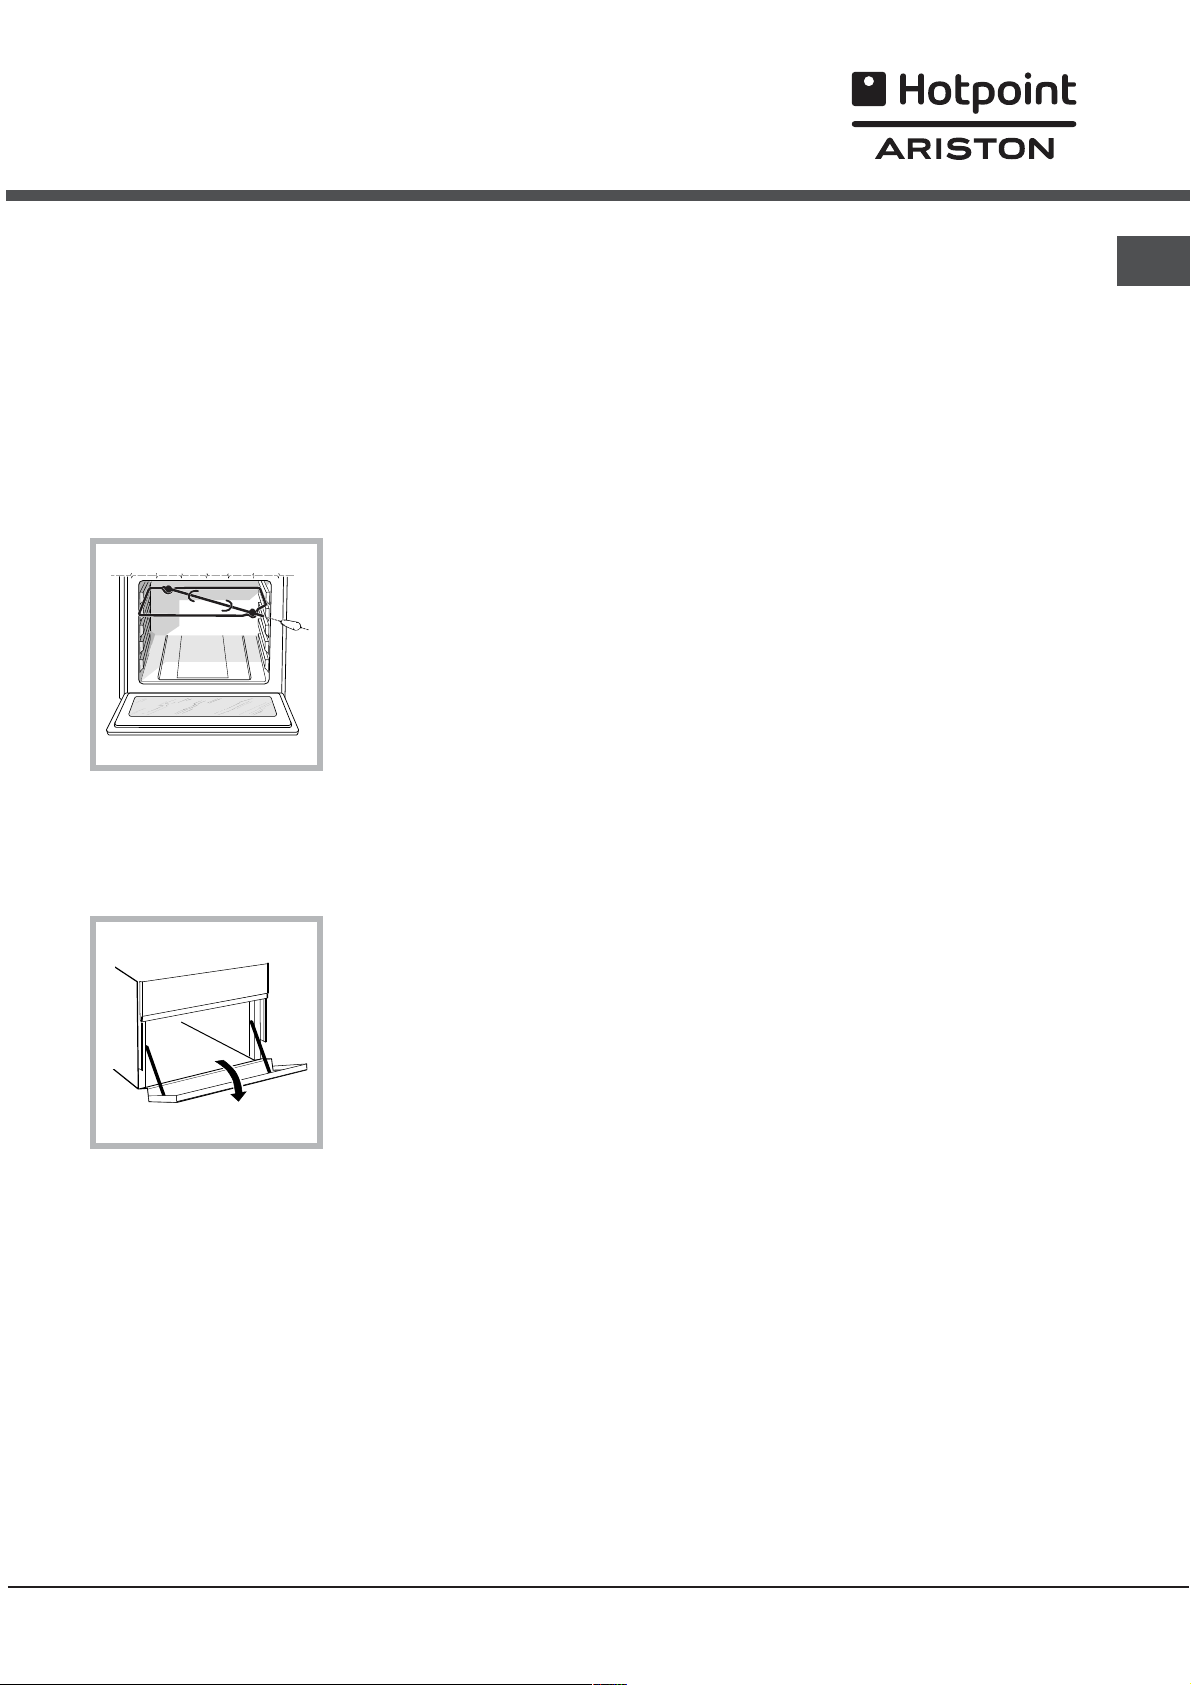
Rotisserie
3. Activate the rotisserie by selecting
the SELECTOR knob.
Lower compartment*
button to adjust the volume of the alarm
To operate the
rotisserie (see diagram)
proceed as follows:
1. Place the dripping
pan in position 1.
2. Place the rotisserie
support in position 4
and insert the spit in
the hole provided on
the back panel of the
oven.
or T with
2
Cooking on several shelves simultaneously
If it is necessary to use two racks, use the FAN
OVEN cooking mode
mode suited to this type of cooking. We also
recommend that:
Positions 1 and 5 are not used. This is because
excessive direct heat can burn temperature
sensitive foods.
Positions 2 and 4 are used and that food that
requires more heat is placed on the rack in
position 2.
When cooking foods that require different cooking
times and temperatures, set a temperature that is
halfway between the two recommended
temperatures (see Oven cooking advice table)
and place the more delicate food on the rack in
position 4. Remove the food that requires a
shorter cooking time first.
When cooking pizzas on several racks with the
temperature set to 220°C, the oven is preheated
for 15 minutes. Generally speaking, cooking on
the rack in position 4 takes longer: we
recommend that the pizza cooked on the lowest
rack position is removed first, followed by the
pizza cooked in position 4 a few minutes later.
Place the dripping pan on the bottom and the rack
on top.
, as this is the only cooking
b
GB
There is a compartment
underneath the oven
that may be used to
store oven accessories
or deep dishes. To open
the door pull it
downwards (see
figure).
Do not place flammable materials in the lower oven
compartment.
The internal surfaces of the compartment (where
present) may become hot.
* Only available in certain models.
7
Page 8
GB
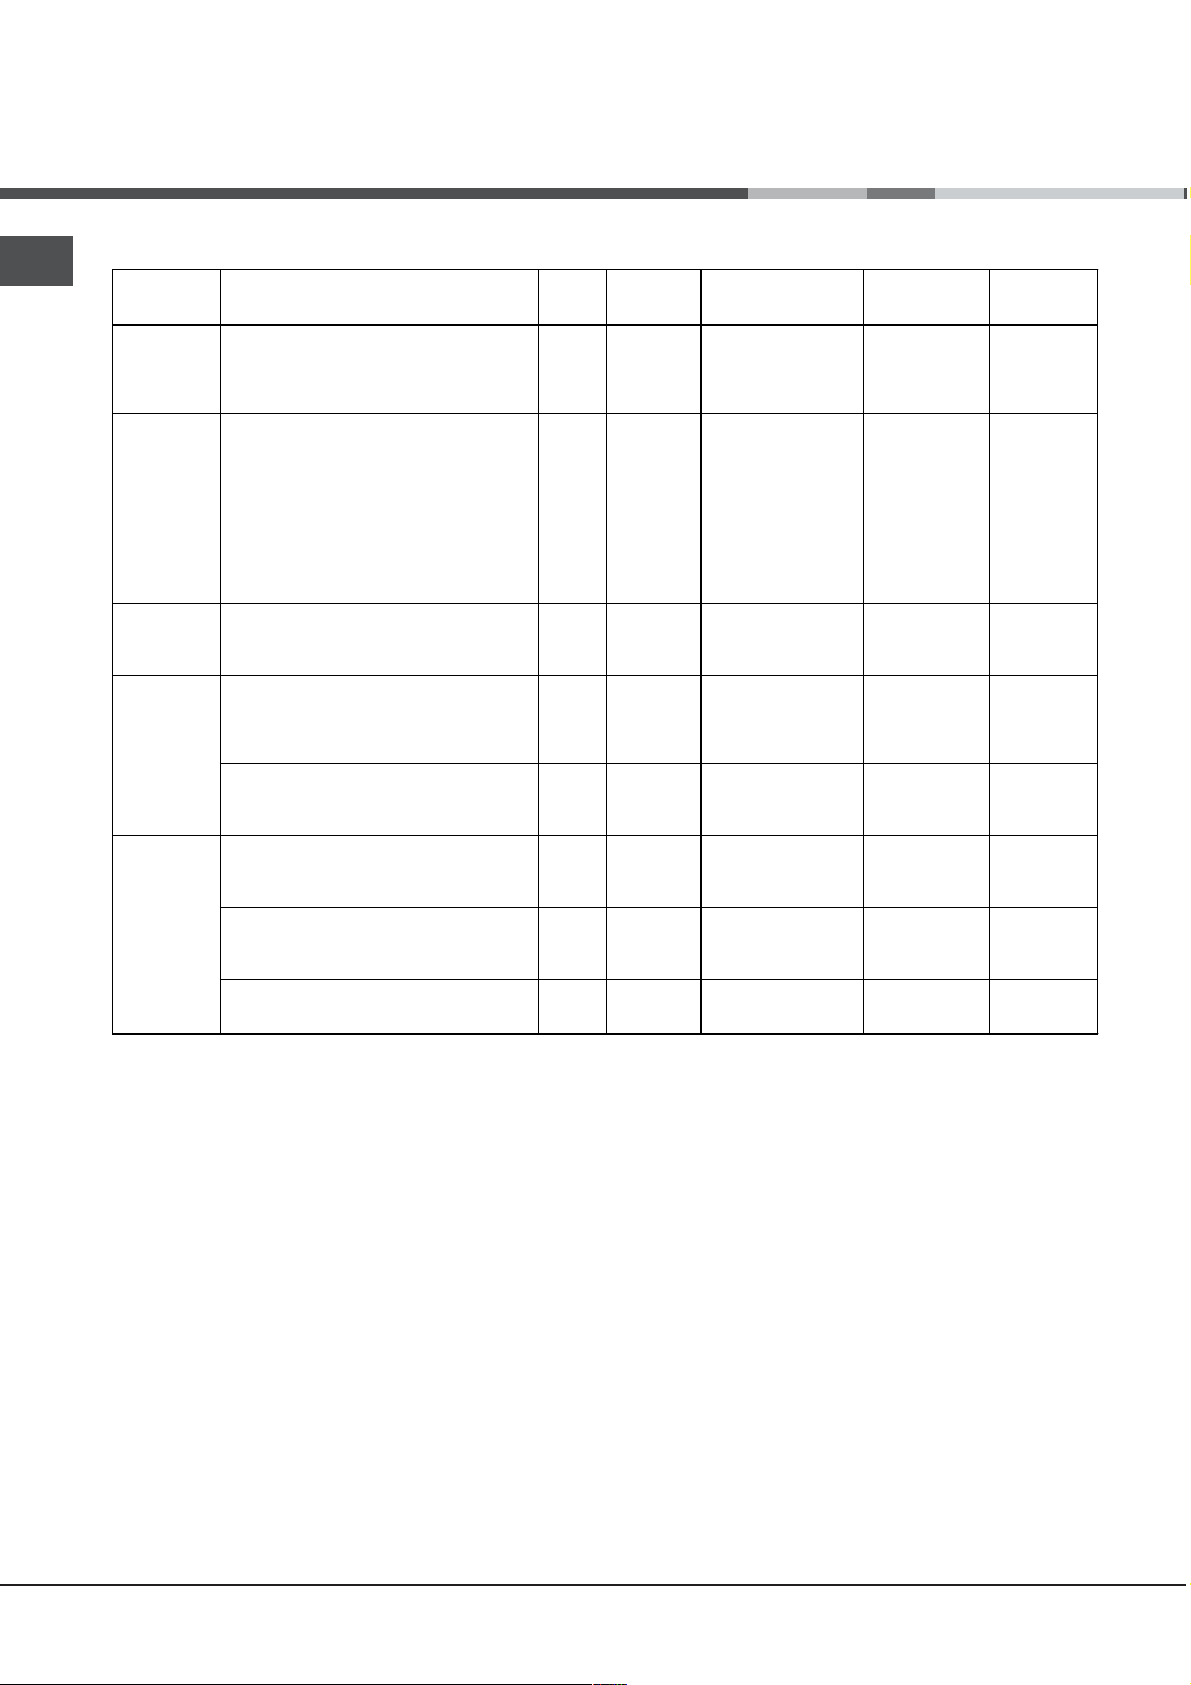
Oven cooking advice table
Cooking
modes
Static
Fan-assisted
Grill
Double Grill
Fan-assisted
Double Grill
Duck
Roast veal or beef
Roast pork
Biscuits (shortcrust pastry)
Tarts
Pizza (on 2 racks)
Lasagne
Lamb
Roast chicken + potatoes
Mackerel
Sponge cake made with yoghurt
Cream puffs (on 2 racks)
Biscuits (on 2 racks)
Sponge cake (on 1 rack)
Sponge cake (on 2 racks)
Savoury pies
Sole and cuttlefish
Squid and prawn kebabs
Cod fillet
Grilled vegetables
Veal steak
Cutlets
Hamburgers
Mackerel
Toast
With the rotisserie
Spit-roast veal
Spit-roast chicken
Spit-roast lamb
Grilled chicken
Cuttlefish
Chicken (on the spit) +
potatoes (on the dripping pan)
With the rotisserie
Spit-roast veal
Spit-roast chicken
Spit-roast lamb
With multi-spit rotisserie
Meat kebabs
Vegetable kebabs
Foods
(where present)
Weight
(in kg)
1
1
1
-
1
1
1
1
1+1
1
1
0.5
0.5
0.5
1
1.5
1
1
1
1
1
1
1
1
4 pcs
1.0
1.5
1.0
1.5
1.5
1.5
-
1.5
1.5
1.5
1.0
0.8
Rack
position
3
3
3
3
3
2 and 4
3
2
2 and 4
2
2
2 and 4
2 and 4
2
2 and 4
3
4
4
4
3/4
4
4
4
4
4
-
-
-
2
2
-
2
-
-
-
-
-
Preheating time
(min)
15
15
15
15
15
15
10
10
15
10
10
10
10
10
10
15
5
5
5
5
5
5
5
5
5
5
5
5
5
5
5
5
5
5
5
5
5
Recommended
Temperature
(°C)
200
200
200
180
180
230
180
180
200
180
170
190
180
170
170
200
Max
Max
Max
Max
Max
Max
Max
Max
Max
Max
Max
Max
200
200
200
200
200
200
200
200
200
Cooking
time
(minutes)
65-75
70-75
70-80
15-20
30-35
15-20
30-35
40-45
60-70
30-35
40-50
20-25
10-15
15-20
20-25
25-30
8-10
6-8
10
10-15
15-20
15-20
7-10
15-20
2-3
80-90
70-80
70-80
55-60
30-35
70-75
70-75
70-80
70-80
70-80
40-45
25-30
8
Page 9
Using the glass ceramic hob
The glue applied on the gaskets leaves traces of
grease on the glass. Before using the appliance, we
recommend you remove these with a special nonabrasive cleaning product. During the first few hours
of use there may be a smell of rubber which will
disappear very quickly.
Switching the cooking zones on and off
To switch on a cooking zone, turn the corresponding
knob in a clockwise direction.
To switch it off again, turn the knob in an
anticlockwise direction until it is in the 0 position.
If the ELECTRIC HOTPLATE ON indicator light is lit,
this shows that at least one hotplate on the hob is
switched on.
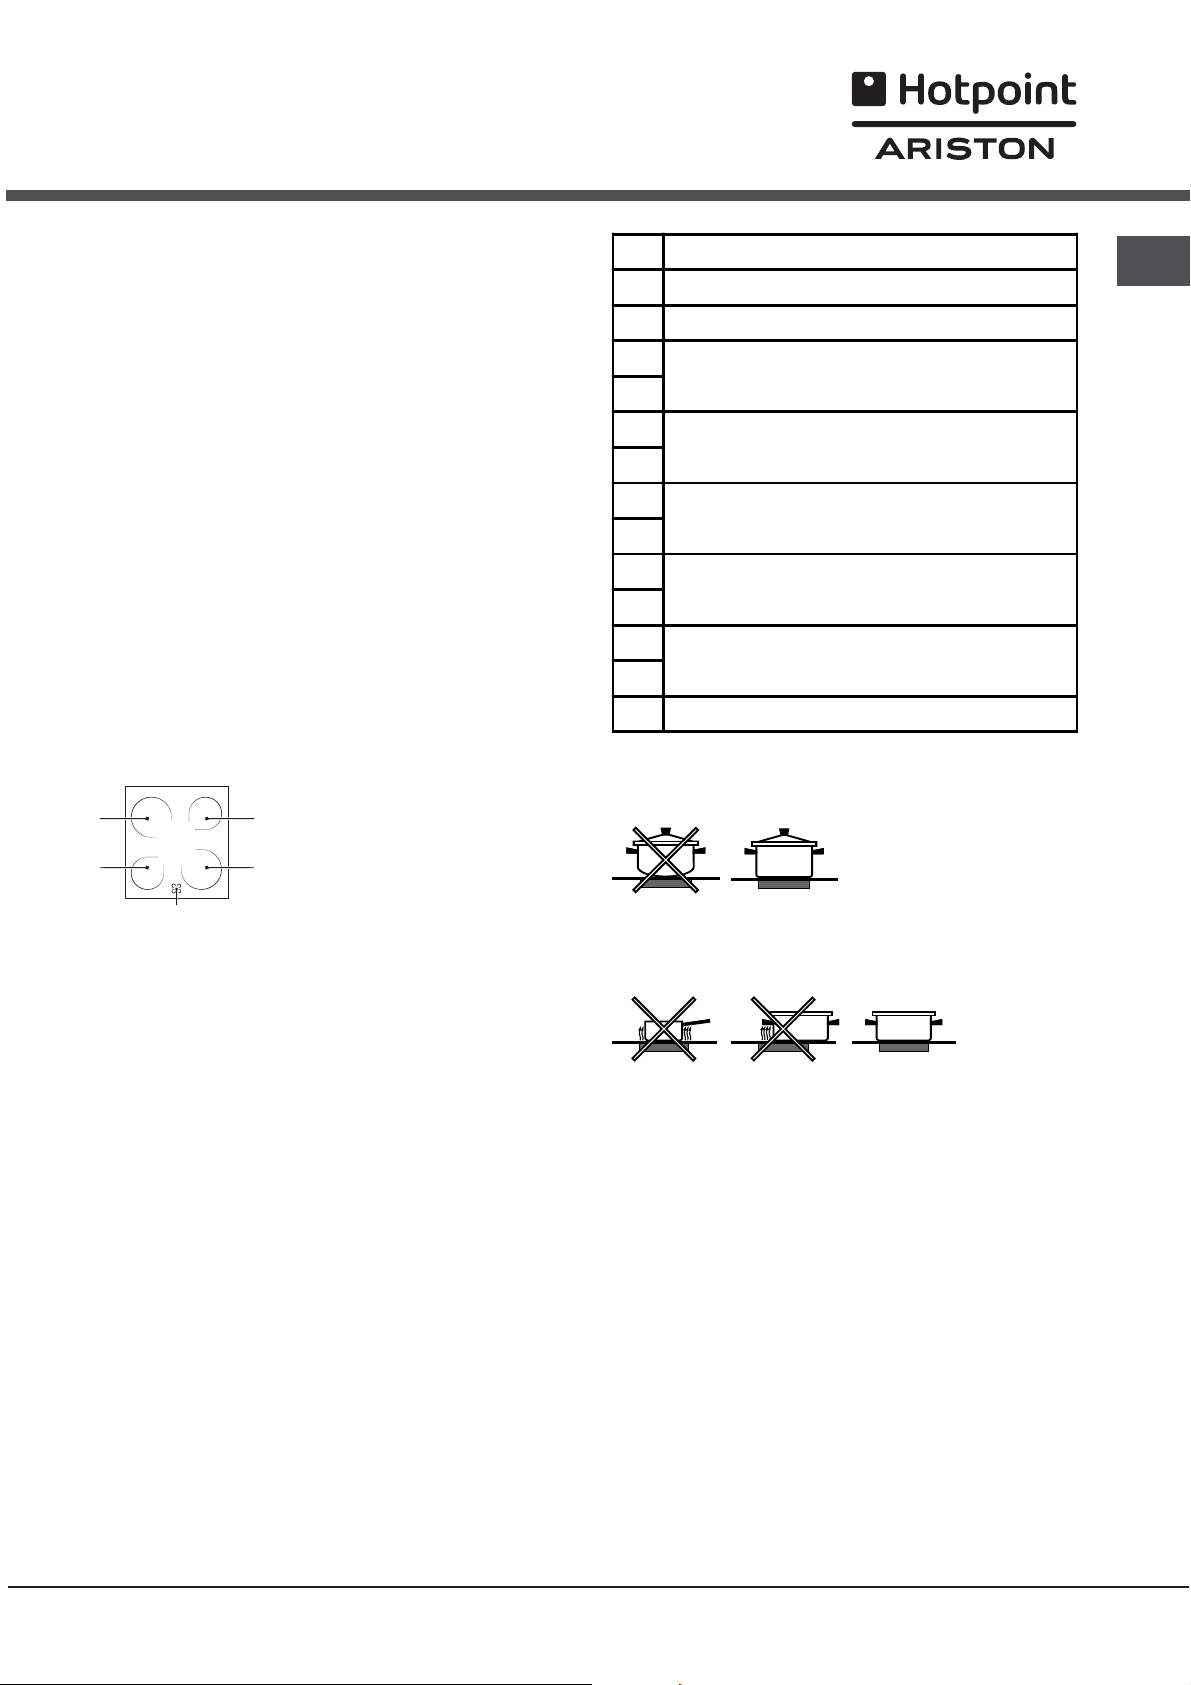
Cooking zones
The hob is equipped with electric halogen heating
elements. When they are in use the following items
on the hob become red.
A. The cooking zone with
A
A
B
when the heating element has been switched off but
is still hot.
halogen heating elements.
A
B. The residual heat indicator
light: this indicates that the
A
temperature of the
corresponding cooking zone
is greater than 60°C, even
Pos. Radiant hotplate
0
Off
1
Melting butter and chocolate
2
Heating liquids
3
4
Soups and sauces
5
6
Cooking at boiling point
7
8
Pan-roasting
9
10
Boiling large quantities
11
12
Frying
Practical advice on using the hob
Use pans with a thick, flat base to ensure that
they adhere perfectly to the cooking zone.
Always use pans with a diameter that is large
enough to cover the hotplate fully, in order to use
all the heat produced.
GB
Cooking zones with halogen heating elements
These emit heat via radiation from the halogen
lamps they contain. They have similar properties to
gas burners: they are easy to control and reach set
temperatures quickly, allowing you to actually see
the power they are providing.
Do not look directly at the halogen heating elements.
Turn the corresponding knob in a clockwise
direction, to a position between 1 and 12.
Always make sure that the base of the pan is
completely clean and dry: this ensures that the
pans adhere perfectly to the cooking zones and
that both the pans and the hob last for a longer
period of time.
Avoid using the same cookware that is used on
gas burners: the heat concentration on gas
burners may have warped the base of the pan,
causing it not to adhere to the surface correctly.
Never leave a cooking zone switched on without a
pan on top of it, as doing so may cause the zone
to become damaged.
9
Page 10

Precautions and tips
GB
This appliance has been designed and
manufactured in compliance with international safety
standards.
The following warnings are provided for safety
reasons and must be read carefully.
General safety
The glass ceramic hob is resistant to temperature
fluctuations and shocks. It is, however, wise to
remember that blades or cooking utensils may
ruin the surface of the hob. If this happens,
remove the plug of the cooker from the electricity
socket and contact an authorised Technical
Assistance Centre in order to request original
spare parts. Failure to comply with the above may
compromise the safety of the appliance.
If the surface of the hob is cracked, switch off the
appliance to prevent electric shocks from
occurring.
The appliance was designed for domestic use
inside the home and is not intended for
commercial or industrial use.
The appliance must not be installed outdoors, even
in covered areas. It is extremely dangerous to
leave the appliance exposed to rain and storms.
Do not touch the appliance with bare feet or with
wet or damp hands and feet.
The appliance must be used by adults only for the
preparation of food, in accordance with the
instructions provided in this booklet.
The instruction booklet accompanies a class 1
(insulated) or class 2 - subclass 1 (recessed
between 2 cupboards) appliance.
When the appliance is in use, the heating
elements and some parts of the oven door
become extremely hot. Make sure you don't
touch them and keep children well away.
Make sure that the power supply cables of other
electrical appliances do not come into contact
with the hot parts of the oven.
The openings used for the ventilation and
dispersion of heat must never be covered.
Always use oven gloves when placing cookware
in the oven or when removing it.
Do not use flammable liquids (alcohol, petrol,
etc...) near the appliance while it is in use.
Do not place flammable material in the lower
storage compartment or in the oven itself. If the
appliance is switched on accidentally, it could
catch fire.
Always make sure the knobs are in the
when the appliance is not in use.
When unplugging the appliance, always pull the
plug from the mains socket; do not pull on the
position
cable.
Never perform any cleaning or maintenance work
without having disconnected the appliance from
the electricity mains.
If the appliance breaks down, under no
circumstances should you attempt to repair the
appliance yourself. Repairs carried out by
inexperienced persons may cause injury or further
malfunctioning of the appliance. Contact
Assistance.
Do not rest heavy objects on the open oven door.
Disposal
When disposing of packaging material: observe
local legislation so that the packaging may be
reused.
The European Directive 2002/96/EC relating to
Waste Electrical and Electronic Equipment
(WEEE) states that household appliances should
not be disposed of using the normal solid urban
waste cycle. Exhausted appliances should be
collected separately in order to optimise the cost
of re-using and recycling the materials inside the
machine, while preventing potential damage to
the atmosphere and to public health. The
crossed-out dustbin is marked on all products to
remind the owner of their obligations regarding
separated waste collection.
Exhausted appliances may be collected by the
public waste collection service, taken to suitable
collection areas in the area or, if permitted by
current national legislation, they may be returned
to the dealers as part of an exchange deal for a
new equivalent product.
All major manufacturers of household appliances
participate in the creation and organisation of
systems for the collection and disposal of old and
disused appliances.
Respecting and conserving the
environment
You can help to reduce the peak load of the
electricity supply network companies by using the
oven in the hours between late afternoon and the
early hours of the morning.
Always keep the oven door closed when using the
GRILL, DOUBLE GRILL and FAN-ASSISTED
DOUBLE GRILL modes: This will achieve better
results while saving energy (approximately 10%).
Check the door seals regularly and wipe them
clean to ensure they are free of debris so that
they adhere properly to the door, thus avoiding
heat dispersion.
10
Page 11
Care and maintenance
Switching the appliance off
Disconnect your appliance from the electricity supply
before carrying out any work on it.
Never use steam cleaners or pressure cleaners on the
appliance.
Cleaning the oven
The stainless steel or enamel-coated external parts
and the rubber seals may be cleaned using a sponge
that has been soaked in lukewarm water and neutral
soap. Use specialised products for the removal of
stubborn stains. After cleaning, rinse and dry
thoroughly. Do not use abrasive powders or corrosive
substances.
The inside of the
each use, while it is still lukewarm. Use hot water and
detergent, then rinse well and dry with a soft cloth. Do
not use abrasive products.
Clean the glass part of the oven door using a sponge
and a non-abrasive cleaning product, then dry
thoroughly with a soft cloth. Do not use rough
abrasive material or sharp metal scrapers as these
could scratch the surface and cause the glass to
crack.
The accessories can be washed like everyday
crockery, and are even dishwasher safe.
Dirt and grease should be removed from the control
panel using a non-abrasive sponge or a soft cloth.
oven should ideally be cleaned after
Inspecting the oven seals
Check the door seals around the oven regularly. If the
seals are damaged, please contact your nearest Aftersales Service Centre. We recommend that the oven is
not used until the seals have been replaced.
Replacing the oven light bulb
1. After disconnecting the oven from the
electricity mains, remove the glass lid
covering the lamp socket (see figure).
2. Remove the light bulb and replace
it with a similar one: voltage 230 V,
wattage 25 W, cap E 14.
3. Replace the lid and reconnect the
oven to the electricity supply.
Cleaning the glass ceramic hob
Do not use abrasive or corrosive detergents (for
example, products in spray cans for cleaning barbecues
and ovens), stain removers, anti-rust products, powder
detergents or sponges with abrasive surfaces: these
may scratch the surface beyond repair.
It is usually sufficient simply to wash the hob using a
damp sponge and dry it with absorbent kitchen roll.
If the hob is particularly dirty, rub it with a special
glass ceramic cleaning product, then rinse well and
dry thoroughly.
To remove more stubborn dirt, use a suitable scraper
(this is not supplied with the appliance). Remove
spills as soon as possible, without waiting for the
appliance to cool, to
deposits. You can obtain excellent results by using a
rustproof steel wire sponge - specifically designed for
glass ceramic surfaces - soaked in soapy water.
If plastic or sugary substances have accidentally
been melted on the hob, remove them immediately
with the scraper, while the surface is still hot.
Once
Always remember to rinse the appliance well with
it is clean, the hob may be treated with a special
protective maintenance product: the invisible film left
by this product protects the surface from drips during
cooking. This maintenance should be carried out
while the appliance is warm (not hot) or cold.
clean water and dry it thoroughly: residues can
become encrusted during subsequent cooking
processes.
Glass ceramic hob
cleaners
Window scraper Razor blade
scrapers
Replacement blades DIY Stores,
COLLO luneta
HOB BRITE
Hob Clean
SWISSCLEANER
avoid residues forming crusty
Available from
DIY Stores
supermarkets,
chemists
Boots, Co-op stores,
department stores, Regional
Electricity Company shops,
supermarkets
Cleaning stainless steel
Stainless steel can be marked by hard water that has
been left on the surface for a long time, or by aggressive
detergents that contain phosphorus. We recommend
that the steel surfaces are rinsed well then dried
thoroughly.
Assistance
Please have the following information handy:
The appliance model (Mod.).
The serial number (S/N).
This information can be found on the data plate
located on the appliance and/or on the packaging.
GB
11
Page 12

Ðóêîâ îä ñòâî ïî эксплу атации
КУХОННАЯ ПЛИТА С ДУХОВЫМ ШКАФОМ
Содержание
GB RS
English, 1 РУССКИÉ,12
FR
Français, 23
Монтаж, 13-14
Расположение и нивелировка
Электрическое подсоединение
Технические данные
Îïèñàíèå èçäåëèÿ, 15
Общии вид
Панель управления
Âключение и эксплуатаöèÿ, 16-19
Включение духового шкафа
Программы приготовления
Электронныи таимер
Таблица приготовления в духовом шкафу
RS
C3VM5R /HA
Ñòåêëîêåðàìè÷åñêàÿ âàðî÷íàÿ ïàíåëü, 20
Включение и выключение нагревательных зон
Нагревательные зоны
Предоñторожноñòè è ðåêîìåíäàöèè, 21
Общие требования к безопасности
Утилизация
Экономия электроэнергии и охрана окружающеи
среды
Òåõíè÷åñêîå обслуæèâàíèå è óõîä, 22
Отключение электропитания
Чистка духового шкафа
Замена лампочки в духовом шкафу
Чистка стеклокерамическои варочнои панели
Техническое обслуживание
Page 13

Óñòàновка
Важно сохранить данное руководство для его
последующих консультации. В случае продажи,
передачи или переезда проверьте, чтобы данное
руководство сопровождало изделие.
Внимательно прочитаите инструкции: в них
содержатся важные сведения об установке,
эксплуатации и безопасности изделия.
Установка изделия производится в соответствии
с данными инструкциями квалифицированными
специалистами.
Любая операция по регуляции или техническому
обслуживанию должна производиться только
после отсоединения электроприбора от сети
электропитания.
Располоæåíèå è íèâåëèðîâêà
Изделие может быть установлено рядом с
кухонными элементами, высота которых не
превышает поверхность варочнои панели.
Проверьте, чтобы стена, к которои прилегает
задняя часть изделия, была из невозгораемого
материала и устоичивои к теплу (Т 90°C).
Порядок монтажа:
изделие может быть установлено на кухне, в
столовои или в однокомнатнои квартире (не в
ваннои комнате);
если варочная панель кухоннои плиты выше
мебельных элементов, необходимо отодвинуть
их от плиты на расстояние не менее 200 мм.
если кухонная
HOOD
Min. mm.
600
mm.
420
Min.
420
Min. mm.
выполнены из возгораемого материала (см.
рисунок);
не заправляите занавески за кухонную плиту и
не приближаите их на расстояние меньше 200
мм.
возможная кухонная вытяжка должна быть
установлена в соответствии с инструкциями,
приведенными в техническом руководстве к
вытяжке.
плита устанавливается
под навесным шкафом,
он должен
располагаться на
высоте не менее 420
mm. with hood
mm. without hood
650
мм от поверхности
700
min.
min.
варочнои панели.
Это расстояние
должно быть 700 мм,
если навесные шкафы
Âûравнивание
При необходимости
выровнять изделие вкрутите
в специальные отверстия по
углам в основании кухоннои
плиты прилагающиеся
регуляционные ножки* по
(см. рисунок).
Прилагающиеся ножки*
вставляются под основание
кухоннои плиты.
Ýëåêòðè÷åñêîå ïîäñîåäèíåíèå
Ïîäñîåäèíåíèå êàáåëÿ ýëåêòðîïèòàíèÿ
Кабель расчитывается в зависимости от типа
электрического соединения по следующеи
электрическои схеме:
Порядок подсоединения кабеля электропитания:
H05RR-F 5x2.5 CEI-UNEL 35363
400 3N
400V 2N
H05RR-F 4x4 CEI-UNEL 35363
230V
H05RR-F 3x4 CEI-UNEL 35363
1 2
S
R
12345
R
1
2
R
1. Отвинтите шуруп V
на зажимнои коробке и
снимите крышку (ñì.
рисунок).
V
2. установите
соединительную
3
2
1
перемычку А (см.
рисунок) ïî
приведеннои выше
электрическои схеме
Зажимная коробка
расчитана на
B
N
A
монофазное
соединение 230 В:
зажимы 1, 2 и 3
соединены друг с другом; перемычка 4-5
4
3
T
S
3
5
N
4
5
N
RS
N
13
Page 14

RS
расположена в нижнеи части зажимнои коробки.
3. подсоедините провода N и
6 в соответствии
со схемои (см. рисунок) и до упора закрутите
винты зажимов.
4. подсоедините оставшиеся провода к зажимам
1-2-3 и закрутите винты.
5. закрепите кабель электропитания в
специальном кабельном сальнике.
6. закроите крышку зажимнои коробки, закрутив
винт V.
Ïодсоединение кабеля ê ñåòè электропитания
Установите на кабель электропитания нормализованную
штепсельную вилк у, расчитанную на нагрузку,
указанную на заводскои табличке изделия.
В случае прямого подключения к сети электропитания
между кухоннои плитои и сетью необходимо установить
мультиполярныи выключатель с минимальным
расстоянием между контактами 3 мм, расчитанныи на
данную нагрузку и соответствующии деиствующим
нормативам (выключатель не должен размыкать провод
заземления). Кабель электропитания должен быть
расположен таким образом, чтобы ни в однои точке его
температура не превышала температуру помещения
более чем на 50°C.
Перед подсоединением кабеля проверьте следующее:
электрическая розетка должна быть соединена с
заземлением и соответствовать нормативам;
электрическая розетка должна быть рассчитана
на максимальную потребляемую мощность
изделия, указанную на заводскои таблике;
напряжение и частота тока сети должны
соответствовать электрическим данным изделия;
электрическая розетка должна быть совместима
со штепсельнои вилкои изделия. В противном
случае замените розетку или вилку; не
используите удлинители или троиники.
ТЕХНИЧЕСКИЕ
ДАННЫЕ
Габаритные размеры
духового шкафа
ВхШхГ
Объе м
Рабочие размеры
ящика для
разогревания пищи
Напряжение и частота
элект ропитания
Керамическая
варочная панель
Передняя левая
Задняя левая
Задняя правая
Передняя правая
Макс. поглощаемая
мощность
керамическими
варочными панелями
ТАБЛИЧКА С
ЭЛЕКТРИЧЕСКИМИ
ДАННЫМИ
34x38x41 cì
л 53
ширина 42 см.
глубина 44 см.
высота 17 см.
см. табличку с техническими
характеристиками
1200 Âò
1800 Âò
1200 Âò
1800 Âò
6000 Вт
Директива 2002/40/СЕ об этикетках
электрических духовых шкафов. Норматив
EN 50304
Расход электроэнергии Натуральная
конвекция – функция нагревания:
Ста тичес кая
Расход электроэнергии Заявление Класса
- Принудительная конвекция функция
нагревания:
Дирек тива ЕС: 73/23/CEE от 19/02/73
(Низкое напряжение) с последующими
изменениями –
89/336/СЕЕ от 03/05/89 (Электромагнитная
совместимость) с последующими
изменениями
– 93/68/СЕЕ от 22/07/93 с последующими
изменениями –
2002/96/ЕС.
>
Вентилированное
=
Изделие должно быть установлено таким
образом, чтобы электрическии кабель и
электророзетка были легко доступны.
Электрическии кабель изделия не должен быть
согнут или сжат.
Регулярно проверяите состояние кабеля
электропитания и при необходимости поручаите
его замену только уполномоченным техникам.
Производитель не несет ответственности за
последствия несоблюдения перечисленных
выше требовании.
Имеется только в некоторых моделях
*
14
Page 15

Îписание изделия
Îáùèè âèä
RS
Ïанель óправления
15
Page 16

Âключение è эксплуатация
RS
При первом включении духового шкафа
рекомендуем прокалить его примерно в течение
30 минут при максимальнои температуре с
закрытои дверцеи. Затем выключите духовои
шкаф, откроите дверцу и проветрите помещение.
Запах, которыи вы можете почувствовать, вызван
испарением веществ, использованных для
предохранения духового шкафа.
Перед началом эксплуатации необходимо снять
пленку, наклеенную с боков изделия.
Âêëþ÷åíèå äóõîâîãî øêàôà
1. Выберите нужную программу приготовления при
помощи рукоятки ПРОГРАММЫ.
2. Выберите температуру, рекомендуемую для
даннои программы или нужную вам температуру
при помощи рукоятки ТЕРМОСТАТ.
В специальнои таблице приводится перечень
типов приготовления с соответствующими
рекомендуемыми температурами (см. Таблица
приготовления в духового шкафу).
В процессе приготовления в любои момент можно:
изменить программу приготовления при помощи
рукоятки ПРОГРАММЫ;
изменить температуру при помощи рукоятки
ТЕРМОСТАТ;
запрограммировать приготовление и время
окончания приготовления (ñì íèæå);
прервать приготовление, повернув рукоятку
ПРОГРАММЫ в положение «0».
Индикатор ÒÅÐÌÎСТАТА
Включение этого индикатора означает, что
духовои шкаф нагревается. Индикатор гаснет,
когда внутри духового шкафа будет достигнута
заданная температура. На данном этапе
индикатор то загорается, то гаснет, показывая, что
термостат включен и поддерживает температуру
неизменнои.
Îсвещение äóхового øêàôà
Включется, когда рукоятка ПРОГРАММЫ
устанавливается в любое положение кроме 0, и
остается включенным до тех пор, пока работает
духовои шкаф. При выборе положения
помощи рукоятки освещение включается без
подключения нагревательных элементов.
8
ïðè
Никогда не ставьте никаких предметов на дно
духового шкафа, так как они могут повредить
эмалированное покрытие. Используите положение
1 настроики духового шкафа только для
приготовления на вертеле.
Всегда ставьте посуду на прилагающуюся
решетку.
16
Page 17

Ïðîãðàììû ïðèãîòîâëåíèÿ
Для всех программ можно задать температуру от
50°C до МАКС кроме:
ГРИЛЬ и ДВОИНОИ ГРИЛЬ (рекомендуется
устанавливать только МАКС. температуру);
выделение жара с принудительнои циркуляциеи
воздуха внутри духового шкафа. Это препятствует
обгоранию поверхности продукта, повышая
проникающую способность жара. Этот режим
подходит для быстрого гриля или для приготовления
крупных кусков мяса без использования вертела.
RS
ДВОИНОИ ВЕНТИЛИРОВАННЫИ ГРИЛЬ
(рекомендуется не превышать температуру 200°C).
Программа СТАТИ×ÅÑÊÀß ÄÓÕΠÊÀ
a
Включаются два нагревательных элемента: нижнии и
верхнии. При приготовлении блюд в традициональном
режиме лучше использовать только один уровень в
духовом шкафу, в противном случае распределение
температуры будет неоптимальным.
Программа ÂÅНТИЛИРÎÂАННАЯ ÄÓÕÎÂÊÀ
b
Включаются попеременно нижнии и круглыи
нагревательные элементы и вентилятор. Так как
жар является постоянным во всем духовом шкафу,
воздух обеспечивает однородное приготовление и
подрумянивание продукта. Можно одновременно
использовать не более двух уровнеи в духовке.
Программа ÃÐÈËÜ
c
Включается центральная часть верхнего
нагревательного элемента. Высокая температура и
жар прямого деиствия гриля рекомендуется для
приготовления продуктов, нуждающихся в высокои
поверхностнои температуре (телячии и говяжих
бифштексов, вырезки, антрекотов). Это программа
не требует большого расхода энергии, идеально
подходит для приготовления на гриле небольших
порции. Поместите продукт в центр решетки, так как
жар не распространяется по углам.
Программа ÄÂÎÈÍÎÈ ÃÐÈËÜ
2
Включается верхнии нагревательныи элемент и вертел.
Это гриль большего размера особои формы,
повышающии на 50% эффективность
приготовления, позволяющии распространение
жара по углам. Используите этот режим гриля для
однородного подрумянивания.
Программа ÄÂÎÈÍÎÈ ÂÅНТИЛИРУÅÌÛÈ ÃÐÈËÜ
T
Включается верхнии нагревательныи элемент,
вертел и вентилятор. Сочетает однонаправленное
Для приготовления в режимах ГРИЛЬ, ДВОИНОИ
ГРИЛЬ и ДВОИНОИ ВЕНТИЛИРУЕМЫИ ГРИЛЬ
дверца духового шкафа должна быть закрыта.
При использовании ГРИЛЯ и ДВОИНОГО ГРИЛЯ
установите решетку на 5-ыи уровень и противень
для сбора соков (жира) на 1-ыи. При
использовании ДВОИНОГО ВЕНТИЛИРУЕМОГО
ГРИЛЯ установите решетку на 2-ои или 3-ии
уровень, а противень на 1-ыи для сбора соков.
Ýëåêòðîííûè òàèìåð
Показывает время и выполняет функцию таимера с
обратным отсчетом.
Все функции включаются примерно через 7
секунд после их выбора.
Ðåãóëÿöия часов
После осуществления подсоединения к сети
электропитания или после отключения напряжения
на дисплее мигает значение: 0:00
Нажмите кнопку
G и затем при помощи кнопок
e + установите точное время. Для быстрои
регуляции держите кнопки нажатыми.
При необходимости откорректировать время
выполните вышеописанные операции.
Ôóíêöия таимера
Эта функция открывается при нажатии кнопки
на дисплее показывается символ
нажатии кнопки
на 10 секунд вплоть до 99 минут и 50 секунд. Если
вы будете продолжать нажмете на эту кнопку,
значение времени будет увеличиваться на одну
минуту вплоть до 10 минут.
При помощи значение уменьшается.
После установки нужного отрезка времени,
начинается обратныи отсчет. По истечении
заданного времени раздается звуковои сигнал,
погасить которыи вы можете, нажав любую копку.
На дисплеи можно вывести время при помощи
кнопки
функция таимера. Примерно через 7 секунд на
дисплеи автоматически вернется визуализация
таимера.
G, символ n означает, что была включена
+ значение времени увеличивается
n. При каждом
n è
17
Page 18

RS
Порядок отмены заданного времени
Нажмите кнопку вплот до 0:00.
Ðåãóëÿöия громкости звóкового
сигнала
После осуществления и подтверждения регуляции
часов при помощи кнопки
громкость звукового сигнала.
Âертел
стенке духового шкафа;
3. включите вертел при помощи рукоятки
ПРОГРАММЫ
Нижнии отсек*
2
o T.
можно отрегулировать
Порядок включения
вертела (см. рисунок):
1. установите
противень на 1-ыи
уровень;
2. установите
держатель вертела на
4-ыи уровень и
вставьте вертел в
специальное
отверстие в заднеи
Снизу духового шкафа
имеется отсек,
которыи может быть
использован для
хранения кухонных
принадлежностеи или
кастрюль. Для
открывания дверцы
поверните ее вниз (ñì.
рисунок).
Îдновременное приготовление на
нескольких óровнях
При необходимости использовать две решетки
выберите программу ВЕНТИЛИРОВАННАЯ
ДУХОВКА
такои тип приготовления. Кроме того
рекомендуется:
не используите 1-ыи и 5-ыи уровни: они
подвергаются прямому воздеиствию горячего
воздуха, которыи может сжечь деликатные
продукты.
используите в основном 2-ои и 4-ыи уровни,
помещая на 2-ои уровень продукты, требующие
большего жара.
для продуктов, приготовление которых требует
разного времени и температуры, следует задать
среднюю температуру из двух
рекомендованных (см. Таблицу приготовления
в духовом шкафу) и поместите более
деликатные продукты на 4-ыи уровень. Вначале
выньте из духовки продукт, требующии более
быстрого приготовления.
при приготовлении пицц на нескольких уровнях
при температуре 220°C, следует
предварительно разогреть духовку в течение 15
минут. Обычно приготовление на 4-ом уровне
требует большего времени: поэтому
рекомендуется вначале вынуть пиццу с более
низкого уровня, и только через несколько минут
вынуть пиццу с 4-ого уровня.
Установите проитвень снизу, а решетку сверху.
, единственную расчитанную на
b
Не помещаите возгораемых предметов в нижнии
отсек.
Внутренняя поверхность ящика (если он
имеется) может сильно нагреться.
* Имеется только в некоторых моделях
18
Page 19

Òàáëèöà ïðèãîòîâëåíèÿ â äóõîâîì øêàôó
Ïðîãðàììû
Ñòàòическое
Âåíòилированное
Ãðèëü
Äâîéíîй гриль
Äâîéíîé
âåíòилированнûé
ãðèëü
Ïðîäóêòû
Óòêà
Æаркое èç телятины èëè говядины
Æаркое èç свинины
Печенье (песочное)
Песочныé òîðò ñ начинкоé
Пицца (на 2 уровнях)
Ëазанья
Áаранина
Êурица ñ картошкоé
Скумбрия
Êекс
Эклеры (на 2 уровн ях)
Печенье (на 2 уровнях)
Áисквитныé òîðò (íà 1 уровне)
Áисквитныé òîðò (íà 2 уровнях)
Несладкие торты
Êамбала è каракатицы
Êальмары è креветки íà шампурах
Ôèëå трески
Овощи-гриль
Òелячиé бифштекс
Отбивные
Гамбургер
Скумбрия
Горячие бутерброды
На вертеле
Òелятина íà вертеле
Êурица íà вертеле
Áаранина íà вертеле
Êурица-гриль
Êаракатицы
Êурица íà вертеле
картошка (на противене)
На вертеле
Òелятина íà вертеле
Êурица íà вертеле
Áаранина íà вертеле
На вертеле с несколькими
шампурами (где имеется)
Шашлык
Овощной шашлык
Âåñ
(êã)
1
1
1
1
1
1
1
1+1
1
1
0.5
0.5
0.5
1
1.5
1
1
1
1
1
1
1
1
4 øò.
1.0
1.5
1.0
1.5
1.5
1.5
-
1.5
1.5
1.5
1.0
0.8
Óровень
3
3
3
3
3
2 è 4
3
2
2 è 4
2
2
4
2 è
2 è 4
2
2 è 4
3
4
4
4
3/4
4
4
4
4
4
-
-
2
2
2
-
-
-
-
-
Âðåìÿ
íàãревания
(ìèí.)
15
15
15
15
15
15
10
10
15
10
10
10
10
10
10
15
5
5
5
5
5
5
5
5
5
5
5
5
5
5
5
5
5
5
5
5
5
Рекоменäóåìàÿ
òемпераòóðà (°C)
200
200
200
180
180
230
180
180
200
180
170
190
180
170
170
200
Ìàêñ.
Ìàêñ.
Ìàêñ.
Ìàêñ.
Ìàêñ.
Ìàêñ.
Ìàêñ.
Ìàêñ.
Ìàêñ.
Ìàêñ.
Ìàêñ.
Ìàêñ.
200
200
200
200
200
200
200
200
200
Продолжит-ть
ïðèãîòовления
(ìèíóòû)
65-75
70-75
70-80
15-20
30-35
15-20
30-35
40-45
60-70
30-35
40-50
20-25
10-15
15-20
20-25
25-30
8-10
6-8
10-15
15-20
15-20
7-10
15-20
2-3
80-90
70-80
70-80
55-60
30-35
70-75
70-75
70-80
70-80
70-80
40-45
25-30
10
RS
19
Page 20

Ýлектрическая варочная панель
RS
на стекляннои поверхности варочнои панели
могут быть видны сальные следы от клея,
нанесенного на прокладки. Перед началом
эксплуатации изделия следует удалить следы
клея при помощи специального неабразивного
моющего средства. В первые часы работы вы
можете почувствовать запах жженои резины,
которыи быстро пропадает.
Âключенèå è âûêëþ÷åíèå
íàãðåâàòåëüíûõ çîí
Для включения нагревательнои зоны поверните по
часовои стрелке соответствующую рукоятку.
Для выключения поверните рукоятку против
часовои стрелки на «0».
Включение индикатора ЗОНЫ ВКЛЮЧЕНЫ
показывает, что какая-то из нагревательных зон на
варочнои панели включена.
Íàãðåâàòåëüíûå çîíû
На варочнои панели
A
A
B
галогенными элементами.
B. Индикатор нагрева: показывает, что
температура в соответствующеи нагревательнои
зоне превышает 60°C, также в случае, если
элемент выключен, но еще не остыл.
находятся электрические
A
галогенные нагревательные
элементы. В рабочем
A
режиме она раскалаются до
красна:
A. Нагревательная зона с
Ïîç. Электрическая êàíôîðêà
0
Âыключено
1 Äëÿ топления сливочного масла, шоколада
2
Для разогревания жидкостей
3
4
Для кремов è соусов
5
6
Для приготовления при температуре кипения
7
8
Для жаркого
9
10
Для крупных вареных блюд
11
12 Для фритюра
Практические рекомендаöии по
использованию варочнои панели
Используите посуду с плоским толстым дном,
идеально прилегающим к зоне нагревания;
Используите кастрюли с дном такого диаметра,
чтобы полностью закрыть зону нагревания для
оптимального использования всего
выделяемого тепла;
Нагревательные зоны с галогенными
элементами.
Передают тепло посредством излучения
внутреннеи галогеннои лампы. Такои принцип
нагревания по своим характеристикам аналогичен
типичным газовым конфоркам: быстрая реакция на
управление и мгновенная визуализация
мощности.
Не следует долго смотреть на включенные
галогенные элементы.
Поверните соответствующую рукоятку по часовои
стрелки из положения 1 в положение 12.
20
проверьте, чтобы дно кастрюль было всегда
сухим и чистым: таким образом гарантируется
оптимальное прилегание к нагревательным
зонам, а также продлевает срок службы
варочнои панели и кастрюль;
не следует использовать на посуду,
использованную на газовых конфорках:
концентрация тепла на газовых конфорках
может деформировать дно посуды и нарушить
прилегание к нагревательнои зоне;
никогда не оставляите нагревательные зоны
включенными без посуды, так как это может
повредить их.
Page 21

Ïредосторожности è
рекомендаöèè
Изделие спроектировано и изготовлено â соответствии с
международными нормативами по безопасности.
Необходимо внимательно прочитать настоящие
предупреждения, составленные в целях вашеи
безопасности.
Îáùèå òðåáîâàíèÿ ê áåçîïàñíîñòè
Стеклокерамическая варочная панель является
устоичивои к скачкам температуры и к ударам. Тем не
менее следует помнить, что лезвия или острые
кухонные приборы могут повредить поверхность
варочнои панели. В случае повреждения варочнои
панели незамедлительно отсоедините штепсельную
вилку панели от сети электропитания, обращаитесь
только в уполномоченныи центр технического
обслуживания и требуите установки только
оригинальных запчастеи. Несоблюдение
вышеуказанных рекомендации
скомпрометировать безопасное функционирование
изделия.
Данное изделие предназначается для
непрофессионального использования â домашних
условиях.
Запрещается устанавливать изделие на улице,
даже под навесом, так как воздеиствие на него
дождя и грозы является чрезвычаино опасным.
Не прикасаитесь к изделию влажными руками,
босиком или с мокрыми ногами.
Изделие предназначено для приготовления
пищевых продуктов, может быть использовано
только взрослыми лицами в
инструкциями, приведенными в данном
техническом руководстве.
Данное техническое руководство относится к
бытовому электроприбору класса 1 (отдельное
изделие) или класса 2 подгруппа 1 (встроенное
между 2 кухонными элементами).
Не разрешаите детям играть рядом с изделием.
Избегаите контактов проводов электропитания других
бытовых электроприборов с горячими частями изделия.
Не закрываите вентиляционные решетки и
отверстия рассеивания тепла.
Всегда
или вынимаете блюда из духовки.
Íå используите горючие жидкости (спирт, бензин è
т.д.) рядом с работающеи кухоннои плитои.
Не кладите возгораемые материалы в нижнии отсек
или в духовои шкаф: при случаином включении
изделия такие материалы могут загореться.
Когда изделие не используется, всегда проверяите,
чтобы рукоятки находились в положении
Не тяните за провод электропитания для
отсоединения вилки изделия из электрическои
розетки, возьмитесь за вилку рукои.
надеваите кухонные варежки, когда ставите
может
соответствии ñ
.
Перед началом чистки или технического
обслуживания изделия всегда вынимаите
штепсельную вилку из электророзетки.
 случае неисправности категорически
запрещается открывать внутренние механизмы
изделия с целью самостоятельного ремонта.
Обратитесь в центр технического обслуживания.
Íå ставьте тяжелые предметы на открытую дверцу
духового шкафа
Óòèëèçàöèÿ
Уничтожение упаковочных материалов:
соблюдаите местные нормативы по утилизации
упаковочных материалов.
Согласно Европеискои Директиве 2002/96/СЕ
касательно утилизации электронных и
электрических электроприборов (RAEE)
электроприборы не должны выбрасываться вместе
с обычным городским мусором. Выведенные из
строя приборы должны собираться отдельно для
оптимизации их утилизации и рекуперации
составляющих их материалов, а также для
безопасности окружающеи среды и здоровья.
Символ зачеркнутая мусорная корзинка,
имеющиися на всех приборах, служит
напоминанием об их отдельнои утилизации.
Старые бытовые электроприборы могут быть переданы
в общественныи центр утилизации, отвезены в
специальные муниципальные зоны или, если это
предусмотрено национальными нормативами,
возвращены в магазин при покупке нового изделия
аналогичного типа.
Все ведущие производители бытовых электроприборов
содеиствуют созданию и управлению системами по
сбору и утилизации старых электроприборов.
Ýêîíîìèÿ ýëектроэнергèè è îõðàíà
îêðóæàþùåè ñðåäû
Если вы будете пользоваться духовым шкафом
вечером и до раннего утра, это поможет
сократить нагрузку потребления электроэнергии
электростанциями.
При использовании режимов ГРИЛЬ, ДВОИНОИ
ГРИЛЬ и ДВОИНОИ ВЕНТИЛИРОВАННЫИ
ГРИЛЬ дверца духового шкафа должна
оставаться закрытои: Это необходимо для
значительнои экономии электроэнергии
(примерно 10%), а также для лучших
результатов приготовления.
Содержите уплотнения в исправном и чистом
состоянии, проверяите, чтобы они плотно
прилегали к дверце и не пропускали утечек
тепла.
RS
21
Page 22

Òехническое
îáñëуживание è óõîä
RS
Îòêëþ÷åíèå ýëåêòðîïèòàíèÿ
Перед началом какои-либо операции по обслуживанию или
чистке отсоедините изделие от сети электропитания.
Никогда не используéте паровые чистящие агрегаты
или агрегаты под высоким давлением для чистки
изделия.
×èñòêà äóõîâîãî øêàôà
Наружные эмалированные элементы или детали из
нержавеющеи стали, а также резиновые уплотнения
можно протирать губкои, смоченнои в теплои воде или
в растворе неитрального моющего средства. Для
удаления особо трудных пятен используите
специальные чистящие средства, имеющиеся в
продаже. После чистки рекомендуется тщательно
удалить остатки моющего средства влажнои тряпкои и
высушить духовку. Не используите абразивные
порошки или
Следует производить внутреннюю чистку духового
шкафа после каждого его использования, не
дожидаясь его полного охлаждения. Используите
теплую воду и моющее средство, ополосните и
протрите мягкои тряпкои. Избегаите использования
абразивных средств.
Äëÿ чистки стекла дверцы используйте
неабразивные губки и чистящие средства, затем
вытрите насухо мягкой тряпкой. Не используйте
твердые абразивные материалы или
металлические скребки, которые могут поцарапать
поверхность и разбить стекло.
Ñъемные детали можно легко вымыть как любую
другую посуду, также в посудомоечнои машине.
Панель с рукоятками необходимо очищать от пятен
и жира при помощи мягкои губки или тряпки.
коррозииные вещества.
острые
Проверяите óплотнения дóхового шкафа.
Регулярно проверяите состояние уплотнения вокруг
дверцы духового шкафа. В случае повреждения
уплотнения обращаитесь в ближаишии Центр
Технического Обслуживания. Не рекомендуется
пользоваться духовкои с поврежденным уплотнением.
Çàìåíà ëàìïî÷êè â äóõîâîì øêàôó
1. Отключите духовои шкаф от сети
электропитания, снимите
стеклянную защитную крышку лампы
(ñì. рисунок).
2. Выкрутите лампочку и замените
ее на новую такого же типа:
напряжение 230 В, мощность 25 Вт,
резьба Е 14.
3. Восстановите на место крышку и вновь подключите
духовои шкаф к сети электропитания.
×èñòêà ñòåêëîêåðàìè÷åñêîè âàðî÷íîè
ïàíåëè
Не следует пользоваться абразивными или
коррозивными чистящими средствами такими как
спраи для чистки духовок и мангалов, пятновыводители
или средства для удаления ржавчины, порошковыми
чистящими средствами или абразивными губками: они
могут необратимо поцарапать поверхность изделия.
 качестве регулярного ухода достаточно вымыть
варочную панель влажнои губкои и затем высушить
кухонным бумажным полотенцем.
Если варочная панель сильно
используите специальное чистящее средство для
стеклокерамических поверхностеи, ополосните
водои и высушите.
Для удаления сильных загрязнении используите
специальныи скребок (не прилагается к изделию).
Удаляите загрязнения незамедлительно, не
дожидаясь охлаждения изделия, во избежание
затвердевания остатков пищи. Очень удобна для
чистки мочалка из проволоки из нержавеющеи
стали, специально для стеклокерамических
поверхностеи , смоченная в мыльном растворе.
Если на варочнои
какие-либо предметы или пластиковые материалы
или сахар, незамедлительно удалите их скребком с
еще горячеи поверхности.
Ïî завершении чистки варочная панель может быть
обработана специальным защитным средством для
ухода за стеклокерамическими поверхностями. Это
средство образует на поверхности варочнои панели
невидимую защитную пленку, предохраняющую
поверхность в случае утечек пище в процессе
приготовления. Рекомендуется производить
когда варочная панель едва теплая или холодная.
Следует всегда ополаскивать варочную панель
чистои водои и насухо вытирать: возможные остатки
чистящих средств могут затвердеть при последующеи
готовке.
Чистящие средства для
кер амичес кой
поверхности
Скребки
Сменные лезвия
COLLO luneta
HOB BRITE
Hob C le an
SWISSCLEANER
панели случаино расплавились
загрязнена,
чистку,
Где можно приобрести
Фирменные магазины,
универмаги, супермаркеты.
магазины электробытов ой
техники, хозя йств енные
магазины.
×истка деталеи èç нержавеющеи стали
На деталях из нержавеющеи стали могут появиться
пятна, если на них в течение длительного времени
воздеиствует вода с высоким содержанием извести или
чистящие средства содержащие фосфор.
Рекомендуется обильно ополоснуть изделие и
тщательно высушить.
Òåõíè÷åñêîå îáñëóæèâàíèå
При обращении в Центр Технического Обслуживания
необходимо сообщить:
модель изделия (Мод.)
номер тех. паспорта (серииныи ¹)
Последние сведения находятся на заводскои табличке,
расположеннои на изделии и/или на упаковке.
22
Page 23

Mode demploi
GB
English, 1
RS
РУССКИЙ,12
FR
Français, 23
CUISINIERE
FR
Sommaire
Installation, 24-25
Positionnement et nivellement
Raccordement électrique
Caractéristiques techniques
Description de lappareil, 26
Vue densemble
Tableau de bord
Utilisation du four, 27-30
Mise en marche du four
Programmes de cuisson
Minuteur électronique
Tableau de cuisson
C3VM5R /HA
Utilisation du plan vitrocéramique, 31
Allumer et éteindre les foyers
Les foyers
Précautions et conseils, 32
Sécurité générale
Mise au rebut
Economies et respect de lenvironnement
Nettoyage et entretien, 33
Mise hors tension
Nettoyage du four
Remplacement de lampoule déclairage du four
Nettoyage du plan de cuisson vitrocéramique
Assistance
Page 24

1
2
3
N
A
B
Installation
FR
Conservez ce mode demploi pour pouvoir le consulter
à tout moment. En cas de vente, de cession ou de
déménagement, veillez à ce quil suive lappareil.
Lisez attentivement les instructions : elles
contiennent des conseils importants sur linstallation,
lutilisation et la sécurité de votre appareil
Linstallation de lappareil doit être effectuée par un
professionnel du secteur conformément aux
instructions du fabricant.
Nimporte quelle opération de réglage ou
dentretien doit être effectuée après avoir débranché
la prise de lappareil.
Positionnement et nivellement
Lappareil peut être installé à côté de meubles dont
la hauteur ne dépasse pas celle du plan de cuisson.
Assurez-vous que le mur en contact avec la paroi
arrière de lappareil est réalisé en matériel ignifuge
résistant à la chaleur (T 90°C).
Montage des pieds* fournis
avec lappareil par
encastrement sous la base.
Raccordement électrique
Montage du câble dalimentation
Le cordon doit être dimensionné en fonction du type
de raccordement électrique utilisé selon le schéma
de connexion suivant:
H05RR-F 5x2.5 CEI-UNEL 35363
400 3N
400V 2N
H05RR-F 4x4 CEI-UNEL 35363
230V
H05RR-F 3x4 CEI-UNEL 35363
1 2
S
R
12345
R
1
2
R
4
3
T
S
3
5
N
N
4
5
N
Pour une installation correcte :
installez cet appareil dans une cuisine, une salle à
manger ou un studio (jamais dans une salle de bains);
si le plan de cuisson de la cuisinière dépasse le
plan de travail des meubles, ces derniers doivent
être placés à au moins 200 mm de lappareil.
si la cuisinière est
installée sous un élément
suspendu, il faut que ce
dernier soit placé à au
moins 420 mmde
mm. with hood
mm. without hood
distance du plan.
650
700
Il faut prévoir une distance
min.
min.
mm.
420
Min.
HOOD
Min. mm.
600
420
Min. mm.
de 700 mm si les
éléments suspendus sont
inflammables (voir figure);
ne placez pas de rideaux derrière ou sur les côtés
de la cuisinière à moins de 200 mm de distance.
pour linstallation de hottes, conformez-vous aux
instructions de leur notice demploi.
Nivellement
Pour mettre lappareil bien à
plat, vissez les pieds de
réglage fournis aux
emplacements prévus aux
coins à la base de la
cuisinière (voir figure).
Pour monter le câble dalimentation :
1. Dévissez la vis V du
bornier et tirez le
couvercle pour louvrir
V
(voir figure).
2. positionnez le
cavalier de
raccordement A (voir
figure) selon le schéma
de connexion illustré
plus haut. Le bornier
est prévu pour
raccordement
monophasé230 V : les
bornes 1, 2 et 3 sont
reliées les unes aux autres; le pont 4-5 se trouve
dans la partie inférieure du bornier.
3. positionnez les fils N et
6 conformément au
dessin (voir figure) et effectuez le raccordement en
serrant à fond les vis des bornes.
4. positionnez les fils restants sur les bornes 1-2-3
et serrez les vis.
24
Page 25

5. fixez le câble dalimentation dans le serre-câble
prévu.
6. fermez le couvercle du bornier et vissez la vis V.
Branchement du câble dalimentation au réseau
électrique
Montez sur le câble une fiche normalisée adaptée à
la charge indiquée sur létiquette des
caractéristiques collée sur lappareil.
En cas de raccordement direct au réseau, intercalez
entre lappareil et le réseau un interrupteur à coupure
omnipolaire ayant au moins 3 mm décartement
entre les contacts, dimensionné à la charge et
conforme aux normes en vigueur (le fil de terre ne
doit pas être interrompu par linterrupteur). Le câble
dalimentation ne doit atteindre, en aucun point, une
température dépassant de 50°C la température
ambiante.
Avant de procéder au branchement, assurez-vous
que :
la prise est bien munie dune terre conforme à la loi;
la prise est bien apte à supporter la puissance
maximale de lappareil, indiquée sur la plaquette
signalétique;
la tension dalimentation est bien comprise entre
les valeurs indiquées sur la plaquette
signalétique;
la prise est bien compatible avec la fiche de
lappareil. Si ce nest pas le cas, remplacez la
prise ou la fiche, nutilisez ni rallonges ni prises
multiples.
Après installation de lappareil, le câble électrique
et la prise de courant doivent être facilement
accessibles
CARACTERISTIQUES TECHNIQUES
Dimensions du
fou r HxLxP
Volume
Dimensions
utiles du tiroir
chauffe-p lats
Tension et
fréquence
d'alime ntation :
Plan de cuisson
vitrocéramique
Avant gauche
Arrière gauche
Arrière droit
Avant droit
Absorption Max.
plan de cuisson
vitrocéramique
ETIQUETTE
ENERGIE
34x38x41 cm
l 53
largeur 42 cm
profondeur 44 cm
hauteur 17 cm
voir plaquette signalétique
1200 W
1800 W
1200 W
1800 W
6000 W
Directive
l'étiquette des fours électriques
Norme EN 50304
- Consommation énergie
convection naturelle.
Fonction four : Statique
- Consommation énergie déclarée
pour Classe convection Forcée
Fonction four : Ventilé
Directives Communautaires:
73/23/CEE du 19/02/73 (Basse
Tension) et modifications
successives
-89/336/CEE du 03/05/89
(Compatib ili té électromagnétique)
et modifications successives
-93/68/CEE du 22/07/93 et
modifications successives2002/96/EC
2004/40/CE sur
FR
=
>
Le câble ne doit être ni plié ni excessivement
écrasé.
Le câble doit être contrôlé périodiquement et ne
peut être remplacé que par un technicien agréé.
Nous déclinons toute responsabilité en cas de
non respect des normes énu
Nexiste que sur certains modèles
*
mérées ci-dessus.
25
Page 26

Description de
lappareil
FR
Vue densemble
Plan de cuisson
vitrocéramique
Tableau de bord
Support GRILLE
Support LECHEFRITE
Pied de réglage
Tableau de bord
GLISSIERES
de coulissement
niveau 5
niveau 4
niveau 3
niveau 2
niveau 1
Pied de réglage
Minuteur
électronique
Touche
MINUTEUR
PROGRAMMES
Bouton
THERMOSTAT
Bouton
Voyant
THERMOSTAT
Voyant
FONCTIONNEMENT FOYERS
Bouton foyer
HALOGENE
26
Page 27

Utilisation du four
Lors de son premier allumage, faites fonctionner le
four à vide, porte fermée, pendant au moins une
heure en réglant la température à son maximum.
Puis éteignez-le, ouvrez la porte et aérez la pièce.
Lodeur qui se dégage est due à lévaporation des
produits utilisés pour protéger le four.
Avant toute utilisation, vous devez impérativement
enlever les films plastiques situés sur les côtés de
lappareil
Mise en marche du four
1. Pour sélectionner le programme de cuisson
souhaité, tournez le bouton PROGRAMMES.
2. Choisissez la température conseillée pour ce
programme ou celle que vous préférez à laide du
bouton THERMOSTAT.
Un tableau de cuisson vous guidera dans vos
cuissons en vous indiquant notamment les
températures conseillées pour chacune delles (voir
tableau cuisson au four).
En cours de cuisson, vous pouvez à tout moment :
modifier le programme de cuisson à laide du
bouton PROGRAMMES;
modifier la température à laide du bouton
THERMOSTAT;
programmer la durée et lheure de fin de cuisson
(voir ci-dessous);
interrompre la cuisson en ramenant le bouton
PROGRAMMES sur 0.
Voyant THERMOSTAT
Allumé, il signale la montée en chaleur du four. Il
séteint dès que la température sélectionnée est
atteinte. Le voyant sallume et séteint tour à tour
pour indiquer que le thermostat fonctionne et
maintient la température au degré près.
Eclairage du four
Pour lallumer, amenez le bouton PROGRAMMES sur
une position autre que la position 0. Il reste allumé
tant que le four est en marche. Si vous amenez le
bouton sur
aucune résistance.
, la lampe sallume sans activer
8
FR
Ne posez jamais dobjets à même la sole du four,
vous pourriez abîmer lémail. Nutilisez la position 1
du four quen cas de cuissons au tournebroche.
Placez toujours vos plats sur la grille fournie avec
lappareil.
27
Page 28

FR
Programmes de cuisson
Pour tous les programmes, vous pouvez
sélectionner une température comprise entre 50°C et
MAX., sauf pour :
uniforme de la chaleur dans lenceinte du four. Plus
de risques de brûler vos aliments en surface et plus
grande pénétration de la chaleur. Très utile pour des
grillades rapides ou pour griller de grosses pièces
de viande sans utiliser le tournebroche.
GRIL et DOUBLE GRIL (il est conseillé dans ce
cas de sélectionner MAX.);
DOUBLE GRIL VENTILE (il est conseillé de ne pas
dépasser 200°C).
Programme FOUR STATIQUE
a
Mise en marche des résistances de voûte et de
sole. Pour cette cuisson traditionnelle, ne cuisez que
sur un seul niveau pour avoir une meilleure diffusion
de la chaleur.
Programme FOUR VENTILE
b
Activation, à tour de rôle, de la résistance de sole et
de la résistance de voûte ainsi que de la turbine. La
chaleur est constante et bien répartie à lintérieur du
four, lair cuit et dore de façon uniforme en tous
points. Vous pouvez cuire au maximum sur deux
niveaux en même temps.
Programme GRIL
I
Activation de la partie centrale de la résistance de
voûte. La température élevée et directe du gril est
conseillée pour tous les aliments qui exigent une
haute température en surface (steak de veau et de
buf, filet, entrecôte) Ce programme, idéal pour
griller de petites pièces permet de réduire la
consommation délectricité. Attention à bien placer
le plat au milieu de la grille car, dans les coins, la
chaleur ne suffit pas à le cuire.
Programme DOUBLE G RIL
2
Un gril plus grand que dhabitude et au design novateur
qui augmente de 50% les performances de cuisson et
qui supprime les zones dangle où la chaleur narrive
pas. Utilisez ce gril pour dorer de façon uniforme.
Programme DOUBLE GRIL VENTILE
T
Mise en marche de la résistance de voûte, de la
turbine et du tournebroche (si lappareil en est
équipé). Lirradiation thermique unidirectionnelle
sajoute au brassage de lair pour une répartition
Les cuissons GRIL, DOUBLE GRIL et DOUBLE
GRIL VENTILE doivent avoir lieu porte fermée.
En cas de cuisson en mode GRIL ou DOUBLE
GRIL, placez la grille au gradin 5 et la lèchefrite au
gradin 1 pour récupérer les jus de cuisson. En cas
de cuisson en mode DOUBLE GRIL VENTILE, placez
la grill au gradin 2 ou 3 et la lèchefrite au gradin 1
pour récupérer les jus de cuisson.
Minuteur électronique
Permet d'afficher l'heure et de faire fonctionner la
minuterie au compte à rebours.
Toutes les fonctions sont activées environ 7
secondes après leur sélection.
Remise à l'heure de l'horloge
Après raccordement à la ligne ou après une coupure
de courant, l'afficheur clignote sur : 0:00
Appuyez sur la touche
à l'aide des touches - et +. Appuyez sur les
touches sans les relâcher pour accélérer
l'avancement.
Pour toute remise à l'heure, procédez comme
susmentionné.
Fonction minuterie
Pour accéder à cette fonction, appuyez sur la touche
G et sélectionnez l'heure
n, l'écran affiche le symbole n. A chaque pression
de la touche + correspond un avancement de 10
secondes jusqu'à 99 minutes 50 secondes.
Continuez à appuyer pour obtenir un avancement du
temps par augmentation d'une minute jusqu'à 10
heures maximum.
La touche
Une fois que la durée souhaitée a été sélectionnée,
le compte à rebours commence. Un signal sonore
retentit une fois le temps écoulé, pour l'arrêter
appuyez sur une touche quelconque.
Pour afficher l'heure, appuyez sur la touche
symbole
sélectionnée. 7 secondes après, l'écran revient
automatiquement à la fonction minuterie.
Nexiste que sur certains modèles
*
sert à revenir en arrière.
G, le
n indique que la fonction minuterie est
28
Page 29

Pour annuler une durée déjà sélectionnée.
Appuyez sur la touche
Réglage de volume du signal sonore.
Après avoir choisi et confirmé les sélections de
l'horloge, vous pouvez régler le volume du signal
acoustique à l'aide de la touche
Tournebroche*
tournebroche, sélectionnez
PROGRAMMES.
Niche inférieure*
jusqu'à 0:00.
.
Pour actionner le
tournebroche, procédez
comme suit :
1. placez la lèchefrite au
gradin 1;
2. placez le berceau au
gradin 4 et encastrez le
bout arrière de la broche
dans le trou situé au fond
de lenceinte (voir figure);
3. pour actionner le
2/T
à laide du bouton
Cuisson simultanée sur plusieurs niveaux
Sil vous avez besoin de deux grilles, utilisez le
programme FOUR VENTILE
qui vous permet de cuire sur deux niveaux. Mieux
vaut en outre :
ne pas utiliser les gradins 1 et 5 : ils sont
directement frappés par lair chaud qui pourrait
brûler vos mets délicats.
utilisez surtout les gradins 2 et 4 et placez au gradin
2 les plats qui exigent davantage de chaleur.
en cas de cuisson simultanée de plats dont les
temps et les températures de cuisson varient,
choisissez une température intermédiaire entre les
deux conseillées (voir Tableau cuisson au four) et
enfournez les plats plus délicats au gradin 4.
Sortez du four, avant les autres, le plat dont la
cuisson est plus rapide.
lors de la cuisson de pizza sur plusieurs niveaux à
une température de 220°C, mieux vaut préchauffer
le four pendant 15 minutes. Normalement, la
cuisson au gradin 4 exige davantage de temps : il
est par conséquent conseillé de sortir du four
dabord la pizza placée au niveau inférieur et de
laisser cuire celle du gradin 4 quelques minutes de
plus.
Placez la lèchefrite en bas et la grille en haut.
car cest le le seul
b
FR
Une niche ménagée audessous du four peut
être utilisée pour
entreposer des
accessoires ou des
casseroles. Pour ouvrir
le volet, faites-le pivoter
vers le bas (voir figure).
Ne pas stocker de matériel inflammable dans la
niche du bas.
Les surfaces intérieures du tiroir (s'il y en a un)
peuvent devenir chaudes.
Nexiste que sur certains modèles
*
29
Page 30

FR
Tableau de cuisson
Programmes Aliments Poids
Canard
Roast-beef
Statique
Ventilé
Gril
Double Gril
Double Gril
Ventilé
Rôti de porc
Biscuits
Tartes
Pizza (sur 2 niveaux)
Lasagnes
Agneau
Poulet rôti + pommes de terre
Maquereaux
Cake aux fruits
Choux (sur 2 niveaux)
Biscuits (sur 2 niveaux)
Génoise (sur 1 niveau)
Génoise (sur 2 niveaux)
Tartes salées
Soles et seiches
Brochettes de calmars et crevettes
Tranches de colin
Légumes grillés
Steaks de veau
Côtelettes
Hamburgers
Maquereaux
Croque-monsieur
Avec tournebroche
Veau à la broche
Poulet à la broche
Agneau à la broche
Poulet grillé
Seiches
Poulet (à la broche) + pommes de terre
(dans lèchefrite)
Avec tournebroche
Veau à la broche
Poulet à la broche
Agneau à la broche
Avec tournebrochettes (si votre appareil en
est équipé)
Brochettes de viande
Brochettes de légumes
(Kg)
1+1
0.5
0.5
0.5
1.5
n.° 4
1.0
1.5
1.0
1.5
1.5
1.5
1.5
1.5
1.5
1.0
0.8
Niveau
enfourne
1
1
1
1
1
1
1
1
1
1
1
1
1
1
1
1
1
1
ment
3
3
3
3
3
2 e 4
3
2
2 e 4
2
2
2 e 4
2 e 4
2
2 e 4
3
4
4
4
3/4
4
4
4
4
4
-
-
2
2
2
-
-
-
-
-
Préchauffage
(minutes)
15
15
15
15
15
15
10
10
15
10
10
10
10
10
10
15
5
5
5
5
5
5
5
5
5
5
5
5
5
5
5
5
5
5
5
5
5
Température
préconisée
200
200
200
180
180
230
180
180
200
180
170
190
180
170
170
200
Max
Max
Max
Max
Max
Max
Max
Max
Max
Max
Max
Max
200
200
200
200
200
200
200
200
200
Durée
cuisson
(minutes)
65-75
70-75
70-80
15-20
30-35
15-20
30-35
40-45
60-70
30-35
40-50
20-25
10-15
15-20
20-25
25-30
8-10
6-8
10
10-15
15-20
15-20
7-10
15-20
2-3
80-90
70-80
70-80
55-60
30-35
70-75
70-75
70-80
70-80
70-80
40-45
25-30
30
Page 31

Utilisation du plan de
cuisson vitrocéramique
La colle utilisée pour les joints laisse des traces de
graisse sur le verre. Nous vous conseillons de les
éliminer avant dutiliser lappareil, à laide dun produit
dentretien non abrasif. Une odeur de caoutchouc
peut se dégager au cours des premières heures
dutilisation, elle disparaîtra très vite.
Allumer et éteindre les foyers
Pour allumer un foyer, tournez le bouton
correspondant dans le sens des aiguilles dune
montre.
Pour léteindre, tournez le bouton dans le sens
inverse des aiguilles dune montre jusquà 0.
Lallumage du voyant FONCTIONNEMENT FOYERS
signale quau moins un foyer du plan de cuisson est
allumé.
Les foyers
Le plan de cuisson peut être équipé de foyers
radiants ou halogènes. Ils deviennent tous rouges
pendant leur fonctionnement :
A. Foyer halogène.
A
A
B
B. Voyant de chaleur
A
résiduelle : il signale une
température supérieure à 60°C
A
du foyer correspondant et ce
même après extinction de ce
dernier.
Pos Plaqu e automatique
Éteint
0
Pour faire fondre le beurre, le chocolat
1
2
Pour réchauffer les liquides
3
4
Pour crèmes et sauces
5
6
Pot au feu - Blanquette - Entremets
7
8
Pâtes - Riz
9
10
Steaks - Poissons - Omelettes
11
Fritures
12
Conseils dutilisation du plan de cuisson
Utilisez des casseroles à fond plat et de forte
épaisseur pour quelles adhèrent parfaitement à la
zone de chauffe ;
FR
Foyers halogènes
Ils transmettent la chaleur par irradiation de la lampe
halogène quils contiennent. Ils se caractérisent par
leurs propriétés qui rappellent celles du gaz : une
prompte réponse aux commandes et une
visualisation immédiate de la puissance.
Ne pas fixer du regard les foyers halogènes.
Tournez le bouton correspondant dans le sens des
aiguilles dune montre de 1 à 12.
utilisez des casseroles dont le diamètre couvre
complètement la zone de chauffe de façon à
exploiter au mieux toute la chaleur disponible;
assurez-vous que le fond des casseroles soit
toujours parfaitement sec et propre : ladhérence
aux foyers sera ainsi optimale et tant les
casseroles que le plan de cuisson dureront plus
longtemps;
évitez dutiliser les mêmes casseroles utilisées
sur des brûleurs à gaz : la concentration de
chaleur des brûleurs à gaz peut déformer le fond
de la casserole qui perd son adhérence ;
ne laissez jamais un foyer allumé sans casserole,
il risque de sendommager.
31
Page 32

Précautions et conseils
FR
Cet appareil a été conçu et fabriqué conformément
aux normes internationales de sécurité.
Ces conseils sont fournis pour des raisons de
sécurité et doivent être lus attentivement.
Sécurité générale
Le plan de cuisson vitrocéramique résiste aux
sautes de température et aux chocs. N'oubliez
toutefois pas que des lames ou des ustensiles de
cuisine pointus peuvent casser la surface du plan
de cuisson. En cas de cassure, débranchez
immédiatement l'appareil du secteur, faites appel
à un service après-vente agréé et exigez
l'utilisation de pièces détachées d'origine. Le non
respect de ces indications peut compromettre la
sécurité de l'appareil.
Si la surface de la table est fêlée, éteindre
l'appareil pour éviter tout risque d'électrocution.
Cet appareil a été conçu pour un usage familial,
de type non professionnel.
Cet appareil ne doit pas être installé en extérieur,
même dans un endroit abrité, il est en effet très
dangereux de le laisser exposé à la pluie et aux
orages.
Ne touchez pas à lappareil si vous êtes pieds
nus ou si vous avez les mains ou les pieds
mouillés ou humides.
Cet appareil qui sert à cuire des aliments ne doit
être utilisé que par des adultes conformément aux
instructions du mode demploi.
Cette notice concerne un appareil classe 1 (libre
pose) ou classe 2 - sous-classe 1 (encastré entre
deux meubles).
En cours de fonctionnement, les éléments
chauffants et certaines parties du four
deviennent très chaudes. Attention à ne pas les
to
ucher et à garder les enfants à distance.
Evitez que le cordon dalimentation dautres petits
électroménagers touche à des parties chaudes de
lappareil.
Les orifices ou les fentes daération ou dévacuation
de la chaleur ne doivent pas être bouchés
Utilisez toujours des gants de protection pour
enfourner ou sortir des plats du four.
Nutilisez pas de solutions inflammables (alcool,
essence..) à proximité de lappareil lorsquil est
en marche.
Ne stockez pas de matériel inflammable dans la
niche de rangement du bas ou dans le four : si
lappareil était par inadvertance mis en marche, il
pourrait prendre feu.
Les surfaces intérieures du tiroir (s'il y en a un)
peuvent devenir chaudes.
Quand lappareil nest pas utilisé, assurez-vous
toujours que les boutons sont bien sur la position
Ne tirez surtout pas sur le câble pour débrancher
la fiche de la prise de courant.
Neffectuez aucune opération de nettoyage ou
dentretien sans avoir auparavant débranché la
fiche de la prise de courant.
En cas de panne, nessayez en aucun cas
daccéder aux mécanismes internes pour tenter
de réparer lappareil. Faites appel au service
dassistance.
Ne posez pas dobjets lourds sur la porte du four
ouverte.
.
Mise au rebut
Mise au rebut du matériel demballage :
conformez-vous aux réglementations locales, les
emballages pourront ainsi être recyclés.
La Directive Européenne 2002/96/EC sur les Déchets
des Equipements Electriques et Electroniques
(DEEE), exige que les appareils ménagers usagés
ne soient pas jetés dans le flux normal des déchets
municipaux. Les appareils usagés doivent être
collectés séparément afin doptimiser le taux de
récupération et le recyclage des matériaux qui les
composent et réduire limpact sur la santé humaine
et lenvironnement. Le symbole de la poubelle
barrée est apposé sur tous les produits pour
rappeler les obligations de collecte séparée. Les
consommateurs devront contacter les autorités
locales ou leur revendeur concernant la démarche à
suivre pour lenlèvement de leur vieil appareil.
Economies et respect de
lenvironnement
Pour faire des économies délectricité, utilisez
autant que possible votre four pendant les heures
creuses.
Pour vos cuissons au GRIL, DOUBLE GRIL et
DOUBLE GRIL VENTILE nous vous conseillons de
garder la porte du four fermée: vous obtiendrez
de meilleurs résultats tout en faisant de sensibles
économies dénergie (10% environ).
Gardez toujours les joints propres et en bon état
pour quils adhèrent bien à la porte et ne causent
pas de déperdition de chaleur.
32
Page 33

Nettoyage et entretien
Mise hors tension
Avant toute opération de nettoyage ou dentretien
coupez lalimentation électrique de lappareil.
Ne nettoyez jamais lappareil avec des nettoyeurs
vapeur ou haute pression.
Nettoyage du four
Nettoyez lextérieur émaillé ou inox et les joints en
caoutchouc à laide dune éponge imbibée deau
tiède additionnée de savon neutre. Si les taches sont
difficiles à enlever, utilisez des produits spéciaux. Il
est conseillé de rincer abondamment et dessuyer
après le nettoy
produits corrosifs.
Nettoyez lenceinte après toute utilisation, quand le
four est encore tiède. Utilisez de leau chaude et du
détergent, rincez et séchez avec un chiffon doux.
Evitez tout produit abrasif.
Nettoyer la vitre de la porte
abrasifs et des éponges non grattantes, essuyer
ensuite avec un chiffon doux. Ne pas utiliser de
matériaux abrasifs ou de racloirs métalliques aiguisés
qui risquent de rayer la surface et de briser le verre.
Les accessoires peuvent être lavés comme de la
vaisselle courante y compris en lave-vaisselle.
Pour éliminer la graisse et la saleté du tableau de
bord, nettoyez-le avec une éponge non abrasive ou
avec un chiffon doux.
Contrôler les joints du four
Contrôlez périodiquement létat du joint autour de la
porte du four. Sil est abîmé, adressez-vous au service
après-vente le plus proche de votre domicile. Mieux vaut
ne pas utiliser le four tant quil nest pas réparé.
age. Nutilisez ni poudres abrasives ni
avec des produits non
Remplacement de lampoule déclairage
du four
1. Débranchez le four, enlevez le
couvercle en verre du logement de la
lampe (voir figure).
2. Dévissez lampoule et remplacez-la
par une autre de même type : tension
230 V, puissance 25 W, culot E 14.
3. Remontez le couvercle et
rebranchez le
four au réseau électrique.
Si la table est sale, frottez avec un produit
dentretien adapté au verre vitrocéramique, rincez
et essuyez.
Pour enlever les salissures en relief, utilisez un
grattoir spécial (pas fourni avec lappareil). Intervenez
dès que possible, nattendez pas que lappareil ait
refroidi afin déviter toute incrustation des salissures.
Lutilisation dune éponge en fil dacier inoxydable,
spéciale verre vitrocéramique, imprégnée deau
savonneuse donne dexcellents résultats.
Tout objet, matière plastique ou sucre ayant
accidentellement fondu sur la table de cuisson
doit être aussitôt enlevé à laide du grattoir tant
que la surface est encore chaude.
Une fois que la table est propre, vous pouvez
appliquer un produit dentretien et de protection
spécial : celui-ci forme un film invisible qui
protège la surface en cas de débordement
accidentel. Opérez de préférence quand lappareil
est tiède ou froid.
Prenez soin de toujours bien rincer à leau claire et de
sécher la table : les résidus des produits pourraient
en effet sincruster lors dune prochaine cuisson.
Produits de nettoyage
Où les acheter
spéciaux pour vitrocéramique
Raclette à lames et lames de
rechange
Stahl-Fix
SWISSCLEANER
WK TOP
Autres produits pour
Bricolage et
quincaillerie
Articles ménagers
Bricolage
Quincaillerie
Supermarchés
vitrocéramique
Nettoyage de lacier inox
Des taches peuvent se former sur lacier inox si ce
dernier reste trop longtemps au contact dune eau très
calcaire ou de détergents agressifs contenant du
phosphore. Nous vous conseillons de rincer
abondamment et de bien essuyer.
FR
Nettoyage du plan de cuisson
vitrocéramique
Nutilisez jamais de détergents abrasifs ou corrosifs,
tels que des bombes aérosols pour grilloirs et fours, des
détacheurs et dérouilleurs, des poudres à récurer ou
des éponges à surface abrasive : ils risquent de rayer
irrémédiablement la surface.
Pour un entretien courant, passez une éponge
humide sur la surface de la table et séchez avec
du papier essuie-tout.
Assistance
Indiquez-lui :
le modèle de votre appareil (Mod.)
son numéro de série (S/N)
Ces informations figurent sur la plaquette
signalétique apposée sur votre appareil et/ou sur
son emballage.
33
Page 34

FR
34
Page 35

FR
35
Page 36

FR
04/2007 - 195061827.00
36
 Loading...