

Page 1

Fridge/freezer combined
Installation and use
Комбинированный
холодильник-морозильник
Установка и использование
Page 2

BCS 313 V
Fridge/freezer combined 1
GB
Instructions for installation and use
Комбинированный холодильник-морозильник
CSI
Инструкции по установке и использованию
11
To maintain the EFFICIENCY and SAFETY of this appliance, we recommend:
- call only the Service Centers authorized by the manufacturer
- always use original Spare Parts
Производитель оставляет за собой право без предупреждения вносить
изменения в конструкцию, не ухудшающие эффективность работы
оборудования.
- Некоторые параметры, приведенные в этой инструкции, являются приблизительными.
- Производитель не несет ответственности за незначительные отклонения от указанных величин.
Page 3

Safety - a good habit to get into.
ATTENTION
Read your manual carefully since it contains instructions
which will ensure safe installation, use and maintenance of
your appliance.
Your Refrigerator is built to International safety standards
(EN60) and has been awarded the European approval mark
(IMQ) for compliance with UK electrical safety requirements.
It also meets the EC standards on the prevention and elimination of radio interference (EC directive 87/308 - 02.06.89).
1. This appliance must not be installed outdoors - not even in
an area protected by a roof. It is extremely danger ous to leave
it exposed to rain or storms.
2. It must only be used by adults and exclusively to refrigerate
and freeze foodstuffs, following the instructions for use contained in this manual.
3. Do not ever touch or handle the appliance with bare feet or
with wet hands or feet.
4. It is highly recommended that you do not use extension
cords or multiple socket adapters. If the refrigerator is installed
between cabinets, make sure that the cord is not bent or dangerously pinched or compressed.
5. Never pull on the cord or the refrigerator to remove the
plug from the wall socket - this is very dangerous.
6. Never touch the cooling components within the appliance,
especially with wet hands because this could result in injury.
Never put ice cubes just removed from the freezer into your
mouth because they could stick to your mouth and cause burns.
7. Never clean or perform maintenance on the appliance
without first removing the plug from the socket; in fact,
turning the knob for adjusting the temperature to the "0"·
setting is not sufficient to eliminate all electrical contact with
the mains.
8. Before having your old refrigerator picked up for disposal,
remove or make inoperable any locking devices to prevent children who might play in or around the appliance from being
locked inside.
9. Before calling for service/assistance in the case of malfunction, consult the chapter entitled “Is There a Problem? to determine whether it is possible to eliminate the problem. do not
try to repair the problem by trying to access the internal components of the appliance.
10. If damaged, the power supply cord on this appliance
must necessarily be replaced by our service centre because
special tools are required for replacement.
11. Do not use electric appliances inside the compartment for
food storage, if these are not those recommended by the
manufacturer.
12. At the end of the functional life of your appliance –
containing cyclopentane gas in the insulation foam and perhaps
gas R600a (isobutane) in the refrigeration circuit – the latter
should made safe before being sent to the dump.
For this operation, please contact your dealer or the Local
Organisation in charge of waste disposal.
Installation
To ensure that the appliance operates properly and to
reduce energy consumption, it is important that the
appliance is installed correctly .
V entilation
The compressor and condenser generate heat and, therefore, need to be ventilated properly. Rooms with less than
perfect ventilation are not very suited for installation of the
appliance. Therefore, it should be installed in a room with
an opening (window or French window) that provide the
appropriate amount of air re-circulation. It is also important
that the room not be too humid.
Away from Heat
This appliance should not be positioned in a place where it is
directly exposed to sunlight or directly next to an iven/hob.
Electrical Connection and Earthing
Before proceeding with the electrical connection, make sure
that the voltage indicated on the rating plate, located at the
bottom left near the vegetable crisper, corresponds to the
mains voltage in your home and that the socket is fitted
with a standard earthing wire in accordance with safety
standards for 46/90 systems. If the socket is not fitted with
an earthing wire, the manufacturer will not be held liability
for any damages and or injuries arising out of the use of the
appliance. Do not use multiple sockets or adapters.
Position the appliance in such a way that you can access
the socket where it is plugged in.
Insufficient power?
The electrical socket must be able to handle the maximum
power load of the appliance, which is indicated on the rating plate located at the bottom left next to the vegetable
crisper.
Before making the electrical connection ...
After the appliance has been delivered, place it in the vertical upright position and wait at least 3 hours before inserting the plug into the socket in order to ensure that it functions properly .
1
GB
Page 4

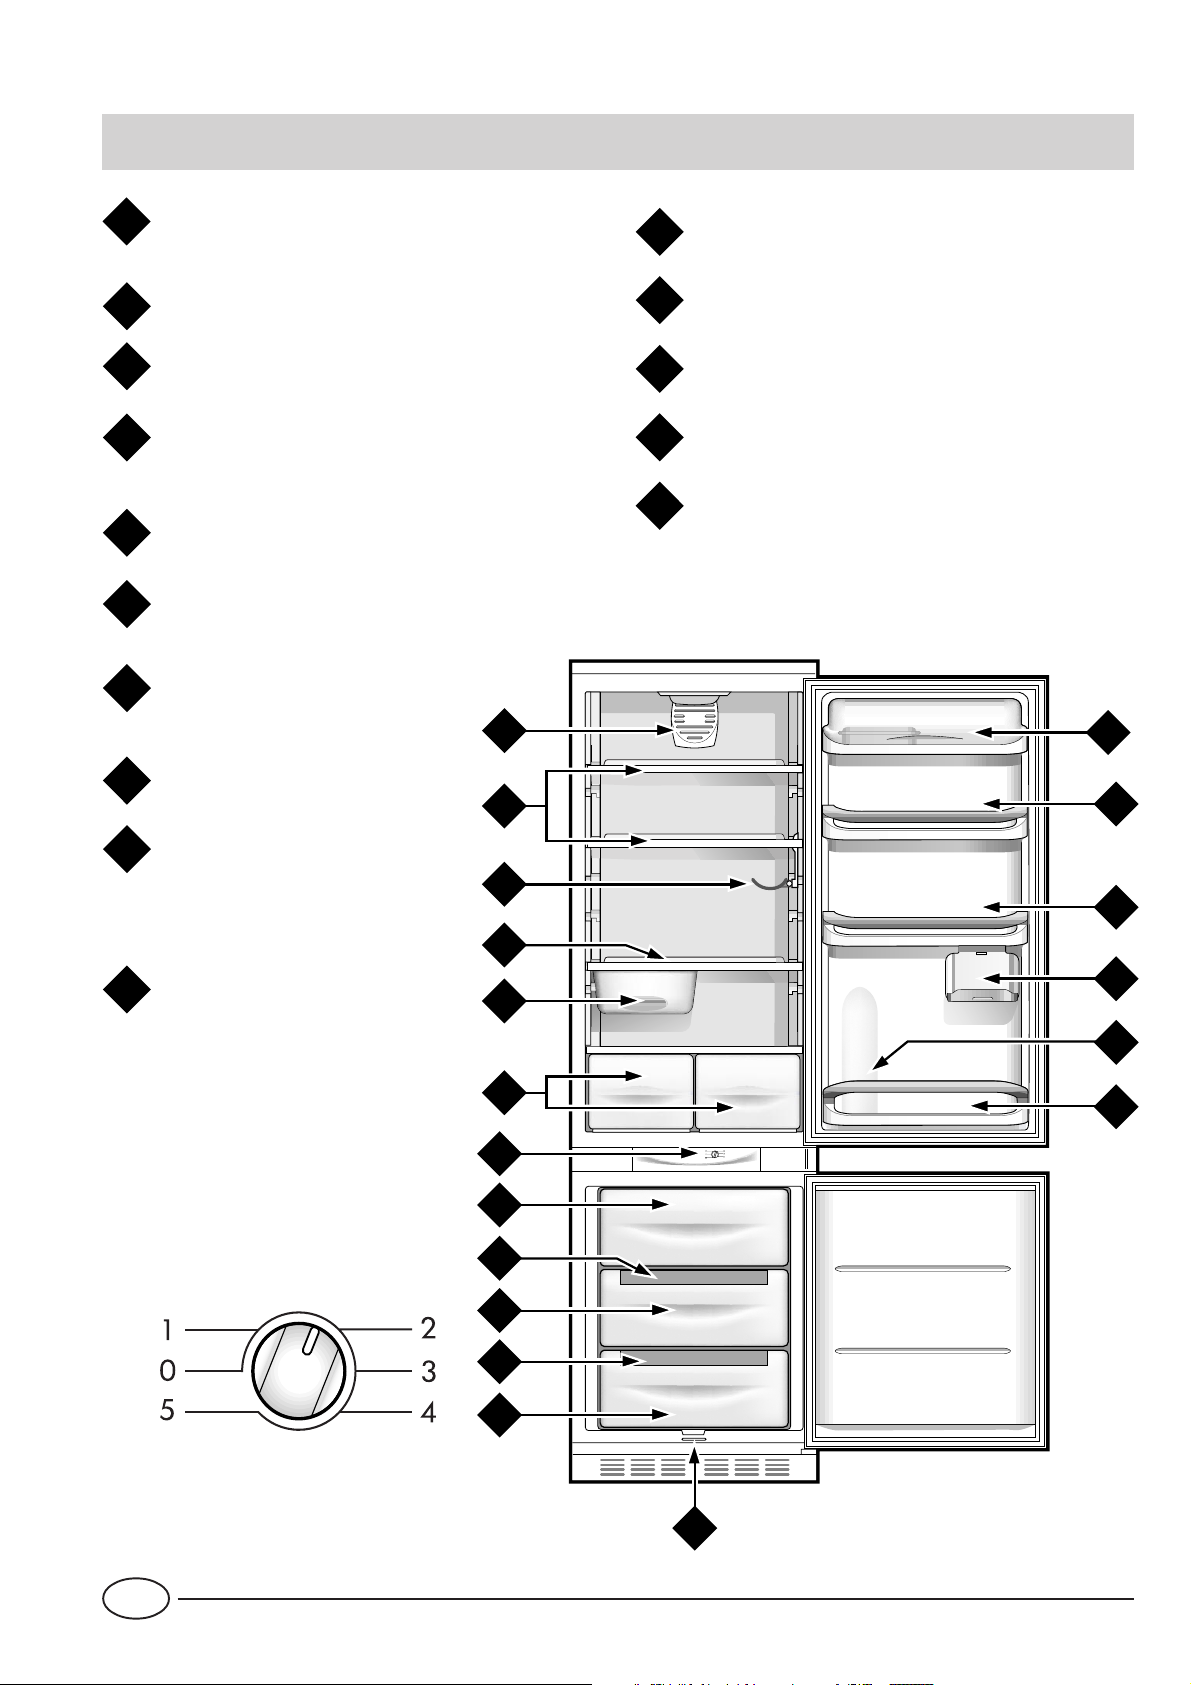
Close-up view
M
D
E
O
N
L
M
F
K
A
B
C
B
J
G
H
G
I
H
Removable door shelves with lid, with egg tray
A
and lidded butter dish
Removable miscellaneous shelf
B
Hinged shelf
C
Compartment for a 2 litre bottle
D
Removable door shelf for bottles
E
Drain system for drawing off
F
defrost water from freezer
compartment
Compartment for storing
G
Fruit and Vegetable Crispers
K
Meat/cheese storage box
L
Removable/Adjustable Shelves
M
Hinged bottle rack
N
"A.I.R. System"
O
(Ariston Integrated Refrigeration)
frozen foods
Ice tray "ESY ICE"
H
Compartment for freezing
I
fresh foods and storing frozen
foods
Compartment for freezing
J
fresh foods and storing frozen
foods
This knob is used to regulate the
temperature in the two compartments with the following settings:
0 The refrigerator is off;
1 less cold;
5 colder
GB
2
Page 5

How to Start the Appliance
NOTICE
After the appliance has been delivered, stand it in the
upright position and wait approximately 3 hours before connecting it to the electrical outlet to guarantee
that it operates properly.
Before placing foodstuffs in the refrigerator or fr eezer , clean
the interior well with warm water and baking soda.
After having plugged the appliance into the socket, make
sure that the refrigerator light has turned on. Then turn the
thermostat knob “J” to setting “3”. After a few hours have
passed, you can place fresh food in the refrigerator compartment and frozen foods into the freezer.
How to use the refrigerator compartment...
The thermostat automatically regulates the temperature inside the appliance
1 = less cold 5 = colder
It is recommended that a medium setting be used.
To increase the amount of space, optimize arrangement and
improve appearance, this appliance has a “cooling area” located within the back panel of the refrigerator compartment.
When the appliance is operating, this panel may be covered
with frost or droplets of water depending on whether the compressor is operating or not at a given time. Do not be concerned about this! The refrigerator is operating normally.
If the thermostat knob is positioned on higher settings while
the refrigerator is heavily filled and the ambient temperature
high, the appliance may run continuously , resulting in the for mation of frost on the back cooling area. This will lead to an
increase in energy consumption.
To avoid this situation, just turn the thermostat knob to a
lower setting so that the appliance defrosts automatically .
The refrigerator compartment of your appliance is equipped with
A.I.R. System (Ariston Integrated Refrigeration) which allows
an optimal food storage while simplifying the use of the refrigerator
thanks to the following features:
- Fast temperature reset: after the doors heve been opened,
the internal temperatures return to optimal values faster,
improving food storage.
- More uniform temperature distribution: this makes it possible
to place any type of food on any shelf.
- Higher humidity level: this allows you to store food longer.
The refrigerator compartment is equipped with practical slideout shelves (Fig. 1) which can be adjusted for height using the
appropriate guides. This feature allows you to store large containers and food products.
Remember to cool hot food before storing otherwise the temperature inside the appliance will increase, causing the compressor to work harder and use more energy.
Do not store liquids in unsealed containers since this will increase the humidity and lead to the formation of frost in the
refrigerator.
Be careful not to place containers (plastic or glass), food or
other objects in direct contact with the cooling area of the
back wall of the refrigerator. This could harm the food, increase energy consumption and facilitate the formation of
condensate (on food, containers, etc.).
T o use the meat/cheese box, unhook it and remove it fr om the
shelf. To optimise space according to your needs, the same
can be moved laterally (Fig. 2).
The side bottle rack can be used either for storing bottles (Fig.
3) as well as several cans (2-4) placed horizontally (Fig. 4). If
not in use, the bottle/can rack can be tipped up and away to
make more room inside the refrigerator.
1
B
B
B
A
A - Blown air which is cooled when it comes into contact with
the refrigeration panel
B - Hotter air is drawn in
Remember to follow our instructions on the storage life of
foods: If not stored properly , even the fr eshest food will deteriorate quite quickly.
Contrary to popular belief, cooked foods do not keep longer
than fresh food.
A
3
Fig. 1
Fig. 3
2
Fig. 2
Fig. 4
GB
Page 6

How to use the freezer compartment...
- For the preparation of food to be frozen, please consult a specialized manual.
- Food that has been thawed, even partially , must not be refrozen: you must cook it in order to consume it (within 24
hours) or to freeze it once again.
- Fresh foods that you intend to freeze must not be placed
in contact with those that are already frozen or those that
have been fast-frozen. Rather, they must be placed on the
grid in the freezer compartment, in contact with the walls
of the compartment (back or side) if possible. Please keep in
mind that proper conservation of frozen foods depends on
the speed with which they are frozen.
- During the freezing process, avoid opening the door of the
freezer .
- The maximum daily quantity of food that can be frozen is
indicated on the rating plate located to the left of the vegetable crisper.
- In order to freeze and then thaw foods optimally, it is recommended that you divide food into small portions so that
they freeze quickly and uniformly. The packages should be
clearly marked with the content and the date they were
frozen.
- Do not open the freezer door in the event of a power
failure or malfunction. This precaution will slow the rise in
temperature within the compartment. If the door is not
opened, frozen and fast-frozen foods will remain in their
current state for approximately 9-14 hours.
- Do not place full bottles in the freezer: they could easily
burst because all liquids increase in volume when they freeze.
- If the ambient temperature remains below 14°C for an
extended period of time, the temperature needed for extended storage of food in the freezer will not be reached,
resulting in reduced storage life of the food.
Ice trays
This new concept of ice trays is an exclusive Merloni patent.
The fact that they are situated on the top part of the freezer
drawers ensures greater ergonomics and cleanliness and
leaves more room free inside the drawers : the ice no longer
comes into contact with the food placed inside the freezer
compartment; furthermore, the dripping of the water during
filling is avoided (a lid to cover up the hole after filling with
water is also provided).
Instructions for use (Fig. 5)
Fill up the tray with water via the special hole up to the level
indicated (MAX WATER LEVEL), taking care not to exceed
it: inserting more water than is necessary will lead to the
formation of ice which could obstruct the exit of the ice
cubes.
If you have used an excessive amount of water, you will
have to wait until the ice has melted, empty out the tray
and re-fill it with water.
Once you have filled the ice tray up with water through the
hole indicated, turn it by 90 °. Thanks to the connected
compartments, the water fills up the special shapes, after
which you can cover the hole up with the special cap and
place the ice tray in the inner door of the freezer
compartment.
Once the ice has formed, all you need to do is to knock the
tray against a hard surface so that the ice cubes come away
from their housing and come out of the same hole used to
fill the tray with water . T o make it easier for the ice cubes to
come out, wet the outside of the tray.
WARNING: every time you fill up the ice tray with water ,
make sure that the same is completely empty and that there
are no traces of ice left inside it.
The minimum time required for ice to form well is
approximately 8 hours.
GB
MAX
WATER LEVEL
MAX
WATER LEVEL
Fig. 5
4
Page 7

Guide to Using the Freezer
Meat and Fish
Food Wrapping
Beef Roast Tinfoil 2 / 3 9 / 10 Not required.
Lamb Tinfoil 1 / 2 6 Not required.
Pork Roast Tinfoil 1 6 Not required.
Veal Roast Tinfoil 1 8 Not required.
Veal/Pork Chops
Veal/Lamb Cutlets
Minced Meat
Heart and Liver Plastic Baggies 3 Not required.
Each piece wrapped in cling wrap and
then in tinfoil (4 to 6 slices)
Each piece wrapped in cling wrap and
then in tinfoil (4 to 6 slices)
In aluminium containers covered with cling
wrap.
Tenderising
(days)
Freshly
minced
Storage
(months)
6 Not required.
6 Not required.
2 Slowly in refrigerator.
Thawing Time
Sausages Cling Wrap or Tinfoil 2 As necessary.
Chicken and Turkey Tinfoil 1 / 3 9 Very slowly in refrigerator.
Duck and Goose Tinfoil 1 / 4 6 Very slowly in refrigerator.
Pheasant, Partrige and
Wild Duck
Hare and Rabbit Tinfoil 3 / 4 6 Very slowly in refrigerator.
Venison Tinfoil or Cling Wrap 5 / 6 9 Very slowly in refrigerator.
Large Fish Ti nfoil or Cling Wrap 4 / 6 Very slowly in refrigerator.
Small Fish Plastic Baggies 2 / 3 Not required.
Crustaceans Plastic Baggies 3 / 6 Not required.
Shellfish
Tinfoil 1 / 3 9 Very slowly in refrigerator.
Store in salted water in aluminium
containers or plastic containers.
3 Very slowly in refrigerator.
Boiled Fish Tinfoil or Cling Wrap 12 In hot water.
Fried Fish Plastic Baggies 4 / 6 Directly in pan.
5
GB
Page 8

Fruits and Vegetables
Food Preparation
Apples and Pears Peel and cut into slices. 2’
Apricots, Peaches,
Cherries and Plums
Strawb erries
Blackberries and
Raspberries
Cooked Fruit Cut, cook and strain.
Fruit Juice Wash, cut and crush.
Cauliflower
Cabbage and
Brussel Sprouts
Peas Shell and wash. 2’ Plastic Baggies 12 Not required.
Peel and pit. 1’ / 2’
Rinse and fry.
Remove leaves, cut head
into small pieces and blanch
in wate r and a little lem on
juice .
Wash a nd c ut into sm all
pieces.
Blanching
Time
2’ Plastic Baggies 12 Not required.
1’ / 2’ Plastic Baggies 10 / 12 At room temperature.
Wrapping
In Containers (cover
with syrup)
In Containers (cover
with syrup)
In Containers (cover
with sugar)
In Containers (add
10% sugar)
In Containers (sugar
to taste)
Storage
(months)
12
12
10 / 12
12
10 / 12
Thawing Time
In refrigerator very
slowly.
In refrigerator very
slowly.
In refrigerator very
slowly.
In refrigerator very
slowly.
In refrigerator very
slowly.
French Beans Wash and slice if required. 2 Plastic Baggies 10 / 12 Not required.
Carrots, Peppers
and Turnips
Mush rooms a nd
Asparagus
Spinach Wash and mince. 2’ Plastic Baggies 12 At room temperature.
Vegetable for Soups
Various Foods Preparation
Bread Plastic Baggies 4
Cakes Plastic Baggies 6
Cream Plastic Containers 6
Butter
Peel, w a sh an d slice if
necessary.
Wash, peel and cut up. 3’ / 4’
Wash and cut up in small
pieces.
3’ / 4’ Plastic Baggies 12 Not required.
3’
Blanching
Time
Plastic Baggies or
Containers
Plastic Baggies or
Containers
Wrapping
In original wrapping
or tinfoil
6 At room temperature.
6 / 7 Not required.
Storage
(months)
6 In refrigerato r.
Thawing time
At room temperature
and in the oven.
About 10 minutes at
room temperature,
cook at 100/200°C.
At room temperature or
in refrigerator.
Boiled Food or
Vegetable Soup
Eggs
GB
Plastic or Glass
Containers
Freeze without shells
in sm a ll co nta ine rs
6
3 / 6
10
At room temperature or
in hot water.
At room temperature or
in refrigerator.
Page 9

Tips on Saving Energy
- Install the Appliance Properly
In other words, away from sources of heat and direct sunlight, in a well ventilated room complying with the minimum distances indicated in the paragraph entitled, “ Installation/Ventilation.”.
THE ACTUAL ENERGY CONSUMPTION OF THE
APPLIANCE DEPENDS ON THE WAY THE SAME IS USED
AND ON ITS LOCATION.
The consumption tests were performed in 560mm deep
column units, the most common installation setting for this
appliance.
- Use the Right Temperature Setting
A setting which is too cold increases energy consumption.
- Do not Overfill
To conserve food properly, the cold air must circulate freely
within the refrigerator . If it is overfilled, this will prevent pr oper
air circulation, forcing the compressor to work continuously.
- Close the Doors
Open your refrigerator as little as possible because each time
you do so you loose much of the cold air. To raise the temperature to the proper level again, the motor must work for
a long time, consuming energy.
- Keep an Eye on the Seals
Keep the seals clean and make sure that they adhere well to
the door. This alone will ensure that no cold air escapes.
- No Hot Foods
A hot pot or pan placed in the refrigerator immediately raises
the temperature several degrees. Let hot cookwar e and food
cool to ambient temperature before placing them in the refrigerator .
- Defrost the Freezer
Check the thickness of the frost on the walls of the freezer
and immediately defrost it if the layer of frost is too thick.
(see the section entitled, “Keeping your Appliance in Shape”).
Keeping Your Appliance in Shape
Before doing any cleaning, disconnect the appliance
from the electricity (by pulling out the plug or turning
off the general switch in your home).
Defrosting
WARNING: do not damage the refrigeration cir cuit.
Do not use mechanical devices or other tools to speed
up the defrosting process, unless they have been recommended by the manufacturer.
How to Defrost the Refrigerator
This appliance defrosts automatically and the water is
channeled to the back toward the drain installed for this
purpose (fig. 6). Here, the heat produced by the compr essor
will make it evaporate. The only thing you must do is to
periodically check and clean the hole of the drain, which is
located behind the vegetable crispers, so that the water
drains properly.
How to Defrost the Freezer
- Every so often, remove the frost with the scraper provided
with the appliance (do not use knives or metal objects).
- If the frost is more than 15 mm thick, the freezer must be
defrosted.
Proceed as follows: turn the thermostat knob (H) to the ·
setting "0" (Fig. 7). Then wrap all the frozen and fast-fr ozen
food in newspaper, placing it either in the refrigerator or in
a cool place. Leave the freezer door open so that the frost
thaws completely . Y ou can speed this process by placing containers of warm water in the compartment.
The unit is provided with a system which allows the defrost
water to be collected in a container to be placed beneath
the unit (proceed as illustrated in fig 8).
Fig. 6
7
Fig. 7
Fig. 8
GB
Page 10

Cleaning and Special Maintenance
Before cleaning the refrigerator , disconnect it from the
electrical mains (by removing the plug from the socket
or by turning off the main electricity switch for the
apartment or house).
- The materials used to build your appliance are hygienic
and do not transmit odors. However , to preserve this quality
of your appliance, the food stored in it must be well closed
and covered to prevent spills which could stain it and cause
unpleasant odors.
- Only water and baking soda. T o clean both the interior and
exterior, use a sponge with warm water and baking soda,
which is, among other things, a good disinfectant. If you do
not have any in the house, you can use a neutral soap.
- What not to use. Never use abrasives, bleach or ammonia.
Solvents and similar products are strictly prohibited.
- All the removable part should be taken out and allowed to
soak in hot water and dishwashing soap. Rinse and dry them
well before putting them back in the refrigerator.
- When the appliance is not used for a long time. If you
decide not to use the appliance (during the summer), it must
cleaned and the doors left open to prevent the formation of
mold and unpleasant odors.
- Replacing the light bulb.
When replacing the light of the refrigerator compartment
unplug the unit from the power supply and chang the used
lamp with another one of not more than 15 W.
For access ti lamp "A", remove the centre screw "B" at the
back of the lamp cover, as indicated in fig. 9.
Fig. 9
A
B
GB
8
Page 11

Is There a Problem?
The refrigerator does not function.
Have you checked whether:
• The main switch for the electricity to the apartment or
home has been turned off;
• The plug is properly inserted in the outlet;
• The outlet is adequate; try inserting the plug into another
outlet in the room.
The refrigerator and the freezer do not cool
properly.
Have you checked whether:
• The doors do not close well or the seals are faulty;
• The doors are left open too long;
• The thermostat knob is not on the proper setting;
• The refrigerator or freezer is overfilled.
The food in the refrigerator becomes too cold.
Have you checked whether:
• The thermostat knob is on the proper setting;
• The food is in contact with the back wall - which is the
coldest part.
If after all the checks, the appliance still does not operate or
the problem persists, call the nearest Service Centre and
inform them of: the type of problem, the abbreviation of
the model name (Mod.) and the relative numbers (S/N) written on the rating plate located at the bottom left next to
the vegetable crisper (see examples in the figures below).
75
Test
P.S-I.
TI
Net
Util
Utile
Pressure
HIGH-235
LOW 140
RG 2330
Mod.
220 - 240 V- 50 Hz 150 W
340
Total
Gross
Bruto
Brut
Compr.
Syst.
Kompr.
Made in Italy 13918
Gross
Bruto
Brut
R 134 a
kg 0,090
93139180000 S/N 704211801
Cod.
Gross
Bruto
Brut
W
Fuse
A
Freez. Capac
Poder de Cong
4,0
kg/24 h
Max 15 w
Class
Clase
N
Classe
Never call on unauthorized technicians and always
refuse spare parts which are not originals.
The motor runs continuously.
Have you checked whether
• The doors are not closed well or have remained open too
long;
• The ambient temperature is too high;
• The thermostat knob is not on the proper setting.
The appliance makes too much noise.
The gas refrigerant produces a slight noise even when the
compressor is not running (this is not a defect).
Have you checked whether:
• The refrigerator is level.
• The appliance was installed between cabinets or objects
that vibrate and make noise.
There is water on the bottom of the refrigerator.
Have you checked whether:
• The hole for draining the water from the frost is clogged
(see fig. 6).
9
GB
Page 12

GB
10
Page 13

Безопасность хорошая привычка
Внимательно прочитайте данное руководство: оно поможет
Вам ознакомиться с возможностями холодильника, правилами
его монтажа, использования и обслуживания.
Ваш холодильник изготовлен в соответствии с международными стандартами безопасности (EN 60). За удовлетворение требований электробезопасности Великобритании
холодильник был отмечен маркой соответствия (IMQ). Оборудование отвечает требованиям ЕС (директива ЕС 87/308
от 02.06.89) о предотвращении и устранении радиопомех.
1. Холодильник разработан для использования внутри помещений. Ни при каких обстоятельствах не используйте оборудование на улице.
2. Холодильник должен использоваться в домашних условиях
для замораживания свежих продуктов и хранения замороженных продуктов в соответствии с инструкциями данного
руководства.
3. Не касайтесь оборудования мокрыми или сырыми руками.
Не пользуйтесь холодильником босиком.
4. Не используйте для подключения холодильника удлинители и тройники. Если холодильник установлен между
предметами мебели, убедитесь, что провод не перекручен и
не прижат.
5. Никогда не тяните за провод или за сам холодильник, чтобы
отсоединить его от розетки. Это очень опасно.
6. Не касайтесь внутренних охлаждающих элементов холодильника, особенно влажными руками, чтобы не получить
местное обморожение. Не берите сразу в рот кубики льда,
вынутые из морозильного отделения Вы можете обжечься.
7. Перед выполнением любых работ по мойке или обслуживанию отсоедините холодильник от сети, вынув вилку из
розетки. Имейте в виду, что установки термостата в положение "0" недостаточно для полного отключения электропитания холодильника.
8. Прежде чем избавиться от старого холодильника необходимо сломать или снять с него запирающие приспособления, чтобы обезопасить детей, которые могут закрыть себя
внутри во время игры.
9. При возникновении нестандартной ситуации отключите
холодильник от сети и позвоните в сервисный центр, телефон которого напечатан в гарантийном документе (сервисном сертификате, сервисной книжке). Перед звонком в
сервисный центр прочитайте раздел «Устранение неисправностей». Возможно Вы сами решите возникшую проблему.
Не пытайтесь самостоятельно чинить холодильник, если
требуется вмешательство в его внутренние компоненты.
10. Если необходимо заменить питающий кабель, обратитесь в сервисный центр (в любом случае при подсоединении
кабеля должны использоваться специальные контакты и
инструменты).
Запрещается изменение конструкции холодильника и вмешательство лиц, не уполномоченных производителем на
гарантийный ремонт.
11. Не используйте электроприборы, предназначенные для
приготовления пищи, для ее хранения в холодильнике, если
это не рекомендовано производителем.
12. Если Вы решили больше не использовать Ваш холодильник, перед тем как выбросить, позаботьтесь об его
утилизации. Ваш холодильник содержит циклопентановый газ
в изоляционной пене и, возможно, изобутан (R600) в
охлаждающем контуре в последнем случае Вам необходимо связаться с местной организацией, ответственной за
утилизацию.
Установка
Правильная установка необходима для обеспечения
надежной и наиболее эффективной работы холодильника.
Вентиляция
Компрессор и конденсатор холодильника в процессе работы нагреваются, поэтому необходимо обеспечить достаточную вентиляцию. Холодильник должен быть
установлен в хорошо проветриваемом помещении с
нормальной влажностью. Запрещено устанавливать
холодильники в помещениях с повышенной влажностью,
например, ванных комнатах, подвалах.
Не располагайте вблизи источников тепла
Не следует устанавливать холодильник так, чтобы он находился под воздействием прямых солнечных лучей или
рядом с источниками тепла (кухонными плитами, духовками и т.п.).
Подключение к электросети
Перед подключением к электросети убедитесь, что напряжение сети соответствует данным, указанным в таблице, которая находится на левой стороне холодильного
отделения рядом с ящиками для хранения овощей и фруктов; розетка заземлена в соответствии с нормами
безопасности.
Запрещено использование переходников и удлинителей,
так как они создают опасность возгорания.
Оборудование, подключенное с нарушением требований
безопасности бытовых приборов большой мощности, изложенных в данной инструкции, является потенциально
опасным. Производитель не несет ответственности за
ущерб здоровью и собственности, если он вызван несоблюдением указанных норм установки.
Холодильник должен быть установлен таким образом, чтобы Вы всегда имели доступ к розетке.
Розетка
Розетка должна выдерживать полную электрическую нагрузку холодильника, которая указана в табличке характеристик оборудования.
Перед подключением к электросети
Установите холодильник вертикально и подождите примерно 3 часа перед подключением его к электросети
это необходимо для правильной работы холодильника.
1111
CSI
Page 14
Описание
Съемная полка с лотком для яиц и
A
масленкой
Съемная полка для разных продуктов
B
Полка с крышкой
C
Гнездо для одной бутылки ¸мкостью 2
D
литра
Съемная дверная полка для бутылок
E
Дренажная система для отвода
F
оттаявшей воды
Отделение для хранения
G
Ящики для овощей и фруктов
K
Скользящий контейнер для мяса и сыра
L
Съемные, регулируемые по высоте полки
M
Откидная полка для бутылок
N
Система охлаждения воздуха "A.I.R.
O
System" («Интегрированная система
охлаждения Аристон»)
замороженных продуктов
Лоток для льда "EASW ICE"
H
Отделение для
I
замораживания свежих
продуктов и хранения
замороженных продуктов
Рукоятка термостата
J
холодильного отделения
Рукоятка термостата
позволяет регулировать температуру в холодильном и морозильном отделениях.
Возможны следующие
установки:
0 холодильник выключен;
1 минимальное охлаждение;
5 максимальное охлаждение.
O
M
N
M
L
K
J
I
H
A
B
B
C
D
E
CSI
G
H
G
F
12
Page 15

Включение холодильника
ВНИМАНИЕ
После установки подождите примерно три часа
перед тем, как подключить холодильник к
электросети, чтобы быть уверенными, что
хладагент после транспортировки распределился должным образом это необходимо для правильной работы холодильника.
До помещения продуктов в холодильник необходимо
вымыть внутренние поверхности холодильной и морозильной камер раствором пищевой соды.
После того как Вы подключили холодильник к электрической сети, убедитесь, что лампочка в
холодильнике загорелась, установите рукоятку
термостата J в среднее положение (3), через
несколько часов Вы можете поместить продукты в
холодильное отделение.
Использование холодильного отделения
Температура внутри холодильного отделения автоматически регулируется в соответствии с позицией,
установленной рукояткой термостата.
1 наименее холодный режим
5 наиболее холодный режим
Мы рекомендуем устанавливать термостат на
среднюю позицию.
Для того, чтобы увеличить пространство,
оптимизировать расположение продуктов и
улучшить видимость внутри отделения, испаритель
расположен на задней панели холодильного
отделения. Во время работы холодильника панель
может покрываться инеем или каплями воды в зависимости от того, работает компрессор в данный
момент или нет. Не беспокойтесь, это совершенно
нормально.
Если термостат установлен на максимальную
позицию (например, холодильник сильно заполнен
продуктами или температура в помещении очень
высокая), то компрессор может работать
беспрерывно, в результате чего на панели
испарителя образуется слой инея. Это приводит к
повышенному потреблению электроэнергии. Во
избежание подобной ситуации просто установите
рукоятку термостата À на меньшую позицию, так
чтобы холодильник разморозился автоматически.
Холодильное отделение Вашего холодильника оснащено
системой охлаждения воздуха "A.I.R. System", которая
позволяет достигать оптимального режима хранения продуктов и, в то же время, упрощает процесс использования
холодильника благодаря следующим функциям:
- Быстрое восстановление температуры: после открыва-
ния дверцы внутренняя температура возвращается к
оптимальному значению быстрее, улучшая режим хранения продуктов.
- Ровное распределение температуры: позволяет помещать любые продукты на любые полки.
- Высокий уровень влажности: увеличивает срок хране-
ния продуктов.
A - выдуваемый воздух, охлаждающийся
B - втягиваемый нагретый воздух.
Следуйте инструкции по хранению: при неправильном
хранении даже самые свежие продукты быстро
испортятся.
Вопреки общеизвестному мнению помните, что приготовленные продукты можно хранить меньшее время, чем
свежие.
Холодильное отделение оборудовано практичными съемными полками (Рис. 1), высота которых может регулироваться, это позволяет размещать крупные упаковки и
большие емкости. Полки могут быть наклонены для хранения открытых бутылок.
Дайте пище остыть, перед тем как помещать ее в холодильник. Это позволит избежать повышения температуры
в холодильнике, а следовательно, дополнительной нагрузки на компрессор и дополнительного расхода электроэнергии.
Не ставьте в холодильник жидкости в открытых емкостях,
это увеличит влажность и приведет к формированию инея
на стенках.
B
B
A
при соприкосновении с холодной панелью;
B
A
1
2
1313
Ðèñ. 1
CSI
Page 16

Контейнер для хранения сыра/мяса (L) - съемный. Для
оптимизации свободного места контейнер можно
сдвинуть поперек (Рис. 2).
Боковая откидная полка для бутылок (N) может использоваться для горизонтального хранения любой бутылки
(Рис. 3) или нескольких (2-4-х) консервных банок (Рис.
4). Если полка не используется, ее можно закрыть, освободив место в холодильнике.
Ðèñ. 3
Ðèñ. 2
Ðèñ. 4
Использование морозильного отделения
Для подготовки продуктов к замораживанию
смотрите специальную инструкцию.
1. Продукты, хотя бы частично размороженные, не следует замораживать повторно: используйте их для приготовления блюд, которые следует либо употребить в
течение 24 часов, либо заморозить.
2. Когда замораживаете свежие продукты, не
допускайте, чтобы они касались ранее замороженных
продуктов. Предпочтительно, чтобы продукты
размещались на верхней решетке морозильной
камеры, по возможности соприкасаясь с задней и
боковыми стенками. Помните, что сохранность продуктов зависит от скорости замораживания.
3. Максимальное количество продуктов, которое вы можете заморозить за один день, указано на внутренней
стороне дверцы.
4. Старайтесь не открывать дверь морозильного отделения во время замораживания.
5. Для правильного хранения и легкости последующего
размораживания размещайте продукты в морозильном отделении небольшими порциями; это
способствует более быстрому и надежному
замораживанию. Рекомендуем вести записи с
указанием даты замораживания.
6. В случае сбоев в электропитании не открывайте дверцу
холодильного отделения. Это поможет сохранить продукты по крайней мере в течение 9-14 часов.
7. Не помещайте в холодильник полные бутылки, особенно если в них находятся плотно закупоренные
шипучие или газированные напитки. Вода,
расширяясь, может взорвать бутылку.
8. Если температура окружающей среды в течение продолжительного времени не превышает 14°С, то температура, необходимая для хранения продуктов, не
будет достигнута, что сократит время хранения
продуктов.
CSI
14
Page 17

Лотки для льда
Этот новый тип формочек для ледяных кубиков
запатентован фирмой Merloni. Их расположение в
верхней части ящиков морозильной камеры
обеспечивает большую эргономику и чистоту: лед
не соприкасается с продуктами, помещенными в
морозильное отделение. Более того, исключается
пролив воды во время заполнения (после заполнения закройте прилагаемой крышкой).
Инструкции по использованию (Рис. 5)
Заполните лоток водой через специальное отверстие до
указанного уровня (МАХ WATER LEVEL максимальный
уровень воды), превышение уровня может привести к
тому, что извлечение льда из формы будет затруднено.
Если Вы все-таки превысили максимально допустимый
уровень, подождите пока лед растает, опорожните форму
и заполните еще раз.
После того, как Вы заполнили форму до указанного уровня, поверните ее на 90 градусов. По принципу
сообщающихся сосудов вода заполняет формочки, после
чего отверстие закрывается пробкой, и формочки
помещаются в специальное гнездо в ящике.
Когда лед будет готов, постучите формой о твердую поверхность, чтобы кубики льда вышли из формовочных
гнезд, затем вытрясите их через заливное отверстие. Готовые кубики льда будет легче вытряхнуть, если вы намочите внешнюю поверхность формы.
ПРЕДУПРЕЖДЕНИЕ: каждый раз перед использованием
формы убедитесь, что она совершенно пуста и в ней не
остались кусочки льда.
Минимальное время, необходимое для приготовления
льда примерно 8 часов.
Ðèñ. 5
MAX
WATER LEVEL
MAX
WATER LEVEL
Рекомендации по экономии электроэнергии
- Правильно установите холодильник
На расстоянии от источников тепла, вне досягаемости
прямых солнечных лучей, в хорошо проветриваемом помещении и с соблюдением расстояний, указанных в гл.
"Установка" (§ "Вентиляция").
ФАКТИЧЕСКИЙ РАСХОД ЭНЕРГИИ ЗАВИСИТ ОТ
СПОСОБА УПОТРЕБЛЕНИЯ ПРИБОРА И ОТ МЕСТА,
ГДЕ ОН БУДЕТ РАЗМЕЩЕН.
Испытания на расход были проведены в колонках
глубиной 560 мм, т.е. на обычных условиях
установки.
- Только оптимальное охлаждение
Установка излишне низкой температуры увеличит расход
электроэнергии.
- Не переполняйте
Для сохранности продуктов важна достаточная циркуляция
воздуха. Переполнение продуктами мешает должной циркуляции воздуха, заставляя мотор работать непрерывно.
- Закрывайте дверцы
Открывайте дверцы только при необходимости, помните, что каждое открывание дверцы несколько повышает
температуру внутри холодильника. Для восстановления
прежней температуры мотор должен работать длительное
время, потребляя дополнительную электроэнергию.
- Следите за уплотнителями
Следите за тем, чтобы резиновые уплотнители оставались чистыми и плотно прилегали к дверцам, это позволит избежать утечки холодного воздуха.
- Не помещайте горячую пищу
Горячие продукты, помещенные в холодильник, немедленно повышают температуру на несколько градусов.
Дайте остыть продуктам и посуде до комнатной
температуры перед тем, как помещать их в холодильник.
- Размораживайте морозильное отделение
Проверяйте толщину инея на стенках морозильника, и
немедленно разморозьте его, если слой инея слишком
толстый (см. гл. «Обслуживание и уход»).
1515
CSI
Page 18

2-3 9-10
1-2 6
16
18
3
2
1-3 9
1-4 6
1-3 9
3-4 6
5-6 9
6
6
2
4-6
2-3
3-6
12
4-6
CSI
16
3
Page 19

1 -2
1-2 10-12
2 12
2
2 12
(
(
(
12
12
10-12
12
10-12
2 10-12
3-4 12
3-4
2 12
6
6-7
4
6
6
6
3-6
10
1717
CSI
Page 20

Обслуживание и уход
Перед выполнением любых операций по мойке
и обслуживанию отсоедините холодильник от
электросети.
Размораживание
Внимание: не используйте для ускорения процесса
размораживания предметы, которые могут
поцарапать стенки холодильника или нарушить
герметичность холодильной камеры.
Размораживание холодильного отделения
Холодильное отделение
размораживается автоматически;
образующаяся вода поступает в дренажную систему (ðèñ.6), затем испаряется теплом компрессора. Единственное,
что Вам необходимо
делать для обслуживания холодильного отделения следить, чтобы
дренажное отверстие, которое находится за ящиком
для овощей и фруктов, не было засорено.
Pèñ. 7
Размораживание морозильного отделения
Со временем на внутренних стенках морозильного
отделения нарастает иней, который следует удалять
специальным пластмассовым скребком,
поставляемым вместе с холодильником.
При толщине инея более 5 мм следует разморозить
морозильное отделение. Поставьте рукоятку
термостата J в положение «0» (ðèñ.7).
На время размораживания заверните
замороженные продукты в несколько слоев газет и
поместите их, по возможности, в холодное место.
Оставьте дверь открытой для того, чтобы иней
растаял быстрее, для ускорения размораживания
поместите в морозильник кастрюлю с теплой водой.
Холодильник имеет дренажную систему, поставьте
подходящую емкость, как показано на ðèñ. 8.
Вымойте и тщательно высушите камеры перед повторным включением.
Обслуживание и уход
· Ваш холодильник изготовлен из не пахнущих гигиенических материалов. Для сохранения этих
характеристик, всегда храните сильно пахнущие
продукты в плотно закрывающихся контейнерах
чтобы избежать образования запахов, которые
потом будет сложно удалить.
· Внутренние и внешние поверхности холодильника
мойте губкой или мягкой тканью, смоченной в
растворе пищевой соды в теплой воде (сода также
является хорошим дезинфектором). При отсутствии
пищевой соды используйте нейтральное моющее
средство.
· Никогда не используйте органические растворители, абразивные, хлоро- и аммиакосодержащие
вещества.
· Все съемные части можно мыть в раствором мыла
или моющего средства в воде. Также их можно мыть
в посудомоечной машине. Помните, что все съемные
части необходимо тщательно высушить перед тем,
как поставить их обратно в холодильник.
· Пыль может скапливаться на задней панели холодильника и препятствовать его нормальной работе.
Пропылесосьте заднюю стенку холодильника
осторожно, используя подходящие насадки.
· Если вы не собираетесь использовать холодильник
продолжительное время, вымойте его изнутри,
высушите и оставьте дверь приоткрытой, чтобы
избежать образования неприятного запаха и
плесени.
Замена лампы освещения
(данная процедура не является гарантийным ремонтом).
Отключите холодильник от сети, вынув вилку из розетки.
Выверните лампу и замените ее аналогичной (мощностью не более 15 Вт). Для доступа к лампе "À", отверните
центральный винт "Â" на задней части плафона, как показано на Рис. 9.
A
Ðèñ. 7
CSI
B
Ðèñ. 9
Ðèñ. 8
18
Page 21

Устранение неисправностей
В случае неудовлетворительной работы
холодильника или возникновения неисправностей
прочитайте этот раздел, прежде чем вызывать
техников. В большинстве случае Вы можете решить
возникшие проблемы сами.
Холодильник не работает
Проверьте:
· в доме не отключено электричество;
· вилка надежно вставлена в розетку;
· розетка исправна; для проверки подключите устройство, в исправности которого Вы уверены;
· попробуйте подключиться к другой розетке.
Температура в отделениях
холодильника слишком высокая
Проверьте:
· дверцы отделений закрыты плотно, уплотнения на
дверцах не повреждены;
· термостат находится в правильном положении;
· отделения не переполнены продуктами;
· дверь отделения не открывали часто.
В холодильном отделении
скапливается вода
Проверьте
· Дренажное отверстие не засорено (см. ðèñ. 6.
Если после проверки холодильник не работает, или проблемы остаются, свяжитесь с сервисным центром и при
звонке сообщите следующую информацию: номер гарантийного документа (сервисной книжки, сервисного сертификата и т.п.), неисправность, модель (Mod.),
серийный номер (S/N), обозначенные на
информационной табличке, расположенной слева за
ящиком для овощей и фруктов (см. примеры на ðèñ.
íèæå).
75
Test
P.S-I.
TI
Net
Util
Utile
Pressure
HIGH-235
LOW 140
RG 2330
Mod.
220 - 240 V- 50 Hz 150 W
340
Total
Gross
Bruto
Brut
Compr.
Syst.
Kompr.
Made in Italy 13918
Gross
Bruto
Brut
R 134 a
kg 0,090
93139180000 S/N 704211801
Cod.
Gross
Bruto
Brut
W
Fuse
A
Freez. Capac
Poder de Cong
4,0
kg/24 h
Max 15 w
Class
Clase
N
Classe
Продукты в холодильном отделении
переохлаждаются
Проверьте:
· термостат находится в правильном положении;
· продукты не касаются задней части холодильника
она очень холодная.
Постоянно работает компрессор
Проверьте:
· дверцы холодильника плотно закрываются и открываются не слишком часто;
· температура в помещении не слишком высокая;
· термостат находится в правильном положении.
Холодильник слишком шумит при
работе
Проверьте:
Хладагент, циркулирующий внутри системы
охлаждения, может негромко булькать, даже если
компрессор не работает. Не беспокойтесь, это
совершенно нормально.
· Холодильник выровнен.
· Холодильник не касается постоянно вибрирующих посторонних предметов (например, окружающей мебели).
· Не пользуйтесь услугами лиц, не
уполномоченных производителем.
· При ремонте требуйте использования оригинальных запасных частей.
Merloni Elettrodomestici spa
Срок службы
10 ëåò
со дня изготовления
Производитель оставляет за собой право без предупреждения вносить изменения в конструкцию и комплектацию, не
ухудшающие эффективность работы оборудования.
Некоторые параметры, приведенные в этой инструкции,
являются приблизительными. Производитель не несет
ответственности за незначительные отклонения от указанных величин.
1919
CSI
Page 22

CSI
20
Page 23

Page 24

Via Aristide Merloni, 47
60044 Fabriano (AN) Italj
tel. +39 0732 6611
www.merloni,com
05/2003 - 195038733.00 - Xerox Business Services DocuTech
 Loading...