

Page 1

Instructions for
installation and use
This symbol reminds you to read this instruction manual.
EN
English,1
ES
Español,13
I
Italiano,37
AQUALTIS
NL
Nederlands,25
Contents
Installation, 2-3
Unpacking and levelling
Connecting the electricity and water supplies
Technical data
Description of the machine, 4-5
Control panel
How to run a wash cycle or a drying
cycle, 6
Wash cycles and options, 7
Table of wash cycles
Wash options
WASHER-DRYER
EN
AQM8F 49 U
Detergents and laundry, 8
Detergent
Preparing the laundry
Washing recommendations
Load balancing system
Precautions and advice, 9
General safety
Disposal
Opening the porthole door manually
Care and maintenance, 10
Cutting off the water and electricity supplies
Cleaning the machine
Cleaning the detergent dispenser drawer
Caring for your appliance drum
Cleaning the pump
Checking the water inlet hose
Trouble shooting, 11
Assistance, 12
1
Page 2
Installation
EN
This instruction manual should be kept in a safe place
for future reference. If the washer-dryer is sold, given
away or moved, please ensure the manual is kept with
the machine, so that the new owner may benefit from
the advice contained within it.
Read these instructions carefully: they contain vital
information relating to the safe installation and operation
of the appliance.
Inside the pack containing this manual, you will also
find the guarantee and all the details necessary for
installation.
Unpacking and levelling
Unpacking
1. Once you have removed all the packaging from the
washer-dryer, make sure it has not been damaged
during transportation.
If it has been damaged, contact the retailer and do not
proceed any further with the installation process.
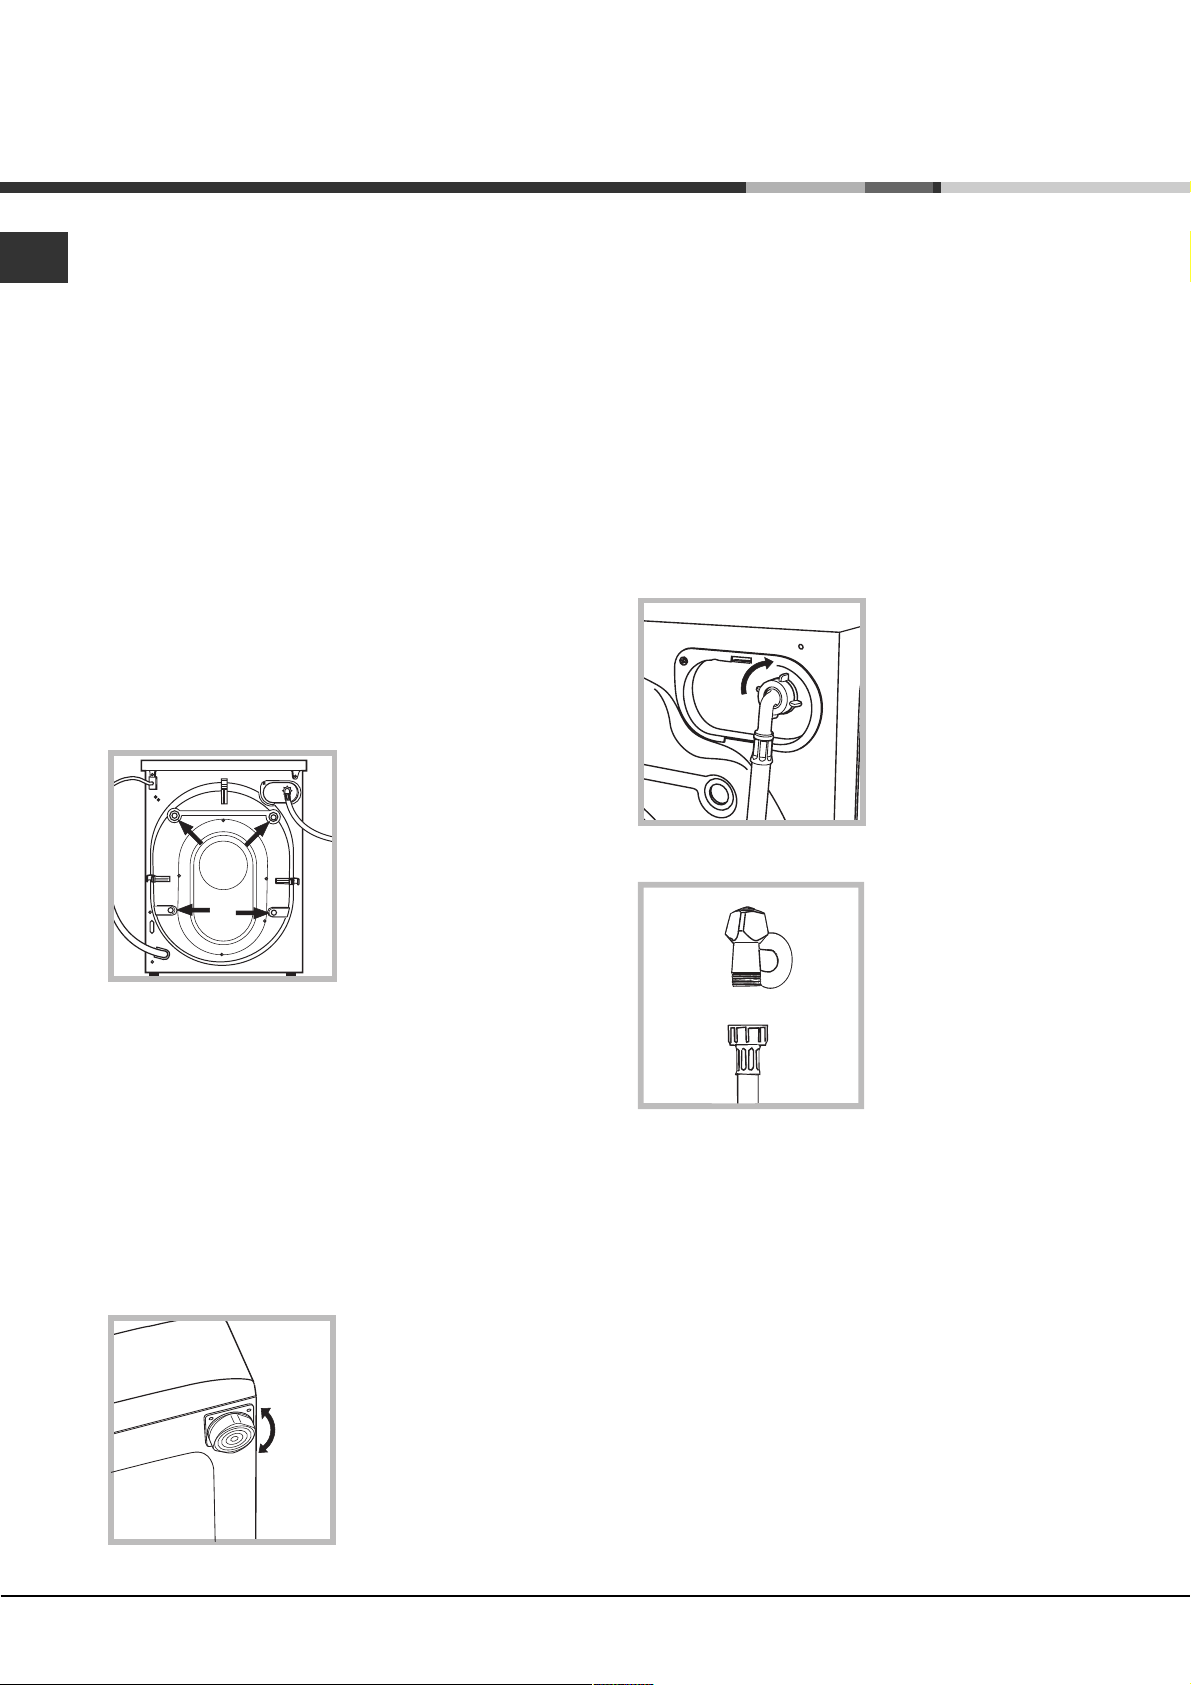
2. Remove the 4
protective screws (used
during transportation) and
the corresponding spacer,
located on the rear part of
the appliance (see figure).
If the appliance is levelled correctly, it will be more
stable and much less likely to cause vibrations and noise
while it is operating, particularly during the spin cycle.
If it is placed on carpet or a rug, adjust the feet in such
a way as to allow a sufficient ventilation space
underneath the washer-dryer.
Connecting the electricity and water
supplies
Connecting the water inlet hose
Before connecting the inlet hose to the water supply,
run the water until it is perfectly clear.
1. Connect the inlet hose
to the machine by
screwing it onto the cold
water inlet of the
appliance, which is
situated on the top righthand side of the rear part
of the appliance (see
figure).
2. Connect the inlet hose
by screwing it to a cold
water tab using a 3/4 gas
threaded connection (see
figure).
3. Close off the holes using the plastic plugs supplied in
the pack.
4. Keep all the parts in a safe place; they will be needed
again if the washer-dryer is moved to another location,
to prevent the inside of the appliance being damaged.
Packaging materials should not be used as toys for
children.
Levelling
1. Place the washer-dryer on a flat sturdy floor, without
resting it up against walls or cabinets.
2. If the floor is uneven,
the front feet of the
machine may be adjusted
until it reaches a horizontal
position (the angle of
inclination must not
exceed 2 degrees).
3. Make sure that the hose is not folded over or bent.
The water pressure at the tap must fall within the
values indicated in the Technical data table (see next
page).
If the inlet hose is not long enough, contact a
specialised shop or an authorised technician.
Never use second-hand or old inlet hoses; use the
products supplied with the machine.
2
Page 3

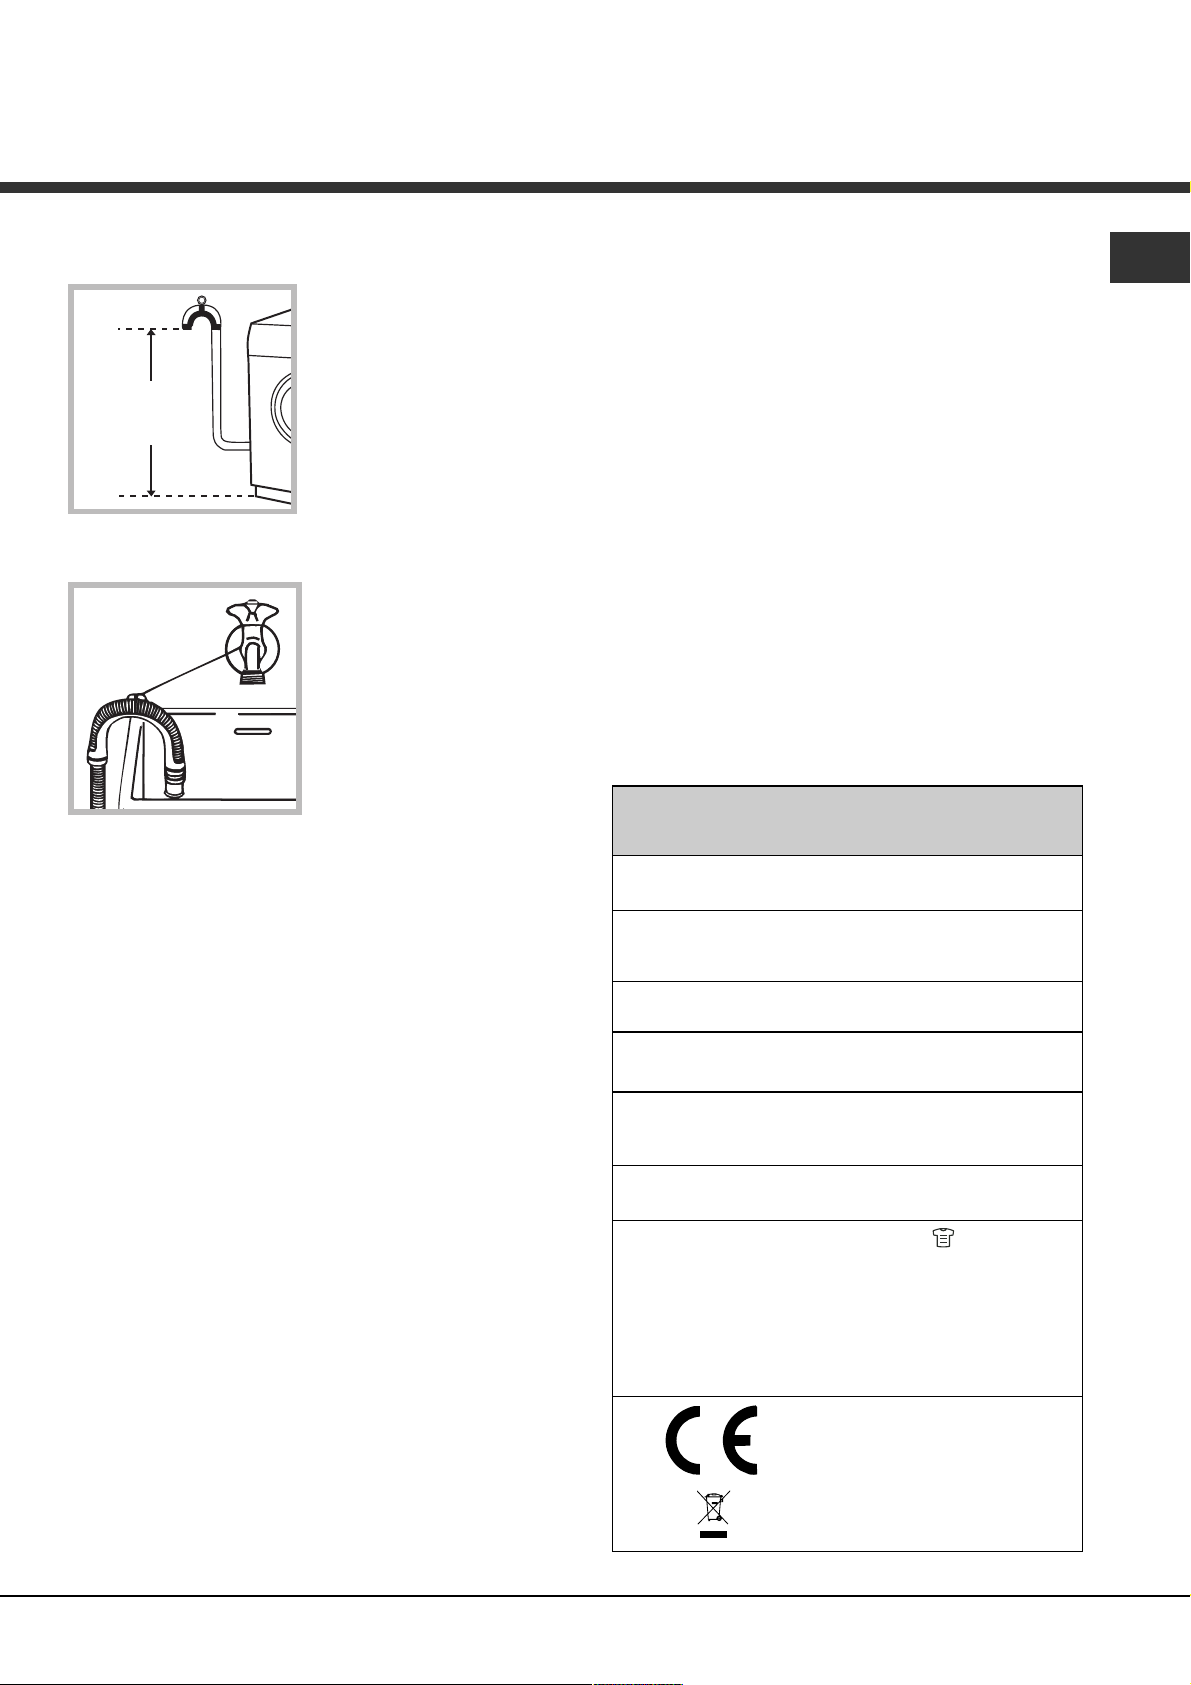
Connecting the drain hose
65 - 100 cm
Connect the drain hose to
drain duct piping or a wall
drain located between 65
and 100 cm above the
floor, making sure it is not
bent at all.
Alternatively, rest the drain
hose on the side of a
washbasin or bathtub,
fastening the duct
supplied to the tap (see
figure).
The free end of the hose
should not be underwater.
Do not use extension cords or multiple sockets.
EN
The cable should not be bent or compressed.
The power supply cable and plug must only be
replaced by authorised technicians.
Warning! The company shall not be held responsible in
the event that these regulations are not respected.
We advise against the use of hose extensions; if it is
absolutely necessary, the extension must have the same
diameter as the original hose and must not exceed 150
cm in length.
Electrical connections
Before plugging the appliance into the electricity socket,
make sure that:
the socket is earthed and complies with all applicable
laws;
the socket is able to withstand the maximum power
load of the appliance as indicated in the Technical
data table (see opposite);
the power supply voltage falls within the values
indicated in the Technical data table (see opposite);
the socket is compatible with the plug of the
appliance. If this is not the case, have the socket or
the plug replaced.
The machine must not be installed outdoors, even in
covered areas. It is extremely dangerous to leave the
appliance exposed to rain, storms and other weather
conditions.
The mains socket must remain within easy reach after
the washer-dryer has been installed.
Technical data
Model
Dimensions
Capacity
Electrical
connections
Water connections
Spin speed
Energy rated
programmes
according to
regulation
EN 50229
AQM8F 49 U
width 59,5 cm
height 85 cm
depth 64,5 cm
from 1to 8 kg for wash programme
from 1 to 6 kg for the drying programme
please refer to the technical data
plate fixed to the machine
maximum pressure 1 MPa (10 bar)
minimum pressure 0.05 MPa (0.5 bar)
drum capacity 62 litres
up to 1400 rotations per minute
Wash: programme ; temperature
60°C; using a load of 8 kg.
Drying: first drying cycle performed
with a 2 kg load, by selecting the
drying level "L1";
Second drying cycle performed with a
6 kg load, selecting the maximum
drying level "L4".
This appliance conforms to the
following EC Directives:
- 2004/108/EC (Electromagnetic
Compatibility)
- 2006/95/EC (Low Voltage)
- 2002/96/EC
3
Page 4
Description of the machine
EN
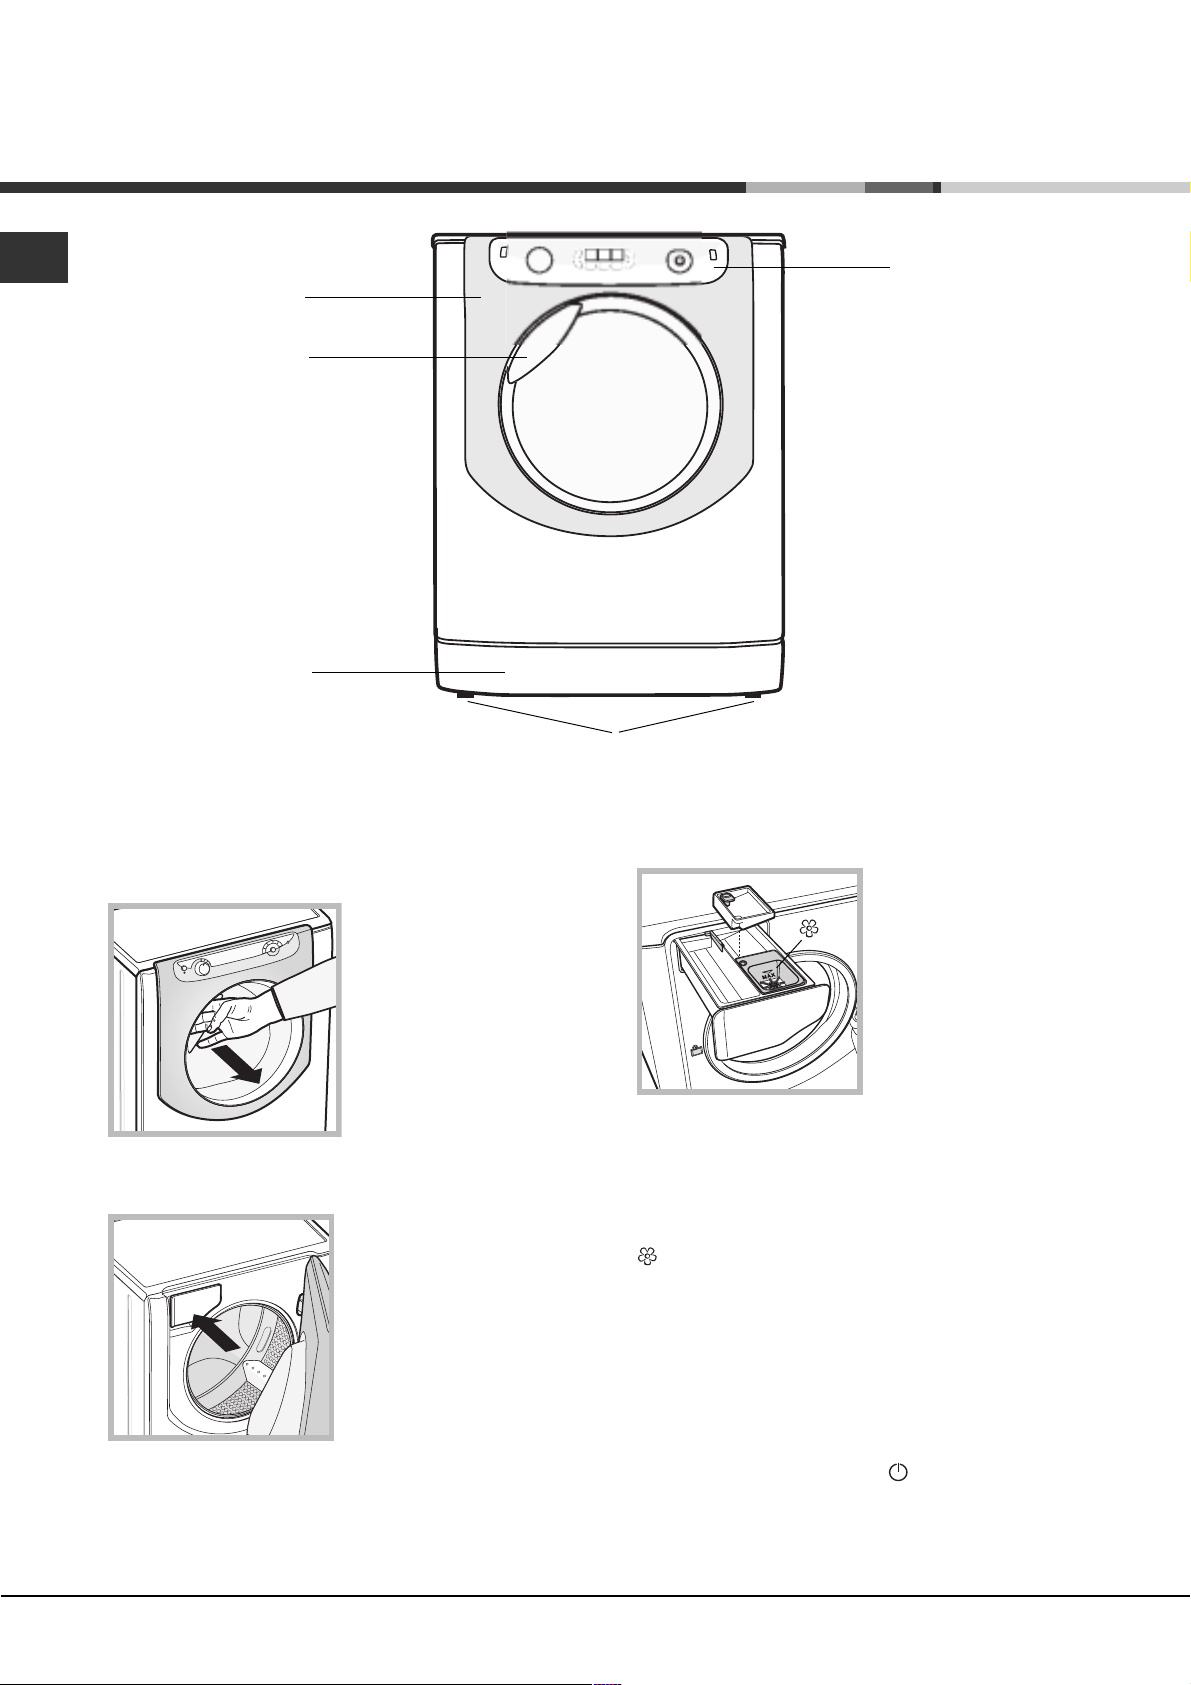
PORTHOLE DOOR
PORTHOLE DOOR
HANDLE
KICK STRIP
CONTROL
PANEL
ADJUSTABLE FEET
PORTHOLE DOOR
Always use the handle to
open the porthole door (see
figure).
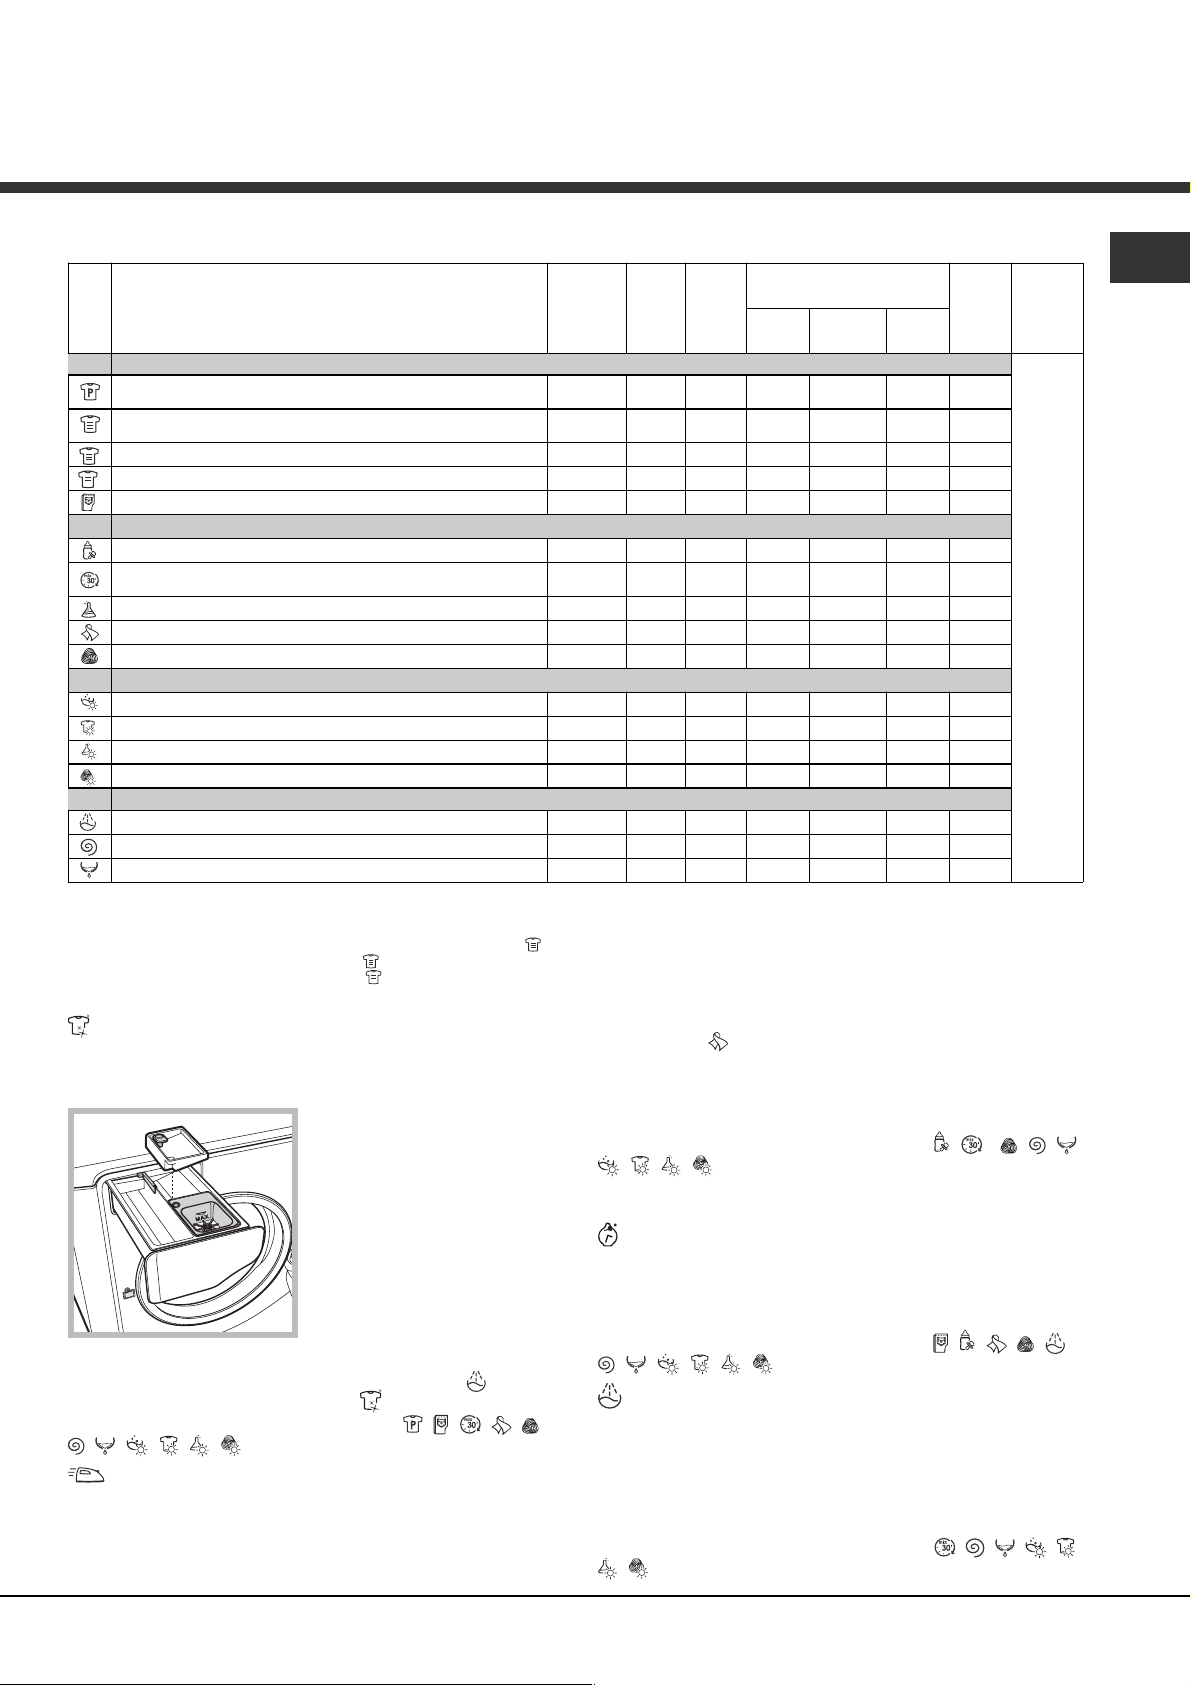
DETERGENT DISPENSER DRAWER
The detergent dispenser
drawer is located inside the
machine and can be
accessed by opening the
door.
For more information on
detergent measures, please
refer to the chapter entitled
Detergents and laundry.
Note: stick the label showing
the wash cycle descriptions and options on the front of
the detergent dispenser drawer. You will find the sticker
in the pack containing this manual.
1. pre-wash compartment:
3
1
2
the drawer immediately before you start the washerdryer.
3. extra compartment: Bleach
The use of extra compartment 3 excludes the prewash function.
washing additives compartment: for fabric softener or
liquid additives. We recommend that the maximum level
indicated by the grille is not exceeded, and that
concentrated fabric softeners are diluted.
Standby mode
This washer-dryer, in compliance with new energy saving
regulations, is fitted with an automatic standby system
which is enabled after about 30 minutes if no activity is
detected. Press the ON-OFF
for the machine to start up again.
use powder detergent.
Before pouring in the
detergent, make sure that
extra compartment 3 has
been removed.
2. main wash compartment:
use powder or liquid
detergent. If using the latter
type of detergent, we
recommend it is poured into
button briefly and wait
4
Page 5
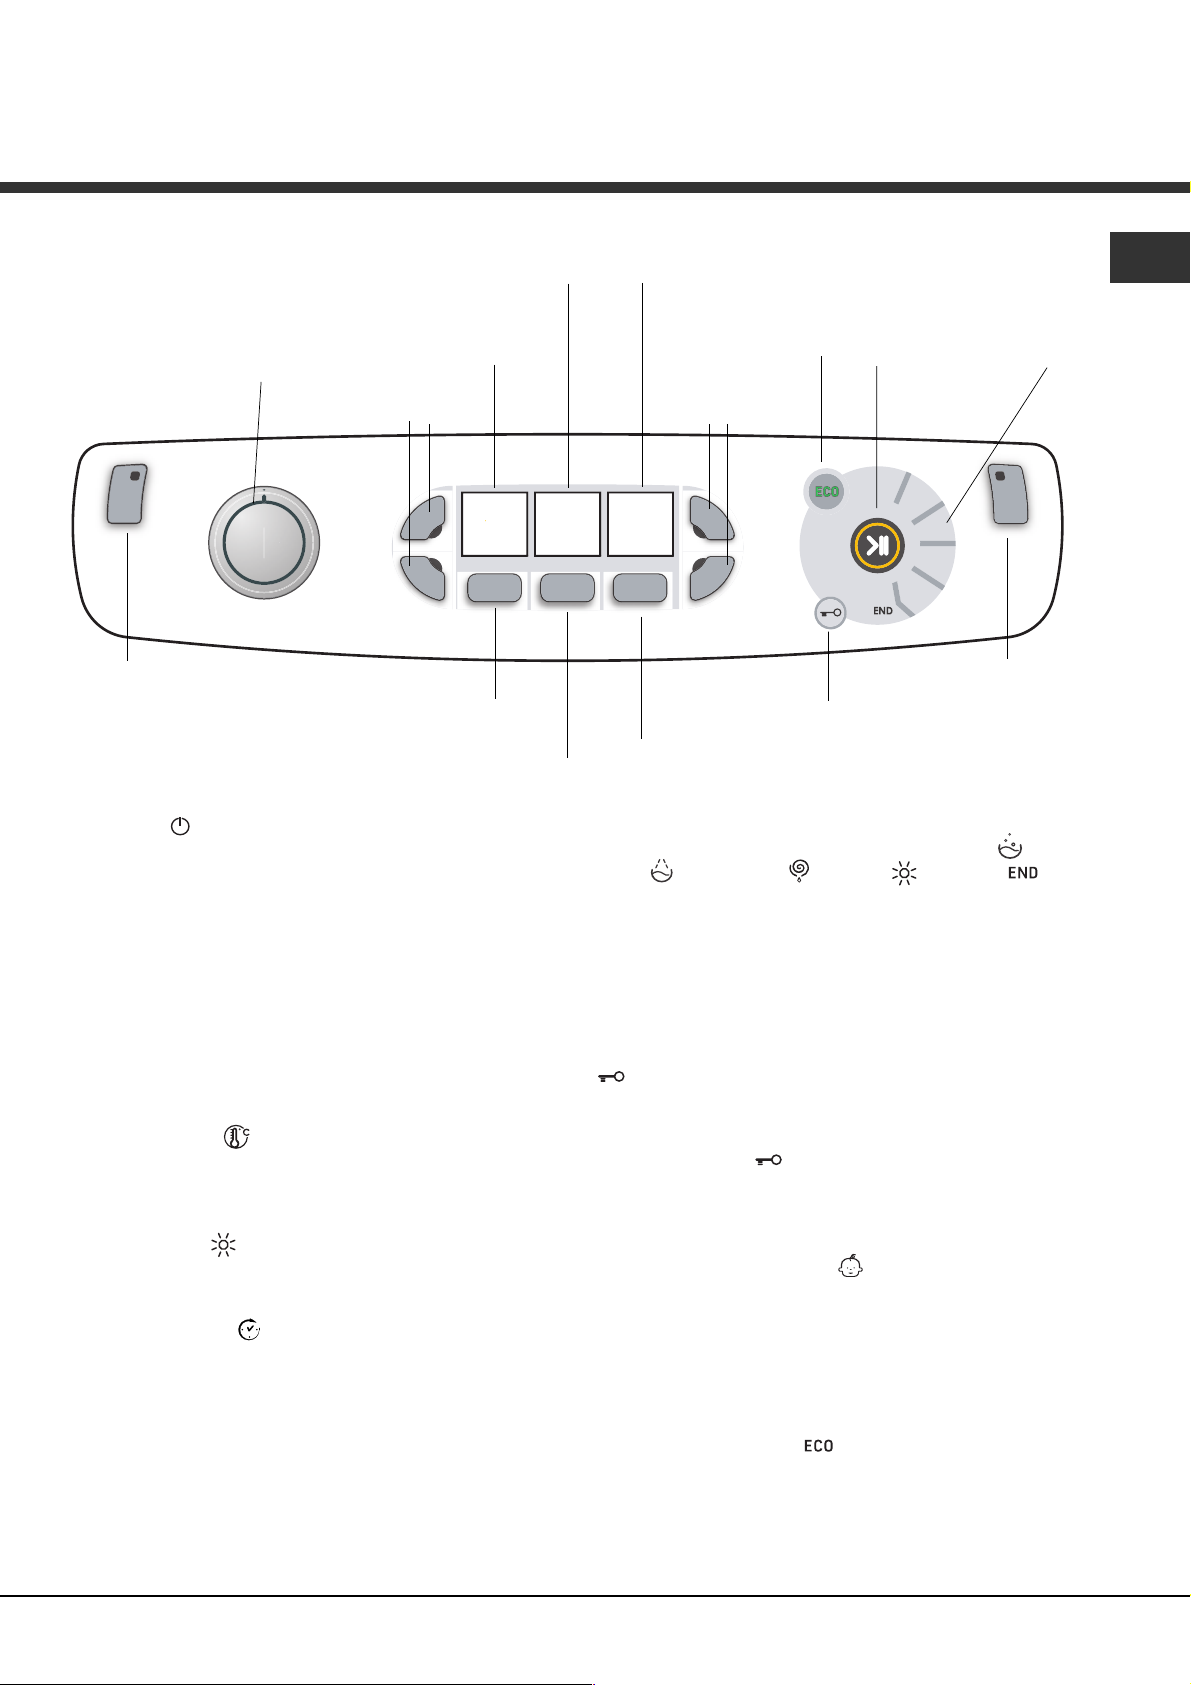
Control panel
WASH CYCLE
SELECTOR knob
TEMPERATURE
OPTION buttons with
indicator lights
display
DRYING
display
DELAYED START/CYCLE
DURATIONdisplay
ECO indicator light
OPTION buttons with
indicator lights
EN
WASH
CYCLE
PHASE
icons
START/PAUSE
button with indicator
light
Button withON/OFF
indicator light
TEMPERATURE button
DRYING
Button with ON/OFF indicator light: press this briefly
to switch the machine on or off. The green indicator light
indicates that the machine is switched on. To switch off
the washer-dryer during the wash cycle, press and hold
the button for approximately 3 seconds; if the button is
pressed briefly or accidentally the machine will not
switch off. If the machine is switched off during a wash
cycle, this wash cycle will be cancelled.
WASH CYCLE SELECTOR knob: may be turned in
either direction. To select the most suitable wash cycle,
please refer to the Table of wash cycles.
The knob will not move during the wash cycle.
TEMPERATURE
button: press to modify or exclude
the temperature setting; the value selected will appear
on the display above (see "How to run a wash cycle or a
drying cycle").
DRYING button
: press to decrease or exclude drying;
the selected drying level or time will appear on the display
(see "How to run a wash cycle or a drying cycle").
DELAYED START
button: press to set a delayed
start for the selected wash cycle; the set delay time will
appear on the display above (see "How to run a wash
cycle or a drying cycle").
OPTION buttons with indicator lights: press to select the
available options. The indicator light corresponding to the
selected option will remain lit (see "How to run a wash
cycle or a drying cycle").
button
DELAYED
START
button
DOOR LOCKED
indicator light
CONTROL PANEL
LOCK button with
indicator light
WASH CYCLE PHASE icons: these illuminate to
indicate the progress of the wash cycle (Wash
Rinse
Spin/Drain Drying ). The text
lights up when the cycle is complete.
START/PAUSE button with indicator light: when the
green indicator light flashes slowly, press the button to
start a wash cycle. Once the cycle has begun the
indicator light will remain lit in a fixed manner. To pause
the wash cycle, press the button again; the indicator
light will flash in an orange colour. If the Door locked
indicator light is switched off, the door may be
opened. To start the wash cycle from the point at which
it was interrupted, press the button again.
DOOR LOCKED
indicator light: indicates that the
porthole door is locked. To open the door, pause the
wash cycle (see "How to run a wash cycle or a drying
cycle").
CONTROL PANEL LOCK
button with indicator
light: to activate or deactivate the control panel lock,
press and hold the button for approximately 2 seconds.
when the indicator light is illuminated, the control panel is
locked. This means it is possible to prevent wash cycles
from being modified accidentally, especially where there
are children in the home.
ECO indicator light: the
icon lights up when, after
altering the washing parameters, an energy saving of at
least 10% is made. Furthermore, before the machine
enters Standby mode, the icon will light up for a few
seconds; when the machine is switched off the
estimated energy saving will be around the 80% mark.
5
Page 6
How to run a wash cycle or a
drying cycle
EN
WARNING: before you use the washer-dryer for the first
time, run a wash cycle with detergent and no laundry,
using the 90° cottons cycle without pre-wash.
1. SWITCH THE MACHINE ON. Press the
All the indicator lights will illuminate for 1 second; the
indicator light corresponding to the
remain lit in a fixed manner and the START/PAUSE
indicator light will flash slowly.
2. LOAD THE LAUNDRY. Open the porthole door.
Load the laundry, making sure you do not exceed the
maximum load value indicated in the table of wash
cycles on the following page.
3. MEASURE OUT THE DETERGENT. Pull out the
detergent dispenser drawer and pour the detergent
into the relevant compartments as described in
Description of the machine.
4. CLOSE THE PORTHOLE DOOR.
5. SELECT THE PROGRAMME. Turn the WASH CYCLE
SELECTOR KNOB right or left, until you have selected
the desired wash cycle. A temperature and spin speed is
set for each wash cycle; these may be adjusted.
6. CUSTOMISE THE WASH CYCLE. Use the
relevant buttons on the control panel:
Modify the temperature.
The machine automatically displays the maximum
temperature values set for the selected cycle, or the
most recently-used settings if they are compatible
with the selected cycle. The temperature can be
decreased by pressing the
wash (
pressed again, the maximum values are restored.
Exception: if the Cottons programme is selected, the
temperature can be increased up to a value of 90°C.
Setting the drying cycle
The first time the button
will automatically select the maximum drying cycle
which is compatible with the selected wash cycle.
Subsequent presses will decrease the drying level and
then the drying time, until the cycle is excluded
completely (
the maximum values are restored.
Drying may be set as follows:
A - Based on a set time period: between 20 and 180
minutes.
B- Based on the desired laundry dryness level:
Iron (L1): suitable for clothes which will need ironing
afterwards. the remaining dampness softens creases,
making them easier to remove.
Hanger (L2): ideal for clothes which do not need to be
dried fully.
Cupboard (L3): suitable for laundry which can be put
back in a cupboard without being ironed.
Extra (L4): suitable for garments which need to be
dried completely, such as sponges and bathrobes.
If your laundry load to be washed and dried is much
greater than the maximum stated load (see adjacent
table), perform the wash cycle, and when the cycle is
complete, divide the garments into groups and put
some of them back in the drum. At this point, follow
the instructions provided for a "Drying only" cycle.
) setting is reached. If these buttons are
). If these buttons are pressed again,
button, until the cold
is pressed, the machine
button will then
button.
Repeat this procedure for the remainder of the load. A
cooling-down period is always added to the end of
each drying cycle.
Drying only
Use the cycle selector knob to select a drying cycle
(
- - ) in accordance with the type of fabric. The
desired drying level or time may also be set using the
DRYING button
Set a delayed start.
Press the button until you have reached the desired
delay time. During the setting process, the delay time
is shown on the display and the
After selecting a delayed start time, the fixed
symbol and the cycle duration will appear on the
display. Press the button once to display the selected
delay time. To remove the delayed start option, press
the button until the display shows the text OFF; the
symbol will disappear.
Once the START/PAUSE button has been pressed,
the time delay may only be decreased.
Modify the cycle settings.
Press the OPTION buttons to customise the wash
cycle in accordance with your own requirements.
Press the button to activate the option; the
corresponding indicator light will switch on.
Press the button again to disable the option; the
indicator light will switch off.
If the selected option is not compatible with the
selected wash cycle, this incompatibility will be
signalled by the flashing of the indicator light and a
sound alert (3 beeps); the option will not be activated.
If the selected option is not compatible with another
option that has been selected previously, the indicator
light corresponding to the first option selected will flash
and only the second option will be activated; the
indicator light corresponding to the button will remain
lit in a constant manner.
7. START THE PROGRAMME. Press the START/
PAUSE button. The corresponding indicator light
remains lit in a fixed manner and the porthole door
locks (the
illuminates). The icons corresponding to the wash
cycle phases will light up during the cycle to indicate
which phase is currently in progress.
To change a wash cycle once it has already started,
pause the washer-dryer by pressing the START/
PAUSE button; then select the desired cycle and
press the START/PAUSE button again. To open the
door during a wash cycle, press the START/PAUSE
button; if the DOOR LOCKED
switched off you may open the door. Press the
START/PAUSE button again to restart the wash cycle
from the point at which it was interrupted.
8. THE END OF THE WASH CYCLE. This is indicated
by the illuminated text END. The porthole door may be
opened immediately. If the START/PAUSE indicator light
is flashing, press the button to end the cycle. Open the
door, unload the laundry and switch off the machine.
If you wish to cancel a cycle which has already begun,
press and hold the
the machine switches off.
.
symbol flashes.
DOOR LOCKED indicator light
indicator light is
button until the cycle stops and
6
Page 7
Wash cycles and options
Table of wash cycles
Icon Description of the wash cycle
Cottons wash cycles
Cottons
(Add detergent to the relevant compartment).
Cottons (1):
Cottons (2):
Coloured
Jeans
Special cycles
Baby:
Mix 30':
for wool, silk and clothes which require washing by hand)
Durable
Silk :
Wool:
Drying cycles
Wash&Dry 30° 1400
Drying Cotton - Drying Synthetic - Drying Wool - -
Partials wash cycles
Rinse - 1400
Spin - 1400
Drain - 0 - - - - 8
(*) Note: 10 minutes after the START, the machine will recalculate the time remaining until the end of the wash cycle on the basis of the load inside it; this
value will then be shown on the display.
For all Test Institutes:
1) Test wash cycle in compliance with regulation EN 50229: set wash cycle
2) Long wash cycle for cottons: set wash cycle
3) Short wash cycle for cottons: set wash cycle
with pre-wash
heavily soiled whites and resistant colours.
heavily soiled whites and delicate colours.
Cottons (3)
heavily soiled delicate colours
to refresh lightly soiled garments quickly (not suitable
Synthetics
for garments in silk and viscose, lingerie.
for wool, cashmere, etc.
with a temperature of 40°C.
with a temperature of 40°C.
Max.
temp .
(°C)
90° 1400
60°
(Max. 90°)
40° 1400
40° 1400
40° 800
40° 800
30° 800
60° 800
30° 0 -
40° 800
with a temperature of 60°C.
Wash options
Super Wash
This option offers a high-performance wash due to the
greater quantity of water used in the initial phase of the
cycle, and due to the increased wash cycle duration, is
particularly useful for the
3
1
2
carrying out a full wash cycle, pour the bleach into the
extra compartment 3, select the "Rinse" cycle
activate the "Super Wash" option
It cannot be used in conjunction with
, , , , , .
Easy Iron
By selecting this option, the wash and spin cycles will be
modified in order to reduce the formation of creases.
At the end of the cycle the washer-dryer drum
will rotate slowly; the Easy Iron and START/PAUSE
removal of stubborn stains.
It can be used with or
without bleach. If you desire
bleaching, insert the extra
tray compartment (3) into
compartment 1. When
pouring in the bleach, be
careful not to exceed the
max level marked on the
central pivot (see figure).
To bleach laundry without
and
.
, , , , ,
Max.
speed
Drying
(rpm)
1400
indicator lights will flash. To end the cycle press the
START/PAUSE button or the Easy Iron button.
For the Silk
cycle while the laundry is soaking and the Easy
Iron indicator light will flash. To drain the water so that
the laundry may be removed, press the START/PAUSE
button or the Easy Iron button.
It cannot be used in conjunction with
, , , .
Note: If you also want to run the drying cycle, this option is
enabled only if combined with level Iron (L1).
Time Saver
If you select this option, the wash cycle duration will be
reduced by 30%-50%, depending on the selected cycle,
thereby guaranteeing simultaneous water and energy
saving. Use this cycle for lightly soiled garments.
It cannot be used in conjunction with
, , , , , .
Extra rinse
By selecting this option, the efficiency of the rinse is
increased and optimal residual detergent removal is
guaranteed. It is particularly useful for skin which is
sensitive to detergents. We recommend this option is
used with a full load of washing, or when a large amount
of detergent is required.
It cannot be used in conjunction with
, .
Detergent and additives
Wash
ll l
ll l l
ll l l
ll l l
ll l
ll l l
ll l
ll l l
ll l
ll l
l
l
l
l
l
Fabric
softener
ll
- - - 6
- - - 4
- - - 1,5
-
- - - 8
Bleach
ll
Max.
load
(kg)
- 8
8
8
8
- 4
4
- 3,5
4
- 2
- 2
- 1
8
wash cycle, the machine will end the
, , , , ,
, , , , ,
, , , , ,
Cycle
duration
on the display.
EN
(*) The duration of the wash cycles can be checked
7
Page 8

Detergents and laundry
EN
Detergent
The type and quantity of detergent required depend on
the type of fabric you are washing (cotton, wool, silk,
etc.), as well as its colour, the washing temperature, the
level of soiling and the hardness of the water in the area.
Measuring out the detergent carefully will avoid wastage
and help to protect the environment: although they are
biodegradable, detergents still contain ingredients which
alter the balance of nature.
We recommend the following:
use powder detergents for white cotton garments and
pre-washing.
use liquid detergents for delicate cotton garments and
for all low-temperature wash cycles.
use gentle liquid detergents for wool and silk
garments.
The detergent should be poured into the relevant
compartment - or the dispenser placed directly inside
the drum - before the wash cycle begins. In the latter
case, it will not be possible to select the Cottons with
pre-wash cycle.
Do not use hand washing detergents because these
create too much foam.
Preparing the laundry
Shake out the garments before loading them into the
machine.
Divide the laundry according fabric type (symbol on the
washing instruction label) and colour, making sure you
separate the coloured garments from the white ones;
Empty all pockets and check the buttons;
Do not exceed the values listed in the Table of wash
cycles, which refer to the weight of the laundry when dry.
How much does your laundry weigh?
1 sheet 400-500 g
1 pillowcase 150-200 g
1 tablecloth 400-500 g
1 bathrobe 900-1200 g
1 towel 150-250 g
1 pair of jeans 400-500 g
1 shirt 150-200 g
Curtains: use the Silk
and place them in a pillow case or mesh bag.
Wool: is the only washer-dryer brand to have been
awarded the prestigious Woolmark Platinum Care
endorsement (M.0508) by the Woolmark Company,
which means that all woollen garments may be washed
in the washer-dryer, even those which state hand wash
only
used to wash all woollen garments in the washer-dryer
while guaranteeing optimum performance.
Bedlinen and towels: use the Bed & Bath
to wash laundry from all over the house; this optimises
fabric softener performance and helps you save time and
energy. We recommend the use of powder detergent.
Stubborn stains: it is wise to treat stubborn stains with
solid soap before washing, and to use the Cottons with
pre-wash cycle.
Wash & Dry
soiled garments quickly. This cycle may be used to wash
and dry a laundry load of up to 1 kg in just 60 minutes.
To achieve optimum results, use liquid detergent and pretreat cuffs, collars and stains.
on the label. The Wool wash cycle can be
was designed to wash and dry lightly
wash cycle. Fold curtains
cycle
Load balancing system
Before every spin cycle, to avoid excessive vibrations
before every spin and to distribute the load in a uniform
manner, the drum rotates continuously at a speed which
is slightly greater than the washing rotation speed. If,
after several attempts, the load is not balanced
correctly, the machine spins at a reduced spin speed. If
the load is excessively unbalanced, the washer-dryer
performs the distribution process instead of spinning. To
encourage improved load distribution and balance, we
recommend small and large garments are mixed in the
load.
Washing recommendations
Jeans: use the special Jeans wash cycle for all
denim garments; turn inside out before washing and use
a liquid detergent.
Baby: use the special Baby
the remove the soiling typically caused by babies, while
removing all traces of detergent from nappies in order to
prevent the delicate skin of babies from suffering allergic
reactions. The cycle has been designed to reduce the
amount of bacteria by using a greater quantity of water
and optimising the effect of special disinfecting additives
added to the detergent. At the end of the wash cycle,
the machine will slowly rotate the drum; to end the cycle
press the START/PAUSE button.
Silk: use the special Silk
garments. We recommend the use of special detergent
which has been designed to wash delicate clothes.
8
wash cycle to remove
wash cycle to wash all silk
Page 9
Precautions and tips
The machine was designed and constructed in
accordance with international safety regulations. The
following information is provided for safety reasons and
must therefore be read carefully.
General safety
This appliance is not intended for use by persons
(including children) with reduced physical, sensory or
mental capabilities, or lack of experience and
knowledge, unless they have been given supervision
or instruction concerning use of the appliance by a
person responsible for their safety.
Children should be supervised to ensure that they do
not play with the appliance.
Do not dry unwashed items in the tumble dryer.
Items that have been soiled with substances such
as cooking oil, acetone, alcohol, petrol, kerosene,
spot removers, turpentine, waxes and wax removers
should be washed in hot water with an extra amount
of detergent before being dried in the tumble dryer.
Items such as foam rubber (latex foam), shower
caps, waterproof textiles, rubber backed articles and
clothes or pillows fitted with foam rubber pads should
not be dried in the tumble dryer.
Fabric softeners, or similar products, should be used
as specified by the fabric softener instructions.
The final part of a tumble dryer cycle occurs without
heat (cool down cycle) to ensure that the items are
left at a temperature that ensures that the items will
not be damaged.
WARNING: Never stop a tumble dryer before the end
of the drying cycle unless all items are quickly
removed and spread out so that the heat is
dissipated.
This appliance was designed for domestic use only.
Do not touch the machine when barefoot or with wet
or damp hands or feet.
Do not pull on the power supply cable when
unplugging the appliance from the electricity socket.
Hold the plug and pull.
Do not touch the drained water as it may reach
extremely high temperatures.
Never force the porthole door. This could damage the
safety lock mechanism designed to prevent
accidental opening.
If the appliance breaks down, do not under any
circumstances access the internal mechanisms in an
attempt to repair it yourself.
Always keep children well away from the appliance
while it is operating.
If it must be moved, proceed with the help of two or
three people and handle it with the utmost care.
Never try to do this alone, because the appliance is
very heavy.
Before loading laundry into the washer dryer, make
sure the drum is empty.
During the drying phase, the door tends to get
quite hot.
Do not use the appliance to dry clothes that have
been washed with flammable solvents (e.g.
trichlorethylene).
Do not use the appliance to dry foam rubber or
similar elastomers.
Make sure that the water tap is turned on during
the drying cycles.
Disposal
Disposing of the packaging materials: observe local
regulations so that the packaging may be re-used.
The European Directive 2002/96/EC relating to Waste
Electrical and Electronic Equipment (WEEE) states
that household appliances should not be disposed of
using the normal solid urban waste cycle. Exhausted
appliances should be collected separately in order to
optimise the cost of re-using and recycling the
materials inside the machine, while preventing
potential damage to the atmosphere and to public
health. The crossed-out dustbin is marked on all
products to remind the owner of their obligations
regarding separated waste collection.
For more information relating to the correct disposal of
household appliances, owners should contact their
local authorities or appliance dealer.
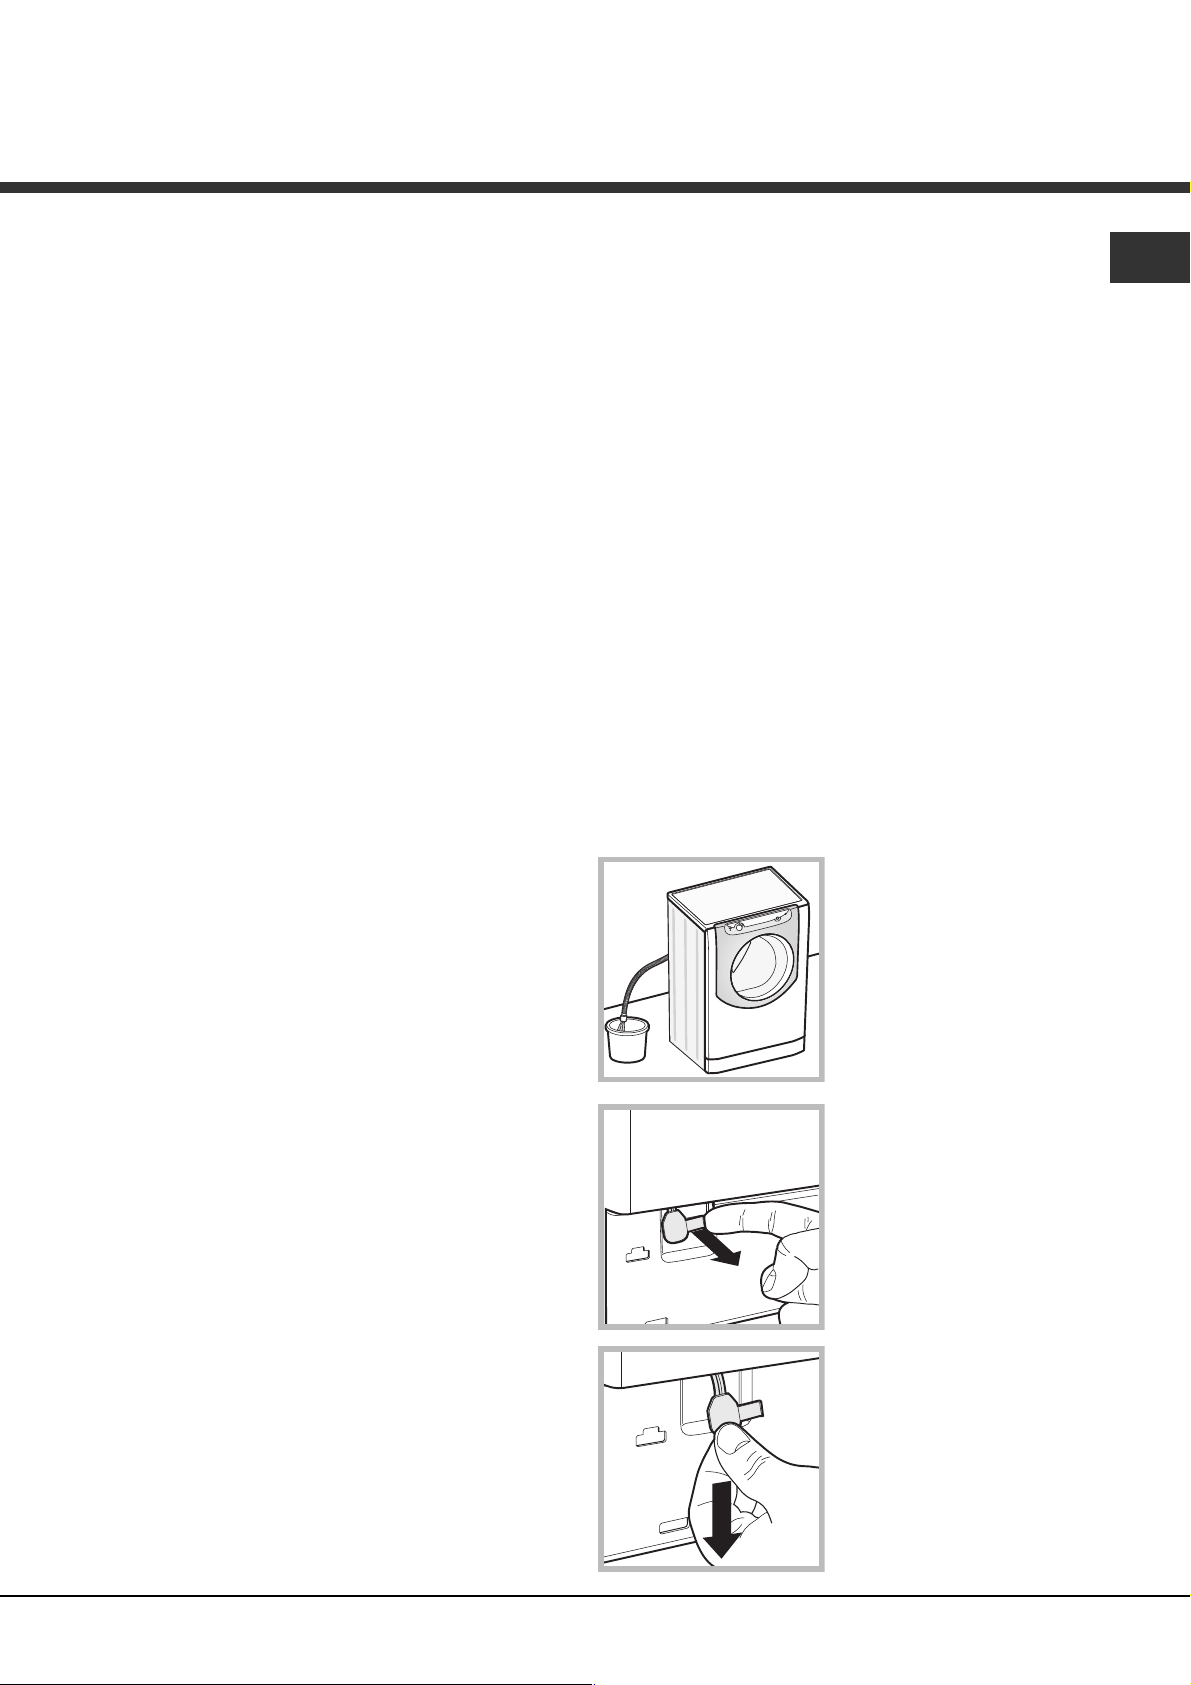
Opening the porthole door manually
In the event that it is not possible to open the porthole
door due to a powercut, and if you wish to remove the
laundry, proceed as follows:
1. remove the plug from the
electrical socket.
2. make sure the water level
inside the machine is lower
than the door opening; if it is
not, remove excess water
using the drain hose,
collecting it in a bucket as
indicated in the figure.
3. remove the cover panel
on the lower front part of the
washer dryer (see overleaf).
4. pull outwards using the
tab as indicated in the figure,
until the plastic tie-rod is
freed from its stop position;
pull downwards until you
hear a click, which
indicates that the door is
now unlocked.
5. open the door; if this is
still not possible repeat the
procedure.
6. reposition the panel,
making sure the hooks are
securely in place before you
push it onto the appliance.
EN
9
Page 10

Care and maintenance
EN
Cutting off the water and electricity
supplies
Turn off the water tap after every wash cycle. This will
limit wear on the hydraulic system in the machine and
help to prevent leaks.
Unplug the appliance when cleaning it and during all
maintenance work.
Cleaning the machine
The outer parts and rubber components of the appliance
can be cleaned using a soft cloth soaked in lukewarm
soapy water. Do not use solvents or abrasives.
Cleaning the detergent dispenser
drawer
To remove the drawer, press
lever (1) and pull the drawer
outwards (2) (see figure).
Wash it under running
water; this procedure should
be repeated frequently.
To access the pre-chamber:
2
1. take off the cover panel on the front of the machine
by first pressing it in the centre and then pushing
downwards on both sides until you can remove it (see
figures);
2. position a container so
that it will collect the water
which flows out
(approximately 1.5 l) (see
figure);
3. unscrew the lid by
rotating it in an anticlockwise direction (see
figure);
Caring for your appliance drum
Always leave the door ajar to prevent unpleasant
odours from forming.
Cleaning the pump
The washer-dryer is fitted with a self-cleaning pump
which does not require any maintenance. Sometimes,
small items (such as coins or buttons) may fall into the
protective pre-chamber at the base of the pump.
Make sure the wash cycle has finished and unplug the
appliance.
4. clean the inside thoroughly;
5. screw the lid back on;
6. reposition the panel, making sure the hooks are
securely in place before you push it onto the appliance.
Checking the water inlet hose
Check the inlet hose at least once a year. If there are
any cracks, it should be replaced immediately: during
the wash cycles, water pressure is very strong and a
cracked hose could easily split open.
10
Page 11

Trouble shooting
Your washer-dryer could occasionally fail to work. Before contacting the Technical Assistance Centre
(see Assistance), make sure that the problem cannot be not solved easily using the following list.
Problem:
The washer-dryer does not switch on.
The wash cycle does not start.
The washer-dryer does not fill
with water.
The washer-dryer door remains
locked.
The machine continuously fills
with water and drains.
The washer-dryer does not drain
or spin.
The machine vibrates a lot during
the spin cycle.
The washer-dryer leaks.
The icons corresponding to the
Phase in progress flash rapidly
at the same time as the ON/OFF
Possible causes / Solutions:
The appliance is not plugged into the socket fully, or not enough to make contact.
There is no power in the house.
The door is not closed properly.
The START/PAUSE button has not been pressed.
The water tap has not been opened.
A delayed start has been set.
The water inlet hose is not connected to the tap.
The hose is bent.
The water tap has not been opened.
There is no water supply in the house.
The pressure is too low.
The START/PAUSE button has not been pressed.
If you have selected the Baby
the wash cycle has finished the machine will slowly rotate the drum; to end
the cycle press the START/PAUSE button or the Easy iron
you have selected the Silk
while the laundry is soaking; to drain the water so that the laundry may be
removed, press the START/PAUSE button or the Easy iron
The drain hose is not fitted at a height between 65 and 100 cm from the
floor (see Installation).
The free end of the hose is under water (see Installation).
If the dwelling is on one of the upper floors of a building, there may be
problems relating to water drainage, causing the washer-dryer to fill with
water and drain continuously. Special anti-draining valves are available in
shops and help to prevent this inconvenience.
The wall drainage system is not fitted with a breather pipe.
The wash cycle does not include draining: Some wash cycles require the
drain phase to be started manually (see Wash cycles and options).
The Easy iron option is enabled: to complete the wash cycle, press the
START/PAUSE button (Wash cycles and options).
The drain hose is bent (see Installation).
The drainage duct is clogged.
The drum was not unlocked correctly during installation (see Installation).
The machine is not level (see Installation ).
The machine is trapped between cabinets and walls (see Installation).
The load is unbalanced (see Detergents and laundry).
The water inlet hose is not screwed on properly (see Installation).
The detergent dispenser is blocked (to clean it, see Care and maintenance).
The drain hose is not fixed in place properly (see Installation).
Switch off the machine and unplug it, wait for approximately 1 minute and
then switch it back on again. If the problem persists, contact the Technical
Assistance Service.
cycle or the Easy iron option, when
wash cycle, the machine will end the cycle
indicator light.
EN
button. If
button.
There is too much foam.
The washer-dryer door remains locked.
The washer-dryer does not dry.
The detergent is not suitable for machine washing (it should display the text
for washer-dryers or hand and machine wash, or the like).
Too much detergent was used.
Perform the manual unlocking procedure (see Precautions and tips).
The appliance is not plugged into the socket, or not enough to make contact.
There has been a power failure.
The appliance door is not shut properly.
A DELAY TIMER has been set.
DRYING is in the
position.
11
Page 12

Assistance
EN
Before calling for Assistance:
Check whether you can solve the problem by yourself (see Trouble shooting);
Restart the wash cycle to check whether the problem has been solved;
If it has not, contact the Authorised Technical Assistance Service.
If the washer-dryer has been installed or used incorrectly, you will have to pay for the call-out service.
Always request the assistance of authorised technicians.
Please have the following information to hand:
the type of problem;
the appliance model (Mod.);
the serial number (S/N).
The above information can be found on the data plate located on the appliance itself.
Note: To exit Demo mode, press and hold the two ON/OFF and START/PAUSE buttons simultaneously for 3 seconds.
12
Page 13

Instrucciones para la
instalación y el uso
! Este símbolo te recuerda que debes leer este manual de
instrucciones.
ES
Español
AQUALTIS
Sumario
Instalación, 14-15
Desembalaje y nivelación
Conexiones hidráulicas y eléctricas
Datos técnicos
Descripción de la máquina, 16-17
Panel de control
Cómo efectuar un ciclo de lavado o de
secado, 18
Programas y opciones, 19
Tabla de Programas
Opciones de lavado
LAVASECADORA
ES
AQM8F 49 U
Detergentes y ropa, 20
Detergente
Preparar la ropa
Consejos sobre el lavado
Sistema de equilibrado de la carga
Precauciones y consejos, 21
Seguridad general
Eliminación
Apertura manual de la puerta
Mantenimiento y cuidados, 22
Interrumpir el agua y la corriente eléctrica
Limpiar la máquina
Limpiar el contenedor de detergentes
Cuidar el cesto
Limpiar la bomba
Controlar el tubo de alimentación de agua
Anomalías y soluciones, 23
Asistencia, 24
13
Page 14

Instalación
ES
Es importante conservar este manual para poder
consultarlo en cualquier momento. En el caso de venta,
cesión o traslado, controle que permanezca junto con la
lavasecadora.
Lea atentamente las instrucciones: ellas contienen
importante información sobre la instalación, el uso y la
seguridad.
En el sobre que contiene este manual encontrará,
además de la garantía, piezas que servirán para la
instalación.
Desembalaje y nivelación
Desembalaje
1. Una vez desembalada la lavasecadora, controle que
no haya sufrido daños durante el traslado.
Si estuviera dañada no la conecte y llame al revendedor.
2. Quite los 4 tornillos de
protección para el
transporte y el
correspondiente
distanciador, ubicados en
la parte posterior (ver la
figura).
Cuando se instala sobre moquetas o alfombras, regule
las patas para que, debajo de la lavasecadora, quede un
espacio suficiente para la ventilación.
Conexiones hidráulicas y eléctricas
Conexión del tubo de alimentación de agua
Antes de conectar el tubo de alimentación a la red
hídrica, haga correr agua hasta que sea límpida.
1. Conecte el tubo de
alimentación a la máquina
enroscándolo en la toma
de agua correspondiente
ubicada en la parte
posterior derecha (arriba)
(ver la figura).
2. Conecte el tubo de
alimentación enroscándolo
a un grifo de agua fría con
la boca roscada de 3/4 gas
(ver la figura).
3. Cierre los orificios con los tapones de plástico
contenidos en el sobre.
4. Conserve todas las piezas porque si la lavasecadora
tuviera que ser trasladada nuevamente, se deberían
volver a colocar para evitar daños internos.
Los embalajes no son juguetes para los niños.
Nivelación
1. Instale la lavasecadora sobre un piso plano y rígido,
sin apoyarla en las paredes ni en los muebles.
2. Compense las
irregularidades
desenroscando o
enroscando las patas
hasta que la máquina
quede en posición
horizontal (no debe estar
inclinada más de 2
grados).
Una cuidadosa nivelación brinda estabilidad y evita
vibraciones y ruidos, sobre todo durante el centrifugado.
3. Controle que en el tubo no hayan pliegues ni
estrangulaciones.
La presión de agua del grifo debe estar comprendida
dentro de los valores contenidos en la tabla de Datos
técnicos (ver la página correspondiente).
Si la longitud del tubo de alimentación no es la
suficiente, diríjase a un negocio especializado o a un
técnico autorizado.
No utilice nunca tubos de carga usados o viejos, utilice
siempre los suministrados con la máquina.
14
Page 15
Conexión del tubo de descarga
Conecte el tubo de
descarga a una tubería de
descarga o a una
descarga de pared
ubicadas a una distancia
65 - 100 cm
del piso comprendida entre
65 y 100 cm., evitando
siempre plegarlo.
Una alternativa es apoyar
el tubo de descarga en el
borde de un lavamanos o
de una bañera, uniendo la
guía suministrada con el
aparato, al grifo (ver la
figura).
El extremo libre del tubo
de descarga no debe
permanecer sumergido en
el agua.
El cable no debe estar plegado ni sufrir compresiones.
ES
El cable de alimentación y el enchufe deben ser
sustituidos sólo por técnicos autorizados.
¡Atención! La empresa fabricante declina toda
responsabilidad en caso de que estas normas no sean
respetadas.
Datos técnicos
No se aconseja utilizar tubos de prolongación, si fuera
indispensable hacerlo, la prolongación debe tener el
mismo diámetro del tubo original y no superar los 150
cm.
Conexión eléctrica
Antes de enchufar el aparato, verifique que:
la toma tenga la conexión a tierra y haya sido hecha
según las normas legales;
la toma sea capaz de soportar la carga máxima de
potencia de la máquina indicada en la tabla de Datos
técnicos (ver al costado);
la tensión de alimentación esté comprendida dentro
de los valores indicados en la tabla de Datos técnicos
(ver al costado);
la toma sea compatible con el enchufe de la
máquina. Si no es así, sustituya la toma o el enchufe.
La máquina no debe ser instalada al aire libre, ni
siquiera si el lugar está protegido, ya que es muy
peligroso dejarla expuesta a la lluvia o a las tormentas.
Una vez instalada la máquina, la toma de corriente
debe ser fácilmente accesible.
No utilice prolongaciones ni conexiones múltiples.
Modelo
Dimensiones
Capacidad
Conexiones
eléctricas
Conexiones
hídricas
Velocidad de
centrifugado
Programas de
control según la
norma EN 50229
AQM8F 49 U
ancho 59,5 cm.
altura 85 cm.
profundidad 64,5 cm.
de 1 a 8 kg para el lavado
de 1 a 6 kg para el secado.
ver la placa de características
técnicas aplicada en la máquina
presión máxima 1 MPa (10 bar)
presión mínima 0,05 MPa (0,5 bar)
capacidad del cesto 62 litros
máxima 1400 r.p.m.
lavado: programa ; temperatura
60ºC; efectuado con 8 kg. de carga.
secado: primer secado realizado
con 2 kg de carga seleccionando el
nivel de secado "L1";
Segundo secado realizado con 6 kg.
de carga seleccionando el nivel de
secado "L4".
Esta máquina cumple con lo
establecido por las siguientes
Directivas de la Comunidad:
- 2004/108/CE (Compatibilidad
Electromagnética)
- 2002/96/CE
- 2006/95/CE (Baja Tensión)
15
Page 16

Descripción de la máquina
ES
PUERTA
MANIJA DE
LA PUERTA
ZÓCALO
PANEL DE
CONTROL
PATAS REGULABLES
PUERTA
Para abrir la puerta utilice
siempre la manija
correspondiente (ver la
figura).
CONTENEDOR DE DETERGENTE
El contenedor de
detergentes se encuentra
en el interior de la máquina y
se accede a él abriendo la
puerta.
Para la dosificación de
detergente, ver el capítulo
Detergentes y ropa.
Nota: adhiera al contenedor
de detergente el adhesivo
con la descripción de los
programas y las opciones. El adhesivo se encuentra en
el sobre que contiene este manual.
1. cubeta para el prelavado:
3
1
2
en marcha de la lavasecadora.
3. cubeta adicional: Blanqueador
utilice detergente en polvo.
Antes de verter el
detergente, verifique que no
esté colocada la cubeta
adicional 3.
2. cubeta para el lavado:
utilice detergente en polvo o
líquido. En este último caso
se recomienda verterlo un
instante antes de la puesta
El uso de la cubeta adicional 3 excluye el
prelavado.
cubeta para aditivos: para suavizante o aditivos
líquidos. Se recomienda no superar nunca el nivel
máximo indicado por la rejilla y diluir los suavizantes
concentrados.
Modalidad de stand by
Esta lavasecadora está en conformidad con las nuevas
normativas vinculadas al ahorro energético. Está dotada
de un sistema de auto-apagado (stand by) que, en caso
de no funcionamiento, se activa pasados
aproximadamente 30 minutos. Presionar brevemente el
botón ON/OFF
y esperar que la máquina se active.
16
Page 17

Panel de control
Mando de
PROGRAMAS
Pantalla TEMPERATURA
Botones con Pilotos
OPCIONES
Pantalla
SECADO
Pantalla COMIENZO RETRASADO/
DURACIÓN DEL CICLO
Botón con piloto
Botones con
Pilotos
Piloto
ECO
START/PAUSE
OPCIONES
ES
Iconos FASES
DE LAVADO
Botón con piloto
ON/OFF
Botón con piloto ON/OFF: presione brevemente el
botón para encender o apagar la máquina. El piloto
verde indica que la máquina está encendida. Para
apagar la lavasecadora durante el lavado, es necesario
mantener presionado el botón durante más tiempo,
aproximadamente 3 seg.; si se presiona en forma más
breve o accidental, la máquina no se apagará. Si la
máquina se apaga durante un lavado en curso, dicho
lavado se anulará.
Mando de PROGRAMAS: se puede girar en ambas
direcciones. Para elegir el programa más apropiado,
consulte la Tabla de programas.
Durante el lavado, el mando no se mueve.
Botón
excluir la temperatura; el valor elegido está indicado en
la pantalla que se encuentra encima (ver Cómo
efectuar un ciclo de lavado o de secado).
Botón SECADO
secado; el nivel o el tiempo de secado seleccionado se
indica en el visor (ver Cómo efectuar un ciclo de lavado
o de secado).
Botón
fijar el comienzo retrasado del programa elegido; el valor
del retraso elegido está indicado en la pantalla que se
encuentra encima (ver Cómo efectuar un ciclo de
lavado o de secado).
Botones con Pilotos OPCIONES: presiónelos para
seleccionar las opciones disponibles. El piloto
correspondiente a la opción seleccionada permanecerá
encendido (ver Cómo efectuar un ciclo de lavado o de
secado).
TEMPERATURA: presiónelo para modificar o
COMIENZO RETRASADO: presiónelo para
Botón TEMPERATURA
Botón SECADO
: presionar para reducir o excluir el
Botón COMIENZO
RETRASADO
Piloto BLOQUEO
Botón con piloto
BLOQUEO DE
BOTONES
DE LA PUERTA
Iconos FASES DE LAVADO: se iluminan para indicar el
avance del ciclo (Lavado
Centrifugado/Desagüe Secado ).
El mensaje
Botón con piloto START/PAUSE: cuando el piloto verde
centellea lentamente, presione el botón para que
comience el lavado. Una vez que el ciclo ha
comenzado, el piloto se mantiene fijo. Para poner en
pausa el lavado, presione nuevamente el botón; el piloto
centelleará con un color anaranjado. Si el piloto
Bloqueo de la puerta
la puerta.
Para que el lavado se reanude a partir del momento en
el cual fue interrumpido, presione nuevamente el botón.
Piloto
puerta está bloqueada. Para abrir la puerta es necesario
poner el ciclo en pausa (ver Cómo efectuar un ciclo de
lavado o de secado).
Botón con piloto
activar o desactivar el bloqueo del panel de control,
mantenga presionado el botón durante 2 segundos
aproximadamente. El piloto encendido indica que el
panel de control está bloqueado. De este modo, se
evitan modificaciones accidentales de los programas,
sobre todo si en la casa hay niños.
Piloto ECO: el ícono
modificando los parámetros de lavado, se obtenga un
ahorro de energía del 10% como mínimo. Además,
antes que la máquina entre en la modalidad "Stand by",
el icono se encenderá unos pocos segundos; con la
máquina apagada la recuperación energética estimada
será de aprox. el 80%.
se ilumina cuando ha finalizado el ciclo.
BLOQUEO DE LA PUERTA: indica que la
BLOQUEO DE BOTONES: para
Aclarado
está apagado, se podrá abrir
se encenderá cuando,
17
Page 18

Cómo efectuar un ciclo de lavado
o de secado
ES
NOTA: la primera vez que se utiliza la lavasecadora,
realice un ciclo de lavado sin ropa pero con detergente,
seleccionando el programa algodón 90º sin prelavado.
1. ENCENDER LA MÁQUINA. Presione el botón
Todos los pilotos se encenderán durante 1 segundo y
luego permanecerá encendido en forma fija el piloto del
botón
2. CARGAR LA ROPA. Abra la puerta. Cargue la ropa,
cuidando no superar la cantidad de carga indicada en
la tabla de programas de la página siguiente.
3. DOSIFICAR EL DETERGENTE. Extraiga el
contenedor y vierta el detergente en las cubetas
correspondientes como se explica en Descripción de
la máquina.
4. CERRAR LA PUERTA.
5. ELEGIR EL PROGRAMA. Gire el MANDO DE
PROGRAMAS hacia la derecha o hacia la izquierda
hasta seleccionar el programa deseado; se asociarán
al mismo, una temperatura y una velocidad de
centrifugado que luego se pueden modificar.
6. PERSONALIZAR EL CICLO DE LAVADO. Utilice
los botones correspondientes del panel de control:
La máquina muestra automáticamente la temperatura
previstas para el programa fijado o las últimas
seleccionadas si son compatibles con el programa
elegido. Presionando el botón
progresivamente la temperatura hasta llegar al lavado
en frío (
se volverá a los valores máximos previstos.
, el piloto START/PAUSE centelleará lentamente.
Modifique la temperatura.
se disminuye
). Si se presionan una vez más los botones,
.
Excepción: cuando se selecciona el programa
ALGODÓN, la temperatura se puede aumentar hasta 90°.
Programar el secado
Con la primera presión del botón
automáticamente el nivel de secado máximo compatible
con el programa seleccionado. Las siguientes presiones
disminuyen el nivel y el tiempo de secado hasta llegar a la
exclusión
se volverá a los valores máximos previstos.
Es posible programar el secado:
A - En base al tiempo: de 20 a 180 minutos.
B - En función del nivel de secado deseado
Planchar (L1): especial para prendas que después deben
plancharse. El nivel de humedad residual atenúa las arrugas
y facilita su eliminación.
Colgar (L2): ideal para aquellas prendas que no requieren el
secado completo.
Doblar (L3): se adapta para la ropa que se coloca en el
armario sin necesidad de planchar.
Extra (L4): especial para las prendas que necesitan un
secado completo como toallas o albornoces.
Si excepcionalmente la carga de ropa para lavar y secar es
superior al máximo previsto (ver la Tabla de programas),
realice el lavado, y una vez finalizado el programa, divida la
carga y coloque una parte en el cesto. A partir de ese
momento, siga las instrucciones para efectuar "Sólo el
secado". Repita las mismas operaciones para la carga
restante. Al finalizar el secado continúa siempre un período
de enfriamiento.
( ). Si se presionan una vez más los botones,
la máquina selecciona
Sólo el secado
Seleccionar con el mando de programas el secado
adecuado (
también el nivel o el tiempo de secado deseado utilizando el
botón SECADO
Seleccionar el comienzo retrasado.
Presione el botón correspondiente hasta alcanzar el
valor del retraso deseado. Durante la selección se
visualiza el tiempo de retraso junto con el símbolo
que centellea. Después de haber seleccionado el
comienzo retrasado, la pantalla visualizará el símbolo
fijo y la duración del ciclo. Presionando el botón
una vez, se visualiza el retraso seleccionado.
Para anular el comienzo retrasado, presione el botón
hasta que en la pantalla aparezca la palabra OFF; el
símbolo
Una vez presionado el botón START/PAUSE el valor
del retraso se podrá modificar sólo disminuyéndolo.
Modificar las características del ciclo.
Presione los botones OPCIONES para personalizar el
lavado según sus exigencias.
Presione el botón para activar la opción; se
encenderá el piloto correspondiente.
Presione nuevamente el botón para desactivar la
opción; el piloto se apagará.
Si la opción seleccionada no es compatible con el
programa elegido, la incompatibilidad se indicará con
el centelleo del piloto y una señal sonora (3 sonidos) y
la opción no se activará.
Si la opción elegida no es compatible con otra
seleccionada precedentemente, el piloto
correspondiente a la primera opción seleccionada
centelleará y quedará activada sólo la segunda, el
piloto del botón permanecerá fijo.
7. PONER EN MARCHA EL PROGRAMA. Presione el
botón START/PAUSE. El piloto correspondiente
quedará fijo y la puerta se bloqueará (piloto
BLOQUEO DE LA PUERTA
iconos correspondientes a las fases de lavado se
iluminarán durante el ciclo para indicar la fase en
curso. Para cambiar un programa mientras un ciclo
se está ejecutando, ponga la lavasecadora en pausa
presionando el botón START/PAUSE; luego
seleccione el ciclo deseado y presione nuevamente el
botón START/PAUSE. Para abrir la puerta mientras un
ciclo se está ejecutando, presione el botón START/
PAUSE; si el piloto BLOQUEO DE LA PUERTA
está apagado, será posible abrir la puerta. Presione
nuevamente el botón START/PAUSE para reanudar el
programa a partir del momento en el que se había
interrumpido.
8. FIN DEL PROGRAMA. Se indica con la palabra
END encendida. La puerta se podrá abrir
inmediatamente. Si el piloto START/PAUSE centellea,
presione el botón para terminar el ciclo. Abra la
puerta, descargue la ropa y apague la máquina.
Si desea anular un ciclo que ya ha comenzado,
mantenga presionado el botón
interrumpa y la máquina se apague.
- - ) al tipo de tejido. Se puede programar
.
se apagará.
encendido). Los
hasta que el ciclo se
18
Page 19

Programas y opciones
Tabla de programas
Icono Descripción del Programa
Programas Algodón
Algodón
(Agregue el detergente en el compartimento correspondiente).
Algodón (1)
Algodón (2):
Algodón de color (3)
Vaq ueros
Programas especiales
Baby:
Mix 30':
aconseja utilizarlo para lana, seda y prendas para lavar a mano).
Sintético re siste nte s
Seda:
Lana:
Programas de Secado
"Lava y seca" 30° 1400
Secado "Algodón" - Secado" Sintético" - Secado "Lana" - -
Programas parciales
Aclarado - 1400
Centrifugado - 1400
Desagüe - 0 - - - - 8
(*) Nota: después de aproximadamente 10 minutos del START, en base a la carga efectuada, la máquina recalculará y visualizará el tiempo que falta para la
finalización del programa.
Para todos los Test Institutes:
1) Programa de control según la norma EN 50229: seleccione el programa
2) Programa algodón largo: seleccione el programa
3) Programa algodón corto: seleccione el programa
con prelavado
: blancos y colores resistentes muy sucios.
blancos y colores delicados muy sucios.
colores delicados muy sucios.
para refrescar rápidamente prendas poco sucias (no se
para prendas de seda, viscosa, lencería.
para lana, cachemira, etc.
con una temperatura de 40ºC.
con una temperatura de 40ºC.
Te m p .
max.
(Max. 90°)
con una temperatura de 60ºC.
Opciones de lavado
Super Lavado
Gracias al uso de una mayor
3
1
2
en dotación, en la cubeta 1. Al dosificar el blanqueador, no
supere el nivel max indicado en el perno central (ver la figura).
Para realizar sólo el blanqueo, sin realizar un lavado
completo, verter el blanqueador en la cubeta adicional 3,
seleccionar el programa "Aclarado"
"Super Lavado"
.
No se puede activar con los programas
, , , , , .
Fácil Planchado
Cuando se selecciona esta opción, el lavado y el centrifugado
se modificarán oportunamente para disminuir la formación de
arrugas. Al finalizar el ciclo, la lavasecadora realizará giros
lentos del cesto; los pilotos Fácil Planchado y START/
cantidad de agua en la fase
inicial del ciclo y a la mayor
duración del programa, esta
opción garantiza un lavado con
óptimos resultados, es útil
para eliminar las manchas más
resistentes.
Puede emplearse con o sin
lejía. Si se desea efectuar
también el blanqueado
introducir la cubeta adicional 3
y activar la opción
, , , , ,
Velocidad
máx.
(°C)
90° 1400
60°
40° 1400
40° 1400
40° 800
40° 800
30° 800
60° 800
30° 0 -
40° 800
(r.p.m.)
Secado
1400
PAUSE centellearán. Para terminar el ciclo, presione el botón
START/PAUSE o el botón Fácil Planchado. En el programa
Seda
la máquina terminará el ciclo dejando la ropa en
remojo y el piloto Fácil Planchado centelleará. Para
descargar el agua y poder sacar la ropa, es necesario
presionar el botón START/PAUSE o el botón Fácil
Planchado.
No se puede activar con los programas
, , , .
Note: Si desea realizar también el secado, este botón
funciona sólo conjuntamente con el nivel L1.
Ahorro de tiempo
Seleccionando esta opción se disminuye la duración del
programa en un 30%-50% en base al ciclo elegido,
garantizando al mismo tiempo un ahorro de agua y energía.
Utilice este ciclo para prendas no excesivamente sucias.
No se puede activar con los programas
, , , , .
Extra Aclarado
Al elegir esta opción aumentará la eficacia del aclarado y se
asegurará la máxima eliminación de los residuos de
detergente. Es útil para pieles particularmente sensibles a los
detergentes. Se aconseja el uso de esta opción cuando la
lavasecadora funciona a plena carga o utilizando elevadas
dosis de detergente.
No se puede activar con los programas
, .
Detergentes y aditivos
Suavi-
Lavado
lll
llll
llll
llll
lll
llll
lll
llll
ll
lll
lll
l
l
l
l
l
- - - 6
- - - 4
- - - 1,5
-
- - - 8
Blanqu-
zante
ll
Carga
eador
- 8
- 4
- 3,5
- 2
- 2
- 1
, , , , ,
, , , , , ,
, , , , ,
max.
(Kg)
8
8
8
4
4
8
Duración
del ciclo
lavado en la pantalla.
ES
(*) Se puede controlar la duración de los programas de
19
Page 20

Detergentes y ropa
ES
Detergente
El tipo y la cantidad de detergente dependen del tipo de
tejido (algodón, lana, seda...), del color, de la
temperatura de lavado, del grado de suciedad y de la
dureza del agua.
Dosificar bien el detergente evita derroches y protege el
medio ambiente: aún siendo biodegradables, los
detergentes contienen elementos que alteran el equilibrio
de la naturaleza.
Se aconseja:
usar detergentes en polvo para prendas de algodón
blancas y para el prelavado.
usar detergentes líquidos para prendas delicadas de
algodón y para todos los programas a baja
temperatura.
usar detergentes líquidos delicados para lana y seda.
El detergente se debe verter antes del comienzo del
lavado en la cubeta correspondiente, o en el dosificador
que se coloca directamente en el cesto. En este último
caso, no se puede seleccionar el ciclo Algodón con
prelavado.
No use detergentes para lavar a mano porque
producen demasiada espuma.
Preparar la ropa
Abra bien las prendas antes de cargarlas.
Divida la ropa según el tipo de tejido (símbolo en la
etiqueta de la prenda) y el color, separando las
prendas de color de las blancas;
Vacíe los bolsillos y controle los botones;
No supere los valores indicados en la Tabla de
Programas referidos al peso de la ropa seca.
¿Cuánto pesa la ropa?
1 sábana 400-500 gr.
1 funda 150-200 gr.
1 mantel 400-500 gr.
1 albornoz 900-1200 gr.
1 toalla 150-250 gr.
1 jeans 400-500 gr.
1 camisa 150-200 gr.
Cortinas: utilice el programa Seda
colóquelas dentro de una funda o de una bolsa de red.
Lana: es la única lavasecadora que ha obtenido el
prestigioso reconocimiento Woolmark Platinum Care
(M.0508) otorgado por The Woolmark Company que
certifica el lavado en lavasecadora de todas las prendas
de lana, incluidas aquellas que contienen la etiqueta sólo
lavado a mano
lavar en lavasecadora todas las prendas de lana con la
garantía de obtener los mejores resultados.
Manchas difíciles: es una buena costumbre tratar las
manchas difíciles con jabón sólido antes del lavado y
utilizar el programa Algodón con prelavado.
Lava y Seca
prendas ligeramente sucias y en poco tiempo:
Seleccionando este ciclo se puede lavar y secar hasta
1 kg de ropa en sólo 60 minutos.
Para alcanzar los mejores resultados utilizar detergente
líquido; pre-tratar puños, cuellos y manchas.
. Con el programa Lana, se pueden
: ha sido estudiado para lavar y secar
. Pliéguelas y
Sistema de equilibrado de la carga
Antes de cada centrifugado, para evitar vibraciones
excesivas y para distribuir la carga de modo uniforme, el
cesto realiza rotaciones a una velocidad ligeramente
superior a la del lavado. Si después de varios intentos, la
carga todavía no está correctamente equilibrada, la
máquina realiza el centrifugado a una velocidad inferior a
la prevista. Cuando existe un excesivo desequilibrio, la
lavasecadora realiza la distribución antes que el
centrifugado. Para obtener una mejor distribución de la
carga y su correcto equilibrado, se aconseja mezclar
prendas grandes y pequeñas.
Consejos sobre el lavado
Vaqueros: utilice el programa correspondiente
Vaqueros
voltee las prendas antes del lavado y utilice un
detergente líquido.
Baby: utilice el programa correspondiente Baby
quitar la suciedad típica de los niños y eliminar el
detergente de las prendas evitando reacciones alérgicas
en la piel delicada de los mismos. Este ciclo ha sido
estudiado para disminuir la carga bacteriana utilizando
una mayor cantidad de agua y optimizando el efecto de
aditivos específicos higienizantes agregados al detergente.
Al finalizar el lavado, la máquina realizará lentas
rotaciones del cesto; para terminar el ciclo, presione el
botón START/PAUSE.
Seda: utilice el programa correspondiente Seda
para lavar todas las prendas de seda. Se aconseja el
uso de un detergente específico para prendas delicadas.
20
para todas las prendas de tejido Denim;
para
Page 21

Precauciones y consejos
La máquina fue proyectada y fabricada en conformidad
con las normas internacionales de seguridad. Estas
advertencias se suministran por razones de seguridad y
deben ser leídas atentamente.
Seguridad general
El aparato no debe ser empleado por personas (niños
incluidos) con capacidades físicas, sensoriales o mentales
reducidas y con experiencias y conocimientos
insuficientes, a menos que dicho uso no se realice bajo la
supervisión o las instrucciones de una persona
responsable de su seguridad. Los niños deben ser
vigilados para asegurarse que no jueguen con el aparato.
- No secar prendas no lavadas.
- Las prendas sucias con sustancias como aceite de
cocina acetona, alcohol, gasolina, kerosén, quitamanchas,
trementina, cera o sustancias para quitarlas, deben lavarse
con agua caliente con una cantidad mayor de detergente
antes de secarlas en la secadora.
- Objetos como la goma expandida (látex), las gorras de
ducha, los materiales textiles impermeables, los artículos
con un lado de goma y las prendas o cojines que tienen
partes de látex no deben secarse en la secadora.
- Suavizantes o productos similares deben emplearse
de acuerdo con las instrucciones del fabricante.
- La parte final de un ciclo de la secadora se realiza
sin calor (ciclo de enfriamiento) para garantizar que los
artículos no se dañen.
ATENCIÓN: Nunca detener una secadora antes que
finalice el programa de secado. En este caso, sacar
con rapidez todas las prendas y colgarlas para
enfriarlas con celeridad.
Este aparato ha sido fabricado para un uso de tipo
doméstico exclusivamente.
No toque la máquina con los pies desnudos ni con las
manos o los pies mojados o húmedos.
No desenchufe la máquina tirando el cable, sino
tomando el enchufe.
No toque el agua de descarga porque puede alcanzar
temperaturas elevadas.
Nunca fuerce la puerta: podría dañarse el mecanismo
de seguridad que la protege de aperturas
accidentales.
En caso de avería, no acceda nunca a los
mecanismos internos para intentar una reparación.
Controle siempre que los niños no se acerquen a la
máquina cuando está en funcionamiento.
Si debe ser trasladada, deberán intervenir dos o más
personas, procediendo con el máximo cuidado. La
máquina no debe ser desplazada nunca por una sola
persona ya que es muy pesada.
Antes de introducir la ropa controle que el cesto esté
vacío.
Durante el secado la puerta tiende a calentarse.
No seque ropa lavada con solventes inflamables
(por ej. tricloroetileno).
No seque gomaespuma o elastómeros análogos.
Verifique que, durante las fases de secado, el grifo de
agua esté abierto.
Eliminación
Eliminación del material de embalaje: respete las
normas locales, de ese modo, los embalajes podrán
volver a ser utilizados.
La norma Europea 2002/96/CE sobre la eliminación
de aparatos eléctricos y electrónicos, indica que los
electrodomésticos no deben ser eliminados de la
misma manera que los desechos sólidos urbanos. Los
aparatos en desuso se deben recoger
separadamente para optimizar el porcentaje de
recuperación y reciclaje de los materiales que los
componen e impedir potenciales daños para la salud
y el medio ambiente. El símbolo de la papelera
tachada se encuentra en todos los productos para
recordar la obligación de recolección separada.
Para mayor información sobre la correcta eliminación
de los electrodomésticos, los poseedores de los
mismos podrán dirigirse al servicio público responsable
o a los revendedores.
Apertura manual de la puerta
Si desea sacar la ropa de la lavasecadora y no es
posible abrir la puerta debido a un corte de energía
eléctrica, proceda del siguiente modo:
1. desenchufe la máquina.
2. verifique que el nivel de
agua en el interior de la
máquina sea inferior al
hueco de la puerta; si no es
así, extraiga el agua en
exceso utilizando el tubo de
descarga y recogiéndola en
un balde como se indica en
la figura.
3. quite el panel de
cobertura delantero de la
lavasecadora (ver la página
siguiente).
4. utilizando la lengüeta
indicada en la figura, tire
hacia fuera hasta liberar la
varilla de plástico del retén;
tire posteriormente hacia
abajo hasta sentir un breve
sonido que indica que la
puerta está desbloqueada.
5. abra la puerta; si todavía
no es posible, repita la
operación.
6. vuelva a montar el panel
verificando, antes de
empujarlo hacia la máquina,
que los ganchos se hayan
introducido en las
correspondientes ranuras.
ES
21
Page 22

Mantenimiento y cuidados
ES
Interrumpir el agua y la corriente
eléctrica
Cierre el grifo de agua después de cada lavado. De
este modo se limita el desgaste de la instalación
hidráulica de la máquina y se elimina el peligro de
pérdidas.
Desenchufe la máquina cuando la debe limpiar y
durante los trabajos de mantenimiento.
Limpiar la máquina
La parte externa y las partes de goma se pueden limpiar
con un paño empapado en agua tibia y jabón. No use
solventes ni productos abrasivos.
Limpiar el contenedor de detergentes
Para extraer el contenedor,
presione la palanca (1) y tire
hacia afuera (2) (ver la
figura).
Lávelo debajo del agua
corriente, esta limpieza se
debe realizar
frecuentemente.
Cuidar el cesto
Para acceder a la precámara:
2
1. quite el panel de cobertura delantero de la máquina
presionando hacia el centro, luego empuje hacia abajo
desde ambos costados y extráigalo (ver las figuras).
2. coloque un recipiente
para recoger el agua que se
verterá (aproximadamente
1,5 lt.) (ver la figura);
3. desenrosque la tapa
girándola en sentido
antihorario (ver la figura);
4. limpie con cuidado el interior;
5. vuelva a enroscar la tapa;
6. vuelva a montar el panel verificando, antes de
empujarlo hacia la máquina, que los ganchos se hayan
introducido en las correspondientes ranuras.
Deje siempre semicerrada la puerta para evitar que se
formen malos olores.
Limpiar la bomba
La máquina posee una bomba autolimpiante que no
necesita mantenimiento. Pero puede suceder que
objetos pequeños (monedas, botones) caigan en la
precámara que protege la bomba, situada en la parte
inferior de la misma.
Verifique que el ciclo de lavado haya terminado y
desenchufe la máquina.
22
Controlar el tubo de alimentación de
agua
Controle el tubo de alimentación al menos una vez al
año. Si presenta grietas o rajaduras debe ser sustituido:
durante los lavados, las fuertes presiones podrían
provocar roturas imprevistas.
Page 23

Anomalías y soluciones
Puede suceder que la máquina no funcione. Antes de llamar al Servicio de Asistencia Técnica (ver Asistencia
Técnica), controle que no se trate de un problema de fácil solución utilizando la siguiente lista.
Anomalías:
La máquina no se enciende.
El ciclo de lavado no comienza.
La máquina no carga agua.
La puerta de la máquina
permanece bloqueada.
La máquina carga y descarga
agua continuamente.
La máquina no descarga o no
centrífuga.
La máquina vibra mucho durante
la centrifugación.
La máquina pierde agua.
Los iconos correspondientes a
la Fase en curso centellean
velozmente junto con el piloto
Posibles causas / Solución:
El enchufe no está introducido en la toma de corriente, o no hace contacto.
En la casa no hay corriente.
La puerta no está bien cerrada.
El botón START/PAUSE no fue presionado.
El grifo de agua no está abierto.
Se fijó un retraso de la hora de puesta en funcionamiento.
El tubo de alimentación de agua no está conectado al grifo.
El tubo está plegado.
El grifo de agua no está abierto.
En la casa no hay agua.
No hay suficiente presión.
El botón START/PAUSE no fue presionado.
Seleccionando el ciclo Baby
el ciclo, la lavasecadora realizará lentas rotaciones del cesto; para terminar el
ciclo, presione el botón START/PAUSE o el botón Fácil Planchado
Seleccionando el ciclo Seda
remojo; para descargar el agua y poder quitar la ropa, es necesario presionar
el botón START/PAUSE o el botón Fácil Planchado
El tubo de descarga no está instalado entre los 65 y 100 cm. del suelo (ver Instalación).
El extremo del tubo de descarga está sumergido en el agua (ver Instalación).
Si la vivienda se encuentra en uno de los últimos pisos de un edificio, es posible
que se verifiquen fenómenos de sifonaje, por ello la máquina carga y descarga
agua de modo continuo. Para eliminar este inconveniente se encuentran
disponibles en el comercio válvulas especiales que permiten evitar el sifonaje.
La descarga de pared no posee un respiradero.
El programa no prevé la descarga: con algunos programas es necesario
ponerla en marcha manualmente (ver Programas y opciones).
La opción Fácil Planchado está activa: para completar el programa, presione
el botón START/PAUSE (ver Programas y opciones).
El tubo de descarga está plegado (ver Instalación).
El conducto de descarga está obstruido.
El cesto, en el momento de la instalación, no fue desbloqueado correctamente
(ver Instalación).
La máquina no está instalada en un lugar plano (ver Instalación).
Existe muy poco espacio entre la máquina, los muebles y la pared (ver Instalación).
La carga está desequilibrada (ver Detergentes y ropa).
El tubo de alimentación de agua no está bien enroscado (ver Instalación).
El contenedor de detergentes está obstruido (para ver Mantenimiento y cuidados).
El tubo de descarga no está bien fijado (ver Instalación).
Apague la máquina y desenchúfela, espere aproximadamente 1 minuto y
luego vuelva a encenderla. Si la anomalía persiste, llame al Servicio de
Asistencia Técnica.
o la opción Fácil Planchado , al finalizar
la máquina terminará el ciclo con la ropa en
.
ON/OFF.
ES
.
Se forma demasiada espuma.
La puerta de la máquina
permanece bloqueada.
La Lavasecadora no seca.
El detergente no es específico para la lavasecadora (debe contener algunas de
las frases para lavasecadora, a mano o en lavasecadora o similares).
La dosificación fue excesiva.
Realice el procedimiento de desbloqueo manual (ver Precauciones y consejos).
El enchufe no está introducido en la toma de corriente, o no hace contacto.
En la casa no hay corriente.
La puerta no está bien cerrada.
Se fijó un retraso de la hora de puesta en funcionamiento.
El SECADO está en la posición ( ).
23
Page 24

Asistencia
ES
Antes de llamar al Servicio de Asistencia Técnica:
Verifique si la anomalía la puede resolver Ud. solo (ver Anomalías y Soluciones);
Vuelva a poner en marcha el programa para controlar si el inconveniente fue resuelto;
Si no es así, llame al Servicio de Asistencia Técnica Autorizado.
En el caso de una instalación errónea o un uso incorrecto de la lavasecadora, la intervención de asistencia
técnica deberá ser pagada.
No recurra nunca a técnicos no autorizados.
Comunique:
el tipo de anomalía;
el modelo de la máquina (Mod.);
el número de serie (S/N ).
Esta última información se encuentra en la placa de características colocada en el aparato.
La siguiente información es válida solo para España.
Para otros países de habla hispana consulte a su vendedor.
Ampliación de garantía
Llame al 902.363.539 y le informaremos sobre el fantástico plan de ampliación de garantía hasta 5 años.
Consiga una cobertura total adicional de
Piezas y componentes
Mano de obra de los técnicos
Desplazamiento a su domicilio de los técnicos
Y NO PAGUE AVERIAS NUNCA MAS
Servicio de asistencia técnica (SAT)
Llame al 902.133.133 y nuestros técnicos intervendrán con rapidez y eficacia, devolviendo el electrodoméstico a
sus condiciones óptimas de funcionamiento.
En el SAT encontrará recambios, accesorios y productos específicos para la limpieza y mantenimiento de su
electrodoméstico a precios competitivos.
ESTAMOS A SU SERVICIO
Nota: para salir del Demo Mode presione simultáneamente durante 3 seg. los dos botones ON/OFF y START/PAUSE .
24
Page 25

Instructies voor
installatie en gebruik
Dit symbool herinnert u eraan om deze gebruikshandleiding te lezen.
NL
Inhoud
Nederlands
Installatie, 26-27
Uitpakken en waterpas zetten
Water en elektrische aansluitingen
Technische gegevens
Beschrijving van de wasdroogmachine, 28-29
Bedieningspaneel
Het uitvoeren van een was- of droogcyclus, 30
Programmas en opties, 31
Programmatabel
Wasopties
AQUALTIS
AQM8F 49 U
Wasmiddelen en wasgoed, 32
Wasmiddel
Voorbereiden van het wasgoed
Wastips
Balanceersysteem van de lading
WASDROOGMACHINE
NL
Voorzorgsmaatregelen en advies, 33
Algemene veiligheid
Afvalverwijdering
Handmatige opening van het deurtje
Onderhoud en verzorging, 34
Afsluiten van water en stroom
Reinigen van de wasdroogmachine
Reinigen van het wasmiddelbakje
Verzorging van de trommel
Reinigen van de pomp
Controle van de buis van de watertoevoer
Storingen en oplossingen, 35
Service, 36
25
Page 26

Installatie
NL
Het is belangrijk dit boekje te bewaren, zodat u het op
ieder gewenst moment kunt raadplegen. In het geval u
de wasdroogmachine verkoopt of u verhuist, moet u de
handleiding bij het apparaat bewaren.
Lees de instructies aandachtig door: u vindt er
belangrijke informatie betreffende installatie, gebruik en
veiligheid.
In de envelop vindt u samen met deze
gebruiksaanwijzing, de garantie en onderdelen die nodig
zijn voor de installatie.
Uitpakken en waterpas zetten
Uitpakken
1. Zodra u de wasdroogmachine uitgepakt heeft, dient u
te controleren of hij niet beschadigd is tijdens het
transport.
Indien dit wel het geval is moet hij niet worden
aangesloten en moet u contact opnemen met de
handelaar.
2. Verwijder de 4
beschermschroeven voor
het transport en de
bijbehorende afstandsleider
die zich aan de achterkant
bevinden (zie afbeelding).
Een correcte nivellering geeft de machine stabiliteit en
vermijdt, vooral tijdens de centrifuge, vibraties en lawaai.
In het geval de wasdroogmachine op vloerbedekking of
tapijt staat regelt u de stelvoetjes zodanig dat onder de
automaat genoeg ruimte is voor ventilatie.
Water en elektrische aansluitingen
Aansluiting van de watertoevoerslang
Voordat u watertoevoerbuis aansluit op het waternet
moet u het water laten lopen totdat het helder is.
1. Verbind de
watertoevoerslang aan de
wasdroogmachine door
hem met de haakse
aansluiting op de
betreffende watertoevoer
te schroeven, rechtsboven
aan de achterkant (zie
afbeelding).
2. Sluit de toevoerbuis aan
op de koudwaterkraan met
een mondstuk met
schroefdraad van 3/4 gas
(zie afbeelding).
3. Sluit de gaten af met de in de envelop bijgeleverde
plastic doppen.
4. Bewaar alle onderdelen; mocht de wasdroogmachine
ooit nog worden vervoerd, dan moeten deze weer
worden aangebracht om interne schade te voorkomen.
Het verpakkingsmateriaal is geen speelgoed voor
kinderen.
Waterpas zetten
1. Installeer de wasdroogmachine op een rechte en
stevige vloer en laat hem niet tegen muren of meubels
leunen.
2. Compenseer eventuele
oneffenheden door de
stelvoetjes vast of los te
draaien totdat de
automaat volledig
horizontaal staat (hij mag
niet meer dan 2 graden
hellen).
3. Let erop dat er geen knellingen of kronkels in de buis
zijn.
De waterdruk van de kraan moet zich binnen de
waarden van de tabel Technische Gegevens bevinden
(zie bladzijde hiernaast).
Als de toevoerbuis niet lang genoeg is moet u zich
wenden tot een gespecialiseerde winkel of een
bevoegde installateur.
Gebruik nooit tweedehands of oude slangen, maar
alleen die slagen die bij het apparaat worden geleverd.
26
Page 27

Aansluiting van de afvoerbuis
Verbind de afvoerbuis,
zonder hem te buigen, aan
een afvoerleiding of aan
een afvoer in de muur die
zich tussen de 65 en 100
65 - 100 cm
cm van de grond af
bevindt.
Als alternatief kunt u de
afvoerbuis aan de rand
van een wasbak of
badkuip hangen nadat u
hem met de steun aan de
kraan heeft bevestigd (zie
afbeelding).
Het uiteinde van de
afvoerslang mag niet
onder water hangen.
Als de wasdroogmachine is geïnstalleerd moet het
stopcontact gemakkelijk te bereiken zijn.
Gebruik geen verlengsnoeren of dubbelstekkers.
Het snoer mag niet geknikt of samengedrukt worden.
De voedingskabel en de stekker mogen alleen door
een bevoegde installateur worden vervangen.
Belangrijk! De fabrikant kan niet aansprakelijk worden
gesteld wanneer deze normen niet worden nageleefd.
NL
Gebruik nooit verlengstukken voor de slang; indien dit
niet te vermijden is moet het verlengstuk dezelfde
doorsnede hebben als de oorspronkelijke slang en mag
hij niet langer zijn dan 150 cm.
Elektrische aansluiting
Voordat u de stekker in het stopcontact steekt moet u
zich ervan verzekeren dat:
het stopcontact geaard is en voldoet aan de geldende
normen;
het stopcontact het maximum vermogen van de
wasdroogmachine kan verdragen, zoals aangegeven
in de tabel Technische Gegevens (zie hiernaast);
de spanning zich bevindt tussen de waarden die zijn
aangegeven in de tabel Technische Gegevens (zie
hiernaast);
de contactdoos geschikt is voor de stekker van de
automaat. Indien dit niet zo is moet of de stekker of
het stopcontact vervangen worden.
De wasdroogmachine mag niet buitenshuis worden
geïnstalleerd, ook niet op een beschutte plaats,
aangezien het gevaarlijk is hem aan regen en onweer
bloot te stellen. Kortom, hij mag beslist niet vochtig
staan.
Technische gegevens
Model
Afmetingen
Vermogen
Elektrische
aansluitingen
Aansluiting
waterleiding
Snelheid
centrifuge
Controle-programma's volgens de
norm EN 50229
AQM8F 49 U
breedte cm 59,5
hoogte cm 85
diepte cm 64,5
van 1 tot 8 kg voor het wassen;
van 1 tot 6 kg voor het drogen
zie het typeplaatje met de technische
eigenschappen dat op het apparaat is
bevestigd
max. druk 1 MPa (10 bar)
min. druk 0,05 MPa (0,5 bar)
Inhoud trommel 62 liters
tot 1400 toeren per minuut
wassen:
60°C; uitgevoerd met 8 kg lading.
drogen: eerste droging uitgevoerd
met 2 kg lading op maximum
droogstand "L1"; tweede droging
uitgevoerd met 6 kg lading op
maximum droogstand "L4".
Deze apparatuur voldoet aan de
volgende CE voorschriften:
- 2004/108/CE (Elektromagnetische
compatiabiliteit)
- 2002/96/CE
- 2006/95/CE (Laagspanning)
programma ; temperatuur
27
Page 28

Beschrijving van de
wasdroogmachine
NL
WASDROOGMACHINE
HANDVAT DEUR
WASDROOGMACHINE
DEUR
BEDIENINGSPANEEL
VOETSTUK
STELVOETJES
DEUR
Om de deur van de
wasdroogmachine te
openen dient u altijd het
speciale handvat te
gebruiken (zie afbeelding).
WASMIDDELBAKJE
Het wasmiddelbakje bevindt
zich aan de binnenkant van
de automaat en verschijnt
als u de deur opent.
Voor de dosering van
wasmiddelen zie het
hoofdstuk Wasmiddelen en
wasgoed.
N.B.: plak de sticker met de
beschrijving van
programmas en opties op
het wasmiddelbakje. De
sticker bevindt zich in het zakje waar ook deze
handleiding zat.
1. wasmiddelbakje voorwas:
3
1
2
de wasdroogmachine start erin te schenken.
3. extra bakje:Bleekmiddel
Het gebruik van het extra bakje 3 sluit de voorwas uit.
bakje wasverzachters: voor wasverzachter. We raden
u aan om nooit het maximaal aangegeven niveau te
overschrijden (aangegeven door rooster) en om
geconcentreerde wasverzachters aan te lengen.
Stand- by modus
Deze wasdroogmachine beschikt, in overeenkomst met
de nieuwe normen betreffende de energiebesparing,
over een systeem wat het apparaat automatisch na 30
minuten uitschakelt (stand-by) indien men het niet
gebruikt. Druk kort op de ON/OFF
de wasdroogmachine weer aangaat.
gebruik waspoeder.
Voordat u het middel erin
strooit moet u controleren of
het aanvullende bakje 3 er
niet in zit.
2. wasmiddelbakje
hoofdwas: gebruik
waspoeder of vloeibaar
wasmiddel. In dit laatste
geval raden wij u aan het
wasmiddel direct voordat u
toets en wacht tot
28
Page 29

Bedieningspaneel
Knop
PROGRAMMAS
Display TEMPERATUUR
Knoppen met
Controlelampjes OPTIES
Display
DROGEN
Display VERTRAAGDE START/
DUUR CYCLUS
Knoppen met
Controlelampjes
Controlelampje
ECO
OPTIES
Knop met
controlelampje
START/PAUSE
Symbolen
WASFASES
NL
Knop met controlelampje
ON/OFF
TEMPERATUUR
Knop
Knop DROGEN
Knop met controlelampje ON/OFF: druk even op de
knop om de wasdroogmachine aan of uit te zetten. Het
groene controlelampje geeft aan dat de
wasdroogmachine aanstaat. Om de wasdroogmachine
tijdens de wascyclus uit te zetten moet u de knop iets
langer, circa 3 seconden, ingedrukt houden. Als u de
kort of per ongeluk indrukt zal de wasdroogmachine niet
uitgaan. Als u de wasdroogmachine tijdens de
wascyclus uitdoet wordt de cyclus automatisch
geannuleerd.
Knop PROGRAMMAS: kan beide richtingen op
draaien. Voor de juiste programmakeuze kunt u de
Programmatabel raadplegen.
Gedurende het programma blijft de knop stilstaan.
Knop
TEMPERATUUR: druk hierop om de
temperatuur te wijzigen of uit te sluiten. De gekozen
waarde leest u af op bovenstaand display (zie Het
uitvoeren van een was- of droogcyclus).
Knop UITGESTELDE
START
Controlelampje DEUR
Knop met controlelampje
TOETSBLOKKERING
GEBLOKKEERD
Symbolen WASFASES: gaan aan om weer te geven in
welke fase van de cyclus de automaat zich bevindt
(Wassen
- Spoelen - Centrifugeren/Afpompen
- Drogen ). De tekst wordt verlicht als de
wascyclus is beëindigd.
Knop met controlelampje START/PAUSE: als het
groene controlelampje langzaam knippert, drukt u op de
knop om de wascyclus te starten. Als de cyclus is
gestart blijft het controlelampje vast aanstaan. Als u de
wascyclus wilt pauzeren drukt u nogmaals op de knop.
Het controlelampje wordt oranje en gaat knipperen. Als
het controlelampje Deur Geblokkeerd
uit is, kunt u
het deurtje openen. Om het programma te hervatten
drukt u opnieuw op de knop.
Controlelampje
DEUR GEBLOKKEERD: geeft aan
dat de deur geblokkeerd is. Om de deur te openen
moet u de wascyclus pauzeren (zie Het uitvoeren van
een was- of droogcyclus).
Knop
DROGEN: druk hierop om het drogen te
verminderen of volledig uit te sluiten. Het gekozen
droogniveau of droogtijd leest u af op het display (zie
Het uitvoeren van een was- of droogcyclus).
Knop
UITGESTELDE START: druk hierop om een
uitgestelde start van het gekozen programma in te
stellen. De ingestelde vertraging leest u af van
bovenstaand display (zie Het uitvoeren van een was- of
droogcyclus).
Knoppen met Controlelampjes OPTIES: druk hierop om
de beschikbare opties te selecteren. Het controlelampje
dat overeenkomt met de geselecteerde optie blijft aan
(zie Het uitvoeren van een was- of droogcyclus).
Knop met controlelampje
TOETSBLOKKERING:
om de blokkering van het bedieningspaneel in of uit te
schakelen dient u de KNOP een aantal seconden (3-4)
ingedrukt te houden. Het ontstoken controlelampje geeft
aan dat het bedieningspaneel geblokkeerd is. Op deze
manier kunt u voorkomen dat er ongewilde wijzigingen
aan de programmas worden aangebracht, bijvoorbeeld
bij aanwezigheid van kinderen.
Controlelampje ECO: het symbool
gaat aan als,
nadat u de wasparameters heeft gewijzigd, u een
energiebesparing bereikt van minstens 10%. Bovendien
zal, voor het apparaat in de Stand by modus treedt,
het symbool enkele seconden lang aangaan. Als het
apparaat uitstaat zal de geschatte energiebesparing
circa 80% zijn.
29
Page 30

Het uitvoeren van een was- of
droogcyclus
NL
N.B.: voordat u de wasdroogmachine gaat gebruiken moet u
hem met wasmiddel maar zonder wasgoed een wascyclus
laten uitvoeren. Kies het programma van 90° zonder voorwas.
1. DOE DE WASDROOGMACHINE AAN. Druk op de toets
. Alle controlelampjes gaan 1 seconde lang aan, waarna het
controlelampje van de knop
START/PAUSE zal langzaam gaan knipperen.
2. LAAD HET WASGOED. Open de deur. Laad het
wasgoed in en zorg ervoor nooit de laadhoeveelheid te
overschrijden die wordt aangegeven in de programmatabel
op de volgende bladzijde.
3. WASMIDDEL DOSEREN. Trek het bakje naar buiten en
doe het wasmiddel in de speciale vakjes zoals aangegeven
in Beschrijving van de wasdroogmachine.
4. SLUIT DE DEUR.
5. KIES HET PROGRAMMA. Draai de
PROGRAMMAKNOP naar rechts of naar links totdat u het
gewenste programma heeft geselecteerd. Er worden
automatisch een temperatuur en een centrifugesnelheid
geselecteerd die naderhand kunnen worden gewijzigd.
6. DE WASCYCLUS AANPASSEN. Dit kunt u doen met
behulp van de knoppen op het bedieningspaneel:
Wijzigen van de temperatuur.
Het apparaat toont automatisch de maximale temperatuur en
centrifuge die voor het ingestelde programma gelden of de
laatst geselecteerde waarden, mits deze compatibel zijn met
het gekozen programma. Door op de knop
kunt u de temperatuur langzaamaan verlagen, tot aan de
koude wascyclus ( ). Als u nogmaals op de knoppen drukt
zult u wederom op de maximale waarden terugkeren.
Uitzondering: als u het programma Katoen selecteert kunt u
de temperatuur tot op 90° instellen.
Het drogen instellen
De eerste keer dat u op de toets
automatisch het maximale droogniveau selecteren dat past
bij het geselecteerde programma. Elke volgende keer dat u
op de toets drukt zal het niveau dalen, waarna ook de
droogtijd, totdat het zal worden uitgesloten, aangegeven
door "
wederom op de maximale waarden terugkeren.
Het is mogelijk het drogen in te stellen:
A - Op tijdsbasis: van 20 tot 180 minuten.
B - Aan de hand van het gewenste droogniveau:
Strijkdroog (L1): geschikt voor wasgoed dat naderhand
moet worden gestreken. De overgebleven vochtigheid zal
de vouwen verzachten en het verwijderen ervan
vergemakkelijken.
Hangerdroog (L2): ideaal voor die kledingstukken die
geen volledige droging nodig hebben.
Kastdroog (L3): geschikt voor wasgoed dat direct in de
kast kan worden gelegd, zonder te worden gestreken.
Extra droog (L3): geschikt voor wasgoed dat volledig
droog moet zijn, zoals handdoeken en badjassen.
Als in een uitzonderlijk geval de lading wasgoed voor wassen
en drogen meer is dan het toegestane maximum (zie
Programmatabel), dan voert u eerst het wassen uit. Aan het
einde hiervan verdeelt u de lading en laadt u één gedeelte in de
". Als u nogmaals op de knoppen drukt zult u
aanblijft. Het controlelampje
te drukken
drukt zal het apparaat
trommel. Volg nu de aanwijzingen voor het uitvoeren van
"Alleen drogen". Herhaal deze handelingen met de rest van
de lading. Aan het einde van de droogcyclus wordt altijd
een afkoeltijd ingezet.
Alleen drogen
Selecteer met de programmaknop een droogniveau (
) aan de hand van het type materiaal. Het is ook mogelijk het
gewenste niveau of de tijd van het drogen in te stellen met de
toets DROGEN
Een uitgestelde start instellen.
Druk op de betreffende knop totdat u de gewenste
vertraging bereikt. Tijdens het instellen verschijnt de tijd van
de vertraging samen met het knipperende symbool
Nadat u de uitgestelde start heeft ingesteld toont het
display het symbool
cyclus. Als u één keer op de betreffende knop drukt wordt
de ingestelde vertraging getoond. Om de uitgestelde start
te verwijderen drukt u op de knop totdat op het display de
tekst OFF verschijnt. Het symbool gaat uit.
Op het moment dat u de knop START/PAUSE indrukt zal
de waarde van de vertraging alleen kunnen worden
verminderd.
De eigenschappen van de cyclus wijzigen.
Druk op de knoppen OPTIES om de wascyclus naar wens
aan te passen.
Druk op de knop om de optie te activeren. Het
desbetreffende controlelampje gaat aan.
Druk nogmaals op de knop om de optie te deactiveren.
Het desbetreffende controlelampje gaat uit.
Als de gekozen optie niet geschikt is voor het ingestelde
programma zal het betreffende controlelampje gaan
knipperen, zal er een geluidssignaal klinken (3 pieptonen) en
zal de optie niet worden geactiveerd.
Als de geselecteerde optie niet compatibel is met een
optie die daarvòòr is ingesteld, zal het controlelampje van
de eerst geselecteerde optie gaan knipperen en zal alleen
de tweede optie worden geactiveerd. Het controlelampje
van de betreffende knop zal aanblijven.
7. HET PROGRAMMA STARTEN. Druk op de toets START/
PAUSE. Het betreffende controlelampje zal aanblijven en de
deur zal worden geblokkeerd (het controlelampje DEUR
GEBLOKKEERD
bij de verschillende wasfases worden tijdens de cyclus
verlicht om aan te geven welke fase bezig is. Om een
programma te wijzigen van een reeds gestarte wascyclus
doet u de wasdroogmachine op pauze met behulp van de
knop START/PAUSE. Selecteer daarna de gewenste cyclus
en druk nogmaals op de knop START/PAUSE. Om de deur
te openen tijdens de wascyclus drukt u op de knop START/
PAUSE. Als het controlelampje DEUR GEBLOKKEERD
uit gaat kunt u de deur openen. Om het programma te
hervatten drukt u opnieuw op de knop START/PAUSE.
8. EINDE VAN HET PROGRAMMA. Wordt aangegeven
door de tekst END. De deur kan gelijk worden geopend.
Als het controlelampje START/PAUSE knippert druk u op
de toets om de wascyclus te beëindigen. Open de deur,
laad het wasgoed uit en schakel de wasdroogmachine uit.
Als u een reeds gestarte cyclus wilt annuleren houdt u de
knop
apparaat uitgaat.
ingedrukt totdat de cyclus wordt onderbroken en het
.
(niet knipperend) en de duur van de
blijft aanstaan). De symbolen die horen
- -
.
30
Page 31

Programmas en opties
Programmatabel
Sym-
Besc hrijving van het Progra mm a
bool
Programma's Katoen
Katoen
met voorwas
(D oe h et w as middel in h et s pecia le vakje).
Katoen (1):
Katoen (2):
Bont
Jeans
Speciale programma's
Baby:
Gemengd 30':
wasgoed (niet geschikt voor wol, zijde en handwas).
Kleurvast
Zijde:
Wol:
Dr oog programma's
Was & droog 30° 1400
Drogen Katoen - Drogen Synthetisch - Drogen Wol - -
Ex tra program ma 's
Spoelen - 1400
Centrifugeren - 1400
Afpompen - 0 - - - - 8
(*) N.B.: circa 10 minuten na de START zal de wasdroogmachine aan de hand van het ingeladen wasgoed de resterende tijd tot aan het einde van het
programma opnieuw berekenen en tonen.
Voor alle Test Institutes:
1) Controleprogramma volgens de norm EN 50229: selecteer het programma met een temperatuur van 60°C.
2) Programma katoen lang: selecteer het programma
3) Programma katoen kort: selecteer het programma
zeer vuil wit en kleurecht bont wasgoed.
zeer vuile witte en bonte fijne was.
Katoen (3)
zeer vuile fijne bonte was.
voor het snel opfrissen van niet zo vuil
Synthetisch
voor zijde, viscose, lingerie.
voor wol, kasjmier, etc.
met een temperatuur van 40°C.
met een temperatuur van 40°C.
Max.
Te m p .
(°C )
90° 1400
60°
(Max. 90°)
40° 1400
40° 1400
40° 800
40° 800
30° 800
60° 800
30° 0 -
40° 800
Wasopties
Super Wash
Deze optie garandeert een kwalitatief zeer hoog wasresultaat
dankzij het gebruik van een grotere hoeveelheid water in de
beginfase van de cyclus en een langere tijdsduur van het
programma. Kan met of
3
1
2
volledige was uit te voeren, giet u het bleekmiddel in
het extra bakje 3, stelt u het programma "Spoelen"
in, en activeert de optie "Super Wash" .
Deze optie is niet beschikbaar tijdens de programmas ,
, , , , , , , , , .
Makkelijk Strijken
Als u deze optie selecteert zullen het wassen en de centrifuge
dusdanig worden aangepast dat er minder kreuken worden
gevormd. Aan het einde van de wascyclus zal de
Wasdroogmachine de trommel langzaam laten ronddraaien. De
controlelampjes Makkelijk Strijken en START/PAUSE gaan
zonder bleekmiddel gebruikt
worden.
Als u de was ook
wilt bleken, het extra
bijgeleverde bakje 3 in bakje
1 doen. Let bij het gieten
van het bleekwater dat u
het niveau "max",
aangegeven op de centrale
pin, niet overschrijdt (zie
afb.). Als u alleen wilt
bleken zonder een
Max.
snelhe id
(toeren p er
minuut)
1400
Dr ogen
ll l
ll l l
ll l l
ll l l
ll l
ll l l
ll l
ll l l
ll l
ll l
l
l
l
l
l
START/PAUSE of op de knop Makkelijk Strijken.
Bij het programma Zijde
cyclus door het wasgoed in de week te laten staan. Het
controlelampje Makkelijk Strijken gaat knipperen. Om het water
af te voeren en de was uit de automaat te halen moet u op de
knop START/PAUSE drukken of op de knop Makkelijk Strijken.
Deze optie is niet beschikbaar tijdens de programmas
, , , , , , , .
Als u de was ook wilt drogen, is deze knop alleen actief
wanneer hij gecombineerd is met het niveau Strijkdroog (L1).
Tijd Sparen
Als u deze optie selecteert verkort u de duur van het
programma met 30%-50% aan de hand van de gekozen
cyclus en zorgt u als gevolg voor een aanzienlijke water- en
energiebesparing. Gebruik deze cyclus voor niet zo vuil
wasgoed.
Deze optie is niet beschikbaar tijdens de programmas
, , , , , , , , .
Extra Spoelen
Door deze optie te selecteren verhoogt u het spoelresultaat en
zorgt u ervoor dat elk spoor van wasmiddel verdwijnt. Deze
optie is vooral nuttig bij personen wiens huid gevoelig is voor
wasmiddelen. We raden deze optie aan wanneer een volle lading
moet worden gewassen of wanneer zeer veel wasmiddel wordt
gebruikt.
Deze optie is niet beschikbaar tijdens de programmas
, , , , , .
knipperen. Om de cyclus te beëindigen drukt u op de knop
Wasmiddel en
wasversterkers
Was-
middel
Wasverz-
achter
ll
- - - 6
- - - 4
- - - 1,5
-
- - - 8
Bleekmiddel
ll
lading
- 8
- 4
- 3,5
- 2
- 2
- 1
beëindigt de Wasdroogmachine de
Max.
(kg)
8
8
8
2
4
8
Duur-
cyclus
(*) U kunt de duur van de wasprogrammas op het display
controleren.
,
, ,
,
NL
31
Page 32

Wasmiddelen en wasgoed
NL
Wasmiddel
De keuze en de hoeveelheid wasmiddel hangen af van
het type stof (katoen, wol, zijde), van de kleur van het
wasgoed, de wastemperatuur, de vuilgraad en de
hardheid van het water.
Een juiste dosering van het wasmiddel voorkomt
verspillingen en beschermt het milieu: ook al zijn
wasmiddelen biologisch afbreekbaar, toch bevatten ze
elementen die het evenwicht in de natuur verstoren.
We raden u aan:
waspoeder te gebruiken voor de witte katoenen was
en voor de voorwas.
vloeibaar wasmiddel te gebruiken voor fijne katoenen
was en voor alle programmas op lage temperatuur.
speciale vloeibare wasmiddelen te gebruiken voor wol
en zijde.
Het wasmiddel kan voor het starten van het programma
in het speciale bakje worden gedaan, of in de wasbol die
direct in de trommel wordt geplaatst. Als u een wasbol
gebruikt kunt u het programma Katoen met voorwas
niet gebruiken.
Gebruik nooit wasmiddelen voor handwas aangezien
die te veel schuim vormen.
Voorbereiden van het wasgoed
Open de kledingstukken voor u ze inlaadt.
Scheid het wasgoed volgens het type stof (symbool
op het etiket van het kledingstuk) en de kleur. Let er
goed op dat u de bonte was scheidt van de witte
was;
Leeg de zakken en controleer de knopen;
Overschrijd nooit het gewicht dat wordt aangegeven
in de Programmatabel wat geldt voor droog
wasgoed.
Hoeveel weegt wasgoed?
1 laken 400-500 gr.
1 kussensloop 150-200 gr.
1 tafellaken 400-500 gr.
1 badjas 900-1200 gr.
1 handdoek 150-250 gr.
1 spijkerbroek 400-500 gr.
1 overhemd/blouse 150-200 gr.
Wastips
Jeans: gebruik het speciale programma Jeans voor
al uw spijkergoed. Draai de kledingstukken
binnenstebuiten voor het wassen en gebruik een
vloeibaar wasmiddel.
Baby: gebruik het speciale programma Baby
het wassen van typisch kindervuil en vervolgens al het
wasmiddel te verwijderen om allergie te voorkomen op
de tere kinderhuid. Deze cyclus is speciaal ontwikkeld
om de hoeveelheid bacteriën terug te dringen door een
vergroot waterverbruik en een optimale toepassing van
hygiënische wasversterkers.
Aan het einde van de wascyclus zal de trommel
langzaam ronddraaien. Om de cyclus te beëindigen druk
u op de START/PAUSE toets.
Zijde: gebruik het speciale programma Zijde
alle zijden kledingstukken te wassen. We raden u aan
een speciaal wasmiddel voor fijne was te gebruiken.
voor
om
Gordijnen: Gebruik het programma Zijde
gordijnen nauwkeurig en doe ze in een kussensloop of net.
Wol: is het enige bedrijf dat een Wasdroogmachine
heeft ontwikkeld die de prestigieuze Woolmark Platinum
Care (M.0508) onderscheiding heeft gekregen van The
Woolmark Company. Dit garandeert dat u alle wollen
kledingstukken in de automaat kunt wassen, ook
wasgoed met het etiket alleen handwas
programma Wol kunt u al uw wollen wasgoed in de
automaat wassen, met gegarandeerd het beste
resultaat.
Moeilijke vlekken: het beste kunt u moeilijke vlekken
voorbehandelen met een stuk zeep voor u ze in de
Wasdroogmachine doet en het programma Katoen met
voorwas gebruiken.
Was & droog: is bedoeld voor het snel wassen en
drogen van niet zo vuil wasgoed. Als u deze cyclus
selecteert kunt u tot aan 1 kg wasgoed wassen en
drogen, in slechts 60 minuten. Gebruik voor de beste
resultaten een vloeibaar wasmiddel. Behandel
manchetten, kragen en vlekken eerst voor met een
speciaal product.
. Vouw de
. Met het
Balanceersysteem van de lading
Om overmatige trillingen te vermijden verdeelt de
automaat de lading voor het centrifugeren op een
gelijkmatige manier. Dit gebeurt door de trommel te laten
draaien op een snelheid die iets hoger ligt dan de
wassnelheid. Als na herhaaldelijke pogingen de lading
nog steeds niet goed is gebalanceerd, zal de
Wasdroogmachine de centrifuge op een lagere snelheid
uitvoeren dan die voorzien was. Als de lading zeer uit
balans is zal de Wasdroogmachine een verdeling
uitvoeren in plaats van een centrifuge. Teneinde een
betere distributie van de waslading en een juiste
balancering te bereiken raden wij u aan kleine en grote
kledingstukken te mengen.
32
Page 33

Voorzorgsmaatregelen en
advies
Deze wasdroogmachine is ontworpen en uitgevoerd
volgens de internationale veiligheidsnormen. Deze
aanwijzingen zijn voor uw eigen veiligheid geschreven en
moeten aandachtig worden doorgenomen.
Algemene veiligheid
Dit apparaat is uitsluitend ontworpen voor
huishoudelijk niet-professioneel gebruik.
Het apparaat mag niet worden gebruikt door
personen (kinderen inbegrepen), met beperkte
lichamelijke, sensorische of mentale vermogens of
met onvoldoende ervaring en kennis, tenzij het
gebruik plaatsvindt onder het toezicht of volgens de
instructies van een persoon die verantwoordelijk is
voor hun veiligheid. Kinderen moeten in de gaten
worden gehouden om te verzekeren dat ze niet met
het apparaat spelen.
- Geen ongewassen kledingstukken drogen.
- Kleding die bevuild is met stoffen zoals kookolie,
aceton, alcohol, benzine, kirosine,
vlekkenverwijderaar, terpentine, was en stoffen om
was te verwijderen moet met een grotere hoeveelheid
wasmiddel in warm water gewassen worden alvorens
de kleding in de wasdroger te drogen.
- Voorwerpen zoals schuimrubber, douchemutsen,
waterdichte stoffen, artikelen met een rubberen kant
en kleding of kussens die onderdelen van
schuimrubber bevatten mogen niet in de wasdroger
gedroogd worden.
- Wasverzachter en gelijksoortige producten moeten
overeenkmostig de instructies van de fabrikant
gebruikt worden.
- Het laatste deel van een droogcyclus wordt
uitgevoerd zonder warmte (koelcyclus) om te zorgen
dat de artikelen niet beschadigd worden.
LET OP: Stop de wasdroger nooit voordat het
droogprogramma beeindigd is. In dit geval snel al het
wasgoed uit de droger halen en het wasgoed
ophangen om het snel te laten drogen.
Raak de machine niet aan als u blootsvoets bent of
met natte of vochtige handen of voeten.
Trek de stekker nooit uit het stopcontact door aan
het snoer te trekken, maar altijd door de stekker zelf
beet te pakken.
Raak het afvoerwater niet aan aangezien het zeer
heet kan zijn.
Forceer nooit de deur van de wasdroogmachine: het
veiligheidsmechanisme dat een ongewild openen van
de deur voorkomt, kan beschadigd worden.
Probeer in geval van storingen nooit zelf de interne
mechanismen van de wasdroogmachine te
repareren.
Zorg ervoor dat kleine kinderen niet te dicht bij de
machine komen als deze in werking is.
Als het apparaat verplaatst moet worden doe dit dan
met twee of drie personen tegelijk en heel voorzichtig.
Doe dit nooit alleen, want het apparaat is erg zwaar.
Voordat u het wasgoed in de automaat laadt, moet u
controleren of hij leeg is.
Afvalverwijdering
Het verwijderen van het verpakkingsmateriaal: houdt
u aan de plaatselijke normen zodat het materiaal
hergebruikt kan worden.
De Europese richtlijn 2002/96/CE, betreffende
afgedankte elektrische en elektronische apparatuur,
voorziet dat huishoudelijke apparatuur niet met het
normale afval mag worden meegegeven. De
afgedankte apparatuur moet apart worden opgehaald
om het wedergebruik van materialen waarvan hij is
gemaakt te optimaliseren en om potentiële schade
aan de gezondheid en het milieu te voorkomen. Het
symbool van de afvalemmer met een kruis staat op
elk product, om aan te geven dat het apart moet
worden weggegooid.
Voor verdere informatie betreffende het correcte
verwijderen van huishoudelijke apparatuur kunnen de
gebruikers zich wenden tot de gemeentelijke
reinigingsdienst of de verkoper.
Handmatige opening van het deurtje
Mocht er in het huis geen stroom aanwezig zijn en u wilt
het deurtje openen om de was op te hangen, dan dient
u het volgende te doen:
1. haal de stekker uit het
stopcontact.
2. controleer dat het
waterniveau in de automaat
lager is dan het deurtje; als
dat niet het geval is kunt het
water weg laten vloeien door
middel van de afvoerbuis en
dit opvangen in een emmer,
zoals aangegeven in de
afbeelding.
3. verwijder het paneel aan
de voorkant van de
wasdroogmachine (zie
volgende pagina).
4. trek het lipje aangegeven
in de afbeelding naar voren
totdat het plastic bandje
loskomt; trek hem daarna
naar beneden totdat u klik
hoort, wat aangeeft dat de
deur is geopend.
5. open de deur; als dat niet
lukt moet u de handeling
herhalen.
6. monteer het paneel weer,
met de haakjes goed
bevestigd in de juiste
openingen, voordat u het
paneel tegen de machine
aandrukt.
NL
33
Page 34

Onderhoud en verzorging
NL
Afsluiten van water en stroom
Sluit na iedere wasbeurt de kraan af. Hiermee
beperkt u slijtage van de waterinstallatie van de
wasdroogmachine alsmede lekkagegevaar.
Sluit altijd eerst de stroom af voordat u de
wasdroogmachine schoonmaakt en gedurende
onderhoudswerkzaamheden.
Reinigen van de wasdroogmachine
De buitenkant en de rubberen onderdelen kunnen met
een spons en een lauw sopje worden schoongemaakt.
Gebruik nooit schuurmiddelen of oplosmiddelen.
Reinigen van het wasmiddelbakje
Verwijder het laatje door op
het hendeltje (1) te drukken
en het naar voren te trekken
(2) (zie afbeelding).
Was het onder stromend
water. Dit moet u regelmatig
doen.
Toegang tot het voorvakje:
2
1. verwijder het afdekpaneel aan de voorzijde van de
wasdroogmachine door er op het midden op te drukken.
Duw beide zijkanten naar beneden toe en verwijder het
paneel (zie afbeeldingen).
2. plaats een bakje om het
water op te vangen dat eruit
zal lopen (circa 1,5 l) (zie
afbeelding).
3. draai het deksel eraf,
tegen de klok in (zie
afbeelding).
Verzorging van de trommel
Laat de deur van de wasdroogmachine altijd op een
kier staan om te voorkomen dat er nare luchtjes
worden gevormd.
Reinigen van de pomp
De wasdroogmachine is voorzien van een zelfreinigende
pomp die niet hoeft te worden onderhouden. Het kan
echter gebeuren dat kleine voorwerpen (muntjes,
knopen) in het voorvakje dat de pomp beschermt en
zich aan de onderkant ervan bevindt, terechtkomen.
Verzeker u ervan dat de wascyclus beëindigd is en haal
de stekker uit het stopcontact.
4. maak de binnenkant goed schoon;
5. schroef het deksel er weer op;
6. monteer het paneel weer, met de haakjes goed
bevestigd in de juiste openingen, voordat u het paneel
tegen de machine aandrukt.
Controle van de buis van de watertoevoer
Controleer minstens een keer per jaar de
watertoevoerbuis. Als er barstjes of scheuren in zitten
moet hij vervangen worden: gedurende het wassen kan
de hoge waterdruk onverwachts breuken veroorzaken.
34
Page 35

Storingen en oplossingen
Het kan gebeuren dat het apparaat niet werkt. Voor u contact opneemt met de Servicedienst (zie Service) moet u
controleren of het niet een storing betreft die u zelf makkelijk kunt verhelpen met behulp van de volgende lijst.
Storingen:
De wasdroogmachine gaat niet aan.
De wascyclus start niet.
De wasdroogmachine heeft geen
watertoevoer.
De deur van het apparaat is
geblokkeerd.
De wasdroogmachine blijft water
aan- en afvoeren.
Mogelijke oorzaken / Oplossing:
De stekker zit niet in het stopcontact of niet ver genoeg om contact te maken.
Het hele huis zit zonder stroom.
De deur is niet goed dicht.
De START/PAUSE toets is niet ingedrukt.
De waterkraan is niet open.
U heeft een uitgestelde start ingesteld.
De watertoevoerbuis is niet aangesloten op de kraan.
De toevoerslang is gebogen.
De waterkraan is niet open.
Het hele huis zit zonder water.
Er is onvoldoende druk.
De START/PAUSE toets is niet ingedrukt.
Als u de cyclus Baby
wasdroogmachine aan het einde van de cyclus de trommel langzaam laten
ronddraaien. Om de cyclus te beëindigen drukt u op de knop START/PAUSE of
op de knop Makkelijk Strijken
wasdroogmachine de cyclus beëindigen door de was in het water te laten
weken. Om het water af te voeren en de was uit de automaat te halen moet
u op de knop START/PAUSE drukken of op de knop Makkelijk Strijken
De afvoerbuis is niet op 65 tot 100 cm afstand van de grond af geïnstalleerd
(zie Installatie).
Het uiteinde van de afvoerbuis ligt onder water (zie Installatie).
Als u op een van de hoogste verdiepingen van een flatgebouw woont, kan
zich een hevelingsprobleem voordoen, waarbij de wasdroogmachine
voortdurend water aan- en afvoert. Om deze storing te verhelpen zijn er in
de handel speciale beluchters te koop.
De afvoer in de muur heeft geen ontluchting.
selecteert of de optie Makkelijk Strijken , zal de
. Als u de cyclus Zijde selecteert zal de
NL
.
De wasdroogmachine voert het
water niet af of centrifugeert niet.
De machine trilt erg tijdens het
centrifugeren.
De wasdroogmachine lekt.
De symbolen van Fase in
voortgang knipperen snel, tegelijk
met het controlelampje ON/OFF.
Er ontstaat teveel schuim.
De deur van het apparaat is
geblokkeerd.
De Wasdroogmachine droogt niet.
Het programma voorziet geen afvoer: bij enkele programmas moet dit met
de hand worden gestart (zie Programmas en opties).
De optie Makkelijk Strijken is actief: voor het beëindigen van het programma
drukt u op de toets START/PAUSE (zie Programmas en opties).
De afvoerslang is gebogen (zie Installatie).
De afvoerleiding is verstopt.
De trommel is bij het installeren niet op de juiste wijze gedeblokkeerd (zie
Installatie).
De wasdroogmachine staat niet goed recht (zie Installatie).
De wasdroogmachine staat te krap tussen meubels en muur (zie Installatie).
De waslading is niet gebalanceerd (zie Wasmiddelen en wasgoed).
De slang van de watertoevoer is niet goed aangeschroefd (zie Installatie).
Het wasmiddelbakje is verstopt (voor reiniging zie Onderhoud en verzorging).
De afvoerslang is niet goed aangesloten (zie Installatie).
Doe de wasdroogmachine uit en haal de stekker uit het stopcontact.
Wacht circa 1 minuut en doe hem daarna weer aan. Als de storing
voortzet, dient u de Servicedienst in te schakelen.
Het wasmiddel is niet bedoeld voor wasautomaten (er moet voor
wasdroogmachine, handwas en machinewas, of dergelijke op staan).
U heeft teveel wasmiddel gebruikt.
Voer een handmatige deblokkering uit (zie Voorzorgsmaatregelen en
advies).
De stekker is niet in het stopcontact of niet ver genoeg ingestoken om
contact te maken.
Er is geen stroom.
De deur is niet goed dicht.
Uitgestelde start is ingesteld.
De DROOG toets staat op
.
35
Page 36

Service
NL
Voordat u de Servicedienst inschakelt:
Controleer eerst of u het probleem zelf kunt oplossen (zie Storingen en oplossingen);
Start het programma opnieuw om te controleren of de storing is verholpen;
Als dit niet het geval is, kunt u contact opnemen met de erkende Servicedienst.
In het geval de wasdroogmachine verkeerd is geïnstalleerd of u hem niet correct heeft gebruikt zal u gevraagd
worden de reparatiekosten te betalen.
Wendt u nooit tot een niet erkende installateur.
Vermeld:
het type storing;
het model wasdroogmachine (Mod.);
het serienummer (S/N).
Deze laatste gegevens vindt u op het typeplaatje op het apparaat.
N.B.: om de Demo Mode te verlaten drukt u tegelijkertijd 3 sec. lang of de twee knoppen ON/OFF en START/PAUSE .
36
Page 37

Istruzioni per
linstallazione e luso
Questo simbolo ti ricorda di leggere questo libretto istruzioni.
I
Italiano
AQUALTIS
AQM8F 49 U
Sommario
Installazione, 38-39
Disimballo e livellamento
Collegamenti idraulici ed elettrici
Dati tecnici
Descrizione della macchina, 40-41
Pannello comandi
Come effettuare un ciclo di lavaggio o
di asciugatura, 42
Programmi e opzioni, 43
Tabella Programmi
Le opzioni di lavaggio
Detersivi e biancheria, 44
Detersivo
Preparare la biancheria
Programmi particolari
Sistema bilanciamento del carico
LAVASCIUGA
I
Precauzioni e consigli, 45
Sicurezza generale
Smaltimento
Apertura manuale della porta oblò
Manutenzione e cura, 46
Escludere acqua e corrente elettrica
Pulire la macchina
Pulire il cassetto dei detersivi
Curare il cestello
Pulire la pompa
Controllare il tubo di alimentazione dellacqua
Anomalie e rimedi, 47
Assistenza, 48
Assistenza Attiva 7 giorni su 7
37
Page 38

Installazione
E importante conservare questo libretto per poterlo
I
consultare in ogni momento. In caso di vendita, di
cessione o di trasloco, assicurarsi che resti insieme
alla lavasciuga.
Leggere attentamente le istruzioni: ci sono importanti
informazioni sullinstallazione, sulluso e sulla
sicurezza.
Nella busta contenente questo libretto troverete,
oltre alla garanzia, dei particolari che serviranno per
linstallazione.
Disimballo e livellamento
Disimballo
1. Una volta disimballata la lavasciuga, controllare che
non abbia subito danni durante il trasporto.
Se fosse danneggiata non collegarla e contattare
il rivenditore.
2. Rimuovere le 4 viti di
protezione per il
trasporto ed il relativo
distanziale posti nella
parte posteriore (vedi
figura).
In caso sia posizionata su moquette o tappeti,
regolare i piedini in modo da conservare sotto la
lavasciuga lo spazio necessario per la ventilazione.
Collegamenti idraulici ed elettrici
Collegamento del tubo di alimentazione dellacqua
Prima di collegare il tubo di alimentazione alla rete
idrica, far scorrere l'acqua finché non sia limpida.
1. Collegare il tubo di
alimentazione alla
macchina avvitandolo
all'apposita presa
d'acqua, nella parte
posteriore in alto a
destra (vedi figura).
2. Collegare il tubo di
alimentazione
avvitandolo a un
rubinetto d'acqua fredda
con bocca filettata da
3/4 gas (vedi figura).
3. Chiudere i fori con i tappi di plastica contenuti nella
busta.
4. Conservare tutti i pezzi; qualora la lavasciuga
dovesse essere trasportata, dovranno essere rimontati
per evitare danneggiamenti interni.
Gli imballaggi non sono giocattoli per bambini.
Livellamento
1. Posizionare la lavasciuga su un pavimento piano e
rigido, senza appoggiarla a muri o mobili.
2. Compensare le
irregolarità svitando o
avvitando i piedini finchè
la macchina non sia
orizzontale (non deve
essere inclinata più di 2
gradi).
Un accurato livellamento dà stabilità ed evita vibrazioni
e rumorosità soprattutto nella fase di centrifuga.
3. Fare attenzione che nel tubo non ci siano né pieghe
né strozzature.
La pressione idrica del rubinetto deve essere
compresa nei valori della tabella Dati tecnici
(vedi pagina a fianco).
Se la lunghezza del tubo di alimentazione non fosse
sufficiente, rivolgersi a un negozio specializzato o a un
tecnico autorizzato.
Non utilizzare mai tubi di carico usati o vecchi, ma
quelli in dotazione alla macchina.
38
Page 39

Collegamento del tubo di scarico
Collegare il tubo di
scarico a una conduttura
di scarico o a uno
scarico a muro posti tra
65 e 100 cm da terra
65 - 100 cm
evitando assolutamente
di piegarlo.
In alternativa,
appoggiare il tubo di
scarico al bordo di un
lavandino o di una
vasca, legando la guida
in dotazione al rubinetto
(vedi figura).
L'estremità libera del
tubo di scarico non
deve rimanere immersa
nell'acqua.
Non usare prolunghe e multiple.
I
Il cavo non deve subire piegature o compressioni.
Il cavo di alimentazione e la spina devono essere
sostituiti solo da tecnici autorizzati.
Attenzione! Lazienda declina ogni responsabilità
qualora queste norme non vengano rispettate.
È sconsigliato usare tubi di prolunga; se
indispensabile, la prolunga deve avere lo stesso
diametro del tubo originale e non superare i 150 cm.
Collegamento elettrico
Prima di inserire la spina nella presa della corrente,
accertarsi che:
la presa abbia la messa a terra e sia a norma
di legge;
la presa sia in grado di sopportare il carico
massimo di potenza della macchina, indicato
nella tabella Dati tecnici (vedi a fianco);
la tensione di alimentazione sia compresa nei
valori indicati nella tabella Dati tecnici (vedi a
fianco);
la presa sia compatibile con la spina della
macchina. In caso contrario far sostituire la presa o
la spina.
La macchina non va installata all'aperto, nemmeno
se lo spazio è riparato, perché è molto pericoloso
lasciarla esposta a pioggia e temporali.
A macchina installata, la presa della corrente deve
essere facilmente raggiungibile.
Dati tecnici
Modello
Dimensioni
Capacità
Collegamenti
elettrici
Collegamenti
idrici
Velocità d i
centrifuga
Programmi di
controllo
secondo la norma
EN 50229
AQM8F 49 U
larghezza cm 59,5
altezza cm 85
profondità cm 64,5
da 1 a 8 kg per il lavaggio
da 1 a 6 kg per l'asciugatura
vedi la targhetta caratteristiche
tecniche applicata sulla macchina
pressione massima 1 MPa (10 bar)
pressione minima 0,05 MPa (0,5 bar)
capacità del cesto 62 litri
sino a 1400 giri al minuto
lavaggio: programma ; temperatura
60°C; effettuato con 8 kg di carico.
asciugatura: prima asciugatura
effettuata con 2 kg di carico
selezionando il livello di asciugatura "L1";
seconda asciugatura effettuata con 6 kg
di carico selezionando il livello di
asciugatura "L4".
Questa apparecchiatura è conforme
alle seguenti Direttive Comunitarie:
- 2004/108/CE(Compatibilità
Elettromagnetica)
- 2002/96/CE
- 2006/95/CE (Bassa Tensione)
39
Page 40

Descrizione della macchina
I
PORTA OBLÒ
MANIGLIA
PORTA
OBLÒ
ZOCCOLO
PIEDINI REGOLABILI
PANNELLO
COMANDI
PORTA OBLO
Per aprire la porta oblò
utilizzare sempre lapposita
maniglia
CASSETTO DETERSIVI
Il cassetto detersivi si
trova allinterno della
macchina e vi si accede
aprendo la porta.
Per il dosaggio dei detersivi vedi il capitolo Detersivi
e biancheria.
Nota: attaccare sul
cassetto detersivi ladesi-
vo con le descrizioni dei
programmi e opzioni. Ladesivo si trova nella busta
contenente questo libretto.
(vedi figura).
1. vaschetta per il
3
1
2
si raccomanda di versarlo immediatamente prima
dellavvio della lavasciuga.
3. vaschetta aggiuntiva: Candeggina
prelavaggio: usare detersivo
in polvere.
Prima di versare il detersivo verificare che non sia
inserita la vaschetta
aggiuntiva 3.
2. vaschetta per il lavaggio:
usare detersivo in polvere o
liquido. In questultimo caso
Lutilizzo della vaschetta aggiuntiva 3 esclude il
prelavaggio.
vaschetta per additivi: per ammorbidente o additivi
liquidi. Si raccomanda di non superare mai il livello
massimo indicato dalla griglia e di diluire ammorbidenti
concentrati.
Modalità di stand by
Questa macchina, in conformità alle nuove normative
legate al risparmio energetico, è dotata di un sistema
di autospegnimento (stand by) che entra in funzione
dopo circa 30 minuti nel caso di non utilizzo. Premere
brevemente il tasto ON-OFF
macchina si riattivi.
e attendere che la
40
Page 41

Pannello comandi
Manopola
PROGRAMMI
Display
TEMPERATURA
Pulsanti con Spie
OPZIONI
Display
ASCIUGATURA
Display
PARTENZA RITARDATA/
DURATA CICLO
Spia
Pulsanti e Spie
ECO
OPZIONI
I
Icone
FASI DI
LAVAGGIO
Pulsante con spia
AVVIO/
PAUSA
Pulsante con spia
ON/OFF
TEMPERATURA
Pulsante
ASCIUGATURA
Pulsante con spia ON/OFF: premere brevemente il
pulsante per accendere o spegnere la macchina. La
spia verde indica che la macchina è accesa. Per
spegnere la lavasciuga durante il lavaggio è necessario
tenere premuto il pulsante più a lungo, circa 3 sec.;
una pressione breve o accidentale non permetterà lo
spegnimento della macchina.
Lo spegnimento della macchina durante un lavaggio in
corso annulla il lavaggio stesso.
Manopola PROGRAMMI: può essere ruotata in
entrambe le direzioni. Per impostare il programma più
adatto vedi la Tabella programmi.
Durante il lavaggio la manopola resta ferma.
Pulsante
TEMPERATURA: premere per modificare
o escludere la temperatura; il valore scelto viene indicato
dal display soprastante (vedi Come effettuare un ciclo
di lavaggio).
Pulsante
Pulsante
PARTENZA
RITARDATA
Spia
BLOCCO
Pulsante con spia
BLOCCO
TASTI
PORTA
Icone FASI DI LAVAGGIO: si illuminano ad indicare
l'avanzamento del ciclo (Lavaggio
- Risciacquo
- Centrifuga/Scarico - Asciugatura ).
La scritta
si illumina quando il ciclo è terminato.
Pulsante con spia AVVIO/PAUSA: quando la spia
verde lampeggia lentamente, premere il pulsante per
avviare un lavaggio. A ciclo avviato la spia diventa
fissa. Per mettere in pausa il lavaggio, premere
nuovamente il pulsante; la spia lampeggerà con colore
arancione. Se la spia Blocco porta
è spenta, si
potrà aprire la porta oblò.
Per far ripartire il lavaggio dal punto in cui è stato
interrotto, premere nuovamente il pulsante.
Spia
BLOCCO PORTA: indica che la porta oblò è
bloccata. Per aprire la porta è necessario mettere il
ciclo in pausa (vedi Come effettuare un ciclo di
lavaggio).
Pulsante
ASCIUGATURA: premere per ridurre o
escludere lasciugatura; il livello o il tempo di
asciugatura selezionato viene indicato nel display (vedi
Come effettuare un ciclo di lavaggio o asciugatura).
Pulsante
PARTENZA RITARDATA: premere per
impostare una partenza ritardata del programma prescelto;
il valore del ritardo impostato viene indicato dal display
soprastante (vedi Come effettuare un ciclo di lavaggio).
Pulsanti con SpieOPZIONI: premere per selezionare le
opzioni disponibili. La spia relativa allopzione selezionata
rimarrà accesa (vedi Come effettuare un ciclo di
lavaggio).
Pulsante con spia
BLOCCO TASTI: per attivare o
disattivare il blocco del pannello comandi, tenere
premuto il pulsante per circa 2 secondi. La spia accesa
indica che il pannello comandi è bloccato. In questo
modo si impediscono modifiche accidentali dei
programmi, soprattutto se in casa ci sono dei bambini.
Spia ECO: licona
si accenderà quando,
modificando i parametri di lavaggio, si otterrà un
risparmio di energia di almeno il 10%.
Inoltre prima che la macchina entri nella modalità di
Stand by licona
si accenderà per pochi secondi;
a macchina spenta il recupero energetico stimato sarà
dell80% circa.
41
Page 42

Come effettuare un ciclo di
lavaggio o di asciugatura
NOTA: la prima volta che si utilizza la lavasciuga,
I
effettuare un ciclo di lavaggio senza biancheria ma con
detersivo impostando il programma cotone 90° senza
prelavaggio.
1. ACCENDERE LA MACCHINA. Premere il pulsante
. Tutte le spie si accenderanno per 1 secondo dopo
il quale rimarrà accesa fissa la spia del pulsante
spia AVVIO/PAUSA lampeggerà lentamente.
2. CARICARE LA BIANCHERIA. Aprire la porta oblò.
Caricare la biancheria facendo attenzione a non
superare la quantità di carico indicata nella tabella
programmi della pagina successiva.
3. DOSARE IL DETERSIVO. Estrarre il cassetto e
versare il detersivo nelle apposite vaschette come
spiegato in Descrizione della macchina.
4. CHIUDERE LA PORTA OBLO.
5. SCEGLIERE IL PROGRAMMA. Ruotare la
MANOPOLA PROGRAMMI verso destra o verso
sinistra fino a selezionare il programma desiderato;
viene associata una temperatura e una velocità di
centrifuga che possono essere modificati.
6. PERSONALIZZARE IL CICLO DI LAVAGGIO.
Agire sugli appositi pulsanti del pannello comandi:
Modificare la temperatura
La macchina visualizza automaticamente la
temperatura massima prevista per il programma
impostato o lultima selezionata se compatibile con il
programma scelto. Premendo il pulsante
progressivamente la temperatura sino al lavaggio a
freddo ( ). Unulteriore pressione del pulsante
riporterà il valore a quello massimo previsto.
Eccezione: selezionando il programma Cotone
Bianchi la temperatura può essere portata sino a 90°.
Modificare lasciugatura
Alla prima pressione del tasto
seleziona automaticamente il livello di asciugatura
massimo compatibile al programma selezionato. Le
successive pressioni fanno decrementare il livello e
successivamente il tempo di asciugatura fino alla sua
esclusione (
riporterà il valore a quello massimo previsto.
Sono previste due tipi di asciugatura:
A - In base al tempo: da 20 a 180.
B - In base al livello di umidità dei capi asciugati:
Stirare
Appendere
necessitano di un'asciugatura completa.
Ripiegare L3: adatto per il bucato da riporre nell'armadio senza bisogno di stiratura.
Extra
unasciugatura completa come spugne e accappatoi.
Se eccezionalmente il carico di biancheria da lavare ed
asciugare è superiore al massimo previsto (vedi tabella
accanto), effettuare il lavaggio, e a programma ultimato,
dividere il carico e rimetterne una parte nel cestello. Seguire
a questo punto le istruzioni per effettuare SOLO
ASCIUGATURA.
L1: capi leggermente umidi, facili da stirare.
L4: adatto capi che necessitano di
). Unulteriore pressione del pulsante
L2: ideale per quei capi che non
la macchina
, la
si riduce
Ripeti le stesse operazioni per il carico rimanente. Alla fine
dell'asciugatura viene effettuato un periodo di raffreddamento.
SOLO ASCIUGATURA
Selezionare con la manopola dei programmi
unasciugatura (
possibile impostare anche il livello o il tempo di
asciugatura desiderato con il tasto ASCIUGATURA
Impostare la partenza ritardata.
Premere il pulsante relativo fino a raggiungere il tempo
del ritardo desiderato. Durante limpostazione viene
visualizzato il tempo del ritardo insieme al simbolo
che lampeggia. Dopo aver impostato la partenza
ritardata il display visualizzerà il simbolo
durata del ciclo. Premendo il pulsante una volta viene
visualizzato il tempo di ritardo impostato. Per rimuovere
la partenza ritardata premere il pulsante fino a che sul
display compare la scritta OFF; il simbolo
spegnerà.
Una volta premuto il pulsante AVVIO/PAUSA il valore del
ritardo potrà essere modificato solo diminuendolo.
Modificare le caratteristiche del ciclo.
Premere i pulsanti OPZIONI per personalizzare il
lavaggio secondo le proprie esigenze.
Premere il pulsante per attivare lopzione; si
accenderà la spia relativa.
Premere nuovamente il pulsante per disattivare
lopzione; la spia si spegnerà.
Se lopzione selezionata non è compatibile con il
programma impostato, lincompatibilità verrà
segnalata con il lampeggio della spia ed un segnale
acustico (3 beep) e lopzione non verrà attivata.
Se lopzione selezionata non è compatibile con unaltra
precedentemente impostata, la spia relativa alla prima
opzione selezionata lampeggerà e verrà attivata solo la
seconda, la spia del pulsante si fisserà.
7. AVVIARE IL PROGRAMMA. Premere il tasto AVVIO/
PAUSA. La spia relativa si fisserà e la porta oblò si
bloccherà (spia BLOCCO PORTA
icone relative alle fasi di lavaggio si illumineranno
durante il ciclo ad indicare la fase in corso. Per
cambiare un programma mentre un ciclo è in corso,
mettere la lavasciuga in pausa premendo il pulsante
AVVIO/PAUSA; selezionare quindi il ciclo desiderato e
premere nuovamente il pulsante AVVIO/PAUSA. Per
aprire la porta mentre un ciclo è in corso premere il
pulsante AVVIO/PAUSA; se la spia BLOCCO PORTA
è spenta sarà possibile aprire la porta. Premere
nuovamente sul pulsante AVVIO/PAUSA per far
ripartire il programma dal punto in cui era stato
interrotto.
8. FINE DEL PROGRAMMA. Viene indicata dalla scritta
END accesa. La porta oblò si potrà aprire
immediatamente. Se la spia AVVIO/PAUSA lampeggia,
premere il pulsante per terminare il ciclo. Aprire la porta,
scaricare la biancheria e spegnere la macchina.
Se si desidera annullare un ciclo già avviato, tenere
premuto il pulsante
e la macchina si spegnerà.
- - ) in base al tipo di tessuto. È
.
fisso e la
si
accesa). Le
finché il ciclo non verrà interrotto
42
Page 43

Programmi e opzioni
Tabella programmi
Icona Descrizione del Programma
Programmi Cotone
Cotone bianchi
Cotone bianchi (1):
Cotone bianchi (2):
Cotone colorati (3)
Jeans
Programmi speciali
colori delicati molto sporchi.
Baby:
Mix 30':
(non indicato per lana, seta e capi da lavare a mano).
Sintetici resistenti
per capi in seta, viscosa, lingerie.
Seta:
per lana, cachemire, ecc.
Lana:
Programmi Asciugatura
Asciugatura "Lava&Asciuga" - Asciugatura "Cotone" - Asciugatura "Sintetici" - Asciugatura "Lana" - -
Programmi parziali
Risciacquo - 1400
Centrifuga - 1400
Scarico - 0 - - - - 8
(*) Nota: dopo circa 10 minuti dallo START, la macchina in base al carico effettuato, ricalcolerà e visualizzera il tempo residuo alla fine del programma.
Per tutti Test Institutes:
1) Programma di controllo secondo la norma EN 50229: impostare il programma con una temperaura di 60°C.
2) Programma cotone lungo: impostare il programma
3) Programma cotone corto: impostare il programma
con
prelavaggio
bianchi e colorati resistenti molto sporchi.
bianchi e colorati delicati molto sporchi.
per rinfrescare rapidamente capi poco sporchi
con una temperatura di 40°C.
con una temperatura di 40°C.
Temp.
60° (Max.
Opzioni di lavaggio
Super Wash
Questa opzione garantisce un lavaggio di alte prestazioni
grazie allutilizzo di una maggior quantità d acqua nella
fase iniziale del ciclo e alla maggior durata del programma
ed è utile per eliminare le
3
1
2
(vedi figura). Se si desidera solo candeggiare senza
effettuare il lavaggio completo, versare la candeggina
nella vaschetta aggiuntiva 3, impostare il programma
Risciacquo
e attivare l'opzione Super Wash .
Non è attivabile sui programmi , , , , , , , ,
, , .
Stirameno
Selezionando questa opzione, il lavaggio e la centrifuga
saranno opportunamente modificati per ridurre la
formazione di pieghe. Al temine del ciclo la lavasciuga
effettuerà delle lente rotazioni del cestello; le spie
Stirameno e AVVIO/PAUSA lampeggeranno.
macchie più resistenti. Può
essere utilizzata con o
senza candeggina.
Se si desidera effettuare
anche il candeggio inserire la
vaschetta aggiuntiva 3, in
dotazione, nella vaschetta 1.
Nel dosare la candeggina non
superare il livello max
indicato sul perno centrale
Velocità
max.
(°C)
90° 1400
90°)
40° 1400
40° 1400
40° 800
40° 800
30° 800
60° 800
30° 0 40° 800
max.
(gir i a l
minuto)
1400
Per terminare il ciclo premere il pulsante AVVIO/
PAUSA o il pulsante Stirameno.
Nel programma Seta
ciclo con la biancheria in ammollo e la spia
Stirameno lampeggerà. Per scaricare lacqua e poter
rimuovere il bucato è necessario premere il pulsante
AVVIO/PAUSA o il pulsante "Stirameno".
Non è attivabile sui programmi , , , , , ,
, , .
Note: se si vuole effettuare anche unasciugatura, questa
opzione è attiva solo selezionando il livello L1 (Stirare).
Risparmia Tempo
Selezionando questa opzione si riduce la durata del
programma del 30%-50% in base al ciclo scelto,
garantendo al contempo un risparmio di acqua ed
energia. Utilizzare questo ciclo per capi non
eccessivamente sporchi.
Non è attivabile sui programmi , , , , , ,
, , , , .
Extra Risciacquo
Selezionando questa opzione si aumenta lefficacia del
risciacquo e si assicura la massima rimozione dei
residui del detersivo. E utile per pelli particolarmente
sensibili ai detersivi. Si consiglia lutilizzo di questa
opzione con la lavasciuga a pieno carico o con
lutilizzo di elevate dosi di detersivo.
Non è attivabile sui programmi , , , , , , .
Asciugatura
ll l
ll l l
ll l l
ll l l
ll l
ll l l
ll l
ll l l
ll l
l
l
l
l
l
l
Deter sivi e additivi
Detersivo
Lavaggio
ll
Ammor-
bidente
- - - 1
- - - 6
- - - 4
- - - 1,5
-
- - - 8
Candeg-
ll
la macchina terminerà il
gina
- 8
- 4
- 3,5
- 2
- 2
Carico
max.
(Kg)
8
8
8
4
4
8
Durata
ciclo
(*) E' possibile controllare la durata dei programmi di lavaggio
sul display.
43
Page 44

Detersivi e biancheria
Detersivo
I
La scelta e la quantità del detersivo dipendono dal
tipo di tessuto (cotone, lana, seta...), dal colore, dalla
temperatura di lavaggio, dal grado di sporco e dalla
durezza dellacqua.
Dosare bene il detersivo evita sprechi e protegge
lambiente: pur biodegradabili, i detersivi contengono
elementi che alterano lequilibrio della natura.
Si consiglia di:
usare detersivi in polvere per capi in cotone bianchi
e per il prelavaggio.
usare detersivi liquidi per capi delicati in cotone e
per tutti i programmi a bassa temperatura.
usare detersivi liquidi delicati per lana e seta.
Il detersivo deve essere versato prima dellinizio del
lavaggio nellapposita vaschetta, oppure nel dosatore
da porre direttamente nel cestello. In questo caso non
si può selezionare il ciclo Cotone con prelavaggio.
Non usare detersivi per il lavaggio a mano perché
formano troppa schiuma.
Preparare la biancheria
Aprire bene i capi prima di caricarli.
Suddividere la biancheria secondo il tipo di tessuto
(simbolo sulletichetta del capo) ed il colore facendo
attenzione a separare i capi colorati da quelli
bianchi;
Svuotare le tasche e controllare i bottoni;
Non superare i valori indicati nella Tabella
Programmi riferiti al peso della biancheria asciutta.
Quanto pesa la biancheria?
1 lenzuolo 400-500 gr.
1 federa 150-200 gr.
1 tovaglia 400-500 gr.
1 accappatoio 900-1200 gr.
1 asciugamano 150-250 gr.
1 jeans 400-500 gr.
1 camicia 150-200 gr.
Seta: utilizzare lapposito programma Seta
lavare tutti i capi in seta. Si consiglia lutilizzo di un
detersivo specifico per capi delicati.
Tende: utilizzare il programma Seta
raccomanda di piegarle e sistemarle dentro una federa
o un sacchetto di rete.
Lana: è lunica lavasciuga ad aver ottenuto il
prestigioso riconoscimento Woolmark Platinum Care
(M.0508) da parte di The Woolmark Company, che
certifica il lavaggio in lavatrice di tutti i capi in lana,
anche quelli recanti letichetta solo lavaggio a mano
. Con il programma Lana si possono lavare in
lavatrice tutti i capi in lana con la garanzia delle
migliori performance.
Macchie ostinate: è bene trattare le macchie
ostinate con sapone solido prima del lavaggio e di
utilizzare il programma Cotone con prelavaggio
Lava & Asciuga
asciugare capi leggermente sporchi in poco tempo.
Selezionando questo ciclo è possibile lavare e
asciugare fino a 1 kg di bucato in soli 60 minuti.
Per ottenere i migliori risultati utilizzare detersivo
liquido; pretrattare polsini, colli e macchie.
: è studiato per lavare e
. Si
per
.
Sistema bilanciamento del carico
Prima di ogni centrifuga, per evitare vibrazioni eccessive
e per distribuire il carico in modo uniforme, il cestello
effettua delle rotazioni ad una velocità leggermente
superiore a quella del lavaggio. Se al termine di ripetuti
tentativi il carico non fosse ancora correttamente
bilanciato la macchina effettua la centrifuga ad una
velocità inferiore a quella prevista. In presenza di
eccessivo sbilanciamento la lavasciuga effettua la
distribuzione anzichè la centrifuga. Per favorire una
migliore distribuzione del carico e il suo corretto
bilanciamento si consiglia di mescolare capi grandi e
piccoli.
Programmi particolari
Jeans: utilizzare lapposito programma Jeans per
tutti i capi in tessuto Denim; rovesciare i capi prima
del lavaggio ed utilizzare un detersivo liquido.
Baby: utilizzare lapposito programma Baby
asportare lo sporco tipico dei bambini e rimuovere il
detersivo dai panni onde evitare reazioni allergiche alla
pelle delicata dei bambini. Questo ciclo è stato
studiato per ridurre la carica batterica utilizzando una
maggior quantità di acqua e ottimizzando l'effetto di
additivi specifici igenizzanti aggiunti al detersivo.
Al temine del lavaggio la macchina effettuerà delle
lente rotazioni del cestello; per terminare il ciclo
premere il tasto AVVIO/PAUSA.
44
per
Page 45

Precauzioni e consigli
La macchina è stata progettata e costruita in
conformità alle norme internazionali di sicurezza. Queste
avvertenze sono fornite per ragioni di
sicurezza e devono essere lette attentamente.
Sicurezza generale
Questo apparecchio è stato concepito esclusivamente
per un uso di tipo domestico.
L'apparecchio non deve essere utilizzato da persone
(bambini compresi) con capacità fisiche, sensoriali o
mentali ridotte e con esperienze e conoscenze
insufficienti, a meno che tale utilizzo non avvenga
sotto la supervisione o le istruzioni di una persona
responsabile della loro sicurezza.
I bambini devono essere sorvegliati per garantire che
non giochino con l'apparecchio.
- Non asciugare capi non lavati.
- I capi sporchi di sostanze quali l'olio di cottura,
l'acetone, l'alcol, la benzina, il cherosene, gli
smacchiatori, la trementina, la cera e le sostanze per
rimuoverla devono essere lavati in acqua calda con
una quantità maggiore di detergente prima di
asciugarli nell'asciugabiancheria.
- Oggetti come la gomma espansa (schiuma di lattice),
le cuffie per la doccia, i materiali tessili impermeabili,
gli articoli con un lato di gomma e i vestiti o i cuscini
che hanno delle parti in schiuma di lattice non devono
essere asciugati nell'asciugabiancheria.
- Ammorbidenti o prodotti simili devono essere usati
conformemente alle istruzioni del produttore.
- La parte finale di un ciclo dell'asciugabiancheria
avviene senza calore (ciclo di raffreddamento) per
garantire che gli articoli non vengano danneggiati.
ATTENZIONE: Non arrestare mai un'asciugabiancheria
prima del termine del programma di asciugatura. In
questo caso prelevare rapidamente tutti i capi di
biancheria e stenderli per farli raffreddare rapidamente.
La macchina deve essere usata solo da persone
adulte e secondo le istruzioni riportate in questo
libretto.
Non toccare la macchina a piedi nudi o con le mani o i
piedi bagnati o umidi.
Non staccare la spina dalla presa della corrente
tirando il cavo, bensì afferrando la spina.
Non toccare lacqua di scarico, che può raggiungere
temperature elevate.
Non forzare in nessun caso la porta loblò: potrebbe
danneggiarsi il meccanismo di sicurezza che
protegge da aperture accidentali.
In caso di guasto, in nessun caso accedere ai
meccanismi interni per tentare una riparazione.
Controllare sempre che i bambini non si avvicinino
alla macchina in funzione.
Se deve essere spostata, lavorare in due o tre persone
con la massima attenzione. Mai da soli perché la
macchina è molto pesante.
Prima di introdurre la biancheria controllare che il
cestello sia vuoto.
Durante lasciugatura loblò tende a scaldarsi.
Non asciugare biancheria lavata con solventi
infiammabili (es. trielina).
Non asciugare gommapiuma o elastomeri analoghi.
Assicurati che durante le fasi di asciugatura il
rubinetto dell'acqua sia aperto.
Smaltimento
Smaltimento del materiale di imballaggio: attenersi
alle norme locali, così gli imballaggi potranno
essere riutilizzati.
La direttiva Europea 2002/96/CE sui rifiuti di
apparecchiature elettriche ed elettroniche, prevede
che gli elettrodomestici non debbano essere smaltiti
nel normale flusso dei rifiuti solidi urbani. Gli
apparecchi dismessi devono essere raccolti
separatamente per ottimizzare il tasso di recupero e
riciclaggio dei materiali che li compongono ed
impedire potenziali danni per la salute e l'ambiente. Il
simbolo del cestino barrato è riportato su tutti i prodotti
per ricordare gli obblighi di raccolta separata.
Per ulteriori informazioni, sulla corretta dismissione
degli elettrodomestici, i detentori potranno rivolgersi al
servizio pubblico preposto o ai rivenditori.
Apertura manuale della porta oblò
Nel caso non sia possibile aprire la porta oblò a causa
della mancanza di energia elettrica e volete stendere il
bucato, procedere come segue:
1. togliere la spina dalla presa di corrente.
2. verificate che il livello
dellacqua allinterno della
macchina sia inferiore rispetto
allapertura delloblò; in caso
contrario togliere lacqua in
eccedenza attraverso il tubo
di scarico raccogliendola in
un secchio come indicato in
figura.
3. rimuovere il pannello di copertura sul lato anteriore
della lavasciuga (vedi pagina seguente).
4. utilizzando la linguetta indicata in figura tirare verso
lesterno fino a liberare il tirante in plastica dal fermo;
tirarlo successivamente verso il basso fino a sentire un
click che indica che la porta è sbloccata.
5. aprite la porta; nel caso non sia ancora possibile
ripetete loperazione.
6. rimontare il pannello assicurandosi, prima di
spingerlo verso la macchina, di aver inserito i ganci
nelle apposite asole.
45
Page 46

Manutenzione e cura
Escludere acqua e corrente elettrica
I
Chiudere il rubinetto dellacqua dopo ogni
lavaggio. Si limita così lusura dellimpianto
idraulico della macchina e si elimina il pericolo di
perdite.
Staccare la spina della corrente quando si pulisce la
macchina e durante i lavori di manutenzione.
Pulire la macchina
La parte esterna e le parti in gomma possono essere
puliti con un panno imbevuto di acqua tiepida e
sapone. Non usare solventi o abrasivi.
Pulire il cassetto dei detersivi
Per estrarre il cassetto
premere la leva (1) e tirarlo
verso l'esterno (2) (vedi
figura).
Lavarlo sotto lacqua
corrente; questa pulizia va
effettuata
frequentemente.
Curare il cestello
Per accedere alla precamera:
2
1. rimuovere il pannello di copertura sul lato anteriore
della macchina premendo verso il centro, quindi spingere
verso il basso da entrambe i lati ed estrarlo (vedi figure).
2. posizionare un contenitore
per raccogliere lacqua che
uscirà (circa 1,5 lt) (vedi figura);
3. svitare il coperchio
ruotandolo in senso
antiorario (vedi figura);
4. pulire accuratamente linterno;
5. riavvitare il coperchio;
6. rimontare il pannello assicurandosi, prima di spingerlo
verso la macchina, di aver inserito i ganci nelle apposite
asole.
Lasciare sempre socchiusa la porta oblò per evitare
che si formino cattivi odori.
Pulire la pompa
La macchina è dotata di una pompa autopulente che
non ha bisogno di manutenzione. Può però succedere
che piccoli oggetti (monete, bottoni) cadano nella
precamera che protegge la pompa, situata nella parte
inferiore di essa.
Assicurarsi che il ciclo di lavaggio sia terminato e
staccare la spina.
Controllare il tubo di alimentazione
dellacqua
Controllare il tubo di alimentazione almeno una volta
allanno. Se presenta screpolature e fessure va sostituito:
durante i lavaggi le forti pressioni potrebbero provocare
improvvise spaccature.
46
Page 47

Anomalie e rimedi
Può accadere che la macchina non funzioni. Prima di telefonare allAssistenza (vedi Assistenza), controllare che non si
tratti di un problema facilmente risolvibile aiutandosi con il seguente elenco.
Anomalie:
La macchina
non si accende.
Il ciclo di lavaggio
non inizia.
La macchina non carica acqua.
La porta della macchina rimane
bloccata.
La macchina carica e scarica
acqua di continuo.
La macchina non scarica
o non centrifuga.
La macchina vibra
molto durante la centrifuga.
La macchina perde acqua.
Le icone relative alla Fase in corso
lampeggiano velocemente contemporaneamente alla spia ON/OFF.
Si forma troppa schiuma.
La porta della macchina è bloccata.
La macchina non asciuga.
Possibili cause / Soluzione:
La spina non è inserita nella presa della corrente, o non abbastanza
da fare contatto.
In casa non cè corrente.
La porta oblò non è ben chiusa.
Il pulsante AVVIO/PAUSA non è stato premuto.
Il rubinetto dellacqua non è aperto.
Si è impostato un ritardo sullora di avvio (vedi Come effettuare un ciclo di lavaggio).
Il tubo di alimentazione dellacqua non è collegato al rubinetto.
Il tubo è piegato.
Il rubinetto dellacqua non è aperto.
In casa manca lacqua.
Non cè sufficiente pressione.
Il pulsante AVVIO/PAUSA non è stato premuto.
Selezionando il ciclo Baby
la lavasciuga effettuerà delle lente rotazioni del cestello; per terminare il ciclo
premere il pulsante AVVIO/PAUSA o il pulsante Stirameno . Selezionando
il ciclo Seta
scaricare lacqua e poter rimuovere il bucato è necessario premere il pulsante
AVVIO/PAUSA o il pulsante "Stirameno ".
Il tubo di scarico non è installato fra 65 e 100 cm da terra (vedi Installazione).
Lestremità del tubo di scarico è immersa nellacqua (vedi Installazione).
Se labitazione si trova agli ultimi piani di un edificio, è possibile che si verifichino fenomeni
di sifonaggio, per cui la macchina carica e scarica acqua di continuo. Per eliminare
linconveniente sono disponibili in commercio apposite valvole anti-sifonaggio.
Lo scarico a muro non ha lo sfiato daria.
Il programma non prevede lo scarico: con alcuni programmi occorre avviarlo
manualmente.
È attiva la opzione Stirameno: per completare il programma
premere il pulsante AVVIO/PAUSA (vedi Programmi e opzioni).
Il tubo di scarico è piegato (vedi Installazione).
La conduttura di scarico è ostruita.
Il cestello, al momento dellinstallazione, non è stato sbloccato
correttamente (vedi Installazione).
La macchina non è in piano (vedi Installazione).
La macchina è stretta tra mobili e muro (vedi Installazione).
Il carico è sbilanciato (vedi Descrizione della macchina).
Il tubo di alimentazione dellacqua non è ben avvitato (vedi Installazione).
Il cassetto dei detersivi è intasato (per pulirlo vedi Manutenzione e cura).
Il tubo di scarico non è fissato bene (vedi Installazione).
Spegnere la macchina e togliere la spina dalla presa, attendere circa 1
minuto quindi riaccenderla. Se lanomalia persiste, chiamare lAssistenza.
Il detersivo non è specifico per lavasciuga (deve esserci la dicitura per
lavatrice, a mano e in lavatrice, o simili).
Il dosaggio è stato eccessivo.
Eseguire la procedura di sblocco manuale (vedi "Precauzioni e consigli").
La spina non è inserita nella presa della corrente, o non abbastanza
da fare contatto.
In casa non cè corrente.
Loblò non è ben chiuso.
Si è impostato un ritardo sullora di avvio.
L ASCIUGATURA è nella posizione (
la macchina terminerà il ciclo con la biancheria in ammollo; per
o lopzione Stirameno , al temine del ciclo
).
I
47
Page 48

Assistenza
195078685.02
11/2010 - Xerox Fabriano
Prima di contattare lAssistenza:
I
Verificare se lanomalia può essere risolta autonomamente (vedi Anomalie e Rimedi);
Riavviare il programma per controllare se linconveniente è stato ovviato;
In caso negativo, contattare il Servizio Assistenza Tecnico Autorizzato.
In caso di errata installazione o uso non corretto della lavasciuga lintervento di assistenza sarà a pagamento.
Non ricorrere mai a tecnici non autorizzati.
Nota: per uscire dal Demo Mode premere contemporanemanete per 3 sec. i due pulsanti ON/OFF e AVVIO/PAUSA .
Comunicare:
il tipo di anomalia;
il modello della macchina (Mod.);
il numero di serie (S/N).
Queste ultime informazioni si trovano sulla targhetta caratteristiche posta sullapparecchio.
Assistenza Attiva 7 giorni su 7
*
In caso di necessità dintervento chiamare il Numero Unico Nazionale 199.199.199*.
Un operatore sarà a completa disposizione per fissare un appuntamento con il Centro Assistenza Tecnico
Autorizzato più vicino al luogo da cui si chiama.
È attivo 7 giorni su 7, sabato e domenica compresi, e non lascia mai inascoltata una richiesta.
* Al costo di 14,25 centesimi di Euro al minuto (iva inclusa) dal Lun. al Ven. dalle 08:00 alle 18:30, il Sab. dalle 08:00 alle 13:00 e di 5,58
centesimi di Euro al minuto (iva inclusa) dal Lun. al Ven. dalle 18:30 alle 08:00, il Sab. dalle 13:00 alle 08:00 e i giorni festivi, per chi
chiama da telefono fisso.
Per chi chiama da radiomobile le tariffe sono legate al piano tariffario delloperatore telefonico utilizzato.
Le suddette tariffe potrebbero essere soggette a variazione da parte delloperatore telefonico; per maggiori informazioni consultare il sito
www.hotpoint-ariston.eu.
48
 Loading...