

Page 1
Operating Instructions
OVEN
GB RS
Русский, 11English,1
MOS 538 J X RU/HA
MOSS 537 J X RU/HA
KZ
Contents
Installation, 2-3
Positioning
Electrical connections
Data plate
Description of the appliance, 4
Overall view
Control panel
Start-up and use, 5
Starting the oven
The electronic cooking programmer, 6
Cooking modes, 7-8
Cooking modes
Practical cooking advice
Cooking advice table
Precautions and tips, 9
General safety
Disposal
Respecting and conserving the environment
Assistance
GB
Maintenance and care, 10
Switching the appliance off
Cleaning the appliance
Cleaning the oven door
Replacing the light bulb
Page 2
Installation
560 mm.
4
5
m
m
.
GB
! Before placing your new appliance into operation
please read these operating instructions carefully.
They contain important information for safe use, for
installation and for care of the appliance.
! Please keep these operating instructions for future
reference. Pass them on to possible new owners of
the appliance.
Positioning
! Keep packaging material out of the reach of
children. It can become a choking or suffocation
hazard. (see Precautions and tips).
! The appliance must be installed by a qualified
person in compliance with the instructions provided.
Incorrect installation may cause harm to persons,
animals or may damage property.
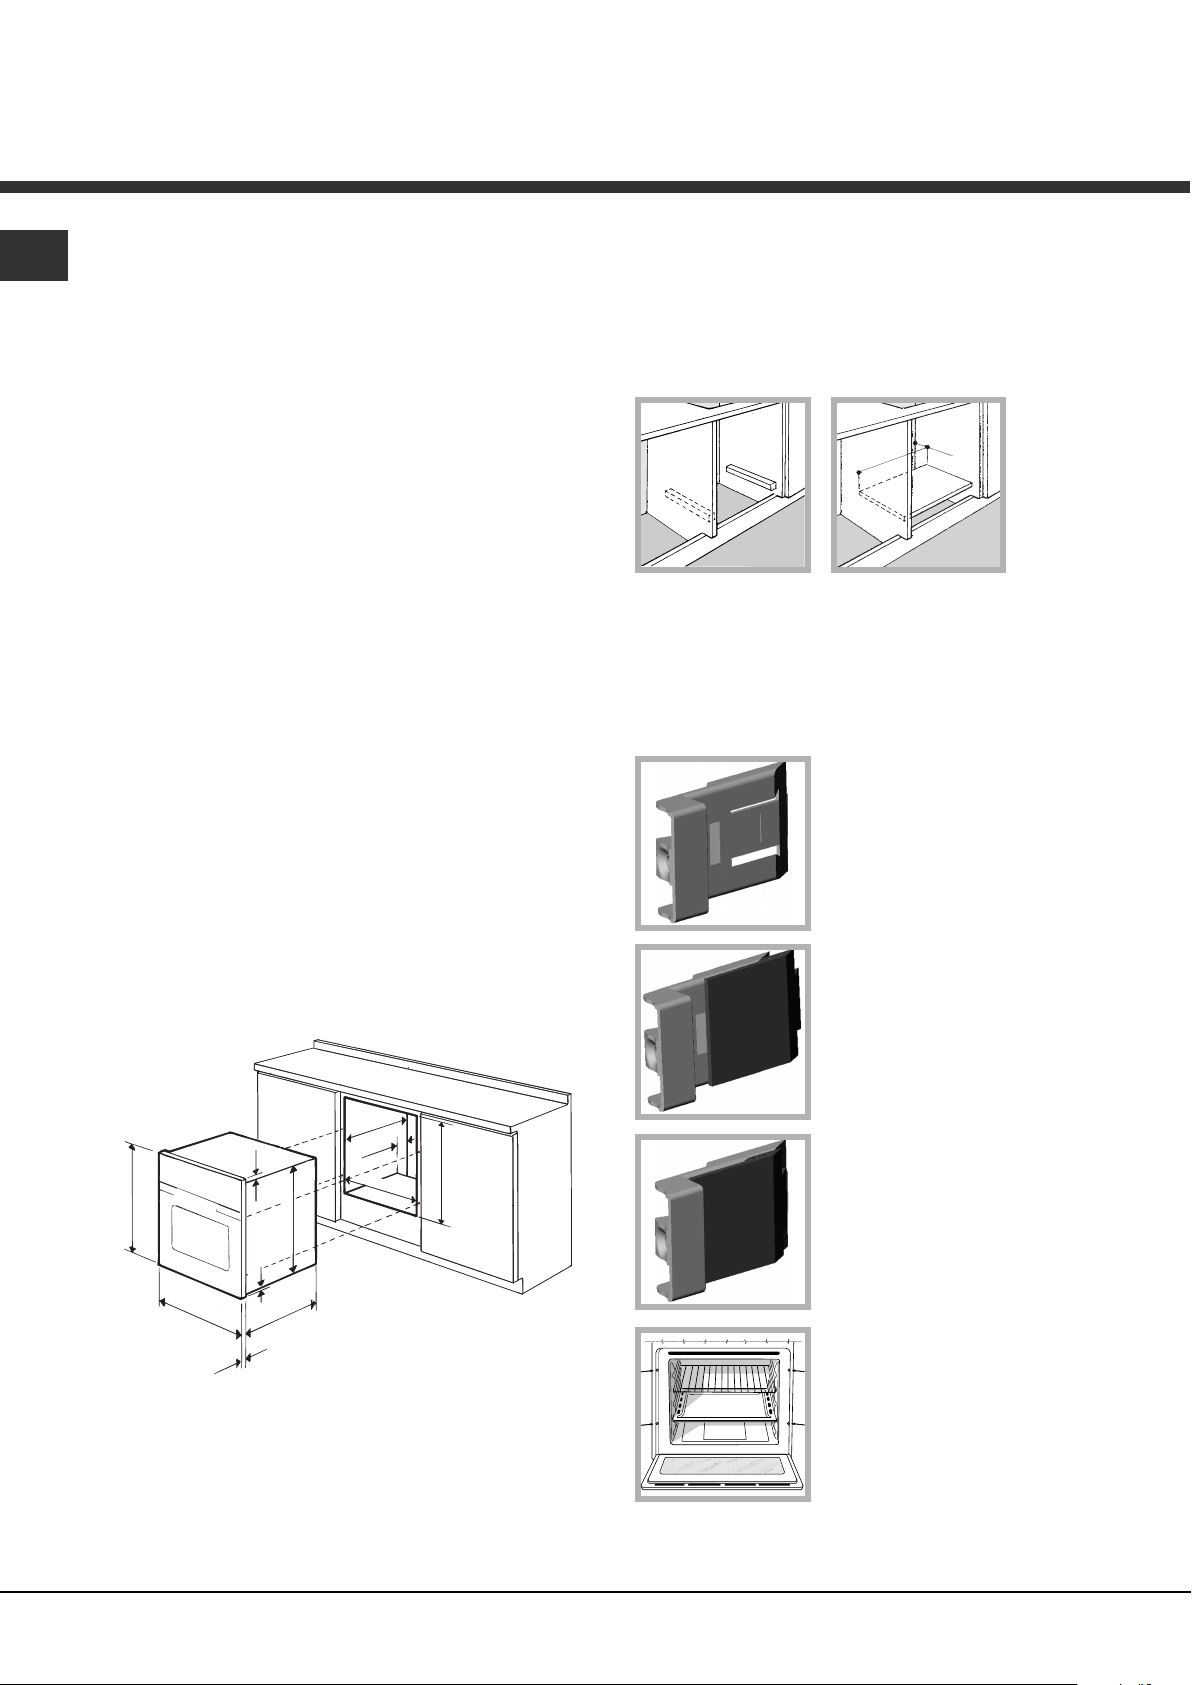
Fitting the appliance
Use the appropriate cabinet to ensure that the
appliance functions properly.
• The panels adjacent to the oven must be made of
heat-resistant material.
Ventilation
To ensure good ventilation, the back panel of the
cabinet must be removed. It is advisable to install
the oven so that it rests on two strips of wood, or on
a completely flat surface with an opening of at least
45 x 560 mm (see diagrams).
Centring and fastening
Position the 4 tabs on the side of the oven according
to the 4 holes of the outer frame. Adjust the tabs
according to the thickness of the cabinet side panel,
as shown below:
thickness of 20 mm: take off
the removable part of the tab
(see diagram)
• Cabinets with a veneer exterior must be assembled
with glues which can withstand temperatures of up
to 100°C.
• to install the oven under the counter (see diagram)
and in a kitchen unit, the cabinet must have the
following dimensions:
547 mm. min.
23 mm.
595 mm.
5 mm.
595 mm.
545 mm.
24 mm.
45 mm.
560 mm.
575-585 mm.
567 mm.
! The appliance must not come into contact with
electrical parts once it has been installed.
The consumption indications on the data plate have
been calculated for this type of installation.
thickness of 18 mm: use the
first groove, which has already
been set in the factory (see
diagram)
thickness of 16 mm: use the
second groove (see diagram)
Secure the appliance to the
cabinet by opening the oven
door and putting 4 screws into
the 4 holes of the outer frame.
! All parts which ensure the
safe operation of the
appliance must not be
removable without the aid of a tool.
2
Page 3
Electrical connections
DATA PLATE
width cm 43.5
height cm 32
depth cm 41,5
lt. 58
voltage: 220-240V ~ 50/60Hz o 50Hz
(see data plate) maximum power
absorbed 2250W
Directive 2002/40/EC on the label of
electric ovens Norm EN 50304
Energy consumption for Natural
convection heating mode:
a Convection
Declared energy consumption for
Forced convection Class
heating mode: b Fan assisted
This appliance conforms to the
following European Economic
Community directives:
- 2006/95/EEC of 12/12/06 (Low
Voltage) and subsequent
amendments;
- 2004/108/EEC of 15/12/04
(Electromagnetic Compatibility) and
subsequent amendments;
- 93/68/EEC of 22/07/93 and
subsequent amendments.
- 2002/96/EC and subsequent
amendments.
! Ovens equipped with a three-pole power supply
cable are designed to operate with alternating
current at the voltage and frequency indicated on
the data plate located on the appliance (see below).
• The voltage must be in the range between the
values indicated on the data plate (see below).
• The socket is compatible with the plug of the
appliance. If the socket is incompatible with the
plug, ask an authorised technician to replace it.
Do not use extension cords or multiple sockets.
GB
Fitting the power supply cable
1. Open the terminal
board by inserting a
screwdriver into the
side tabs of the cover.
Use the screwdriver as
a lever by pushing it
down to open the cover
(see diagram).
2. Loosen the cable
clamp screw and
remove it, using a
screwdriver as a lever
(see figure).
3. Remove the wire
contact screws L-N, then fasten the wires
under the screw heads,
respecting the colour
code: Blue (N), Brown
(L) and Yellow-Green
Verde (
! Once the appliance has been installed, the power
supply cable and the electrical socket must be
easily accessible.
! The cable must not be bent or compressed.
! The cable must be checked regularly and replaced
by authorised technicians only (see Assistance).
! The manufacturer declines any liability should
these safety measures not be observed.
).
Dimensions
Connecting the supply cable to the mains
Install a standardised plug corresponding to the
load indicated on the data plate (see side).
The appliance must be directly connected to the mains
using an omnipolar circuit-breaker with a minimum
contact opening of 3 mm installed between the
appliance and the mains, suitable for the load indicated
and complying with current electrical regulations (the
earthing wire must not be interrupted by the circuitbreaker). The supply cable must not come into contact
with surfaces with temperatures higher than 50°C.
! The installer must ensure that the correct electrical
connection has been made and that it is compliant
with safety regulations.
Before connecting to the power supply, make sure that:
• The appliance is earthed and the plug is
compliant with the law.
• The socket can withstand the maximum power of
the appliance, which is indicated on the data
plate (see below).
Volume
Elect rical
connections
ENERGY LABEL
3
Page 4
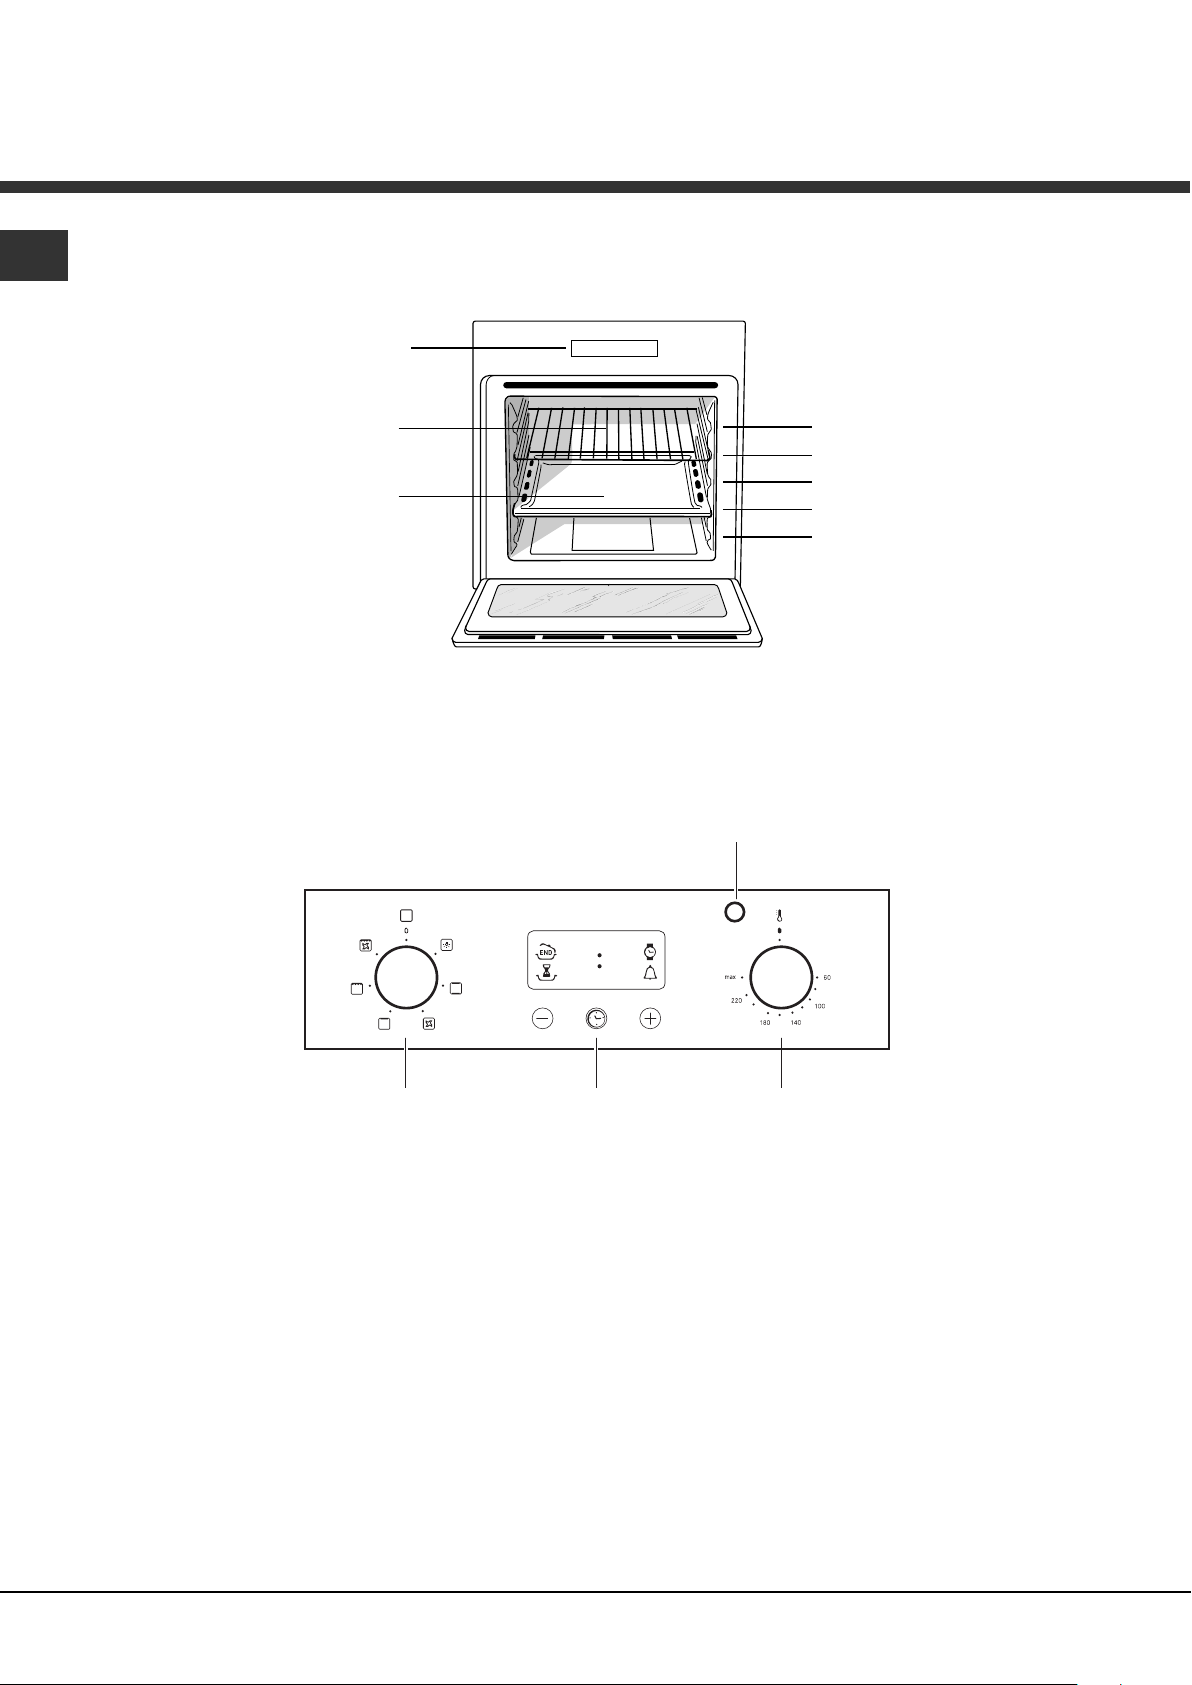
Description of the appliance
GB
Overall view
Control panel
Control panel
GRILL
DRIPPING PAN
GUIDES for the
sliding racks
position 5
position 4
position 3
position 2
position 1
THERMOSTAT
indicator light
* Only on certain models
SELECTOR
knob
•• ••
ELECTRONIC
Programmer*
THERMOSTAT
knob
4
Page 5

Start-up and use
! The first time you use your appliance, heat the
empty oven with its door closed at its maximum
temperature for at least half an hour. Ensure that the
room is well ventilated before switching the oven off
and opening the oven door. The appliance may
produce a slightly unpleasant odour caused by the
burning away of protective substances used during
the manufacturing process.
Starting the oven
1. Select the desired cooking mode by turning the
SELECTOR knob.
2. Select the desired temperature with the
THERMOSTAT knob. See the Cooking advice table for
cooking modes and the suggested cooking
temperatures (see Cooking Modes).
3. When preheating is finished, the THERMOSTAT
indicator light will stay on: place the food in the oven.
4. You may do the following during cooking:
- change the cooking mode by turning the SELECTOR
knob.
- change the temperature by turning the
THERMOSTAT knob.
- stop cooking by turning the SELECTOR knob to the
“0” position.
Cooling ventilation
In order to cool down the external temperature of the
oven, some models are fitted with a cooling fan that
blows out air between the control panel and the oven
door.
! Once the cooking has been completed, the cooling
fan remains on until the oven has cooled down
sufficiently.
Oven light
It goes on when selecting
knob. It stays on when a cooking mode is selected.
8 with the SELECTOR
GB
! Never put objects directly on the oven bottom to
avoid damaging the enamel coating.
! Always place cookware on the rack(s) provided.
5
Page 6
The electronic cooking
programmer
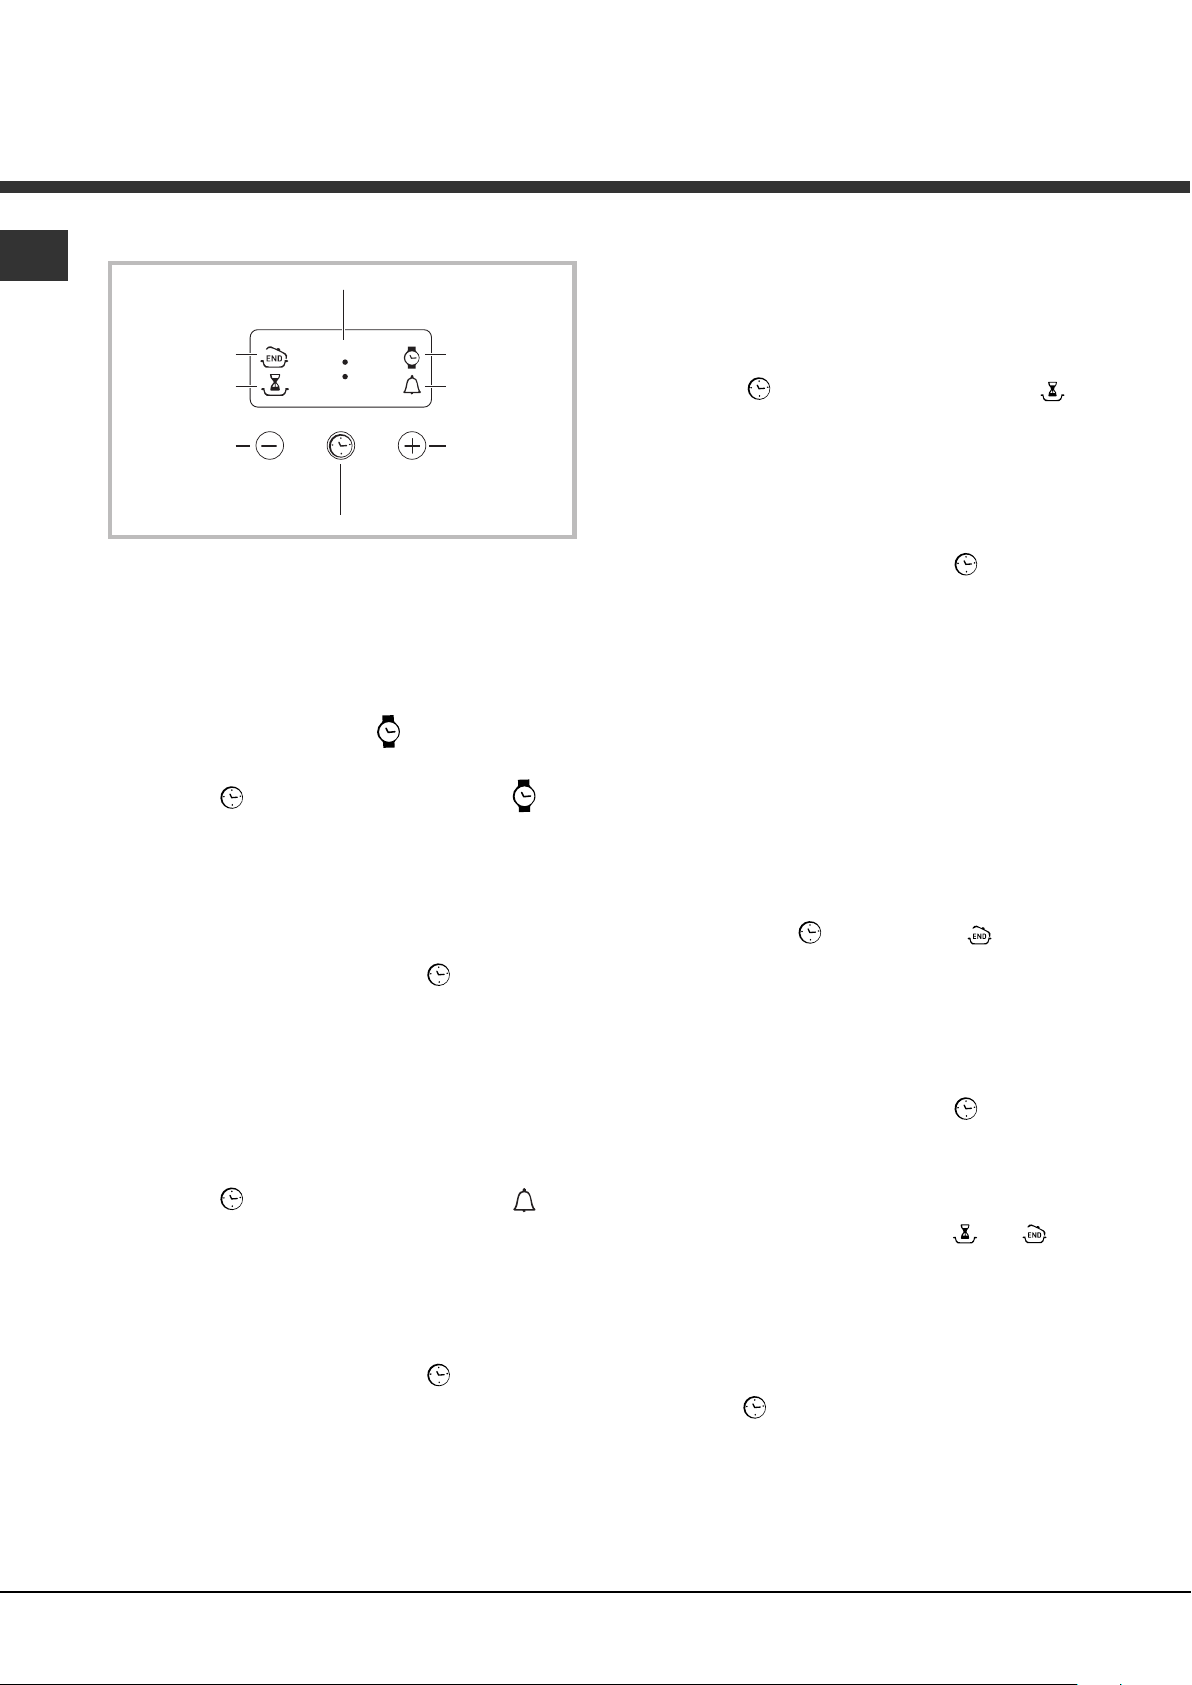
GB
DISPLAY
END OF
COOKING icon
DURATION
icon
DECREASE TIME
button
•• ••
SET TIME
button
CLOCK icon
TIMER icon
INCREASE TIME
button
Setting the clock
! The clock may be set when the oven is switched
off or when it is switched on, provided that a the end
time of a cooking cycle has not been programmed
previously.
After the appliance has been connected to the
mains, or after a blackout, the
numerical digits on the DISPLAY will begin to flash.
1. Press the
icon and the four digits on the display begin to
flash.
2. Use the “+” and “-” buttons to adjust the time; if
you press and hold either button, the display will
scroll through the values more quickly, making it
quicker and easier to set the desired value.
3. Wait for 10 seconds or press the
to finalise the setting.
button several times until the
icon and the four
button again
Setting the timer
! This function does not interrupt cooking and does
not affect the oven; it is simply used to activate the
buzzer when the set amount of time has elapsed.
1. Press the
icon and the three digits on the display begin to
flash.
2. Use the “+” and “-” buttons to set the desired
time; if you press and hold either button, the display
will scroll through the values more quickly, making it
quicker and easier to set the value.
3. Wait for 10 seconds or press the
to finalise the setting.
The display will then show the time as it counts
down. When this period of time has elapsed the
buzzer will be activated.
button several times until the
button again
Programming cooking
! A cooking mode must be selected before
programming can take place.
Programming the cooking duration
1. Press the
icon and the three digits on the DISPLAY begin to
flash.
2. Use the “+” and “-” buttons to set the desired
duration; if you press and hold either button, the
display will scroll through the values more quickly,
making it quicker and easier to set the value.
3. Wait for 10 seconds or press the
to finalise the setting.
4. When the set time has elapsed, the text END
appears on the DISPLAY, the oven will stop cooking
and a buzzer sounds.
• For example: it is 9:00 a.m. and a time of 1 hour
and 15 minutes is programmed. The programme
will stop automatically at 10:15 a.m.
Setting the end time for a cooking mode
! A cooking duration must be set before the cooking
end time can be scheduled.
1. Follow steps 1 to 3 to set the duration as detailed
above.
2. Next, press the
the four digits on the DISPLAY begin to flash.
3. use the “+” and “-” buttons to adjust the cooking
end time; if you press and hold either button, the
display will scroll through the values more quickly,
making it quicker and easier to set the desired
value.
4. Wait for 10 seconds or press the
to finalise the setting.
5. When the set time has elapsed, the text END
appears on the DISPLAY, the oven will stop cooking
and a buzzer sounds.
Programming has been set when the
buttons are illuminated. The DISPLAY shows the
cooking end time and the cooking duration
alternately.
Cancelling a programme
To cancel a programme:
• press the
the setting you wish to cancel and the digits on the
display are no longer flashing. Press the “-” button
until the digits 00:00 appear on the display.
• Press and hold the “+” and “-” buttons; this will
cancel all the settings selected previously,
including timer settings.
button several times until the
button again
button until the icon and
button again
and
button until the icon corresponding to
6
Page 7

Cooking modes
Cooking modes
! A temperature value can be set for all cooking
modes between 60°C and Max, except for
• GRILL (recommended: set only to MAX power
level);
• GRATIN (recommended: do not exceed 200°C).
a TRADITIONAL OVEN mode
Both the top and bottom heating elements will come
on. With this traditional cooking mode, it is best to use
one cooking rack only; if more than one rack is used,
the heat will be distributed unevenly.
b MULTI-COOKING mode
All the heating elements (top and bottom), as well as
the fan, will come on. Since the heat remains constant
throughout the oven, the air cooks and browns food
uniformly. A maximum of two racks may be used at
the same time.
c TOP OVEN mode
The top heating element comes on. This mode can be
used to brown food at the end of cooking.
d GRILL mode
The top heating element comes on. The extremely
high and direct temperature of the grill makes it
possible to brown the surface of meats and roasts
while locking in the juices to keep them tender. The
grill is also highly recommended for dishes that
require a high temperature on the surface: such as
beef steaks, veal, rib steak, filets, hamburgers etc...
Some grilling examples are included in the “Practical
Cooking Advice” paragraph. Always cook in this mode
with the oven door closed.
Practical cooking advice
GB
! Do not place racks in position 1 and 5 during fanassisted cooking. Excessive direct heat can burn
temperature sensitive foods.
! In the GRILL and GRATIN cooking modes, place
the dripping pan in position 1 to collect cooking
residues (fat and/or grease).
MULTI-COOKING
• Use position 2 and 4, placing the food that requires
more heat on 2.
• Place the dripping pan on the bottom and the rack
on top.
GRILL
• Insert the rack in position 3 or 4. Place the food in
the centre of the rack.
• We recommend that you set the maximum power
level. The top heating element is regulated by a
thermostat and may not always be on.
PIZZA
• For best results when cooking pizza, use the
MULTI-COOKING mode.
• Use a light aluminium pizza pan. Place it on the
rack provided.
For a crispy crust, do not use the dripping pan
(prevents crust from forming by extending cooking
time).
• If the pizza has a lot of toppings, we recommend
adding the mozzarella cheese on top of the pizza
halfway through the cooking process.
e GRATIN mode
The top heating element, as well as the fan, will
come on. This combination of features increases the
effectiveness of the unidirectional thermal radiation of
the heating elements through forced circulation of the
air throughout the oven. This helps prevent food
from burning on the surface, allowing the heat to
penetrate right into the food. Always cook in this
mode with the oven door closed.
7
Page 8
GB
Cooking advice table
Cooking
modes
Convection
Oven
Multi-cooking
Top oven
Grill
Gratin
Foods
Duck
Roast veal or beef
Pork roast
Biscuits (short pastry)
Tarts
Pizza (on 2 racks)
Lasagne
Lamb
Roast chicken + potatoes
Mackerel
Plum cake
Cream puffs (on 2 racks)
Biscuits (on 2 racks)
Sponge cake (on 1 rack)
Sponge cake (on 2 racks)
Savoury pies
Browning food to perfect cooking - 3/4 15 220 -
Soles and cuttlefish
Squid and prawn kebabs
Cod filet
Grilled vegetables
Veal steak
Cutlets
Hamburgers
Mackerels
Toasts
Grilled chicken
Cuttlefish
Weight
(in kg)
1
1
1
1
1
1
1
1+1
1
1
0.5
0.5
0.5
1
1.5
1
1
1
1
1
1
1
1
4
1.5
1.5
Rack
position
3
3
3
3
3
2 and 4
3
2
2 and 4
2
2
2 and 4
2 and 4
2
2 and 4
3
4
4
4
3 or 4
4
4
4
4
4
2
2
Pre-heating
time (min)
15
15
15
15
15
15
10
10
15
10
10
10
10
10
10
15
5
5
5
5
5
5
5
5
5
5
5
Recommended
temperature
200
200
200
180
180
230
180
180
200
180
170
190
180
170
170
200
Max
Max
Max
Max
Max
Max
Max
Max
Max
200
200
Cooking
time
(minutes)
65-75
70-75
70-80
15-20
30-35
15-20
30-35
40-45
60-70
30-35
40-50
20-25
10-15
15-20
20-25
25-30
8-10
6-8
10
10-15
15-20
15-20
7-10
15-20
2-3
55-60
30-35
8
Page 9

Precautions and tips
! The appliance was designed and manufactured in
compliance with international safety standards. The
following warnings are provided for safety reasons
and must be read carefully.
General safety
• The appliance was designed for domestic use
inside the home and is not intended for
commercial or industrial use.
• The appliance must not be installed outdoors, even
in covered areas. It is extremely dangerous to
leave the appliance exposed to rain and storms.
• When handling the appliance, always use the
handles provided on the sides of the oven.
• Do not touch the appliance with bare feet or with
wet or moist hands and feet.
• The appliance must be used by adults only for
the preparation of food, in accordance with the
instructions outlined in this booklet. Any other
use of the appliance (e.g. for heating the room)
constitutes improper use and is dangerous.
The manufacturer may not be held liable for
any damage resulting from improper, incorrect
and unreasonable use of the appliance.
• When the appliance is in use, the heating
elements and some parts of the oven door
become extremely hot. Make sure you don't
touch them and keep children well away.
• Ensure that the power supply cable of other
electrical appliances does not come into contact
with the hot parts of the oven.
• The openings used for ventilation and dispersion
of heat must never be covered.
• Always grip the oven door handle in the centre:
the ends may be hot.
• Always use oven gloves to place cookware in the
oven or when removing it.
• Do not use aluminium foil to line the bottom of the
oven.
• Do not place flammable materials in the oven: if
the appliance is switched on by mistake, it could
catch fire.
• Always make sure the knobs are in the “”/“
position when the appliance is not in use.
• When unplugging the appliance always pull the plug
from the mains socket, do not pull on the cable.
• Never carry out any cleaning or maintenance work
without having unplugged the plug from the
mains.
• In the case of a malfunction, under no
circumstances should you attempt to repair the
appliance yourself. Repairs carried out by
inexperienced persons may cause injury or further
malfunctioning of the appliance. Contact a Service
Centre (see Assistance).
”
• Do not rest heavy objects on the open oven door.
• The appliance should not be operated by people
(including children) with reduced physical,
sensory or mental capacities, by inexperienced
individuals or by anyone who is not familiar with
the product. These individuals should, at the very
least, be supervised by someone who assumes
responsibility for their safety or receive
preliminary instructions relating to the operation of
the appliance.
• Do not let children play with the appliance.
Disposal
• Observe local environmental standards when
disposing packaging material for recycling
purposes. Observe existing legislation when
disposing of the old appliance.
• The European Directive 2002/96/EC on Waste
Electrical and Electronic Equipment (WEEE),
requires that old household electrical appliances
must not be disposed of in the normal unsorted
municipal waste stream. Old appliances must be
collected separately in order to optimise the
recovery and recycling of the materials they
contain and reduce the impact on human health
and the environment. The crossed out “wheeled
bin” symbol on the product reminds you of your
obligation, that when you dispose of the
appliance it must be separately collected.
Consumers should contact their local authority or
retailer for information concerning the correct
disposal of their old appliance.
Respecting and conserving the
environment
• By using the appliance in the hours between late
afternoon and early morning, you can help reduce
the work load placed on electrical companies.
• Always keep the oven door closed when using the
GRILL and GRATIN mode to attain best results
and to save energy (approximately 10%).
• Regularly check the door seals and wipe clean to
ensure they are free of debris so that they stick
properly to the door and do not allow heat to
disperse.
Assistance
Communicating:
• appliance model (Mod.)
• serial number (S/N)
This information is found on the data plate located
on the appliance and/or on the packaging.
GB
9
Page 10
Maintenance and care
F
F
GB
Switching the appliance off
Disconnect your appliance from the electricity
supply before carrying out any work on it.
Cleaning the appliance
• The stainless-steel or enamel-coated external parts
as well as the rubber seals may be cleaned using a
sponge that has been soaked in lukewarm water
and neutral soap. If these stains are difficult to
remove, use only specialised products. After
cleaning, rinse and dry thoroughly. Do not use
abrasive powders or corrosive substances.
• Ideally, the inside of the oven should be cleaned
after each use, when it is still lukewarm. Use hot
water and detergent, rinse and dry with a soft cloth.
Do not use abrasive products.
• All accessories - with the exception of the sliding
racks - can be washed like everyday crockery.
! Never use steam cleaners or pressure cleaners on
the appliance.
Cleaning the oven door
Inspecting the seals
Check the door seals around the oven periodically. If
the seals are damaged, please contact your nearest
After-sales Service Centre (see Assistance).
We recommend not using the oven until the seals have
been replaced.
Replacing the light bulb
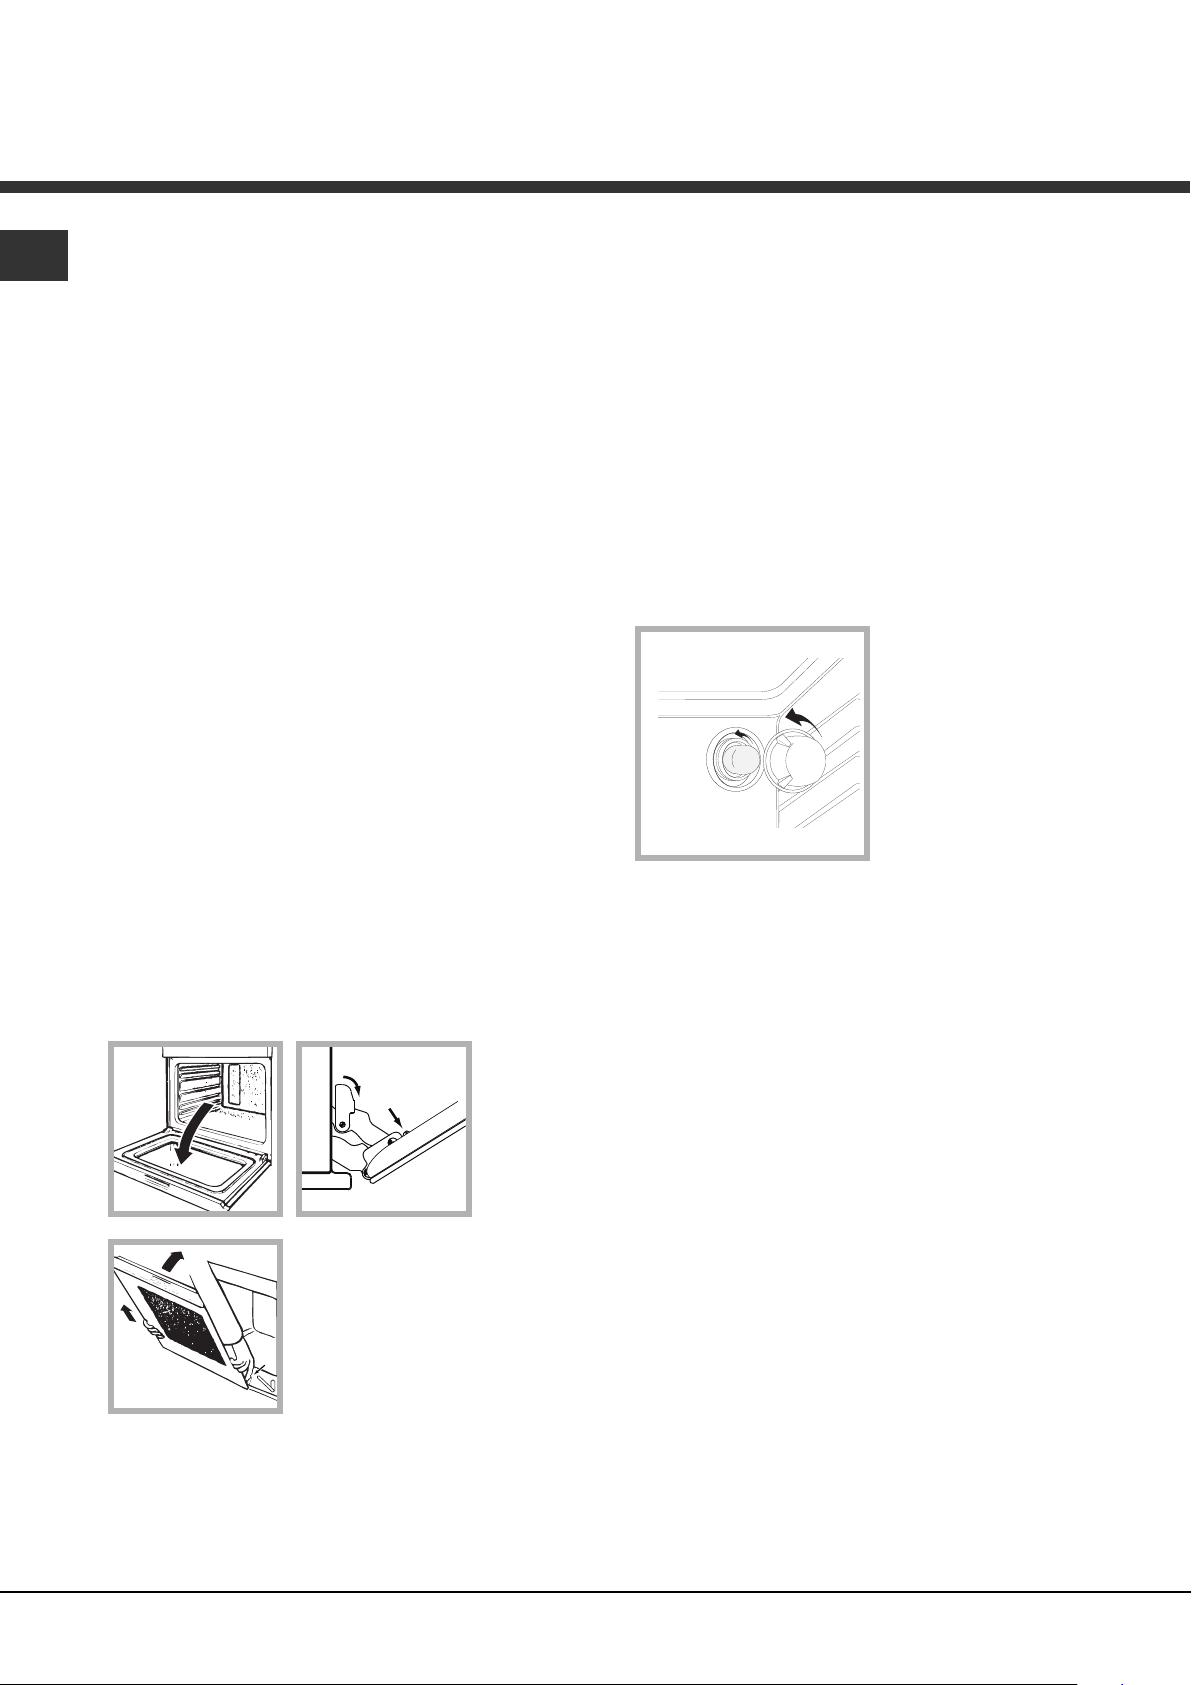
To replace the oven light bulb:
1. Remove the glass cover of the lamp-holder.
2. Remove the light bulb and replace it with a similar
one: Wattage 25 W, cap E 14.
3. Replace the glass cover (see diagram).
Clean the glass part of the oven door using a sponge
and a non-abrasive cleaning product, then dry
thoroughly with a soft cloth. Do not use rough abrasive
material or sharp metal scrapers as these could
scratch the surface and cause the glass to crack. To
clean more thoroughly, you can remove the oven door.
1. Open the oven door fully (see diagram).
2. Lift up and turn the small levers located on the
two hinges (see diagram).
3. Grip the door on the two
external sides and close it
approximately half way. Unlock
the door by pressing on the
clamps
towards you lifting it out of its
seat (see diagram).
To replace the door, reverse
this sequence.
FF
F, then pull the door
FF
10
Page 11

Руководство по
эксплуатации
RSGB
Русский, 11English, 1
MOS 538 J X RU/HA
MOSS 537 J X RU/HA
KZ
ДУХОВОИ ШКАФ
Содержание
RS
Монтаж, 12-13
Расположение
Электрическое подключение
Паспортная табличка
Описание изделия, 14
Общии вид
Панель управления
Включение и эксплуатация, 15
Включение духового шкафа
Электронный таймер программирования
выпечки, 16
Программы, 17-18
Программы приготовления
Практические советы по приготовлению
Таблица приготовления
Предосторожности и рекомендации, 19
Общие требования к безопасности
Утилизация
Экономия электроэнергии и охрана окружающеи
среды
Техническое обслуживание и уход, 20
Отключение электропитания
Чистка изделия
Чистка дверцы
Замена лампочки
Техническое обслуживание
11
Page 12

560 mm.
4
5
m
m
.
Установка
RS
! Важно сохранить данное руководство для его
последующих консультации. В случае продажи,
передачи изделия или при переезде на новое
место жительства необходимо проверить, чтобы
руководство оставалось вместе с изделием, для
того чтобы его новыи владелец мог ознакомиться
с правилами эксплуатации и с соответствующими
предупреждениями.
! Внимательно прочитаите инструкции: в них
содержатся важные сведения об установке,
эксплуатации и безопасности изделия.
Расположение
! Не разрешаите детям играть с упаковочными
материалами.
Упаковочные материалы должны быть уничтожены
в соответствии с правилами раздельного сбора
мусора (см. Предосторожности и рекомендации).
! Установка изделия производится в соответствии
с данными инструкциями квалифицированными
специалистами. Неправильныи монтаж изделия
может стать причинои повреждения имущества и
причинить ущерб людям и домашним животным.
Встроенныи монтаж
Для обеспечения исправного функционирования
изделия кухонныи элемент должен иметь
соответствующие характеристики:
• панели кухонных элементов, прилегающих к
духовому шкафу, должны быть выполнены из
термостоикого материала;
• клеи кухонных элементов элементов из
фанерованного дерева должен быть устоичивым
к температуре 100°C.
• для встраивания духового шкафа под
кухонным топом (см. рисунок) или в колонну
ниша кухонного элемента должна иметь
следующие размеры:
Вентиляция
Для обеспечения надлежащеи вентиляции
необходимо снять заднюю панель ниши кухонного
элемента. Рекомендуется установить духовои
шкаф на два деревянных бруска или на сплошное
основание с отверстием диаметром не менее 45 х
560 мм (см чертежи).
Центровка и крепление
4 крепежных элемента с боков духового шкафа
должны быть отрегулированы в соответствии с 4
отверстиями в раме в зависимости от толщины
боковои панели кухонного элемента:
толщина 20 мм: полностью
удалите съемную часть
крепежного элемента (см.
схему);
толщина 18 мм: используите
первыи паз, согласно уже
готовои конфигурации
производителя (см. схему);
547 mm. min.
23 mm.
595 mm.
5 mm.
595 mm.
545 mm.
24 mm.
45 mm.
560 mm.
575-585 mm.
567 mm.
! После встраивания изделия в кухонныи элемент
должна быть исключена возможность касания к
электрическими частями.
Расход электроэнергии, указанныи на паспортнои
табличке изделия, был замерян для данного типа
монтажа
12
толщина 16 мм: используите
второи паз (см. схему).
Для крепления изделия к
кухонному элементу:
откроите дверцу духового
шкафа и завинтите 4 шурупа
для деревянных панелеи в 4
отверстия в периметральнои
раме.
! Все защитные элементы
должны быть закреплены таким образом, чтобы их
можно было снять только при помощи
Page 13

специального инструмента.
Электрическое подключение
! Духовые шкафы, укомплектованные трехполюсным
кабелем электропитания, расчитаны на
функционирование с переменным током с
напряжением и частотои электропитания, указанными
на паспортнои табличке с данными (см. ниже).
Подсоединение сетевого кабеля
1. Откроите зажимную
коробку, нажав при
помощи отвертки на
выступы с боков
крышки: потяните и
откроите крышку (см.
схему).
2. Отвинтите винт
кабельного сальника и
выньте его, поддев
отверткои (см. схему).
3. Отвинтите винты
контактов L-N-
и
затем прикрепите
провода под
головками винтов,
соблюдая цветовую
маркировку Синии (N)
Коричневыи (L) Желтозеленыи (
).
Подсоединение сетевого кабеля изделия к
сети электропитания
Установите на сетевои кабель нормализованную
штепсельную вилку, расчитанную на нагрузку,
указанную на паспортнои табличке (см. сбоку).
В случае прямого подключения к сети
электропитания между изделием и сетью
необходимо установить многополюсныи
выключатель с минимальным расстоянием между
контактами 3 мм, расчитанныи на данную нагрузку и
соответствующии деиствующим нормативам
(выключатель не должен размыкать провод
заземления). Сетевои кабель должен быть
расположен таким образом, чтобы ни в однои точке
его температура не превышала температуру
помещения более чем на 50°C.
! Электромонтер несет ответственность за
правильное подключение изделия к электрическои
сети и за соблюдение правил безопасности.
Перед подключением изделия к сети электропитания
проверьте следующее:
• сетевая розетка должна быть соединена с
заземлением и соответствовать нормативам;
• сетевая розетка должна быть рассчитана на
максимальную потребляемую мощность изделия,
указанную на паспортнои табличке (см. ниже);
• напряжение сети электропитания должно
находиться в пределах значении, указанных на
паспортнои табличке (см. ниже);
• сетевая розетка должна быть совместима со
штепсельнои вилкои изделия. В противном случае
замените сетевую розетку или штепсельную вилку;
не используите удлинители или троиники.
! Изделие должно быть установлено таким образом,
чтобы сетевои кабель и сетевая розетка были легко
доступны.
! Сетевои шнур изделия не должен быть согнут или сжат.
! Регулярно проверяите состояние кабеля
электропитания и в случае необходимости поручите
его замену только уполномоченным техникам (см.
Техническое обслуживание).
! Производитель не несет ответственности за последствия
несоблюдения перечисленных выше требовании.
ПАСПОРТНАЯ ТАБЛИЧКА
Габаритные
размеры
Объем 58 л
Электрическое
подключение
МАРКИРОВКА
ПОТРЕБЛЕНИЯ
ЭЛЕКТРОЭНЕРГИИ
ширина 43,5 см.
высота 32 см.
глубина 41,5 см.
напряжение 220 – 240 В ~ 50/60
Гц или 50 Гц (см. паспортную
табличку)
макс. поглощаемая мощность
2250 Вт
Директива 2002/40/СЕ об
этикетках электрических духовых
шкафов. Норматив EN 50304
Расход электроэнергии
Натуральная конвекция –
функция нагревания:
Традициональная духовка
Заявление о расходе
электроэнергии класса
принудительной конвекции -
функция нагревания:
Одновременное приготовление
Данное изделие соответствует
следующим Директивам
Европейского Сообщества:
- 2006/95/CEE от 12.12.06 (Низкое
напряжение) с последующими
изменениями – 2004/108/СЕЕ от
15/12/04 (Электромагнитная
совместимость) с последующими
изменениями – 93/68/СЕЕ от
22/07/93 с последующими
изменениями.
2002/96/CE с последующими
изменениями.
a
b
RS
13
Page 14

Описание изделия
RS
Общии вид
Панель управления
•• ••
*
Имеется только в некоторых моделях
*
14
Page 15

Включение и
эксплуатация
! При первом включении духового шкафа
рекомендуем прокалить его примерно в течение
часа при максимальнои температуре с закрытои
дверцеи. Затем выключите духовои шкаф,
откроите дверцу и проветрите помещение. Запах,
которыи вы можете почувствовать, вызван
испарением веществ, использованных для
предохранения духового шкафа.
Включение духового шкафа
1. Выберите нужную программу приготовления при
помощи рукоятки ПРОГРАММЫ.
2. Выберите температуру при помощи регулятора
ТЕРМОСТАТ. В специальнои таблице приводится
перечень типов приготовления с
соответствующими рекомендуемыми
температурами (см. Программы).
3. Включенныи индикатор ТЕРМОСТАТА означает
текущую фазу нагрева духовки до заданнои
температуры.
4. В процессе приготовления в любои момент
можно:
- изменить программу приготовления при помощи
рукоятки ПРОГРАММЫ;
- изменить температуру при помощи регулятора
ТЕРМОСТАТ;
- прервать приготовление, повернув рукоятку
ПРОГРАММЫ в положение «0».
Охладительная вентиляция
Для понижения температуры вокруг работающего
духового шкафа некоторые модели оснащаются
охладительным вентилятором. Этот вентилятор
направляет струю воздуха между панелью
управления и дверцеи духового шкафа.
! По завершении приготовления вентилятор
продолжает работать вплоть до надлежащего
охлаждения духовки.
Освещение духового шкафа
Загорается при выборе
ПРОГРАММЫ. Остается включеннои при выборе
программы приготовления.
8 при помощи рукоятки
RS
! Никогда не ставьте никаких предметов на дно
духового шкафа, так как они могут повредить
эмалированное покрытие.
! Всегда ставьте посуду на прилагающуюся
решетку.
Имеется только в некоторых моделях
*
15
Page 16

Электронный таймер
программирования выпечки
RS
•• ••
Программирование часов
! Часы можно настроить как при выключенном
духовом шкафу, так и при включенном, при условии
что не было задано время окончания выпечки.
После подключения к электрической сети или после
отключения электроэнергии, начнет мигать икона
и четыре цифры на ДИСПЛЕЕ.
1. Нажмите несколько раз кнопку и удерживайте
до тех пор, пока на ДИСПЛЕЕ не замигает икона
и четыре цифровых значения;
2. при помощи “+” и “-” регулируется время; при их
удерживании цифры меняются быстрее, что
облегчает установку.
3. подождите 10 сек. или нажмите снова на кнопку
для фиксирования установки.
Программирование таймера
! Данная функция не прерывает процесса выпечки и
не зависит от работы духового шкафа. Она
позволяет только включить звуковой сигнал по
истечении заданного времени.
1. Нажмите несколько раз кнопку до тех пор,
пока на ДИСПЛЕЕ не замигает символ
и три цифровые значения;
2. при помощи “+” и “-” регулируется время; при их
удерживании цифры меняются быстрее, что
облегчает установку.
3. подождите 10 сек. или нажмите снова на кнопку
для фиксирования установки.
На дисплее будет показан обратный отсчет времени,
по завершении которого включится звуковой сигнал.
Программирование выпечки
! Запрограммировать готовку можно только после
выбора соответствующей программы.
Порядок программирования
продолжительности выпечки
1. Нажмите несколько раз кнопку до тех пор,
пока на ДИСПЛЕЕ не замигает символ и три
цифровые значения;
2. при помощи “+” и “-” регулируется время; при их
удерживании цифры меняются быстрее, что
облегчает установку.
3. подождите 10 сек. или нажмите снова на кнопку
для фиксирования установки.
4. по истечении заданного времени на дисплее
показывается надпись END (КОНЕЦ), и духовой
шкаф завершает приготовление со звуковым
сигналом. Для ее остановки нажмите любую
кнопку.
•
Пример: в 9.00 вы программируете выпечку, на
которую потребуется 1 час 15 минут. Приготовление
автоматически завершится в 10:15.
Порядок программирования окончания
выпечки
! Запрограммировать окончание выпечки можно
только после настройки ее продолжительности.
1. Выполните операции с пункта 1 по пункт 3, в
которых описывается порядок программирования
продолжительности;
2. затем нажмите несколько раз кнопку до тех
пор, пока на ДИСПЛЕЕ не замигает символ
и четыре цифровых значения;
3. при помощи “+” и “-” регулируется время
окончания готовки; при их удерживании цифры
меняются быстрее, что облегчает установку.
4. подождите 10 сек. или нажмите снова на кнопку
для фиксирования установки.
5. по истечении заданного времени на дисплее
показывается надпись END (КОНЕЦ), и духовой
шкаф завершает приготовление со звуковым
сигналом. Для ее остановки нажмите любую
кнопку.
Включенные символы и указывают, что
произведено программирование. На ДИСПЛЕЕ
попеременно показывается время окончания и
продолжительность выпечки.
• Пример: в 9:00 Вы программируете
продолжительность 1 час. В 12:30 планируется
завершить цикл. Программа автоматически
запускается в 11:30.
Отмена программирования
Порядок отмены запрограммированного значения:
• нажимать на кнопку до тех пор, пока на
дисплее не начнет мигать символ установки,
который нужно отменить, и цифры. Нажимать на
кнопку “-” до тех пор, пока на дисплее не появятся
цифры 00:00.
• одновременно нажать и удерживать кнопки “+” и ”-
”; таким образом отменяются все заданные
установки, включая таймер.
16
Page 17

Программы
Программы приготовления
! Для всех программ можно задать температуру от
60°C до МАКС кроме:
• ГРИЛЬ (рекомендуется устанавливать только
МАКС. температуру);
• ПОДРУМЯНИВАНИЕ (рекомендуется не
превышать температуру 200°C).
a Программа ТРАДИЦИОНАЛЬНАЯ
ДУХОВКА
Включаются два нагревательных элемента:
нижнии и верхнии. В режиме традиционального
приготовления рекомендуется использовать
только один уровень: при использовании
нескольких уровнеи распределение температуры
будет неоптимальным.
b Программа ОДНОВРЕМЕННОЕ
ПРИГОТОВЛЕНИЕ
Включаются все нагревательные элементы
(верхнии и нижнии) и вентилятор. Так как жар
является постоянным во всем духовом шкафу,
воздух обеспечивает однородное приготовление и
подрумянивание продукта. Одновременно можно
использовать не более двух уровнеи духового
шкафа.
c Программа ВЕРХНИИ НАГРЕВАТЕЛЬ
Включается верхнии нагревательныи элемент. Эта
функция может быть использована для доводки
готовых блюд.
d Программа ГРИЛЬ
Включается верхнии нагревательныи элемент.
Значительная температура прямого деиствия
гриля позволяет получить быстрое образование
корочки на поверхности продукта, которая
препятствует выходу соков и сохраняет продукт
нежным и сочным внутри. Использование функции
гриль в особенности рекомендуется для блюд,
для приготовления которых требуется высокая
поверхностная температура: телячьих и говяжьих
бифштексов, антрекотов, вырезки, гамбургеров и
т.д. В параграфе «Практические советы по
приготовлению» приводятся некоторые примеры
использования духового шкафа. Готовьте блюда с
закрытои дверцеи духового шкафа.
проникающую способность жара. Готовьте блюда
с закрытои дверцеи духового шкафа.
Практические советы по
приготовлению
! В режиме вентилируемого приготовления не
используите 1-ыи и 5-ыи уровни: они
подвергаются прямому воздеиствию горячего
воздуха, которыи может сжечь деликатные
продукты.
! При использовании функции ГРИЛЬ и
ПОДРУМЯНИВАНИЕ поместите противень на
уровень 1 для сбора жидкостеи, выделяемого при
жарке (сок и/или жир).
ОДНОВРЕМЕННОЕ ПРИГОТОВЛЕНИЕ
• Используются 2-ои и 4-ыи уровни, на 2-ои
помещаются продукты, требующие более
интенсивного жара.
• Установите проитвень снизу, а решетку сверху.
ГРИЛЬ
• Установите решетку на уровень 3 или 4,
поместите продукты в центр решетки.
• Рекомендуется выбрать максимальную
мощность духовки. Не беспокоитесь, если
верхнии элемент не остается постоянно
включенным: его работа управляется
термостатом.
ПИЦЦА
• Для выпечки вкуснои пиццы используите
программу ОДНОВРЕМЕННОЕ
ПРИГОТОВЛЕНИЕ.
• Используите противень из легкого алюминия,
устанавливая его на прилагающуюся решетку.
При использовании противеня время выпечки
удлиняется, что затрудняет получение
хрустящеи пиццы.
• В случае выпечки пиццы с обильнои начинкои
рекомендуется положить на пиццу сыр
моццарелла в середине выпечки.
RS
e Программа ПОДРУМЯНИВАНИЕ
Включается верхнии нагревательныи элемент и
вертел. Сочетает однонаправленное выделение
жара с принудительнои циркуляциеи воздуха
внутри духового шкафа. Это препятствует
обгоранию поверхности продуктов, повышая
17
Page 18

RS
Таблица приготовления
Программы
Традициональная
духовка
Одновременное
приготовление
Forno Sopra
(Нагрев сверху)
Гриль
Gratin
(Подрумянивание)
Продукты
Утка
Жаркое из телятины или
говядины
Жаркое из свинины
Печ енье (песочн ое)
Песочный торт с начинкой
Пицца (на 2-х уровня х)
Лазанья
Баранина
Жареная курица с
картошкой
Скумбрия
Бисквитный кекс
Эклеры (на 2-х уровнях)
Печень е (на 2-х уровнях)
Бисквит (на 1-ом уровне)
Бисквит (на 2-х уровнях)
Несладкие торты
Доведение доготовности - 3/4 15 220 -
Камбала и каракатицы
Кальмары и креветки на
шампурах
Филе трески
Овощи-гриль
Телячий бифштекс
Отбивные
Гамбургер
Скумбрия
Горячие бутерброды
Курица-гриль
Каракатицы
Вес
(кг)
1+1
0.5
0.5
0.5
1.5
n.° 4
1.5
1.5
1
1
1
1
1
1
1
1
1
1
1
1
1
1
1
1
1
1
-
Уровень
3
3
3
3
3
2 и 4
3
2
2 и 4
2
2
2 и 4
2 и 4
2
2 и 4
3
4
4
4
3/4
4
4
4
4
4
2
2
Время
нагревания
(мин.)
15
15
15
15
15
15
10
10
15
10
10
10
10
10
10
15
5
5
5
5
5
5
5
5
5
5
5
Рекомендуемая
температура
200
200
200
180
180
230
180
180
200
180
170
190
180
170
170
200
Макс.
Макс.
Макс.
Макс.
Макс.
Макс.
Макс.
Макс.
Макс.
200
200
Продолжит-ть
приготовления
(минуты)
65-75
70-75
70-80
15-20
30-35
15-20
30-35
40-45
60-70
30-35
40-50
20-25
10-15
15-20
20-25
25-30
8-10
6-8
10
10-15
15-20
15-20
7-10
15-20
2-3
55-60
30-35
18
Page 19

Предосторожности и
рекомендации
! Изделие спроектировано и изготовлено в
соответствии с международными нормативами по
безопасности. Необходимо внимательно прочитать
настоящие предупреждения, составленные в
целях вашеи безопасности.
Общие требования к безопасности
• Данное изделие предназначается для
непрофессионального использования в
домашних условиях.
• Запрещается устанавливать изделие на улице,
даже под навесом, так как воздеиствие на него
дождя и грозы является чрезвычаино опасным.
• Для перемещения изделия всегда беритесь за
специальные ручки, расположенные с боков
духового шкафа.
• Не прикасаитесь к изделию влажными руками,
босиком или с мокрыми ногами.
• Изделие предназначено для приготовления
пищевых продуктов, может быть
использовано только взрослыми лицами в
соответствии с инструкциями,
приведенными в данном техническом
руководстве. Любое другое его
использование (например: отопление
помещения) считается ненадлежащим и
следовательно опасным. Производитель не
несет ответственности за возможный
ущерб, вызванный ненадлежащим,
неправильным и неразумным
использованием изделия.
• В процессе эксплуатации изделия
нагревательные элементы и некоторые
части дверцы духового шкафа сильно
нагреваются. Необходимо проявлять
острожность во избежание контактов с
этими частями и не разрешать детям
приближаться к духовке.
• Следите, чтобы сетевые шнуры других бытовых
электроприборов не прикасались к горячим
частям духового шкафа.
• Не закрываите вентиляционные решетки и
отверстия рассеивания тепла.
• Беритесь за ручку дверцы в центре: с боков она
может быть горячеи.
• Всегда надеваите кухонные варежки, когда
ставите или вынимаете блюда из духовки.
• Не покрываите дно духового шкафа фольгои.
• Не храните в духовом шкафу возгораемых
предметов: при случаином включении изделия
такие материалы могут загореться.
• Всегда проверяите, чтобы регуляторы
находились в положении “”/“
не используется.
• Не тяните за сетевои кабель для отсоединения
вилки изделия из сетевои розетки, возьмитесь
за вилку рукои.
”, когда изделие
• Перед началом чистки или технического
обслуживания изделия всегда вынимаите
штепсельную вилку из сетевои розетки.
• В случае неисправности категорически
запрещается открывать внутренние механизмы
изделия с целью их самостоятельного ремонта.
Обращаитесь в Центр Сервисного
обслуживания (см. Техобслуживание).
• Не ставьте тяжелые предметы на открытую
дверцу духового шкафа
Утилизация
• Уничтожение упаковочных материалов:
соблюдаите местные нормативы с целью
повторного использования упаковочных
материалов.
• Согласно Европеискои Директиве 2002/96/СЕ
касательно утилизации электронных и
электрических электроприборов электроприборы
не должны выбрасываться вместе с обычным
городским мусором. Выведенные из строя
приборы должны собираться отдельно для
оптимизации их утилизации и рекуперации
составляющих их материалов, а также для
безопасности окружающеи среды и здоровья.
Символ зачеркнутая мусорная корзинка,
имеющиися на всех приборах, служит
напоминанием об их отдельнои утилизации.
За более подробнои информациеи о правильнои
утилизации бытовых электроприборов
пользователи могут обратиться в специальную
государственную организацию или в магазин.
Экономия электроэнергии и охрана
окружающеи среды
• Если вы будете пользоваться духовым шкафом
вечером и до раннего утра, это поможет
сократить нагрузку потребления электроэнергии
электростанциями.
• Рекомендуется всегда готовить в режиме
ГРИЛЬ и ПОДРУМЯНИВАНИЕ с закрытои
дверцеи: это необходимо для значительнои
экономии электроэнергии (примерно 10%), а
также для лучших результатов приготовления.
• Содержите уплотнения в исправном и чистом
состоянии, проверяите, чтобы они плотно
прилегали к дверце и не пропускали утечек
тепла.
RS
19
Page 20

Техническое
F
F
обслуживание и уход
RS
Обесточивание изделия
Перед началом какои-либо операции по
обслуживанию или чистке отсоедините изделие от
сети электропитания.
Чистка изделия
• Наружные эмалированные элементы или детали
из нержавеющеи стали, а также резиновые
уплотнения можно протирать губкои, смоченнои
в теплои воде или в растворе неитрального
моющего средства. Для удаления особо
трудных пятен используите специальные
чистящие средства, имеющиеся в продаже.
После чистки рекомендуется тщательно удалить
остатки моющего средства влажнои тряпкои и
высушить духовку. Не используите абразивные
порошки или коррозииные вещества.
• Следует производить внутреннюю чистку
духового шкафа после каждого его
использования, не дожидаясь его полного
охлаждения. Используите теплую воду и
моющее средство, ополосните и протрите
мягкои тряпкои. Избегаите использования
абразивных средств.
• Съемные детали можно легко вымыть как
любую другую посуду, также в посудомоечнои
машине.
! Не используите паровые чистящие агрегаты или
агрегаты под высоким давлением для чистки
изделия.
Чистка дверцы
Для чистки стекла дверцы используйте
неабразивные губки и чистящие средства, затем
вытрите насухо мягкой тряпкой. Не используйте
твердые абразивные материалы или острые
металлические скребки, которые могут поцарапать
поверхность и разбить стекло.
Для более тщательной чистки можно снять дверцу
духовки.
1. полностью откройте дверцу духовки (см. схему);
2. поднимите и поверните шпонки на двух
шарнирах (см. схему);
Проверка уплотнении
Регулярно проверяите состояние уплотнения
вокруг дверцы духового шкафа. В случае
повреждения уплотнения обращаитесь в
ближаишии Центр Технического Обслуживания
(см. Техническое обслуживание). Не
рекомендуется пользоваться духовкои с
поврежденным уплотнением.
Замена лампочки
Замена лампочки в духовом шкафу:
1. Отвинтите стеклянную крышку плафона
лампочки;
2. Выкрутите лампочку
и замените ее на
новую такого же типа:
мощность 25 Вт,
резьба Е 14.
3. Восстановите
крышку на место (см.
схему).
Техническое обслуживание
! ‘Никогда не обращаитесь к неуполномоченным
техникам.
При обращении в Сервия Технического
обслуживания сообщите:
• Тип неисправности;
• Модель изделия (Мод.)
• Номер тех. паспорта (серииныи №)
Эти данные вы наидете на паспортнои табличке,
расположеннои на изделии.
3. возьмитесь за дверцу
руками с двух сторон,
плавно закройте ее, но не
полностью. Нажмите на
упоры F, затем потяните
дверцу на себя, снимая ее с
петель (см. схему). Для
установки дверцы на место
выполните вышеописанные
операции в обратном
порядке.
20
Page 21

Пайдалану нұсқаулығы
ПЕШ
GB
English, 1
RS
Русский, 11
MOS 538 J X RU/HA
MOSS 537 J X RU/HA
KZ
Қазақша, 21
Мазмұны
Орнату, 22-23
Орналастыру
Электр қосылымдары
Деректер кестесі
Құрылғы сипаттамасы, 24
Жалпы шолу
Басқару тақтасы
Қосу және пайдалану, 25
Пешті қосу
Электрондық тағам дайындау
бағдарламалаушысы, 26
Тағам дайындау режимдері, 27-28
Тағам дайындау режимдері
Тағам дайындау бойынша кеңес
Тағам дайындау бойынша кеңес кестесі
Сақтандырулар мен кеңестер, 29
Жалпы қауіпсіздік
Жою
Қоршаған ортаны сақтау және қорғау
Көмек
KZ
Жөндеу және күтім, 30
Құрылғыны өшіру
Құрылғыны тазалау
Пеш есігін тазалау
Шамды ауыстыру
Page 22

Орнату
560 мм.
45 мм.
KZ
! Жаңа құрылғымен жұмысты бастамастан бұрын
осы пайдалану нұсқаулығын мұқият оқып шығыңыз.
Мұнда құрылғыны қауіпсіз қолдану, орнату және оны
күту туралы маңызды ақпараттар қамтылған.
! Келешекте анықтама ретінде қарау үшін пайдалану
нұсқаулығын сақтап қойыңыз. Оны құрылғының кез
келген жаңа иесіне беріңіз.
Орналастыру
! Орау материалдарын балалардың қолы жетпейтін
жерде сақтаңыз. Тыныс тарылу немесе тұншығып
қалу қаупін туғызуы мүмкін. (Сақтандырулар мен
кеңестер бөлімін қараңыз).
! Құрылғыны нұсқауларға сәйкес арнайы біліктілігі бар
маман орнатуға тиіс. Құрылғы дұрыс орнатылмаған
жағдайда, адамдар мен жануарлар өміріне қауіп
төндіруі немесе мүлікті зақымдауы мүмкін.
Құрылғыны орнату
Құрылғының дұрыс жұмыс жасайтынын тексеру үшін
қолайлы шкафты қолданыңыз.
• Пешке жақын қабырғалар ыстыққа төзімді
материалдан жасалған болуы қажет.
•
Сыртқы қабығы бар шкафтарды жинағанда 100°C
температураға төзетін желімдер қолданылуы қажет.
Желдету
Лайықты желдетудің орнатылғанын тексеру үшін
шкафтың артқы қабырғасын алып тастау қажет.
Пешті екі ағаш тақтайға немесе кемінде 45 x 560 мм
ашық тұрған тегіс жерде орналастыру ұсынылады
(сызбаны қараңыз).
Ортаға қою және бекіту
Пештің бүйірлеріндегі 4 құлақша сыртқы жақтаудың
4 тесігіне сәйкес келетіндей етіп орнатыңыз.
Құлақшаларды төменде көрсетілгендей шкафтың
бүйір қабырғасының қалыңдығына қарай лайықтаңыз:
қалыңдығы 20 мм:
құлақшаның жылжымалы
бөлігін алып тастаңыз
(сызбаны қараңыз).
• пешті ас үй үстелінің астына (сызбаны қараңыз)
немесе ас үй жиһазының ішіне орнату үшін
шкафтың өлшемдері төмендегідей болуы қажет:
547 мм мин.
567 мм.
45 мм.
558 мм.
593 мм.
23 мм.
595 мм.
5 мм.
595 мм.
545 мм.
24 mm.
! Құрылғы орнатылған кезде кез келген электрлі
заттардан алыс болуы қажет.
Негізгі деректер кестесінде берілген пайдалану
ортасының көрсеткіштері осы орнату түрі үшін
есептелген.
қалыңдығы 18 мм: зауытта
орнатылған бірінші тілікті
пайдаланыңыз (сызбаны
қараңыз).
қалыңдығы 16 мм: екінші
тілікті пайдаланыңыз
(сызбаны қараңыз).
Пештің есігін ашып, 4
бұрандалы бекіткішті сыртқы
жақтаудың 4 тесігіне кіргізіп,
құрылғыны шкафқа бекітіңіз.
! Құрылғының қауіпсіз жұмыс
істеуін қамтамасыз ететін
барлық бөліктері арнайы
құралдардың көмегімен ғана
алынуы тиіс.
22
Page 23

Электр қосылымдары
! Үш ұялы электр кабелі бар пеш айнымалы ток
кернеуімен және құрылғыда орналасқан негізгі
деректер кестесінде көрсетілген жиілікпен жұмыс
істеу үшін жасақталған (төменге қараңыз).
Электр кабелін орнату
1. Қақпақтың бүйір
құлақшаларына
бұрауышты тығып,
дәнекер қалқаншаны
ашыңыз. Бұрауышты
төмен басқанда қақпақты
ашатындай тұтқа түрінде
пайдаланыңыз (сызбаны
қараңыз).
2. Бұрауышты тұтқа
түрінде пайдаланып,
қыспа бұранданы
босатып алып тастаңыз
(сызбаны қараңыз).
3. Үш сымды L-N-
байланыс бұрандаларын
алып тастап, түстеріне
сай сымдарды бұранда
бастарының астына
бекітіңіз: Көк (N), Қоңыр (L)
және Сары-жасыл ( ).
Электр кабелін желіге қосу
• Кернеу деректер кестесінде көрсетілген мән
аралығы аумағында болады (астын қараңыз).
• Розетка құрылғының айырғышына сәйкес келеді.
Розетка айырғышына сәйкес болмаса, өкілетті
маманнан оны ауыстырып беруді өтініңіз.
Бірнеше розеткалар мен ұзартқыш сымдарын
пайдаланбаңыз.
! Құрылғы орнатылғаннан кейін электр кабелі мен
розетка жақын жерде болуы қажет.
! Кабель иілмеуі немесе қысылмауы қажет.
! Кабель жиі тексеріліп, тек өкілетті маманның
көмегімен ғана алмастырылуы тиіс (Көмек бөлімін
қараңыз).
! Қауіпсіздік шаралары сақталмаған жағдайда
өндіруші жауапкершілікті өз мойнына алудан бас
тартады.
ДЕРЕКТЕР КЕСТЕСІ
ені 43,5 см
Өлшемдері
Көлемі 58 л
Электр
қосылымдары
биіктігі 32 см
тереңдігі 41,5 см
кернеуі: 220-240 В~ 50/60 Гц немесе
50Гц (деректер кестесін қараңыз),
ең көп тұтынылатын қуат – 2250 Вт
KZ
Деректер кестесінде көрсетілген жүктемеге сәйкес
стандартты айырғышты орнатыңыз (бүйірін қараңыз).
Құрылғы, құрылғы мен желі арасында орнатылған 3
мм ашық кішкене байланысы бар және анықталған
жүктемеге лайықты және ағымдағы ток реттеуіне
сәйкес болып келетін (жерге қосылған сым
автоматты айырып-қосқыштан ажыратылмауы тиіс)
жан-жақты автоматты айырып-қосқышты пайдалану
арқылы тікелей электр желісіне қосылуы қажет.
Электр кабелін температурасы 50°C-тан жоғары
болатын жерден өтпейтіндей етіп орналастыру қажет.
! Орнатушы дұрыс ток байланысын орнатқанына
және оның қауіпсіздік ережелеріне сәйкес екендігіне
сенімді болуы қажет.
Құрылғыны тоққа қоспастан бұрын төмендегілерді
тексеріңіз:
• Құрылғы жерге қосылған және айырғыш заңға
сәйкес болып табылады.
• Розетка негізгі деректер кестесінде көрсетілген
құрылғының ең жоғарғы күшіне төзімді (астын
қараңыз).
ҚУАТ БЕЛГІСІ
Электр пештерінің белгісіндегі
2002/40/EC нұсқауы, EN 50304
стандарты
Табиғи конвекция класы– қыздыру
күйіне арналған қуат тұтыну:
Конвекция
Мәжбүрлі конвекция класы
– қыздыру күйіне арналған
мәлімденген қуат тұтынуы:
Желдеткіш көмегімен
Бұл құрылғы Еуропа экономикалық
қауымдастығының келесі
нұсқауларына сай келеді: -2006
жылдың 12 ақпанындағы 2006/95/
EEC (төмен кернеу туралы) және
одан кейінгі түзетулер; -2004 жылдың
15 мамырындағы 2004/108/EEC
(электромагниттік үйлесімділік туралы)
және одан кейінгі түзетулер; -1993
жылдың 22 шілдесіндегі 93/68/EEC
және одан кейінгі түзетулер; - 2002/96/
EC және одан кейінгі түзетулер
23
Page 24

Құрылғы сипаттамасы
Басқару тақтасы
ГРИЛЬ
ТАБА
Сырғымалы сөрелерге
арналған СЫРҒЫТПАЛАР
5-позиция
4-позиция
3-позиция
2-позиция
1-позиция
РЕТТЕУ
тұтқасы
ТЕРМОСТАТ
тұтқасы
ТЕРМОСТАТ
индикатор шамы
ТАЙМЕР*
тұтқасы
РЕТТЕУ
тұтқасы
ТЕРМОСТАТ
тұтқасы
ТЕРМОСТАТ
индикатор шамы
ЭЛЕКТРОНДЫҚ
бағдарламалаушы
•• ••
KZ
Жалпы шолу
Басқару тақтасы
* Тек белгілі бір модельдерде
24
Page 25

Қосу және пайдалану
! Құрылғыны алғаш рет пайдаланғанда оны бос
күйінде есігін жауып, ең жоғарғы температурада
кемінде жарты сағаттай қыздырыңыз. Пешті
өшіріп, оның есігін ашпастан бұрын бөлменің
жақсы желдетілгенін тексеріңіз. Өндіру кезінде
қолданылған қорғағыш заттардың жанып кетуіне
байланысты жеңіл жағымсыз иіс шығуы мүмкін.
Пешті қосу
1. РЕТТЕУ тұтқасын бұрау арқылы қажетті тағам
дайындау режимін таңдаңыз.
2. ТЕРМОСТАТ тұтқасы көмегімен қажетті
температураны таңдаңыз. Тағам дайындау
режимдері және ұсынылған тағам дайындау
температуралары туралы мәліметті “Тағам
дайындау бойынша кеңестер” кестесінен қараңыз
(Тағам дайындау режимдері бөлімін қараңыз).
3. Алдын ала қыздыру аяқталғанда, ТЕРМОСТАТ
индикатор шамы жанады: тағамды пешке салыңыз.
4. Тағам дайындау барысында төмендегі нәрселерді
орындауға болады:
- РЕТТЕУ тұтқасын бұрау арқылы қажетті тағам
дайындау режимін өзгерту.
- THERMOSTAT (ТЕРМОСТАТ) тұтқасын бұрау
арқылы температураны өзгерту.
- РЕТТЕУ тұтқасын “0” позициясына бұрап, тағам
дайындау үрдісін тоқтату.
Салқындату желдеткіші
KZ
Пештің сыртқы температурасын салқындату үшін
кейбір модельдер басқару тақтасы мен пеш есігінің
арасына жел айдайтын салқындату желдеткішімен
жабдықталады.
! Пісіріп болғаннан кейін де пеш толық
салқындағанға дейін желдеткіш қосулы тұрады.
Пештің шамдары
РЕТТЕУ тұтқасымен функциясы таңдалған
уақытта ол жұмысын жалғастырады. Тағам
дайындау режимі таңдалғанда ол қосылып тұрады.
! Эмальді қабат зақымдануының алдын алу үшін
ешқашан пештің астыңғы жағына зат қоймаңыз.
! Әрқашан асхана ыдыстарын берілген тартпа(лар)
ға қойыңыз.
25
Page 26

Электрондық тағам дайындау
ДИСПЛЕЙ
УАҚЫТТЫ ОРНАТУ
түймесі
ПІСІРУ
АЯҚТАЛДЫ
белгішесі
Сағат белгішесі
ҰЗАҚТЫҚ
белгішесі
ТАЙМЕР белгішесі
УАҚЫТТЫ
АЗАЙТУ
түймесі
УАҚЫТТЫ
КӨБЕЙТУ түймесі
•• ••
бағдарламалаушысы
KZ
Сағатты орнату
! Сағат пеш қосулы немесе ажыратулы тұрған кезде
орнатылады және пісіру режимінің аяқталу уақытын
алдын ала белгіленген кезде орнатады.
Құрылғы электр желісіне жалғанғаннан немесе қуат
уақытша ажыратылғаннан кейін ДИСПЛЕЙДЕГІ
белгішесі мен төрт сан жыпылықтай бастайды.
1. Дисплейде белгішесі мен төрт сан
жыпылықтағанша түймесін бірнеше рет басыңыз.
2. Уақытты реттеу үшін «+» және «-» түймелерін
пайдаланыңыз; егер түймелердің бірін басып ұстап
тұрсаңыз, дисплей қалаған мәнді орнатуды оңай әрі
жылдам ете отырып, мәндер бойымен жылдамырақ
айналады.
3. 10 секунд күтіңіз немесе реттеуді аяқтау үшін
түймесін қайта басыңыз.
Таймерді орнату
! Бұл функция ас пісіруге кедергі жасамайды және
пешке әсер етпейді; ол белгіленген уақыт өткен
кезде дыбысты сигнал беру үшін пайдаланылады.
1. Дисплейде белгішесі мен үш сан
жыпылықтағанша түймесін бірнеше рет басыңыз.
2. Уақытты реттеу үшін «+» және «-» түймелерін
пайдаланыңыз; егер түймелердің бірін басып ұстап
тұрсаңыз, дисплей қалаған мәнді орнатуды оңай әрі
жылдам ете отырып, мәндер бойымен жылдамырақ
айналады.
3. 10 секунд күтіңіз немесе реттеуді аяқтау үшін
түймесін қайта басыңыз.
Дисплейде кері саналып жатқан уақыт көрсетіледі.
Осы уақыт кезеңі аяқталған кезде дыбысты сигнал
беріледі.
Пісіруді бағдарламалау
! Тағам дайындау режимі бағдарламалау
басталардан бұрын таңдалуға тиіс.
Пісіру ұзақтығын орнату
1. Дисплейде белгішесі мен үш сан
жыпылықтағанша түймесін бірнеше рет басыңыз.
2. Уақытты реттеу үшін «+» және «-» түймелерін
пайдаланыңыз; егер түймелердің бірін басып ұстап
тұрсаңыз, дисплей қалаған мәнді орнатуды оңай әрі
жылдам ете отырып, мәндер бойымен жылдамырақ
айналады.
3. 10 секунд күтіңіз немесе реттеуді аяқтау үшін
түймесін қайта басыңыз.
4. Белгіленген уақыт өткенде ДИСПЛЕЙ бетінде
«END» («Аяқталды») деген мәтін шығып, пеш
пісіруді тоқтатады да, дыбыстық сигнал ойнайды.
• Мысалы: қазір сағат 9:00 делік және уақыт 1 сағат
15 минутқа орнатылсын. Бағдарлама сағат 10:15
болғанда автоматты түрде тоқтайды.
Тағам дайындау режимінің аяқталу уақытын
орнату
! Пісірудің аяқталу уақыты белгіленбей тұрып, пісіру
ұзақтығын орнату керек.
1. Ұзақтықты жоғарыда сипатталғандай орнату үшін
1-ден 3-қадамға дейін орындаңыз.
2. Содан кейін, түймесін ДИСПЛЕЙ бетіндегі
белгішесі мен үш сан жыпылықтай бастағанша
басыңыз.
3. Уақытты реттеу үшін «+» және «-» түймелерін
пайдаланыңыз; егер түймелердің бірін басып ұстап
тұрсаңыз, дисплей қалаған мәнді орнатуды оңай әрі
жылдам ете отырып, мәндер бойымен жылдамырақ
айналады.
4. 10 секунд күтіңіз немесе реттеуді аяқтау үшін
түймесін қайта басыңыз.
5. Белгіленген уақыт өткенде ДИСПЛЕЙ бетінде
«END» («Аяқталды») деген мәтін шығып, пеш
пісіруді тоқтатады да, дыбыстық сигнал ойнайды.
Бағдарламала орнатылғанда және түймелері
жыпылықтайды. ДИСПЛЕЙ пісірудің аяқталу уақыты
мен пісіру ұзақтығын алма-кезек көрсетіп тұрады.
Әрекетті болдырмау
Әрекетті болдырмау үшін:
• түймесін болдырмау қажет параметрге
сәйкес келетін белгіше мен дисплейдегі сандар
жыпылықтауын тоқтатқанша басыңыз. «-» түймесін
дисплейде 00:00 сандары көрінгенше басыңыз.
• «+» және «-» түймелерін басып тұрыңыз; бұл
алдыңғы таңдалған параметрлерді, сондай-ақ,
таймер параметрлерін да болдырмайды.
26
Page 27

Тағам дайындау режимдері
Тағам дайындау режимдері
! Төмендегілерден басқа тағам дайындау
режимдерінің барлығына 60°C пен МАКС аралығында
кез келген температура мәні орнатылуы мүмкін
• ГРИЛЬ (кеңес: тек МАКС деңгейін орнатыңыз)
• ГРАТИН (кеңес: 200°C-тан асырмаңыз).
TRADITIONAL OVEN (ДАҒДЫЛЫ ПЕШ) режимі
Үстіңгі және астыңғы қыздыру элементтері қосылады.
Тағам дайындаудың дағдылы режимін пайдаланғанда
тек бір тағам дайындау тартпасын пайдаланған
дұрыс, бірден көп тартпа қолданылғанда пеш ішіндегі
температура бірдей болмауы мүмкін.
MULTI-COOKING (КӨП ТАҒАМ ДАЙЫНДАУ) режимі
Барлық қыздыру элементтері (үстіңгі және
астыңғы) және желдеткіш қосылады. Пештің қызуы
тұрақты болатындықтан ауа тағамды біркелкі
қызартып пісіреді. Бір уақытта ең көбі екі тартпаны
пайдалануға болады.
Тағам дайындау бойынша кеңес
! Желдеткіш көмегімен тағам дайындау барысында
тартпаларды бірінші және бесінші позицияларға
орналастырмаңыз. Шамадан тыс жылу температураға
сезімтал тағамдарды күйдіріп жіберуі мүмкін.
! GRILL (ГРИЛЬ) және GRATIN (ГРАТИН) режимдерінде
тағамның қалдықтарын (май сияқты) жинау үшін
тұтқалы табаны бірінші позицияға орналастырыңыз.
КӨП ТАҒАМ ДАЙЫНДАУ
• Молырақ жылуды талап ететін тағамды екінші
позициядағы тартпаға салып, екінші және төртінші
позицияларды қолданыңыз.
• Тұтқалы табаны астыңғы жаққа, ал тартпаны
үстіңгі жаққа орнатыңыз.
ГРИЛЬ
• Тартпаны 3 немесе 4-позицияға орналастырыңыз.
Тағамды тартпаның ортасына салыңыз.
KZ
ҮСТІҢГІ ПЕШ режимі
Үстіңгі қыздыру элементі іске қосылады. Бұл
режимді тағамды дайындаудың аяғында қызарту
үшін пайдалануға болады.
GRILL (ГРИЛЬ) режимі
Үстіңгі қыздыру элементі іске қосылады. Грильдің
аса жоғары әрі тіке температурасы ет пен қақталған
етті жұмсақ түрде қалдыру үшін нәрін ішінде ұстай
отырып, олардың бетін қызартуға мүмкіндік береді.
Сондай-ақ, жоғары бет температурасын қажет ететін
тағамдарға грильді пайдаланған абзал: бифштекс,
сиыр еті, қабырға стейкі, белдеме, гамбургерлер және
т.б... Кейбір мысалдар “Тағам дайындау бойынша
кеңес” параграфында берілген. Осы режимде ас
пісіргенде пештің есігін әрқашанда жабық ұстаңыз.
GRATIN (ГРАТИН) режимі
Астыңғы және айналмалы қыздыру элементтері мен
желдеткіш қосылады. Осы мүмкіндіктердің жиыны
пештегі ауаның күшейтілген айналымы арқылы
қыздыру элементтерінің бір бағытқа жылылық
бөлуінің тиімділігін арттырады. Бұл тағамды күйіп
кетуден сақтауға көмектеседі және жылудың
тағамның ішкі жағына енуіне мүмкіндік береді. Бұл
режим пайдаланылғанда пештің есігі әрдайым
жабық тұруы қажет.
• Қуат деңгейін ең жоғарғы мәнге орнату ұсынылады.
Үстіңгі қыздыру элементі термостат арқылы реттеледі
және тұрақты күйде қосылып тұрмауы мүмкін.
ПИЦЦА
• Пицца пісіру кезінде ең жақсы нәтижеге қол
жеткізу үшін КӨП ТАҒАМ ДАЙЫНДАУ режимін
пайдаланыңыз.
• Жеңіл алюминийден жасалған пицца табасын
пайдаланыңыз. Оны қамтамасыз етілген тартпаға
орналастырыңыз.
Сыртын қытырлақ етіп пісіру үшін тұтқалы табаны
пайдаланбаңыз (пісіру мерзімін ұзарту арқылы
қытырлақ болуына кедергі жасайды).
• Пиццаның беті көп құрамды болғанда пісіру
үрдісінің ортасында пиццаның үстіне моцарелла
ірімшігін қосу ұсынылады.
27
Page 28

Тағам дайындау бойынша кеңес кестесі
KZ
Тағам
дайындау
режимдері
Конвекция
пеші
MulticookingКөп
тағам
дайындау
Top
ovenҮстіңгі
пеш
GrillГриль Камбала мен каркатица
Гратин Грильде пісірілген тауық еті
Тағамдар Салмақ
Үйрек
Қуырылған бұзау немесе сиыр еті
Қуырылған шошқа еті
Печенье (кішкентай нан өнімдері)
Бәліш
Пицца (2 тартпада)
Лазанья
Жас қой еті
Қуырылған тауық еті + картоп
Макрель
Мейіз қосылған кекс
Көпіршітілген қаймақ қосылған бәліш
(2 тартпада)
Печенье (2 тартпада)
Бисквит торты (1 тартпада)
Бисквит торты (2 тартпада)
Хош иісті бәліш
Кәміл тағам дайындау үшін тағамды
қызарту
Кальмар мен асшаян кебабы
Треска белдемесі
Грильде пісірілген көкөністер
Бұзау етінен пісірілген стейк
Котлет
Гамбургер
Скумбрия
Қуырылған нан
Каракатица
(кг)
1
1
1
-
1
1
1
1
1+1
1
1
0.5
0.5
0.5
1
1.5
- 3/4 15 220 -
1
1
1
1
1
1
1
1
4
1.5
1.5
Тартпа
позициясы
3
3
3
3
3
2 және 4
3
2
2 және 4
2
2
2 және 4
2 және 4
2
2 және 4
3
4
4
4
3 не 4
4
4
4
4
4
2
2
Алдын ала қыздыру
уақыты (мин)
15
15
15
15
15
15
10
10
15
10
10
10
10
10
10
15
5
5
5
5
5
5
5
5
5
5
5
Ұсынылатын
температура
200
200
200
180
180
230
180
180
200
180
170
190
180
170
170
200
Ең жоғары
Ең жоғары
Ең жоғары
Ең жоғары
Ең жоғары
Ең жоғары
Ең жоғары
Ең жоғары
Ең жоғары
200
200
ұзақтығы
Пісіру
(минут)
65-75
70-75
70-80
15-20
30-35
15-20
30-35
40-45
60-70
30-35
40-50
20-25
10-15
15-20
20-25
25-30
8-10
6-8
10
10-15
15-20
15-20
7-10
15-20
2-3
55-60
30-35
28
Page 29

Сақтандырулар мен кеңестер
! Бұл құрылғы халықаралық қауіпсіздік стандарттарына
сай өңделіп шығарылған. Төмендегі ескертулер қауіпсіздік
ережелерін ескерту мақсатында берілген және оны мұқият
оқып шығу қажет.
Жалпы қауіпсіздік
• Құрылғы үйде қолдануға арналған, оны коммерциялық
немесе өндірістік тұрғыда қолдануға болмайды.
• Жабық жер болса да, құрылғыны сыртта қолданбау
қажет. Құрылғыны қорғаусыз жаңбыр мен боранда
қалдыру аса қауіпті.
• Құрылғыны қолданған уақытта пештің бүйіріндегі
тұтқаларды пайдаланыңыз.
• Құрылғыны жалаң аяқ немесе қол-аяғыңыз ылғал
немесе дымқыл болғанда ұстамаңыз.
• Құрылғы осы кітапшада берілген нұсқауларға сай тек
ересек адамдар ғана тағам дайындау мақсатында
пайдаланылуы тиіс.
• Құрылғыны пайдаланған уақытта қыздыру элементтері
және пеш есігінің белгілі бөліктері қатты қызады.
Бұларға тимейтініңізге және балалардан аулақ
ұстайтыныңызға көз жеткізіңіз.
• Басқа электр құрылғыларына арналған электр кабелі
пештің ыстық бөліктеріне тимейтінін тексеріңіз.
• Желдету және ыстықты салқындатуға арналған ашық
жерлерді ешқашан жаппау керек.
• Пеш есігінің тұтқасын әрқашан ортасынан ұстаңыз:
шеттері ыстық болуы мүмкін.
• Пешке асханалық ыдысты қоярда немесе оны алған
кезде әрдайым пеш қолғаптарын пайдаланыңыз.
• Пеш түбін туралау үшін алюминий фольганы
пайдаланбаңыз.
• Пешке жанғыш заттарды қоймаңыз. Егер байқаусызда
құрылғы қосылатын болса, бұл заттың жануы мүмкін.
• Құрылғыны қолданбаған кезде түймешіктерінің “”/“”
орнында екенін тексеріңіз.
• Құрылғыны өшіргенде айырғышты әрдайым желі
розеткасынан алыңыз, кабельден тартып суырмаңыз.
• Штепсель айырын электр желісінен ажыратпастан
тазалау немесе күтім көрсету жұмыстарын ешқашан
жасамаңыз.
• Егер құрылғы істен шыққан болса, ешбір жағдайда
жөндеу жұмысын өзіңіз жасамаңыз. Тәжірибесіз
адам тарапынан жасалған жөндеу жұмыстарынан
құрылғының істен шығуы немесе жарамсыз болып
қалуы мүмкін. Қызмет көрсету орталығымен
байланысыңыз (Көмек бөлімін қараңыз).
• Ашық пештің есігіне ауыр заттарды қоймаңыз.
• Құрылғыны физикалық, сезімталдық және психикалық
қабілеттері төмен адамдар (балалар да кіреді),
тәжірибесіз немесе өнімнен хабары жоқ кез келген
адамның қолданбауы тиіс. Мұндай адамдарға, кем
дегенде, қауіпсіздіктерін қамтамасыз ететін біреулер
жетекші болуы керек немесе құрылғының жұмысына
қатысты кіріспе нұсқаулары берілуі тиіс.
• Балаларға құрылғымен ойнауға рұқсат етпеңіз.
Жою
• Орау материалдарын қайта пайдалану мақсатымен
тастаған кезде жергілікті қоршаған орта стандарттарын
қадағалаңыз. Ескі құрылғыны тастағанда қолданылатын
заң ережелерін қадағалаңыз.
• Электр және электроникалық құралдардың
қалдықтарына (WEEE) қатысты 2002/96/EC
Еуропа заңнамасына сәйкес үй құрылғылары
қалыпты сортталмаған қалалық қалдық ағымымен
бірге жойылмауы тиіс. Қоршаған орта мен адам
денсаулығына тиетін зиянның алдын ала отырып, ескі
құрылғылар қайта пайдалануды және қайта өңдеуді
оңтайландыру мақсатында бөлек жиналуы керек.
Өнімдегі сызылған “доңғалақты қоқыс жәшік” сізге
құрылғыны тастаған уақытта бөлек жиналуы туралы
есіңізге салады.
Ескі құрылғыларды дұрыс тастау жөнінде ақпарат алу
үшін пайдаланушылар жергілікті өкілдеріне немесе
сатушыларына хабарласулары керек.
Қоршаған ортаны сақтау және қорғау
• Құрылғыны таңертең ерте немесе түстен кейін кешірек
пайдалану арқылы электр қуатын қамтамасыз етуші
компаниялардың жүктемесін азайтуға көмектесе аласыз.
• Жақсы нәтиже алу үшін және энергияны үнемдеу үшін
(шамамен 10%). GRILL (ГРИЛЬ) және GRATIN (ГРАТИН)
режимдерін пайдаланғанда пештің есігін жабық ұстаңыз.
• Есік тығыздағыштарын жиі тексеріңіз, олар есікке
тығыз келетіндей етіп, қалдық болмауы үшін тазалап
сүртіп тұрыңыз, осылайша ыстықтың сыртқа шығуын
болдырмайсыз.
Көмек
Байланыс ақпараты:
• Құрылғының моделі (Мод.)
• Сериялық нөмірі (С/н).
Бұл ақпарат құрылғыда орнатылған деректеме кестесінде
немесе орамадан табылуы мүмкін.
KZ
29
Page 30

Жөндеу және күтім
F
Құрылғыны өшіру
KZ
Кез келген бір жұмысты бастамастан бұрын
құрылғыны тоқтан ажыратыңыз.
Құрылғыны тазалау
• Тот баспайтын болат немесе эмальданған сыртқы
бөліктер және резеңке тығыздағыштар салқын
сумен нейтралды сабынға малынған ысқышпен
тазартылады. Қиын дақтарды кетіру үшін арнайы
өнімдерді пайдаланыңыз. Жуып болған соң оны
шайып, мұқият құрғатыңыз. Қатты ұнтақтарды
немесе таттандыратын заттарды пайдаланбаңыз.
• Пештің іші әрбір қолданғаннан кейін жылы
кезінде мұқият тазалануы тиіс. Ыстық су мен
тазартқышты пайдаланыңыз, одан кейін шайып,
жұмсақ шүберекпен құрғатып сүртіңіз. Қырғыш
заттарды пайдаланбаңыз.
• Сырғымалы тартпалардан басқа барлық керекжарақтар күнделікті ыдыстар сияқты жуылуы
мүмкін.
! Құрылғыда ешқашан бу тазартқышты немесе
шаңсорғышты пайдаланбаңыз.
Тығыздағыштарды тексеру
Пештегі есік тығыздағыштарын жиі тексеріп
тұрыңыз. Егер тығыздағыштар зақымдалған болса,
жақын жердегі Сатудан кейін қызмет көрсету
орталығына хабарласыңыз (Көмек бөлімін қараңыз).
Тығыздағыштар ауыстырылғанға дейін пешті
пайдаланбауды ұсынамыз.
Шамды ауыстыру
Пештің шамын ауыстыру үшін:
1. Шам ұясының шыны қақпағын алыңыз.
2. Шамды алып, оны сондай басқа шаммен
ауыстырыңыз: Қуаты 25 Вт, цоколі E 14.
3. Шыны қақпақты орнына қойыңыз (сызбаны
қараңыз).
Пеш есігін тазалау
Пеш есігінің әйнегін ысқышпен және қырғыш
емес тазартқыш құралдармен тазалап, жұмсақ
шүберекпен мұқият құрғатыңыз. Қатты қырғыш затты
немесе өткір темір қырғыштарды пайдаланбаңыз,
себебі олар әйнек бетін тырнап, оның сынуына
әкелуі мүмкін. Мұқият тазалау үшін пештің есігін
алып тастауға болады.
1. Пеш есігін толық ашыңыз (сызбаны қараңыз).
2. Екі ілмекте орналасқан тұтқаларды көтеріп,
бұрыңыз (сызбаны қараңыз).
3. Есікті екі жағынан қатты
ұстап, жартылай жабыңыз.
Қысқыштарды Fбасу
арқылы есікті босатыңыз,
одан кейін есікті орнынан
F
шығарылатындай өзіңізге
қарай тартыңыз (сызбаны
қараңыз).
Есікті орнына қою үшін осы іс
ретін кері орындаңыз.
30
Page 31

KZ
31
Page 32

KZ
02/2012 - 195100363.00
XEROX FABRIANO
32
 Loading...