

Page 1

Manual de
Instrucciones
ES
Español, 1
LSF 712
EN
English,13
LAVAVAJILLAS
Sumario
Instalación, 2-3
Colocación y nivelación
Conexiones hidráulicas y eléctricas
Advertencias para el primer lavado
Datos técnicos
Descripción del aparato, 4
Vista de conjunto
Panel de control
Cargar los cestos, 5
Cesto inferior
Cesto de los cubiertos
Cesto superior
Puesta en funcionamiento y uso, 6-7
Poner en funcionamiento el lavavajillas
Cargar el detergente
Opciones de lavado
Programas, 8
Tabla de programas
Abrillantador y sal regeneradora, 9
Cargar el abrillantador
Cargar la sal regeneradora
Mantenimiento y cuidados, 10
Interrumpir el agua y la corriente eléctrica
Limpiar el lavavajillas
Evitar los malos olores
Limpiar los rociadores
Limpieza del filtro de entrada de agua
Limpiar los filtros
Si se ausenta durante largos períodos
Precauciones, consejos y Asistencia
Técnica, 11
Seguridad general
Eliminación
Ahorrar y respetar el medio ambiente
Asistencia Técnica
Anomalías y soluciones, 12
1
Page 2
Instalación
-5
Es importante conservar este manual para poder
consultarlo en cualquier momento. En caso de venta, de
cesión o de traslado, controle que permanezca junto con el
aparato.
Lea atentamente las instrucciones: contienen información
importante sobre la instalación, sobre el uso y sobre la
seguridad.
En caso de traslado mantenga el aparato en posición
vertical; si fuera necesario inclinarlo, hágalo hacia la parte
posterior.
Este aparato ha sido proyectado para uso doméstico y
para aplicaciones similares, por ejemplo:
- Áreas destinadas a cocina para el personal de tiendas,
oficinas y otros ambientes de trabajo
- Casas agrícolas
- Uso por parte de clientes de hoteles, moteles y otros
ambientes residenciales
- Bed and breakfast.
Colocación y nivelación
1. Desembale el aparato y controle que no haya sufrido daños
durante el transporte.
Si estuviera dañado, no lo conecte y llame al revendedor.
2. Coloque el lavavajillas haciendo adherir los costados o la
parte posterior a los muebles adyacentes o a la pared. El
aparato también se puede empotrar debajo de una superficie
de trabajo continua
* (ver la hoja de Montaje).
Los tubos de carga y de descarga de agua y el cable de
alimentación eléctrica se pueden orientar hacia la derecha o
hacia la izquierda para permitir una mejor instalación.
Conexión del tubo de carga de agua
A una toma de agua fría: enrosque bien el tubo de carga a
un grifo con boca roscada de ¾ gas; antes de enroscarlo,
haga correr agua hasta que salga límpida para que las
impurezas que pudiera contener no obstruyan el aparato.
A una toma de agua caliente: en el caso de una instalación
centralizada de radiadores, el lavavajillas se puede
alimentar con agua caliente de la red, mientras no supere
una temperatura de 60ºC.
Enrosque el tubo al grifo de la misma forma descrita para la
toma de agua fría.
Si la longitud del tubo de carga no es la adecuada,
diríjase a un negocio especializado o a un técnico autorizado
(ver Asistencia Técnica).
La presión del agua debe estar comprendida entre los
valores indicados en la tabla de Datos técnicos (ver al lado).
Controle que en el tubo no hayan pliegues ni
estrangulaciones.
Conexión del tubo de descarga de agua
Conecte el tubo de descarga, sin plegarlo, a una tubería
de descarga con un diámetro mínimo de 4 cm.
3. Coloque el lavavajillas sobre un piso plano y rígido.
Compense las irregularidades desenroscando o enroscando
las patas delanteras hasta que el aparato esté en posición
horizontal. Una cuidadosa nivelación brinda estabilidad y evita
vibraciones, ruidos y desplazamientos.
*. Para regular la altura de la pata posterior, accione el
4
casquillo hexagonal rojo que se encuentra en la parte inferior
frontal y central del lavavajillas, utilizando una llave de boca
hexagonal con una apertura de 8 mm. girando en sentido
horario para aumentar la altura y en sentido antihorario para
disminuirla. (ver la hoja de instrucciones para empotramiento
anexada a la documentación).
Conexiones hidráulicas y eléctricas
La adaptación de las redes eléctricas e hidráulicas para
la instalación debe ser realizada sólo por personal
especializado.
El lavavajillas no se debe apoyar en los tubos ni en el
cable de alimentación eléctrica.
El aparato debe conectarse a la red de distribución de
agua empleando tubos nuevos.
No reutilice los tubos viejos.
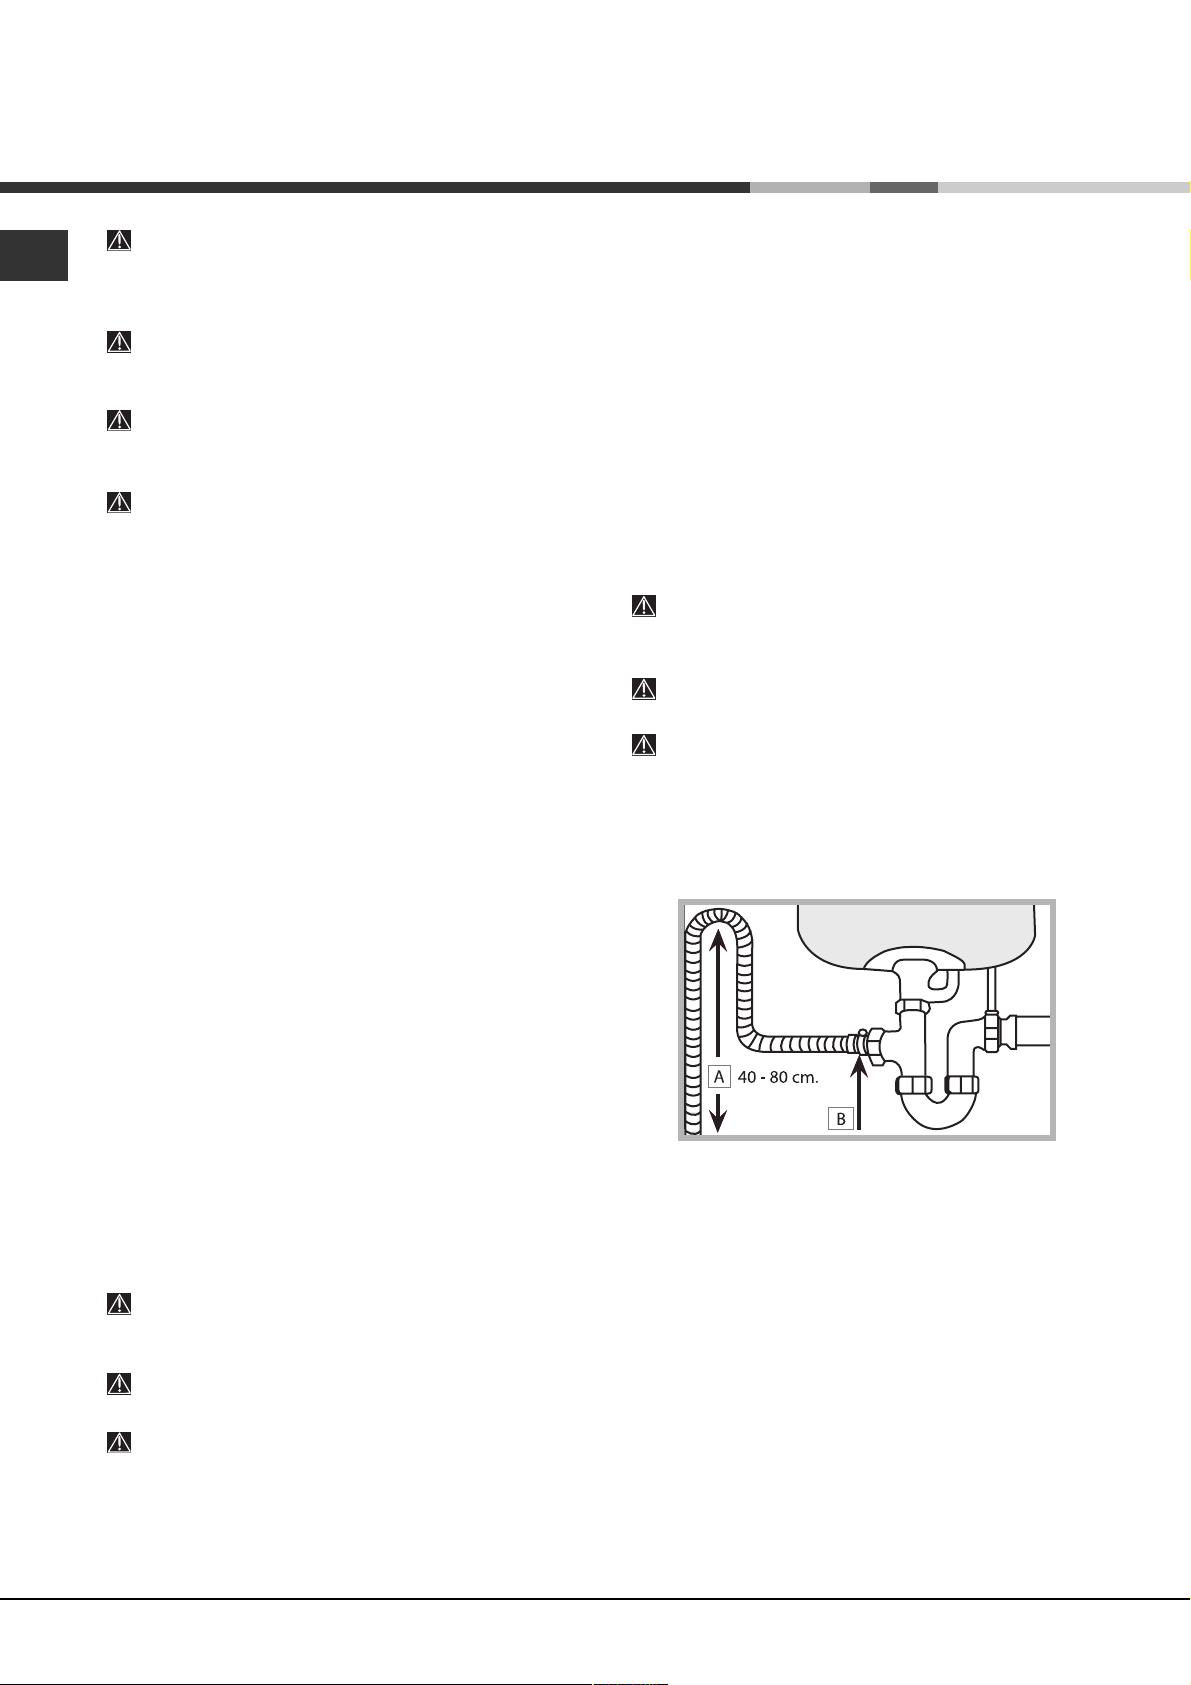
El tubo de descarga debe estar a una altura
comprendida entre 40 y 80 cm. del piso o de la
superficie de apoyo del lavavajillas (A).
Antes de conectar el tubo de descarga del agua al sifón
del lavabo, quite el tapón de plástico (B).
* Presente sólo en algunos modelos.
2
Page 3
Dispositivo de seguridad contra inundación
Para garantizar que no se produzcan inundaciones, el
lavavajillas:
- posee un sistema que interrumpe la entrada de agua en el
caso de anomalías o de pérdidas desde el interior.
Algunos modelos poseen un dispositivo adicional de
seguridad New Acqua Stop
inundaciones aún en el caso de rotura del tubo de
alimentación.
ATENCIÓN: ¡VOLTAJE PELIGROSO!
En ningún caso se debe cortar el tubo de carga de agua
porque contiene partes conectadas a una fuente eléctrica.
*, que los protege contra
Conexión eléctrica
Antes de introducir el enchufe en la toma de corriente, controle
que:
Cinta anticondensación*
Después de haber empotrado el lavavajillas, abra la puerta y
pegue la cinta adhesiva transparente debajo de la superficie
de madera para protegerla de una posible condensación.
Advertencias para el primer lavado
Después de la instalación e inmediatamente antes del primer
lavado, llene completamente de agua el depósito de sal y
agregue aproximadamente 1 kg. de sal (ver el capítulo
Abrillantador y sal regeneradora): es normal que el agua se
derrame. Seleccione el grado de dureza del agua (ver el
capítulo Abrillantador y sal regeneradora).
carga de sal, la luz indicadora de FALTA DE SAL
Cuando no se llena el contenedor de sal, se puede dañar
el ablandador de agua y el elemento que produce calor.
- Después de la
* se apaga.
-5
la toma posea conexión a tierra y que sea conforme con la
ley;
la toma sea capaz de soportar la carga máxima de
potencia de la máquina indicada en la placa de
características ubicada en la contrapuerta (ver el capítulo
Descripción del lavavajillas);
la tensión de alimentación esté comprendida dentro de los
valores indicados en la placa de características ubicada en
la contrapuerta;
la toma sea compatible con el enchufe del aparato. Si no es
así, solicite la sustitución del enchufe a un técnico
autorizado (ver Asistencia Técnica); no utilice
prolongaciones ni tomas múltiples.
Una vez instalado el aparato, el cable de alimentación
eléctrica y la toma de corriente deben ser fácilmente
accesibles.
El cable no se debe plegar ni comprimir.
Si el cable de alimentación está dañado, deberá ser
cambiado por el fabricante o por su servicio de asistencia
técnica a fin de prevenir riesgos. (Ver Asistencia)
La Empresa declina toda responsabilidad cuando no se
hayan respetado estas normas.
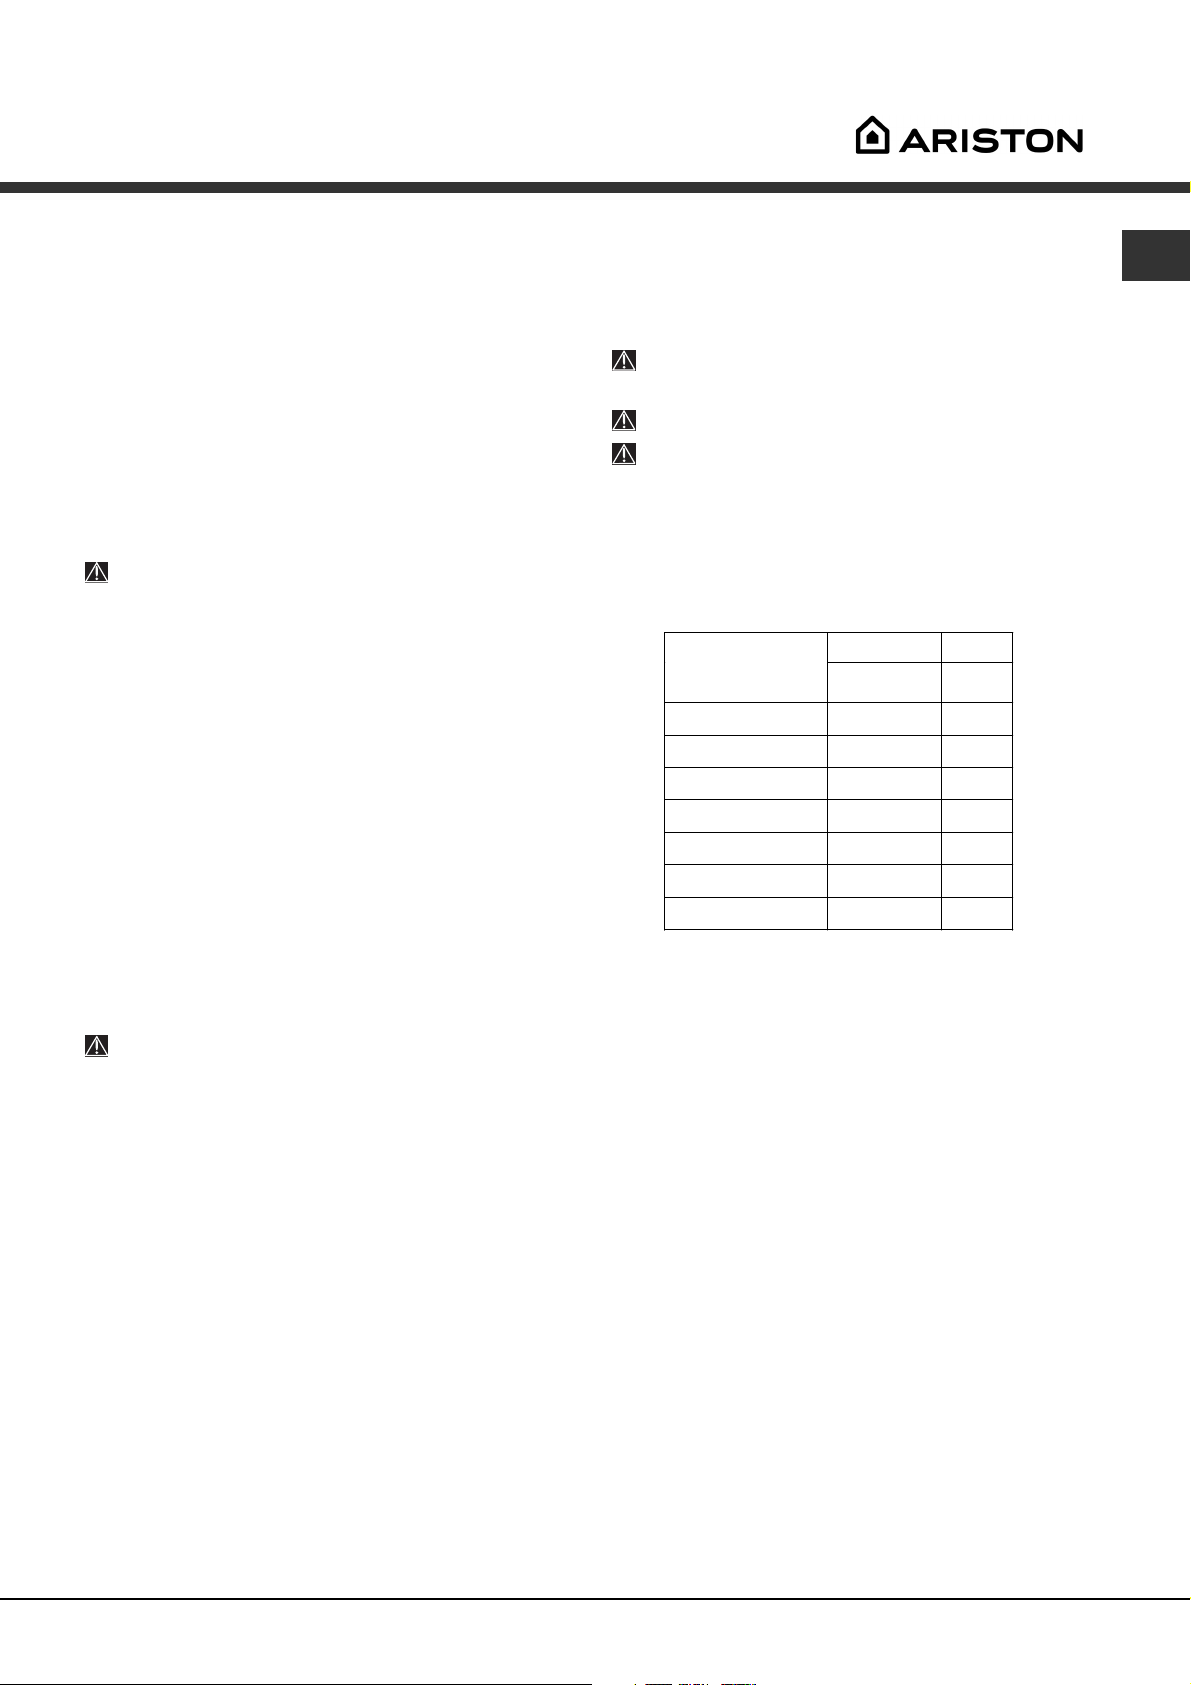
Datos técnicos
ancho: 45 cm
Dimensiones
Capacidad 10 cubiertos estándar
Presión del agua
de alimentación
Tensión de
alimentación
Potencia total
absorbida
Fusible Ver la placa de características
altura: 85 cm
profundidad: 60 cm
0,05 ÷ 1MPa (0,5 ÷ 10 bar)
7,25 si – 145 psi
Ver la placa de características
Ver la placa de características
Este aparato es conforme a las
siguientes Directivas de la
Comunidad:
-2006/95/EC (Bajo Voltaje)
-2004/108/EC (Compatibilidad
Electromagnética)
-97/17/CE (etiquetado)
-2005/32/EC (Comm. Reg.
1275/2008) (Ecodesign)
-2002/96/CE
* Presente sólo en algunos modelos.
3
Page 4
Descripción del aparato
-5
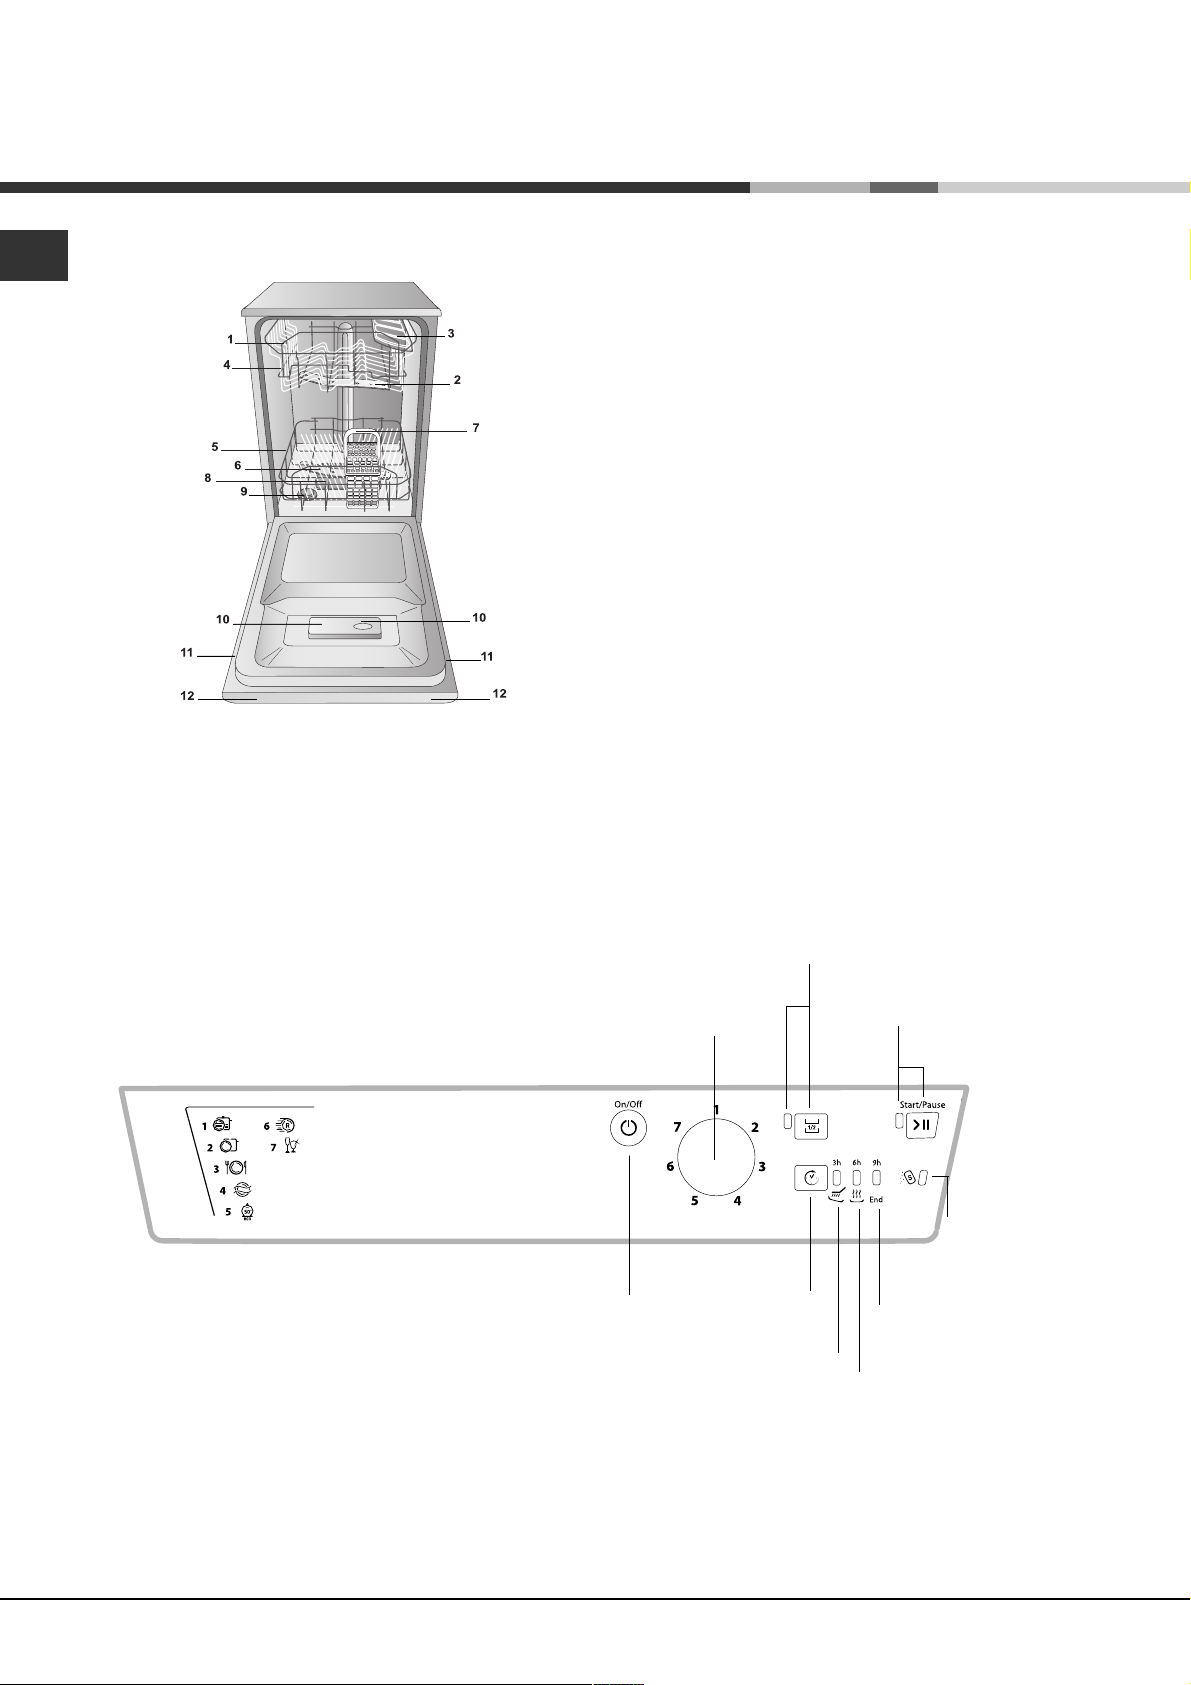
Vista de conjunto
1. Cesto superior
2. Rociador superior
3. Cestos adicionales
4. Regulador de la altura del cesto
5. Cesto inferior
6. Rociador inferior
7. Cesto para cubiertos
8. Filtro de lavado
9. Depósito de sal
10. Cubetas de detergente y depósito de
abrillantador
11. Placa de características
12. Panel de control
***
Panel de control
Botón de Selección
de Programas
Botón
ON-OFF/Reset
Botón y piloto
Media carga*
Botón Comienzo
retrasado*
Piloto Lavado y comienzo
retrasado 3 h.*
Botón y piloto Puesta
en marcha/Pausa
Piloto
Falta de Sal*
Piloto Fin y comienzo
retrasado 9 h.*
Piloto Secado y comienzo
retrasado 6 h.*
*** Sólo en los modelos con empotramiento total.
* Presente sólo en algunos modelos.
La cantidad y el tipo de programas y opciones varían según el modelo de lavavajillas.
4
Page 5

Cargar los cestos
Antes de cargar los cestos, elimine de la vajilla los
residuos de alimentos y vacíe los vasos y copas.
Coloque la vajilla cuidando que quede bien firme y que no
se vuelque.
Después de haber realizado la carga, controle que los
rociadores giren libremente.
Cesto inferior
El cesto inferior puede contener ollas, tapas, platos,
ensaladeras, cubiertos, etc.según los Ejemplos de carga.
Los platos y tapas grandes se deben colocar preferentemente
a los costados del cesto, cuidando no bloquear la rotación del
rociador superior.
Algunos modelos de lavavajillas poseen
sectores reclinables*, los mismos se
pueden utilizar en posición vertical para
colocar platos o en posición horizontal
para colocar ollas y ensaladeras.
Cesto de los cubiertos
El cesto de los cubiertos puede ser diferente según el modelo
de lavavajillas. El cesto de los cubiertos se debe colocar
frontalmente, sobre el cesto inferior, haciéndolo correr entre las
partes fijas, o sobre el cesto superior, cuando se realiza un
lavado con media carga (en los modelos que poseen dicha
opción).
- Posee cestos adicionales
deslizables que permiten
una disposición óptima de
los cubiertos.
Inclinación A Inclinación B Inclinación C
- Levante el cesto adicional, hágalo correr ligeramente y
colóquelo con la inclinación deseada.
Regular la altura del cesto superior
Para facilitar la colocación de la vajilla, se puede ubicar el cesto
superior en posición alta o baja.
Es preferible regular la altura del cesto superior con el
CESTO VACÍO.
No levante ni baje el cesto de un solo lado.
Abra los sujetadores de las guías del
cesto, a la izquierda y a la derecha, y
extráigalo; colóquelo arriba o abajo,
hágalo deslizar a lo largo de las guías
hasta hacer entrar también las ruedas
delanteras y cierre los sujetadores (ver
la figura).
Si el cesto posee manijas Dual Space
(ver la figura), lleve el cesto superior
hasta el final del recorrido, coja las
manijas a los costados del cesto y
muévalo hacia arriba o hacia abajo; deje
caer el cesto acompañándolo.
*
Ejemplos de carga del cesto superior
-5
Los cuchillos y utensilios con puntas cortantes deben
colocarse en el cesto para cubiertos con las puntas hacia abajo
o dispuestos en los cestos especiales adicionales del cesto
superior en posición horizontal.
Ejemplos de colocación del cesto para cubiertos
Cesto superior
Cargue en este cesto la vajilla delicada y liviana: vasos, tazas
de té y de café, platitos, ensaladeras bajas, sartenes, ollas
bajas poco sucias, como se indica en los Ejemplos de carga.
Tazas y tacitas, cuchillos largos y puntiagudos, cubiertos
para servir: colóquelas en los cestos adicionales
Cestos adicionales con inclinación variable*
- La inclinación permite obtener mayor espacio en el cesto
superior, colocar copas con pies de diferentes longitudes y
mejorar las prestaciones de secado.
**.
Ejemplos de carga del cesto inferior
Vajilla no adecuada para el lavado en lavavajillas
Objetos de madera, con empuñadura de madera o de
cuerno o con partes encoladas.
Objetos de aluminio, cobre, latón, peltre o estaño.
Vajilla de plástico que no sea termorresistente.
Porcelanas antiguas o pintadas a mano.
Vajilla de plata antigua. La vajilla de plata que no es antigua,
en cambio, se puede lavar con un programa delicado y
controlando que no esté en contacto con otros metales.
* Presente sólo en algunos modelos.
** Cantidad y posición variables.
Se aconseja el uso de vajilla adecuada para el lavado en
lavavajillas.
5
Page 6
Puesta en
funcionamiento y uso
-5
Poner en funcionamiento el lavavajillas
1. Abra el grifo de agua.
2. Presione el botón ENCENDIDO-APAGADO: todos los
pilotos presentes en el panel de mandos se iluminan durante
algunos segundos.
3. Abra la puerta y dosifique el detergente (ver más adelante).
4. Cargue los cestos (ver Cargar los cestos) y cierre la
puerta.
5. Seleccione el programa girando el mando de SELECCIÓN
DE PROGRAMA en sentido horario: haga coincidir la muesca
que se encuentra en el mando con el número o con el símbolo
del programa. El piloto correspondiente al botón PUESTA EN
FUNCIONAMIENTO/PAUSA centelleará.
6. Seleccione las opciones de lavado* (ver al lado).
7. Ponga en funcionamiento presionando el botón PUESTA EN
FUNCIONAMIENTO, el piloto dejará de centellear (luz fija). El
encendido del piloto correspondiente al lavado indica el
comienzo del programa.
8. Al final del programa se ilumina el piloto FIN (luz fija).
Apague el aparato presionando el botón ENCENDIDOAPAGADO, cierre el grifo de agua y desenchufe el aparato.
9. Espere algunos minutos antes de quitar la vajilla para evitar
quemarse. Descargue los cestos comenzando por el inferior.
- Para disminuir el consumo de energía
eléctrica, en algunos casos en que NO se utiliza,
la máquina se apaga automáticamente.
Modificar un programa en curso
Si no se ha seleccionado el programa deseado, es posible
modificarlo, siempre que haya comenzado recién: una vez
comenzado el lavado, para cambiar el ciclo de lavado apague
la máquina presionando en forma prolongada el botón
ENCENDIDO/APAGADO/Reset, vuelva a encenderla con el
mismo botón y seleccione nuevamente el programa y las
opciones deseadas.
Cargar el detergente
Los buenos resultados de un lavado dependen también de la
correcta dosificación del detergente, si se excede, no se lava
más eficazmente y se contamina el medio ambiente.
Utilice sólo detergente para lavavajillas.
NO UTILICE detergentes para lavado a mano.
Al finalizar el ciclo, un uso excesivo de
detergente puede dejar residuos de espuma.
El uso de las pastillas se aconseja sólo en
los modelos que poseen la opción PASTILLAS
MULTIFUNCIÓN.
Las mejores prestaciones de lavado y secado
se obtienen sólo con el uso de detergente en
polvo, abrillantador líquido y sal.
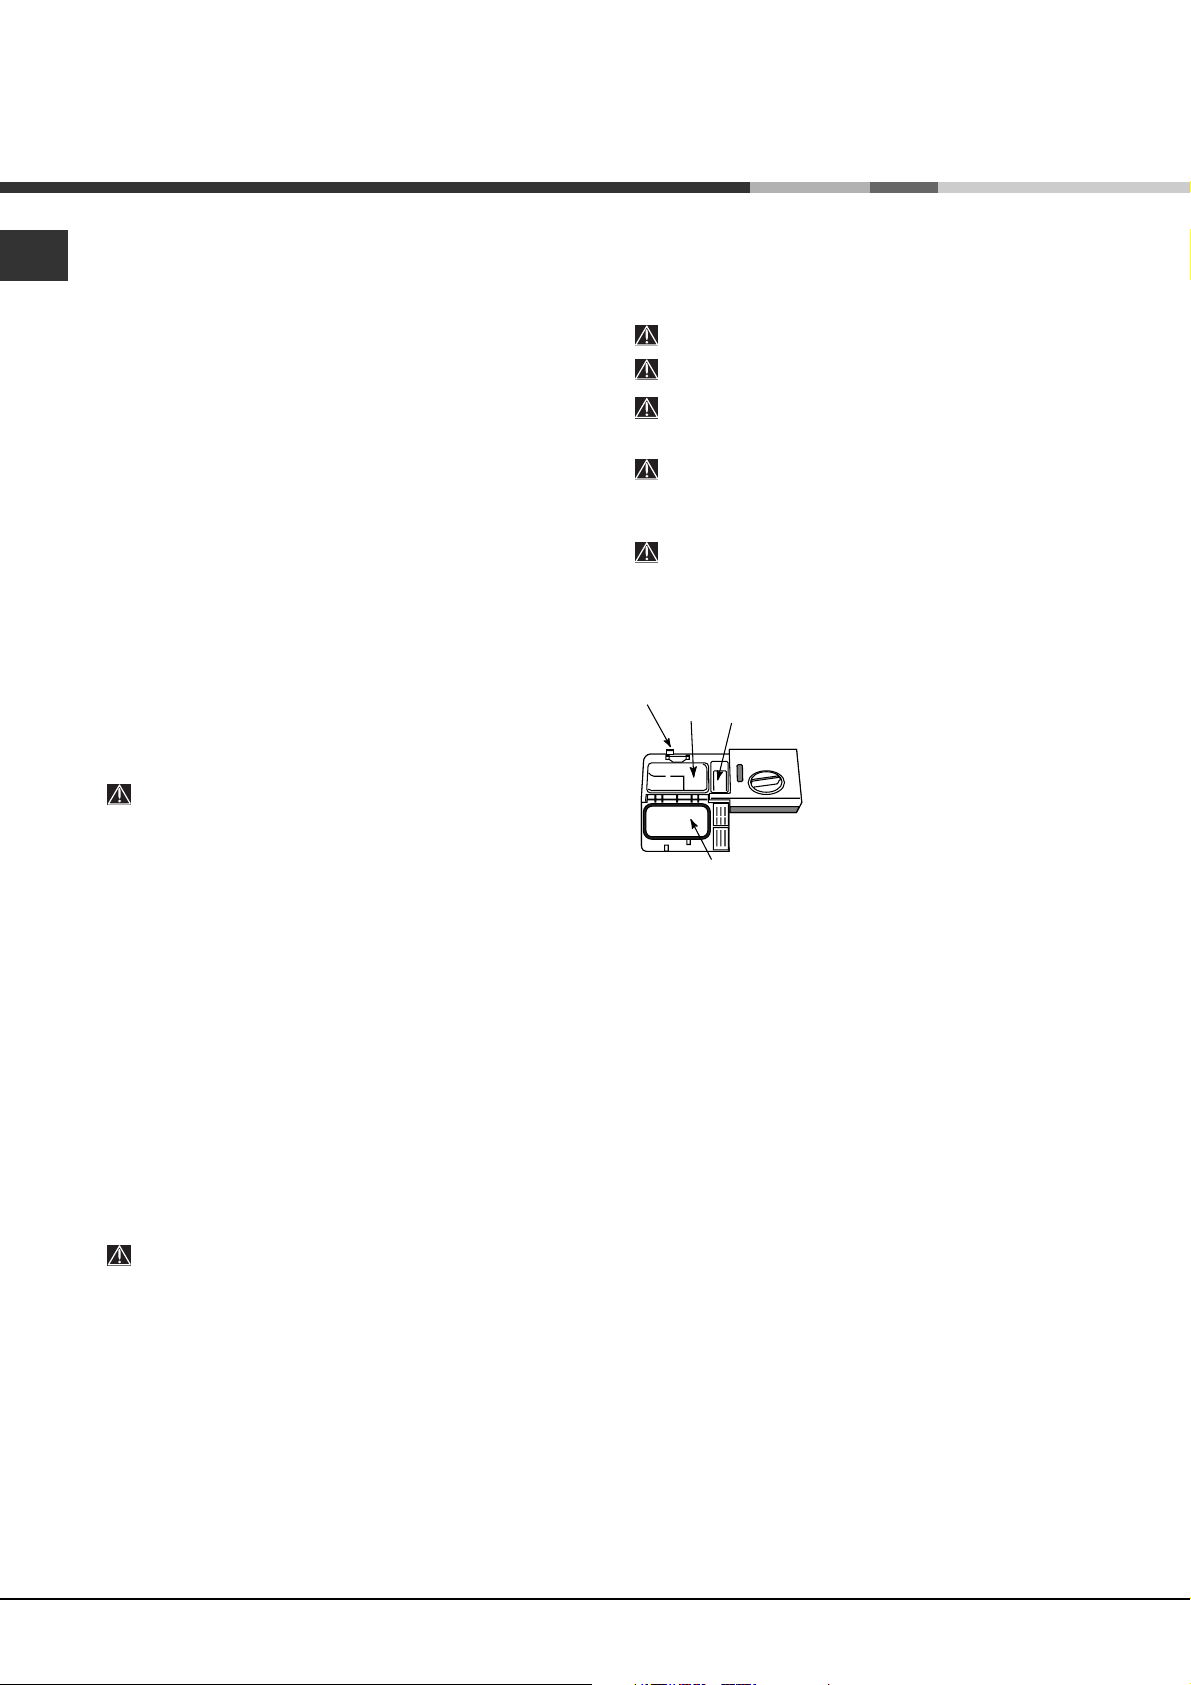
cubeta A: Detergente para lavado
cubeta B: Detergente para prelavado
D
A
B
C
cuba.
3. Elimine los residuos de detergente de los bordes de la
cubeta y cierre la tapa hasta el enganche.
1. Abra la tapa C presionando el
botón D.
2. Dosifique el detergente
consultando la Tabla de programas:
en polvo: cubetas A y B.
en pastillas: si el programa
necesita una, colóquela en la cubeta
A y cierre la tapa; si necesita dos,
coloque la segunda en el fondo de la
Agregar vajilla
Presione el botón Puesta en funcionamiento/Pausa, (la luz del
botón centellea). Abra la puerta teniendo cuidado con el
escape de vapor e introduzca la vajilla. Presione el botón
Puesta en funcionamiento/Pausa (luz fija): el ciclo se
reanudará.
Presionando el botón Puesta en funcionamiento/Pausa
para poner la máquina en pausa, se interrumpe tanto el
programa como el Comienzo Retrasado, si se había fijado.
En esta fase no se puede cambiar el programa.
Interrupciones accidentales
Si durante el lavado se abre la puerta o se produce una
interrupción de corriente, el programa se interrumpe. Cuando
se cierra la puerta o vuelve la corriente, el programa se
reanudará a partir del punto en el que se había interrumpido.
6
* Presente sólo en algunos modelos.
Page 7
Opciones de lavado*
Las OPCIONES pueden ser elegidas, modificadas o anuladas
sólo después de haber elegido el programa de lavado y
antes de haber presionado el botón Puesta en funcionamiento/
Pausa.
Pueden seleccionarse sólo las opciones compatibles con el
tipo de programa elegido. Si una opción no es compatible con
el programa seleccionado, (ver la tabla de programas) el led
correspondiente centelleará velozmente 3 veces.
Si se selecciona una opción incompatible con otra o con un
programa de lavado precedentemente elegido, la opción no
compatible centellea 3 veces y se apaga, mientras que
permanece encendida al última selección realizada.
Para deseleccionar una opción erróneamente elegida,
presione de nuevo el botón correspondiente.
Media carga
Si la vajilla que debe lavar es poca, se puede utilizar la media
carga que permite ahorrar agua, energa y detergente.
Seleccione el programa y presione el botn MEDIA CARGA: el
piloto se iluminar.
Recuerde que debe reducir a la mitad la cantidad de
detergente.
Es preferible utilizar detergente en polvo.
Esta opcin no est disponible con el programa:
Rapido.
-5
Comienzo retrasado
Es posible postergar 3, 6 o 9 horas el comienzo del
programa.
Después de haber seleccionado un programa de lavado y
eventualmente otras opciones, seleccione el retraso deseado
presionando, las veces necesarias, el botón de Comienzo
Retrasado; los pilotos de lavado (3 horas), secado (6 horas)
y fin (9 horas) centellearán sucesivamente.
Si se presiona nuevamente el botón Comienzo Retrasado, se
deselecciona la opción.
Una vez realizada la selección, presionando el botón Puesta
en funcionamiento/Pausa comenzará la cuenta al revés, el
piloto del retraso seleccionado centelleará y el botón Puesta
en funcionamiento/Pausa dejará de centellear (luz fija).
Una vez cumplido el tiempo, el piloto del retraso seleccionado
dejará de centellear (luz fija) y el programa comenzará.
No es posible seleccionar el Comienzo Retrasado
después que el ciclo ha comenzado.
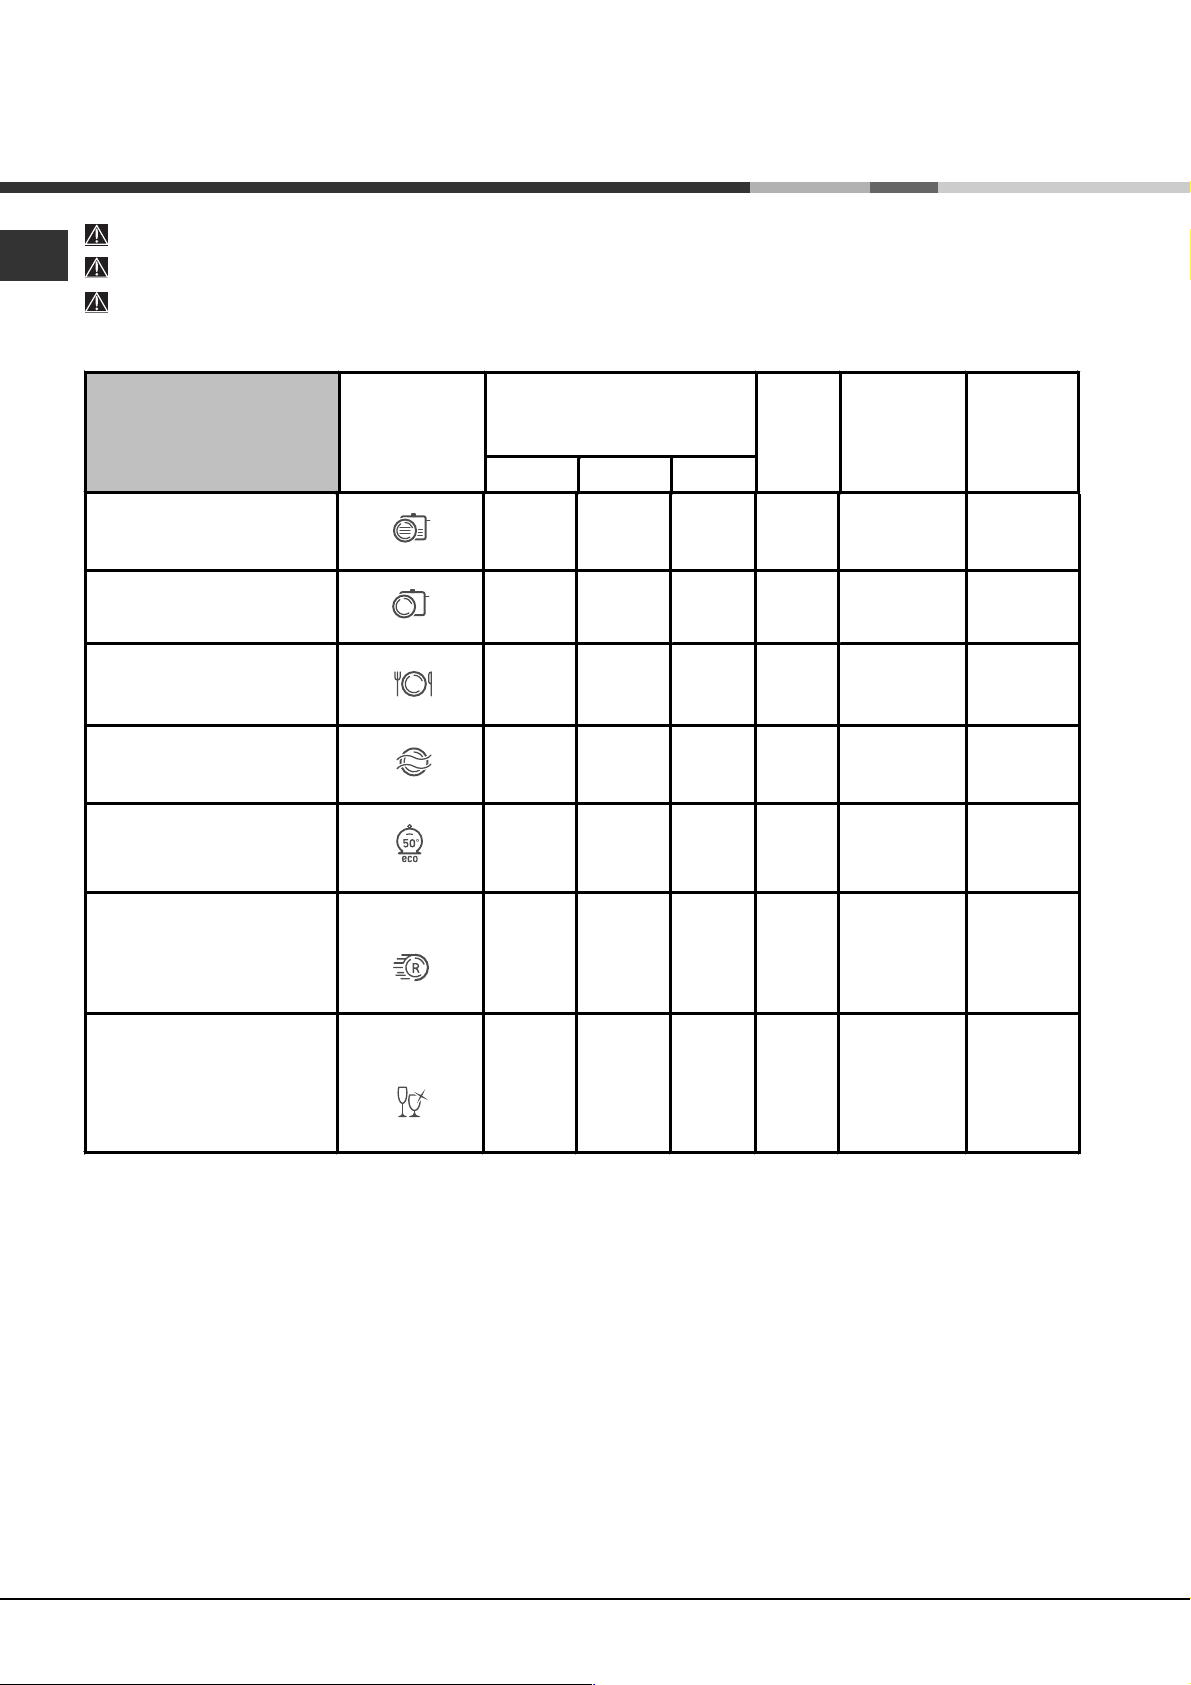
Tabla de
Opciones
1. Intensivo
2. Normal
3. Cotidiano
4. Remojo
5. Eco
6. Rápido
7. Cristalería fina
A
Comienzo
Retrasado
B
Media
carga
Si Si
Si Si
Si Si
Si Si
Si Si
Si No
Si Si
* Presente sólo en algunos modelos.
7
Page 8
Programas
-5
Si la vajilla está poco sucia o ha sido aclarada precedentemente bajo el agua, recuerde disminuir la dosis de detergente.
La cantidad y el tipo de programas y opciones varían según el modelo de lavavajillas.
Indicaciones para la
selección de programas
Vajilla y ollas muy sucias (no
usar para piezas delicadas).
Vajilla y ollas normalmente
sucias. Programa estándar
diario.
Para las OPCIONES consulte la tabla de Opciones que se encuentra en la página de Puesta en funcionamiento y Uso.
Vajilla con la suciedad diaria en
cantidad limitada. (4 cubiertos +
1 olla + 1 sartén).
Lavado preliminar a la espera
de completar la carga en la
comida sucesiva.
Lavado ecológico de bajo
consumo energético, adecuado
para vajilla y ollas.
Ciclo económico y veloz que se
utiliza inmediatamente después
del uso para vajilla poco sucia.
(2 platos + 2 vasos + 4
cubiertos + 1 olla + 1 sartén
pequeña) 6. Rápido
Ciclo económico y veloz que se
utiliza inmediatamente después
del uso, para vajilla delicada
más sensible a las altas
temperaturas. (copas, cesto
superior + platos delicados,
cesto inferior).
Programa
1. Intensivo
2. Normal
3. Cotidiano
4. Remojo
5. Eco
*
7. Cristalería fina
Detergente
(A) = cubeta A
(B) = cubeta B
Secado Opciones
en polvo Líquido Pastillas
25 g (A)
21 g (A)
4 g (B)
25 g (A) 25 ml (A) 1 (A)
25 ml (A)
21 ml (A)
4 ml (B)
1 (A)
Si
1 (A) Si A - B
No
No No No No A - B
25 g (A) 25 ml (A) 1 (A)
21 g (A) 21 ml (A) 1 (A)
25 g (A) 25 ml (A) 1 (A)
Si
No
Si
A - B
1:50’
A - B
0:08’
A - B
A
A - B
Duración
del
programa
(tolerancia
±10%)
Hrs. Min.
2:25’
1:00’
2:50’
0:35’
1:35’
Nota:
Las mejores prestaciones de los programas "Cotidiano y Rápido" se obtienen preferiblemente respetando la cantidad de cubiertos
especificados.
* El programa Eco respeta la norma EN-50242, tiene una duración mayor que la de otros programas pero es el que produce el menor
consumo de energía y además respeta el medio ambiente.
Nota para los Laboratorios de Pruebas: para obtener información detallada sobre las condiciones de la prueba comparativa EN,
consulte la siguiente dirección: ASSISTENZA_EN_LVS@indesitcompany.com
Para facilitar la dosificación del detergente, es importante saber que:
1 cucharada = 15 gr. de polvo = 15 ml. de líquido aproximadamente - 1 cucharadita = 5 gr. de polvo = 5 ml. de líquido aproximadamente
8
Page 9

Abrillantador y sal
regeneradora
Use solamente productos específicos para
lavavajillas.
No use sal de cocina o industrial ni detergente
para lavar a mano.
Respete las indicaciones contenidas en el
envase.
Si utiliza un producto multifunción, no es necesario
agregar abrillantador pero se aconseja agregar sal,
especialmente si el agua es muy dura. Respete las
indicaciones contenidas en el envase.
Si no se agrega ni sal ni abrillantador, es normal
que los pilotos FALTA DE SAL
ABRILLANTADOR
* continúan encendidos.
* y FALTA DE
Cargar el abrillantador
El abrillantador facilita el secado de la vajilla haciendo deslizar
el agua por la superficie para que no se produzcan estrías o
manchas.
El depósito del abrillantador se debe llenar:
cuando en el panel de mandos se enciende el piloto FALTA
DE ABRILLANTADOR
el interior de la cuba.
Regular la dosis de abrillantador
Si no está satisfecho con el resultado del secado, puede
regular la dosis de abrillantador. Con un destornillador gire
el regulador (F) eligiendo entre 6 posiciones (la regulación
de fábrica es en la posición 4):
si en la vajilla se producen estrías blancas, gire el
regulador hacia los números bajos (1-3).
si hay gotas de agua o manchas de caliza, gire el
regulador hacia los números altos (4-6).
Fijación de la dureza del agua
Cada lavavajillas está acompañado por un ablandador de
agua que, utilizando sal regeneradora específica para
lavavajillas, suministra agua sin caliza para lavar la vajilla.
Este lavavajillas permite ser regulado para disminuir la
contaminación y optimizar las prestaciones del lavado en
función de la dureza del agua. El dato se puede encontrar en
la Administración que suministra el agua potable.
- Apague la máquina con el botón ENCENDIDO/APAGADO y
abra la puerta.
- Coloque el mando de SELECCIÓN DE PROGRAMA en el 5º
programa, posteriormente en el 1º programa y luego
nuevamente en el 5º.
- Presione el botón ENCENDIDO/APAGADO, los pilotos de
las fases del ciclo centellearán; ahora es posible seleccionar
el nivel de dureza. A cada programa le corresponde un nivel
*;
1. Abra el depósito girando el
tapón (G) en sentido antihorario.
2. Vierta el abrillantador evitando
que se derrame. Si esto sucede,
limpie rápidamente con un paño
seco.
F
3. Vuelva a enroscar el tapón.
G
No vierta NUNCA el
abrillantador directamente en
de dureza:
Ej.: 1° programa, nivel de dureza 1
2º programa, nivel de dureza 2, etc. hasta un máximo de
cinco
* niveles.
(El ablandador está configurado de fábrica en el nivel 3).
- Para salir de la función se puede: esperar algunos segundos,
presionar un botón de las opciones
botón ENCENDIDO/APAGADO (ON/OFF).
Aunque se utilicen las pastillas multifunción, llene el depósito de
sal.
Tabla de Durezas del Agua
°dH °fH mmol/l nivel
0 6 0 10 0 1 1
6 11 11 20 1,1 2 2
12 17 21 30 2,1 3 3
17 34 31 60 3,1 6 4
34 50 61 90 6,1 9
De 0ºf a 10ºf se aconseja no utilizar sal.
*con esta configuración, la duración de los
ciclos puede prolongarse levemente.
(°dH = dureza en grados alemanes - °fH = dureza en grados
franceses - mmol/l = milimol/litro)
* o apagar la maquina con el
*
5
Cargar la sal regeneradora
Para obtener buenos resultados en el lavado, es
indispensable verificar que el depósito de sal no esté nunca
vacío. La sal regeneradora elimina la caliza del agua evitando
que se deposite sobre la vajilla.
El depósito de sal está ubicado en la parte inferior del
lavavajillas (ver Descripción) y se debe llenar:
cuando, observando el tapón de sal, no se ve el flotador
verde
*;
cuando en el panel de mandos se enciende el piloto FALTA
*;
DE SAL
1. Extraiga el cesto inferior y desenrosque
el tapón del depósito girando en sentido
antihorario.
2. Sólo la primera vez que se utiliza: llene
el depósito de agua hasta el borde.
3. Coloque el embudo
hasta el borde (aproximadamente 1 kg); es normal que se
derrame un poco de agua.
4. Saque el embudo*, elimine los residuos de sal de la boca
de entrada; enjuague el tapón bajo el agua corriente antes de
enroscarlo, colóquelo cabeza abajo y haga fluir el agua por
las cuatro ranuras dispuestas en forma de estrella en la parte
inferior del tapón. (Tapón de sal con flotador verde
Es aconsejable realizar esta operación cada vez que se
carga la sal.
Cierre bien con el tapón para evitar que en el depósito entre
detergente durante el lavado (podría dañarse
irremediablemente el suavizador).
Cuando sea necesario, cargue la sal antes de un ciclo de
lavado para eliminar la solución salina derramada del
recipiente de sal.
* (ver la figura) y llene el depósito de sal
*)
* Presente sólo en algunos modelos.
-5
9
Page 10

Mantenimiento y
cuidados
Interrumpir el agua y la corriente
-5
eléctrica
Cierre el grifo de agua después de cada lavado para
eliminar el riesgo de pérdidas.
Desenchufe el aparato antes de limpiarlo y durante
los trabajos de mantenimiento.
Limpiar el lavavajillas
La superficie externa y el panel de control se pueden
limpiar con un paño no abrasivo empapado en agua.
No utilice disolventes ni productos abrasivos.
Se pueden eliminar las manchas de la cuba interna
con un paño empapado en agua y un poco de
vinagre.
Evitar los malos olores
Deje siempre semicerrada la puerta para evitar la
estancación de humedad.
Limpie regularmente las juntas perimétricas de la
puerta y de las cubetas de detergente con una
esponja húmeda. De este modo se evitarán
estancamientos de comida que son los principales
responsables del mal olor.
Limpiar los rociadores
Puede suceder que algunos residuos de comida se
adhieran a los brazos rociadores y obstruyan los
orificios por los que debe salir el agua: cada tanto es
importante controlarlos y limpiarlos con un cepillo no
metálico.
Ambos rociadores son desmontables.
Para desmontar el rociador
superior, es necesario
desenroscar el casquillo de
plástico girando en sentido
antihorario.
se vuelve a montar con los
orificios dirigidos hacia arriba.
El rociador inferior se extrae
tirándolo hacia arriba.
El rociador superior
Periódicamente limpie el filtro de entrada de agua
colocado a la salida del grifo.
- Cierre el grifo de agua.
- Desenrosque el extremo del tubo de carga de agua, quite el
filtro y límpielo delicadamente bajo un chorro de agua
corriente.
- Introduzca nuevamente el filtro y enrosque el tubo.
Limpiar los filtros
El grupo filtrante está formado por tres filtros que eliminan del
agua de lavado los residuos de alimentos y la vuelven a poner
en circulación: para obtener buenos resultados en el lavado,
es necesario limpiarlos.
Limpie los filtros regularmente.
El lavavajillas no se debe utilizar sin filtros o con el filtro
desenganchado.
Después de algunos lavados, controle el grupo filtrante y si
es necesario límpielo con cuidado bajo el agua corriente y
con la ayuda de un cepillo no metálico, respetando las
siguientes instrucciones:
1. gire en sentido antihorario el filtro cilíndrico C y extráigalo
(fig. 1).
2. Extraiga el cartucho del filtro B ejerciendo una ligera
presión sobre las aletas laterales (Fig. 2);
3. Extraiga el plato del filtro de acero inoxidable A. (fig. 3).
4. Inspeccione el sumidero y elimine los residuos de
comida. NO QUITE NUNCA la protección de la bomba de
lavado (detalle de color negro) (fig. 4).
+
)
!
"
Limpieza del filtro de entrada de agua
Si los tubos de agua son nuevos o permanecieron
inactivos durante mucho tiempo, antes de realizar la
conexión, haga correr el agua para verificar que sea
límpida y que no contenga impurezas. Sin esta
precaución, existe el riesgo de que el lugar por donde
entra el agua se obstruya, dañando el lavavajillas.
10
*
Después de la limpieza de los filtros, vuelva a montar el grupo
filtrante y a colocarlo correctamente en su lugar. Esto es
fundamental para el buen funcionamiento del lavavajillas.
Si se ausenta durante largos períodos
Desenchufe el aparato y cierre el grifo de agua.
Deje la puerta semicerrada.
Al regresar, haga un lavado con el lavavajillas vacío.
* Presente sólo en algunos modelos.
Page 11

Precauciones, consejos y
Asistencia Técnica
El aparato ha sido proyectado y fabricado en
conformidad con las normas internacionales sobre seguridad.
Estas advertencias se suministran por razones de seguridad
y deben ser leídas atentamente.
Seguridad general
Este electrodoméstico no puede ser utilizado por los niños
ni por personas discapacitadas a nivel físico, sensorial o
psíquico, así como con falta de experiencia o conocimiento
del mismo, a menos que estén supervisados o
capacitados al uso por parte de una persona responsable
de su seguridad.
Los niños requieren la supervisión de un adulto para evitar
que jueguen con el electrodoméstico.
El aparato ha sido fabricado para un uso de tipo no
profesional en el interior de una vivienda.
El aparato debe ser utilizado para el lavado de la vajilla de
uso doméstico, sólo por personas adultas y según las
instrucciones contenidas en este manual.
El aparato no se debe instalar al aire libre, ni siquiera si el
lugar está reparado porque es muy peligroso dejarlo
expuesto a la lluvia o a las tormentas.
No toque el lavavajillas si está descalzo.
No desenchufe el aparato tirando del cable sino sujetando
el enchufe.
Es necesario cerrar el grifo de agua y desenchufar el
aparato antes de realizar operaciones de limpieza y
mantenimiento.
En caso de avería, no acceda nunca a los mecanismos
internos para intentar su reparación.
No toque nunca la resistencia.
No se apoye ni se siente sobre la puerta abierta: el aparato
podría volcarse.
La puerta no debe dejarse abierta porque puede significar
un obstáculo con el que tropezar.
Conserve el detergente y el abrillantador fuera del alcance
de los niños.
Los embalajes no son juguetes para los niños.
Eliminación
Eliminación del material de embalaje: respete las normas
locales para que los embalajes puedan ser reutilizados.
La norma Europea 2002/96/CE sobre desechos de
equipos eléctricos y electrónicos (RAEE), prevé que los
electrodomésticos no se deben eliminar junto con los
residuos sólidos urbanos normales. Los aparatos
eliminados deben ser recogidos en forma separada
para optimizar la tasa de recuperación y reciclado de
materiales que los componen e impedir que provoquen
daños a la salud y el medio ambiente. El símbolo del
cesto tachado se encuentra en todos los productos para
recordar la obligación de recolección separada.
Para mayor información sobre la correcta eliminación de
los electrodomésticos, los poseedores de los mismos
podrán dirigirse al servicio público encargado de la
recolección o a los revendedores.
Ahorrar y respetar el medio ambiente
Ahorre agua y energía
Ponga en funcionamiento el lavavajillas sólo con plena
carga. A la espera de que la máquina esté llena, prevenga
los malos olores con el ciclo Remojo (ver Programas).
Seleccione un programa adecuado al tipo de vajilla y al
grado de suciedad consultando la Tabla de programas:
- para vajilla normalmente sucia utilice el programa Eco que
garantiza un bajo consumo energético y de agua.
- si la carga es poca, active la opción Media carga
Puesta en funcionamiento y uso).
Si el suministro de energía eléctrica prevé horarios de
ahorro energético, realice los lavados en los horarios
con tarifa reducida. La opción Comienzo retrasado
(ver Puesta en funcionamiento y uso) puede ayudar a
organizar los lavados en ese sentido.
* (ver
*
Detergentes sin fosfatos, sin cloro y que
contengan enzimas
Se aconseja usar detergentes sin fosfatos y sin cloro que
son los más indicados para proteger el medio ambiente.
Las enzimas desarrollan una acción particularmente
eficaz con temperaturas próximas a los 50ºC, por lo tanto,
utilizando detergentes con enzimas se pueden elegir
lavados a bajas temperaturas y obtener los mismos
resultados que si se realizaran a 65ºC.
Para evitar derroches, dosifique bien el detergente,
teniendo en cuenta las indicaciones del fabricante, la
dureza del agua, el grado de suciedad y la cantidad de
vajilla que debe lavar. Aún siendo biodegradables, los
detergentes contienen elementos que alteran el equilibrio
de la naturaleza.
Asistencia Técnica
Antes de llamar al Servicio de Asistencia Técnica:
Verifique si la anomalía puede ser resuelta por Ud. mismo
(ver Anomalías y Soluciones).
Vuelva a poner en funcionamiento el programa para
controlar si el inconveniente ha sido resuelto.
Si no es así, llame al Servicio de Asistencia Técnica
Autorizado.
No llame nunca a técnicos no autorizados.
Comunique:
el tipo de anomalía;
el modelo de la máquina (Mod.);
y el número de serie (S/N).
Esta información se encuentra en la placa de
características ubicada en el aparato (ver Descripción
del aparato).
-5
* Presente sólo en algunos modelos.
11
Page 12

Anomalías y soluciones
Si el aparato presenta anomalías de funcionamiento, controle los siguientes puntos antes de llamar al
-5
Servicio de Asistencia Técnica.
Anomalías: Posibles causas / Solución:
El lavavajillas no arranca o no
responde a los mandos
La puerta no se cierra • Se disparó la cerradura; empuje enérgicamente la puerta hasta escuchar el
El lavavajillas no descarga agua. • El programa aún no ha terminado.
El lavavajillas hace ruido. • Los elementos de la vajilla se golpean entre sí o contra los rociadores.
En la vajilla y en los vasos quedan
depósitos calcáreos o una pátina
blanquecina.
En la vajilla y en los vasos quedan
estrías o matices azulados.
La vajilla no queda bien seca. • Se ha seleccionado un programa sin secado.
La vajilla no queda limpia. • Los cestos están demasiado cargados (ver Cargar los cestos).
• Apague la máquina con el botón ON/OFF, vuelva a encenderla después de un
minuto aproximadamente y elija el programa.
• El enchufe no está bien introducido en la toma de corriente.
• La puerta del lavavajillas no está bien cerrada.
característico sonido (clack).
• El tubo de descarga de agua está plegado (ver Instalación).
• La descarga del lavabo está obstruida.
• El filtro está obstruido con residuos de comida.
• Excesiva espuma: el detergente no está dosificado adecuadamente o no es
adecuado para lavar en lavavajillas. (ver Puesta en funcionamiento y uso).
• Falta la sal regeneradora o su regulación no es la adecuada para la dureza del
agua (ver Abrillantador y sal).
• El tapón del depósito de sal no está bien cerrado.
• El abrillantador se ha terminado o la dosis es insuficiente.
• La dosis de abrillantador es excesiva.
• El abrillantador se ha terminado o la dosis es insuficiente (ver Abrillantador y
sal).
• La regulación del abrillantador no es la adecuada.
• La vajilla es de material antiadherente o de plástico.
• La vajilla no está bien distribuida.
• Los rociadores no giran libremente.
• El programa de lavado no es suficientemente enérgico (ver Programas).
• Excesiva espuma: el detergente no está dosificado adecuadamente o no es
adecuado para lavar en lavavajillas. (ver Puesta en funcionamiento y uso).
• El tapón del abrillantador no se ha cerrado correctamente.
• El filtro está sucio u obstruido (ver Mantenimiento y cuidados).
• Falta sal regeneradora (ver Abrillantador y sal).
El lavavajillas no carga agua Alarma por grifo cerrado.
(se escuchan breves sonidos
(centellean los pilotos Secado y Fin).
Alarma por el tubo de carga de
agua / Filtro de entrada de agua
obstruido
(centellean los pilotos Lavado,
Secado y Fin).
*)
* Presente sólo en algunos modelos.
12
• Falta agua en la red hídrica.
• El tubo de carga de agua está plegado (ver Instalación).
• Abra el grifo y el aparato comenzará a funcionar en pocos minutos.
• El aparato se ha bloqueado porque no se ha intervenido al sonar la alarma.
Apague la máquina con el botón ENCENDIDO/APAGADO (ON/OFF), abra el
grifo y después de 20 segundos vuelva a encenderla presionando el mismo
botón. Vuelva a programar la máquina y póngala en funcionamiento.
• Apague la máquina presionando el botón ENCENDIDO/APAGADO (ON/OFF).
Cierre el grifo de agua para evitar inundaciones y desenchufe el aparato.
Controle que el filtro de entrada de agua no esté obstruido con impurezas. (ver
el capítulo “Mantenimiento y Cuidados”)
Page 13

Operating instructions
DISHWASHER
EN
English,13
LSF 712
Contents
Installation, 14-15
Positioning and levelling
Connecting the water and electricity supplies
Advice regarding the first wash cycle
Technical data
Description of the appliance, 16
Overall view
Control panel
Loading the racks, 17
Lower rack
Cutlery basket
Upper rack
Start-up and use, 18-19
Starting the dishwasher
Measuring out the detergent
Wash options
Wash cycles, 20
Table of wash cycles
Rinse aid and refined salt, 21
Measuring out the rinse aid
Measuring out the refined salt
Care and maintenance, 22
Shutting off the water and electricity supplies
Cleaning the dishwasher
Preventing unpleasant odours
Cleaning the sprayer arms
Cleaning the water inlet filter
Cleaning the filters
Leaving the machine unused for extended periods
Precautions, advice and Assistance, 23
General safety
Disposal
Saving energy and respecting the environment
Assistance
Troubleshooting, 24
Page 14

Installation
EN
Keep this instruction manual in a safe place for
future reference. If the appliance is sold, given away or
moved, please ensure the manual is kept with the
machine, so that the new owner may benefit from the
advice contained within it.
Please read this instruction manual carefully: it
contains important information regarding the safe
installation, use and maintenance of the appliance.
If the appliance must be moved at any time, keep it in
an upright position; if absolutely necessary, it may be
tilted onto its back.
This appliance is intended to be used in household and
similar applications such as:
- staff kitchen areas in shops, offices and other working
environments;
- farm houses;
- by clients in hotels, motels and other residential type
environments;
- bed and breakfast type environments.
Positioning and levelling
1. Remove the appliance from all packaging and check
that it has not been damaged during transportation.
If it has been damaged, contact the retailer and do not
proceed any further with the installation process.
2. Check the dishwasher by placing it so that its sides or
back panel are in contact with the adjacent cabinets or
even with the wall. This appliance can also be recessed
under a single worktop
sheet).
* (see the Assembly instruction
Connecting the water inlet hose
To a suitable cold water connection point: before
attaching the hose, run the water until it is perfectly
clear so that any impurities that may be present in the
water do not clog the appliance; after performing this
operation, screw the inlet hose tightly onto a tap with
a ¾ gas threaded connection.
To a suitable hot water connection point: your
dishwasher may be supplied with hot water from the
mains supply (if you have a central heating system
with radiators) provided that it does not exceed a
temperature of 60°C.
Screw the hose to the tap as described for connection
to a cold water supply.
If the inlet hose is not long enough, contact a
specialist store or an authorised technician (see
Assistance).
The water pressure must be within the values
indicated in the Technical data table (see adjacent
information).
The hose should not be bent or compressed.
Connecting the water outlet hose
Connect the outlet hose (without bending it) to a drain
duct with a minimum diameter of 4 cm.
3. Position the dishwasher on a level and sturdy floor. If
the floor is uneven, the front feet of the appliance may be
adjusted until it reaches a horizontal position. If the
appliance is levelled correctly, it will be more stable and
much less likely to move or cause vibrations and noise
while it is operating.
4. Adjust the height of the rear foot from the front of the
appliance
a hexagonal spanner (red color) with an opening of 8 mm in a
clockwise direction to increase the height or in an
anticlockwise direction to decrease the height.
* on the central lower part of the dishwasher, turning
Connecting the water and electricity
supplies
Connection to the water and electricity supplies
should only be performed by a qualified technician.
The dishwasher should not stand on top of the water
hoses or the electricity supply cable.
The appliance must be connected to the water
supply network using new hoses.
Do not use old hoses.
The water inlet and outlet hoses and the electricity
supply cable may be positioned towards the right or the
left in order to achieve the best possible installation.
The outlet hose must be at a height ranging from 40 to
80 cm from the floor / surface where the dishwasher
rests (A).
Before connecting the water outlet hose to the sink
drain, remove the plastic plug (B).
* Only available in selected models.
14
Page 15

Anti-flooding protection
To ensure floods do not occur, the dishwasher:
- is provided with a special system which blocks the
water supply in the event of anomalies or leaks from
inside the appliance.
Anti-condensation strip*
After installing the dishwasher, open the door and stick
the adhesive transparent strip under the wooden shelf in
order to protect it from any condensation which may
form.
EN
Some models are also equipped with the supplementary
safety device New Acqua Stop
flooding protection even in the event of a supply hose
rupture.
*, which guarantees anti-
WARNING: HAZARDOUS VOLTAGE!
Under no circumstance should the water inlet hose be
cut as it contains live electrical parts.
Electrical connection
Before inserting the plug into the electrical socket, make
sure that:
The socket is earthed and complies with current
regulations.
The socket can withstand the maximum load of the
appliance, which is indicated on the data plate
located on the inside of the door (see chapter entitled
Description of the appliance).
The power supply voltage falls within the values
indicated on the data plate on the inside of the door.
The socket is compatible with the plug of the
appliance. If this is not the case, ask an authorised
technician to replace the plug (see Assistance); do
not use extension cables or multiple sockets.
Once the appliance has been installed, the power
supply cable and the electrical socket should be easily
accessible.
The cable should not be bent or compressed.
If the power supply cable is damaged, it must be replaced by the manufacturer or its Technical Assistance
Service in order to prevent all potential hazards. (See Assistance)
The Company shall not be held responsible for any
incidents that occur if these regulations are not
observed.
Advice regarding the first wash cycle
After the appliance has been installed, immediately
before running the first wash cycle, completely fill the
salt dispenser with water and add only then
approximately 1 kg of salt (see chapter entitled Rinse aid
and refined salt). The water may overflow: this is normal
and is not a cause for concern. Select the water
hardness value (see chapter entitled Rinse aid and
refined salt). - After the salt has been poured into the
machine, the LOW SALT indicator light
If the salt container is not filled, the water softener
and the heating element may be damaged as a result.
Technical data
width 45 cm
Dimensions
Capacity 10 standard place-settings
Water supply
pressure
Power supply
voltage
Total absorbed
power
Fuse See appliance data plate
height 85 cm
depth 60 cm
0,05 ÷ 1MPa (0.5 ÷ 10 bar)
7,25 psi – 145 psi
See appliance data plate
See appliance data plate
This dishwasher conforms to the
following European Community
Directives:
-2006/95/EC (Low Voltage)
-2004/108/EC (Electromagnetic
Compatibility)
-2005/32/EC (Comm. Reg.
1275/2008) (Ecodesign)
-97/17/EC (Labelling)
-2002/96/CE Waste Electrical
and Electronic Equipment
(WEEE)
* switches off.
* Only available in selected models.
15
Page 16

Description of the
appliance
EN
Overall view
1. Upper rack
2. Upper sprayer arm
3. Tip-up compartments
4. Rack height adjuster
5. Lower rack
6. Lower sprayer arm
7. Cutlery basket
8. Washing filter
9. Salt dispenser
10. Detergent and rinse aid dispensers
11. Data plate
12. Control Panel
***
Control panel
Select wash cycle knob
ON/OFF/RESET button
Half load button
and indicator light
Delayed start button
Washing and 3h. Delayed
start indicator light
Drying and 6h.Delayed
start indicator light
Start/Pause button
and indicator light
Low Salt
indicator light
End and 9h. Delayed
start indicator light
***Only in completely built-in models.
* Only available in selected models.
The number and type of wash cycles and options may vary depending on the dishwasher model.
16
Page 17

Loading the racks
Before loading the racks, remove all food residues from
the crockery and empty liquids from glasses and cups.
Arrange the crockery so that it is held in place firmly and
does not tip over.
After loading the appliance, check that the sprayer arms
can rotate freely.
Lower rack
The lower rack can hold pans, lids, plates, salad bowls, cutlery,
etc. as seen in the Loading examples.
Plates and large covers should be placed at the sides of the
rack, ensuring that they do not block the rotation of the upper
sprayer arm.
Some dishwasher models are fitted
with tip-up sections*, which can be
used in a vertical position when
arranging plates or in a horizontal
position when arranging pans and
salad bowls.
Cutlery basket
The type of cutlery basket may vary according to the
dishwasher model: The cutlery basket should be positioned at
the front of the lower rack, by sliding it between the fixed
inserts, or on the upper rack when the half load option has been
selected (in models featuring this option).
- It has a collapsible
sliding system which
means the cutlery can be
arranged in the best
possible way.
Tilt A Tilt B Tilt C
-Lift the tip-up compartment, slide it gently and position it in the
desired tilt angle.
Adjusting the height of the upper rack
In order to make it easier to arrange the crockery, the upper
rack may be moved to a higher or lower level.
The height of the upper rack should ideally be adjusted
WHEN THE RACK IS EMPTY.
Never lift or lower the rack on one side only.
Open the left and right guide rail stops
and pull out the rack; position it higher or
lower as required, slide it along the guide
rails until the front wheels are in place and
close the stops (see figure).
If the rack is fitted with Dual Space
handles
rack until it reaches its stop point, grip the
handles at the sides of the rack and move
it upwards or downwards, then slowly let it
fall back into place.
* (see figure), pull out the upper
Loading examples for the upper rack
EN
Knives and other utensils with sharp edges must be
placed in the cutlery basket with the points facing downwards,
or they must be positioned horizontally in the tip-up
compartments on the upper rack.
Cutlery basket positioning examples
ù
Upper rack
Load this rack with delicate and lightweight crockery: glasses,
tea and coffee cups, saucers, small salad bowls, saucepans
and small saucepans which are not too soiled, using the
Loading examples as a guide.
Mugs and cups, long sharp knives and serving utensils:
place these on the tip-up compartments
Tip-up compartments with adjustable tilt*
- The tilt feature can be used to increase the space in the upper
rack, to position wine glasses with different stem lengths safely
and to improve drying performance.
**.
Loading examples for the lower rack
Items which should not be washed in the
dishwasher
Wooden items, objects with wooden or horn handles or
glued-on parts.
Items made from aluminium, copper, brass, pewter or tin.
Items made from plastic material which is not heat-resistant.
Antique or hand-painted porcelain.
Antique silver. Silver which is not antique may, however, be
washed in the dishwasher using a delicate wash cycle,
provided that it does not come into contact with other metals.
We recommend the use of crockery which is dishwasher
safe.
*Only available in selected models.
** The number and position may vary.
17
Page 18

Start-up and use
EN
Starting the dishwasher
1. Turn the water tap on.
2. Press the ON/OFF button: all the indicator lights on
the control panel will light up for a few seconds.
3. Open the door and pour in a suitable amount of
detergent (see below).
4. Load the racks (see Loading the racks) and shut the
door.
5. Select the wash cycle by turning the WASH CYCLE
SELECT knob in a clockwise direction: align the notch
on the knob with the number or symbol representing
the desired wash cycle. The START/PAUSE indicator
light will flash.
6. Select the wash options
information).
7. Start the cycle by pressing the START button; the
indicator light will light up and remain lit in a fixed
manner. The indicator light corresponding to the
wash phase will switch on, signalling that the wash
cycle has begun.
8. At the end of the wash cycle the END indicator light
will switch on (fixed light). Switch off the appliance by
pressing the ON/OFF button, shut off the water valve
and unplug the appliance from the electricity socket.
9. Wait for a few minutes before removing the
crockery, in order to avoid burns. Unload the racks,
beginning with the lower level.
- The machine will switch off automatically
during certain periods of inactivity, in order to
minimise electricity consumption.
Modifying a wash cycle in progress
If a mistake was made during the wash cycle selection
process it is possible to change the cycle, provided that
it has only just begun: once the wash cycle has started,
switch off the machine by pressing and holding the ON/
OFF/Reset button. Switch it back on using the same
button and select the desired wash cycle and options.
* (see adjacent
Measuring out the detergent
A good wash result also depends on the correct
amount of detergent being used; exceeding the stated
amount does not result in a more effective wash and
increases environmental pollution.
Only use detergent which has been
specifically designed for dishwashers.
DO NOT USE washing up liquid.
Using excessive detergent may result in foam
residue remaining in the machine after the cycle
has ended.
The use of tablets is only recommended for
models which offer the MULTI-FUNCTIONAL
TABLETS option.
To achieve the best results from each washing
and drying cycle, powder detergent, rinse aid liquid
and salt should be used.
Compartment A: Washing detergent
Compartment B: Pre-wash detergent
D
A
B
C
when the cycle requires 1 tablet, place it in compartment
A and close the cover; when it requires 2, place the
second tablet at the bottom of the appliance.
3. Remove detergent residues from the edges of the
compartment and close the cover until it clicks.
1. Open cover C by pressing
button D.
2. Pour in the detergent after
consulting the Table of wash
cycles:
For powder detergent use
compartments A and B.
For detergent in tablet form:
Adding extra crockery
Press the Start/Pause button (the corresponding
indicator light will flash). Open the door, taking care to
avoid the escaping steam, and place the crockery inside
the appliance. Press the Start/Pause button (fixed light):
the cycle starts from the point at which it was interrupted.
If the Start/Pause button is pressed so as to pause the
machine, the wash cycle or the Delayed Start* function
(if selected) is interrupted.
At this stage it is not possible to change the wash cycle.
Accidental interruptions
If the door is opened during the wash cycle, or if there is
a power cut, the cycle stops. It starts again from the point
at which it was interrupted once the door has been shut
or once the electricity supply is restored.
18
* Only available in selected models.
Page 19

Wash options*
The OPTIONS may only be set, modified or reset
after the wash cycle has been selected and before
the Start/Pause button has been pressed.
Only the options which are compatible with the type of
wash cycle set may be selected. If an option is not compatible with the selected was cycle (see Table of wash
cycles), the corresponding LED flashes rapidly 3 times.
If an option is selected which is incompatible with another option or wash cycle selected previously, the incompatible option light will flash 3 times and switches
off, while the most recently selected setting remains lit.
Half load
EN
If there are not many dishes to be washed, a half load
cycle may be used in order to save water, electricity and
detergent. Select the wash cycle and press the HALF
LOAD button: the indicator light will illuminate.
Remember to halve the amount of detergent.
It is better to use powder detergent in this case.
This option is incompatible with the following wash
cycle: Rapide wash.
To deselect an option which has been set by mis-
take, press the corresponding button again.
Delayed start
It is possible to delay the start time of the wash cycle by 3, 6
or 9 hours.
After selecting the desired wash cycle and any other
options, select Delayed Start by pressing the Delayed
Start button repeatedly; the washing (3 hours), drying (6
hours) and end (9 hours) indicator lights will flash in
succession.
If the Delayed Start button is pressed again, the option is
deselected.
After the selection process, the countdown will begin if the
Start/Pause button is pressed. The selected delay period
indicator light flashes and the Start/Pause button stops
flashing (fixed light).
When the time has elapsed, the indicator light
corresponding to the selected delay period stops flashing
(fixed light) and the wash cycle begins.
The Delayed Start function cannot be set once the
wash has already started.
Table of
options
1. Intensive
2. Normal
3. Daily 60’
4. Soak
5. Eco
6. Rapid
7. Crystal
A B
Delayed
Start
Yes
Yes
Yes
Yes
Yes
Yes
Yes
Half
Load
Yes
Yes
Yes
Yes
Yes
No
Yes
* Only available in selected models.
19
Page 20

Wash cycles
EN
If the crockery is only lightly soiled or if it has been rinsed with water before being placed in the
dishwasher, reduce the amount of detergent used accordingly.
The number and type of wash cycles and options may vary depending on the dishwasher model.
For available OPTIONS please refer to the Table of options on the Start-up and use page.
Wash cycle selection
instructions
Heavily soiled dishes and
pans (not to be used for
delicate items).
Normally soiled pans and
dishes. Standard daily wash
cycle.
Limited quantity of daily
soiling. (4 place settings + 1
saucepan +1 frying pan).
Pre-wash for dishes while
awaiting completion of the
load with the dishes from the
next meal.
Environmentally-friendly wash
cycle with low energy
consumption levels, suitable
for pans and dishes.
Economic and fast wash to
be used for lightly soiled
dishes. (Run cycle
immediately after use) (2
plates + 2 glasses + 4 pieces
of cutlery + 1 saucepan + 1
small frying pan).
Economic and fast wash for
delicate items which are
sensitive to high
temperatures. (Run cycle
immediately after use)
(glasses upper rack +
delicate plates lower rack).
Wash cycle
1.Intensive
2. Normal
3. Daily 60’
4. Soak
*
5. Eco
6. Rapid
7. Crystal
(A) = compartment A
(B) = compartment B
Powder Liquid Tablets
25 g (A) 25 ml (A) 1 (A)
21 g (A)
4 g (B)
25 g (A) 25 ml (A) 1 (A)
No
25 g (A) 25 ml (A) 1 (A)
21 g (A)
30 g (A)
Detergent
21 ml (A)
4 ml (B)
No
21 ml (A)
30 g (A)
1 (A)
No
1 (A)
1 (A)
Wash
cycles
which
include
drying
Yes
Yes
No
No
Yes
No
Yes
Options
A-B
A-B
A-B
A-B
A-B
A
A-B
Wash cycle
duration
(tolerance
±10%)
Hrs. Min.
2:25’
1:50’
1:00’
0:08’
2:50’
0:35’
1:35’
Notes:
Optimum performance levels when using the "Daily 60 - Rapide wash" cycles can be achieved by observing the maximum amounts
of crockery specified.
To make it easier to measure out the detergent, it is worth remembering that:
1 tablespoon = 15 gr. of powder = approximately 15 ml of liquid - 1 teaspoon = 5 gr. of powder = approximately 5 ml of liquid
* The Eco wash cycle adheres to the regulation EN-50242. Although it has a longer duration than other wash cycles it uses less
energy and is les harmful to the environment.
Note for Test Laboratories: for information relating to comparative EN testing conditions, please send an email to the following
address: ASSISTENZA_EN_LVS@indesitcompany.com
20
Page 21

Rinse aid and refined salt
Only use products which have been
specifically designed for dishwashers.
Do not use table salt or industrial salt, or
washing up liquid.
Follow the instructions given on the packaging.
If using a multi-functional product it is not necessary to
add rinse aid; however, we recommend that you add salt,
especially if you live in an area where the water is hard or
very hard. Follow the instructions given on the packaging.
If you do not add salt or rinse aid, the LOW
* and LOW RINSE AID* indicator lights
SALT
remain lit.
Measuring out the rinse aid
Rinse aid makes it easier for the crockery to dry, as water
runs off surfaces more readily and therefore does not leave
streaks or marks.
The rinse aid dispenser should be filled:
When the LOW RINSE AID
panel/dislay is illuminated;
NEVER pour the rinse aid directly into the appliance tub.
Adjusting the amount of rinse aid
If you are not completely satisfied with the drying results,
you may adjust the quantity of rinse aid used. Use a
screwdriver to turn the dosage adjuster (F) to one of the 6
pre-set positions (the default position is set to 4):
If there are streaks on the crockery, set the adjustment
device to a lower number (1-3).
If drops of water remain on the crockery or if there are
limescale marks present after the cycle has finished, set
the adjuster to a higher number (4-6).
Setting the water hardness
Every dishwasher is equipped with a water softener which, by
using refined salt designed especially for this type of
appliance, supplies water without limescale which is then used
to wash the crockery.
This dishwasher offers a setting which helps to reduce
pollution and optimises washing performance in accordance
with the water hardness level in your area. This information can
be obtained from your local water supplier.
- Switch the machine off using the ON/OFF button and
open the door.
- Set the SELECT WASH CYCLE knob first to wash cycle 5,
then to wash cycle 1, then to wash cycle 5 again.
- Press the ON/OFF button; the wash cycle phase (washing,
drying, end) indicator lights will flash. It is now possible to
* indicator light on the control
1. Open the dispenser by turning
the lid (G) in an anticlockwise
direction.
2. Pour in the rinse aid, making
sure it does not overflow from the
F
dispenser. If this happens, clean
the spill immediately with a dry
G
cloth.
3. Screw the lid back on.
select the water hardness level. There is a water hardness
level for every wash cycle:
E.g.: wash cycle 1, water hardness level 1
wash cycle 2, water hardness level 2, etc. etc., up to a maximum of 5
(The default water softener setting is level 3).
- To exit the function, wait a few seconds or press one of the
option buttons
button.
Even if using multi-functional tablets, the salt dispenser should
still be filled.
(°dH = hardness measured in German degrees - °f =
hardness measured in French degrees - mmol/l = millimoles
per litre)
* levels.
*, or switch off the machine using the ON/OFF
Water Hardness Table
°dH °fH mmol/l level
0 6 0 10 0 1 1
6 11 11 20 1.1 2 2
12 17 21 30 2.1 3 3
17 34 31 60 3.1 6 4
34 50 61 90 6.1 9
For values between 0°f and 10°f, we do not
recommend the use of salt.
* this setting may cause a slight increase in the
duration of the cycle.
5
*
Measuring out the refined salt
In order to achieve the best possible results using a wash
cycle, make sure that the dispenser is never empty.
Refined salt removes limescale from the water, thus
avoiding the formation of deposits on crockery.
The salt dispenser is located in the lower part of the
dishwasher (see Description) and should be filled:
When the green float
the cap of the salt dispenser.
When the LOW SALT
display is illuminated;
salt container right up to its edge (this should hold
approximately 1 kg); it is not unusual for a little water to leak
out.
4. Remove the funnel* and wipe any salt residue away from the
opening; rinse the cap under running water and then screw it
on, the head facing downwards so as to let the water flow out
of the four cracks which are arranged in a star shape on the
lower part of the cap. (Salt cap with green float
It is advisable to perform this procedure every time you
add salt to the container.
Make sure the cap is screwed on tightly, so that no detergent
can get into the container during the wash cycle (this could
damage the water softener beyond repair).
When necessary, measure out the salt before a wash
cycle so that any saline solution which has leaked out of the
salt dispenser is removed.
* cannot be seen by simply looking at
* indicator light on the control panel/
1. Remove the lower rack and unscrew the
container cap (anticlockwise).
2. The first time you do this: fill the water tank
right up to its edge.
3. Position the funnel
* (see figure) and fill the
*)
EN
* Only available in selected models.
21
Page 22

Care and maintenance
Shutting off the water and electricity
EN
supplies
Turn off the water tap after every wash cycle to avoid
leaks.
Always unplug the appliance when cleaning it and
when performing maintenance work.
Cleaning the dishwasher
The external surfaces of the machine and the control
panel may be cleaned using a non-abrasive cloth
which has been dampened with water. Do not use
solvents or abrasive products.
Any marks on the inside of the appliance may be
removed using a cloth dampened with water and a
little vinegar.
Preventing unpleasant odours
Always keep the door of the appliance ajar in order to
avoid moisture from forming and being trapped inside
the machine.
Clean the seals around the door and detergent
dispensers regularly using a damp sponge. This will
avoid food becoming trapped in the seals, which is
the main cause behind the formation of unpleasant
odours.
Cleaning the sprayer arms
Food residue may become encrusted onto the sprayer
arms and block the holes used to spray the water. It is
therefore recommended that the arms are checked from
time to time and cleaned with a small non-metallic
brush.
The two sprayer arms may both be removed.
To remove the upper sprayer
arm, rotate the locking ring in
an anti-clockwise direction.
The upper sprayer arm should
be replaced with the holes
facing upwards.
Clean the water inlet filter at the tap outlet regularly.
- Turn off the water tap.
- Unscrew the end of the water inlet hose, remove the filter
and clean it carefully under running water.
- Replace the filter and screw the water hose back into
position.
Cleaning the filters
The filter assembly consists of three filters which remove food
residues from the washing water and then recirculate the
water. They should be cleaned if you wish to achieve the
best results in every wash.
Clean the filters regularly.
The dishwasher should not be used without filters, or if the
filter is loose.
After several washes, check the filter assembly and if
necessary clean it thoroughly under running water, using a
non-metallic brush and following the instructions below:
1. Turn the cylindrical filter C in an anti-clockwise direction
and pull it out (fig. 1).
2. Remove the cup filter B by exerting a slight pressure on the
side flaps (fig. 2).
3. Slide out the stainless steel plate filter A (fig. 3).
4. Inspect the trap and remove any food residue. NEVER
REMOVE the wash cycle pump (black detail) (fig. 4).
C
1
A
2
The lower sprayer arm can be
removed by pulling it upwards.
Cleaning the water inlet filter*
If the water hoses are new or have not been used for an
extended period of time, let the water run to make sure it
is clear and free of impurities before performing the
necessary connections. If this precaution is not taken,
the water inlet could become blocked and damage the
dishwasher.
22
3
After cleaning the filters, replace the filter assembly and fix it
in position correctly; this is essential for maintaining the
efficient operation of the dishwasher.
4
Leaving the machine unused for extended
periods
Disconnect the appliance from the electricity supply and
shut off the water tap.
Leave the door of the appliance ajar.
When you return, run a wash cycle when the dishwasher is
empty.
* Only available in selected models.
Page 23

Precautions, advice and
Assistance
This appliance was designed and manufactured in
compliance with current international safety standards. The
following information has been provided for safety reasons
and should therefore be read carefully.
General safety
This appliance is not intended for use by persons
(including children) with reduced physical, sensory or
mental capabilities, or lack of experience and knowledge,
unless they have been given supervision or instruction
concerning use of the appliance by a person responsible
for their safety.
Children should be supervised to ensure that they do not
play with the appliance.
The appliance was designed for domestic use inside the
home and is not intended for commercial or industrial use.
The appliance must be used by adults only, to wash
domestic crockery in accordance with the instructions in
this manual.
The appliance must not be installed outdoors, even in
covered areas. It is extremely dangerous to leave the
machine exposed to rain and storms.
Do not touch the appliance when barefoot.
When unplugging the appliance always pull the plug from
the mains socket, do not pull on the cable.
The water supply tap must be shut off and the plug should
be removed from the electrical socket before cleaning the
appliance or carrying out any maintenance work.
If the appliance breaks down, do not under any
circumstances touch the internal parts in an attempt to
perform the repair work yourself.
Never touch the heating element.
Do not lean or sit on the open door of the appliance: this
may cause the appliance to overturn.
The door should not be left open as it may create a
dangerous obstacle.
Keep detergent and rinse aid out of reach of children.
The packaging material should not be used as a toy.
Saving energy and respecting the
environment
Saving water and energy
Only begin a wash cycle when the dishwasher is full. While
waiting for the dishwasher to be filled, prevent unpleasant
odours using the Soak cycle (see Wash cycles).
Select a wash cycle which is suited to the type of crockery
and to the soil level of the crockery using the Table of wash
cycles:
- For dishes with a normal soil level, use the Eco wash
cycle, which guarantees low energy and water
consumption levels.
- If the load is smaller than usual activate the Half load
option
* (see Start-up and use).
If your electricity supply contract gives details of electricity
saving time bands, run wash cycles during the periods
when a lower tariff is applied. The Delayed start
(see Start-up and use) helps you organise the wash cycles
accordingly.
Phosphate-free and chlorine-free detergents
containing enzymes
We strongly recommend that you use detergents that do
not contain phosphates or chlorine, as these products are
harmful to the environment.
Enzymes provide a particularly effective action at
temperatures around 50°C, and as a result detergents
containing enzymes can be used in conjunction with lowtemperature wash cycles in order to achieve the same
results as a normal 65°C wash cycle.
To avoid wasting detergent, use the product in appropriate
quantities based on the manufacturers recommendations,
the hardness of the water and the soil level and quantity of
crockery to be washed. Even if they are biodegradable,
detergents contain substances which may alter the balance
of nature.
* button
EN
Disposal
Disposal of packaging materials: observe local legislation
so that the packaging may be reused.
The European Directive 2002/96/EC relating to Waste
Electrical and Electronic Equipment (WEEE) states that
household appliances should not be disposed of using the
normal solid urban waste cycle. Exhausted appliances
should be collected separately in order to optimise the cost
of re-using and recycling the materials inside the machine,
while preventing potential damage to the atmosphere and
to public health. The crossed-out dustbin is marked on all
products to remind the owner of their obligations regarding
separated waste collection.
For further information relating to the correct disposal of
household appliances, owners may contact the relevant
public authority or the local appliance dealer.
* Only available in selected models.
Assistance
Before contacting Assistance:
Check whether the problem can be resolved using the
Troubleshooting guide (see Troubleshooting).
Restart the programme to check whether the problem has
ceased to exist.
If the problem persists, contact the Authorised Technical
Assistance Service.
Never use the services of unauthorised technicians.
Please have the following information to hand:
The type of malfunction.
The appliance model (Mod.).
The serial number (S/N).
This information can be found on the appliance data plate (see
Description of the appliance).
23
Page 24

Troubleshooting
05/2011 - Xerox Fabriano
Whenever the appliance fails to work, check for a solution from the following list before calling for
EN
Assistance.
Problem: Possible causes / Solutions:
195087147.00
The dishwasher does not start or
cannot be controlled
The door won’t close • The lock was released. Strongly push the door until a “clacking” noise is heard.
No water drains out from the
dishwasher.
The dishwasher makes excessive
noise.
The dishes and glasses are
covered in a white film or
limescale deposits.
The dishes and glasses are
streaked or have a bluish tinge.
The crockery has not been dried
properly.
The dishes are not clean. • The racks are overloaded (see Loading the racks).
• Switch off the appliance by pressing the ON/OFF button, switch it back on after
approximately one minute and reset the program.
• The appliance has not been plugged in properly.
• The dishwasher door has not been shut properly.
• The dishwasher cycle has not yet finished.
• The water inlet hose is bent (see Installation).
• The drain duct is blocked.
• The filter is clogged up with food residues.
• The dishes are rattling against each other or against the sprayer arms.
• An excessive amount of foam has been produced: the detergent has not been
measured out correctly or it is not suitable for use in dishwashers (see Start-up
and use).
• The level of the refined salt is low or the dosage setting is not suited to the
hardness of the water (see Rinse aid and salt).
• The lid on the salt dispenser is not closed properly.
• The rinse aid has been used up or the dosage is too low.
• The rinse aid dosage is too high.
• A wash cycle without a drying program has been selected.
• The rinse aid has been used up or the dosage is too low (see Rinse aid and
salt).
• The rinse aid dispenser setting is not suitable.
• The crockery is made from non-stick material or plastic.
• The crockery has not been arranged well.
• The sprayer arms cannot move freely.
• The wash cycle is too gentle (see Wash cycles).
• An excessive amount of foam has been produced: the detergent has not been
measured out correctly or it is not suitable for use in dishwashers (see Start-up
and use).
• The lid on the rinse aid compartment has not been shut correctly.
• The filter is dirty or blocked (see Care and maintenance).
• The refined salt level is low (see Rinse aid and salt).
The dishwasher does not take any
water in - Tap shut-off alarm
(several short beeps are emitted
(the Drying and End indicator lights
flash).
Water inlet hose alarm / Water inlet
filter blocked
(the Washing, Drying and End
indicator lights flashes).
*)
* Only available in selected models.
24
• There is no water in the mains supply.
• The water inlet hose is bent (see Installation).
• Turn on the tap and the appliance will start after a few minutes.
• The appliance lock has been activated because no action was taken when the
beeps
* sounded. Switch off the appliance using the ON/OFF button, turn on the
tap and switch the appliance back on after 20 seconds by pressing the same
button. Re-program the appliance and restart the wash cycle.
• Switch off the appliance by pressing the ON/OFF button. Shut off the water tap
to eliminate the risk of flooding and remove the plug from the electrical socket.
Make sure the water inlet filter has not become blocked by impurities (see “Care
and maintenance” chapter).
 Loading...