

Page 1
LL 65
LL 65
TR
GB
Bulaþýk makinesi
Yerleþtirme ve Kullaným Kýlavuzu
Dishwasher
Instructions for installation and use
Page 2
Page 3
ulaþýk makinesi
B
Bulaþýk Makineleri için pratik
rehber
Bu kitapçýk yeni beyaz eþyanýzýn size sunduðu bütün
kolaylýklarý eðlenceli bir þekilde anlatmaktadýr. Okurken
bulaþýklarýnýzý daha iyi ve temiz bir þekilde nasýl yýkayacaðýnýza
ve bulaþýk makinenizin daha uzun ömürlü olmasýný nasýl
saðlayacaðýnýza dair püf noktalarý öðreneceksiniz.
1. Kurma ve taþýma (sayfa.8)
Teslimat ve taþýnmadan sonra yapýlacak kurma iþlemi bulaþýk
makinenizin düzgün çalýþmasý için en önemli iþlemdir. Her
zaman:
1. Elektrik tesisatýnýn uygunluðunu,
2. Su giriþ ve boþaltma hortumlarýnýn doðru bir þekilde baðlanmýþ
olmasýný,
3. Bulaþýk makinenizi koyduðunuz mekanda zeminin düz
olmasýný kontrol ediniz, böylece bulaþýk makinenizin daha uzun
ömürlü ve iyi çalýþmasýný saðlamýþ olursunuz.
2. Kumanda panelinin anlaþýlmasý(sayfa.2)
Bulaþýk makinesini oluþturan kýsýmlarý öðrenirseniz makinenizi
daha kolay kullanýrsýnýz. Kumanda panelinde komutlarýn ve iç
parçalarýn detaylý bir tanýmýný bulabilirsiniz.
3. Bulaþýklar makinenin içine nasýl yerleþtirilmeli (sayfa.3)
Bu sayfada bulaþýk makinesinin en iyi þekilde nasýl yükleneceðini
ve sepetlerin nasýl daha verimli bir þekilde kullanýlacaðýný
göreceksiniz.
çaðýrmadan önce bu sayfalarý okuyunuz; bir dizi problem için
çözümleri burada bulabilirsiniz. Eðer sorun devam ederse
Ariston Yetkili Servisini arayýn, sorununuz en kýsa sürede servis
tarafýndan giderilecektir.
4. Bulaþýk makinesinin çalýþtýrýlmasý(sayfa. 4)
8. Sizin ve çocuklarýnýzýn emniyeti (sayfa.9)
Bulaþýk makinesini doldurduktan sonra, uygun programý
seçmeniz, parlatýcý ve deterjaný doðru bir þekilde koymanýz
gerekecektir. Bu sayfalarý okumak yýkama iþleminin her
safhasýnda size yardýmcý olacaktýr.
5. Tuz: önemli bir dost (sayfa. 7)
Tuzun doðru miktarda kullanýmý bulaþýk makinenizin ömrünü
uzatýrken muhtemel kireçlenmeleri önleyerek bulaþýklarýnýzýn
daha iyi yýkanmasýný saðlar.
Bu bölümü dikkatli bir þekilde okuyunuz. Montaj, kullaným ve
bakým emniyeti hakkýnda gerekli bilgileri bu bölümde
bulabileceksiniz.
9. Ýtina ve bakým (Sayfa.10)
Ayda bir filtreleri ve pervaneleri kontrol ediniz. Bu bölümde bunu
nasýl yapacaðýnýzý öðreneceksiniz.
10. Bulaþýk makinenizi nasýl koruyacaksýnýz (sayfa.10)
6. Tasarruf saðlayacak faydalý ipuçlarý (sayfa.7)
Bu bölümde okuyacaðýnýz kurallara uyarsanýz makinenizin
Bu bölümde bulaþýklarýn temizliðinde daha iyi sonuçlar almaya
ve tasarruf saðlamaya yönelik tavsiyeler bulacaksýnýz.
ömrünü uzatmýþ olursunuz.
11. Teknik özellikler(sayfa.2)
7. Sorunlar ve çözümleri (sayfa.9)
Beyaz eþyanýzýn Avrupa yönetmeliklerine uygun tüm teknik
özelliklerini bu sayfada bulabilirsiniz.
Bulaþýk makinenizde bir problem varsa Ariston Yetkili Servisini
ARISTON BULAÞIK MAKÝNESÝ - Yerleþtirme ve kullaným kýlavuzu 1
Page 4
ulaþýk makinesi
G
J
I
L
K
H
F
E
B
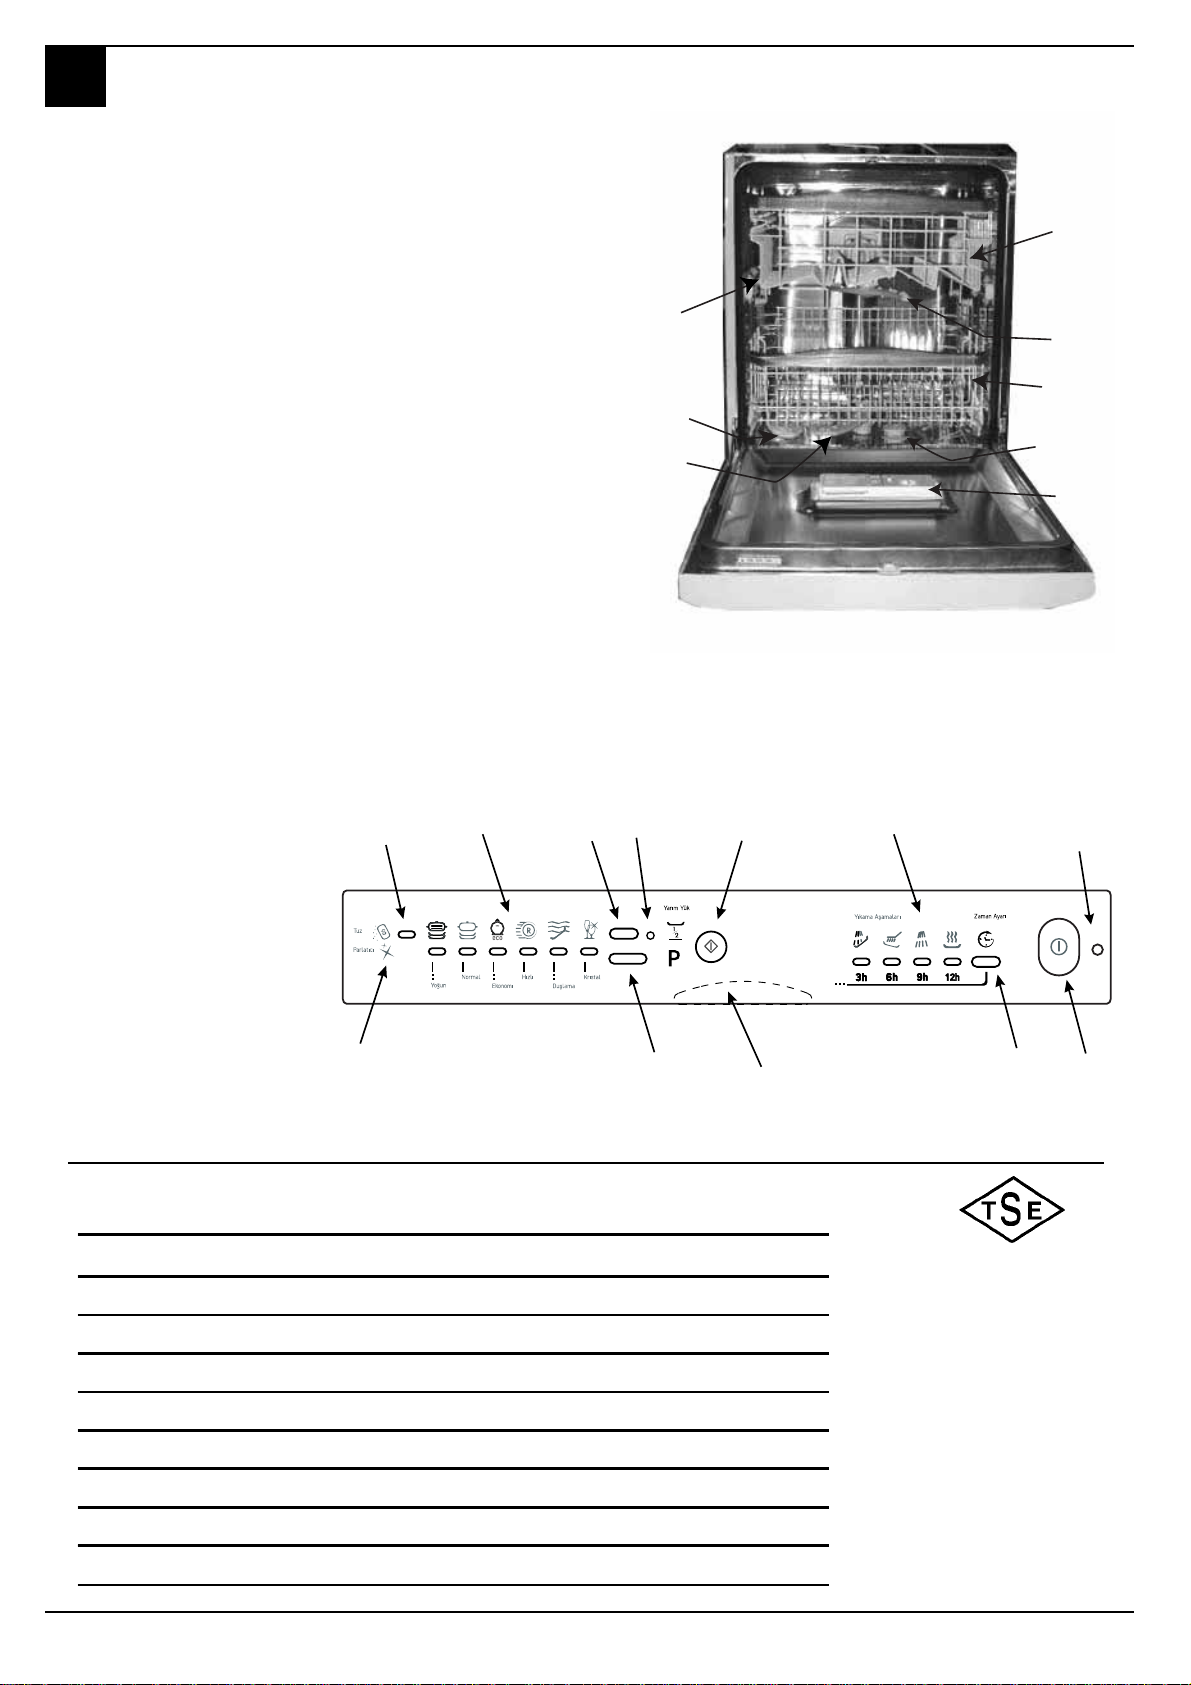
Bulaþýk makinenizi beraber açalým
Makinenizin yapýsýný
inceleyelim
Bulaþýk makinenizi oluþturan parçalarý tanýmak onu
daha iyi bir þekilde kullanmanýzý saðlayacaktýr.
E. Üst sepet
F. Üst pervane
G. Üst sepet yükseklik ayar
mekanizmasý
Kumanda emrinizde
H. Alt sepet
I. Alt pervane
J. Tuz haznesi
K. Filtre
L. Deterjan ve parlatýcý haznesi
A. ON-OFF düðmesi
Makineyi açmak için bu
düðmeye bas
B. ON-OFF ýþýklý göstergesi
Makinenin açýk olduðunu
gösterir
C. Kapak kulpu
Bulaþýk makinesinin kapaðýný
açmaya yarar.
D. Yýkama geciktirme seçim
düðmesi.
Seçmiþ olduðun sonradan
çalýþtýrma programýnýn
baþlangýcýný, 12, 9, 6 veya 3
saat sonrasý için ayarlamaya
yarar.
E. Iþýklý program
göstergeleri
Seçmiþ olduðun programý
bildirir.
F. Yarým yükleme ayar
düðmesi
Üst sepetle yarým yüklene
imkaný verir.
G. Yýkama devre göstergesi
ve erteleme göstergesi
(ön yýkama, yýkama,
durulama, kurulama.)
sonradan çalýþtýrma
programýný ayarladýysan
çalýþmaya baþlamasý için
kalan süreyi görüntüler.
H. Yarým yükleme ýþýklý
gösterge lambasý
Yarým yükleme programýný
ayarladýðýný hatýrlatýr
R. Start/Reset düðmesi
Start la yýkama devresini
baþlatýr, Reset ile tüm
girilmiþ emirleri silersiniz.
P. Program seçimi
düðmesi
Düðmeye her basýþta ýþýklý
gösterge lambalarý peþ
peþe yanacaktýr
S. Tuz bitiþ ikaz lambasý
Tuz ilave etmek gerektiðini
hatýrlatýr.
S
T
E
T. Parlatýcý bitiþ ikaz
lambasý
Tuz ilave etmek gerektiðini
hatýrlatýr.
H
F
P
R
C
G
B
D
A
Teknik özellikler
Teknik Ûzellikler
Geniãlik 60 cm.
Derinlik 60 cm.
Yákseklik 85 cm.
Kapasite 12 kiãilik yemek takâmâ
Giriã suyu basâncâ 30 KPaÜ 1MPa (0,3 Ü10 bar)
¬alâãma gerilimi árán plaketine bakân
Toplam gáÌ árán plaketine bakân
Sigorta árán plaketine bakân
2 ARISTON BULAÞIK MAKÝNESi - Yerleþtirme ve kullaným kýlavuzu
TS11300 EN 60335-2-5
Bu bulaþýk makinesi
aþaðýdaki Avrupa Birliði
Normlarýna uygundur:
73/23/CEE
(Düþük akým)ve
sonradan yapýlan
düzenlemeler;
89/336/EEC
(elektromanyetik uyum)
ve sonradan yapýlan
düzenlemeler.
97/17/CE
(Etiketleme)
Page 5
ulaþýk makinesi
B
Bulaþýklarýnýzý makinenize nasýl yerleþtirmelisiniz?
Yýkama iþlemine baþlamadan önce yapacaðýnýz birkaç þey makinenizin daha uzun ömürlü olmasýný saðlayacaktýr.
Bulaþýklarý, üzerindeki büyük kalýntýlarý temizleyip fazla kurumuþ tencereleri ve tavalarý ýslatýp öyle makineye yerleþtiriniz.
Bulaþýklarý yerleþtirdikten sonra pervanelerin rahat bir þekilde dönüp dönmediklerini kontrol ediniz.
Herþeyden önce.
Bulaþýklarý sepetlere
yerleþtirmeden önce yemek
artýklarýný sýyýr, böylece,
yýkama veriminin düþmesine
sebep olacak filtre
týkanmalarýný önlemiþ olursun.
Tencere ve tavalarýn dibi
tutumuþsa, bunlarý yýkama
öncesinde suda býrak.
Bulaþýklarý yerleþtirme
iþlemini kolaylaþtýrmak için
sepeti dýþarý doðru çek.
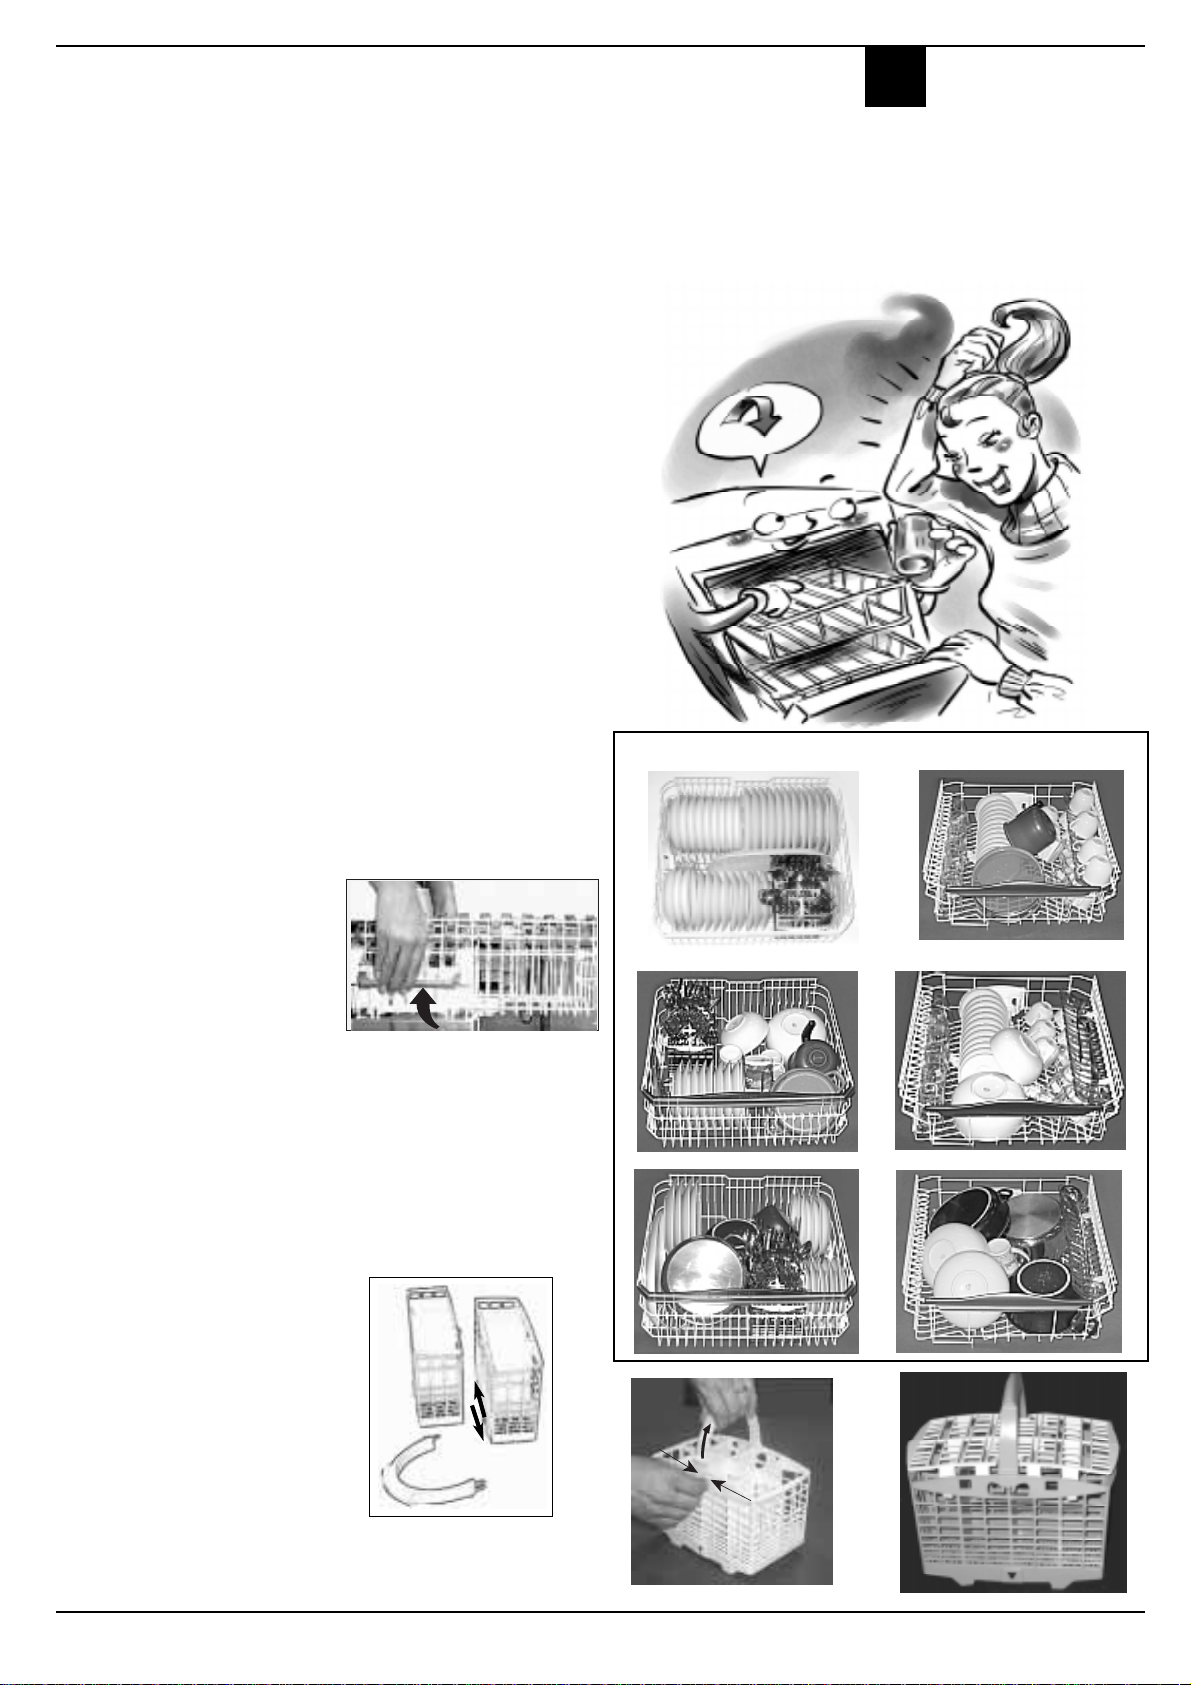
Çok sistemli sepetler
Bu model bulaþýk
makinesinde çatal-kaþýk
sepetinin yaný sýra, yeni ve
modern bir anlayýþla
gerçekleþtirilmiþ olan alt ve üst
sepetler bulunur. Gerçekten
de, yapýlarý itibariyle geniþ
kapsamlý bir yerleþtirmeye
imkan tanýyarak, beklentilerini
en iyi þekilde karþýlarlar.
Sepet saplarýný düzenli olarak
yýkayabilirsin: ufak tespit
baþlýklarýný çýkart, saplarý
çýkartarak, akan suyun altýnda
yýkadýktan sonra yine ayni
baþlýklarý kullanarak yerlerine
yerleþtir.
Çatal-býçak sepetçiðini, sapýný
ve iki
tarafýný birleþtiren mandallarý
çýkartmak suretiyle ikiye
ayýrabilirsiniz (A ve B þekillerine
bak).
Yýkayacak az çatal-býçaðýn
olduðu zamanlar bu sepetçiðin
tek tarafýný kullanabilirsin.
Bu sepetçiðin çýkartýlabilir iki
ýzgarasý vardýr: çatal-býçaklarý,
saplarý aþaðý gelecek þekilde,
birer birer sepetçiðin yuvalarýna
yerleþtir.
Aralarýnda temas etmeyecekleri
þekilde yerleþtir.
Üst sepet yüksekliðinin
ayarlanmasý
Bulaþýklarýnýzý üst sepeti
alçaltýp yükselterek rahatlýkla
yerleþtirebilirsiniz. Üst sepetin
iki yanýnda iki kol yer
almaktadýr.
C
alt sepet
üst sepet
Alt sepete neler yerleþtirilir?
Alt sepete yýkanmasý daha zor
bulaþýklarý yerleþtirmeni
tavsiye ederiz: tencereler,
kapaklar, düz ve çukur
tabaklar, ve ayrýca da þunlar:
büyük ve küçük fincanlarla
bardaklar. (fotoðraflarda
yerleþtirme örnekleri
göreceksin).
Servis tabaklarý ve büyük
kapaklar: sepetin yan
kisimlarina yerlestirilmistir.
Tencereler, salata kaseleri:
her zaman ters çevrilmiþ
olmalarý gerekmektedir.
Derin kap-kaçak: eðimli
olarak yerleþtir, böylece su,
daha iyi yýkanabilmeleri için,
rahatlýkla temas eder ve
akar.
Bardak ve fincanlar: þekilde
gösterildiði gibi yerleþtir.
Üst sepetin iki yanýnda iki kol yer
almaktadýr. Bu kollarý kullanarak
sepetlerin yüksekliðini
ayarlayabilirsiniz.
B
A
ARISTON BULAÞIK MAKÝNESÝ - Yerleþtirme ve kullaným kýlavuzu 3
Page 6
ulaþýk makinesi
B
Bulaþýk makinasýný çalýþtýrmak
Hazýrmýsýnýz? Baþlayalým!
Bulaþýk makinasýný yüklediniz ve þimdi yýkama programýný seçmeniz gerek. Birkaç
dakika içinde öðreneceksiniz!
Herþeyden önce.
Su musluðunu tamamen açýnýz
ve A ON-OFF tuþuna basýnýz.
Kýsa bir ikaz sesi duyacaksýn ve
B göstergesi yanacak. Þimdi
makine devreye girmiþtir,
programlayabilirsiniz.
Program seçimi.
P düðmesine basarak
program seçiniz. Düðmeye her
basýþýnýzda bir ikaz sesi
duyacaksýnýz ve E göstergesi
lambalarý arka arkaya
yanacaktýr. Yýkayacaðýnýz
bulaþýklarýn türüne göre uygun
olan programý seçiniz (6.
sayfaya bir göz atýnýz, program
tablosunu bulacaksýnýz). Kapak
kapalý ise, R Baþlat
düðmesine basýlýnca sesli bir
ikaz duyulur ve seçilen program
kýsa bir süre sonra devreye
girer.
Bulaþýk makinesi sizi
bilgilendirir.
Bulaþýk makineniz ýþýklý
göstergelerle (G) donatýlmýþ
olup, sizi yýkama iþleminin
aþamalarý hakkýnda
bilgilendirir.
Ýþte yýkama aþamalarý :
Ön yýkama, yýkama,
durulama, kurutma.
Herhangi bir bulaþýðý
koymayý mý unuttunuz?
Herkesin baþýna gelebilir. ONOFF düðmesine basarak
programý durdurunuz,
unuttuðunuz parçayý
yerleþtiriniz ve ON-OFF
düðmesine tekrar
basýnýz.Program
durdurduðunuz aþamadan
itibaren çalýþmaya devam
edecektir.
Bitti mi?
Yýkama iþleminin bittiði 2 kýsa
sinyal ve kurutma göstergesinin
yanýp sönmesiyle belirtilir.
· A düðmesine basarak
makineyi kapatýnýz,
böylece elektrik giriþini
kesmiþ olacaksýnýz.
· Su musluðunu kapatýnýz.
· Bulaþýklarý çýkartmadan
birkaç dakika bekleyin :
yanarsýnýz! Biraz
beklerseniz buharla daha
iyi kurumuþ olurlar.
· Öncelikle alt sepeti
boþaltýnýz.
Bulaþýklarý
çýkarmaya
kalkmadan önce
programýn sona
erdiðinden emin
olun!
Düðmeye her basýþýnýzda sesli
bir ikaz iþareti duyacak ve G
göstergesinde seçilen
geciktirme süresini
göreceksiniz.
Þimdi istediðin programý
seçebilirsiniz. R düðmesine
basýnýz, sesli bir ikaz iþaretinden
sonra bekleme süresi için geri
sayým baþlayacaktýr. Bu süre
sonunda gösterge sönecek ve
program devreye girecektir.
Fikir mi deðiþtirdiniz?
Fikir deðiþtirirseniz daha önce
çalýþtýrmak için de
ayarlayabilirsiniz: D düðmesine
basarak seçiniz. Programý
yenilemek gerekmez.
Tek bir sepette mi yýkama
yapmak istiyorsunuz?
Deterjan dozunu yarým
kullanmayý unutmayýnýz.
Yýkanacak az bulaþýðýnýz varsa,
su, elektrik enerjisi ve deterjan
tasarrufu saðlamak için yarým yük
yapabilirsiniz. Herhangi bir
yýkama iþlemini seçmeden önce
F düðmesine basýnýz, H
göstergesinin yandýðýný
göreceksiniz, böylece bulaþýk
makineniz yanlýzca üst sepette
yýkama yapacaktýr.
Bulaþýk makineniz her an hangi
aþamada olduðunu size bildirir.
Yürütülen iþlemin
deðiþtirilmesi.
Yanlýþ program seçtiyseniz
korkmayýnýz! Yeni baþlamýþ
olduðu takdirde yürütülmekte
olan programý
deðiþtirebilirsiniz.R Reset
düðmesini 5 saniye basýlý
tutunuz. Biri uzun ve bunu takip
eden 3 kýsa sinyal
duyacaksýnýz.G göstergesi
sönecek ve artýk tüm
programlamalar iptal edilmiþ
olacaktýr. Þimdi tekrar doðru
programlamayý yapabilirsiniz.
Elektrik mi kesildi?
Makinenin kapaðýný mý
açtýnýz?
Elektrik kesildiði veya kapaðý
açtýðýnýz zaman yürütülmekte
olan program durur ve sonra
tekrar devreye girer. Herþey
kontrol altýnda!
Ne zaman baþlayacaðýna siz
karar verin.
Bulaþýk makinesini
yerleþtirdikten sonra, tercihiniz
olan program ayarýný
yapmadan önce ne zaman
çalýþtýrmak istediðinizi de
seçebilirsiniz. D düðmesine
basýnýz, böylece 12, 9, 6 ve 3
saate kadar programýn
baþlangýcýný erteleyebilirsiniz.
Eðer geciktirme programýný iptal
edip de hemen çalýþtýrmak
istiyorsanýz, D düðmesine,
çalýþma baþlayana kadar, arka
arkaya basýnýz böylece
programýn devreye giriþiyle ilgili
gösterge yanacaktýr.
G göstergelerinin çift görevi
1) Zaman ayarý
proglamlandýðýnda yanýp
söner : size zaman ayarýnýn
programlandýðýný hatýrlatýr.
2) yýkama aþamasý
göstergesi sabit yanar :
programýn devrede olduðunu ve
hangi yýkama aþamasýný
gerçekleþtirdiðini gösterir.
4 ARISTON BULAÞIK MAKÝNESi - Yerleþtirme ve kullaným kýlavuzu
Hangi programlarý seçtiðinizi
görmek ister misiniz?
Proram devam ederken,
herhangi bir safhada, P
düðmesine basarsanýz, kýsa bir
süre için yürütülmekte olan
program göstergesi ve daha
sonra, eðer ayarladýysanýz, yarým
yük göstergesi yanacaktýr.
Yýkama bittiðinde
yada devam ettiðinde
kapaðý açarken
makinadan çýkan
sýcak buharlara
dikkat edin,
yanýklara
yol açabilir!
Page 7
Deterjan ve parlatýcý
ulaþýk makinesi
B
Bulaþýk makineleri için özel olarak üretilmiþ deterjanlarý kullanýnýz. Yýkama iþlemine baþlamadan
önce deterjaný makinenin kapaðýnýn iç kýsmýnda bulunan hazneye koyunuz.
Deterjan
Deterjaný nasýl koyacaksýnýz
Deterjan haznesinin kapaðýný
(A) açmak için B tuþuna
basýnýz. Deterjan haznesinin
her iki bölümüne C ve Dye
belirtilen miktarda doldurunuz.
Þimdi kapaðý kapatýnýz.
Deterjan haznesinin kapaðý
kapanmýyorsa..
Deterjan haznesinin
kenarlarýnda deterjan
artýklarýnýn olup olmadýðýný
kontrol ediniz. Deterjanlarý
temizlediðinizde kapaðýn
kapandýðýný göreceksiniz.
B
25 gr
D
.
C
5 gr.
Faydalý tavsiyeler
Bulaþýk makinenizin
deterjan haznesini sadece
makinenizi kullanacaðýnýz
zaman doldurunuz. Eðer
daha önceden
doldurulduysa deterjan
ýslaklýk ve nem yüzünden
bozulabilir ve temizleme
gücünü kaybeder.
Deterjan miktarýný doðru
bir þekilde ayarlayýnýz:
Eðer fazla koyarsanýz
daha fazla temizlik elde
etmezsiniz.
A
Parlatýcý.
Parlatýcý, bulaþýklarýn
kurumasýný kolaylaþtýrarak,
onlarýn daha parlak olmasýný
saðlar. Parlatýcý haznesi
kapaðýn içindedir, D
göstergesi vasýtasýyla
parlatýcýnýn bitmiþ olduðunu
gördüðün zaman doldurmalýsýn.
Parlatýcýnýn bittiðini ýþýklý
göstergeyle bildiren modellerde
ise, bu gösterge yandýðýnda
veya yanýp
söndüðünde.Doldurma
sýrasýnda,parlatýcý dýþarýya
döküldüðünde,döküleni,bir
sünger vasýtasýyla, iyice silin.
Parlatýcý haznesinin
doldurulmasý
Parlatýcý haznesini açmak için
týpayý (C) saat yönünün tersi
yönüne çeviriniz. Sýzmayý
engellemek için parlatýcýyý
dökerken dikkatli olunuz.
Bulaþýk makineniz tarafýndan
kullanýlan parlatýcýnýn miktarýný
kendiniz belirleyebilirsiniz.
Tornavida veya metal bir para
ile parlatýcý haznesinin
kapaðýnýn altýndaki regülatörü
çeviriniz.
F
C
D
6 ayrý konum bulunmaktadýr. Fabrika
çýkýþý olarak 4. konuma ayarlýdýr.
Kullanýlan parlatýcý
miktarýnýn doðru
iyileþtirmektedir. Eðer
bulaþýklar üzerinde su
damlacýklarý veya
herhangi bir leke
görürseniz parlatýcý
ayarýný daha yüksek
bir konuma getiriniz.
Tam tersine eðer
çizikler görürseniz
parlatýcý ayarýný daha
olmasý kurutma
iþlemini
bulaþýklarýnýzýn
üzerinde beyaz
düþük konuma
getiriniz.
Dikkat
Piyasada ayný anda deterjan, tuz ve parlatýcý içeren bulaþýk temizleyici ürünler (3ü bir arada) bulmak mümkündür.
(3 in 1). Her hal-i karda, makinenin iç cidarlarýnda ve bulaþýklarýnýn üstünde beyaz lekeler oluþmasýný önlemek amacýyla,
gerekli hazneye en azýndan tuz koymaný tavsiye ediyoruz.
Diðer yandan parlatýcý eklemenizi sadece bulaþýk kurutmasý tatmin edici olmadýðýnda öneririz.
Her iki durumda da temizleyici maddenin amblajýnda bulunan üretici talimatlarýný izlemeye özen gösterin.
Sadece bu tip temizleyici maddelere baþvuruyorsanýz birkaç yýkama devresi sonunda tuz ve parlatýcý ikaz sinyallerinin
devamlý yanýp sönmesi çok doðal olacaktýr.
ARISTON BULAÞIK MAKÝNESÝ - Yerleþtirme ve kullaným kýlavuzu 5
Page 8
ulaþýk makinesi
B
Doðru programý mý seçtiniz?
Her türlü bulaþýk için yýkama programý
Bulaþýk makinesinde yapacaðýnýz yýkamalarda hijyenik bir ortamýn ve güvenilir
temizliðin garantisini bulacaksýnýz.
Tuz, parlatýcý, doðru miktarda deterjan ve doðru yýkama programý: iþte en iyi
sonuca ulaþmak ve makinenizi uzun süre kullanabilmek için gerekli formül.
Deterjam
Ûn yâkama
+ yâkama
5+25 gr.
Program
Sáper GáÌlá
Yâkama
Program seÌimi iÌin
uayarâlar
¬ok kirli bulaãâk(hassas
parÌalarla kullamamak
ázere)
Yâkama safhasânân tanâmâ
40C de sâcak suyla Ûn yâkama;
65 C de uzun sáreli âkama;
soÕuk suyla 2 durulama;
65 de sâcak durulama;
Kurulama
Bulaþýklarýnýz için doðru
yýkama programýný
seçiniz. En uygun
programýn seçimi temiz
bulaþýklar, su ve enerji
tüketimi için önemlidir.
Yâkama
sáresi
(% 10
Parlatâcâ
*
deÕiãimle
ekstra
kurulama
olmaksâzân)
120'
Normal
Yâkama
Hâz lâ Yâkama
Duãlama
Kristal
Yâkama
Normal kirlilikte
bulaãâklar iÌin.
Gánlák standard
program.
Normal kirlilikteki
bulaãâklar iÌin, az enerji
sarfiyatâyla ekolojik
yâkama.
$]NLUOLEXODÒÐNODUÐ
NXOODQÐPGDQKHPHQ
VRQUD\ÐNDPDNLoLQ
WDVDUUXIOX\ÐNDPD
.XUXWPD VÐ]
Bir sonraki ÛÕánán
bulaãâklarânâ beklerken
suda bârakma.
Yáksek âsâya duyarlâ
hassas eãyalar iÌin,
kullanâmdan hemen
sonra, Ûzel yâkama
iãlemi,.
SoÕuk suyla Ûn yâkama
50 de kâsa sáreli yâkama
70C de sâcak durulama
Kurulama
2 SoÕuk suyla Ûn yâkamalar
50 C de uzun sáreli yâkama
65C de sâcak suyla durulama
Kurulama
40 C de kâsa yâkama
SoÕuk suyla durulama
Yemek artâklarânân kap-kaÌaÕa
yapâãmasânâ Ûnlemek iÌin kâsa
sáreli ve soÕuk sulu yâkama
50C de yâkama
45C de âlâk durulama
65C de sâcak durulama
Kurulama
5+25 gr.
5+25 gr.
25 gr. 24'
25 gr.
*
*
*
72'
130'
12 '
96'
6 ARISTON BULAÞIK MAKÝNESi - Yerleþtirme ve kullaným kýlavuzu
Page 9

Tuz olmadan asla
ulaþýk makinesi
B
Evinizin Suyu
Sularýn sertliði oturulan mevkiiye göre deðiþmektedir. Eðer evinizde kullandýðýnýz su sert
ise bu suyun kireçten arýndýrýlmadan kullanýlmasý bulaþýklar üzerinde lekelere sebep
olacaktýr. Bulaþýk makineleri için olan özel bir tuz kullanýlarak kirecin etkisi yok edilmelidir.
Tuz haznesinin doldurulmasý
Her zaman sadece bulaþýk
makinalarý için özel üretilmiþ
tuzlarý kullanýnýz. Tuz haznesi alt
sepetin altýnda yer almaktadýr.
1. Alt sepeti çýkarýnýz ve tuz
haznesinin kapaðýný gevþetip
çýkarýnýz.
2.Makineye ilk defa tuz
koyuyorsanýz önce tuz
haznesini su ile doldurunuz.
3. Bulaþýk makineniz ile birlikte
verilen huniyi kullanarak
hazneye yaklaþýk 2kg tuz
koyunuz. Hazneden bir miktar
suyun taþtýðýný görmeniz
normaldir.
4. Tuz haznesinin kapaðýný takýp
iyice sýkýþtýrýnýz.
Tuzu ne zaman eklemek
gerek?
Tuz deposu, "S" tuz eksiði sinyali
yandýðý zaman doldurulmalýdýr.
Bulaþýk makinanýz üç yýkama
devresi boyunca bu eksikliði size
hatýrlatacaktýr.
Akýllý tuz
Bulaþýk makineniz evinizde
kullanýlan suyun sertlik
derecesine göre tuz tüketimini
ayarlayabilir. Böylece tuz tüketimi
en aza indirgenmiþ olur.
Tuz tüketimini ayarlamak için:
1. Tuz haznesinin kapaðýný
gevþeterek çýkarýn.
2. Tuz haznesinin üzerinde bir ok
iþareti göreceksiniz (resme
bakýnýz). Eðer gerekiyorsa
saat yönünün tersine
çevirerek iþareti "-" den "+" ya
getiriniz.
Yandaki su sertliði tablosuna
bakarak okun konumunu seçiniz.
Su sertliÕi
dH fH mmol/l
0 - 10 0 - 17 0 - 1,7 / 0 /
10- 25 18-44 1,8 - 4,4 - 20 60
25- 50 45- 89 4,5 - 8,9 ORTA 40 40
> 50 > 89 > 8,9 + 60 25
Bulaþýklarýnýz üzerinde
engellemek için yýkamaya
baþlamadan önce tuz
SeÌici
pozisyonu
sertliðini bilmiyorsanýz su
saðlayan þebekeden
bölgenizdeki suyun
sertliðini öðreniniz.
tortu oluþumunu
koyunuz.
Tuz
táketimi
(program
/gram)
Evinizdeki suyun
Otonomi
(progra-
m/
2kg)
Faydalý tavsiyeler
Bulaþýklarýnýzý nasýl korursunuz?
n Hemen hemen tüm gümüþ
eþyalar makinede
yýkanabilir. Sadece antika
gümüþler ve pas yapýcý bir
madde ile süslenmiþ
gümüþler yýkanamaz. Sýcak
su antika olan gümüþlerin
deforme olmasýna, motifli
olanlarýn motiflerinin
kaybolmasýna neden olur.
Gümüþ eþyalarýn diðer
metallerle temasýna engel
olursanýz kararmalarýný ve
lekelenmelerini önlemiþ
olursunuz.
Bulaþýk makinesi size
zaman kazandýrmaktan
öte bulaþýklarýnýzý yüksek
ýsýlarda yýkadýðý için daha
hijyenik bir yýkama
saðlamaktadýr.
■ Gümüþ tabaklar özellikle tuz,
yumurta, zeytinyaðý sirke ile
temas etmiþlerse kullaným
sonrasýnda hemen
yýkanmalýdýr.
■ Çok hassas olan bulaþýklar
için makinenizde mevcut
olan özel programý
kullanýnýz.
Nasýl tasarruf saðlanýr
Beyaz eþyalarý akýllý kullanýrsanýz hem tasarruf edersiniz
hem de doðaya saygýlý olursunuz.
Maksimum yük
Tüketim deðerlerini en aza indirmek için bulaþýk makinenizi
iyice doldurmadan çalýþtýrmayýnýz. Tamamen dolmasý
birkaç gününüzü alýyorsa ýslatma programýný kullanarak
oluþabilecek kötü kokularý yok edebilirsiniz.
Doðru yýkama programý
Bulaþýk makinenize yerleþtirdiðiniz bulaþýklara en uygun
yýkama programýný seçiniz. Program seçimi bulaþýðýn
türüne ve ne kadar kirli olduðuna baðlýdýr. Doðru programý
seçmek için
sayfa 6 daki tablodan yararlanýnýz.
ARISTON BULAÞIK MAKÝNESÝ - Yerleþtirme ve kullaným kýlavuzu 7
Page 10
ulaþýk makinesi
B
Kurma ve taþýma
Makineniz eve getirildiðinde
Yeni satýn alýndýðýnda veya bir evden baþka bir eve taþýnýldýðýnda iyi yapýlmýþ bir
montaj, bulaþýk makinenizin daha iyi çalýþmasýný saðlar.
Bulaþýk makinesine iyi bir yer
seçilmelidir. Makine duvara
yakýn veya mutfak tezgahýnýn
altýna yerleþtirilebilir. Bulaþýk
makinesinin su alma ve
boþaltma iþlemleri için iki ayrý
hortumu bulunmaktadýr.
Bu model bulaþýk makinasý düz
bir yüzeyinin altýna ankastre
edilebilir (ilgili kýlavuzu
okuyunuz).
Denge
Makine Ariston Yetkili Servisi
tarafýndan yerine
yerleþtirildikten sonra ayak
ayarlarý yapýlarak zemine iyi
oturmasý saðlanmalýdýr. Ýyi bir
ayarýn yapýlmasý bulaþýk
makinenizin düzgün çalýþmasý
için çok önemlidir.
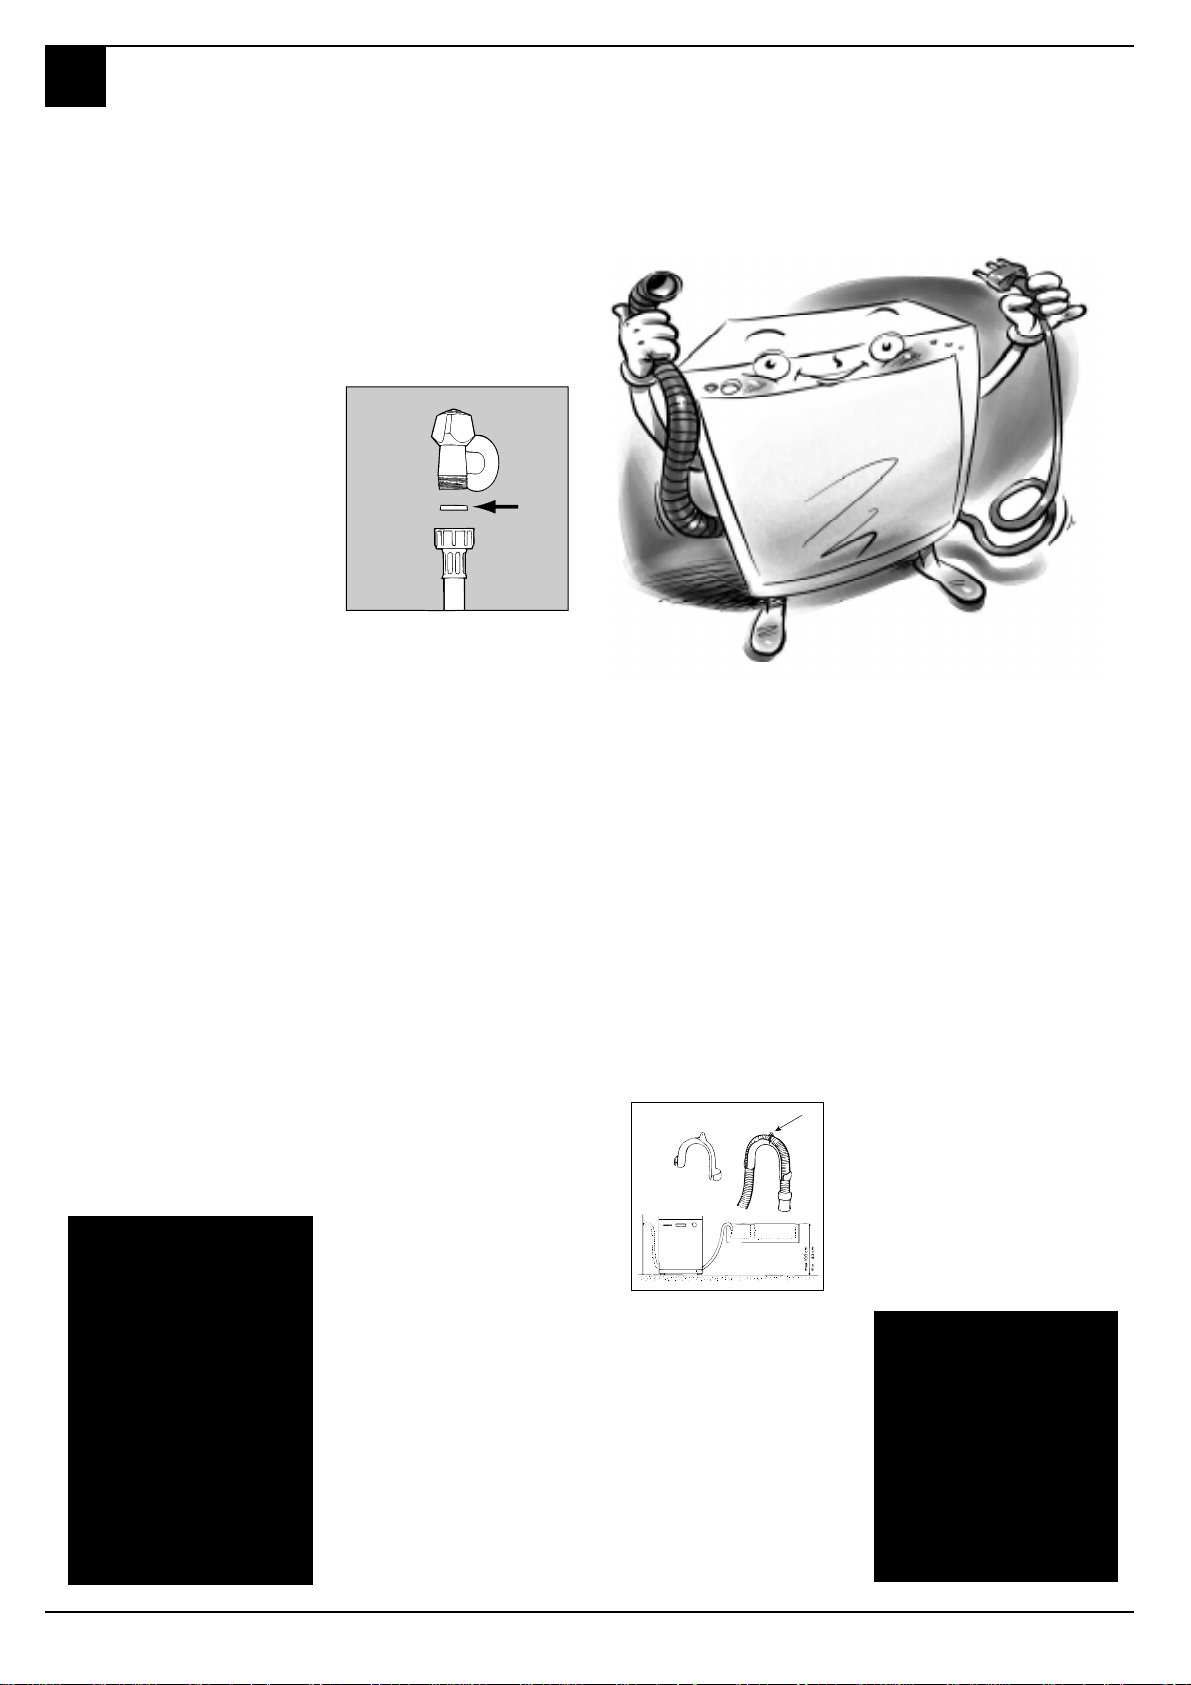
Soðuk su giriþ baðlantýsý.
Cihazýn su þebekesine
baðlantýsý daima makinanýn
donanýmýnda olan doldurma
borusu vasýtasýyla yapýlmalýdýr,
baþka tip borularý asla
kullanmayýn. Herhangi bir
deðiþim için mutlaka orijinal
yedek parça kullanýn.
Su giriþ borusunu ¾ lük vida diþi
açýlmýþ bir soðuk su musluðuna
baðlayýn. Bu baðlantýyý
gerçekleþtirirken borunun
musluða iyi sýkýlmasýna özen
gösterin. Eðer borular yeni ise
veya uzun süredir kullanýlmadý
ise baðlantýyý yapmadan önce
borulardan su akýtmak sureti ile
borularda kalýntýlar olup
olmadýðý kontrol edilmelidir. Bu
kontrol yapýlmaz ise suyun giriþ
yaptýðý noktada tortu oluþmasý
ve bunun da makineye zarar
verme riski oluþur.
A
.2
Sýcak su giriþine baðlantý
Bulaþýk makineniz sýcak suya
baðlý olarak da çalýþabilir
(merkezi sýcak su tesisatýnýz var
ise).Ancak su sýcaklýðý 60°C yi
geçmemelidir. Sýcak su
tesisatýnýz var ise yýkama süresi
de 15dk daha azalmýþ olur.
Ancak yýkama etkinliði biraz
azalacaktýr. Sýcak su baðlantýsý
soðuk su baðlantýsý ile ayný
þekilde yapýlmalýdýr.
Atýk su boþaltma baðlantýsý.
Atýk su borusunu, evde bulunan
ve çapý minimum 4 cm olan
boþaltma borusuna yada
doðrudan lavaboya yatýrýn.
Boruda boðum yada aþýrý
kývrýmlar olmamasýna dikkat
edin. Gerektiðinde, donanýmda
olan (þekile bak.) plastik dirseði
de kullanabilirsiniz. Borunun A
harfiyle tanýmlanmýþ kýsmý 40
ve 100 cm arasýnda yükseklikte
bulunmalýdýr.
Boru su içinde bulunmamalýdýr.
A
Elektrik baðlantýsý
Herþeyden önce gerilim ve
frekans deðerlerinin makinenin
kapaðýnýn iç tarafýnda bulunan
ürün plaketinin üzerindeki
deðerlere uygunluðunu kontrol
edin.
Topraklý priz:
Makinenizin fiþini topraklý prize
takýnýz. Bu tip bir prize sahip
olup olmadýðýnýzý kontrol ediniz.
Eðer elektrik kablosu zarar
görmüþ ise deðiþtirilmesi için
Ariston Yetkili Servisini arayýnýz.
Bulaþýk makinesi ile
birlikte verilen özel
plastik parça,
boþaltma
hortumunun hareket
etmesini ve suyun
baþka bir yere
boþalmasýný
engellemek için
duvara
sabitlenmelidir.
8 ARISTON BULAÞIK MAKÝNESi - Yerleþtirme ve kullaným kýlavuzu
Eðer priz cihazýn
fiþine uygun türde
deðilse adaptör veya
çoklu priz kullanmak
yerine prizi uygun
tipte olan bir tanesi
ile deðiþtirin.
Page 11

ulaþýk makinesi
Sorunlar ve çözümleri
B
Eðer bir sorununuz var ise bu bölümü okuyunuz.
Makinenin çalýþmamasý veya bir problem çýkmasý durumunda Ariston Yetkili Servisini çaðýrmadan önce aþaðýdaki kontrolleri
yapýnýz.
Bulaþýk makinesi çalýþmýyor
n Su musluðu açýk mý?
n Su musluðu su giriþ
hortumuna doðru bir þekilde
baðlanmýþ mý?
n Evin suyu kesik mi?
n Su basýncý yeterli mi?
n Hortum bükülmüþ mü?
n Su giriþindeki hortum filtresi
týkalý mý?
n Makinenin kapýsý tam
kapanmamýþ olabilir mi?
Bulaþýklar temiz çýkmýyorsa
n Deterjan miktarýný iyi
ayarladýnýz mý?
n Seçmiþ olduðunuz yýkama
programý yüklediðiniz bulaþýðýn
cinsine uygun mu?
n Filtre temiz mi?
n Pervaneler rahatça
dönebiliyor mu?
Bulaþýk makinesi suyu
boþaltmýyor ise
n Boþaltma hortumu bükülmüþ
olabilir mi?
Bulaþýk makinesinin
içerisinde kalker kalýntýlarý ve
beyaz lekeler var ise
n Tuz haznesinin kapaðý iyice
kapatýlmýþ mý?
n Parlatýcý ayarý doðru yapýlmýþ
mý?
Arýza uyarýlarý
Bulaþýk makinanýz, çalýþma
sýrasýnda meydana gelebilecek
arýzalarý algýlayabilen bir
emniyet sistemiyle
donatýlmýþtýr. Bu arýzalar, sýk sýk
yanýp sönen bir yada iki G
program devre sinyali
tarafýndan bildirilir.
Hangi sinyalin yanýp söndüðünü
not aldýktan sonra makinayý
durdurun ve yetkili bakým
servisini arayýn.
Musluk kapalý alarmý
Su musluðunu açmayý
unuttuysanýz, makineniz birkaç
dakika süreyle ve kýsa sesli
ikazlarla bunu size hatýrlatýr.
Suyu açýnýz ve göreceksiniz ki
makine birkaç dakika sonra
çalýþmaya baþlayacaktýr. Bu
ikaz sinyalleri esnasýnda siz
yoksanýz, makine bloke olur ve
4 ile 5 (hýzlý ve ýslatma) program
göstergeleri kýsa aralýklarla
yanýp söner. On-Off düðmesi
vasýtasýyla kapatýnýz, su
musluðunu açýnýz ve takriben
20 saniye bekledikten sonra
makineyi yeniden açýnýz,
programlama iþlemlerini
tekrarlayýnýz ve Start
düðmesiyle çalýþtýr.
Filtreler týkalý alarmý
Makine bloke olmuþ ve 3 ile 5
(ekonomik ve suda býrakma)
program göstergeleri kýsa
aralýklarla yanýp sönüyorlarsa,
filtre irice yemek artýklarýyla
týkanmýþ demektir. Makineyi
kapat,10.sayfada gösterildiði
gibi filitreyi iyice temizleyip
yerine taktýktan sonra makineyi
tekrar çalýþtýr.programlama
iþlemlerini tekrarlayýnýz ve Start
düðmesiyle çalýþtýrýnýz.
Herþeyi kontrol etmenize
raðmen bulaþýk makineniz
hala çalýþmýyor ve sorun hala
devam ediyor ise
En yakýn Ariston Yetkili
Servisini arayýnýz, arýza tipini ve
makinenin kapaðýnýn iç yan
kýsmýnda yeralan model, seri
numarasýný bildiriniz.
Sadece Ariston Yetkili
Servisine baþvurunuz ve
sadece orjinal yedek
parça kullanýnýz.
Evinizdeki Emniyet
Bulaþýk makineniz uluslararasý emniyet normlarýna uygun bir þekilde üretilmiþtir. Uyarýlarý ve bu kitapçýktaki bilgileri dikkatli bir
þekilde okuyunuz. Kurma, kullanma ve bakým emniyeti için sizlere deðerli bilgiler verilmektedir. Kötü sürprizlerle karþýlaþmamak
için:
1. Ambalajý Ariston Yetkili
Servisi eþliðinde açýnýz.
2. Ambalajý açtýðýnýzda
makineyi kontrol ediniz
eðer herhangi bir hasar
varsa yetkili servisi
uyarýnýz.
3. Bulaþýk makinesi sadece
yetiþkinler tarafýndan
kullanýlmalýdýr. Çýplak
ayakla veya ýslak elle
makineye dokunmayýnýz.
4. Ekli kablo veya çoklu priz
kullanmayýnýz. Eðer
elektrik kablosunun
uzunluðu yeterli deðil ise
daha uzun bir kablo ile
deðiþtiriniz. Kablonun
kývrýlmamasýna veya
aðýrlýk altýnda
kalmamasýna dikkat ediniz.
5. Anormal çalýþma
durumlarýnda veya bakým
esnasýnda fiþini prizden
çekiniz.
6. Çocuklarý deterjandan ve
makinenin kapaðýnýn açýk
olmasý durumunda
makineden uzak tutunuz.
7. Makineniz dýþ ortamda
kurulmamalýdýr.Makineyi
dýþ mekan þartlarýna
(yaðmur, güneþ..) maruz
býrakmak çok tehlikelidir.
8. Yýkama programý sonunda
rezistansa dokunmayýnýz.
9. Açýk kapýya dayanmayýnýz
veya kapýnýn üzerine
oturmayýnýz.
10. Arýza durumunda su
musluðunu kapatýnýz, fiþi
prizden çekiniz ve Ariston
Yetkili Servisini arayýnýz.
11. Makineyi uzun süre
kullanmayacak iseniz fiþi
prizden çekiniz.
Sadece orjinal ve Ariston tarafýndan
garantili yedek parça kullanan uzman ve
yetkili servis teknisyeni istiyorum.
ARISTON BULAÞIK MAKÝNESÝ - Yerleþtirme ve kullaným kýlavuzu 9
Page 12

ulaþýk makinesi
B
Özen ve bakým
Özel temizleme ve bakým
Filtre grubu
Her zaman mükemmel yýkama
neticeleri elde edebilmek için
filtre gurubunu temizlemek
gerekir.
Yýkama suyu devreye girmeden
önce filtre edilerek yemek
artýklarýndan arýndýrýlýr. Bu
nedenle, her yýkamadan sonra,
yarým ay þeklindeki A filtresiyle
C bölümündeki yemek
artýklarýnýn temizlenmesi
tavsiye olunur; bu iþlemi
gerçekleþtirmek için C
bölümündeki tutamaðý yukarý
doðru çekiniz. Su ile çalkalamak
yeterlidir.
Tüm filtre gurubunun ayda bir
defa temizlenmesi gerekir:
yarým ay þeklindeki A filtresi +
C bölmesi + silindir þeklindeki
B filtresi + D mikro filtresi.
B filtresi sola doðru çevrilerek
çýkartýlýr. Temizlenmesi için
metal olmayan bir fýrça
kullanýnýz.
Parçalarý (resimdeki gibi)
birleþtiriniz ve filtre gurubunu
bulaþýk makinesine yerleþtiriniz.
Yuvasýna oturtunuz ve
bastýrarak yerleþtiriniz.
Bulaþýk makinesi filtresiz olarak
D
A
C
B
kullanýlmamalýdýr. Filtreleri
doðru takmazsanýz,
yýkamalardan iyi netice
alamayacaðýnýz gibi, bulaþýk
makineniz de zarar görebilir.
Pervanelerin temizliði
Bazý yemek kalýntýlarýnýn
pervanelerin üzerine yapýþmak
sureti ile püskürtme
gözeneklerini týkadýðý haller
olabilir. Pervaneleri arasýra
kontrol ediniz ve temizleyiniz.
1
B
2
C
A
Bulaþýk Makinenizi Koruyunuz
Birkaç noktaya dikkat ederseniz bulaþýk makinenizi korumuþ olursunuz.
Her yýkama sonrasý.
Yýkama programýnýn sonunda
kapaðý yarým açýk býrakýnýz.
Böylece rutubet ve kötü kokular
oluþmayacaktýr.
Cihazýn fiþini çekiniz.
Bulaþýk makinenizin bakýmýný
ve temizliðini yapmadan önce
elektrik fiþini prizden çekiniz. Bu
sizin herhangi bir tehlikeyle
karþýlaþmanýza engel olacaktýr.
Çözücü veya aþýndýrýcý
malzemeler kullanmayýnýz.
Bulaþýk makinenizin dýþ
kýsýmlarýný ve parçalarýný
temizlemek için ne çözücülere
ne de aþýndýrýcý maddelere
ihtiyacýnýz var. Sadece ýlýk su
ile ýslatýlmýþ bir bez kullanýnýz.
Makinenizin iç yüzeylerinde
lekeler görürseniz
servislerimizden temin
edebileceðiniz bulaþýk
makineleri için özel üretilmiþ
malzemeler kullanýnýz.
Tatile mi gidiyorsunuz?
Uzun bir süre boyunca evden
uzakta olacaksanýz aþaðýdaki
noktalara dikkat ediniz:
Makine boþ halde iken bir
yýkama gerçekleþtiriniz.
Su giriþ musluðunu kapatýnýz.
Kapýyý yarý açýk olarak
býrakýnýz Ýstenmeyen kokularý
önlemiþ olursunuz.
Taþýma
Taþýma esnasýnda makinenin
dikey durumda olmasýna dikkat
ediniz eðer gerekiyor ise arka
tarafa doðru eðebilirsiniz.
Kapý iç contalarý
Bulaþýk makinelerinin içinde
meydana gelen kokularýn en
büyük sorumlularýndan birisi de
contalar arasýnda sýkýþan
yiyecek kalýntýlarýdýr. Contalarý
ýslatýlmýþ bir sünger ile
temizlemeniz yeterli olacaktýr.
Bulaþýk makineniz bir çöp öðütücü deðildir!
Bulaþýklar üzerindeki ufak kalýntýlar bulaþýk makineniz
tarafýndan kolayca temizlenebilir,fakat kemikleri,
kabuklarý ve diðer büyük kalýntýlarý temizledikten sonra
bulaþýklarý makineye yerleþtirmelisiniz. Bardaklarý
içlerindeki sývýyý boþalttýktan sonra makineye koyunuz.
10 ARISTON BULAÞIK MAKÝNESi - Yerleþtirme ve kullaným kýlavuzu
Page 13

Quick guide to your
dishwasher
This manual explains pleasantly all your new electric
household appliance has to offer. In addition, you will
discover a world of useful hints and handy tips to help
you get a better wash from your dishwasher and to make
it last longer.
1. Installation and moving (p. 18)
Installation, after delivery or your moving house, is the most important
procedure for the correct operation of your dishwasher. Always check:
1. That the electricity system is in accordance with norms;
2. That the water inlet and outlet hoses are connected correctly;
3. That the dishwasher is level on the ground. It is worth it: for the longer
life span and the correct operation of your dishwasher.
2. Control panel at your orders (p.12)
ISHWASHER
D
Learn to get to know the parts which make up your dishwasher, you will
use it better for it. This is where you will find the description of the
controls and the internal parts.
3. How to load your dishes (p.13)
This page includes useful tips to help you load your dishwasher correctly
and make the most of all the available space.
4. How to start your dishwasher (p. 14)
8. Safety for you and your family (p.19)
After loading the dishes, you need to select the right wash cycle and
measure out the correct dose of detergent and rinse aid. Reading these
pages will help you through all the wash phases.
5. Salt: an important ally (p. 17)
Using the right salt and in the right quantity will help you maintain your
dishwasher in top condition, to wash better and to avoid possible damage
caused by limescale.
Read this chapter carefully, as it will provide you with useful information
on installation, use and maintenance safety. To avoid nasty surprises.
9. Special care and maintenance (p.20)
Once in a while, once a month, spend a little time on the filter assembly
and the sprayer arms. This is where you can learn how.
10. Keeping your dishwasher in shape (p.20)
6. Advice and suggestions to help you make savings
as well (p. 17)
This is where you will find small tips on how to wash your dishes better
and to help make savings by selecting a wash cycle which best suits the
type of load.
Respect the few rules you will find here, and the result will be an enduring
top-shape dishwasher.
11. Technical characteristics (p. 12)
All your appliance's technical data, in accordance with norms and
regulations as always.
7. Troubleshooting (p.19)
Before calling the technician, have a look here: a lot of problems can
have an immediate solution. If you can't manage to solve it yourself,
then call the Ariston helpline and any problem will be solved as quickly as
possible.
12. Ariston is still with you after purchase (p.21)
Ariston supports its products by means of after-sales services and
assistance, offering you special guarantees, professional assistance as
well as quality spare parts and accessories. To find out more, call the
Ariston Freefone Number.
ARISTON DISHWASHER - Instructions for installation and use
11
Page 14

ISHWASHER
G
J
I
L
K
H
F
E
D
Let's open up your dishwasher
together
How is it made?
Learn to get to know the parts which make up
your dishwasher, you will use it better for it.
E. Upper rack
F. Top sprayer arm
G. Rack height adjuster
H. Lower rack
I. Bottom sprayer arm
J. Salt container cap
K. Washing filter
L. Detergent and rinse aid
dispenser
Control panel at your orders
A. On-Off button
Press this button to
switch the appliance on.
B. ON-OFF Indicator light
This light informs you
that the dishwasher is on.
C. Door opening handle
Use this handle to open the
dishwasher door.
D. Delayed start select
button
This button delays the
start of the wash cycle
you selected by 12, 9, 6
or 3 hours.
E.Cycle indicator light
This light informs you
which cycle you have
selected or the one in
progress.
F. Half load selection
button
To allow you to wash a
half-load on the upper
rack
G. Cycle phase and
delayed start indicator
lights
These indicator lights
inform you which cycle
phase is under way
(pre-wash, wash, rinses,
drying) and, if you
have set a delayed start;
they also indicate the
amount of time left
until the wash cycle
starts.
S
E
H. Half load Indicator
Light
This light informs you
that the half load you
have selected.
P. Cycle select button
Each time this button is
pressed, one of the cycle
indicator lights E will
come on in sequence.
R. Start/Reset Button
With Start, the wash cycle
begins, whereas all the
settings are cleared with
Reset.
H
F
R
S. Low salt indicator light
To tell you that its time
to add more salt.
T. Low rinse aid indicator
light
To tell you that its time
to add more rinse aid.
G
B
T
Technical Characteristics
:LGWK FP
'HSWK FP
+HLJKW FP
&DSDFLW\ VWDQGDUGSODFHVHWWLQJV
0DLQVZDWHUSUHVVXUH .3D·03D·EDU
3RZHUYROWDJH 6HHGDWDSODWH
7RWDODEVRUEHUSRZHU 6HHGDWDSODWH
)XVH 6HHGDWDSODWH
12
ARISTON DISHWASHER - Instructions for installation and use
7HFKQLFDOFKDUDFWHULVWLFV
P
C
This dishwasher
conforms to the
following European
Community Directives:
D
A
73/23/EC
(
Low Voltage Directive)
and subsequent
amendments;
89/336/EEC
(Electromagnetic
compatibility) and
subsequent
amendments.
97/17/CE
(Labelling)
Page 15

ISHWASHER
D
How to load your dishes
Before washing, a few small steps can help you get a better wash and keep your dishwasher for longer.
Remove the largest scraps of food left over on your plates, soak saucepans and frying pans with tough
incrustations. After loading your dishes, make sure the blades on the sprayer arm turn well
First of all.
Before placing the dishes in the
racks, remove the largest scraps
of food left over on your plates,
you will thus avoid blocking the
filter, which would reduce the
efficacy of the wash.
If the saucepans and frying pans
are very dirty, allow them to soak
before being washed. To make it
easier to load your dishes, pull the
racks out.
Multisystem racks
This dishwasher model is fitted with
newer and more modern upper and
lower racks and a cutlery basket.
They are made to provide greater
flexibility in loading dishes, making
them more suitable to meet your
specific needs.
What goes into the
lower rack?
We recommend you place the most
difficult dishes to wash into the
lower rack: saucepans, lids, soup
dishes and plates, but also: mugs,
cups and glasses (see photos for
load examples).
What goes into the
upper rack?
Place delicate and lightweight
dishes in the upper rack: glasses,
tea cups and coffee cups, saucers
- but plates too - shallow salad
bowls, slightly dirty frying pans and
shallow pans.
Position light weight dishes in such
a way as to avoid their being moved
by the spray of water.
The appliance can also be equipped
with one or two tip-up
compartments onto which you can
place mugs and cups, as well as
long sharp knives and serving
cutlery.
After loading the dishes, remember
to check that the blades on the
sprayer arms can turn freely
without hitting against any dishes.
How to adjust the top
rack.
The upper rack can be set in high
or low position to enable you to
organise your dishes effortlessly.
lower rack
Load examples
upper rack
Serving dishes and large
lids: place them on the sides
of the rack.
Saucepans, salad bowls:
must always be placed upside
down
Very deep dishes: place
them obliquely, thus allowing
water to run down them and
cleaning them better
Glasses and cups: position
them as indicated in the figure.
The cutlery basket can be split up
by pulling out the handle and
removing the clips that keeps the
two parts joined together.
When you only have little cutlery
to wash, you can use just half the
basket; save space for other
crockery or place the other half of
the basket in the upper rack instead
(see figures A and B).
This basket is equipped with two
removable grids: insert the cutlery
one by one into the slots, with the
handles at the bottom. Position
them so that they don't touch.
Fig.C
There are two handles on the sides
of the upper rack: use these to
adjust its height (see fig. C)
A1
B
A
ARISTON DISHWASHER - Instructions for installation and use
13
Page 16

ISHWASHER
D
Starting the dishwasher
Ready, steady, go!
You have loaded your dishes and you now have
to set the wash cycle. It takes just one minute
to learn how
First of all.
Turn on the water tap completely
and press ON-OFF button "A". you
will hear a short beep and indicator
light "B" lights up. Now the
appliance is on and awaiting instructions.
Selecting the wash
cycle.
Select the wash cycle by pressing
button "P". Each time you press
the button, a beep will sound and
indicator lights "E" will light up in
sequence: choose the cycle you
deem most suited to the type of
dishes to be washed (take a look at
page 16, where you will find the
wash cycle table). If the appliance
door is shut, press the Start button
"R" and you will hear a beep; the
cycle will start up within a few
seconds.
The dishwasher informs
you.
Your dishwasher is fitted with
indicator lights (G) which light up
to indicate the cycle phase under
way.
Here are the symbols corresponding to each cycle phase:
pre-wash, wash, rinses, drying.
At all times, your dishwasher tells
you which cycle phase is under
way.
Modifying a wash cycle
in progress.
But if you have chosen the wrong
cycle, not to worry! You can modify
the wash cycle in progress, if it has
only just started. Keep the RESET
button "R" pressed for about 5
seconds: a prolonged beep will
sound, followed by three short
beeps. Indicator light "G" will turn
off and at this stage, all the settings
will have been cancelled. You are
now free to re-set the correct wash
cycle.
You've left out a dish?
Well, it happens to everyone. Interrupt the wash cycle by pressing the
ON-OFF button, insert the dish you
had forgotten and press the ONOFF button again. The cycle will
start up from where you interrupted
it.
Finished?
The end of the wash cycle is indicated by two short beeps and the
flashing of the drying phase indicator light.
Turn the appliance off by press-
ing button "A", thus cutting off
the electricity supply.
Turn off the water tap.
Wait a few minutes before unload-
ing the dishes: they are very
hot! If you wait a little while, they
dry better thanks to the steam.
Empty the lower rack first.
Make sure the
wash cycle has
ended before
removing the
dishes!
There's been a power
failure? Have you opened
the dishwasher door?
The wash cycle stops and then
restarts when the electricity comes
back on or when you shut the door.
Everything is under control!
You decide when it
starts.
When you have loaded the dishes,
you can choose when to start your
dishwasher before setting the wash
cycle desired. Press button "D" to
delay the start of the wash cycle
by 12, 9, 6 or 3 hours. Each time
you press it, you will hear a short
beep and the indicator light "G"
corresponding to the selected
delay will light up.
Now you can select the desired
wash cycle. Press the start button
"R" and after you hear the beep,
the countdown to the delayed start
will begin.
Once this time is up, the indicator
light will stop flashing and the wash
cycle will begin.
If you have set a 12 hour delay, for
example, once you have selected
the wash cycle, the 12 hour
indicator light will flash followed
by the others in sequence until the
set time delay is up. A quick look
at the indicator lights will keep you
informed of the countdown
progress at all times.
Have you changed your
mind?
If you change your mind, you can
set a shorter time delay: press button "D" to select it. You need not
reset the wash cycle.
If on the other hand you want to
cancel the delay set and you want
the cycle to start immediately,
press button "D" repeatedly until
the cycle starts and indicator light
"G" corresponding to the cycle
start phase comes on.
Dual function of indicator
lights "G"
1) flashing to indicate a
delayed start: to remind you
that you have set a delayed start;
2) on and not flashing
beneath the cycle phase
symbol:
meaning the cycle has started and
is in the phase indicated by the
symbol.
You want to wash on one
rack only? Remember to
use half the amount of
detergent.
If you only have a few dishes to
wash, you can decide to run a halfload, to save on water, electricity
and detergent. Before setting any
wash cycle whatsoever, press button "F", indicator light "H" will light
up and your dishwasher will wash
on the upper rack only.
Would you like to see
which settings you have
made?
At any time, when the cycle is under
way, if you press button "P", the
cycle in progress indicator light will
light up for a few seconds, followed
by the half load indicator light,
wherever set.
If opening the
door soon after
the end of the
programme,or
during it, stand
away from the
Dishwasher, to
avoid possible
injury from hot
steam.
14
ARISTON DISHWASHER - Instructions for installation and use
Page 17

Detergent and rinse aid
ISHWASHER
D
Only use specific dishwasher detergents. Pour the detergent into the
dispenser on the inside of the door. Before the wash cycle starts!
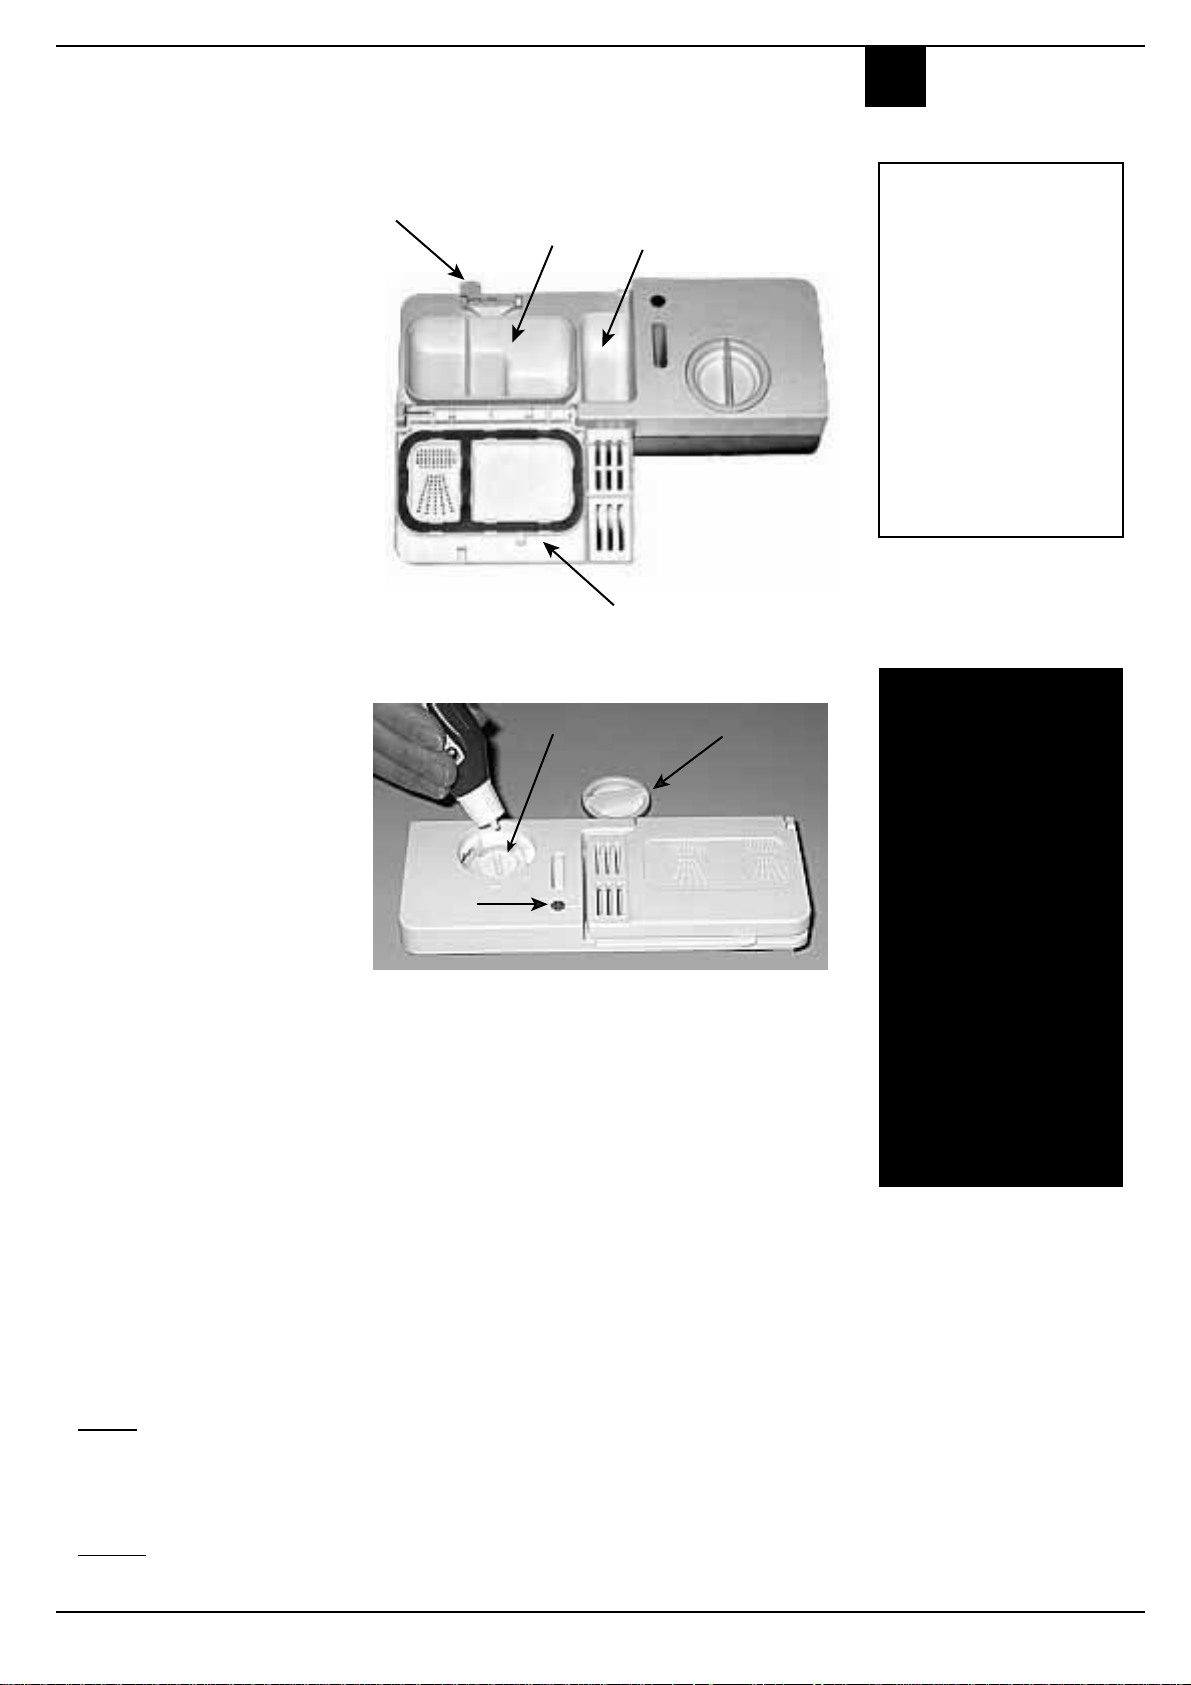
The detergent
Loading the detergent
To open lid A, press button B. The
detergent should be poured into the
two containers C and D up to the
rim.
Now you can close the lid: press it
down until you hear it click.
If you prefer to use the detergent
in tablet form, then place one inside
the container D and close the lid.
It won't close!
Check whether there is any
detergent residue on the edges of
the dispenser. It is due to this residue that the lid won't close. Get rid
of it and you'll see that it closes.
B
25 gr
D
.
C
5 gr.
Useful tips
Use the right
amount of
detergent: if you
use too much,
you will not get
cleaner dishes,
but just more
environmental
pollution.
Keep your
dishwasher
detergent and
rinse aid in a
cool, dry place
and away from
children.
A
The rinse aid.
This product makes dishes sparkle
more as it improves their drying.
The rinse aid container is situated
on the inside of the appliance door;
you should refill it when you see
the container is empty by means
of indicator light D.
(If your dishwasher is fitted with a
low rinse aid indicator light, fill
the container up when the indicator
light flashes or lights up).
Loading the rinse aid.
To open the dispenser, turn cap C
anticlockwise. Take care when you
pour in the rinse aid to avoid it
overflowing. You can adapt the
amount of rinse aid used by the
dishwasher: regulate the adjuster
F which you will find under lid C.
You can choose from six different
positions.
F
D
You can choose from six different
positions. It is normally set to 4.
C
Proper dosage of
improves drying.
If drops of water
remain on the
dishes or spotting
occurs, turn the
dosage adjuster to
a higher setting.
If, on the other
hand, the dishes
streaks, then turn
adjuster down to
a lower setting.
the rinse aid
have white
the dosage
Warning
Three-in-one dishwasher tablets are now available on the market, and combine the detergent, salt and rinse aid
all in one. If the water in your area is hard or very hard, we still recommend you pour extra salt into the
relevant dispenser to prevent the formation of white streaks on your dishes or on the appliance interior.
Add rinse aid to the corresponding container only if you are dissatisfied with the results on your dishes.
In any case, please read the manufacturer's instructions provided on the packet.
If you use only these products, it is normal for the salt and rinse aid indicator lights to flash permanently after
a certain number of cycles.
ARISTON DISHWASHER - Instructions for installation and use
15
Page 18

ISHWASHER
D
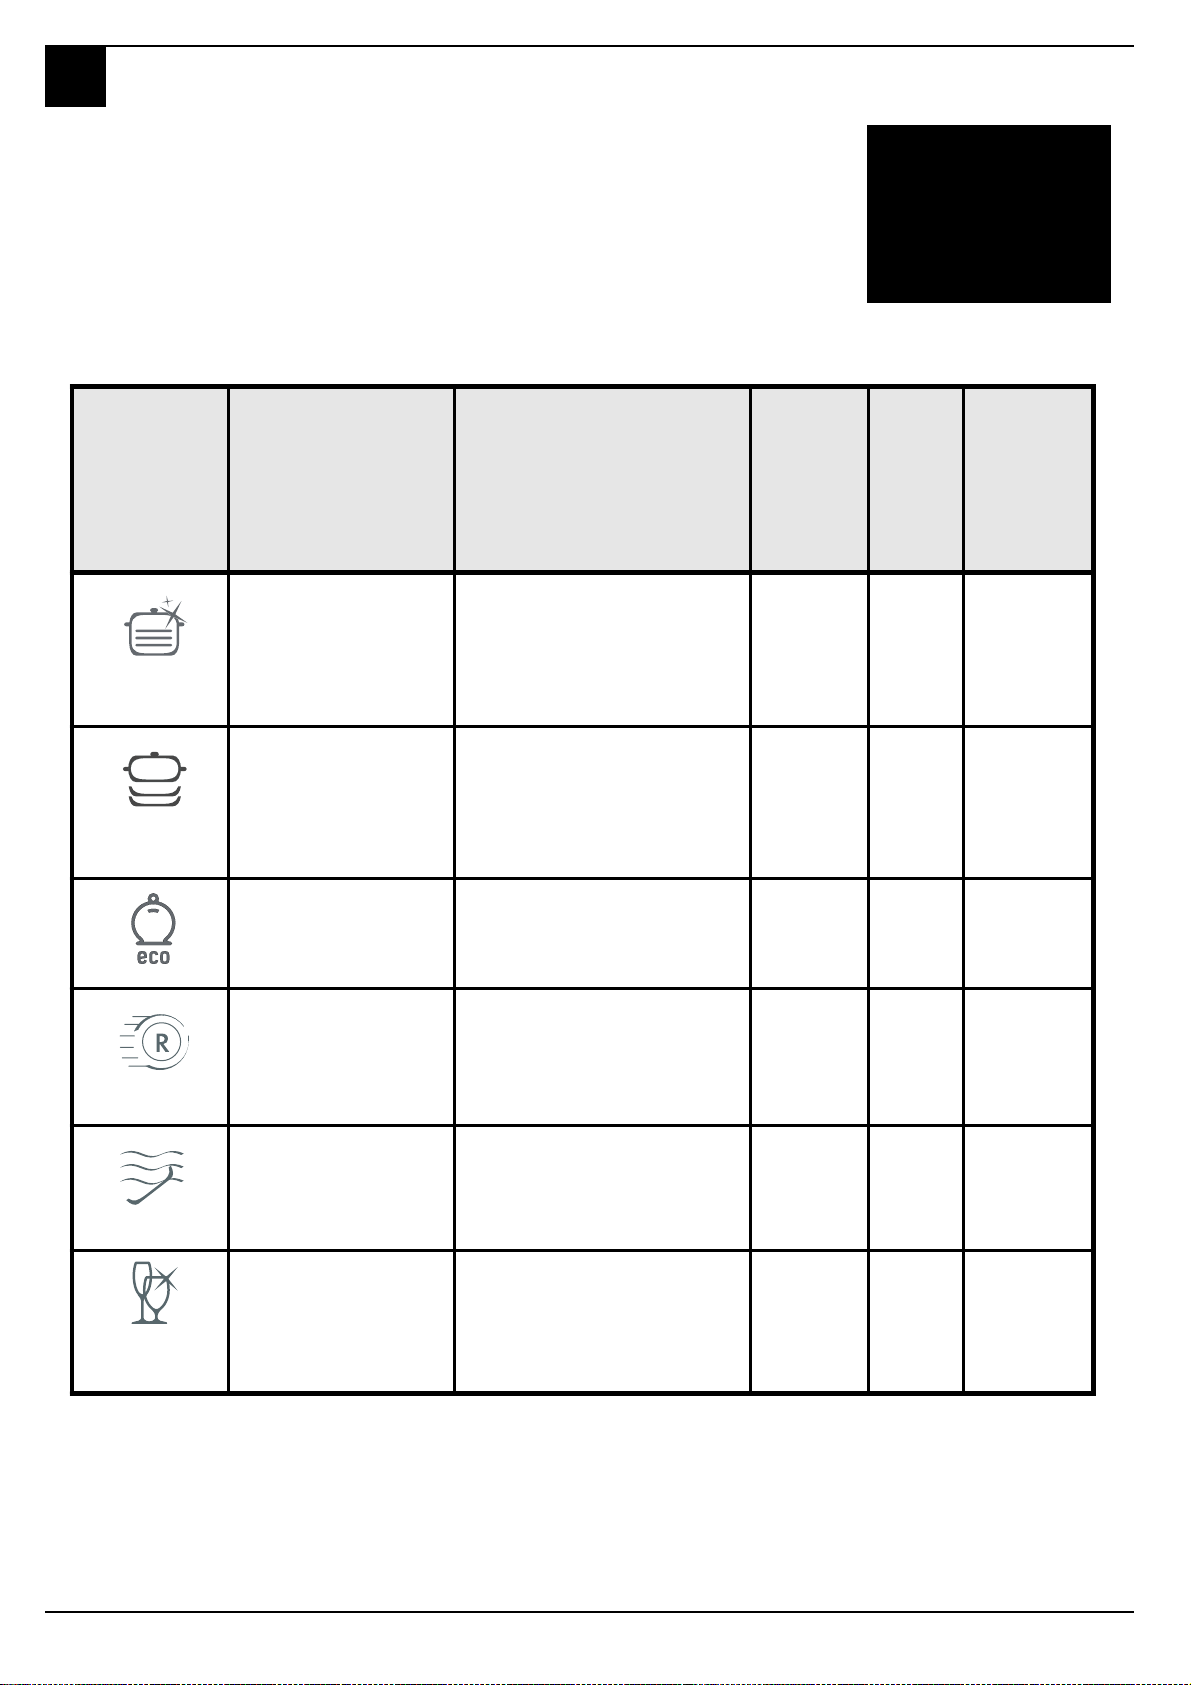
Select the right wash cycle
A wash cycle for every
degree of soil
Salt, rinse aid, the right amount of detergent and the correct wash cycle:
this is the formula to get the best results and to keep your dishwasher in
shape
'HWHUJHQW
IRUSUHZDVK
ZDVK
J
&\FOH
6XSHU:DVK
&\FOHVH OH FWLRQ
LQVWUXFWLRQV
9HU\GLUW\GLVKHVDQGSDQV
QRWWREHXVHGIRUGHOLFDWH
LWHPV
&\FOHGHVFULSWLRQ
3UHZDVKZLWKKRWZDWHUDW&
([WHQGHGZDVKDW&
FROGULQVHV
+RWULQVHDW&
'U\LQJ
wash cycle for your
Selecting the most
suitable wash cycle
for the load ensures
clean dishes and a
more convenient
use of water and
5LQVH$LG
Select the right
dishes.
electricity.
:DV KF\FOH
GXUDWLRQ
WROHUDQFH
'DLO\:DVK
5DSLG
6RDNLQJ
&U\VWDO
&\FOHIRUQRUPDOO\GLUW\
SDQVDQGGLVKHV6WDQGDUG
GDLO\ F\F OH
(QYLURQPHQWDOO\ IULHQGO\
F\FOHZLWKORZHQHUJ\
FRQVXPSWLRQOHYHOVVXLWDEOH
IRUQRUPDOO\GLUW\SDQVDQG
GLVKHV
(FRQRPLFDQGIDVWF\FOHWR
EHXVHGIRUVOLJKWO\GLUW\
GLVKHV5XQF\FOH
LPPHGLDWHO\DIWHUXVH1R
GU\LQJ
3UHOLPLQDU\ZDVKF\FOHIRU
GLVKHVZKLOHDZDLWLQJ
FRPSOHWLRQRIWKHORDGZLWK
WKHGLVKHVIURPWKHQH[W
PHDO
6SHFLDOF\FOHWREHXVHG
IRUPRUHGHOLFDWHLWHPV
ZKLFKDUHVHQVLWLYHWR KLJK
WHPSHUDWXUHV5XQF\FOH
LPPHGLDWHO\DIWHUXVH
3UHZDVKZLWKFROGZDWHU
6KRUWZDVKDW
+RWULQVHDW&
'U\LQJ
&ROGSUHZDVKHV
([WHQGHGZDVKDW&
+RWULQVHDW&
'U\LQJ
6KRUWZDVKDW&
&ROGULQVH
6KRUWFROGZDVKWRSUHYHQWIRRG
IURP GU\LQJRQWR WKH GLVKHV
:DVKDW&
5LQVHDW&
+RWULQVHDW&
'U\LQJ
J
J
J
J
16
ARISTON DISHWASHER - Instructions for installation and use
Page 19

Never without salt
ISHWASHER
D
Water in your home
Water hardness varies according to where you live. If the water in your home is
hard, without water softening, incrustations would form on your dishes. Your
dishwasher is fitted with a water softener which uses special salt to get rid of
To prevent rust
from forming, load
the salt just before
beginning a wash
limescale in the water.
Loading the salt.
Always use salt which is intended
for dishwasher use.
The salt container is situated
underneath the lower rack, fill it
up as follows:
1.Pull out the lower rack
completely, unscrew and
remove the container cap
2. Is it the first time you load the
salt? First fill the container up
with water (you won't have to
do this again next time)
3. Put the dishwasher funnel on the
hole and pour in approximately
two kilos of salt. It is normal
that some water comes out of
the container.
4. Screw the cap back in place
carefully.
When should I load the salt?
The salt container should be filled
up when the low salt indicator light
"S" flashes. Once you have loaded
the salt for the first time, it is
normal that the low salt indicator
light stays on or flashes for about 5
consecutive cycles.
Salt adjustment
Your dishwasher can adjust its salt
consumption according to the hardness of the water in your home.
This way, you can optimise and
customise your dishwasher's salt
consumption (not too much, nor too
little).
To adjust salt consumption, do as
follows:
1. Unscrew the salt container cap
2. There is an arrow on the neck of
the container (see figure): if
necessary, turn the arrow anticlockwise from the "-" setting
to the "+" setting.
Select the arrow position
depending on the water hardness,
referring to the table provided.
Water Hardness
Clarke
degrees
0 - 14 0 - 17 0 -1,7 / 0 /
14 - 36 18 - 44 1,8 - 4,4 "-" 20 60
36 - 71 45 - 89 4,5 - 8,9 MED 40 40
>71 > 89 > 8,9 "+" 60 25
°fH mmol/l
Selector
position
You don't know
water in your
home is? Ask the
company that
supplies water in
cycle.
Salt
consumption
(grams/cycle)
how hard the
your area.
Autonomy
(cycles\2kg)
Suggestions and advice for you.
Savings are easy
How to look after and protect
the dishes you hold dear
■ Almost all silverware can be
cleaned in a dishwasher.
There are two exceptions: old
silverware and silverware
decorated with an oxidising
agent. Hot water can loosen
the handles on old silverware
ad wear off the decorations on
the other.
Never let silverware come into
contact with other metals: you
will thus avoid stains and
blackening
Apart from
making you save
time and energy,
your dishwasher
disinfects your
dishes, washing
them at a high
temperature.
■ Silver plates and serving dishes
should be washed immediately
after use, especially if they have
contained salt, eggs, olives,
mustard, vinegar, fruit juices
and cooked vegetables.
■ For particularly delicate dishes,
we recommend you use the
specific wash cycle offered by
your dishwasher.
Using your electric household appliances
wisely helps you make savings and is
good for the environment.
Maximum load.
To optimise consumption levels, try to use the
dishwasher with a full load only. If it takes
quite some time to fill up your dishwasher,
use the soak cycle to avoid the formation of
bad odours and caked-on food.
The right wash cycle.
Select the most suitable wash cycle for the
type of load you have placed in the dishwasher.
The choice of wash cycle depends on the type
of dishes to wash and on how dirty they are.
To select the right wash cycle, please consult
the wash cycle table on page 16.
ARISTON DISHWASHER - Instructions for installation and use
17
Page 20

ISHWASHER
D
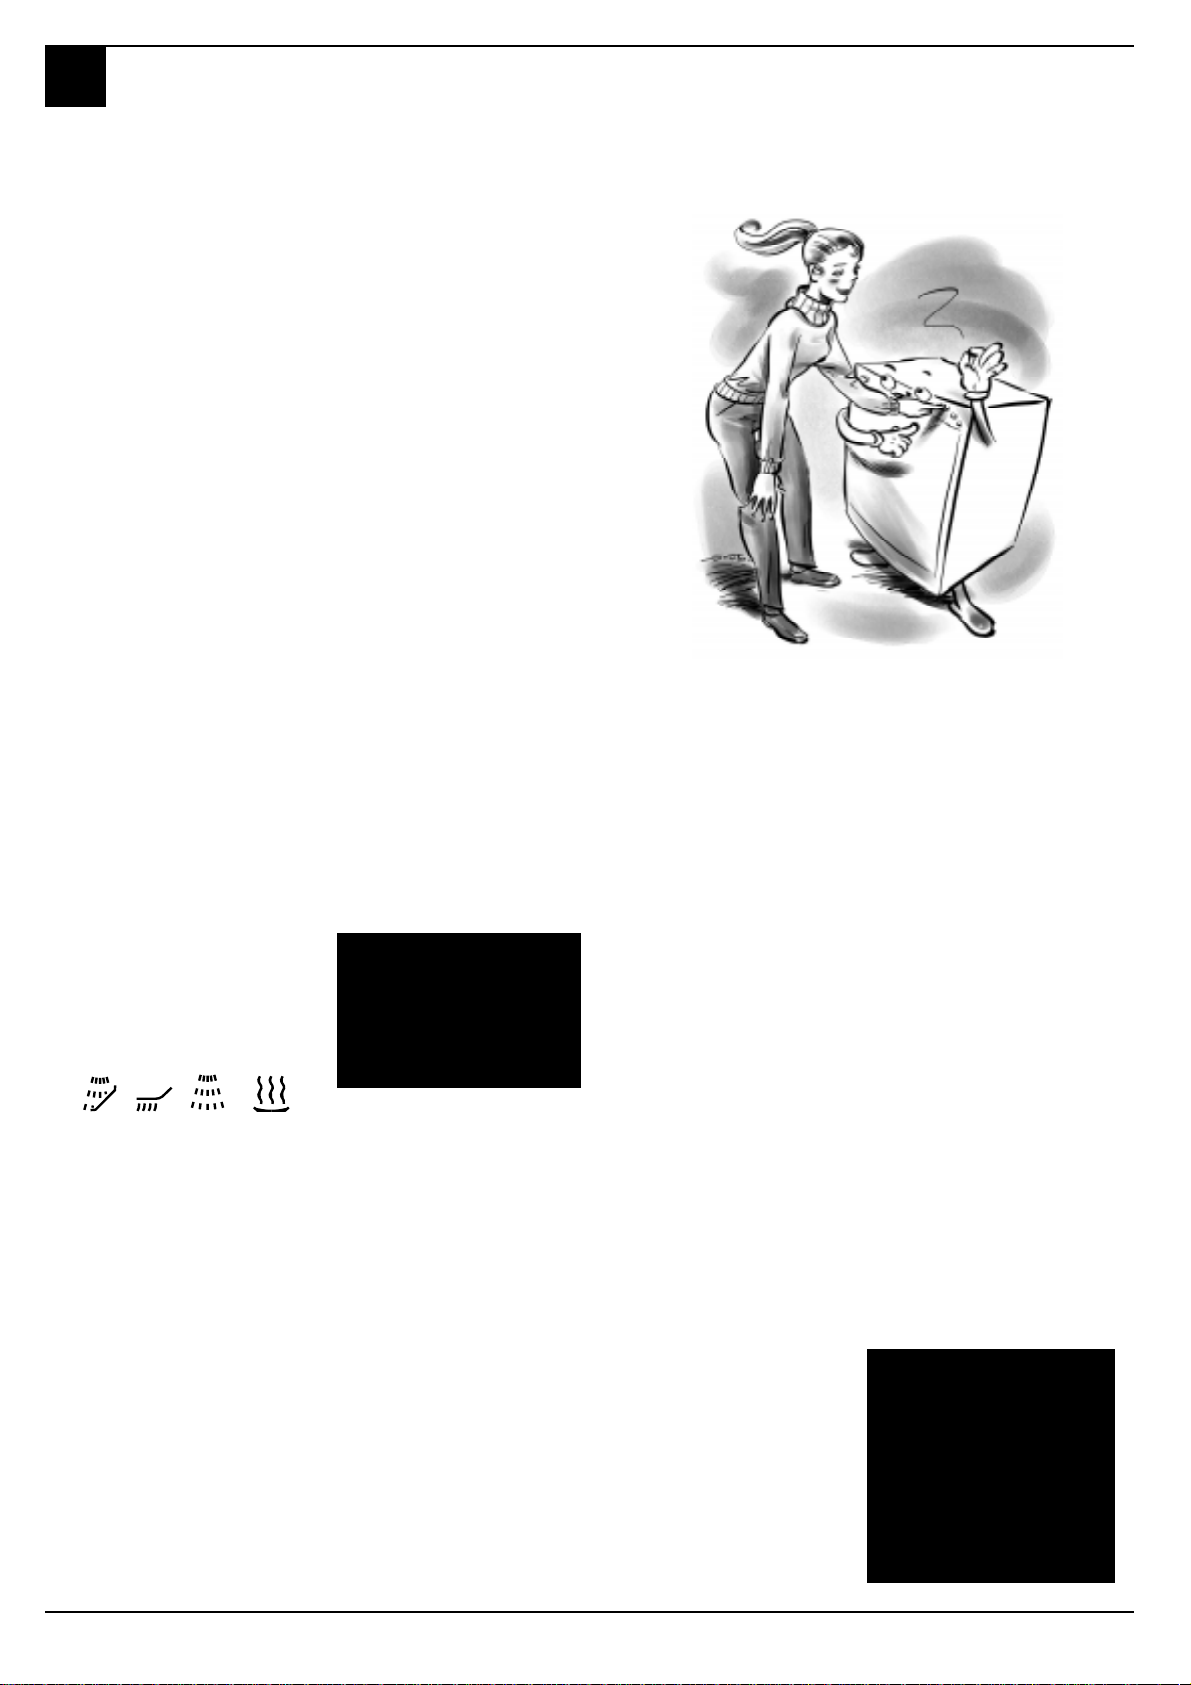
Installation and moving
Your dishwasher has arrived
After having bought or moved your dishwasher to another home, a
correct installation ensures that your dishwasher will operate
smoothly and efficiently.
Choose where you want to install
your dishwasher, you can even
place it so that its sides or back
panel are side by side with furniture
or up against the wall. The
dishwasher is provided with water
supply and drain hoses, which can
be directed towards the left or right
to facilitate appropriate
installation.
This dishwasher model can be built
under a single worktop (please read
the relevant instruction sheet).
making the connection. If this
precaution is not taken, the water
inlet could get blocked, causing
damage to your dishwasher.
A
Levelling.
Once the appliance is positioned,
adjust the feet by screwing them in
or out depending on how high you
want it and to level it so that it is
horizontal. Make sure that it is not
inclined more than 2 degrees. If the
appliance is level, it will help ensure
its correct operation.
Cold water connection.
This electric household appliance
should be connected to the water
mains using the cold water supply
hose provided with the appliance
only. Do not use a different hose. In
the event of replacements, use
original spare parts only.
Connect the cold water supply
hose to a 3/4 gas threaded
connection, insert the small filter
supplied with the dishwasher and
taking care to screw it tightly onto
the tap (see figure 2). If the water
hoses are new or have been out of
use for an extended period of time,
let the water run to make sure it is
clear and free of impurities before
If the power
socket to which
the appliance is
connected is not
compatible with
the plug, replace
it with a suitable
plug rather than
using adapters or
multiple plugs as
these could cause
overheating or
burns.
Fig.2
Hot water connection.
Your dishwasher can be supplied
with hot water from the mains
supply (if you have a central heating
system with radiators) at a temperature of no more than 60°C.
In this case, the wash cycle time
will be about 15 minutes shorter
and the wash will be slightly less
effective.
The connection must be made to
hot water supply following the
same procedures as those indicated
for the cold water connection.
Drain hose connection.
Drain hose connection.
Fit the drain pipe into a drain line
with a minimum diameter of 4 cm
or place it over the sink. Avoid
restricting or bending it. Use the
special plastic elbow provided (see
figure) to position it in the best
possible way. The part of the pipe
marked with the letter A should be
between 40 and 100 cm above the
ground.
The pipe should not be immersed
in water.
A
Electrical connection.
First of all, check that the mains
voltage and frequency values
correspond to those stated on the
rating plate located on the stainless
steel inner door of the appliance
and that the electrical system to
which the dishwasher is connected
is sized for the maximum current
indicated on said rating plate.
Earth: indispensable
safety.
Only now can you plug the
appliance into a socket provided
with an efficient earth connection
(the system's earthing is a
guarantee of safety provided for by
law, make sure your system has
it).
Power supply wire.
Check the power supply wire on a
regular basis; if it is damaged, we
recommend you have it replaced
by an authorised technical
Assistance service centre.
The plug
The dishwasher plug must be
accessible even when the appliance
is installed as a built-in unit so that
maintenance can be done safely.
The special
plastic elbow
should be
fastened firmly
onto the wall to
prevent the drain
hose from
moving and
allowing water to
spill outside the
drain.
18
ARISTON DISHWASHER - Instructions for installation and use
Page 21

ISHWASHER
Troubleshooting
D
If you have a problem, read this
Your dishwasher may not work or not function properly. In many cases, these are problems which can be
solved without having to call for a technician. Before calling the service centre, always check the points
below.
The dishwasher won't start
■ Is the water supply tap turned
on?
■ Is the water supply tap
connected to the hose properly?
■ Has the water in your home
been cut off?
■ Is the pressure of the water
supply sufficient?
■ Is the hose bent?
■ Is the filter on the water supply
hose blocked?
■ Is the dishwasher door open?
The dishes are not clean.
■ Have you put the right amount
of detergent into the dispenser?
■ Is the wash cycle suitable for
the dishes you have placed
inside the appliance?
■ Are the filter and microfilter
clean?
■ Can the sprayer arms turn
freely?
The dishwasher won't
drain.
■ Is the drain hose bent?
Limescale deposits or a
white film form on the
dishes.
■ Is the lid on the salt container
closed properly?
■ Is the rinse aid dosage correct?
Error messages.
Your dishwasher is equipped with
a safety system which is able to
detect any operating anomalies.
These anomalies are reported by
one or two wash cycle indicator
lights "E" flashing rapidly. Take a
note of which lights are flashing,
turn the appliance off and call for
technical assistance.
Tap off alarm
If you have forgotten to turn the
water tap on, your appliance will
remind you of this by sounding a
few short beeps for a few minutes.
Turn the tap on and your appliance
will start up again after a few
minutes. Were you to be absent
when these beeps are sounded, the
Safety within your home
appliance will be blocked automatically and wash cycle 4 and 5
indicator lights (quick wash and
soak) will flash rapidly. Turn the
appliance off at the ON-OFF button, turn on the water tap and wait
approximately 20 seconds before
turning the appliance back on, then
repeat the programming operations
and start the appliance by pressing
the Start button.
Clogged filter alarm
If the appliance is blocked and
wash cycle 3 and 5 indicator lights
(eco and soak) flash rapidly, this
means the filter is clogged by large
particles of food residue. Turn the
appliance off, clean the filter
thoroughly and reposition it in its
seat as illustrated on page 20. Then
turn the appliance back on. Repeat
the programming operations and
start the dishwasher by pressing
the Start button.
You have checked
everything, but the
dishwasher still doesn't
work and the problem
persists?
Call an authorised service centre
near you and remember to mention:
the type of malfunction
the model mark (Mod.) and the
serial number (S/N.) indicated on
the rating plate located on the inner
door, to one side.
Never call upon the
services of
unauthorised
technicians and always
refuse spare parts that
are not originals.
Your dishwasher was built in accordance with the strictest international safety regulations. They protect
you and your family. Read the instructions and information contained in this manual: they will provide
you with useful hints as to installation, use and maintenance safety. To avoid nasty surprises.
1. Dispose of the packaging
material carefully (follow the
instructions on how to divide
your rubbish up provided by
your local Council)
2. After removing the packaging,
check to make sure your
appliance is intact. If in doubt,
contact a qualified
professional.
3. Your dishwasher must only be
used by adults and for washing
household dishes, according to
the instructions included in
this manual. Do not touch the
appliance with wet hands or
feet or barefoot.
4. We discourage the use of
extension leads and multiple
plugs. If the electricity supply
wire is not long enough, then
have it replaced with one of
the correct length and
remember that it should be
free of bends or dangerous
kinks.
5. If the appliance is not operating
properly or if maintenance
operations are necessary,
disconnect the dishwasher
from the mains power supply
(unplug it!).
6. Keep children away from the
dishwasher when it is open and
keep detergents out of their
reach.
7. Your dishwasher is not to be
installed outdoors, not even if
the area is covered by a roof:
it is extremely dangerous to
leave it exposed to rain and
thunderstorms.
8. Do not touch the heating
element during or straight after
a wash cycle.
9. Do not lean or sit on the door
when it is open, as this could
overturn the dishwasher.
10. If the appliance malfunctions,
turn off the water inlet tap and
disconnect the plug from the
wall socket. Then try
consulting the section entitled
"I you have a problem, read
this". If you cannot resolve the
problem, then call the service
centre.
I only want an authorised
specialised technician with original
Ariston guaranteed spare parts
11. Once taken out of use,
appliances must be made
inoperable: cut the power
supply wire and damage the
door lock.
ARISTON DISHWASHER - Instructions for installation and use
19
Page 22

ISHWASHER
D
Care and maintenance
Cleaning and special maintenance
The filter assembly
If you want consistent good results
from your dishwasher, you need to
clean the filter assembly.
The food particles are removed
from the wash water, allowing it to
be recirculated during the cycle,
filtered perfectly. For this reason,
it is a good idea to remove the larger
food particles trapped inside the
cup C and the semi-circular filter
A after each wash; pull the cup
handle upwards to remove them.
Just rinse them under running
water.
The entire filter assembly should
be cleaned thoroughly once a
month: cup C + semi-circular filter
A + cylindrical filter B. Rotate filter
B anticlockwise to remove it.
For cleaning, use a non metallic
brush.
Reassemble the filter parts (as
shown in the figure) and reinsert
the whole assembly into the
dishwasher. Position it into its
housing and press downwards.
The dishwasher is not to be used
without filters. Improper
replacement of the filters may reduce the efficiency of the wash and
even damage your dishwasher.
D
A
C
B
1
B
2
C
A
Once in a while,
once a month,
spend a little time
on the filter
assembly and the
sprayer arms.
Cleaning the Water Inlet
Filter
Periodically clean the water inlet
filter (see figure 2 under
"Installation") located on the outlet
of the water supply tap. After
turning off the water tap, unscrew
the end of the water supply hose,
remove the filter and clean it
carefully under running water.
Then, return the filter to its place
and tighten the water supply hose
back into position.
Cleaning the sprayer
arms.
Food residue may become
encrusted onto the sprayer arms
and block the holes where water
comes out. Check the sprayer arms
regularly and clean them once in a
while (letters F and I Close-up
view).
Keep your dishwasher in shape
Respecting these few rules ensures you will always
have a reliable work companion by your side.
After every wash.
When the wash cycle has ended,
always remember to turn off the
water supply tap and to leave the
appliance door ajar. This way,
moisture and bad odours will not
be trapped inside.
Unplug the appliance.
Before carrying out any cleaning
or maintenance on the dishwasher,
always remove the plug from the
electricity socket. Do not run risks.
No solvents! No abrasives!
To clean the exterior and rubber
parts of your appliance, do not use
solvents or abrasive cleaning
products. Use a cloth dampened
with lukewarm soapy water only.
If there are any stains on the
surface of the appliance interior,
use a cloth dampened with water
and a little white vinegar, or a
cleaning product specifically made
for dishwashers.
Going on holiday?
When you go away for an extended
period of time, we recommend you
do the following:
run a cycle with the dishwasher
empty
turn off the water inlet tap.
leave the appliance door ajar
This will help the seals last longer
and prevent unpleasant odours
from forming inside the appliance.
Moving the appliance.
Should the appliance have to be
moved, try to keep it in a vertical
position. If absolutely necessary, it
can be positioned on its back.
The seals.
One of the factors that cause
unpleasant odours to form inside
the dishwasher is food that remains
trapped in the seals. Periodic
cleaning using a damp sponge will
prevent this from occurring.
Your dishwasher is not a waste
disintegrator!
Do not worry about removing every
single bit of food residue from your
dishes, but do get rid of bones, peel and
rind and any other left-overs before
placing them in the racks. Empty out
all glasses and cups.
20
ARISTON DISHWASHER - Instructions for installation and use
Page 23

Page 24

Merloni Elettrodomestici Beyaz Eþya San. ve Tic A.Þ.
Merloni Elettrodomestici Beyaz Eþya Paz. A.Þ.
Kore Þehitleri cad. Yzb. Kaya Aldoðan Sok.
No:17 80300- Zincirlikuyu- Ýstanbul
Tel (0.212.) 212 54 85
04/2003- 195037698.00- XEROX BUSINESS SERVICES - DOCUTECH
 Loading...