

Page 1

Руководство по
эксплуатации
RS
РУССКИЙ, 1
CI 6I FA R/HA
GB
English, 21 Français, 41
FR
КУХОННАЯ ПЛИТА С ДУХОВЫМ ШКАФОМ
RS
Содержание
Монтаж, 2-3
Расположение и нивелировка
Электрическое подключение
Таблица характеристик
Описание изделия, 4-5
Общий вид
Консоль управления
Дисплей
Консоль управления варочной панели
Включение и эксплуатация, 6-10
Настройка часов
Настройка таймера
Эксплуатация духового шкафа
Программы приготовления в ручном режиме
Программы приготовления в автоматическом режиме
Программирование приготовления
Практические советы по приготовлению
Таблица режимов приготовления в духовом шкафу
Стеклокерамическая варочная панель, 11-15
Включение варочной панели
Включение варочных зон
Вольтодобавочное устройство
Выключение индукционных конфорок
Программирование продолжительности приготовления
Таймер
Блокировка управлений
Выключение варочной панели
Режим «demo»
Практические советы по эксплуатации изделия
Защитные устройства
Техническое описание конфорок
Практические советы по приготовлению блюд
Предосторожности и рекомендации, 16-17
Общие требования по безопасности
Утилизация
Экономия электроэнергии и охрана окружающей среды
Техническое обслуживание и уход, 18-19
Обесточивание изделия
Чистка духового шкафа
Замена лампочки в духовом шкафу
Чистка стеклокерамической варочной панели
Автоматическая пиролитическая чистка духовки
Сервисное обслуживание, 20
Page 2
Ìонтаж
RS
Важно сохранить данное руководство для его
последующих консультации. В случае продажи,
передачи или переезда проверьте, чтобы данное
техническое руководство сопровождало изделие.
Внимательно прочитайте инструкции: в них
содержатся важные сведения о монтаже изделия,
его эксплуатации и безопасности.
Установка изделия производится в соответствии
с данными инструкциями квалифицированными
специалистами.
Любая операция по регуляции или техническому
обслуживанию должна производиться только
после отсоединения кухонной плиты от сети
электропитания.
Расположение и нивелировка
Изделие может быть установлено рядом с
кухонными элементами, высота которых не
превышает поверхность варочной панели.
Проверьте, чтобы стена, к которой прилегает
задняя часть изделия, была из невозгораемого
материала и устойчивой к теплу (Т 90°C).
Правильный порядок монтажа:
изделие может быть
HOOD
Min. mm.
600
mm.
420
Min.
420
Min. mm.
600 мм от кухонной плиты.
если кухонная плита устанавливается под
навесным кухонным шкафом, он должен
располагаться на высоте не менее 420 мм от
поверхности варочной панели.
Это расстояние должно быть 700 мм, если
навесные шкафы выполнены из возгораемого
материала (см. схему);
вытяжке.
установлено на кухне,
в столовой или в
однокомнатной
квартире (не в ванной
комнате);
mm. with hood
mm. without hood
если варочная
650
700
панель кухни выше
min.
min.
кухонных элементов,
последние должны
располагаться на
расстоянии не менее
не заправляйте занавески
за кухонную плиту и не
приближайте их на
расстояние меньше 200 мм.
возможная кухонная
вытяжка должна быть
установлена в соответствии с
инструкциями, приведенными
в техническом руководстве к
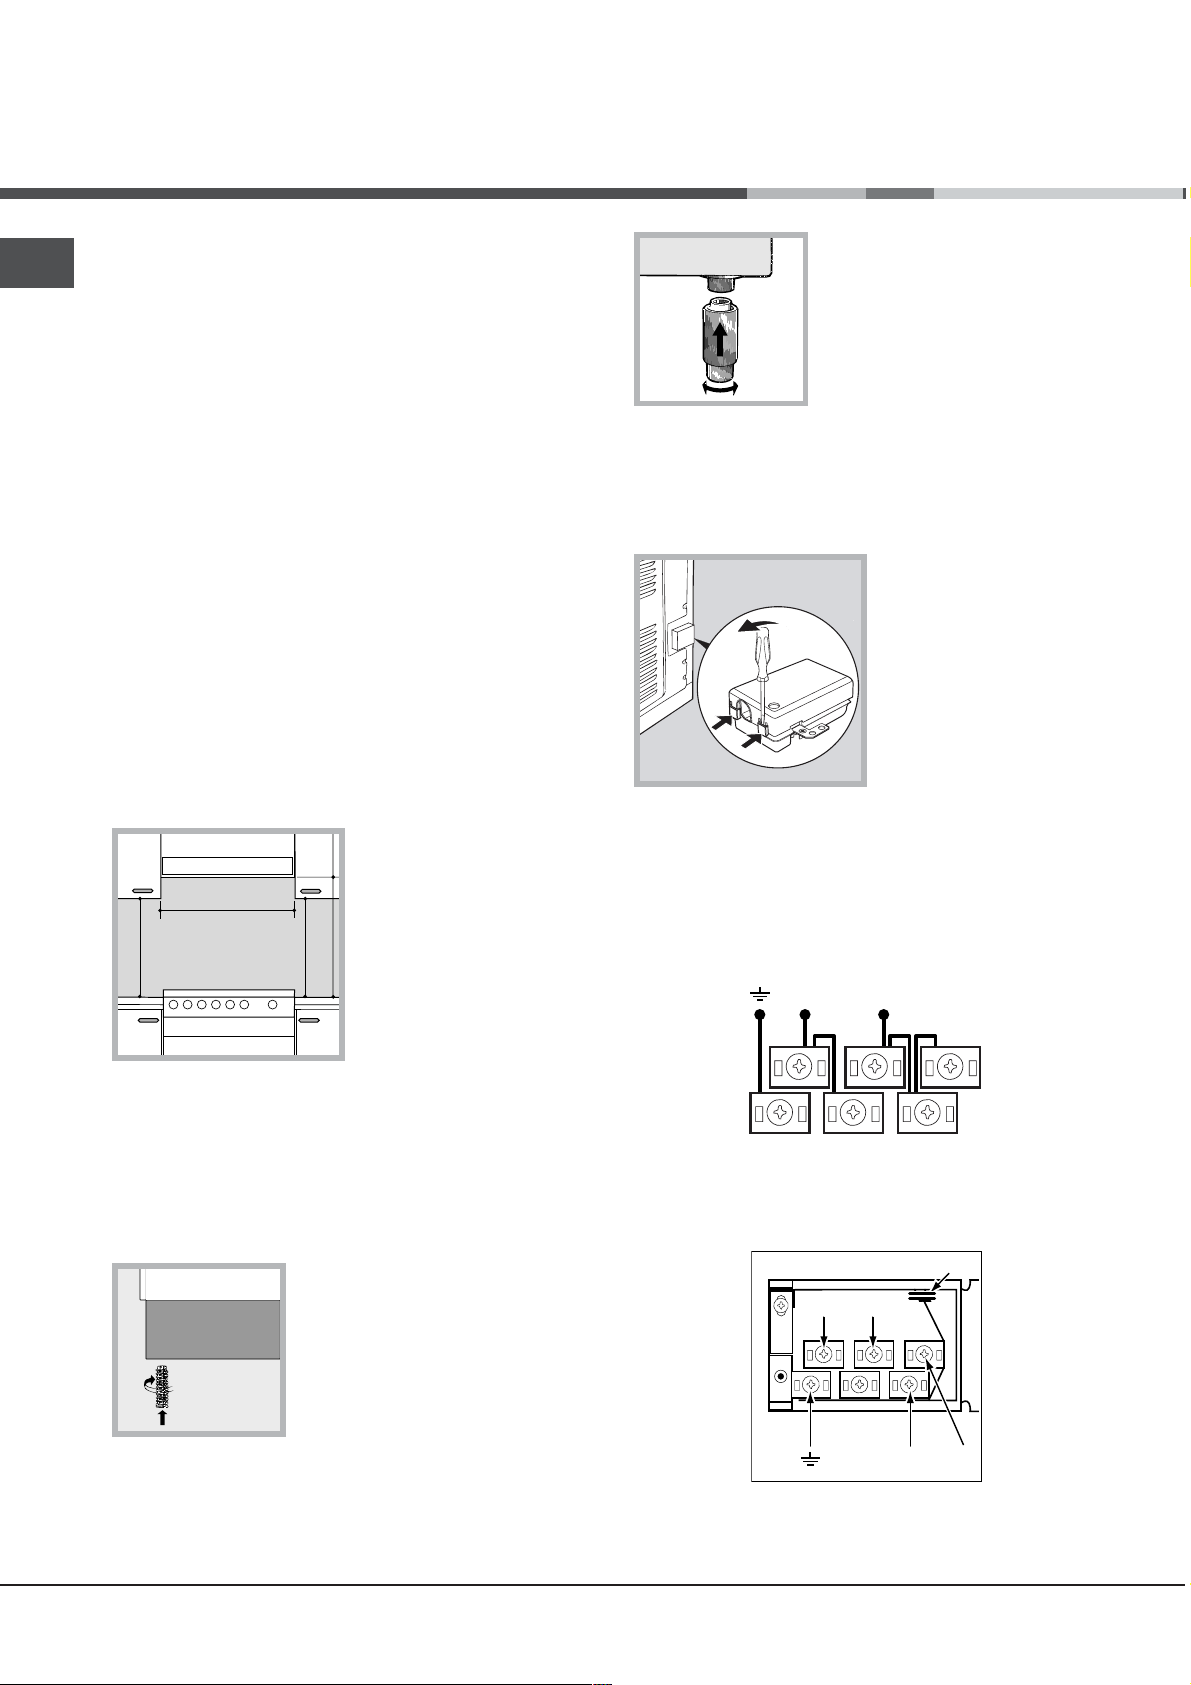
Нивелировка
При необходимости
выровнять изделие вкрутите
в специальные отверстия по
углам в основании кухонной
плиты прилагающиеся
нивелировочные ножки (см.
схема).
Ножки* вставляются в основание кухонной плиты.
Электрическое подключение
Подсоединение сетевого шнура
Порядок открывания зажимной коробки:
При помощи
отвертки
приподнимите боковые
шпонки крышки
зажимной коробки;
Потяните и откройте
крышку зажимной
коробки.
Для подсоединения кабеля электропитания
выполнить следующие операции:
отвинтите винт кабельного зажима и винты
контактов
Фабричная установка перемычек соответствует
монофазному соединению 230 В (см. схему).
230V 1N~
H07RN-F 3x4 CEI-UNEL 35364
NL
5
3
4
для осуществления электрических соединений,
показанных на схемах, используйте две
перемычки, расположенные внутри
соединительной коробки (см. схему - ссылка P).
1
2
P
NL2L1
L3
Presente solo su alcuni modelli.
*
2
Page 3
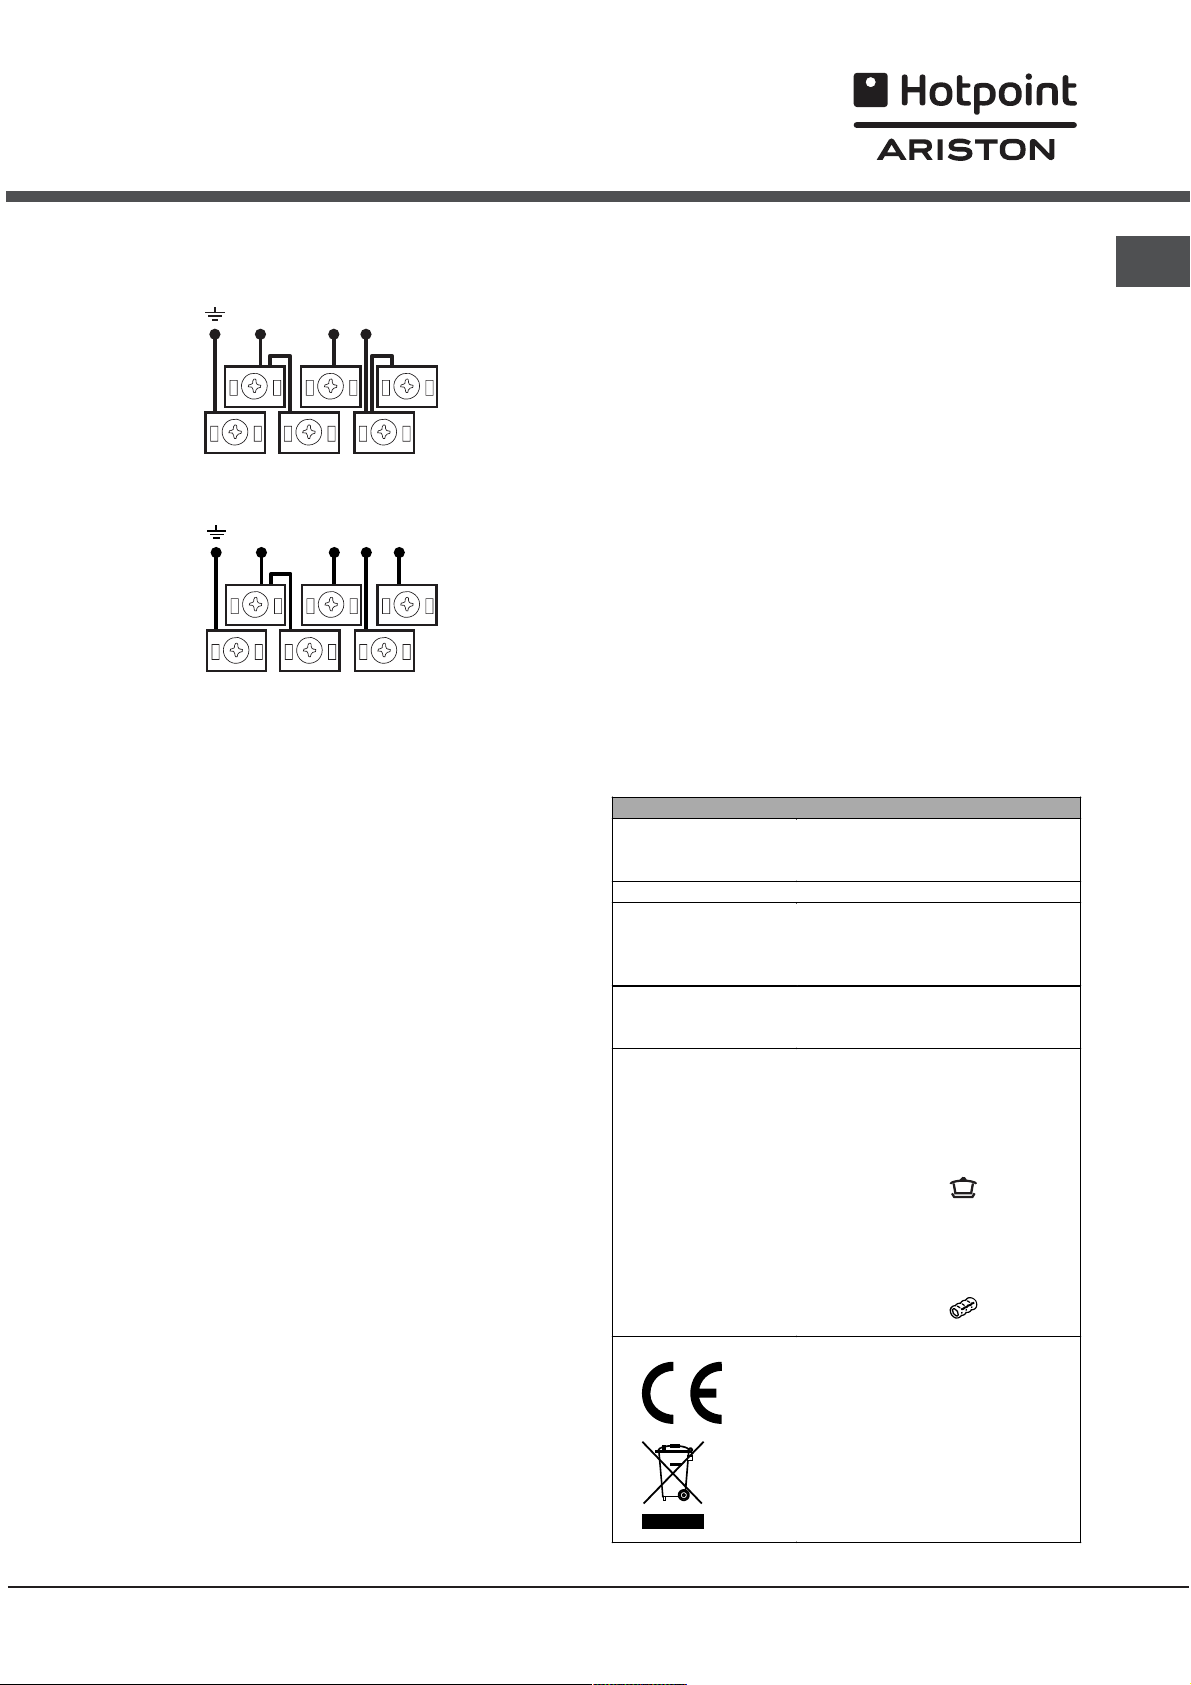
400V 2N~
H05RR-F 4x4 CEI-UNEL 35363
NL2L1
5
3
4
1
2
400V 3N~
H05RR-F 5x2.5 CEI-UNEL 35363
NL3L1L2
5
3
4
зафиксируйте сетевой шнур в специальном
кабельном зажиме и закройте крышку.
Ïîäñîåäèíåíèå ñåòåâîãî êàбеля изделия к
сеòè ýëåêòðîïèòàíèÿ
Установите на сетевой кабель нормализованную
штепсельную вилку, расчитанную на нагрузку,
указанную на паспортной табличке (см. сбоку).
В случае прямого подключения к сети
электропитания между изделием и сетью
необходимо установить многополюсный
выключатель с минимальным расстоянием между
контактами 3 мм, расчитанный на данную нагрузку
и соответствующий действующим нормативам
(выключатель не должен размыкать провод
заземления). Сетевой кабель должен быть
расположен таким образом, чтобы ни в одной
точке его температура не превышала температуру
помещения более чем на 50°C.
Электромонтер несет ответственность за
правильное подключение изделия к электрической
сети и за соблюдение правил безопасности.
Перед подключением изделия к сети
электропитания проверьте следующее:
сетевая розетка должна быть соединена с
заземлением и соответствовать нормативам;
сетевая розетка должна быть расчитана на
максимальную потребляемую мощность изделия,
указанную на паспортной табличке (ñì. íèæå);
напряжение сети электропитания должно
находиться в пределах значений, указанных на
паспортной табличке (ñì. íèæå);
Имеется только в некоторых моделях.
*
1
2
сетевая розетка должна быть совместима со
штепсельной вилкой изделия. В противном
случае замените розетку или вилку; не
используйте удлинители или тройники.
Изделие должно быть установлено таким
образом, чтобы сетевой кабель и сетевая розетка
были легко доступны.
Сетевой кабель изделия не должен быть согнут
или сжат.
Регулярно проверяйте состояние сетевого кабеля
и в случае необходимости поручите его замену
только уполномоченным техникам (см. Сервисное
обслуживание).
Ïðîèçâîäèòåëü íå íåñåò
îòâåòñòâåííîñòè çà
ïîследсòâèÿ íåñîблюдеíия перечислеííûõ
âûøå òðåáîâàíèé.
ТАБЛИЦА ХАРАКТЕРИСТИК
Габаритные
размеры духового
шкафа ВхШхГ
Объем
Рабочие размеры
ящика для
разогревания
пищи
Напряжение и
частота
электропитания
МАРКИРОВКА
ПОТРЕБЛЕНИЯ
ЭЛЕКТРОЭНЕРГИИ
32x43,5x40 cm
56 ë
ширина 42 см.
глубина 44 см.
высота 8,5 см.
см. табличку с техническими
характеристиками
Директива 2002/40/СЕ об
этикетках электрических
духовых шкафов. Норматив EN
50304
Расход электроэнергии
Натуральная конвекция в
режиме нагрева:
Традиционная
Заявление о расходе
электроэнергии класса
принудительной конвекции – в
режиме нагрева:
Полуфабрикаты
Директива ЕС: 2006/95/CEE от
12.12.06 (Низкое напряжение) с
последующими изменениями –
89/336/СЕЕ от 03/05/89
(Электромагнитная
совместимость) с
последующими изменениями –
-93/68/СЕЕ от 22/07/93 с
последующими изменениями –
2002/96/ЕС.
RS
3
Page 4
Îïисание изделия
RS
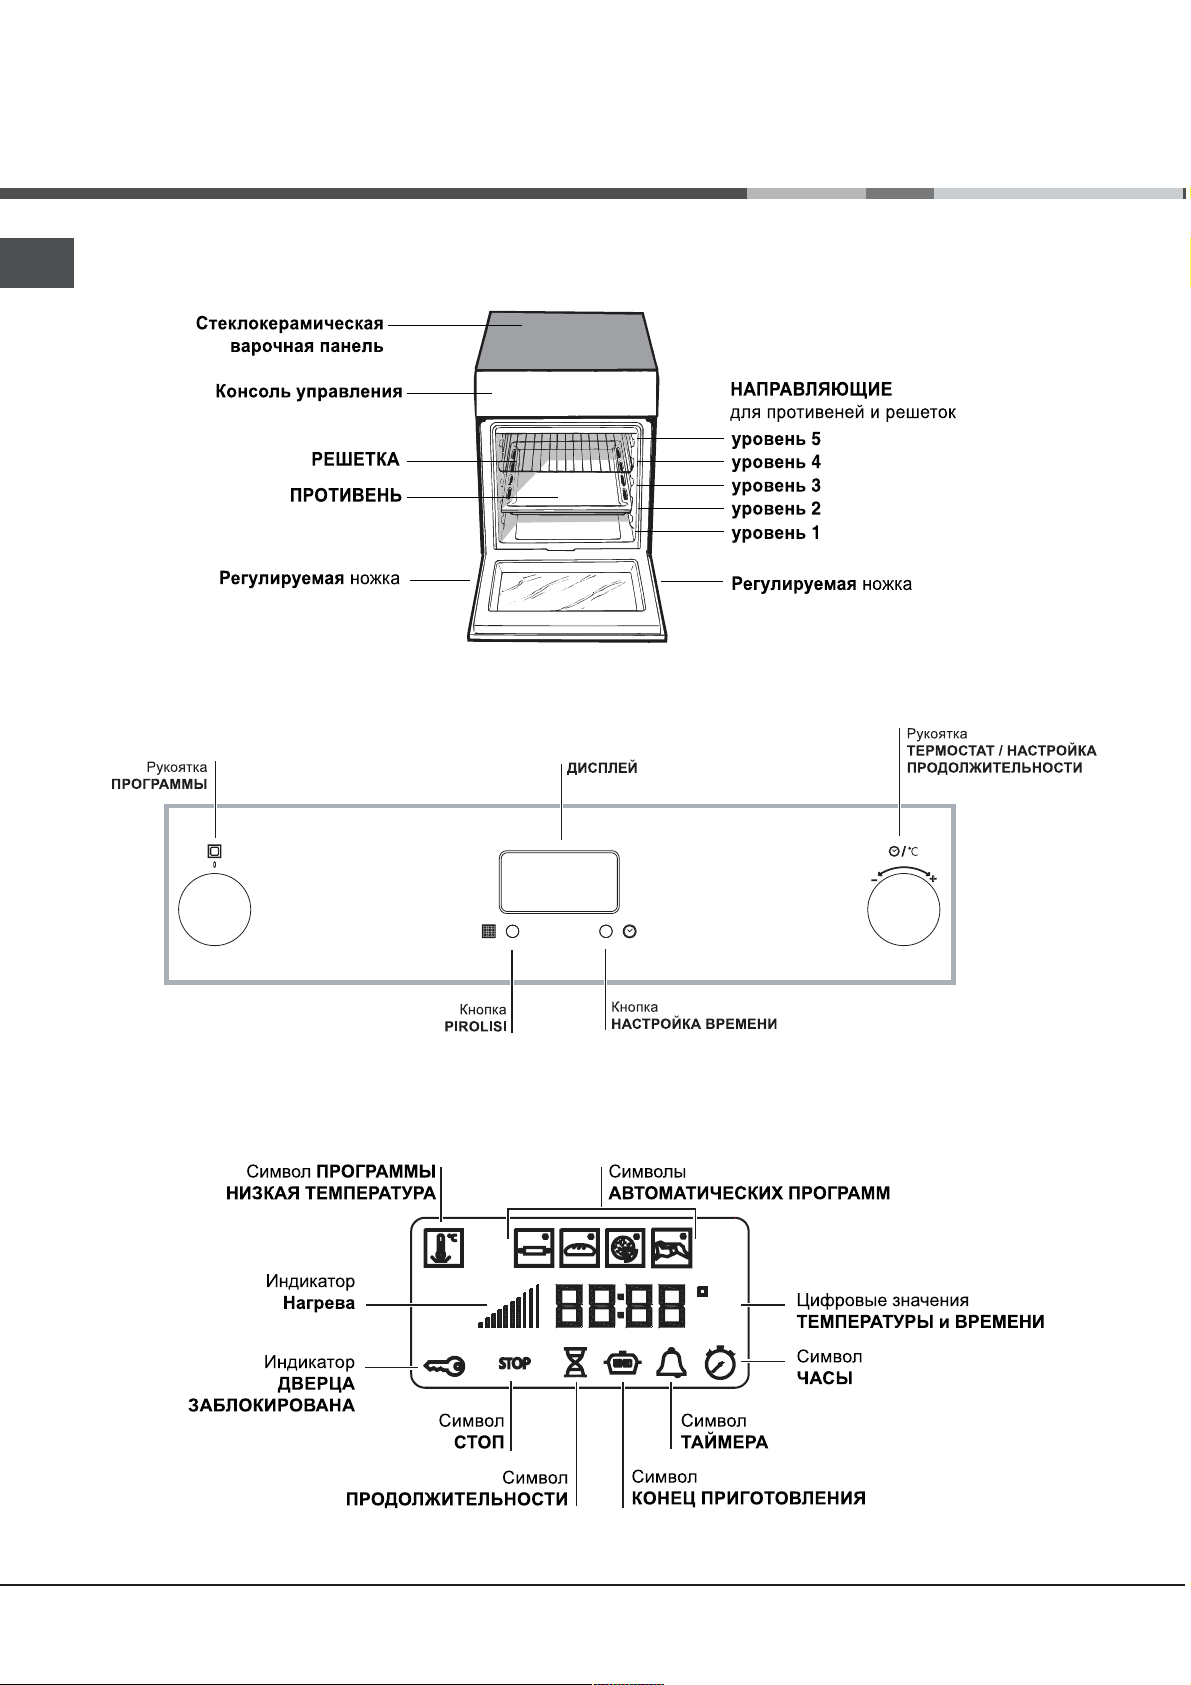
Îáùèé âèä
Консоль управления
Дисплеé
Имеется только в некоторых моделях.
*
4
Page 5
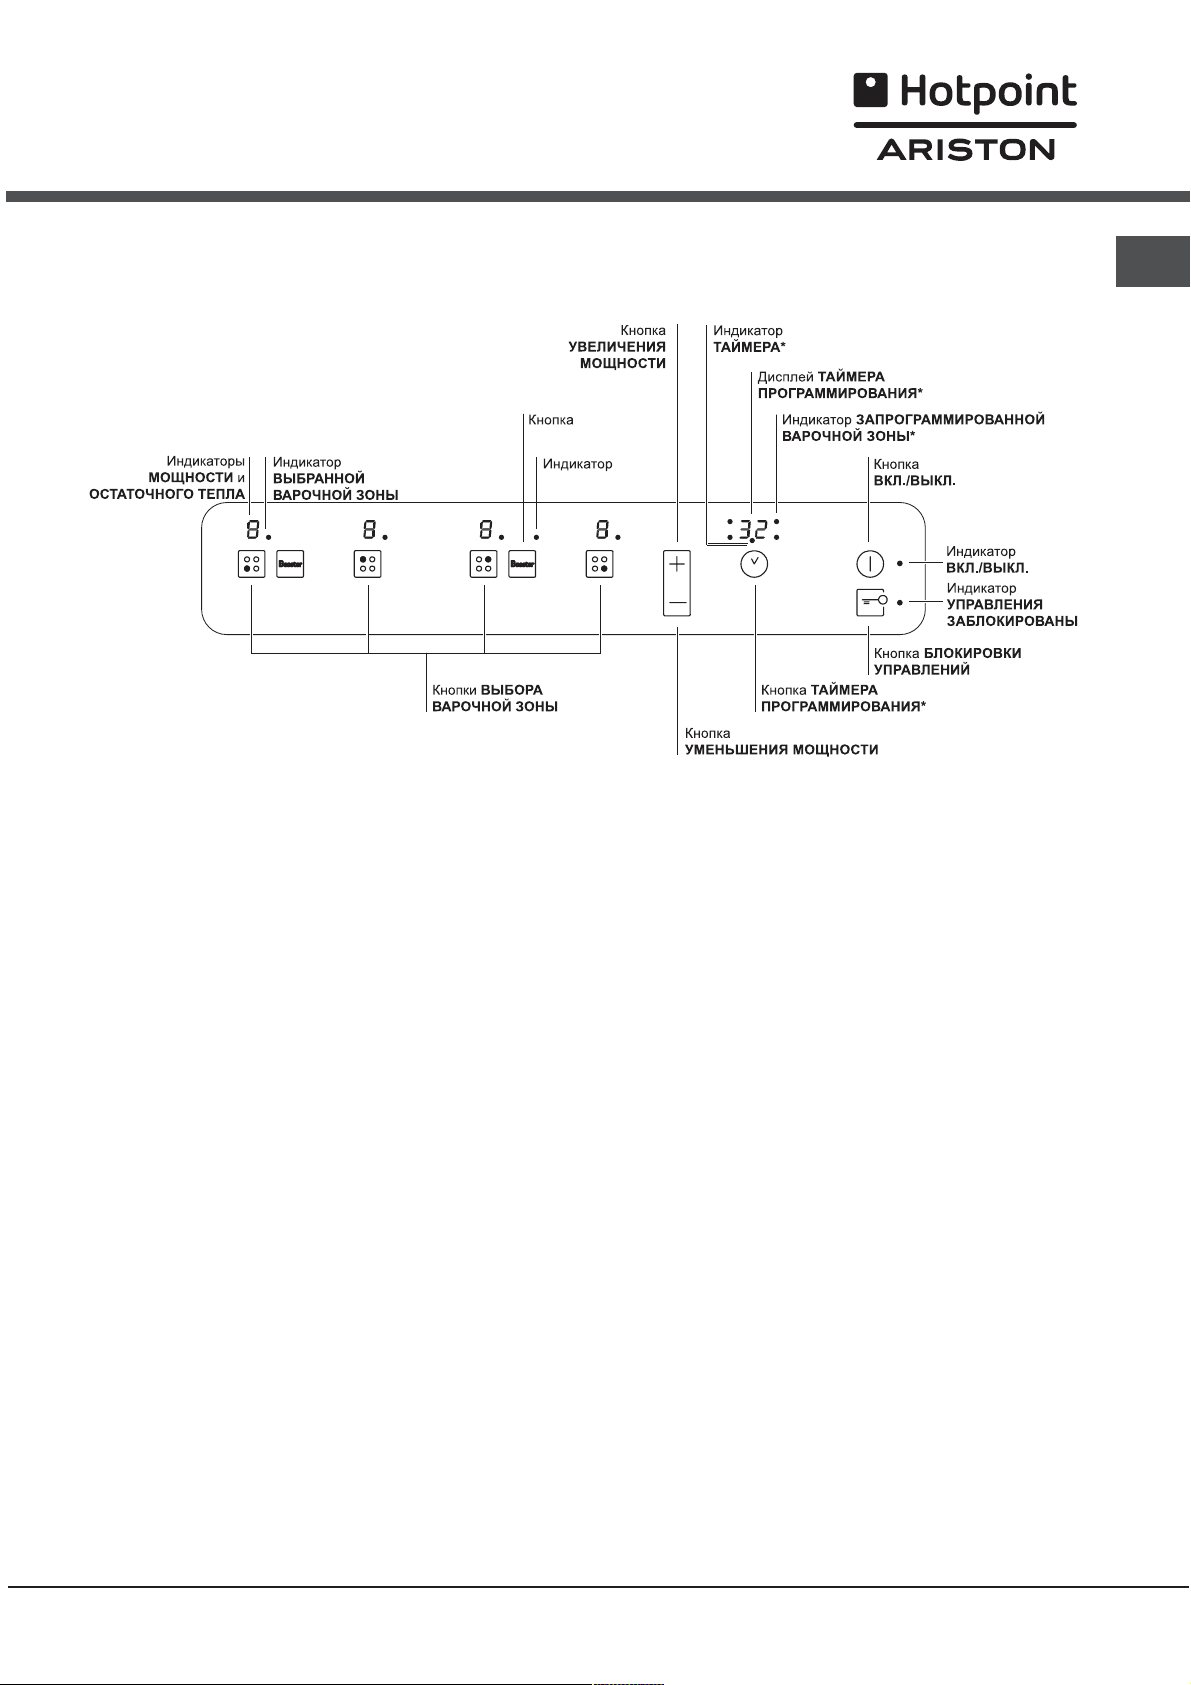
Панель управления
RS
BOOSTER*
BOOSTER*
Кнопка ÓÂÅËÈ×ÅÍÈÅ ÌÎÙÍÎÑÒÈ служит для
включения варочнои зоны и регуляции
мощности нагрева (см. Включение и
эксплуатация).
Кнопка ÓÌÅÍÜØÅÍÈÅ ÌÎÙÍÎÑÒÈ служит для
регуляции мощности и выключения варочнои
зоны (см. Включение и эксплуатация).
Индикатор ÂÛÁРАННАЯ ВАРÎ×ÍÀß ÇÎÍÀ
показывает, что соответствующая варочная
зона была выбрана и следовательно возможно
произвести настроики ее функции.
Кнопка ÂÛÁÎÐ ÂÀÐÎ×ÍÎÈ ÇÎНЫ служит для
выбора нужнои варочнои зоны.
Индикатор ÌÎÙÍÎÑÒÜ: показывает уровень
нагрева.
Кнопка ON/OFF (ÂÊË./ÂÛÊË.) служит для
включения и выключения изделия.
Индикатор ON/O
состояние изделия, включено или выключено.
Кнопка ÒÀÈÌÅÐ ÏÐÎÃРАММИРÎВАНИЯ*
служит для настроики продолжительности
приготовления (см. Включение и эксплуатация).
FF (ÂÊË./ÂÛÊË.): показывает
Дисплеи ÒÀÈÌÅÐÀ ÏÐÎÃРАММИРÎВАНИЯ*:
показывает различные настроики
программирования (см. Включение и
эксплуатация).
Индикаторы ÇÀÏÐÎÃРАММИРÎВАННЫÅ
ÂÀÐÎ×ÍÛÅ ÇÎÍÛ*: показывают варочные
зоны после запуска программирования ( ñì.
Включение и эксплуатация).
Кнопка ÁËÎÊÈÐÎÂÊÀ УПРАВЛÅНИИ служит
для защиты управлении варочнои панели от
случаиных измнении (ñì. Включение и
эксплуатация).
Индикатор УПРАВЛÅÍÈß ÇÀÁËÎÊÈÐÎÂÀÍÛ
показывает, что управления заблокированы ( ñì.
Включение и эксплуатация).
Кнопка BOOSTER* служит для включения
дополнительного электропитания 3000 Вт
индукционной конфорки (см. Включение и
эксплуатация).
Индикатор BOOSTER* показывает, что функция
вольтодобавочного устройства включена.
Индикатор ÒÀÈÌÅÐ* показывает, что таимер
включен
Имеется только в некоторых моделях.
*
5
Page 6

Âключение è
эксплуатация
RS
Íастройка часов
Часы можно настроить как при выключенном
духовом шкафе, так и при включенном, при
условии, что не было задано время окончания
приготовления.
1. Нажмите несколько раз кнопку
пока на ДИСПЛЕЕ не замигает символ
первые два цифровые значения;
2. поверните регулятор НАСТРОЙКА ЧАСОВ в
сторону + и - для настройки часов;
3. вновь нажмите кнопку
ДИСПЛЕЕ не замигают другие два цифровые
значения;
4. поверните регулятор НАСТРОЙКА ЧАСОВ в
сторону + и - для выставления минут;
5. вновь нажмите кнопку
äî òåõ ïîð, ïîêà íà
для подтверждения.
äî òåõ ïîð,
è
Настроéêà òàéìåðà
Данная функция не прерывает приготовление и
не зависит от работы духового шкафа. Она
позволяет включить звуковой сигнал по истечении
заданного времени.
1. Нажмите несколько раз кнопку
пока на ДИСПЛЕЕ не замигает символ
цифровые значения;
2. поверните регулятор НАСТРОЙКА ЧАСОВ в
сторону + и - для выставления минут;
3. вновь нажмите кнопку
На дисплее будет показан обратный отсчет
времени, по завершении которого включится
звуковой сигнал.
для подтверждения.
äî òåõ ïîð,
è òðè
Эксплуатация духового шкафа
Перед началом эксплуатации обязательно нужно
удалить защитную пленку с боковых панелей
изделия.
При первом включении духового шкафа
рекомендуем прокалить его примерно в течение
часа при максимальной температуре с закрытой
дверцей. Затем выключите духовой шкаф,
откройте дверцу и проветрите помещение. Запах,
который вы можете почувствовать, вызван
испарением веществ, использованных для
предохранения духового шкафа.
1. Выберите нужную программу приготовления при
помощи рукоятки ПРОГРАММЫ.
2. Духовой шкаф начнет фазу предварительного
нагрева, и загорится индикатор нагрева.
Вы можете изменить температуру при помощи
регулятора ТЕРМОСТАТ.
3. Когда индикатор предварительного нагрева
погаснет, и раздастся звуковой сигнал
завершения нагрева духовки: Вы можете
поместить в него продукт.
4. В процессе приготовления в любой момент можно:
- изменить программу приготовления при помощи
рукоятки ПРОГРАММЫ;
- изменить температуру при помощи регулятора
ТЕРМОСТАТ;
- запрограммировать продолжительность и время
окончания приготовления (см. программы
приготовления);
- прервать приготовление, повернув рукоятку
ПРОГРАММЫ в положение «0».
5. Продолжительность приготовления может быть
изменена (см. программы приготовления).
6. В случае внезапного отключения
электропитания, если температура в духовом
шкафу не слишком понизилась, срабатывает
система, возобновляющая программу
приготовления с момента, в который она была
прервана. Программирование, сделанное в
ожидании продолжения программы, не
сохраняется после возвращения электропитания и
должно быть выполнено повторно.
В программах ПОЛУФАБРИКАТЫ фаза
предварительного нагрева не предусмотрена.
Никогда не ставьте никакие предметы на дно
духового шкафа, так как они могут повредить
эмалированное покрытие.
Всегда ставьте посуду на прилагающуюся
решетку.
Îõëàäèòельная вентиляция
Для понижения температуры снаружи духового
шкафа в процессе приготовления, охладительный
вентилятор создает поток воздуха между
передней панелью и дверцей духового шкафа. В
начале программы пиролитической чистки
PIROLISI вентилятор охлаждения работает на
малой скорости.
По завершении приготовления вентилятор
продолжает работать вплоть до надлежащего
охлаждения духовки.
Îñâåùåíèå äóõîâîãî øêàôà
Лампочка может быть включена в любой момент,
даже при выключенной духовке, при открывании
дверцы.
6
Page 7
Программû приготовления в ручном
режиме
Каждая программа имеет заданную температуру
приготовления. Температуру можно настроить
вручную от 40°C e 250°C. В режиме ВЕРТЕЛ
задана температура 270°C.
Программа ТРАДИÖÈÎÍÍÀß ÄÓÕÎÂÊÀ
В режиме традиционного приготовления
рекомендуется использовать только один уровень.
Программа ÎÄÍÎÂÐÅÌÅÍÍÎÅ
ÏÐÈÃÎÒÎÂËÅÍÈÅ ÍÀ ÍÅÑÊÎËÜÊÈÕ ÓÐÎÂÍßÕ
Так как жар является постоянным во всем
духовом шкафу, воздух обеспечивает однородное
приготовление и подрумянивание продукта.
Можно одновременно использовать не более двух
уровней в духовке.
Программа ÏÎËÓÔÀÁÐÈÊÀÒÛ
Сочетает однонаправленное выделение жара с
принудительной циркуляцией воздуха внутри
духового шкафа.
Это препятствует обгоранию поверхности
продуктов, повышая проникающую способность
жара. Готовьте блюда с закрытой дверцей
духового шкафа.
Программа ÂÅÐÒÅË
Данная функция оптимально подходит для
приготовления на вертеле. Готовьте блюда с
закрытой дверцей духового шкафа.
Программы ÍÈÇÊÀß ÒÅÌÏÅРАТУРА
Этот режим приготовления служит для расстойки
теста, разморозки продуктов, приготовления
йогуртов, более или менее быстрого разогрева
готовых блюд, для продолжительного
приготовления при низкой температуре. В данном
режиме можно выбрать одну из следующих
температур: 40, 65, 90°C.
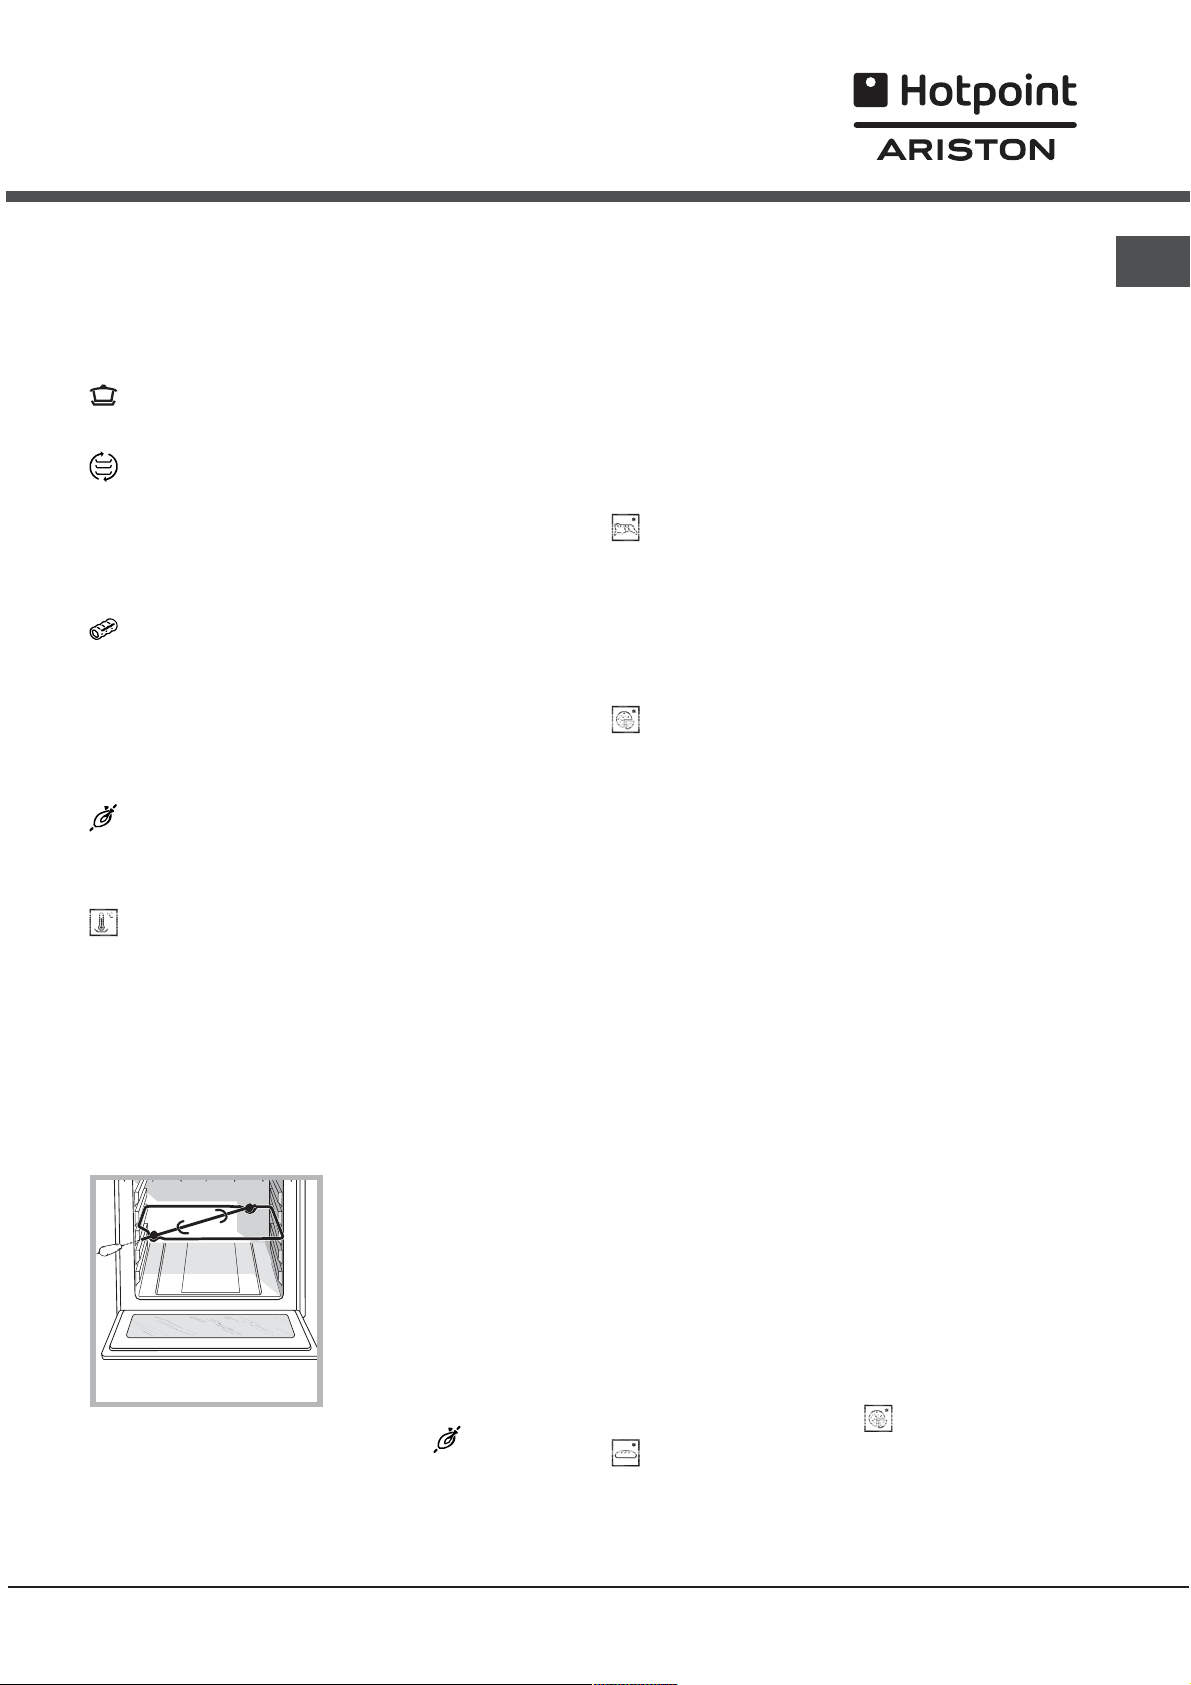
Âåðòåë
Порядок включения вертела (см. схему):
1. установите
противень на 1-ый
уровень;
2. установите
держатель вертела на
3-ий уровень и
вставьте вертел в
специальное
отверстие в задней
стенке духового
шкафа;
3. включите вертел, выбрав символы
После начала выполнения программы при
открывании дверцы духовки вертел
останавливается.
;
Программû приготовления в
автоматическом режиме
Температура и продолжительность приготовления
задаются системой C.O.P.® (Оптимальное
запрограммированное приготовление),
автоматически обеспечивающей оптимальный
результат. Приготовление автоматически
завершается, и духовой шкаф включает звуковой
сигнал, означающий, что блюдо готово.
Продолжительность приготовления может быть
изменена на несколько минут в описанном ниже
порядке, в описании отдельных режимов.
Программа ÆÀÐÊÎÅ ÈÇ ÃÎВЯДИНЫ
Эта программа предназначена для приготовления
телятины, свинины, баранины. Мясо помещаются в
духовку без ее предварительного нагрева. Тем не
менее Вы можете разогреть духовку перед
помещением в нее продукта. В этом режиме Вы
можете изменить только продолжительность
приготовления на -20/+25 минут.
Программа ÏÈÖÖÀ
Эта программа предназначена для выпечки пиццы.
Смотрите рецепт и описание программы в
следующем параграфе. В этом режиме Вы можете
изменить только продолжительность приготовления
на -5/+5 минут.
Для оптимального результата рекомендуем строго
следовать приведенным ниже инструкциям:
соблюдайте рецепт;
вес теста должен быть от 500 до 700 гр.
слегка смажьте маслом противень и лотки.
Пицца помещаются в духовку без ее
предварительного нагрева. Если Вы хотите
поместить пиццу в духовой шкаф, нагретый после
приготовления при высокой температуре, на
дисплее будет показана надпись «Hot» до тех пор,
пока температура в духовке не понизится до 120°С.
На данном этапе можно поместить в духовку пиццу.
Ðåöåïò ПИЦЦЫ:
1 1
1 противень
1 1
èëè нагретая духовка
Рецепт для 3-х пицц весом примерно 550 гр: 1000
гр. муки, 500 гр. воды, 20 гр. соли, 20 гр. сахара,
3
10 ë
оливкового масла, 20 гр. Пивных дрожжей
(или 2 пакетика сухих дрожжей)
Расстойка теста при комнатной температуре: 1
час или в ручном режиме НИЗКАЯ
ТЕМПЕРАТУРА при 40°С дать расстояться
примерно в течение 30/45 минут.
Пицца помещаются в духовку без ее
предварительного нагрева.
Включите приготовление
Ïðîãðàììà ÕËÅÁ
Эта программа предназначена для выпечки хлеба.
Для оптимального результата рекомендуем строго
следовать приведенным ниже инструкциям:
, ,
, нижний уровень
, ,
ПИЦЦА
, ,
, холодная
, ,
RS
7
Page 8
RS
соблюдайте рецепт;
максимальный вес на противень;
не забывайте налить 1 дл холодной воды в
противень, установленный на 5-ом уровне;
Хлеб помещается в духовку без ее предварительного
нагрева. Если Вы хотите поместить хлеб в духовой
шкаф, нагретый после приготовления при высокой
температуре, на дисплее будет показана надпись
«Hot» до тех пор, пока температура в духовке не
понизится до 120°С. На данном этапе можно
поместить в духовку хлеб для выпечки.
Ðåöåïò ХЛЕБА:
1 противень макс. на 1000 гр, нижний уровень.
Рецепт на 1000 гр. теста: 600 гр. муки, 360 гр.
воды, 11 гр. соли, 25 гр. свежих дрожжей (или 2
пакетика сухих дрожжей)
Приготовление:
Смешайте в большой миске муку с солью.
Разведите дрожжи в теплой воде (примерно 35°C).
Сделайте в центре муки лунку.
Налейте в лунку разведенные в воде дрожжи.
Замесите в течение 10 минут однородное,
эластичное тесто, не прилипающее к рукам.
Сформируйте из теста шар, поместите его в
миску и накройте его прозрачной кухонной
пленкой во избежание засыхания поверхности
теста. Поместите миску с тестом на расстойку в
духовой шкаф, включив ручной режим НИЗКАЯ
ТЕМПЕРАТУРА 40°C и дайте ему подняться
примерно в течение 1 часа (тесто должно
увеличиться вдвое в объеме).
Разделите подошедшее тесто на части.
Разложите булки на противене на листе бумаги
для духовки.
Посыпьте булки мукой.
Сделайте сверху булок надрезы.
íå çàáóäüте налить 1 äë õолодной воды в
ïðîòèâåíü, óñòàíîâëåííûé íà 5-ûé
óðîâåíü. Äëÿ ÷èñ
èñïîëüçîâàòü âîäó ñ óêñóñîì.
Хлеб помещается в духовку без ее
предварительного нагрева.
Включите приготовление
По завершении выпечки выложите готовые
булки на решетку вплоть до их полного
охлаждения.
Программа КОНДИТÅРСКАЯ ВЫПÅ×ÊÀ
Эта программа идеально подходит для выпечки
кондитерских изделий. Изделия помещаются в
духовку без ее предварительного нагрева. Тем не
менее Вы можете разогреть духовку перед
помещением в нее продукта. В этом режиме Вы
можете изменить только продолжительность
приготовления на -10/+10 минут.
òêè ðåêîìåíäóåì
ÕËÅÁ
Программирование приготовления
Запрограммировать приготовление можно только
после выбора программы приготовления.
Ïорядок наñòðîéêè ïðîäîëæительíîñòè
ïðèãîòîâëåíèÿ
1. Нажмите несколько раз кнопку
пока на ДИСПЛЕЕ не замигает символ
цифровые значения;
2. поверните регулятор НАСТРОЙКА ЧАСОВ в
сторону + и - для выставления нужной
продолжительности;
3. вновь нажмите кнопку
4. по истечении заданного времени на дисплее
показывается надпись END (КОНЕЦ), и духовой
шкаф завершает приготовление со звуковым
сигналом.
Пример: в 9:00 Вы задаете приготовление, на
которое потребуется 1 час 15 минут.
Приготовление автоматически завершится в
10:15.
Íàñòðîéêà îêîí÷àíèÿ ïðèãîòîâëåíèÿ
Настроить окончание приготовления можно
только после настройки продолжительности
приготовления.
1. Выполните операции с пункта 1 по пункт 3, в
которых описывается порядок настройки
продолжительности;
2. затем нажмите несколько раз кнопку
пор, пока на ДИСПЛЕЕ не замигает символ
два цифровых значения;
3. поверните регулятор НАСТРОЙКА ЧАСОВ в
сторону + и - для настройки часов;
4. вновь нажмите кнопку
ДИСПЛЕЕ не замигают другие два цифровые
значения;
5. поверните регулятор НАСТРОЙКА ЧАСОВ в
сторону + и - для выставления минут;
6. вновь нажмите кнопку
7. по истечении заданного времени на дисплее
показывается надпись END (КОНЕЦ), и духовой шкаф
завершает приготовление со звуковым сигналом.
Пример: в 9.00 Вы программируете
приготовление, на которое потребуется 1 час 15
минут, и время 12:30, когда приготовления
должно завершиться. Программа автоматически
запускается в 11:15:00.
Включенные символы
приготовление было запрограммировано. На
ДИСПЛЕЕ попеременно показывается время
окончания приготовления и продолжительность
приготовления.
Для отмены программы поверните рукоятку
ПРОГРАММЫ в положение «0».
для подтверждения;
äî òåõ ïîð, ïîêà íà
для подтверждения;
è означают, что
äî òåõ ïîð,
è òðè
äî òåõ
è
Практические советû по
приготовлению
Для приготовления в вентилируемом режиме не
используйте уровни
8
Page 9
1 и 5: они подвергаются прямому воздействию
горячего воздуха, который может сжечь
деликатные продукты.
В режимах ВЕРТЕЛ и ПОЛФАБРИКАТЫ
поместите противень на 1-ый уровень для сбора
жидкостей, выделяемых при жарке (сок и/или жир).
ОДНОВРЕМЕННОЕ ПРИГОТОВЛЕНИЕ
Используются 2-ой и 4-ый уровни, на 2-ой
помещаются продукты, требующие более
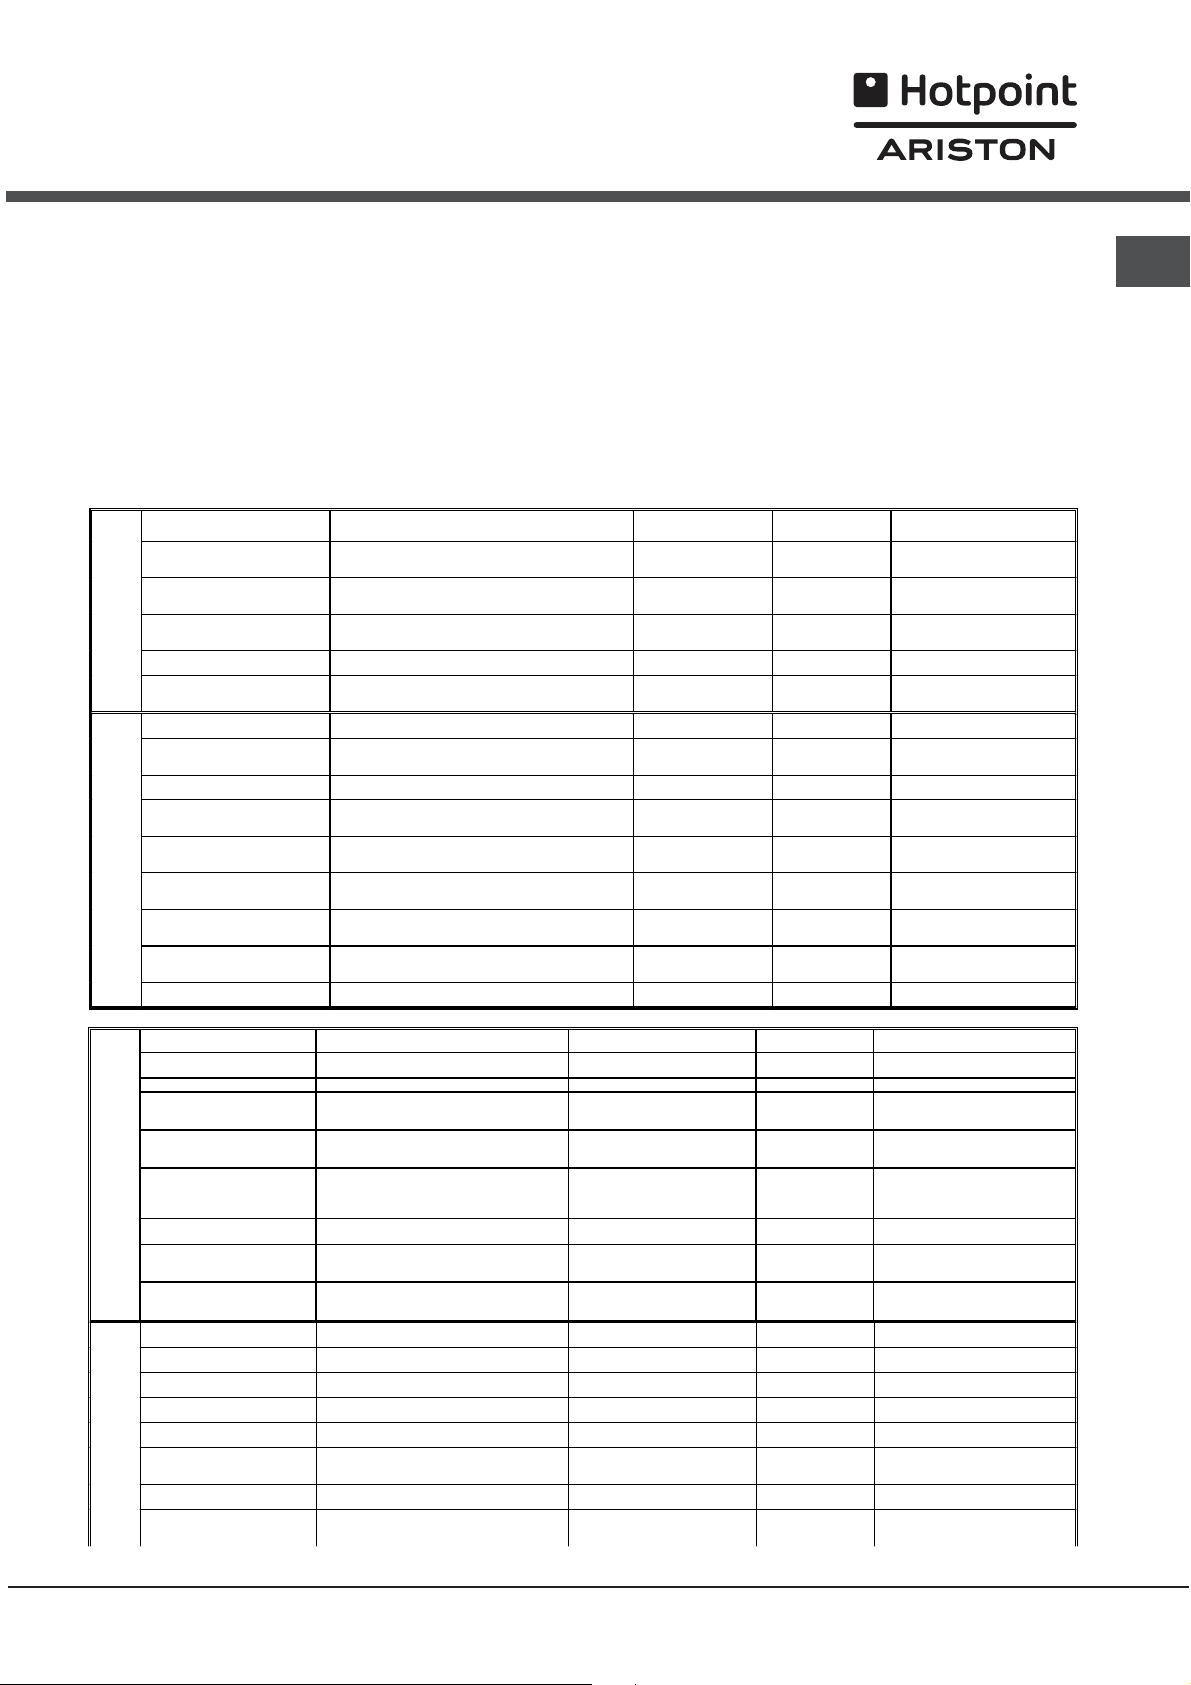
Таблица приготовления
ÏÅÐÂÛÅ ÁËÞÄÀ
ÇЕРНОБОБОВ ÛÅ
ÏÐÎÄÓÊÒÛ
Несладк иé бисквитныé êåêñ
Äомашние òîð òû
Áëþäà â горшочках
Áëþäà â лотках
Ôарширов анные овощи
Овощи, тушеные â горшочке салат латук, морковь с шафраном, скорцобüÿíêà è ò.ä. Традиöионныé
Открытыé пирог фл ан
Áëþäà â горшочках
Ïëþäà â тесте
Áëþäà â ôîëüãå
Суфле
Çапеканки
Суфле
Ðèñ
бисквитныé кеск с оливка ми, с тунöîì è ò.ä.
домашниé сырныé торт, за пеканк а с семгоé,...
рыба, мясо, овощи, гусина пече нü è ò.ä. â горшочке
запек анка из куриной печени , пюре из семги, яйца в
сырное, ово щное, рыбное и т.д. суфле
картофельная запеканка, суп па рменьтер, лазанья и
картофель, помидоры, кабачки, капуста и т.д.
грибной флан, овощные оладьи и т.д.
овощи â горшочке
суфле из спаржи, помидоров è ò.ä.
овощная запеканка è ò.ä.
òðþôå ëè è ò.ä.
ПРИМЕРÛ
лотке è ò.ä.
ò.ä.
Ïëîâ
интенсивного жара.
Установите проитвень снизу, а решетку сверху.
RS
ПИЦЦА
Используйте противень из легкого алюминия,
устанавливая его на прилагающуюся решетку.
При использовании противеня время выпечки
удлиняется, что препятствует получению
хрустящей пиццы.
В случае выпечки пиццы с обильной начинкой
рекомендуется положить на пиццу сыр
моццарелла в середине выпечки.
ÔÓНКЦИЯ
Кондитер ская вы печ ка
или Приготовление на
нескольких уровнях
Кондитер ская вы печ ка
или Приготовление на
нескольких уровнях
Традиöионныé
Традиöионныé
Одновременное
пригот овление на
нескольких уровнях
(или полуфабр икаты)
Одновременное
пригот овлен ие на
нескольких уровнях
Традиöионныé
Традиöионныé
Одновременное
пригот овлен ие на
нескольких уровнях
Одновременное
пригот овление на
нескольких уровнях
Одновременное
пригот овлен ие на
нескольких уровнях
Традиöионныé
запеканка
ТЕМПЕРАТÓÐÀ
200-210 °C
160 °C
200 °C на противене
160 °C
160 °C
200 °C
200 °C
200 °C
160 °C
160 °C
200 °C
200 °C на противене
200 °C
180 °C
ТИП ПРОТИВЕНЯ
форма для тор та ставится на
противенü
форма ñ горшочками стави тся на
противенü (íà ïàðó с уже го рячей
лоток ставится на противень (íà
ïàðó ñ уже горячеé âîäî é)
форма для тор та ставится на
лоток устанавливается на
форма для тор та ставится на
горшочек, óñòà íà âë èâà åì ûé íà
лоток или форма для торта
ставятся на противень (на пар у с
уже горячеé âî äîé)
форма для торта ставятся на
противень (на па ру с уж е горячей
форма для тор та ставится на
продукт в фольге помещает ся на
лоток устанавливается на
âîäîé)
противенü
противенü
на противене
противенü
противенü
âîäîé)
противенü
противенü
противенü
ПРОДУКТЫ
Запеченая птица
Птица на вертеле
Запеч еное мяс о
крупные куски тушеного мяса
Мясо тушеное в горшочке,
ÌßÑÎ
традиционные блþäà
Блюда на гриле
Ìÿñî â òåñò å
Áëþда в соляноé корке
Рыба-гриль и шашл ык из рыбы
Рыба, приготовленная целиком
(фаршированная)
Рыбное филе (с добавлением
вина или других жидкостеé
ÐÛÁÀ
Ðûáà â ôîëüãå
Рыба в тесте (в песочн ом или
слоеном тест е
Запеканка из рыбы
Суфле
Рыба в соляноé корке
ПРИМЕРЫ
)
курица, утка, цып лено к, каплун
жаркое из свинины, теля тины , индейки ,
ростбиф, баранья нога, оленья нога, куриная
грудка, фаршированная теляти ной, и т.д.
нога, тушеная целиком, крупный ка плун или
говядина, тушеная в вине бургоньон, кролик
по-охотничьи, тел яти на в горшочке Маренг о,
тушеная ягнятина , курица по-баски, и т.д.,
бифштексы, отбивные, колбаски, ша шлык ,
говяжüÿ вырезка Веллингтон, нога в тесте и
средиземноморская султанка, тунец è ò.ä.
семга, морскоé ерш, трес ка, лаврак и т.д
)
камбала, лиманда, молл юски сант-жак и т.д.
запеченая трес ка а ля провансалü è ò.ä
курица, цыплята
èíäåéêà è ò.ä.
бакенхов, блюда в лотках и т.д.
куриные окорочка è ò.ä.
птица в соляноé корке и т.д
лаврак, ск умбрия, сардины,
дорада, карп è ò.ä.
семга, шашл ык из рыбы и т.д
ìîëëþñê è ñàíò-æàê è ò.ä.
лаврак, карп и т.д
Однов ременно е приготовление
.
ò.ä
.
.
Одновре менное приготовление
Одновре менное приготовление
Одновре менное приготовление
.
Одновре менное приготовление
Одновре менное приготовление
.
запеканка (или полуфабр икаты
.
Одновре менное приготовление
Одновре менное приготовление
ÐÅÆÈÌ
Полуфабрикаты
Вертел
Полуфабрикаты
на нескольких уровнях
Традиционныé
на нескольких уровнях
на нескольких уровнях
на нескольких уровнях
Традиционныé
на нескольких уровнях
на нескольких уровнях
(
ãðèëü для подрумян ивани я
на нескольких уровнях
на нескольких уровнях
Ãðèëü
Ãðèëü
)
)
ТЕМПЕРАТУРА
200°C
250°C
200°C
180°C
(íà 1/3
приготовления
понизи тü äî 160°
190°C
270°C
200°C
240°C
250°C
200°C
200°C
200°C
200°C
200-210°C
260°C
200°C
240°C
C)
ТИП ПРОТИВЕНЯ
тушка птицы помещается на
решетку
соком
противенü
противенü
на противене
на противене
на противене
на противене
на противенü
противенü
крепления для вертел а
кусок мяса поме щается на решетку
мясо помещается на противень и
регулярно поливается выделяемым
горшочек, устанавливаемый на
на гриле ( уровень выбирается в
зависимости от толщ ины куска)
на противене (для больших по рций
после запекания теста понизи ть
температуру до 160°C)
мясо помещается на противень или
лоток устанавливается íà
на гриле ( уровень выбирается в
зависимости от толщ ины куска)
лоток устанавливается íà
противень (или решетка для
подрумянивания â режиме грилü)
форма для торта, устанавливаемыé
рыба помещается на противень ил и
лоток устанавливается íà
9
Page 10
RS
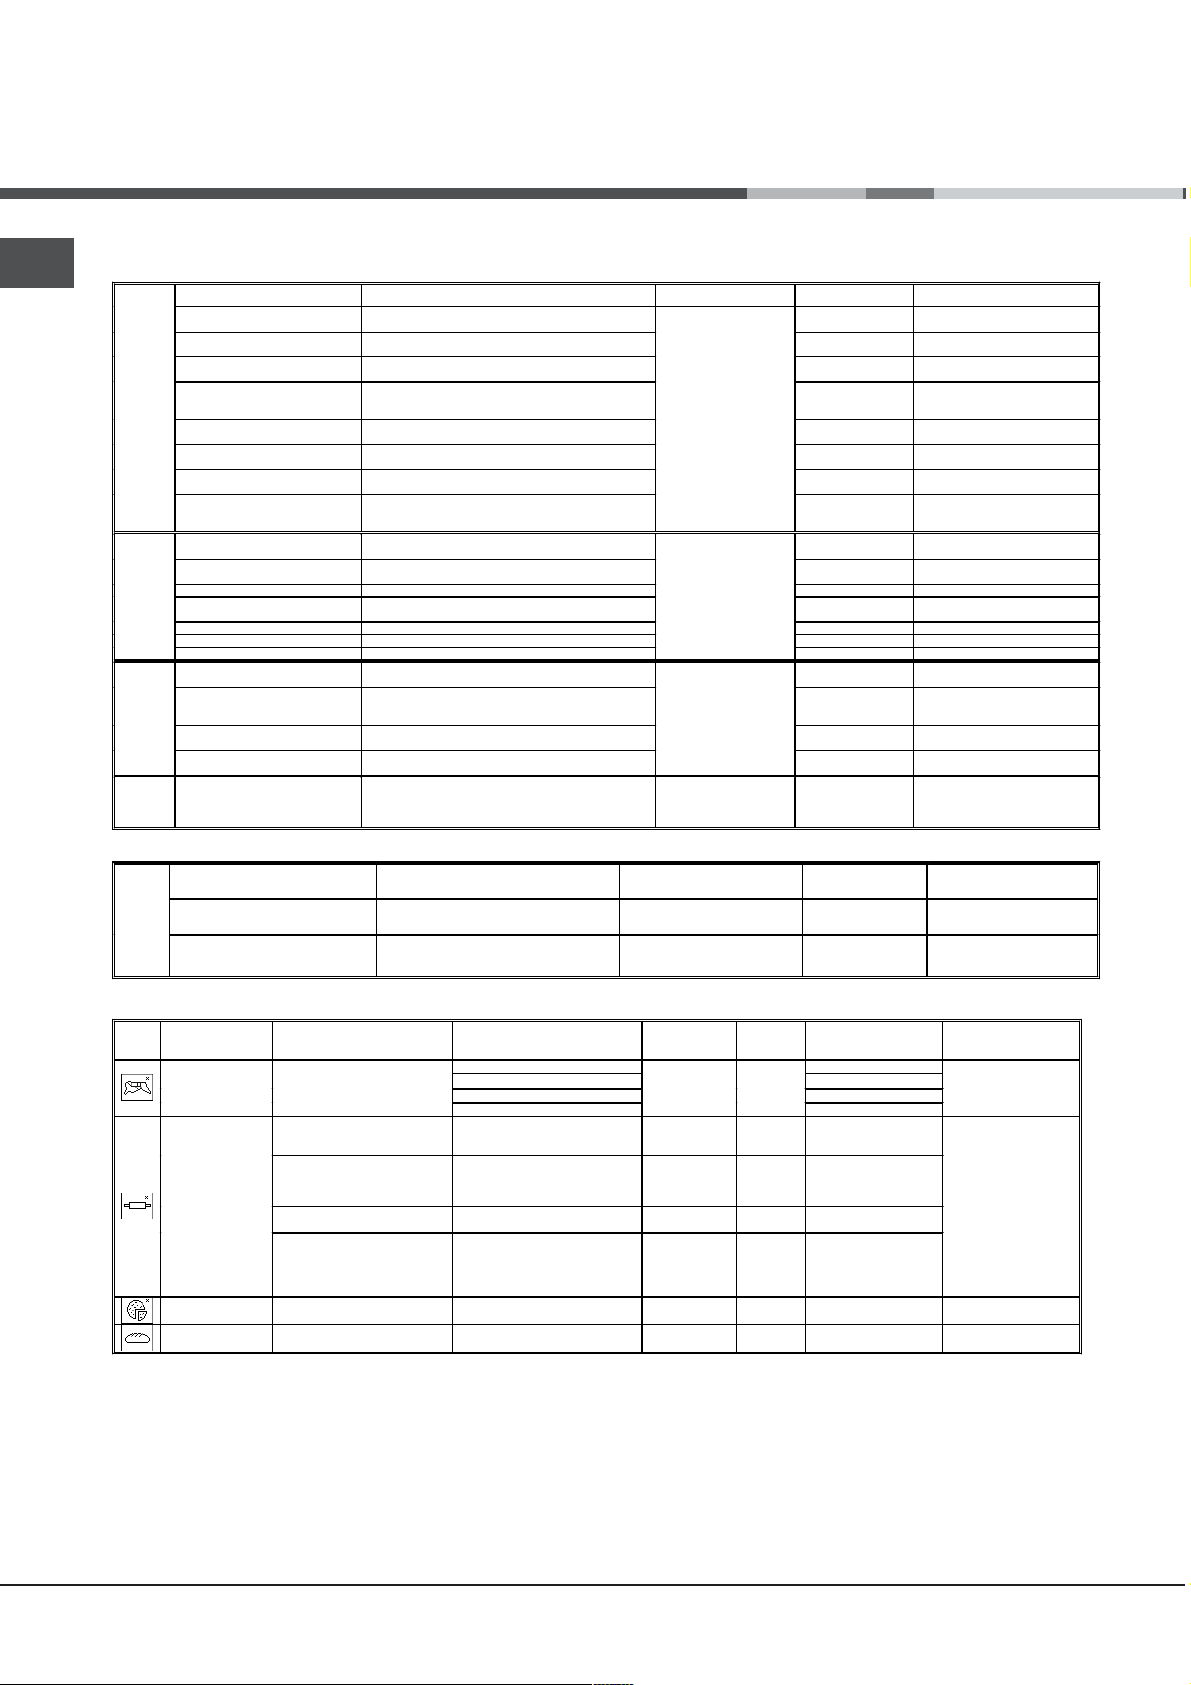
Таблица приготовления
ÌÅËÊÀß
ËÅÃÊÈÅ БЛЮДА
ÔÐÓÊÒÛ
ÏÐÎÄÓÊÒÛ
Печенüå (íåäð îææåâîå òåñòî)
Òîðòû ñ áåëûì сыром
Ïåñî÷íые пиро ги из дрожжевого
Âûïå÷êà êîðæåé äëÿ ïåñî÷íûõ
ïèрогов (ïåсочное òåñòî)
Ïèðîãè (ïåñî÷íîå èëè слоенîå
Ìåëêàÿ êîíäèòåðñêàÿ âûïå÷êà
(èç дрожжåâîãî òåñ òà)
ÊÎÍÄÈÒÅÐÑÊÀß ÂÛÏÅ×ÊÀ
Êðóïíàÿ êîíäèòåðñêàÿ âûïå÷êà
(èç дрожжåâîãî òåñ òà)
Òåсто для печенья
ÂÛÏÅ×ÊÀ
ÊÎÍÄÈÒÅÐÑÊÀß
ÏÅÐÅÄ
ÄЕСЕРТОÌ
Ïåñî÷íое тесто
Ñëîåíîå òåñòî
Ìèíäàëüíîе печенüå, кокосовоå
Äðîææåâîå òåñòî
Áåëîå áåçå
ßíòàðíîå áåçå
Êðåìû è ñëàäêèå ôëàí èç манки êðåì-êàðàìåëü, êðåì-áðþëå, шоколàäíûé ôëàí è ò.ä.
Ðèñîâûé десерт
Ôðóêòû ñ начинêîé èëи фруктû â
òåñòà
òåñòî)
ýêëåðû
печенüå
Ïóää èíã
Ñóôëå
ôîëüãå
áèñêâèòû, ñàâîéñêîå печен üå, печенüå-ðóëåòû,
ïèðîãè ñ ñàõàðîì, òîð òû èç ñóõàðåé с фруктîâîé
ïðîôèòåðîëè, ìåëêèå ýêëåðû, «îðåøêè», òîðò Ñàíò
êðóàññàíû, ïå ñî÷íûå òîðòû ñ ñàõàðîì, áóëî÷êè áåç
Ýëüçàññêèé ïèðîã, áóëêè, êóëè÷, ñëàäêèé ïèðîã
ïå÷å íüå â áóìàæíûõ формо÷êàõ, печенüå èç жидкого
ïåñî÷íое печенье, печенье spritz, сухие òàрта летки è
ðàçëичная ñëадкая выпечка из слоеного теста
ìèíäàëüíîе печенüå с кокосовым орåõîì èëè ñ
ïóääèíã èç õëåáà èëè булок, рисовый пудд инг
ÏÐÈÌÅÐÛ
шоколàäíûé òîðò ñ îðåõàìè,
ïåñî÷íûå ïèðîãè ñ начинêîé èç ñâåæèõ ÿãîä
(клубника, маëèíà è ò.ä.)
ïèðîãè ñ начинêîé èç ãðóø è ò.ä.
начинк и, мелкое печенüе саварин и т.д.
ìåëêèå áóëî÷êè, ìåëêèå êðóàññàíû è ò.ä.
ðèñ-êîíäå, èìïåðàòðñêèé ðèñ è ò.ä.
ñóôëå ñ ëèêåðîì, ôðóêòîâîå ñóôëå è ò.ä.
ÿáëîêè, печенûå в духовкå è ò.ä.
200 °C
начинêîé
Îíîðå è ò.ä
òåñòà è ò.ä.
ò.ä.
ìèíäàëåì
70 °C íà ïðî òèâåíå
Êîíäèòåрская вы печка
èëè Ïðèãîòовление на
íåñêîëüêèõ уровнях
Êîíäèòåрская вы печка
èëè Ïðèãîòовление на
íåñêîëüêèõ уровнях
Êîíäèòåрская вы печка
èëè Ïðèãîòовление на
íåñêîëüêèõ уровнях
Îäíîâðåìåííîå
ïðèãîòîâëåíèå íà
íåñêîëüêèõ уровнях
ÔÓÍÊÖÈß
ÒÅÌÏÅÐÀÒÓÐÀ
200 °C
180 °C
180 °C
220 °C
190 °C íà ïðî òèâåíå
180 °C íà ïðî òèâåíå
160 °C
180 °C íà ïðî òèâåíå
200 °C íà ïðî òèâåíå
200 °C íà ïðî òèâåíå
180 °C íà ïðî òèâåíå
180 °C íà ïðî òèâåíå
110 °C íà ïðî òèâåíå
190 °C
160 °C
180 °C
200 °C
200 °C
ÒÈÏ ÏÐÎÒИВЕНЯ
ôîðì à äëÿ òîðòà ñòàâèòñÿ íà
ïðîòèâåíü
ôîðì à äëÿ òîðòà ñòàâèòñÿ íà
ïðîòèâåíü
ôîðì à äëÿ òîðòà ñòàâèòñÿ íà
ïðîòèâåíü
ôîðì а для торта,
óñòàí àâëèâàåìûé íà ïðîòè
(ñóõàÿ ôàñîëü â òåñòå)
ôîðì à äëÿ òîðòà ñòàâèòñÿ íà
ïðîòèâåíü
íà ïðî òèâåíå
òîðòîâ, óñòàíàâëèâàåìîé íà
ôîðì à äëÿ òîðòà ñòàâèòñÿ íà
óñòàí àâëèâàåìûå íà ïðîòèâåíü
ôîðì à äëÿ òîðòà ñòàâèòñÿ íà
ôîðì à äëÿ òîðòà ñòàâèòñÿ íà
óñòàí àâëèâàåìûé
èëè â ôîðìå äëÿ
ïðîòèâåíü
ïðîòèâåíü
Ôîðìû èëè ëîòîê,
(íà ïàðó íà ïðîòè
ïðîòèâåíü
ïðîòèâåíü
ôîðì à äëÿ òîðòà ,
èëè ôðóêòû â ôîëüãå íà
íà ïðîòèâåíü,
ïðîòèâåíå
âåíå)
âåíü
РАЗНОЕ
ПРОДУКТЫ ÏÐИМЕРЫ ФУНКЦИЯ ТЕМПЕРАТУРА ÒÈÏ ПРОТ ИВЕНЯ
Éогурт Низкая температура 40 °C
Сухие продукты
грибы, тра вы, фрукты или овощи,
нарезанные ломтиками, è ò.ä.
Низкая температура 65 °C на решетке
горшочек, установленный
на противе нь
Программы приготовления â автоматическом режиме
Функция
*
Указанная прод олжительность при готовления служи т только в качестве примера и может быть изменена в соо тветствии с личными вкусами. Время разогрев ания духовки является фиксированным и не мо жет быть
изменено вручную
**
Продолжительн ость приготовлен ия в автоматич еском режиме з адается автом атически. Значения, приведенные в таблице, относятся к минимальной и ма кси мальн ой п родолжительности, которая может быть
изменена пользователем, начиная с авто матически заданн ой продолжитель ности
***
По рецепту налейте
Жаркое из
говядин ы
Конди терск ая
выпечка
Пицца
Õëåá *** 2 55
.
Рекомедуемая программа
для...
Песочные торты ñ фруктовой
слоеное тесто с фланом или
(вишневый пирог, ñëî¸íûé
пирог ñ миндальным кремом,
100
ãð âîäû â противень
Жаркое из мяса
Бискви т и торт четыре
четверти (с химическими
дрожжами)
начинкой (песочной или
áåç íåãî)
Слоеное тесто
Конди терск ая выпечка из
нежрожжевого теста
домашние пироги è ò.ä.)
Лепешка (зам ес теста)
.
ПРИМЕРЫ
Жаркое из телятины
Жаркое из свинины
Жаре ная курица
Баранья нога
бисквитный тор т с фруктовой
начинкой, миндальное печенье,
торт четыре четверти и т.д.
песочный ялочный пирог, пирог
с сливами мирабель, с грушами
пирожки с яблоками, домашние
пироги, мелка я выпечка и т.д.
è ò.ä.
íà против ене
2 28**
.
ПРОТИВЕНИ
на против ене
èëè â лотке
форма для
торта ставится
на решетку
на против ене
Уровень
противеня
äëÿ
2
Продолжительность
приготовления
(минуты)
2 45**
2
2
2
Нагрев духовки
Без пре двар итель ного
нагрева
Без пре двар итель ного
нагрева
Разогретая или
неразогретая духовка
Без пре двар итель ного
нагрева
10
Page 11
Ýксплуатация варочной
панели
На стекляннои поверхности варочнои панели могут быть
видны сальные следы от клея, нанесенного на прокладки
Перед началом эксплуатации изделия следует удалить
следы клея при помощи специального неабразивного
моющего средства. В первые часы работы вы можете
почувствовать запах жженои резины, которыи быстро
пропадает.
Через несколко секунд после подсоединения варочнои
панели к сети электропитания включается короткии
звуковои сигнал. Только после этого можно включить
варочную панель.
Нормальный шумовой уровень варочной панели:
Ãóäåíèå: вызвано вибрацией металлических
элементов, из которых состоит индуктор, и кастрюли,
образуя электромагнитное поле, необходимое для
нагрева. Оно увеличивается по мере повышения
мощности индуктора.
Ëåãêèé ñâèñò: слышен в случае помещения на варочную
зону пустой кастрюли. Свист пропадает, как только в
кастрюлю будут положены продукты или налита
жидкость.
Ïîòðåñêèâàíèå: этот звук образуется вибрацией
материала, из которого изоготовлено дно кастрюли,
пронизываемого паразитным током, создаваемым
электромагнитным полем (индукцией). Потрескивание
может быть более или менее сильным в зависимости
от материала, из которого изоготовлено дно кастрюли, и
сокращается в случае кастрюли большого размера.
Ñèëüíûé ñâèñò: слышен при одновременной работе
двух индукторов, расположенных по одной вертикали,
при максимальной мощности и/или когда на большем
индукторе включена функция вольтодобавочного
устройства, а другой является саморегулируемым.
Свист сокращается при понижении мощности
саморегулируемого индуктора. Особенно он слышен,
когда дно кастрюли изготовлено из солев разных
сплавов.
Øóì âåíòèëÿòîðà: для исправной работы варочной
панели и для защиты электронной части от возможного
перегрева необходимо включать вентилятор.
Вентилятор работает с максимальной мощностью,
когда большой индуктор включен на максимальную
мощность,или когда включено вольтодобавочное
устройство. Во всех остальных случаях вентилятор
работает со средней мощностью в зависимости от
отмечаемой температуры. Кроме того вентилятор
может продолжать работать также после выключения
варочной панели, если ее температура остается
высокой.
Ïåðå÷èñленныå âûøå øóìû
òåõíîëîãèè è íå îáÿçàòåëüíî îçíà÷àþò íåèñïðàâíîñòè â
ðàáîòå èçделия.
При длительном нажатии на кнопки - è + происходит
быстрая смена уровнеи мощности и минут таимера.
ïðèñóùè èíäóêöèîííîé
Включение варочноé панели
Включите варочную панель, нажав кнопку примерно
на одну секунду.
Включение варочнûõ çîí
Каждая зона варочнои панели включается при помощи
кнопки
двоинои кнопки
Для включения однои из варочных зон нажмите
соответствующую кнопку и настроите нужную
мощность при помощи кнопок
и регулятора мощности, состоящего из
- è +.
- è +.
Вольтодобавочное устроéñòâî booster*
Для ускорения нагрева некоторых варочных зон можно
включить вольтодобавочное устройство при помощи
Booster
кнопки
функция добавляет мощности до 2000 Вт или 3000 Вт в
зависимости от размера данной варочной зоны.
Вольтодобавочное устройство автоматически
отключается через 4 минуты. До тех пор, пока будет
включено вольтодобавочная функция одной из варочных
зон, соответствующая передняя или задняя варочная зона
будет работать с сокращенной мощностью (например,
если включено вольтодобавочное устройство левой
задней варочной зоны, понижается мощность левой
передней варочной зоны). Более подробные разъяснения
смотрите в Техническом описании моделей.
. Включается индикатор на кнопке. Эта
Âûключение варочнûõ çîí
Для отключения варочнои зоны выберите ее при помощи
соответствующеи кнопки
Нажмите кнопку
постепенно понизится вплоть до выключения.
-: мощность варочнои зоны
и затем:
Программирование продолжительности
приготовления
Можно одновременно настроить все варочные зоны на
приготовление от 1 до 99 минут.
1. Выбрать варочную зону при помощи соответствующеи
кнопки выбора.
2. Настроить температуру варочной зоны.
3. Нажать кнопку программирования
3. Настроить нужную продолжительность приготовления
.
RS
при помощи кнопок
- è +.
11
Page 12
RS
4. Подтвердить настройки при помощи кнопки .
Обратный отсчет таймера начинается сразу же. По
завершении заданного приготовления раздается звуковой
сигнал (в течение 1 минуты), и варочная зона
выключается.
Повторите вышеописанную операцию для каждой
варочной зоны, которую требуется запрограммировать.
Âèçóàëèçàöèÿ â ñëó÷àå ïðîãðàììèðîâàíèÿ íåñêолькиõ
âàðî÷íûõ çîí
В случае программирования одной или нескольких варочных
зон на дисплее показывается отсчет времени варочной зоны,
на которой приготовление ближе всего к завершению, с
указанием ее положения соответствующим мигающим
индикатором. Индикаторы других запрограммированных
варочных зон остаются включенными.
Для визуализации оставшегося времени приготовления
остальных запрограммированных варочных зон нажмите
несколько раз кнопку
по часовои стрелке будет показано время всех
запрограммированных варочных зон, начиная с левои
переднеи.
: на дисплее последовательно и
Áлокировка управлениé
В процессе функционирования варочнои панели можно
заблокировать ее управления во избежание случаиного
изменения настроек (дети, в процессе уборки и т.д.). При
помощи кнопки
над этои кнопкои загорается.
Для разблокировки управлении (напр., для прерывания
приготовления) необходимо: нажать кнопку
несколько секунд, индикатор погаснет, и управления
разблокируются.
управления блокируются, и индикатор
íà
Âûключение варочноé панели
Для выключения изделия нажмите кнопку .
Если управления варочнои панели были заблокированы,
они останутся заблокированными также после повторого
включения варочнои панели. Для повторого включения
варочнои панели необходимо сначала разблокировать
управления.
Режим «demo»
Èçìåíåíèå ïðîãðàììèðîâàíèÿ
1. Нажмите несколько раз кнопку
будет показано время варочнои зоны, которое требуется
изменить.
2. При помощи кнопок
продожительность.
3. Подтвердите настроику при помощи кнопки
Для отмены программирования выполните описанные
выше операции. В пункте 2 нажмите кнопку
продолжительность станет постепенно убывать вплоть до
выключения 0. Программирование будет обнулено, и
дисплеи выидет из режима программирования.
- è + задаите новую
äî òåõ ïîð, ïîêà íå
.
- :
Òàéìåð
Варочная панель должна быть включена.
Таимер служит для настроики продолжительности
приготовления вплоть до 99 минут.
1. Нажмите кнопку программирования
пока не загорится индикатор таимера.
2. Настроите нужную продолжительность приготовления
äî òåõ ïîð,
Можно задать демонстрационныи режим, в котором
панель управлении работает как обычно (включая кнопки
программирования), но нагревательные элементы не
включаются. Для перехода в режим «демо» варочная
панель должна быть включена, а все варочные зоны
выключены:
Нажмите и держите одновременно нажатыми кнопки
+ и - в течение 6 секунд. По истечении 6 секунд
индикатор ON/OFF и индикатор БЛОКИРОВКА
УПРАВЛЕНИИ замигают на одну секунду. Отпустите
кнопки
+ и - и нажмите кнопку ;
на дисплее появится надпись DE и MO, и варочная
панель выключится.
при последующем включении варочная панель
включается в режиме demo.
Для отмены этого режима выполните операции в
описанном выше порядке. На дисплее появится надпись
DE и OF, и варочная панель выключится. При
последующем включении варочная панель включается в
рабочем режиме.
при помощи кнопок
3. Подтвердите настроику при помощи кнопки
Обратныи отсчет таимера начинается сразу же. По
истечении заданного времени включится звуковои сигнал
(на 1 минуту).
12
- è +.
.
Page 13
Практические советû по эксплуатации
изделия
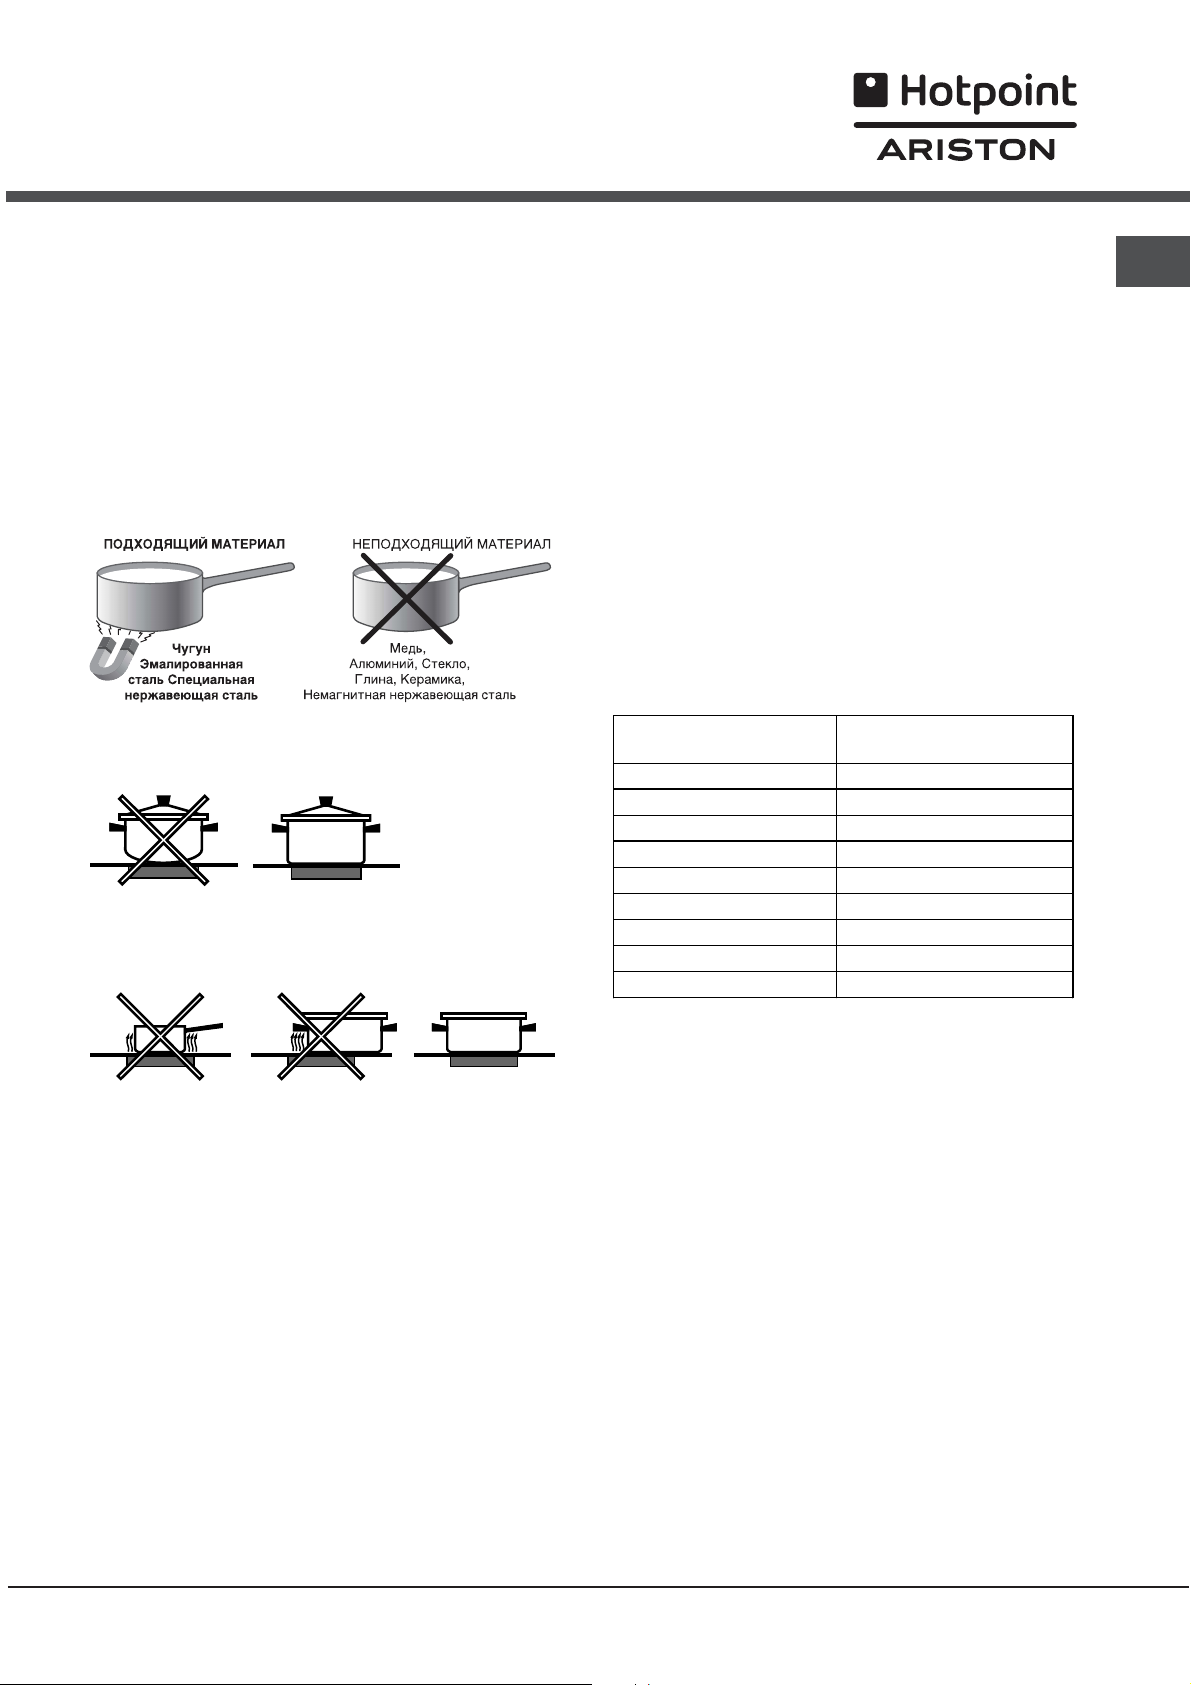
Используите посуду из материала, подходящего для
индукционного нагревания (ферромагнитныи материал).
Рекомендуется использовать посуду из: чугуна,
эмалированнои стали или специальнои стали для
индукционного нагревания. Для проверки пригодности
посуды достаточно использовать магнит.
Кроме того для больше эффективности варочнои панели
следует:
Использовать посуду с плоским толстым дном,
идеально прилегающим к зоне нагрева;
Ïåðåãðåâ
В случае перегрева электронных комплектующих
варочная панель автоматически отключается, и на
дисплее появляется
пропадает, и варочная панель возвращается в рабочии
режим, когда температура опускается до допустимого
уровня.
Ïðåäîõðàíèòåëüíûé âûêëþ÷àòåëü
Изделие оснащено предохранительным выключателем,
автоматически отключающим варочные зоны по истечении
времени функционирования данного уровня мощности. В
процессе аварииного отключения на дисплее появляется
«0».
Пример: задняя правая варочная зона настроена на 5,
передняя левая варочная зона настроена на 2. Задняя
правая варочная зона отключается через 5 часа работы,
передняя левая через 8 часов.
F с мигающим кодом. Это сообщение
RS
Использовать посуду с дном такого диаметра, чтобы
полностью закрыть варочную зону для оптимального
использования всего выделяемого тепла.
Проверить, чтобы дно используемои посуды было
всегда совершенно сухим и чистым для идеального
прилегания к варочнои зоне и для долгого срока
службы как варочнои панели, так и самои посуды.
Не следует использовать на даннои варочнои панели
посуду, использованную на газовых конфорках.
концентрация тепла на газовых конфорках может
деформировать дно посуды и нарушить прилегание к
варочнои зоне;
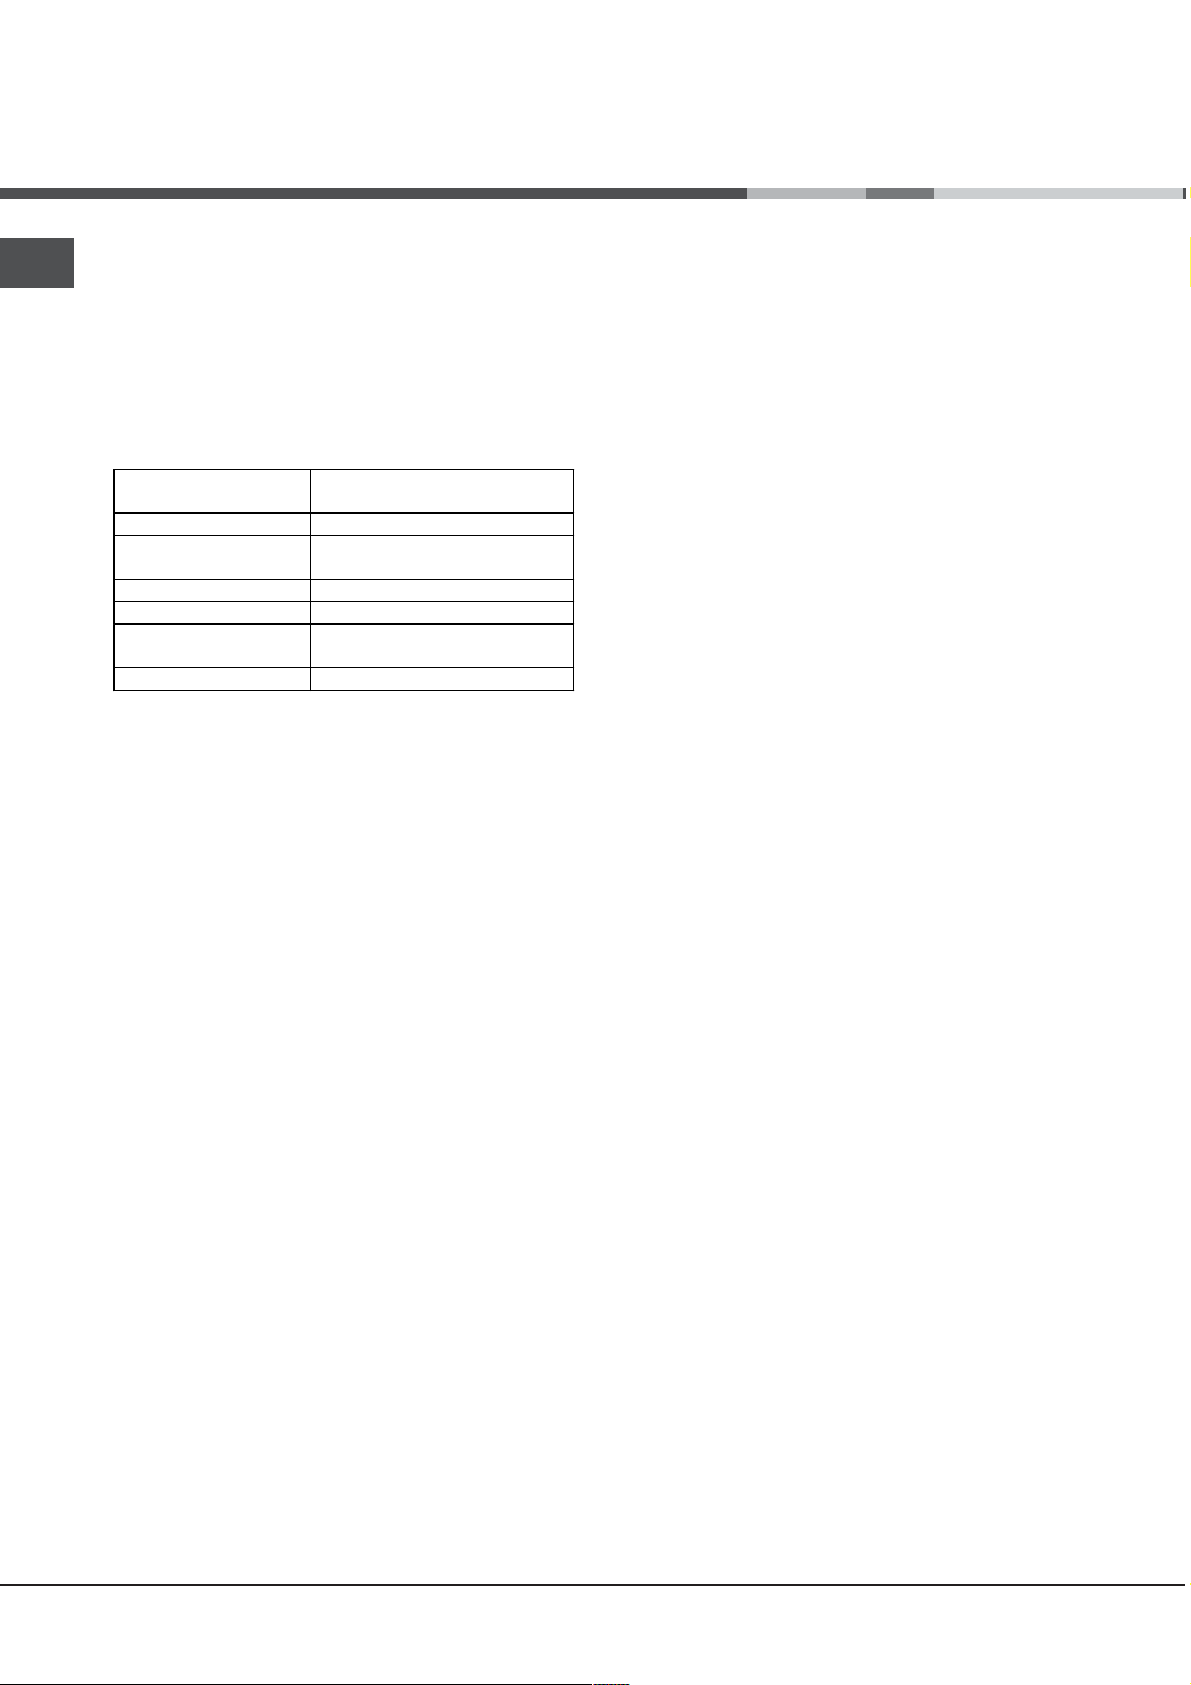
Çàùèòíûе устроéñòâà
Сенсор наличия посудû
Óровень мощности
1 9
2 8
3 7
4 6
5 5
6 4
7 3
8 2
9 1
Çâóêîâàÿ ñèãíàëèçàöèÿ
Некоторые неисправности такие как:
какои-либо предмет (посуда, столовыи прибор и т.д.)
находится в зоне управлении более 10 секунд.
утчека жидкости на зону управлении;
при длительном нажатии на кнопку может включиться
звуковои сигнал. Устраните причину неисправности для
гашения звуковои сигнализации. Если причина
неисправности не будет устранена, звуковои сигнал не
гасится, и варочная панель выключается.
Макс. кол-во часов
функционирования
Каждая варочная зона укомплектована сенсором наличия
посуды. Конфорка выделяет тепло только при наличии на
неи посуды с размерами, соответствующими даннои
конфорке. Мигающии индикатор может означать:
неподходящая посуда
посуда неподходящего диаметра
посуда снята с варочной зоны
13
Page 14
RS
Техническое описание конфорок
Система индукционного нагревания является
самой быстрой из существующих технологий
нагрева. В отличие от традициональных конфорок
нагрев производится не конфоркой: нагревается
непосредственно содержимое кастрюли, дно
которой обязательно должно быть из
ферромагнитного материала.
Ìодели варочных
панелей
Варочные зоны Ìощность (Вт)
Задняя левая I 1400 – 600 если передняя
Задняя правая I 2200 – B 3000*
Передняя левая I 2200 – B 3000*
Передняя правая I 1400 – 600 если задняя
Îбщая мощность 7200
Óñëîâíûå обозначåíèÿ:
I = простая индукционная варочная зона
B = вольтодобавочное устройство: индукционная
варочная зона может иметь дополнительное
электропитание 3000 Вт
* = максимальная мощность ограничена 600 Вт
до тех пор, пока включено вольтодобавочное
устройство соответствующей задней
индукционной конфорки (см. Включение и
эксплуатация).
CI 6I FA R/HA
Ëåâàÿ*
правая*
14
Page 15
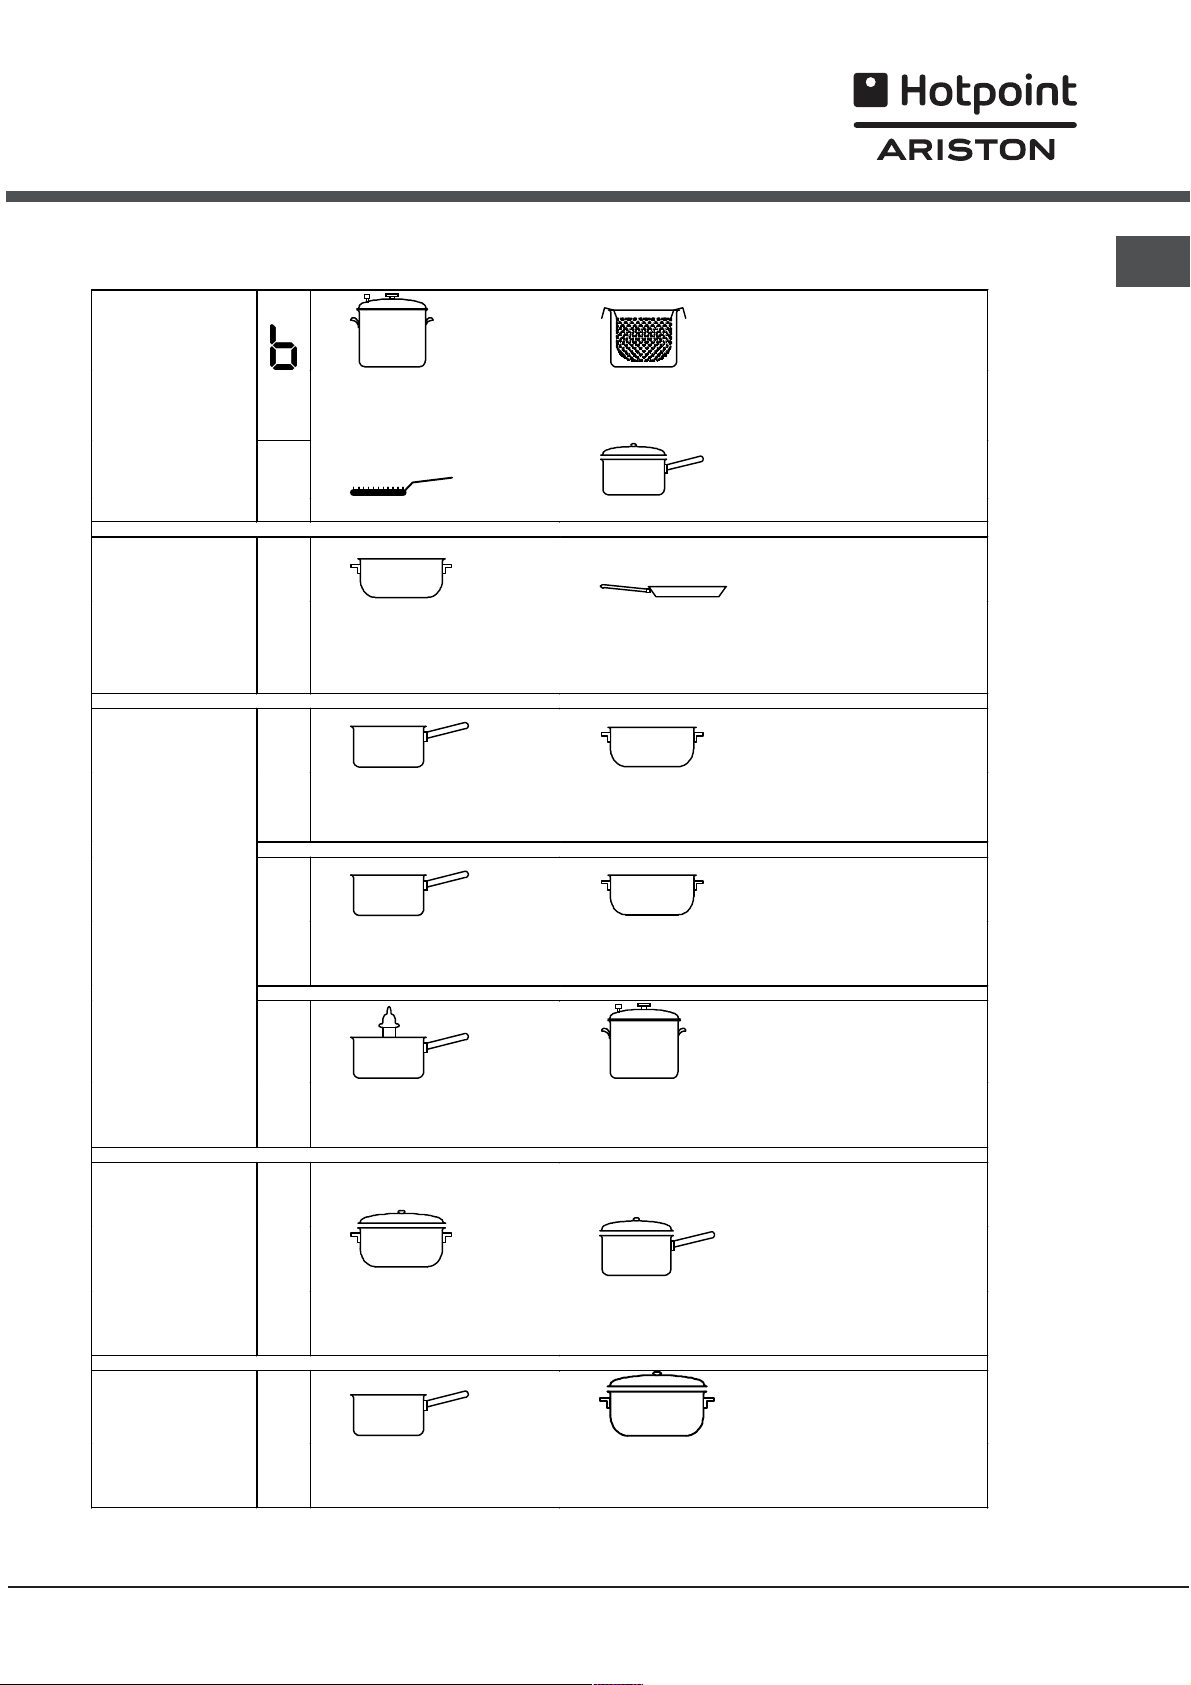
Практические советû по приготовлению блюд
RS
Приготовление под
ª
большом огне
Приготовление на
èå íà
среднем
Приготовлен
îãíå
¶
¶
§
давлением
Скороварка
Áифштексы
Áëèíû
Áыстрое загустени (Æидкие соусы)
Êипячение âîäû (äëÿ варки макарон, риса, овощей)
Êипячение молока
§
Постепенное загустение (густые соусы)
Ôритюр
Варка
Приготовление на среднем огне,
обжаривание
(Жаркое, бифштексы, эскалопы, рыбное
филе, яичница)
S
S
Приготовление на умеренном огне
¢
Приготовление на
пару
Продолжение приготовление в
скороварке после первого выпуска пара
¢
£
Приготовление
åíèå íà
Приготовл
на малом îãíå
îãíå
самом
малом
¡
Приготовление на
малом огне (рагу)
Øоколадный ñîóñ
Разогревание готовых блюд
Поддержание блюд в горячем состоянии
15
Page 16

Ïредосторожности è
рекомендации
RS
Изделие спроектировано и изготовлено в
соответствии с международными нормативами по
безопасности. Необходимо внимательно прочитать
настоящие предупреждения, составленные в
целях вашеи безопасности.
Îáùие требования по безопасности
Äàííûе инструкции относятся только к
странам, обозначения которûх приведенû
в руководстве и на паспортноé табличке
изделия.
Данное изделие предназначается для
непрофессионального использования в
домашних условиях.
Запрещается устанавливать изделие на улице,
даже под навесом, так как воздействие на него
дождя и грозы является чрезвычайно опасным.
Не прикасайтесь к изделию влажными руками,
босиком или с мокрыми ногами.
Изделие предназначено для приготовления
пищевых продуктов, может быть использовано
только взрослыми лицами в соответствии с
инструкциями, приведенными в данном
техническом руководстве.
Данное техническое руководство относится к
бытовому электроприбору класса 1 (отдельное
изделие) или класса 2 подгруппа 1
(встроенное между 2 кухонными элементами).
 ïðîöåññå ýêñплуатаöèè èçделия
íàãðåâàòåëüíûå ýëåìåíòû è íåêîòîðûå
÷àñòè äâåðöû äóõîâêè ïîäâåðãàþòñÿ
ñèëüíîì
îñòðîæíîñòü âî èçáåæàíèå êîíòàêòîâ ñ
ýòèìè ÷àñòÿìè è íå ðàçðåøàòü äåòÿì
ïðèáëèæàòüñÿ ê äóõîâêå.
Избегайте контактов проводов электропитания
других бытовых электроприборов с горячими
частями изделия.
Не закрывайте вентиляционные решетки и
отверстия рассеивания тепла.
Не ставьте на конфорки деформированную или
неустойчивую посуду во избежание ее
опрокидывания. Ставьте посуду на варочную
панель так, чтобы случайно не задеть за
рукоятки кастрюль и не опрокинуть их.
Всегда надевайте кухонные варежки, когда
ставите или вынимаете блюда из духовки.
Не используйте горючие жидкости (спирт,
бензин и т.д.) рядом с работающей кухонной
плитой.
Не кладите возгораемые материалы в нижний
отсек или в духовой шкаф: при случайном
включении изделия такие материалы могут
загореться.
Когда изделие не используется, всегда
проверяйте, чтобы регуляторы находились в
положении
Не тяните за сетевой кабель для отсоединения
штепсельной вилки изделия из сетевой розетки,
возьмитесь за вилку рукой.
ó íàãðåâó. Íåîáõîäèìо проявляòü
.
Перед началом чистки или технического
обслуживания изделия всегда отсоединяйте
штепсельную вилку из сетевой розетки.
В случае неисправности категорически
запрещается открывать внутренние механизмы
изделия с целью их самостоятельного ремонта.
Обратитесь в Сервис технического
обслуживания.
Не ставьте тяжелые предметы на открытую
дверцу духового шкафа.
Внутренняя поверхность ящика (если он
имеется) может сильно нагреться.
Стеклокерамическая варочная панель устойчива
к механическим ударам, тем не менее она
может треснуть (или даже разбиться) при ударе
острым предметом или инструментом. В этом
случае незамедлительно отсоедините изделие
от сети электропитания и обратитесь в
Сервисный Центр.
Если поверхность варочной панели треснула,
выключите ее во избежание ударов током.
Помните, что температура варочных зон
остается очень высокой в течение тридцати
минут после их выключения. Остаточное тепло
показывается также индикатором (см.
Включение и эксплуатация).
Держите на безопасном расстоянии от варочной
панели любые предметы, которые могут
расплавиться, например, пластмасса, алюминий
или изделия из сахара. Обращайте особое
внимание на упаковочные материалы,
полиэтиленовую или алюминиевую пленку: если
оставить эти материалы на еще горячей или
теплой поверхности, они могут серьезно
повредить варочую панель.
Следите, чтобы ручки кастрюль на варочной
панели были всегда повернуты таким образом,
чтобы вы не могли случайно задеть их.
Не тяните за сетевой кабель для отсоединения
штепсельной вилки изделия из сетевой розетки,
возьмитесь за вилку рукой.
Перед началом чистки или технического
обслуживания изделия всегда отсоединяйте
штепсельную вилку из сетевой розетки.
Не кладите металлические предметы (ножи,
ложки, крышки и т.д.) на варочную панель, так
как они могут сильно нагреться.
Эксплуатация изделия лицами (включая детей) с
ограниченными физическими, сенсорными или
умственными способностями, неопытными
лицами или лицами, незнакомыми с правилами
эксплуатации данного изделия, запрещается
без контроля со стороны лица, отвечающего за
их безопасность, или без обучения правилам
пользования изделием.
Не разрешайте детям играть с бытовым
электроприбором.
Если кухонная плита устанавливается на
возвышение, необходимо зафиксировать ее
надлежащим образом.
16
Page 17

Ïредупреæäåíèå äëÿ íîñèòåëåé
ýëåêòðîêàðäèîñòèìóëÿòîðîâ èëè äðóãèõ
ìåäèöèíñêèõ èìïëàíòèðîâàííûõ
àïïàðàòîâ:
Варочная панель полностью соответствует всем
действующим нормативам по электромагнитным
помехам.
Поэтому данное изделие полностью отвечает
всем требованиям закона (директивы 89/336/
CEE). Изделие было изготовлено таким
образом, чтобы не создавать помех
электрическим приборам, при условии, что эти
приборы также соответствуют вышеуказанным
нормативам.
Индуктивная варочная панель образует
электромагнитные поля малого диапазона.
Во избежание помех между варочной панелью и
электрокардиостимулятором последний должен
соответствовать действующим нормативам.
Поэтому мы можем гарантировать соответствие
нормативам только нашего изделия. За
информацией о соответствии и о возможных
проблемах из-за несовместимости обращайтесь
к вашему лечащему врачу или к производителю
электрокардиостимулятора.
После использования выключите варочную
панель при помощи специальной команды, не
полагаясь на сенсор обнаружения посуды.
Экономия электроэнергии и охрана
окружаюùåé ñðåäû
Если Вы будете пользоваться духовым шкафом
вечером и до раннего утра, это поможет
сократить нагрузку потребления электроэнергии
электростанциями. Дополнительные функции
программ, в особенности «приготовление с
задержкой» (см. Программы) позволят Вам
сэкономить электроэнергию.
Рекомендуется всегда готовить в режимах
ВЕРТЕЛ и ПОЛУФАБРИКАТЫ с закрытой
дверцей: это необходимо для значительной
экономии электроэнергии (примерно 10%), а
также для лучших результатов приготовления.
Содержите уплотнения в исправном и чистом
состоянии, проверяйте, чтобы они плотно
прилегали к дверце и не пропускали утечек
тепла.
RS
Утилизация
Уничтожение упаковочных материалов:
соблюдаите местные нормативы с целью
повторного использования упаковочных
материалов.
Согласно Европеискои Директиве 2002/96/СЕ
касательно утилизации электронных и
электрических электроприборов электроприборы
не должны выбрасываться вместе с обычным
городским мусором. Выведенные из строя
приборы должны собираться отдельно для
оптимизации их утилизации и рекуперации
составляющих их материалов, а также для
безопасности окружающеи среды и здоровья.
Символ зачеркнутая мусорная корзинка,
имеющиися на всех приборах, служит
напоминанием об их отдельнои утилизации.
За более подробнои информациеи о правильнои
утилизации бытовых электроприборов
пользователи могут обратиться в специальную
государственную организацию или в магазин.
17
Page 18
Òåхническое
обслуæивание è óõîä
RS
Обесточивание изделия
Перед началом какой-либо операции по
обслуживанию или чистке отсоедините изделие от
сети электропитания.
×истка изделия
Не используйте паровые чистящие агрегаты или
агрегаты под высоким давлением для чистки изделия.
Для чистки стекла дверцы используйте
неабразивные губки и чистящие средства,
затем вытрите насухо мягкой тряпкой. Не
используйте твердые абразивные материалы
или острые металлические скребки, которые
могут поцарапать поверхность и разбить стекло.
Наружные эмалированные элементы или детали
из нержавеющей стали, а также резиновые
уплотнения можно протирать губкой, смоченной
в теплой воде или в растворе нейтрального
моющего средства. Для удаления особо
трудных пятен используйте специальные
чистящие средства, имеющиеся в продаже.
После чистки рекомендуется тщательно удалить
остатки моющего средства влажной тряпкой и
высушить духовку. Не используйте абразивные
порошки или коррозийные вещества.
Следует производить внутреннюю чистку
духового шкафа после каждого его
использования, не дожидаясь его полного
охлаждения. Используйте теплую воду и моющее
средство, ополосните и протрите мягкой тряпкой.
Избегайте использования абразивных средств.
Съемные детали можно легко вымыть как
любую другую посуду, также в посудомоечной
машине.
Панель с рукоятками необходимо очищать от пятен
и жира при помощи мягкой губки или тряпки.
На деталях из нержавеющей стали могут появиться
пятна, если на них в течение длительного времени
воздействует вода с высоким содержанием извести
или чистящие средства содержащие фосфор.
Рекомендуется обильно ополоснуть изделие и
тщательно высушить.
Ïðîâåðêà óïëîòíåíèé
Регулярно проверяйте состояние уплотнения вокруг
дверцы духового шкафа. В случае повреждения
уплотнения обращайтесь в ближайший Центр
Сервисного Обслуживания (см. Сервисное
обслуживание). Не рекомендуется пользоваться
духовкой с поврежденным уплотнением.
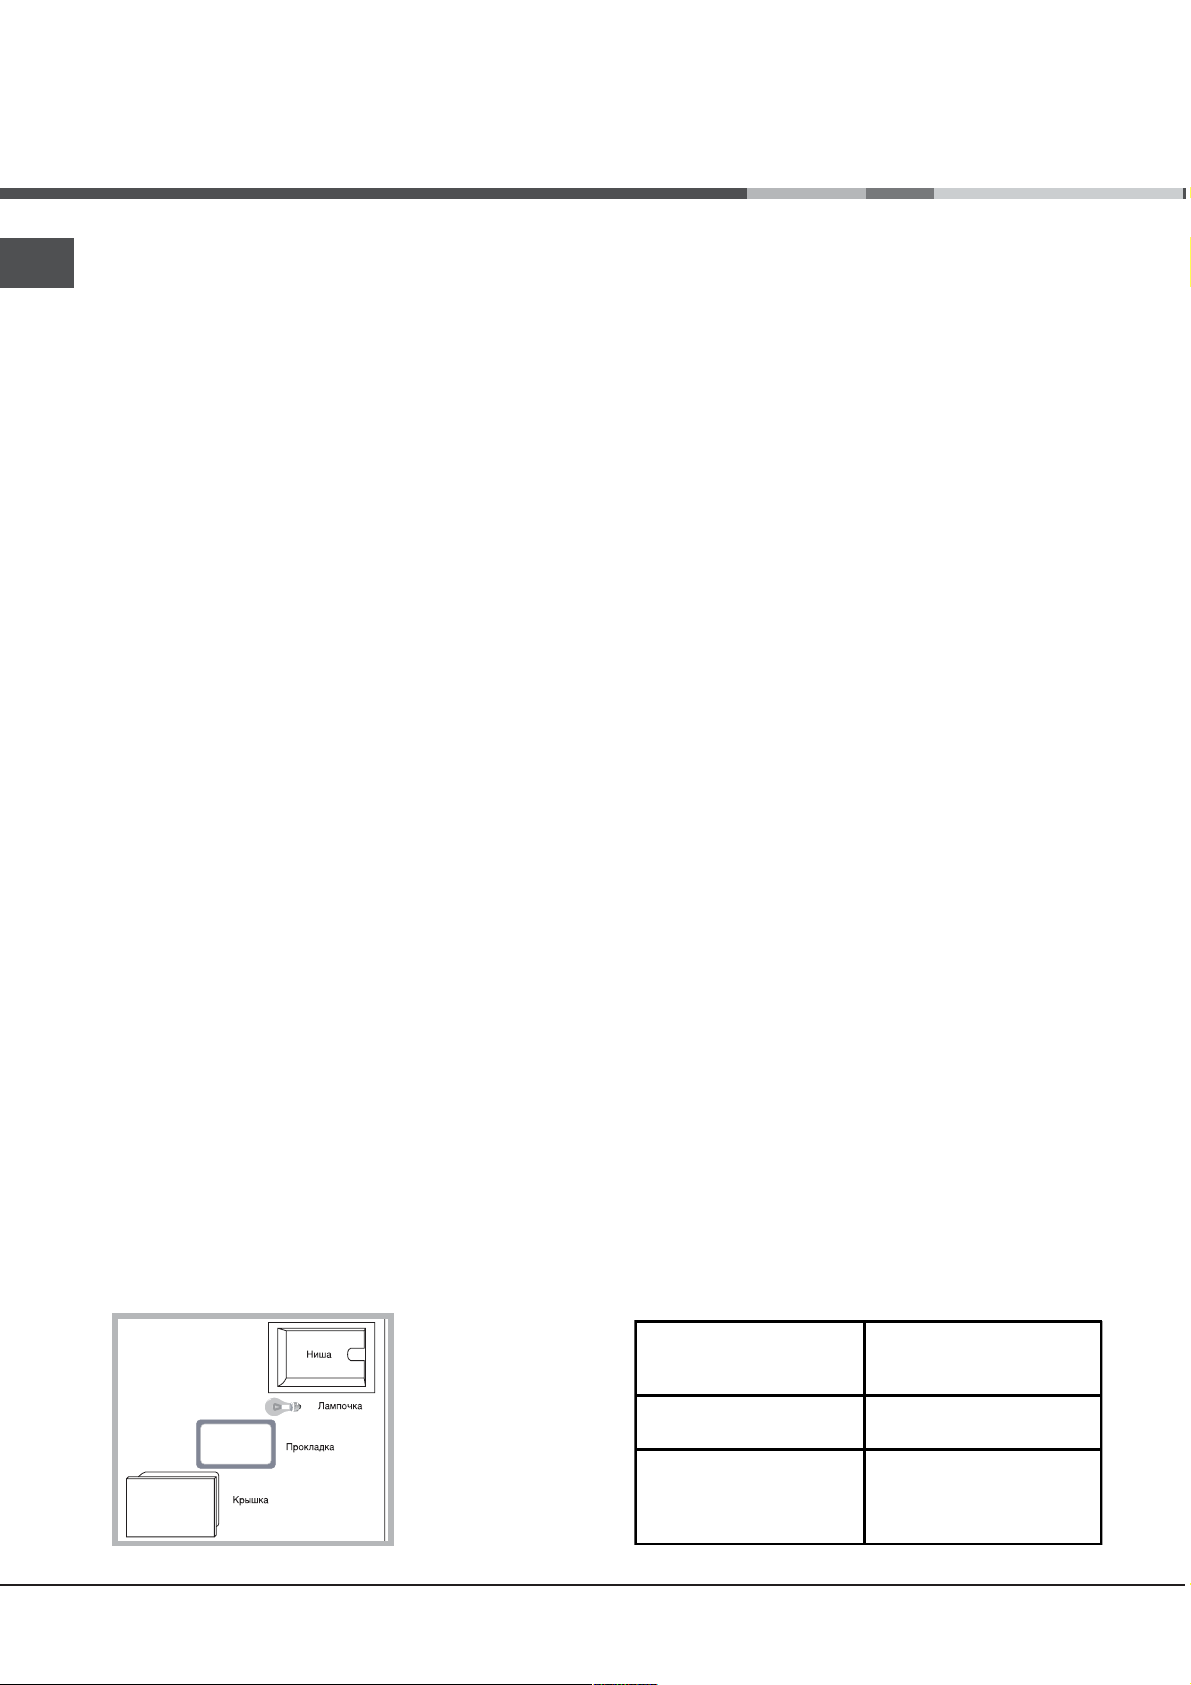
Çамена лампочки
1. Снимите стеклянную крышку при помощи отвертки.
2. Выкрутите лампочку и замените ее на новую
такого же типа: мощность 15 Вт, резьба Е 14.
Восстановите на место крышку, обращая внимание
на правильное положение уплотнения (см. схему).
×истка стеклокерамической варочноé
панели
Не следует пользоваться абразивными или
коррозивными чистящими средствами такими как
спрай для чистки духовок и мангалов,
пятновыводители или средства для удаления
ржавчины, порошковыми чистящими средствами
или абразивными губками: они могут необратимо
поцарапать поверхность изделия.
В качестве регулярного ухода достаточно
вымыть варочную панель влажной губкой и
затем протереть насухо кухонным бумажным
полотенцем.
Если варочная панель сильно загрязнена,
используйте специальное чистящее средство
для стеклокерамических поверхностей,
ополосните водой и протрите насухо.
Для удаления особо сильных загрязнений
используйте специальный скребок. Удаляйте
загрязнения незамедлительно, не дожидаясь
охлаждения изделия, во избежание
затвердевания остатков пищи. Очень удобна
для чистки мочалка из проволоки из
нержавеющей стали, специально для
стеклокерамических поверхностей, смоченная в
мыльном растворе.
Если на варочной панели случайно
расплавились какие-либо предметы или
пластиковые материалы или сахар,
незамедлительно удалите их скребком с еще
горячей поверхности.
По завершении чистки варочная панель может
быть обработана специальным защитным
средством для ухода за стеклокерамическими
поверхностями: это средство образует на
поверхности варочной панели невидимую
защитную пленку, предохраняющую
поверхность в случае утечек пищи в процессе
приготовления. Рекомендуется производить
чистку, когда варочная панель едва теплая или
холодная.
Следует всегда полностью удалить с варочной
панели остатки моющего средства и насухо
вытиреть: возможные остатки моющих средств
могут затвердеть при последующем
приготовлении.
18
Замена лампочки
в духовом
шкафу:
Чистящие ср едства для
керамической
поверхности
Скребки
Сменные лезвия
COLLO luneta
HOB BRITE
Hob C le an
SWISSCLEANER
Где можно приобрести
Фирменные магазины,
универмаги, супермаркеты.
магазины электробытов ой
техники, хозяйственные
магазины.
Page 19

Автоматическая пиролитическая
чистка духовки PIROLISI
Программа PIROLISI нагревает духовой шкаф до
500°C и включает процесс пиролитической чистки,
то есть сжигает загрязнения. Загрязнения
буквально кремируются.
В процессе пиролитической чистки поверхности
могут сильно нагреться: не разрешайте детям
приближаться к духовому шкафу. Через стекло
дверцы духовки можно увидеть вспыхивающие
частицы: это мгновенное сгорание, является
абсолютно нормальным явлением и является
совершенно безопасным.
Подгтовка к пиролитической чистке:
влажной губкой удалите из духовки наиболее
крупные загрязнения. Не используйте моющие
средства;
выньте из духовки все съемные детали;
не вешайте тряпки или кухонные полотенца на
ручку дверцы духового шкафа.
поверните рукоятку ПРОГРАММЫ в положение
0
! Если температура в духовом шкафу слишком
высокая, процесс пиролитической чистки может не
начаться. Подождите, пока температура
понизится.
! Программа начнется только после закрывания
дверцы духовки.
Для запуска пиролитической чистки PIROLISI
нажмите примерно на 4 секунды кнопку
помощи регулятора НАСТРОЙКА ЧАСОВ можно
задать нужный уровень чистки с заданной и
неизменяемой продолжительностью:
1. Экономный (ЕСО): поверните регулятор на «-».
Продолжительность 1 час;
2. Нормальный (NOR): начальный уровень.
Продолжительность 1 час 30 минут;
3. Интенсивный (INT): поверните регулятор на «+».
Продолжительность 2 часа.
4. Нажмите кнопку
Для программы PIROLISI также как и для обычной
программы приготовления можно
запрограммировать время окончания
пиролитической чистки (см. Программирование
окончания пиролитической чистки).
для подтверждения.
. Ïðè
Çàùèòíûå óñòðîéñòâà
включенный символ
что дверца духового шкафа автоматически
заблокирована из-за высокой температуры;
символ
нажав кнопку
чистки;
в случае аномалии электропитание
нагревательных элементов прерывается;
после блокировки дверцы духового шкафа
невозможно изменить настройку
продолжительности и завершения цикла чистки.
Íàñòðîéêà âðåìåíè çàâåðøåíèÿ
ïèðîëèòè÷åñêîé ÷èñòêè
1. Нажмите несколько раз кнопку
пока на ДИСПЛЕЕ не замигает символ
цифровых значения;
2. поверните регулятор НАСТРОЙКА ЧАСОВ в
сторону + и - для настройки часов;
3. вновь нажмите кнопку
ДИСПЛЕЕ не замигают другие два цифровые
значения;
4. поверните регулятор НАСТРОЙКА ЧАСОВ в
сторону + и - для выставления минут;
5. вновь нажмите кнопку
6. по истечении заданного времени на ДИСПЛЕЕ
показывается надпись END (КОНЕЦ) и раздается
звуковой сигнал.
Пример: в 9:00 вы выбрали программу PIROLISI
в Экономной режиме, следовательно с
заданной продолжительностью 1 час. В 12:30
планируется завершить цикл. Программа
автоматически запускается в 11:30.
Включенные символы
функция была запрограммирована. На ДИСПЛЕЕ
попеременно показывается время окончания
чистки PIROLISI и ее продолжительность.
Çàâåðøåíèå àâòîìàòè÷åñêîé ïèðîëèòè÷åñêîé ÷èñòêè
Перед тем как открыть дверцу духового шкафа
необходимо дождаться, пока температура внутри
духовки опустится до безопасного значения. На
данном этапе можно заметить налет белого пепла
на дней и стенах духового шкафа: удалите его
влажной губкой после полного охлаждения
духовки. Если же вы хотите воспользоваться
оставшимся теплом для приготовления пищи,
пепел можно не удалять: он никаким образом не
повредит приготавливаемым продуктам.
означает, что в любой момент,
, можно отменить программу
на дисплее означает,
äî òåõ ïîð,
è äâà
äî òåõ ïîð, ïîêà íà
для подтверждения;
è означают, что
RS
19
Page 20

RS
Ñервисное
обслуæивание
Âнимание:
Изделие оснащено системой автоматической диагностики, позволяющей выявить возможные
неисправности. Неисправности показываются на дисплее посредством следующих сообщений: F с
последующими номерами.
В этом случае необходимо вызвать техника из центра сервисного обслуживания.
! Никогда не обращайтесь к неуполномоченным техникам.
Ïðè îáðàùåíèè â Öåíòр Сервисíîãî Îáñëóæèâàíèÿ íåîáõîäèìî ñîîáùèòü:
Тип неисправности;
Модель изделия (Мод.)
Номер тех. паспорта (серийный ¹)
Эти данные вы найдете на паспортной табличке, расположенной на изделии.
20
Page 21

Operating Instructions
Contents
RS
РУССКИЙ,1
CI 6I FA R/HA
GB FR
Français, 41English,21
Installation, 22-23
Positioning and levelling
Electrical connection
Table of characteristics
Description of the appliance, 24-25
Overall view
Control panel
Display
Hob control panel
Start-up and use, 26-30
Setting the clock
Setting the timer
Using the oven
Manual cooking modes
Automatic cooking modes
Programming cooking
Practical cooking advice
Oven cooking advice table
COOKER AND OVEN
GB
Start-up and use, 31-35
Switching on the hob
Switching on the cooking zones
Booster function
Switching off the cooking zones
Programming the cooking duration
Timer
Control panel lock
Switching off the hob
Demo mode
Practical advice on using the appliance
Safety devices
Technical description of the models
Practical cooking advice
Precautions and tips, 36-37
General safety
Disposal
Respecting and conserving the environment
Care and maintenance, 38-39
Switching the appliance off
Cleaning the appliance
Replacing the oven light bulb
Cleaning the glass ceramic hob
Automatic cleaning using the PYROLYTIC cycle
Assistance, 40
Page 22

Installation
GB
Please keep this instruction booklet in a safe place
for future reference.. Make sure the booklet remains
with the appliance if it is sold, given away or moved.
Please read this manual carefully: it contains
important information on installation, operation and
safety.
The appliance must be installed by a qualified
professional in accordance with the instructions
provided.
Any necessary adjustment or maintenance must be
performed after the cooker has been disconnected
from the electricity supply.
Positioning and levelling
The appliance may be installed alongside any
cupboards whose height does not exceed that of the
hob surface.
Make sure that the wall which is in contact with the
back of the appliance is made from a nonflammable, heat-resistant material (T 90°C).
To install the appliance correctly:
Place it in the kitchen, the dining room or the
studio flat (not in the bathroom).
If the top of the hob is higher than the cupboards,
the appliance must be installed at least 600 mm
away from them.
If the cooker is installed underneath a wall cabinet,
there must be a minimum distance of 420 mm
between this cabinet and the top of the hob.
This distance should
be increased to 700
mm if the wall cabinets
are flammable (see
figure).
mm with hood
Do not position
mm without hood
650
700
blinds behind the
Min.
Min.
cooker or less than 200
mm away from its
sides.
mm.
420
Min.
HOOD
Min. mm.
600
420
Min. mm.
Levelling
If it is necessary to level the
appliance, screw the
adjustable feet into the
positions provided on each
corner of the base of the
cooker (see figure).
The legs* fit into the slots on
the underside of the base of
the cooker.
Electrical connection
Fitting the power supply cable
To open the terminal board:
Insert a screwdriver into the side tabs of the
terminal board cover.
Pull the cover to
open it.
To install the cable, follow the instructions below:
Loosen the cable clamp screw and the wire
contact screws.
The jumpers are pre-set at the Factory for 230 V
single-phase connection (see figure).
230V 1N~
H07RN-F 3x4 CEI-UNEL 35364
NL
Any hoods must be installed in accordance with
the instructions listed in the relevant operating
manual.
22
5
3
4
1
2
To carry out the electrical connections as shown in
the figures, use the two jumpers inside the box
(see figure - labelled P).
Page 23

NL2L1
The socket can withstand the maximum power of
P
the appliance, which is indicated by the data
plate.
GB
The voltage falls between the values indicated on
the data plate.
The socket is compatible with the plug of the
appliance. If the socket is incompatible with the
plug, ask an authorised technician to replace it.
Do not use extension cords or multiple sockets.
L3
400V 2N~
H05RR-F 4x4 CEI-UNEL 35363
NL2L1
5
3
4
1
2
400V 3N~
H05RR-F 5x2.5 CEI-UNEL 35363
NL3L1L2
5
3
4
Secure the power supply cable by fastening the
cable clamp screw then put the cover back on.
Connecting the supply cable to the electricity mains
Install a standardised plug corresponding to the
load indicated on the appliance data plate (see
Technical data table).
The appliance must be directly connected to the
mains using an omnipolar switch with a minimum
contact opening of 3 mm installed between the
appliance and the mains. The switch must be
suitable for the charge indicated and must comply
with current electrical regulations (the earthing wire
must not be interrupted by the switch). The supply
cable must be positioned so that it does not come
into contact with temperatures higher than 50°C at
any point.
Before connecting the appliance to the power
supply, make sure that:
The appliance is earthed and the plug is compliant
with the law.
1
2
Once the appliance has been installed, the power
supply cable and the electrical socket must be
easily accessible.
The cable must not be bent or compressed.
The cable must be checked regularly and replaced
by authorised technicians only.
The manufacturer declines any lia
bility should
these safety measures not be observed.
96/EC.
TABLE OF CHARACTERIST ICS
Oven dimensions
(HxWxD)
Volume 56 l
Useful
measurements
relating to the oven
compartment
Voltage and
frequency
ENERGY LABEL
32x43.5x40 cm
width 42 cm
depth 44 cm
height 8.5 cm
see data plate
Directive 2002/40/EC on the label of
electric ovens. Standard EN 50304
Energy consumption for Natural
convection heating mode:
Convection mode
Declared energy consumption for
Forced convection Class heating
mode:
Roasting
EC Directives: 2006/95/EEC dated
12.12.06 (Low Voltage) and subsequent
amendments - 89/336/EEC dated
03/05/89 (Electromagnetic
Compatibility) and subsequent
amendments - 90/369/EEC dated
29/06/90 (Gas) and subsequent
amendments - 93/68/EEC dated
22/07/93 and subsequent amendments
- 2002/
23
Page 24

Description of the appliance
/
GB
Overall view
DRIPPING PAN shelf
Control panel
SELECTOR
knob
Glass ceramic
hob
Control panel
RACK shelf
Adjustable foot
DISPLAY
GUIDE RAILS
for the sliding racks
position 5
position 4
position 3
position 2
position 1
Adjustable foot
THERMOSTAT
TIMER
knob
Display
Only available in certain models.
*
24
LOW TEMPERATURE
Preheating
indicator
DOOR LOCK
indicator
PYROLITIC CYCLE
MODE icon
button
STOP
icon
DURATION
icon
SET TIMER
button
AUTOMATIC
COOKING MODE icons
TIMER
icon
END OF COOKING
icon
TEMPERATURE
and TIME digits
CLOCK
icon
Page 25

Hob control panel
POWER and
RESIDUAL HEAT
indicators
COOKING ZONE
SELECTED indicator light
BOOSTER*
button
COOKING ZONE
SELECTOR buttons
INCREASE
POWER button
BOOSTER*
indicator light
GB
TIMER*
indicator light
PROGRAMME TIMER*
display
COOKING ZONE PROGRAMMED*
indicator light
ON/OFF
button
ON/OFF
indicator light
CONTROLS LOCKED
indicator light
CONTROL PANEL
LOCK button
PROGRAMME
TIMER* button
REDUCE POWER
button
INCREASE POWER button switches on the
hotplate and controls the power (see Start-up and
use).
REDUCE POWER button controls the power and
switches off the hotplate (see Start-up and use).
COOKING ZONE SELECTOR button shows a
particular cooking zone has been selected and
therefore various adjustments are possible.
COOKING ZONE SELECTOR button is used to
select the desired cooking zone.
POWER indicator provides a visual display for the
current heat level.
ON/OFF button switches the appliance on and off.
ON/OFF indicator light shows whether the
appliance is on or off.
PROGRAMME TIMER* button controls the
cooking programme times (see Start-up and use).
PROGRA
MME TIMER* display shows which
programme has been selected (see Start-up and
use).
COOKING ZONE PROGRAMMED* indicator lights
show which cooking zones are being used during
a cooking programme (see Start-up and use).
CONTROL PANEL LOCK button prevents
accidental changes to the hob settings (see Start-
up and use).
CONTROL PANEL LOCK indicator light shows
the control panel has been locked (see Start-up
and use).
BOOSTER button* activates the booster function -
3000 W - of the cooking zone (see Start-up and
use).
BOOSTER indicator light* shows that the booster
function has been activated.
TIMER* indicator light shows that the timer has
been activated
Only available in certain models.
*
25
Page 26

Start-up and use
GB
Setting the clock
The clock may be set when the oven is switched
off or when it is switched on, provided that the end
time of a cooking cycle has not been programmed
previously.
1. Press the
icon and the first two numerical digits on the display
start to flash.
2. Turn the TIMER KNOB towards + and - to
adjust the hour value.
3. Press the
digits on the DISPLAY begin to flash.
4. Turn the TIMER KNOB towards + and - to
adjust the minute value.
5. Press the
button several times until the
button again until the other two
button again to confirm.
Setting the timer
This function does not interrupt cooking and does
not affect the oven; it is simply used to activate the
buzzer when the set amount of time has elapsed.
1. Press the
icon and the three numerical digits on the DISPLAY
begin to flash.
2. Turn the TIMER KNOB towards + and - to
adjust the minute value.
3. Press the
The display will then show the time as it counts
down. When this period of time has elapsed the
buzzer will be activated.
button several times until the
button again to confirm.
The temperature may be changed by turning the
THERMOSTAT knob
3. When the preheating indicator
and a buzzer sounds the preheating process is
complete: you may now place the food in the oven.
4. During cooking it is always possible to:
- Change the cooking mode by turning the
SELECTOR knob.
- Change the temperature by turning the
THERMOSTAT knob.
- Set the cooking duration and the cooking end time
(see Cooking modes).
- Stop cooking by turning the SELECTOR knob to
the 0 position.
5. The cooking time may be modified (see Cooking
Modes).
6. If a blackout occurs while the oven is already in
operation, an automatic system within the appliance
will reactivate the cooking mode from the point at
which it was interrupted, provided that the
temperature has not dropped below a certain level.
Programmed cooking modes which have not started
will not be restored and must be reprogrammed.
There is no preheating stage for the ROASTING
and BARBECUE modes.
Never put objects directly on the bottom of the
oven; this will prevent the enamel coating from being
damaged.
Always place cookware on the rack(s) provided.
Cooling ventilation
switches off
Using the oven
Before operating the product, remove all plastic
film from the sides of the appliance.
The first time you use your appliance, heat the
empty oven with its door closed at its maximum
temperature for at least half an hour. Make sure that
the room is well ventilated before switching the oven
off and opening the oven door. The appliance may
emit a slightly unpleasant odour caused by
protective substances used during the
manufacturing process burning away.
1. Select the desired cooking mode by turning the
SELECTOR knob.
2. The oven begins its preheating stage and the
preheating indicator lights up.
26
In order to cool down the external temperature of the oven,
a cooling fan blows a stream of air between the control
panel and the oven door. At the beginning of the
PYROLYTIC cycle, the cooling fan operates at low
speed.
Once cooking has been completed, the cooling fan
remains on until the oven has cooled down sufficiently.
Oven light
When the oven is not in operation, the lamp can be
switched on at any time by opening the oven door.
Only available in certain models.
*
Page 27

Manual cooking modes
All cooking modes have a default cooking temperature which
may be adjusted manually to a value between 40°C and 250°C as
desired. In the SPIT ROAST mode, the default power level value
is 270°C.
TRADITIONAL OVEN mode
When using this traditional cooking mode, it is best to use one
cooking rack only.
Automatic cooking modes
GB
The temperature and cooking duration are pre-set
values, guaranteeing a perfect result every time - automatically.
These values are set using the C.O.P.® (Programmed
Optimal Cooking) system. The cooking cycle stops
automatically and the oven indicates when the dish is cooked.
The cooking duration may be modified by a period of several
minutes, as specified in the description of the individual functions
below.
MULTILEVEL mode
Since the heat remains constant throughout the oven, the air
cooks and browns food in a uniform manner. A maximum of two
racks may be used at the same time.
ROASTING mode
This combination of features increases the effectiveness of the
unidirectional thermal radiation provided by the heating elements
through the forced circulation of the air throughout the oven.
This helps prevent food from burning on the surface and allows
the heat to penetrate right into the food. Always cook in this
mode with the oven door closed.
SPIT ROAST mode
The function is ideal for rotisserie spit cooking. Always cook in
this mode with the oven door closed.
LOW TEMPERATURE modes
This type of cooking can be used for proving, defrosting,
preparing yoghurt, heating dishes at the required speed and slow
cooking at low temperatures. The temperature options are: 40,
65, 90 °C.
Sp it roast
To operate the spit roast function
(see diagram) proceed as follows:
1. Place the dripping pan in
position 1.
2. Place the rotisserie
support in position 3 and
insert the spit in the hole
provided on the back panel
of the oven.
3. Start the spit roast function
by selecting the
symbols.
When this mode is enabled, the rotisserie spit will stop if the
door is opened.
ROAST... mode
Use this function to cook beef, pork and lamb. Place the meat
inside the oven while it is still cold. The dish may also be placed
in a preheated oven. It will only be possible to adjust the duration
by -20/+25 minutes.
PIZZA mode
Use this function to make pizza. Please see the following chapter
for further details. It will only be possible to adjust the duration by
-5/+5 minutes.
To achieve the best possible results, we recommend that you
carefully observe the instructions below:
Follow the recipe.
The weight of the dough should be between 500 g and 700 g.
Lightly grease the dripping pan and the baking trays.
Place the food inside the oven while it is still cold. If you wish to
place the food in the oven after it has been preheated,
immediately following a high-temperature cooking programme, the
text Hot will appear on the display until the temperature of the
oven has fallen to 120°. At this point it will be possible to place
the pizza in the oven.
Reci pe fo r PIZZA:
1 Dripping pan on a low shelf level, hot or cold oven
Recipe for 3 pizzas weighing approximately 550 g: 1000 g flour,
500 ml water, 20 g salt, 20 g sugar, 100 ml olive oil, 20 g fresh
yeast (or 2 sachets of powder yeast)
Leavening at room temperature: 1 hour, or LOW
TEMPERATURE manual function set to 40°. Leave to rise for
approximately 30-45 minutes.
Place the food inside the oven while it is still cold.
Start the
BREAD mode
To obtain the best results, we recommend that you carefully
observe the instructions below:
Follow the recipe.
Do not exceed the maximum weight of the dripping pan.
Reme mber to po ur 100 ml of cold water into
the baking tray in p osition 5.
Place the food inside the oven while it is still cold. If you wish to
place the food in the oven after it has been preheated,
PIZZA cooking mode.
27
Page 28

GB
immediately following a high-temperature cooking programme, the
text Hot will appear on the display until the temperature of the
oven has fallen to 40°. At this point it will be possible to place the
bread in the oven.
Reci pe for BREAD:
1 Dripping pan weighing 1000 g max placed on a low shelf level
Recipe for 1000 g of dough: 600 g flour, 360 g water, 11g salt,
25 g fresh yeast (or 2 sachets of powder yeast)
Method:
Mix flour and salt in a large bowl.
Dilute yeast in lukewarm water (approximately 35 degrees).
Make a small well in the mound of flour.
Pour in water and yeast mixture.
Knead dough by stretching and folding it over itself with the
palm of your hand for 10 minutes until it has a uniform
consistency and is not too sticky.
Form the dough into a ball shape, place it in a large bowl and
cover it with transparent plastic wrap to prevent the surface of
the dough from drying out. Select the manual LOW
TEMPERATURE function on the oven and set the
temperature to 40°C. Place the bowl inside and leave the
dough to rise for approximately 1 hour (the dough should
double in volume).
Cut the dough into equal sized loaves.
Place them in the dripping pan on oven paper.
Cover the loaves with flour.
Make incisions on the loaves.
Reme mber to po ur 100 ml of cold water into
the baking tray in position 5. For cleaning purposes,
we recommend the use of water and vinegar.
Place the loaves inside the oven while it is still cold.
Start the
Once baked, leave the loaves on one of the grill racks until
they have cooled completely.
BAKED CAKES mode
This function is ideal for baking cakes. Place the food inside the
oven while it is still cold. The dish may also be placed in a
preheated oven. It will only be possible to adjust the duration by 10/+10 minutes.
BREAD cooking mode.
Programming cooking
A cooking mode must be selected before programming can take
place.
Pro gramming t he cooking duration
1. Press the
three digits on the DISPLAY begin to flash.
2. Turn the TIMER KNOB towards + and - to adjust the
duration.
button several times until the icon and the
3. Press the
4. When the set time has elapsed, the text END appears on the
DISPLAY, the oven will stop cooking and a buzzer sounds.
For example: it is 9:00 a.m. and a time of 1 hour and 15
minutes is programmed. The programme will stop automatically
at 10:15 a.m.
Se tting the en d time for a cook ing mode
A cooking duration must be set before the cooking end time
can be scheduled.
1. Follow steps 1 to 3 to set the duration as detailed above.
2. Next, press the
digits on the DISPLAY begin to flash.
3. Turn the TIMER KNOB towards + and - to adjust the hour
value.
4. Press the
DISPLAY begin to flash.
5. Turn the TIMER KNOB towards + and - to adjust the minute
value.
6. Press the
7. When the set time has elapsed, the text END appears on the
DISPLAY, the oven will stop cooking and a buzzer sounds.
For example: it is 9:00 a.m. and a time of 1 hour and 15
minutes is programmed, while the end time is set to 12:30. The
programme will start automatically at 11:15 a.m.
Programming has been set when the
illuminated. The DISPLAY shows the cooking end time and the
cooking duration alternately.
To cancel programming, turn the SELECTOR knob to the 0
position.
button again to confirm;
button until the icon and the two
button again until the other two digits on the
button again to confirm.
and buttons are
Practical cooking advice
Do not place racks in position 1 and 5 during fan-assisted
cooking. This is because excessive direct heat can burn
temperature sensitive foods.
In the SPIT ROAST, BARBECUE and ROASTING cooking
modes, place the dripping pan in position 1 to collect cooking
residues (fat and/or grease).
MULTILEVEL
Use positions 2 and 4, placing the food which requires more
heat on 2.
Place the dripping pan on the bottom and the rack on top.
PIZZA
Use a light aluminium pizza pan. Place it on the rack provided.
For a crispy crust, do not use the dripping pan as it prevents the
crust from forming by extending the total cooking time.
If the pizza has a lot of toppings, we recommend adding the
mozzarella cheese on top of the pizza halfway through the
cooking process.
28
Page 29

Oven cooking advice table
Savoury sponge cake
made with yoghurt
Country-style pie
“En cocotte” dishes
STARTERS
CANAPES AND
Stuffed vegetables potatoes, tomatoes, courgettes, cabbages, etc.
Braised vegetables en
I LEGUMI
Dishes with a crust
Baking in foil (“en
DISHES
Terrines
Soufflé
Gratin dishes
cocotte
Flan
Terrines
Soufflé
papillote”)
Rice
savoury sponge cak e with olives, tuna, etc. Baked cakes or Multilevel
cheese country-style pie, sa lmon pastry, … Baked cakes or Multilevel
fish, meat, vegetable, foie gras terrines, etc.
poultry liver pie, salmon mousse, eggs en cocotte,
cheese soufflé, vegetable s oufflé, fish soufflé, etc.
potato gratin, parmentier, lasagne, etc.
lettuce, saffron carrots, salsify, etc.
mushroom flan, vegetable pancake, etc.
asparagus soufflé , tomato s oufflé, etc.
etc.
Pilaff
EXAMPLES
vegetable terrine s
vegetable pie, etc.
truffles, etc.
GB
Multilevel
Gratin
Multilevel
Multilevel
Multilevel
Multilevel
TEMPERATURE
200-210 °C
160 °C
200 °C
160 °C
160 °C
200 °C
200 °C
200 °C
160 °C
160 °C
200 °C
200 °C
200 °C
180 °C
FUNCTION
Traditional oven
Traditional oven
(or Roasting)
Traditional oven
Traditional oven
Traditional oven
Traditional oven
terrine mould on dripping pan (bain-
baking dish on dripping pan (bain-
baking dish or cake tin on dripping
pan (bain-marie filled with hot water)
cake tin on dripping pan (bain-marie
SUPPORT
cake tin on dripping pan
on dripping pan
marie filled with hot water)
marie filled with hot water)
cake tin on dripping pan
tray on dripping pan
on dripping pan
or cake tin on dripping pan
baking dish on dripping pan
filled with hot water)
cake tin on dripping pan
on dripping pan
foil pouch on dripping pan
tray on plate
Meat casseroles and traditional
MEAT
FISH
DISHES EXAMPLES COOKING MODE TEMPERATURE SUPPORTS
Roast poultry chicken, duck, cockerel, capon. Roasting 200 °C poultry on the grid
Poultry on the spit chicken, cockerel Turnspit 270 °C turnspit support
Roasts
large pieces of braised meat whole ham on the bone, large capon or turkey, etc. Multi-level
dishes
Grilled meat ribs, cutlets, sausages, kebabs, chicken thighs, etc. Multi-level 200 °C
Meat pies Beef Wellington, steak and kidney pie, etc. Multi-level 200 °C
Salt-baking salt-baked poultry, etc. Multi-level 240 °C
Grilled fish and fish kebabs bass, mackerel, sardines, mullet, tuna, etc. Multi-level 180 °C
Whole fish (stuffed) sea bream, carp, etc. Multi-level 200 °C on the oven tray
Fish fillets (with basting) salmon, scorpion fish, cod, bass, etc. Convection mode 200 °C on the oven tray
Foil parcels sole, dab, scallops, etc. Multi-level 200 °C on the oven tray
Fish pies (flaky or shortcrust
pastry)
Fish au gratin brandade gratin, etc. gratin (or roasting) 200-210 °C dish on the oven tray
Soufflés scallop soufflé, etc. Multi-level 200 °C soufflé dish on the oven tray
Salt-baked fish bass, carp, etc. Multi-level 240 °C
roast pork, veal, turkey, beef, leg of lamb, haunch of
venison, stuffed veal breast, etc.
beef bourguignon, rabbit chasseur, veal Marengo,
lamb stew, Basquaise chicken, etc. hotpots,
cassoulet, etc.
salmon, pike, etc. Multi-level 200 °C on the oven tray
Roasting 200 °C meat directly on the grid
180 °C (one third
into cooking, lower
the t emper atur e to
160°C)
meat on the oven tray baste
Convection mode 190 °C casserole dish on the oven tray
on the grid (the rack depends
on the tray (for large pieces of
meat, lower the temperature to
160°C when the pastry crust is
meat on the oven tray or in a
on the grid (the rack depends
fish on the oven tray or in a
regularly with the juice
on the size)
baked)
dish on the oven tray
on the size)
dish on the oven tray
29
Page 30

GB
Oven cooking advice table
Biscuit cakes (without yeast)
BAKED DESSERTS
PASTRIES
DESSERTS
FRUIT Stuffed or foil-baked fruit baked apples, etc. Multilevel 200 °C
White cheese tart 200 °C cake tin on dripping pan
Tarts made using leavened dough sugar pie, fruit brioche loaf, etc. 180 °C cake tin on dripping pan
Tart cases (crumbly sweet pastry) fresh fruit tarts (strawberry, raspberry, etc.) 180 °C
Pies (shortcrust or puff pastry) pear pie, etc. 220 °C cake tin on dripping pan
Mini sweet pastries (natural
Large sweet pastries (natural
Biscuit dough biscuits in paper trays, scooping biscuits, etc. 180 °C on dripping pan
Crumbly sweet pastry shortbread, spritz cookies, plain biscuits, etc. 200 °C on dripping pan
Amaretti, coconut balls coconut or almond amaretti 180 °C on dripping pan
Leavened dough mini-brioches, mini-croissants, etc. 180 °C on dripping pan
White meringues 70 °C on dripping pan
Golden meringues
Cream desserts and flans,
DISHES
Cream puffs
yeast)
yeast)
Puff pastry various types of puff pastry dessert, etc. 200 °C on dripping pan
Pudding
semolina
Rice desserts
Soufflé liqueur soufflé, fruit soufflé, etc.
sponge cake, sponge fingers, swirled biscuits,
profiteroles, mini cream puffs, cream puffs,
Paris-Brest pastry dessert, Saint Honoré cake,
croissants, sugar pie, plain brioche (no filling),
Kugelhopf, brioche, panettone, sweet bread,
pudding made with bread or brioche, rice
crème caramel, crème brûlée, chocolate flan,
riz condé rice pudding, Imperial rice pudding,
EXAMPLES
brownies, etc.
mini savarin cakes, etc.
etc.
etc.
pudding
etc.
etc.
FUNCTION
Baked cakes or Multilevel
Baked cakes or Multilevel
Baked cakes or Multilevel
TEMPERATURE
200 °C cake tin on dripping pan
cake tin on dripping pan (with
baking beans weighing the
pastry down )
190 °C on dripping pan
180 °C on dripping pan
160 °C
110 °C on dripping pan
190 °C cake tin on dripping pan
160 °C
180 °C cake tin on dripping pan
200 °C cake tin on dripping pan
on dripping pan or cake tin on
dripping pan
moulds or baking dish on
dripping pan (bain-marie on
dripping pan)
cake tin or foil pouch on
dripping pan
SUPPORT
VARIOUS
DISHES
Yoghurt
Dried foods mushrooms, herbs, sliced fruit or vegetables, etc. Low temperature
EXAMPLES
Low temperature
FUNCTION
TEMPERATURE
40 °C
65 °C
baking dish on dripping pan
SUPPORT
on grille
Automatic cooking mode s
Mode Cooking programme recommended for … EXAMPLES SUPPORT
Roast
beef
Sponge cake with yoghurt and pound
Fruit tarts (short crust pastry or puff
Baked
cakes
Pizzas Deep-pan pizza, focaccia (bread dough) 2 28** Hot or cold
Bread *** 2 55 Cold
* The cooking times listed above are intended as guidelines only and may be modified to suit personal tastes. Oven preheating times are set by default and cannot be modified manually.
** The duration of the automatic cooking functions are set by default. The values in the table refer to the minimum and maximum duration, which may be modified by the user, taking the
default value as a starting point.
*** As stated in the recipe, pour 100 g water into the dripping pan.
pastry, with or without flan filling)
Desserts without yeast (clafoutis, almond
pithivier, country-style cake, etc.)
Meat roasts
cake (with baking powder)
Puff pastry
fruit cake, marble cake, pound cake,
apple tart, Mirabelle plum tart, pear
apple puffs, country-style tarts,
roast veal
roast pork
roast chicken
leg of lamb
etc.
tart, etc.
pastries, etc.
on dripping pan
On dripping pan or baking
pan
cake tin on grille 2 45* *
cake tin on grille 2
on dripping pan 2
Dripping pan
level
Cooking time
(minutes)
2
2
Oven at start
Cold
Cold
30
Page 31

Start-up and use
The glue applied on the gaskets leaves traces of
grease on the glass. Before using the appliance, we
recommend you remove these with a special nonabrasive cleaning product. During the first few hours
of use there may be a smell of rubber which will
disappear very quickly.
A few seconds after the hob is connected to the
electricity supply, a buzzer will sound. The hob may
now be switched on.
Types of noise during normal hob operation:
Buzz: due to the vibration of the metallic parts
that make up the induction element and the pot; it
is generated by the electromagnetic field required
for heating and increases as the power of the
induction element increases.
Soft whistle: heard when the pot placed on the
heating zone is empty; the noise disappears once
food or water is placed into the pot.
Crackle: produced by the vibration of materials
on the bottom of the pot due to the flow of
parasitic currents caused by electromagnetic
fields (induction); can be more or less intense
depending on the material making up the bottom
of the pot, and decreases as the pot dimensions
increase.
Loud whistle: heard when two induction
elements of the same group function
simultaneously at maximum power and/or when
the booster function is set on the larger element
while the other is auto-adjusted. Noise is reduced
by decreasing the power level of the autoadjusted induction element; pot bottom layers
made of different kinds of materials are among
the main causes of this noise.
Fan noise: a fan is necessary to ensure the hob
functions correctly and to safeguard the electronic
unit from possible overheating. The fan functions
at maximum power when the large induction
element is at maximum power or when the booster
function is on; in all other cases, it works at
average power depending on the temperature
detected. Furthermore, the fan may continue to
work even after switching the hob off, if the
temperature detected is high.
The types of noise listed above are due to induction
technology and are not necessarily operational
faults.
Switching on the hob
To switch the hob on, press and hold the button
for approximately one second.
Switching on the cooking zones
Each cooking zone is controlled using a selector
button
consisting of a double
To begin operating a cooking zone, press the
corresponding control button and set the desired
power level (between 0 and 9) using the buttons
and a power adjustment device
- and + button.
- and +.
Booster function*
The booster function for some of the cooking zones
may be used to shorten heating-up times. It may be
activated by pressing the
light directly above the button will illuminate. This
function boosts the power to 2000 W or 3000 W,
depending on the size of the relevant cooking zone.
The booster stops automatically after 4 minutes. While
the booster for one of the cooking zones is active, the
corresponding front or rear cooking zone will operate at
a reduced power level (e.g. if the booster for the rear
left-hand hotplate has been activated, the power level
of the front left-hand hotplate will be reduced). For
further information, please refer to the Technical
description of the models.
Switching off the cooking zones
To switch off a cooking zone, select it using the
corresponding selector button
Press the
will progressively decrease until it is switched off.
- button: the power of the cooking zone
Programming the cooking duration
All the cooking zones may be programmed
simultaneously, for a duration between 1 and 99
minutes.
Booster
button. The indicator
and:
GB
If the - or + button is pressed for an extended
period of time, the display scrolls quickly though the
power levels and timer minutes.
Only available on certain models.
*
1. Select the cooking zone using the corresponding
selector button.
2. Adjust the temperature.
3. Press the
programming button.
31
Page 32

GB
4. Set the cooking duration using the - and +
buttons.
The timer begins counting down immediately. When
the time has elapsed, a buzzer will sound (for one
minute).
5. Confirm by pressing the
The timer begins counting down immediately. A
buzzer sounds for approximately 1 minute and the
cooking zone switches off when the set programme
has finished.
Repeat the above procedure for each hotplate you
wish to programme.
Using multiple programmes and the display
If one or more hotplates are programmed, the
display will show the data for the hotplate with the
least time remaining, and the light corresponding to
the position of the hotplate will flash. The lights
corresponding to the other hotplates programmed
will be switched on.
To display the time remaining for the other
programmed hotplates, press the
repeatedly. The times remaining for each hotplate
will be shown in a clockwise order, beginning with
the front left hotplate.
Changing the programme
button.
button
Control panel lock
When the hob is switched on, it is possible to lock
the oven controls in order to avoid accidental
changes being made to the settings (by children,
during cleaning, etc.). Press the
the control panel: the indicator light above the button
will switch on.
To use any of the controls (e.g. to stop cooking),
you must switch off this function. Press the
button for a few moments, the indicator light will
switch off and the lock function will be removed.
button to lock
Switching off the hob
Press the button to switch the appliance off.
If the control panel lock has been activated, the
controls will continue to be locked even after the hob
is switched on again. In order to switch the hob on
again, you must first remove the lock function.
Demo mode
1. Press the
you wish to change is shown.
2. Use the
3. Confirm by pressing the
To cancel a programme, follow the above
instructions. At step 2, press the
duration decreases progressively until it reaches 0
and switches off. The programme resets and the
display exits programming mode.
button repeatedly until the duration
buttons to set the new duration.
button.
- button: the
Timer
The hob must be switched on.
The timer can be used to set a duration up to 99
minutes.
1. Press the
indicator light is illuminated.
2. Set the desired duration using the
buttons.
programming button until the timer
- and +
It is possible to set the hob to a demonstration
mode where all the controls work normally but the
heating elements do not switch on. To activate the
demo mode the hob must be switched on, with all
the hotplates switched off.
Press and hold the
simultaneously for 6 seconds. When the 6
seconds have elapsed, the ON/OFF and
CONTROLS LOCKED indicator lights will flash for
one second. Release the
press the
The display will show the text DE and MO and the
hob will be switched off.
When the hob is switched on again it will be set to
the demo mode.
To exit this mode, follow the procedure described
above. The display will show the text DE and OF
and the hob will be switched off. When it is next
switched on, the hob will function normally.
+ and - buttons
+ and - buttons and
button;
3. Confirm by pressing the
32
button.
Page 33

Practical advice on using the appliance
Use cookware made from materials which are
compatible with the induction principle
(ferromagnetic material). We especially recommend
pans made from: cast iron, coated steel or special
stainless steel adapted for induction. Use a magnet
to test the compatibility of the cookware.
SUITABLE
UNSUITABLE
Residual heat indicators
Each cooking zone is equipped with a residual heat
indicator. This indicator signals which cooking zones
are still at a high temperature. If the power display
shows
, the cooking zone is still hot. It is
possible, for example, to keep a dish warm or melt
butter or chocolate. As the cooking zone cools, the
power display will show
. The display switches off
when the cooking zone has cooled sufficiently.
GB
*
Enamelled steel
Special stainless steel
Cast iron
Aluminium, Glass, Earthenware,
Ceramic, non magnetic Stainless steel
Copper,
In addition, to obtain the best results from your hob:
Use pans with a thick, flat base in order to fully
utilise the cooking zone.
Always use pans with a diameter which is large
enough to cover the hotplate fully, in order to use all
the available heat.
Make sure that the base of the cookware is
always clean and dry, in order to fully utilise and
extend the life of both the cooking zones and the
cookware.
Avoid using the same cookware which has been
used on gas burners: the heat concentration on
gas burners may distort the base of the pan,
causing it not to adhere correctly.
Overheating protection
If the electronic elements overheat, the hob switches
off automatically and
F appears on the display,
followed by a flashing number. When the
temperature has reached a suitable level, this
message disappears and the hob may be used
again.
Safety switch
The appliance has a safety switch which
automatically switches the cooking zones off after
they have been in operation for a certain amount of
time at a particular power level. When the safety
switch has been triggered, the display shows 0.
For example: the right rear hotplate is set to 5 and
will switch off after 5 hours of continuous operation,
while the front left hotplate is set to 2 and will switch
off after 8 hours.
Power level
Maximum operating
time in hours
19
28
37
Safety devices
Pan sensor
Each cooking zone is equipped with a pan sensor
device. The hotplate only emits heat when a pan
with suitable measurements for the cooking zone is
placed on it. If the indicator light is flashing, it may
indicate:
An incompatible pan
A pan whose diameter is too small
The pan has been removed from the hotplate.
46
55
64
73
82
91
33
Page 34

GB
Buzzer
This can also indicate several irregularities:
An object (a pan, cutlery, etc.) has been placed
on the control panel for more than 10 seconds.
Something has been spilt on the control panel.
A button has been pressed for too long. All of the
above situations may cause the buzzer to sound.
Remove the cause of the malfunction to stop the
buzzer. If the cause of the problem is not
removed, the buzzer will keep sounding and the
hob will switch off.
Technical description of cooking zones
The induction system is the quickest existing way of
cooking. Unlike traditional hotplates where the
cooking zone heats up, with the induction system
heat is generated directly inside ferromagnetic
based pans.
Hobs
Cooking zone
Back Left
Back Right
Front Left
Front Right
Total power
CI 6I FA R /HA
Power (W)
I 1400 600 se Ant. Sx*
I 2200 B 3000*
I 2200 B 3000*
I 1400 600 se Post. Dx*
7200
Key:
I = single induction cooking zone
B = booster: the power of the cooking zone may be
boosted to 3000W
* = the maximum power is limited to 600 W until the
booster is activated for the appropriate rear
cooking zone (see Start-up and use).
34
Page 35

Practical cooking advice
GB
cooking
Very high-flame
cooking
High-flame
Pressure cooking
ª
¶
¶
§
§
Pressure cooker
Grilling Boiling
Crêpes Cooking on a high flame and browning
Fast thickening (liquid juices)
Boiling water (pasta, rice, vegetables)
Milk
Slow thickening (dense juices)
Frying
(roasts, steaks, escalopes, fish fillets,
fried eggs)
S
Medium-flame cooking
S
Bain-marie cooking Pressure cooking after whistle
¢
cooking
Low-flame
flame
cooking
Very low-
¢
£
¡
Low-flame cooking
(stews)
Chocolate sauce Keeping food hot
-{}Reheating dishes
35
Page 36

Precautions and tips
GB
This appliance has been designed and
manufactured in compliance with international
safety standards. The following warnings are
provided for safety reasons and must be read
carefully.
General safety
These instructions are only valid for the
countries whose symbols appear in the manual
and on the serial number plate located on the
appliance.
The appliance was designed for domestic use
inside the home and is not intended for commercial
or industrial use.
The appliance must not be installed outdoors, even
in covered areas. It is extremely dangerous to leave
the appliance exposed to rain and storms.
Do not touch the appliance while barefoot, or with
wet or damp hands and feet.
The appliance must be used by adults only for the
preparation of food, in accordance with the
instructions provided in this booklet.
The instruction booklet accompanies a class 1
(insulated) or class 2 - subclass 1 (recessed
between 2 cupboards) appliance.
Do not touch the heating elements or certain
parts of the oven door when the appliance is in
use; th
children well away from it and do not touch the
hot parts yourself.
Make sure that the power supply cables of other
electrical appliances do not come into contact with
the hot parts of the oven.
The openings used for ventilation and heat dispersal
must never be covered.
Do not use unstable or misshapen pans on the
cooking zones; this will help to avoid accidental
spills. Make sure pan handles are turned towards
the centre of the hob in order to avoid accidental
burns.
Always use oven gloves when placing cookware in
the oven or when removing it.
Do not use flammable liquids (alcohol, petrol, etc...)
near the appliance while it is in use.
Do not place flammable material in the lower storage
compartment or in the oven itself. If the appliance is
switched on accidentally, the materials could catch
fire.
Always make sure the knobs are in the o position
when the appliance is not in use.
When unplugging the appliance, always pull the
plug from the mains socket; do not pull on the
cable.
ese parts become extremely hot. Keep
Never perform any cleaning or maintenance work
without having disconnected the appliance from the
electricity mains.
If the appliance breaks down, under no
circumstances should you attempt to perform the
repairs yourself. Repairs carried out by
inexperienced individuals may cause injury or
further malfunctioning of the appliance. Contact the
Assistance Service.
Do not rest heavy objects on the open oven door.
The internal surfaces of the compartment (where
present) may become hot.
The glass ceramic hob is resistant to mechanical
shocks, but it may crack (or even break) if struck
with a sharp object such as a utensil. If this
happens, disconnect the appliance from the
electricity mains immediately and contact a Service
Centre.
If the surface of the hob is cracked, switch off the
appliance to prevent electric shocks from occurring.
Remember that the cooking zones remain relatively
hot for at least thirty minutes after they have been
switched off. An indicator light provides a warning
when residual heat is present (see Start-up and
use).
Keep any object which could melt away from the
hob, for example plastic and aluminium objects, or
products with a high sugar content. Be especially
careful when using plastic film and aluminium foil or
packaging: if placed on surfaces which are still hot,
they may cause serious damage to the hob.
Always make sure that pan handles are turned
towards the centre of the hob in order to avoid
accidental burns.
When unplugging the appliance, always pull the
plug from the mains socket; do not pull on the
cable.
Never perform any cleaning or maintenance work
without having disconnected the appliance from the
electricity mains.
Do not place metal objects (knives, spoons, pan
lids, etc.) on the hob as they may become hot.
The appliance should not be operated by people
(including children) with reduced physical, sensory
or mental capacities, by inexperienced individuals
or by anyone who is not familiar with the product.
These individuals should, at the very least, be
supervised by someone who assumes responsibility
for their safety or receive preliminary instructions
relating to the operation of the appliance.
Do not let children play with the appliance.
If the cooker is installed on a pedestal, take all
necessary precautions to ensure that the appliance
does not slide off this pedestal.
36
Page 37

For the attention of wearers of pacemakers or
other active implants:
The hob complies with all current standards on
electromagnetic interference.
Your induction hob is therefore perfectly in
keeping with legal requirements (89/336/CEE
directives). It is designed not to create
interference on any other electrical apparatus
being used on condition that the apparatus in
question also complies with this legislation.
Your induction hob generates short-range
magnetic fields.
To avoid any interference between your induction
hob and a pacemaker, the latter must be
designed to comply with relevant regulations.
In this respect, we can only guarantee our own
product conformity. Please consult the pacemaker
manufacturer or your doctor concerning its
conformity or any possible incompatibility.
After using the hob, switch it off using the
corresponding control device; do not rely solely
on the pan sensor.
Respecting and conserving the
environment
You can help to reduce the peak load of the
electricity supply network companies by using the
oven in the hours between late afternoon and the
early hours of the morning. The cooking mode
programming options, and particularly the
delayed cooking mode (see Cooking modes),
make this possible.
Always keep the oven door closed when using the
SPIT ROAST and ROASTING modes. this will
achieve improved results while saving energy
(approximately 10%).
Check the door seals regularly and wipe them
clean to ensure they are free of debris so that
they adhere properly to the door, thus avoiding
the dispersal of heat.
GB
Disposal
When disposing of packaging material: observe
local legislation so that the packaging may be
reused.
The European Directive 2002/96/EC relating to
Waste Electrical and Electronic Equipment
(WEEE) states that household appliances should
not be disposed of using the normal solid urban
waste cycle. Exhausted appliances should be
collected separately in order to optimise the cost
of re-using and recycling the materials inside the
machine, while preventing potential damage to
the atmosphere and to public health. The
crossed-out dustbin is marked on all products to
remind the owner of their obligations regarding
separated waste collection.
For further information relating to the correct
disposal of exhausted household appliances,
owners may contact the public service provided
or their local dealer.
37
Page 38

Care and maintenance
GB
Switching the appliance off
Disconnect your appliance from the electricity supply
before carrying out any work on it.
Cleaning the oven
Never use steam cleaners or pressure cleaners on
the appliance.
Clean the glass part of the oven door using a
sponge and a non-abrasive cleaning product,
then dry thoroughly with a soft cloth. Do not use
rough abrasive material or sharp metal scrapers
as these could scratch the surface and cause the
glass to crack.
The stainless steel or enamel-coated external
parts and the rubber seals may be cleaned using
a sponge which has been soaked in lukewarm
water and neutral soap. Use specialised products
for the removal of stubborn stains. After cleaning,
rinse and dry thoroughly. Do not use abrasive
powders or corrosive substances.
The inside of the oven should ideally be cleaned
after each use, while it is still lukewarm. Use hot
water and detergent, then rinse well and dry with
a soft cloth. Do not use abrasive products.
The accessories can be washed like everyday
crockery, and are even dishwasher safe.
Dirt and grease should be removed from the control
panel using a non-abrasive sponge or a soft cloth.
Stainless steel can be marked by hard water that
has been left on the surface for a long time, or by
aggressive detergents that contain phosphorus.
We recommend that the steel surfaces are rinsed
well then dried thoroughly.
Inspecting the oven seals
Check the door seals around the oven regularly. If the
seals are damaged, please contact your nearest Aftersales Service Centre. We recommend that the oven is
not used until the seals have been replaced.
Replacing the oven light bulb
To replace the
Cavity
Light bulb
Seal
oven light bulb:
1. Remove the glass cover using a screwdriver.
2. Unscrew the light bulb and replace it with a
similar one: Wattage 15 W, cap E 14.
Replace the glass cover, making sure the seal is
positioned correctly (see diagram).
Cleaning the glass ceramic hob
Do not use abrasive or corrosive detergents (for
example, products in spray cans for cleaning barbecues
and ovens), stain removers, anti-rust products, powder
detergents or sponges with abrasive surfaces: these
may scratch the surface beyond repair.
It is usually sufficient simply to wash the hob using a
damp sponge and dry it with
If the hob is particularly dirty, rub it with a special
glass ceramic cleaning product, then rinse well and
dry thoroughly.
To remove more stubborn dirt, use a suitable scraper
(this is not supplied with the appliance). Remove
spills as soon as possible, without waiting for the
appliance to cool, to
deposits. You can obtain excellent results by using a
rustproof steel wire sponge - specifically designed for
glass ceramic surfaces - soaked in soapy water.
If plastic or sugary substances have accidentally
been melted on the hob, remove them immediately
with the scraper, while the surface is still hot.
Once
Always remember to rinse the appliance well with
it is clean, the hob may be treated with a special
protective maintenance product: the invisible film left
by this product protects the surface from drips during
cooking. This maintenance should be carried out
while the appliance is warm (not hot) or cold.
clean water and dry it thoroughly: residues can
become encrusted during subsequent cooking
processes.
Glass ceramic hob
cleaners
Window scraper Razor blade
scrapers
Replacement blades DIY Stores,
COLLO luneta
HOB BRITE
Hob Clean
SWISSCLEANER
avoid residues forming crusty
absorbent kitchen roll.
Available from
DIY Stores
supermarkets,
chemists
Boots, Co-op stores,
department stores, Regional
Electricity Company shops,
supermarkets
Cover
Only available in certain models.
*
38
Page 39

Automatic cleaning using the
PYROLYTIC cycle
Safety devices
GB
During the PYROLYTIC cycle, the internal
temperature of the oven reaches 500°C. The
pyrolytic cycle is activated and burns away food
and grime residues. Dirt is literally incinerated.
Keep children away from the appliance during the
automatic cleaning cycle as surfaces may become
very hot. Particles may ignite inside the oven as a
result of the combustion process. There is no cause
for concern: this process is both normal and hazardfree.
Before initiating the PYROLYTIC CYCLE:
Remove large or coarse food residues from the
inside of the oven using a damp sponge. Do not
use detergents.
Remove all accessories.
Do not place tea towels or pot holders over the
oven handle.
Turn the SELECTOR knob to the 0 position.
! If the oven is too hot, the pyrolytic cycle may not
start. Wait for the oven to cool down.
! The programme may only be started once the oven
door has been closed.
To activate the PYROLITIC CYCLE cleaning
procedure, press and hold the
approximately 4 seconds. The TIMER KNOB may be
used to select the desired cleaning level; there are
three default time settings which cannot be
modified.
1. Economy (ECO): turn the knob towards -.
Duration 1 hour.
2. Normal (NOR): initial level. Duration 1 hour and 30
minutes.
3. Intensive (INT): turn the knob towards +.
Duration 2 hours.
4. Press the
An end time for the PYROLITIC CYCLE (as for a
normal cooking cycle) may be programmed (see
Programming the automatic cleaning end time).
button to confirm.
button for
The
that the oven door was automatically locked as
soon as the temperature reached a high value.
The
may be cancelled at any time by pressing the
button.
If a malfunction occurs, the heating elements will
be switched off.
Once the oven door has been locked, you cannot
change the duration and cycle end time settings.
Programming the automatic cleaning end time
1. Press the
digits on the DISPLAY begin to flash.
2. Turn the TIMER KNOB towards + and - to
adjust the hour value.
3. Press the
digits on the DISPLAY begin to flash.
4. Turn the TIMER KNOB towards + and - to
adjust the minute value.
5. Press the
6. When the set time has elapsed, the text END
appears on the display and a buzzer sounds.
For example: it is 9:00 a.m. and the Economy
PYROLYTIC cycle has been selected: default set
time 1 hour. 12:30 is scheduled as the end time.
The programme will start automatically at 11:30
a.m.
Programming has been set when the
buttons are illuminated. The DISPLAY shows the
PYROLITIC CYCLE end time and duration
alternately.
Once the automatic cleaning cycle is over
You will have to wait until the temperature inside the
oven has cooled down sufficiently before you can
open the oven door. You will notice some white dust
deposits on the bottom and the sides of your oven;
remove these deposits with a damp sponge once
the oven has cooled down completely. Alternatively,
you can make use of the already heated oven, in
which case it is not necessary to remove the
deposits, they are completely harmless and will not
affect your food in any way.
icon on the display, when lit, indicates
icon indicates that the cleaning cycle
button until the icon and the two
button again until the other two
button again to confirm;
and
39
Page 40

GB
Assistance
Warning:
The appliance is fitted with an automatic diagnostic system which detects any malfunctions. Malfunctions are
displayed by messages of the following type: F followed by numbers.
Call for technical assistance in the event of a malfunction.
Never use the services of an unauthorised technician.
Please have the following information to hand:
The type of problem encountered.
The appliance model (Mod.).
The serial number (S/N).
The latter two pieces of information can be found on the data plate located on the appliance.
40
Page 41

Mode demploi
RS
РУССКИЙ,1
CI 6I FA R /HA
GB
English,21
FR
Français, 41
CUISINE ET FOUR
FR
Sommaire
Installation, 42-43
Positionnement et nivellement
Raccordement électrique
Tableau des caractéristiques
Description de lappareil, 44-45
Vue densemble
Tableau de bord
Afficheur
Panneau de contrôle - Plan de cuisson
Mise en marche et utilisation, 46-50
Mise à lheure de lhorloge
Programmer la minuterie
Utilisation du four
Programmes de cuisson manuels
Programmes de cuisson automatiques
Comment programmer une cuisson
Conseils de cuisson
Tableau de cuisson au four
Utilisation du plan de cuisson
vitrocéramique, 51-55
Mise sous tension de la table de cuisson
Allumage des foyers
Fonction booster
Extinction des foyers
Programmation de la durée de cuisson
Le minuteur
Verrouillage des commandes
Extinction de la table de cuisson
Mode Démonstration (demo)
Conseils dutilisation de lappareil
Les sécurités
Description technique des modèles
Conseils utiles pour la cuisson
Précautions et conseils, 56-57
Sécurité générale
Mise au rebut
Economies et respect de lenvironnement
Nettoyage et entretien, 58-59
Mise hors tension
Nettoyage de lappareil
Remplacement de lampoule déclairage du four
Nettoyage du plan de cuisson vitrocéramique
Nettoyage automatique par PYROLYSE
Assistance, 60
Page 42

Installation
FR
Conserver ce mode demploi pour pouvoir le
consulter à tout moment. En cas de vente, de
cession ou de déménagement, veiller à ce quil
suive lappareil.
Lisez attentivement les instructions : elles
contiennent des conseils importants sur linstallation,
lutilisation et la sécurité de lappareil
Linstallation de lappareil doit être effectuée par un
professionnel du secteur conformément aux
instructions du fabricant.
Nimporte quelle opération de réglage, dentretien
ou autre, doit être effectuée après avoir débranché
la prise de la cuisinière.
Positionnement et nivellement
Lappareil peut être installé à côté de meubles dont
la hauteur ne dépasse pas celle du plan de cuisson.
Sassurer que le mur en contact avec la paroi
arrière de lappareil est réalisé en matériel ignifuge
résistant à la chaleur (T 90°C).
Nivellement
Pour mettre lappareil bien à
plat, visser les pieds de
réglage fournis aux
emplacements prévus aux
coins à la base de la
cuisinière (voir figure).
Montage des pieds* par
encastrement sous la base.
Raccordement électrique
Montage du cordon dalimentation
Ouverture du bornier:
Faites pression à laide dun tournevis sur les
languettes latérales du couvercle du bornier;
Tirez et ouvrez le
couvercle du bornier.
Pour une installation correcte :
installer cet appareil dans une cuisine, une salle à
manger ou un studio (jamais dans une salle de
bain) ;
si le plan de cuisson de la cuisinière dépasse le
plan de travail des meubles, ces derniers doivent
être placés à au moins 600 mm de lappareil.
si la cuisinière est installée sous un élément suspendu,
il faut que ce dernier soit placé à moins de 420 mm
de distance du plan.
Il faut prévoir une
HOOD
distance de 700 mm si
les éléments suspendus
Min. mm.
mm.
420
Min.
600
420
Min. mm.
sont inflammables (voir
figure);
mm. with hood
ne pas placer de
mm. without hood
650
700
rideaux derrière ou sur
min.
min.
les côtés de la
cuisinière à moins de
200 mm de distance.
pour linstallation de hottes, se conformer aux
instructions de leur notice demploi.
Pour monter le cordon dalimentation, procédez
comme suit:
dévissez la vis du serre-câble de même que les
vis des contacts
Les pontets sont montés en usine pour
raccordement à 230V monophasé (voir figure).
230V 1N~
H07RN-F 3x4 CEI-UNEL 35364
NL
5
3
4
pour effectuer les raccordements électriques
illustrés figure, utilisez les deux pontets placés
dans le boîtier (voir figure - référence P)
1
2
42
Page 43

P
NL2L1
L3
400V 2N~
H05RR-F 4x4 CEI-UNEL 35363
NL2L1
Après installation de lappareil, le câble électrique
et la prise de courant doivent être facilement
accessibles
Le câble ne doit être ni plié ni excessivement
écrasé.
Le câble doit être contrôlé périodiquement et ne
peut être remplacé que par un technicien agréé.
Nous déclinons toute respo
nsabilité en cas de
non respect des normes énumérées ci-dessus.
FR
5
3
4
1
2
400V 3N~
H05RR-F 5x2.5 CEI-UNEL 35363
NL3L1L2
5
3
4
fixez le câble dalimentation dans le serre-câble
correspondant et fermez le couvercle.
Branchement du câble dalimentation au réseau
électrique
En cas de raccordement direct au réseau, intercaler
entre lappareil et le réseau un interrupteur à coupure
omnipolaire ayant au moins 3 mm décartement
entre les contacts, dimensionné à la charge et
conforme aux normes en vigueur (le fil de terre ne
doit pas être interrompu par linterrupteur). Le câble
dalimentation ne doit atteindre, en aucun point, une
température dépassant de 50°C la température
ambiante.
Avant de procéder au branchement, sassurer que :
la prise est bien munie dune terre conforme à la loi;
la prise est bien apte à supporter la puissance
maximale de lappareil, indiquée sur la plaque
signalétique;
la tension dalimentation est bien comprise entre
les valeurs indiquées sur la plaque signalétique;
Ne pas utiliser de rallonges ni de prises multiples.
Nexiste que sur certains modèles
*
1
2
TABLEAU DES CARACTERISTIQUES
Dimensions du
four HxLxP
Volume l 56
Dimensions utiles
du tiroir chauffeplats
Tension et
fréquence
dalimentation
ETIQUETTE
ENERGIE
32x43,5x40 cm
largeur 42 cm
profondeur 44 cm
hauteur 8,5 cm
voir plaque signalétique
Directive 2002/40/CE sur l'étiquette
des fours électriques Norme EN
50304
Consommation énergie convection
Naturelle fonction four :
Tradition
Consommation énergie déclaration
Classe convection Forcée
fonction four : Rôtisserie
Directives Communautaires :
2006/95/CEE du 12.12.06 (Basse
Tension) et modifications
successives - 89/336/CEE du
03/05/89 (Compatibilité
Electromagnétique) et
modifications successives 90/369/CEE du
modifications successives
93/68/CEE du 22/07/93 et
modifications successives -
2002/96/CEE.
29/06/90 (Gaz) et
43
Page 44

Description de lappareil
/
FR
Vue densemble
Table de cuisson
Vitrocéramique
Support LECHEFRITE
Tableau de bord
Bouton
PROGRAMMES
Tableau de bord
Support GRILLE
Pied de réglage
AFFICHEUR
GLISSIERES
de coulissement
niveau 5
niveau 4
niveau 3
niveau 2
niveau 1
Pied de réglage
Bouton
THERMOSTAT
SELECTION
TEMPS
Afficheur
Icône PROGRAMME
BASSE TEMPERATURE
Indicateur de
Préchauffage
Voyant
PORTE
VERROUILLEE
Nexiste que sur certains modèles
*
44
PYROLYSE
Icône
STOP
Touche
Icône
DUREE
Touche
SELECTION TEMPS
Icônes PROGRAMMES
AUTOMATIQUES
Icône
MINUTEUR
Icône
FIN DE CUISSON
Chiffres TEMPERATURE
et TEMPS
Icône
HORLOGE
Page 45

Panneau de contrôle - Plan de cuisson
Touche AUGMENTATION
Indicateurs de PUISSANCE et
de CHALEUR RÉSIDUELLE
Voyant
FOYER SÉLECTIONNÉ
Touches
SÉLECTION FOYER
DE PUISSANCE
Touche
BOOSTER*
Voyant
BOOSTER*
Voyant
MINUTEUR*
Afficheur
PROGRAMMATEUR*
Voyant
FOYER PROGRAMMÉ*
Touche
PROGRAMMATEUR*
Touche
DIMINUTION DE PUISSANCE
Touche
ON/OFF
Voyant
ON/OFF
Voyant
COMMANDES VERROUILLÉES
Touche
VERROUILLAGE DES COMMANDES
FR
Touche AUGMENTATION DE PUISSANCE pour
allumer le foyer et régler sa puissance (voir Mise
en marche et utilisation).
Touche DIMINUTION DE PUISSANCE pour régler
la puissance et éteindre le foyer (voir Mise en
marche et utilisation).
Voyant FOYER SELECTIONNE pour signaler que
le foyer correspondant a été sélectionné et que
les régulations sont donc possibles.
Touche SELECTION FOYER pour sélectionner le
foyer souhaité
Indicateur de PUISSANCE : une colonne
lumineuse pour signaler le niveau de puissance
atteint.
Touche ON/OFF pour allumer ou éteindre
lappareil.
Voyant ON/O
FF : il signale si lappareil est allumé
ou éteint.
Touche PROGRAMMATEUR* pour programmer la
durée dune cuisson (voir Mise en marche et
Utilisation).
Afficheur PROGRAMMATEUR* : pour afficher les
choix correspondant à la programmation (voir
Mise en marche et utilisation).
Voyants FOYER PROGRAMMÉ* : ils indiquent les
foyers quand une programmation est lancée (voir
Mise en marche et utilisation).
Touche VERROUILLAGE DES COMMANDES
pour empêcher toute intervention extérieure sur
les réglages de la table de cuisson (voir Mise en
marche et Utilisation).
Voyant COMMANDES VERROUILLEES : pour
signaler le verrouillage des commandes (voir Mise
en marche et Utilisation).
Touche
BOOSTER* pour brancher la
suralimentation - 3000 W du foyer (voir Mise en
marche et utilisation).
Voyant BOOSTER* il signale que la fonction de
suralimentation du booster est activée.
Voyant MINUTEUR* il signale que le minuteur est
activé
Nexiste que sur certains modèles
*
45
Page 46

Mise en marche et utilisation
FR
Mise à lheure de lhorloge
Son réglage est possible que le four soit éteint ou
allumé mais ceci ne correspond pas à une
programmation de fin de cuisson.
1. Appuyer plusieurs fois de suite sur la touche
jusquà ce que licône et les deux digits
numériques de lAFFICHEUR se mettent à clignoter;
2. tourner le bouton SELECTION DES TEMPS vers le
«+» et «-» pour régler lheure;
3. appuyer à nouveau sur la touche
que les deux autres digits numériques de
lAFFICHEUR se mettent à clignoter;
4. tourner le bouton SELECTION DES TEMPS vers le
«+» et «-» pour régler les minutes ;
5. appuyer à nouveau sur la touche
confirmer.
jusquà ce
pour
Programmer la minuterie
Cette fonction ne stoppe pas la cuisson et est
indépendante du fonctionnement du four ; elle sert
uniquement à déclencher un signal sonore à
lexpiration des minutes sélectionnées.
1. Appuyer plusieurs fois de suite sur la touche
jusquà ce que licône et les trois digits
numériques de lAFFICHEUR se mettent à clignoter ;
2. tourner le bouton SELECTION DES TEMPS vers le
«+» et «-» pour régler les minutes ;
3. appuyer à nouveau sur la touche
confirmer.
Laffichage du compte à rebours suivra. Un signal
sonore indiquera la fin du décompte.
pour
Utilisation du four
Avant toute utilisation, enlever les pellicules
plastiques sur les côtés de lappareil
Pour modifier la température, tourner le bouton
THERMOSTAT.
3. Lextinction de lindicateur de préchauffage
et le déclenchement du signal sonore indiquent la fin
du préchauffage: il est temps denfourner les plats.
4. En cours de cuisson, il est possible à tout
moment de :
- modifier le programme de cuisson à laide du
bouton PROGRAMMES;
- modifier la température à laide du bouton
THERMOSTAT;
- programmer la durée et lheure de fin de cuisson
(voir programmes de cuisson);
- stopper la cuisson en ramenant le bouton
PROGRAMMES sur 0;
5. Possibilité de modifier la durée de cuisson (voir
Programmes de cuisson).
6. En cas de coupure de courant, si la température
du four nest pas trop redescendue, un dispositif
spécial fait repartir le programme à partir du moment
où il a été interrompu. Les programmations en
attente de démarrage ne sont par contre pas
rétablies et doivent être reprogrammées dès
rétablissement du courant.
Aucun préchauffage nest prévu pour les
programmes ROTISSERIE.
Ne jamais poser dobjets à même la sole du four,
lémail risque de sabîmer.
Il faut toujours enfourner les plats sur la grille
fournie avec lappareil.
Système de refroidissement
Pour obtenir un abaissement des températures
extérieures, un système de refroidissement souffle de lair
à lextérieur par une fente située entre le bandeau et la
porte du four. Au début du programme PYROLYSE, le
ventilateur fonctionne à faible vitesse.
Le ventilateur continue à tourner après larrêt du four
jusquà ce quil se soit suffisamment refroidi.
Lors de son premier allumage, faire fonctionner le
four à vide, porte fermée, pendant au moins une
heure en réglant la température à son maximum.
Puis éteindre le four, ouvrir la porte et aérer la pièce.
Lodeur qui se dégage est due à lévaporation des
produits utilisés pour protéger le four.
1. Pour sélectionner le programme de cuisson
souhaité, tourner la manette PROGRAMMES.
2. Le four se place en phase de préchauffage,
lindicateur préchauffage sallume.
46
Eclairage du four
Four éteint, il sallume dès ouverture de la porte du four.
Page 47

Programmes de cuisson manuels
Tous les programmes ont une température de cuisson
présélectionnée. Il est possible de la régler manuellement,
entre 40°C et 250°C au choix. Pour le programme
TOURNEBROCHE, la valeur présélectionnée est 270°C.
Programme FOUR TRADITION
Pour cette cuisson traditionnelle mieux vaut cuire sur un seul
niveau.
Programmes de cuisson automatiques
FR
La température et la durée de cuisson sont
présélectionnées et ne peuvent pas être modifiées à
laide du système C.O.P.® (Cuisson Optimale
Programmée) qui garantit automatiquement un résultat
parfait. La cuisson sarrête automatiquement et le four signale
que le plat est cuit. La durée de cuisson peut être modifiée de
quelques minutes, comme indiqué ci-dessous dans la
description des différentes fonctions.
Programme MULTINIVEAUX
La chaleur est constante et bien répartie à lintérieur du four,
lair cuit et dore de façon uniforme en tous points. Il est
possible de cuire au maximum sur deux niveaux en même
temps.
Programme ROTICCERIE
Lirradiation thermique unidirectionnelle sajoute au brassage de
lair pour une répartition uniforme de la chaleur dans lenceinte
du four. Plus de risque de brûler les aliments en surface et plus
grande pénétration de la chaleur. Cuisson porte du four fermée.
Programme TOURNEBROCHE
Cette fonction est optimisée pour les cuissons au
tournebroche. Cuissons porte du four fermée.
Programmes BASSE TEMPERATURE
Ce type de cuisson permet de faire lever les pâtes, de
décongeler, de préparer du yaourt, de réchauffer plus ou
moins rapidement et de cuire lentement à basse température.
Températures sélectionnables : 40, 65, 90 °C.
To urn eb r o che
Pour actionner le tournebroche
(voir figure), procéder comme
suit:
1. placer la lèchefrite au
niveau 1;
2. placer le berceau au
niveau 3 et encastrer le
bout arrière de la broche
dans le trou situé au fond
de lenceinte;
3. actionner le
tournebroche en sélectionnant les icônes
Quand le programme est lancé, le tournebroche sarrête dès
ouverture de la porte du four.
;
Programme ROTI
Choisir cette fonction pour cuisiner de la viande de veau, de
porc, dagneau. Enfourner à froid. Il est aussi possible
denfourner à chaud. Seule la durée peut être modifiée, à
raison de -20/+25 minutes.
Programme PIZZA
Cest la fonction idéale pour la cuisson des pizzas. Se reporter
au paragraphe suivant pour une recette détaillée. Seule la
durée peut être modifiée, à raison de -5/+5 minutes.
Pour obtenir de meilleurs résultats, nous recommandons de
suivre attentivement les conseils suivants :
suivre la recette à la lettre;
le poids de la pâte doit être compris entre 500g et 700g.
graisser légèrement la lèchefrite et les plats à rôti.
Enfourner à froid. Au cas où vous souhaiteriez enfourner à
chaud, après une cuisson à haute température, lafficheur
visualisera le message Hot jusquà ce que la température du
four aura atteint 120 °C. Vous pouvez alors enfourner la pizza.
Recette PIZZA :
1 Plaque, gradin du bas, four froid ou chaud
Recette pour 3 pizzas denviron 550g : 1.000g de farine, 500g
deau, 20g de sel, 20 g de sucre, 10 cl dhuile dolive, 20g de
levure de boulanger fraîche (ou bien 2 sachets en poudre)
Levage à température ambiante : 1 heure ou fonction
manuelle BASSE TEMPÉRATURE à 40°C et laisser lever
environ 30/45 minutes.
Enfourner à froid.
Démarrer la cuisson
Programme PAIN
Pour obtenir de meilleurs résultats, nous recommandons de
suivre attentivement les conseils suivants :
suivre la recette à la lettre;
respecter le poids maximal pour chaque plaque;
ne pas ou b lier de verser 1dl deau froide dans
la lèc hefrit e au grad i n 5;
Enfourner à froid. Au cas où vous souhaiteriez enfourner à
chaud, après une cuisson à haute température, lafficheur
visualisera le message Hot jusquà ce que la température du
four aura atteint 40 °C. Vous pouvez alors enfourner le pain.
PIZZA
47
Page 48

FR
Recette du PAIN :
1 Plaque de 1000g Maxi. gradin du bas
Exemple: il est 9h00 et la durée programmée est de 1h15.
Le programme sarrête automatiquement à 10h15.
Recette pour 1000g de pâte : 600g de farine, 360g deau,
11g de sel, 25g de levure de boulanger fraîche (ou bien 2
sachets en poudre)
Procédé :
Mélanger la farine et le sel dans un grand récipient.
Diluer la levure de boulanger dans de leau légèrement
tiède (35 degrés environ).
Disposer la farine en fontaine.
Verser le mélange deau et de levure
Mélanger et pétrir jusquà obtenir une pâte homogène et
peu collante, létirer avec la paume de la main et la replier
sur elle-même pendant 10 minutes.
Former une boule, la placer dans un saladier et couvrir d'un
film plastique pour éviter que la surface de la pâte ne
sèche. Glisser le saladier dans le four, sélectionner la
fonction manuelle BASSE TEMPERATURE à 40°C et laisser
lever environ 1 heure (la pâte doit doubler de volume).
Diviser la boule pour obtenir plusieurs pains.
Les placer sur la plaque du four recouverte de papier
sulfurisé.
Saupoudrer les pains de farine.
Pratiquer des entailles sur les pains.
ne pas oubli er de vers er 1dl d e au fr oide
dans la lèchefrite au gradin 5; Pour son
nettoyage, utiliser le leau et du vinaigre.
Enfourner à froid.
Démarrer la cuisson
En fin de cuisson, laisser reposer les pains sur une grille
jusquà ce quils aient complètement refroidi.
PAIN
Programmer la fin d u n e cui sso n
La programmation dune fin de cuisson nest possible
quaprès avoir sélectionné une durée de cuisson.
1. Suivre la procédure de 1 à 3 décrite pour la durée;
2. appuyer ensuite sur la touche
et les deux digits numériques de lAFFICHEUR se mettent
à clignoter;
3. tourner le bouton SELECTION DES TEMPS vers le «+» et «-
» pour régler lheure;
4. appuyer à nouveau sur la touche
deux autres digits numériques de lAFFICHEUR se mettent à
clignoter;
5. tourner le bouton SELECTION DES TEMPS vers le «+» et «-
» pour régler les minutes ;
6. appuyer à nouveau sur la touche
7. à expiration de la durée sélectionnée, lAFFICHEUR affiche
END, le four stoppe la cuisson et un signal sonore retentit.
Exemple: il est 9h00, la durée programmée est de 1h15 et
lheure de fin de cuisson est fixée à 12h30. Le programme
démarre automatiquement à 11h15.
Les icônes
programmation a été lancée. LAFFICHEUR affiche à tour de
rôle lheure de fin de cuisson et la durée.
Pour annuler une programmation, amener le bouton
PROGRAMMES sur «0».
et éclairées signalent quune
jusquà ce que licône
jusquà ce que les
pour confirmer;
Conseils de cuisson
Programme GATEAUX
Cette fonction est idéale pour la cuisson des gâteaux.
Enfourner à froid. Il est aussi possible denfourner à chaud.
Seule la durée peut être modifiée, à raison de -10/+10
minutes.
Comment programmer une cuisson
La programmation nest possible quaprès avoir sélectionné
un programme de cuisson.
Programmer la duré e de cuisso n
1. Appuyer plusieurs fois de suite sur la touche
que licône
lAFFICHEUR se mettent à clignoter;
2. tourner le bouton SELECTION DES TEMPS vers le «+» et «» pour régler la durée désirée ;
3. appuyer à nouveau sur la touche
4. à expiration de la durée sélectionnée, lAFFICHEUR affiche
END, le four stoppe la cuisson et un signal sonore retentit.
et les trois chiffres numériques de
pour confirmer;
jusquà ce
Pour les cuissons ventilées ne pas utiliser les gradins 1et 5:
ils sont directement frappés par lair chaud qui pourrait brûler
les mets délicats.
En cas de cuisson en mode TOURNEBROCHE, BARBECUE
ou ROTISSERIE, placer la lèchefrite au gradin 1 pour
récupérer les jus ou graisses de cuisson.
MULTICUISSON
Utiliser les gradins 2 et 4 et placer au 2 les plats qui
exigent davantage de chaleur.
Placer la lèchefrite en bas et la grille en haut.
PIZZA
Utiliser un plat en aluminium léger et lenfourner sur la grille
du four.
En cas dutilisation du plateau émaillé, le temps de cuisson
sera plus long et la pizza beaucoup moins croustillante.
Si les pizzas sont bien garnies, najouter la mozzarelle quà
mi-cuisson.
48
Page 49

Tableau de cuisson au four
Gâteaux r ustiques
ENTRÉES
Ramequins individuels
Légumes farcis
Légumes braisés en cocotte
LES LÉGUMES
PLATS
Gâteaux salés
Terrines
Soufflés
Mets au gratin
Flans
Terrines
Soufflés
Beignets
Papillote
Riz
Terrines de foie de volaille, purée de saumon, œufs en
gratin de pommes de terre, soupe Parmentier, lasagnes,
Gâteaux a ux olives, au thon, etc.
gâteaux rustiques au fromage, terrine de saumon,…
terrines de poisson, viandes, légumes, foie gras, etc.
soufflé au fromage, aux légumes, au poisson, etc.
pommes de terre, tomates, courgettes, choux, etc.
laitue, carottes au safran, salsifis blanc, etc.
flan aux champignons, om elettes a ux légumes, etc.
soufflé d’asperges, aux tomates, etc.
etc.
Pilaf
EXEMPLES
cocotte, etc.
terrine de légumes
terrine de légumes, etc.
truffes, etc.
FR
Tradition
Tradition
gratin
Tradition
Tradition
Tradition
Tradition
TEMPÉRATURE SUPPORTS
160 °C
200 °C
160 °C
160 °C
200 °C
200-210 °C
200 °C
200 °C
160 °C
160 °C
200 °C
200 °C
200 °C
180 °C
moule à terrine sur lèchefrite (bain-marie
ramequins sur lèchefrite (bain-marie
ramequin ou moule sur lèchefrite (bain-
marie ave c eau déjà chaude)
moule sur lèchefrite (bain-marie avec
moule sur lèchefrite
sur lèchefrite
avec eau déjà chaude)
avec eau déjà chaude)
moule sur lèchefrite
plat sur lèchefrite
sur lèchefrite
ou moule sur lèchefrite
cocotte sur lèchefrite
eau déjà chaude)
moule sur lèchefrite
sur lèchefrite
Papillote sur lèchefrite
plat sur lèchefrite
FONCTION
Gâteaux ou
multiniveaux
Gâteaux ou
multiniveaux
Multiniveaux
(ou rôtisserie)
Multiniveaux
Multiniveaux
Multiniveaux
Multiniveaux
LES VIANDES
Préparations en croûte de sel volailles en croûte de sel,… multiniveaux 240°C
Poissons grillés et brochettes bar, maquereau, sardine, rouget, thon,… multiniveaux 180°C
LES POISSONS
PLATS EXEMPLES FONCTION TEMPERATURE SUPPORTS
Volailles rôties poulet, canard, coquelet, chapon,. rôtisserie 200°C volaille sur grille
Volailles au tournebroche poulet, coquelets tournebroche 270°C berceau tournebroche
Rôtis
Grosses pièces braisées
Sauté de viande en cocotte
et plats traditionnels
Grillades
Viandes en croûte filet de bœuf Wellington, jambon en croûte,… multiniveaux 200°C
rôti de porc, de veau, de dinde, rosbif, gigot
d'agneau, gigue de chevreuil, poitrine de veau
jambon entier braisé à l'os, très gros chapon ou
bœuf bourguignon, lapin chasseur, sauté de veau
Marengo, navarin d'agneau, poulet basquaise,...
côtes, côtelettes, saucisses à griller, brochettes,
farcie,…
dinde, …
baeckenhoffe, cassoulet,…
cuisses de poulet,…
rôtisserie 200°C viande sur grille
multiniveaux
180°C
(au tiers de la
cuisson, baisser à
160°C)
viande sur plat eau
arroser régulièrement avec le
tradition 190°C cocotte sur plateau
multiniveaux 200°C
sur grille (le gradin est fonction
sur plateau (pour les grosses
pièces, baisser à 160°C après la
cuisson de la croûte)
viande sur plateau ou plat sur
sur grille (le gradin est fonction
Poissons entiers (farcis) dorade, carpe,… multiniveaux 200°C sur plateau
Filets de poissons (avec
mouillement)
Papillotes sole, limande, saint jacques,… multiniveaux 200°C sur plateau
Poissons en croûte (pâte
feuilletée ou brisée)
Gratins de poisson brandade de morue gratinée,…
Soufflés saint jacques,… multiniveaux 200°C moule sur plateau
Poissons en croûte de sel bar, dorade,… multiniveaux 240°C
saumon, rascasse, cabillaud, loup,… tradition 200°C sur plateau
saumon, brochet,… multiniveaux 200°C sur plateau
gratin
(ou rôtisserie)
200-210°C plat sur plateau
poisson sur plateau ou plat sur
jus
de l'épaisseur)
plateau
de l'épaisseur)
plateau
49
Page 50

FR
Tableau de cuisson au four
Biscuits (sa ns levure)
Tartes au fromage blanc
Cuisson de bases pour tarte s (pâte sablée)
PÂTISSERIES
Grandes pâtisseries (levure de boulanger)
FOURS
PETITS
ENTREMETS
FRUITS Fruits farcis ou en papillote
Tartes à pâte levée
Terrines (pâte feuilletée ou pâte brisée)
Petites pâtisseries (le vure de boulanger)
Macarons, boules à la n oix de coco
Meringues blanches
Meringues ambrées
Crèmes et flancs Gâteaux de semoule crème au carame l, crème brûlée, flan au chocolat, etc.
PLATS
choux
Pâte à b iscuits
Pâte sablée
Pâte feuilletée
Pâte levé e
Pudding
Desserts au riz
Soufflés
génoise, biscuits à la cuiller, biscuits roulés, Brownies,
tartes au sucre, tartes aux fruits à pâte brioche
tartes aux fruits frais (fraises, framboises, etc.)
profiteroles, petits choux, choux, Paris Brest, Saint
croissants, tartes au sucr e, brioches vides, petits
kougloff, brioches panettone, pain sucré,...
biscuits en caissettes papier, biscuits à la cuiller, etc.
sablés, biscuits spritz, biscuits secs, etc.
diverses pâtisseries feuilletées, etc.
macarons à la noix de coco ou aux am andes
pudding à base de pain ou pâte à brioche, pudding au riz 190 °C
soufflé à la liqueur, soufflé aux fruits, etc.
EXEMPLES
Terrines aux poires, etc.
honoré, etc.
savarins, etc.
mini-brioche, min i-croissant, etc .
riz condé, riz impératrice, etc.
pommes au four, etc.
200 °C
70 °C
FONCTION TEMPÉRATURE
Gâteaux ou
multiniveaux
Gâteaux ou
multiniveaux
Gâteaux ou
multiniveaux
Multiniveaux 200 °C moule ou papillote sur lèchefrite
200 °C
180 °C
180 °C
220 °C
190 °C
180 °C
160 °C
180 °C
200 °C
200 °C
180 °C
180 °C
110 °C
160 °C
180 °C
200 °C
SUPPORTS
moule sur lèchefrite
moule sur lèchefrite
moule sur lèchefrite
moule sur lèchefrite (haricots
secs sur pâte)
moule sur lèchefrite
sur lèchefrite
sur lèchefrite
sur lèchefrite ou moule sur
sur lèchefrite
sur lèchefrite
sur lèchefrite
sur lèchefrite
sur lèchefrite
sur lèchefrite
sur lèchefrite
moule sur lèchefrite
Moules ou ramequins sur
lèchefrite (bain-marie sur
lèchefrite)
moule sur lèchefrite
moule sur lèchefrite
lèchefrite
DIVERS
Programmes de cuisson au tom a tiqu e s
Fonction Cuisson préconisée pour …
* Les temps de cuisson sont purement indicatifs et peuvent être modifiés selon les goûts de chacun. Les temps de préchauffage du four sont pré sélec tionnés et ne sont p as modifi ables
manuellement.
** Les du rées des cuissons automati ques sont préséle ctionné es. Les va leurs fig urant da ns le table au se réfè rent à la d urée mini male et maximale, pouvant être modif iée par l'utilisateur à
partir de la durée présélectionnée.
*** Comme indiqué dans la recette, ajouter 100 g d'eau dans la lèchefrite.
PLATS
Yaourt
champignons, fines herbes, fruits ou légumes en tranches,
Aliments secs
Rôti de
boeuf
Gâteaux
Pizzas*
Pain *** 2 55 Froid
Rôtis de viande
Plum-cake et 4/ 4 (avec levure
Tartes aux fruits (pâte bris ée ou
pâte feuilletée, avec ou sans flan)
Gâteaux sans levure (clafoutis,
Pizzas à pâte épaisse, fougasses
chimique)
Pâte feuilletée
pithiviers, feuilletés, gâteau
rustique, etc.)
(pâte à pain)
EXEMPLES
Basse temperature
etc.
tartes aux pommes, mirabelles, poires,
chaussons aux pommes, gâteaux
EXEMPLES
Rôti de veau
Rôti de porc
Poulet rôti
Gigot d’agneau
cake aux fruits, marbrés, 4/4, etc.
etc.
rustiques, terrines, etc.
sur lèchefrite
2 28**
FONCTION
Basse temperatur e
lèche-frite ou plat
moule sur grille
moule sur grille
TEMPÉRATURE
SUPPORTS
sur lè chefrite
40 °C
65 °C
Gradin plateau
émaillé
2
2 45**
2
2
2
SUPPORTS
ramequin sur lèchefr ite
sur grille
Durée cuisson
(minutes)
Enfournement
Froid
Froid
Chaud ou
froid
50
Page 51

Mise en marche et
utilisation
La colle utilisée pour les joints laisse des traces de
graisse sur le verre. Nous vous conseillons de les
éliminer avant dutiliser lappareil, à laide dun
produit dentretien non abrasif. Une odeur de
caoutchouc peut se dégager au cours des
premières heures dutilisation, elle disparaîtra très
vite.
Lors du branchement de la table, un bip sonore
retentit au bout de quelques secondes. A partir de
ce moment-là vous pouvez allumer votre table de
cuisson.
Bruits de fonctionnement normaux de la table de
cuisson :
Bourdonnement : il est dû à la vibration des
éléments métalliques qui composent le
générateur et le récipient de cuisson. Il est
produit par le champ électromagnétique
nécessaire à la montée en température ; il
augmente au fur et à mesure que le niveau de
puissance du générateur augmente.
Léger sifflement : il se produit quand la
casserole posée sur le foyer est vide; le bruit
disparaît dès qu'on y introduit de l'eau ou des
aliments.
Crépitement : il s'agit d'un bruit produit par les
vibrations du matériau composant le fond de la
casserole quand il est traversé par les courants
parasites dus au champ électromagnétique
(induction) ; il est plus ou moins intense selon le
type de matériau utilisé pour le fond et il diminue
au fur et à mesure que les dimensions de la
casserole augmentent.
Sifflement intense : il se produit quand les
deux générateurs fonctionnent en même temps
sur la même verticale à leur puissance maximale
et/ou quand la fonction booster est insérée sur le
plus grand d'entre eux et que l'
autorégulé. Le bruit diminue dès qu'on baisse le
niveau de puissance du générateur autorégulé; il
est plus manifeste quand le fond de la casserole
est formé de plusieurs couches de matériaux
différents.
Bruit du ventilateur : pour un fonctionnement
correct de la table et pour garantir la sécurité des
composants électroniques contre tout risque de
surchauffe, il faut actionner un ventilateur. Le
ventilateur fonctionne à sa puissance maximum
quand le générateur plus grand est à son niveau
de puissance maximum ou quand la fonction
booster est insérée; dans tous les autres cas, il
fonctionne à sa puissance intermédiaire selon la
température détectée. Il se peut d'ailleurs que le
ventilateur continue à fonctionner même après la
désactivation de la table si la température
détectée est trop élevée.
autre est
Les bruits énumérés sont rattachés à la technologie
de l'induction et ne signalent pas forcément des
défauts de fonctionnement.
Une pression prolongée sur les touches - et +
accélère lavancement rapide des niveaux de
puissance et des minutes du minuteur.
Mise sous tension de la table de cuisson
Pour mettre la table de cuisson sous tension,
appuyer sur la touche
environ.
pendant une seconde
Allumage des foyers
Chaque foyer est activé par une touche de sélection
et par un dispositif de réglage de la
puissance à double touche
Pour mettre en marche un foyer, appuyer sur la
commande correspondante et sélectionner la
puissance voulue à laide des touches
- et +.
- et +.
Fonction booster*
Pour accélérer la montée en température, une
fonction booster est disponible sur certains foyers,
pour lactiver appuyer sur la touche
placé au-dessus de la touche sallume. Cette
fonction suralimente la puissance à 2000 ou 3000W
selon la dimension du foyer concerné.
Le booster sarrête automatiquement après 4
minutes. Tant que le booster dun foyer est activé, la
puissance du foyer correspondant avant ou arrière
est limitée (par ex : si le booster est activé sur le
foyer arrière gauche, la puissance du foyer avant
gauche baisse). Pour de plus amples
renseignements, consulter Description technique
des modèles.
Booster
. Le voyant
Extinction des foyers
Pour éteindre un foyer, le sélectionner à laide de la
touche de sélection correspondante
Appuyez sur la touche
descend progressivement jusquà extinction.
Nexiste que sur certains modèles
*
- : la puissance du foyer
et :
FR
51
Page 52

FR
Programmation de la durée de cuisson
Il est possible de programmer simultanément tous
les foyers pour une durée comprise entre 1 et 99
minutes.
Le minuteur
La table de cuisson doit être allumée.
Le minuteur permet de sélectionner une durée de 99
minutes maximum.
1. Sélectionner le foyer à laide de la touche de
sélection correspondante.
2. Régler sa température.
3. Appuyer sur la touche de programmation
3. Sélectionner la durée de cuisson désirée à laide
des touches
4. Appuyer sur la touche
Le compte à rebours du minuteur démarre aussitôt.
La fin de la cuisson programmée est indiquée par un
signal acoustique (durée 1 minute) et le foyer
séteint.
Procéder de même pour tous les foyers devant être
programmés.
Affichage en cas de programmation multiple
En cas de programmation d'un ou de plusieurs
foyers, l'écran affiche le temps restant pour le foyer
qui se rapproche le plus de la fin du temps
programmé, dont la position est indiquée par
clignotement du voyant correspondant. Les voyants
des autres foyers programmés sont allumés.
Pour afficher le temps restant des autres foyers
programmés, appuyer plusieurs fois de suite sur la
- et +.
pour valider.
.
1. Appuyer sur la touche de programmation
Jusquà ce que le voyant minuteur sallume.
2. Sélectionner la durée désirée à laide des touches
.
- et +.
3. Appuyer sur la touche
Le compte à rebours du minuteur démarre aussitôt.
Une fois le temps écoulé, un signal sonore retentit
(pendant 1 minute).
Verrouillage des commandes
Pendant le fonctionnement de la table, il est
possible de verrouiller les commandes pour
empêcher toute intervention extérieure sur le réglage
(enfants, nettoyage...). Appuyer sur la touche
pour verrouiller les commandes, le voyant situé au-
dessus de la touche sallume.
Pour pouvoir modifier les réglages (interrompre la
cuisson par ex.) il faut déverrouiller les commandes
: appuyer sur la touche
instants, le voyant séteint et les commandes sont
déverrouillées.
pour valider.
pendant quelques
touche
sens des aiguilles dune montre des temps de tous
les foyers programmés, en partant du foyer avant
gauche
Modifier la programmation
1. Appuyer plusieurs fois de suite sur la touche
jusquà affichage du temps correspondant au foyer
devant être modifié.
2. Sélectionner un nouveau temps à laide des
touches
3. Appuyer sur la touche
Pour annuler une programmation, procéder comme
indiqué plus haut. Au point 2, appuyer sur la touche
: il y aura affichage à la suite et dans le
- et +.
pour valider.
- : la durée diminue progressivement jusquà
lextinction 0. La programmation est remise à zéro et
lafficheur quitte le mode programmation.
Extinction de la table de cuisson
Appuyer sur la touche pour éteindre lappareil.
Si les commandes de lappareil ont été verrouillées,
elles le seront encore au rallumage de la table. Pour
pouvoir rallumer la table de cuisson, il faut dabord
,
déverrouiller les commandes.
Mode Démonstration (demo)
Il est possible de sélectionner une utilisation en
mode démonstration où le tableau de bord
fonctionne normalement (y compris les commandes
concernant la programmation) mais où les éléments
chauffants ne sallument pas. Pour activer le mode
démonstration (demo), il faut que la table soit sous
tension et que tous les foyers soient éteints :
Appuyer simultanément sur les touches + et et
les garder enfoncées pendant 6 secondes. Au
bout de 6 secondes, le voyant ON/OFF et le
52
Page 53

voyant VERROUILLAGE DES COMMANDES se
mettent à clignoter pendant une seconde. Lâcher
les touches
;
il y a affichage de DE et de MO et la table
séteint;
au rallumage successif, la table se trouvera en
mode démonstration (demo).
Pour quitter ce mode de fonctionnement, suivre la
procédure décrite plus haut. Il y a affichage de DE
et de OF et la table séteint. Au rallumage successif,
la table fonctionnera normalement.
+ et et appuyer sur la touche
Conseils dutilisation de lappareil
Utiliser des récipients dont le matériau est
compatible avec linduction (matériau
ferromagnétique). Nous recommandons lutilisation
de casseroles en: fonte, acier émaillé ou inox
spécial induction. Pour sassurer de la compatibilité
dun récipient, effectuer un test avec un aimant.
A UTILISER
NE CONVIENT PAS
Eviter dutiliser les mêmes casseroles que sur les
brûleurs à gaz. la concentration de chaleur sur les
brûleurs à gaz peut déformer le fond de la
casserole qui perd de son adhérence.
Les sécurités
Détection de récipient
Chaque foyer est équipé dune détection de
casserole. Le foyer ne délivre de puissance quen
présence dune casserole adaptée au foyer. Le
voyant clignotant peut signaler :
une casserole incompatible
une casserole de trop petit diamètre
que la casserole a été soulevée
Indicateurs de chaleur résiduelle
Chaque foyer est équipé dun indicateur de chaleur
résiduelle. Cet indicateur signale les foyers dont la
température est encore élevée. Si lafficheur de
puissance affiche
chaud. On peut par exemple sen servir pour garder
un plat au chaud ou faire fondre du beurre ou du
chocolat. Lors du refroidissement du foyer,
, cest que le foyer est encore
FR
*
Pour obtenir de meilleures performances de la table
de cuisson :
Utiliser des casseroles à fond plat et de forte
Utiliser des casseroles dont le diamètre couvre
Veiller à ce que la base des casseroles soit
Fonte
Acier émaillé
Inox spécial
épaisseur pour quelles adhèrent parfaitement à la
zone de chauffe
complètement la zone de chauffe de façon à ce
que toute la chaleur disponible puisse être
utilisée.
toujours parfaitement sèche et propre pour
garantir un bon contact et une longue durée de
vie des foyers mais aussi des casseroles.
Céramique, Inox non magnétique
Cuivre
Aluminium, Verre, Terre,
lafficheur de puissance affiche
séteint dès que le foyer a suffisamment refroidi.
Surchauffe
En cas de surchauffe de ses composants
électroniques, la table séteint automatiquement et
lafficheur indique
affichage disparaît et la table est à nouveau
utilisable dès que la température est redescendue à
un niveau acceptable.
Interrupteur sécurité
Lappareil est équipé dun interrupteur de sécurité
qui interrompt instantanément le fonctionnement des
foyers dès quun temps limite de fonctionnement à
un niveau de puissance donné est atteint. Pendant
linterruption de sécurité, lafficheur indique 0.
Exemple : le foyer arrière droit est réglé sur 5, tandis
que le foyer avant gauche est réglé sur 2. Le foyer
arrière droit séteindra au bout de 5 heures de
fonctionnement tandis que le foyer avant gauche
séteindra au bout de 8 heures.
F suivi dun chiffre clignotant. Cet
. Lafficheur
53
Page 54

FR
Puissance
Durée limite de
fonctionnement
19
28
Description technique des foyers
Linduction est le procédé de cuisson le plus rapide.
Contrairement aux plaques traditionnelles, le foyer
német aucune chaleur : la chaleur est produite à
lintérieur du récipient à condition que le fond de ce
dernier soit en matériau ferromagnétique.
37
46
55
64
73
82
91
Signal sonore
Des anomalies, comme par exemple :
un objet (casserole, couvert, ...) placé plus de 10
secondes sur la zone de commande,
un débordement sur la zone de commande,
une pression prolongée sur une touche,
peuvent déclencher un signal sonore. Eliminer la
cause de dysfonctionnement pour stopper le
signal sonore. Si la cause de lanomalie nest pas
éliminée, le signal sonore continue à retentir et la
table séteint.
Tables de cuisson
Foyers
Arrière gauche I 1400 – 600 si avant gche*
Arrière droit I 2200 – B 3000*
Avant gauche I 2200 – B 3000*
Avant droit I 1400 – 600 si arrière drt*
Puissance totale 7200
CI 6I FA R /HA
Puissance (en W)
Légende :
I = foyer à induction simple
B = booster: le foyer peut être suralimenté à 3000 W
* = la puissance maximale est limitée à 600 W tant
que le booster est activé sur le foyer arrière
correspondant (voir Mise en marche et Utilisation).
54
Page 55

Conseils utiles pour la cuisson
FR
Mise en pression
Autocuisser
ª
Cuiccon très vive
Grillade Ebullition
vive
Cuisson
Crepes Saise et coloration
¶
¶
§
§
Réduction rapide (Sauce liquides)
Eau Frémissante (Pates, Riz, Légumes)
Lait
Réduction lente (Sauce épaisses)
Friture
(Rotis, Steack, Escalope, Filets de poisson,
Oeufs au plat)
S
Cuisson moyenne
S
Cuisson au bain-marie Cuisson Autocuiseur après chuchotement
¢
¢
£
Cuisson douce
Mijotage (Ragouts)
douce
Cuisson très
¡
Sauce chocolat Maintien au chaud
Réchauffage des préparations
55
Page 56

Précautions et conseils
FR
Cet appareil a été conçu et fabriqué
conformément aux normes internationales de
sécurité. Ces consignes de sécurité sont très
importantes et doivent être lues attentivement.
Sécurité générale
Ces instructions ne sont valables que pour les
pays dont les symboles figurent dans la notice
et sur la plaquette d'immatriculation de
l'appareil.
Cet appareil a été conçu pour un usage familial, de
type non professionnel.
Cet appareil ne doit pas être installé en extérieur,
même dans un endroit à l'abri, il est en effet très
dangereux de le laisser exposé à la pluie et aux
orages.
Ne pas toucher l'appareil avec les mains mouillées
ou humides ou si l'on est pieds nus.
Cet appareil qui sert à cuire des aliments ne doit
être utilisé que par des adultes conformément aux
instructions du mode d'emploi.
Cette notice concerne un appareil classe 1 (libre
pose) ou classe 2 - sous-classe 1 (encastré entre
deux meubles).
En cours de fonctionnement, les éléments
chauffants et certaines parties de la porte
peuvent deve
les toucher et à garder les enfants à distance.
Eviter que le cordon d'alimentation d'autres petits
électroménagers touche à des parties chaudes de
l'appareil.
Les orifices ou les fentes d'aération ou d'évacuation
de la chaleur ne doivent pas être bouchés
Ne pas poser de casseroles instables ou déformées
sur les foyers pour éviter tout risque de
renversement. Placer les casseroles sur le plan de
cuisson, manches tournés vers l'intérieur, pour éviter
de les heurter par mégarde.
Utiliser toujours des gants de protection pour
enfourner ou sortir les plats du four.
Ne pas utiliser de solutions inflammables (alcool,
essence, etc.) à proximité de l'appareil lorsqu'il est
en marche.
Ne pas stocker de matériel inflammable dans la
niche de rangement du bas ou dans le four : si
l'appareil était par inadvertance mis en marche, il
pourrait prendre feu.
Quand l'appareil n'est pas utilisé, s'assurer que les
boutons sont bien sur la position o.
Ne tirez surtout pas sur le cordon de l'appareil pour
débrancher la fiche de la prise de courant.
N'effectuer aucune opération de nettoyage ou
d'entretien sans avoir auparavant débranché la fiche
nir très chauds. Attention à ne pas
de la prise de courant.
En cas de panne, n'essayer en aucun cas d'accéder
aux mécanismes internes pour tenter de réparer
l'appareil. Faire appel au service d'assistance.
Ne pas poser d'objets lourds sur la porte du four
ouverte.
Les surfaces intérieures du tiroir (s'il y en a un)
peuvent devenir chaudes.
Le plan vitrocéramique résiste aux chocs
mécaniques, il peut toutefois se fendre (ou même
se briser) sous l'effet d'un choc provoqué par un
objet pointu, tel qu'un ustensile par exemple. Dans
ce cas, débrancher immédiatement l'appareil du
réseau électrique et s'adresser à un centre
d'assistance technique.
Si la surface de la table est fêlée, éteindre l'appareil
pour éviter tout risque d'électrocution.
Ne pas oublier que la température des foyers reste
assez élevée pendant trente minutes au moins
après leur extinction. La chaleur résiduelle est aussi
signalée par un voyant (voir Mise en marche et
Utilisation).
Garder à bonne distance de la table de cuisson tout
objet qui pourrait fondre, des objets en plastique ou
en aluminium par exemple, ou des produits à haute
teneur en sucre. Faire très attention aux emballages,
au film plastique et au papier aluminium : au contact
des surfaces encore chaudes ou tièdes, ils risquent
d'endommager gravement la table.
S'assurer que les manches des casseroles soient
toujours tournés vers l'intérieur de la table de
cuisson pour éviter tout risque d'accident.
Ne tirez surtout pas sur le cordon de l'
débrancher la fiche de la prise de courant.
N'effectuer aucune opération de nettoyage ou
d'entretien sans avoir auparavant débranché la fiche
de la prise de courant.
Ne pas poser d'objets métalliques (couteaux,
cuillères, couvercles, etc.) sur la table, ils risquent
de devenir brûlants.
Il n'est pas prévu que cet appareil soit utilisé par
des personnes (enfants compris) présentant des
capacités physiques, sensorielles ou mentales
réduites ou qui n'ont pas l'expérience ou les
connaissances indispensables, à moins quelles ne
le fassent sous la surveillance de quelqu'un
responsable de leur sécurité ou quelles aient été
dûment formées sur l'utilisation de l'appareil.
Eviter que les enfants ne jouent avec l'appareil.
Si la cuisinière est installée sur un socle, prendre les
précautions qui s'imposent pour que l'appareil ne
tombe pas de ce socle.
appareil pour
56
Page 57

Avis à toute personne portant un pacemaker ou
autre implant médical actif :
La table est conforme à toutes les
réglementations en matière dinterférences
électromagnétiques.
Par conséquent, ce produit est parfaitement
conforme à toutes les dispositions légales
(directives 89/336/CEE). Il a été conçu de manière
à ne pas provoquer dinterférences à dautres
appareils électriques utilisés, pourvu que ceux-ci
soient également conformes aux réglementations
susmentionnées.
La table induction génère des champs
électromagnétiques à courte portée.
Afin déviter tout risque dinterférence entre la
table de cuisson et le pacemaker, ce dernier
devra être fabriqué conformément à la
réglementation en vigueur.
A ce propos, nous ne pouvons assurer que la
conformité de notre produit. Pour tous
renseignements quant à la conformité ou à des
problèmes éventuels dincompatibilité, prière de
sadresser à son médecin traitant ou au fabricant
du pacemaker.
Après utilisation, éteindre la table de cuisson à
l'aide de son dispositif de commande et ne pas
se fier uniquement à son détecteur de casserole.
Economies et respect de
lenvironnement
Pour faire des économies délectricité, utiliser
autant que possible le four pendant les heures
creuses. Les options de programmation des
cuissons et plus particulièrement la cuisson
différée (voir Programmes), permettent de
sorganiser en ce sens.
Pour les cuissons au TOURNEBROCHE et
ROTISSERIE, nous recommandons de garder la
porte du four fermée: les résultats obtenus sont
meilleurs et la consommation dénergie est
moindre (environ 10% déconomie).
Garder les joints propres et en bon état pour quils
adhèrent bien à la porte et ne causent pas de
déperdition de chaleur.
FR
Mise au rebut
Mise au rebut du matériel demballage : se
conformer aux réglementations locales, les
emballages pourront ainsi être recyclés.
La directive européenne 2002/96/CE relative aux
déchets déquipements électriques et
électroniques (DEEE), prévoit que les
électroménagers ne peuvent pas être traités
comme des déchets solides urbains courants.
Les appareils usagés doivent faire lobjet dune
collecte séparée pour optimiser le taux de
récupération et de recyclage des matériaux qui
les composent et empêcher tout danger pour la
santé et pour lenvironnement. Le symbole de la
poubelle barrée est appliqué sur tous les produits
pour rappeler quils font lobjet dune collecte
sélective.
Pour de plus amples renseignements sur la mise
au rebut des électroménagers, les possesseurs
peuvent sadresser au service public prévu à cet
effet ou aux commerçants.
57
Page 58

Nettoyage et entretien
FR
Mise hors tension
Avant toute opération de nettoyage ou dentretien
couper lalimentation électrique de lappareil.
Nettoyage du four
! Ne jamais nettoyer lappareil avec des nettoyeurs
vapeur ou haute pression.
Nettoyer la vitre de la porte avec des produits non
abrasifs et des éponges non grattantes, essuyer
ensuite avec un chiffon doux. Ne pas utiliser de
matériaux abrasifs ou de racloirs métalliques
aiguisés qui risquent de rayer la surface et de
briser le verre.
Nettoyer lextérieur émaillé ou inox et les joints en
caoutchouc à laide dune éponge imbibée deau
tiède additionnée de savon neutre. Si les taches
sont difficiles à enlever, utiliser des produits
spéciaux. Il est conseillé de rincer abondamment
et dessuyer après le nettoyage. Ne pas utiliser
de poudres abrasives ni de produits corrosifs.
Nettoyer lenceinte après toute utilisation, quand
le four est encore tiède. Utiliser de leau chaude et
du détergent, rincer et essuyer avec un chiffon
doux. Eviter tout produit abrasif.
Les accessoires peuvent être lavés comme de la
vaisselle courante y compris en lave-vaisselle.
Pour éliminer la graisse et la saleté du tableau de
bord, le nettoyer avec une éponge non abrasive
ou avec un chiffon doux.
Des taches peuvent se former sur lacier inox si
ce dernier reste trop longtemps au contact dune
eau très calcaire ou de détergents agressifs
contenant du phosphore. Nous conseillons de
rincer abondamment et de bien essuyer.
Contrôler les joints du four
Contrôler périodiquement létat du joint autour de la
porte du four. Sil est abîmé, sadresser au service
après-vente le plus proche de son domicile. Mieux
vaut ne pas utiliser le four tant quil nest pas réparé.
Remplacement de lampoule déclairage
du four
Pour changer
Cavité
Ampoule
Joint
Couvercle
lampoule
déclairage du
four :
2. Dévisser lampoule et la remplacer par une autre
de même type : puissance 15 W, culot E 14.
Remettre le couvercle en place en prenant bien soin
de repositionner correctement le joint (voir figure).
Nettoyage du plan de cuisson
vitrocéramique
! Ne jamais utiliser de détergents abrasifs ou corrosifs,
tels que des bombes aérosols pour grilloirs et fours,
des détacheurs et dérouilleurs, des poudres à récurer
ou des éponges à surface abrasive : ils risquent de
rayer irrémédiablement la surface.
Pour un entretien courant, passer une éponge
humide sur la surface de la table et essuyer avec
du papier essuie-tout.
Si la table est sale, frotter avec un produit
dentretien adapté au verre vitrocéramique, rincer
et essuyer.
Pour enlever les salissures en relief, utiliser un
grattoir spécial (pas fourni avec lappareil).
Intervenir dès que possible, ne pas attendre que
lappareil ait refroidi afin déviter toute incrustation
des salissures. Lutilisation dune éponge en fil
dacier inoxydable, spéciale verre vitrocéramique,
imprégnée deau savonneuse donne dexcellents
résultats.
Tout objet, matière plastique ou sucre ayant
accidentellement fondu sur la table de cuisson
doit être aussitôt enlevé à laide du grattoir tant
que la surface est encore chaude.
Une fois que la table est propre, elle peut être
traitée avec un produit dentretien et de protection
spécial : celui-ci forme un film invisible qui
protège la surface en cas de débordement
accidentel. Opérer de préférence quand lappareil
est tiède ou froid.
Prendre soin de toujours bien rincer à leau claire
et dessuyer la table : les résidus des produits
pourraient en effet sincruster lors dune prochaine
cuisson.
Produits de nettoyage
spéciaux pour
vitrocéramique
Raclette à lames et lames de
rechange
Stahl-Fix
SWISSCLEANER
WK TOP
Autres produits pour
vitrocéramique
Où les acheter
Bricolage et
quincaillerie
Articles ménagers
Bricolage
Quincaillerie
Supermarchés
1. enlever le couvercle en verre à laide dun
tournevis.
58
Nexiste que sur certains modèles
*
Page 59

Nettoyage automatique par PYROLYSE
Pendant le programme PYROLYSE, la température à
lintérieur du four atteint 500°C et lance le processus
de pyrolyse, autrement dit, la carbonisation des
salissures alimentaires. Les salissures sont
littéralement incinérées.
Pendant la pyrolyse, les surfaces peuvent devenir
très chaudes : garder les enfants à distance. Il peut
arriver de voir, à travers la vitre, des particules qui
silluminent: il sagit dune combustion instantanée,
phénomène tout à fait normal et sans danger.
Avant dactiver la PYROLYSE :
enlevez avec une éponge humide les salissures
en excès. Ne pas utiliser de détergents;
sortir tous les accessoires;
ne pas placer de serviettes ou de maniques sur la
poignée du four.
positionner le bouton PROGRAMMES sur «0»
! Si le four est excessivement chaud, la pyrolyse
pourrait ne pas démarrer. Attendre quil refroidisse.
! Lactivation du programme nest possible quaprès
avoir fermé la porte du four.
Pour activer le cycle de nettoyage PYROLYSE,
appuyer 4 secondes sur la touche
SELECTION TEMPS permet de choisir le niveau de
nettoyage désiré avec durée présélectionnée et non
modifiable :
1. Economique (ECO) : tournez le bouton vers «- ».
Durée 1 heure ;
2. Normal (NOR) : niveau initial. Durée 1 heure 30 ;
3. Intensif (INT) : tournez le bouton vers «+». Durée
2 heures.
4. Appuyer sur la touche
Egalement pour le cycle PYROLYSE, comme pour
tout cycle de cuisson, il est possible de programmer
la fin du cycle de nettoyage (voir Programmer la fin
du nettoyage automatique).
Les sécurités
pour confirmer.
. Le bouton
licône
à tout moment, le cycle de nettoyage par
pression sur la touche ;
en cas danomalie de fonctionnement,
lalimentation des résistances est
automatiquement coupée;
une fois que la porte est verrouillée, aucune
modification de sélection de durée et de fin de
cycle nest plus possible.
Programmer la fin du nettoyage automatique
1. Appuyer sur la touche
et les deux digits numériques de lAFFICHEUR
ne se mettent à clignoter;
2. tourner le bouton SELECTION DES TEMPS vers le
«+» et «-» pour régler lheure;
3. appuyer à nouveau sur la touche
que les deux autres digits numériques de
lAFFICHEUR ne se mettent à clignoter;
4. tourner le bouton SELECTION DES TEMPS vers le
«+» et «-» pour régler les minutes ;
5. appuyer à nouveau sur la touche
confirmer;
6. un signal sonore indique que le temps est écoulé
et lAFFICHEUR affiche END.
Exemple: il est 9 h, choix dune PYROLYSE
niveau Economique avec une durée
présélectionnée de 1 heure. Lheure finale de la
pyrolyse est fixée à 12h30. Le programme
démarre automatiquement à 11h30.
Les icônes
programmation a été lancée. LAFFICHEUR affiche à
tour de rôle lheure de fin PYROLYSE et la durée.
A la fin du nettoyage automatique
Pour pouvoir ouvrir la porte du four, il faudra attendre
que la température du four descende à un niveau
acceptable. Il se peut que des résidus blancs
poussiéreux se déposent sur lenceinte du four : les
enlever avec une éponge humide après
refroidissement complet de lappareil. Pourquoi ne
pas profiter de la chaleur emmagasinée pour faire
démarrer une cuisson sans se soucier des résidus
poussiéreux: ils sont tout à fait inoffensifs.
indique quil est possible dannuler,
jusquà ce que licône
jusquà ce
pour
et éclairées signalent quune
FR
licône
le verrouillage automatique de la porte du four
dès que la température a atteint des valeurs
élevées;
sallume sur lafficheur pour indiquer
59
Page 60

FR
Assistance
12/2008 - 195073293.00
XEROX BUSINESS SERVICES
Attention :
Lappareil monte un système dautotest qui permet de détecter toute anomalie de fonctionnement. Ces
anomalies sont affichées sous la forme: F suivi des chiffres.
Contactez alors un service dassistance technique.
Ne jamais faire appel à des techniciens non agréés.
Indiquer :
le type danomalie;
le modèle de lappareil (Mod.);
Son numéro de série (S/N).
Ces informations figurent sur la plaque signalétique apposée sur lappareil
60
 Loading...