

Page 1

Congelatore
Installazione e uso
Freezer
Installation and use
Congélateur
Installation et emploi
Einbautiefkühlgeräte
Installation und Gebrauch
Vriekast
Installatie en gebruik
Congelador
I
nstalación y uso
Congelador
Instalação e uso
Page 2

BFS 121
Congelatore sottotavolo integrato 1
I
Istruzioni per l'installazione e l'uso
GB
F
D
NL
E
P
Integrated under-counter fitting freezer 7
Instructions for installation and use
Congélateur dessous de table intégré 13
Instruction pour l'installation et l'emploi
Integrierbarer unterbau-Gefrierschrank 19
Installation- und Gebrauchshinweise
Aangepaste aanrecht-vrieskast 27
Gebruiksaanwijzingen vor de plaatsing en gebruik
Congelador bajo integrable 33
Instrucciones para la instalación y uso
Congelador integrado embaixo da mesa 39
Instruções para a instalação e o uso
Per garantire l’efficienza e la sicurezza di questo elettrodomestico:
- rivolgetevi esclusivamente a centri di assistenza tecnica autorizzati
- richiedete sempre l’utilizzo di parti di ricambio originali
To maintain the EFFICIENCY and SAFETY of this appliance, we recommend:
- call only the Service Centers authorized by the manufacturer
- always use original Spare Parts
Pour garantir l’efficacité et la sécurité de ce produit:
- adressez-vous exclusivement aux Centres d’assistance technique agréés
- demander toujours l’utilisation de pièces détachées originales
Um die Leistungsfähigkeit und Sicherheit dieses Gerätes zu gewährleisten,
bitte folgendes beachten:
- wenden Sie sich ausschließlich an unsere autorisierten Service-Stellen
- verlangen Sie, daß nur Original-Ersatzteile verwendet werden
Om de doelmatigheid en veiligheid van dit toestel te garanderen raden wij u aan:
- voor reparaties alleen de Service Centers te bellen die door de fabrikant gemachtigd zijn
- altijd gebruik te maken van originele onderdelen
Para garantizar la eficacia y seguridad de este electrodoméstico:
- Diríjase exclusivamente al Servicio Técnico Oficial del Fabricante.
- Solicite siempre la utilización de recambios originales.
Para garantir a eficiência e a segurança deste electrodoméstico:
- dirija-se exclusivamente a centros de assistência técnica autorizados
- solicite sempre a utilização de peças originais
Page 3

La sicurezza, una buona abitudine
A TTENZIONE
Leggete attentamente le avvertenze contenute nel presente libretto in quanto forniscono importanti indicazioni riguardanti la sicurezza di installazione, d’uso e di manutenzione.
Questa apparecchiatura è conforme alle seguenti Direttive Comunitarie:
- 73/23/CEE del 19/02/73 (Basse Tensioni) e successive
modificazioni;
- 89/336/CEE del 03/05/89 (Compatibilità Elettr omagnetica)
e successive modificazioni.
1. Questo apparecchio non va installato all’aperto, nemmeno se lo spazio è riparato da una tettoia; è molto pericoloso
lasciarlo esposto alla pioggia e ai temporali.
2. Deve essere usato soltanto da adulti ed esclusivamente
per conservare i cibi, seguendo le istruzioni d’uso scritte in
questo manuale.
3. Non toccate né manovrate mai l’apparecchio a piedi nudi
o con le mani o piedi bagnati.
4. Sconsigliamo di ricorrere a prolunghe e multiple. Se il congelatore è installato tra i mobili, controllate che il cavo non
subisca piegature o compressioni pericolose.
5. Non tirate mai il cavo né il congelatore per staccare la
spina dalla presa a muro: è molto pericoloso.
6. Non toccate le parti interne raffreddanti soprattutto con
le mani bagnate poiché potreste scottarvi o ferirvi. Né mettere in bocca cubetti di ghiaccio appena estratti dal freezer
poiché rischiate di ustionarvi.
7. Prima di procedere a qualsiasi operazione di pulizia staccare l'apparecchio dalla rete di alimentazione (disinserendo
la spina o l'interruttore generale dell'appartamento).
8. Prima di farvi ritirare il vecchio congelatore, mettete fuori
uso l’eventuale serratura per evitare che i bambini, giocando, possano rimanere chiusi dentro l’apparecchio.
9. In caso di guasto, prima di chiamare il servizio-assistenza,
controllate al capitolo “C’è qualche problema?” per verificare se è possibile eliminare l’eventuale inconveniente. Non
tentate di riparare il guasto, cercando di accedere alle par ti
interne.
10. In caso di sostituzione del cavo di alimentazione rivolgersi ai nostri Centri di Aassistenza. In alcuni casi le connessioni sono eseguite con terminali speciali, in altri è richiesto
l’uso di un utensile speciale per accedere ai collegamenti.
11. Non usate apparecchi elettrici all'interno dello scomparto conservatore di cibi, se questi non sono del tipo raccomandato dal costruttore.
12. Al termine della vita funzionale dell'apparecchio, contenente gas ciclopentano nella schiuma isolante ed eventualmente gas R600a (isobutano) nel circuito refrigerante, lo stesso dovrà essere messo in sicurezza prima dell'invio in discarica. Per questa operazione rivolgetevi al vostro negoziante
o all'Ente Locale preposto.
Installazione
Per garantire un buon funzionamento e un consumo
contenuto di elettricità è importante che l’installazione sia eseguita correttamente.
L’aerazione
Il compressore ed il condensatore emettono calor e e richiedono perciò una buona aerazione. Sono poco adatti ambienti con una non perfetta ventilazione. L’apparecchio va
quindi installato in un ambiente servito da un’apertura (finestra o portafinestra) che assicuri il necessario ricambio
dell’aria. E che non sia troppo umido.
Fare attenzione, durante l'installazione, a non coprire od
ostruire le griglie che permettono la buona ventilazione dell'apparecchio.
Lontano dal calore
Evitare di posizionare l'apparecchio in un luogo direttamente
esposto alla luce solare, accanto alla cucina elettrica o similari.
Collegamento elettrico e messa a terra
Prima di procedere al collegamento elettrico, controllate che
il voltaggio indicato sulla targhetta caratteristiche, che si trova
all'interno del congelatore, corrisponda a quella del vostro
impianto di casa, e che la presa sia dotata di una regolare
messa a terra, come prescrive la legge sulla sicurezza degli
impianti 46/90. Se manca la messa a terra, la Casa
Costruttrice declina ogni responsabilità. Non usate prese multiple o adattatori.Posizionare l’apparecchio in mode che la
presa, a cui è collegato, sia accessibile.
Posizionare l’apparecchio in modo che la pr esa, a cui è
collegato, sia accessibile.
La potenza è insufficiente?
La presa elettrica deve essere in grado di sopportare il carico
massimo di potenza dell’apparecchio, indicata sulla targhetta
caratteristiche posta in basso a sinistra accanto alla verduriera.
Prima di collegarlo elettricamente
Dopo il trasporto posizionare l’apparecchio verticalmente ed
attendere almeno 3 ore prima di collegarlo alla presa, per
consentire un corretto funzionamento.
1
I
Page 4
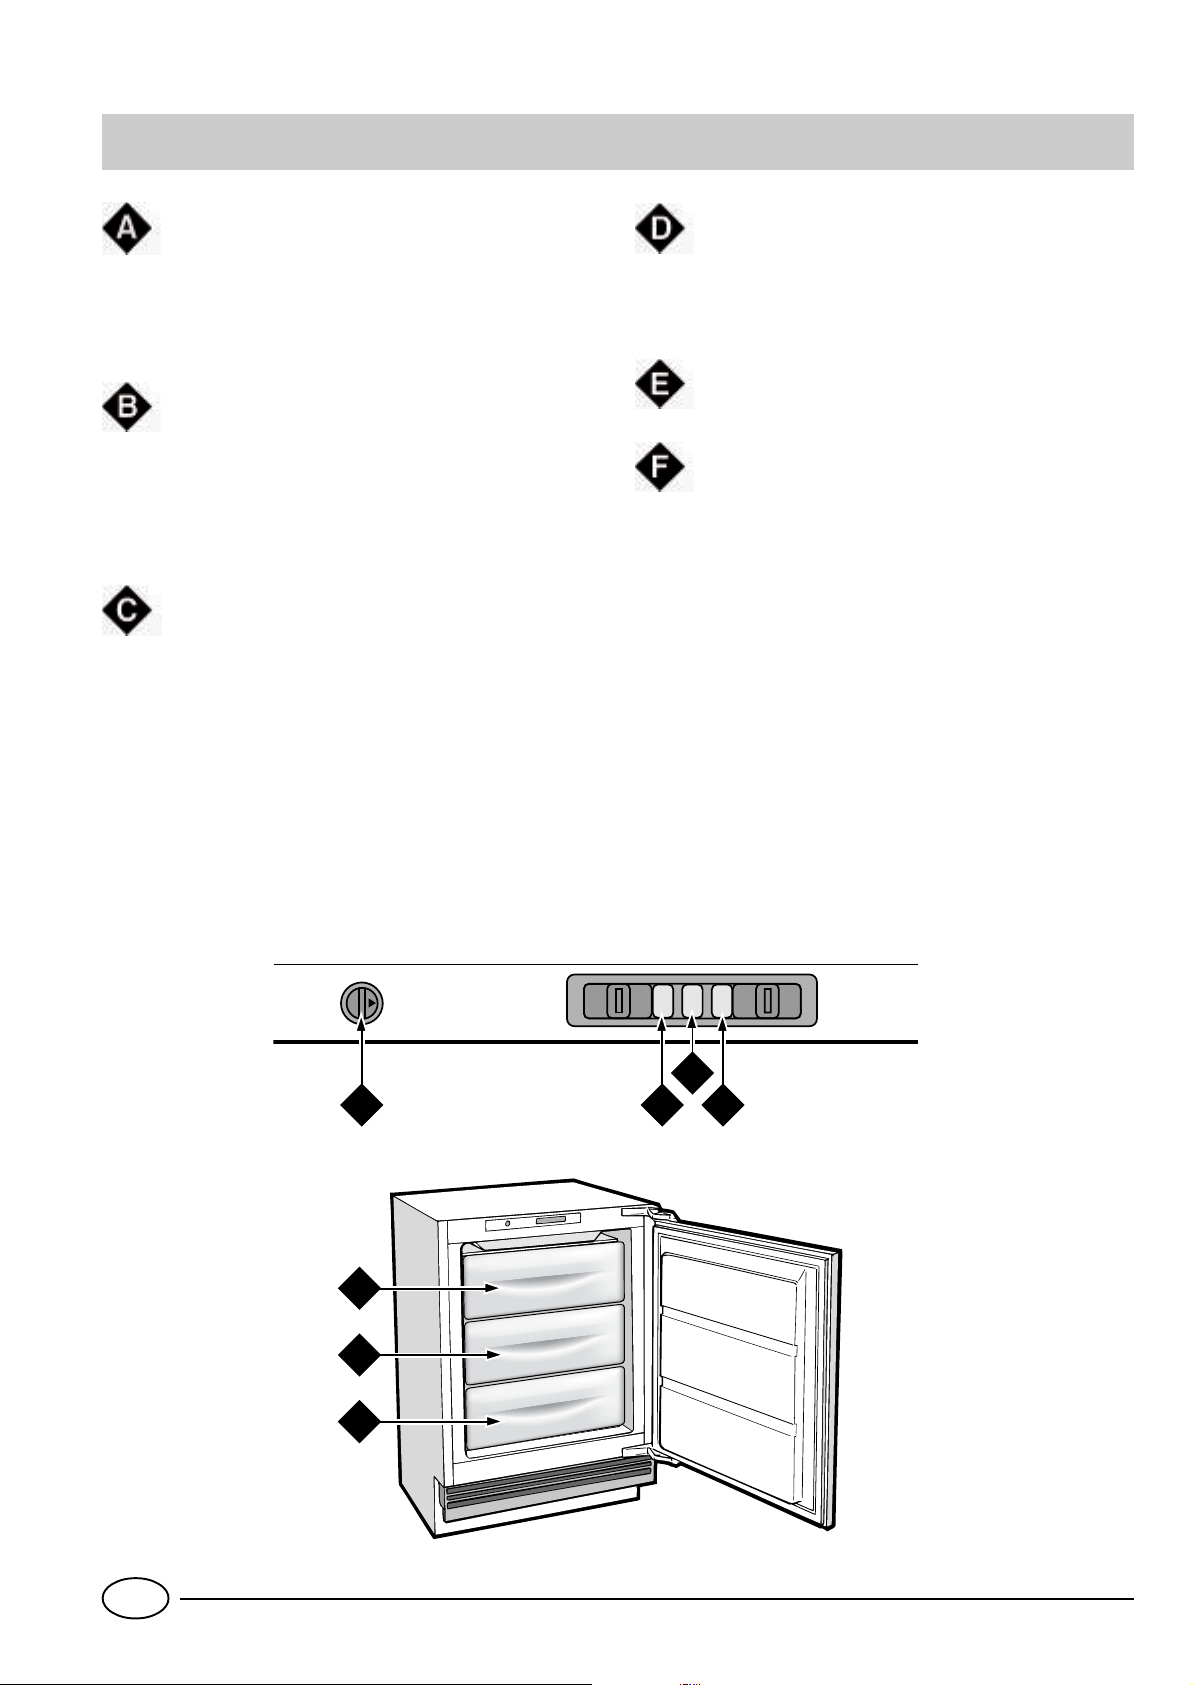
Visto da vicino
Manopola per la regolazione della temperatura
Regola automaticamente la temperatura all'interno dell'apparecchio. Ruotando la manopola dalla
posizione 1 alla posizione 5 è possibile ottenere
temperature sempre più fredde.
La lampada verde
Quando è accesa (spostare l'interruttore verso
destra) indica che l'apparecchio è collegato alla rete
di alimentazione. Spostando l'interruttore verso
sinistra) lampada verde coperta) l'apparecchio è
disinserito dalla presa di corrente.
La lampada gialla
Quando è accesa (spostare l'interruttore verso
sinistra) permette il funzionamento continuo del
compressore per raggiungere le basse temperatur e
necessarie al congelamento rapido delle derrate
fresche.
Spostando l'interruttore verso destra (lampada
gialla coperta) il congelamento funziona secondo la
regolazione del termostato.
La lampada rossa
Si accende quando la temperatura all'interno
dell'apparecchio è insufficiente per conservar e delle
derrate.
Vano utilizzabile per il congelamento e la conservazione
V ani per la conservazione
2
1
3
5
4
SN
A C B
E
F
F
I0
D
I
2
Page 5

Come avviare il congelatore
ATTENZIONE
Dopo il trasporto, posizionare l’apparecchio verticalmente ed attendere circa 3 ore prima di collegarlo alla
presa di corrente per favorire un buon funzionamento.
Per un funzionamento ottimale ed economico ricordatevi di porre la manopola per la regolazione della temperatura sulla posizione di temperatura media.
Come utilizzarlo al meglio
Per congelare bene
- Un alimento scongelato, anche solo parzialmente, non deve
mai essere ricongelato: lo dovete cuocere per consumarlo
(entro 24 ore) oppure per ricongelarlo.
- Per la preparazione dei cibi da congelare consultare un
manuale specializzato.
- Gli alimenti freschi da congelare non devono essere posti a
contatto con quelli già congelati o surgelati ma vanno messi
nel vano superiore dove la temperatura scende sotto i -18°C
ed è l’ideale per congelar bene i cibi. Non bisogna infatti
dimenticare che la buona conservazione degli alimenti congelati dipende dalla velocità di congelazione.
- Durante la congelazione evitate di aprire la porta del congelatore.
- Congelate soltanto la quantità, in kg, indicata sulla targhetta delle caratteristiche.
- Effettuare l’operazione di congelamento accendendo la
lampada gialla e dopo questa operazione introdurre i cibi da
congelare nel vano superiore avendo cura che gli stessi siano disposti, il più possibile, a contatto diretto con i piani
raffreddanti e che non siano messi a contatto con eventuali
derrate già congelate nello stesso vano.
- L’introduzione di notevoli quantitativi di cibi da congelare
può riscaldare momentaneamente la temperatura all’interno dello scomparto freezer (accensione della lampada rossa). Tale situazione, essendo transitoria, non pregiudica la
buona conservazione degli alimenti già stivati.
- Dopo 24 ore, terminato il congelamento, provvedere allo
spegnimento della lampada gialla.
Attenzione: .questa operazione non va dimenticata se si
vogliono evitare inutili sprechi di energia.
- Per ottenere una conservazione e una successiva scongelazione ottimali è consigliabile dividere i cibi in piccole porzioni così si congeleranno rapidamente e in modo omogeneo.
Sulle confezioni riportate le indicazioni sul contenuto e sulla
data di congelamento.
Una volta collegato l'apparecchio alla rete di alimentazione,
accertarsi che la lampada verde sia accesa e provvedere ad
accendere anche quella gialla.
Quando la lampada rossa si sarà spenta, provvedere allo spegnimento della lampada gialla; a questo punto l'apparecchio è pronto per essere adoperato.
- Non aprite la porta del congelatore in caso di mancanza di
corrente o di un guasto, ritarderete così l’aumento della temperatura al suo interno. In questo modo i surgelati e i congelati si conserveranno senza alterazioni per circa 9-14 ore.
- Non mettete nel congelatore bottiglie piene: potrebbero
rompersi poiché, gelandosi, tutti i liquidi aumentano di volume.
- Riempite le bacinelle dei cubetti di ghiaccio fino a circa 3/4
della loro altezza.
Conservazione
Per ottenere una buona conservazione di alimenti surgelati
o di cibi congelati non posizionare mai l’indice della manopola del termostato al di sotto di 1, qualunque sia la temperatura ambiente.
Per temperature ambiente fino a 25°-27°C l’indice della
manopola va posizionato tra 1 e 2 mentre per temperature
ambiente fino a 32°C tra 2 e 3.
I tempi massimi di conservazione dei cibi congelati sono riportati nelle tabelle “Guida all’utilizzo dello scomparto congelatore”.
Osservare sempre scrupolosamente le istruzioni riportate sulle
confezioni dei cibi surgelati e in assenza di esse non conservare per più di 3 mesi dalla data di acquisto.
All’acquisto di prodotti surgelati occorre sincerarsi che gli stessi
siano conservati a temperatura adeguata e che l’involucro
sia intatto.
Per mantenere inalterata la qualità del cibo surgelato è opportuno trasportarlo in appositi contenitori e riporlo al più
presto all’interno dell’apparecchio.
Qualora una confezione presentasse tracce di umidità e anor mali rigonfiamenti è probabile che sia stata precedentemente conservata a temperatura inadeguata e che il contenuto
si sia nel frattempo deteriorato.
3
I
Page 6
Come tenerlo in forma
Prima di procedere a qualsiasi operazione di pulizia
staccare l'apparecchio dalla rete di alimentazione
(disinserendo la spina o l'interruttore generale dell'appartamento).
Sbrinamento
A TTENZIONE: non danneggiare il circuito r efrigerante.
Fare attenzione a non usare dispositivi meccanici o altri utensili per accelerare il processo di sbrinamento,
oltre a quelli raccomandati dal costruttore.
E’ opportuno, di tanto in tanto, togliere la brina che ricopre
i ripiani dell’apparecchio.
Attenzione a non usare, per tale operazione, oggetti metallici appuntiti .che possono provocare forature al cir cuito r efrigerante con conseguente irreparabile danneggiamento
dell’apparecchio, ma servirsi del raschietto in plastica fornito in dotazione.
Per ottenere il completo sbrinamento dell’apparecchio (da
effettuare una o due volte l’anno) spegnere la lampada verde e lasciare aperta la porta fino al completo scioglimento
della brina.
C'è qualche problema?
Per accelerare le operazioni di sbrinamento si può introdurre all’interno dell’apparecchio una o più bacinelle di acqua
tiepida.
Durante l’operazione di sbrinamento è opportuno avvolgere i cibi messi in conservazione con più fogli di carta e sistemarli in luoghi freschi. Poiché l’inevitabile aumento di temperatura ne abbrevia la durata è consigliabile consumarli a
breve scadenza.
Pulizia e manutenzioni particolari
La pulizia dell’apparecchio va effettuata periodicamente
impiegando bicarbonato di sodio sciolto in acqua tiepida.
Evitare in ogni caso l’uso di prodotti abrasivi, detergenti o
saponi; dopo il lavaggio risciacquare con acqua pulita ed
asciugare con cura.
Effettuate tali operazioni, riaccendere la lampada verde e
riportare la manopola termostato nella posizione di funzionamento desiderata.
Dopo 2 o 3 ore di funzionamento l’apparecchio è di nuovo
pronto per la conservazione dei cibi surgelati o congelati.
Lampada spia verde spenta
Avete controllato se:
••
• non manchi la corrente;
••
••
• l'interruttore generale dell'appartamento non è disinseri-
••
to;
Lampada allarme rossa sempre accesa
Avete controllato se:
••
• la porta non chiude bene o la guarnizione è rovinate;
••
••
• la porta viene aperta molto spesso;
••
••
• la manopola di regolazione della temperatura non è in
••
posizione corretta;
••
• sulle pareti interne la brina non è eccessiva
••
Il motore funziona di continuo.
Avete controllato se:
••
• la lampada gialla non sia accesa (condizione di funziona-
••
mento continuo);
••
• il termostato è nella posizione corretta.
••
L’apparecchio emette troppo rumore.
Avete controllato se:
••
• Il congelatore è posto ben in piano:
••
••
• è stato installato tra mobili o oggetti che vibrano ed emet-
••
tono rumori;
••
• il gas refrigerante interno produce un leggero rumore an-
••
che quando il compressore è fermo (non è un difetto).
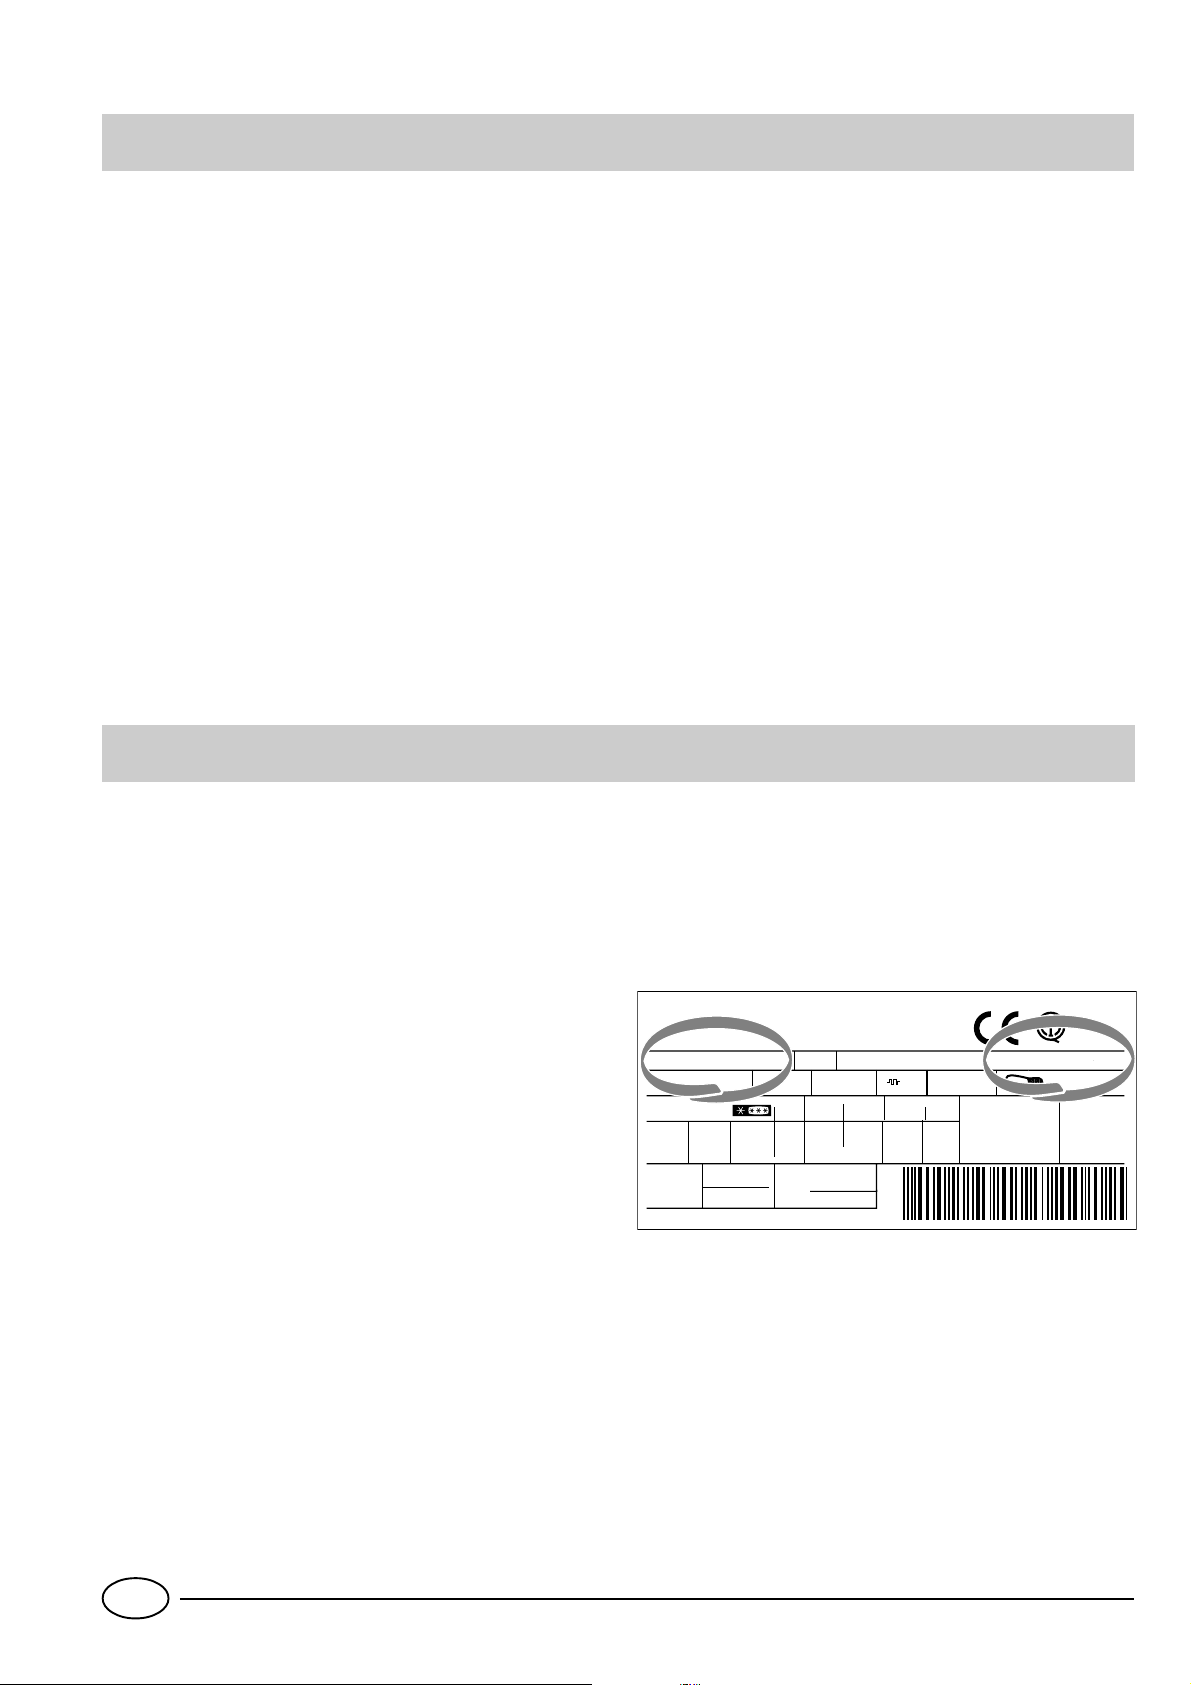
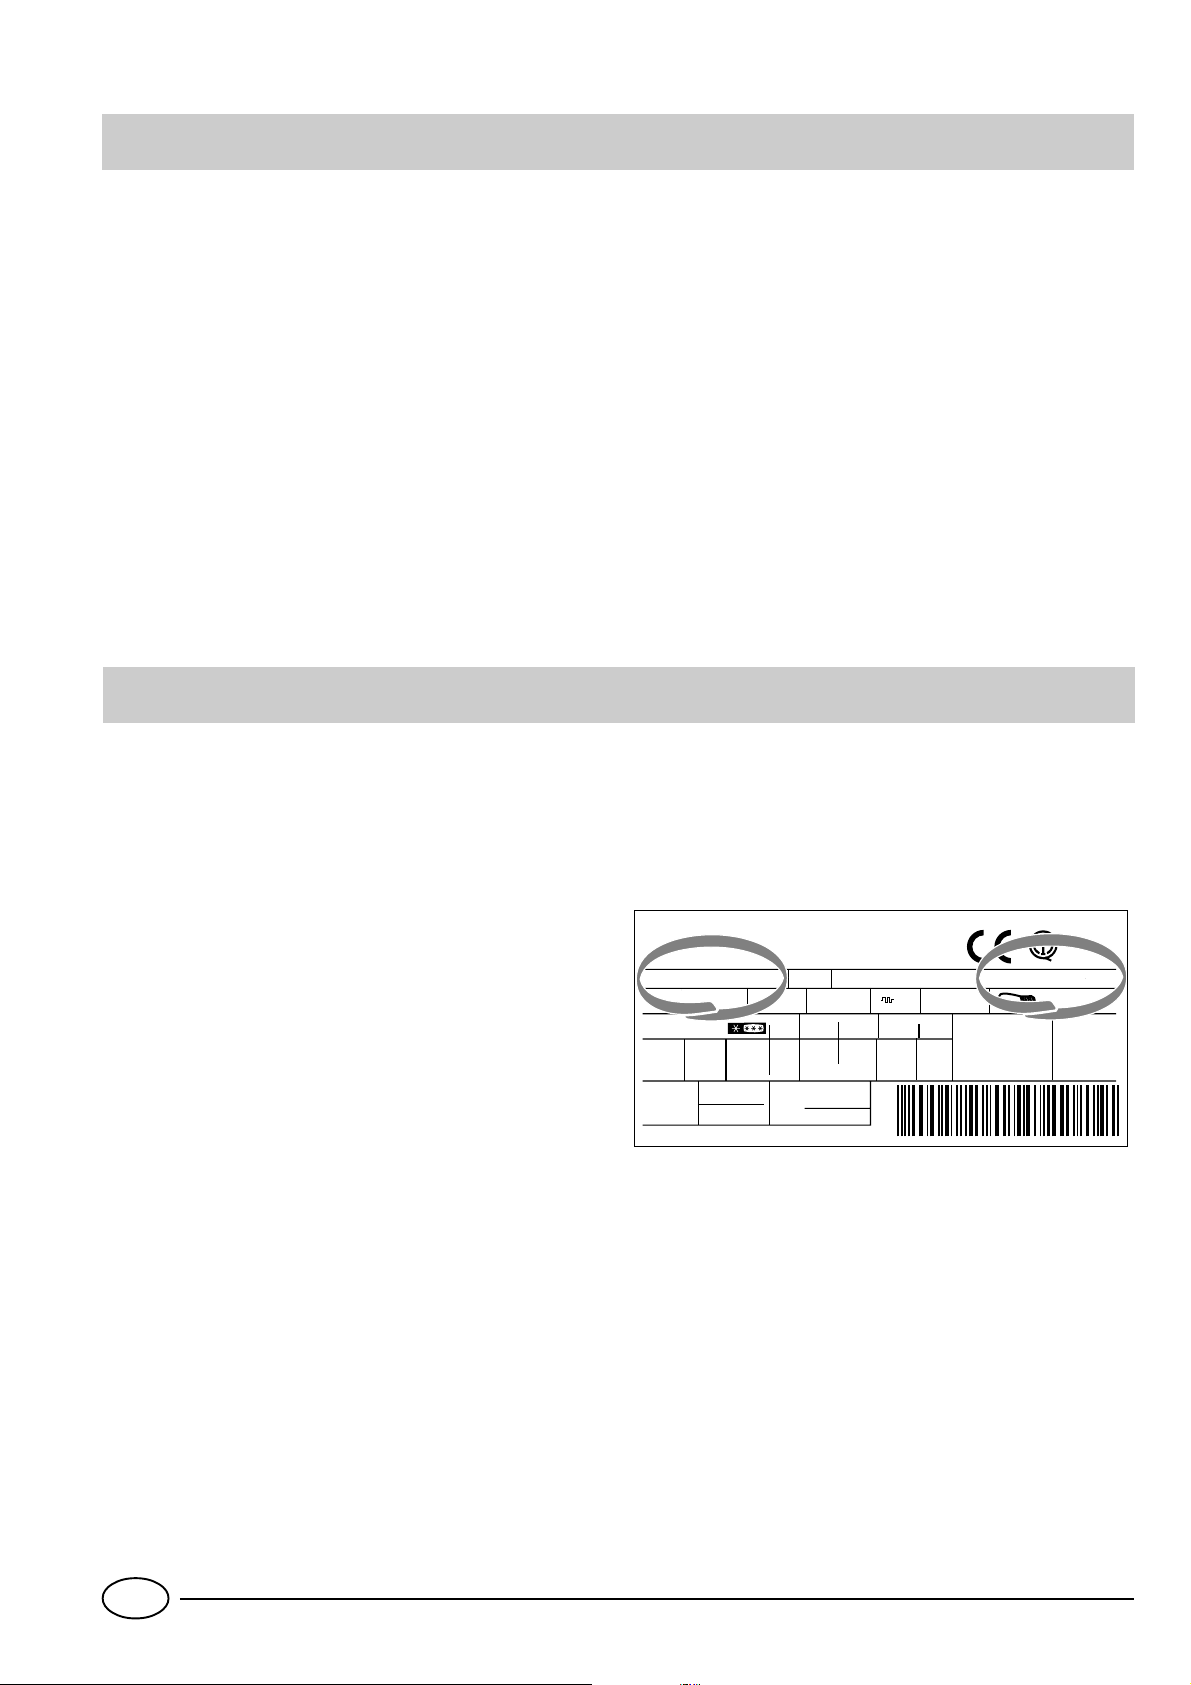
Se, nonostante tutti i controlli, l’apparecchio non funziona e
l’inconveniente da voi rilevato continua ad esserci, chiamate il Centro di Assistenza più vicino, comunicando queste
informazioni: il tipo di guasto, la sigla del modello (Mod.) e
i relativi numeri (S/N) scritti sulla targhetta delle caratteristiche si trova all'interno dell'apparecchio (vedi esempi nelle
figure seguenti).
75
Test
P.S-I.
TI
Net
Util
Utile
Pressure
HIGH-235
LOW 140
RG 2330
Mod.
220 - 240 V- 50 Hz 150 W
340
Total
Gross
Bruto
Brut
Compr.
Syst.
Kompr.
Made in Italy 13918
Gross
Bruto
Brut
R 134 a
kg 0,090
93139180000 S/N 704211801
Cod.
Gross
Bruto
Brut
W
Fuse
A
Freez. Capac
Poder de Cong
kg/24 h
4,0
Max 15 w
Class
Clase
N
Classe
Non ricorrete mai a tecnici non autorizzati e rifiutate sempre l’installazione di pezzi di ricambio non originali.
I
4
Page 7
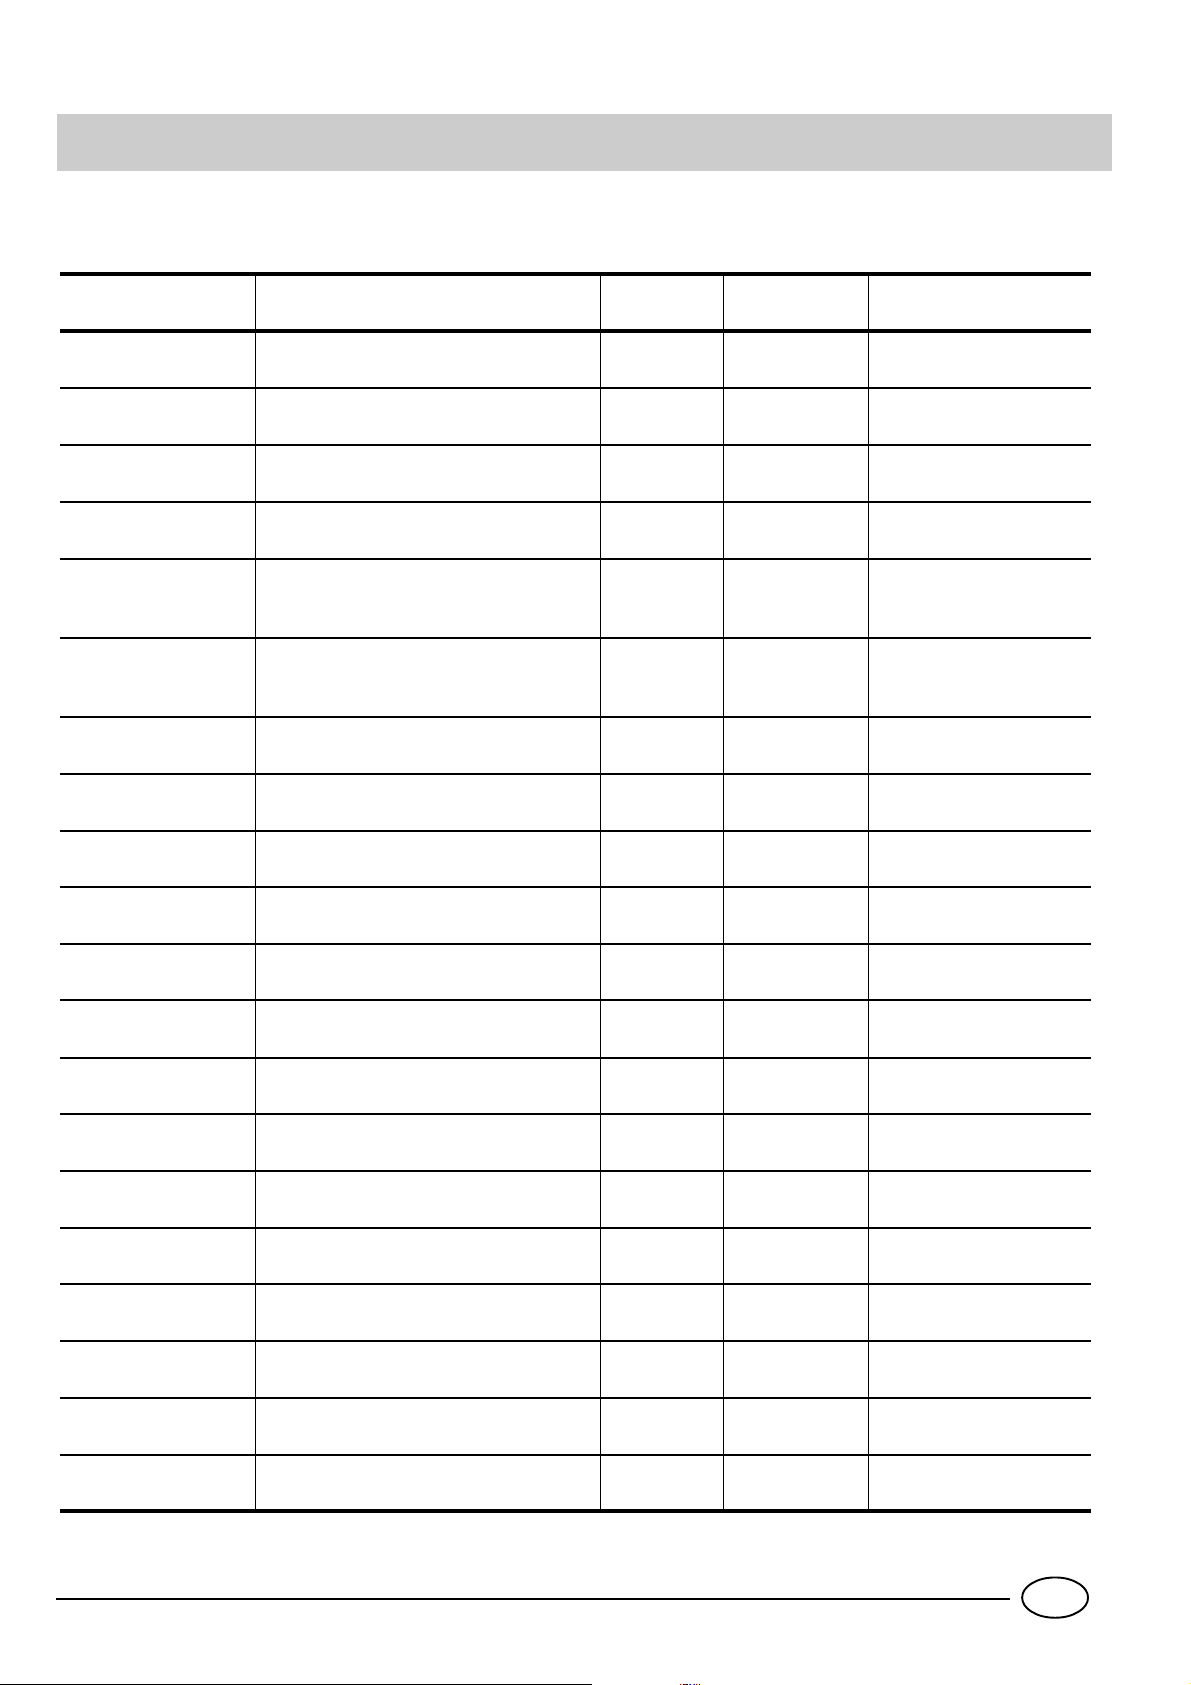
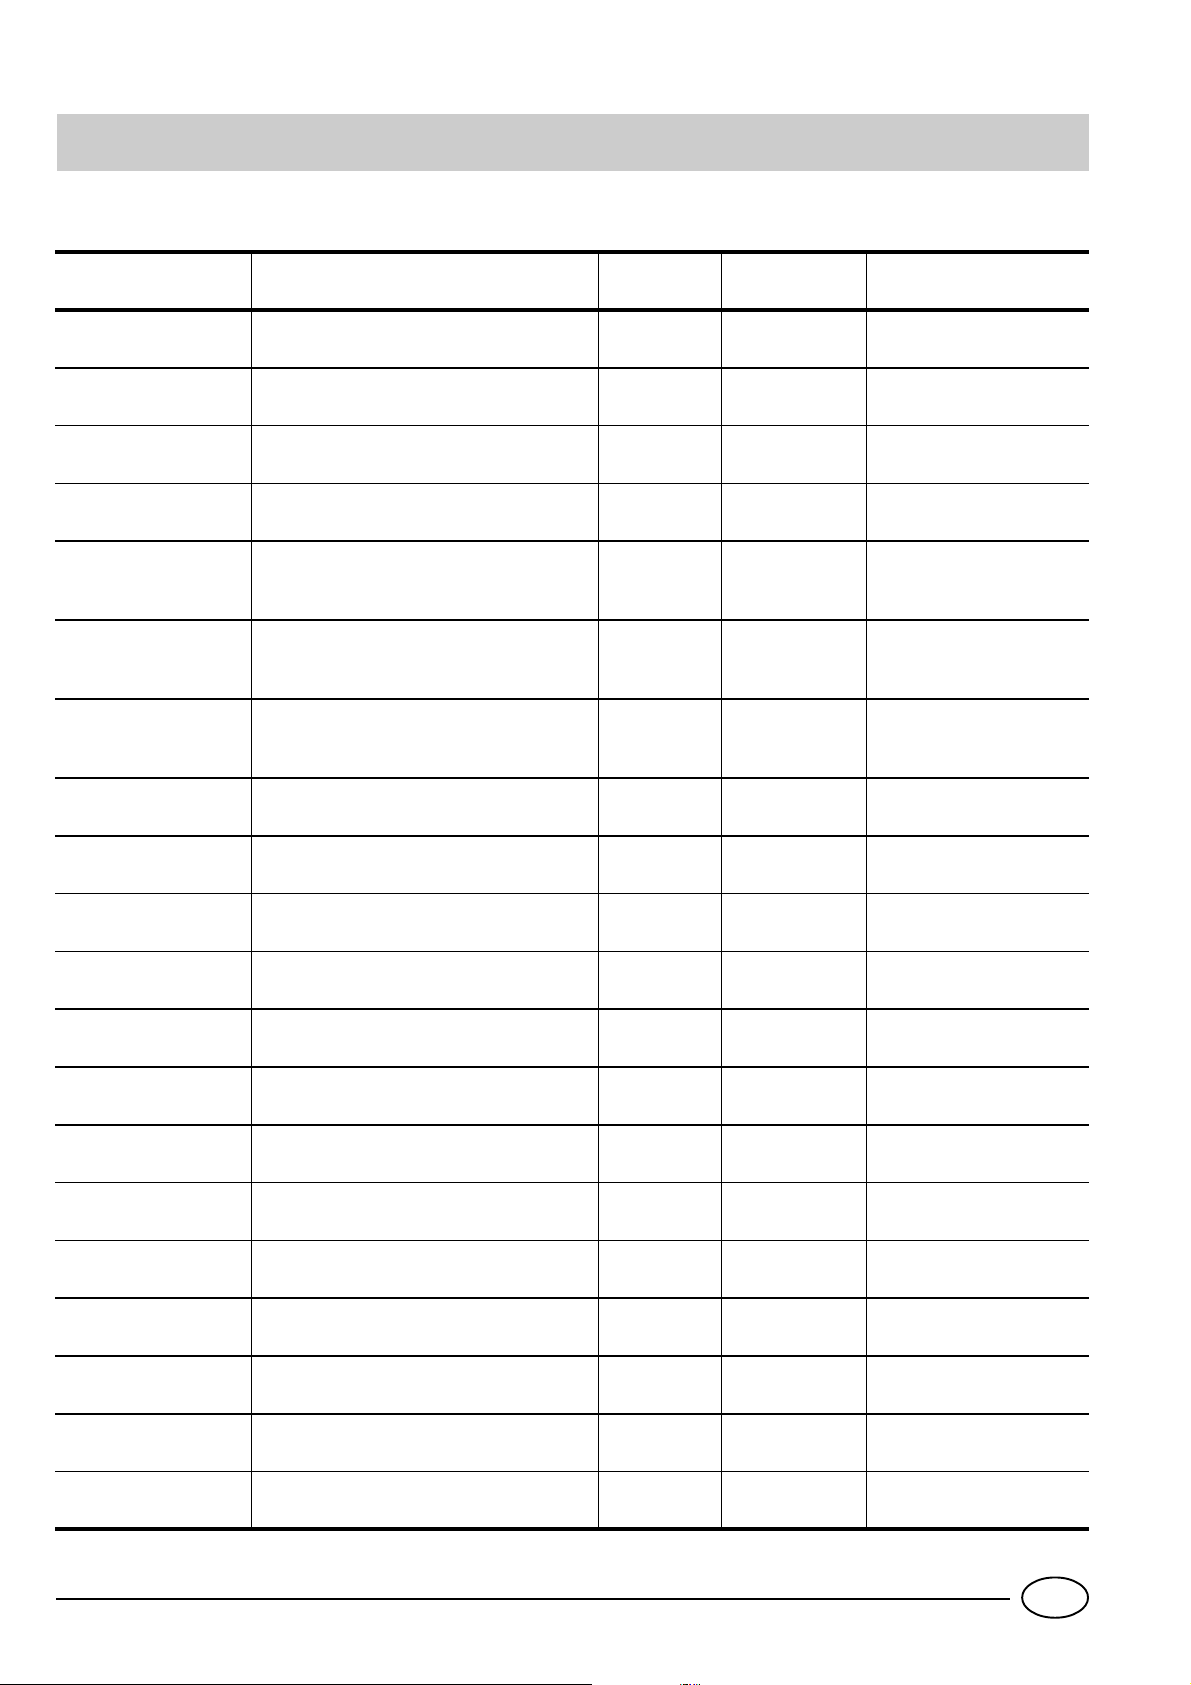
Guida all'utilizzo del congelatore
Carni e pesci
Tipo Confezionamento
Arrosto e bolli to di
manzo
Agnello Avvolto in fo gl io di allu m in io 1 / 2 6 Non necessario
Arrosto di m aiale Avvolto in fo gl io di allu m in io 1 6 Non necessario
Arrosto e bolli to di
vitello
Bistecche e braciole di
maiale
Fettine e cotolette di
agnello o manzo
Cartne macinata
Cuore e fagato In sacchetti di politene 3 Non necessario
Salsicce In fogli di politene o alluminio 2 A seconda dell'uso
Avvolto in fo gl io di allu m in io 2 / 3 9 / 10 Non necessario
Avvolto in fo gl io di allu m in io 1 8 Non necessario
Ogni fetta avvolta in politene e quindi in
foglio di allum ini o in num er o di 4- 5
Ogni fetta avvolta in politene e quindi in
foglio di allum ini o in num er o di 4- 5
In contenitori di alluminio ri coperti con
politene
Frollatura
(giorni)
Freschissima 2 Lentamente in frigorifero
Conservazione
(mesi)
6 Non necessario
6 Non necessario
Scongelamento
Polli e tacchini Avvolti in fo gl i di all uminio 1 / 3 9 Lentamente in frigorifero
Anatre e oche In fogli di alluminio 1 / 4 6 Lentamente in frigorifero
Anatre selv atiche,
fagiani e pernici
Conigli e lepri In fogli di alluminio 3 / 4 6 Lentamente in frigorifero
Cervo e capriolo In fogli di alluminio o politene 5 / 6 9 Lentamente in frigorifero
Pesci grossi In fogli di alluminio o politene 4 / 6 Lentamente in frigorifero
Pesci piccoli In buste di polit e ne 2 / 3 Non necessario
Crostacei In buste di polit e ne 3 / 6 Non necessario
Molluschi
Pesci cotti In fogli di alluminio o politene 12 In acqua calda
Pesci fritti In sacchetti di politene 4 / 6 Direttamente in padella
In fogli di alluminio 1 / 3 9 Lentamente in frigorifero
In contenitori di alluminio o plastica
ricopert i c o n ac qu a e s al e
3 Lentamente in frigorifero
5
I
Page 8
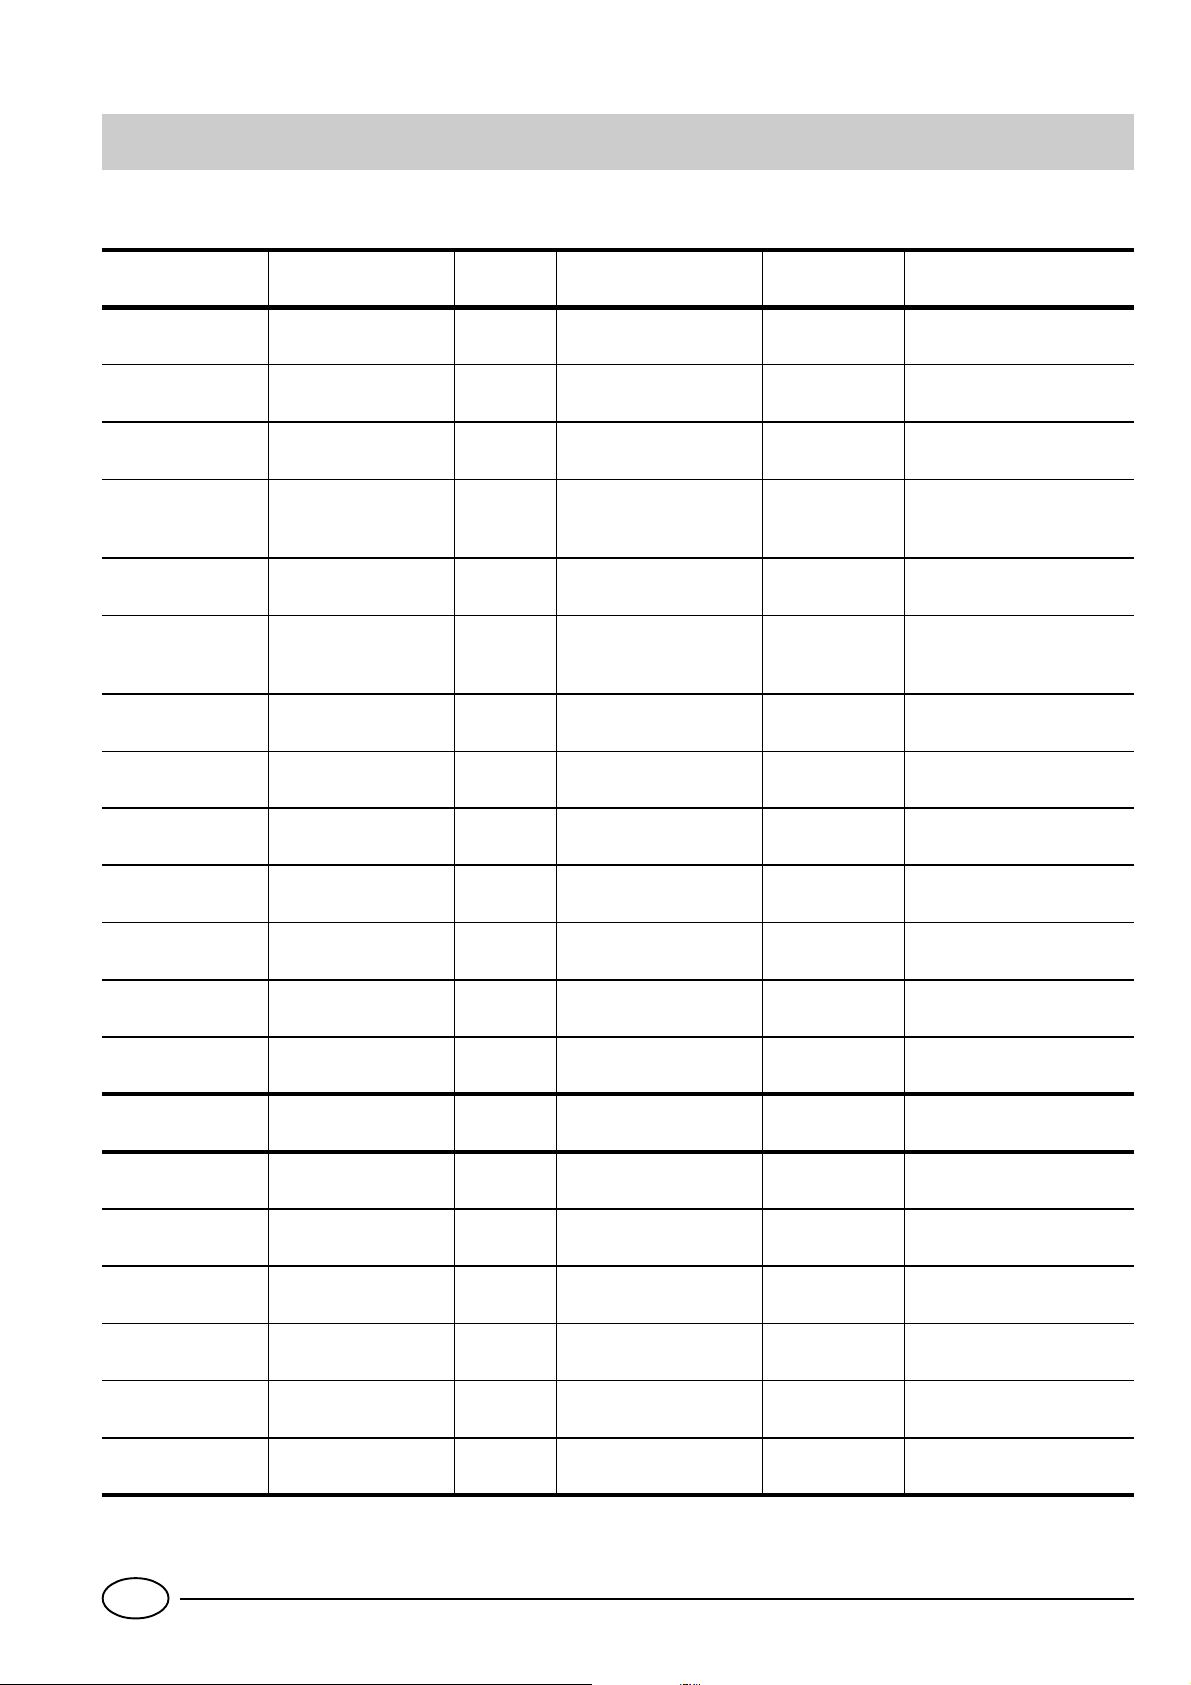
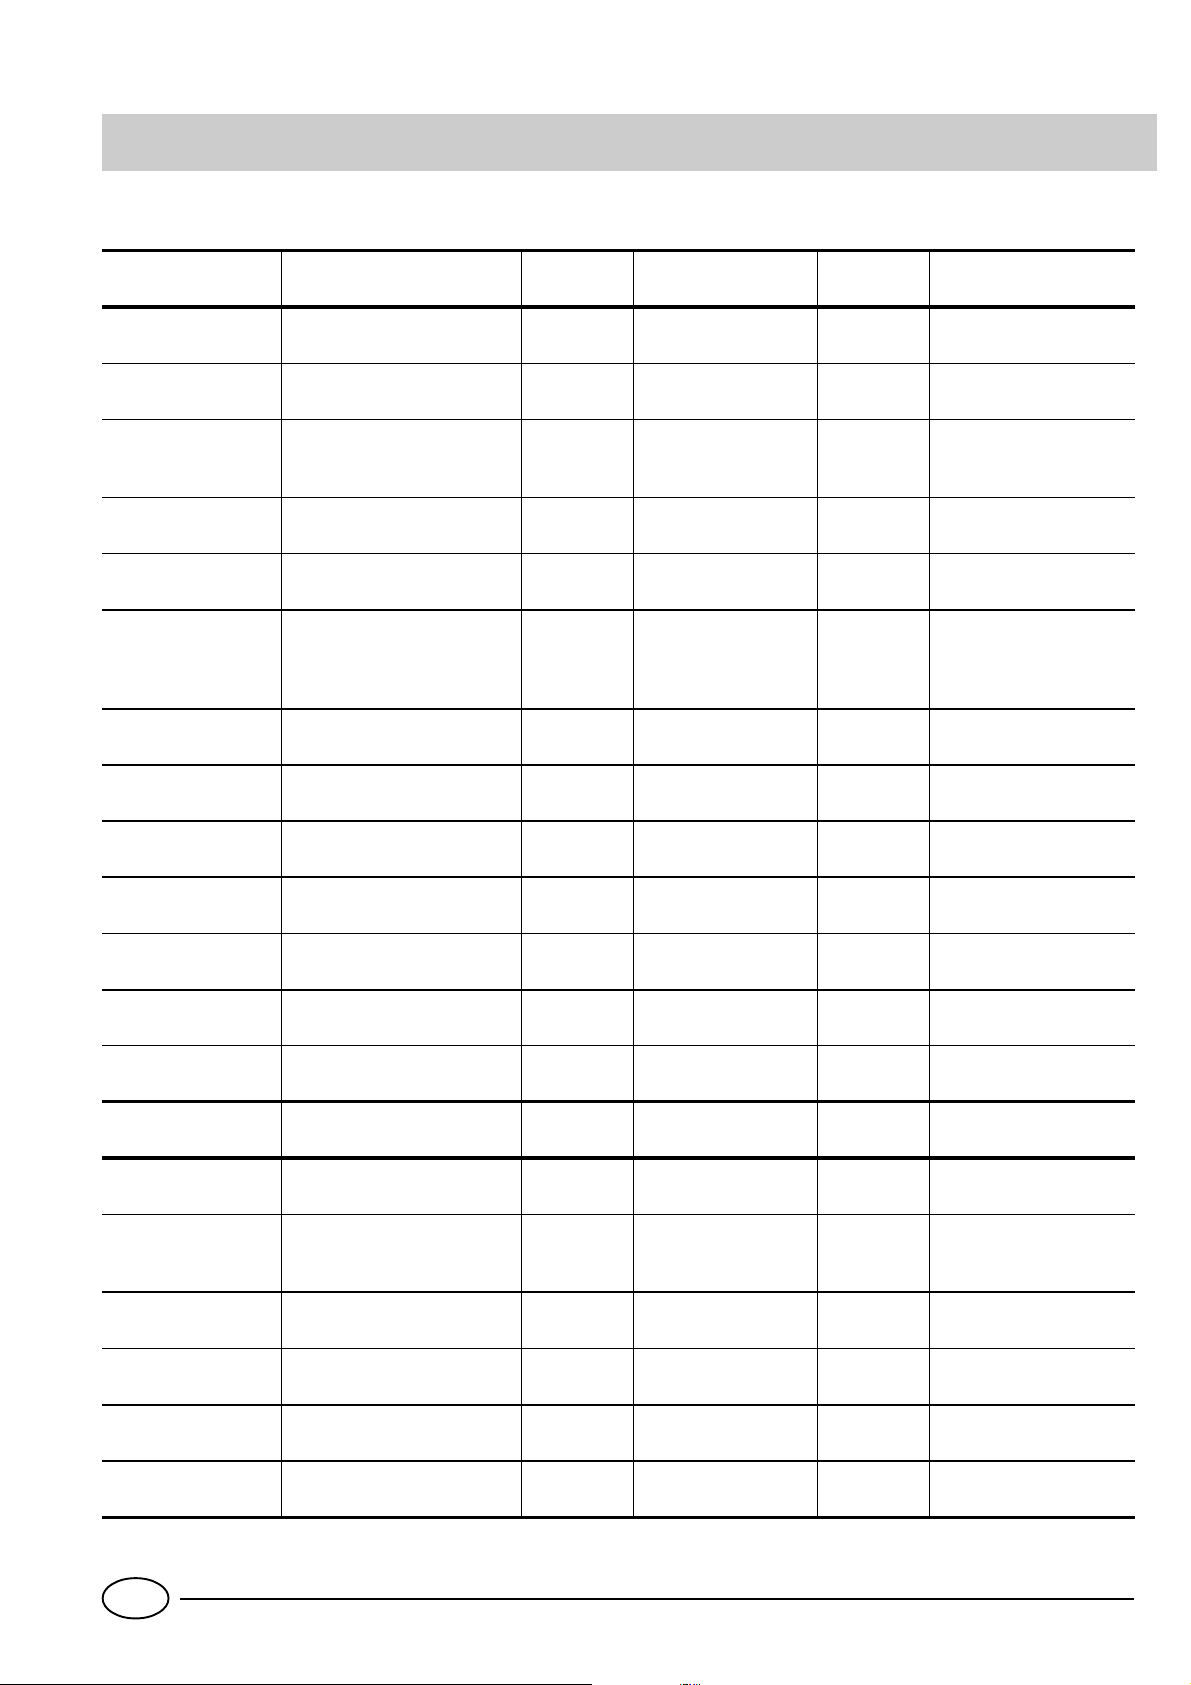
Guida all'utilizzo del congelatore
Frutta e verdura
Tipo Preparazione
Mele e pere
Albicocche, pesche,
ciliege e prugne
Fragole, more e
mirtilli
Frutta cotta
Succhi di frutta
Cavolfiori
Cavolo e cavolini
Piselli Sbucciare e lavare 2' In sacchetti di politene 12 Non necessari o
Fagiolini
Sbucciare e tagliare a
pezzetti
Snocciolare e pelare 1' / 2'
Pulire, lavare e lasciare
asciugare
Tagliare, cuocere e
passare
Lavare, tagliare e
schiacciare
Spezzett a re e s c ottare
in acqua e succo di
limone
Pulire e lavar e
(spezzettare)
Lavare e tagliare a
pezzetti
Scottatura
(min)
2'
2' In sacchetti di politene 12 Non necessari o
1' / 2' In sacchetti di politene 10 / 12 A temperatura ambiente
2 In sacchetti di politene 10 / 12 Non necessari o
Confezionamento
In contenitori ricoperti di
sciroppo
In contenitori ricoperti di
sciroppo
In contenitori ricoperti di
zucchero
In contenitori,
aggiungere 10% di
zucchero
In contenitori, zucchero
a piacere
Conservazione
(mesi)
12 Lentamente in frigorifero
12 Lentamente in frigorifero
10 / 12 Lentamente in frigorifero
12 Lentamente in frigorifero
10 / 12 Lentamente in frigorifero
Scongelamento
Carote, peperoni e
rape
Funghi e asparagi Lavare e tagliare 3' / 4' In sacchetti o contenitori 6 A temperatura ambiente
Spinaci Lavare e tagliuzzare 2' In sacchetti di politene 12 A temperatura ambiente
Verdure varie per
minestra
Cibi vari Preparazione Scottatura Confezionamento
Pane In sacchetti di politene 4
Torte In fogli di politene 6
Panna In contenitori di plastica 6
Burro
Cibi cotti,
minestrone
Uova
Tagliare a fett e,
pelare, lavare
Lavare e tagliare a
pezzetti
3' / 4' In sacchetti di politene 12 Non necessario
3'
In sacchetti in piccole
porzioni
Nel suo incarto originale
avvolto in alluminio
Suddiviso in co ntenitori
di plastica o vetro
Congelare sen za guscio
in piccoli contenitori
6 / 7 A temperatura ambiente
Conservazione
(mesi)
6 In frigorifero
3 / 6
10
Scongelamento
A temperatura ambiente o
nel frigorifero
A temperatura ambiente e
cuocere a 100/200°C
A temperatura ambiente o
nel frigorifero
A temperatura ambiente e
in acqua calda
A temperatura ambiente o
nel frigorifero
I
6
Page 9

Safety a good habit to get into
ATTENTION
Read your handbook carefully since it contains instructions
which will ensure safe installation, use and maintenance of
your appliance.
Your freezer is built to International standards (EN60) and
has been awarded the European approval mark (IMQ) for
compliance to UK electrical safety requirements. It also meets
the EC standards on the prevention and elimination of radio
interference (EC directive 87/308 - 02.06.89).
1. This appliance is designed to be used indoors and under
no circumstances should it be installed outside.
2. The appliance should be used only by adults exclusively for
storing foodstuffs in compliance with the instructions provided in the handbook. Under no circumstances should children be allowed to operate, or tamper with, this product.
3. For electrical safety , do not attempt to operate this appliance with wet hands or feet.
4. Do not operate this appliance connected to an extension
lead. If a longer supply cable is required, this must be replaced with one of the same specifications in compliance
with the current electrical regulations. This operation should
be carried out by a qualified person. Ensure that the cable is
not trapped or damaged during the installation.
5. Never pull the cable or the appliance to remove the plug
from the socket.
6. Do not touch the internal cooling elements, especially if
your hands are wet, since you could burn or hurt yourself.
Do not eat ice cubes straight out of the freezer.
7. Before doing any cleaning, disconnect the appliance from
the electricity (by pulling out the plug orturning off the general switch in your home).
8. Before disposing of your old appliance, remember to break
or remove the lock as a safety measure to protect childr en who
might lock themselves inside the appliance when playing.
9. If your appliance is not operating properly , before calling your
after-sales service r ead the chapter on “T rouble Shooting” which
might help you resolve the problem. Do not attempt to repair
the fault by intervening on the internal components.
10. If the power supply cord must be replaced, please contact one of our Customer Service Centers. In some cases,
the connections are made using special terminals and in others a special tool must be used to access the connections.
11. Do not use electric appliances inside the compartment for
food storage, if these are not those recommended by the
manufacturer.
12. At the end of the functional life of your appliance –
containing cyclopentane gas in the insulation foam and perhaps
gas R600a (isobutane) in the refrigeration circuit – the latter
should made safe before being sent to the dump.
For this operation, please contact your dealer or the Local
Organisation in charge of waste disposal.
Installation
To ensure that the appliance operates pr operly and to
reduce energy consumption, it is important that the
appliance is installed correctly .
Ventilation
The compressor and condenser generate heat and, therefore, need to be ventilated properly. Rooms with less than
perfect ventilation are not very suited for installation of the
appliance. Therefore, it should be installed in a room with
an opening (window or French window) that provide the
appropriate amount of air re-circulation. It is also important
that the room not be too humid.
During installation, make sure not to cover or obstruct the
grates that allow for proper ventilation of the appliance.
Away from Heat
Avoid positioning the appliance in a place where it is directly
exposed to sunlight or near an oven, cook top or the like.
Electrical Connection and Earthing
Before proceeding with the electrical connection, make sure
that the voltage indicated on the rating plate, located within
the freezer, corresponds to the mains voltage in your home
and that the socket is fitted with a standard earthing wire in
accordance with safety standards for 46/90 systems. If the
socket is not fitted with an earthing wire, the manufacturer
will not be held liability for any damages and or injuries arising out of the use of the appliance. Do not use multiple
sockets or adapters.
Position the appliance in such a way that you can access
the socket where it is plugged in.
Insufficient power?
The electrical socket must be able to handle the maximum
power load of the appliance, which is indicated on the rating plate located at the bottom left next to the vegetable
crisper.
Before making the electrical connection ...
After the appliance has been delivered, place it in the vertical upright position and wait at least 3 hours before inserting the plug into the socket in order to ensure that it functions properly .
For English Market only
The appliance is fitted with a continental 2-èin plug for factory
testing. Before installation the plug should be cut off. The appliance is designed to be installed in a switched spur outlet
fused at 13 Ampere. If the installation requires a 13 Ampere
plug type to be fitted it should be conform to BSI 1363.
7
GB
Page 10

A closer look
Thermostat
This regulates the temperature inside the appliance
automatically. Turn the knob from setting 1 to 3 for
increasingly colder temperatures.
To adjust the thermostat, use a coin to turn the
knob.
Green Light
When the light is on (move the switch to the right)
this indicates that the appliance is connected to the
mains. When the switch is moved to the left (green
light covered), the appliance is disconnected from
the mains.
Y ellow Light
When this light is on (move the switch to the left),
the compressor will operate continuously to reach
the lower temperatures necessary for freezing fresh
foods quickly. By moving the switch to the right
(yellow light covered) the freezer is operated by the
thermostat.
Red Light
D
This light goes on when the temperature inside the
appliance is not sufficient to preserve foodstuffs.
Compartment for freezing and storage
Storage compartments
2
1
3
5
4
SN
A C B
E
F
F
I0
D
GB
8
Page 11

Setting up your appliance
ATTENTION
After transport stand the appliance upright and wait
at least 3 hours before plugging the appliance into the
mains to ensure proper performance.
Use these average temperature settings to ensure optimum performance and save energy .
Using your freezer
Freezing
- Remember that you should never re-freeze products you
have allowed to thaw, even if only partially: cook the food,
then either eat (within 24 hours) or re-freeze it.
- When freezing fresh foods, remember that they should
not touch other previously frozen or deep frozen foods. Place
the food that you wish to freeze in the top compartment
where the temperature will fall below -18°C, ideal for
freezing food properly . Remember that pr oper conservation
depends on the speed of freezing.
- Do not open the freezer door during freezing.
- Freeze only the quantities (in kg) shown on the data plate.
Important: never freeze more than the nominal amount of
food .indicated on the rating plate at one time.
- If a large amount of food is introduced for freezing at one
time, the freezer temperature may momentarily increase
inside the compartment (red light on). Since this is just a
transient situation, the foods already stored in the freezer
will not be harmed.
- After 24 hours, freezing will be completed, turn off the
yellow light.
Important: .Remember to carry out this last step in order
to save energy .
- For the best conservation and defrosting, remember to
freeze small portions; this will ensure rapid and uniform
freezing. Mark the freezing date and description of the
contents on the package, as shown in the table.
- In the case of power failure or breakdown, do not open
the freezer door. This will help maintain the temperature
inside the freezer ensuring that foods are conserved for at
least 9-14 hours.
- Do not store full bottles in the freezer since they could
explode when they freeze. (Remember that liquids increase
in volume when frozen).
- Fill the ice trays so that they are no more than 3/4 full.
Once the appliance has been connected to the mains, ensure
that the green light is on and turn the yellow light on as
well.
When the red light is off, turn off the yellow light: the
appliance is now ready for use.
Preservation of Foodstuffs
To preserve frozen and deep-frozen foods well, never set
the thermostat below 1, no matter what the room temperature is.
For room temperatures fr om 25°C to 27°C the knob should
be set between 1 and 2 while for room temperatures of up
to 32°C, set between 2 and 3.
The maximum storage times for frozen foods are indicated
in the tables “Guide for using the freezer.
Always follow the instructions on the packages of deep
frozen foods carefully and if there are no instructions
neverkeep the food for more than 3 months from the date
of purchase.
When buying deep-frozen foods, ensure that they have been
stored at appropriate temperatures and that the wrapping
is intact.
To keep the quality of the deep-frozen food unlatered,
transfer it to special containers and then place it inside the
storage compartment as soon as possible.
If a packing shows signs of moisture and abnormal swelling,
it has probably been stored at the wrong temperature and
the contents have been spoiled.
9
GB
Page 12
Caring for your appliance
Before doing any cleaning, disconnect the appliance
from the electricity (by pulling out the plug orturning
off the general switch in your home).
Defrosting
WARNING: do not damage the refrigeration circuit.
Do not use mechanical devices or other tools to speed
up the defrosting process, unless they have been recommended by the manufacturer.
The frost should be removed from the walls of the appliance
periodically.
Never use sharp metal objects to remove frost because they
could pierce the cooling circuit and damage the freezer
beyong repair.
Use the plastic scraper provided for this purpose.
To defrost the appliance completely (this should be done
once or twice a year), turn off the green light and leave the
door open until the frost has completely thawed.
Trouble shooting
Green Light Off
Check that:
••
• there is no power failure
••
••
• the general switch or circuit breaker in your home is not
••
disconnected
Red Light always On
Check that:
••
• the door is shut properly and that the door seals are not
••
damaged;
••
• the thermostat temperature knob is on the correct setting;
••
••
• there is not too much frost on the inside walls.
••
Compressor operates continuously
Check that:
••
• the yellow light is not on (continuous operating function);
••
••
• the thermostat is in the correct position.
••
To speed up defrosting, place one or more basins of warm
water inside the appliance.
When defrosting, remove the frozen food from the
appliance, wrap it in newspaper and store in a cool place.
Since the rise in temperature will shorten the storage life of
the food, it should be used as soon as possible.
Cleaning and maintenance
The refrigerator should be cleaned periodically with a solution
of bicarbonate of soda and warm water . Never use abrasives,
detergents or soaps; after washing, rinse with clean water
and dry with care.
When these operations have been completed, turn on the
green light and set the thermostat knob to the appropriate
operating position.
After 2 or 3 hours, the appliance will once again be ready
for preserving frozen and deep-frozen foods.
If after all the checks, the appliance still does not operate or
the problem persists, call the nearest Service Centre and inform them of: the type of problem, the abbreviation of the
model name (Mod.) and the relative numbers (S/N) written
on the rating plate located within the freezer (see examples
in the figures below).
75
Test
P.S-I.
TI
Net
Util
Utile
Pressure
HIGH-235
LOW 140
RG 2330
Mod.
220 - 240 V- 50 Hz 150 W
340
Total
Gross
Bruto
Brut
Compr.
Syst.
Kompr.
Made in Italy 13918
Gross
Bruto
Brut
R 134 a
kg 0,090
93139180000 S/N 704211801
Cod.
Gross
Bruto
Brut
W
Fuse
A
Freez. Capac
Poder de Cong
kg/24 h
4,0
Max 15 w
Class
Clase
N
Classe
The appliance is noisy.
Check that:
••
• The appliance is perfectly level;
••
••
• The appliance has been installed between cabinets or other
••
items that vibrate or are noisy.
••
• Remember that the refrigerating gas in the cooling circuit
••
causes a slight bubbling sound, even when the compressor
is not running (this is quite normal).
GB
Never call on unauthorized technicians and always
refuse spare parts which are not originals.
10
Page 13
Guife for using the freezer
Meat and fish
Food Wrapping
Beef Roast Tinfoil 2 / 3 9 / 10 Not required.
Lamb Tinfoil 1 / 2 6 Not required.
Pork Roast Tinfoil 1 6 Not required.
Veal Roast Tinfoil 1 8 Not required.
Veal/Pork Cho p s
Veal/Lam b C utlets
Minced Meat
Heart and Liver Plastic Baggies 3 Not required.
Each piece wr apped in cling wrap and t he n
in tinfoil (4 to 6 slices)
Each piece wr apped in cling wrap and t he n
in tinfoil (4 to 6 slices)
In aluminium containers covered with cling
wrap.
Tenderising
(days)
Freshly
minced
Storage
(months)
6 Not required.
6 Not required.
2 Slowly in refrigerator.
Thawing Time
Sausages Cling Wrap or Tinfoil 2 As necessary.
Chicken and Turkey Tinfoil 1 / 3 9 Very slowly in refrigerator.
Duck and Goose Tinfoil 1 / 4 6 Very slowly in refrigerator.
Pheasant, Partrige and
Wild Duck
Hare and Rabbit Tinfoil 3 / 4 6 Very slowly in refrigerator.
Venison Tinfoil or Cling Wrap 5 / 6 9 Very slowly in refrigerator.
Large Fish Tinfoil or Cling Wrap 4 / 6 Very slowly in refrigerator.
Small Fish Plastic Baggies 2 / 3 Not required.
Crustaceans Plastic Baggies 3 / 6 Not required.
Shellfish
Boiled Fish Tinfoil or Cling Wrap 12 In hot water.
Tinfoil 1 / 3 9 Very slowly in refrigerator.
Store in salted water in aluminium
containers or plastic containers.
3 Very slowly in refrigerator.
Fried Fish Plastic Baggies 4 / 6 Directly in pan.
11
GB
Page 14
Guife for using the freezer
Fruit and vegetable
Food Preparation
Apples and Pears Peel and cut into slices. 2'
Apricots, Peaches,
Cherries and Plums
Strawberries
Blackberries and
Raspberries
Cooked Fruit Cut, cook and strain.
Fruit Juice Wash, cut and crush.
Cauliflower
Cabbage and Brussel
Sprouts
Peas Shell and wash. 2' Plastic Baggies 12 Not required.
Peel and pit. 1' / 2'
Rinse and fry.
Remove leaves, cut head into
small pieces and blanch in
water and a little lemon
juice.
Wash and cut into small
pieces.
Blanching
Time
2' Plastic Baggies 12 Not required.
1' / 2' Plastic Baggies 10 / 12 At room temperature.
Wrapping
In Containers (cover
with syrup)
In Containers (cover
with syrup)
In Containers (cover
with sugar)
In Containers (add
10% sugar)
In Containers (sugar
to taste)
Storage
(months)
12
12
10 / 12
12
10 / 12
Thawing Time
In refrigerator very
slowly.
In refrigerator very
slowly.
In refrigerator very
slowly.
In refrigerator very
slowly.
In refrigerator very
slowly.
French Beans Wash and slice if required. 2 Plastic Baggies 10 / 12 Not required.
Carrots, Peppers and
Turnips
Mushrooms and
Asparagus
Spinach Wash and mince. 2' Plastic Baggies 12 At room temperature.
Vegetable for Soups
Various Foods Preparation
Bread Plastic Baggies 4
Cakes Plastic Baggies 6
Cream Plastic Containers 6
Butter
Boiled Food or
Vegetable Soup
Peel, wash and slice if
necessary.
Wash, peel and cut up. 3' / 4'
Wash and cut up in small
pieces.
3' / 4' Plastic Baggies 12 Not required.
3'
Blanching
Time
Plastic Baggies or
Containers
Plastic Baggies or
Containers
Wrapping
In original wrapping
or tinfoil
Plastic or Glass
Containers
6 At room temperature.
6 / 7 Not required.
Storage
(months)
6 In refrigerator.
3 / 6
Thawing time
At room temperature
and in the oven.
About 10 minutes at
room temperature, cook
at 100/200°C.
At room temperature or
in refrigerator.
At room temperature or
in hot water.
Eggs
GB
Freeze without shells
in small containers
12
10
At room temperature or
in refrigerator.
Page 15

La sécurité, une bonne habitude
ATTENTION
Lire attentivement les avertissements contenus dans ce livret car ils fournissent des indications importantes pour la
sécurité de l’installation, de l’utilisation et de l’entretien.
Ce congélateur a été construit conformément aux normes
internationales de sécurité qui ont pour but de protéger le
consommateur. Cet appareil a en effet obtenu le label IMQ
que les techniciens de l’Institut Italien de Qualité n’accordent qu’aux appareils conformes aux normes du CEI: Comité Electrotechnique Italien.
1. Cet appareil ne doit pas être installé en plein air même s’il
s’agit d’un endroit abrité; il est très dangereux de le laisser
exposé à la pluie et aux intempéries.
2. Seuls les adultes doivent l’utiliser et exclusivement pour
conserver les aliments en suivant le mode d’emploi qu’indique ce manuel.
3. Il ne faut ni toucher ni utiliser l’appareil pieds nus ou avec
les mains ou les pieds mouillés.
4. Nous déconseillons d’utiliser des rallonges et des fiches
multiples. Il faut vérifier que le câble ne soit ni plié, ni dangereusement comprimé.
5. Il est très dangereux de tirer le câble ou le congélateur
pour débrancher la fiche.
6. Ne touchez jamais les parties internes refroidissantes avec
les mains mouillées, vous pourriez vous brûler ou vous bles-
ser. Ne mettez jamais dans la bouche les glaçons qui viennent de sortir du freezer, vous pourriez vous brûler.
7. Avant de procéder à toute opération de nettoyage, débrancher l'appareil du réseau d'alimentation ( en débrancher la fiche ou l'interrupteur général de l'habitation).
8. Avant de rendre le réfrigérateur usé, il faut mettre hors
d’usage la serrure pour éviter que les enfants, en jouant,
puis sent rester enfermés dans l’appareil.
9. En cas de panne, avant de téléphoner au service AprèsVente, nous conseillons de vérifier grâce au chapitre “Que
faire?” que l’inconvénient puisse être facilement éliminé. Ne
tentez pas de réparer la panne en essayant d’accéder aux
composants internes.
10. En cas de changement du câble d’alimentation, adressez-vous à nos Services après-vente. Dans certains cas, les
connexions sont réalisées au moyen de bornes spéciales, dans
d’autres, un outil spécial est indispensable pour accéder aux
raccordements.
11. Ne pas utiliser d’appareils électriques à l’intérieur du
compartiment de conservation des aliments s’ils n’appartiennent
pas aux catégories recommandées par le fabricant.
12. Avant d’envoyer votre appareil hors d’usage à la déchetterie,
veillez à le rendre sûr car sa mousse isolante contient du gaz
cyclopentane et son circuit réfrigérant peut contenir du gaz R600a
(isobutane). Pour cette opération, adressez-vous à votre revendeur
ou au Service local prévu à cet effet.
Installation
Pour garantir le bon fonctionnement de votre appareil
tout en réduisant sa consommation d’électricité, il faut
qu’il soit installé correctement.
L’aération
Le compresseur et le condenseur produisent de la chaleur et
exigent par conséquent une bonne aération. Les pièces mal
ventilées sont par conséquent déconseillées. L’appareil doit
donc être installé dans une pièce munie d’une ouverture
(fenêtre ou porte-fenêtre) qui permette de renouveler l’air
et qui ne soit pas trop humide.
Attention, lors de son installation, à ne pas boucher les grilles
d’aération de l’appareil.
Loin de toute source de chaleur
Evitez d’installer votre appareil dans un endroit exposé à la
lumière directe du soleil ou près d’une cuisinière électrique
ou autre.
Raccordement électrique et mise à la terre
Avant de procéder à tout raccordement électrique, contrôlez si le voltage indiqué sur la plaquette des caractéristiques,
située à l'intérieur du congélateur, correspond bien à celui
de votre installation et contrôlez si la prise est dotée d’une
mise à la terre conforme, comme prescrit par la loi 46/90 sur
la sécurité des installations. S’il n’y a pas de mise à la terre,
le Fabricant décline toute responsabilité. N’utilisez ni prises
multiples ni adaptateurs.
Installez l’appareil de manière à ce que la prise à
laquelle il est connecté soit parfaitement accessible.
La puissance est insuffisante?
La prise électrique doit être en mesure de supporter la charge
maximum de puissance de l’appareil, indiquée sur la plaquette des caractéristiques placée en bas à gauche à côté
du bac à légumes.
Avant de le raccorder électriquement
Après le transport, pour que votre appareil fonctionne bien,
placez-le à la verticale et attendez au moins 3 heures avant
de le brancher à la prise.
13
F
Page 16

Vu de près
Le thermostat
Il règle automatiquement la température à
l’intérieur de l’appareil. En tournant le bouton de la
position 1 à la position 5, on peut obtenir des
températures de plus en plus froides.
Pour effectuer le réglage du thermostat, tourner le
bouton à l’aide d’une pièce de monnaie.
Le voyant vert
Quand il est allumé (interrupteur déplacé vers la
droite) il indique que l’appareil est branché au
réseau d’alimentation.
En déplaçant l’interrupteur vers la gauche (voyant
vert caché), l’appareil est débranché du réseau
d’alimentation.
Le voyant jaune
Quand il est allumé (interrupteur déplacé vers la
gauche) il indique que le compresseur fonctionne
de façon continue pour atteindre les basses
températures nécessaires à la congélation rapide
des denrées fraîches. En déplaçant l’interrupteur
vers la droite (voyant jaune caché) le congélateur
fonctionne suivant le réglage du thermostat.
Le voyant rouge
Il s’allume pour indiquer que la température à
l’intérieur de l’appareil est insuffisante pour la
conservation des aliments.
Compartiment à utiliser pour la congelation et
la conservation
Compartiments à utiliser pour la conservation
2
1
3
5
4
SN
A C B
E
F
F
I0
D
F
14
Page 17

Mise en service du congélateur
ATTENTION
Après le transport et avant de brancher l’appareil, il
est conseillé d’attendre environ 3 heur es pour obtenir
un fonctionnement optimal.
Pour obtenir un fonctionnement optimal et économique, souvenez-vous de placer la commande du thermostat sur la position de la température moyenne.
Comment l'utiliser au mieux
Pour bien congeler
- Un aliment décongelé même seulement en partie, ne doit
jamais être recongelé: il faut le cuire pour le consommer
dans les 24 heures.
- Pour le conditionnement des aliments à congeler , consulter
une brochure spécialisée.
- Les aliments frais que l’on doit congeler ne doivent pas
être mis à contact avec ceux qui sont déjà congelés ou
surgelés mais il faut les placer dans le compartiment supérieur
où la température parvient à -18°C, ce qui est l’idéal pour
bien congeler les aliments. En effet il ne faut pas oublier que
la bonne conservation des aliments congelés dépend de la
vitesse de congélation.
- Pendant la congélation, évitez d’ouvrir la porte du
congélateur.
- Congelez seulement la quantité indiquée en Kg. sur la
plaquette des caractéristiques.
- Pour congeler, allumer le voyant jaune puis introduire les
aliments à congeler dans le compartiment supérieur en
veillant à ce que ces derniers soient disposés le plus possible
au contact direct des surfaces réfrigérantes et à ce qu’ils ne
soient pas placés au contact des denrées déjà congelées.
- L’introduction de quantités importantes d’aliments à
congeler peut faire monter momentanément la température
à l’intérieur du compartiment freezer (allumage du voyant
rouge). Cette situation étant momentanée, elle ne
compromet pas la bonne conservation des aliments déjà
stockés.
- Au bout de 24 heures, une fois la congélation terminée,
éteindre le voyant jaune.
Attention: il ne faut pas oublier d’ef fectuer cette opération
pour éviter tout gaspillage d’énergie.
- Pour obtenir une conservation et une congélation optimales,
nous conseillons de séparer les aliments en petites portions
car ainsi ils se congèleront rapidement et de façon homogène.
Sur les paquets écrivez les indications concernant le contenu
et la date de congélation, en suivant les instructions indiquées
dans le tableau.
- En cas de panne de courant, évitez d’ouvrir la porte du
congélateur, vous empêcherez ainsi que la température
s’élève à l’intérieur . Les produits congelés et surgelés pourront
être ainsi conservés sans altération pendant 9/14 heures.
Avant de placer les denrées dans le réfrigérateur, nettoyez
lAprès avoir relié l’appareil au réseau d’alimentation, vérifier
que le voyant vert est bien allumé et allumer également le
voyant jaune.
Une fois le voyant rouge éteint, éteindre le voyant jaune: à
présent, l’appareil est prêt à être utilisé.
- N’introduisez pas dans le congélateur de bouteilles
contenant des boissons gazeuses: elles pourraient se briser
étant donné qu’en gelant tous les liquides augmentent leur
volume.
- Remplissez les bacs à glaçons jusqu’ à 3/4 de leur hauteur .
Conservation
Pour assurer une bonne conservation des produits surgelés
ou des aliments congelés, ne jamais placer le repère du
bouton du thermostat sur une position inférieure à 1, quelle
que soit la température ambiante. Pour des températures
ambiantes allant jusqu’à 25-27°C, le repère du thermostat
devra être placé entre 1 et 2 alors que pour des températur es
ambiantes allant jusqu’à 32°C, il devra être placé entre 2 et
3.
Les durées maximum de conservation des aliments congelés
sont indiquées sur les tableaux “Guide pour l’utilisation du
congélateur”..
Suivez toujours attentivement les instructions qui figurent
sur l’emballage des produits surgelés et au cas oû aucune
indication ne figurerait sur l’emballage, il est conseillé de ne
pas conserver ces aliments plus de trois mois après la date
d’achat.
Lorsqu’on achète des aliments surgelés, il faut s’assurer qu’ils
aient bien été conservés à une température adéquate et que
l’emballage soit intact.
Pour conserver aux aliments surgelés leurs qualités naturelles,
il est conseillé de les transporter dans des récipients ou dans
des sachets prévus à cet effet et de les introduire au plus vite
dans votre congélateur.
Si l’emballage présente des traces d’humidité ou bien s’il est
gonflé de façon anormale, cela signifie qu’il n’a
probablement pas été conservé à la température adéquate
et que son contenu s’est détérioré.
15
F
Page 18

Un bon entrerien
Avant de procéder à toute opération de nettoyage, débrancher l'appareil du réseau d'alimentation ( en débrancher la fiche ou l'interrupteur général de l'habitation)
voyant vert et laisser la porte ouverte jusqu’à ce que le givre
ait entièrement fondu.
Pour accélérer l’opération de dégivrage, on peut introduire
une ou deux cuvettes d’eau tiède à l’intérieur de l’appareil.
Dégivrage
A TTENTION: ne pas endommager le circuit réfrigérant.
Attention: n’utilisez ni dispositifs mécaniques ni outils
pour accélérer l’opération de dégivrage, en dehors de
ceux conseillés par le fabricant.Comment dégivrer le
Pendant l’opération de dégivrage, il est conseillé d’envelopper
les aliments conservés dans plusieurs feuilles de papier journal
et les placer dans un endroit frais. Etant donné que l’inévitable
hausse de température en abrège la durée de conservation,
il est conseillé de les consommer dans de brefs délais.
compartiment réfrigérateur .
Il est conseillé d’enlever de temps à autre le givre qui se
forme sur les rayons du congélateur.
Pendant cette opération faire attention à ne pas utiliser
d’objets métalliques pointus qui pourraient percer le circuit
réfrigérant en endommageant l’appareil de façon irréparable
mais, se servir de la raclette en plastique fournie avec
l’appareil.
Pour obtenir le dégivrage complet de votre appareil
(opération à effectuer une ou deux fois par an), éteindre le
Nettoyage et entretien particuliers
Une fois le dégivrage effectué, il est conseillé de procéder
au nettoyage de l’appareil en utilisant du bicarbonate de
soude dissout dans de l’eau tiède.
Eviter absolument d’utiliser des produits abrasifs, des
détergents ou des produits savonneux.
Après avoir effectué ces opérations, allumer le voyant vert
et placer le bouton du thermostat sur la position désirée.
Après 2 ou 3 heures de fonctionnement, l’appareil est de
Quelques problèmes: que faire?
Voyant vert éteint
Vérifiez que:
••
• il n’y ait pas de coupure de courant;
••
••
• L’interrupteur général de l’appartement ne soit pas dé-
••
branché.
Voyant rouge d’alarme toujours allumé
Si, malgré tous ces contrôles, l’appareil ne fonctionne toujours pas et l’inconvénient persiste, faites appel au service
après-vente le plus proche de chez vous en indiquant: le
type de panne, le sigle du modèle (Mod.) ainsi que les chiffres (S/N) indiqués sur la plaquette des caractéristiques située à l'intérieur du congélateur (voir exemples dans les figures suivantes).
Vérifiez que:
••
• La porte soit bien fermée et que les joints d’étanchéité ne
••
soient pas abîmés.
••
• La porte soit le moins souvent ouverte.
••
••
• Le boutons de réglage de la température soit dans la posi-
••
tion correcte.
••
• l n’y ait pas trop de givre sur les parois internes de l’appareil
••
Compresseur qui marche sans arrêt
Vérifiez que se:
••
• le voyant jaune ne soit pas allumé (fonctionnement
••
continu).
••
• le thermostat soit sur la bonne position.
••
L’appareil est trop bruyant
Vérifiez que se:
••
• Le congélateur soit installé sur une surface plane.
••
••
• Le congelateur ne soit pas installé entre des meubles ou
••
des objets qui vibrent ou qui sont bruyants.
••
• Il ne s’agisse du gaz intérieur qui produit un léger bruit
••
quand le compresseur s’arrête (ce qui est normal).
75
Test
P.S-I.
TI
Net
Util
Utile
Pressure
HIGH-235
LOW 140
RG 2330
Mod.
220 - 240 V- 50 Hz 150 W
340
Total
Gross
Bruto
Brut
Compr.
Syst.
Kompr.
Made in Italy 13918
Gross
Bruto
Brut
R 134 a
kg 0,090
93139180000 S/N 704211801
Cod.
Gross
Bruto
Brut
W
Fuse
A
Freez. Capac
Poder de Cong
kg/24 h
4,0
Max 15 w
Class
Clase
N
Classe
Ne faites jamais appel à des techniciens non agréés et
refusez toujours des pièces détachées non originales.
F
16
Page 19

Guide à l'utilisation du congélateur
Viandes, volailles, poisson
Type Confection
Rôti et boe uf b ou illi Enveloppé dans du papier aluminium 2 / 3 9 / 10 Pas nécessaire
Agneau Enveloppé dans du papier aluminium 1 / 2 6 Pas nécessaire
Rôti de porc Enveloppé dans du papier aluminium 1 6 Pas nécessaire
Veau rôti ou blanchi Enveloppé dans du papier aluminium 1 8 Pas nécessaire
Biftecks et côtelettes
de porc ou de veau
Tranches et côtelettes
d'agneau ou de boeuf
Viande hachée
Coeur et foie Sachets en polypropylène 3 Pas nécessaire
Par tranche enveloppée une par une dans
une feuille de polythéne puis dans du papier
aluminium, pas plus de 4 à 5 morceaux
ensemble
Chaq ue t ran che env elop pé e d an s un e feu ille
de polythéne puis dans du papier aluminium,
pas plus de 4 à 5 morceaux ensemble
Dans des bacs aluminium recouverts d'une
feuille de polyp ropylè ne
Faisandage
(jours)
Très fraîche 2
Conservation
(mois)
6 Pas nécessaire
6 Pas nécessaire
Décongélation
Lentement dans le
réfrigérateur
Saucisses Papier aluminium ou polypropylène 2 Selon l'emploi
Poulets et dindons Papier aluminium 1 / 3 9
Canards et oies Papier aluminium 1 / 4 6
Canards sauvages
faisan s, pe rdrix
Lapins, lièvres Papier aluminium 3 / 4 6
Chevreuil, cerf Papier aluminium ou polypropylène 5 / 6 9
Gros poissons Papier aluminium ou polypropylène 4 / 6
Petits poissons Sachets en polypropylène 2 / 3 Pas nécessaire
Crustacés Sachets en polypropylène 3 / 6 Pas nécessaire
Mollu s ques
Papier aluminium 1 / 3 9
Dans des bacs aluminium ou plastique
plongés dans du sel et de l'eau
3
Lentement dans le
réfrigérateur
Lentement dans le
réfrigérateur
Lentement dans le
réfrigérateur
Lentement dans le
réfrigérateur
Lentement dans le
réfrigérateur
Lentement dans le
réfrigérateur
Lentement dans le
réfrigérateur
Poissons cuits Papier aluminium ou polypropylène 12 Dans de l'eau chaude
Poissons frits Sachets en polypropylène 4 / 6
Directement dans la
poêle
17
F
Page 20

Guide à l'utilisation du congélateur
Fruits et légumes
Type Préparation Cuisson Confection
Pommes et poires
Abricots pêches
cerises, prunes
Fraises, mûres et
myrtilles
Fruits cuits Couper, cuire et passer
Jus de fruit Laver, couper et écraser
Choux-fleurs
Choux, choux de
Bruxelles
Petits pois Écosser et laver 2' Sachets en polythène 12 Pas nécessaire
Haricots verts
Carottes, poivrons,
navets
Peler et couper en
morceaux
Ôter les noyaux et peler 1' / 2'
Nettoyer, laver et laisser
sécher
Couper en morceaux et
blanchir à l'eau additionnée
de jus de citron
Nettoyer, laver et couper 1' / 2' Sachets en polythène 10 / 12 À température ambiante
Laver et couper en
morceaux
Couper en lamelles, peler et
laver
3' / 4' Sachets en polythène 12 Pas nécessaire
Dans des bacs, couvrir avec
2'
du sirop
Dans des bacs, couvrir avec
du sirop
Dans des bacs, couvrir avec
du sucre
Dans des bacs, ajouter 10%
de sucre
Dans des bacs, sucre à
discrétion
2' Sachets en polythène 12 Pas nécessaire
2' Sachets en polythène 10 / 12 Pas nécessaire
Conserv.
(mois)
12
12
10 / 12
12
10 / 12
Décongélation
Lentement dans le
réfrigérateur
Lentement dans le
réfrigérateur
Lentement dans le
réfrigérateur
Lentement dans le
réfrigérateur
Lentement dans le
réfrigérateur
Champignons et
asperges
Epinards Laver et hacher 2' Sachets en polythène 12 À température ambiante
Légumes assortis
pour potage
Denrées diverses Préparation Cuisson Confection
Pain Sachets en polythène 4
Gâteaux Feuilles de polythène 6
Crème fraîche Bacs en plastique 6
Beurre
Denrées cuites,
soupe de légumes
Oeufs
Laver et couper 3' / 4' Sachets ou bacs 6 A température ambiante
Laver et couper en
morceaux
En petites portions dans des
3'
sachets
Dans son papier original
enveloppé dans du papier
aluminium
Partagés dans des bacs verre
ou plastique
Congeler sans coquille dans
de petits bacs
6 / 7 À température ambiante
Conserv.
(mois)
6 Dans le réfrigérateur
3 / 6
10
Décongélation
À température ambiante
et dans le four
À température ambiante
et cuire à 100/200°C
À température ambiante
ou dans le réfrigérateur
À température ambiante
ou dans de l'eau chaude
À température ambiante
ou dans le réfrigérateur
F
18
Page 21

Die Sicherheit - Eine gute Gewohnheit und unsere Verpflichtung
ACHTUNG
Lesen Sie bitte vor Inbetriebnahme aufmerksam die nachstehenden Sicherheitshinweise in dieser Anleitung. Sie enthalten wichtige Angaben über die Sicherheit bei Installation, Benutzung und Instandhaltung.
Diese Gerät wurde gemäß der internationalen Sicherheitsregelung zum Schutz des Verbrauchers konstruiert. Das Gerät weist das IMQ Qualitätszeichen auf, ausgegeben vom
Istituto Italiano di Qualità (Ital. Institut zur Qualitätsüberprüfung A.d.Ü.), Dieses Zeichen wird nur den Geräten zuteil, die den Normen des CEI, Comitato Elettrotecnico Italiano
(Elektrotechn. Komitat Italiens, A.d.Ü.) entsprechen.
Diese Gerät eignet sich zum Kühlen und Gefrieren von Lebensmitteln und zur Eisbereitung.
Es ist für die Verwendung im privaten Haushalt bestimmt.
Bei Einsatz im gewerblichen Bereich sind die für das Gewer be gültigen Bestimmungen zu beachten.
1. Sollte das Gerät wieder Erwarten auf dem Transport zu
Ihnen beschädigt worden sein, nehmen Sie es nicht in Betrieb ohne zuvor Rücksprache mit Ihrem Lieferanten gehalten zu haben.
2. Es darf nur von Erwachsenen benutzt werden und ausschließlich zur Konservierung und zum Einfrieren von Speisen unter Beachtung der hier aufgeführten Anleitung.
3. Berühren oder bedienen Sie niemals das Gerät mit nassen
Händen oder barfuß, wenn Sie auf feuchtem oder nassen
Bodenbelag stehen.
4. Wir raten vom Einsatz von Mehrfachsteckern, Adaptersteckern oder Verlängerungen ab.
9. Reparaturen an Elektrogeräten dürfen nur von Fachkräften
ausgeführt werden. Durch unsachgemäße Reparaturen können erhebliche Gefahren für den Benutzer entstehen.
10. Vermeiden Sie Beschädigungen an Teilen des Kältemittelkreislaufes, zum Beispiel durch Aufstechen von Kältemittelkanälen mit scharfen Gegenständen usw..
11. Lagern Sie keine Flüssigkeiten in Flaschen oder Dosen,
insbesondere mit kohlensäurehaltigen Flüssigkeiten, im
Gefrierteil des Gerätes. Ihr Gerät könnte durch platzende
Gebinde beschädigt werden.
12. Sollte Ihr Gerät nicht funktionieren oder einen Defekt
aufweisen, lesen Sie zuerst das Kapitel “Gibt`s ein Problem?”,
bevor Sie den technischen Service anrufen; eventuell kann
der Fehler so behoben werden. Versuchen Sie nicht, in das
Innere der Kombination zu gelangen, um den Defekt zu reparieren.
14. Im Falle einer Beschädigung des Gerätespeisekabels muß
dieses zwangsläufig durch unseren Kundendienst
ausgewechselt werden, da hierzu Spezialwerkzeuge benötigt
werden.
15. Bitte verwenden Sie im Innern des Lagerfachs für Speisen
keine Elektrogeräte, die nicht ausdrücklichst von der
Herstellerfirma empfohlen wurden.
16. Vor der Entsorgung eines Altgerätes - das ZyklopentaneGas im Isolierschaum, und eventuell R600a - Gas (Isobutan)
im Kühlkreis enthält - muss dieses sichergestellt werden,
bevor es der Entsorgung zugeführt wird.
Wenden Sie sich hierzu an Ihren Händler oder an die
zuständige kommunale Entsorgungsstelle.
5. Trennen Sie das Gerät im Fehlerfall, bei W artung und bei
der Reinigung vom Stromnetz oder schalten Sie die entsprechende Sicherung aus. Ziehen Sie bitte bei Entfernen des
Netzkabels nie am Kabel, sondern bitte immer am Netzstecker.
6. Vor jedem Reinigungsvorgang ist es erforderlich, die
Stromversorgung zu unterbrechen (Stecker herausziehen
oder Hauptsicherung entfernen)
7. Berühren Sie nicht die inneren Kühlteile, besonders nicht
mit nassen Händen; Sie könnten sich verbrennen oder verletzen. Nehmen Sie niemals frisch entnommene Eiswürfel
oder gefrorenes Speiseeis in den Mund, Sie könnten sich
durch die sehr starken T emperaturunterschiede verbr ennen.
8. Vor der Entsorgung Ihres alten Kühlschranks entfernen
Sie das Schloß, soweit vorhanden, um zu verhindern, daß
spielende Kinder eingesperrt werden könnten.
Entsorgung ihres Altgerätes sowie der V erpackung des
Neugerätes.
Ältere Kühl- und Gefriergeräte enthalten im Kältekreis und
in der Isolation Fluorchlorkohlenwasserstoffe (FCKW). Dieses FCKW kann, wenn es freigesetzt wird, die Ozonschicht
der Atmosphäre schädigen.
Nehmen Sie deshalb zum Entsorgen des Altgerätes Ihre zuständige kommunale Entsorgungsstelle in Anspruch. Achten Sie bitte darauf, daß die Rohrleitungen Ihres Kältegerätes
bis zum Abtransport zu einer sachgerechten und umweltfreundlichen Entsorgung nicht beschädigt werden.
In der Bundesrepublik Deutschland können Sie die Verpakkung Ihres Neugerätes zur weiteren stofflichen V erwendung
Ihrem Händler zurückgeben.
19
D
Page 22

Installationshinweise
Um eine optimale und langfristige Funktion sowie einen möglichst geringen Stromverbrauch zu erzielen, ist
es wichtig, das Gerät korrekt zu installieren.
Die Be- und Entlüftung
Der Kompressor sowie der Kondensator strahlen Wärme aus,
weshalb sich eine gute Lüftung als notwendig erweist. Das
Gerät muß deshalb in einem trockenen Raum aufgestellt
werden, in dem eine Öffnung (Fenster oder Balkontür) für
den nötigen Luftaustausch sorgt. Achten Sie bitte bei der
Installation darauf, die Luftgitter, die eine gute Belüftung
des Gerätes ermöglichen, zu verdecken oder zu verstopfen.
Von Hitzequellen fernhalten
Vermeiden Sie, das Gerät dort aufzustellen, wo es der direkten Einwirkung von Sonnenstrahlen ausgesetzt ist, oder in
der Nähe des Elektroherdes oder ähnlichen Wärmespendern.
Elektroanschluß und Erdung
Vor dem Stromanschluß kontrollieren Sie bitte, ob die Voltangaben auf dem Schild links neben dem Gemüsefach den
Stromdaten Ihrer Wohnung entspr echen, und ob die Steckdose über eine ordnungsgemäße, dem Stromanlagensicherheitsgesetz 46/90 entsprechende Erdung aufweist.
Fehlt diese Erdung, lehnt der Hersteller jegliche Verantwortung und Gewährleistung ab. Benutzen Sie keine Mehrfachstecker oder Adapter.
Stellen Sie das Gerät bitte so auf, dass der
Anschlussstecker gut zugänglich ist.
Ist die Stromleistung ausreichend?
Die Steckdose muß die Höchsleistungsbelastung des Gerätes aufnehmen können, die auf dem Datenschild im Innem
des Gefrierschrankes angegeben ist.
Vor dem Stromanschluß
Stellen Sie das Gerät nach dem T ransport senkr echt auf und
warten Sie mind. 3 Stunden, bevor Sie es an den Stromkreis
anschließen, um eine einwandfreie Funktionsweise zu garantieren.
D
20
Page 23

Aus der Nähe betrachtet
Thermostat
Der Thermostat reguliert automatisch die
Innentemperatur des Gefrierschrankes.
Durch Drehen des Temperaturwählers von Pos. 1 bis
Pos. 5 wird eine kältere Temperatur erreicht
(Stellung 5 ist die kälteste Stufe).
Verwenden Sie zum Drehen des Temperaturwählers
ein Geldstück.
Grüne Lampe
Betätigen Sie den Schalter nach rechts, leuchtet die
grüne Lampe auf, d.h. das Gerät ist in Betrieb.
Drücken Sie den Schalter nach links (grüne Lampe
erlischt), ist das Gerät abgeschaltet.
Gelbe Lampe
Zum Einfrieren frischer Lebensmittel benutzen Sie
den Schnellgefriergang. Hierzu betätigen Sie den
Schalter nach rechts: Für den Normalbetrieb
(Lagerung des Gefriergutes) muß der Schalter in
Links-Position sein.
Rote Lampe
Diese Lampe warnt im Fall eines
Temperaturanstieges im Gefrierraum.
Fach zum Einfrieren frischer Lebensmittel
sowie Lagerung von Tiefkühlgut
Lagerfächer für Gefriergut
2
1
3
5
4
SN
A C B
E
F
F
I0
D
21
D
Page 24

Die erste Inbetriebnahme des Gerätes
ACHTUNG
Bitte warten Sie nach dem Aufstellen, bzw. nach einem Transport ca. 3 Stunden, bevor Sie das Gerät in
Betrieb nehmen, um ein optimales Funktionieren zu
gewährleisten.
Um eine Optimale und Kostensparende Funktion Ihres Gerätes zu gewährleisten, denken Sie bitte daran,
die Drehknöpfe des Kühlschrankes und des Gefrierabteils auf eine mittlere Temperatur einzustellen.
Gebrauch des gerätes
So friere ich richtig ein
- Eine einmal aufgetaute Speise, auch nur teilweise aufgetaut,
darf auf keinen Fall noch einmal eingefroren werden!
- Wenn Sie frische Nahrungsmittel einfrieren möchten,
achten Sie bitte darauf, da diese nicht mit bereits
eingefrorenen oder tiefgefrorenen Speisen in Kontakt
kommen. Lagern Sie frische Nahrungsmittel daher zunächst
in das in das obere Fach ein, in welchem eine GefrierTemperatur bis unter -18°C herrscht; die ideale Temperatur
für richtiges Einfrieren. V ergessen Sie nicht, da die Haltbarkeit
der Tiefkühlkost davon abhängt, wie schnell sie eingefroren
wurde.
- Während des Einfrierens vermeiden Sie ein Öffnen des
Gefrierteils.
- Zur optimalen Vorbereitung der einzufrierenden
Lebensmittel empfehlen wir, eine (im Handel erhältliche)
Gefrierfibel zu Rate zu ziehen.
- Vor dem Einlagern von frischen Lebensmitteln schalten Sie
die gelbe Kontrolleuchte ein. Legen Sie die einzufrierenden
Lebensmittel in dfas oberste Fach ein und achten Sie darauf,
daß das einzufrierende Gut möglichst flach auf dem Boden
des Gefrierraumes gelegt wird.
Einzufrierende Lebensmittel sollten nicht mit bereits
gefrorenem Gut in Berührung kommen.
- Beim Einlegen größerer Mengen frischer Lebensmittel in
das Schnellgefrierfach kann es vorübergehend zu einem
Ansteigen der Innentemperatur führen (die rote
Kontrollampe leuchtet auf).
Das beeinflußt jedoch in keinem Fall die Konservierung bereits
eingelagerten Gefriergutes.
- Man rechnet 24 Stunden bis zur Beendigung des
Gefriervorganges. Danach bitte die gelbe Lampe ausschalten.
Achtung: .Vergessen Sie nicht, die gelbe Lampe
auszuschalten, um unnützen Energieverbrauch zu
vermeiden.
Schließen Sie das Gerät an das Versorgungsnetz an und
schalten Sie die grüne und gelbe Lampe ein. Die rote Lampe
leuchtet so lange, bis die erforderliche Innentemperatur
erreicht ist. Nach Erlöschen der roten Lampe schalten Sie die
gelbe Lampe aus; Ihr Gerät ist jetzt betriebsbereit.
- Um eine optimale Konservierung und in der Folge ein
optimales Auftauen zu gewährleisten, empfehlen wir, die
Speisen in kleine Portionen abzufüllen; auf diese Weise tauen
sie schnell und gleichmäig auf. Beschriften Sie die Behälter
mit Angaben wie Inhalt und Einfrier-Datum (s. Tab).
- Bitte öffnen Sie bei einem Stromausfall oder Defekt nicht
die Tür des Gefrierteils; so zögern Sie ein Ansteigen der
Temperatur im Inneren hinaus. Die eingefrorenen und
tiefgekühlten Speisen halten sich so unverändert ca. 9 - 14
Stunden.
- Geben Sie keine Flaschen oder Dosen in das Gefrierteil, die
kohlensäurehaltige Getränke enthalten: sie könnten bersten,
da alle Flüssigkeiten unter Kälteeinwirkung ihr Volumen
vergröern (Siehe auch Sicherheitshinweise).
- Füllen Sie die Eiswürfelbehälter nur bis ca. 3/4 ihres
Volumens auf.
Lagerung
Um eine optimale Konservierung des Tiefkühlgutes zu
gewährleisten, wählen Sie, unabhängig von der vorhandenen
Raumtemperatur, nie eine Temperaturstufe unter 1. Bei
Raumtemperaturen von 25°- 27°C sollte der
Temperaturwähler zwischen Pos. 1 und 2 eingestellt sein,
bei Raumtemperaturen um 32°C zwischen 2 und 3.
Die maximale Lagerdauer der einzelnen Lebensmittel ist in
den T abellen “Anleitung zum Gebrauch des Gefriergerätes”.
Achten Sie beim Einkauf von Tiefkühlkost auf die auf der
Verpackung gegebenen Hinweise bezüglich der Lagerdauer.
Sollten diese fehlen, das Tiefkühlgut nie länger als 3 Monate
nach dem Kauf einlagern.
Außerdem sollten Sie beim Einkauf auf vorschriftsmäßige
Lagertemperatur sowie Verpackung der Tiefkühlkost achten.
Das gekaufte Tiefkühlgut sollte gut verpackt transportiert
und auf dem schnellsten Weg eingelagert werden.
Sollte die Verpackung Feuchtigkeitsspuren oder
Ausbeulungen aufweisen, besteht die Gefahr, daß das
Gefriergut nicht vorschriftsmäßig gelagert wurde und
dadurch ungenießbar ist.
D
22
Page 25

So halte ich das Gerät in Topform
Vor jedem Reinigungsvorgang ist es erforderlich, die
Stromversorgung zu unterbrechen (Stecker herausziehen oder Hauptsicherung entfernen)..
Abtauen
ACHTUNG: Der Kältekreis darf nicht beschädigt
werden.
Vermeiden Sie den Gebrauch mechanischer V orrichtungen oder anderer Gegenstände, außer den vom Hersteller empfohlenen, um den Abtauvorgang zu beschleunigen.
Von Zeit zu Zeit sollte der Reif im Gefrierraum entfernt
werden. Verwenden Sie dazu ausschließlich den
mitgelieferten Kunststoffschaber(auf keinen Fall Messer oder
andere spitze Metallgegenstände). Sie könnten damit das
Gerät beschädigen.
Ein- bis zweimal im Jahr oder nach starker Reifbildung muß
derGefrierschrank abgetaut werden. Schalten Sie die grüne
Lampe aus und lassen Sie die Tür geöffnet.
Zum Beschleunigen des Abtauens kann ein Gefäß mit
warmem Wasser in das Gerät gestellt werden.
Vor dem Abtauen die Lebensmittel auslagern und möglichst
dicht gepackt in mehrere Lagen Zeitungspapier
eingeschlagen an einem kühlen Ort aufbewahren. Durch den
unvermeidlichen Temperaturanstieg wird die Lagerzeit des
Gefriergutes verkürzt, und wir empfehlen daher
baldmöglichen Verzehr.
Während des Abtauens ist es empfehlenswert, die
Lebensmittel in mehrere Lagen Zeitungspapier einzuwickeln
und an einem kühlen Ort zwischenzulagern. Da diese
unvermeidliche T ermperaturerhöhung die Haltbarkeitsdauer
verkürzt, ist es ratsam, die Lebensmittel rasch zu verbrauchen.
Reinigung und Pflege
Nach Beendigung des Abtauvorganges empfehlen wir eine
Reinigung des Gerätes mit lauwarmem Wasser, dem ein
handelsübliches Spülmittel zugestetz werden kann. Auf
keinen Fall Scheuermittel verwenden!
Nach Beendigung des Reinigungsprozesses schalten Sie bitte
die grüne Kontrolleuchte wieder ein und stellen Sie den
Temperaturwähler auf die gewünschte Position.
Nach 2 - 3 Betriebsstunden können Sie Ihr Tiefkühlgut wieder
einlagern.
23
D
Page 26

Anleitung zum Gebrauch des Grfriergerätes
Fleisch und Fisch
Lebensmittel Verpackung Abhängen
Rindfleisch Aluminiumfolie 2 / 3 9 / 10 Nicht nötig
Hammelfleisch Aluminiumfolie 1 / 2 6 Nicht nötig
Schweinefleisch Aluminiumfolie 1 6 Nicht nötig
Kalbfleisch Aluminiumfolie 1 8 Nicht nötig
Kalb-oder
Schweinekotelett
Hammelkotelett
Hackfleisch Alubehälter und Plastikfolie Frisch 2 Langsam im Kühlschra nk
Leber Plastikbeutel 3 Nicht nötig
Wurst Plastik- oder Alufolie 2 Je nach Gebrauch
Plastikfol ie z w i s chen den einzeln en
Scheiben anschließend 4-6 Stück in
Alufolie
Plastikfol ie z w i s chen den einzeln en
Scheiben anschließend 4-6 Stück in
Alufolie
Lagerdauer
(Monate)
6 Nicht nötig
6 Nicht nötig
Auftauen
Geflügel Alufolie 1 / 3 9 Langsam i m Kühl sc h r ank
Gans - Ente Alufolie 1 / 4 6 Langsam im Kühls ch r a nk
Wild Alufolie 1 / 3 9 Langsam im Kühl s c h ra nk
Hasen - Kanichen Alufolie 3 / 4 6 Langsam i m Kühl sc h ra nk
Hirsch Alufolie oder Plastikfolie 5 / 6 9 Langsam i m Kühl sc h r ank
Große Fische Alufolie oder Plastikfolie 4 / 6 Langsam i m Kühlschrank
Kleine Fische Plastikbeutel 2 / 3 Nicht nötig
Schalentiere Plastikbeutel 3 / 6 Nicht nötig
Muscheln Alu- oder Plastikbehälter mit Salzwasser 3 Langsam im Kühl s chrank
Gekochter Fisch Alufolie oder Plastikfolie 12 In warmem Wasser
Bratfisch Plastikbeutel 4 / 6 Direkt in der Brat pfanne
D
24
Page 27

Obst und verschiedene Speisen
Lebensmittel Vorbereitung
Äpfel und Birnen
Aprikosen, Pfirsiche,
Kirschen, Zwetschgen
Erdbeeren, Heidelbeeren,
Johannisbeeren,
Himbeeren
Gekochtes Obst
Obst
Blumenkohl
Rosenkohl
Erbsen
Bohnen, grüne
Waschen,schälen und
in Stücke schneiden
Waschen und
entkernen
Waschen, verlesen,
gut abtropfen lassen
Waschen, In Stücke
schneiden
Waschen, In Stücke
schneiden
Putzen, verlesen,
blanchieren in
Zitronenwasser
Putzen, waschen, in
Stücke schneiden
Waschen und
auslesen
Waschen, inStücke
schneiden
Blanchierzeit
(Minuten)
2'
1' / 2'
2' Plastikbeutel 12 Nicht nötig
1' / 2' Plastikbeutel 10 / 12 Bei Raumtemperatur
2' Plastikbeutel 12 Nicht nötig
3' Plastikbeutel 10 / 12 Nicht nötig
Verpackung
Behälter mit Zuckersirup
bedecken
Behälter mit Zuckersirup
bedecken
Behälter mit Zuckersirup
bedecken
Behälter 10% Zucker
zugeben
Behälter nach Belieben
zuckern
Lagerdauer
(Monate)
12
12
10 / 12
12
10 / 12
Auftauen
Langsam im
Kühlschrank
Langsam im
Kühlschrank
Langsam im
Kühlschrank
Langsam im
Kühlschrank
Langsam im
Kühlschrank
Karotten, Paprika
Pilze, Spargel
Spinat
Suppengemüse
Verschiedene Speisen Vorbereitung Blanchierzeit Verpackung
Brot Plastikbeutel 4
Torten In Plastikfolien 6
Sahne Behälter 6
Butter
Gekochte Lebensmittel
Waschen schülen,
scheiben schneiden
Waschen und
schneiden
Waschen und
zerschneiden
Waschen und
zerschneiden
3' / 4' Plastikbeutel 12 Nicht nötig
3' / 4' Plastikbeutel - Behälter 6 Bei Raumtemperatur
2' Plastikbeutel 12 Bei Raumtemperatur
3'
Verpackt in kleinen
Portionen
Originalverpackung
Alufolie
Aufgeteilt in
entsprechenden
Behältern
6 / 7 Bei Raumtemperatur
Lagerdauer
(Monate)
3 / 6 Kühlschrank
Auftauen
Bei Raumtemperatur
oder im Backofen
Bei Raumtemperatur
und bei 100/200°C
backen
Bei Raumtemperatur
oder im Kühlschrank
6 Kühlschrank
Eier
In kleinen Behältern
ohne Schale
25
10
Raumtemperatur
oder Kühlschrank
D
Page 28

Gibt's ein Problem?
Grüne Lampe leuchtet nicht
Bitte kontrollieren Sie, ob:
••
• Ist die Stromzufuhr unterbrochen?
••
••
• Ist der Hauptschalter der Wohnung eingeschaltet?
••
Rote Warnlampe brennt ständig
Bitte kontrollieren Sie, ob:
••
• die Tür richtig schließt oder die Dichtung beschädigt ist;
••
••
• die Tür oft, zum Beispiel von Kindern geöffnet werden;
••
••
• der T emperatur-Reglerknopf richtig eingestellt ist:
••
der Kühlschrank überladen isti?
••
• Ist die Reifschicht zu dick?
••
Der Motor/Kompressor läuft ständig
Bitte kontrollieren Sie, ob:
••
• Leuchtet die gelbe Lampe? (Dann ist das Gerät auf
••
Dauerbetrieb eingestellt).
••
• Ist der T emperatur wahlschalter in der richtigen Stellung?
••
Sollte trotz aller Kontrollen das Gerät nicht funktionieren
und der von Ihnen festgestellte Fehler weiter bestehen bleiben, dann fordern Sie bitte den nächstgelegenen technischen Kundendienst an und teilen Sie dort zusammen mit
Ihrer Fehlerbeschreibung folgende Daten mit: die Modellbezeichnung (Mod.), die entsprechenden Nummern (S/N),
die auf dem Schild im Innem des Gefrierschrankes angegeben sind (siehe untenstehende Beispiele).
75
Test
P.S-I.
TI
Net
Util
Utile
Pressure
HIGH-235
LOW 140
RG 2330
Mod.
220 - 240 V- 50 Hz 150 W
340
Total
Gross
Bruto
Brut
Compr.
Syst.
Kompr.
Made in Italy 13918
Gross
Bruto
Brut
R 134 a
kg 0,090
93139180000 S/N 704211801
Cod.
Gross
Bruto
Brut
W
Fuse
A
Freez. Capac
Poder de Cong
kg/24 h
4,0
Max 15 w
Class
Clase
N
Classe
Beauftragen Sie auf keinen Fall einen nicht befugten
Kundendienst und lassen Sie ausschließlich OriginalErsatzteile einbauen.
Das Gerät macht zu viel Lärm
Bitte kontrollieren Sie, ob:
••
• Ihr Gerät gerade (in der Waage) steht
••
••
• es zwischen Möbeln oder Gegenständen steht, die vibrie-
••
ren und daher zu Lärmentwicklung Ihres Gerätes führen
können;
••
• Das Kühlgas im Inneren erzeugt ein leichtes
••
Geräusch, auch bei Stillstand des Kompressors (das ist kein
Defekt).
D
26
Page 29

De veiligheid, een goede gewoonte
BELANGRIJK
Lees de inhoud van deze gebruiksaanwijzing aandachtig aangezien het belangrijke aanwijzingen bevat betreffende de
veiligheid van insapparaat is vervaardigd volgens de internationale veiligheidsnormen die gericht zijn op het beschermen van de gebruiker. Het apparaat heeft het merkteken
IMQ verworven dat wordt uitgegeven door het Italiaanse
Instituut van Kwaliteit, alleen aan apparaten die voldoen
aan de normen van de CEI, de Italiaanse Electrotechnische
Commissie.
1. Dit apparaat mag niet buiten geïnstalleerd worden, ook
niet als het onder een dakje zou staan; het is uiterst gevaarlijk het bloot te stellen aan regen en onweer.
2. Het mag alleen door volwassenen gebruikt worden en
uitsluitend voor het conserveren van etenswaren, volgens
de instructies in deze gebruiksaanwijzing.
3. Raak het apparaat niet aan als u blootvoets bent of met
natte handen of voeten.
4. Wij raden af verlengsnoeren en dubbelstekkers te gebruiken. Controleren dat de snoer niet gebogen ligt of gevaarlijke druk ondergaat.
5. T rek nooit aan het snoer of aan het apparaat om de stekker uit het stopcontact te halen: dit is heel gevaarlijk.
6. Raak de binnenkant van de vrieskast niet aan, vooral niet
met natte handen: u kunt zich vastvriezen of verwonden.
Neem ook geen ijsblokjes in uw mond zodra ze uit de vrieskast komen, u kunt zich verwonden.
7. Alvorens de reinigingswerkzaamheden uit te voeren, dient
u de stroomtoevoer te verbreken (door de stekker uit het
stopcontact te nemen of de hoofsschakelaar van uw woning uit te schakelen).
8. Voor dat uw oude koelkast wordt weggehaald moet u de
sluiting van de deur onklaar maken om te vermijden dat
spelende kinderen erin worden opgesloten.
9. Als er problemen optreden moet u, voordat u er een
installateur bijhaalt, eerst controleren in het hoofdstuk “Problemen?” of het mogelijk is zelf het probleem op te lossen.
Probeer nooit aan de inwendige delen te komen om een
probleem op te lossen.
10. Als uw voedingskabel vervangen moet worden, moet u
zich tot onze T echnische Dienst wenden. In sommige gevallen zijn de aansluitingen uitgevoerd met speciale contacten;
in andere gevallen is het noodzakelijk een speciaal gereedschap te gebruiken teneinde toegang te krijgen tot de verbindingen.
11. Gebruik geen elektrische apparaten in het bewaarvak
van de etenswaren tenzij van het soort dat door de fabrikant
wordt aangeraden.
12. Als het apparaat op is moet het veilig worden gemaakt
voordat het definitief wordt weggedaan, aangezien het
isolerende piepschuim cyclopentaangas bevat en zich
eventueel R600a gas (isobutaan) in het koelcircuit bevindt.
Wendt u zich voor deze ingreep tot uw handelaar of tot de
betreffende plaatselijke authoriteit.
Installation
Voor het goed functioner en en zuinig energieverbruik
is het belangrijk dat het installeren op de juiste wijze
wordt uitgevoerd.
Ventilatie
De compressor en de condensator geven warmte af en vragen dus om een goede ventilatie. Het apparaat moet dus
geplaatst worden in een vertrek met een raam of buitendeur, die de nodige luchtvervanging garanderen. Het vertrek mag niet vochtig zijn.
Let erop gedurende het installeren dat de ventilatier oosters
van het apparaat niet bedekt of verstopt worden.
Ver van de hitte
Plaats het apparaat niet op een zonnige plek, naast het fornuis of dergelijke.
Electrische aansluiting en aarding
Controleer om te beginnen of de gegevens op het typeplaatje, linksonder naast de groentenlade, overeenkomen
met die van het electrische net van uw woning en of het
stopcontact voorzien is van een aardleiding zoals voorgeschreven door de wet voor de veiligheid van installaties 46/
90. Als de aardleiding ontbreekt wijst de Fabrikant iedere
aansprakelijkheid af. Gebruik geen dubbelstekkers of
adapters.
Plaats het apparaat op zodanige wijze dat het
stopcontact waarmee het is verbonden gemakkelijk
bereikbaar is.
Is het vermogen voldoende?
De wandcontactdoos moet in staat zijn de maximale belasing
van het apparaat te dragen dat is aangegeven op het typeplaatje. Dit plaatje bevindt zich binnenin de vriezer.
Voor de electrische aansluiting
Houd het apparaat vertikaal gedurende het vervoer en,voor
het goed functioneren, wacht minstens 3 uren voordat u
het aansluit.
27
NL
Page 30

Van dichtbij gezien
De thermostaat
Deze regelt automatisch de temperatuur in het
apparaat Door de knop van stand 1 naar stand 5 te
draaien, verkrijgt men een steeds lagere
temperatuur.De thermostaat wordt geregeld door
de knop met behulp van een muntje te draaien.
Groen indicatielampje
Dit lampje brandt (schakelaar naar rechts
verplaatsen) wanneer de netstroom is ingeschakeld.
Door de schakelaar naar links te verplaatsen (het
groene lampje is nu afgedekt) wordt de
stroomtoevoer uitgeschakeld.
Geel indicatielampje
Dit lampje brandt (schakelaar naar links verplaatsen)
wanneer de compressor op ononderbroken wijze
functioneert, teneinde de lage temperatuur te
bereiken die voor het invriezen van verse
levensmiddelen benodigd is. Door de schakelaar
naar rechts te verplaatsen (het gele lampje is nu
afgedekt), functioneert de diepvriezer weer volgens
de thermostaatinstelling.
Rood indicatielampje
Dit lampje gaat branden om aan te geven dat de
binnentemperatuur niet toereikend is voor de
conservering van de levensmiddelen
V ak voor invriezing en conservering
V ak voor conservering
2
1
3
5
4
SN
A C B
E
F
F
I0
D
NL
28
Page 31

Het starten van de koelkast
BELANGRIJK
Zet het apparaat na het transport vertikaal en wacht
ongeveer 3 uren teneinde een optimale werking te begunstigen.
Voor optimale en zuinige werking moeten de knoppen van de koelkast en van de vrieskast op middeltemperatuur staan.
Het beste gebruik
Goed invriezen
- Ontdooide diepvriesproducten, ook slechts gedeeltelijk
ontdooid, mogen nooit weer ingevroren worden: u moet
het koken en opeten (binnen 24 uur) of koken en weer
invriezen.
- In te vriezen verse etenswaren moeten niet in contact staan
met reeds ingevroren of diepvriesproducten, maar moeten
geplaatst worden in het bovenste vak waar de temperatuur
daalt tot -18°C hetgeen ideaal is voor goed invriezen. Vergeet
niet dat een goede conservatie afhangt van de snelheid
waarmee wordt ingevroren.
- Open de deur niet gedurende het invriesproces.
- Vries alleen de hoeveelheid in kg die is aangegeven op het
etiket links van de groenten-la.
- Om in te vriezen dient u het gele lampje in te schakelen en
vervolgens de in te vriezen etenswaren in het bovenvak te
plaatsen. Hierbij behoren de etenswaren zoveel mogelijk in
direct contact te staan met de koelvlakken, daarbij oplettend
dat ze de in hetzelfde vak reeds bevroren etenswaren niet
raken.
- Bij het inbrengen van grote hoeveelheden in te vriezen
etenswarenkan de temperatuur in de freezer tijdelijk stijgen
(het rode lampje gaat branden). Daar deze situatie echter
van korte duur is, zullen de reeds opgeslagen etenswaren
hiervan geen schade ondervinden.
- Wanneer na 24 uur het invriesproces is be+indigd, dient
uhet gele lampje weer uit te schakelen.
Opgelet : deze procedure moet men niet vergeten om
onnodig energieverbruik te voorkomen.
- Voor optimaal invriezen en later ontdooien raden wij aan
de etenswaren in kleine porties te verdelen zodat ze snel en
gelijkmatig bevriezen. Schrijf de inhoud en de datum op de
pakken, en volg de instructies in de tabellen “Gids voor het
klaarmaken en invriezen”.
- Open de deur niet als de stroom uit mocht vallen of er zich
een probleem voordoet, zo stelt u het stijgen van de
temperatuur uit. De ingevroren of diepvriesproducten blijven
ongeveer 9-14 uren zonder verandering geconserveerd.
- Plaats geen volle flessen in de vrieskast: zij kunnen breken
aangezien alle vloeistoffen zich gedurende het vriesproces
uitzetten.
- Vul de bakjes voor ijsblokjes tot ongeveer 3/4 van hun
hoogte.
Na aansluiting van het apparaat aan het stroomnet behoort
het groene lampje te branden en dient u tevens het gele
lampje in te schakelen. Zodra het rode lampje uitgaat, dient
u ook het gele lampje uit te schakelen en het appparaat is
klaar voor gebruik.
Conserveren
Voor een goed behoud van de diepvriesprodukten mag de
thermostaatknop, ongeacht de omgevingstemperatuur,
nooit lager dan op 1 worden afgesteld.
Voor omgevingstemperaturen tot 25°-27°C dient de
thermostaatknop op een stand tussen 1 en 2 te worden
afgesteld en bij omgevingstemperaturen tot 32°C op een
stand tussen 2 en 3.
De maximale bewaartijden van de diepvriesprodukten staan
aangegeven in de tabellen “Gids voor het gebruik van de
vriesafdeling”.
Neem altijd nauwgezet de instructies die op de verpakking
van de diepvriesprodukten staan aangegeven in acht en voor
het geval deze mochten ontbreken, wordt aangeraden de
produkten niet langer dan tot 3 maanden na de
aankoopdatum te bewaren.
29
NL
Page 32

Het onderhoud
Alvorens de reinigingswerkzaamheden uit te voeren,
dient u de stroomtoevoer te verbreken (door de stekker uit het stopcontact te nemen of de hoofsschakelaar
van uw woning uit te schakelen)
Ontdooien
BELANGRIJK: let erop dat u het koelcircuit niet
beschadigt.
Gebruik geen mechanische middelen of andere voorwerpen om het ontdooiingsproces te versnellen, maar
alleen die door de fabrikant worden aanbevolen.
Het wordt aangeraden van tijd tot tijd de ijslaag te
verwijderen die zich afzet op de wanden van de diepvriezer .
Gebruik hiervoor geen puntige metalen voorwerpen die op
onherstelbare wijze de koelleiding van het apparaat kunnen
beschadigen, maar gebruik het bijgeleverde plastic
schrapertje. Voor volledige ontdooiing van het apparaat (één
of twee maal per jaar uit te voeren), dient u het groene
lampje uit te schakelen en de deur open te laten totdat de
ijslaag geheel gesmolten is. Om het ontdooien sneller te
laten verlopen kunt u één of meer bakjes met lauw water in
het apparaat plaatsen.
Gedurende de ontdooitijd kunt u het best de opgeslagen
diepvriesprodukten in meerdere lagen krantepapier wikkelen
en op een koele plaats leggen. Aangezien de onvermijdelijke
temperatuurverhoging de bewaartijd verkort, wordt aangeraden
de diepvriesprodukten binnen korte tijd te nuttigen.
Het reinigen en speciaal onderhoud
Na het ontdooien wordt aangeraden het apparaat met lauw
sodawater schoon te maken. ermijd in elk geval het gebruik
van schuurmiddelen, detergenten of zeepprodukten.
Gedurende het ontdooien dienen de bevror en etenswaren in
kranten te worden gewikkeld en op een koele plaats te worden
gelegd om zoveel mogelijk temperatuurverhoging tegen te
gaan. Maar aangezien temperatuurverhoging altijd nadelig is
voor de bewaartijd van de diepvriesprodukten, dienen deze
bij voorkeur zo snel mogelijk te worden genuttigd.
Na al deze handelingen te hebben uitgevoerd, dient u het
groene lampje weer in te schakelen en de thermostaatknop
op de gewenste stand af te stellen.
Na 2 of 3 uren is het apparaat opnieuw gereed om de
diepvriesprodukten te conserveren.
Problemen?
Het groene lampje is uit
Heeft u gecontroleerd of:
••
• de hoofdschakelaar van het buis is uitgeschakeld;
••
••
• de stekker niet goed in het stopcontact zit;
••
Het rode lampje blijft branden
Heeft u gecontroleerd of:
••
• de deur niet goed sluit of de dichting versleten is:
••
••
• de deur te vaak worden geopend;
••
••
• de temperatuurknop niet in de juiste positie staan;
••
••
• er zich niet een te dikke ijslaag op de binnenwanden van
••
het apparaat heeft afgezet.
De motor blijft functioneren
Heeft u gecontroleerd of:
••
• het gele lampje niet aan is (aanduiding van ononderbroken
••
werking)
••
• de thermostaat op de goede stand is afgesteld.
••
Het apparaat maakt teveel lawaai
Heeft u gecontroleerd of:
••
• het apparaat goed waterpas sraat;.
••
••
• tussen meubelen of voorwerpen in staat die trillen en la-
••
waai maken;
••
• het verkoelingsgas binnenin een licht rumoer maakt ook
••
als de compressor niet in werking is (dit is geen defect).
Als ondanks alle controles het apparaat niet functioneert en het
door u geconstateerde gebrek er nog steeds is, wend u zich dan
tot een erkende installateur met deze informatie: het soort gebrek, het codenummer van het model (Mod.) en de betreffende
nummers (S/N) op het typeplaatje(zie de hiervolgende voorbeelden). Dit plaatle bevindt zich binnenin de vriezer .
75
Test
P.S-I.
TI
Net
Util
Utile
Pressure
HIGH-235
LOW 140
RG 2330
Mod.
220 - 240 V- 50 Hz 150 W
340
Total
Gross
Bruto
Brut
Compr.
Syst.
Kompr.
Made in Italy 13918
Gross
Bruto
Brut
R 134 a
kg 0,090
93139180000 S/N 704211801
Cod.
Gross
Bruto
Brut
Fuse
W
A
Freez. Capac
Poder de Cong
kg/24 h
4,0
Max 15 w
Class
Clase
N
Classe
Wend u zich nooit tot een niet-erkende installateur en
weiger niet-originele onderdelen.
NL
30
Page 33

Gids voor het gebruik van de vrieskast
Vlees en vis
Soorten Verpakken
Runderbraadstuk Gewikkeld in aluminium folie 2 / 3 9 / 10 Niet nodig
Lamsvlees Gewikkeld in aluminium folie 1 / 2 6 Niet nodig
Varkensbraadstuk Gewikkeld in aluminium folie 1 6 Niet nodig
Kalfsbraadstuk Gewikkeld in aluminium folie 1 8 Niet nodig
Biefstukjes en
varkenslap
Lams- en
varkenscoteletten
Gehaktvlees In aluminium met plastic er omheen Zeer vers 2 Langzaam in koelkast
Hart en lever In plastic zakjes 3 Niet nodig
Worstjes In plastic of aluminium folie 2 Volgens gebruik
Ieder afzonderlijk in plastic folie en dan 4-6
samen in aluminium folie
Ieder afzonderlijk in plastic folie en dan 4-6
samen in aluminium folie
Besterven
(dagen)
Conservatie
(in maanden)
6 Niet nodig
6 Niet nodig
Ontdooien
Kip en kalkoen Gewikkeld in aluminium folie 1 / 3 9 Langzaam in koelkast
Eend en gans Gewikkeld in aluminium folie 1 / 4 6 Langzaam in koelkast
Wilde eend, fazant en
patrijs
Konijn en haas Gewikkeld in aluminium folie 3 / 4 6 Langzaam in koelkast
Hert en ree In aluminium of plastic folie 5 / 6 9 Langzaam in koelkast
Grote vissen In aluminium of plastic folie 4 / 6 Langzaam in koelkast
Kleine vissen In plastic zakjes 2 / 3 Niet nodig
Schaaldieren In plastic zakjes 3 / 6 Niet nodig
Weekdieren
Gekookte vis In aluminium of plastic folie 12 In warm water
Gewikkeld in aluminium folie 1 / 3 9 Langzaam in koelkast
In aluminium of plastic bakken met water
en zout
3 Langzaam in koelkast
Gebakken vis In plastic zakjes 4 / 6 Rechtstreeks in pan
31
NL
Page 34

Vlees en vis
Soot Preparatie
Appel
Abrikozen, perzi k en,
kersen en pruimen
Aardbeien, mo er bei en
en bosbessen
Gekookt fruit
Vruchtensap
Bloemkool
Kool en spruitjes
Erwtjes Doppen en wasser 2' In pl astic zakjes 12 Niet nodig
Sperziebonen Wassen en in stukjes 2 In plastic zakjes 10 / 12 Niet nodig
Schillen en in stukjes
snijden
Ontpitten en schillen 1' / 2' In bakjes, in siroop 12 Langzaam in koelkast
Wassen en laten
drogen
Snijden, koken en
zeven
Wassen, snijden en
persen
In stukjes in water
met citroen dompelen
Reinigen en wassen
(in stukjes)
In heet
water
2' In bakjes, in siroop 12 Langzaam in koelkast
2' In plastic zakjes 12 Niet nodig
1' / 2' In plas tic zakjes 10 / 12 Kamertemperatuur
Voorbereiding
In bakjes, met suiker
bedekt
In bakjes, 10% suiker
toevoegen
In bakjes, suiker naar
smaak
Conservatie
(in maanden)
10 / 12 Langzaam in koelkast
12 Langzaam in koelkast
10 / 12 Langzaam in koelkast
Ondtooien
Wortels, paprika's en
knolraap
Paddestoelen en
asperges
Spinazie Wassen en fijn snijden 2' In za kjes of bakjes 12 Kamertemperatuur
Soepgroenten
Diversen Preparatie
Brood In plastic z akj es 4
Taarten In plastic folie 6
Room In plastic bakj es 6
Boter
Gekookt voe dsel en
groentescep
In schijven, schillen en
wasser
Wassen en snijden 3' / 4' In zakjes of bakj es 6 Kamertemperatuur
Wassen en in stukjes
snijden
3' / 4' In plas tic zakjes 12 Niet nodig
3' In zakjes, in kleine porties 6 / 7 Kamertemperatuur
In heet
water
Voorbereiding
In de originele verpakking
met aluminium er omheen
Onderverde el d in pla s t ic
of glazen bakjes
Conservatie
(in maanden)
6 In de koelkast
3 / 6
Ondooien
Op kamertemperatuur
en in de oven
Op kamertemperatuur
en koken op 100/200°C
Op kamertemperatuur
of in de koelkast
Op kamertemperatuur
of in warm water
Eieren
NL
Invriezen zonder gu scio in
kleine bakjes
32
10
Op kamertemperatuur
of in de koelkast
Page 35

La seguridad, una buena costumbre
ATENCIÓN
Lea atentamente este folleto, pues le proporcionará importantes indicaciones sobre la seguridad de la instalación, de
uso y de mantenimiento.
Este aparato ha sido fabricado en conformidad con las normas internacionales de seguridad, cuyo objeto es proteger
al consumidor .
Ha obtenido además la marca IMQ, otorgada por los técnicos del Instituto Italiano de Calidad a los aparatos que cumplen las normas del CEI (Comité Electrotécnico Italiano).
1. No debe instalar el aparato en el exterior , ni siquiera aunque esté protegido con un cobertizo; es muy peligroso exponerlo a la lluvia y los temporales.
2. Sólo deben manejarlo personas adultas, exclusivamente
para conservar alimentos frescos, osiguiendo las instrucciones de este manual.
3. No toque ni manipule nunca el aparato estando descalzo, ni con las manos o los pies mojados o húmedos.
4. No aconsejamos la utilización de prolongadores ni enchufes múltiples. Si el aparato se instala entre muebles, compruebe que el cable de alimentación no queda aprisionado
ni doblado: es peligroso.
5. No tire nunca del cable ni del aparato para desconectar el
enchufe de la toma de la pared: es muy peligroso. Aconsejamos tirar directamente de la clavija.
6. No toque las partes internas refrigerantes, sobre todo
con las manos mojadas, pues podría quemarse o lastimarse.
No introduzca en la boca cubitos de hielo recién extraídos
del congelador, pues podría quemarse.
7. Antes de cualquier operación de limpieza desconectar
previamente el aparato de la red de alimentación (simplemente desenchufando la clavija o apagando el interruptor
general de la vivienda).
8. Antes de r etirar el frigorífico antiguo, inutilice la cerradura para evitar que los niños, al jugar, queden encerrados
dentro del aparato.
9. En caso de anomalía, antes de llamar al servicio de asistencia, consulte el capítulo “Solución de problemas”. No
intente reparar la avería ni acceder a las partes internas.
10. Cuando se deba sustituir el cable de alimentación, dirigirse a nuestros Centros de Asistencia. En algunos casos las
conexiones se realizan con terminales especiales, en otros
casos es necesario el uso de una herramienta especial para
acceder a las conexiones.
11. No use aparatos eléctricos dentro del compartimiento
conservador de alimentos si los mismos no son del tipo
recomendado por el fabricante.
12. Al finalizar la vida funcional del aparato – que contiene
gas ciclopentano en la espuma aislante y eventualmente gas
R600a (isobutano) en el circuito refrigerante – el mismo se
deberá asegurar contra pérdidas antes de enviarlo al basurero.
Para esta operación dirigirse al comerciante o al Ente Local
encargado.
Instalación
Para garantizar un buen funcionamiento y un mínimo
consumo de electricidad es importante que la instalación se realice correctamente.
La aireación
El compresor y el condensador emiten calor y por ello requieren una buena aireación. No son adecuados los ambientes con poca ventilación. Por lo tanto, el aparato se debe
instalar en un ambiente que posea una apertura (ventana o
puertaventana) que asegure el necesario intercambio de aire.
Y que no sea demasiado húmedo.
T ener cuidado, durante la instalación, de no cubrir u obstruir
las rejillas que permiten la buena ventilación del aparato.
Lejos del calor
Evitar colocar el aparato en un lugar expuesto directamente
a la luz solar, junto a la cocina eléctrica o similares.
Conexión eléctrica y puesta a tierra
Antes de proceder a la conexión eléctrica, controlar que el
voltaje indicado en la placa de características, colocada abajo y a la izquierda junto al recipiente para verduras, corres-
ponda con la de la instalación de su casa, y que la toma de
corriente posea una regular puesta a tierra, de acuerdo a
lo prescripto por la ley sobre la seguridad de las instalaciones 46/90. Si no existe la puesta a tierra, el Fabricante declina toda responsabilidad. No usar tomas múltiples o
adaptadores.
Coloque el aparato de modo tal que se pueda acceder fácilmente al toma al cual está conectado.
¿La potencia es insuficiente?
El tomacorriente eléctrico debe ser capaz de soportar la
carga máxima de potencia del aparato, indicada en la placa de características situada al interior del congelador.
Antes de conectarlo eléctricamente
Después del transporte, colocar el aparato verticalmente y
esperar 3 horas como mínimo antes de conectarlo al
tomacorriente, para permitir un correcto funcionamiento.
33
E
Page 36

Vista de cerca
El termostato
Regula automaticamente la temperatura en el
interior del aparato. Girando el selector de la
posición 1 a la posición 5 es posible obtener
temperaturas más frías.
Para efectuar la regulación del termostato girar el
selector utilizando una moneda.
La lámpara verde
Cuando esta encendida (desplazar el interruptor
hacia la derecha) indica que el aparato está
conectado a la red de alimentación. Desplazando el
interruptor hacia la izquierda (lámpara verde
cubierta), el aparato está deconectado de la red de
alimentación.
La lámpara amarilla
Cuando está encendida (desplazar el interruptor
hacia la izquierda) permite el funcionamiento
continuo del compresor para alcanzar las bajas
temperaturas necesarias para el congelamiento
rápido de los alimentos frescos. Desplazando el
interuptor hacia la derecha (lámpara amarilla
cubierta) el congelamiento se realiza según la
regulación del termostato.
La lámpara roja
Si accende quando la temperatura all'interno
dell'apparecchio è insufficiente per conservar e delle
derrate.
Compartimiento utilizable para el
congelamiento y la conservación
Compartimientos para la conservación
2
1
3
5
4
SN
A C B
E
F
F
I0
D
E
34
Page 37

Puesta en marcha
ATENCIÓN
Después del transporte, antes de poner en marcha el
aparato se recomienda esperar unas 3 horas desde la
instalación para permitir un correcto funcionamiento.
Recuerde que para un funcionamiento óptimo y económico, debe colocar el mando del frigorífico en la
posición de temperatura intermedia.
CÓmo utilizarlo mejor
Para congelar bien
- No congele de nuevo un alimento descongelado, aunque
sólo sea parcialmente: cocínelo para consumirlo (en 24 horas)
o para volverlo a congelar.
- Para la preparación de alimentos a congelar, consultar un
manual especializado.
- Para congelar alimentos frescos utilice únicamente el
compartimiento superior, sin rebasar nunca la cantidad
máxima aconsejada en la placa de características; en dicho
compartimiento la temperatura desciende por debajo de 18°C, que es ideal para congelar bien los alimentos. No olvide
que la buena conservación de los alimentos congelados
depende de la velocidad de congelación.
- Durante la congelación, evite abrir la puerta del congelador .
- Congele únicamente la cantidad en kg indicada en la placa
de características que encontrará a la izquierda del cajón
para frutas y verduras.
- Para efectuar la operación de descongelación, encender
primero la lámpara amarilla y luego introducir los alimentos
a congelar en el compartimiento superior, teniendo la
precaución de disponerlos de manera que resulten en
contacto directo con las superficies refrigerantes y que no
estén en contacto con otros alimentos ya congelados en el
mismo compartimiento.
- La introducción de una cantidad considerable de alimentos
a congelar puede aumentar momentaneamente la temperatura en el interior del compartimiento congelador
(encendido de la lámpara roja). Dicha situación, al ser transitoria, perjudica la buena conservación de los alimentos ya
almacenados.
- Al cabo de 24 horas, terminada la congelación, proceder al
apagado de la lámpara amarilla.
Atención: no olvidarse de efectuar esta operación si se
quieren evitar derroches inútiles de energía.
- Para conseguir una conservación y una descongelación
óptimas, se aconseja repartir los alimentos en pequeñas
cantidades, así se descongelarán rápidamente y de forma
homogénea. Indique en los envases su contenido y la fecha
de congelación.
Una vez conectado el aparato a la red de alimentación,
asegurarse que la lámpara verde esté encendida y
seguidamente encender también la amarilla.
Cuando la lámpara roja se haya apagado, apagar también
la amarilla: a partir de este momento el aparato está listo
para ser utilizado.
- No abra la puerta del congelador en caso de interrupción
del suministro eléctrico o de avería: así retrasará la elevación
de la temperatura en su interior y los congelados se
conservarán sin alteraciones de 9 a 14 horas.
- No introduzca en el congelador botellas con bebidas
gaseosas: podrían romperse, ya que todos los líquidos
aumentan de volumen al congelarse.
- Llene las cubetas para cubitos de hielo hasta unas 3/4 partes
de su altura.
Conservación
Para obtener una buena conservación de alimentos
surgelados o congelados, no situar nunca el índice del selector
del termostato por debajo de 1, cualquiera sea la temperatura ambiente.
Para temperaturas ambiente de hasta 25°-27°C el índice
del selector debe colocarse entre 1 y 2 mientras que para
temperaturas ambiente de hasta 32°C entre 2 y 3.
Los tiempos máximos de conservación de los alimentos
congelados se indican en las tablas “Guía para la utilización
del congelador”.
Observar siempre escrupulosamente las instrucciones
impresas en los envases de los alimentos surgelados y en
ausencia de éstas, no conservar por más de 3 meses a partir
de la fecha de compra.
Al comprar productos congelados, es necesario comprobar
que los mismos hayan sido conservados a una temperatura
adecuada y que el envase esté intacto
Para mantener inalterada la calidad del alimento surgelado
será oportuno pasarlo a recipientes apropiados y volver a
introducirlo lo más rápido posible en el interior del aparato.
Si un envase presenta indicios de humedad o deformaciones
anormales, es probable que haya sido anteriormente
conservado a una temperatura inadecuada y que su
contenido se haya durante ese tiempo deteriorado.
35
E
Page 38

Cómo mantenerlo en buen estado
Antes de cualquier operación de limpieza desconectar
previamente el aparato de la red de alimentación (simplemente desenchufando la clavija o apagando el interruptor general de la vivienda)
Descongelación
A TENCIÓN: no dañe el circuito r efrigerante.
Prestar atención de no utilizar dispositivos mecánicos
u otro medios para acelerar el proceso de
descongelamiento que no sean aquellos recomendados
por el constructor .
Se recomienda eliminar, de vez en cuando, la escarcha que
recubre los estantes del aparato. Atención: para esta
operación no usar objetos puntiagudos que pueden provocar perforaciones en el circuito refrigerante, provocando
daños irreparables al aparato; utilizar la espátula de plástico
suministrada junto con el aparato.
Para obtener una decongelación completa del aparato (a
efectuar una o dos veces al año) apagar la lámpara verde y
dejar abierta la puerta hasta que la escarcha se haya disuelto
por completo.
Solución de problemas
Para acelerar la operación de descongelación, puede
introducirse en el interior del aparato una o más cubetas
con agua tibia.
Durante la operación de descongelación se recomienda
envolver los alimentos concervados en hojas de papel y
colocarlos en un lugar fresco. Se aconseja consumirlos lo
antes posible, dado que el inevitable aumento de la temperatura reduce la duración de conservación de los mismos.
Limpieza y mantenimiento especiales
La limpieza del aparato debe efectuarse periódicamente
utilizando bicarbonato de sodio disuelto en agua tibia. Evitar el uso de productos abrasivos, detergentes o jabones;
luego del lavado enjuagar con agua limpia y secar
cuidadosamente.
Una vez efectuadas dichas operaciones, volver a encender
la lámpara verde y llevar el selector del termostato a la
pocición de funcionamiento deseada. Al cabo de 2 o 3 horas
de funcionamiento el aparato está listo de nuevo para la
conservación de alimentos surgelados o congelados.
Lámpara piloto verde apagada
Compruebe que:
••
• haya corriente;
••
••
• El interruptor general de la casa esté conectado.
••
Lámpara alarma roja siempre
Compruebe que:
••
• La puerta cierren bien y la junta no estén estropeada.
••
••
• La puerta no se abran muy a menudo.
••
••
• El mando de regulación esté en la posición correcta.
••
••
• en las paredes internas no haya excesiva cantidad de
••
escarcha
Funciona-miento del compresor sin
interrupción
Compruebe que:
••
• la lámpara amarilla no esté encendida (condición de
••
funcionamiento continuo);
••
• el termostato esté en la posición correcta.
••
El aparato hace demasiado ruido
Compruebe que:
••
• El aparato esté bien nivelado.
••
••
• El aparato esté instalado entre muebles y objetos que vi-
••
bren y emitan ruido.
••
• El gas refrigerante interno produce un ligero ruido incluso
••
cuando el compresor está parado (no es un defecto).
Si, no obstante se hayan realizado todos los controles, el
aparato no funciona y el inconveniente detectado existe
todavía, llamar al Centro de Asistencia más cercano, comunicando las siguientes informaciones: el tipo de avería, la
sigla del modelo (Mod.) y los relativos números (S/N) escritos en la placa de características situada al interior del congelador (ver los ejemplos en las siguientes figuras).
75
Test
P.S-I.
TI
Net
Util
Utile
Pressure
HIGH-235
LOW 140
RG 2330
Mod.
220 - 240 V- 50 Hz 150 W
340
Total
Gross
Bruto
Brut
Compr.
Syst.
Kompr.
Made in Italy 13918
Gross
Bruto
Brut
R 134 a
kg 0,090
93139180000 S/N 704211801
Cod.
Gross
Bruto
Brut
W
Fuse
A
Freez. Capac
Poder de Cong
kg/24 h
4,0
Max 15 w
Class
Clase
N
Classe
No recurrir nunca a técnicos no autorizados y rechazar
siempre la instalación de repuestos no originales.
E
36
Page 39

Guía para la utilización del congelador
Carne y pescados
Tipo Confección
Asado y cocido d e
novillo
Cordero Envuelto en hojas de aluminio 1 / 2 6 N o necesario
Asado de cerdo Envuelto en hojas de aluminio 1 6 No necesario
Asado y cocido d e
ternera
Bistec de cerdo
Lonchas y costillas de
cordero o novillo
Carne picada
Corazón y hígado En bolsitas de politeno 3 No necesario
Envuelto en hojas de aluminio 2 / 3 9 / 10 No necesario
Envuelto en hojas de aluminio 1 8 No necesario
Cada loncha tiene que ser envuelta en
politeno y luego en hojas de aluminio en
número de 4-5
Cada lonchaa tiene que ser envuelta en
politeno y luego en hojas de aluminio en
número de 4-5
En recipientes de aluminio cubierto con
polite n o
Macerado de
la carn e (d ias)
Fresquísima 2
Duración
(mese s)
6 No necesario
6 No necesario
Descongelación
Lentamente en
frigorífico
Salchichas En hojas de politeno o aluminio 2 Según e l empleo
Pollos y pavos Envuelto en hojas de aluminio 1 / 3 9
Patos y gansos En hojas de aluminio 1 / 4 6
Patos salvajes, faisanes
y perdices
Conejos y liebres En hojas de aluminio 3 / 4 6
Ciervo y corzo En hojas de aluminio o politeno 5 / 6 9
Pescados muy grandes En hojas de aluminio o politeno 4 / 6
Pescados pequeños En sobres de politeno 2 / 3 No necesario
Mariscosos En sobres de politeno 3 / 6 No necesario
Moluscos
En hojas de aluminio 1 / 3 9
En recipientes de aluminio o plástico cubiertos
con agua y sal
3
Lentamente en
frigorífico
Lentamente en
frigorífico
Lentamente en
frigorífico
Lentamente en
frigorífico
Lentamente en
frigorífico
Lentamente en
frigorífico
Pescados cocidos En hojas de aluminio o politeno 12 En agua caliente
Pescados fritos En sobres de politeno 4 / 6
Directamente en la
sartén
37
E
Page 40

Guía para la utilización del congelador
Carne y pescados
Tipo Confección
Manzanas y peras
Albaricoques, melocotones,
cerezas y ciruelas
Fresas, moras y arándanos
Fruta cocida
Jugos de fruta Lavar, cortar y aplastar
Co liflores
Coles y coles de Bruselas Limpiar y lavar (partir) 1' / 2' En bolsitas de politeno 10 / 12
Gu isa nte s P ela r y la va r 2 ' E n bo lsita s d e p o liten o 12 N o n ec es ario
Judías verdes
Zanahorias, pimientos y
nabos
Pelar y cortar en
pedacitos
Desh ue sar y p elar 1 ' / 2'
Limpiar, lavar y dejar
secar
Cortar, cocinar y
tamiza r
Partir y calentar en
agua y jugo de limón
Lavar y co rtar en
pedacitos
Cortar en rebanadas,
pela r y la va r
Cocci-
ón
3' / 4' En bolsitas de politeno 12 No necesario
Confección
En recipientes, cubiertos
2'
de almíbar
En recipientes, cubiertos
de almíbar
En recipientes, cubiertos
de azúcar
En recipientes, agregar
el 10% de azúcar
En recipientes, azúcar
según los gusto s
2' En bolsitas de politeno 12 No necesario
2 En bolsitas de politeno 10 / 12 No necesario
Duración
(me se s)
12
12
10 / 12
12
10 / 12
Descongelación
Lentamente en
frigorífico
Lentamente en
frigorífico
Lentamente en
frigorífico
Lentamente en
frigorífico
Lentamente en
frigorífico
A temperatura
ambiente
Setas y espárragos Lavar y cortar 3' / 4' En bolsitas o recipientes 6
Espinacas Lavar y desmenuzar 2' En bo lsitas de politeno 12
Verduras varias para sopa
Tipo Confección
Pan En bolsitas de politeno 4
Tortas En hojas de politeno 6
Nata
M antequilla
Com idas cocida s, sopa de
legumbres
Lavar y co rtar en
pedacitos
Scott-
atura
En bolsitas en pequeñas
3'
porciones
Confección
En recipientes de
plástico
En e l e nvo lto rio o rigin al
y en alu m in io
Divididos en recipientes
de plástico o vidrio
6 / 7
Duración
(me se s)
3 / 6
A temperatura
ambiente
A temperatura
ambiente
A temperatura
ambiente
Descongelación
A temperatura
ambiente y en el horno
A temperatura
amb iente y co cer a
100/200°C
6
6 E n frigorífico
A temperatura
ambiente o en el
frigorífico
A temperatura
ambiente o en agua
calie n t e
Huevos
E
Congelar sin cáscara en
pequeños recipientes
38
10
A temperatura
ambiente o en el
frigorífico
Page 41

A segurança, un bom hábito
ATENÇÃO
Ler atentamente as advertências mensionadas neste livro de
instruções dado que fornecem importantes indicações relativas à segurança da instalaço, à utilização e à manutenção.
Este aoarelho foi concebido segundo as normas internacionais de segurança criadas fundamentalmente para a protecção do consumidor .
Na realidade este aparelho obteve o certificado de
homologaço IMQ passado pelos técnicos do Instituto Italiano de Qualidade, certificado que só é atribuido aos aparelhos que cumpram as normas do CEI, Comitato Elettrotecnico
Italiano.
1. Este aparelho não deve ser instalado ao ar livre, mesmo
se a área estiver protegida por uma cobertura; é muito perigoso deixa-lo exposto à chuva e às intempéries.
2. Deve ser utilizado só por adultos e exclusivamente para
conservar os alimentos, de acordo com as instruções descritas neste manual.
3. Nunca tocar nem manusear este aparelho com os pés
descaços ou com as mos ou os pés molhados.
4. Não é aconselhável a utilização de adaptadores ou extenções,
sobretudo em ambientes húmidos. Se o aparelho está instalado entre móveis, controlar se o cabo de alimentaçáo ficou sujeito a dobras ou compressões perigosas.
5. Nunca puxar o cabo de alimentaçáo ou o aparelho para
desligar a ficha da tomada da parede: é muito perigoso.
6. Náo tocar nas superfícies internas de refrigeraçáo, sobretudo com as máos molhadas, porque poderá sofrer queimaduras ou feridas. Náo coma cubos de gelo acabados de
retirar do cogelador, porque pode pr ovocar queimaduras.
7. Antes de começar as operações de limpeza lembre de
desligar o aparelho da corrente (desinserindo a ficha da tomada ou o interruptor geral do apartamento).
8. Sempre que o novo aparelho se destine a substituir outr o,
de um modelo mais antigo, recomenda-se a inutilizaçáo do
mecanismo de fecho das portas do antigo antes de o deitar
fora, evitando deste modo, que as crianças, nas suas brincadeiras, possam ficar trancadas no seu interior.
9. Sempre que o aparelho no funcione correctamente, antes de recorrer ao Serviço de Assistência Técnica, leia o capítulo “O que fazer se ocorre alguma anomalia?” para verificar se é possível eliminar a eventual anomalia. Nâo tente
proceder à reparaçáo, mexendo nas partes internas do aparelho.
10. No caso de dano, o cavo de alimentação eléctrica deste
aparelho deve ser trocado obrigatoriamente pelo nosso
Serviço de Assistência Técnica, porque é necessário utilizar
ferramentas especiais.
11. não use aparelhos eléctricos no interior do compartimento
para guardar alimentos, excepto os de tipo recomendado pelo
fabricante.
12, No final da vida útil do aparelho – que contém gás
ciclopentano na espuma de isolamento e eventualmente gás
R600a (isobutano) no circuito de refrigeração – é necessário
colocar o mesmo em segurança, antes de mandar eliminá-lo.
Para esta operação, entre em contacto com o seu revendedor
ou com o organismo local encarregado.
Instalação
Para garantir um bom funcionamento e um consumo
reduzido de electricidade é importante que a instalação seja efectuada correctamente.
A ventilação
O compressor e o condensador emitem calor e portanto precisam de uma boa ventilação. São pouco adequados os ambientes com ventilação imperfeita. Portanto o aparelho deve ser
instalado num ambiente dotado de uma abertura (janela ou
porta externa) para assegurar a necessária renovação de ar . O
ambiente também não deve ser demasiado húmido.
Ter cuidado, durante a instalação, para não cobrir ou obstruir
as grelhas que permitem a boa ventilação do aparelho.
Afastado do calor
Evitar de posicionar o aparelho num ligar directamente exposto à luz solar, ao lado do fogão eléctrico ou similar.
Ligação eléctrica e ligação à terra
Antes de proceder à ligação eléctrica, controlar se a tensão
indicada na placa de características, colocada embaixo à
esquerda, junto ao recipiente para verduras, corresponde a
tensão da instalação eléctrica da casa e se a tomada está
equipada com uma ligação à terra regular, na maneira
indicada pelas leis relativas à segurança das instalações N°.
46/90. Se não houver uma ligação à terra, o Fabricador declina toda e qualquer responsabilidade. Não utilizar fichas
múltiplas ou adaptadores.
Posicione o aparelho de modo que haja acesso à
tomada em que estiver ligada.
A potência é insuficiente ?
A tomada eléctrica deve ser capaz de suportar a máxima
carga de potência do aparelho, indicada na placa de características, situada dentro do congelador.
Antes da ligação eléctrica
Depois do transporte, colocar o aparelho verticalmente e
aguardar pelo menos 3 horas antes de ligá-lo na tomada,
para permitir o seu funcionamento correcto.
39
P
Page 42

Descrição do aparelho
O termostato
Regula automaticamente a temperatura dentro do
aparelho. Girando o manípulo da posição 1 à
posição 5 obtém-se temperaturas cada vez mais
baixas.
Para efectuar a regulação do termostato girar o
manípulo utilizando uma moeda.
O indicador luminoso verde
Quando está aceso (mover o interruptor para a
direita), indica que o aparelho está ligado à rede de
alimentação. Movendo o interruptor para a
esquerda (indicador luminoso verde coberto), o
aparelho está desligado da rede de alimentação.
O indicador luminoso amarelo
Quando está aceso (mover o interruptor para a
esquerda), consente o funcionamento contínuo do
compressor para que sejam alcançadas as
temperaturas baixas necessárias para o
congelamento veloz de alimentos frescos.
Ao mover o interruptor para a direita (indicador
luminoso amarelo coberto), o congelamento
funciona conforme a regulação do termostato.
Indicador luminoso vermelho
Acende-se quando a temperatura dentro do
aparelho não é suficiente para conservar os
alimentos.
Vão utilizável para congelamento e
conservação
Vão para conservação
2
1
3
5
4
SN
A C B
E
F
F
I0
D
P
40
Page 43

Como pôr em funcionamento o aparelho
A TENÇÃO
Depois de qualquer transporte, antes de ligar o aparelho à corrente, é aconselhável esperar cerca de 3 horas
para assegurar um bom funcionamento.
Para um funcionamento óptimo e económico, coloque
o manípulo prra regulação da temperatura numa posição intermédia.
Quando o aparelho estiver ligado à rede de alimentação,
controlar que o indicador verde esteja aceso e acender
também o indicador luminoso amarelo.
Quando o indicador vermelho se apaga desligar o indicador
amarelo: a esta altura o aparelho está pronto para ser
utilizado.
Como utilizar malhor o congelador
Para congelar bem
- Um alimento descongelado, ainda que só parcialmente,
não deve voltar a ser congelato: deverá cozinhá-lo para o
consumir (dentro de 24 horas) ou para o congelar.
- Os alimentos frescos , a congelar , não devem ser colocados
em contacto com os que já estão congelados mas sim no
compartimento superior onde a temperatura desce abaixo
dos -18°C , temperatura ideal para congelar bem os
alimentos. Não deve esquecer que a boa conservação dos
alimentos congelados depende da rapidez com que se processa a congelação.
- Durante a congelação, evitar abrir a porta do congelador .
- Congelar, no máximo, a quantidade, em kg, indicada na
placa de caracteristicas, colocada à esquerda da verdureira.
- Efectuar a operação de congelamento acendendo o
indicador amarelo e, depois desta operação, introduzir os
alimentos a serem congelados no vão superior tomando
cuidado para que estejam em contacto directo com as
superfícies frias, evitando o contacto com eventuais alimentos
já congelados contidos no mesmo vão.
- A introdução de quantidades excessivas de alimentos a
serem congelados pode aumentar temporariamente a temperatura dentro do congelador (acendimento do indicador
luminoso vermelho). Esta situação, sendo transitória, não
prejudica a boa conservação dos alimentos introduzidos anteriormente.
- Após 24 horas, uma vez terminado o congelamento, proceder apagando o indicador amarelo.
Atenção: esta operação não deve ser esquecida para
evitar inúteis desperdícios de energia.
- Para obter uma conservação e sucessiva congelação
óptimas, é aconselhável separar os alimentos em pequenas
quantidades, porque assim congelam mais rapidamente e
de um modo homogéneo. Para os alimentos já
confeccionados, de-verá reportar-se às indicações sobr e tipos
de alimentos e duração de congelação , contidas nas
tabelas.”Guia de utilização do congelador”.
- No caso de falta de energia eléctrica ou avaria, no abra a
porta do congelador , assim r etar dará o aumento da temperatura no seu interior . Deste modo, os alimentos congelados
conservar-se-ão sem alteração durante cer ca de 9-14 horas.
- Não guarde no congelador recipientes contendo líquidos,
sobretudo se se tratar de bebidas gaseificadas, dado que os
líquidos ao serem congelados , aumentam de volume
podendo fazer rebentar o reservatório onde se encontram.
- Não encha de água, a mais de 3/4 da sua altura, as couvettes
d couvettes de gelo.
Conservação
Para obter uma boa conservação de alimentos surgelados
ou congelados, não colocar nunca o indicador do manípulo
do termostato abaixo de 1 independentemente da temperatura ambiente.Para temperatura ambiente até 25°-27°C
o indicador do manípulo deve ser colocado entre 1 e 2,
enquanto que para temperaturas ambiente até 32°C entre
2 e 3.
O tempo máximo de conservação dos alimentos congelados
está indicado nas tabelas “Guia para utilização do
congelador”.
Respeitar sempre as instruções escritas nas confecções de
alimentos surgelados e, em falta das mesmas, não conservar os alimentos por mais de três meses a partir da data de
compra.
Ao comprar alimentos surgelados é necessário assegurar -se
de que os mesmos tenham sido conservados à temperatura
correcta e que a embalagem esteja intacta.
Para manter inalterada a qualidade dos alimentos surgelados
é oportuno transportá-los em recipientes apropriados e repôlos o antes possível dentro do congelador.
Se a confecção tiver manchas de umidade ou inchaços
anormais provavelmente foi conservada a uma temperatura
incorrecta e o conteúdo pode ter se deteriorado.
41
P
Page 44

Como conservar o aparelho
Antes de começar as operações de limpeza lembre de
desligar o aparelho da corrente (desinserindo a ficha
da tomada ou o interruptor geral do apartamento)
Para acelerar as operações de descongelamento é possível
introduzir dentro do aparelho uma ou mais bacias com água
morna.
Durante a operação de descongelamento convém embrulhar
Descongelamento
A TENÇÃO: não estrague o cir cuito de r efrigeração.
Ter cuidado para não utilizar dispositivos mecânicos
ou outros instrumentos para tornar mais veloz o pro-
os alimentos conservados com várias folhas de papel e colocálos num lugar ventilado. Considerando que o inevitável
aumento de temperatura diminuirá a duração destes, é
aconselhável consumi-los a curto prazo.
cesso de descongelação, além dos recomendados pelo
fabricador.
Convém, de vez em quando, remover a geada que recobre
as prateleiras do aparelho.
Atenção: não utilizar objetos metálicos pontiagudos que
podem provocar perfurações no circuito refrigerante e
consequentemente danificar permanentemente o aparelho.
Para esta operação, usar o raspador de plástico fornecido
com o aparelho. Para obter o descongelamento completo
do aparelho (a ser efectuado uma ou duas vezes por ano),
apagar o indicador luminoso verde e deixar a porta aberta
até que a geada derreta completamente.
Limpeza
A limpeza do aparelho deve ser efectuada periodicamente
utilizando bicarbonato de sódio dissolvido em água morna.
Evitar de todas formas, o uso de substâncias abrasivas,
detergentes ou sabões. Após a lavagem enxaguar com água
limpa e secar com cuidado.
Uma vez terminadas estas operações pode-se acender
novamente o indicador luminoso verde e colocar o manípulo
do termostato na posição de funcionamento desejada. Depois
de 2 ou 3 horas de funcionamento o aparelho está pronto
para conservar outra vez alimentos congelados ou surgelados.
O que fazer se ocorrer alguma anomalia?
Indicador luminoso verde apagado
Deve verificar se:
••
• não falte corrente eléctrica;
••
••
• O interruptor geral do apartamento está desligado.
••
Indicador luminoso de alarme vermelho permanentemente aceso
Deve verificar se:
••
• A porta fecha bem e se a guarnição (borracha de vedação)
••
está em bom estado;
••
• A porta e aberta com muita frequência;
••
••
• O manípulo de regulaço da temperatura está na posição
••
correcta;
••
• não haja demasiada geada nas paredes do congelador.
••
O compressor funciona continuamente
Deve verificar se:
••
• A porta no está bem fechada ou se é aberta com muita
••
frequência;
••
• O manípulo de regulaço da temperatura está na posição
••
correcta.
O aparelho emite muito ruído
Deve verificar se:
••
• O aparelho está bem nivelado;
••
••
• Está instalado entre móveis ou objectos que vibram e
••
emitem ruídos;
••
• O gás refrigerante que circula no interior do circuíto de
••
refrigeração pode provocar um ligeiro ruído (gorgojar) ,
mesmo quando o compressor não está em funcionamento.
Não se preocupe, não é um defeito , trata-se de uma situação normal..
Se, apesar de todos os controlos, o aparelho não funcionar
e a anomalia que notou continuar a verificar-se, chamar o
Centro de Assistência Técnica mais próximo, comunicando
as seguintes informações : o tipo de avaria, a sigla do modelo (Mod.) e os respectivos números (S/N) escritos na placa
de características situada dentro do congelador . (ver os exemplos nas figuras seguintes).
75
Test
P.S-I.
TI
Net
Util
Utile
Pressure
HIGH-235
LOW 140
RG 2330
Mod.
220 - 240 V- 50 Hz 150 W
340
Total
Gross
Bruto
Brut
Compr.
Syst.
Kompr.
Made in Italy 13918
Gross
Bruto
Brut
R 134 a
kg 0,090
93139180000 S/N 704211801
Cod.
Gross
Bruto
Brut
W
Fuse
A
Freez. Capac
Poder de Cong
kg/24 h
4,0
Max 15 w
Class
Clase
N
Classe
Nunca recorrer a técnicos não autorizados e recusar sempre a instalação de peças sobresselentes não originais.
P
42
Page 45

Guia para utilização do congelador
Carne e peixe
Tipo de alimentos Acondicionamento
Vaca assada e cozida Envolta em folha de aluminio 2 / 3 9 / 10 Não necessária
Carneiro Envolto em folha de aluminio 1 / 2 6 Não necessária
Porco assado Envolto em folha de aluminio 1 6 Não necessária
Vitela assada ou cozida Envolta em folha de aluminio 1 8 Não necessária
Bifes ou costeletas de
porco ou vitela
Fatias ou costeletas de
carneiro ou vaca
Carne picada
Coração e figado Em saquetas de polietileno 3 Não necessária
Salsichas
Cada peça envolta em película de
polietileno e em seguida em folha de
aluminio, em conjuntos de 4 e 6
Cada peça envolta em pelicula de
polietileno e em seguida em folha de
aluminio, em conjuntos de 4 e 6
Em sacos de aluminio, coberto com
pelicula de polietileno
Envolto em folha de aluminio ou pelicula
de polietileno
Maturação
(dias)
Fresquíssima 2 Lentamente no frigorífico
Conservação
(meses)
6 Não necessária
6 Não necessária
2 Em função do uso
Descongelação
Frango e perú Envolto em folha de aluminio 1 / 3 9 Lentamente no frigorífico
Pato e ganso Envolto em folha de aluminio 1 / 4 6 Lentamente no frigorífico
Pato bravo, faisão,
perdiz, (caça)
Coelho e lebre Envolto em folha de aluminio 3 / 4 6 Lentamente no frigorífico
Veado, cabrito
Peixe grande (grosso)
Peixe miúdo Em sacos de polietileno 2 / 3 Não necessária
Crustáceos En sacos de polietileno 3 / 6 Não necessária
Molúscos
Peixes cozidos
Peixes fritos Em saquetas de polietileno 4 / 6 Directamente na frigideira
Envolto em folha de aluminio 1 / 3 9 Lentamente no frigorífico
Envolto em folha de aluminio ou pelicula
de polietileno
Envolto em folha de aluminio ou pelicula
de polietileno
Em embalagens de aluminio ou plástico,
cobertos com água salgada
Envolto em folha de aluminio ou pelicula
de polietileno
5 / 6 9 Lentamente no frigorífico
4 / 6 Lentamente no frigorífico
3 Lentamente no frigorífico
12 Em água quente
43
P
Page 46

Guia para utilização do congelador
Frutas e legumes
Tipo Preparação Fervura Acondicionamento
Maçãs e peras
Alperces, pêssegos,
cerejas e ameixas
Morangos, amoras e
mirtilo
Fruta cozida
Sumos de frutos
Couve flor
Couves e grelos Arranjar e lavar 1' / 2' Em sacos de polietileno 10 / 12 À temperatura ambiente
Ervilhas Descascar e lavar 2' Em sacos de polietileno 12 Não necessária
Feijão verde
Descascar e cortar em
pedaços
Tirar os caroços e a
pele
Tirar o pé, lavar e
deixar secar
Cortar, cozer e coar a
água
Lavar, cortar e
espremer os frutos
Cortar em pedaços e
escaldar em água e
sumo de liimão
Lavar e cortar em
pedaços
2'
1' / 2'
2' Em sacos de polietileno 12 Não necessária
2 Em sacos de polietileno 10 / 12 Não necessária
Em recipientes, cobertas
de calda de açúcar
Em recipientes, cobertas
de calda de açúcar
Em recipientes, cobertas
de calda de açúcar
Em recipientes, adicionar
10% de açúcar
Em recipientes, juntar
açúcar a gosto
Conservação
(meses)
12
12
10 / 12
12
10 / 12
Descongelação
Lentamente no
frigorífico
Lentamente no
frigorífico
Lentamente no
frigorífico
Lentamente no
frigorífico
Lentamente no
frigorífico
Cenouras, pimentos
e nabos
Cogumelos e
espargos
Espinafres
Legumes diversos
para sopa
Outros alimentos Preparação Fervura Acondicionamento
Pão Em sacos de polietileno 4
Bolos
Natas
Manteiga
Alimentos cozidos,
sopa
Cortar em tiras,
descascar e lavar
Lavar e cortar 3' / 4' Em sacos ou recipientes 6 À temperatura ambiente
Lavar e cortar em
pedaços
Lavar e cortar em
pedaços
3' / 4' Em sacos de polietileno 12 Não necessária
2' Em sacos de polietileno 12 À temperatura ambiente
3'
Em sacos com pequenas
porções
Em pelicula de
polietileno
Em recipientes de
plástico
Na embalagem envolto
em aluminio
Repartido por recipientes
de plastico ou vidro
6 / 7 À temperatura ambiente
Conservação
(meses)
3 / 6
Descongelação
À temperatura ambiente
e no forno
6
6
6 No frigorífico
À temperatura ambiente
e cozer a 100/200°C
À temperatura ambiente
ou no frigorífico
À temperatura ambiente
ou em água quente
Ovos Congelar sem casca 10
P
44
À temperatura ambiente
ou no frigorífico
Page 47

.
Page 48

Viale Aristide Merloni, 47
60044 Fabriano (AN) Italy
Tel. +39 0732 6611
www.aristonchannel.com
11/2004 - 195032142.02 - Xerox Business Services DocuTech
 Loading...