

Page 1

For use with the following list numbers :
TM
INFUS(5
M
Compatible with
Software
EC REP
Hospira UK Limited
Horizon, Honey Lane
Hurley, Maidenhead, SL6 6RJ, UK
Hospira Inc.
275 N. Field Drive
Lake Forest, Illinois, 60045
USA
CE Marked 30010-27, 30011-27, 30012-27,
30010-54, 30011-54, 30012-54,
30010-57, 30011-57, 30012-57
T
Not CE Marked, not
available in Europe
System Operating Manual
0086
Australian Sponsor: Hospira Pty Ltd,
430-98340-001 (B, 2016-12)
Melbourne VIC,
Australia,
Telephone: 1300 046 774
30010-04, 30011-04, 30012-04,
30010-10, 30011-10, 30012-10,
30010-65, 30011-65, 30012-65
Page 2

Notes
ii System Operating Manual
Page 3

Change History
Part Number Description of Change
Plum 360 Infuser
430-98340-001
(A, 2016-10)
430-98340-001
(B, 2016-12)
Initial Release
Added “Expected Service Life” definition to
glossary in Section 1.
Updated “Battery Maintenance” in Section 10.
Updated “Battery Operation” and “Expected
Service Life” specifications in Section 11.
System Operating Manual iii
Page 4

Notes
iv System Operating Manual
Page 5

Plum 360 Infuser
Contents
Section 1, Introduction . . . . . . . . . . . . . . . . . . . . 1-1
Intended Use . . . . . . . . . . . . . . . . . . . . . . . . . . . . . . . . . . . . . . 1-2
User Qualification . . . . . . . . . . . . . . . . . . . . . . . . . . . . . . . . . . 1-3
Training. . . . . . . . . . . . . . . . . . . . . . . . . . . . . . . . . . . . . . . . . . . 1-3
Conventions . . . . . . . . . . . . . . . . . . . . . . . . . . . . . . . . . . . . . . . 1-4
Illustrations, Screen Displays, and Software
Messages . . . . . . . . . . . . . . . . . . . . . . . . . . . . . . . . . . 1-5
Definitions . . . . . . . . . . . . . . . . . . . . . . . . . . . . . . . . . . . . . . . . 1-6
Precautions. . . . . . . . . . . . . . . . . . . . . . . . . . . . . . . . . . . . . . . 1-11
Warnings, Cautions, and Guidelines . . . . . . . . . . . . . . . 1-11
General Warnings and Cautions . . . . . . . . . . . . . . . . . . 1-12
Piggyback, Concurrent, and Secondary Delivery
Guidelines. . . . . . . . . . . . . . . . . . . . . . . . . . . . . . . . . 1-13
Guidelines When Opening the Cassette Door . . . . . . . 1-16
Administration Sets and Accessories Guidelines . . . . . 1-16
Precautions to Avoid Unintended Bolus . . . . . . . . . . . . 1-18
Guidelines to Avoid Air in the Patient Line . . . . . . . . . 1-19
Guidelines During Backpriming . . . . . . . . . . . . . . . . . . . 1-19
Battery Guidelines . . . . . . . . . . . . . . . . . . . . . . . . . . . . . 1-20
Guidelines During Cleaning . . . . . . . . . . . . . . . . . . . . . . 1-20
Artifacts. . . . . . . . . . . . . . . . . . . . . . . . . . . . . . . . . . . . . . 1-21
Interconnecting of Medical Equipment . . . . . . . . . . . . 1-22
Guidance on EMC Compatibility . . . . . . . . . . . . . . . . . . . . . 1-23
FCC Information. . . . . . . . . . . . . . . . . . . . . . . . . . . . . . . . . . . 1-24
US FCC (Federal Communications Commission)
Statement (United States Only) . . . . . . . . . . . . . . . 1-24
FCC Interference Statement (United States Only) . . . . 1-24
Canadian Department of Communications Industry
Canada Notice (Canada Only). . . . . . . . . . . . . . . . . 1-25
Radio Frequency Exposure Statement . . . . . . . . . . . . . 1-25
FCC Rules, Part 15/Industry Canada . . . . . . . . . . . . . . . 1-25
R&TTE . . . . . . . . . . . . . . . . . . . . . . . . . . . . . . . . . . . . . . . 1-26
RoHS . . . . . . . . . . . . . . . . . . . . . . . . . . . . . . . . . . . . . . . . 1-27
System Operating Manual v
Page 6

Includes Systems Compatible with Hospira MedNet
Taiwan NCC Warning Statement . . . . . . . . . . . . . . . . . .1-27
Suspected Cybersecurity Event or Threat . . . . . . . . . . . . . . .1-28
Section 2, Equipment Description. . . . . . . . . . . . .2-1
Keypad and Display. . . . . . . . . . . . . . . . . . . . . . . . . . . . . . . . . .2-2
Alphanumeric Keypad . . . . . . . . . . . . . . . . . . . . . . . . . . . . 2-2
Numeric Keypad. . . . . . . . . . . . . . . . . . . . . . . . . . . . . . . . . 2-3
Operating Keys . . . . . . . . . . . . . . . . . . . . . . . . . . . . . . . . . . . . .2-4
Indicators. . . . . . . . . . . . . . . . . . . . . . . . . . . . . . . . . . . . . . . . . . 2-7
Display Symbols . . . . . . . . . . . . . . . . . . . . . . . . . . . . . . . . . . . .2-7
CE Module . . . . . . . . . . . . . . . . . . . . . . . . . . . . . . . . . . . . . . . .2-10
Pole Clamp, Potential Equalization Terminal, and
Power Cord. . . . . . . . . . . . . . . . . . . . . . . . . . . . . . . . . . . .2-12
Plum Administration Sets . . . . . . . . . . . . . . . . . . . . . . . . . . .2-14
The Plum Cassette . . . . . . . . . . . . . . . . . . . . . . . . . . . . . .2-15
Other Administration Set Features. . . . . . . . . . . . . . . . .2-18
Section 3, Basic Operations . . . . . . . . . . . . . . . . .3-1
Mounting the Infuser on an I.V. Pole . . . . . . . . . . . . . . . . . . .3-2
Mounting Multiple Infusers to an I.V. Pole . . . . . . . . . . .3-4
Attaching a Nurse Call Interface Cable . . . . . . . . . . . . . . . . . 3-6
Opening the Cassette Door . . . . . . . . . . . . . . . . . . . . . . . . . . . 3-6
Opening the Cassette Door Completely . . . . . . . . . . . . . . . . .3-8
Closing the Cassette Door . . . . . . . . . . . . . . . . . . . . . . . . . . .3-10
Turning Power On . . . . . . . . . . . . . . . . . . . . . . . . . . . . . . . . . .3-11
Turning Power Off. . . . . . . . . . . . . . . . . . . . . . . . . . . . . . . . . .3-12
Viewing the Display . . . . . . . . . . . . . . . . . . . . . . . . . . . . . . . .3-12
Using the Keypad and Controls . . . . . . . . . . . . . . . . . . . . . . .3-13
Using the Keypad to Enter Program Information . . . . .3-13
Silencing the Keypad. . . . . . . . . . . . . . . . . . . . . . . . . . . .3-13
Locking and Unlocking the Keypad . . . . . . . . . . . . . . . .3-14
Using the Keypad to Search the Drug List. . . . . . . . . . .3-17
Working with Alarms . . . . . . . . . . . . . . . . . . . . . . . . . . . . . . .3-18
Test the Alarm System. . . . . . . . . . . . . . . . . . . . . . . . . . .3-19
Responding to an Alarm . . . . . . . . . . . . . . . . . . . . . . . . .3-19
Adjusting the Audio Alarm Volume . . . . . . . . . . . . . . . .3-20
vi System Operating Manual
Page 7

Plum 360 Infuser
Programming a Callback Alarm. . . . . . . . . . . . . . . . . . . 3-21
Restarting the Delivery Automatically After a Distal
Occlusion Alarm. . . . . . . . . . . . . . . . . . . . . . . . . . . . 3-21
Stopping and Restarting a Delivery . . . . . . . . . . . . . . . . . . . 3-22
Clearing a Line . . . . . . . . . . . . . . . . . . . . . . . . . . . . . . . . . . . . 3-24
Setting the Post Infusion Rate . . . . . . . . . . . . . . . . . . . . . . . 3-24
Post Infusion Rate (Loading Dose Delivery and
Multistep Delivery) . . . . . . . . . . . . . . . . . . . . . . . . . 3-26
Viewing and Clearing the Volumes Infused. . . . . . . . . . . . . 3-26
Adjusting Display Lighting and Contrast . . . . . . . . . . . . . . . 3-28
Viewing CCA and Infuser Settings . . . . . . . . . . . . . . . . . . . . 3-29
CCA/Infuser Setting Descriptions . . . . . . . . . . . . . . . . . 3-31
Changing the Default Infuser Settings . . . . . . . . . . . . . 3-34
Setting the Distal Pressure Alarm Limit. . . . . . . . . . . . . . . . 3-34
Changing the Default Line B Delivery Mode . . . . . . . . . . . . 3-36
Section 4, Plum Administration Sets . . . . . . . . . . 4-1
Priming a Primary Administration Set . . . . . . . . . . . . . . . . . . 4-2
Loading a Cassette. . . . . . . . . . . . . . . . . . . . . . . . . . . . . . . . . . 4-8
Preparing a Secondary Delivery
from an Administration Set . . . . . . . . . . . . . . . . . . . . . . 4-10
Connecting a Secondary Line or Syringe . . . . . . . . . . . . . . . 4-13
Connecting to a Clave Port . . . . . . . . . . . . . . . . . . . . . . 4-14
Connecting to a Prepierced Port . . . . . . . . . . . . . . . . . . 4-16
Connecting to a Capped Port. . . . . . . . . . . . . . . . . . . . . 4-18
Priming the Syringe Adapter . . . . . . . . . . . . . . . . . . . . . 4-19
Preparing a Secondary Delivery
from a Syringe . . . . . . . . . . . . . . . . . . . . . . . . . . . . . . . . 4-19
Backpriming . . . . . . . . . . . . . . . . . . . . . . . . . . . . . . . . . . . . . . 4-21
Preparing to Backprime . . . . . . . . . . . . . . . . . . . . . . . . . 4-22
Backpriming Procedure . . . . . . . . . . . . . . . . . . . . . . . . . 4-23
Discontinuing Electronic Flow Control and Setting
Gravity Flow . . . . . . . . . . . . . . . . . . . . . . . . . . . . . . . . . . 4-25
Removing a Secondary Line or Syringe . . . . . . . . . . . . . . . . 4-27
Discontinuing Fluid Administration . . . . . . . . . . . . . . . . . . . 4-28
Changing Administration Sets . . . . . . . . . . . . . . . . . . . . . . . 4-29
Resolving a Distal Air-in-Line Alarm . . . . . . . . . . . . . . . . . . 4-30
System Operating Manual vii
Page 8

Includes Systems Compatible with Hospira MedNet
Avoiding Unintended Bolus While Resolving a Distal
Occlusion . . . . . . . . . . . . . . . . . . . . . . . . . . . . . . . . . . . . .4-31
Section 5, Programming . . . . . . . . . . . . . . . . . . . .5-1
Programming Features Common
to the Default Drug Library
and Custom Drug Libraries . . . . . . . . . . . . . . . . . . . . . . . .5-1
Auto-Calculations . . . . . . . . . . . . . . . . . . . . . . . . . . . . . . .5-1
Body Surface Area (BSA) Dosing Unit . . . . . . . . . . . . . . . 5-1
Programming Line B . . . . . . . . . . . . . . . . . . . . . . . . . . . . .5-2
Clearing Line Settings . . . . . . . . . . . . . . . . . . . . . . . . . . . .5-2
Programming with a Default Drug Library . . . . . . . . . . . . . . . 5-3
Programming Without a Drug List . . . . . . . . . . . . . . . . . . 5-3
Programming with a Drug List. . . . . . . . . . . . . . . . . . . . . . . . .5-4
Programming with a Custom Drug Library . . . . . . . . . . . . . . .5-5
Hard Limits. . . . . . . . . . . . . . . . . . . . . . . . . . . . . . . . . . . . . 5-6
Soft Limits . . . . . . . . . . . . . . . . . . . . . . . . . . . . . . . . . . . . . 5-6
Programming Line B with Line A Programmed . . . . . . . . 5-7
Changing a CCA from the Drug List Screen. . . . . . . . . . .5-7
Delaying a Line. . . . . . . . . . . . . . . . . . . . . . . . . . . . . . . . . .5-8
Putting a Line in Standby – A/B Delivery Screen . . . . . .5-8
Putting a Line in Standby – Confirmation Screen. . . . . .5-8
Putting a Line in Standby – Piggyback Mode . . . . . . . . .5-9
Canceling Standby – Piggyback Mode . . . . . . . . . . . . . . . 5-9
Nurse Callback . . . . . . . . . . . . . . . . . . . . . . . . . . . . . . . . . . . . .5-9
Section 6, Auto-Programming . . . . . . . . . . . . . . .6-1
Auto-Programming the Plum 360 Infuser . . . . . . . . . . . . . . .6-2
Section 7, Additional Features . . . . . . . . . . . . . . .7-1
Delay a Line. . . . . . . . . . . . . . . . . . . . . . . . . . . . . . . . . . . . . . . . 7-1
Standby . . . . . . . . . . . . . . . . . . . . . . . . . . . . . . . . . . . . . . . . . . . 7-1
Put 1 or 2 Lines in Standby from the Delivery
Screen (Non-Piggyback). . . . . . . . . . . . . . . . . . . . . . .7-2
Cancel Standby for 1 or 2 Lines from the Delivery
Screen (Non-Piggyback) . . . . . . . . . . . . . . . . . . . . . . 7-2
viii System Operating Manual
Page 9

Plum 360 Infuser
Put Piggyback Mode in Standby . . . . . . . . . . . . . . . . . . . 7-3
Cancel Piggyback Mode Standby . . . . . . . . . . . . . . . . . . 7-3
Examples of Automatic Calculation. . . . . . . . . . . . . . . . . . . . 7-4
mL/hr - Initial Programming . . . . . . . . . . . . . . . . . . . . . . 7-4
mL/hr - After VTBI Complete Alarm . . . . . . . . . . . . . . . . 7-4
Non-Time-Based Dose Calculation (for example, mL) -
Initial Programming . . . . . . . . . . . . . . . . . . . . . . . . . 7-5
Non-Time-Based Dose Calculation (for example, mL) -
After VTBI Complete Alarm . . . . . . . . . . . . . . . . . . . 7-5
Time-Based Dose Calculation (for example, mg/min) -
Initial Programming . . . . . . . . . . . . . . . . . . . . . . . . . 7-6
Time-Based Dose Calculation (for example, mg/min) -
After VTBI Complete Alarm. . . . . . . . . . . . . . . . . . . . 7-7
Recalculation Alert When Titrating a Confirmed mL/hr
or Non-Time-Based Dosing Unit . . . . . . . . . . . . . . . 7-7
Section 8, Delivery Options . . . . . . . . . . . . . . . . . 8-1
Programming a Bolus Dose. . . . . . . . . . . . . . . . . . . . . . . . . . . 8-1
Programming a Loading Dose. . . . . . . . . . . . . . . . . . . . . . . . . 8-4
Programming a Multistep Delivery. . . . . . . . . . . . . . . . . . . . . 8-6
Adding a Step to a Multistep Delivery . . . . . . . . . . . . . . . . . . 8-8
Adding VTBI to Loading Dose or Multistep Program After
VTBI Complete Alarm Activates. . . . . . . . . . . . . . . . . . . . 8-9
Titration . . . . . . . . . . . . . . . . . . . . . . . . . . . . . . . . . . . . . . . . . 8-11
Loading Dose Delivery and Multistep Delivery . . . . . . . 8-11
Changing the CCA During Infusion . . . . . . . . . . . . . . . . . . . 8-11
Section 9, Alarms and Troubleshooting . . . . . . . . 9-1
Alarm Priority Levels . . . . . . . . . . . . . . . . . . . . . . . . . . . . . . . . 9-1
General Alarms. . . . . . . . . . . . . . . . . . . . . . . . . . . . . . . . . . . . . 9-2
High Priority Alarms . . . . . . . . . . . . . . . . . . . . . . . . . . . . . 9-2
Medium Priority Alarms . . . . . . . . . . . . . . . . . . . . . . . . . 9-5
Low Priority Alarms . . . . . . . . . . . . . . . . . . . . . . . . . . . . . 9-6
Line A Alarms . . . . . . . . . . . . . . . . . . . . . . . . . . . . . . . . . . . . . . 9-7
High Priority Alarms . . . . . . . . . . . . . . . . . . . . . . . . . . . . . 9-7
Medium Priority Alarms . . . . . . . . . . . . . . . . . . . . . . . . . . 9-9
System Operating Manual ix
Page 10

Includes Systems Compatible with Hospira MedNet
Line B Alarms . . . . . . . . . . . . . . . . . . . . . . . . . . . . . . . . . . . . .9-11
High Priority Alarms . . . . . . . . . . . . . . . . . . . . . . . . . . . .9-11
Medium Priority Alarms . . . . . . . . . . . . . . . . . . . . . . . . .9-14
Lines A and B Alarms . . . . . . . . . . . . . . . . . . . . . . . . . . . . . . .9-16
High Priority Alarms . . . . . . . . . . . . . . . . . . . . . . . . . . . .9-16
Rejected Auto-Programs . . . . . . . . . . . . . . . . . . . . . . . . . . . .9-20
Partially Programmed Line . . . . . . . . . . . . . . . . . . . . . . .9-24
Invalid Titration . . . . . . . . . . . . . . . . . . . . . . . . . . . . . . . .9-24
Section 10, Cleaning, Maintenance, Storage,
and Service . . . . . . . . . . . . . . . . . . . . . . . . . .10-1
Cleaning the Infuser . . . . . . . . . . . . . . . . . . . . . . . . . . . . . . . .10-1
Cleaning Procedure . . . . . . . . . . . . . . . . . . . . . . . . . . . . .10-2
Cleaning Supplies . . . . . . . . . . . . . . . . . . . . . . . . . . . . . .10-3
Infuser Maintenance . . . . . . . . . . . . . . . . . . . . . . . . . . . . . . .10-4
Battery Maintenance . . . . . . . . . . . . . . . . . . . . . . . . . . . . . . .10-4
Storage . . . . . . . . . . . . . . . . . . . . . . . . . . . . . . . . . . . . . . . . . .10-5
Service . . . . . . . . . . . . . . . . . . . . . . . . . . . . . . . . . . . . . . . . . . .10-6
Section 11, Specifications . . . . . . . . . . . . . . . . .11-1
Physical . . . . . . . . . . . . . . . . . . . . . . . . . . . . . . . . . . . . . . . . . .11-1
Electrical . . . . . . . . . . . . . . . . . . . . . . . . . . . . . . . . . . . . . . . . .11-2
Connectivity Engine . . . . . . . . . . . . . . . . . . . . . . . . . . . . . . . .11-5
VTBI Range . . . . . . . . . . . . . . . . . . . . . . . . . . . . . . . . . . . . . . .11-6
Delivery Rate Range . . . . . . . . . . . . . . . . . . . . . . . . . . . . . . . .11-6
Air-in-Line Alarm . . . . . . . . . . . . . . . . . . . . . . . . . . . . . . . . . .11-6
Occlusion Alarm and Limits . . . . . . . . . . . . . . . . . . . . . . . . . .11-7
Time To Detect Downstream Occlusions. . . . . . . . . . . . . . . .11-8
Maximum Unintended Bolus Volume Released After
Distal Occlusion is Resolved . . . . . . . . . . . . . . . . . . . . . .11-9
Delivery Accuracy . . . . . . . . . . . . . . . . . . . . . . . . . . . . . . . . .11-10
Bolus Delivery Accuracy . . . . . . . . . . . . . . . . . . . . . . . .11-11
Enteral or High Viscosity Fluids Effects . . . . . . . . . . . .11-11
Trumpet Curves . . . . . . . . . . . . . . . . . . . . . . . . . . . . . . . . . . .11-12
Example . . . . . . . . . . . . . . . . . . . . . . . . . . . . . . . . . . . . .11-13
x System Operating Manual
Page 11

Plum 360 Infuser
Section 12, Supplies and Accessories. . . . . . . . . 12-1
Administration Sets (for list numbers ending in -04,
-10, and -65) . . . . . . . . . . . . . . . . . . . . . . . . . . . . . . . . . 12-1
Primary I.V. PlumSets . . . . . . . . . . . . . . . . . . . . . . . . . . . 12-1
Secondary I.V. Set . . . . . . . . . . . . . . . . . . . . . . . . . . . . . . 12-6
Burettes/Solusets . . . . . . . . . . . . . . . . . . . . . . . . . . . . . . 12-6
Blood Sets . . . . . . . . . . . . . . . . . . . . . . . . . . . . . . . . . . . . 12-8
Enteral Sets . . . . . . . . . . . . . . . . . . . . . . . . . . . . . . . . . . . 12-9
For Epidural Administration. . . . . . . . . . . . . . . . . . . . . . 12-9
Conversion PlumSets . . . . . . . . . . . . . . . . . . . . . . . . . . 12-10
Extension Sets. . . . . . . . . . . . . . . . . . . . . . . . . . . . . . . . 12-11
Administration Sets (for list numbers ending in -27,
-54, and -57) . . . . . . . . . . . . . . . . . . . . . . . . . . . . . . . . 12-11
Primary I.V. PlumSets . . . . . . . . . . . . . . . . . . . . . . . . . . 12-11
Secondary I.V. Sets . . . . . . . . . . . . . . . . . . . . . . . . . . . . 12-16
Burettes. . . . . . . . . . . . . . . . . . . . . . . . . . . . . . . . . . . . . 12-16
Blood Sets . . . . . . . . . . . . . . . . . . . . . . . . . . . . . . . . . . . 12-18
Enteral Sets . . . . . . . . . . . . . . . . . . . . . . . . . . . . . . . . . . 12-19
Administration Fluids . . . . . . . . . . . . . . . . . . . . . . . . . . . . . 12-19
Containers . . . . . . . . . . . . . . . . . . . . . . . . . . . . . . . . . . . 12-19
Accessories . . . . . . . . . . . . . . . . . . . . . . . . . . . . . . . . . . . . . . 12-20
Tandem Carrier . . . . . . . . . . . . . . . . . . . . . . . . . . . . . . . 12-20
Multiple Device Adapter . . . . . . . . . . . . . . . . . . . . . . . 12-23
Hospira I.V. Pole . . . . . . . . . . . . . . . . . . . . . . . . . . . . . . 12-25
T-bar Accessory. . . . . . . . . . . . . . . . . . . . . . . . . . . . . . . 12-27
I.V. Mini-Pole . . . . . . . . . . . . . . . . . . . . . . . . . . . . . . . . 12-29
Hospira MedNet Safety Software. . . . . . . . . . . . . . . . . . . . 12-30
Loss of Communication . . . . . . . . . . . . . . . . . . . . . . . . 12-31
Section 13, Warranty . . . . . . . . . . . . . . . . . . . . 13-1
Section 14, CCAs and Drug Libraries . . . . . . . . . 14-1
DDL CCA and Drug List . . . . . . . . . . . . . . . . . . . . . . . . . . . . . 14-1
Custom Drug Library (CDL) . . . . . . . . . . . . . . . . . . . . . . . . . . 14-9
Dosing Units and Allowable Ranges. . . . . . . . . . . . . . . . . . 14-10
Patient Data Limits . . . . . . . . . . . . . . . . . . . . . . . . . . . . . . . 14-12
System Operating Manual xi
Page 12

Includes Systems Compatible with Hospira MedNet
Notes
xii System Operating Manual
Page 13

Plum 360 Infuser
Section 1
Introduction
The Plum 360™ is a large volume infuser capable of delivering fluids
for a variety of therapies such as parenteral, enteral, or epidural
infusions. The Plum 360 infuser can deliver fluids over a broad range
of infusion rates and is capable of Concurrent delivery from one or
more rigid or flexible fluid containers.
The Plum 360 infuser features an innovative design that automates
many aspects of Concurrent, Secondary, and Piggyback infusions.
A positive valving cassette allows two lines to be delivered
at independent rates. The volume to be infused (VTBI) is delivered
through one line to a patient. The two lines can be delivered
in Concurrent mode (together) or Piggyback mode (one after another)
without raising or lowering I.V. bags.
The Plum 360 infuser also enables fluid pathway troubleshooting
such as removing proximal air in line, without disconnecting the
patient line.
System Operating Manual 1-1
Page 14

Includes Systems Compatible with Hospira MedNet
The Plum 360 can act as a standalone infuser, or in conjunction with
the Hospira MedNet™ software to provide medication safety software
at the point of care, with customized drug libraries to support hospital
defined protocols by clinical care area. In such a configuration,
the Plum 360 infuser can communicate with systems on the network
via Ethernet or state of the art wireless communication using
an 802.11 a/b/g/n/, 2.4 GHz/5 GHz dual-band radio.
The Plum 360 infuser and Hospira MedNet software interface with
other hospital systems such as Electronic Health Records, Electronic
Medication Administration Records, Bar Code Point of Care, Real
Time Location Services, and other systems designed to create
efficiency and consistency in managing patient information and
clinical workflows.
Each infuser includes a Connectivity Engine (CE) which provides
both wired Ethernet and wireless 802.11 a/b/g/n networking
capabilities. The Plum 360 infuser interfaces with Hospira MedNet
application software to download drug library and infuser software
updates and enable auto-programming of the infuser.
The Plum 360 infuser is fully compatible with LifeCare™ Plum™
Series administration sets and accessories, and the LifeShield™ and
CLAVE™ needleless connection systems, providing a convenient
and cost-effective infuser.
Intended Use
The Plum 360 infuser is intended for parenteral, enteral, and epidural
therapies and the administration of whole blood and blood products.
1-2 System Operating Manual
Page 15

Plum 360 Infuser
User Qualification
The Plum 360 infuser is intended for use at the direction or under the
supervision of licensed physicians or certified healthcare
professionals who are trained in the use of the infuser and the
administration of parenteral, enteral, and epidural therapies and the
administration of whole blood and blood products.
Training
Hospira Corporation offers a complete range of training and
education to help new users and experienced personnel acquire the
knowledge and confidence to operate the Plum infuser properly and
efficiently.
Training is available at the time of infuser purchase. Supplemental
training can be purchased throughout the infuser's service life.
Training content is tailored to the needs of the medical facility and
is presented by clinical personnel. Hospira works with hospital staff
to identify training needs, including duration and frequency of training.
Training is mandatory for new device installation.
Contact your Hospira Representative for more information about
available training programs.
System Operating Manual 1-3
Page 16

Includes Systems Compatible with Hospira MedNet
WARNING
Conventions
This section describes the conventions used throughout this manual,
as follows:
Convention Application Example
Italic Function or mode
Italic, bold, blue Reference to a section,
[BRACKETED
ALL CAPS]
specific instructions,
or disclaimer
figure, or table
Keys on the device are
displayed in
[BRACKETED ALL
CAPS] or with a
graphic.
Primary Only:
Attach an empty
container.
(See
Adjusting
the Audio Alarm
Volume
page 3-20)
[START]
or
on
[Bracketed Blue] Softkey Options [Choose]
Initial Caps lowercase Screen displays and
device labels (as
appropriate)
Bold Emphasis ...sets are supplied
A WARNING MESSAGE CONTAINS SPECIAL SAFETY EMPHASIS
AND MUST BE OBSERVED AT ALL TIMES. FAILURE TO OBSERVE
A WARNING MESSAGE IS POTENTIALLY LIFE-THREATENING.
Program
Dose Calculation
Sterile and are
for....
1-4 System Operating Manual
Page 17

Plum 360 Infuser
CAUTION
A CAUTION CONTAINS INFORMATION THAT COULD PREVENT
IRREVERSIBLE
FAILURE TO OBSERVE A CAUTION COULD RESULT IN SERIOUS USER
OR PATIENT INJURY.
PRODUCT DAMAGE OR HARDWARE FAILURE.
MANDATORY ACTION
A Mandatory Action symbol means the instructions that follow
describe a required action. Failure to observe a Mandatory
Action could impact user or patient safety.
PROHIBITION
A Prohibition symbol highlights a safety notice describing
a prohibited action. Failure to observe a Prohibition could
impact user or patient safety.
NOTE: A Note highlights information that helps explain a concept
or procedure.
Illustrations, Screen Displays, and Software Messages
There may be minor language differences between software
messages shown in this manual and the infuser's user interface.
These differences include alternate spelling and terminology for
English-language infusers with list numbers ending in -27, -54, and
-57.
Illustrations and screen examples in this manual are graphic
depictions, not exact representations of the product.
System Operating Manual 1-5
Page 18

Includes Systems Compatible with Hospira MedNet
Definitions
Term Definition
Administration Set The cassette with flexible tubing assembly that
connects a source fluid container to a patient
access device for fluid administration.
Air Trap A component of the cassette that allows trapping
and removal of proximal air.
Alarm A condition that invokes audible and/or visible
alarm indicators requiring operator attention.
Alert A visual signal that provides information to you
or prompts further action.
Alternate Units The Dose Rate units that may be selected.
Alternate Units are any units other than mL/hr.
Alternate Units
Parameters
Auto-Program Auto-programming refers to the ability to receive
Backpressure
Backprime
Biomed Mode Name for the non-delivery mode of infuser
Bolus A rapid infusion of a relatively large volume of fluid
Drug Amount, Diluent Amount, Patient Weight,
Height for
if applicable), and Dose Rate.
a remotely configured therapy from Hospira
MedNet Software.
The resistance to fluid flow on the
portion of the
expressed as pounds per square inch (PSI).
The use of fluid in Line A to move proximal air
or fluid into a receptacle attached to
No fluid is delivered distal to the cassette during
a backprime.
operation for hospital technicians (Biomeds)
who have access to technical information such
as delivery parameter limits and displays default
settings.
or dose of the drug currently being administered
(same medication, concentration, and dosing unit)
to enhance a therapeutic response. Also see
BSA (manually or calculated
Distal or output
Administration Set, usually
Line B.
Unintended Bolus on page 1-11.
1-6 System Operating Manual
Page 19

Plum 360 Infuser
Term Definition
BSA
CAIR™ Trade name of Hospira's enhanced performance
Cassette A component of an administration set specifically
CCA Clinical Care Area. The CCA is a defined physical
CDL Custom Drug Library. A drug library that is based
CE Connectivity Engine is a component of an infuser
Channel The distal line of an administration set that
Cleared Settings When programmed delivery settings for an
Clinical Use The clinical use attributed to a medication entry.
Composite Version
String
Concentration
Concurrent
Delivery
Concurrent Mode A mode that enables the user to program Line B
Body Surface Area, in m
of medication doses that require a patient’s height
and weight.
roller clamp.
designed to work with the Plum infuser that
facilitates two lines in and one line out, allowing
primary and secondary I.V. delivery rates to be
controlled separately.
or virtual area in the hospital for a specific patient
population that comprises rules for infuser settings
and which drugs can be used along with their
associated delivery limits.
on hospital-defined practices and customized
using the Hospira MedNet application.
that allows communications with the device over
wired or wireless networks.
connects to the patient.
individual line or both lines are reset to their default
settings.
The library-identifying string transmitted to the
infuser by the Hospira MedNet application.
Concentration refers to the ratio of
Amount
Simultaneous delivery of fluids on
and
for Concurrent delivery.
(in mg, for example) to diluent (in mL).
Line B.
2
, for calculation
Drug
Line A
System Operating Manual 1-7
Page 20

Includes Systems Compatible with Hospira MedNet
Term Definition
DDL Default Drug Library. A factory default
non-customized drug library with a default set
of infuser settings and drugs available for use
and their associated concentration and dosing
units. DDL has 1 to 17 pages.
Delay Start A pending delivery program that will automatically
start and not require operator action at the delay
time programmed.
Device The infuser, not including the disposable
administration sets.
Diluent (Volume) Volume of fluid in which a medication is diluted.
Distal
Dose A volume of medication to be delivered
Dosing Unit Unit of measure for a drug to be delivered.
Drug Amount The mass or quantity of medication to be delivered
Duration The time period required to deliver a programmed
Enteral Delivery using an intestinal route.
Expected
Service Life
Filling Head Height
(FHH)
Hard Limit The upper- and lower-dosing limits associated with
The portion of the
downstream from the
chamber.
on a continuous basis.
before being mixed with a diluent.
infusion.
The amount of time from the date of installation
that the manufacturer will provide technical service
to the device. Technical service involves repairs,
technical support questions and troubleshooting,
and replacement parts.
The height difference between the source
container and the distal line output.
a drug, in Hospira MedNet drug library, that cannot
be overridden by the operator.
Administration Set
Cassette’s pumping
1-8 System Operating Manual
Page 21

Plum 360 Infuser
Term Definition
Hospira MedNet Hospira MedNet provides healthcare professionals
with the capability to send, receive, and store
information from infusers. The bi-directional
communication between the HMSS and infusers
includes infusion parameters, infuser default
configurations, infuser location, history, events,
trending, alarms and status.
Infiltration Unintentional fluid migration into the tissues
surrounding a venipuncture site.
Infuser
I.V. Push The act of manually pushing on the syringe
Key Any of the marked locations on the front panel
KVO Keep Vein Open. The Post Infusion Rate setting
Line A The proximal Primary tubing attached to the A port
Line B The proximal secondary line/syringe attached
Loading Dose Allows programming of an initial infusion rate/dose
Maintenance Dose A pre-programmed rate/dose for a specific volume
Malfunction One of a number of alarm conditions that indicate
Device.
See
plunger to deliver the contents of medication
through access at a Y-site of an administration set.
intended for user input via a pressing action.
that provides a minimal delivery rate (1 mL/hr
or the actual programmed rate when less than
1 mL/hr), intended to provide sufficient fluid flow
to decrease the potential for clotting at the
I.V. infusion site.
of the cassette.
to the secondary port of the cassette.
for a specific volume and duration, automatically
followed by a maintenance rate/dose for a specific
volume and duration from the same container
(for example, a fluid challenge) using the same
dosing unit.
and duration from the same container that
automatically follows the completion of a
Dose
.
a failure of the infuser.
Loading
System Operating Manual 1-9
Page 22

Includes Systems Compatible with Hospira MedNet
Term Definition
Mode A type of secondary infusion, either Piggyback
or Concurrent.
Multistep A sequential program that can deliver up to
10 steps from one container at different rates,
VTBIs and durations using the same
doses,
dosing unit.
Non-Time-Based
Dosing Unit
Outgassing The release of a gas that was dissolved, trapped,
Override An action by a clinician that acknowledges
Parenteral Delivery via other than an intestinal route,
Piggybackable A drug setting in a custom drug library that
Piggyback Mode
Prime
Proximal
Rate The amount of fluid pumped to the patient over
Rule Set
Service Mode A non-therapeutic mode used for configuring the
A dosing unit that does not include a time
component (for example, grams).
frozen or absorbed in a material.
and confirms an alert and then proceeds with
a program containing a parameter that falls
outside the hospital-defined
such as intravenous (I.V.) injection.
indicates whether a drug is allowed to be delivered
in Piggyback Mode.
The delivery mode that suspends
while
Line B delivers. Line A resumes when Line
B delivery completes.
The action of filling the Plum Administration
Set
, Plum Cassette, and all connected tubing
with the fluid to be infused.
Upstream (input, as
with respect to the
portion of the Administration Set.
a given period of time, expressed in mL/hr.
The programmed
associated with a drug entry from the
Hospira MedNet Drug Library.
infuser and changing default settings.
Line A and/or Line B)
Cassette pumping chamber
Soft Limits and Hard Limits
Soft Limits.
Line A delivery
CCA in the
1-10 System Operating Manual
Page 23

Plum 360 Infuser
Term Definition
Softkey A front panel key on the bottom portion of the
display screen that is assigned specific functions
within the operational context of a particular
screen.
Soft Limit The upper- and lower-dosing limits associated
with a drug, in the Hospira MedNet drug library,
that can be overridden by the operator.
Standby A pending delivery program that requires operator
action to begin the infusion.
Tall-Man Lettering Uses uppercase letters in combination with
lowercase letters to help clinicians differentiate
among sound-alike or look-alike drug names.
Time-Based
Dosing
Titration
Unintended Bolus A single, unintended volume of fluid delivered.
Unit of Measure One of a variety of terms used to describe a drug
VTBI Volume To Be Infused. The volume of fluid
A dosing unit that includes a time component
(for example, g/min).
A change in
in a currently running or programmed infusion.
Also see Bolus on page 1-6.
amount, such as grams, mg, or units.
or I.V. solution (remaining) for delivery
by a program or Therapy step from a Line.
Rate, Dose Duration, and/or VTBI
Precautions
The Plum 360 infuser has been designed and manufactured
to be safe, reliable, and easy to use. This section details precautions
and possible hazards.
Warnings, Cautions, and Guidelines
For safe operation of the Plum 360 infuser, observe the Warnings,
Cautions, and recommendations in the following sections.
System Operating Manual 1-11
Page 24

Includes Systems Compatible with Hospira MedNet
WARNING
General Warnings and Cautions
POSSIBLE EXPLOSION HAZARD EXISTS IF THE PLUM 360
INFUSER IS USED IN THE PRESENCE OF FLAMMABLE
ANESTHETICS.
TO AVOID THE RISK OF ELECTRIC SHOCK, THE EQUIPMENT
MUST ONLY BE CONNECTED TO A SUPPLY MAINS WITH
PROTECTIVE EARTH.
NO MODIFICATION OF THIS EQUIPMENT IS ALLOWED.
NO ADDITIONAL DEVICES CAN BE CONNECTED TO THE INFUSER
THAT HAVE NOT BEEN SPECIFIED AS COMPATIBLE WITH THE
INFUSER BY HOSPIRA.
ARRANGE TUBING, CORDS, AND CABLES TO MINIMIZE THE RISK
OF PATIENT STRANGULATION OR ENTANGLEMENT.
DO NOT PLACE THE INFUSER IN SERVICE IF IT FAILS THE SELF
TEST.
DO NOT OPERATE THE PLUM 360 INFUSER WITH THE CASE
OPENED.
1-12 System Operating Manual
ALTHOUGH UNLIKELY, FAILURE OF CERTAIN ROBUST
MECHANICAL COMPONENTS SUCH AS THE ANTI-FREE FLOW
MECHANISM OR VALVE CONTROL SPRINGS COULD CAUSE
FLUID DELIVERY LIMITED TO THE CONTENTS OF THE FLUID
CONTAINER.
SINGLE FAULT FAILURE OF CERTAIN ELECTRONIC/MOTOR
CONTROL COMPONENTS WOULD RESULT IN NO MORE THAN
5 mL OF UNEXPECTED FLUID DELIVERY.
ADMINISTER ONLY ANESTHETICS/ANALGESICS APPROVED
FOR EPIDURAL ADMINISTRATION (AS INDICATED OR ALLOWED
BY THE DRUGS’ FDA APPROVED LABELLING OR HEALTH
CANADA APPROVED LABELLING). EPIDURAL ADMINISTRATION
OF DRUGS OTHER THAN THOSE INDICATED FOR EPIDURAL USE
COULD RESULT IN SERIOUS INJURY TO THE PATIENT.
Page 25

Plum 360 Infuser
CAUTION
CAUTION
DO NOT USE THE INFUSER IN A MRI ENVIRONMENT OR IN THE
PRESENCE OF STRONG MAGNETIC FIELDS. SERIOUS INJURY
OR DAMAGE TO EQUIPMENT MAY RESULT.
DO NOT USE THE INFUSER IN ANY HYPERBARIC OR OXYGENRICH ENVIRONMENT. SERIOUS INJURY OR DAMAGE
TO EQUIPMENT MAY RESULT.
DO NOT EXPOSE THE INFUSER DIRECTLY TO X-RAYS
OR ULTRASOUND; PERMANENT DAMAGE TO THE INFUSER’S
ELECTRONIC CIRCUITRY MAY OCCUR.
CONSULT THE PHARMACY TO CONFIRM DRUG COMPATIBILITY,
CONCENTRATION, DELIVERY RATES, AND VOLUMES ARE ALL
SUITABLE FOR SECONDARY, CONCURRENT AND PIGGYBACK
DELIVERY MODES.
EXERCISE CAUTION WHEN THE PATIENT IS AMBULATORY WHILE
CONNECTED TO THE INFUSER.
Piggyback, Concurrent, and Secondary Delivery Guidelines
Primary and secondary fluids are delivered to the patient through
a common cassette and distal line. Observe the following guidelines
during Piggyback, Concurrent, and Secondary deliveries.
CLOSE ALL CLAMPS ON THE PRIMARY AND SECONDARY LINES,
OR REMOVE THE SECONDARY CONTAINER, BEFORE OPENING THE
CASSETTE
SECONDARY FLUIDS AND TO PREVENT UNRESTRICTED FLOW.
DOOR TO PREVENT THE MIXTURE OF PRIMARY AND
System Operating Manual 1-13
Page 26

Includes Systems Compatible with Hospira MedNet
CAUTION
WARNING
CAUTION
IF THE PRIMARY RATE IS SET HIGHER THAN THE SECONDARY RATE,
ANY DISTAL FLUID REMAINING FROM THE SECONDARY INFUSION WILL
BE
INFUSED AT THE NEW, HIGHER RATE.
IF THE SECONDARY RATE IS SET HIGHER THAN THE PRIMARY RATE,
ANY DISTAL FLUID REMAINING FROM THE PRIMARY INFUSION WILL BE
INFUSED AT THE NEW, HIGHER RATE.
Concurrent Delivery of Critical Drugs
ENSURE MEDICATIONS THAT ARE DELIVERED
CONCURRENTLY, OR IN PIGGYBACK, ARE COMPATIBLE.
AT RATES BELOW 0.4 mL/HR, PAUSES IN FLOW CONTINUITY
OF MORE
PHYSIOLOGIC
HALF-LIFE.
When delivering short half-life critical drugs (see Critical Drug
Examples on page 1-15) using the Plum 360 infuser in Concurrent
mode, the following delivery rate guidelines should be observed:
THAN 20 SECONDS WILL OCCUR, WHICH MAY IMPACT THE
RESPONSE TO DRUGS THAT HAVE A VERY SHORT
• If the critical drug (with half-life less than 6 minutes) is to be infused
• If the critical drug (with half-life less than 6 minutes) is to be infused
• If the critical drug (with half-life less than 6 minutes) is to be infused
1-14 System Operating Manual
at less than 2 mL/hr, the other infusion should be no faster than
5 times the critical drug’s rate. Dopamine, for example, delivered
at 1.5 mL/hr should not be accompanied by an infusion
programmed any faster than 7.5 mL/hr.
at 2 - 5 mL/hr the other infusion should be no faster than ten times
the critical drug’s rate. Dopamine, for example, delivered at 3.5 mL/
hr should not be accompanied by an infusion programmed any
faster than 35 mL/hr.
at 5.1 mL/hr or greater, the other infusion can be programmed
at any desired rate.
Page 27

Plum 360 Infuser
NOTE: The total of the primary rate plus the secondary rate cannot
exceed 500 mL/hr.
These guidelines apply only when infusing short half-life critical drugs
in Concurrent mode. Individual patient responses may vary requiring
adjustment of delivery rates.
Delivery Rate Guidelines
Short Half-life
(less than 6 minutes)
Critical Drug Infusion Rate
0.5 - 1.9 mL/hr 5 Times the Critical Drug Rate
2 - 5 mL/hr 10 Times the Critical Drug Rate
5.1 or Greater Any Desired Ratio
Maximum Rate
of Accompanying Infusion
Critical Drug Examples
Examples of drugs with a short half-life (approximately 6 minutes
or less when given intravenously) include:
Dobutamine Esmolol Nitroprusside
Dopamine Isoproterenol Norepinephrine
Epinephrine Lidocaine Oxytocin
Epoprostenol Nitroglycerin Procainamide
For these drugs, the Concurrent flow guidelines should be followed
when the infusion rate of the drug will be 5 mL/hr or less.
System Operating Manual 1-15
Page 28

Includes Systems Compatible with Hospira MedNet
NOTE: The list of critical drugs on page 1-15 is not intended to be allinclusive of critical drugs or drugs with a short half-life.
The clinician should become familiar with the pharmacodynamics
of any critical drug before administration.
This information is presented to inform clinicians of a rare situation
that could be misinterpreted if they are unfamiliar with this
phenomenon.
Guidelines When Opening the Cassette Door
NOTE: Opening the cassette door will stop the infusion on one
or both the lines.
• To prevent unrestricted flow and mixing fluids in lines A and B,
close all clamps, or remove the secondary container, before
opening the cassette door.
• A small amount of fluid is expelled from the set (less than or equal
to 0.1 mL) each time the door is opened or closed with a set
installed. If potent drugs are being used, take appropriate action
to guard against over-medication of the patient.
• Keep the cassette door securely closed while the infuser is not
in use to avoid cassette door damage.
Administration Sets and Accessories Guidelines
• Use only compatible LifeCare PlumSets with the Plum 360 infuser.
See individual set instructions for additional information.
• Administration sets should be changed at least every 96 hours.
Discard after use.
• LifeCare I.V. infusion sets with integral nonblood filters are not for
use in the administration of blood, blood products, emulsions,
suspensions, or any medications not totally soluble in the solution
being administered. These medications may be administered
through the lower Y-injection site, below the filter.
1-16 System Operating Manual
Page 29

Plum 360 Infuser
WARNING
WARNING
WHEN INFUSING AT LOW DELIVERY RATES (5 mL/HR OR LESS)
USE THICK-WALLED MICROBORE PLUMSETS. THIS WILL
REDUCE THE AMOUNT OF THE UNINTENDED FLUID BOLUS THAT
MAY BE DELIVERED WHEN A DISTAL OCCLUSION IS RELEASED.
• Microbore PlumSets are not recommended at flow rates above
100 mL/hr.
USE OF MICROBORE SETS AT RATES GREATER THAN
100 ML/HR MAY INCREASE THE LIKELIHOOD OF DISTAL
OCCLUSIONS RESULTING IN DELAY OF THERAPY, AND REDUCE
SYSTEM ACCURACY AS STATED IN THE Delivery Accuracy
SECTION STARTING ON PAGE 11-10.
• When infusing at delivery rates of 0.1 to 999 mL/hr, macrobore
PlumSets may be used.
• When attaching a syringe to the primary port (Line A), use standard
clinical practices to ensure the syringe is secure in order to reduce
the chances of creating a proximal occlusion.
• Syringes must be between 3 mL (minimum) to 60 mL (maximum).
Syringes larger than 10 mL may be directly attached to the
secondary port of the cassette. Use a syringe adapter on syringes
10 mL or smaller. For syringe sets on Line A, use a vented syringe
adapter with all syringes from 3 mL to 60 mL.
• Before disconnecting a syringe from the cassette, pull up the
plunger slightly to avoid spilling the fluid.
• Before disconnecting a rigid container from the cassette, close the
upper slide clamp or clamp proximal tubing, open the cassette door,
and then remove and invert the cassette (ports down) to avoid
spilling the fluid.
System Operating Manual 1-17
Page 30

Includes Systems Compatible with Hospira MedNet
Precautions to Avoid Unintended Bolus
In addition to the following procedure, refer to Maximum Unintended
Bolus Volume Released After Distal Occlusion is Resolved on
page 11-9.
Use the following procedure to avoid the administration of an
unintended bolus following a distal occlusion:
1. If the administration set does not have a clamp distal to the
cassette, disconnect the tubing from the patient while eliminating
the distal occlusion.
If the administration set has a clamp on the distal line, ensure that
the clamp is closed (even if the closed clamp caused the distal
occlusion alarm).
2. Close all clamps on the primary and secondary lines.
3. Open the cassette door and remove the cassette.
4. Gently pull out the flow regulator on the cassette to dissipate the
pressure for a brief moment, and then push in on the flow
regulator to close it.
5. Eliminate the source of occlusion, unless it was caused by
a closed distal clamp. (The distal clamp must remain closed
until Step 8.)
6. If the distal line was removed, reattach it to the patient access
device.
7. Reinsert the cassette and close the cassette door.
8. Open all clamps and resume infusion.
For other conditions that may cause an unintended bolus to be
administered, see Guidelines When Opening the Cassette Door
on page 1-16 and Administration Sets and Accessories
Guidelines on page 1-16.
1-18 System Operating Manual
Page 31

Plum 360 Infuser
Guidelines to Avoid Air in the Patient Line
• Air bubbles may form distal to the cassette as the result of normal
outgassing of dissolved air in the fluid in one or more of the
following cases:
• Chilled solution is in use
• Certain fluids known to routinely outgas are in use
• The infuser is mounted significantly above the patient. Minimize
this differential (head height) when outgassing is a concern.
• The infuser is infusing at very low rates between 0.1 and 5 mL/hr.
In these cases, an air-eliminating filter may be used when clinically
appropriate.
• Repeated opening and closing of the door may defeat the proximal
air-in-line alarm and may cause a distal air-in-line alarm, requiring
repriming.
• When using a syringe adapter, retract the plunger to draw
approximately 1 mL of fluid into the syringe to clear air from the
adapter filter.
Guidelines During Backpriming
• Backpriming is not recommended for reconstituting secondary
containers containing dry powders.
• To avoid pressurization when backpriming into a syringe, confirm
that there is sufficient empty space to accept the backprimed fluid
before beginning a backprime. Approximately 5 mL of fluid is
transferred from the primary to the secondary port during
30 seconds of continuous backpriming.
• To accept the backprimed air and/or fluid, a line with a container
or a syringe needs to be attached to the secondary port.
System Operating Manual 1-19
Page 32

Includes Systems Compatible with Hospira MedNet
Battery Guidelines
Use AC (mains) power whenever possible. Connect to AC
(mains) power during storage to ensure a fully charged battery
for emergencies.
• Do not use the Plum 360 infuser to operate on patients when the
battery is removed. Use of a properly maintained and charged
battery helps to ensure proper operation.
• The battery may not be fully charged upon receipt. Connect the
infuser to AC (mains) power for at least eight hours.
• If the quality of the earth grounding source is in doubt, use battery
power.
• If the low-battery alarm sounds, connect the infuser to AC (mains)
power immediately.
Guidelines During Cleaning
• To avoid mechanical or electronic damage, do not immerse the
Plum 360 infuser in any fluids or cleaning solutions.
• Do not spray cleaning solutions toward any opening in the
instrument.
• Certain cleaning and sanitizing solutions may slowly degrade
components made from some plastic materials. Using abrasive
cleaners or cleaning solutions not recommended by Hospira may
result in product damage. Do not use compounds containing
combinations of isopropyl alcohol and dimethyl benzyl ammonium
chloride.
• Never use sharp objects such as fingernails, paper clips, or needles
to clean any part of the infuser.
• Do not sterilize by heat, steam, ethylene oxide (ETO), or radiation.
• To avoid infuser damage, cleaning solutions should only be used as
directed. The disinfecting properties of cleaning solutions vary;
consult the manufacturer for specific information.
For more information, see Cleaning the Infuser on page 10-1
and the Plum 360 Infuser Technical Service Manual.
1-20 System Operating Manual
Page 33

Plum 360 Infuser
Artifacts
Nonhazardous, low-level electrical potentials are commonly observed
when fluids are administered using infusion devices. These potentials
are well within accepted safety standards, but may create artifacts
on voltage-sensing equipment such as ECG, EMG, and EEG
machines. These artifacts vary at a rate that is associated with the
infusion rate. If the monitoring machine is not operating correctly
or has loose or defective connections to its sensing electrodes, these
artifacts may be accentuated so as to simulate actual physiological
signals.
To determine if the abnormality in the monitoring equipment is caused
by the infusion device instead of some other source in the
environment, set the infusion device so that it is temporarily not
delivering fluid. Disappearance of the abnormality indicates that
it was probably caused by the electronic noise generated by the
infusion device. Proper setup and maintenance of the monitoring
equipment should eliminate the artifact. Refer to the appropriate
monitoring equipment system documentation for setup and
maintenance instructions.
The Plum 360 infuser is designed to operate normally in the presence
of most encountered electromagnetic interference (EMI) conditions.
In the event of extreme levels of interference, such as encountered
next to an electrosurgical generator, it is possible that the normal
operation of a sensor or microcomputer might be disrupted.
Even in this event, the outcome would likely be a false alarm
or detected system malfunction and would not result in a hazard
to patient or operator.
This equipment has been tested and found to comply with the EMC
limits for its classification of medical device. Those limits are designed
to provide reasonable protection against harmful interference in a
typical medical installation. The equipment generates, uses and can
radiate radio frequency energy and, if not installed and used in
accordance with the instructions, may cause harmful interference to
other devices in the vicinity. However, there is no guarantee that
interference will not occur in a particular installation. If this equipment
does cause harmful interference with other devices, which can be
determined by turning the equipment off and on, the user is
System Operating Manual 1-21
Page 34

Includes Systems Compatible with Hospira MedNet
encouraged to try to correct the interference by one or more of the
following measures:
• Reorient or relocate the receiving device
• Increase the separation between the equipment
• Connect the equipment into an outlet on a circuit different from that
to which the other device(s) is connected
• Consult the manufacturer or field service technician for help
Portable and mobile RF communications equipment, such as cellular
telephones, 2-way radios, Bluetooth™ devices, microwave ovens,
in close proximity to this device may affect wireless and wired
communications with the infuser and/or the operation of the infuser.
Special cautions need to be exercised regarding EMC. These include:
• Use of a shielded Ethernet cable (CAT5 STP or better) for
plugging into the RJ45 Ethernet connector. Using an unshielded
Ethernet cable may result in increased emissions or decreased
immunity performance.
• Maintaining a minimum separation distance of 2 ½ ft between the
infuser system and portable/mobile RF communications
equipment.
Interconnecting of Medical Equipment
Accessory equipment connected to the analog and digital interfaces
must be certified according to the respective IEC Standards (for
example, IEC 60950 for data processing equipment and IEC 60601-1
for Medical Equipment). Any person who connects additional
equipment to the signal input or output part configures a medical
system, and is therefore responsible for ensuring that the system
complies with the requirements of Standard IEC/EN 60601-1.
1-22 System Operating Manual
Page 35

Plum 360 Infuser
WARNING
Guidance on EMC Compatibility
The Plum 360 infuser has been tested to the requirements of
IEC 60601-1-2012, IEC 60601-1-2:2007, and IEC 60601-2-24-2012.
The Plum 360 infuser is also compliant to EN 60601-1-2:2007 and EN
60601-2-24:1998. The infuser meets the EMC requirements of the
Medical Device Directive 93/42/EEC with amendments by 2007/47/
EC. Refer to the Plum 360 Infuser Technical Service Manual for
further details of the EMC testing procedures and compliance levels.
There is a shared responsibility between manufacturers, customers
and users to ensure that Medical Equipment and Systems are
designed and operated as intended. Medical electrical equipment
needs special cautions regarding electromagnetic compatibility and
needs to be installed and used according to the electromagnetic
compatibility information provided in this manual.
The device is suitable for use in all establishments, including
domestic establishments. If extended operation during power mains
interruption is needed, use battery power.
Always manage the electromagnetic environment.
The guidance included in this manual provides information needed to:
• Determine the device’s suitability for use in the intended
environment.
• Manage the electromagnetic environment to permit the device
to perform as intended without disturbing other equipment.
Separate the device from all other electronic equipment. If the device
must be used near other electrical equipment, monitor the equipment
to ensure there is no electromagnetic interference.
DEVICES SHOULD NOT BE USED ADJACENT TO OR STACKED
WITH OTHER EQUIPMENT. IF THE DEVICE MUST BE USED
ADJACENT TO OR STACKED WITH OTHER EQUIPMENT,
MONITOR THE DEVICES TO VERIFY NORMAL OPERATION.
USE ONLY components specifically labeled for use with the
Plum 360 infuser to help ensure the device operates as intended.
System Operating Manual 1-23
Page 36

Includes Systems Compatible with Hospira MedNet
If you suspect external RF sources or other equipment are influencing
device operation, contact the biomedical engineering department for
additional guidelines concerning electromagnetic immunity.
Contact the biomedical engineering department for additional
information in the technical service manual concerning operating
devices near RF sources.
FCC Information
US FCC (Federal Communications Commission) Statement (United States Only)
The device has been tested and found to comply with the limits for
a Class B digital device, pursuant to Part 15C, 15E of the FCC rules.
These limits are designed to provide reasonable protection against
harmful interference.
Operation is subject to the following two conditions: (1) This device
may not cause interference, and (2) This device must accept any
interference, including that may cause undesired operation of these
devices.
FCC Interference Statement (United States Only)
This equipment has been tested and found to comply with the limits
for a Class B digital device, pursuant to Part 15 of the FCC rules.
These limits are designed to provide reasonable protection against
harmful interference in a residential installation. This equipment
generates, uses, and can radiate radio frequency energy and, if not
installed and used in accordance with the instructions, may cause
harmful interference to radio communications. However, there is no
guarantee that interference will not occur in a particular installation.
1-24 System Operating Manual
Page 37

Plum 360 Infuser
If this equipment does cause harmful interference to radio or
television reception, which can be determined by turning the
equipment off and on, the user is encouraged to try to correct the
interference by one or more of the following measures:
• Re-orient or relocate the receiving antenna
• Increase the separation between the equipment and receiver
• Connect the equipment to an outlet on a circuit different from that
to which the receiver is connected
• Consult the dealer or an experienced radio/television technician
for help
This device and its antenna(s) must not be co-located or operated in
conjunction with any other antenna or transmitter.
Canadian Department of Communications Industry Canada Notice (Canada Only)
The Class B digital apparatus complies with Canadian ICES-003.
Radio Frequency Exposure Statement
The Wireless LAN radio device in the Connectivity Engine peripheral
assembly with this infusion device has been evaluated and found
compliant to the requirements of the following Radio Frequency
exposure standards.
FCC Rules, Part 15/Industry Canada
This device complies with Part 15 of FCC Rules and Industry Canada
license-exempt RSS standard(s). Operation is subject to the following
two conditions:
(1) This device may not cause harmful interference, and
(2) This device must accept any interference, including interference
that may cause undesired operation of this device.
System Operating Manual 1-25
Page 38

Includes Systems Compatible with Hospira MedNet
This equipment complies with FCC/IC radiation exposure limits set
forth for an uncontrolled environment and meets the FCC radio
frequency (RF) Exposure Guidelines in Supplement C to OET65 and
RSS-102 of the IC radio frequency (RF) Exposure rules.
Under Industry Canada regulations, this radio transmitter may only
operate using an antenna of a type and maximum (or lesser) gain
approved for the transmitter by Industry Canada. To reduce potential
radio interference to other users, the antenna type and its gain should
be so chosen that the equivalent isotropically radiated power (e.i.r.p.)
is not more than that necessary for successful communication.
This radio transmitter (identify the device by certification number,
or model number if Category II) has been approved by Industry
Canada to operate with the antenna types listed below with the
maximum permissible gain and required antenna impedance for each
antenna type indicated. Antenna types not included in this list, having
a gain greater than the maximum gain indicated for that type, are
strictly prohibited for use with this device.
For product available in the USA/Canada market, only channels 1-11
can be operated. Selection of other channels is not possible.
If this device is to be operated in the 5.15~5.25 GHz frequency range,
it is restricted to indoor environments only.
Antenna: Proprietary
Antenna Gain Information: Embedded Antenna: 4.2dBi (2.4 GHz),
5.1dBi (5 GHz)
Frequency Tolerance: ±20ppm
R&TTE
Hospira Inc., hereby declares that this Plum 360 infuser is in
compliance with the essential requirements and other relevant
provisions of Directive 1999/5/EC.
The Plum 360 infuser is intended to support radio telecommunication
throughout the European Union.
An appropriately translated copy of Declaration of Conformity can be
located here: Hospira Inc., 275 N. Field Drive, Lake Forest, Illinois,
60045, USA.
1-26 System Operating Manual
Page 39

Plum 360 Infuser
RoHS
Hospira Inc., hereby declares that this Plum Infusion Pump is in
compliance with Directive 2011/65/EU on the restriction of the use of
certain hazardous substances in electrical and electronic equipment
(RoHS).
Taiwan NCC Warning Statement
According to “Administrative Regulations on Low Power Radio Waves
Radiated Devices”
Without permission granted by the NCC, any company, enterprise, or
user is not allowed to change frequency, enhance transmitting power
or alter original characteristic as well as performance to an approved
low power radiofrequency devices. The low power radio-frequency
devices shall not influence aircraft security and interfere legal
communications; If found, the user shall cease operating immediately
until no interference is achieved. The said legal communications
means radio communications is operated in compliance with the
Telecommunications Act.
The low power radio-frequency devices must be susceptible with the
interference from legal communications or ISM radio wave radiated
devices.
經型式認證合格之低功率射頻電機,非經許可,公司、商號或使用者均不得擅自變
更頻率、加大功率或變更原設計之特性及功能。低功率射頻電機之使用不得影響飛
航安全及干擾合法通信;經發現有干擾現象時,應立即停用,並改善至無干擾時方
得繼續使用。前項合法通信,指依電信法規定作業之無線電通信。低功率射頻電機
須忍受合法通信或工業、科學及醫療用電波輻射性電機設備之干擾。
System Operating Manual 1-27
Page 40

Includes Systems Compatible with Hospira MedNet
Suspected Cybersecurity Event or Threat
The section contains information on the recommended procedure
upon detecting a suspected cybersecurity event or threat.
1. Contact hospital and/or follow hospital guidelines to report the
suspected cybersecurity event or threat.
Attempts to exploit a remote vulnerability on an infusion device
would require penetration of several layers of network security
enforced by the hospital, including firewalls. These measures
serve as the primary defense against tampering with a medical
device.
2. Contact Hospira to report the suspected cybersecurity event or
threat.
1-28 System Operating Manual
Page 41

Plum 360 Infuser
Section 2
Equipment Description
For a technical description of the Plum 360 infuser, see the Plum 360
Infuser Technical Service Manual.
The Plum 360 infuser includes the infuser (pumping module)
and attached Connectivity Engine peripheral module (CE module),
and this System Operating Manual. The CE module provides wired
Ethernet and wireless 802.11 a/b/g/n local area networking
capabilities. This allows the infuser to connect to the facility’s network
and communicate with the optional Hospira MedNet networked
application software to download software and drug libraries,
and to enable auto-programming features. Optional accessories are
also available.
Each infusion requires a disposable, single-use Plum administration
set to provide the fluid path between the fluid container and the
patient access device. Each administration set includes a proprietary
cassette that works with the pumping mechanism on the infuser
to provide accurate fluid delivery and air management.
System Operating Manual 2-1
Page 42

Includes Systems Compatible with Hospira MedNet
AB
AB
Settings /
Vols / CCA
Back
Prime
Rate
mL/hr
Vol Inf
mL
0
00
0
Medical
Select Line A/B to program
START
STOP
AC ON
a b c d e f
g h i j k l m n o
p q r s t u v w x y z
CLEAR LOCK KEYPAD
AUDIO PAUSED
ON OFF
Line A Flow
Indicator
Messages
Softkey
Label
Softkey
Status
Region
Start
and
Stop
Keys
AC
Connected
Indicator
ON/OFF
Key
Audio Paused Key
Number/Letter KeyClear Key Decimal Key
Line B Flow
Indicator
Line
Working
Region
CCA
Name
Hospira
MedNet
Connected
Battery
Charge
Indicator
Wireless
Signal
Strength
Select Key
Lock Keypad
Key
See Section 12 for a list of Plum administration sets and optional
accessories.
The following sections describe the Plum 360 infuser hardware and
Plum administration sets.
Keypad and Display
This manual covers Plum 360 infusers with an alphanumeric keypad
and Plum 360 infusers with a numeric keypad.
The screen examples used in this manual are representative of an
infuser with an alphanumeric keypad.
Alphanumeric Keypad
2-2 System Operating Manual
Page 43

Numeric Keypad
AB
AB
Settings /
Vols / CCA
Back
Prime
Rate
mL/hr
Vol Inf
mL
0
00
0
Medical
Select Line A/B to program
Line A Flow
Indicator
Messages
Softkey
Label
Softkey
Status
Region
Start
and
Stop
Keys
Mains ON
Indicator
ON/OFF
Key
Audio Paused Key
Number KeyClear Key Comma Key
Line B Flow
Indicator
Line
Working
Region
CCA
Name
Hospira
MedNet
Connected
Battery
Charge
Indicator
Wireless
Signal
Strength
Select Key
Lock Keypad
Key
Plum 360 Infuser
System Operating Manual 2-3
Page 44

Includes Systems Compatible with Hospira MedNet
Operating Keys
[ON/OFF] - Infuser power on and off. See Turning Power
On and Turning Power Off for more information.
[START] - Is the first key to press to start a delivery.
For safety reasons, every delivery must be confirmed
by checking the programming and then pressing
an additional softkey, in response to a prompt.
[STOP] - Stops delivery.
If two lines are pumping when you press [STOP], you must
press one of the following softkeys:
or
[Stop All] in response to a prompt to specify which
line(s) to stop (see page 2-6 for more information about
softkeys).
[Stop A], [Stop B],
[SELECT] - Moves the cursor between fields on the display.
The top pair of arrows moves the cursor up or to the left.
The bottom pair of arrows moves the cursor down
or to the right.
[LOCK KEYPAD] - Pressing this key, followed by entering a
lock passcode, disables all keys on the keypad except
[STOP] until a valid unlock passcode is entered. See
Locking and Unlocking the Keypad for more information.
2-4 System Operating Manual
Page 45

Plum 360 Infuser
[AUDIO PAUSED] - Has two functions, temporarily silencing
all audio output for any active alarms for two minutes
or temporarily silencing keypad input sound feedback for two
minutes if there are no active alarms. See Programming a
Callback Alarm and Silencing the Keypad for more
information.
[C] - Clears all values in the currently-highlighted field.
[C] also clears the dashes (-- -- --) that are displayed when
an entry is invalid or a drug delivery parameter is beyond the
pre-programmed hard limits.
NOTE: [C] will NOT clear an entire program.
Alphanumeric Keypad - [DECIMAL KEY] - Adds the
decimal point needed when entering numbers other than
whole numbers (1.2 mL, for example).
NOTE: On the infuser display, any digits after the decimal
point will be ¾ of the height of the whole number digits.
Numeric Keypad - [COMMA KEY] - Adds the comma
needed when entering numbers other than whole numbers
(1,2 ml, for example).
NOTE: On the infuser display, any digits after the comma
will be ¾ of the height of the whole number digits.
System Operating Manual 2-5
Page 46

Includes Systems Compatible with Hospira MedNet
a b c d e f
g h i j k l m n o
p q r s t u v w x y z
Previous
Screen
Delay Multistep
Loading
Dose
Alphanumeric Keypad -
Number keys - Have two
functions, entering numbers
in any highlighted field and
navigating through the drug
library.
See Using the Keypad to Enter
Program Information and
Using the Keypad to Search
the Drug List for more
information.
Numeric Keypad -
Number keys - To enter
numbers in any highlighted field.
See Using the Keypad to Enter
Program Information for more
information.
2-6 System Operating Manual
Softkeys - Offer functions that
are appropriate for the screen
currently being displayed.
The current function for each
softkey appears on the display;
you press the triangular key
below it to choose the function.
In this manual, softkeys are
represented by a triangle and the
name in brackets;
[Delay],
for example.
Page 47

Indicators
Flow Indicator - Green LED that blinks while a delivery
is in progress, lights steadily when a delivery is in Standby
or is Delayed, Stopped, or Paused, and is off when a delivery
is not programmed for the line.
There are two flow indicators above the display. The one
on the left is for Line A, the one on the right is for Line B.
AC (Mains) ON Indicator - Green LED that lights steadily
when the infuser is plugged into AC (mains) power. During
this time, the battery charges continuously when a battery is
installed.
If the infuser is unplugged, the AC ON Indicator light goes off
within seconds, indicating that the infuser is operating on
battery power.
NOTE: If the device is plugged into AC (mains) power with a
battery installed, and the AC ON Indicator is not illuminated,
contact technical support.
Plum 360 Infuser
Display Symbols
Caution - Appears on the display to inform the clinician to
use CAUTION because the specified drug has been
programmed without rule sets (soft or hard limits), and may
have been programmed outside of specified safety limits for
that specific drug.
Upper Soft Limit Override - appears next to the drug name
when the dosage of the drug being infused is higher than the
upper soft limit set for the drug in the Custom Drug Library
(for systems with Hospira MedNet software only).
System Operating Manual 2-7
Page 48

Includes Systems Compatible with Hospira MedNet
Lower Soft Limit Override - appears next to the drug name
when the dosage of the drug being infused is less than the
lower soft limit set for the drug in the Custom Drug Library
(for systems with Hospira MedNet software only).
Wireless Connection - appears when the infuser
is communicating with the network using a wireless
connection.
The number of bars indicate the strength of the wireless
connection. The following figure shows the signal strength
from highest on the left to lowest on the right.
If the signal strength is low, try relocating the infuser closer
to the access point.
Ethernet - appears when the infuser is communicating
with the network over a wired (Ethernet) connection.
Hospira MedNet Connection - appears when the infuser
is communicating with Hospira MedNet software over either
a wireless or Ethernet connection.
2-8 System Operating Manual
Page 49

Plum 360 Infuser
Battery Capacity - shows the battery charge level when
a battery is installed in the infuser, or indicates that a battery
is not installed.
The following figure shows all possible appearances for this
symbol. From left to right, the symbols represent 100%, 75%
50%, and 25% charge levels, a fully-depleted battery,
and a battery not installed.
Alarm - appears when an alarm is currently active.
The following figure shows the two states for this symbol.
The appearance changes to the symbol on the right when
all audio output is temporarily silenced by pressing the
[AUDIO PAUSED] key.
!!!
Alarm Priority - appears before each alarm message,
indicating the priority. This symbol has three possible states:
!!! - High priority alarm
!! - Medium priority alarm
! - Low priority alarm
The infuser also sounds the appropriate high, medium,
or low auditory alarm signal.
Lock - appears when the keypad is locked (see Locking
and Unlocking the Keypad
System Operating Manual 2-9
on page 3-14).
Page 50

Includes Systems Compatible with Hospira MedNet
Service
Port
(Hospira
Use Only)
Nurse Call
Interface
Port
I/O Port
Cover
Ethernet
Port
Volume
Control
Knob
Activity
Indicator
LEDs
CE Module
Connection of the Plum 360 infuser to an IT network could result
in previously unidentified risks to patients, operators, or third parties.
The organization that makes those connections must identify and
control those risks.
The wireless CE (Connectivity Engine) Module attached to the back
of the infuser provides both wired Ethernet and wireless 802.11
networking capabilities for connection to Hospira MedNet software
on your facility’s network (see Hospira MedNet Safety Software on
page 12-30).
In addition to its communications features, the CE Module includes
these infuser controls:
2-10 System Operating Manual
Page 51

Plum 360 Infuser
Activity Indicator LEDs – These LEDs show CE Module
activity.
CE Module Activity LED Color Indication
Powering up and performing
self-check tests.
Ready for operation. Green
Communicating via Ethernet
or Wi-Fi.
*
Module is shut down
or there
is system failure.
* For information about CE shutdown, see the Plum 360 Infuser Technical Service
Manual.
Green
Yello w
Yello w
Green
Yello w
Green
Yello w
On
On
Blinking
Off
Blinking
Blinking
Off
Off
Volu m e Knob – adjusts the sound level of the audible alarm.
Rotate the knob clockwise to increase the volume. Rotate
the knob counterclockwise to decrease the volume.
Nurse Call Interface Connector– connects to the facility’s
Nurse Call System to provide remote notification for all
infuser alarms (see Attaching a Nurse Call Interface
Cable).
Ethernet port – accepts a shielded Ethernet cable
to connect to a local area network.
System Operating Manual 2-11
Page 52
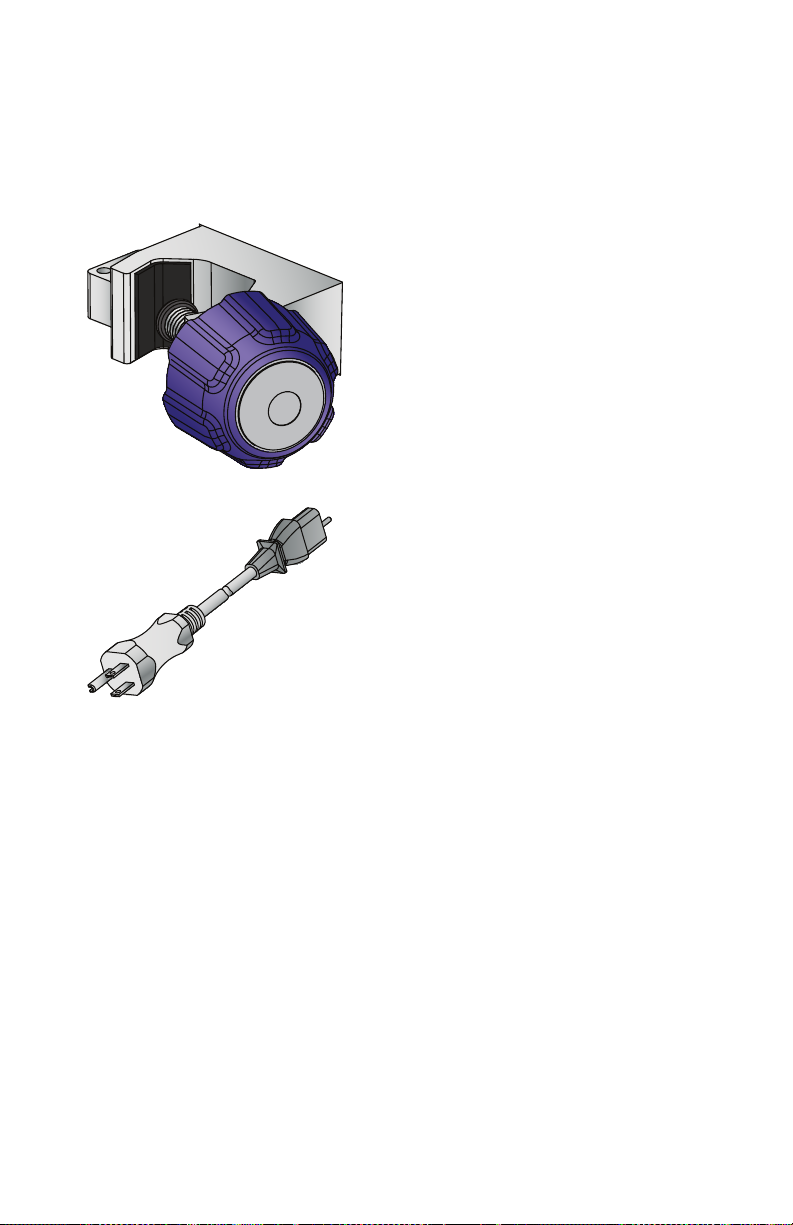
Includes Systems Compatible with Hospira MedNet
Pole Clamp, Potential Equalization Terminal, and Power Cord
Pole Clamp - adjusts to fit round I.V.
poles from 0.5 - 1.5 inches (1.2 cm to
3.8 cm) in diameter. See Mounting
the Infuser on an I.V. Pole
page 3-2 for more information. When
the pole clamp is tight enough, a
ratcheting sound indicates that the
clamp is being over-tightened.
Power Cord - Plugs into AC (mains)
power to provide power, charge the
battery, and ground the infuser
enclosure and chassis. The power
cord connection to the infuser is
protected by an enclosure to prevent
accidental disconnection. The power
cord can be replaced if damaged
(see the Plum 360 Infuser Technical
Service Manual).
on
2-12 System Operating Manual
Page 53

Plum 360 Infuser
POTENTIAL
(48$/,=$7,21
TERMINAL
Potential Equalization Terminal is used to ensure that the infuser is
at the same electric potential (voltage)
as the other devices in the treatment
location. Ideally the electrical potential
is at zero volts, so that no current can
inadvertently flow from one device to
another through a patient.
When the infuser’s power cord
is connected to an AC (mains) outlet,
the grounding wire of the power cord
forces the infuser enclosure and
chassis to be at zero volts. If the
infuser power cord is not connected
to the mains outlet, a separate
grounding cord should be connected
from the Potential Equalization
Terminal to a grounding terminal in the
treatment location.
System Operating Manual 2-13
Page 54
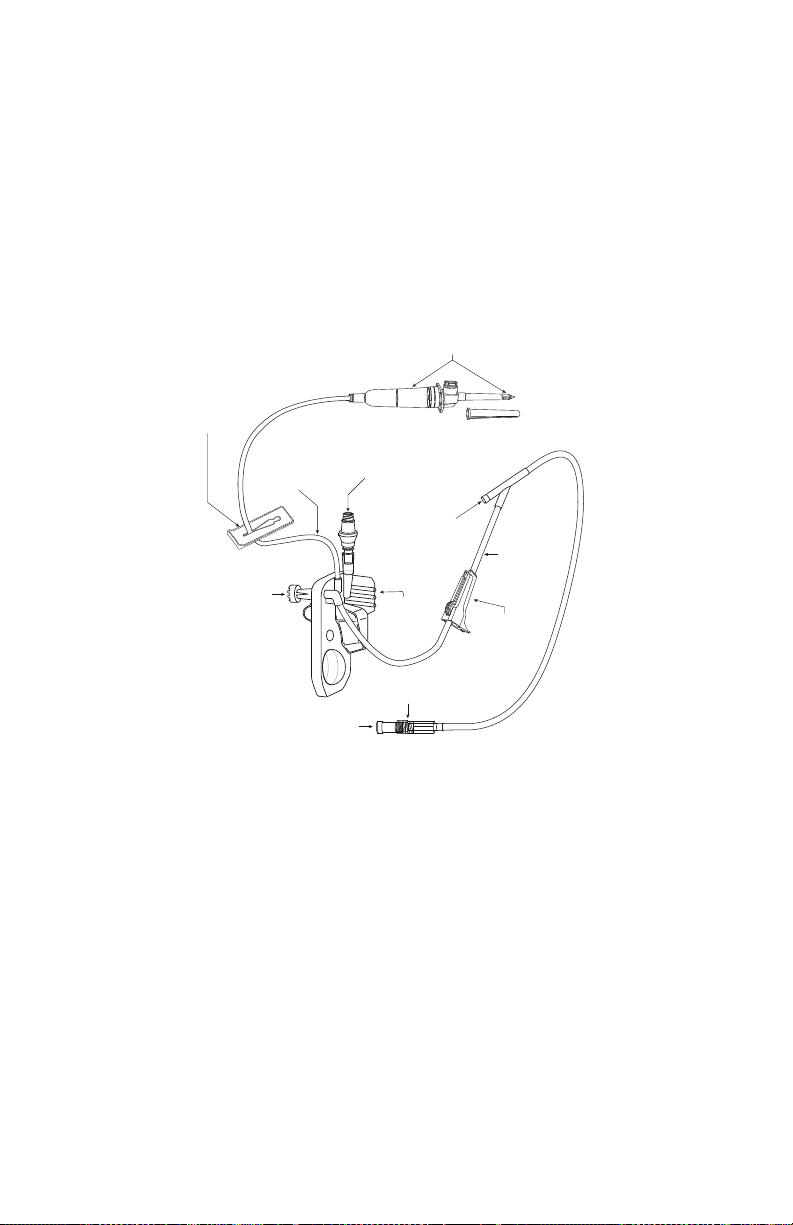
Includes Systems Compatible with Hospira MedNet
CASSETTE
FINGER
GRIP
CAIR
(ROLLER)
CLAMP
DISTAL
(PATIENT)
LINE
Y-SITE
(For IV push delivery
of medicine)
LOCKING COLLAR
CONNECTOR
PRIMARY
LINE
SECONDARY PORT
(Prepierced, capped, Clave
(Not for IV push delivery of medicine))
SLIDE CLAMP
FLOW
REGULATOR
CONVERTIBLE PIERCING PIN
WITH DRIP CHAMBER
PROTECTIVE CAP
WITH FILTER
(Connect to patient access device)
Plum Administration Sets
Plum administration sets are available for a wide variety of uses,
including intravenous, blood, enteral, and epidural deliveries.
Intravenous, epidural, and blood sets are supplied sterile. Some sets
have additional features such as burettes, filters, or special tubing
(see Administration Sets (for list numbers ending in -04, -10, and
-65) on page 12-1 for a description of each Plum administration set).
The following sections describe the most common features.
See Section 4 for instructions on how to prepare and use Plum
administration sets. See set packaging for specific instructions.
2-14 System Operating Manual
Page 55
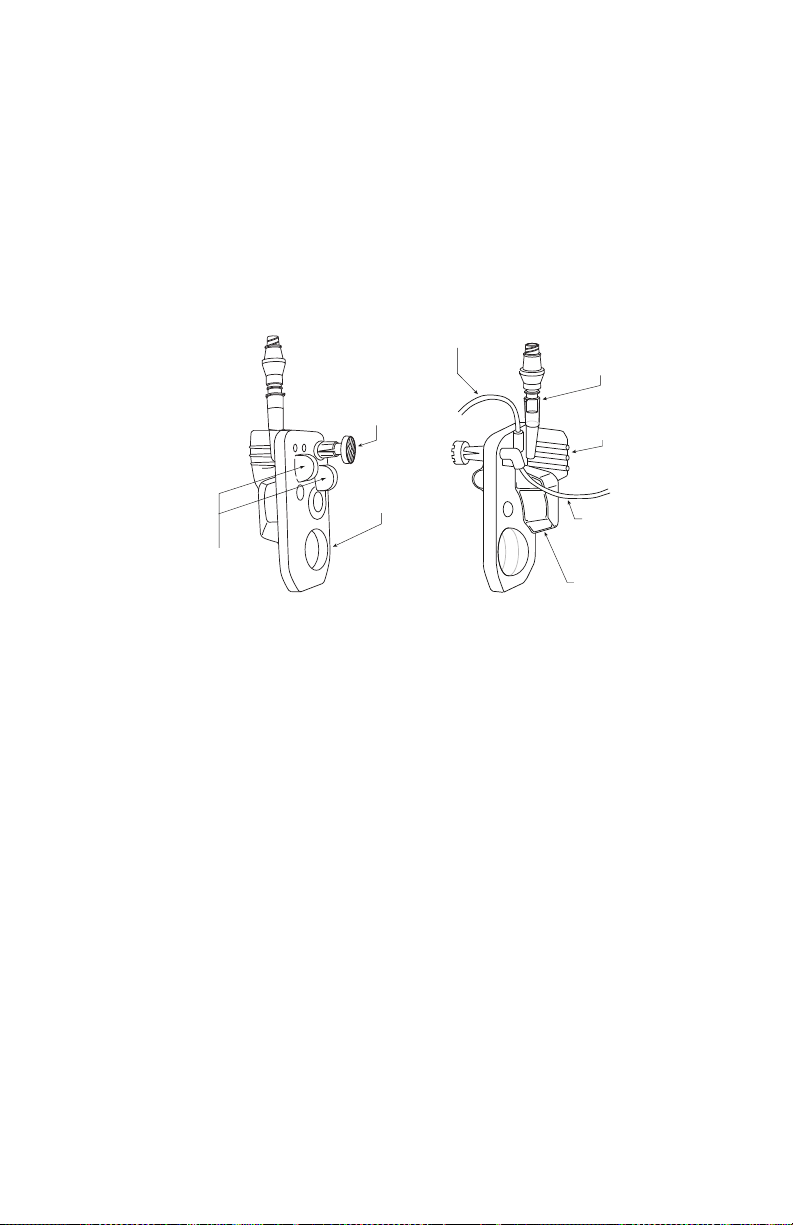
Plum 360 Infuser
FINGER
GRIP
DISTAL
(PATIENT)
LINE
AIR TRAP
(PROXIMAL)
PRIMARY
LINE
FLOW
REGULATOR
PUMPING
CHAMBER
AIR-IN-LINE
SENSORS
(PROXIMAL)
SECONDARY
PORT
The Plum Cassette
Each PlumSet includes a proprietary cassette that works with
the infuser’s pumping mechanism to provide fluid delivery,
air management, and occlusion detection.
The following figure shows the parts of the cassette.
The air trap allows 1 mL of air before the infuser sounds a cassette
alarm. To remove air bubbles from the air trap, perform Backpriming.
System Operating Manual 2-15
Page 56

Includes Systems Compatible with Hospira MedNet
Most cassettes also include a secondary port for attaching a line
or syringe for Piggyback or Concurrent fluid delivery. The secondary
port has one of these connectors:
Clave secondary ports are compatible with
sets or syringes that employ male luer
adaptors for connection. Clave secondary
ports are incompatible with needles.
The Clave needle-less design provides
a mechanically- and microbiologically-closed
fluid path.
Capped secondary ports are also compatible
with secondary sets or syringes that employ
male luer adaptors for connection. Capped
ports are incompatible with needles.
Prepierced secondary ports accept
a locking blunt cannula (see
on page 12-20) attached to a secondary line
or syringe.
Accessories
2-16 System Operating Manual
Page 57

Plum 360 Infuser
The cassette also has these features:
• A finger grip to assist placing the cassette in the correct position,
to guide and load it into the door tracks of the cassette door.
• A pumping chamber that works with the pumping mechanism
on the infuser to pump fluid to the patient.
• An air trap that collects air bubbles from the I.V. proximal A and B
lines. Air trap capacity is 1 mL of air that can be removed
by backpriming (see Backpriming on page 4-21).
• Air-in-line sensor bulbs that work with the proximal and distal air-
in-line detectors in the infuser to check for air bubbles that may
be entering or leaving the cassette.
• A flow regulator that can be used to manually control flow during
priming or when using gravity flow to deliver fluid. When you insert
the cassette into the infuser and close the cassette door,
a mechanism opens the flow regulator to allow the infuser to control
fluid flow. When you open the cassette door, the same mechanism
closes the flow regulator to prevent unrestricted flow from the distal
line.
System Operating Manual 2-17
Page 58

Includes Systems Compatible with Hospira MedNet
CLOSED
POSITION
OPEN
POSITION
PARKED
POSITION
Other Administration Set Features
Most Plum administration sets have some combination of the
following features. For complete information about all the features
of a particular administration set, refer to the label on the
administration set packaging.
The convertible piercing pin spikes the seal
on the fluid container and secures the
administration set tubing to the container.
The piercing pin has a built-in filter vent that
allows use with flexible or rigid fluid containers,
and an integrated drip chamber with score mark
for monitoring fluid flow.
If using a rigid fluid container (glass bottle,
for example), open the filter vent cover above
the drip chamber. If using a flexible plastic
container, make sure this vent cover is closed.
Slide clamps can be placed anywhere on the
tubing. The shape of the cutout provides three
clamp positions:
• Open position, in the middle of the cutout,
allows fluid to flow and also allows the clamp
to slide freely on the tubing.
Closed position, at the narrow end of the
•
cutout, clamps the line, preventing fluid flow.
The closed clamp stays in a fixed position
on the tubing.
Parked position, at the wide end of the
•
cutout, also allows fluid to flow, but keeps
the clamp in a fixed position on the tubing
to prevent movement.
2-18 System Operating Manual
Page 59
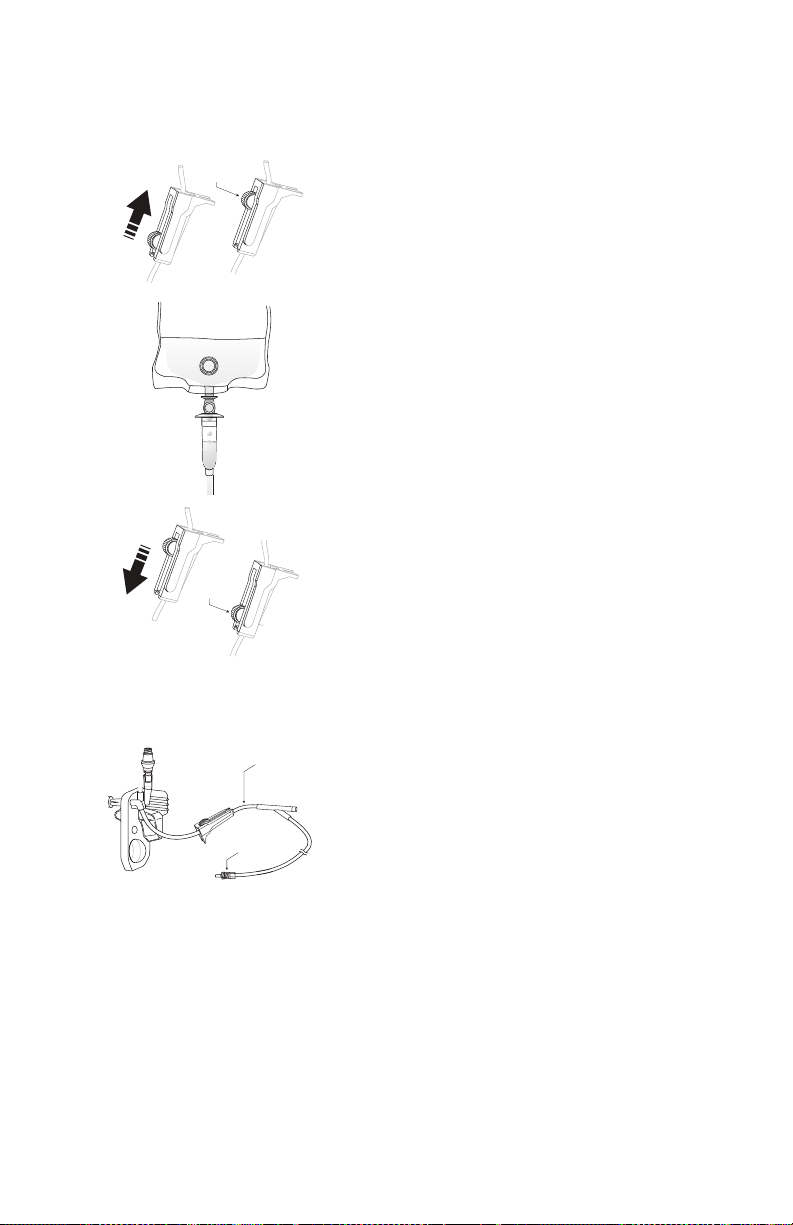
Plum 360 Infuser
OPEN
POSITION
CLOSED
POSITION
DISTAL (PATIENT)
LINE
LOCKING COLLAR
CONNECTOR
Roller Clamps
allow controlled fluid flow.
• To gradually increase fluid flow, slide the roller
towards the fully Open position.
• Observe the fluid drops in the drip chamber.
• To gradually decrease and then stop fluid flow,
slide the roller towards the fully
Closed
position.
The distal line (patient line) runs from the
cassette to the patient.
The connector that attaches the distal line
to the patient access device has a locking collar
that prevents accidental disconnection.
NOTE: The cap on the connector has a filter
that allows the set to be primed while the cap is
on as long as the cap stays dry. Cap is a sterile
fluid path barrier when in place.
System Operating Manual 2-19
Page 60

Includes Systems Compatible with Hospira MedNet
Notes
2-20 System Operating Manual
Page 61

Plum 360 Infuser
WARNING
Section 3
Basic Operations
The Plum 360 infuser does not require any special installation.
Before placing the infuser into service for the first time, the only
preparation needed is to have a biomedical technician customize the
default settings according to the facility’s needs, clean the infuser,
and then fully charge the battery. See the Plum 360 Infuser
Technical Service Manual for more information.
If using Hospira MedNet safety software, the infuser must also
be connected to the facility’s network to download infuser
configuration, Clinical Care Area (CCA), and Custom Drug Library
(CDL) information before being placed into service.
Once these preparations are complete, follow these basic steps
to deliver fluids to the patient:
1. Mount the infuser on an I.V. pole (see Mounting the Infuser on
an I.V. Pole on page 3-2), or place the infuser on a stable
surface.
Do not place the infuser on an unstable surface.
CONNECT THE AC (MAINS) CORD TO A PROPERLY
GROUNDED RECEPTACLE.
System Operating Manual 3-1
Page 62

Includes Systems Compatible with Hospira MedNet
CAUTION
2. Connect the power cord to an AC (mains) power receptacle and
confirm that the green AC ON indicator lights.
Ensure that access to the mains plug is not blocked while
using the infuser so that the plug can be disconnected
from the mains power receptacle in the event of an
emergency.
3. (Optional) Attach a Nurse Call Cable between the Nurse Call
Interface Port on the back of the infuser and your facility’s Nurse
Call system (see Attaching a Nurse Call Interface Cable on
page 3-6).
4. Prime and install a Plum administration set (see Priming a
Primary Administration Set on page 4-2). Confirm that the
cassette door is closed before attaching an administration set
to the patient access device.
5. Turn the infuser on and allow it to successfully complete the
Self Test (see Turning Power On on page 3-11).
6. Attach the administration set to the patient access device.
7. Program the delivery and start the infusion (Programming on
page 5-1 and Delivery Options on page 8-1).
Mounting the Infuser on an I.V. Pole
The Plum infuser pole clamp is designed to be mounted on an I.V.
pole with a diameter from 0.5 - 1.5 inches (1.2 cm to 3.8 cm). To do
this:
1. Make sure the pole is assembled correctly, rests on a stable
3-2 System Operating Manual
FOR STABILITY AND TO RESIST TIPPING, MOUNT INFUSER TO THE
HOSPIRA
INSTRUCTIONS
USED, THE RESPONSIBLE ORGANIZATION MUST VERIFY STABILITY.
surface, and is placed where infuser operations will not
be affected by other equipment.
I.V. POLE LISTED IN THE ACCESSORIES SECTION PER THE
PROVIDED WITH THE POLE. IF A DIFFERENT POLE IS
Page 63

Plum 360 Infuser
CAUTION
CAUTION
IF THE PLUM INFUSER IS BEING USED NEXT TO OTHER ELECTRICAL/
ELECTRONIC EQUIPMENT, OBSERVE THE FUNCTIONING OF THE
INFUSER
ELECTROMAGNETIC
USED IN THE VICINITY OF THE INFUSER.
TO ENSURE THAT IT IS NOT BEING AFFECTED BY
INTERFERENCE FROM OTHER DEVICES BEING
2. Turn the pole clamp knob counterclockwise until the gap between
the pole clamp and the pole clamp screw is wide enough to fit the
I.V. pole.
3. Grasp the infuser by the handle and position the clamp around
the I.V. pole.
4. Rest the pole against the
pole support. Refer to
Section 12, Accessories,
for proper mounting height.
5. With your other hand,
turn the pole clamp knob
clockwise to secure the
infuser to the pole.
NOTE: The Plum 360 infuser
pole clamp has a ratchet
mechanism that produces an audible click when properly
tightened. When the pole clamp is tight enough, a ratcheting
sound indicates that the clamp is being over-tightened
MAKE SURE THE POLE CLAMP IS TIGHTENED PROPERLY AND THE
INFUSER
PERSONAL INJURY OR DAMAGE TO THE INFUSER.
IS SECURELY ATTACHED TO THE POLE, TO PREVENT
.
6. Push down and pull up on the infuser to confirm that it is tightly
clamped to the I.V. pole, without vertical or rotational slippage.
If you detect slippage, loosen the pole clamp screw, realign the
pole clamp, tighten the pole clamp screw, and then check again.
System Operating Manual 3-3
Page 64

Includes Systems Compatible with Hospira MedNet
Mounting Multiple Infusers to an I.V. Pole
If there is a need to mount multiple infusers on an I.V. pole, use the
approved Hospira I.V. Pole on page 12-25 and Multiple Device
Adapter on page 12-23. The documentation included with the
Hospira I.V. pole lists the allowable number of infusers and their
mounting heights to maintain the required stability of the system.
For guidance, refer to the illustration on page 3-5.
3-4 System Operating Manual
Page 65
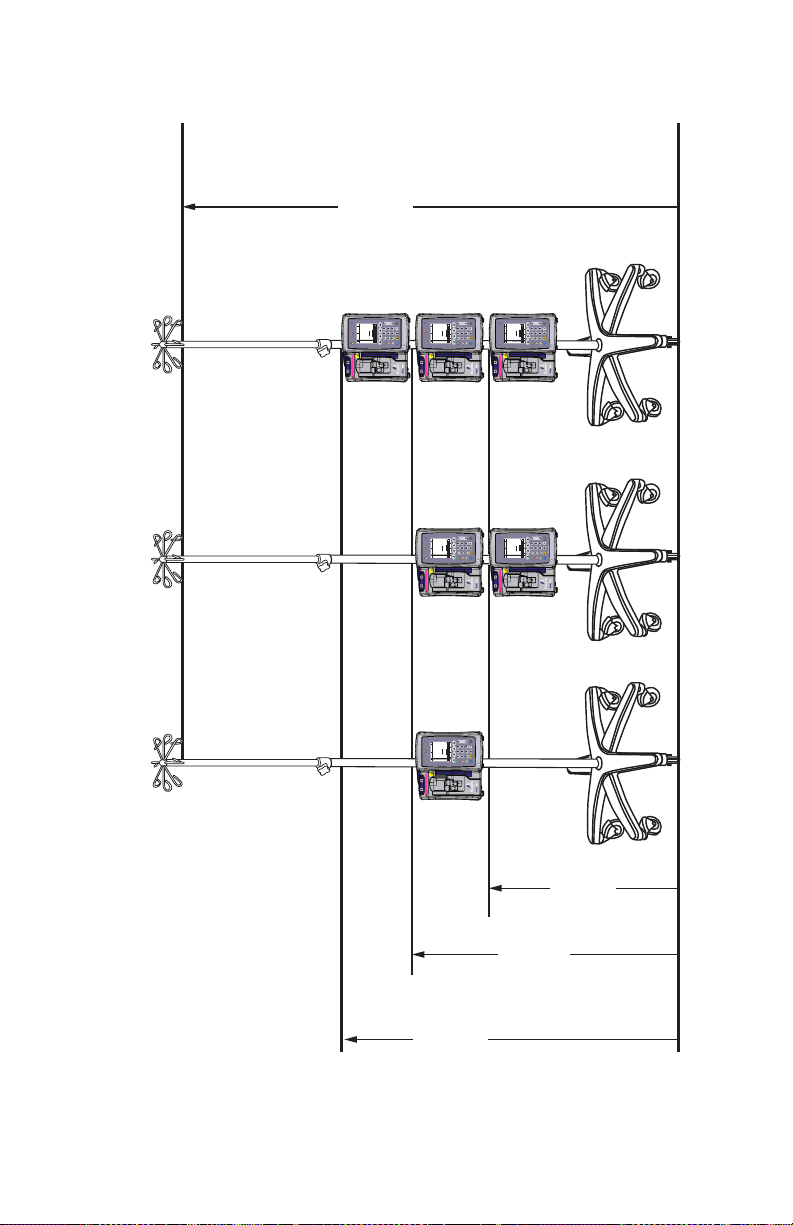
I.V. Pole with Three Mounted Infusers
68 Inches (173 cm)
maximum
50 Inches
(127 cm)
40 Inches
(102 cm)
30 Inches
(76 cm)
Infuser 1 Infuser 1
Infuser 2
Infuser 3
Infuser 1
Infuser 2
AB
AB
Settings /
Vols / CCA
Back
Prime
Rate
mL/hr
Vol Inf
mL
0
00
0
DDL
Select Line A/B to program
START
STOP
AC ON
a b c d e f
g h i j k l m n o
p q r s t u v w x y z
CLEAR LOCK KEYPAD
AUDIO PAUSED
ON OFF
WARNING: CLOSE ALL CLAMPS BEFORE OPENING DOOR
Follow instructions for use. The System Operating Manual
contains proper use, warnings, and cautions.
CLOSE
LEVER
WHEN
NOTINUSE
AB
AB
Settings /
Vols / CCA
Back
Prime
Rate
mL/hr
Vol Inf
mL
0
00
0
DDL
Select Line A/B to program
START
STOP
AC ON
a b c d e f
g h i j k l m n o
p q r s t u v w x y z
CLEAR LOCK KEYPAD
AUDIO PAUSED
ON OFF
WARNING: CLOSE ALL CLAMPS BEFORE OPENING DOOR
Follow instructions for use. The System Operating Manual
contains proper use, warnings, and cautions.
CLOSE
LEVER
WHEN
NOTINUSE
Plum 360 Infuser
System Operating Manual 3-5
Page 66

Includes Systems Compatible with Hospira MedNet
WARNING
CAUTION
TO CLOSE
SLIDE CLAMP
CLOSED
POSITION
ROLLER
ROLLER
TO CLOSE
CAIR CLAMP
CLOSED
POSITION
Attaching a Nurse Call Interface Cable
The Plum 360 infuser can connect to your facility’s Nurse Call system
through the Plum Nurse Call Interface cable (see Accessories on
page 12-20).
To connect the infuser to a Nurse Call system:
1. Attach the rectangular connector on the Nurse Call interface
cable to the Nurse Call interface connector that is built into the
CE unit on the back of the infuser.
2. Attach the other end of the cable to the Nurse Call System port
at the patient’s bedside.
Opening the Cassette Door
CLOSE ALL CLAMPS ON THE PRIMARY AND SECONDARY
LINES, OR REMOVE THE SECONDARY CONTAINER, BEFORE
OPENING THE CASSETTE DOOR TO PREVENT THE MIXTURE OF
PRIMARY AND SECONDARY FLUIDS AND TO PREVENT
UNRESTRICTED FLOW.
3-6 System Operating Manual
A SMALL AMOUNT OF FLUID IS EXPELLED FROM THE SET (LESS THAN
OR
EQUAL TO 0.1 mL) EACH TIME THE CASSETTE DOOR IS OPENED
OR
CLOSED WITH A SET INSTALLED. IF POTENT DRUGS ARE BEING
USED
, TAKE APPROPRIATE ACTION TO GUARD AGAINST
OVERMEDICATION OF THE PATIENT.
Page 67

Plum 360 Infuser
Infuser components located behind the cassette door interact with the
cassette to control fluid flow, preventing primary and secondary fluids
from mixing, and allowing fluid to reach the patient only when the
infuser is pumping. The fluid regulator closes to prevent fluid flow
toapatient.
When you open the cassette door, infuser components are no longer
in contact with the cassette. Always close all clamps before you
open the cassette door so that fluid does not flow into drip
chambers.
To open the cassette door:
1. Make sure that all slide clamp and lower CAIR (roller) clamps are
closed before opening the cassette door.
2. Lift the cassette door lever as shown in the following illustration.
System Operating Manual 3-7
Page 68

Includes Systems Compatible with Hospira MedNet
WARNING
TO CLOSE
SLIDE CLAMP
CLOSED
POSITION
ROLLER
ROLLER
TO CLOSE
CAIR CLAMP
CLOSED
POSITION
Opening the Cassette Door Completely
The cassette door can be opened flat if needed, for example,
to retrieve a dropped cap, remove a stuck cassette, or wipe a spill.
CLOSE ALL CLAMPS ON THE PRIMARY AND SECONDARY
LINES, OR REMOVE THE SECONDARY CONTAINER, BEFORE
OPENING THE CASSETTE DOOR TO PREVENT THE MIXTURE OF
PRIMARY AND SECONDARY FLUIDS AND TO PREVENT
UNRESTRICTED FLOW.
To open the cassette door completely:
1. Close all slide clamp and lower CAIR (roller) clamps before
opening the cassette door.
2. Lift the cassette door lever to open the cassette door.
3-8 System Operating Manual
Page 69
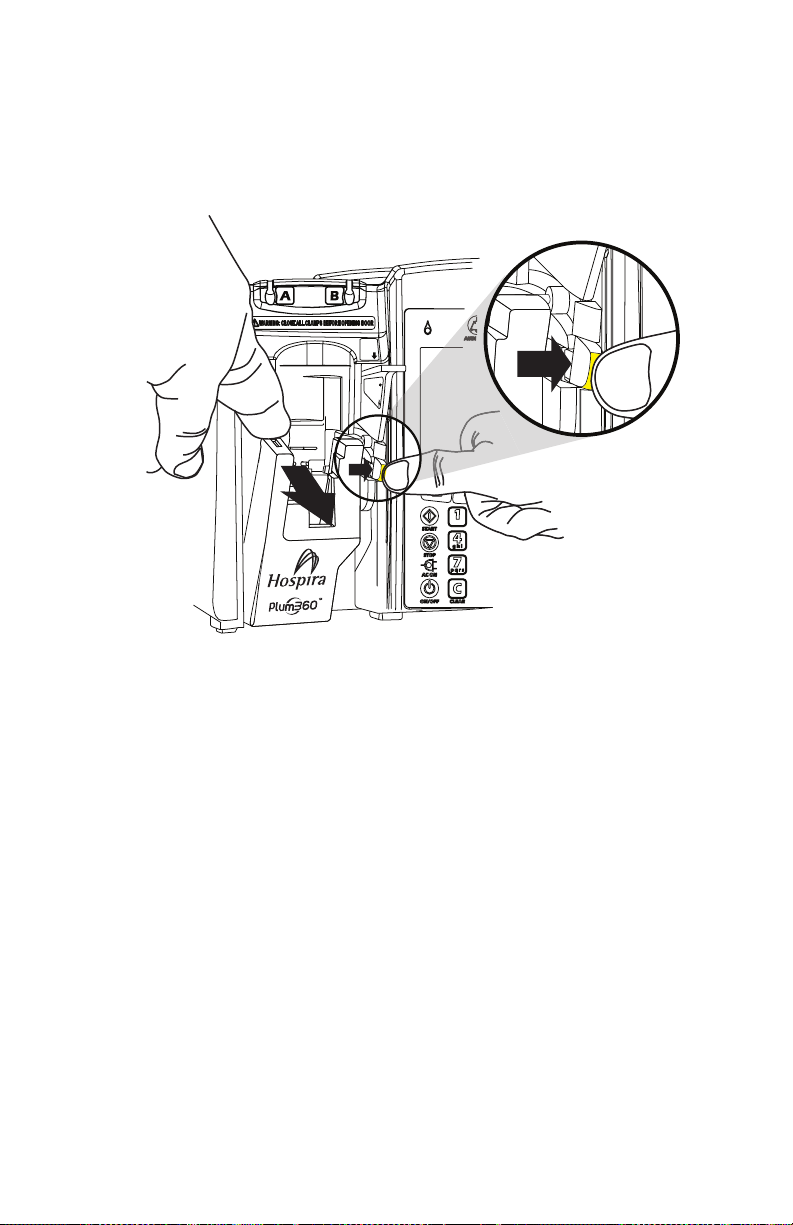
Plum 360 Infuser
CLOSE
LEVER
WHEN
NOT
IN
USE
CLOSE LEVER WHEN
NOT IN USE
PRESS TAB TO
UNLATCH DOOR
3. Press the yellow door release tab on the lower part of the door
lever to disengage the cassette door from the door latch,
and then gently press the cassette door down until it opens
completely.
NOTE: The precision pumping mechanism located behind the
cassette door includes pins and sensors that can be damaged
by rough handling.
System Operating Manual 3-9
Page 70

Includes Systems Compatible with Hospira MedNet
CLOSE
LEVER
WHEN
NOT
IN
USE
CLOSE
LEVER
WHEN
NOT
IN
USE
WARNING: CLOSE ALL CLAMPS BEFORE OPENING DOOR
OSE LEVER WHEN
NOT IN USE
ESS TAB TO
LATCH DOOR
BEFORE OPENING DOOR
LEVER
CLOSED
Closing the Cassette Door
Keep the cassette door closed while not in use to avoid damage
to the cassette door.
To close the cassette door, press down on the cassette door lever.
If the infuser is turned on when you close the cassette door,
the cassette test begins automatically.
3-10 System Operating Manual
Page 71

Plum 360 Infuser
CAUTION
Turning Power On
Each time you turn the power on, the infuser performs a System Self
Test to check the operation of critical systems and alarms,
then prompts for a cassette, if one is not already installed. The infuser
then performs a cassette test that checks for air bubbles and verifies
the integrity of the cassette’s pumping components.
DO NOT USE THE INFUSER ON A PATIENT IF THE BATTERY IS NOT
INSTALLED.
Do not use the infuser if the Self Test fails.
NOTE: A small amount of fluid may be expelled from the set
(less than or equal to 0.2 mL) when the infuser is powered on.
If potent drugs are being used, take appropriate action to guard
against over-medication of the patient.
Cassette test failure can be caused by improper cassette priming.
In that case, perform backpriming to resolve the problem. If the test
still fails, replace the administration set with a properly primed set.
If the failure persists, replace the infuser.
To turn power on:
1. Make sure the power cord is plugged into AC (mains) power and
that the infuser is mounted securely on an I.V. pole or located
on a stable surface.
Ensure that access to the mains plug is not blocked while
using the infuser so that the plug can be disconnected
from the mains power receptacle in the event
of an emergency.
2. Press [ON/OFF] until you hear a beep, the Hospira logo appears
on the screen, and the Line A and Line B flow indicators (drip
symbols) briefly blink.
The infuser checks for a cassette and then begins the System
Self Test, followed by the cassette test.
System Operating Manual 3-11
Page 72

Includes Systems Compatible with Hospira MedNet
• If you see the prompt “Insert PLUM Set, Close Lever,” insert
a primed Plum cassette into the infuser to continue.
• If you see the prompt “New Patient?” the infuser has a stored
program from the last delivery. To clear the programming, press
[Yes]; to keep it, press [No].
NOTE: If the cassette test fails while the New Patient? prompt
is displayed, press [Yes] or [No], as appropriate, and then
hold down [Backprime] to clear air from the cassette.
See Backpriming on page 4-21 for more information.
Turning Power Off
NOTE: Always turn the infuser off when not in use, to reduce the
consumption of electrical energy.
You can only turn power off if the status is STOPPED or blank for both
lines.
To turn power off:
1. Stop all active deliveries (see Stopping and Restarting a
Delivery on page 3-22).
2. Press [ON/OFF] until you hear a beep.
NOTE: If the Plum 360 infuser has been turned off for longer than five
hours, all delivery settings are cleared and programming options are
restored to their default selections for next use.
Viewing the Display
When operating the infuser, position yourself at a distance of no more
than 39 inches (1 M) from the display.
Make sure you are directly in front of the display, or at an angle
of no more than 20 degrees off this position.
3-12 System Operating Manual
Page 73

Plum 360 Infuser
Using the Keypad and Controls
The alphanumeric keypad on the Plum 360 infuser has two functions,
entering information to program a delivery and searching through the
drug library.
Using the Keypad to Enter Program Information
When entering numbers in a Program screen (to program a delivery
rate or VTBI, for example), highlight the field and press the number
keys as needed.
• Use [Decimal] when entering numbers other than whole numbers
(1.2 mL, for example)
• Use [SELECT] to move the cursor between programming fields.
• Press the top pair of arrows to move up or to the left.
• Press the bottom pair of arrows to move down or to the right.
• Press [C] to clear all values in the currently-highlighted field
or to clear the dashes (-- -- --) that are displayed when an entry
is invalid or a drug delivery parameter is beyond the preprogrammed hard limits.
NOTE: [C] will NOT clear an entire program.
Silencing the Keypad
To silence key press feedback sounds when there are no active
alarms, press [AUDIO PAUSED]. A message will display while key
press feedback is silenced.
Keypad sounds resume automatically after 2 minutes.
When the infuser enters an alarm state, silencing is deactivated
and keypad sounds automatically resume.
System Operating Manual 3-13
Page 74

Includes Systems Compatible with Hospira MedNet
Locking and Unlocking the Keypad
A passcode is used to both lock and unlock the keypad. Please
contact Hospira or the hospital Biomedical staff for the code. The
same passcode is used to both lock and unlock the keypad.
The keypad can be locked to prevent unauthorized use. The keypad
lock disables all keys on the keypad except [STOP] until a valid
passcode is entered.
For safety reasons, [STOP] will stop an active delivery, even when the
keypad is locked. [Stop All], [Stop A], [Stop B], and [Cancel]
are all functional.
Pressing [STOP] or opening the cassette door during an infusion
while the keypad is locked activates an alarm that cannot be silenced
until a valid passcode is entered and the keypad is unlocked.
If an incorrect passcode is entered, the infuser displays an error
message.
• The number of unsuccessful attempts to unlock the keypad entered
is displayed in the passcode dialog box, so you can monitor the
infuser for attempts at unauthorized access.
• Each attempt is also recorded in the infuser log. Logs can be
retrieved by the Biomedical staff. See the Plum 360 Infuser
Technical Service Manual for more information.
3-14 System Operating Manual
Page 75
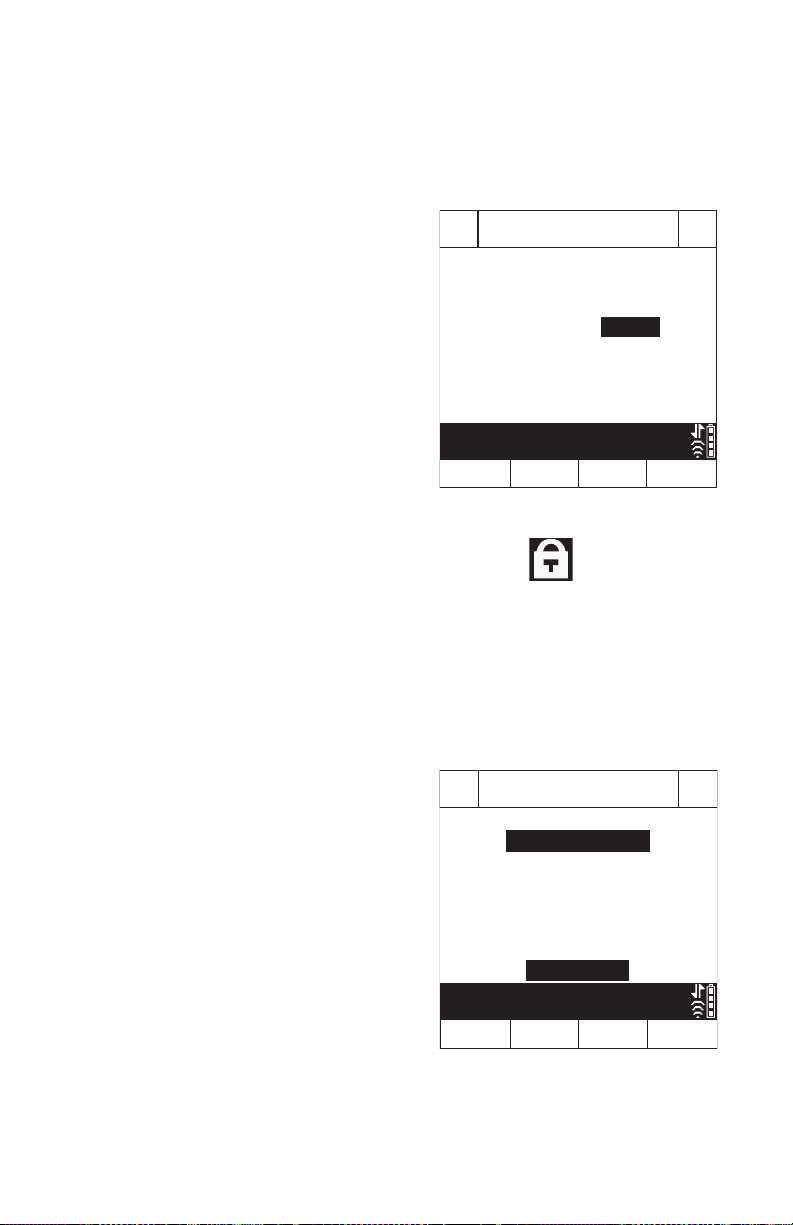
Plum 360 Infuser
A BPasscode
Enter Cancel
Use keypad then press Enter
Enter Passcode to Lock Keypad
****
Passcode
Settings/Vols/CCA
Choose
Previous
Screen
Lock
Keypad
Version 15.0.0.XX
Default Drug Library
DDL Version 02
Select then press Choose
AB
Post Infusion Rate
Volumes Infused
Lighting/Contrast
CCA Settings
Pressure
DDL
To lock the keypad (Method #1):
1. Press the [LOCK KEYPAD] hard key.
2. The Passcode data entry
screen appears on the display.
3. Enter the passcode using the
numeric keypad.
4. Press the [Enter] soft key.
When the keypad is locked, the lock symbol appears in the
bottom right corner of the delivery screen.
To lock the keypad (Method #2):
1. At the main delivery screen, press the [Settings/Vols/CCA] soft
key.
2. The Settings/Vols/CCA screen
appears on the display.
System Operating Manual 3-15
Page 76
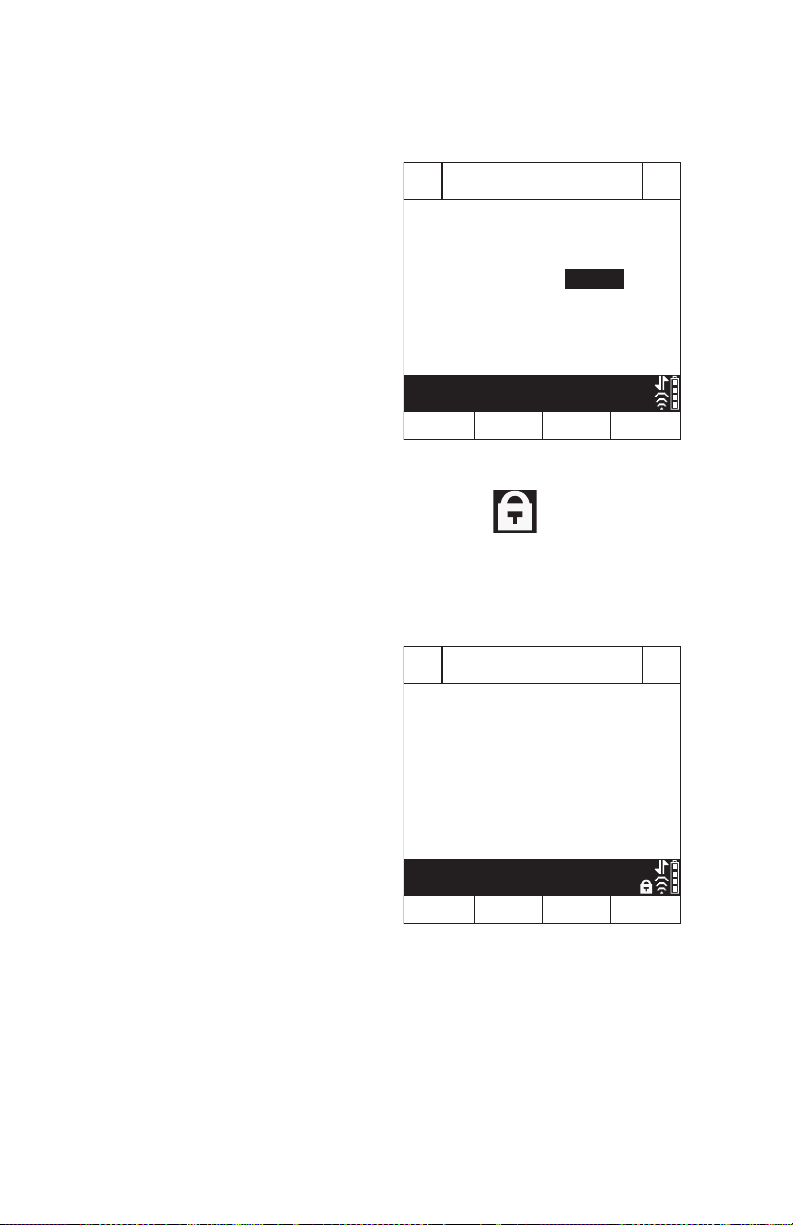
Includes Systems Compatible with Hospira MedNet
A BPasscode
Enter Cancel
Use keypad then press Enter
Enter Passcode to Lock Keypad
****
Passcode
A BPasscode
Enter Cancel
Use keypad then press Enter
Enter Passcode to Unlock Keypad
****
Passcode
3. Press the [Lock Keypad] soft key.
4. The Passcode data entry
screen appears on the display.
5. Enter the passcode using the
numeric keypad.
6. Press the [Enter] soft key.
When the keypad is locked, the lock symbol appears in the
bottom right corner of the delivery screen.
To unlock the keypad:
1. Press any key on the keypad to
display the Passcode data entry
screen.
2. Enter the passcode using the
numeric keypad.
3. Press the [Enter] soft key.
NOTE: During infusion, pressing [STOP], or opening the cassette
door, activates an alarm that cannot be silenced until the keypad is
unlocked.
3-16 System Operating Manual
Page 77

Plum 360 Infuser
a b c d e f
g h i j k l m n o
p q r s t u v w x y z
Using the Keypad to Search the Drug List
You can quickly locate a drug in the drug list by using the keypad
to spell up to the first three letters of the drug name.
The following figure shows how each number key matches up
to a letter. Since each key represents more than one letter, more than
one keypress may be required to enter the letter.
To search the drug list and select a drug:
1. Display the drug list.
• For systems with Hospira MedNet software, the custom drug
list appears after you select a CCA and Line A or Line B.
• For systems without Hospira MedNet software, select Line A
or Line B and press [Drug List] to display the DDL.
2. Press the key that represents the first letter of the drug name.
If the letter you need is not in the first position on the key, repeat
the keypress quickly to enter the letter you need.
For example, press the 5 key once to enter J, or quickly press 5
twice to enter K, or quickly press 5 three times to enter L.
• To enter a number, quickly press the key an additional time.
For example, to enter 5, quickly press the 5 key four times.
• As you spell the name, the infuser sorts the drug list and
displays only the matching drugs.
System Operating Manual 3-17
Page 78

Includes Systems Compatible with Hospira MedNet
• To sort further, wait for the screen to display “Press 0-9 to refine
sort”, and then use the keypad to enter the second letter.
Repeat, if needed, to enter the third letter of the drug name.
NOTE: To restart your search at any time, press [C].
3. Use [Page Down], [Page Up], and [SELECT] as needed
to select the drug from the sorted list, and then press [Choose].
Working with Alarms
Alarms on the Plum 360 infuser have two components, a message
that appears on the display and an audible signal. The infuser has an
intelligent alarm system that handles more than one alarm at a time.
There are different indicators for high, medium, and low priority
alarms, as shown in the following table.
Alarm Priority
High !!! + message A series of tones in a 3-2-3-2
Medium !! + message Double tone repeated every
Low ! + message Double tone repeated every
If a Nurse Call Interface cable is connected to the facility’s Nurse Call
system, the infuser also sends a signal to that system each time
an alarm is activated (see Attaching a Nurse Call Interface Cable
on page 3-6).
See Alarms and Troubleshooting on page 9-1 for descriptions
of alarms, their priorities, and how to resolve them.
Display
Indicator
Audio Indicator
cadence, repeated every
2 seconds
2 seconds
10 seconds
3-18 System Operating Manual
Page 79

Plum 360 Infuser
Test the Alarm System
To test the alarm system before using on a patient:
1. Load a non-primed cassette in the infuser and power the infuser
on if it is not already on.
2. Verify the Cassette Test Failure alarm activates and the audible
alarm sounds.
3. Verify the alarm volume is appropriate for the patient
environment.
4. Adjust the volume using the Volume Control knob on the back
of the infuser, if necessary.
5. Press the [AUDIO PAUSED] key, and verify that the alarm audio
is paused.
Responding to an Alarm
1. If the keypad is locked out, enter the unlock code on the keypad.
2. Press [AUDIO PAUSED] to silence the audible part of an alarm
for 2 minutes. The alarm symbol on the display changes:
The display also flashes and shows the alarm message until the
alarm condition is resolved.
NOTE: Alarm sounds resume after 2 minutes, but can be paused
again if resolving the alarm condition takes more time.
3. Check the display for the alarm message.
4. Correct the alarm condition (see Alarms and Troubleshooting
on page 9-1).
5. Press [START] to resume infusion. If more than one line
is programmed, press [Start A], [Start B], or [Start All]
as needed.
System Operating Manual 3-19
Page 80

Includes Systems Compatible with Hospira MedNet
WARNING
NOTE: Each alarm puts an entry in the infuser logs.
If troubleshooting does not correct the problem, contact the
Biomedical department, who can check the logs and further
isolate the problem.
A malfunction alarm alerts you to turn off the infuser and restart it.
If the alarm continues, replace the infuser.
Adjusting the Audio Alarm Volume
CHECK THAT THE ALARM VOLUME LEVEL IS APPROPRIATE FOR
THE CURRENT PATIENT AND BACKGROUND NOISE LEVEL
BEFORE USE ON THE PATIENT.
The alarm volume control knob is located on the back of the infuser
(see CE Module on page 2-10).
• To increase the volume, turn the knob clockwise.
• To decrease the volume, turn the knob counterclockwise.
3-20 System Operating Manual
Page 81

Plum 360 Infuser
Programming a Callback Alarm
You can program a Callback Alarm to alert you to each interim step
of a Loading Dose or Multistep delivery, or to notify you that
a Piggyback or Bolus delivery has ended. See Delivery Options on
page 8-1 and Standby on page 7-1 for more information.
A Callback Alarm is a medium priority alarm that must be
acknowledged by the clinician. To turn off a Callback Alarm, press
[AUDIO PAUSED].
If a Nurse Call Interface cable is connected to the facility’s Nurse Call
system, the infuser also sends an alarm signal to that system.
Restarting the Delivery Automatically After a Distal Occlusion Alarm
• When the infuser detects a distal occlusion, delivery stops
immediately and the infuser issues an alarm. The Plum 360 infuser
can restart the delivery automatically if the distal occlusion clears
within 60 seconds. This gives time to resolve the occlusion without
the need to restart the delivery manually by pressing the [START]
key. During the 60 seconds, the infuser monitors the pressure,
the delivery screen displays the status PAUSED, and the infuser
issues a medium priority alarm. As soon as the pressure drops
below the Distal Occlusion Alarm Limit, the alarm clears and
delivery restarts immediately.
• If the occlusion is not resolved within 60 seconds, or the maximum
number of restarts is exceeded, the delivery status changes
to STOPPED. The alarm priority changes from medium to high.
The change in the audible alarm cadence alerts you that you must
intervene to resolve the alarm (see Working with Alarms on
page 3-18 for descriptions of the audible alarms).
• When two lines are delivering, if either line exceeds the maximum
number of restarts, the priority changes to high and the alarm must
be resolved manually by pressing the [START] key.
System Operating Manual 3-21
Page 82

Includes Systems Compatible with Hospira MedNet
If Hospira MedNet software is installed, each CCA can be configured
to allow up to 10 restarts per infusion. Without Hospira MedNet
software, the number of restarts can be configured by the Biomedical
staff for the default CCA (DDL). To view the maximum number
of restarts for the current CCA, see Viewing CCA and Infuser
Settings on page 3-29.
Stopping and Restarting a Delivery
The following procedure describes how to stop and restart an active
delivery. Active deliveries include not only those that have the status
PUMPING, but also those that are in STANDBY, DELAYED,
or PENDING.
Where two lines are active, pressing [STOP] does not stop any lines.
You must choose to stop only one line or stop all or cancel the
attempt.
To stop a delivery:
1. Press [STOP].
• If only one line is active, pumping stops immediately.
• If both lines are active, the infuser prompts you to choose which
line to stop.
2. Press [Stop A] or [Stop B] to stop the individual line or press
[Stop All] to stop both at once.
To cancel the request and not stop any lines, press
NOTE: When two lines are active when you press [STOP], the infuser
will alarm after 15 seconds if you don’t press a softkey to choose the
line(s) to stop. Pressing the [STOP] hardkey does not stop infusion.
Opening the cassette door will stop the infusion on one or both the
lines.
3-22 System Operating Manual
[Cancel].
Page 83

Plum 360 Infuser
WARNING
If you are stopping the infusion entirely, see Discontinuing Fluid
Administration on page 4-28 for instructions on removing the
administration set from the patient. See Discontinuing Electronic
Flow Control and Setting Gravity Flow on page 4-25 for
instructions on removing the administration set from the infuser but
continuing fluid administration.
CLOSE ALL CLAMPS BEFORE OPENING THE CASSETTE DOOR!
To restart a delivery:
1. Press [START]. If only one line was pumping when delivery was
stopped, pumping resumes immediately.
• If the line was in DELAY the Delay countdown resumes where
it left off when the line was stopped.
• If the line was in STANDBY, pumping resumes when you press
[START]. To return the line to Standby, press [Standby].
2. If both lines are stopped, the infuser prompts you to choose which
line to start. Press [Start A] or [Start B] to start the
corresponding line, or press [Start All] to start both lines at
once. If either line is in DELAY or STANDBY, the infuser responds
as described in Step 1.
To cancel the request to resume pumping, press [Cancel].
If no soft key is pressed within 15 seconds, an alarm will sound.
System Operating Manual 3-23
Page 84

Includes Systems Compatible with Hospira MedNet
Clearing a Line
When you clear a line, all the programming is cleared for that line.
The Volume Infused reading for that line is not cleared. The Volume
Infused reading for the other line and the Total Volume reading are
not affected.
Each time you close the cassette door or turn the infuser on,
the infuser prompts “New Patient?” to give you the option to clear all
settings on both lines. This is a safety feature to ensure that a patient
does not get a stored delivery that was programmed for a different
patient. If you press [Yes], all programming and Volumes Infused
data are cleared and settings are returned to their defaults.
To clear a line:
1. If the line you want to clear is pumping, press [STOP].
2. Record the volume infused for the line, if needed (see Viewing
and Clearing the Volumes Infused on page 3-26).
3. Press [A] or [B] to choose the line to clear.
4. In response to the prompt, press [Yes].
5. To cancel clearing a line and resume pumping, select [No],
[START], and then [Yes].
Setting the Post Infusion Rate
After the programmed VTBI is delivered, the infuser issues a VTBI
Complete alarm, and begins delivering a Post Infusion Rate.
The default Post Infusion Rate setting is KVO, but the default setting
can be changed in Hospira MedNet software by the CCA. On infusers
without Hospira MedNet software, the Post Infusion Rate default
setting can be changed by a biomedical technician.
3-24 System Operating Manual
Page 85

Plum 360 Infuser
Settings/Vols/CCA
Choose
Previous
Lock
Version 15.0.0.XX
Default Drug Library
DDL Version 02
Select then press Choose
AB
Post Infusion Rate
Volumes Infused
Lighting/Contrast
CCA Settings
Pressure
DDL
You can change the default setting to one of the following:
• KVO - the infuser continues to deliver fluid at a Keep Vein Open
(KVO) rate of 1 mL/hr. If the delivery rate of the infusion that just
completed was less than 1 mL/hr, the KVO rate will continue at the
same delivery rate (for example, if the delivery rate was 0.5 mL/hr,
the KVO rate will be 0.5 mL/hr).
• Rate - the infuser continues to deliver fluid at the programmed rate,
maintaining the therapeutic rate until the VTBI Complete alarm can
be resolved
For a Concurrent delivery, the Post Infusion Rate is set for both lines.
As each line completes its VTBI delivery, that line begins infusing
automatically at the Post Infusion Rate.
For a Piggyback delivery, the Post Infusion Rate does not apply on
Line B. The infuser switches to Line A automatically when the
Piggyback Delivery is complete.
When Line A is no longer in a Pending state (STANDBY, DELAY,
CLEAR, or STOPPED) and Piggyback delivery is complete, a “VTBI
Completed Line B! Add more VTBI OR Clear B” alarm is received.
To set the Post Infusion Rate:
1. On the delivery screen,
press [Settings/Vols/
CCA]. The Settings/Vols/
CCA screen appears,
with Post Infusion rate
highlighted.
System Operating Manual 3-25
Keypad
Screen
Page 86

Includes Systems Compatible with Hospira MedNet
Post Infusion Rate
Previous
KVO/
Done
Change using KVO/Rate.
Press Done to save and return.
AB
KVO
Post Infusion Rate
2. Press
3. To change the current
4. Press [Done] to save
[Choose].
The Post Infusion Rate
screen appears, with
the current setting
highlighted.
setting, press [KVO/
Rate] (to return to the
previous setting, press
[KVO/Rate] again).
your changes and return
to the Settings/Vols/CCA
screen, and then press
[Previous Screen]
to return to the delivery screen.
Rate
Screen
Post Infusion Rate (Loading Dose Delivery and Multistep Delivery)
During a Loading Dose delivery or a Multistep Delivery, you can stop
the Post Infusion Rate and make changes (perform titration)
to the VTBI. For more information, see Adding VTBI to Loading
Dose or Multistep Program After VTBI Complete Alarm Activates
on page 8-9
Viewing and Clearing the Volumes Infused
The infuser records the volume infused during each delivery and
keeps separate records for Line A and Line B, and a cumulative total
for both lines. The recorded volume infused is retained for 5 hours
after the infuser is turned off.
The following procedure describes how to view the volume infused
records and clear them when necessary.
3-26 System Operating Manual
Page 87

Plum 360 Infuser
Volumes Infused
Clear A Clear B
Previous
Screen
Clear
Total
Line A 4 mL
Line B 5 mL
Total Volume 9 mL
Clear A, Clear B or Clear Total?
AB
DDL
250
Heparin
units mL
25,000
250
Iocane
mg mL
500
NOTE: All programming, including the volumes infused, is cleared
when you turn the infuser off, and then turn it on again, then answer
“Yes” to the “New Patient?” prompt, or when you select a new CCA.
To view and clear the volumes infused:
1. On the main delivery screen (of a Plum 360 infuser with Hospira
MedNet software), press [Settings/Vols/CCA] to display the
Settings/Vols/CCA screen shown on page 3-25.
2. Use [SELECT] to highlight Volumes Infused and then press
[Choose].
The Volumes Infused screen
displays the volumes infused
on Line A, Line B, and the total
volume infused on both lines since
the last time the values were
cleared.
3. To view the Volumes Infused data
without clearing any values,
press [Previous Screen].
Press [Previous Screen] again
to return to the delivery screen.
(The screen will automatically time out after 30 seconds and
return to the delivery screen if you do not press a softkey.)
4. To clear the Volumes Infused data:
• Press [Clear A] to clear the Line A total only, and return to the
Settings/Vols/CCA screen.
• Press [Clear B] to clear the Line B total only, and return to the
Settings/Vols/CCA screen.
• Press [Clear Total] to clear all values, including the Total
Volume, and return to the Settings/Vols/CCA screen.
• Press [Previous Screen] to return to the Settings/Vols/CCA
screen.
If you do not press a key in 30 seconds, the Delivery screen
automatically returns.
System Operating Manual 3-27
Page 88

Includes Systems Compatible with Hospira MedNet
Light / Contrast
Done
Previous
Screen
Decrease
Setting
Increase
Setting
Use Increase / Decrease Settings.
Press Done to save and return.
AB
Backlight Intensity
Display Contrast
Adjusting Display Lighting and Contrast
You can adjust the lighting and contrast on the infuser display screen
to ensure visibility and customize the level for the surrounding
environment.
To adjust display lighting and contrast:
1. On the main delivery screen, press
[Settings/Vols/CCA]
to display the Settings/Vols/CCA screen shown on page 3-25.
2. Use [SELECT] to highlight
Lighting/Contrast and press
[Choose]. The Light/
Contrast screen appears,
with Backlight Intensity
highlighted.
3. Use [Increase Setting]
and [Decrease Setting]
to adjust the backlight
intensity.
4. Press [SELECT] to highlight
Display Contrast.
5. Use [Increase Setting] and [Decrease Setting] to adjust the
display contrast.
6. Press [Done] to save the current settings and return to the
Settings/Vols/CCA screen or press [Previous Screen] to leave
this screen without saving changes.
Press [Previous Screen] to return to the Settings/Vols/CCA
screen.
3-28 System Operating Manual
Page 89

Plum 360 Infuser
Viewing CCA and Infuser Settings
CCA and infuser settings set defaults and limits that are appropriate
for the patient population of each Clinical Care Area (CCA).
• For systems with Hospira MedNet software, CCA/Infuser settings
are configured for each CCA through the Hospira MedNet software.
The settings are downloaded to all infusers over the network
through a wireless or Ethernet connection.
• For systems without Hospira MedNet software, CCA/Infuser
settings are configured for each infuser through a special Biomed
menu (see the Plum 360 Infuser Technical Service Manual).
To view CCA/Infuser settings when you select or change a CCA,
press [CCA Details] on the Select CCA screen. You can also view
the CCA settings for the current CCA from the Settings/Vols/CCA
menu. The following procedure describes how to do this.
System Operating Manual 3-29
Page 90

Includes Systems Compatible with Hospira MedNet
CCA Settings
Previous
Page
Page
p
CCA settings: Medical ICU1
Maximum Rate: 999 mL/hr
Maximum Patient Weight: 500 kg
Minimum Patient Weight: 0.1 kg
Maximum Patient Height: 305 cm
Minimum Patient Height: 7.5 cm
Maximum Patient BSA: 7.07 m2
Minimum Patient BSA: 0.012 m2
Default Distal Alarm Pressure: 6 psi
Distal Alarm Resets: 0
Page Down / Up to view all
To view the current CCA and Infuser settings:
On an infuser with a DDL, the CCA is set by a biomed technician.
You cannot select a CCA on an infuser with a DDL.
1. On the delivery screen,
press [Settings/Vols/
CCA] to display the
Settings/Vols/CCA menu
shown on page 3-25.
2. Select
[CCA Settings]
and press [Choose].
The CCA Settings screen
displays.
3. Press
[Page Down]
and [Page Up] to view
all the CCA and Infuser
settings.
U
Down
4. When you are finished,
press [Previous Screen] to return to the Settings/Vols/CCA
screen. Press [Previous Screen] again to return to the delivery
screen.
Screen
3-30 System Operating Manual
Page 91

Plum 360 Infuser
CCA/Infuser Setting Descriptions
CCA Settings Description
Maximum Rate The highest rate that you can program
for a single line or Piggyback delivery.
For Concurrent delivery, the total rate for
Line A + Line B must be <= 500 mL/hr.
If this exceeds the maximum rate per
line (for example, if the maximum rate
is set to 200 mL/hr), then the maximum
rate is enforced.
Maximum Patient Weight
Minimum Patient Weight
Maximum Patient Height
Minimum Patient Height
Maximum Patient BSA
Minimum Patient BSA
Together, these display the allowable
patient weight range for the CCA when
you program a weight-based or BSAbased delivery.
Patient Data Limits on
See
page 14-12 for the increments that can
be programmed for different weight
ranges.
Together, these display the allowable
patient height range for the CCA when
you program a weight-based or BSAbased delivery.
Patient Data Limits on
See
page 14-12 for the increments that can
be programmed for different height
ranges.
Together, these display the allowable
patient BSA range for the CCA when
you program a BSA-based delivery.
Patient Data Limits on
See
page 14-12 for the increments that
can be programmed for different BSA
ranges.
System Operating Manual 3-31
Page 92

Includes Systems Compatible with Hospira MedNet
CCA Settings Description
Default Distal Alarm
Pressure
Distal Alarm Resets Displays the number of times that the
Displays the normal Distal Alarm
Pressure Limit for the CCA. You can
change this value for a delivery, when
needed.
Setting the Distal Pressure
See
Alarm Limit
information.
infuser will restart delivery automatically
when a distal occlusion is resolved
within 60 seconds.
Set by a biomedical technician or the
CCA in Hospira MedNet software.
Default setting is 0.
on page 3-34 for more
NOTE: This feature is disabled for the
CCA if Distal Alarm Resets = 0.
Allow Standby If Allow Standby = Yes, deliveries can be
put into Standby up to the configured
Maximum Standby Time which
is between 24 and 72 hours.
(Default is 72 hours.)
If Allow Standby = No,
not appear on the Program screen.
[Standby] will
Allow Delayed Start If Allow Delayed Start = Yes, you can
program a Delayed Start of up to 23:59
hh:mm for deliveries.
If Allow Delayed Start = No,
will not appear on the Program screen.
[Delay]
3-32 System Operating Manual
Page 93

Plum 360 Infuser
Infuser Settings Description
Default End of Infusion: Sets the rate of infusion after VTBI
is delivered to either KVO (Keep Vein
Open) or Rate.
See Setting the Post Infusion Rate
on page 3-24 for more information.
Default B Delivery Mode Sets the initial Line B delivery mode
to Piggyback or Concurrent. Default is
Piggyback. You can change this mode
any time you program a delivery on
Line B by pressing
Default Nurse Callback When Default Nurse Callback = Yes,
a medium priority alarm will be issued
automatically at the end of:
• any step but the last step of Multistep
delivery,
• a Loading Dose delivery,
• a Piggyback infusion, or
• a Bolus delivery.
[Change Mode].
The user can change the Callback
setting from the default setting of Yes.
When Default Nurse Callback = No,
a Callback Alarm must be set manually,
if needed, for each of these.
Maximum Standby Time This is the maximum time that a delivery
can remain in Standby before the infuser
issues a high priority Inactivity alarm.
The Maximum Standby Time is defined
in the drug library. The available range is
24 to 72 hours, with a default of 72
hours.
System Operating Manual 3-33
Page 94

Includes Systems Compatible with Hospira MedNet
WARNING
Changing the Default Infuser Settings
CCA settings are set based on the patient population and cannot be
changed. Infuser settings that begin with “Default” can be adjusted for
a particular delivery, if clinically necessary.
• To change the Distal Alarm Pressure Limit from the preset Default
Distal Alarm Pressure, see Setting the Distal Pressure Alarm
Limit on page 3-34.
• To change the Post Infusion Rate from the value set by the Default
End of Infusion setting, see Setting the Post Infusion Rate on
page 3-24.
• To change the Line B delivery mode from the Default Line B
Delivery Mode setting, see Programming on page 5-1
.
• To set a Nurse Callback Alarm for a Multistep, Loading Dose,
Piggyback delivery, or Bolus delivery, see Programming a
Callback Alarm on page 3-21.
Setting the Distal Pressure Alarm Limit
The distal pressure limit sets the threshold for the distal occlusion
alarm. When the infuser detects that the distal pressure in the
cassette sensor area is greater than the distal pressure limit you set,
± 3 psi, the infuser issues an alarm (see Restarting the Delivery
Automatically After a Distal Occlusion Alarm on page 3-21 for
more information).
The infuser checks the distal pressure and updates the reading every
second. You can view the distal pressure reading on the same screen
where you set the distal pressure limit.
3-34 System Operating Manual
BEFORE STARTING A DELIVERY, VERIFY THE DISTAL
PRESSURE ALARM LIMIT OR SET THE APPROPRIATE LIMIT
FOR THE PATIENT, FLOW RATE AND ADMINISTRATION SET.
Page 95

Plum 360 Infuser
CAUTION
Pressure
Previous
Done
Enter value using keypad.
Press Done to save and return.
AB
6
Distal Pressure Alarm Limit psi
1.5
Current Distal Pressure psi
To view the current distal pressure reading and set the distal
pressure limit:
1. On the main delivery
screen, press
[Settings/
Vols/CCA] to display the
Settings/Vols/CCA screen
shown on page 3-25.
2. Use [SELECT] to highlight
Pressure and press
[Choose] to view. Upon
completion, select [Done]
or [Previous Screen] to
return to the Settings/Vols/
CCA screen; then press
[Previous Screen] to
Screen
return to the main delivery screen.
Check the Distal Occlusion alarm setting before each
patient use to ensure that the setting is correct for the
current patient.
To change the Distal Pressure Alarm Limit:
DO NOT SET THE DISTAL PRESSURE ALARM LEVEL LOWER THAN 3
PSI (155 MMHG) OR HIGHER THAN 12 PSI (624 MMHG). SETTING THE
ALARM
ALARM FUNCTIONING.
OUTSIDE OF THAT RANGE MAY RESULT IN UNRELIABLE
1. If the infuser is running, stop the infusion.
2. Press [Settings/Vols/CCA] to display the Settings/Vols/CCA
screen.
3. Use [SELECT] to highlight Distal Pressure Alarm Limit and press
[Choose].
System Operating Manual 3-35
Page 96

Includes Systems Compatible with Hospira MedNet
4. Change the limit to the desired PSI value between 3 and 12.
5. Use the keypad to Press [Done] to save your changes and
return to the Settings/Vols/CCA screen or press [Previous
Screen] to view the settings without making changes.
6. Press
[Previous Screen] to return to the main delivery screen.
Changing the Default Line B Delivery Mode
To change the default Line B delivery mode:
1. Press
2. Choose a drug and associated dosing units, if applicable.
3. Choose a dosing unit (the default is mL/hr) to display the
4. Navigate to the current Mode field (displaying Piggyback
5. Press [START] for confirmation when all program parameters
[B] to choose Line B. The Program screen appears,
displaying No Drug Selected.
Program screen.
or Concurrent), then [Change Mode].
have been populated, then [Yes] to start delivery.
3-36 System Operating Manual
Page 97

Plum 360 Infuser
CAUTION
CASSETTE
FINGER
GRIP
CAIR
(ROLLER)
CLAMP
DISTAL
(PATIENT)
LINE
Y-SITE
(For IV push delivery
of medicine)
LOCKING COLLAR
CONNECTOR
PRIMARY
LINE
SECONDARY PORT
(Prepierced, capped, Clave
(Not for IV push delivery of medicine))
SLIDE CLAMP
FLOW
REGULATOR
CONVERTIBLE PIERCING PIN
WITH DRIP CHAMBER
PROTECTIVE CAP
WITH FILTER
(Connect to patient access device)
Section 4
Plum Administration Sets
Plum 360 infuser operation requires single-use LifeCare Plum series
administration sets (PlumSets). For a list of approved administration
sets, visit the Hospira website (http://products.hospira.com).
PLUM ADMINISTRATION SETS ARE NOT FOR USE WITH HIGH
PRESSURE INFUSION.
The following illustration shows the parts of a typical Plum primary
I.V. administration set.
System Operating Manual 4-1
Page 98

Includes Systems Compatible with Hospira MedNet
WARNING
WARNING
WARNING
Plum administration sets have a 96-hour performance limit. Refer to
the set packaging or facility policy for guidelines on when to change
the set.
See Plum Administration Sets on page 2-14 for more information
about administration set features. See Supplies and Accessories
on page 12-1 for a list of Plum administration sets.
Priming a Primary Administration Set
Priming fills the cassette, tubing, and any other special features of the
set with fluid, displacing air. Proper priming is an important part of air
management.
The following procedure gives the general steps for priming a Plum
administration set. Refer to the administration set packaging for
complete instructions on how to prime the set.
DO NOT PRIME THE ADMINISTRATION SET WHILE IT IS
CONNECTED TO A PATIENT.
Sterile administration sets are indicated on the administration set
packaging. Refer to the packaging for the method of sterilization.
\
4-2 System Operating Manual
DO NOT RESTERILIZE OR REUSE ADMINISTRATION SETS.
ADMINISTRATION SETS ARE SINGLE-USE ONLY.
RESTERILIZATION OR REUSE OF THE SETS MAY RESULT IN
INACCURATE DELIVERY, INFECTION, AND ALLERGIC
REACTION.
USE ONLY HOSPIRA PLUM ADMINISTRATION SETS WITH
A CASSETTE SPECIFIED FOR USE WITH THE PLUM INFUSER.
USE OF NON-PLUM CASSETTES CAN RESULT IN IMPROPER
FUNCTIONING OF THE INFUSER OR INACCURATE DELIVERY.
Page 99

Plum 360 Infuser
WARNING
INSPECT THE ADMINISTRATION SET PACKAGING. IF THE
PACKAGING IS NOT INTACT, DISCARD IT AND USE A NEW SET.
Do not use a Plum Administration set for longer than
96 continuous hours. Administration sets are single-patient
use only.
To prime a Plum administration set:
Use aseptic technique with all fluid path connections to prevent
contamination and infection. Remove caps when required and
secure all connections.
1. Attach the infuser to a compatible I.V. Pole (see Mounting the
Infuser on an I.V. Pole on page 3-2) or place the infuser
on a flat, stable surface.
2. Inspect the administration set packaging. If the packaging is not
intact, discard it and use a new set.
3. Open the package and remove the administration set.
4. Press the cassette flow regulator in to make sure it is closed and
confirm that there is no flow during priming.
System Operating Manual 4-3
Page 100
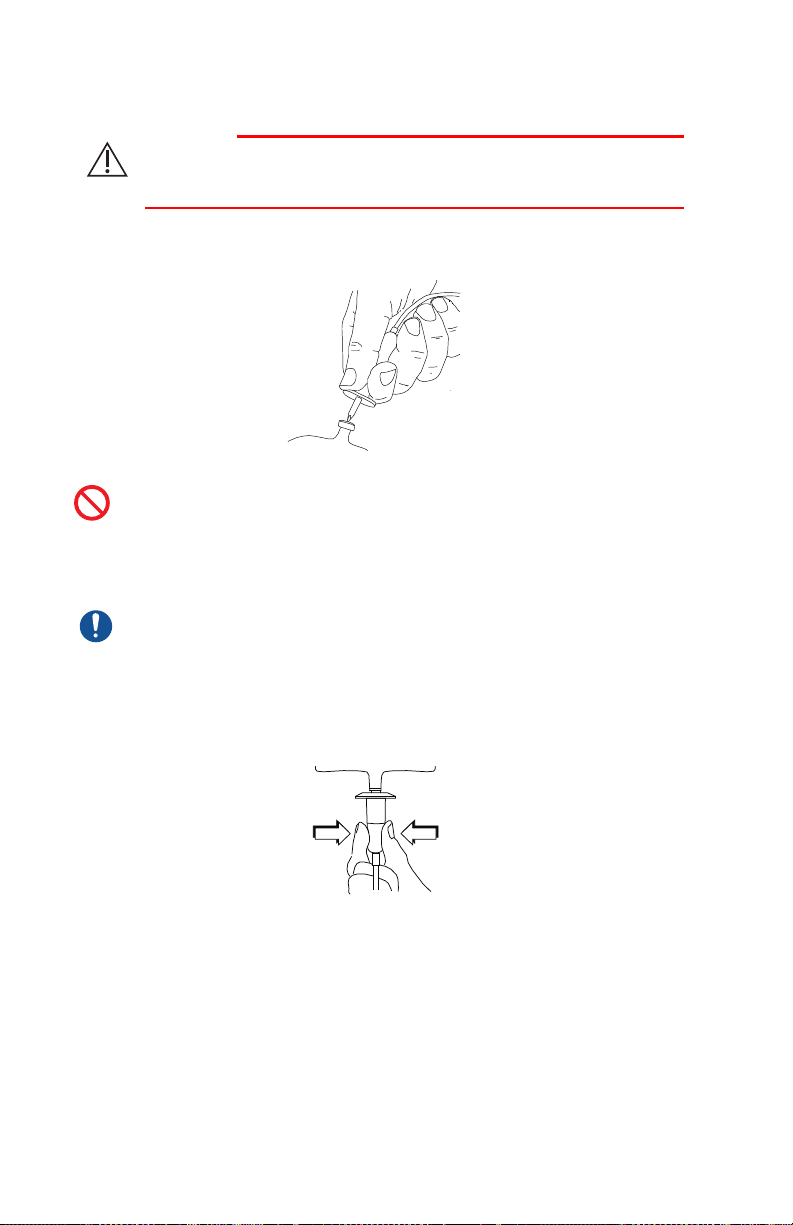
Includes Systems Compatible with Hospira MedNet
CAUTION
BE CAREFUL WHEN PIERCING THE SOLUTION CONTAINER TO AVOID
PUNCTURING IT.
5. Insert the piercing pin into the outlet on the fluid container using
a twisting motion.
Do not insert the piercing pin while the container is hanging
above the infuser.
6. Suspend the container on an I.V. Pole.
Check the container for leaks. If any part of the container
is leaking, replace it
7. Squeeze the drip chamber to the score mark. Do not completely
4-4 System Operating Manual
fill the drip chamber.
 Loading...