


PARAGON OWNER’S GUIDE
Horizon Fitness
P.O. Box 219, 3236 County Hwy N
Cottage Grove, Wisconsin 53527
Customer Assistance Center: 1.888.993.3199
Fax: 1.608.839.8518 or www.horizonfitness.com

paragon
9
paragon
20
SAFETY KEY
Your treadmill will not start unless the safety key is
placed on the safety key holder. Attach the clip end
securely to your clothing. This safety key is designed to
cut the power to the treadmill if you should fall. NEVER
USE THE TREADMILL WITHOUT
SECURING THE SAFETY KEY CLIP TO YOUR CLOTHING. PULL
ON THE SAFETY KEY CLIP FIRST TO MAKE SURE IT WILL NOT
LIMITED HOME USE WARRANTY
FRAME - LIFETIME
Horizon Fitness warrants the frame against defects in workmanship
and materials for the lifetime of the original owner.
DRIVE MOTOR - 10 year
Horizon Fitness warrants the drive motor against defects in workmanship and materials for a period of ten years from the date of
purchase, so long as the device remains in the possession of the
original owner.
ELEVATION MOTOR - 3 year
Horizon Fitness warrants the elevation motor against defects in
workmanship and materials for a period of three years from the date
of purchase, so long as the device remains in the possession of the
original owner.
ELECTRONICS & PARTS - 1 year
Horizon Fitness warrants the electronic components and all original
parts for a period of one year from the date of original purchase, so
long as the device remains in the possession of the original owner.
LABOR- 1 year
Horizon Fitness shall cover the labor cost for the repair of the
device for a period of 1 year from the date of the original purchase,
so long as the device remains in the possession of the original owner.
EXCLUSIONS AND LIMITATIONS
This warranty applies only to the original owner and is not transferable. This warranty is expressly limited to the repair or replacement of a defective frame, motor, electronic component, or defective
part and is the sole remedy of the warranty. The warranty does not
cover normal wear and tear, improper assembly or maintenance, or
installation of parts or accessories not originally intended or compatible with the Treadmill as sold. The warranty does not apply to
damage or failure due to accident, abuse, corrosion, discoloration of
paint or plastic, or neglect. Horizon Fitness shall not be responsible
for incidental or consequential damages. All returns must be preauthorized by Horizon Fitness. Horizon Fitness’ obligation under
this warranty is limited to replacing or repairing, at Horizon
Fitness’ option, the product at one of its authorized service centers.
An Horizon Fitness authorized service center must receive all products for which a warranty claim is made. These products must be
received with all freight and other transportation charges prepaid,
accompanied by sufficient proof of purchase. Parts and electronic
components reconditioned to As New Condition by Horizon Fitness
or its vendors may sometimes be supplied as warranty replacement
parts and constitute fulfillment of warranty terms. This warranty
gives you specific legal rights, and your rights may vary from state
to state.


Table of Contents
paragon
27
MONTHLY LOG SHEETS
SAFETY INSTRUCTIONS 4
FOLDING & MOVING 7
LEVELING, POWER & EMERGENCY STOP
8
QUICK START UP 1 0
PROFILES 11
DISPLAY 1 2
PROGRAMMING 14
TARGET ZONE, MONITORING 15
TROUBLESHOOTING 16
COMMON QUESTIONS 17
TENSION & CENTERING BELT 18
HOME USE WARRANTY 20
STRETCHING 21
EXERCISE GUIDELINES 23
FITNESS GOALS 2 5
WEEKLY LOG SHEETS 2 6
MONTHLY LOG SHEETS 27

paragon
3
paragon
26
WEEKLY LOG SHEETS
CONSOLE
HANDLE-
RUNNING
TRANSPORT
SIDE
LEVEL-
MOTOR

IMPORTANT SAFETY INSTRUCTIONS
SAVE THESE INSTRUCTIONS
Read all instructions before using this Treadmill.
When using an electrical product, basic precautions should
always be followed, including the following:
Read all instructions before using this HORIZON FITNESS
Treadmill
WARNING! Connect this exercise product to a properly
grounded outlet only. See grounding instructions.
GROUNDING INSTRUCTIONS
This product must be grounded. If a treadmill should
malfunction or breakdown, grounding provides a path of
least resistance for electrical current to reduce the risk of
electrical shock. This product is equipped with a cord having an equipment-grounding conductor and a grounding
plug. The plug must be plugged into an appropriate outlet
that is properly installed and grounded in accordance with
local codes and ordinances.
DANGER!Improper connection of the equipment-
grounding
conductor can result in a risk of electric shock. Check with
a
qualified electrician or serviceman if you are in doubt as to
whether the product is properly grounded. Do not modify
the plug provided with the product. If it will not fit the outlet, have a proper outlet installed by a qualified electrician.
paragon
4
paragon
25
ACHIEVING YOUR FITNESS GOALS
An important step in developing a long term fitness program is to determine your goals. Is your primary goal for
exercising on your Horizon Fitness Treadmill to lose
weight? Improve muscle? Burn Stress? Prepare for the
spring racing schedule? Knowing what your goals are
will help you develop a more successful exercise program. Below are some common exercise goals:
If possible try to define your personal goals in precise,
measurable terms, and then put your goals in writing.
The more specific you can be, the easier it will be to
track your progress. If your goals are long term, divide
them up into monthly and weekly segments. Longer term
goals can lose some of the immediate motivation benefits.
Short term goals are easier to achieve. Your Horizon
Fitness Treadmill console provides you with several readouts that can be used to record your progress. You can
track Distance, Calories or Time. Time is the most important and useful of test functions.
Keeping an exercise dairy
Photocopy the weekly and monthly log sheets on the following pages to make your personal exercise log book. As
time goes by you’ll be able to look back with pride at the
- Weight Loss
- Improve Body Shape and Tone
- Increased Energy Level
- Improved Sports Performance
-Improved Cardiovascular
- Weight Maintenance
- Strengthen Leg
Muscles
- Improved Sleep
Patterns
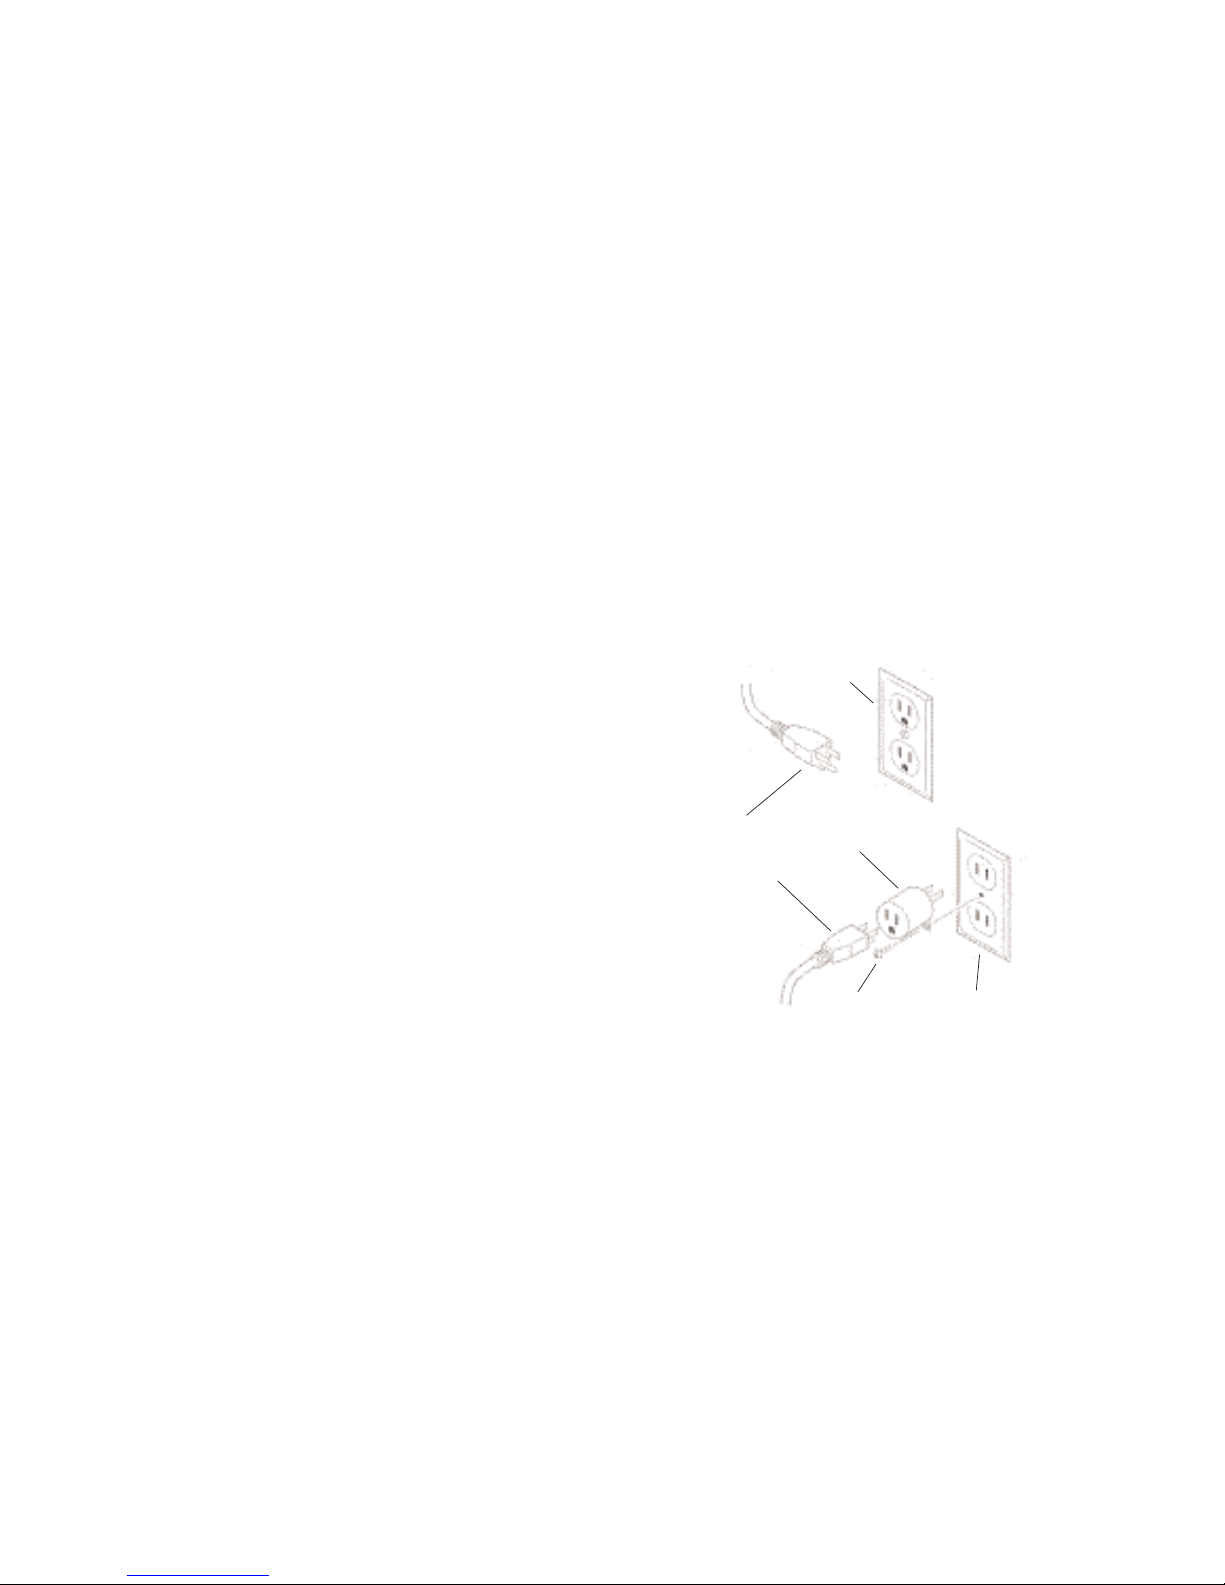
This product is for use on a nominal 120-volt circuit, and
has a grounding plug that looks like the plug illustrated
below. A
temporary adapter such as the one illustrated below may
be used to connect this plug to a 2-pole receptacle as
shown, if a properly grounded outlet is not available. The
temporary adapter should be used only until a properly
grounded outlet can be installed by a qualified electrician. The green colored rigid ear, lug, or the like extending from the adapter must be connected to a permanent
ground such as a properly grounded outlet box cover.
paragon
5
paragon
24
How Hard?
How hard you workout is also determined by your goals.
If you use your Horizon Fitness Treadmill to prepare for a
5K run, you will probably work out at a higher intensity
than if your goal is general fitness. Regardless of your
long term goals, always begin an exercise program at low
intensity. Aerobic exercise does not have to be painful to
be beneficial! There are two ways to measure your exercise intensity. The first is by monitoring your heart rate,
and the second is by evaluating your perceived exertion
level (this is simpler than it sounds!).
Perceived Exertion Level
The second and simpler way to gauge your exercise
intensity is to evaluate your perceived exertion level.
While exercising if you are too winded to maintain a conversation without gasping, you are working out too hard.
A good rule of thumb is to work to the point of exhilaration, not exhaustion. If you cannot catch your breath, it’s
time to slow down. Always be aware of other warning
signs of overexertion.
3-POLE
GROUND-
ED
GROUNDED
TREAD-
MILL
METAL
GROUND-
ING
2-POLE
OUTLET IN
GROUNDED
ADAPTOR

WARNING! To reduce the risk of burns, fire, elec-
trical shock or injury to persons:
• Never use the treadmill before securing the safety
tether clip
to your clothing.
• If you experience chest pains, nausea, dizziness, or
shortness
of breath, stop exercising immediately and consult your
physician before continuing.
• Do not wear clothes that might catch on any part of the
treadmill.
•Keep power cord away from heated surfaces.
• Keep children off of treadmill at all times.
• Do not use treadmill outdoors.
• Unplug treadmill before moving it.
• Do not remove the treadmill motor covers or roller cov-
ers.
Service should be performed only by an authorized
Horizon
Fitness service provider.
• Treadmill should be plugged into a dedicated 20amp cir-
cuit.
CHILDREN
• Keep children off your Treadmill at all times.
• When the Treadmill is in use, young children and pets
should
be kept at least 10 feet away.
OTHER SAFETY TIPS FOR YOUR HORIZON FITNESS
TREADMILL
CAUTION! If you experience chest pains, nausea, dizzi-
ness or shortness of breath, stop exercising immediately
and consult your physician before continuing.
• Do not wear clothing that might catch on any part of
paragon
6
paragon
23
EXERCISE GUIDELINES
Always consult your physician before beginning an exercise
program.
How Often?
The American Heart Association recommends that you
exercise at least 3 to 4 days per week to maintain cardiovascular fitness. If you have other goals such as weight
or fat loss, you will achieve your goal faster with more
frequent exercise. Whether it’s 3 days or 6 days, remember that your ultimate goal should be to make exercise a
lifetime habit. Many people are successful staying with a
fitness program if they set aside a specific time of day to
exercise. It doesn’t matter whether it’s in the morning
before your shower, during lunch hour or while watching the evening news. What’s more important is that it’s
a time that allows you to keep a schedule, and a time
when you won’t be interrupted. If you are to be successful with your fitness program, you have to make it a priority in your life. So decide on a time, pull out your day
planner and pencil in your exercise times for the next
month!
How Long?
For aerobic exercise benefits, it’s recommended that you
exercise from between 24 and 32 minutes per session. But
start slowly and gradually increase your exercise times.
If you’ve been sedentary during the past year, it may be
a good idea to keep your exercise times to as little as five
minutes initially. Your body will need time to adjust to

paragon
7
FOLDING
Firmly grasp the back end of the treadmill. Carefully lift
the end of the treadmill deck to the upright position.
Make sure the deck is securely locked before letting go of
the deck.
MOVING
Your Horizon Fitness treadmill has a pair of transport
wheels built into the base frame. To move, make sure the
treadmill is folded and securely latched. Then firmly
grasp the handlebars, tilt the treadmill back and roll.
paragon
22
THE IMPORTANCE OF WARM UP AND COOL
DOWN
WARM UP
The first 2 to 5 minutes of a workout should be devoted to
warming up. The warm-up will limber your muscles and
prepare them for more strenuous exercise. Make sure
that you warm-up on your Horizon Fitness product at a
slow pace.
COOL DOWN
Never stop exercising suddenly! A cool-down period
allows your heart to readjust to the decreased demand.
Make sure that your cool down period consists of a very
slow pace to allow your heart rate to lower. After the
cool-down, repeat the stretching exercises on page 21 to
loosen and relax your muscles.

paragon
8
paragon
21
LEVELING
The treadmill should be level for optimum use. Once you
have placed the treadmill where you intend to use it,
raise or lower the adjustable levelers located on the
treadmill base frame. Once you have leveled the treadmill, lock the levelers in place by tightening the nuts
against the frame. To assure the
TURN POWER ON
Make sure that your treadmill is properly connected to a
power outlet. The on/off switch is located next to the power
cord. Flip this switch to the 'on' position, so that the switch
is lit. You will hear a beep and the console will light up.
DEVELOPING A FITNESS PROGRAM
STRETCH FIRST
Before using your Horizon Fitness product, it is best to
take a few minutes doing a few gentle stretching exercises. Stretching prior to exercise will improve flexibility
and reduce chances of exercise related injury. Ease into
each of these stretches with a slow gentle motion. Do not
stretch to the point of pain. Make sure not to bounce
while doing these stretches.
WALL PUSH
Stand near a wall with the toes of one foot about 18" from
the wall, and the other foot about 12" behind the other
foot. Lean forward, pushing against the wall with your
palms. Keep your heels flat and hold this position for a
count of 15 seconds. Make sure that you do not bounce
while stretching. Alternate positions of your feet and
repeat for a total of 8 repetitions.
STANDING QUADRICEPS STRETCH
Using a wall to provide balance, grasp your left ankle
with your left hand and hold your foot against the back
of your thigh for a count of 15 seconds. Repeat with your
right ankle and hand, and continue alternating for a
total of 8 repetitions.
SEATED TOE TOUCH
Sit on the floor with your legs together and straight out
in front of you. Do not lock your knees. Extend your fin-

paragon
9
paragon
20
SAFETY KEY
Your treadmill will not start unless the safety key is
placed on the safety key holder. Attach the clip end
securely to your clothing. This safety key is designed to
cut the power to the treadmill if you should fall. NEVER
USE THE TREADMILL WITHOUT
SECURING THE SAFETY KEY CLIP TO YOUR CLOTHING. PULL
ON THE SAFETY KEY CLIP FIRST TO MAKE SURE IT WILL NOT
LIMITED HOME USE WARRANTY
FRAME - LIFETIME
Horizon Fitness warrants the frame against defects in workmanship
and materials for the lifetime of the original owner.
DRIVE MOTOR - 10 year
Horizon Fitness warrants the drive motor against defects in workmanship and materials for a period of ten years from the date of
purchase, so long as the device remains in the possession of the
original owner.
ELEVATION MOTOR - 3 year
Horizon Fitness warrants the elevation motor against defects in
workmanship and materials for a period of three years from the date
of purchase, so long as the device remains in the possession of the
original owner.
ELECTRONICS & PARTS - 1 year
Horizon Fitness warrants the electronic components and all original
parts for a period of one year from the date of original purchase, so
long as the device remains in the possession of the original owner.
LABOR- 1 year
Horizon Fitness shall cover the labor cost for the repair of the
device for a period of 1 year from the date of the original purchase,
so long as the device remains in the possession of the original owner.
EXCLUSIONS AND LIMITATIONS
This warranty applies only to the original owner and is not transferable. This warranty is expressly limited to the repair or replacement of a defective frame, motor, electronic component, or defective
part and is the sole remedy of the warranty. The warranty does not
cover normal wear and tear, improper assembly or maintenance, or
installation of parts or accessories not originally intended or compatible with the Treadmill as sold. The warranty does not apply to
damage or failure due to accident, abuse, corrosion, discoloration of
paint or plastic, or neglect. Horizon Fitness shall not be responsible
for incidental or consequential damages. All returns must be preauthorized by Horizon Fitness. Horizon Fitness’ obligation under
this warranty is limited to replacing or repairing, at Horizon
Fitness’ option, the product at one of its authorized service centers.
An Horizon Fitness authorized service center must receive all products for which a warranty claim is made. These products must be
received with all freight and other transportation charges prepaid,
accompanied by sufficient proof of purchase. Parts and electronic
components reconditioned to As New Condition by Horizon Fitness
or its vendors may sometimes be supplied as warranty replacement
parts and constitute fulfillment of warranty terms. This warranty
gives you specific legal rights, and your rights may vary from state
to state.

paragon
10
paragon
19
QUICK START UP
Simply press the Start button to begin exercising.
PAUSE
Press the Stop button to pause your workout.
RESET
Press and hold the Stop button to reset the treadmill.
CENTERING THE BELT
If the running belt is too far to the right side, use the
supplied Allen wrench to turn the right tension bolt
clockwise 1/4 turn at a time until the belt remains centered during use.
If the running belt is too far to the left side, turn the left
tension bolt clockwise 1/4 turn at a time until the belt
remains centered during use.
If the belt is too far to the left side:
1) Turn the left roller bolt 1/4 turn clockwise (tighten).
If the belt is too far to the right side:
1) Turn the right roller bolt 1/4 turn clockwise (tighten).

paragon
11
paragon
18
P1 - MANUAL
Customized workout, with no default
Time.
PROFILES
P2 - INTERVALS
Speed changes; Time defaults to 24
minutes
P3 - ROLLING
Speed changes; Time defaults to 48
minutes
P4 - WEIGHT LOSS
Elevation changes; Time defaults to
48 minutes
P5 - HILL WALK
Elevation and speed changes; no
preset time.
P6 - HILL RUN
Elevation and speed changes; no
preset time.
TENSIONING THE BELT
If you can feel a slipping sensation when running on
the treadmill, the running belt must be tightened. In
most cases, the belt has stretched from use, causing the
belt to slip. This is a normal and common adjustment. To
eliminate this slipping, tension both the rear roller bolts
with the 8
MM
Allen wrench, turning it 1/4 TURN to the
right as shown. Try the treadmill again to check for slipping. Repeat if necessary, but NEVER TURN the roller
bolts more than 1/4 turn at a time. The belt tension is set
DO NOT STAND ON THE BELT
While you are preparing to use the treadmill, do not stand
on the belt. Place your feet on the side rails before starting the treadmill. Start walking on the belt only after the
belt has begun to move. Never start the treadmill at a fast
running speed and attempt to jump on!

paragon
12
paragon
17
DISPLAY
SELECT
Used to view your Calories
and Laps during your workout;
console will automatically
default back to show
Elevation (Laps can only be
viewed in the Manual
CALORIES
Total Calories burned during your workout.
PULSE
Shown as Beats Per Minute. Used to monitor your
heart rate during your workout (displayed when
contact is made with both grips).
DISTANCE
Miles traveled during your workout.
LAPS
One lap around profile window equals 1/4 of a mile
(Manual Program only).
TIME
Shown as Minutes:Seconds. View the time remaining or
the time elapsed in your workout.
COMMON PRODUCT QUESTIONS
Are the sounds my treadmill makes normal?
All treadmills make a certain type of thumping noise due
to the belt riding over the rollers, especially new treadmills. This noise will diminish over time, although may
not totally go away. Over time, the belt will stretch, causing the belt to ride smoother over the rollers.
Why is the treadmill I had delivered louder than
the one at the store?
All fitness products seem quieter in a large store showroom because there is generally more background noise
than in your home. Also, there will be less reverberation
on a carpeted
concrete floor than on a wood overlay floor. Sometimes a
heavy rubber mat will help reduce reverberation
through the floor. If a fitness product is placed close to a
wall, there will be more reflected noise.
When should I be worried about a noise?
As long as the sounds your treadmill makes are no louder
that a normal conversational tone of voice, it is considered normal noise. If your treadmill is louder than this,
you may want to call the Horizon Fitness Customer Service
Center @ 1.888.993.3199. Sometimes an initial diagnosis
can be made over the phone.
MAINTENANCE
What kind of routine maintenance is required?
We use sealed bearings throughout our treadmill so lubrication is not needed. The most important maintenance
step is to
simply wipe your perspiration off the treadmill after
each use.

paragon
13
paragon
16
TROUBLESHOOTING YOUR TREADMILL
Horizon Fitness treadmills are designed to be reliable and
easy to use. However, if you experience a problem, please
reference the troubleshooting guide listed below.
PROBLEM: The console does not light up.
SOLUTION: Verify that the power cord is plugged in
properly to the outlet, and that the treadmill switch is
turned on.
PROBLEM: The treadmill circuit breaker trips during a
workout.
SOLUTION: Verify that the treadmill is plugged into a
dedicated 20amp circuit.
PROBLEM: The treadmill shuts off when elevating
SOLUTION: Verify that there is enough slack in the
power cord to reach to the wall outlet during elevation.
PROBLEM: The running belt does not stay centered during a workout.
SOLUTION: Verify that the treadmill is on a level surface. Verify that the belt is properly tightened (refer to
Centering The Belt; page 19).
If the above troubleshooting section does not remedy the
problem, discontinue use and turn the power off.
DO NOT RETURN TO THE STORE, PLEASE CON-
TACT THE HORIZON FITNESS CUSTOMER ASSIS-
TANCE CENTER; TOLLFREE @ 1-888-993-3199.
ELEVATION
Shown in the top right
hand window. Indicates the
incline of your walking or
running
SPEED
Shown in the top righthand display window.
Indicates how fast your
walking or running surface
PROGRAM PROFILE
Represents the Program
profile (P2 Intervals - P6
Hill Run) that you have
chosen.
LAP PROFILE
One lap around the profile
window equals 1/4 of a mile
(Manual program only)
DISPLAY

paragon
14
TARGET HEART RATE ZONE
Your Target Heart Rate Zone is a percentage of your maximum heart rate. Target Zone will vary for each individual, depending on age, current level of conditioning, and
personal fitness goals. The American Heart Association
recommends working-out at a Target Heart Rate Zone of
between 60% and 75% of your maximum heart rate. See
the chart below for convenient reference.
EXAMPLE for a 42-year old user: find A G E along the
bottom of the chart (round to 40), follow A G E column up
to the TARGET ZONE BAR. RESULTS: 60% of maximum Hear
paragon
15
CHOOSING A
PROGRAM
Choose a Program by pressing the FAST or SLOW speed
buttons (P1 Manual - P6 Hill
Run). Once the desired pro-
CHOOSING THE TIME
Choose Time by pressing the
FAST or SLOW speed buttons
or use the default time. Once
the desired time is selected,
press the START button.
FINISHING A WORKOUT
When your workout is finished, the treadmill console
will beep twice and ‘E N D’
will be
flashing in the Time window. Your workout information will stay displayed
Monitoring Your Heart Rate
Place the palm of your hands directly on the grip pulse
handlebars. Both hands must grip the bars for your heart
rate to register. When griping the pulse handlebars, do
not grip tightly. Holding the grips tightly may elevate
your blood pressure. Keep a loose, cupping hold. It is recommended that you hold the grip pulse handlebars only
long enough to see your heart rate readout on the console. You may experience an erratic readout if consistent-
 Loading...