


4
TREADMILL OWNER’S MANUAL
MANUEL DU PROPRIÉTAIRE DU TAPIS ROULANT
MANUAL DEL PROPIETARIO DE LA CAMINADORA
Read the TREADMILL GUIDE before using this OWNER’S MANUAL.
Lire le GUIDE D’UTILISATION DU TAPIS ROULANT avant de se référer au présent MANUEL DU PROPRIÉTAIRE.
Lea la GUÍA DE LA CAMINADORA antes de utilizar este MANUAL DEL PROPIETARIO.

3 ENGLISH
33 FRANÇAIS
63 ESPAÑOL
2

IMPORTANT PRECAUTIONS
SAVE THESE INSTRUCTIONS
When using an electrical product, basic precautions should always be followed, including the following: Read all instructions before
using this treadmill. It is the responsibility of the owner to ensure that all users of this treadmill are adequately informed of all warnings
and precautions. If you have any questions after reading this guide, contact Customer Tech Support at the number listed on the back
panel of the OWNER’S MANUAL.
This treadmill is intended for in-home use only. Do not use this treadmill in any commercial, rental, school or institutional setting.
Failureto comply will void the warranty.
3

DANGER
TO REDUCE THE RISK OF ELECTRICAL SHOCK:
Always unplug the treadmill from the electrical outlet immediately after using, before cleaning, performing maintenance and putting on or
taking off parts.
WARNING
TO REDUCE THE RISK OF BURNS, FIRE, ELECTRICAL SHOCK OR INJURY TO PERSONS:
• Never use the treadmill before securing the safety tether clip to your clothing.
• If you experience any kind of pain, including but not limited to chest pains, nausea, dizziness, or shortness of breath, stop exercising
immediately and consult your physician before continuing.
• When exercising, always maintain a comfortable pace.
• Do not wear clothes that might catch on any part of the treadmill.
• Always wear athletic shoes while using this equipment.
• Do not jump on the treadmill.
• At no time should more than one person be on treadmill while in operation.
• This treadmill should not be used by persons weighing more than specified in the OWNER’S MANUAL WARRANTY SECTION. Failure
tocomply will void the warranty.
• When lowering the treadmill deck, wait until rear feet are firmly on the floor before stepping on the deck.
• Disconnect all power before servicing or moving the equipment. To clean, wipe surfaces down with soap and slightly damp cloth only;
never use solvents. (See MAINTENANCE)
• The treadmill should never be left unattended when plugged in. Unplug from outlet when not in use, and before putting on or taking
offparts.
• Do not operate under blanket or pillow. Excessive heating can occur and cause fire, electric shock, or injury to persons.
4
• Connect this exercise product to a properly grounded outlet only.

WARNING
TO REDUCE THE RISK OF BURNS, FIRE, ELECTRICAL SHOCK OR INJURY TO PERSONS:
• At NO time should pets or children under the age of 13 be closer to the treadmill than 10 feet.
• At NO time should children under the age of 13 use the treadmill.
• Children over the age of 13 or disabled persons should not use the treadmill without adult supervision.
• Use the treadmill only for its intended use as described in the treadmill guide and owner’s manual.
• Do not use other attachments that are not recommended by the manufacturer. Attachments may cause injury.
• Never operate the treadmill if it has a damaged cord or plug, if it is not working properly, if it has been dropped or damaged,
orimmersed in water. Return the treadmill to a service center for examination and repair.
• Keep power cord away from heated surfaces. Do not carry this unit by its supply cord or use the cord as a handle.
• Never operate the treadmill with the air opening blocked. Keep the air opening clean, free of lint, hair, and the like.
• To prevent electrical shock, never drop or insert any object into any opening.
• Do not operate where aerosol (spray) products are being used or when oxygen is being administered.
• To disconnect, turn all controls to the off position, then remove plug from outlet.
• Do not use treadmill in any location that is not temperature controlled, such as but not limited to garages, porches, pool rooms,
bathrooms, car ports or outdoors. Failure to comply will void the warranty.
• This treadmill is intended for in-home use only. Do not use this treadmill in any commercial, rental, school or institutional setting.
Failureto comply will void the warranty.
• Do not remove the console covers unless instructed by Customer Tech Support. Service should only be done by an authorized service
atechnician.
It is essential that your treadmill is used only indoors, in a climate controlled room. If your treadmill has been exposed to colder
temperatures or high moisture climates, it is strongly recommended that the treadmill is warmed up to room temperature before first
time use. Failure to do so may cause premature electronic failure.
5
GROUNDING INSTRUCTIONS
This product must be grounded. If a treadmill should malfunction or breakdown, grounding provides a path of least resistance for electrical
current to reduce the risk of electrical shock. This product is equipped with a cord having an equipment-grounding conductor and a grounding
plug. The plug must be plugged into an appropriate outlet that is properly installed and grounded in accordance with local codes and
ordinances.
DANGER
Improper connection of the equipment-grounding conductor can result in a risk of electric shock. Check with a qualified electrician or
service provider if you are in doubt as to whether the product is properly grounded. Do not modify the plug provided with the product.
If it will not fit the outlet, have a proper outlet installed by a qualified electrician.
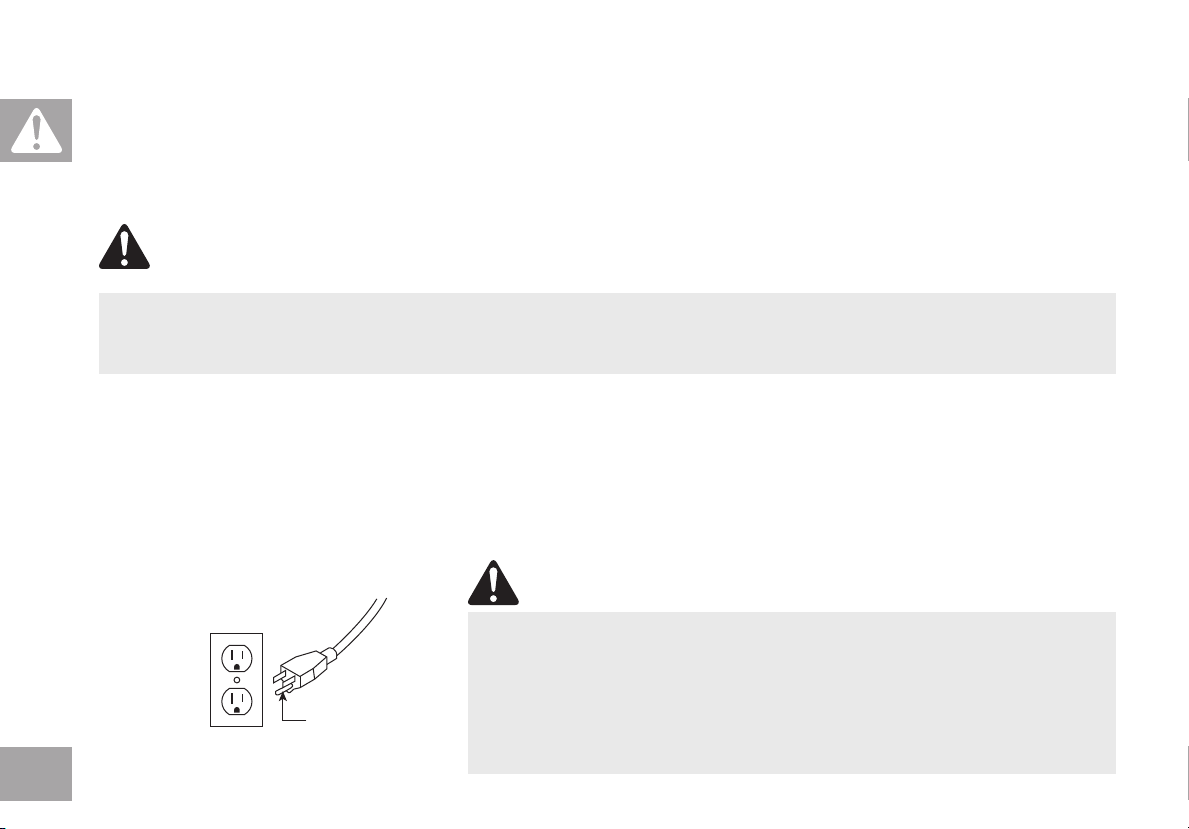
This product is for use on a nominal 110-120 Volt circuit and has a grounding plug that looks like the plug in the illustration. Make sure
thatthe product is connected to an outlet having the same configuration as the plug. No adapter should be used with this product.
This product must be used on a dedicated circuit. To determine if you are on a dedicated circuit, shut off the power to that circuit and
observe if any other devices lose power. If so, move devices to a different circuit. Note: There are usually multiple outlets on one circuit.
Thistreadmill should be used with a minimum 15-amp circuit.
WARNING
6
3-POLE
GROUNDED
OUTLET
GROUNDING PIN
Connect this exercise product to a properly grounded outlet only.
Never operate product with a damaged cord or plug even if it is working properly.
Never operate any product if it appears damaged, or has been immersed in water.
Contact Customer Tech Support for replacement or repair.

ASSEMBLY
WARNING
There are several areas during the assembly process that special attention must be paid. It is very important to follow the assembly
instructions correctly and to make sure all parts are firmly tightened. If the assembly instructions are not followed correctly, the treadmill
could have parts that are not tightened and will seem loose and may cause irritating noises. To prevent damage to the treadmill, the
assembly instructions must be reviewed and corrective actions should be taken.
Before proceeding, find your treadmill’s serial number located on a white barcode sticker near
the on/off power switch and power cord and enter it in the space provided below.
ENTER YOUR SERIAL NUMBER AND MODEL NAME IN THE BOXES BELOW:
» Refer to the SERIAL NUMBER and MODEL NAME when calling for service.
SERIAL NUMBER:
TM
MODEL NAME: HORIZON 7.4AT TREADMILL
SERIAL NUMBER LOCATION
7

SPEAKERS
CONSOLE
TABLET/READING RACK
WATER BOTTLE HOLDER
PULSE RATE GRIPS
ON/OFF SWITCH
POWER CORD
MOTOR COVER
TRANSPORT WHEEL
8
FOOT LOCK LATCH DECAL
(UNDERNEATH FOOT LATCH)
CONTROL PANEL AND DISPLAY WINDOWS
CONSOLE FAN
SAFETY KEY PLACEMENT
CROSS SUPPORT BAR
CONSOLE MAST
FOOT LATCH (UNDERNEATH DECK)
RUNNING BELT/RUNNING DECK
SIDE RAIL
ROLLER END CAP
REAR ROLLER
TENSION/ALIGNMENT BOLTS

TOOLS INCLUDED:
F 8 mm T-Wrench
F 6 mm L-Wrench
F 5 mm L-Wrench
PARTS INCLUDED:
F 1 Main Frame
F 1 Console Assembly
F 2 Console Masts
F 1 Cross Support Bar
F 1 Hardware Kit
F 1 Safety Key
F 1 Audio Adapter Cable
F 1 Bottle of Silicone Lubricant
(for 2 applications)
F 1 Power Cord
F 2 Pulse Rate Grips
NEED HELP?
If you have questions or if there
are any missing parts, contact
Customer Tech Support. Contact
information is located on the
back panel of this manual.
PRE ASSEMBLY
UNPACKING
Place the treadmill carton on a level flat surface. It is recommended that you place a
protective covering on your floor. Take CAUTION when handling and transporting this unit.
Never open box when it is on its side. Once the banding straps have been removed, do not
lift or transport this unit unless it is fully assembled and in the upright folded position, with
the lock latch secure. Unpack and assemble the unit where it will be used. The enclosed
treadmill is equipped with high-pressure shocks and may spring open if mishandled. Never
grab hold of any portion of the incline frame and attempt to lift or move the treadmill.
WARNING
DO NOT ATTEMPT TO LIFT THE TREADMILL! Do not move or lift treadmill from
packaging until specified to do so in the assembly instructions. You may remove the
plastic wrap from console masts.
WARNING
FAILURE TO FOLLOW THESE INSTRUCTIONS COULD RESULT IN INJURY!
NOTE: During each assembly step, ensure that ALL nuts and bolts are in place and partially
threaded in before completely tightening any ONE bolt.
NOTE: A light application of grease may aid in the installation of hardware. Any grease, such
as lithium bike grease is recommended.
9

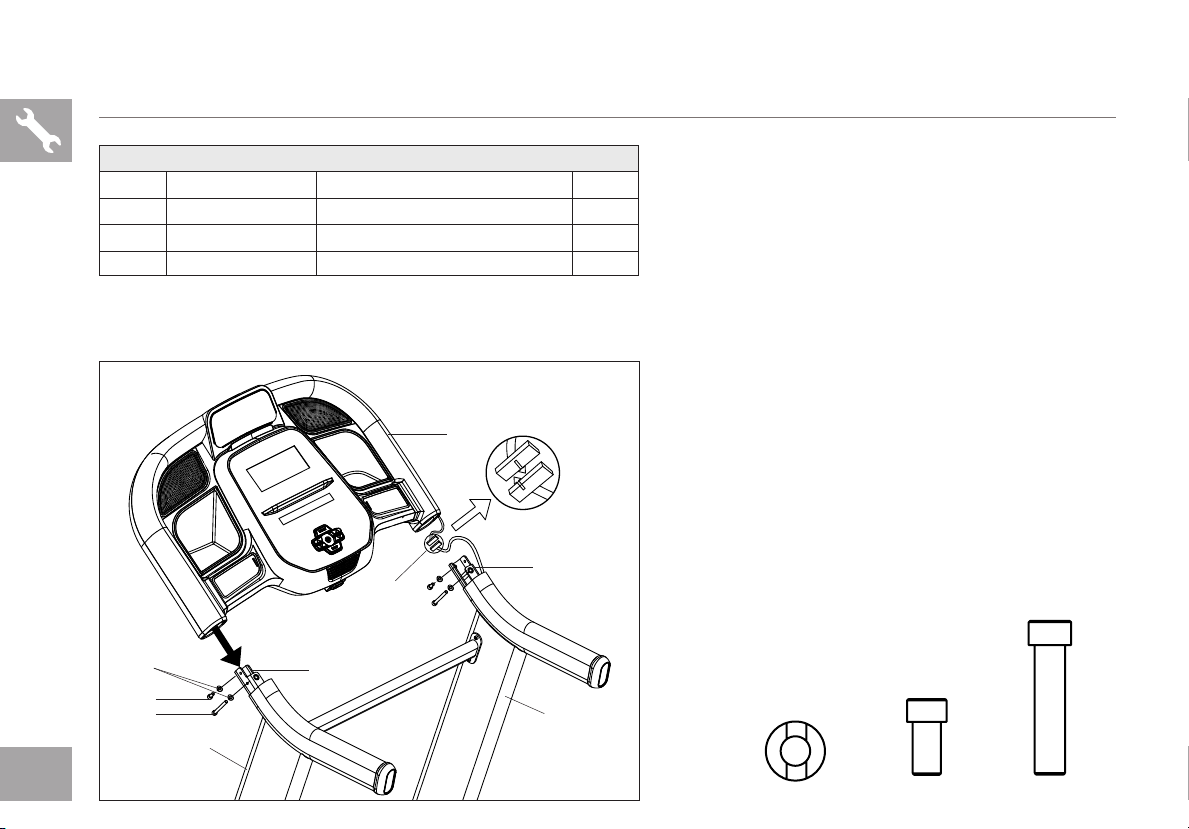
ASSEMBLY STEP 1
10
HARDWARE FOR STEP 1
PAR T TYPE DESCRIPTION QTY
M8X1. 25PX11L 2 A UPRIGHT GUIDE BOLT
M8X1.25PX80L 8B MA ST BOLT
D
FL AT WASH ER
SPRING WASHER
4
1
C
D
B
8.4X15.5X1.6T
8.2X15.4X2.0T
7
2
4
D
C
A
A
3
8C
8
B
A Cut the yellow banding straps and lift the running
deck upward from the rear to remove all contents from
underneath the running deck.
B Open HARDWARE FOR STEP 1.
C Insert UPRIGHT GUIDE BOLT (A) into MAIN FRAME
BRACKET (1) and fully tighten.
NOTE: Do not fully tighten the following bolts until the
end of STEP 4.
D Attach LEAD WIRE to bottom end of CONSOLE
CABLE (2). Pull LEAD WIRE through RIGHT
CONSOLE MAST (4). After pulling the wire through
the mast, the top of the CONSOLE CABLE (2) should
be located at the ATTACHMENT BRACKET (7).
E Attach RIGHT CONSOLE MAST (4) to MAIN
FRAME(3) using 4 BOLTS (B), 4 FLAT WASHERS (C)
AND 4SPRING WASHERS (D). Feed the extra console
cable back into the upright mast.
NOTE: Be careful not to pinch the console cable
while attaching the right console mast.
F Repeat STEP E on the LEFT SIDE.
A
B
C
D

ASSEMBLY STEP 2
HARDWARE FOR STEP 2
PAR T TYPE DESCRIPTION QTY
M6X1.0PX15L 4 E BOLT
NOTE: Do not fully tighten bolts until STEP
3.
E
5
4
4
A Open HARDWARE FOR STEP 2.
B Attach CROSS SUPPORT BAR (5) using holes on
UPRIGHT MASTS (4) with 4 BOLTS (E).
E
11
ASSEMBLY STEP 3
12
HARDWARE FOR STEP 3
PAR T TYPE DESCRIPTION QTY
F
G
H
F
G
H
ARC WASHER
SHORT BOLT
LONG BOLT
7
4
8.4X15.5X1.6T
M8x1.25Px15L
M8x1.25Px70 L
6
7
2
4
A Open HARDWARE FOR STEP 3.
B Have someone help hold the console while attaching
4
2
2
the CONSOLE CABLE (2). Use the lead wire to
carefully pull the CONSOLE CABLE (2) out of the
RIGHT CONSOLE MAST (4). Attach the CONSOLE
CABLE (2) from the CONSOLE (6) to the CONSOLE
CABLE (2) from the top of the RIGHT UPRIGHT MAST
(4). Detach and discard the lead wire.
C Carefully slide the CONSOLE (6) onto the
ATTACHMENT BRACKETS (7) being careful not to
pinch the CONSOLE CABLE (2). Align the holes on the
bottom side of the CONSOLE (6) with the holes on the
ATTACHMENT BRACKETS (7).
D Attach the CONSOLE (6) to the ATTACHMENT
BRACKETS (7) by first placing ARC WASHERS (F)
onto BOLTS (G) AND (H) as illustrated. Insert SHORT
BOLTS (G) into the top hole of the ATTACHMENT
BRACKET (7) and LONG BOLTS (H) into the bottom
hole.
E Repeat STEP D for the opposite side.
F G H

ASSEMBLY STEP 4
HARDWARE FOR STEP 4
PAR T TYPE DESCRIPTION QTY
M8x15L 8I BOLT
8.2X15.4X2.0T 8J SPRING WASHER
8.4X15.5X1.6T 8K FL AT WASH ER
6
9L
9R
8
K
J
I
A Open HARDWARE FOR STEP 4.
B Attach RIGHT SIDE PULSE RATE GRIP (8)
tothe underside of the CONSOLE (6) using
4 BOLTS (I), 4 SPRING WASHERS (J) and
4 FLAT WASHERS (K).
C Connect the RIGHT CONSOLE CABLES (9R)
andcarefully tuck in wires to avoid damage.
D Repeat STEP B on the LEFT SIDE.
E Connect the LEFT CONSOLE CABLES (9L)
andcarefully tuck wires to avoid damage.
NOTE: Fully tighten all bolts from PREVIOUS STEPS
I J K
ASSEMBLY COMPLETE!
Before the first use, lubricate the treadmill deck by
following the instructions in the MAINTENANCE
section in the TREADMILL GUIDE.
13

14

TREADMILL OPERATION
This section explains how to use your treadmill’s console and programming.
The BASIC OPERATION section in the TREADMILL GUIDE has instructions for the following:
• LOCATION OF THE TREADMILL
• USING THE SAFETY KEY
• FOLDING THE TREADMILL
• MOVING THE TREADMILL
• LEVELING THE TREADMILL
• TENSIONING THE RUNNING BELT
• CENTERING THE RUNNING BELT
• USING THE HEART RATE FUNCTION
15
R
16
M
G
K
I
I
LT T
JS
M
H
J

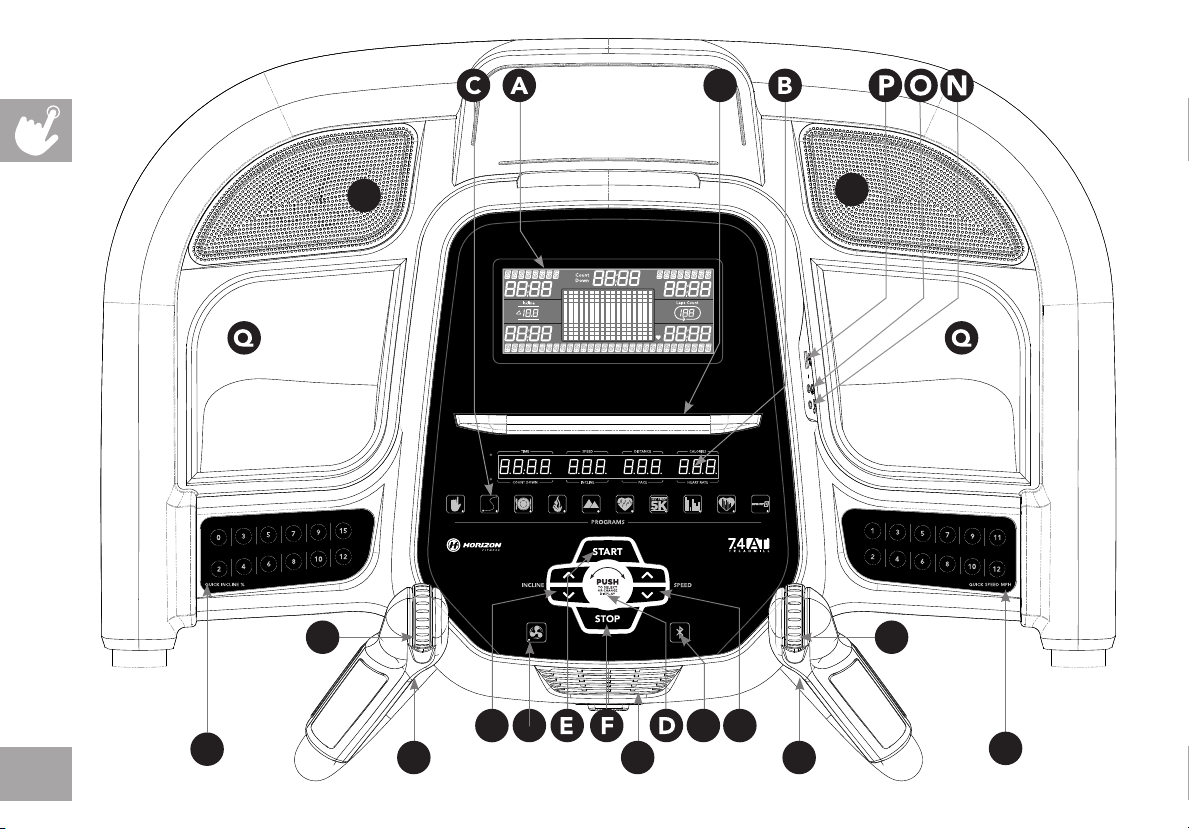
CONSOLE OPERATION
Note: There is a thin protective sheet of clear plastic on the overlay of the console that should be removed before use.
A) LCD DISPLAY WINDOWS: Watts, Pace, Calories/Hour, Heart Rate, Laps.
B) LED DISPLAY: Time, Speed, Distance, Incline, Pace, Heart Rate, and Calories.
C) WORKOUT LED INDICATORS: indicates what workout is set for the current program.
D) SELECT TARGET/WORKOUT KNOB: rotate/press to select your desired workout/target
E) START: press to begin exercising, start your workout, or resume exercising after pause.
F) STOP: press to pause/end your workout. Hold for 3 seconds to reset the console.
G) INCLINE SCROLL WHEEL: used to adjust incline in small increments (.5%).
H) SPEED SCROLL WHEEL: used to adjust speed in small increments (.1 MPH).
I) INCLINE QUICK KEYS: used to reach desired incline more quickly.
J) SPEED QUICK KEYS: used to reach desired speed more quickly.
K) FAN KEY: press to turn fan on and off.
L) FAN: personal workout fan.
M) SPEAKERS: music plays through speakers when your CD / MP3 player is connected to the console.
N) AUDIO IN JACK: plug your CD / MP3 player into the console using the included audio adaptor cable.
O) AUDIO OUT / HEADPHONE JACK: plug your headphones into this jack to listen to your music through the headphones.
Note: when headphones are plugged into the headphone jack the sound will no longer come out throughthe speakers.
P) USB INPUT: 1A/5V USB output power.
Q) WATER BOTTLE POCKETS: holds personal workout equipment.
R) TABLET/READING RACK: holds tablet or reading material.
S) BLUETOOTH INDICTOR LIGHT: displays when machine is paired with a Bluetooth compatible device.
T) INTERVAL KEYS: these are programmable keys. When an user is selected, they can be programmed to a desired
speed and incline setting.
17

18
DISPLAY WINDOWS
• TIME: Shown as minutes : seconds. View the time remaining or the time elapsed in your workout.
• DISTANCE: Shown as miles. Indicates distance traveled during your workout.
• SPEED: Shown as MPH. Indicates how fast your walking or running surface is moving.
• INCLINE: Shown as percent. Indicates the incline of your walking or running surface.
• CALORIES: Total calories burned during your workout.
• HEART RATE: Shown as BPM (beats per minute). Used to monitor your heart rate (displayed when contact is made
with both pulse grips).
• PACE: Indicates how many minutes it takes to complete a mile while running or walking at your current speed.
• WATTS: Indicates the power output at your current speed and incline.
• CALORIES/ HOUR: Indicates the number of calories you will burn in an hour at your current speed and incline
• BRICKYARD: Each vertical segment represents a speed or incline unit, each horizontal segment represents time.
• LAPS: Shows how many 400 meter (¼ mile) laps have been completed.
• COUNT (SPRINT 8): Shows how many Sprint 8 program sprints you have completed

GETTING STARTED
1) Check to make sure no objects are placed on the belt that will hinder the movement of the treadmill.
2) Plug in the power cord and turn the treadmill ON. (The ON/OFF switch is next to the power cord.)
3) Stand on the side rails of the treadmill.
4) Attach the safety key clip to part of your clothing making sure that it is secure and will not become detached during operation.
5) Insert the safety key into the safety keyhole in the console.
6) You have two options to start your workout:
A) QUICK START UP
Simply press the START key to begin working out.
Time, distance, and calories will all count up from zero. OR...
B) SELECT A WORKOUT OR TARGET
1) Select your USER by turning the workout knob and then pressing when your desired USER is displayed.
2) Select your WEIGHT by turning the workout knob and then pressing when your desired WEIGHT is displayed.
3) Select your PROGRAM by turning the workout knob and then pressing when your desired PROGRAM is displayed.
4) Adjust the SETTING by turning the workout knob and then pressing when your desired SETTING is displayed.
5) Press START to begin.
19

Roll forward/backward to increase/decrease incline.
INCLINE SCROLL WHEEL
INTERVAL BUTTON 1 INTERVAL BUTTON 2
SPEED SCROLL WHEEL
Roll forward/backward to increase/decrease speed
HOW TO PROGRAM AND USE CUSTOM INTERVAL BUTTONS
The programmable interval buttons located on the pulse rate grips are designed to help you customize this machine to match whatever
workout you like to do the most.
The LEFT and RIGHT INTERVAL BUTTONS are programmable for speed and incline.
To program the INTERVAL button, you must select a user, start the machine, set the desired speed and incline, press and hold the
desired INTERVAL button for three seconds until the treadmill beeps. Now the INTERVAL button is programmed to your settings. After
programming the INTERVAL button, it will remember the setting for that user until reprogrammed.
Now when the INTERVAL button is pressed, the treadmill speed and incline will change to the settings you programmed for that button.
20
The most common type of workout these keys will help with is interval training. We suggest programming one of the INTERVAL buttons to
your high intensity segments and the other to your recovery segments.
Another common use is to set one INTERVAL button to your warm up and cool down settings and the other to your desired workout
settings.
These buttons should allow you to customize the settings of your treadmill to quickly fit the type of workout you enjoy most.
Warm Up
4:00 Mins
WORKOUT PROFILES
MANUAL: Control everything about your workout – from start to finish. This program is a basic workout with no pre-defined
settings, allowing you to manually adjust the machine at any time. It begins with an incline at 0 and speed at 0.5 mph.
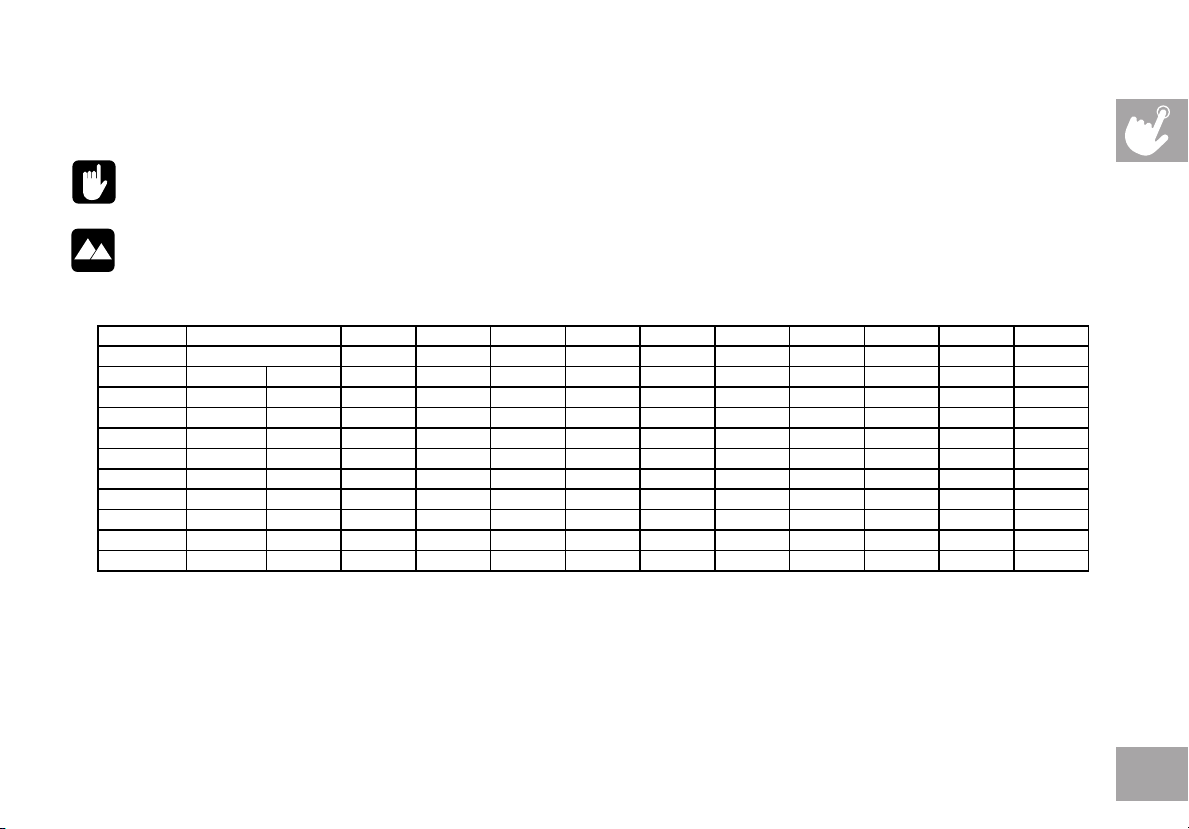
HILL CLIMB: Simulates a hill ascent and descent. This program helps tone muscle and improve cardiovascular ability. Incline
changes and segments repeat every 30 seconds.
Incline changes and segments repeat every 30 seconds.
Segment 1 2 3 4 5 6 7 8 9 10
Time 30 sec 30 sec 30 sec 30 sec 30 sec 30 sec 30 sec 30 sec 30 sec 30 sec
Level 1 0 0 1 1.5 2 2.5 3 3 2.5 2 1.5 1
Level 2 0 0 1.5 2 2.5 3 3.5 3.5 3 2.5 2 1.5
Level 3 0 1 2 2.5 3 3.5 4 4 3.5 3 2.5 2
Level 4 0 1.5 2.5 3 3.5 4 4.5 4.5 4 3.5 3 2.5
Level 5 0 1.5 3 3.5 4 4.5 5 5 4.5 4 3.5 3
Level 6 0 1.5 3.5 4 4.5 5 5.5 5.5 5 4.5 4 3.5
Level 7 0 1.5 4 4.5 5 5.5 6 6 5.5 5 4.5 4
Level 8 0 2 4.5 5 5.5 6 6.5 6.5 6 5.5 5 4.5
Level 9 0 2 5 5.5 6 6.5 7 7 6.5 6 5.5 5
Level 10 0 2 5.5 6 6.5 7 7.5 7.5 7 6.5 6 5.5
21

MY FIRST 5K: This 9-week program is intended for inexperienced runners looking to run their first 5k or simply begin an exercise
Week Workout#1 Workout#2 Workout#3
5minutewarmup 5minutewarmup 5minutewarmup
1minjog 1minjog 1minjog
1.5minwalk 1.5minwalk 1.5minwalk
1minjog 1minjog 1minjog
1.5minwalk 1.5minwalk 1.5minwalk
1minjog 1minjog 1minjog
1.5minwalk 1.5minwalk 1.5minwalk
1minjog 1minjog 1minjog
1.5minwalk 1.5minwalk 1.5minwalk
1minjog 1minjog 1minjog
1.5minwalk 1.5minwalk 1.5minwalk
1minjog 1minjog 1minjog
1.5minwalk 1.5minwalk 1.5minwalk
1minjog 1minjog 1minjog
1.5minwalk 1.5minwalk 1.5minwalk
1minjog 1minjog 1minjog
1.5minwalk 1.5minwalk 1.5minwalk
5minutecooldown 5minutecooldown 5minutecooldown
5minutewarmup 5minutewarmup 5minutewarmup
1.5minutejog 1.5minutejog 1.5minutejog
2minutewalk 2minutewalk 2minutewalk
1.5minutejog 1.5minutejog 1.5minutejog
2minutewalk 2minutewalk 2minutewalk
1.5minutejog 1.5minutejog 1.5minutejog
2minutewalk 2minutewalk 2minutewalk
1.5minutejog 1.5minutejog 1.5minutejog
2minutewalk 2minutewalk 2minutewalk
1.5minutejog 1.5minutejog 1.5minutejog
2minutewalk 2minutewalk 2minutewalk
1.5minutejog 1.5minutejog 1.5minutejog
2minutewalk 2minutewalk 2minutewalk
5minutecooldown 5minutecooldown 5minutecooldown
5minutewarmup 5minutewarmup 5minutewarmup
1.5minutejog 1.5minutejog 1.5minutejog
1.5minutewalk 1.5minutewalk 1.5minutewalk
3minutejog 3minutejog 3minutejog
3minutewalk 3minutewalk 3minutewalk
1.5minutejog 1.5minutejog 1.5minutejog
1.5minutewalk 1.5minutewalk 1.5minutewalk
3minutejog 3minutejog 3minutejog
3minutewalk 3minutewalk 3minutewalk
5minutecooldown 5minutecooldown 5minutecooldown
Warmupandcooldownspeeds1.0mphor75%ofwalkspeed,whicheverisgreater
Week Workout#1 Workout#2 Workout#3
5minutewarmup 5minutewarmup 5minutewarmup
3minutejog 3minutejog 3minutejog
1.5minutewalk 1.5minutewalk 1.5minutewalk
5minutejog 5minutejog 5minutejog
2.5minutewalk 2.5minutewalk 2.5minutewalk
3minutejog 3minutejog 3minutejog
1.5minutewalk 1.5minutewalk 1.5minutewalk
5minutejog 5minutejog 5minutejog
5minutecooldown 5minutecooldown 5minutecooldown
5minutewarmup 5minutewarmup 5minutewarmup
5minutejog 5minutejog 5minutejog
3minutewalk 3minutewalk 3minutewalk
5minutejog 5minutejog 5minutejog
3minutewalk 3minutewalk 3minutewalk
5minutejog 5minutejog 5minutejog
5minutecooldown 5minutecooldown 5minutecooldown
5minutewarmup 5minutewarmup 5minutewarmup
5minutejog 10minutejog 25minutejog
3minutewalk 3minutewalk 5minutecooldown
8minutejog 10minutejog
3minutewalk 5minutecooldown
5minutejog
5minutecooldown
5minutewarmup 5minutewarmup 5minutewarmup
25minutejog 25minutejog 25minutejog
5minutecooldown 5minutecooldown 5minutecooldown
5minutewarmup 5minutewarmup 5minutewarmup
28minutejog 28minutejog 28minutejog
5minutecooldown 5minutecooldown 5minutecooldown
5minutewarmup 5minutewarmup 5minutewarmup
30minutejog 30minutejog 30minutejog
5minutecooldown 5minutecooldown 5minutecooldown
Warmupandcooldownspeeds1.0mphor75%ofwalkspeed,whicheverisgreater
routine. It is designed specifically to keep you motivated and engaged, gradually building your strength, increasing your stamina
and giving you the confidence it takes to complete your first 5k.
1
2
3
4
5
6
7
8
9
22

FAT BURN: Relatively slow and steady is the name of the game to maximize your weight-loss goals. Promotes weight
Level 9
Segment
Warm Up
Level 7
Level 8
Level 10
Time
4:00 Mins
Level 1
Level 2
Level 6
Level 3
Level 4
Level 5
loss by increasing and decreasing the speed and incline, while keeping you in your fat burning zone.
Speed and Incline changes, segments repeat every 30 seconds.
1 2 3 4 5 6 7 8
Incline 0 0.5 1.5 1.5 1 0.5 0.5 0.5 1 1.5
Speed 0.5 1.5 2 2.5 3 3.5 4 3.5 3 2.5
Incline 0 0.5 1.5 1.5 1 0.5 1 0.5 1 1.5
Speed 0.5 1.9 2.5 3 3.5 4 4.5 4 3.5 3
Incline 0.5 1 2 2 1.5 1 1 1 1.5 2
Speed 0.5 2.3 3 3.5 4 4.5 5 4.5 4 3.5
Incline 0.5 1 2 2 1.5 1 1 1 1.5 2
Speed 1 2.6 3.5 4 4.5 5 5.5 5 4.5 4
Incline 1 1.5 2.5 2.5 2 1.5 1.5 1.5 2 2.5
Speed 1 3 4 4.5 5 5.5 6 5.5 5 4.5
Incline 1 1.5 2.5 2.5 2 1.5 1.5 1.5 2 2.5
Speed 1 3.4 4.5 5 5.5 6 6.5 6 5.5 5
Incline 1.5 2 3 3 2.5 2 2 2 2.5 3
Speed 1.4 3.8 5 5.5 6 6.5 7 6.5 6 5.5
Incline 1.5 2 3 3 2.5 2 2 2 2.5 3
Speed 1.4 4.1 5.5 6 6.5 7 7.5 7 6.5 6
Incline 2 2.5 3.5 3.5 3 2.5 2.5 2.5 3 3.5
Speed 1.4 4.5 6 6.5 7 7.5 8 7.5 7 6.5
Incline 2 2.5 3.5 3.5 3 2.5 2.5 2.5 3 3.5
Speed 1.4 4.9 6.5 7 7.5 8 8.5 8 7.5 7
30 sec 30 sec 30 sec 30 sec 30 sec 30 sec 30 sec 30 sec
CUSTOM: Allows you to create and reuse your perfect workout with a combination of a specific speed, incline and time
or distance. The ultimate in personal programming. This is a time or distance based goal program.
23

Warm Up
TARGET PROFILES
DISTANCE: Push yourself and go further during your workout with 13 distance workouts. Choose from 1 mile, 2 miles, 5k, 5 miles,
10k, 8 miles, 15k, 10 miles, 20k, half marathon, 15 miles, 20 miles, and marathon goals. You set your level.
Incline changes and all segments are 0.1 miles.
Segment
Distance
Level 1
Level 2
Level 3
Level 4
Level 5
Level 6
Level 7
Level 8
Level 9
Level 10
Segment 1 2 3 4 5 6 7 8 9 10 11 12 13 14 15
Calories 20 cal 20 cal 20 cal 20 cal 20 cal 20 cal 20 cal 20 cal 20 cal 20 cal 20 cal 20 cal 20 cal 20 cal 20 cal 20 cal 20 cal
Level 1 0 0 0 0 0 0 0 0 0 0 0 0 0 0 0 0 0
Level 2 0 0.5 1 3 2 3 2 3 2.5 3.5 2.5 3 2 3 2 3 1
Level 3 0.5 1 1.5 3.5 1.5 3.5 2.5 3.5 2.5 4 2.5 3.5 2.5 3.5 1.5 3.5 1.5
Level 4 0.5 1 1.5 3.5 2.5 3.5 2.5 3.5 3 4 3 3.5 2.5 3.5 2.5 3.5 1.5
Level 5 1 1.5 2 4 2 4 3 4 3 4.5 3 4 3 4 2 4 2
Level 6 1 1.5 2 4 3 4 3 4 3.5 4.5 3.5 4 3 4 3 4 2
Level 7 1.5 2 2.5 4.5 2.5 4.5 3.5 4.5 3.5 5 3.5 4.5 3.5 4.5 2.5 4.5 2.5
Level 8 1.5 2 2.5 4.5 3.5 4.5 3.5 4.5 4 5 4 4.5 3.5 4.5 3.5 4.5 2.5
Level 9 2 2.5 3 5 3 5 4 5 4 5.5 4 5 4 5 3 5 3
Level 10 2 2.5 3 5 4 5 4 5 4.5 5.5 4.5 5 4 5 4 5 3
Warm Up
.1 mi
0
0
.5
.5
1
1
1.5
1.5
2
2
.1 mi
1.5
1.5
2.5
2.5
1
2
3
4
5
6
7
8
9
10
11
12
13
1.5
2.5
2.5
3.5
14
.1 mi
0
0
2
3
3.5
3.5
2
4
3
4
4.5
4.5
3
5
4
5
.1 mi
.1 mi
.1 mi
.1 mi
.1 mi
0.1 mi
.1 mi
.1 mi
.1 mi
.1 mi
.1 mi
.1 mi
3.5
3.5
4.5
4.5
.1 mi
0
3
4
4
5
5
0
0
.5
1.5
1
1.5
1
2.5
2
2.5
2
0
0
0
0
0
0
0
0
0
1
3
2
3
2
3
2.5
3.5
4.5
4.5
5.5
5.5
2.5
4
2.5
3.5
3.5
4.5
3.5
3
3.5
3
4.5
4
4.5
4
4
5
5
3.5
1.5
3.5
2.5
3.5
3.5
2.5
3.5
4.5
4.5
2.5
4
3
4
3
3.5
3.5
5
4
5
4
2
4
4.5
4.5
2
4
3
2.5
3.5
5
3
5
4
2
3
3
3.5
4.5
4.5
2.5
3
4
3
4
3.5
3.5
4
5
4
5
4.5
0
3
2
2.5
2.5
4
3
4
3
3.5
3.5
5
4
5
4
CALORIES: Set goals for burning calories from 20 to 980 calories in 20 calorie increments. You set your level to keep you in your fat
burning zone.
Incline changes and all segments are 20 calories.
15
.1 mi
0
1
1.5
1.5
2
2
2.5
2.5
3
3
24

TARGET HEART RATE: This program is designed for you to improve your overall cardiovascular tness levels. You simply
set your target heart rate. The program will then monitor and adjust the intensity level to maintain your heart rate within
your targeted range while you exercise – a proven method to maximize your weight loss and tness goals. A chest strap is
required and must be worn during the duration of this program. See below for calculating your target heart rate.
Calculating Your Target Heart Rate
The first step in knowing the right intensity for your training is to find out your maximum heart rate (max HR = 220 – your age). The agebased method provides an average statistical prediction of your max HR and is a good method for the majority of people, especially those
new to heart rate training.
The most precise and accurate way of determining your individual max HR is to have it clinically tested by a cardiologist or exercise
physiologist through the use of a maximal stress test. If you are over the age of 40, overweight, have been sedentary for several years,
orhave a history of heart disease in your family, clinical testing is recommended.
This chart gives examples of the heart rate range for a 30 year old exercising at 5 different heart rate zones. For example, a 30-year-old’s
max HR is 220 – 30 = 190 bpm and 90% max HR is 190 × 0.9 = 171 bpm.
Target Heart
Additional target heart rate notes:
The treadmill incline will automatically adjust to bring you near your
specified heart rate.
If there is no heart rate detected, the unit will not change the
incline.
If your heart rate is 25 beats over your target zone the program
will shut down.
Target Heart
Rate Zone
Rate Zone
VERY HARD
90 - 100%
HARD
80 - 90%
MODERATE
70 - 80%
LIGHT
60 - 70%
VERY LIGHT
50 - 60%
Workout
Duration
< 5 min
2-10 min 152-171 BPM Shorter Workouts
10-40 min
40-80 min
20-40 min
Example THR
(age 30)
171-190 BPM
133-152 BPM
114-133 BPM
104-114BPM
Your THR Recommend For
Fit persons for
athletic training
Moderately long
Workouts
Longer and
frequently repeated
shorter exercises
Weight management
and active recovery
25
CUSTOM HEART RATE: This program allows you to set your Heart Rate for a specified time. The program will adjust incline
to keep your Heart Rate in your target zone. Build multiple Heart Rate targets into a full program to help you reach your
cardiovascular goals. The program total time includes a 4 minute warm up and 4 minute cool down time. Your selected custom
heart rates will repeat after the warm up until 4 minutes before the total time expires.
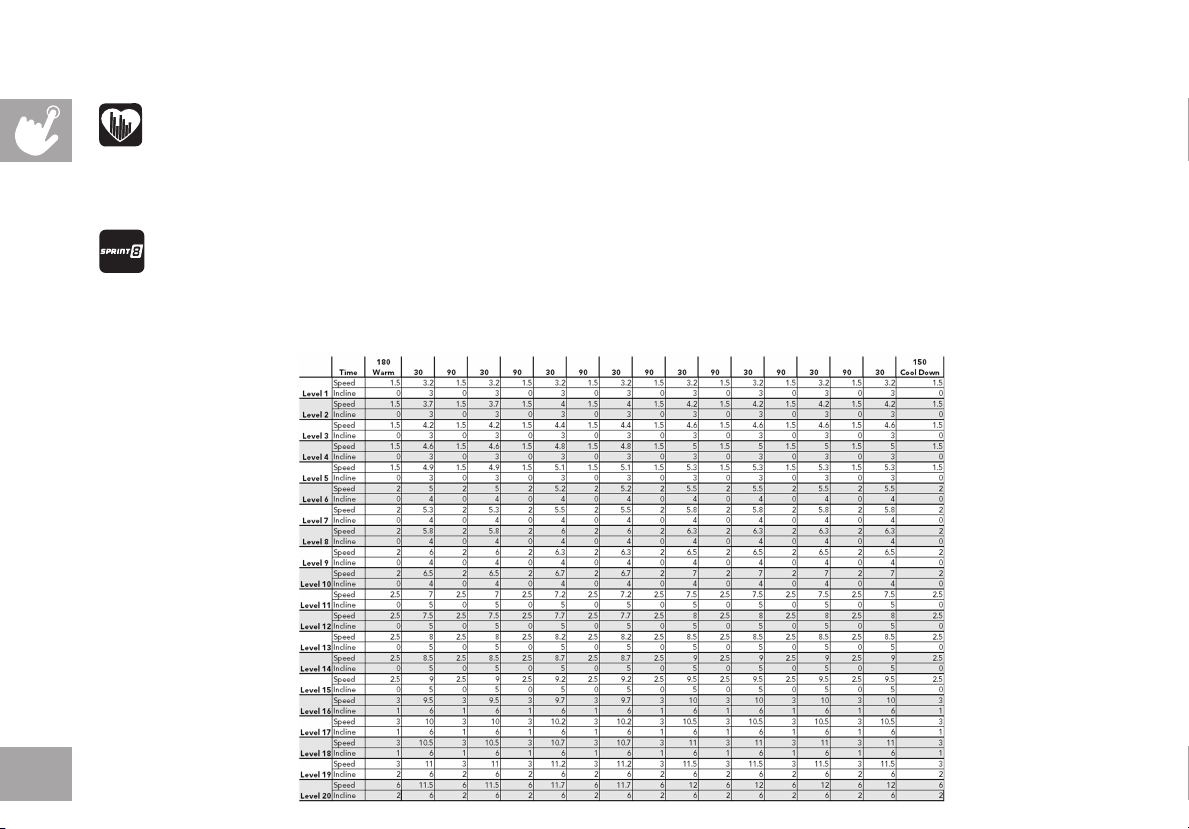
SPRINT 8: A time based program that allows you to select a level. After warm up, the program will give you 30 seconds at a high
speed and intensity, alternating with 90 seconds at a lower recovery speed. Increasing levels will allow you to keep your calorie
burn high and increase your overall running speed.
TREADMILL SPRINT 8 CHART
Speed changes and segments repeat 90 and 30 seconds.
26

TO RESET THE CONSOLE
Hold STOP key for 3 seconds.
FINISHING YOUR WORKOUT
When your workout is complete, the unit will beep. Your workout information will stay displayed on the console for 30 seconds and then reset.
USING YOUR MUSIC DEVICE
The 7.4AT Treadmill will connect and stream music form your compatible music device. This includes many smart phones and traditional mp3
players such as the iPod®.
Your 7.4AT Treadmill comes equipped with Bluetooth speakers. Bluetooth compatible devices (running Bluetooth 4.0) can stream music
wirelessly from your device to the speakers. You can also connect your music device via an audio cable and still stream music through the
speakers. Instructions for both types of audio connection are detailed below.
CONNECTING VIA BLUETOOTH 4.0LE
1) Check to ensure that your music device is Bluetooth 4.0 compatible
2) Go into your device’s Bluetooth settings and scan for devices.
3) On your music device, locate the Bluetooth device list. Select your unit that appears on this list.
Wait for your music device to finish pairing with the unit.
4) You will know when pairing is successful when your music device shows the unit as now being a paired device.
WHEN UNIT IS POWERED OFF THEN BACK ON
If you turn your unit off, or if it goes into sleep mode, the next time it is powered on the unit will look to pair with the last music device with which it was
paired. It will automatically pair at this time.
RE-PAIRING MUSIC DEVICES
In the event that the unit cannot find the last paired music device (for example, the music device is off or not being used) then the unit will stop looking
to pair with the music device. If this happens, and if you wish to use your music device again, then you will need to go through the pairing process listed
above and re-pair through your music device’s settings.
USING MULTIPLE MUSIC DEVICES
If multiple devices are being paired with the unit (i.e.: multiple users are using the unit and pairing their music devices with it) then the unit will look to
pair with the last device used and “forget” other devices. If you wish to re-pair a “forgotten” music device, then you will need to un-pair the current
paired device and then re-pair your device through the pairing procedure noted above.
27

CONNECTING VIA AN AUDIO CABLE
1) Connect the included AUDIO ADAPTOR CABLE to the AUDIO IN JACK on the top right of the console and the headphone jack on your music device.
2) Use your CD / MP3 player buttons to adjust song settings.
3) Remove the AUDIO ADAPTOR CABLE when not in use.
4) If you don’t want to use the SPEAKERS, you can plug your headphones into the AUDIO OUT JACK at the bottom of the console. This ensures that if
you accidentally catch the headphone line while running, you won’t drop your device to the ground.
AFG TABLET CONNECTED FITNESS SYSTEM
Your Horizon machine is tablet ready, allowing you to use Bluetooth 4.0 technology to wirelessly connect your tablet to your Horizon machine. Using
the free downloadable AFG PRO FITNESS app will enable you to control your unit’s operating functions via your tablet. The app will also allow you to
monitor your workout, track your progress and view your workout history. The AFG PRO FITNESS app can be downloaded from either the iTunes store
for iOS devices or from the Google store for Android devices.
For information about connecting your tablet to your Horizon machine setting up the AFG PRO FITNESS and controlling and monitoring your workout
with your tablet, see the AFG Connected Fitness Manual included with your unit.
BLUETOOTH HEART RATE MONITORING
The 7.4AT Treadmill is equipped with multi-channel Bluetooth which enables you to wirelessly connect compatible Bluetooth heart rate
monitoring devices to this unit. You will need to ensure that your wireless heart rate monitoring device is Bluetooth 4.0 compatible and is also
“open” to sharing data. Non-“open” or “closed” devices typically only share data with their proprietary apps. The 7.4AT Treadmill needs an
“open” device to receive data from the device. You may need to consult with your device’s owner’s manual or the manufacturer to confirm if it
is an open device.
If you are using a tablet and running the AFG PRO FITNESS app, the compatible Bluetooth heart rate monitoring device will pair automatically to
the app. The machine’s console will then receive the heart rate information from your tablet. If you wish to use the Bluetooth heart rate
monitoring device without a tablet and AFG PRO FITNESS app, press and hold the Bluetooth button on the console for 5 seconds. This will
enable the console to communicate directly with the Bluetooth heart rate monitoring device. Heart rate information will be displayed on your
console display. When in heart rate monitor mode, the console will be unable to communicate to the tablet. To enable tablet communication,
press and hold the Bluetooth button on the console for 5 seconds or reset power.
28

LIMITED HOME-USE WARRANTY
29

WEIGHT CAPACITY = 350 lbs (158kilograms)
EXCLUSIONS AND LIMITATIONS
30
FRAME • LIFETIME
Horizon Fitness warrants the frame against defects in
workmanship and materials for the lifetime of the original owner,
so long as the device remains in the possession of the original
owner. (The frame is defined as the welded metal base of the
unit and does not include any parts that can be removed.)
MOTOR • LIFETIME
Horizon Fitness warrants the motor against defects in
workmanship and materials for the lifetime of the original owner,
so long as the device remains in the possession of the original
owner. Labor or installation of motor is not covered under the
motor warranty.
ELECTRONICS & PARTS • 5 YEAR
Horizon Fitness warrants the electronic components, finish
and all original parts for a period of three year from the date
of original purchase, so long as the device remains in the
possession of the original owner.
LABOR • 2 YEAR
Horizon Fitness shall cover the labor cost for the repair of the
device for a period of one year from the date of the original
purchase, so long as the device remains in the possession of the
original owner.
Who IS covered:
• The original owner and is not transferable.
What IS covered:
• Repair or replacement of a defective motor, electronic
component, or defective part and is the sole remedy of the
warranty.
What IS NOT covered:
• Normal wear and tear, improper assembly or maintenance,
orinstallation of parts or accessories not originally intended
or compatible with the equipment as sold.
• Damage or failure due to accident, abuse, corrosion,
discoloration of paint or plastic, neglect, theft, vandalism,
fire, flood, wind, lightning, freezing, or other natural disasters
of any kind, power reduction, fluctuation or failure from
whatever cause, unusual atmospheric conditions, collision,
introduction of foreign objects into the covered unit, or
modifications that are unauthorized or not recommended
byHorizon Fitness.
• Incidental or consequential damages. Horizon Fitness is not
responsible or liable for indirect, special or consequential
damages, economic loss, loss of property, or profits, loss
of enjoyment or use, or other consequential damages of
whatsoever nature in connection with the purchase, use,
repair or maintenance of the equipment. Horizon Fitness does
not provide monetary or other compensation for any such
repairs or replacement parts costs, including but not limited
to gym membership fees, work time lost, diagnostic visits,
maintenance visits or transportation.

• Equipment used for commercial purposes or any use other
than a single family or Household, unless endorsed by Horizon
Fitness for coverage.
• Equipment owned or operated outside the US and Canada.
• Delivery, assembly, installation, setup for original or
replacement units or labor or other costs associated with
removal or replacement of the covered unit.
• Any attempt to repair this equipment creates a risk of injury.
Horizon Fitness is not responsible or liable for any damage,
loss or liability arising from any personal injury incurred during
the course of, or as a result of any repair or attempted repair
of your fitness equipment by other than an authorized service
technician. All repairs attempted by you on your fitness
equipment are undertaken AT YOUR OWN RISK and Horizon
Fitness shall have no liability for any injury to the person or
property arising from such repairs.
• If you are out of the manufacturer’s warranty but have
anextended warranty, refer to your extended warranty
contract for contact information regarding requests for
extended warranty service or repair.
SERVICE/RETURNS
• In-home service is available within 150 miles of the nearest
authorized Service Provider (Mileage beyond 150 miles
from an authorized service center is the responsibility of the
consumer).
• All returns must be pre-authorized by Horizon Fitness.
• Horizon Fitness’ obligation under this warranty is limited to
replacing or repairing, at Horizon Fitness’ option, the same or
comparable model.
• Horizon Fitness may request defective components be
returned to Horizon Fitness upon completion of warranty
service using a prepaid return shipping label. If you have been
advised to return parts and did not receive a label, please
contact Customer Tech Support.
• Replacement units, parts and electronic components
reconditioned to as-new condition by Horizon Fitness or its
vendors may sometimes be supplied as warranty replacement
and constitute fulfillment of warranty terms.
• This warranty gives you specific legal rights, and your rights
may vary from state to state.
31

FRANÇAIS
32

PRÉCAUTIONS IMPORTANTES
CONSERVEZ CES INSTRUCTIONS
Lors de l'utilisation d'un produit électrique, des précautions de base doivent toujours être respectées, notamment les suivantes: Lisez
toutes les instructions avant d'utiliser ce tapis de course. Il incombe au propriétaire de s'assurer que tous les utilisateurs de ce tapis
decourse sont correctement informés de tous les avertissements et de toutes les précautions. Si vous avez des questions après avoir
luce guide, contactez le support technique au numéro indiqué sur le panneau arrière du MANUEL DU PROPRIÉTAIRE.
Ce tapis de course est destiné à un usage domestique uniquement. N'utilisez pas ce tapis de course dans un environnement commercial,
locatif, scolaire ou institutionnel. Si vous ne vous conformez pas à ces instructions, la garantie sera annulée.
33

34
DANGER
POUR RÉDUIRE LE RISQUE DE CHOC ÉLECTRIQUE:
Débranchez toujours le tapis de course de la prise de courant immédiatement après l'avoir utilisé et avant de le nettoyer, d'effectuer
desopérations de maintenance et de mettre ou d'enlever des pièces.
AVERTISSEMENT
POUR RÉDUIRE LE RISQUE DE BRÛLURE, D’INCENDIE, DE CHOC ÉLECTRIQUE OU DE BLESSURE:
• N'utilisez jamais le tapis de course avant de fixer la pince d'attache de sécurité à vos vêtements.
• Si vous ressentez une douleur quelconque, notamment des douleurs à la poitrine, des nausées, des étourdissements ou un essoufflement,
arrêtez immédiatement de faire l'exercice et consultez votre médecin avant de continuer.
• Lors de l'exécution de tout exercice, maintenez toujours un rythme confortable.
• Ne portez pas de vêtements susceptibles de se coincer sur une partie quelconque du tapis de course.
• Portez toujours des chaussures de sport lorsque vous utilisez cet équipement.
• Ne sautez pas sur le tapis de course.
• À aucun moment, plus d'une personne ne doit être sur le tapis de course pendant son fonctionnement.
• Ce tapis de course ne doit pas être utilisé par des personnes pesant plus que le poids spécifié dans la SECTION GARANTIE DU MANUEL
DU PROPRIÉTAIRE. Si vous ne vous conformez pas à ces instructions, la garantie sera annulée.
• Lorsque vous abaissez la plateforme du tapis de course, attendez que les pieds arrière soient posés fermement sur le sol avant
de monter sur la plateforme.
• Débranchez toutes les sources d'alimentation avant de réparer ou de déplacer l'équipement. Pour nettoyer, frottez les surfaces avec
dusavon et un chiffon légèrement humide; n'utilisez jamais de solvants. (Voir MAINTENANCE)
• Un tapis de course ne doit jamais être laissé sans surveillance lorsqu'il est branché. Débranchez-le de la prise de courant lorsqu'il n'est
pasutilisé et avant de mettre ou de retirer des pièces.
• Ne pas utiliser sous une couverture ou un oreiller. Une surchauffe peut se produire et provoquer un incendie, une électrocution
ou des blessures.
• Connectez ce produit d'exercice uniquement à une prise correctement mise à la terre.

AVERTISSEMENT
POUR RÉDUIRE LE RISQUE DE BRÛLURE, D’INCENDIE, DE CHOC ÉLECTRIQUE OU DE BLESSURE:
• À AUCUN moment, les animaux de compagnie et les enfants de moins de 13 ans ne doivent s'approcher du tapis de course à moins
de3mètres.
• Les enfants de moins de 13 ans ne doivent à AUCUN moment utiliser le tapis de course.
• Les enfants de plus de 13 ans ou les personnes handicapées ne doivent pas utiliser le tapis de course sans la surveillance d'un adulte.
• Utilisez le tapis de course uniquement pour l'usage prévu, tel que décrit dans le guide du tapis de course et le manuel du propriétaire.
• N'utilisez pas d'autres accessoires non recommandés par le fabricant. Les accessoires peuvent causer des blessures.
• N'utilisez jamais le tapis de course si son cordon ou sa fiche est endommagé(e), si elle ne fonctionne pas correctement ou si elle a été
endommagée, jetée par terre ou immergée dans l'eau. Renvoyez le tapis de course à un centre de service pour examen et réparation.
• Tenez le cordon d'alimentation à l'écart des surfaces chauffées. Ne transportez pas cet appareil en le tenant par son cordon
d'alimentation et n'utilisez pas le cordon comme poignée.
• N'utilisez jamais le tapis de course avec l'ouverture d'air bloquée. Gardez l'ouverture d'air propre et exempte de peluches, de cheveux
et autres crasses.
• Pour éviter les chocs électriques, ne laissez jamais tomber ni n'insérez aucun objet dans une ouverture.
• Ne l'utilisez pas lorsque des aérosols (sprays) sont utilisés ou lorsque de l’oxygène est administré.
• Pour la déconnecter, mettez toutes les commandes en position d'arrêt, puis retirez la fiche de la prise.
• N'utilisez pas le tapis de course dans un endroit où la température n'est pas contrôlée, comme par exemple, les garages, les vérandas,
les salles de billard, les salles de bain, les abris de voiture ou à l'extérieur. Si vous ne vous conformez pas à ces instructions, la garantie
sera annulée.
• Ce tapis de course est destiné à un usage domestique uniquement. N'utilisez pas ce tapis de course dans un environnement commercial,
locatif, scolaire ou institutionnel. Si vous ne vous conformez pas à ces instructions, la garantie sera annulée.
• Ne retirez pas les couvercles de la console, sauf si l'assistance technique client vous l'a demandé. L'entretien ne doit être effectué
quepar un technicien de service autorisé.
Il est essentiel que votre tapis de course ne soit utilisé qu'à l'intérieur, dans une pièce climatisée. Si votre tapis de course a été exposé
à des températures plus froides ou à des climats très humides, il est fortement recommandé de réchauffer le tapis de course jusqu'à
latempérature ambiante avant la première utilisation. Dans le cas contraire, cela peut entraîner une défaillance électronique prématurée.
35

INSTRUCTIONS DE LA MISE À LA TERRE
Ce produit doit être mis à la terre. En cas de dysfonctionnement ou de panne, la mise à la terre fournit un chemin de moindre résistance
aucourant électrique afin de réduire le risque de choc électrique. Ce produit est équipé d'un cordon muni d'un conducteur de mise à la
terre de l'équipement et d'une prise de terre. La fiche doit être branchée dans une prise appropriée qui est correctement installée et mise
àla terre conformément à tous les codes et règlements locaux.
DANGER
Une mauvaise connexion du conducteur de mise à la terre de l'équipement peut entraîner un risque de choc électrique. Consultez
unélectricien qualifié ou un réparateur si vous avez des doutes quant à la mise à la terre du produit. Ne modifiez pas la fiche fournie
avec le produit. Si elle ne correspond pas à la prise, faites installer une prise adéquate par un électricien qualifié.
Ce produit est destiné à être utilisé sur un circuit nominal de 110-120 volts et possède une fiche de mise à la terre qui ressemble à la fiche
dans l'illustration. Assurez-vous que le produit est connecté à une prise ayant la même configuration que la fiche. Aucun adaptateur ne doit
être utilisé avec ce produit.
Ce produit doit être utilisé sur un circuit dédié. Pour déterminer si vous êtes sur un circuit dédié, mettez ce circuit hors tension et observez
si un autre appareil manque de courant. Si tel est le cas, déplacez les périphériques sur un autre circuit. Remarque: Il y a généralement
plusieurs prises sur un circuit. Ce tapis roulant doit être utilisé avec un circuit minimum de 15 ampères.
AVERTISSEMENT
36
PRISE MISE
À LA TERR E
À 3 PÔLES
BROCHE
DE MISE
À LA TERR E
Connectez ce produit d'exercice uniquement à une prise correctement mise à la terre.
N'utilisez jamais le produit avec un cordon ou une prise endommagé(e), même s'il
fonctionne correctement.
N'utilisez jamais le produit s'il semble endommagé ou s'il a été immergé dans l'eau.
Contactez l'assistance technique client pour un remplacement ou une réparation.

MONTAGE
AVERTISSEMENT
Il y a plusieurs points au cours du processus d'assemblage qui doivent faire l'objet d'une attention particulière. Il est très important
de suivre correctement les instructions d'assemblage et de s'assurer que toutes les pièces sont fermement serrées. Si les instructions
d'assemblage ne sont pas suivies correctement, il se pourrait que certaines pièces du tapis de course ne soient pas serrées correctement,
semblent lâches et provoquent des bruits agaçants. Pour éviter d'endommager le tapis de course, les instructions d'assemblage doivent
être vérifiées et des mesures correctives doivent être prises.
Avant de commencer, trouvez le numéro de série du tapis de course sur l'autocollant
blanc àcodes-barres près de l’interrupteur marche / arrêt et du cordon d’alimentation,
puisentrez-le dans l’espace prévu à cet effet.
ENTREZ VOTRE NUMÉRO DE SÉRIE ET VOTRE NOM DE MODÈLE DANS LES CASES
CI-DESSOUS:
» Référez-vous au NUMÉRO DE SÉRIE et au NOM DE MODÈLE lorsque vous appelez le service.
NUMÉRO DE SÉRIE:
TM
NOM DU MODÈLE: TAPIS DE COURSE HORIZON 7.4AT
EMPLACEMENT
DU NUMÉRO DESÉRIE
37

HAUT-PARLEURS
CONSOLE
TABLETTE / SUPPORT
DE LECTURE
38
PORTE-BIDON
CAPTEUR DE POULS
COMMUTATION MARCHE / ARRÊT
CORDON D'ALIMENTATION
COUVERCLE
DE MOTEUR
ROUE DE TRANSPORT
DÉCALCOMANIE DU LOQUET DE VERROUILLAGE DE PIED
(EN DESSOUS DU LOQUET DE PIED)
PANNEAU DE COMMANDE
ETFENÊTRES D'AFFICHAGE
VENTILATEUR
DE CONSOLE
PLACEMENT DE LA CLÉ DE SÉCURITÉ
BARRE DE SUPPORT TRANSVERSALE
MÂT DE CONSOLE
VERROU DE DE PIED
(EN DESSOUS DE LA PLATEFORME)
COURROIE DE COURSE /
PLATEFORME DE COURSE
RAIL LATÉRAL
EMBOUT
DE ROULEAU
TENSION
DE ROULEAU ARRIÈRE /
BOULONS D'ALIGNEMENT

OUTILS INCLUS:
PRÉ-ASSEMBLAGE
F Clé en T de 8 mm
F Clé en L de 6 mm
F Clé en L de 5 mm
PIÈCES INCLUSES:
F 1 châssis principal
F 1 ensemble de console
F 2 mâts de console
F 1 barre de support transversale
F 1 kit de matériel
F 1 clé de sécurité
F 1 câble adaptateur audio
F 1 flacon de lubrifiant à base de silicone
(pour 2 applications)
F 1 cordon d'alimentation
F 2 capteurs de pouls
BESOIN D'AIDE?
Si vous avez des questions
ousides pièces sont manquantes,
contactez l'assistance technique
à la clientèle. Les informations
decontact se trouvent au dos
dece manuel.
DÉBALLAGE
Placez le carton du tapis de course sur une surface plane et de niveau. Il est recommandé
de placer un revêtement de protection sur votre sol. Prenez des PRÉCAUTIONS lors de la
manipulation et du transport de cet appareil. N'ouvrez jamais la boîte lorsqu'elle est sur
le côté. Une fois les sangles retirées, ne soulevez pas et ne transportez pas cet appareil
à moins qu’il soit complètement assemblé et en position repliée debout, avec le loquet
de verrouillage bien en place. Déballez et assemblez l’appareil à l'endroit où il sera utilisé.
Letapis de course fermé est équipé d’amortisseurs à haute pression et peut s’ouvrir en cas
de mauvaise manipulation. Ne saisissez jamais une partie du châssis incliné et n'essayez pas
de soulever ou de déplacer le tapis de course.
AVERTISSEMENT
N'ESSAYEZ PAS DE SOULEVER LE TAPIS DE COURSE! Ne retirez pas
etnesoulevez pas le tapis de course de son emballage jusqu’à ce que cela
voussoitdemandé dans les instructions de montage. Vous pouvez retirer
lapellicule deplastique des mâts de la console.
AVERTISSEMENT
LE NON-RESPECT DE CES INSTRUCTIONS PEUT ENTRAÎNER DES BLESSURES !
REMARQUE: Lors de chaque étape d'assemblage, assurez-vous que TOUS les écrous et
boulons sont en place et partiellement filetés avant de serrer complètement UN SEUL boulon.
REMARQUE : Une légère application de graisse peut faciliter l'installation du matériel.
Toutegraisse, telle que la graisse au lithium pour vélo, est recommandée.
39

ASSEMBLAGE ÉTAPE 1
40
MATÉRIEL POUR L'ÉTAPE 1
PIÈCE TYPE DESCRIPTION QTÉ
BOULON GUIDE
VERTICAL
RONDELLE PLATE
RONDELLE ÉLASTIQUE
D
4
1
C
D
B
2
A
3
M8X1, 25PX11L 2 A
M8X1,25PX80L 8B BOULON DE MÂT
8,4X15,5X1,6T
8,2X15,4X2,0T
A
8C
8
7
4
B
D
C
A Coupez les sangles jaunes et soulevez la plateforme
de course par l'arrière pour retirer tout le contenu
dudessous de la plateforme de course.
B Ouverture du MATÉRIEL POUR L'ÉTAPE 1.
C Insérez le BOULON GUIDE VERTICAL (A) dans
leSUPPORT DE CHÂSSIS PRINCIPAL (1) et serrez
àfond.
REMARQUE : Ne serrez pas complètement
lesboulons suivants avant la fin de l’ÉTAPE 4.
D Branchez le FIL DE GUIDAGE au CÂBLE DE LA
CONSOLE (2). Passer le FIL DE GUIDAGE dans le
MONTANT DE CONSOLE DROIT (4). Cela fait, le
bout du CÂBLE DE LA CONSOLE (2) doit se trouver
en haut du SUPPORTS DE FIXATION (7).
E Fixez le MÂT DE CONSOLE DROIT (4) au
CHÂSSIS PRINCIPAL(3) à l'aide 4 BOULONS(B),
4 RONDELLES PLATES (C) et 4RONDELLES
ÉLASTIQUES (D). Réinsérez le câble de console
supplémentaire dans le mât vertical.
REMARQUE : Veillez à ne pas pincer le câble de la
console lors de la fixation du mât de console droit.
F Répétez l'ÉTAPE E sur le CÔTÉ GAUCHE.
A
B
C
D

ASSEMBLAGE ÉTAPE 2
MATÉRIEL POUR L'ÉTAPE 2
PIÈCE TYPE DESCRIPTION QTÉ
M6X1,0PX15L 4 E BOULON
REMARQUE : Ne serrez pas complètement
les boulons avant l'ÉTAPE 3.
E
5
4
4
A Ouverture du MATÉRIEL POUR L'ÉTAPE 2.
B Fixez la BARRE DE SUPPORT TRANSVERSALE (5)
aumoyen des trous sur les MÂTS VERTICAUX (4)
avec4 BOULONS (E).
E
41

ASSEMBLAGE ÉTAPE 3
42
MATÉRIEL POUR L'ÉTAPE 3
PIÈCE TYPE DESCRIPTION QTÉ
F
RONDELLE EN ARC
G
H
F
G
H
BOULON COURT
BOULON LONG
7
4
8,4X15,5X1,6T
M8x1,25Px15L
M8x1,2 5P x70L
6
7
2
4
A Ouverture du MATÉRIEL POUR L'ÉTAPE 3.
B Demandez à quelqu'un de vous aider à tenir la console
4
2
2
pendant que vous fixez le CÂBLE DE CONSOLE (2).
Utilisez le fil conducteur pour tirer soigneusement
le CÂBLE DE CONSOLE (2) du MÂT DE CONSOLE
DROIT (4). Fixez le CÂBLE DE CONSOLE (2) de
la CONSOLE (6) au CÂBLE DE CONSOLE (2)
enhaut du MÂT VERTICAL DROIT (4). Détachez
etjetez le fil conducteur.
C Glissez soigneusement la CONSOLE (6) sur les
SUPPORTS DE FIXATION (7) en prenant soin de ne
pas pincer le CÂBLE DE CONSOLE (2). Alignez les
trous du côté inférieur de la CONSOLE (6) sur les trous
des SUPPORTS DE FIXATION (7).
D Fixez la CONSOLE (6) aux SUPPORTS DE
FIXATION(7) en plaçant d’abord les RONDELLES EN
ARC (F) sur les BOULONS (G) ET (H) tel qu’illustré.
Insérez les BOULONS COURTS (G) dans le trou
supérieur duSUPPORT DE FIXATION (7) et les
BOULONS LONGS (H) dans le trou inférieur.
E Répétez l'étape D pour le côté opposé.
F G H

ASSEMBLAGE ÉTAPE 4
MATÉRLEL POUR L'ÉTAPE 4
PIÈCE TYPE DESCRIPTION QTÉ
M8x15L 8I BOULON
8,2X15,4X2,0T 8J RONDELLE ÉLASTIQUE
8,4X15,5X1,6T 8K RONDELLE PLATE
6
9L
9R
8
K
J
I
A Ouverture du MATÉRIEL POUR L'ÉTAPE 4.
B Fixez le CARDIO-FREQUENCEMÈTRE CÔTÉ
DROIT (8) au dessous de la CONSOLE (6) à l'aide
de 4BOULONS (I), 4 RONDELLES ÉLASTIQUES (J)
et4 RONDELLESPLATES(K).
C Connectez les CÂBLES DE CONSOLE DROITS (9R) et
calez soigneusement les fils pour éviter les dommages.
D Répétez l'ÉTAPE B sur le CÔTÉ GAUCHE.
E Connectez les CÂBLES DE CONSOLE GAUCHES(9L)
et calez soigneusement les fils pour éviter les dommages.
REMARQUE: Serrez à fond tous les boulons
des ÉTAPES PRÉCÉDENTES.
I J k
L'ASSEMBLAGE EST TERMINÉ!
Avant la première utilisation, lubrifiez la plateforme du
tapis de course en suivant les instructions de la section
MAINTENANCE du GUIDE DU TAPIS DE COURSE.
43

44

FONCTIONNEMENT DU TAPIS
ROULANT
Cette section explique comment utiliser la console et la programmation de votre tapis de course.
La section FONCTIONS DE BASE du guide du tapis de course contient les instructions suivantes:
• EMPLACEMENT DU TAPIS DE COURSE
• UTILISATION DE LA CLÉ DE SÉCURITÉ
• PLIAGE DU TAPIS ROULANT
• DÉPLACEMENT DU TAPIS ROULANT
• NIVELLEMENT DU TAPIS DE COURSE
• TENSION DE LA COURROIE DE COURSE
• CENTRAGE DE LA COURROIE DE COURSE
• UTILISATION DE LA FONCTION FRÉQUENCE CARDIAQUE (HEART RATE)
45

R
46
M
G
I
K
I
LT T
JS
M
H
J

FONCTIONNEMENT DE LA CONSOLE
Remarque: Il y a une mince feuille protectrice de plastique transparent sur le revêtement de la console qui doit être retirée
avant utilisation.
A) FENÊTRE D'AFFICHAGE LCD: Watts, cadence, calories / temps, fréquence cardiaque, tours.
B) AFFICHAGE DEL: Temps, vitesse, distance, inclinaison, cadence, fréquence cardiaque et calories.
C) VOYANTS DEL D'ENTRAÎNEMENT: indiquent quel entraînement est défini pour le programme en cours.
D) BOUTON DE SÉLECTION DE CIBLE / D'ENTRAÎNEMENT: faites pivoter / appuyez pour sélectionner votre
entraînement souhaité / cible.
E) DÉMARRAGE: appuyez pour commencer l'exercice, démarrer votre entraînement ou reprendre l'exercice après une pause.
F) STOP: appuyez sur pour mettre en pause / terminer votre entraînement. Maintenez la position pendant 3 secondes
pour réinitialiser la console.
G) MOLETTE D’INCLINAISON: sert à ajuster l’inclinaison par petits incréments (5%).
H) MOLETTE DE VITESSE: sert à ajuster la vitesse par petits incréments (0,1 mph).
I) TOUCHES RAPIDES D'INCLINAISON: permettent d'atteindre plus rapidement l'inclinaison souhaitée.
J) TOUCHES RAPIDES DE VITESSE: permettent d'atteindre plus rapidement la vitesse souhaitée.
K) TOUCHE VENTILATEUR: appuyez sur pour allumer et éteindre le ventilateur.
L) VENTILATEUR: fan d'entraînement personnel.
M) HAUT-PARLEURS: la musique passe par les haut-parleurs lorsque votre lecteur CD / MP3 est connecté à la console.
N) PRISE D’ENTRÉE AUDIO: Branchez votre lecteur CD / MP3 sur la console à l’aide du câble adaptateur audio fourni.
O) SORTIE AUDIO / PRISE CASQUE: branchez vos écouteurs dans cette prise pour écouter votre musique via les écouteurs.
Remarque: lorsque des écouteurs sont branchés sur la prise pour écouteurs, le son ne sera plus émis par les haut-parleurs.
P) ENTRÉE USB: Puissance de sortie USB 1A / 5V.
Q) POCHETTES POUR BOUTEILLES D'EAU: servent à contenir l'équipement d'entraînement personnel.
R) TABLETTE / SUPPORT DE LECTURE: sert à contenir une tablette ou du matériel de lecture.
S) VOYANT LUMINEUX BLUETOOTH: s'affiche lorsque la machine est couplée à un périphérique compatible Bluetooth.
T) TOUCHES D’INTERVALLE: ces touches sont programmables. Lorsqu’un utilisateur est sélectionné, il peut être
programmé à la vitesse et à l’inclinaison souhaitées.
47

48
FENÊTRES D'AFFICHAGE
• TEMPS: Représenté en minutes : secondes. Affichez le temps restant ou le temps écoulé dans votre entraînement.
• DISTANCE: Représenté en miles. Indique la distance parcourue restante pendant votre entraînement.
• VITESSE: Représenté en MPH (miles par heure). Indique à quelle vitesse bouge votre surface de marche ou de course.
• INCLINAISON: Affichée en pourcentage. Indique l'inclinaison de votre surface de marche ou de course.
• CALORIES: Total des calories brûlées pendant votre entraînement.
• FRÉQUENCE CARDIAQUE: Représentée en BPM (battements par minute). Sert à surveiller votre fréquence cardiaque (s'affiche lorsque
le contact est établi avec les deux capteurs de pouls).
• CADENCE: Indique le nombre de minutes nécessaires pour parcourir un kilomètre en courant ou en marchant à la vitesse actuelle.
• WATTS: Indique la puissance de sortie à votre vitesse et votre inclinaison actuelles.
• CALORIES/ HEURE: Indique le nombre de calories que vous brûlerez en une heure à la vitesse et l’inclinaison actuelles.
• BRIQUETERIE: Chaque segment vertical représente une unité de vitesse ou d’inclinaison, chaque segment horizontal représente le
temps.
• TOURS: Indique combien de tours ont été effectués sur 400 mètres (¼ de mile).
• COMPTE (SPRINT 8): Indique le nombre de sprints du programme Sprint 8 que vous avez effectués.

GUIDE DE DÉMARRAGE
1) Assurez-vous qu'aucun objet qui pourrait gêner le mouvement du tapis de course n'est placé sur la courroie.
2) Branchez le cordon d’alimentation et allumez le tapis de course. (L’interrupteur ON / OFF est situé à côté du cordon d’alimentation.)
3) Tenez-vous sur les rails latéraux du tapis de course.
4) Attachez le clip de la clé de sécurité à une partie de votre vêtement en vous assurant qu'il est bien en place et qu'il ne se détachera
pas pendant le fonctionnement.
5) Insérez la clé de sécurité dans le trou de sécurité dans la console.
6) Vous avez deux options pour commencer votre entraînement:
A) DÉMARRAGE RAPIDE
Il suffit d'appuyer sur la touche START pour commencer l’entraînement.
Le temps, la distance et les calories commenceront à être comptés à partir de zéro. OU...
B) SÉLECTIONNEZ UN ENTRAÎNEMENT OU UNE CIBLE
1) Sélectionnez votre UTILISATEUR en tournant le bouton d'entraînement puis en appuyant lorsque UTILISATEUR souhaité est affiché.
2) Sélectionnez votre POIDS en tournant le bouton d'entraînement puis en appuyant lorsque POIDS souhaité est affiché.
3) Sélectionnez votre PROGRAMME en tournant le bouton d'entraînement puis en appuyant lorsque PROGRAMME souhaité est affiché.
4) Sélectionnez votre PARAMÈTRE en tournant le bouton d'entraînement puis en appuyant lorsque PARAMÈTRE souhaité est affiché.
5) Appuyez sur START pour commencer.
49

50
Faites rouler en avant / en arrière pour augmenter /
MOLETTE D’INCLINAISON
diminuer l’inclinaison.
BOUTON D’INTERVALLE 1 BOUTON INTERVALLE 2
MOLETTE DE VITESSE
Faites rouler en avant / en arrière pour augmenter/
diminuer la vitesse.
COMMENT PROGRAMMER ET UTILISER LES BOUTONS D’INTERVALLE PERSONNALISÉS
Les boutons d’intervalle programmables situés sur les capteurs de pouls sont conçus pour vous aider à personnaliser cette machine
enfonction de l’entraînement que vous aimez le plus effectuer.
Les BOUTONS D’INTERVALLE GAUCHE et DROIT sont programmables pour la vitesse et l’inclinaison.
Pour programmer le bouton d’INTERVALLE, vous devez sélectionner un utilisateur, démarrer la machine, régler la vitesse et l’inclinaison
souhaitées, appuyer sur le bouton d’INTERVALLE souhaité pendant 3 secondes et le maintenir enfoncé jusqu’à ce que le tapis de
course émette un bip. Le bouton d’INTERVALLE est maintenant programmée selon vos réglages. Après la programmation du bouton
d’INTERVALLE, il se souviendra du réglage pour cet utilisateur jusqu’à ce qu’il soit à nouveau reprogrammé.
Désormais, lorsque vous appuierez sur le bouton d’INTERVALLE, la vitesse et l’inclinaison du tapis de course se modifieront selon
lesréglages que vous avez programmés pour ce bouton.
L’entraînement par intervalles est le type d’entraînement le plus courant pour lequel ces touches vous aideront. Nous vous suggérons
deprogrammer l’un des boutons d’INTERVALLE sur vos segments de haute intensité et l’autre sur vos segments de récupération.
Une autre utilisation courante consiste à définir un bouton d’INTERVALLE sur vos réglages d’échauffement et de récupération et l’autre
surles réglages d’entraînement que vous souhaitez.
Ces boutons devraient vous permettre de personnaliser les paramètres de votre tapis de course pour s’adapter rapidement au type
d’entraînement que vous aimez le plus.

Échauffement
PROFILS D'ENTRAÎNEMENT
MANUEL: Contrôlez tout votre entraînement, du début à la fin. Ce programme est un entraînement de base sans paramètres
prédéfinis, vous permettant d’ajuster manuellement la machine à tout moment. Il commence par une pente à 0 et une vitesse
de0,5 mph.
ASCENSION DE CÔTE: Simule une montée et une descente de colline. Ce programme aide à tonifier les muscles et à améliorer
les capacités cardiovasculaires. Les changements d'inclinaison et les segments se répètent toutes les 30 secondes.
Les changements d'inclinaison et les segments se répètent toutes les 30 secondes.
Segment 1 2 3 4 5 6 7 8 9 10
Temps
4:00 minutes
30
secondes
Niveau 1 0 0 1 1,5 2 2,5 3 3 2,5 2 1,5 1
Niveau 2 0 0 1,5 2 2,5 3 3,5 3,5 3 2,5 2 1,5
Niveau 3 0 1 2 2,5 3 3,5 4 4 3,5 3 2,5 2
Niveau 4 0 1,5 2,5 3 3,5 4 4,5 4,5 4 3,5 3 2,5
Niveau 5 0 1,5 3 3,5 4 4,5 5 5 4,5 4 3,5 3
Niveau 6 0 1,5 3,5 4 4,5 5 5,5 5,5 5 4,5 4 3,5
Niveau 7 0 1,5 4 4,5 5 5,5 6 6 5,5 5 4,5 4
Niveau 8 0 2 4,5 5 5,5 6 6,5 6,5 6 5,5 5 4,5
Niveau 9 0 2 5 5,5 6 6,5 7 7 6,5 6 5,5 5
Niveau 10 0 2 5,5 6 6,5 7 7,5 7,5 7 6,5 6 5,5
30
secondes
30
secondes
30
secondes
30
secondes
30
secondes
30
secondes
30
secondes
30
secondes
30
secondes
51

MES 5 PREMIERS KM: Ce programme de 9 semaines est destiné aux coureurs inexpérimentés qui cherchent à effectuer leurs
Semaine
Entraînement #1
Entraînement #2
Entraînement #3
1
5 minutes d'échauffement
5 minutes d'échauffement
5 minutes d'échauffement
1 minute de jogging
1 minute de jogging
1 minute de jogging
1,5 minute de marche
1,5 minute de marche
1,5 minute de marche
1 minute de jogging
1 minute de jogging
1 minute de jogging
1,5 minute de marche
1,5 minute de marche
1,5 minute de marche
1 minute de jogging
1 minute de jogging
1 minute de jogging
1,5 minute de marche
1,5 minute de marche
1,5 minute de marche
1 minute de jogging
1 minute de jogging
1 minute de jogging
1,5 minute de marche
1,5 minute de marche
1,5 minute de marche
1 minute de jogging
1 minute de jogging
1 minute de jogging
1,5 minute de marche
1,5 minute de marche
1,5 minute de marche
1 minute de jogging
1 minute de jogging
1 minute de jogging
1,5 minute de marche
1,5 minute de marche
1,5 minute de marche
1 minute de jogging
1 minute de jogging
1 minute de jogging
1,5 minute de marche
1,5 minute de marche
1,5 minute de marche
1 minute de jogging
1 minute de jogging
1 minute de jogging
1,5 minute de marche
1,5 minute de marche
1,5 minute de marche
5 minutes de repos
5 minutes de repos
5 minutes de repos
2
5 minutes d'échauffement
5 minutes d'échauffement
5 minutes d'échauffement
1,5 minute de jogging
1,5 minute de jogging
1,5 minute de jogging
2 minutes de marche
2 minutes de marche
2 minutes de marche
1,5 minute de jogging
1,5 minute de jogging
1,5 minute de jogging
2 minutes de marche
2 minutes de marche
2 minutes de marche
1,5 minute de jogging
1,5 minute de jogging
1,5 minute de jogging
2 minutes de marche
2 minutes de marche
2 minutes de marche
1,5 minute de jogging
1,5 minute de jogging
1,5 minute de jogging
2 minutes de marche
2 minutes de marche
2 minutes de marche
1,5 minute de jogging
1,5 minute de jogging
1,5 minute de jogging
2 minutes de marche
2 minutes de marche
2 minutes de marche
1,5 minute de jogging
1,5 minute de jogging
1,5 minute de jogging
2 minutes de marche
2 minutes de marche
2 minutes de marche
5 minutes de repos
5 minutes de repos
5 minutes de repos
3
5 minutes d'échauffement
5 minutes d'échauffement
5 minutes d'échauffement
1,5 minute de jogging
1,5 minute de jogging
1,5 minute de jogging
1,5 minute de marche
1,5 minute de marche
1,5 minute de marche
3 minutes de jogging
3 minutes de jogging
3 minutes de jogging
3 minutes de marche
3 minutes de marche
3 minutes de marche
1,5 minute de jogging
1,5 minute de jogging
1,5 minute de jogging
1,5 minute de marche
1,5 minute de marche
1,5 minute de marche
3 minutes de jogging
3 minutes de jogging
3 minutes de jogging
3 minutes de marche
3 minutes de marche
3 minutes de marche
5 minutes de repos
5 minutes de repos
5 minutes de repos
Vitesse d'échauffement et de repos : 1,5 km / h ou 75% de la vitesse de marche, selon la valeur
la plus élevée
Semaine
Entraînement #1
Entraînement #2
Entraînement #3
4
5 minutes d'échauffement
5 minutes d'échauffement
5 minutes d'échauffement
3 minutes de jogging
3 minutes de jogging
3 minutes de jogging
1,5 minute de marche
1,5 minute de marche
1,5 minute de marche
5 minutes de jogging
5 minutes de jogging
5 minutes de jogging
2,5 minutes de marche
2,5 minutes de marche
2,5 minutes de marche
3 minutes de jogging
3 minutes de jogging
3 minutes de jogging
1,5 minute de marche
1,5 minute de marche
1,5 minute de marche
5 minutes de jogging
5 minutes de jogging
5 minutes de jogging
5 minutes de repos
5 minutes de repos
5 minutes de repos
5
5 minutes d'échauffement
5 minutes d'échauffement
5 minutes d'échauffement
5 minutes de jogging
5 minutes de jogging
5 minutes de jogging
3 minutes de marche
3 minutes de marche
3 minutes de marche
5 minutes de jogging
5 minutes de jogging
5 minutes de jogging
3 minutes de marche
3 minutes de marche
3 minutes de marche
5 minutes de jogging
5 minutes de jogging
5 minutes de jogging
5 minutes de repos
5 minutes de repos
5 minutes de repos
6
5 minutes d'échauffement
5 minutes d'échauffement
5 minutes d'échauffement
5 minutes de jogging
10 minutes de jogging
25 minutes de jogging
3 minutes de marche
3 minutes de marche
5 minutes de repos
8 minutes de jogging
10 minutes de jogging
3 minutes de marche
5 minutes de repos
5 minutes de jogging
5 minutes de repos
7
5 minutes d'échauffement
5 minutes d'échauffement
5 minutes d'échauffement
25 minutes de jogging
25 minutes de jogging
25 minutes de jogging
5 minutes de repos
5 minutes de repos
5 minutes de repos
8
5 minutes d'échauffement
5 minutes d'échauffement
5 minutes d'échauffement
28 minutes de jogging
28 minutes de jogging
28 minutes de jogging
5 minutes de repos
5 minutes de repos
5 minutes de repos
9
5 minutes d'échauffement
5 minutes d'échauffement
5 minutes d'échauffement
30 minutes de jogging
30 minutes de jogging
30 minutes de jogging
5 minutes de repos
5 minutes de repos
5 minutes de repos
Vitesse d'échauffement et de repos : 1,5 km / h ou 75% de la vitesse de marche, selon la valeur
la plus élevée
5premiers kilomètres ou tout simplement à commencer une routine d’exercices. Il a été spécialement conçu pour maintenir
votremotivation et votre engagement, améliorer progressivement votre force, augmenter votre endurance et vous donner
laconfiance nécessaire pour terminer votre 5 premier km.
52

COMBUSTION DES GRAISSES: Y aller relativement lentement et de manière régulière, voilà la clé pour maximiser vos objectifs
Niveau 9
Segment
Échauffement
Niveau 7
Niveau 8
Niveau 10
Niveau 1
Niveau 2
Niveau 6
Niveau 3
Niveau 4
Niveau 5
de perte de poids. Favorise la perte de poids en augmentant et diminuant la vitesse et l'inclinaison, tout en vous maintenant
dansvotre zone de combustion des graisses.
Changements de vitesse et d'inclinaison; les segments se répètent toutes les 30 secondes.
1 2 3 4 5 6 7 8
Temps
4:00 minutes
30
secondes
30
secondes
30
secondes
30
secondes
30
secondes
30
secondes
30
secondes
30
secondes
Inclinaison 0 0,5 1,5 1,5 1 0,5 0,5 0,5 1 1,5
Vitesse 0,5 1,5 2 2,5 3 3,5 4 3,5 3 2,5
Inclinaison 0 0,5 1,5 1,5 1 0,5 1 0,5 1 1,5
Vitesse 0,5 1,9 2,5 3 3,5 4 4,5 4 3,5 3
Inclinaison 0,5 1 2 2 1,5 1 1 1 1,5 2
Vitesse 0,5 2,3 3 3,5 4 4,5 5 4,5 4 3,5
Inclinaison 0,5 1 2 2 1,5 1 1 1 1,5 2
Vitesse 1 2,6 3,5 4 4,5 5 5,5 5 4,5 4
Inclinaison 1 1,5 2,5 2,5 2 1,5 1,5 1,5 2 2,5
Vitesse 1 3 4 4,5 5 5,5 6 5,5 5 4,5
Inclinaison 1 1,5 2,5 2,5 2 1,5 1,5 1,5 2 2,5
Vitesse 1 3,4 4,5 5 5,5 6 6,5 6 5,5 5
Inclinaison 1,5 2 3 3 2,5 2 2 2 2,5 3
Vitesse 1,4 3,8 5 5,5 6 6,5 7 6,5 6 5,5
Inclinaison 1,5 2 3 3 2,5 2 2 2 2,5 3
Vitesse 1,4 4,1 5,5 6 6,5 7 7,5 7 6,5 6
Inclinaison 2 2,5 3,5 3,5 3 2,5 2,5 2,5 3 3,5
Vitesse 1,4 4,5 6 6,5 7 7,5 8 7,5 7 6,5
Inclinaison 2 2,5 3,5 3,5 3 2,5 2,5 2,5 3 3,5
Vitesse 1,4 4,9 6,5 7 7,5 8 8,5 8 7,5 7
PERSONNALISATION: Vous permet de créer et de réutiliser votre entraînement idéal en combinant une vitesse, une inclinaison
et un temps ou une distance spécifiques. Le nec plus ultra de la programmation personnelle. Il s'agit d'un
programme d'objectifs basé sur le temps ou la distance.
53

Échauffement
PROFILS CIBLES
DISTANCE: Poussez-vous à aller plus loin pendant votre entraînement avec 13 entraînements de distance. Choisissez parmi 1 mile,
2miles, 5 km, 5 miles, 10 km, 15 miles, 15 km, 10 miles, 20 km, un semi-marathon, 15 miles, 20 miles et un marathon. C'est vous qui
définissez votre niveau.
Les changements d'inclinaison et tous les segments sont de 0,16 km.
Segment
Distance
Niveau 1
Niveau 2
Niveau 3
Niveau 4
Niveau 5
Niveau 6
Niveau 7
Niveau 8
Niveau 9
Niveau 10
Segment 1 2 3 4 5 6 7 8 9 10 11 12 13 14 15
Calories 20 cal 20 cal 20 cal 20 cal 20 cal 20 cal 20 cal 20 cal 20 cal 20 cal 20 cal 20 cal 20 cal 20 cal 20 cal 20 cal 20 cal
Niveau 1 0 0 0 0 0 0 0 0 0 0 0 0 0 0 0 0 0
Niveau 2 0 0,5 1 3 2 3 2 3 2,5 3,5 2,5 3 2 3 2 3 1
Niveau 3 0,5 1 1,5 3,5 1,5 3,5 2,5 3,5 2,5 4 2,5 3,5 2,5 3,5 1,5 3,5 1,5
Niveau 4 0,5 1 1,5 3,5 2,5 3,5 2,5 3,5 3 4 3 3,5 2,5 3,5 2,5 3,5 1,5
Niveau 5 1 1,5 2 4 2 4 3 4 3 4,5 3 4 3 4 2 4 2
Niveau 6 1 1,5 2 4 3 4 3 4 3,5 4,5 3,5 4 3 4 3 4 2
Niveau 7 1,5 2 2,5 4,5 2,5 4,5 3,5 4,5 3,5 5 3,5 4,5 3,5 4,5 2,5 4,5 2,5
Niveau 8 1,5 2 2,5 4,5 3,5 4,5 3,5 4,5 4 5 4 4,5 3,5 4,5 3,5 4,5 2,5
Niveau 9 2 2,5 3 5 3 5 4 5 4 5,5 4 5 4 5 3 5 3
Niveau 10 2 2,5 3 5 4 5 4 5 4,5 5,5 4,5 5 4 5 4 5 3
Échauffement
,1 mi
,1 mi
0
0
,5
,5
1
1
1,5
1,5
2
2
1,5
1,5
2,5
2,5
1
2
3
4
5
6
7
8
9
10
11
12
13
1,5
2,5
2,5
3,5
14
,1 mi
0
0
2
3
3,5
3,5
2
4
3
4
4,5
4,5
3
5
4
5
,1 mi
,1 mi
,1 mi
,1 mi
,1 mi
0,1 mi
,1 mi
,1 mi
,1 mi
,1 mi
,1 mi
,1 mi
3,5
3,5
4,5
4,5
,1 mi
0
3
4
4
5
5
0
0
,5
1,5
1
1,5
1
2,5
2
2,5
2
0
0
0
0
0
0
0
0
0
1
3
2
3
2
3
2,5
3,5
4,5
4,5
5,5
5,5
2,5
4
2,5
3,5
3,5
4,5
3,5
3
3,5
3
4,5
4
4,5
4
4
5
5
3,5
1,5
3,5
2,5
3,5
3,5
2,5
3,5
4,5
4,5
2,5
4
3
4
3
3,5
3,5
5
4
5
4
2
4
4,5
4,5
2
4
3
2,5
3,5
5
3
5
4
2
3
3
3,5
4,5
4,5
2,5
3
4
3
4
3,5
3,5
4
5
4
5
4,5
0
3
2
2,5
2,5
4
3
4
3
3,5
3,5
5
4
5
4
CALORIES: Définissez des objectifs pour brûler des calories de 20 à 980 calories par tranche de 20 calories. C'est vous qui
définissez votre niveau pour vous maintenir dans votre zone de combustion des graisses.
Les changements d'inclinaison et tous les segments sont de 20 calories.
15
,1 mi
0
1
1,5
1,5
2
2
2,5
2,5
3
3
54

FRÉQUENCE CARDIAQUE CIBLE: Ce programme est conçu pour vous aider à améliorer votre condition physique
cardiovasculaire globale. Il vous suft de dénir votre fréquence cardiaque cible. Ensuite, le programme surveillera
etajustera le niveau d'intensité pour maintenir votre fréquence cardiaque dans les limites de votre plage cible pendant
que vous faites de l'exercice; une méthode éprouvée pour maximiser vos objectifs de perte de poids et de mise en forme.
Unesangle pectorale est requise et doit être portée pendant la durée de ce programme. Voir ci-dessous pour calculer
votre fréquence cardiaque cible.
Calcul de votre fréquence cardiaque cible
La première étape pour connaître la bonne intensité pour votre entraînement consiste à déterminer votre fréquence cardiaque maximale
(FC max = 220 - votre âge). La méthode basée sur l'âge fournit une prédiction statistique moyenne de votre FC maximale. C'est une bonne
méthode pour la majorité des gens, notamment pour les débutants en entraînement à la fréquence cardiaque.
Le moyen le plus précis et exact de déterminer votre FC maximale individuelle est de la soumettre à un test clinique effectué par
uncardiologue ou un physiologiste de l'exercice, au moyen d'un test de stress maximal. Si vous avez plus de 40 ans, si vous êtes en
excès de poids, si vous êtes sédentaire depuis plusieurs années ou si vous avez des antécédents de maladie cardiaque dans votre famille,
destests cliniques sont recommandés.
Ce graphique donne des exemples de plage de fréquence cardiaque pour un sujet de 30 ans faisant de l'exercice dans 5 zones
defréquence cardiaque différentes. Par exemple, la FC maximale d’un sujet de 30 ans est de 220 - 30 = 190 battements parminute
etsafréquence cardiaque maximale à 90% est
de190×0,9=171 battements par minute.
Remarques supplémentaires sur la fréquence cardiaque cible:
L’inclinaison du tapis de course s’ajuste automatiquement pour
vous rapprocher de votre fréquence cardiaque spécifiée.
Si aucune fréquence cardiaque n'est détectée, l'appareil
nechangera pas l'inclinaison.
Si votre fréquence cardiaque est de 25 battements au-dessus
devotre zone cible, le programme s’arrêtera.
Zone de
fréquence
cardiaque cible
TRÈS DUR
90 - 100%
DUR
80 - 90%
MODÉRÉ
70 - 80%
LÉGER
60 - 70%
TRÈS LÉGER
50 - 60%
Durée
d'entraînement
< 5 min
2-10 min
10-40 min
40-80 min
20-40 min
Exemple de FCC
(âge: 30 ans)
171-190 BPM
152-171 BPM
133-152 BPM
114-133 BPM
104 - 114 BPM
Votre FCC
Recommander
pour
Personnes aptes à un
entraînement athlétique
Entraînements courts
Entraînements
moyennement longs
Exercices plus longs et
exercices plus courts
répétés fréquemment
Gestion du poids et
récupération active
55

FRÉQUENCE CARDIAQUE PERSONNALISÉE: Ce programme vous permet de définir votre fréquence cardiaque pour une durée
spécifiée. Le programme ajustera l’inclinaison pour maintenir votre fréquence cardiaque dans la zone cible. Élaborez plusieurs
cibles de fréquence cardiaque dans un programme complet pour vous aider à atteindre vos objectifs cardiovasculaires. La durée
totale du programme comprend 4 minutes d’échauffement et 4 minutes de récupération. La fréquence cardiaque personnalisée
que vous avez sélectionnée se répètera après l'échauffement jusqu’à 4 minutes avant l’expiration du temps total.
SPRINTS 8: Un programme basé sur le temps qui vous permet de sélectionner un niveau. Après l'échauffement, le programme
vous donnera 30 secondes à une vitesse et une intensité élevées, en alternance avec 90 secondes à une vitesse de récupération
inférieure. L'augmentation des niveaux vous permettra de garder votre dépense calorique élevée et d'augmenter votre vitesse
decourse globale.
GRAPHIQUE TAPIS ROULANT SPRINT 8
Les changements de vitesse et les segments se répètent 90 et 30 secondes.
56

POUR RÉINITIALISER LA CONSOLE
Maintenir la touche STOP pendant 3 secondes.
FIN DE VOTRE ENTRAÎNEMENT
Lorsque votre entraînement sera terminé, l'appareil émettra un bip. Les informations de votre entraînement resteront affichées sur la console
pendant 30 secondes, puis réinitialisées.
UTILISATION DE VOTRE PÉRIPHÉRIQUE DE MUSIQUE
Le tapis de course 7.4AT connectera et diffusera de la musique depuis votre périphérique compatible. Cela inclut de nombreux téléphones
intelligents et lecteurs mp3 traditionnels, tels que l'iPod®.
Votre tapis de course 7.4AT est équipé de haut-parleurs Bluetooth. Les appareils compatibles Bluetooth (avec Bluetooth 4.0) peuvent diffuser de la
musique sans fil depuis votre périphérique vers les haut-parleurs. Vous pouvez également connecter votre périphérique demusique via un câble
audio et diffuser en même temps de la musique à travers les haut-parleurs. Les instructions pour les deux types deconnexion audio sont détaillées
ci-dessous.
CONNEXION VIA BLUETOOTH 4.0LE
1) Vérifiez que votre périphérique de musique est compatible Bluetooth 4.0.
2) Accédez aux paramètres Bluetooth de votre périphérique et recherchez d'autres appareils.
3) Sur votre périphérique de musique, localisez la liste des appareils Bluetooth. Sélectionnez votre appareil qui apparaît dans cette liste.
Attendez que votre périphérique de musique ait fini de s'apparier avec l’appareil.
4) Vous saurez si l'appairage a réussi lorsque votre périphérique de musique affichera l’appareil en tant que périphérique couplé.
LORSQUE L’APPAREIL EST ÉTEINT PUIS RALLUMÉ
Si vous éteignez votre appareil, ou s'il passe en mode veille, lors de sa prochaine mise sous tension, l'appareil cherchera à se coupler au dernier
périphérique de musique avec lequel il a été appairé. Il sera automatiquement appairé à ce moment.
RÉ-APPAIRAGE DE PÉRIPHÉRIQUES DE MUSIQUE
Si l'appareil ne parvient pas à trouver le dernier périphérique de musique appairé (par exemple, le périphérique de musique est éteint ou n'est pas utilisé),
il cessera de chercher à coupler le périphérique de musique. Si cela se produit et si vous souhaitez utiliser à nouveau votre périphérique de musique, vous
devrez suivre la procédure d'appairage indiquée ci-dessus et effectuer un nouvel appairage via les paramètres de votre périphérique de musique.
UTILISATION DE PLUSIEURS PÉRIPHÉRIQUES DE MUSIQUE
Si plusieurs périphériques sont couplés à l’appareil (c’est-à-dire que plusieurs utilisateurs utilisent le l’appareil et y associent leurs périphériques
demusique), l’appareil cherchera à apparier le dernier dispositif utilisé et «oubliera» les autres périphériques. Si vous souhaitez à nouveau apparier
un périphérique de musique «oublié», vous devrez alors supprimer l'appairage du périphérique actuellement couplé, puis associer à nouveau votre
périphérique en suivant la procédure d'appairage indiquée ci-dessus.
57

58
CONNEXION VIA UN CABLE AUDIO
1) Branchez le CÂBLE DE L'ADAPTATEUR AUDIO fourni à la PRISE D'ENTRÉE AUDIO en haut à droite de la console et à la prise casque de votre
périphérique de musique.
2) Utilisez les boutons de votre lecteur cd / mp3 pour régler les paramètres de la chanson.
3) Retirez le CÂBLE DE L'ADAPTATEUR AUDIO lorsque vous ne l’utilisez pas.
4) Si vous ne souhaitez pas utiliser les HAUT-PARLEURS, vous pouvez brancher votre casque à la PRISE DE SORTIE AUDIO située au bas de la
console. Ainsi, si vous attrapez accidentellement le fil de casque pendant que vous courrez, votre appareil ne tombera pas au sol.
SYSTÈME DE FITNESS CONNECTÉ POUR TABLETTE AFG
Votre machine Horizon est compatible avec les tablettes, ce qui vous permet d’utiliser la technologie Bluetooth 4.0 pour connecter sans fil votre
tablette à votre machine Horizon. L'utilisation de l'application AFG PRO FITNESS téléchargeable gratuitement vous permettra de contrôler les
fonctions de votre appareil via votre tablette. L'application vous permettra également de surveiller votre entraînement, de suivre vos progrès et de
consulter l'historique devos entraînements. L'application AFG PRO FITNESS peuvent être téléchargées à partir d'iTunes Store pour les appareils iOS
ou de Google Store pour les appareils Android.
Pour davantage d'informations sur la connexion de votre tablette à votre machine Horizon pour configurer AFG PRO FITNESS, ainsi que pour
contrôler et surveiller votre entraînement avec votre tablette, consultez le manuel AFG Connected Fitness fourni avec votre appareil.
SURVEILLANCE DE LA FRÉQUENCE CARDIAQUE BLUETOOTH
Le tapis de course 7.4AT est équipé de la technologie Bluetooth à multicanaux, qui vous permet de connecter sans fil des périphériques de
surveillance de la fréquence cardiaque Bluetooth compatibles avec cet appareil. Vous devrez vous assurer que votre appareil de surveillance de la
fréquence cardiaque sans fil est compatible avec Bluetooth 4.0 et qu'il est également «ouvert» au partage de données. Les appareils «non ouverts»
ou «fermés» ne partagent généralement les données qu'avec leurs applications propriétaires. Le tapis de course 7.4AT nécessite un périphérique
«ouvert» pour recevoir les données de ce dernier. Vous devrez peut-être consulter le manuel du propriétaire de votre périphérique ou le fabricant
pour savoir s’il s’agit d’un périphérique ouvert.
Si vous utilisez une tablette et exécutez l'application AFG PRO FITNESS, l'appareil de surveillance de la fréquence cardiaque Bluetooth compatible
sera automatiquement couplé à l'application. La console de l’appareil recevra alors les informations de fréquence cardiaque de votre tablette. Si vous
souhaitez utiliser le dispositif de surveillance de la fréquence cardiaque Bluetooth sans tablette ni application AFG PRO FITNESS, maintenez enfoncé
lebouton Bluetooth de la console pendant 5 secondes. Cela permettra à la console de communiquer directement avec le dispositif de surveillance
dela fréquence cardiaque Bluetooth. Les informations de fréquence cardiaque seront affichées sur l’écran de votre console. En mode moniteur
defréquence cardiaque, la console ne pourra pas communiquer avec la tablette. Pour activer la communication avec la tablette, maintenez le bouton
Bluetooth sur la console enfoncé pendant 5 secondes ou réinitialisez l'alimentation.

GARANTIE LIMITÉE
D'UTILISATION À DOMICILE
59

CAPACITÉ DE POIDS = 350 livres (158 kilogrammes)
EXCLUSIONS ET RESTRICTIONS
60
CHÂSSIS • DURÉE DE VIE
Horizon Fitness garantit le châssis contre les défauts de
fabrication et de matériaux pendant toute la vie du propriétaire
initial, tant que l'appareil reste en possession de ce dernier.
(Le châssis est défini comme la base en métal soudé de
l'appareil et n'inclut aucune pièce pouvant être retirée.)
MOTEUR • DURÉE DE VIE
Horizon Fitness garantit le moteur contre les défauts de
fabrication et de matériaux pendant toute la vie du propriétaire
initial, tant que l'appareil reste en possession de ce dernier.
Lamain-d'œuvre ou l'installation du moteur n'est pas couverte
par la garantie du moteur.
ÉLECTRONIQUE ET PIÈCES • 5 ANS
Horizon Fitness garantit les composants électroniques, lafinition
et toutes les pièces d'origine pour une période de trois ans
àcompter de la date d'achat d'origine, tant que l'appareil
resteen possession du propriétaire d'origine.
MAIN-D'ŒUVRE • 2 ANS
Horizon Fitness prend en charge les coûts de main-d'œuvre
pour la réparation de l'appareil pendant une période d'un
anàcompter de la date d'achat d'origine, tant que l'appareil
resteen possession du propriétaire d'origine.
Qui EST couvert:
• Le propriétaire original et il n'est pas transférable.
Ce qui EST couvert:
• La réparation ou le remplacement d'un moteur en panne,
d'un composant électronique ou d'une pièce défectueuse
constitue le seul recours de la garantie.
Ce qui N'EST PAS couvert:
• Usure normale, montage ou entretien inadéquat,
ouinstallation de pièces ou accessoires non initialement
prévus ou compatibles avec l'équipement vendu.
• Dommages ou pannes dus à un accident, abus, corrosion,
décoloration de la peinture ou du plastique, négligence,
vol, vandalisme, incendie, inondation, vent, foudre, gel
ouautres catastrophes naturelles de toute nature, réduction
depuissance, fluctuation ou défaillance due àquelque cause
quece soit, conditions atmosphériques inhabituelles, collision,
introduction de corps étrangers dansl’unité couverte ou
modifications non autorisées ou non recommandées par
Horizon Fitness.
• Dommages accidentels ou consécutifs. Horizon Fitness
n'est pas responsable des dommages indirects, spéciaux
ouconsécutifs, des pertes économiques, des pertes de
biens ou de profits, de la perte de jouissance ou d'usage,
oudetout autre dommage indirect de quelque nature que
cesoit, liés à l'achat, l'utilisation, la réparation oul'entretien
du équipement. Horizon Fitness ne fournit aucune

compensation monétaire ou autre pour les coûts de réparation
ou de remplacement de pièces, y compris, mais sans s'y
limiter, les frais d'adhésion à une salle de sport, le temps
detravail perdu, les visites de diagnostic, les visites d'entretien
ouletransport.
• L'équipement utilisé à des fins commerciales ou pour toute
utilisation autre par une famille ou un ménage unique, à moins
que Horizon Fitness n'approuve sa couverture.
• Matériel détenu ou exploité en dehors des États-Unis et du
Canada.
• Livraison, assemblage, installation, configuration des unités
d'origine ou de remplacement, main-d'œuvre ou autres coûts
associés au retrait ou au remplacement de l'unité couverte.
• Toute tentative de réparation de cet équipement peut
engendrer un risque de blessure. Horizon Fitness n'est
pas responsable des dommages, pertes ou responsabilités
résultant de blessures personnelles subies au cours ou à la
suite d'une réparation ou d'une tentative de réparation de
votre équipement de fitness par des personnes autres qu'un
technicien de service agréé. Toutes les réparations que vous
tentez d’effectuer sur votre appareil de fitness sont effectuées
À VOS RISQUES et Horizon Fitness ne pourra être tenue
responsable des blessures qui pourraient en résulter pour
lapersonne ou les biens.
SERVICE / RETOURS
• Le service à domicile est disponible dans un rayon de 150km
du fournisseur de service agréé le plus proche (le kilométrage
au-delà de 150 km d'un centre de service agréé incombe
auconsommateur).
• Tous les retours doivent être autorisés au préalable
parHorizon Fitness.
• L’obligation d’Horizon Fitness au titre de cette garantie se
limite au remplacement ou à la réparation, au choix d’Horizon
Fitness, du même modèle ou d’un modèle comparable.
• Horizon Fitness peut demander à ce que les composants
défectueux soient renvoyés à Horizon Fitness à la fin du
service de garantie en utilisant une étiquette d'expédition
deretour prépayée. Si vous avez été prié de renvoyer des
pièces et que vous n'avez pas reçu d'étiquette, veuillez
contacter le support technique.
• Des unités de remplacement, des pièces et des composants
électroniques remis à l'état neuf par Horizon Fitness ou ses
fournisseurs peuvent parfois être fournies en remplacement
de la garantie et constituent le respect des conditions
delagarantie.
• Cette garantie vous donne des droits légaux spécifiques,
etvos droits peuvent varier d’un État à l’autre.
• Si vous n’êtes plus sous la garantie du fabricant mais que vous
avez une garantie prolongée, reportez-vous à votre contrat
degarantie prolongée pour connaître les coordonnées pour les
demandes de réparation ou de service sous garantie prolongée.
61

ESPAÑOL
62

PRECAUCIONES IMPORTANTES
GUARDE ESTAS INSTRUCCIONES
A la hora de utilizar un producto eléctrico, siempre se deben adoptar precauciones básicas, entre ellas las siguientes: Lea todas las
instrucciones antes de utilizar la cinta. El propietario es responsable de garantizar que todos los usuarios de la cinta estén informados
de manera adecuada sobre las advertencias y precauciones. Si tiene alguna pregunta después de leer este manual, póngase en contacto
con el servicio de asistencia técnica a través del número indicado en el panel posterior del presente MANUAL DE USUARIO.
Esta cinta ha sido concebida para un uso exclusivamente doméstico. No la utilice en ningún establecimiento comercial, escolar,
institucional ni de alquiler. El incumplimiento de estas indicaciones dará lugar a la anulación de la garantía.
63

64
PELIGRO
PARA REDUCIR EL RIESGO DE DESCARGA ELÉCTRICA:
Desenchufe la cinta de la corriente eléctrica inmediatamente después de su uso, antes de proceder a su limpieza o mantenimiento
y al montar o desmontar piezas.
ADVERTENCIA
PARA REDUCIR EL RIESGO DE QUEMADURAS, INCENDIOS, DESCARGAS ELÉCTRICAS
OLESIONES PERSONALES:
• No utilice la cinta sin enganchar el clip de fijación de seguridad a su ropa.
• Si nota algún tipo de dolor, como, por ejemplo, dolores en el pecho, náuseas, mareos o dificultades para respirar, pare de hacer ejercicio
de inmediato y consulte a su médico antes de continuar.
• A la hora de hacer ejercicio, mantenga en todo momento un ritmo que le resulte cómodo.
• No utilice prendas de vestir que se puedan enganchar en alguna pieza de la cinta.
• Utilice siempre zapatillas de deporte cuando utilice el equipo.
• No salte sobre la cinta.
• En ningún momento debe haber más de una persona sobre la cinta cuando esté en marcha.
• Las personas con un peso superior al especificado en el APARTADO DE GARANTÍA DEL MANUAL DE USUARIO no deben utilizar la cinta.
El incumplimiento de estas indicaciones dará lugar a la anulación de la garantía.
• Al bajar la plataforma de la cinta, espere a que las patas traseras estén bien apoyadas sobre el suelo antes de subirse.
• Desconecte la alimentación eléctrica antes de mover el equipo o de realizar tareas de mantenimiento. Para limpiarla, pase únicamente
unpaño ligeramente húmedo y con jabón por las superficies. Nunca utilice disolventes. (Consulte MANTENIMIENTO)
• No deje la cinta sin vigilancia mientras está enchufada. Desenchúfela de la corriente cuando no la esté usando y antes de montar
odesmontar piezas.
• No utilizar bajo sábanas o almohadas, ya que podría producirse un calentamiento excesivo que, a su vez, podría causar un incendio,
descargas eléctricas o daños personales.
• Conecte la máquina de ejercicios únicamente a una toma de corriente con una conexión a tierra adecuada.

ADVERTENCIA
PARA REDUCIR EL RIESGO DE QUEMADURAS, INCENDIOS, DESCARGAS ELÉCTRICAS
OLESIONES PERSONALES:
• Las mascotas y los niños menores de 13años no deben estar BAJO NINGUNA CIRCUNSTANCIA a menos de 3metros (10 ft) de la cinta.
• Los niños menores de 13años no deben utilizar la cinta BAJO NINGUNA CIRCUNSTANCIA.
• Los niños mayores de 13años y las personas discapacitadas no deben utilizar la cinta sin la supervisión de un adulto.
• Use la cinta únicamente como se describe en el manual del producto y del usuario.
• No utilice accesorios que no estén recomendados por el fabricante. Los accesorios pueden causar lesiones.
• No utilice la cinta si algún cable o enchufe se encuentra dañado, si no funciona correctamente, si se ha caído o estropeado, o si se ha
sumergido en agua. Devuelva la cinta al centro de servicio para su revisión y reparación.
• Mantenga el cable de alimentación alejado de superficies calientes. No emplee el cable de alimentación para mover el equipo ni como tirador.
• No use la cinta con el orificio de ventilación bloqueado. Mantenga el orificio de ventilación limpio y libre de pelos, pelusas y otros
elementos similares.
• Para evitar las descargas eléctricas, no introduzca ni deje caer ningún objeto en las aberturas.
• No utilice el equipo en lugares en los que se utilizan aerosoles (pulverizadores) o si se está administrando oxígeno.
• Para desconectar la unidad, coloque todos los controles en posición de apagado y desconecte el enchufe de la toma.
• No utilice la cinta en estancias sin control de la temperatura, como, por ejemplo, garajes, porches, salas de billar, cuartos de baño,
aparcamientos cubiertos o espacios exteriores. El incumplimiento de estas indicaciones dará lugar a la anulación de la garantía.
• Esta cinta ha sido concebida para un uso exclusivamente doméstico. No la utilice en ningún establecimiento comercial, escolar,
institucional ni de alquiler. El incumplimiento de estas indicaciones dará lugar a la anulación de la garantía.
• No extraiga las cubiertas de la consola a menos que se lo indique el servicio de asistencia técnica. El mantenimiento deberá llevarlo
acabo únicamente un técnico de mantenimiento autorizado.
Es fundamental que esta cinta solo se utilice en espacios interiores, en salas con control de la temperatura. Si la cinta se ha visto expuesta
a temperaturas más bajas o a climas muy húmedos, se recomienda encarecidamente ajustar su temperatura a la de la habitación antes
de utilizarla por primera vez. Si no se procede de este modo, podrían producirse fallos electrónicos prematuros.
65

INSTRUCCIONES PARA LA CONEXIÓN A TIERRA
El producto debe estar conectado a tierra. En caso de avería o error, la conexión a tierra proporciona una vía de menor resistencia para
lacorriente eléctrica, lo que reduce el riesgo de descarga eléctrica. El equipo incluye un cable con un conductor y un enchufe deconexión
atierra. El enchufe debe estar conectado a una toma de corriente correctamente instalada y conectado a tierra de acuerdo con
loestablecido en los códigos y ordenanzas locales.
PELIGRO
Una mala conexión del conductor de conexión a tierra puede conllevar riesgos de descarga eléctrica. Consulte a un electricista
otécnico cualificado si tiene dudas sobre si el producto está conectado a tierra adecuadamente. No cambie el enchufe del producto.
Sino encaja en la toma de corriente, contacte con un electricista cualificado para que instale una toma apropiada.
Este producto deberá utilizarse en un circuito de 110-120voltios nominal y posee un enchufe de conexión a tierra similar al que se muestra
en la ilustración. Asegúrese de que el producto esté conectado a una toma que posea la misma configuración que el enchufe. No deben
usarse adaptadores con este producto.
El producto debe utilizarse en un circuito específico. Para saber si está utilizando un circuito específico, desconecte la alimentación de dicho
circuito y compruebe si también se desconecta algún otro dispositivo. En caso afirmativo, cambie los dispositivos a otro circuito.
Nota: Unsolo circuito suele integrar diversas salidas. La cinta debe utilizarse en un circuito de 15amperios como mínimo.
ADVERTENCIA
66
DE CONEXIÓN
TOMA
A TIER RA
DE 3 POLOS
PASADOR
DE CONEXIÓN
A TIER RA
Conecte la máquina de ejercicios únicamente a una toma de corriente con una
conexión a tierra adecuada.
No use el producto si algún cable o enchufe está dañado, incluso si funciona
correctamente.
No use ningún producto si parece dañado o se ha sumergido en agua.
Contacte con el servicio de asistencia técnica para sustituciones o reparaciones.

MONTAJE
ADVERTENCIA
Durante el proceso de montaje, hay varias zonas a las que se debe prestar especial atención. Es muy importante seguir las instrucciones
de montaje correctamente y asegurarse de apretar bien todas las piezas. Si no se siguen las instrucciones de montaje correctamente,
podrían quedar piezas sin apretar en la cinta, que parecerá que están sueltas y que pueden causar ruidos molestos. Para evitar daños
en la cinta, deberán consultarse las instrucciones de montaje y adoptarse las medidas correctivas que correspondan.
Antes de continuar, localice el número de serie de la cinta, que está situado en la pegatina
blanca con el código de barras (cerca del interruptor de encendido/apagado y el cable de
alimentación), e introdúzcalo en el espacio disponible a continuación.
INTRODUZCA EL NÚMERO DE SERIE Y EL NOMBRE DEL MODELO
EN LAS CASILLAS DISPONIBLES A CONTINUACIÓN:
» Si se pone en contacto con el servicio técnico, indique el NÚMERO DE SERIE
y el NOMBRE DEL MODELO.
NÚMERO DE SERIE:
TM
NOMBRE DEL MODELO: HORIZON 7.4AT TREADMILL
UBICACIÓN DEL NÚMERO DE SERIE
67

ALTAVOCES
CONSOLA
SOPORTE PARA LECTURA/TABLET
68
PORTABOTELLAS
PUÑOS MEDIDORES
DEL PULSO
INTERRUPTOR
DEENCENDIDO/APAGADO
CABLE DE ALIMENTACIÓN
CUBIERTA DEL MOTOR
RUEDA DE TRANSPORTE
PLACA DEL PASADOR DE BLOQUEO DE PIE
(DEBAJO DEL PASADOR DE PIE)
PANEL DE CONTROL E INDICADORES
VENTILADOR
DE LA CONSOLA
SOPORTE DE LA
LLAVE DE SEGURIDAD
BARRA DE APOYO TRANSVERSAL
POSTE DE LA CONSOLA
PASADOR DE PIE
(DEBAJO DE LA PLATAFORMA)
CINTA/PLATAFORMA PARA CORRER
BARRA LATERAL
TAPA DEL EXTREMO
DEL RODILLO
PERNOS DE
TENSIÓN/ALINEAMIENTO
DEL RODILLO TRASERO

HERRAMIENTAS INCLUIDAS:
F Llave en T de 8 mm
F Llave en L de 6 mm
F Llave en L de 5 mm
PIEZAS INCLUIDAS:
F 1 bastidor principal
F 1 conjunto de consola
F 2 postes de consola
F 1 barra de apoyo transversal
F 1 paquete de piezas de tornillería
F 1 llave de seguridad
F 1 cable adaptador para audio
F 1 botella de lubricante a base
de silicona (para 2 usos)
F 1 cable de alimentación
F 2 puños medidores del pulso
¿NECESITA AYUDA?
Si tiene preguntas o si faltan piezas,
póngase en contacto con el servicio
de asistencia técnica. Encontrará
lainformación de contacto en la parte
trasera de este manual.
MONTAJE PREVIO
DESEMBALAJE
Coloque la caja de la cinta en una superficie plana y nivelada. Se recomienda que coloque
una cubierta protectora en el suelo. Extreme las precauciones a la hora de manipular
ytransportar la unidad. Nunca abra la caja de lado. Una vez retiradas las correas, no levante
ni mueva la unidad si esta no está completamente montada y en posición vertical plegada,
con el pasador de bloqueo fijo. Desembale y monte la unidad en el lugar en el que se
vaya a utilizar. La cinta está equipada con amortiguadores de alta presión y puede abrirse
si se maneja de manera incorrecta. No agarre ninguna parte del bastidor inclinado ni intente
levantar omover la cinta.
ADVERTENCIA
NO INTENTE LEVANTAR LA CINTA. No mueva ni levante la cinta del embalaje
hasta que se especifique lo contrario en las instrucciones de montaje. Puede retirar
el envoltorio de plástico de los postes de la consola.
ADVERTENCIA
SI NO SIGUE ESTAS INSTRUCCIONES, PODRÍA SUFRIR LESIONES.
NOTA: Durante cada uno de los pasos del montaje, asegúrese de que TODAS las tuercas
y los pernos se encuentren en su sitio y estén parcialmente enroscados antes de apretar
cualquiera de ellos.
NOTA: Aplique un poco de lubricante para facilitar la instalación de las piezas. Puedeemplear
cualquier tipo de lubricante (como grasa de litio para bicicletas).
69

MONTAJE PASO 1
70
PIEZAS DE TORNILLERÍA PARA EL PASO 1
PIEZA TIPO DESCRIPCIÓN CANT.
M8X1, 25PX11L 2 A PERNO GUÍA VERTICAL
M8X1,25PX80L 8B PERNO DEL POSTE
ARANDELA PLANA
ARANDEL A ELÁSTICA
D
4
1
D
B
8,4X15,5X1,6T
8,2X15,4X2,0T
7
2
4
D
C
A
A
C
3
8C
8
B
A Corte las correas amarillas y levante la plataforma para
correr desde la parte trasera para retirar los restos que
haya debajo de ella.
B Abra EL PAQUETE DE PIEZAS DE TORNILLERÍA
PARA LLEVAR A CABO EL PASO 1.
C Introduzca el PERNO GUÍA VERTICAL (A)
en el SOPORTE DEL BASTIDOR PRINCIPAL (1)
yapriételo por completo.
NOTA: No apriete por completo los siguientes
pernos hasta el final del PASO 4.
D Conectar el CABLE CONDUCTOR al final del CABLE
DE LA CONSOLA (2). Meta el CABLE CONDUCTOR
por el POSTE DERECHO DE LA CONSOLA (4). Una
vez que haya pasado todo el alambre de alimentación
del cable a través del poste, la punta superior del
CABLE DE LA CONSOLA (2) debe quedar en la parte
superior del
SOPORTES DEFIJACIÓN (7)
.
E Fije el POSTE DERECHO (4) DE LA CONSOLA
al BASTIDOR PRINCIPAL (3) con 4 PERNOS (B),
4 ARANDELAS PLANAS (C) y 4ARANDELAS
ELÁSTICAS (D). Vuelva a colocar el cable adicional
dela consola en el poste vertical.
NOTA: Tenga cuidado de no aplastar el cable de la
consola al fijar el poste derecho.
F Repita el PASO E en el LADO IZQUIERDO.
A
B
C
D

MONTAJE PASO 2
PIEZAS DE TORNILLERÍA PARA EL PASO 2
PIEZA TIPO DESCRIPCIÓN CANT.
M6X1,0PX15L 4 E PERNO
NOTA: No apriete por completo los pernos
hasta llegar al PASO 3.
E
5
4
4
A Abra EL PAQUETE DE PIEZAS DE TORNILLERÍA
PARA LLEVAR A CABO EL PASO 2.
B Fije la BARRA DE APOYO TRANSVERSAL (5)
utilizando los orificios de los POSTES VERTICALES (4)
y4 PERNOS (E).
E
71

MONTAJE PASO 3
72
PIEZAS DE TORNILLERÍA PARA EL PASO 3
PIEZA TIPO DESCRIPCIÓN CANT.
F
ARANDELA DE ARCO
G
H
F
G
H
PERNO CORTO
PERNO LARGO
4
8,4X15,5X1,6T
M8x1,25Px15L
M8x1,2 5P x70L
6
7
2
7
4
2
2
4
A Abra EL PAQUETE DE PIEZAS DE TORNILLERÍA
PARA LLEVAR A CABO EL PASO 3.
B Pida a alguien que le ayude a sujetar la consola
mientras fija el CABLE DE LA CONSOLA (2).
Utilice el cable conductor para extraer con cuidado
el CABLE DE LA CONSOLA (2) del POSTE
DERECHO DELACONSOLA (4). Fije el CABLE
DELACONSOLA (2) desde la CONSOLA (6)
alCABLE DELACONSOLA(2) desde la parte
superior del POSTE DERECHO DELA CONSOLA(4).
Desconectey deseche el cable conductor.
C Deslice con cuidado la CONSOLA (6) sobre los
SOPORTES DE FIJACIÓN (7), teniendo cuidado
deno aplastar el CABLE DE LA CONSOLA(2).
Alineelosorificios de la parte inferior de la
CONSOLA(6) conlos de los SOPORTES
DEFIJACIÓN (7).
D Fije la CONSOLA (6) a los SOPORTES DE FIJACIÓN(7)
colocando primero las ARANDELAS DE ARCO(F)
sobre los PERNOS (G) Y (H) tal y como se muestra
enla ilustración. Introduzca los PERNOS CORTOS(G)
en el orificio superior del SOPORTE DE FIJACIÓN(7)
ylos PERNOS LARGOS (H) en el inferior.
E Repita el PASO D en el lado contrario.
F G H

MONTAJE PASO 4
PIEZAS DE TORNILLERÍA PARA EL PASO 4
PIEZA TIPO DESCRIPCIÓN CANT.
M8x15L 8I PERNO
8,2X15,4X2,0T 8J ARANDEL A ELÁSTICA
8,4X15,5X1,6T 8K ARANDELA PLANA
6
9L
9R
8
K
J
I
A Abra EL PAQUETE DE PIEZAS DE TORNILLERÍA
PARA LLEVAR A CABO EL PASO 4.
B Fije el PUÑO MEDIDOR DEL PULSO DERECHO
(8) ala parte inferior de la CONSOLA (6) con
4PERNOS(I), 4 ARANDELAS ELÁSTICAS (J)
y4ARANDELAS PLANAS (K).
C Conecte los CABLES DE LA CONSOLA
DERECHOS(9R) e introdúzcalos con cuidado para
evitar daños.
D Repita el PASO B en el LADO IZQUIERDO.
E Conecte los CABLES DE LA CONSOLA
IZQUIERDOS(9L) e introdúzcalos con cuidado
paraevitar daños.
NOTA: Apriete por completo todos los pernos
de los PASOS ANTERIORES.
I J K
MONTAJE FINALIZADO
Antes de utilizarla por primera vez, siga las
instrucciones de la sección de MANTENIMIENTO del
MANUAL DE LA CINTA para lubricar la plataforma.
73

74

FUNCIONAMIENTO DE LA CINTA
En esta sección, aprenderá a utilizar la consola de la cinta y a programarla.
La sección FUNCIONAMIENTO BÁSICO del MANUAL DE LA CINTA contiene las instrucciones
paralosiguiente:
• UBICACIÓN DE LA CINTA
• USO DE LA LLAVE DE SEGURIDAD
• PLEGAR LA CINTA
• MOVER LA CINTA
• NIVELAR LA CINTA
• TENSAR LA CINTA DE CORRER
• CENTRAR LA CINTA DE CORRER
• USO DE LA FUNCIÓN DE FRECUENCIA CARDÍACA
75

R
76
M
G
K
I
I
LT T
JS
M
H
J

FUNCIONAMIENTO DE LA CONSOLA
Nota: En la parte superior de la consola, hay una fina lámina de plástico transparente que actúa como protección;
retírelaantes de utilizar la consola.
A) VENTANAS DE LA PANTALLA LCD: vatios, ritmo, calorías/hora, frecuencia cardíaca y vueltas.
B) INDICADOR LED: tiempo, velocidad, distancia, inclinación, ritmo, frecuencia cardíaca y calorías.
C) INDICADORES DE ENTRENAMIENTO LED: indican qué entrenamiento está asignado al programa actual.
D) BOTÓN PARA SELECCIONAR OBJETIVO/ENTRENAMIENTO: gírelo o púlselo para seleccionar el entrenamiento/
objetivo deseado.
E) INICIO: púlselo para empezar a hacer ejercicio, iniciar un entrenamiento reanudar un ejercicio después de una pausa.
F) PARAR: púlselo para pausar/finalizar el entrenamiento. Manténgalo pulsado durante 3 segundos para reiniciar la consola.
G) RUEDA DE DESPLAZAMIENTO DE LA INCLINACIÓN: se utiliza para adaptar la inclinación en pequeños incrementos
(0,5%).
H) RUEDA DE DESPLAZAMIENTO DE LA VELOCIDAD: se utiliza para ajustar la velocidad mediante pequeños
incrementos (0,1mi/h).
I) TECLAS DE INCLINACIÓN RÁPIDA: utilícelas para llegar a la inclinación deseada más rápidamente.
J) TECLAS DE VELOCIDAD RÁPIDA: utilícelas para llegar a la velocidad deseada más rápidamente.
K) TECLA DE VENTILADOR: púlsela para encender y apagar el ventilador.
L) VENTILADOR: active la función de ventilador durante el entrenamiento.
M) ALTAVOCES: conecte el reproductor de CD/MP3 para reproducir música por los altavoces.
N) CLAVIJA DE ENTRADA DE AUDIO: conecte su reproductor de CD/MP3 a la consola mediante el cable adaptador
para audio suministrado.
O) CLAVIJA DE SALIDA DE AUDIO/AURICULARES: conecte los auriculares en la clavija para escuchar música a través
de ellos. Nota: Al conectar los auriculares en esta clavija, el sonido deja de salir por los altavoces.
P) ENTRADA USB: potencia de salida de 1A/5V.
Q) PORTABOTELLAS: permite sujetar el equipo de entrenamiento.
R) SOPORTE PARA LECTURA/TABLET: permite sujetar material de lectura o la tablet.
S) LUZ INDICADORA DE BLUETOOTH: aparece cuando el aparato está asociado con un dispositivo compatible
conBluetooth.
T) TECLAS DE INTERVALO: se trata de teclas programables. Cuando se selecciona un usuario, pueden programarse
segúnlos ajustes de velocidad e inclinación deseados.
77

78
INDICADORES
• HORA: se muestra con el formato «minutos:segundos». Indica el tiempo restante de entrenamiento o el tiempo de ejercicio transcurrido.
• DISTANCIA: se muestra en millas (1 milla =1,609km). Indica la distancia recorrida durante el entrenamiento.
• VELOCIDAD: se indica en mph (millas por hora). Indica la velocidad a la que se mueve la superficie mientras corre o anda.
• INCLINACIÓN: se muestra como un porcentaje. Indica la inclinación de la superficie mientras corre o anda.
• CALORÍAS: total de calorías quemadas en el entrenamiento.
• FRECUENCIA CARDÍACA: se indica en p.p.m. (pulsaciones por minuto). Se utiliza para controlar la frecuencia cardíaca (lacual se
muestra al hacer contacto con los dos puños medidores del pulso).
• RITMO: indica cuántos minutos tarda en completar una milla al caminar o correr a la velocidad establecida.
• VATIOS: muestra la potencia generada a la velocidad e inclinación establecidas.
• CALORÍAS/HORA: muestra el número de calorías que quemará en una hora a la velocidad e inclinación establecidas.
• FÁBRICA DE LADRILLOS: Cada segmento vertical representa una unidad de velocidad o inclinación, cada segmento horizontal
representa el tiempo.
• VUELTAS: muestra cuántas vueltas de 400m (¼ de milla) ha completado.
• RECUENTO (SPRINT 8): muestra la cantidad de esprints del programa Sprint 8 que ha completado.

PRIMEROS PASOS
1) Compruebe que no haya objetos en la cinta que obstaculicen su movimiento.
2) Conecte el cable de alimentación y encienda la cinta (el interruptor de encendido/apagado se encuentra al lado del cable
dealimentación).
3) Apóyese en las barras laterales de la cinta.
4) Fije la presilla de la llave de seguridad a su ropa y asegúrese de que no se caiga durante el funcionamiento.
5) Introduzca la llave de seguridad en el orificio específico de la consola.
6) Existen dos maneras de iniciar el entrenamiento:
A) INICIO RÁPIDO
Pulse la tecla de INICIAR para comenzar el entrenamiento.
Tiempo, distancia y calorías comenzarán a contar a partir de cero. O...
B) SELECCIÓN DE UN ENTRENAMIENTO/OBJETIVO
1) Para seleccionar el USUARIO, gire el botón de entrenamiento y púlselo cuando se muestre el USUARIO deseado.
2) Para seleccionar el PESO, gire el botón de entrenamiento y púlselo cuando se muestre el PESO deseado.
3) Para seleccionar el PROGRAMA, gire el botón de entrenamiento y púlselo cuando se muestre el PROGRAMA deseado.
4) Para ajustar la CONFIGURACIÓN, gire el botón de entrenamiento y púlselo cuando se muestre la CONFIGURACIÓN deseada.
5) Pulse INICIAR para comenzar.
79

80
RUEDA DE DESPLAZAMIENTO
DELAINCLINACIÓN
Deslice hacia delante y hacia atrás para aumentar
odisminuir la inclinación.
BOTÓN DE INTERVALO 1 BOTÓN DE INTERVALO 2
MOLETTE DE VITESSE
Faites rouler en avant / en arrière pour augmenter/
diminuer la vitesse.
CÓMO PROGRAMAR Y UTILIZAR LOS BOTONES DE INTERVALO PERSONALIZADOS
Los botones de intervalo programables situados en el puño medidor están diseñados para ayudarle a personalizar su máquina de forma que
se ajuste a sus preferencias de entrenamiento.
Los BOTONES DE INTERVALOS IZQUIERDO y DERECHO pueden programarse en velocidad e inclinación.
Para programar la tecla de INTERVALO debe seleccionar un usuario, iniciar la máquina, establecer la velocidad e inclinación deseadas,
pulsar y mantener pulsado el botón del INTERVALO deseado durante tres segundos hasta que la cinta emita un pitido. Ahora el botón de
INTERVALO está programado con sus ajustes. Después de programar la tecla de INTERVALO, se guardará el ajuste para ese usuario hasta
que se programe de nuevo.
A partir de ahora, al pulsar la tecla de INTERVALO la velocidad e inclinación de la cinta cambiarán a los ajustes que se han programado
paraese botón.
Estas teclas le serán útiles sobre todo en el entrenamiento de intervalos. Le recomendamos programar uno de los botones de INTERVALO
según sus segmentos de alta intensidad y el otro según sus segmentos de recuperación.
Otro uso habitual consiste en ajustar un botón de INTERVALO según la configuración de calentamiento y enfriamiento y la otra, según
laconfiguración de entrenamiento deseada.
Estos botones le permitirán personalizar los ajustes de su cinta para que se adapten rápidamente al tipo de entrenamiento que más le
guste.

Calentamiento
4:00 min
PERFILES DE ENTRENAMIENTO
MANUAL: controle todos los aspectos del entrenamiento, desde el principio hasta el final. Este programa inicia un entrenamiento
básico sin ajustes predefinidos, lo cual le permite configurar la máquina de forma manual en cualquier momento. Comienza con
una inclinación 0 y una velocidad de 0,8 km/h.
ESCALADA: permite simular la subida y bajada de una colina. Este programa ayuda a mejorar la condición muscular y la resistencia
cardiovascular. La inclinación cambia y los segmentos se repiten cada 30 segundos.
La inclinación cambia y los segmentos se repiten cada 30 segundos.
Segmento 1 2 3 4 5 6 7 8 9 10
Tiempo 30 s 30 s 30 s 30 s 30 s 30 s 30 s 30 s 30 s 30 s
Nivel 1 0 0 1 1,5 2 2,5 3 3 2,5 2 1,5 1
Nivel 2 0 0 1,5 2 2,5 3 3,5 3,5 3 2,5 2 1,5
Nivel 3 0 1 2 2,5 3 3,5 4 4 3,5 3 2,5 2
Nivel 4 0 1,5 2,5 3 3,5 4 4,5 4,5 4 3,5 3 2,5
Nivel 5 0 1,5 3 3,5 4 4,5 5 5 4,5 4 3,5 3
Nivel 6 0 1,5 3,5 4 4,5 5 5,5 5,5 5 4,5 4 3,5
Nivel 7 0 1,5 4 4,5 5 5,5 6 6 5,5 5 4,5 4
Nivel 8 0 2 4,5 5 5,5 6 6,5 6,5 6 5,5 5 4,5
Nivel 9 0 2 5 5,5 6 6,5 7 7 6,5 6 5,5 5
Nivel 10 0 2 5,5 6 6,5 7 7,5 7,5 7 6,5 6 5,5
81

MIS PRIMEROS 5KM: este programa de nueve semanas está diseñado para corredores sin experiencia que desean recorrer
Semana
Entrenamiento n.º 1
Entrenamiento n.º 2
Entrenamiento n.º 3
1
Calentamiento 5 min
Calentamiento 5 min
Calentamiento 5 min
Carrera 1 min
Carrera 1 min
Carrera 1 min
Caminata 1,5 min
Caminata 1,5 min
Caminata 1,5 min
Carrera 1 min
Carrera 1 min
Carrera 1 min
Caminata 1,5 min
Caminata 1,5 min
Caminata 1,5 min
Carrera 1 min
Carrera 1 min
Carrera 1 min
Caminata 1,5 min
Caminata 1,5 min
Caminata 1,5 min
Carrera 1 min
Carrera 1 min
Carrera 1 min
Caminata 1,5 min
Caminata 1,5 min
Caminata 1,5 min
Carrera 1 min
Carrera 1 min
Carrera 1 min
Caminata 1,5 min
Caminata 1,5 min
Caminata 1,5 min
Carrera 1 min
Carrera 1 min
Carrera 1 min
Caminata 1,5 min
Caminata 1,5 min
Caminata 1,5 min
Carrera 1 min
Carrera 1 min
Carrera 1 min
Caminata 1,5 min
Caminata 1,5 min
Caminata 1,5 min
Carrera 1 min
Carrera 1 min
Carrera 1 min
Caminata 1,5 min
Caminata 1,5 min
Caminata 1,5 min
Enfriamiento 5 min
Enfriamiento 5 min
Enfriamiento 5 min
2
Calentamiento 5 min
Calentamiento 5 min
Calentamiento 5 min
Carrera 1,5 min
Carrera 1,5 min
Carrera 1,5 min
Caminata 2 min
Caminata 2 min
Caminata 2 min
Carrera 1,5 min
Carrera 1,5 min
Carrera 1,5 min
Caminata 2 min
Caminata 2 min
Caminata 2 min
Carrera 1,5 min
Carrera 1,5 min
Carrera 1,5 min
Caminata 2 min
Caminata 2 min
Caminata 2 min
Carrera 1,5 min
Carrera 1,5 min
Carrera 1,5 min
Caminata 2 min
Caminata 2 min
Caminata 2 min
Carrera 1,5 min
Carrera 1,5 min
Carrera 1,5 min
Caminata 2 min
Caminata 2 min
Caminata 2 min
Carrera 1,5 min
Carrera 1,5 min
Carrera 1,5 min
Caminata 2 min
Caminata 2 min
Caminata 2 min
Enfriamiento 5 min
Enfriamiento 5 min
Enfriamiento 5 min
3
Calentamiento 5 min
Calentamiento 5 min
Calentamiento 5 min
Carrera 1,5 min
Carrera 1,5 min
Carrera 1,5 min
Caminata 1,5 min
Caminata 1,5 min
Caminata 1,5 min
Carrera 3 min
Carrera 3 min
Carrera 3 min
Caminata 3 min
Caminata 3 min
Caminata 3 min
Carrera 1,5 min
Carrera 1,5 min
Carrera 1,5 min
Caminata 1,5 min
Caminata 1,5 min
Caminata 1,5 min
Carrera 3 min
Carrera 3 min
Carrera 3 min
Caminata 3 min
Caminata 3 min
Caminata 3 min
Enfriamiento 5 min
Enfriamiento 5 min
Enfriamiento 5 min
Velocidad de calentamiento y enfriamiento: 1,5 km/h o 75 % de la velocidad de caminata
(la que sea mayor)
Semana
Entrenamiento n.º 1
Entrenamiento n.º 2
Entrenamiento n.º 3
4
Calentamiento 5 min
Calentamiento 5 min
Calentamiento 5 min
Carrera 3 min
Carrera 3 min
Carrera 3 min
Caminata 1,5 min
Caminata 1,5 min
Caminata 1,5 min
Carrera 5 min
Carrera 5 min
Carrera 5 min
Caminata 2,5 min
Caminata 2,5 min
Caminata 2,5 min
Carrera 3 min
Carrera 3 min
Carrera 3 min
Caminata 1,5 min
Caminata 1,5 min
Caminata 1,5 min
Carrera 5 min
Carrera 5 min
Carrera 5 min
Enfriamiento 5 min
Enfriamiento 5 min
Enfriamiento 5 min
5
Calentamiento 5 min
Calentamiento 5 min
Calentamiento 5 min
Carrera 5 min
Carrera 5 min
Carrera 5 min
Caminata 3 min
Caminata 3 min
Caminata 3 min
Carrera 5 min
Carrera 5 min
Carrera 5 min
Caminata 3 min
Caminata 3 min
Caminata 3 min
Carrera 5 min
Carrera 5 min
Carrera 5 min
Enfriamiento 5 min
Enfriamiento 5 min
Enfriamiento 5 min
6
Calentamiento 5 min
Calentamiento 5 min
Calentamiento 5 min
Carrera 5 min
Carrera 10 min
Carrera 25 min
Caminata 3 min
Caminata 3 min
Enfriamiento 5 min
Carrera 8 min
Carrera 10 min
Caminata 3 min
Enfriamiento 5 min
Carrera 5 min
Enfriamiento 5 min
7
Calentamiento 5 min
Calentamiento 5 min
Calentamiento 5 min
Carrera 25 min
Carrera 25 min
Carrera 25 min
Enfriamiento 5 min
Enfriamiento 5 min
Enfriamiento 5 min
8
Calentamiento 5 min
Calentamiento 5 min
Calentamiento 5 min
Carrera 28 min
Carrera 28 min
Carrera 28 min
Enfriamiento 5 min
Enfriamiento 5 min
Enfriamiento 5 min
9
Calentamiento 5 min
Calentamiento 5 min
Calentamiento 5 min
Carrera 30 min
Carrera 30 min
Carrera 30 min
Enfriamiento 5 min
Enfriamiento 5 min
Enfriamiento 5 min
Velocidad de calentamiento y enfriamiento: 1,5 km/h o 75 % de la velocidad de caminata
(la que sea mayor)
susprimeros 5km o simplemente comenzar con una rutina de ejercicios. Se ha concebido específicamente para mantenerlo
motivado y comprometido, ya que le permitirá aumentar su fuerza y resistencia progresivamente y obtener la confianza
necesariapara completar sus primeros 5km.
82

QUEMAR GRASAS: este programa permite realizar entrenamientos relativamente lentos y constantes para alcanzar sus objetivos.
Nivel 9
Segmento
Calentamiento
Nivel 7
Nivel 8
Nivel 10
Tiempo
4:00 min
Nivel 1
Nivel 2
Nivel 6
Nivel 3
Nivel 4
Nivel 5
Favorece la pérdida de peso al aumentar y disminuir la velocidad y la inclinación, siempre dentro del rango de quema de grasas.
La inclinación y la velocidad cambian, los segmentos se repiten cada 30 segundos.
1 2 3 4 5 6 7 8
Inclinación 0 0,5 1,5 1,5 1 0,5 0,5 0,5 1 1,5
Velocidad 0,5 1,5 2 2,5 3 3,5 4 3,5 3 2,5
Inclinación 0 0,5 1,5 1,5 1 0,5 1 0,5 1 1,5
Velocidad 0,5 1,9 2,5 3 3,5 4 4,5 4 3,5 3
Inclinación 0,5 1 2 2 1,5 1 1 1 1,5 2
Velocidad 0,5 2,3 3 3,5 4 4,5 5 4,5 4 3,5
Inclinación 0,5 1 2 2 1,5 1 1 1 1,5 2
Velocidad 1 2,6 3,5 4 4,5 5 5,5 5 4,5 4
Inclinación 1 1,5 2,5 2,5 2 1,5 1,5 1,5 2 2,5
Velocidad 1 3 4 4,5 5 5,5 6 5,5 5 4,5
Inclinación 1 1,5 2,5 2,5 2 1,5 1,5 1,5 2 2,5
Velocidad 1 3,4 4,5 5 5,5 6 6,5 6 5,5 5
Inclinación 1,5 2 3 3 2,5 2 2 2 2,5 3
Velocidad 1,4 3,8 5 5,5 6 6,5 7 6,5 6 5,5
Inclinación 1,5 2 3 3 2,5 2 2 2 2,5 3
Velocidad 1,4 4,1 5,5 6 6,5 7 7,5 7 6,5 6
Inclinación 2 2,5 3,5 3,5 3 2,5 2,5 2,5 3 3,5
Velocidad 1,4 4,5 6 6,5 7 7,5 8 7,5 7 6,5
Inclinación 2 2,5 3,5 3,5 3 2,5 2,5 2,5 3 3,5
Velocidad 1,4 4,9 6,5 7 7,5 8 8,5 8 7,5 7
30 s 30 s 30 s 30 s 30 s 30 s 30 s 30 s
PERSONALIZADO: le permitirá crear o volver a realizar ese entrenamiento que tan bien le funciona gracias a la combinación
de una velocidad, una inclinación, un tiempo o una distancia específicos. Lo último en programación
personalizada: un programa de objetivos basado en el tiempo y la distancia.
83

Calentamiento
PERFILES DE OBJETIVO
DISTANCIA: esfuércese y trate de ir más allá con las 13 distancias de entrenamiento. Escoja entre objetivos de 1 milla, 2 millas,
5km, 5 millas, 10km, 8 millas, 15km, 10 millas, 20km, media maratón, 15 millas, 20 millas y maratón. Marque su propio ritmo.
Los cambios de inclinación y los segmentos son de 0,1millas.
Segmento
Distancia
Nivel 1
Nivel 2
Nivel 3
Nivel 4
Nivel 5
Nivel 6
Nivel 7
Nivel 8
Nivel 9
Nivel 10
Segmento 1 2 3 4 5 6 7 8 9 10 11 12 13 14 15
Calorías 20 cal 20 cal 20 cal 20 cal 20 cal 20 cal 20 cal 20 cal 20 cal 20 cal 20 cal 20 cal 20 cal 20 cal 20 cal 20 cal 20 cal
Nivel 1 0 0 0 0 0 0 0 0 0 0 0 0 0 0 0 0 0
Nivel 2 0 0,5 1 3 2 3 2 3 2,5 3,5 2,5 3 2 3 2 3 1
Nivel 3 0,5 1 1,5 3,5 1,5 3,5 2,5 3,5 2,5 4 2,5 3,5 2,5 3,5 1,5 3,5 1,5
Nivel 4 0,5 1 1,5 3,5 2,5 3,5 2,5 3,5 3 4 3 3,5 2,5 3,5 2,5 3,5 1,5
Nivel 5 1 1,5 2 4 2 4 3 4 3 4,5 3 4 3 4 2 4 2
Nivel 6 1 1,5 2 4 3 4 3 4 3,5 4,5 3,5 4 3 4 3 4 2
Nivel 7 1,5 2 2,5 4,5 2,5 4,5 3,5 4,5 3,5 5 3,5 4,5 3,5 4,5 2,5 4,5 2,5
Nivel 8 1,5 2 2,5 4,5 3,5 4,5 3,5 4,5 4 5 4 4,5 3,5 4,5 3,5 4,5 2,5
Nivel 9 2 2,5 3 5 3 5 4 5 4 5,5 4 5 4 5 3 5 3
Nivel 10 2 2,5 3 5 4 5 4 5 4,5 5,5 4,5 5 4 5 4 5 3
Calentamiento
0,1 mi
0,1 mi
0
0
0,5
0,5
1
1
1,5
1,5
2
2
0,5
1,5
1,5
2,5
2,5
1
2
3
4
5
6
7
8
9
10
11
12
13
1,5
2,5
2,5
3,5
14
0,1 mi
0
0
2
3
3,5
3,5
2
4
3
4
4,5
4,5
3
5
4
5
0,1 mi
0,1 mi
0,1 mi
0,1 mi
0,1 mi
0,1 mi
0,1 mi
0,1 mi
0,1 mi
0,1 mi
0,1 mi
0,1 mi
3,5
3,5
4,5
4,5
0,1 mi
0
3
4
4
5
5
0
0
1,5
1
1,5
1
2,5
2
2,5
2
0
0
0
0
0
0
0
0
0
1
3
2
3
2
3
2,5
3,5
4,5
4,5
5,5
5,5
2,5
4
2,5
4
3
3
3,5
5
3,5
5
4
4
4,5
3,5
1,5
3,5
2,5
3,5
3,5
2,5
3,5
4,5
4,5
2,5
4
3
4
3
3,5
3,5
5
4
5
4
2
4
2
4,5
4,5
3
3
2
4
3
2,5
3,5
5
3
5
4
3,5
4,5
4,5
2,5
3
4
3
4
3,5
3,5
4
5
4
5
4,5
3,5
3,5
4,5
4,5
0
3
2
2,5
2,5
4
3
4
3
3,5
3,5
5
4
5
4
CALORÍAS: fíjese objetivos para quemar entre 20 y 980 calorías, con incrementos de 20 calorías. Marque su propio ritmo, siempre
dentro del rango de quema de grasas.
Los cambios de inclinación y los segmentos son de 20 calorías.
15
0,1 mi
0
1
1,5
1,5
2
2
2,5
2,5
3
3
84

FRECUENCIA CARDÍACA OBJETIVO: este programa se ha diseñado para mejorar los niveles generales de resistencia
cardiovascular. Simplemente, indique su frecuencia cardíaca objetivo. El programa controlará y ajustará el nivel
deintensidad para mantener la frecuencia cardíaca dentro de la zona objetivo mientras hace ejercicio. Este es un método
probado que le permitirá maximizar la pérdida de peso y alcanzar sus objetivos. Debe utilizarse una cinta de pecho
durantetoda la duración del programa. Para calcular su frecuencia cardíaca objetivo, consulte la siguiente información.
Cálculo de la frecuencia cardíaca objetivo
El primer paso para saber la intensidad que deberá aplicar a su entrenamiento es conocer la frecuencia cardíaca máxima que debe
alcanzar (FC máx. = 220 - su edad). Este método basado en la edad proporciona una estimación estadística promedio de la frecuencia
cardíaca máxima que debe alcanzar y, al mismo tiempo, resulta adecuado para la mayoría de personas, especialmente aquellos que acaban
decomenzar a realizar entrenamientos de frecuencia cardíaca.
La forma más precisa y adecuada de determinar la frecuencia cardíaca máxima es comprobarla de forma médica, con un cardiólogo
ofisiólogo del ejercicio, mediante una prueba de esfuerzo máximo. Si tiene más de 40 años, sobrepeso, ha sido sedentario durante varios
años o cuenta con un historial de enfermedades del corazón en su familia, le recomendamos dicha prueba médica.
Esta tabla ofrece ejemplos del rango de frecuencia cardíaca para una persona de 30 años que ejercita cinco zonas de frecuencia cardíaca
diferentes. Por ejemplo, la frecuencia cardíaca máxima total para una persona de 30 años será 220-30 = 190p.p.m., mientras que el 90%
de dicho valor será 190 x 0,9 = 171 p.p.m.
Notas adicionales sobre la frecuencia cardíaca objetivo:
La inclinación de la cinta se ajusta automáticamente para cumplir
con la frecuencia cardíaca objetivo deseada.
Si no se detecta la frecuencia cardíaca, la unidad no cambiará
lainclinación.
Si su frecuencia cardíaca se encuentra 25 pulsaciones por encima
del objetivo, el programa se desactivará.
Zona de frecuencia
cardíaca objetivo
MUY INTENSO
(90-100%)
INTENSO
(80-90%)
MODERADO
(70-80%)
SUAVE
(60-70 %)
MUY SUAVE
(50-60%)
Duración del
entrenamiento
<5 min
2-10min
10-40min
40-80min
20-40min
Ejemplo de
frecuencia cardíaca
objetivo (30 años)
171-190
p.p.m.
152-171
p.p.m.
133-152
p.p.m.
114-133
p.p.m.
104-114
p.p.m.
Su frecuencia
cardíaca objetivo
Recomendado para
Personas en forma,
entrenamientos atléticos
Entrenamientos
más cortos
Entrenamientos
relativamente largos
Ejercicios más largos
y ejercicios cortos
repetidos con frecuencia
Control del peso
y recuperación activa
85

FRECUENCIA CARDÍACA PERSONALIZADA: este programa le permitirá establecer la frecuencia cardíaca para un determinado
período. El programa ajustará la inclinación para mantener la frecuencia cardíaca dentro de zona objetivo. Desarrolle múltiples
objetivos de frecuencia cardíaca en un programa completo que le ayudará a alcanzar sus objetivos cardiovasculares. El tiempo del
programa total incluye un calentamiento de 4 minutos y un tiempo de reposo de 4minutos. Las frecuencias cardíacas personalizadas
que haya seleccionado se repetirán después del calentamiento hasta 4 minutos antes de que se agote el tiempo total.
SPRINTS 8: un programa basado en tiempo que permite seleccionar un nivel. Después del calentamiento, el programa activará
durante 30segundos una velocidad y una intensidad elevadas, que alternará con 90segundos a una velocidad de recuperación
menor. Los niveles en aumento le permitirán mantener un alto consumo de calorías y aumentar la velocidad global de la carrera.
TABLA DEL PROGRAMA SPRINT 8 DE LA CINTA
La velocidad cambia y los segmentos se repiten cada 90 y 30 segundos.
86

REINICIAR LA CONSOLA
Mantenga pulsado el botón PARAR durante 3 segundos.
FINALIZAR EL ENTRENAMIENTO
Cuando complete el entrenamiento, la unidad emitirá un pitido. La información del entrenamiento permanecerá en la consola durante
30segundos y, a continuación, se reiniciará.
UTILIZAR UN REPRODUCTOR DE MÚSICA
La cinta 7.4AT Treadmill se conectará y reproducirá la música de los reproductores de música compatibles, incluidos numerosos teléfonos
inteligentes y reproductores mp3 tradicionales como iPod®.
La cinta 7.4AT Treadmill incluye altavoces Bluetooth. Los dispositivos Bluetooth compatibles (funciona con Bluetooth 4.0) pueden reproducir
música del dispositivo de forma inalámbrica a través de los altavoces. También puede conectar un reproductor de música por medio de un
cable de audio y seguir reproduciendo música a través de los altavoces. Las instrucciones para ambos tipos de conexión de audio se detallan a
continuación.
CONEXIÓN BLUETOOTH 4.0LE
1) Compruebe que su reproductor de música es compatible con Bluetooth 4.0.
2) Acceda a los ajustes de Bluetooth del reproductor y busque otros dispositivos.
3) Busque la lista de dispositivos con Bluetooth en el reproductor y seleccione la unidad que aparezca.
Espere a que su reproductor se vincule a la unidad.
4) La vinculación habrá finalizado cuando el reproductor indique que la unidad se ha vinculado.
APAGAR Y VOLVER A ENCENDER LA UNIDAD
Si apaga la unidad o esta entra en modo de suspensión, la próxima vez que se encienda buscará automáticamente el último reproductor de música
con el que se vinculó y se vinculará de nuevo automáticamente.
VOLVER A VINCULAR UN REPRODUCTOR DE MÚSICA
Si la unidad no puede encontrar el último reproductor de música vinculado (por ejemplo, si está apagado o no se está utilizando), dejará de intentar
vincularse con él. En caso de que esto suceda y desee volver a utilizar el reproductor, deberá repetir el proceso mencionado anteriormente y volver
avincularlo a través de la configuración del reproductor.
UTILIZAR VARIOS REPRODUCTORES DE MÚSICA
Si se están vinculando varios reproductores con la unidad (es decir, si varios usuarios utilizan la unidad y vinculan sus dispositivos de música), esta
intentará vincularse al último dispositivo utilizado y «olvidar» el resto de dispositivos. Si desea volver a vincular un reproductor de música «olvidado»,
deberá desvincular el dispositivo que esté vinculado en el momento y volver a asociar el suyo mediante el procedimiento descrito anteriormente.
87

88
CONEXIÓN POR CABLE DE AUDIO
1) Conecte el CABLE ADAPTADOR PARA AUDIO suministrado en la CLAVIJA DE ENTRADA DE AUDIO situada en la parte superior derecha
de la consola y en la clavija para auriculares de su reproductor multimedia.
2) Utilice los botones del reproductor de CD/MP3 para configurar los ajustes de las pistas de audio.
3) Desconecte el CABLE ADAPTADOR PARA AUDIO si no lo está utilizándolo.
4) Si no quiere utilizar los ALTAVOCES, puede conectar los auriculares en la CLAVIJA DE SALIDA DE AUDIO situada en la parte inferior de la consola.
De esta manera, si engancha por accidente el cable de los auriculares mientras corre, el dispositivo no se caerá al suelo.
SISTEMA AFG FITNESS CONECTADO PARA TABLET
La unidad Horizon admite el uso de tablets, por lo que podrá utilizar la tecnología Bluetooth 4.0 para conectar su tablet a la unidad Horizon de forma
inalámbrica. Al utilizar la aplicación de descarga gratuita AFG PRO FITNESS, podrá controlar las funciones operativas de la unidad a través de la
tablet. La aplicación también le permitirá supervisar su entrenamiento, realizar el seguimiento de sus avances y visualizar su historial de entrenamiento.
La aplicación AFG PRO FITNESS se puede descargar desde iTunes Store (dispositivos iOS) o desde la Google Store (dispositivos Android).
Para obtener información sobre la conexión de la tablet a la unidad Horizon, configurar la aplicación AFG PRO FITNESS y controlar y supervisar
losentrenamientos con la tablet, consulte el manual de AFG Fitness Conectado que se incluye con su unidad.
CONTROL DE LA FRECUENCIA CARDÍACA POR BLUETOOTH
La cinta 7.4AT Treadmillestá equipada con la función Bluetooth multicanal, que le permitirá conectar por Bluetooth dispositivos
desupervisión de la frecuencia cardíaca compatibles de forma inalámbrica a esta unidad. Necesitará asegurarse de que el dispositivo
inalámbrico de control de frecuencia cardíaca es compatible con Bluetooth 4.0 y de que está «abierto» para compartir datos.
Losdispositivos que no estén «abiertos» o que estén «cerrados» solo permiten compartir datos con las aplicaciones del propietario.
La cinta 7.4AT Treadmill necesita un dispositivo «abierto» para recibir los datos de este. Puede que sea necesario consultar el manual
deusuario ofabricante del dispositivo para confirmar que se trata de un dispositivo «abierto».
En caso de que esté utilizando una tablet y ejecutando la aplicación AFG PRO FITNESS, el dispositivo compatible de monitorización
de la frecuencia cardíaca por Bluetooth se asociará automáticamente con la aplicación. Después, la consola de la unidad recibirá la
información dela frecuencia cardíaca desde su tablet. En caso de que quiera utilizar el dispositivo de supervisión de la frecuencia cardíaca
por Bluetooth sin una tablet con la aplicación AFG PRO FITNESS, mantenga pulsado el botón de Bluetooth de la consola durante
5segundos. Esto permitirá a la consola comunicarse directamente con el dispositivo de supervisión de la frecuencia cardíaca por Bluetooth.
En la pantalla dela consola, se mostrará la información sobre la frecuencia cardíaca. Cuando se encuentre en modo de monitorización
de la frecuencia cardíaca, la consola no podrá establecer comunicación con la tablet. Para habilitar la comunicación con una tablet,
mantenga pulsado elbotón de Bluetooth de la consola durante 5 segundos o reinicie la unidad.

GARANTÍA LIMITADA AL USO
DOMÉSTICO
89

CAPACIDAD DE PESO = 350lb (158kg)
EXCLUSIONES Y LIMITACIONES
90
BASTIDOR • TODA LA VIDA
Horizon Fitness ofrece una garantía del bastidor frente a los
defectos de mano de obra y del material durante toda la vida
del propietario original, siempre y cuando el dispositivo siga
estando en posesión del propietario original. (Por bastidor
se entiende la base metálica soldada de la unidad; no incluye
ninguna pieza que se pueda extraer.)
MOTOR • TODA LA VIDA
Horizon Fitness ofrece una garantía del motor frente a los
defectos de mano de obra y del material durante toda la vida
del propietario original, siempre y cuando el dispositivo siga
estando en posesión del propietario original. La garantía del
motor no cubre la mano de obra ni la instalación del motor.
COMPONENTES ELECTRÓNICOS Y PIEZAS • 5 AÑOS
Horizon Fitness ofrece una garantía de los componentes
eléctricos, así como de las piezas originales y terminadas,
durante un periodo de tres años a partir de la fecha de compra
original, siempre y cuando el dispositivo siga en posesión
delpropietario original.
MANO DE OBRA • 2 AÑOS
Horizon Fitness cubrirá todos los costes de mano deobra
destinados a la reparación del dispositivo durante
unperíodo deun año a partir de la fecha de compra original,
siempre ycuando el dispositivo continúe en posesión del
propietariooriginal.
A quién CUBRE la garantía:
• La garantía cubre al propietario original y no es transferible.
Qué CUBRE la garantía:
• Las reparaciones o el recambio de un motor, componente
electrónico o pieza defectuosos, lo cual constituirá el único
recurso de la garantía.
Qué NO CUBRE la garantía:
• El desgaste normal, los problemas surgidos a raíz de un
montaje o mantenimiento inadecuados o de la instalación
de piezas o accesorios no concebidos originalmente para
elequipo tal y como se comercializa o no compatibles con él.
• Los daños o fallos provocados por accidentes; el uso indebido
del equipo; la corrosión; la decoloración de la pintura o
el plástico; negligencias; robos; actividades vandálicas;
incendios; inundaciones, vientos, rayos eléctricos, heladas
uotros desastres naturales de cualquier tipo; la reducción
de la potencia y la fluctuación o el fallo eléctricos provocado
por cualquier motivo; las condiciones atmosféricas inusuales;
los choques, la introducción de objetos extraños en la unidad
cubierta por la garantía o la realización de modificaciones
noautorizadas o no recomendadas por Horizon Fitness.
• Los daños accidentales o consecuentes. Horizon Fitness
no es responsable de los daños indirectos, especiales
oconsecuentes; de las pérdidas económicas, de
propiedad, de beneficios, de disfrute o de uso; ni de otros
daños consecuentes de cualquier tipo relacionados con
laadquisición, el uso, la reparación o el mantenimiento
del equipo. Horizon Fitness no ofrece compensaciones

monetarias ni de otro tipo para sufragar los costes
delas reparaciones o las piezas de repuesto, entre otras,
enconcepto de cuotas de inscripción en gimnasios, tiempo
de trabajo perdido, visitas de los servicios de diagnóstico
omantenimiento, o el transporte.
• Los equipos que se utilicen para fines comerciales o que
nosean utilizados por una sola familia o unidad doméstica,
amenos que Horizon Fitness autorice su cobertura.
• Los equipos adquiridos o utilizados fuera de España y Portugal.
• La entrega, el montaje, la instalación, la configuración de
unidades originales o de repuesto, la mano de obra u otros
gastos relacionados con la retirada o la sustitución de la unidad
cubierta por la garantía.
• Cualquier intento de reparar este equipo conlleva un riesgo de
lesiones. Horizon Fitness no es responsable de ningún daño,
pérdida o inconveniente derivado de cualquier lesión personal
sufrida durante o tras una reparación, o intento de reparación,
de su equipo de entrenamiento por parte de alguien que
no sea un técnico de mantenimiento autorizado. Todas las
reparaciones que intente realizar usted mismo en el equipo de
entrenamiento serán realizadas POR SU CUENTA Y RIESGO, y
Horizon Fitness no asumirá responsabilidad alguna por ningún
daño personal o material derivado de dichas reparaciones.
• Si su garantía del fabricante ya ha caducado, pero dispone
de una garantía ampliada, consulte su contrato de garantía
ampliada para obtener la información de contacto necesaria
para solicitar reparaciones o servicios de la garantía ampliada.
SERVICIO Y DEVOLUCIONES
• Hay disponible servicio a domicilio para aquellos clientes que
se encuentran a menos de 240km del proveedor de servicios
autorizado más cercano (el kilometraje a partir de los 240km
de un centro de servicio autorizado será responsabilidad
delcliente).
• Todas las devoluciones deben contar con una autorización
previa de Horizon Fitness.
• En virtud de esta garantía, la única obligación de Horizon
Fitness se limita a sustituir o reparar, de acuerdo con el
criterio de Horizon Fitness, el mismo modelo u otro similar.
• Horizon Fitness puede solicitar que se le devuelvan
loscomponentes defectuosos una vez finalizado el servicio
delagarantía utilizando una etiqueta de devolución
prepagada. Si le han indicado que debe devolver las piezas,
pero no ha recibido ninguna etiqueta, póngase en contacto
con elservicio de asistencia técnica.
• En ocasiones, podrán suministrarse como repuestos
degarantía unidades, piezas y componentes electrónicos
de repuesto reacondicionados por el fabricante o sus
distribuidores de tal manera que se encuentran en un estado
equivalente al nuevo, lo cual constituirá el cumplimiento
delas condiciones de la garantía.
• Esta garantía le otorga derechos jurídicos específicos,
loscuales pueden variar entre los distintos estados.
91

STOP
ARRÊTER
PARAR
PARAR
ARRÊTER
PARAR
CUSTOMER
TECH SUPPORT
DO NOT RETURN TO THE RETAILER
if you have any problems during assembly or
if parts are missing.
For fast and friendly service, please contact
one of our trained customer technicians via
phone, email or our website.
We want to know if you have a problem and
we want to have an opportunity to correct it
for you.
NOTE: Please read the TROUBLESHOOTING
section in the TREADMILL GUIDE before
contacting Customer Tech Support.
Additional product information is available on
our website.
NE PAS RETOURNER L’APPAREIL AU DÉTAILLANT
en cas de difficulté lors de l´assemblage ou si des pièces
manquent.
Pour obtenir un service rapide et utile, veuillez communiquer
avec un de nos techniciens formés au soutien à la clientèle par
téléphone, courriel ou notre site Web.
Si vous avez un problème, n´hésitez pas à nous contacter afin
que nous puissions vous aider à le résoudre.
REMARQUE: lire la section DÉPANNAGE du GUIDE
D´UTILISATION DU TAPIS ROULANT avant de communiquer
avec l´assistance technique. Des renseignements
supplémentaires sur le produit sont disponibles sur notre site
Web.
ASSISTANCE
TECHNIQUE
USA & CANADA:
1-855-396-2524
techsupport@horizonfitness.com
www.horizonfitness.com
Horizon 7.4AT 05272020 © 2019 Horizon Fitness
Designed & Engineered in the U.S.A. • Made in China | Conçu et élaboré aux États-Unis. • Fabriqué en Chine | Diseñado en los EE.UU. • Hecho en China
SERVICIO DE ASISTENCIA
TÉCNICA PARA CLIENTES
NO DEVOLVER AL VENDEDOR
si tiene algún inconveniente durante el armado o si faltan
piezas.
Para obtener un servicio rápido y grato, comuníquese con
uno de nuestros técnicos capacitados para la atención de
clientes vía teléfono, correo electrónico o nuestro sitio
web.
Queremos saber si tiene un problema y queremos tener la
oportunidad de corregirlo para usted.
NOTA: Antes de comunicarse con el Servicio de asistencia
técnica para clientes, lea la sección de RESOLUCIÓN
DE PROBLEMAS en la GUÍA DE LA CAMINADORA.
En nuestro sitio web hay información adicional sobre el
producto.
Horizon Fitness
1600 Landmark Drive,
Cottage Grove WI, 53527
 Loading...