

Page 1
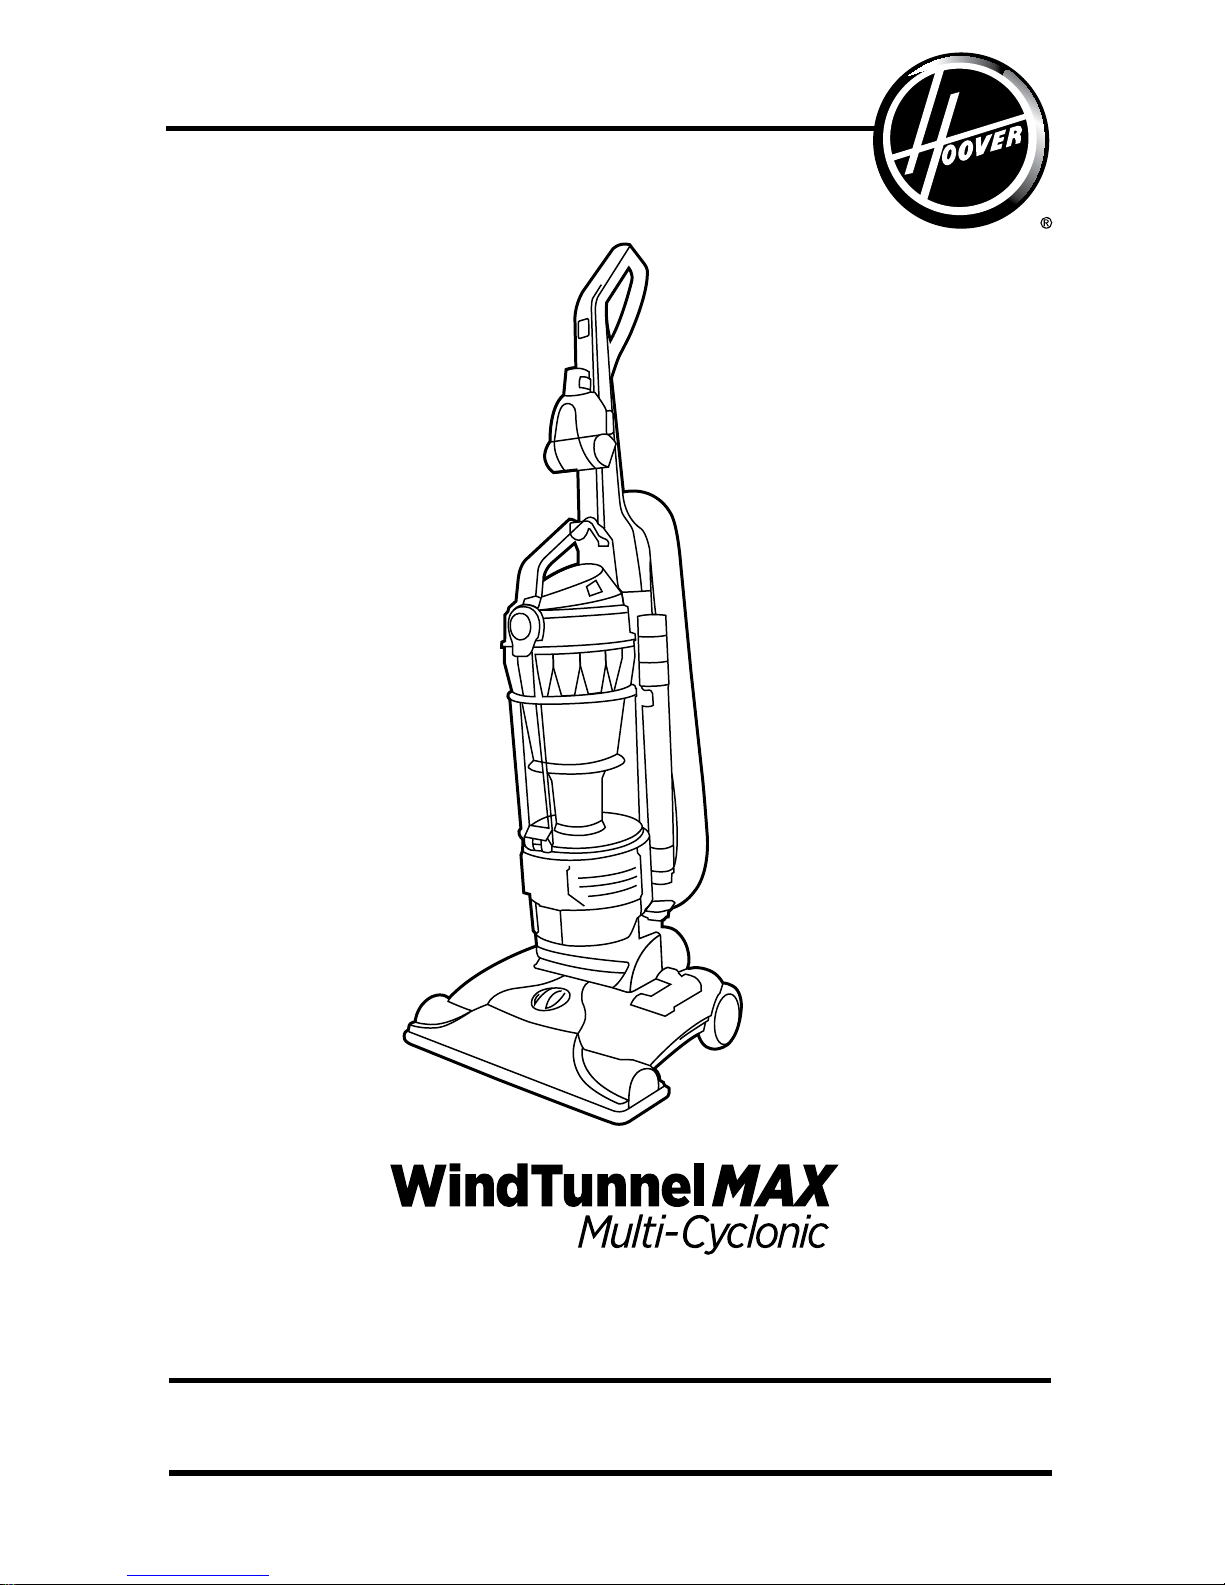
hoover.com
OWNER’S MANUAL
Operating and Servicing Instructions
©2011 Techtronic Floor Care Technology Limited. All Rights Reserved. #961132001 ID101356-R0
THIS PRODUCT IS INTENDED FOR HOUSEHOLD USE ONLY.
IF USED COMMERCIALLY WARRANTY IS VOID.
Español - página E1
IMPORTANT: READ CAREFULLY BEFORE ASSEMBLY AND USE.
Questions or concerns? For assistance, please call Customer Service at 1-800-944-9200
Mon-Fri 8am-7pm EST. PLEASE DO NOT RETURN THIS PRODUCT TO THE STORE.
Page 2
Important Safety Instructions....................................................................................3
Vacuum Assembly ......................................................................................................5
Carton Contents ......................................................................................................5
Attach Handle ..........................................................................................................5
Attach Dirt Cup ........................................................................................................ 5
Position Tools ..........................................................................................................5
How To Use .................................................................................................................6
Vacuum Description .................................................................................................6
On-Off Switch .......................................................................................................... 6
Suction Only Mode/ Brushroll Shut-Off ....................................................................6
Cord Rewind and Storage .......................................................................................6
Folding Handle ........................................................................................................7
Transporting Cleaner ...............................................................................................7
Handle Positions ......................................................................................................7
Carpet Height Adjustment ........................................................................................7
Tools ..........................................................................................................................8
Select Proper Tool ...................................................................................................8
Removing Hose .......................................................................................................8
Attach Wand And Tools ...........................................................................................8
How To Clean Tools .................................................................................................8
Stair Cleaning ..........................................................................................................9
Maintenance ................................................................................................................10
Dirt Cup ...................................................................................................................10
Filters .......................................................................................................................11
Brushroll ..................................................................................................................12
Hose ........................................................................................................................13
Air-Powered Hand Tool ...........................................................................................13
Headlight .................................................................................................................13
Belt ..........................................................................................................................14
Troubleshooting .........................................................................................................15
Service .........................................................................................................................16
Warranty ......................................................................................................................17
2
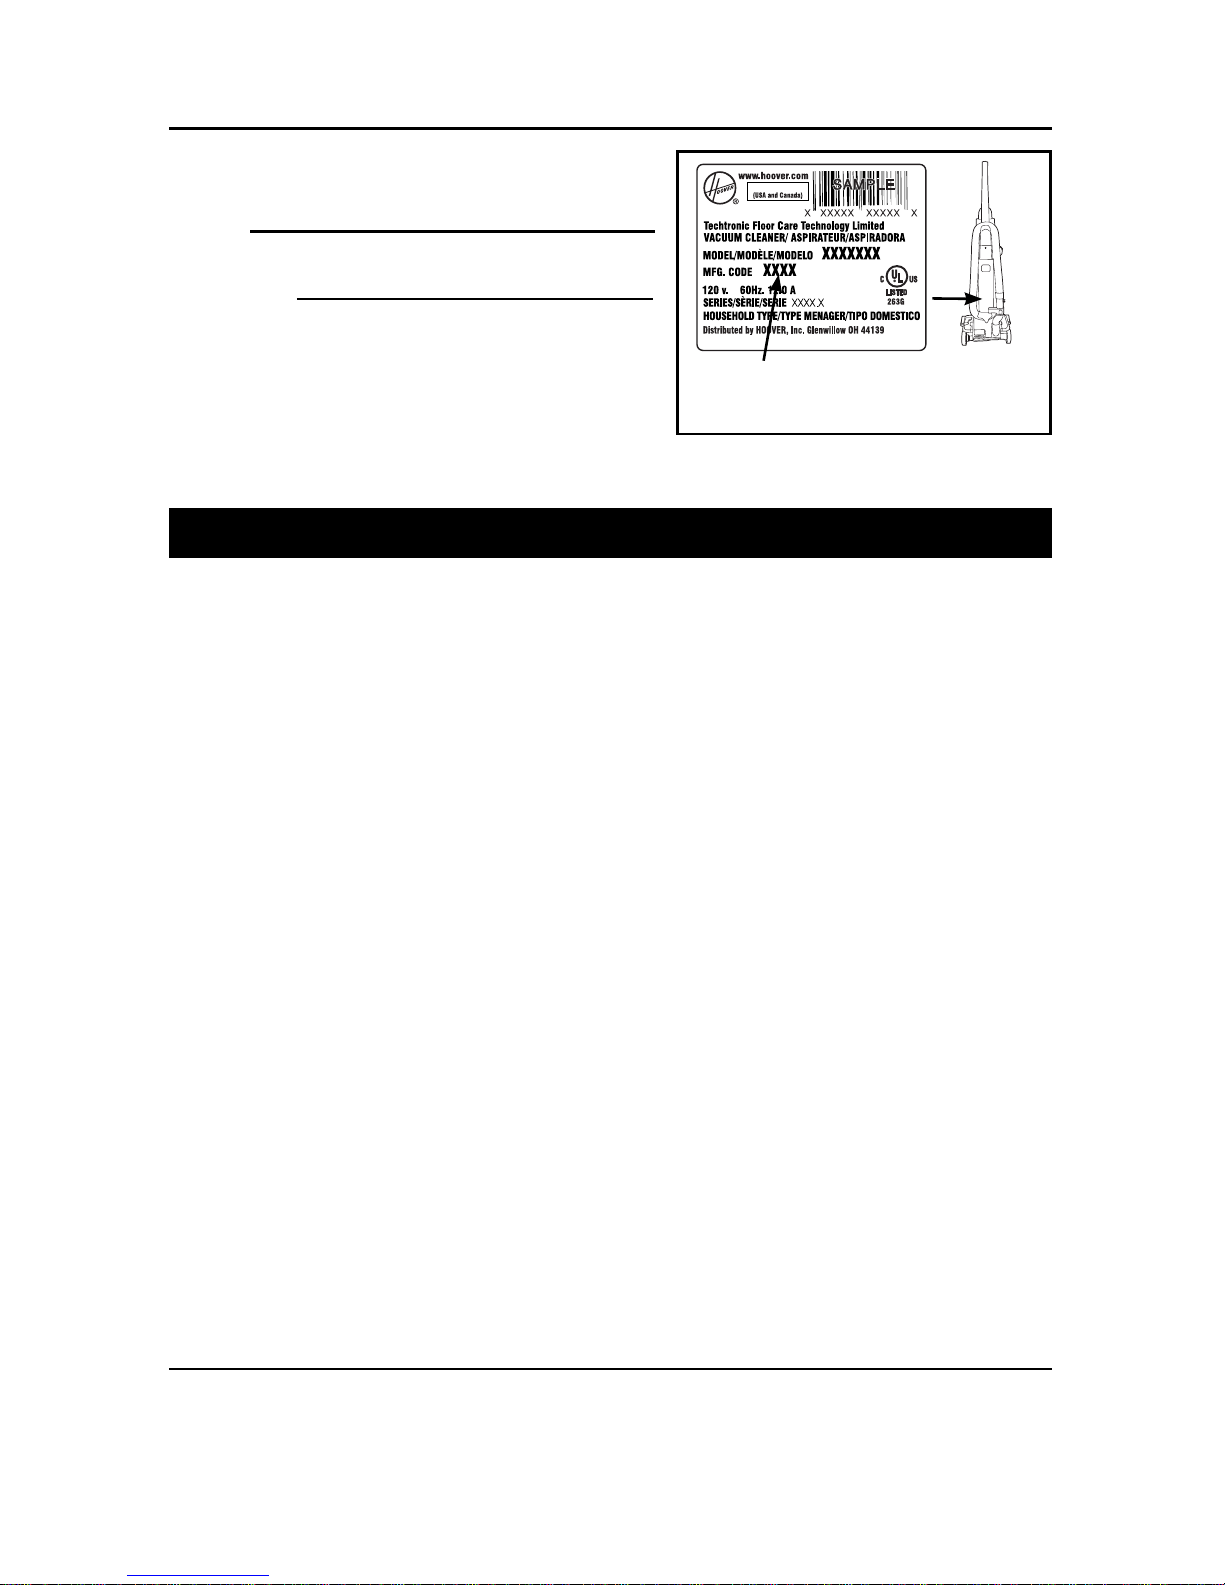
Thank you for choosing a HOOVER® product.
Please enter the complete model and Manufacturing
Code in the spaces provided.
MODEL
MFG. CODE
Hint: Attach your sales receipt to this owner’s manual.
Verification of date of purchase may be required for
warranty service of your HOOVER
®
product.
Be sure to register your product online at Hoover.com or
call 1-800-944-9200 to register by phone. Visit Hoover.com
for additional video instructions for assembly and
maintenance.
1-800-944-9200
Made in Mexico
MANUFACTURING CODE
If you need assistance:
Visit our website at hoover.com. Follow the authorized dealer locator link to find the Hoover® authorized
dealer nearest you or call 1-800-944-9200 for an automated referral of Hoover® authorized dealer
locations (U.S. only) or to speak with a customer service representative; Mon- Fri 8am- 7pm EST.
PLEASE DO NOT RETURN THIS PRODUCT TO THE STORE.
(Label located on back of vacuum)
CONTENTS
Page 3

3
IMPORTANT SAFETY INSTRUCTIONS
SAVE THESE INSTRUCTIONS
When using an electrical appliance, basic precautions should always be
followed, including the following:
READ ALL INSTRUCTIONS BEFORE USING THIS APPLIANCE.
WARNING: TO REDUCE THE RISK OF FIRE,
ELECTRIC SHOCK OR INJURY:
• Fully assemble before operating.
• Operate vacuum only at voltage specified on data label on back of cleaner.
• Do not leave appliance when plugged in. Unplug from outlet when not in use and
before cleaning or servicing.
• Do not use outdoors or on wet surfaces.
• Do not allow to be used as a toy. Not intended for use by children age 12 and under.
Close supervision is necessary when used near children. To avoid injury or damage,
keep children away from product, and do not allow children to place fingers or other
objects into any openings.
• Use only as described in this manual. Use only manufacturer’s recommended
attachments and products.
• Do not use with damaged cord or plug. If appliance is not working as it should, has
been dropped, damaged, left outdoors, or dropped into water, take it to a service
center prior to continuing use.
• Do not pull or carry by cord, use cord as a handle, close a door on cord, or pull cord
around sharp edges or corners. Do not place product on cord. Do not run appliance
over cord. Keep cord away from heated surfaces.
• Do not unplug by pulling on cord. To unplug, grasp the plug, not the cord.
• Do not handle plug or appliance with wet hands.
• Do not put any object into openings. Do not use with any opening blocked; keep free
of dust, lint, hair, and anything that may reduce air flow.
• Keep hair, loose clothing, fingers, and all parts of body away from openings and
moving parts.
• Turn off all controls before unplugging.
• Use extra care when cleaning on stairs. To avoid personal injury or damage, and to
prevent the cleaner from falling, always place cleaner at bottom of stairs on floor.
Do not place cleaner on stairs or furniture, as it may result in injury or damage.
• Do not use to pick up flammable or combustible liquids, such as gasoline, or fine
wood sandings, or use in areas where they may be present.
• Hold plug when rewinding onto cord reel. Do not allow plug to whip when rewinding.
• Unplug before connecting Air-Powered Hand Tool.
• Do not pick up anything that is burning or smoking, such as cigarettes, matches, or
hot ashes.
• Do not use without Dirt Cup and/or Filters in place.
• WARNING: This product contains chemicals known to the State of California to cause
cancer, birth defects or reproductive harm. WASH HANDS AFTER HANDLING.
Page 4

CAUTION: TO REDUCE THE RISK OF DAMAGE:
• Avoid picking up hard, sharp objects with this product, as they may cause damage.
• Store in a dry place. Do not expose machine to freezing temperatures.
• Do not use sharp objects to clean out hose as they can cause damage.
• With brushroll on, do not allow cleaner to sit in one location for an extended period
of time, as damage to floor can result.
WARNING:
• To reduce the risk of electric shock, this appliance has a polarized plug (one blade
is wider than the other). This plug will fit in a polarized outlet only one way. If the
plug does not fit fully in the outlet, reverse the plug. If it still does not fit, contact a
qualified electrican to install the proper outlet. Do not change the plug in any way.
4
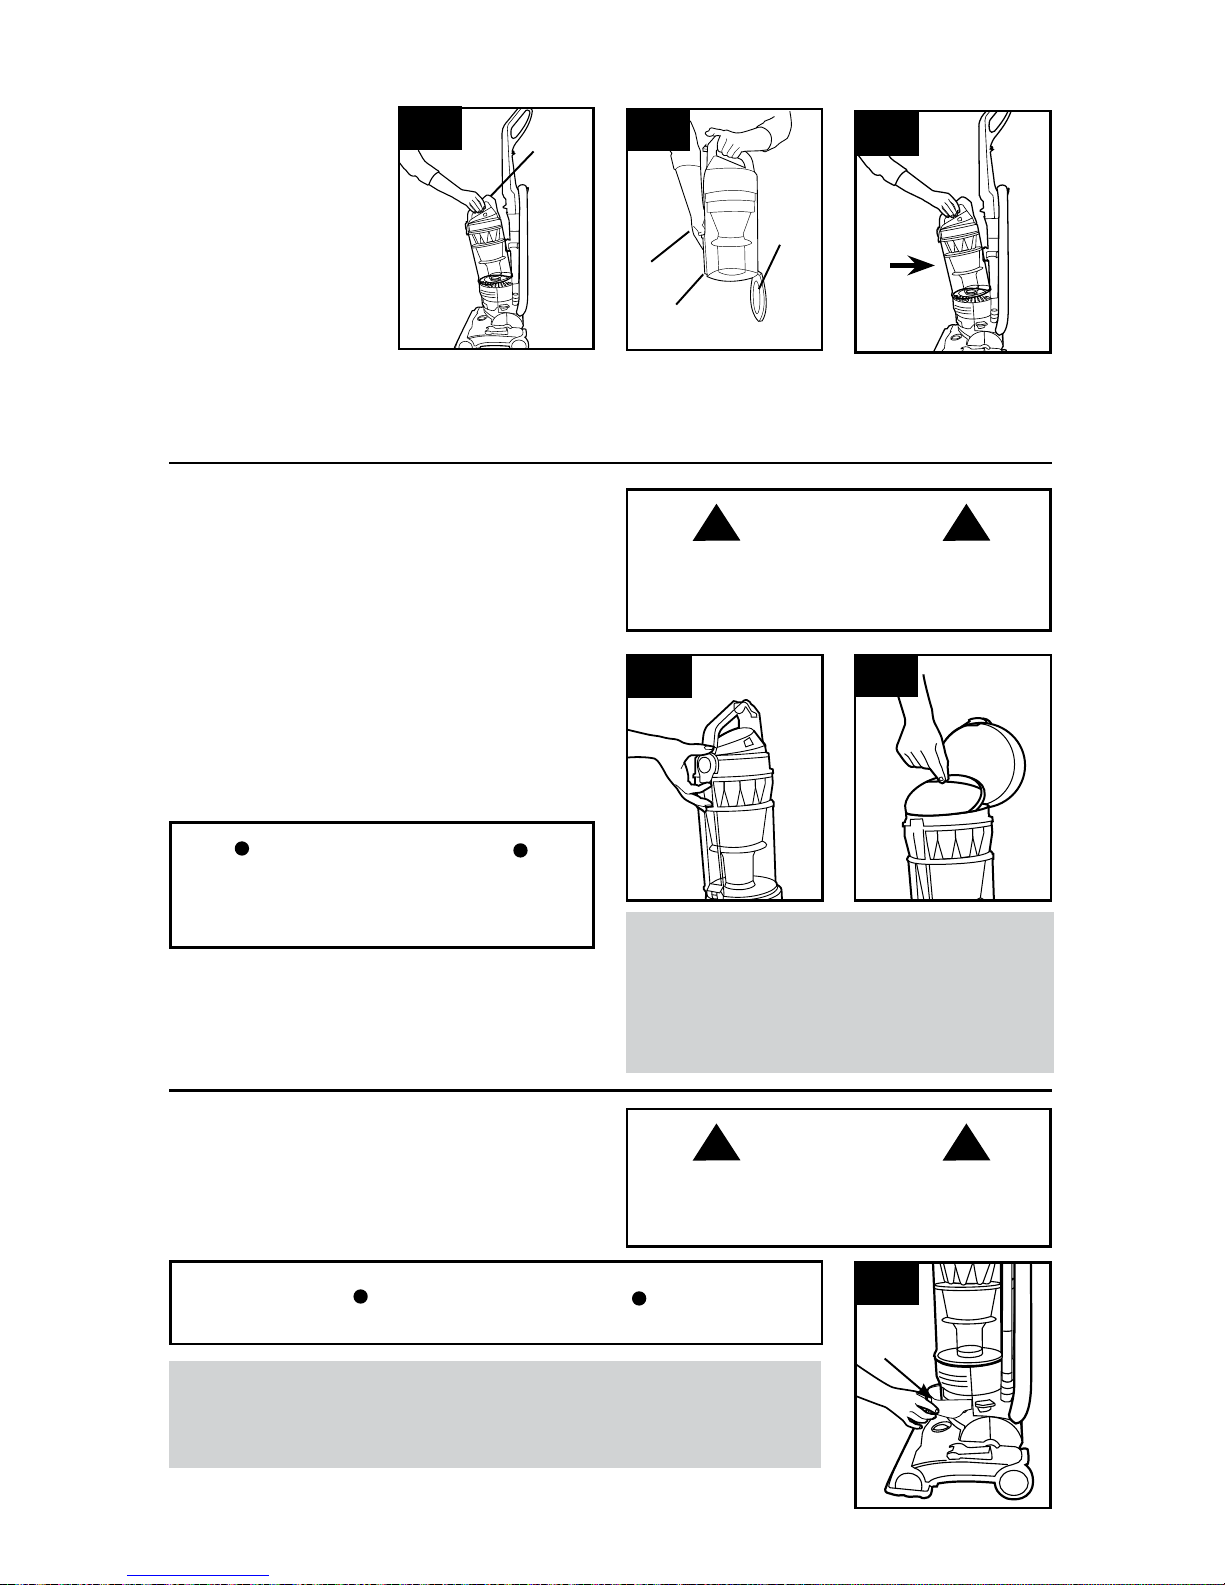
Page 5
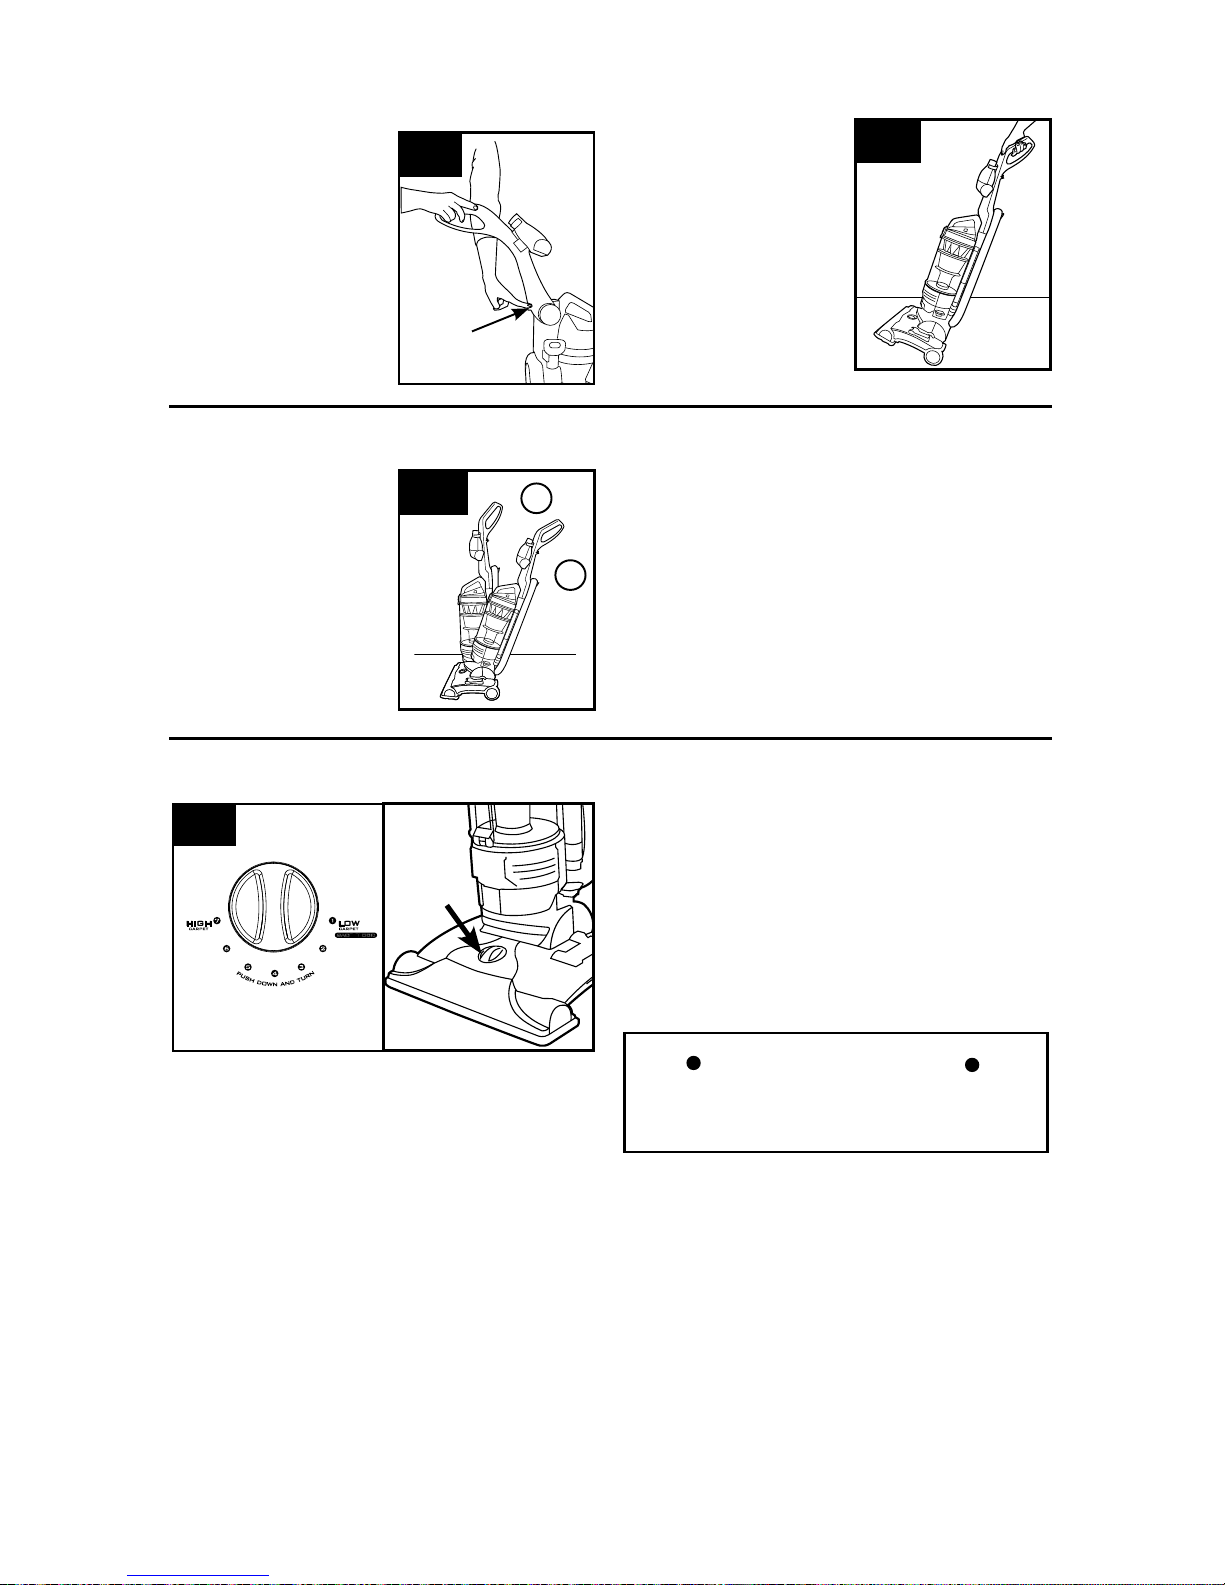
ATTACH HANDLE
(varies per model)
POSITION TOOLS (varies per model)
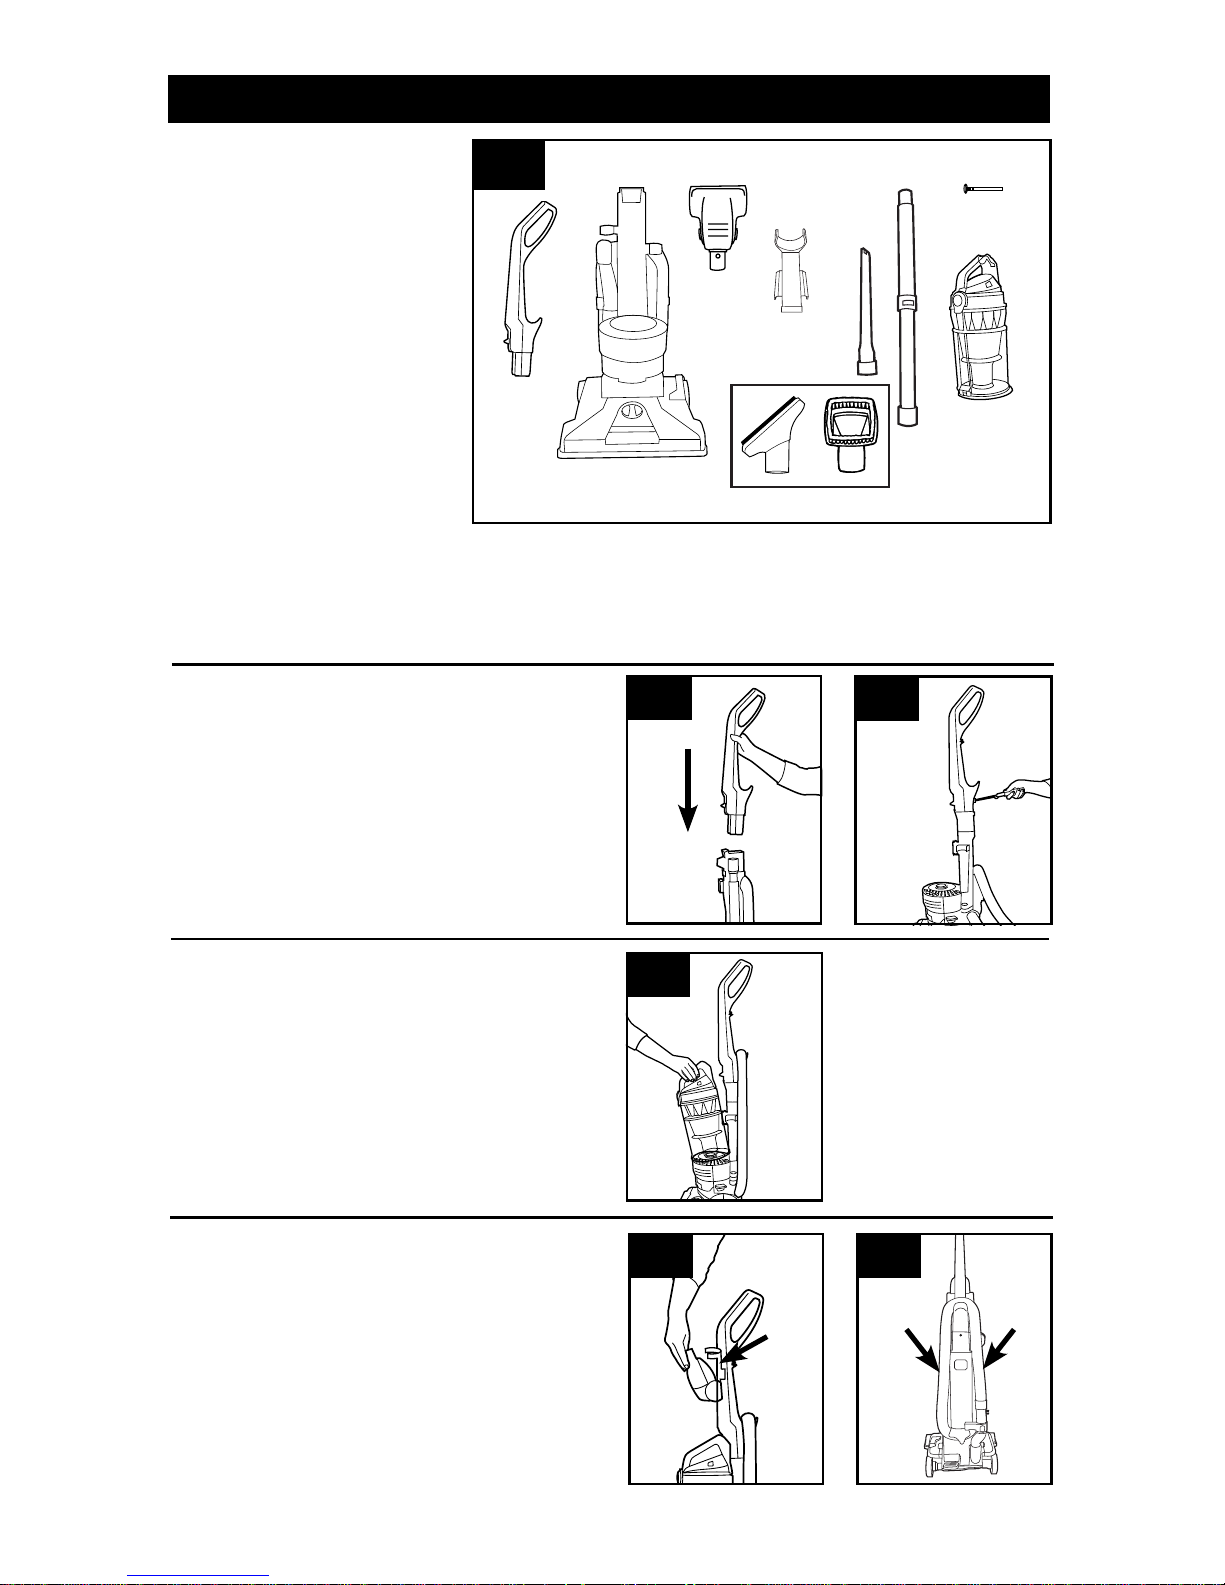
1. VACUUM ASSEMBLY
A. Handle*
B. Vacuum Base
C. Air-Powered Hand Tool*
D. Air-Powered Hand Tool Clip*
E. Crevice T ool
F. Dusting/Upholstery Tool*
G. Extension Wand
H. Screw (for assembly)
I. Dirt Cup
*V aries per model
Remove all parts from carton and
identify each item shown.
Make sure all parts are located
before disposing of packing
materials.
Additional parts may be ordered at
Hoover.com or call 1-800-944-9200.
5
1.3
1.2
Note: Remove the screw located in the vacuum
base and set aside until instruction 1.3
1.2 Insert handle section into vacuum base. Push
down firmly.
1.3 Using a Phillips screwdriver, fasten (1) screw
behind handle into vacuum base.
ATTACH DIRT CUP
1.4
1.4 Place bottom of dirt cup into vacuum body first.
Pivot cup into vacuum. Dirt cup is secure when you
hear a click.
1.5 1.6
1.5 Secure Air-Powered Hand Tool Clip (A) over
ridges on side of handle. Attach bottom of AirPowered Hand T ool and pivot into clip until secure.
1.6 Place Crevice Tool into Wand and slide into
tool storage area on left back side (B) of vacuum
and place Upholstery Tool on right back side (C) of
vacuum as shown.
b
C
CARTON CONTENTS
A
Actual model may vary from images shown.
B
C
E
1.1
F
G
H
I
D
A
Page 6
2.1
VACUUM DESCRIPTION
2.2 Plug cord into
electrical outlet.
To turn vacuum ON,
push ON/OFF switch
once.
To turn vacuum OFF,
push switch again.
2.3 For optimal cleaning performance on bare floors
and carpet with pile deeper than 1”, brushroll should
be turned off.
The vacuum is shipped with the brushroll in the ON
position. To turn brushroll OFF for Suction Only
Mode, step on pedal (A).
1
2
3
5
8
9
22
15
10
12
16
7
18
19
11
2.2
2.3
A
2. HOW TO USE
1. Handle**
2. ON/OFF Switch
3. Dirt Cup Release Button
4. Carry Handle
5. Dirt Cup
6. Stair Cleaning Handle
7. Headlight*
8. Height Adjustment
9. Furniture Guard
10. Brushroll On/Off Pedal*
(Suction Only Mode)
1 1. Cord Rewind Pedal*
12. Filter made with HEPA media
and Carbon Filter* Access
13. Rinsable Filter Access
14. System Check Indicator
15. Air-Powered Hand T ool **
16. Crevice Tool (inside wand)
17. Extension Wand
18. Hose
19. Handle Release Pedal
20. Hose Tube
21. Hose Release Button
22. Dusting/ Upholstery T ool**
SUCTION ONLY MODE/ BRUSHROLL SHUT-OFFON-OFF SWITCH
To return cord for storage, unplug from wall.
2.4 Grasp the end of the plug and pull to release cord from cord reel until red tape
is reached.
T o return cord for storage, hold plug and press down Cord Release Pedal (A) on side
of cord reel. Hold plug when rewinding onto cord reel. Do not allow plug to whip
when rewinding.
CORD REWIND AND STORAGE
13
21
20
6
2.4
A
14
*Available on select models only
**V aries per model
17
for bare floors and very high pile carpet
When pulling on the cord, yellow tape will identify when the cord is almost fully
extended. When red tape is visible on the cord, the cord has reached its allowable
extended length. Do not pull the cord out any further.
6
Actual model may vary from images shown.
4
Pedal (A) is inactive when the cleaner is in the
upright position.
IMPORTANT
Brushroll should be in off position for cleaning of
high pile carpet deeper than 1”.
CAUTION
! !
IMPORTANT
Page 7
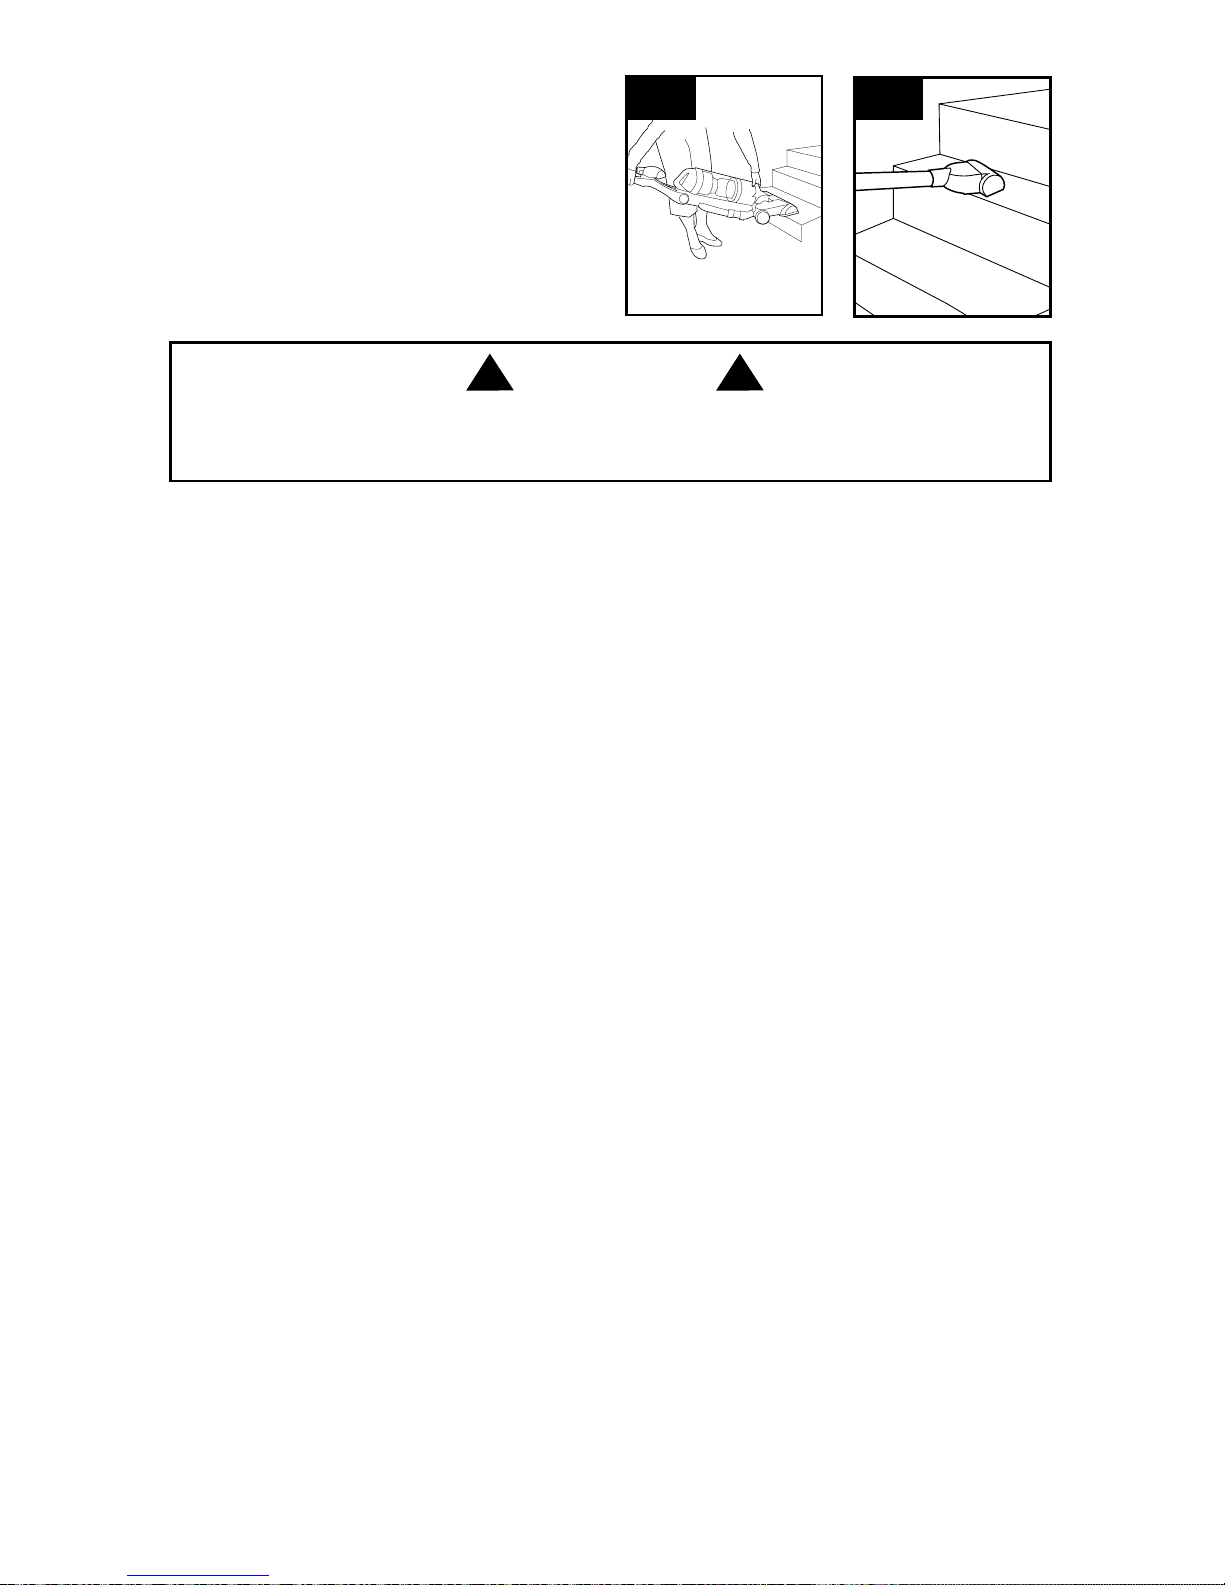
A
2.8 To adjust height setting, PUSH DOWN and
TURN knob (A) to desired height setting.
For maximum cleaning performance, the following
carpet height settings are recommended:
• Lowest setting: for all typesof carpet and
bare floors.
• Higher settings: for very deep pile carpet,
where easier pushing effort is desired, while
maintaining good cleaning performance.
2.8
If the vacuum is difficult to push, push down and
turn knob to the next higher setting.
CARPET HEIGHT ADJUSTMENT
IMPORTANT
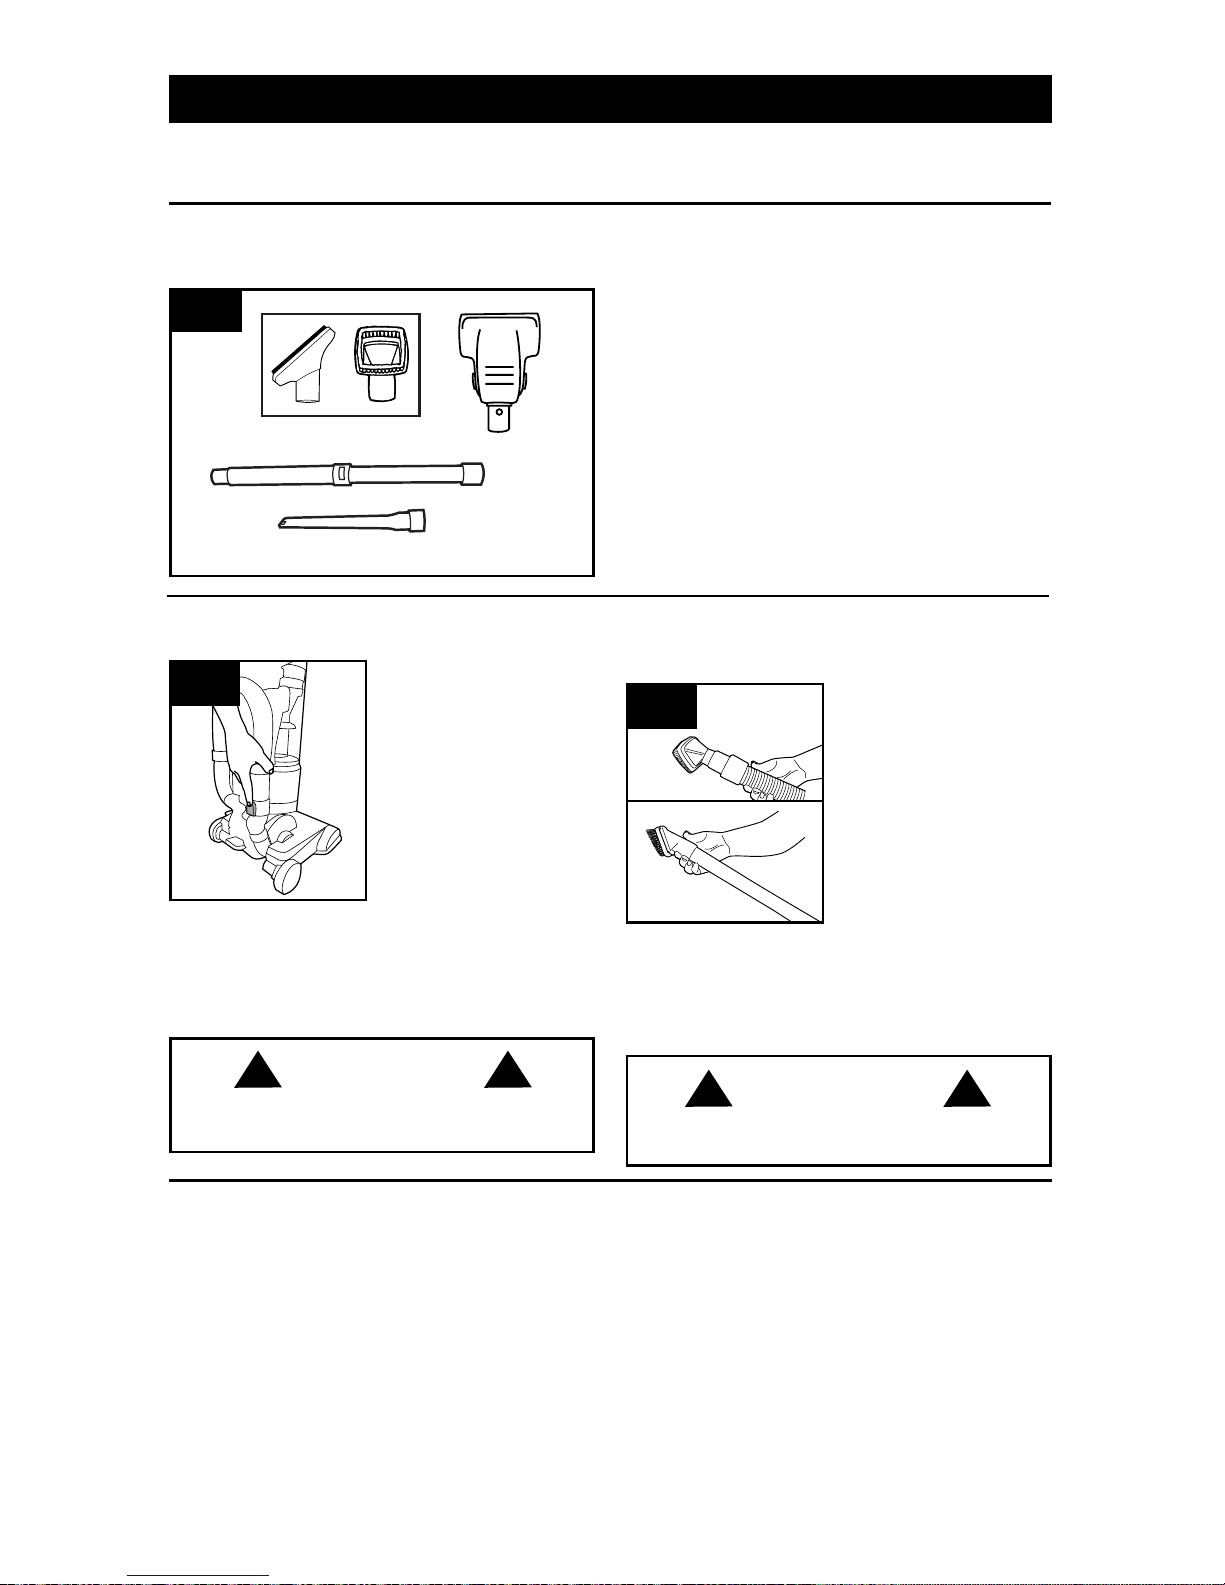
TRANSPORTING CLEANER
2.6 To move your
cleaner from room to
room, put handle in
upright position, tilt
cleaner back on rear
wheels and push
forward.
2.6
HANDLE POSITIONS
2.7
2.7 The handle of your
cleaner has two
positions: 1) Upright for
storage and when using
cleaning tools. 2)
Operating position for
general operation on
carpets and floors.
Step on handle release
pedal to lower handle.
1
2
7
Actual model may vary from images shown.
2.5 Press Handle
Release (A) to fold the
handle to storage position.
FOLDING HANDLE
for storage.
(Available on select models only)
2.5
A
Page 8
8
A. Use Upholstery Tool to clean upholstered
furniture, draperies, mattresses, clothing, and
carpeted stairs. (Tool varies per model)
B. Air-Powered Hand Tool may be used for
upholstered furniture, draperies, mattresses,
clothing, automobile interiors, and carpeted stairs.
(Tool varies per model)
C. Extension Wand is used to give extra length to
your hose. Use it with any of the above tools.
D. Crevice Tool may be used in tight spaces,
corners and along edges in such places as
dresser drawers, upholstered furniture, stairs and
baseboards.
Tools allow for cleaning surfaces above the floor and for reaching hard to clean areas.
The vacuum is ready for tool use when handle is in upright position.
3. TOOLS
SELECT PROPER TOOL
(T ools may vary per model)
REMOVING HOSE
3.2
3.2 When using cleaning
tools, place cleaner
handle in the upright
position. The agitator
brushroll will not rotate
when the cleaner is in
the upright position.
To remove hose for tool
use, press the hose
release button and pull
hose end out.
To lock back into place,
push hose into hose
tube until you hear a
click.
Actual model may vary from images shown.
ATTACH WAND AND TOOLS
(T ools may vary per model)
3.3
3.3 Attach tool or wand
to the hose (A).
Attach tool to wand (B)
by pushing it firmly onto
the wand.
Twist wand or tool
slightly to tighten or
loosen the connection.
To extend wand, twist
counter-clockwise to
the unlocked position,
extend wand & twist
clockwise until tight.
Reverse to collapse.
b
A
WARNING
!
Unplug vacuum before connecting AirPowered Hand T ool.
!
3.1
b
C
D
A
CAUTION
! !
To reduce the risk of personal injury from moving
parts, unplug vacuum before servicing.
To clean Hose and Air-Powered Hand Tool, wipe
with a damp cloth. DO NOT submerge in water.
Other cleaning tools may be washed in warm water
with a mild detergent. Rinse and air dry 24 hours
before using.
HOW TO CLEAN TOOLS
Page 9
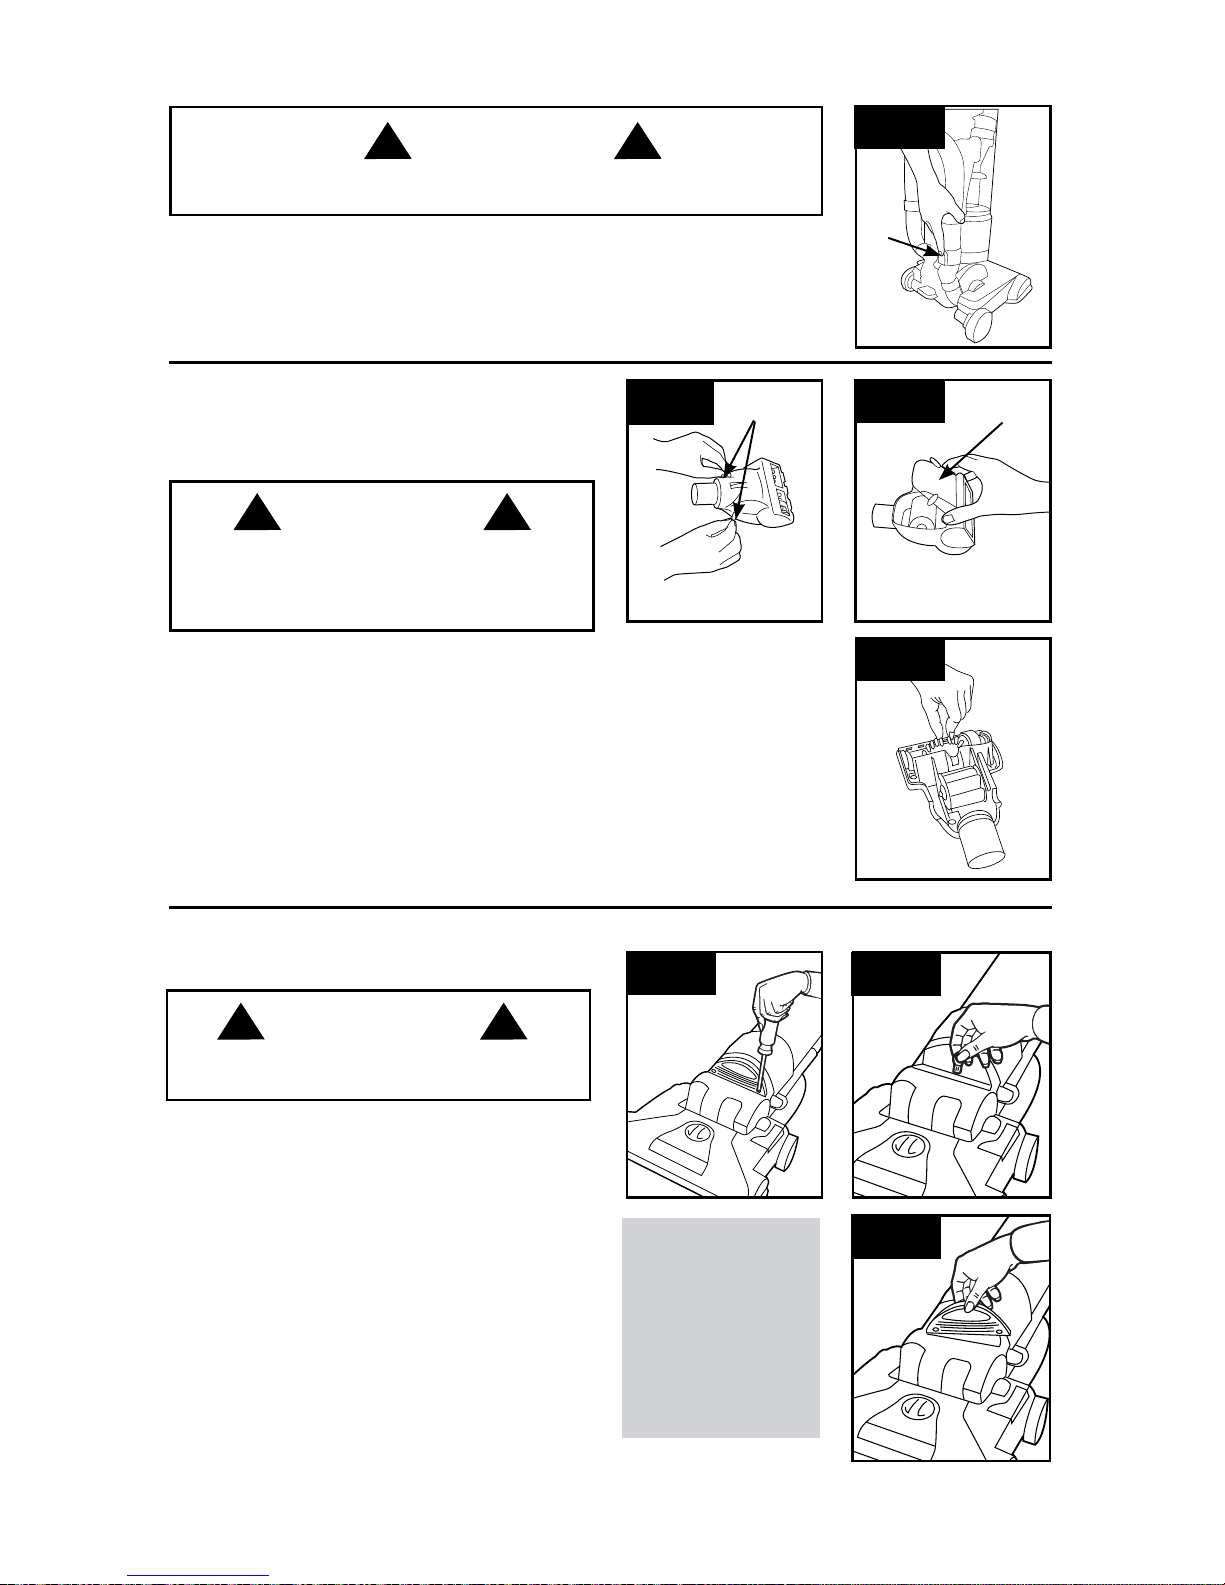
3.4 Lift vacuum by Stair Cleaning Handle and
position on stairs. Clean forward to back. Never
leave the vacuum standing on stairs when not
cleaning.
3.5 Use the Hose and Air-Powered Hand Tool
(Tool varies per model) for stair cleaning. When using
tools, always ensure handle is in upright position.
3.4
STAIR CLEANING
CAUTION
! !
Use extra care when cleaning on stairs. To avoid personal injury or damage, and to prevent the cleaner
from falling, always place cleaner at bottom of stairs on floor. Do not place cleaner on stairs or furniture,
as it may result in injury or damage. When using tools, always ensure handle is in upright position.
3.5
9
Actual model may vary from images shown.
Page 10
10
4. MAINTENANCE
A Thermal Protector has been designed into your cleaner to protect it from overheating. When the
thermal protector activates the cleaner will stop running.
If this happens proceed as follows:
1. Turn cleaner OFF and unplug it from the electrical outlet.
2. Empty dirt cup.
3. Inspect the nozzle inlet, hose connector, hose, dirt cup inlet, cyclonic filter, rinsable filter, and
HEPA filter for any obstructions. Clear obstructions if present.
4. When cleaner is unplugged and motor cools for 30 minutes, the thermal protector will deactivate
and cleaning may continue.
If the thermal protector continues to activate after following the above steps, your cleaner
needs servicing.
NOTICE
! !
Familiarize yourself with these home maintenance tasks as proper use and
care of your vacuum will ensure continued cleaning effectiveness.
The System Check Indicator located at (A), alerts you to possible system
performance issues.
A
4.1
PROBLEM POSSIBLE CAUSE POSSIBLE SOLUTION
If System Check
Indicator is red:
1. Rinsable filter and/or filter made
with HEPA media is dirty .
1. Clean rinsable filter and/or filter made with
HEP A media - reference pg. 11
2. Dirt cup is full and/or clogged. 2. Empty dirt cup - reference pg. 1 1
3. Brushroll and/or hose is
clogged.
3. Check hose for clogging - reference pg 13.
Check brushroll for clogging - reference pg. 12.
Any other servicing should be done by an authorized service representative.
Actual model may vary from images shown.
4.2 To maintain optimal performance, empty the dirt cup before the dirt cup
reaches the max line (A). Place the vacuum in the upright position before
removing the dirt cup.
When to Empty
DIRT CUP
CAUTION
! !
To reduce the risk of personal injury - unplug vacuum before servicing.
Do not use vacuum without dirt cup or filters in place.
Very fine materials, such as face powder or cornstarch, may seal the filter
and cause a reduction in performance. When using the vacuum for this
type of dust, empty the cup and clean the filters often.
4.2
A
Page 11
11
4.3
How to Empty
4.3 Press dirt cup
release button (A) and
pivot cup out.
4.4 Hold dirt cup over
trash receptacle, push
dirt cup door release
lever (B) to open dirt
cup door (C).
Close dirt cup door (C).
Press firmly to secure
at front (D).
4.4
b
A
C
4.5
4.5 Place bottom of dirt cup into vacuum body first. Pivot dirt cup into vacuum
body and press firmly until it locks into place.
To maintain optimal performance, filters should
be cleaned at least every two months under
normal use.
Rinsable Filter: How to Clean
Remove dirt cup as described in Fig. 4.3.
4.6 Pull up on dirt cup latch to open.
4.7 Pull on filter by the pocket to remove rinsable filter.
Hold filter under running water for at least two
minutes to remove dirt and debris. Squeeze filter
twice while underwater. Remove from water and
squeeze a final time to remove excess water.
FILTERS: When to Clean
4.7
CAUTION
! !
To reduce the risk of personal injury - unplug
vacuum before servicing. Do not use vacuum
without dirt cup or filters in place.
D
IMPORTANT
Allow filter to dry completely before replacing.
Dry filter on edge so air circulates on both sides
of filter. This may take up to 48 hours.
Replace filter with pocket and graphics facing up.
Close lid securely by pushing until it clicks.
Replace dirt cup as described in Fig 4.5.
4.6
When used and maintained properly, your Rinsable
Filter should not need replacement within the
warranty period. If desired, additional filter is
available at Hoover.com or call 1-800-944-9200.
Ask for Hoover
®
Part No. 304087001
What to Buy: Rinsable Filter
Actual model may vary from images shown.
4.8
4.8 With fingers in slots, pull filter frame (A)
straight out. Hold filter over a trash receptacle
and tap out dirt and debris.
Slide back into position on vacuum.
A
CAUTION
! !
To reduce the risk of personal injury - unplug
vacuum before servicing. Do not use vacuum
without dirt cup or filters in place.
What to Buy: Filter Made With HEPA Media
When used and maintained properly, your Filter should not need replacement
within the warranty period. If desired, additional filter is available at Hoover.com
or call 1-800-944-9200. Ask for Hoover
®
Part No. 303172001.
IMPORTANT
DO NOT RINSE OR WASH THE FILTER MADE WITH HEPA MEDIA.
Filter Made With HEPA Media: How to Clean
Page 12
12
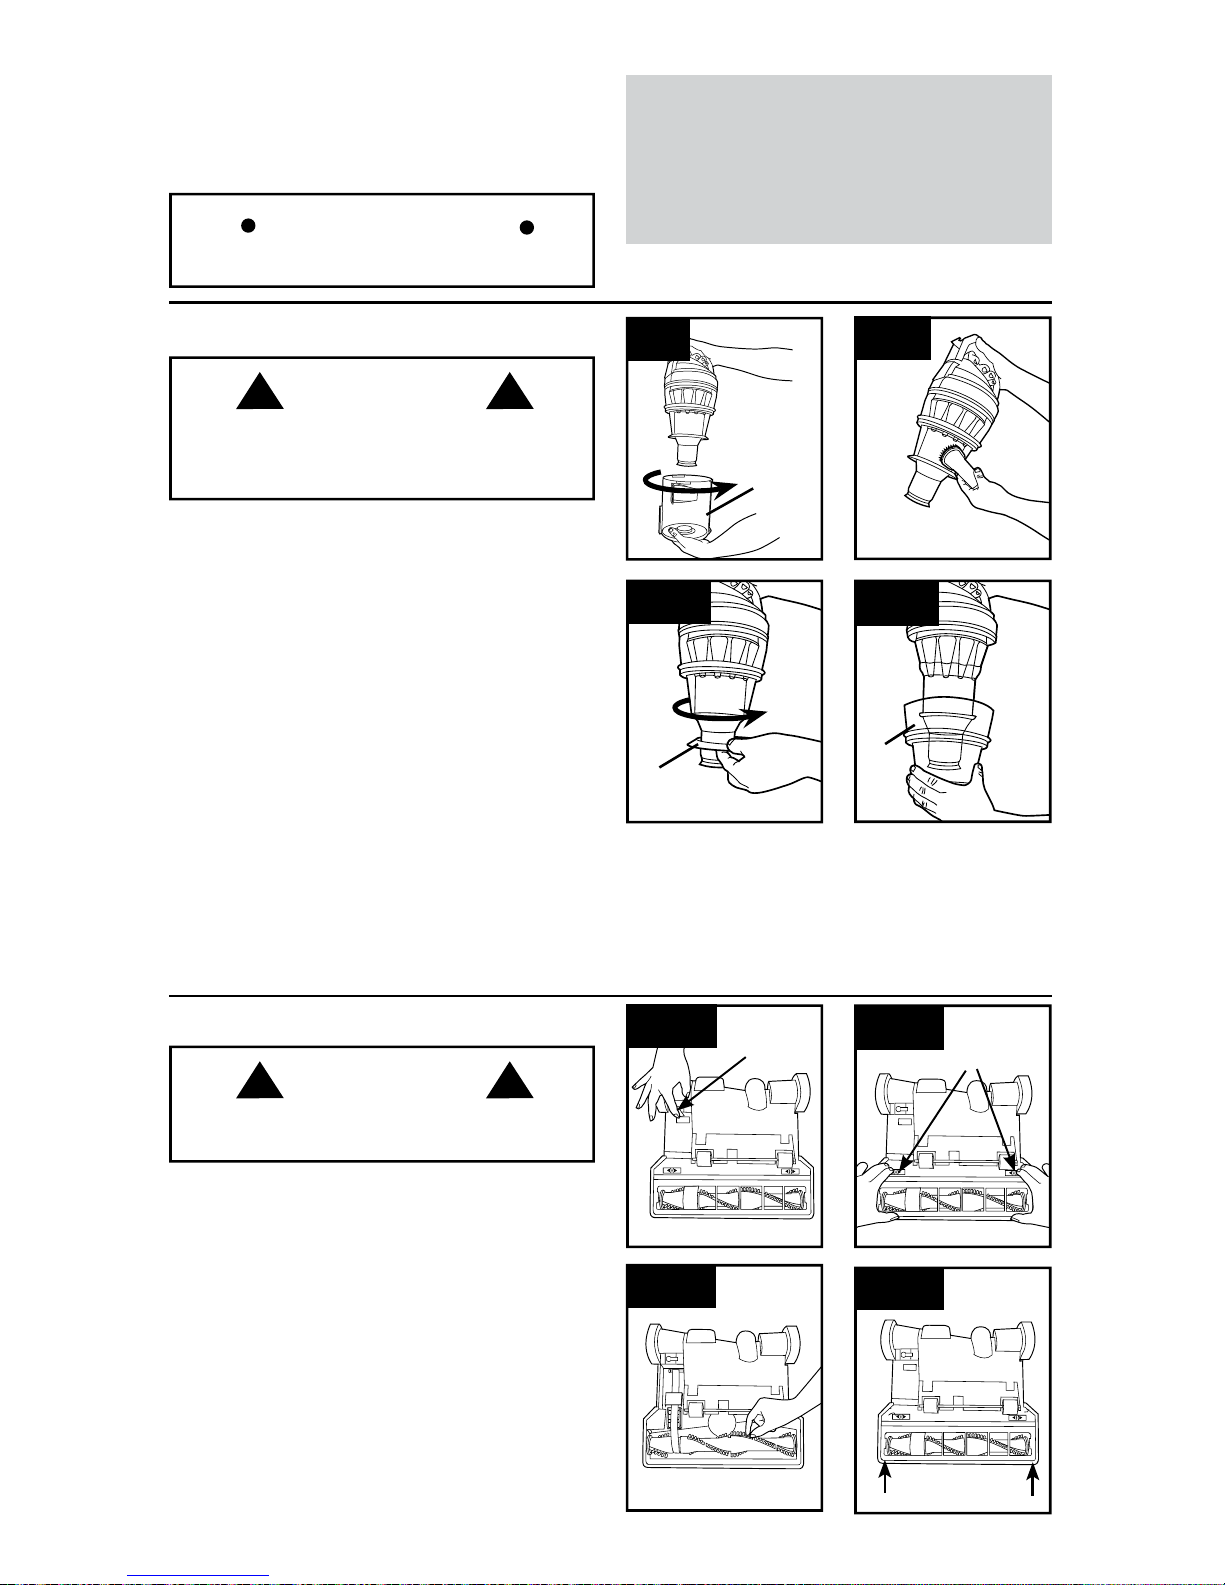
Cyclonic Filter Assembly: How to Clean
Remove dirt cup as described in Fig. 4.3.
4.9 Twist filter assembly (A) counter-clockwise.
Remove assembly from dirt cup.
4.10 Dirt and debris can be cleaned from the filter
assembly with the Dusting/ Upholstery Tool.
4.1 1 If further cleaning of the internal filter assembly
is required, turn dust skirt (B) counterclockwise to
remove.
4.12 Grab dirt cup shroud (C), pull straight off and
clean with dusting/upholstery tool.
After cleaning, replace dirt cup shroud (C) onto and
inside edge of filter assembly and align center lines
with Hoover
®
emblem. Place skirt (B) onto shroud,
align (4) slots with (4) tabs, and turn clockwise to lock.
Place the filter assembly (4.9, A) on the dirt cup,
aligning (3) tabs on filter with (3) slots on dirt cup (B)
and twist it clockwise to secure into position.
CAUTION
! !
To reduce the risk of personal injury - unplug
vacuum before servicing. Do not use vacuum
without dirt cup or filters in place.
4.9
4.10
4.11
What to Buy: Carbon Filter
Carbon Filter may need to be replaced more
often to maintain optimal odor absorbing
effectiveness. Additional filter is available at
Hoover.com or call 1-800-944-9200. Ask for
Hoover
®
Part No. 902404001.
Carbon Filter : How to Clean
(Available on select models only).
Your Carbon Filter is located on the underside of
the Filter made with HEPA media.
IMPORTANT
DO NOT RINSE OR WASH the Carbon Filter.
Actual model may vary from images shown.
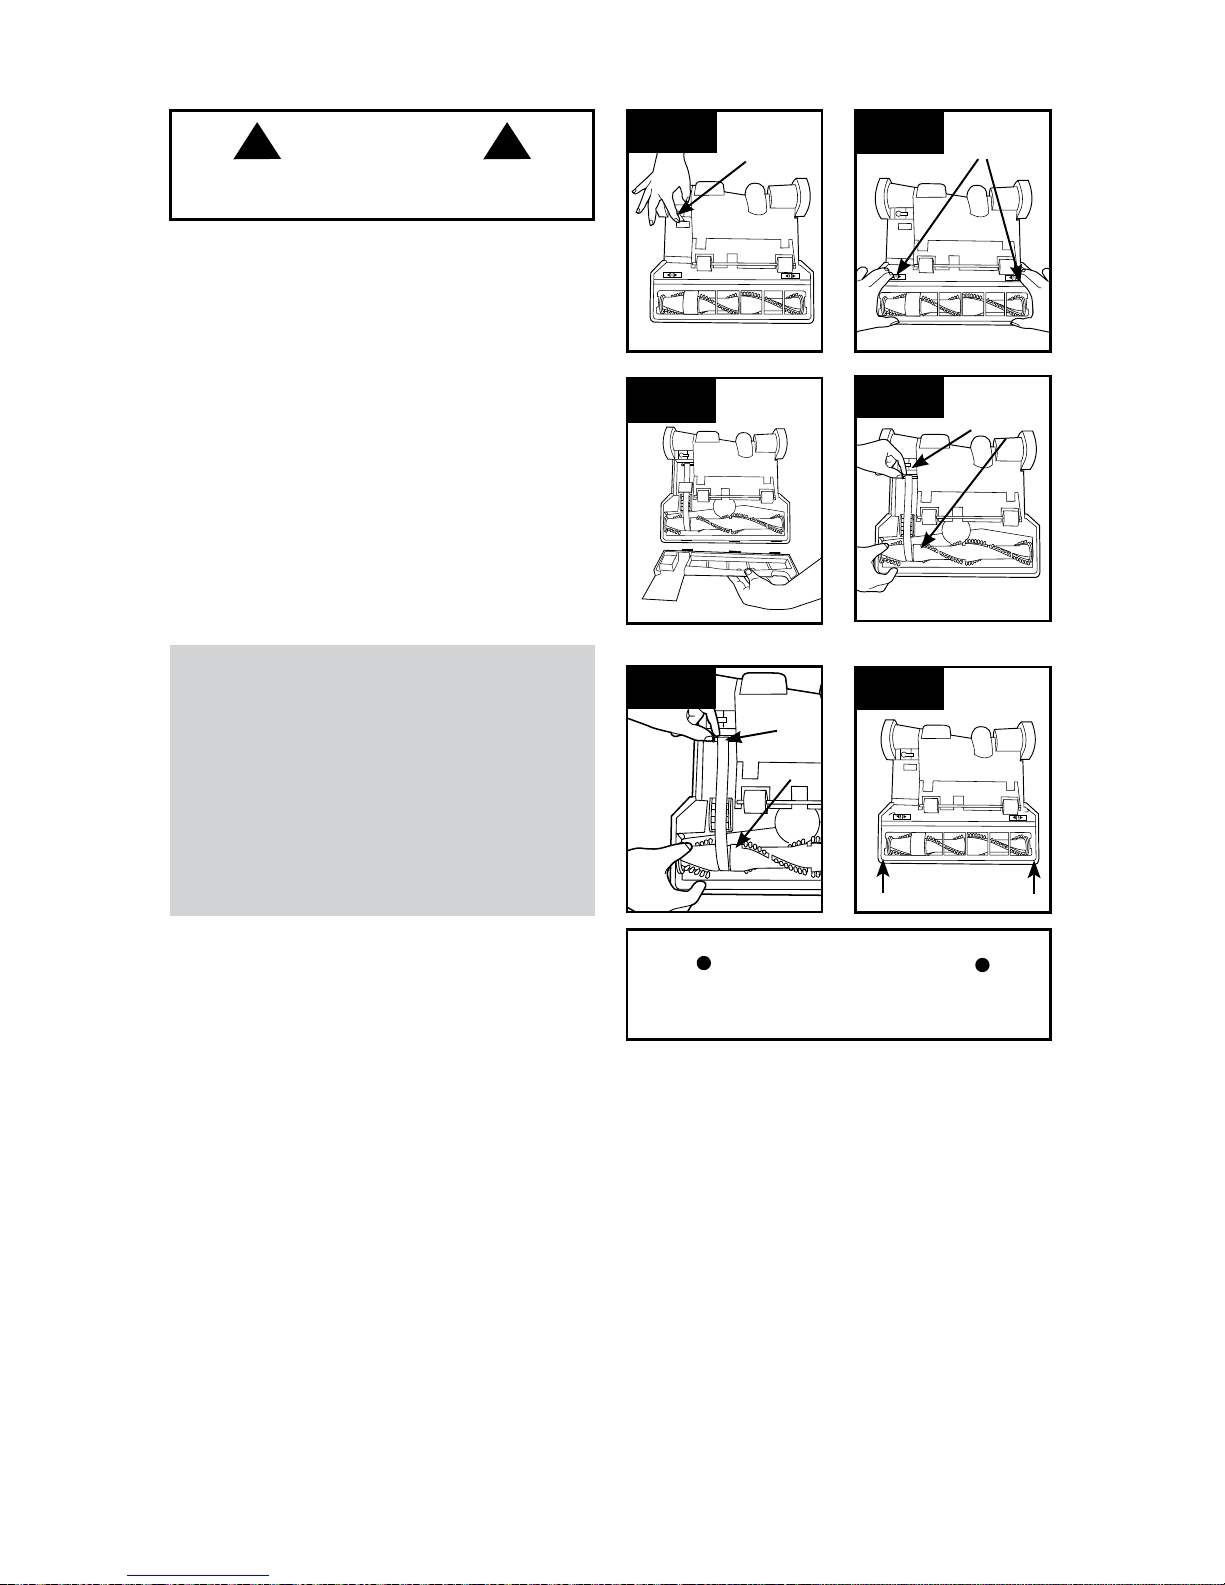
BRUSHROLL: How to Clean
4.13 Turn vacuum over so bottom side is facing up.
Rotate red upper latch (A) counterclockwise.
4.14 Slide (2) lower latches (B) to the unlock position.
4.15 Pivot out bottom plate and remove any debris
and/or hair from brushroll.
4.16 Reposition bottom plate, aligning (2) screws
on nozzle with lower latches (4.14,B). Press
firmly on all front edges (4.16) of nozzle guard to
ensure that it is properly seated. Slide (2) lower
latches to lock in position, and rotate red upper
latch clockwise.
4.13
4.14
A
b
4.15
CAUTION
! !
To reduce the risk of personal injury from moving
parts, unplug vacuum before servicing.
4.16
The Hoover® emblem and center lines on the dirt
cup should all align on the front of the dirt cup if
assembled correctly.
Replace dirt cup as described in Fig. 4.5.
b
C
A
4.12
Page 13
13
4.20
4.18
4.18 Turn tool so bottom faces up. Rotate the
latches (A) on either side of tool.
4.19 Remove bottom plate (B).
4.20 Remove any debris and/ or hair from brushroll.
Replace bottom plate by aligning tabs along front
edge of tool. Rotate latches back into locked
position.
A
AIR-POWERED HAND TOOL:
How to Clean
(Tool varies per model)
4.19
b
HOSE: How to Clean
4.17
A
CAUTION
! !
To reduce the risk of personal injury from moving parts, unplug vacuum
before servicing.
4.17 To remove hose for tool use, press the hose release button (A) and pull
hose end out.
Clear away debris or obstructions from hose. Do not use sharp objects to clean
out hose as they can cause damage. To lock back into place, push hose into
hose tube until you hear a click.
CAUTION
! !
To reduce the risk of personal injury from moving
parts, unplug vacuum before servicing.
Not to be used for grooming a pet.
Actual model may vary from images shown.
4.21
4.22
4.23
Removing Lens
Press Handle Release Pedal and place handle in
low position.
4.21 Using a Phillips screwdriver, remove (2)
screws as shown and lift off lens.
Installing Bulb
4.22 Pull old bulb straight out of socket. Push new
bulb straight into socket until locked in place.
Do not use excessive force when installing bulb.
Do not twist or turn bulb when installing bulb.
Replacing Lens
4.23 Reposition lens and secure with screws.
What to Buy:
Headlight
Additional bulbs may
be ordered at Hoover.
com or call 1-800944-9200. Ask for
Hoover® Part No.
27313-107.
HEADLIGHT: How to Replace
WARNING
! !
To reduce the risk of electrical shock, unplug
vacuum before cleaning or servicing.
(available on select models only)
Page 14
14
BELT
The belt is located under the bottom plate of the
vacuum and should be checked from time to time
to be sure it is in good condition.
When To Replace
How To Replace
4.24 Turn vacuum over so bottom side is facing up.
Rotate red upper latch (A) counter clockwise.
4.25 Slide 2 lower latches (B) to the unlock position.
4.26 Lift off bottom plate.
4.27 Remove used belt from brushroll (C) then from
motor shaft (metal rod) (D) and discard.
Replace belt if it is stretched, cut or broken.
To check the belt, refer to Fig. 4.24 - 4.26.
4.26
C
D
4.27
4.24
4.25
A
b
CAUTION
! !
To reduce the risk of personal injury from moving
parts, unplug vacuum before servicing.
Actual model may vary from images shown.
4.28 With lettering on outside of belt, slide new belt
over motor shaft (metal rod) (E).
Then slip other end of belt around area of brushroll
without bristles (F).
With belt in place, pull and slide brushroll into nozzle
making sure that the brushroll end caps are in the
correct orientation.
4.29 Reposition bottom plate, aligning (2) screws
on nozzle with lower latches (4.25,B). Press firmly
on all front edges (4.29) of nozzle guard to ensure
that it is properly seated. Slide (2) lower latches to
lock in position, and rotate red upper latch
clockwise.
4.28
E
F
What to Buy: Belt
Use only genuine HOOVER® belts with your
vacuum.
When purchasing a new belt for models
with
Brushroll On/Off (Suction Only Mode), ask for
Flat Belt - HOOVER
®
part No. 562289001 or
AH20065.
If desired, additional belts can be purchased at
Hoover.com or 1-800-944-9200
IMPORTANT
Rotate brushroll manually to make sure belt is
not twisted.
4.29
Page 15

15
5. TROUBLESHOOTING
If a minor problem occurs, it usually can be solved quite easily when the cause is found by using the
checklist below.
Any other servicing should be done by an authorized service representative.
WARNING
! !
To reduce risk of personal injury - unplug vacuum before servicing.
PROBLEM POSSIBLE CAUSE POSSIBLE SOLUTION
Vacuum won’t
run
1. Power cord not firmly plugged
into outlet.
1. Plug unit in firmly.
2. Blown fuse or tripped breaker. 2. Check fuse or breaker in home. Replace
fuse/reset breaker in home.
3. Thermal Protector activated. 3. Unplug and allow vacuum to cool for 30min.
(This willl reset the thermal protector)
System Check
Indicator has
turned red
or
Vacuum won’t
pick up
or
Low suction
1.Rinsable Filter and/ or Filter
made with HEPA media is dirty.
1. Clean Rinsable Filter and or Filter made
with HEPA media - Pg. 11.
2. Dirt cup full and/ or clogged. 2. Empty dirt cup - Pg. 10.
3. Broken or worn belt. 3. Replace belt - Pg.14.
4. Brushroll and/ or Hose clogged. 4. Check Hose - Pg. 13. Check Brushroll - Pg. 12.
5. Carpet height setting is
incorrect.
5. Set Carpet Height Adjustment to appropria t e
setting for carpet being cleaned - Pg.7.
6. Suction Only Mode is ON. 6. Step on Brushroll ON/OFF Pedal to turn
Suction Only Mode OFF - Pg. 6.
Cord Rewind
does not work
1. Cord reel does not retract. 1. Call 1-800-944-9200 for the nearest
authorized service representative.
Dust escaping
from vacuum
1. Dirt cup full. 1. Empty dirt cup - Pg. 10.
2. Dirt cup not installed correctly. 2. Review Dirt Cup removal & replacement Pg. 11.
3. Hose not installed correctly. 3. Review Hose installation - Pg. 8.
4. Rinsable and/ or Filter made
with HEPA media not installed
completely.
4. Review Filter Removal and Cleaning - Pg.
11.
Headlight not
working
1. Bulb burnt out. 1. Replace bulb - Pg. 13.
2. Loose electrical wires. 2. Call 1-800-944-9200 for nearest authorized
Hoover
®
dealer.
Vacuum is
difficult to push
or won’t move
forward
1. Carpet height setting is
incorrect.
1a. Set Carpet Height Adjustment knob to
appropriate setting for carpet being cleaned
- Pg. 7.
2. Brushroll is activated. 2. For very high pile carpet deeper than 1”,
turn brushroll off.
Air-Powered
Hand Tool
brushroll won’t
turn
1. Too much pressure being
applied to tool.
1. Continue using tool applying light pressure.
2. Blockage. 2. Remove blockage.
3. Low vacuum suction. 3. Check items under “Vacuum won’t pick or
Low suction.”
Smoky/burning
smell detected
1. Belt broken or stretched. 1. Replace brushroll belt - Pg. 14.
2. Brushroll is clogged. 2. Clear/ remove debris from brushroll - Pg. 12.
Page 16

16
To obtain approved Hoover
®
service and genuine Hoover® parts, locate the nearest Authorized Hoover
®
Warranty Service Dealer (Depot) by:
•CheckingtheYellowPagesunder“VacuumCleaners”or“Household”.
•Visitourwebsiteathoover.com(U.S.Customers)orhoover.ca(Canadiancustomers).
Follow the service center link to find the service outlet nearest you.
•Foranautomatedreferralofauthorizedserviceoutletlocationscall1-800-944-9200.
Do not send your vacuum to Hoover
®
, Inc., Company in Glenwillow for service. This will only result in delay.
If you need further assistance:
To speak with a customer service representative call 1-800-944-9200; Mon-Fri 8am-7pm EST. Always
identify your vacuum by the complete model number when requesting information or ordering parts. (The
model number appears on the bottom of the vacuum.)
PLEASE DO NOT RETURN THIS PRODUCT TO THE STORE.
6. SERVICE
Page 17

17
7. WARRANTY
LIMITED TWO YEAR WARRANTY
(Domestic Use)
WHA T THIS WARRANTY COVERS
When used and maintained in normal household
use and in accordance with the Owner’s Manual,
your HOOVER
®
product is warranted against
original defects in material and workmanship for
a full two years from date of purchase (the
“Warranty Period”). During the Warranty Period,
Hoover
®
will provide labor and parts, at no cost
to you, to correct any such defect in products
purchased in the United States, U.S. Military
Exchanges and Canada.
HOW TO MAKE A WARRANTY CLAIM
If this product is not as warranted, take or send
the product to either a Hoover
®
Authorized
Warranty Service Dealer along with proof of
purchase. For an automated referral to authorized
service outlets in the U.S.A., phone: 1-800-9449200 OR visit Hoover
®
online at www.hoover .
com. For additional assistance or information
concerning this Warranty or the availability of
warranty service outlets, phone the Hoover
®
Consumer Response Center, Phone 1-800-9449200, Mon-Fri 8am-7pm EST.
WHA T THIS WARRANTY DOES NOT COVER
This Warranty does not cover: use of the product
in a commercial operation (such as maid,
janitorial and equipment rental services),
brushroll, belt, improper maintenance of the
product, damage due to misuse, acts of God,
nature, vandalism or other acts beyond the
control of Hoover
®
, owner’s acts or omissions,
use outside the country in which the product
was initially purchased and resales of the
product by the original owner. This warranty
does not cover pick up, delivery,
transportation or house calls. However, if you
mail your product to a Hoover
®
Authorized
Warranty Service Dealer, cost of shipping will be
paid one way.
This warranty does not apply to products
purchased outside the United States, including its
territories and possessions, outside a U.S. Military
Exchange and outside of Canada. This warranty
does not cover products purchased from a party
that is not an authorized retailer, dealer, or
distributor of Hoover
®
products.
OTHER IMPORTANT TERMS
This Warranty is not transferable and may not be
assigned. This Warranty shall be governed and
construed under the laws of the state of Ohio. The
Warranty Period will not be extended by any
replacement or repair performed under this
Warranty.
THIS WARRANTY IS THE EXCLUSIVE
WARRANTY AND REMEDY PROVIDED BY
HOOVER
®
. ALL OTHER WARRANTIES,
EXPRESSED OR IMPLIED, INCLUDING
WARRANTIES OF MERCHANTABILITY OR
FITNESS FOR PARTICULAR PURPOSE, ARE
DISCLAIMED. IN NO EVENT WILL HOOVER
BE LIABLE FOR ANY SPECIAL, INDIRECT,
INCIDENTAL OR CONSEQUENTIAL DAMAGES
OF ANY KIND OR NATURE TO OWNER OR
ANY PARTY CLAIMING THROUGH OWNER,
WHETHER BASED IN CONTRACT,
NEGLIGENCE, TORT OR STRICT PRODUCTS
LIABILITY OR ARISING FROM ANY CAUSE
WHATSOEVER. Some states do not allow the
exclusion of consequential damages, so the
above exclusion may not apply to you. This
warranty gives you specific rights; you may also
have others that vary from state to state.
Page 18

www.hoover.com
MANUAL DEL PROPIETARIO
Instrucciones de Funcionamiento y Servicio
©2011 Techtronic Floor Care Technology Limited. Todos los derechos reservados. #961132001 ID101356-R0
ESTA ASPIRADORA PARA ALFOMBRAS ESTÁ DISEÑADA
PARA USO DOMÉSTICO.
EL USO COMERCIAL DE ESTE PRODUCTO ANULA LA GARANTÍA.
E1
IMPORTANTE: LEA ATENTAMENTE ANTES DE ENSAMBLAR Y USAR.
¿Tiene alguna pregunta o inquietud? Para obtener asistencia, llame al Servicio de atención al
cliente al 1-800 944 9200, de lunes a viernes, de 8 a.m. a 7 p.m., hora del ESTE.
POR FAVOR, NO DEVUELVA ESTE PRODUCTO A LA TIENDA.
Page 19

E2
Gracias por haber elegido un producto HOOVER®.
Anote los números completos de Código de fabricación
en los espacios provistos.
MODELO
CÓDIGO DE FAbRICACIÓN
Consejo: Adjunte su recibo de compra a este Manual del
propietario. Para obtener el servicio de garantía de su
producto HOOVER
®
puede requerirse la verificación de la
fecha de compra.
Inscriba su producto en línea en Hoover.com, o llame al
1-800-944-9200 si prefiere hacerlo por teléfono. Visite
Hoover.com para obtener instrucciones adicionales en
video para el armado y el mantenimiento.
1-800-944-9200
Made in Mexico
CÓDIGO DE FABRICACIÓN
Si necesita ayuda:
Visite nuestro sitio web en www.hoover.com. Haga clic en el enlace que permite localizar los vendedores autorizados hoover para encontrar el vendedor más cercano, o marque el 1-800-944-9200 para
escuchar un mensaje indicando la dirección de los vendedores autorizados Hoover® (sólo en ee. Uu.)
O para hablar con un representante de atención al cliente (de 8 am a 7 pm, hora estándar del este, de
lunes a viernes).
POR FAVOR, NO DEVUELVA ESTE PRODUCTO A LA TIENDA.
(Etiqueta ubicada en la parte
posterior de la aspiradora)
ÍNDICE
Salvaguardias importantes .............................................................................................................. E3
Ensamblado de la aspiradora ......................................................................................................... E5
Contenido de la caja .....................................................................................................................E5
Colocación Del Mango..................................................................................................................E5
Conexión del contenedor para polvo ............................................................................................ E5
Ubicación de los accesorios .........................................................................................................E5
Cómo usar la aspiradora .................................................................................................................E6
Descripción de la aspiradora ........................................................................................................E6
Interruptor de encender/apagar (ON/OFF) ...................................................................................E6
Modo suction only/ Apagado del rodillo de escobillas del agitador ..............................................E6
Enrollado del cordón y almacenamiento....................................................................................... E7
Plegado del mango ....................................................................................................................... E7
Traslado de la aspiradora ............................................................................................................. E7
Posiciones del mango...................................................................................................................E7
Ajuste de la altura para alfombras ................................................................................................ E7
Accesorios ........................................................................................................................................ E8
Seleccione el accesorio apropiado ............................................................................................... E8
Retiro de la manguera .................................................................................................................. E8
Conexión del tubo y de los accesorios ......................................................................................... E8
Limpieza de escaleras .................................................................................................................. E8
Cómo limpiar los accesorios .........................................................................................................E9
Mantenimiento .................................................................................................................................. E10
Depósito para polvo ...................................................................................................................... E10
Los Filtros ..................................................................................................................................... E11
Rodillo de cepillos ......................................................................................................................... E13
Manguera ...................................................................................................................................... E13
Accesorio de mano turboaccionado .............................................................................................E13
Luz delantera ...............................................................................................................................E14
Correa ...........................................................................................................................................E15
Solución de problemas .................................................................................................................... E15
Servicio .............................................................................................................................................E17
Garantía .............................................................................................................................................E18
Page 20

E3
¡SALVAGUARDIAS IMPORTANTES!
¡GUARDE ESTAS INSTRUCCIONES!
Al usar un aparato eléctrico, observe siempre las precauciones básicas,
incluyendo las siguientes:
LEA TODAS LAS INSTRUCCIONES ANTES DE USAR ESTE APARATO
ADVERTENCIA: PARA REDUCIR EL RIESGO
DE INCENDIOS, CHOqUES ELÉCTRICOS O
LESIONES:
• Ensamble completamente el producto antes de hacerlo funcionar.
• Cualquier otra tarea de mantenimiento debe ser realizada por un representante de
mantenimiento autorizado.
• Haga funcionar la aspiradora solamente con el voltaje especificado en la placa de
datos, que se encuentra en la parte posterior de la aspiradora.
• No use este aparato en lugares al aire libre ni en superficies húmedas.
• No permita que el aparato se use como un juguete. No está diseñado para que lo usen
niños de 12 años o menos. Se requiere una supervisión estricta cuando este aparato
se usa cerca de los niños. Para evitar lesiones o daños, mantenga a los niños lejos del
producto y no permita que coloquen los dedos ni otros objetos dentro de las aberturas.
• Use el producto sólo como se describe en este manual. Use sólo los accesorios y productos recomendados por el fabricante.
• No use este aparato con un cordón o enchufe dañados. Si el aparato no está funcionando adecuadamente, se dejó caer, se dañó, se dejó a la intemperie o se dejó caer
dentro del agua, llévelo a un Centro de servicio antes de continuar usándolo.
• No tire del cordón ni traslade el aparato jalando del cordón, ni tampoco lo use como
manija; no cierre la puerta cuando el cordón está atravesado ni tire de este alrededor
de bordes o esquinas filosos. No coloque el producto sobre el cordón. No haga funcionar el aparato encima del cordón. Mantenga el cordón lejos de superficies calientes.
• No lo desenchufe tirando del cordón. Para desenchufarlo, sujete el enchufe, no el
cordón.
• Nunca manipule el enchufe ni el aparato con las manos húmedas.
• No coloque ningún objeto en las aberturas. No use este aparato con ninguna abertura
obstruida; manténgalo libre de suciedad, pelusa, cabello y cualquier objeto que pueda
reducir el flujo de aire.
• Mantenga el cabello, la ropa holgada, los dedos y todas las partes del cuerpo fuera de
las aberturas y otras piezas en movimiento.
• Apague todos los controles antes de desenchufarlo.
• Tenga especial cuidado al limpiar escaleras. Para evitar lesiones personales o daños, y
evitar que la aspiradora se caiga, siempre colóquela al pie de la escalera, en el suelo.
No coloque la aspiradora sobre escaleras ni muebles, ya que puede ocasionar lesiones
o daños.
• No use este aparato para aspirar líquidos inflamables o combustibles, como gasolina,
o restos de madera lijada, ni lo use en áreas donde dichos materiales pudieran estar
presentes.
Page 21

ADVERTENCIA: PARA REDUCIR EL RIESGO
DE DAÑOS:
• Evite aspirar objetos duros y filosos con este producto, ya que pueden causar
daños.
• Guarde la máquina en un lugar seco. No la exponga a temperaturas de congelamiento.
• No use objetos filosos para limpiar la manguera, ya que pueden causar daños.
• Cuando el rodillo de cepillos esté encendido, no deje que el aparato permanezca
inmóvil durando mucho tiempo, ya que podría dañar el suelo.
ADVERTENCIA:
• Para disminuir el riesgo de choque eléctrico, este aparato tiene un enchufe
polarizado (una patilla es más ancha que la otra). Este enchufe puede usarse en
una toma de corriente polarizada, de una sola manera. Si el enchufe no encaja
completamente en la toma de corriente, colóquelo al revés. Si aun así no encaja,
comuníquese con un electricista calificado para que instale la toma de corriente
apropiada. No haga ningún tipo de modificación al enchufe.
E4
• Sujete el enchufe cuando enrolle el cordón en la bobina. No permita que el enchufe dé
latigazos al enrollarlo.
• Desenchufe el aparato antes de conectar el accesorio de mano turboaccionado.
• No aspire ningún objeto que se esté quemando o que libere humo, como cigarrillos,
fósforos o cenizas calientes.
• No use el producto sin el contenedor para polvo y/o los filtros colocados en su lugar.
• ADVERTENCIA: Este producto contiene sustancias químicas reconocidas por el estado
de California como causantes de cáncer, defectos congénitos o daño reproductivo.
LÁVESE LAS MANOS DESPUÉS DE USAR EL PRODUCTO.
Page 22

E5
1. ENSAMBLADO DE LA ASPIRADORA
A. Sección del mango*
B. Cuerpo de la aspiradora
C. Accesorio de mano
turboaccionado*
D. Clip para el accesorio de mano
turboaccionado
E. Boquilla para hendiduras
F. Accesorio para polvo/tapizados**
G. Tubo
H. Tornillo (para el ensamblaje)
I. Contenedor para polvo
*El accesorio varía según el
modelo.
Retire todas las piezas de la caja
e identifique cada artículo que se
muestra.
Nota: Retire el tornillo que se encuentra en la base
de la aspiradora y apártelo hasta la instrucción 1.3
1.2 Introduzca la sección del mango en la base de
la aspiradora. Empuje hacia abajo con fuerza.
1.3 Con un destornillador Phillips, asegure (1) tor-
nillo que se encuentra detrás del mango en la base
de la aspiradora.
1.4 En primer lugar, coloque la parte inferior del
contenedor para polvo dentro del cuerpo de la
aspiradora. Gire el contenedor dentro de la aspiradora. El contenedor para polvo está asegurado
cuando escucha un clic.
(El accesorio varía según el modelo)
1.5 Asegure el clip del accesorio de mano turboaccionado (A) sobre los rebordes en el lateral del
mango. Conecte la parte inferior del accesorio de
mano turboaccionado y gire dentro del clip hasta
que esté seguro.
1.6 Coloque el accesorio para hendiduras en el
tubo y deslícelo dentro del área de almacenamiento
del accesorio en la parte posterior izquierda (B) de
la aspiradora y coloque el accesorio para tapizados
en la parte posterior derecha (C) de la aspiradora,
como se muestra.
COLOCACIÓN DEL MANGO
variar según el modelo)
CONEXIÓN DEL CONTENEDOR
PARA POLVO
UBICACIÓN DE LOS ACCESORIOS
CONTENIDO DE LA CAJA
El modelo real puede no coincidir con
las imágenes que se muestran.
Asegúrese de ubicar todas las piezas antes de eliminar el embalaje.
Para pedir piezas adicionales, visite Hoover.com o llame al 1 800944-9200.
1.3
1.2
1.4
1.5 1.6
b
C
A
B
C
E
1.1
F
G
H
I
D
A
Page 23

DESCRIPCIÓN DE LA ASPIRADORA
2.2 Enchufe el cordón
en una toma de corriente eléctrica.
Para encender la aspiradora (ON), empuje el
interruptor de encender
y apagar una vez.
Para apagar la aspiradora (OFF), empuje el
interruptor de nuevo.
2.3 Para un óptimo
desempeño de limpieza sobre
pisos sin alfombra y alfombras
con pelo de más de 1 pulgada
de espesor, el cepillo giratorio
debería estar apagado.
La aspiradora se envía con el
rodillo de cepillos en la
posición ON. A fin de apagar
el rodillo de cepillos para el
Modo Suction Only (Sólo succión), pise el pedal (A).
2. FUNCIONAMIENTO
1. Mango**
2. Botón de encender/apagar
3. Botón para soltar el depósito
para polvo
4. Asa para transportar
5. Contenedor para polvo
6. Mango para limpieza de escaleras
7. Luz delantera
8. Ajuste de la altura para alfombras
9. Protector para muebles
10. Pedal para encender/apagar el
rodillo de cepillos *
(Modo Suction Only [Sólo succión])
1 1. Botón para rebobinar el cordón
12. Acceso al filtro hecho con medios
filtrantes HEPA y al filtro de carbono*
13. Acceso al filtro lavable
14. Indicador de verificación del
sistema
15. Accesorio de mano turboaccionado**
16. Boquilla para hendiduras
17. Tubo
18. Manguera
19. Pedal para soltar el mango
20. Tubo de la manguera
21. Botón de liberación de la manguera
22. Accesorio para polvo/tapizados**
MODO SUCTION ONLY (SÓLO SUCCIÓN)/ APAGADO DEL RODILLO DE
ESCOBILLAS DEL AGITADOR
INTERRUPTOR DE ENCENDER/
APAGAR (ON/OFF)
*Disponible sólo en algunos modelos.
**El accesorio varía según el modelo.
E6
El modelo real puede no coincidir con
las imágenes que se muestran.
2.1
1
2
3
5
8
9
22
15
10
12
16
7
18
19
11
2.3
A
13
21
20
6
14
17
4
2.2
El pedal (A) permanece inactivo mientras el
aparato está en posición vertical.
El cepillo giratorio debería estar en la
posición de apagado para limpiar alfombras con pelo de más de 1 pulgada de
IMPORTANTE
ADVERTENCIA
!
Para pisos sin alfombra y alfombras de pelo muy largo
Page 24

E7
2.8 Para ajustar la posición de altura, EMPUJE la
aspiradora HACIA ABAJO y GIRE la perilla (A)
hasta la posición deseada.
•Posiciones baja y media: para todo tipo de
alfombras.
•Posición alta: para alfombra de pelo muy
denso cuando se desea disminuir el esfuerzo
de empuje en tanto que se mantiene una
buena eficiencia de limpieza.
Si le cuesta mucho empujar la aspiradora, gire
la perilla a la siguiente posición más alta.
AJUSTE DE LA ALTURA PARA ALFOMBRAS
IMPORTANTE
El modelo real puede no coincidir con
las imágenes que se muestran.
TRASLADO DE LA ASPIRADORA
2.6 Para mover su aspiradora de una habitación a otra, coloque el
mango en posición vertical, incline la aspiradora hacia atrás sobre las
ruedas posteriores, y
empuje hacia delante.
2.6
POSICIONES DEL MANGO
2.7
2.7 El mango de su
aspiradora tiene dos
posiciones: 1) vertical,
para almacenarla o para
usar los accesorios de
limpieza; 2) posición de
funcionamiento, para su
uso general en moquetas y suelos.
Pise el pedal para soltar
el mango y bajarlo.
1
2
A
2.8
Para regresar el cable para el
guardado, desenchufe de la pared.
2.4 Tome el extremo de la clavija y tire para
liberar el cordón de su riel hasta llegar a la
cinta roja.
Para regresar el cordón a la posición de
almacenamiento, sujete el enchufe y presione hacia abajo el pedal para soltar el
cordón (A) que se encuentra en el lateral de
la bobina. Sujete el enchufe cuando enrolle
el cordón en la bobina. No permita que el
enchufe dé latigazos al enrollarlo.
2.5
2.5 Presione el pedal para soltar el
mango (A) para plegar el mango a
la posición de almacenamiento.
ENROLLADO DEL
CORDÓN Y
ALMACENAMIENTO
A
Al tirar del
cordón,
una cinta amarilla le indicará que está casi
totalmente extendido. La cinta roja
aparece cuando el cordón está totalmente
extendido, así que no lo jale más.
IMPORTANTE
(Disponible sólo en
algunos modelos)
2.4
A
PLEGADO DEL MANGO
para almacenamiento.
(Disponible sólo en algunos modelos)
Page 25

E8
El modelo real puede no coincidir con
las imágenes que se muestran.
A. Use el accesorio para tapizados para limpiar
muebles tapizados, cortinajes, colchones, prendas
de vestir y escaleras enmoquetadas. (Los accesorios
varían según el modelo)
B. El accesorio de mano turboaccionado puede
usarse para muebles tapizados, cortinajes, colchones,
prendas de vestir, interiores de automóviles y escaleras enmoquetadas. (Los accesorios varían según
el modelo)
C. El tubo se usa para alargar la manguera. Úselo con
cualquiera de los accesorios antes mencionados.
D. El accesorio para hendiduras puede usarse en
lugares estrechos, en esquinas y en bordes de sitios,
como cajones de cómodas, muebles tapizados,
escaleras y zócalos.
Los accesorios le permiten limpiar superficies que están a mayor altura que el piso y llegar a áreas
difíciles de limpiar.
La aspiradora está lista para usarse con los accesorios cuando el mango está en posición vertical.
3. ACCESORIOS
SELECCIONE EL ACCESORIO
APROPIADO
(Los accesorios pueden variar según el modelo)
3.3 Coloque el accesorio o el tubo en la
manguera (A).
Conecte el accesorio al
tubo (B) empujándolo
con fuerza sobre el
tubo.
Gire levemente el tubo
o el accesorio para
conectarlos con mayor
o menor fuerza.
RETIRO DE LA MANGUERA
3.2 Al usar accesorios
de limpieza, coloque el
mango del aparato en
posición vertical. El
rodillo de cepillos del
agitador no girará si el
aparato está en posición
vertical.
A fin de retirar la
manguera para usar el
accesorio, presione el
botón de liberación y tire
el extremo de la
manguera hacia afuera.
Para volver a trabarla
en su lugar, empuje la
manguera dentro del
tubo de la manguera
hasta que escuche un
clic.
CONEXIÓN DEL TUBO Y DE LOS
ACCESORIOS
Desenchufe la aspiradora antes de conectar el
accesorio de mano turboaccionado.
ADVERTENCIA
! !
3.2
3.3
b
A
3.1
b
C
D
A
Para alargar el tubo, gire en sentido antihorario
hasta la posición desbloqueada, extienda el tubo y
gire en sentido horario hasta que quede bloqueado.
Para acortar el tubo, siga los pasos anteriores en
sentido inverso.
Para limpiar la Manguera y el Accesorio Manual Impulsado por Aire, pase un trapo húmedo. NO sumerja en agua.
Los otros accesorios de limpieza se pueden lavar en agua tibia con un detergente suave. Enjuague y
deje secar al aire durante 24 horas antes de utilizar.
CÓMO LIMPIAR LOS ACCESORIOS
Page 26

LIMPIEZA DE ESCALERAS
Tenga especial cuidado al limpiar escaleras. Para evitar lesiones personales o daños, y evitar que
la aspiradora se caiga, siempre colóquela al pie de la escalera, en el suelo. No coloque la aspiradora sobre escaleras ni muebles, ya que puede ocasionar lesiones o daños. Al usar accesorios,
asegúrese de que el mango esté en posición vertical.
3.4 Levante la aspiradora por el mango para limpieza
de escaleras y colóquela sobre las escaleras. Limpie
de adelante hacia atrás. Nunca deje la aspiradora
sobre las escaleras cuando no esté limpiando.
3.5 Use la manguera y el accesorio de mano turboaccionado (Los accesorios varían según el
modelo) para limpiar escaleras. Al usar acceso-
rios, asegúrese de que el mango esté en posición
vertical.
E9
ADVERTENCIA
! !
El modelo real puede no coincidir con
las imágenes que se muestran.
3.4 3.5
Page 27

E10
El modelo real puede no coincidir con
las imágenes que se muestran.
4. MANTENIMIENTO
Su aspiradora tiene incorporado un protector térmico para impedir el sobrecalentamiento. Cuando se
activa el protector térmico, la aspiradora deja de funcionar.
Si esto sucede, proceda de la siguiente manera:
1. Apague la aspiradora y desenchúfela de la toma de corriente eléctrica.
2. Vacíe el contenedor para polvo.
3. Inspeccione la entrada de la boquilla, el conector de la manguera, la manguera, la entrada del
contenedor para polvo, el filtro ciclónico, el filtro enjuagable y el filtro HEPA para asegurarse de
que no hay obstrucciones. Si hay obstrucciones, elimínelas.
4. Cuando la aspiradora está desenchufada y se deja enfriar el motor durante 30 minutos, el protec
tor térmico se desactiva, y se puede continuar pasando la aspiradora.
Si el protector térmico sigue activándose después de efectuar los pasos anteriores, es posible que su
aspiradora necesite mantenimiento.
AVISO
! !
4.1 Familiarícese con estas tareas de mantenimiento en el hogar, ya que el
uso y cuidado apropiados de su aspiradora asegurarán una limpieza continuamente eficaz.
Cualquier otra tarea de mantenimiento debe ser realizada por un representante de
mantenimiento autorizado.
PROBLEMA CAUSA POSIBLE SOLUCIÓN POSIBLE
El indicador de
verificación del
filtro se ha iluminado en
rojo.
1. El filtro enjuagable y/o el filtro hecho con
medios filtrantes HEPA están sucios.
1. Limpie el filtro enjuagable y/o el filtro hecho
con medios filtrantes HEPA – Pág. E9
2. El contenedor para polvo está lleno y/o
tapado.
2. Vacíe el contenedor para polvo - Pág. E9.
4. Rodillo de cepillos y/o manguera
tapados.
4. Revise la manguera - Pág. E11. Revise el
rodillo de cepillos - Pág. E11.
Any other servicing should be done by an authorized service representative.
A
4.1
Para reducir el riesgo de lesiones ocasionadas por piezas en movimiento,
desenchufe la aspiradora antes de realizar el mantenimiento. No use la
aspiradora sin el contenedor para polvo ni los filtros colocados en su lugar.
Los materiales muy finos, como talco facial o maicena, pueden sellar el filtro
y reducir el rendimiento. Cuando use la aspiradora para este tipo de suciedad, vacíe el contenedor y limpie los filtros con frecuencia.
ADVERTENCIA
! !
4.2 Para mantener un rendimiento óptimo, vacíe el contenedor para polvo
antes de que alcance su nivel máximo (A). Coloque la aspiradora en posición
vertical antes de retirar el contenedor para polvo.
Cuándo vaciarlo
DEPÓSITO PARA POLVO
continúe>>
4.2
A
Page 28

E11
El modelo real puede no coincidir con
las imágenes que se muestran.
Como vaciarlo
DEPÓSITO PARA POLVO
Cierre la puerta del contenedor para polvo (B). Presione firmemente para
asegurar en la parte delantera (C).
4.5 En primer lugar, coloque la parte inferior del contenedor para polvo dentro del cuerpo de la aspiradora. Gire el contenedor para polvo en el cuerpo
de la aspiradora y presione firmemente hasta que se trabe en su lugar.
Para mantener un rendimiento óptimo, el filtro
debe limpiarse cada dos meses en condiciones
de uso normales.
Filtro enjuagable: Cómo limpiar
Retire el contenedor para polvo, como se describe
en la Fig. 4.3.
4.6 Tire hacia arriba la traba del contenedor para
polvo (A) para abrir.
4.7 Tire de la bolsita del filtro para retirar el filtro
enjuagable.
Mantenga el filtro debajo del agua corriente durante
dos minutos para retirar la suciedad y los residuos.
Oprima el filtro dos veces debajo del agua. Oprima
una última vez para retirar el exceso de agua.
LOS FILTROS: Cuándo limpiarlo
Coloque el filtro en su reborde para secarlo, de
forma que el aire circule en ambos lados del
filtro. Esto puede demorar hasta 48 horas.
Vuelva a colocar el filtro con el bolsillo y la imagen
orientados hacia arriba.
Cierre la tapa firmemente presionando hasta que
haga “clic”.
Vuelva a colocar el contenedor para polvo, como se
describe en la Fig. 4.5.
Filtro enjuagable: Qué comprar
Para reducir el riesgo de lesiones ocasionadas por
piezas en movimiento, desenchufe la aspiradora
antes de realizar el mantenimiento. No use la aspiradora sin el contenedor para polvo ni los filtros colocados en su lugar.
IMPORTANTE
ADVERTENCIA
! !
4.3 Presione el botón
de liberación del contenedor para polvo (A)
y gire el contenedor
hacia afuera.
4.4 Sujetando el contenedor para polvo
sobre el recipiente de
basura, presione el
botón de liberación de la
puerta del contenedor
para polvo (A) para abrir
la puerta del contenedor
para polvo (B).
Siempre que el uso y el mantenimiento se realicen correctamente, su filtro enjuagable no necesita reemplazarse dentro del período de garantía.Si
lo desea, puede adquirir el filtro adicionales en
Hoover.com o al 1-800-944-9200 Si lo desea, hay
filtros adicionales disponibles. Solicite la pieza n.°
304087001 de Hoover
®
.
4.8 Con los dedos en las ranuras, tire del marco del
filtro (A) directamente hacia afuera. Sujete el filtro
sobre el recipiente de basura y golpéelo suavemente
para retirar la suciedad y los residuos.
Vuelva a deslizarlo en su posición, en la aspiradora.
Filtro hecho con medios filtrantes HEPA: Cómo limpiar
4.3
4.4
b
A
C
4.5
D
4.7
4.6
Para reducir el riesgo de lesiones ocasionadas por
piezas en movimiento, desenchufe la aspiradora
antes de realizar el mantenimiento. No use la aspiradora sin el contenedor para polvo ni los filtros
colocados en su lugar.
ADVERTENCIA
! !
continúe>>
Page 29

Conjunto del filtro ciclónico:
Cómo limpiar
Retire el contenedor para polvo, como se describe
en la Fig. 4.3.
4.9 Gire el conjunto del filtro (A) en sentido antihorario. Retire el conjunto del contenedor para
polvo.
4.10 La suciedad y los residuos pueden limpiarse del
conjunto del filtro con el accesorio para polvo/
tapizados.
4.1 1 Si requiere limpiar mejor la parte interior del filtro, gire la falda (B) del contenedor para polvo en
sentido antihorario para removerla.
4.12 Sujete bien la tela del contenedor para polvo (C),
tire para sacarla, y límpiela con el accesorio para
desempolvar/para tapizados.
Una vez terminada la limpieza, vuelva a colocar la
tela del contenedor para polvo (C) en el reborde del
ensamblaje del filtro, y alinee las líneas centrales con
el emblema de Hoover
®
. Coloque la falda (B) en la
tela, alinee las 4 ranuras con las 4 lengüetas, y gire
en sentido horario para cerrar bien.
Para reducir el riesgo de lesiones ocasionadas
por piezas en movimiento, desenchufe la aspiradora antes de realizar el mantenimiento.
No use la aspiradora sin el contenedor para
polvo ni los filtros colocados en su lugar.
ADVERTENCIA
! !
Qué comprar: Filtro de carbono: Si lo
desea, hay filtros adicionales disponibles.
Solicite la pieza n.° 902404001 de Hoover
®
.
Filtro de carbono: Cómo limpiar
(Disponible sólo en algunos modelos)
El filtro de carbón se ubica en la parte inferior
del filtro hecho con medio filtrante HEPA
NO ENJUAGUE NI LAVE el cartucho de Filtro de carbono.
IMPORTANTE
NO ENJUAGUE NI LAVE EL FILTRO HECHO CON MEDIO
FILTRANTE HEPA.
IMPORTANTE
Qué comprar: Filtro hecho con medios filtrantes HEPA
Siempre que el uso y el mantenimiento se realicen correctamente, su filtro no
necesita reemplazarse dentro del período de garantía. Si lo desea, hay filtros
adicionales disponibles. Solicite la pieza n.° 303172001 de Hoover
®
.
4.8
A
4.9
4.10
A
Coloque el conjunto del filtro en el contenedor para
polvo, alineando las (3) lengüetas (A) del filtro con
las (3) ranuras del contenedor para polvo (B), y gire
en sentido horario para asegurarlo en su posición.
Si el ensamblaje se realizó de forma correcta, el
emblema de Hoover® y las líneas centrales del contenedor para polvo estarán alineados con la parte
frontal del contenedor para polvo (C).
Vuelva a colocar el contenedor para polvo, como se
describe en la Fig. 4.5.
E12
El modelo real puede no coincidir con
las imágenes que se muestran.
4.11
b
C
4.12
Page 30

E13
El modelo real puede no coincidir con
las imágenes que se muestran.
4.20
4.18
4.18 Voltee el accesorio de modo que la parte inferior mire hacia arriba. Gire las trabas (A) a ambos
lados del accesorio.
4.19 Retire la placa inferior (B).
4.20 Retire toda la suciedad y/o el cabello del rodillo
de cepillos.
Vuelva a colocar la placa inferior y gire las trabas
nuevamente a la posición de trabado.
A
ACCESORIO DE MANO
TURBOACCIONADO:
Cómo limpiar
(Los accesorios varían según el modelo)
4.19
b
Para reducir el riesgo de lesiones ocasionadas
por piezas en movimiento, desenchufe la aspiradora antes de realizar el mantenimiento.
MANGUERA: Cómo limpiar
Para reducir el riesgo de lesiones ocasionadas por piezas en movimiento,
desenchufe la aspiradora antes de realizar el mantenimiento.
4.17 A fin de retirar la manguera para usar el accesorio, presione el botón de
liberación de la manguera (A) y tire el extremo de la manguera hacia afuera.
Elimine la suciedad o las obstrucciones de la manguera. No use objetos filosos
para limpiar la manguera, ya que pueden causar daños. Para volver a trabarla
en su lugar, empuje la manguera dentro del tubo de la manguera hasta que
escuche un clic.
ADVERTENCIA
! !
ADVERTENCIA
! !
RODILLO DE CEPILLOS:
Cómo limpiar
4.13 Voltee la aspiradora de modo que la parte
inferior mire hacia arriba.
Gire la traba superior roja (A) en sentido antihorario.
4.14 Deslice (2) las trabas inferiores (B) a la posición
de destrabado.
4.15 Gire hacia afuera la placa inferior y retire toda
la suciedad y/o cabello del rodillo de cepillos.
4.16 Vuelva a posicionar la placa inferior, alineando
los (2) tornillos de la boquilla con las trabas inferiores (4.14,B). Presione firmemente en todos los
bordes delanteros (4.16) de la protección de la
boquilla para asegurar que esté asentada adecuadamente.
Para reducir el riesgo de lesiones ocasionadas
por piezas en movimiento, desenchufe la aspiradora antes de realizar el mantenimiento.
ADVERTENCIA
! !
4.13
4.14
A
b
4.15 4.16
4.17
A
Page 31

E14
CORREA
La correa se encuentra debajo de la placa inferior
de la aspiradora, y debe verificarse periódicamente para asegurarse de que esté en buenas
condiciones.
Cuándo reemplazarla
Reemplace la correa si está estirada, cortada o
rota.
Para revisar la correa plana, consulte la Fig. 4.24
- 4.26.
Cómo reemplazarla
4.24 Voltee la aspiradora de modo que la parte
inferior mire hacia arriba. Gire la traba superior roja
(A) en sentido antihorario.
4.25 Deslice (2) las trabas inferiores (B) a la
posición de destrabado.
4.26 Levante la placa inferior.
4.27 Retire la correa usada del rodillo de cepillos
(C); luego, del eje del motor (varilla de metal) (D) y
deséchela.
Para reducir el riesgo de lesiones ocasionadas
por piezas en movimiento, desenchufe la aspiradora antes de realizar el mantenimiento.
ADVERTENCIA
! !
Cómo retirar la lente
Presione el pedal para soltar el mango y coloque el
mango en la posición baja.
4.21 Con un destornillador Phillips, retire los (2)
tornillos como se muestra y levante la lente.
Cómo instalar la bombilla
4.22 Extraiga la bombilla usada directamente de su
receptáculo. Empuje la nueva bombilla directamente en su receptáculo hasta que quede trabada
en su lugar.
No se requiere demasiada fuerza.
No se requiere girar la bombilla.
Cómo volver a colocar la lente
4.23 Vuelva a colocar la lente y asegúrela con
tornillo
Qué comprar:
Luz delantera
Si lo desea, puede
adquirir Luz delantera adicionales en
Hoover.com o al
1-800-944-9200. Esta
aspiradora utiliza una
lámpara n. ° 27313-
107 de HOOVER
®
.
LUZ DELANTERA: Cómo reemplazarla
Para reducir el riesgo de lesiones ocasionadas
por piezas en movimiento, desenchufe la aspiradora antes de realizar el mantenimiento.
ADVERTENCIA
! !
4.21
4.22
4.23
(Disponible sólo en algunos modelos)
4.26
C
D
4.27
4.24
4.25
A
b
continúe>>
Page 32

E15
5. SOLUCIÓN DE PROBLEMAS
Si ocurre un problema menor, generalmente puede resolverse con bastante facilidad cuando se halla la
causa, usando esta lista de verificación.
Cualquier otra tarea de mantenimiento debe ser realizada por un representante de mantenimiento autorizado.
Para reducir el riesgo de lesiones ocasionadas por piezas en movimiento, desenchufe la aspiradora
antes de realizar el mantenimiento.
ADVERTENCIA
! !
4.28 Con la inscripción en la parte exterior de la
correa, deslice la correa nueva sobre el eje del
motor (varilla de metal) (E).
Deslice luego el otro extremo de la correa alrededor
del área del cepillo giratorio que no tiene cerdas
(F).
Con la correa en su lugar, tire del rodillo de cepillos
y deslícelo dentro de la boquilla, asegurándose de
que las tapas de extremo del rodillo de cepillos
Gire el rodillo de cepillos en forma manual para
asegurarse de que no se haya torcido la correa.
tengan la orientación correcta.
4.29 Vuelva a posicionar la placa inferior, alineando
los (2) tornillos de la boquilla con las trabas inferiores (4.25,B). Presione firmemente en todos los
bordes delanteros (4.29) de la protección de la
boquilla para asegurar que esté asentada adecuadamente.
IMPORTANTE
Qué comprar: Correa plana
4.29
CORREA (continuado)
Utilice únicamente correas genuinas de
HOOVER
®
con su aspiradora.
Al comprar una correa nueva para modelos de
rodillo de cepillos con interruptor (modo “Sólo
succión”), solicite la correa plana, nº de pieza
562289001 de HOOVER
®
y AH20065.
Al comprar una correa nueva para modelos sin
rodillo de cepillos con interruptor (modo “Sólo
succión”), solicite la correa elástica, nº de pieza
38528058 de HOOVER
®
y AH20080.
Si lo desea, puede adquirir correas adicionales
en Hoover.com o al 1-800-944-9200
PROBLEMA CAUSA POSIBLE SOLUCIÓN POSIBLE
La aspiradora
no funciona
1. No está bien enchufada. 1. Enchúfela bien.
2. Fusible quemado o se disparó el
disyuntor.
2. Inspeccione el fusible o el disyuntor.
3. Protector térmico activado. 3. Desenchufe y deje que la aspiradora se enfríe
durante 30 min. (Esto reajustará el protector térmico).
El indicador de
verificación del
filtro se ha iluminado en rojo.
o La aspiradora
no aspira o
baja succión.
1. El filtro enjuagable y/o el filtro hecho
con medios filtrantes HEPA están sucios.
1. Limpie el filtro enjuagable y/o el filtro hecho con
medios filtrantes HEPA – Pág. E11.
2. El contenedor para polvo está lleno y/o
tapado.
2. Vacíe el contenedor para polvo - Pág. E10.
3. La correa está rota o desgastada. 3. Reemplace la correa - Pág.E14.
4. Rodillo de cepillos y/o manguera tapa-
dos.
4. Revise la manguera - Pág. E11. Revise el rodillo de
cepillos - Pág. E12.
5. La posición de la altura para moque-
tas es incorrecta.
5. Coloque el ajuste de altura de la moqueta en la
posición apropiada para la moqueta que está limpiando - Pág. E7.
6. El modo Suction Only (Sólo succión)
está encendido.
6. Pise el pedal para encender/apagar el rodillo de
cepillos para apagar el modo Suction Only (Sólo
succión) - Pág. E6.
4.28
E
F
Page 33

PROBLEMA CAUSA POSIBLE SOLUCIÓN POSIBLE
El enrollador de
cordón no funciona.
1. El riel del cordón no se retrae. 1. Llame al 1-800-944-9200 para hablar con el representante de servicios autorizado más cercano.
El polvo sale de
la
aspiradora.
1. El recipiente de polvo está lleno. 1. Vacíe el recipiente de polvo - Pág. E10.
2. El contenedor para polvo no está insta-
lado correctamente.
2. Revise la sección Cómo retirar y volver a colocar
el contenedor para polvo - Pág. E11.
3. La manguera no está instalada cor-
rectamente.
3. Revise la sección Instalación de la manguera - Pág.
E8.
4. El filtro enjuagable y/o el filtro hecho con
medios filtrantes HEPA no están instalados
completamente.
4. Revise la sección Cómo retirar y limpiar el filtro Pág. E11.
La luz frontal no
funciona
1. Foco fundido. 1. Reemplace el foco - Pág. E13.
2. Cables eléctricos sueltos. 2. Llame al 1-800-944-9200 para encontrar el concesionario autorizado de Hoover® más cercano.
Dificultad para
empujar la
aspiradora
1. La posición de la altura para moquetas
es incorrecta.
1. Coloque la perilla de ajuste de altura de la moqueta en la posición apropiada para la moqueta que
está limpiando - Pág. E7.
2. El rodillo de cepillos esté encendido 2. Para alfombras de pelo muy largo, de más de 1
pulgada de espesor, apague el cepillo giratorio.
El rodillo de
cepillos del
accesorio de
mano turboaccionado no gira
1. Se está aplicando demasiada presión
al accesorio.
1. Continúe usando el accesorio aplicando una
presión leve.
2. Obstrucción. 2. Elimine la obstrucción.
3. Baja succión de la aspiradora. 3. Revise los puntos que se encuentran en la sección “La aspiradora no aspira o Baja succión”.
Se detecta un
olor a humo/
quemado
1. Correa rota o estirada. 1. Reemplace la correa del rodillo de cepillos - Pág.
E14.
2. El rodillo de cepillos está tapado. 2. Elimine/retire los residuos del rodillo de cepillos Pág. 12.
E16
Page 34

Para obtener un servicio aprobado de Hoover® y piezas genuinas de Hoover®, encuentre el Concesionario
autorizado de servicio de garantía de Hoover® (depositario) más cercano:
•ConsultandolasPáginasamarillasenlasección“Aspiradoras–uso”doméstico.
•Visitenuestrositiowebenhoover.com(clientes
estadounidenses) o hoover.ca (clientes canadienses). Siga el enlace del centro de servicio para
encontrar el centro de servicio más cercano.
•Paraqueleinformendemaneraautomáticalaubicacióndeloscentrosautorizadosdeservicio,llame
al 1-800-944-9200. No envíe su aspiradora a Hoover
®
, Inc., Company en Glenwillow para realizar el
servicio. Esto sólo provocará demoras.
Si necesita recibir más ayuda:
Para hablar con un representante de atención al cliente, llame al 1-800-944-9200; de lunes a viernes, de
8 a.m. a 7 p.m., hora del Este. Siempre identifique su aspiradora por el número de modelo completo al
solicitar información o realizar pedidos de piezas.
(El número de modelo aparece en la parte inferior de la aspiradora).
NO DEVUELVA ESTE PRODUCTO A LA TIENDA.
6. SERVICIO
E17
Page 35

7. GARANTÍA
GARANTÍA LIMITADA DE DOS AÑOS
(Para uso doméstico)
QUÉ CUbRE ESTA GARANTÍA
Siempre que el uso y el mantenimiento de su
producto HOOVER
®
se realicen en condiciones
de uso doméstico normales y según el Manual
del usuario, el producto estará garantizado contra
defectos originales en el material y la fabricación
durante de dos años completos desde la fecha de
compra (el “Período de Garantía”). Durante el
Período de Garantía, Hoover
®
le proporcionará
gratuitamente, como se describe en esta garantía,
la mano de obra y las piezas necesarias para
corregir cualquier defecto en los productos comprados en los Estados Unidos, en una tienda
situada en una base militar de los EE. UU. y en
Canadá.
CÓMO HACER UN RECLAMO EN VIRTUD DE
LA GARANTÍA
Si este producto no se ajusta a las condiciones
garantizadas, llévelo a un Concesionario autorizado de servicio de garantía de Hoover
®
junto
con el comprobante de compra. Para que le informen de manera automática la ubicación de los
centros autorizados de servicio, llame al: 1-800944-9200 o visite Hoover
®
en Internet, en hoover.
com. (clientes estadounidenses) o hoover.ca (clientes canadienses). Si necesita asistencia adicional o información sobre esta Garantía o la
disponibilidad de los centros de servicio de
garantía, llame al 1-800-944-9200, de lunes a
viernes, de 8 a.m. a 7 p.m., hora del Este.
QUÉ NO CUbRE ESTA GARANTÍA
Esta garantía no cubre: el uso del producto con
cualquier fin comercial (como servicios de limpieza, mantenimiento y de alquiler de equipos), el
mantenimiento inadecuado del producto, los
daños provocados por el uso indebido, caso fortuito, hechos de la naturaleza, vandalismo u otros
actos que excedan del control de Hoover
®
,
acciones u omisiones del propietario, uso fuera
del país en que el producto fue comprado inicialmente y reventa del producto por parte del propietario original. Esta garantía no cubre el retiro del
producto, la entrega, el transporte ni las visitas a
domicilio.
Esta garantía no se aplica a los productos comprados fuera de los Estados Unidos, incluidos
sus territorios y posesiones, fuera de una tienda
situada en una base militar de los EE. UU. ni
fuera de Canadá. Esta garantía no cubre los
productos comprados a una parte que no sea un
minorista, concesionario o distribuidor autorizados de los productos de Hoover
®
.
OTROS TÉRMINOS IMPORTANTES
Esta Garantía no es transferible ni puede cederse. Esta Garantía se regirá e interpretará de
conformidad con las leyes del estado de Ohio. El
Período de Garantía no se prorrogará en función
de ningún reemplazo o reparación realizados en
virtud de esta Garantía.
EST A GARANTÍA ES LA ÚNICA GARANTÍA Y EL
ÚNICO RECURSO QUE HOOVER
®
PROPORCIONA. TODAS LAS DEMÁS
GARANTÍAS, EXPRESAS O IMPLÍCITAS,
INCLUIDAS LAS GARANTÍAS DE
COMERCIABILIDAD O APTITUD PARA UN FIN
PARTICULAR, QUEDAN EXCLUIDAS. HOOVER
NO SERÁ RESPONSABLE EN NINGÚN CASO
POR NINGÚN DAÑO ESPECIAL, INDIRECTO,
INCIDENTAL O MEDIATO DE NINGÚN TIPO O
NATURALEZA CON RESPECTO AL
PROPIETARIO O A CUALQUIER PARTE QUE
REALICE UN RECLAMO A TRAVÉS DEL
PROPIETARIO, YA SEA QUE SE BASE EN
RESPONSABILIDAD CONTRACTUAL,
NEGLIGENCIA, RESPONSABILIDAD
EXTRACONTRACTUAL O RESPONSABILIDAD
CIVIL OBJETIVA POR LOS PRODUCTOS, O
EMERGENTE DE CUALQUIER OTRA CAUSA.
Algunos estados no permiten la exclusión de los
daños mediatos, por lo cual es posible que la
exclusión mencionada no se aplique en su caso.
Esta garantía le otorga derechos específicos; es
posible que, además, tenga otros derechos que
varían de un estado a otro.
E18
Page 36

www.hoover.com
GUIDE D’UTILISATION
Instructions d’utilisation et d’entretien
©2011 Techtronic Floor Care Technology Limited. Tous droits réservés. #961132001 ID101356-R0
L’UTILISATION DE CE PRODUIT À DES FINS COMMERCIALES INVALIDE
LA PRÉSENTE GARANTIE.
IMPORTANT : LIRE CES INSTRUCTIONS ATTENTIVEMENT AVANT
D’UTILISER L’ASPIRATEUR.
Vous avez des questions ou des inquiétudes? Veuillez appeler le service à la clientèle au
1 800 9449200 du lundi au vendredi, de 8 h à 19 h (HNE).
VEUILLEZ NE PAS RETOURNER CE PRODUIT AU MAGASIN.
Page 37

Merci d’avoir choisi un produit HOOVERMD.
Veuillez inscrire les numéros de modèle et de série
COMPLETS dans les espaces fournis à cet effet
MODèLE
CODE DE FAbRICATION
Conseil: Il est recommandé de joindre votre reçu de
caisse au guide de l’utilisateur, car une vérification de la
date d’achat peut être effectuée avant toute réparation
couverte par la garantie de votre produit HOOVERMD.
N’oubliez pas d’enregistrer votre produit en ligne, à
l’adresse Hoover.com, ou par téléphone, au
1-800-944-9200. Visiter le Hoover.com pour visualiser
une vidéo présentant les instructions d’assemblage et
d’entretien.
1-800-944-9200
Made in Mexico
CODE DE FABRICATION
Pour obtenir de l’assistance :
visitez notre site web à l’adresse www.hoover.ca. Cliquez sur le lien du localisateur de marchands
autorisés HooverMD pour trouver le marchand le plus près de chez vous, ou composez le 1 800 944
9200 pour écouter un message indiquant les adresses des marchands autorisés Hoover
MD
(é.-U.
Seulement) ou pour parler à un représentant du service à la clientèle (de 8 h à 19 h, hne, du lundi au
vendredi).
VEUILLEZ NE PAS RETOURNER CE PRODUIT AU MAGASIN.
(Étiquette située au dos de l’aspirateur)
CONTENU
Consignes de sécurité importantes................................................................................................ 3
Assemblage de l’aspirateur ............................................................................................................. 5
Contenu de l’emballage ................................................................................................................ 5
Fixer Le Manche ...........................................................................................................................5
Fixer le videpoussière ................................................................................................................... 5
Installer les accessoires ...............................................................................................................5
Utilisation .......................................................................................................................................... 6
Description de l’aspirateur ............................................................................................................6
Interrupteur Marche/ Arrêt............................................................................................................. 6
Mode de succion seulement/ Arrêt automatique du rouleau-brosse agitateur ............................. 6
Enrouleur de cordon et rangement ............................................................................................... 7
Poignée pliante .............................................................................................................................7
Transport de l’aspirateur ............................................................................................................... 7
Positions du manche ....................................................................................................................7
Réglage selon la hauteur du tapis ................................................................................................ 7
Accessoires ......................................................................................................................................8
Sélection de l’accessoire approprié .............................................................................................. 8
Retrait du tuyau ............................................................................................................................8
Fixation de la lance et des accessoires ........................................................................................ 8
Nettoyage d’escaliers ................................................................................................................... 8
Accessoires de nettoyage.............................................................................................................9
Entretien ............................................................................................................................................10
Vide-poussière .............................................................................................................................. 10
Filtres ............................................................................................................................................11
Rouleaubrosse ..............................................................................................................................12
Tuyau ............................................................................................................................................13
Accessoire portatif électrique........................................................................................................13
Phare ............................................................................................................................................ 13
Courroie ........................................................................................................................................ 14
Dépannage ........................................................................................................................................ 15
Service ............................................................................................................................................... 16
Garantie .............................................................................................................................................17
2
Page 38

CONSIGNES DE SÉCURITÉ IMPORTANTES
RANGER ET CONSERVER CES
INSTRUCTIONS
Durant l’utilisation d’un appareil électrique, toujours respecter les précautions
élémentaires, y compris les suivantes :
LIRE TOUTES LES INSTRUCTIONS AVANT D’UTILISER CET APPAREIL.
AVERTISSEMENT: AFIN DE RÉDUIRE AU
MINIMUM LES RISqUES D’INCENDIE, DE
CHOC ÉLECTRIqUE OU DE BLESSURES :
• Assembler complètement avant l’utilisation.
• N’utiliser l’aspirateur qu’à la tension spécifiée sur la plaque signalétique située au
dos de l’appareil.
• Ne pas laisser l’appareil sans surveillance lorsqu’il est branché. Le débrancher
quand il n’est pas utilisé et avant d’en faire l’entretien.
• Ne pas utiliser l’appareil à l’extérieur ou sur des surfaces humides.
• Ne pas permettre que l’appareil soit utilisé comme un jouet. Ce produit n’est pas
conçu pour être utilisé par des enfants de 12 ans et moins. Exercer une étroite
surveillance lorsque l’appareil est utilisé à proximité d’enfants. Pour éviter les ris
ques de blessures ou de dommages, tenir le produit hors de la portée des enfants,
et ne pas leur permettre de placer leurs doigts ou des objets dans les ouvertures.
• L’appareil doit être utilisé seulement comme indiqué dans ce manuel. Utiliser
uniquement les accessoires et les produits recommandés par le fabricant.
• Ne pas utiliser l’appareil si la fiche ou le cordon est endommagé. Si l’aspirateur
ne fonctionne pas adéquatement, s’il est tombé, a été endommagé, a été laissé à
l’extérieur ou est tombé dans l’eau, l’expédier à un centre de réparation pour qu’il
soit vérifié.
• Ne pas tirer l’appareil par le cordon, ne pas se servir du cordon comme poignée,
ne pas fermer de portes sur le cordon et ne pas contourner des coins ou des rebords
tranchants avec le cordon. Éviter de faire rouler l’appareil sur le cordon. Tenir le
cordon éloigné des surfaces chaudes.
• Ne pas tirer sur le cordon pour débrancher l’appareil, mais plutôt sur la fiche.
• Ne pas manipuler la fiche ou l’aspirateur avec les mains mouillées.
• Ne pas insérer d’objets dans les ouvertures de l’appareil. Ne pas utiliser l’appareil
si les orifices sont obstrués; retirer la poussière, la mousse, les cheveux ou tout ce
qui pourrait réduire le débit d’air.
• Garder les cheveux, les vêtements amples, les doigts et toute autre partie du corps
à l’écart des ouvertures et des pièces en mouvement.
• Éteindre toutes les commandes avant de débrancher l’appareil.
• Être très prudent pendant l’utilisation dans les escaliers. Ne pas déposer l’aspirateur
sur les marches. Afin d’éviter les blessures ou les dommages et d’empêcher
l’appareil de tomber, toujours placer l’appareil au bas de l’escalier. Ne pas placer
l’appareil dans les escaliers ou sur un meuble, ce qui pourrait causer des blessures
ou des dommages.
3
Page 39

• Ne pas aspirer les liquides inflammables ou combustibles comme l’essence, ni
utiliser l’appareil à proximité de ces matériaux.
• Tenir la fiche lors de l’enroulement du cordon afin qu’elle ne cingle pas.
• Débrancher l’appareil avant de fixer un accessoire portatif électrique.
• N’aspirer aucune matière brûlante ou dégageant de la fumée, comme des ciga
rettes, des allumettes ou des cendres chaudes.
• Ne pas utiliser l’appareil sans son vide-poussière ou ses filtres.
• MISE EN GARDE : Cet appareil contient des produits chimiques reconnus par l’État
de la Californie comme pouvant causer le cancer ou, entraîner des malformations
congénitales ou d’autres troubles de la reproduction. SE LAVER LES MAINS
APRÈS L’UTILISATION DE L’APPAREIL.
MISE EN GARDE : POUR RÉDUIRE LES
RISqUES DE DOMMAGES :
• Éviter de ramasser des objets durs ou aux arêtes tranchantes avec l’appareil.
Ils peuvent endommager l’appareil.
• Ranger dans un endroit sec. Ne pas exposer l’appareil à des températures
de gel.
• Ne pas utiliser d’objets aux arêtes tranchantes pour nettoyer le tuyau car
cela risquerait de l’endommager.
• Lorsque le rouleau-brosse est installé, ne pas laisser l’appareil au même
endroit pendant de longues périodes de temps, car cela pourrait
endommager le plancher.
MISE EN GARDE :
• Afin de réduire les risques de décharge électrique, cet appareil est muni
d’une fiche polarisée (une tige est plus large que l’autre). Cette fiche ne peut
être insérée que dans une prise de courant polarisée et uniquement dans un
sens. Si la fiche ne s’insère pas complètement dans la prise, il faut l’inverser.
Si elle ne s’insère toujours pas, demander à un électricien qualifié d’installer
la prise appropriée. Ne jamais modifier la fiche.
4
Page 40

FIXER LE MANCHE
INSTALLER LES ACCESSOIRES
1. ENSAMBLADO DE LA ASPIRADORAN
A. Poignée*
B. Aspirateur
C. Accessoire portatif électrique*
D. Pince pour accessoire portatif
électrique
E. Suceur plat
F. Brosse à épousseter/buse pour
meuble*
G. Rallonge
H. Vis (pour l’assemblage)
I. Vide-poussière
*V arient selon le modèle.
Retirer toutes les pièces de
l’emballage.
Avant d’éliminer les matériaux
d’emballage, s’assurer qu’aucune
des pièces illustrées ne manque.
5
1.4 Placer d’abord la base du vide-poussière dans
l’appareil. Faire pivoter le videpoussière dans
l’aspirateur. Le videpoussière est fixé adéquatement quand vous entendez un clic.
1.5 Fixer la pince pour accessoires portatifs électriques (A) sur les rainures sur le côté du manche.
Fixer fermement le bas de l’accessoire portatif électrique et le pivot dans la pince.
1.6 Placer le suceur plat dans la rallonge et le faire
glisser dans le compartiment pour accessoires sur
le côté gauche au dos (B) de l’aspirateur et placer
la brosse pour tissus d’ameublement sur le côté
droit au dos (C) de l’aspirateur, tel qu’illustré.
FIXER LE VIDEPOUSSIÈRE
CONTENU DE L’EMBALLAGE
(Varient selon le modèle)
Nota : Retirer la vis située dans la base de
l’aspirateur et la mettre de côté jusqu’à la
directive 1.3.
1.2 Insérer le manche dans la base de l’aspirateur.
Appuyer fermement.
1.3 À l’aide d’un tournevis à tête cruciforme, serrer
(1) vis située à l’arrière du manche dans la base de
l’aspirateur.
Le modèle d’aspirateur peut varier de
celui illustré.
B
C
E
1.1
F
G
H
I
D
A
Commander des pièces additionnelles à Hoover.com ou
composer le 800 944-9200.
1.3
1.2
1.4
(V arient selon le modèle)
1.5 1.6
b
C
A
Page 41

CARACTÉRISTIQUES
Brancher le cordon dans
une prise d’alimentation.
Pour allumer l’appareil,
appuyer sur l’interrupteur Marche Arrêt.
Pour éteindre l’appareil,
appuyer de nouveau
sur l’interrupteur
2.3 Pour un nettoyage optimal
sur les planchers à surface
dure et les moquettes dont le
velours est plus épais que
1 po, le rouleau-brosse doit
être désactivé.
Quand l’aspirateur est
expédié, le rouleaubrosse
est à la position MARCHE
(ON). Pour désactiver le
rouleaubrosse pour le mode
de succion seulement,
peser sur la pédale (A).
2. FUNCIONAMIENTO
1. Poignée**
2. Bouton marche/arrêt
3. Bouton de dégagement du
videpoussière
4. Poignée de transport
5. Vide-poussière
6. Poignée pour le nettoyage des
escaliers
7. Ampoule*
8. Réglage selon la hauteur
du tapis
9. Protège-meubles
10.Pédale de marche/arrêt du rou
leaubrosse*
(mode de succion seulement)
1 1. Enrouleur de cordon*
12. Accès au filtre avec substance
filtrante HEPA et au filtre
au charbon*
13. Accès au filtre lavable
14. Indicateur de vérification du
système
15. Accessoire portatif électrique**
16. Bec suceur
17. Rallonge
18. Tuyau
19. Pédale de déblocage du manche
20. Tube pour tuyau
MODE DE SUCCION SEULEMENT/ ARRÊT AUTOMATIQUE DU
ROULEAU-BROSSE AGITATEUR
INTERRUPTEUR MARCHE/ ARRÊT
*Seulement sur certains modèles.
**Les accessoires varient selon le modèle.
21. Bouton de dégagement du tuyau
22. Brosse à épousseter/buse pour meuble**
Pour les planchers à surface dure et les
moquettes à velours très épais
Le modèle d’aspirateur peut varier de
celui illustré.
2.1
1
2
3
5
8
9
22
15
10
12
16
7
18
19
11
13
21
20
6
14
17
4
2.3
A
2.2
La pédale (A) est inactive lorsque l’appareil
est en position verticale.
IMPORTANT
Le rouleau-brosse doit être désactivé pour le
nettoyage de moquettes dont le velours est
plus épais que 1 po.
AVERTISSEMENT
!
6
Page 42

2.8 Pour ajuster le réglage de hauteur, APPUYER
et TOURNER le bouton (A) jusqu’au réglage souhaité.
For maximum cleaning performance, the following
carpet height settings are recommended:
•Réglagesinférieuretmoyen:pourtousles
types de tapis.
•Réglagesupérieur:pourlestapistrèsépais,
lorsqu’un effort moindre est désiré tout en
maintenant une bonne performance.
S’il vous est difficile de pousser l’aspirateur,
tourner le bouton jusqu’au réglage supérieur.
RÉGLAGE SELON LA HAUTEUR
DU TAPIS
IMPORTANT
7
Le modèle d’aspirateur peut varier de
celui illustré.
TRANSPORT DE L’ASPIRATEUR
2.6 Pour déplacer
l’appareil d’une pièce à
l’autre, placer le manche
en position verticale,
incliner l’appareil vers
l’arrière pour le faire
reposer sur ses roues
arrière, puis le pousser
vers l’avant.
2.6
POSITIONS DU MANCHE
2.7
2.7 Le manche de l’aspirateur comporte deux
positions : 1) Position verticale, pour le rangement
et l’utilisation des accessoires. 2) Position de
fonctionnement, pour l’utilisation normale sur les
tapis et les parquets.
Appuyer avec le pied sur la pédale de déblocage
pour abaisser le manche.
1
2
A
2.8
2.5 Appuyer sur le
bouton de dégagement
de la poignée (A) pour
la replier dans sa
position de rangement.
POIGNÉE PLIANTE
our le rangement.
2.5
A
(Seulement sur certains
modèles.)
Pour faire rentrer le cordon, le débrancher de la prise murale.
2.4 Empoigner l’extrémité de la fiche et tirer pour dégager le cordon de l’enrouleur
de cordon jusqu’à ce que le ruban rouge soit atteint.
Pour faire rentrer le cordon, tenir la fiche et appuyer sur le bouton (A) situé sur le
dessus de l’enrouleur de cordon. Pour éviter que le cordon ne fouette, tenir la
fiche pendant que le cordon s’enroule.
ENROULEUR DE CORDON ET RANGEMENT
Lorsque le cordon est tiré, un ruban jaune indique le moment où il est
presque entièrement sorti. Lorsque le ruban rouge est visible, cela signifie
que le cordon a atteint la longueur maximale possible. À ce moment, ne pas
tirer davantage sur le cordon.
2.4
A
IMPORTANT
Page 43

A. Utiliser l’accessoire pour tissu d’ameublement
pour nettoyer les meubles capitonnés, les rideaux,
les matelas et les escaliers recouverts de
moquette. (Les accessoires varient selon les
modèles)
B. L’accessoire portatif électrique peut être utilisé
pour les meubles capitonnés, les rideaux, les matelas, les vêtements, les garnitures intérieures pour
voitures et les escaliers recouverts de moquette. (Les
accessoires varient selon les modèles)
C. La lance sert à rallonger votre tuyau. Elle peut
être utilisée avec tous les accessoires cidessus.
D. Le suceur plat peut être utilisé dans les espaces
étroits, dans les coins et le long des bordures,
comme dans les tiroirs de bureaux, sur les meubles
capitonnés, dans les escaliers et le long des
plinthes.
Les accessoires permettent de nettoyer les surfaces plus élevées et les endroits difficiles à atteindre.
Pour utiliser les accessoires, placer le manche à la position verticale.
3. ACCESSOIRES
SÉLECTION DE L’ACCESSOIRE
APPROPRIÉ
(Les accessoires peuvent varier selon les
modèles)
3.3 Fixer l’accessoire ou
la lance au tuyau (A).
Fixer l’accessoire à la
lance (B) en l’enfonçant
bien en place.
Tourner l’accessoire
légèrement pour serrer
ou desserrer le raccordement.
RETRAIT DU TUYAU
3.2 Pour l’utilisation des
accessoires de nettoyage, mettre le manche
de l’appareil en position
verticale. Le rouleaubrosse agitateur ne
tournera pas lorsque
l’appareil est en position verticale.
Pour retirer le tuyau
afin d’utiliser un accessoire, appuyer sur le
bouton de dégagement
du tuyau et retirer
l’extrémité du tuyau.
Pour réenclencher le
tuyau en place, insérer le
tuyau dans le tube pour
le tuyau jusqu’à ce que
vous entendiez un clic.
FIXATION DE LA LANCE ET DES
ACCESSOIRES
AVERTISSEMENT:
!
Débrancher l’aspirateur avant de brancher
l’accessoire portatif électrique.
8
Le modèle d’aspirateur peut varier de
celui illustré.
3.1
b
C
D
A
3.2
3.3
b
A
Pour allonger la lance, tourner dans le sens antihoraire jusqu’à la position de déverrouillage, allonger la
lance, tourner dans le sens horaire et serrer. Inverser
le procédé pour raccourcir la lance.
Pour nettoyer le tuyau et l’accessoire portatif à air comprimé, essuyer avec un chiffon humide. NE PAS
immerger dans l’eau.
Les autres accessoires de nettoyage peuvent être lavés avec un détersif doux dans de l’eau tiède. Rincer
les accessoires et les laisser sécher à l’air pendant 24 heures avant de les utiliser.
ACCESSOIRES DE NETTOYAGE
Page 44

3.4 Soulever l’aspirateur à l’aide de la poignée
pour le nettoyage des escaliers et le placer dans
les escaliers. Nettoyer de l’avant vers l’arrière. Ne
jamais laisser l’aspirateur dans un escalier
lorsqu’il n’est pas utilisé.
3.5 Utiliser le tuyau et l’accessoire portatif
électrique pour nettoyer les escaliers. Pour
l’utilisation d’accessoires, toujours s’assurer que
le manche est en position verticale.
NETTOYAGE D’ESCALIERS
MISE EN GARDE
!
!
Faire preuve d’une grande prudence pendant l’utilisation dans les escaliers. Afin d’éviter les
blessures ou les dommages et d’empêcher l’appareil de tomber, toujours placer l’appareil au bas de
l’escalier. Ne pas placer l’appareil dans un escalier ou sur un meuble, car cela risquerait de causer
des blessures ou des dommages. Pour l’utilisation d’accessoires, toujours s’assurer que le manche
est en position verticale.
9
Le modèle d’aspirateur peut varier de
celui illustré.
3.4 3.5
Page 45

4. ENTRETIEN
L’aspirateur est doté d’un protecteur thermique interne pour le protéger contre la surchauffe. Lorsque le
protecteur thermique est activé, l’aspirateur s’arrête.
Si cela se produit, procéder comme suit :
1. Éteindre l’aspirateur et le débrancher.
2. Vider le videpoussière.
3. Inspecter l’entrée de la buse, le connecteur à l’extrémité du tuyau, le tuyau, l’entrée du vide poussière, le filtre cyclonique, le filtre lavable et le filtre HEPA pour repérer une obstruction.
Dégager les obstructions au besoin.
4. Lorsque l’aspirateur est débranché et que le moteur a refroidi pendant 30 minutes, le protecteur
thermique est automatiquement réinitialisé, et l’aspirateur peut de nouveau être utilisé.
Si le protecteur thermique est encore activé après avoir suivi les étapes ci-dessus, il se peut que
l’aspirateur ait besoin d’entretien.
AVIS
! !
4.1 Il est recommandé de vous familiariser avec les tâches d’entretien; l’utilisation
et l’entretien appropriés de l’appareil assureront son bon fonctionnement.
L’indicateur de vérification du système situé dans la zone (A) vous informe des
problèmes possibles liés au rendement du système.
Toute autre tâche d’entretien doit être confiée à un représentant de service autorisé.
PROBLÈME CAUSE POSSIBLE CAUSE POSSIBLE
Indicateur de
vérification du
système s’est
illuminé en rouge
1. Le filtre lavable et/ou le filtre
avec substance filtrante HEPA sont
sales.
1. Nettoyer le filtre lavable et/ou le filtre avec substance filtrante HEPA – Pg. 9..
2. Le videpoussière est plein ou
obstrué.
2. Vider le videpoussière – Pg. 9.
4. Le rouleaubrosse ou le tuyau est
obstrué.
4. Vérifier le tuyau – Pg. 11. Vérifier le rouleaubrosse – Pg. 11.
10
Le modèle d’aspirateur peut varier de
celui illustré.
A
4.1
4.2 Pour maintenir un rendement optimal, vider le vide-poussière avant que la poussière n’atteingne la ligne
de quantité maximale (A). Placer l’aspirateur en position verticale avant d’enlever le videpoussière.
Quand le vider
VIDE-POUSSIÈRE
Pour réduire les risques de blessures causées par des pièces en mouvement, débrancher l’appareil avant d’en effectuer l’entretien. Ne pas utiliser
l’aspirateur si le videpoussière ou les filtres ne sont pas en place.
Des matières très fines, comme la poudre pour le visage ou la fécule de
maïs, peuvent boucher le filtre et nuire au rendement de l’appareil. Lorsque
l’appareil est utilisé pour aspirer de telles poussières, vider le videpoussière et nettoyer les filtres souvent.
MISE EN GARDE
!
!
4.2
A
Page 46

11
Comment le nettoyer
4.3 Appuyer sur le
bouton de dégagement
du videpoussière (A) et
faire pivoter le
videpoussière pour le
retirer.
4.4 Tenir le videpoussière audessus d’une
poubelle, appuyer sur
le bouton de
dégagement de la
porte du videpoussière
(B) pour ouvrir la porte
du vide-poussière (C).
Refermer la porte du videpoussière (C). Appuyer fermement pour l’enclencher en
place à l’avant (D).
4.5 Placer d’abord la base du vide-poussière dans l’appareil. Faire pivoter le videpoussière dans l’aspirateur et appuyer fermement jusqu’à ce qu’il se bloque.
Pour maintenir le rendement optimal de l’appareil,
le filtre doit être nettoyé tous les deux mois dans
des conditions d’utilisation normales.
Filtre lavable :Comment le nettoyer
Retirer le videpoussière tel qu’il est illustré à la
Fig. 4.3.
4.6 Tirer sur le verrou du videpoussière pour l’ouvrir.
4.7 Tirer sur le filtre par la pochette pour retirer le
filtre lavable.
Tenir le filtre sous l’eau courante pendant deux minutes pour en éliminer la poussière et les débris.
Torde le filtre pendant qu’il est sous l’eau. Tordre une
dernière fois pour en retirer l’excès d’eau.
FILTRES: Quand le nettoyer
Pour réduire les risques de blessures causées
par des pièces en mouvement, débrancher
l’aspirateur avant d’en effectuer l’entretien. Ne
pas utiliser l’aspirateur si le videpoussière ou les
filtres ne sont pas en place.
MISE EN GARDE
!
!
Faire sécher le filtre sur son flanc pour que l’air
puisse circuler des deux côtés. Le séchage
peut prendre jusqu’à 48 heures.
Remettre le filtre en place, la pochette et les illustra-
tions vers le haut.
Bien fermer le couvercle en le poussant jusqu’à ce
qu’un déclic se fasse entendre.
Replacer le videpoussière tel qu’il est décrit à la
Fig 4.5.
IMPORTANT
Si le filtre lavable est utilisé et entretenu de façon
appropriée, il ne devra pas être remplacé pendant
la période de garantie. Au besoin, il est possible
d’acheter des filtres supplémentaires. Au besoin, il
est possible d’acheter des filtres supplémentaires
en visitant le site Hoover.com ou en composant le
1-800-944-9200. Demander la pièce Hoover
MD
no
304087001.
Quoi acheter : Filtre lavable
Le modèle d’aspirateur peut varier de
celui illustré.
4.3
4.4
b
A
C
4.5
D
4.7
4.6
4.8 Placer vos doigts dans les encoches, et tirer sur
le cadre du filtre (A) pour l’enlever. Tenir le filtre
audessus d’une poubelle et le tapoter pour en faire
tomber la poussière et les débris. Replacer en position sur l’aspirateur.
Pour réduire les risques de blessures causées
par des pièces en mouvement, débrancher
l’aspirateur avant d’en effectuer l’entretien. Ne
pas utiliser l’aspirateur si le videpoussière ou les
filtres ne sont pas en place.
MISE EN GARDE
!
!
Filtre composé d’une substance
filtrante HEPA : Comment le nettoyer
Quoi acheter: Filtre composé d’une substance filtrante HEPA
Si le filtre est utilisé et entretenu de façon appropriée, il ne devra pas être remplacé pendant la période
de garantie. Au besoin, il est possible d’acheter des filtres supplémentaires. Demander la pièce Hoover
MD
no 303172001.
NE PAS RINCER OU LAVER LE FILTRE AVEC SUBSTANCE
FIL TRANTE HEP A.
IMPORTANT
Page 47

Assemblage du filtre cyclonique :
comment le nettoyer
Retirer le videpoussière, tel qu’illustré à la Fig. 4.3.
4.9 Tourner le filtre (A) dans le sens antihoraire
pour retirer le videpoussière.
4.10 La poussière et les débris peuvent être évacués du filtre à l’aide de la brosse à épousseter/pour
tissu d’ameublement.
4.11 Si l’assemblage du filtre interne nécessite un
nettoyage supplémentaire, tourner la collerette (B)
du filtre à poussière dans le sens antihoraire pour le
retirer.
4.12 Saisir le montage du vide-poussière (C), le
retirer bien droit et le nettoyer à l’aide du
dépoussiéreur / de l’accessoire pour tissu
d’ameublement.
Après le nettoyage, remettre en place le montage
du vide-poussière (C) le long du bord intérieur de
l’assemblage du filtre et aligner les lignes centrales
sur le logo Hoover
MD
. Placer la collerette (B) sur le
montage, aligner les fentes (4) sur les pattes (4) et
tourner dans le sens horaire pour verrouiller.
Pour réduire les risques de blessures causées
par des pièces en mouvement, débrancher
l’appareil avant d’en effectuer l’entretien.
Ne pas utiliser l’aspirateur si le videpoussière
ou les filtres ne sont pas en place.
MISE EN GARDE
!
!
12
Quoi acheter : Carbon Filter
Si le filtre est utilisé et entretenu de façon
appropriée, il ne devra pas être remplacé pendant la période de garantie. Au besoin, il est
possible d’acheter des filtres supplémentaires.
Demander la pièce Hoover
MD
no 902404001.
Filtre au charbon : comment le nettoyer
(Seulement sur certains modèles.)
Le filtre au charbon est situé sous le filtre avec
substance filtrante HEPA.
NE PAS RINCER OU LAVER la cartouche du
Filtre au charbon.
IMPORTANT
Le modèle d’aspirateur peut varier de
celui illustré.
4.9
4.10
A
Placer le filtre sur le videpoussière, aligner les trois
(3) languettes (A) sur le filtre avec les trois (3) encoches sur le videpoussière (B) et le tourner dans le
sens horaire pour l’enclencher en position
L’emblème HooverMD et les lignes centrales situées
sur le vide-poussière devraient s’aligner sur le
devant du vide-poussière (C) lorsque l’assemblage
est correct.
Replacer le videpoussière tel qu’il est illustré à la
Fig. 4.5.
ROULEAUBROSSE : comment le
nettoyer
4.13 Tourner l’aspirateur à l’envers. Faire tourner le
verrou rouge supérieur (A) dans le sens antihoraire.
4.14 Faire glisser les verrous (2) inférieurs (B)
jusqu’à la position de déverrouillage.
Pour réduire les risques de blessures causées
par des pièces en mouvement, débrancher
l’appareil avant d’en effectuer l’entretien.
MISE EN GARDE
!
!
4.13
4.14
A
b
continuez>>
4.11
b
C
4.12
Page 48

13
4.20
4.18
4.18 Tourner l’appareil à l’envers.
Faire tourner les languettes (A) de chaque côté de
l’appareil.
4.19 Retirer la plaque inférieure (B).
4.20 Retirer les débris/poils du rouleaubrosse.
Replacer la plaque inférieure, et faire tourner les
languettes pour les reverrouiller dans la bonne
position.
A
ACCESSOIRE PORTATIF
ÉLECTRIQUE :
Comment le nettoyer
(Les accessoires varient selon les modèles)
4.19
b
TUYAU : Comment le nettoyer
Pour réduire les risques de blessures causées par des pièces en mouvement,
débrancher l’appareil avant d’en effectuer l’entretien.
4.17 Pour retirer le tuyau afin d’utiliser un accessoire, appuyer sur le bouton de
dégagement du tuyau (A) et tirer sur le tuyau pour en sortir l’extrémité.
Éliminer les débris ou les obstructions présents dans le tuyau. Ne pas utiliser
d’objets aux arêtes tranchantes pour nettoyer le tuyau car cela risquerait de
l’endommager. Pour reverrouiller dans la bonne position, pousser le tuyau dans
le tube pour le tuyau jusqu’à ce que vous entendiez un clic.
Pour réduire les risques de blessures causées
par des pièces en mouvement, débrancher
l’appareil avant d’en effectuer l’entretien.
MISE EN GARDE
!
!
MISE EN GARDE
!
!
Le modèle d’aspirateur peut varier de
celui illustré.
4.15
4.15 Faire tourner la plaque inférieure vers l’extérieur
et retirer les débris/poils du rouleaubrosse.
4.16 Replacer la plaque inférieure, en alignant les
vis (2) de la buse sur les verrous inférieurs
(4.14, B). Appuyer fermement sur les bords avant
(4.16) du protecteur de la buse pour s’assurer qu’il
est bien en place.
4.17
A
L’AMPOULE : Comment le remplacer
Afin de réduire au minimum les risques d’incendie, de choc électrique ou
de blessures, débrancher l’appareil avant d’en effectuer l’entretien.
AVERTISSEMENT
!
!
4.21
(Seulement sur certains modèles.)
Retrait de la lentille
Appuyer sur la pédale de dégagement du manche et placer le manche à sa
position basse.
4.21 Utiliser un tournevis à tête cruciforme, retirer (2) vis, tel qu’il est illustré, et
soulever la lentille.
continuez>>
4.16
Page 49

COURROIE
La courroie, située sous la plaque au bas de
l’aspirateur, doit être vérifiée périodiquement.
Quand procéder au remplacement
Comment procéder au remplacement
4.24 Tourner l’aspirateur à l’envers. Faire tourner la
languette rouge supérieure (A) dans le sens antihoraire.
4.25 Faire glisser les verrous (2) inférieurs (B)
jusqu’à la position de déverrouillage.
4.26 Soulever la plaque inférieure.
4.27 Retirer la courroie usée du rouleaubrosse (C) puis
de l’arbre du moteur (barre de métal) (D), et la jeter.
Remplacer la courroie si elle est étirée, coupée ou
brisée. Pour vérifier la courroie plate, consulter les
Fig. 4.24 à 4.26.
Pour réduire les risques de blessures causées
par des pièces en mouvement, débrancher
l’appareil avant d’en effectuer l’entretien.
MISE EN GARDE
!
!
14
Le modèle d’aspirateur peut varier de
celui illustré.
Installation de l’ampoule
4.22 Retirer la vieille ampoule de la douille. Placer
la nouvelle ampoule dans la douille jusqu’à ce
qu’elle soit verrouillée en place.
Il n’est pas nécessaire d’exercer une force
excessive.
Il n’est pas nécessaire de faire tourner l’ampoule.
Réinstallation de la lentille
4.23 Remettre en place la lentille et la fixer à l’aide
de vis.
Quoi acheter : L’ampoule
Au besoin, il est possible d’acheter L’ampoule supplémentaires en visitant le site Hoover.com ou en composant le 1-800-944-9200. Cet appareil utilise une ampoule, piece HOOVER n˚ 27313 -107.
4.22 4.23
4.26
C
D
4.27
4.24
4.25
A
b
Quoi acheter : Courroie plate
Faire tourner le rouleaubrosse manuellement
pour vous assurer que la courroie n’est pas
tordue.
IMPORTANT
Utiliser uniquement des courroies HOOVERMD
d’origine avec l’aspirateur.
Pour l’achat d’une nouvelle courroie destinée
aux modèles à rouleau-brosse (mode de succion seulement), demander une courroie plate
HOOVER
MD
– no de pièce 562289001.
Au besoin, il est possible d’acheter des courroies
supplémentaires en visitant le site Hoover.com ou
en composant le 1 800-944-9200.
continuez>>
Page 50

15
PROBLÈME CAUSE POSSIBLE CAUSE POSSIBLE
L’appareil ne
fonctionne pas
1. Le cordon d’alimentation n’est pas
fermement branché dans la prise.
1. Bien enfoncer la fiche mâle dans la prise de courant.
2. Fusible grillé/disjoncteur déclenché. 2. Remplacer le fusible/réenclencher le disjoncteur.
3. Protecteur thermique activé.. 3. Débrancher et laisser l’aspirateur refroidir pendant
30 minutes (cela réinitialisera le protecteur thermique).
Indicateur de vérification du système s’est illuminé en rouge
ou l’aspirateur
n’aspire pas ou
faible puissance
de succion
1. Le filtre lavable et/ou le filtre avec
substance filtrante HEPA sont sales.
1. Nettoyer le filtre lavable et/ou le filtre avec substance filtrante HEPA – Pg. 11.
2. Le videpoussière est plein ou obstrué. 2. Vider le videpoussière – Pg.11.
3. Courroie cassée ou usée. 3. Remplacer la courroie - Pg.14.
4. Le rouleaubrosse ou le tuyau est
obstrué.
4. Vérifier le tuyau – Pg. 13. Vérifier le rouleaubrosse –
Pg. 12.
5. Le réglage de hauteur pour la
moquette est inadéquat.
5. Choisir un réglage de hauteur approprié à la
moquette que vous nettoyez – Pg. 7.
6. Le mode Succion seulement est
activé.
6. Appuyer sur la pédale de MARCHE/ARRÊT (ON/
OFF) du rouleaubrosse pour désactiver le mode
Succion seulement– Pg. 6.
L’enrouleur de
cordon ne fonctionne pas.
1. L’enrouleur ne rétracte pas le cordon. 1. Composer le 1 800 9449200 pour communiquer
avec le représentant de service autorisé le plus près.
Poussière
s’échappant de
l’aspirateur.
1. Godet à poussière plein. 1. Revoir l’enlèvement et la réinstallation du godet à
poussière - Pg. 11.
2. Le videpoussière n’est pas installé
correctement.
2. Passer en revue la façon de retirer et de remplacer
le videpoussière – Pg. 11.
3. Le tuyau n’est pas installé correcte-
ment.
3. Relire les instructions d’installation du tuyau - Pg. 8.
4. Le filtre lavable et/ou le filtre avec
substance filtrante HEPA ne sont pas
installés complètement.
4. Relisez les instructions de retrait et de nettoyage
du filtre - Pg. 11.
5. DÉPANNAGE
Si un problème mineur survient, il est habituellement possible de le résoudre facilement si la cause est
déterminée à l’aide de la liste ci dessous.
Toute autre tâche d’entretien doit être confiée à un représentant de service autorisé.
AVERTISSEMENT
!
!
Pour réduire les risques de blessures causées par des pièces en mouvement, débrancher l’appareil avant
d’en effectuer l’entretien.
4.28 Placer vers l’extérieur le côté de la courroie
comportant des lettres, puis faire glisser la nouvelle
courroie sur l’arbre du moteur (tige de métal) (E).
Faire ensuite glisser l’autre extrémité de la courroie
autour de la partie sans poils du rouleau-brosse (F).
Une fois la nouvelle courroie installée, tirer et faire
glisser le rouleaubrosse dans la buse en veillant à
ce que les extrémités du rouleaubrosse soient orientées correctement.
4.28
E
F
4.29 Replacer la plaque inférieure, en alignant les vis (2) de la buse sur les verrous inférieurs (4.25, B).
Appuyer fermement sur les bords avant (4.29) du protecteur de la buse pour s’assurer qu’il est bien en
place.
4.29
Page 51

16
PROBLÈME CAUSE POSSIBLE CAUSE POSSIBLE
La lumière avant
ne fonctionne pas
1. L’ampoule est brûlée. 1. Changer l’ampoule - Pg. 13.
2. Fils électriques lâches. 2. Téléphoner au 1 800 9449200 pour communiquer
avec votre détaillant autorisé Hoover
MD
local.
L’aspirateur est difficile à pousser ou
refuse d’avancer
1. Le réglage de la hauteur pour la
moquette est incorrect.
1. Tourner le bouton de réglage de la hauteur en fonction de la moquette que vous nettoyez – Pg. 7.
2. Le rouleau-brosse est installé. 2. Pour les moquettes à velours plus épais que 1 po,
désactiver le rouleau-brosse.
Le rouleaubrosse
de l’accessoire
portatif ne tourne
pas
1. Trop de pression est appliquée à
l’appareil.
1. Continuer d’utiliser l’accessoire en appliquant une
faible pression.
2. Obstruction. 2. Dégager l’obstruction.
3. Faible succion de l’aspirateur. 3. Vérifier les éléments sous « L’aspirateur n’aspire pas
ou n’exerce qu’une faible succion ».
De la fumée ou
une odeur de
brûlé se dégage
1. Courroie brisée ou étirée. 1. Remplacer la courroie du rouleaubrosse – Pg. 14.
2. Le rouleaubrosse est obstrué. 2. Retirer/éliminer les débris du rouleaubrosse –
Pg. 12.
Pour obtenir du service autorisé HooverMD et des pièces HooverMD d’origine, trouver l’atelier de service
garanti autorisé (dépôt) le plus près de chez vous. Pour ce faire :
• ConsulterlesPagesjaunesàlarubrique«Aspirateursdomestiques».OU
• VisiternotresiteWebwww.hoover.com(auxÉtats-Unis)ouwww.hoover.ca(auCanada).Cliquersur
le lien « Service à la clientèle » pour connaître l’adresse du Centre de service le plus près de chez vous.
• Composerle 1-800-944-9200pour écouter un messageindiquant lesadressesdes Centres de
service autorisés. Prière de ne pas envoyer votre aspirateur à Hoover
MD
, Inc. à Glenwillow, en Ohio,
pour qu’il soit réparé. Cela n’entraînera que des délais supplémentaires.
Si vous avez besoin d’autres renseignements :
Pour parler avec un représentant du service à la clientèle, composer le 1-800-944-9200 du lun. au ven. de
8 h à 17 h (HNE). Au Canada, communiquer avec Hoover
MD
Canada, à Toronto : 755, Progress Ave,
Scarborough (ON) Toujours identifier l’aspirateur par le numéro du modèle et le code de fabrication lorsque
vous demandez des informations ou que vous commandez des pièces de rechange. (Le numéro de modèle
figure au bas de l’appareil.)
6. SERVICE
Page 52

17
GARANTIE LIMITÉE DE DEUX ANS
(Usage domestique)
ÉLÉMENTS COUVERTS PAR LA PRÉSENTE
GARANTIE
Votre produit HOOVER
MD
est garanti pour des
conditions normales d’utilisation et d’entretien
domestiques, comme il est stipulé dans le Guide
de l’utilisateur, contre les défauts de matériaux et
de fabrication pour une période complète de deux
ans à compter de la date d’achat (la « Période de
garantie »). Pendant la Période de garantie,
Hoover
MD
fournira, sans frais supplémentaires,
les pièces et la main-d’œuvre nécessaires à la
remise en bon état de fonctionnement de tout
produit acheté aux États-Unis, au Canada ou par
l’intermédiaire du Programme d’échanges militaires américain.
COMMENT PRÉSENTER UNE RÉCLAMATION
AU TITRE DE LA GARANTIE
Si ce produit ne fonctionne pas comme annoncé,
l’apporter à un atelier de service garanti autorisé
Hoover, accompagné de la preuve d’achat. Pour
accéder à un service d’aide automatique donnant
la liste des centres de service autorisés, composer le 1 800 944-9200 OU visiter Hoover
MD
sur
Internet à hoover.com (clients aux États-Unis) ou
à hoover.ca (clients au Canada). Pour de plus
amples renseignements ou pour toute question
sur la présente garantie ou sur l’emplacement
des différents centres de service garanti, téléphoner au 1-800-944-9200, du lun. au ven. de 8 h
à 19 h (HNE). Au Canada, communiquer avec
Hoover Canada
ÉLÉMENTS NON COUVERTS PAR LA
PRÉSENTE GARANTIE
La présente garantie ne couvre pas : toute utilisation commerciale du produit (p. ex., utilisation
dans le cadre de services ménagers, de conciergerie ou de location de matériel)
Rouleaubrosse, Courroie ; l’entretien inadéquat
du produit; les dommages liés à une utilisation
inadéquate, à des cas fortuits ou catastrophes
naturelles, au vandalisme, à tout autre acte hors
du contrôle de Hoover
MD
ou à tout acte ou négligence de la part du propriétaire du produit; toute
utilisation dans un pays autre que celui où le
produit a été acheté initialement, et tout produit
revendu par son propriétaire original. La présente
garantie ne couvre pas le ramassage, la livraison,
le transport ou la réparation à domicile du produit.
Cette garantie ne s’applique pas aux produits
achetés : hors des États-Unis (ce qui comprend
ses territoires et possessions); hors du Programme
d’échanges militaires américain; hors du Canada.
Cette garantie ne couvre pas les produits achetés
chez un tiers autre qu’un détaillant, marchand ou
distributeur autorisé de produits Hoover
MD
.
AUTRES CONDITIONS IMPORTANTES
La présente garantie n’est pas transférable et ne
peut pas être cédée. La présente garantie sera
régie et interprétée selon les lois de l’État de
l’Ohio. La Période de garantie ne peut pas être
prolongée par quelque réparation ou remplacement que ce soit exécuté en vertu de la présente
garantie.
LA PRÉSENTE GARANTIE EST L’UNIQUE
GARANTIE ET RECOURS FOURNIS PAR
HOOVERMD. HOOVERMD DÉCLINE TOUTE
RESPONSABILITÉ QUANT À TOUTES LES
AUTRES GARANTIES EXPRESSES OU
T ACITES, Y COMPRIS LES GARANTIES LIÉES
À LA QUALITÉ MARCHANDE OU À LA
COMPATIBILITÉ DU PRODUIT POUR UN
USAGE PARTICULIER. HOOVERMD NE
POURRA EN AUCUN CAS ÊTRE TENUE
RESPONSABLE DE TOUS DOMMAGESINTÉRÊTS SPÉCIAUX OU DOMMAGES
INDIRECTS, ACCESSOIRES OU
CONSÉCUTIFS DE QUELQUE NATURE QUE
CE SOIT SUBIS PAR LE PROPRIÉTAIRE DU
PRODUIT OU PAR TOUTE P AR TIE RÉCLAMANT
PAR L’INTERMÉDIAIRE DU PROPRIÉTAIRE,
QU’ILS RELÈVENT DU DROIT DES CONTRATS,
DE LA NÉGLIGENCE, DE LA RESPONSABILITÉ
CIVILE DÉLICTUELLE OU DE LA
RESPONSABILITÉ STRICTE DU FAIT DES
PRODUITS, OU QU’ILS DÉCOULENT DE
QUELQUE CAUSE QUE CE SOIT. Certains
États ne permettent pas l’exclusion des dommages consécutifs; par conséquent, l’exclusion
précédente pourrait ne pas être applicable dans
votre cas. La présente garantie vous donne des
droits spécifiques; vous pouvez également avoir
d’autres droits, qui varient d’un État à l’autre.
7. GARANTIE
 Loading...