

Page 1
Central Vacuum Systems
A c c e s s o r i e s
Owner’s Manual
English ➜ pp. 1-11
Français ➜pp. 12-17
www.hoover.com
Review this manual before
operating cleaner.
Page 2
Fill in and re t a i n
The HOOVER Central Vacuum System Accessories include a hose,nozzle and tools.
For your record s ,please enter model and serial nu m b e rs in the spaces prov i d e d
b e l ow and retain in a safe place.
Power Nozzle Pa rt No. Serial No.
(See bottom of power nozzle)
A c c e s s o ry kit Model No. (see pack age panel)
A t t a ch your sales receipt to this ow n e r ’s manu a l . Verification of purchase date may be
r e q u i r e d .
I n d e x
A s s e m bl i n g . . . . . . . . . . . . . . . . . . . . . . . . . . . . . . . . . . . . . . . . . . . . . .4
H ow to Use
C l e a n e r . . . . . . . . . . . . . . . . . . . . . . . . . . . . . . . . . . . . . . . . . . . . . . . . . .5
Cleaning tools. . . . . . . . . . . . . . . . . . . . . . . . . . . . . . . . . . . . . .5
Power nozzles . . . . . . . . . . . . . . . . . . . . . . . . . . . . . . . . . . . . . .6
If you have a pro bl e m. . . . . . . . . . . . . . . . . . . . . . . . . . . .1 0
Clearing bl o ck age s. . . . . . . . . . . . . . . . . . . . . . . . . . . .1 0
S e rv i c e . . . . . . . . . . . . . . . . . . . . . . . . . . . . . . . . . . . . . . . . . . . . . . . .1 0
I m p o rtant Safe g u a rd s . . . . . . . . . . . . . . . . . . . . . . . . . . . .2
M a i n t e n a n c e
L u b r i c a t i o n. . . . . . . . . . . . . . . . . . . . . . . . . . . . . . . . . . . . . . . . . . . .9
S t a n d a rd and ‘ Pow e r M A X ’
p ower nozzles
Replacing agitator brush ro l l . . . . . . . . . . . .7
Replacing belt . . . . . . . . . . . . . . . . . . . . . . . . . . . . . . . . . .6 - 7
Replacing headlight . . . . . . . . . . . . . . . . . . . . . . . . . . . .8
‘ W i n d Tunnel™ power nozzle
Replacing agitator brush ro l l . . . . . . . . . . . .9
Replacing belt . . . . . . . . . . . . . . . . . . . . . . . . . . . . . . . . . .8 - 9
Replacing headlight . . . . . . . . . . . . . . . . . . . . . . . . . . . .9
U n p a ck i n g . . . . . . . . . . . . . . . . . . . . . . . . . . . . . . . . . . . . . . . . . . . . . . . .3
Nozzle descriptions . . . . . . . . . . . . . . . . . . . . . . . . . . . .3
© 1994 The Hoover Company
www.hoover.com
I m p o rtant Safeguard s !
When using an electrical appliance,basic precautions should alw ays be fo l l ow e d ,
i n cluding the fo l l ow i n g :
READ ALL INSTRUCTIONS BEFORE USING THIS APPLIANCE
Wa rn i n g :
• Do not use powered nozzle outdoors .
• Close supervision is necessary when any appliance is used by or near ch i l d r e n .
Do not allow cleaning system to be used as a toy or to run unattended at any time.
• Do not allow any objects to be put into wall inlets.
• Keep hair,loose cl o t h i n g ,f i n ge rs ,feet and all parts of body aw ay from openings,
rotating agitator and any other moving part s . Do not operate nozzle in bare feet or
when wearing open toe shoes or sandals.
• Units with cordless hose use only with Hoover valve type W V.
• The hose contains electrical wires. Do not use if damage d ,c u t ,or punctured.
Avoid picking up sharp objects.
• Do not pick up anything that is burning or smoking,s u ch as cigarettes,m a t ch e s ,
or hot ashes.
• Do not use to pick up flammable or combu s t i ble liquids such as gasoline or use in
areas where they may be present.
• Use extra care when cleaning stairs .
• Do not put any object into openings. Do not use with any openings bl o ck e d :keep
free of dust,l i n t ,h a i r,and anything that may reduce air flow.
• Do not pull or carry by cord ,use cord as a handle,close a door on cord or pull
c o rd around sharp edges or corners . Do not run appliance over cord . Keep cord
aw ay from heated surfaces.
• A lw ays disconnect cord from electrical outlet before connecting or disconnecting
hose or motorized nozzle.
• Unplug cleaner when not in use. Turn off all controls before unplugg i n g .
• Disconnect hose from wall inlet and cord from electrical outlet when not in use and
b e fore servicing motorized nozzle.
• Grasp the plug to disconnect from wall outlet to avoid damage to cord ,p l u g ,
p ro n g s ,or receptacl e. N ever handle plug or appliance with wet hands.
• Do not use with damaged cord or plug. If appliance is not working as it should,
has been dro p p e d ,d a m age d ,left outdoors ,or dropped into water,take it to Hoover
Fa c t o ry Service Center or Au t h o r i zed Hoover Warranty Service Dealer (Depot).
• Use vacuum cleaner only for its intended use as described in this ow n e r ’s manu a l .
Use only attachments recommended by The Hoover Company ;o t h e rs may cause
h a z a rd s .
To reduce the risk of fire, electric shock, or injury:
Save these instructions!
2
Page 3
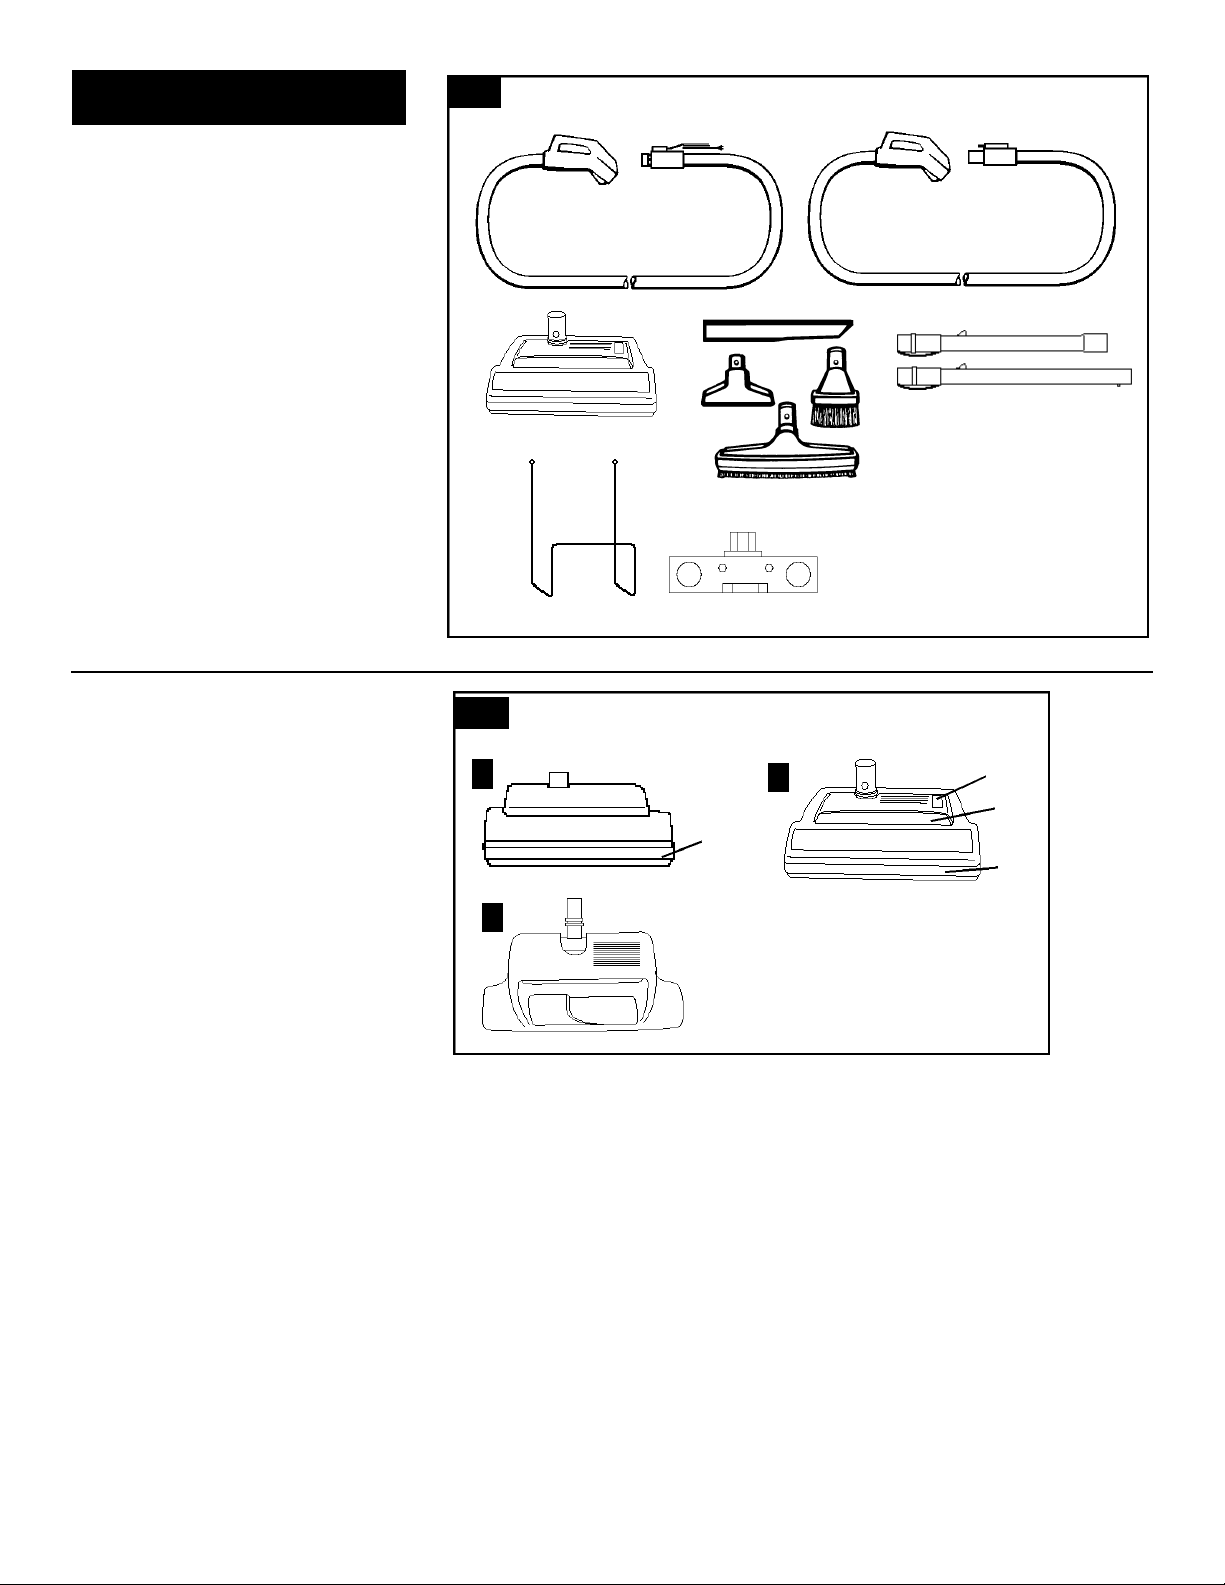
1. Unpacking
A . C o rd e d H o s e
(Models S5697, S5701,S5703)
B C o rd e d l e s s H o s e
(Model S5709)
C . Power nozzle
(see descriptions below)
D. C r evice tool
E . Dusting brush
F. Wall/floor brush
G . Furniture nozzle
H . Extension wands - some models
have two sets of extension wands:
• metal wands which can remain
attached to the power nozzle
• plastic wands which can be used
with cleaning tools.
I . H o s e / Tool rack
r
1-1
C
A
B
D
G
E
H
F
I
Nozzle Descriptions
1 . S t a n d a rd nozzle ( M o d e l S 5 6 9 7 )
2 . PowerMAX™ nozzle
(Model S5701)
3 . W i n d Tunnel™ nozzle
(Models S5711, S5713)
4 . Furniture guard
5 . Headlight - PowerMAX™ &
Wi n d Tunnel™ nozzles
6 . Belt ch e ck window -
PowerMAX™ nozzle only
Operate cleaner only at vo l t age specified
on data plate on bottom of cl e a n e r.
This cleaner is intended for household
u s e.
1-2
1
2
6
5
4
4
3
3
Page 4
2. Assembling
r
2-1
A
B
Push the wand/tool latch on the hand grip
(A) to the unlock symbol.
Push the hand grip (A) down onto wand so
that the button projection (B) fits into the
slot. Push the latch to the lock symbol to
s e c u re wand.
2-4
2-2
C
D
For metal wands, attach second wand or
tool by fitting button projection (D) on one
into spring latch (C) of first wand. Attach
nozzle in same manner.
To release, press down on center of latch
and remove tool, nozzle, or wand.
2-5
F
2-3
For plastic wands, t u rn plastic latch ring
on wand until outer slot lines up with inner
s l o t .
2-6
Push wand down onto second wand or tool
so that button projection fits into slot. Tu rn
latch ring to lock into place. Reverse pro c ed u re to remove wand or tool.
Attach corded hose to
wall inlet valve
2-7
G
After attaching wands and nozzle to hose,
p ress remote control switch on the hand
grip to “OFF.” Open wall inlet valve and
push end of hose firmly into opening.
Push hose power cord plug )G) into an
electrical outlet.
4
Push plug (F) of nozzle power cord completely into cord receptacle undern e a t h
hand grip.
N OT E : B e fore attaching or remov i n g
nozzle power cord ,a lw ays disconnect
hose power cord (CORDED hose) fro m
electrical outlet or disconnect hose fro m
To reduce the risk of electric shock, this
appliance has a polarized plug (one blade
is wider than the other). This plug will fit in
a polarized outlet only one way. If the plug
does not fit fully in the outlet, reverse the
plug. If it still does not fit, contact a qualified electrician to install the proper outlet.
DO NOT CHANGE THE PLUG IN ANY
WAY.
Unplug hose power cord when finished
cl e a n i n g .
electrified inlet valve (CORDLESS hose).
Position nozzle power cord into clips on
wands, placing excess cord between nozzle and bottom clip.
Attach cordless hose
to electrified wall inlet
v a l v e
2-8
After attaching wands and nozzle to hose,
p ress remote control switch on the hand
grip to “OFF”. Open electrified wall inlet
valve and push end of hose and mating
pins into opening. Hose is automatically
e n e rgized to operate nozzle.
Unplug hose when finished cl e a n i n g .
Page 5

3. How to use
3-1
A
Hand grip contro l s
ON-OFF Switch
The ON-OFF switch (A) for the Power Unit
is located on the hand grip of the hose.
3-4
3-2
B
Floor Surface Switch
The floor surface switch (B) on the hand
grip controls the agitator on the nozzles.
“RUG” turns agitator brush roll ON.
“BARE” turns agitator brush roll OFF.
3-5
3-3
Handle positions
The handle has two positions when used with
the power nozzle: upright and operating.
To lower handle to operating position, place
your foot firmly on the power nozzle and pull
handle back.
3-6
1
3
Brushed edge cleaning
B rushed edge cleaning is provided on
both sides of the nozzle to remove embedded dirt in carpet near baseboard and furn i t u re. Guide side of nozzle parallel to
edge of carpet or furn i t u re as shown.
C
Suction re g u l a t o r
The suction regulator (C) is located on one
of the metal wands.
Open the suction regulator for less suction
when cleaning lightweight fabrics or thro w
rugs. Close the suction regulator (as
shown) for maximum suction.
If power nozzle is difficult to push on some
carpet, open the suction re g u l a t o r. This will
p revent damage to the belt.
2
4
Cleaning tools
The cleaning tools have many uses. Select
the tool best suited for the cleaning task
f rom the descriptions below.
1 . C r evice tool may be used in tight
spaces, corners and along edges in such
places as dresser drawers, upholstere d
f u rn i t u re, stairs and baseboard s .
2 . Furniture nozzle may be used for
u p h o l s t e red furn i t u re, draperies, tapestries,
m a t t resses, clothing, automobile interiors
and carpeted stairs.
3 . Dusting brush may be used for carv e d
f u rn i t u re, table tops, books, lamps, lighting
f i x t u res, venetian blinds, baseboards, shutters and re g i s t e r s .
4 . Wall/floor brush may be used for walls
and wood, vinyl, brick, slate and other hard
s u rface floors.
Connect cleaning tools to hand grip or
wands as shown in assembly section.
5
Page 6

3-5
3-6
D
Power nozzles
Carpet or rug cleaning
When using the nozzle for carpet and ru g
cleaning, push the Floor Surface Switch (D)
on hand grip toward “ RU G ” . This setting
p rovides the agitator action n e c e s s a ry to
deep clean carpets. The nozzle adjusts
automatically to various carpet pile heights.
3-7
It is, there f o re, necessary to a lw ay s
unplug the hose power cord from the
electrical outlet when cleaning is fini s h e d .
H a rd surface floor cleaning
The nozzle can be used for cleaning hard
s u rface floors such as wood, linoleum,
vinyl, asphalt and rubber tile, sealed cork,
c o n c rete and terrazzo, as well as carpet.
To set the power nozzle for hard surf a c e
floor cleaning, push the Floor Surf a c e
Switch (D) toward “ BA R E ”. This setting
p rovides no agitator action. If you pre f e r,
you may use the wall/floor brush to clean
b a re floors.
4. Maintenance
Familiarize yourself with these home maintenance tasks as proper use and care of
your cleaner will ensure continued cleaning eff e c t i v e n e s s .
S t a n d a rd and
PowerMAX™ power
n o z z l e s
The belt
The belt in your power nozzle drives the
a g i t a t o r. It has been designed specifically
for use in this cleaner and is important for
e ffective operation.
E
Note: The headlight (E) on the ‘PowerMAX’
nozzle remains ON as long as the hose
power cord is plugged into an electrical
o u t l e t .
What to buy
Use only a genuine HOOVER B e l t N o .
4 0 2 0 1 0 4 5 when a belt replacement is nec-
e s s a ry.
When to re p l a c e
The belt should be checked from time to
time to be sure it is in good condition. To
check, remove the nozzle cover (see following section). Replace the belt if it is
s t retched, cut, or bro k e n .
4-1
A
On the PowerMAX™ nozzle, the belt is visible through the belt check window (A) on
top of the nozzle. If the belt is broken, the
motor pulley will be visible through the wind o w.
6
4-2
How to re p l a c e
Disconnect hose power cord from electrical outlet and disconnect power nozzle from extension wands.
Tu rn nozzle over and unscrew the 4
recessed Phillips head scre w s .
N o t e : Do not remove the 3 screws in the
triangle formation as these hold the
motor in place.
4-3
R e t u rn nozzle to original position, lift off
nozzle cover.
Page 7

4-4
4-5
4-6
C
B
If belt is not broken, pull it off the motor
pulley (B).
4-7
Position nozzle cover on front lip of
nozzle base. Press cover into place.
Tu rn nozzle over and replace scre w s .
Lift up end of agitator. Remove old belt
f rom agitator pulley (C) and replace with
new belt. Lettering on belt must be visible.
The agitator brush ro l l
re p l a c e m e n t
What to buy
The agitator may be replaced with either a
single or double row of bru s h e s .
Single row of brushes - Hoover part N o .
4 8 4 1 4 - 0 5 1 .
Double row of brushes - Hoover part N o .
4 8 4 1 4 - 0 4 9 .
D
S t retch belt back and attach to motor pulley.
Hold opposite end of agitator in place.
Push belt end forw a rd, rotating end plate
(D) until it slides into place. Tu rn agitator,
making sure it rotates fre e l y.
4 - 8
When to re p l a c e
Disconnect hose power cord from electrical outlet.
To check condition of brushes, move edge
of card across agitator opening while turning agitator. To maintain cleaning eff e c t i v eness, replace brushes if they do not touch
c a rd .
How to re p l a c e
Disconnect hose power cord from electrical outlet and disconnect power nozzle from extension wands.
1. Remove nozzle cover, agitator and belt
as shown in Figs. 4-2 to 4-5.
2. Lift out old agitator and discard .
3. Replace new agitator and belt as
shown in Figs 4-4 to 4-7.
The headlight
( PowerMAX™ power nozzle only )
The headlight,located under the nozzle
c o v e r.
Use only Hoover part N o .2 7 3 1 7 - 3 0 7,
which is a fused bulb, when replacing the
h e a d l i g h t .
4 - 9
How to to re p l a c e
Disconnect hose power cord from electrical outlet and disconnect power nozzle from extension wands.
1. Remove the nozzle cover as shown in
Figs. 4-2 to 4-5.
2. Push old bulb into socket and twist to
remove. Push new bulb into socket and
twist into place.
3. Replace nozzle cover.
7
Page 8

W i n d Tunnel™ power
n o z z l e
The belt
The belt in your power nozzle drives the
a g i t a t o r. It has been designed specifically
for use in this nozzle and is important for
e ffective operation.
What to buy
Use only a genuine HOOVER B e l t N o .
40201180 when a belt replacement is nec-
e s s a ry.
When to replace
The belt should be checked from time to
time to be sure it is in good condition. To
check, remove the hood (see following
section). Replace the belt if it is stre t c h e d ,
cut, or bro k e n .
How to re p l a c e
With CORDED hose,disconnect hose
p ower cord from electrical outlet. W i t h
CORDLESS hose,disconnect end of
hose from electrified inlet va l v e. T h e n
disconnect power nozzle from ex t e n s i o n
w a n d s .
4 - 1 0
To remove hood, turn nozzle over and
unscrew the 4 recessed Phillips head
screws.
Note: Do not remove the 3 screws in
the triangle formation as these hold
the motor in place.
4 - 1 1
Return nozzle to original position and lift
off hood.
4 - 1 4
F
4 - 1 2
E
Remove brush roll cover (E) by remov-
ing the 3 Phillips head screws.
4 - 1 5
G
4 - 1 3
E
Lift off brush roll cover (E).
4 - 1 6
H
If belt is not broken but is stretched or
cut, pull it off the motor pulley (F).
8
Lift up end of agitator brush roll. Remove
old belt from agitator pulley (G) and
replace with new belt. Lettering on belt
must be visible.
Stretch belt back and attach to motor
pulley.
Hold opposite end of agitator brush roll in
place. Push belt end forw a rd, ro t a t i n g
end plate (H) until it slides into place.
Tu rn agitator, making sure it rotates fre e l y.
Page 9

4 - 1 7
4 - 1 8
Agitator brushes and
brush roll re p l a c e m e n t
When to replace brushes
With CORDED hose,disconnect hose
p ower cord from electrical outlet. W i t h
CORDLESS hose,disconnect end of
hose from electrified inlet va l v e.
E
Replace brush roll cover (E) over agitator
b rush roll. Replace 3 short scre w s .
4 - 1 9
When brush roll brushes are worn, the
b rush roll should be re p l a c e d .
To check condition of brushes, move
edge of a card across bottom plate while
t u rning brush roll. To maintain cleaning
e ffectiveness, replace brush roll if bru s h e s
do not touch card .
4 - 2 0
Position hood on top of nozzle base.
Tu rn nozzle over. Replace 2 short scre w s
at the back of nozzle and 2 long scre w s
at the fro n t .
What to buy
When purchasing a new agitator bru s h
roll, ask for HOOVER p a rt n o .4 8 4 1 4 - 0 7 1 .
How to replace
With CORDED hose,disconnect hose
p ower cord from electrical outlet. W i t h
CORDLESS hose,disconnect end of
hose from electrified inlet va l v e.
1. Remove hood, duct cover, belt and
b rush roll as shown in Figs. 4-10 to 4-15.
2. Discard old brush ro l l .
3. Replace new brush roll and belt as
shown in Figs. 4-16 to 4-18.
4 - 2 1
Headlight re p l a c e-
m e n t
The headlight, located on top of the
power nozzle, operates when the clean-
er is turned on. Use only HOOVER
part no. 27317-307, which is a fused
bulb, when replacing the headlight.
5. If you have a
p ro b l e m
How to replace
Disconnect cleaner from electrical
outlet and disconnect power nozzle
from extension wands.
1. Remove the hood as shown in
Figs. 4-10 and 4-11.
2. Push old bulb into socket and twist to
remove. Push new bulb into socket and
twist into place.
3. Replace hood.
Edge groomer
replacement
When to replace
The edge groomers, located on both
sides of the nozzle, should be re p l a c e d
when they no longer extend past the sur-
face of the bottom plate.
J
I
What to buy
When purchasing edge groomers, ask for
Hoover p a r t n o .3 9 5 1 1 0 0 4 .
How to replace
Disconnect cleaner from electrical
outlet.
1. Remove hood and b rush ro l l cover as
shown in Figs. 4-10 to 4-13.
2. Pull off both old edge groomers (I).
3.Push each new groomer onto the 3
tabs (J), starting with one of the end
tabs. Then push the groomer onto the
middle and remaining end tab.
4. Replace brush roll cover and hood as
shown in Figs. 4-17 and 4-18.
If a minor problem occurs, it usually can
be solved quite easily when the cause is
found by using the check list below.
Problem: Agitator brush roll
won’t run
Possible cause
Possible solution
• Hose power cord, nozzle power
cord or cordless hose, not
firmly plugged in.
• Plug firmly into receptacle.
• Broken or worn belt.
• Replace belt.
• Floor surface set to “BARE” in
wrong position.
• Set floor surface to “RUG” posi-
tion.
Continued ➜
9
Page 10

Problem: Nozzle won’t pick-up
Possible cause
Possible solution
• Low suction.
• Check Power Unit filter.
• Blockage in system.
• Remove blockage.
• Agitator brush roll not running.
• See preceeding section.
• Agitator brush roll brushes
worn.
• Replace brushes.
S e rv i c e
To obtain approved HOOVER service and
genuine HOOVER parts, locate the neare s t
H o over Fa c t o ry Service Center or
Au t h o r i zed Hoover Warranty Serv i c e
Dealer (Depot) b y :
• checking the Yellow Pages under
“ Vacuum Cleaners - Household”
OR -
• checking the list of Factory Service
Centers provided with this cleaner
OR -
• calling 1 - 8 0 0 - 9 4 4 - 9 2 0 0 for an
automated re f e rral of authorized
s e rvice outlet locations (U.S. only)
OR -
• checking the Service section of
The Hoover Company online at
w w w. h o ov e rc o m p a ny. c o m
Do not send your cleaner to The Hoover
Company in North Canton for service, this
will only result in delay.
If further assistance is needed, contact The
Hoover Company Consumer Response
C e n t e r, North Canton, Ohio 44720
Phone: 330-499-9499.
In Canada, contact Hoover Canada,
Burlington, Ontario L7R 4A8,
Phone: 1-800-263-6376.
Always identify your cleaner by the c o m-
p l e t e model number when re q u e s t i n g
i n f o rmation or ordering parts. (The model
number appears on the bottom of the
c l e a n e r. )
L u b r i c a t i o n
The motor is equipped with two bearings
that contain sufficient lubrication for the life
of the motor. The addition of lubricant
could cause damage. T h e r e fo r e,do not
a dd lubricant to either motor bearing.
The agitator is equipped with two ball
bearings that should be lubricated periodically by a Hoover Factory Service Center
or an authorized Hoover Wa rranty Serv i c e
Dealer (Depot).
10
Clearing blockages
Remove larger items from carpet and floor
s u rfaces before vacuuming to help pre v e n t
o b s t ructions in the hose, wands or nozzle
c o n n e c t o r, and maintain the cleaning eff e ctiveness of your Central Vacuum System.
1. To check for obstructions, first press ONOFF Switch on hand grip to “OFF” to turn
o ff Power Unit.
2. Disconnect nozzle power cord and
wands from hand grip.
5-1
3. Tu rn “ON” Power Unit and check hose
end for suction. Remove any obstruction.
4. Remove nozzle from wands and attach
wands to hose. Check for suction and
remove any obstru c t i o n s .
5-2
5 .B e fo r e attaching nozzle to wands,
check nozzle connector (A).
6. Push nozzle connector down to lowest
position. Look into nozzle connector and
remove any obstru c t i o n s .
A
Limited Warranty
(Domestic Use)
Applies in United States Only
POWER UNIT
- FIVE YEARS
-ALL MODELS
SUCTION MOTOR
- FIVE YEARS - MODELS5671
- SEVEN YEARS - Model S5673
-TEN YEARS - Model S5573 &
Model S5675
ATTACHMENT SET
- FULL ONE YEAR WARRANTY
(PACKED WITH ATTACMENTS)
The power unit of your HOOVER®
Central Vacuum System is warranted in
n o rmal household use, in accordance with
the instructions provided with your power
unit, against original defects in materials
and workmanship for a period of five
years from date of purchase. In addition,
the suction motor of the power unit of
Model S5673 is warranted for an additional 2 years and the suction motors of
Model S5573 and Model S5675 are warranted for an additional 5 years against
original defects in materials and workmanship. This warranty applies when the pro duct is purchased in the United States
including its territories and possessions,
or from a U.S. Military Exchange. A
product purchased elsewhere is covered by a limited warranty which covers
the cost of parts only for the time periods given above. For Canada, see
Canadian Warranty.
This warranty does not apply if the
power unit is used in a commercial or
rental application.
This warranty covers all labor and parts
necessary to place the power unit in
correct operating condition during the
warranty period.
Warranty service can only be obtained
by presenting the power unit to a
Hoover Factory Service Center listed on
the back of this warranty. Proof of purchase may be required.
This warranty does not cover pick-up,
delivery or house calls; however, if
youmail your power unit to a Hoover
Factory Service Center for warranty service, transportation will be paid one
way under this warranty.
This warranty does not cover installation damages, installation materials, or
damage to the power unit caused by
defective or improper installation of the
Central Vacuum System.
While this warranty gives you specific
legal rights, you may also have other
rights which vary from state to state.
If there are any questions concerning
this warranty, or the availability of warranty service outlets, write or phone the
Consumer Response Center,
The Hoover Company, 101 East Maple
Street, North Canton, Ohio 44720.
Phone (330) 499-9499.
Page 11

APPLIES IN CANADA
ONLY
WARRANTY
HOOVER DOMESTIC
FLOORCARE APPLIANCE
THE EXCEPTIONAL
WARRANTY
WITHOUT EXCEPTION*
THE EXCEPTIONAL WARRANTY WITHOUT EXCEPTION*
HOOVER CENTRAL VACUUM PRODUCTS
CENTRALVACUUM CLEANING ATTACHMENTSETS
1
5
Full one year warranty covers everything including belts,
brushes and bulbs.
MODELS5671, S5672
CENTRALVACUUM POWER UNIT
A full five year warranty on all parts and labour.
A full warranty on all parts and labour in
accordance with the chart on the follow-
ing page.
Notwithstanding any other provision in
this warranty or any applicable statutory
provisions, neither the Company nor the
Purchaser shall be liable to the other for
special or consequential damages or
damages for loss of use arising directly
or indirectly from any breach of this contract, fundamental or otherwise or from
any tortious acts or omissions of their
respective employees or agents. In no
event shall the liability of the Company
exceed the unit price of any part or parts
which are defective or are not delivered.
Subject to any other warranty packed
with the product, this express warranty is
the only warranty applicable to your
HOOVER DOMESTIC FLOORCARE
APPLIANCE and is expressly in lieu of
any warranty otherwise implied by law,
including, but not limited to, implied warranties or merchantability or fitness for
any particular purpose.The remedies
available under this express warranty
shall be the only remedies available to
the purchaser. Hoover Canada neither
assumes, nor authorizes anyone to
assume for it, any other responsibility
related to the sale of HOOVER DOMESTIC FLOORCARE APPLIANCES.
This warranty is void if repairs are performed by unauthorized persons or if
other than genuine Hoover replacement
parts or accessories are used.
MODELS5673, S5674
CENTRALVACUUM POWER UNIT
A full five year warranty on all parts and labour
7
1 0
*Normal domestic use only.
Hoover Warranties are honoured at authorized warranty depots across Canada.For in-
warranty or regular service, contact a Hoover authorized service depot nearest you.
These dealers are listed in the yellow pages of your telephone directory under the
heading of Vacuum Cleaners - Household.
AUTHORIZED WARRANTY SERVICE DEALERS are listed in the directory as in the
following example:
SMITH VACUUM CLEANER SALES & SERVICE
IF FURTHER ASSISTANCE IS NEEDED IN CANADA, CONTACT:
HOOVER CANADA, 4151 NORTH SERVICE ROAD,
BURLINGTON,ONTARIO L7R 4A8 1-800-263-6376
PLUS AN EXTENDED WARRANTY
FOR TWOYEARS ON THE MOTOR.
MODELS5675 and S5573
CENTRALVACUUM POWER UNIT
A full five year warranty on all parts and labour
PLUS AN EXTENDED WARRANTY
FOR FIVE YEARS ON THE MOTOR.
HOOVER APPLIANCES
AUTHORIZED WARRANTY
SERVICE CENTER
123 ANY STREET — 123-4567
* For commercial or rental use, the
wa r ranty is limited to three (3)
months from date of purchase.
“This wa r ranty is not applicable to
H o over products sold in those Prov i n c e s
which have consumer legislation which
specifies mandatory wa r ranty prov i s i o n s
limiting and defining wa r ranty prov i s i o n s.”
HOOVER CANADA,
BURLINGTON, ONTARIO
L7R 4A8
1-800-263-6376
THE HOOVER COMPANY, NORTH CANTON, OHIO 44720
HOOVER CANADA - A DIVISION OF MAYTAG LIMITED
BURLINGTON, ONTARIO L7R 4A8
11
 Loading...