

Page 1
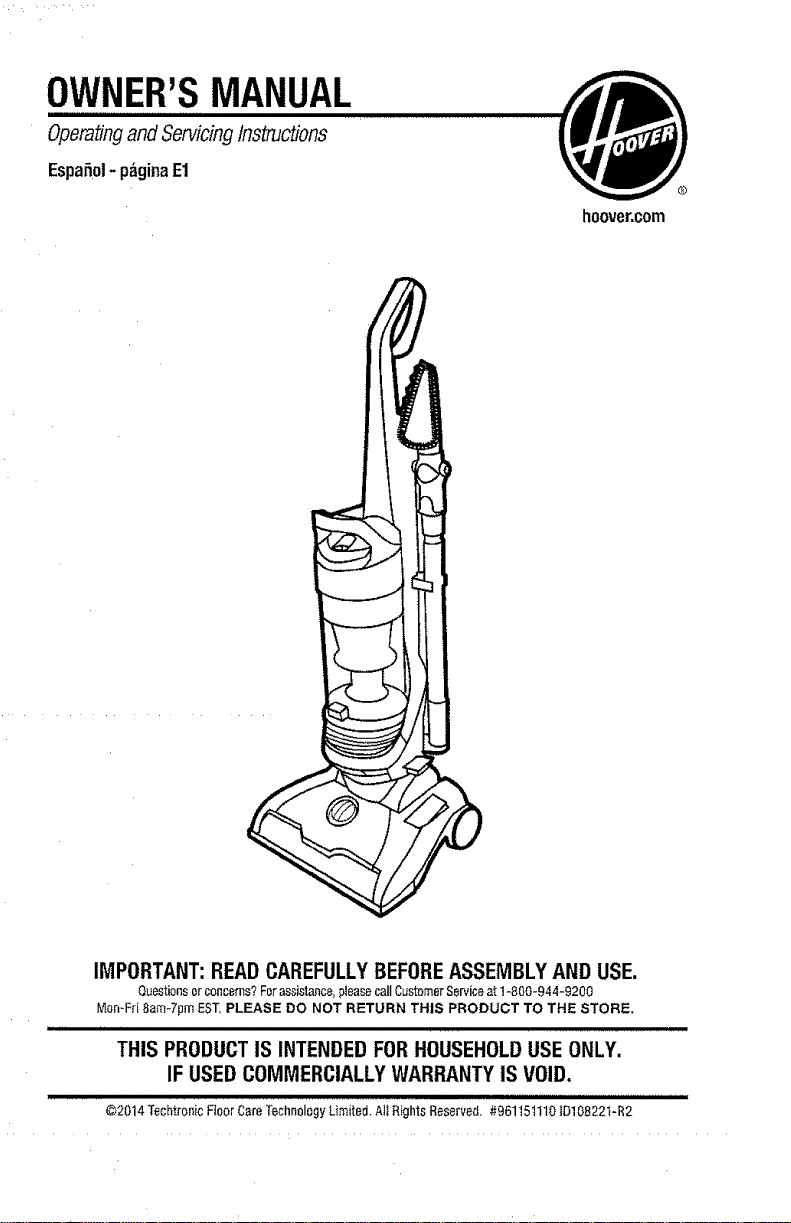
OWNER'SMANUAL
OperatingandServicingInstructions
EspaSol- p,_ginaE1
hoove_com
IMPORTANT: READCAREFULLYBEFOREASSEMBLY AND USE.
Questionsor concerns?Forassistance,ptBasecallCustomerServiceat1-800-944-9200
Mon-Fd 8am_7pmEST, PLEASE DO NOT RETURN THIS PRODUCT TO THE STORE.
THIS PRODUCTiS INTENDEDFOR HOUSEHOLDUSE ONLY.
IF USED COMMERCIALLYWARRANTY IS VOID.
©2014Techtronic FloorCareTechnologyLimited. All Rights Reserved. #9611511101D108221-R2
,,,,,,,,,,,,,,,,,,,,,,,,,,,,,, ,, ,, ,,,,, ,, ,,, ,,,, ,, ,,,,, ,,,,
Page 2
Thankyou for choosinga HOOVER_'product,
Please enter the complete mode] and Manufactunng Coc[e_n the
spacesprov_decI.
MODEL
MFG. CODE
Hint Altaeh your sales _ece_pttothrsowner's manual Venflcabonel
dat_ of purol_ase may L_e reqmreP for
warranty sen_lceof your HOOVER'-product
Be sure to register your productcnhne at }4oovercam or caJl1-8Q0-
944-9200 to regLsterby pl_one.
Important Safety Instructions .......................................................................... 3
Vacuum Assembly ............................................................................................. 5
Carton Contents...................................................................................... 5
Attach Handle .......................................................... 5
Position Teals.............................................................................. 5
Attach D[rt Cop ..................................................................... 5
How To Use ........................................................................................................ 6
VacuumDescription ....................................................................... 5
0n-0ff Sw_tcb.......................................................................... 6
Cord Release ....................................................................... 6
Carpet HeightAdjustment ............................................... 6
Suction _3nlyMode, Brushrc[ISh_t-Off ........................................ 7
Tools .................................................................................................................. 7
Select Proper Toot......................................................................... 7
RemovingHose ............................................................................................... ?
Attach Wand AndTools............................................................... 7
Stair Cleaning........................................................................ 8
CordRmvmd& Storage ................................................................... 8
HOwToCleanTools............................................................... 8
Maintenance ...................................................................................................... 8
D_rtCup............................................................................9
F_lters,
........................................................... 9-10
Brushrol[ ......................................................... t
Belt ..
.................................................................. t2
Hose .................................................. t3
TurboTool .................................................................. 13
TroubLes hooting ................................................................................................. 14
Service ................................................................................................................ 15
Warranty ............................................................................................................. 16
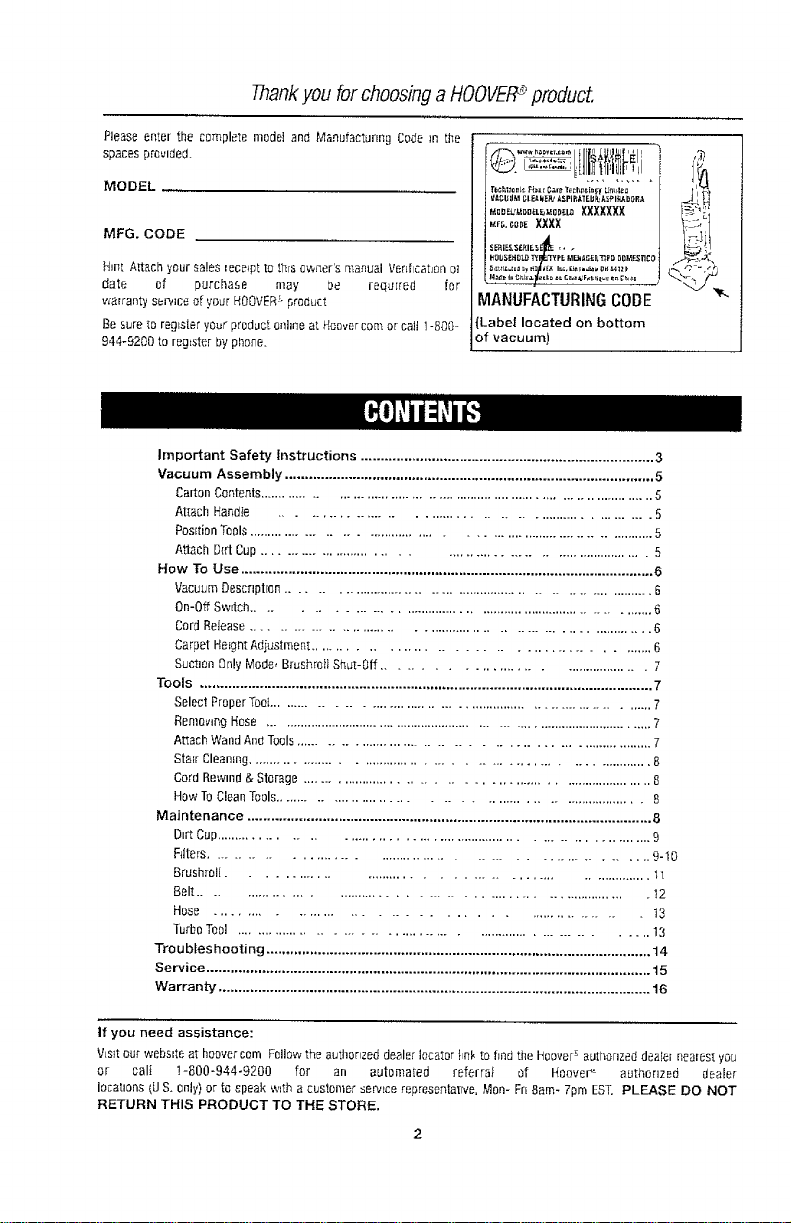
[©.,......Lit[li I,l F
f_ _ I_ eL,r_ DeeL _ _fi_ PeL_ XXXXXXX
MANUFACTURINGCODE
{Label located on bottom
of vacuum)
If you need assistance:
V;s_tour webs_teat hoovercom Folbw the authonzed dealer locaterhnl, to find the Ho[_ver'authonzed deale_nealest you
or call 1-800-944-9200 for an automated referral of Hoover' authorized dealer
locations {US. only) or to speak w_tha customer servicerepresentawe, Man- Fn 8am- 7proEST. PLEASE DO NOT
RETURN THIS PRODUCT TO THE STORE.
Page 3
IMPORTANTSAFETYINSTRUCTIONS
SAVETHESEINSTRUCTIONS
When using an electrical appliance, basic precautions should always be
followed, including the following:
READ ALL INSTRUCTIONSBEFOREUSINGTHIS APPLIANCE.
WARNING:TOREDUCETHERISKOFFIRE,
ELECTRICSHOCKORINJURY:
• Fullyassemblebeforeoperating.
• Operatecleaneronlyat voltagespecifiedon datalabelon bottomof cleaner.
• Donot leaveappliancewhen pluggedin. Unplugfrom outlet when not in useand
beforecleaningor servicing.
° Donot useoutdoorsor onwet surfaces.
• Donotallowto beusedas atoy.Notintendedfor usebychildrenage12 andunder.
Closesupervisionisnecessarywhen usednearchildren.Toavoidinjuryordamage,
keepchildrenawayfrom product,anddonot allowchildrento placefingersor other
objectsinto anyopenings.
° Useonly as described in this manual. Use only manufacturer's recommended
attachmentsandproducts.
° Donot usewith damagedcordor plug. Ifapplianceis not working asitshould,has
been dropped,damaged,left outdoors,or droppedintowater, take it to a service
center priorto continuinguse.
• Do notpullor carrybycord,usecordasa handle,closea dooroncord, orpull cord
aroundsharpedgesor corners.Donotplaceproducton cord. Donot runappliance
overcord. Keepcordawayfrom heatedsurfaces.
° Donot unplugbypullingon cord.Tounplug,graspthe plug,not the cord.
° Donot handleplugor appliancewithwet hands.
° Do notputanyobjectintoopenings.Donotusewithanyopeningblocked;keepfree
of dust,lint, hair, andanythingthat mayreduceairflow.
• Keephair, looseclothing,fingers, and all partsof body away from openingsand
movingparts.Brushrollcontinuesto rotatewhenin the uprightposition.
° Turnoff allcontrolsbeforeunplugging.
• Useextracare when cleaningon stairs.Toavoid personalinjuryor damage,andto
preventthecleanerfrom falling,alwaysplacecleanerat bottom of stairs on floor.
Donotplacecleaneronstairsor furniture,as it mayresult in injuryor damage.
° Donotuseto pick up flammableor combustibleliquids,such as gasoline,orfine
woodsandings,or useinareaswheretheymay bepresent.
, Holdplugwhenrewindingontocord reel.Donotallow plugtowhipwhen rewinding.
° UnplugbeforeconnectingTurboTool.
,, Donotpick up anythingthat is burningorsmoking,suchascigarettes,matches,or
hotashes.
° Donot usewithout dirtcupandlor filtersin place.
• WARNING:Thisproductcontainschemicalsknownto the Stated Califomiato cause
cancer,birthdefectsorreproductiveharm.WASHHANDSAFT£RHANDL/NG,
Page 4
CAUTION:TOREDUCETHERISKOFDAMAGE:
• Avoidpickingup hard,sharpobjectswith this product,asthey maycausedamage.
• Storeappropriately indoorsin a dry place. Do not exposemachineto freezing
temperatures.
o Brushroll continues to turn while product is turned on and handleis in upright
position. To avoiddamage to carpet, rugs,furniture and flooring, avoid tipping
cleaneror setting it on furniture,fringed arearugs, or carpetedstairs duringtool
use.
° Donot use sharpobjectsto cleanouthoseasthey can causedamage.
,, Withbrushrollon, do notallowcleanerto sit in onelocationfor anextendedperiod
of time,as damageto the floor can result.
WARNING:
° Toreducetherisk ofelectric shock,this appliancehas apolarizedplug (oneblade
iswider than theother).This plugwilt fit in a polarizedoutlet onlyoneway. Ifthe
plug doesnotfit fully inthe outlet, reversethe plug. If it still doesnotfit, contacta
qualified electrican to install the proper outlet. Do not changethe plug in any
way.
.... 4
Page 5
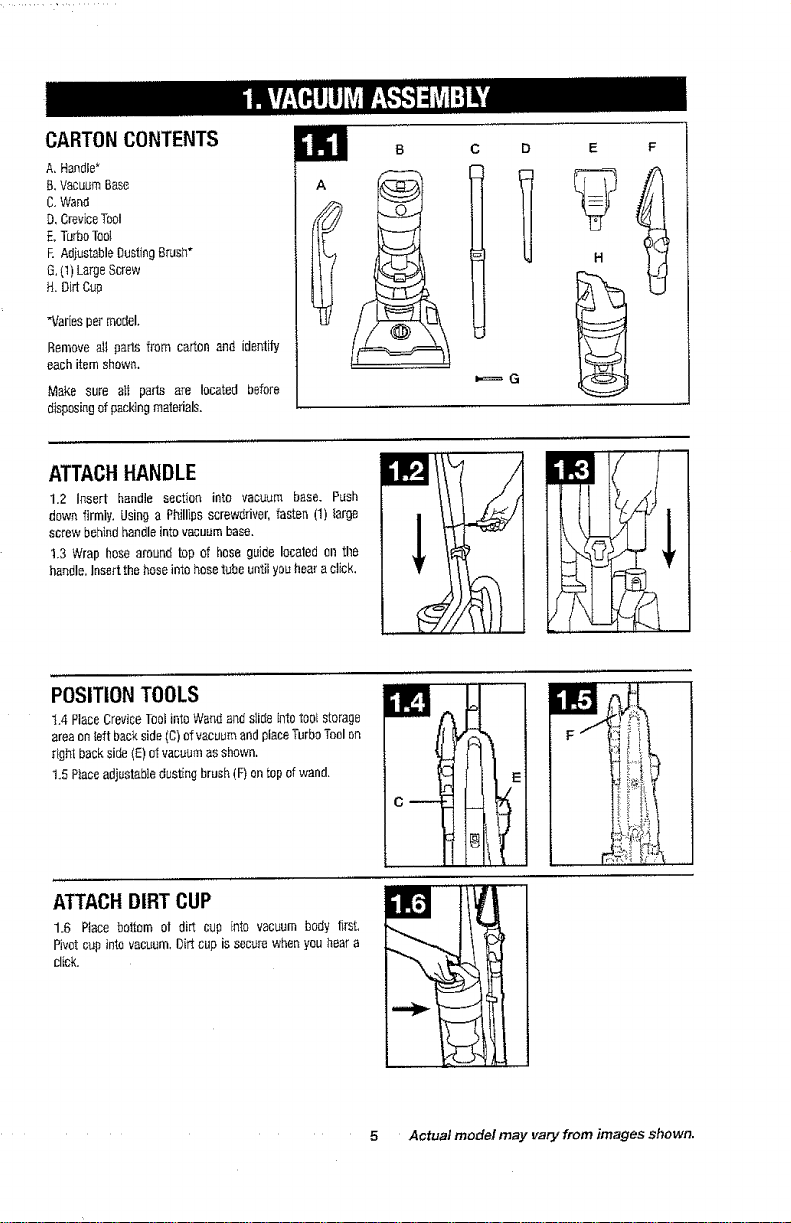
CARTONCONTENTS
A, Handle*
B, VacuumBase
C,Wand
O,CreviceTo0I
E, TurboToot
E AdjustableDusting8[ush*
6, (1)LargeScrew
H.DiMCup
"Variesper model,
Remove all paris from carton and identily
each item shawm
Make sure eli pads are located before
disposingof pacldngmaterials,
A
ATTACHHANDLE
1.2 Insert handle section into vacuum base, Push
dawn firmiy. Using a Phillipsscrewdriver, fasten (1) large
screw behindhandleintovacuum base.
1.3 Wrap hose araund top of bose guide located el1tile
handle. Insert the hase into hose tube unfit yauhearaclick.
POSITION TOOLS
t.4 PlaceCreviceTeal into Wand and s(ideinto toot starage
areaon{eft back side(C)ofvacuum and placeTurbo Toolan
right backside (E)o4vacuumas shown.
1.5 Raceadjustabledusting brush iF) an tapof wand.
B
D E F
,-=== G
ATTACHDIRT CUP
1.6 Ptace bottom a! dirt CUp into vacuum body first,
Pivot cup into vacuum.Dirtcup is secure whenyou bear a
click,
5 Actual model may vary from images shown.
Page 6

VACUUM DESCRIPTION
1. Handle
2. DirtCupReleaseButton
3. CarryHandle
4. SystemCheckIndicator
5. RinsableFilterAccess
6, DirtCup
7. Ritermadewith HEPAmedia
8. HeightAdjustment
g. FurnitureGuard
lg. AdjustableOust_ngBrush
1!. Wand
12. CreviceTool(insidewand)
13. CordRewindPedal
t4. BrushrotlONtOFFPOdal
t5. HandleReleasePedal
16. Hose
17, TurboTool
t8, ON/OFFSwiDh
t9. HoseReleaseButton
20, HoseConnectingTube
!
16
17
18
7
8
9
t5
19
ON-OFF SWITCH
22 Plugcord into electrical
outlet.
To turn vacuum ON(I--ON),
push ON,OFFswitch (A) to
ONposition.
To turn vacuum OFF
(O=OFF-),push switchto OFF
pesitbn,
II!t IA |
,_ARPETHEIGHTADJUSTMENT*
"Numberof heightse_ngs vary"per model.
CORDRELEASE
2.3 Priorto using,graspthe
endof the plug and putl to
release the cord from the
cord reel until red tape is
reached.
•IMPORTANT•
Wt_enpuilingon the cord,yetlow tapewilt identify when
thecord is almosl lul_yexiended,Whenred tapeJsvisible
on i_lecord, tile cord has reachedits fu[tlength,(Do not
pull the cord past the red tape.)
2.4 Toadjust heigl_tsetting,PUSHDOWNandTURNknob(C)
to desiredheightsetting.
For maximum cleaning performance, the iollowing carpet
heightse_ngs arerecnmmeodec_:
• Hard floor setting: for use on hard floors only.
• Low through High se_ngs: Adiust depending on
ca-_ettype.
', For high pile carpet, use high carpet setting to
easepushingeffort,
• IMPORTANT•
if the vacuum is difficult to push, push down and turn
knobto thenext highersetSng.
Actual model may vary from images shown, 6
Page 7

SUCTIONONLYMODE/BRUSHROLL SHUT-0FF
for bare floors and very high pile carpet
2.3 For optimal cleaning
performanceon bare floors
andcarpet with pile deeper
than 1", brushrotlsi_uuldbe
turnedoff.
Thevacuum is shippedwEth
the hrushrolI in the ON
pDsitioe. To turn brushrolt
OF}=for SuctionOn_ Mode,
step on pedet(A).
• IMPORTANT•
Pedal(A) is inactivewhen the cleaner is in the upright
position.
Brushrottshould bein off position for cleaningof highp[te
carpetdeepertllan t".
A CAUTION,&
Not tobe usedfor grooming a pet.
A CAUTION
Toolsallow forcleaningsurfacesabovethe floorandfor reach-
inghardto dean areas.
The vacuum is ready for toni use when handle is in updght
posiU0n,
SELECTPROPERTOOL
A B C D
REMOVING HOSE
3.2 Toremove hosefor toot
use,press the hoserelease
buttonandpullhoseendout,
Tolockbackintoplace,push
hoseinto hosetube untityou
heara click,
• IMPORTANT•
Brushrotlcongnuesto turnwhile productis turnedonand
handleis in uprightposi_en.Toavoid damageto carpet,
rugs,tum_ureandfloodng, avoidt_ppfngcleanerOrsetting
it onfum_re, fringedarearags,or carpetedstairsduring
teduse.
A, Wandisusedto giveextraiengthto yourhose,Useitwith
any of the abovetools,
B, Crevice Tool may be used in tight spaces,
comers and along edges in such placesas dresser drawers,
uphofsteredfum_re, stairsendbaseboards.
C. TurboToolmaybe usedforupholsteredfurniture,draperies,
matiresses,clothing,and carpeteds_irs.
D, Use Adjustable Ousting Brush to clean uphotstered
turniture, draperies, mattresses, clothing,carpeted stairs,
lightfixtures,_d fanswith5 cleaningpositions.
ATTACHWAND AND TOOLS
A CAUTIONA
To reducethe dsk of injury from movingparts - Unplug
beforeservicing.
3.3To attachtootorwand to
hose,push firmly intoplace.
,A CAUTIONAk
Notto be usedforgroomingapet.
............. 7 Actual model may vary from images shown,
Page 8
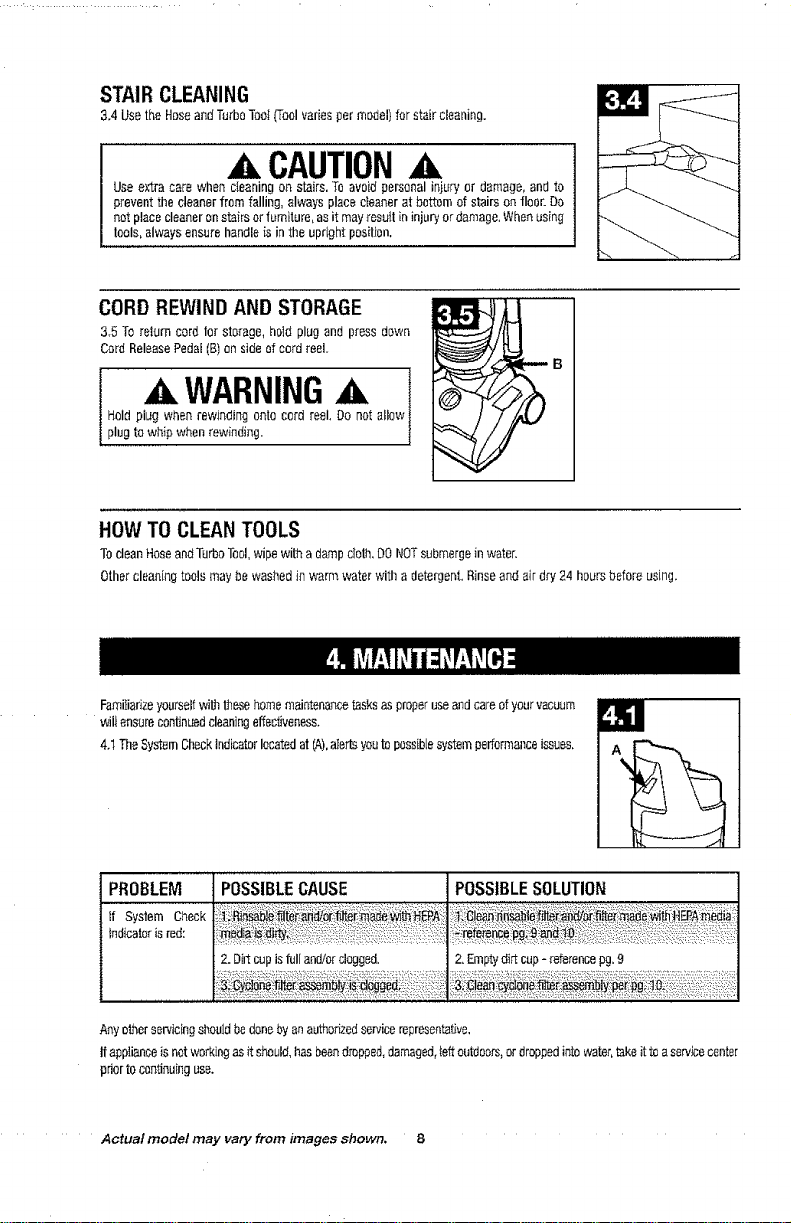
STAIR CLEANING
3.4 Use the Hoseand TurboTool_ool varies per model}for stair cleaning.
A CAUTION
Use extra care when c{eaningon stairs,To avoid personal injury or damage,and to
prevent the cleanerfrom falling, always place oieanerat bottom of stairs on floor. DO
not place cleaneron stairs orlumiture, asit may reeuitin injury ordamage,When using
tools, always ensure handleis in the upright position.
CORD REWINDAND STORAGE
3.5 Toreturn cord for storage, hold plug and press down
CordReleasePedal(B)on side of cord reel.
Heldplug when rewinding onto cord reel, 0o not aIlow
I,,w,,.,.o,,1
plugto whip when rewinding.
NOW TO CLEANTOOLS
TocleanHose andTurboTool,wipe wi_ a damp cloth,DONOTsubmergein water.
Othercleaning tools may be washedin warm water witI] a detergent.Rinseand airdry 24 hoursbefore using.
FamiIiarizeyourselfwith thesehome maintenancetasksas properuse andcare of your vacuum
wii_ensureconidnuedcleaningeffectiveness.
4.t TheSystemCheckIndicatorlocatedat (A),aIertsyouto possiblesystempedormanceissues,
PROBLEM
It System Check
Indicatoris red:
Any otherso,vicingshouldbe donebyan authorizedservicerepresentative,
tf applianceisnot workingasit should,hasbeendropped,damaged,teftoutdoors,or droppedintowater,takeit toa servicecenter
pdorto continuinguse.
Actual model may vary from images shown. 8
POSSIBLECAUSE POSSIBLESOLUTION
2.Dirtcup isfull and/or clogged, 2.Emptydirt cup- referencepg,9
Page 9
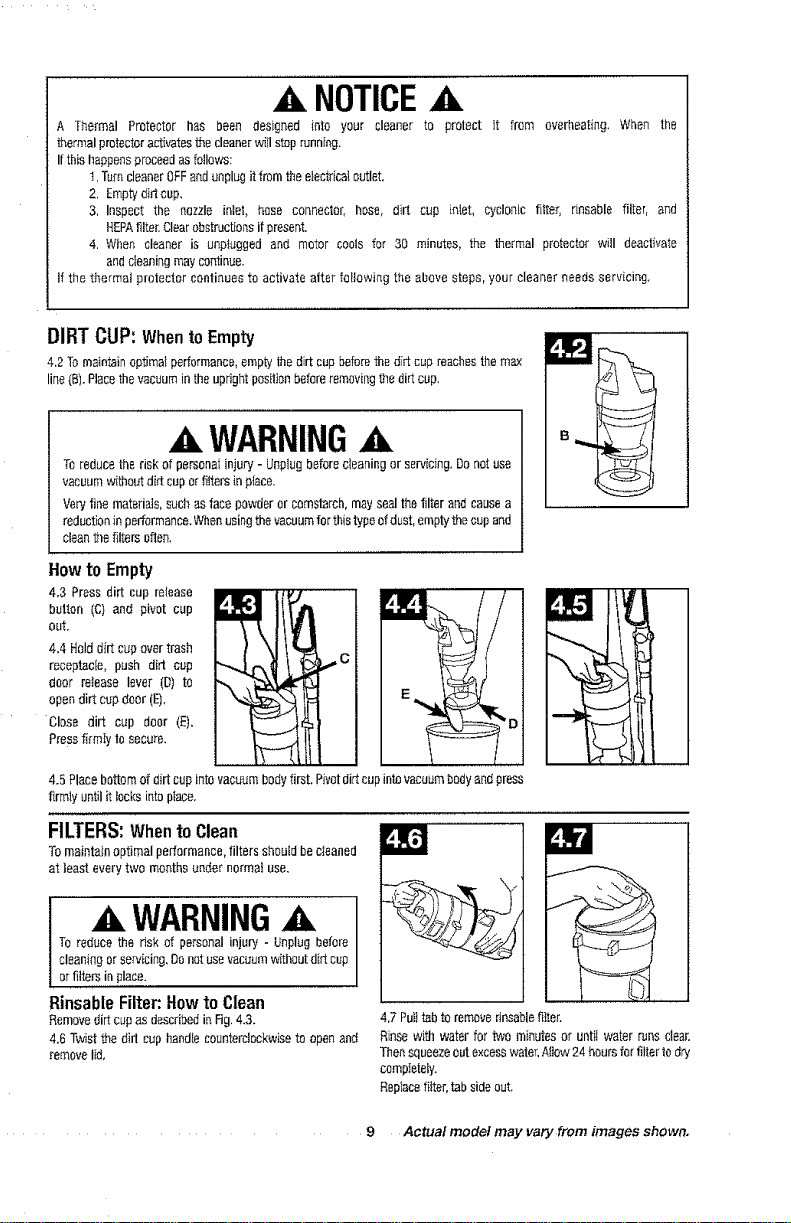
NOTICE
A Thermal Protector has been designed into your cleaner to prot_ct ]t from overheating. When the
thermalprotectoractivatesf_e cleanerwill stop running.
It this happensproceedasfollows:
1,TorncleanerOFFandunplug it from the dectdcal outlet,
2. Emptydirt cop,
3. Inspect the nozzle intet, hose connector, hose, dirt cup intet, cyclonic filtefi rinsable filter, and
HEPAfilter.Clearobstructionsif present.
4. When cleaner is unp{ugged and motor cools for 30 minutes, the thermal protector will deactivate
andc_eaningmaycontinue.
If the thermal protector continues to activate after foIiowing the above steps, your cleaner needs servicing,
DIRT CUP: Whento Empty
4,2 Tomaintainoptimal performance,empty thedirt cup beforethe dirt cup reachesthe max
line (B).Placethevacuum inthe upright positionbeforeremovb_gthedirt cup.
WARNING
Toreduce the risk of personatinjury - Unplugbeforecleaning or servicing.Donot use
vacuumwithoutd[_tcup orfilters in place.
Veryfine materials, such asface powderor cornstarch,may sealthe filter and causea
reductionin performance.Whenusing the vacuumfor thistypeof dust,empty_e cup and
cleanthe filters often,
How to Empty
4.3 Press dirt cup re,ease
button (C) and pivot cup
out,
4.4 Holddirt cup over trash
receptac[e, push dirt cup
door release lever (D) to
open dirt cup door(E).
Close dirt cup door (£).
Pressfirmiy to secure.
_"_ iffl I
4.5 Placebottomof dirtcupintovacuum bodyfirst, Pivotdirtcup intovacuumbodyandpress
firmly untilit iocks into prate.
FILTERS:WhentoClean
Tomaintain optimal performance,filters should becleaned
at least every two months under normal use,
WARNING
To reduce the _isk of personalinju_ - Unplugbefore
cleaning or sewicing,Donot usevacuumwithout dirt cup
or filters inplace.
RinsableFilter:Rowto Clean
Removedirt cup as d_scribedin Rg. 4.3.
4,6 Twistthe did cup handle counterclockwiset_ open and
removelid,
4,7 Pulltab to removerinsablefilter.
Rinsewith water for h_e minutes or anti[ water runs clear.
Then squeezeoutexcesswater,Nlow 24 hoursfor filterto dry
compIetaty.
Rep_acafilter, tabside out,
9 Actual model may vary from images shown.
|
Page 10
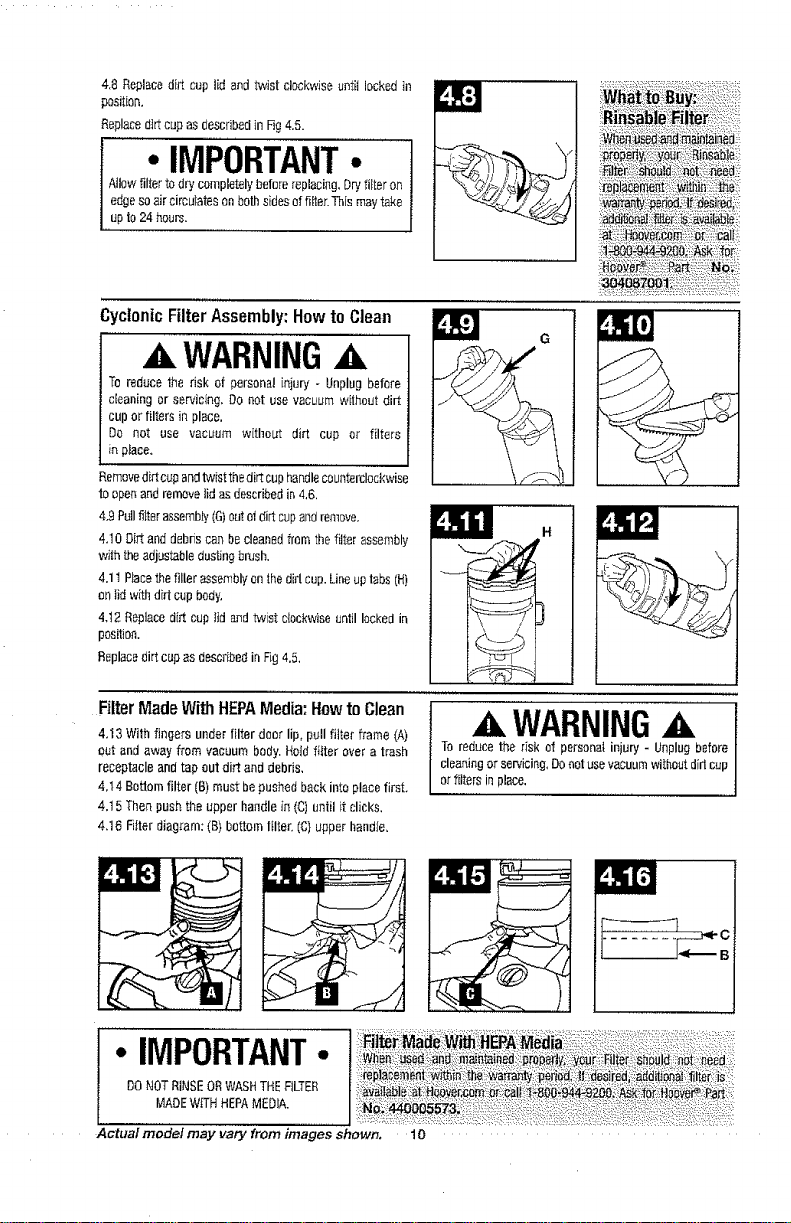
4,8 Replacedid cup lid andtwist clockwiseuntil locked in
position.
Replacedirt cup asdescribedin Fig4,5.
• IMPORTANT•
Ailowfilter todry completely beforereplacing,Dryfilter on
edgeso air circulateson both sidesof filter.This maytake
up to24 hours.
CyclonicFilterAssembly:HowtoClean
WARNING,&
To reduce the risk of persona[ injury - Unplug before
c[eanthgor servicing. Do not use vacuum without di_
cupor filters in place,
Do not use vacuum without dirt cup or filters
in piace.
Removedirt cupandtwistthedirtcup handlecounterclockwim
to oper_andremovelid asdescribed in 4,6.
4,9 Pullfi_terassemb,B/(G)outet dirt cupandremove,
4,10 Dirt and debrmcan becleaned from the filter assembly
with the adjustabledustingbrdsh,
4.1t Placethe filler assemblyonthedirI cup.Lineup tabs[H)
_ri tidwith dirt cup body,
4,t2 Replacedirt cup tid andtwist clockwiseuntil locked in
position,
Replacedirt cup as describedin Fig 4.5,
G
FilterMadeWithHEPAMedia:HowtoClean
4,13 With fingers under filter door lip, pull filter frame (A)
gut and away from vacuumbody, Reid filter over a trash
receptacle and tap out dirt and debris,
4,14 Bottomfilter (g) must bepushed back into placefirst.
4.15 Then pushthe upper handle in (C] until it clicks,
4,16 Fitterdiagram: (B) bottom filter. (C}upper handJe,
A WARNING
To reduce the risk of persenat injury - Unplug before
cleaningor servicing,DOnot usevacuum wi[houtdidcup
orfilters inplace.
i
• IMPORTANT•
DONOTRINSEORWASHTHE FILTER :I,_Q_!_ _:_ii_:l:,_:::_i_aii _S()_920_:_!i_il;_q-_,_:i_a_:::i
MADEWITHHEPAMEDIA. _8_3i::i', : i::i :_:::ii:i: :i:!i: :i:i:i__:i:i_i_,!!:II::: '! ::_:i_: :,i::::::i::
Actual model may vary from images shown, 10
c
B
Page 11

BRUSHROLL:HowtoClean
_
Toreducethe risk of injuryfrom movingparts- Unplug
beforeservicing.
CAUTIONA I
Brushroll- Bottomplatewithscrews
Placehandlein the lowpositionand turn the cleaneroverso
the bottomsideis up.
4.t7 Remove the 6 screws as shown with a Phillips
screwdriver,
4.18 Pivotoff bo_m plate,
4.19 Removeanydeb_ a_diorl_r frombrush_aIL
Replace the bottom plate aligning the screw holes and
inst_ll _he6 screws asshown,
t I Actual model may vary from images shown,
Page 12

BELT __
CAUTION,A
Toreducethe risk of injury from moving parts- Unplug
beforeservicing.
The belt is locatedunderthe bottomplateoftbe vacuum and
should be checkedfrom timeto time to be sureit is in good
condition.
When To Replace
Reptacebelt if it is damaged,cut or broken.Referto direc-
tbns below,
How To Replace - Bottomplatewithscrews
Placehandleinthe low positionand turnthe cleaneroverso
the bottomsideis up,
4.20 Removethe 6 screws as shown with a PNlips screw-
driver.
4.21 Lift off bottom pbte (A).
4.22 Removeused belt from b#Jshrot_(C)then from motor
shaft(metal rod)(D)and discard.
4,23W_ le_ onoutsideofbelt,slidenewLeftoverrr_torshaft(meta;rod)[tb.
Thenslip aroundareaof brushrolIwithoutbristles (G).
424 With belt inp}ace,puI_andslide broehrol{into nozzlemaking sure thatthe brushro]lend
capsare in the correctorientation,
Placethebottom plate aligningthescrewlmtesand re-installthe6 screws.
• il i!i' !4,
Actual model may vary from images shown. 12
Page 13

HOSE
Toreducethe risk of personalir_jury- Unplug before cleaning or servicing,
Howte CLean
4.25 To remoVe I_ose for tool use, press the hose release button (A} and pull
hoseendout.
C_earawaydebrisor obstructionsfromhose.Donotuse sharpobjects todeanout hose as they
can causedamage.Tolock back into place,pushhose into hosetube untiIyou heara click,
TURBOTOOL
Toreduce the risk of injuryfrom moving parts- Unplug
i A CAUTION
, beforeservicing,
HowtoClean
4.28 Turntool so bottom facesup. Rotatehe _atoh_s(A)on
eithersicleoftool.
4,27 Removebottom p_ate(B),
4.28 Removea_ydebdsandJorhairfrombn._brolL
Replacebottomplateby aligningtabs alongfrontedge of tool
Rotate latches back intolocked position,
,
LUBRICATION
The motora_d brashrotI are equippedwi_h bear_gs which
containsufficient lubricaUo_for &air ih_etime.
The additio;_of lubricant couldcause damage,De not add
lubdCaStto motoror br_shrolL
Actual model may vary from images shown, 13
Notto beused forgroom{riga pet,
CAUTION,A
t
Page 14

ifaminorproblemoccurs,itusuattycanbesolvedquiteeasilywhenthecauseisfoundbyusingthe
cl)ecklistbelow,
Anyetherservicingel;ou[d bedone byan authorizedservicerepresentative.
ifapplianceisnot workingasit should,hasbeendropped,damaged,leftoutdoors,ordroppedintowater,takeitto aservicecenter
:_dortocontinuinguse.
WARNING
Toreduce rfskof personalinjury- Unplugbeforecleaningor se_4cing.
PROBLEM POSSIBLECAUSE POSSIBLESOLUTION
Vacuum',.,on't........... : : ;:
run
2,Blown fuseor trippedbreaker. 2,Check fuseor breakerfl_home. Replace
fusdreset breakerinhome.
System Check
Indicator has
turned red
or
Vacuum won't
pick up
or
Low suction
Cord Rewind
does not work
DuSt escaping
from vacuum
Vacuum is
difficult to push
or won't move
forward
,,,.,,,,, ,,
Turbo Tool
brushroll won't
turn
Smoky/burning
smell detected
1.RinsableFilterandI orFitter
madewith HF.PAmediais dirty,
3, Brokenor worn bolt,
5. Carpet height setting is
fncorrect,
t, Dirtcup fult.
3.Hosenotins_tled correctIy.
1.Carpetheightsetting is
incorrect.
2, Blockage.
1.8eli brokenor st'etched,
t. CleanRinsableFilterandor Rlter made
with HEPAmedia- Pg,9 arid tO.
3. Replacebelt- Pg,t2.
5. SetCaNet HeightAdjustmentto appropriatesetting
for carpetbeingcleaned- Pg.&
1.Emptydirt _op_ Pg.9,
! 3.ReviewRoseinstallation- Pg. 7.
1,SetCarpetHeightAdjustmentknob to
appropriatesel_ingfor carpetbeingcleaned
-Pg.6.
2.Removeblockage- Pg.1t
1,ReplacebnJshrolIbelt - Pg,12,
iiii!!
14 Actual model may vary fr_m images shown,
Page 15

Toobtainapproved Hoover_ servEceand genuLr_eHooveF_ paFts,locateThenearestAutnenzedHeav_r_-warrant_yService I)e-_ler
iOepot)by
• CheckingfLheYelEowPagesunder'VacuumC,iean_rs"or Housuheld".
• V_sttour webstteat hoover.camfU S.Customers)or hoover.ca(Canadiancustemars_
Followl_e servLcecenter I_n_to find the serviceoutletsearestyou,
• ForaJ_automatedreferr_ of authorizedservice oudetlacabonscall 1-800-944-9200,
Ounot sendyourvacuumto Hoover:'tnc, Company_nGlenw_llowfor serviceThisw_tler_lyresult_ndel_y
If you need further assistance:
TospeakwLthacustomerserwcerepmsen_t_vecal{1-800-944-9200, Mun-Fn8am-7pm ES%AtwaysIdon_f_"yourvacuum by
the cempfetemodelnumber when r_quesbng_r_farmabonor ordering parts,('ibe modelnumberappearsart t/_ubottomof _u
vacuum}
PLEASEDONOTRETURNTHISPRODUCTTOTHESTORE.
15
Page 16

LIMITED TWO YEARWARRANTY
(Domestic Use)
WHAT THIS WARRANTY COVERS
WIlen usedandmaintainedinnormalhouseholduseand in
accordance with the Owner's Manual, your HOOVER_
productis warrantedagainstoriginaldefectsinmaterialand
workmanshipfor afull twoyear from date of purchase(the
"Warranty Period").During the Warranty Period,Hoover_'
will providelabor andparts,atno costto you,to correctany
such defectin productspurchasedin theUnitedStates,U.S.
MilitaryExchangesandCanada.
HOW TO MAKE A WARRANTY CLAIM
ifthis product isnot aswarranted,takeor sendthe product
to either a Hoover'_ AuthorizedWarranty Service Dealer
along with proof of purchase,RJran automated referralto
authorizedserviceeutIetsin the&S.A., phone:1-800-944-
9200 OR visit Hoover"_ online at w_rw.hoover.com.For
additional assistance or information concerning this
Warranty or the availability of warranty service eut_ets,
phone the Hoover® Consumer ResponseCenter,Phone
1-800-944-9200, Mon-Fri8am-7pm EST.
WHAT THIS WARRANTY DOES NOT COVER
This Warranty does not cover: use of the product in a
commerciaJ operation (such as maid, janitorial and
equipment rental services), brushroil, belt, improper
maintenanceofthe product,damagedueto misuse,actsof
God,nature,vandalism or etheracts beyondthe control of
Hoover_,owner'sactsor omissions,useoutsidethecountry
inwhich the productwas initially purchasedand rasatasef
the productby the originalowner,Thiswarranty doesnot
cover pick up, delivery,
transpo_tion or house ca_Is.However,if you mail your
productto a HOOveP'_AuthorizedWarrantyServiceDenier,
costof shippingwill be paidoneway,
Thiswarranty doesnotapplyto productspurchasedoutside
the UnitedStates,inctuding its territoriesand possessions,
outsidea U,S,MilitaryExchangeandoutsideofCanada.This
warrantydoesoct cover products purchasedfrom a pa_y
that is net an authorized retailer,dealer,or distdbutor of
Hoover_ products.
OTHER IMPORTANT TERMS
ThisWarrantyis not transferableand may notbe assigned.
ThisWarranty shalt be governed and construedunder the
lawsof thestate of Ohio.TheWarrantyPeriod wit! not be
exlended by any replacementor repair pedormedunder
this Warran%
THIS WARRANTYIS THE EXCLUSIVEWARRANTYAND
REMEDYPROVIDEDBYHOOVER®,ALLOTHERWARRANTES.
EXPRESSEDOR IMPUED,INCLUDINGWARRANTESOF
MERCHANTAelUTYOR FITNESS FOR PARTICULAR
PURPOSE,AREDfSCLA{MEO,INNOEVENTWILLHOOVER
BEUABLEFORANYSPECIAL,INDIRECT,INCIDENTALOR
CONSEQUENTIALDAMAGESOFANYKiNDOR NATURETO
OWNEROR ANY PARTYCLAIMINGTHROUGHOWNER,
WHETHERBASEDiN CONTRACT,NEGLIGENCE,TORTOR
STRICTPRODUCTSUAelLtTY OR ARISINGFROMANY
CAUSEWHATSOEVER.Some states do not allow the
e×clueionof consequentialdamages,sothe aboveexclusion
may not appiy to you. This warranty givesyou specific
rights;you may aiso haveothers that varyfrom state to
state,
!6
Page 17

MANUALDELPROPIETARIO
lnstruccionesde Funcionamientoy Servicio k__i_
hoover.corn
IMPORTANTE: LEA ATENTAMENTEANTES DE ENSAMBLAR Y USAR.
_Tiene algunapregunta o inquietud? Para obtener asistencia_Ilame al Servicio de atenciSn a!
ciiente aI 1-800 944 9200, de lunes a vfernes,de Ba.m. a 7 p.m., horadel ESTE.
POR FAVOR, NO DEVUELVA ESTE PRODUCTO A LA TtENDA.
ESTAASPIRADORAPARA ALFOMBRAS ESTA DISENADA
PARA USODOMESTIC0.
ELUS0 COMERCIALDE ESTEPRODUCTOAN!JLALA GARANTIA,
©20!4 TechtronicFloorCareTechnologyLimited,Todoslosderechosreservados.#96t151110 ID108221-R2
El
Page 18

Graciasper haber etegidoun productoHOOVER_.
Anote los n_meroscompletes de C_digede fabricacion enlos espa-
ties provistas,
MODELO
CODIGO DE FABRICAC|ON
Co_sejo:Adiunte su _ecibode compra a esteManual de1p_opietado,
Pare obtenereJservicio de garantia de SL_productoHOOVER® puede
requedrse la vedficaci6n deia fecha de compra.
Inscribe su producto ea linen en Hoover,corn,e Nameat t-800_944-
9200 si prefie_ehaeedo pertelefeno. Visite Hoovencempara obtener
instrucciones adicionales en video pare el armada y el manten-
_miento.
Salvaguardias importantes ............................................................................... E3
Ensarnblado de ta aspiradora .......................................................................... E5
Contenidode la caja........................................................................................................... E5
Colacaci_n Del Mango........................................................................................................ E5
U_icaci#nde los acceeedos................................................................................................ £5
ConexiSndel contenedor pare potvo................................................................................... E5
CSmo usar la aspiradora ..................................................................................E6
DescripciSnde la aspiradora.............................................................................................. E6
Interrupter de_ncender/apagar (0N/0FF)........................................................................... £6
Comel{berarel cordSn....................................................................................................... E6
Ajuste de _aaltura pare atfornbras...................................................................................... E6
Mode"$61oSueciSn"/ Pedalparae_cenderlapagar el rodillo de eepiIIes........................... E7
Accesorios ......................................................................................................... E7
Seleccieneel accesorio apropiado...................................................................................... E7
Reti[o de la manguera........................................................................................................ E7
6onexiSndel tubey delos accesorios................................................................................ E7
Limpiezade eseaieras........................................................................................................ E7
CSmoenralIar el oordSny c_moalmaceaar eldispositivo................................................... E8
C6m0I]mpiar10Saceesorios............................................................................................... E8
Mantenimiento ................................................................................................... E8
DepSsitopare polvo............................................................................................................ E£
LosI-qltros.......................................................................................................................... E9=10
Rodiltede cepitlos.............................................................................................................. E11
Correa................................................................................................................................ E12
Mangaera........................................................................................................................... E13
Accesoriode mar_oturboaccioaada.................................................................................... El3
Sotuoi6n de problemas ..................................................................................... E14
Servioio ............................................................................................................... E15
Garantia .............................................................................................................. E16
t:'2C,j'x' ......
COD1G0DEFABRICACION
(EInt'_merode modeloapareceen la #ode
interiorde ]a aspira_om)
Si necesita ayuda:
Visitenuestrositio web en www.heovef.com.Hagaclic en el on]aceq_e permiteIocatizarlosven_ederesat_torizadoshoover
pare encontraret vendedorrnascercane,n marque el 1-800-944-9200 pare eseachar_n mensaje indicandola direcci6n
de _esvendederesautodz_dosHeove_' (s(_loenee, Uu,)0 p_ra honor co_ _n representa_tede atenci_na_cliente (de8 am
a 7 pro, hera est_ndardeI este,de lanes a viernes).
PeR FAVOR, NO DEVUELVA _STE PRODUCTO A LA TIENDA.
E2
Page 19

iSALVAGUARDIASIMPORTANTES!
iGUARDEESTASINSTRUCCIONES!
AI usar un aparato eiectrico, observesiempre las precaucionesb_sicas, incluyendo
las siguientes:
LEATODASLAS INSTRUCCIONESANTES DEUSAR ESTEAPARATO
ADVERTENCIA:PARA REDUCIREL RIESGO
DE INCENDIOS,CHOQUESELI CTRICOS0
LESIONES:
• Ensamblecompletamenteet productoantes de hacerlofuncionar.
• Hagafuncionar la aspiradora[_nicamentecon la tension que se especificaen la
etiquetade datosen la parteinferior de la aspiradora.
• Hagafuncionarla aspiradorasdamenteconetvoltajeespecificadoentapiacade
datos,que se encuentraen la parte posteriorde ta aspiradora.
• No use esteaparatoen tugaresal aire libre ni en superficieshtimedas.
• Nopermita queel aparatose use como un juguete. Noest_ dise_adopara que
!ousen nifios de t2 afios o menos.Se requiereuna supervisionestricta cuando
esteaparatose usacerca de los nifios. Paraevitar lesioneso dafios,mantengaa
losni_oslejosdel productoy no permitaque coloquenlos dedosni otros objetos
dentrode las aberturas.
• Useel productosolocomosedescribeen este manual.Usesololos accesoriosy
productosrecomendadospor et fabricante.
• No use este aparatocon un cordon o enchufe dafiados. Si el aparato no est&
funcionando adecuadamente,se dej6 caer, se daRO,se dej6 a la intemperie o
se dejo caer dentro del agua, llOveloa un Centrode servicio antes de continuar
us#,ndoto.
,, No tire del cordon ni traslade el aparatojalando del cordon, ni tampoco1ouse
como manija;no cierre la puertacuandoel cord6nest_atravesadonitire de este
alrededorde bordeso esquinasfilosos.No coloque el producto sobre el cordon.
No haga funcionar el aparato encima del cordon. Mantenga el cordon tejosde
superficiescalientes.
• No lo desenchufetirando delcordon.Paradesenchufarlo,sujeteel enchufe,no el
cordon.
• Nuncamanipuleel enchufeni el aparatocon tas manosh_medas.
• No coloque ning_n objeto en las aberturas.No use este aparato con ninguna
abertura obstruida; mant_ngalo libre de suciedad, petusa,cabello y cualquier
objetoque puedareducirel flujo de aire.
• Mantengael cabetlo, la ropa holgada,los dedosy todas taspartes del cuerpo
fuerade las aberturasy otras piezasen movimientoo
• Apaguetodos loscontroles antesde desenchufado.
• Tenga especial cuidado al limpiar escaleras. Para evitar lesiones personales
o dahos, y evitar que la aspiradorase caiga, siempre col_quela aI pie de la
escalera,en el suelo. No coloque la aspiradorasobreescalerasni muebles, ya
que puedeocasionarlesioneso dafios.
• No use este aparato para aspirar liquidos inflamabtes o combustibles, como
gasolina, o restosde madera lijada, ni io use en areasdondedichos materiales
pudieranestar presentes.
....... E3 .......................
Page 20

• Sujete el enchufe cuando enrolle el cord6n en ta bobina_No permita que el
enchufe d6 latigazosal enrollarlo.
• Desenchufeel aparatoantes deconectaret accesoriodeTurbo.
• No aspire ningOnobjeto que se est_ quemando o que libere humo, como
cigarrillos,f6sforos o cenizascalientes.
• No use el producto sin el contenedorpara polvo yio los filtros colocadosen su
lugar.
• ADVERTENCIA:Este producto contiene sustancias quimicas reconocidas por
el estadode Californiacomo causantesdec_ncer, defectoscong#nitoso dafio
reproductivo. LAVESELASMANOSDESPUESDE USAREL PRODUCTO,
ADVERTENCIA:PARAREDUCIREL RIESGO
DEDANOS:
• Evite aspirar objetos duros y filosos con este producto,ya que pueden causar
dafios.
• Guardeadecuadamentebajotecho y en un [ugarseco.Noexpongala maquinaa
temperaturas por debajodel puntode congelaci6n.
• El rodillo de cepillos continOagirando mientras el producto esta encendidoy
el mango est_ en posicion vertical. Paraevitar que lasmoquetas, los tapetes,
los muebiesy los suelosse da_en, evite inclinar la aspiradora o apoyarlasobre
muebles,alfombrasde areaconflecoso escalerasenmoquetadasduranteel uso
del accesorio.
• Nouse objetosfi!osos paratimpiar lamanguera,ya quepuedencausarda_os.
° Cuandoel rodiliode cepitlosest6 encendido,nodeje queet aparatopermanezca
inm6vil durandomucho tiempo, ya que podriada_arel suelo.
ADVERTENCIA:
• Para disminuir el riesgo de choque el6ctrico, este aparato tiene un enchufe
polarizado(una patillaes mas ancha que taotra). Esteenchufepuedeusarseen
una toma de corriente polarizada,de una sola manera.Si el enchufeno encaja
completamenteen la toma de corriente, col6queloal rev6s.Siaun asi noencaja,
comunfquesecon un electricista calificadopara queinstale Iatoma de corriente
apropiada.NohaganingOntipo de modificaci6nal enchufe.
E4
Page 21

CONTENIDODE LA CAJA
A. Secci6ndelmango*
& Cuerpode laaspiradara
C.Tuba
D.Accesonoparehendiduras
E,Accesedode Turbo
F, Cepilbajustableparepelvo"
G. (1)Tamiito grade
H. Contenedorparepolio
",9accesodovedasegOnel model&
Retiretodaslas piezasde Iacajae Jdent_ique
cadaarticuloqoese roues[re.
Aseg_resedeubicar todasIasp[ezasantesde
etimJnarel embalaje,
COLOCACIONDELMANGO
1.2 lnsertela secci6n deI mango dontro de la base de la
asp[radar& Presienehaciaabaio fim_emente,OtiUzandoun
destomilladorPh[Ifips,a]uste el tomille del_s del mango (1)
dentrode la basede Ia aspiradora,
1.3 Enro;IeIa mangueraalrededorde la parte superior de la
guia que se encuentraen el asa, {ntroduzcala manguera
dentred_Ituba de la manguerahaste que escuche unclio.
UBtCACIONDE LOS ACCESORIOS
1,4 Cotoquee_accesorioparehendidurasen el tuba ydes-
ticeb enel areade almacenamientode accesariesen{aporte
posteriorJzquierda(C)de ta aspiradora.Co!oqueelacceserio
Turboen taporte posteriorderecha(E)de la asp[mdora,coma
se muestra.
t,5 CeioqueIe cepiIIoa]ustablepare polve (F)en ei extreme
deI tube.
CONEXIONDEL CONTENEDORPARA
POLVO
t.6 En primerlugar,coloque la parte inferierdelcontenedor
parepoivodentredelcuerpodeia aspiradora,Gireelcontene-
dor dentre de Ia aspiradara,El contenedorpare poJvees_
aseguradocuandoescucbaun clic,
E5 ..... Et modelo real puede no coin¢idir con
los imdgenes que se muestran,
Page 22

DESCRIPCIONDE LAASPIRADORA
1. Mango
2. BatonpareseJtarel dep6sito
parepdve
3, Asapara_anspe_r
4, Incline(forde vertficaeiSnc_el
sistema
5. Access at fiftmlavabie
6, Contenedorparapo{ve
7. AccesoaIescapedel fi_tro
& Ajustede Iaallure parealfombpas
9. Protectorparemuebles
10, Cepiiloaiustabtepapapolvo
t 1. Tube
12. Boquillap_a headiduF_
!3, Bot6aparerebobinare{cerd6n
14. Pedalde encendido/apagado(lel
cepiIlogiratorio
15, Pedalparesoltarel mango
16. Manguera
17, AcceseriedeTurbo
!8. 8otdnde encen(leriapagar
19, gebSnde_ibepaeidnde la
manguera
29. TubsdeIa manguera
7
8
9
m16
=_--18
t--i'- 2o
INTERRUPTORDE ENCENDER/
APAGAR (ON/OFF)
2.2 Enchufe e_cerd6n en
aria tome de cerriente
e/_ctriea.
Pareengender la aspirado-
ra(ON),empuje el interrup-
ter ala posici6n ON
(I=ON).(A).
Pare apagar la asp[Fedora
ala posicidn OFF (0 =
apagar).
LANZAMIENTODELACUERDA
2,3 Antes de uti{izarle,
sujeie el extreme del
enehufey tire para Iiberar
el cerd6n de Ia bobina
hasteque yeaIa cinta role.
•IMPORTANTE•
AItJrardeIcerd_, u_acinta
am_]_ _eindicar._quaesta
casi to_menteext_ndido.
Cuandevea Is data reiaenel
cable._steha abanzadosu
maxima leng[I_dde extee-:
si6n(No pase la €into
rein).
AJUSTE DE LA ALTURA PARA ALFOMBRAS*
_]1 2.4 PareaiuatarIa posic[6nde altura, EMPUJEhaciaabajo y
C " GIREla peritla (C)hastelapesici6ndeseada.
,_g_, o_ - Pare mequeta do pelo {argo, utilice ta eor_figura
!_@e * Cnnfiguracionesaaja, Mediay Alto:ajusb
•Numberdelosajustesdeaitura vedaper vacio.
!
• Pisodare: pareel useen piSOS(lures eolamente.
seg_nel t[ga de moqoet&
ci6n de mequeta altaa fin de empujar con mayor
faciI]dad.
Et modelo real puede no coincidir con E6 ....
los imagenes clue se rnuestran,
Page 23

MODO SUCTIONONLY(SOLOSUCCION)/APAGADODELRODILLODE
ESCOBILLASDELAGITADOR
Data pleas sin a/fombra y
alfombras de pete muy largo
2.3 Para un 6primodesempe_,ode
limpiezasabre pisos sin alfombra y
alfombras con pain de m_s de I
pulgada de espesor, el ccpille
giratorio deberiaastor apagado.
La aspi_adoraseanviacon el mdillo
de cepil]nsen la posici6nON.A fin
de apagarel rodillodecepillos para
el ModeSuction Only(S6Iosucci6n),
piseel pedal(A).
Los accesoriosle permitcn Iimpiar superficies
quaestan a mayoraltura qL_eel pisoy Ilegara
areas
dificiles de limpiar.
La aspiraderaesla lisla para usarse con los
accosodoscuandoe} mangoosta en posici6n
voriJcaI.
B mdillo de cepi}losoontinOagirandomienlras el aparato est_encen-
dido yel man,in estao_ posici6nre,cal. Paraevitar qua _asmoquetas.
lostapetes,los muei31esy lossuelosso daSen,eviteindinar el aparato
o apeyarlesabre muobles,aifombresde _rea con flecos o escaleras
enmDquatadasdurante el usedelacoesorio.
• IMPORTANTE•
El pedal(A) permaneceinaclivo mien#as el apamto
es_ enposici6nve_cal.
A PRECAUCION
El cepiHogiratoriodeberiaastore[_laposici6nde
apagadapara Iimpiaratfombrascon polo demas
de t pulgadade espesor.
A.PRECAUCION,A
No se debe utilizarpara acicalar mascotas.
• IMPORTANTE•
SELECCIONEEL ACCESORIOAPROPIADO
F.,EI,I
A B C D
A. Eltubese usapapaaiargarIamanguera*.OseloconcuaJquiera
de insa_osodosantesmonoionado&
B, EIaocesado para hendiduras*pL_edeusarooen fugaroo
estTechos,en osquinasy e_ hordesde sitJes,comeeajonesde
c6medas,mueblestapizados,esca!orasy z6oa}os,
C. Et accesorio de Turbo* uI_iizarpara muebteotapizados,
codJnas,oolchonos,ropa,y escalerasaliombradas.
D.Useet cepiile ajustable para polvo pare limpiar muebles
tapizadns,cortinas,oolchones,ropa. oscalorascon moqueta,
acoosorios Iuminesos y ventiladores con 5 posicinnes de
limpieza.
RETIRO DE LA MANGUERA
3.2 A fin do retirar la
manguora para usar ei
accesodo,prosioneel bot6n
de iibemci(_ny tire el extre-
me de Ia manguem haoia
duora.
Para velvet a trab_da ensu
lugar, empuje la manguera
der_tro de] tube de Ia
manguera hasta qua
escuche _n clio.
A PRECAUCION,&
No sedebeuiifizarparaacicalarmascaras.
............................ E7
CONEXI()N DELTUBO Y DE LOS
ACCESORIOS
A PRECAUCI0N
Pararoducirotr_osgodolesionosoausadasperias partes
m6vilos,deoconecteanteSdo dar servicio.
33 Para conootar el
aocesorio o el tube a la
manguera, empOioios
firrnementeen su lugar.
E! modeto real puede no coincidir con
los im#genes qua se muestran,
Page 24

LtMPIEZA DEESCALERAS
3.4 Usela mangueray elacceser[ode Turbo (Los aeeesoriosvarian seg_n el medele)pare
Iimpiarescaleras,
,A ADVERTENCIA
Tongaespecialcuidadaal iimpiar escalates.Pare evitar lesienespersonal_so doses, y
evi{arquata aspiracloraseca[go,siemprecol6quetaaIpie de ia esealera,en et susie,No
cdoque la aspiradorasabre escaEerasaLmuebles,ya qua puede aces[charleeionese
da_.es.Aluser accesories,aseg0resede que el mangoest_ en pesici6n vertical.
ENROLl.ADODEL CORDONY ALMACENAMIENTO
3.5Pareregresarelce_16na Iaposici6ndealmacenamiento,sufeteelenchufeypresionehaciaabajo
eipedalparesol_r el cord6nfB)quaseencuen_raenel lateralde {abobina.
,& ADVERTENCIAA,
Sujete _Iencbufe cuande enrelt_ el cord6n en I& bobina. NO9ermita qua eleachufe d_ In,gazes aI
enroilario.
C()MO LIMPtAR LOSACCESORIOS
Parelimpiarla mangueray e!accesor[odeTurbo,pasountrapshSmedo.NOsumeTjae_ague,
Los demos herramientas de limpieza se pueden Iavar en agua tibia con detergents. Enju_,gue{asy dais/as secar alairs
detente 24 he,as antes de atilizadas.
4.t Familiaficesecon estastareas de m_ntenimienta en el begat,ya qua el usey cuidado
ap_apiadosde su aspiradoraasegurar&nuna Iimpiezacentinuamenteeffcaz,
Caalquierolratareade mantenimientodebeset realizadaperun represeatantede mantenimiento
,_.atodzado.
PROBLEMA CAUSAPOSIBLE SOLUCIt]NPOSIBLE
verificacian det
filtro se ha gu-
minado en 2.Eicontensdorp_'_pD_voest__teney/otape@ 2.Vaci_elcontenedo_"pa_ palvo-Peg.Eg.
rojo.
Caatquierotra tarea de manten]m[entedebe set realizadapo_un represent_te de mantenim]entoautofizado,
Si el operate no est_ funcienandeadecuadamente, sedejd caer,se da_fi(_,se dej6a Jab_temperiee se dej6 caer dentre dei
ague, Ji_veJaa un centre _e servic]e antes de continuer usandelo.
El modelo real puede no coincidir con E8
los imageries que se muestran.
Page 25

AVIS0 A
Suaspiradora tiene incorporadoun protector t6rmico paraimpedir ei sobrecalentamient&Cuandose aetiva el protector
t6rmice_la aspiradoradejadefancionar.
Siesto sucede,procedade la siguiantemanera;
1. ApagueIaaspkadoray desench_fdadeIa tomade corrienteelec#ica.
2, Vacieel contenedorpara potvo+
3. Inspeccione ]a entrada de Ia boquilla, el conecter de Ia manguera, ta mangLEera,ia entrada de1
cantanedor paca palvo, et fittro cidonico, eL filtro enjuagabie y eI fittro HEPA para asegura[se de
quano hay obs_accieses,Sihay obsbuccior,es,etim{nelas,
4. Cuanda la aspiradara eat_ desench_fada y ae deja enffiar el mater durante 30 minutes, el protec
tart_rmico sedesactiva,y sepueda continuarpesandoia aspiradara,
Siel protectort6rmieosigueestiv,indasedespu6sde efectuar los paaesantedores,es pesiNequa su espiradoranecesite
mantenimientO,
DEP()SlT0 PARA POLVO
Outridevaciarlo 4,2 Paramantenerun rendimiento6primo,vaciee!cantanedarparepaneantes de quaalcancesu
Para reducirel riesgode Iesionesocasienadasper piezasan rnovimiento,daaenchufela
aspiraderaantesde real[zarel mantenimienfz).No useIa aspiraderasin elcentenedarpara
pone ni los_l_oscolocadosen su Iugar.
Losmateria]esm_ fines,come taloofadaI o maicana,puedanseilaret filtTOy redueirel
rendJmiento,Cuandouseta aspiradorapara este ripede suciedad,vac{eel contenedary
limpie losfiltroscon iTecuencia.
;areavaciarlo
4,3 Presione el bot6n de desen_
ganc_ede_contenedorparepelve(C)
y haga girar el contenedor hacia
fuer'a.
4,4 Sestenga el contenedorpara
polvosabre un cubadebasur&pre-
sienaIalengu6tadedesenganehede
Ia puerta delcontenederpara petvo
(D} paraabrir tapuertadeIcentene-
dot parapotvo(£),
Cierreiap_e_ del contenederpara
poive(_, Presi6nelaflm_ementepara
quecierrebien.
nivel nlaxima (8).CoIoqLela aspirador_en position vaCdca_antes de retirar el contenedorpara
peN&
A, ADVERTENCIA
4.5 Coloqueprimem Ia parte inferior det contenedor parapone deniro delcuerpode _a
aspiradora.Hagagirar e]conteneder para polvoa{interior del cuerpa de [a aspiradora
y presione firmemente basra quase trabe en su lugar.
LOS FILTROS:Cu_ndoiimpiarlo
Para mantener an rend]miento6ptimo, el filtro debe limpi-
arse oada dosmesas en cendieionesde usenormales,
Extraigaelcentenedorpara polvotatcome se describeen Ia
Figura4.3.
4.6 Hagag[rar el mangodeI contenederparapolvoen ses_d_o
an_homriopareabdrle,yqu;tela tapa.
4.7 Tirede la iengLietapapaextraerel fil_ enj_agabie.
Enjuaguecooaguadarantedosminutesobasraquaelaguacorm
timpi&Luegoescurraparaquitarel excesode agua.Permit_qua
effiitToseaequecompfetamentedurante24 hems,
Vuelvaa co{ocarelfi_:), con elladede la leng_etahaciafuera.
t ADVERTENCIAA
E9
Parareducirel desgede }esionesocadonadaspar piezasen l
movimiento,desenchufela aepimdomantesde realJzarel
mantenimieeto.No usela aspiradomsine$centenedorpara J
polveni1_filtrosc_IocadosensuiugaT.
"_i'm'o'de'lo real puede no coincidir con"
/as imageries qua se muestran,
Page 26

4,8Vuglvaa colocarlatapedW conWnedarparepeeveygire
en sentidohomdobasraq_ese trabeensu posic[6n,
Vuelva a colecar el centenedor #ara poJvolal come se
d_scfibeen la RgL_ra4.5,
Deje que el filtro se seque campEetamenteantes de
votvera colocario.Estepuededemeterhaste 24 hares.
Conjuntodel filtro cicl6nico:Cbrnolimpiar
A ADVERTENCIA1
Pararedodr el r;esgedelesinneeocaWonadasperpiezasI
en movimienta,desenchufeta aspiradoraantesde reali- I
zare} mantenimiento. I
No use la aspjradorasin el contenedor parepolvo n[ los I
filLrosc(}locadosen su fugar, 1
Retireel centenedorpare pa_voy haga girar el mango del
conteaedorpara gelvo en sentimoan_horario para abrirle y
qaita_latapa come sedescribeen 4.6.
4.9Tire clelcenjantodeIf_Jtre(6) pareextraedncleIcontensdor
parapelvnyretirefo.
4.10 Lasuciedady losresidL}ospL_edenJimpiarsedeJoonjunto
delfiltroconel cepillo ajustablepare polvo.
4,t 1 Cateq_eet conjunlodelfiltro enetcontenedorparapolvo.
Alinestas _engiJetas(H)de la tara cone[ cuerpodel cantons-
dot parepotvo,
4,12Vuelvaacolocar]atal3adefeontenedorpafa potvoy gi_e
ea sentidohoratiohastequese trabeen sa posici6n.
Vuelva a cclocar el contenedor pare pelvo tel coma se
describe en _aRgura4.5.
Filtro hecho con medios filtrantes HEPA:C6mo limpiar
4.13 ColocandoIns dodosdebajodot bardsde tapuerto del
fil_ro,t_redel marco del filtTa(A)haeiafuem apart,_ndnlode1
_;uerpode la aspiradora. Sujeteel filtro sabreel recipientsde
basuray golp_Wosuavementepa_ rotifer la suciedady los
residaos,
4,I4 La parts inferiordeI filtro (8) debeser colocadaen su
lugar pr;mero..
4J5LuegO,empujeetasa superioren(C)hastequese trabe.
4,16 Diagrama detfi_tro:(B)Rllro inferior.(C)Asasuperior.
R
,&ADVERTENCIAA
PaPared_cirel riesgodelos]onesocasioaadasparp]ez_sen
movim[eato,desert€hare_aaspi_dar_antesde realJzarel
man_nimiento,NouseIa aspir_dorasinel contenedorpare
pelvenilosfiltroscolocadosensuIugar.
• \/
• IMPORTANTE•
NOENJUAGUENtLAVEELHLTR0 HECHO
CONMEDI0 FILTRANTEHEPA,
El modelo real puede no coincidir con ..... EtO ............................
fas im_genes que se muestrano
Page 27

RODILLODECEPILLOS:C6mo limpiarlo
PRECAUCION
Pare reducirel riesgode les[enesecasionadaeper pie-
zas en mevimiento, dosenchufeIa aspiraderaantes de
realizar el mantenimiente,
Rodiilo de cepillos -
Placa inferiorcontornillos
C6molimpiar
Coloqueelmangoen_apusiciSnbajay d_ vueltaala aspira_
dora de mode que eI ladeinferior quedehaciaarriba.
4,17 Quite los6 tomiIbs conundestemiltade_Philtipscome
semuest_'_.
4,18 Hagagirar la plocainferior ponaquitarla.
4,t9 Quitetodo residueyio cabelfudel cepillo girato[io.
Vuelvaa eolocarIaplaca inferioroIinean(_eIos odfie[osde los
terni!los,e insolelos6 temiIIescome semuestra.
Eli
El modelo real puede no coincidir con
los irndgenes que ae rnuestran.
Page 28

CORREA
ParareducireJriesgode lesionesocas[onadas_or ptezas
ADVERTENCIAA
en movimien[o,dase%hufela aspiradoraantesde realizar
el manteQmien_.
La correa se encuentra ubicada bajo Ia placa inferior de la
aspiradora,y debeser revisada pari6_icamentepar_asegu-
rarsede quaest_en buenas condiciones,
Ouande reemplazar
ReemplaceIacorrea si es_ daSada,certadao rot_, Consalte
IasinstruccioneSa continuaci6n.
Come reemplazar
Placa inferior con tornillos
Colaqaeel mangoen la posici6nbaja y d_ vuelta a IaaspiTa-
dora de modo qua el ladoinferior quedehaciaardba.
4,20 Quite los6 tornitlos con undestornEtiadorPhillipscoma
se muestra,
4.21 Levanteia placa interior (A)paraquitada.
4.22 Retire la cor{eausadadel cepillo giratodo (C),I_egodot
ejedel motor(barra met_Iioa)(D)y des6cheta,
4.23 ConIas ietrasentapartaexteriorde lacorrea,deslicelanuevacorreasabreelejedeemotor
(barrametfilica)(E).
4,24 OeslfcelaIuagoalrededordei _ea delcepiIIogiratorioquano gonecabalas(G).
Unavezquala correa eat6en su I_gar,tire delcepJl]ogiraf#rioy dasIicelodentrode ta boqu[tta.
asagur&ndosedequa Ias tapasde los ex#emoadel cepilIogiratodoest_nen taor_en_ci6ncor-
reck.
Coloquelaplacainferioralir_eandoIosorificiosdelostornilDs,y vuelvaa co_ocar}as6tomitles.
j' & " /_
El modelo real puede no coincidir con E12
las im#genes qua se muestran,
Page 29

MANGUERA
A ADVERTENCIA
Pareredudr el riesgodetasionesocasionadas- DeseashL_fela aspiradoraantesde reaI[zarel
mantenimienf_.
COmolimpiar
4,25 A fin cI8retirar la ma_guerapareuser el asceserb,presiene el bot6n de liberaci6nde la
manguera(A)ytireel extreme dela manguerahaciaafuera.
E_irninela suciedad e lasobstruedonesde lamanguera.Nouse objetesfilosospareflmpiar Ia
manguera,ya que puedencauserdefies,Parevolveratrabadaensu lugar,empujeIs msncjuera
dentrodeituba de lamanguera hasteque esc_cheun die.
ACCESORIODE TURBO
,&,ADVERTENCIAA
Parereducirel riesge de Iesionesocasionadasperpiezas
enmovimiente- Oesenchufela sspiradoraantesde real[-
zard mantenimiento.
C6molimpiar
4,26 Vetteeel accesodode mode que la p&rteinferiormire
haciaardba.Girelas_rabas(A}asmbes lades delascesodo.
4.27 RetireIapieceinferior(B),
4.28 Retiretealsla suciedadyio el eabellodeIrodiltode cepiF
los.
Vueivaa coleearIsplaceinferiory gire]astrabasnuevsmentea
ia pesiei6nde trabado,
I ,&PRECAUCION
,,, Nosedebeutilizerpareasicalarmascota&
LUBRICACiON
B meter y e_ oepillo giratorio estat_ equip_des con
rodamientes qtJeeontienen sufieiente _ubricaci6npare su
rids OtiI,
Agregar lubrieantecausaria defies. Perlo tanto, noagregue
lubricante a losredamientesdoI motor y cepille.
E13
El modelo real puede no coincidir con
/as imageries que se muestrano
Page 30

Si ocurreun prob/emamanor,genemtm_nt8pude _esdve_secon bastantefadtJdadcuandose hallata causa,usandoasialista
de verificacidn.
Cuatquierotratarea de mantenimientodebeser reatizadapotun representantedemantenimientoauterizado,
Si el aparato no esta fundonando adecuadamente, se dejo caer, se da_,6, se dej6 a la intemperie o se
dej6 caer dentro del agua, tlevelo a un canto de servicio antes de continuar us,_ndolo.
A ADVERTENCIA
Parareducirel riesgode lesionesocasioi_adasperoDesenchufeIa aspiradoraantesde rediza_el mantenimiento.
PROBLEMA
La aspiradora
130ful3c|OI3a
Et indicador de
verificaci6n deI
filtro se ha ilu-
minado en rojo.
o
La aspiradora
no aspira
o
Baja sucd6n,
El pone sale de
la
aspirador&
DificuItad para
empujar [a
aspiradora
EI rodiIIo de
¢apiilos del
acoesor_o de
Turbo no gira
CAUSAPOSIBLE SOLUCI()NPOSIBLE
2.FLIsibleque_tn_.doo sedJspar6el disyunter, 2, Irlspecdone d fusibJ8o d disyurdor.
1,Elfiltro eni#agableyto el fi{tro _lechocon
readiesfiitranf.esH£PAest_nsudos,
3. Lacorrea es_ r0ta o desgaslada.
5. La podc[Sn de la altura #ara moque_as
es incerreda.
t. Limpieel flltre enj_agableyio d tittle hechecon r_ediesfiitrantes
HEPA= Pag.E9y El0.
3.Reernplaceta correa - P_g.E12,
I 5, Cd_ue elajuste de afturade lanloq_eta _n ta podci6n aprepiada
i para lamoquda q_eest_ limpianflo- P_g, E6,
:_:_ _,
I.B redpientede p_o es_ Itena,
3, La¢_ang_erano es_ instatada c0_eda. 3, P_se las_dSn I_n deI_ n_ng_r_ _Bg, ET_
manta.
1,La posiciSr_de la altura para moquetas es 1, Cdoqae fa _pedtad_a}_ste dealtura de,Ia moqueta en ia
ir,.corred_, podci6r_apropiada para Iame_ue_aquaest,5Iirn£ia_o __'a.g,B.
2.Obstrdcd6n, 2.Etimire la obstr_Jcci6n+P&g,Etl,
I. Vacie d recipiente d_ pdvo - P_g,Eg.
Se detecta un
olor a humo!
quemado
1.Con-BaTofao estirad_. 1,Reempi,tcela_drea dd radi_Jode _pJtb_ - Pag. EI2,
E14
Page 31

ParaobtenerunservicioaprobadodeHoover_ypiezasgenuinasd_Hoovere,encuentreetConcesionarioautorizadedeser_icio
degarantiade Hoover_(deposi_rio) m_scercano:
• Consu]tandolasP_ginasamadilasen {asecci6n "Aspiradoras- uso"dom_stico.
• Visi{enuesbosiSoweb enhoover,corn(clientes
estadounidenses) o hoover.ca (ciientes canadienses)+ Sign el enlace del contro de servicio para
encontTafelcentro de serviciomAscercano.
• Para q_e ie inlormen de manera automation la ubicaci6n de los centros autorizados de ser¢icio, [lame
al 1-800-944-9200, No env[e su aspiradora a Hoover®, Inc., Com£any en Gienwiliow para realizar et
servioio+Estos6Ioprovooarademoras.
Si necesita re_ibir m_s ayuda:
ParahaNar conun representantede atenci6nal ctiente,I[ameal 1-800-944-9200; de lunss aviemes,de 8a.m. a 7 p.m.,horn
del Este.Sfempreidontificluesu as£iradorapor el nOmerode modelo compleb al solicilar inlormaci6no reatizarpedidosde
piezas.
(ElriiTmerede modeloalPareoeen taparte inferiordo la asNradora),
NODEVUELVAESTIEPROI)UOTOA LAYIENDA,
E15
Page 32

GARANTJALIMITADA DE DOSANOS
(Para use dom_stico)
QUE CUBRE ESTA GARANT|A
Swmpre qua el usey el mantenimientode su preducto
HOOVER_ se realicen en condidones de use demestico
norrnatesyseg_n et Manualdetusuade,d producteesta_
garanDado centredefectos eriginaIesen el material y la
fabdcaciendurante de dos aflos campletosdesde_afecha
de compra(at "Peffedode Garant_a").DuranteelPerfododa
Garan_a,Hoovere te pro_orcienar&gra_itamente, comese
describe en esta garnet[a, Ia mane de ebra y Ins piezas
neeesariaspareeer_egircualquierdefectoen _ospreductos
compradosen losEs_das Un[dus,enUnalJendasituadaen
unabasemilitaJ'dotesEE.UU.yen Caned&
COMe HACER UN RECLAMO EN VfRTUD DE
LA GARANTiA
Sieste product0no se ajusta a Inseond[cionesgarantiza-
das, II_veloa unCeneesionarinauterizadade servic[o de
garantiade Hoover_'juntocan el comprobantedo eemgra.
ParequaIe informen de manemautom_ticala ubieaci6nde
foscecttrosauterizadesde ser¢icio,llama el: t-800-944-
9200 e visite Hoover_ en Intemat,en hoover,cam, (dientes
estadounidenses)o hoover,ca (clienteeeanadienses}.S[
necesita asistencia adidunal o iefurmadSn sobre esta
Garantiao la disponibifidadde los ceetrosde seP_iciode
garanga,llamaal 1-800-944-9200, de Iunes a vieme&de
8 a,m. a7 p.m, heradei_:ste.
QUE NO CUBRE ESTA GARANTiA
Estagarantianoeubre:eI use detproductoconcualquierfin
comercial(comeserv[ciosde limpieza,mantenimientoy de
alquiterde equipos),el mantenimienteinadecuadodel pro-
ducto,tos de{tiesprovocadosper el use indebide,casetot-
tulle,hechesde Ianaturaleza,vandaliemeu etrosacresqua
e×cedandetcontrol de Hoover_, accienesu omisienesdei
prepietario,usefuera de[palsen quael productoruecom-
prado iniciatmente y reventa del producteper parte deI
propietarb odginaL Estagarantia fie cubre et retire [tel
preducto,taentrega,e[transporte ni las visitasadomici_iD.
Estagarantiane seaplica a lospreductoscempradesfuera
delos EstadosUnidos,incluidessueterritories yposesianes,
fuera deuna t_endasituada en una basemilitar de los EE.
UU.r_ifuera de Caead&Esta garantianocubretoepruduc-
toscompra_osa unapartequa noseaun mifiodsta,conc_
esionarioo distribuidor autudzadesde los productosde
HoovaP.
OTROS Tt_RMINOS IMPORTANTES
Esta Garan_Jano es tcansfe[ibla ni puede cederse. Esta
Garan_ase [egir_,a inte@reWr_,de cunformida_con Ias
leyesdelestadedeOhio,ElPeffodede 6erant_ano seprer-
rogar_en fund6n dening_nreemplazeo repareci6n reet-
izadosee vJ_Jdde estaGarantia.
ESTA GAPANTIAES LA ONtCAGARANTJAY EL ONICO
RECURSOQUE HOOVER_ PROPORCIONA.TODASLAS
DEMASGARANTiAS,EXPRESAS0 iMPLJCtTAS,tNCLUIDAS
LAS GARANTiASDECOMERCIABIUDAD0 APTITUDPARA
UN FIN PARTICULAR,QUEDANEXCLUDAS,HOOVERNO
SER,_RESPONSABLE£N NINGONCASOPORNINGONOANO
ESPECIAL,INDIRECT&INCIDENTAL0 MEDIATODENINGUN
TIPO0 NATURALEZACONRESPECTOAL PRORETARIO0A
CUALQUERPARTEOUEREALICEUN RECLAMOATPAVES
DEL PROPETARtO,YA SEA QUE SE BASE £N
RESPONSABtUDAD CONTRACTUAL, NEGLIGENCIA,
RESPONSAB&IDAD EXTRACONTRACTUAL 0
RESPONSAelLIDADCIVILOBJET1VAPORLOSPRODUCTOS,
0 EMEROENT£DE CUALOUIEROTRACAUSA.Algunosesta-
dos no permitenla exclusie_de ins da_as mecliatos,perto
caw esposible quala exclusi{_nmencienadanose apiique
en su case.EstagarantfaleotorgadereeI_osespeci{[cos;es
posiWequa,edemas,tengae_rosderechesquavariande un
estadoaotro.
E16 .........................
 Loading...