

Page 1
SERVICE INSTRUCTIONS
,HOOVER - BAGLESS
CLEANERS
o41oo 149 E -1
Page 2
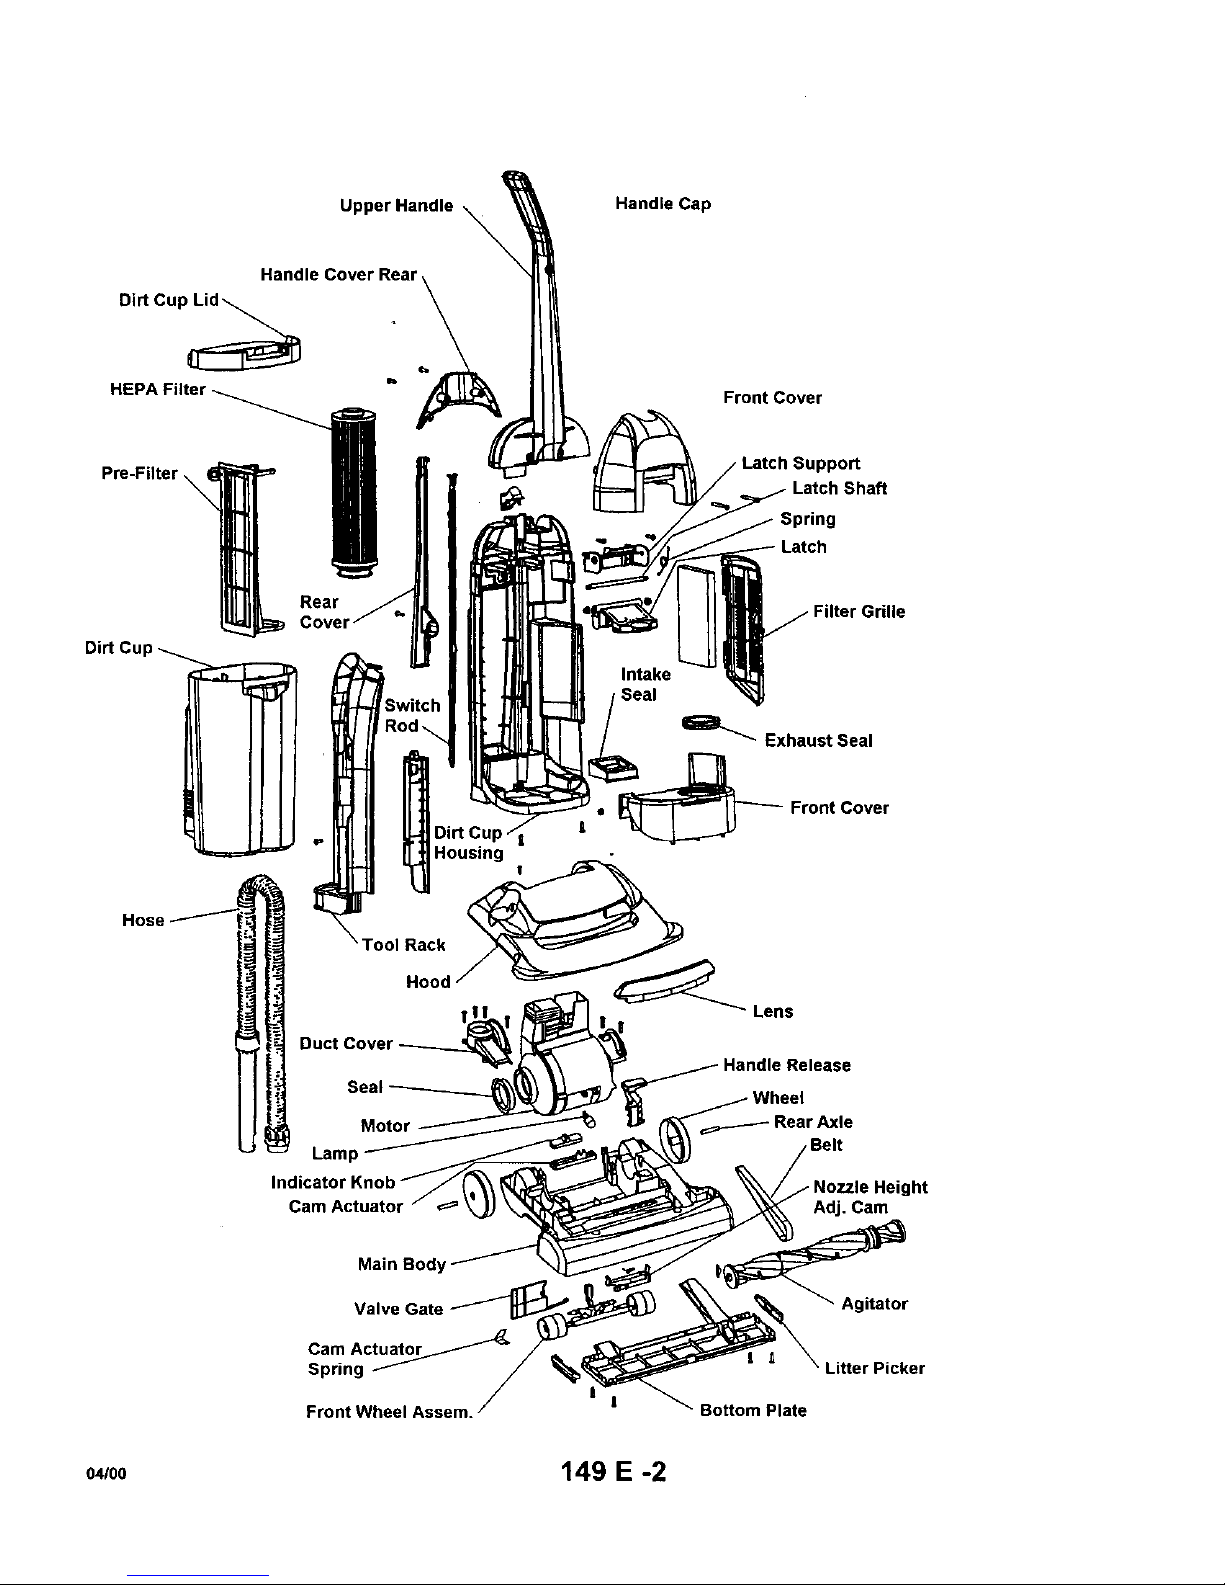
Upper Handle
Handle Cover Rear
Di_ Cup_
HEPA
Handle Cap
Front Cover
Pre-Filter __ Rear
Dirt Cup _ ,_
pport
Latch Shaft
Spring
Filter Grille
Housing
rool Rack @
Hood "
Front Cover
Lens
Seal
Motor
Lamp
Cam Actuator
Rear Axle
Nozzle Height
•Cam
Main Body
Valve
Cam Ac_
Spring
Front Wheel Assem.
Bottom Plate
gitator
Litter Picker
o4100 149 E -2
Page 3
I. General
The Hoover Twin Chamber TM Bagless upright cleaners
were first introduced in mid - 2000. The initial line
consisted of three models.
• Handle
Handle Swmtch
Wand
Extension
Wand
Head
Light-
Stair Clng
Soft Guard Carpet Hood
furniture Height Adj
protector
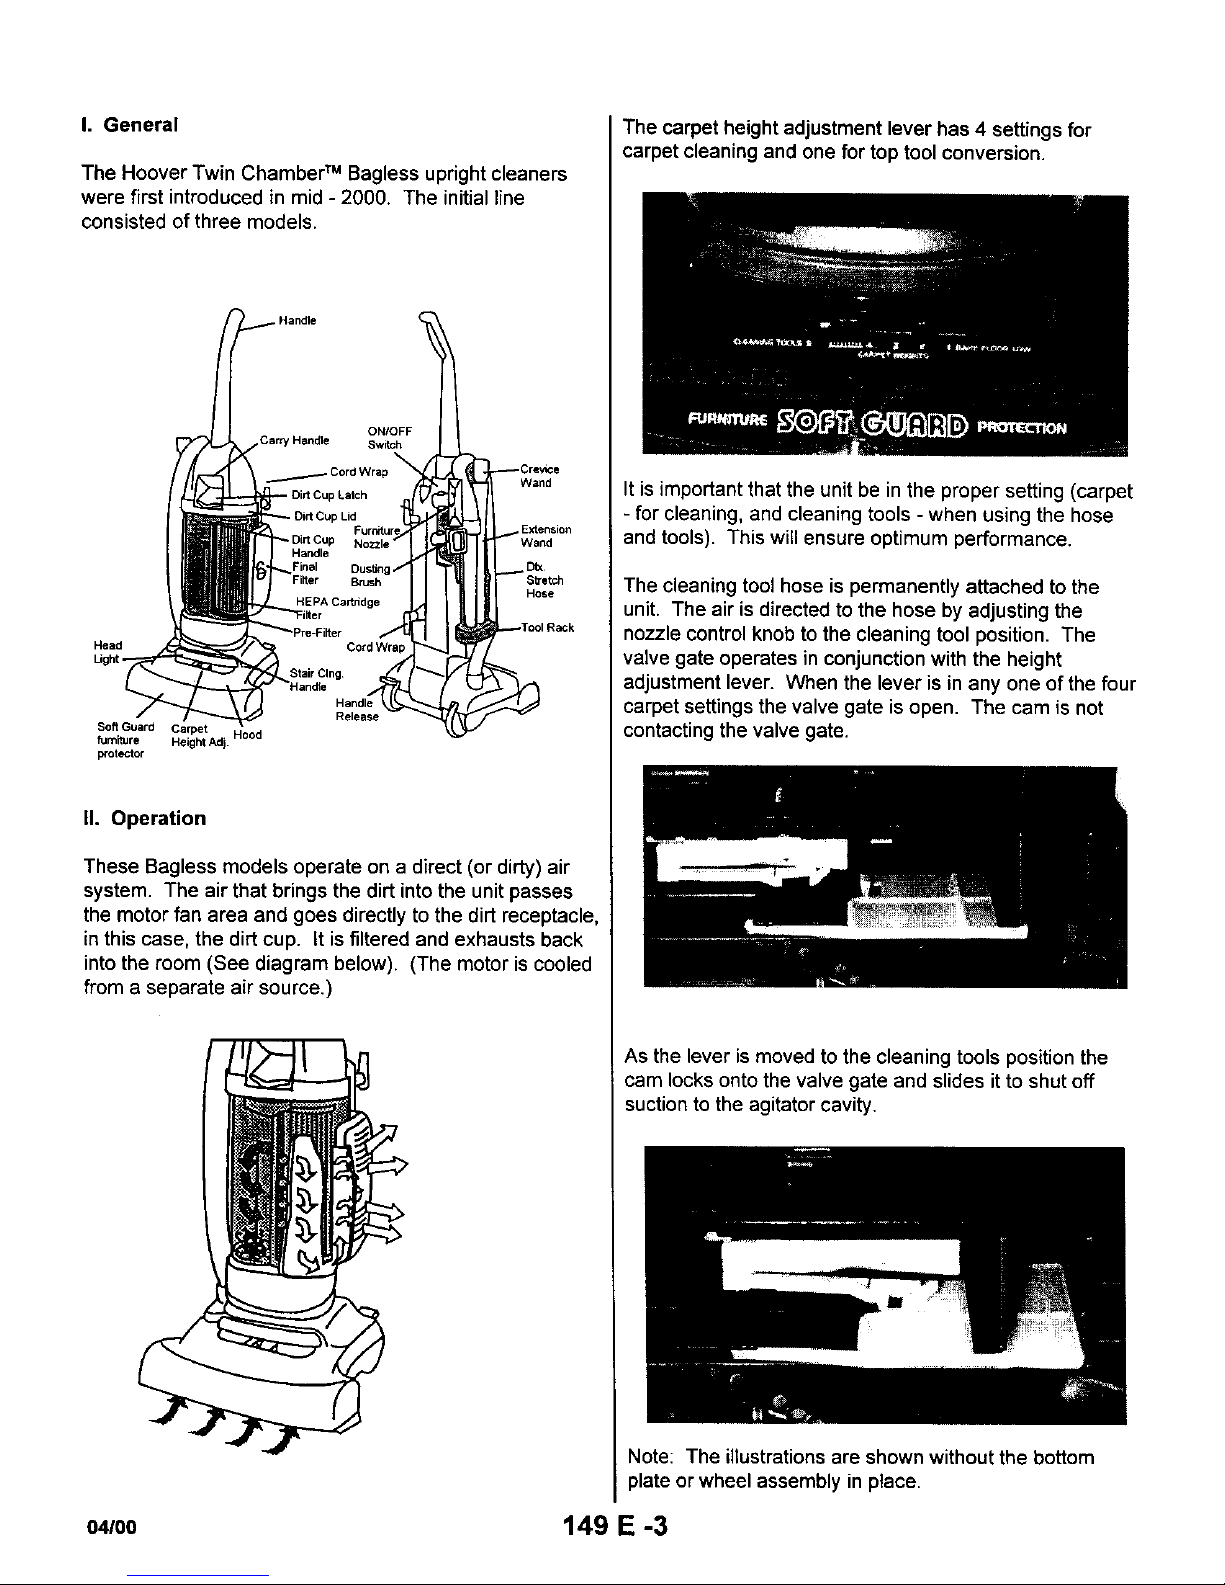
II. Operation
These Bagless models operate on a direct (or dirty) air
system. The air that brings the dirt into the unitpasses
the motor fan area and goes directly to the dirt receptacle,
in this case, the dirt cup. It isfiltered and exhausts back
intothe room (See diagram below). (The motor is cooled
from a separate air source.)
The carpet height adjustment lever has 4 settings for
carpet cleaning and one for top tool conversion.
It is important that the unit be in the proper setting (carpet
- for cleaning, and cleaning tools - when using the hose
and tools). This will ensure optimum performance.
The cleaning tool hose is permanently attached to the
unit. The air is directed to the hose by adjusting the
nozzle control knob to the cleaning tool position• The
valve gate operates in conjunction with the height
adjustment lever. When the lever is in any one of the four
carpet settings the valve gate is open. The cam is not
contacting the valve gate•
As the lever is moved to the cleaning tools position the
cam locks onto the valve gate and slides it to shut off
suction to the agitator cavity•
Note: The illustrations are shown without the bottom
plate or wheel assembly in place.
04/00 149 E -3
Page 4
III. Disassembly
A. Twin Chamber TM Dirt Cup Assembly
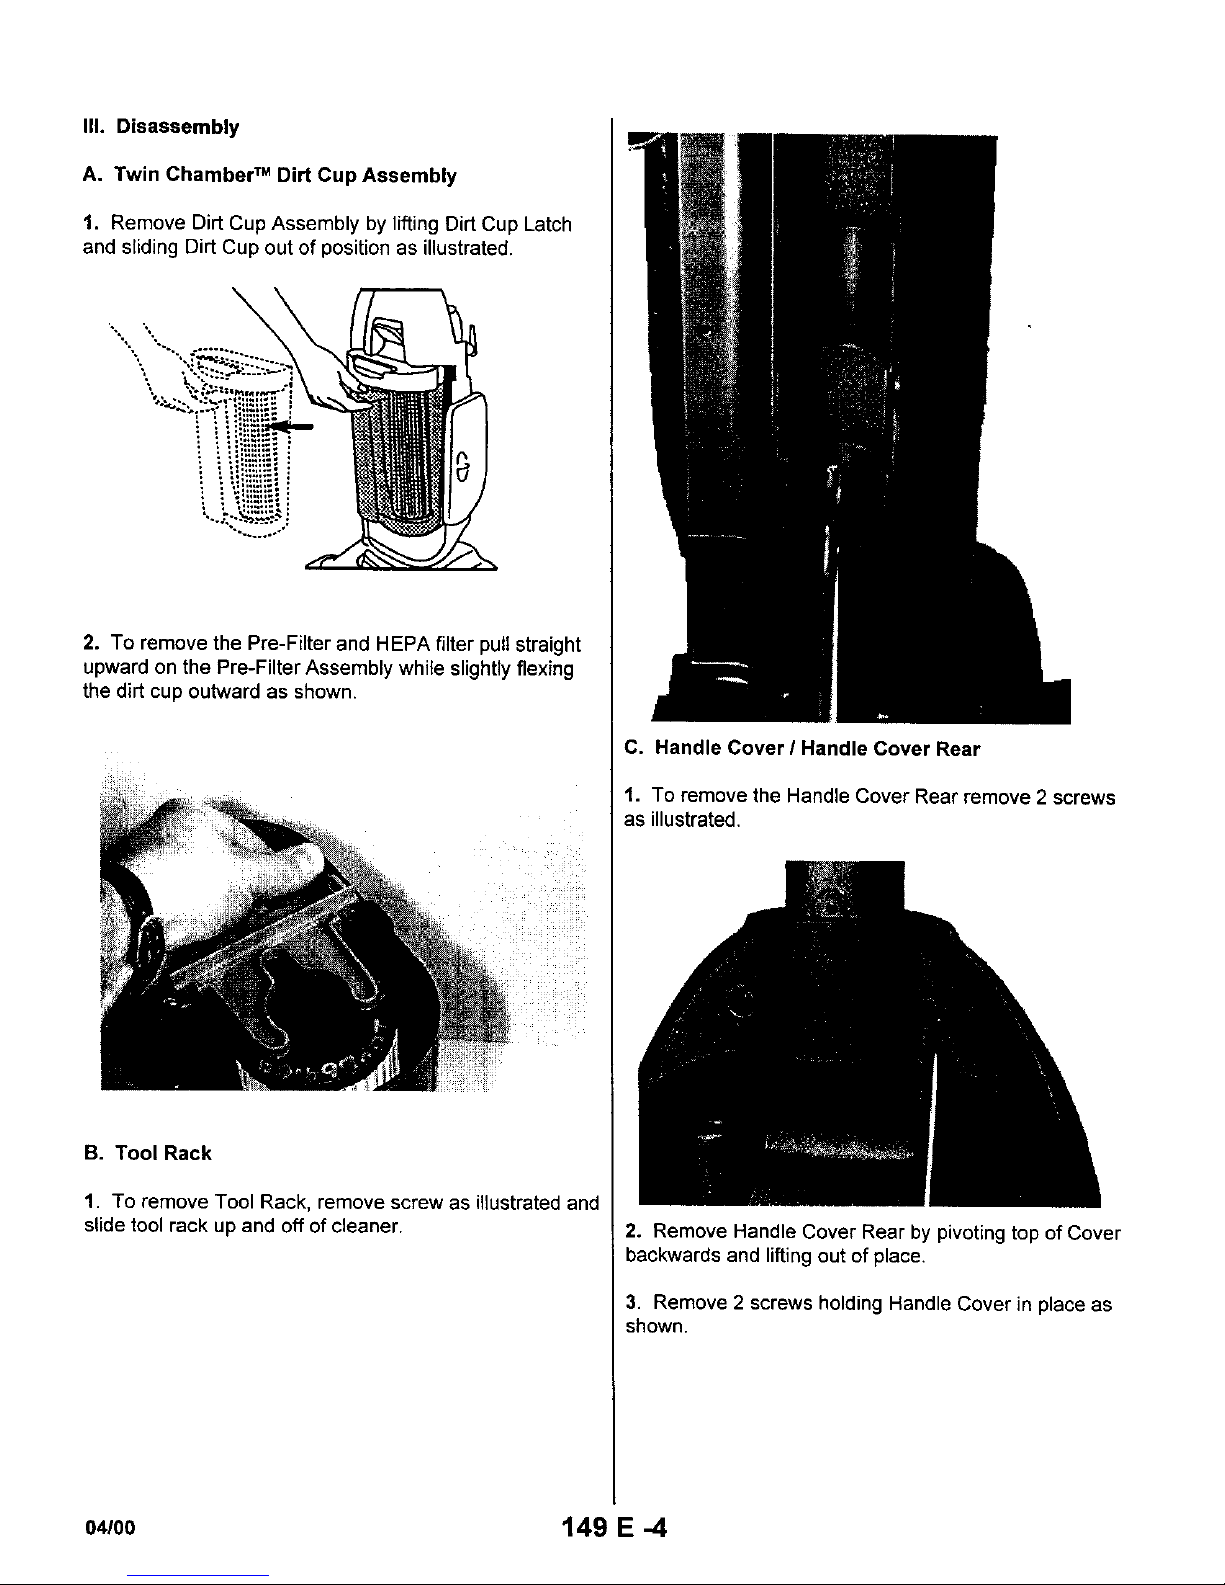
1. Remove Dirt Cup Assembly by lifting Dirt Cup Latch
and sliding Dirt Cup out of position as illustrated.
\
\
2. To remove the Pre-Filter and HEPA filter putt straight
upward on the Pre-Filter Assembly while slightly flexing
the dirt cup outward as shown.
B. Tool Rack
1. To remove Tool Rack, remove screw as illustrated and
slide tool rack up and off of cleaner.
C. Handle Cover I Handle Cover Rear
t. To remove the Handle Cover Rear remove 2 screws
as illustrated.
2. Remove Handle Cover Rear by pivoting top of Cover
backwards and lifting out of place.
3. Remove 2 screws holding Handle Cover in place as
shown.
04100 149 E -4
Page 5

4. To remove handle cover, pry handle cover as shown
and pull forward out of position.
D. Dirt Cup Latch
t. Remove 2 screws as illustrated and pull Dirt Cup
Latch straight forward and off of Upper Handle
Assembly.
E. Upper Handle Assembly
1. Pry out ward on back panel of Upper Handle to
release tabs on back of handle as shown. While prying
)ull handle up to release from cleaner.
F. Lower Handle I Attachment Cord
1. To replace Attachment Cord, once the Upper Handle
has been removed, the strain relief can be lifted out of
_osition.
Note routing of cord through hook at top of handle.
2. Remove bolt located as shown so that Lower Handle
can be removed. Once the bolt has been removed the
Handle can be pulled straight up and off of the cleaner.
04/00 14 €, E-5
Page 6

3. Once the Lower Handle has been removed from the
base of cleaner the Attachment Cord can be lifted out of
Lower Handle and replaced.
Note: The attachment cord has a small bump located on
the end of the plug. This prevents the cord from easily
sliding out of the Lower Handle.
G. Final Filter I Final Filter Grille
1. The Final Filter Grille can be removed by unsnapping
the grille from the hinges on the Dirt Cup Housing.
2. The Final Filter is placed into the holder with the green
side of the filter facing outward.
G. Front Cover
1. The Front Cover is replaced by removing the 2 screws
as illustrated below. Once the screws are removed the
Front Cover can be lifted off of the Dirt Cup Housing.
Note: The Final Filter Grille should be opened (if it has
not been removed to ease removal of Front Cover.
H. Switch Control I Rear Cover
1. Remove 1 screw inside lower cord hook.
2. Release clips located on upper end of Rear Cover by
prying and lifting Rear Cover as illustrated.
3. Once Rear Cover is removed the ON/OFF button can
be released and the Switch Rod slid up and out of the
cleaner.
I. Intake Seal
1. The Intake Seal can be replaced by lifting out of
position. Upon reassembly insure that tab on back of
seal is positioned inside slot on Lower Handle.
o4/oo 149 E -6
Page 7

J. Hood
1. Remove height adjustment lever.
HeightAdj Lever
2. Remove four screws as illustrated
K. Headlight
1. Remove hood.
2. Remove bulb by pulling straight out of socket; push
new bulb into socket until it locks in place.
L. Bottom Plate
1. Turn cleaner upside down.
2. Remove four screws securing bottom plate.
3, Lift bottom plate up and off of unit.
M. Agitator / Belt
1. Remove bottom plate,
2. Lift agitator out of housing and slide agitator out from
belt.
3. Remove belt from around motor shaft.
N. Front Wheel Assembly
1, Remove cam actuator spring from the front wheel
support retainingboss and remove by pulling out of the
main body retention pocket.
2. Pivot front wheel assembly upward and slide from
retaining slots in main body.
0410o 149 E -7
Page 8

O. Hose
1, Remove four screws securing L.H. motor retainer,
2. Hose can be removed from motor retainer by
releasing two tabs from under side of retainer.
P. Motor
1. Remove motor retainer R.H. two screws and motor
retainer L.H. four screws.
2. Lift motor assembly upward and off of main body.
Note: When reassembling motor to main body be careful
not to damage motor seal between motor and main body.
Q. Nozzle Height Adjustment Cam I Cam Actuator
1. Remove bottom plate.
2, Remove valve gate.
3. Remove front wheel support.
4. Remove hood,
5. Release the two nozzle height adjustment cam
retention tabs.
The spring on the cam is replaceable.
R. Rear Wheels.
1. Release the rear wheel shaft from the main body
retention slots.
Note: The main body must be flexed on one side or the
other of the rear wheels while pulling upward on the rear
wheel shaft and then on the other side of the rear wheel
to facilitate removal.
S. Handle Release Lever
1. Remove hood.
2, Lower handle to its lowest position,
3. Release the handle lever shaft protrusion from the
main body retention slots,
o41oo 149 E -8
Page 9

T, Motor Assembly
1. Remove handle.
2. Remove hood.
3. Release belt from motor shaft.
4. Remove motor retainer R.H, and L.H.
5. Lift motor oft the main body. Check for the seal at the
inlet to the fan chamber. This seal is friction fit and slides
out of the housing,
Motor service
SWITCH
1
Serviceable components are listed on the above
schematic. Failure of any component not listed requires
replacement of the entire motor.
Fan
1. Remove light bulb by pulling straight out of the socket.
2. Remove four screws which retain the fan chamber to
the motor end cap assembly.
3. Remove motor end cap assembly by sliding it off the
fan chamber and motor housing assembly.
4. Remove the molded duct seal by sliding it oft the
housings.
5. Lift off fan chamber and remove fan (LH thread)
At this point, you have broken a latex paint seal between
the motor housing and fan chamber cover. It is important
that aluminum tape be installed in its place as shown
below. Motor Brush Holder Assembly
(Replaced as an assembly which includes motor brush
and holder)
1. Remove four screws which retain fan chamber to
motor end cap assembly.
2. Slide fan chamber and motor housing assembly out of
motor end cap assembly.
3. Grasp motor brush holder assemblies with pliers and
slide then outward to release the terminal connection.
Upon reassembly of new motor brush holder assemblies,
)osition holders and slide them into place insuring the
field terminal connection and continue to insert until they
stop.
Do not grasp outside of brush holder with pliers as it
could damage the holder and cause the carbon brush to
stick.
On/off switch
1. Remove fan.
2. Remove brush holders.
3. Remove armature.
4. Remove field assembly
5. Remove switch/attachment cord terminal blade.
o4/oo 149 E -9
Page 10

6. Remove field winding lead from switch terminal by
uncrimping connection.
7. Remove switch by releasing switch pressure tabs and
snapping switch out of holder.
Note: When installing a new switch, the field winding lead
must be securely crimped to the proper switch terminal.
04100 149 E -10
Page 11

Troubleshooting check list - Hoover Bagless Cleaner
The following is a guide to aid in determining the origin of a problem for which these models could conceivably
be brought in for service.
PROBLEM POSSIBLE CAUSE POSSIBLE SOLUTION
A, Motor won't
run
1, Not firmly plugged in.
2. No voltage in customer's wall plug.
3. On/off switch bad.
4. Open in attachment cord.
5. Open circuit in motor.
6. Fan jammed by foreign object.
7. Broken switch control rod.
1. Check power cord for proper connections.
2. Plug into known good voltage source.
3. Replace switch
4. Replace cord.
5. Check motor wiring (armature & field).
6. Remove obstruction,
7. Replace switch control rod.
B. Motor runs
cleaner won't
pickup,
1. Agitator belt broken or worn.
2. Dirt Cup full.
3. Worn agitator brushes.
4, Warped or damaged bottom plate.
5, Blocked air flow system.
6. Nozzle control knob in "cleaning
tools" position.
1. Replace belt.
2, Empty Dirt Cup / Clean HEPA filter.
3. Replace agitator.
4. Replace bottom plate.
5. Clear blockage.
6. Adjust to one of the four carpet cleaning
positions.
C. Motor
intermittent
1. Loose wire connection.
2, Defective on/off switch.
3. Worn carbon brushes.
4. Motor brush hanging in holder.
1, Check all connections.
2. Check and change switch.
3, Replace motor brush holder assembly.
4. Replace motor brush holder assembly.
D. Motor runs
hot
1. Refer to 2 and 5 under Item B
Replace motor.
2. Worn carbon brushes,
3. Shorted or overloaded field coil.
4. Shorted or overloaded armature.
5. Loose wire connection.
6. Motor air vent clogged.
7. Tight motor bearings.
,
The items referred can cause the motor to
run hot because all restrict the air supply.
Field and armature will be generally discolored.
2. Replace motor brush holder assembly.
3. Replace motor.
4. Replace motor.
5. Connections should be tight to prevent
high resistance. Tighten connections or
replace as necessary.
6. Clear air restriction.
7. Check and replace motor if necessary.
E. Cleaner noisy 1. Interference between bottom plate
and agitator,
2. Broken blade(s) on fan.
3. Agitator bearings dry or worn.
4, Warped agitator.
1. Check to see if bottom plate is damaged
or mis - positioned.
2. Replace fan.
3. Grease or replace bearings.
4. Replace agitator.
F. No pickup
using tools
1. Cleaner not set to "cleaning tools"
position.
2. Obstruction in hose.
3. Valve gate not functioning.
1. Check setting.
2. Clear obstruction.
3. Remove bottom plate and check operation
04/00 149 E -11
Page 12

i
U5288-900
32541004
36153064
36153065
36426043
36433145
36923011
37245037
137249007
37257261
37258052
37258056
37258127
37259001
38355013
38775072
38783026
38784079
40201189
42249005
42252A89
43611042
46388025
51632007
51869058
PARTS
J
i USER DEALER
i
LATCH SHAFT
LATCH - DIRT CUP
LATCH SUPPORT
PRE FILTER
TOOL RACK
TOOL RACK GUIDE
BoTroM PLATE
FRONT COVER
FILTER GRILLE
REAR COVER
HANDLE COVER REAR
HANDLE COVER
DIRT CUP HOUSING
SPRING
DIRT CUP
INTAKE SEAL
EXHAUST SEAL
HANDLE HARDWARE ASSEM
DIRT CUP LID
HOOD ASSEMBLY
FILTER {HEPA)
ATTACHMENT CORD
LABEL - FILTER GRILLE
DIRT CUP WARNING LABEL
$0.62
I
i $2.34
$1.87
I $7.80
$13.62
$1.25
$12.48
$8.84
$1.56
$0.94
$1.72
$7.49
! $30.16
$0.21
$29.12
$2.34
$0.99
$0.62
$6.24
$19.66
$29.99
$12.48
$0.31
$O.52
$0.42
$1.56
$1.25
$5.20
$9.10
$0.83
$8.32
$5.93
$1.04
$0.62
$1.14
$4.99
$20.12
$0.16
$19.76
$1.56
$0.68
$0.42
$4.16
$13.10
$19.99
$8.32 i
$0.21
$0.36
I
q
J
SEARS !
$0.28 '
$1.03
$0.83
$3.43
$6.01
$O.55
$5.49
$3.91
$0.69
$0.41
$0.75
$3.29
$13.28
$0.11
$13.04
$1.03
$0.45
$O.28
$2.75
$8.65
$13.19
$5.49
$0.14
$0.24 ,I
51879031 DIRTCUPREMOVALLABEL $0.10 , $0.06 $0.04
T56511A76 I OWNERMANUAL _$0.0-0 1- -$0-1b0- ] $0.0(3
_58175145 i =CARTOON -j $0.00 _ $4.16 ] $2.75 ]
 Loading...