


U4093
Hoover U4093, U4089, U4077, U4069, U4033 Owner’s Manual
...
Hoovere
Convertible
Cleaner
TM
Owners
Manual
INDEX
Adjusting Cleaner to Rug ......................... 5
Assembling Cleaner ................................ 3-4
Attachments .......................................... 6-8
Belt .................................................... 10-11
Brushes ................................................... 12
Changing the Throw-away Bag ............... 4,9
Energy Saving Tips ................................. 14
Handle Adjustments ................................. 5
Important Safeguards ............................... 2
Service ..................................................... 13
User Check List ....................................... 13

IMPORTANTSAFEGUARDS
Warning: Electric shock could occur if used outdoors or
on wet surfaces.
Keep hands, feet, and hair away from rotating agitator.
Read all instructions. Use cleaner only for its intended
functions.
Avoid picking up hard, sharp objects with the cleaner.
They may damage the cleaner and the bag.
Do not use cleaner to pick up matches, or LIVE ashes
and cigarette butts.
Don't run cleaner over cord. It may damage insulation.
Change bag frequently when picking up very fine materials
such as powder.
Instruct children not to play with the cleaner and to stay
clear of cleaner when it is in use.
Grasp the plug to disconnect from wall outlet to avoid
damage to cord, plug, prong, or receptacle.
The use of an extension cord is not recommended.
Unplug cleaner when not in use.
Always disconnect cord from electrical outlet before
servicing the cleaner.
If cleaner is in disrepair, do not attempt to operate.
Have repairs made by the qualified personnel at Hoover
Factory Service Centers or Authorized Hoover Warranty
Service Dealers.
SAVE THESE INSTRUCTIONS
c The Hoover Company 1971
8_
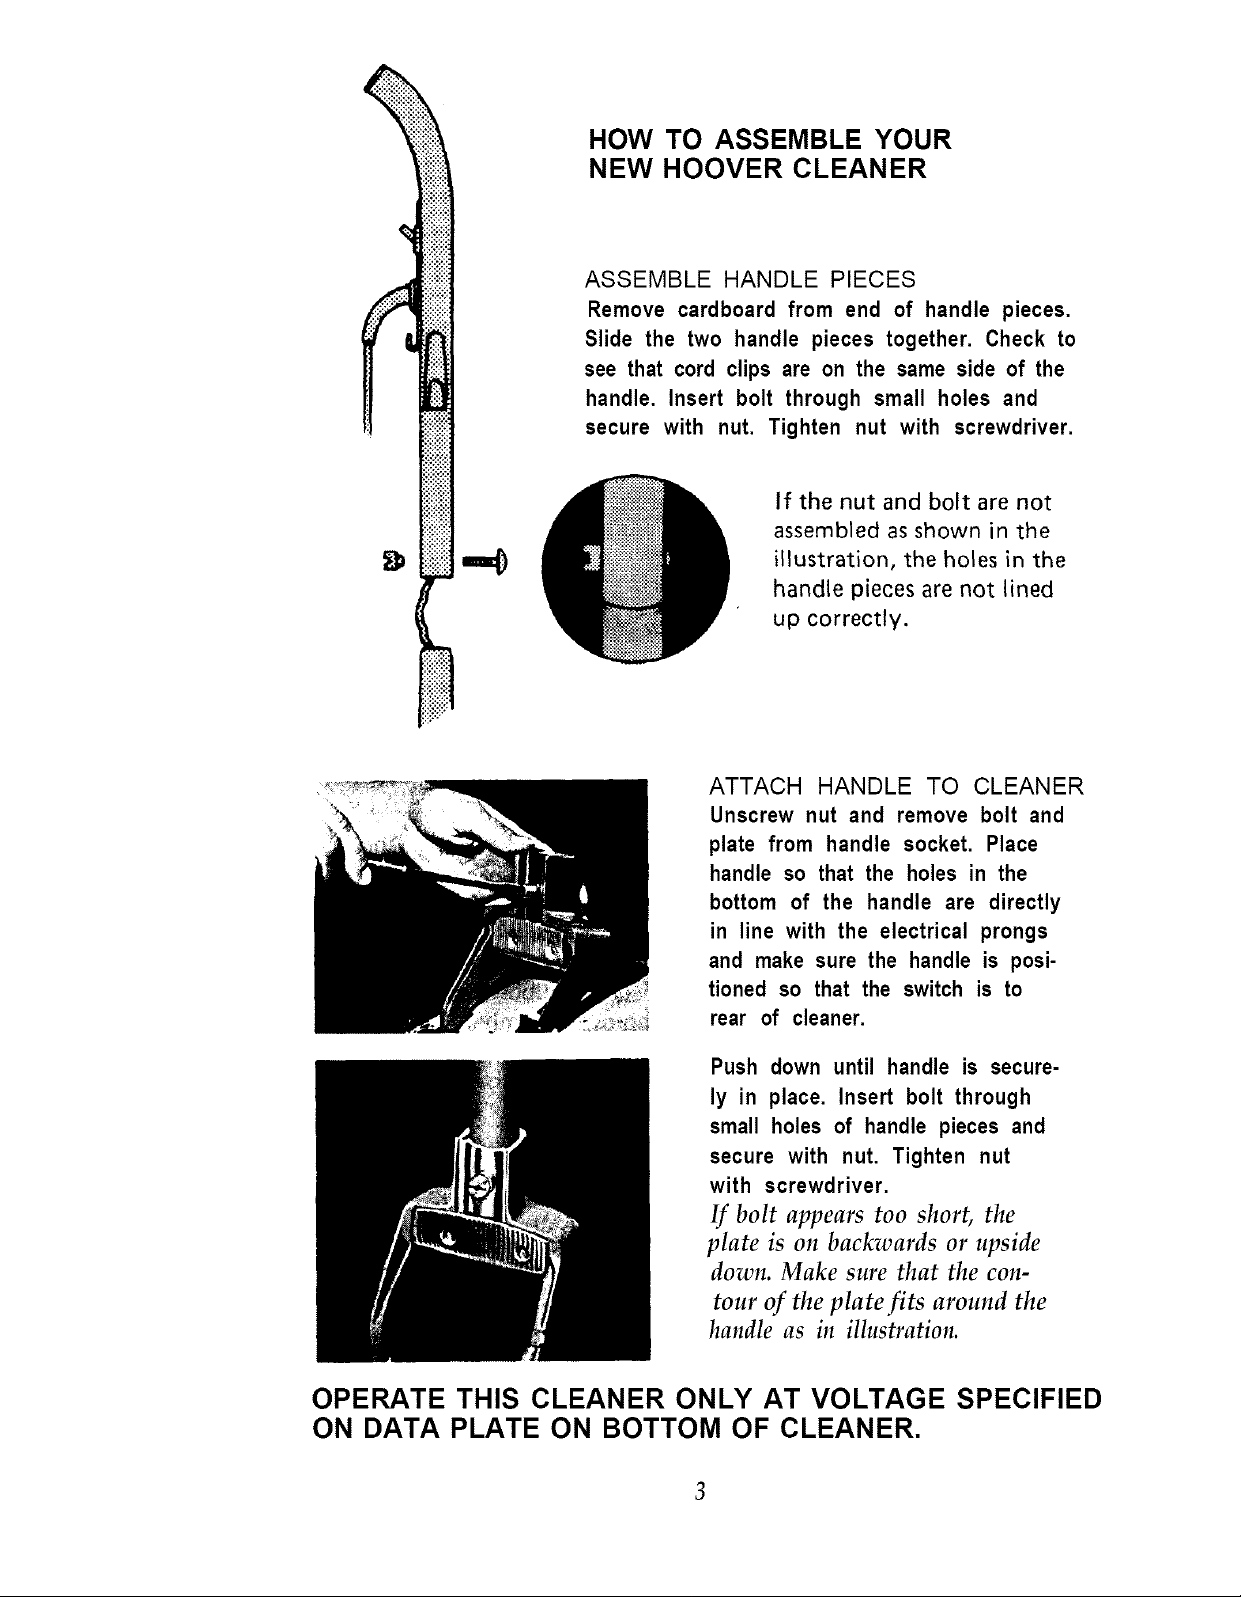
HOW TO ASSEMBLE YOUR
NEW HOOVER CLEANER
ASSEMBLE HANDLE PIECES
Remove cardboard from end of handle pieces.
Slide the two handle pieces together. Check to
see that cord clips are on the same side of the
handle. Insert bolt through small holes and
secure with nut. Tighten nut with screwdriver.
If the nut and bolt are not
assembled as shown in the
illustration, the holes in the
handle pieces are not lined
up correctly.
ATTACH HANDLE TO CLEANER
Unscrew nut and remove bolt and
plate from handle socket. Place
handle so that the holes in the
bottom of the handle are directly
in line with the electrical prongs
and make sure the handle is posi-
tioned so that the switch is to
rear of cleaner.
Push down until handle is secure-
ly in place. Insert bolt through
small holes of handle pieces and
secure with nut. Tighten nut
with screwdriver.
If bolt appears too short, the
plate is on backwards or upside
down. Make sure that the con-
tour of the plate fits around the
handle as in illustration.
OPERATE THIS CLEANER ONLY AT VOLTAGE SPECIFIED
ON DATA PLATE ON BOTTOM OF CLEANER.
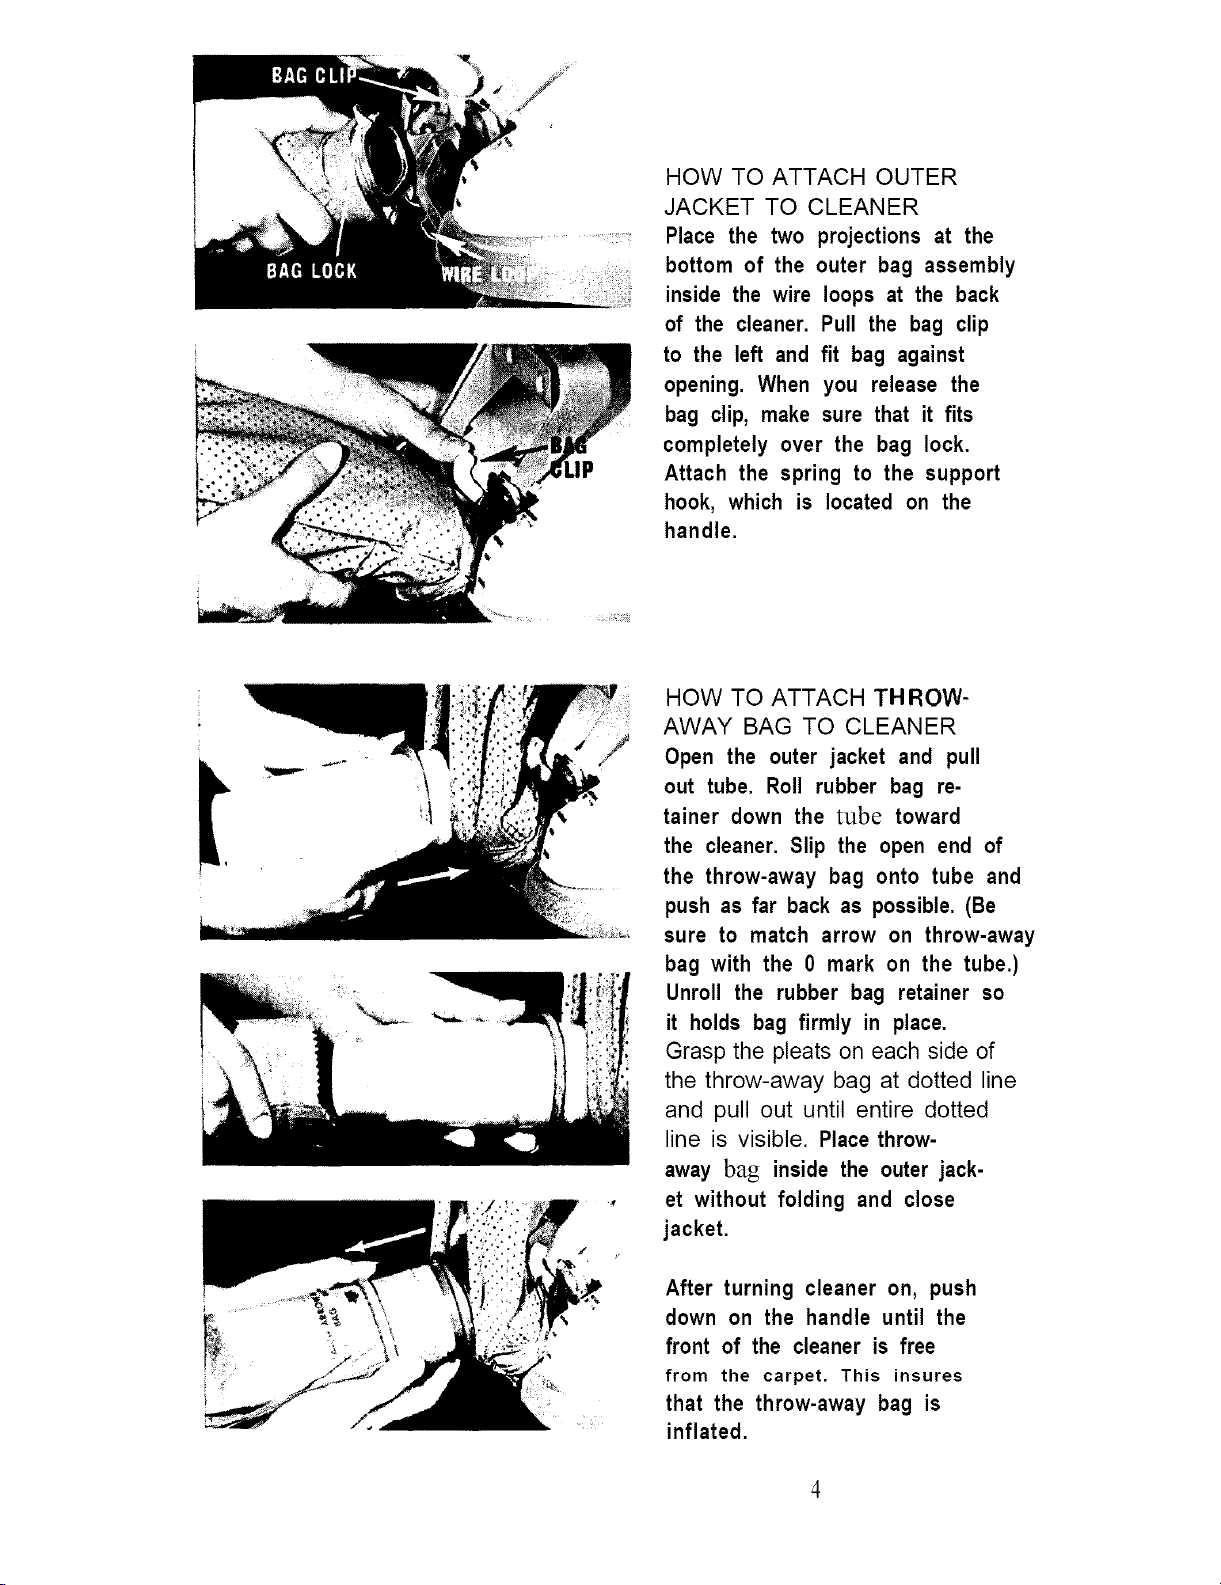
HOW TO ATTACH OUTER
JACKET TO CLEANER
Place the two projections at the
bottom of the
inside the wire
of the cleaner.
to the left and
opening. When
outer bag assembly
loops at the back
Pull the bag clip
fit bag against
you release the
bag clip, make sure that it fits
completely over the bag lock.
Attach the spring to the support
hook, which is located on the
handle.
HOW TO ATTACH TH ROW-
AWAY BAG TO CLEANER
Open the outer jacket and pull
out tube. Roll rubber bag re-
tainer down the tube toward
the cleaner. Slip the open end of
the throw-away bag onto tube and
push as far back as possible. (Be
sure to match arrow on throw-away
bag with the 0 mark on the tube.)
Unroll the rubber bag retainer so
it holds bag firmly in place.
Grasp the pleats on each side of
the throw-away bag at dotted line
and pull out until entire dotted
line is visible. Place throw-
away bag inside the outer jack-
et without folding and close
jacket.
After turning cleaner on, push
down on the handle until the
front of the cleaner is free
from the carpet. This insures
that the throw-away bag is
inflated.
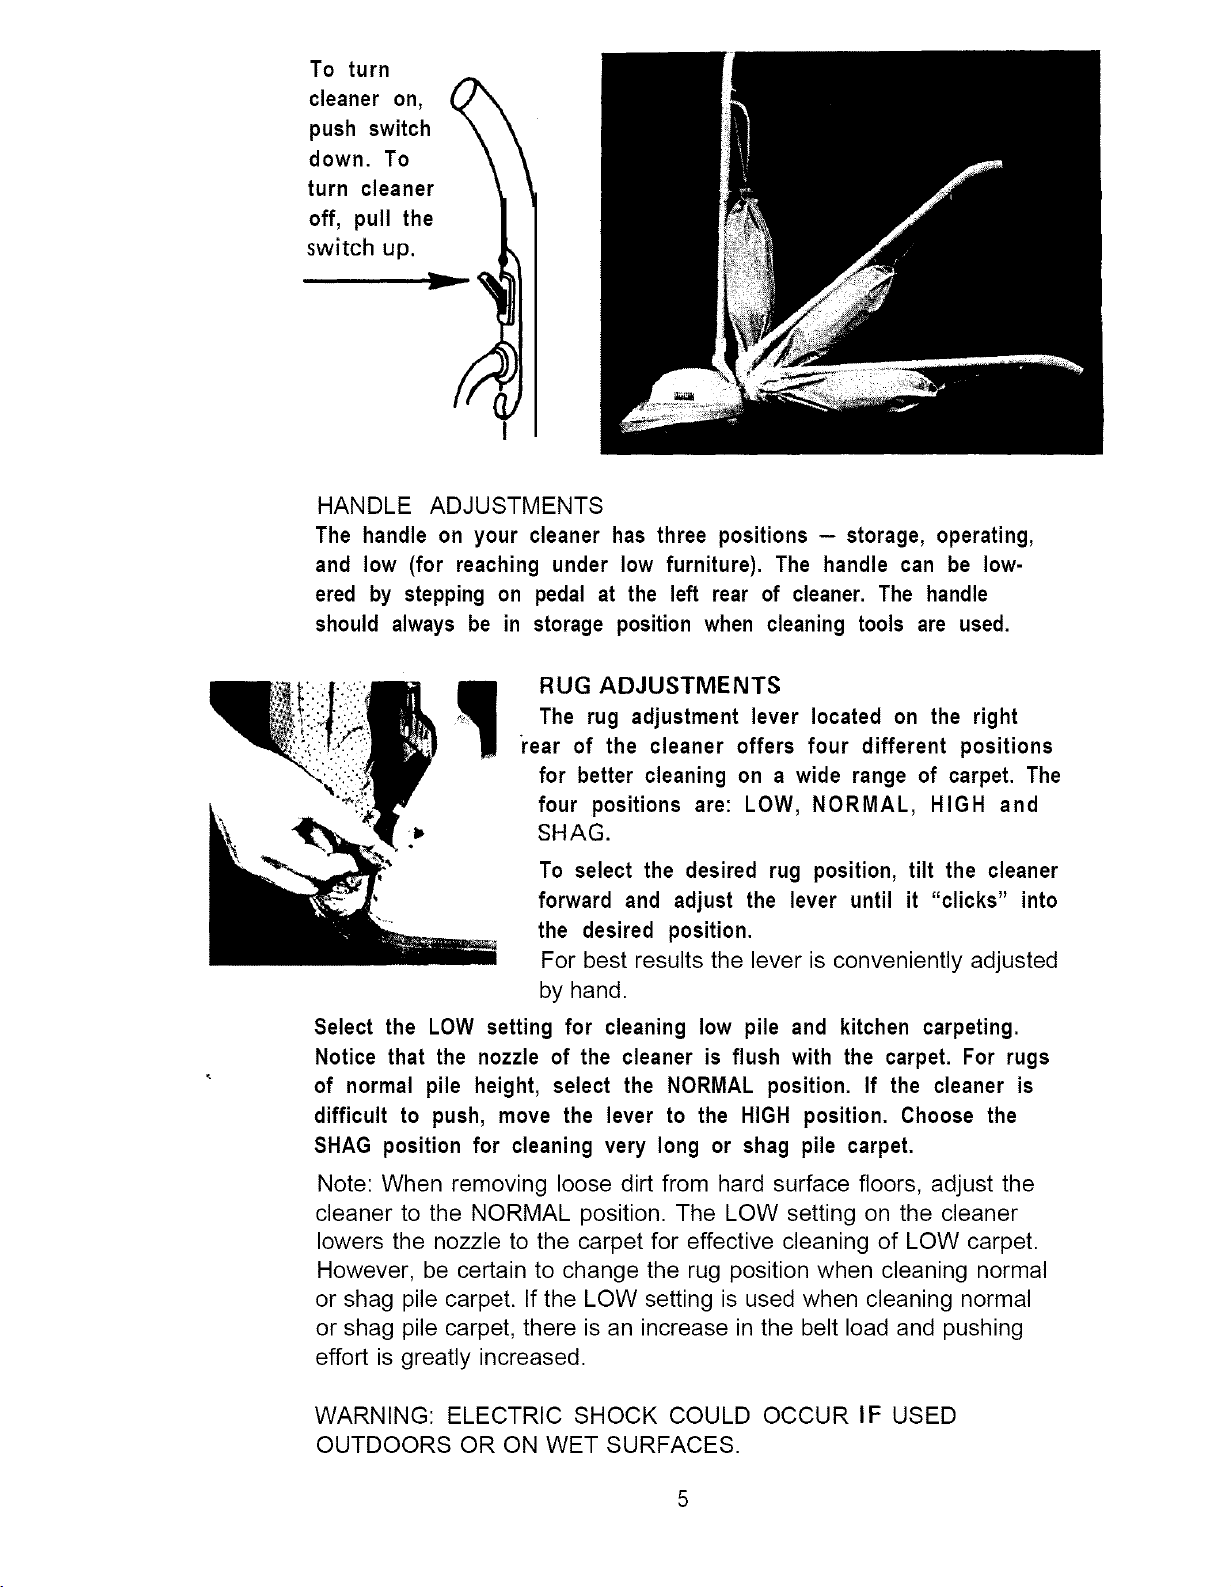
To turn
cleaner on,
push switch
down. To
turn cleaner
off, pull the
switch up.
I
HANDLE ADJUSTMENTS
The handle on your cleaner has three positions - storage, operating,
and low (for reaching under low furniture). The handle can be low-
ered by stepping on pedal at the left rear of cleaner. The handle
should always be in storage position when cleaning tools are used.
RUG ADJUSTMENTS
The rug adjustment lever located on the right
rear of the cleaner offers four different positions
for better cleaning on a wide range of carpet. The
four positions are: LOW, NORMAL, HIGH and
SHAG.
To select the desired rug position, tilt the cleaner
forward and adjust the lever until it "clicks" into
the desired position.
For best results the lever is conveniently adjusted
by hand.
Select the LOW setting for cleaning low pile and kitchen carpeting.
Notice that the nozzle of the cleaner is flush with the carpet. For rugs
of normal pile height, select the NORMAL position. If the cleaner is
difficult to push, move the lever to the HIGH position. Choose the
SHAG position for cleaning very long or shag pile carpet.
Note: When removing loose dirt from hard surface floors, adjust the
cleaner to the NORMAL position. The LOW setting on the cleaner
lowers the nozzle to the carpet for effective cleaning of LOW carpet.
However, be certain to change the rug position when cleaning normal
or shag pile carpet. If the LOW setting is used when cleaning normal
or shag pile carpet, there is an increase in the belt load and pushing
effort is greatly increased.
WARNING: ELECTRIC SHOCK COULD OCCUR IF USED
OUTDOORS OR ON WET SURFACES.
 Loading...