

Page 1
Instruction Book
OHNC272X
Condenser Tumble Dryer
40001945.qxd 23/09/2004 09:38 Page 1
Page 2
English . . . . . . . . . . . . . . . . . . . . . . . . . . . . . . . . . . . . . . . . . . . . 2
Español . . . . . . . . . . . . . . . . . . . . . . . . . . . . . . . . . . . . . . . . . . . 20
Introduction . . . . . . . . . . . . . . . . . . . . . . . . . . . . . . . . . . . . . . . . . . . . . . . 3
Delivery information . . . . . . . . . . . . . . . . . . . . . . . . . . . . . . . . . . . . . . . . . . . . . 3
Unpacking the Product . . . . . . . . . . . . . . . . . . . . . . . . . . . . . . . . . . . 3
Safety reminders . . . . . . . . . . . . . . . . . . . . . . . . . . . . . . . . . . . . . . . . . . 4
Installation . . . . . . . . . . . . . . . . . . . . . . . . . . . . . . . . . . . . . . . . . . . . . . . . . . . . . 4
Use . . . . . . . . . . . . . . . . . . . . . . . . . . . . . . . . . . . . . . . . . . . . . . . . . . . . . . . . . . . 4
The Laundry . . . . . . . . . . . . . . . . . . . . . . . . . . . . . . . . . . . . . . . . . . . . . . . . . . . . 5
Environmental Issues . . . . . . . . . . . . . . . . . . . . . . . . . . . . . . . . . . . . . . . . . . . . . 5
GIAS Service . . . . . . . . . . . . . . . . . . . . . . . . . . . . . . . . . . . . . . . . . . . . . . . . . . . . 5
Installation. . . . . . . . . . . . . . . . . . . . . . . . . . . . . . . . . . . . . . . . . . . . . . . . . 6
Electrical requirements . . . . . . . . . . . . . . . . . . . . . . . . . . . . . . . . . . . . . . . . . . . 6
Adjusting the feet . . . . . . . . . . . . . . . . . . . . . . . . . . . . . . . . . . . . . . . . . . . . . . . 6
Ventilation. . . . . . . . . . . . . . . . . . . . . . . . . . . . . . . . . . . . . . . . . . . . . . . . . 7
Preparing the load . . . . . . . . . . . . . . . . . . . . . . . . . . . . . . . . . . . . . . . . 8
Clothes preparation . . . . . . . . . . . . . . . . . . . . . . . . . . . . . . . . . . . . . . . . . . . . . . 8
Sorting the load. . . . . . . . . . . . . . . . . . . . . . . . . . . . . . . . . . . . . . . . . . . . . . . . . 9
Drying advice. . . . . . . . . . . . . . . . . . . . . . . . . . . . . . . . . . . . . . . . . . . . . 10
Do not tumble dry . . . . . . . . . . . . . . . . . . . . . . . . . . . . . . . . . . . . . . . . . . . . . . 10
Energy saving. . . . . . . . . . . . . . . . . . . . . . . . . . . . . . . . . . . . . . . . . . . . . . . . . . 10
Drying guide . . . . . . . . . . . . . . . . . . . . . . . . . . . . . . . . . . . . . . . . . . . . . . . . . . 10
Controls and indicators . . . . . . . . . . . . . . . . . . . . . . . . . . . . . . . . . 11
Door and Filter . . . . . . . . . . . . . . . . . . . . . . . . . . . . . . . . . . . . . . . . . . . 12
Opening the door . . . . . . . . . . . . . . . . . . . . . . . . . . . . . . . . . . . . . . . . . . . . . . 12
Filter. . . . . . . . . . . . . . . . . . . . . . . . . . . . . . . . . . . . . . . . . . . . . . . . . . . . . . . . . 12
Filter care indicator . . . . . . . . . . . . . . . . . . . . . . . . . . . . . . . . . . . . . . . . . . . . . 12
Water container . . . . . . . . . . . . . . . . . . . . . . . . . . . . . . . . . . . . . . . . . . 13
To remove the container . . . . . . . . . . . . . . . . . . . . . . . . . . . . . . . . . . . . . . . . . 13
Condenser . . . . . . . . . . . . . . . . . . . . . . . . . . . . . . . . . . . . . . . . . . . . . . . . 14
To remove the condenser . . . . . . . . . . . . . . . . . . . . . . . . . . . . . . . . . . . . . . . . 14
Selecting the Programme . . . . . . . . . . . . . . . . . . . . . . . . . . . . . . . 15
Operation . . . . . . . . . . . . . . . . . . . . . . . . . . . . . . . . . . . . . . . . . . . . . . . . . 16
Cancelling and resetting the programme . . . . . . . . . . . . . . . . . . . . . . . . . . . . 17
Cleaning and Routine Maintenance. . . . . . . . . . . . . . . . . . . . 17
Cleaning the dryer . . . . . . . . . . . . . . . . . . . . . . . . . . . . . . . . . . . . . . . . . . . . . . 17
Technical specifications . . . . . . . . . . . . . . . . . . . . . . . . . . . . . . . . . . . . . . . . . . 17
Troubleshooting. . . . . . . . . . . . . . . . . . . . . . . . . . . . . . . . . . . . . . . . . . 18
Customer Service. . . . . . . . . . . . . . . . . . . . . . . . . . . . . . . . . . . . . . . . . 19
Spares. . . . . . . . . . . . . . . . . . . . . . . . . . . . . . . . . . . . . . . . . . . . . . . . . . . . . . . . 19
GIAS Service . . . . . . . . . . . . . . . . . . . . . . . . . . . . . . . . . . . . . . . . . . . . . . . . . . . 19
2
40001945.qxd 23/09/2004 09:38 Page 2
Page 3
Introduction
Please read and follow these instructions
carefully and operate the machine accordingly.
This booklet provides important guidelines for
safe use, installation, maintenance and some
useful advice for best results when using your
machine.
Keep all documentation in a safe place for future
reference or for any future owners
Delivery information
Please check that the following items are
delivered with the appliance:
● Instruction manual
● Guarantee card
● Energy label
Remove the machine from its packaging close to
the final location of the machine.
1. Cut carefully around the base of the
packaging and up one corner.
2. Remove the polythene sleeve and lift the
dryer off the polystyrene base.
3
Check that no
damage has
occurred to the
machine during
transit. If it has,
call for service by
GIAS.
Failure to comply
with the above
can compromise
the safety of the
appliance. You
may be charged
for a service call if
a problem with
your machine is
caused by misuse.
Unpacking the product
Dispose of the packaging safely. Make
sure it is out of the reach of children,
it is a potential source of danger.
40001945.qxd 23/09/2004 09:38 Page 3
Page 4
Safety reminders
Installation
● Check that the product has no visible signs of damage before use. If
damaged do not use and please call GIAS Service.
● Do not use adapters, multiple connectors and/or extensions.
● This machine should not be installed in a bathroom or shower room.
● Never install the dryer against curtains and be sure to prevent items from
falling or collecting behind the dryer.
Use
● WARNING Misuse of a tumble dryer may create a fire hazard.
● This machine is solely for domestic use, i.e. to dry household textiles and
garments.
● This machine should only be used for its intended purpose as described in
this manual. Ensure that the instructions for installation and use are fully
understood before operating the appliance.
● Do not touch the appliance when hands or feet are damp or wet.
● Do not lean on the door when loading the machine or use the door to
lift or move the machine.
● Do not allow children to play with the machine or its controls.
● WARNING Do not use the product if the fluff filter is not in position or is
damaged; fluff could be ignited.
● WARNING Where the hot surface symbol is located the
temperature rise during operation of the tumble dryer may be in excess
of 60 degrees C.
● Remove the plug from the electricity supply. Always remove the plug
before cleaning the appliance.
● Do not continue to use this machine if it appears to be faulty.
● Lint and fluff must not be allowed to collect on the floor around the
outside of the machine.
● The drum inside may be very hot. Always allow the dryer to complete the
cool down period before removing the laundry.
4
40001945.qxd 23/09/2004 09:38 Page 4
Page 5
The Laundry
● WARNING Do not tumble dry fabrics treated with dry cleaning fluids.
● WARNING Foam rubber materials can, under certain circumstances, when
heated become ignited by spontaneous combustion. Foam plastic, foam
rubber and rubber-like material are not suitable for tumble drying.
Articles made from these materials MUST NOT be placed in the dryer.
● Always refer to the laundry care labels for directions on suitability for
drying.
● Clothes should be spin dried or thoroughly wrung before they are put
into the tumble dryer. Clothes that are dripping wet should NOT be put
into the dryer.
● Lighters and matches must not be left in pockets and NEVER use
flammable liquids near the machine.
● Glass fibre curtains should NEVER be put in this machine. Skin irritation
may occur if other garments are contaminated with the glass fibres.
● Garments treated or contaminated with flammable cleaning sprays or
liquids such as petrol, cooking oil or aerosol sprays MUST NOT be put in
this machine.
Environmental Issues
● All packaging materials used are environmentally-friendly and recyclable.
Please help dispose of the packaging via environmentally-friendly means.
Your local council will be able to give you details of current means of
disposal.
● To ensure safety when disposing of an old tumble dryer disconnect the
mains plug from the socket, cut the mains power cable and destroy this
together with the plug. To prevent children shutting themselves in the
machine break the door hinges or the door lock.
GIAS Service
● To ensure the continued safe and efficient operation of this appliance we
recommend that any servicing or repairs are only carried out by an
authorised GIAS Service engineer.
5
If the appliance is not running properly or breaks down,
switch it off and disconnect the plug from the socket.
Consult GIAS Service for possible repair.
40001945.qxd 23/09/2004 09:38 Page 5
Page 6
Electrical requirements
Tumble dryers are supplied to operate at a
voltage of 230V, 50 Hz. Check that the supply
circuit is rated to at least 16A.
Electricity can be extremely dangerous.
This appliance must be earthed.
The socket outlet and the plug on the appliance
must be of the same type.
Do not use multiple adapters and/or extension
leads.
The plug should be accessible for disconnection
after the appliance has been installed.
The wires in the mains lead are coloured in
accordance with the following codes:
Blue NEUTRAL
Brown LIVE
Green and Yellow EARTH
CE Appliance complies with European Directive
89/336/EEC, 73/23/EEC and subsequent
amendments.
Adjusting the feet
Once the machine is in place the feet should be
adjusted to ensure that the machine is level.
Adjust the four feet to ensure the machine is firm
and level.
6
You may be
charged for a
service call if a
problem with
your machine is
caused by
incorrect
installation.
If the mains cord
on this
appliance is
damaged, it
must be
replaced by a
special cord
which is ONLY
obtainable from
the GIAS spares
service. It must
be installed by a
competent
person.
Installation
Do not plug the machine in and switch
it on at the mains until the installation
is completed.
For your safety, this dryer must be
correctly installed.
If there is any doubt about installation,
call GIAS Service for advice.
40001945.qxd 23/09/2004 09:38 Page 6
Page 7
Adequate ventilation must be provided in the
room where the tumble dryer is located to
prevent gases from appliances burning other
fuels, including open fires, being drawn into the
room during operation of the tumble dryer.
● Exhaust air must not be discharged into a
flue which is used for exhausting fumes
from appliances burning gas or other fuels.
● Check regularly that the air flowing through
the dryer is not restricted.
● Check the fluff filter after use, and clean, if
necessary.
● The inlet and outlets should be kept free
from obstructions. To ensure adequate
ventilation the space between the bottom
of the machine and the floor must not be
obstructed. There should be a gap of at
least 12mm between the machine and any
obstructions.
● Prevent items from falling or collecting
behind the dryer as these may obstruct the
air inlet and outlet.
● NEVER install the dryer up against curtains.
7
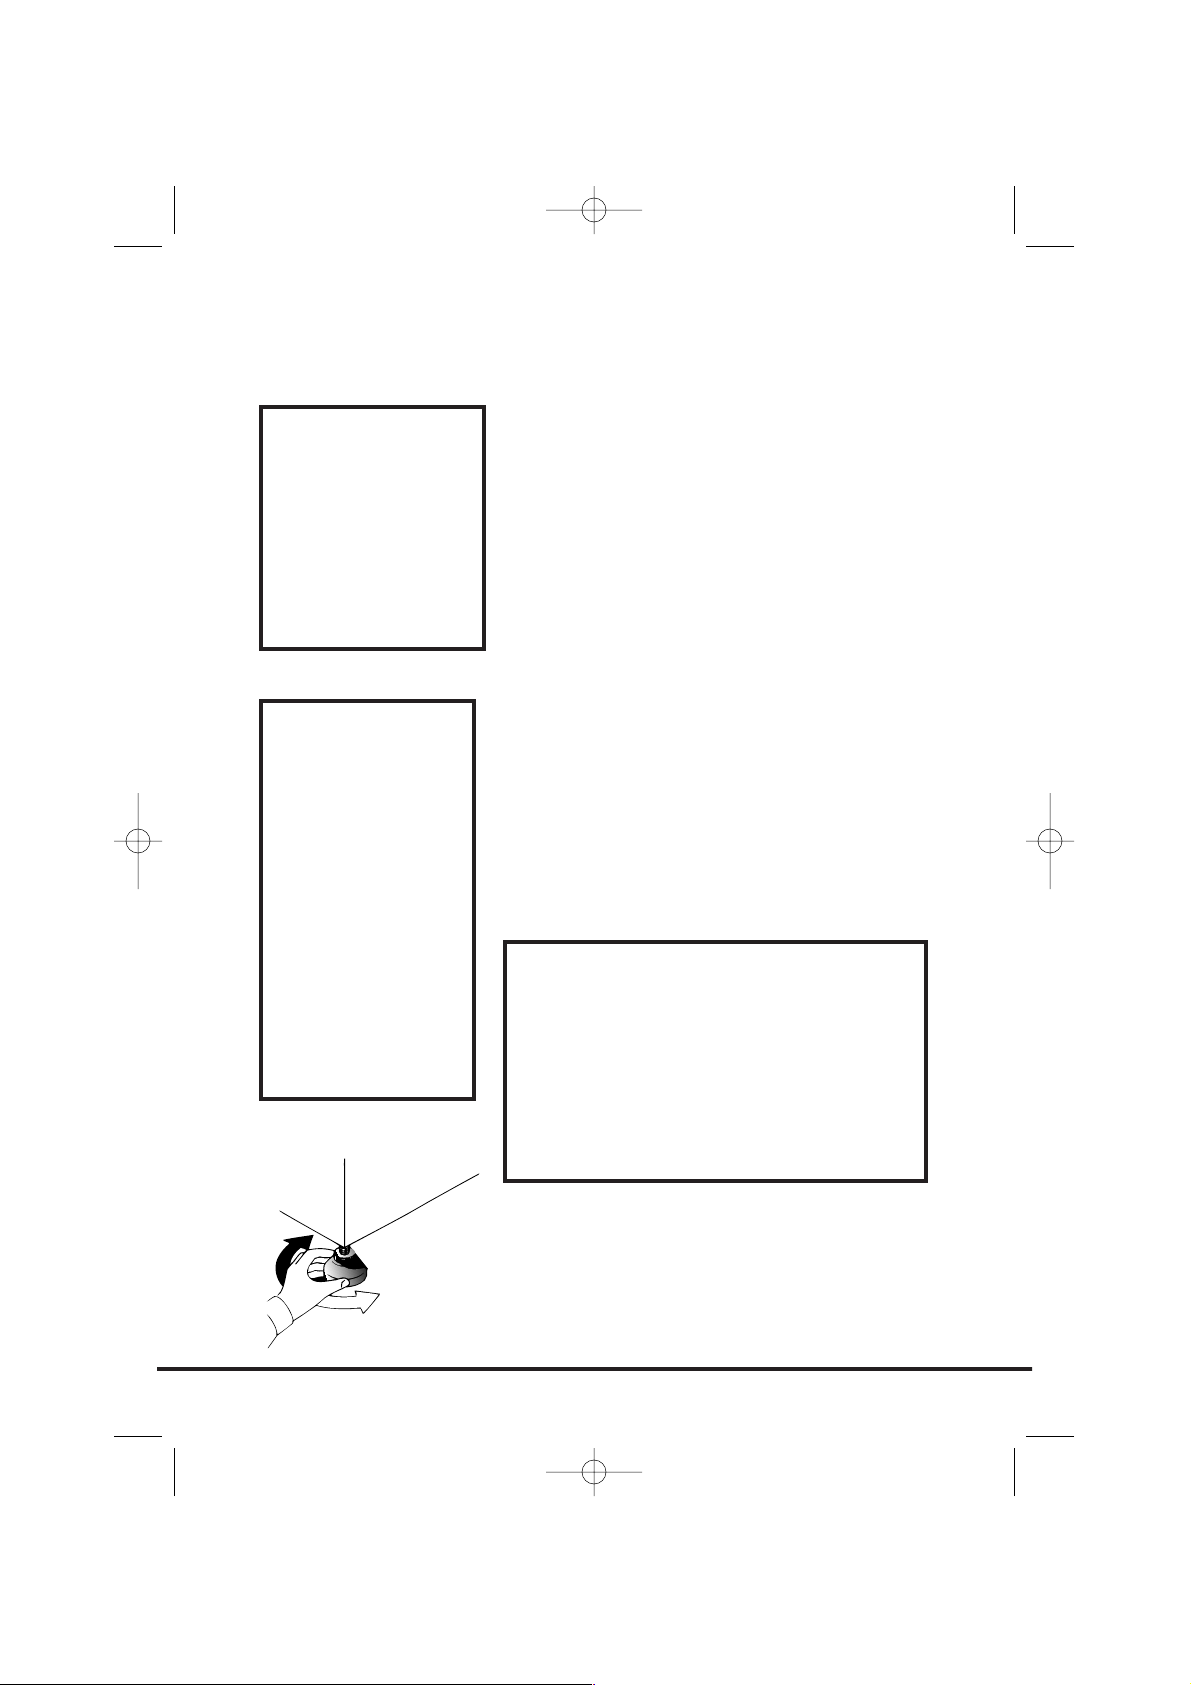
Ventilation
AIR OUTLETS
AIR OUTLETS IN THE BASE
AIR INLET VENTS
40001945.qxd 23/09/2004 09:38 Page 7
Page 8
Before using the tumble dryer for the first time:
● Please read this instruction book thoroughly.
● Remove all items packed inside drum.
● Wipe the inside of the drum and door with
a damp cloth to remove any dust which may
have settled in transit.
Clothes preparation
Make sure that the laundry you are going to dry
is suitable for drying in a tumble dryer, as shown
by the care symbols on each item.
Check that all fastenings are closed and that
pockets are empty. Turn the articles inside out.
Place clothes loosely in the drum to make sure
that they don't get tangled.
Maximum drying weight
● Cottons Max. 7.5 kg
● Synthetics Max. 3.5 kg
8
Preparing the load
Do not overload
the drum, large
items when wet
can exceed the
maximum
admissible
clothes load
(for example:
sleeping bags,
duvets).
40001945.qxd 23/09/2004 09:38 Page 8
Page 9
Sort the load as follows:
● By care symbols
These can be found on the collar or inside
seam:
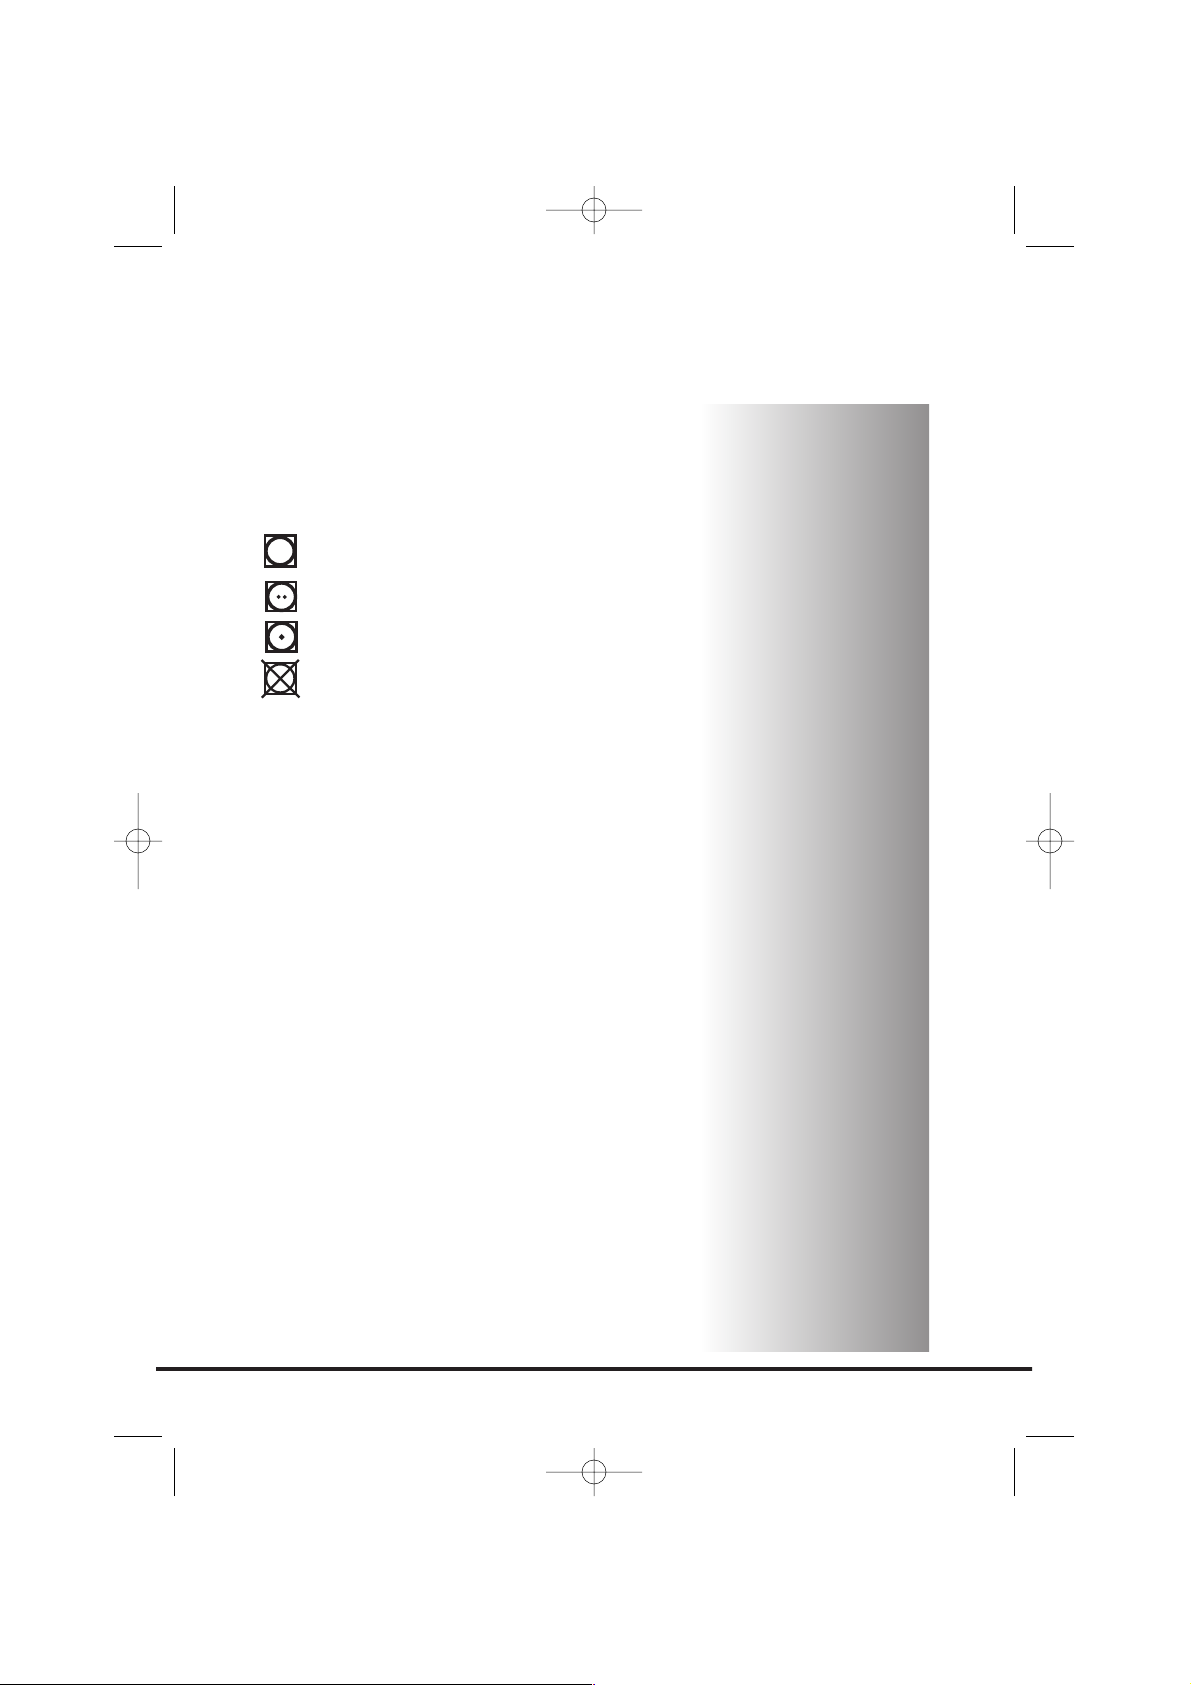
Suitable for tumble drying.
Tumble drying at high temperature.
Tumble drying at low temperature only.
Do not tumble dry.
If the item does not have a care label it
must be assumed that it is not suitable
for tumble drying.
● By amount and thickness
Whenever the load is bigger than the dryer
capacity, separate clothes according to
thickness (e.g. towels from thin underwear).
● By type of fabric
Cottons/linen: Towels, cotton jersey, bed and
table linen.
Synthetics: Blouses, shirts, overalls, etc.
made of polyester or polyamid, as well as
for cotton/synthetic mixes.
● By drying level
Sort into: iron dry, cupboard dry, etc. For
delicate articles press the Delicados
Sintéticos button to select low drying
temperature.
9
40001945.qxd 23/09/2004 09:38 Page 9
Page 10

Do not tumble dry:
Woollens, silk, delicate fabrics, nylon stockings,
delicate embroidery, fabrics with metallic
decorations, garments with PVC or leather
trimmings, training shoes, bulky items such as
sleeping bags, etc.
Energy saving
Only put into the tumble dryer laundry which has
been thoroughly wrung or spin-dried. The drier
the laundry the shorter the drying time thus
saving electricity.
ALWAYS
● Try to dry the maximum weight of laundry,
this will save time and electricity.
● Check that the filter is clean before every
drying cycle.
NEVER
● Exceed the maximum weight, this will waste
time and electricity.
● Put dripping wet items into the tumble
dryer, this may damage the appliance.
Drying guide
The table shows approximate drying times,
depending on the type of fabric and dampness of
the clothes.
10
Drying advice
IMPORTANT: Do
not dry articles
which have been
treated with a
dry cleaning fluid
or rubber clothes
(danger of fire or
explosion).
During the last
15 minutes the
load is always
tumbled in cool
air.
Fabric
COTTON
SYNTHETICS
ACRYLIC
HEAT
SETTING
HIGH
LOW
LOW
INDICATOR
LIGHT
OFF
ON
ON
HEAVY
LOAD
140-165 min
–
–
MEDIUM
LOAD
70-80 min
70-80 min
50-65 min
LIGHT
LOAD
50-65 min
40-55 min
30-40 min
40001945.qxd 23/09/2004 09:38 Page 10
Page 11
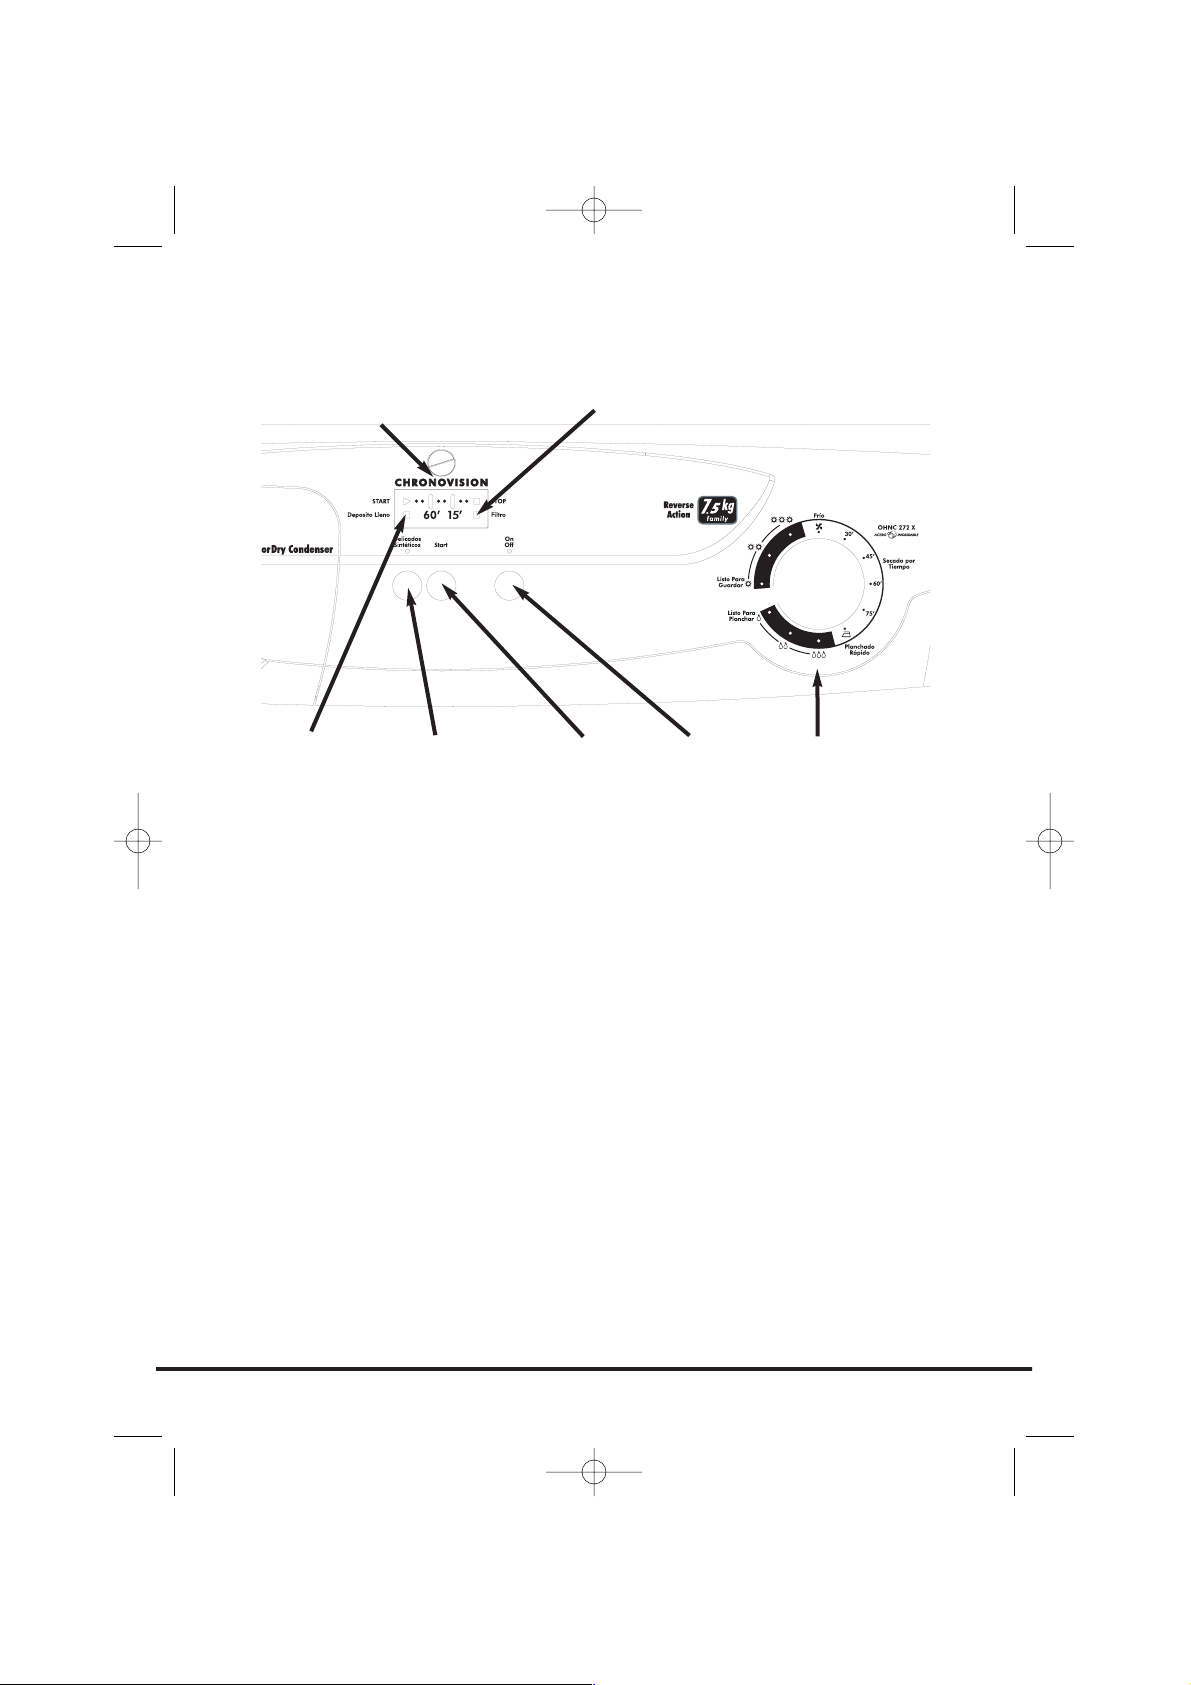
Control panel and indicator lights
Programme Selector – Select the required programme
On/Off button and indicator – Press to switch on, the indicator will light
Start – Press Start to commence the selected drying programme. Press for
5 seconds to cancel/reset the programme
Acrylics/Synthetics button (Delicados Sintéticos) – Press to reduce the heat
level for delicate items, the indicator above the button will light up. To change
the heat setting the programme must be reset
Low Heat – Indicator light ON High Heat – Indicator light OFF
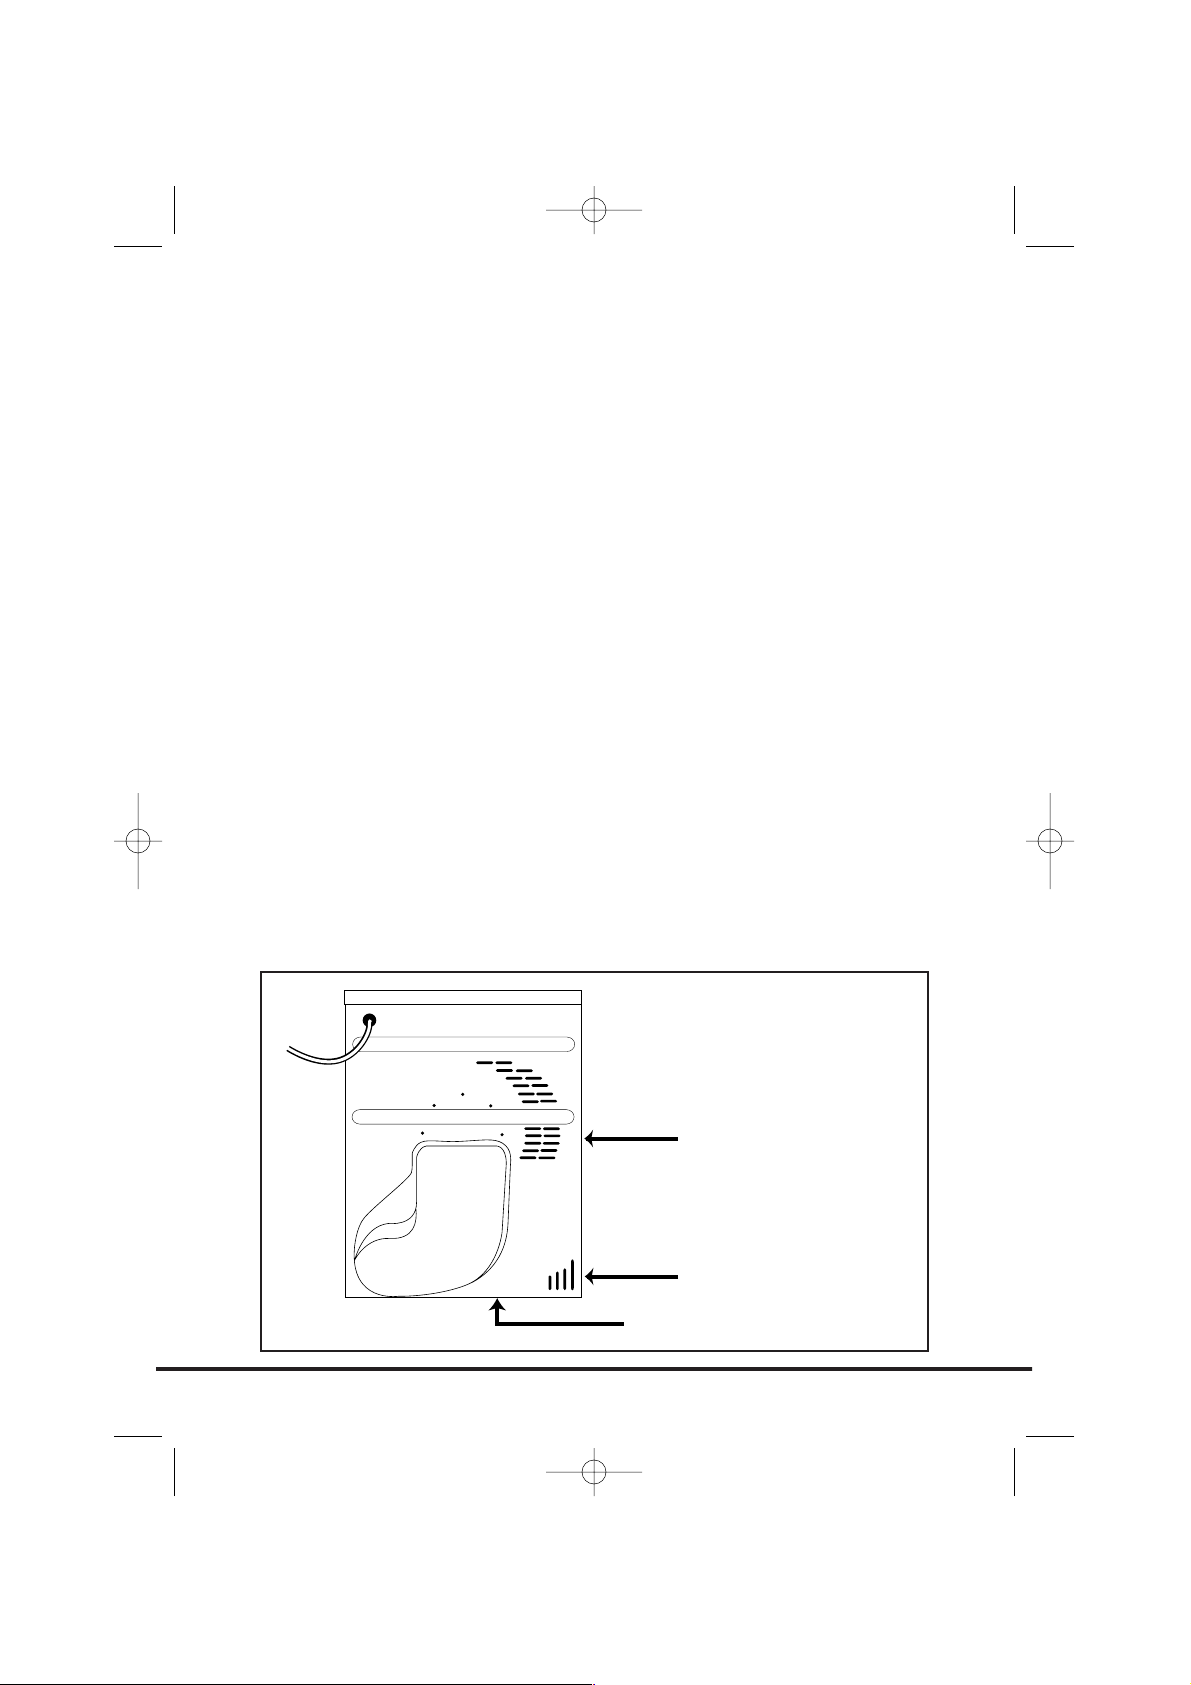
Empty Water indicator (Deposito Lleno) – lights when the water container is
full
Filter Care indicator (Filtro) – lights when the filter needs cleaning
CHRONOVISION display
START – When the dryer is switched On the START indicator will flash, when
the programme starts the START indicator will light up
60' – Indicator lights when there is less than 60 minutes left until completion
of the programme
15' – Indicator lights when there is less than 15 minutes left until completion
of the programme. At this stage of the drying cycle the machine enters the
Cool Down phase
STOP – Indicator lights when the programme is finished.
11
Controls and indicators
ACRYLICS/
SYNTHETICS
BUTTON
ON/OFF
BUTTON
FILTER CARE
INDICATOR
EMPTY
WATER
INDICATOR
PROGRAMME
SELECTOR
START
BUTTON
CHRONOVISION DISPLAY
40001945.qxd 23/09/2004 09:38 Page 11
Page 12

Opening the door
Pull on handle to open the door.
To restart the dryer, close the door and press
Start.
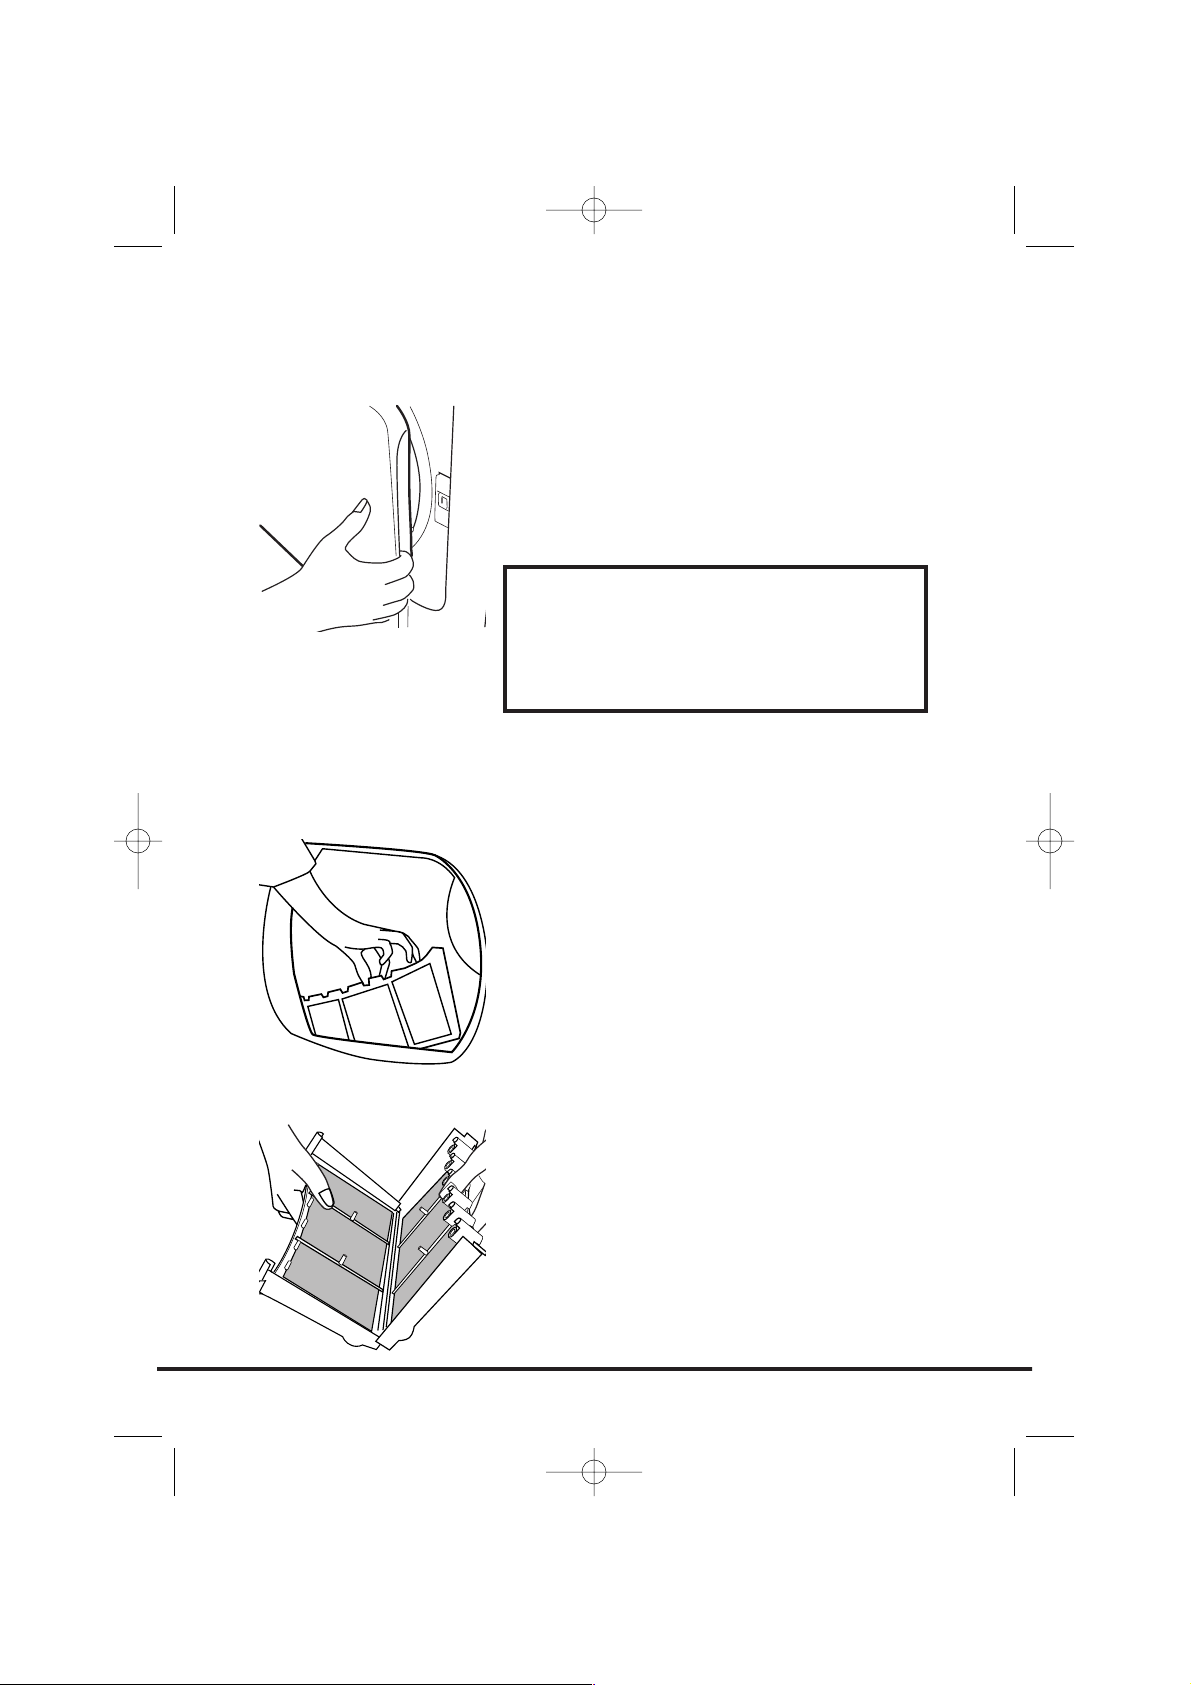
Filter
IMPORTANT: To maintain the efficiency of the
dryer check that the fluff filter is clean before
each drying cycle.
1. Pull the filter upwards.
2. Open filter as shown.
3. Gently remove lint using a soft brush or
your fingertips.
4. Snap the filter together and push back into
place.
Filter Care Indicator
Filtro lights when the filter needs cleaning.
If the laundry is not drying check that the filter is
not clogged.
12
Door and Filter
WARNING!
When the tumble dryer is in use the
drum and door may be VERY HOT.
40001945.qxd 23/09/2004 09:38 Page 12
Page 13

The water removed from the laundry during the
drying cycle is collected in a container at the
bottom of the dryer.
When the container is full the Deposito Lleno
indicator on the control panel will light, and the
container MUST be emptied. However, we
recommend that the container is emptied after
each drying cycle.
NOTE: Very little water will collect during the
first few cycles of a new machine as an internal
reservoir is filled first.
To remove the container
1. Gently pull the bottom of the kickplate so
that it unclips from the dryer. The top
section can then be unhinged allowing the
kickplate to be completely removed.
2. Pull firmly on the handgrip and slide the
water container out of the dryer.
Support the container with both hands. When
full, the water container will weigh about 4kg.
3. Open the lid located on the top of the
container and empty the water.
4. Refit the lid and slide the water container
back into position. PUSH FIRMLY INTO
PLACE.
5. Refit the kickplate by engaging the hinges
at the top and 'snapping' the lower clips
into place.
13
Water Container
40001945.qxd 23/09/2004 09:38 Page 13
Page 14

Important: Always switch off and remove the
plug from the electricity supply before cleaning
the condenser.
To maintain the efficiency of the dryer regularly
check that the condenser is clean.
To remove the
condenser
1. Remove the kickplate (see page 13).
2. Turn the two locking levers anti-clockwise
and pull out the condenser.
3. Pull out the condenser unit.
4. Gently remove any dust or fluff with a cloth,
then wash the unit by holding it under a
running tap turning it so that water flows
between the plates, to remove any dust or
fluff.
5. Refit the condenser ensuring it is in the
correct way (as indicated by the arrow) and
pushed firmly into place. Lock the two levers
by turning them clockwise.
6. Refit the kickplate.
14
Condenser
40001945.qxd 23/09/2004 09:38 Page 14
Page 15
Note: The sensor may not detect a small load of
small articles. For small loads and separate items
or pre-dried fabrics with low moisture content,
use the timed programmes. Set the programme
between 30 and 75 minutes depending on the
load size and dryness required, and select high
or low heat depending upon the fabric type.
If the sensor does not detect the item the dryer
will only operate for 10 minutes before going
into cooldown.
If the load is too large or too wet to tumble dry
the dryer will automatically go into cooldown
after 180 minutes.
15
Selecting the Programme
Programme
Bone Dry
Extra Dry
Cupboard Dry
Iron Dry
Medium Dry
Damp Dry
Fast Iron
75'
60'
45'
30'
Refresh
Description
Select the degree of dryness that you require.
This ranges from Bone Dry for bath towels and
bathrobes, through Cupboard Dry for items that
will be put away without ironing, to the
programmes that leave the laundry suitable for
ironing.
The Fast Iron programme provides a conditioning
and anticrease function. The dryer will heat the
load for 9 minutes followed by a 3 minute cool
down period and is especially good for garments
which may have been left for some time prior to
ironing, in a linen basket for example. Garments
may also become stiffened when dried outside on a
washing line or inside on radiators. The Fast Iron
process relaxes the creases in the fabric making
ironing quicker and easier.
75 minutes of drying
60 minutes of drying
45 minutes of drying
30 minutes of drying
Tumbling of laundry in cool air
The Sensor Dry machine gives many options for drying the laundry to suit all
circumstances.
The table below lists the programmes and the function of each programme.
40001945.qxd 23/09/2004 09:38 Page 15
Page 16

1. Open the door and load the drum with
laundry. Ensure that garments do not hinder
closure of the door.
2. Gently close the door pushing it slowly until
you hear the door 'click' shut.
3. Press the On/Off button to switch on the
dryer. The indicator will light up and the
START indicator will flash.
4. Turn the Programme Selector dial to select
the required drying program (see
Programme Guide).
5. If drying synthetics, acrylics or delicate items,
press the Delicados Sintéticos button to
reduce the heat level.
The light above the push button will light
up when the machine is in low heat setting.
To deselect this status the machine must be
reset.
6. Press the Start button. The dryer will start
automatically and the START indicator will
be continuously lit.
7. The CHRONOVISION display will show the
drying progress in terms of time remaining.
8. If the door is opened during the programme
to check the laundry, it is necessary to press
Start to recommence drying after the door
has been closed.
9. When the 15' indicator is lit the machine
will enter the cool down phase, the clothes
will be tumbled in cool air allowing the load
to cool down.
10. When the programme is complete the STOP
indicator will light.
16
WARNING!
The drum, door
and load may be
very hot.
Operation
40001945.qxd 23/09/2004 09:38 Page 16
Page 17

Cancelling and resetting
the programme
To cancel a programme press the Start button for
5 seconds. The machine will indicate that it has
been reset by the START indicator flashing. It is
possible to change the programme within the
first 10 minutes without using the cancel and
reset function.
Cleaning the dryer
● Clean the filter and empty the water
container after every drying cycle.
● Regularly clean the condenser.
● After each period of use, wipe the inside of
the drum and leave the door open for a
while to allow circulation of air to dry it.
● Wipe the outside of the machine and the
door with a soft cloth.
● DO NOT use abrasive pads or cleaning
agents.
● To prevent the door sticking or the build up
of fluff periodically clean the inner door and
gasket with a damp cloth.
Technical specifications
Drum capacity 115 litres
Maximum load 7.5 kg
Height 85cm
Width 60cm
Depth 60cm
Energy Label Band C
17
IMPORTANT
Always switch
off and remove
the plug from
the electricity
supply before
cleaning this
appliance.
For electrical data
refer to the
rating label on
the front of the
dryer cabinet
(with the door
open).
Cleaning and Routine
Maintenance
40001945.qxd 23/09/2004 09:38 Page 17
Page 18

What might be the cause of...
Defects you can remedy yourself
Before calling GIAS Service for technical advice please run through the
following checklist. A charge will be made if the machine is found to be
working or has been installed incorrectly or used incorrectly. If the problem
persists after completing the recommended checks, please call GIAS Service,
they may be able to assist you over the telephone.
Drying time is too long/clothes are not dry enough…
● Have you selected the correct drying time/programme?
● Were the clothes too wet? Were the clothes thoroughly wrung or spin-
dried?
● Does the filter need cleaning?
● Does the condenser need cleaning?
● Is the dryer overloaded?
● Are the inlets, outlets and base of the dryer free from obstructions?
● Has the Delicados Sintéticos option been selected from a previous cycle?
The dryer does not operate…
● Is there a working electricity supply to the dryer? Check using another
appliance such as a table lamp.
● Is the plug properly connected to the mains supply?
● Is there a power failure?
● Has the fuse blown?
● Is the door fully closed?
● Is the dryer switched on, both at the mains supply and at the machine?
● Has the drying time or the programme been selected?
● Has the machine been switched on again after opening the door?
● Has the dryer stopped operating because the water tray is full and needs
emptying?
The dryer is noisy…
● Switch off the dryer and contact GIAS Service for advice.
The Filter Care Indicator is on…
● Does the filter need cleaning?
● Does the condenser need cleaning?
Empty Water Indicator is on…
● Does the water container need emptying?
18
Troubleshooting
40001945.qxd 23/09/2004 09:38 Page 18
Page 19

Should there still be a problem with your dryer
after completing all the recommended checks,
please call GIAS Service for advice. They may be
able to assist you over the telephone or arrange
for a suitable appointment for an engineer to call
under the terms of your guarantee. However, a
charge may be made if any of the following
applies to your machine:
● Is found to be in working order.
● Has not been installed in accordance with
the installation instructions.
● Has been used incorrectly.
Spares
Always use genuine spares, available direct from
GIAS Service.
GIAS Service
For service and repairs call your local GIAS
Service engineer.
The manufacturer declines all responsibility in the
event of any printing mistakes in this booklet.
The manufacturer also reserves the right to make
appropriate modifications to its products without
changing the essential characteristics.
19
Customer Service
40001945.qxd 23/09/2004 09:38 Page 19
Page 20

Introducción . . . . . . . . . . . . . . . . . . . . . . . . . . . . . . . . . . . . . . . . . . . . . . 21
Información de entrega. . . . . . . . . . . . . . . . . . . . . . . . . . . . . . . . . . . . . . . . . . 21
Desembalaje del producto . . . . . . . . . . . . . . . . . . . . . . . . . . . . . . 21
Advertencias sobre seguridad . . . . . . . . . . . . . . . . . . . . . . . . . . 22
Instalación . . . . . . . . . . . . . . . . . . . . . . . . . . . . . . . . . . . . . . . . . . . . . . . . . . . . 22
Uso . . . . . . . . . . . . . . . . . . . . . . . . . . . . . . . . . . . . . . . . . . . . . . . . . . . . . . . . . . 22
La colada . . . . . . . . . . . . . . . . . . . . . . . . . . . . . . . . . . . . . . . . . . . . . . . . . . . . . 23
Temas medioambientales. . . . . . . . . . . . . . . . . . . . . . . . . . . . . . . . . . . . . . . . . 23
Servicio técnico de GIAS. . . . . . . . . . . . . . . . . . . . . . . . . . . . . . . . . . . . . . . . . . 23
Instalación . . . . . . . . . . . . . . . . . . . . . . . . . . . . . . . . . . . . . . . . . . . . . . . . 24
Requisitos eléctricos. . . . . . . . . . . . . . . . . . . . . . . . . . . . . . . . . . . . . . . . . . . . . 24
Ajuste de las patas . . . . . . . . . . . . . . . . . . . . . . . . . . . . . . . . . . . . . . . . . . . . . . 24
Ventilación. . . . . . . . . . . . . . . . . . . . . . . . . . . . . . . . . . . . . . . . . . . . . . . . 25
Preparación del material para secar. . . . . . . . . . . . . . . . . . . . 26
Preparación de la ropa. . . . . . . . . . . . . . . . . . . . . . . . . . . . . . . . . . . . . . . . . . . 26
Clasificación del material para secar . . . . . . . . . . . . . . . . . . . . . . . . . . . . . . . . 27
Consejos para el secado . . . . . . . . . . . . . . . . . . . . . . . . . . . . . . . . . 28
No secar en secadora . . . . . . . . . . . . . . . . . . . . . . . . . . . . . . . . . . . . . . . . . . . . 28
Ahorro de energía . . . . . . . . . . . . . . . . . . . . . . . . . . . . . . . . . . . . . . . . . . . . . . 28
Guía de secado. . . . . . . . . . . . . . . . . . . . . . . . . . . . . . . . . . . . . . . . . . . . . . . . . 28
Controles e indicadores . . . . . . . . . . . . . . . . . . . . . . . . . . . . . . . . . 29
Puerta y filtro. . . . . . . . . . . . . . . . . . . . . . . . . . . . . . . . . . . . . . . . . . . . . 30
Modo de abrir la puerta . . . . . . . . . . . . . . . . . . . . . . . . . . . . . . . . . . . . . . . . . 30
Filtro. . . . . . . . . . . . . . . . . . . . . . . . . . . . . . . . . . . . . . . . . . . . . . . . . . . . . . . . . 30
Control de mantenimiento del filtro . . . . . . . . . . . . . . . . . . . . . . . . . . . . . . . . 30
Depósito del agua . . . . . . . . . . . . . . . . . . . . . . . . . . . . . . . . . . . . . . . 31
Modo de sacar el recipiente . . . . . . . . . . . . . . . . . . . . . . . . . . . . . . . . . . . . . . 31
Condensador . . . . . . . . . . . . . . . . . . . . . . . . . . . . . . . . . . . . . . . . . . . . . 32
Modo de sacar el condensador . . . . . . . . . . . . . . . . . . . . . . . . . . . . . . . . . . . . 32
Selección del programa. . . . . . . . . . . . . . . . . . . . . . . . . . . . . . . . . . 33
Operación. . . . . . . . . . . . . . . . . . . . . . . . . . . . . . . . . . . . . . . . . . . . . . . . . 34
Modo de cancelar y restablecer el programa . . . . . . . . . . . . . . . . . . . . . . . . . 35
Limpieza y mantenimiento de rutina . . . . . . . . . . . . . . . . . . 35
Limpieza de la secadora. . . . . . . . . . . . . . . . . . . . . . . . . . . . . . . . . . . . . . . . . . 35
Especificaciones técnicas . . . . . . . . . . . . . . . . . . . . . . . . . . . . . . . . . . . . . . . . . 35
Resolución de problemas. . . . . . . . . . . . . . . . . . . . . . . . . . . . . . . . 36
Servicio de atención al cliente . . . . . . . . . . . . . . . . . . . . . . . . . . 37
Servicio de recambios. . . . . . . . . . . . . . . . . . . . . . . . . . . . . . . . . . . . . . . . . . . . 37
Servicio técnico de GIAS. . . . . . . . . . . . . . . . . . . . . . . . . . . . . . . . . . . . . . . . . . 37
20
40001945SPA.qxd 23/09/2004 09:41 Page 20
Page 21

Introducción
Por favor lea cuidadosamente estas instrucciones y
utilice la máquina según sus indicaciones. Este folleto
presenta directrices importantes para uso seguro,
instalación y mantenimiento, y algunos consejos para
obtener los mejores resultados de su secadora.
Conserve toda la documentación en un lugar seguro
para referencia futura o para los dueños futuros
Información de entrega
Por favor verifique que los siguientes artículos hayan
sido entregados con el electrodoméstico:
● Manual de instrucciones
● Tarjeta de garantía
● Etiqueta de energía
Desembale la secadora en un lugar cercano al de su
instalación definitiva.
1. Corte con cuidado la base del embalaje y levante
una de las esquinas.
2. Retire la funda de plástico y saque la secadora de
la base de poliestireno.
21
Verifique que no se
hayan producido
daños al
electrodoméstico
durante el transporte.
De haberlos, llame al
Servicio Técnico de
GIAS.
Si no se cumplen los
requisitos descritos
anteriormente, es
posible que se
perjudique la
seguridad del
electrodoméstico. Es
posible que se le
cobre una llamada al
servicio técnico si el
problema con el
electrodoméstico es el
resultado de un uso
incorrecto.
Desembalaje del producto
Deshágase de los materiales de embalaje de
forma segura. Asegúrese de que estén fuera
del alcance de los niños, dado que es una
fuente potencial de peligro.
40001945SPA.qxd 23/09/2004 09:41 Page 21
Page 22

Advertencias sobre seguridad
Instalación
● Verifique que el producto no tenga daños visibles antes de usarlo. En caso de
presentar algún daño, no lo use y póngase en contacto con el Servicio técnico de
GIAS.
● No utilice adaptadores, conectores múltiples ni alargaderas.
● No se debe instalar esta máquina en un cuarto de baño ni en una sala de ducha.
● Nunca instale la secadora junto a cortinas, y procure que no caigan objetos ni se
acumule nada detrás de la secadora.
Uso
● ADVERTENCIA El uso incorrecto de una secadora puede provocar riesgo de
incendio.
● Esta máquina está diseñada para ser utilizada en el hogar, es decir, para secar
tejidos y prendas de uso diario.
● Esta máquina debe usarse solamente para el propósito para el cual fue diseñada.
Las instrucciones para la instalación y el uso deben comprenderse cabalmente
antes de hacer funcionar el electrodoméstico.
● No toque el electrodoméstico cuando tenga las manos o los pies mojados o
húmedos.
● No se apoye en la puerta al cargar la secadora ni utilice la puerta para levantar o
mover la máquina.
● No permita a los niños jugar con la máquina ni los mandos.
● ADVERTENCIA No use el producto si el filtro de pelusa no está en su lugar o si está
dañado, ya que la pelusa podría arder.
● ADVERTENCIA En el lugar donde aparezca el símbolo de superficie caliente ,
el incremento de temperatura durante la operación de la secadora puede exceder
los 60 grados centígrados.
● Desconecte el enchufe de la red del suministro eléctrico. Siempre debe
desenchufar la máquina antes de limpiarla.
● No siga usando esta máquina si pareciera tener algún desperfecto.
● No hay que dejar que se acumulen lanilla y pelusas en el suelo alrededor de la
máquina.
● El tambor del interior puede calentarse mucho. Antes de retirar la ropa de la
máquina, siempre deje que ésta termine de enfriarse.
22
40001945SPA.qxd 23/09/2004 09:41 Page 22
Page 23

La colada
● ADVERTENCIA No debe usarse para secar tejidos tratados con líquidos para
limpiado en seco.
● ADVERTENCIA Los materiales de goma de espuma, en algunas circunstancias,
pueden arder por combustión espontánea si se calientan. Espuma plástica, goma
de espuma, y materiales semejantes a la goma no son apropiados para secarse en
secadora. NO HAY QUE introducir en la secadora piezas hechas de estos
materiales.
● Consulte siempre las etiquetas sobre lavado de las prendas para conocer si se
pueden secar en secadora.
● Antes de introducir ropa en la secadora, aquélla debe centrifugarse o estrujarse
bien. Prendas que escurren agua NO deben introducirse en la secadora.
● Deben sacarse de los bolsillos encendedores y cerillas, y no se debe NUNCA usar
líquidos inflamables cerca de la máquina.
● No se debe NUNCA introducir cortinas de fibra de vidrio en esta máquina. Puede
producirse irritación de la piel si otras prendas se contaminan con fibras de vidrio.
● Las prendas tratadas o contaminadas con productos de limpieza inflamables o
líquidos tales como gasolina, aceite para cocinar o aerosoles NO DEBEN colocarse
en esta máquina.
Temas medioambientales
● Todos los materiales de embalaje utilizados son ecológicos y reciclables. Por favor
deshágase de los materiales de embalaje por medios ecológicos. Su ayuntamiento
podrá informarle de los medios actuales de desecho.
● Por razones de seguridad cuando se deseche una secadora, desenchufe el cable
eléctrico de la toma general, corte el cable y destrúyalo junto con el enchufe. Para
evitar que los niños se queden encerrados en la máquina, rompa las bisagras o la
cerradura de la puerta.
Servicio técnico de GIAS
● Para la operación segura y eficiente de esta máquina, recomendamos que todo
mantenimiento o reparación sea ejecutado únicamente por un ingeniero
autorizado del Servicio técnico de GIAS.
23
Si el electrodoméstico no funciona correctamente o se avería,
apáguelo y desconecte el enchufe de la toma de corriente.
Consulte al Servicio técnico de GIAS para la posible reparación.
40001945SPA.qxd 23/09/2004 09:41 Page 23
Page 24

Requisitos eléctricos
Las secadoras están preparadas para funcionar con un
voltaje de 230 V, a 50 Hz. Verifique que el circuito de
suministro tenga una corriente nominal de al menos 16 A.
La electricidad puede ser muy peligrosa.
Es imprescindible que esta máquina tenga conexión a
tierra.
La toma de corriente y el enchufe del electrodoméstico
deben ser del mismo tipo.
No utilice adaptadores múltiples ni alargaderas.
Después de haberse instalado la máquina, el enchufe
debe quedar en una posición fácil de alcanzar en el
momento de desconectarlo.
Los conductores del cable de conexión eléctrica son de
diferentes colores, según la codificación siguiente:
Azul NEUTRO
Marrón CON CORRIENTE
Verde y amarillo CONEXIÓN A TIERRA
Este electrodoméstico CE cumple la Directiva europea
89/336/EEC, 73/23/EEC y sus enmiendas subsiguientes.
Ajuste de las patas
Una vez que la máquina esté en su sitio, las patas deben
ajustarse para asegurarse de que esté nivelada.
Ajuste las cuatro patas para garantizar que la máquina
esté firme y nivelada.
24
Es posible que se le
cobre una llamada
al servicio técnico
si el problema con
el electrodoméstico
es el resultado de
una instalación
incorrecta.
Si se dañara el
cable eléctrico de
esta máquina,
debe
reemplazarse con
un cable especial
que se puede
obtener
ÚNICAMENTE del
Servicio de
recambios de
GIAS. Una
persona
capacitada debe
encargarse de la
instalación.
Instalación
No enchufe el electrodoméstico ni lo
encienda conectado a la red eléctrica hasta
que se haya completado la instalación.
Para su protección, hay que instalar esta
secadora correctamente.
En caso de alguna duda acerca de la
instalación, llame al Servicio GIAS de
Atención al Cliente para obtener asesoría.
40001945SPA.qxd 23/09/2004 09:41 Page 24
Page 25

Debe suministrarse ventilación adecuada en la sala
donde esté ubicada la secadora para evitar que los
gases de aparatos que quemen otros combustibles,
incluyendo llamas abiertas, ingresen en la sala cuando
se está usando la secadora.
● El aire extraído no debe descargarse dentro de un
conducto que sea utilizado para expulsar humos
de aparatos que quemen gas u otros
combustibles.
● Compruebe periódicamente que no esté obstruido
el paso de la corriente de aire a través de la
secadora.
● Después de usar la máquina, revise el filtro de
polvo y límpielo si es necesario.
● Las tomas y salidas de aire deben mantenerse
libres de todo obstáculo. Para que haya suficiente
ventilación, no debe haber ningún obstáculo en el
espacio que se encuentra entre el fondo de la
máquina y el suelo. Debería haber una separación
de por lo menos 12 mm entre la máquina y
cualquier obstáculo.
● Procure que no caigan objetos ni se acumulen
detrás de la máquina, ya que éstos pueden tapar
la entrada y salida de aire.
● NUNCA instale la secadora junto a cortinas.
25
Ventilación
SALIDAS DE AIRE
SALIDAS DE AIRE EN LA BASE
TOMAS DE AIRE
40001945SPA.qxd 23/09/2004 09:41 Page 25
Page 26
Antes de usar por primera vez la secadora:
● Por favor lea con atención las instrucciones de
este manual.
● Retire todos los artículos que haya guardado en el
interior del tambor.
● Con un trapo húmedo, limpie el interior del
tambor y de la puerta para quitar el polvo que
pueda haberse depositado durante el traslado.
Preparación de la ropa
Compruebe que los artículos que propone secar sean
apropiados para secadora, de acuerdo a los símbolos
sobre cuidado que lleve cada artículo.
Compruebe que todos los cierres estén cerrados, y que
no quede nada en los bolsillos. Ponga los artículos al
revés. Coloque la ropa en el tambor, sin presionarla,
para asegurar que no se enrede.
Peso máximo del
material
● Piezas de algodón máx. 7,5 kg
● Piezas de fibras sintéticas máx. 3,5 kg
26
Preparación del material
para secar
No cargue el
tambor en exceso;
los artículos
grandes, al
humedecerse,
pueden superar la
carga de ropa
máxima admisible
(por ejemplo: sacos
de dormir,
edredones).
40001945SPA.qxd 23/09/2004 09:41 Page 26
Page 27

Clasifique los artículos
que se van a secar de la
siguiente manera:
● Según los símbolos de cuidado
Se encuentran en el cuello o en la costura interior:
Apropiado para secadora.
Usar secadora a alta temperatura.
Usar secadora solamente a baja temperatura.
No secar en secadora.
Si el artículo no tiene etiqueta de lavado, se
debe presuponer que no es apropiado para
secadora.
● Según la cantidad y el grosor
Cuando la cantidad del material para secar sea
mayor que la capacidad de la secadora, separe la
ropa de acuerdo a su espesor (por ej. separe las
toallas de la ropa interior delgada).
● Según el tipo de tela
Algodón/hilo: Toallas, jerseys de algodón, ropa de
cama y mantelería.
Fibras sintéticas: Blusas, camisas, monos, etc.
hechos de poliéster o poliamida, y también para
mezclas de algodón/fibras sintéticas.
● Según el grado de secado
Clasificar los artículos según como tienen que
quedar: listos para planchar, listos para guardar,
etc. Para prendas delicadas, presione el botón
Delicados Sintéticos para seleccionar una
temperatura más baja de secado.
27
40001945SPA.qxd 23/09/2004 09:41 Page 27
Page 28

No secar en secadora:
Prendas de lana, seda, telas delicadas, medias de nylon,
bordados delicados, tela con adornos metálicos, prendas
con guarniciones de PVC o de cuero, zapatillas de
deporte, piezas voluminosas como sacos de dormir, etc.
Ahorro de energía
Se deben poner en la secadora solamente artículos que
se hayan estrujado bien o que se hayan centrifugado
para quitar el agua. A menos humedad que tengan las
prendas que se han de secar, más corto será el tiempo
de secado, lo cual ahorrará energía eléctrica.
SIEMPRE
● Procure secar el máximo peso permitido de
artículos, para economizar tiempo y energía.
● Compruebe que el filtro esté limpio antes de
iniciar el ciclo de secado.
NUNCA
● Debe excederse del peso máximo, porque de
hacerlo así se malgasta tiempo y energía eléctrica.
● Introduzca en la secadora artículos que chorreen
agua, porque se puede dañar el aparato.
Guía de secado
En la tabla se señala el tiempo aproximado de secado,
según el tipo de tela y la humedad de la ropa.
28
Consejos para el secado
IMPORTANTE: No
usar la secadora
para artículos que
se hayan tratado
con líquidos para
limpiado en seco ni
para prendas de
goma (peligro de
incendio o de
explosión).
Durante los
últimos
15 minutos, las
piezas siempre
giran en aire frío.
Tejido
ALGODÓN
FIBRAS
SINTÉTICAS
FIBRAS
ACRÍLICAS
TEMPERATURA
SELECCIONADA
ALTA
BAJA
BAJA
LUZ
INDICADORA
APAGADA
ENCENDIDA
ENCENDIDA
PESADO
140-165 Mín
–
–
MEDIANO
70-80 Mín
70-80 Mín
50-65 Mín
LIGERO
50-65 Mín
40-55 Mín
30-40 Mín
40001945SPA.qxd 23/09/2004 09:41 Page 28
Page 29

Panel de control y luces de aviso
Selector de programa – Seleccione el programa requerido
Botón On/Off e indicador – Presiónelo para activar la máquina y se iluminará el
indicador.
Botón Start (INICIO) – Presione Start para comenzar el programa de secado seleccionado.
Presione durante 5 segundos para cancelar/restablecer el programa.
Botón Delicados Sintéticos – Presiónelo para bajar la temperatura para prendas
delicadas: se iluminará el indicador de encima del botón. Para cambiar la temperatura
seleccionada, el programa se debe restablecer
Calor suave – Indicador ENCENDIDO
Calor intenso – Indicador APAGADO
Indicador de desagotar agua (Deposito Lleno) – se enciende cuando el depósito del agua
está lleno
Control de mantenimiento del filtro (Filtro) – se enciende cuando el filtro debe limpiarse
Pantalla de TIEMPO RESTANTE (CHRONOVISION)
START – Cuando la secadora está encendida, el indicador START parpadea; cuando
comienza el programa, el indicador START se enciende.
60': el indicador se enciende cuando quedan menos de 60 minutos hasta el final del
programa.
15': el indicador se enciende cuando quedan menos de 15 minutos hasta el final del
programa. En esta etapa del ciclo de secado, la máquina entra en la fase de
enfriamiento.
STOP - El indicador se enciende cuando termina el programa.
29
Controles e indicadores
BOTÓN
DELICADOS
SINTÉTICOS
BOTÓN ON/OFF
(MARCHA/
PARADA)
CONTROL DE MANTENIMIENTO
DEL FILTRO
INDICADOR
DEPOSITO
LLENO
SELECTOR DE
PROGRAMA
BOTÓN START
(INICIO)
PANTALLA DE TIEMPO RESTANTE
(CHRONOVISION)
40001945SPA.qxd 23/09/2004 09:41 Page 29
Page 30
Modo de abrir la puerta
Tire de la palanca para abrir la puerta.
Para poner la secadora en marcha nuevamente, cierre la
puerta y presione Start.
Filtro
IMPORTANTE: Para mantener la secadora en condiciones
de funcionamiento eficiente, compruebe que el filtro de
polvo esté limpio antes de cada ciclo de secado.
1. Tire del filtro hacia arriba.
2. Abra el filtro de la manera señalada.
3. Saque las pelusas usando un cepillo suave o con la
punta de los dedos.
4. Rearme el filtro, acoplándolo con un golpe seco, y
empújelo nuevamente a su sitio.
El control de
mantenimiento del filtro
Filtro se ilumina cuando hay que limpiar el filtro.
Si las piezas para secar no se secan, verifique que no se
haya tapado el filtro.
30
Puerta y filtro
¡AVISO!
Cuando la secadora está en uso, puede
que el tambor y la puerta SE CALIENTEN
MUCHO.
40001945SPA.qxd 23/09/2004 09:41 Page 30
Page 31

El agua que se saca de la ropa durante el ciclo de
secado se recoge en un recipiente que se encuentra en
el fondo de la secadora.
Cuando el depósito está lleno, se ilumina el indicador
Deposito Lleno del panel de control, y, SIN FALTA, hay
que vaciar el depósito. Sin embargo, recomendamos
vaciar el recipiente después de cada ciclo de secado.
NOTA: Durante los primeros ciclos de una máquina
nueva se amontonará muy poca agua, ya que primero
se llena un tanque interno.
Modo de sacar el
recipiente
1. Tire cuidadosamente de la parte inferior del
protector para desengancharlo de la secadora. A
continuación se puede abrir la parte superior,
permitiendo sacar completamente el protector.
2. Tire firmemente de la empuñadura y saque el
recipiente para agua, deslizándolo para retirarlo
de la secadora.
Sostenga el recipiente con ambas manos. Cuando el
depósito del agua está lleno, pesa alrededor de 4 kg.
3. Abra la tapa que se encuentra en la parte
superior del depósito, y vacíe el agua.
4. Vuelva a poner la tapa de nuevo y reinstale el
recipiente para agua, deslizándolo hasta que
entre en su posición. PRESIÓNELO FIRMEMENTE
HASTA QUE ENTRE EN SU POSICIÓN.
5. Vuelva a instalar el protector acoplando los
goznes de la parte superior y haciendo que los
ganchos de abajo entren en posición de un golpe
seco.
31
Depósito del agua
40001945SPA.qxd 23/09/2004 09:41 Page 31
Page 32

IMPORTANTE: Antes de limpiar el condensador, siempre
debe apagar el suministro de electricidad y sacar el
enchufe del tomacorriente.
Para que la secadora siga funcionando de modo
eficiente, revise el condensador periódicamente para
constatar si está limpio.
Modo de sacar el
condensador
1. Saque la plancha protectora (consulte la página
31).
2. Haga girar las dos palancas de sujeción hacia la
izquierda y extraiga el condensador.
3. Saque el condensador.
4. Con un trapo saque con cuidado el polvo o lanilla,
y luego lave la unidad sosteniéndola en el chorro
de agua del grifo, y hágala girar para que el agua
corra entre las placas, para sacar el polvo o lanilla
que éstas puedan tener.
5. Vuelva a instalar el condensador, cuidando de
presionarlo de la manera correcta (según indica la
flecha) hasta que quede en su posición. Trabe las
dos palancas haciéndolas girar hacia la derecha.
6. Vuelva a instalar el protector.
32
Condensador
40001945SPA.qxd 23/09/2004 09:41 Page 32
Page 33

Nota: Es posible que el sensor no detecte una pequeña
cantidad de piezas pequeñas. Para cantidades pequeñas
y piezas separadas o telas previamente secadas que
contienen poca humedad, utilice los programas de
duración controlada. Ponga el programa entre 30 y 75
minutos según la cantidad de piezas que se quiere secar
y el grado de secado requerido, y seleccione
temperatura alta o baja, dependiendo del tipo de tela.
Si el sensor no detecta la pieza, la secadora sólo
funcionará durante 10 minutos antes de entrar en la
etapa de enfriamiento.
Si la cantidad de piezas es excesiva o están demasiado mojadas para secar en la
secadora, ésta entrará automáticamente a la etapa de enfriamiento después de 180
minutos.
33
Selección del programa
Programa
Completamente seco
Extraseco
Listo para guardar
Listo para planchar
Medianamente seco
Un poco húmedo
Planchado rápido
75'
60'
45'
30'
Refrescar
Descripción
Seleccione el nivel de secado requerido.
Abarca desde Completamente seco para toallas de
baño y albornoces, Listo para guardar para artículos
que se vayan a guardar sin planchar, hasta
programas que dejan la colada lista para planchar.
El programa Planchado rápido proporciona una
función de acondicionamiento y antiarrugas. Con
esta función, la secadora calienta la ropa por 9
minutos, y luego la enfría por 3 minutos, lo cual es
especialmente apropiado para prendas que se
hayan dejado por un buen tiempo antes de
plancharlas, en un cesto de la ropa, por ejemplo.
Cuando se ha secado la ropa afuera en una cuerda
o en radiadores, dentro de la casa, también a veces
se pone rígida. Con el proceso de Planchado rápido,
se suavizan las arrugas de la tela, haciendo que el
planchado sea más rápido y fácil.
75 minutos de secado
60 minutos de secado
45 minutos de secado
30 minutos de secado
Secado de la colada con aire frío
La secadora Sensor Dry ofrece muchas opciones para secar la colada y adaptarse a todas
las circunstancias.
En la tabla a continuación se enumeran los programas y la función de cada programa.
40001945SPA.qxd 23/09/2004 09:41 Page 33
Page 34

1. Abra la puerta e introduzca la ropa en el tambor,
cuidando de que aquélla no estorbe al cerrar la
puerta.
2. Cierre la puerta suavemente, empujándola
lentamente hasta que oiga un ruido de ‘clic’.
3. Presione el botón On/Off para activar la secadora.
El indicador se enciende y el indicador START
parpadea.
4. Gire el indicador selector de programa para
seleccionar el programa de secado requerido
(consulte la Guía de programas).
5. Para secar fibras sintéticas, acrílicas o piezas
delicadas, presione el botón Delicados Sintéticos
para bajar la temperatura.
La luz encima del botón se encenderá cuando la
máquina esté en la temperatura seleccionada
baja. Para deseleccionar este estado, la máquina
se debe restablecer.
6. Presione el botón Start. La secadora se pone en
marcha automáticamente y el indicador START
está continuamente encendido.
7. La pantalla de CHRONOVISION muestra el
progreso del secado en cuanto a tiempo restante.
8. Si se abre la puerta durante el programa para
verificar la colada, es necesario presionar Start
para volver a comenzar el secado una vez que se
haya cerrado la puerta.
9. Cuando el indicador 15' se enciende, la máquina
entra en la etapa de enfriamiento y la ropa gira
en aire frío permitiendo que la colada se enfríe.
10. Al finalizarse el programa, se enciende el
indicador STOP.
34
¡AVISO!
El tambor, la
puerta y las piezas
que se han secado
pueden estar muy
calientes.
Operación
40001945SPA.qxd 23/09/2004 09:41 Page 34
Page 35

Modo de cancelar y
restablecer el programa
Para cancelar un programa, presione el botón Start
durante 5 segundos. La máquina indicará que se ha
restablecido mediante el indicador START parpadeando.
Es posible cambiar el programa durante los 10 primeros
minutos sin utilizar la función de cancelar y restablecer.
Limpieza de la secadora
● Después de cada ciclo de secado, limpie el filtro y
vacíe el depósito del agua.
● Limpie el condensador con regularidad.
● Cada vez, después de usar la secadora, pase un
trapo por el interior del tambor y deje la puerta
abierta por un rato para permitir que circule el
aire para secarla.
● Con un trapo suave, limpie la parte exterior de la
máquina y la puerta.
● NO use almohadillas abrasivas ni productos
químicos de limpieza.
● Para evitar que la puerta quede pegada o que se
acumule pelusa, se debe limpiar la puerta interna
y la junta con un trapo húmedo.
Especificaciones técnicas
Capacidad del tambor 115 litros
Peso máximo que se puede secar 7,5 kg
Altura 85 cm
Ancho 60 cm
Profundidad 60 cm
Categoría de consumo de energía C
35
IMPORTANTE
Antes de limpiar
esta máquina,
siempre debe
apagarla y retirar
el enchufe de la
red del suministro
eléctrico.
Para datos
referentes a
energía eléctrica,
refiérase a la
etiqueta de
homologación que
se encuentra en la
parte delantera de
la secadora (con la
puerta abierta).
Limpieza y mantenimiento
de rutina
40001945SPA.qxd 23/09/2004 09:41 Page 35
Page 36

Causa posible de ...
Defectos que puede solucionar usted mismo
Antes de llamar al Servicio técnico de GIAS para obtener asesoramiento técnico, lea
detenidamente la siguiente lista. Se cobrará el servicio técnico si resulta que la máquina
funciona correctamente, o si ha sido instalada o utilizada incorrectamente. Si el
problema continúa después de completar la verificación recomendada, por favor llame
al Servicio técnico de GIAS para recibir asistencia telefónica.
El tiempo de secado es excesivamente largo/la ropa
no se seca suficientemente…
● ¿Ha seleccionado el tiempo de secado/programa correcto?
● ¿Estaba la ropa demasiado mojada? ¿La ropa fue bien estrujada o centrifugada?
● ¿Hace falta limpiar el filtro?
● ¿Hace falta limpiar el condensador?
● ¿Se ha sobrecargado la secadora?
● ¿Las tomas y salidas de aire y la base de la secadora están libres, sin obstáculos?
● ¿Se tiene todavía seleccionada la opción Delicados Sintéticos de un ciclo anterior?
La secadora no funciona…
● ¿Está funcionando el suministro de electricidad hacia la secadora? Compruébelo
con otro aparato como una lámpara de mesa.
● ¿El enchufe está correctamente conectado al suministro de la red?
● ¿Se ha cortado la electricidad?
● ¿Se ha quemado el fusible?
● ¿La puerta está completamente cerrada?
● ¿La secadora está encendida, tanto en el suministro de electricidad como en la
máquina?
● ¿Se ha seleccionado el programa o el tiempo de secado?
● ¿Se ha encendido la máquina después de abrir la puerta?
● ¿La secadora ha dejado de funcionar porque el depósito del agua está lleno y hay
que vaciarlo?
La secadora hace mucho ruido…
● Apague la secadora y póngase en contacto con el Servicio técnico de GIAS para
obtener asesoría.
El control de mantenimiento del filtro está encendido…
● ¿Hace falta limpiar el filtro?
● ¿Hace falta limpiar el condensador?
El indicador Depósito Lleno está encendido…
● ¿Hace falta sacar el agua del recipiente?
36
Resolución de problemas
40001945SPA.qxd 23/09/2004 09:41 Page 36
Page 37

Si después de revisar todos los aspectos recomendados
persistiera algún problema con la secadora, llame al
Servicio técnico de GIAS para obtener asesoría. Es
posible que le puedan asesorar por teléfono o bien
convenir una hora apropiada para que le visite un
ingeniero bajo los términos de la garantía. Sin embargo,
es posible que se le cobre si alguna de las situaciones
siguientes es aplicable a su máquina:
● Si se halla en buen estado de funcionamiento.
● Si no se ha realizado la instalación de acuerdo a
las instrucciones.
● Si se ha usado incorrectamente.
Servicio de recambios
Utilice siempre recambios auténticos, que se pueden
conseguir a través del Servicio técnico de GIAS.
Servicio técnico de GIAS
Para mantenimiento y reparaciones, llame al ingeniero
del Servicio técnico de GIAS local.
El fabricante no se hace responsable de los errores de
imprenta que puedan existir en este folleto. El
fabricante también se reserva el derecho de efectuar
modificaciones a sus productos sin cambiar las
características esenciales.
37
Servicio de atención al cliente
40001945SPA.qxd 23/09/2004 09:41 Page 37
Page 38

40001945
40001945.qxd 23/09/2004 09:38 Page 20
 Loading...