

Page 1

Instruction Book
Washing Machine
English
Español
40003361.qxd 27/06/2005 17:17 Page 1
Page 2

Introduction . . . . . . . . . . . . . . . . . . . . . . . . . . . . . . . . . . . . . . . . . . 3
Delivery information . . . . . . . . . . . . . . . . . . . . . . . . . . . . . . . . . . . . . . . . . . . . . 3
Do’s . . . . . . . . . . . . . . . . . . . . . . . . . . . . . . . . . . . . . . . . . . . . . . . . . . . . . . . . . . 3
Don’ts. . . . . . . . . . . . . . . . . . . . . . . . . . . . . . . . . . . . . . . . . . . . . . . . . . . . . . . . . 4
Unpacking the Product . . . . . . . . . . . . . . . . . . . . . . . . . . . . . . . . . . . 5
Installation. . . . . . . . . . . . . . . . . . . . . . . . . . . . . . . . . . . . . . . . . . . . . . . . . 7
Choose a location . . . . . . . . . . . . . . . . . . . . . . . . . . . . . . . . . . . . . . . . . . . . . . . 7
Electricity supply . . . . . . . . . . . . . . . . . . . . . . . . . . . . . . . . . . . . . . . . . . . . . . . . 8
Water supply . . . . . . . . . . . . . . . . . . . . . . . . . . . . . . . . . . . . . . . . . . . . . . . . . . . 8
Connecting to the cold water supply . . . . . . . . . . . . . . . . . . . . . . . . . . . . . . . . 9
Connection of the machine to the drain . . . . . . . . . . . . . . . . . . . . . . . . . . . . . 10
Moving the machine into position . . . . . . . . . . . . . . . . . . . . . . . . . . . . . . . . . 11
Adjusting the feet . . . . . . . . . . . . . . . . . . . . . . . . . . . . . . . . . . . . . . . . . . . . . . 11
Testing the installation . . . . . . . . . . . . . . . . . . . . . . . . . . . . . . . . . . 12
Washing advice . . . . . . . . . . . . . . . . . . . . . . . . . . . . . . . . . . . . . . . . . . 13
Loading your washing machine. . . . . . . . . . . . . . . . . . . . . . . . . . . . . . . . . . . . 13
Sorting the laundry . . . . . . . . . . . . . . . . . . . . . . . . . . . . . . . . . . . . . . . . . . . . . 14
The Dispenser . . . . . . . . . . . . . . . . . . . . . . . . . . . . . . . . . . . . . . . . . . . . 15
Detergent dosage . . . . . . . . . . . . . . . . . . . . . . . . . . . . . . . . . . . . . . . . . . . . . . 15
Dispensing instructions . . . . . . . . . . . . . . . . . . . . . . . . . . . . . . . . . . . . . . . . . . 16
The Control Panel . . . . . . . . . . . . . . . . . . . . . . . . . . . . . . . . . . . . . . . . 17
Wash Options . . . . . . . . . . . . . . . . . . . . . . . . . . . . . . . . . . . . . . . . . . . . 20
Automatic Features . . . . . . . . . . . . . . . . . . . . . . . . . . . . . . . . . . . . . . . . . . . . . 23
Programme Selector . . . . . . . . . . . . . . . . . . . . . . . . . . . . . . . . . . . . . 24
Special Programmes. . . . . . . . . . . . . . . . . . . . . . . . . . . . . . . . . . . . . . . . . . . . . 25
Daily Programmes . . . . . . . . . . . . . . . . . . . . . . . . . . . . . . . . . . . . . . . . . . . . . . 26
Programme Guide. . . . . . . . . . . . . . . . . . . . . . . . . . . . . . . . . . . . . . . . 27
A Typical Wash . . . . . . . . . . . . . . . . . . . . . . . . . . . . . . . . . . . . . . . . . . . 28
Selecting the wash programme . . . . . . . . . . . . . . . . . . . . . . . . . . . . . . . . . . . . 29
Starting the wash cycle . . . . . . . . . . . . . . . . . . . . . . . . . . . . . . . . . . . . . . . . . . 29
Cleaning and Routine Maintenance. . . . . . . . . . . . . . . . . . . . 30
Troubleshooting. . . . . . . . . . . . . . . . . . . . . . . . . . . . . . . . . . . . . . . . . . 32
Power Failure . . . . . . . . . . . . . . . . . . . . . . . . . . . . . . . . . . . . . . . . . . . . . . . . . . 35
2
English . . . . . . . . . . . . . . . . . . . . . . . . . . . . . . . . . . . . . . . . . . . . 2
Español . . . . . . . . . . . . . . . . . . . . . . . . . . . . . . . . . . . . . . . . . . . 36
40003361.qxd 27/06/2005 17:17 Page 2
Page 3

Introduction
Please read and follow these instructions
carefully and operate the machine accordingly.
This booklet provides important guidelines for
safe use, installation, maintenance and some
useful advice for best results when using your
machine.
Keep all documentation in a safe place for future
reference or for any future owners.
Delivery information
Please check that the following items are
delivered with the appliance:
● Instruction manual
● Guarantee card
● Blanking plug
● Inlet hose & hooked end support
(see Unpacking and Installation Instructions)
● Base panel & x2 push clips
● Energy Label
Do’s
● All packaging materials used are
environmentally-friendly and recyclable.
Please help dispose of the packaging via
environmentally-friendly means. Your local
council will be able to give you details of
current means of disposal.
● To ensure safety when disposing of an old
washing machine disconnect the mains plug
from the socket, cut the mains power cable
and destroy this together with the plug. To
prevent children shutting themselves in the
machine break the door hinges or the door
lock.
● This machine is solely for domestic use,
i.e. to wash, rinse and spin dry household
textiles and garments.
3
Check that no
damage has
occurred to the
machine during
transit. If it has,
call for service
by GIAS.
40003361.qxd 27/06/2005 17:17 Page 3
Page 4
Don’ts
● Do not touch the appliance when hands or
feet are damp or wet.
● Do not lean on the door when loading the
machine or use the door to lift or move the
machine.
● Do not use adapters, multiple connectors
and/or extensions.
● Do not allow children to play with the
machine or its controls.
● Do not try to open the door when water is
visible in the drum or the door locked
indicator (Seguridad Puerta) is on.
European directive
2002/96/EC
This appliance is marked according to the
European directive 2002/96/EC on Waste Electrical
and Electronic Equipment (WEEE).
By ensuring this product is disposed of correctly,
you will help prevent potential negative
consequences for the environment and human
health, which could otherwise be caused by
inappropriate waste handling of this product.
The symbol on the product indicates that this
product may not be treated as household waste.
Instead it shall be handed over to the applicable
collection point for the recycling of electrical and
electronic equipment
Disposal must be carried out in accordance with
local environmental regulations for waste
disposal.
For more detailed information about treatment,
recovery and recycling of this product, please
contact your local city office, your household
waste disposal service or the shop where you
purchased the product.
4
Failure to
comply with
the above can
compromise the
safety of the
appliance. You
may be charged
for a service call
if a problem
with your
machine is
caused by
misuse.
If the appliance
is not running
properly or
breaks down,
switch it off,
disconnect the
plug from the
socket, turn off
the water
supply and do
not tamper
with the
appliance.
Consult GIAS
Service for
possible repair.
40003361.qxd 27/06/2005 17:17 Page 4
Page 5
Unpacking the product
Remove the machine from its packaging close to
the final location of the machine.
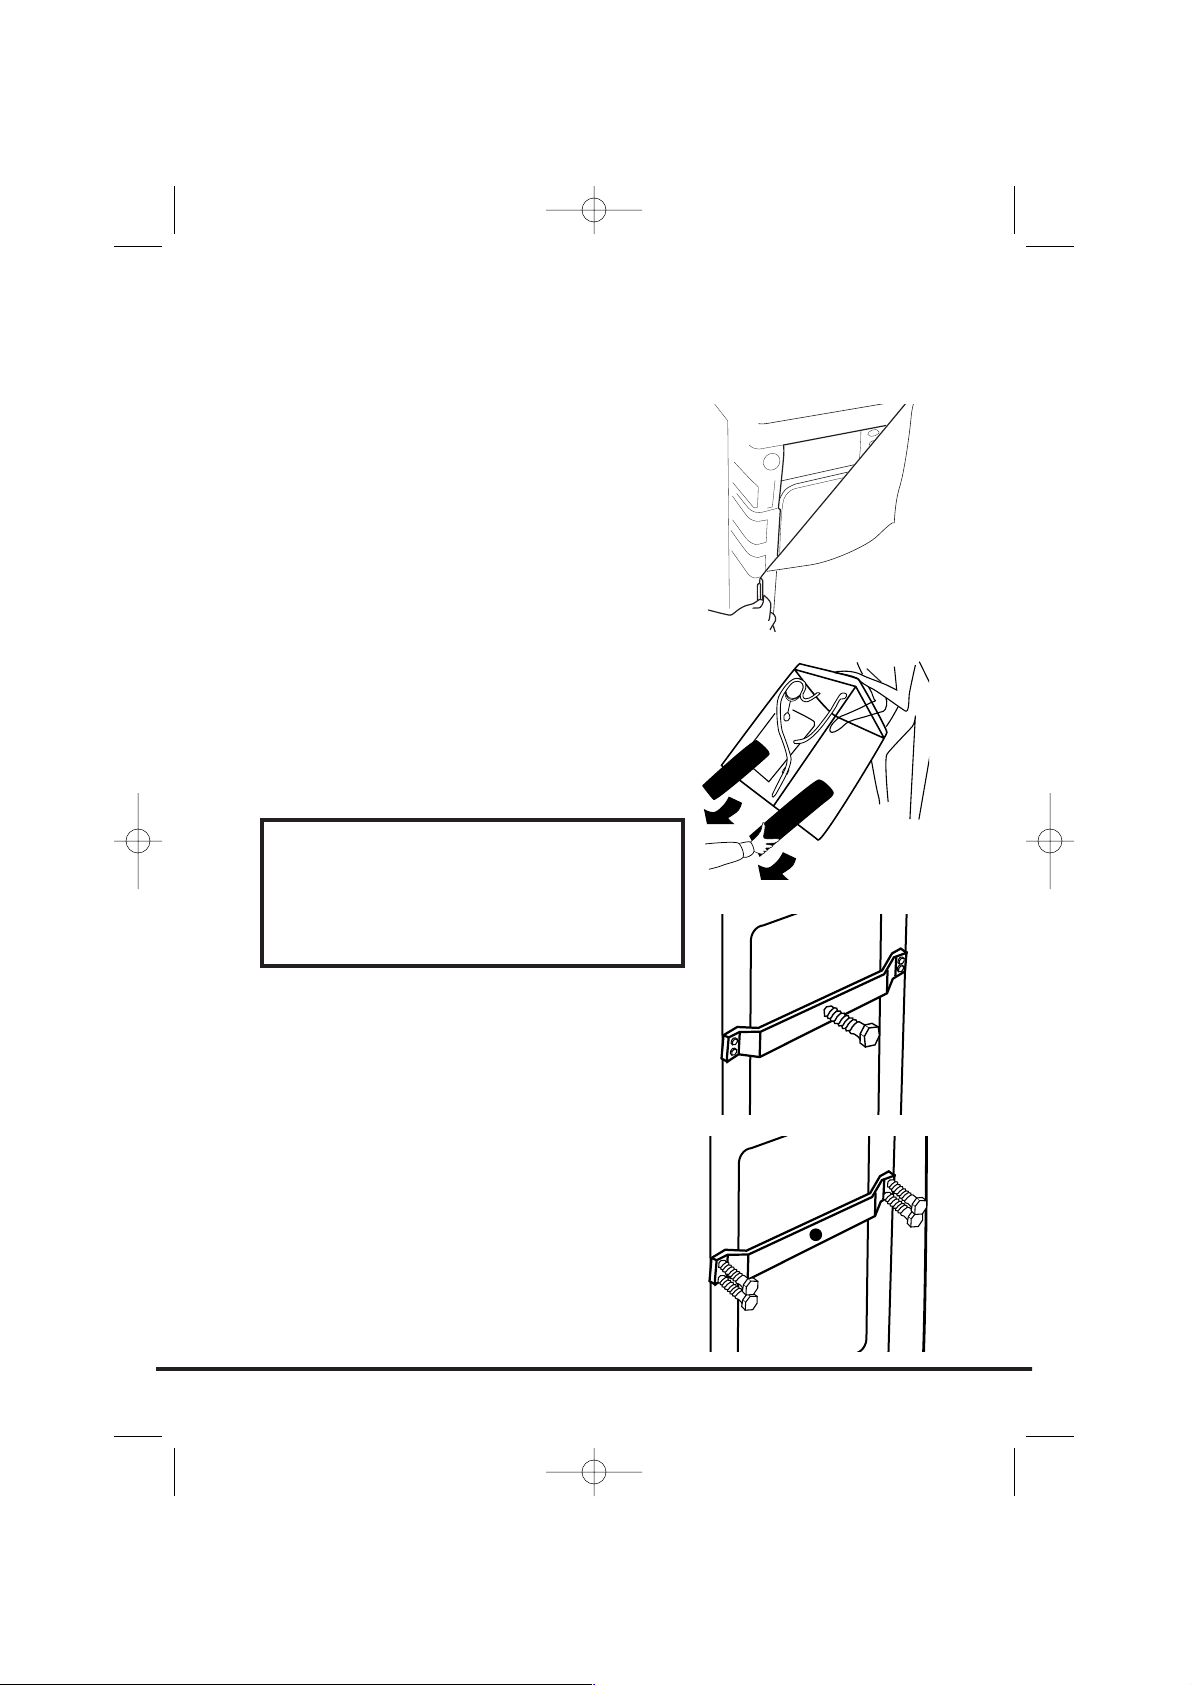
1. Cut carefully around the base of the
packaging.
2. Lay the machine on its back and remove the
base and the two polystyrene spacers on
each side of the machine. We recommend
that a second person assist in the lifting and
manoeuvring of the machine.
3. Return the machine to the upright position,
remove the remainder of the packaging and
the central screw in the transit bar.
4. Remove the four retaining screws in the
transit bar and pull out the transit bracket.
5
Dispose of the packaging safely.
Make sure it is out of the reach
of children, it is a potential
source of danger.
40003361.qxd 27/06/2005 17:17 Page 5
Page 6
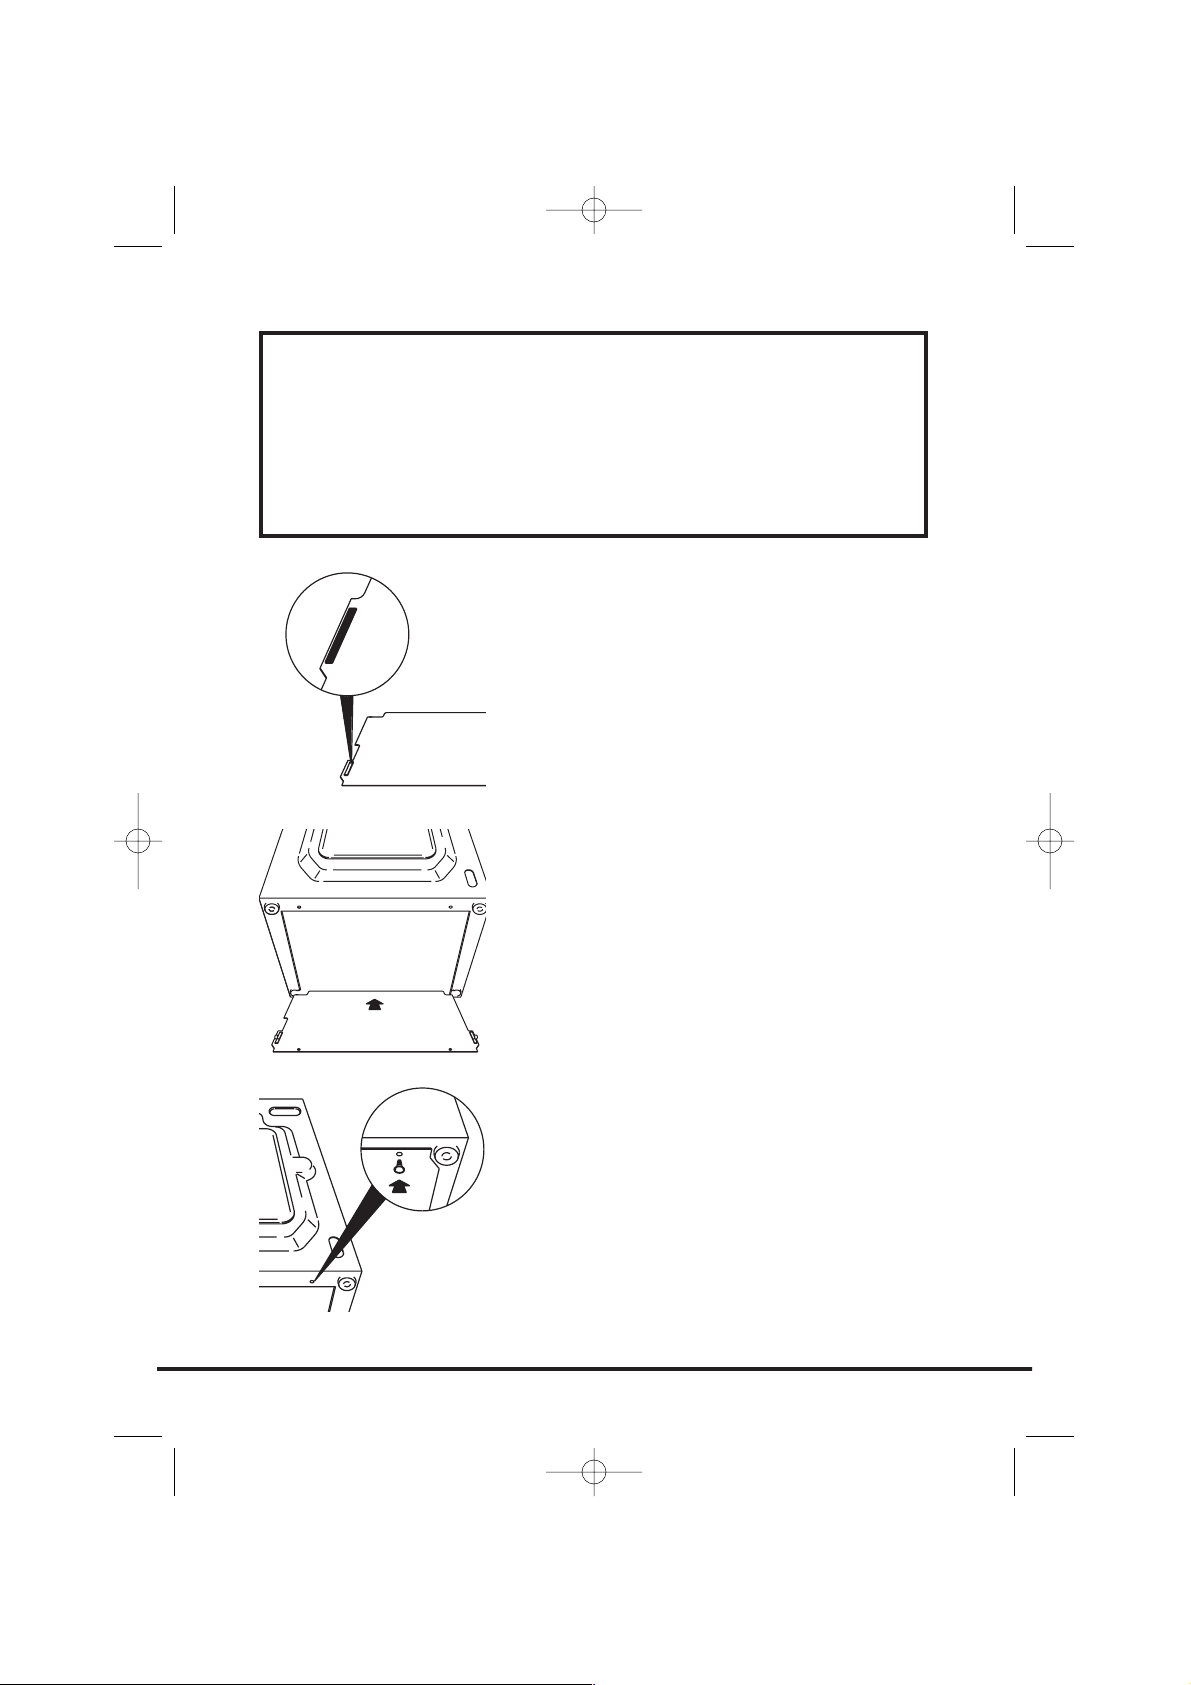
5. Take the base panel provided and fit the
two self adhesive strips by removing the
backing paper on one side and locating the
strips on each side of the base panel.
6. Tilt the machine forward and locate the
base panel under the front of the machine.
Remove the remaining backing paper from
the self-adhesive strips and offer up the
base panel to the bottom of the cabinet.
7. Take the two plastic fixing clips and fix the
base panel to the base of the machine.
Bring the machine back to the upright
position.
6
We recommend you keep the transit bracket and
screws to protect the machine for future transit.
The manufacturers will not be responsible for any
damage to the machine caused by not following the
instructions relating to releasing the transit protection.
The user is responsible for all installation costs.
40003361.qxd 27/06/2005 17:17 Page 6
Page 7
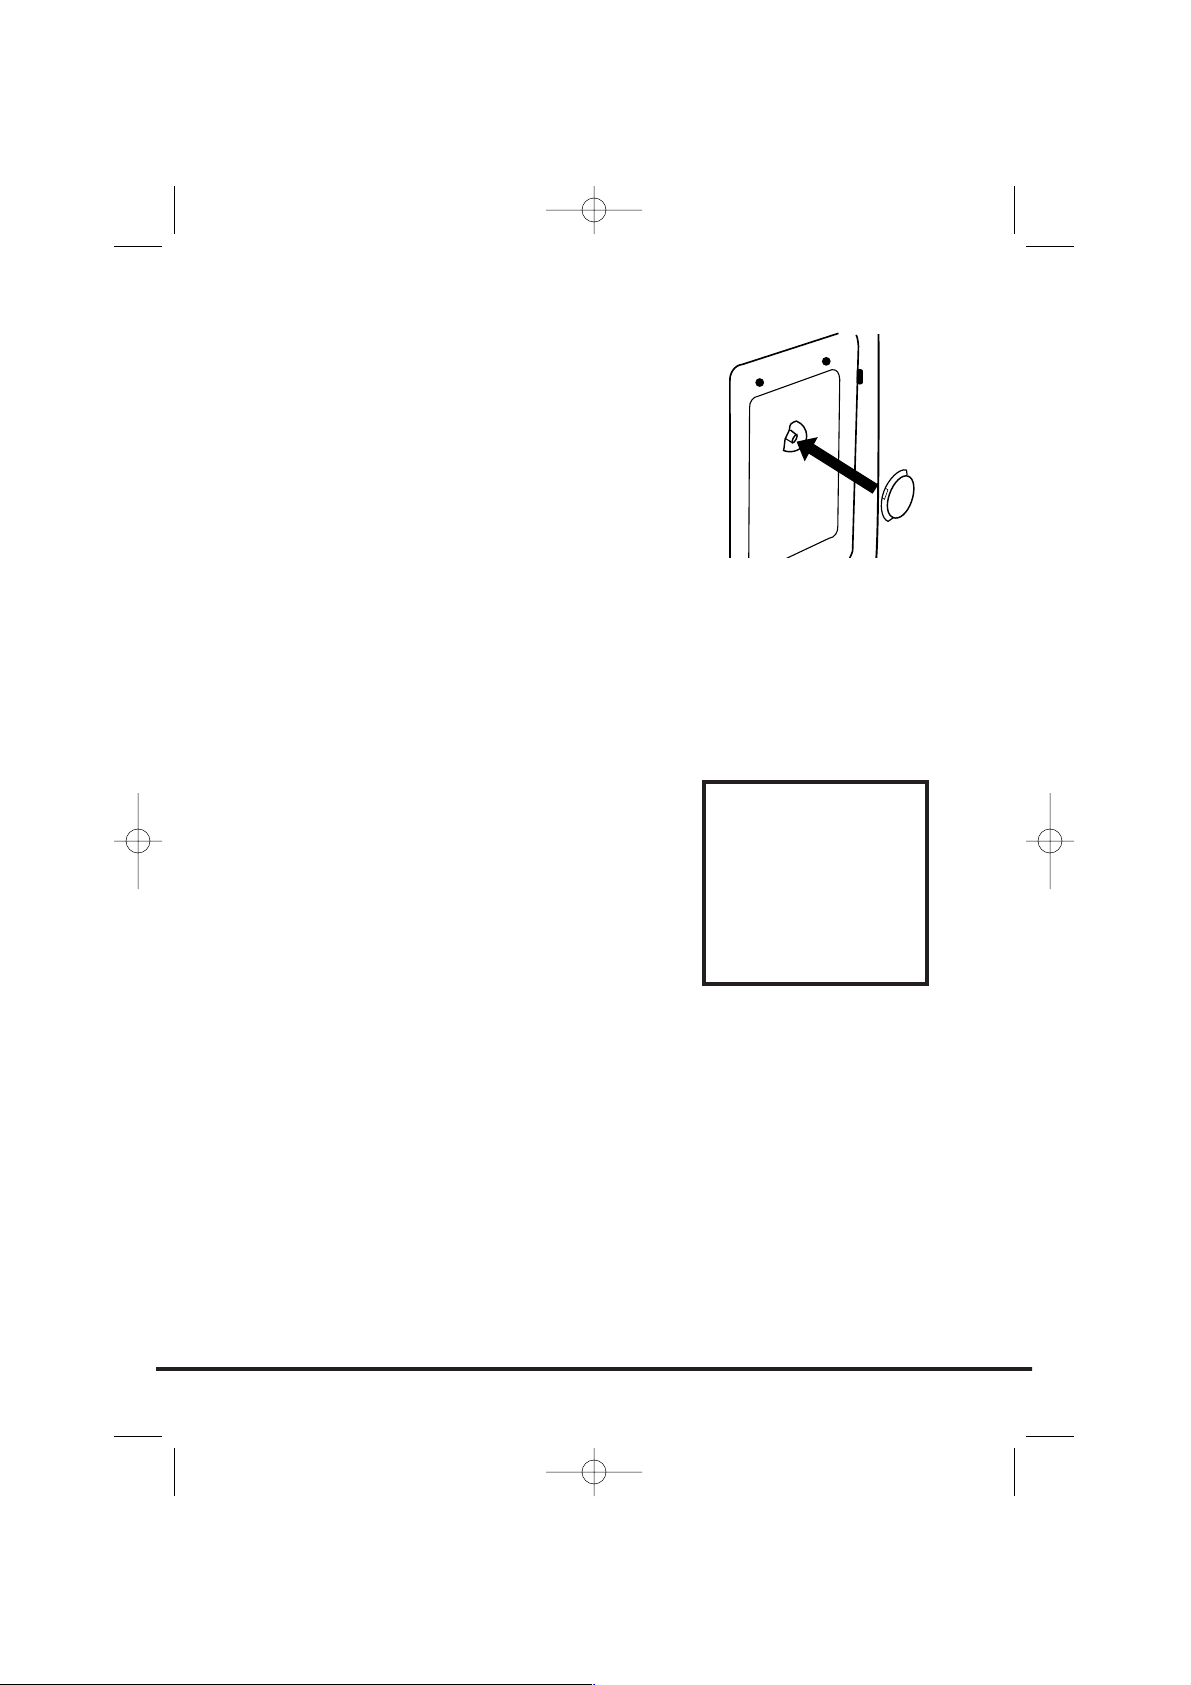
8. Cover the central hole in the rear of the
machine with the cap enclosed in the
instruction bag.
Choose a location
● After the machine has been installed, ensure
that the mains plug and water supply valves
are easily accessible.
● Make sure there is enough space for the
machine. Select a space at least 600mm wide
and 850mm high. Also leave enough space
to open the door fully so you can load and
unload it easily.
● Keep the area underneath and around the
machine free of combustible materials such
as lint, paper, rags, chemicals etc.
7
Installation
Do not plug the
machine in and
switch it on at
the mains until
the installation
is completed.
40003361.qxd 27/06/2005 17:17 Page 7
Page 8
Electricity supply
Washing machines are supplied to operate at a
voltage of 230V, 50 Hz single phase. Check that
the supply circuit is rated to at least 16A.
Electricity can be extremely dangerous.
This washing machine must be earthed.
The socket outlet and the plug on the appliance
must be of the same type.
Do not use multiple adapters and/or extension
leads.
The wires in the mains lead are coloured in
accordance with the following codes:
Blue NEUTRAL
Brown LIVE
Green and Yellow EARTH
CE Appliance complies with European Directive
89/336/EEC, 73/23/EEC and subsequent
amendments.
Water supply
● The cold water pressure should be between
0.05-0.8 Mpa.
● Do not connect the machine to a single
outlet instantaneous water heater.
● The water supply tap should be accessible
when the machine is installed.
● Before connecting the fill hose, check that
the water is running from the water supply
tap to be used.
8
You may be
charged for a
service call if a
problem with
your machine is
caused by
incorrect
installation.
If the mains
cord on this
appliance is
damaged, it
must be
replaced by a
special cord
which is ONLY
obtainable from
the GIAS spares
service. It must
be installed by
a competent
person.
40003361.qxd 27/06/2005 17:17 Page 8
Page 9
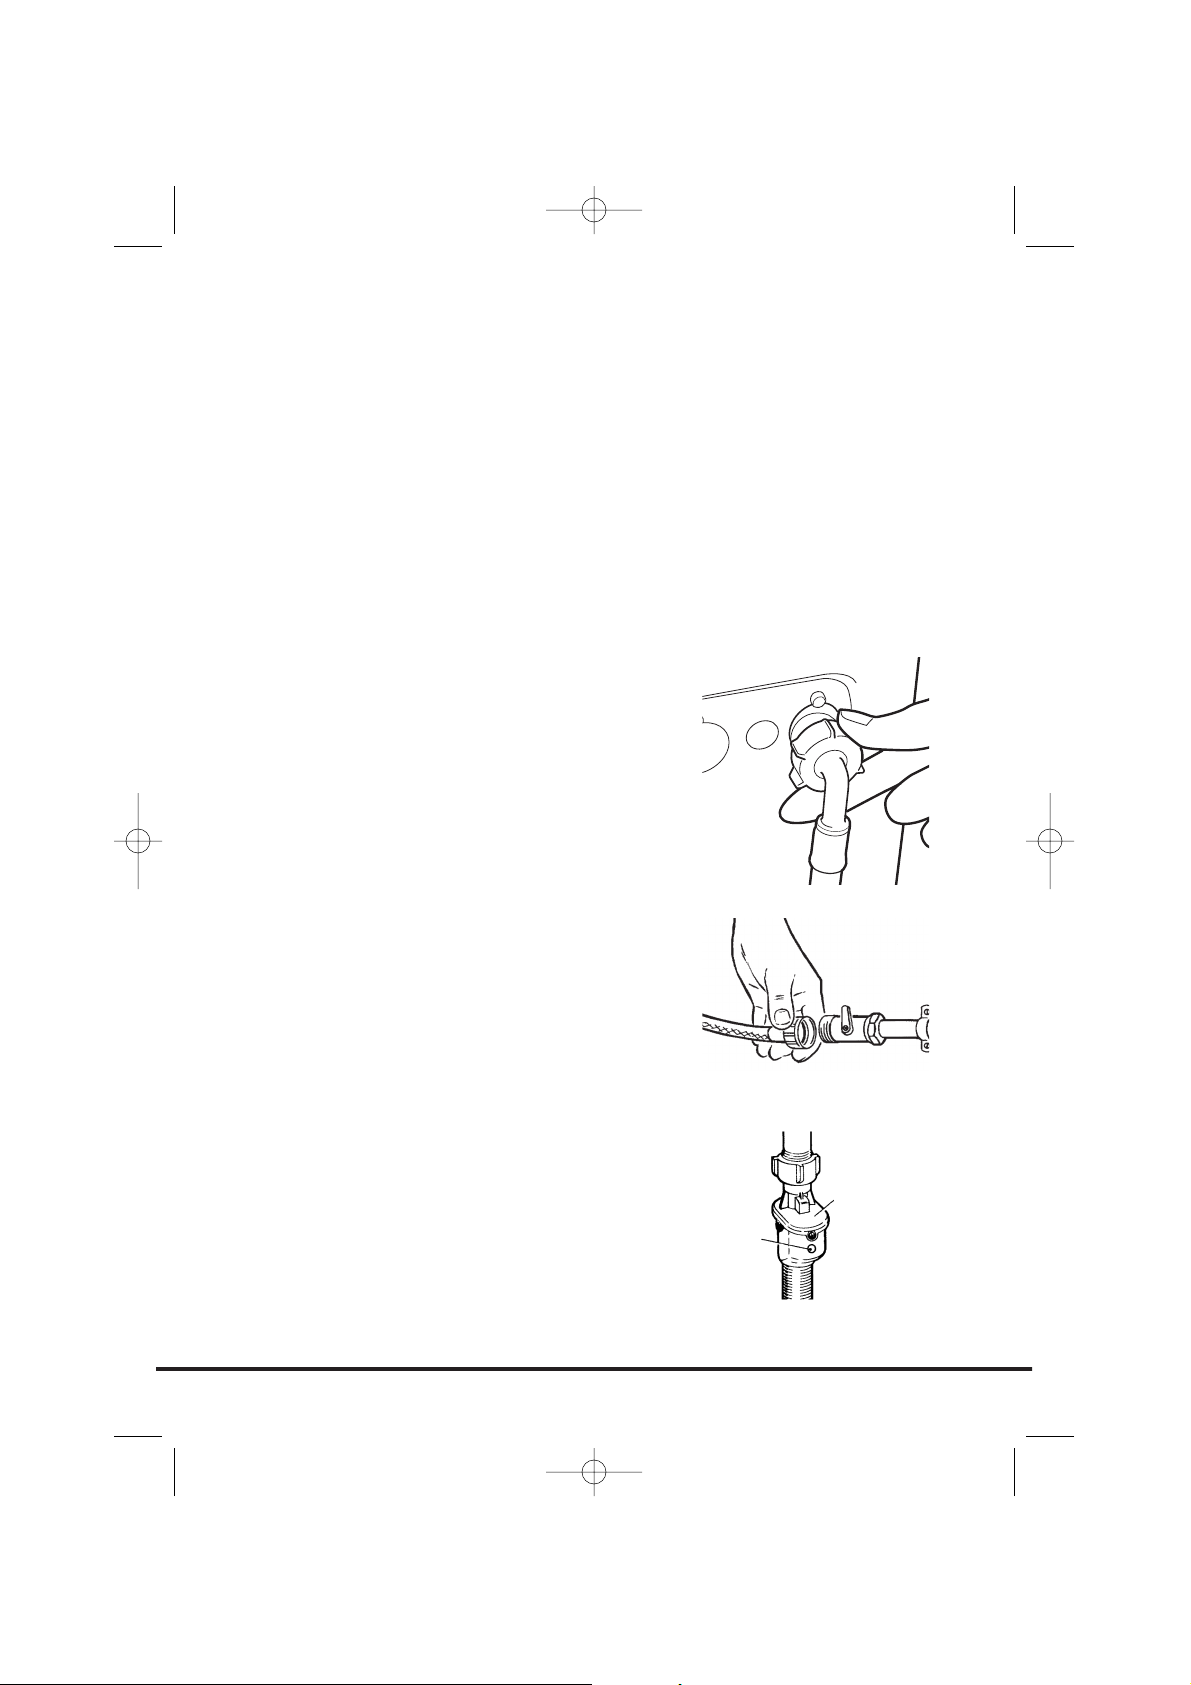
This machine has an inlet hose with a 19mm
(3/4") threaded ferrule fitted to the end, to
attach between the threaded connector on the
appliance and the water supply.
Only use the new hose supplied to connect the
machine and ensure that the sealing washers are
in place inside the hose connectors.
Do not re-use old hoses which are attached to
existing installations.
Do not over-tighten the connections. Hand tight
is sufficient.
Do not trap or kink the hose.
1. Connect the elbow end of the hose provided
to the threaded inlet on the back of the
machine.
Grey pipe to the white threaded inlet on
the machine.
2. Hand tighten the connector.
3. Connect the straight ends of the pipes to
the water supply; ensure that there are no
kinks.
4. Turn on the water supply and check for
leaks. If there is a leak, turn off the water
supply, disconnect the hose and check the
sealing washers are in place. Refit the hose
and turn on the water supply.
Aqua-stop
Certain models will be supplied with special hose
that has a double skin and incorporates a water
valve (A). If the inner hose bursts the valve will
automatically shut off the water supply to
prevent flooding. The indicator turns red (B).
Should this happen, turn off the water supply
immediately and obtain a replacement hose from
GIAS Service.
The installation is the same as a conventional
hose with the valve end of the aqua-stop hose
fitted to the water supply.
9
Connecting to the cold water supply
A
B
40003361.qxd 27/06/2005 17:18 Page 9
Page 10
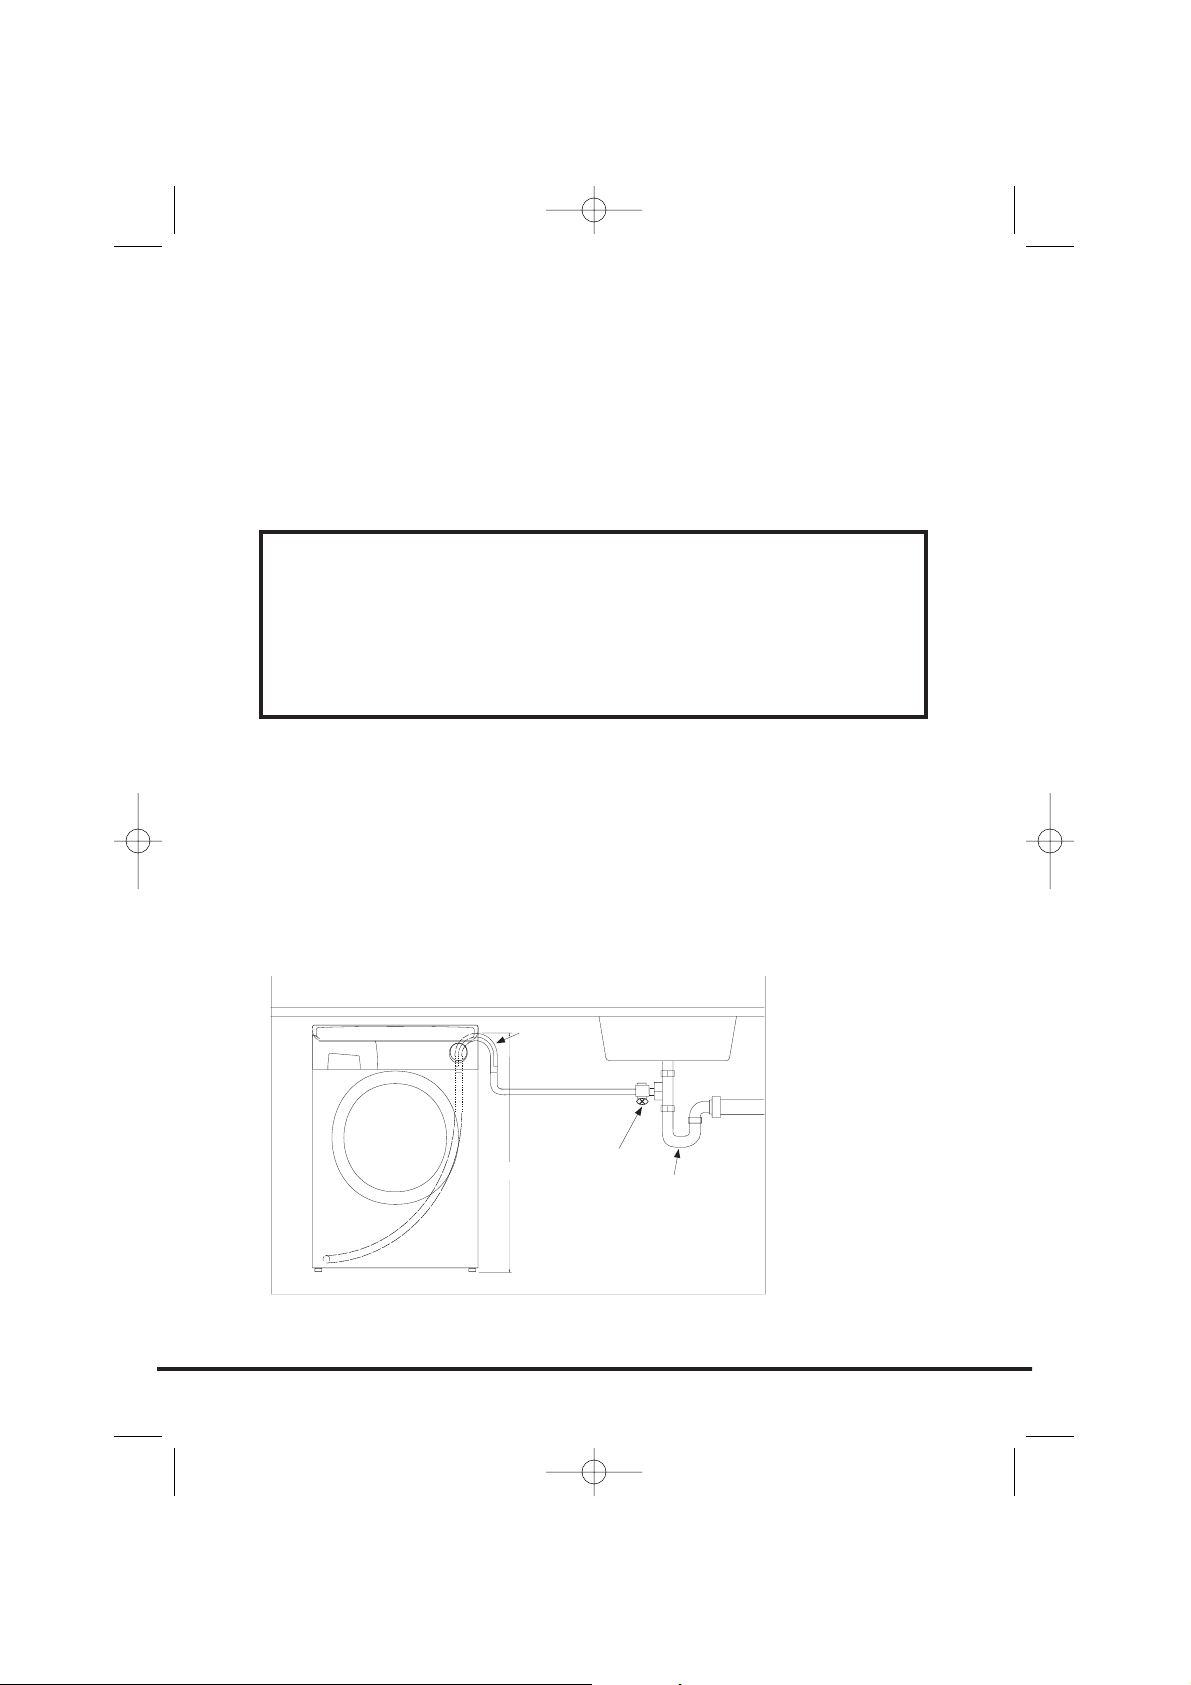
Connection of the machine to the
drain
This machine must be connected in accordance with the water supply
regulations. Water byelaws prohibit connection to a surface water drain.
Decide which plumbing option suits you best then follow the instructions
below.
Option 1
Waste pipe connection (waste trap)
Fit the hooked end support to the outlet pipe. Position at least 800mm off the
floor.
After removing the blanking plug or cutting the membrane from the waste
system securely fix the outlet pipe to the drainage system, using a hose clip.
Secure the hooked end support up to at least 800mm to avoid water being
drawn back into the machine.
10
All machines are tested with water prior to leaving the
factory so a small amount of water may remain in the
drum and drain hose.
Flooding could occur if any part of the installation is
not completed correctly.
800 mm
hose clip
hooked end suppport
sink
flexible
discharge hose
trap with hose
adaptor
40003361.qxd 27/06/2005 17:18 Page 10
Page 11
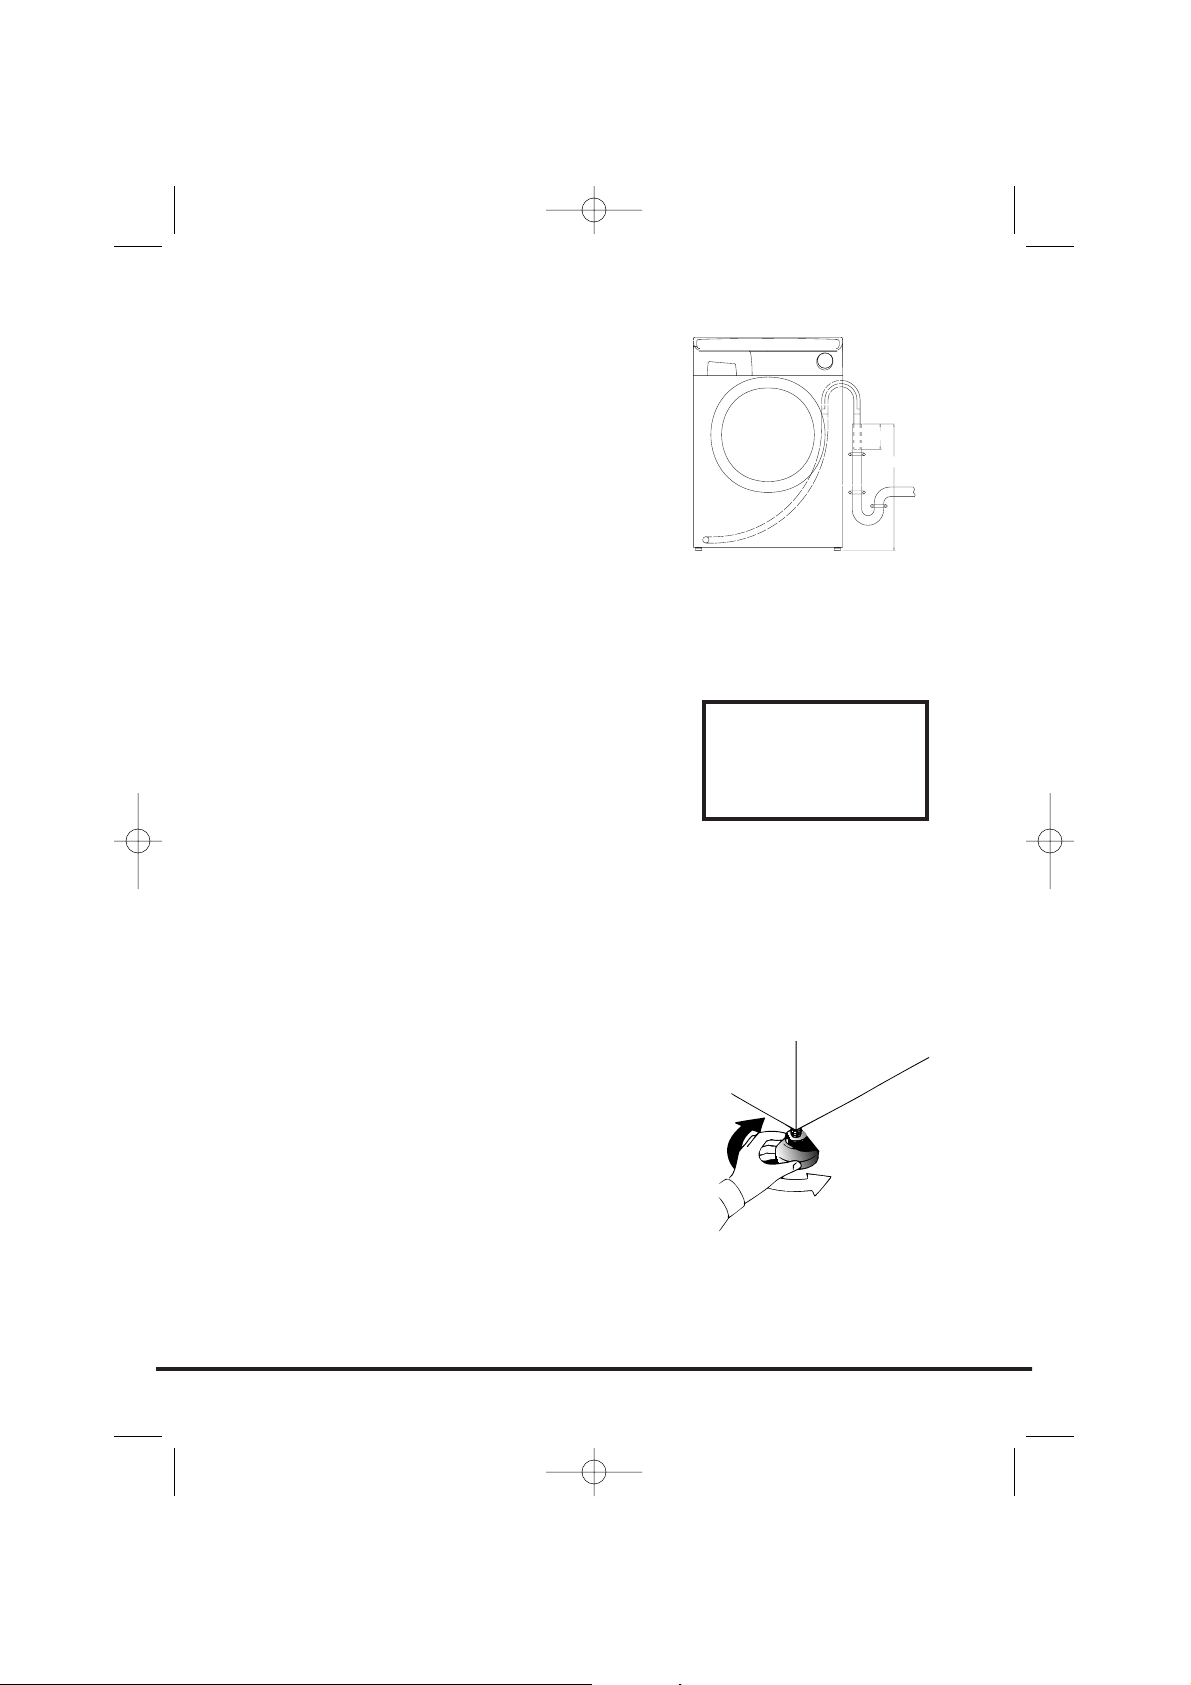
Option 2
Into a standpipe
Ensure that the standpipe is not located near
an electrical socket.
Fit the hooked end support to the outlet pipe.
Install the hose into the standpipe ensuring
that the pipe is at least 500mm from the floor.
Insert the outlet pipe approximately 100mm
into the standpipe.
Moving the machine
into position
Your machine is heavy so care must be taken
when moving it. We recommend that two people
move the machine to avoid strain and possible
injury.
● Take care not to damage flooring when
moving the machine.
● When moving the machine to its final
position take care not to kink or damage
the hose at the back of the machine.
Adjusting the feet
Once the machine is in place the feet should be
adjusted to ensure that the machine is level. If
the machine is not level it may become noisy or
move.
Adjust the feet on the front corners of the
machine until the machine is firm and level.
When the machine is firm and level, tighten the
locking nuts on the two feet.
11
Do not drag or
lift the machine
by its door.
100 mm
500 mm min
40003361.qxd 27/06/2005 17:18 Page 11
Page 12
Refer to the programme guide for details of how
to select programmes.
1. Turn on the water supply and check for
leaks from the fill hose.
2. Switch on the electricity supply.
3. Select the spin programme and then
press the Start Pausa button to start the
machine. Allow the programme to continue
for one minute and then cancel the
programme by returning the selector to the
OFF position. This will remove any water
remaining in the machine from factory
testing.
4. To check for cold water filling to the
machine:
Select the rinse programme and press
the Start Pausa button to start the machine.
Allow the tumble action to continue until
the water has pumped out. Check that the
drain outlet is not leaking or overflowing.
5. Switch off the machine at the end of the
cycle by turning the programme knob to the
OFF position.
6. Select the spin programme and press
the Start Pausa button to start the machine.
If the machine takes longer than one minute
to empty check the drain hose for kinks.
Installation testing is now
complete.
Now you have successfully installed the machine
we advise that you run the machine to ensure the
drum is thoroughly clean after testing and
storage. Select Algodón Resistentes and run the
machine for a complete cycle using only wash
detergent and water.
12
Testing the installation
This
programme
will take
approximately
2 hours to
complete.
40003361.qxd 27/06/2005 17:18 Page 12
Page 13
The following tips are designed to assist in
getting the best results from your machine whilst
utilising it in the most environmentally-friendly
and economical way. It is also important to
understand the items to avoid in your laundry, to
ensure the continued safe and reliable operation
of your machine.
Loading your washing
machine
To make further reductions of energy, water and
detergent consumption, we recommend that you
put a full load into your machine. Energy savings
of up to 50% can be achieved by washing one full
load compared to two half loads.
Do not overload the machine as this will reduce
the quality of the wash and may cause damage
to the machine and your laundry.
When is prewashing really
needed?
Only with particularly dirty loads! Energy savings
of 5 to 15% are made by not selecting the
prewash option for less dirty laundry. Pre-treat
awkward stains with a washable stain remover.
Which wash temperature should
you choose?
Using stain removers before machine washing
reduces the need to wash at temperatures over
60°C.
Using a 40°C wash temperature can make energy
savings of up to 50%.
Heavily soiled laundry
To ensure the best performance when washing a
particularly dirty load, we recommend that you
reduce the amount of items to be put into the
machine. Allowing more space in the drum the
13
Washing advice
40003361.qxd 27/06/2005 17:18 Page 13
Page 14
items can circulate more freely and will wash
cleaner.
Sorting the laundry
Items to avoid
We recommend that you do not wash underwired
bras in the machine. Should the wires become
detached it could cause damage to your clothes
and the machine. If the washcare label states that
the bra is machine washable then we advise
placing it in a wash bag.
Recommendations
Always follow the wash care labelling on the
garments.
Fasten zips, tie strings and close press studs to
prevent tangling. Ensure that pockets are
emptied of loose change and other small items.
Check that there are no metal objects in the
laundry as these may damage the laundry and
the machine.
Place small items in a wash bag.
14
Do not use the
machine to
wash items that
do not have a
wash label.
Do not wash
items
previously
treated with
solvents.
40003361.qxd 27/06/2005 17:18 Page 14
Page 15
Detergent dosage
Only use detergents which are suitable for use in a washing machine. You will
obtain the best results from your wash with the minimum use of chemical
products, and the best care for your laundry if you take into consideration the
degree of soiling as well as the type of detergent to choose.
The amount of detergent to use depends on:
● Water hardness.
Depending on the hardness of the water and the type of detergent used,
it is possible to reduce the amount of detergent.
The softer the water supply, the less detergent is required.
● The degree of soiling.
It is possible to reduce the amount of detergent used depending on the
degree of soiling.
Use less detergent for less soiled items.
● Amount of laundry.
It is possible to reduce the amount of detergent when washing only a
small amount of laundry.
For smaller loads use less detergent.
The dosages shown on the packaging of detergents for washing delicates
often already refer to a reduced wash size. Always follow the dosage
instructions on the detergent packaging.
15
The Dispenser
DO NOT exceed the maximum detergent dosage
COMPARTMENT I
Prewash detergent
Maximum dosage
100ml of powder
COMPARTMENT II
Mainwash detergent
Maximum dosage
200ml of powder
COMPARTMENT
Fabric Conditioner
Maximum dosage 200ml
40003361.qxd 27/06/2005 17:18 Page 15
Page 16
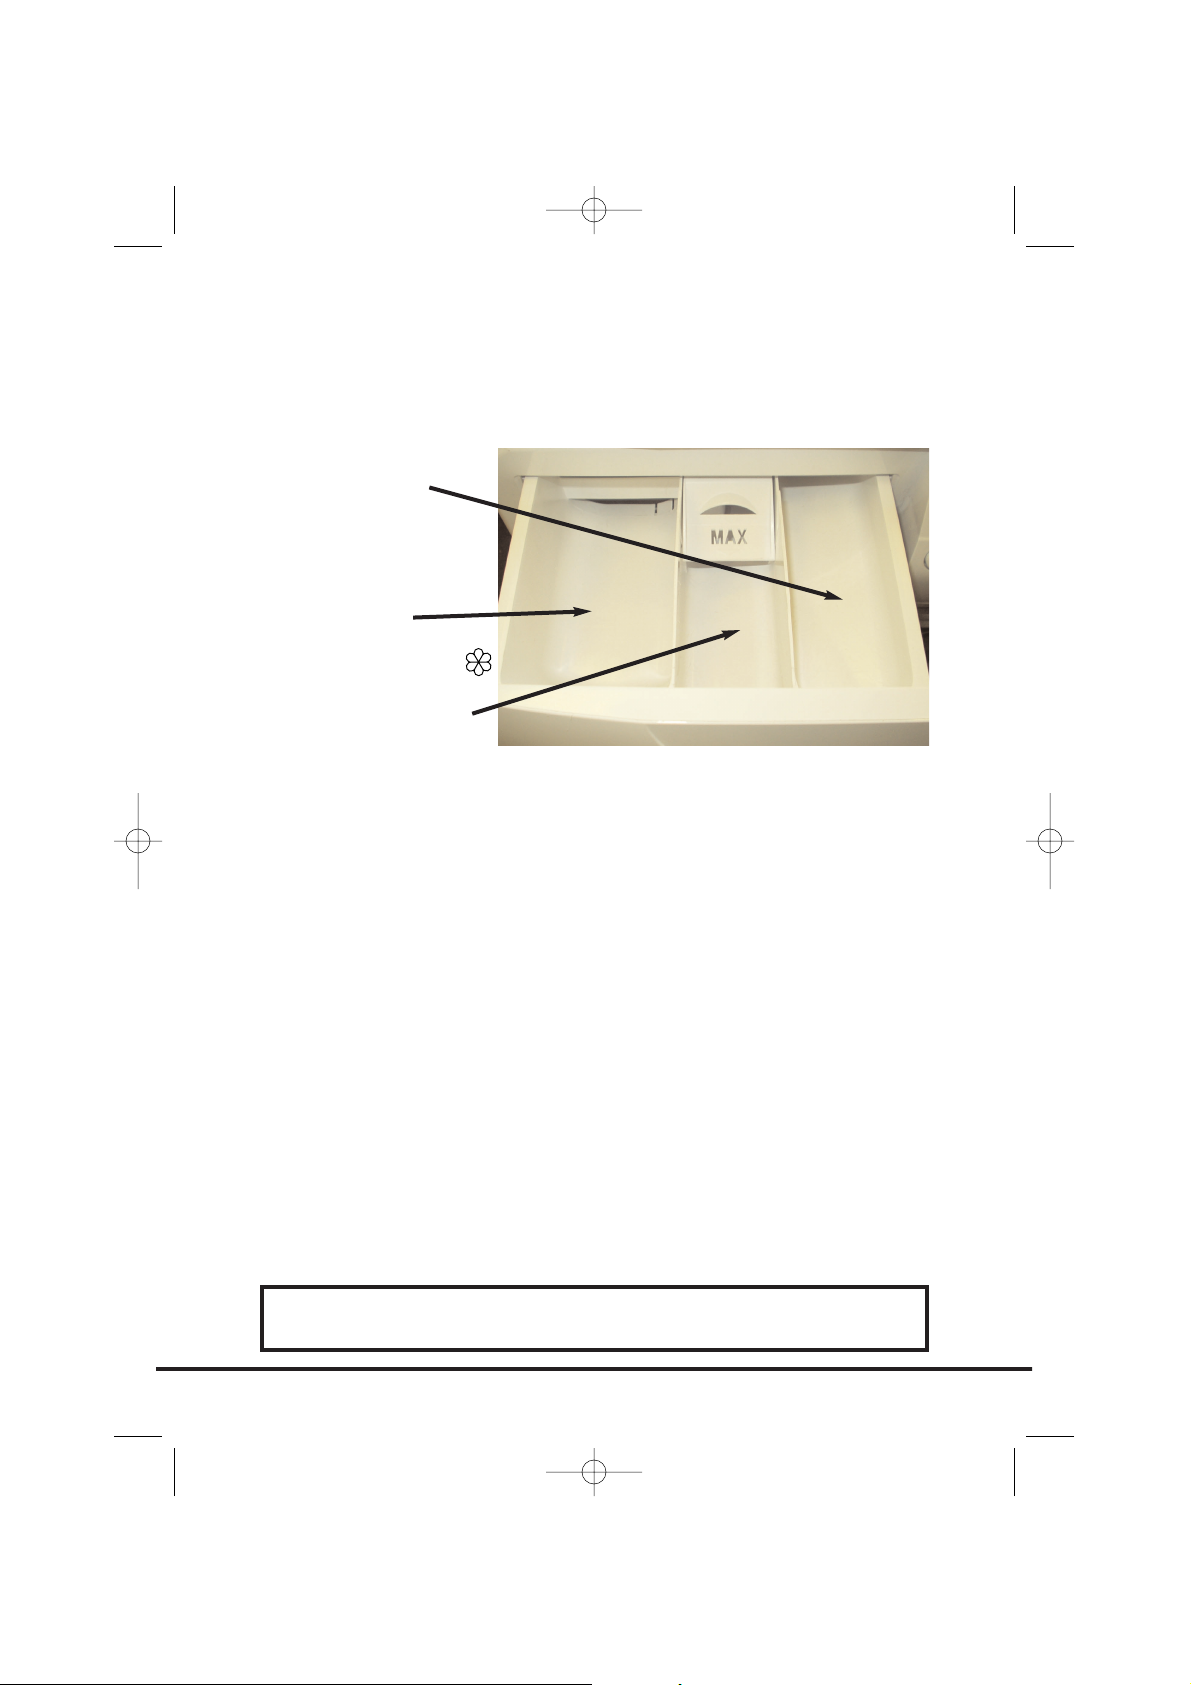
Dispensing instructions
The detergent drawer is split into 3 compartments:
● the left-hand compartment, labelled "II", is
for detergent used during the main wash.
● the centre compartment, labelled is for
special additives such as fabric softeners,
fragrances, starch, brighteners etc.
● the right-hand compartment, labelled "I", is
for detergent used during Prewash.
Dispensing in the drum
Liquid detergents and some tablets are dispensed
via the machine drum using the recommended
dispensing device which is placed upright on top
of the washload towards the back of the drum.
Some tablets are designed to be placed in the
dispenser drawer, check the detergent pack for
details.
16
Do not put any
items into the
drawer other
than detergents
that are
designed to be
dispensed from
the drawer as
they may cause
blockage or
damage.
40003361.qxd 27/06/2005 17:18 Page 16
Page 17
Turning the machine on
The machine is turned on by selecting a programme via the programme
selector. This status will be indicated by the STOP indicator light flashing, this
light will continue to flash until the machine has started or the machine is
returned to the OFF position.
Start/Pause (Start Pausa)
Start
After selecting the programme and the required options press the Start Pausa
button once to start the machine. The STOP light will stop flashing and START
light will illuminate and there will be a short time delay to the start of the
programme while the machine sets the wash parameters for the selected
programme and options. If the duration of the programme you have selected
is shorter than 60 minutes, then the time remaining indicator will illuminate
accordingly. The Seguridad Puerta indicator light will also illuminate a few
seconds after pressing the Start Pause button.
17
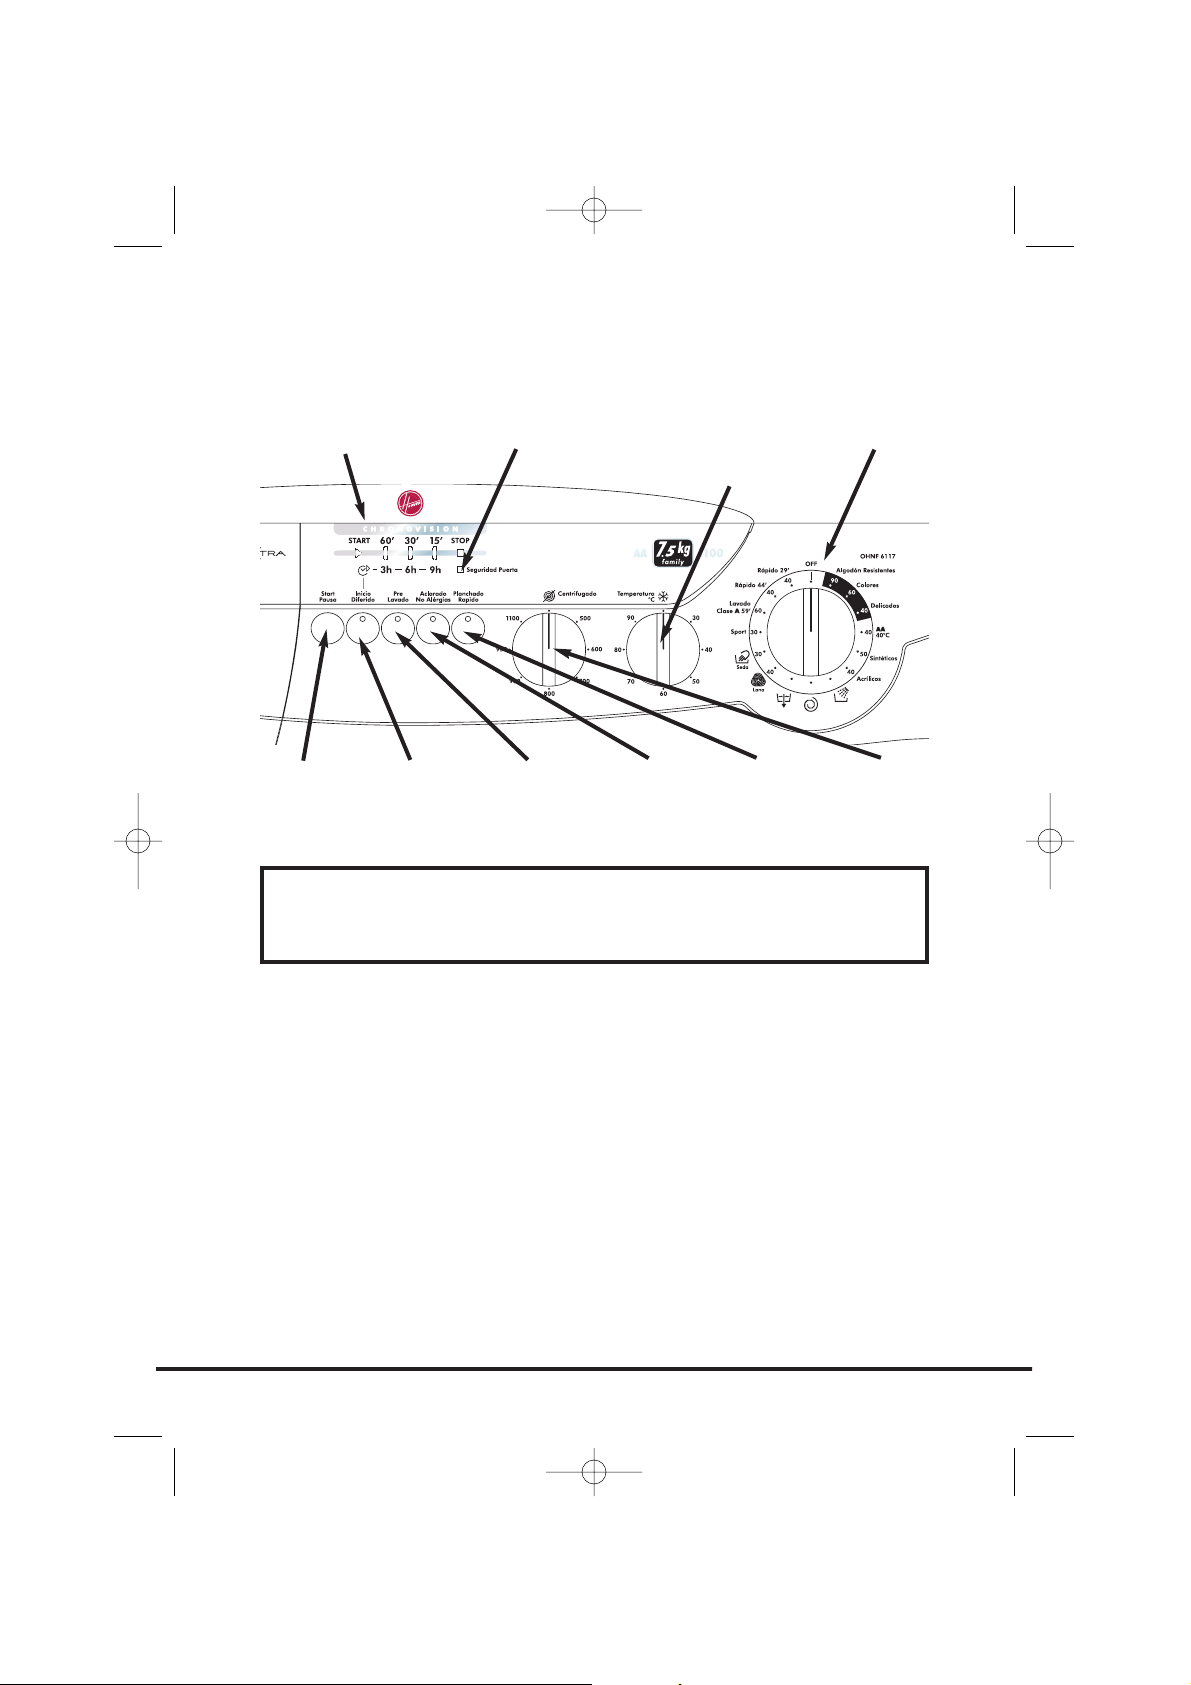
The Control Panel
The programme selector must be returned to the OFF
position to reset the controls between each wash cycle.
CHRONOVISION
Display
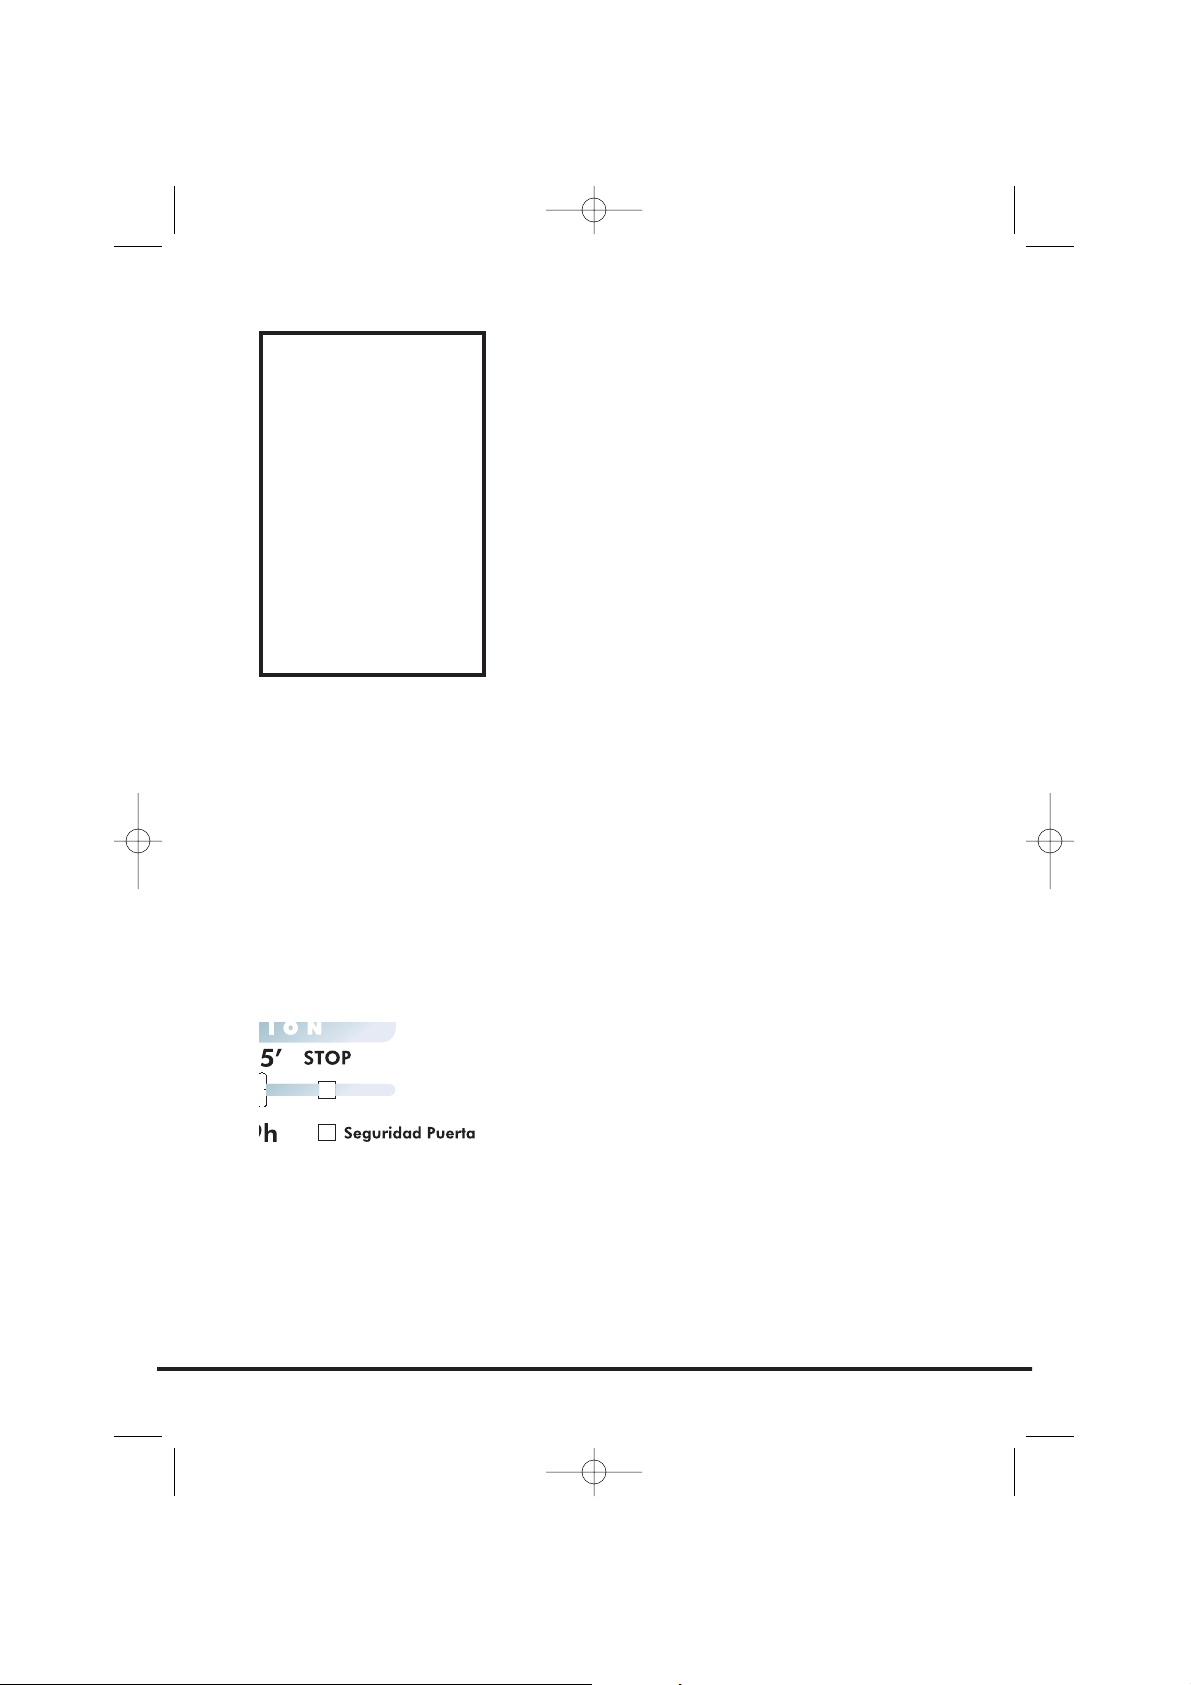
Door Locked Indicator
(Seguridad Puerta)
Start/Pause
(Start
Pausa)
Start Delay
(Inicio
Diferido)
Pre Wash
(Pre Lavado)
Extra Rinse
(Aclarado
No Alérgias)
Fast Iron
(Planchado
Rapido)
Spin Speed
Selector
(Centrifugado)
Temperature
Selector
(Temperatura °C)
Programme
Selector
40003361.qxd 27/06/2005 17:18 Page 17
Page 18
Pause (Pausa)
The programme may be paused at any time
during the wash cycle by holding down the Start
Pausa button for about two seconds. When the
machine is in the paused mode, the time
remaining for the programme in the
CHRONOVISION indicator and option buttons will
flash. The Seguridad Puerta indicator light will
remain illuminated for approximately 2 minutes.
The door can be opened when this indicator goes
out. To restart the programme, press the Start
Pausa button once again.
Cancelling and changing the
programme
To cancel the programme the programme selector
should be rotated to the OFF position.
Select a new programme and start as detailed
above.
Door Locked indicator
(Seguridad Puerta)
The Seguridad Puerta indicator light is
illuminated when the door is fully closed and the
machine is ON.
When Start Pausa is pressed on the machine with
the door closed the indicator will flash
momentarily and then illuminate. If the door is
not closed the indicator will continue to flash.
A special safety device prevents the door from
being opened immediately after the end of the
cycle. Wait for 2 minutes after the wash cycle has
finished and the Seguridad Puerta light has gone
out before opening the door. As a safety
measure, check that there is no water evident in
the drum. At the end of the cycle turn the
programme selector to OFF.
If the programme is paused, the Seguridad Puerta
indicator will go out after 2 minutes and the door
can be opened. Check there is no water evident
in the drum before opening the door.
18
When starting a
subsequent
wash cycle the
programme
selector must
be returned to
OFF prior to the
next
programme
being selected
and started.
40003361.qxd 27/06/2005 17:18 Page 18
Page 19
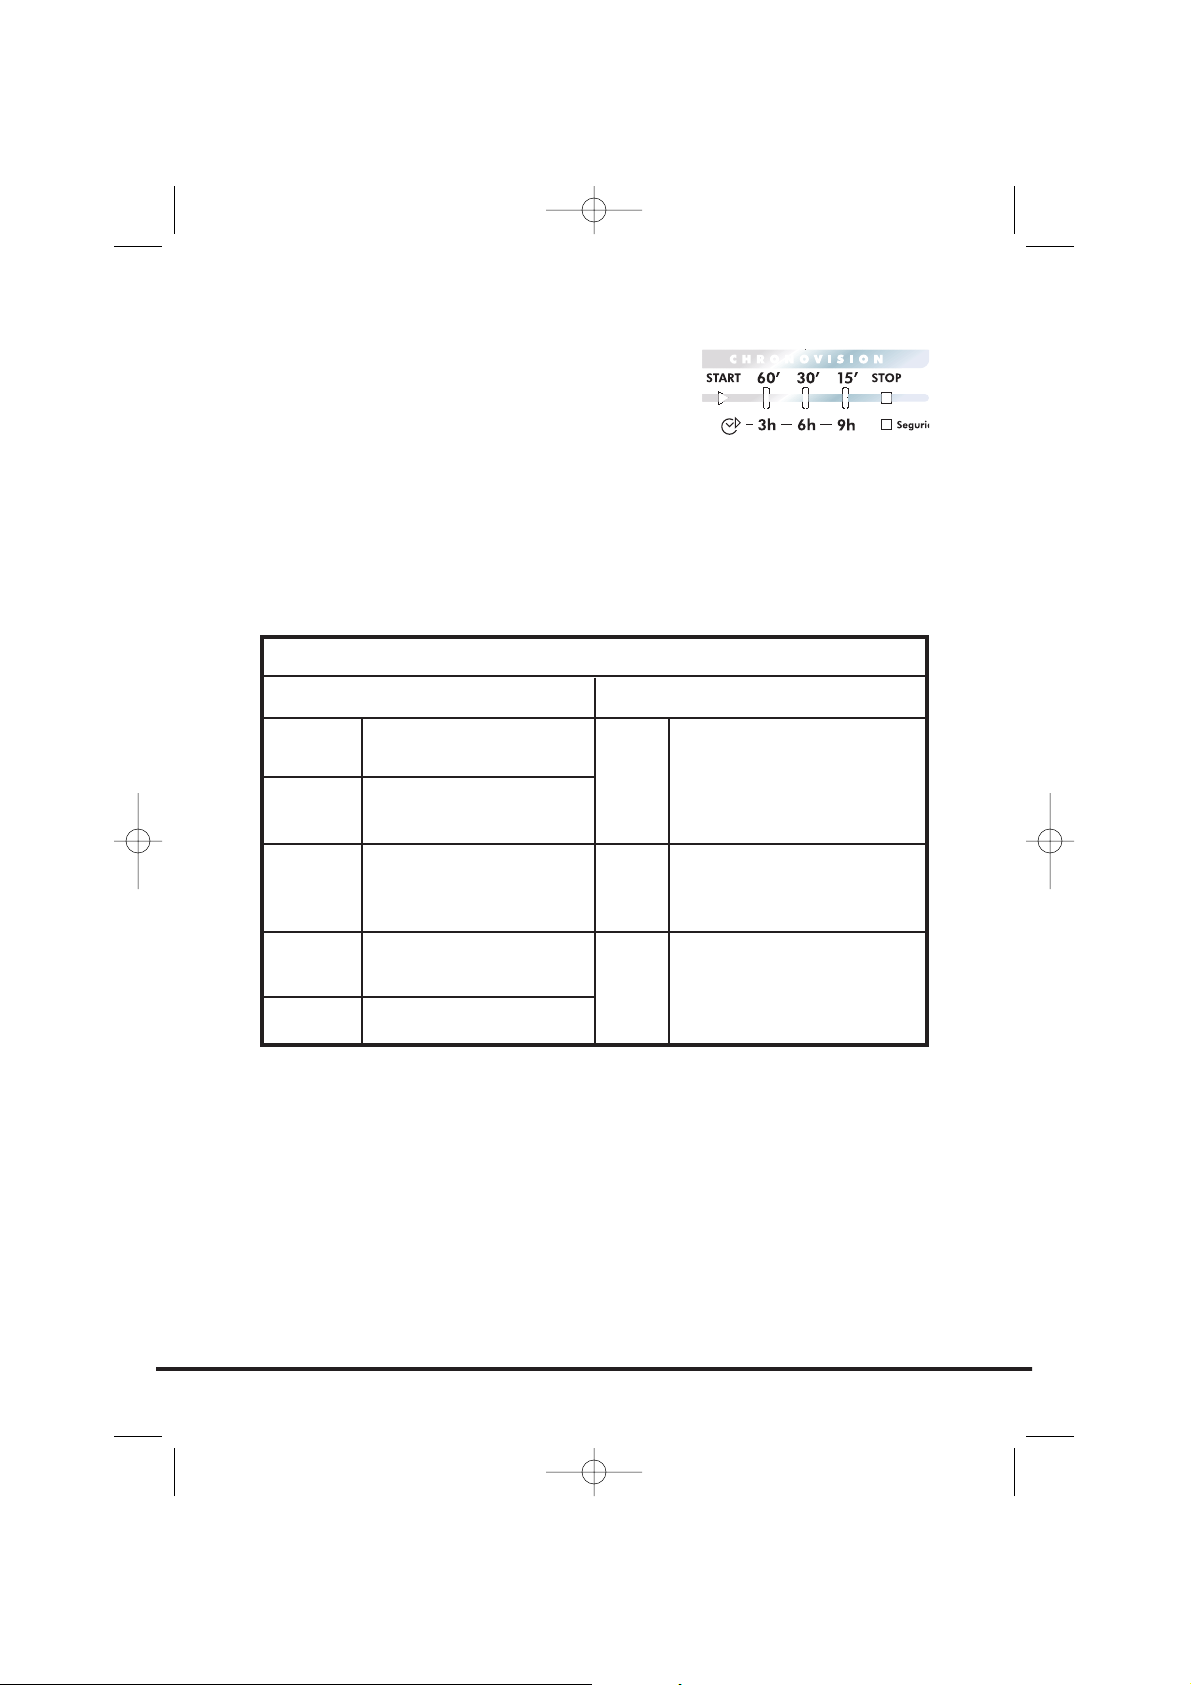
CHRONOVISION
In order to better manage your time, this washing
machine features an indicator light system that
keeps you constantly informed on the remaining
cycle time and the status of the Inicio Diferido
function.
When a drying time is selected the
CHRONOVISION display will display the time
remaining on the washing programme when the
washing is taking place and the time remaining in
the drying phase when drying is taking place.
19
START
60'
30'
15'
STOP
Remaining time above
60 minutes
Remaining time less
than 60 minutes
Remaining time less
than 30 minutes
Remaining time less
than 15 minutes
End of the programme
3h
6h
9h
3 hours or less remaining
before the programme
commences
6 hours or less remaining
before the programme
commences
9 hours or less remaining
before the programme
commences
CHRONOVISION DISPLAY
WASH PROGRESS
START DELAY
40003361.qxd 27/06/2005 17:18 Page 19
Page 20
Prewash (Pre Lavado)
This option is available on the cottons and
synthetics programmes. Prewash is automatic on
the Sports programme. This option is particularly
useful for heavily soiled loads and can be used
before selecting the main wash programme.
Detergent for this programme should be added
to the first compartment of the soap drawer
labelled "I" (Please refer to Detergent Drawer
section of manual). We recommend you only use
20% of the main wash detergent quantity.
Start Delay (Inicio Diferido)
This option is available to delay the start of the
wash cycle by up to 9 hours. The selection of the
time is completed by pressing the Inicio Diferido
button, the CHRONOVISION display will indicate
the time selected. When the correct delay is
selected press the Start Pausa button to start the
cycle.
Extra Rinse (Aclarado No Alérgias)
This option is available on the cottons
programmes. The option increases the number of
rinses to five (including the final conditioned
rinse). This can help prevent skin irritation from
detergent residue for people with particularly
sensitive skin. Selecting the Aclarado No Alérgias
button is also recommended when washing
heavily soiled fabrics which need a lot of
detergent, or when the wash load contains
towelling fabrics that have a greater tendency to
retain detergent.
20
Wash Options
The options
should be
selected
BEFORE
pressing the
Start Pausa
button
40003361.qxd 27/06/2005 17:18 Page 20
Page 21
Fast Iron (Planchado Rapido)
This option is only available on synthetics, acrylics, woolmark and silk
programmes.
21
Programme
Synthetics
(Sintéticos)
Acrylics
(Acrílicos)
Woollens
(Lana)
Silk
(Seda)
Fast Iron Function
Programme is completed
by a short, very low spin
speed.
The machine stops in the
final rinse stage and the
option indicators
blink.The load is held in
the water in the drum,
thus reducing creasing
and enabling easier
ironing.
The machine stops in the
final rinse stage and the
option indicators
blink.The load is held in
the water in the drum,
thus reducing creasing
and enabling easier
ironing.
The machine stops in the
final rinse stage and the
option indicators
blink.The load is held in
the water in the drum,
thus reducing creasing
and enabling easier
ironing.
Action to complete the cycle
If a spin cycle is required please
select the appropriate spin (see
Programme Guide).
Press the Planchado Rapido
button to continue with the
programme. The machine will
then pump out the remaining
water and the programme will
conclude with a short spin.
Finally, the programme carries
out a brief tumbling action to
loosen the items in the load.
Press the Planchado Rapido
button and the machine will
pump out the water and
complete the cycle with a short
spin cycle.
Press the Planchado Rapido
button and the machine will
pump out the water to complete
the cycle. The clothes load will
not be spun and will therefore
be very wet.
40003361.qxd 27/06/2005 17:18 Page 21
Page 22
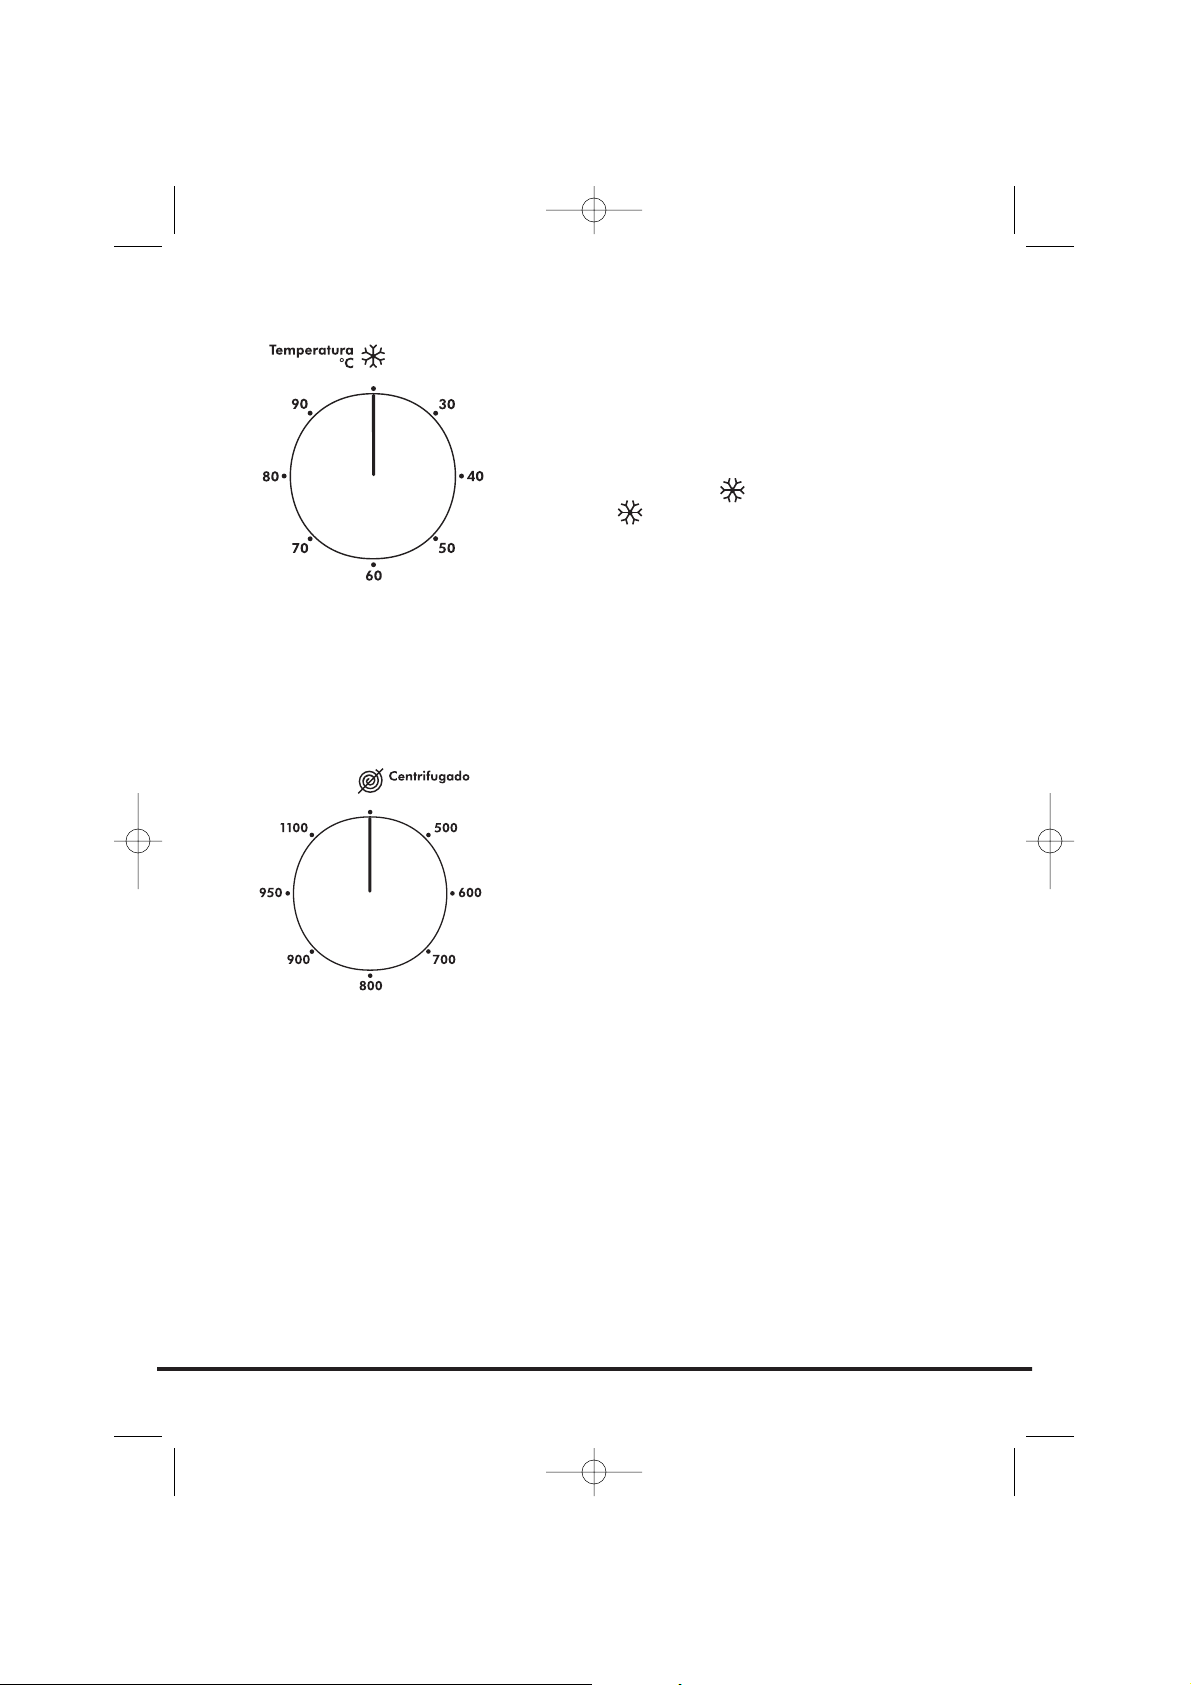
Temperature Selector
(Temperatura °C)
The washing machine is equipped with a
temperature selector knob to set the temperature
you require. Bigger energy savings can be
achieved by using the lower temperature settings
around the dial between and 40°C. By
selecting the position, the wash temperature
is limited to the water inlet temperature, thus
reducing energy consumption further. We
recommend that the temperature shown on wash
care garments should never be exceeded.
In the case where the temperature has been
accidentally set higher than that of the chosen
programme, (see Programme Guide table), the
machine will lower the temperature automatically
to protect the fabrics.
Spin Speed Selector
(Centrifugado)
By adjusting the control knob it is possible to
reduce the maximum spin speed of your selected
programme to suit your needs and to help reduce
any creasing of fabrics. Turn the Centrifugado
selector knob until the indicator aligns with the
required spin speed. The maximum spin speed
will vary depending on the specification of the
machine.
22
40003361.qxd 27/06/2005 17:18 Page 22
Page 23

Automatic Features
Automatic Variable Capacity
(Half Load)
The washing machine is fitted with a self
adjusting water level system. This system enables
the machine to use the optimum amount of
water needed to wash and rinse the laundry in
relation to the particular load. This results in a
reduction of the water and electricity used
without in any way compromising the washing
and rinsing performance. The amount of water
and electricity used will always be appropriate for
the clothes load.
The washing machine automatically ensures
excellent washing results at minimum cost whilst
respecting the environment.
Out of Balance protection
This model is fitted with an electronic sensor
device that checks if the load is balanced
correctly. If the load is slightly unbalanced the
machine will re-balance it automatically to then
carry out the normal spin.
If, after several attempts, balance is not restored
a reduced spin speed will be used.
If loads are seriously unbalanced the spin stage
will be cancelled. This helps limit vibration,
reduce noise and improve the washing machine's
reliability and life.
23
40003361.qxd 27/06/2005 17:18 Page 23
Page 24

For handling the various types of fabric and their level of soiling in your
laundry the washing machine has different programme groups according to
type of wash, temperature, spin speeds and duration (see Programme Guide).
Cottons (Algodón)
The programmes are designed for maximum washing and rinsing. With spin
cycles in between, they guarantee the laundry is rinsed perfectly. The final spin
cycle ensures laundry is spun dry as much as possible up to the maximum
speed.
Synthetics and mixed fabrics (Sintéticos y tejidos
mixtos)
Washing and rinsing performance is optimised through drum rotation speeds
and water levels. The delicate spin action minimises creasing.
Delicates (Delicados)
This is a new concept in washing, with a cycle that comprises alternate periods
of activity and pauses, particularly suitable for washing very delicate fabrics.
Washing and rinsing are carried out using a high water level to provide the
best results.
Rinse, Spin and Drain
Individual programmes are available for rinsing, (including the opportunity to
add fabric conditioner), spinning, at 800rpm or less if selected via the
Centrifugado selector, and draining the water from the machine.
24
Programme Selector
40003361.qxd 27/06/2005 17:18 Page 24
Page 25

Special Programmes
Woolmark (Lana)
A programme dedicated to washing fabrics
labelled with the woolmark symbol . The cycle
comprises of alternate periods of activity and
pauses. Washing and rinsing are carried out using
a high water level to provide the best results. The
programme has a maximum temperature of 30°C
and concludes with 3 rinses, one for fabric
conditioner, and a short spin.
Silk (Seda)
This washing machine also has a gentle Silk and
Hand Wash programme cycle. This programme
allows a complete washing cycle for garments
specified as “Hand Wash only” and laundry items
made from silk or specified “Wash as silk” on the
fabric label.
The programme has a maximum temperature of
30°C and concludes with 3 rinses, one for fabric
conditioner, and no final spin.
Sport
Sports items have been given their own wash care
programme. This washing machine has a unique
Sportswear programme.
It is specially designed to wash mixed sportswear
fabrics that cannot be washed on hotter
programmes and is designed to remove the
soiling and staining created by participation in
sports activities.
This programme starts with a cold prewash that
breaks down and loosens any excess dirt and then
washes at a cool 30°C, rinses twice (one is for
fabric conditioner) and spins slowly for the best
care of your heavily soiled, delicate garments.
Detergent for the prewash part of the
programme should be added to compartment I
and detergent for the mainwash should be added
to compartment II. Follow the instructions given
in 'The Dispenser' section.
25
40003361.qxd 27/06/2005 17:18 Page 25
Page 26

‘A’ wash 59'
(Lavado Clase A 59')
This specially designed programme maintains the
high quality wash performance identified with the
‘A’ rating whilst greatly reducing the wash time.
The programme is designed for a maximum load of
3.5 kg and is intended for cotton fabrics and items
colourfast to 60°C. The programme concludes with
2 rinses and a high speed spin sequence.
Daily Programmes
(Lavado Rápido)
By maintaining exceptional washing performance,
these programmes allow you to know in advance
the necessary time for your everyday laundry. In
fact, this washing machine is equipped with two
daily rapid programmes at 40°C, that were just
studied for lightly soiled fabrics and medium or
small loads.
Daily 44' (Rápido 44')
A complete washing cycle (wash, rinse and spin),
able to wash in approximately 44 minutes
suitable for:
● a maximum load of 3.5 kgs
● lightly soiled fabrics (cotton and mixed
fabrics)
With this programme we recommend that you
reduce the detergent loading dose (compared to
the normal one), in order to avoid detergent
waste.
Daily 29' (Rápido 29')
A complete washing cycle (wash, rinse and spin),
able to wash in approximately 29 minutes
suitable for:
● a maximum load of 2.5 kgs
● lightly soiled fabrics (cotton and mixed
fabrics)
With this programme we recommend that you
reduce the detergent loading dose (compared to
the normal one), in order to avoid detergent waste.
26
40003361.qxd 27/06/2005 17:18 Page 26
Page 27

27
Programme Guide
Energy label data based on Colores programme tested in accordance with
CENELEC EN60456
AlgodónSintéticos Tejidos
mixtos
Delicados
Special Programmes
Algodón
Resistentes
Colores
Delicados
AA 40°C
Sintéticos
Acrílicos
Rinse
Spin
Drain
Lana
Seda
Sport
Lavado
Clase A 59'
Rápido
44'
Rápido
29'
Maximum
Load
Size (kg)
7.5
7.5
7.5
7.5
3
3
-
-
-
1.5
1.5
3
3.5
3.5
2.5
Fabric Type
Cottons, linen
Cotton, colourfast
mixed fibres
Cottons, mixed fabrics,
Coloureds Non-fast
Cottons, mixed fabrics
and synthetics
Mixed fabrics
and synthetics
Synthetics, acrylics
and coloured
mixed fabrics
Mixed Fabrics
Mixed Fabrics.
Spin speed of 800 rpm
max.
Mixed Fabrics
Machine washable
wool
Silks and 'Hand Wash
only' garments
Mixed fabrics
Cotton, colourfast
mixed fibres
Lightly soiled cottons
and mixed fabrics
Lightly soiled cottons
and mixed fabrics
Maximum
Water
Temp (°C)
90
60
40
40
50
40
-
-
-
40
30
30
60
40
40
Programme
40003361.qxd 27/06/2005 17:18 Page 27
Page 28

This section summarises the main points when
completing a wash cycle. For detailed
explanations of features, options and details of
the machine refer to the relevant section in the
instruction manual.
Preparing the laundry
Select and sort the laundry according to the wash
care labels found on each garment. Always check
the care labels.
Loading the laundry
Open the door.
Put the laundry in the washing machine. Close
the door by pushing it until it clicks, ensuring that
no items of laundry are obstructing the lock or
door seal.
Putting detergent in machine
Open the drawer, choose the detergent and put
in the recommended amount.
Do not exceed the dosage stated below
Close the drawer again.
28
A Typical Wash
Maximum quantity
of powder/liquid
100ml
200ml
200ml
Wash
Prewash (option)
Main Wash
(all programmes)
Fabric Conditioner
Compartment
I
II
Liquid
detergents and
some
concentrated
powders and
tablets that are
to be placed
directly into the
drum should
use the
recommended
dispensing
device.
40003361.qxd 27/06/2005 17:18 Page 28
Page 29

Refer to the Programme Guide or the programme
descriptions on the front of the machine to select
the most suitable programme.
The programme is selected by turning the
programme selector and aligning the programme
name with the indicator.
Check that the STOP indicator is flashing, if not
check that the door is properly closed.
Check that the tap is turned on and that the
discharge hose is positioned correctly.
Select the required wash options
Starting the wash cycle
Press the Start Pausa button. The Seguridad
Puerta indicator and the START light illuminate,
within a few seconds the programme will begin.
Do not try to open the door when the Seguridad
Puerta indicator is on.
Do not open the dispenser drawer during the
wash programme.
If you wish to pause the programme press the
Start Pausa button and after 2 minutes the door
can be opened. To cancel the programme the
programme selector should be turned to the OFF
position. A new programme can be selected after
cancelling the programme.
When the programme has finished
Wait for the door lock to be released. The
Seguridad Puerta indicator will go out after
approximately 2 minutes and then the door can
be opened.
Switch off the machine by turning the
programme selector to the OFF position before
selecting the next programme (this action resets
the memory in the machine).
Open the door.
Remove the laundry.
Disconnect the plug from the mains power supply
and turn off the water supply after every use.
29
Selecting the wash programme
40003361.qxd 27/06/2005 17:18 Page 29
Page 30

The washing machine needs very little
maintenance, but regular attention to a few small
details will ensure the continued performance of
your washing machine.
Do not use abrasive cleaners, scouring pads,
solvent based cleaners or polishes; wiping the
outside of the machine with a damp cloth will
suffice.
Cleaning the soap dispenser
1. Clean the compartments occasionally to
remove detergents and additives.
2. To do this you just need to pull the drawer
out firmly from the machine, but without
forcing it.
3. Clean the compartments and the syphon
cover under warm running water.
4. Clean the soap dispenser housing to remove
any residue of soap powder
5. Replace the drawer.
Cleaning the door glass
Regularly clean the door glass with a damp cloth.
A build up of soiling and residues from the water
may result in water leaking from the door.
Do not use abrasive cleaners as they can scratch
the surface.
30
Cleaning and Routine
Maintenance
40003361.qxd 27/06/2005 17:18 Page 30
Page 31

Cleaning the filter
The washing machine is fitted with a special filter
to prevent items such as coins, buttons, etc.
blocking the discharge hose. These may be
retrieved by:
1. Removing the kickplate by gently pulling it
from the bottom in an outwards and
upwards direction.
2. Use the kickplate to collect the water still in
the filter.
3. Use a screwdriver to loosen the screw
holding the filter, turn the filter
anticlockwise until it stops, remove it and
clean it. After cleaning it, reassemble
following the above instructions in reverse
order.
Replace the kickplate.
We recommend that the filter be cleaned
frequently, at least once a month.
Maintenance wash
Using small quantities of detergent and low
temperature wash programmes can cause the
gradual build up of grease, dirt and scale. Over
time these deposits can damage your laundry and
your machine. They can also cause your machine
to smell. We recommend that you carry out a
maintenance wash a couple of times per year to
keep your machine and pipe work clean and free
of these deposits. Simply run the Algodón
Resistentes programme without a load and with
the normal quantity of detergent.
This wash will take approximately
2 hours to complete.
31
40003361.qxd 27/06/2005 17:18 Page 31
Page 32

What might be the cause of...
Defects you can remedy yourself
Before calling GIAS Service for technical advice please run through the
following checklist. A charge will be made if the machine is found to be
working or has been installed incorrectly or used incorrectly. If the problem
persists after completing the recommended checks, please call the GIAS
Service, they may be able to assist you over the telephone.
The machine will not start…
● Close the door. Check that there is power to the machine. Select a
programme and press Start Pausa Check if the door lock light is
illuminated.
If it is not, check the following:
1. Is the machine connected to the electrical supply?
2. Is the electrical supply OK, check another socket?
3. Has the fuse on the machine blown? If so, replace it.
● If the door locked light is illuminated and the machine does not start this
means that the machine cannot fill with water, check the following:
1. Check the programme dial is correctly aligned with the programme.
2. Is the water supply to the machine switched on?
3. Are the pipes kinked or restricted in any way?
Water does not drain away…
● Ensure that there is not a blockage in the drain hose or the hose is not
kinked.
● Is the drain hose installed correctly? If connected to the sink waste make
sure you have cut the membrane or removed the bung from the under
sink drainage unit.
● Check for foreign bodies in the filter. If present, clean the filter.
If you have found any of the above problems correct them and run the
machine through a spin cycle to drain the water.
● Is the Planchado Rapido function selected? If so, deselect the option and
the programme will complete (see page 21 for complete explanation of
the function).
32
Troubleshooting
40003361.qxd 27/06/2005 17:18 Page 32
Page 33

Water on the floor around the washing machine…
● Is the fill hose tightened? If so, replace the rubber washers and re-tighten.
● Is the standpipe or the household drain blocked? If so, clear the blockage
yourself or call a plumber.
● Is there clothing or dirt between the door gasket and the door glass?
Ensure that the door glass and gasket are kept clean and free of laundry
when loading the machine.
The machine does not spin…
● Water has not drained from the machine? Check the points highlighted
above.
● Have you selected an option that changes the spin profile (Planchado
Rapido or change of spin speed on the selector)? Check the feature in
the description of the controls.
● Is the load unbalanced? To reduce noise and vibration and improve the
machine’s reliability and life, the machine is fitted with an electronic
sensor that detects if the load is unbalanced. To improve the spin
performance the load can be re-distributed by hand at the end of the
cycle and then re-spun.
The machine is noisy or vibrates a lot during the cycle…
● Has the transit system been fully removed? Check that the bracket and
the polystyrene packing have been taken off the machine.
● Are there any loose items in the pockets of clothing that can rattle in the
drum and cause damage?
● Is the load unbalanced? Stop the programme, re-distribute the load and
restart.
The programme takes a long time…
● Some programmes do take a long time (over 2 hours). Low water
pressure can increase the length of the programme.
The door will not open…
● Has the programme finished?
Is the STOP light illuminated? If not the programme is not complete.
Has the Seguridad Puerta light gone out? If not wait a further couple of
minutes and the light will go out and you will be able to open the door.
● Has the programme finished but the door remains locked? The START and
Pre Lavado light will flash intermittently indicating that the water supply
has been interrupted during the wash cycle. Turn the machine to OFF to
reset the machine and this will allow the door to open.
33
40003361.qxd 27/06/2005 17:18 Page 33
Page 34

● If water remains in the drum refer to 'Water does not drain away…'
above.
Problem with the dispenser…
● Not all the detergent has been flushed away.
1. Check the water supply tap is fully turned on.
2. Check the inlet hose is not kinked.
● The dispenser drawer will not close properly.
1. Check the drawer is aligned properly
2. Check the drawer is not clogged with detergent (see Cleaning and
Routine Maintenance)
● Steam is coming from the dispenser.
The machine is designed to vent through the drawer, this is nothing to
worry about.
Remember, you may be charged for the service call if incorrect installation or
misuse causes a problem with your machine.
Note:
The use of environmentally-friendly, phosphate-free detergents (check
detergent information on pack) can have the following effects:
● Waste water from rinsing may be cloudier because of the presence of a
white powder (zeolites) held in suspension, without the rinse
performance being adversely affected.
● Presence of white powder on laundry after washing, which is not
absorbed by the fabric and does not alter the colour of the fabric.
● The presence of foam in the final rinsing water is not necessarily an
indication of poor rinsing. Carrying out more rinse cycles does not serve
any purpose in such cases.
34
40003361.qxd 27/06/2005 17:18 Page 34
Page 35

Power Failure
If there is a power failure the wash cycle will be
interrupted, and the wash programme and
functions will be suspended. When the power is
restored, the wash programme and functions will
restart from the same point and complete the
programme.
During a power failure the water can be drained
and the load can be removed from the machine
as follows:
1. Switch off the machine both via the
programme knob and the mains power
supply. Remove the plug from the mains
power supply socket.
2. Carefully move the machine so the rear of
the machine is accessible. Please follow the
safety precautions which we recommend
under the Safety Notes section of this
manual.
3. Unclip the drain hose from the rear panel of
the machine and lower the hose into a bowl
on the floor. When the bowl is full raise the
end of the drain pipe to a height higher
than the top of the appliance to stop the
flow of water. Empty and replace the bowl
and continue draining the machine until
empty.
4. Once the machine is fully drained of water,
clip the hose to the rear of the machine.
Open the door and remove the load.
The door can be opened approximately 2 minutes
after the power failure.
Do not force open the door.
35
40003361.qxd 27/06/2005 17:18 Page 35
Page 36

Introducción. . . . . . . . . . . . . . . . . . . . . . . . . . . . . . . . . . . . . . . . . . 37
Información de entrega. . . . . . . . . . . . . . . . . . . . . . . . . . . . . . . . . . . . . . . . . . 37
Qué hacer. . . . . . . . . . . . . . . . . . . . . . . . . . . . . . . . . . . . . . . . . . . . . . . . . . . . . 37
Qué evitar . . . . . . . . . . . . . . . . . . . . . . . . . . . . . . . . . . . . . . . . . . . . . . . . . . . . 38
Desembalaje del producto . . . . . . . . . . . . . . . . . . . . . . . . . . . . . . 39
Instalación . . . . . . . . . . . . . . . . . . . . . . . . . . . . . . . . . . . . . . . . . . . . . . . . 41
Elección de una ubicación . . . . . . . . . . . . . . . . . . . . . . . . . . . . . . . . . . . . . . . . 41
Suministro eléctrico . . . . . . . . . . . . . . . . . . . . . . . . . . . . . . . . . . . . . . . . . . . . . 42
Suministro de agua . . . . . . . . . . . . . . . . . . . . . . . . . . . . . . . . . . . . . . . . . . . . . 42
Conexión al suministro de agua fría . . . . . . . . . . . . . . . . . . . . . . . . . . . . . . . . 43
Conexión de la lavadora al desagüe . . . . . . . . . . . . . . . . . . . . . . . . . . . . . . . . 44
Colocación del electrodoméstico en su lugar . . . . . . . . . . . . . . . . . . . . . . . . . 45
Ajuste de las patas . . . . . . . . . . . . . . . . . . . . . . . . . . . . . . . . . . . . . . . . . . . . . . 45
Prueba de la instalación . . . . . . . . . . . . . . . . . . . . . . . . . . . . . . . . . 46
Consejos para el lavado . . . . . . . . . . . . . . . . . . . . . . . . . . . . . . . . . 47
Carga de su lavadora . . . . . . . . . . . . . . . . . . . . . . . . . . . . . . . . . . . . . . . . . . . . 47
Clasificación de la colada. . . . . . . . . . . . . . . . . . . . . . . . . . . . . . . . . . . . . . . . . 48
El dosificador . . . . . . . . . . . . . . . . . . . . . . . . . . . . . . . . . . . . . . . . . . . . . 49
Dosificación de detergente . . . . . . . . . . . . . . . . . . . . . . . . . . . . . . . . . . . . . . . 49
Instrucciones de dosificación . . . . . . . . . . . . . . . . . . . . . . . . . . . . . . . . . . . . . . 50
El panel de control . . . . . . . . . . . . . . . . . . . . . . . . . . . . . . . . . . . . . . . 51
Opciones de lavado. . . . . . . . . . . . . . . . . . . . . . . . . . . . . . . . . . . . . . 54
Funciones automáticas. . . . . . . . . . . . . . . . . . . . . . . . . . . . . . . . . . . . . . . . . . . 57
Selector de programa. . . . . . . . . . . . . . . . . . . . . . . . . . . . . . . . . . . . 58
Programas especiales . . . . . . . . . . . . . . . . . . . . . . . . . . . . . . . . . . . . . . . . . . . . 59
Programas diarios . . . . . . . . . . . . . . . . . . . . . . . . . . . . . . . . . . . . . . . . . . . . . . 60
Guía de programas . . . . . . . . . . . . . . . . . . . . . . . . . . . . . . . . . . . . . . 61
Un lavado típico. . . . . . . . . . . . . . . . . . . . . . . . . . . . . . . . . . . . . . . . . . 62
Selección del programa de lavado. . . . . . . . . . . . . . . . . . . . . . . . . . . . . . . . . . 63
Inicio del ciclo de lavado . . . . . . . . . . . . . . . . . . . . . . . . . . . . . . . . . . . . . . . . . 63
Limpieza y mantenimiento de rutina . . . . . . . . . . . . . . . . . . 64
Resolución de problemas. . . . . . . . . . . . . . . . . . . . . . . . . . . . . . . . 66
Corte de suministro de energía eléctrica. . . . . . . . . . . . . . . . . . . . . . . . . . . . . 69
36
40003361SPA.qxd 27/06/2005 17:41 Page 36
Page 37

Introducción
Por favor lea cuidadosamente estas instrucciones y
utilice la máquina según sus indicaciones. Este folleto
presenta directrices importantes para uso seguro,
instalación y mantenimiento, y algunos consejos para
obtener los mejores resultados de su secadora.
Conserve toda la documentación en un lugar seguro
para referencia futura o para los dueños futuros.
Información de entrega
Por favor verifique que los siguientes artículos hayan
sido entregados con el electrodoméstico:
● Manual de instrucciones
● Tarjeta de garantía
● Tapón obturador
● Manguera de entrada y soporte en forma de
gancho (véase Instrucciones de desembalaje e
instalación)
● Panel de base y x2 abrazaderas de presión
● Etiqueta de energía
Qué hacer
● Todos los materiales de embalaje utilizados son
ecológicos y reciclables. Por favor deshágase de
los materiales de embalaje por medios ecológicos.
Su ayuntamiento podrá informarle de los medios
actuales de desecho.
● Por razones de seguridad cuando se deseche una
lavadora vieja, desenchufe el cable eléctrico de la
toma general, corte el cable y destrúyalo junto
con el enchufe. Para evitar que los niños se
queden encerrados en la máquina, rompa las
bisagras o la cerradura de la puerta.
● Esta máquina está diseñada para ser utilizada en
el hogar, es decir para lavar, aclarar y centrifugar
tejidos y prendas de uso diario.
37
Verifique que no se
hayan producido
daños al
electrodoméstico
durante el
transporte. De
haberlos, llame al
Servicio técnico de
GIAS.
40003361SPA.qxd 27/06/2005 17:41 Page 37
Page 38

Qué evitar
● No toque el electrodoméstico cuando tenga las
manos o los pies mojados o húmedos.
● No se apoye en la puerta al cargar la secadora ni
utilice la puerta para levantar o mover la
máquina.
● No utilice adaptadores, conectores múltiples ni
alargaderas.
● No permita a los niños jugar con la máquina ni
los mandos.
● No intente abrir la puerta cuando haya agua
visible en el tambor o el indicador de puerta
bloqueada (Seguridad Puerta) esté encendido.
Directiva Europea
2002/96/CE
Este electrodomestico está marcado conforme a la
directiva Europea 2002/96/CE sobre los residuos de
aparatos eléctricos y electrónicos (WEEE).
Asegurándose que este producto ha sido eliminado
correctamente, ayudará a evitar posibles consecuencias
negativas en el ambiente y la salud de las personas, que
pudiera verificarse por causa de un anómalo
tratamiento de este producto.
El simbolo sobre el producto indica que este aparato no
puede ser tratado como un residuo doméstico normal,
en su ligar deberá ser entregado al centro de recogidas
para reciclaje de aparatos eléctricos y electrónicos.
La eliminación debe ser efectuada de acuerdo con las
reglas medioambientales vigentes para el tratamiento
de los residuos.
Para informacion más detallada sobre el tratamiento,
recuperación y reciclaje de este producto, por favor
contacte con la oficina compentente (del departamento
de ecología y mediomabiente), o su servicio de recogida
a domicilio si lo hubiera o el punto de venta donde
compró el producto.
38
Si no se cumplen
los requisitos
descritos
anteriormente, es
posible que se
perjudique la
seguridad del
electrodoméstico.
Es posible que se le
cobre una llamada
al servicio técnico
si el problema con
el electrodoméstico
es el resultado de
un uso incorrecto.
Si el
electrodoméstico
no funciona
correctamente o se
avería, apáguelo,
desconecte el
enchufe de la toma
de corriente, corte
el suministro de
agua y no
desmonte ni
manipule los
componentes del
electrodoméstico.
Consulte al Servicio
técnico de GIAS
para la posible
reparación.
40003361SPA.qxd 27/06/2005 17:41 Page 38
Page 39

Desembalaje del producto
Desembale la lavadora en un lugar cercano al de su
instalación definitiva.
1. Corte con cuidado la base del embalaje.
2. Coloque la lavadora sobre su parte posterior y
retire la base y los dos separadores de poliestireno
de ambos lados de la máquina. Recomendamos
que una segunda persona le ayude al levantar y
mover la lavadora.
3. Vuelva a colocar la lavadora en posición vertical,
retire el resto del embalaje y el tornillo central de
la barra de transporte.
4. Retire los cuatro tornillos de contención de la
barra de transporte y saque la ménsula de
transporte.
39
Deshágase de los materiales de
embalaje de forma segura. Asegúrese
de que estén fuera del alcance de los
niños, dado que es una fuente potencial
de peligro.
40003361SPA.qxd 27/06/2005 17:41 Page 39
Page 40

5. Tome el panel de base proporcionado y coloque
las dos tiras autoadhesivas retirando el papel de
protección en un lado y colocando las tiras a
ambos lados del panel de base.
6. Incline la lavadora hacia delante y sitúe el panel
de base debajo de la parte frontal de la máquina.
Retire el papel de protección restante de las tiras
autoadhesivas y mueva el panel de base hacia la
parte inferior del armario.
7. Tome las dos abrazaderas de plástico y pegue el
panel de base a la base de la lavadora. Vuelva a
colocar la lavadora en posición vertical.
40
Recomendamos que conserve la ménsula de transporte y los
tornillos de protección de la lavadora para usarse en caso de
transporte futuro. Los fabricantes no serán responsables de
ningún daño a la lavadora causado como resultado de no haber
cumplido las instrucciones que se refieren a liberación de la
protección para el transporte. El usuario es responsable de todos
los gastos de instalación.
40003361SPA.qxd 27/06/2005 17:41 Page 40
Page 41

8. Tape el orificio central de la parte posterior de la
lavadora con el tapón que encontrará en la bolsa
que contiene las instrucciones.
Elección de una
ubicación
● Una vez que la máquina haya sido instalada,
asegúrese de que el enchufe de toma de corriente
y las llaves de paso de agua queden fácilmente
accesibles.
● Compruebe que haya suficiente espacio para la
lavadora. Seleccione un espacio de al menos 600
mm de anchura y 850 mm de altura. Deje también
suficiente espacio para abrir la puerta
completamente de forma que pueda cargar y
descargar con facilidad.
● Mantenga el área de debajo y alrededor de la
lavadora libre de materiales combustibles como
pelusas, papel, trapos, sustancias químicas, etc.
41
Instalación
No enchufe el
electrodoméstico ni
lo encienda
conectado a la red
eléctrica hasta que
se haya
completado la
instalación.
40003361SPA.qxd 27/06/2005 17:41 Page 41
Page 42

Suministro eléctrico
Las lavadoras están preparadas para funcionar con un
voltaje monofásico de 230 V, a 50 Hz. Verifique que el
circuito de suministro tenga una corriente nominal de al
menos 16 A.
La electricidad puede ser muy peligrosa.
Es imprescindible que esta lavadora esté conectada a
tierra.
La toma de corriente y el enchufe del electrodoméstico
deben ser del mismo tipo.
No utilice adaptadores múltiples ni alargaderas.
Los conductores del cable de conexión eléctrica son de
diferentes colores, según la codificación siguiente:
Azul NEUTRO
Marrón CON CORRIENTE
Verde y amarillo TIERRA
Este electrodoméstico CE cumple la Directiva europea
89/336/EEC, 73/23/EEC y sus enmiendas subsiguientes.
Suministro de agua
● La presión del agua fría debe ser entre 0,05-0,8
Mpa.
● No conecte la lavadora a un calentador de agua
instantáneo de una sola salida.
● La llave de suministro de agua debe estar
accesible cuando la lavadora esté instalada.
● Antes de conectar la manguera de llenado,
compruebe que hay agua en la llave de suministro
de agua que va a utilizar.
42
Es posible que se le
cobre una llamada
al servicio técnico
si el problema con
el electrodoméstico
es el resultado de
una instalación
incorrecta.
Si se dañara el
cable eléctrico de
esta máquina,
debe reemplazarse
con un cable
especial que se
puede obtener
ÚNICAMENTE del
Servicio de
recambios de GIAS.
Una persona
capacitada debe
encargarse de la
instalación.
40003361SPA.qxd 27/06/2005 17:41 Page 42
Page 43

Conexión al suministro
de agua fría
Esta máquina tiene una manguera de entrada con una
férula roscada de 19 mm (3/4”) conectada en el extremo
para ser colocada entre el conector roscado del
electrodoméstico y el suministro de agua.
Sólo utilice la nueva manguera que se incluye para
conectar la máquina, y asegúrese de que las arandelas
estancas estén ubicadas dentro de los conectores de la
manguera.
No reutilice mangueras viejas que estén conectadas a
instalaciones existentes.
No apriete demasiado las conexiones. Es suficiente con
un apriete manual.
No atrape ni deforme la manguera.
1. Conecte el extremo acodado de la manguera
proporcionada en la entrada roscada de la parte
posterior de la lavadora.
La manguera gris se conecta a la entrada roscada
blanca de la lavadora.
2. Apriete el conector con la mano.
3. Conecte los extremos rectos de las mangueras al
suministro de agua; asegúrese de que no estén
enroscadas.
4. Abra el suministro de agua y verifique si hay
alguna pérdida. Si hay una pérdida, cierre el
suministro de agua, desconecte la manguera y
compruebe que las arandelas estancas estén
instaladas. Vuelva a conectar la manguera y abra
el suministro de agua.
Aqua-stop
Algunos modelos se proporcionan con una manguera
especial que tiene una piel doble e incluye una válvula
de agua (A). Caso de reventar la manguera interior, la
válvula cortará el paso de agua automáticamente para
impedir que se produzcan inundaciones. El testigo
luminoso se pone de color rojo (B). Si esto ocurre, corte
el suministro de agua inmediatamente y encargue una
manguera de repuesto del Servicio técnico de Gias.
La instalación es igual que la de una manguera
convencional con el extremo de la válvula de la
manguera aqua-stop conectado al suministro de agua.
43
A
B
40003361SPA.qxd 27/06/2005 17:42 Page 43
Page 44

Conexión de la lavadora al desagüe
Este electrodoméstico debe conectarse según las normas de suministro de agua. La
normativa local de aguas prohíbe la conexión a un desagüe de agua superficial.
Decida qué opción de fontanería le conviene más y siga las instrucciones a
continuación.
Opción 1
Conexión de la manguera de desagüe (sifón de
desagüe)
Instale el soporte en forma de gancho en la manguera de salida. Colóquelo al menos a
800 mm del suelo.
Después de retirar el tapón obturador o de cortar la membrana del sistema de desagüe,
conecte bien la manguera de salida al sistema de desagüe mediante una abrazadera.
Fije el soporte en forma de gancho al menos a 800 mm para evitar que el agua vuelva a
entrar en la lavadora.
44
Todas las lavadoras se prueban con agua antes de salir de la
fábrica, por lo que puede quedar una pequeña cantidad de agua
en el tambor y manguera de desagüe.
Podría producirse un desbordamiento si cualquier parte de la
instalación no se ha completado correctamente.
800 mm
abrazadera
soporte en forma
de gancho
fregadero
manguera de
desagüe flexible
sifón con adaptador
de manguera
40003361SPA.qxd 27/06/2005 17:42 Page 44
Page 45

Opción 2
En un tubo de desagüe
Compruebe que el tubo de desagüe no se encuentre
cerca de una toma de corriente eléctrica.
Instale el soporte en forma de gancho en la manguera
de salida. Instale la manguera en el tubo de desagüe
asegurándose de que la manguera esté al menos a
500 mm del suelo.
Inserte la manguera de salida aproximadamente a
100 mm en el tubo de desagüe.
Colocación del
electrodoméstico en su
lugar
El electrodoméstico pesa mucho, así que tenga cuidado
al moverlo. Recomendamos que lo muevan entre dos
personas para evitar esguinces y posibles lesiones.
● Tenga cuidado de no dañar el suelo al mover la
máquina.
● Al colocarla en su ubicación final, tenga cuidado
de no deformar ni dañar la manguera en la parte
posterior de la máquina.
Ajuste de las patas
Una vez que la máquina esté en su sitio, las patas deben
ajustarse para asegurarse de que esté nivelada. Si la
máquina no está nivelada, puede hacer mucho ruido o
moverse.
Ajuste las patas en las esquinas frontales de la máquina
hasta que esté firme y nivelada.
Cuando lo esté, apriete las tuercas de sujeción de las dos
patas.
45
No arrastre ni
levante la lavadora
por la puerta.
100 mm
500 mm min.
40003361SPA.qxd 27/06/2005 17:42 Page 45
Page 46

Consulte la guía de programas para obtener más
detalles acerca de cómo seleccionar programas.
1. Abra el suministro de agua y verifique si hay
alguna pérdida en la manguera de llenado.
2. Encienda el suministro de energía eléctrica.
3. Seleccione el programa de centrifugado y
luego presione el botón de Start Pausa para
iniciar la máquina. Deje funcionar el programa
durante un minuto y luego cancélelo volviendo a
colocar el selector en la posición OFF. Esto
eliminará la totalidad del agua restante en la
máquina introducida durante las pruebas de
fábrica.
4. Para verificar el llenado de agua fría de la
lavadora:
Seleccione el programa de aclarado y
presione el botón Start Pausa para iniciar la
máquina.
Deje funcionar la lavadora hasta que el agua se
haya evacuado por completo. Verifique que la
salida de desagüe no tenga fugas y que no se esté
desbordando.
5. Apague la máquina al final del ciclo colocando el
mando de programa en la posición PARADA.
6. Seleccione el programa de centrifugado y
presione el botón Start Pausa para iniciar la
máquina. Si la lavadora tarda más de un minuto
en vaciarse, verifique que no se haya deformado
la manguera de desagüe.
Ahora la prueba de instalación ha
finalizado.
Ahora que ha instalado la lavadora correctamente, le
recomendamos que la haga funcionar para asegurarse
de que el tambor esté perfectamente limpio después de
la prueba y el almacenamiento. Seleccione Algodón
Resistentes y ejecute el ciclo completo de la lavadora
utilizando sólo detergente de lavado y agua.
46
Prueba de la instalación
Este programa
tardará
aproximadamente
2 horas en
completarse.
40003361SPA.qxd 27/06/2005 17:42 Page 46
Page 47

Las siguientes recomendaciones están diseñadas para
ayudarle a conseguir los mejores resultados de su
electrodoméstico mientras lo utiliza de la forma más
ecológica y económica. También es importante entender
las prendas que debe evitar en su colada para
garantizar el funcionamiento continuo, seguro y fiable
de su electrodoméstico.
Carga de su lavadora
Para reducir el consumo de energía, agua y detergente,
recomendamos que ponga una carga completa en la
máquina. Es posible ahorrar hasta un 50% de energía si
se lava una carga completa en lugar de dos medias
cargas.
No cargue la lavadora en exceso, ya que reducirá la
calidad del lavado y podría causar daños a la máquina y
la colada.
¿Cuándo realmente es necesario
el prelavado?
¡Sólo con cargas especialmente sucias! Se puede ahorrar
entre un 5 y un 15% de energía si no se selecciona la
opción de prelavado para una colada que no esté
demasiado sucia. Trate previamente las manchas difíciles
con un quitamanchas lavable.
¿Qué temperatura debe utilizar?
El uso de quitamanchas antes del lavado reduce la
necesidad de lavar a temperaturas superiores a 60°C.
El uso de una temperatura de lavado de 40°C puede
ahorrar hasta un 50% de energía.
Colada muy sucia
Para asegurar el mejor rendimiento cuando se lave una
carga especialmente sucia, recomendamos que reduzca
la cantidad de colada que coloca en la máquina. Al
permitir más espacio en el tambor, las prendas
circularán más libremente y se lavarán mejor.
47
Consejos para el lavado
40003361SPA.qxd 27/06/2005 17:42 Page 47
Page 48

Clasificación de la colada
Artículos que evitar
Recomendamos que no lave sujetadores con aro en la
lavadora. Si los aros se salen, podrían dañar la colada y
la lavadora. Si la etiqueta de lavado indica que el
sujetador es lavable a máquina, entonces le
recomendamos que lo coloque en una bolsa de lavado.
Recomendaciones
Siempre siga las instrucciones de lavado de las
etiquetas de las prendas.
Cierre las cremalleras, ate los cordones y cierre los
broches para evitar que la ropa se enrede. Compruebe
que los bolsillos están vacíos y no contienen monedas
ni otros artículos pequeños.
Compruebe que no hay objetos metálicos en la colada,
ya que pueden dañar la ropa y la lavadora.
Coloque los artículos pequeños en una bolsa de lavado.
48
No utilice lave a
máquina artículos
que no tienen
etiqueta de lavado.
No lave artículos
previamente
tratados con
disolventes.
40003361SPA.qxd 27/06/2005 17:42 Page 48
Page 49

Dosificación de detergente
Sólo utilice detergentes que sean aptos para ser usados en una lavadora. Obtendrá los
mejores resultados en el lavado si utiliza las cantidades mínimas de productos químicos,
y si tiene en cuenta el grado de suciedad de la colada así como el tipo de detergente
que selecciona.
La cantidad de detergente a usar depende de lo siguiente:
● Dureza del agua;
según la dureza del agua y el tipo de detergente usado, es posible reducir la
cantidad de detergente.
Cuanto más blanda sea el agua del suministro, menor será la cantidad de
detergente que se requiere.
● Grado de suciedad;
es posible reducir la cantidad de detergente usado según el grado de suciedad.
Utilice menos detergente para artículos que estén menos sucios.
● Cantidad de colada;
es posible reducir la cantidad de detergente cuando se lava sólo una pequeña
cantidad de colada.
Para cargas menores utilice menos detergente.
Las dosificaciones que se indican en el envase de los detergentes para ropa delicada
suelen referirse a un lavado reducido. Siempre siga las instrucciones de dosificación del
envase de detergente.
49
El dosificador
NO supere la dosificación máxima de detergente
COMPARTIMIENTO I
Detergente para prelavado
Dosificación máxima 100 ml
de detergente en polvo
COMPARTIMIENTO II
Detergente para lavado principal
Dosificación máxima
200 ml de detergente
en polvo
COMPARTIMIENTO
Suavizante
Dosificación máxima 200 ml
40003361SPA.qxd 27/06/2005 17:42 Page 49
Page 50

Instrucciones de
dosificación
El cajón de detergente está dividido en
3 compartimientos:
● el compartimiento de la izquierda, con el rótulo
"II", es para el detergente utilizado durante el
lavado principal.
● el compartimiento central, con el rótulo es
para aditivos especiales, como suavizantes,
fragancias, almidón, potenciadores de brillo, etc.
● el compartimiento de la derecha, con el rótulo
"II", es para el detergente utilizado durante el
prelavado.
Dosificación en el tambor
Los detergentes líquidos y algunas pastillas se dosifican
desde el tambor de la lavadora mediante un dispositivo
dosificador correspondiente que se coloca de forma
vertical encima de la colada en la parte posterior del
tambor. Algunas pastillas están diseñadas para colocarse
en el cajón dosificador, compruebe el envase del
detergente para obtener más detalles.
50
No coloque ningún
artículo en el cajón
que no sea
detergente
diseñado para
dosificarse desde el
cajón, ya que
podrían provocar
obstrucciones o
daños.
40003361SPA.qxd 27/06/2005 17:42 Page 50
Page 51

Encendido de la lavadora
La lavadora se enciende seleccionando un programa en el selector de programa. Este
estado se indica por la luz del indicador STOP que parpadea; la luz seguirá parpadeando
hasta que la lavadora comience o se vuelva a colocar en la posición OFF.
Start Pausa
Start
Después de seleccionar el programa y las opciones requeridas, presione el botón Start
Pausa una vez para iniciar la lavadora. La luz STOP dejará de parpadear y la luz START
(MARCHA) se iluminará y se producirá un pequeño retraso al inicio del programa
mientras la máquina configura los parámetros de lavado para el programa seleccionado
y las opciones. Si la duración del programa que ha seleccionado es inferior a 60 minutos,
entonces se iluminará el indicador de tiempo restante. El indicador Seguridad Puerta
también se iluminará unos cuantos segundos después de presionar el botón Start Pause.
51
El panel de control
El selector de programa debe volver a colocarse en la posición OFF
(PARADA) para restablecer los controles entre cada ciclo de lavado.
Pantalla
CHRONOVISION
Indicador de puerta
bloqueada
(Seguridad Puerta)
Start Pausa
Inicio
Diferido
Pre Lavado
Aclarado No
Alérgias
Planchado
Rápido
Selector de
velocidad de
centrifugado
(Centrifugado)
Selector de
temperatura
(Temperatura °C)
Selector de
programa
40003361SPA.qxd 27/06/2005 17:42 Page 51
Page 52

Pausa
Es posible parar el programa en cualquier momento del
ciclo de lavado manteniendo el botón Start Pausa
presionado unos dos segundos. Cuando la lavadora está
en el modo pausado, el tiempo restante del programa
en el indicador CHRONOVISION y los botones de opción
parpadearán. El indicador Seguridad Puerta
permanecerá iluminado durante aproximadamente 2
minutos. La puerta se podrá abrir cuando se apague el
indicador. Para reiniciar el programa, presione el botón
Start Pausa una vez más.
Modo de cancelar y cambiar el
programa
Para cancelar el programa, el selector de programa
debe girarse a la posición OFF.
Seleccione un programa nuevo y comience como se
indica anteriormente.
Indicador de puerta bloqueada
(Seguridad Puerta)
El indicador Seguridad Puerta se ilumina cuando la
puerta está completamente cerrada y la lavadora está
ENCENDIDA.
Cuando se presiona Start Pausa en la lavadora con la
puerta cerrada, el indicador parpadeará un momento y,
a continuación, se iluminará. Si la puerta no está
cerrada, el indicador continuará parpadeando.
Un dispositivo de seguridad especial evita que pueda
abrirse la puerta nada más finalizar el ciclo. Espere 2
minutos después de finalizar el ciclo de lavado y de
haberse apagado la luz de Seguridad Puerta antes de
abrir la puerta. Como medida de seguridad, verifique
que no haya indicios de agua en el tambor. Al final del
ciclo, gire el selector de programa a OFF.
Si el programa está pausado, el indicador Seguridad
Puerta se apagará a los 2 minutos y la puerta se podrá
abrir. Verifique que no haya indicios de agua en el
tambor antes de abrir la puerta.
52
Al iniciar un ciclo
de lavado
subsiguiente, el
selector de
programa debe
volver a colocarse
en OFF antes de
que se seleccione e
inicie el siguiente
programa.
40003361SPA.qxd 27/06/2005 17:42 Page 52
Page 53

CHRONOVISION
Para administrar mejor su tiempo, esta lavadora dispone
de un sistema de indicadores que le mantiene
constantemente informado del tiempo restante de ciclo
y el estado de la función de Inicio Diferido.
Cuando se selecciona un tiempo de secado, la pantalla
CHRONOVISION mostrará el tiempo restante del
programa de lavado cuando se esté realizando el lavado
y el tiempo restante de la fase de secado cuando se esté
realizando el secado.
53
START
60'
30'
15'
STOP
Tiempo restante superior a
60 minutos
Tiempo restante inferior a
60 minutos
Tiempo restante inferior a
30 minutos
Tiempo restante inferior a
15 minutos
Fin del programa
3h
6h
9h
3 horas o menos restantes
antes de que comience el
programa
6 horas o menos restantes
antes de que comience el
programa
9 horas o menos restantes
antes de que comience el
programa
PANTALLA CHRONOVISION
PROGRESO DEL LAVADO
INICIO DIFERIDO
40003361SPA.qxd 27/06/2005 17:42 Page 53
Page 54

Pre Lavado
Esta opción está disponible en los programas de
algodón y fibras sintéticas. El prelavado es automático
en el programa para artículos deportivos. Esta opción es
particularmente útil para cargas con un alto nivel de
suciedad y puede ser utilizada antes de seleccionar el
programa de lavado principal. El detergente para este
programa debería agregarse al primer compartimiento
del cajón del jabón que está marcado con una letra “I”
(Por favor consulte la sección de Cajón del detergente
del manual). Recomendamos que sólo utilice el 20% de
la cantidad de detergente para lavado principal.
Inicio Diferido
Esta opción está disponible para retrasar el inicio del
ciclo de lavado hasta 9 horas. La selección del tiempo se
completa presionando el botón Inicio Diferido, la
pantalla CHRONOVISION indicará el tiempo
seleccionado. Cuando haya seleccionado el retraso
correcto, presione el botón Start Pausa para iniciar el
ciclo.
Aclarado No Alérgias
Esta opción está disponible en los programas de
algodón. La opción aumenta el número de aclarados a
cinco (incluido el aclarado con suavizante final). Esto
puede ayudar a evitar la irritación de la piel debido a
los residuos del detergente para las personas que tienen
piel particularmente sensible. También se recomienda
que seleccione el botón Aclarado No Alérgias cuando se
laven tejidos con un alto nivel de suciedad, ya que se
necesita una gran cantidad de detergente, o cuando la
carga de lavado contiene material de toalla que tiende
a retener el detergente.
54
Opciones de lavado
Las opciones deben
seleccionarse
ANTES de
presionar el botón
Start Pausa.
40003361SPA.qxd 27/06/2005 17:42 Page 54
Page 55

Planchado Rápido
Esta opción sólo está disponible en los programas de fibras sintéticas, fibras acrílicas,
Woolmark y seda.
55
Programa
Sintéticos
Acrílicos
Lana
Seda
Función de planchado
rápido
El programa se completa
con un centrifugado corto a
muy baja velocidad.
La lavadora se para durante
la fase final del aclarado
con los indicadores de
opción parpadeando y la
carga se mantiene dentro
del agua en el tambor. Esto
reduce las arrugas y permite
un planchado más fácil.
La lavadora se para durante
la fase final del aclarado
con los indicadores de
opción parpadeando y la
carga se mantiene dentro
del agua en el tambor. Esto
reduce las arrugas y permite
un planchado más fácil.
La lavadora se para durante
la fase final del aclarado
con los indicadores de
opción parpadeando y la
carga se mantiene dentro
del agua en el tambor. Esto
reduce las arrugas y permite
un planchado más fácil.
Acción para completar el ciclo
Si se requiere un ciclo de
centrifugado, seleccione el
centrifugado adecuado (consulte la
Guía de programas).
Pulse el botón de “Planchado
Rapido” para reanudar el programa.
Ahora la lavadora eliminará el agua
restante y se terminará el programa
con un centrifugado corto. Por
último, el programa realiza una
breve acción de dar vueltas para
separar las prendas de la colada.
Presione el botón “Planchado
Rapido” y la lavadora eliminará el
agua y completará el ciclo con un
centrifugado corto.
Presione el botón “Planchado
Rapido” y la lavadora eliminará el
agua para completar el ciclo. La
carga de ropa no se centrifugará y,
por lo tanto, estará muy mojada.
40003361SPA.qxd 27/06/2005 17:42 Page 55
Page 56

Selector de temperatura
(Temperatura °C)
La lavadora está equipada con un mando selector de
temperatura para establecer la temperatura deseada. Se
puede ahorrar mucha energía si se usan las
temperaturas más bajas del indicador entre y 40°C.
Seleccionando la posición , la temperatura de
lavado está limitada a la temperatura de entrada del
agua, reduciendo aún más el consumo de energía.
Recomendamos no usar jamás temperaturas superiores
a las indicadas en las etiquetas de lavado de las prendas.
En el caso de haberse ajustado inadvertidamente la
temperatura en una superior a la del programa
seleccionado, (véase el cuadro Guía de programas), la
lavadora la reducirá automáticamente para proteger los
tejidos.
Selector de velocidad de
centrifugado (Centrifugado)
Ajustando el mando de control se puede reducir la
velocidad de centrifugado máxima del programa
seleccionado para satisfacer sus necesidades y ayudar a
reducir la formación de arrugas en los tejidos. Gire el
mando selector Centrifugado hasta que el indicador
quede alineado con la velocidad de centrifugado
deseada. La velocidad de centrifugado máxima variará
según la especificación de la lavadora.
56
40003361SPA.qxd 27/06/2005 17:42 Page 56
Page 57

Funciones automáticas
Capacidad variable automática
(Media carga)
La lavadora está equipada con un sistema de autoajuste
de nivel de agua. Este sistema permite que la máquina
utilice la cantidad de agua óptima, necesaria para lavar
y aclarar la colada de una carga en particular. Esto tiene
como resultado una reducción en el consumo de agua y
electricidad sin perjudicar el lavado y aclarado. La
cantidad de agua y electricidad utilizadas siempre serán
aptas para la carga de ropa.
La lavadora automáticamente asegura resultados de
lavado excelentes a un coste mínimo, y al mismo tiempo
respeta al medio ambiente.
Protección contra desequilibrios
Este modelo está equipado con un sensor electrónico
que verifica si la carga está correctamente equilibrada.
Si la carga está ligeramente desequilibrada, la máquina
la reequilibrará automáticamente para que se pueda
realizar un centrifugado normal.
Si después de varios intentos no se restaura el
equilibrio, debe utilizarse una velocidad de
centrifugado inferior.
Si las cargas están muy desequilibradas, se anulará la
fase de centrifugado. Esto ayuda a limitar las
vibraciones, reducir los ruidos y mejorar la fiabilidad y la
vida útil de la lavadora.
57
40003361SPA.qxd 27/06/2005 17:42 Page 57
Page 58

Para manipular los distintos tipos de tejido y su nivel de suciedad en la colada, la
lavadora tiene distintos grupos de programas según el tipo de lavado, la temperatura,
las velocidades de centrifugado y la duración (consulte la Guía de programas).
Algodón
Los programas están diseñados para lograr el máximo lavado y aclarado posibles. Con
sus ciclos de centrifugado intermedios, se garantiza que la colada quede perfectamente
aclarada. El ciclo de centrifugado final asegura que la colada sea centrifugada para
secarse en la mayor medida posible a la velocidad máxima.
Sintéticos y tejidos mixtos
El rendimiento del lavado y aclarado se optimiza por medio de las velocidades de
rotación del tambor y los niveles de agua. El centrifugado de acción suave minimiza la
formación de arrugas.
Delicados
Éste es un nuevo concepto en el mundo del lavado, con un ciclo que comprende
períodos alternos de actividad y pausa, particularmente apto para lavar tejidos muy
delicados. Tanto el lavado como el aclarado se realizan utilizando un alto nivel de agua
para brindar los mejores resultados.
Aclarado, centrifugado y desagüe
Hay disponibles programas individuales para el aclarado, (incluida la posibilidad de
añadir suavizante), el centrifugado, a 800 rpm o menos si se elige en el selector
Centrifugado y el desagüe del agua de la lavadora.
58
Selector de programa
40003361SPA.qxd 27/06/2005 17:42 Page 58
Page 59

Programas especiales
Lana
Programa dedicado a lavar tejidos con el símbolo
Woolmark en la etiqueta. El ciclo comprende períodos
alternos de actividad y pausa. Tanto el lavado como el
aclarado se realizan utilizando un alto nivel de agua
para brindar los mejores resultados. Este programa
alcanza una temperatura máxima de 30°C y finaliza con
3 aclarados, uno con suavizante, y un centrifugado
corto.
Seda
Esta lavadora también cuenta con el ciclo de programa
de seda y lavado a mano suave. Este programa permite
un ciclo de lavado completo para prendas especificadas
como “Sólo lavado a mano” y prendas hechas de seda o
en cuya etiqueta se especifique “Lavar como seda”.
Este programa alcanza una temperatura máxima de
30°C y finaliza con 3 aclarados, uno con suavizante y sin
centrifugado final.
Sport
Los artículos deportivos tienen su propio programa de
lavado. Esta lavadora cuenta con un programa especial
para ropa deportiva.
Está especialmente diseñado para mezclar tejidos
deportivos mixtos que no pueden ser lavados con
programas más calientes y está diseñado para quitar la
suciedad y las manchas creadas como consecuencia de la
participación en actividades deportivas.
Este programa comienza con un prelavado frío que
descompone y afloja cualquier exceso de suciedad y
luego lava a una temperatura tibia de 30°C, aclara dos
veces (una vez es para el suavizante) y centrifuga
suavemente para cuidar mejor su ropa delicada con un
alto nivel de suciedad.
El detergente para el prelavado del programa debe
añadirse al compartimiento I y el detergente para el
lavado principal al compartimiento II. Siga las
instrucciones indicadas en la sección “El dosificador”.
59
40003361SPA.qxd 27/06/2005 17:42 Page 59
Page 60

Lavado Clase A 59’
Este programa especialmente diseñado mantiene el
rendimiento del lavado de alta calidad identificado con
la clasificación “A” al mismo tiempo que reduce en gran
medida el tiempo de lavado. El programa está diseñado
para una carga máxima de 3,5 kg y sirve para tejidos de
algodón y artículos que destiñen a 60°C. El programa
finaliza con 2 aclarados y una secuencia de centrifugado
de alta velocidad.
Programas diarios
(Lavado Rápido)
Manteniendo un rendimiento del lavado excepcional,
estos programas le permiten saber por adelantado el
tiempo necesario para la colada diaria. De hecho, esta
lavadora está equipada con dos programas diarios
rápidos a 40°C, que se diseñaron para prendas poco
sucias y cargas medianas o pequeñas.
Rápido 44'
Ciclo de lavado completo (lavado, aclarado y
centrifugado), capaz de lavar en aproximadamente
44 minutos adecuado para:
● una carga máxima de 3,5 kg
● prendas poco sucias (algodón y tejidos mixtos)
Con este programa, le recomendamos que reduzca la
dosificación de detergente (comparada con la normal)
para evitar desperdiciarlo.
Rápido 29'
Ciclo de lavado completo (lavado, aclarado y
centrifugado), capaz de lavar en aproximadamente
29 minutos adecuado para:
● una carga máxima de 2,5 kg
● prendas poco sucias (algodón y tejidos mixtos)
Con este programa, le recomendamos que reduzca la
dosificación de detergente (comparada con la normal)
para evitar desperdiciarlo.
60
40003361SPA.qxd 27/06/2005 17:42 Page 60
Page 61

61
Guía de programas
Los datos de la etiqueta de energía se basan en el programa “Colores” probado según la
norma CENELEC EN60456
AlgodónSintéticos Tejidos
mixtos
Delicados
Programas especiales
Algodón
Resistentes
Colores
Delicados
AA 40°C
Sintéticos
Acrílicos
Aclarado
Centrifugado
Desagüe
Lana
Seda
Sport
Lavado Clase A
59'
Rápido
44'
Rápido
29'
Tamaño
de carga
máxima (kg)
7,5
7,5
7,5
7,5
3
3
-
-
-
1,5
1,5
3
3,5
3,5
2,5
Tipo de tejido
Algodón, hilo
Algodón, fibras
mixtas que no destiñen
Algodón, tejidos mixtos,
tejidos de color que destiñen
Algodón, tejidos mixtos
y fibras sintéticas
Tejidos mixtos
y fibras sintéticas
Fibras sintéticas, tejidos
acrílicos y tejidos mixtos de
color
Tejidos mixtos
Tejidos mixtos.
Velocidad de centrifugado
de 800 rpm máx.
Tejidos mixtos
Lana lavable a
máquina
Sedas y tejidos con la etiqueta
“Sólo lavado a mano”
Tejidos mixtos
Algodón, fibras
mixtas que no destiñen
Prendas de algodón poco
sucias y tejidos mixtos
Prendas de algodón poco
sucias y tejidos mixtos
Temp.
máxima del
agua (°C)
90
60
40
40
50
40
-
-
-
40
30
30
60
40
40
Programa
40003361SPA.qxd 27/06/2005 17:42 Page 61
Page 62

En esta sección se resumen los puntos principales al
completar un ciclo de lavado. Para explicaciones
detalladas de funciones, opciones y detalles de la
lavadora, consulte la sección relevante del manual de
instrucciones.
Preparación de la colada
Seleccione y clasifique la colada según las etiquetas de
cuidado de cada prenda. Siempre verifique las etiquetas
de cuidado de la ropa.
Carga de la colada
Abra la puerta.
Ponga la colada en la lavadora. Cierre la puerta
empujándola hasta que oiga un ruido de “clic”,
asegurándose de que ninguna prenda esté obstruyendo
la cerradura ni la junta de goma de la puerta.
Carga de detergente en la
máquina
Abra el cajón, seleccione el detergente e introduzca la
cantidad recomendada.
No sobrepase la dosificación indicada más adelante
Vuelva a cerrar el cajón.
62
Un lavado típico
Cantidad máxima
de polvo/líquido
100 ml
200 ml
200 ml
Lavado
Prelavado (opción)
Lavado principal
(todos los programas)
Suavizante
Compartimiento
I
II
Los detergentes
líquidos y algunos
detergentes
concentrados en
polvo y pastillas
que se colocan
directamente en el
tambor deben
ponerse en el
dispositivo
dosificador
correspondiente.
40003361SPA.qxd 27/06/2005 17:42 Page 62
Page 63

Remítase a la Guía de programas o a las descripciones
que aparecen en la parte frontal de la lavadora para
seleccionar el programa más adecuado.
El programa se selecciona girando el selector de
programa y alineando el nombre del programa con el
indicador.
Compruebe que el indicador STOP esté parpadeando, si
no compruebe que la puerta esté bien cerrada.
Verifique que la llave de paso esté abierta y que la
manguera de desagüe esté colocada correctamente.
Seleccione las opciones de lavado
requeridas
Inicio del ciclo de lavado
Presione el botón Start Pausa. El indicador Seguridad
Puerta y la luz START se iluminan, y dentro de unos
segundos comenzará el programa.
No intente abrir la puerta cuando el indicador
Seguridad Puerta esté encendido.
No abra el cajón dosificador durante el programa de
lavado.
Si desea parar el programa, presione el botón Start
Pausa y después de 2 minutos podrá abrir la puerta.
Para cancelar el programa, el selector de programa
debe girarse a la posición OFF. Después de cancelar el
programa, se puede seleccionar uno nuevo.
Una vez que el programa ha
finalizado:
Espere a que se libere la puerta. El indicador Seguridad
Puerta se apagará después de aproximadamente 2
minutos y entonces se podrá abrir la puerta.
Apague la lavadora girando el selector de programa a
la posición OFF antes de seleccionar el siguiente
programa (esta acción restablece la memoria de la
máquina).
Abra la puerta.
Saque la colada.
Desconecte el enchufe de la toma de corriente general y
corte el suministro de agua después de cada uso.
63
Selección del programa de lavado
40003361SPA.qxd 27/06/2005 17:42 Page 63
Page 64

La lavadora necesita muy poco mantenimiento, pero
prestando atención a unos cuantos detalles garantizará
su rendimiento continuado.
No utilice limpiadores abrasivos, estropajos, limpiadores
con base disolvente ni ceras; con pasar un trapo
húmedo por el exterior de la lavadora basta.
Limpieza del dosificador de jabón
1. Limpie los compartimientos periódicamente para
eliminar los restos de detergentes y
acondicionadores.
2. Para ello sólo necesita tirar del cajón hacia afuera
con firmeza, pero sin forzarlo.
3. Limpie los compartimientos y la tapa del sifón con
agua corriente templada.
4. Limpie el hueco del dosificador de jabón para
quitar cualquier residuo de detergente en polvo
5. Vuelva a poner el cajón en su sitio.
Limpieza del cristal de la puerta
Regularmente limpie el cristal de la puerta con un trapo
húmedo. Una acumulación de suciedad y residuos del
agua puede resultar en que el agua se escape por la
puerta.
No utilice limpiadores abrasivos ya que pueden rayar la
superficie.
64
Limpieza y mantenimiento
de rutina
40003361SPA.qxd 27/06/2005 17:42 Page 64
Page 65

Limpieza del filtro
La lavadora está equipada con un filtro especial para
evitar que artículos como monedas, botones, etc.
obstruyan la manguera de desagüe. Estos artículos
pueden ser recuperados:
1. Desmonte la placa de arranque tirando
suavemente del fondo hacia afuera en dirección
ascendente.
2. Utilice la placa frontal inferior para recoger el
agua que aún quede en el filtro.
3. Utilice un destornillador para aflojar el tornillo
que sostiene el filtro, gire el filtro en sentido
contrario a las agujas del reloj hasta que se
detenga, extráigalo y límpielo. Después de
limpiarlo, vuelva a montarlo siguiendo las
instrucciones que aparecen arriba en orden
inverso.
Vuelva a colocar la placa frontal inferior.
Recomendamos que se limpie el filtro con frecuencia,
como mínimo una vez al mes.
Lavado de mantenimiento
El uso de pequeñas cantidades de detergente y
programas de lavado a baja temperatura puede
provocar la acumulación gradual de grasa, suciedad y
cal. Con el tiempo, estos depósitos pueden dañar la
colada y la lavadora. También pueden hacer que la
lavadora huela mal. Le recomendamos que realice un
lavado de mantenimiento un par de veces al año para
mantener la lavadora y las tuberías limpias y sin
depósitos. Simplemente seleccione el programa
Algodón Resistentes sin ninguna carga y con la cantidad
normal de detergente.
Este lavado tardará
aproximadamente 2 horas en
completarse.
65
40003361SPA.qxd 27/06/2005 17:42 Page 65
Page 66

Causa posible de...
Defectos que puede solucionar usted mismo
Antes de llamar al Servicio técnico de GIAS para obtener asesoramiento técnico, lea
detenidamente la siguiente lista. Se cobrará el servicio técnico si resulta que la máquina
funciona correctamente, o si ha sido instalada o utilizada incorrectamente. Si el
problema continúa después de completar la verificación recomendada, por favor llame
al Servicio técnico de GIAS para recibir asistencia telefónica.
La lavadora no se pone en marcha…
● Cierre la puerta. Compruebe que esté conectada a la electricidad. Seleccione un
programa y presione Start Pausa. Compruebe si la luz de bloqueo de la puerta está
iluminada.
Si no lo está, compruebe lo siguiente:
1. ¿Está conectada la lavadora al suministro de energía?
2. ¿Funciona bien el suministro de energía? Compruebe otro enchufe.
3. ¿Se ha quemado el fusible de la lavadora? En caso afirmativo, cámbielo.
● Si la luz de puerta bloqueada está iluminada y la lavadora no se pone en marcha,
significa que no se puede llenar de agua; compruebe lo siguiente:
1. Compruebe que el indicador de programa esté correctamente alineado con el
programa.
2. ¿Está abierto el suministro de agua de la lavadora?
3. ¿Están las mangueras enroscadas u obstruidas de alguna manera?
El agua no se desagua…
● Compruebe que la manguera de desagüe no esté bloqueada ni enroscada.
● ¿Está la manguera de desagüe instalada correctamente? Si está conectada al
desagüe del fregadero, asegúrese de haber cortado la membrana o de haber
quitado el tapón de la unidad de desagüe de debajo del fregadero.
● Asegúrese de que no haya objetos extraños en el filtro. De haberlos, límpielos.
Si ha encontrado alguno de los problemas anteriores, soluciónelo y seleccione un ciclo
de centrifugado para expulsar el agua.
● ¿Está seleccionada la función “Planchado Rapido”? En su caso, deseleccione la
opción y el programa se completará (consulte la página 55 para obtener una
explicación completa de la función).
66
Resolución de problemas
40003361SPA.qxd 27/06/2005 17:42 Page 66
Page 67

Hay agua en el suelo en las inmediaciones de la
lavadora…
● ¿Está bien apretada la manguera de llenado? En su caso, cambie las arandelas de
goma y vuelva a apretarla.
● ¿Está obstruido el tubo de desagüe o el desagüe doméstico? En su caso,
desatásquelo usted mismo o llame a un fontanero.
● ¿Hay ropa o suciedad entre la junta y el cristal de la puerta? Asegúrese de que la
junta y el cristal de la puerta estén limpios y que no haya ropa al cargar la lavadora.
La lavadora no centrifuga…
● ¿No se ha expulsado el agua de la lavadora? Compruebe los puntos resaltados
anteriormente.
● ¿Ha seleccionado una opción que cambia el perfil de centrifugado (“Planchado
Rapido” o ha cambiado la velocidad de centrifugado en el selector)? Compruebe
la función en la descripción de los controles.
● ¿Está desequilibrada la carga? Para reducir el ruido y las vibraciones, así como para
mejorar la fiabilidad y la vida útil de la lavadora, ésta viene equipada con un
sensor electrónico que detecta si la carga no está equilibrada. Para mejorar el
rendimiento del centrifugado, la carga se puede redistribuir manualmente al final
del ciclo para volver a centrifugarla.
La lavadora hace mucho ruido o vibra demasiado
durante el ciclo…
● ¿Se ha quitado por completo el sistema de transporte? Compruebe que se haya
retirado de la lavadora la ménsula y el embalaje de poliestireno.
● ¿Hay elementos sueltos en los bolsillos de la ropa que puedan hacer ruido en el
tambor y provocar daños?
● ¿Está desequilibrada la carga? Detenga el programa, vuelva a distribuir la carga y
comience de nuevo.
El programa tarda demasiado…
● Algunos programas tardan mucho tiempo (más de 2 horas). Una baja presión del
agua puede aumentar la longitud del programa.
La puerta no se abre…
● ¿Ha terminado el programa?
¿Está encendida la luz STOP? De lo contrario, el programa no se ha completado.
¿Se ha apagado la luz Seguridad Puerta? De lo contrario, espere un par de
minutos hasta que se apague la luz y entonces podrá abrir la puerta.
● ¿Ha terminado el programa pero la puerta sigue bloqueada? La luz START y Pre
Lavado parpadearán de forma intermitente indicando que el suministro de agua se
ha interrumpido durante el ciclo de lavado. Apague la lavadora para restablecerla y
esto le permitirá abrir la puerta.
67
40003361SPA.qxd 27/06/2005 17:42 Page 67
Page 68

● Si queda agua en el tambor, consulte la sección “El agua no se desagua…” que
aparece arriba.
Problema con el dosificador…
● No se ha eliminado todo el detergente.
1. Compruebe que la llave del suministro de agua esté completamente abierta.
2. Compruebe que la manguera de entrada no esté enroscada.
● El cajón dosificador no se cierra correctamente.
1. Compruebe que el cajón esté bien alineado
2. Compruebe que el cajón no esté atascado de detergente (consulte Limpieza y
mantenimiento de rutina)
● Sale vapor del dosificador.
La lavadora está diseñada para ventilarse por el cajón, no debe preocuparse por
esto.
Recuerde que es posible que se le cobre la llamada al servicio técnico si el problema con
el electrodoméstico es el resultado de una instalación o uso incorrectos.
Nota:
El uso de detergentes ecológicos, sin fosfatos (verifique la información del detergente
en el envase) puede producir los siguientes efectos:
● El agua de descarga del aclarado puede ser más turbia debido a la presencia de un
polvo blanco (zeolitas) que se encuentra suspendido, pero esto no causa ningún
efecto adverso sobre el aclarado.
● Presencia de polvo blanco sobre la ropa lavada después del lavado, la cual no es
absorbida por el tejido y no altera el color de la misma.
● La presencia de espuma en el agua de aclarado final no es necesariamente un
indicador de un aclarado deficiente. Llevar a cabo más ciclos de aclarado no tiene
sentido en estos casos.
68
40003361SPA.qxd 27/06/2005 17:42 Page 68
Page 69

Corte de suministro de
energía eléctrica
Si se produce un corte de suministro de energía
eléctrica, el ciclo de lavado será interrumpido, y se
suspenderán tanto el programa de lavado como sus
funciones. Cuando se reestablezca el suministro de
energía eléctrica, tanto el programa de lavado como sus
funciones se reanudarán desde el mismo punto hasta
finalizar el programa.
Durante un corte de suministro eléctrico, se puede
expulsar el agua y sacar la carga de la lavadora de la
siguiente manera:
1. Apague la máquina en el mando de control y el
suministro de energía eléctrica. Retire el enchufe
de la toma de corriente general.
2. Mueva la máquina con cuidado, de manera que
resulte accesible su parte posterior. Siga las
precauciones de seguridad que recomendamos en
la sección Observaciones de seguridad de este
manual.
3. Desenganche la manguera de desagüe del panel
posterior de la máquina y baje la manguera a un
balde en el suelo. Cuando el balde esté lleno,
levante el extremo de la manguera de desagüe a
una altura mayor a la parte superior del
electrodoméstico para detener el caudal de agua.
Vacíe y vuelva a colocar el balde, y siga
desaguando la lavadora hasta que esté vacía.
4. Una vez que la máquina esté completamente
desaguada, enganche la manguera a la parte
posterior de la máquina. Abra la puerta y saque la
ropa.
La puerta se puede abrir aproximadamente 2 minutos
después del corte del suministro eléctrico.
No fuerce la puerta para abrirla.
69
40003361SPA.qxd 27/06/2005 17:42 Page 69
Page 70

Page 71

Page 72

40003361
40003361.qxd 27/06/2005 17:18 Page 36
 Loading...