

Page 1
CORDLESS BACKPACK
USER MANUAL
For use with model CH93619.
IMPORTANT:
ASSEMBLY AND USE. THIS PRODUCT IS
INTENDED FOR COMMERCIAL USE ONLY.
READ CAREFULLY BEFORE
Page 2

Welcome.
Thank you for choosing a Hoover® Commercial product.
IF YOU NEED ASSISTANCE
Please call 1-888-768-2014 (Mon-Fri 8am-5pm EST) to speak with a customer
service representative; or visit our website at HooverCommercial.com.
2
Page 3

Table of Contents
Safety Instructions 4-5
Product Features 6-7
Getting Started 8
Assembling Wand & Attaching The Tools 8
Harness Ergonomics & Height Adjustment 9
Using Your MPWR
Wearing the MPWR
MPWR
™
40v Battery & Charger 12-13
Maintenance 14
How To Replace The Filter Bag 15
Filters 16-17
Troubleshooting 18
™
40v Cordless Backpack 10
™
40v Backpack Vacuum 11
Warranty 19
Español 21
Français 39
3
Page 4

IMPORTANT SAFETY INSTRUCTIONS
SAVE THESE INSTRUCTIONS!
IMPORTANT: READ CAREFULLY BEFORE ASSEMBLY AND USE. WHEN USING AN ELECTRICAL
APPLIANCE, BASIC PRECAUTIONS SHOULD ALWAYS BE FOLLOWED, INCLUDING THE FOLLOWING:
READ ALL INSTRUCTIONS BEFORE USING THIS APPLIANCE.
WARNING:
TO REDUCE THE RISK OF FIRE, ELECTRIC SHOCK, OR INJURY:
NEVER EXPOSE YOUR BATTERY PACK, VACUUM CLEANER, OR CHARGER TO WATER,
MOISTURE, OR FLUIDS, INCLUDING BUT NOT LIMITED TO CORROSIVE OR CONDUCTIVE
FLUIDS, OR ALLOW FLUIDS TO FLOW INSIDE THESE ITEMS.
Corrosive or conductive uids, such as salt water, chlorine, certain industrial chemicals, and bleach or bleach containing
products, etc. , can cause a short cir cuit in the bat tery pack . If your bat tery pack is exposed to a cor rosive or conductive uid , do
not at tempt to use or charge the battery pack and immediately perf orm the follow ing steps:
Wear appropriate personal protective equipment, including eye protection and rubber gloves.
Place your exposed battery pack in a large bucket , such as a 5 gallon or similar bucket, and ll th e bucket with r egular tap water.
Do not place more than t wo packs in the bucket.
Loca te the bucket outdoors in an area inaccessible to children and pet s and away from all buildings, gar ages/sheds, st ructure s,
vehicles, and combustible/ammable materials.
Leave the battery pack(s) in the bucket lled wit h tap water and call Cus tomer Ser vice at 1-8 88-768-2 014 for addit ional
instruct ions on the proper disposal of the exposed ba ttery pack(s).
•
Fully assemble before operating.
•
Do not use the unit, store or charge battery outdoors or on wet surfaces. Do not allow charger to get wet.
•
The charger is for indoor use only. Be sure to always keep the battery and charger in a dry place.
•
Do not allow to be used as a toy. Not intended for use by children age 12 and under. Close supervision is necessar y when used near
children. To avoid injury or damage, keep children away from product, and do not allow children to place ngers or other objects into
any openings.
•
Use only as described in this manual. Use only Hoover Commercial’s recommended att achments and products.
•
Do not use charger with damaged cord or plug. If appliance or charger is not working as it should, has been dropped, damaged, left
outdoors, or dropped into water, call customer service at 1.888.76 8.2014 prior to continuing use.
•
Do not pull or c arry charger by cord, use cord as a handle, close a door on cord, or pull cord around sharp edges or corners. Do not
place product on cord. Do not run appliance over cord. Keep cord away f rom heated sur faces.
•
Do not unplug charger by pulling on cord. To unplug charger, grasp the plug, not the cord.
•
Do not handle charger — including charger plug and char ger terminals, or appliance — with wet hands.
•
Do not incinerate the charger, battery, or appliance even if it is severely damaged. The batteries can explode in a re.
•
Do not put any objec t into ventilation openings. Do not use with any opening blocked; keep free of dust, lint, hair, and any thing that
may reduce air ow.
•
Dress properly. Do not wear loose clothing or jewelry. Contain long hair. Keep hair, loose clothing, ngers, and all parts of body
away fr om openings and moving par ts. Loose clothing, jewelry, or long hair can be caught in internal moving parts.
•
Use extra care when cleaning on stairs. To avoid personal injury or damage, and to prevent the cleaner from falling, always place
cleaner at bottom of stairs or on oor. Do not place cleaner on stairs or furniture, as it may result in injury or damage.
•
This product includes rechargeable lithium-ion batteries. Do not expose bat teries to high temperatures, as they may catch re and/
or explode.
•
Do not expose battery to cr ushing, incineration or similar actions.
•
Do not dispose of batter y in a re or trash compactor. See batter y disposal section for directions.
•
Do not at tempt to disassemble battery.
•
Unplug the charger from the outlet before any routine cleaning or maintenance.
•
Leaks f rom batter y cells can occur under extreme conditions. If any liquid gets on the skin wash quickly with soap and water. If any
liquid gets into the eyes, do not rub eyes, immediately ush them with clean water continuously for a minimum of 15 minutes. Seek
medical at tention immediately.
•
Recharge only with the charger (Hoover Commercial Part #CH 07150) supplied by Hoover Commercial to recharge. A charger that is
suitable for one t ype of battery pack may cr eate a risk of injury and re when used with another battery pack.
•
Use only the battery (Hoover Commercial Par t #CH17360) supplied by Hoover Commer cial. Use of any other battery p acks may
create a risk of injur y and re.
•
Do not touch or insert objects into battery pack or charger terminals.
•
Do not at tempt to shor t circuit the bat tery or char ger terminals.
4
Page 5

•
Do not use to pick up ammable or combustible liquids, such as gasoline, or ne wood sandings, or use in areas where they may be
present.
•
NEVER vacuum materials that are burning or smoking, such as hot coals, cigaret te butts, matches, or hot ashes etc.
•
Do not use withou t Filters and/or Dust Bag in place.
•
P revent unintentional starting. Ensure the s witch is in the of f-position before connecting to bat tery pack , picking up or carrying the
appliance. Carr ying the appliance with your nger on the switch or energizing appliance that has the switch on invites accidents.
•
A lways remove the bat tery pack from the appliance before making any adjustments, changing accessories, s toring produc t,
cleaning or when not in use. Removing batter y pack will prevent accidental starting that could cause serious personal injury.
•
W hen battery pack is in use, keep it away from other metal object s, like paper clips, coins, keys, nails, screws, or other small metal
object s, that can make a connection from one terminal to another. Shor ting the battery terminals together may cause burns or a
re.
•
Under abusive conditions, liquid may be ejected from the b attery; avoid contact. If contact accidentally occurs, ush with water. If
liquid cont acts eyes, additionally seek medical help. Liquid ejected from the batter y may cause irritation or burns.
•
Do not use a battery pack or appliance that is damaged or modied. Damaged or modied batteries may exhibit unpredictable
behavior resulting in re, explosion or risk of injur y.
•
Do not exp ose batter y pack or appliance to re or excessive temperature. Exposure to re or temperature above 265°F (130°C) may
cause explosion.
•
F ollow all charging instructions and do not charge the battery pack or appliance outside of the t emperature r ange specied in the
instructions. Charging improperly or at temperatures out side of the specied range may damage the battery and increase the risk
of re.
•
Have ser vicing performed by a qualied repair person using only identical replacement par ts. This will ensure that the safety of the
product is maintained.
•
Do not modify or attempt to repair the appliance or the bat tery pack except as indicated in the instructions for use and care.
CAUTION: TO REDUCE THE RISK OF DAMAGE:
•
Avoid picking up hard, sharp objects with this product, as they may cause damage.
•
Do not expose machine to freezing temperatures.
•
Do not use sharp objects to clean out hose as they can cause damage.
WARNING: TO REDUCE THE RISK OF ELECTRIC SHOCK, THE CHARGER HAS
A POLARIZED PLUG (ONE BLADE IS WIDER THAN THE OTHER). THIS PLUG WILL FIT IN A
POLARIZED OUTLET ONLY ONE WAY. IF THE PLUG DOES NOT FIT FULLY IN THE OUTLET,
REVERSE THE PLUG. IF IT STILL DOES NOT FIT, CONTACT A QUALIFIED ELECTRICIAN TO
INSTALL THE PROPER OUTLET. DO NOT CHANGE THE PLUG IN ANY WAY.
SAFETY INSTRUCTIONS
BATTERY DISPOSAL WARNING: RISK OF EXPLOSION OR EXPOSURE TO TOXIC
MATERIAL.
CAUTION:
disassemble, heat above manufacturer’s maximum temperature limit (40°C/104°F), or incinerate. Replace battery with Hoover
Commercial Batter y Part #CH17360 only. Use of another bat tery may present a risk of re or explosion. Dispose of used battery
promptly. Keep away from children. Do not disassemble and do not dispose of in re. Do not at tempt to disassemble the battery
or remove any component projecting from the batter y terminals. The battery and charger have no user ser viceable parts. Fire or
injury may result. Prior to disposal, protect exposed terminals with heavy insulating tape to prevent shorting.
LITHIUM-ION BATTERIES:
sound manner. The EPA certied RBRC Battery Recycling Seal on the lithium-ion (Li-ion) batter y indicated Techtronic
Industries, a corporate afliate of Hoover Commercial, is voluntarily participating in an industr y program to collect
and recycle these bat teries at the end of their useful life, when taken out of service in the United States or C anada.
The RBRC program provides a convenient alternative to placing used Li-ion batteries into the trash or the municipal
waste stream, which may be illegal in your area. Please visit ww w.rbrc.org/call2recycle/
for information on Li-ion battery recycling and disposal bans/restrictions in your area.
Hoover Commercial involvement in this program is part of our commitment to preser ving our
environment and conserving our natural resources.
The batter y used in this device may present a risk of re or chemical burn if mistreated. Do not
The batter y must be collected, recycled or disposed of in an environmentally
5
Page 6
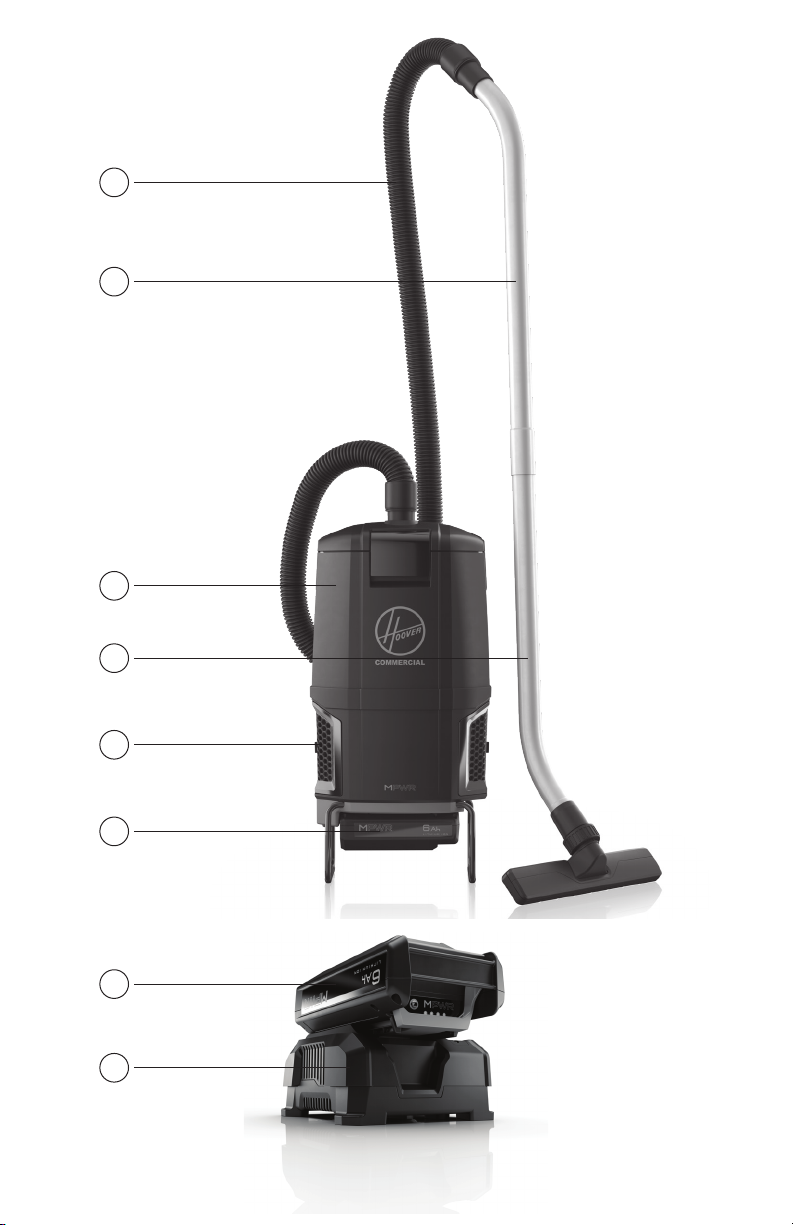
Product Features
A
Hose
B
Upper Wand
C
Vacuum Assembly
•
Allergen Filter Bag
• Cloth Filter Bag
• HEPA Media Filter
D
Lower Wand
E
Final Filters
•
HEPA Media Filters
•
Hexaguard™ Filters
F
MPWR™40V Li-ion Battery*
G
MPWR™40V Charger*
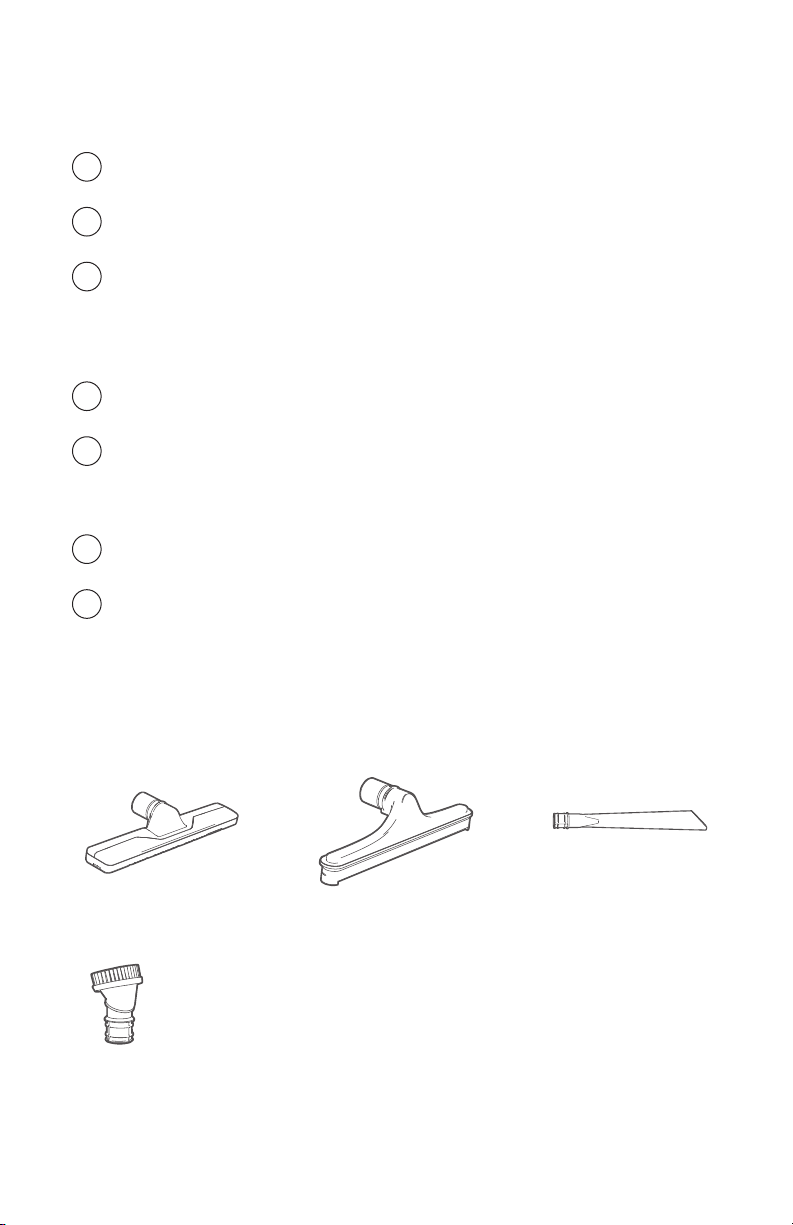
Tools
Ca rpet Tool Hard Floor Tool
Dusting Brush
6
Crevice Tool
*SOL D SEPARAT ELY
Page 7
PRODUCT FEATURES
A
B
C
D
E
F
F
G
7
Page 8
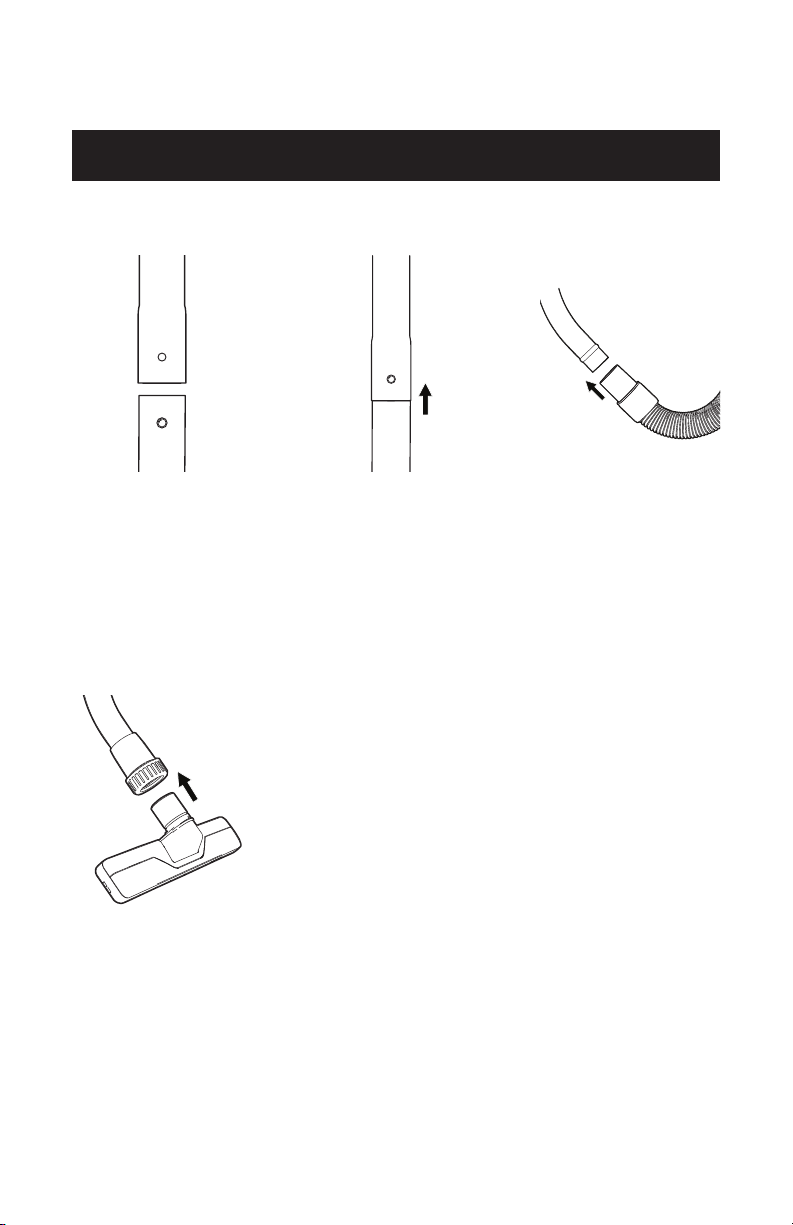
Assembling Wand & Attaching The Tools
CAUTION:
Align the small silver
1
button on the lower
wand with the small
opening on the upper
wand.
NOT TO BE USED FOR GROOMING A PET. FULLY ASSEMBLE PRODUCT PRIOR TO USE.
Insert lower wand into
2
upper wand until small
button clicks into the
small opening.
Firmly push hose end
3
over the open end of
the upper wand past
the raised ring.
To use the oor tools,
4
loosen the cuff on the
lower wand by twisting
counterclockwise
without removing the
cuff completely. Insert
the oor tool into the
cuff and align the metal
ring with the groove in
the tool. Tighten cuff
8
by twisting clockwise.
Page 9
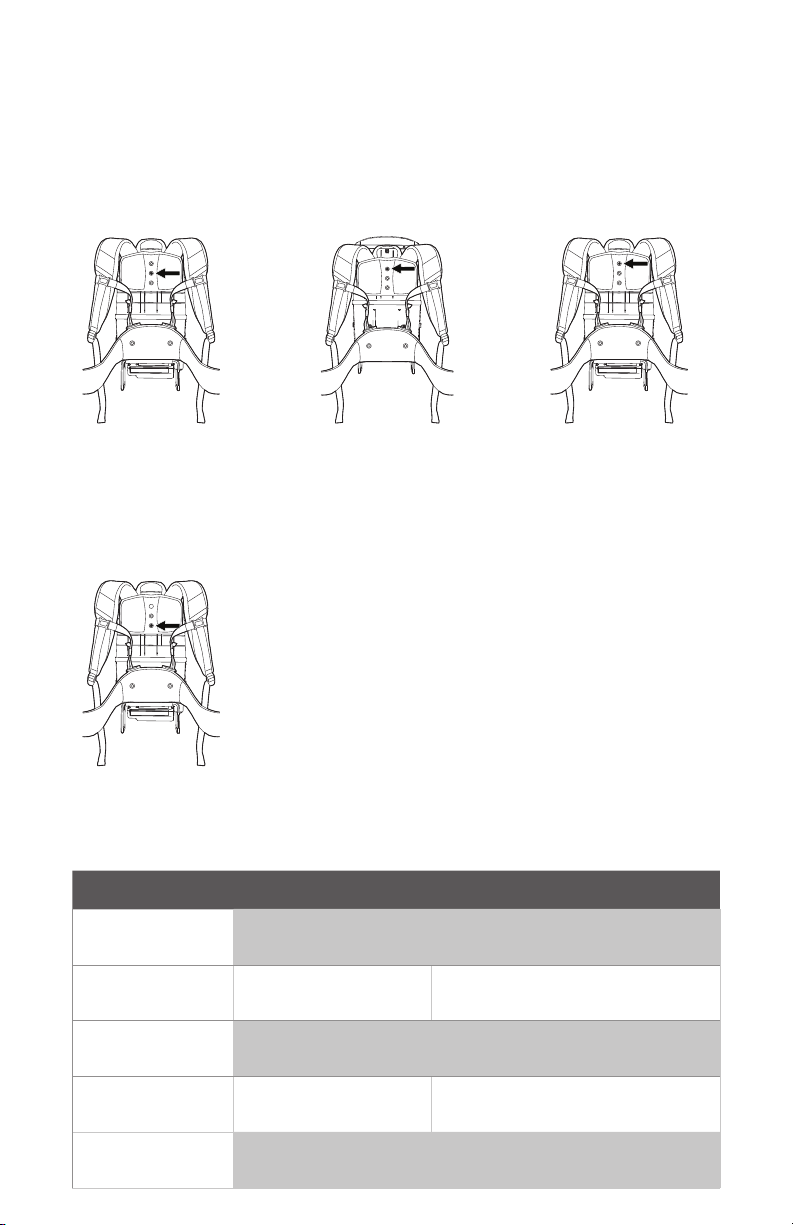
Harness Ergonomics & Height Adjustment
NOTE: The Harness has been designed and engineered to accommodate a wide range of users
and can be adjusted to t, according to height. The Upper Harness should sit between the shoulder
blades for a comfortable t. The backpack is shipped with the Upper Harness positioned with the
center hole mounted to the middle Height Adjustment Boss.
HARNESS ERGONOMICS & HEIGHT ADJUSTMENT
To adjust the Upper
1
Harness,use a Phillips
screwdriver to remove
the screw from the Height
Adjustment Boss.
For taller users move the lowest
height adjustment boss upward.
Setting User Height Adjustment
Setting 1 5’2”≤
Setting 2 5’3”- 5’6”
Setting 3 5’7”-5’10”
Move the Upper Harness
2
and fully tighten screw
into the correct Height
Adjustment Boss.
Slide top height adjustment boss all the way
to bottom
Slide top height adjustment boss to second
lowest setting
Middle adjustment boss should be directly in
the center
For shorter users,
move to the top Height
Adjustment Boss
downward.
Setting 4 5’11”- 6’2”
Setting 5 6’3”>
Slide bottom height adjustment boss to
second highest setting
Slide bottom height adjustment boss all the
way to the top
9
Page 10
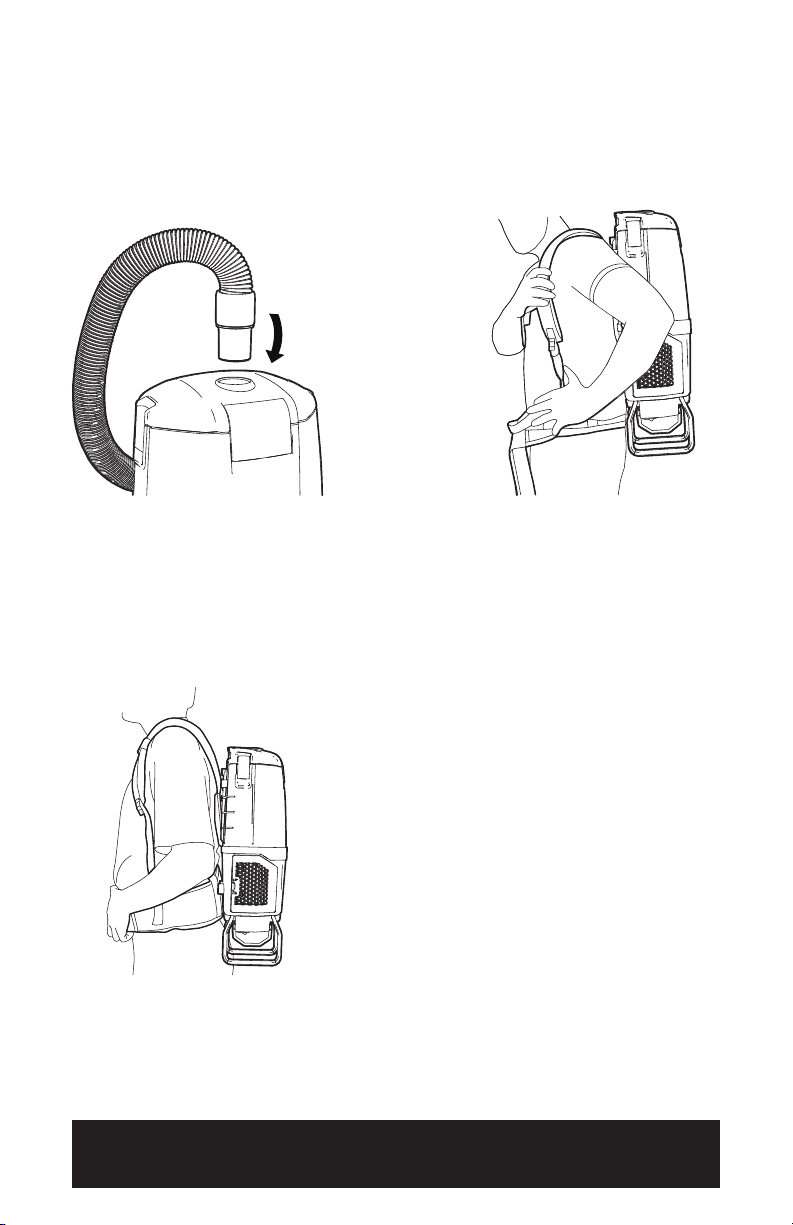
Using Your MPWR™ 40v Backpack
NOTE: Do not use vacuum without both lter bag and HEPA lters in place.
AMBIENT TEMPERATURE RANGE:
0 °C – 40 °C (32 °F – 104 °F)
Insert hose end rmly into hose
1
inlet.
Position lower rear pad into the
3
small of back so that weight of
machine is resting on the hips,
and not shoulders.
Loosen shoulder straps then
2
lift backpack, sliding both arms
through shoulder straps.
WARNING:
OR SERVICING.
10
TO REDU CE THE RISK OF PERSONAL INJURY: REMOVE BATTERY BEFORE CLEANING
Page 11
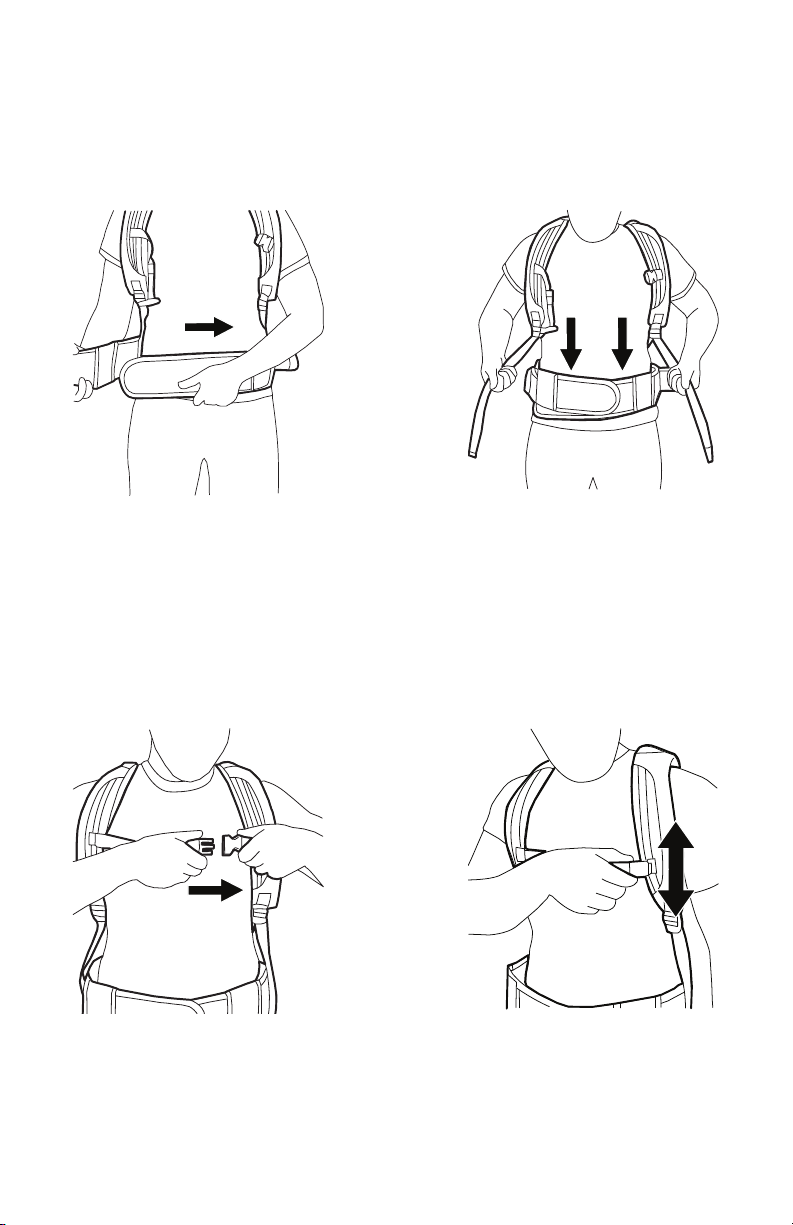
Wearing the MPWR™ 40v Backpack Vacuum
NOTE: The ergonomic harness is designed to easily identify the steps for wearing the backpack
correctly.
WEARING THE MPWR
40V BACKPACK VACUUM
™
Tighten waist strap until secure
1
and comfortable. NOTE: Should
you require additional length,
the extension belt can be placed
between belt ends and adjusted
to desired length.
Connect the sternum strap buckle
3
and tighten or loosen as needed.
Pull down on ends of shoulder
2
straps until upper harness touches
shoulder blades. Nearly all weight
of machine should be on hips. You
should be able to easily slide your
nger between each strap and
shoulder. Retighten waist band
if necessary.
Slide sternum straps up or down
4
for adjustment.
11
Page 12

MPWR™ 40v Battery & Charger (Sold Separately)
NOTE: Batteries are shipped in a low charge condition to prevent possible problems. You should
charge them before rst use.
CHARGING AMBIENT TEMPERATURE RANGE:
5 °C – 40 °C (41 °F – 104 °F)
To charge the battery, slide
1
battery into charger. Push
backward until battery clicks into
place and LED Status Indicator
is lit.
When charging, the fully lit LEDs
3
on the battery will indicate charge
level.
Charger LED Status Indicator will
2
turn green when battery is fully
charged. If the charger ashes red
and green, an error has occurred.
Remove and replace battery.
To remove battery, press the
4
release button and slide battery
forward while holding down on
charger base.
12
Page 13

MPWR™ 40v Battery & Charger (Sold Separately)
MPWR
™
40V BATTERY & CHARGER
Insert battery into housing by
1
grasping the integrated handle
and pushing rmly in until battery
locks into place.
To remove battery, grasp the
3
integrated handle while pressing
the handle release. Slide out from
housing by pulling while holding
down release button.
Press orange switch to power up
2
the unit.
I (HUSH): Hush™ mode quiet
cleaning.
II (BOOST): High trafc area
cleaning.
(O) OFF: Turn off by returning
switch to center position.
13
Page 14

Maintenance
Any other servicing should be done by an authorized service representative.
THERMAL PROTECTOR STATEMENT
A thermal protector has been designed into your cleaner to protect it from overheating.
When the thermal protector activates the cleaner it will stop running.
If this happens proceed as follows:
1. Turn cleaner OFF and remove battery pack.
2. Check fullness of bag, change if needed.
3. Inspect the air path for any obstructions. Clear obstructions if present.
4. When battery pack is removed and motor cools for 30 minutes, the thermal protector will
deactivate and cleaning may continue.
If the thermal protector continues to activate after following the above steps, your cleaner
needs servicing.
WARNING:
OR SERV ICING. IF APPLIANCE OR CHARGER IS NOT WORKING AS IT SHOULD, HAS BEEN DROPPED, DAMAGED, LEFT OUTDOORS, OR
DROPPED INTO WATER, CALL CUSTOMER SERVI CE AT 1.888.768.2014 PRIOR TO CONT INUING USE
NOTE: When using the vacuum to pick up very ne dust, such as sawdust or drywall dust, it will be
necessary to replace the bag and clean the lters at more frequent intervals to maintain maximum
suction. Fine dust will clog bag pores and reduce suction, prior to bag becoming full.
Check lter bag. Change, if full.
1
TO REDU CE THE RISK OF PERSONAL INJURY: REMOVE BATTERY BEFORE CLEANING
Check for clogs in nozzle, wand,
2
hose, and bag inlet. Clear any
obstructions.
14
Page 15
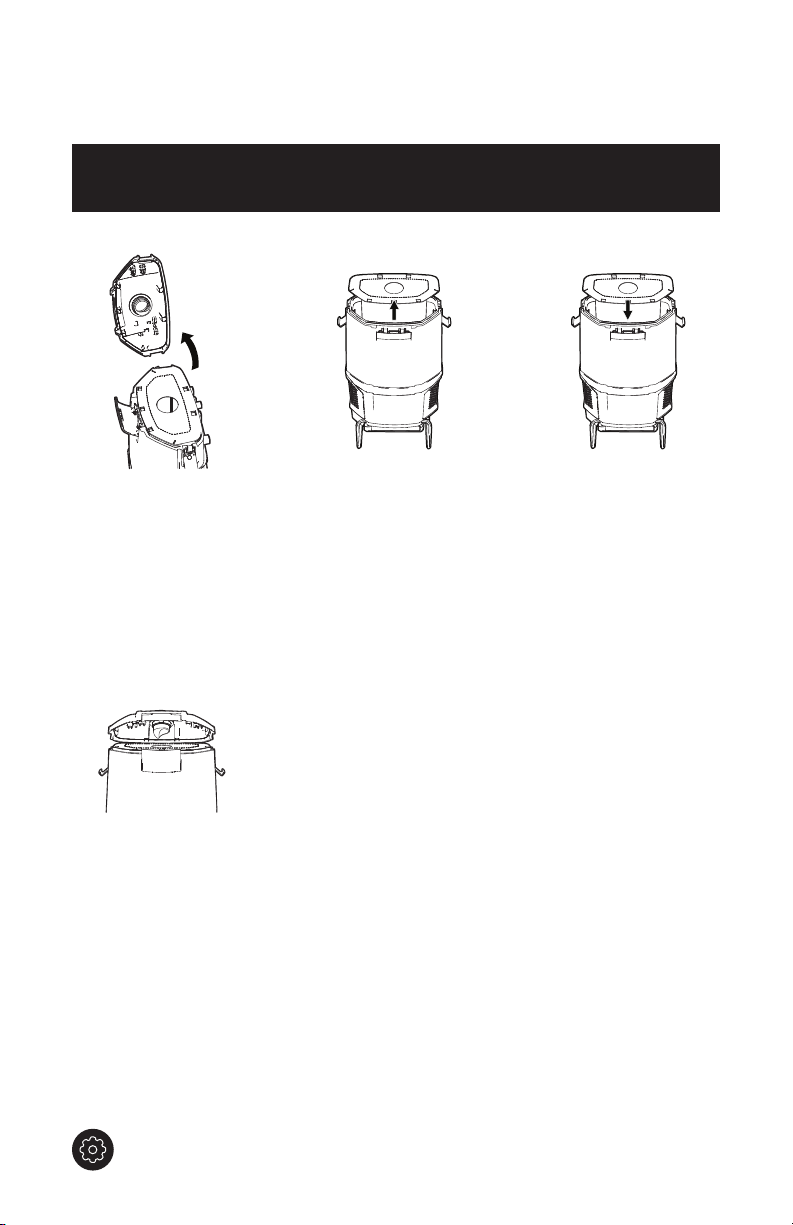
How To Replace The Filter Bag
HOW TO REPLACE THE FILTER BAG
WARNING:
OR SERVICING.
Open top cover by
1
unlocking the 3
latches.
TO REDU CE THE RISK OF PERSONAL INJURY: REMOVE BATTERY BEFORE CLEANING
Lift out Filter bag.
2
Insert new bag by
3
aligning the tabs into
the opening in the
cardboard collar.
Replace top cover and
4
secure latches.
REPLACEMENT BAGS
Allergen Filtration Open Mouth Design 10 Pack Part No. AH10231
Allergen Filtration 10 Pack Part No. AH10232
15
Page 16
Filters
WARNING:
OR SERV ICING. DO NOT OPERATE VACUUM WITHOUT BOTH INLET F ILTER AND FINAL FILTERS IN PL ACE.
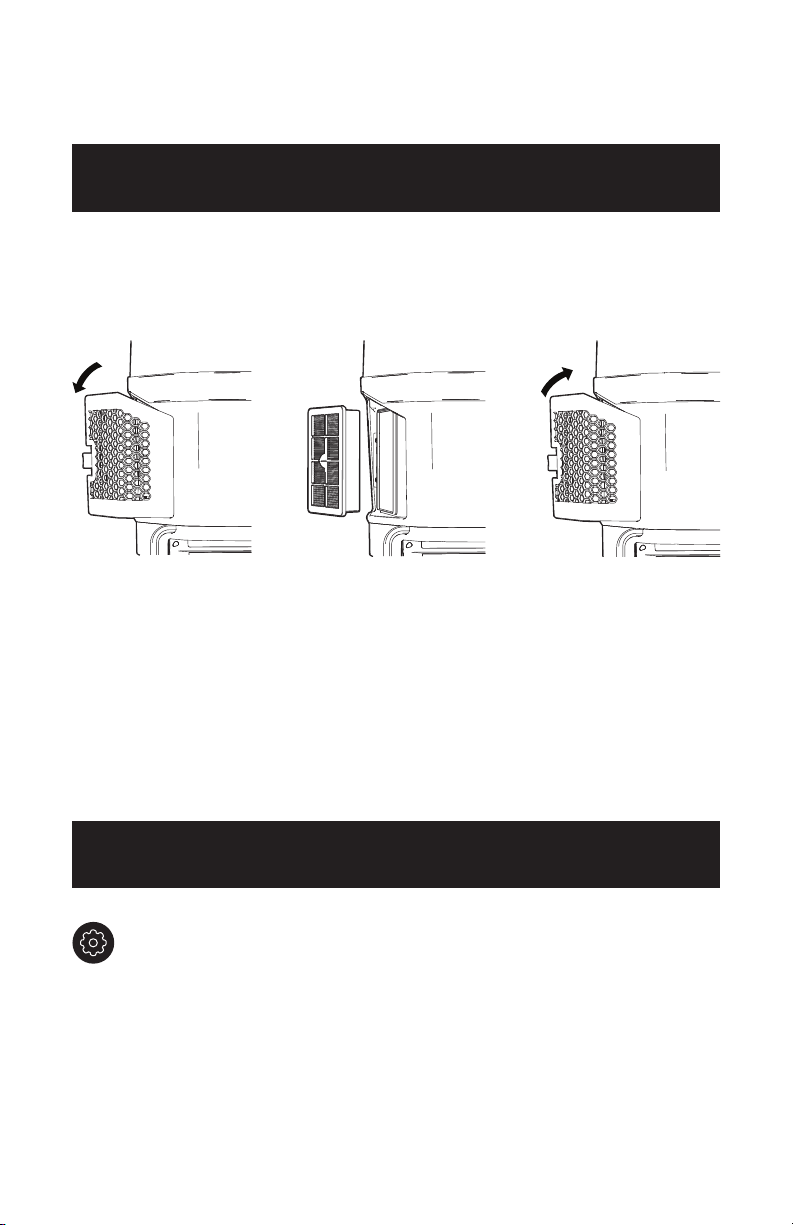
HEPA MEDIA FINAL FILTER
The nal lters assist in the ltration process to return cleaner air to the room. There are 2 HEPA
Filters, one on each side of the backpack.
Remove lter door
1
by pulling rear tab
forward and rotating
out.
TO REDU CE THE RISK OF PERSONAL INJURY – REMOVE BATTERY BEFORE CL EANING
Pull lter out by the
2
frame. Hand rinse in
cold water under low
pressure. Rinse only
surface facing inside
of machine. Let dry for
24 hours and reposition
into the lter housing.
To replace lter door,
3
align the two forward
facing tabs and rotate
into place. Press rear
tab until door snaps
into place.
IMPORTANT:
EDGE SO A IR CIRCULATES ON BOTH SIDE S OF FILTER. THIS MAY TAKE UP TO 24 HOURS.
REPLACEMENT FILTER
Inspect HEPA Media Final Filter every month, rinsing when necessary. Check for
wear of media and replace if pleats are damaged. Change lter regularly to maintain
maximum performance.
HEPA Media Final Filter 2 Pack Part No. AH40006
16
ALLOW FILTER TO DRY COMPLETELY BEFORE REPLACING. DRY FILTER ON
Page 17
Filters
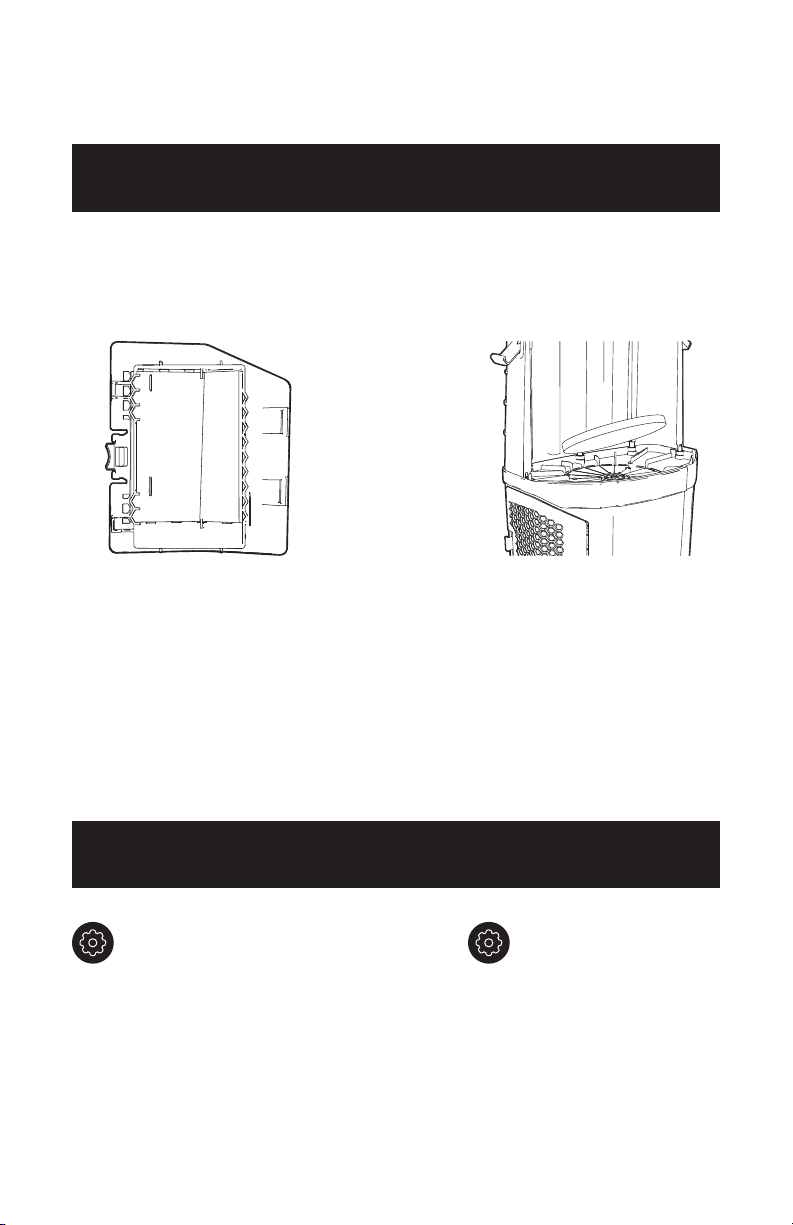
FILTERS
WARNING:
OR SERV ICING. DO NOT OPERATE VACUUM WITHOUT BOTH INLET F ILTER AND FINAL FILTERS IN PL ACE.
™
HEXAGUARD
CARBON FILTER
The HexaGuard™ Filters are
1
located on the inside of the lter
door. Pull to remove.
ACTIVATED
TO REDU CE THE RISK OF PERSONAL INJURY – REMOVE BATTERY BEFORE CL EANING
INLET FILTER
The inlet lter is located on the inside,
bottom of bag housing and protects
the motor from damage.
If the lter becomes dirty, pull
1
off the grill and lift out the lter.
Hand rinse in cold water under
low pressure. Let lter dry for 24
hours. Reposition dry lter and
snap grill into place.
IMPORTANT:
EDGE SO A IR CIRCULATES ON BOTH SIDE S OF FILTER. THIS MAY TAKE UP TO 24 HOURS.
REPLACEMENT
FILTER
Replace HexaGuard™
Filter yearly for optimum
performance.
Part No. 440009176
LUBRICATION
The motor is equipped with bearings which contain sufcient lubrication for its lifetime.
The addition of lubrication could cause damage. Do not add lubrication to motor.
ALLOW FILTER TO DRY COMPLETELY BEFORE REPLACING. DRY FILTER ON
REPLACEMENT
FILTER
Inspect Inlet Filter every
2 weeks to keep vacuum
running at peak performance.
Part No. 440009175
17
Page 18

Troubleshooting
STORAGE: Always remove the battery pack before storing the charger or any time the charger is unplugged.
WARNING
TO REDU CE THE RISK OF PERSONAL INJURY: REMOVE BATTERY BEFORE CLEANING OR SERVICING. IF
APPLIANCE IS NOT WORKING A S IT SHOULD, HAS BEEN DROPPED, DAMAGED, LEFT OUTDOORS, OR DROPPED INTO WATER, TAKE IT TO
A SERVICE CENTER PRIOR TO CONTINUING USE.
Any other servicing should be done by an authorized service representative.
RED
GREEN
CHARGER
Power On
Without battery pack
Testing
Hot battery pack
Cold battery pack
Deeply discharged
Error
Error Flashing Flashing Battery pack or charger is damaged or faulty.
•
Error, try to repeat the conditions a second time by removing and reinstalling the battery pack. If the LED status repeats a
second time, try charging a different battery.
•
If a different battery charges normally, dispose of the pack (see BATTERY DISPOSAL section).
•
If a different battery also indicates “Error,” the charger may be damaged or faulty.
Charging
Fast charging OFFFlashing Battery is being charged.
Ready
Battery full
LED
ON OFF
OFF
LED
ORANGE
LED
Ready to charge battery pack.
OFF
When battery pack reaches cooled temperature, charger begins charge mode.
OFFOFF
When battery pack reaches warmed temperature, charger begins charge mode.
ON
Charger conditions battery until normal voltage is reached, then begins charge mode.
OFF
.
OFF
Charging is complete.
OFFON
ACTION
Problem Possible Cause Possible Solution
Vacuum won’t run 1. Your battery may not be
inserted properly.
1. Make sure the batter y is fully seated in
battery cavity.
2. Your battery may not be
charged.
2. Check the Charge Level Indicator and
charge the battery if it’s low.
3. Your battery may be too hot. 3. Remove battery and let cool for 30 minutes,
replace battery and retr y or replace with
second charged battery.
4. There may be internal
4. Call for service:
1-888-768-2014
.
component damage.
Bag Check Indicator
has turned red OR
1. Filter Bag full and/
or clogged.
1. Empty Filter Bag - Pg. 15.
vacuum won’t pick
up OR low suction
Dust escaping from
1. Filter Bag full. 1. Empty Filter Bag - Pg. 15.
vacuum
2. Filter Bag not installed
correctly.
2. Review Filter Bag removal &
replacement - Pg. 15.
3. Hose not installed correctly. 3. Review Hose installation - Pg. 10.
18
Page 19

Wand is difcult
to push or won’t
move forward
1. Incorrect Floor Tool. 1. Check that the Carpet Tool is being used for
carpet and Hard Floor Tool is being used for
hard oors.
2. Adjust angle of oor tool by tilting up,
making easier to push.
2 YEAR LIMITED WARRANTY
WHAT THIS WARRANTY COVERS
When used and maintained in normal Commercial use and in accordance with the Owner’s Guide your Hoover®
Commercial charger and battery are warranted against original defects in material and workmanship for 2 year
limited warranty from date of purchase (the “ Warranty P eriod”). During the Warr anty Period, Hoover C ommercial
will provide labor and parts, at no cost to you, to correct any such defect in your CH93619 that was purchased
in the United States, at a U.S. Military Exchange, or in Canada. Hoover Commercial also reserves the right to
provide you with a replacement product(s) or refund, in Hoover Commercial’s discretion, in order to satisfy the
terms of this warranty.
HOW TO MAKE A WARRANTY CLAIM
If this product is not as warranted, take or send the product to a Hoover® Commercial Authorized Warranty
Service Dealer along with proof of purchase. For an automated referral to authorized service outlets, phone:
1-888-768-2014
or information concerning this Warranty or the availability of warranty service outlets, phone
Mon-Fri 8am-5pm EST.
WHAT THIS WARRANTY DOES NOT COVER
Certain parts for your
normal wear. These items include belts, agitator roll sleeves, agitator bearings, brushes, bags, lters and bulbs.
These parts are not covered by this Warranty. This Warranty also does not cover: improper maintenance of the
product, damage due to misuse, acts of God, nature, vandalism or other acts beyond the control of
Commercial
resale o f the product b y the original own er, defec ts or damages c aused by repair or alteration by any one other than
an Authorized
any alleged defective product and make nal decisions on any warranty claim. This warranty does not cover pick
up, deliver y, transportation or house calls. However, if you mail your product to a
Warranty Service Dealer for warranty service, cost of shipping will be paid one way.
OR visit Hoover® Commercial online at www.hoovercommercial.com. For additional assistance
Hoover® Commercial product require replacement in the ordinary course of use due to
, owner’s acts or omissions, use outside the country in which the product was initially purchased,
Hoover® Commercial
Warranty Service Dealer.
Hoover® Commercial
Hoover® Commercial
reserves the right to inspect
1-888-768-2014
Hoover®
Authorized
WARRANTY
,
OTHER IMPORTANT TERMS
This Warr anty is not transfer able and may not be assigned. T his Warranty shall be gov erned and cons trued under
the laws of the state of North Carolina. The Warranty Period will not be extended by any replacement or repair
performed under this Warranty. THIS WARRANTY IS THE EXCLUSIVE WARRANTY AND REMEDY PROVIDED
BY HOOVER® COMMERCIAL. ALL OTHER WARRANTIES, EXPRESSED OR IMPLIED, INCLUDING WARRANTIES
OF MERCHANTABILITY OR FITNESS FOR PARTICULAR PURPOSE, ARE DISCLAIMED. IN NO EVENT WILL
HOOVER® BE LIA BLE FOR ANY SPE CIAL, INDI RECT, INCIDENTA L OR CONSEQUE NTIAL DA MAGES OF AN Y KIND
OR NATURE TO OWNER OR ANY PARTY CLAIMING THROUGH OWNER, WHETHER BASED IN CONTRACT,
NEGLIGENCE, TORT OR STRICT PRODUCTS LIABILITY OR ARISING FROM ANY CAUSE WHATSOEVER. Some
states do not allow the exclusion of consequential damages, so the above exclusion may not apply to you. This
warranty gives you specic rights; you may also have others that vary from state to state.
19
Page 20

MANUAL DEL USUARIO
Para usar con el modelo CH93619.
IMPORTANTE:
YUSAR ESTE APARATO. ESTE PRODUCTO SOLO TIENE COMO FIN SU
USO COMERCIAL.
LEA LA GUÍA CON ATENCIÓN ANTES DE ENSAMBL AR
Bienvenido.
Gracias por elegir un producto Hoover® Commercial.
20
SI NECESITA AYUDA
Llame al 1-888-768-2014 (de lunes a viernes de 8 a.m. a 5 p. m., hora estándar del este)
para hablar con un representante del ser vicio al cliente o visite nuestro sitio web en
HooverCommercial.com.
Page 21

Índice
Instrucciones de seguridad 22-23
Características 24-25
Cómo comenzar 26
Armado del tubo y conexión de las herramientas
Ergonomía del arnés y ajuste de la altura
™
Uso de su mochila MPWR
de 40 V inalámbrica 28
Uso de la aspiradora de mochila de 40v MPWR
™
Batería y cargador MPWR
de 40 V 30-31
26
27
™
29
Mantenimiento
Cómo reemplazar la bolsa de ltro
Filtros
Resolución de problemas
32
33
34-35
36
Garantía 37
21
Page 22

INSTRUCCIONES DE SEGURIDAD IMPORTANTES
¡GUARDE ESTAS INSTRUCCIONES!
IMPORTANTE: LEA ESTE MANUAL CON ATENCIÓN ANTES DE ENSAMBLAR Y USAR ESTE APARATO.
CUANDO SE UTILIZAN APARATOS ELÉCTRICOS, SE DEBEN SEGUIR SIEMPRE PRECAUCIONES BÁSICAS, INCLUIDAS LAS
SIGUIENTES: LEA TODAS LAS INSTRUCCIONES ANTES DE UTILIZAR ESTE APARATO.
ADVERTENCIA: PARA REDUCIR EL RIESGO DE INCENDIO, DESCARGA ELÉCTRICA O LESIONES:
NUNCA EXPONGA EL PAQUETE DE BATERÍAS, LA ASPIRADORA, O EL CARGADOR AL AGUA, LA HUMEDAD O LOS
LÍQUIDOS, INCLUIDOS, ENTRE OTROS, LOS LÍQUIDOS CORROSIVOS O CONDUCTORES, NI PERMITA QUE LOS LÍQUIDOS
INGRESEN EN ESTOS ELEMENTOS.
Los líquidos corrosivos o conductores, como el agua salada, el cloro, ciertos productos químicos industriales, y la lavandina o
los productos a base de lavandina, etc., pueden pr ovocar un cor tocircuit o en el paquete de baterías. Si el paquete de bat erías
se expone a un líquido corr osivo o conductor, no intente usar ni cargar el paquete de baterías, y realice los pasos siguientes de
inmediato:
Utilic e el equipo personal protec tor adecuado, incluida protección ocular y guantes de goma.
Coloque el paquete de baterías expuesto en un cubo grande, como un cubo de 5 galones (18 litros) o similar, y llene el cubo con
agua corriente común.
No coloque más de dos paquetes en el cubo.
Coloque el cubo en exteriore s, en una zona inaccesible para lo s niños y las mascotas , y lejos de edicios, garajes /cobertizos,
estructuras, vehículos y materiales combustibles/inamables.
Deje el paquete de batarías en el cubo lleno con agua corriente y llame al Ser vicio de atención al cliente al 1- 888-768-20 14 para
obtener instrucciones adicionales para desechar correctamente los paquetes de batarías expuestos.
•
Arme la unidad por completo antes de ponerla en funcionamiento.
•
No utilice la unidad, ni guarde o cargue la batería a la intemperie ni sobre supercies mojadas. Evite que el cargador se moje.
•
El cargador es para uso en interiores solamente. Siempre asegúrese de guardar la batería y el cargador en un lugar seco.
•
Evite que la unidad se utilice como un juguete. Los niños de 12 años o menos no deben utilizar la unidad. Cuando se lo utilice cerca de niños, será
necesario hacerlo bajo una estricta supervisión. Para evitar lesiones o daños, mantenga a los niños alejados del producto y no permita que introduzcan
los dedos ni objetos en ninguna de las aberturas del producto.
•
Utilice la unidad únicamente según se describe en este manual. Utilice únicamente los accesorios y productos recomendados por Hoover Commercial.
•
No utilice el cargador si el cable o el enchufe se encuentran dañados. Si el aparato o el cargador no funcionan como deben; si se han caído, han sido
dañados, dejados a la intemperie o sumergidos en agua, llame al servicio de atención al cliente al 1.888.768.2014 antes de continuar el uso.
•
No extraiga ni transporte el cargador tomándolo por el cable; no tire del cable, no cierre una puerta con él ni lo enrosque alrededor de bordes o esquinas
losas. No apoye el producto sobre el cable. No pase el aparato por encima del cable. Mantenga el cable lejos de las supercies calientes.
•
No desenchufe el cargador tirando del cable. Para desenchufarlo, agarre el enchufe, no el cable.
•
No manipule el cargador (incluido el enchufe y los terminales) ni el aparato con las manos mojadas.
•
No incinere el cargador, la batería ni el aparato, aun si estuvieran muy dañados. Las baterías pueden explotar y provocar un incendio.
•
No coloque ningún objeto en las aberturas de las ventilaciones. No utilice la unidad si alguna de sus aberturas se encuentra bloqueada. Manténgala libre
de polvo, pelusas, cabello y cualquier otro elemento que pueda disminuir el ujo de aire.
•
Utilice las prendas adecuadas. No utilice prendas sueltas ni joyas. Átese el pelo largo. Evite que el cabello, la ropa suelta, los dedos y cualquier otra
parte del cuerpo entren en contacto con las aberturas y las piezas móviles de la unidad. Las prendas sueltas, las joyas o el cabello largo pueden quedar
atrapados en las piezas móviles internas.
•
Extreme las precauciones cuando limpie en escaleras. Para evitar lesiones o daños físicos, y a n de evitar que la aspiradora se caiga, colóquela siempre
al pie de las escaleras o sobre el suelo. No coloque la aspiradora sobre las escaleras ni sobre un mueble, ya que pueden generarse lesiones o daños.
•
Este producto incluye baterías recargables de iones de litio. No exponga las baterías a altas temperaturas, ya que pueden prenderse fuego o explotar.
•
No aplaste ni incinere la batería, ni la someta a acciones similares.
•
No deseche la batería en un incinerador ni en un compactador de desechos. Consulte la sección sobre desecho de la batería para obtener instrucciones.
•
No intente desarmar la batería.
•
Desenchufe el cargador del tomacorriente antes de llevar a cabo una rutina de limpieza o mantenimiento en la unidad.
•
En condiciones extremas, pueden producirse pérdidas en las celdas de la batería. Si la piel entrara en contacto con el líquido, lávese rápidamente con
jabón y agua. Si el líquido le entrara en los ojos, no se los frote. Enjuáguelos de inmediato con agua limpia, en forma continua durante 15 minutos como
mínimo. Consulte a un médico de inmediato.
•
Recargue solo con el cargador (N.° de pieza de Hoover Commercial CH07150) suministrado por Hoover Commercial para la recarga. Un cargador adaptado
para un tipo de paquete de baterías puede crear un riesgo de lesiones e incendio cuando se lo utiliza con otro paquete de baterías.
•
Use solo la batería (N.° de pieza de Hoover Commercial CH17360) suministrada por Hoover Commercial. El uso de un paquete de baterías distinto puede
crear un riesgo de lesiones e incendios.
22
Page 23

A
G
E
•
No toque el paquete de baterías ni los terminales del cargador, ni inserte objetos en ellos.
•
No intente cortocircuitar la batería ni los terminales del cargador.
•
No utilice la unidad para aspirar líquidos combustibles o inamables, tales como gasolina o restos de madera lijada, ni la utilice en áreas en las que
dichas sustancias puedan estar presentes.
•
NUNCA aspire materiales que puedan quemarse o generar humo, como carbón caliente, colillas de cigarrillos, fósforos, cenizas calientes, etc.
•
No utilice el aparato si no tiene colocado la bolsa de recolección de residuos del ltro.
•
Evite el encendido accidental. Asegúrese de que el interruptor esté en la posición de apagado antes de conectar el paquete de baterías, de levantar o de transportar
el artefacto. Transportar el artefacto con su dedo en el interruptor o conectar el artefacto con el interruptor encendido puede provocar accidentes.
•
Siempre retire el paquete de baterías del aparato antes de realizar cualquier ajuste, cambiar accesorios, almacenar el producto, limpiarlo, o cuando no esté en uso. La
extracción del paquete de baterías evitará el arranque accidental, que puede provocar lesiones personales graves.
•
Cuando el paquete de baterías está en uso, manténgalo alejado de otros objetos de metal, como sujetadores de papeles, monedas, llaves, clavos, tornillos u otros
objetos metálicos pequeños que puedan realizar una conexión desde una terminal a la otra. Si se produce un cortocircuito entre las terminales se pueden generar
quemaduras o incendios.
•
Bajo condiciones severas, puede eyectarse líquido desde la batería. Evite el contacto. Si sucede un contacto accidental, lávese con agua. Si el líquido entra en
contacto con los ojos, busque asistencia médica adicional. El líquido eyectado desde la batería puede provocar irritación o quemaduras.
•
No use un paquete de baterías o un aparato que esté dañado o se haya modicado. Las baterías dañadas o modicadas pueden exhibir un comportamiento
impredecible que puede provocar incendios, explosiones o riesgo de lesiones.
•
No exponga el paquete de baterías o el aparato al fuego o a temperaturas excesivas. La exposición al fuego o a temperaturas sobre los 265°F puede causar una
explosión.
•
Siga todas las instrucciones de carga y no cargue el paquete de baterías ni el aparato fuera del rango de temperaturas especicado en las instrucciones. La carga
incorrecta o a temperaturas que estén fuera del rango especicado puede dañar la batería y aumentar el riesgo de incendios.
•
Solo una persona calicada debe realizar el mantenimiento de la unidad, y deben utilizarse únicamente piezas de repuesto idénticas. Esto garantizará que se
mantenga la seguridad del producto.
•
No modique ni intente reparar el aparato o el paquete de baterías (según corresponda), excepto como se indica en las instrucciones de uso y mantenimiento.
PRECAUCIÓN: PARA DISMINUIR EL RIESGO DE DAÑOS:
•
Evite aspirar objetos duros y losos con este producto, ya que pueden dañarlo.
•
No exponga la máquina a temperaturas bajo cero.
•
No utilice objetos losos para limpiar la manguera, ya que pueden dañar la unidad.
ADVERTENCIA: PARA REDUCIR EL RIESGO DE DESCARGA ELÉCTRICA, EL CARGADOR TIENE UN ENCHUFE POLARIZADO
(UNA CLAVIJA ES MÁS ANCHA QUE LA OTRA). ESTE ENCHUFE CABE EN UN TOMACORRIENTE POLARIZADO DE UNA SOLA
MANERA. SI NO ENCAJA POR COMPLETO EN EL TOMACORRIENTE, INVIERTA EL ENCHUFE. SI AÚN NO ENCAJA, CONTACTE
A UN ELECTRICISTA CALIFICADO PARA QUE INSTALE EL TOMACORRIENTE CORRESPONDIENTE. NO REALICE NINGÚN TIPO DE
MODIFICACIÓN EN EL ENCHUFE.
ADVERTENCIA SOBRE LA ELIMINACIÓN DE LA BATERÍA:
PRECAUCIÓN:
La batería utilizada en este dispositivo puede presentar riesgo de incendio o quemaduras químicas si no se utiliza adecuadamente. No
RIESGO DE EXPLOSIÓN O EXPOSICIÓN A MATERIAL TÓXICO.
la desarme, incinere, ni caliente a temperaturas superiores al límite máximo de temperatura establecido por el fabricante (60°C/140°F). Reemplace la batería solo
con baterías Hoover Commercial N.° de pieza CH90040. El uso de otra batería puede representar riesgos de incendios o explosiones. Deseche la batería usada
rápidamente. Manténgala alejada de los niños. No la desarme ni la deseche prendiéndola fuego. No intente desarmar la batería o eliminar algún componente que
sobresalga de las terminales de la batería. La batería y el cargador no contienen piezas a las que el usuario pueda realizarles un servicio de mantenimiento. Esto podría
causar incendio o lesiones. Antes de desecharla, proteja las terminales expuestas con cinta aislante gruesa, para evitar un cortocircuito.
BATERÍAS DE IONES DE LITIO:
medio am biente. El Sell o de reciclado d e la batería R BRC cert icado po r EPA (Agenc ia de Protec ción Ambien tal) en la bat ería de iones d e
litio (L i-ion) indica q ue Techtronic I ndustrie s, una aliada co rporati va de Hoove r Commerci al, se encuent ra parti cipando volu ntariamen te en
un prog rama indus trial para r ecolect ar y reciclar es tas bate rías al nal de sus v idas útiles, c uando son re tiradas de se rvicio en lo s Estado s
Unidos o C anadá. El pr ograma RB RC propor ciona una con veniente al ternati va a la colocac ión de las bate rías de iones d e
litio us adas en la basur a o en el ujo de des echos munici pales, lo que pu ede ser ilegal e n su área. Visi te www.r brc.org /
call2r ecycle/p ara obtene r informac ión sobre el re ciclaje de las ba terías de ion es de litio y las re striccio nes/prohi biciones
sobre d esechos e n su área. La p articipa ción de Hoove r Commerci al en este pro grama for ma parte d e nuestro co mpromiso
por pr eservar e l medio ambien te y conser var los recu rsos natu rales.
La ba tería debe re colecta rse, recicl arse o dese charse en fo rma que no sea p erjudicial al
23
Page 24

Características del producto
A
Manguera
B
Tubo superior
C
Ensamble de la aspiradora
•
Bolsa del ltro de alérgenos
• Bolsa del ltro del paño
•
Filtro para medio HEPA
D
Tubo inferior
E
Filtros Hexaguard
F
Batería de Li-ion M-PWR
F
Cargador de M-PWR
™
™
™
de 40 V*
de 40 V*
Herramientas
Herramienta para alfombras Herr amienta pa ra pisos dur os
Herr amienta pa ra limpieza
enrincones
Cepillo quitapolvo
24
*SE VE NDE POR SEPA RADO
Page 25

CARACTERÍSTICAS DEL PRODUCTO
A
B
C
D
E
F
F
G
25
Page 26

Armado del tubo y conexión de las herramientas
PRECAUCIÓN:
ARME COMPLE TAMEN TE EL PRODUC TO ANTES DE USARLO.
Alinee el botón plateado
1
pequeño de la varilla
inferior con la abertura
pequeña de la varilla
superior.
Inserte la varilla inferior
2
en la varilla superior
hasta que el botón
pequeño haga clic en la
abertura pequeña.
LA ASP IRADORA NO DE BE UTILIZ ARSE PARA LIMPIAR MASCOTAS.
Empuje rmemente el
3
extremo de la manguera
sobre el extremo abierto
del tubo superior después
del anillo elevado.
26
Para usar las herramientas
4
para pisos, aoje el manguito
del tubo inferior girándolo
en sentido contrario a las
agujas del reloj sin extraerlo
completamente. Inserte la
herramienta para pisos dentro
del manguito y alinee el anillo
metálico con la ranura de
la herramienta. Ajuste el
manguito girándolo en sentido
de las agujas del reloj.
Page 27

Ergonomía del arnés y ajuste de la altura
NOTE: El arnés se ha diseñado e ideado para adaptarse a una amplia variedad de usuarios y puede
regularse para obtener la altura deseada. El arnés superior debería apoyarse sobre los omóplatos
para que esté cómodo. La mochila se envía con un arnés superior con el oricio central posicionado
en el saliente de ajuste de altura medio.
ERGONOMÍA DEL ARNÉS Y AJUSTE DE LA ALTURA
Para ajustar el arnés
1
superior, use un
destornillador Phillips para
quitar el tornillo del saliente
de ajuste dealtura.
Para los usuarios más altos, mueva el
ajuste de altura más bajo hacia arriba.
Conguración Altura del usuario Ajuste
Conguración 1
Conguración 2
Conguración 3
5’2”≤
5’3”- 5’6”
5’7”-5’10”
Mueva el arnés superior y
2
ajuste el tornillo por completo
en el saliente deajuste de
altura correcto.
Deslice el saliente de ajuste de altura superior
completamente hasta abajo
Deslice el saliente de ajuste de altura superior
hasta el segundo valor más bajo
El saliente de ajuste medio debe estar
directamente en el centro
Para los usuarios más bajos,
muévalo hacia abajo hasta el
saliente de ajuste de altura
superior.
Conguración 4
Conguración 5
5’11”- 6’2”
6’3”>
Deslice el saliente de ajuste de altura inferior
hasta el segundo valor más alto
Deslice el saliente de ajuste de altura inferior
completamente hasta arriba
27
Page 28

Uso de su mochila MPWR
NOTA: No utilice la aspiradora sin la bolsa de ltro y los ltros HEPA.
RANGO DE TEMPERATURA AMBIENTE:
5 °C – 50 °C (41 °F – 122 °F)
™
40v
Inserte el extremo de la manguera
1
rmemente en la entrada de la
manguera.
Apoye la almohadilla trasera inferior
3
sobre la espalda inferior, de modo que
el peso de la máquina descanse sobre
la cadera y no sobre los hombros.
Aoje las correas para hombros, luego
2
levante la mochila y deslice los brazos
por las correas para hombros.
ADVERTENCIA:
BATERÍA ANTES DE LIMPIAR LA UNIDAD O REALIZARLE UN SERVICIO DE MANTENIMIENTO.
28
PARA RE DUCIR EL RIE SGO DE LESI ONES PERS ONALES : EXTRAI GA LA
Page 29

Uso de la aspiradora de mochila de 40v MPWR
NOTA: El arnés ergonómico está diseñado para que estos pasos de la correcta colocación de la mochila se
identiquen con facilidad. Busque las echas numeradas en las piezas correspondientes nombradas en las
siguientes instrucciones.
™
USO DE LA ASPIRADORA DE MOCHILA DE 40V MPWR
™
Ajuste la correa de la cintura hasta
1
que quede rme y cómoda. NOTA: En
caso de que requiera más longitud, el
cinturón de extensión puede colocarse
entre los extremos del cinturón y se
puede ajustar a la longitud deseada.
Conecte la hebilla de la correa del
3
esternón y ajústela o aójela según
sea necesario.
Tire hacia abajo los extremos de las
2
correas para hombros hasta que el
arnés superior toque los omóplatos.
Casi todo el peso de la máquina
debería estar sobre la cadera. Debería
poder deslizar el dedo con facilidad
entre cada correa y hombro. Vuelva a
ajustar la correa de la cintura de ser
necesario.
Deslice las correas del esternón hacia
4
arriba o abajo para ajustarlas.
29
Page 30

Batería y cargador MPWR
NOTA: Las baterías se envían en condiciones de poca carga para evitar posibles problemas. Debe cargarlas
antes del primer uso.
RANGO DE TEMPERATURA AMBIENTE PARA LA CARGA:
™
40v
5 °C – 40 °C (41 °F – 104 °F)
Para cargar la batería, deslice la
1
batería en el cargador. Empuje hacia
atrás hasta que la batería encastre
en su lugar y se encienda el indicador
LED de estado.
Cuando se realiza la carga, los LED
3
completamente iluminados de la
batería indicarán el nivel de carga.
El indicador LED de estado se
2
encenderá en color verde cuando la
batería esté completamente cargada.
Si el cargador emite una luz roja y
verde parpadeante, signica que se
ha producido un error. Retire la batería
yreemplácela.
Para retirar la batería, presione el
4
botón de liberación y deslice la batería
hacia adelante mientras sostiene la
base del cargador.
30
Page 31

Batería y cargador MPWR
™
40v
BATERÍA Y CARGADOR MPWR
40V
™
Inserte la batería en la carcasa
1
tomando el mango integrado y
empujándolo rmemente hasta que
trabe la batería en su lugar.
Para retirar la batería, tome el mango
3
integrado mientras presiona la
liberación del mango. Deslice hacia
afuera de la carcasa tirando mientras
mantiene presionado el botón de
liberación.
Presione el interruptor naranja para
2
encender la unidad.
I (HUSH): Modo de limpieza
silencioso Hush™.
II (BOOST): Área de limpieza de alto
tráco.
(O) OFF: Apáguela llevando el
interruptor a la posición central.
31
Page 32

Mantenimiento
Todo otro servicio de mantenimiento deberá ser realizado por personal técnico autorizado.
DECL ARACIÓN DEL PROTECTOR TÉRMICO
Se ha colocado un protector térmico en la aspiradora para protegerla contra el sobrecalentamiento.
Cuando dicho protector se active, la aspiradora dejará de funcionar.
De ser así, proceda como se indica a continuación:
1. Apague la limpiadora y retire el paquete de baterías.
2. Verique el nivel de llenado de la bolsa y cámbiela si es necesario.
3. Inspeccione la vía de aire en busca de obstrucciones. Limpie cualquier obstrucción presente.
4. Una vez que haya extraído el paquete de baterías y el motor se haya enfriado durante 30 minutos,
elprotector térmico se desactivará y usted podrá retomar la limpieza.
Si el protector térmico continúa activándose luego de haber seguido los pasos anteriores, signica que su
aspiradora necesita un servicio de mantenimiento.
ADVERTENCIA
REALIZARLE UN SERVICIO DE MANTENIMIENTO.
NOTA: Cuando utilice la aspiradora para recoger polvo muy no, como el aserrín o el polvo de mampostería,
será necesario reemplazar la bolsa y limpiar los ltros con más frecuencia para mantener un máximo poder de
succión. El polvo no obstaculizará los poros de la bolsa y reducirá la succión, antes de que la bolsa se llene.
Inspeccione la bolsa de ltro.
1
Cámbiela si está llena.
PARA RE DUCIR EL RIE SGO DE LESI ONES PERS ONALES : EXTRAI GA LA BATER ÍA ANTES DE L IMPIAR L A UNIDAD O
Revise que no haya obstrucciones
2
en la boquilla, el tubo, la manguera y
la entrada de la bolsa. Elimine todo
elemento obstructivo.
32
Page 33

Cómo reemplazar la bolsa de ltro
CÓMO REEMPLAZAR LA BOLSA DE FILTRO
ADVERTENCIA:
BATERÍA ANTES DE LIMPIAR LA UNIDAD O REALIZARLE UN SERVICIO DE MANTENIMIENTO.
Abra la cubierta
1
superiordestrabando
los3 pestillos.
Quite la bolsa del ltro.
2
PARA RE DUCIR EL RIE SGO DE LESI ONES PERS ONALES : EXTRAI GA LA
Inserte una nueva bolsa
3
deslizando el cartón por
debajo de las pestañas
hasta que la bolsa esté
bien ja en su lugar.
Inserte una bolsa nueva
4
alineando las lengüetas
en la abertura del cuello
de cartón.
BOLSAS DE REEMPLAZO
Diseño de boca abierta para ltración de alérgenos, paquete de 10, N.° de pieza AH10231
Filtración de alérgenos, paquete de 10, N.° de pieza AH10232
33
Page 34

Filtros
ADVERTENCIA:
BATER ÍA ANTES DE L IMPIARL A OREALI ZARLE UN SE RVICIO DE M ANTENIM IENTO. NO H AGA FUNCI ONAR LA ASP IRADORA S IN EL FILTRO DE E NTRADA N I
LOS FI LTROS FINA LES.
FILTRO FINAL DE MEDIOS HEPA
Los ltros nales ayudan en el proceso de ltración para devolver aire más limpio a la habitación. Hay 2 ltros
HEPA, uno a cada lado de la mochila.
Retire la puer ta del ltro
1
tirando de la pestaña
trasera hacia delante y
gírela para quitarla.
Extraiga el ltro tirando
2
del armazón. Enjuáguelo
a mano con agua fría y
baja presión. Solo lave
la supercie que da al
interior de la máquina.
Déjelo secar durante 24
horas y vuelva a colocarlo
en la cavidad para ltros.
PARA DI SMINUIR EL R IESGO DE LE SIONES FÍS ICAS, RE TIRE LA
Para volver a colocar la
3
puerta del ltro, alinee
las dos pestañas hacia
adelante y gírelas en su
lugar. Presione la pestaña
trasera hasta que la
puerta calce en su lugar.
IMPORTANTE:
COLO CARLO. SE QUE EL FILTRO D E CANTO PAR A QUE EL AIRE C IRCULE A AM BOS LADOS D EL FILTRO. E STO PUEDE DE MORAR HA STA 24 HORAS.
FILTRO DE REEMPLAZO
Inspeccione el Filtro nal de medios HEPA cada mes, y lávelo cuando sea necesario.
Verique el desgaste del medio y reemplace los pliegues si están dañados. Cambie el ltro
periódicamente para mantener un máximo rendimiento.
N.° de pieza AH40006
34
PERM ITA QUE EL FILTR O SE SEQUE CO MPLETAME NTE ANTE S DE VOLVER A
Page 35

FILTROS
ADVERTENCIA:
BATER ÍA ANTES DE L IMPIARL A OREALI ZARLE UN SE RVICIO DE M ANTENIM IENTO. NO H AGA FUNCI ONAR LA ASP IRADORA S IN EL FILTRO DE E NTRADA N I
LOS FI LTROS FINA LES.
HEXAGUARD
FILTRO DE CARBONO
1
™
ACTIVADO
Los ltros HexaGuard™ están dentro
de la puerta de ltros. Tire de esta
para retirarla.
PARA DI SMINUIR EL R IESGO DE LE SIONES FÍS ICAS, RE TIRE LA
FILTRO DE ENTRADA
El ltro de entrada está ubicado en el
interior y la parte inferior de la cavidad
para ltros y protege al motor de daños.
Si el ltro se ensucia, tire de la parrilla
1
y levante el ltro para extraerlo.
Enjuáguelo a mano con agua fría
y baja presión. Deje secar el ltro
durante 24 horas. Vuelva a colocar
el ltro seco y encaje la parrilla en
su lugar.
IMPORTANTE:
COLO CARLO. SE QUE EL FILTRO D E CANTO PAR A QUE EL AIRE C IRCULE A AM BOS LADOS D EL FILTRO. E STO PUEDE DE MORAR HA STA 24 HORAS.
FILTRO D E
REEMPLAZO
Reemplace el ltro HexaGuard™
anualmente para lograr un
rendimiento óptimo.
N.° de pieza 440009176
LUBRICACIÓN
El motor viene equipado con cojinetes que tienen la suciente lubricación para toda su vida útil.
Si le agrega lubricantes, esto podría dañar el motor. No le agregue lubricantes al motor.
PERM ITA QUE EL FILTR O SE SEQUE CO MPLETAME NTE ANTE S DE VOLVER A
FILTRO D E
REEMPLAZO
Inspeccione el ltro de entrada
cada 2 semanas para mantener
la aspiradora funcionando a un
rendimiento óptimo.
N.° de pieza 440009175
35
Page 36

Resolución de problemas
ALMACENAMIENTO: Siempre retire el paquete de baterías antes de almacenar el cargador o cuando el cargador esté desenchufado.
ADVERTENCIA:
PARA RE DUCIR EL RIE SGO DE LESI ONES PERS ONALES : EXTRAI GA LA
BATER ÍA ANTES DE L IMPIAR L A UNIDAD O RE ALIZARL E UN SERVIC IO DE MANT ENIMIEN TO. SI EL APAR ATO NO FUNCIO NA COMO DEB E, SI SE HA CAÍ DO,
DAÑA DO O DEJADO A L A INTEMP ERIE, O SI SE H A SUMERGIDO E N AGUA, LLÉ VELO A UN CE NTRO TÉC NICO ANT ES DE CONTI NUAR USÁND OLO.
Todo otro servicio de mantenimiento deberá ser realizado por personal técnico autorizado.
LED
LED
CARGADOR
Encender
Sin el paquete de baterías Encendido
Pruebas
Paquete de baterías caliente
Paquete de baterías frío
Completamente descargado
Error
Error El paquete de baterías o el cargador
•
Error, intente repetir las condiciones una segunda vez antes de extraer y volver a instalar el paquete de baterías. Si el estado del LED se repite por
segunda vez, intente cargar una batería diferente.
•
Si la batería diferente se carga normalmente, deseche el paquete (consulte la sección
•
Si una batería diferente también indica "Error", el cargador puede estar dañado o defectuoso.
Carga
Carga más rápida La batería se está cargando.
Lista
Batería cargada La carga está completa.
ROJO
Parpadeante Parpadeante
Apagado
LED
VERDE
NARANJA
ApagadoApagado
Encendido
ApagadoApagado
Apagado
Parpadeante
Apagado
Apagado
EncendidoApagado
Listo para cargar el paquete de baterías.
Cuando el paquete de baterías alcance la temperatura de enfriamiento, el cargador comenzará el modo de carga.
Cuando el paquete de baterías alcance la temperatura de calentamiento, el cargador comenzará el modo de carga.
El cargador demora la carga de la batería hasta alcanzar el voltaje normal, y luego comienza el modo de carga.
estar dañado o defectuoso.
ELIMINACIÓN DE LA BATERÍA
ACCIÓN
).
Problema Causa posible Solución posible
La aspiradora no
funciona
1. Es posible que la batería no esté
correctamente introducida.
1. Asegúrese de que la batería esté completamente
apoyada en la cavidad de la batería.
2. Es posible que la batería no esté
cargada.
3. Es posible que la batería se
haya recalentado.
2. Verique el Indicador de nivel de carga y recargue
la batería si el nivel fuer a bajo.
3. Extraiga la batería y déjela enfriar durante
30minutos, vuelva a colocar la b atería y pruébela
nuevamente o reemplácela por otra batería
cargada.
4. Es posible que existan daños en
4. Llame p ara obtener servicio: 1-8 88-768-2 014.
los componentes internos.
El indicador de
comprobación de bolsa
1. Bolsa de ltro llena y/
oatascada.
1. Vacíe la bolsa de ltro (pág. 3 3)
está en color rojo O la
aspiradora no succiona
O la succión es baja
Sale polvo de la
1. Bolsa de ltro llena. 1. Vacíe la bolsa de ltro (p ág. 33)
aspiradora
2. La bolsa de ltro no es tá
instaladacorrectamente.
3. La manguera no est á colocada
correctamente.
2. Repase la sección de extracción y reemplazo
delabolsa de ltro (pág. 3 3)
3. Consulte la sección Colocación de la
manguera(pág. 28).
36
Page 37

Es difícil empujar el
tubo aspiradora o la
aspiradora no avanza
1. Herramienta para pisos
incorrecta.
1. Verique que se esté utilizando la herramienta
para alfombras en alfombras y la herramienta
para pisos duros en pisos duros.
2. Ajuste el ángulo de la her ramienta para pisos
inclinándola hacia arrib a, lo que hace más fácil
el empuje.
GARANTÍA LIMITADA DE 2 AÑOS
COBERTURA DE LA GARANTÍA
En casos de uso y mantenimiento comerciales en condiciones normales y conforme a la Guía del propietario, el cargador y la
batería Hoover
limitada de 1 año desde la fecha de compra (en adelante, el “Plazo de la garantía”). Durante el Plazo de la garantía, Hoover
Comme rcial le prop orcionará la m ano de obra y los r epuestos , sin costo algun o, para repar ar dicha falla en su p roducto C H93619
adquirido en los Estados Unidos, en tiendas de int ercambios militares de los EE.UU. y en Canadá. Hoover Commer cial también
se reserva al derecho de ofrecerle un producto de reemplazo o un reembolso, a discreción de Hoover Commercial, a discreción
de Hoover Commercial, a n de satisfacer los términos de esta garantía.
CÓMO REALIZ AR UN RECL AMO POR LA GARANTÍA
Si este p roducto no p resentar a las caract erísticas ga rantizada s, llévelo o envíel o a un Distribuido r Técnico Ocial A utorizadode
Hoover
autorizado, llame al: 1-888-768-2014 O visite Hoover
asiste ncia adicional o informa ción relaciona da con esta Garantía o con la disp onibilidad de los Centro s de servicio s autorizad os
de garantía, llame el 1-88 8-768-2014, de lunes a viernes de 8 a. m. a 5 p. m., Hora Estándar del Este.
NO CUBIERTO POR LA PRESENTE GAR ANTÍA
Algunas piezas de su producto
normal. Entre ellas se incluyen las correas, las mangas del rodillo del agitador, los cojinetes del agitador, los cepillos, las bolsas,
los ltros y las bombillas. E sta Garantía no cubre estas piezas. La presente Garantía tampoco cubre: mantenimiento inadecuado
del producto, daños debido al uso incorrecto, casos fortuitos o hechos de la naturaleza, vandalismo u otros actos que estén
más allá del control de
producto originalmente, reventa del producto por par te del propietario original, defectos o daños causados por reparaciones
o modicaciones que no hayan sido llevadas a cabo por un Distribuidor de Servicios de Garantía Autorizado de
Commercial
tomar decisiones nales sobre cualquier reclamo de garantía. Esta garantía no cubre la recolección, la entrega, el transporte ni
el servicio a domicilio del producto. No obstante, si envía el producto por correo postal al Distribuidor de Servicios de Garantía
Autorizado de
®
Comme rcial tienen g arantía co ntra fallas de f ábrica en lo s materiales y f allas por mano d e obra por una g arantía
®
Commercial junto con el comprobante de compra. Para ser redirigido en forma automáticaaunCentro de servicios
®
Commercial en línea en www.hoovercommercial.com. Para obtener
Hoover® Commercial requieren reemplazo durante el curso habitual del uso, debido al desgaste
Hoover® Commercial
, actos u omisiones del propietario, uso fuera del país en donde se compró el
Hoover®
.
Hoover® Commercial
Hoover® Commercial
se reserva el derecho de inspeccionar todos los productos considerados defectuosos y de
para obtener el servicio de la garantía, el envío tendr á un costo de ida solamente.
GARANTÍA
®
OTROS TÉRMINOS IMPORTANTES
Esta garantía no es transferible y no podrá ser cedida. Esta garantía se regirá e interpretará de conformidad con las leyes del
Estado de Nor th Carolina. El Plazo de la garantía no se prolongará por ningún reemplazo o reparación realizados conforme
a la garantía. ESTA GARANTÍA REPRESENTA L A GARANTÍA Y EL RECURSO LEGAL EXCLUSIVOS, PROPORCIONADOS POR
®
COMMERCIAL. TODAS LAS DEMÁS GARANTÍAS, EXPRESAS O IMPLÍCITAS, SERÁN RECHAZADAS, INCLUIDAS
HOOVER
LAS GARANTÍAS DE APTITUD PARA LA VENTA O ADECUACIÓN A FINES ESPECÍFICOS. EN NINGÚN SUPUESTO HOOVER
SERÁ RESPONSABLE POR DAÑOS ESPECIALES, INDIRECTOS, INCIDENTALES O EMERGENTES DE NINGUNA CL ASE
RECL AMAD OS POR EL PR OPIETAR IO O CUALQU IER PARTE P OR INTER MEDIO DE ES TE, YA SEA EN V IRTUD DE UN C ONTRAT O,
POR NEGLIGENCIA, HECHO ILÍCITO CIVIL O RESPONSABILIDAD OBJETIVA, NI POR CUALQUIER OTRA CAUSA. En algunos
estados, la exclusión de los daños mediatos no está permitida, de modo que la exclusión precedente puede no serle aplicable.
Esta garantía le otorga derechos especícos. También pue de tener otros derechos, que varían según el estado.
®
37
Page 38

GUIDE D’UTILISATION
Pour utilisation avec le modèle CH93619.
IMPORTANT:
AVANT D’ASSEMBLER ET D’UTILISER L’APPAREIL. CE PRODUIT EST DESTINÉ
À UN USAGE COMMERCIAL SEULEMENT.
LISEZ ATTENTIVEMENT LE PRÉSENT GUIDE D’UTILISATION
Bienvenue
Merci d’avoir choisi un produit commercial HooverMC.
38
SI VOUS AVEZ BESOIN D’AIDE
Veuillez appeler au 1 888 768-2014 (lundi au vendredi de 8 h à 17 h HNE) pour parler à un
représentant du service à la clientèle ou visitez notre site internet à HooverCommercial.com.
Page 39

Table des matières
Consignes de sécurité 40-41
Caractéristiques 42-43
Premiers pas 44
Assemblage de la rallonge et installation des accessoires 44
Harnais ergonomique et ajustement de la hauteur 45
MC
Utilisation de votre aspirateur dorsal sans-l 40V MPWR
MC
Port de l’aspirateur dorsal M-PWR
Batterie et chargeur 40V MPWR
de 40V 47
MC
48-49
Entretien 50
Comment remplacer le sac-ltre 51
Filtres 52-53
Dépannage 54
46
Garantie 55
39
Page 40

CONSIGNES DE SÉCURITÉ IMPORTANTES
CONSERVEZ CES INSTRUCTIONS!
IMPORTANT : LISEZ ATTENTIVEMENT AVANT L’ASSEMBLAGE ET L’UTILISATION. LORSQUE VOUS
UTILISEZ DES APPAREILS ÉLECTRIQUES, VEUILLEZ TOUJOURS RESPECTER ENTRE AUTRES LES CONSIGNES DE
SÉCURITÉ ÉLÉMENTAIRES SUIVANTES:
VEUILLEZ LIRE TOUTES LES INSTRUCTIONS AVANT D’UTILISER CET APPAREIL.
AVERTISSEMENT: POUR RÉDUIRE LE RISQUE D’INCENDIE, DE DÉCHARGE ÉLECTRIQUE OU DE
BLESSURE: N’EXPOSEZ JAMAIS VOTRE BLOC-PILES, VOTRE ASPIRATEUR OU VOTRE CHARGEUR À DE L’EAU, DE
L’HUMIDITÉ OU DES LIQUIDES, Y COMPRIS, SANS S’Y LIMITER, DES LIQUIDES CORROSIFS OU CONDUCTEURS ET NE
LAISSEZ JAMAIS LES LIQUIDES S’INFILTRER DANS CES ARTICLES.
Les liquides corrosifs ou conducteurs, comme l’eau salée, le chlore, certains produits chimiques industriels, les agents de
blanchiment , les produits con tenant des agents de blanchiment, etc., peuvent causer un cour t-circuit dans le blo c-piles. Si le
bloc-piles es t exposé à un liquide corrosif ou condu cteur, ne pas tenter de l’utiliser ou de le charger. Effect uer immédiatemen t les
étapes ci-dessous:
Porter le matériel de protection individuelle approprié, dont des lunettes de protection et des gants en caoutchouc.
Placer le bloc-piles exposé dan s un grand seau, comme un seau de 5 gallons ou d’une capacité similaire, et le r emplir d’eau du
robinet. Eviter d e placer plus de deu x blocs dans le se au.
Placer le seau à l’ex térieur dans un endroit hor s de la portée des enfant s et des animau x, loin des bâtimen ts, des garages, des
remis es, des str uctures , des véhicules e t des matériaux com bustibles ou inammables.
Laisser le ou les blocs-piles dans le s eau rempli d’eau du robinet et co mmuniquer avec le ser vice à la client èle au 1 888 768 -2014
pour ob tenir des directives supplémentaires sur l’élimination adéquate du ou d es blocs-piles exposé(s).
•
Assemblez entièrement l’appareil avant de l’utiliser.
•
Évitez d’utiliser l’appareil, de le ranger ou de charger sa pile à l’extérieur ou sur des surfaces mouillées. N’exposez pas le chargeur à l’eau ou à l’humidité.
•
Le chargeur est conçu pour être utilisé à l’intérieur seulement. Assurez-vous de toujours conserver la pile et le chargeur dans un endroit sec.
•
Ne permettez pas aux enfants de jouer avec l’appareil. Cet appareil ne doit pas être utilisé par des enfants de moins de 12ans. Exercez une surveillance
étroite lorsque l’appareil est utilisé à proximité d’enfants. Gardez l’appareil hors de la portée des enfants et ne laissez pas ces derniers introduire leurs
doigts ou d’autres objets dans aucune ouverture an d’éviter les blessures ou les bris.
•
Utilisez l’appareil uniquement aux ns décrites dans le présent guide. Utilisez uniquement les accessoires et les produits recommandés par Hoover Commercial.
•
N’utilisez pas le chargeur si la che ou le cordon est endommagé. Si l’appareil ou le chargeur ne fonctionne pas comme il le devrait, est tombé, est
endommagé, a été laissé à l’extérieur ou a pris l’eau, communiquez avec le service à la clientèle au 18887682014 avant de continuer à l’utiliser.
•
Ne tirez pas ni ne transportez le chargeur par le cordon, n’utilisez pas le cordon comme une poignée, ne coincez pas le cordon dans l’embrasure d’une
porte et ne l’appuyez pas contre des arêtes tranchantes ou des coins. Ne placez pas l’appareil sur le cordon. Ne faites pas rouler l’appareil sur le cordon.
Tenez le cordon éloigné des surfaces chaudes.
•
Ne débranchez pas le chargeur en tirant sur le cordon. Pour débrancher le chargeur, tirez sur la che.
•
Ne manipulez pas le chargeur, y compris la che et les bornes, ni l’appareil si vous avez les mains mouillées.
•
N’incinérez pas le chargeur, la pile ou l’appareil mêmes s’ils sont gravement endommagés. La pile peut exploser au feu.
•
N’introduisez pas d’objets dans les ouvertures d’aération. N’utilisez pas l’appareil si les ouvertures sont obstruées. Assurez-vous qu’elles sont exemptes
de poussière, de mousse, de cheveux ou de tout ce qui pourrait réduire le débit d’air.
•
Habillez-vous convenablement. Évitez de porter des vêtements amples ou des bijoux. Attachez les cheveux longs. Gardez les cheveux, les vêtements
amples, les doigts et toute autre partie du corps à l’écart des ouvertures et des pièces en mouvement. Les vêtements amples, les bijoux et les cheveux
longs peuvent rester coincés dans les pièces mobiles internes.
•
Redoublez de prudence lorsque vous utilisez l’appareil dans un escalier. Pour éviter tout dommage ou blessure et empêcher l’appareil de tomber, placez
toujours ce dernier au bas des escaliers, sur le plancher. Ne placez pas l’appareil sur les marches d’un escalier ou sur un meuble, car cela peut entraîner
des dommages ou des blessures.
•
Ce produit contient des piles au lithium-ion rechargeables. N’exposez pas la pile à des températures élevées, car elle pourrait s’enammer et exploser.
•
Évitez d’écraser et d’incinérer la pile ou de la soumettre à des actions similaires.
•
Ne jetez pas la pile au feu ou dans un compresseur à déchets. Consultez le chapitre sur l’élimination de la pile pour obtenir des instructions.
•
Ne tentez pas de démonter la pile.
•
Débranchez le chargeur de la prise avant de procéder à tout nettoyage ou entretien de routine.
•
La pile peut fuir si elle est soumise à des conditions extrêmes. Si l’électrolyte entre en contact avec votre peau, lavez aussitôt les parties touchées avec
de l’eau et du savon. En cas de contact avec les yeux, ne frottez pas. Rincez immédiatement vos yeux à l’eau propre pendant au moins 15minutes et
consultez un médecin sans attendre.
•
Utilisez seulement le chargeur (Hoover Commercial, no de pièce CH07150) fourni avec votre appareil Hoover Commercial pour recharger la pile. Le
40
Page 41

R
E
C
I
C
L
E
chargeur adéquat pour un type de bloc-piles présente un risque de blessure et d’incendie s’il est utilisé avec un bloc-piles différent.
•
Utilisez seulement la pile (Hoover Commercial, no de pièce CH17360) fournie avec votre appareil Hoover Commercial. L’utilisation de tout autre bloc-piles
présente un risque de blessure et d’incendie.
•
Ne touchez pas aux bornes du chargeur et du bloc-piles et n’y insérez pas d’objets.
•
Ne tentez pas de court-circuiter la pile ou les bornes du chargeur.
•
N’utilisez pas l’appareil pour aspirer des liquides inammables ou combustibles, comme de l’essence, ni de la sciure de bois, ni dans des endroits où de telles substances
peuvent être présentes.
•
N’aspirez JAMAIS de matières qui brûlent ou qui dégagent de la fumée, comme des charbons chauds, des mégots de cigarette, des allumettes, des cendres chaudes, etc.
•
N’utilisez pas l’appareil sans avoir installé le sac à poussière et le ltre.
•
Prévenez les mises en marche non intentionnelles. Assurez-vous que l’interrupteur est en position d’arrêt avant de connecter le bloc-piles, de prendre l’appareil ou de le
transporter. Transporter l’appareil en conservant les doigts près de l’interrupteur et brancher l’appareil sur une source électrique lorsque l’interrupteur est en position de
marche sont deux situations qui présentent des risques d’accident.
•
Retirez touj ours le bloc-p iles de l’appareil ava nt d’effec tuer des régla ges, de changer d ’accessoire s ou d’entrepos er ou de netto yer le produit o u
lorsqu’ il n’est pa s utilisé. Le ret rait du bloc- piles permet de p révenir les dém arrages ac cidentels qui po urraient caus er des blessur es graves.
•
Lorsqu’un bloc-piles est en fonction, maintenez-le à distance d’autres objets métalliques (trombones, pièces de monnaie, clés, clous, vis ou autres menus objets) susceptibles
d’établir un contact entre deux bornes. Un tel contact cour t-circuitant entre deux bornes de la pile présente des risques de brûlures ou d’incendie.
•
Dans des conditions extrêmes, un liquide pourrait être expulsé de la pile. En cas de contact accidentel, rincez les régions touchées avec de l’eau. En cas de contact avec les
yeux, rincez-les avec de l’eau et demandez une assistance médicale. Le liquide expulsé de la pile peut être une source d’irritation ou de brûlures.
•
N’utilisez ni un bloc-piles ni un appareil endommagé ou modié. Le fonctionnement des piles endommagées ou modiées peut être imprévisible et présenter des risques
d’incendie, d’explosion ou de blessures.
•
N’exposez pas le bloc-piles ou l’appareil au feu ou à une température excessive. L’exposition au feu ou à une température supérieure à 130°C (265°F) représente un risque
d’explosion.
•
Suivez toutes les instructions portant sur la recharge. Ne rechargez pas le bloc-piles ni l’appareil à des températures autres que celles indiquées dans ces instructions. Toute
recharge à des températures hors de la plage indiquée présente des risques d’endommager la pile en plus d’augmenter les risques d’incendie.
•
Lorsqu’un entretien est nécessaire, conez votre appareil à un réparateur qualié qui n’utilisera que des pièces de rechange identiques aux pièces
d’origine. Vous vous assurerez ainsi de préserver la sécurité de l’appareil.
•
Ne modiez ni l’appareil ni le bloc-piles et ne tentez pas de les réparer, sauf dans la mesure indiquée dans les présentes instructions quant à leur utilisation et à l’entretien requis.
•
Le rouleau-brosse peut redémarrer de façon soudaine; coupez l’alimentation et retirez la pile avant le nettoyage ou l’entretien.
MISE EN GARDE: POUR RÉDUIRE LES RISQUES DE DOMMAGE:
•
Utilise z seulement sur u n plancher sec .
•
Évit ez d’utiliser l’app areil pour rama sser des objet s durs ou aux arê tes tranch antes, car ils pourraient end ommager l’appa reil.
•
Range z l’appareil adé quatement à l’intér ieur et dans un endroit se c. N’exposez p as l’appareil à des condit ions de gel.
•
N’utilise z pas d’objet aux ar êtes tranchantes pour netto yer le tuyau, c ar cela risquer ait de l’endomma ger. Lorsque le r ouleau-
brosse est en m arche, ne laiss ez pas l’aspirat eur trop long temps au même endroit , car vous risq ueriez d’endom mager le planch er.
CONSIGNES DE SÉCURITÉ
AVERTISSEMENT: CE PRODUIT CONTIENT DES PRODUITS CHIMIQUES
RECONNUS PAR L’ÉTAT DE LA CALIFORNIE COMME POUVANT CAUSER LE CANCER, DES ANOMALIES
CONGÉNITALES OU D’AUTRES DYSFONCTIONS DU SYSTÈME REPRODUCTEUR. BIEN SE LAVER LES MAINS
APRÈS L’UTILISATION.
AVERTISSEMENT RELATIF À L’ÉLIMINATION DE LA BATTERIE:
RISQUE D’EXPLOSION OU D’EXPOSITION AUX MATIÈRES TOXIQUES :
MISE EN GARDE:
de brûlu re chimique si elle n’es t pas manipulé e adéquate ment. Ne la dé montez pa s, ne la chauf fez pas au- delà de la tempé rature ma ximale éta blie
par le fa bricant (6 0°C/140°F ) et ne l’incin érez pas. Re mplacez la ba tterie uni quement pa r une batt erie Hoover C ommercial, n o de pièce CH9 004 0.
L’utilisation d ’une autre ba tterie po urrait cau ser un incend ie ou une explo sion. Jetez r apidement t oute bat terie usag ée. Gardez la b atteri e hors de
la por tée des enf ants. Ne dém ontez pas la b atteri e et ne la jetez p as au feu. Ne ten tez pas de dém onter la bat terie ou de r etirer tou t composa nt en
saillie des b ornes de la b atterie . Ne tentez p as de remplac er des pièces d e la batte rie ou du charg eur. Cela pourr ait provoq uer un incend ie ou une
explo sion. Avant de je ter la bat terie, prot égez les bo rnes expo sées à l’aide d’un ép ais ruban iso lant pour évi ter les cour ts-cir cuits.
BATT ERIE AU LITHIUM-ION:
de rec yclage des b atterie s au lithium-io n de la RBRC cer tié par l ’EPA indique qu e Techt ronicIndus tries, soc iété aflié e à Hoover Co mmercial,
par ticipe volon tairement à u n program me de collect e et de recyc lage des bat teries us agées au Can ada et aux Éta ts-Unis . Le progra mme de
recy clage de la RBR C offre un e solution de r echange pr atique qui pe rmet d’é viter que les b atteri es soient jet ées à la poubell e ou dans les
ordur es ménagèr es municipale s, ce qui pourr ait être illég al dans votr e région. Co nsultez le sit e www.rb rc.org /call2recy cle/
pour ob tenir de l’inf ormation s ur le recycl age des bat teries au lit hium-ion ainsi q ue sur les inte rdictions o u les restr ictions
touch ant leur élimina tion dans vot re région. L a partici pation de Ho over Comme rcial à ce pro gramme tém oigne de son
engag ement à prot éger l’envir onnement et l es ressour ces natu relles.
La ba tterie doi t être recu eillie, recyclé e ou éliminée dan s le respec t de l’environn ement. Le s ceau
La ba tterie ut ilisée dans cet a ppareil peu t présent er un risque d ’incendie ou
41
Page 42

Caractéristiques du produit
A
Tuy au
B
Tube supérieur
C
Corps de l’aspirateur
•
Sac-ltre anti-allergène
• Sac-ltre en tissu
•
Filtre HEPA
D
Tube inférieur
E
Filtres Hexaguard
F
Batterie au lithium-ion 40V M-PWR
F
Chargeur 40V M-PWR
MC
MC
*
MC
*
Outils de dépoussiérage
Accessoire pour tapis Accessoire pour plancher
Suceur plat
Brosse à épousseter
42
*VENDU SÉPARÉMENT
Page 43

CARACTÉRISTIQUES DU PRODUIT
A
B
C
D
E
F
F
G
43
Page 44

Assemblage de la rallonge et installation des
accessoires
MISE EN GARDE
Alignez le petit bouton
1
argent du tube inférieur
avec la petite ouverture
dans le tube supérieur.
N’UTILISEZ PAS L’ASPIRATEUR POUR TOILETTER UN ANIMAL.
Insérez le tube inférieur
2
dans le tube supérieur
jusqu’à ce que le petit
bouton s’enclenche dans
la petite ouver ture.
Pressez fermement
3
l’extrémité du boyau
contre l’extrémité ouverte
du tube en dépassant
l’anneau surélevé.
44
Pour utiliser les accessoires
4
pour plancher, dévisser le
manchon du tube inférieur
en le tournant vers la
gauche, mais sans le retirer
complètement. Insérez
l’accessoire pour plancher
dans le manchon et alignez
l’anneau métallique avec
la rainure de l’accessoire.
Serrez le manchon en
tournant vers la droite.
Page 45

Harnais ergonomique et ajustement de la hauteur
REMARQUE: Le harnais a été conçu et dessiné pour s’adapter à plusieurs grandeurs d’utilisateurs et s’ajuste
selon la grandeur. La partie supérieure du harnais doit reposer entre les omoplates pour obtenir un port
confortable. La position du harnais supérieur du sac à dos livré est située dans le trou central d’ajustement
dela partie saillante de hauteur moyenne.
HERNAIS ERGONOMIQUE ET AJUSTEMENT DE LA HAUTEUR
Pour les utilisateurs de petite
1
taille, déplacez vers le bas la
partie supérieure du harnais à
la position du haut sur la plaque
d’ajustement de la hauteur.
Pour les utilisateurs de grande taille,
faites glisser la partie saillante inférieure
de la plaque d’ajustement vers le haut.
Position
Position 1 5’2”≤
Position 2 5’3”- 5’6”
Position 3 5’7”-5’10”
Taille de l’utilisateur Ajustement
Déplacez la partie supérieure
2
du harnais et serrez
fermement la vis à la bonne
hauteur d’ajustement de la
partie saillante.
Pour les utilisateurs de petite
taille, déplacez la par tie
supérieure du harnais à la
position du haut sur la plaque
d’ajustement de la hauteur.
Faites glisser la partie saillante supérieure de la plaque
d’ajustement jusque dans le bas
Faites glisser la partie saillante supérieure de la plaque
d’ajustement jusqu’à la deuxième position la plus basse
La partie saillante centrale de la plaque d’ajustement
doit se trouver directement au centre
Position 4 5’11”- 6’2”
Position 5 6’3”>
Faites glisser la partie saillante inférieure de la plaque
d’ajustement jusqu’à la deuxième position la plus haute
Faites glisser la partie saillante inférieure de la plaque
d’ajustement jusque dans le haut
45
Page 46

Utilisation de votre sac à dos 6Q HUSHTONE
REMARQUE: Ne passez pas l’aspirateur sans avoir installé les deux sacs-ltres et les ltres HEPA.
TEMPÉRATURE AMBIANTE:
5°C à 50°C (41°F à 122°F)
MC
Insérez fermement l’extrémité du
1
tuyau dans le manchon du tuyau.
Placez la partie inférieure du coussin
3
au bas du dos de manière à ce que
le poids de l’appareil repose sur les
hanches et non les épaules.
Relâchez les bandoulières puis
2
soulevez le sac à dos en glissant les
deux bras dans les bandoulières.
MISE EN GARDE:
BATTERIE AVANT D’EFFECTUER LE NETTOYAGE OU L’ENTRETIEN DE L’APPAREIL.
46
POUR RÉ DUIRE LES R ISQUES DE B LESSURE : RE TIREZ L A
Page 47

Port de l’aspirateur dorsal M-PWR
REMARQUE: Le harnais ergonomique est dessiné de manière à identier facilement les étapes de bon port du
sac à dos. Repérez les èches chiffrées des légendes de parties correspondantes indiquées dans les directives
ci-dessous.
MC
de 40V
PORT DE L’ASPIRATEUR DORSAL M-PWR
DE 40V
MC
Serrez la ceinture jusqu’à ce
1
qu’elle tienne fermement sur vos
hanches tout en étant confortable.
REMARQUE: Si une longueur
additionnelle est requise, la courroie
de rallonge peut être placée entre les
extrémités de la courroie et ajustée à
la longueur désirée.
Enclenchez la boucle de la bandoulière
3
de poitrine et serrez-la ou déserrez-la
au besoin.
Tirez les deux extrémités des
2
bandoulières jusqu’à ce que la partie
supérieure du harnais touche aux
omoplates. Presque tout le poids de
l’appareil doit reposer sur les hanches.
Vous devez pouvoir insérer facilement
un doigt entre chaque bandoulière
et l’épaule. Resserrez la ceinture
aubesoin.
Glissez les bandoulières de poitrine
4
vers le haut ou le bas pour les ajuster.
47
Page 48

Batterie et chargeur 40V M-PWR
MC
REMARQUE: Au moment de la livraison, le niveau de charge des batteries est faible an d’éviter d’éventuels
problèmes. Vous devez les recharger avant de les utiliser une première fois.
TEMPÉRATURE AMBIANTE POUR LA RECHARGE:
5°C à 40°C (41°F à 104°F)
Pour recharger la batterie, faites-la
1
glisser dans le chargeur. Poussez la
batterie vers le fond jusqu’à ce qu’elle
s’enclenche et que le voyant DEL
s’allume.
Au moment de la recharge, le voyant
3
DEL sur la batterie donne une
indication sur le niveau de charge.
Le voyant DEL passe au vert lorsque
2
labatterie est entièrement rechargée.
Si le voyant du chargeur clignote
en vert et en rouge, une erreur est
survenue. Retirez la batterie et
remettez-la enplace.
Pour retirer la batterie, appuyez sur
4
le bouton de dégagement et faites
glisser la batterie vers l’avant en
maintenant la base du chargeur.
48
Page 49

Batterie et chargeur 40V M-PWR
MC
BATTERIE ET CHARGEUR 40V M-PWR
MC
Insérez la batterie dans son
1
compartiment et fermez-le en
appuyant fermement sur la poignée
intégrée jusqu’à ce que la batterie
soitxée correctement en place.
Pour retirer la pile, saisissez la poignée
3
intégrée tout en appuyant sur la
pédale de dégagement. Puis, toujours
en maintenant enfoncé le bouton de
dégagement, faites glisser la batterie
en dehors de son compartiment.
Appuyez sur l’interrupteur orange pour
2
mettre l’appareil en marche.
I (HUSH) : Mode de nettoyage
silencieux Hush
II (BOOST) : Nettoyage des
circulations piétonnières intenses
(O) (OFF) : Éteignez l’appareil en
repositionnant l’interrupteur au centre.
MC
49
Page 50

Entretien
Toute autre tâche d’entretien doit être conée à un représentant de service autorisé.
RUPTEUR THERMIQUE
Votre appareil est équipé d’un rupteur thermique interne an de le protéger contre la surchauffe.
L’appareil cessera de fonctionner si ce rupteur thermique s’active.
Voici ce qu’il faut faire lorsque ceci survient :
1. Éteignez l’aspirateur et retirez le bloc-piles.
2. Vériez si le sac est plein et changez-le au besoin.
3. Vériez si la conduite d’air est obstruée. Dégagez toutes les obstructions visibles.
4. Le rupteur thermique se réinitialisera une fois que le moteur se sera refroidi pendant 30minutes après le
retrait du bloc-piles. Vous pourrez à ce moment reprendre le travail.
Votre appareil devra être réparé si le rupteur thermique ne se réinitialise pas après avoir respecté les étapes
ci-dessus.
MISE EN GARDE:
PAS COMME IL LE DEVRAI T, EST TOMBÉ, EST ENDOMMAGÉ, A ÉTÉ LAISSÉ À L’EXTÉRIE UR OU A PRIS L’EAU, COMMUNIQ UEZ AVEC LE
SERVICE À LA CLIENTÈL E AU 18887682014 AVANT DE CONTINUER À L’UT ILISER.
REMARQUE: Si vous utilisez l’aspirateur pour ramasser des poussières très nes, comme de la sciure ou de
la poussière de placoplâtre, il sera nécessaire de remplacer le sac et de nettoyer les ltres à des intervalles
fréquents an de maintenir une puissance de ramassage maximale. La poussière ne colmatera les pores du
sac et réduira l’aspiration avant que le sac ne soit plein.
Vériez le sac-ltre. Changez-le s’il
1
est plein.
SI L’APPAREIL OU LE CHARGEUR NE FONCT IONNE
Vériez si la buse, le tuyau et l’entrée
2
du sac sont obstrués. Dégagez toutes
les obstructions.
50
Page 51

Comment remplacer le sac-ltre
COMMENT REMPLACER LE SAC-FILTRE
MISE EN GARDE:
BATTERIE AVANT D’EFFECTUER LE NETTOYAGE OU L’ENTRETIEN DE L’APPAREIL.
Ouver le couvercle
1
supérieur en déclenchant
les 3 languettes.
Soulevez le sac du ltre.
2
POUR RÉ DUIRE LES R ISQUES DE B LESSURE : RE TIREZ L A
Insérez le nouveau
3
sac en alignant les
deux languettes dans
l’ouverture du col en
carton.
Réinstallez le couvercle
4
supérieur et enclenchez
les languettes.
SACS DE RECHANGE
Conception à col ouvert pour ltration des allergènes, paquet de10, no de pièceAH10231
Filtration allergène, paquet de10, no de pièceAH10232
51
Page 52

Filtres
MISE EN GARDE:
LA BAT TERIE AVANT D’E FFECT UER LE NET TOYAGE OU L’ENTR ETIEN DE L’APPARE IL. N’UTI LISEZ PAS L’ASPIR ATEUR SI LE FI LTRE D’ENT RÉE ET LES F ILTRES
D’EX TRÉMIT É NE SONT PAS INS TALLÉS.
FILTRE CONÇU AVEC LA TECHNOLOGIE HEPA
Les ltres nisseurs contribuent au processus de ltration en assainissant l’air rejeté dans la pièce. Il y a deux
ltres HEPA; un ltre de chaque côté du sac à dos.
Retirez la porte du ltre
1
en tirant la languette
arrière vers l’avant puis
tournez-la.
Dégagez le ltre du cadre
2
et sortez-le. Rincez-le
à l’eau froide, sous un
faible débit d’eau. Rincez
seulement la surface
dirigée vers l’intérieur de
l’appareil. Laissez sécher
pendant 24 heures et
replacez dans le boîtier
du ltre.
POUR RÉ DUIRE LES R ISQUES DE B LESSURE: RE TIREZ
Réinstallez la porte du
3
ltre en alignant les deux
languettes dirigées vers
l’avant et tournez-les.
Appuyez sur la languette
arrière jusqu’à ce que
la porte s’enclenche
correctement.
IMPORTANT:
PLAC E. PLACE Z LE FILTRE DE C ÔTÉ POUR LE F AIRE SÉCHE R DE SORTE Q UE L’AIR CIR CULE DES DE UX CÔTÉS D U FILTRE. LE T EMPS DE SÉC HAGE PEUT
PREND RE JUSQU’À 24HEU RES.
REMPLACEMENT DU FILTRE
Inspectez le ltre nisseur HEPA tous les mois et rincez-le si nécessaire. Vériez si le ltre
est usé et remplacez-le si les plis sont endommagés. Changez le ltre régulièrement pour
maintenir une performance optimale.
No de pièce: AH40006
52
LAISSEZ SÉCHER COMPLÈTEMENT LE FILTRE AVANT DE LE REMETTRE EN
Page 53

FILTRES
MISE EN GARDE:
LA BAT TERIE AVANT D’E FFECT UER LE NET TOYAGE OU L’ENTR ETIEN DE L’APPARE IL. N’UTI LISEZ PAS L’ASPIR ATEUR SI LE FI LTRE D’ENT RÉE ET LES F ILTRES
D’EX TRÉMIT É NE SONT PAS INS TALLÉS.
FILTRE HEXAGUARD
(FILTRE À CHARBON ACTIF)
Les ltres HexaGuardMC sont situés à
1
l’intérieur de la porte du ltre. Tirez
pour retirer.
MC
POUR RÉ DUIRE LES R ISQUES DE B LESSURE: RE TIREZ
FILTRE D’ENTRÉE
Le ltre d’entrée est situé à l’intérieur,
au fond du logement de sac et offre une
protection contre les bris du moteur.
Si le ltre devient sale, retirez la grille
1
et soulevez le ltre puis le sortir.
Rincez-le à l’eau froide, sous un faible
débit d’eau. Laissez-le sécher pendant
24heures. Repositionnez le ltre sec
et xez la grille en place.
IMPORTANT:
PLAC E. PLACE Z LE FILTRE DE C ÔTÉ POUR LE F AIRE SÉCHE R DE SORTE Q UE L’AIR CIR CULE DES DE UX CÔTÉS D U FILTRE. LE T EMPS DE SÉC HAGE PEUT
PREND RE JUSQU’À 24HEU RES.
REMPLACEMENT
DUFILTRE
Remplacez le ltre HexaGuard™
chaque année pour obtenir une
performance optimale.
No de pièce: 440009176
LUBRIFICATION
Le moteur est équipement de roulements suf samment lubriés pour toute la durée de vie de l’appareil.
L’ajout de lubriant pourrait causer des dommages. N’ajoutez pas de lubriant dans le moteur.
LAISSEZ SÉCHER COMPLÈTEMENT LE FILTRE AVANT DE LE REMETTRE EN
REMPLACEMENT
DUFILTRE
Inspectez le ltre d’entrée
tous les deux semaines pour
que l’aspirateur offre une
performance optimale.
No de pièce: 440009175
53
Page 54

Dépannage
RANGEMENT: Retirez toujours le bloc-piles avant d’entreposer le chargeur ou chaque fois que le chargeur est débranché.
ARRÊTMARCHEARRÊT
AVERTISSEMENT:
POUR RÉ DUIRE LES R ISQUES DE B LESSURE:
RET IREZ LA BAT TERIE AVANT D’E FFECT UER LE NET TOYAGE OU L’ENTR ETIEN DE L’APPARE IL. N’UTI LISEZ PAS L’ASPIR ATEUR SI LE FI LTRE D’ENT RÉE ET LES
FILTRE S D’EXT RÉMITÉ NE S ONT PAS INSTAL LÉS. CES SEZ D’UT ILISER L’APPARE IL S’IL NE FON CTIONNE PAS C OMME PRÉV U, S’IL A ÉTÉ É CHAPPÉ S UR LE SOL
OU DANS L’E AU, S’IL ES TENDOMMAGÉ O U S’IL A ÉTÉ L AISSÉ À L’EX TÉRIEUR E T APPORT EZ-LE AU CEN TRE DE RÉPARAT IONS.
Toute autre tâche d’entretien doit être conée à un représentant de service autorisé.
TÉMOIN
TÉMOIN
CHARGEUR
Appareil sous tension
Sans le bloc-piles
Essai
Bloc-piles chaud
Bloc-piles froid Lorsque le bloc-piles est chaud, le chargeur commence en mode charge.
Charge très faible
Erreur
Erreur
•
Erreur, essayez de répéter les étapes en enlevant et en réinstallant le bloc-piles. Si l’état de la DEL est toujours le même,
essayez de charger une pile différente.
•
Si l’autre pile se charge normalement, jetez la pile (reportez-vous à la section
•
Si une batterie différente indique également «Erreur», le chargeur peut être endommagé ou défectueux.
Recharge
Recharge rapide La pile est en charge.
Prêt
Pile chargée La charge est terminée.
DEL ROUGE
MARCHE
ClignotementClignotement
ARRÊT
TÉMOIN
DEL VERT
ORANGE
ARRÊT ARRÊT
MARCHE
ARRÊTARRÊT
Clignotement
Prêt à charger le bloc-piles.
Lorsque le bloc-piles est refroidi, le chargeur commence en mode charge.
Le chargeur charge préalablement la pile jusqu’à une tension normale, puis
commence en mode charge
Le bloc-piles ou le chargeur est endommagé ou défectueux.
ARRÊT
ÉLIMINATION DE LA BATTERIE
ARRÊT
ACTION
).
Problème Cause possible Solution possible
L’aspirateur ne
fonctionne pas.
1. La batterie n’est peut-être pas
installée adéquatement.
1. Assurez-vous que la bat terie est bien installée
dans son réceptacle.
2. La batterie n’est peut-être pas
chargée.
3. La batterie est peut-être trop
chaude.
2. Vériez l’indicateur de charge et rechar gez la
batterie si le niveau est bas.
3. Retirez la ba tterie et laissez-la refroidir pendant
30minutes, puis remet tez-la en plac e et essayez
de nouveau l’appareil ou utilisez la deuxième
batterie si celle-ci est chargée.
L’indicateur de
vérication du sac est
rouge OU l’appareil
4. Un composant interne est peutêtre endommagé.
1. Le sac-ltre est plein
ou obstrué
4. Communiquez avec le service technique au
1888768-2 014.
1. Videz le sac-ltre - Voir page51.
n’aspire plus OU la
succion est faible.
La poussière s’échappe
de l’aspirateur.
1. Le sac-ltre est plein. 1. Videz le sac-ltre - Voir page51.
2. Le sac-lt re n’est pas installé
correctement.
2. Consultez la section sur le retrait et le
remplacement
du sac-ltre– v oir page51.
3. Le tuyau est mal installé. 3. Consultez le chapit re d’installation du boyau Voirpage 4 6.
54
Page 55

Il est dif cile, voire
déplacer ou à pousser
vers l’avant.
1. Accessoire pour plancher mal
installé.
1. Assurez-vous que l’accessoir e pour tapis est
utilisé sur un tapis et que l’accessoire pour
plancher est utilisé sur des planchers durs.
2. Ajustez l’angle de l’accessoire pour plancher en
l’inclinant ver s le haut pour faciliter sa p oussée.
GARANTIE LIMITÉE DE 2ANS
COUVERTURE DE LA GARANTIE
Votre chargeur HooverMD Commercial et sa pile sont garantis pour des conditions normales d’utilisation et d’entretien
comme rciaux, com me le stipule le Gui de d’utilisatio n, contre les d éfauts de ma tériaux et de f abrication pour une p ériode limité e
de 2ans à compter de la date d’achat (ci-après la «période de garantie»). Pendant la période de garantie, Hoover Commercial
offrira une main-d’œuvre et des pièces sans frais pour corriger les défauts dans votre modèle CH93619 acheté aux États-Unis
ou au Canada ou dans le cadre d’échanges militaires avec les États-Unis. Hoover Commercial se réserve également le droit, à
son entière discrétion, de vous fournir un ou des produits de remplacement ou un remboursement pour respecter les modalités
de la présente garantie.
RÉCL AMATION AU TITRE DE L A GARANTIE
Si le produit n’est pas dans l’état prévu par la garantie, apportez ou envoyez le produit chez un fournisseur autorisédeservice
sous garantie Hoover
service automatisé au 1888768-2014 OU visitez Hoover
du sout ien ou d’autres r enseigneme nts au sujet de la g arantie ou po ur connaît re les boutiq ues offra nt les répar ations au titr e de
la garan tie, composez le 1888768-2014, entre 8h et 17h (HNE) du lundi au vendredi.
ÉLÉMENTS NON COUVERTS PAR LA GARANTIE
Cer taines pièc es de votre pr oduit comme rcial
usure normale. Ces pièces comprennent les courroies, les manchons du rouleau-brosse, les roulements du rouleau-brosse, les
brosses, les sacs, les ltres et les ampoules. Ces pièces ne sont pas couvertes par la présente garantie. De plus, la présente
garantie ne couvre pas : un entretien inadéquat du produit, les bris causés par la mauvaise utilisation, les cas fortuits, les
catastrophes naturelles, le vandalisme et autres actes hors du contrôle de
du propriétaire, l’utilisation à l’extérieur du pays d’achat, la revente du produit par le premier acheteur, les défauts ou les
dommages causés par quiconque autre qu’un fournisseur autorisé de service sous garantie
droit d’inspecter tout produit présumé défectueux et de prendre les décisions dénitives à l’égard de toute réclamation au titre
de la gar antie. La pré sente gar antie ne couv re pas le rama ssage, la liv raison, le tra nsport, n i les répara tions à domicile . Toute fois,
si vous envoyez votre produit par courrier à un fournisseur autorisé de service sous garantie
répar ation sous garantie, les frais de livraison de re tour seront payés.
MD
avec une preuve d’achat. Pour obtenir la liste des points de service autorisés,composez le numéro du
MD
Commercial en ligne au www.hoovercommercial.com. Pour obtenir
HooverMD doive nt être remp lacées dans le c ours norm al d’utilisatio n en raison d’une
HooverMDCommercial
, les agissements ou omissions
HooverMD Commercial
se réserve le
HooverMD Commercial
pour une
GARANTIE
AUTRES CONDITIONS IMPORTANTES
La pré sente gar antie n’est pa s transf érable et ne p eut pas êtr e cédée. L a présent e garanti e sera régie e t interpr étée selon l es lois
de l’Ét at de l’Nort h Carolina. L a période de ga rantie ne ser a pas prolong ée après tout r emplaceme nt ou toute ré paration au ti tre
de la pré sente gara ntie. CET TE GAR ANTIE E ST VOTRE U NIQUE REC OURS ET VO IE DE DROIT F OURNIS PAR HO OVER
AUTRES GARANTIES, EXPRESSES OU TACITES, INCLUANT LES GARANTIES DE QUALITÉ MARCHANDE OU D’ADAPTATION
À UN USAGE PARTICULIER, SONT DÉCLINÉES. EN AUCUN TEMPS, HOOVER
MD
NE POURRA ÊTRE TENUE RESPONSABLE DE
TOUS L ES DOMMA GES-INT ÉRÊTS S PÉCIAU X, INDIRE CTS, ACC IDENTE LS OU ACCES SOIRES D’AUC UNE SORT E OU D’AUCUNE
NATURE ENVERS LE PROPRIÉTAIRE OU DE TOUTES PARTIES RÉCLAMANT AU NOM DU PROPRIÉTAIRE, QUE CE SOIT PAR
CONTRAT, NÉGLIGENCE, TORT OU RESPONSABILITÉ STRICTE DES PRODUITS OU SURVENUS PAR QUELQUE CAUSE QUE CE
SOIT. Cer tains État s ne permet tent pas l’exclusion des dommage s consécutifs. Par consé quent, l’exclusion précéden te pourrait
ne pas êt re applicable d ans votre cas . La présente garantie vou s donne des droits pré cis. Vous pouve z également avoir d’autr es
droits, lesquels varient d’une province à l’autr e.
MD
. TOUT ES
55
Page 56

HooverCommercial.com
IMAG ES MAY DIFF ER FROM ACT UAL PROD UCT.
© 2019 TECH TRONIC F LOORCA RE TECHN OLOGY LIM ITED
#964A00209
 Loading...