

Page 1

HMGS 2594 DBK CH
MICROWAVE OVENS
USER INSTRUCTIONS
FORNI A MICROONDE
MANUALE DI ISTRUZIONI
GB
IT
Page 2

GB
1
Microwave Oven
INSTRUCTION MANUAL
MODEL:HMGS 2594 DBK CH
Read these instructions carefully before using your
microwave oven,and keep it carefully.
If you follow the instructions, your oven will provide you with
many years of good service.
SA VE THESE INSTRUCTIONS CAREFULLY
Page 3

GB
2
PRECAUTIONS TO AVOID POSSIBLE EXPOSURE
TO EXCESSIVE MICROWAVE ENERGY
(a) Do not attempt to operate this oven with the door open since this can
result in harmful exposure to microwave energy. It is important not to
break or tamper with the safety interlocks.
(b) Do not place any object between the oven front face and the door or allow
soil or cleaner residue to accumulate on sealing surfaces.
(c) WARNING: If the door or door seals are damaged, the oven must not
be operated until it has been repaired by a competent person.
ADDENDUM
If the apparatus is not maintained in a good state of cleanliness, its surface could
be degraded and affect the lifespan of the apparatus and lead to a dangerous
situation.
Specifications
Model:
Rated Voltage:
Rated Input Power(Microwave):
Output Power (Microwave):
Rated
Microwave with Steam intput:
Grill with Steam input:
Oven Capacity:
Turntable Diameter:
External Dimensions:
Net Weight:
HMGS 2594 DBK CH
230V~50Hz
1450W
900W
2300W
1900W
25L
315mm
513x440x305mm
Approx. 16.5 kg
Page 4

GB
3
IMPORTANT SAFETY INSTRUCTIONS
WARNING
1. Warning: Liquids and other foods must
not be heated in sealed containers since
they are liable to explode.
2. Warning: It is hazardous for anyone other
than a competent person to remove a
cover which gives protection against
exposure to microwave energy.
3. Warning: Only allow children to use the
oven without supervision when adequate
instructions have been given so that the
child is able to use the oven in a safe way
and understand the hazards of improper
use.
4. Warning: When the appliance is operated
in the combination mode, children should
only use the oven under adult supervision
due to the temperatures generated.
(only for grill series)
5. Only use utensils suitable for use in
microwave ovens.
6. The oven should be cleaned regularly and
any food deposits should be removed.
7. Read and follow the specific:"PRECAU TIONS TO AVOID POSSIBLE EXPOSURE
TO EXCESSIVE MICROWAVE ENERGY".
8. When heating food in plastic or paper
containers, keep an eye on the oven due
to the possibility of ignition.
9. If smoke is observed, switch off or unplug
the appliance and keep the door closed
in order to stifle any flames.
10. Do not overcook food.
11. Do not use the oven cavity for storage
purposes. Do not store items,
such as bread, cookies, etc. inside the
oven.
12. Remove wire twist-ties and metal handles
from paper or plastic containers/bags
before placing them in the oven.
13. Install or locate this oven only in
accordance with the installation
instructions provided.
14. Eggs in the shell and whole hard-boiled
eggs should not be heated in microwave
ovens since they may explode, even
after microwave heating has ended.
To reduce the risk of fire, electric shock, injury to persons
or exposure to excessive microwave oven energy when
using your appliance, follow basic precautions, including
the following:
15. Use this appliance only for its intended
uses as described in manual. Do not
use corrosive chemicals or vapors
in this appliance. This oven is especially
designed to heat. It is not designed for
industrial or laboratory use.
16. If the supply cord is damaged, it must
be replaced by the manufacturer, its
service agent or similarly qualified
persons in order to avoid a hazard.
17. Do not store or use this appliance
outdoors.
18. Do not use this oven near water, in a
wet basement or near a swimming
pool.
19. The temperature of accessible surfaces
may be high when the appliance is
operating. Keep cord away from heated
surface, and do not cover any events
on the oven.
20. Do not let cord hang over edge of table
or counter.
21. Failure to maintain the oven in a clean
condition could lead to deterioration
of the surface that could adversely
affect the life of the appliance and
possibly result in a hazardous situation.
22. The contents of feeding bottles and
baby food jars shall be stirred or shaken
and the temperature checked before
consumption, in order to avoid burns.
23. Microwave heating of beverages can
result in delayed eruptive boiling,
therefore take care when handling the
container.
24.The appliance is not intended for use by
persons (including children) with reduced
physical , sensory or mental capabilities,
or lack of experience and knowledge,
unless they have been given supervision
or instruction concerning use of the
appliance by a person responsible for their
safety.
25.Children should be supervised to ensure
that they do not play with the appliance.
26.The microwave oven shall not be placed
in a cabinet.
Page 5

GB
4
To Reduce the Risk of Injury to Persons
Grounding Installation
DANGER
Electric Shock Hazard
Touching some of the internal
components can cause serious
personal injury or death. Do not
disassemble this appliance.
WARNING
Electric Shock Hazard
Improper use of the grounding
can result in electric shock. Do
not plug into an outlet until
appliance is properly installed
and grounded.
This appliance must be grounded. In the event of
an electrical short circuit, grounding reduces the
risk of electric shock by providing an escape wire
for the electric current. This appliance is equipped
with a cord having a grounding wire with a
grounding plug. The plug must be plugged into an
outlet that is properly installed and grounded.
Consult a qualified electrician or serviceman if the
grounding instructions are not completely
understood or if doubt exists as to whether the
appliance is properly grounded. If it is necessary
to use an extension cord , use only a 3-wire
extension cord.
CLEANING
Be sure to disconnect the
oven from the power supply.
1. Clean the inside of the oven after using
with a slightly damp cloth.
2. Clean the accessories in the usual way
in soapy water.
3. The door frame and seal and
neighbouring parts must be cleaned
carefully with a damp cloth when they
are dirty.
1. A short power-supply cord is provided to
reduce the risks resulting from becoming
entangled in or tripping over a longer cord.
2. If a long cord set or extension cord is used:
1)The marked electrical rating of the cord set
or extension cord should be at least as great
as the electrical rating of the appliance.
2)The extension cord must be a grounding type 3-wire cord.
3)The long cord should be arranged so that it
will not drape over the counter top or tabletop
where it can be pulled on by children or tripped
over unintentionally.
Page 6

GB
5
UTENSILS
CAUTION
Personal Injury Hazard
It is hazardous for anyone
other than a compentent person
to carry out any service or repair
operation that involves the removal
of a cover which gives protection
against exposure to microwave
energy.
See the instructions on "Materials you can use in
microwave oven or to be avoided in microwave oven."
There may be certain non-metallic utensils that are not
safe to use for microwaving. If in doubt, you can test the
utensil in question following the procedure below.
Utensil Test:
1. Fill a microwave-safe container with 1 cup of cold
water (250ml) along with the utensil in question.
2. Cook on maximum power for 1 minute.
3. Carefully feel the utensil. If the empty utensil is
warm, do not use it for microwave cooking.
4. Do not exceed 1 minute cooking time.
Materials you can use in microwave oven
Utensils Remarks
Aluminum foil Shielding only. Small smooth pieces can be used to cover thin parts of
meat or poultry to prevent overcooking. Arcing can occur if foil is too
close to oven walls. The foil should be at least 1 inch (2.5cm) away from
oven walls.
Browning dish
Dinnerware
Glass jars
Glassware
Oven cooking
bags
Paper plates
and cups
Paper towels
Parchment
paper
Plastic
Plastic wrap
Thermometers Microwave-safe only (meat and candy thermometers).
Wax paper Use as a cover to prevent splattering and retain moisture.
Follow manufacturer’s instructions. The bottom of browning dish must be
at least 3/16 inch (5mm) above the turntable. Incorrect usage may cause
the turntable to break.
Microwave-safe only. Follow manufacturer's instructions. Do not use
cracked or chipped dishes.
Always remove lid. Use only to heat food until just warm. Most glass jars
are not heat resistant and may break.
Heat-resistant oven glassware only. Make sure there is no metallic trim.
Do not use cracked or chipped dishes.
Follow manufacturer’s instructions. Do not close with metal tie. Make
slits to allow steam to escape.
Use for short–term cooking/warming only. Do not leave oven unattended
while cooking.
Use to cover food for reheating and absorbing fat. Use with supervision
for a short-term cooking only.
Use as a cover to prevent splattering or a wrap for steaming.
Microwave-safe only. Follow the manufacturer’s instructions. Should be
labeled "Microwave Safe". Some plastic containers soften, as the food
inside gets hot. "Boiling bags" and tightly closed plastic bags should be
slit, pierced or vented as directed by package.
Microwave-safe only. Use to cover food during cooking to retain
moisture. Do not allow plastic wrap to touch food.
Page 7
GB
6
Materials to be avoided in microwave oven
Utensils Remarks
Aluminum tray
Food carton with
metal handle
Metal or metal
trimmed utensils
Metal twist ties
Paper bags
Plastic foam
Wood
May cause arcing. Transfer food into microwave-safe dish.
May cause arcing. Transfer food into microwave-safe dish.
-
Metal shields the food from microwave energy. Metal trim may
cause arcing.
May cause arcing and could cause a fire in the oven.
May cause a fire in the oven.
Plastic foam may melt or contaminate the liquid inside when exposed
to high temperature.
Wood will dry out when used in the microwave oven and may split
or crack.
SETTING UP YOUR OVEN
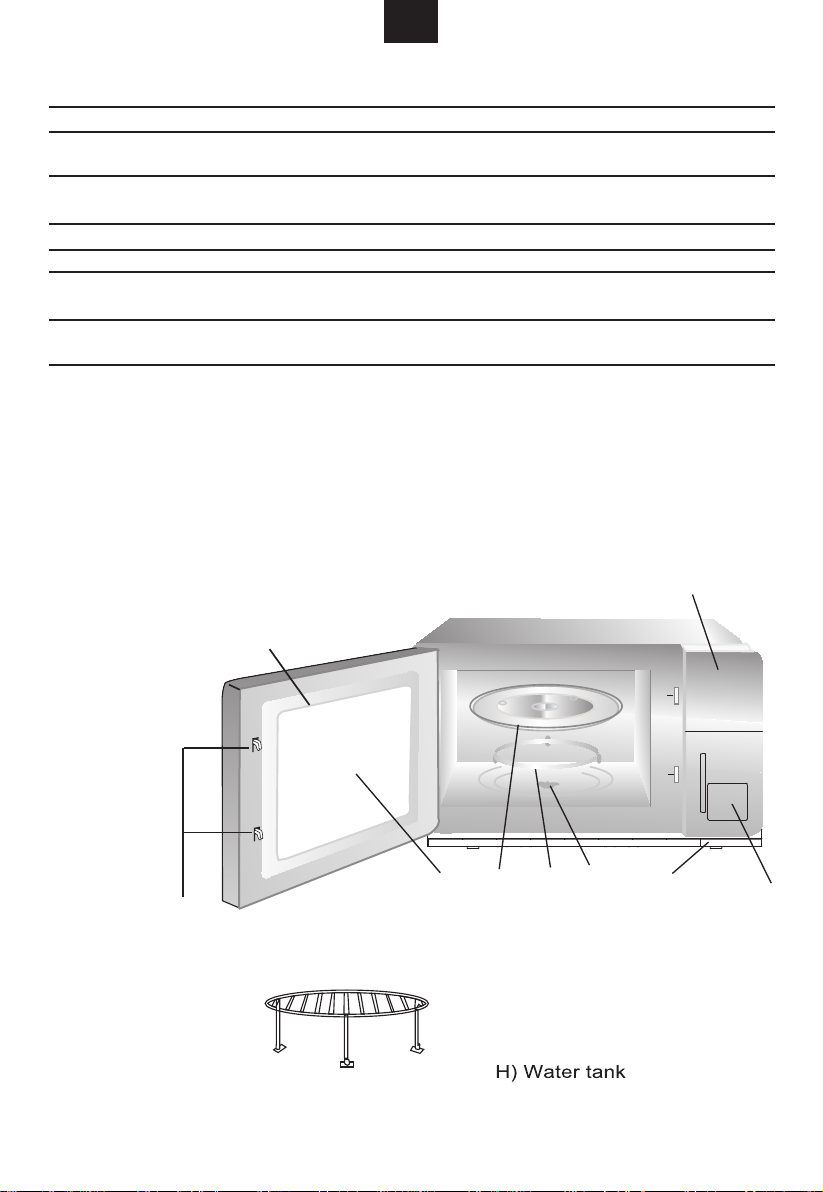
Names of Oven Parts and Accessories
Remove the oven and all materials from the carton and oven cavity.
Your oven comes with the following accessories:
Glass tray 1
Turntable ring assembly 1
Instruction Manual 1
F
A
G
Grill Rack( Only for Grill series )
Shut off oven power if the door is opened during operation.
C B
D
E
A) Control panel
B) Turntable shaft
C) Turntable ring assembly
D) Glass tray
E) Observation window
F) Door assembly
G) Safety interlock system
I) Profile collecting wate
I
H
Page 8
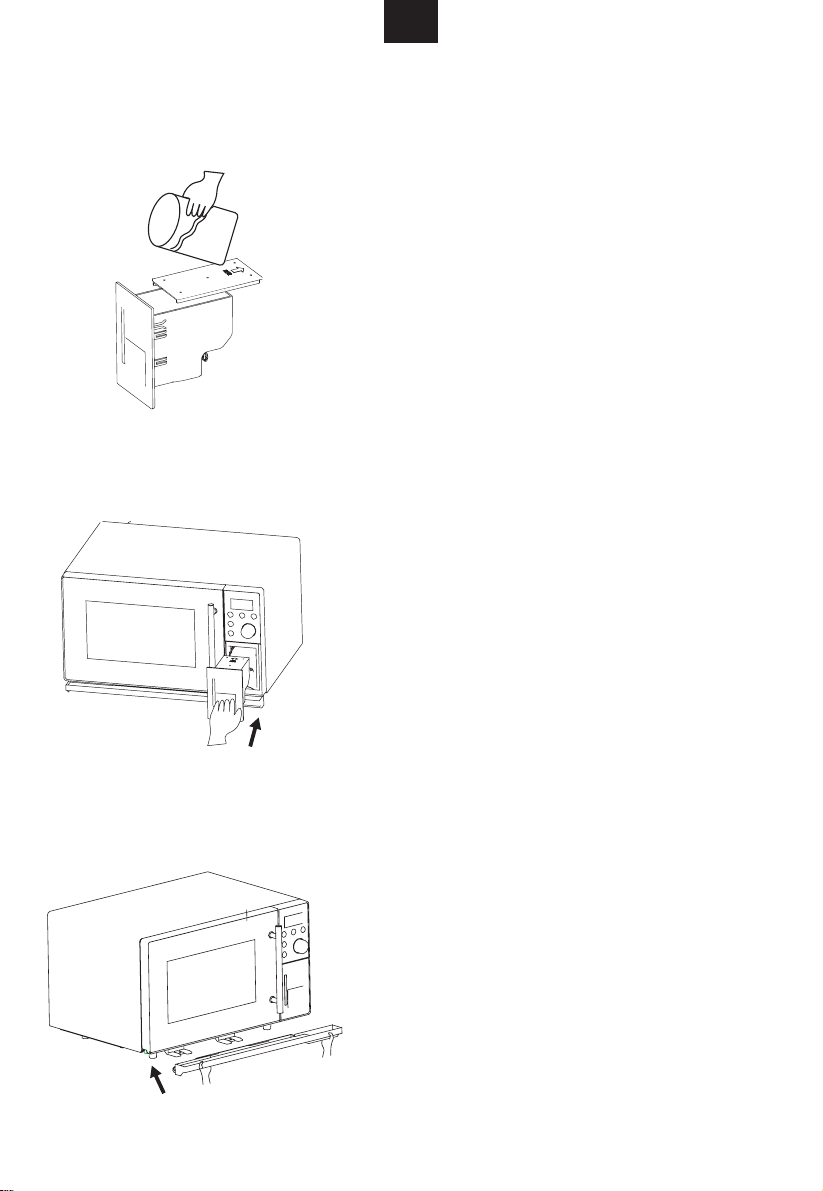
Water Tank Installation
7
GB
1.Open the water tank (ref. H) and pour water into the
tank. Don't put water over the MAX indication on the
frontal panel. Then cover the lid of the water tank.
2.Push the water tank into the unit with force,otherwise ,
if the water tank is not installed properly, the steam
function cannot be used but the oven can still work
under microwave and grill function.
3.Take the profile collecting water (reference I) with two
hands and fix this component at the
door.
bottom of the unit
Page 9

GB
8
Pay Special Attention to:
1.Under steam function, if the water level of the water tank is lower than the MIN ,the unit will
stop working with display "E-2"and the buzzer sounds for alert .At this time ,you should
pull out the water tank , fill the water in, then push it into the oven again as above
guidence 2. Press " " to continue cooking.
2.When the steam function is not used for a long time , please pour out the water of the tank
and fix it on the unit.
3.During cooking,there will be few steam out from the oven or sweat on the door, this is normal
normal phenomenon, sponge the water with cloth.
4.Clear the periodically.
During cooking with steam , do not open the door. If you need ,please open carefully,
5.
otherwise , you could have risk of burn .
6. Do not pull out the watre tank when water level is full. If it is pulled,the water will
flow backwards,this is normal.
7. Please pay attention to the water level in the water tank.
8. It is suggusted that you should use purified water or distilled water.
profile collecting water
Page 10
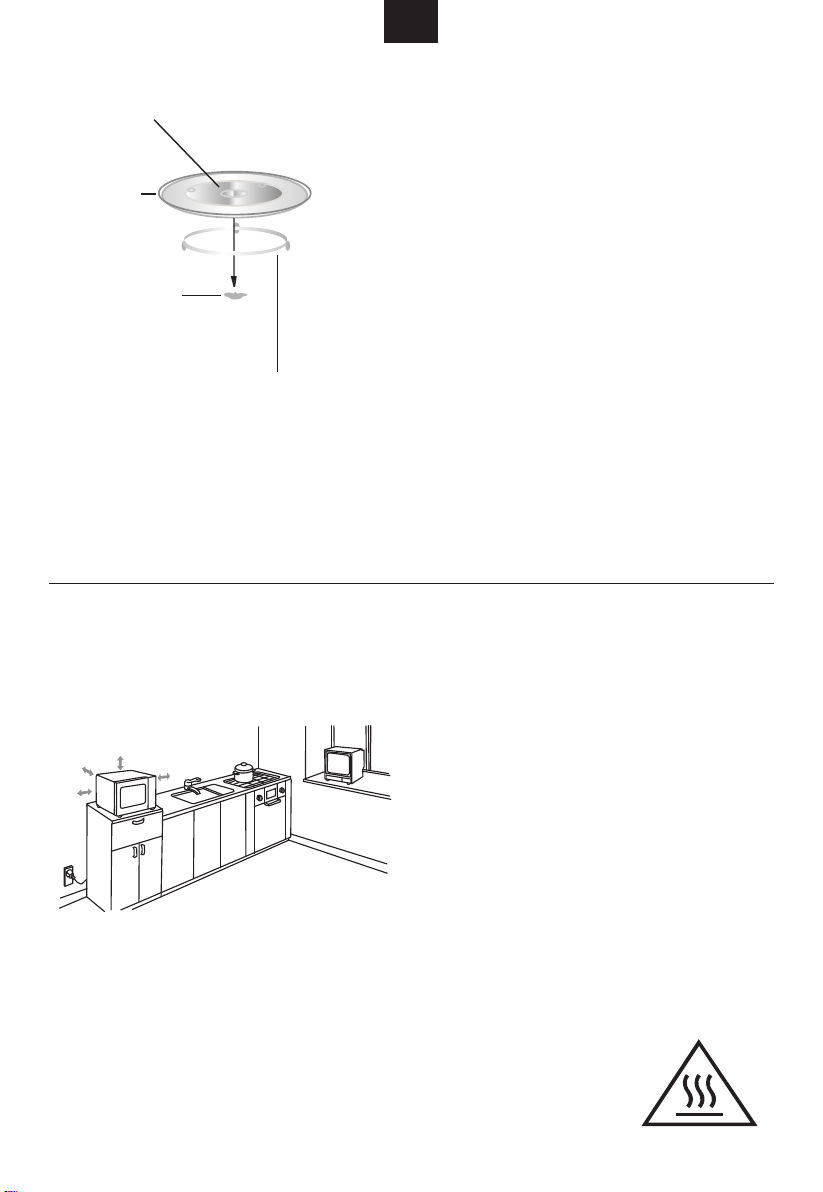
Turntable Installation
9
Hub (underside)
Glass tray
Turntable shaft
Turntable ring assembly
a. Never place the
tray should never be restricted.
b. Both
always be used during cooking.
c. All food and containers of food are always placed
on the
d. If
glass tray
breaks, contact your nearest authorized service
center.
Countertop Installation
Remove all packing material and accessories.
Examine the oven for any damage such as
dents or broken door. Do not install if oven is
damaged.
GB
glass tray
glass tray
glass tray
and
for cooking.
or
turntable ring assembly
Cabinet: Remove any protective film found
on the microwave oven cabinet surface.
Do not remove the light brown Mica cover
that is attached to the oven cavity to
protect the magnetron.
upside down. The glass
turntable ring assembly
cracks or
must
Installation
1. Select a level surface that provide
enough open space for the intake
and/or outlet vents.
12 inch(30cm)
3.0 inch(7.5cm)
3.0 inch(7.5cm)
A minimum clearance of 3.0 inches
(7.5cm) is required between the oven and
any adjacent walls. One side must be open.
(1) Leave a minimum clearance of 12
inches (30cm) above the oven.
(2) Do not remove the legs from the
bottom of the oven.
OPEN
(3) Blocking the intake and/or outlet openings
can damage the oven.
(4) Place the oven as far away from
radios and TV as possible.
Operation of microwave oven may
cause interference to your radio or TV
reception.
2. Plug your oven into a standard household
outlet. Be sure the voltage and the
frequency is the same as the voltage
and the frequency on the rating label.
WARNING: Do not install oven over a
range cooktop or other heat-producing
appliance. If installed near or over a heat
source, the oven could be damaged and
the warranty would be void.
The accessible surface
may be hot during
operation.
Page 11

GB
10
Operation Instructions
Special Instructions
1. Do not open the oven door! If it is open,the fan will continue working for 3 minutes.This is normal.
2. When "E-2" displays, which means no water or few water, the fan will continue working for 3
minutes.This is normal.
3. Do not pull out the watre tank when water level is full. If it is pulled,the water will
flow backwards,this is normal. Cause it will keep the water clean.
4. Please pay attention to the water level in the gutter box.
5. It is suggusted that you should use purified water or distilled water.
1. Clock Setting
When the microwave oven is electrified, the LED will display "0:00", buzzer will ring once.
(1) When in waiting states, press " ",hour figures flash.
(2) Turn " " to input the hour figures.Its range is 0-23.
(3) Press " " to confirm the clock.
(4) Turn " " to input the minute figures.Its range is 0-59.
(5) Press " " to confirm.":" flashes.
Note: 1) If the clock is not set, it would not function when powered.
2) During the process of clock setting, if you press " ", the
oven will go back to the previous status automatically.
2. Microwave Cooking
Press " " the LED will display "P100 .
Press " " for times
or turn " "to choose the power you want, and "P100", "P80" "P50", "P30",
"P10","G"..."C-2" will display for each added press. Then press
" " to confirm, and turn " " to set cooking time from 0:05 to
95:00. Press " " again to start cooking.
Example: If you want to use 80% microwave power to cook for 20 minutes, you can
operate the oven as the following steps.
1) Press " once, the screen display "P100"."
2) Press " " once again or turn" " to choose 80%
microwave power.
3) Press " " to confirm, and the screen displays "P 80".
"
Page 12
GB
11
4) Turn " " to adjust the cooking time until the oven displays "20:00".
5) Press " " to start cooking .
Note: the step quantities for the adjustment time of the coding switch are as follow:
0---1 min : 5 seconds
1---5 min : 10 seconds
5---10 min : 30 seconds
10---30 min : 1 minute
30---95 min : 5 minutes
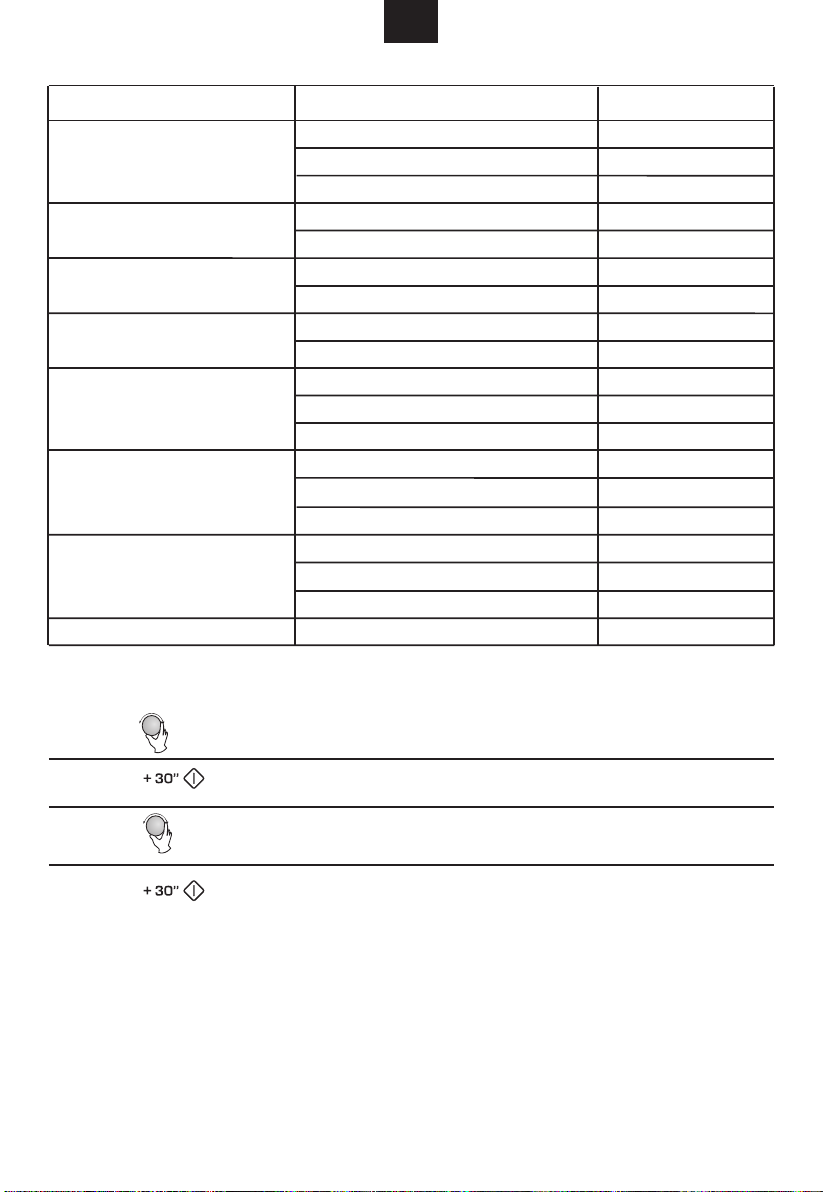
" " Pad instructions
Order
1
Display
P100
Microwave
Power
100%
Grill
Power
2
3
4
5
6
7
8
P80
P50
P30
P10
G(Grill)
C-1(Combi.1)
C-2(Combi.2)
80%
50%
30%
10%
0%
55%
36%
100%
45%
64%
3. Grill or Combi. Cooking
Press " " the LED will display "P100 .
Press " " for times
or turn " "to choose the power you want, and "P100", "P80" "P50", "P30",
"P10","G"..."C-2" will display for each added press. Then press
" " to confirm, and turn " " to set cooking time from 0:05 to
95:00. Press " " again to start cooking.
Example: If you want to use 55% microwave power and 45% grill power(C-1) to cook for
10 minutes, you can operate the oven as the following steps.
1) Press " " once, the screen display "P100".
"
2) Press " times or turn " " to choose combi. 1 mode."
Page 13
GB
12
3) Press " " to confirm, and the screen displays "C-1".
4) Turn " " to adjust the cooking time until the oven displays "10:00".
5) Press " " to start cooking .
Note:If half the grill time passes, the oven sounds twice, and this is normal.
In order to have a better effect of grilling food, you should turn the food over,
close the door, press " " to start cooing, and then if no operation the oven
will continue cooking.
4. Quick Start
1) In waiting state, Press " " to start cooking with 100% power,
each added press will increase 30 seconds cooking time up to 95 minutes.
2) In microwave, grill, combi. cooking or time defrost state, each press of
" " can increase 30 seconds of cooking time.
5. Defrost By Weight
1) Press " " once, and the oven will display "dEF1".
2) Turn " " to select the weight of food from 100 to 2000 g.
3) Press " " to start defrosting.
6. Defrost By Time
1) Press " " twice, and the oven will display "dEF2".
2) Turn " " to select the defrost time.The max.time is 95 minutes.
3) Press " " to start defrosting.The defrost power is P30,and
cannot be changed.
7. Auto Menu
1) Turn " " left to choose the menu, and "A 1" to "A 8" will display, which
means sausage,oat, burger,bancon,chicken pieces,pasta,soup and mince.
2) Press " " to confirm.
3) Turn " " to choose the default weight as the menu chart.
4) Press " " to start cooking.
- -
Page 14
The menu chart:
13
GB
Menu
A-1
Sausage
A-2 Oat
A-3 Burger
A-4 Bancon
A-5
Chicken Pieces
A-6
Pasta
A-7
Soup
A-8 Mince Meat
Weight
150
350
500
550 g
1100 g
1 piece
2 pieces
4 pieces
8 pieces
150g
350g
500g
50g
100g
150g
500g
750g
1000g
4 pieces(110g/piece)
Display
150
350
500
550
1100
1
2
4
8
150
350
500
50
100
150
500
750
1000
4
Example: If you want to use "Auto Menu" to cook soup for 500g.
1) Turn " " left till "A-7" display.
2) Press " " to confirm.
3) Turn " " to select the weight of soup till "500" display.
4) Press " " to start cooking.
Note: When cooking chicken pieces and 2/3 cooking time passes, the
buzzer will sound twice to tell you to turn the food over for better cooking.
Page 15

GB
14
8. Steam Menu
1) Turn " " right to choose the menu, and "S-01" to "S-07" will display, which
means potato,vegetable,fish,chop,steak,chicken and pizza.
2) Press " " to confirm.
3) Turn " " to choose the default weight as the menu chart.
4) Press " " to start cooking.
The steam menu chart:
Menu
S-01
Potato
(Inicial temp.is normal temp.)
S-02
Vegetable
(Inicial temp.is 5 degrees)
S-03
Fish
(Inicial temp.is normal temp.)
S-04
Chop
(Inicial temp.is normal temp.)
S-05
Steak
(Inicial temp.is normal temp.)
S-06
Chicken
(Inicial temp.is normal temp.)
S-07 Pizza
(Inicial temp.is minus 18 degrees)
Weight
1(About 230 g)
2(About 460 g)
3(About 690 g)
150 g
350 g
500 g
150g
350g
500g
150g
350g
500g
150g
350g
500g
800g
1000g
1200g
400g
Display
1
2
3
150
350
500
150
350
500
150
350
500
150
350
500
800
1000
1200
400
Note:1) The inicail temperature for pizza is minus degrees.
2) When cooking chop,steak and chicken and 2/3 cooking time passes, the
buzzer will sound twice to tell you to turn the food over for better cooking.
81
Page 16

GB
15
Example: If you want to use "Auto Menu" to cook fish for 350g.
1) Turn " " clockwise till "S-03" display.
2) Press " " to confirm.
3) Turn " " to select the weight of fish till "350" display.
4) Press " " to start cooking.
9. Cleaning Function
1) In waiting state, press " " once, and the oven will
display "CL-1".Press " " again, "CL-2" will display.
2) Press " " to confirm. The default time will diaplay.
The default time for CL-1 is 5 minutes.The default time for CL-2 is 10 minutes.
3) Press " " to start cleaning.
Buzzer will sound five times when cleaning finish and turn back to waiting
state.
Note: the fixed time for cleaning cannot be changed.
10. Microwave/Grill+Steam Combination Cooking
1) In waiting state, press " " once, and the oven will display
"CL-1".
2) Press " " times or turn " ","CL-1","CL-2","P1-S",
"P2-S","P3-S","G-S",CL-1" or "CL-2" will display in order.
3) Press " " to confirm the steam combination way.
4) Turn " " to adjust the cooking time from 5 minutes to 95 minutes.
) Press " " to start .
5 cooking
Buzzer will sound five times after cooking finish.
Power
Level
Display
Microwave
Power
Grill
Power
Steam
Power
1 2 3 4
P1-S P2-S P3-S G-S
100% 79% 48% /
/ / / 100%
100% 100% 100% 100%
Page 17

11. Steam Protection Function
16
GB
Code
E-1
E-2
Note: During cooking process, the oven door cannot be opened. If the door is opened,
the oven stops working and the fan will work for 3 minutes.Door must be closed
and press " " to resume cooking.
1
2. Multi-section cooking
At most 2 sections can be set for cooking. In multi-section cooking, if one section is
defrosting, then defrosting shall be placed in the first section.
Example: If you want to defrost food for 5 minutes and then cook with 80% microwave
power for 7 minutes, operate it as the following:
1) Press " " twice, and the oven will display "dEF2".
Trouble
The oven stops
the buzzer will sound twice
working.
The oven has no water
or few water.
Cause
The sensor temperature cannot arrives at 40
degrees
When the sensor temperature arrives at 135
degrees,the oven stops working.The buzzer will
sound twice.If no water added, it will display all
the time.If water added,the screen will display the
surplus time.At this time,you must press
" " to resume cooking.
Otherwise,the oven will wait.
when the oven works for 2 minutes,
2) Turn " " to select the defrost time till "5:00" display.
3) Press " " once, the screen display "P100".
4) Press " " once again or turn " " to choose 80%
microwave power.
5) Press " " to confirm, and the screen displays "P 80".
6) Turn " " to adjust the cooking time till the oven displays "7:00".
7) Press " " to start cooking, and buzzer will sound once for the
first section, defrosting time counts down; buzzer will sound once again entering
the second cooking. when cooking finish, buzzer sounds five times.
Page 18

1 . Sensor Protection Function
17
3
GB
Code
E-5
E-6
Trouble
the buzzer will sound twice
The sensor is disconnected
The sensor is short circuit.
Cause
During steam and cleaning process, if the
sensor is disconnected, the oven will stop
working. You must press " "
or electricified once again.
During steam and cleaning process, if the
sensor is short circuit, the oven will stop
working. You must press " "
or electricified once again.
14. Inquiring Function
In states of microwave,grill and combination cooking, press " ",
the current power will be displayed for 3 seconds. After 3 seconds, the oven will turn back
to the former state.
15. Lock-out Function for Children
Lock: In waiting state, press " " for 3 seconds, there will be a long beep
denoting entering the children-lock state and the locked indicator will display if the
time has been set, otherwise, the LED will display " ".
Lock quitting: In locked state, press " " for 3 seconds, there will be a long
"beep" denoting that the lock is released.
16. Specification
(1) The buzzer will sound once when turning the knob at the beginning;
(2) " " must be pressed to continue cooking if the door is opened
during cooking;
(3) Once the cooking programme has been set , " " is not pressed
in 1 minute. The current time will be displayed. The setting will be cancelled.
(4) The buzzer sounds once by efficient press, inefficient press will be no responce.
(5) The buzzer will sound five times to remind you when cooking is finished.
Page 19

Maintenance
18
Troubleshooting
GB
It is forbidden to run the unit without any food inside.
It is very dangerous.
Page 20

GB
19
This appliance is marked according to the European directive
2002/96/EC on Waste Electrical and Electronic Equipment (WEEE).
By ensuring this product is disposed of correctly, you will help
prevent potential negative consequences for the environment and
human health, which could otherwise be caused by inappropriate
waste handling of this product.
The symbol on the product indicates that this product may not be
treated as household waste. Instead it shall be handed over to the
applicable collection point for the recycling of electrical and electronic equipment
Disposal must be carried out in accordance with local environmental regulations for
waste disposal.
For more detailed information about treatment, recovery and recycling of this
product, please contact your local city office, your household waste disposal service
or the shop where you purchased the product
.
CUSTOMER ASSISTANCE SERVICE
If you cannot identify the cause of the operating anomaly. switch off the appliance (do not subject it
to rought treatment) and contact the Assistance Service.
PRODUCT SERIAL NUMBER. Where can I find it?
It is important that you to inform the Assistance Service of your product code and its serial number (a 16
character code which begins with the number 3); this can be found on the guarantee certificate or on
the data plate located on the appliance.
It will help to avoid wasted journerys to technicians, thereby (and most significantly) saving the
corresponding callout charges.
Page 21

GB
20
Using the Crusty Plate
Your HOOVER microwave oven has a crusty plate as an additional
accessory.
This crusty plate allows you to brown food not only on the top with
the grill, but also the bottom of the food turns crispy and brown due to
the high temperature of the crusty plate.
Several items which you can prepare on the crusty plate can be found
in the chart (see next page).
The crusty plate can also be used for bacon, eggs, sausages, etc.
1. Place the crusty plate directly on the turntable and preheat
it with highest Microwave-Grill-Combination[600W+Grill] by
following the times and instructions in the chart.
• Always use oven gloves to take out the crusty plate, as
it is becomming very hot.
2. Brush the plate with oil if you are cooking food, such as
bacon and eggs, in order to brown the food nicely.
• Please note that the crusty plate has a teflon layer
which is not scratch-resis tant. Do not use any sharp
objects like a knife to cut on the crusty plate.
• Use plastic accessories to avoid scratches on the
sur
face of the crusty plate or remove the food from the
plate before cutting
3. Place the food on the crusty plate.
• Do not place any objects on the crusty plate that are
not heat-resistant; e.g. plastic bowels.
• Never place the crusty plate in the oven without
turntable.
4. Place the crusty plate on the metal rack(or turntable) in the
microwave.
Select the appropriate cooking time and power.
5.
Refer to the table on the next page.
Page 22

GB
21
Using the Crusty Plate
How to clean the Crusty Plate
Clean the crusty plate withwarm water and detergent and rinse
off with clean water.
Do not use a scrubbingbrush or a hard sponge otherwise the top
layer will be damaged.
Please Note
The crusty plate is not dishwasher-safe.
Crusty Plate Setting
We recommend to preheat the crusty plate directly on the turn-table.
Preheat the crusty plate with the 600W+Grill function and follow the
times and instructions in the table.
Food Portion Power Preheati
Bacon
Grilled
Tomatoes
Burger
(frozen)
Baguettes
(frozen)
Oven Chips
(frozen)
4 slices
(80g)
8 slices
(160g)
200g
(2pcs)
400g
(4pcs)
2pieces
(125g)
4pieces
(250g)
100-150g
(1pc)
200-250g
(2pcs)
200g
300g
400g
C1 3min. 3-3½min.
C1 3min. 3min.
C1 3min. 6-6½ min
C1 5min. 5-6min.
C1 4min. 9min.
ng Time
Cooking
Time
4½ -5min.
4min.
8-8½min.
6-7min.
12min.
15min.
Recommendations
Preheatcrustyplate.Put
slices side by side on
crusty plate. Put crusty
plate on the rack.
Preheat crusty plate.
Cut tomatoes in halves.
Put some cheese on
top. Arrangein a circle
on crusty plate. Put
crusty plate on the rack.
Preheatcrustyplate.Put
frozen burger in a circle
on crustyplate. Put
crusty plate on the rack.
Turn over after 4-5min.
Preheatcrustyplate.Put
one bag ue ttebeside the
centre, 2 baguettes side
by sideon the pla te.Put
crusty plate on rack.
Preheat crusty plate.
Distribute oven chipson
crusty plate.Put the
plate on the rack. Turn
overafter halfof cooking
time.
Page 23

Crusty Plate Setting
22
GB
Food Portion Power Preheati
Fish Fingers
(frozen)
Chicken
Nuggets
(frozen)
150g
(5pcs)
300g
(10pcs)
125g
250g
C1 4min. 6-6½min.
C1 4min. 4½-5min.
ng Time
Cooking
Time
8½-9min.
6½-7min.
Recommendations
Preheat crusty plate.
Brush plate with 1 tbsp.
Put fishfingers in a
circle onthe plate. T u rn
overafter3½min(5
pcs) or after 5 min (10
pcs).
Preheat crusty plate.
Brush plate with 1 tbsp.
Put chicken nuggets on
the plate. Put crusty
plate on the rack. Turn
over after 3 min (125g)
or 5 min (250g).
Page 24

IT
23
Forno a microonde
MANUALE DI ISTRUZIONI
MODELLO: HMGS 2594 DBK CH
Leggere attentamente le istruzioni prima di utilizzare il forno a
microonde e conservarle con cura.
Il rispetto delle istruzioni garantirà un corretto funzionamento del
forno per molti anni.
CONSERVARE CON CURA LE PRESENTI ISTRUZIONI
Page 25

IT
24
PRECAUZIONI PER EVITARE UNA POSSIBILE
ESPOSIZIONE A UN’ECCESSIVA ENERGIA DELLE
MICROONDE
(a) Non tentare di utilizzare il forno con lo sportello aperto, onde evitare una
dannosa esposizione all’energia delle microonde. È importante non
manomettere i dispositivi di blocco per la sicurezza.
(b) Non posizionare alcun oggetto tra la superficie anteriore del forno e lo
sportello; inoltre, non consentire l’accumulo di sporcizia o residui di
detergenti sulle superfici di guarnizione.
(c) AVVERTENZA: se lo sportello o le sue guarnizioni sono danneggiati, non
utilizzare il forno finché non sia stato riparato da personale esperto.
ADDENDUM
Se l’elettrodomestico non viene mantenuto ben pulito, la sua superficie
potrebbe danneggiarsi, potrebbe ridursi la durata dell’elettrodomestico e si
potrebbero verificare situazioni pericolose.
Caratteristiche tecniche
Modello: HMGS 2594 DBK CH
Tensione nominale: 230 V~50 Hz
Potenza di ingresso nominale
1450 W
(microonde):
Potenza di uscita nominale
900 W
( ): microonde
Microonde con uscita di
2300 W
vapore:
Grill con uscita di vapore: 1900 W
Capacità del forno: 25 l
Diametro del piatto girevole: Ø 315 mm
Dimensioni esterne: 513 x 440 x 305 mm
Peso netto: Circa 1 , kg 6 5
Page 26

IT
25
IMPORTANTI ISTRUZIONI PER LA SICUREZZA
AVVERTENZA
1. Avvertenza: i liquidi e i prodotti alimentari
non devono essere riscaldati all’interno di
contenitori sigillati, che potrebbero esplodere.
2. Avvertenza: la rimozione del coperchio, che
protegge dall’esposizione all’energia a
microonde, può rivelarsi pericolosa per le
persone non esperte.
3. Avvertenza: consentire ai bambini di
utilizzare il forno senza supervisione solo se
sono state fornite istruzioni adeguate, in
modo che i bambini possano utilizzare il forno
in sicurezza e comprendano i pericoli di un
uso improprio.
4. Avvertenza: quando l’elettrodomestico viene
utilizzato nel modo combinato, i bambini
dovrebbero utilizzare il forno solo con la
supervisione di un adulto a causa delle
temperature generate (solo per la serie con
grill).
5. Utilizzare solamente utensili adatti all’uso nei
forni a microonde.
6. Pulire regolarmente il forno e rimuovere
eventuali depositi di cibo.
7. Leggere e seguire le indicazioni nella sezione
“PRECAUZIONI PER EVITARE UNA
POSSIBILE ESPOSIZIONE A
UN’ECCESSIVA ENERGIA DELLE
MICROONDE”.
8. Durante il riscaldamento di cibo in contenitori
di carta o plastica, non perdere di vista il forno
(possibilità di accensione del materiale).
9. Se si rilevano fuoriuscite di fumo, spegnere o
scollegare l’elettrodomestico e tenere lo
sportello chiuso per soffocare eventuali
fiamme.
10. Non cucinare troppo il cibo.
11. Non utilizzare la cavità del forno per la
conservazione. Non conservare gli alimenti,
come pane, biscotti, ecc., all’interno del forno.
12. Rimuovere le maniglie e i componenti in
metalli da sacchetti e contenitori in plastica o
carta prima di porli nel forno.
13. Installare il forno rispettando tutte le istruzioni
di installazione in dotazione.
14. Le uova nel guscio e le uova sode non
dovrebbero essere riscaldate nel forno a
microonde, in quanto potrebbero esplodere
(anche al termine del riscaldamento a
microonde).
15. Utilizzare l’elettrodomestico solo per l’uso
Per ridurre il pericolo di incendi, scosse elettriche, infortuni o
eccessiva esposizione all’energia del forno a microonde durante
l’uso dell’elettrodomestico, attenersi alle precauzioni fondamentali
riportate di seguito:
previsto descritto nel manuale. Non utilizzare
vapori o sostanze chimiche corrosive
nell’elettrodomestico. Il forno è progettato
nello specifico per il riscaldamento; non è
pensato per l’uso industriale o in laboratorio.
16. Se il cavo di alimentazione è danneggiato,
richiederne la sostituzione al produttore, al
tecnico dell’assistenza o ad altro personale
qualificato, onde evitare pericoli.
17. Non utilizzare o conservare questo
elettrodomestico all’aperto.
18. Non utilizzare il forno in prossimità di acqua,
su una base umida o in prossimità di una
piscina.
19. La temperatura delle superfici può essere
molto alta durante il funzionamento
dell’elettrodomestico. Tenere il cavo lontano
dalle superfici calde e non coprire le prese di
ventilazione del forno.
20. Evitare che il cavo penda dal bordo del tavolo
o del bancone.
21. La mancata pulizia del forno potrebbe
provocare un deterioramento della superficie,
con conseguente riduzione della durata
dell’elettrodomestico e possibili situazioni di
pericolo.
22. Il contenuto di biberon e contenitori per
alimenti per bambini deve essere mescolato
o agitato; è inoltre opportuno controllarne la
temperatura prima del consumo, onde evitare
ustioni.
23. Il riscaldamento a microonde delle bevande
può causare un’ebollizione ritardata; prestare
attenzione quando si maneggia il contenitore.
24. Questo elettrodomestico non è destinato
all’uso da parte di persone (compresi i
bambini) con ridotte capacità fisiche,
sensoriali o mentali, oppure prive di
esperienze e conoscenze, a meno che siano
sottoposti a vigilanza o istruiti sull’utilizzo
dell’elettrodomestico da parte di una
personale responsabile della loro sicurezza.
25. È necessario vigilare sui bambini per
impedire che giochino con l’elettrodomestico.
26. Non posizionare il forno a microonde
all’interno di un armadietto.
Page 27

IT
26
Per ridurre il pericolo di infortuni
Installazione con messa a terra
PERICOLO
Pericolo di folgorazione: il
contatto con alcuni
componenti interni può
causare gravi infortuni o la
morte. Non smontare
l’elettrodomestico.
AVVERTENZA
Pericolo di folgorazione: un
uso improprio della messa a
terra può causare
folgorazioni elettriche. Non
inserire la spina nella presa
fin quando l’elettrodomestico
non è stato correttamente
installato e collegato a terra.
PULIZIA
Scollegare il forno
dall’alimentazione.
1. Pulire la parte interna del
forno dopo l’uso con un
panno umido.
2. Pulire gli accessori con le
consuete modalità in
acqua e detergente.
3. Il telaio dello sportello, la
guarnizione e le parti
circostanti devono essere
pulite con cura utilizzando
un panno umido, quando
risultano sporchi.
Questo apparecchio deve essere collegato a terra. Nel
caso di cortocircuito elettrico, la messa a terra riduce il
pericolo di folgorazioni, garantendo la disponibilità di un filo
per scaricare la corrente elettrica. Questo apparecchio è
dotato di un cavo con un filo e una spina di messa a terra.
La spina deve essere inserita in una presa correttamente
installata e collegata a terra.
Rivolgersi a un elettricista qualificato o a una persona
esperta se non si comprendono pienamente le istruzioni
per la messa a terra o se si hanno dubbi sull’effettivo
collegamento a terra dell’elettrodomestico. Se è
necessario utilizzare una prolunga, utilizzare solamente un
cavo a tre fili.
1. Il cavo di alimentazione in dotazione è corto per evitare
i rischi dovuti all’inciampare o al restare impigliati in un
cavo lungo.
2. Se viene utilizzato un cavo più lungo o una prolunga:
1) La classificazione elettrica del cavo o della prolunga
deve essere pari o superiore a quella
dell’elettrodomestico.
2) La prolunga deve essere un cavo a tre fili con messa
a terra.
3) Il cavo lungo deve essere disposto in modo che non
penda dal banco o dal tavolo, per evitare che venga
tirato dai bambini o trascinato involontariamente.
Page 28

IT
27
UTENSILI
ATTENZIONE
Pericolo di infortuni
L’esecuzione di operazioni di
manutenzione o riparazione
che comportano la rimozione
del coperchio, che protegge
dall’esposizione all’energia a
microonde, può rivelarsi
pericolosa per le persone non
esperte.
Consultare le istruzioni nella sezione “Materiali utilizzabili e
non nel forno a microonde”. Alcuni utensili non metallici
non sono adatti all’uso nel microonde. In caso di dubbi, è
possibile provare l’utensile in questione attenendosi alla
procedura riportata di seguito.
Prova degli utensili:
1. Riempire un contenitore adatto al microonde con 250 ml
di acqua fredda e inserirlo nel forno con l’utensile in
questione.
2. Cuocere alla massima potenza per un minuto.
3. Toccare con attenzione l’utensile: se risulta caldo, non
utilizzarlo per la cottura a microonde.
4. Non superare il tempo di cottura di un minuto.
Materiali utilizzabili nel forno a microonde
Utensili Commenti
Fogli di
alluminio
Piatti crisp Attenersi alle istruzioni del produttore. La parte inferiore del piatto crisp deve
Servizi da
tavola
Barattoli di
vetro
Utensili in vetro Solo utensili in vetro resistenti al calore. Controllare che non vi siano parti
Sacchetti per
cottura in forno
Piatti e bicchieri
di carta
Tovaglioli di
carta
Carta forno Utilizzare come copertura per impedire gli schizzi o come involucro per la
Utensili in
plastica
Pellicola Solo se adatta al microonde. Utilizzarla per coprire il cibo durante la cottura
Termometri Solo se adatti al microonde (termometri per carne e dolci).
Carta oleata Utilizzare come copertura per impedire gli schizzi e per trattenere l’umidità.
Solo per la protezione. È possibile utilizzare piccoli pezzi per coprire le parti
più sottili di carne e pollame onde evitare una cottura eccessiva. Possono
verificarsi archi elettrici se il foglio di alluminio è troppo vicino alle pareti del
forno. Il foglio deve trovarsi ad almeno 2,5 cm di distanza dalle pareti.
trovarsi almeno 5 mm sopra il piatto girevole. Un uso non corretto potrebbe
causare la rottura del piatto girevole.
Solo se adatti al microonde. Attenersi alle istruzioni del produttore. Non
utilizzare piatti incrinati o scheggiati.
Rimuovere sempre il coperchio. Utilizzarli solo per riscaldare il cibo a
temperatura. La maggior parte dei barattoli di vetro non è resistente al calore
e può rompersi.
metalliche.
Non utilizzare piatti incrinati o scheggiati.
Attenersi alle istruzioni del produttore. Non chiuderli con la fascetta in
metallo. Produrre delle fessure per consentire la fuoriuscita del vapore.
Utilizzarli solo per il riscaldamento o la cottura a breve termine. Non lasciarli
incustoditi durante la cottura.
Utilizzarli per coprire il cibo per il riscaldamento e l’assorbimento dei grassi.
Utilizzarli dietro supervisione e solo per la cottura a breve termine.
cottura a vapore.
Solo se adatti al microonde. Attenersi alle istruzioni del produttore. Dovrebbe
essere presente l’indicazione “adatti all’uso in microonde”. Alcuni contenitori
in plastica si ammorbidiscono quando il cibo all’interno diventa caldo. I
sacchetti per la bollitura e i sacchetti in plastica sigillati dovrebbero essere
forati o ventilati come indicato sulla confezione.
per mantenere l’umidità. Evitare che la pellicola entri a contatto con il cibo.
Page 29

IT
28
Materiali non utilizzabili nel forno a microonde
Utensili Commenti
Vassoi di alluminio Possono causare archi elettrici. Trasferire il cibo in contenitori
Cartoni per cibo con
impugnatura in metallo
Utensili in metallo Il metallo impedisce all’energia delle microonde di raggiungere il
Fascette in metallo Possono causare archi elettrici e incendi all’interno del forno.
Sacchetti di carta Possono causare incendi all’interno del forno.
Schiuma plastica
espansa
Legno Il legno si secca se utilizzato nel forno a microonde e può
PREDISPOSIZIONE DEL FORNO
Nomi dei componenti e degli accessori del forno
Rimuovere il forno e tutti i materiali dal cartone e dalla cavità del forno.
Il forno è dotato dei seguenti accessori:
Vassoio in vetro 1
Gruppo dell’anello per piatto girevole 1
Manuale di istruzioni 1
adatti al microonde.
Possono causare archi elettrici. Trasferire il cibo in contenitori
adatti al microonde.
cibo. I profili in metallo possono causare archi elettrici.
La schiuma plastica può fondersi o contaminare il liquido
all’interno se viene esposta ad alte temperature.
creparsi o rompersi.
A
F
C B
D
E
G
A) Pannello di controllo
B) Albero del piatto girevole
C) Gruppo dell’anello per piatto girevole
D) Vassoio in vetro
E) Finestra di ispezione
F) Gruppo sportello
G) Sistema di blocco di sicurezza
H) Serbatoio dell'acqua
I) Scanalatura di raccolta dell'acqua
Griglia per grill (solo per la serie Grill)
Spegnere il forno quando viene aperto lo sportello durante l’uso.
I
H
Page 30

IT
29
INSTALLAZIONE SERBATOIO ACQUA
1. Aprire il serbatoio dell’acqua (rif. H) e versare l'acqua
al suo interno. Non versare acqua oltre l’indicazione
“MAX” riportata sul pannello frontale. Quindi coprire
il serbatoio di acqua con l’apposito coperchio
trasparente.
2. Spingere il serbatoio dell’acqua nell’unità con forza,
altrimenti, se il serbatoio non è installato
correttamente, la funzione vapore non potrà essere
utilizzata, anche se il forno potrà ancora lavorare
come funzione microonde e grill.
3. Prendete il profilo di raccolta dell’ acqua
(riferimento I), e fissarlo con due mani nella parte
inferiore della porta unità.
Page 31

IT
30
Prestare particolare attenzione a:
1. Durante la funzione vapore, se il livello di acqua del serbatoio è inferiore a “MIN”, l'unità
smette di lavorare mostrando sul display l’indicazione "E-2" con contemporaneo segnale
acustico per avvertire dell’anomalia. In questo momento, si dovrebbe estrarre il serbatoio,
riempirlo con acqua, quindi spingerlo nell’unità forno nuovamente come descritto già al
punto 2 del precedente capitolo. Premere " " per continuare la cottura.
2. Quando la funzione vapore non è utilizzata per un lungo periodo, si consiglia di svuotare il
serbatoio e reinserirlo nella unità.
3. Durante la cottura, si potrà notare del vapore fuoriuscire dal forno o depositarsi sulla porta,
questo è un fenomeno normale; pulire il vetro con un panno.
4. Svuotare il profilo di raccolta acqua periodicamente.
5. Durante la cottura a vapore, si consiglia di non aprire la porta del forno. Se è proprio
necessario, si prega di aprirla con attenzione, altrimenti si potrebbe avere il rischio di
bruciature dovute al vapore.
6. Non estrarre il serbatoio d’acqua quando il livello non è sotto “MIN”. Se si estrae il
serbatoio con acqua all’interno, si verificherebbe la fuoriuscita di liquido dalla valvola del
serbatoio, questo è normale.
7. Si prega di prestare attenzione al livello di acqua nel serbatoio.
8. Si suggerisce di utilizzare acqua purificata o acqua distillata.
Page 32

Montaggio del piatto girevole
g
31
Perno (parte inferiore)
IT
a. Non posizionare il vassoio in vetro capovolto. Il vassoio in
vetro non dovrebbe mai presentare restrizioni.
Vassoio in
vetro
Albero del piatto
irevole
Gruppo dell’anello per piatto girevole
Montaggio del ripiano
Rimuovere tutti gli accessori e i materiali di
imballaggio. Esaminare il forno per
rilevare eventuali danni, come
ammaccature o sportelli rotti. Non
installare il forno se danneggiato.
Installazione
1. Scegliere una superficie in piano con
spazio sufficiente per le aperture di
ingresso e uscita dell’aria.
12 inch(30cm)
3.0 inch(7.5cm)
3.0 inch(7.5cm)
È richiesto uno spazio di almeno 7,5
cm tra il forno e le pareti adiacenti. Un
lato deve essere aperto.
(1) Lasciare almeno 30 cm di spazio
sopra il forno.
(2) Non rimuovere i piedini nella parte
inferiore del forno.
OPEN
b. Sia il vassoio in vetro sia il gruppo dell’anello per piatto
girevole devono essere utilizzati sempre durante la
cottura.
c. Gli alimenti e i contenitori devono essere sempre posti sul
vassoio di vetro per la cottura.
d. Se il vassoio in vetro o il gruppo dell’anello per piatto
girevole si crepano o si rompono, rivolgersi al centro di
assistenza autorizzato di zona.
Forno: rimuovere la pellicola protettiva
presente sulla superficie del forno a
microonde.
Non rimuovere la copertura in mica
marrone chiaro, fissata alla cavità del
forno per proteggere il magnetron.
(3) L’ostruzione delle aperture per l’ingresso
e/o l’uscita dell’aria può causare danni al
forno.
(4) Posizionare il forno il più lontano possibile
da radio e televisori.
Il funzionamento del forno a microonde
può causare interferenze nella ricezione
radiotelevisiva.
2. Inserire la spina del forno in una presa di
rete standard. Assicurarsi che la tensione
e la frequenza corrispondano a quelle
indicate sulla targhetta.
AVVERTENZA: non installare il forno sopra
un fornello o altri elettrodomestici che
producono calore. Se viene installato in
prossimità di una fonte di calore, il forno può
subire danni e la garanzia verrebbe
invalidata.
La superficie accessibile
può divenire molto calda
durante l’uso.
Page 33

IT
32
Istruzioni di funzionamento
Istruzioni speciali
1. Non aprire lo sportello del forno. Se è aperto, la ventola continua a funzionare per 3
minuti. È un comportamento normale.
2. Quando viene visualizzato “E-2”, avvertenza che indica la mancanza di acqua, la ventola
continua a funzionare per 3 minuti. È un comportamento normale.
3. Non estrarre il serbatoio dell’acqua quando è pieno. Diversamente, l’acqua potrebbe
scorrere all’indietro (è un comportamento normale) al fine di mantenere pulita l’acqua.
4. Prestare attenzione al livello dell’acqua nel contenitore di scolo.
5. Si consiglia l’uso di acqua distillata o purificata.
1. Impostazione dell’orario
Non appena il forno a microonde viene collegato alla presa di rete, sul display viene
visualizzato “0:00” e viene emesso un segnale acustico.
(1) In modalità di attesa, premere “ ”; le cifre che indicano l’ora
lampeggiano.
(2) Ruotare “ ” per immettere le ore. Il valore deve essere compreso tra 0 e 23.
(3) Premere “ ” per confermare l’ora.
(4) Ruotare “ ” per immettere i minuti. Il valore deve essere compreso tra 0 e 59.
(5) Premere “ ” per confermare; l’indicazione “:” lampeggia.
Nota: 1) Anche se è collegato alla presa di corrente, il forno non funziona se l’orologio
non è impostato.
2) Se durante la procedura di impostazione dell’orario si preme “ ”,
il forno ripristinerà automaticamente l’impostazione precedente.
2. Cottura a microonde
Premere “ ”; sul display viene visualizzato “P100”.
Premere più volte “ ” o ruotare “ ” per scegliere la potenza
desiderata; ad ogni pressione del tasto, verranno visualizzate in successione le indicazioni
“P100”, “P80” “P50”, “P30”, “P10”, “G”, “C-2”. Premere “ ” per
confermare, quindi ruotare “
95:00. Premere di nuovo “ ” per avviare la cottura.
Esempio: se si vuole cuocere con una potenza dell’80% per 20 minuti, impostare il forno
secondo le istruzioni riportate di seguito.
1) Premere una volta “ ”; sul display viene visualizzato “P100”.
2) Premere di nuovo “ ” una volta o ruotare “ ” per selezionare la
potenza dell’80%.
3) Premere “ ” per confermare; sul display viene visualizzato “P80”.
” per impostare un tempo di cottura compreso tra 0:05 e
Page 34

IT
33
4) Ruotare “ ” per regolare il tempo di cottura finché il display del forno non visualizza
“20 00”. :
5) Premere “ ” per avviare la cottura.
Nota: il selettore consente di aumentare o diminuire il tempo di cottura secondo i seguenti
incrementi:
0-1 min : 5 secondi
1-5 min : 10 secondi
5-10 min : 30 secondi
10-30 min : 1 minuto
30-95 min : 5 minuti
“ ”
Ordine Display Potenza
3. Cottura grill o combinata
Premere “ ”; sul display viene visualizzato “P100”.
Premere più volte “
desiderata; ad ogni pressione del tasto, verranno visualizzate in successione le indicazioni
“P100”, “P80” “P50”, “P30”, “P10”, “G”, ... “C-2”. Premere “
confermare, quindi ruotare “ ” per impostare un tempo di cottura compreso tra 0:05 e
95:00. Premere di nuovo “ ” per avviare la cottura.
Esempio: se si vuole cuocere con una potenza del microonde del 55% e una potenza del
grill (C-1) del 45% per 10 minuti, impostare il forno secondo le istruzioni riportate di
seguito.
1) Premere una volta “ ”; sul display viene visualizzato “P100”.
2) Premere più volte “ ” o ruotare “ ” per selezionare la modalità
Combi.1.
Visualizzazione
microonde
1
2
3
4
5
6
7
8
P100
P80
P50
P30
P10
G (Grill)
C-1 (Combi.1)
C-2 (Combi.2)
” o ruotare “ ” per scegliere la potenza
100%
80%
50%
30%
10%
0% 100%
55% 45%
36% 64%
” per
Potenza grill
Page 35

IT
34
3) Premere “ ” per confermare; sul display viene visualizzato “C-1”.
4) Ruotare “ ” per regolare il tempo di cottura finché sul display del forno non viene
visualizzato “10:00”.
5) Premere “ ” per avviare la cottura.
Nota: nella modalità grill, una volta trascorsa la metà del tempo impostato, il forno emette
due segnali acustici; è un comportamento normale.
Per ottenere una buona rosolatura del cibo, si deve girare il cibo, chiudere la porta e,
se non ci sono cambiamenti, premere " " per avviavr la cottura, il forno
proseguirà la cottura.
4. Avvio veloce
1) In modalità di attesa, premere “ ” per avviare la cottura con una
potenza del 100%; ad ogni pressione del tasto si aggiungono 30 secondi al tempo di
cottura, per un massimo di 95 minuti.
2) Nelle modalità microonde, grill, combi o scongelamento con impostazione del tempo,
ogni pressione sul tasto “ ” aumenta di 30 secondi il tempo di
cottura.
5. Scongelamento con impostazione del peso
1) Premere una volta “ ”; sul forno viene visualizzato “dEF1”.
2) Ruotare “ ” per selezionare il peso del cibo da scongelare (compreso tra 100 e 2000
g).
3) Premere “ ” per avviare lo scongelamento.
6. Scongelamento con impostazione del tempo
1) Premere due volte “
”; sul display viene visualizzato “dEF2”.
2) Ruotare “
3) Premere “ ” per avviare lo scongelamento. La potenza di
scongelamento è P30 e non può essere modificata.
7. Menu automatico
1) Ruotare “ ” verso sinistra per selezionare il menu; verranno visualizzati i menu da “A-1”
ad “A 8”, corrispondenti rispettivamente a salsicce, avena, hamburger, pancetta, pollo,
-
pasta, minestra e carne macinata.
2) Premere “
3) Ruotare “ ” per scegliere il peso predefinito indicato nella tabella dei menu.
4) Premere “ ” per avviare la cottura.
” per selezionare il tempo di scongelamento. Il tempo massimo è 95 minuti.
” per confermare.
Page 36

IT
35
Tabella dei menu:
Menu Peso Display
A-1
Salsiccia
Avena
Hamburger
Pancetta
A-5
Pollo
A-6
Pasta
A-7
Minestra
A 8 -
Carne macinata
Esempio: utilizzare “Auto Menu” per cuocere 500 g di minestra.
1) Ruotare “
2) Premere “
3) Ruotare “ ” per selezionare il peso della minestra finché non viene visualizzato “500”.
4) Premere “
Nota: durante la cottura del pollo, una volta trascorsi i 2/3 del tempo di cottura, viene emesso
un segnale acustico che ricorda di girare il cibo per una migliore cottura.
” verso sinistra finché non viene visualizzato “A-7”.
” per confermare.
” per avviare la cottura.
4 pezzi (110 g/pezzo) 4
150 150
350 350
500 500
550 g 550 A-2
1100 g 1100
1 pezzo 1 A-3
2 pezzi 2
4 pezzi 4 A-4
8 pezzi 8
150 g 150
350 g 350
500 g 500
50 g 50
100 g 100
150 g 150
500 g 500
750 g 750
1000 g 1000
Page 37

IT
36
8. Menu a vapore
1) Ruotare “ ” verso destra per selezionare il menu; verranno visualizzati i menu da
“S-01” a “S-07”, corrispondenti rispettivamente a patate, verdure, pesce, costata,
bistecca, pollo e pizza.
2) Premere “ ” per confermare.
3) Ruotare “ ” per scegliere il peso predefinito indicato nella tabella dei menu.
4) Premere “ ” per avviare la cottura.
Tabella dei menu a vapore:
Menu Peso Display
S-01
Patate
(temp. iniziale normale)
S-02
Verdure
(temp. iniziale 5°)
S-03
Pesce
(temp. iniziale normale)
S-04
Costata
(temp. iniziale normale)
S-05
Bistecca
(temp. iniziale normale)
S-06
Pollo
(temp. iniziale normale)
S-07
Pizza
(temp. iniziale -18°)
Nota: 1) La temperatura iniziale per la pizza è °. 18
2) Durante la cottura di costate, bistecche e pollo, una volta trascorsi i 2/3 del tempo
di cottura, viene emesso un segnale acustico che ricorda di girare il cibo per una
migliore cottura.
1 (circa 230 g) 1
2 (circa 460 g) 2
3 (circa 690 g) 3
150 g 150
350 g 350
500 g 500
150 g 150
350 g 350
500 g 500
150 g 150
350 g 350
500 g 500
150 g 150
350 g 350
500 g 500
800 g 800
1000 g 1000
1200 g 1200
400 g 400
Page 38

IT
37
Esempio: utilizzare “Auto Menu” per cuocere un pesce di 350 g.
1) Ruotare “ ” in senso orario finché non viene visualizzato “S-03”.
2) Premere “ ” per confermare.
3) Ruotare “ ” per selezionare il peso del pesce finché non viene visualizzato “350”.
4) Premere “ ” per avviare la cottura.
9. Funzione di pulizia
1) In modalità di attesa, premere una volta “
visualizzato “CL-1”. Premere di nuovo “
“CL-2”.
2) Premere “ ” per confermare. Viene visualizzato il tempo predefinito.
Il tempo predefinito per CL-1 è 5 minuti; il tempo predefinito per CL-2 è 10 minuti.
3) Premere “ ” per avviare la pulizia.
Al termine della pulizia vengono emessi cinque segnali acustici e il forno torna alla modalità
di attesa.
Nota: la durata della pulizia non può essere modificata.
10. Cottura combinata microonde/grill + vapore
1) In modalità di attesa, premere una volta “ ”; sul forno viene
visualizzato “CL-1”.
2) Premere più volte “
” o ruotare “ ” per visualizzare, nell’ordine,
“CL-1”, “CL-2”, “P1-S”, “P2-S”, “P3-S”, “G-S”, “CL-1” o “CL-2”.
3) Premere “ ” per confermare il funzionamento combinato a vapore.
4) Ruotare “ ” per regolare il tempo di cottura tra 5 e 95 minuti.
5) Premere “ ” per avviare la cottura.
Al termine della cottura vengono emessi cinque segnali acustici.
Livello di potenza
Display P1-S P2-S P3-S G-S
Potenza microonde 100% 79% 48% /
Potenza grill
Potenza vapore 100% 100% 100% 100%
”; sul forno viene
” per visualizzare
1 2 3 4
/ / / 100%
Page 39

IT
38
11. Funzione di protezione dal vapore
Codice Problema Causa
E-1
E-2
Mancanza di acqua.
Nota: durante la cottura, non si deve aprire lo sportello del forno. Se lo sportello viene aperto,
il forno si spegne e la ventola continua a funzionare per 3 minuti. Chiudere lo sportello e
premere “ ” per riprendere la cottura.
12. Cottura multisessione
Per la cottura possono essere impostate al massimo due sessioni. Con la cottura
multisessione, se una delle modalità selezionate è lo scongelamento, tale modalità verrà
assegnata alla prima sessione.
Esempio: scongelare del cibo in 5 minuti e quindi cuocere ad una potenza dell’80% per 7
1) Premere due volte “ ”; sul display viene visualizzato “dEF2”.
2) Ruotare “ ” per selezionare il tempo di scongelamento finché non viene visualizzato
3) Premere una volta “
4) Premere “
5) Premere “ ” per confermare; sul display viene visualizzato “P80”.
6) Ruotare “ ” per regolare il tempo di cottura finché sul display del forno non viene
7) Premere “ ” per avviare la cottura. Viene emesso un primo segnale
minuti.
“5:00”.
” ancora una volta o ruotare “ ” per selezionare 80%.
visualizzato “7:00”.
acustico per indicare l’inizio della prima sessione, dopodiché inizierà il conto alla rovescia
del tempo impostato per lo scongelamento, trascorso il quale verrà emesso un secondo
segnale acustico che precederà l’avvio della seconda sessione di cottura. Al termine
della cottura, verranno emessi cinque segnali acustici.
La temperatura del sensore non raggiunge 40° se il
forno rimane in funzione per 2 minuti.
Quando la temperatura del sensore raggiunge
135°, il forno smette di funzionare. Viene emesso
due volte il segnale acustico. Se non viene aggiunta
acqua, l’indicazione rimane visibile sul display; se
viene aggiunta acqua, sul display viene visualizzato
il tempo rimanente. Premere
“ ” per riprendere la cottura.
Diversamente, il forno rimane in attesa.
”; sul display viene visualizzato “P100”.
Page 40

IT
39
1 . Funzione di protezione del sensore 3
Codice Problema Causa
E-5 Sensore scollegato. Durante i processi di cottura a vapore e pulizia, il
E-6 Cortocircuito del sensore.
14. Visualizzazione di informazioni
Se si preme “ ” nelle modalità di cottura a microonde, grill, combinata
o a vapore, vengono visualizzati per 3 secondi la potenza corrente, il grill o il tipo di vapore.
Trascorsi 3 secondi, il forno tornerà allo stato precedente.
15. Funzione di blocco per i bambini
Blocco: in modalità di attesa, premere “ ” per 3 secondi; il forno emetterà un
segnale acustico prolungato ad indicare che il forno è in modalità di blocco. Se impostata,
viene visualizzata l’ora, altrimenti sul display viene visualizzato “
Sblocco: nella modalità di blocco, premere “
emetterà un segnale acustico prolungato ad indicare che la funzione è stata disattivata.
16. Caratteristiche tecniche
(1) Alla prima rotazione della manopola viene emesso un segnale acustico.
(2) “ ” deve essere premuto per continuare la cottura dopo l’apertura
dello sportello.
(3) Una volta impostato il programma di cottura, premere “ ” entro 1
minuto. Diversamente, viene visualizzata l’ora corrente e l’impostazione viene
annullata.
(4) Ad ogni pressione corretta viene emesso un segnale acustico; se la pressione non è
corretta non vi saranno risposte.
(5) Al termine della cottura il segnale acustico viene emesso cinque volte.
forno smette di funzionare se il sensore viene
scollegato. Premere “ ” oppure
ricollegare la spina alla presa di corrente.
Durante i processi di cottura a vapore e pulizia, il
forno smette di funzionare se il sensore è in
cortocircuito. Premere “ ”
oppure ricollegare la spina alla presa di corrente..
”.
” per 3 secondi; il forno
Page 41

Manutenzione
È
40
Risoluzione dei problemi
Il forno a microonde
interferisce con la ricezione
televisiva
IT
Normale
La ricezione radiotelevisiva può subire interferenze
quando il forno a microonde è in funzione. Le interferenze
sono simili a quelle di altri elettrodomestici, come mixer,
aspirapolvere e ventilatori elettrici. È un comportamento
normale.
L’illuminazione del forno si
attenua
Accumulo di vapore sullo
sportello, fuoriuscita di aria
calda dalle aperture di
ventilazione
Il forno viene avviato per
sbaglio senza alimenti
all’interno
Problema Possibile causa Soluzione
Non è possibile accendere il
forno.
Il forno non si scalda. (4) Lo sportello non è chiuso
Il piatto girevole in vetro
emette rumori durante il
funzionamento del forno a
microonde.
Nella cottura a microonde a bassa potenza, la luce del
forno può attenuarsi. È un comportamento normale.
Durante la cottura può fuoriuscire del vapore dal cibo. La
maggior parte fuoriesce dalle aperture di ventilazione, Ma
parte di esso può accumularsi in punti freddi, come lo
sportello del forno. È un comportamento normale.
pericoloso accendere il forno senza alimenti all’interno. Il
pericolo è molto elevato.
(1) Il cavo di alimentazione
non è inserito correttamente.
(2) Fusibile bruciato o
interruttore di circuito attivo.
(3) Problema della presa. Provare la presa con altri
correttamente.
(5) Rullo e parte inferiore del
forno sporchi.
Scollegare il cavo, Quindi
ricollegarlo dopo 10 secondi.
Sostituire il fusibile o
reimpostare l’interruttore di
circuito (la riparazione deve
essere effettuata da
personale esperto di
Candy).
apparecchi elettrici o
elettronici.
Chiudere bene lo sportello.
Consultare “Manutenzione
del microonde” per
informazioni sulla pulizia.
Page 42

IT
41
Il simbolo su questo prodotto indica che esso non deve essere trattato come rifiuto
domestico. Deve invece essere conferito al punto di raccolta predisposto per il riciclo delle
apparecchiature elettriche ed elettroniche. Lo smaltimento deve avvenire secondo le norme
ambientali locali in materia di smaltimento dei rifiuti.
Per maggiori informazioni sul trattamento, il ritiro e il riciclo di questo prodotto consultare le
autorità comunali, il servizio per la raccolta dei rifiuti o il negozio in cui il prodotto è stato
acquistato.
CERTIFICATO DI GARANZIA CONVENZIONALE: cosa fare?
Il Suo prodotto è garantito, alle condizioni e nei termini riportati sul certificato inserito nel prodotto ed
in base alle previsioni del decreto legislativo 24/02, nonché del decreto legislativo 6 settembre 2005,
n. 206, per un periodo di 24 mesi decorrenti dalla data di consegna del bene.
Così come riportato nei testi dei Decreti Legislativi citati, il certificato di garanzia dovrà essere da Lei
conservato, debitamente compilato, per essere mostrato al Servizio Assistenza Tecnica Autorizzato,
in caso di necessità, unitamente ad un documento fiscalmente valido rilasciato dal rivenditore al
momento dell’acquisto (bolla di consegna, fattura, scontrino fiscale, altro) sul quale siano indicati il
nominativo del rivenditore, la data di consegna, gli estremi identificativi del prodotto ed il prezzo di
cessione
Resta pure inteso che, salvo prova contraria, poiché si presume che i difetti di conformità che si
manifestano entro sei mesi dalla consegna del bene esistessero già a tale data, a meno che tale
ipotesi sia incompatibile con la natura del bene o con la natura del difetto di conformità, il Servizio di
Assistenza Tecnica Autorizzato Gias, verificato il diritto all’intervento, lo effettuerà senza addebitare
il diritto fisso di intervento a domicilio, la manodopera ed i ricambi.
Per contro, nel successivo periodo di diciotto mesi di vigenza della garanzia, sarà invece onere del
consumatore che intenda fruire dei rimedi accordati dalla garanzia stessa provare l’esistenza del
difetto di conformità del bene sin dal momento della consegna;
nel caso in cui il consumatore non fosse in grado di fornire detta prova, non potranno essere
applicate le condizioni di garanzia previste e pertanto il Servizio di Assistenza Tecnica Autorizzato
Gias effettuerà l’intervento addebitando al consumatore tutti i costi relativi.
ESTENSIONE DELLA GARANZIA FINO A 5 ANNI : come?
Le ricordiamo inoltre che sullo stesso certificato di garanzia convenzionale Lei troverà le
informazioni ed i documenti necessari per prolungare la garanzia dell’apparecchio sino a 5 anni e
così, in caso di guasto, non pagare il diritto fisso di intervento a domicilio, la manodopera ed i
ricambi.
Per qualsiasi informazione necessitasse, La preghiamo rivolgersi al numero telefonico del Servizio
Questa apparecchiatura è marchiata secondo la Direttiva Europea
2002/96/CE per lo smaltimento delle apparecchiature elettriche ed
elettroniche (Waste Electrical and Electronic Equipment, WEEE).
Facendo in modo che questo prodotto venga smaltito correttamente
aiuterete a prevenire potenziali conseguenze negative per l’ambiente e
la salute dell’uomo, che potrebbero essere causate da uno smaltimento
non corretto.
SERVIZIO ASSISTENZA CLIENTI
Page 43

IT
42
Clienti 199121314.
ANOMALIE E MALFUNZIONAMENTI: a chi rivolgersi ?
Per qualsiasi necessità il centro assistenza autorizzato è a Sua completa disposizione per fornirle i
chiarimenti necessari;
comunque qualora il Suo prodotto presenti anomalie o mal funzionamenti, prima di rivolgersi al
Servizio Assistenza Autorizzato, consigliamo vivamente di effettuare i controlli indicati sopra.
UN SOLO NUMERO TELEFONICO PER OTTENERE ASSISTENZA.
Qualora il problema dovesse persistere, componendo il “Numero Utile” sotto indicato, sarà messo
MATRICOLA DEL PRODOTTO. Dove si trova?
E’ indispensabile che comunichi al Servizio Assistenza Tecnica Autorizzato la sigla del prodotto ed il
numero di matricola (16 caratteri che iniziano con la cifra 3) che troverà sul certificato di garanzia
In questo modo Lei potrà contribuire ad evitare trasferte inutili del tecnico, risparmiando oltretutto i
relativi costi.
in contatto direttamente con il Servizio Assistenza Tecnica
Autorizzato che opera nella Sua zona di residenza.
Attenzione, la chiamata è a pagamento;
il costo verrà comunicato, tramite messaggio vocale, dal Servizio
clienti dell’operatore telefonico utilizzato. Dettagli sono presenti sul
sito internet www.hoover.it
Page 44

IT
43
Utilizzo del piatto crisper
Il vostro forno a microonde HOOVER ha un piatto crisper come
orio aggiuntivo.
access
Il piatto crisper permette di dorare il cibo non solo sulla cima con il
, ma anche il fondo del cibo diventerà croccante e dorato grazie
grill
all'alta temperatura della piatto crisper.
Nella tabella si possono trovare diversi piatti che si possono preparare
sul piatto crisper (vedere pagina seguente).
Il piatto crisper può anche essere utilizzata per bacon, uova, salsicce,
.
ecc
1. Posizionare il piatto crisper direttamente sul piatto rotante
e preriscaldare con la combinazione massima microondegrill] seguendo i tempi e le istruzioni nella tabella.
• Utilizzare sempre guanti da forno per estrarre il piatto
crisper, poiché diventa molto calda.
2.
Se si cuoce cibo come uova e bacon, per dorare il cibo in
modo invitante spennellare il piatto con olio.
• Notare che il piatto crisper ha uno strato di teflon che
non è resistente ai graffi. Non usare nessun oggetto
acuminato come coltelli per tagliare sul piatto crisper.
• Utilizzare accessori in plastica per evitare di graffiare la
superficie della piastra di doratura o togliere il cibo
dalla piastra prima di tagliarlo.
3. Collocare il cibo sul piatto crisper.
• Non mettere nessun oggetto sul piatto crisper che non
sia resistente al calore; per es. ciotole in plastica.
• Non inserire mai il piatto crisper nel forno senza piatto
rotante.
4. Posizionare il piatto crisper sull'incastellatura metallica (o
piatto rotante) nel microonde.
Selezionare il tempo di cottura e la potenza corretti.
5.
Utilizzo del piatto crisper
Come pulire i lpiatto crisper
Pulire il piatto crisper con acquatiepida e detergente e
risciacquare con acqua pulita.
Non usare una spazzolaabrasiva o una spugna dura altrimentilo
strato esterno si rovinerà.
Attenzione:
Il piatto crisper nonè lavabile in lavastoviglie
:
.
Page 45

IT
44
Impostazionedel piatto crisper
Si raccomanda di preriscaldare il piatto crisper direttamentesulpiatto
rotante. Preriscaldare il piatto crisper con la funzione 600W+Grill e
seguire i tempi e le istruzioni in tabella.
Cibo
Bacon
Pomodori
grigliati
Hamburger
(surgelati)
Baguette
(surgelata)
Porzione
4 fette
(80g)
8 fette
(160g)
200g
(2 pezzi)
400g
(4 pezzi)
2 pezzi
(125g)
4 pezzi
(250g)
100-150g
(1 pezzo)
200-250g
(2 pezzi)
Potenza Tempodi
preriscal
damento
C1 3min. 3-3½min.
C1 3min. 3min.
C1 3min. 6-6½min
C1 5min. 5-6min.
Tempo di
cottura
4½ -5 min.
4min.
8-8½ min.
6-7 min.
Raccomandazioni
Preriscaldare il piatto
crisper. Mettere le fette
una accanto all'altra sul
piatto. Posizionare il
piatto sull'incastellatura.
Preriscaldare il piatto
crisper. Tagliare i
pomodori a metà.
Mettervi sopra del
formaggio. Sistemare in
cerchio sul piatto.
Posizionare il piatto
sull'incastellatura.
Preriscaldare il piatto
crisper. Mettere gli
hamburger surgelati in
cerchio sul piatto
crisper.
Posizionare il piatto
sull'incastellatura.
Spegnere dopo 4-5 min.
Preriscaldare il piatto
crisper. Mettere una
baguette vicino al
centro, 2 baguette una
accanto all'altra sul
piatto. Posizionare il
piatto sull'incastellatura.
Patatine al
forno
(surgelati)
200g
300g
400g
C1 4min. 9min.
12 min.
15 min.
Preriscaldare il piatto
crisper. Distribuire le
patatine sul piatto.
Posizionare il piatto
sull'incastellatura.
Spegnere a metà del
tempo di cottura.
Page 46

IT
45
Impostazionedel piatto crisper
Cibo
Bastoncini
di pesce
(surgelati)
Bocconcini
di pollo
(surgelati)
Porzione
150g
(5 pezzi)
300g
(10 pezzi)
125g
250g
Potenza Tempodi
preriscal
damento
C1 4m
C1 4min. 4½-5min.
in.
Tempo di
cottura
6-6½min.
8½-9 min.
6½-7 min.
Raccomandazioni
Preriscaldare il piatto
crisper. Spennellare il
piatto con 1 cucchiaio
datavola diolio. Mettere
i bastoncini in cerchio
sul piatto. Spegnere
dopo 3 min. 1/2 (5
pezzi) odopo 5 min.(10
pezzi).
Preriscaldare il piatto
crisper. Spennellare il
piatto con 1 cucchiaio
datavola diolio. Mettere
i bocconcini di pollosul
piatto. Posizionare il
piatto sull'incastellatura.
Spegnere dopo 3 minuti
(125g) o 5 min.(250g).
 Loading...